

Hotpoint RH967 Use And Care Book Manual
BefoUsingYourCookingCenter
ReadThis I!Jseand Care Book
Take the time to read this book and learn how to
enjoy your new Cooking Center. Itcontains detailed
operating instructions and recommended maintenance, as well as handy tips to help you gain maximum benefits from your Cooking Center. Once
you have read the book, keep it handy to answer
any questions you may have.
If you haveany additional questions concerning the
operation of your Cooking Center, write—including
your phone number—to:
Consumer Affairs
Hotpoint
Appliance Park
Louisville, Kentucky 40225
IF YOU RECEIVED A DAMAGED COOKING
CENTER, immediately contact the dealer (or builder)
from whom you purchased it. They have been
informed of the proper procedure to take care of
such matters and can handle it for you.
Register Your cooking center
It is ~mportant that we, the manufacturer, know the
location of your Cooking Center should a need
occur for adjustments.
Please check with your supplier to be sure he has
registered you as the owner; also send in your Pur-
chase Record Card. If you move, or if you are not
the original purchaser please write to us, stating
model and serial numbers. This appiiance must be
registered. Piease be certain that it is.
Write to:
Hotpoint
Range Product Service
AP2-210
Appliance Park
Louisville, Kentucky 40225
Record Mode!andserial Numbers
Your Cooking Center has a nameplate on which is
stamped the model and serial number. (See page 8
for location.)
Model and serial numbers are also on the Purchase
Record Card which came with your Cooking Center.
Record the numbers in the spaces below.
Please refer to both model and serial numbers in
any future correspondence or product service calls
concerning your Cooking Center.
iUiodeiNumber
Seria! Number
Date Purchased
KEEP PURCHASE RECEiPT WiTi-i THiS BOOK TO
ESTABLISH THE WARRANTY PERiOD.
Before You (2311forService
Check “The Problem Solver”. (See page 40,) It lists
many minor causes of operating problems that you
can correct yourself and may save you an unneces-
sary service call.
If You Need Sewice
In many cities, there’s a Hotpoint Factory Service
Center. Call, and a radio-dispatched truck will
come to your home by appointment—morning or
afternoon. Charge the work, if you like. All the centers accept both Master Card and Visa cards. (See
page 41.)
Or look for Hotpoint franchised Customer Care@
servicers. You’ll find them in the Yellow Pages
under “HOTPOINT CUSTOMER CARE@SERVICE”
or “GENERAL ELECTRIC—HOTPOINT CUSTOMER
CARE@SERVICE”.
if you need service literature, parts iists, parts or
accessories, contact one of the Factory Service
Centers, a franchised Customer Care@servicer or
your Hotpoint dealer.
Extended Service Contracts: The terms of your
warranty provide free service covering failures due
to manufacturing defects for a definite period of
time.
After this warranty expires you may purchase an
Extended Service Contract which will enable you to
budget your service needs. This coverage beyond
warranty is available from our Factory Service Centers and from many franchised Customer Care@
servicers. It is a good idea to apply for this coverage
before your warranty expires.
S!eps to Follow for Further Help
First,contact the people who serviced your Cooking
Center. Explain why you are dissatisfied. In most
cases, this will solve the problem.
Next, if you are still dissatisfied, write all the
details—including your phone number—to:
Finaiiy, if
Manager, Consumer Relations
Hotpoint
WCE-312
Appliance Park
Louisville, Kentucky 40225
your problem is still not resolved, write:
Major Appliance Consumer Action Panel
20 North Wacker Drive
Chicago, Illinois 60606
This panel, known as MACAP, is a group of indc-
pendent consumer experts under the sponsorship of
severa! industry associations. Its purpose is to study
practices and advisethe industry of ways to improve
customer service. Because MACAP is free of industry
control and influence, it is able to make impartial
recommendations, considering eachcaseindividually.
2
@1982General Electric Co.,
U.S.A. All rights reserved.
Tableof Contents
MICROWAVE OVEN
Precautionsfor SafeUse
.. ... .. ... . .. ... ..... . ..... .
4
SafetyTips
... . ... .. ... ..... .. . .. . ... .. ... .. ... ... .
4-7
Featuresof Your Oven
.. .. . .. .. ... . ... .. ... .. . ... .. .
8
TouchControl Panel..... .. ... .. . .. ... . ..... ... .....9
Automatic Cooking (Auto Cook) .. ... ... .. . .....10.11
Automatic Roasting(AutoRoast)... ... . .. .. . ....12. 13
Quick SetControl- “
... .. . .. .. ..... . .. . . .. .. ... ... ...
16
buick SetChart
.. ... .. . .. ....... . .. . . .. ... ..... ...
17
Defrost ... .. . .
.. ... .. ... .. ..... ... . . .. .. ... ... ... .
16
Time Cook..........................””” ●OO”O”0000.15
TemperatureCook
.. ... .. ..... ... ... ... .. . .....* ..
18
Hold/Timer .. . ..... .. . ... .. .. ... ... . .. ...o. .””o”oo19
RANGETOP
SafetyTips.. . . .. ..... ... .. .. . .....*~.......~”0.””04-7
HowtoUse
... . ..... ... .. .. .. ... . . ... .. ... .
. . . . ...20
Cooking Chart . ..... ... .. .. . .. . .. . ... ..... ... ..26!27
CONVENTIONAL OVEN
SafetyTips
. ... . .. .. . .. ..... .. . ... . .. . ..... .. . .. . ..
4-7
Features. ... . ... .. ... ... .. ... ... ... ... ....+” ”s”””s”8
OvenControls
..... ... .. .. . .. ... ... . ... .. ... ... ... .
8
OvenLight ... . ..... ... ... .. ... .. . ... ... .. ..+. .”.””21
OvenShelves.. ... .. . .. .
. . ...0.. . . . . . . . . . . . . . . . . . .
21
MinuteTimer, Clock,Automatic OvenTimer .. . ... .. 21
Baking... ... . . .. .. ... ..... . .. ... . .. . ..... ... ... ...
21
Broiling ... ... . ..... ... . .. ... .. ... ... . .. .
.. . .. . ....22
Roasting
.. .. . .. ... .. . .. .. . .. . .. .. ....... ..... .. . ..
22
BakingChart...... ... .. .
... .. .. .. ... .. .. ..... . .. . .
28
Broiling Chart. .. ... ..... ... .. .. . ....... .. ..... ... .
29
RoastingChart.. ... .. ... ..... .. .. . .... ..... .......30
CAREOFYOURCOOKING CENTER
Self-CleanOperation
.. . .. .. ... .. ....... .. . .. ... ...
23
OvenVentDuct ...... ... .. ... .. . .. .. .. ... ..... ....24
Careof SurfaceUnits
... .. ... .. ........ . ... .. ... ...
24
LampReplacement... ..... ... .. .. ....... . .. .. ... ..
24
OvenThermostatAdjustment. ...... .... ... .. . .....24
Careof MicrowaveOven&
TemperatureProbe.... ... .. .. .. . .. .. . .. ..... ....24
CleaningChart (All Parts). .. .. .. ... .... ..... . .. ... .
25
GENERAL
BeforeUsingYourRange..... .. ... .. .. .. . .. . .. .....2
EnergyConservationTips..... ... .. .. .. . .. . .. .. ... .. 3
Model&Serial NumberLocation . .. .... . .. ... .. . ....8
TheProblemSolver . ... .. ... . .. .. .. ..... ..... .....40
AutomaticCookingRecipeGuide .. ..... . .. .. . .. ... 31
Meats
.. ... .. . .. ... ..... ... .. ... .. .. ... .. ... ..
32,33
Vegetables
... .. ... ... .. ... .. .. . .. .. ... .. ... ..
34,35
Desserts
... .. ... ... .. ... ..... .. . .. .. ... .. ... .
36,37
AutomaticCookingChart . ....... ... .. ..... .....38.39
FactoryServiceCenters . ..... .. ....... .. . .. . .. ... .
41
Warranty.. ... ... .. ... .. . ..... .. . .. ..... .. .
BackCover
EnergyConsewationTips
A. !Mhxovvave Coding
1.
2.
Use proper power Iev=l as recommended and
DO NOT OVERCOOK.
DOnot operate the
oven while emPtY. If bYacci-
dent the oven should run empty a minute or two,
no harm is done. However, try to avoid operating
the oven empty at all times–saves energy and
also ensures good long term life of oven.
El. TOD-Of-Ww3-l%3rtfw3co~~~~fl!
1.
2.
3.
4.
a
5.
6.
Us; cooking uten~ils of medi~m weight aluminum, tight-fitting covers, and flat bottoms which
completely cover the heated portion of the surface unit.
Cook fresh vegetables with a minimum amount
of water in a covered pan.
“Keep an eye”
on ;oods when bringing them
quickly to cooking temperatures at HIGH heat.
When food reaches cooking temperature, reduce heat immediately to lowest setting that will
keep it cooking.
Use residual heat with surface cooking whenever possible. For example, when cooking eggs
in the shell bring water to boil, then turn to OFF
position to complete the cooking.
Always turn surface unit OFF before removing
utensil.
Use correct heat for cooking task . . . high heats
to start cooking (if time allows, do not use HIGH
heat to start), medium high—quick brownings,
medium—slow frying, low—finish cooking most
quantities, simmer–double boiler heat, finish
cooking, and special for small quantities.
7. When boiling water for tea or coffee, heat only
the amount needed. It is not economical to boil a
container full of water for only one or two cups.
C. Oven Ccmkhw
1.
2.
3.
4.
5.
6.
3
Preheat the ov~n only when necessary. Most
foods will cook satisfactorily without preheating.
If you find preheating is necessary, keep an eye
on the indicator light, and put food in the oven
promptly after the light goes out.
Always turn oven OFF before removing food.
During baking, avoid frequent door openings.
Keep door open as short a time as possible
when it is opened.
For self-cleaning oven, be sure to wipe up excess spillage before self-cleaning operation.
Cook complete oven meals instead of just one
food item. Potatoes, other vegetables, and some
desserts will cook together with a main-dish casserole, meat loaf, chicken or roast. Choose
foods that cook at the same temperature in approximately the same time.
Use residual heat in oven whenever possible to
finish cooking ,casseroles, oven meals, etc. Also
add rolls or precooked desserts to warm oven,
using residual heat to warm them.
l~]re~:aution.s toJAvclk! !~ossib!e Exposure ‘to Excessi~4e rtiicroifi~aveEnerg]f
1. Do Not Attempt to operate this oven with the
3. Do Not Operate the oven if it is damaged. It is
door open since open door operation can result in
particularly important that the oven door close
harmful exposure to microwave energy. It is impor-
properly and that there is no damage to the (1) door
tant not to defeat or tamper with the safety
(bent), (2) hinges and latches (broken or loosened),
interlocks.
(3) door seals and sealing surfaces.
2. Do Not Place any object between the oven front
4. The Oven Shouid not be adjusted or repaired by
face and the door or allow soil or cleaner residue to
anyone except properly qualified service personnel.
accumulate on sealing surfaces.
~$di?ei?2!%W4Get
.
7fiiur
cooking center
@~av~th~ installer showyouthe location of the
range circuit breaker or fuse, and mark it
for easy reference.
@Have it installed and properly grounded by
a qualified installer.
Don’thave children aloni”or unattendedwhere a
range is hot or in operation. They could be
seriously burned.
Don’tallow anyonetoclimb,standor hangonthe
door, drawer or range top. They could damage
the range and even tip it over causing severe
personal injury.
Donottouch heatingelementsor interior surface
of oven. These surfaces may be hot enough
to burn even though they are dark in color.
During and after use, do not touch, or let
clothing or other flammable materials
contact surface units, areas nearby surface
units or any interior area of the oven; allow
sufficient time for cooling first.
Potentially hot surfaces include the
cooktop and areas facing the cooktop, oven
vent opening and surfaces near the
openings, and crevices around the oven
door.
Wear proper clothing. Loose fitting or
hanging garments should never be worn
while using the appliance.
e
Never use your appliance for warming or
heating the room.
Do not use your oven to dry newspapers. If
overheated, they can catch fire.
CAUTION:Dfl NOTSTOREITEMSOFINTEREST
TOCHILDRENINCABINETSABOVEA RANGEOR
ONTHEBACKSPLASHOFA RANGE–CHILDREN
CLIMBING ON THE RANGETO REACHITEMS
COULDBESERIOUSLYINJURED.
Donot store flammable materials in an oven or
near the cooktop.
Keephoodandgreasefilters clean to maint
good venting and to avoid grease fires.
.....
‘<.;
..,.,
I&j
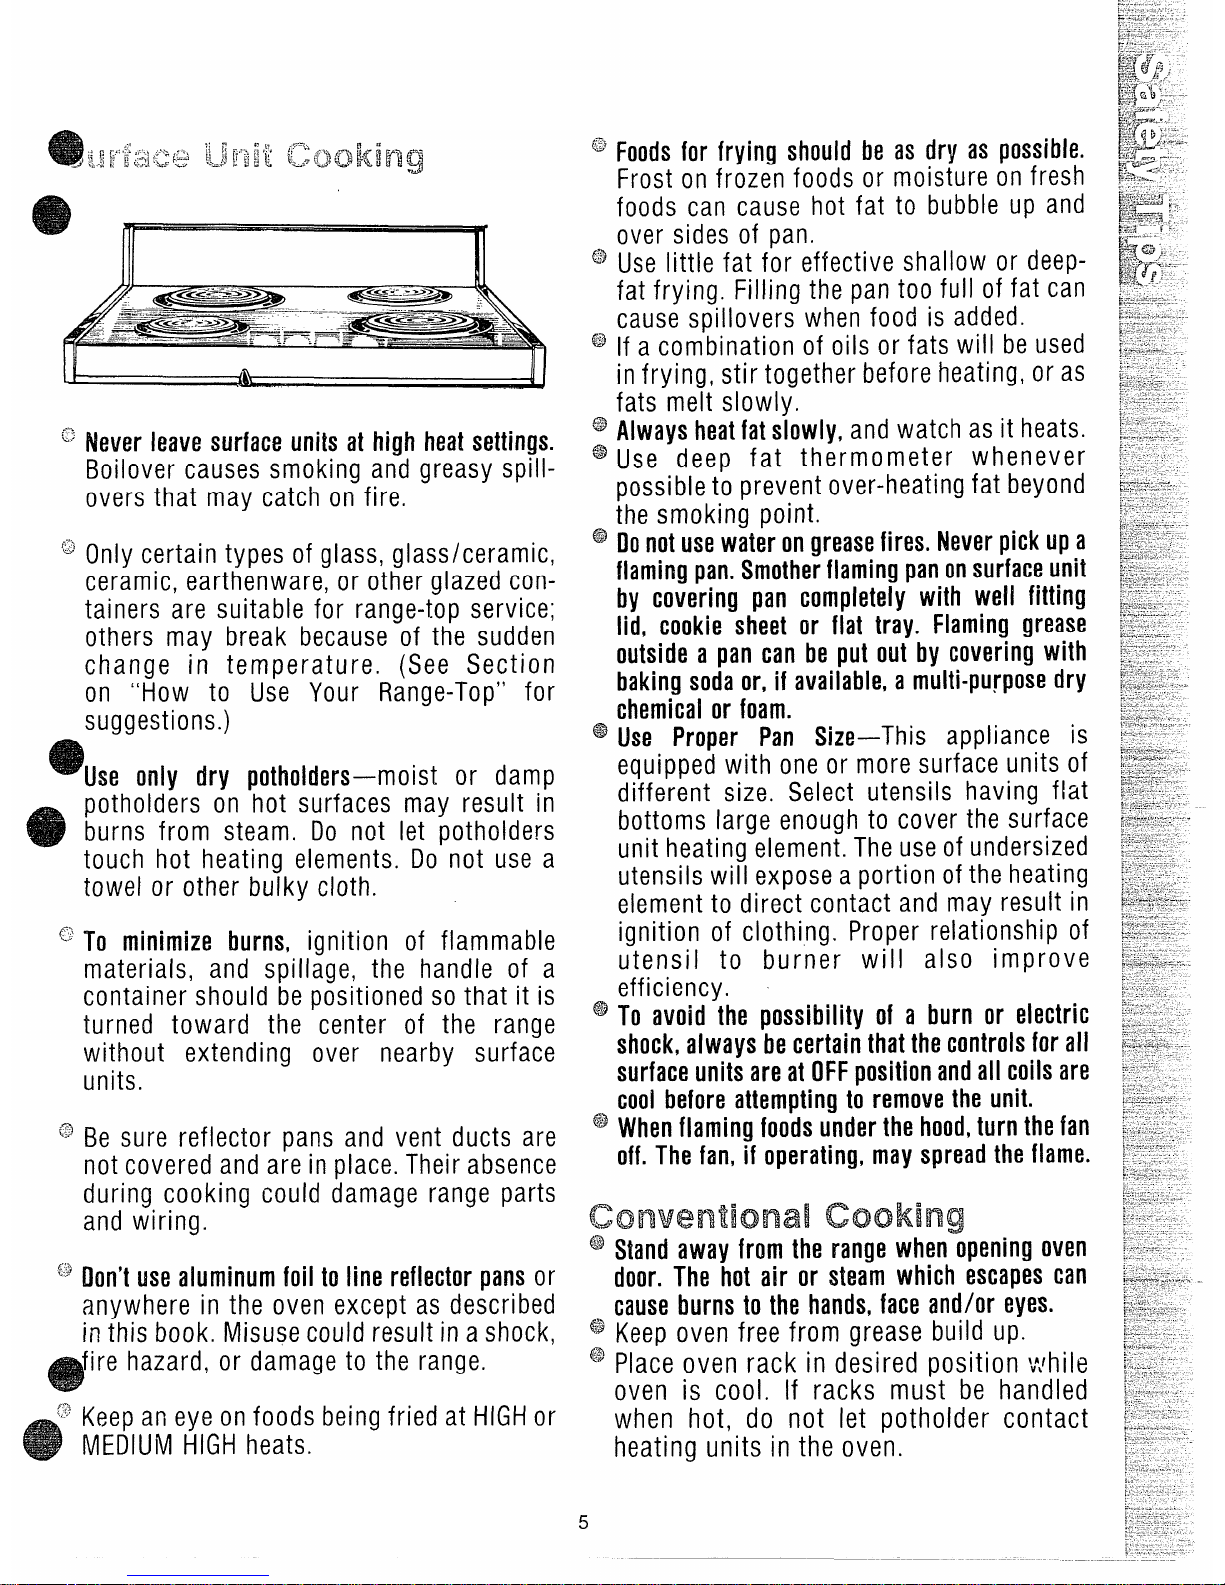
Neverleave surfac~units at high heatsettings.
Boilover causes smoking and greasy spillovers that may catch on fire.
Only certain types of glass, glass/ceramic,
ceramic, earthenware, or other glazed containers are suitable for range-top service;
others may break because of the sudden
change in temperature. (See Section
on “How to Use Your Range-Top” for
suggestions.)
‘Use only dry potholdws-moist or damp
potholders on ‘hot surfaces may result in
burns from steam. Do not let potholders
touch hot heating elements. Do not use a
towel or other bulky cloth.
To minimize burns, ignition of flammable
materials, and spillage, the handle of a
container should be positioned so that it is
turned toward the center of the range
without extending over nearby surface
units.
Be sure reflector pans and vent ducts are
not covered and are in place. Their absence
during cooking could damage range parts
and wiring.
Don’tusealuminum foil to line reflector pansor
anywhere in the oven except as described
in this book. Misuse could result in a shock,
fire hazard, or damage to the range.
‘:] Keep an eye on foods being fried at HIGHor
MEDIUM HIGH heats.
69
Foodsfor frying should be as dry as possible.
Frost on frozen foods or moisture on fresh
foods can cause hot fat to bubble up and
over sides of pan.
Use little fat for effective shallow or deepfat frying. Filling the pan too full of fat can
cause spillovers when food is added.
If a combination of oils or fats will be used
in frying, stir together before heating, or as
fats melt slowly.
Always heatfat slowly, and watch as it heats.
Use deep fat thermometer whenever
possible to prevent over-heating fat beyond
the smoking point.
Ilonotusewater ongreasefires. Neverpickup a
flamingpan.Smotherflaming panonsurfaceunit
by covering pan completely with well fitting
lid, cookie sheet or flat tray. Flaming grease
outside a pan can be put out by covering with
baking sodaor, if available,a multi-purposedry
chemicalor foam.
Use Proper Pan Size–This appliance is
equipped with one or more surface units of
different size, Select utensils having flat
bottoms large enough to cover the surface
unit heating element. The use of undersized
utensils will expose a portion of the heating
element to direct contact and may result in
ignition of clothing. Proper relationship of
utensil to burner will also improve
efficiency. ~
To avoid the possibility of a burn or electric
shock,always becertain that the controlsfor all
surfaceunits areatOFFpositionandall coils are
cool before attempting to removethe unit.
Whenflaming foodsunderthe hood,turn thefan
off. The fan, if operating, mayspreadthe flame.
@Standaway from the range when opening oven
door. The hot air or steam which escapescan
causeburns to the hands,face and/or eyes.
‘$ Keep oven free from grease build up.
‘$ Place oven rack in desired position v~hile
oven is cool. If racks must be handled
when hot, do not let potholder contact
heating units in the oven.
5
@
e
@
@
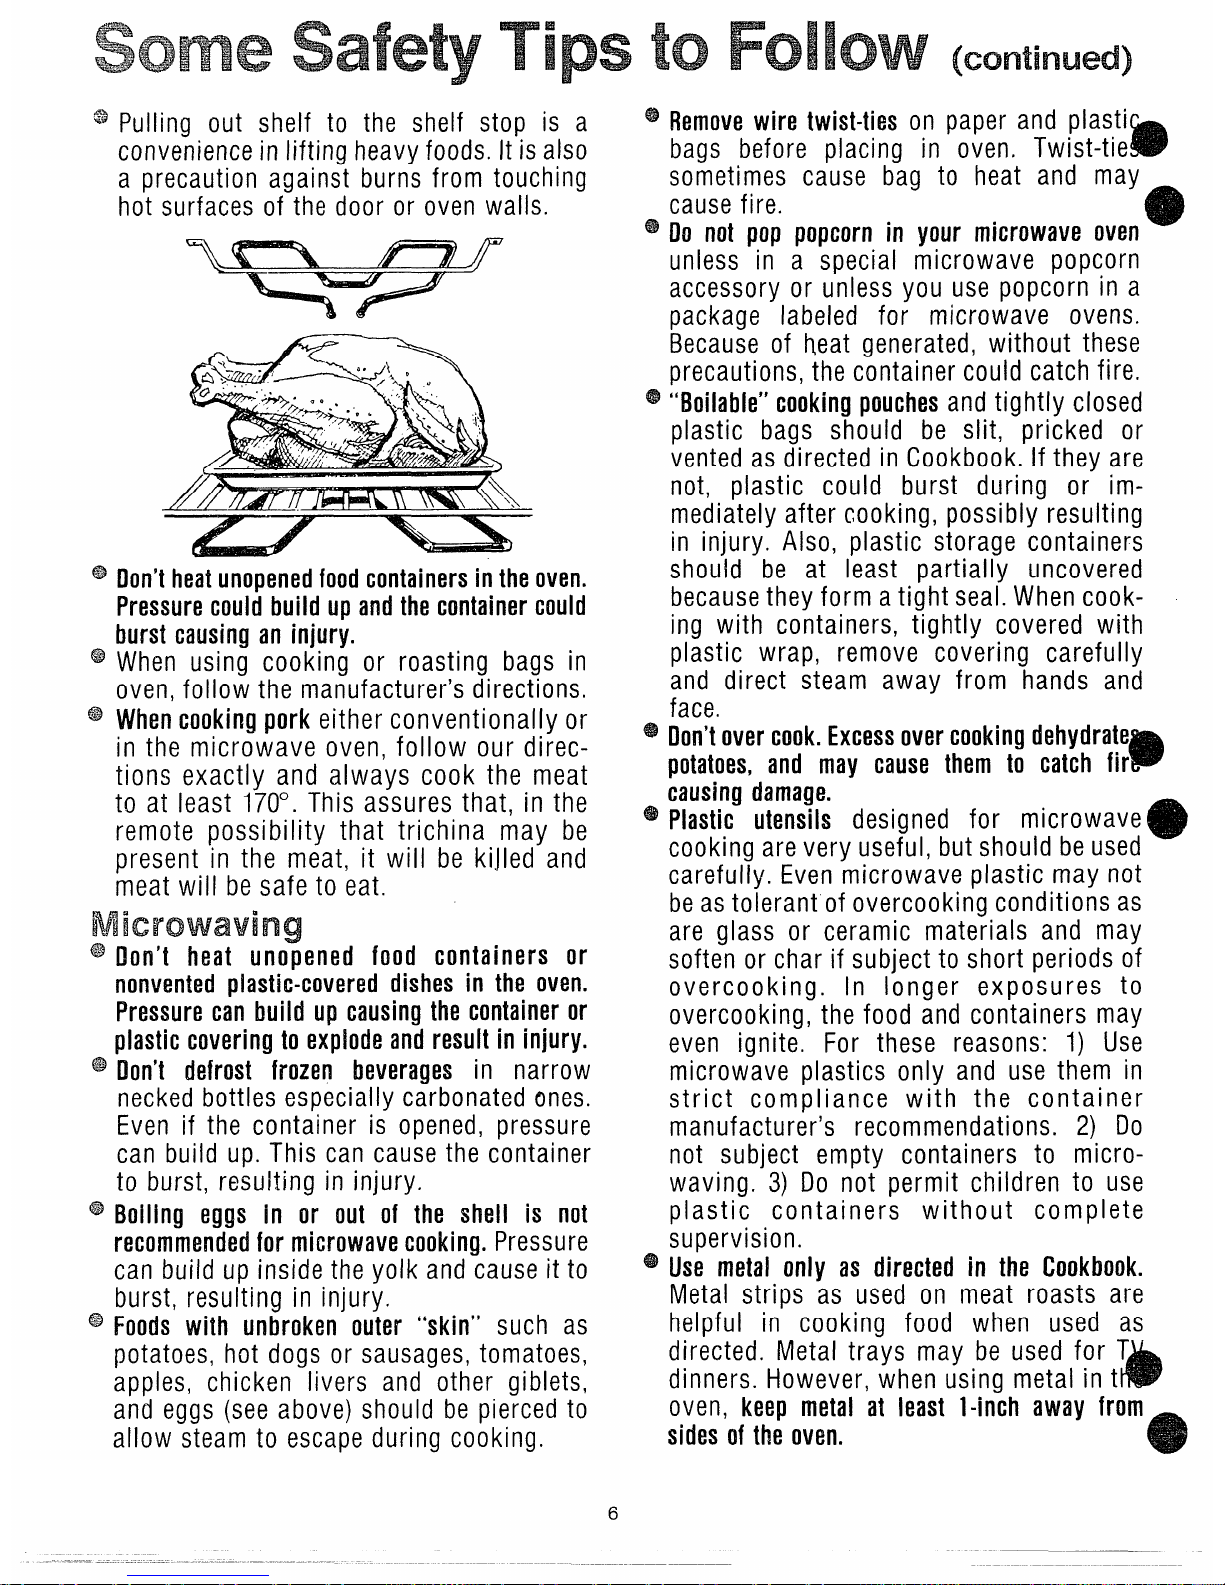
Pulling out shelf to the shelf stop is a
convenience in lifting heavy foods. It is also
a precaution against burns from touching
hot surfaces of the door or oven walls.
Don’theatunopenedfoodcontainersin theoven.
Pressurecouldbuild up andthe container could
burst causing an injury.
When using cooking or roasting bags in
oven, follow the manufacturer’s directions.
Whencooking pork either conventionally or
in the microwave oven, follow our di~ections exactly and always cook the meat
to at least 170°. This assures that, in the
remote possibility that trichina may be
present in the meat, it will be ki,lled and
meat will be safe to eat.
Microwaving
@
$3
@
@
Don’t heat uno~ened food containers or
nonvented plastic-covered dishes in the oven.
Pressurecan build up causing the container or
plastic covering to explode andresult in injury.
Don’t defrost frozen beverages in narrow
necked bottles especially carbonated ones.
Even if the container is opened, pressure
can build up. This can cause the container
to burst, resulting in injury.
Boiling eggs in or out of the shell is not
recommended for microwave cooking. Pressure
can build up inside the yolk and cause it to
burst, resulting in injury.
Foods with unbroken outer “skin” such as
potatoes, hot dogs or sausages, tomatoes,
apples, chicken livers and other giblets,
and eggs (see above) should be pierced to
allow steam to escape during cooking.
6
@
6$
Removewire twist-ties on paper and plasti
bags before placing in oven. Twist-tie
b
sometimes cause bag to heat and may
cause fire.
Do not pop popcorn in your microwave oven
e
unless in a special microwave popcorn
accessory or unless you use popcorn in a
package labeled for microwave ovens.
Because of heat generated, without these
precautions, the container could catch fire.
“Boilable” cookingpouchesand tightly closed
plastic bags should be slit, pricked or
vented as directed in Cookbook. If they are
not, plastic could burst during or immediately after cooking, possibly resulting
in injury. Also, plastic storage containers
should be at least partially uncovered
because they form a tight seal. When cooking with containers, tightly covered with
plastic wrap, remove covering carefully
and direct steam away from hands and
face.
Don’tover cook.Excessovercookingdehydrate
B
potatoes, and may cause them to catch fir
causing damage.
Plastic utensils designed for microwave
cooking are very useful, but should be used
carefully. Even microwave plastic may not
be as tolerant of overcooking conditions as
are glass or ceramic materials and may
soften or char if subject to short periods of
overcooking. In longer exposures to
overcooking, the food and containers may
even ignite. For these reasons: 1) Use
microwave plastics only and use them in
strict compliance with the container
manufacturer’s recommendations. 2) Do
not subject empty containers to microwaving. 3) Do not permit children to use
plastic containers without complete
supervision.
Use metal only as directed in the Cookbook.
Metal strips as used on meat roasts are
helpful in cooking food when used as
directed. Metal trays may be used for T
dinners. However, when using metal in t
h
oven, keep metal at least l-inch away from
sides of the oven.
e
ODO not usc any thmnorrwter in food you arc
microwaving unless that thermometer is
designed or recommended for use in the
microwave oven.
43D0 not operate the oven while empty to avoid
damageto the ovenandth~ dangerof fire. If by
accident the oven should run empty a
minute or two, no harm is done. However,
try to avoid operating the oven empty at all
times—it saves energy and prolongs life of
the oven.
‘3 Cooking utensils may becomehot because of
heat transferred from the heated food. This
is especially true if plastic wrap has been
covering the top and handles of the utensil,
Pot holders may be needed to handle the
utensil.
Sometimes,theovenshelf can becometoohotto
touch. Be careful touching the shelf during
and after cooking.
Removethe temperature probe from the oven
when not using it to cook with. If you leave
the probe inside the oven without inserting
it in food or liquid, and turn on microwave
energy, it can create electrical arcing in the
oven, and damage oven walls,
If food should ever ignite: Keepthe oven door
closed. Turn off the power immediately: Touch
CLEAR/OFF or disconnect power cord or
shut off power at the fuse/circuit breaker
panel,
o not use your microwave oven to dry
newspapers. If overheated, they can catch
_ fire.
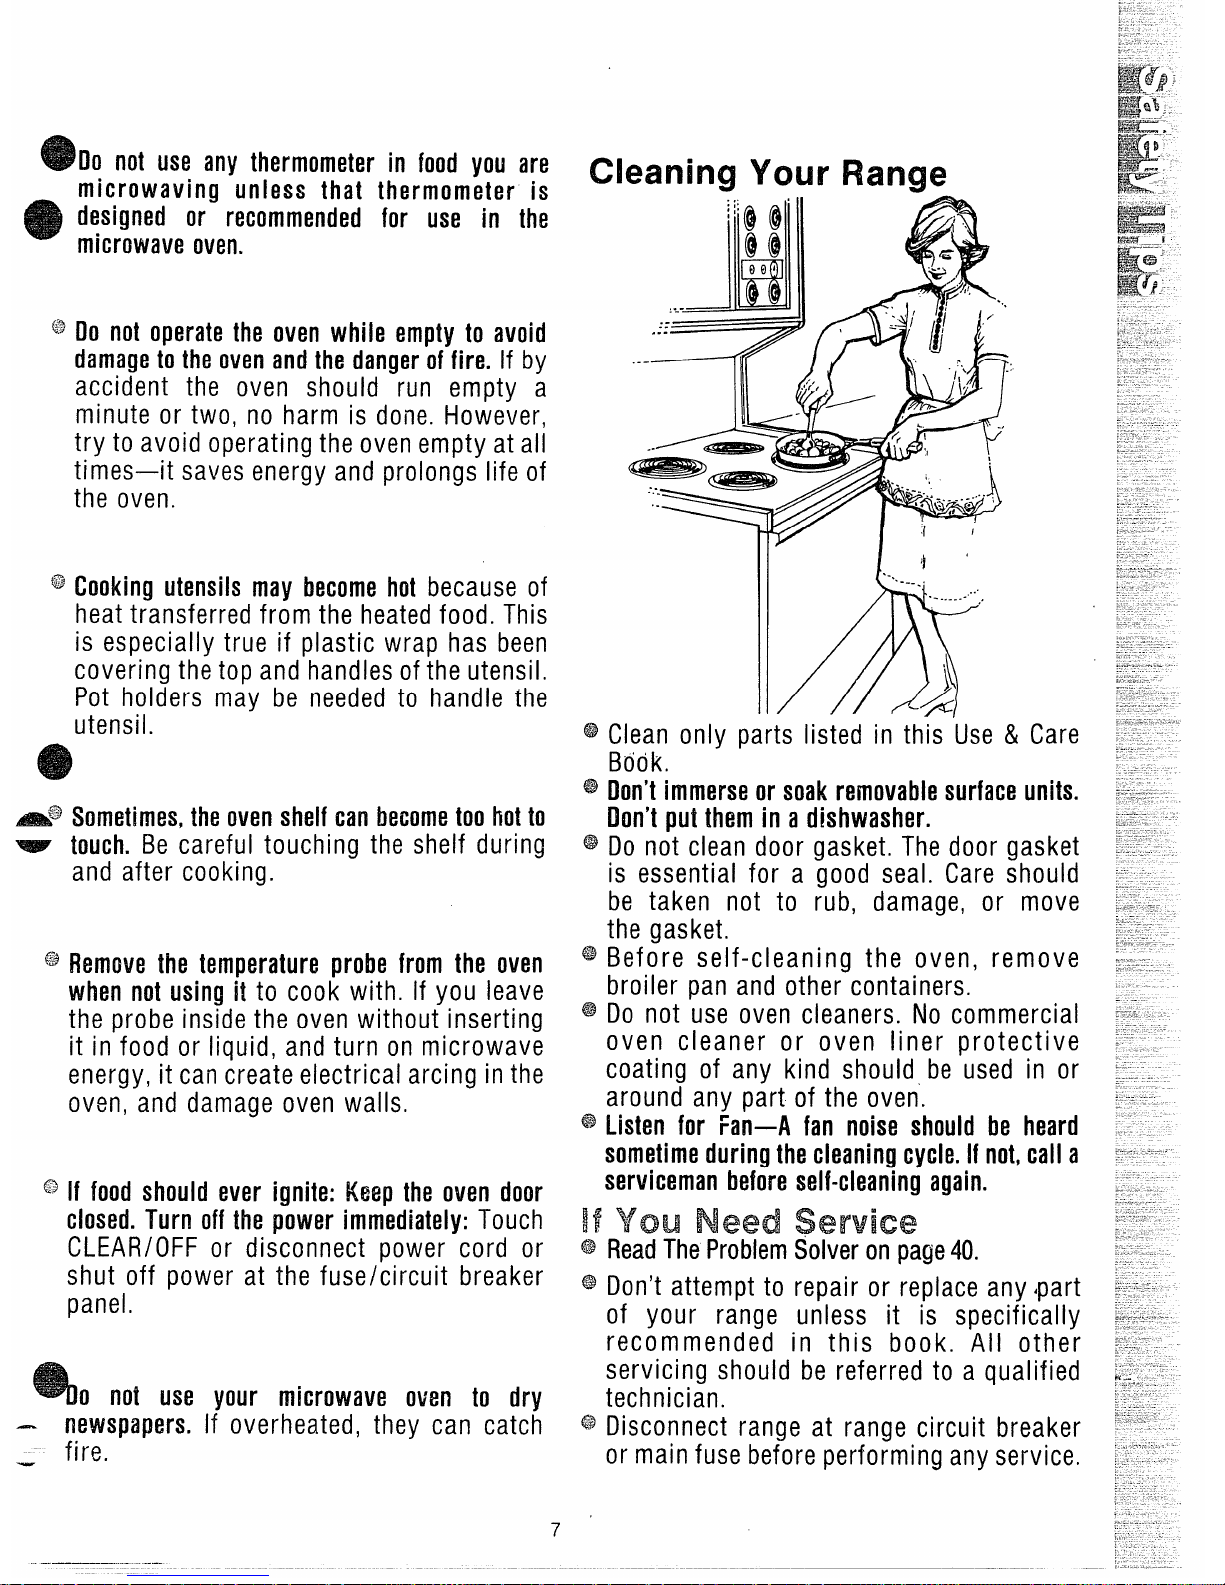
cleaningYourRange
(8$’
@
@
@
@
@
Clean only parts listed in this Use & Care
Book.
Don’timmerseor soak removablesurface units.
Don’tput thorn in adishwasher.
Do not clean door gasket, The door gasket
is essential for a good seal. Care should
be taken not to rub, damage, or move
the gasket.
Before self-cleaning the oven, remove
broiler pan and other containers.
Do not use oven cleaners. No commercial
oven cleaner or oven liner protective
coating of any kind should be used in or
around any part of the oven.
Listen for Fan–A fan noise should be heard
sometimeduring thecleaning cycle. If not,call a
serviceman beforeself-cleaning again.
U You Need Service
ReadTheProblemSolver on page40.
Don’t attempt to repair or replace any ipart
of your range unless it is specifically
recommended in this book. AH other
servicing should be referred to a qualified
technician,
Disconnect range at range
or main fuse before perform
circuit breaker
ng any service.
FeaturesofYourCookingCenter
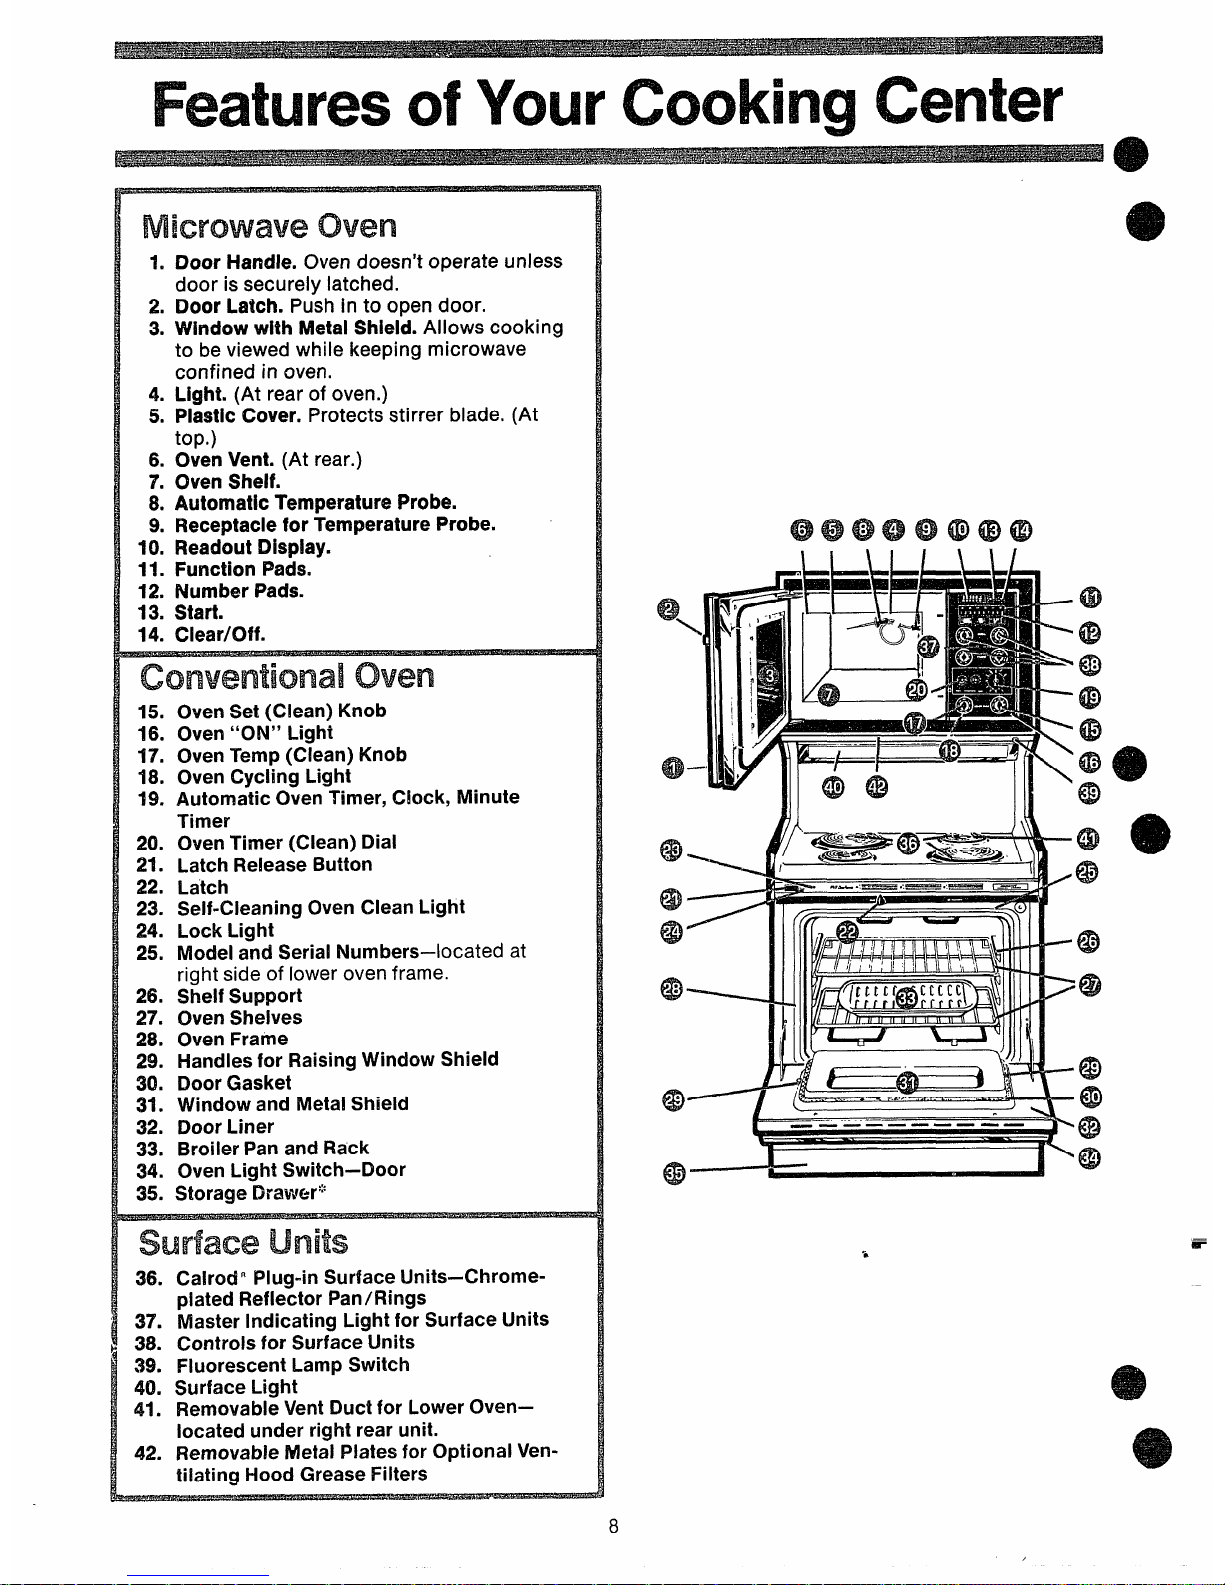
MicrowaveOven
1.
2.
3.
4.
5.
6.
7.
8.
9.
10.
11.
12.
13.
14.
Door Handle. Ovendoesn’t operate unless
door is securely latched.
Door La#ch.Push in to open door.
Window with NletaiShieid. Allows cooking
to be viewed while keeping microwave
confined in oven.
Light. (At rear of oven.)
Piastic Cover. Protects stirrer blade. (At
top.)
Oven Vent. (At rear.)
Oven Shelf.
Automatic Temperature Probe.
Receptaclefor Temperature Probe.
Readout Dispiay.
Function Pads.
Number Pads.
Startm
Ciear/C)ff.
conventionaloven
75.
16.
17.
18.
19.
20.
21.
22.
23.
24.
25.
26.
27=
28.
29.
30.
31.
32.
33.
34.
35.
OvenSet (Ciean) Knob
Oven“ON” Light
OvenTemp (Ciean) Knob
Oven Cyciing Light
AutomaticOvenTimer, Clock, Minute
Timer
OvenTimer (Ciean) Diai
LatchReiease Button
Latch
Seif-Cieaning Oven Ciean Light
Lock Light
Model and Seriai Numbers–located at
right side of lower oven frame.
Sheif Support
OvenSheives
OvenFrame
i+andiesfor RaisingWindow Shieid
DoorGasket
Window and M/ietaiShieid
DoorLiner
BroiierPan and Rack
OvenLight Switch–Door
Storage !Drawer’fi
surfaceunits
36.
37.
38.
39.
40.
41.
42.
CairodnPiug-in Surface tJnits-Chromepiated Refiector Pan/Rings
Master indicating Light for Surface Units
Controisfor Surface I.Jnits
FluorescentLamp Switch
Surface Light
IRemovabieVentDuct for LowerOven–
iocated under rightrear unit.
FWnovabie Metal Platesfor Optional Ventilating Hood Grease Filters
-LJ-LLJ-LLf-
Wiiiliill I ---+%=4‘
@
@
a)
:
@
.
@
@
.
@
*
6P
@
*
:
@
m)
——-—— ———— -—
8
YourTouchControlPanel
@
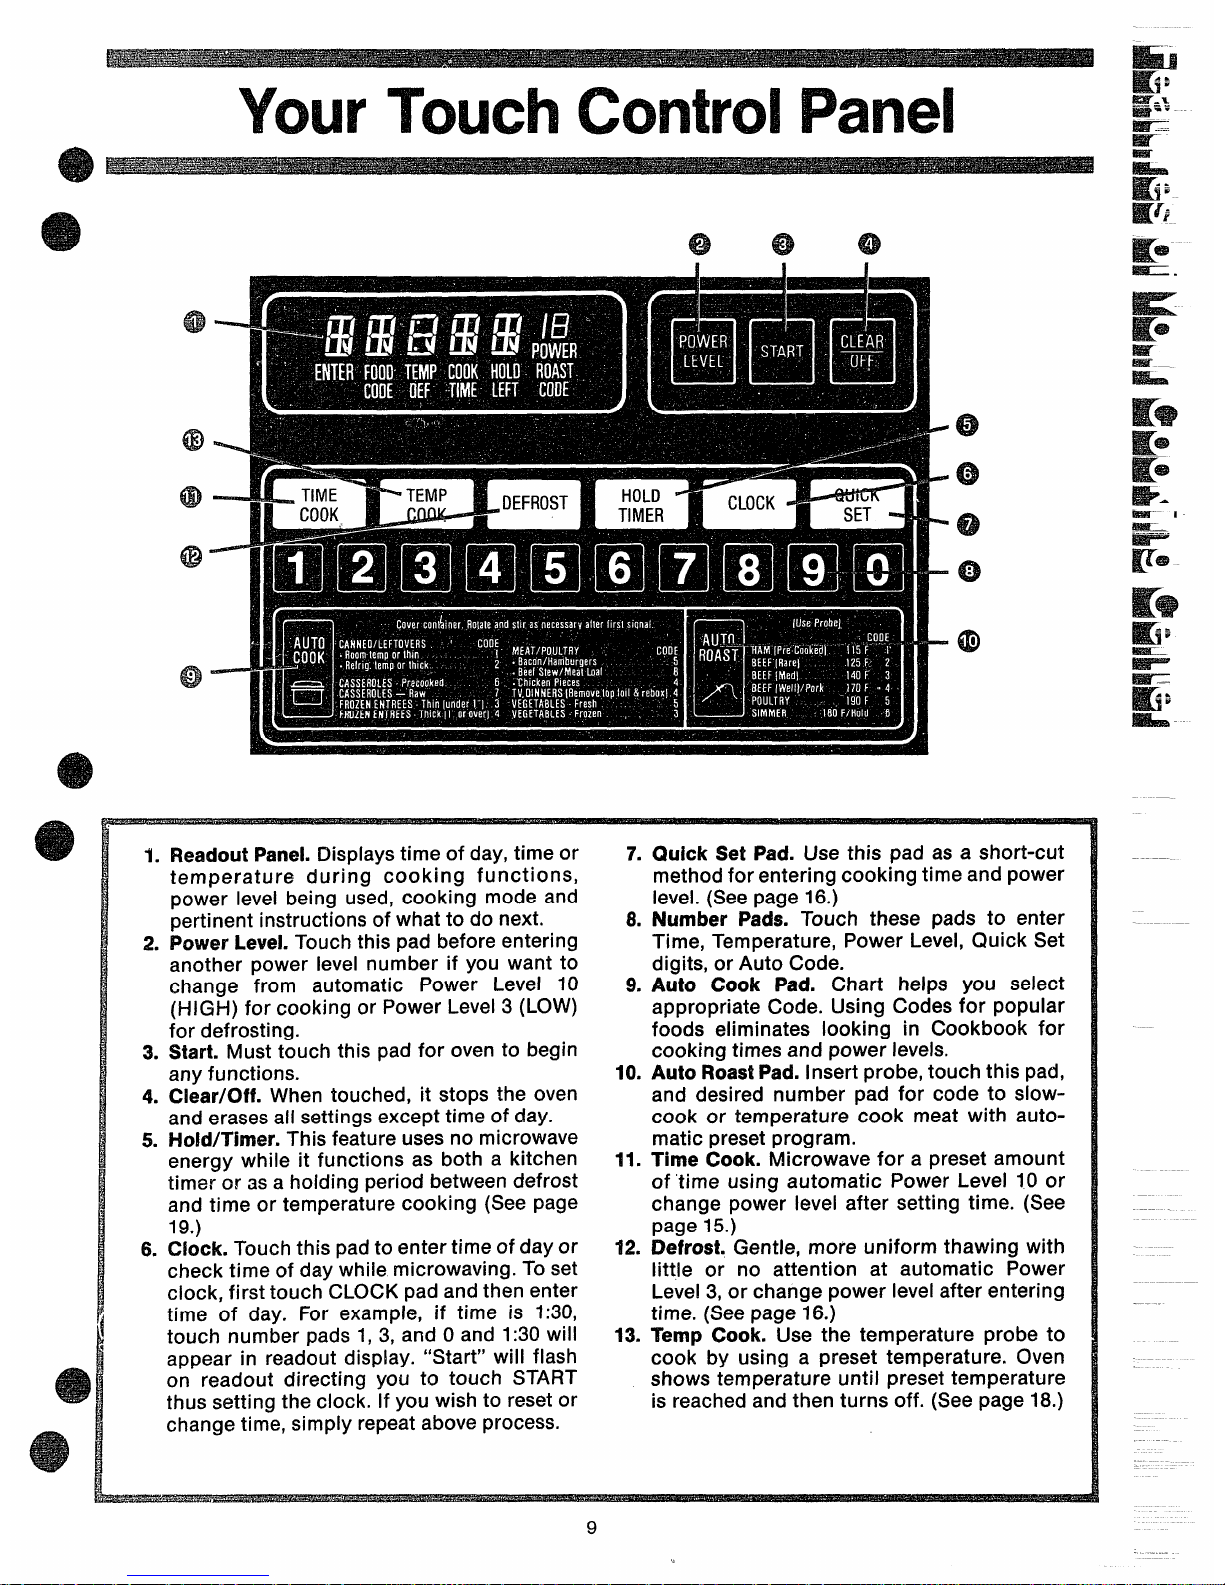
1. Readout Panel. Displays time of day, time or
7. Quick Set Pad. Use this pad as a short-cut
temperature during cooking functions, method for entering cooking time and power
power level being used, cooking mode and
level. (See page 16.)
pertinent instructions of what to do next. 8. Number Pads. Touch these pads to enter
2. Power Levei. Touch this pad before entering
Time, Temperature, Power Level, Quick Set
another power level number if you want to
digits, or Auto Code.
change from automatic Power Level 10
9. Auto Cook Pad, Chart helps you select
(HIGH) for cooking or Power Level 3 (LOW)
appropriate Code. Using Codes for popular
for defrosting.
foods eliminates looking in Cookbook for
3. Start. Must touch this pad for oven to begin
cooking times and power levels.
any functions.
10. Auto RoastPact.insert probe, touch this pad,
4. Ciear/Off. When touched, it stops the oven
and desired number pad for code to slow-
and erases all settings except time of day.
cook or temperature cook meat with auto-
5. Hoid/Timer. This feature uses no microwave
matic preset program.
energy while it functions as both a kitchen 11. Time Cook. Microwave for a preset amount
timer or as a holding period between defrost
of ‘time using automatic Power Level 10 or
and time or temperature cooking (See page change power level after setting time. (See
19.) page 15.)
& Clock. Touch this pad to enter time of day or
12. Defrost. Gentle, more uniform thawing with
check time of day while microwaving. To set
little or no attention at automatic Power
clock, first touch CLOCK pad and then enter
Level 3, or change power level after entering
time of day. For example, if time is 1:30,
time. (See page 16.)
touch number pads 1, 3, and Oand 1:30 will
13. Temp Cook. Use the temperature probe to
appear in readout display. “Start” will flash cook by using a preset temperature. Oven
on readout directing you to touch START
shows temperature until preset temperature
thus setting the clock. If you wish to reset or is reached and then turns off. (See page 18.)
change time, simply repeat above process.
9
~ Microwave(hen ~
AutomaticCooking
.
~e
The Auto Cook pad may be used to eliminate your
the sensor detects steam from the foods. Other
need to look up cooking time in the Cookbook, or Auto Cook control settings, which are for fresh or
guessing how long to set cooking time. By actually
frozen foods, need additional time after steam has
sensing the s~eamwhich escapes as food micro-
been sensed. For these foods, the oven determines
waves, this feature automatically adjusts the oven’s
the amount of additional time needed, then autocooking time to various types and amounts of food.
matically switches the oven to Time Cook for the
Because cooking containers must be covered, this
necessary cooking time remaining, Oven beeps
feature is best with foods which you wish to steam
when it switches to Time Cook (AUTO on readout is
or to retain moisture. Foods which are best micro-
replaced by numbers indicating cooking time), and
waved uncovered or only lightly covered should
oven door can be opened for stirring or rotating
be cooked using time or temperature settings, or
food.
Quick Set control.
Be careful of steam when removing tight covers.
After touching the Auto Cook pad, and pressing
When you remove cover, direct the steam away
Start, you will see the word AUTO on the readout,
from hands and face.
which indicates that the sensor has been activated
Be sur~ the exterior of the cooking container and
to sense steam from the food. To prevent the es-
interior of microwave oven are dry.
cape of steam from the oven, do not open the door
Always cover food containers using lids or plastic
while the word AUTO is on the readout. If door is
wrap. Plastic wrap should be loose over food to
opened, ERROR appears. Close door and touch
allow for expansion. Seal by pressing plastic wrap
START immediately.
firmly around edges. For best results, never stretch
Setting 1, which is designed for easy reheating of
plastic wrap tightly over food, or use tight-sealing
foods, automatically turns the oven off as soon as
plastic lids.
Always stir or rotate after beeping signal.
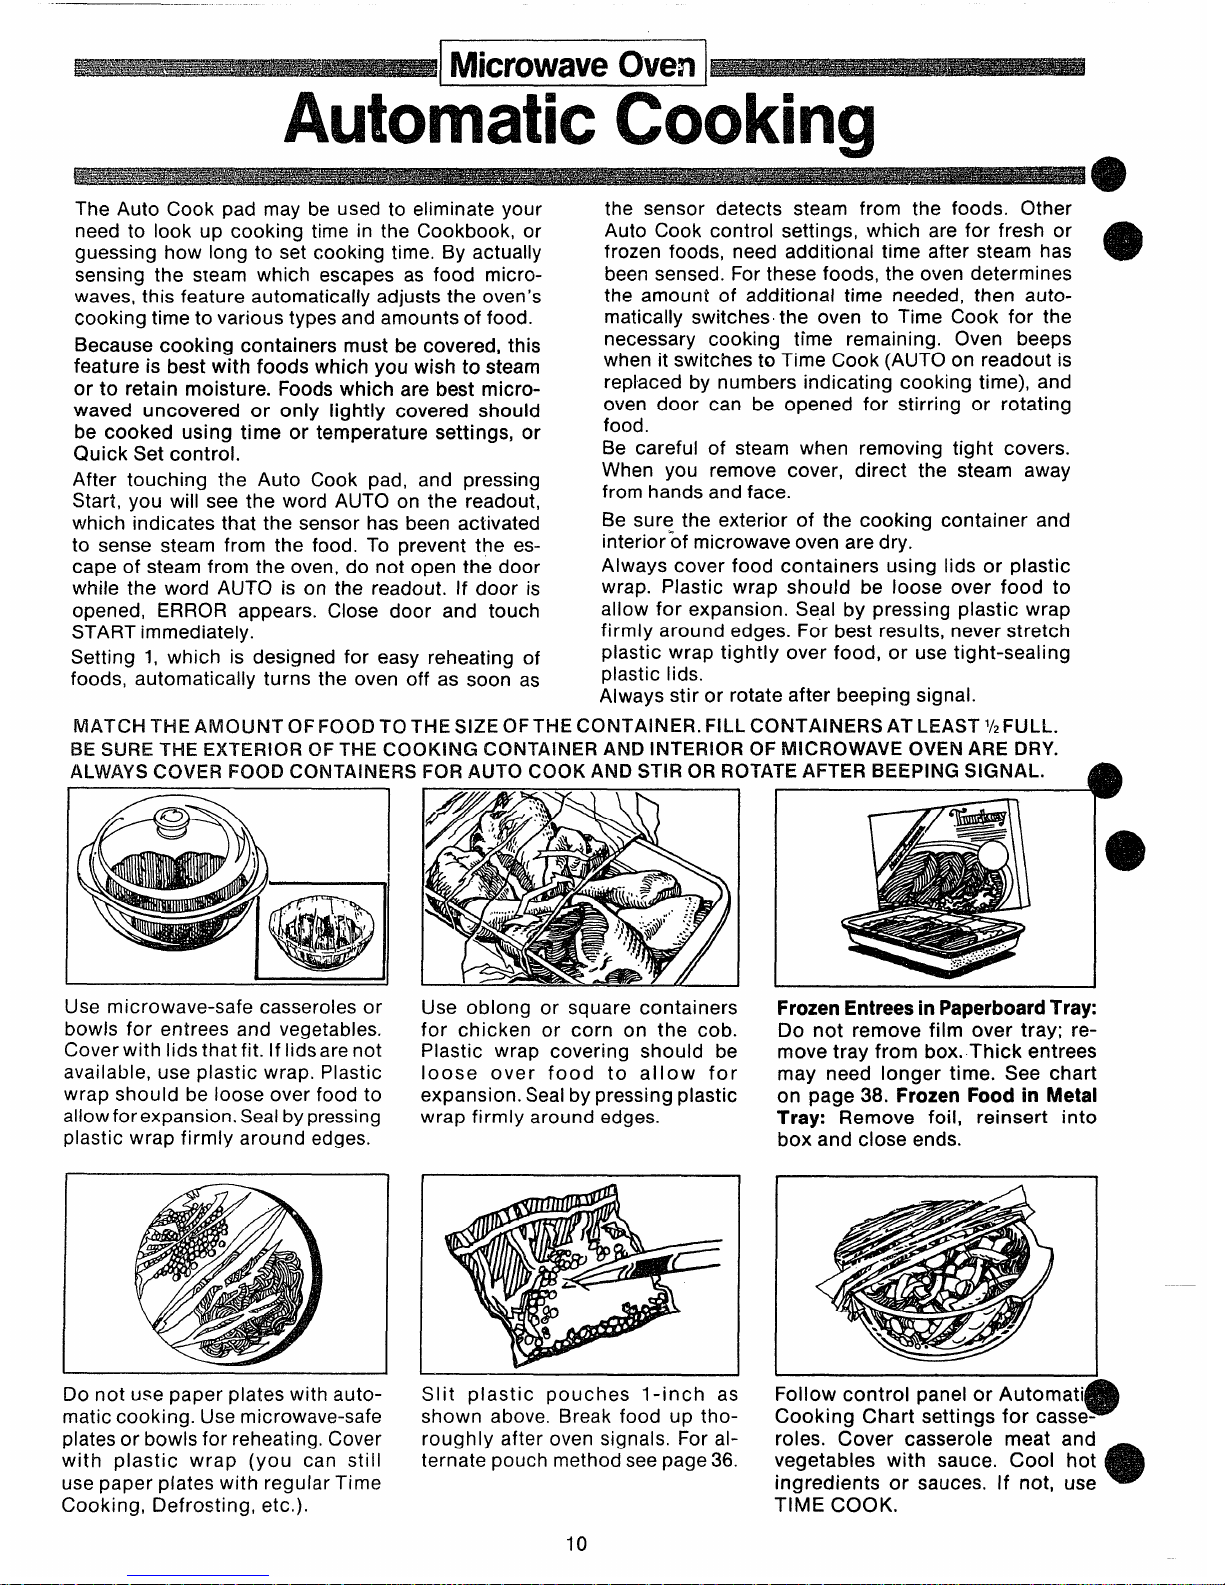
MATcHTHEAMouNT oFFooDTo THEslzE oFTHEcoNTAINER. FILLcoNTAiNERs AT LEAsT`/2FuLL.
BE SURE THE EXTERIOR OFTHE COOKING CONTAINER AND INTERIOR OF MICROWAVE OVEN ARE DRY.
ALWAYSCOVER FOOD CONTAINERS FOR AUTO COOK AND STIR OR ROTATEAFTER BEEPING SIGNAL. ~
Use microwave-safe casseroles or
bowls for entrees and vegetables.
Cover with lids that fit. If lids are not
available, use plastic wrap. Plastic
wrap should be loose over food to
allow for expansion. Seal bypressing
plastic wrap firmly around edges.
Use oblong or square containers
for chicken or corn on the cob.
Plastic wrap covering should be
loose over food to allow for
expansion. Seal by pressing plastic
wrap firmly around edges.
FrozenEntreesin PaperboardTray:
Do not remove film over tray; remove tray from box. Thick entrees
may need longer time. See chart
on page 38. Frozen Food in Metal
Tray: Remove foil, reinsert into
box and close ends.
Do not use paper plates with auto-
matic cooking. Use microwave-safe
plates or bowls for reheating. Cover
with plastic wrap (you can still
use paper plates with regular Time
Cooking, Defrosting, etc.).
Slit plastic pouches l-inch as
shown above. Break food up tho-
roughly after oven signals. For al-
ternate pouch method see page 36.
Follow control panel or Automati
e
Cooking Chart settings for casse-
roles. Cover casserole meat and
vegetables with sauce. Cool hot
ingredients or sauces, If not, use
TIME COOK,
10
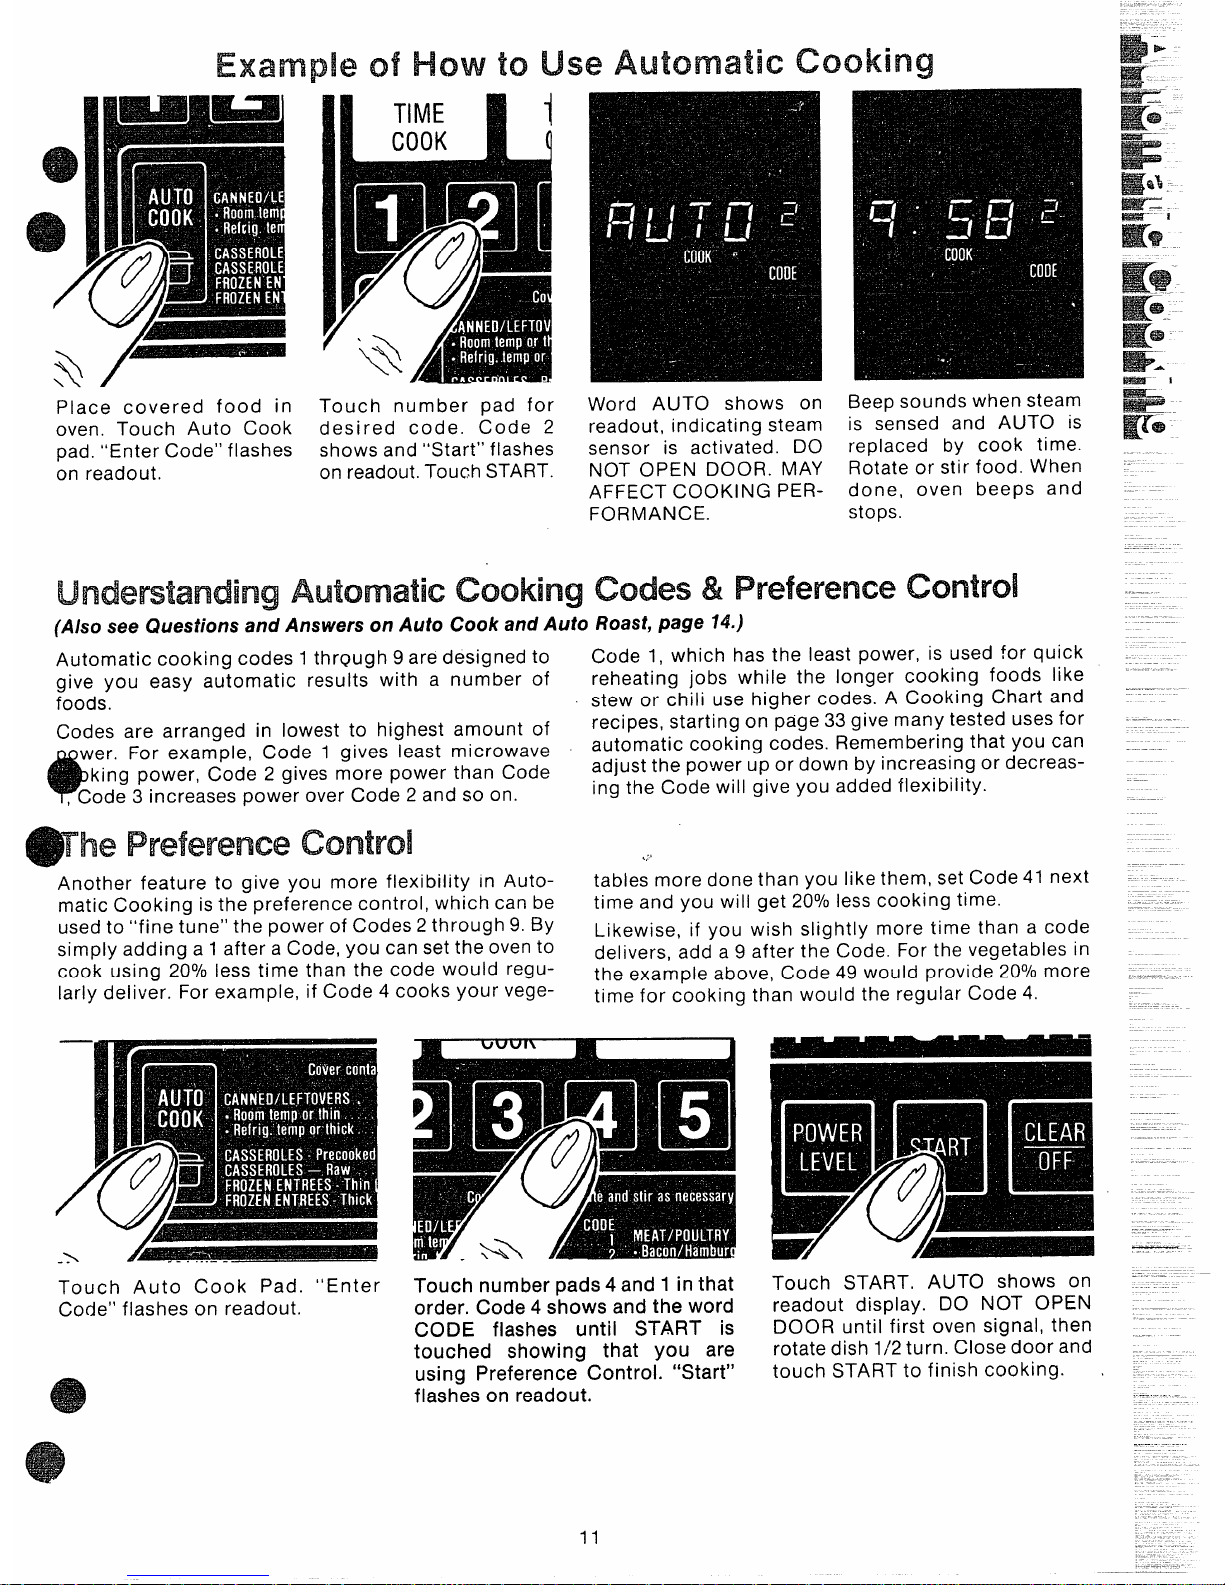
ExampleofHow toUseAutomaticCooking
Place covered food in
oven. Touch Auto Cook
pad. “Enter Code” flashes
on readout.
Touch number pad for
desired code. Code 2
shows and “Start” flashes
on readout. Touch START.
Word AUTO shows on
readout, indicating steam
sensor is activated. DO
NOT OPEN DOOR. MAY
AFFECT COOKING PERFORMANCE.
Beep sounds when steam
is sensed and AUTO is
replaced by cook time.
Rotate or stir food. When
done, oven beeps and
stops.
UndemandingAutomaticcookingcodes8!Preferencecontrol
(Alsosee Questionsand Answerson Auto Cook and Auto Roast,page 14.)
Automatic cooking codes 1thrQugh 9are designed to
Code 1, which has the least power, is used for quick
give you easy automatic results with a number of
reheating jobs while the longer cooking foods like
foods.
stew or chili use higher codes. A Cooking Chart and
Codes are arranged in lowest to highest amount of
recipes, starting on page 33 give many tested uses for
*
wer. For example, Code 1 gives least microwave
automatic cooking codes. Remembering that you can
king power, Code 2 gives more power than Code
adjust the power up or down by increasing or decreas-
Code 3 increases power over Code 2 and so on.
ing the Code will give you added flexibility.
-he Preferencecontrol
,,:,
Another feature to give you more flexibility In Auto-
tables more done than you Iike them, set Code 41 next
matic Cooking is the preference control, which can be
time and you will get 20°/0less cooking time.
used to “fine tune” the power of Codes 2through 9. By
Likewise, if you wish slightly more time than a code
simply adding a 1after a Code, you can set the oven to
delivers, add a 9 after the Code. For the vegetables in
cook using 20°/0less time than the code would regu-
the example above, Code 49 would provide 20°/0more
lady deliver. For example, if Code 4 cooks your vege-
time for cooking than would the regular Code 4.
-y
4+’......_-
Touch Auto Cook Pad. “Enter
Code” flashes on readout.
Touch number pads 4 and 1 in that
order. Code 4 shows and the word
CODE flashes until START is
touched showing that you are
using Preference Control. “Start”
flashes on readout.
Touch START. AUTO shows on
readout display. DO NOT OPEN
DOOR until first oven signal, then
rotate dish 1/2 turn. Close door and
touch START to finish cooking. ~
11
r
1
~1 MicrowaveOven1~
AutomaticRoasting
Auto Roast uses the temperature probe to cook to
Just as in conventional roasting, only tender roasts
the desired serving temperature. Unlike Temp Cook, should be Auto Roasted until specified internal temwhich uses a single power level, Auto Roast uses
peratures are reached. Less tender roasts should
up to 3 power settings which automatically switch
be microwaved by time, according to the Cookbook
during roasting, thus providing even tender cooking
which comes with your oven. Complete information
results without overcooking.
on preparing roasts for microwaving is in your
Cookbook.
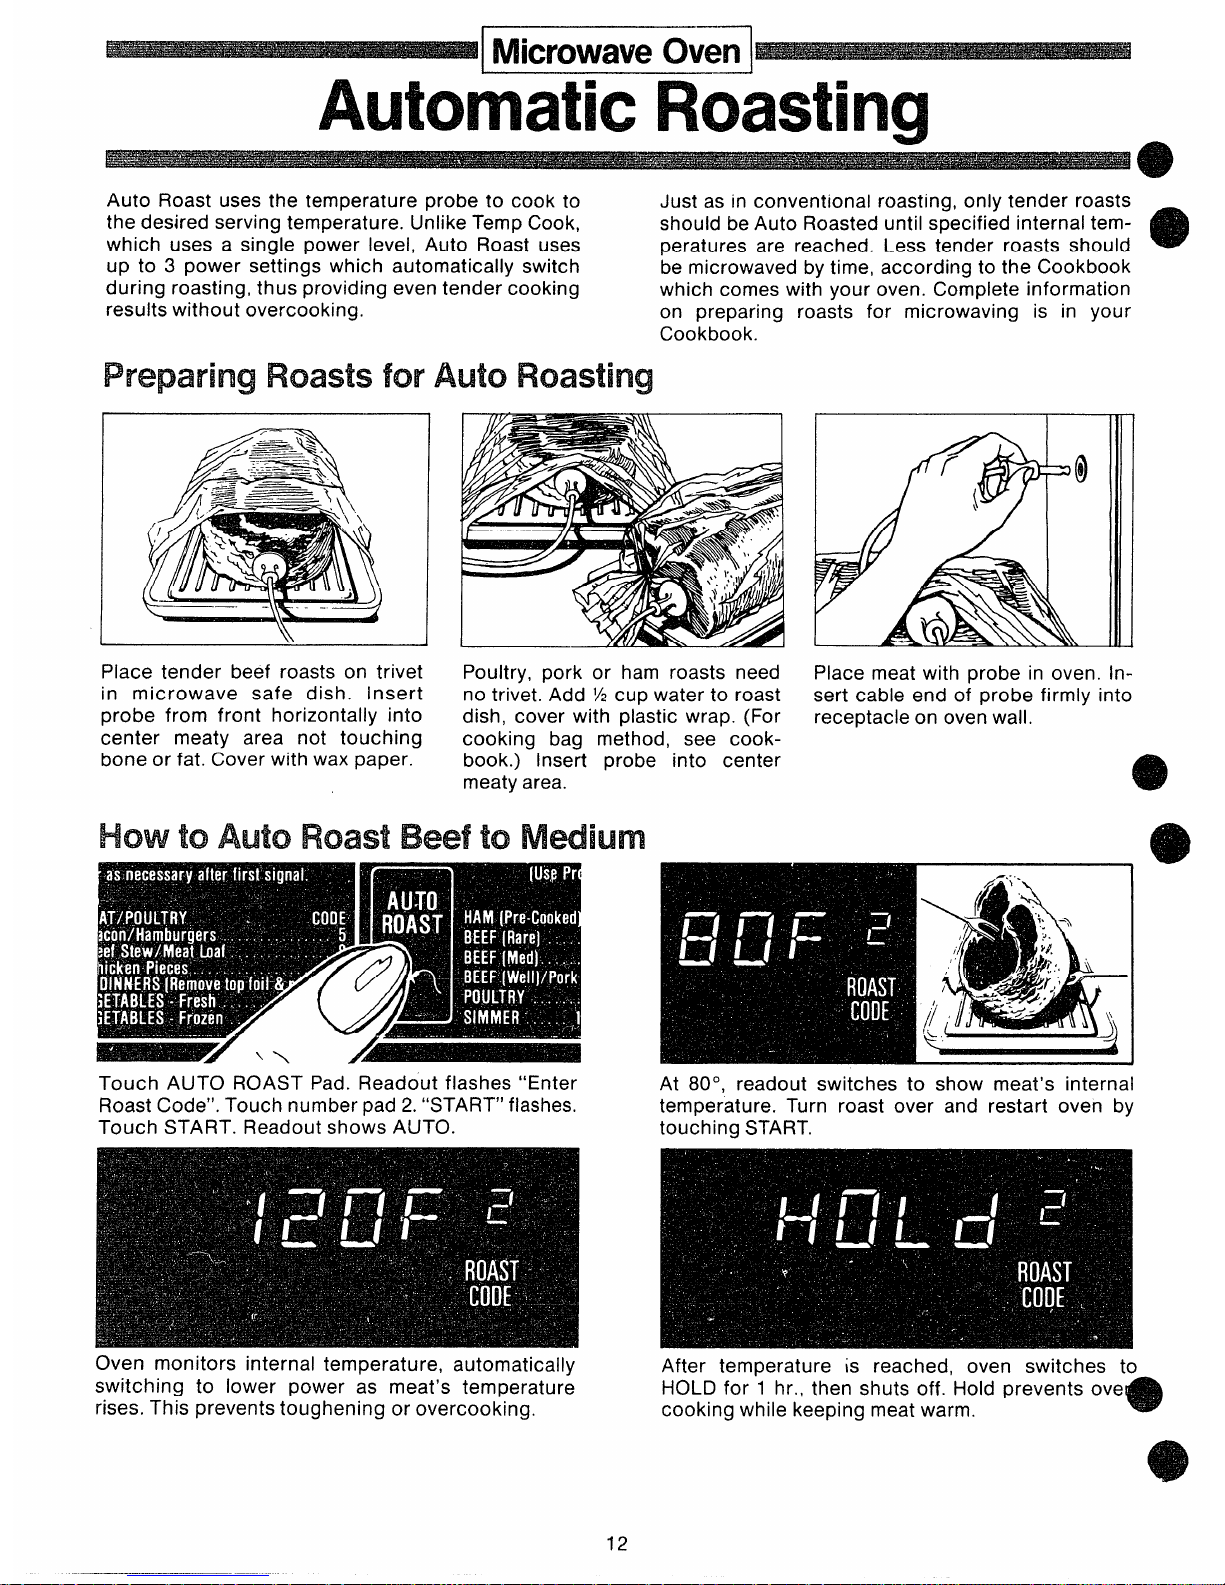
Preparing Roasts for Auto Roasting
Place tender beef roasts on trivet
in microwave safe dish. insert
probe from front horizontally into
center meaty area not touching
bone or fat. Cover with wax paper.
Poultry, pork or ham roasts need
no trivet. Add % cup water to roast
dish, cover with plastic wrap. (For
cooking bag method, see cookbook.) Insert probe into center
meaty area.
HowtoAutoRoastBeeftoMWium
II
Place meat with probe in oven. insert cable end of probe firmly into
receptacle on oven wall.
e
a
Touch AUTO ROAST Pad. Readout flashes “Enter
Roast Code”. Touch number pad 2.“START” flashes.
Touch START. Readout shows AUTO.
At 80°, readout switches to show meat’s internal
temperature. Turn roast over and restart oven by
touching START.
Oven monitors internal temperature, automatically
switching to lower power as meat’s temperature
rises. This prevents toughening or overcooking.
After temperature is reached, oven switches to
HOLD for 1 hr., then shuts off. Hold prevents ove
cooking while keeping meat warm.
m
12
AutoRoastChad
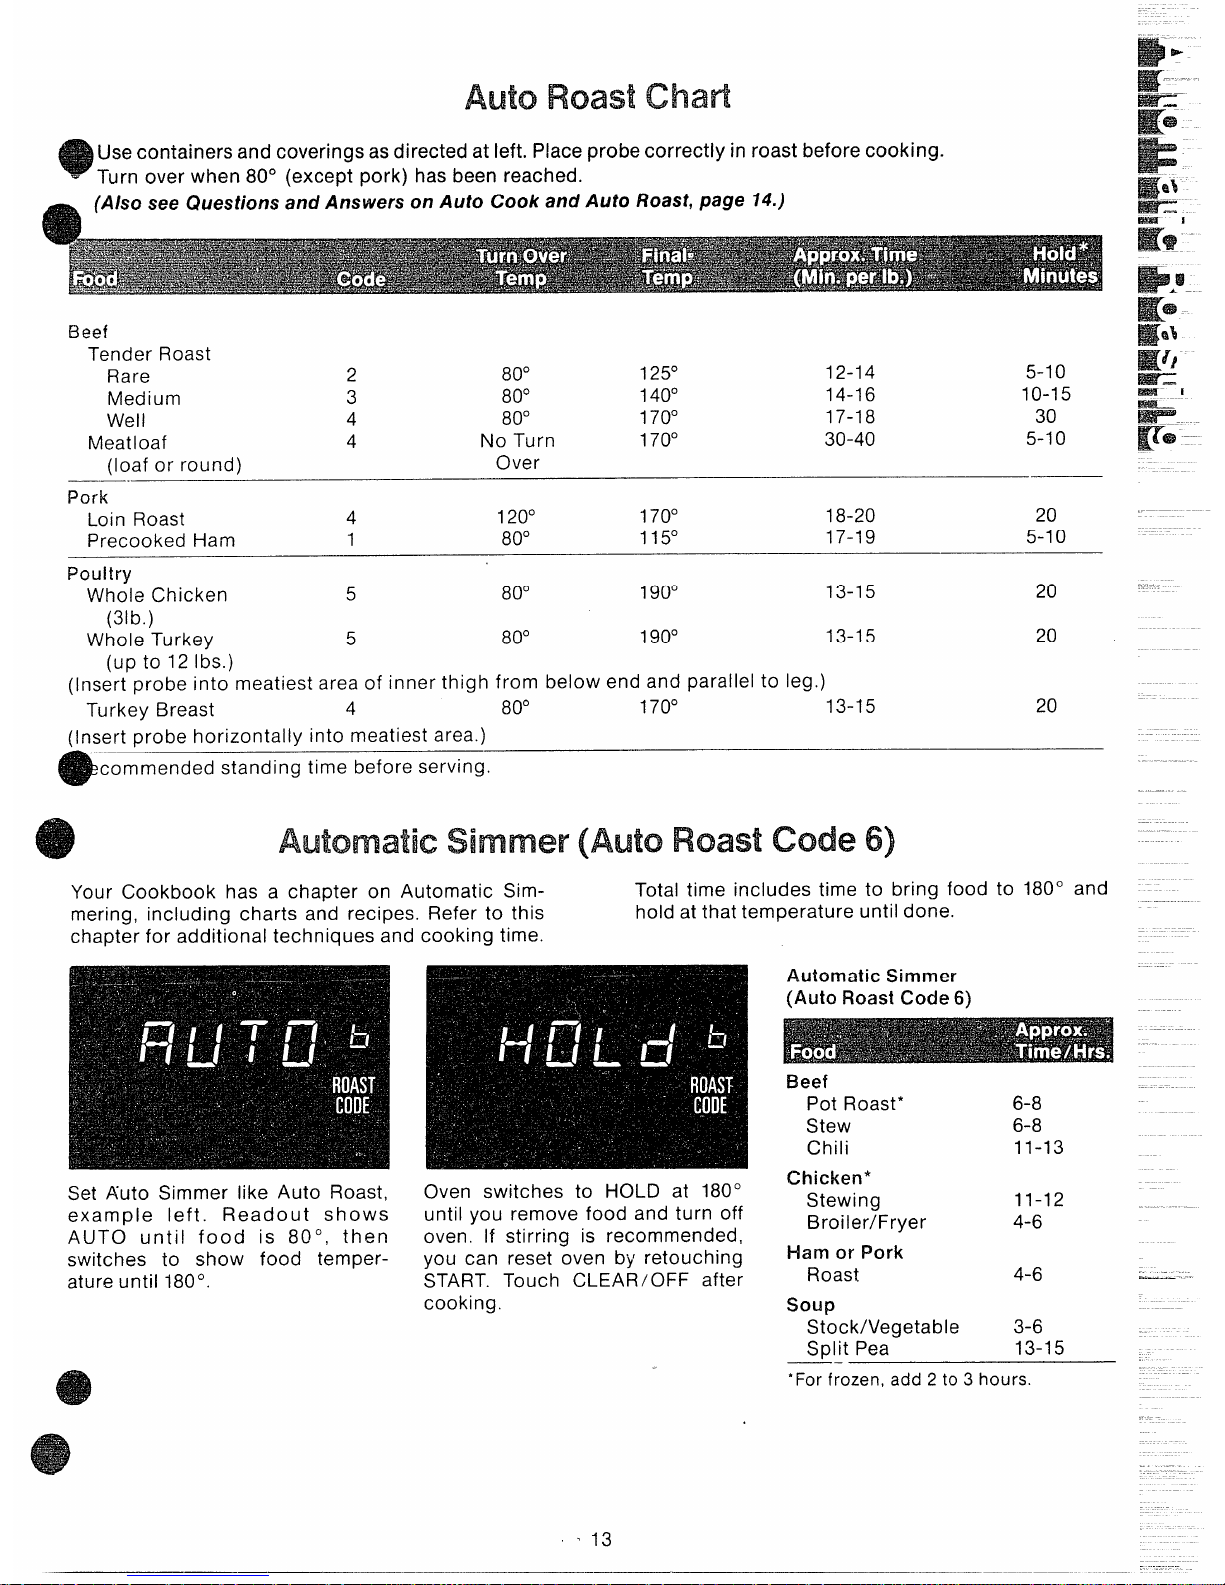
Usecontainers and coverings as directed at left. Place probe correctly in roast before cooking.
Turn over when 80° (except pork) has been reached.
(Also see Questionsand Answers on Auto Cook and Auto Roast, page 14.)
Beef
Tender Roast
Rare
2
80°
125°
12-14
5-1o
Medium
3
80°
140°
14-16 10-15
Well
4
80°
170°
17-18 30
Meatloaf
4
No Turn
170°
30-40 5-1o
(loaf or round)
Over
Pork -
Loin Roast
4
120°
170° 18-20
20
Precooked Ham
1
80°
115° 17-19 5-1o
Pollltry
Whole Chicken
5
80°
190°
13-15 20
(31b.)
Whole Turkey
5
80° 190°
13-15 20
(up to 12 Ibs.)
(Insert probe into meatiest area of inner thigh from below end and parallel to leg.)
Turkey Breast
4
80°
170° 13-15
20
(Insert probe horizontally into meatiest area.)
commended standing time before serving.
Your Cookbook has a chapter on Automatic Sim-
Total time includes time to bring food to 180° and
mering, including charts and recipes. Refer to this
hold at that temperature until done.
chapter for additional techniques and cooking time.
Set Auto Simmer like Auto Roast,
example left.
Readout shows
AUTO until food is 80°, then
switches to show food temperature until 180°.
Oven switches to HOLD at 180°
until you remove food and turn off
oven. If stirring is recommended,
you can reset oven by retouching
START. Touch CLEAR/OFF after
cooking.
‘ 13
Automatic Simmer
(Auto Roast Code 6)
Beef
Pot Roast* 6-8
Stew
6-8
Chili 11-13
Chicken*
Stewing
11-12
Broiler/Fryer
4-6
Ham or Pork
Roast 4-6
soup
Stock/Vegetable 3-6
Split Pea
13-15
——
‘For frozen,add 2to 3 hours.
 Loading...