

Hotpoint RH961GJ Use And Care Manual
Howtogetthebestfrom
®
Useand Careof
model
RH961GJ
Features p8
Microwave
AUTOROASTfeature
Microwave
DELAYSTARTfeature
Microwave
QUICKSETfeature
Howto operatethe
sdf-cleaningloweroven
plO
p13
p16
p30
Questions?
use the Problem Solver p34

Contents Help us help you...
Microwaving Tips.. ........... 3
Safety Instructions ......... .4-6
Features of Your
Cooking Center ............ 8
Touch Control Panel ........ _.. 9
Automatic Roasting &
Guide ................... 10, 11
AutOmatic Simmer ". .......... 11
Defrosting .................. 12
Time Cook ................. 13
Delay Start ................. 13
Temp Cook/Hold ........... _ 14
Minute/Second Timer .......... 15
Quick Set Feature ........ .16, 17
Safety Instructions ......... :4-6
How to Use ................. 18
Home Canning Tips .......... 19
Cooking Guide..i ......... 20, 21
Safety Instructions ........... 4-6
Features .................... 8
Oven Controls ............... 8
Oven Light ................. 22
Oven Shelves ............... 22
Minute Timer; Clock,
Automatic Oven Timer.. .... 22
Baking & Guide .......... 22, 23
Roasting & Guide ......... 24, 25
Broiling & Guide ......... 26, 27
Operating the
Self-Cleaning Oven ...... 30, 31
Read this book carefully.
It is intended to help you operate
and maintain your new Cooking
Center properly.
Keep it handy for answers to your
questions.
If you don't understand something
or need more help, write (include
your phone number):
Consumer Affairs
Hotpoint
Appliance Park
Louisville, KY40225
Write down the model
and serial numbers.
You'll find them on a label inside
the upper oven on the left side.
These numbers are also on the
Consumer Product Ownership
Registration Card that came with
your Cooking Center. Before
sending in this card, please write
these numbers here:
Model Number
Serial Number
Use these numbers in any
correspondence or service calls
concerning your Cooking Center.
The electric output of this
microwave oven is 625 watts.
Be sure your oven is
registered.
It is important that we, the
manufacturer, know the location of
your Cooking Center should a need
occur for adjustments.
Your supplier is responsible for
registering you as the owner.
Please check with your supplier to
be sure he has done so; also send in
your Consumer Product Ownership
Registration Card. If you move, or
if you are not the original purchaser
please write to us, stating model
and serial numbers. This appliance
must be registered. Please be certain
that it is.
Write to:
Hotpoint
Range Product Service
Appliance Park
Louisville, KY40225
If you received a
damaged oven...
Immediately contact the dealer
(or builder) that sold you the
Cooking Center.
Save time and money.
Before you request service...
check the Problem Solver on pages
34 and 35. It lists minor causes of
operating problems that you can
correct yourself.
Optional Accessory
available at extra cost from your
Hotpoint supplier.
JX79 Charcoal Filter Kit.
Add for non-vented installation.
Before Using Your
Cooking Center ...... .... :. 2
Energy-Saving Tips ..... _ ... _. 7
Model & Serial Number
Location. ....... . ....... 2, 8
Care and Cleaning ......28-33
The Problem Solver ....... 34, 35
Exhaust System ........ : .... 36
If You Need ServiCe .......... 37
Warranty ........... Back Cover
_ 2
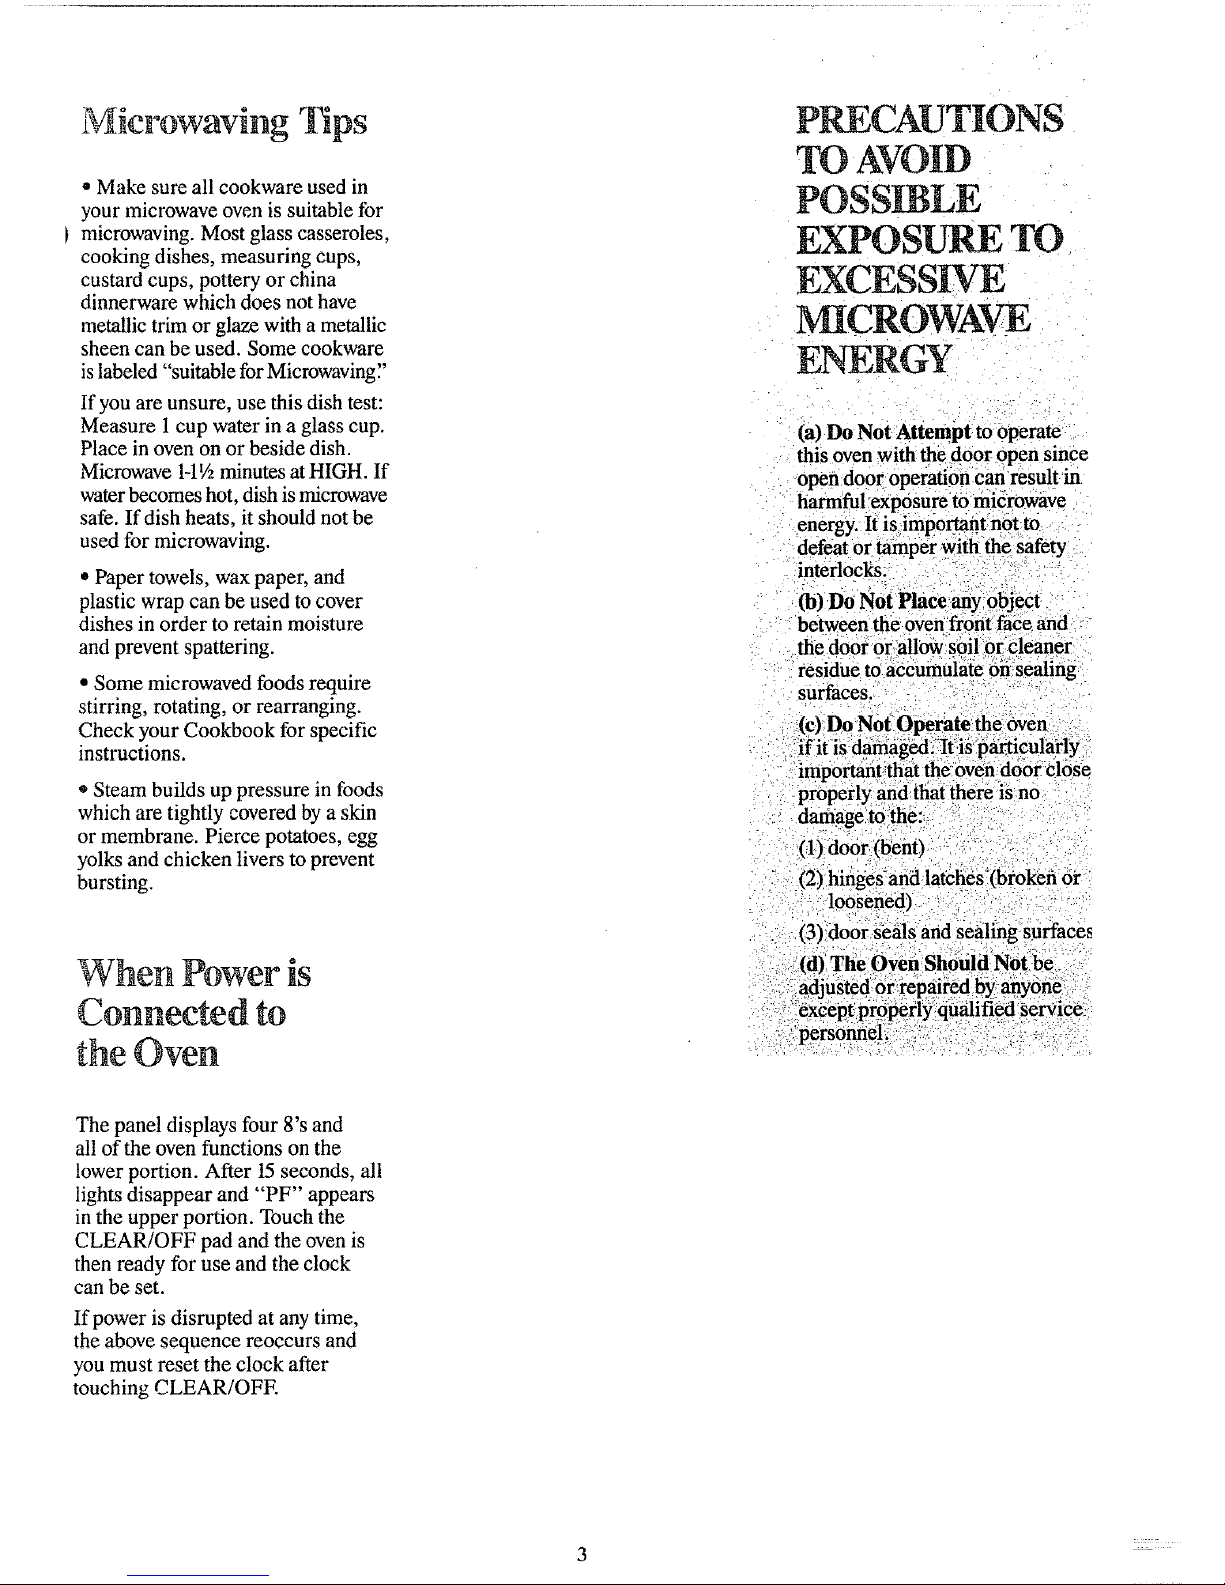
i ficrowaving 1 ps
• Make sure all cookware used in
your microwave oven is suitable for
} microwaving. Most glass casseroles,
cooking dishes, measuring cups,
custard cups, pottery or china
dinnerware which does not have
metallic trim or glaze with a metallic
sheen can be used. Some cookware
is labeled "suitable for Microwaving."
If you are unsure, use this dish test:
Measure 1cup water in a glass cup.
Place in oven on or beside dish.
Microwave 1-1Vzminutes at HIGH. If
water becomes hot, dish is microwave
safe. If dish heats, it should not be
used for microwaving.
* Paper towels, wax paper, and
plastic wrap can be used to cover
dishes in order to retain moisture
and prevent spattering.
• Some microwaved foods require
stirring, rotating, or rearranging.
Check your Cookbook for specific
instructions.
• Steam builds up pressure in foods
which are tightly covered by a skin
or membrane. Pierce potatoes, egg
yolks and chicken livers to prevent
bursting.
PRECAUTIONS;
TO AVOID
POSSIBLE
EXPOSURE TO
EXCESSIVE
MICROWAVE
ENERGY i
(a) Do Not Attempt to operate
this oven with the door Open since
opendoor operation Can result in
harmful:exp0sure'tomicrOwfive
energy. !t is:important n0tto
defeat or tamper with the safety
interlocks i .: •
(b) DoNor Place_an_ _object
between the ovenfront face and _:-
the door or:allOW!s6il or cleaner
residue to a_cumuiate6_ sealing,_
surfaces.
(c) DoNor Operatetlae oven i
:, : _:ifitisd_g_l_it!)sp_iculai;]Y _-
: / imPo_t_a the-10vcn d0or:el0se
; properly and that there isno. : ' :
: ? :(2)hinges"and latclies'_(i0mleefi6r
. i" :,: .lo0s_fied ) -_" ,..;:_:
. _.(3)idoor _e_iis and sealingsUrfaces
When Power is
Connected to
the Oven
The panel displays four 8's and
all of the oven functions on the
lower portion. After 15 seconds, all
lights disappear and "PF" appears
in the upper portion. Touch the
CLEAR/OFF pad and the oven is
then ready for use and the clock
can be set.
If power is disrupted at any time,
the above sequence reoccurs and
you must reset the clock after
touching CLEAR/OFF.
: ._.:/::adjilsted6r_epaii_ed !_Y_y6iig_/: _
.....
! ,IPORTANT SAFETY INSTRUCTIONS
Read all instructions before using this appliance.
When using electrical appliances
basic safety precautions should be
IOIIUWCH, III_IUUIII_ HII_ IOllOWlllg.
WARNING Toreduce
the risk of burns, electric shock,
fire, injury to persons or
_XpO_;LII-_ tO t_Xt.;CgSblVt_ IIllCrowav_
energy:
• Use this applianceonly for its
intendeduse as described in this
manual.
*Be sure your appliance is
properly install&land grounded by
a qualifiedtechnician inaccordance
with the provided installation
Instructions.
* This appliance must be
connected to a grounded, metallic,
permanent wiring system, or an
equipment grounding conductor
blIULIIU LI_ IUII Wltll tll_ Cll't;tllt
conductors and connected to the
ooninrn_nt crrnnndinc_ t_rrninM or
lead on the appliance.
_ rl_l _ lr • 1 It . i
I nls appnance snoula oe servlcea
only by qualified service personnel.
["_nt._,_t n_r_ct ._nfhftr_7_fl ca_tt_r_
facility for examination, repair or
adjustment.
* Before performing any service,
F_T_/'_I_]_TNTI3'/'_T ' "T%.TI:? D A "KT/_-t._
POWER SUPPLY AT THE
HOUSEHOLD DISTRIBUTION
PANEL BY REMOVING THE
FUSE OR SWITCHING OFF
THE CIRCUIT BREAKER.
DOnot cover or block any
openings on the appliance.
DOnot use outdoors.
DO not operate this appliance if
it is not working properly, or if it
has been damaged or dropped.
As with anv annlianee, close
.... ./ --17 K
supervision is necessary when
used by children.
Do not leave children alone--
children should not be left alone or
gllgtll_llU_J. HI i_[_ WIIt_IU: _lppllilllUC
is in use. They should never be
allnwad to _it or _tnnd on _nv n_rt
of the appliance.
-- r____q_. -II ............. _t_ _|_ __1_
t, 13011"[ allOW allyOlle _0 CllmO_
stand or hang on the door,
draw_,, nr *.ono_ tan Tho_ oaniR
damage the range and even tip
it over causing severe personal
injury.
INTEREST TO CHILDREN
SHOULD NOT_BE STORED
IN CABINETS ABOVE A
RANGE OR ON THE
BACKSPLASH OF A RANGE--
CHILDREN CLIMBING ON
.......... REACH'I'HI_ NAN Uil_ 10
ITEMS COULD BE SERIOUSLY
l_T It I'D l_t_
ILL •dl I,,./,l'_,l._.lL/_
• Wear proper clothing. Loose
fitting or hanging garments should
never be worn while using the
ili)l_lli:l.llU_. I"lOlllllli:l.Ol_. lll_lt_[l:'ll
could be ignited if brought in
r_nnta_t with hnt h_ntinc, _l_rn_nt_
and may cause severe burns.
• Use only dry potholders--
moist or damp potholders on hot
dta/.ll,&_O l_,l_,j JLt*,¢dt, tlL otll I./12.1£10 XI'-_III
steam. Do not let potholders touch
hot heating elements. Do not use
a towel or other bulky cloth.
• Never use your appliance for
w_irmlna a*- h_of|na tla_ r,aam
l_eaUt_tAA_UUt_ UI. ltl_lUttltltlt_ tlUt_t*_ IUUltll*
Storage in or on appliance--
Flammable materials should not
be stored in an oven or near
OUI lO_t._l._ tJtlllt_.
Keep hood and grease filters
clean to maintain good venting
andto avoidgrease fires.
- Do not let cooking grease
or other flammable materials
raKt_UIIIUI_IILU !11 I.I!1_ I iill_U Ol
near it.
• Do not use water on grease
fires. Never pick up a flaming
pan. _momer uamlng pan on
surface unit by covering pan
,r.amnl_t_lw wlfh _0o_11I:'it'tlna lld
cookie sheet or flat tray. Flaming
grease outside a pan can be put
out by covering with baking soda
or, if available, a multi-purpose
dry chemical or foam.
• Do not touch heating elements
or interior surface of oven. These
surfaces may be hot enough to
burn even though they are dark in
color. During and after use, do
not touch, or let clothing or other
flammable materials contact
units or any interior area of the
oven; allow ._nffieient time for
cooling, first.
Pnt_ntiMIv h_t _llr'_O0.C lrtO|llrlO
the cooktop and areas facing the
cooktop, oven vent opening and
surfaces near the openings, and
crevices around the oven door.
Remember: The inside surface
ofthe ovenmay be hot when the
door is opened.
• When cooking pork follow our
directions exactly and always cook
the meat to at least 170°E This
assures that, in the remote
possibility that trichina may be
present in the meat, it will be killed
and meat will be safe to eat.
MicrowaveOven:
)• Read and follow the specific
"PRECAUTIONS TO AVOID
POSSIBLE EXPOSURE TO
EXCESSIVE MICROWAVE
ENERGY" found on page 3.
• To reduce the risk of fire in the
oven cavity:
--Do not overcook food. Carefully
attend appliance if paper, plastic
or other combustible materials
are placed inside the oven to
facilitate cooking.
--Remove wire twist-ties from
paper or plastic bags before
placing bags in oven.
--Do not use your microwave
oven to dry newspapers.
--Paper towels,napkinsand
waxpaper. Recycledpaper
products can contain metal flecks
which may cause arcing or ignite.
I O,_./ctaL IJIOLItgltbt_ bUltlI.Otllllll_ tiff LVII
or nylonfilamentsshouldbe
avoided_ as they may also ignite.
--Do not pop popcorn in your
mierawnvo avon nnle._,qin a gnecinl
microwavepopcornaccessoryor
unlessyouusepopcornlabeled
foruseinmicrowaveovens.
--Do notoperatetheovenwhile
empty to avoid damagetothe
ovenand the dangeroffire. If
byaccidenttheovenshouldrun
emptya minuteor two,noharm
is done.However,try toavoid
operating the oven empty at tux
times--it saves energy and
prolongs life of the oven.
--If materials inside the oven
oh,_,,IA;c,n;ta lra,:,n n_7_. An,ar
closed, turn oven off, and
disconnect the power cord, or
shu_:off power at the fuse or
circuit breaker panel.
• Some products such as whole
eggs and sealed containers--for
example, closed glass jars--may
explode and should not be heated
in this oven.
• See door surface cleaning
instructions on page 28.
•Don't defrost frozen beverages
in narrow-necked bottles (especially
carbonated beverages). Even if
the container is opened, pressure
_UII 1)11111,1 U[J* 1111_, _._g:Lllt_O.UL3I_ tll4G
container to burst, resulting in
inlnrv
• Use metal only as directed in
K'4_ -1-L - -1- T___'I ___= ........ _1 _
I[._OOKHOOK. U011 Stl-lpS _tS tidied 011
meat roasts are helpful when used
ae_hnsun in ('_nnlrhnnlc
l_t_ tJ_A_vv u Jt_i _,.J_vvx_,
TV dinners may be microwaved
;n G-all t_.o_Tolace th,ar_ _4IAtvh_ah.
111 l_.Jll LI(/.J_._ JL%.._o¢.._ tllgJLll JI-T 111_11,
remove top foil cover and return
tray to box. When using metal in
microwave oven, keep metal
(except for DOUBLE DUTY TM
shell) at least ! inch away from
sides of oven.
•Cooking utensils may become
hot because of heat transferred
from theheated food. This is
especially trueif plastic wrap has
• DOlling eggs is not
recommended in a microwave
_,_r_rt Dr_,eellra. o_n hlli|/_l iin
inside egg yolk and may cause it
to burst, resulting in injury.
• Foods with unbroken outer
i_ll_lllt _ut_ll O__ l./_,..'l.O.tr,./r_, _ttt.tott_t..o,
tomatoes, apples, chicken livers
and other gibleL%and egg yolks
(see previous caution) should be
pierced to allow steam to escape
during cooking.
• ph_fie I Itep_LIs--P!astic utens_s
designed for microwave cooking are
very useful, but should be used
carefully. Even microwave plastic
may not be as tolerant of
overcooking conditions as are
glass or ceramic materials and
lllUy _uILg;ll UL _110,1 11 _UUJGt_L_U tu
short periods of overcooking. In
lnnot_r _Ynng_w_ to nv_.r_oNkinfr
thefoodandutensilscouldignite.
Forthesereasons:1)Use
microwaveplasticsonlyanduse
themin strict compliancewith
been covering the top and handles
of the utensil. Potholders may be
•Sometimes,theovenfloor
can become toohot totouch.Be
carefultouchingthefloorduring
_ ._ -11 __'_ ........ 1_]__
aim alter COOKlllg,
• Do not use any thermometer
in food you are microwaving
the utensil manufacturer's
recommendations. 2) Do not
suoj¢ct _IIII31L_/ UtCll_ill3 tU
microwaving. 3) Do not permit
oh;lctr_n tn uea,rdn_tlo _t,_n_il_:
%_JtI/JL%,4_JLWlt a_,_ ¢¢v _JX¢_xv _tWtA_l_
withoutcompletesupervision.
_ g£1_ _i al qq __ _I__ .... •
-'_Ollaole'" COOKing pOUCHeS
and tightly closed plastic bags
should be slit, pierced or vented
as directed in Cookbook. If they
unlessthe thermometer is designed
or recommended for use inthe are not, plastic could burst during
_. ................ or immediately after cooking,
m_crowaveoven. possibly resulting in injury. Also,
• Remove the temperature plastic storage containers should
probe from the oven when not be at least partially uncovered
using it to cook with. If you leave because they form a tight seal.
the probe inside the ovenwithout "".... '-" -"1-..... ".....
inserting it in food or liquid, and
turnon microwaveenergy,itcan
create electrical arcing in the
oven, and damage oven walls.
•Avoid heating baby food in
glassjars, even without their lids;
especially meat and egg mixtures.
w nen coorang w_m COlll211llC[_
tightly covered with plastic wrap,
remove covering carefully and direct
steam away from hands and face.
i (continuednextpage)_
IMPORTANT SAFETY INSTRUCTIONS (continued)
* Use of the DOUBLE DUTY T"
shelf accessory. (See your
Cookbook for proper use.)
--Remove the shelf from oven
when not in use.
--Do not store or cook with shelf
on floor of oven. Product damage
may result.
--Use potholders when handling
the shelf and utensils. They may
be hot.
--Do not use microwave browning
dish on shelf. The shelf could
overheat.
Seif-Cieaning Lower Oven:
* Stand away from the range
when opening oven door. The
hot air or steam which escapes
can cause burns to hands, face
and/or eyes.
* Don't heat unopened food
containers in the oven. Pressure
could build up and the container
could burst, causing an injury.
• Keep oven vent ducts
unobstructed.
s Keep oven free from grease
bu ldup,
* Place oven rack in desired
__:_.' ..... k: _.....UVt_n 1_ _uOI. lI
tJo_itiou wuil :^ _- _ Tg
racks must be handled when hot,
do not let potholder contact
heating units in the oven.
• Pulling out shelf to the shelf stop
1_5 _ _OutYU,lltellL;lG ill liltlltl_ li_itv _/
foods. It is also a precaution
against burns from touching hot
surfaces of the door or oven walls.
A l"trl _ _ 1 :
" W nellUsing COOKIngor
roasting bags in oven, follow
the manufacturer's directions.
, Do not use your oven to dry
newspapers, if overheated, they
cancatch fire.
* Do not clean door gasket. It is
essential for a good seal. Be careful
not to rub, damage or move it.
• Do not use oven cleaners. No
commercial oven cleaner or oven
liner protective coating of any kind
should be used in or around any
part of the oven.
- Clean only parts listed in this
Use and Care Book.
-- IJ[l'4/llk, l]li, ll=lk, ilk-illlill_ I_11[ II'_l_li,
remove broiler pan and other
utensils.
Surface Cooking Unit_:
•Use Proper Pan Size--This
appdance 1S cquq)vcu with one or
more surface units of different size.
Select utensids ha.vi_n.gfiat bottoms
large enough to cover the surface
unit heating element. The use of
undersized utensils will expose a
portion of the heating element to
direct contact and may result in
ignition of clothing. Proper
l_l_tl'Otl,'Slllp U! Uttt;ll_ll tO Otllllel
will also improve efficiency.
• Never leave surface units
unattended at high heat settings.
_-:' ................ _-- and .....
honOrer causes smomllg" greasy
spillovers that may catch on fire.
• Be sure drip pans and vent ducts
are not covered and arein place.
Their absence during cooking could
damage range parts and wiring.
• Don't use aluminum foil to line
drip pans or anywhere in the oven
except as described in this book.
Misuse could result in a shock; fire
hazard, or damage to the rang e .
• Only certain types of glass,
glass/ceramic, ceramic, earthenware
or other glazed containers are
suitable for range-top service;
ume_ m_tyt,_cur, ucc_tu_c u_ the
sudden change in temperature.
(See page 19 for suggestions.)
•To minimize burns, ignition of
flammable materials and spillage,
the handle of a container should
be turned toward the center of the
range without extending over
n_al oy _uiia_ Umt_.
*Don't immerse or soak
removable surface units. Don_t
put them in a dishwasher.
• Alwaysturn surface unit to
OFF before removing utensil.
• Keep an eye on foods being
flied at HIGH orMEDIUM
HIGH heats.
-"To avmd mr po_wlaty t,l a
burn or electric shock, always
be ce_n.ainthat the controls for
all surface units are at OFF
_position and all coils are cool
before attempting to remove
the unit.
* When flaming foods under the
hood, turn the fan off. The fan, if
operating, may spread the flame.
, Foods for r_)4ng should be as
dry as possible.Frost on frozen
foods or moisture on flesh foods
can cause hot fatto bubble up and
over sides of pan.
*Use little fat for effective shallow
or deen-fat frvino Filling the pan
tOOfull of fat can cause spillovers
when food is added.
• If a combination of oils or
fats will be use2 in frying, stir
together before heating, or as
fats melt slowly.
* Always heat fat slowly, and
watch as it heats.
* Use deep fat thermometer
whenever possible to prevent
overheating fat beyond the
smoking point.
SAVE THESE
INSTRUCTIONS
6
Your range, like many other
household items, is heavy and
can settle into soft floor coverings
such as cushioned vinyl or
LdI_L||i_, ¥¥11t:;11 IIIUVI|I_ [11_ li:lll_q;:_
on this type of flooring, use care,
and it is recommended that these
simple and inexpensive instructions
be followed.
The range should be installed on
a sheet of plywood (or similar
llldt_ll_l) _ IUIIUW_; VVgl_'i'l g[gl[_
floor covering ends at the front of
the range, the area that the range
will rest on should be built up with
plywood to the same level or higher
than the floor covering. This will
then allow the range to be moved
for cleaning or servicing°
ve mg me
Ranue
Leveling screws are located on
each corner of the base of the
range. By removing the bottom
drawer you can level the range to
an uneven floor with the use of a
nutdriver.
"ib remove drawer, pull drawer out
all the way, tilt up the front and
$._'A./*l_*J'Y'tv,_ XL. &%] It t*.,lJlg*,L_,-_ Jtllh21_l[ t _l_l[Jtr_[*¢,,,_
at back of drawer beyond stop on
range glides. Lift drawer if necessary
to insert easily. Let front of drawer
down, then push in to close.
Energy-Savir Tips
• i_ .a.
.............. "aF"
wr, wmas i,xm w_w,A_ ! --
• TIRe nranar nt_o_r iaval *g
recommended and DO NOT
OVERCOOK.
* Do not operate the oven while
empty. If by accident the oven
shouid runempty a minute or two,
no h_m is don_However, t_ to,
_VUI_ Up_ _t ling UlF r UV Fl_ _lllp Ly ._t
all times--saves energy and als0
ensures g6od; 10ng-term life 0f oven.
• Pro_ho.at the nvo.n nniv when
..................... j .......
necessary.Most foodswill cook
satisfactorily withoutpreheating:
If you find preheating is necessary,
keep aneye on the indicator light,
_n_ m_f _ ;n fh_ ¢x,tran n#amrifl,tt -
•*uu p.u,. _,o,,_.* u. u.._ vv_,.t l.,.v._.ktu J
after the light goes out_
• _lW_y_ tUlll UV_ll UFF (O_G1Ol4_
remowng food. :_
• During baking, avoid frequent
door openingsl Keep door open as
ghort a timo, a_ nog_ihlo, whan it i_
opened.
weight aluminum;: fight-fitting
covers:, and fiat bottoms Which
portion Ofthe surface unit.
• cOOK treSl!:vegetaoleSWltri a
minimum amount of water in a
covered nan
...... r ....
• Watch foods When bringing them
high heat. When food reaches
cooking •temperature, reduce heat
immediately to lowest settingthat
will keep it cooking.
• Use residual heat with surface
cooking whenever possible.For =
-- l "l/l t3b, ll--k, lk, fllllLll_ IJV_,,'II_ Ul_ i_llll_
to Wipe Up excess spillage before
self-cleaning operation.
, Co0k compiete oven meals
insteiid 6f iuSt:One fooditem.
P0tatoes, 0thervegetables; and
some desserts will cook together
with a main_dish casserole, meat
loaf,:chickenor roast. Choose
f0ods' thatlc00k atthe same
temperature in approximately
the same time.
* Use residuai heat in oVen
whenever possible to fifiish
CoOking EasseroleS, oven meals,
'etc. Alsoadd rolls or precooked
example, wnen cooKmgeggs in the " _ aessertsto warm oven, using
shell, bring water to boil, then turn :' :residual heat t0 warm them.
to OFF position to complete the
cOoking:
* Always turn surface unit OFF
before _removing utensi!: .
* Use correct heat for Cooking task...
high heats to start cooking (if time
allows, do not use high heat to start),
medium high--quick brownings, -
medium--slow frying, low--finish
cooking most quantities, simmer--
double boiler heat, finish cooking,
and special for small quantities.
When boiling water for teaor
coffee, heat only the amount
needed. It is not economical to
boil a container full of water for
only one or two cups.
Features of Your Cooking Center
..... i
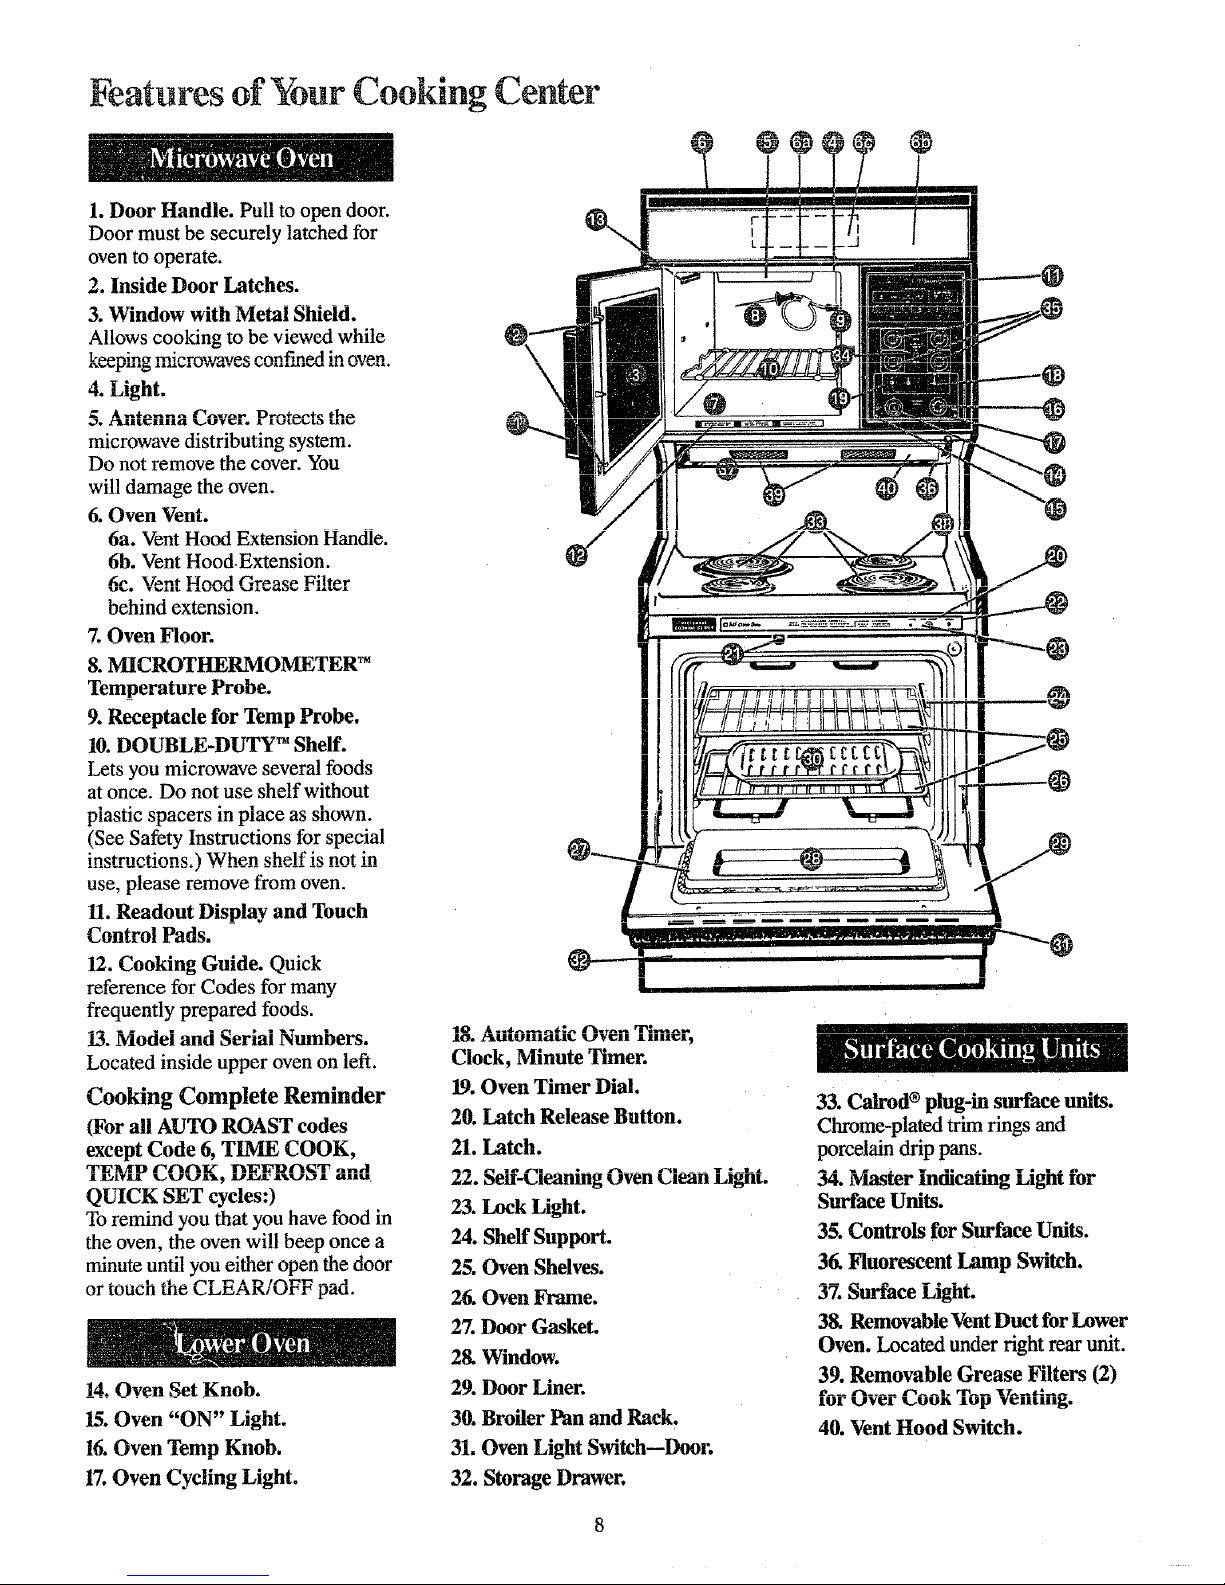
1. Door Handle. Pull to open door.
Door must be securely latched for
oven to operate.
2. Inside Door Latches.
3. Window with Metal Shield.
Allows cooking to be viewed while
l_n_n_ m_t_rr_xt_tt_ rnn'_n_rl in _v_rl
4. Light.
,.3. /Y_lit_51111a _L,Jql_l. & IlJt_._l..,IA_ I,Ilt./
microwave distributing system.
Do not remove the cover. You
will damage the oven.
6. Oven Vent.
6a. Vent Hood Extension Handle.
6b. Vent HoodExtension.
Ig_. _t/c_nt l-.lnnrl C'_r#acF. "lT,;ltF, r
behind extension.
7. Oven Floor.
8. MICROTHERMOMETER TM
Temperature Probe.
9. Receptacle for Temp Probe.
10. DOUBLE-DUTY TM Shelf.
Lets you microwave several foods
at once. Do not use shelf without
plastic spacers in place as shown.
(See Safety Instructions for special
instructionso) When shelf is not in
use, please remove from oven.
11. Readout Display and Touch
Control Pads.
12. Cooking Guide. Quick
reference for Codes for many
frequently prepared foods.
i3. Model and Serial Numbers.
Located inside upper oven on left.
Cooking Complete Reminder
(For all AUTO ROAST codes
except Code 6, TIME COOK,
QUICK SET cycles:)
To remind you that you have food in
the oven, the oven will beep once a
minute until you either open the door
or touch the CLEAR/OFF pad.
14. Oven Set Knob.
15. Oven "ON" Light.
16. Oven Temp Knob.
17. Oven Cycling Light.
\
.ItO. Z']kUlLUllldL|IL XJVIg_Ill Alllll_l_lt 9
Clock, Minute Timer.
19. Oven Timer Dial.
20. Latch Release Button.
21. Latch.
22. Serf-Cleaning Oven Clean Light.
23. Lock Light.
24. Shelf Support.
25. Oven Shelves.
26, Oven Frame.
27. Door Gasket.
28. Window.
29. Door Liner.
30. Broiler Pan and Rack.
31. Oven Light Switch--Door.
32. Storage Drawer.
33. Calrod ®plug-in surface units.
Chrome-plated trim rings and
porcelain drip pans.
34. Master indicating Light for
Surface Units.
35. Controls fer Surface Units.
36. Fluorescent Lamp Switch.
37. Surface Light.
38, Removable Vent Duct for Lower
Oven. Located under right rear unit,
39. Removable Grease Filters (2)
40. Vent Hood Switch.
Features of Your Touch Control Panel
e e e
I I /
[ I I ¸
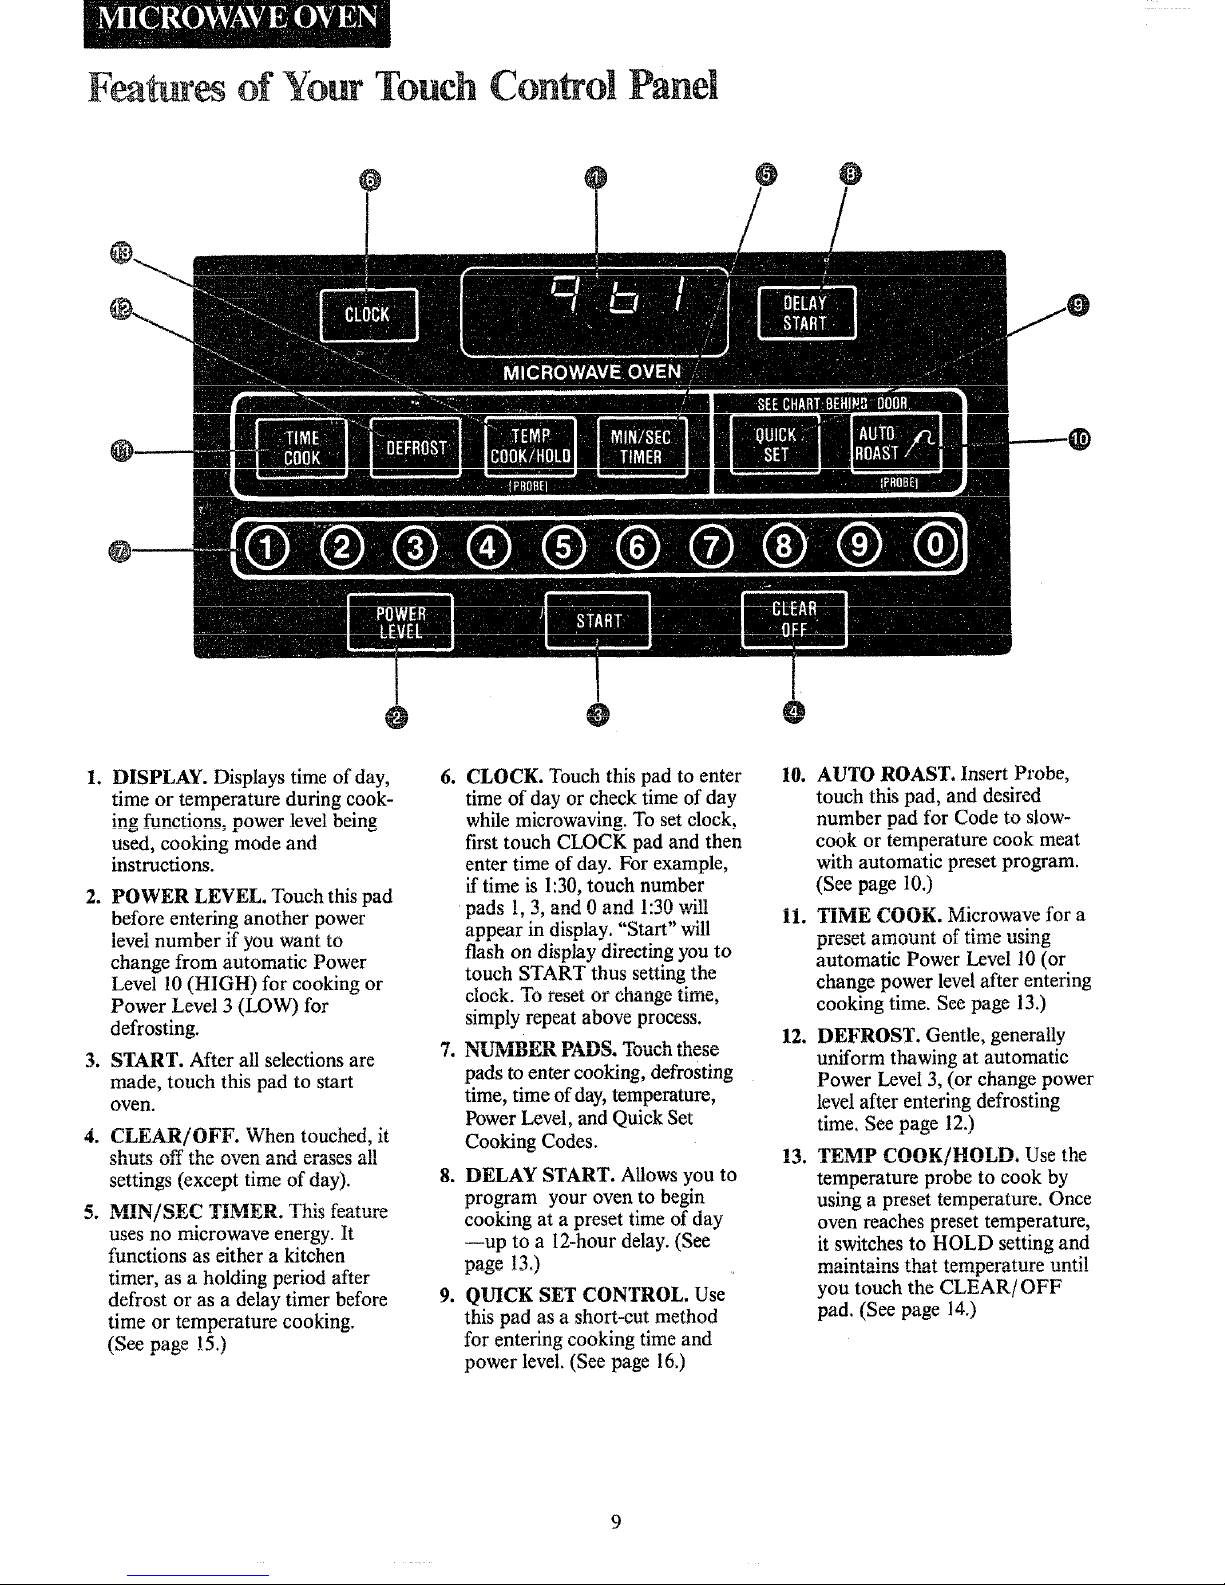
1. DISPLAY. Displays time of day,
time or temperature during cook-
ing functions_ power level being
used, cooking mode and
instructions.
2. POWER LEVEL. Touch this pad
before entering another power
JeveJnumt}er u you want to
change from automatic Power
Level 10 (HIGH) for cooking or
Power Level 3 (LOW) for
defrosting.
3. START. After all selections are
made, touch this pad to start
oven.
4. CLEAR/OFF. When touched, it
settings (except time of day).
uses no microwave energy. It
functions as either a kitchen
timer, as a holding period after
defrost or as a delay timer before
time or temperature cooking.
(See page !5.)
6. CLOCK. Touch this pad to enter
time of day or check time of day
while microwaving. To set clock,
first touch CLOCK pad and then
enter time of day. For example,
if time is 1:30, touch number
n_rle 1 ':l _nAO_nd 1.qn.rln
appear in display. "Start" will
flash on display directing you to
touch START thus setting the
CLOCK.to reset or change LJIIle,
simply repeat above process.
pads to enter cooking, defrosting
time, time of day, temperature,
Power Level, and Quick Set
Cooking Codes.
8. DELAY START. Allows you to
program your oven to begin
cooking at a preset time of day
--up to a 12-hour delay. (See
na_e 133
9. QUICK SET CONTROL. Use
this pad as a short-cut method
for entering cooking time and
power level. (See page 16.)
10. AUTO ROAST, Insert Probe,
touch this pad, and desired
number pad for Code to slow-
cook or temperature cook meat
with automatic preset program.
(See page 10.)
ii. TiME COOK. Microwave for a
automatic Power Level 10 (or
change power level after entering
cooking time. See page 13.)
12. DEFROST. Gentle, generally
uniform thawing at automatic
Power Level 3, (or change power
level after entering defrosting
time. See page 12.)
1"1 T]_'lqv'IP C'f_IIf_TK/I-11NT.I']I IT_, th_
temperature probe to cook by
using a preset temperature. Once
oven reaches preset temperature,
it switches to HOLD setting and
mnlnfnln¢, thnf t_mner_ltllre _mtil
you touch the CLEAR/OFF
pad. (See page 14.)
Automatic Roas g
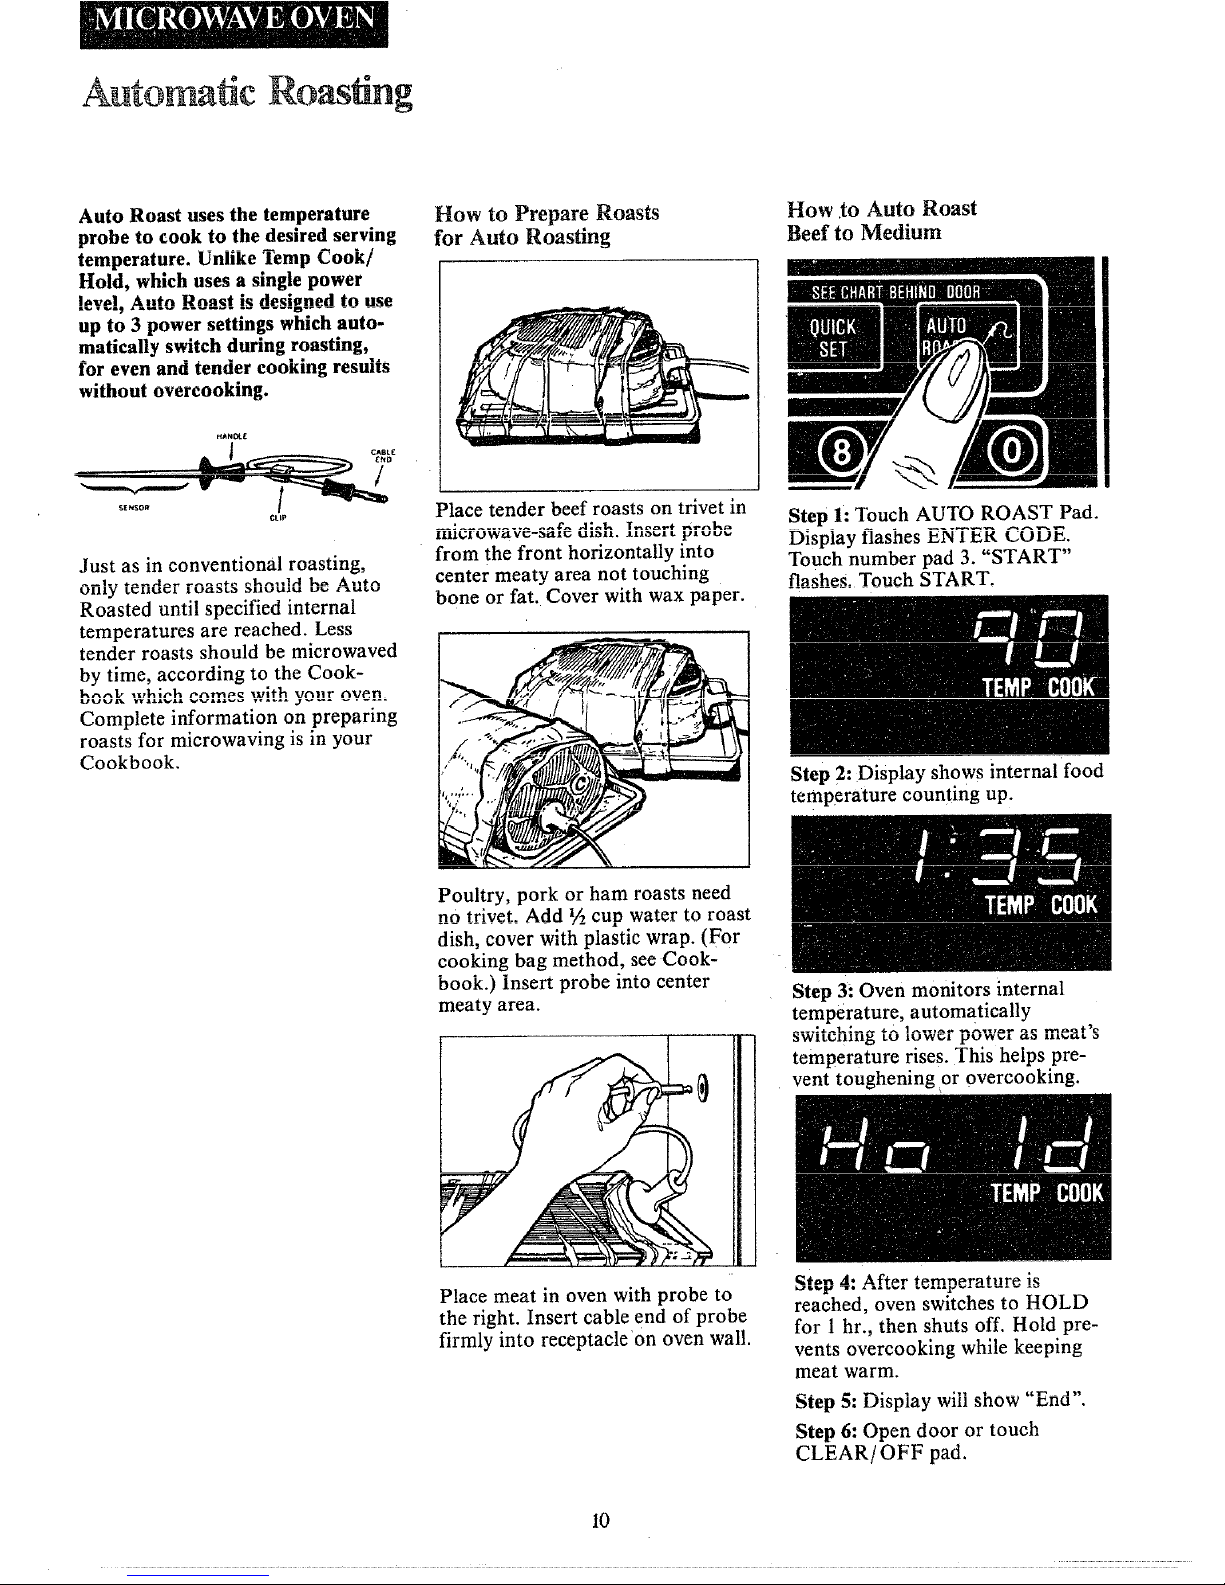
Auto Roast uses the temperature
probe to cook to the desired serving
temperature. Unlike 1-_mp Cook/
Hold, which uses a single power
I_v_l AHtn Rn_t i_ designed to use
up to 3 power settings which auto-
matically switch during roasting,
for even and tender cooking results
without overcooking.
HAm_E
CAat_
EN0
/
_ENson
CUP
Just as in conventional roasting,
UIlI_ L_IIU_I IuaDL_ _IITJULI_ LI_,+ _r%L&l*_
Roasted until specified internal
temperatures are reached. Less
tender roasts should be microwaved
by time, according to the Cook-
kr,,_k u_h_r,h r,r_p_ 'txdth V_llr Nv_n
Complete information on preparing
roasts for microwaving is in your
Cookbook.
How to Prepare Roasts
for Auto Roasting
r
#S LZF_g
+
Place tender beef roasts on trivet in
II11_1 UW_J-VU-ai_I_ U.l}ll. lll_Ul t, I)l uu_-
from the front horizontally into
center meaty area not touching
bone or fat. Cover with wax paper.
Poultry, pork or ham roasts need
no trivet. Add 1./,_cup water to roast
dish, cover with plastic wrap. (For
cooking bag method, see Cook-
book.) insert probe into center
meaty area.
How .to Auto Roast
Beef to Medium
mmn llmml
I mmmum'l x__-_ _ I
Step 1: Touch AUTO ROAST Pad.
Display Ilashes t_N t Et< tSUDt_.
Touch number pad 3. "START"
flashes. Touch START.
Step 2: Display shows internal food
temperature counting up.
Step 3: Oven monitors internal
temperature, automatically
temperature rises. This helps pre-
vent toughening or overeooking.
Place meat in oven with probe to
the right. Insert cable end of probe
firmly into receptacle on oven wall.
K_an A. At_t_r +amr_armtur_ i_
reached, oven switches to HOLD
for 1 hr., then shuts off. Hold pre-
vents overcooking while keeping
meat warm.
_tep _: t)lsplay wnJ snow tznu
Step 6: Open door or touch
CLEAR/OFF pad.
10
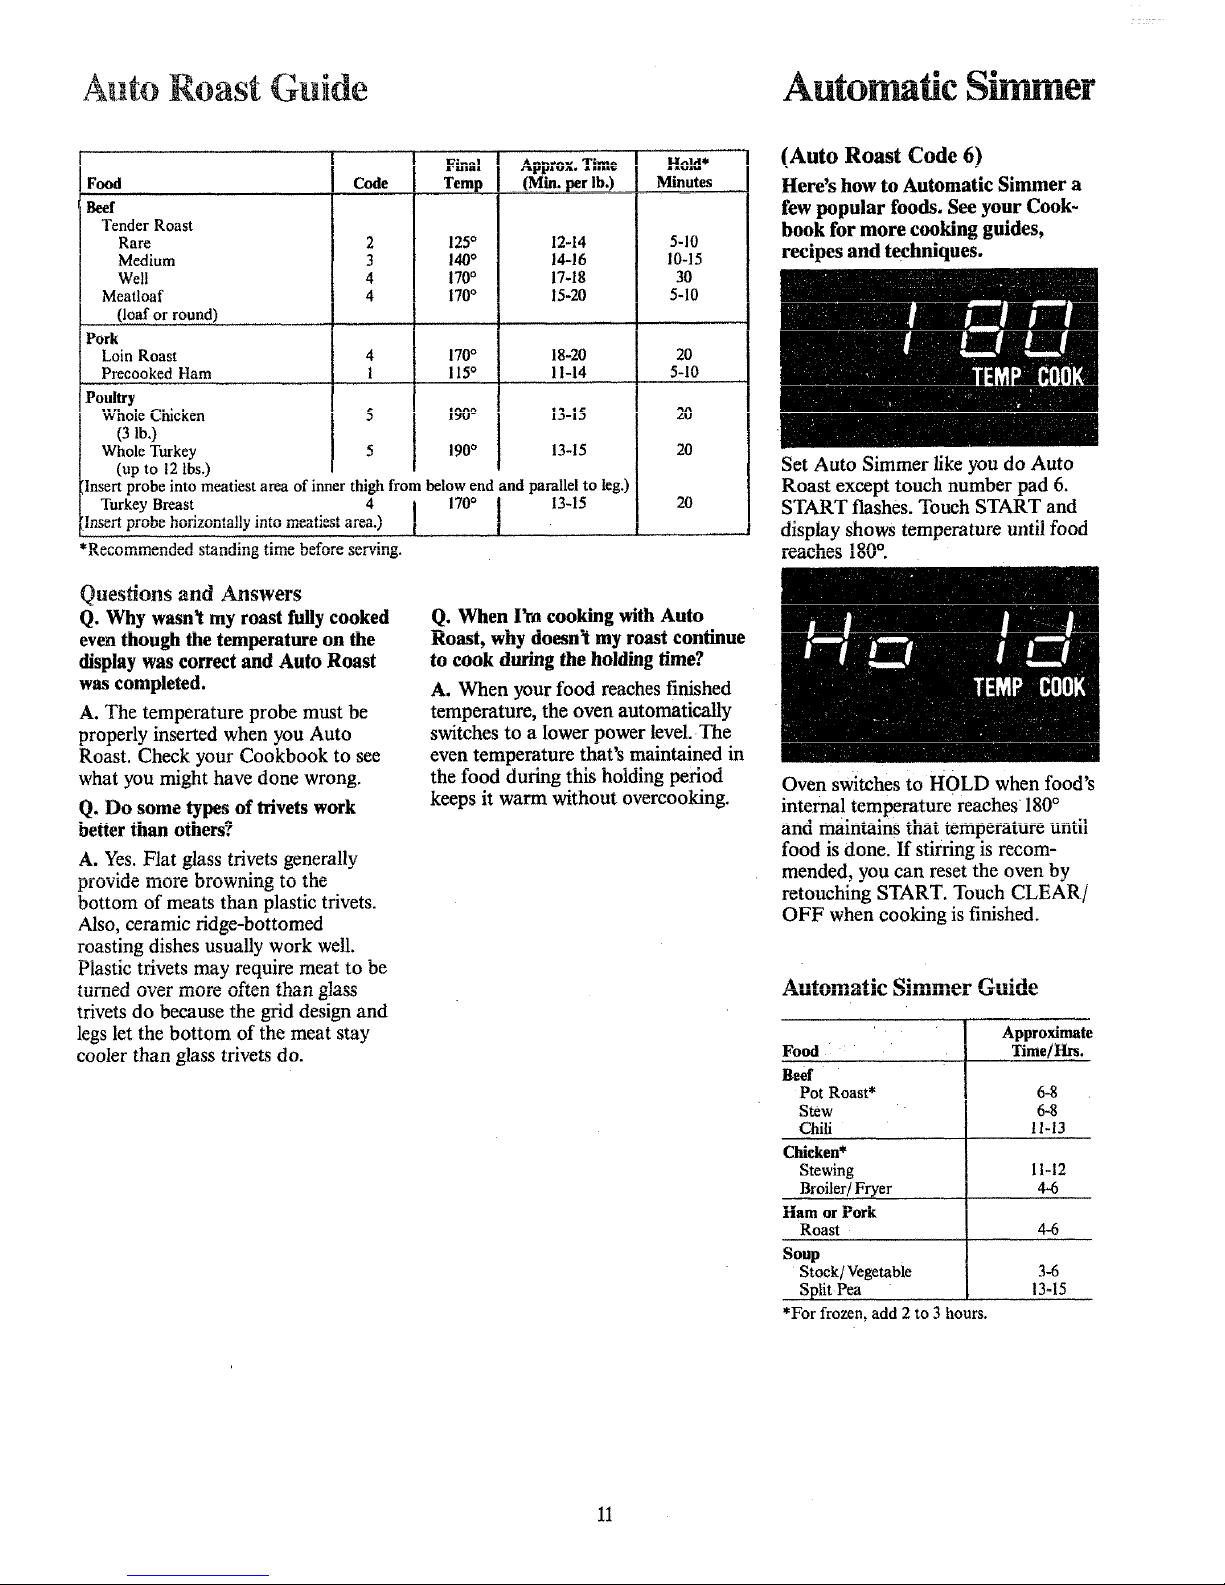
.I-_ U[U][]]_ B_ 311IBII_[
Food
Beef
Tender Roast
Rare
Medium
We!!
Meatloaf
, (loaf or round)
Pork
Loin Roast
Precooked Ham
Poultry
Whole Chicken
(3 lb,)
Whole Turkey
(up to 12 lbs.)
Code
2
3
4
4
I I
4
1
I I
I:1
a"..... I+I +......... ; I .....Tempi (Min. per lb. Minutes
125° 12-14
140° 14-16
1700 1%18
170° 15-20
170° 18-20
115° 11-14
I_U- IJ-IJ
190° 13-15
Jnsert probe into meatiest area of inner thigh from below end and parallel to leg.)
Turkey Breast 4 I 170° I 13-15
,_+,+++_,+i+,.++,.,++,.,.+.+,+,o....._y .+,+,o =.,.+.,.¢..,._+.i,.+,.+.., I l
1"_._,b+111111%++llg+.+_ +'++_l+11Ull+_+ I++lU,,, U+I.'++'A+ +I.*+_ V_.IlI_ '.
5-10
10-15
30
5-10
20
5-10
z.u
2O
2O
Questions and Answers
Q. Why wasn't my roast fully cooked
even though the temperature on the
display was correct and Auto Roast
was completed.
A. The temperature probe must be
properly inserted when you Auto
Roast. Check your Cookbook to see
what you might have done wrong.
Q. Do some types of trivets work
better than others?
A. Yes. Flat glass trivets generally
pIUVIU_ IIIUI_ UiUWIIIII_ LU LII_
bottom of meats than plastic trivets.
Also, ceramic ridge-bottomed
roasting dishes usually work well.
Plastic trivets may require meat to be
trivets do because the grid design and
legs let the bottom of the meat stay
cooler than glass trivets do.
Q. When I'm cooking with Auto
Roast, why doesn't my roast continue
to cook during the holding time?
A. When your food reaches finished
temperature, the oven automatically
switches to a lower power level. The
even temperature that's maintained in
the food during this holding period
keeps it warm without overcooking.
(Auto Roast Code 6)
Here's how to Automatic Simmer a
few popular foods. See your Cook-
book for more cooking guides,
recipes and techniques.
Set Auto Simmer fike you do Auto
Roast except touch number pad 6.
START flashes. Touch START and
display shows temperature until food
Oven switches to HOLD when food's
interna! temperature _aches1180 __.....
anu maintains mat temperature umu
food is done. If stirring is recom-
mended, you can reset the oven by
retouching START. Touch CLEAR/
OFF when cooking is finished.
Approximate
Food Time/Has.
Beef
Pot Roast* 6-8
Stew 6-8
Chili 11-13
Chicken*
Stewing 11-12
Broiler/Fryer 4-6
Ham or Pork
Roast 4-6
Soup
Stock/Vegetable 3-6
Split Pea 13-15
*For frozen, add 2 to 3 hours.
11
The Defrost setting is designed for
_np_dv thnwlno i-,f frnTpn fnr0d_ _nd
is one of the great advantages of a
microwave oven.
• Power Level 3 is automatically
set for defrosting, but you may
change this for more flexibility.
• See your Cookbook for
defrosting help.
When the oven completes
off. It will then display "End" and
beep once a minute until you either
open the door or touch the CLEAR/
OFF pad.
the defrost functions, defrost frozen
pork chops by using the following
steps.
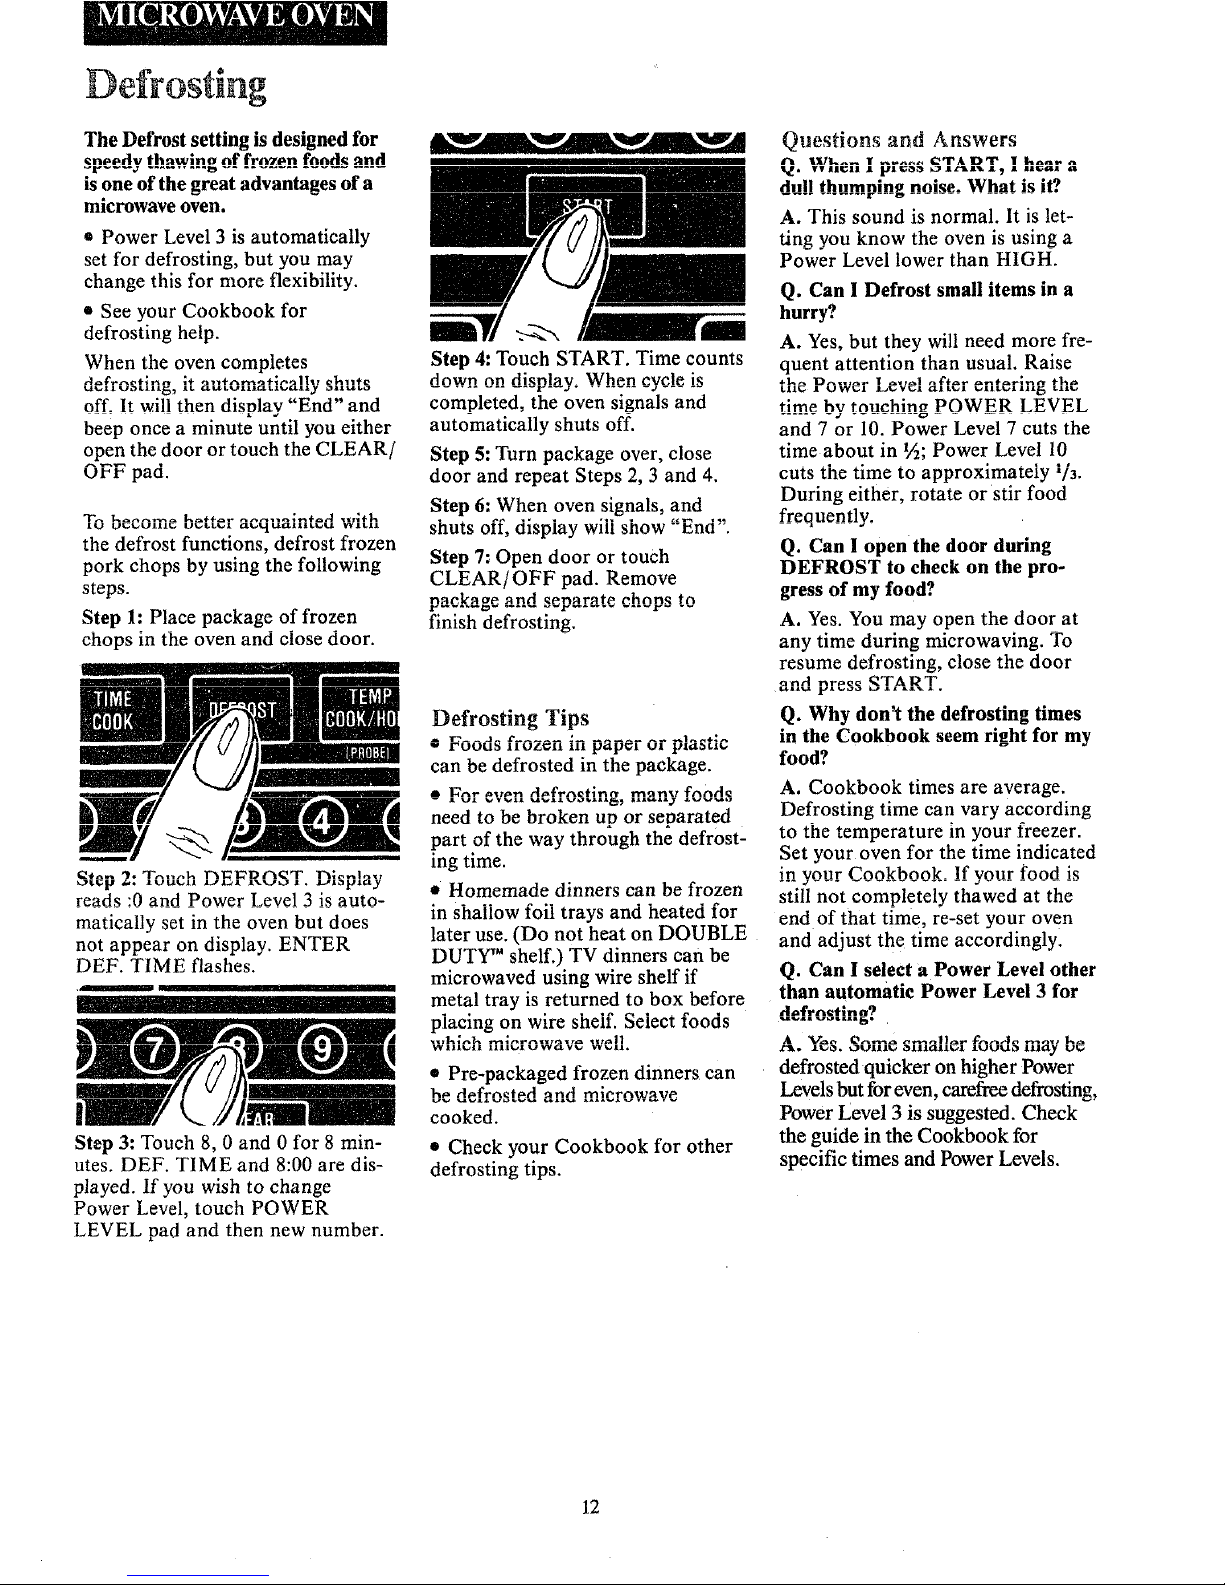
Step 1: Place package of frozen
chops in the oven and close door.
[/I lI
reads :0 and Power Level 3 is auto-
matically set in the oven but does
not appear on display. ENTER
DEF. TIME flashes.
Step 3: Touch 8, 0 and 0 for 8 min-
utes. DEF. TIME and 8:00 are dis-
played. If you wish to change
Power Level, touch POWER
LEVEL pad and then new number.
__,,V_i,Vl_a
I I
Step 4: Touch START. Time counts
down An di_nlav When cycle i_
completed, the oven signals and
automatically shuts off.
Step 5: Turn package over, close
door and repeat Steps 2, 3 and 4.
Step 6: When oven signals, and
shuts off, display wiii show "End".
Step 7: Open door or touch
CLEAR/OFF pad. Remove
nat_kac, e and _ennrnte ehonR to
finish defrosting.
Defrosting Tips
can be defrosted in the package.
need to be broken up or separated
part of the way through the defrost-
ing time.
* Homemade dinners can be frozen
in Shallow foil trays and heated for
later use. (Do not heat on DOUBLE
DUTY TM shelf.) TV dinners can be
microwaved using wire shelf if
metal tray is returned to box before
placing on wire shelf. Select foods
• Pre-packaged frozen dinners can
be defrosted and microwave
cooked.
• Check your Cookbook for other
defrosting tips.
Questions and Answers
_* IVllCll I lalll_ OlZ'lkl_l_ I IIK;glA a
_dullthumping noise. What is it?
A. This sound is normal. It is let-
ting you know the oven is using a
Power Level lower than HIGH.
Q. Can I Defrost small items in a
hurry?
A. Yes, but they will need more fre-
quent attention than usual. Raise
Llll_i I IJW_:I JL_K_._$. O.ILl.¢l _.,111,1,¢1111_ 1,11_._
time by touchi_ng POWER LEVEL
and 7 or 10. Power Level 7 cuts the
time about in ½; Power Level 10
cuts the time to approximately _/_.
During either, rotate or stir food
frequently.
Q. Can I open the door during
DEFROST to check on the pro-
gress of my food?
A. Yes. You may open the door at
any time during microwaving. To
resume defrosting, close the door
_nd nr_ _TA12T
Q. Why don't the defrosting times
in the Cookbook seem right for my
food?
A. Cookbook times are average.
Defrosting time can vary according
to the temperature in your freezer.
Set your oven for the time indicated
in your C.nnkhnok If your food ir
still not completely thawed at the
end of that time, re-set your oven
and adjust the time accordingly.
Q. Can I select a Power Level other
than automatie Power Level 3 for
Z_k. JLK)_. _UIIJLK9 _111_i11_:91 JI.UUU_m 111_ r U_
defrosted quicker on higher Power
Levels but for even, carefree defrosting,
Power Level 3 is suggested. Check
the guide in the Cookbook for
specific times and Power Levels.
12
 Loading...