

Hotpoint RGH846GEJ Use And Care Manual
!fiiioGhei!Mliiiirowave
Cooking Center
Contents
Aluminum Foil
5,7,25
Microwave Oven
IO-13
Use and Care of
Anti-Tip Bracket
3,8,9
Control Panel
10
Appliance Registration
2
Cooking by Temperature 13
Care and Cleaning
21-27
Cooking by Time
12
Features
9
Defrosting
11
Installation
8
Light Bulb
21
Leveling
8
Temperature Probe
13,21
Lift-Up Cooktop
25
Microwaving Tips
8
Lower Oven
15
Model and Serial Numbers 2
Air Adjustment
28
Precautions
3
Baking, Baking Guide
17, 18
Problem Solver 30,31
Broiling, Broiling Guide 20
Repair Service
31
Continuous-Cleaning Care 22
Safety Instructions
3-7
Control Settings
15, 16
Surface Cooking
14
Door Removal
23
Burners, Burner Grates 26,27
Light; Bulb Replacement 15, 25
Control Settings
14
Lighting Instructions
15
Cookware Tips
14
Oven Bottom Removal
24
Drip Pans
26,27
Preheating
17, 18
Flame Size
14
Roasting, Roasting Guide 19
Lighting Instructions
14
Shelves
15,24,27
Warranty
Back Cover
Thermostat Adjustment
29
Timer and Clock
16
GE Answer Center”
Vent Duct
16
800.626.2000
gas model
RGH846GEJ
The electric output
of the microwave oven
in this cooking center
is 650 watts.
HmPolNT
Help us help you...
Before using your cooking
center, read this book
carefully.
It is intended to help you operate
and maintain your new cooking
center properly.
Keep it handy for answers to your
questions.
If you don’t understand something
or need more help, write (include
your phone number):
Consumer Affairs
Hotpoint
Appliance Park
Louisville, KY40225
Write down the model and
serial numbers.
You’ll find them on a label located
in the burner box under the
cooktop.
See page 9.
These numbers are also on the
Consumer Product Ownership
Registration Card that came with
your
cooking center. Before
sending in this card, please write
these numbers here:
Model Number
~erfil
Number
Use these numbers in any
correspondence or service calls
concerning your cooking center.
Be sure your cooking
center is registered.
It
is important that we, the
manufacturer, know the location of
your cooking center should a need
occur for adjustments.
Your supplier is responsible for
registering you as the owner.
Please check with your supplier to
be sure he has done so; also send in
your Consumer Product Ownership
Registration Card. If you move, or
if you are not the original purchaser
please write to us, stating model
and serial numbers.
This appliance
must be registered. Please be certain
that it is.
Write to:
Hotpoint
Range Product Service
Appliance Park
Louisville, KY40225
If you received a damaged
cooking center . . .
Immediately contact the dealer
(or builder) that sold you the
cooking center.
Save time and money.
Before you request service . . .
check the Problem Solver on pages
30 and 31. It lists causes of minor
operating problems that you can
.
.
correct yourself.
All these things are normal with your microwave oven:
.
Steam or vapor escaping from
. Dull thumping sound while
around the door. oven is operating.
● Light reflection around door or
●
Some TV-Radio interference
outer case. might be noticed while using your
●
Dimming oven light and change
microwave oven. It’s similar to the
in blower sound may occur while
interference caused by other small
operating at power levels other
appliances and does not indicate a
than high.
problem with your oven.
FOR YOUR SAFETY
If you smell gas:
1. Open windows.
2. Don’t touch
electrical switches:
I
3*
4.
●
Don’t turn electric switches
Extinguish any
open flame.
Immediately call
your gas supplier.
I
on or off because sparks may
ignite the gas.
I
FOR YOUR SAFETY
Do not store or use
gasoline or other
flammable vapors and
liquids in the vicinity
of this or any other
appliance.
2
PRECAUTIONS
TO AVOID
POSSIBLE
EXPOSURE TO
EXCESSIVE
MICROWAVE
ENERGY
(a) Do Not Attempt
to
operate
this oven with the door open since
open-door operation can result in
harmful exposure to microwave
energy. It is important not to
defeat or tamper with the safety
interlocks.
(b) Do Not Place
any object
between the oven front face and
the
door or allow soil or cleaner
residue to accumulate on sealing
surfaces.
(c) Do Not Operate
the oven
if
it is damaged. It is particularly
important that the oven door close
properly and that there is no
damage to the:
(1) door (bent)
(2)
hinges and latches (broken or
loosened)
(3)
door seals and sealing surfaces.
(d) The oven Should Not be
adjusted or repaired by anyone except
properly qualified service personnel.
IMPORTANT SAFETY INSTRUCTIONS
Read all instructions before using this appliance.
IMPORTANT
SAFETY NOTICE
The California Safe Drinking
Water and Toxic Enforcement
Act requires the Governor of
California to publish a list of
substances known to the state
to cause cancer and requires
businesses to warn customers
of potential exposure to such
substances.
Gas appliances can cause
minor exposure to three of these
substances, namely benzene,
formaldehyde and soot, caused
primarily by the incomplete
combustion of natural gas or LP
fuels. Properly adjusted burners,
indicated by a bluish rather than
a yellow flame, will minimize
incomplete combustion. Exposure
to these substances can be
minimized further by venting
with an open window or using
a ventilation fan or hood.
When You Get Your
Cooking Center
●
Have the installer show you
the location of the cooking center
gas cut-off valve and how to shut
it off if necessary.
●
Have your cooking center
installed and properly grounded
by a qualified installer,
in
accordance with the Installation
Instructions. Any adjustment and
service should be performed only
by qualified gas range installers
or service technicians.
s
Plug your cooking center into
a 120-volt grounded outlet only.
Do not remove the round
grounding prong from the plug. If
in doubt about the grounding of
the home electrical system, it is
your personal responsibility and
obligation to have an ungrounded
outlet replaced with a
properly-
grounded three-prong
outlet
in
accordance with the National
Electrical Code. Do not use an
extension cord with this appliance.
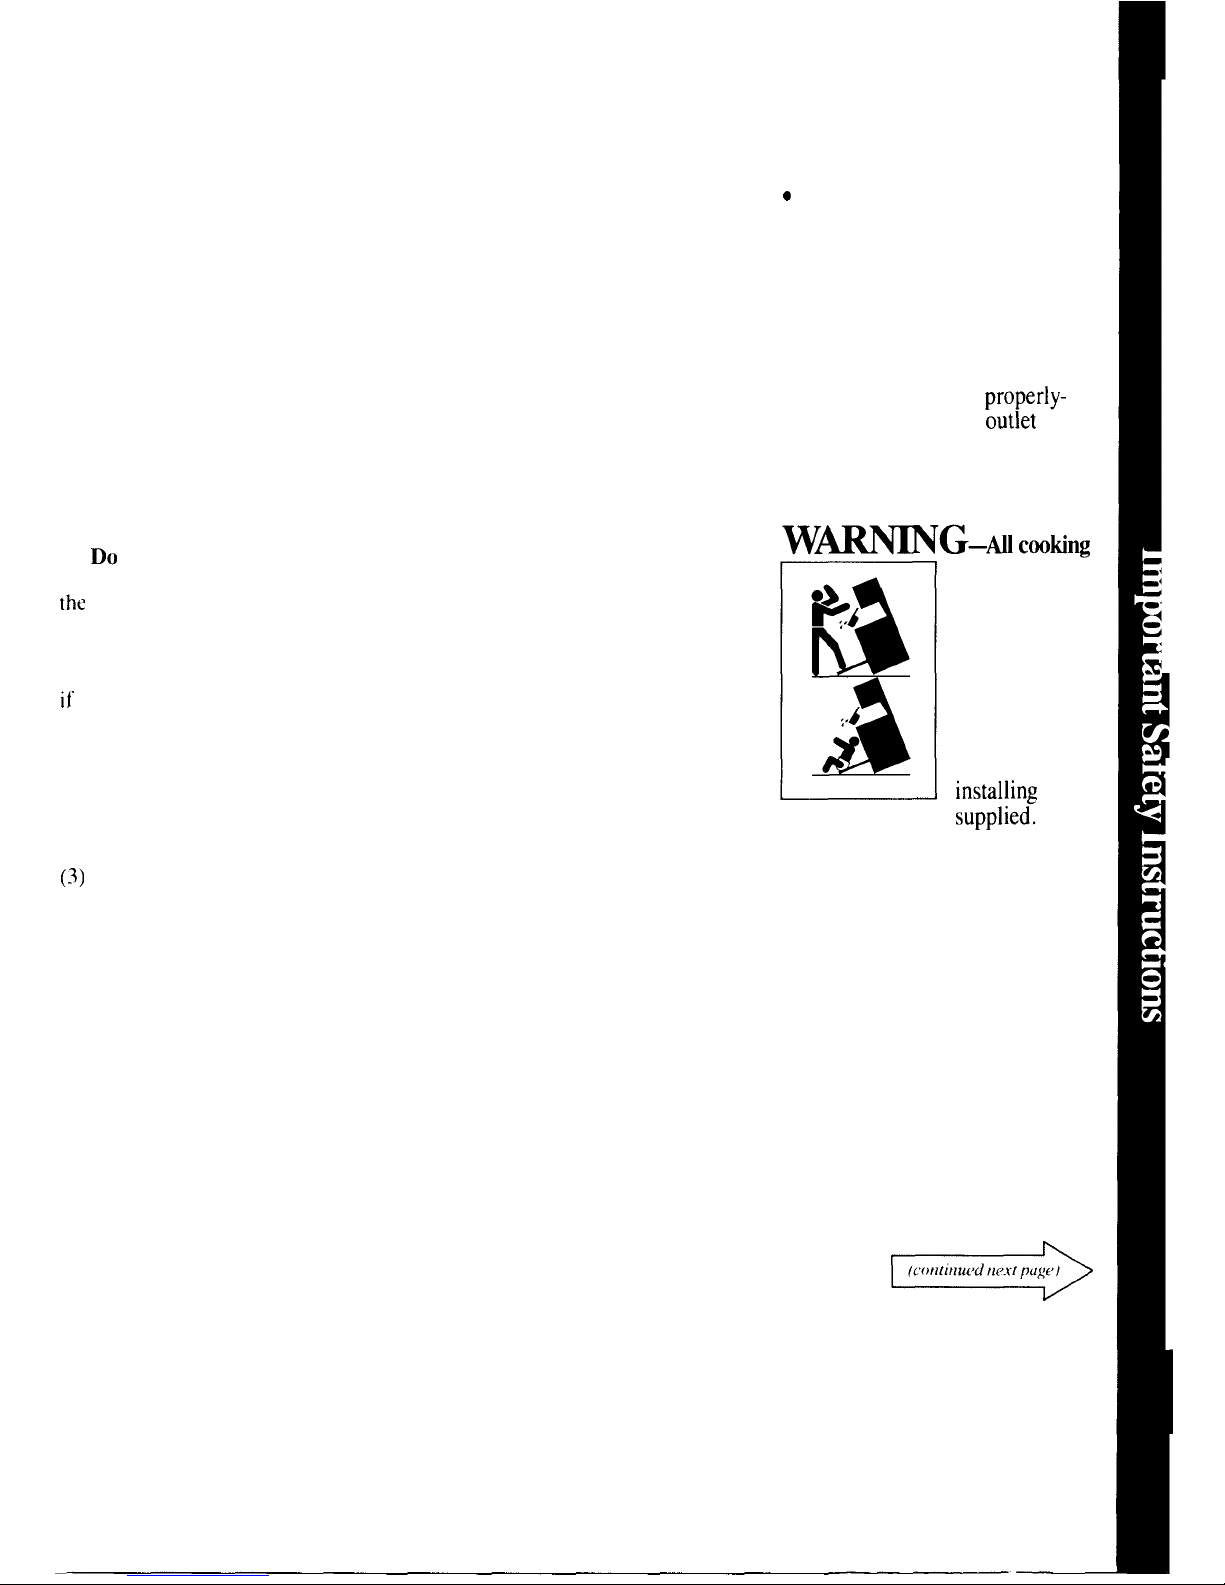
centers can
tip and injury
could result.
To prevent
accidental
tipping of the
cooking center,
attach it to
the floor by
installing
the
ANTI-TIP bracket
supplied:
To
check if the bracket is installed
and engaged properly, carefully
tip the cooking center forward to
check if the ANTI-TIP bracket is
engaged with the leveling legs.
If you pull the cooking center out
from the wall for any reason, make
sure the rear legs are returned to
their positions in the bracket when
you push the cooking center back.
3

IMPORTANT SAFETY INSTRUCTIONS
(continued)
●
Be sure all packing materials
are removed from the cooking
center
before operating it, to
prevent fire or smoke damage
should the packing material ignite
●
Be sure your cooking center is
correctly adjusted by a qualified
service technician or installer
for the type of gas (Natural or
LP) on which it is to be used.
Your cooking center can be
converted for use on either type of
gas. See Installation Instructions.
●
This cooking center is
specifically designed to heat or
cook food, and is not intended
for laboratory or industrial use.
●
After prolonged use of
the lower oven, high floor
temperatures may result and
many floor coverings will not
withstand this kind of use.
Never install the cooking center
over vinyl tile or linoleum that
cannot withstand such type of
use. Never install it directly over
interior kitchen carpeting.
Using Your Cooking Center
●
Don’t leave children alone or
unattended where a cooking
center is hot or in operation.
They could be seriously burned.
s
Don’t
allow
anyone to climb,
stand or hang on the door,
drawer or cooktop.
They could
damage the cooking center and
even tip it over causing severe
personal injury.
c
CAUTION: ITEMS OF
INTEREST TO CHILDREN
SHOULD NOT BE STORED
IN CABINETS ABOVE A
COOKING CENTER OR ON
THE COOKTOP-CHILDREN
CLIMBING ON THE COOKING
CENTER TO REACH ITEMS
COULD BE SERIOUSLY
INJURED.
●
Let
burner grates and other
surfaces cool before touching
them or leaving them where
children can reach them.
●
Never wear loose fitting or
hanging garments while using
the appliance.
Flammable
material could be ignited if
brought in contact with flame or
hot oven surfaces and may cause
severe burns.
●
Never use your appliance for
warming or heating the room.
Prolonged use of the cooking
center without adequate ventilation
can be hazardous.
●
Do not use water on grease
fires.
Never pick up a flaming
pan. Turn off burner, then
smother flaming pan by covering
pan completely with well fitting
lid, cookie sheet or flat tray.
Flaming grease outside a pan can
be put out by covering with
baking soda or, if available, with
a multi-purpose dry chemical or
foam type fire extinguisher.
●
Do not store flammable
materials in an oven or near the
cooktop.
●
Do not let cooking grease or
other flammable materials
accumulate in or near the
cooking center.
c
When cooking pork,
follow
the
directions exactly and always cook
the meat to an internal temperature
of at least
170”F.
This assures that,
in the remote possibility that
trichina may be present in the
meat, it will be
killed
and meat
will be safe to eat.
Microwave Oven:
●
Read and follow the specific
“PRECAUTIONS TO AVOID
POSSIBLE EXPOSURE TO
EXCESSIVE MICROWAVE
ENERGY” found on page 3.
●
See door surface cleaning
instructions on page 21.
c
To reduce the risk of fire in
the oven cavity:
–Do not overcook food.
Carefully attend appliance if
paper, plastic or other combustible
materials are placed inside the
oven to facilitate cooking.
—Remove wire twist-ties
from
paper or plastic bags before
placing bags in oven.
—Do not use your microwave
oven to dry newspapers.
–Do not use recycled paper
products.
Recycled paper towels,
napkins and wax paper can contain
metal flecks which may cause
arcing or ignite. Paper products
containing nylon or nylon
filaments should be avoided,
as
they may also ignite.
4
–Do not pop popcorn in your
microwave oven
unless in a
special microwave popcorn
accessory or unless you use
popcorn labeled for use in
microwave ovens,
–Do
not overcook potatoes.
They could dehydrate and catch
fire, causing damage to your oven,
–Do not operate the oven while
empty to avoid damage to the
oven and the danger of fire.
If
by accident the oven should run
cmpty
a minute or two, no harm
is done. However, try to avoid
operating the oven empty
at all
times-it saves energy and
prolongs I ife of the oven,
●
If materials inside the oven
should ignite,
keep oven door
closed, turn oven off, and
disconnect the power cord, or
shut
oft’
power at the fuse or
circuit breaker panel.
●
Some products such as whole
eggs and sealed containers—for
example, closed glass jars—may
explode and should not be heated
in this oven.
●
Don’t defrost frozen
beverages
in narrow necked
bottles (especially carbonated
beverages). Even if the container
is opened, pressure can build up.
This can cause the container to
burst, resulting in injury.
●
Use metal only as directed in
cookbook.
Foil strips as used on
meat roasts are helpful when used
as shown in cookbook.
TV dinners maybe microwaved
in foil trays less than 3/4” high;
retnove
top foil cover and return
tray to box. When using metal in
microwave oven,
keep metal at
least 1 inch away from sides of
oven.
●
Cooking utensils may become
hot
because of heat transferred
from the heated food. Pot holders
may be needed to handle the
utensil.
●
Sometimes, the cooking tray
can become too hot to touch.
Be
careful touching the cooking tray
during and after cooking.
●
Foods cooked in liquids
(such
as pasta) may tend to boil over
more rapidly than foods
containing less moisture. Should
this occur, refer to page 21 for
instructions on how to clean the
inside of the oven.
●
Thermometer—Do not use a
thermometer in food you are
microwaving unless the
thermometer is designed or
recommended for use in the
microwave oven.
●
Remove the temperature
probe from the oven when not
in use.
If you leave the probe
inside the oven without inserting
it in food or liquid, and turn on
microwave energy, it can create
electrical arcing in the oven, and
damage oven
walls.
. Plastic utensils—Plastic
utensils designed
for microwave
cooking are very useful, but
should be used carefully. Even
J
microwave plastic may not be as
tolerant of overcooking conditions
as are glass or ceramic materials
and may soften or char if subjected
to short periods of overcooking.
In longer exposures to overcooking,
the fbod and utensils could ignite.
For these reasons: 1) Use microwave
plastics only and use them in
strict compliance with the utensil
manufacturer’s recommendations.
2) Do not subject empty utensils
to microwaving. 3) Do not permit
children to use plastic utensils
without complete supervision.
●
Boiling eggs is not
recommended in a microwave
oven. Pressure can build
up
inside egg yolk and may cause it
to burst, resulting in injury.
●
Foods with unbroken outer
“skin”
such as potatoes,
sausages, tomatoes, apples,
chicken livers and other giblets,
and egg yolks (see previous
caution) should be pierced to
allow steam to escape during
cooking.
●
~~Boilable”
cooking pouches
and tightly closed plastic bags
should be slit, pierced or vented
as directed in cookbook. If they
are not, plastic could burst during
or immediately after cooking,
possibly resulting in injury. Also,
plastic storage containers should
beat least partially uncovered
because they form a tight seal.
When cooking with containers
tightly covered with plastic wrap,
remove covering carefully and
direct steam away from hands and
face.
5

IMPOmmT
SAFETY INSTRUCTIONS
(continued)
●
Avoid heating baby food in
glass jars, even without their lids;
especially meat and egg mixtures.
●
Spontaneous boiling—Under
certain special circumstances,
liquids may start to boil during or
shortly after removal from the
microwave oven. To prevent burns
from splashing liquid, stir the
liquid briefly before removing the
container from the microwave
oven.
Surface Cooking
●
Always use the LITE position
when igniting top burners and
make
sure the burners have ignited.
●
Never leave surface burners
unattended at HI flame settings,
Boilover
causes smoking and
greasy spillovers that may catch
on fire.
●
Adjust top burner flame size
so it does not extend beyond the
edge of the cooking utensil.
Excessive flame is hazardous.
●
Use only dry pot
holders—
moist or damp pot holders on hot
surfaces may result in burns from
steam. Do not let pot
holdFrs
come
near open flames when lifting
utensils. Do not use a towel or
other bulky cloth in place of a
pot holder.
●
To minimize the possibility of
burns,
ignition of flammable
materials, and spillage, turn the
cookware handles toward the side
or back of the cooktop without
extending over adjacent burners.
●
Always turn surface burner
to OFF before removing utensil.
●
Carefully watch foods being
fried at HI flame setting.
●
Never
block
the vents (air
openings) of the cooking center.
They provide the air inlet and
outlet which is necessary for the
cooking center to operate
properly with correct combustion.
●
Do not use a wok on the
cooking surface if the wok has a
round metal ring which is placed
over the burner grate to support
the wok.
This ring acts as a heat
trap which may damage the
burner grate and burner head.
Also, it may cause the burner to
work improperly. This may cause
a carbon monoxide level above
that allowed by current standards,
resulting in a health hazard.
●
Foods for frying should be as
dry as possible.
Frost on frozen
foods or moisture on fresh foods
can cause hot fat to bubble up and
over sides of pan.
●
Use least possible amount of
fat for effective shallow or
deep-
fat frying.
Filling the pan too
full
of fat can cause spillovers when
food is added.
●
If a combination of oils or
fats will be used in frying,
stir
together before heating, or as
fats melt slowly.
●
Always heat fat slowly,
and
watch as it heats.
●
Use deep fat thermometer
whenever possible
to prevent
overheating fat beyond the
smoking point.
●
Use proper pan
size—Avoid
pans that are unstable or easily
tipped. Select utensils having flat
bottoms large enough to properly
contain food avoiding
boilovers
and spillovers, and large enough
to cover burner grate. This will
both save cleaning and prevent
hazardous accumulations of food,
since heavy spattering or spillovers
left on cooktop can ignite. Use
pans with handles that can be
easily grasped and remain cool.
●
Use only glass cookware that
is recommended
for use on gas
burners.
●
Keep all plastics away from
top burners.
. To avoid the possibility of a
burn, always be certain that the
controls for
all
burners are at
OFF position and
all
grates are
cool before attempting to
remove a grate.
●
When flaming foods under
the hood, turn the fan off. The
fan, if operating, may spread
the flame.
●
If cooking center is located
near a window, do not
use long
curtains which could blow over
the top burners and create a fire
hazard.
●
If you smell gas,
turn off the
gas to the range and call a qualified
service technician. Never use an
open flame to locate a leak.
6
Baking, Broiling and
Roasting
●
Do not use oven for a storage
area.
●
Stand away from the cooking
center when opening the door
of a hot oven. The hot air or
steam which escapes can cause
burns to hands, face and/or eyes.
c
Keep oven free from grease
buildup.
●
Place oven shelves in desired
position while oven is cool.
●
Pulling out shelf to the shelf
stop is a convenience in lifting
heavy foods. It is also a
precaution against burns from
touching hot surfaces of the
oven door or walls.
●
Don’t heat unopened food
containers in the oven. Pressure
could build up and the container
could burst causing an injury.
●
Don’t use aluminum foil
anywhere in the oven except as
described in this book.
Misuse
could result in a fire hazard or
damage to the cooking center.
●
When using cooking or
roasting bags in oven,
follow
the manufacturer’s direction.
●
Use only glass cookware that
is recommended
for use in gas
ovens.
●
Always remove broiler pan
from the oven as soon as you
finish broiling.
Grease left in the
pan can catch fire if oven is used
without removing the grease from
the broiler pan.
●
When broiling, if meat is too
close to the flame, the fat may
ignite.
Trim excess fat to prevent
excessive flare-ups.
●
Make sure broiler pan is in
place correctly
to reduce the
possibility of grease fires.
●
If you should have a grease
fire in the broiler pan,
turn off
oven, and keep oven door closed
to contain fire until it burns out.
Cleaning Your Cooking
Center
●
Clean only parts listed in this
Use and Care Book.
/
●
Keep cooking center clean and
free of accumulations of grease
or
spillovers
which may ignite.
If You Need Service
●
Read “The Problem Solver”
on pages 30 and 31 of this book.
●
Don’t attempt to repair
or replace any part of your
cooking center unless it is
specifically recommended in
this book.
All
other servicing
should be referred to a qualified
technician.
SAVE THESE
INSTRUCTIONS
7

Microwaving Tips
. Make sure
all
cookware
used
in
your microwave oven is suitable
tbr
microwaving. Most
glass
casseroles,
cooking dishes, measuring cups,
custard cups, pottery
or china
dinnerware which does not have
metallic trim
or
glaze with a metallic
sheen can
be used.
SOme
cookware is
labeled
“suitable for
microwaving:’
It’ you
are
unsure, use this dish test:
Measure 1 cup water in a glass cup.
Place
in oven on or beside dish.
Microwave 1-1 M minutes at High
(10). If water becomes hot, dish is
microwave safe. If dish heats, it
should not be used for microwaving.
●
Paper towels, wax paper, and
plastic wrap can be used to cover
dishes in order to retain moisture
and prevent spattering.
●
Some microwaved foods require
stirring, rotating, or rearranging.
Check your cookbook for specific
instructions.
Installing the
Cooking Center
Your cooking center, like so many
other
household items, is heavy
iind
can settle into soft floor coverings
such as cushioned vinyl or carpeting.
When moving the cooking center
on this type of flooring, use care.
Do
not install the cooking center
over kitchen carpeting
unless you
place
an
insulating pad or sheet of
l/4-inch-thick plywood between
the cooking center and carpeting.
When the floor covering ends at
the front of the cooking
cente~
the
area that the cooking center will
rest on should be built up with
plywood
or similar material to the
same level or higher than the
floor
covering. This will allow the
cooking center to be moved for
cleaning or servicing.
Leveling the
Cooking Center
Leveling legs are located on each
corner of the base
of
the cooking
center.
Your cooking center must be
Icvcl
in order to produce proper cooking
and baking results. After it is in
its final location, place a level
horizontally on
an
oven shelf
and
check the
Ievelncss
front to
back
and side to side. Level the cooking
center by adjusting the leveling legs
Both of the rear leveling legs will
engage the ANTI-TIP bracket (allow
for some side to side adjustment).
Allow a minimum clearance of 1/8”
between the cooking center and the
leveling legs to permit installation
into the ANTI-TIP bracket.
●
Steam builds up pressure in foods
which are tightly covered by a skin
or membrane. Pierce potatoes, egg
yolks and chicken livers to prevent
bursting.
8
Features of Your Cooking Center
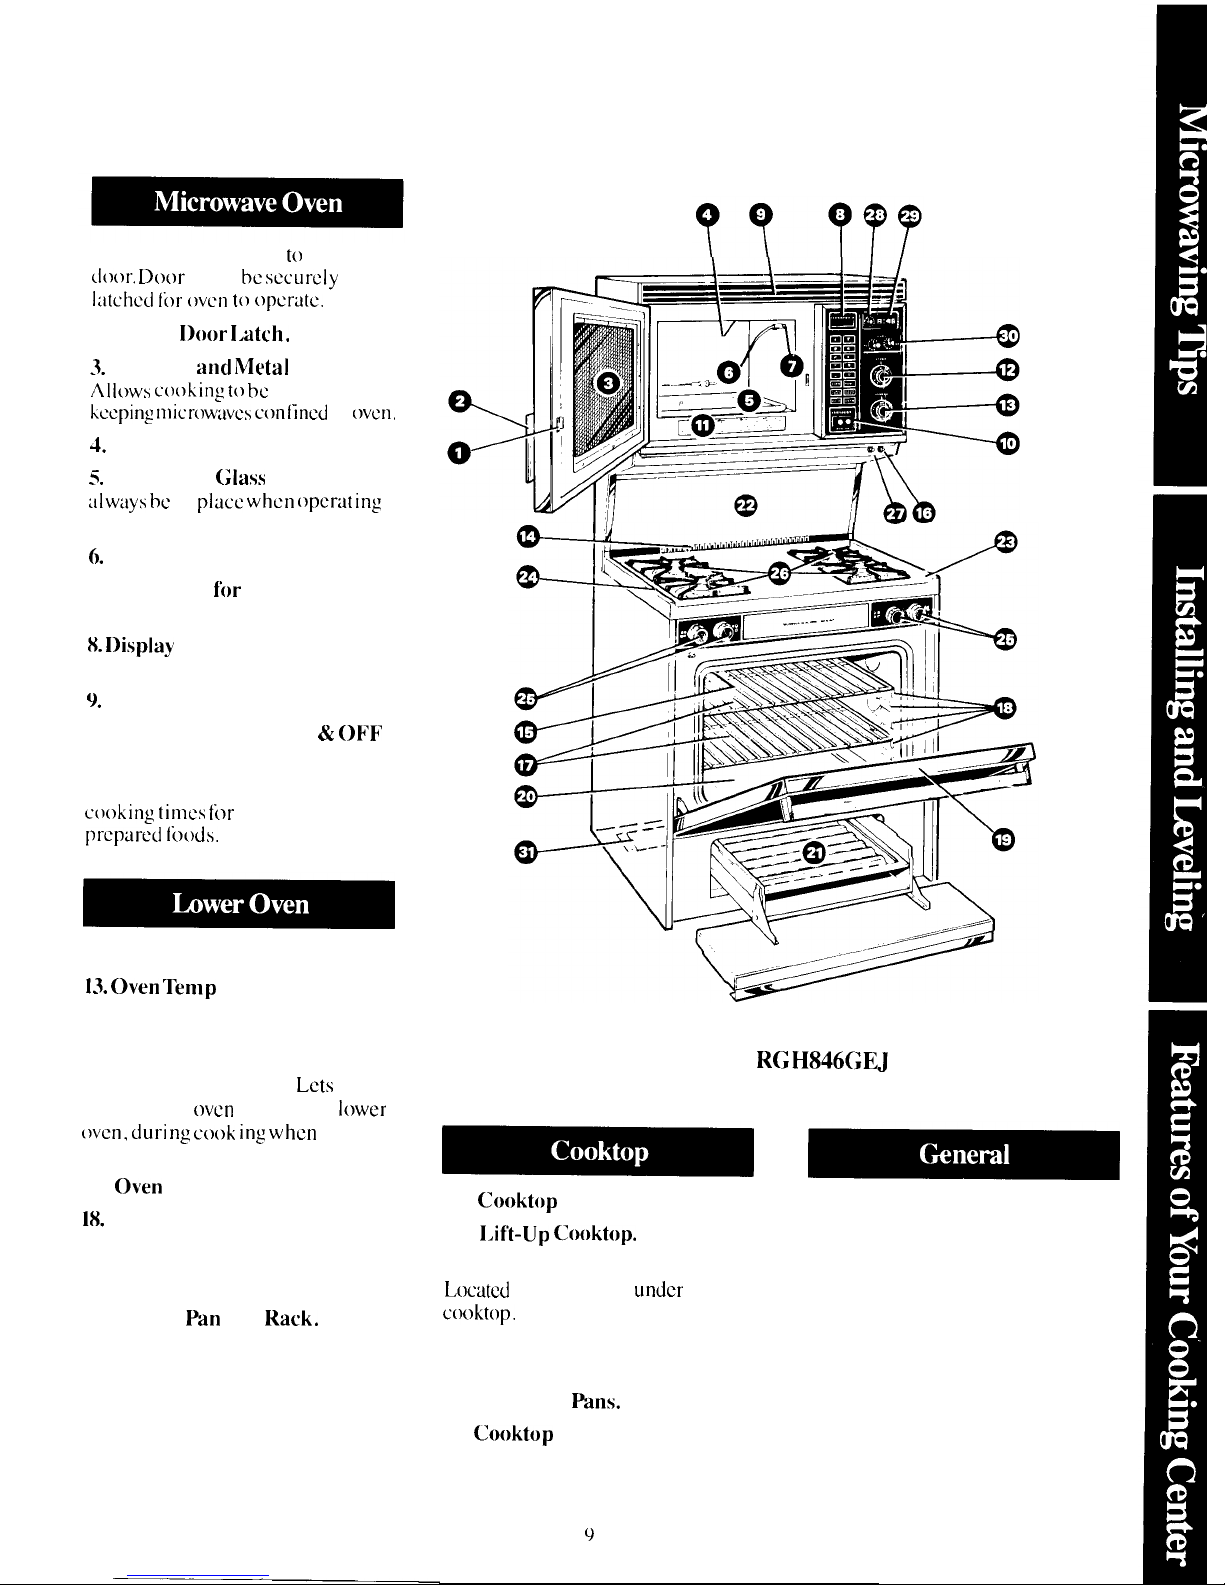
1. Door Handle.
Pull to open
d(x)r. E)(X)I-
must be
securely
latched Ii)r (wcn to opcrtitc,
2. Inside
I)oor I,atch.
3.
Window
and Metal
Shield.
Allows cooking” to bc
viewed while
kping microwaves c(mlinul
in
[wcn.
4.
oven light.
5.
Removable
Glass
Tray.
Must
:Ilways bc
in
place when opcrat ing
the oven.
6.
Temperature Probe.
7. Receptacle
fl)r
Temperature
Probe.
K I)isplay
and Touch Control
Panel.
9.
Microwave oven Vent.
lo. Microwave Oven ON
& OIW
Buttons.
Il. Cooking Guide. Suggested
cooking times for
many frequently
prepared foods.
12. Oven Set Knob.
13.
oven
Temp
Knob.
14. Oven Vent.
15. oven Interior Light.
16. oven Light Switch.
Lets
you
turn interior
oven
light on, in
tower
(wcn, dur-i ng cook ing when
door is
Closed.
17.
oven
Shelves.
18.
19.
20.
21.
Oven Shelf Supports.
Removable oven Door.
Removable oven Bottom.
Broiler
Pan
and
I&k.
Model RGH846GEJ
22.
Cooktop
Light.
28. Minute Timer.
23.
Lif’t-Up
(lmktop.
29. Digital Clock.
24. Model and Serial Numbers.
30. Automatic Oven Timer.
Located
in burner box
under
Times lower oven cooking
cooktop.
operations.
25. Surface Burner Controls.
31. Anti-Tip Bracket.
26. Surface Burners, Grates and
(See
Installation Instructions)
Chrome Drip
Pans.
27. (hoktop Light Switch.
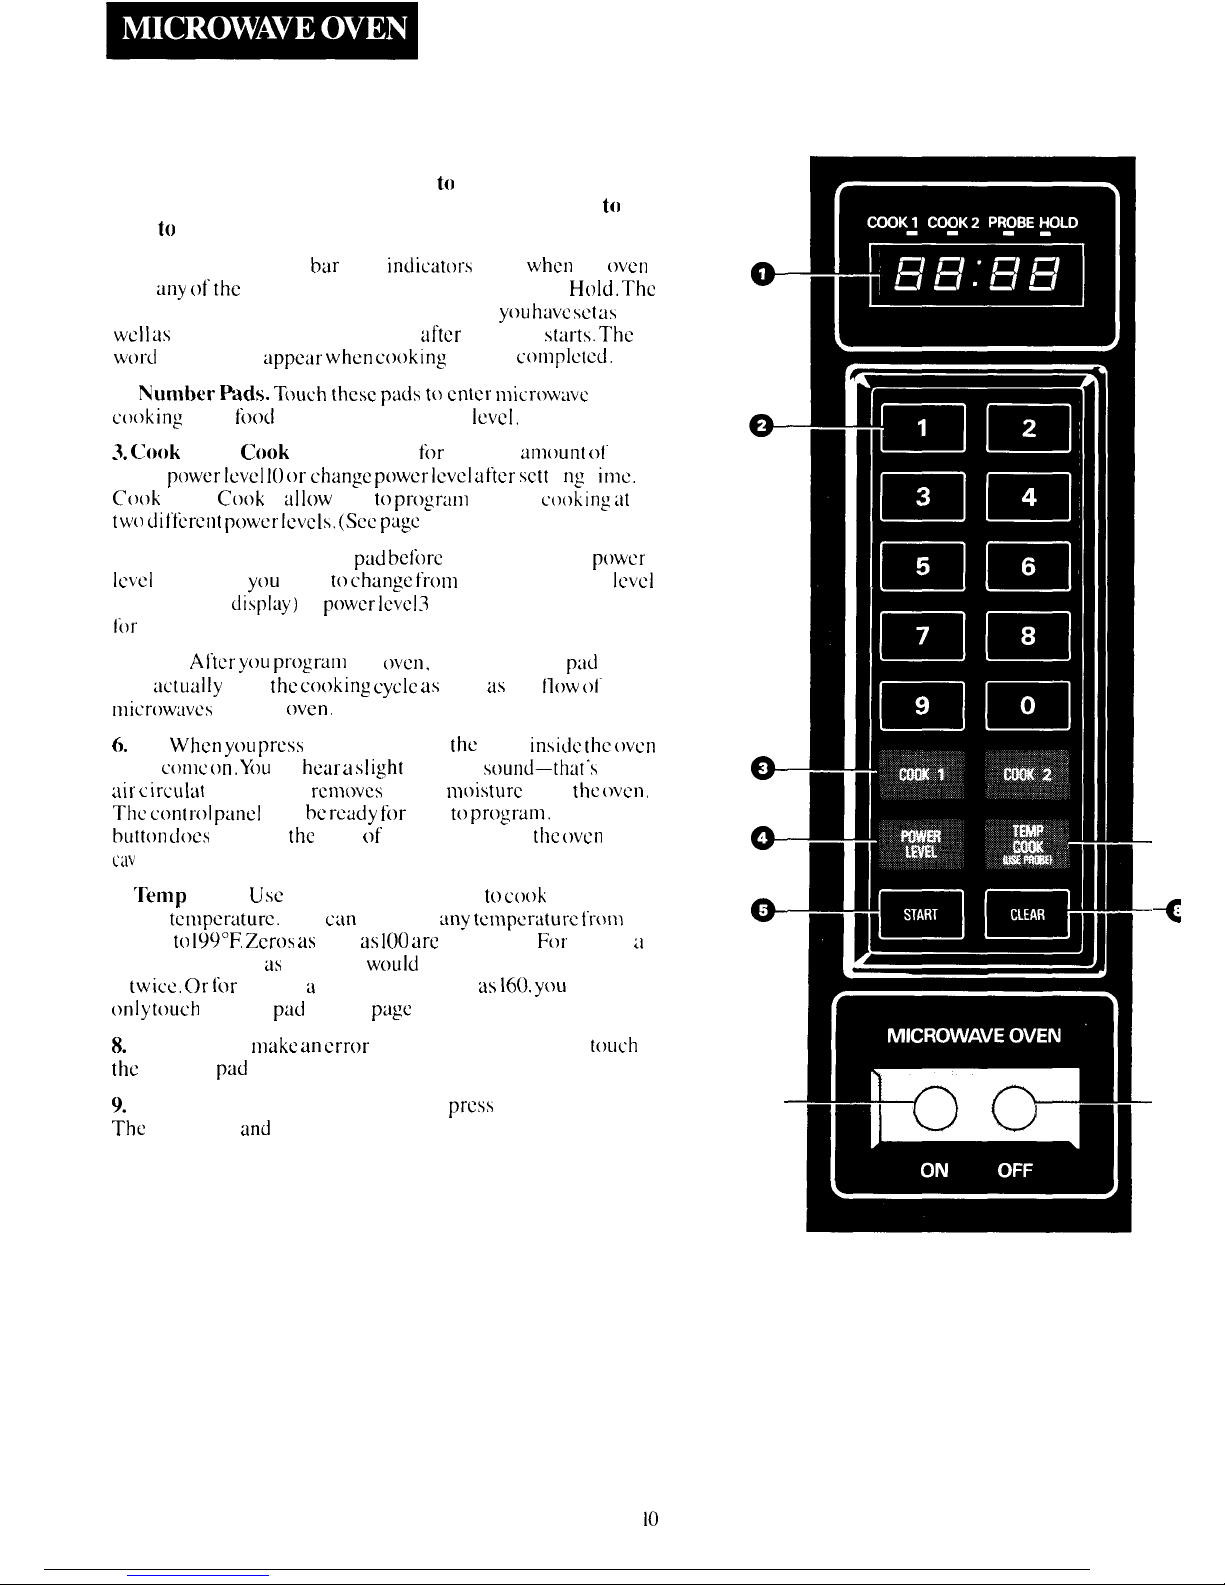
Features of Your Touch Control Panel
The touch control panel allows you to set the oven controls
electronically with the touch of a finger. It’s designed
to
be
easy
to
use and understand.
1. Display.
Individual
bur
light
indicators
show
when
the
twcn
is in
any of” the
functions: Cook 1, Cook 2, Probe or
Hold. The
digital numbers will show what power level
y(w have set us
WCII as
the cooking time remaining after the oven
s(~irts. The
word
“End” will
appeur when c(mking
time is
c(~n]plctcd.
2.
Numher Fads. T(mch these ptids to enter n~icr(~wavc
cooking”
time,
fomi
temperature or power
lCVCI.
3. (hok
1 and (Xok 2. Microwave
for
a preset
amount of’
time
using
power Ievcl 10
or
change power level after sctt
i ng t
imc,
C(lok
1 and
C(x)k
2
iIllow
you to
prcyram
2-stage
ctx)kin: at
two different power levels. (See page
12. )
4. Power Level.
Touch this
ptid before
entering another
p(~wcr
Iwel
number if
you
want to
change from
automatic power
level
10 (“HI” 011
displuy)
or
power ICVCI 3
(Low, “30” 011 display)
Ii)r
defrosting.
S. Start.
After you progrtim
the
~wcn,
press the Start
pad
which
will
:ictually
start
the cooking cycle as
well as the
flow 01”
nlicrowavcs
into the
(wen.
(ON button must be pressed. )
6.
On.
When yc)u press
the ON button.
the
light
inside the (wcn
w i II
CX)IIIC on. Ybu
’1]
hear a SI ight
whirring
sound-that”s
the
air c irculut
ion fan that
rcmovcs
excess
mt)isturc
from
the twcn.
The c(~ntrol panel
will be
ready for
you to
progrum.
The ON
button d(ms
not start
the
flow of microwaves into
the (wcn
cm it y.
7.
lemp
Cook.
Use
the temperature probe to
cook
with a
preset
tcnlpcrature.
You cm program
any tcmpcrtiturc frt~nl
1000” to
199°F.
Zeros as well as
100 arc
automatic.
For
setting
ii
temperature such as 155, you
would
simply touch number pad
5
twice.
Or
k~r
setting a temperature such as
160. ytm
would
(~nly t(mch
number
pad
6. (See
page
13. )
8.
Clear. If you
make an mm
in programming. simply
t(mch
the
CLEAR
pad
and start over.
9.
Off. When you’re finished cooking.
press
the OFF button.
The
oven light
and
fan will shut off.
9-
0-
Q--
o--
43--
0---
--6
-c
 Loading...