

Hotpoint RGB540SEP, RGBS08, RGB540 Owner's Manual
0
GEAppliances.com
U
LF)
I
0
Safety Instructions ...... 2-s
Operating Instructions
Aluminum Foil............. 10, 11
Clock and Timer ................ 8
Oven ........................ 9-12
Baking and Roasting ........ 10
Broiling .................. 11, 12
Broiling Guide ............... 12
Oven Control ................. 9
Power Outage ............... 10
Preheating ................... 10
Surface Cooking ............. 6, 7
Thermostat Adjustment ....... 13
Careand Cleaning
Air Vents ...................... 19
Broiler Pan and Grid........... 19
Burner Assemblies ........ 14, 15
Burner Caps and Heads ...... 16
Burner Grates ................. 15
Control Panel and Knobs ...... 19
Cooktop Surface .............. 17
Drip Pans ..................... 14
Lift-Off Oven Door............. 18
Lift-Up Cooktop ............... 17
Oven Bottom .................. 18
Oven Interior .................. 21
Removable Broiler Drawer .... 19
Racks ......................... 20
Stainless Steel Surfaces ....... 17
Installation
Instructions ............ 22-35
Anti-Tip Device ................ 35
Connect the Range
to Gas..................... 26-29
Convert to LPGas ............. 25
Dimensions and
Clearances .................... 24
Electrical Connections .... 30, 34
Level the Range ............... 34
Light the Pilots ............ 30-33
Troubleshooting Tips.36-38
Accessories ................ 41
Consumer Support
Consumer
Support .............. Back Cover
Ownership Registration
for Customers in Canada
only ....................... 39, 40
Warranty for Customers
in C(]nada ..................... /43
Warranty for Customers
in the U.S.A.................... /42
Standard-Cleon
Models:
RGBS08
RGB524
RGB528
RGB530
RGB533
RGB540
RGB526
Write the model and serial
numbers here:
Model #
Serial #
You can find them on (] label on the
front of the range behind the kick
panel or broiler drawer.
In Canada, contact us at:
www. GEAppliances.ca
49-85199 05-11 JR

IMPORTANT SAFETY INFORIV/AT/ON.
READ ALL INSTRUCTIONS BEFORE USING.
IA WARNING I,'the information in this manual is not followed exactly, a fire or explosion may
result, causing property damage, personal injury or death.
- Do not store or use gasoline or other flammable vapors and liquids in the vicinity of this or any other appliance.
- WHAT TO DO IFYOU SHELL GAS
_:, Do not try to light any appliance.
_:, Do not touch any electrical switch; do not use any phone in your building.
_:, Immediately call your gas supplier from a neighbor's phone. Follow the gas supplier's instructions.
_:_ If you cannot reach your gas supplier, call the fire department.
- Installation and service must be performed by a qualified installer, service agency or the gas supplier.
WARNING I
All ranges can tip.
BURNS or other SERIOUSINJURIEScan result.
INSTALLand CHECKthe anti-tip bracket following the instructions supplied with the bracket.
To reduce the risk of tipping the range, the range must be secured by a properly installed anti-tip
bracket. See installation instructions shipped with the bracket for complete details before attempting
to install.
To check if the bracket is installed and engaged properly, look underneath the range to see that the
rear leveling leg is engaged in the bracket. On some models, the storage drawer or kick panel can be
removed for easy inspection. If visual inspection is not possible, slide the range forward, confirm the
anti-tip bracket is securely attached to the floor or wall, and slide the range back so the rear leveling leg is under the
anti-tip bracket.
If the range is pulled from the wall for any reason, always repeat this procedure to verify the range is properly secured
by the anti-tip bracket.
Never completely remove the leveling legs or the range will not be secured to the anti-tip device properly.
If you did not receive an anti-tip bracket with your purchase, call 1.800.626.8774 to receive one at no cost (in Canada,
call 1.800.561.3344). For installation instructions of the bracket, visit GEAppliances.com (in Canada, GEAppliances.ca).
I WARNING IIMPORTANTSAFETYNOTICE
The California Safe Drinking Water and Toxic Enforcement Act requires the Governor of California to publish a list of
substances known to the state to cause cancer, birth defects or other reproductive harm, and requires businesses to
warn customers of potential exposure to such substances.
Thefiberglassinsulation inself-cleanovensgives off a verysmall amount of carbon monoxide during the cleaning cycle.
Exposurecan be minimized byventing with an open window or using a ventilation fan or hood.
SAVE THESE INSTRUCTIONS
IAWARNINGIGENERALSAFETYINSTRUCTIONS
iii}}i
Do not leave children alone or unattended in an
I WARNINGI
NEVER use this appliance as a space heater to heat
or warm the room. Doing so may result in carbon
monoxide poisoning and overheating of the oven.
Use this appliance for its intended purpose as described
in this owner's manual.
area where an appliance is in use. They should never
be allowed to climb, sit or stand on any port of the
appliance.
iii}i}}li_
Do not store items of interest to children above a range
or on the buckguurd of a range-children climbing on
the range to reach items could be seriously injured.
GEAppliances.com
Hove yourrangeinstalledand properlygrounded by
a qualifiedinstallerinaccordancewiththeprovided
installationinstructions.Any adjustmentand service
shouldbe performedonlyby a qualifiedgas range
installersorservicetechnicians.Do notattempttorepair
orreplaceany portofyour rangeunlessitisspecifically
recommended inthismanual.
_::Your range is shipped from the factory set for use
with natural gas. It can be converted for use with LP
gas. If required, thse adjustments must be made by a
qualified technician in accordance with the installatoin
instructions and local codes. The agency performing this
work assumes responsibility for the conversion.
i Have the installer show you the location of the range
gas shut-off valve and how to turn it off if necessary.
Plug your range into a 120-volt grounded outlet only. Do
not remove the round grounding prong from the plug.
If in doubt about the grounding of the home electrical
system, it is your responsibility and obligation to have on
ungrounded outlet replaced with a properly grounded,
three prong outlet in accordance with the National
Electrical Code. Do not use on extension cord with this
appliance.
Before performing any service, unplug the range
or disconnect the power supply at the household
distribution panel by removing the fuse or switching off
the circuit breaker.
Be sure all packing materials are removed from the
range before operating to prevent ignition of these
materials.
Do not allow anyone to climb, stand or hang on the
oven door, drawer or cooktop. They could damage the
range or tip it over causing severe injury or death.
Never block the vents (air openings) of the range. They
provide the air inlets and outlets that are necessary for
the range to operate properly with correct combustion.
Air openings are located at the rear of the cooktop,
at the top and bottom of the oven door, and at the
bottomof the range under the warming drawer, lower
oven drawer or kick panel.
iii}}i
Use only dry pot holders-moist or damp pot holders on
hot surfaces may result in burns from steam. Do not let
pot holders touch surface burners, burner grate, or oven
heating element. Do not use a towel or other bulky cloth
in place of pot holders.
Be careful not to touch hot surfaces of the range.
Potentially hot surfaces include burners, grates, cooktop,
backguard, oven and door interior and crevices around
the oven door.
Do not heat unopened food containers. Pressure could
build up and the container could burst, causing an
injury.
iii}}i
Cook meat and poultry thoroughly-meat to at least an
internal temperature of 160°F and poultry to at least
an internal temperature of 180°F. Cooking to these
temperatures usually protects against foodborne illness.
_::Avoid scratching or impacting glass doors, cooktops or
control panels. Doing so may lead to glass breakage. Do
not cook on o product with broken glass. Shock, fire or
cuts may occur.
SAVE THESE INSTRUCTIONS
3
IMPORTANT SAFETY INFORIV/AT/ON.
READ ALL INSTRUCTIONS BEFORE USING.
IA WARNING JKEEPFLAMMABLEMATERIALSAWAYFROMTHERANGE
Do not store or use flammable materials in an oven or
near the cooktop, including paper, plastic, pot holders,
linens, wall coverings, curtains, drapes and gasoline or
other flammable vapors and liquids.
Never wear loose-fitting or hanging garments while
using the appliance. Avoid storing commonly used items
in cabinetes above the range and be careful when
reaching over the range. Clothing inclose proximity to
burners or hot surfaces may ignite causing severe burns.
Do not let cooking grease or other flammable materials
accumulate in or near the range. Grease in the oven or
on the cooktop may ignite.
Clean ventilating hoods frequently. Grease should not
be allowed to accumulate on the hood or filter.
IAWARNINGI IN THEEVENTOFA FIRE,TAKETHEFOLLOWINGSTEPS
TO PREVENTINJURYAND FIRESPREADING:
Do not use water on grease fires. Never pick up
a flaming pan. Turn the controls off. Smother a
flaming pan on a surface burner by covering the pan
completely with a well-fitting lid, cookie sheet or flat
tray. If necessary, use a multi-purpose dry chemical or
foam-type fire extinguisher.
If there is a fire in the oven during baking, turn the oven
off and keep the door closed until the fire goes out. If
necessary, use a multi-purpose dry chemical or foam
type fire extinguisher.
iiiil}i
If there is a fire in the oven during self-clean, turn the
oven off and wait for the fire to go out. Do not force
the door open. Introduction of fresh air at self-clean
temperatures may lead to a burst of flame from the
oven. Failure to follow this instruction may result in
severe burns.
WARNINGl COOKTOP SAFETYINSTRUCTIONS
Never leave the surface burners unattended at medium
or high heat settings. Foods, especially oily foods, may
ignite resulting in fire that could spread to surrounding
cabinets.
_::Never leave oil unattended while frying. Ifallowed to
heat beyond its smoking point, oil may ignite resulting
in fire that may spread to surrounding cabinets. Use a
deep fat thermometer whenever possible to monitor oil
temperature.
To avoid oil spillover and fire, use a minimum amount of
oil when shallow pan-frying and avoid cooking frozen
foods with excessive amounts of ice.
::: Useproper pan size and avoid pans that are unstable
or easily tipped. Select cookware that is matched to the
size of the burner. Burner flames should be adjusted so
that they do not extend beyond the bottom of the pan.
Excessive flame may be hazardous.
Always use the LITE position when igniting the top
burners and make sure the burners have ignited.
When using glass/ceramic cookware, makesureit is
suitable for cooktop service;others may breakbecause
of sudden change intemperature.
To minimize the possibility of burns, ignition of
flammable materials and spillage, the handle of a
container should be turned toward the center of the
range without extending over nearby burners.
When preparing flaming foods under a hood, turn the
fan on.
Do not use a wok with a round metal support ring. the
ring may trap heat and block air to the burner resulting
in a carbon monoxide hazard.
iiiiiil
Do not attempt to lift the cooktop. Doing so may
damage the gas tubing to the surface burners resulting
in a gas leak and risk of fire.
iiiiiiili_
When disabling Gas/Control Lockout (on some models),
make sure the surface controls are set to the OFF
position. This will prevent unintended gas flow from the
burners.
iiiil}i
Do not use aluminum foil to cover the grates or line
any part of the cooktop. Doing so may result in carbon
monoxide poisoning, overheating of the cooktop
surfaces, or a potential fire hazard.
4 SAVETHESEINSTRUCTIONS
IAWARNING lOVEN SAFETY INSTRUCTIONS
iiiiiil
IAI.1.WA,,N I io NEVER coverany slots,holes,or
passages _nthe oven bottom or cover an entire rack with
materials such as aluminum foil. Doing so blocks air flow
through the oven and may cause carbon monixide
poisoning. Aluminum foil linings may also trap heat, causing
a fire hazard.
Standawayfrom the range when opening the oven
door. Hot airor steam which escapescan cause burns
to hands,face and/or eyes.
Keepthe oven freefrom grease buildup.Greaseinthe
oven may ignite.
Placeoven racks in desired location whileoven iscool.
If rack must be moved while oven ishot, be careful to
avoidtouching hot surfaces.
Pull the oven rack to the stop-lock position when
loading and unloading food from the oven. This helps
prevent burns from touching hot surfaces of the door
and oven walls.
iiiiiiili_
Do not leave items such as paper, cooking utensils or
food in the oven when not in use. Items stored in an
oven can ignite.
Do not leave items on the cooktop near the oven vent
which is in the center of the backguard. Items may
overheat resulting in a risk of fire or burns.
When using cooking or roasting bags in the oven, follow
the manufacturer's directions.
Never broil with door open. Open-door broiling is not
permitted due to overheating of control knobs.
GEAppliances.com
IA WARNING I SELF-CLEANINGOVENSAFETYINSTRUCTIONS
The self-cleaning feature operates the oven at temperatures high enough to burn away food soils in the oven.
Follow these instructions for safe operation.
Before operating the self-clean cycle, remove pans,
shiny metal oven racks and other utensils from the
oven. Only porcelain-coated oven racks may be left in
the oven. Do not use self-clean to clean other parts,
such as grates.
Beforeoperating the self-cleancycle,wipe grease and
food soilsfrom the oven.Excessiveamount of grease
may ignite leadingto smoke damage to your home.
If the self-cleaning mode malfunctions, turn the oven off
and disconnect the power supply. Have it serviced by a
qualified technician.
Do not clean the door gasket. The door gasket is
essential for a good seal. Care should be taken not to
rub, damage or move the gasket.
iiiiiil
Do notuse oven cleaners.No commercial oven cleaner
or oven liner protective coating of any kind should be
used inor around any part of the oven.
WARNINGIWARMINGDRAWER/LOWER OVEN DRAWER SAFETY
INSTRUCTIONS (Somemodels)
The purpose of the warming drawer is to hold hot
cooked foods at serving temperature. Bacteria will grow
in food while it is below 140°F. Do not put cold food in
warming drawer. Do not heat food for more than
2 hours. Failure to follow these instructions may result in
foodborne illness.
Do not leave paper products, plastics, canned food or
combustible materials in the drawer. They may ignite.
Usecare when opening the drawer. Open the drawer a
crack and let hot airor steam escape before removing
or replacing food. Hot air or steam that escapescan
cause burnsto hands,face and/or eyes.
Do not use aluminum foil to line the warming drawer.
Foil is an excellent heat insulator and will trap heat
beneath it.This will upset the performance of the
drawer and potentially cause a fire hazard.
Do not touch the heating element or the interior surface
of the drawer. These surfaces may be hot enough to
cause burns.
SAVE THESE INSTRUCTIONS s
Using thegas surface burners.
Throughout this manual, features and appearance may vary from your model.
iili
i_ilI _ i_i
iiiiiiiiiiiii
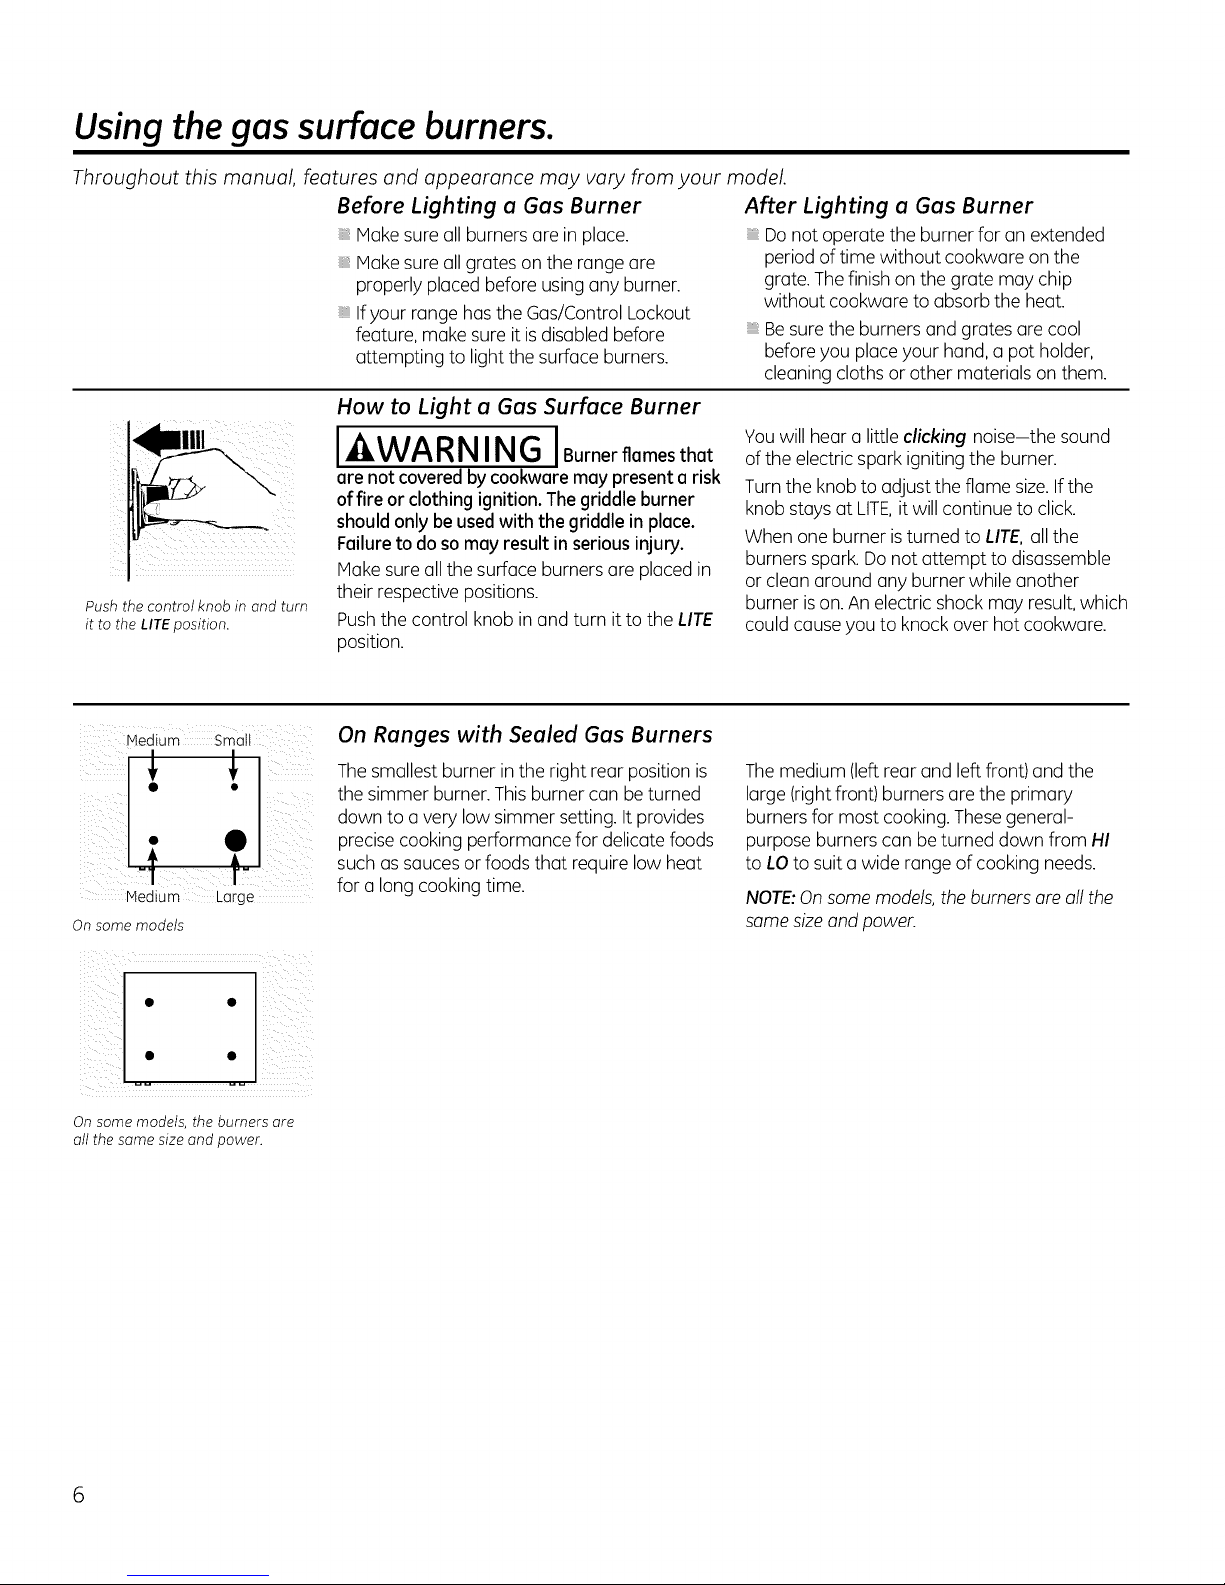
Push the control knob in and turn
it to the LITE _osition.
Before Lighting a Gas Burner
Make sureall burners arein place.
Make sureall grates on the range are
properly placed before using any burner.
Ifyour range hasthe Gas/Control Lockout
feature, make sure it isdisabled before
attempting to light the surface burners.
How to Light a Gas Surface Burner
I_WARNING IBurnerflamesthat
ere not covered by cookwere may present e risk
of fire or clothing ignition.Thegriddle burner
should only be usedwith the griddle in place.
Failureto do so mayresultin serious injury.
Make sure oilthe surface burners ore placed in
their respective positions.
Pushthe control knob in and turn it to the LIT5
position.
After Lighting a Gas Burner
Donot operatethe burner for on extended
period of time without cookwore onthe
grate.Thefinish on the grate may chip
without cookwore to absorb the heat.
Be sure the burners and grates are cool
before you place your hand, o pot holder,
cleaning cloths or other materials on them.
You will hear o little clicking noise-the sound
of the electric spark igniting the burner.
Turn the knob to adjust the flame size. Ifthe
knob stays at LITE, it will continue to click.
When one burner is turned to LIT& all the
burners spark. Do not attempt to disassemble
or clean around any burner while another
burner is on. An electric shock may result, which
could cause you to knock over hot cookwore.
Medium Large
On some models
) ,_ ., LS( ¸
On some models, the burners are
all the same size and power.
On Ranges with Sealed Gas Burners
Thesmallest burner in the right rear position is
the simmer burner. Thisburner con beturned
down to u very low simmer setting. It provides
precisecooking performance for delicate foods
such us sauces orfoods that require low heat
for o long cooking time.
Themedium (leftrear and left front) andthe
large (right front) burners ore the primary
burners for most cooking.Thesegeneral-
purpose burnerscon be turned down from HI
to LOto suit a wide rangeof cooking needs.
NOTE:Onsome models,the burnersore oll the
some sizeand power.
How to Select Flame Size
GEAppliances.com
Forsafe handling of cookware, never let the
flames extend up the sides of the cookware.
Watch the flame, not the knob, as you reduce
heat. When fast heating is desired, the flame
size on a gas burner should match the
cookware you are using.
Top-of-Range Cookware
Aluminum: Hedium-weight cookware is
recommended because it heats quickly
and evenly. Host foods brown evenly inan
aluminum skillet. Usesaucepanswith tight-
fitting lidswhen cooking with minimum
amounts ofwater.
Cast-Iron: Ifheated slowly, most skillets will
give satisfactory results.
Enamelware: Undersome conditions,the
enamel of some cookware may melt. Follow
cookware manufacturer's recommendations
for cooking methods.
Glass: Thereare two types of glass cookwure-
those for oven use only and those for top-of-
range cooking (saucepans,coffee and teapots).
Glassconducts heat very slowly.
Flameslarger than the bottom of the cookware
will not result infaster heating of the cookware
and could be hazardous.
HeatproofGlass Ceramic: Can be used for
either surface or oven cooking. Itconducts
heat very slowly and cools very slowly. Check
cookware manufacturer's directions to be sure
it can be used on gas ranges.
Stainless Steel: This metal alone has poor
heating properties and is usually combined
with copper, aluminum or other metals for
improved heat distribution. Combination metal
skillets usuallywork satisfactorily if they are
used with medium heat asthe manufacturer
recommends.
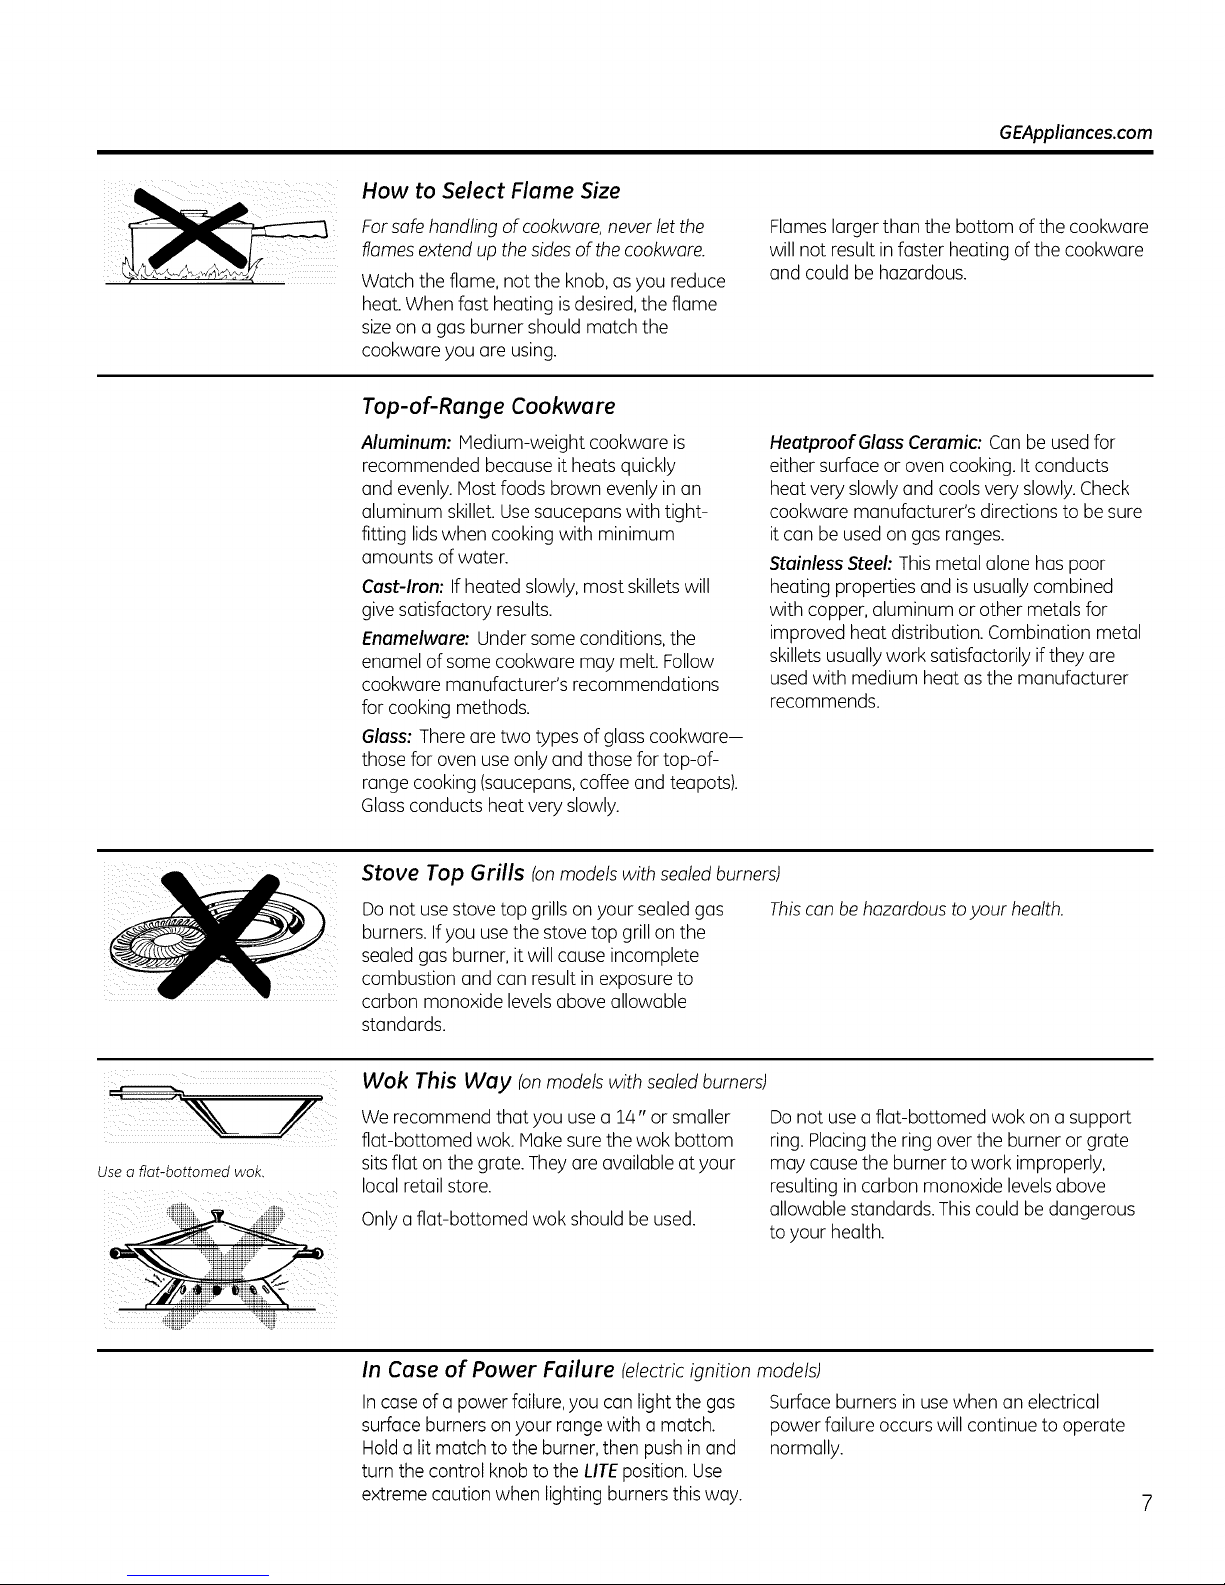
Use a fiat-bottomed wok.
ti!iiiiiii!i_..... _iiiii'
Stove Top Grills {onmodels with sealed burners)
Donot usestove top grills on your sealed gas
Thiscan behazardous toyour health.
burners. Ifyou use the stove top grill on the
sealed gas burner, itwill cause incomplete
combustion and can result in exposure to
carbon monoxide levels above allowable
standards.
Wok This Way {onmodels with sealed burners)
We recommend that you use a 14" or smaller
flat-bottomed wok. Hake surethe wok bottom
sitsflat onthe grate. Theyare available at your
local retailstore.
Only a flat-bottomed wok should beused.
Donot usea flat-bottomed wok on asupport
ring. Placingthe ring overthe burner or grate
may cause the burner to work improperly,
resulting in carbon monoxide levelsabove
allowable standards.Thiscould be dangerous
to your health.
In Case of Power Failure {electric ignition models)
Incase of a power failure, you can light the gas Surface burners in use when an electrical
surface burners on your range with a match, power failure occurs willcontinue to operate
Hold a litmatch to the burner, then push inand normally.
turn the control knob to the LITE position. Use
extreme caution when lighting burners this way.
Usingthe clock and timer.
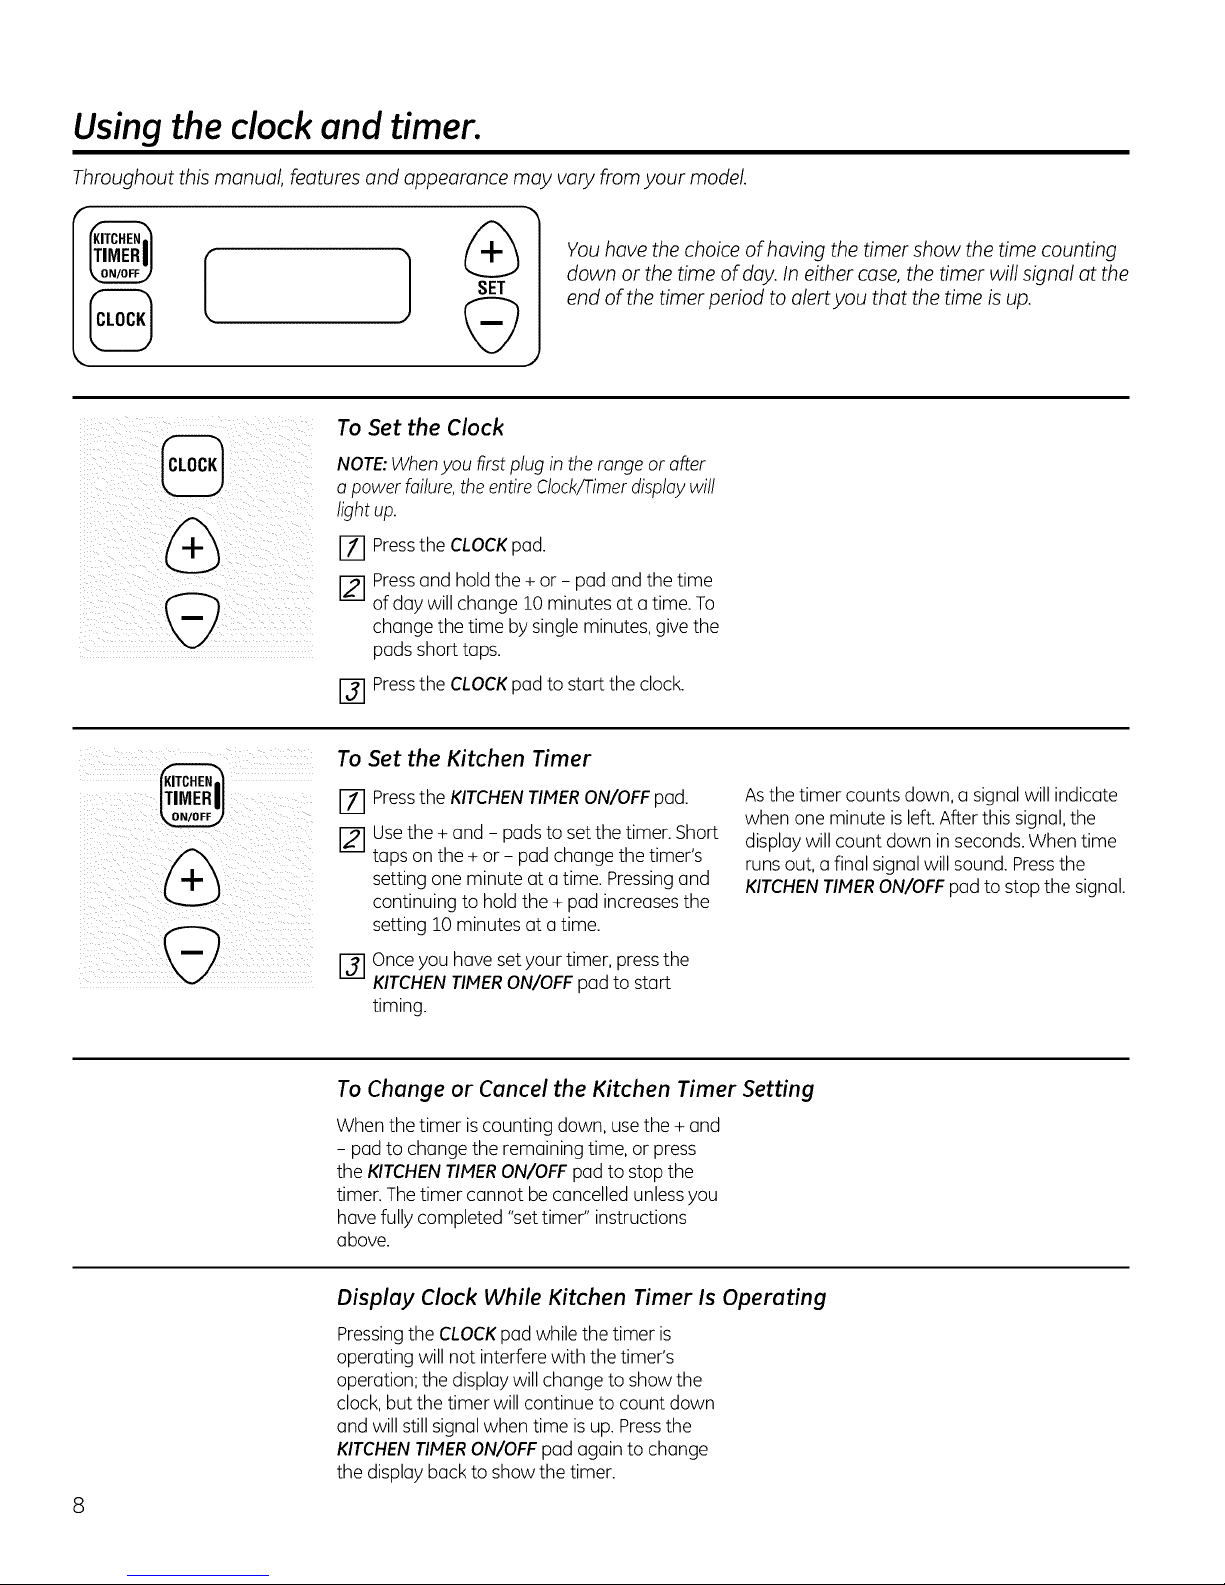
Throughout this manual, features and appearance may vary from your model.
f
@ db
To Set the Clock
@
db
NOTE:Whenyou firstplug in the range or after
a power failure,the entireClock/Timerdisplaywill
lightup.
[] Pressthe CLOCKpad.
[] Pressand holdthe + or - pad and the time
of day will change 10 minutes at a time. To
change the time by single minutes,give the
pads short taps.
r-_ Pressthe CLOCKpad to start the clock.
To Set the Kitchen Timer
[-il Pressthe KITCHENTIMERON/OFFpad.
Usethe + and - padsto set the timer. Short
taps on the + or - pad change the timer's
setting one minute at a time. Pressingand
continuing to hold the +pad increasesthe
setting 10 minutes at a time.
You have the choice of having the timer show the time counting
down or the time of day. In either case, the timer will signal at the
end of the timer period to alert you that the time is up.
Asthe timer counts down,a signalwill indicate
when one minute isleft.After this signal,the
display will count down in seconds.When time
runs out, afinal signalwill sound. Pressthe
KITCHENTIMERON/OFFpad to stopthe signal.
r-_ once you have set your timer, press the
KITCHEN TIMER ON/OFF pad to start
timing.
To Change or Cancel the Kitchen Timer Setting
When the timer is counting down, use the + and
- pad to change the remaining time, or press
the KITCHENTIMERON/OFFpad to stopthe
timer. Thetimer cannot be cancelledunlessyou
have fully completed "set timer" instructions
above.
Display Clock While Kitchen Timer Is Operating
Pressingthe CLOCKpadwhile the timer is
operating will not interfere with the timer's
operation; the display will change to show the
clock, but the timer will continue to count down
and will still signalwhen time is up.Pressthe
KITCHENTIMERON/OFFpad again to change
the display back to show the timer.
Using the oven. GEAppliancescom
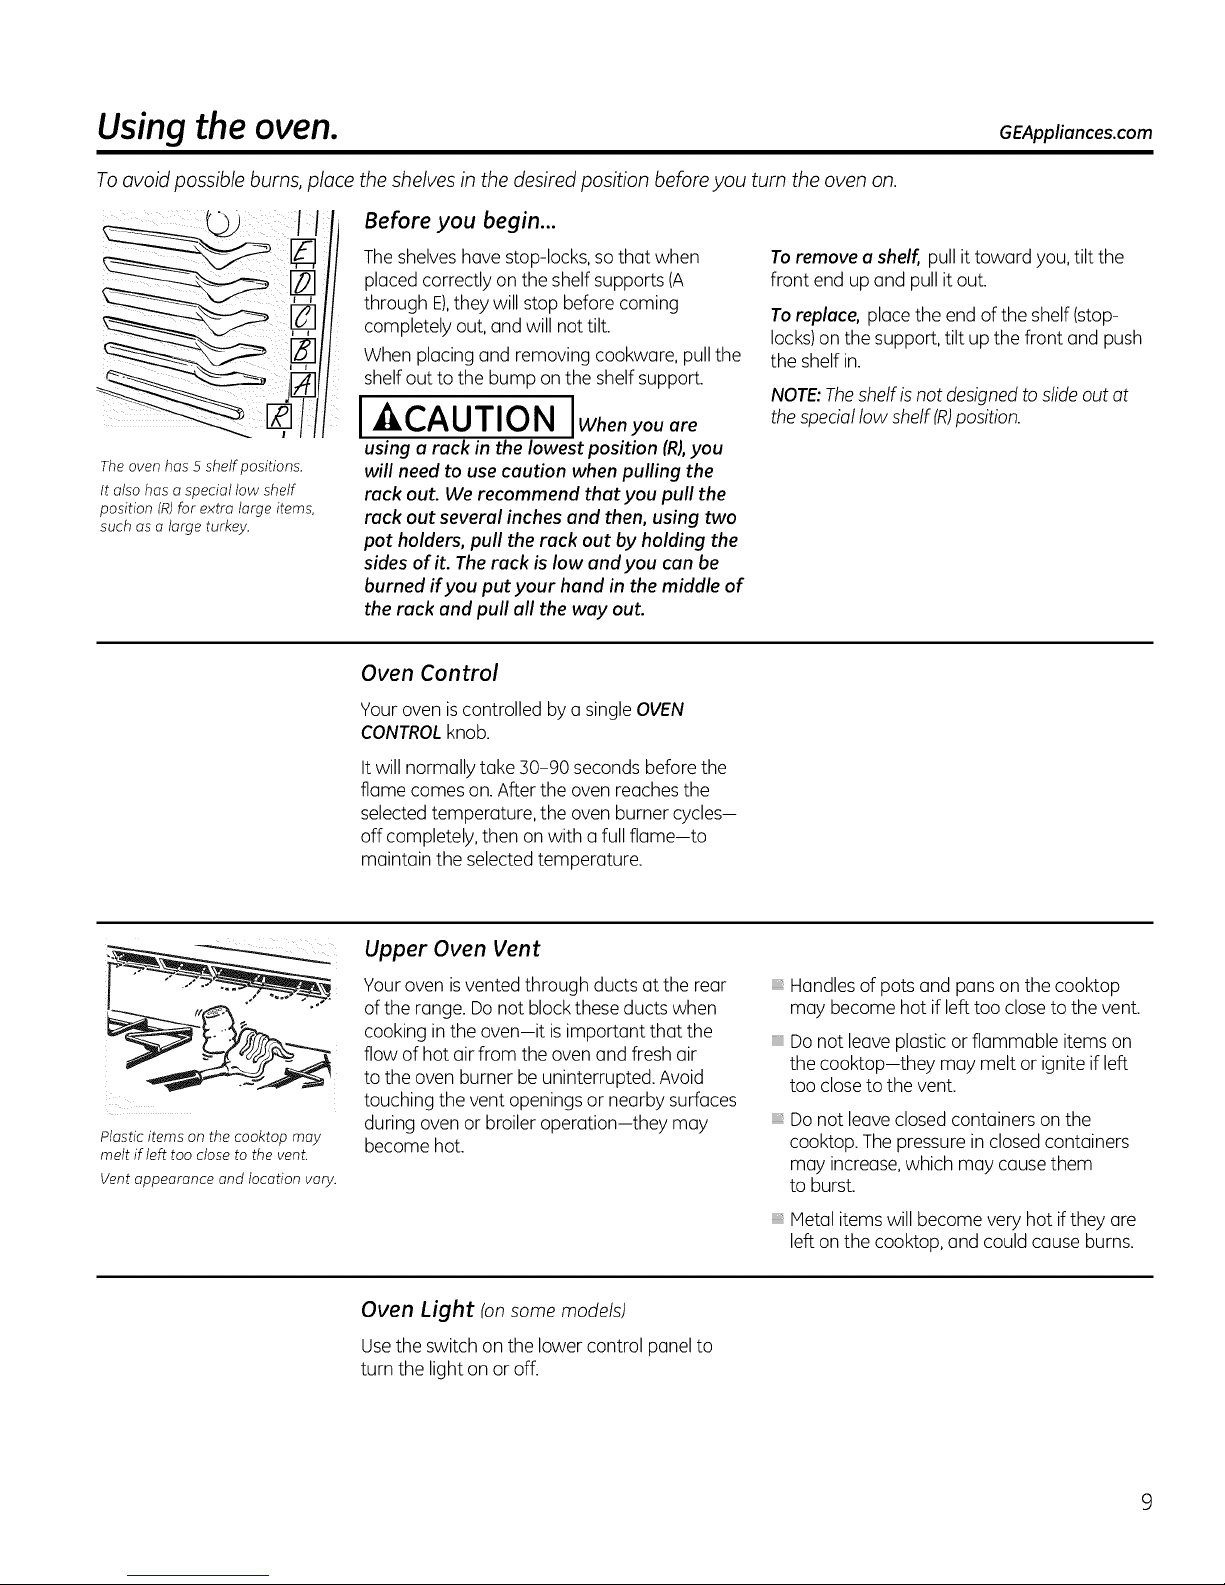
To avoid possible burns, place
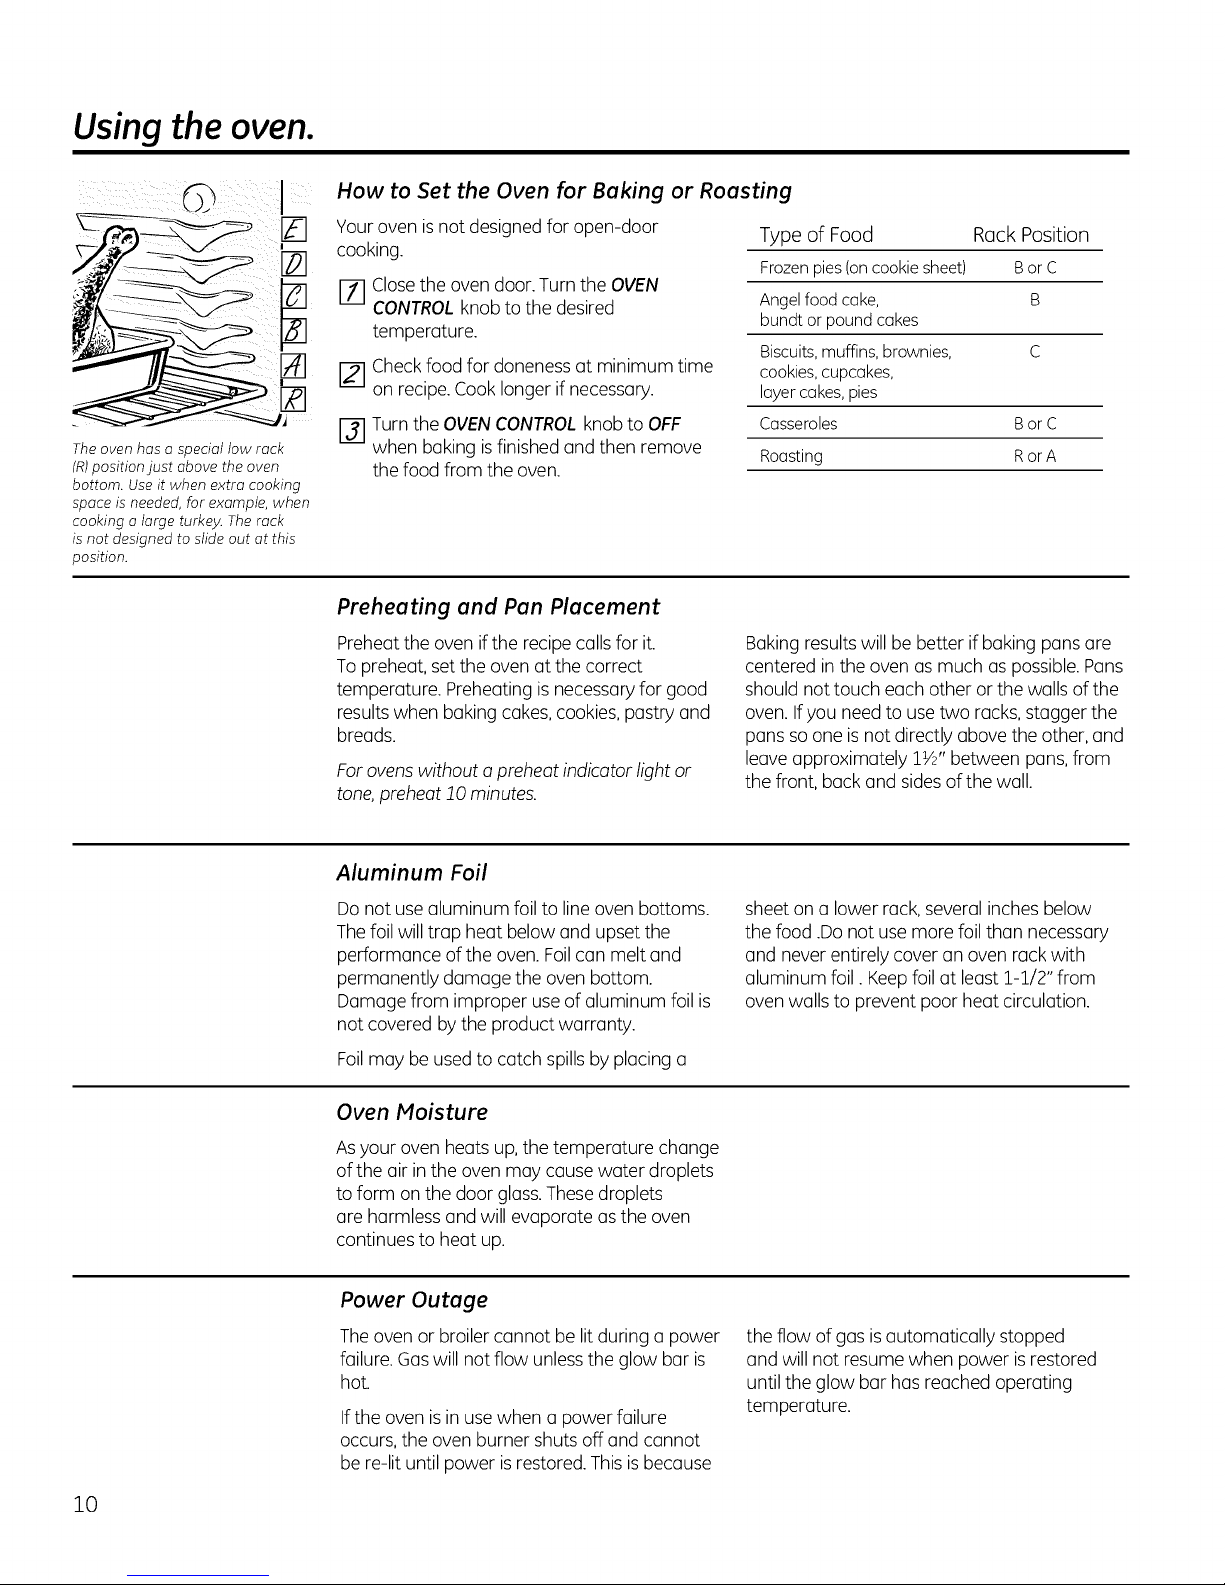
The oven has 5 shelf positions.
It also has a special low shelf
position (R)for extra large items,
such asa large turkey.
the shelves in the desired position before you turn the oven on.
Before you begin...
Theshelveshave stop-locks, sothat when
placed correctly on the shelf supports (A
through E),they will stop before coming
completely out, and will not tilt.
When placing and removing cookware, pull the
shelf out to the bump on the shelf support.
I -&CAUTION IWhenyouare
using a rack in the lowest position (R),you
will need to use caution when pulling the
rack out. We recommend that you pull the
rack out several inches and then, using two
pot holders, pull the rack out by holding the
sides of it. The rack is low and you can be
burned if you put your hand in the middle of
the rack and pull all the way out.
Oven Control
Your oven iscontrolled by a single OVEN
CONTROLknob.
Toremove a shelf, pull ittoward you, tilt the
front end up and pull it out.
Toreplace, place the end of the shelf (stop-
locks)on the support, tilt up the front and push
the shelf in.
NOTE:The shelf is not designed to slide out at
the special low shelf (R)position.
Plastic items on the eooktop may
melt if left too close to the vent.
Vent appearance and location vary.
It will normally take 30-90 seconds before the
flame comes on. After the oven reaches the
selectedtemperature, the oven burner cycles-
off completely, then on with a full flame-to
maintain the selected temperature.
Upper Oven Vent
Your oven isvented through ducts at the rear
of the range. Donot block theseducts when
cooking inthe oven-it isimportant that the
flow of hot air from the oven and fresh air
to the oven burner be uninterrupted. Avoid
touching the vent openings or nearby surfaces
during oven or broiler operation-they may
become hot.
Oven Light (on some models)
Usethe switch on the lower control panel to
turn the light on or off.
Handlesof potsand pans on the cooktop
may become hot if left too closeto the vent.
Donot leaveplastic or flammable items on
the cooktop-they may melt or ignite if left
too closeto the vent.
Donot leaveclosed containers on the
cooktop. The pressurein closedcontainers
may increase,which may causethem
to burst.
Metal items will become very hot if they are
left onthe cooktop, and could cause burns.
Using the oven.
[]
The oven has a special low rack
(R)position just above the oven
bottom. Use it when extra cooking
space is needed, for example, when
cooking a large turkey. The rack
is not designed to slide out at this
position.
How to Set the Oven for Baking or Roasting
Youroven isnot designed for open-door
cooking.
[] Closethe oven door.Turn the OVEN
CONTROLknob to the desired
temperature.
[] Checkfood for doneness at minimum time
on recipe.Cook longerif necessary.
[-_ Turnthe OVENCONTROLknob to OFF
when baking isfinished andthen remove
the food from the oven.
Type of Food Rack Position
Frozenpies(oncookiesheet) BorC
Angelfoodcake, B
bundtor poundcakes
Biscuits,muffins,brownies, C
cookies,cupcakes,
layercakes,pies
Casseroles BorC
Roasting RorA
Preheating and Pan Placement
Preheatthe oven ifthe recipe callsfor it.
Topreheat, setthe oven at the correct
temperature. Preheating is necessaryfor good
resultswhen baking cakes,cookies,pastry and
breads.
Forovens without apreheat indicator light or
tone,preheat 10 minutes.
Aluminum Foil
Do not use aluminum foil to line oven bottoms.
Thefoilwill trap heat below and upset the
performance of the oven. Foilcan melt and
permanently damage the oven bottom.
Damage from improper useof aluminum foil is
not covered by the product warranty.
Foilmay beused to catch spillsby placing a
Oven Moisture
Asyour oven heats up,the temperature change
of the air in the oven may cause water droplets
to form on the door glass.These droplets
are harmless and will evaporate as the oven
continues to heat up.
Baking resultswill be better if baking pans are
centered in the oven as much as possible. Pans
should not touch each other or the walls of the
oven. Ifyou need to usetwo racks,stagger the
pans so one is not directly above the other, and
leave approximately 1W' between pans,from
the front, back and sidesof the wall.
sheet on a lower rack, severalinches below
the food .Donot usemore foil than necessary
and never entirely cover an oven rack with
aluminum foil. Keepfoil at least 1-1/2" from
oven walls to prevent poor heat circulation.
Power Outage
Theoven or broilercannot be lit during a power
failure. Gaswill notflow unlessthe glow bar is
hot.
If the oven isin usewhen a power failure
occurs,the oven burner shuts off and cannot
be re-lit until power is restored.Thisisbecause
10
the flow of gas is automatically stopped
and will not resume when power is restored
until the glow bar has reached operating
temperature.
How to Set the Oven for Broiling
GEAppliances.com
Broiling iscooking food bydirect heatfrom
above the food. Host fish and tender cuts of
meat can be broiled. Followthesedirections to
keep spattering and smoking to a minimum.
Your range hasa compartment below the oven r_
for broiling.
Both the oven and broiler compartment doors
must be closed during broiling.
Turn most foods once during cooking (the
exception isthin fillets of fish; oilone side,place
that side down on broiler grid and cook without
turning until done).Time foods for about
one-half the total cooking time,turn food, then
continue to cook to preferred doneness.
Youcan change the distance of the food
%
from the heat source by positioning the
broiler pan and grid on one of three rack
positions in the broiler compartment--A
(bottom of broiler compartment), B(middle)
and C (top).
[] Preheatingthe broiler or oven is not
necessary and can produce poor results.
@
@
@
[]
If meat hasfat or gristle around the edge,
cut vertical slashes through both about 2"
apart. If desired,the fat may betrimmed,
leaving a layer about 1/8" thick.
Arrange the food on the grid and position
the broiler pan on the appropriate rock in
the oven or broiling compartment. Placing
food closer to the flame increasesexterior
browning of the food, but also increases
spattering and the possibility of fats and
meat juices igniting.
Closethe oven and broiler compartment
door.
Turn the OVEN CONTROL knob to BROIL.
When broiling is finished,turn the OVEN
CONTROLknob to OFF.Removethe broiler
pan from the broiler compartment and
serve the food immediately. Leavethe pan
outside the range to cool.
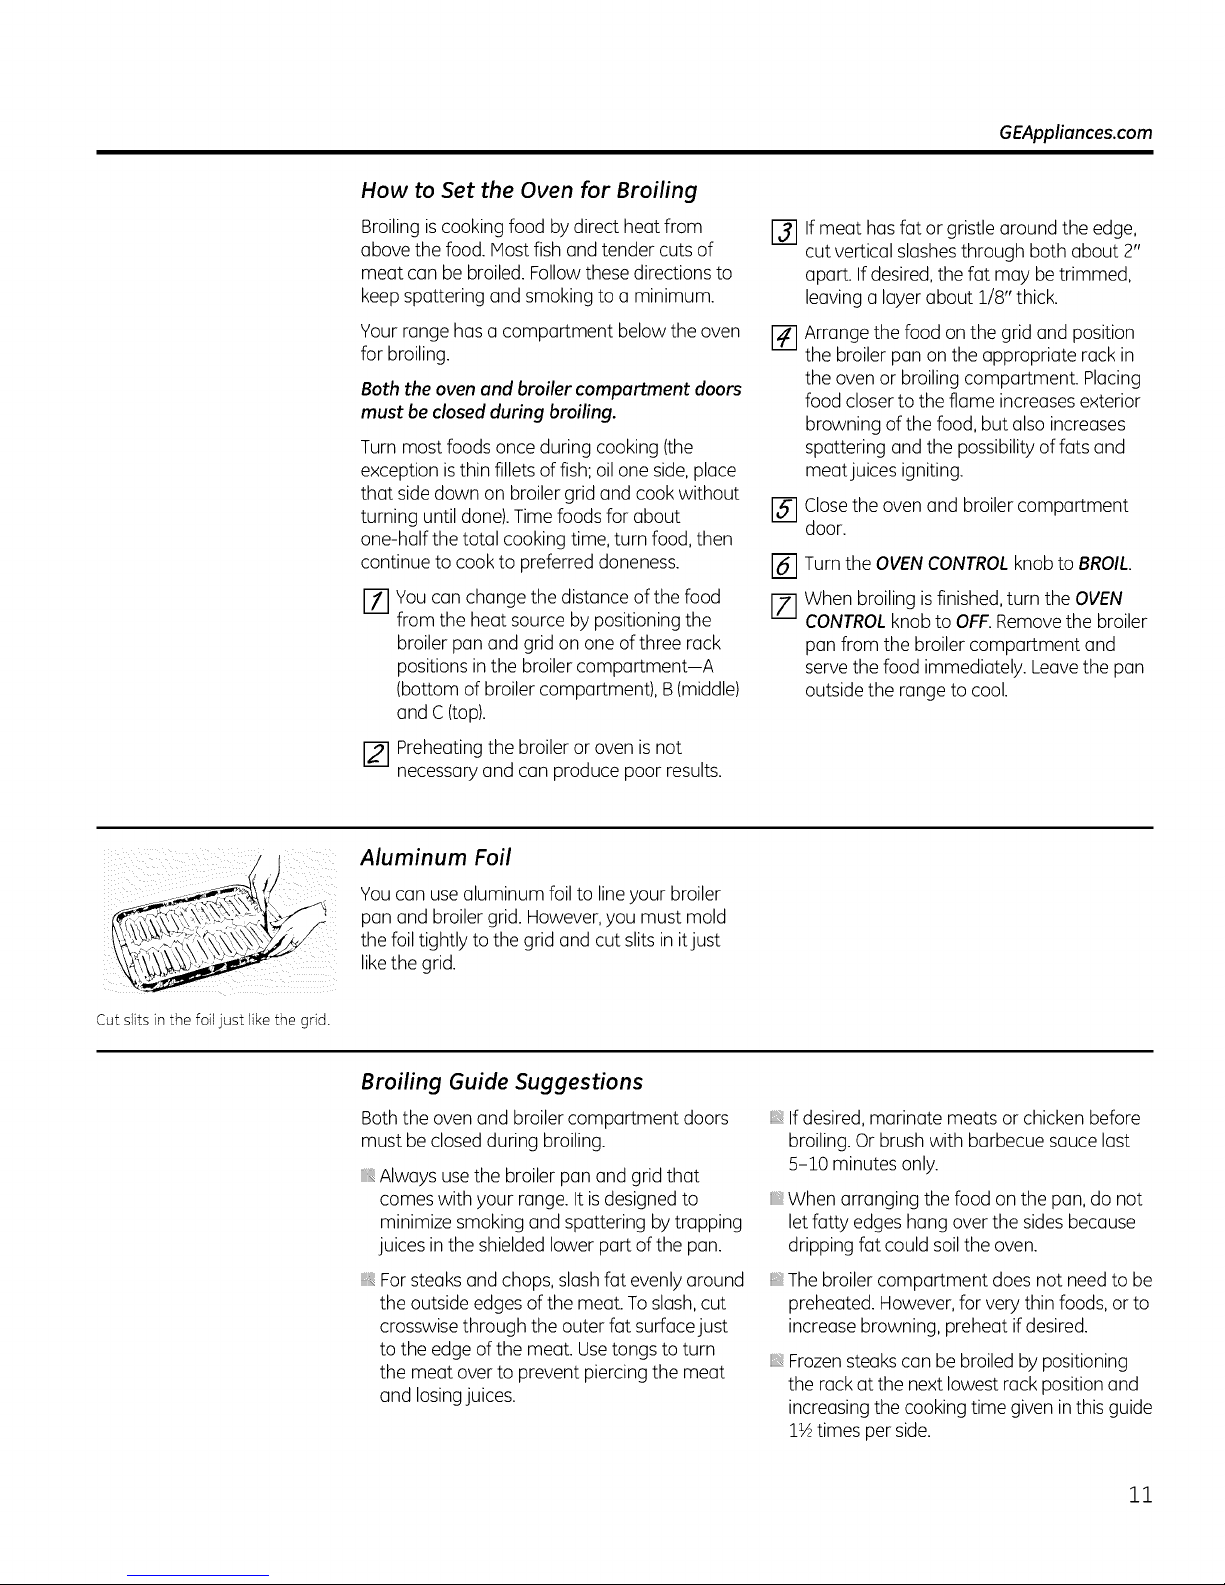
Cut slits in the foil just like the grid.
Aluminum Foil
Youcan usealuminum foil to lineyour broiler
pan and broiler grid. However,you must mold
the foil tightly to the grid and cut slits in itjust
likethe grid.
Broiling Guide Suggestions
Both the oven and broiler compartment doors
must be closedduring broiling.
B Always usethe broiler pan and grid that
comeswith your range. Itis designedto
minimize smoking and spattering by trapping
juices inthe shielded lower part ofthe pan.
Forsteaks and chops,slashfat evenlyaround
the outside edges of the meat. Toslash,cut
crosswisethrough the outer fat surfacejust
to the edge of the meat. Usetongs to turn
the meat over to prevent piercingthe meat
and losingjuices.
iii}iDiiii:,
If desired,marinate meats or chicken before
broiling.Or brush with barbecue sauce last
5-10 minutes only.
When arranging the food on the pan, do not
letfatty edges hang overthe sides because
dripping fat could soilthe oven.
The broiler compartment doesnot need to be
preheated. However,for very thin foods,or to
increase browning, preheat ifdesired.
Frozensteakscan be broiled by positioning
the rack at the next lowest rack positionand
increasingthe cookingtime givenin this guide
J_½times per side.
1Z
Using the oven.
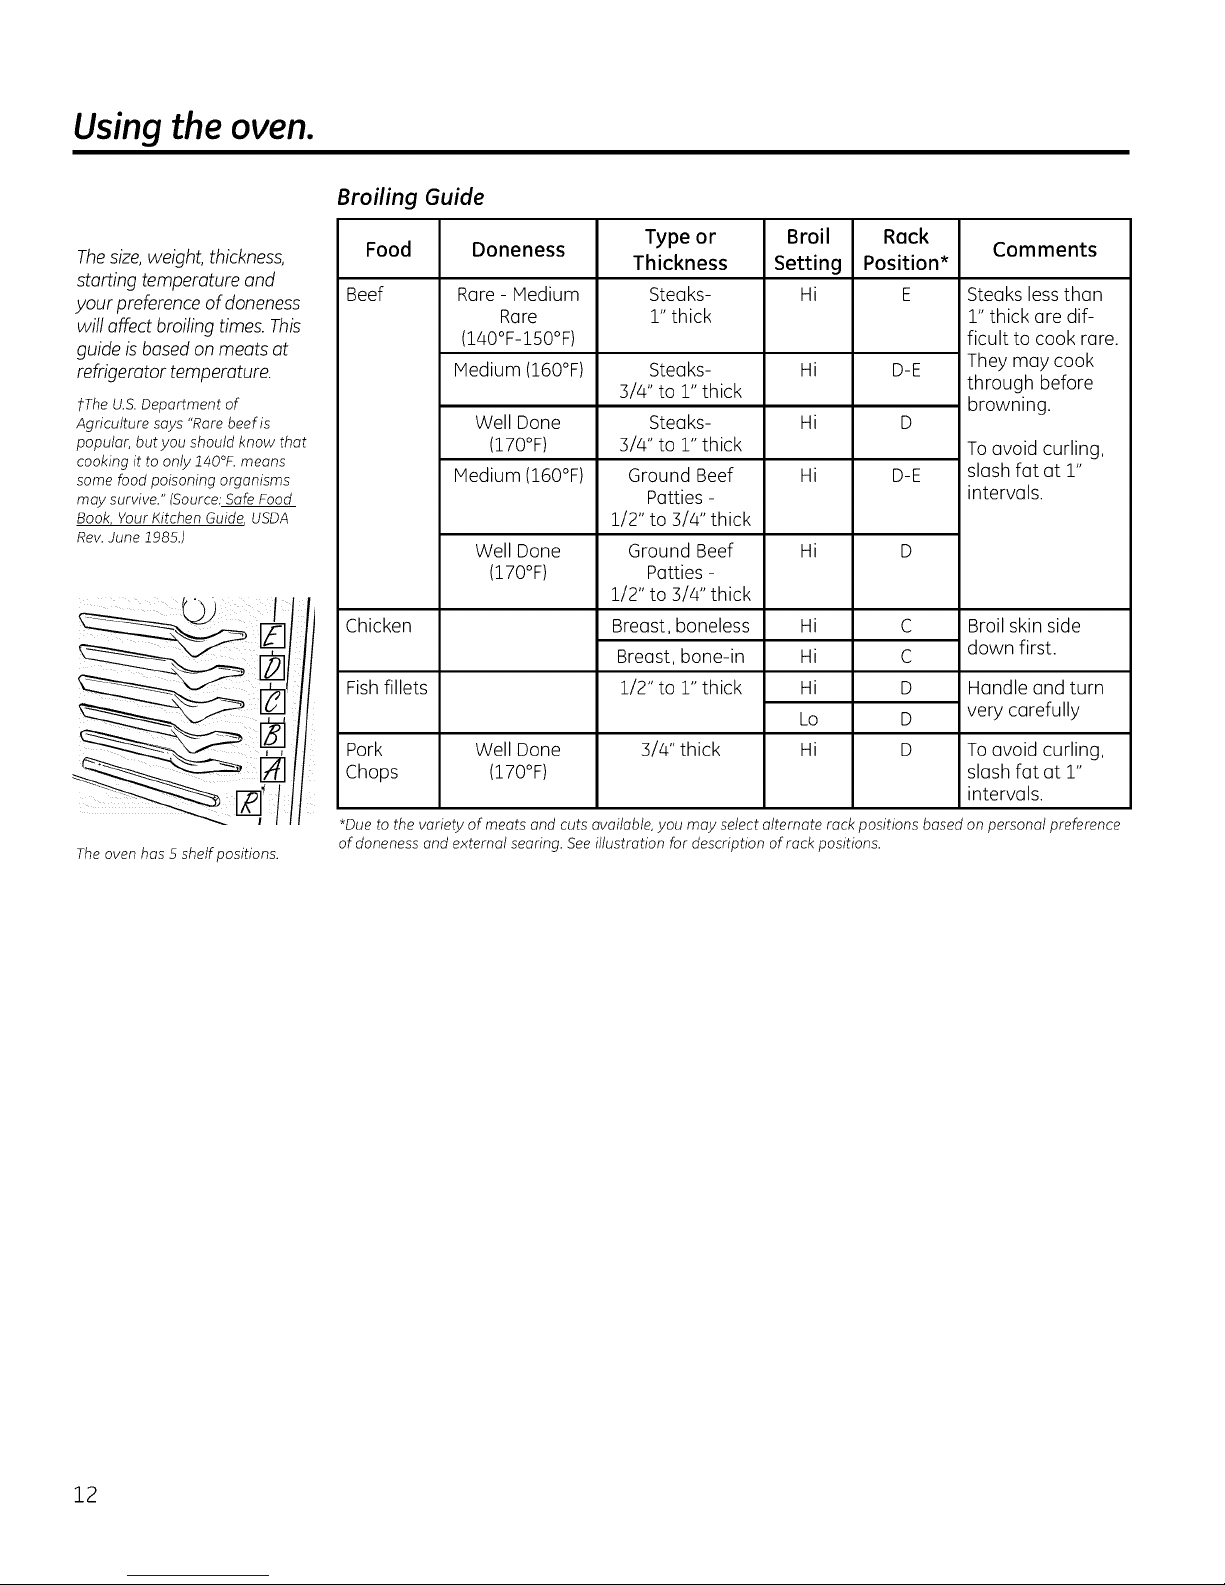
Broiling Guide
Thesize, weight,thickness,
starting temperature and
your preferenceof doneness
will affect broilingtimes. This
guide is basedonmeats at
refrigerator temperature.
?The U.S.Department of
Agriculture says "Rare beef is
popular, but you should know that
cooking it to only 140°K means
some food poisoning organisms
may survive." (Source: Safe Food
Book, Your Kitchen Guide, USDA
Rev. June 1985.)
The oven has 5 shelf positions.
Food
Beef
Doneness
Rare - Medium
Rare
(140°F-150°F)
Medium (160°F)
Type or
Thickness
Steaks-
Broil
Setting
Hi
1"thick
Steaks- Hi D-E
3/4" to 1" thick
Rack
Position*
E
Comments
Steaks less than
1"thick are dif-
ficult to cook rare.
They may cook
through before
browning.
Well Done Steaks- Hi D
(170°F) 3/4" to 1" thick
Medium (160°F) Ground Beef Hi D-E
Patties -
Toavoid curling,
slash fat at 1"
intervals.
1/2" to 3/4" thick
Well Done
(170°F)
Patties -
Hi DGround Beef
1/2" to 3/4" thick
Chicken
Fish fillets
Pork
Chops
(170°F)
Breast, boneless
Breast, bone-in
1/2" to 1" thick
3/4" thick
Hi
Hi
Hi
Lo
HiWell Done
C
C
D
D
D
Broil skin side
down first.
Handle and turn
very carefully
Toavoid curling,
slash fat at 1"
intervals.
*Due to the variety of meats and cuts available, you may select alternate rack positions based on personal preference
of doneness and external searing. Seeillustration for description of rack positions.
22
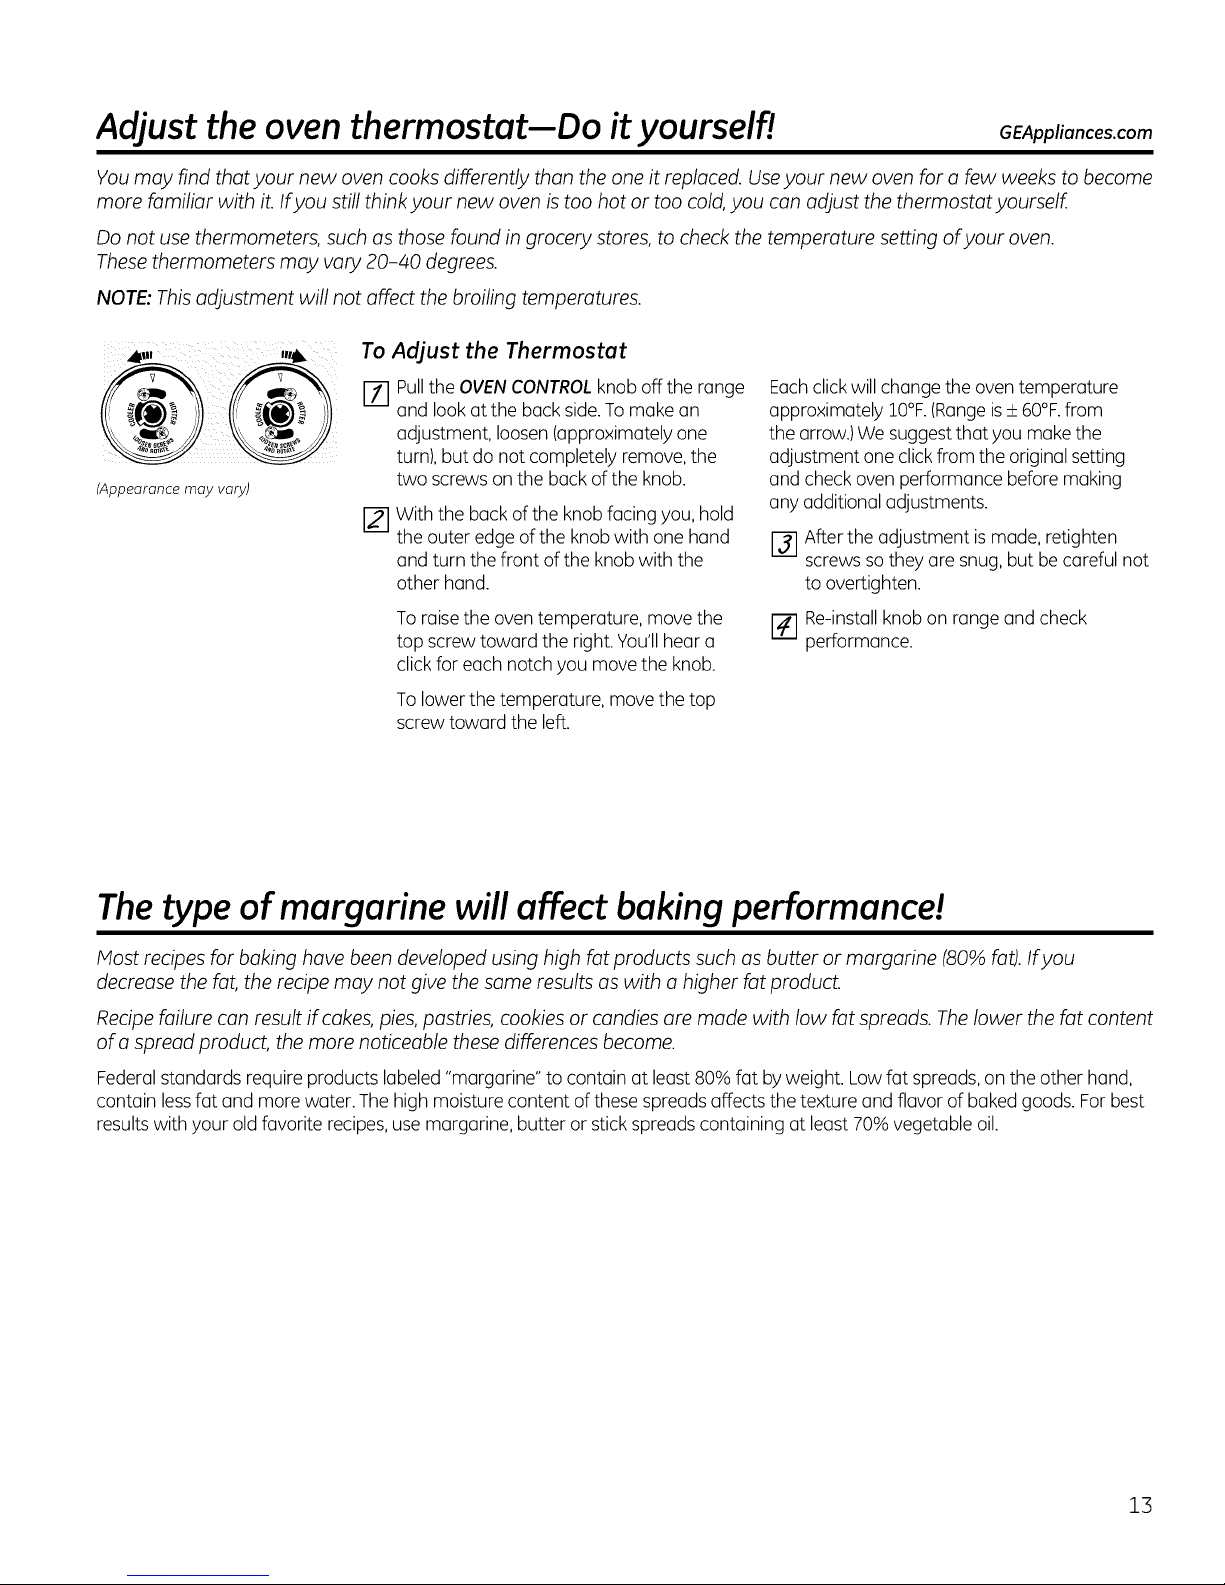
Adjust the oven thermostat--Do it yourself! GEApplionces.com
You may find that your new oven cooks differently than the one it replaced. Useyour new oven for a few weeks to become
more familiar with it.If you still think your new oven is too hot or too cold, you can adjust the thermostat yourself.
Do not use thermometers, such as those found in grocery stores, to check the temperature setting of your oven.
These thermometers may vary 20-/40 degrees.
NOTE: This adjustment will not affect the broiling temperatures.
To Adjust the Thermostat
(Appearance may vary)
Pullthe OVENCONTROLknob off the range
%
and look at the back side.Tomake an
adjustment, loosen(approximately one
turn), but do not completely remove, the
two screws on the back of the knob.
With the back ofthe knob facing you,hold
[]
the outer edge of the knob with one hand
and turn the front of the knob with the
other hand.
Toraisethe oven temperature, move the
top screw toward the right. You'llhear a
clickfor each notch you movethe knob.
Tolower the temperature, move the top
screw toward the left.
Eachclickwill change the oven temperature
approximately IO°F.(Rangeis--60°F.from
the arrow.)We suggestthat you makethe
adjustment one clickfrom the originalsetting
and check oven performance before making
any additional adjustments.
[] After the adjustment is made, retighten
screws so they are snug, but be careful not
to overtighten.
[_] Re-install knob on range and check
performance.
Thetype ofmargarine will affect baking performance!
Most recipes for baking have been developed using high fat products such as butter or margarine (80% fat). Ifyou
decrease the fat, the recipe may not give the same results as with a higher fat product.
Recipe failure can result if cakes, pies, pastries, cookies or candies are made with low fat spreads. The lower the fat content
of a spread product, the more noticeable these differences become.
Federalstandards require products labeled"margarine" to contain at least80% fat by weight. Low fat spreads,on the other hand,
contain lessfat and more water. The high moisture content ofthese spreads affects the texture and flavor of baked goods. For best
resultswith your oldfavorite recipes, usemargarine, butter orstick spreads containing at least 70%vegetable oil.
13
Care and cleaning of the range.
Besure electrical power is off and all surfaces are cool before cleaning any part of the range.
IA J
I WARNINGI Ifuourrangeisremovedforcleaning,servicingoranyreason,be
sure the anti-tip device is reengaged properly when the range is replaced. Failure to take
this precaution could result in tipping of the range and causeinjury.
Tocheck if the bracket is installed and engaged properly, carefully tip the range forward. The
bracket should stop the range within 4 inches.If it does not, the bracket must be reinstalled.
If the range ispulled from the wall for any reason, always repeat this procedure to verify the
range is properly secured by the anti-tip bracket.
Ifyour range has no anti-tip bracket, call 1.800.626.8774 to receiveone at no cost.
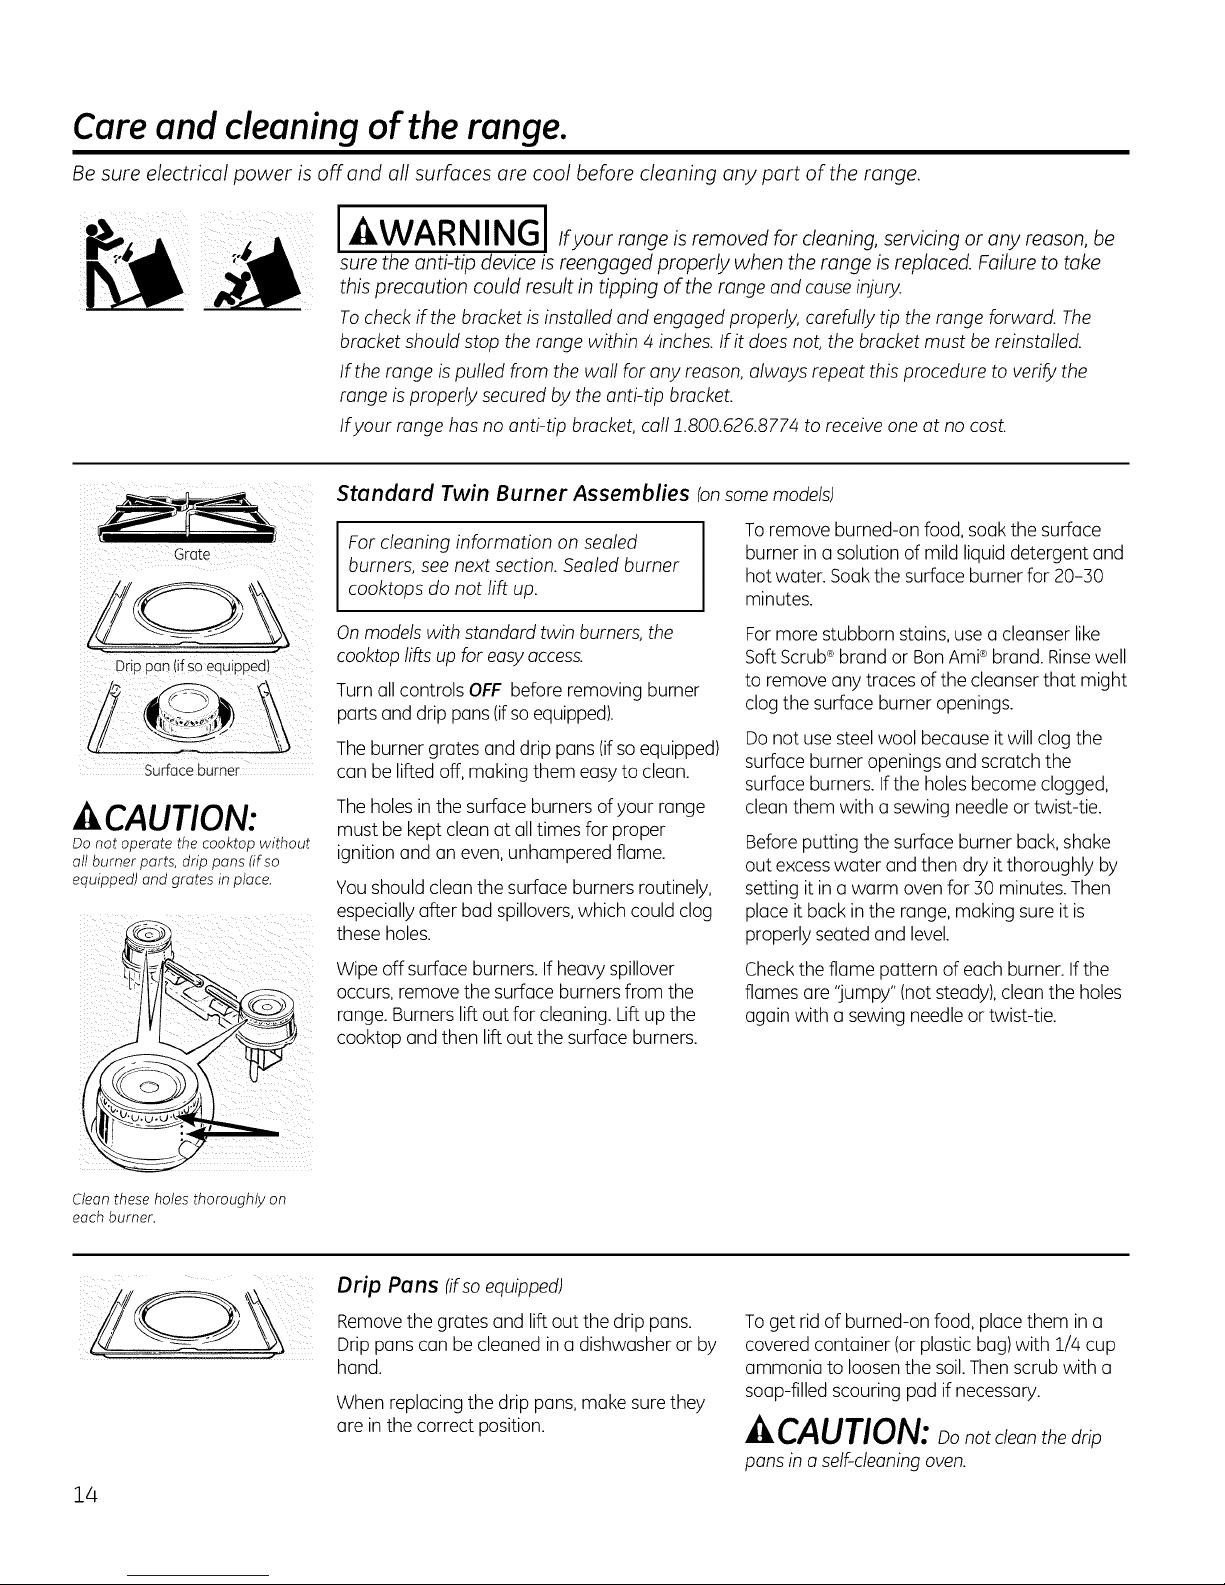
Standard Twin Burner Assemblies (onsomemodels)
Drippan (ifso equipped)
Surface bUrner
CAUTION:
Do not operate the eooktop without
all burner parts, drip pans (if so
equipped) and grates in place.
For cleaning information on sealed
burners, see next section. Sealed burner
cooktops do not lift up.
On modelswith standard twin burners,the
cooktop lifts up for easyaccess.
Turnall controls OFF before removing burner
parts and drip pans(ifsoequipped).
Theburner grates and drip pans (ifso equipped)
can be liftedoff, making them easy to clean.
Theholes inthe surface burners of your range
must be kept cleanat all times for proper
ignition and an even, unhampered flame.
Youshould clean the surface burners routinely,
especiallyafter bad spillovers,which could clog
these holes.
Wipe off surface burners. If heavyspillover
occurs, removethe surface burners from the
range. Burnerslift out for cleaning.Lift up the
cooktop and then lift out the surface burners.
Toremove burned-on food, soakthe surface
burner in a solution of mild liquid detergent and
hot water. Soakthe surface burner for 20-30
minutes.
Formore stubborn stains,use acleanser like
Soft Scrub®brand or BonAmi®brand. Rinsewell
to remove any traces of the cleanser that might
clog the surface burner openings.
Do not use steelwool because itwill clog the
surface burner openings and scratch the
surface burners. Ifthe holesbecome clogged,
clean them with asewing needleortwist-tie.
Before putting the surface burner back,shake
out excesswater and then dry it thoroughly by
setting itin awarm oven for 30 minutes.Then
place it back in the range,making sure it is
properly seated and level.
Checkthe flame pattern of each burner. If the
flames are 'jumpy" (notsteady),cleanthe holes
again with a sewing needleor twist-tie.
Clean these holes thoroughly on
each burner.
Drip Pans (ifsoequipped)
Removethe grates and lift out the drip pans.
Drip pans can be cleaned in a dishwasher or by
hand.
When replacing the drip pans,make surethey
are in the correct position.
3_4
Toget rid of burned-on food, place them in a
covered container (or plastic bag)with 1//4cup
ammonia to loosen the soil.Then scrub with a
soap-filled scouring pad if necessary.
CAUTION: oo not clean the drip
pans in aself-cleaningoven.
 Loading...