

Hotpoint RGB744GEN, RGB745GEN Use, Care & Installation Manual
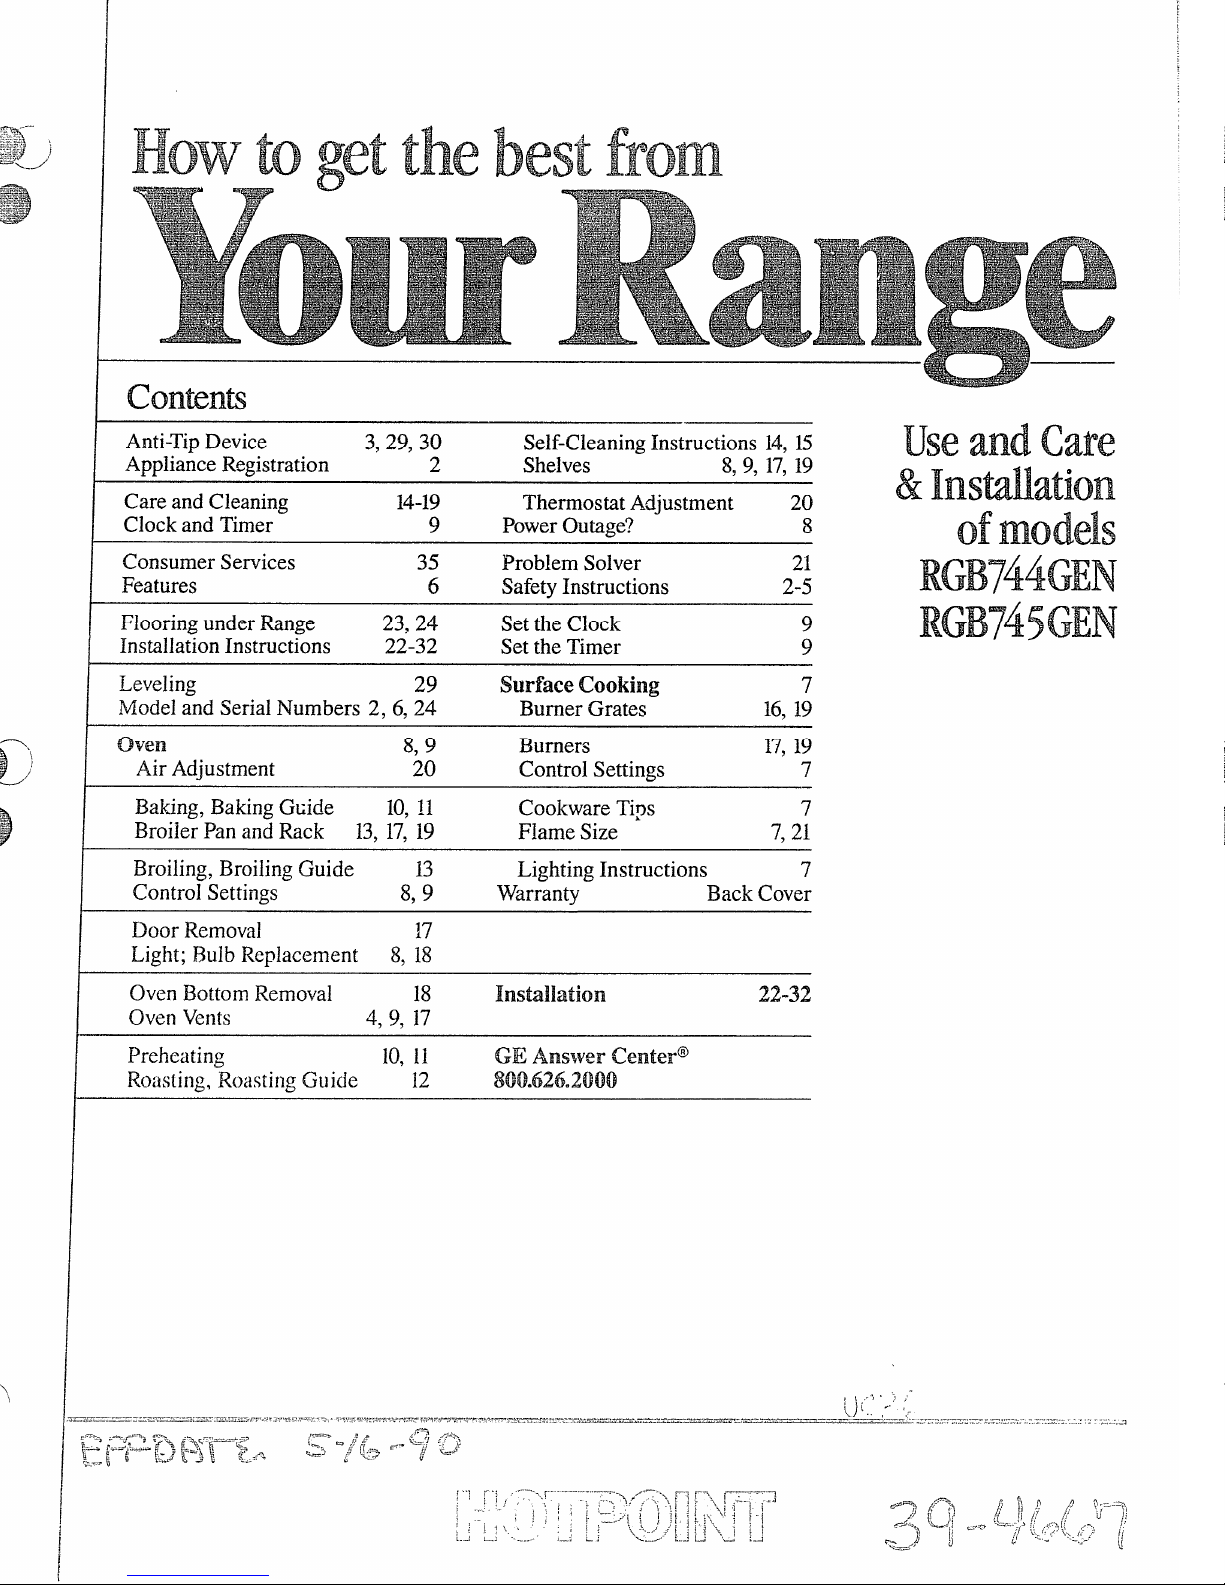
Howtoget thebestfrom
conbnK
Anti-TipDevice 3,29,30 Self-CleaningInstructions 14,15
useandcare
ApplianceRegistration 2
Shelves
8,9, 17,19
Careand Cleaning 14-19 ThermostatA.djustment 20
& Instigation
-94
Clock and Timer- 9
PowerOutage? -
8
of models
I
Consumer Services
Features
35
6
Problem Solver
21
SafetyInstructions 2-5
I
Flooring under ~nge
InstallationInstructions
23,24
22-32
Setthe Clock
9
Setthe Timer 9
I
Leveling 29 Surface Cooking 7
~Modeland Serial Numbers 2, 6,24 Burner Grates
16,19
I
oven 8,9
Burners 17,19
Air Adjustment 20 Control Settings
7
I
Baking,BakingGuide
10,~~
Cookware Tips
7
Broiler Pan and Rack 13,17,19 Flame Size
7,21
I
Broiling,BroilingGuide
13
LightingInstructions 7
Control Settings 8,9 Warranty
Back Cover
Door Removal
17
Light; Bulb Replacement
8, 18
oven BottomRemoval 18 Instillation
22-32
Ove(lVents
4,9, 17
RGB744GE
RGB745GE
1
Preheating 10,11
GE Answer center@
Roasting,RoastingGuide 12
800.626.2000
Readthk bookcareful~y.
If youneedservice,..
It is intendedtohelpyouoperate
and maintainyournewrange
properly.
Keepit handy for answerstoyour
questions.
Ifyou don’tunderstandsomething
or need more help, write (include
yourphonenumber):
ConsumerAffairs
Hotpoint
AppliancePark
Louisville,KY40225
writedownthemodeI
andserialnumbers.
You’llfind them on a labellocated
either on the front frame when you
open the ovendoor or behindthe
storagedrawer or kick panel.
These numbers are also on the
Consumer Product Ownership
RegistrationCard that came with
your range. Beforesendingin this
card, please write these numbers
here:
Model Num—ber
Toobtainservice,see the
ConsumerServicespage in the
backofthisbook.
Toobtainreplacementparts,
contactGE/Hotpoint Appliance
PartsMarts or FactoryService
Centers.
We’reproudofour service and
wantyouto be pleased. If for some
reasonyouare nothappy with the
serviceyou receive,here are three
stepsto followforfurther help.
FIRST,contactthe people who
servicedyourappliance.Explain
whyyouare notpleased. In most
cases, this will solvetie problem.
NEXT, if youare stillno-tpleased,
writeall the details-including
yourphone number-to:
Manager, ConsumerRelations
Hotpoint
AppliancePark
Louisville,Kentucky40225
FINALLY,if yourproblemis still
notresolved, write:
Major Appliance
Consumer ActionPanel
20 North WackerDrive
Chicago,Illinois 60606
Serial Number
Usethese numbers in any
correspondence or service calls
concerning your range.
Immediately contact the dealer (or
builder) that sold you the range.
/-‘
/’
,/../

I]wPQRTmT
SAFETY NmIcE
TheCalifornia SafeDrinking
%Vaterand ToxicEnforcement
ActrequirestheGovernor
CaliforniatopubIishalistof
substancesknowntothestate
tocausecancer,bifi defectsor
otherreproductiveharm, and
requiresbusinessestowarn
customersofpotentialexposure
10suchsubstances.
Gasappliancescancause
minorexposureto fourofthese
substances,namelybenzene,
carbonmonoxide,formaldehyde
andsoot,causedprimarilybythe
incompletecombustionofnatural
gasor LP fuels.Properlyadjusted
burners,indicatedbyabluish
ratherthan ayellowflame,wili
minimizeincompletecombustion.
Exposuretothesesubstancescan
beminimizedbyventingwith
anopenwindowor usinga
ventilationfanor hood.
\vheH You&t Your Raage
QHave the instiller showyou
thelocation of the range gas
of
system,itis yourpersonal
responsibilityandobligationto
haveanungroundedoutletreplaced
witha properly-grounded,three-
prongoutletin accordancewith
theNationalElectricalCode.Do
notuse an extensioncord witl~
thisappliance.
@Besure all pattingmaterials
are removedfromthe range
beforeoperatingit, to preventfire
or smokedamageshouldthe
packingmaterialignite.
e Besure your range iscorrectly
adjusted by
technician or insbller forthe
type ofgas (natural or LP) on
wtich it is to be used. Your
rangecan beconvertedforuse
on eithertype ofgas. See
Instigation Instructions.
@After prolonged use ofa
range9
may result and ImaRy floor
a qualified service
high floor temperatures
coveringsWilinotWithsbnd
this kind of use. Neverinstallthe
rangeovervinyltileor linoleum
thatcannotwithstandsuchtypeof
use. Never installitdirectlyover
interiorkitchencarpeting.
@CAUTION:ITEMS OF
mTEmsT
sHomD Nm BE
cABxmTs ABQW A WGE
mcHILDmN
smmDDJ
o~ON TmBaCkSplaSh
OF A RANGB-cHILDmN
cl.IMBING ONTHE MNGE
mmAcH ITEMSCOULDBE
SEWOUSLYINJUMD.
wmNNG–Allranges
Can tip
injury Could
result. To
prevent
aceidentil
tippingofthe
rmge~ attach
thesupplied
Anti-Tipdevice
I
tothewall.
(SeeInstallationInstructions.)
Tocheckif thedeviceis installed
andengagedproperly,carefully
tiptherangeforward.The Anti-Tip
deviceshouldengageabracketon
thebackwallofthe rangethat
willpreventit fromtippingover.
If youpull therangeoutfrom
thewallfor anyreason, malce
surethe.Anti-’ipdeviceisengagd
withthebracketwhenyoupush
the rangeback’againstthewall.
and
e ~seod~ d~ pt holden—moist
or damppotholdersonhotsurfaces
mayresultinburnsfromsteam.
Donotletpotholderscomenear
openflameswhenfifiingcookware.
Do notusea towelorotherbulky
clotl~in placeofapotholder.
@Tominimizethe possibility
ofburns9ignitionofflammable
materials,and spillage,turn
cookwarehandlestowardtheside
orbackoftherangewithout
extendingoveradjacentburners.
@Mwaysturn sunrfaeeburner
controltoOFFbeforeremoving
cookware.
ecarefully watchfoofi being
fried atahighflamesetting.
e~~~~~~~~~~~~~~~~fi(a~~
opetings)oftherange.They
providethe air inletandoutlet
whichis necessaryfor therange
to operateproperlywithcorrect
combustion.Air openingsare
locatedat therear ofthecooktop,
atthetopoftheovendoor and
underthekickpanelor storage
drawer.
@~~ ~~~~$~~~~~ ~~~~~
tooting surfaceif thewokhasa
roundme@lring
that is placed
overthe burner gratetosupport
thewok.This ring actsas a heat
trap thatmaydamagetheburner
grateandburner head. Also, it
maycausethe burner to work
improperly.This maycausea
carbonmonoxidelevelabovethat
allowedbycurrent standards,
resultingin ahealth hazard.
~Foods for frying should he
dry as possible. Frost
on frozen
as
foodsor moist~]reon fresl~foods
ca~~causehotfatlo bubbieup
and OVer
sides ofpan.
faR
will be used infrying, stir -
togetherbeforeheating,or asfats
meltslowly.
@Mways heat fatslowly9and
watchasit heats.
~$e a deep-fat thermometer
@
wheneverpossibleto prevent
overheatingfatbeyondthe
smokingpoint.
o USeproper pan size—Avoid
pansthatare unstableor easily
tipped.Selectcookwarewith.flat
bottomslargeenoughtocover
burnergrates.Toavoidspillovers,
makesurecookwareislarge
enoughto containfoodproperly.
Thiswillboth savecleaning and.
preventhazardousaccumulations R~‘
offood,sinceheavy spattering or
spilloverslefton rangecan ignite.
Usepanswithhandles that canbe ~:
easilygrasp~ andwiflremaincool.
@Use only glasscookwarethat
isrecommendedfortop-of-range
cooking.
Keepall plastics away from
@
@~~ not]eaveplastic itemson
the coolitop–they maymeltif ‘:’,
lefttoocloseto tl~event.
eDo notleaveany itemsonthe ‘“:;:;
cooktop.Thehotair from the
ventmayigniteflammableitems
and willincreasepressure in
closed containers,whic]~may
causethem.to burst.
ol~$&~$~s~~~s~~~leamolgntof
.
fat for effeci:il~eSlla!lov+or dee~3”
:~$f~’jy~1?G-
fl.iaolqillingtilepan too till
off~~~~nQauseSpilioverswhen
.f~:
~~~~~(j,{~~.~.,
e IJseoniyglasscookware
that is reeom~llended
in gas ovens.
@.AIwa’ysremove broiler pan
from Ovenas soon as you fltish
brailimg. Grease lefi in
cancatchfireif ovenis used
withoutremovingthegreasefrom
thebrofierpan.
e When broiling, if meat istoo
closeto the flame9the fat may
igfite. Trimexcessfattoprevent
excessiveflare-ups.
@Make sure broiler pan is in
pIaeecorrectly to reducethe
possibilityofgreasefires.
@If youshould have agrease
fire in thebroiler pan,turnoff
oven,andkeepdoorclosedto
containfire untilitburns out.
@Donot Cleandoor gasket,
Thedoorgasketis essential for a
goodseal. Care shouldbetaken
nottorub, damageor movethe
gasket.
for use
thepan
@Read ‘tTheProblem sQlver99
on page21ofthis book.
eDon9tattempttorepair
or replace anypartofyour
range unlessit
recommended
otherservicingshouldbe referred
toaqualifiedtechnician.
is specifically
inthis book. All
SAW TmsE
msTRucTIoNs
@Do not use ovenCleaners.No
commercialovencleaneror oven
linerprotectivecoatingofany
kindshouldbe used in or around
anypartof the oven.
@Beforeself-cleaning the oven9
removebroiler pan and other
cookware.
e clean only parb listed in this
use and care BQQIL.
@Iifeeprange clean nnd free of
accumulations of ‘greaseor
Spi]loverswhich may igdtee
..—..
——
——
@
@@@@
I
RGB7@GEN
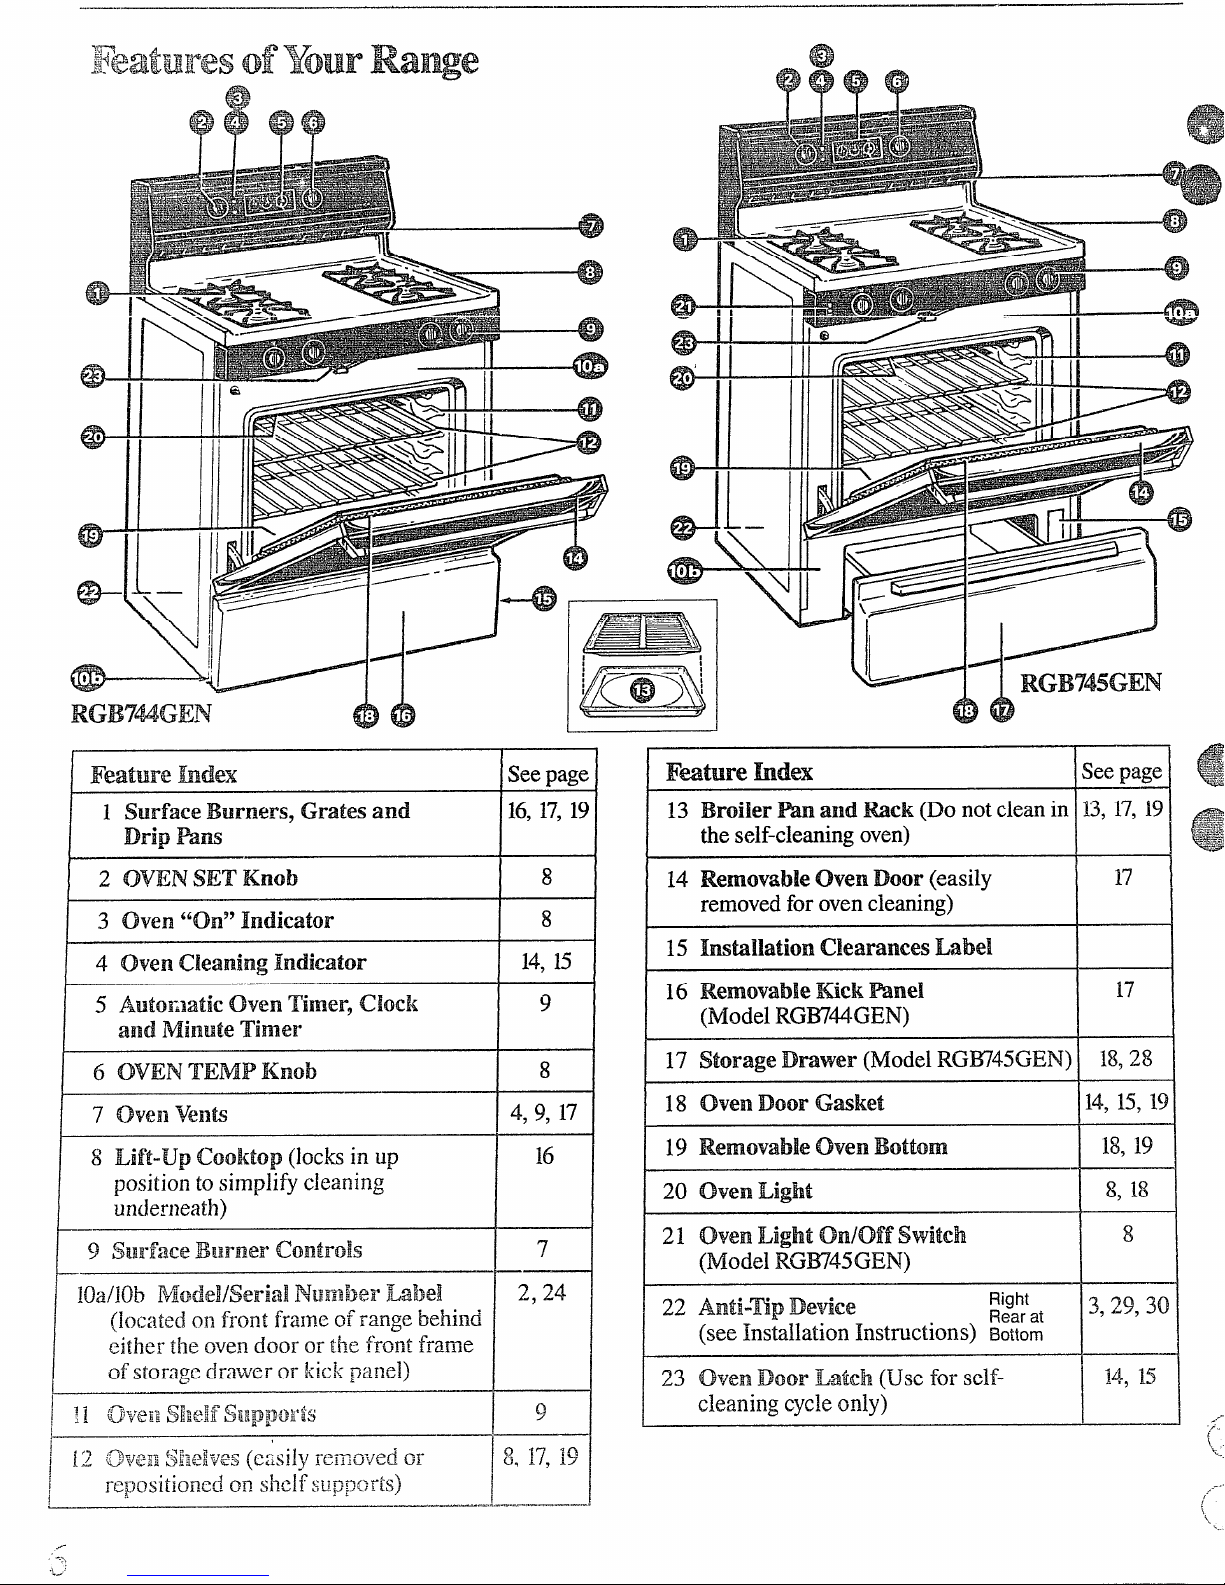
I Feature hdex
1 surfaceBurners, Grates and
Drip mm
I
2 OVEN SET Knob
I
/ 30 Ven “on9’Indicator
6 OVEN TEMP Knob
I
ISeepage I
16,17,19
II
8
I
8
I
-
U4<N
13 Broiler Hn axld~ek (Do not clean in 13,17,19
tie self-cleaningoven)
I
I
14 Removable
removedfor oven cleaning) -
16 Removable=ek Mnel
(Model RGW44GEN)
17 Storage Dmwer (Model RGW45GEN) \ 18,28
19 Removableoven Bottom
20 ovenLight I 8,18
21 oven Light on/off switch 8
(Model RG~45GEN)
OvenDoor(easily 1171
I I@
I
I
17
II
I
18,19
I
I
I
.,--
....
L=
22
Anti-rep De=dee
(seeInstallationInstmctions) ~~;~~
Right
3,29,3
II
...
.,=-,,
{(
ti ,
,,
.._.,
Sllrfa.cecooKng
&g$.
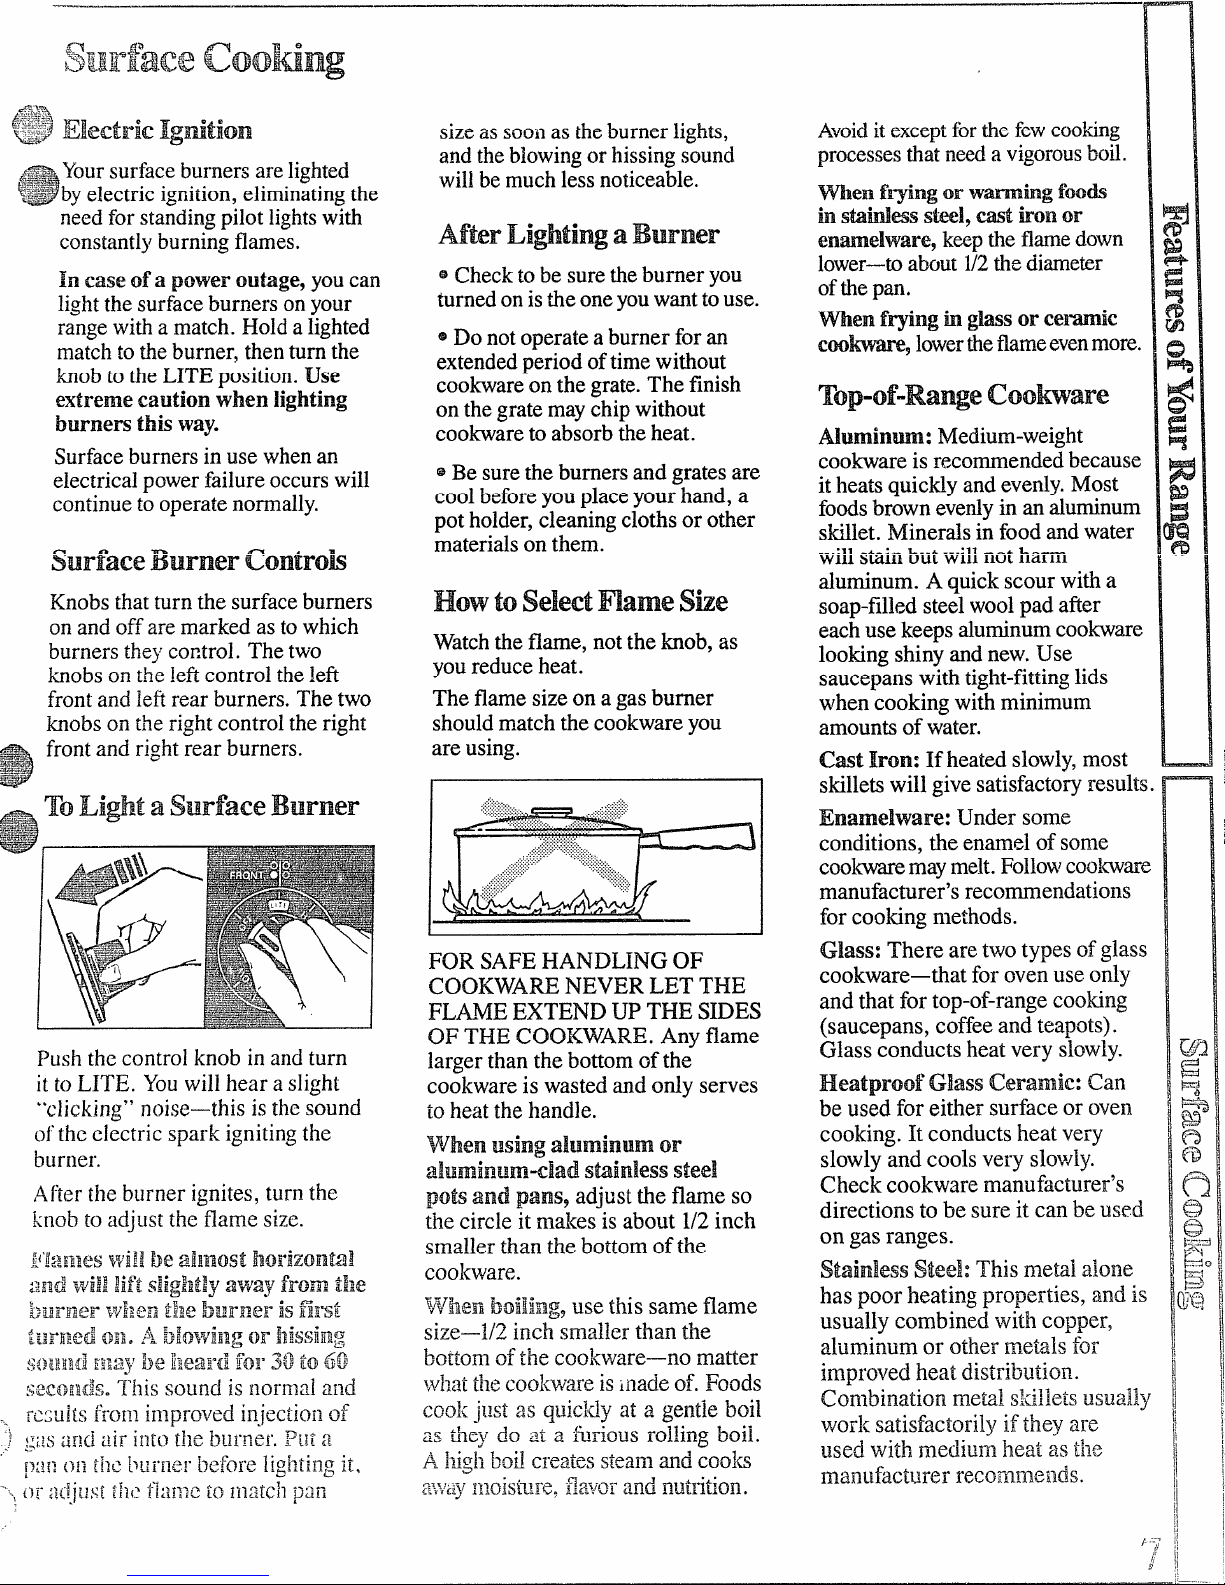
v$# ~IectrieIgtition
~\:g’:-
Yoursurfaceburnersare lighted
~%~byelectricignition,eliminatingthe
3
needforstandingpilot lights with
constantlyburningflames.
In case of a power outage, youcan
lightthe surfaceburners onyour
rangewith a match. Hold a lighted
matchto theburner, thenturn the
knobtothe LITE position.Use
extreme caution
burnem thisway.
Surfaceburners in use whenan
electricalpower failure occurswi~
continueto operatenormally.
surface Burner Controk
Knobsthatturn the surfaceburners
onand off are marked as to which
burners they control. The two
knobson the leficontrol the left
frontand leftrear burners. The two
knobson theright controltheright
frontand rightrear burners.
;
-!
when lighting
sizeassooilas theburnerlighfi,
andtheblowingor hissingsound
willbemuchlessno~iceable.
After Li@tiW a Bwner
~Checkto be suretheburner you
turnedonisthe oneyouwanttouse.
@Do notoperatea burner for an
extendedperiod oftimewithout
cookwareon the grate.The finish
on the grate maychipwithout
cookwareto absorb the heat.
@Be sure the burnersand gratesare
coolbeforeyouplaceyourhand, a
potholder,cleaningclothsor other
materialson them.
How to select mame she
Watchthe flame, nottheknob, as
youreduceheat.
The flame sizeon a gas burner
shouldmatch the cookwareyou
are using.
FOR SAFE HANDLING OF
COOKWARENEVER LET THE
FLAME EXTEND UPTHE S~ES
OF THE COOKWARE. Any flame
larger than the bottomof the
cookwareis wasted and ordy serves
to heat the handle.
when using aluminum or
aiuminum-clad sminless steel
potsand pans9adjusttheflameso
the circle it makes is about 1/2inch
smaller than the bottom of the
cookware.
kI~~]enboiling, usethis same flame
size—-l/2inch smaller than the
bottomof the cookware—nomatter
WJ~~a~the~~o}{wareisinadeof. Foods
cook jtlst as q~licldyat a gentie boil
as fijey do at a.~furiousrolling boil.
A Ydghbod creates steammd cooks
~;~;~Ti]~oist~~re.fl~avorand n~~trition.
Avoiditexceptforthe fewcooking
I
processesthatneeda vigorousboil.
men f~ing or Wmhg fook
h SWMWSSki, cast tioll or
enmelware~ keepthe flamedown
lower—--toabout1/2thediameter
ofthepan.
men f~ng h glassor Cemic
c~-~ lowerthe flameevenmore.
Top-of-Range Coohare
Muminm: Medium-weight
cookwareis recommendedbecause
itheatsquicUy andevenly.Most
foodsbrownevenlyin an aluminum
skillet.Minerals in foodand water
willstainbut willnot harm
aluminum. A quick scour with a
soap-filledsteelwoolpad after
eachuse keeps aluminumcookware
lookingshinyand new. Use
saucepanswith tight-fittinglids
when cookingwith minimum
amountsof water.
Cmt Iron: If heated S1OW1Y,most
skilletswill give satisfacto”~results.
Enamelware: Under some
conditions, the enamel of some
cookwaremaymelt.Followcookware
manufacturer’srecommendations
for cooking methods.
Glass: There aretwo types ofglass
cookware—thatfor oven use only
and that for top-of-riingecooking
(saucepans, coffee and teapots).
Glass conducts heat very slowly.
Heatproof Glass Ceramic: Can
be used for either surface or oven
cooking. It conducts heat very
slowlyand cools very slow~y.
Check cookware manu~~cturer’s
directions to be sure it can be used
on gas ranges.
StainlessSteel:This metal alone
has poor heating properties, and is
usually combined with copper,
aluminum or other metals for
improved heat distribution.
Combination me~l skillets usually
woxksatisfactorily if they are
used with mediun] heat as tl~e
manufacturer recom~lleilds.
},
,’
!f
~~~~~y~~~g~~~~~~
The{)ven !bMrnerandbroil
burneronyourrangeare !ighted
e~ectricignition.Theovenand
by
broiler
cannotbeoperatedinthe
eventofa power failure.
Tolighteitherburner,
OVENSETknobto thedesiredoven
operationand the OVENTEMP
knobto the desired temperature.
The burner shouldignitewithin
60 seconds.
CAUTION:DO NOT MA= ANY
ATTEMPTTO OPERATE THE
ELE~~C IGNITION OVEN
DUR.TNGAN ELE~RICAL
POWEROUTAGE.Theovencamot
befit duringa poweroutage.Gaswdl
notflow unless the glowbar is hot.
If the ovenis in use when a power
outageoccurs,theovenburnershuts
offand cannot be re-lit untilpower
is restored.
Before using Your oven
Be sure you understandhow to set
the controlsproperly. Practice
removingand replacing the shelves
while the oven is cool. Readthe
information and tips on the
followingpages. Keep this book
handy where you can referto it—
especiallyduringthe firstfewweeks.
oven Controk
The controjs for your ovenare
marked OVEN SET and OVEN
TEMP.
turn the
BAm—Use thissettingfor all
normalovenoperations—for
example,for cookingroasts or
casseroles.Only the bottomoven
burner operatesduringbaking.
BROI&Use thissettingfor
broiling,Only thetop (broil)
burnerwill operate.
Tm BAK&When you use this
setting,the ovenwillturn on and
offat the timesyouselect. See
AutomaticOvenTimeronnextpage.
CLEM—Use this settingfor the
self-cleaningfunctiononly.
The OWN TEMP Control
maintainsthe temperatureyou set
fornormal ovenoperationas well
as for broiling.Push and turn
clockwiseto settemperaturesor to
set into CLEAN position.
0~—Shuts off powerto the oven
controls. Oven will not operate.
The OVEN TEMP knob shouldbe
turned to OFF wheneverthe oven
is not in use.
For normal o~’enoperation, push
and turn the knob clockwiseto the
desired temperature which is
marked in
normally take 30 to 60 seconds
beforethe flame comeson.
Afier the ovenreaches the selected
temperature, the ovenburner cycles
—offcompletely,then on with a
full flame-to keeuthe oven
temperature contr~lled.
25°increments.Itwill
ovenMoistEre
Asyour oven heats up, the
temperature change of the air
in the oven may cause water
droplets to form on the door
glass. These dropletsare
harm~essand will evaporateas
the oven continues to heat up.
When the door is opened, the oven
lightcomes on automatically.A
manualon/offswitchislocatedtothe
Iefiofthe surface burner controls.
The lightcomes on automatically
whenthe ovendoor is opened.
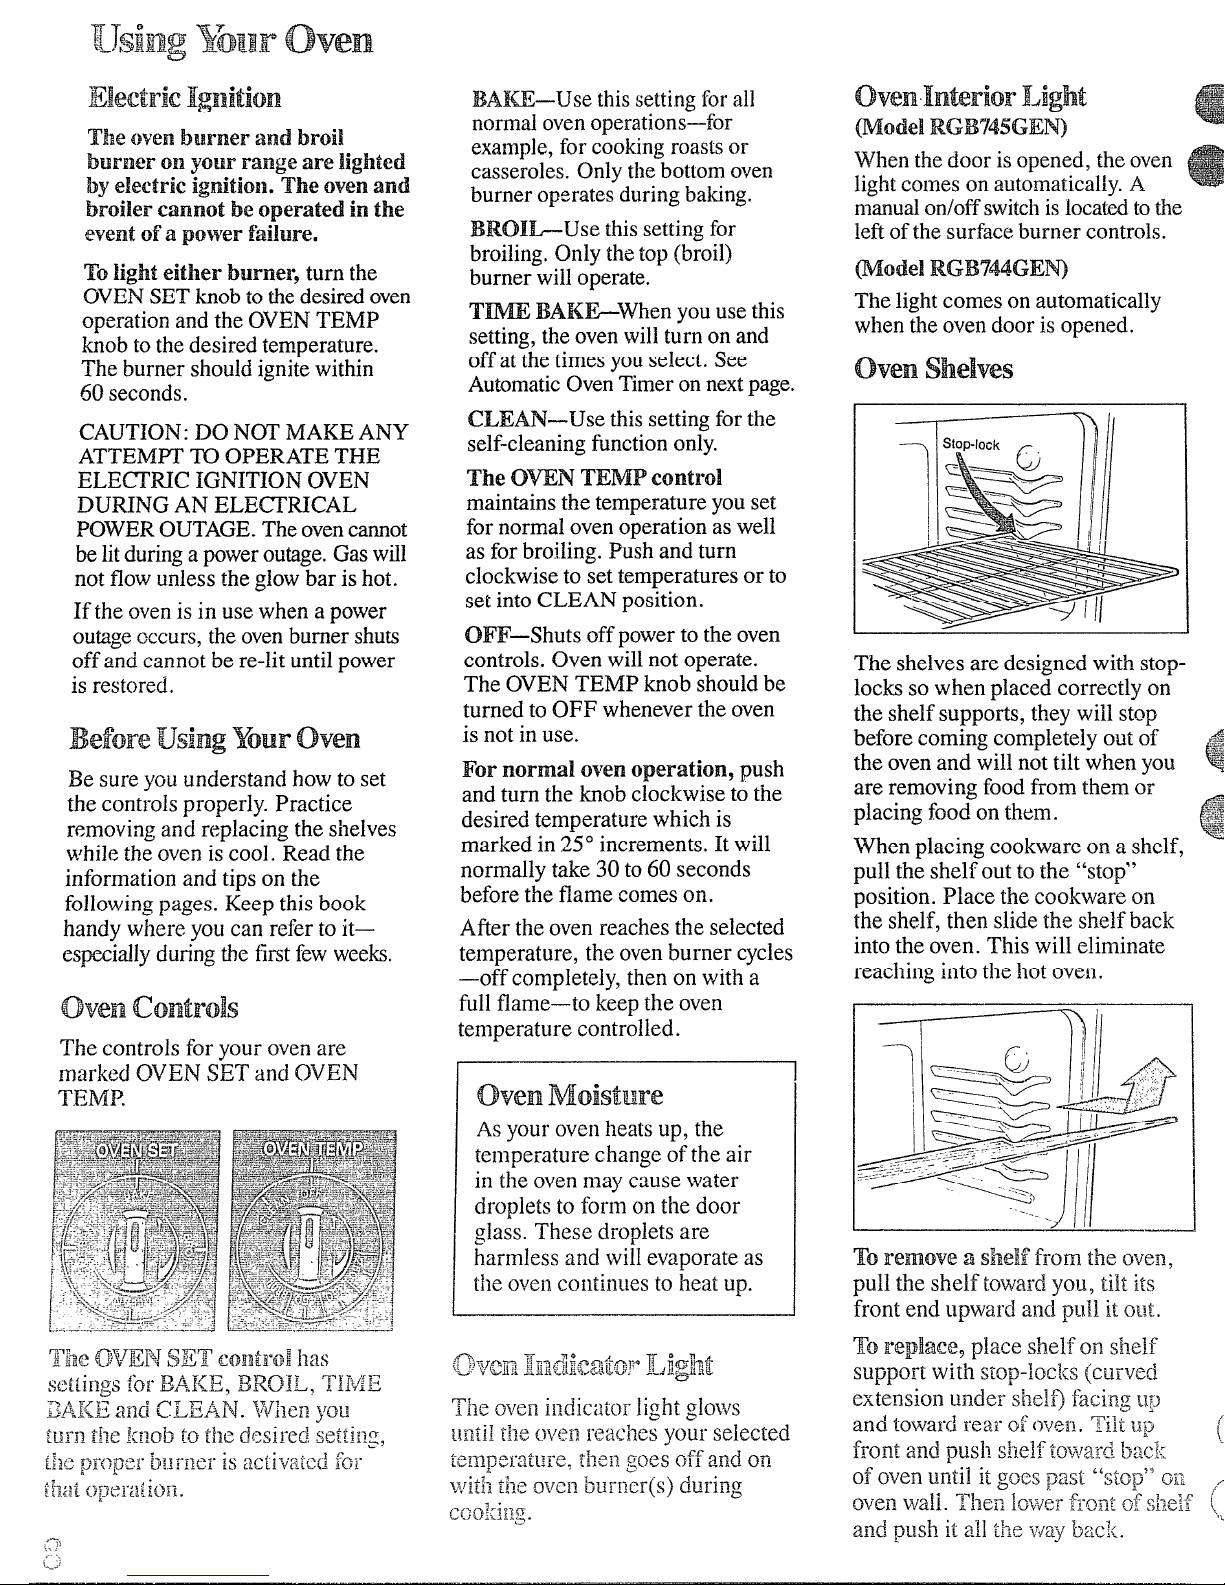
ovenshelves
t
The shelves are designedwith stoplocksso when placed correctly on
the shelf supports, they will stop
beforecoming completely out of
the ovenand will nottilt when you
are removingfoodfrom them or
placing food on them.
When placing cookware on a shelf,
pullthe shelf out to the “stop”
position. Place the cookware on
the shelf, then slide the shelf back
into the oven. This will eliminate
reaching into the hot oven.
I

. . ,... ___________
~G.
The oven has five.shelf supports
%* for normal bakingand roasting—
A (bottom),B, C, .Dand E (top),
Italsohas a speciallow shelf
position,(R) for roastingextralarge
items,suchas a large turkey.Shelf
positionsfor tooting are suggested
The clock and timersonyourrange
are helpfuldevicesthat serve
severalpurposes.
2. SettheDELAYSTARTcontrol.
Wsh in and turntheDELAYST~
dialtothetime youwanttheoven
toturn itselfon. (If you wantit to
startcookingimmediately,do not
setDELAYSTART time.)
The ovenis ventedthroughduct
openingsat the rear ofthe cooktop,
(seepage 6). Do not block these
open;ngs‘whencookingin the
oven—itis importantthat the flowof
hot
airfromtheoven~d freshairto
L5eovenburnersbeuninterrupted.
@vent openings and nearby
surfacesmay becomehot. Do
120ttoune~lthein.
~ HaIldlesofpo@and pansonthe
Cool{topmay becomehot if left
too‘closeto thevent.
Toset the clock, push theknob
in and turn the clock handsto the
righttothe correct time. Then let
theknobout and continueturning
toOFF.
The Mnute her hasbeen
combinedwith the rangeclock.
Use thistimer to time cooking
operations. The color ofitspointer
differsfrom that ofthe clockhands.
Minutesare marked up to 60 on the
center ring of the clock.
Toset the Mnute Timer, turn the
knob to the Iefi,
withoutpushingi??,
untilthe pointer reachesthe number
ofminutes you want totime.
Atthe end ofthe set time, a
buzzersounds to tellyoutime is
up. Turn the knob,
untilthe pointer reaches OFF
in,
and the buzzer stops.
This Timer will automatically start
and stop your ovenfor you. Here’s
what you do:
withoutpushirzg
3. Set the STOPTIME control.
Push in and turn the S~P TIME
knobtothe timeyouwanttheoven
to turn itself off. Remember, foods
will spoilif left in the oventoo long
beforeor afier cooking.
Note: There mustbeat least a
half-hourdifferencebetween the
DELAYSTARTand S~P TIME
dials, and times can be set ody up
to 11hours and 45 minutes in
advance.
4. Setthe OVEN SET knob to
TINIEBAKE.
5. Set the OVENTEMP knobto
the desired cookingtemperature.
The ovenwill turn itself on
immediatelyunless you have setthe
DELAYSTARTcontrol for a later
startingtime. It will operate at the
temperature you selected and turn
itselfoffat the StopTime you
selected.
Afier youtake yourfood
oven,be
sure to turn the OVEN
TEMP knob to OFF.
outoftl~e
-\
;
.,”
1. Make sure both your range clock
and the DELAY STARTdial show
thecorrect time of day.When
~itherthe DELAY STARTdial or
DELAYSTOP dial is pushed in
~ndt~~rned,it will “pop”intoplace
~vllelltlIe
u~ockis reached.
time show~lon tile range
“
.HoMrtosetYourRznge
forBaking
1. Position the shelf or shelvesin
theoven.If cookingontwoshelves
at the same time, staggerthe pans
forbestheat circulation.
2. Closeovendoor. Turn OVEN
SETknobtoBAKEorT~E B~
and turn OVENTEMP knobto
desiredtemperature.
3. Place food in ovenoncenter
ofshelf. Allow at least2 inches
betweenedgeofcookwareand
ovenwallor adjacentcookware.
4. Check foodfor donenessat
minimumtime given onrecipe.
Cooklonger if necessary. Turn
OVENTEMP knobto OFF and
removefood.
Reheating
Preheatingis veryimportantwhen
usingtemperaturesbelow225”F.
andwhen baking foodssuchas
biscuits,cookies,cakesandother
pastries. Preheat theovenforat
least 15minutesif preheatingis
necessary.
Preheating isnotnecessary when
roastingor for long-timecookingof
wholemeals.
SheIfP9Si~~om
Most bakingisdone on the(B)
shelfposition.
Whenbakingthreeor fouritems,
usctwoshelvespositionedonthe
8L D) supports.
(B
Bakeangel food cakes on the (A)
shelf position.
E“’’=ne~j~~
FjakiEEkg .
~Follow:1tested recipe and
me:lsurethe ingredients carefully.
Ifyouarc using a package mix,
followlabel directio~ls.
t’‘dk~y}~y~vcnheatsup, Ille
~em’oerai~irechan~-e(:.fthe::irintile
s
:>lJ@~)?lj;~y~;;pt~~[:~~c~{;~
,,SQ.-A
d;opleis fcf
formonthedoorglass.These
dropletsare harmlessand will
evaporateastheovencontinuesto
heatup.
@Donotopentheovendoorduring
abakingoperation—heatwillbelost
andthebakingtimemightneedto
beextended.Thiscould causepoor
bakingresults.If youmustopenthe
door,openimpartially—only3or4
inches—andcloseit as quicklyas
possible.
@Donotdisturb theheatcirculation
intheovenwiththeuseofaluminum
foil.Iffoilis used, place a small
sheetofit, about 10by 12inchesat
themost, on alowershelfseveral
inchesbelowthe food.Do notplace
foilontheovenbottom.
~o~~o~ ~~ti~~
RobRem
andPossibleSolutiom
Pm
Burningaround
eEdges
oIncorrectbakingtemperature.
Bottom crust soggyand
A11ow crust and/or fi~]ingtoCOO1
@
sufficientlybeforefillingpieshell.
~Fillingmaybe toothinorjuicy.
~Fillingallowedto standinpie shell
beforebaking. (Fillpie shellsand
bakeimmediately.)
QIngredientsand proper measuring
affectthequality ofthecrust. Usea
testedrecipe and goodtechnique.
Makesure there areno tinyholesor
tearsin a bottomcrust. “Patching”
apiecrust could cause soaking.
Pie filling runs over
QTopand bottom crust notsealed
togetherwe~].
~
Edgesofpiecrustnotbuiltup
highenough.
QToomuchfilling.
CIChecksizeofpiep~ate.
Fasiry tstough; Crlistnotflal<y
0~(>0
~ Fat too sofior cut ifltoo
Polldo~lqhlightlyandhandle
little as
ofcrust toothin.
IIILICh]l:llld]i12g.
pos~ible.
edges
unbaked
fine.
as
cAms
Cake riseshigher on one side
Batterspreadunevenlyinpan.
s
~Ovenshelvesnotlevel.
~Warpedpansused.
Cakes cracking on top
Oventemperaturetoohigh.
@
~Battertoothick, followrecipe
orexactpackagedirections.
@Checkforpropershelf position.
~Checkpan’siz~calledforinrecipe.
~~nlpropermixingofcake.
cake fa~ls
~Toomuchshortening,sugaror
liquid.
~Checkleaveningagent,baking
powderor bakingsodatoassure
freshness.Makea habitof noting
expirationdateson packaged
ingredients.
~Cakebakedatincorrect
temperatureor notbakedlong
enough.
~If addingoiltoacakemix, make
certainthe oilisthetypeand
amountspecified.
Crust ishard
Cakehassoggylayer or strealwat :”
bottom
Underminingingredients.
@
~Shorteningtoosoftfor proper
creaming.
~Toomuch liquid.
Cooww & Blscmm
Doughy center;
surface
~
Checktemperature.
heavycrust om
s Checkshelfposition.
~CarefiHyfollowbakinginstructions
asgiveninreliablerecipeoron
conveniencefoodpack~ge.
Flatcookie sheetswill givemore
@
evenbakingresults.Don’tovercrowd
foodson abaking sheet.
~Conveniencefoodsused beyond
their expiration date.
Brownimgmore llotieeab]e on
one side
~Oven door
cl~eck
gasketsead.
Q Checkshelf
notclosf:dproperly,
positio13.
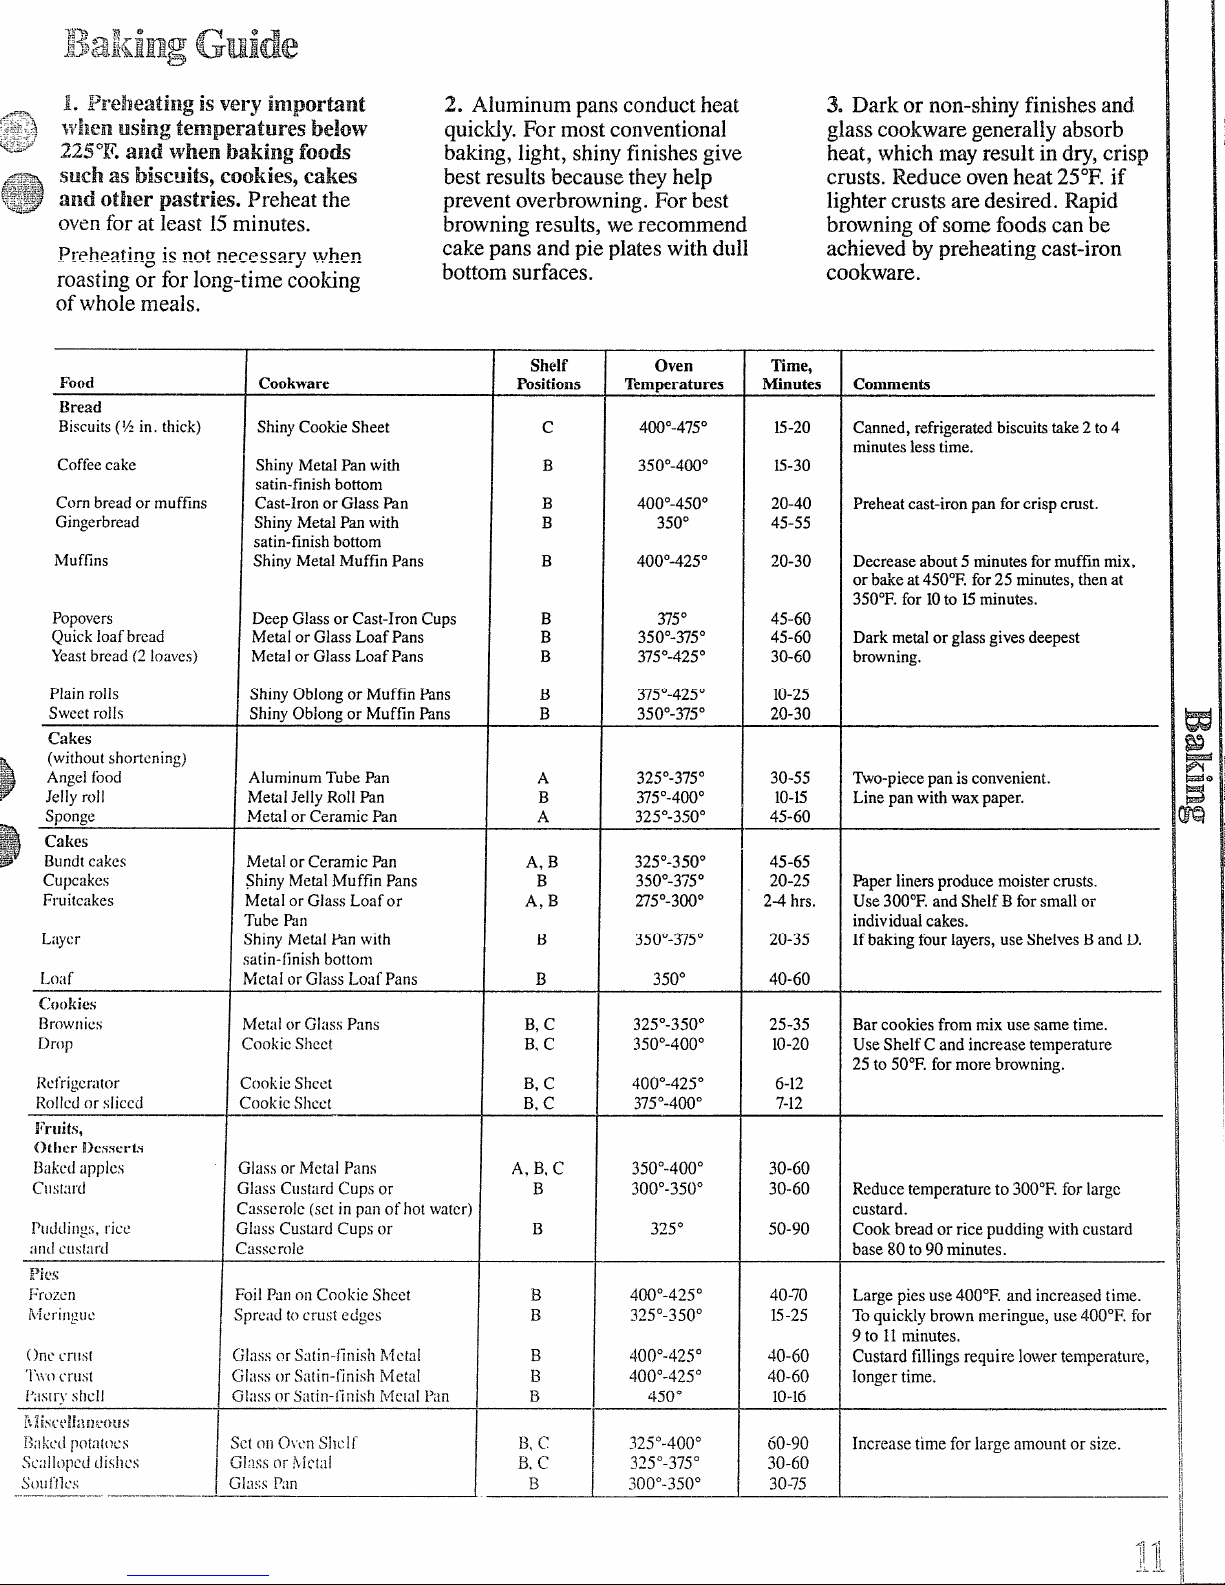
13:3+1’iiERgGuide
1. ~~relleatiiigisvery inlpor~nt
;rElenusing temperatures below
225*N.and }Vhenbakislgfoods
such as biseuiti9eookies9Cakes
and otl~erpastries.Preheatthe
ovenforat least 15minutes.
Preheatingis notnecessarywhen
roastingor for long-timecooking
ofwholemeals.
Foot]
Bread
Biscuits(%in.
Coffeecake
Cornbreadormuffins
Gingerbread
Muftins
Popovers
Quickloafbread
Yeastbread(2loaves)
thick)
Cookware Positions 1 Temperatures
ShinyCookieSheet
ShinyMetalPanwith
satin-finishbottom
Cast-IronorGlassPan
ShinyMetalPanwith
satin-finishbottom
ShinyMetalhluffinPans
>eepGlassor Cast-IronCups
WetalorGlassLoafPans
Metalor GlassLoafPans
2. Aluminumpansconductheat
3. Dark or non-shinyfinishesand
quicldy.For mostconventional glasscookwaregenerallyabsorb
baking,light, shinyfinishesgive
heat, whichmayresultindry,crisp
bestresultsbecausethey help crusts.Reduceovenheat 25°F.if
preventoverbrowning.For best
browningresults, we recommend
cakepansandpie plateswithdull
lightercrustsare desired. Rapid
browningof somefoodscan be
achievedbypreheatingcast-iron
bottomsurfaces. cookware.
shelf
c
B
B
B
B
B
B
B
1
400°-4500
400°-4250
350°-3750
375°-4250
Oven
400°-4750
350°-4000
350°
375°
Time,
Minutes
15-20
15-30
~o-40
45-55
20-30
45-60
45-60
30-60
Commen@
Canned,refrigeratedbiscuitstake2to 4
minuteslesstime.
Preheatcast-ironpanforcrispcrust.
D&reaseabout5minutesformuffmmix,
orbakeat450”F.for25minutes,thenat
350°F.for10to 15minutes.
Darkmetalorglassgivesdeepest
browning.
Plainrolls
Sweetrolls
cakes
(withoutshortening)
Angelfood
Jellyroll
Sponge
Cakes
Bundtcakes
Cupcakes
Fruitcakes
Liiy(:r
Loiif
(;ookies
13rowI)ics
Drop
I{cfrigcrilIclr
Rolled orsliced
;hinyOblongorMuffinPans
;hirwOblongor MuffinPans
~IuminumTubePan
IetalJellyRollPan
4etalorCeramicPan
4etalor CeramicPan
hinyMcta[MuffinPans
MetalorGlassLoafor
TubePJn
ShinyMetalPanwith
satin-finishbottom
Mc(alorGlassLoafPans B
Met:llorGlassPans
CookieSheet
CookieSheet
CookieSheet
GlassorMetalPans
510SSCUStilrdCUpSor
;asscrole(setin
GlassCusulrdCupsor
~asserote
p2nof hotwater)
A,B
A,B
I
B,C
B.C
B,C
B.C
A,B,C
B
B
A
B
A
B
B
B
B
375°-4250
350°-3750
325°-3750
375°-4000
325°-3500
325°-3500
350°-3750
275°-3000
350°-3750
350°
325°-350”
350°-4000
400°-4250
375°-4000
350°-4000
300°-3500
325°
10-25
20-30
30-55
1o-15
45-60
45-65
20-25
2-4hrs.
20-35
40-60
25-35
10-20
6-12
7-12
30-60
30-60
50-90
tie-piece panis convenient.
Linepanwithwaxpaper.
Paperlinersproducemoistercrusts.
Use300°F.andShelfBforsmallor
individualcakes.
Ifbakingfourlayers,useShelvesBandD.
Barcookiesfrommixusesametime.
UseShelfCandincreasetemperature
25to 50°F.formorebrowning.
Reducetemperatureto300°F.forlarge
custard.
Cookbreadorricepuddingwithcustard
base80to90minutes.
‘oilPar]onCookieSheet
ipreadtocrustedges
;fassOrS:itirr-finishNfctal
;I;ISSorSiltin-finishNletal
;1:1SSorSiitin-fiilisflFt4e[ilI
i’an
B,
400°-4250
3~5°_350”
B
B
B
c
400°-4250
400°-4250
450°
~~j”-d~()”
3~5°_3750
300°-3500
40-70
15-25
40-60
40-60
10-16
60-90
30-60
30-75
Largepiesuse400”F.andincreasedtime.
Toquicklybrownmeringue,use400”F.for
9to 11minutes.
Custardfillingsrequirelowertemperature,
longertime.
Increasetimeforlargeamountor
size.
j_:~
 Loading...