

Hotpoint RE942, RE945 User Manual
—.
“EMOBWYIN.!cd Rx
on page28.
ee sectionentitled
.—
+
“
— ——
ReadTM useand cm?molt
Takethe time to read this book and learn how to
enjoyyour newMicrowave Oven.it contains detailed
operating instructions and recommended maintenance,as wei! as handy tips to help you gain maximum benefits from your Microwave Oven. Once
you have read
thebook,keep it handy to answer
any questions you may have.
if you have any additional questions concerning
the operation of your Microwave Oven, write–
including your phonenumber—to:
ConsumerAffairs
Hotpoint
Appliance Park
Louisville, Kentucky 40225
IFYOURECEIVEDA DAMAGEDOVEN,immediately
contact the dealer (or builder) from whom you purchased it, They have beeninformed of the proper
procedure to take care of such matters and can
handleit for you.
RegisterYourOven
]t is important that we,the manufacturer, know the
location of your Microwave Oven should a need
occur for adjustments.
Pleasecheck with your supplier to be sure hehas
registered you asthe owner; also send in your Purchase RecordCard. If you move, or if you are not
the original purchaser please write to us, stating
model and serial numbers. This appliance must be
registered. Pleasebecertain that it is.
Write to:
Hotpoint
RangeProduct Service
AP2-21O
Appliance Park
Louisville, Kentucky 40225
Bekwe You
call forSw’hxl:
Check“Before YouCall for Service” section in the
——
back of the book. Many minor causes of operating
problems that you can correct yourself are
explained. This may save you an unnecessary service call.
If You Need service
in many cities, there’s a Hotpoint Factory Service
Center.Call andaradio-dispatched truck will come
to your home by appointment–mornin9 or afternoon. Chargethe work, if you like. All the centers
accept both Master Chargeand Visacards.
Or look for the tiotpoint Franchised Customer
Care@servicers. You’ll find them in the Yellow
Pages under
“HOTPOINT CUSI”OME!3 CARZ@
SERVICE.”
If youneedserviceliterature,partslists,partsoraccm-
sorie$,contact oneoftheFactory ServiceCenters,a
franchised Customer Care@ Servicer or your
Hotpoint dea!er.
ExtendedServiceContracts:Theterms of your war-
ranty provide free service covering failures duet
manufacturing defects for a definite period of time.
After this warrant expires you ma purchase an
1
Y
ExtendedService ontractwhichwii enableyouto
budget your service needs.This mvera9ebeYond :
warranty is availabie from our Factory Service
Centersandfrom manyfranchised CustomerCare@
servicers. It is a good idea to apply for this coveragebeforeyour warranty expires.
StepstoFollow forFwther I14elp
First, contact the peopie who serviced your Microwave Oven. Explain why you are dissatisfied. in
most cases, this wiil solve the problem.
Next, if you are still dissatisfied, write all the
details+ ncluding your phonenumber–to:
Manager,ConsumerRelations
Hot omt
WC~-312
Appliance Park
Louisville, Kentucky 40225
Finaiiy,if your problem is still not resolved, write:
MajorApplianceConsumerAction Panel
20North Wacker Drive
Chicago,Illinois 60606
This panel, known as MACAP,is a group of inde-
pendent consumer experts under the sponsorship
of several industry associations. Its purpose is to
study practices and advise the industry of ways to
improve customer service. BecauseMACAPis free
of Industry control and influence, it is able to mak
f
im artial recommendations andconsidereachcase
in ividually.
—
1.
2.
?b,.
4.
!5.
——.—..—-—...-— —.—.—..-—————
—. —.—..—.——.—...——.-.......—.- ——-——.———-————_
——..——
I&
——-==
—-
isfar
I!?s?im
Mode! i?E.945 shbwn
,,
----
,!
/
/.
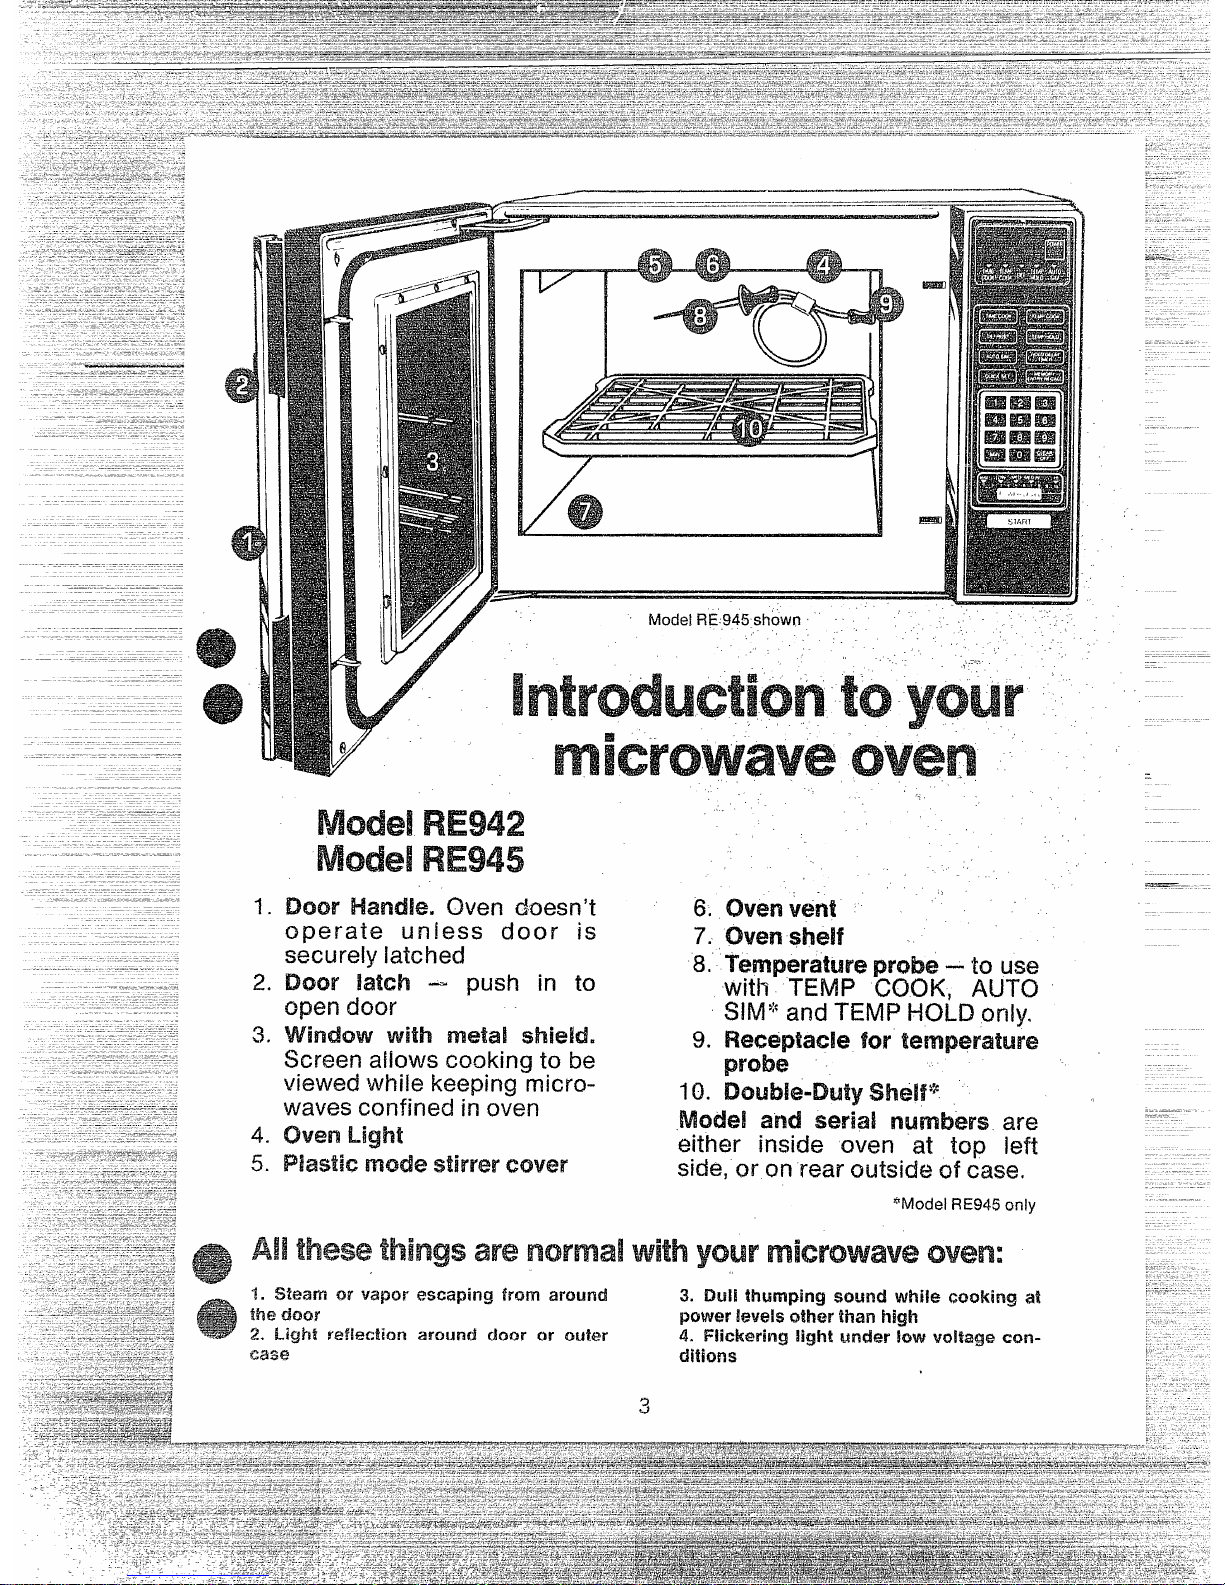
DCKMSHandle. Oven doesn’t
operate wdess door
is
securely latched
Door Ik3tdll -
push
in tO
O~(m
door
metal shield.
Screen allows cooking to be
viewed vvhi[ekeeping microw-
aves confined in oven
Chum
nwxm stirrer COWwr
60CJvenvent
7. oven shdf
8. probe – to use
with TEMP (XXX, AUTO
f$llvl’;’and TEMP HOLD Qrdy.
9. RecqNade! for
probe
10. shelf’%
and .serid are
either inside oven at top left
side, or m rear outside d case.
*Model RE945 cmly
?. %xa3wiw vapor escaping fromm.wiml
3. Dull thumping wxmd
while waking at
WEfhw
poww k?weis
tmww%ilarlhkJh
2, Light
ffMEMkm around Chxwor (3UM’
4. F!ickw’ing iigflt Under low Voitaqe ctXl-
—
—
h-lp’fmi-ltfwM.x?
,-
s . , . . P , . . . . . . . . . . . . . * . . . “ . , . . , , , . .’. s . . , . . . . , . . “ . . , . . . . ,. . . . . . . . “ : . . . . . J . . . . - “ . . . . . . . ●
2
toY@k” ‘
......,..“’.“ . , . . . . . . . , . . . . * , , . . , . . r . . . . . . . . * “ * r . * .
3
A!! the thh-lgs
yixl !%iin da VI/iii-l)/clQr
n-knywP?m we!? -“. - ~ .
~
‘5
.................:.*,.,..........
s . . , . . . . “ ,- .,” . , , . . . . . . . . . . . . u .) . . . ● . . . - . . . . :-. .
Grounding’lnstruat~ofis‘‘
c
...
, . ‘.
6’
......
● “ ,-. , , . , ‘ , . . . . . . . . . . , . “ . . . . “ , . . . 0 . . . < # . . .,* . . * . . * . . . . . . . . . ● . . . . . J * ● *
,,
8
p~~~fl~~kliw hcsafe ~~f?~ < ,
“ “ . . . . . . . . . . . . . . . . . . . . , ● ,. . ‘.. s “.. . . . .“* . . . . . . . . . . . . . . . . . . . . . . . . . . . . . . .
,,
7
~~f~~~’-npq,“ ,- “
&. . . . . . . . . ● :. , . . , . , . . . . . . . . . . . . . . . . . , . . . * . . . . . . . . . . . . . . . “ . a * , . . . . “ . . . . , . .. . . . . . . . . . . .: . . . * . . . . . . .
,)
l%sy rekx-emxiq.h.ie-tothe ccmtid parid ‘ “
.....i........
A,....,.?.s o . . .- s . m. . . . . . .
. . .. .
‘ 8
,. ~
.,
,,,
.-. -.
s&~inzJ tg
13y”wfw ~ “ ‘“ . ‘ ‘-- :-. ~
–--rh’nf?m@@?$J:::..-
–~effo& , : - r , :
- .. . ,. . . ... ..:
$ . . . . . . . . ● . , , , . . . . . . . . . *,. . 4 , “ . . . . . . . . . * . . . . , . . , , w . . . ● .’. . . . . . . . . . , .-. L
-II !gl/
–~o\&?~~j~y
~~~&-!~~• ‘“ “’ - . ~ ‘1~
“ . . .
“ . . , . . . . . . * . . . , ● . . . , * . , . . . . . . . . . . . . . . # ● . b .
. . .. .
“ . . . . . . r . . . “ . . ●
,-
SWjng k) rni&wwnRiiQqbi@mm.ire ‘ ‘ ‘“ -“ ‘“
–Teinpemiifipr$km
.,
.,
3
. . . . . . . . . . *
“ . . ● . . . . 0 , .-. . . ● .’. . . ‘. . ... , . . , . . . . . . . . . , . ~. . . . . . . . . . ● .
-12
–-Tynpe!%iw’e, mckh-lg
;,
,,
“‘1’3’
......,.............
“.. , ● . ● - . . . . , , . . . .’. . . . . , . . , * , . , , . . . . .
. . .
,,
willIi@
, :<
..
$ . . . . . . . . . . . “ . “ . “ . . ● . . . . . . . . . . . . . . . * . . . “ ● , ● . , . . . . . . . . ..:. . . .
“i4-m
settingto ~~w~~~~ -
, “:
......,...................
e . . : . ● . . . ‘-i . . . . . . .
15 ‘
p$,utcjfnatk siminw
: 37
.......,,*..’,. ......i.....“.,.*...“..,.........>............. .....,...P...
F%3@mmIinCJwith temperature
qfj
.....................................................
Men-mryentry’ - ‘ -
...“.....‘.. .
s . . 0 ● . , “ . . . . . . . . . . , . . . . . . . . . . , , , .:. . e . , ● . . . . . . . . . , . .’. . ; . ● , . , . ? . . . . * . .
19
.Defrost as Cw3king function
. . . . . . . . . .
● . . , . * , , . . . , * . . . . . . . . . . . . . * .,. . . . . > ● . . ●,* . . . , . . . . . .
20
ivkxmy l’%xx$H
“ , . . .
● . , . . ● ● , , , . . ‘ . . , . . . . . . . . . . .’. . . , , , “ . . . . , , . . . . . . . . . . . . . “ a + . . . . * . . . , . . . . . . . . s . .
.21
Aim-wfiatic setting
. . . “ . . . . . . . . . ,, . . , .
● . s . . , . . . . . . 6 . . . . . . . . . . . . , , . . . . ‘ . 8 . . . . . . . . . . . . . . , . .
22”23
F%fxki !wxmmefided Vwj piiobe
. . . . . . A . . . . . . . . . . . . . . . . . s . . . . . . . . . . . .
● . . ,“ , . ● . . . . . . .
24
f%JfJ(j~ r-iclt WKh probe
~~
. c, . . . . . s . . . . “ . . . “ . . . . . . . . . . . . . h . .,*
● . * . . . . . : .
Q1..lesticms and ai-lw.Nws
... ... ... ... .d. ..*l. ... *.. ... ... ... .@. *.. ..*** . *`"t."!".".."."`."
25
g~?’g? of y(l?.. jr Ch7fw-1
. . . . . . . . . . . . . . . . . . . . . . . . . . . . . . . . . . . . . . . . . . .
~~.~’~
~~ffJ~~ ‘{gj~ ~g3”[\ ‘for Sei’vicx$ . . . .
98
. , , , . . . , , . . . . . . . . . . . ., . . . . . . + . . . . . * . . . . . “ . . . . . . . ?-..
f=pJQ~y $J=jfy~~~ ~&jtefs . . . . . . . . . . . . . . . . . . . . . . . ;, . . . . . . . “
● . . * . . . . . . ~ ,.. ‘ c ‘ . “ 29-30 ,-.2
@
.’*&
%Lwmnty . . . . . . . . . . . . . . . . .
● ., * . + ., . . ., ., .,....., ., .,. “ . . ‘ ‘ “ . . . . ‘ “ ‘ “ “ ‘ ‘ “
Ehiwk C2Ner - :
~%
F
:&3
. .
,-
Cookingversatility.Cook bytime,by temperature, with
automatic slow cooking, or with
temperature
hold. Your oven lets you tailor
thecookingto thefood.
Fast, familiar cooking by time. You’ll find
mostof your new microwavemeals.willprob-
ablybecooked bytime.Usetime cooking for
most casseroles, vegetables, appetizers,
snacks, and smali, individual foods, like potatoes, hot dogs, hamburgersand meatballs.
H’shandy,too, for pie crust, cakesand other
batterfoods.
Usetemperaturecookingwhenyoucan’!afford guesswork.The solid-state microwave
thermometer te!ls you the internal temperature of food . . .
a reassuringway to cook.
Ideal for big roasts, turkey, and other foods
that need a specific temperature“for proper
doneness.
Temperature cooking takes the guesswork
out of reheating,too. You can cook unusual
shapes, sizes and amounts of food without
the riskofovercooking.
Theautomaticsimmeringfeature*br!ngsout
deep-downflavorand tendernessthe microwaveway.Useall your favorite old-fashioned
slow-cooking recipes, with a difference. The
kitchenstayscool. Andthe automatictemperaturecontrol keepstabsonthe temperature.
Letyourfood simmerall day,ify6uwant. With
the automatic simmer feature, the oven
doesn’t shut off automatically,as it does with
timecookingandtemp~raturecooking. Itsimmersslowlyuntilyou’rereadyfbrthefood.
Temp qold lets you hold foods at perfect
servingtemperature.No need to let foods
losetheir “just-cooked” freshness.Holdthem
at the most appetizing serving temperature
for latecomers,
Defrosta turkeythe afternoonof the feast.
Thespecial Defrostsetting is designed especiallyfor bulkyfoods.
Timea phonecall.‘TheHOLD/DELAYTIMER
setting letsyou do this, with solid-statepreci-
sion. . . . Becausethe timer worksseparately,
just likethetimer on your conventionalrange.
Microwavea meal withoutbeing there!The
Memory setting lets
hould be cooked,
you decide-how dinner
Then it remembersfor
5
you. Someone else can press STARTlater,
and the meal is cooked just the way you
wanted,withoutyou beingthere.
Use your oventhis morning,whi!e it’s re-
memberinghowto microwavetonight’sdinner. Using the Memory Entrj/Reca!l* only
storesinstructions.It doesn’t affect cooking.
You’re free to use the oven for any type
microwaving,while it’s rememberinginstructionsfor later.
Microwavemore than one way, withoutresetting.Your newovenletsyou,defrost-hold-
and-cook for a preset time. For extra flex-
ibility, you can defrost-and-co6kalso, with
timesettings.Oryou candelay-and-cookwith
timeortemperaturesettings.
&tjustthepoweroftheovenatthetouchofa
finger.Ten PowerLevelsgive.you extra con-
trol over what’s cooking. E3utthe oven stays
on full power (HIGH) unless you want a
change.
Enjoya wealthof newrecipeIdeas.The big
Microwave Guide and Cookbook included
with your oven tells you everythingyou need
to know to use your oven properlyand successfully.Microlessonstake you step-by-step
through all the basics. And 445 recipes and
41chartskeepmealtimesinteresting.
Two-shelfco6king* letsyoumicrowaveseveralfoodsat once-even full meals!Referto
specialinstructions.
The controls are easyto use
The controlsare arrangedthe wayyou use
them,in top-to-bottom order, Start at the top,
and select a cooking pad, Then the number
settingsyou want. Next a PowerLevel.Then
pressSTART,
When you want to erase an instruction, the
CLEAR/OFF pad is clearly marked for you.
There’sevenashortcut!Whenrecipescallfor
whole minutes, just touch ~lhl, instead of
touching thezeropadtwice.
Eachtimeyougivetheovenaninstruction,it
responds.Just listen for the signals. If you
heara short signal, the oven is saying“OK,”
A longer,3-secondsignaltells youthat you’re
givingthe oveninstructionsit can’t carryout.
‘IOrI
models equipped with this feature.
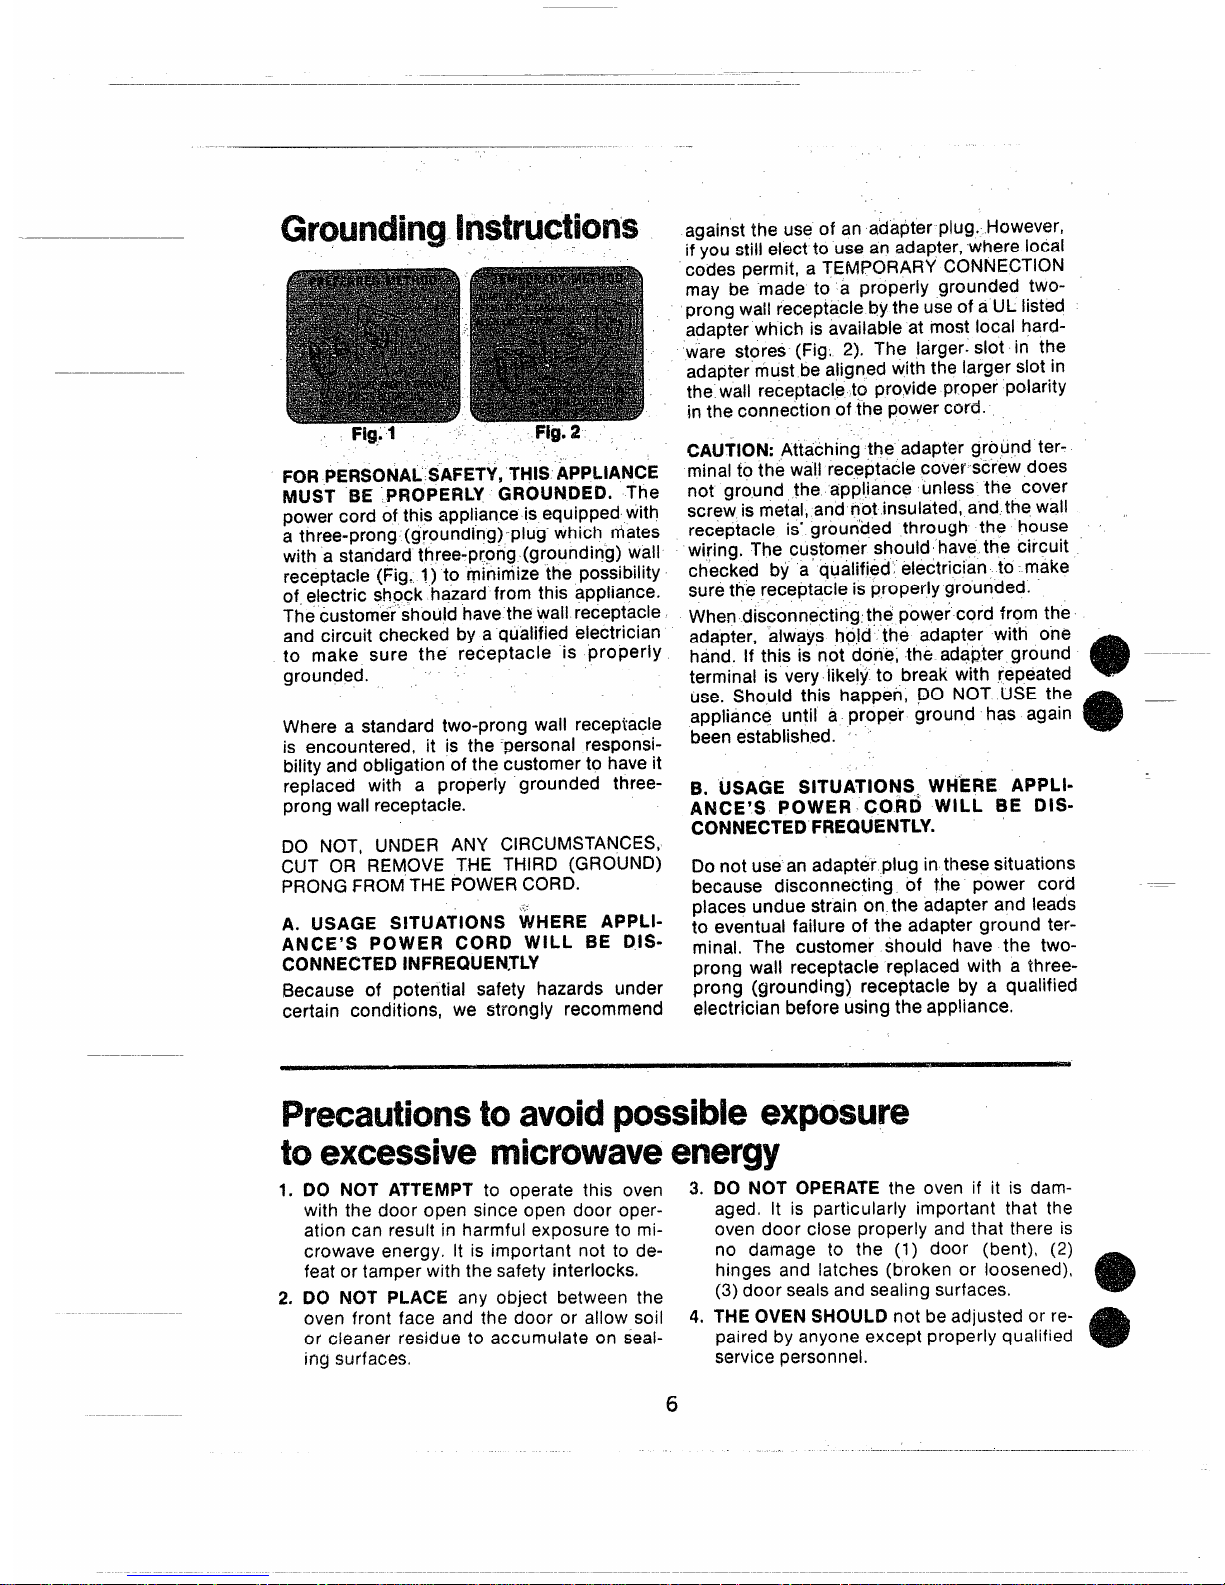
FORPERsONALSAFETY,THISAPpLiANCE
MUST BE PROPERLY GROUNDED. The
power cord of this applianceis equippedwith
a three-prong(grounding) plug”which mates
with a standardthree-prong(grounding) wall
receptacle(Fig. 1) to minimizethe possibility
of.electric shpck hazardfrom this appliance.
Thecustomershouldhavethe wall receptacle
and circuit checked by a qualifiedelectrician
to make sure the receptacle is properly
grounded.
Wherea standard two-prong wall receptacle
is encountered, it is the personal responsi-
bilityandobligation of the customerto haveit
replaced with a properly grounded threeprongwall receptacle.
DO NOT, UNDER ANY CIRCUMSTANCES,
CUT OR REMOVE THE THIRD (GROUND)
PRONGFROMTHEPOWERCORD.
A. IUSAGE S!TUA’I’IONS WHERE APPLlANCE’S POWER CORD WILL BE DIS-
CONNECTEDINFREQUENTLY
Because of potential safety hazards under
certain conditions, we strongly recommend
againstthe useof an adapterplug. However,
if youstill electto useanadapter,where local
codespermit,a TEMPORARYCONNECTION
may be made to a properly grounded twoprongwall receptaclebytheuseof a ULlisted
adapterwhich is availableat mostlocal hard-
ware stores (Fig. 2). The larger.slot in the
adaptermustbealignedwith the largerslotin
the wall receptacleto provide proper polarity
in the connectionof the powercord.
CAUTION:Attaching the adapterground ter-
minalto the wallreceptaclecover-screwdoes
not ground the appliance unless the cover
screwismetal,and not insulated,andthewa14
receptacle is”groun’dedthrough the house
wiring, The customer should havethe circuit
checked by a qualified”electrician to make
surethe receptacleis properlygrounded.
Whendisconnectingthe powercord frpm the
adapter, always hold the adapter with one
hand. If this is not done, the ada@erground
‘---
terminal is very likely to breakwith repeated -
use. Should this happen, ,DONOT USE the
appliance until a proper ground has again
beenestablished.
B. USAGE SITUATiOh@>WHERE APPLI- ‘
ANCE’S POWER CORD WILL BE DIS-
CONNECTEDFREQUENTLY.
Donot useanadapterplug in thesesituations
because disconnecting of the power cord
placesundue strain on the adapterand leads
to eventual failure of the adapter ground ter-
minal. The customer should have the twoprong wall receptacle replaced with a threeprong (grounding) receptacle by a qualified
electricianbeforeusingthe appliance.
toavoid possible exposure
toexcessive microwave energy
1. 00 NOT ATTEMPT to operate this oven 3.
with the door open since open door operation can result in harmfulexposureto microwaveenergy. It is important not to defeatortamperwith the safetyinterlocks.
2. DO NOT PLACE any object between the
oven front face and the door or allow soil 4.
or cleaner residue to accumulateon seal-
ing surfaces.
DO NOT OPERATEthe oven if it is dam-
aged, It is particularly important that the
ovendoor close properly andthat there is
no damage to the (1) door (bent), (2)
hinges and latches (broken or loosened),
(3)door sealsandsealingsurfaces.
THEOVENSHOULDnot beadjustedor re-
pairedby anyoneexceptproperlyqualified
servicepersonnel.
6
“!. For pwsortai safety the oven must be properly
11. !30n’t cWrost frozen liquids-especially carbo-
--——..—..—
grounded, See
gm,mding h@rw2tk3ns f3n p~~e”6 Of
nated ones-in the oven, Even if the “container is
this baok. For best operation, plug this appliance into
opened, pressure can build up. This can cause the ,
its own e{ectrica] out!et, to prevent flickering of lights,
container to burst, resulting in injury,
blowing of fuse or tripping of circuit breaker.
12. Don’t overcook food. Ex~essive overcooking
dries fodd out, and may caus~ ~t th ignite in some
2. Use of Extension Cords. SeCause of potgntia! -----
-safetyhazards under certain coridition~ we strongiy
~a~e~. .-..=.-..,=..:=-..... --!- -----
13. It tood should ever ]gnik?:Keep the oven door ‘
recommend against the use of an ,extension=bo~@,.,,...
However, if youstiil elect to use an exterrsion-c~rd, it
--ciost%.f. Turn M the Dower -Inwnw,fiate!v:Touch
is absolutely necessary that it be a LfL listed 3vwire
grounding type appliance extension cord and that the
current carrying rating of the cord in ,&rn”peres-be 15
amperes cmgreater..Such extension
cordsare,obtain-
ablethroughHotpolntservice.Ifyoudouseanexten-
skm
cord with ybadrmicrowave oven,the interior light
may flicker and the
blowerscyndmayvarywhen ,ovefi
is in use. . ,
., ~
. .
CLEAf3/C)FF or disconr;ect powei ‘cord o; shut off
~ power at the fuse circuit b~eakerpanei. . ~ ~
.,
,.,
14, i3011klgeggs
(in and out of shell] k not recOrn-
mended for microwave cooking: “Pressure can build ‘
up inside egg
yolkandmay cause it tb burst, resultirig
.—_—...—
,tatoes, hot dogs or sausages, -to~atoes~ applps,
chicken livers and other gibiets,a,~~ eggs (see above)
should be pierced to allow steam tci escape ‘during
3. Se certain to place fhe front surface of the door
three inches or more back from the countertop edge
to avoid accidental tipping ofthe
applianceinnorm-al
cooking. ., ~
,,
usage.
----
.,
76. “Boilable” cooking pouc%s and tightly’ closed
plastic bags, or plastic wrap tightly covering containers should be slit, pricked or-vented as otherwise dk
rected in, Cookbook. if they are not, plastic could
burst during or immediately after cooking, resulting. in
injury. Also, plastic storage containers sh~uld bb at
least partially uncovered because they form such a
tight seal, ~
4. Use metal oniy as directed in cookbook. Metal
trips as used cm meat rogsts are helpful in cooking
food when used as directed. Metal trays may be used
for TV dinners. However, when using metal in the
microwave oven, keep metal at least l-inch away.
fromsides of
microwaveoven.
5. Do not operatethe oven while emptyto avoiddam-
age to the oven and the danger of fire. If by accident
the oven should run empty a minute or two, n,oharm is
done, Ffowewer,try to avoid operating the oven enipty
at ail times—it saves energy and prolongs life of the
“,!,
oven.
17. Do not pop popcorn in your microwave oven unless in q special microwave popcorn accessory or un-
less you use popcorn labeled for use in microwave
ovens. Because of the heat generated without these
precautions, the container could catch fire,
18. Piastic Utensiis–Plastic utensils designed for microwave cooking are very usefui, but should be used
carefully. Even microwave plastic may not be as tolerant of overcooking conditions as are giass or ceramic
materials and may soften or char if subjected to short
periods of overcooking. in longer exposures to overcooking, the food and utensils could ignite, For these
reasons: 1) Use microwave plastics -only “and use
them”
instrictcompliancewith the utensil manufac-
turer’s recommendations. 2) Do not subject empty
utensils to microwaving. 3) Do not permit children to
use plastic utensils without complete supervision.
19, Do no! use your microwave oven to dry news-
papers. If overheated, they can catch fire.
20. Use of Shelf AccessoryXt.Toposit,ion shelf so that
it is securely “seated,”
insert into the oven cavity
ebove shelf supports and completely to the back oven
wall. Dro~ !nto place so that the recessed areas are
6, Cooking Merwiis may become hot because of heat
transferred from the heated food. This is especially
true if plastic wrap has been ‘covering the top and
handles of the utensil. Pot holders may-be needed to
handle the utensil.
7. Sometimes, the oven sheif can become too hot to
touch. Be carefui touching the shelf during and after
cooking.
8, DO not use any thermometer in food you are
microwaving unless that thermometer is designed or
recommended for use in the microwave oven.
9, Remove
the temperature probe from the oven
when not using it@
cook with. If you leave the probe
inside the oven without inserting it in food or liquid,
and turn on microwave energy, it can create electrical
arcing in the oven, and damage oven walis.
over the” shelf supports. To remove shelf, lift shelf
10. $Wnove wire twist-tik% cmpaper and plastic bags
before placing in ovrm “~wist-ties sometimes cause
dag to heat, and n-mycause fire.
above supports and then pull forward and out, Do not
olace food on shelf unless it is securelv “seated” cm
on
-..
—-.
.
.-
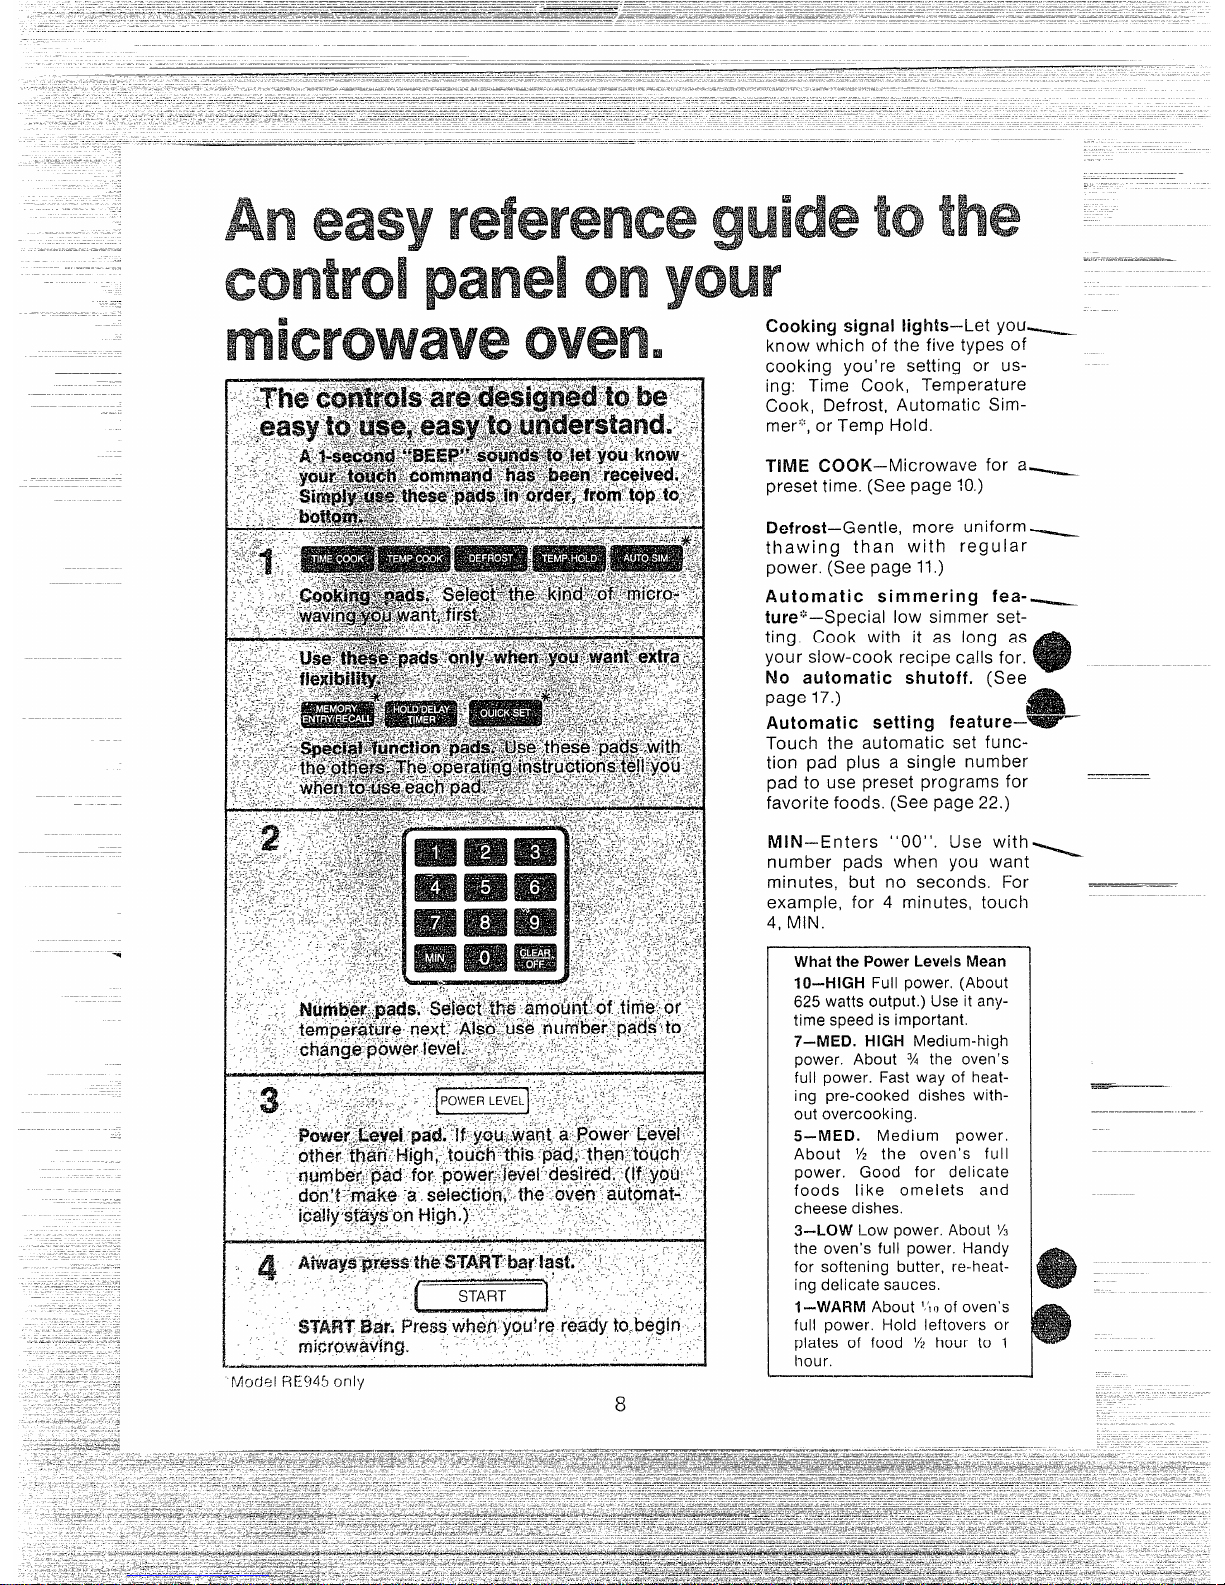
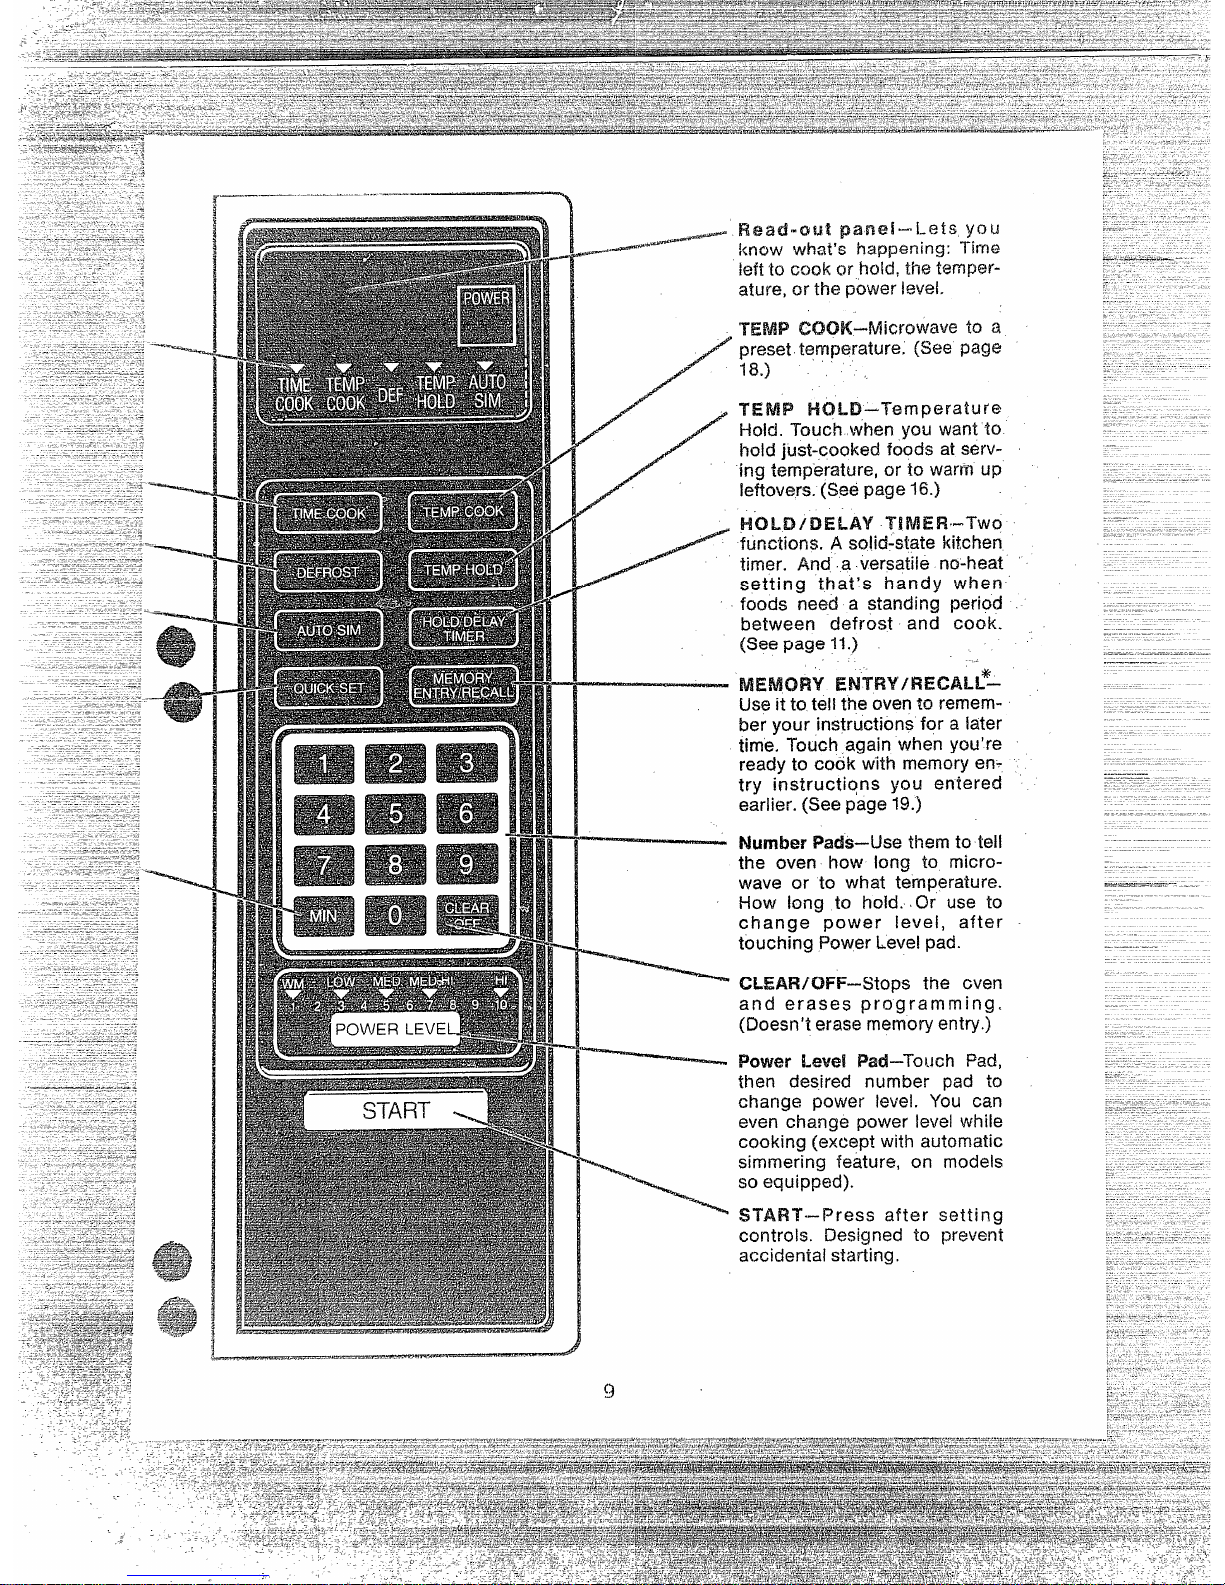
Cooking signal lights–Let you~
know which of the five types of
cooking you’ re setting or using: Time Cook, Temperature
Cook, Defrost, Automatic Simmer:;:,or Temp Hold.
TIME COOK—Microwave for a~
preset time. (See page 10.)
Defrost–Gentle, more uniform~
thawing than with reg uIar
power. (See page 11,)
Automatic simmering fea-....__
ture’;’–Special low simmer setting. Cook with it as long as
your slow-cook recipe calls for.
No automatic shutoff. (See
‘-
.
page 17.)
Automatic setting feature–WIBY_
Touch the automatic set function pad plus a single number
pad to use preset programs for
———
favorite foods. (See page 22.)
IMIN-Enters “00”.
Use with=
number pads when you want
minutes, but no seconds. For
example, for 4 minutes, touch
4, MIN.
What the Power Levels Mean
IO–HIGH Full power. (About
625 watts output.) Use it anytime
speedisimportant.
7–MED. HIGH Medium-high
power. About 3A the oven’s
full power. Fast way of heating pre-cooked dishes without overcooking.
5-M ED. Medium power.
About YZ the oven’s full
power. Goocf for delicate
foods like omelets and
cheese dishes.
3–LOW Low power. About YS
the oven’s full power. Handy
for softening butter, re-heating delicate sauces.
1-WARM About “III of oven’s
full power, Hold leftovers or
plates of food Yzhour to 1
hour.
—
——.
-’+
#@-—’——————
HC)LD/DELAY TiMER-T’wc)
ff..mctions.
A solid-state kitchen
timer. And a versatile no-heat
setting that’s handy when
foods need a standing period
between defrost and cook.
(Seepage~1.)
“-*
ENTFW/REC=$-L–
Useit to tell theovento remember
your instructions for a later
time. Touch,againwhenyou’re
readyto cook with memoryentry irtstructiqns you entered
earlier.(Seepage19.)
NumberPads–use themto tell
the oven how long to microwave or to what temperature.
How long to hold.~€•à•ÀOr use to
change power level, after
touching PowerLevelpad.
tXEAF#/OFF-Stops the cveri
and erases programming.
(Doesn’terasernernoryentry.)
Power Level Pad–Touch Pad,
then desired number pad to
change
power level. You can
even change power level while
cooking (except with automatic
simmering feature, on models
soequipped).
START–Press after setting
controis. Designed ‘to prevent
accidentalstarting.
——
—.————.—...—
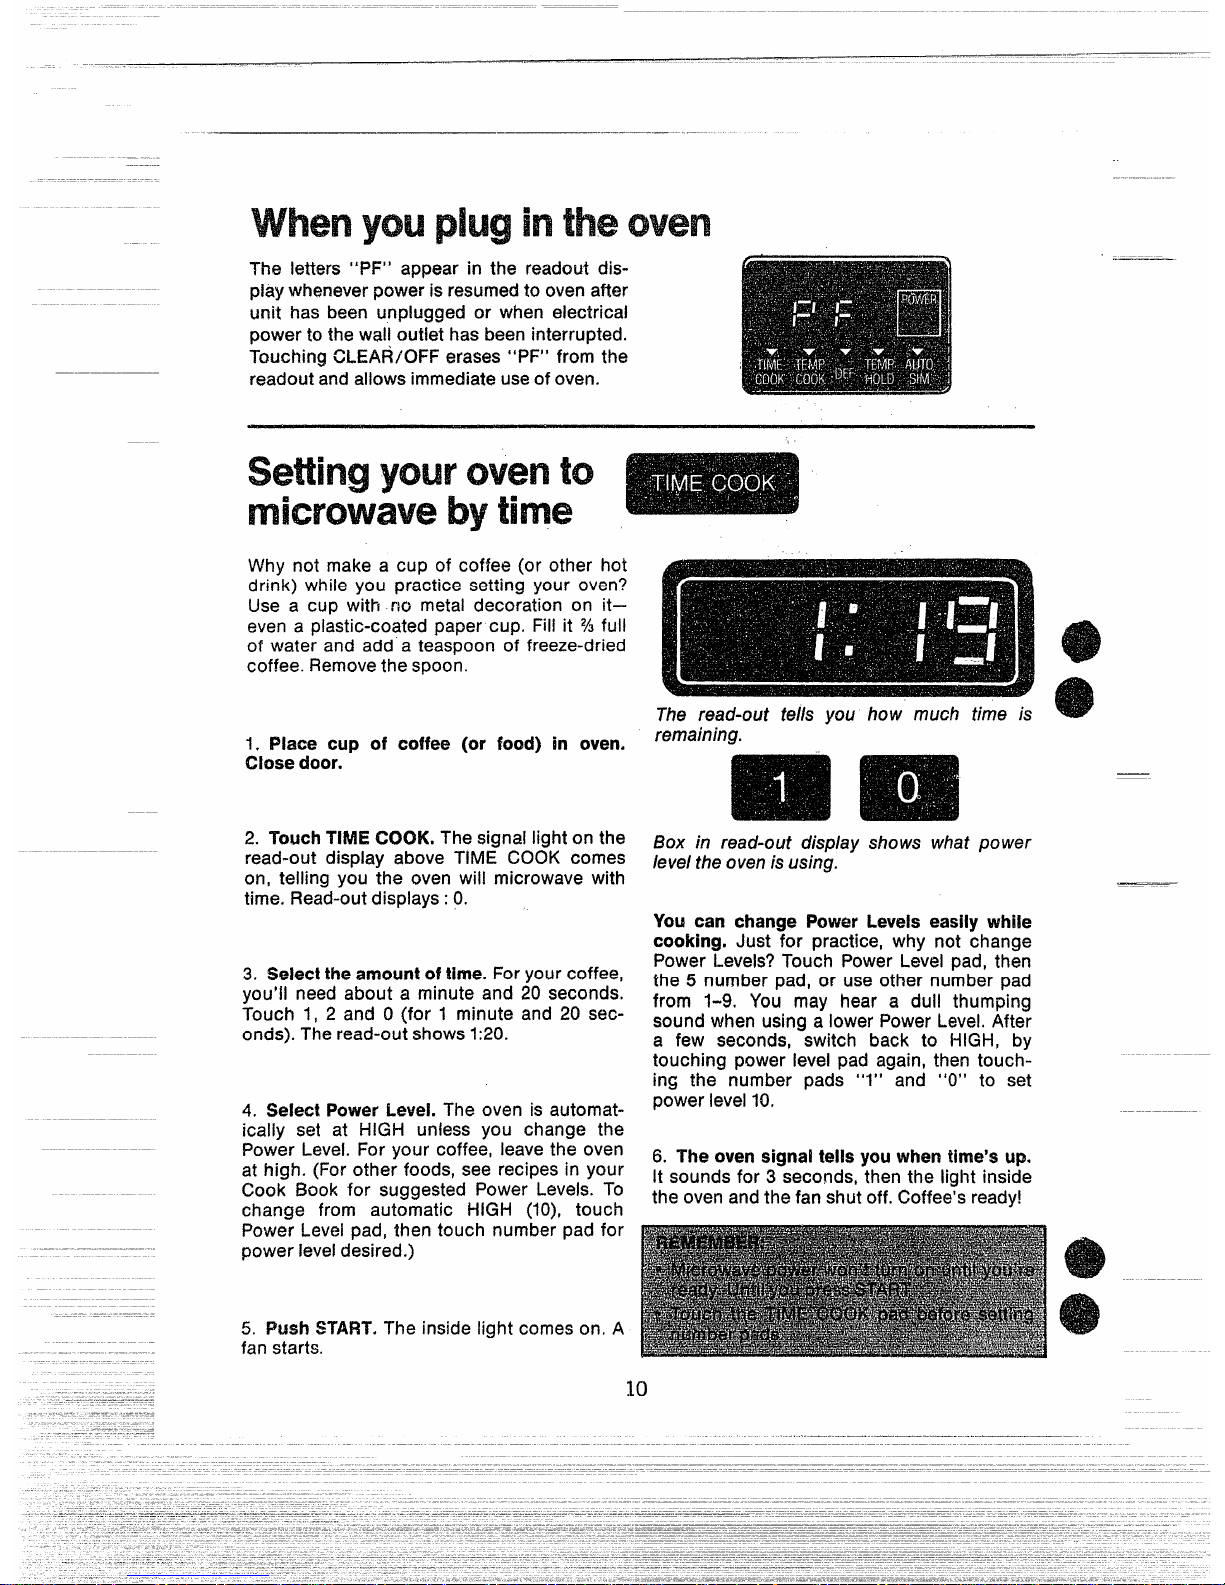
The letters “PF” appear in the readout dis-
piaywhenever
power is resumed to oven after
unit has been unplugged or when electrical
powerto thewalloutlet hasbeeninterrupted.
TouchingCLEAR/OFFerases“PF’* from the
readoutandallowsimmediateuseof oven.
tto
by
Why not make a cup of coffee (or other hot
drink) while you
practice setting your oven?
Use a cup with rw metal decoration on it–
even a plastic-coated paper cup.
Fill it % full
of water and add a teaspoon of freeze-dried
coffee.Removethe spoon.
1. Place cup of coffee (or food) in oven.
Closedoor.
2. TouchTIMECOOK.Thesignallighton the
read-out display above TIME COOK comes
on, telling you the oven will microwavewith
time. Read-outdisplays: 0.
3. Selecttheamountoftime.Foryour coffee,
you’ll need about a minute and 20 seconds.
Touch 1, 2 and 0
(for 1 minute and 20 sec-
onds).
The read-outshows 1:20.
4. !Mect PowerLeveLThe oven is automatically set at HiGH
uniess you change the
Power Levei.
For your coffee, ieavethe oven
at high. (Forother foods, see recipesin your
Cook Book for suggested Power
Leveis. To
change from automatic HiGH (10), touch
PowerLeveipad,then touch number pad for
powerieveidesired.)
5. PushSTART.The inside iight comeson, A
The read-out tells you how much time is
remaining.
Box in read-out display shows what power
leveltheovenisusing.
Youcan changePowerLevelseasilywhile
cooking.Just for practice, why not change
PowerLevels?Touch PowerLevei pad, then
the 5 number pad, or use other numberpad
from 1-9. You may hear a duii thumping
soundwhenusingaiowerPowerLevei.After
a few seconds, switch back to i-iiGH, by
touching power ievei pad again,then touching the number pads “l” and “O” to set
powerievei10.
6, Theovensignaltells youwhentime’sup.
itsoundsfor 3 seconds,thenthe iigilt inside
the ovenandthe fan shutoff. Coffee’sready!
 Loading...