

Hotpoint RE1021 Use And Care Manual
How to get
Y
thebest
from
OW
Mcrowave
Oven
ContenG
Adapter Plugs
30
Problcrn Solver
~1
Use and Care of
Aiunlinum Foil
4
Program C()()king
6
Appliance Registration
~
Repair Service
31
Care
and
Cleaning
29 Safety
Instructions
3.4
Control” Panel
6
Temperature
C()()k
9
Cooking Complete
Reminder 5
Temperature Probe
g 29
C()()king Guide
16-25
Time C()()k
8
Defrosting
7
Warranty
B~lck Cover
Defrosting Guide
12.13
Delayed
C()()king
28
Double
Duty
Shelf
4,
26, 27.29
Extension
Cords
30
Features
5
Grounding Instructions
30
Heating or Reheating Guide
10. 1
I
Hold
Time
28
Light Bulb Replacement
29
Microwaving Tips
~
Minute/Second
Timer
~~
Model and
Serial Numbers
~
Power
Levels
7-9
(JE Answer
Center”
Prccauti(lns
3
800.626.2000
countertop
RE1021
The electric output
of
this microwave
()}en
is 600
watts.

Help us help you...
Before using your oven,
read this book carefully.
It is intended to help you operate
and maintain your new microwave
oven properly.
Keep it handy for answers to your
questions.
If you don’t understand something
or need more help, write (include
your phone number):
Consumer Affairs
Hotpoint
Appliance Park
Louisville, KY40225
Write down the model
and serial numbers.
You’ll find them on a label inside
the oven.
These numbers are also on the
Consumer Product Ownership
Registration Card that came with
your microwave oven. Before
sending in this card, please write
these numbers here:
Model Number
Serial Number
Use these numbers in any
correspondence or service calls
concerning your microwave oven.
Be sure your microwave
oven is registered.
It is important that we know the
location of your microwave oven
should a need occur for adjustments.
Your supplier is responsible for
registering you as the owner.
Please check with your supplier to
be sure he has done so; also send in
your Consumer Product Ownership
Registration Card. If you move, or
if you are not the original purchaser,
please write to us, stating model
and serial numbers.
This appliance
must be registered. Please he certain
that it is.
Write to:
Hotpoint
Range Product Service
Appliance Park
Louisville, KY40225
If you received a
damaged oven . . .
Immediately contact the dealer (or
builder) that sold you the oven.
Save time and money.
Before you request service . . .
check the Problem Solver on page 31.
It lists causes of minor operating
problems that you can correct
yourself.
All these things are normal with your microwave oven:
. Steam or vapor escaping from
●
Dull thumping sound while
around the door.
oven is operating.
● Light reflection around door or
●
Some TV-Radio interference
outer case.
might be noticed while using your
●
Dimming oven light and change
microwave oven. It’s similar to the
in blower sound may occur while
interference caused by other
small
operating at power levels other
appliances and does not indicate a
than high.
problem with your oven.
Microwaving
~ps
●
Make sure all cookware used in
your microwave oven is suitable for
microwaving. Most glass casseroles,
cooking dishes, measuring cups,
custard cups, pottery or china
dinnerware which does not have
metallic trim or
glue
with a metallic
sheen can be used. Some cookware
is labeled “suitable for
Microwaving:’
If you are unsure, use this dish test:
Measure 1 cup water in a glass cup.
Place in oven on or beside dish.
Microwave 1-1 % minutes
at
automatic power level 10 (High).
If water becomes hot, dish is
microwave safe. If dish heats, it
should not be used for microwaving.
●
Paper towels, wax paper and
plastic wrap can be used to cover
dishes in order to retain moisture
and prevent spattering.
●
Some microwaved foods require
stirring, rotating or rearranging.
Check the cooking guide, pages
16-25.
●
Steam builds up pressure in foods
which are tightly covered by a skin
or membrane. Pierce potatoes, egg
yolks and chicken livers to prevent
bursting.
2

PRECAUTIONS
TO AVOID
POSSIBLE
EXPOSURE TO
EXCESSIVE
MICROWAVE
ENERGY
(a) Do
Not Attempt
to operate
this oven with the door open since
open door operation can result in
harmful exposure to microwave
energy. It is important not to
defeat or tamper with the safety
interlocks.
(b) Do Not Place
any object
between the oven front face and
the door or allow soil or cleaner
residue to accumulate on sealing
surfaces.
(c)
Do Not
Operate
the oven
if it is damaged. It is particularly
important that the oven door close
properly and that there is no
damage to the:
(1) door (bent)
(2) hinges and latches (broken or
loosened)
(3) door seals and sealing surfaces.
(d) The Oven Should Not
be
adjusted or repaired by anyone
except properly qualified service
personnel.
IMPORTANT
SAFETY INSTRUCTIONS
Read all instructions before using this appliance.
When using electrical appliances
basic safety precautions should be
followed, including the following:
WARNING–TO reduce
the risk of burns, electric shock,
fire, injury to persons or exposure
to excessive microwave energy:
●
Use this appliance only for
ih
intended use as described in this
manual.
. Read and follow the specific
“PRECAUTIONS
TO
AVOID
POSSIBLE EXPOSURE
~
EXCESSIVE MICROWAVE
ENERGY” at left.
. This appliance must be grounded.
Connect
ordy
to properly
groundd
outlet. See “GROUNDING
INSTRU~IONS”
on page 30.
●
This
microwave oven is
specifically designed to heat or
cook food, and is not intended
for laboratory or industrial use.
●
For best operation, plug this
appliance into its own electrical
out}et,
to prevent flickering of
lights, blowing of fise or tripping
of circuit breaker.
●
Install or locate this appliance
only in accordance with the
provided
ins~ation
instructions.
●
Be
cer~in
to
place
the front
surface of the door three inches or
more back from the countertop
edge to avoid
accidenti tipping
of the appliance in normal usage.
●
Do not cover or
block
any
openings on the appliance.
●
Do not use outdoors.
●
Do not immerse power cord
or plug in water.
●
Keep power cord away from
heated surfaces.
●
Do not let power cord hang
over edge of
table
or counter.
●
Do not operate this appliance
if it has a damaged power cord
or plug, if it is not working
properly, or if it has been
damaged or dropped.
●
See door surface cleaning
instructions on page 29.
Q
This appliance should be
serviced
ody
by
qutified
service
personnel.
Conmct
nearest
authorized service facility for
examination, repair or adjustment.
.
%
with
any
appliance,
CIOse
supervision is necessary when
used by children.
●
To reduce the risk of fire in
the oven cavity:
–Do not overcook food.
Carefully
attend appliance if paper,
plastic;
or other combustible materials are
placed inside the oven to facilitate
cooking,
—Remove wire twist-ties from
paper or plastic bags before
placing bag in oven.
—Do not use your microwave
oven to dry newspapers.
–Mper
towels, napkins and
wax paper. Recycled paper
products can contain metal flecks
which may cause arcing or ignite.
Paper
products containing nylon
or nylon filaments should be
avoided, as they may also ignite.
–Do not operate the oven
while
empty to avoid damage to the
oven and the danger of
fire.
If
by accident the oven should run
empty a minute or two, no harm
is done. However, try to avoid
operating the oven empty at
all
times—it saves energy and
prolongs the life of the oven.
3

IMPORTANT SAFETY INSTRUCTIONS
(continued)
–Do not pop popcorn in your
microwave oven
udess
in a special
microwave popcorn accessory or
udess
you use popcorn labeled for
use in microwave ovens.
–Do not overcook potatoes.
They could dehydrate and catch
fire,
causing damage to your oven.
–If materials inside oven should
ignite, keep oven door closed,
turn oven off, and disconnect
power cord, or shut off power at
fuse or circuit breaker panel.
s
Some products such as whole
eggs and sealed containers-for
example, closed glass jars—may
explode and should not be heated
in this oven.
●
Avoid heating baby food in
glass jars, even without their lids;
especially meat and egg mixtures.
●
Don’t
defrost frozen beverages
in narrow naked bottles (especially
carbonated beverages). Even if the
container is opened, pressure can
bufld
up. This can cause the container
to burst, resulting in injury.
s
Use
mehl
only as directed in
this book.
TV dinners maybe microwaved
in foil trays less than 3/4” high;
remove top foil cover and return
tray to box. When using metal in
the microwave oven, keep
metil
(except for the Double
Duty
TM
shelfl
at least 1 inch away from
sides of oven.
●
Cooking utensils may become
hot because of heat transferred
from the heated food. Pot holders
may be needed to handle the
utensd.
●
Sometimes, the cooking tray
can become too hot to touch. Be
careful handling the cooking tray
during and after cooking.
●
Foods cooked in liquids (such
as pasta) may tend to boil over
more rapidly than foods containing
less moisture. Should this occur,
refer to page 29 for instructions on
how to clean the inside of the oven.
Q
Do not use a thermometer in
food you are microwaving unless
the thermometer is designed or
recommended for use in the
microwave oven.
c
Remove the temperature probe
from the oven when not using it
to cook with. If you leave the
probe inside the oven without
inserting it in food or liquid, and
turn on microwave energy, it can
create electrical arcing in the
oven and damage oven walls.
●
Plastic
utensih-Plastic
utensils
designed for microwave cooking
are very useful, but should be
used carefully. Even microwave
plastic may not be as tolerant of
overcooking conditions as are glass
or ceramic materials and may
soften or char if subjected to short
periods of overcooking. In longer
exposures to overcooking, the
fd
and utensils could ignite. For
these reasons: 1) Use microwave
plastics
ordy
and use them in strict
compliance with the utensil
manufacturer’s recommendations.
2) Do not subject empty utensils to
microwaving. 3) Do not permit
children to use plastic utensils
without complete supervision.
c
When cooking pork follow
the directions exactly and always
cook the meat to an internal
temperature of at least
170°F.
This assures that, in the remote
possibility that trichina may be
present in the meat, it will be
killed and meat will be safe to eat.
●
Boiling eggs is not
recommended in a microwave
oven. Pressure can build up
inside the
egg
yolk and may cause
it to burst, resulting in injury.
●
Foods with unbroken outer
“skin”
such as potatoes, sausages,
tomatoes, apples, chicken livers
and other giblets, and egg yolks
(see previous caution) should be
pierced to allow steam to escape
during cooking.
4
.
~~Boilable”
cooking
pouches
and tightly closed plastic bags
should be slit, pierced or vented
as directed in the convenience
food guide (pages 14 and 15) and
the cooking guide (pages 16-25).
If they are not, plastic could burst
during or immediately after
cooking, possibly resulting in
injury. Also, plastic storage
conbiners
should be at least
partially uncovered because they
form a tight seal. When cooking
with containers tightly covered
with plastic wrap, remove
covering carefully and direct
steam away from hands and face.
●
Sponhneous
boiling—Under
ce~in
special circumstances,
liquids may start to boil during or
shortly after removal from the
microwave oven. To prevent burns
from splashing liquid, stir the
liquid briefly before removing the
container from the microwave oven.
c
Use of the DOUBLE DUTY
TM
shelf accessory.
—Remove the shelf from oven
when not in use.
–Do not store or cook with shelf
on floor of oven. Product damage
may result.
–Use pot holders when handling
the shelf and utensils. They may
be hot.
–Do not use microwave browning
dish on shelf. The shelf could
overheat.
–Be sure that the shelf is
positioned properly inside the
oven to prevent product damage
(see page 26).
SAVE THESE
INSTRUCTIONS

Features of Your Oven
Cooking Complete Reminder (For TIME COOK and TIME DEFROST cycles)
T()
remind you that you have
food
in the oven, the oven will beep once
a minute until you either open the oven door or touch the CLEAR/OFF pad.
1. Door Handle.
Pull to open
door,
Door must be securely
latched
for oven to
operate,
2. Door
btches.
3.
Door Screen. Metal screen
permits viewing
of
foods and keeps
m
icrowdves
contined
inside
oven.
4. Oven Vent.
5. Oven Interior Light.
Turns on
when
the door is opened or when
the oven is operating.
6.
Model and Serial Numbers.
7. Mode Stirrer Cover.
Protects
the microwave energy distributing
system. Do not remove this
cover,
You will damage the oven.
8. MICROTHERMOMETERT”
Temperature Probe.
Use with
TEMP COOK/HOLD function
only.
9.
DOUBLE-DUTY1””
Shelf.
Lets you microwave several
foods
at
once,
(See Safety Instructions
and pages 26
and 27 for
special
instructions, ) When this shelf is not
in
USC
. please remove from oven.
10. (;lass Cooking Tray.
Tray
must be in
place
when using the
oven. Cooking performance
will
be
unsatisfactory without the tray
in place. The tray
may
be removed
for
cleaning.
11. Touch Control
Panel
and
Display. See
next
page for
instructions.
When You Plug in the Oven
The display panel lights up. After 15 seconds, all lights disappear
and
“RESET” appears.
Touch
the CLEAR/OFF pad and oven is
ready for use and the clock can be set.
If power is disrupted
at
any time, the above sequence reoccurs,
and
you must reset Clock after touching CLEAR/OFF.
5
Your Touch Control
Wnel
The Touch Control Panel
allows you to set the oven controls
electronically with the touch of a
finger. It’s
designed to be easy
to use
and
understand.
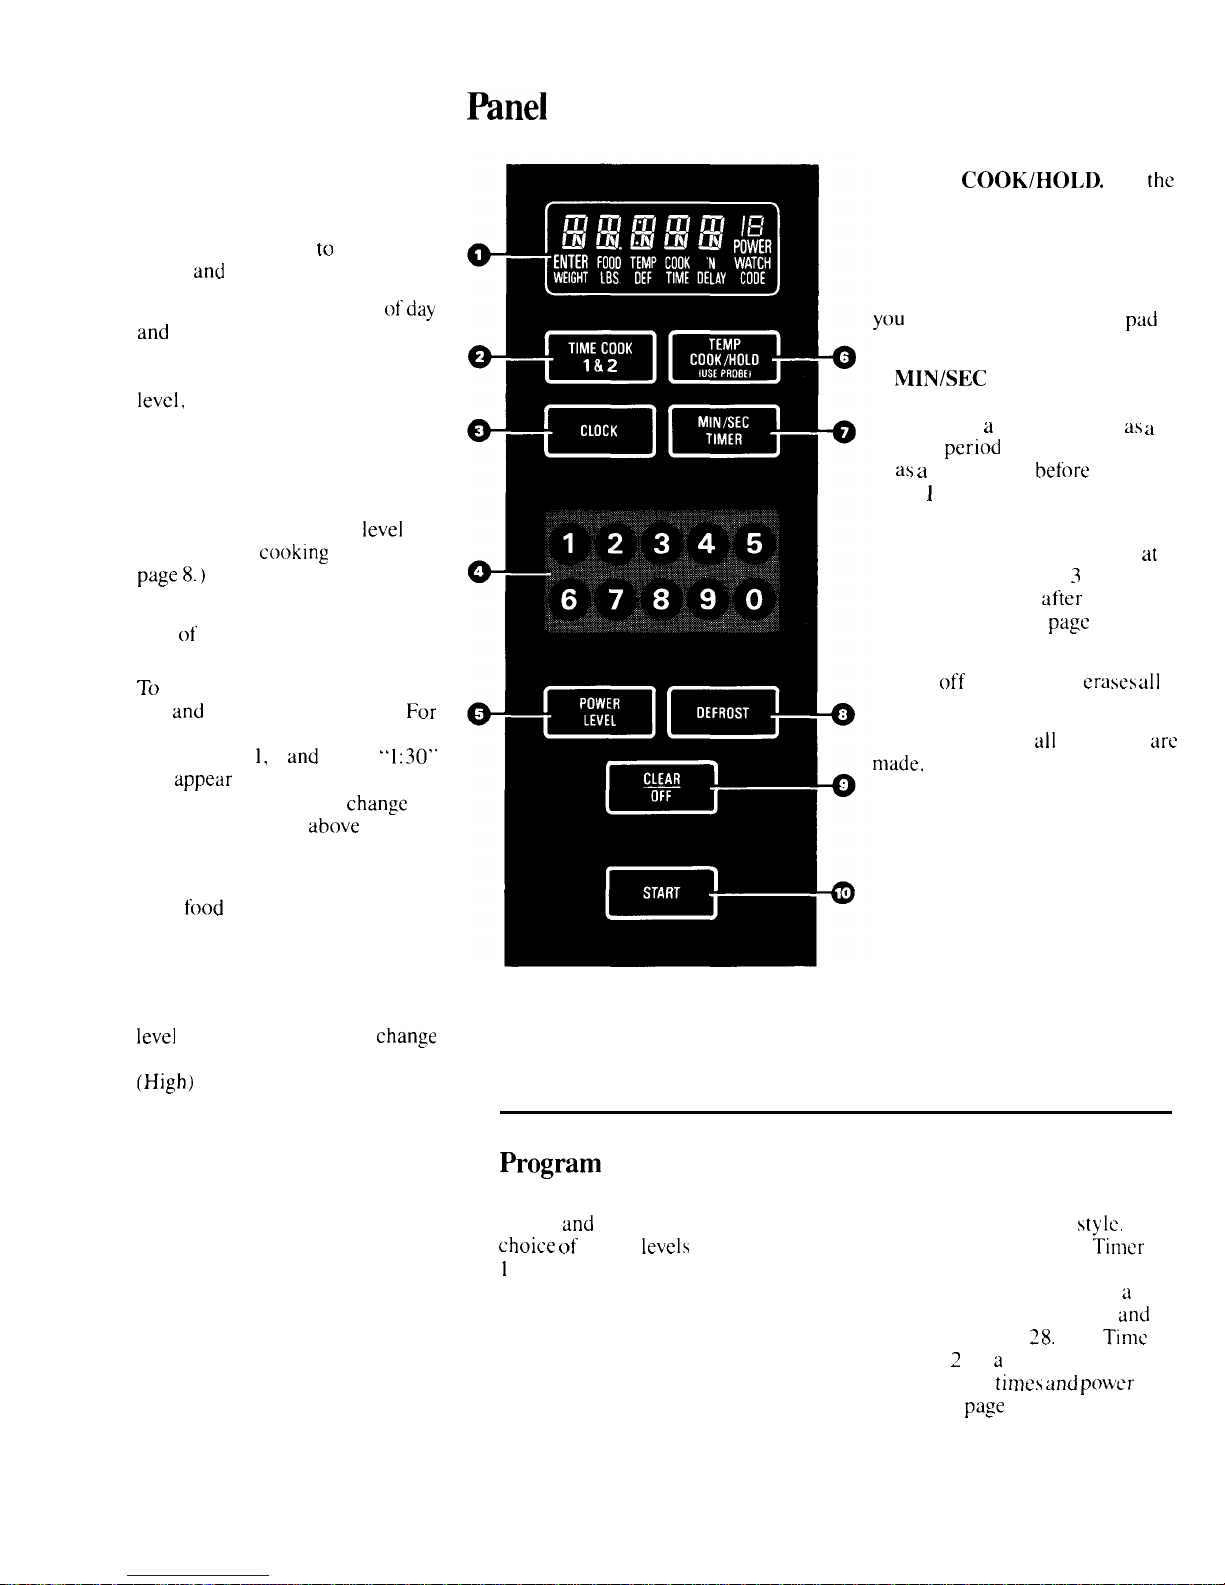
1. DISPLAY.
Displays time ofday
and
time counting down during
cooking functions, food temperature
when using Temp Cook/Hold, power
level,
cooking mode and
instructions.
2. TIME COOK 1 & 2.
Microwave for a preset amount of
time using automatic power level 10
(High), (or change power
level
after entering
cookin&
time. See
page 8.)
3. CLOCK. Touch this pad to enter
time of day or check time of day
while microwaving,
To
set clock, first touch CLOCK
pad
and
then enter time of day.
For
example, if time is 1:30, touch
number pads 1, 3
and
O and
“1:30’.
will appear in display. Touch
START pad. To reset or
change
time, simply repeat
above
process.
4. NUMBER PADS. Touch these
pads to enter cooking/defrosting
time,
food
temperature when using
Temp Cook/Hold, power level and
time of day.
5. POWER LEVEL. Touch this
pad before entering another power
level
number if you want to
chan&e
from automatic power level 10
(High)
for cooking or power level 3
(Low) for defrosting
~ogram
Cooking
6. TEMP COOK/HOI.D. Use
the
temperature probe to cook by using
a preset temperature. Once oven
reaches preset temperature, it
switches to Hold setting and
maintains that temperature until
YOU
touch the CLEAR/OFF
pad
(See page 9.)
7. MIN/SEC TIMER. This feature
uses no microwave energy. It
functions as a kitchen timer.
aS
a
holding period timer after defrost
or as a delay timer
bef(>re
Time
Cook
1
& 2 or Temp Cook/Hold.
(See page 28. )
8. DEFROST. Gentle thawing
at
automatic power level 3 (Low). (or
change power level after entering
defrosting time. See
page
7.)
9. CLEAR/OFF. When touched.
it shuts off the oven and
erases till
settings (except time of day).
10. START. After
all
selections
arc
made,
touch this pad to start oven.
Use your Touch Control Panel to
defrost
and
cook by time using your
choice of
power
levels
from
I
(lowest) to 10 (highest), Temp
Cook/Hold using your choice of
temperature, time kitchen tasks
with the M in/See Timer and set the
clock.
Create your own programs to suit
your individual cooking
style.
For
example: use the M in/See
Timer
to delay the start of Time Cook or
Temp Cook/Hold or program
a
hold time between defrosting
and
cooking, (See page
28.
) Set
Time
Cook 1 & 2 for a two-stage program
using different
times and power
levels. (See
page
8.)
Defrosting
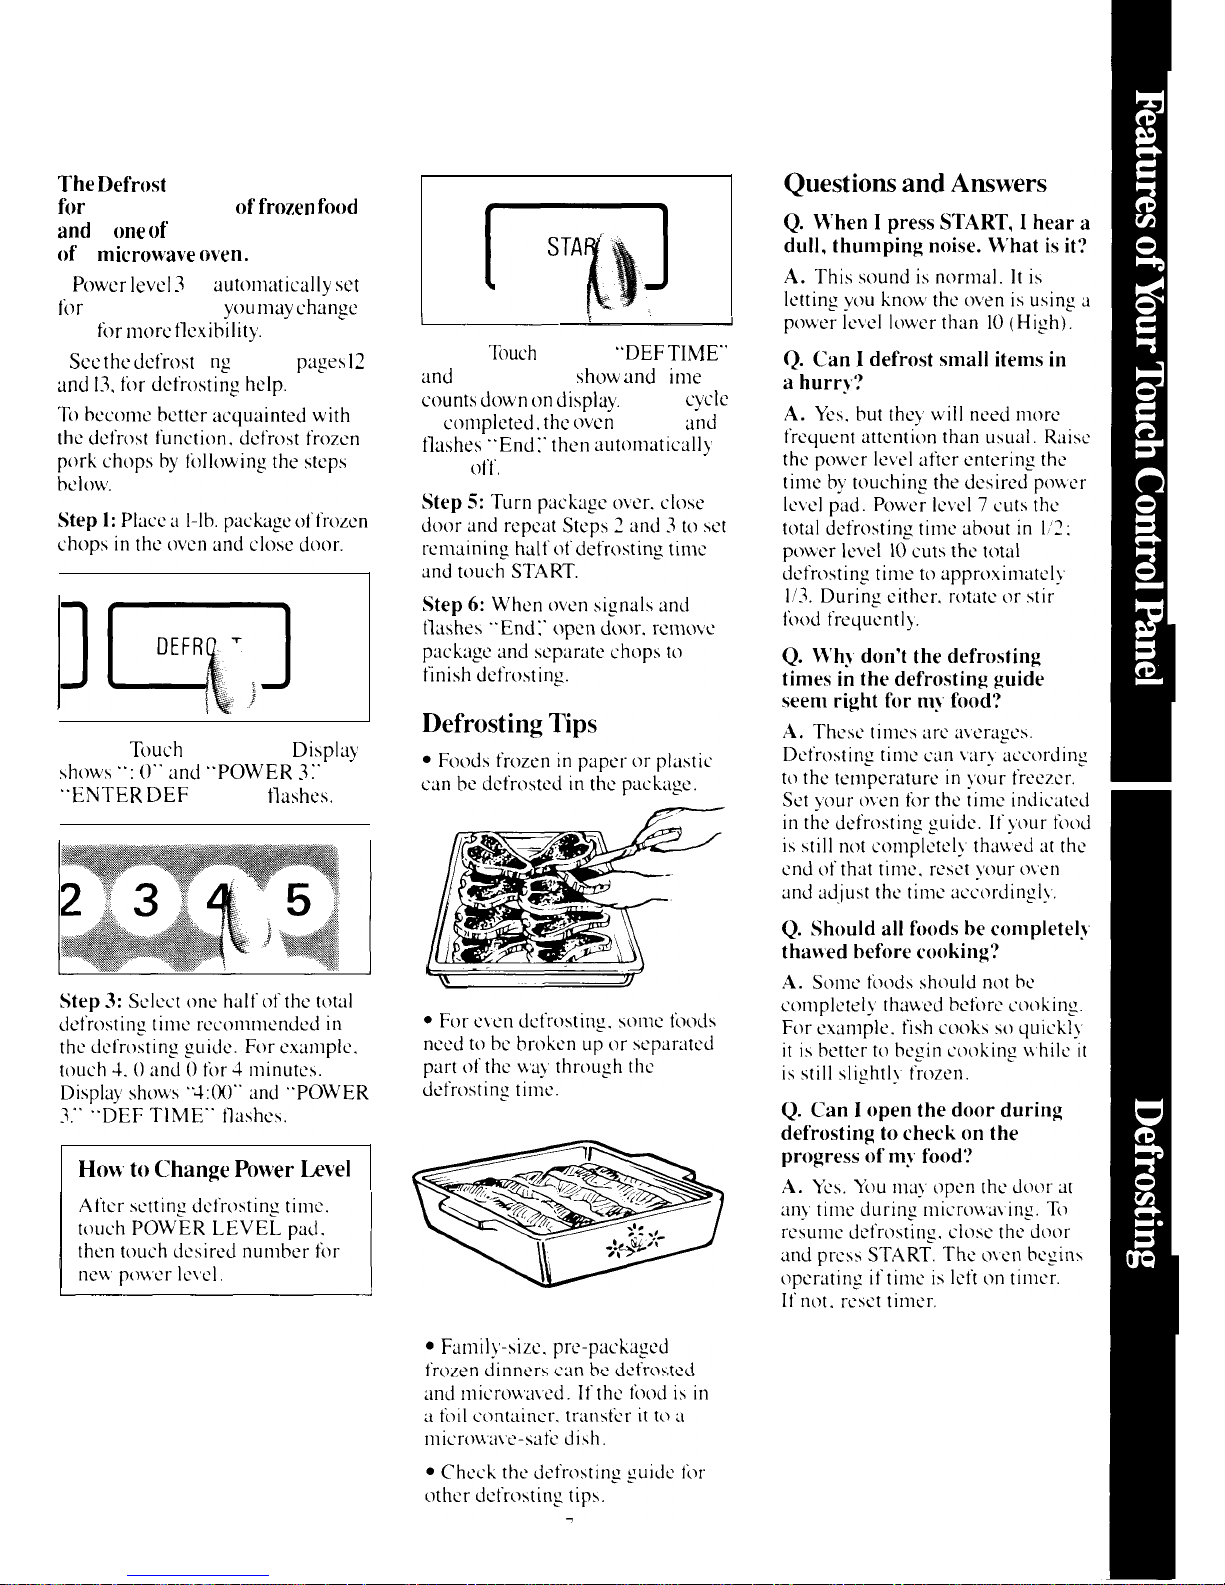
The Defrost
setting is designed
for
speedy thawing of
frozen food
and
is
one of
the great advantages
of a
microwave (}ven.
●
P(Jwcr level 3
is
aut(lnlatica]ly set
t(~r
defrosting. but
you nlay change
this
fc~r nl(~re tlcxibilit}.
.
See the clcfrt~st
i ng guide,
pages 12
tirrd 13, for dcfrt~sting help.
Step 2:
T{~uch
DEFROST.
Displ~}
shows
.’: ().. ilnci “POWER 3:’
‘ENTER DEF TIM E..
tlashes.
HOW to Change Po\ver h~el
STA ‘“:
Step 4:
Touch
START,
‘.DEF TIME.S
and
‘‘POWER 3..
sh(~w urrd
t
inle
cc~unts d(~wn c}n displa).
When
C}CIC
is
c(~nlplcted. the (>ven
signals
and
tlashes “.End:’ then aut(~nlaticall)
shuts
(~1’t’,
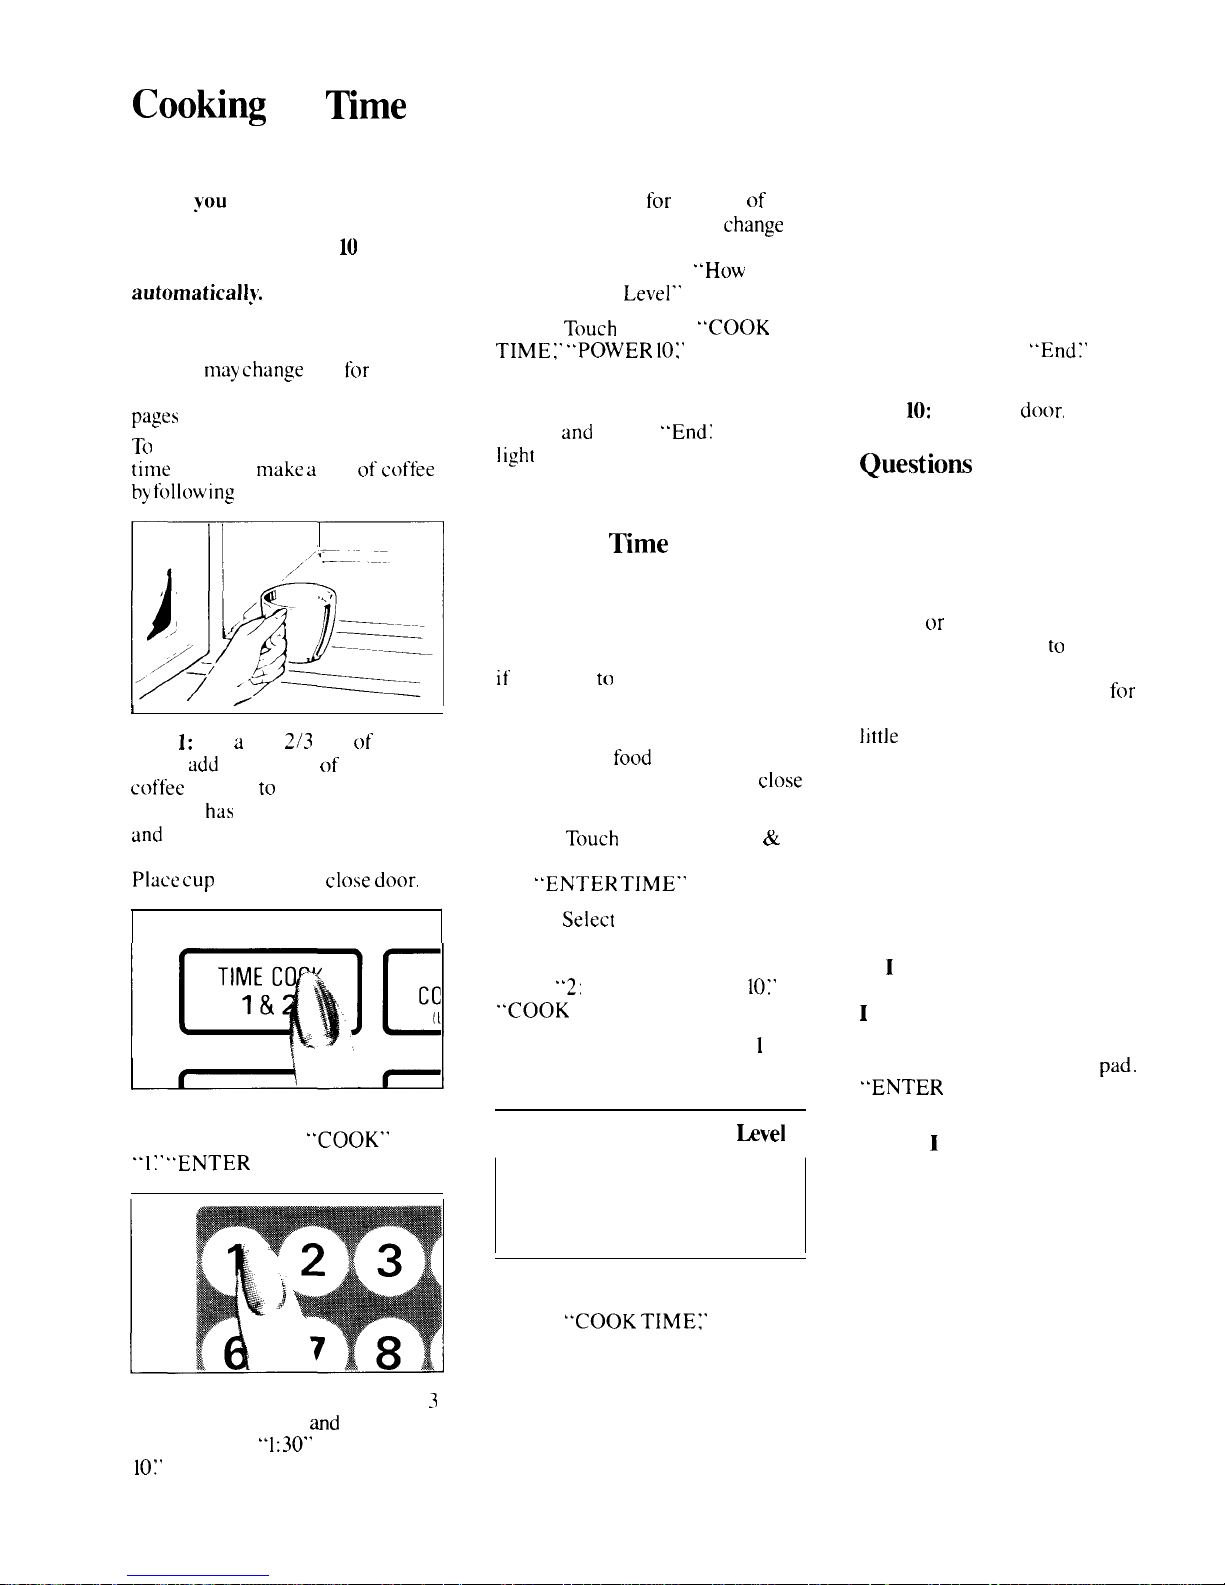
Cooting by
~me
The TIME COOK 1 & 2 feature
allows
you
to microwave for a
preset amount of time using
automatic power level
10
(High), or change power level
automaticall~’.
Power level 10 (High) is
recommended for most cooking,
but you
may change
this
for
more
flexibility. See the cooking guide,
p~~~S
16-25.
T(>
become better acquainted with
time
cooking,
make a
cup of
coffee
by tollowing
the steps below.
1
,
I
Step 1: Fill a cup
2/3
full of
water,
add
1 teaspoon of instant
coffee
and stir to dissolve, Use a
cup that
has
no metal decoration
and
is microwave safe (refer to
Microwaving Tips on page 2).
Place cup
in oven and
close
door
Step 2:
Touch TIME COOK 1 & 2
pad. Display shows “COOK” and
.’1 ~’
“ENTER TIME” tlashes.
Step 3:
Select your time. Touch 1,
3
and O for one minute
and
30 seconds.
Display shows
“1:30”
and “POWER
10:’
“COOK TIME” tlashes.
Because automatic power level 10
is recommended
for
this cup
of
coffee, there is no need to
change
the power level. (If power level 10
is not appropriate, see
.’How
to
Change Power
Level”
below. )
Step
4:
Touch
START.
“COOK
TIME;’
‘POWER
10:’
and time
counting down show on display.
Step
5: When time is up, the oven
signals
and
tlashes
.’Endl
’ Oven,
1 ight
and fan shut off.
Step 6:
Open the door.
Using the Mme Cook 2
Feature
The Time Cook 2 feature lets you
set two time cooking functions
within one program. This is ideal
if
you want to change power levels
during your cooking operations.
Here’s how to do it.
Step 1:
Place
food
in oven in
microwave-safe container and
close
the door.
Step 2:
Touch
TIME COOK 1 & 2
pad. Display shows “COOK” and
“l.”
“ENTER
TIME.’
flashes.
Step
3:
Select
your cooking time.
For example. touch 2, 1 and 5 for
two minutes and 15 seconds. Display
shows
.62:
15” and “POWER
10~’
‘COOK TIME” tlashes.
Step 4: Touch TIME COOK
1
&2.
Step
5: Set your cooking time.
I I
How to Change Power
bvel
After setting cooking time,
touch POWER LEVEL pad,
then touch desired number for
new power level.
Step
6: Touch START.
Step 7: “COOK
TIMEI’
the
selected power level and the first
programmed cook time, counting
down, show on the display.
Step
8:
At the end of the first
programmed cook time, the next
selected power level, “COOK
TIME” and the second programmed
cook time. counting down, show on
the display.
Step
9: When time is up, the oven
signals and flashes
“End~’
The
oven, light and fan shut off.
Step
10:
Open the door.
Questiom
and Answers
Q. I set my oven for the time
called for in the recipe, but at the
end of the time allowed, my food
wasn’t done. What happened?
A.
Since house power varies due
to time
or
location. many recipes
give you a time range
to
prevent
overcooking, Set the oven for
minimum time. test the food
f~>r
doneness, and cook your food a
little
longer. if necessary.
Q. I touched the number pads
and selected my power level. When
I touched START, however, my
oven didn’t come on. Why not?
A. The TIME COOK 1 & 2 pad
must be touched before setting the
number pads or else your oven will
not begin cooking.
Q. I want to cook on a power
level other than High. What do
I
need to do?
A.
To change the power level,
touch the POWER LEVEL
pad.
“ENTER POWER” flashes on the
display panel. Enter new number.
Q. Can I interrupt my Time
Cook function to check the food?
A. Yes.
To resume cooking,
simply close the door and press
the START pad. The timer must be
reset for cooking to resume unless
time is remaining on timer.
Cooking by Temperature
Internal temperature is
the
best
test
f}f d(meness fi)r
many
fo{)ds.
Use TEMP
COOK/HOI.D” to
cook” a
variety of
fi)ods to your
desired finished
f(x)d
temperature.
The
TIMk;
C()()K 1 & 2 setting
is preferred
for
batters,
doughs,
frozen foods”
and
f{)ods
which
are
difficult to
cook”
precisely with
the
probe.
.’TEMP COOK/HOLD.’”
t:lkcs the
guessw(}rk
out
c)t’ cooking”
bccaLlsc
the ~~vcn
autt}n~iitically
signals with
ti~ur
beeps when the
ti)c)d
reaches
the preset tcmpcruturc. The Hold
feature will
nlainmin this temperature
fi~r
up to twelve hours
t)r
until
you
touch the CLEAR/OFF
ptid.
N(~tc:
Oven autc)nlatically switches
to
.’Hold’. when preset
tooci”
tenlperature is reached.
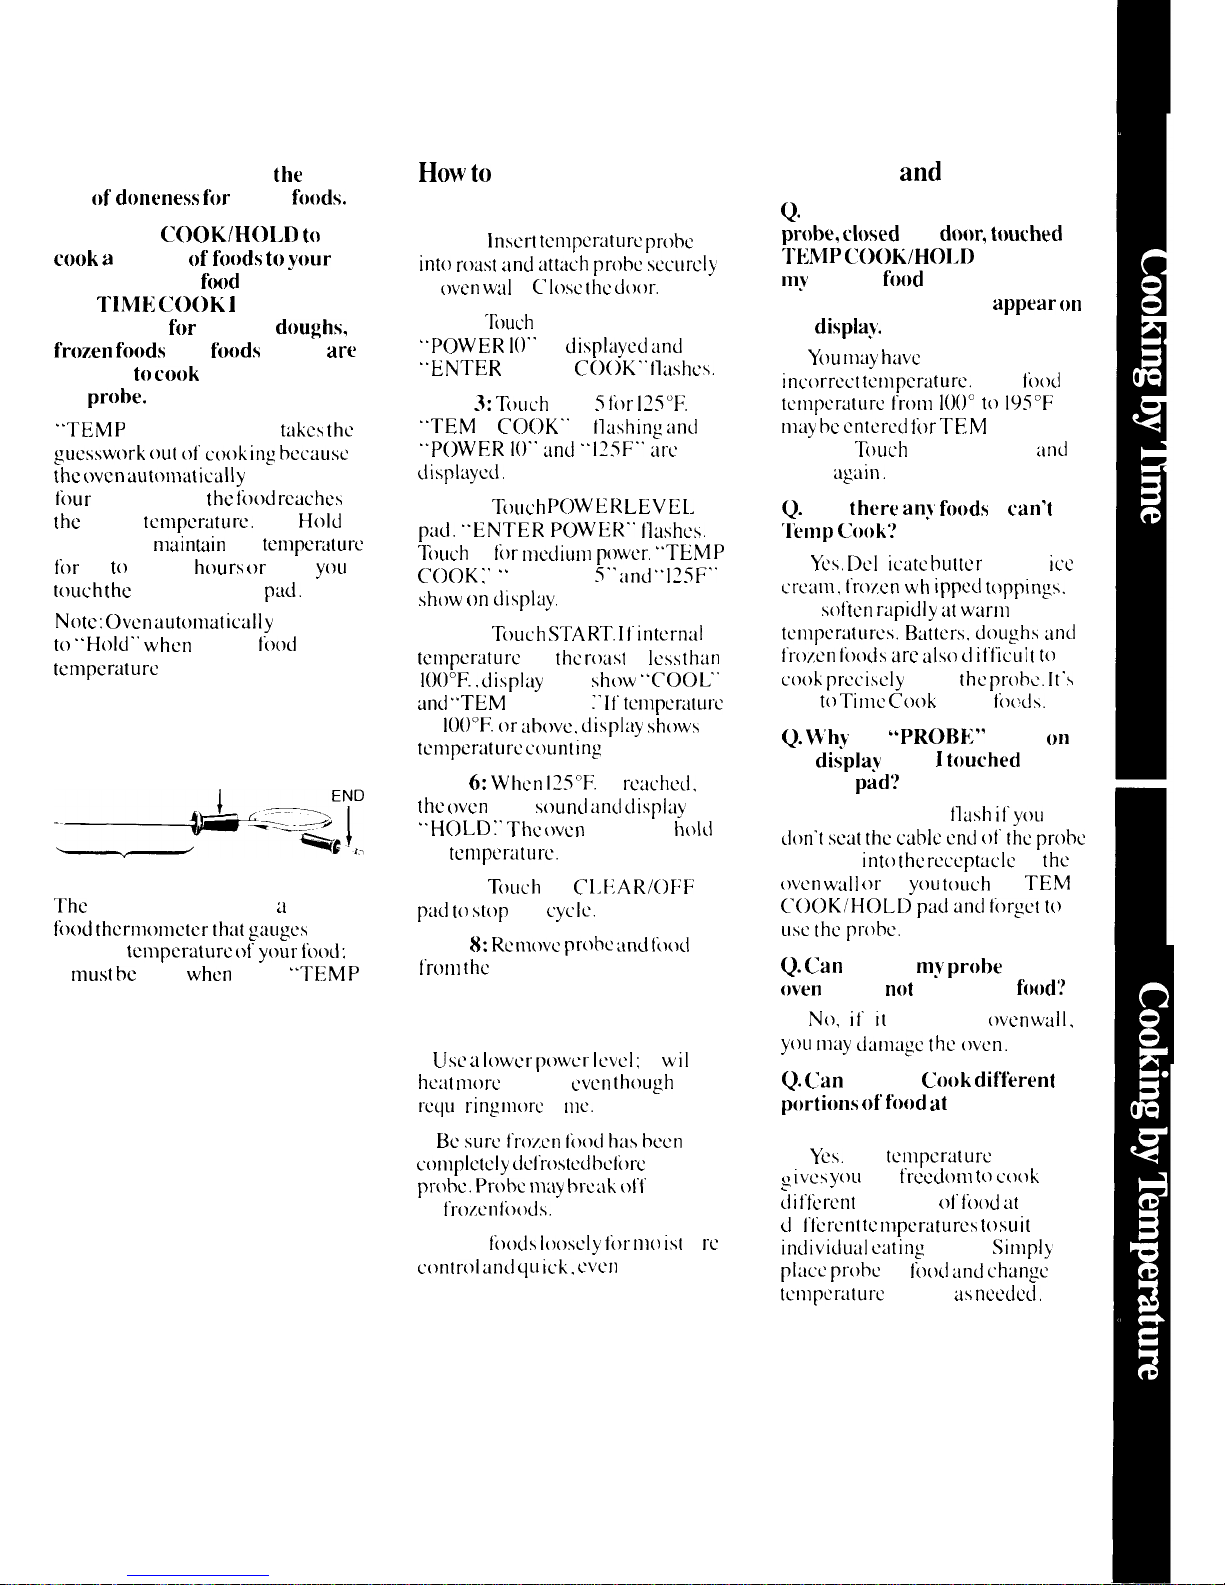
The Temperature Probe
HANDLE
CABLE
SENSOR
The temperature probe is
:i
food”
thcrnlon]ctcr
th;it
g:lugcs the
internal
tcn]pcraturc
(Jf yt~ur fi~t}cl:
it must bc used when using “TEMP
COOK/HOLD.’.
How to
Temp Cook a Rolled
Beef Rib Roast to Medium
Step 1: lnscrt tetnper:iture
pr(~bc
into
roast
tind :]tt:ich
probe
sccurcl}’
in
oven will
I. (’
I(JSC [hc door.”
Step 2:
‘Ii)uch
TEMP COOK/HOLD.
“POWER 10..
is
displ~iycd iind
“ENTER TEMP
COOK.. tliishcs.
Step
3:
Touch 1.2. S
fi~r 125”F.
“TEM P
COOK.”
is
tlashing :Inci
‘POWER
10’. ~lncl .’125F.’ :Irc
ciispltiycci.
Step 4: Touch POWER LEVEL
p:lci. ‘ENTER POWER.
tlashcs.
‘l~~uch
5
ti)r n]e~tiunl p(~wcr,
.’TEMP
COOK:”
‘.
POWER 5..
:inct
..125F’
show on
(Iispluy.
Step 5:
Touch S-rART. [t” interntil
tenlperatul”c
(it’
the ro:lst
is
less ttl:Ln
loOOF.”. ctispl:iy
will
sht~w “COOL’.
an(i .“TEM
P COOK ~.
It’ tcnlpcr~iturc
is
loOOF.” or :Ihove. ciisplily shows
tcnlpcr:iturc cc)unting
Lip.
Step 6:
When 125”F.
is
re:ictlc(t.
the (~vcn
will
s(~uncl iinci ctispl:ly
..HOLD~’ The
i~vcn
will then
tl~~l(i
the tcnlper:iturc.
Step 7: Touch the
CI.I;AR/OFF
p:lci to
stop the cyctc.
Step 8:
Rcnl(wc
prc~he ~ind filclct
t’rc~nl
the oven.
Cooking Tips
●
LJSC LI
tower
p~~wcr
tcvel: it
wil
I
hc:it
nlorc evenly
even
though
rcq LI
i ri ng nlt)rc t i tne.
●
Be
sure
t’rozcn ti)(lct h:is
been
con]ptctcty
ctct’rostcd bcti)rc
inserting
pr(lbc.
PrtJhc nl:iy
brc:lk
t~t’i’
it’ used
i n
t’rozcn
ti)ods.
● Cover
ti~octs tooscly” ti)r
nlo
ist
u
rc
c(~nt rot Llnct
qLl ick. even
heating.
Questions
and
Answers
~.
I
inserted the temperature
probe, closed
the
d(}or, touched
TE;MP
C()()K/HOI.1) and entered
my
desired
fot)d
temperature but
the temperature didn’t
appear (m
the
displa~.
A.
You nl~Iy htive
entered :111
inc(~rrcct
tcnlpcraturc. Any
ti)oci
tcnlpcrtiture
~ronl 1000” t(> 195°F
tnay be
cntercci
ti~r
TEM P COOK/
HOLD.
“rouch
CLEAR/OFF
:Illd
begin ag:lin.
Q. Are
there an~ foods”
I
can’t
‘Iklllp
C()()k’?
A.
Yes, Del
icatc
butter icings, ice
cre:inl.
t’r~~z.cn wh ippcct tt~ppings.
etc.
s(~t’ten
r:lpidly
lit
wartn
tctnpcruturcs. Biittcrs. doughs
:inct
t’rozcn ti)(lcis
arc als(l cl
it’t’icuit to
cook”
prcciscly with the
pr(~bc.
lt.s
best
to
Tinlc C()()k
these
ti~c~(is.
Q. ~h~
did
“PROBh;”
flash
on
the
display
after I
touched
the
START
pad’?
A. ‘P ROBE.’ will tl~sh
il’you
(Ion.t se~t
the ctiblc cnd
of”
the probe
securely
into the receptacle in the
t)ken w:ill (~r”
it’
you
touch the TEM P
C’()()K/HOLD pad
anc]
forget
to
LISC
the
pl-(~bc.
Q.
Can
1 leave
nl~ probe
in the
oven
if” it’s
not
inserted in
food’?”
A.
N(J,
it’ it
touches the
(~ven
wall.
~’OLl
Illlly
CjlllllLlgC
the ol~n.
Q.
Can
I Temp
C()()k dif.fkrent
portif)ns of” fi){)d at
different
temperatures’?
A.
Yes.
The tctnpcraturc probe
(~ i~~~
yoU
the
trccdc~nl tc} ~(~[lk
~(Ii t’fcrcnt
portions
ot” ti)(~d :lt
c1
i
t’tkrcnt tc
nlpcr:itures to suit
inclivi~iu:ll
c:lting styles. Sinlpl}
pl:icc prt)be in
ti~()~l ~ind
chtingc
tcn]pcr:iturc setting as
ncecic~l,
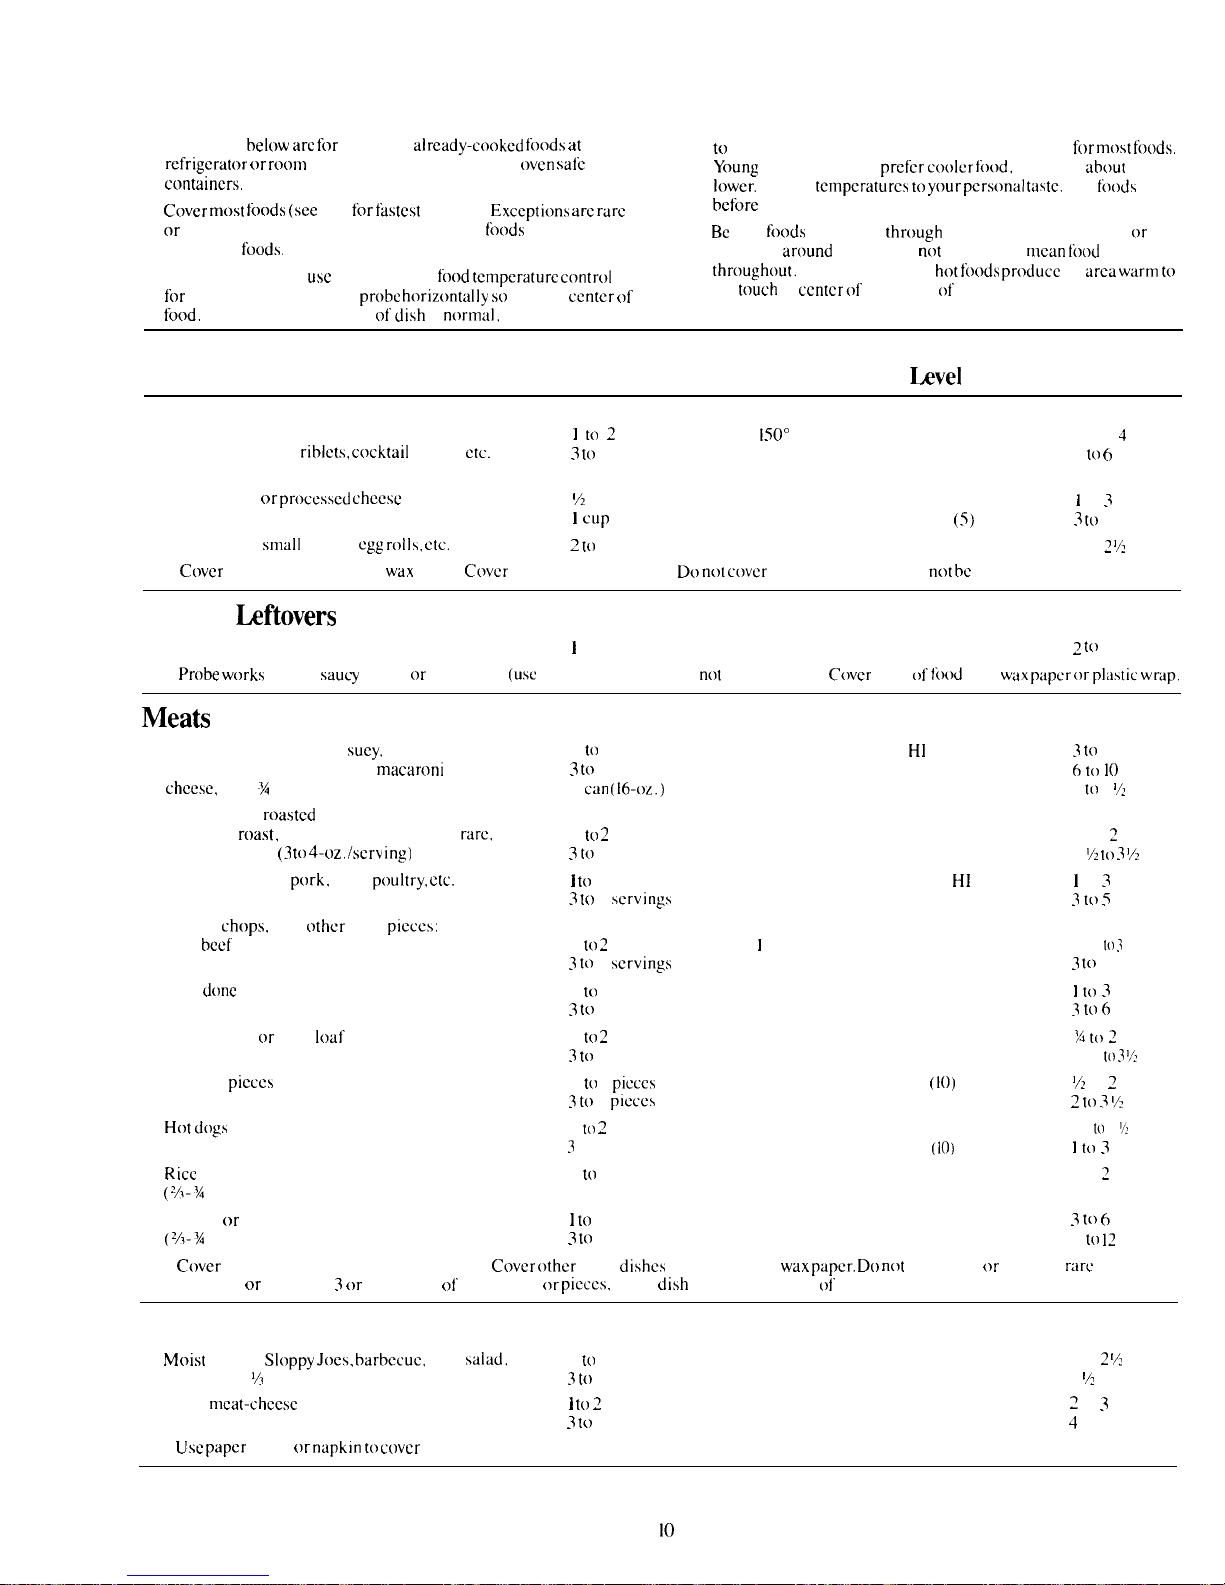
Heating or Reheating Guide
1. Directions
below arc f(>r
reheating
already-e(>oked foods” at
tu
heat. Suggested serving temperatures are given
for most foods.”
refrigcrat(~r
or
r(lmn
temperature, Use microwave
(Jvcn salk
Young
children usually prefer
cooler” fi)~)d,
generally
about
200
c(~ntaincrs.
h}wcr.
Adjust tcmpcraturcs tn
ynur pcrs(mal taste.
Stir
foods”
2.
C(wer m(}st fc)ods (see
tip)
for fastest
heating.
Exccpti(ms arc r~rc
before
serving.
or medium meats. some sandwiches, griddle
fi~(~ds
like pancakes
4.
Be
sure
fi~(>ds
arc heated
through
before serving. Steaming
or
and baked
foods.
bubbling
around
edges dries
not
necessarily
mean food”
is heated
3. Where appropriate,
use
the automatic
food” tcmpera[urc cnntroi
throughout.”
As a general rule,
h(}t foods” pr(>ducc
an area
warm to
for
accurate heating. Place
probe horizontally” s<)
tip is in center of
the
tnuch
in ccntcr
(Jf’
underside of dish.
fu(ld.
Bubbling around edges nf
dish
is
normal.
since center is last
Suggested
Power
Approximate
Item
Amount
Serving Temp.
hvel
Time, Min.
Appetizers
1
tn
2
servings
150°
HI (lo)
1 l/2 to
4
Saucy: meatballs,
riblcts, cncktail
franks,
etc.
3 ((J
4 servings
150°
HI (lo)
4 to
6
(‘A cup/serving)
Dips: cream
(>r pr(~cesscd cheese
1/2
cup
1300
MED (5)
1
to
3
1 cup
1300
MED
(5)
3 [()
5
Pastry bites:
small
pizzas,
cgg rolls, etc.
2 to
4 servings
HI (lo) I to 2
‘/2
Tip:
C(wcr
saucy appetizers with
wax
paper.
C(wcr
dips with plastic wrap.
D() no[ cover
pastry bites, they will
not bc
crisp.
Plate of
bftovers
Meat plus 2 vegetables
1
plate
1500-1600
HI (10)
~ t<,
4
Tip:
Probe works
well in
saucy
dishes or vegetables
(use
in largest serving) but
not
in meat slices.
Cover
plate of
ti)od
with
wax p:ipcr or pl:istic wrap.
Meak and Main Dishes
Saucy main dishes: chop
suey,
spaghetti.
1 to 2 servings
150°-1600
H]
(10)
3 to
7
creamed chicken. chili, stew.
macaroni
and
3 to
4 servings
150°-1600
HI (lo)
6 to 10
chccse. etc. ( % -1 cup/serving)
1
can (16-OZ.)
150°-1600
HI (lo) 4 to 5
‘/2
Thinly sliced
r(~astcd
meat:
Rare beef
roast.
minimum time; medium
rare.
1
to 2
servings
MED HI (7)
l/2 to
2
maximum time (3 to
4-c)z.
/scrv
ing)
3 to
4 servings
MED
HI (7)
I
Y2
to 3
‘/2
Well dune: beef,
pork,
ham,
pnultry, etc.
1 to
2 servings MED H] (7)
1
to
3
3 to
4
servings
MED HI (7)
3 to 5
Steaks.
chops.
ribs,
<>thcr
meat
picccs:
1
Rare beef steak
1
to 2
servings MED HI (7)
1 l/2 to
3
3 t(l
4
servings
1
MED HI (7)
3 to
7
I
Well
done
beef’, chops. ribs. etc.
1
to
2 servings MED HI (7)
I to 3
3 to
4 servings
1
MED HI (7)
3 to 6
Hamburgers or meat loaf
1 to 2 servings HI (lo) x to 2
(4-oz./serving)
3 to
4 servings
HI (lo)
I ‘/2 to 3
‘/!
Chicken
picccs
1
to
2 picccs
HI
(lo)
1/2
to
2
3 to
4
pieces
HI (10)
2 to 3 1/2
Hot dogs
and sausages
1 to
2
HI (10)
l/? to 1
1/2
3
to 4
HI
(10)
1 to 3
Rice
and pasta 1 to 2 servings
150°
HI (lo)
1 to
2
(2A-%
cup/serving)
Tripped or mixed with sauce
1 t(l
2 servings
(2A-X
cup/serving)
150°-1600
HI (10)
3 to 6
3 t(l
4 servings
1500-1600
HI (lo)
8 to
1?
Tip:
C(wer
saucy main dishes with plastic wrap.
C(>ver
other main
dishes
and meats with
wax paper. Dn not
cover rare or medium
mrc
meats.
When heating
or reheating 3 or 4 servings
of”
meat slices or
picccs,
rotate
dish
1/2 turn after half
of”
time.
Sandwiches
Moist
filling:
Sloppy Joes, barbccuc,
ham
salad. 1 to 2 servings MED HI (7)
I to
2 (A
etc. in bun ( Yl cup/serving)
3 to
4 servings
MED HI (7)
2
‘/,
to 4
Thick
rncat-chccsc
filling; with firm bread
1 to 2
servings
MED HI (7)
2
to
3
3 tt)
4 servings
MED HI (7)
4
to 5
Tip:
Use
paper towel or
napkin to c(wcr
sandwiches.
130°
130°
150°
150°
10
 Loading...