

Hotpoint RB790WK1WW, RB790BK1BB, RB787WH2WW, RB787CH2CC, RB787BH2BB Owner’s Manual
...
GEAppliances.com
Safety Information .......... 2-6
¢13
Operating ImlrucCions
Adjust the Oven
Thermostat ................... 91
(;lock and Timer . .......... 15, 16
()yen ..................... 12-14
Oven Controls ............. 10, 11
Sabbath Feature ............ 19, 20
Selecting Types of Cookware ..... 9
Self-Cleaning .............. 24, 25
Special Feaunes ............... 18
Surface Units ................ 7, 8
Timed Baking and Roasting ..... 17
_4'anning Drawer ........... 22, 23
Care and Cleaning ........ 94-33
(;lass Cooktop ............. 39, 33
Self-Cleaning O_en ......... 94, 95
In_lallation Instructions
Anti-Tip Device ............ 34, 40
Before You Beg-in ............. 34
Electrical Connections ....... 36-39
Lex>ling .................. 40, 41
Coil 7@ and
Radiant 7@ Modds
Standard &If-Clean
Clean Modds Modds
JgSO 7 JBP2 l
j s15 j P6o
jBs2 7 RB 74 0
RB525 RB 75 7
RB526 RB 78 7
RB5 36 RB 790
RB540 RB800
Troubleshooting Tips ...... 49-46
Accessories .................. 47
Consumer Support
Consumer Support ..... Back Coxer
Product Registration ........ 49, 50
V\'anantv .................... 51
Write the model and serial
numbers here:
Model #
Serial #
You can find them on a label,
behind the open oven door or
(lrawe_; on the ti'ont tace.
183D6379P025 49-88018 !0-04 JR

IMPORTANTSAFETYINFORMAtiON.
READALLINSTRUCTIONSBEFOREUSING.
A WARNING!
For your safe_ the information in this manual must be followed to minimize the risk of fire or explosion,
electric shock, or to prevent property damage, personal injury, or loss of life.
A WARNINGANTI-TIPDEVICE
All rangescan tip andinjury could result.
Toprevent accidental tipping of the range, attach
it to the wafl by installing the Anti--tip device
supplied.
If the Anti--tip device supplied with the range does
not fit this application, use the universal Anti--tip
device WB2X7909.
Tocheck if the device is installed and engaged
properly, carefully tip the range forward. The
Anti--tip device should engage and pravent
the range from tipping over.
IMPORTANTSAFETYNOtiCE
The California Safe Drinking Water and Toxic
Enforcement Act requires the Governor of
California to publish a list of substances known
to the state to cause cancer, birth defects or other
reproductive harm, and requires businesses to
warn customers of potential exposure to such
substances.
If you pull file rang_ out from file wall for
any reason, make sure the device is properly
eng¢_ged when you push the range back against
the wall• If it is not, there is a possible risk of the
range tipping over and causing inju U if yon or
a child stand, sit or lean on an open door
Please refer to the Anti-Tip device information
in this manual. Failure to take this precaution
could result in tipping of the range and i,lju U.
The fiberglass insulation in self-clean ovens gives
off a very smafl amount of carbon monoxide during
the cleaning cycle. Exposure can be minimized by
venting with an open window or using a ventilation
fan or hood.
SAFETYPRECAUtiONS
When using electrical appliances, basic safety pracautions should be followed, including the following:
Use this appliance only %r its intended
puq)ose as desclJbed in tins )_me_ s Manual.
Be sure your appliance is properly installed
and gaounded by a qualified technician in
accordance with the provided installation
instructions.
iiiiiiiiiiii_iii
Do not attempt to repair or replace any
part of your range unless it is specifically
recommended in this manual. All other
servicing should be refened to a qualified
technician.
iiiiiiiiiiii_iii
Be%re per%truing any service, disconnect
the range power supply at the household
distdbnfion panel by _emoving the fllse or
switching off the circuit breaker
• (
2
Do not leme children alone----_'hildren
should not be left alone or unattended in
an area where an appliance is in use. They
should nexer be allowed to sit or stand on
any part of the appliance.
iiiiiiiiiiii_iii
Do not allow anyone to climb, stand or
hang on file doo,; storage drawel, wamfing
drawel; or cooktop. They could damage the
rang> and even tip it ovel. causing sex>re
personal i_ljtnT.
iiiiiiiiiiii_iii
Do not store flammable materials in an oxen
or near the cooktop.
CAUtiON: Itemsof interestto
iiiiiiiiiiii_iii
children should not be stored in cabinets
aboxe a range or on the backsplash of a
range--children climbing on the range to
reach items could be selqously i,ljured.
GEAppliances.com
COOKMEATANDPOULTRYTHOROUGHLY...
Cookmeat andpoultry thoreughly--meat to atleastanINTERNALtemperatureof 160°Fandpoultry toat least an
iNTERNALtemperatureof 180°ECookingto thesetemperaturesusua//yprotectsagainst foodbomeillness.
WARNING!
SAFETYPRECAUTIONS
Nexer wear loose-fitting or hanging gam_ents
while using the appliance. Be careflfl when
reaching for imms stored oxer the range.
Flammable mamrial could be ignimd if
brought in contact wifl_ hot surface units
or heating elements and m W cause sexere
gilT/IS.
Use only dU pot holders--moist or damp
pot holders on hot surfaces may result in
burns from steam. Do not let pot holders
touch hot surfi_ce units or heating elements.
Do not use a towel or other bulky cloth.
For your safety, nexer use your appliance
for wanning or heating the room.
Do not let cooking grease or oflmr flammable
mamfials accumulam in or near the range.
Do not use wamr on grease fires. Nexer pick
up a flaming pan. Turn the controls off.
Smother a flaming pan on a surface unit by
covering the pan completely with a well-
fitfing lid, cookie sheet or fiat u W. Use a
nmlfi-purpose di T chemical or foam-type
rite extinguisher
Flaming grease outside a pan can be put
out by coxering it with baking soda o_,
if available, 1)y using a multi-purpose dly
chemical or foam-type fire exfinguishen
Flame in the oxen or wanning drawer
can be smothered complemly by closing the
door and mining the oven off or by using a
multi-purpose dU chemical or foam-type fire
extinguisher
Do not touch fl_e snrthce units, the heating
elements or rite interior surface of the oven.
These surfaces may be hot enougtl to bum
exen thougil they are dark in color During
and after use, do not touch, or let cloflling
or other flammable materials contact, tim
surfi_ce units, areas nearby the surface units
or any inmrior a_ea of the oxen; allow
sufficient time for cooling first.
Potenually hot surfaces include the cooktop,
areas fhcing the cooktop, oxen xent opening,
surfaces near the opening, crevices around
rim oxen door and metal trim parts aboxe
the door
REMEMBER:The inside smihce of the oven
may be hot when file door is opened.
Do not store or use combustible mamrials,
gv_soline or other flammable vapors and
liquids in the vicinity of this or any other
appliance.
Kee I) fl_e hood and grease filmrs clean
to maintain g_od xenfing and to ax_id
gTease fires.
Nexer block tim xents (air openings) of fl_e
range. They provide the air inlet and outlet
flint are necessa W for file range to operam
properly with conect combustion. Air
openings are located at file rear of the
cooktop, at tim top and bottom of fl_e oven
door, and at rite bottom of the range under
the warming drawer or storage drawee
3
IMPORTANTSAFETYINFORMATION.
READALLINSTRUCTIONSBEFOREUSING.
OVEN
Stand away from the range when opening
the oxen door Hot air or steam which
escapes can cause bnnls to hands, face
and/or eyes.
Do ,lot heat unopened food containers.
Pressure could build up and die container
could burst, causing an injury.
Kee I) file oxen x_nt unobstructed.
i:
Kee I) the ox>n free flom gxease buildup.
Place the ox>n shelf in the desired posinon
while die oven is cool. If shelves mnst be
handled when hot, do ,lot let pot holder
contact the heanng elements.
SELF-CLEANINGOVEN
Do not clean the door gasket. Tile door
gasket is essential for a good seal. Care
should be taken ,lot to rub, damag> or
mow the gasket.
Clean only parts listed in this Owner's
Manual.
Do ,lot use oven cleaners on self-clean
models. No commercial oxen cleaner or
oxen liner protective coating of any kind
should be used in or around any part of
the oxen. Residue from oxen cleaners will
damage the inside of tile oxen when the
self-clean cycle is used.
Pulling out the shelf to tile stoi>lock is a
comenience in lifting heaxy' foods. It is also
a precaution against bums flom touching
hot surt_tces of the door or oxen walls.
When using cooking or roasting bags in tile
oxen, follow the manufacturer's directions.
Do ,lot use the oxen to d U newspapers.
If overheamd, they can catch on fire.
Do *lot use the oxen for a storag_ area.
Imms stored in an oven can ignite.
Do not leave paper products, cooking
utensils or food in the ox>n when ,lot in use.
Be%re self-cleaning the oven, remoxe the
broiler pan, grid and other cookware.
Be sure to wipe up excess spillage before
starting the self-cleaning operation.
If the self-cleaning mode malflmctions,
turn the oxen off and disconnect the power
supply. Haxe it serviced by a qualified
technician.
Take tile shelxes out of tile oxen before
you begin tile self-clean cycle or they
may discolor
i
4

WARMINGDRAWERronsomemode/s)
GEAppliances.com
The i)ml)ose of die wam_ing drawer is
to hold hot cooked foods at serving
mmperature. Always start with hot fbod;
cold food cannot be heamd or cooked
in tile wanning drawer
Do not use file wamling drawer to d_T
newspapers. If oxerheated, they can catch
on f]Ie.
Do not leave paper products, cooking
umnsils or food in the warming drawer
when not in use.
Ne_er leax>jars or cans of fat dripping:s in
or near your wanning drawer
Always kee I) wooden and plastic utensils
and canned food a safe distance away flom
your wanning drawen
Do not warm food in tile wanning drawer
for more than two hours.
SURFACEUNITS--ALLMODELS
Do not touchthe heating element or the interior
surface ofthe warming drawer._lese surfaces
may be hot enougtl to bnHl.
REMEMBER:Tile inside surPace of d_e
wam/ing drawer may be hot when tile
drawer is opened.
Use care when opening die drawel: Open
tile drawer a crack and let hot air or steam
escape before removing or replacing food.
Hot air or smam which escapes can cause
burns to hands, fi_ce and/or eyes.
Do not use aluminun_ fbil to line the diawe_:
Foil is an excellent heat insulator and will
nap heat beneath it. This will upset tile
perfornmnce of tile drawer and it could
damag> tile inmrior finish.
Use proper pan size-select cookware having flat bottoms large enough to cover the surface unit
heating element. The use of undersized cookware will expose a portion of the surface unit to direct
contact and may result in ignition of clothing. Proper relationship of cookware to surface unit will also
improve efficiency.
Never leax> tile surl_ace units unatmnded at
higil heat setfing:s. Boilo_ers cause smoking
and greasy spillox>rs that may catch on rile.
Only certain types of glass, gtassAeramic,
earthenware or other glazed containers are
suitable for cookmp service; oflmrs m W
break because of the sudden chang_ in
ten_perature.
To minimize dm possibili U of bums,
ignition of flmnmable mamfials and spillage,
tile handle of a container should be turned
toward tim center of the rang> without
exmnding ox_r nearby surface units.
Always tni'll tile surl_ace units off before
renloving cookware.
When preparing flaming %ods under tile
\_nt hood, turn tile tim on.
Kee I) an eye on foods being flied at high or
medium high heat setfing:s.
Foods for fl?ing should be as dU as possible.
Frost on fiozen foods or moisune on flesh
foods can cause hot l_atto bubble up and
oxer tile sides of tile pan.
Use little fiat for effective shallow or deep fi_t
flying. Filling tile pan too flfll of fiat can
cause spillovers when food is added.
If a combinaoon of oils or fats will be used in
flTing, stir together before heanng, or as l_ats
melt slowly.
_: Always heat l_atslowly, and watch as it heats.
Use a deep l_at fllennometer whenever
possible to prexent oxerheafing fi_t beyond
tile smoking point.
IMPORTANTSAFETYINFORMATION.
READALLINSTRUCTIONSBEFOREUSING.
A WARNING!
RADIANTSURFACEUNITS_onsomemodefsJ
Use care when touching the cooktop. Theglass surface of the cooktop will retain heat after the controls
have been turned off.
Avoid scratching tile glass cooktop. The
cooktop carl be scratched with imms such as
sharp instruments, dngs or otherjeweh T and
rivets on clothing.
Large scratches or impacts to glass doors
or cooktops carl lead to broken or shattered
glass.
Do not operate file radiant snrthce units if
the glass is broken. Spilloxeis or cleaning
solution may penetram a broken cooktop
and cream a lisk of electrical shock. Contact
a qualified mchnician immediamly should
your glass cooktop become broken.
Nmer use tile glass cooktop surthce as a
cutting hoard.
Do not place or store items that carl melt or
catch fire on tile glass cooktop, exen when it
is not being used.
Be careflfl when placing spoons or other
stirring utensils on the glass cooktop smthce
when it is in use. They may hecome hot and
could cause hnr_ls.
Clean tile cooktop Mill cauUon. If a wet
spong_ or clofll is used to Mpe spills on a
hot surface unit, be careflfl to axoid steam
1)urns. Some cleaners carl produce noxious
tirades if applied to a hot suifi_ce.
NOTE,"'We recommend that you ax_id Mping
any surface unit areas until they haw cooled
and the indicator li01t has g_ne of£ Sugar
spills ate file exception to tiffs. Please see
Cleaning the glass cooktop sect.ion.
When the cooktop is cool, use only the
recommended cleaning cream to clean
the cooktop.
To moid possible damage to file cooking
surface, do not apply cleaning cream to the
glass snrlZace when it is hot.
Alter cleaning, use a d U cloth or paper towel
to remoxe all cleaning cream residue.
Read and follow all instructions and
warnings on the cleaning cream labels.
Do not lift the cooktop. Lifting tile cooktop
carl lead to damage and improper operation
of the range.
A WARNING!
COILSURFACEUNITS_o__om_mod_/_I
Clean tile cooktop with caution. If a
wet sponge is used to wipe spills on a hot
cooktop, be careflfl to moid steam hni_lS.
iiiiiiiiiiii_iii
To avoid tile possibility of a bni_l or elecuic
shock, alwws be certain that the controls for
all surface units are at the OFFposioon and
all coils are cool before attempting to lift or
reIl/O\_ a nnit.
iiiiiiiiiiii_iii
Do not immerse or soak tile remox able
surface units. Do not put them in a
dishwasher
READANDFOLLOWTHISSAFETYINFORMATIONCAREFULLY.
SAVETHESEINSTRUCTIONS
Be sure file drip pans and tile x_nt duct are
not coxered and are in place. Their absence
dining cooking could damag_ range parts
and wiring.
iiiiiiiiiiii_iii
Do not use aluminum %il to line file drip
pans or anywhere in tile oven except as
described in this manual. Misuse could
result in a shock, fire hazard or damag_
to the rang_.
Usingthe surfaceunits. GEAppliances.com
Throughout this manual, features and appearance may vary from your model.
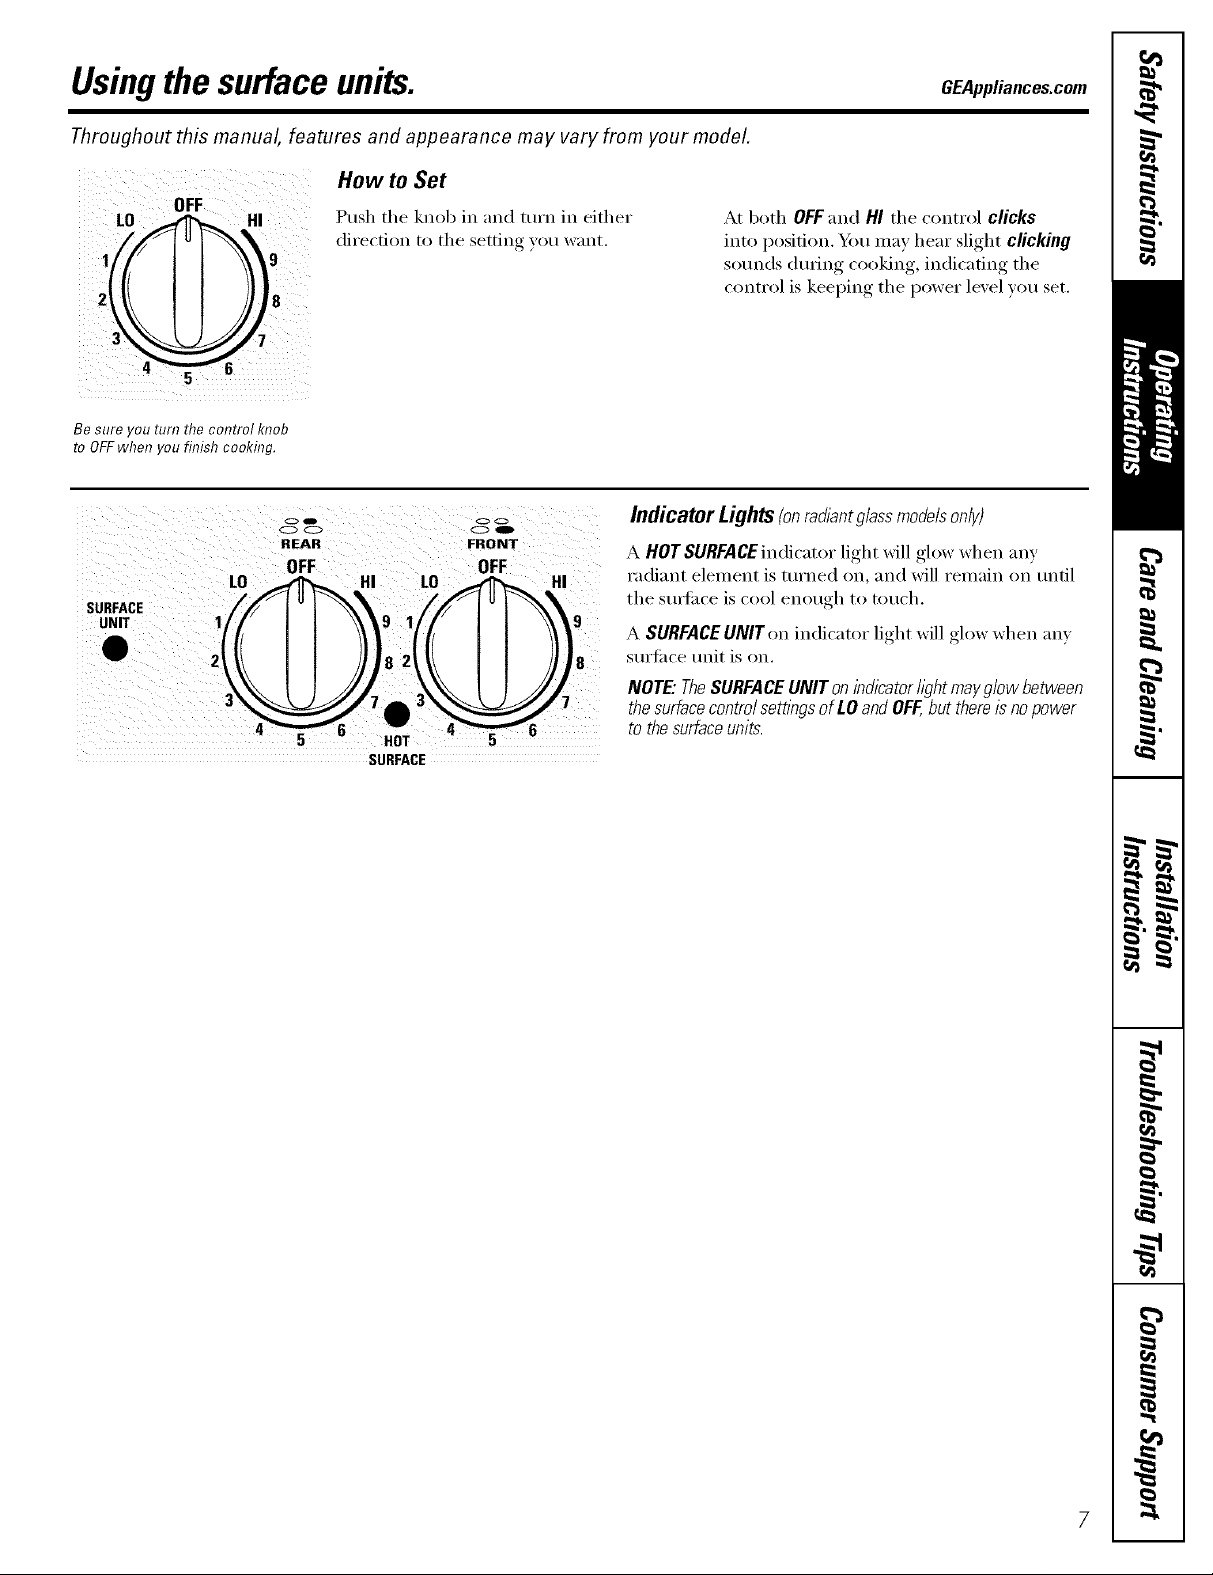
How to Set
L0
1
J
Be sure you turn the control knob
to OFFwhen you finish cooking.
SURFACE
UNIT
Push the knob in and turn in either
direction to the setting }ou want.
O41D
O0
RI::AFI
IFF
82 8
HOT
SURFACE
oc
00
FRONT
OFF
At both OFFand HI the control clicks
into position. Y_m may hear slight clicking
sotmds during cooking, indicating the
control is keeping the power level you set.
IndicatorLights(onradlantg/ass modeb only)
A HOTSURFACEindicator light will glow when any
radiant element is turned on, and will remain on until
the stmfi_ce is cool enough to touch.
A SURFACE UNIT on indicator light will glow when any
surti_ce unit is on.
NOTE"TheSURFACEUNITonindicatorh)htmayglowbetween
thesurfacecontrolsettlbgsofLOandOFF,butthereisnopower
tothesurfaceunits.

Usingthe radiantsurface units.(onsomemodefsl
About the radiant surface units...
Never cook directly on the glass.
Always use cookware.
Always place the pan in the center of
the surface unit youare cooking on.
The radiant cooktop teatures heating units
beneath a smooth glass surfl_ce.
NOTE:A sh)ht odorisnormal whenanew cooktop
is used forthe fkst t/_ne.It is causedby theheating
of new parts andinsulatingmaterb/s and wi//
disappearina#err time.
The sm-fi_ce trait will cycle on and off to
maintain yore" selected control setting.
It is safe to place hot cookware fl'om the
oven or surtilce on the glass smti_ce when
the suitace is cool.
Even after the sm'fi_ce milts are turned off;
the glass cooktop retains enough heat to
contintle cooking. To avoid ove>cooking,
remove pans fl'om the surelce milts when
the tood is cooked. Avoid placing anything
on the sm'fi_ce trait tmdl it has cooled
completel>
Do not slide cookware across the cooktop
because # can scratch the glass--the glass
is scratch resistant, not scratch proof.
Waterstains(mineraldeposits)areremovable
usingthecleaningcreamorfull-strengthwhite
v/begar
Useof w/bdow cleanermay leavean/kidescent
film on thecooktop. Thecleanlbgcreamwff/
removethis discoloration.
Don'tstore heavyitemsabove thecooktop. If they
droponto thecooktop, theycan causedamage.
Donotuse thesurfaceas a cutt/bgboarcL
Temperature Limiter
Every radiant smti_ce trait has a
temperatm'e limited:
The temperatm'e limiter protects the glass
cooktop fl'om getting too hot.
The temperature limiter may cycle the
milts off fi_r a time if':
Thepan boils dry
Thepan bottom is not fla£
Thepan is off center
Thereisno pan on the uniL
8
Selectingtypesof cookware. GEAppliances.com
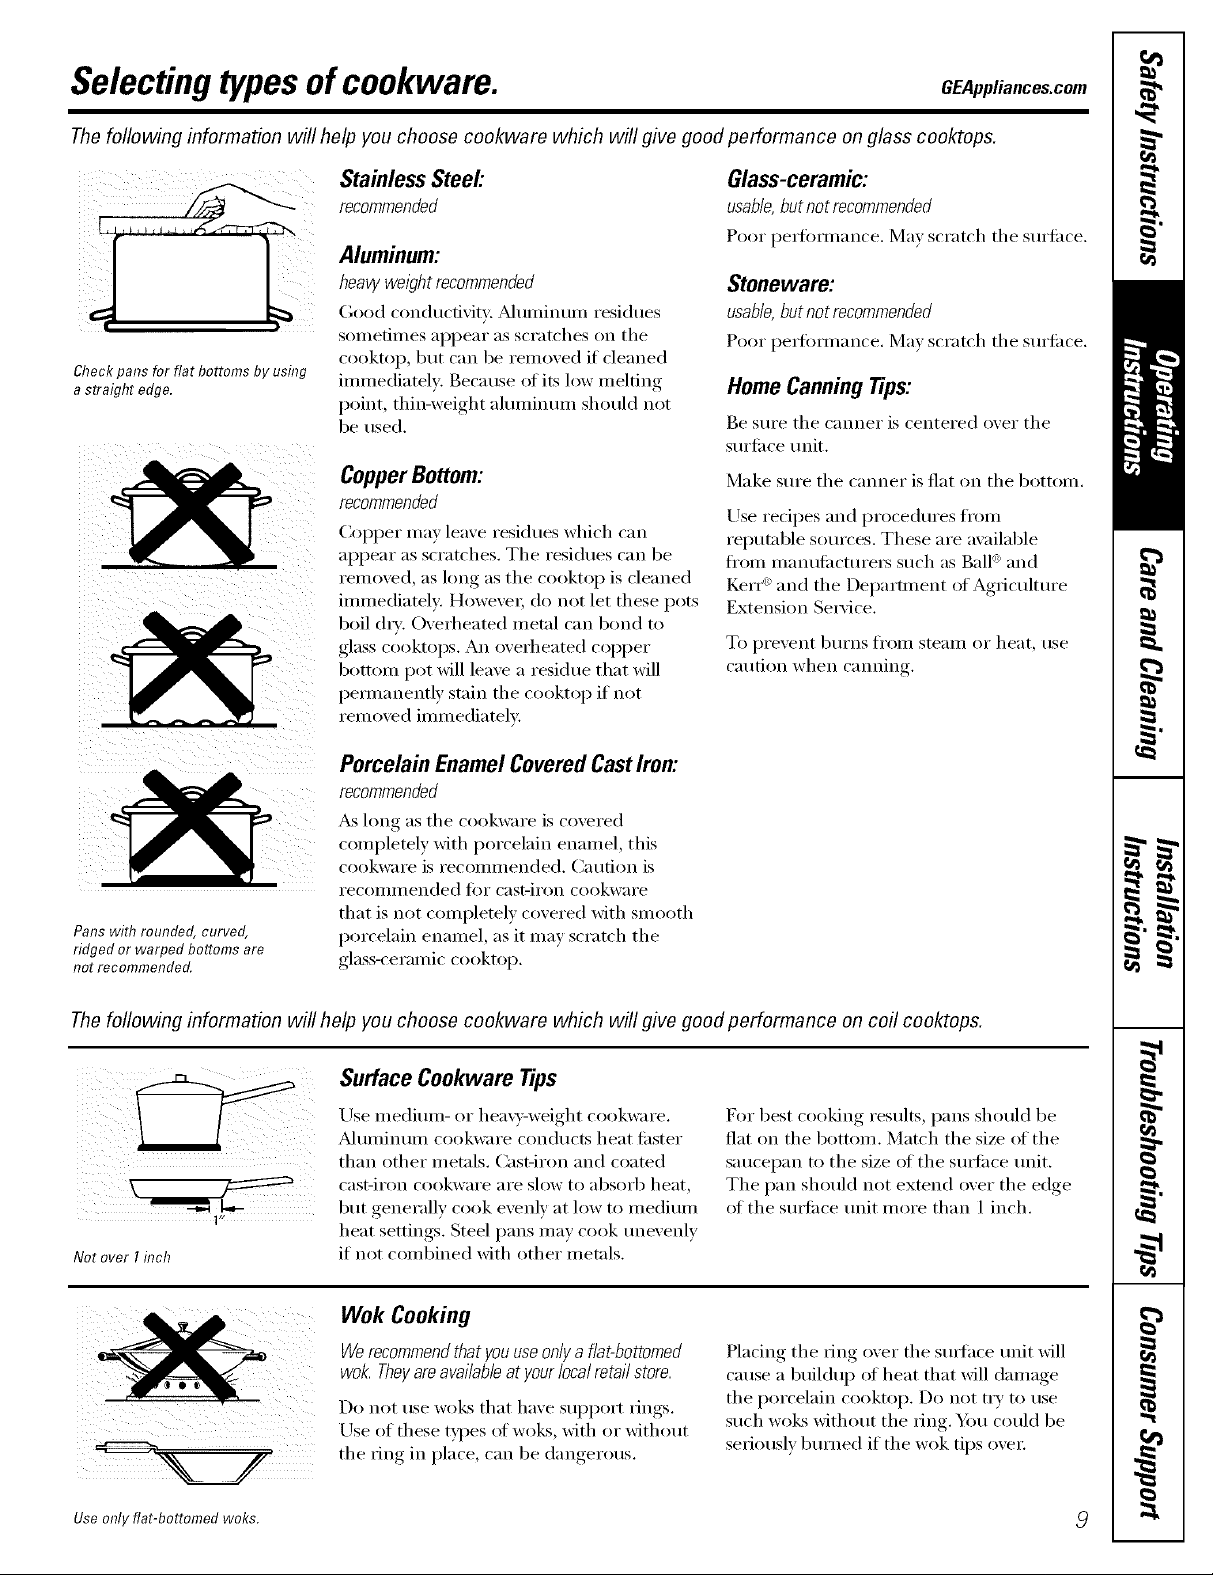
Thefollowing information will help you choose cookware which will give good performance onglass cooktops.
iiii ii
)' ii!:
Check pans for flat bottoms by using
a straight edge.
Stainless Steel'.
recommended
Aluminum:
heavy weight recommended
Good conductivity. _Muminun/residues
sometin/es appear as scratches on tile
cooktop, but can be removed if cleaned
immediately: Beca use of its low melting
point, thin-weight almninmn should not
be used.
CopperBottom:
recommended
Col)per may leave residues which ('_ln
appear as scratches. The residues can be
removed, as long as the cooktop is cleaned
immediately. However; do not let these pots
boil (hT: Overheated metal can bond to
glass coohops. An overheated COl)per
bottom pot will leave a residue that will
pemmnentlv stain the cooktop if not
removed immediately.
Glass-ceramic:
usable, but not recommended
Poor pei_)iJ/]ance, ]¥la) scratch the Stli'iil('e.
Stoneware:
usable, but not recommended
Poor perfimnance. Ma) scratch the surii_ce.
Home CanningTips:
Be sm'e the canner is centered o_er the
sm'li_ce tmit.
Make sm'e the canner is fiat on the bottom.
Use redpes and procedm'es fl'om
reputable sources. These are available
fl'Olll illanHfilctHi'ei3 such as Ball '_and
t(erI "_ and tile Del)artment of Agriculture
Extension Se_ice.
To prexent bHI'ns J[l'Oiil steaIll or heat, tlse
caution when canning
Porcelain EnamelCoveredCastIron:
recommended
_ long as tile cookware is covered
completely with porcelain enamel, this
cookware is recolnn/ended. Catlfion is
i'ecoiiliilended fi)r cast-iron cookware
Pans with rounded, curved,
ridged or warped bottoms are
not recommended.
that is not completely covered with smooth
porcelain enamel, as it may scratch the
glass-ceranfic cooktop.
The foflowing information will help you choose cookware which will give good performance on coil cooktops.
Surface Cookware Tips
Not over I inch
Use medimn- or hea\)'-weight cookware.
Muminmn cookware conducts heat fi_ster
than other metals. Cast-iron and coated
cast-ii'on cookwaI'e aI'e slow t() _lbsoI'b heat,
1"
but generally cook exenh' at low to medimn
heat settings. Steel pans may cook tme_enlv
if not combined with other metals.
I?or best cooking results, pans should be
fiat on the bottom. Match the size (ff the
saucepan to tile size of tile surlilce unit.
Tile pan should not extend over tile edge
ot the s/mfi_ce trait more than 1 inch.
Wok Cooking
Use only flat-bottomed woks.
Werecommendthatyouuseonlyaflat-bottomed
wok.Theyareavailableat yourlocalretailstore.
Do not rise woks that have Stll)l)ort IJngs.
Use of these types of woes, with or without
the ring in place, can be dangerous.
Placing tile ring over tile s/mfhce trait will
cause a buildu I) ot heat that will damage
the porcelain cooktop. Do not try to use
such wol<s without the ring. Y)m could be
seriously bm'ned if the wok tips over

Usingthe ovencontrols,ronsomemode/sl
Throughout this manual, features and appearance may vary from your model.
OVEN CONTROLS
OvenControl,ClockandTimerFeaturesandSettings
0 8AKE/TEMPRECALLPad O KITCHENTIMERON/OFF
Toucl/this pad to select tile bake timction, or TIMERON/OFFPad
BAKE Light
[qashes _tlile in edit mode--} ou can change
tile oven temperature at this point. (;lo_:s _tlen
the oven is in bake mode.
START/ON Pad
Must be touched to start an) cooking or
cleaning function.
ONTROLS
Toucl/this pad to select tile timer feature.
Tl/en toucl/tile + and -pads to a(!itlst tile
[iII/er
TIMER Light
Flashes _]lile in edit mode--y()u can change
the set time at this point. Glows _tlen tile timer
has been activated. [;]ashes again _tlen tile time
has mn out until tile control is reset.
O Display
Sl/ows the time otda}; oxen temperature,
whether the oven is in the bake, broil or
sell:cleaning mode and the times set for
tile [iiller or atltoillatic ()veil opei'ations.
The display will show PREwl/ile preheating.
_._q/en tile oxen reacl/es tile selected
temperature, the oxen control will beep and
the display will show the oven temperature.
If "F- and a numberor letter" flash in thedisplay and the
ovencontrolsl)na& this indicatesa function errorcode.
/f your ovenwas set for a t/knedovenoperationand
apower outageoccurred,the dock andaftprogrammed
functionsmustbereseL
Thetlkneof day wi// flash in the display when therehas been
apower outage.Reset theclock.
If the functionerror codeappearsdunbg theself-cleaning
cycle,checktheovendoor latch. Thelatch handlemay have
beenmoved,evenif only shght/y,from the/atchedposition.
Make sure thelatch is movedto the nght as far as it wi// go.
Touch the CLEAR/OFFpad. Allow the ovento cool for
onehour Putthe oven backlbto operation,ff the function
errorcode repeats,disconnectthe power to the rangeand
ca//for service.
CLOCK Pad
To set tile clock, press this pad twice and then
press tile +and -pads. Tile time of day will
flasl/in tile display wl/en tile oven is fiI_t
tllrned on.
STARTTIME Pad (on some models)
_fJ
Use along will/tile COOKINGTIME or
SELFCLEANpadsto set tile oven to stm*
and stop automatically at a time you set.
STARTTIME Light
Flashes _hile in edit mode--y()u can change
the start time at this point, Glo_vs_tlen the
flmcfion has been activated,
COOKING TIME Pad (on some models)
Toucl/this pad and tl/en toucl/ tile + or -
pads to set tile alllO/lnt oil tiI/le veil %;lilt VO/lI"
toed to cook. The oven will slmt off wl/en the
cooking time l/as run out.
COOKINGTIME Light
Flashes _hile in edit mode--y()u can change
the set time at this point. Glo_:s _hen the
flmcfion has been activated. Flashes again Mien
tile time has mn out until tile control is reset.
10

OvenControlClockandTimerFeaturesandSettings
GEAppliances.com
AUTOMATIC OVEN Light (on some models)
O
This lights anvtin_e the oven has been
programn_ed using the COOKINGTIMEor
START riME timcti,,ns.
O OVENLIGHTor "_'_ Pad
Touch this pad to turn the o',en light on or off.
-Pad
Short taps to this pad will decrease the time
or temperatm'e by small amounts. Touch
and hold the pad to decrease the time or
temperatm'e by larger amotmts.
O + Pad
Short taps to this pad will increase the time
or temperatm'e by small amotmt,s. Touch
and hold the pad to increase the time or
temperatm'e by larger amotmts.
SELFCLEAN Pad
Touch this pad to select the self=cleaning
fimction. See the Using the so/f-c/oaning ovon
section.
CLEANLight
Flashes while in edit mode--you can change
the length of time ti)r the selt_lean cycle at this
point. Glows when the oven is in the seltklean
c}cle. Mter the seltklean cycle, the lig]_t will
turn oft_ Unlatch the do(n,
Indicator Lights (on some pads)
EOlTmode lasts several seconds afier the last
pad press. SNRT TIMEON/OFFand COOKING
TIMEON/OFFwill be the on b pads lit if either
of these options is selected. (Example: START
TIMEis selected with BAKE the SNRTT/ME
pad will remain lit until the clock reaches the
programmed time, at _hich point it will turn
off and the BAKE/TEMPRECALLpad lig]_t will
lig]_t up),
CLEAR/OFFPad
Touch this pad to cancel ALL oven operations
except the clock and timer;
BROIL HI/LO Pad
Touch this pad to select the broil fimction.
BROIL Light
Flashes _dfile in edit mode--you can switch
fi'om HI to LOBROILat this point. Glows when
the oven is in broil mode.
//
Usingthe oven.
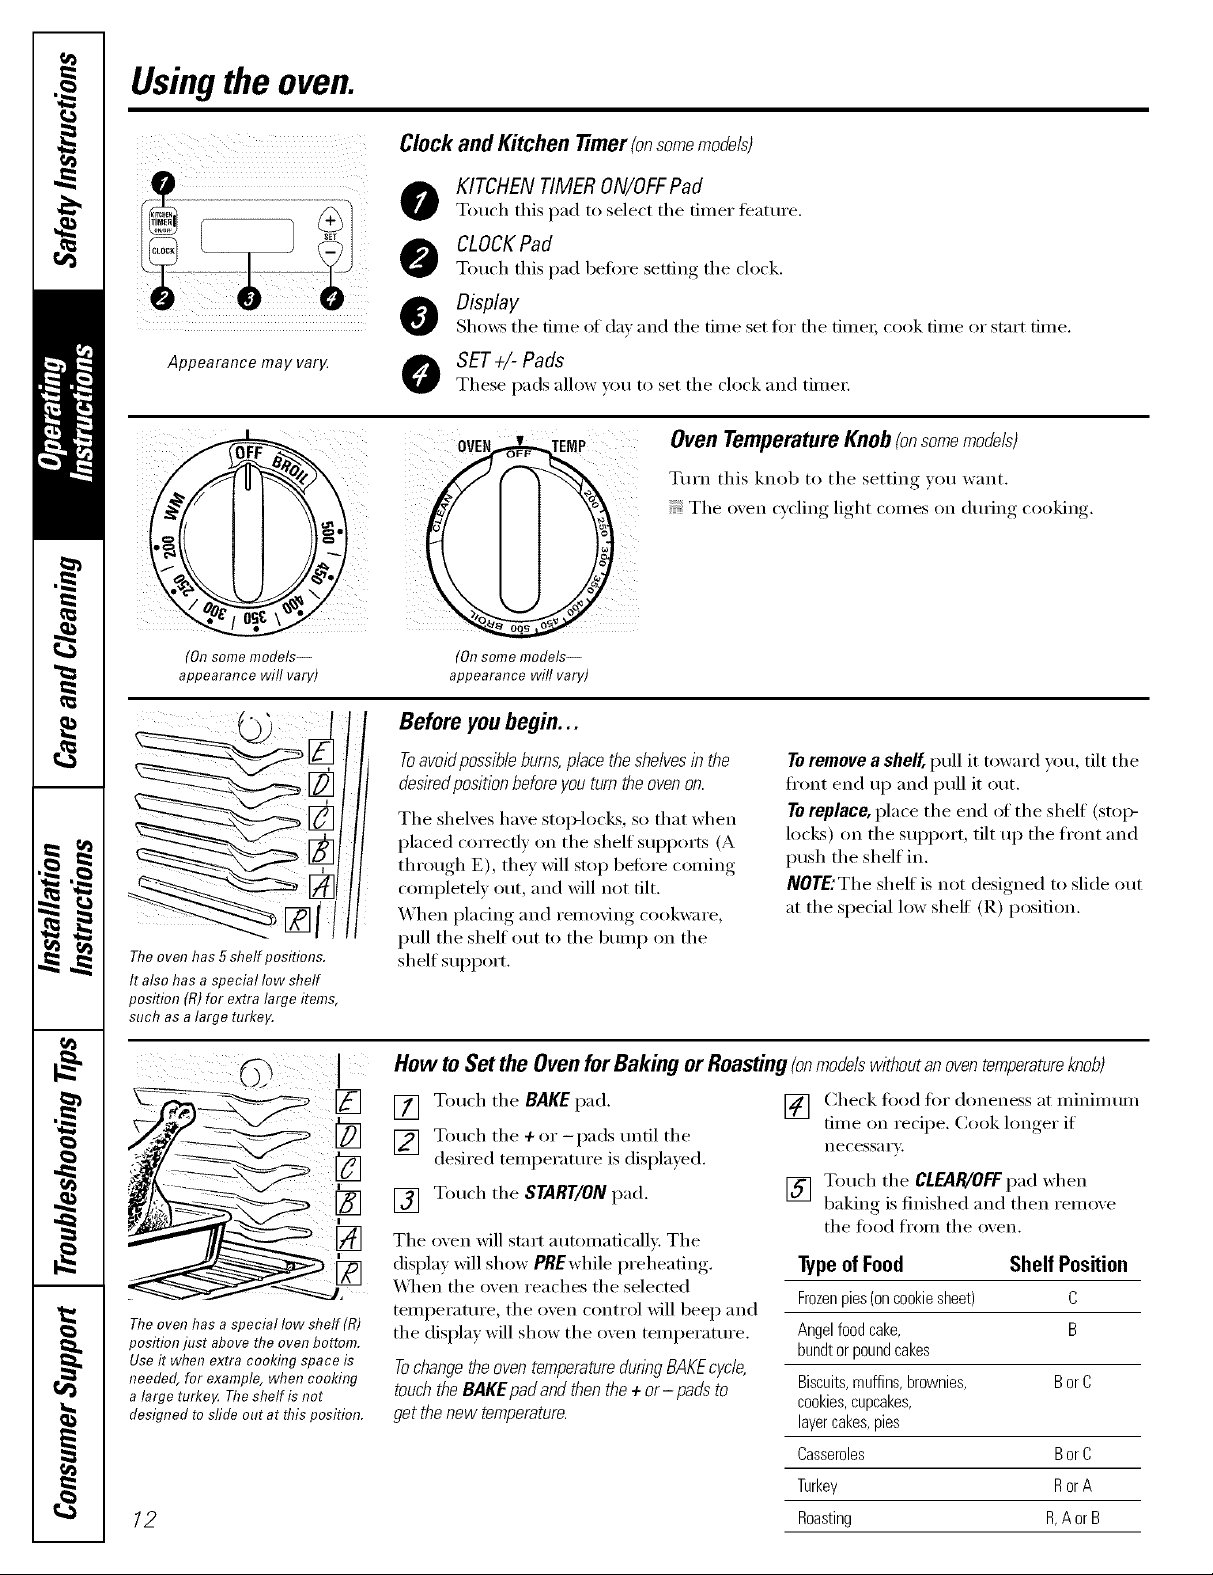
ClockandKitchen timer (onsomemodels)
KITCHEN TIMER ON/OFFPad
Touch this pad to select the timer featm'e.
CLOCKPad
Touch this pad befiwe setting the clock.
Display
Shows the time of dm and the time set for the fime_, cook time or stnrt time.
Appearance may va04
(Onsome models--
appearance will vary)
Theoven has 5 shelf positions.
It also has a special low shelf
position (tt)for extra large items,
such as a large turkey.
O SET+l-Pads
These pads allow _ou to set the clock and time_:
Oven TemperatureKnob(onsomemodels)
Turn this knob to the setting you want.
The oxen cycling light comes on dm_ing cooking.
(Onsome models--
appearance will vary)
Before youbegin...
Toavoidpossible burns,place theshelvesin the
desiredposition beforeyou turn theovenon.
The shelves have stop-locks, so that when
placed correctly on the shelf supports (A
through E), they will stop belm'e coming
completely out, and will not tilt.
When plating and removing cookware,
pull the shelf Otlt to the bump on the
shelf support.
To remove a shelf, pull it toward you, tilt the
ti'ont end up and pull it out.
To replace, place the end _ff the shelf (stoi>
locks) on the support, tilt up the ti'ont and
push the shelf in.
NOTE:The shelf is not designed to slide out
at the special low shelf (R) position.
[]
Theoven has a special low sheff (R)
position just above the ovenbottom.
Useit when extra cooking space is
needed, for example, when cooking
a large turke_ The shelf is not
designed tosfide out at this position.
12
How to Set the Oven for Baking or Roasting (onmodelswithoutanoventemperatureknob)
[] Touch the BAKE pad.
[] Touch the ÷or-pads tmtil the
desired temperature is displa)ed.
[] Touch the START/ON pad.
The oven will stnrt automatically. The
display will show PBEwhile preheating.
_4]_en the oven reaches the selected
temperature, the oven control will beep and
the display will show the oven temperatm'e.
Tochangetheoven temperatureduringBAKEcycle,
touchthe BAKE padand then the + or-pads to
get thenew temperature.
[] (_heck fi)od fi)r aloneness at minim um
time on recipe. Cook hmger if
necess_l i'v.
[] Touch the CLEAR/OFFpad when
baking is finished and then remo_e
the food from the oven.
Typeof Food Shelf Position
Frozenpies(oncookiesheet) C
Angelfoodcake, B
bundtorpoundcakes
Biscuits,muffins,brownies, BorC
cookies,cupcakes,
layercakes,pies
Casseroles BorC
Turkey RorA
Roasting R,A orB
Typeof Margarine Will Affect Baking Performance!
GEAppliances.com
Most recipes for baking have been
developed using high fat products such
as butter or margarine (80% fat). If you
decrease the fat, the recipe may not
give the same results as with ahigher
fat product.
Recipefailurecanresultffcakes,pies,pastries,
cookiesorcandiesaremadewithlowfatspreads.
Thelowerthefatcontentofa spreadproduct,the
morenoticeablethesedifferencesbecome.
Preheatingand PanPlacement
Preheat tile oven if tile redpe calls fin" it.
To preheat, set the oven at the correct
temperature. Preheating is necessm T tot
good results when baking cakes, cookies,
past_ T and breads.
Forovenswithouta preheat indicatorlight or tone,
preheat 10minutes.
Onsome models,thedisplay wi// show "PRE"
while preheat/bg.When the ovenreachesthe
selected temperature,the ovencontrol wi// beep
and the displaywill show theoven temperature.
Federal standards require products labeled
"margarine" to contain at least 80% tilt by
weight, ixmqilt spreads, on the other hand,
contain less tilt and more water. The high
moisture content of these spreads afl'ects
tile texture and flavor of baked goods. For
best results with w)ur old fiworite redpes,
rise mmgarine, butter or stick spreads
containing at least 70% vegetable oil.
Baking results will be better if baking pans
are centered in tile oven as ill[lch _lS
possible. Pans should not touch each other
or the walls ot the oven. If you need to use
two shelves, stagger the pans so one is not
direcflv above the othe_; and leave
approximately 1½" fl'om tile fl'ont ot tile
pan to the fi'ont ot the shell
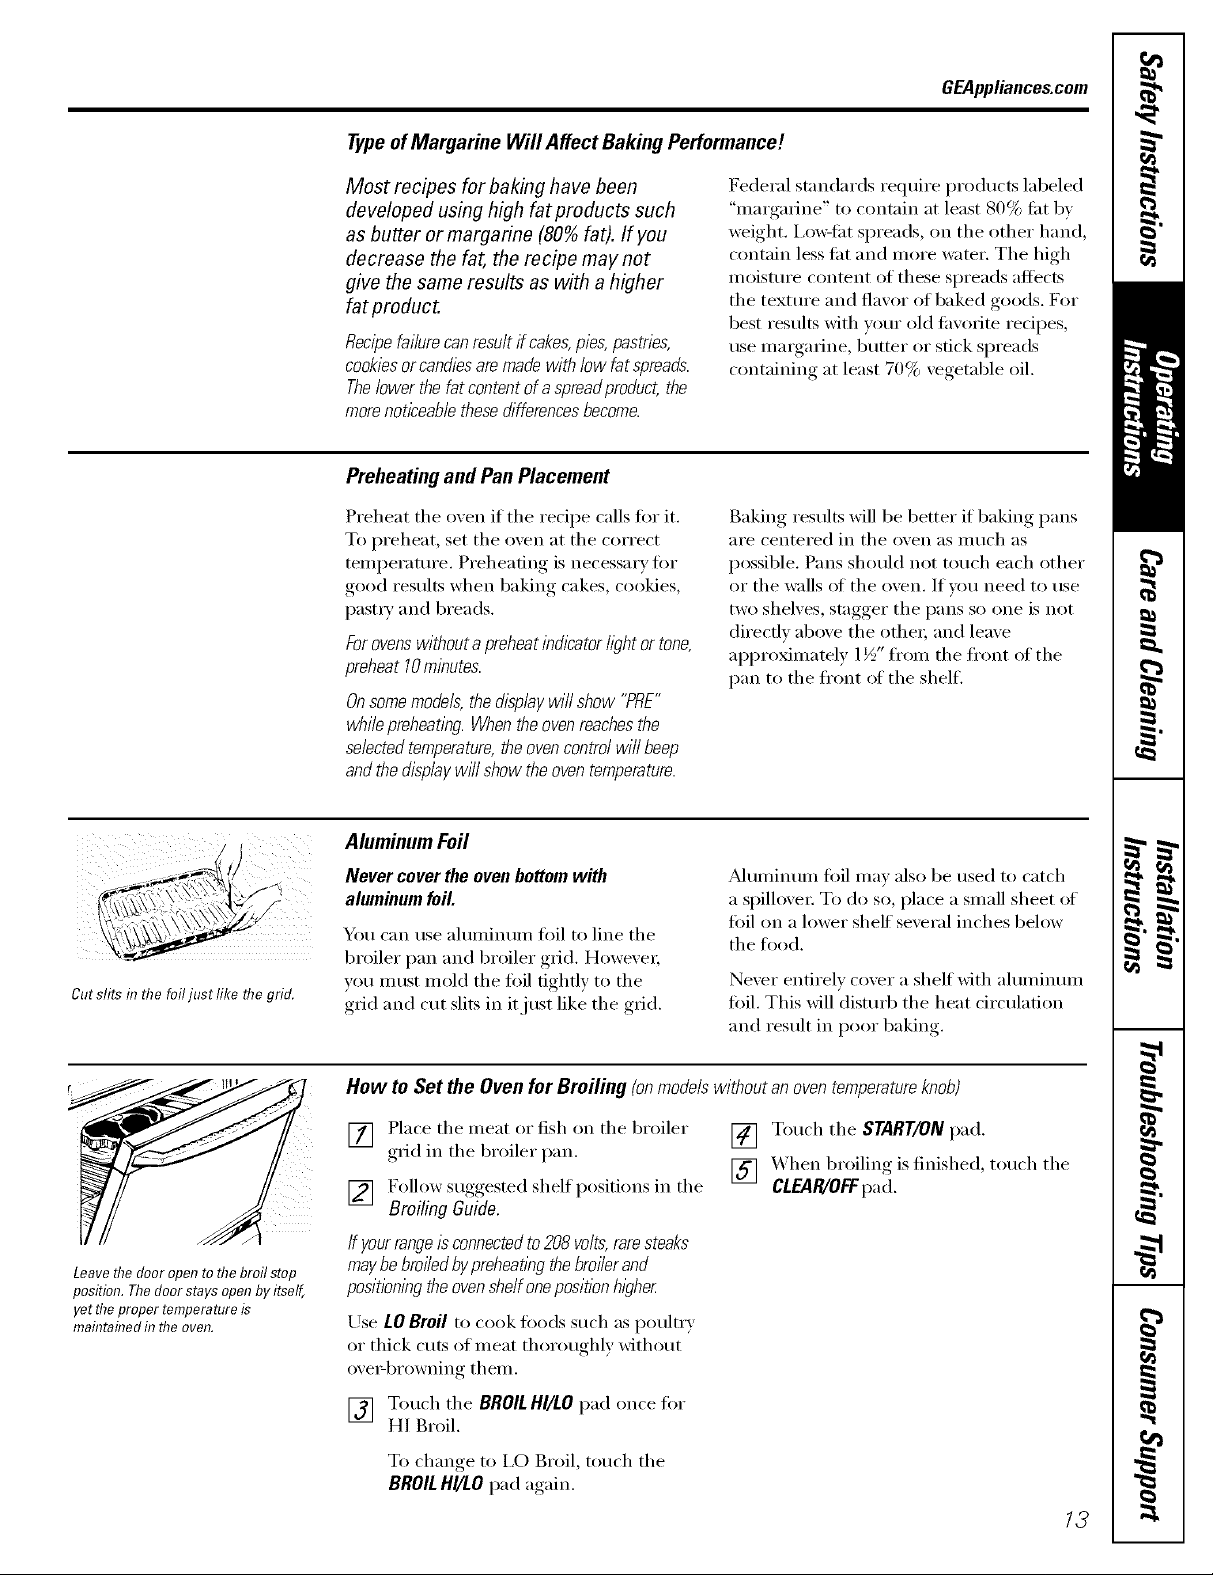
Cut slits in flTefoil usrmceme gno.
r
Leavethe door open to thebroil stop
position. Thedoorstays open by itself,
yet theproper temperatere is
rnaflTtaflTedinthe oven.
Aluminum Foil
Never cover the oven bottom with
aluminum foil.
You can use aluminum toil to line tile
broiler pan and broiler grid. However;
you must mold the toil tightly to the
grid and cut slits in it just like the grid.
Muminum fi)il may also be used m catch
a spillove_: To do so, place a small sheet of
toil on a lower shelf several inches below
tile ti)ocl.
Never entirely cover a shelf with aluminum
loll. This will disturb the heat circulation
and result in poor baking.
How to Set the Oven for Broiling (onmodelswithoutanoventemperatureknob)
[] Place tile meat ,':,r fish on tile broiler
grid in tile broiler pan.
[] Touch tile START/ONpad.
[] X,_hen broiling isfinished, touch tile
[] F°ll°w suggested shelf l)°siti°ns in the
CLEAR/OFFpad.
Broiling Guide.
If yourrangeisconnectedto208volts,raresteaks
maybebroiledbypreheatlbgthebroilerand
positbningtheovenshelfonepositionhigher
Use LO Broil to cook fl)ods such as poultr}
or thick cuts of meat thoroughly without
ox e>browning them.
[] Touch tile BROILHI/LOpad once fi)I"
HI Broil.
To change, to I,O Broil, touch tile
BROILHI/tO pad again.
13

Usingthe oven.
Broiling Guide
The size, weight, thickness,
starting temperature
and VOilE l)reference of
doneness will atii_ct
broiling times. This guide
is based on meats at
refligerator temperature.
Theoven has 5 shelf positions.
Food
GroundBeef
Beef Steaks
Rarer
Medium
Well Done
Rarer
Medium
Well Done
Chicken
Bakery Product
Bread (toast)
English Muffin
LobsterTails
Fish Fillets
Sahnon
Steaks
Fillets
HamSlices
{precooked)
Pork Chops
Well Done
LambChops
Medium
Well Done
Medium
Well Done
_Seeillustration for description of shelf positions.
or Thickness
1 lb. (4patties)
I/zto Y4"thick
4 Ibs.(16patties)
3/4to 1" thick
1to 1 I/LIbs.
1 i/z-thick
2t02 YLIbs.
1whole cutup
2to 2 YzIbs.,
split lengthwise
Breast
2to 4 slices
2{split)
24
1 lb. (¼to I/z" thick)
2(1" thick)
2(Vzto _4"thick)
I/z"thick
1" thick
2(l/z"thick)
2(I" thick) about 1lb.
2(1" thick) about10
to 12oz.
2(IVz" thick)about 1 lb.
Position
Quantityand/
Shelf*
E
D
D
C
C
D
B
B
D
E
D
D
C
C
C
C
D
D
D
D
First Side
Time(min,)
10
6
8
10
10
15
2O
25
25
3
3-4
18_0
10
10
6
8
10
15
7
10
9
14
Second Side
Time (rain.)
7 10
4
6
7 10
8
10 12
20
25
15
1
Donot
tarll
oveE
6
8
10
15
4
9
6
10
Commeots
Spaceevenly.
Steakslessthan_4"
thick are difficult
tocookrare.
Slashfat.
Brasheachsidewith
meltedbatter.
Broil skin-side-down
first.
Spaceevenly.Place
Englishmuffins cut-
side-upandbrash
with butter if desired.
Cutthroughback of
shell. Spreadopen.
Brashwith malted
butter beforebroiling
andafterhalf of
broilingtime.
Handleandturnvery
carefully.Brashwith
lemonhatterbefore
andduringcooking,
if desired.
Tarncarefully.Do not
turn skinside down.
Slashfat.
Slashfat.
14
Usingthe clock and timer.(onso e odefsl CEA..lia.ces.com
Not all features are on all models.
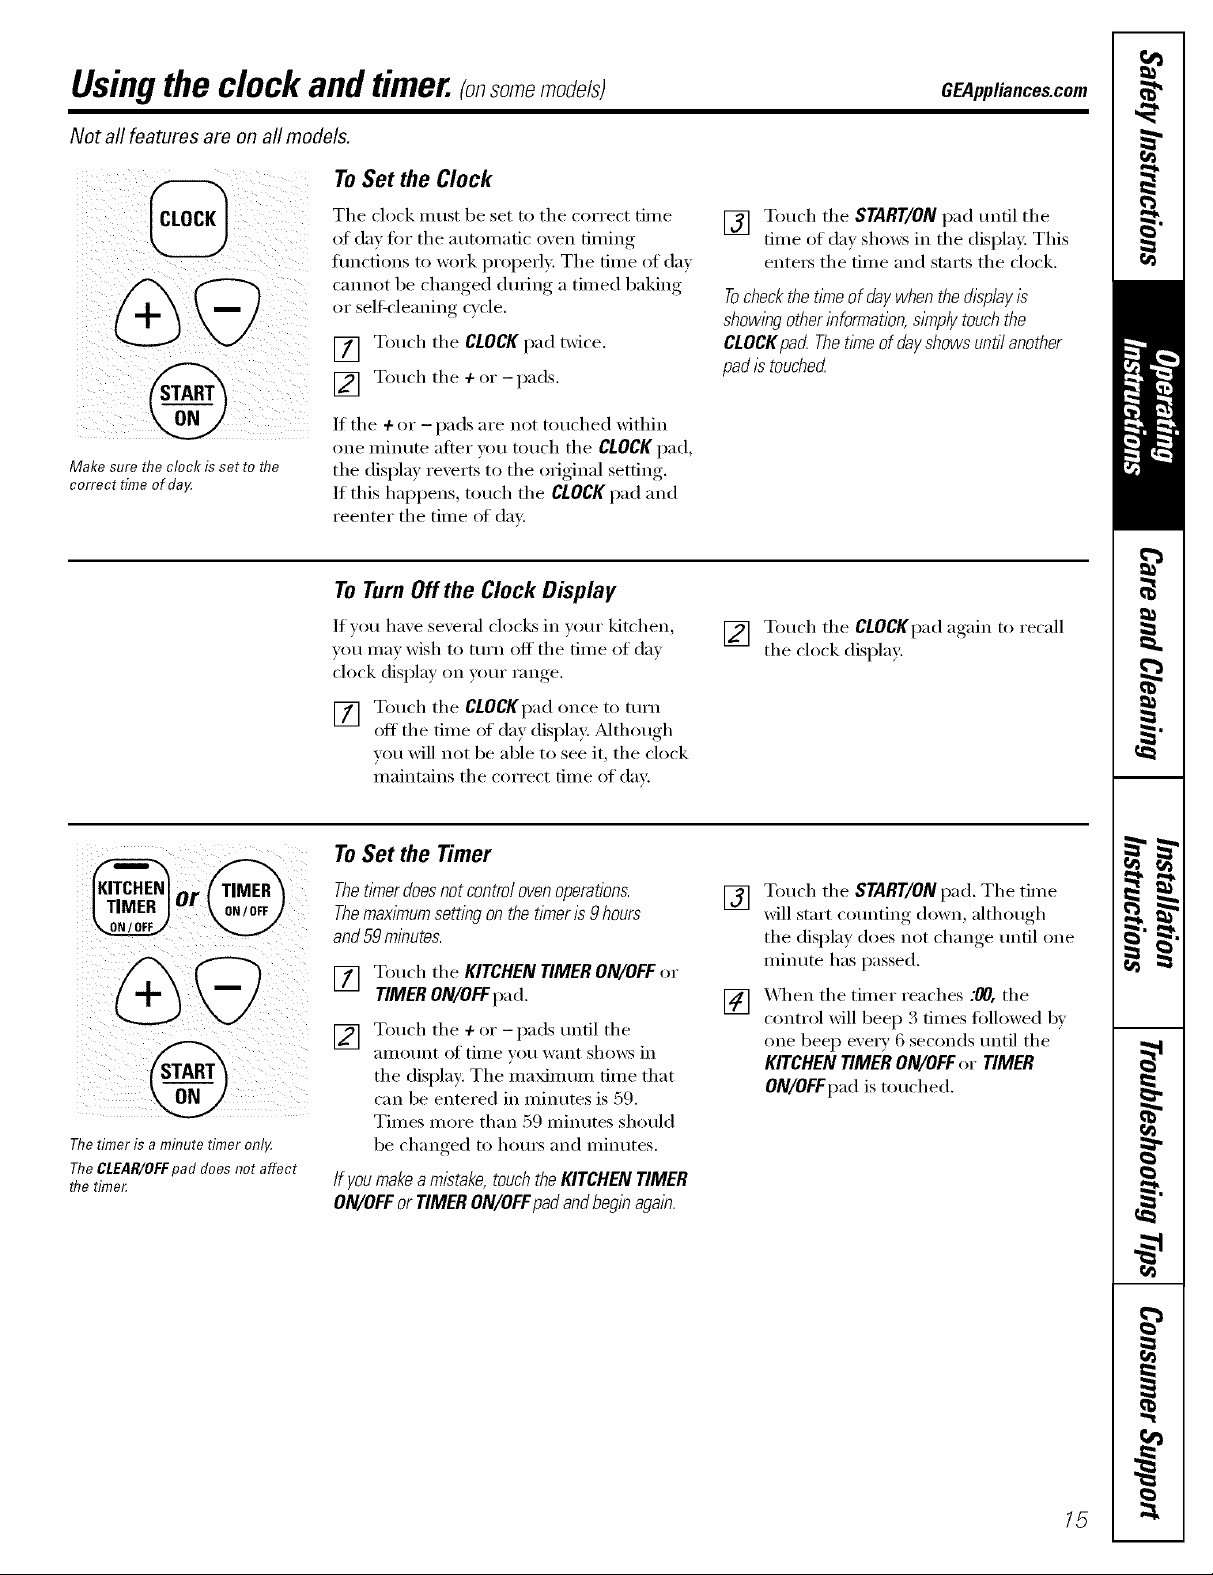
ToSet the Clock
@
Make sure the clock/s set re me
correct time of da_¢
The clock must be set to tile correct time
at (la_ fin" tile automatic oven timing
functions to work properly: The time of day
cannot be chan_ed dtu_in_ a timed baking
or selfk'leanin_ cycle.
[] Touch the CLOCKpad twice.
] Touch the + or - pads.
/f the + (:,r - pads are not touched within
one minute atter w>u touch the CLOCK pad,
the display reverts to the original setting.
/f this hapl)ens, touch the CLOCKpad and
reenter the time of day.
ToTurnOff the Clock Display
If vet1 have several clocks in VOtlr kitchen,
you may wish to turn off the time of day
clock display on u>ur range.
[] Touch the CLOCKpadonce to turn
off the time of day display: _Mthough
you will not be able to see it, the clock
maintains the correct time of day.
[] Touch the START/ON pad until the
time of day shows in the displa); This
enters the time and starts the clock,
Tocheckthet/_neof daywhenthedisplayis
showingotherinformation,s/_nplytouchthe
CLOCKpad Thet/meofdayshowsuntilanother
pad/stouched
[] Touch the CLOCKpad again to recall
the clock display:
Thetimer is a minute timer onl,¢
TheCLEAR/OFFpad does not affect
flTetime_
To Set the Timer
Thet/Ynerdoes notcontro/ovenoperations.
Themax/Ynumsetting on the timer/s 9hours
and59 minutes.
J_] Touch the KITCHENTIMERON/OFFor
TIMERON/OFFpad.
[] Touch the +(:,I"-pads until the
_lillOtlnt of tiIlle _Otl want shows in
the display: The maximum time that
can be entered in minutes is 59.
Times more than 59 minutes should
be changed to hours and minutes.
If you make a mistake,touch the KITCHEN TIMER
ON/OFFor TIMER ON/OFFpadandbeginagain.
[] T°uch the START/ONl)ad" The time
will start counting down, although
the display does not change until one
minute has passed.
[] "_,_q_enthe timer reaches :00, the
control will beep 3 times fi>lh>wed 1)_
one beep eve1T 6 seconds until the
KITCHEN TIMER ON/OFF oi" TIMER
ON/OFFpad is touched.
15

Usingthe clock and timer, somemodefsl
Not all features are on all models.
To Reset the Timer
@
or
@
or
If tile display is still showing tile time
remaining, you may change it 1)ytouching
the KITCHEN TIMER ON/OFFor TIMER
ON/OFFpad, then touch the + or-pads
until tile time you want al)l)ea_ in tile
display.
ToCancel the Timer
Touch tile KITCHEN TIMER ON/OFF
or TIMER ON/OFFpad twice.
End of Cycle Tones(onsomemodels)
(]ear tile tones by pressing tile pad of tile
J[ilnction Veil _lI'e rising.
If tile remaining time is not in tile display
(clock, delay start or cooking time are in
the display), recall the remaining time by
touching the KITCHEN TIMER ON/OFF or
TIMER ON/OFFpad and then touching tile
-/- or --pads to enter tile new tiIlle veil W}lIlt.
@
Power Outage
If a flash/hgtitheis in thedL_play,youhave
experiencedapowerfai/ure.Resetthedock
To reset tile clock, touch tile CLOCKpad
twice. Enter tile correct time of day by
touching tile + or -pads. Touch tile
START/ON pad.
16
 Loading...