

Hotpoint RB768GN, RB767GN Use And Care Manual
How to
get
the best from
YomRange
Conkn@
Aluminum Foil
20
Preheating
517
Use and Care of
Anti-Tip Device
3,5
Roasting/Roasting Guide 18, 19
Appliance Registration
2
Self-Cleaning Instructions 22,23
models
Canning Tips
11
Thermostat Adjustment 27
RB767GN
Care and Cleaning 25-28
Vent Duct 25
Clock/Timer
9
Problem Solver
29,30
RB768GN
Consumer Services
31
Safety Instructions
3,4
Energy-Saving Tips
5
Surface
Cooking
10-13
Features
6,7
Control Settings
10
Installation Instructions
5
Cookware Tips
12, 13
Leveling
5
Surface Light
14
Model and
Serial
Numbers
2
Surface Light Replacement 26
Power Outage?
9
Warranty
Back Cover
Set the Clock
9
Set the Timer
9
Oven
14
Baking/Baking Guide
15-17
Broiling/Broiling Guide 20, 21
Control Panel
8
Control Settings
8, 15-24
Door Removal
25
GE Answer
Center@
Light; Bulb Replacement 14, 25
800.626.2000
Help us help you...
IMPO~NT
Before using your range,
read this book carefully.
It is intended to help you operate
and maintain your new range
properly.
Keep it handy for answers to your
questions.
If you don’t understand something
or need more help, write (include
your phone number):
Consumer Affairs
Hotpoint
Appliance Park
Louisville, KY 40225
Write down the model
and serial numbers.
You’ll find them on a
label
on
the front of the range behind the
storage drawer. See Features of
Your Oven on pages 6 and 7.
These numbers are also on the
Consumer Product Ownership
Registration Card that came with
your range. Before sending in this
card, please write these numbers
here:
Model Number
Serial Number
Use these numbers in any
correspondence or service
caIls
concerning your range.
If you received
a damaged range . . .
Immediately contact the dealer (or
builder) that sold you the range.
Save time and money.
Before you request
service . . .
Check the Problem Solver on
pages 29 and 30. It lists causes of
minor operating problems that you
can correct yourself.
2
If you need service...
To obtain service, see the
Consumer Services page in the
back of this book.
We’re proud of our service and
want you to be pleased. If for some
reason you are not happy with the
service you receive, here are three
steps to follow for further help.
FIRST, contact the people who
serviced your appliance. Explain
why you are not pleased. In most
cases, this will solve the problem.
NEXT, if you are still not pleased,
write all the details-including
your phone number—to:
Manager, Consumer Relations
Hotpoint
Appliance Park
Louisville, Kentucky 40225
FINALLY, if your problem is still
not resolved, write:
Major Appliance
Consumer Action Panel
20 North
Wacker
Drive
Chicago, Illinois 60606
~STRUCTIONS
Read all instructions
before
usi~
this
appliance.
IMPORTANT
SA~TY
NOTICE
The California Safe Drinking
Water and Toxic Enforcement
Act requires the Governor of
California to publish a list of
substances known to the state
to cause birth defects or other
reproductive harm, and requires
businesses to warn customers of
potential exposure to such
substances.
The fiberglass insulation in
self-
clean ovens gives off a very small
amount of carbon monoxide
during the cleaning cycle.
Exposure can be minimized by
venting with an open window or
using a ventilation fan or hood.
When You Wt Your Range
.
Have the
installer show
you the
location of the circuit breaker or
fuse. Mark it for easy reference.
. Be sure your appliance
is
properly installed and grounded
by a qualified technician
in
accordance with the provided
Installation Instructions.
When
using
electrical appliances,
basic safety precautions should be
followed, including the following:
.
Use
this appliance only for iti
intended use as described in this
manual.
● Don’t attempt to repair
or replace any part of your
range unless it is specifically
recommended in this
book.
All
other
semicing
should be referred
to a qualified technician.
IMPORTANT SAmTY~STRUCTIONS
Read all
imtructiom
before wing thk appliance.
.
Before
performing
any
service,
DISCONNECT THE
RANGE POWER SUPPLY
AT THE HOUSEHOLD
DISTRIBUTION PANEL
BY REMOVING THE FUSE
OR SWITCHING OFF THE
CIRCUIT BREAKER.
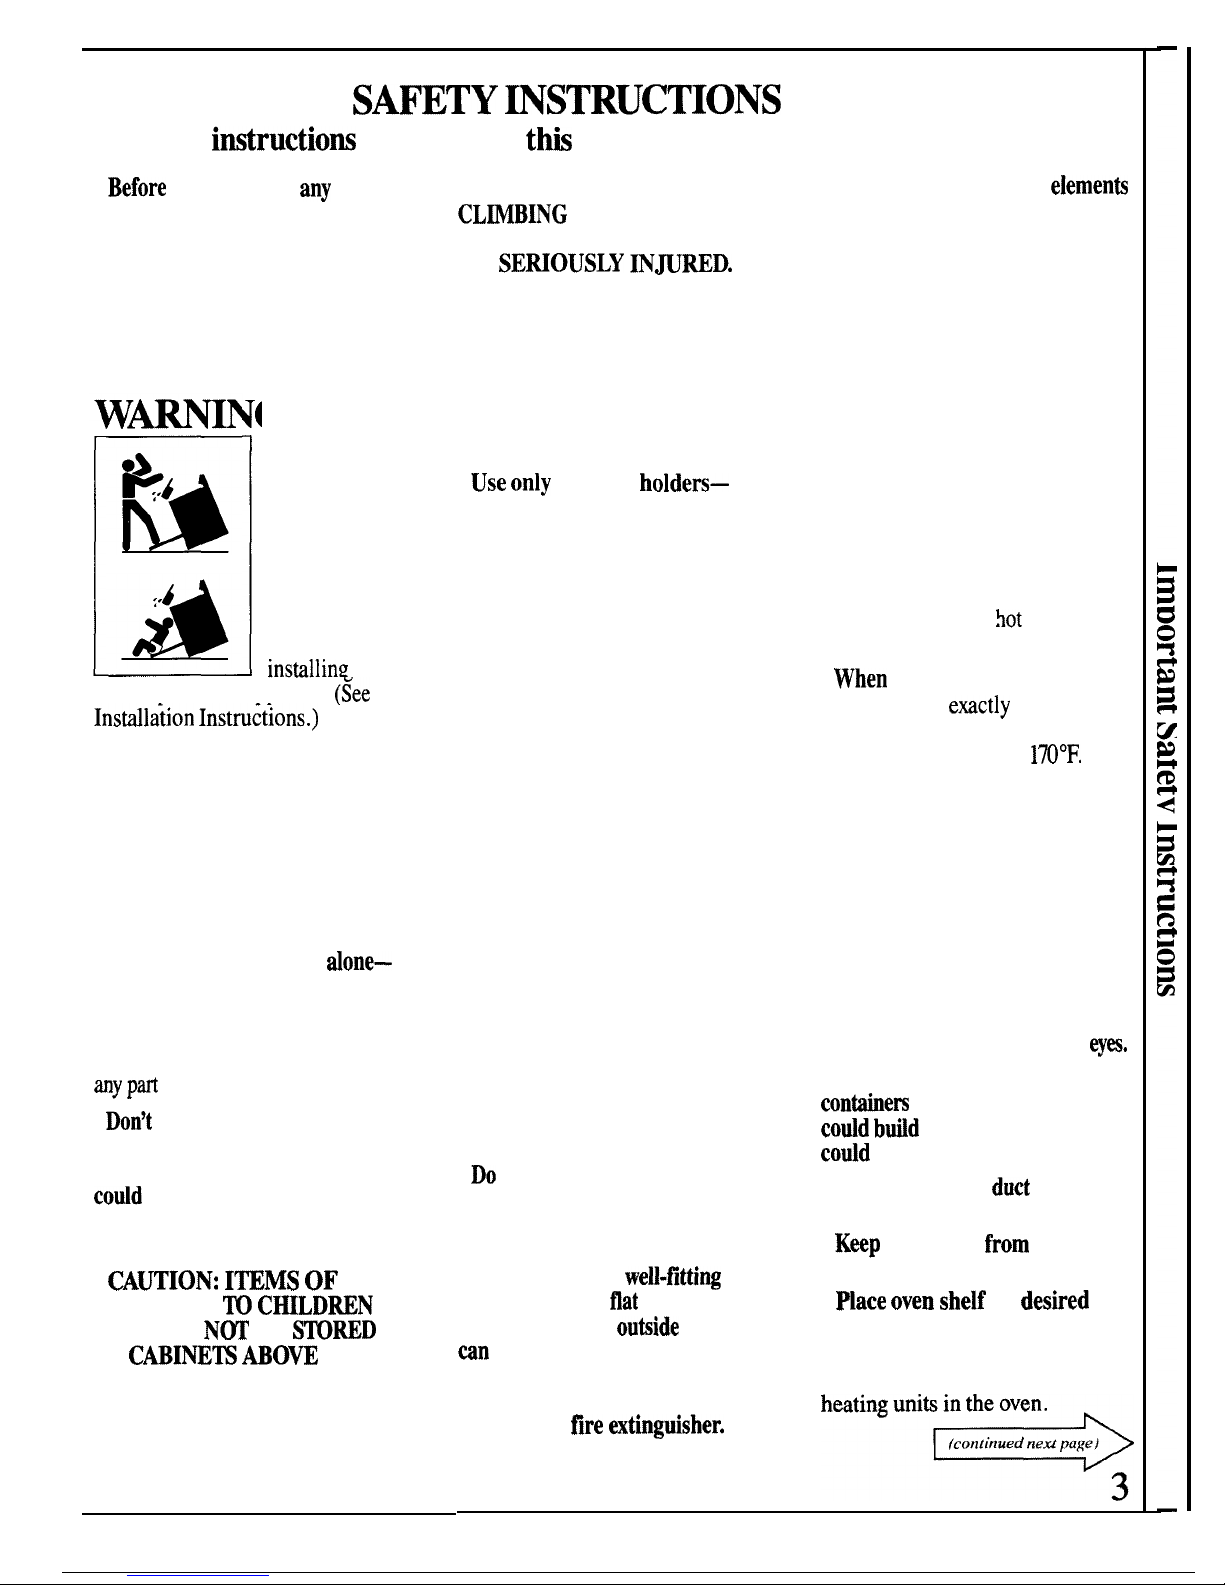
~–All
ranges
can
tip
and
injury could
result. To
prevent
accidental
tipping of the
range,
attach
it to the wall
or floor by
installing
the
Anti-Tip device supplied.
(see
InsMl~ion Instru~~ons.)
To
check if the device is installed
and engaged properly, carefully
tip the range forward until it
engages the device.
If you pull the range out from the
wall for any reason, make sure
the device engages the range
when you push the range back.
●
Do not leave children
done—
children should not be left alone
or unattended in an area where an
appliance is in use. They should
never be allowed to sit or stand on
any part
of the appliance.
●
Don’t
allow anyone to climb,
stand or hang on the door,
drawer or range top. They
codd damage the range and
even tip it over, causing severe
personal injury.
●
CA~ION: I~MS OF
INTEREST ~
C~LDREN
SHOULD
N~
BE
S~RED
IN
CABINE~ ABOW
A
RANGE OR ON THE
BACKSPLASH OF A
RANGE-CHILDREN
CL~BING ON THE RANGE
TO REACH ITEMS COULD
BE
SEWOUSLY
~WRED.
●
Never wear loose-fitting or
hanging garments while using
the appliance.
Flammable
material could be ignited if
brought in contact with hot
heating elements and may cause
severe burns.
.
Use only
dry pot
holdem—
moist or damp potholders on hot
surfaces may result in burns from
steam. Do not let potholders
touch hot heating elements. Do
not use a towel or other bulky
cloth.
●
For your safety, never use
your appliance for warming or
heating the room.
●
Do not store flammable
materials in an oven or near the
cooktop.
●
Do not store or use combustible
materials, gasoline or other
flammable vapors and liquids in
the vicinity of this or any other
appliance.
●
Keep hood and grease filters
clean
to maintain good venting
and to avoid grease fires.
●
Do not let cooking grease
or other flammable materials
accumulate in or near the
range.
. Do not use water on
grease
fires.
Never pick up a flaming
pan. Smother flaming pan on
surface unit by covering pan
completely with
weM-fitting
lid,
cookie sheet or
flat
tray.
Flaming grease
outiide
a pan
un
be put out by covering with
baking soda or, if available, a
multi-purpose dry chemical or
foam-type
fire mtinguisher.
. DO not touch heating
e]ementS
or interior surface of oven.
These surfaces may be hot
enough to burn even though they
are dark in color. During and
after use, do not touch, or let
clothing or other flammable
materials contact surface units,
areas nearby surface units or any
interior area of the oven; allow
sufficient time for cooling, first.
Potentially hot surfaces include
the cooktop and areas facing the
cooktop, oven vent opening and
surfaces near the opening, and
crevices around the oven door.
Remember: The inside surface
of the oven maybe
hot
when the
door is opened.
.
When
cooking pork,
follow
the directions
e~ctly
and always
cook the meat to an internal
temperature of at least
170°F.
This assures that, in the remote
possibility that trichina may be
present in the meat, it will be
killed and the meat will be safe
to eat.
Oven
●
Stand away from range when
opening oven door. Hot air or
steam which escapes can cause
burns to hands, face and/or
eym.
●
Don’t heat unopened food
contiers
in the oven. Pressure
codd btid
up and the container
codd burst, causing an injury.
●
Keep oven vent
duct
unobstructed.
.
Kwp
oven free
from
grease
buildup.
.
place oven shelf
in
desired
position while oven is cool.
If
shelves must be handled when
hot, do not let potholder contact
~O~ANT
SMETY ~STRUCTIONS
(continu~)
.
Mling
out
shelf to the
shelf stop is a convenience in
lifiing
heavy
foods,
It is
Mso
a
precaution against burns from
touching hot surfaces of the
door or oven wds.
.
When using cooking or
roasting bags in oven,
follow
the manufacturer’s directions.
.
DO not
use
your oven to
dry
newspapers.
If overheated, they
can catch
fire,
Self-Cie@~
Oven
.
D
O
not
clean door gasket
before reading special cleaning
instructions on page
22.
The
door gasket is
essenti
for a good
seal. Care should be taken not to
rub, damage or move the gasket.
. Do
not use oven cle~e~,
No
commercial oven cleaner or oven
liner protective coating of any
kind should be used in or around
any part of the oven,
.
C]ean ordy
parts listed in this
Use and Care
Book.
.
Before self+leaning
the
ovens
remove broiler pan and other
cookware.
Stiace Cooti~Uni@
●
Use proper
pan
sire-This
appliance is equipped with one or
more
surtice
units of
difhrent
sire. Select cookware having flat
bottoms large enough to cover the
surface unit heating element. The
use of undersized cookware will
expose a portion of the heating
element to direct contact and may
result in ignition of clothing.
Proper relationship of cookware
to burner will
dso
improve
efficiency.
●
Never l~ve
surface
u~fi
unattended at high heat settings.
Boilover
causes smoking and
greasy
spillovers
that may catch
on
fire.
. Be sure drip pans and
vent
ducts are not covered and are
in place.
Their absence during
cooking could damage range
parts and wiring.
.
DonJt use
aluminum
fofl
to
line drip pans or anywhere in the
oven except as described in this
book. Misuse could result in a
shock, fire hazard or damage to
the range.
.
Ody
certain
types
of
glws?
glass/ceramic, earthenware or
other
gl~ed
containers are
suitable for range-top service;
others may break because of the
sudden change in temperature,
(See section on “Surface
Cooking” for suggestions.)
o To minimk
the possibility
of
burns, ignition of flammable
materials, and spillage, the
handle of a container should be
turned toward the center of the
range without extending over
nearby surface units.
●
~wys
turn surface unit
tO
OFF
before
remo*
cookware.
●
Wep
an eye on foods being
fried at
~GH
or
~DI~
~GH
heat settings.
.
TO avoid
the
possibility
of a burn or electric shock,
always be certain that the
controls for dl surface units are
at OFF position and all
cotis
are
cool before attempting to
lM
or
remove the unit.
Q
Don$t
~me~~
or
soak
removable surface units. Don’t
put them in a dishwasher. Do
not
self<lean
the surface units
in the oven.
●
men
flaming
foods
are
under the hood, turn the fan
off. The fan, if operating, may
spread the flame.
.
Foods
for frying should be
w
dry as possible.
Frost
on frozen
foods or moisture on fresh foods
can cause hot
fit
to bubble up and
over sides of pan.
.
use
little
fat for eff~tive
shallow or deep-fat frying.
Filling the pan too full of fat can
cause
spillovers
when food is
added.
●
Ifa combination
of
oils or
fa~
will be used in frying, stir
together before heating, or as
tits
melt slowly.
.
Mways
heat fat
slowly9
and
watch as it heats.
. Use deep fat thermometer
whenever possible
to prevent
overheating
&t
beyond the
smoking point.
4
Your range, like many other
household items, is heavy and
can settle into soft floor coverings
such as cushioned vinyl or
carpeting.
When moving the range
on this type of flooring, use care,
and it is recommended that these
simple and inexpensive instructions
be followed.
The range should be installed on
a l/4-inch-thick sheet of plywood
(or similar material) as follows:
Men thefior
covering
eds d
the
front of the
mnge,
the area
tiat
the
range will rest on should be built
up with plywood to the same level
or higher than the floor covering.
This will allow the range to be
moved for cleaning or servicing.
Leveling screws are located on
each comer of the base of the
range. Remove the bottom drawer
and you can level the range on
an uneven floor with the use of
a
nutdriver.
To remove drawer, pull drawer
out
all
the way, tilt up the front
and take it out. To replace
drawer, insert glides at back of
drawer beyond stop on range glides.
Lift drawer if necessary to insert
easily. Let front of drawer down,
then push into close.
One of the rear leveling screws
will
engage
the Anti-Tip device
(allow for some side to side
adjustment). Allow a minimum
clearance of 1/8” between the range
and the leveling screw that is to be
installed into the Anti-Tip device.
Surface
Cooting
●
Use cookware of medium weight
aluminum, with tight-fitting covers,
and flat bottoms which completely
cover the heated portion of the
surface unit.
●
Cook fresh vegetables with a
minimum amount of water in a
covered pan.
●
Watch foods when bringing them
quic~y
to cooking temperatures at
high heat. When food reaches
cooking temperature, reduce heat
immediately to lowest setting that
will keep it cooking.
●
Use residual heat with surface
cooking whenever possible. For
example, when cooking eggs in the
shell, bring water and eggs to boil,
then turn to OFF position and
cover with lid to complete the
cooking.
●
Use correct heat setting for
cooking task:
HI—to start cooking (if time
allows, do not use high heat to
start).
MEDIUM HI—quick browning.
MED—s1ow frying.
WARM—finish cooking most
quantities, simmer-double boiler
heat, finish cooking, and special
for small quantities.
LO—to maintain serving
temperature of most foods.
●
When boiling water for tea or
coffee, heat only amount needed.
It is not economical to boil a
container
fill
of water for one
or two cups.
Oven
Cooting
●
Preheat oven only when
necessary. Most foods will cook
satisfactorily without preheating.
If you find preheating is necessary,
watch the electronic oven display,
and put food in oven promptly
after the selected temperature is
displayed and the oven signals.
●
Always turn oven off before
removing food.
●
During baking, avoid frequent
door openings. Keep door open as
short a time as possible if it is
opened.
●
Be sure to wipe up excess spillage
before starting the self-cleaning
operation.
●
Cook complete oven meals
instead of just one food item.
Potatoes, other vegetables, and
some desserts will cook together
with a main-dish casserole, meat
loaf, chicken or roast. Choose
foods that cook at the same
temperature and in approximately
the same time.
●
Use residual heat in the oven
whenever possible to finish
cooking casseroles, oven meals,
etc. Also add rolls or precooked
desserts to warm oven, using
residual heat to warm them.
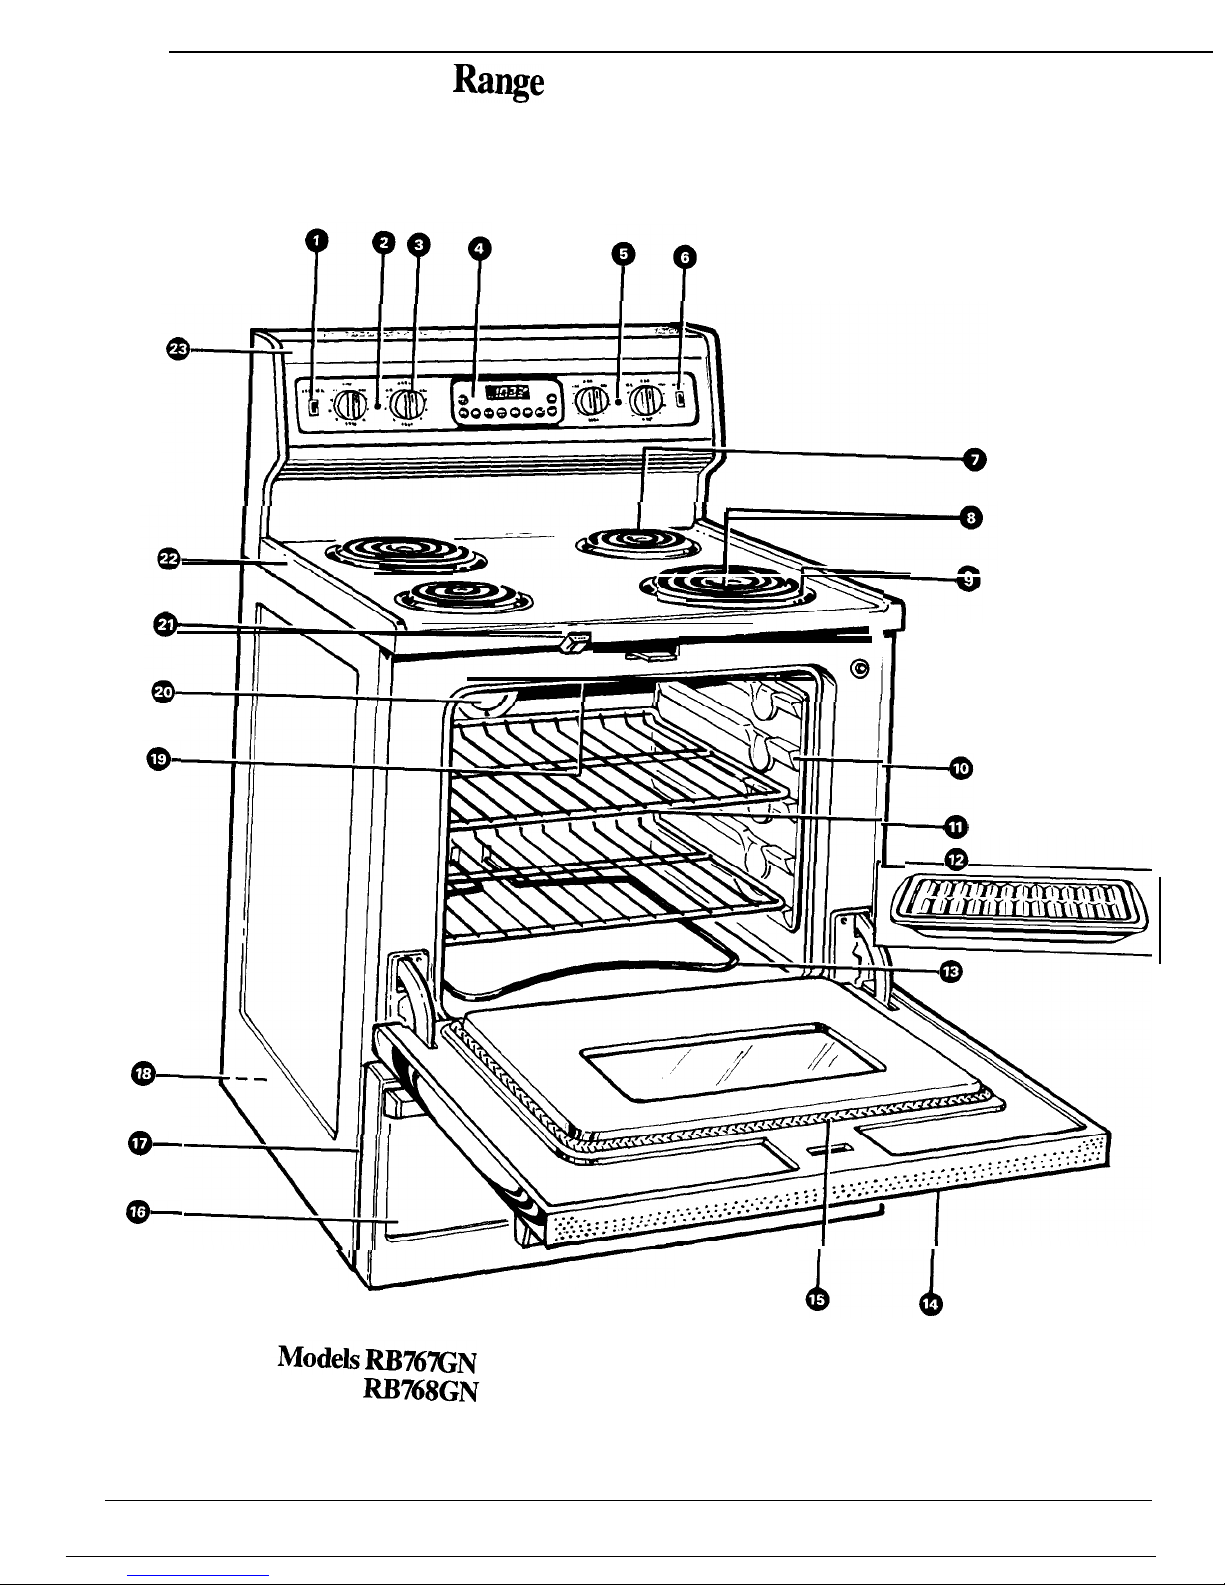
Features of Your
Ra~e
o–
@–
*
6

I
Explained
Feature Index
on page
1
Cooktop
Light Switch
I
14
2 “ON” Indicator Light for Left Surface Units
I
10
3 Surface Unit Controls
I
10,27
4 Electronic Oven Control, Clock and Timer
9
5 “ON” Indicator Light for Right Surface Units
10
6 Oven Light Switch
14
7 Oven Vent
Duct(locatedunder
25
right rear surface unit)
8 Surface Units
]
10,26
9 Chrome-Plated Drip Pans
26
10 Oven Shelf Supports (Letters A, B, C&D
14
indicate cooking position for shelves as
recommended on Cooking Guides. )
11 Oven Shelves
I
14,22,28
12 Broiler
Panand
Rack
I
20,21,28
I
13 Bake Unit
28
14 Removable Oven Door
25
15 Oven Door Gasket
4,22,24
16 Storage Drawer
25,28
I
17 Model and Serial Numbers
2
18 Anti-Tip Device
3,5
(See Installation Instructions)
19 Broil Unit
20,28
20 Oven Interior Light
14,25
21 Door Latch (Use for Self-Clean Only)
22,23
I
22 Lift-Up
Cooktop
26
23 Fluorescent
Cooktop
Light
14,26
7
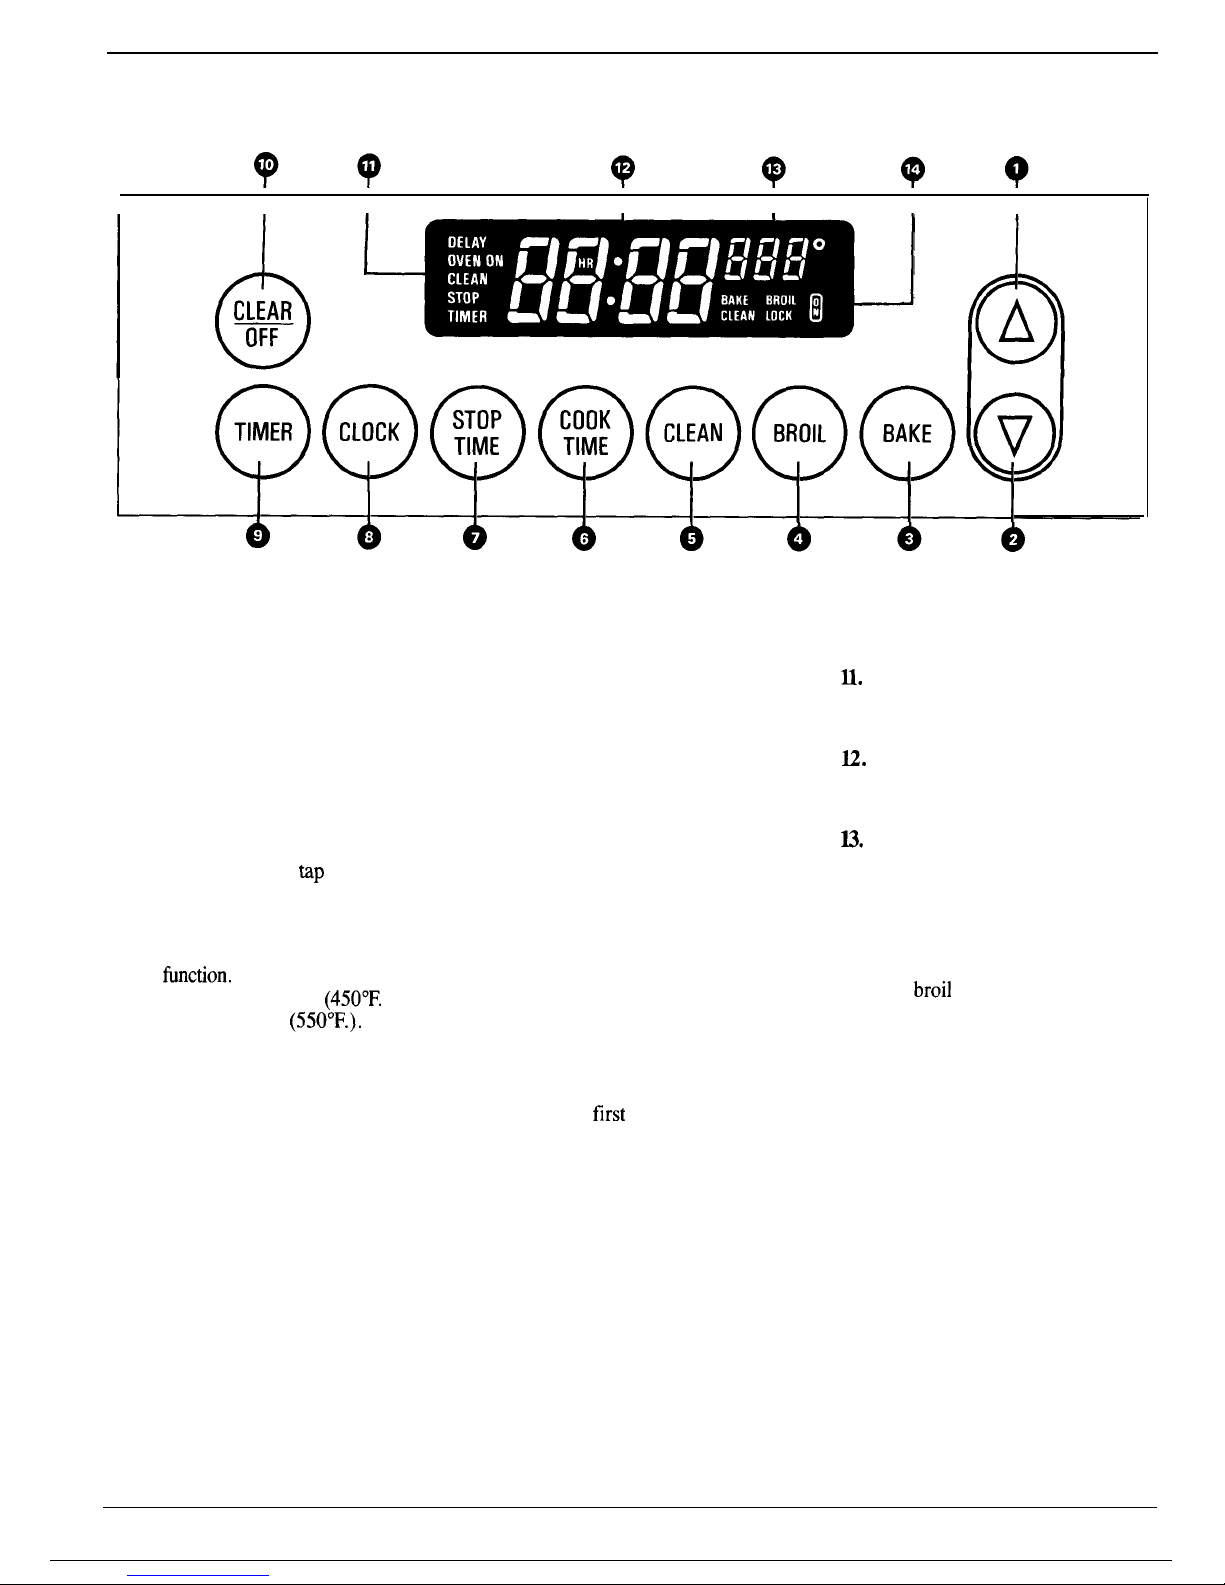
Features of Your Electronic Oven Control
1. INCREASE.
Short taps to this
pad increase time or temperature
by small amounts. Press& hold
pad to increase time or temperature
by larger amounts.
2. DECREASE. Short taps to this
pad decrease time or temperature
by small amounts. Press& hold
pad to decrease time or temperature
by larger amounts.
3. BAKE. Touch this pad to select
bake function. Then tip or press
INCREASE or DECREASE pad to
display desired temperature.
4. BROIL. Touch this pad to select
bred
finction.
Then tap INCREASE
pad once to broil at LO
(450°F.
) or
twice to broil at HI
(550°F.).
Tap
DECREASE pad to change back to
LO broil.
5. CLEAN. Touch this pad to
select self-cleaning function. See
Self-Cleaning Instructions on pages
22 and 23.
6. COOK TIME. Touch this pad
and then touch the INCREASE or
DECREASE pad to set the amount
of time you want your food to cook.
Touch BAKE and the INCREASE
or DECREASE pad to set the oven
temperature. The oven will shut off
after the selected Cook Time has
run out.
7. STOP TIME. Use this pad
along with COOK TIME and
INCREASE or DECREASE pad to
set the oven to start automatically,
cook for a specified time and stop
automatically at a time you select.
8. CLOCK. Touch this pad before
setting the clock.
To set clock, first touch CLOCK
pad. “TIME” will flash in the
display. Tap INCREASE or
DECREASE pad to change the
time of day by small amounts.
Press & hold INCREASE or
DECREASE pad to change the
time of day by larger amounts.
9. TIMER. Touch this pad to
select timer function. The timer
does not control oven operations.
The timer can time up to 9 hours
and 55 minutes.
To set timer,
first
touch TIMER
pad. “TIMER” will flash in the
display. Tap INCREASE or
DECREASE pad to change the
time by small amounts. Press&
hold INCREASE or DECREASE
pad to change the time by larger
amounts.
Hours and minutes will be
displayed if the time set on the
timer is more than 1 hour. Minutes
and seconds will be displayed if the
time set on the timer is less than
1 hour.
10. CLEAR/OFF.
Touch this pad
to cancel all oven operations except
clock and timer.
M.
PROGRAM STATUS.
Words
light up in the display to show the
selected oven mode.
U.
TIME DISPLAY. Shows the
time of day, the times set for the
timer or automatic oven operation.
~.
OVEN TEMPERATURE
AND BROIL DISPLAY. Shows
the oven temperature or the broil
setting selected.
14. FUNCTION INDICATORS.
Lights up to show whether oven is
in bake,
broil
or self-clean mode.
Note: Information can be entered
only if the desired function word is
flashing. Press function key to
begin entry mode.
8
Electronic Control, Clock and
~mer
Clock
The clock must be set for the
automatic oven timing functions to
work properly. The time of day
cannot be changed during a TIME
BAKE or CLEAN cycle.
To Set the
Clock
.,..
;,
:
Step 1:
Touch the CLOCK pad.
The word “TIME” will flash in the
display.
Step
2: Press& hold or tap
INCREASE or DECREASE pad to
set the time of day. (Tap to change
time 1 minute a tap. Press& hold
to change time 10 minutes at a time.)
Example:
Try setting the time for
3:00.
Use a combination of presses
and taps to get familiar with the
control. Since this is a 12-hour
clock, there is no need to worry
about AM or PM.
If you accidentally go past
3:00,
simply press & hold or tap the
DECREASE pad until the time
shows in the display.
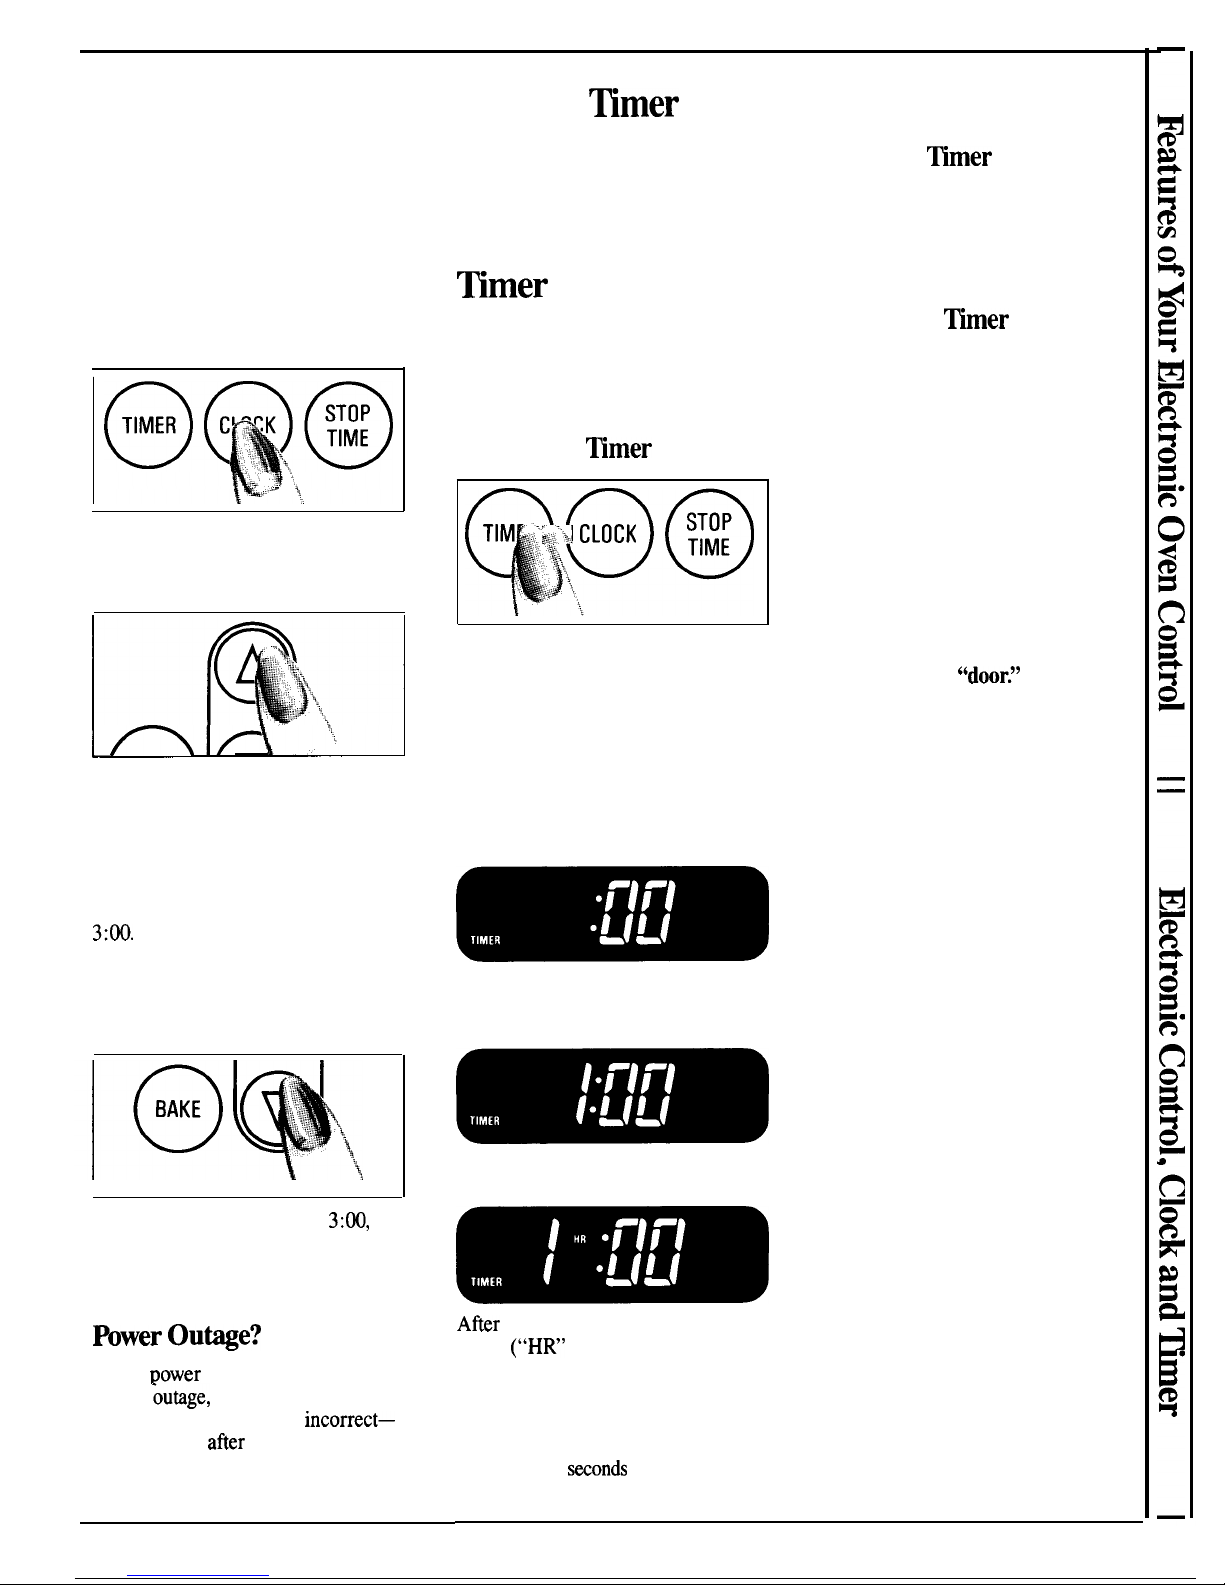
hwer
Ou@e?
When
power
is restored after a
power
~utage,
the display will flash
and time shown will be
incorrect—
for example,
afier
a 5-minute
power interruption the clock will
be 5 minutes slow.
Display flashes until clock is reset.
All other functions that were in
operation when the power went out
will have to be programmed again.
~mer
The timer does not control oven
operations. The maximum setting
on the timer is 9 hours and 55
minutes.
To Set The
~mer
q,p@
TIM
;,,::,;,... CLOCK
Step 1:
Touch the TIMER pad. The
word “TIMER” will flash in the
display.
Step
2: Press& hold or tap
INCREASE or DECREASE pad to
set the amount of time on timer.
(Pressing & holding the pad changes
time in large amounts. Short taps
change time in smaller amounts.)
While setting the timer, the display
will show seconds until 60 seconds
is reached.
Then it will display minutes and
seconds until 60 minutes is reached.
Afier
60 minutes, it will display
hours
(“HR”
now appears in the
display) and minutes until the
maximum time of 9 hours and 55
minutes is reached.
The timer will start automatically
within a few
saonds of releasing the
INCREASE or DECREASE pad.
To Reset
~mer
Touch TIMER pad and then press
& hold or tap INCREASE or
DECREASE pad until desired time
is reached.
To
Cancel
~mer
Press & hold TIMER pad until the
word “TIMER” quits flashing in
the display (about 4 seconds).
Display
Programmed information can be
displayed at any time by touching
the pad of the operation you want to
see. For example, you can display
the current time of day while the
timer is counting down by touching
the CLOCK pad.
Display shows
“door:’
The oven
door is in the locked position.
BAKE, BROIL and COOK TIME
cannot be set if the door is in the
locked position.
“F-” and a number flash in the
display. This is the function error
code.
If function error code appears
during the self-clean function,
check oven door latch—the latch
handle may have been moved, even
if only slightly, from the latched
position. Make sure handle is to the
right as far as it will go. Touch the
CLEAR/OFF pad. If function error
code does not clear, disconnect
power to the range and call for
service.
Tones
At the end of a programmed oven
function, a set of three beeps (the
end-of-cycle tone) will repeat every
6 seconds until you touch any
function pad. If you would like to
change the tone to a single set of 3
beeps that does not repeat, press &
hold the CLEAR/OFF pad for 12
seconds.
To return the end-of-cycle tone to a
repeating signal, press & hold the
CLEAR/OFF pad for 12 seconds.
9
sUrfaCe coo~~
see
Surface Cooking Guide on pages
~-~.
Surface
Cooting
with
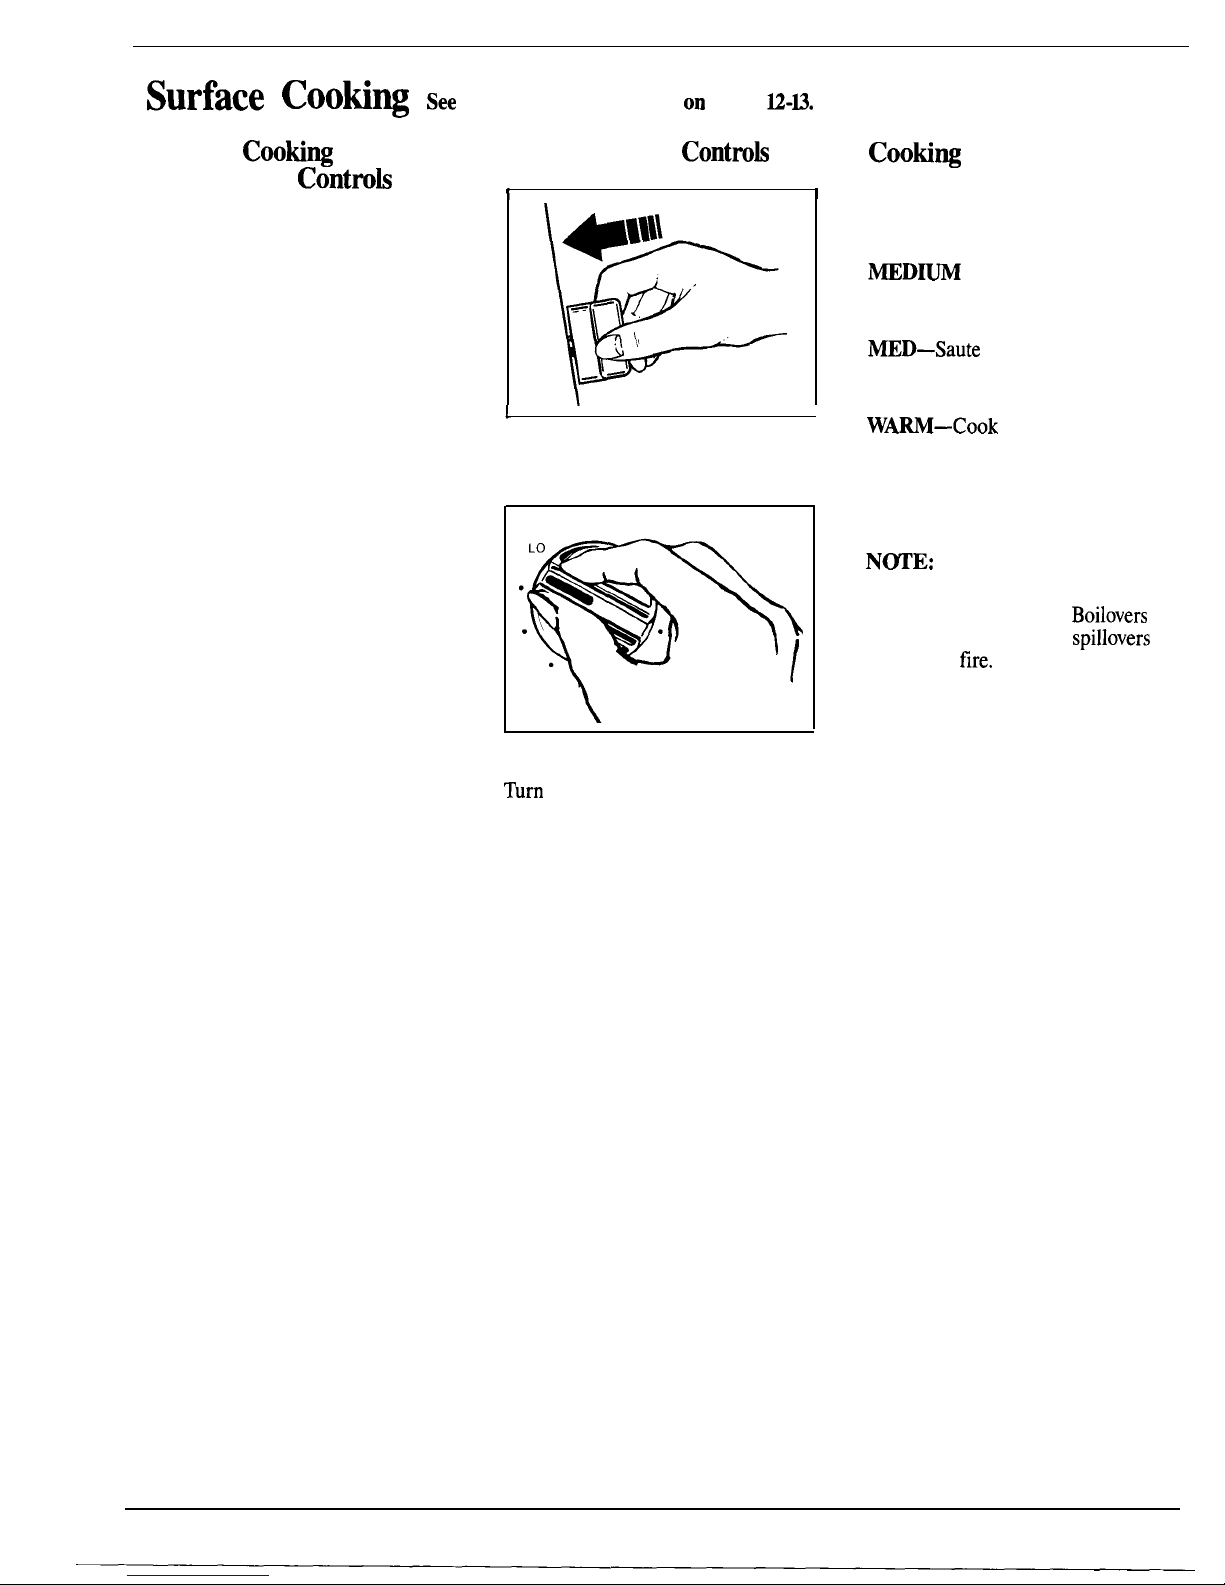
How to Set the
Controh
Infinite Heat
Controb
I
i
Your surface units and controls are
designed to give you an infinite
choice of heat settings for surface
unit cooking.
At both OFF and HI positions,
there is a slight niche so control
“clicks” at those positions; “click”
on HI marks the highest setting; the
OFF
CooHng
Guide
for Using Heat Settings
HI—Quick start for cooking;
brings water to a boil.
MEDI~
HI–Fast fry, pan broil;
maintains a fast boil on large
amounts of food.
MED—Saute
and brown;
maintains a slow boil on large
amounts of food.
I
1
lowest setting is between the words
LO and OFF. In a quiet kitchen you
WA~—Cook
after starting at HI;
Step 1
may hear slight “clicking” sounds
during cooking, indicating heat
Grasp control knob and push in...
settings selected are being
maintained.
Switching heats to higher settings
always shows a quicker change than
switching to lower settings.
Step 2
~rn
either clockwise or counter-
clockwise to desired heat setting.
Control must be pushed in to set
only from OFF position. When
control is in any position other
than OFF, it maybe rotated
without pushing in.
cooks with little water in covered
pan.
LO-Steam rice, cereal; maintains
serving temperature of most foods.
N~E:
1.
At HI, MEDIUM HI, never
leave food unattended.
Boilovers
cause smoking; greasy
spillovers
may catch
fire.
2. At WARM, LO, melt chocolate,
butter on small unit.
Be sure you turn control to OFF
when you finish cooking. An
indicator light will glow when
ANY heat on any surface unit is on.
10
 Loading...