

Hotpoint RB758DP1WW, RB758DP1BB, JSP47BF5BB, RB758DP1CC Owner’s Manual

..-.
om
0
U
U
Om
(I,)
GEAppliancescom
Safety Information ........... 2-6
Operating Instructions
Adjust the Oven
Thermostat ......................... 21
Clock and Timer ................. 15, 16
Oven ............................ 12-14
Oven Controls ................... 10, 11
Sabbath Feature ................ 19, 20
Selecting Types of Cookwore ........ 9
Self-Cleaning .................... 24, 25
Special Features .................... 18
Surface Units ...................... 7,8
Timed Baking and Roosting ........ 17
Worming Drawer ............... 22, 23
Care and Cleaning ......... 26-33
Gloss Cooktop .................. 32, 33
Troubleshooting Tips ...... 34-37
Coil Top and
Radiant Top Models
Standard Self-Clean
Clean Models Models
JBS03 JB600
JBS07 JBP15
JBS15 JBP22
JBS27 JBP27
JBS56 JBP60
RB525 JBP61
RB526 RB740
RB536 RB757
RB540 RB758
RB787
RB790
RB800
O)
LU
Accessories ...................... 38
Consumer Support
Consumer Support ........ Back Cover
Warranty .......................... 39
Write the model and serial
numbers here:
Model #
Serial #
You can find them on a label,
behind the storage drawer or
warming drawer on the oven frame.
183D6379P057 49-88042 OI-09JR
iiiiiiilHiiiliiDiili !
.....L?i_Li!!!ii!i
iii///iiiiiiiiiiiii/iiii
w
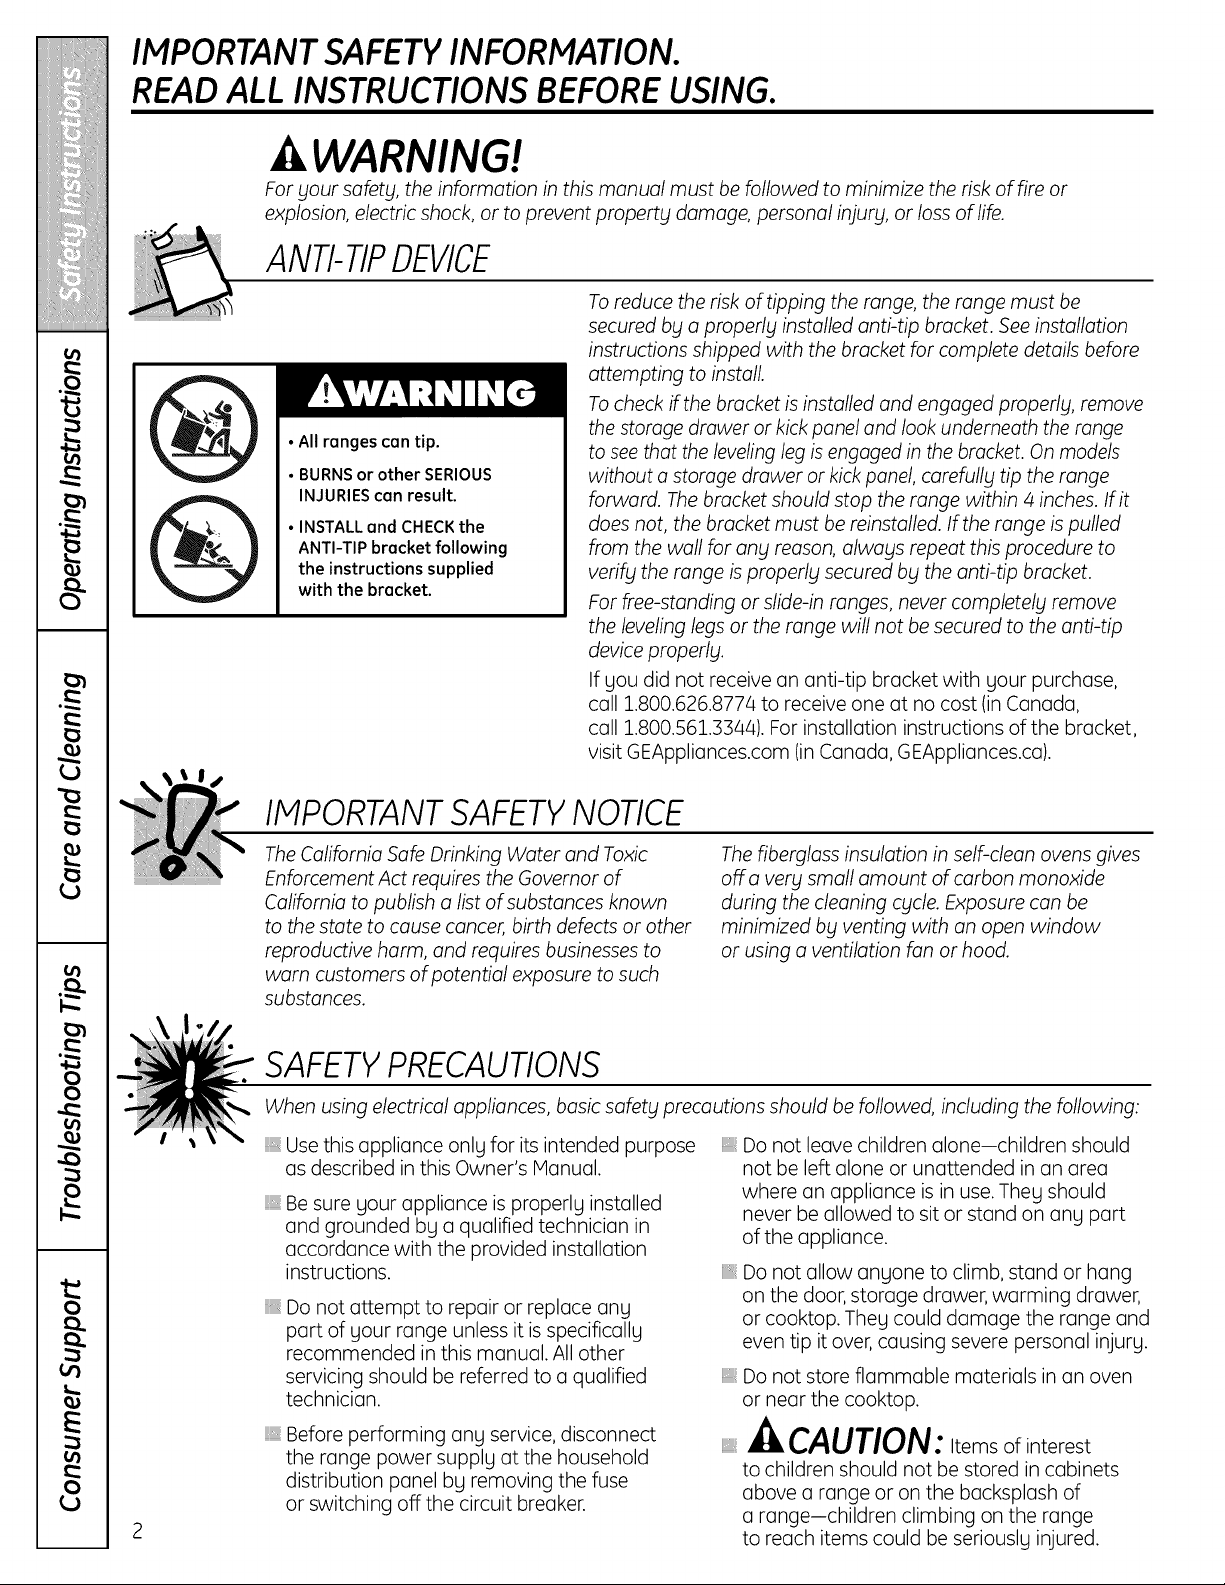
IMPORTANTSAFETYINFORMATION.
READALL INSTRUCTIONSBEFOREUSING.
"0
A WARNING!
For your safety, the information in this manual must be followed to minimize the risk of fire or
explosion, electric shock, or to prevent property damage, personal injury, or loss of life.
ANTI-TIPDEVICE
Toreduce the risk of tipping the range, the range must be
secured by a properly installed anti-tip bracket. See installation
instructions shipped with the bracket for complete details before
attempting to install.
Tocheck if the bracket is installed and engaged properly, remove
• All ranges can tip.
• BURNS or other SERIOUS
INJURIES can result.
• INSTALL and CHECK the
ANTI-TIP bracket following
the instructions supplied
with the bracket.
the storage drawer or kick panel and look underneath the range
to seethat the leveling leg is engaged in the bracket. On models
without a storage drawer or kick panel, carefully tip the range
forward. The bracket should stop the range within 4 inches. If it
does not, the bracket must be reinstalled. If the range is pulled
from the wall for any reason, always repeat this procedure to
verify the range is properly secured by the anti-tip bracket.
For flee-standing or slide-in ranges, never completely remove
the leveling legs or the range will not be secured to the anti-tip
device properly.
If you did not receive an anti-tip bracket with your purchase,
call 1.800.626.8774 to receive one at no cost (in Canada,
call 1.800.561.3344). For installation instructions of the bracket,
visit GEAppliances.com (in Canada, GEAppliances.ca).
_3
t_
o
o
o
E
o
IMPORTANT SAFETYNOTICE
The California Safe Drinking Water and Toxic
Enforcement Act requires the Governor of
California to publish a list of substances known
to the state to cause cancer, birth defects or other
reproductive harm, and requires businesses to
warn customers of potential exposure to such
substances.
The fiberglass insulation in self-dean ovens gives
afro very small amount of carbon monoxide
during the cleaning cycle. Exposure can be
minimized by venting with an open window
or using a ventilation fan or hood.
SAFETYPRECAUTIONS
When using electrical appliances, basic safety precautions should be followed, including the following:
Use this appliance only for its intended purpose
as described inthis Owner's Manual.
iii}iiiliiii!
Be sure your appliance is properly installed
and grounded by a qualified technician in
accordance with the provided installation
instructions.
iii}iiiliiii!
Do not attempt to repair or replace any
part of your range unless it is specifically
recommended in this manual. All other
servicing should be referred to a qualified
technician.
iii}iiiliiii!
Before performing any service, disconnect
the range power supply at the household
distribution panel by removing the fuse
or switching off the circuit breaker.
Do not leave children aloneichildren should
not be left alone or unattended in an area
where an appliance is in use. They should
never be allowed to sit or stand on any part
of the appliance.
iii}iiiliiii!
Do not allow anyone to climb, stand or hang
on the door, storage drawer, warming drawer,
or cooktop. They could damage the range and
even tip it over, causing severe personal injury.
iii}iiiliiii!
Do not store flammable materials in an oven
or near the cooktop.
iii}iiiliiii!
CAUTION:Items of interest
to children should not be stored in cabinets
above a range or on the backsplash of
a rangeichildren climbing on the range
to reach items could be seriously injured.

GEAppliances.com
COOK MEATAND POULTRYTHOROUGHLY...
Cook meat and poultry thoroughly-meat to at least an INTERNALtemperature of 160°F and poultry
to at least an INTERNALtemperature of l 80°E Cooking to these temperatures usually protects against
foodbome illness.
WARNING!
SAFETYPRECAUTIONS
Never wear loose-fitting or hanging garments
while using the appliance. Be careful when
reaching for items stored over the range.
Flammable material could be ignited if brought
in contact with hot surface units or heating
elements and may cause severe burns.
Use only dry pot holders-moist or damp pot
holders on hot surfaces may result in burns
from steam. Do not let pot holders touch hot
surface units or heating elements. Do not use
a towel or other bulky cloth.
For your safety, never use your appliance for
warming or heating the room.
Do not let cooking grease or other flammable
materials accumulate inor near the range.
Do not use water on grease fires. Never pick
up a flaming pan. Turn the controls off.
Smother a flaming pan on a surface unit by
covering the pan completely with a well-fitting
lid, cookie sheet or flat tray. Use a multi-
purpose dry chemical or foam-type fire
extinguisher.
Flaming grease outside a pan can be put out
by covering it with baking soda or, if available,
by using a multi-purpose dry chemical or
foam-type fire extinguisher.
Flame in the oven or warming drawer can be
smothered completely by closing the door
and turning the oven off or by using a multi-
purpose dry chemical or foam-type fire
extinguisher.
Do not touch the surface units, the heating
elements or the interior surface of the oven.
These surfaces may be hot enough to burn
even though they are dark in color. During and
after use, do not touch, or let clothing or other
flammable materials contact, the surface
units, areas nearby the surface units or any
interior area of the oven; allow sufficient time
for cooling first.
Potentially hot surfaces include the cooktop,
areasfacing the cooktop, oven vent opening,
surfaces near the opening, crevices around
the oven door and metal trim parts above
the door.
REMEMBER: The inside surface of the oven
may be hot when the door is opened.
Do not store or use combustible materials,
gasoline or other flammable vapors and
liquids in the vicinity of this or any other
appliance.
Keep the hood and grease filters clean
to maintain good venting and to avoid
grease fires.
Never block the vents (air openings) of the
range. They provide the air inlet and outlet
that are necessary for the range to operate
properly with correct combustion. Air openings
are located at the rear of the cooktop, at the
top and bottom of the oven door, and at the
bottom of the range under the warming
drawer or storage drawer.

iiiiiiilHiiiliiDiili !
IMPORTANTSAFETYINFORMATION.
.....L?I?2i!i
iii///iiiiiiiiMii
w
READALL INSTRUCTIONSBEFOREUSING.
OVEN
Stand away from the range when opening the
oven door. Hot air or steam which escapes
can cause burns to hands, face and/or eyes.
iiiiiiiliiii!
Do not heat unopened food containers.
Pressure could build up and the container
could burst, causing an injury.
iiiiiiiliiii!
Keep the oven vent unobstructed.
iiiiiiiliiii!
Keep the oven free from grease buildup.
iiiiiiiliiii!
Place the oven rack in the desired position
while the oven is cool. If racks must be
handled when hot, do not let pot holder
contact the heating elements.
SELF-CLEANING OVEN ionsomemode/sl
Pulling out the rack to the stop-lock is a
convenience in lifting heavy foods. It is also
a precaution against burns from touching hot
surfaces of the door or oven walls.
iiiiiiiliiii!
When using cooking or roasting bags in the
oven, follow the manufacturer's directions.
iiiiiiiliiii!
Do not use the oven to dry newspapers. If
overheated, they can catch on fire.
iiiiiiiliiii!
Do not use the oven for a storage area. Items
stored in an oven can ignite.
iiiiiiiliiii!
Do not leave paper products, cooking utensils
or food in the oven when not in use.
"0
t_
o
o
_3
Do not clean the door gasket. The door gasket
isessential for a good seal. Care should be
taken not to rub, damage or move the gasket.
Clean only parts listed in this Owner's Manual.
Do not use oven cleaners on self-clean
models. No commercial oven cleaner or oven
liner protective coating of any kind should be
used in or around any part of the oven.
Residue from oven cleaners will damage the
inside of the oven when the self-clean cycle
is used.
iiiiiiiliiii!
Before self-cleaning the oven, remove any
broiler pan, grid and other cookware.
iiiiiiiliiii!
Be sure to wipe up excess spillage before
starting the self-cleaning operation.
iiiiiiiliiii!
If the self-cleaning mode malfunctions, turn
the oven off and disconnect the power supply.
Have it serviced by a qualified technician.
iiiiiiiliiii!
Take the racks out of the oven before
you begin the self-clean cycle or they
may discolor.
o
E
o
4

WARMING DRAWER (onsome models)
GEAppliances.com
The purpose of the warming drawer is to hold
hot cooked foods at serving temperature.
Always start with hot food; cold food cannot
be heated or cooked in the warming drawer.
Do not use the warming drawer to dry
newspapers. If overheated, they can catch
on fire.
Do not leave paper products, cooking utensils
or food in the warming drawer when not
in use.
Never leave jars or cans of fat drippings in
or near your warming drawer.
Always keep wooden and plastic utensils and
canned food a safe distance away from your
warming drawer.
Do not warm food in the warming drawer
for more than two hours.
SURFACEUNITS--ALL MODELS
iiiiiiiliiii!
Do not touch the heating element or the
interior surface of the warming drawer.
These surfaces may be hot enough to burn.
REMEMBER:The inside surface of the
warming drawer may be hot when the
drawer is opened.
iiiiiiiliiii!
Use care when opening the drawer. Open
the drawer a crack and let hot air or steam
escape before removing or replacing food. Hot
air or steam which escapes con cause burns
to hands, face and/or eyes.
iiiiiiiliiii!
Do not use aluminum foil to line the drawer.
Foil isan excellent heat insulator and will
trap heat beneath it. This will upset the
performance of the drawer and it could
damage the interior finish.
Use proper pan sizeJselect cookware having fiat bottoms large enough to cover the surface unit
heating element. The use of undersized cookware will expose a portion of the surface unit to direct
contact and may result in ignition of clothing. Proper relationship of cookware to surface unit will also
improve efficiency.
Never leave the surface units unattended at
high heat settings. Boilovers cause smoking
and greasy spillovers that may catch on fire.
Only certain types of glass, gloss/ceramic,
earthenware or other glazed containers are
suitable for cooktop service; others may break
because of the sudden change in
temperature.
To minimize the possibility of burns, ignition of
flammable materials and spillage, the handle
of a container should be turned toward the
center of the range without extending over
nearby surface units.
Always turn the surface units off before
removing cookware.
Do not flame foods on the cooktop. If you do
flame foods under the hood, turn the fan on.
iiiiiiiliiii!
Keep an eye on foods being fried at high or
medium high heat settings.
iiiiiiiliiii!
Foods for frying should be as dry as possible.
Frost on frozen foods or moisture on fresh
foods can cause hot fat to bubble up and over
the sides of the pan.
iiiiiiiliiii!
Use little fat for effective shallow or deep fat
frying. Filling the pan too full of fat can cause
spillovers when food is added.
iiiiiiiliiii!
If a combination of oils or fats will be used in
frying, stir together before heating, or as fats
melt slowly.
iiiiiiiliiii!
Always heat fat slowly, and watch as it heats.
iiiiiiiliiii!
Use a deep fat thermometer whenever
possible to prevent overheating fat beyond the
smoking point.

iiiiiiilHiiiliiDiili_!
IMPORTANTSAFETYINFORMATION.
.....L?i?2i!i
iiillliiiiiiiiMii
w
"0
"o
a
READALL INSTRUCTIONSBEFOREUSING.
A WARNING!
models)
_ RADIANT SURFACEUNITS ionsome
Use core when touching the cooktop. The gloss surface
hove been turned off.
Avoid scratching the glass cooktop. The
cooktop can be scratched with items such as
sharp instruments, rings or other jewelry and
rivets on clothing.
iiiiiiiliiii!
Large scratches or impacts to glass doors
or cooktops can lead to broken or shattered
glass.
iiiiiiiliiii!
Do not operate the radiant surface units if the
glass is broken. Spillovers or cleaning solution
may penetrate o broken cooktop and create
o risk of electrical shock. Contact o qualified
technician immediately should your glass
cooktop become broken.
iiiiiiiliiii!
Never use the glass cooktop surface as o
cutting board.
iiiiiiiliiii!
Do not place or store items that can melt or
catch fire on the glass cooktop, even when it
is not being used.
Be careful when placing spoons or other
stirring utensils on the glass cooktop surface
when it is in use. They may become hot and
could cause burns.
of the cooktopwill retain heat after the controls
Clean the cooktop with caution. If a wet
sponge or cloth is used to wipe spills on a hot
surface unit, be careful to avoid steam burns.
Some cleaners can produce noxious fumes if
applied to o hot surface.
NOTE: We recommend that you avoid wiping
any surface unit areas until they have cooled
and the indicator light has gone off. Sugar spills
ore the exception to this. Please see Cleaning
the gloss cooktop section.
When the cooktop is cool, use only the
recommended cleaning cream to clean
the cooktop.
To avoid possible damage to the cooking
surface, do not apply cleaning cream to the
glass surface when it is hot.
After cleaning, use a dry cloth or paper towel
to remove all cleaning cream residue.
Read and follow all instructions and warnings
on the cleaning cream labels.
Do not lift the cooktop. Lifting the cooktop can
lead to damage and improper operation of the
range.
_3
t_
t_
o
o
o
E
o
A WARNING!
COIL SURFACEUNITS ionsomemode_sl
iiiiiiiliiii!
Clean the cooktop with caution. If a wet
sponge is used to wipe spills on a hot
cooktop, be careful to avoid steam burns.
iiiiiiiliiii!
To avoid the possibility of a burn or electric
shock, always be certain that the controls for
all surface units are at the Off position and
all coils are cool before attempting to lift or
remove a unit.
iiiil}iiiiiDo not immerse or soak the removable
surface units. Do not put them in a dishwasher.
iiiil}iiiiiBe sure the drip pans and the vent duct ore
READAND FOLLOWTHISSAFETYINFORMATIONCAREFULLY.
SAVETHESEINSTRUCTIONS
6
not covered and are in place. Their absence
during cooking could damage range parts
and wiring.
Do not use aluminum foil to line the drip pans
or anywhere in the oven except as described
in this manual. Misuse could result in o shock,
fire hazard or damage to the range.

Usingthe surface units. OEApUionces.com
Throughout this manual, features and appearance may vary from your model.
off
Lo HJ
6
Besureyou turnthe controlknob
to Offwhen youfinish cooking.
How to Set
Pushthe knob in and turn in either direction
to the setting you want.
9
At both Off and Hi the control clicks
8
into position.You may hear slight clicking
sounds during cooking,indicating the control
7
iskeepingthe power level you set.
Indicotor Lights
(onradiant glass modelsonly)
A HOTSURFACEor HOTCOOl{TOP
(depending on model) indicator light will glow
when anu radiant element is turned on and
will remain on until the surface iscool
enough to touch.
ASURFACEUNITonor BURNERON
(depending on model) indicator light will glow
when anu surface unit ison.
NOTE:TheSURFACEUNITor BURNERON
indicator light may glow between thesurface
control settings of Lo and OFF,but thereis no
power to thesurface units.

Using the radiant surface units, ransome=ode/sJ
ii!ili;ili /iiiiiiiiiili
Nevercookdirectly onthe glass.
Alwaysusecookware.
Alwaysplacethe panin thecenterof
thesurfaceunityouarecookingon.
About the radiant surface units...
The radiant cooktop features heating units
beneath a smooth glasssurface.
NOTE:A slight odor isnormal when a new
cooktop isusedfor the firsttime. It is caused
bg the heating of new parts and insulating
materials and will disappear in a short time.
The surface unit will cgcle on and offto
maintain gour selected control setting.
It is safeto place hot cookware from the oven
or surface on the glass surface when the
surface iscool.
Evenafter the surface units are turned off,
the glass cooktop retains enough heat to
continue cooking. To avoid over-cooking,
remove pans from the surface units when
the food is cooked.Avoidplacing angthing
on the surface unit until it hascooled
completelg.
Do not slide cookware across the cooktop
because it con scratch the gloss--the gloss
is scratch resistant, not scratch proof.
Water stains (mineral deposits)ore
removable using the cleaning cream or
full-strength white vinegar.
Useof window cleanermag leaveon
iridescentfilm on the cooktop. Thecleaning
cream will remove this discoloration.
Don't storeheavy itemsabovethe cooktop.
If theg drop onto the cooktop,theg con
cause damage.
Do not use the surface as a cutting board.
Temperature Limiter
Every radiant surface unit has a temperature
limiter.
Thetemperature limiter protects the glass
cooktop from getting too hot.
Thetemperature limiter mag cgcle the units
off for a time if:
Thepan boilsdry.
Thepan bottom is not flat.
Thepan isoff center.
Thereis no pan on the unit.

Selecting types of cookware. 6EAppliances.com
The following information will help you choose cookware which will give good performance on glass cooktops.
I
Checkpansfor flat bottomsby using
astraight edge.
Stainless Steel:
recommended
Aluminum:
heavy weight recommended
Good conductivity. Aluminum residues
sometimes appear as scratches on the
cooktop, but can be removed if cleaned
immediately. Becauseof its low melting
point, thin-weight aluminum should not
be used.
Copper Bottom:
recommended
Copper mag leave residueswhich can
appear as scratches.Theresiduescan be
removed,as long as the cooktop iscleaned
immediately. However,do not letthese pots
boil dry. Overheated metal can bond to glass
cooktops.An overheated copper bottom pot
will leavea residue that will permanentlg
stain the cooktop if not removed
immediatelg.
Glass-ceramic:
usable,but not recommended
Poorperformance. Hag scratch the surface.
Stoneware:
usable,but not recommended
Poorperformance. Hag scratch the surface.
Home Canning Tips:
Besurethe canner is centered overthe
surface unit.
Make sure the canner isflat on the bottom.
Userecipes and proceduresfrom
reputable sources.These are available
from manufacturers such as Ball®and
Kerr®and the Department ofAgriculture
ExtensionService.
Toprevent burns from steam or heat, use
caution when canning.
Porcelain Enamel Covered Cast Iron:
recommended
Aslong as the cookware iscovered
completely with porcelain enamel, this
cookware isrecommended. Caution is
recommended for cast-iron cookware
Pans with rounded, curved,
ridged or warped bottoms are
not recommended.
The following information will help you choose cookware which will give good performance on coil cooktops.
that isnot completelg covered with smooth
porcelain enamel, as it mag scratch the
glass-ceramic cooktop.
Surface Cookware Tips
Not over1 inch
Use medium- or heavy-weight cookware.
Aluminum cookware conducts heat faster
than other metals. Cast-ironand coated
cast-iron cookware are slowto absorb heat,
but generallg cook evenly at lowto medium
heat settings.Steelpans may cook unevenly
if not combined with other metals.
Forbest cooking results,pans should be
flat on the bottom. Hatch the sizeof the
saucepan to the sizeof the surface unit.
The pan should not extend overthe edge
ofthe surface unit more than I inch.
Wok Cooking
Werecommend that gou use onlg a fiat-
bottomed wok. Thqj ore availableat _jour
local retailstore.
Donot usewoks that have support rings.Use
of these tgpes of woks,with or without the
ring in place,can be dangerous.
Placingthe ring over the surface unit will
cause a buildup of heat that will damage
the porcelain cooktop. Do not try to use such
woks without the ring. Youcould be seriously
burned if the wok tips over.
Useonly flat-bottomedwoks. 9
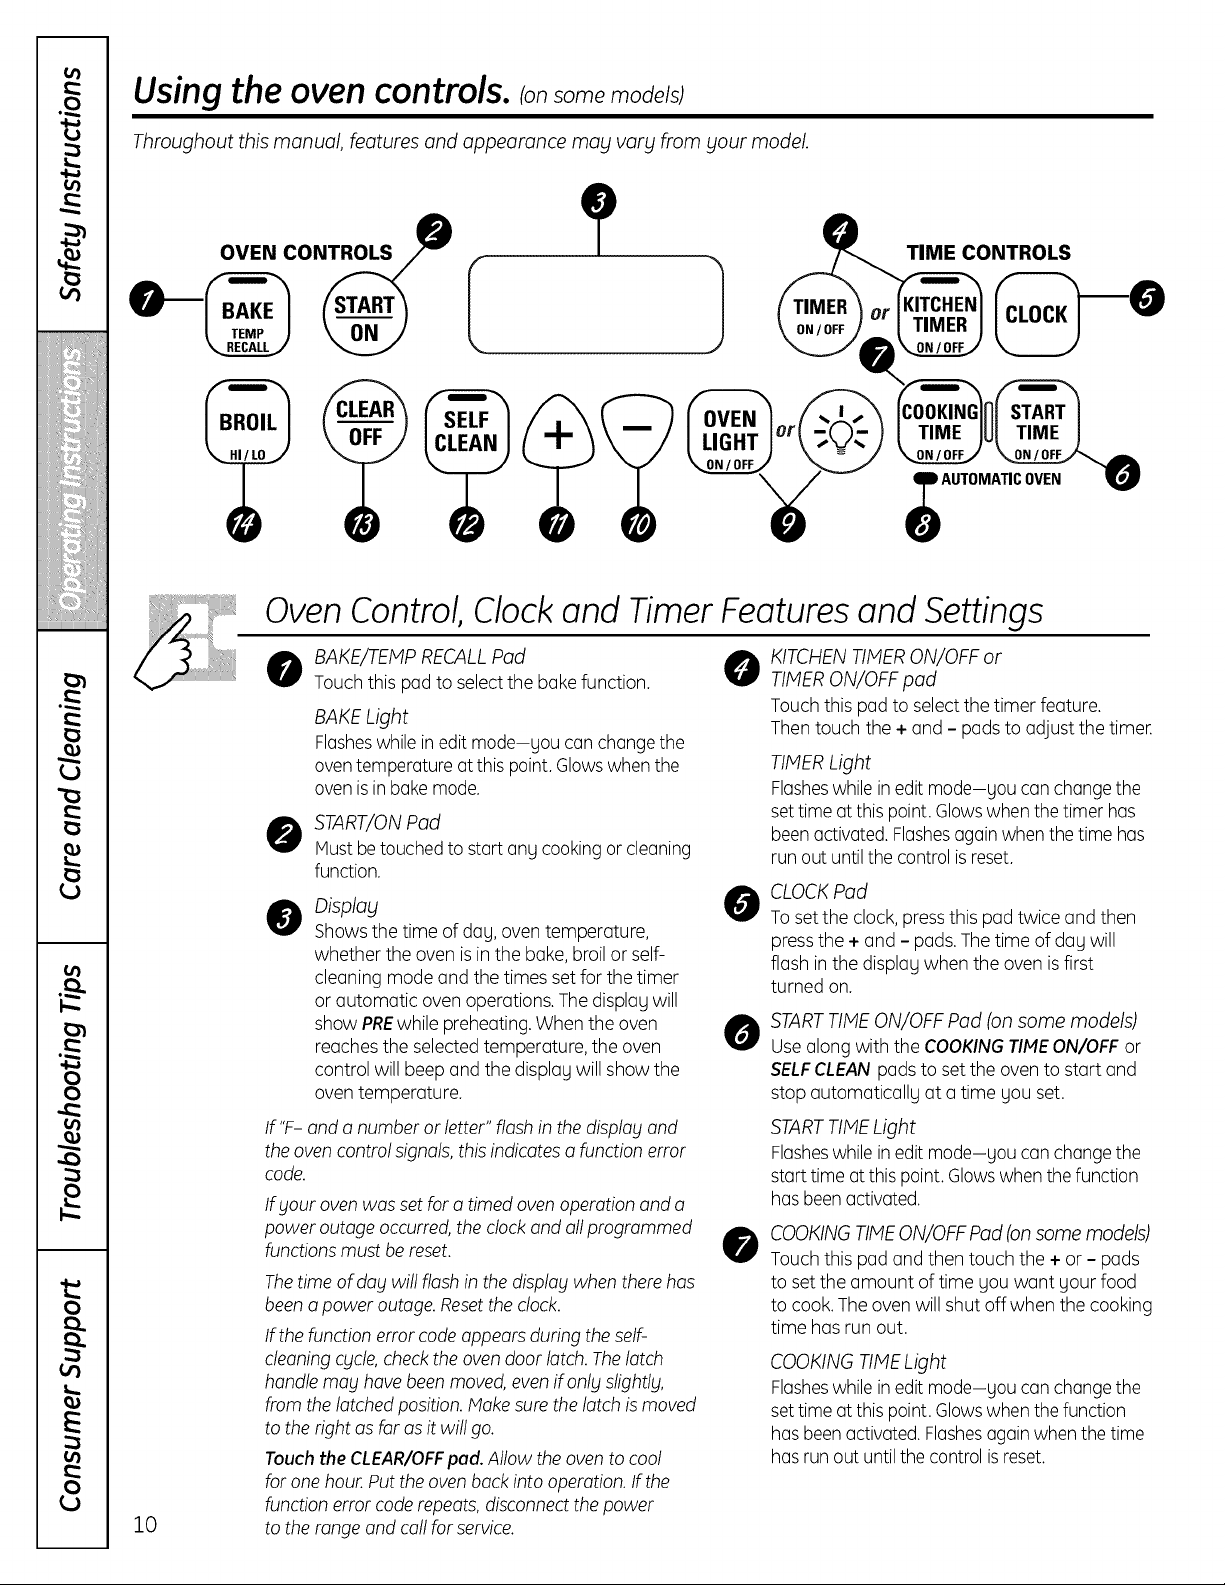
Using the ovencontrols, somemodelsJ
Throughout this manual, features and appearance may vary from your model.
10
OVEN CONTROLS
TIME CONTROLS
KITCHEN
TIMER
COOKING
TIME
Oven Control, Clock and Timer Features and Settings
O AKE/TEMP RECALLPad O
Touch this pad to selectthe bakefunction.
BAKE Light
Flasheswhilein editmode-gou can change the
oventemperatureat this point. Glowswhen the
ovenisin bake mode.
O START/ON Pad
Mustbe touchedto startang cookingor cleaning
function.
O isplay
Showsthe time of dag,oven temperature,
whether the oven isin the bake, broil or self-
cleaning mode and the times setfor the timer
or automatic oven operations. The display will
show PREwhile preheating.When the oven
reaches the selected temperature, the oven
control will beep and the displag will show the
oven temperature.
If'F- and a number or letter" flash in the displag and
the oven control signals, this indicates a function error
code.
If blourovenwas set for a timed ovenoperation and a
power outage occurred,the clockand all programmed _,
functions must be reset.
Thetime of dog will flash in the displagwhen there has
been a power outage. Resettheclock.
If the function error codeappearsduring the self-
cleaningcgcle,check the oven door latch.Thelatch
handle moblhave beenmoved, evenif onlblslight!hi,
from the latchedposition. Makesurethe latch ismoved
to the right as for asit will go.
Touch the CLEAR/OFFpad. Allow the oven to cool
for one hour. Put the oven back into operation. If the
function error code repeats, disconnectthe power
to the range and callfor service.
KITCHENTIMERON/OFF or
TIMERON/OFF pad
Touch this pad to selectthe timer feature.
Then touch the + and - pads to adjust the timer.
TIMERLight
Flasheswhilein editmode-gou can change the
settime atthis point.Glowswhen the timer has
beenactivated.Flashesagainwhen thetime has
run out until the control isreset.
CLOCKPad
0
To setthe clock, pressthis pad twice and then
pressthe + and - pads. Thetime of dag will
flash inthe displagwhen the oven is first
turned on.
STARTTIME ON/OFF Pad (onsome models)
0
Usealong with the COOKINGTIMEON/OFF or
SELFCLEANpads to set the oven to start and
stop automaticallg at a time you set.
STARTTIMELight
Flasheswhilein editmode-gou can change the
start time at this point. Glowswhen the function
hasbeenactivated.
COOKINGTIMEON/OFFPad (onsomemodels)
TB
Touch this pad and then touch the + or - pads
to set the amount oftime you want gour food
to cook.Theoven will shut offwhen the cooking
time has run out.
COOKINGTIMELight
Flasheswhilein editmode-gou can change the
settime atthis point.Glowswhen the function
hasbeenactivated.Flashesagainwhen thetime
hasrun out until the control isreset.
AUTOMATICOVEN

GEAppliances.com
Oven Control, Clock and Timer Features and Settings
AUTOMATICOVENLight (on some models)
0
This lights anytime the oven has been
programmed using the COOKINGTIME
or STARTTIMEfunctions.
OVENLIGHTON/OFF or "0"_Pod
Touch this pad to turn the oven light on or off.
- Pod
Shorttaps to this pad will decreasethe time or
temperature by small amounts. Touch and hold
the pad to decrease the time or temperature by
larger amounts.
+ Pod
0
Shorttaps to this pad will increasethe time or
temperature by small amounts. Touch and hold
the pad to increase the time or temperature by
larger amounts.
SELFCLEANPod (on some models)
@
Touch this pad to selectthe self-cleaning
function. Seethe Usingthe self-cleoning oven
section.
CLEANLight
Flasheswhilein editmode-you canchange
the lengthoftime for the self-cleancycleat this
point. Glowswhen the oven is inthe self-clean
cycle.Afterthe self-cleancycle,the lightwillturn
off.Unlatchthedoor.
Indicator Lights (on some pods)
EPITmodelastsseveralsecondsafter the last
pad press.STARTTIMEON/OFFand COOKING
TIMEON/OFFwill be the only pads lit if either of
theseoptions isselected.(Example:STARTTIME
isselectedwith BAKE-the STARTTIMEpadwill
remainlit untilthe clockreachesthe programmed
time,atwhich point it will turn off andthe
BAKEfrEMPRECALLpadlightwill lightup).
CLEAR/OFFPod
Touch this pad to cancel ALL ovenoperations
except the clock and timer.
O BROIL HI/LO Pod
Touch this pad to selectthe broil function.
BROILLight
Flasheswhilein editmode-you canswitch from
HI to LOBROILat this point. Glowswhen the
ovenisin broilmode.
11
Using the oven.
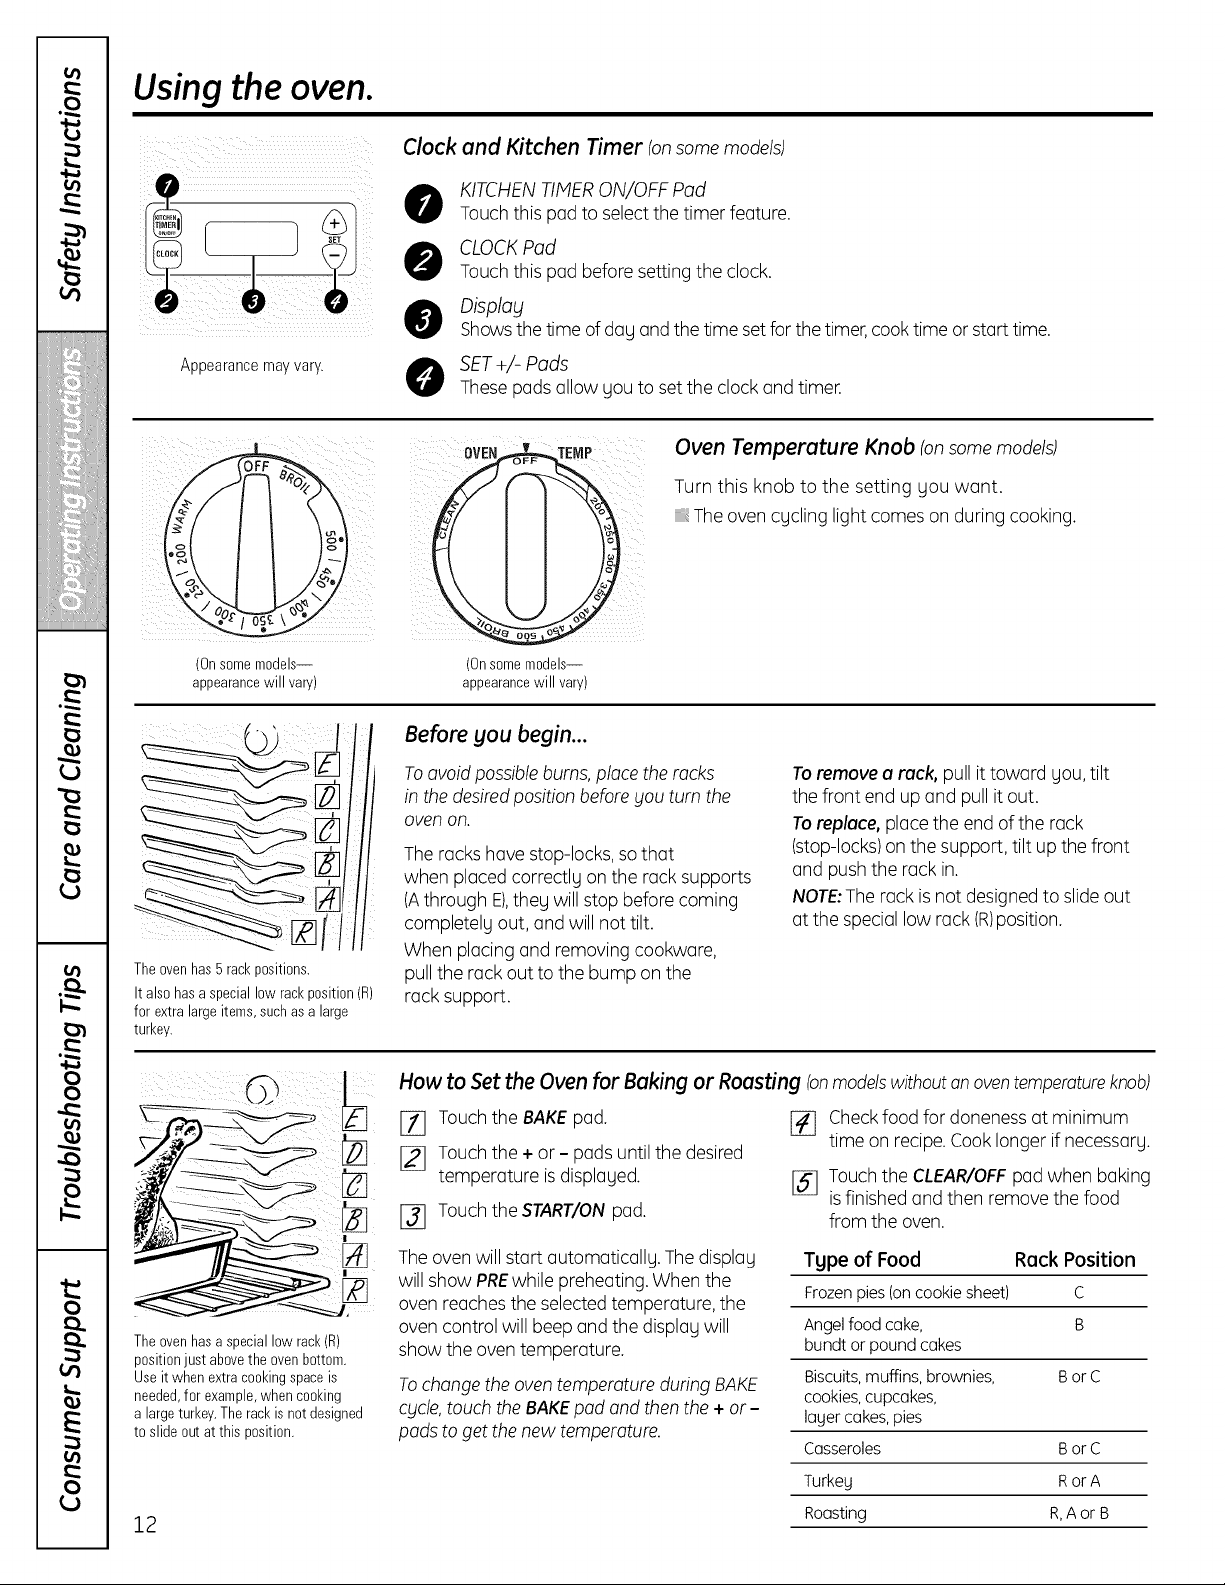
Clock and Kitchen Timer tonsomemodels)
KITCHENTIMERON/OFF Pod
Touch this pad to selectthe timer feature.
CLOCKPod
Touch this pad beforesetting the clock.
Display
Showsthetime of dag and the time setfor the timer,cook time or starttime.
Appearance may vary.
(Onsomemodels--
appearancewill vary)
The ovenhas 5 rackpositions.
It also hasaspecial low rackposition(R)
for extra largeitems,suchas a large
turkey.
O SET+/-Pods
These pads allow gou to set the clock and timer.
Oven Temperature Knob (onsomemodels)
Turn this knob to the setting Uou want.
Theoven cycling light comes on during cooking.
(Onsomemodels--
appearancewill vary)
Before you begin...
Toavoid possibleburns,place the rocks
in the desiredposition before_jouturn the
ovenon.
The rackshave stop-locks, so that
when placedcorrectlg on the rack supports
(Athrough E),they will stop before coming
completely out, and will not tilt.
When placing and removing cookware,
pull the rack outto the bump on the
rack support.
Toremove a rack, pull it toward gou,tilt
the front end up and pull it out.
Toreplace, place the end of the rack
(stop-locks)onthe support, tilt up the front
and push the rack in.
NOTE,Therack is not designed to slide out
at the special low rack (R)position.
%
The ovenhasa speciallow rack(R)
positionjust abovethe ovenbottom.
Useit when extracookingspaceis
needed,for example,whencooking
a largeturkey.Therackis notdesigned
to slideout atthis position.
12
How to Set the Oven for Baking or Roosting Ionmodelswithoutanoventemperatureknob)
[_ Touchthe BAKEpad.
F4] Checkfood for doneness at minimum
time on recipe.Cooklonger if necessary.
[_ Touch the + or - pads until the desired
temperature is displaged.
[]_] Touch the START/ONpad.
The ovenwill start automaticallg. The displag
will show PREwhile preheating. When the
oven reaches the selected temperature, the
oven control will beep and the displag will
show the oventemperature.
Tochange the oven temperature during BAKE
cycle,touch theBAKEpad and thenthe + or -
pads toget thenew temperature.
I_ Touchthe CLEAR/OFFpad when baking
isfinished and then remove the food
from the oven.
Type of Food Reck Position
Frozenpies(oncookiesheet) C
Angel food cake, B
bundtorpoundcakes
Biscuits, muffins, brownies, BorC
cookies,cupcakes,
lagercakes,pies
Casseroles B or C
Turkeg RorA
Roasting R,A or B
 Loading...