

Hotpoint RB747N Use And Care Manual

---
I
. RANGE
I
RC ANDERSON - 1
AP2-21O
I
--c
,.-
{
I
I
!E)ear !Homemaker:
This book was written to help you use and care for your range, and to help you enjoy
the many years of dependable, efficient performance and service for which it was
designed. Keep the book handy to refer to often.
Throughout the book are cautions for your comfort and safety.
ones are also listed below.
IMPORTANT
Read the DOS and DON*TS listed below carefully and frequently
Some important
for safe use of your
range. Remember when cooking on the range, the part in use, especially oven doors and
windows, can be HOT enough to cause a burn. Some areas NEAR the part in use can
also become HOT enough to cause a burn, especially to sensitive skin. After use all
parts take a while to cool. DON’T leave children alone or unattended in area where
range is in use, turn pan handles inward to reduce tipping hazard and let ALL inside
and outside surfaces cool COMPLETELY before touching them.
Let us hear from you if you have any special questions. We will try to help.
Consumers Institute
Appliance Park
Louisville, Kentucky
40225
1.
Have your range installed and properly
grounded by a qualified installer.
2. Have the installer show you the location of
the main range circuit fuse or circuit breaker.
Mark them for easy reference.
3. Disconnect range at main range circuit fuse
or circuit breaker
before servicing the range.
Turning off controls and lights DOES NOT re-
move power to the electrical circuits.
4. Use proper heats, and large enough pans on
surface units to prevent spillovers which could
catch fire.
5. Use ONLY DRY POTHOLDERS on hot pans
and other surfaces to prevent burns from steam.
Never let potholder touch heating coils; they may
be hot even though they are dark in color.
6. Stand away from range when opening oven
door and let hot air or steam escape before removing or placing food.
7. Keep hood and grease filters clean according
to instructions for your model.
See Before You Call for Product Service at rear of
Appliance Consumer Action Panel adjacent to the
DaN’T
1.
Don’t assume you know how to operate al]
parts of the range. Some features may work differently from those on your previous range.
2. Don’t use oven or surface units for heating
the home.
3. Don’t stand or sit on range drawer or oven
door; don’t let children do so.
4. Don’t use aluminum foil except as suggested
in this book. Improper use could cause damage
to the range or could cause a fire.
5. Don’t let ventilating hood operate when you
are “flaming”
liquor or other spirits on surface
unit foods. The hood. if operating, could spread
flames.
6. Don’t use water on grease fires: smother fire
or use dry chemical or foam type extinguisher.
7. Don’t allow anyone, especially children, to
CLIMB, STAND, SIT OR HANG ON an open
oven door so as to prevent damaging the door
and to eliminate the possibility of tipping over
the range or oven.
-J
book.
Also see additional information on the Major
service page.
2
---
---
ABOUT THIS BOOK: This publication is intended to describe the use and care of all
the features of your range. It also covers other range models which may have features
different from your model. Each range should have this publication, plus one which pictures your model, identifies location of specific parts and tells the features of your model.
If you do not receive the second publication, drop a card to the following address and
ask for it: Publications Distribution Section, General Electric Co., P.O. Box
111, New
Concord, Ohio 43762. Include on the card the COMPLETE MODEL NUMBER of
your
range; see the page Before You Call for Product Service for location of the name
plate which includes the model number. Be CERTAIN to include your name, full address
and zip code. You will be sent the correct supplement for your model.
SURFACE COOKING
Calrod R Surface Units, Controls, Reflector Pans, Use of Aluminum Foil . . . . . . . .. 4-7
Cooking Guide and Information. . . . . . . . . . . . . . . . . . . . . . . . . . . . . , . . . . . . . . ...7-8
Cooking Heats– How to Use..,, . . . . . . . . . . . . . . . . . . . . . . . . . . . . . . . . . . . . . ...5
Cooking Utensils
—Materials and Sizes . . . . . . . . . . . . . . . . . . . . . . . . . . . . . . . . . . . . 5
Common Sense Rules . . . . . . . . . . . . . . . . . . . . . . . . . . . . . . . . . . . . . . . . . . . . . . ...6-7
USING YOUR OVEN
Baking, Guide . . . . . . . . . . . . . . . . . . . . . . . . . . . . . . . . . . . . . . . . . . . . . . . . . . . . . ..I2
Broiling, Guide . . . . . . . . . . . . . . . . . . . . . . . . . . . . . . . . . . . . . . . . . . . . . . . . . ...14-15
Minute Timer, Clock, Automatic Oven Timer, Appliance Outlet(s) . . . . . . . . . ...10-11
Roasting, Guide . . . . . . . . . . . . . . . . . . . . . . . . . . . . . . . . . . . . . . . . . . ., . . . . . . . ...13
Using Your Oven, Aluminum Foil . . . . . . . . . . . . . . . . . . . . . . . . . . . . , . . . . . . . . ...9
HOW TO CARE FOR YOUR RANGE
Appliance Outlet(s) –Fuse, Mini-Breaker . . . . . . . . . . . . . . . . . . . . . . . . . . . . . . . ...17
Care of Your Range . . . . . . . . . . . . . . . . . . . . . . . . . . . . . . . . . . . . . . . . . . . . . ...16-19
Cleanin~Charts, Parts, All Finishes . . . . . . . . . . . . . . . . . . . . . . . . . . . . . . . . ...23-24
Cleaning Under the Range . . . . . . .. . . . . . . . . . . . . . . . . . . . . . . . . . . . . . . . . . . . ...19
Lamps, How to Replace . . . . . . . . . . . . . . . . . . . . . . . . . . . . . . . . . . . . . . . . . . ...18-19
Oven Thermostat, Adjusting . . . . . . . . . . . . . . . . . . . . . . . . . . . . . . . . . . . . . . . . . ...18
Oven Vent, Duct, Use of Aluminum Foil . . . . . . . . . . . . . . . . . . . . . . . . . . . . . . . ...17
Porcelain Enamel . . . . . . . . . . . . . . . . . . . . . . . . . . . . . . . . . . . . . . . . . . . . . . . . . . ...16
Removable Oven Door, Non Self-Clean Oven . . . . . . . . . . . . . . . . . . . . . . . . . . . . ...19
Surface Units, Plug-In Feature, Removable Trim Rings. . . . . . . . . . . . . . . . ...16-17
Self-Clean Oven . . . . . . . . . . . . . . . . . . . . . . . . . . . . . . . . . . . . . . . . . . . . . . . . . ...20-23
Useof Aluminum Foil . . . . . . . . . . . . . . . . . . . . . . . . ...4.9.13.14.15. 16,17,19,22,26
<
GENERAL
G’
Before You Call For Service . . . . . . . . . . . . . . . . . . . . . . . . . . . . . . . . . . . . . . . . . ...26
MACAP Information . . . . . . . . . . . . . . . . . . . . . . . . . . . . . . . . . . . . . . . . . . . . . . . ...27
Model and Serial Number Location . . . . . . . . . . . . . . . . . . . . . . . . . . . . . . . . . . . . ...26
Warranty Information . . . . . . . . . . . . . . . . . . . . . . . . . . . . . . . . . . . . . . . . . . . . . . ...28
3
I
--‘i
....
1
I
1
~uuface(hoking
WithTour%finite
SIFikat (?)ontrds
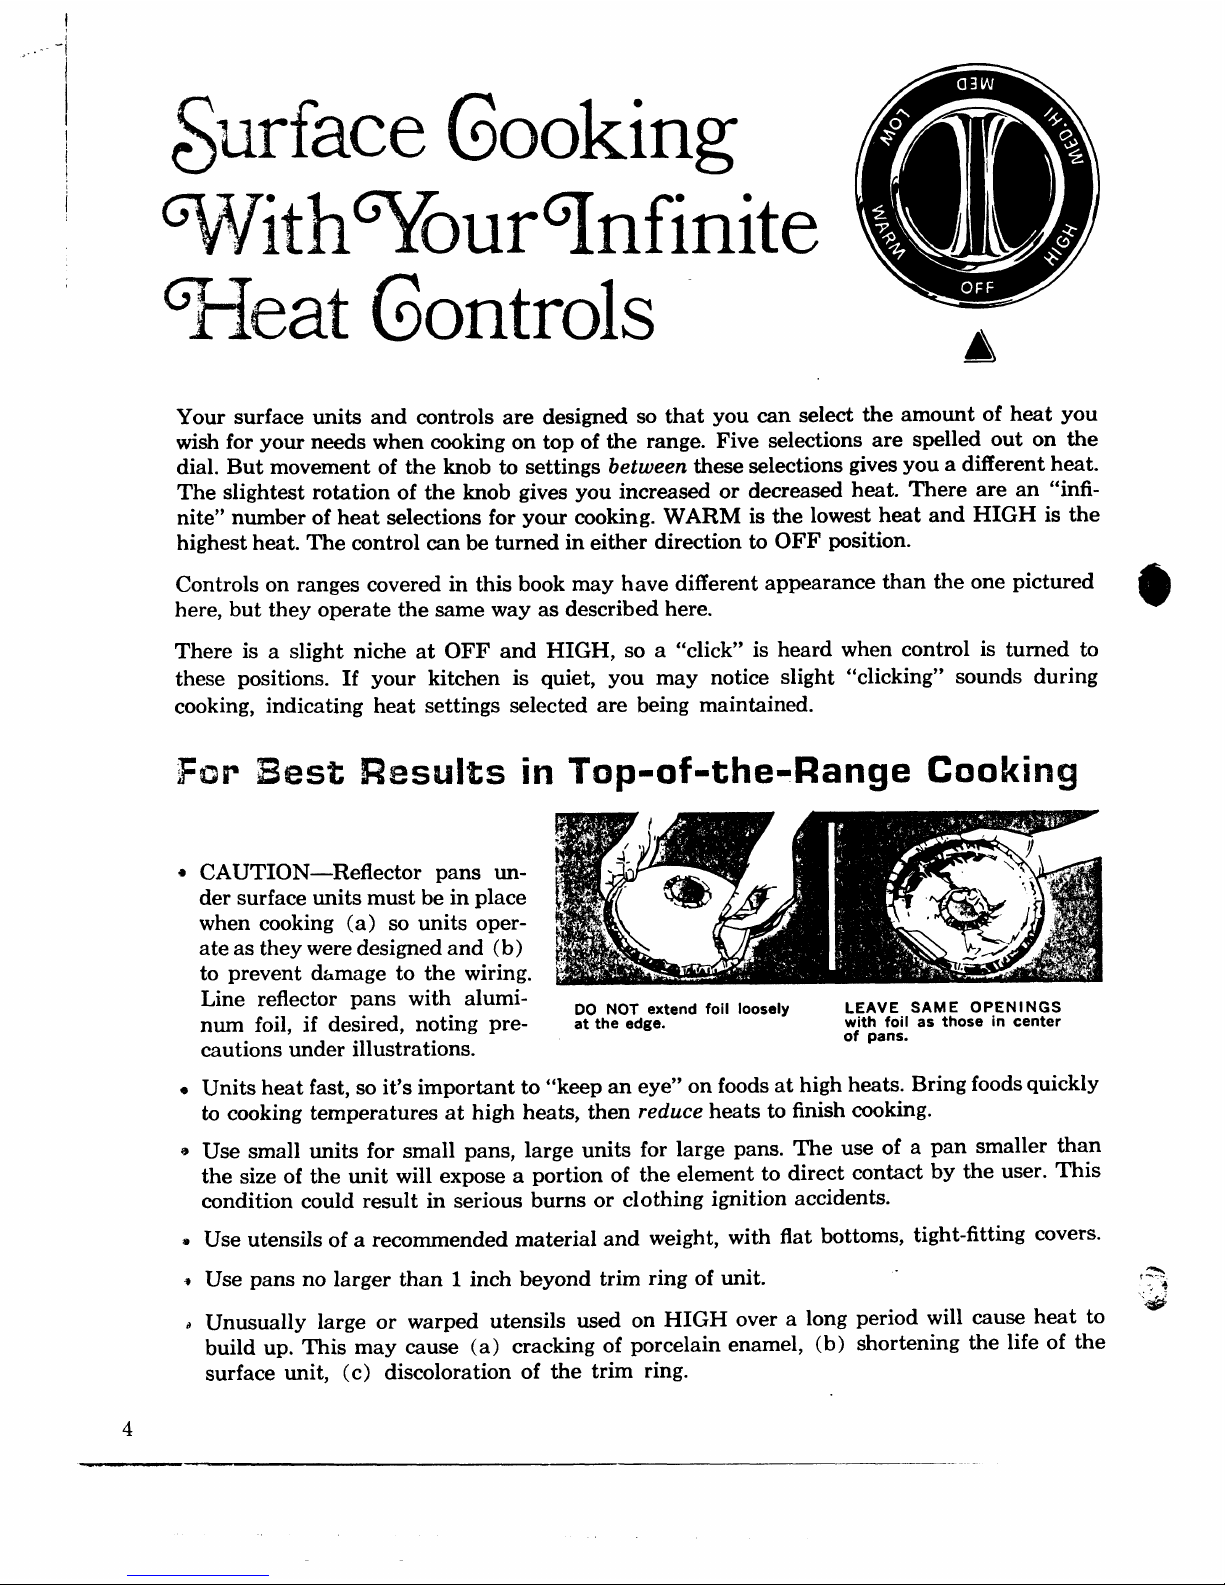
Your surface units and controls are designed so that you can select the amount of heat you
wish for your needs when cooking on top of the range. Five selections are spelled out on the
dial. But movement of the knob to settings between these selections gives you a different heat.
The slightest rotation of the knob gives you increased or decreased heat. There are an “infinite” number of heat selections for your cooking. WARM is the lowest heat and HIGH is the
highest heat. The control can be turned in either direction to OFF position.
Controls on ranges covered in this book may have different appearance than the one pictured
here, but they operate the same way as described here.
@
There is a slight niche at OFI? and HIGH, so a “click” is heard when control is turned to
these positions. If your kitchen is quiet, you may notice slight “clicking” sounds during
cooking, indicating heat settings selected are being maintained.
FOPBesz Results in Top-of-the-Range Cooking
* CAUTION—Refiector pans un-
der surface units must be in place
when cooking (a) so units operate as they were designed and (b)
to prevent damage to the wiring.
Line reflector pans with alumi-
DO NOT extend foil loosely
LEAVE SAME OPENINGS
num foil, if desired, noting pre-
at the edge.
with foil as those in center
of pans.
cautions under illustrations.
* Units heat fast, so it’s important to “keep an eye” on foods at high heats. Bring foods quickly
to cooking temperatures at high heats, then reduce heats to finish cooking.
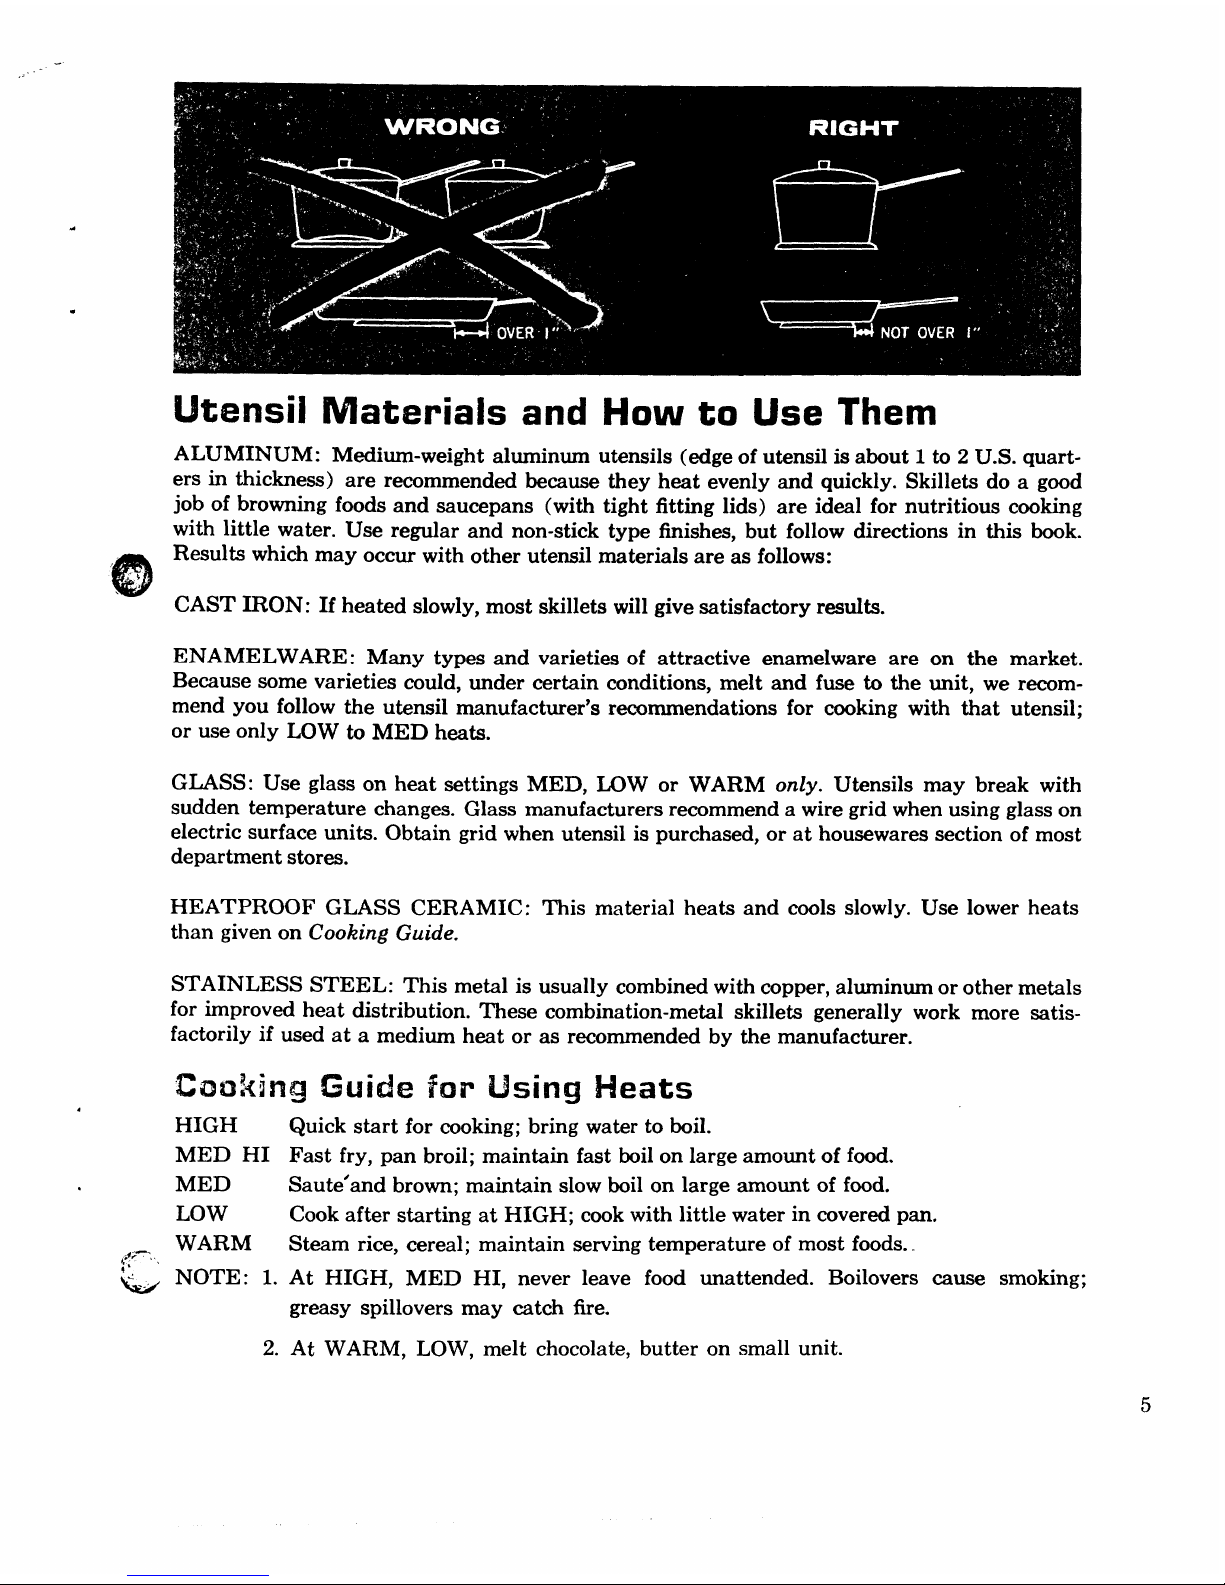
* Use small units for small pans, large units for large pans. The use of a pan smaller than
the size of
the unit will expose a portion of the element to direct contact by the user. This
condition could result in serious burns or clothing ignition accidents.
a
Use utensils of a recommended material and weight, with flat bottoms, tight-fitting covers.
* Use pans no larger than 1 inch beyond trim ring of unit.
f-.,,
-.4
)
Unusually large or warped utensils used on HIGH over a long period will cause heat to ‘~
build up. This may cause (a) cracking of porcelain enamel, (b) shortening the life of the
surface unit, (c) discoloration of the trim ring.
4
Utensil Materials and How to Use Them
ALUMINUM: Medium-weight aluminum utensils (edge of utensil is about 1 to 2 U.S. quarters in thickness) are recommended because they heat evenly and quickly. Skillets do a good
job of browning foods and saucepans (with tight fitting lids) are ideal for nutritious cooking
with little water. Use regular and non-stick type finishes, but follow directions in this book.
Results which may occur with other utensil materials are as follows:
CAST IRON: If heated slowly, most skillets will give satisfactory results.
ENAMELWARE: Many types and varieties of attractive enamelware are on the market.
Because some varieties could, under certain conditions, melt and fuse to the unit, we recommend you follow the utensil manufacturer’s recommendations for cooking with that utensil;
or use only LOW to MED heats.
GLASS: Use glass on heat settings MED, LOW or WARM only. Utensils may break with
sudden temperature changes. Glass manufacturers recommend a wire grid when using glass on
electric surface units. Obtain grid when utensil is purchased, or at housewares section of most
department stores.
HEATPROOF GLASS CERAMIC: This material heats and cools slowly. Use lower heats
than given on Cooking Guide.
STAINLESS STEEL: This metal is usually combined with copper, aluminum or other metals
for improved heat distribution. These combination-metal skillets generally work more satisfactorily if used at a medium heat or as recommended by the manufacturer.
lX30i<i~~
Guide far liking Heats
HIGH
MED HI
MED
LOW
WARM
& NOTE: 1.
2.
Quick start for cooking; bring water to boil.
Fast fry, pan broil; maintain fast boil on large amount of food.
Saute’and brown; maintain slow boil on large amount of food.
Cook after starting at HIGH; cook with little water in covered pan.
Steam rice, cereal; maintain serving temperature of most foods..
At HIGH, MED HI, never leave food unattended. Boilovers cause smoking;
greasy spillovers may catch fire.
At WARM, LOW, melt chocolate, butter on small unit.
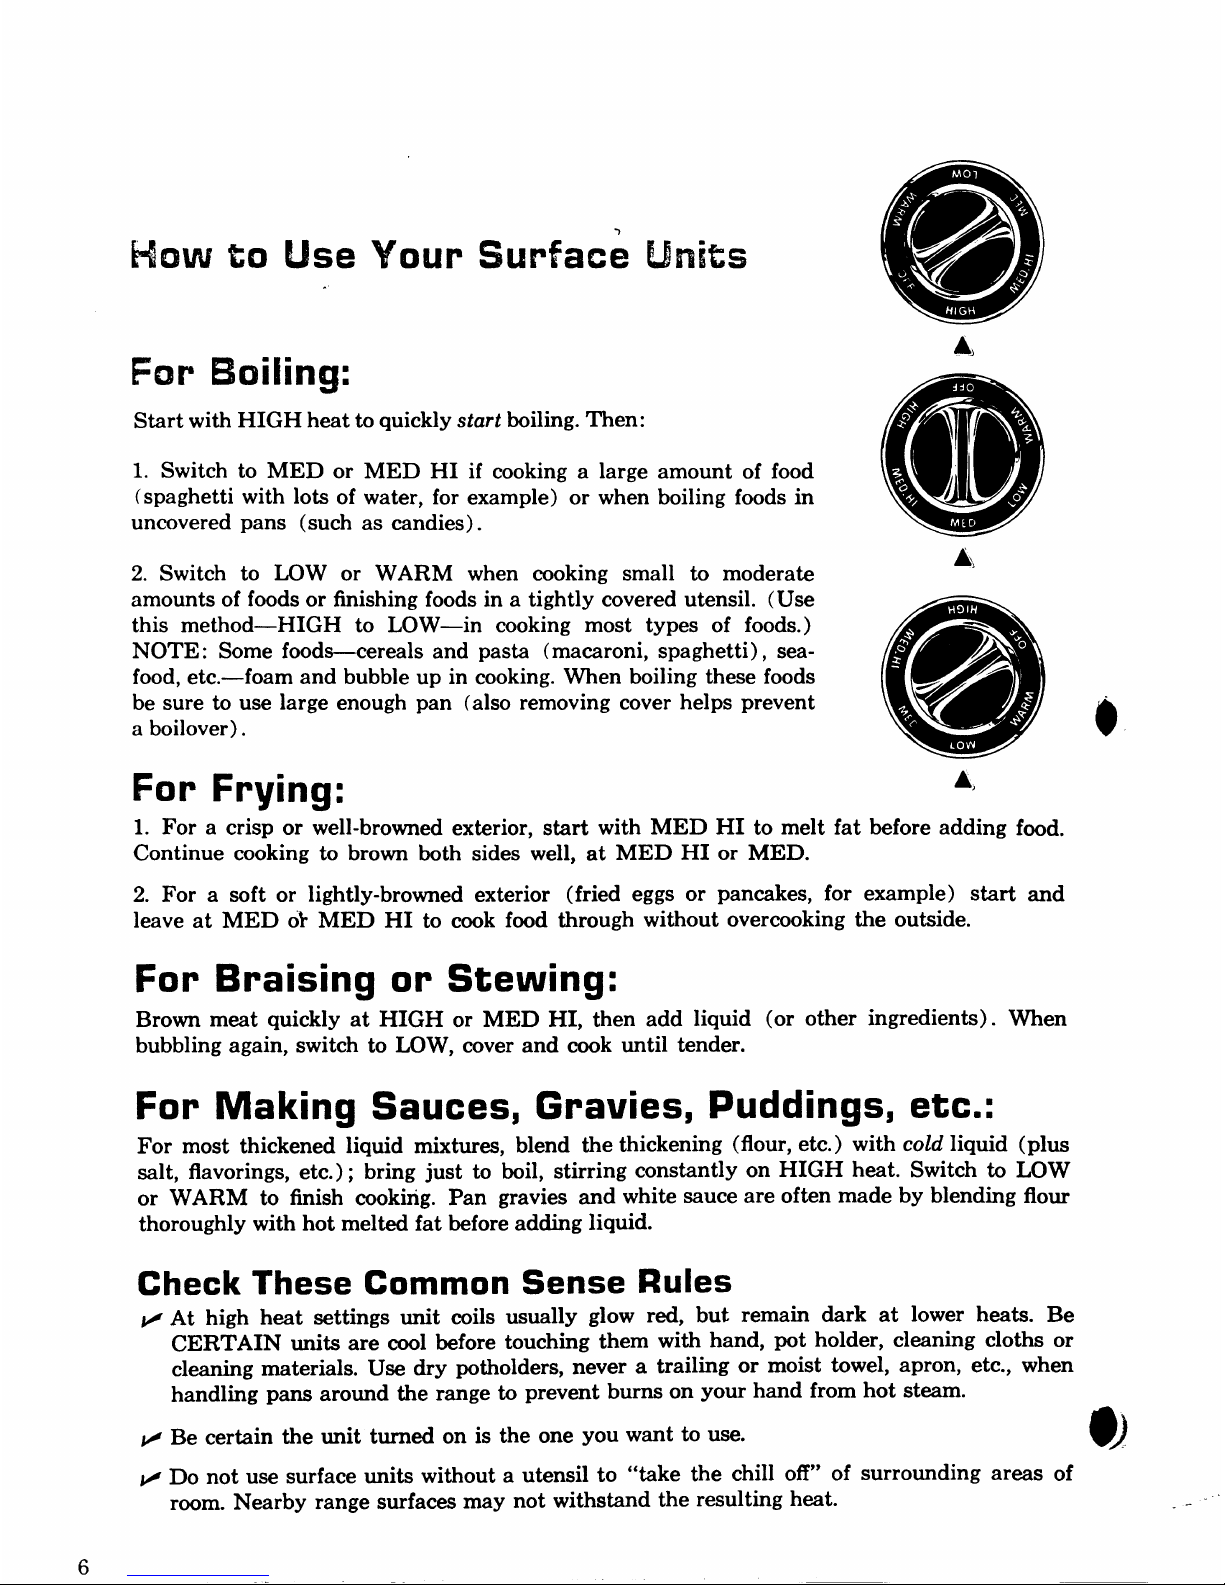
Ii+3wto Ike Your Surface Iihks
For Boiling:
Start with HIGH heat to quickly start boiling. Then:
1. Switch to MED or MED HI if cooking a large amount of food
(spaghetti with lots of water, for example) or when boiling foods in
uncovered pans (such as candies).
2. Switch to LOW or WARM when cooking small to moderate
amounts of foods or finishing foods in a tightly covered utensil. (Use
this method—HIGH to LOW—in cooking most types of foods. )
NOTE: Some foods-cereals and pasta (macaroni, spaghetti), sea-
food, etc.—foam and bubble up in cooking. When boiling these foods
be sure to use large enough pan (also removing cover helps prevent
a boilover).
For Frying:
A,
o
,“
A,
1. For a crisp or well-browned exterior, start with MED HI to melt fat before adding food.
Continue cooking to brown both sides well, at MED HI or MED.
2. For a soft or lightly-browned exterior (fried eggs or pancakes, for example)
start and
leave at MED ok MED HI to cook fmd through without overcooking the outside.
For Braising or Stewing:
Brown meat quickly at HIGH or MED HI, then add liquid (or other ingredients). When
bubbling again, switch to LOW, cover and cook until tender.
For Making Sauces, Gravies, Puddings, etc.:
For most thickened liquid mixtures, blend the thickening (flour, etc. ) with cold liquid (plus
salt, flavorings, etc. ); bring just to boil, stirring
constantly on HIGH heat. Switch to LOW
or WARM to finish cooking. Pan gravies and white sauce are often made by blending flour
thoroughly with hot melted fat before adding liquid.
Check These Common Sense Rules
At high heat settings unit coils usually glow red, but remain dark at lower heats. Be
CERTAIN units are cool before touching them with hand, pot holder, cleaning cloths or
cleaning materials. Use dry potholders, never a trailing or moist towel, apron, etc., when
handling pans around the range to prevent burns on your hand from hot steam.
Be certain the unit turned on is the one you want to use.
6!!!!!!!
Do not use surface units without a utensil to “take the chill off” of surrounding areas of
room. Nearby range surfaces may not withstand the resulting heat.
----
‘---+Be sure you turn control all the way to OFF when you finish cooking. An indicator light
will glow when ANY heat on any surface unit is on.
~ A VENTILATING HOOD with a fan helps to draw in cooking vapors before they escape
to other rooms. Because the fan has such drawing power, special caution is needed
to avoid
spillovers which can catch fire. The hood fan, in operation, couId cause flames to spread.
NEVER operate the hood unattended when cooking at high heats.
*
Turn off fan and remove pan from range before intentionally “flaming” liquor or other spirits.
Push button marked I.AMP or PUSH-HOLD-RELEASE; hold a few seconds or until light
flickers, release, and lamp will turn on. If lamp doesn’t start the first time you push and hold
button, repeat operation twice more to be certain lamp is not burned out. To turn off, push
button and release. To replace lamp, see Care Section.
,..”””1
. . .
. . .. +.,<....
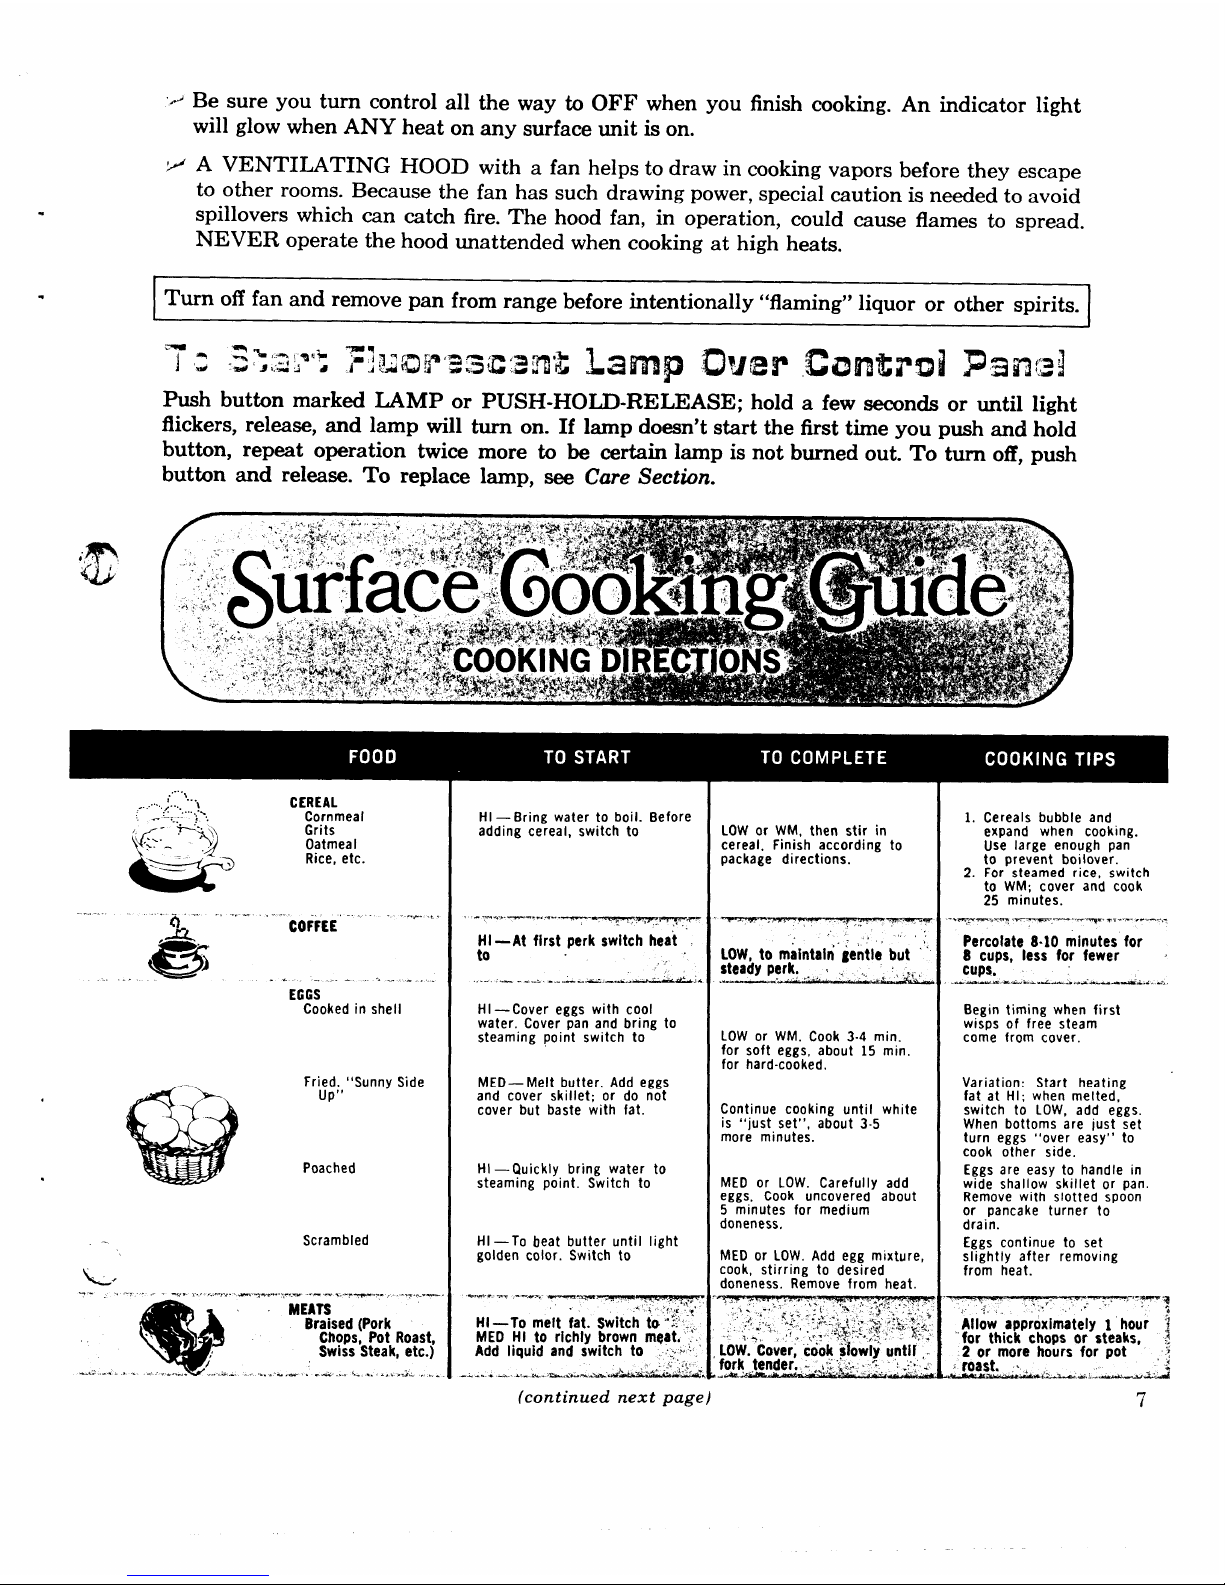
CEREAL
.......\
_- ..
- ..+ .: .. Cornmeal
‘~:. +
Grits
&
Oatmeal
e“ ‘
Rice,etc.
—...
. . . . .. .. .... .. ..
..r ., .
,2.,>
COFFEE
45
)
.,. .
.*---- ....>...... .. . .b.. .
EGGS
Cooked in shell
.- Fried, “Sunny Side
up”
Poached
Scrambled
*’
MEATS
Braised (Pork
..
Chops, Pot Roast,
Swiss Steak, etc.)
;
... J.. ”X.. . .. ...... ...
. . . ...,----- -,, ,4.-
.. >....J&, ...
HI —Bring water to boil. Before
adding cereal, switch to
.s-m. ,.y..., . . ..—
---’-w=wyry--
“.
HI —At first perk switch heat
to
Hi—Cover eggs with cool
water. Cover pan and bring to
steaming point switch to
MED— Melt butter. Add eggs
and cover skillet; or do not
cover but baste with fat.
HI —Quickly bring water to
steaming point. Switch to
HI —To beat butter until light
golden color. Switch to
.,,,
Hi —lo melt fat. Switch’to ‘!.~.
MED HI to richly brown m~at. . .
Add iiauid and switch to :.YX’.
LOW or WM, then stir in
cereal. Finish according to
package directions.
‘.
LOW,to maintain‘gentle’ but ‘‘
LOW or WM. Cook 3-4 min.
for soft eggs, about 15 min.
for hard-cooked.
Continue cooking until white
is “just set”, about 3-5
more minutes.
MED or LOW. Carefully add
eggs. Cook uncovered about
5 minutes for medium
doneness.
MED or LOW. Add egg mixture,
cook, stirring to desired
doneness. Remove from heat.
1. Cereals bubble and
expand when cooking.
Use large enough pan
to prevent boilover.
2. For steamed rice, switch
to WM; cover and cook
25 minutes.
Percolate 8-10 minutes for
8 cups, less for fewer ~
cups.
---. s*-
.. . . ,—
..A”au.&4.A -&.. . .-,
Begin timing when first
wisps of free steam
come from cover.
Variation: Start heating
fat at Hl; when melted,
switch to LOW, add eggs.
When bottoms are just set
turn eggs “over easy” to
cook other side.
Eggs are easy to handle in
wide shallow skillet or pan.
Remove with slotted spoon
or pancake turner to
drain.
Eggs continue to set
slightly after removing
from heat.
Aliow approximately I hour ]
‘for thick chops or steaks, .
.
2 or more hours for pot .:
j roast. ‘,
~—i- .
....—
d
(continued next page)
7’
S!2!!i3
-.*$.
,.
. . .
. . ..-
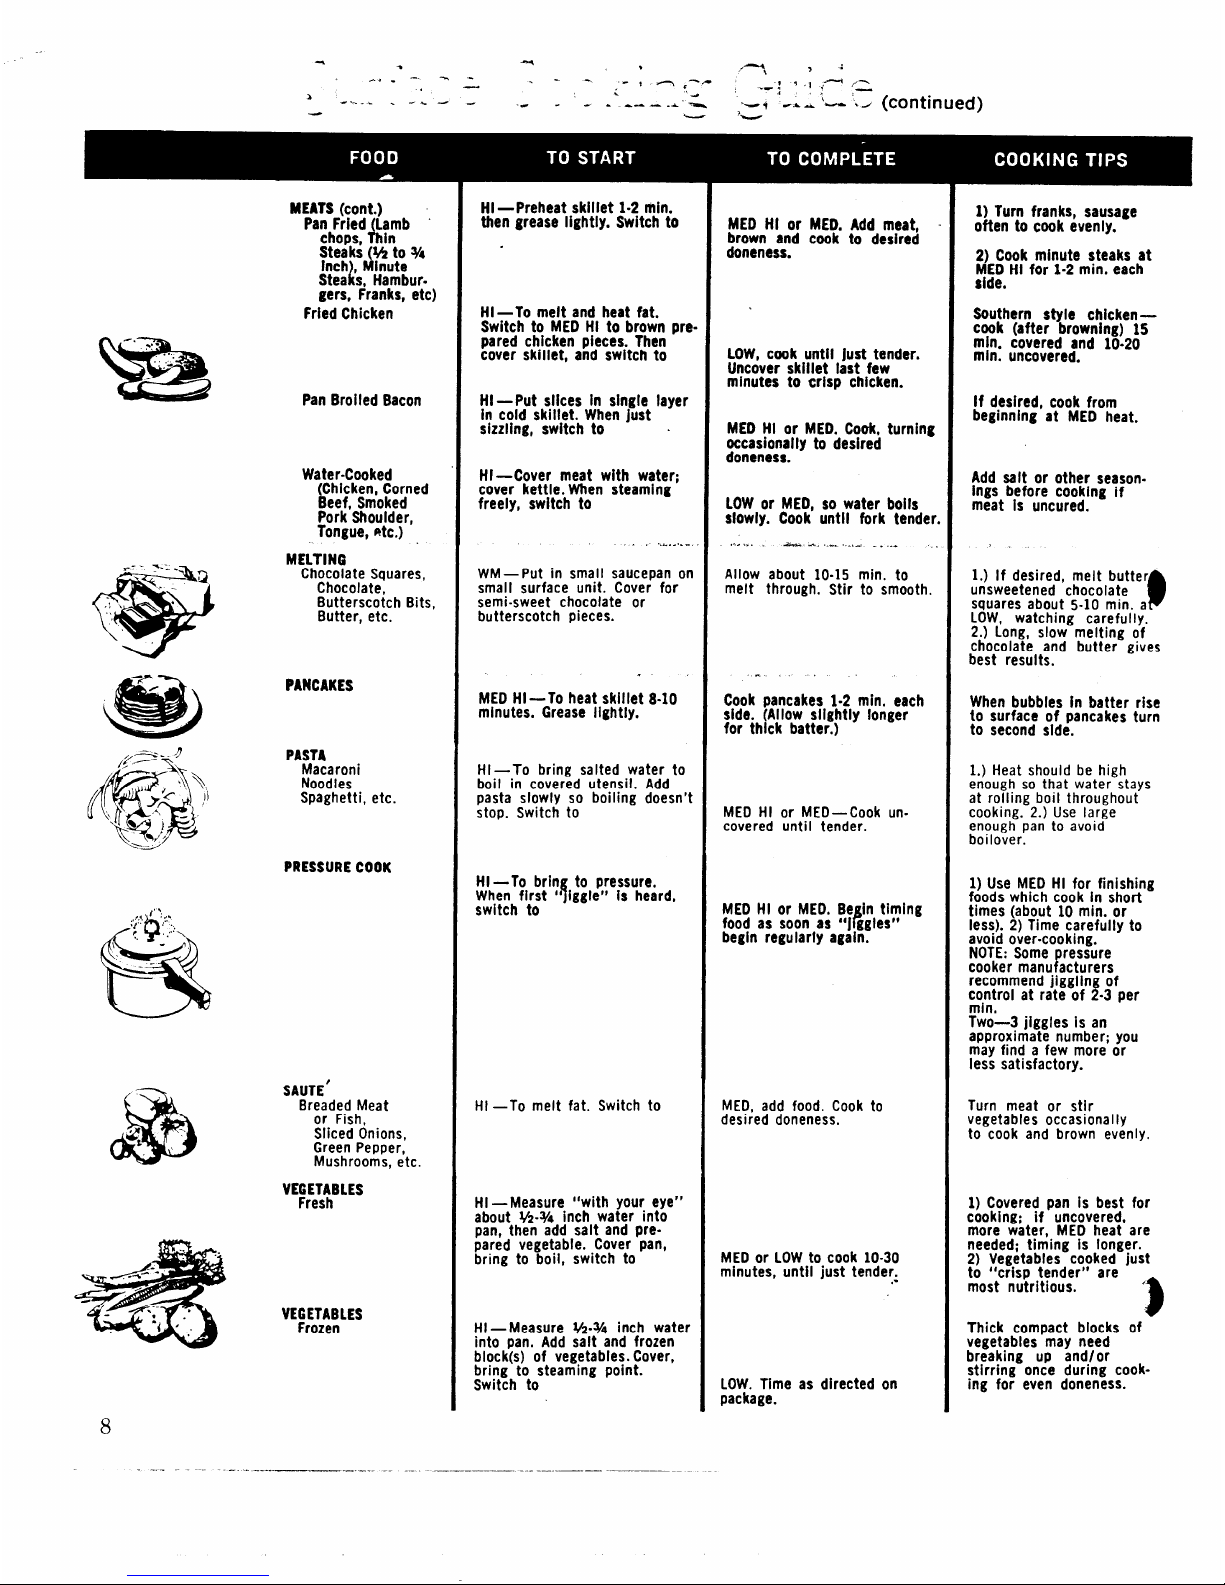
MEATS(cont.)
Pan Fried Lamb ~
Achops, in
Steaks (!+4to 34
Inch , Minute
i
Stea s, Hamburgers, Franks, etc)
Fried Chicken
Pan Broiled Bacon
Water-Cooked
Chicken, Corned
L eef, Smoked
Pork Shoulder,
Tongue,Rtc.)
MELTING
ChocolateSquares,
Chocolate,
Butterscotch
Bits,
Butter, etc.
PANCAKES
PASTA
Macaroni
Noodles
Spaghetti, etc.
PRESSURECOOK
...
e
.-+4-- “ “
.-
.
‘.
“, . “.,
SAUTE’
Breaded
Meat
or Fish,
Sliced Onions,
Green Pepper,
Mushrooms, etc.
—
‘-
HI—Preheat skillet 1-2 min.
then grease lightly. Switch to
HI—To melt and
heatfat.
Switch to MED HI to brown pre.
pared chicken pieces. Then
cover skillet, and switch to
HI—Put sllces in single layer
in cold skillet. When just
sizzling, switch to
HI—Cover meat with water;
cover kettle. When steaming
freely, switch to
. . .........
WM— Put in small saucepan on
small surface unit. Cover for
semi-sweet chocolate or
butterscotch pieces.
MED HI—To heat skillet 8-10
minutes. Grease Ilghtly.
HI —To bring salted water to
boil in covered utensil.
Add
pasta slowly so boiling doesn’t
stop. Switch to
HI—To brin to pressure,
1
When first “ iggle” is heard,
switch to
HI —To melt fat. Switch to
HI — Measure “with your eye”
about %-% inch water into
pan, then add salt and prepared vegetable. Cover pan,
bring to boll, switch to
HI — Measure %.?44 inch water
into pan,
Add salt and frozen
block(s) of vegetables. Cover,
bring to steaming point.
Switch to
8
---- -— -- .-----
——.-. —... —.—.—.— ....—..—— ———-
MED HI or MED. Add meat,
brown and cook to desired
doneness.
LOW, cook until just tender.
Uncover skillet last few
minutes to crisp chicken.
MED HI or MED. Cook, turning
occasionally to desired
doneness.
LOW or MED, so water bolls
slowly. Cook until fork tender,
,,..,..
*----
-....4. . . . .
Allow about 10-15 min. to
melt through. Stir to smooth.
Cook pancakes 1-2 min. each
side. (Allow slightly longer
for thick batter,)
MEO HI or MED— Cook uncovered until tender.
MED
HI or MED. Be in timing
ffood as soon as “j ggles”
begin regularly again.
MED, add food. Cook
desired doneness.
to
MED or LOW to
cook 10-30
minutes, until just
tender.
,-
LOW.Time as directed on
package.
1)Turn franks, sausage
often to cook evenly.
2) Cook minute steaks at
MED HI for 1-2 min. each
side.
Southern style chicken—
cook (after browning) 15
min. covered and 10-20
min. uncovered.
If desired,
cookfrom
beginning at MED heat.
Add salt or other seasonings before cooking if
meat is uncured.
>.
1.) If desired, melt butter
unsweetened chocolate
squares about 5-10 min. a
P
LOW, watching carefully.
2.) Long, slow melting of
chocolate and butter gives
best results.
When bubbles In batter rise
to surface of pancakes turn
to second side.
1,) Heat should be high
enough so that water stays
at rolling boil throughout
cooking. 2.) Use large
enough pan to avoid
boil over.
1) Use MED HI for finishing
foods
which cook in short
times (about 10 min. or
less).
2) Time carefully to
avoid over-cooking.
NOTE:Some ressure
!
cooker manu acturers
recommendjiggling of
control at rate of 2-3 per
mini
Two—3 jiggles is an
approximate number; you
may find a few more or
less satisfactory.
Turn meat or stir
vegetables occasionally
to cook and brown evenly.
1) Covered pan is best for
cooking; if uncovered,
more water. MED heat are
needed; timing is longer.
2) Vegetables
cooked just
to “crisp tender”
are
most
nutritious.
)
.
Thick compact blocks of
vegetables may
need
breaking
up and/or
stirring once during cook-
ing for even doneness.
& .
L
...,
Wsing Tour Oven
Your oven is designed to give you top results in
baking, roasting, and broiling when used as
recommended.
BEFORE USING YOUR OVEN
1.
Look at the controls. Be sure you understand how to set them properly. See directions
for the
Automatic Time Center so you will un-
derstand its use with the controls.
2. Check oven interior. Look at the shelves.
Practice removing and replacing them properly,
to give sure sturdy support.
3. Read over information and tips that follow.
4. Keep this book handy so you can refer to it,
especially during
the first weeks of getting
acquainted with your oven.
ChnM’1Ccmtmh
The controls for the oven are marked OVEN
SET and OVEN TEMP. OVEN SET has
settings for BAKE-, TIME BAKE, BROIL
(and on oven so equipped, CLEAN), and OFF.
Setting the knob to the desired operation auto-
matically activates the proper heating units.
OVEN TEMP maintains the temperature you
set from
WARM ( 150° ) to BROIL (550° ). A
cycling light near this control glows until oven
reaches the selected temperature, then goes off
and on with the oven unit(s) during cooking.
PREHEATING the oven, even to high temperature settings, is speedy—rarely more than
about 10 minutes. Set controls and when the
light goes off, oven is at selected temperature.
For baking cakes, pies, breads, etc., preheating
usually is recommended. For cooking meats,
casseroles and vegetables, preheating is usually
not necessary.
SHELVES
The shelves are designed with stop-locks so that
when placed correctly
on the shelf supports, (a)
will stop before coming completely from the
oven, (b) will
not tilt when removing food nor
when placing food on them.
TO REMOVE, pull shelf toward you and tilt
front end upward. TO REPLACE, place shelf
on shelf support so curve on straight shelf, or
curved tab on reversible shelf, is pointing up-
ward and toward rear of oven. Tilt up front and
push shelf toward back of oven until it goes
past ridge on oven liner; lower front of shelf
and push to back of oven.
The oven has one straight and one reversible
shelf. Three shelf
supports are offered for vari-
ety and flexibility in locating shelves. The reversible shelf may be raised above or lowered
below the straight shelf level; turn the shelf
end-over-end and insert as instructed.
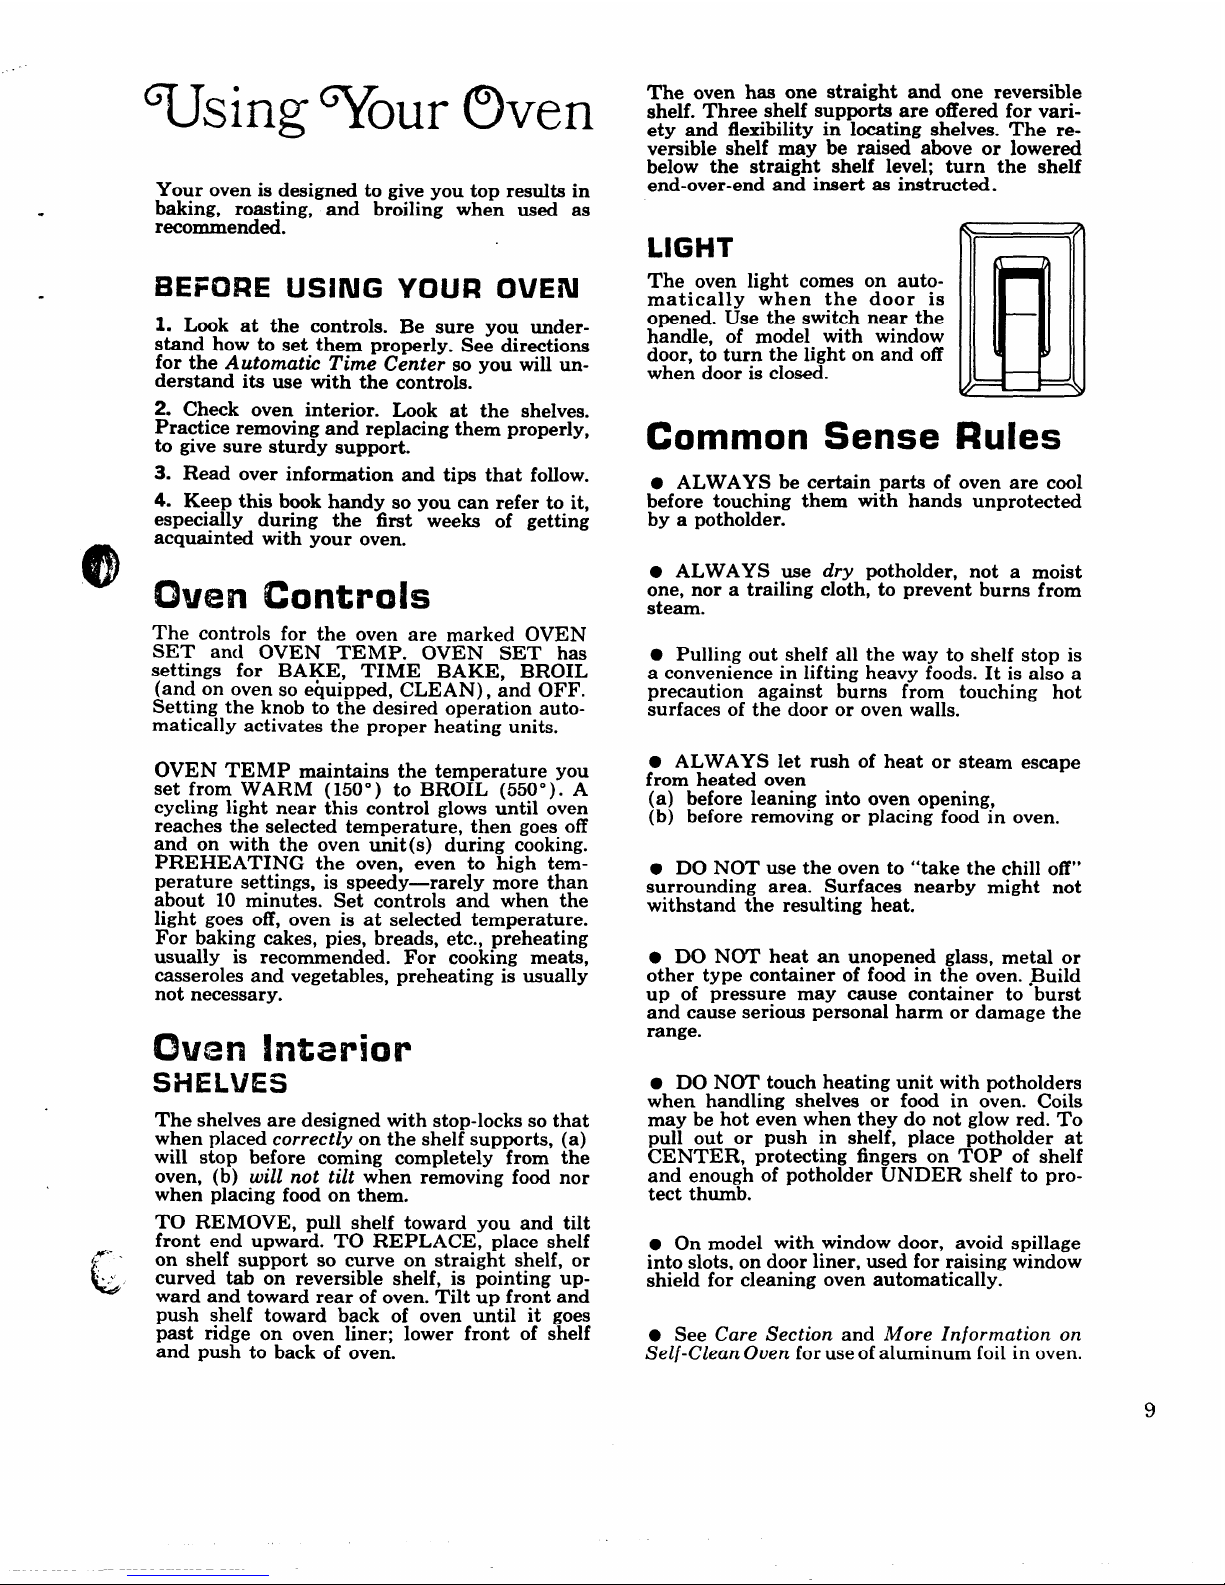
LIGHT
The oven light comes on automatically when the door is
opened. Use the switch near the
handle, of model with window
door, to turn the light on and off
when door is closed.
Common Sense Rules
. ALWAYS be certain parts of oven are cool
before touching them with hands unprotected
by a potholder.
. ALWAYS use
dry potholder, not a moist
one, nor a trailing cloth, to prevent burns from
steam.
. Pulling out shelf all the way to shelf stop is
a convenience in lifting heavy foods. It is also a
precaution against burns from touching hot
surfaces of the door or oven walls.
. ALWAYS let rush of heat or steam escape
from heated oven
(a) before leaning into oven opening,
(b) before removing or placing food in oven.
. DO NOT use the oven to “take the chill off”
surrounding area. Surfaces nearby might not
withstand the resulting heat.
. DO NOT heat an unopened glass, metal or
other type container of food in the oven.
●Build
up of pressure may cause container to burst
and cause serious personal harm or damage the
range.
.
DO NOT touch heating unit with potholders
when handling shelves or food in oven. Coils
may be hot even when they do not glow red. To
pull out or push in shelf, place potholder at
CENTER, protecting fingers on TOP of shelf
and enough of potholder UNDER shelf to protect thumb.
. On model with window door, avoid spillage
into slots, on door liner, used for raising window
shield for cleaning oven automatically.
. See
Care Section and More Information on
Self-Clean
Ouen for use of aluminum foil in oven.
9
 Loading...