

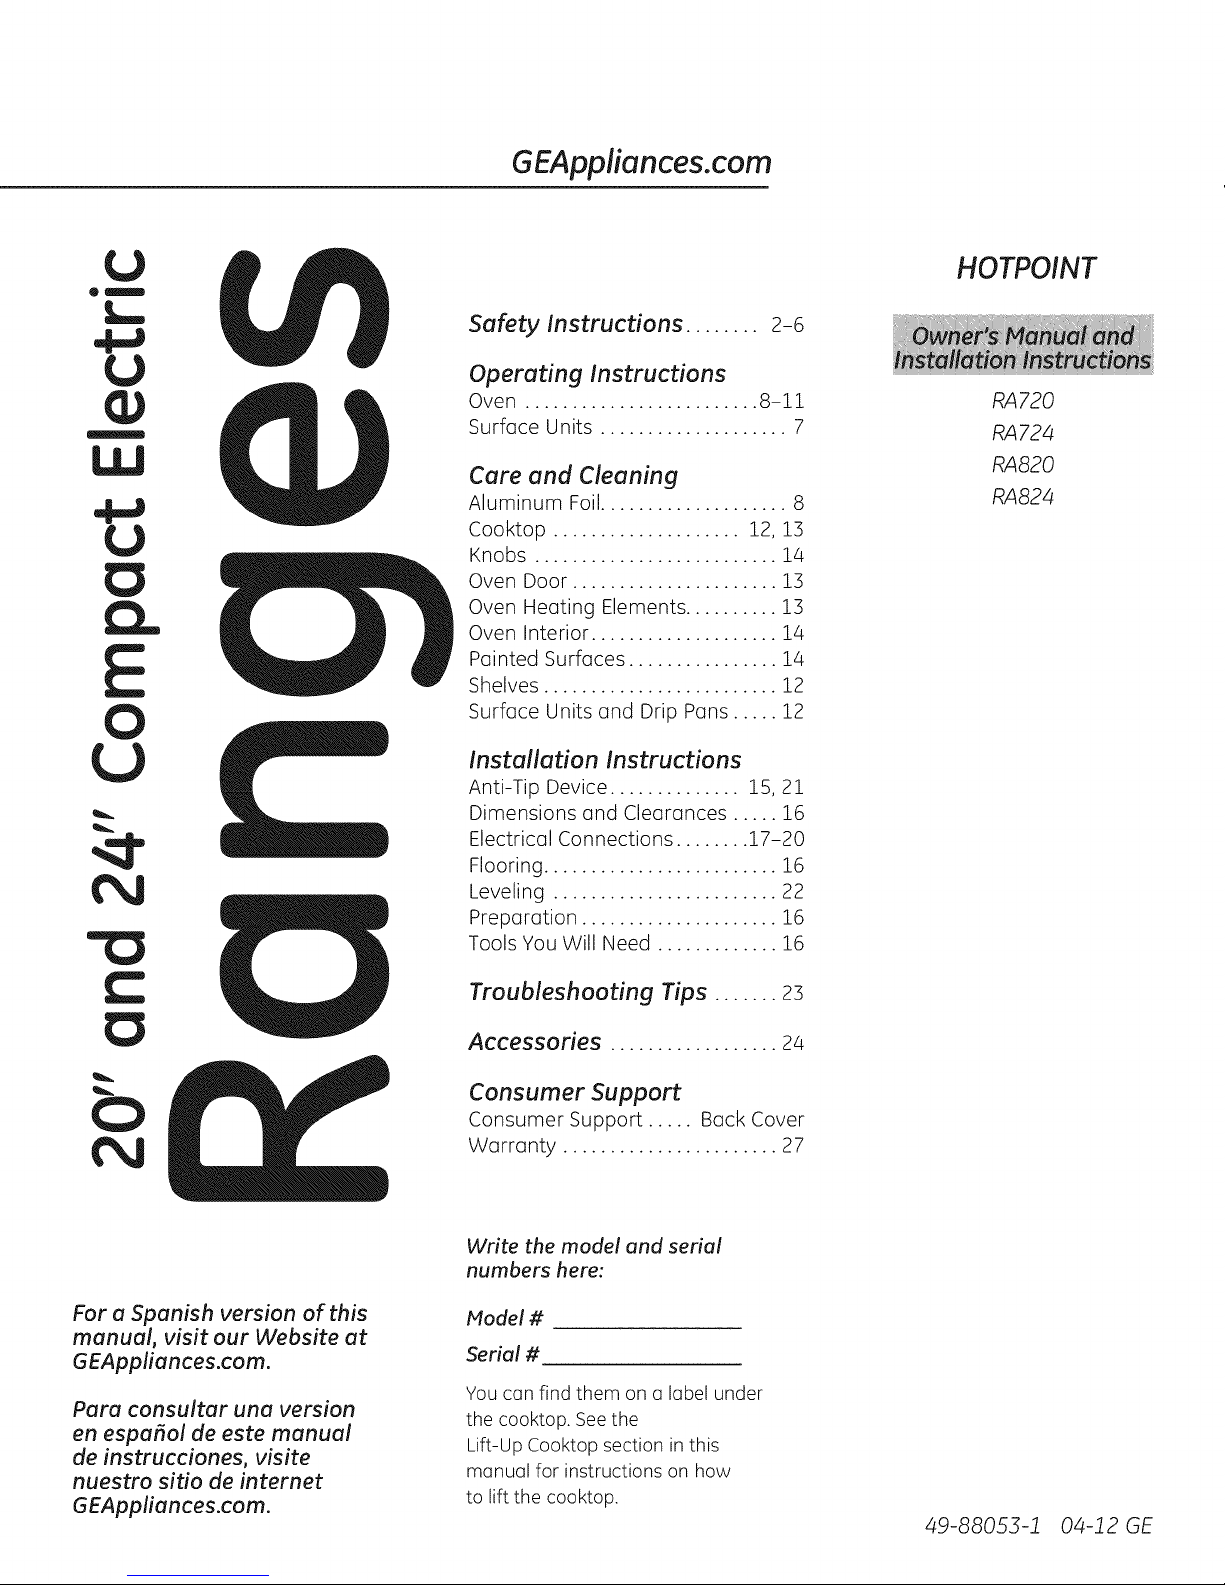
Hotpoint RA720, RA724, RA820, RA824 Owner's Manual & Installation Instructions
GEAppliances.corn
0
01
HOTPOINT
Safety Instructions ........ 2-e
0
-
Operating Instructions
Oven ......................... 8-11
Surface Units .................... 7
Care and Cleaning
Aluminum Foil.................... 8
Cooktop .................... 12, iS
Knobs .......................... 14
Oven Door ...................... 13
Oven Heoting Elements .......... 13
Oven Interior .................... 14
Painted Surfoces ................ 14
Shelves ......................... 12
Surfoce Units end Drip Pens ..... 12
Installation Instructions
Anti-Tip Device .............. 15, 21
Dimensions end Cleoronces ..... 16
Electricol Connections ........ 17-20
Flooring ......................... 16
Leveling ........................ 22
Preparation ..................... 16
Tools You Will Need ............. 16
RA720
RA724
RA820
RA824
0
For e Spanish version of this
manual, visit our Website at
GEAppliances.com.
Para consulter una version
en espafiol de este manual
de instrucciones, visite
nuestro sitio de internet
GEAppliances.com.
Troubleshooting Tips ....... 23
Accessories .................. 24
Consumer Support
Consumer Support ..... Back Cover
Warranty ....................... 27
Write the model and serial
numbers here:
Model #
Serial #
You cGn find them on GIGbel under
the cooktop. Seethe
Lift-Up Cooktop section in this
mGnuGIfor instructions on how
to lift the cooktop.
49-88053-1 04-12 GE
IMPORTANT SAFETY INFORMATION.
READ ALL INSTRUCTIONS BEFORE USING.
[A WARNING j
Read all safety instructions before using the product. Failure to follow these instructions may result in fire, electric shock,
serious injury or death.
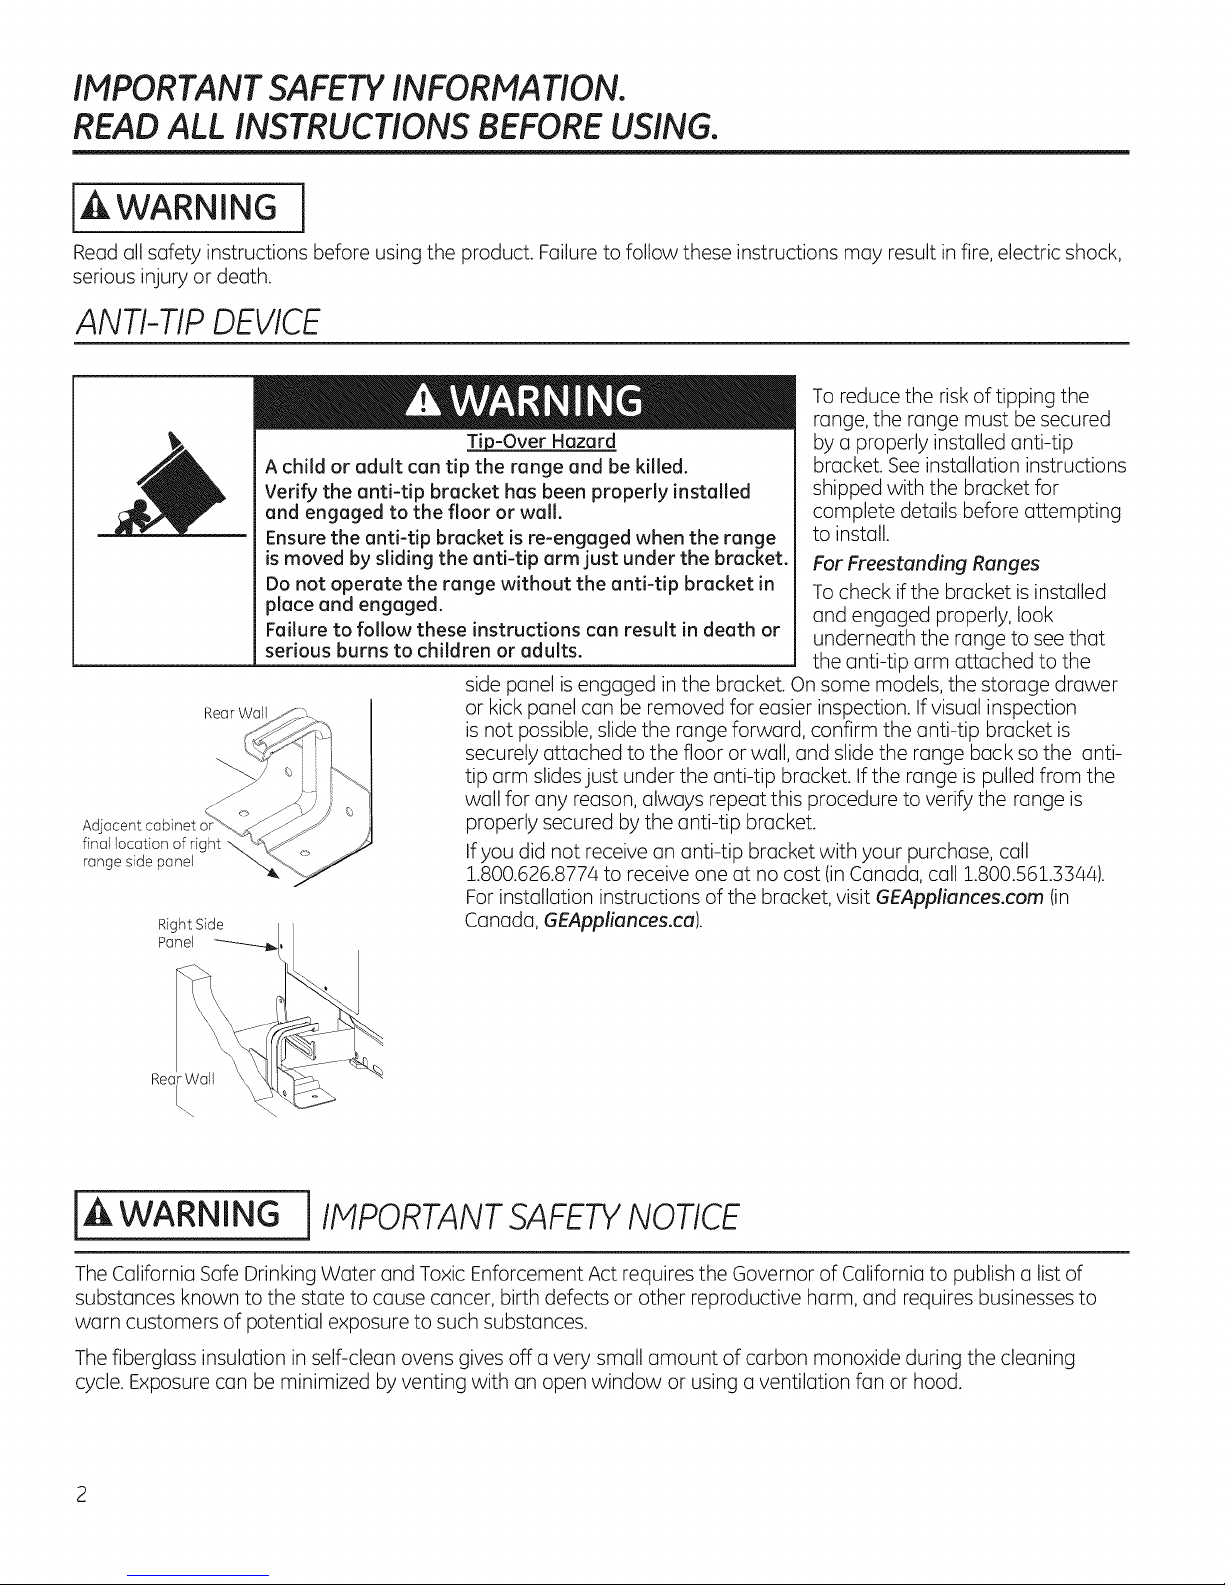
ANTI-TIP DEVICE
To reduce the risk of tipping the
range, the range must be secured
Adjacent cabinet
final location of right
range side panel
Right Side
Panel
Rear Wall
Tip-Over Hazard
A child or adult can tip the range and be killed.
Verify the anti-tip bracket has been properly installed
and engaged to the floor or wall,
Ensure the anti-tip bracket is re-engaged when the range
is moved by sliding the anti-tip arm just under the bracket.
Do not operate the range without the anti-tip bracket in
place and engaged.
Failure to follow these instructions can result in death or
serious burns to children or adults.
side panel is engaged in the bracket. On some models, the storage drawer
or kick panel can be removed for easier inspection. If visual inspection
is not possible, slide the range forward, confirm the anti-tip bracket is
securely attached to the floor or wall, and slide the range back so the anti-
tip arm slides just under the anti-tip bracket. If the range is pulled from the
wall for any reason, always repeat this procedure to verify the range is
properly secured by the anti-tip bracket.
If you did not receive an anti-tip bracket with your purchase, call
1.800.626.8774 to receive one at no cost (in Canada, call 1.800.561.3344).
For installation instructions of the bracket, visit GEAppliances.com (in
Canada, GEAppliances.ca).
by a properly installed anti-tip
bracket. See installation instructions
shipped with the bracket for
complete details before attempting
to install.
For Freestanding Ranges
To check if the bracket isinstalled
and engaged properly, look
underneath the range to see that
the anti-tip arm attached to the
Rear Wa
I
iA WARNING i IMPORTANT SAFETYNOTICE
The California Safe Drinking Water and Toxic Enforcement Act requires the Governor of California to publish a list of
substances known to the state to cause cancer, birth defects or other reproductive harm, and requires businesses to
warn customers of potential exposure to such substances.
The fiberglass insulation in self-clean ovens gives off a very small amount of carbon monoxide during the cleaning
cycle. Exposure can be minimized by venting with an open window or using a ventilation fan or hood.
IA WARNING 1GENERALSAFETYINSTRUCTIONS
GEAppliances.com
Use this appliance for its intended purpose as described
in this Owner's Manual.
Be sure your appliance is properly installed and
grounded by a qualified installer in accordance with the
provided installation instructions.
Do not attempt to repair or replace any part of your
range unless it is specifically recommended in this
manual. All other servicing should be referred to a
qualified technician.
Before performing any service, unplug the range
or disconnect the power supply at the household
distribution panel by removing the fuse or switching off
the circuit breaker.
Do not leave children alone-children should not be left
alone or unattended in an area where an appliance is in
use. They should never be allowed to climb, sit or stand
on any part of the appliance.
CAUTION" Do not store items of interest to
children above a range or on the backguard of a
range-children climbing on the range to reach items
could be seriously injured.
Use only dry pot holders-moist or damp pot holders on
hot surfaces may result in burns from steam. Do not let
pot holders touch hot surface units or heating elements.
Do not use a towel or other bulky cloth in place of pot
holders.
iiiil}i
Do not touch the surface units, the heating elements
or the interior surface of the oven. These surfaces may
be hot enough to burn even though they are dark in
color. During and after use, do not touch, or let clothing
or other flammable materials contact the surface units,
areas nearby the surface units or any interior area of
the oven; allow sufficient time for cooling first. Other
surfaces of the appliance may become hot enough
to cause burns. Potentially hot surfaces include the
cooktop, areas facing the cooktop, oven vent opening,
surfaces near the opening and crevices around the
oven door.
iiiiiiili_
Do not heat unopened food containers. Pressure could
build up and the container could burst, causing an
injury.
iiiiiiili_
Do not use aluminum foil to line drip pans or anywhere
in the oven, except as described in this manual. Foil can
trap heat or melt, resulting in damage to the product
and a shock or fire hazard.
iiiiiiili_
Avoid scratching or impacting glass doors, cook tops or
control panels. Doing so may lead to glass breakage. Do
not cook on a product with broken gloss. Shock, fire or
cuts may occur.
iiiiiiili_
Cook meat and poultry thoroughly-meat to at least an
internal temperature of 160°F and poultry to at least
an internal temperature of 180°F. Cooking to these
temperatures usually protects against foodborne illness.
Never use your appliance for worming or heating the
room.
I,AWARNING I KEEPFLAMMABLE MATERIALSAWAY FROM
THE RANGE.
Do not store or use flammable materials in an oven or
near the cooktop, including paper, plastic, pot holders,
linens, wall coverings, curtains, drapes and gasoline or
other flammable vapors and liquids.
Never wear loose-fitting or hanging garments while
using the appliance. These garments may ignite if they
contact hot surfaces causing severe burns.
Do not let cooking grease or other flammable materials
accumulate in or near the range. Grease in the oven or
on the cooktop may ignite.
Cleon ventilating hoods frequently. Grease should not
be allowed to accumulate on the hood or filter.
IMPORTANT SAFETY INFORMATION.
READ ALL INSTRUCTIONS BEFORE USING.
[A WARNING 1IN THE EVENTOF A FIRE,TAKE THE FOLLOWING
STEPSTO PREVENTTHE FIREFROM SPREADING:
*:, Do not use water on grease fires. Never pick up a
flaming pan. Turn the controls off. Smother a flaming
pan on a surface unit by covering the
pan completely with a well-fitting lid, cookie sheet or flat
tray. Use a multi-purpose dry chemical or foam-type fire
extinguisher.
*:, If there is a fire in the oven during baking, smother the
fire by closing the oven door and turning the oven off or
by using a multi-purpose dry chemical or foam-type fire
extinguisher.
If there is a fire in the oven during self-clean, turn the
oven off and wait for the fire to go out. Do not force
the door open. Introduction of fresh air at self-clean
temperatures may lead to a burst of flame from the
oven. Failure to follow this instruction may result in
severe burns.
iAWARNING ICOOKTOPSAFETYINSTRUCTIONS
Never leave the surface units unattended at medium or
high heat settings. Boilovers cause smoking and greasy
spillovers that may catch on fire.
*:, Never leave oil unattended while frying. If allowed to
heat beyond its smoking point, oil may ignite resulting
in fire that may spread to surrounding cabinets. Use a
deep fat thermometer whenever possible to monitor oil
temperature.
To avoid oil spillover and fire, use a minimum amount of
oil when shallow pan-frying and avoid cooking frozen
foods with excessive amounts of ice.
_:,Useproper pan size--selectcookware havingflat
bottoms largeenough to cover the surface heating
element.Theuse of undersizedcookware will expose
a portion of the surface unit to direct contact and may
resultin ignition of clothing. Properrelationship of
cookware to surface unit will also improve efficiency.
_:,Only certain types of glass, glass/ceramic, earthenware
or other glazed containers are suitable for cooktop
service; others may break because of the sudden
change in temperature.
To minimize the possibility of burns, ignition of
flammable materials and spillage, the handle of a
container should be turned toward the center of the
range without extending over nearby surface units.
When preparing flaming foods under a hood, turn the
fan on.
iiiiiil
If power is lost to an electric cooktop while a surface
unit is ON, the surface unit will turn back on as
soon as power is restored. In the event of power
loss, failure to turn all surface unit knobs to the OFF
position may result in ignition of items on or near the
cooktop, leading to serious injury or death.
IAWARNING IRADIANTCOOKTOPSAFETYINSTRUCTIONS
(Some models)
GEAppliances.com
Use care when touching the cooktop. The glass surface
of the cooktop will retain heat after the controls have
been turned off.
Do not cook on a broken cooktop. If glass cooktop
should break, cleaning solutions and spillovers
may penetrate the broken cooktop and create a
risk of electric shock. Contact a qualified technician
immediately.
Avoid scratching the glass cooktop. The cooktop
can be scratched with items such as knives, sharp
instruments, rings or other jewelry, and rivets on
clothing.
Do not place or store items that can melt or catch fire
on the glass cooktop, even when it is not being used. If
the cooktop is inadvertently turned on, they may ignite.
Heat from the cooktop or oven vent after it isturned off
may cause them to ignite also.
iiiil}i
Use CERAHA BRYTE®ceramic Cooktop Cleaner and
CERAHA BRYTE®Cleaning Pad to clean the cooktop.
Wait until the cooktop cools and the indicator light
goes out before cleaning. A wet sponge or cloth on a
hot surface can cause steam burns. Some cleaners
can produce noxious fumes if applied to a hot surface.
Note: Sugar spills are an exception. They should be
scraped off while still hot using an oven mitt and a
scraper. See the Cleaning the glass cooktop section for
detailed instructions.
iiiiiiili_
Read and follow all instructions and warnings on the
cleaning cream label.
IAWARNING ICOIL COOKTOP SAFETYINSTRUCTIONS
(Some models)
Do not immerse or soak the removable surface units.
Do not put them in a dishwasher. Do not self-clean the
surface units in an oven. Doing so may cause them to
fail presenting a burn or fire hazard.
To avoid the possibility of a burn or electric shock, always
be certain that the controls for all surface units are at the
OFFposition and all coils are cool before attempting to
lift or remove a coil surface unit.
Be sure the drip pans are not covered and are in place.
Their absence during cooking could damage range
parts and wiring.
Do not use aluminum foil to line drip pans. Foil can trap
heat or melt, resulting in damage to the product and a
shock or fire hazard.
IAWARNING ]OVEN SAFETYINSTRUCTIONS
_::Stand away from the range when opening the oven
door. Hot air or steam which escapes can cause burns
to hands, face and/or eyes.
_::Keep the oven vent unobstructed.
_:_Keep the oven free from grease buildup. Grease in the
oven may ignite.
_:_Place oven racks in desired location while oven is cool.
If rack must be moved while oven is hot, do not let pot
holder contact hot heating element in oven.
_:_When using cooking or roasting bags in the oven,
follow the manufacturer's directions.
iiiil}i
Pull the oven rack to the stop-lock position when
loading and unloading food from the oven. This helps
prevent burns from touching hot surfaces of the door
and oven walls.
_:_Do not leave items such as paper, cooking utensils or
food in the oven when not in use. Items stored in an
oven can ignite.
_:: Do not use aluminum foil to line the oven bottom.
Foil can trap heat or melt, resulting in damage to the
product and a shock or fire hazard.
IMPORTANT SAFETY INFORMATION.
REAoALLINSTRUCTIONSBEFOREUSING.
JAWARNINGISELF-CLEaNINGovENSaFm INStRUCtIONS
(Some models)
The self-cleaning feature operates the oven at temperatures high enough to burn away food soils in the oven.
Follow these instructions for safe operation.
Before operating the self-clean cycle, remove pans,
shiny metal oven racks and other utensils from the
oven. Only gray or black porcelain-coated oven racks
and drip pans may be left in the oven. Do not use self-
clean to clean other parts, such as shiny drip pans or
bowls.
Before operating the self-clean cycle, wipe grease and
food soils from the oven. Excessive amount of grease
may ignite leading to smoke damage to your home.
IA WARNING I
WARMING DRAWER/LOWER OVEN DRAWER SAFETY
INSTRUCTIONS Isomemodelsl
The purpose of the warming drawer isto hold hot
cooked foods at serving temperature. Bacteria will
grow in food while it is below 140°F. Do not put cold
food in warming drawer. Do not heat food for more
than 2 hours. Failure to follow these instructions may
result in foodborne illness.
Do not leave paper products, plastics, canned food or
combustible materials in the drawer. They may ignite.
Do not touch the heating element or the interior
surface of the drawer. These surfaces may be hot
enough to cause burns.
If the self-cleaning mode malfunctions, turn the oven
off and disconnect the power supply. Have it serviced
by a qualified technician.
Do not clean the door gasket. The door gasket is
essential for a good seal. Care should be taken not to
rub, damage or move the gasket.
iiiil}i
Do not use oven cleaners. No commercial oven cleaner
or oven liner protective coating of any kind should be
used in or around any part of the oven.
iiiil}i
Usecare when opening the drawer. Open the drawer a
crack and let hot air or steam escape before removing
or replacing food. Hot airor steam that escapescan
cause burnsto hands,face and/or eyes.
iiiiiiili_
Do not use aluminum foil to line the lower drawer. The
foil will trap heat below, and upset the performance of
the oven. Foil can melt and permanently damage the
drawer bottms.
READAND FOLLOWTHISSAFETYINFORMATIONCAREFULLY.
SAVETHESEINSTRUCTIONS
6

Using the surface units, GEApUi°nces.com
Throughout this manual, features and appearance may vary from your model.
Surface Cooking Controls
Yoursurface units and controls are designedto
giveyou a varietyof heat settings for surface
unit cooking.
At both LO and HI positions,there isa slight
niche socontrol clicks at those positions;
HI marks the highest setting; LO, the lowest
setting.
How to Set the Controls
Ina quiet kitchen,you may hear slight clicking
sounds during cooking,indicating heat settings
selected are being maintained.
Switching heats to higher settings always
shows a quicker change in temperature than
switching to lower settings.
Medium
low
[7] Pushthe control knob in.
When control is inany position other than OFF,
you can turn itwithout pushing in.
[] Turneither clockwise or counterclockwise
to desiredheat setting.
Control must be pushed in to set only from the
Besureyou turn control to OFF when you
finish cooking. An indicator light will glow when
ANY surface unit ison.
OFF position.
OFF
2
8
Medium
Heat Setting Guide
HI - Quick start for cooking; bring water to boil.
PIEDIUPIHIGH- Fastfry, pan broil; maintain
fast boil on large amount of food.
PIED- Saute and brown; maintain slow boil on
large amount offood.
high
NOTE:
[Z] At HI or PIEDIUPIHIGH, never leave food
unattended. Boiloverscause smoking;
greasy spillovers may catch fire.
At LO,melt chocolate, butter on small unit.
PIEDIUPILOW- Cereal;maintain serving
temperature of most foods.
LO - Cookafter starting at HI;cook with little
water in covered pun. Useto steam rice.
Cooking Tips
m Usemedium- or heavyweight cookware.
Aluminum cookware conducts heat faster
than other metals. Cast-iron and coated
cast-iron cookware is slow to absorb heat,
but generally cooks evenly at low or medium
heat settings.Steelpans may cook unevenly
if not combined with other metals.
mlDo not overfill cookware with fat that may
spilloverwhen adding food. Frostyfoods
bubble vigorously. Watch foods frying at high
temperatures. Keeprange and hood clean
from accumulated grease.
Toconservethe most cooking energy, pans
should be flat on the bottom, havestraight
sides and tight-fitting lids.Hatch the size
of the saucepan to the sizeof the surface
unit.Apan that extends more than an inch
beyondthe edge of the drip pan traps heat,
which causes "crazing" (fine hairline cracks)
on porcelain, and discoloration ranging from
blueto dark gray on chrome drip pans.
Usingthe oven.
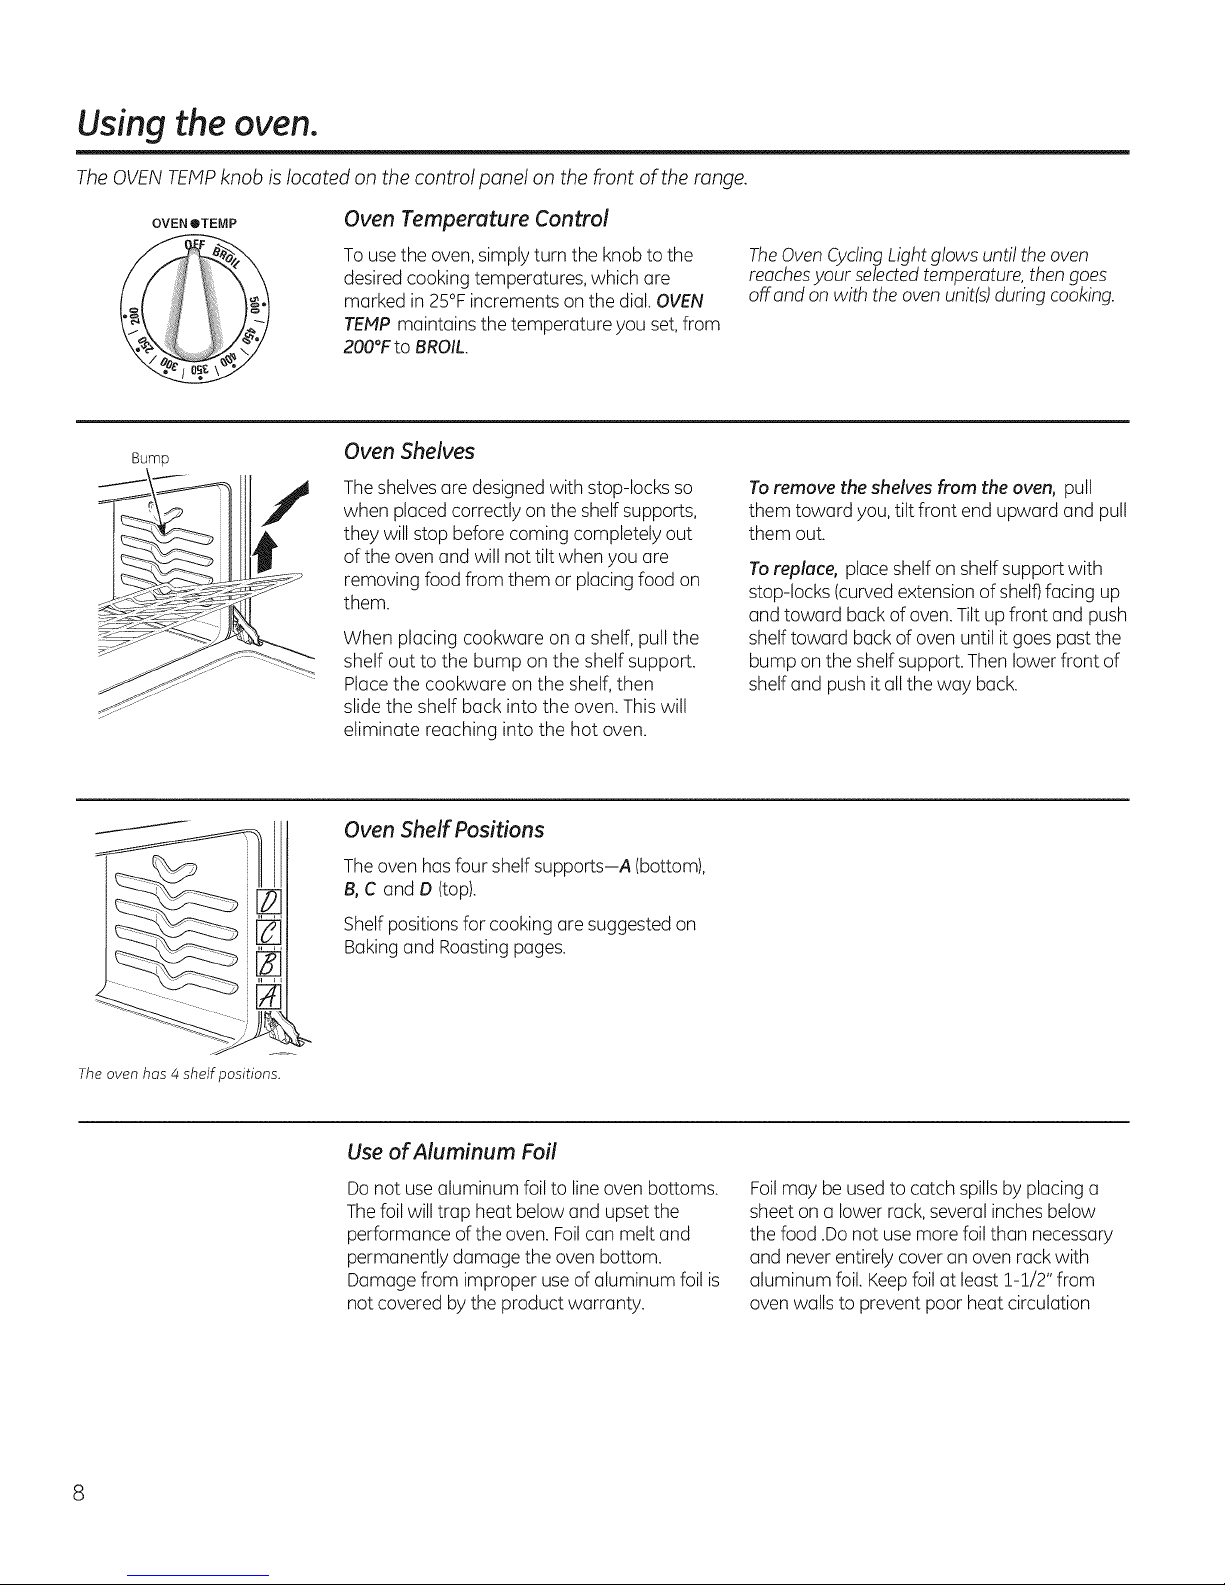
TheOVENTEMPknob islocated on the controlpanel on thefront oft:herange.
OVEN ®TEMP Oven Temperature Control
Bump
To usethe oven, simply turn the knob to the
desiredcooking temperatures, which are
marked in 25°Fincrements onthe dial. OVEN
TEHP maintains the temperature you set, from
200°Fto BROIL.
Oven Shelves
Theshelvesare designed with stop-locks so
when placedcorrectly on the shelf supports,
they will stop before coming completely out
of the oven and will not tilt when you are
removing food from them or placingfood on
them.
When placing cookware on a shelf, pull the
shelf out to the bump on the shelf support.
Placethe cookware on the shelf, then
slidethe shelf back into the oven. This will
eliminate reaching into the hot oven.
Oven Shelf Positions
TheOven CyclingLight glows until theoven
reachesyour selectedtemperature, then goes
off and on with theoven unit(s)during cooking.
Toremove the shelves from the oven, pull
them toward you, tilt front end upward and pull
them out.
Toreplace, place shelf on shelfsupport with
stop-locks (curvedextension of shelf)facing up
and toward back of oven. Tilt up front and push
shelf toward back of oven until it goes past the
bump on the shelf support.Then lowerfront of
shelf and push it all the way back.
The oven has 4 shelf positions.
Theoven hasfour shelf supports--A (bottom),
B,C and D (top).
Shelfpositionsfor cooking are suggestedon
Bakingand Roasting pages.
Use of Aluminum Foil
Donot usealuminum foil to lineoven bottoms.
Thefoilwill trap heat below and upset the
performance of the oven. Foilcan melt and
permanently damage the oven bottom.
Damage from improper use of aluminum foil is
not covered by the product warranty.
Foilmay be used to catch spills by placing a
sheet on a lower rack, several inches below
the food .Do not use more foil than necessary
and never entirely cover an oven rack with
aluminum foil. Keepfoil at least 1-1/2" from
oven walls to prevent poor heat circulation
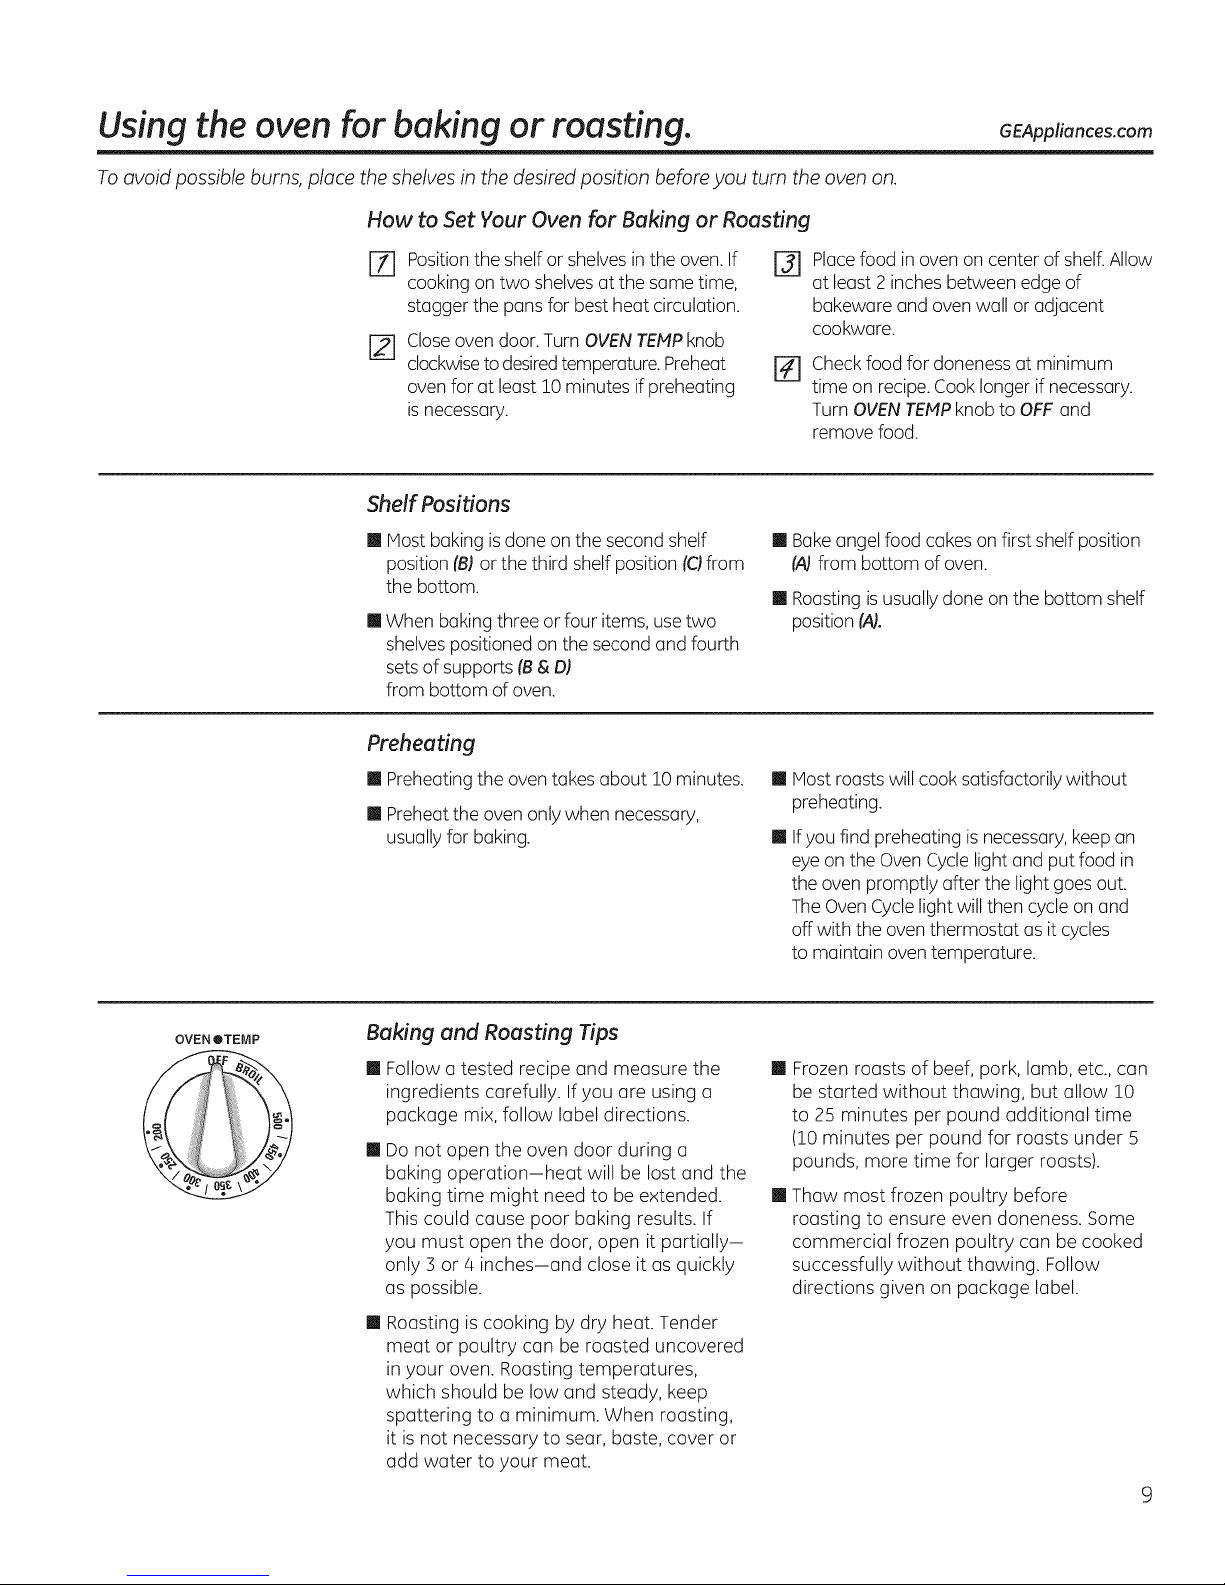
Using the oven for baking or roasting. GEAppliances.com
To avoid possible burns, place the shelves in the desired position before you turn the oven on.
How to Set Your Oven for Baking or Roasting
[] Positionthe shelfor shelvesin the oven. If F31
cooking on two shelves at the same time,
stagger the pans for best heat circulation.
Closeoven door.Turn OVEN TEMP knob
F21
clockwiseto desiredtemperature.Preheat
oven for at least 10 minutes if preheating
isnecessary.
Shelf Positions
m Most baking isdone on the second shelf
position (B) or the third shelf position (C)from
the bottom.
II When baking three or four items, use two
shelvespositioned on the second and fourth
setsof supports (B& D)
from bottom of oven.
[]
m Bakeangel food cakes on first shelf position
il Roastingisusually done on the bottom shelf
Preheating
m Preheatingthe oventakes about 10 minutes, m
II Preheat the oven only when necessary,
usually for baking, m
Placefood in oven on center of shelf.Allow
at least 2 inches between edge of
bakeware and ovenwall or adjacent
cookware.
Checkfood for doneness at minimum
time on recipe. Cooklonger if necessary.
Turn OVENTEMPknob to OFF and
remove food.
(A)from bottom of oven.
position (A).
Host roasts will cook satisfactorily without
preheating.
Ifyou find preheating isnecessary,keep an
eye on the Oven Cyclelight and put food in
the oven promptly after the light goes out.
TheOvenCyclelight will then cycle on and
off with the oventhermostat as it cycles
to maintain oven temperature.
OVEN OTEMP
Baking and Roasting Tips
il Follow a tested recipe and measure the
ingredients carefully. If you are using a
package mix, follow label directions.
In
Do not open the oven door during a
baking operation-heat will be lost and the
baking time might need to be extended.
This could cause poor baking results. If
you must open the door, open it partially-
only :3or 4 inches-and close it as quickly
as possible.
In
Roasting is cooking by dry heat. Tender
meat or poultry can be roasted uncovered
in your oven. Roasting temperatures,
which should be low and steady, keep
spattering to a minimum. When roasting,
it is not necessary to sear, baste, cover or
add water to your meat.
In
Frozen roasts of beef, pork, lamb, etc., can
be started without thawing, but allow !0
to 25 minutes per pound additional time
(!0 minutes per pound for roasts under 5
pounds, more time for larger roasts).
In
Thaw most frozen poultry before
roasting to ensure even aloneness. Some
commercial frozen poultry can be cooked
successfully without thawing. Follow
directions given on package label.
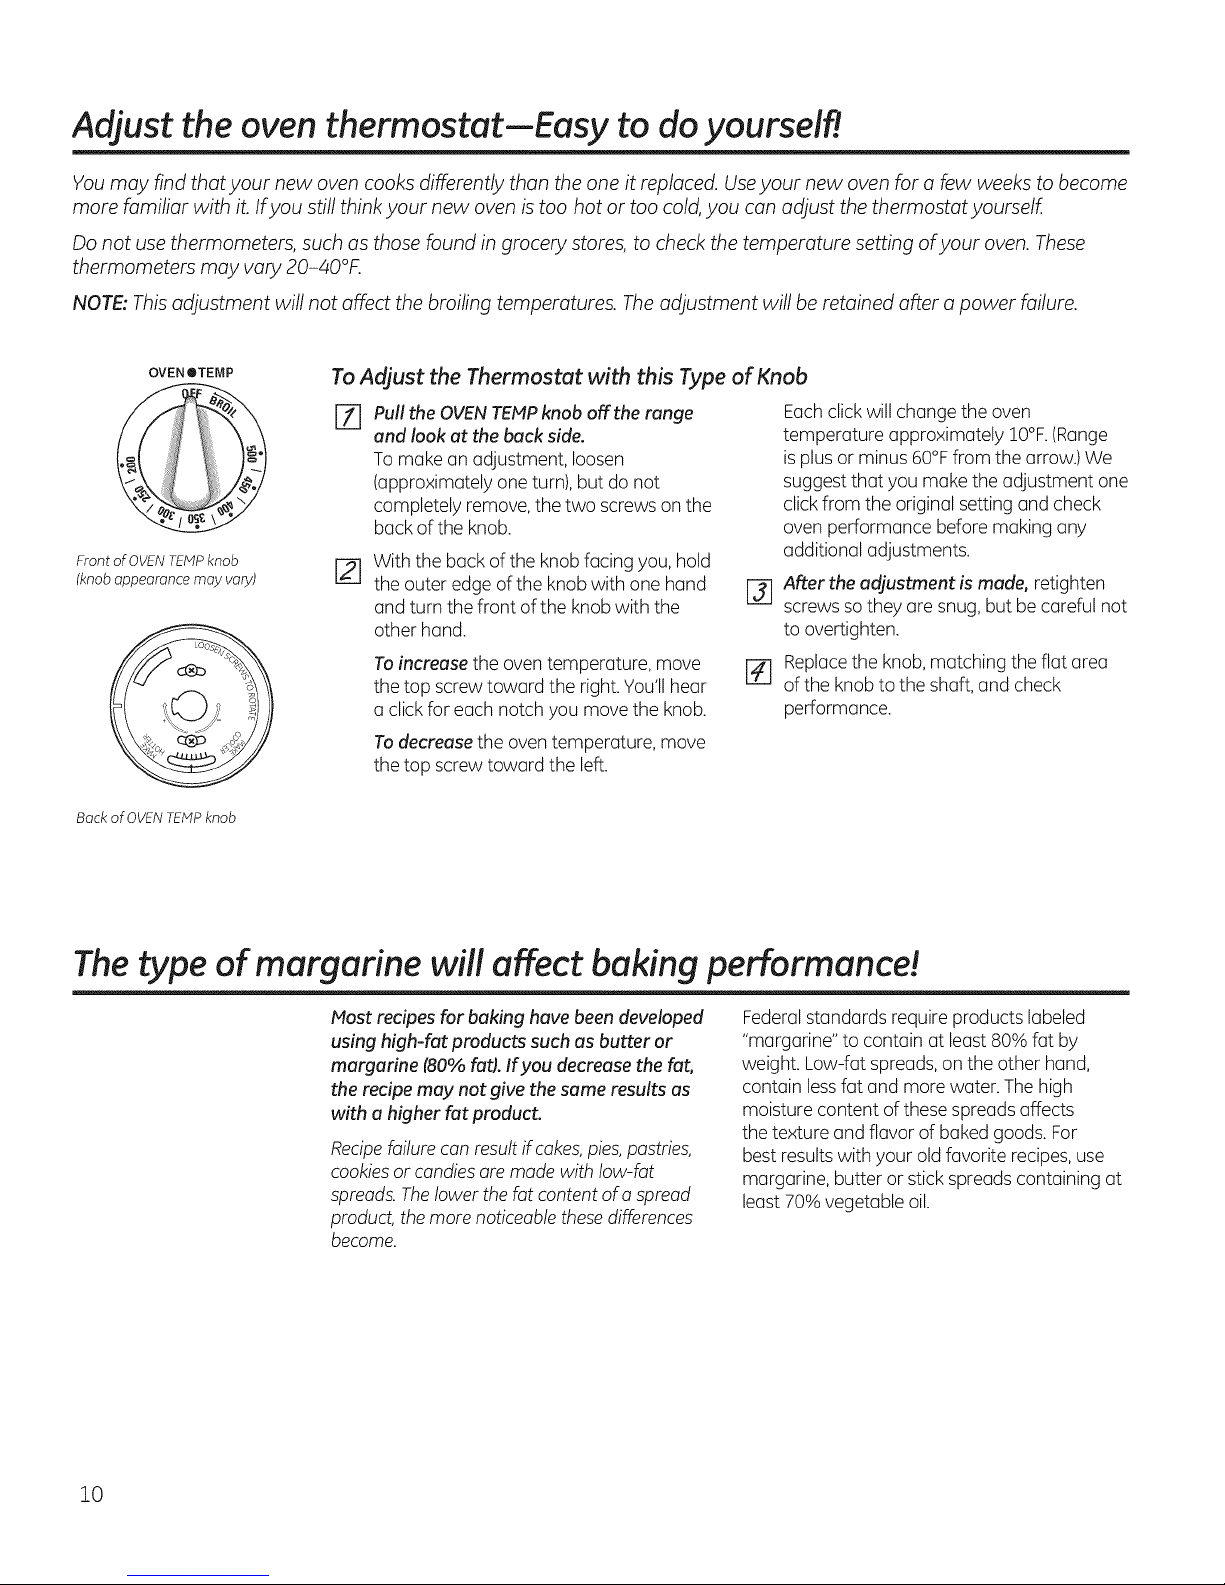
Adjust the oven thermostat--Easy to do yourself!
You may find that your new oven cooks differently than the one it replaced. Useyour new oven for a few weeks to become
more familiar with it. Ifyou still think your new oven is too hot or too cold,you can adjust the thermostat yourself.
Do not use thermometers, such as those found in grocery stores, to check the temperature setting of your oven. These
thermometers may vary 20-40°E
NOTE: This adjustment will not affect the broiling temperatures. The adjustment will be retained after a power failure.
OVENOTEMP
Front of OVEN TEMP knob
(knob appearance may vary)
Backof OVENTEIvlPknob
To Adjust the Thermostat with this Type of Knob
Pull the OVENTEMPknob off the range
%
and look at the buck side.
To make an adjustment, loosen
(approximately one turn), but do not
completely remove, the two screws on the
back of the knob.
With the back of the knobfacing you, hold
the outer edge of the knob with one hand
and turn the front of the knob with the
other hand.
To increase the oven temperature, move
the top screw toward the right. You'llhear
a click for each notch you move the knob.
Todecrease the oventemperature, move
the top screw toward the left.
temperature approximately IO°F.(Range
is plusor minus 60°Ffrom the arrow.) We
suggest that you make the adjustment one
clickfrom the original setting and check
oven performance before making any
additional adjustments.
After the adjustment is made, retighten
@
screws so they are snug, but be careful not
to overtighten.
r_ Replacethe knob,matching the flat area
of the knobto the shaft, and check
Eachclick will change the oven
performance.
The type of margarine will affect baking performance!
Most recipes for baking have been developed
using high-fat products such as butter or
margarine (80% fat). If you decrease the fat,
the recipe may not give the same results as
with a higher fat product.
Recipefailure can resultif cakes,pies,pastries,
cookiesor candiesare made with low-fat
spreads.The lower the fat contentof a spread
product, the more noticeable these differences
become.
10
Federalstandards require products labeled
"margarine" to contain at least 80% fat by
weight. Low-fat spreads,on the other hand,
contain lessfat and more water. The high
moisture content of these spreads affects
the texture and flavor of baked goods. For
best results with your old favorite recipes, use
margarine, butter or stick spreads containing at
least 70% vegetable oil.

Using the oven for broiling. GEApUia ces.com
Broiling may be slightly different from any previous broiling you may beacquainted with, so be sure to read this section
completely.
How to Set Your Oven for Broiling
Broiling is cooking food by intenseradiant heat
from the upper element in the oven.Most fish
and tender cuts of meat can be broiled.Follow
thesestepsto keepspattering and smoking to
a minimum.
r_ if the meat hasfat or gristle around the
edge,cut vertical slashes through both
about 2" apart. Ifdesired,fat may be
trimmed, leaving a layerabout 1/8" thick.
r_ Placethe meat on a broilergrid ina broiler
pan designed for broiling. Always use the
grid so the fat drips intothe broiler pan;
otherwise thejuices may become hot
enough to catch fire.
Broiling Guide
II If desired,marinate meats or chicken before
broiling,or brush with barbecue sauce the
last 5 to !0 minutes only.
II Frozensteaks can be broiled by positioning
the oven shelf at the next lowest shelf
position and increasing cooking time given in
this guide 1½times per side.
r_ Placethe shelf inposition C for most
broiling.
[] Closethe door.Always broil with the door
closed.
Turn the OVEN TEMP knob clockwise to
rm
BROIL. You will feel a slight niche at the
broil position.
Turnfood only once during cooking.
@
Turnthe OVENTEMPknob to OFF.Serve
rrl
food immediately, and leave the pan
outside the oven to cool during the meal
for easiestcleaning.
II When arranging food on pan, do not letfatty
edges hang over sidesbecause the dripping
fat will soil the oven.
II Ifyour range is connected to 208 volts, rare
steaks may be broiled by preheating the
broiler and positioning the oven shelf one
position higher.
Food
Bacon
Ground Beef
Beef Steeks
Medium
Chicken
Fish
Amount or
Thickness
Z/2 lb.
(about 8 thin slices)
1 lb.(4 patties)
1/2 to 3/4"thick
1" thick
1 to 1½1bs.
1 whole
2 to 2½ Ibs.,
split lengthwise
11b.fillets
1/4to 1/2"thick
Shelf
Position
Time In Minutes
First Side Second Side
3Y_min. 3½ min.
i0 min. 7 min.
9 min. 9 min.
35 min. 15 min.
5 min. 5 min.
Comments
Arrange in single layer.
Space evenly.
Steaks less than 1"
thick cookthrough
before browning. Pan
frying is recommended.
Slash fat.
Reduce time about 5
to lO minutes per side
for cut-up chicken.
Brush each side with
melted butter. Broil
skin-side-down first.
Handle and turn very
carefully. Brush with
lemon butter before
and during cooking,
if desired. Preheat
broiler to increase
browning.
ll
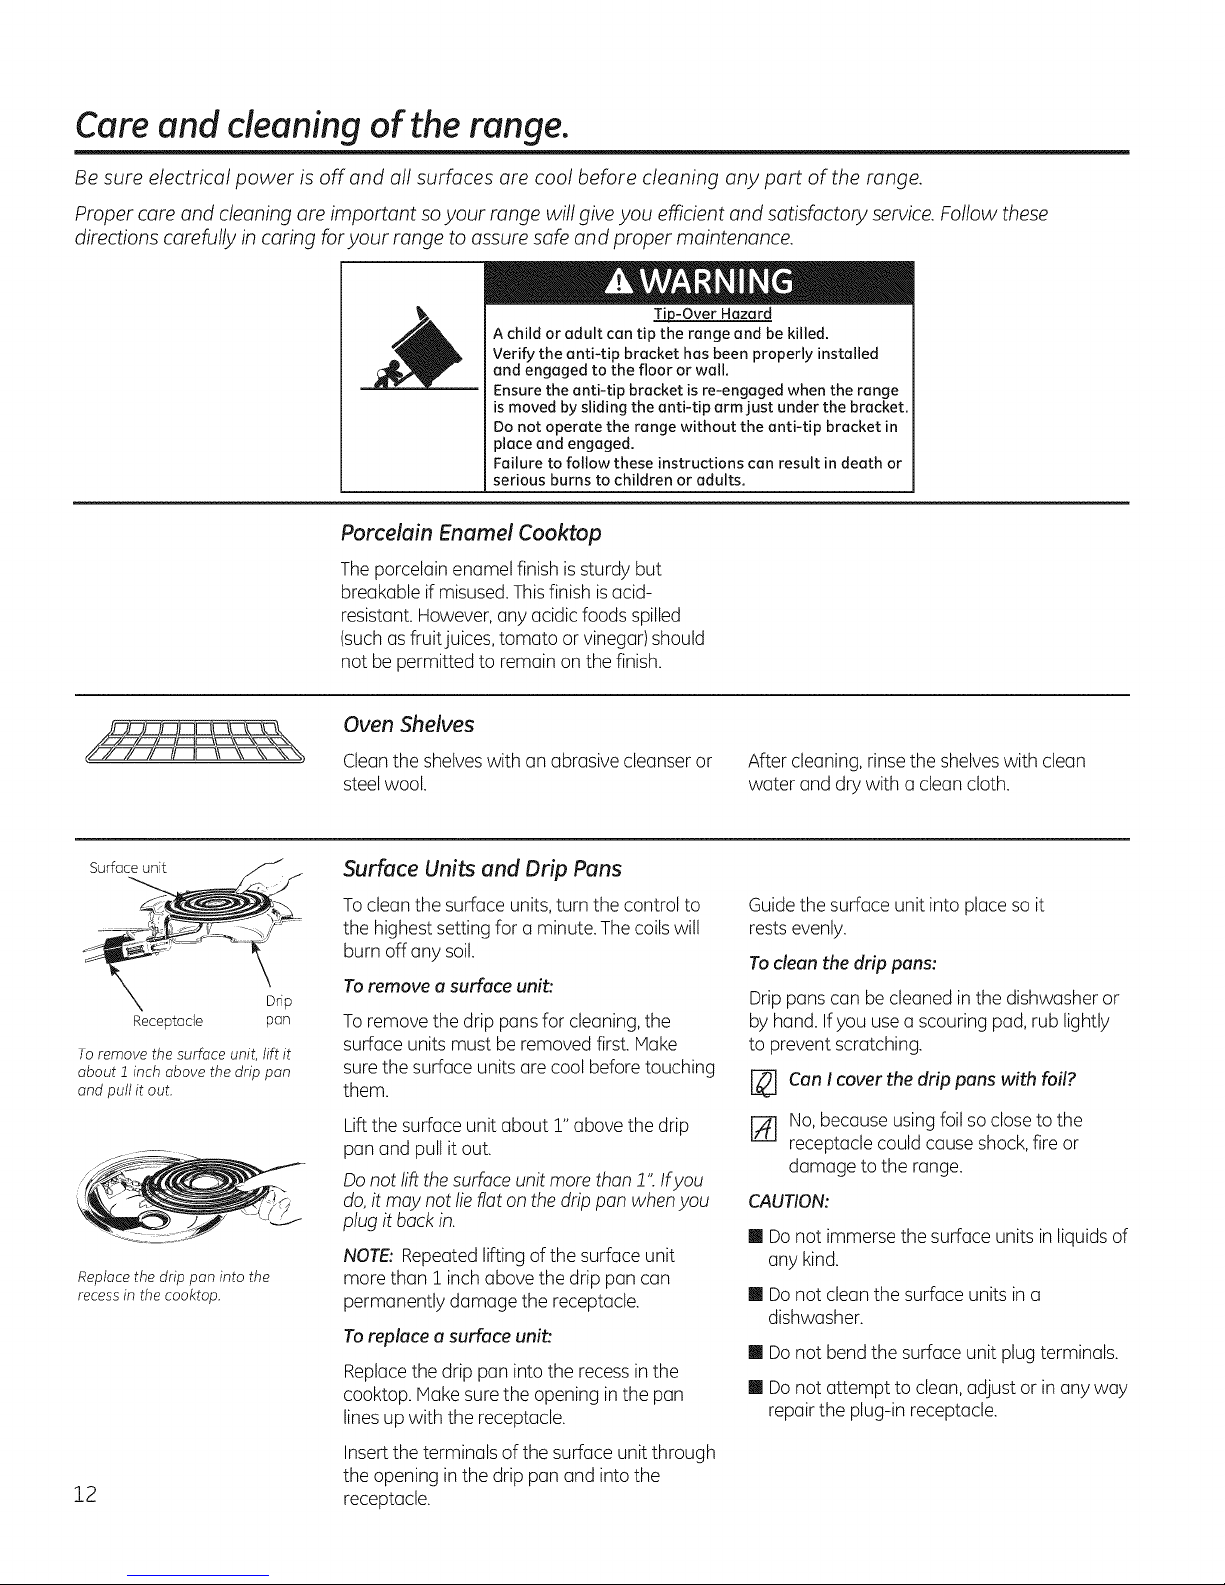
Care and cleaning of the range,
Be sure electrical power is off and all surfaces are cool before cleaning any part of the range.
Proper care and cleaning are important so your range will give you efficient and satisfactory service. Follow these
directions carefully in caring for your range to assure safe and proper maintenance.
Tip-Over Hazard
A child or adult can tip the range and be killed.
Verify the anti-tip bracket has been properly installed
and engaged to the floor or wall.
Ensure the anti-tip bracket is re-engaged when the range
is moved by sliding the anti-tip arm just under the bracket.
Do not operate the range without the anti-tip bracket in
place and engaged.
Failure to follow these instructions can result in death or
serious burns to children or adults.
Porcelain Enamel Cooktop
Theporcelain enamel finish is sturdy but
breakable if misused.Thisfinish isacid-
resistant. However,any acidic foods spilled
(suchasfruit juices,tomato or vinegar)should
not be permitted to remain on the finish.
Receptacle pan
To remove the surface unit, lift it
about ff inch above the drip pan
and pull it out.
Replace the drip pan into the
recessin the cooktop.
12
Oven Shelves
Cleanthe shelveswith an abrasive cleanser or
steel wool.
Surface Units and Drip Pans
Toclean the surface units,turn the control to
the highest setting for a minute. Thecoilswill
burn off any soil.
Toremove a surface unit:
Toremove the drip pansfor cleaning, the
surface units must be removed first. Make
sure the surface units are cool before touching
them.
Liftthe surface unit about 1" above the drip
pan and pull it out.
Do not lift the surface unit more than !" Ifyou
do,it may not lie flat on the drip pan whenyou
plug it back in.
NOTE: Repeatedlifting of the surface unit
more than 1 inch above the drip pan can
permanently damage the receptacle.
To replace a surface unit:
Replacethe drip pan into the recessin the
cooktop. Make surethe opening in the pan
linesup with the receptacle.
Insertthe terminals of the surface unit through
the opening inthe drip pan and into the
receptacle.
After cleaning, rinsethe shelveswith clean
water and dry with a clean cloth.
Guidethe surface unit into placeso it
restsevenly.
To clean the drip pans:
Drip panscan be cleaned in the dishwasher or
by hand. Ifyou usea scouring pad,rub lightly
to prevent scratching.
Can I cover the drip pans with foil?
@
No, because usingfoil so closeto the
%
receptacle could cause shock, fire or
damage to the range.
CAUTION:
il Donot immerse the surface units in liquidsof
any kind.
II Do not clean the surface units in a
dishwasher.
II Do not bend the surface unit plug terminals.
II Do not attempt to clean, adjust or in any way
repair the plug-in receptacle.
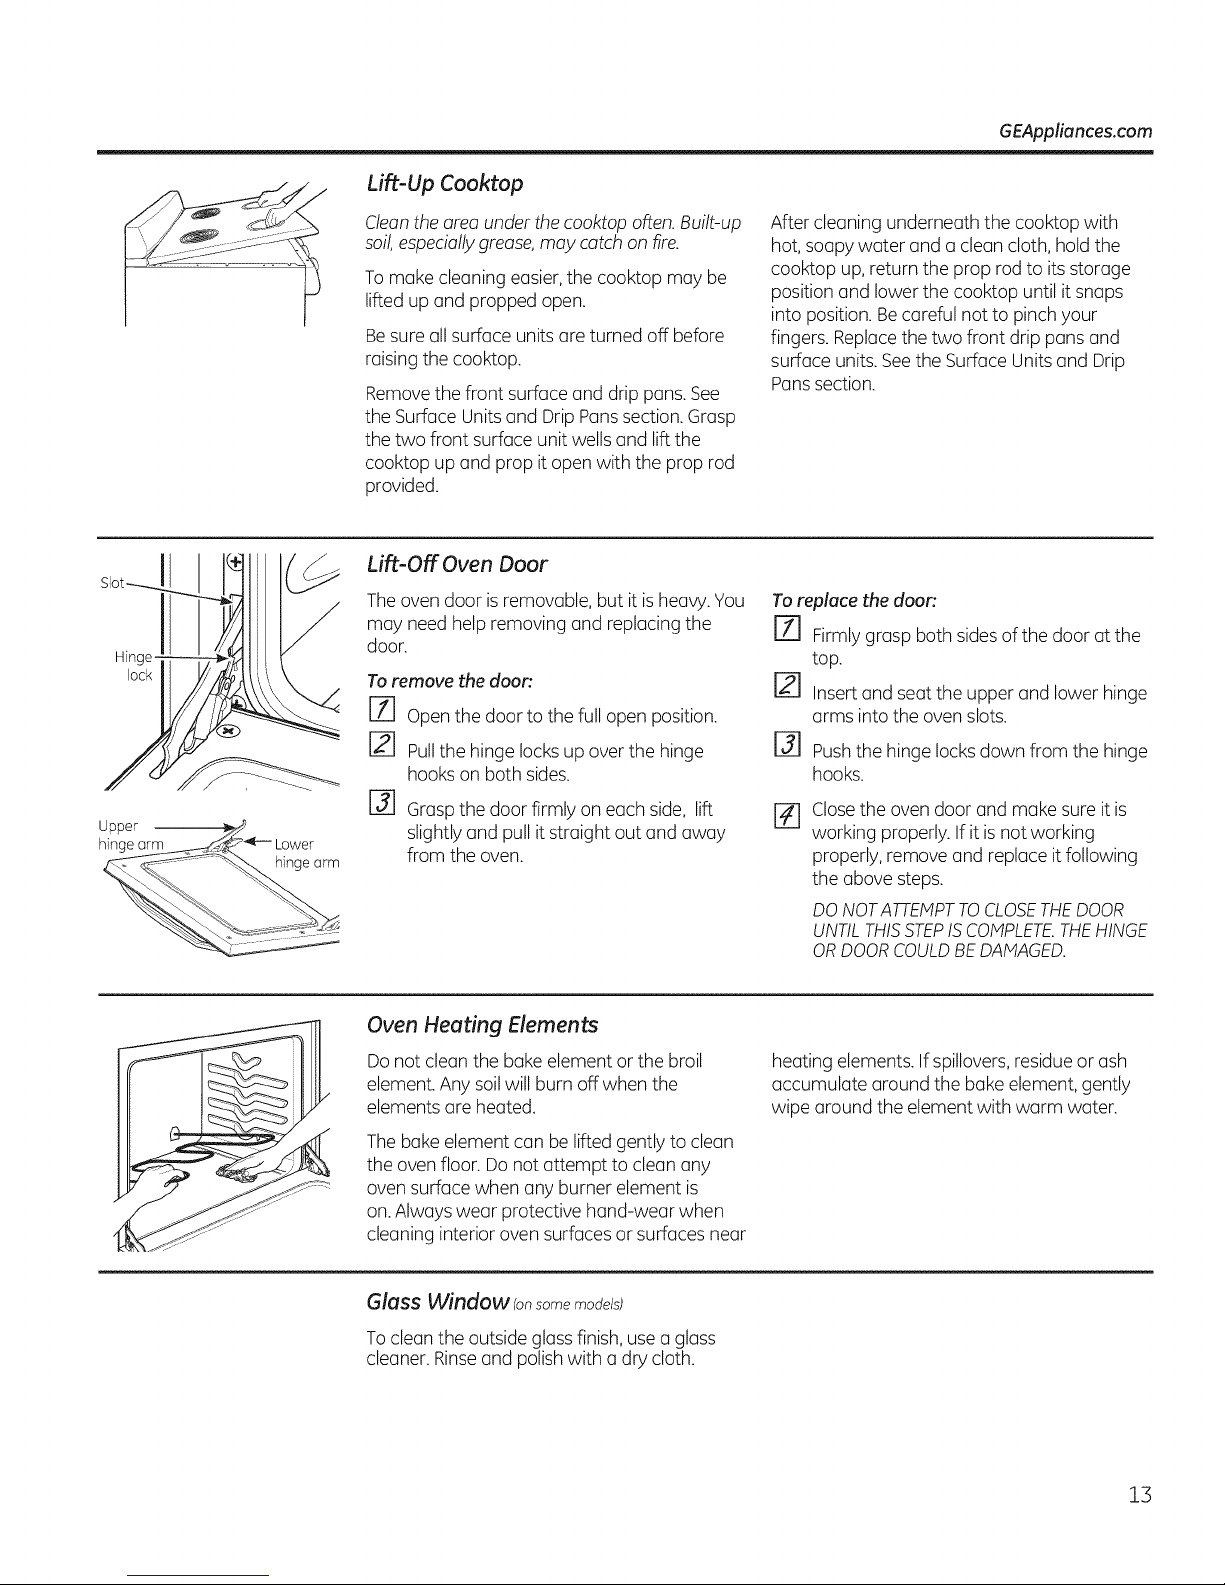
Lift-Up Cooktop
GEAppliances.com
Hinge-
lock
Upper
hinge a__<_2_-- Lower
Cleanthe area under the cooktop often. Built-up
soil,especiallygrease,may catch on fire.
Tomake cleaning easier,the cooktop may be
lifted up and propped open.
Besureall surface unitsare turned off before
raising the cooktop.
Removethe front surface and drip pans. See
the Surface Unitsand DripPans section.Grasp
the two front surface unit wells and lift the
cooktop up and prop it open with the prop rod
provided.
Lift-Off Oven Door
Theoven door is removable, but it is heavy. You
may need help removing and replacing the
door.
To remove the door'.
ry] open the door to the full open position.
[] Pullthe hingelocks up over the hinge
hookson both sides.
@
Graspthe door firmly on each side, lift
slightly and pull it straight out and away
from the oven.
After cleaning underneath the cooktop with
hot, soapy water and a clean cloth, hold the
cooktop up,return the prop rod to its storage
position and lower the cooktop until it snaps
into position.Becareful not to pinch your
fingers. Replacethe two front drip pans and
surface units.Seethe Surface Units and Drip
Panssection.
To replace the door'.
[Z] Firmlygrasp both sides of the door atthe
top.
Insertand seat the upper and lower hinge
arms into the oven slots.
@
Pushthe hinge locksdown from the hinge
hooks.
Closethe oven door and make sure it is
%
working properly. If it is not working
properly, remove and replace it following
the above steps.
DONOTATTEIVtPTTOCLOSETHEDOOR
UNTILTHISSTEPISCOMPLETE.THEHINGE
ORDOORCOULDBEDAMAGED.
Oven Heating Elements
Donot clean the bakeelement or the broil
element.Any soilwill burn off when the
elements are heated.
Thebake element can be lifted gently to clean
the oven floor. Do not attempt to clean any
oven surface when any burner element is
on.Always wear protective hand-wear when
cleaning interior oven surfaces or surfaces near
Glass Window (onsome models)
Tocleanthe outside glass finish,use a glass
cleaner. Rinseand polishwith a dry cloth.
heating elements. If spillovers,residueor ash
accumulate around the bake element,gently
wipe around the element with warm water.
13

Care and cleaning ofthe range,
Control Knobs
Thecontrol knobs may beremoved Foreasier
cleaning.
Make sure the knobs are in the OFFpositions
and pull them straight off the stems for
cleaning.
Painted Surfaces
Painted surfaces include the sides,control
panel,door and kick panel.Cleanthese with
soap and water or a vinegar and water
solution.
Donot usecommercial oven cleaners,cleansing
powders,steel wool or harsh abrasiveson any
painted surface.
Porcelain Oven Interior
With proper care,the porcelainenamel interior
will retain its attractive finish for many years.
Soap and water will normally do the job. Heavy
spattering or spillovers may require cleaning
with a mild abrasive cleanser. Soapy,wet pads
may also be used. Do not allow food spillswith
a high sugar or acid content (suchas milk,
tomatoes, sauerkraut, fruit juices or pie filling)
to remain on the surface.They may cause dull
spots evenafter cleaning.
Household ammonia may make the cleaning
job easier. Place1/2 cup ammonia in a shallow
glass pan and leave in a cold oven overnight.
Theammonia fumes will help loosenthe
burned-on grease and food.
When necessary,you may usea commercial
oven cleaner. Followthe package directions.
Theknobs can be cleaned in a dishwasher or
they may also be washed with soap and water.
Makesurethe insidesof the knobs are dry
before replacing.
Replace the knobs in the OFF position to ensure
proper placement.
Cautions about using spray-on oven cleaners:
II Do not spray the oven cleaner on the
electrical controls and switches because
it could cause a short circuit and result in
sparking or fire.
II Do not directly spray oven cleaner onto the
oven heating elements.
II Do not allow a film from the cleaner to
remain on the temperature sensor-it could
cause the oven to heat improperly. (The
sensor is located at the top of the oven.)
Carefullywipe the bulb clean after each
oven cleaning, being careful not to move the
sensor since a change in its position could
affect how the oven bakes.
ml Do not spray any oven cleaner on the
outside oven door, handles or any exterior
surface of the oven, cabinet or painted
surfaces. The cleaner can damage these
surfaces.
Oven Light Replacement tonsomemodels)
Be sure to let the light cover and bulb cool
completely.
Toremove the cover:
Holda hand under the cover so it doesn't
%
fall when released.With fingers of the
same hand, firmly push back the wire
cover holder. Lift off the cover.
Wire cover holder
14
Donot remove any screws to remove the
COVer.
[] Replacebulb with a 40-watt appliance
bulb,
Toreplace the coven
J-f] Placeit into groove ofthe light receptacle.
Pullwire forward to the center of the
cover until it snaps into place.
F_ connect electrical power to the range.
I stallatio
20" and
24" Compact
I struction
j_ Questions? Call 800.GE.CARES 1800A32.2737) or Visit our Website at: GEAppliances.com ]
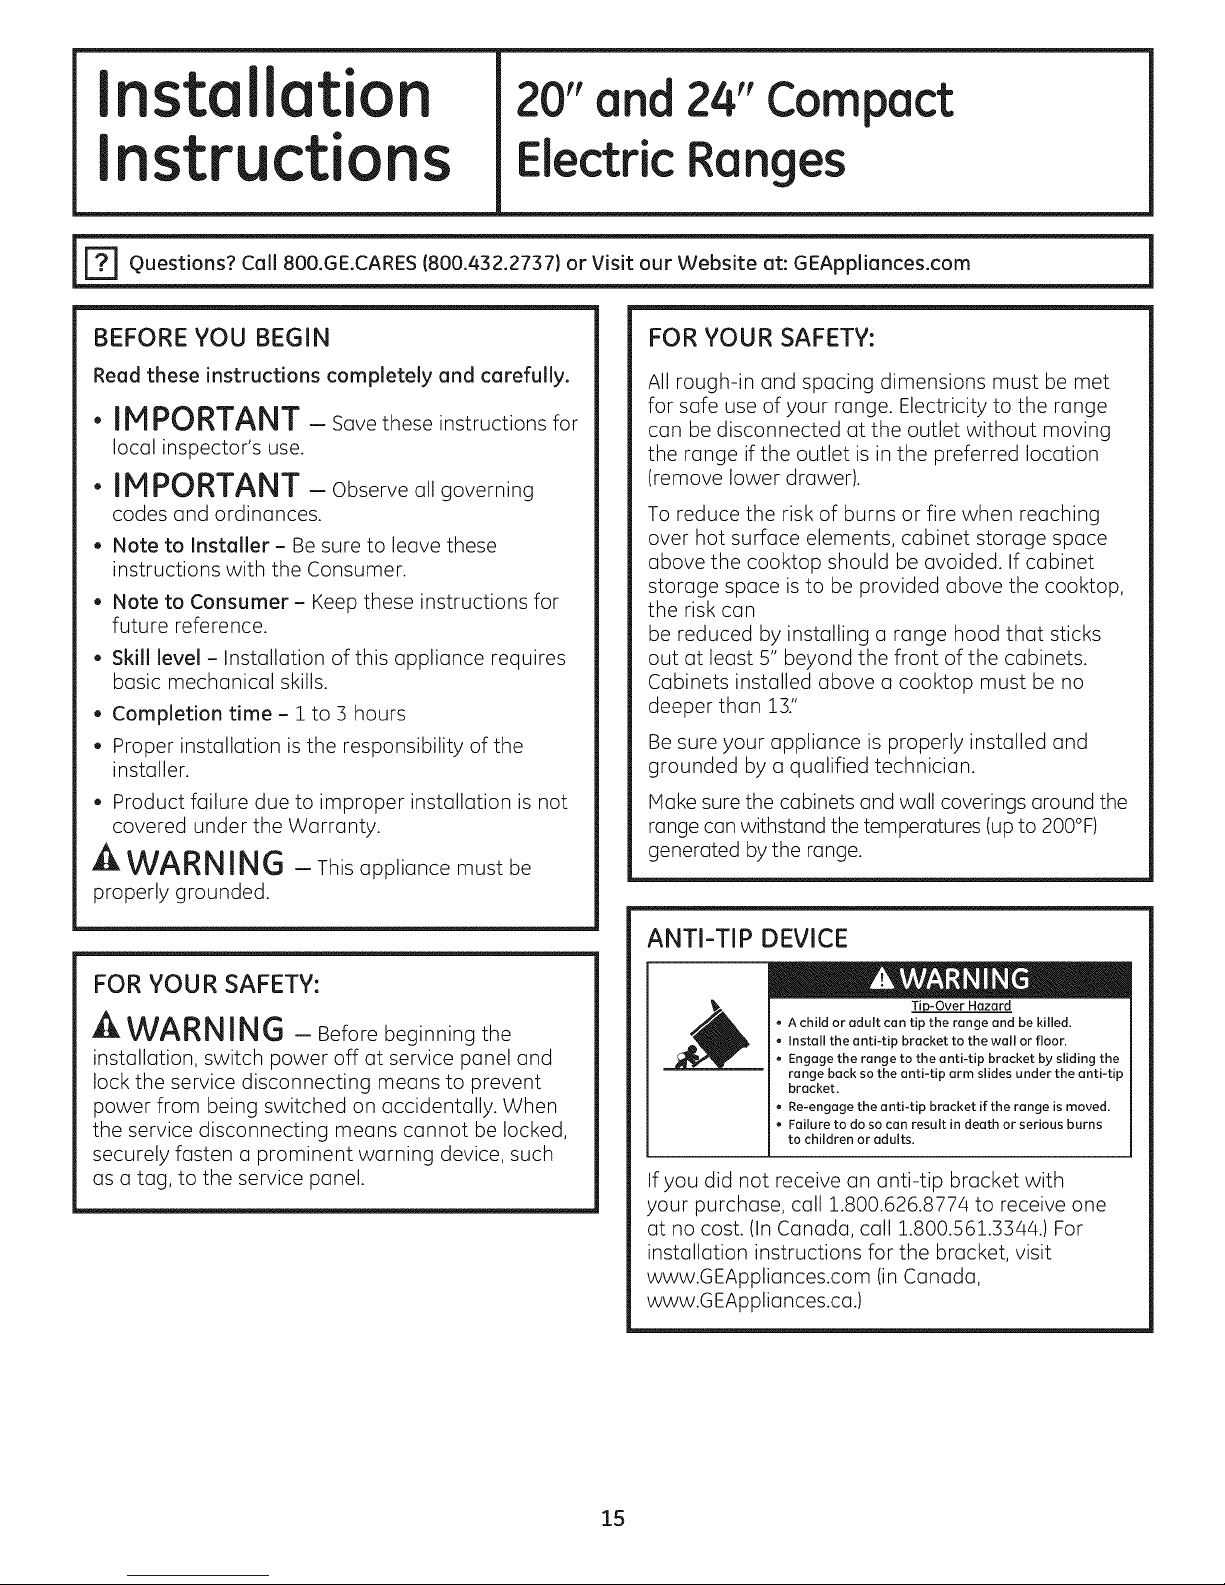
BEFORE YOU BEGIN
Read these instructions completely and carefully.
, IMPORTANT - Savetheseinstructionsfor
local inspector's use.
" IMPORTANT - Observe all governing
codes and ordinances.
, Note to Installer- Be sure to leave these
instructions with the Consumer.
, Note to Consumer - Keep these instructions for
future reference.
, Skill level - Installation of this appliance requires
basic mechanical skills.
, Completion time- 1to 3 hours
, Proper installation is the responsibility of the
installer.
, Product failure due to improper installation is not
covered under the Warranty.
A WARNING - This appliance must be
properly grounded.
Electric
FOR YOUR SAFETY:
All rough-in and spacing dimensions must be met
for safe use of your range. Electricity to the range
con be disconnected at the outlet without moving
the range if the outlet is in the preferred location
(remove lower drawer).
To reduce the risk of burns or fire when reaching
over hot surface elements, cabinet storage space
above the cooktop should be avoided. If cabinet
storage space is to be provided above the cooktop,
the risk can
be reduced by installing a range hood that sticks
out at least 5" beyond the front of the cabinets.
Cabinets installed above a cooktop must be no
deeper than 13."
Be sure your appliance is properly installed and
grounded by a qualified technician.
Make sure the cabinets and wall coverings around the
range can withstand the temperatures (up to 200°F)
generated by the range.
Ranges
FOR YOUR SAFETY:
A WARNING - Beforebeginningthe
installation,switchpower offat servicepaneland
locktheservicedisconnectingmeans to prevent
power from being switchedon occidentally.When
the servicedisconnectingmeans cannot be locked,
securelyfastena prominent warning device,such
as a tag,tothe servicepanel.
ANTI-TIP DEVICE
• A child or adult can tip the range and be killed.
• Install the anti-tip bracket to the wall or floor.
• Engage the range to the anti-tip bracket by sliding the
range back so the anti-tip arm slides under the anti-tip
bracket.
• Re-engage the anti-tip bracket if the range is moved.
• Failure to do so can result in death or serious burns
to children or adults.
If you did not receive an anti-tip bracket with
your purchase, call 1.800.626.8774 to receive one
at no cost. (In Canada, call 1.800.561.3344.) For
installation instructions for the bracket, visit
www.GEAppliances.com (in Canada,
www.G EAppliances.ca.)
15
Tip-Over Hazard

Installation Instructions
PREPARETO INSTALL THE RANGE
MATERIALS YOU MAY NEED
@
(UL Approved 40 AMP)
4-Wire Cord OR 3-Wire Cord Conduit Installations
/4' Long /4' Long Only)
TOOLS YOU WILL NEED
Drill with !/8" Bit
Adjustable Wrench
Squeeze Connector (For
Safety Glasses
Tape Measure
[_] PREPARE THE OPENING
. Allow 2" spacing from the range to adjacent vertical
walls above the cooktop surface. Allow 30" minimum
clearance between the surface units and the bottom
of unprotected wood or metal top cabinet, and 15"
minimum between the countertop and adjacent
cabinet bottom.
. To eliminate the risk of burns or fire when reaching
over hot surface elements, cabinet storage space
above the cooktop should be avoided. If cabinet
storage space is to be provided above the cooktop,
the risk can be reduced by installing a range hood
that protrudes at least S" beyond the front of the
cabinets. Cabinets installed above a cooktop may be
no deeper than 13".
From
combustib e
cooking
Pliers
1/4" Nut Driver Level
Phillips Screwdriver
Flat-blade Screwdriver
PARTS INCLUDED
Anti-Tip Bracket Kit
REMOVE SHIPPING MATERIALS
Remove packaging materials. Failure to
remove packaging materials could result in
damage to the appliance.
Pencil
Wall Mounted .........
Recommended acceptabe electdca outlet
area alert the electrica receptacle so the
lengt _isparallel to t_e floor
Models A B C D
20" Wide 20" 20 %" 2" 41"
24" Wide 2/4" 24 sA" 2" 41"
Flooring under the range
Yourrange, like many other household items, is
heavy and can settle into soft floor coverings such
as cushioned vinyl or carpeting.
When moving the range on this type of flooring,
it should be installed on a 1/4" thick sheet of
plywood (or similar material) as follows:
When the floor covering ends at the front of the
range, the area that the range will rest on should
be built up with plywood
to the same level or higher than the floor
covering. This will allow the range to be moved
for cleaning or servicing.
Surface
16

Installation Instructions
ELECTRICAL CONNECTIONS
ELECTRICAL REQUIREMENTS
A CAUTION: For personal safety, do not
use an extension cord with this appliance.
Remove house fuse or open circuit breaker
before beginning installation.
This appliance must be supplied with the proper
voltage and frequency, and connected to an
individual properly grounded branch circuit,
protected by a circuit breaker or fuse having
amperage as specified on the rating plate. The
rating plate is located under the cooktop. See
the Lift-Up Cooktop section in this manual for
instructions on how to lift the cooktop.
Rating Plate \
ELECTRICAL REQUIREMENTS (cont.)
When installing an electric range in new
construction, follow Steps 3 and 5 for 4-wire
connection.
You must use a 3-wire, single-phase A.C. 208Y/120
Volt or 240/120 Volt, 60 hertz electrical system. If
you connect to aluminum wiring, properly installed
connectors approved for use with aluminum wiring
must be used.
If the electrical service provided does not meet the
above specifications, have a licensed electrician
install an approved outlet.
ALL NEW BRANCH CIRCUIT
INSTALLATIONS, MOBILE
HOMES, RECREATIONAL
VEHICLES AND INSTALLATIONS
WHERE LOCAL CODES DO
NOT ALLOW GROUNDING
THROUGH NEUTRAL, REQUIRE
A 4-CONDUCTOR CORD OR
CONDUIT
We recommend you have the electrical wiring and
hookup of your range connected by a qualified
electrician. After installation, have the electrician
show you where your main range disconnect is
located.
Check with your local utilities for electrical codes
which apply in your area. Failure to wire your oven
according to governing codes could result in a
hazardous condition. If there are no local codes,
your range must be wired and fused to meet the
requirements of the National Electrical Code, ANSI/
NFPA No. 70- Latest Edition. You can get a copy by
writing:
National Fire Protection Association
Batterymarch Park
Quincy, MA 02269
Effective January i,i996, the National Electrical
Code requires that new construction (not existing)
utilize a 4-conductor connection to an electric
range.
Use only a 3-conductor or a 4-conductor UL-listed
range cord. These cords may be provided with ring
terminals on wire and a strain relief device.
A range cord rated at 40 amps with 125/250
minimum volt range is required. A 50 amp range
cord is not recommended but if used, it should
be marked for use with nominal lsA '' diameter
connection openings. Care should be taken
to center the cable and strain relief within the
knockout hole to keep the edge from damaging the
cable.
, Because range terminals are not accessible after
range is in position, flexible service conduit or
cord must be used.
NOTE: If conduit is being used, go to Step 3D and
then to Step 6 or 7.
. On some models, a filter capacitor may be
connected between the black and white leads on
the junction block.
17
 Loading...