

Page 1
Howto
g thebestfrom
AluminumFoil
Anti-TipBracket
ADDlianceRegistration
C~hningTips-
Care and Cleaning
Clock/Timer
Energy-SavingTips
Features
InstallationInstructions
I
1 Leveling
Modeland SerialNumbers
Oven
Baking, Baking Guide
~roi]ing, BroilingGuide ~o>z!
Control Settings
Door Removal
Light; Bulb Replacement 15,22
Roasting,RoastingGuide 18>19
Thermos@tAdjustment
VentDuct
———
20
3,5
22-24
14
6-9
15-21
16,17
15
22
23
22
useandcareof
—
2
5
5
5
2
models
—.._
‘; -)
Problem Solver
ReDairService
Safety Instructions
Sur-faceCooking
25
27
3,4
10-13
Page 2
Readthisbookcarefully.
Itisintendedtohelp youoperate
andmaintainyour new ra~lge
properly.
Immediatelycontactthe dealer (or
builder)d~atsoldyoutilerange.
Keepithandy
for answersto your
questions.
If youdon’tunderstandsomething
or needmore help, write (include
yourphonenumber):
ConsumerAffairs
Hotpoint
AppliancePark
Louisville,KY 40225
writedownthemodel
YOU’11findthem on a label on
the front ofthe range behindthe
ovendoor.
These numbers are also on the
Consumer Product Ownership
RegistrationCard that came with
yourrange. Beforesendingin this
card, please write these numbers
here:
Checkthe Problem Solveron
page25.It listscausesof minor
operatingproblemsthatyoucan
correct yourself.
Model Number
Serial Number
Use these numbers in any
correspondence or service calls
concerning your range.
,
I
2
Page 3
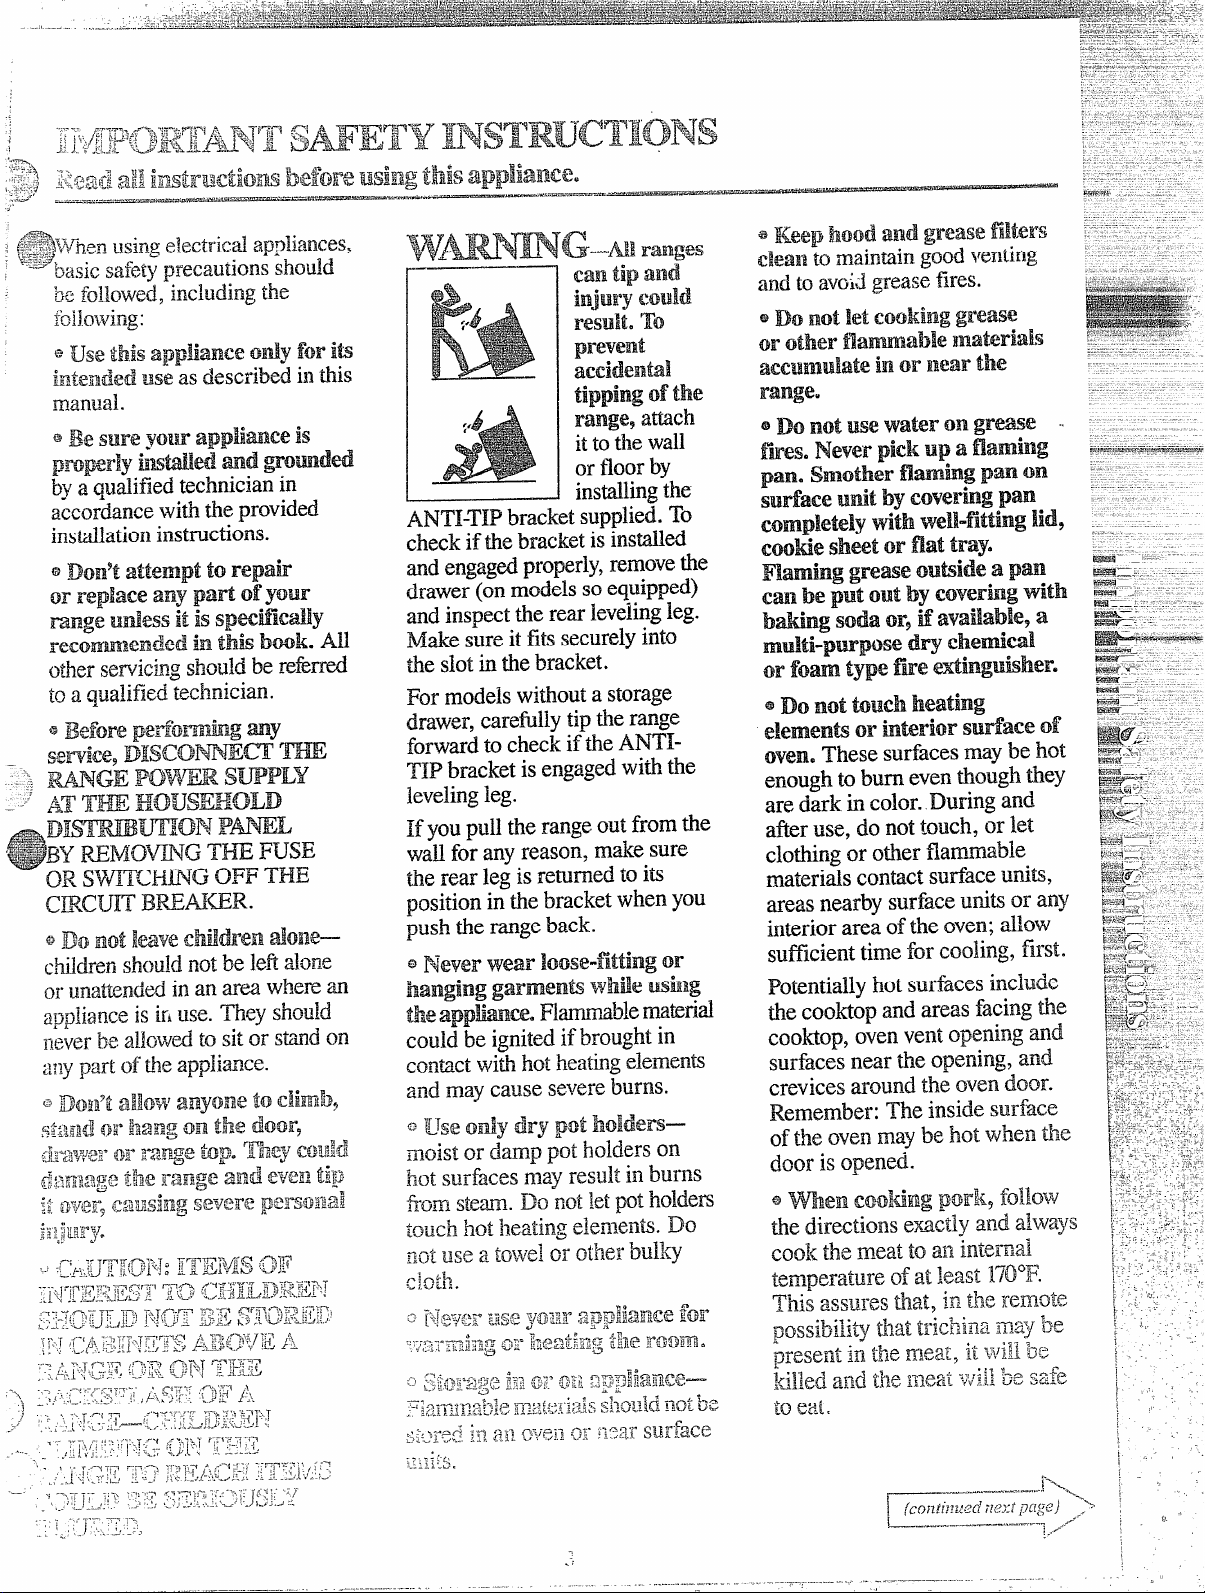
ANTI-TIPbracketsuppli~. To
.._.-—-—... ... --
..————-----.
check if tie bracketis inswd
andengagedproperly,removetie
drawer (on modelssoequipped)
and inspecttie rear levelingleg.
Make sure it fits securelyinto
tie slotintie bracket.
For modelswithouta storage
drawer,carefilly tip @erange
forwardto checkif tie ANTITIP bracket is engaged witi tie
Ievelhg leg.
If you pull the rangeoutfrom tie
waflforany reason, makesure
tie rear leg is re~rned toits
positionin tie bracket when you
push he rangeback.
.
..
.,
Page 4
.-
Page 5

.
.--—----.-—.-.—.-.—-...... . ..
-.
_..
. .
...
call Setfle intoSoitfloor ioverings
such as !cushion@d vinylor
{:arpeting.
When movingthe range
on thistypeof flooring, use care,
andit is recommended that these
simple and inexpensiveinstructions
be followed.
The rangeshouldbe installedon
a sheetofplywood (or similar
material)as follows:men the
floor coveting endsat $hefront of
the mnge, the area that the range
willreston shouldbe built up with
pIywoodto the samelevelor higher
thanthe floor covering.This will
allowthe rangeto be moved for
cleaningor servicing.
~~~ velingscrewsare located on
‘-ach corner of the base of the
Q
range. Removethe bottom drawer
(onmodels so equipped) and you
can levelthe range on an uneven
floor with the use ofa nutdriver.
To
remove drawer, pull dra’wer-
Qzlt all the way, tilt up the front
and talfe it out.ToK’eplaee
drawer, insert gliciesat back of
~~r~lverbeyondstop on range glides,
Ljft drawer if necessary to insert
easily.I.et front of drawer down,
then “push in to close.
* Use cookwareofmediumweight
alumIinum,with tight-fittii~gcovers,
andflat bottomswhich completely
covertheheatedportionofthe
surfaceunit.
@Cook fresh vegetableswith a
minimum.amountofwaterin a
coveredpan.
@Watchfoodswhenbringingthem
quicklyto tooting temperaturesat
HIGH heat. When foodreaches
cookingtemperature, reduceheat
immediatelyto lowestsettingthat
willkeep it cooking.
* Use residud heat with surface
tooting wheneverpossible. For
e-pie, w-hencookingeggsin the
shell, bring water and eggsto boil,
thenturn to OFF positionand
coverwith lid to completethe
cooking.
@Use correct heat for cookingtask:
HIGH—tostart cooking (iftime
allows,do not useHIGH heat to
start).
MEDIUM HI—quickbrowning.
MEDIUM—slowfrying.
LOW—finishcooking most
quantities, simmer—double
boiler
heat, finish cooking, and special
for small quantities.
WARM—tomaintain serving
temperature of most foods.
*Whe~Iboiling water for tea or
coffee, heat only amount needed.
1$is not economical to boil a
container full of water for one
or two cups.
OveaCoo]iimg
Preheatoven o131ywhen
@
necessary.Idost foods will cook
satisfactorilywithoutpreh~ating.
if youfindpreheatingis ncc~ssary,
watchthe indicatorIight,and put
foodinovenpromptlyafterthe
lightgoesout.
@Alwaystirn ovenOFF before
removingfood.
@During baking, avoid frequent
door openings.Keep door open as
shorta time as possibleifit is
opened.
@Cook completeovenmeals
insteadofjust one fooditem.
Potatoes,othervegetables,and
somedessertswill cooktogether
with a main-dish casserole,~meat
loaf, chickenor roast. Choose
foodsthatcook at the same
temperature and in approximately
the same time.
@Use residual heat inthe oven
wheneverpossibleto finish
tooting casseroles, ovenmeals,
etc. Also add.rollsoxprecooked
desserts to warm oven, using
residualheat to warm them.
..
-
—-—--—-—-
—-——.—v....
r_——
..O 1
Page 6
“..-
.
o
*
**
+
.,
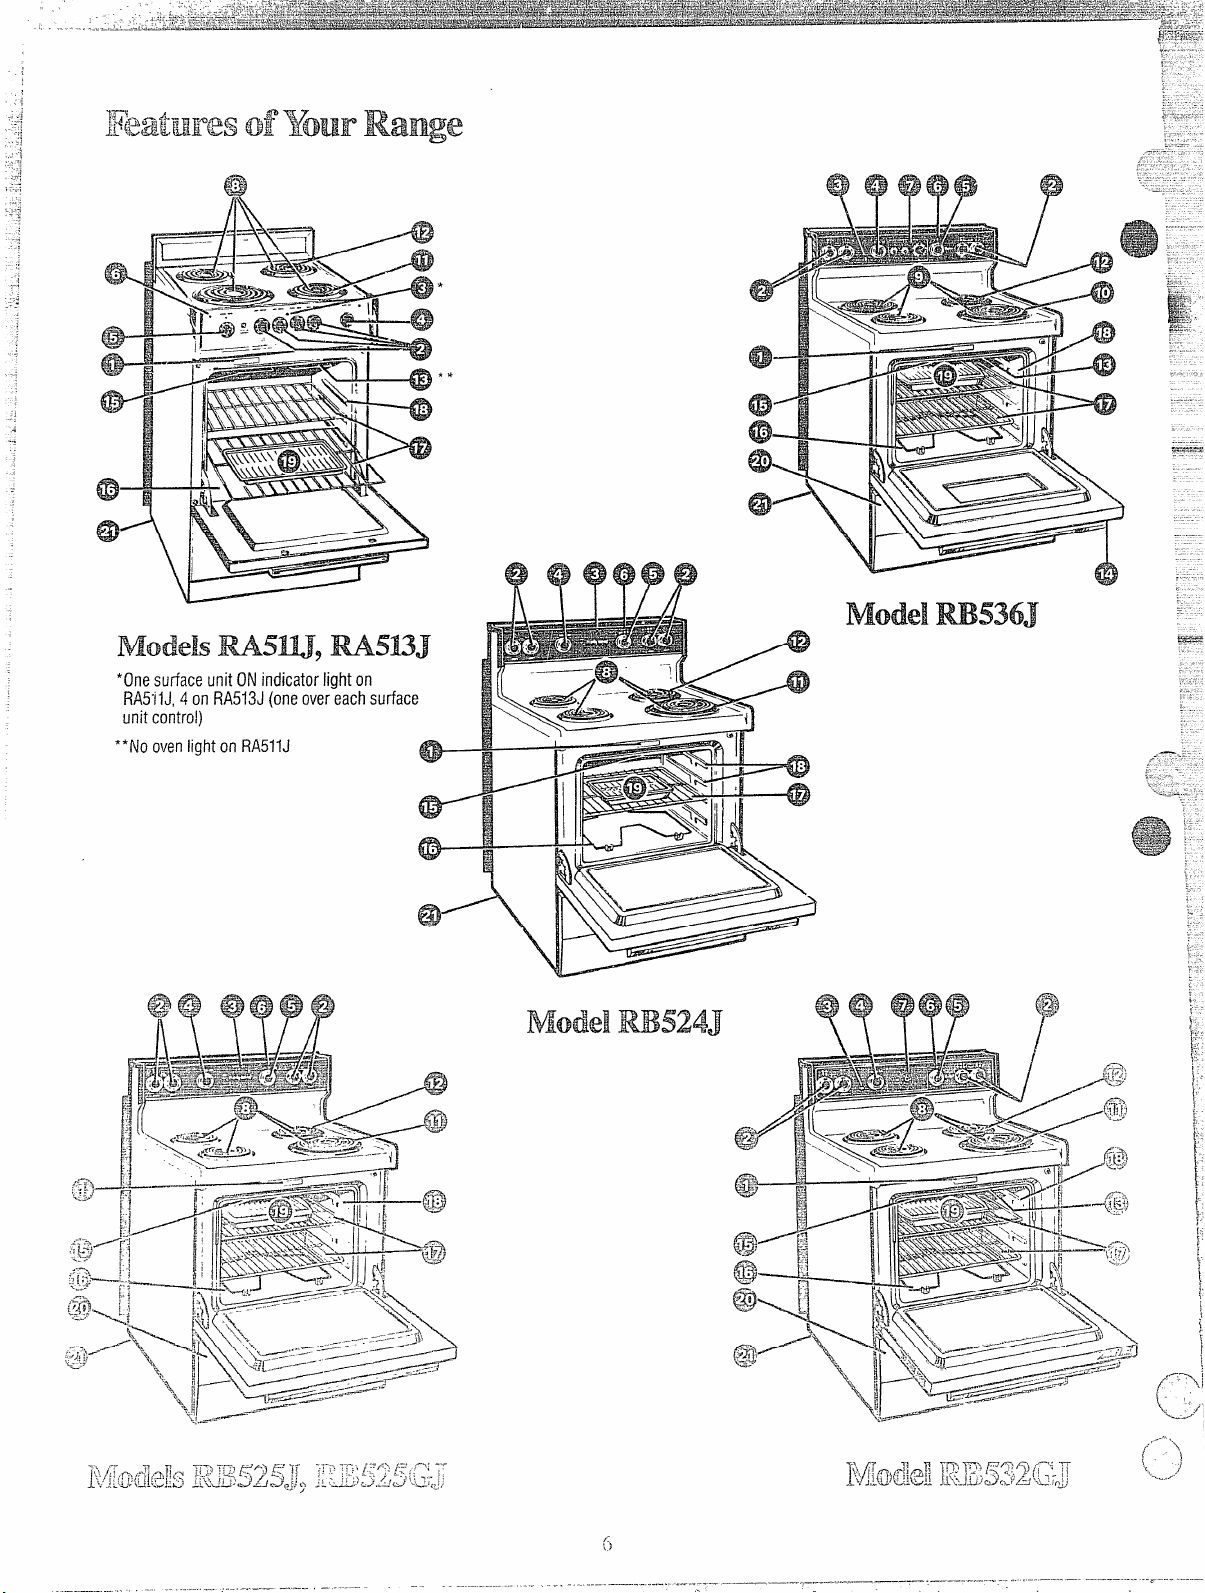
Modelsm5m, M5UJ
*One su~ace unit ON indicator light on
Rfi5-ilJ, 4
unit control)
*“No oven light on RA511J
onRA513J(one over each surface
,/
@
Page 7

1 Modeland SerialNumbers
2 SurfaceUnitControls
3 “ON” IndicatorLight/Lights
forSurfaceUnits
4 OvenSetControl
5 OvenTernpControl
6 OvenCyclingLight
Model
RB524J
@
e
i
7 AutomaticOven Timer,
Clockand MinuteTimer
8 Stay-UpCalrod@SurfaceUnit
(,Mayberaisedbutnotremoved
whencleaningunderunit.)
9 Plug-InCalrod@SurfaceUnit
(May
be removedwhencleaning
underunit.)
10 Chrome-PlatedTrimRings
andPorcelainDripPans
11 Chrome-PlatedTrimRingsand
AluminumDripPans
I
12 OvenVentDuct(Locatedunder
rightrearsurfaceunit.)
I
13 OvenInteriorLight(Comeson
automaticallywhendooris opened.)
I
14 OvenLight Switch
I
15 BroilUnit
I
16 l~akeUnit(Maybe liftedgently
forwipingovenfloor.)
I
14
23 ] 3 6-in. 36-in.
23
22
22
22
22
15
4
@ @
4
e
36-in.
18-in.18-in. 18-in.
4
Q
3 6-in.
18-in.
e @
Clock&
MinaTlrner
3 6-in.
18-in.
2 6-in.
2 8-in.
Q
@
/ 17 OvenShelves
I 18 Ovei~SheifSup~~orts(LettersA, B, C and ‘
D
indicalecookingpositionsfor shelvesas
z-ecommcndedoncookingguides.)
1
20 StorageDrawer
I
I
j ~~
I
I I
2
Q
2
I
Q
I
Page 8
—:
,
..
.
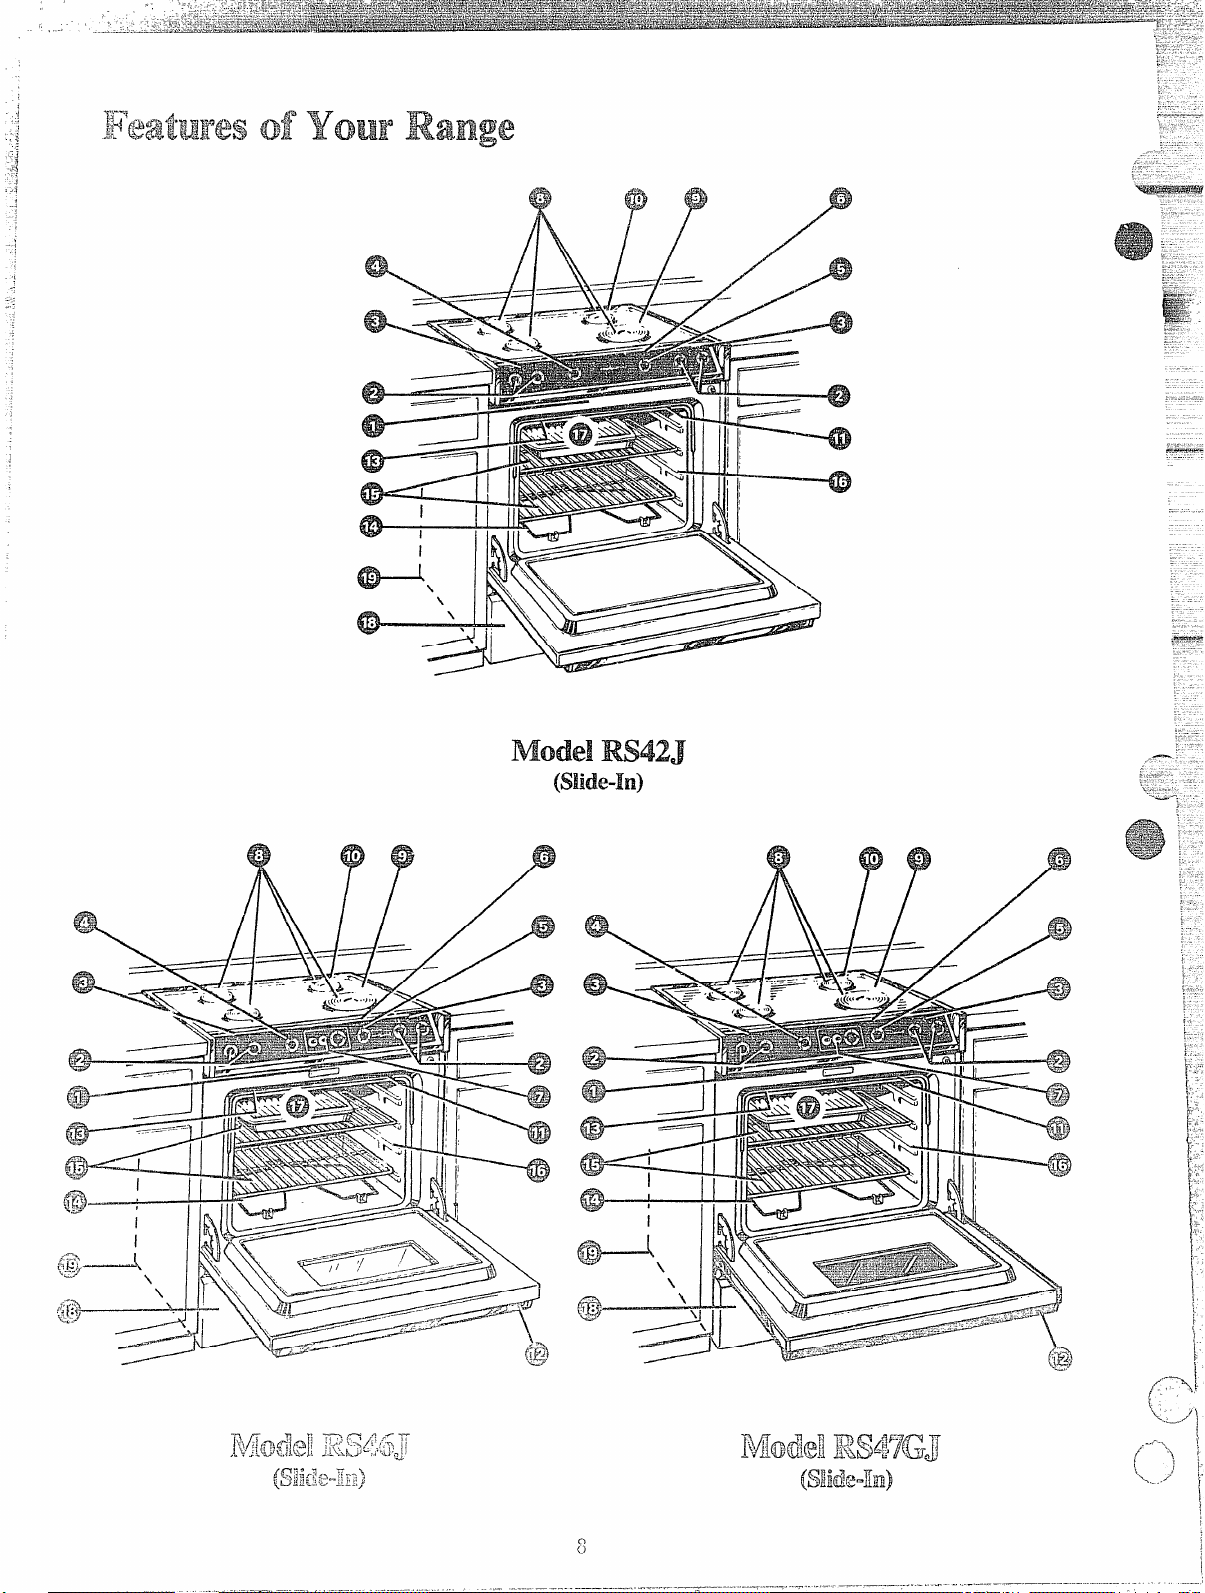
Model RS42J
(slide-In)
e
..
.
..
7
Page 9

.,:
.{
-,
-.
a
.
.
..
}
] 2 SurfaceUnitControls
for SurfaceUnits
I
10
103 “ON” IndicatorLight/Lights
2
2
,
1 5 OvenTempControl
I
I
10 Oven VentDuct (Located under
11 OverIInterior Light (Comeson
I
I
L
12 Oven Light Switch
I 13 Broil Unil
14 Bake Unit (Maybe lifted gently
I
4 Oven Set Control
6 OvenCyclingLight
7 AutomaticOven Timer,
Clock and Minute Timer
8 S&y-UpCalrod” SurfaceUnit
(Maybe raised but notremoved
when cleaningunder unit.)
9 Chrome-Plated Trim Ringsand
AluminuinDrip Pans
right rear surface unit.)
automaticallywhen door is opened.)
for wiping oven floor.)
15
15
e
I
15
14
23 3 6-in. 3 6-in.
1$-in. 1$-in.
22
22
22
15
20
4
e
4
e
e
3 6-in.
18-in.
4
@
=.,
15 Oven SheIves
I
16 Oven Shelf Supports (Letters A, B,
D indicatecooking positionsfor shelves
as recommended on cooking guides.)
17 Broiler Pan and Rack
18 Storage Drawer
19 Anti-TipBracket
(See Installation Instrl]ctions)
1
“j
..-
C and
15
15
20
24
3,5
2
I
I
2
1)
1
,
,0
Page 10

Yoursurfaceunits and controls
.——
—..
.....
aredesignedtogiveyouaninfinite
choiceofheatsetiingsforsurface
unitcooking.
AtbothOFF andHIGH positions,
thereis a slightniche so control
“clicks”atthosepositions;“click”
onHIGH marksthehighestsetting;
thelowestsettingisbetweenthe
wordsWARMafidOFF. In aquiet
kitchen,youmayhear slight
“clicking”sounds during cooking,
indicatingheatsettingsselected
arebeingmaintaind.
Switchingheatstohigher settings
alwaysshowsa quickerchangethan
switchingtolowersettings.
Step 1:Graspcontrolknoband
pushin.
Step 2: Turn either clockwiseor
counterclockwiseto desiredheat
setting.
Quickstartforcooking;
bringwatertobofi.
Fastfry,panbrofl;mair~ti
fastboilonlargeamount
offood.
Sauteandbrown; maintain
slowboilonlargeamou~~t
offood.
{;ookafierstartingat
HIGH; cook withlittle
waterincoveredpan.
WARM Steamrice, cereal;
maintainserving
temperatureofmostfoods.
NmE:
1. AtHIGH, MED HI, neverleave
foodunattended.Boiloverscause
smoking;greasyspilloversmay
catchfire.
2. AtWA~, LOW,meltchocolate,
butteronsmallunit.
control mustbe pushed in
only fromOFF position. when
control isin
than OFF, it maybe rotated
without pllshing in.
any position other
toset
Besureyouturn controltoOFF
whenyoufinishcooking.An
indicatorlightwillglowwhen
ANY heatonanysutiaceunit is on.
- -—--———----------,-
Page 11

,,
————-..,.-_,..—.._.—__—”_.—-.,..
..—-——
1
..?
designedfor canningpurposes.Check
.
themanufacturer’sinstructionsand
recipesfor preservingfoods.Be
surecanner is fiat-bottomeda~]d
fits overthecenterofyourCalrod@
unit. Sincecanninggenerateslarge
amounts of steam, be carefulto
avoidburns from steamor heat.
Canningshouldonly bedoneon
surfaceunits.
Q. Can I cover my drip
foil?
No. Clean as recommendedin
A.
pans with
CleaningGuide.
In surface cooking of foodsother
than canning, the use of largediameter pots (extendingmorethan
l-inch beyondedgeoftrim ring) is
notrecommended, However,when
canning with water-bathor
pressure canner, large-diameter
pots maybe used. This isbecause
l~oilingwatertemperatures (even
under pressure) are not harmfulto
cooktop surfi]cessurrounding
heating unit.
A. Cookwarewithoutflat surfaces
isnotrecommended. The lifeof
yoursurfaceunitcan be shortened
and the rangetopcan be damaged
from the highheat needed for this
typeofcooking.
Q. Whyam I notgettingthe heat
1need from my units even though
I have the knobs on the right
setting?
A. After turning surface unit off
and makingsure it is cool, check to
make sure that your plug-inunits
are securely fastenedintothe
surface connection.
observeFollowingPoints
incanning
1. Bring water to boil on HIGH
heat, then after boilinghas begun,
adjust heat to lowestsettingto
maintain boil (savesenergy and
best uses surface unit.)
2. Be sure canner fits overcenter
of surface unit, If your range does
not allowcanner to be centered on
surface unit, use smaller-diameter
pOtSfor goodcanningresults.
Flat-bottomed canners give best
3.
canning results. Be sure bottom of
canner is flat or slight indentation
fits snugly over surface unit.
Canners with flanged or rippled
bottoms (often foundin enamelware)
are not recommended.
T,
~<~~~=j~
FAA
‘. ~~~~
1
——.-.. ..— .2&.K.7ti%==.—
lfil~w~~~
A. Becausethe s~lrfaceunitis
notflat. Make sure that
the“feet”
onyourCalrod@unitsare.sitting
tightlyin the rangetopindentation
andthe reflectorring is flat on the
rangesurface.
Q. whyis the porcelainfinishon
my cookware
A. If yousetyourCalrod” unit
higherthan requiredforthe
cookwarematerial, and leaveit, the
finishmaysmoke,crack, pop, or
burn dependingon the potor pan.
Also, a too highheatfor long
periods, and smallamountsof dry
food, maydamagethe finish.
4. When canning,use recipes from
reputablesources. Reliablerecipes
are availablefrom the manufacturer
ofyour canner; manufacturers of
glassjars for canning, such as Ball
and Kerr; and the United States
Department of Agriculture
Extension Service.
5. Remember, in followingthe
recipes, that canning is a process
that generates large amountsof
steam. Be careful while canning to
preventburns from steam or heat.
NOTE: If yourrange is being
operated on lowpower (voltage),
canning may take longer than
expected, eventhough directions
havebeen careful~yfollowed. The
process may be improved by:
(1)using a pressure canner,
for fastest heating of large
(2)
water quantities, begi~~with
HOT tap water.
comingOffl
and
Page 12

—
..”....-.
1.
usemedium-or heavy-weight
cookware.Aluminumcookware
conductsheat
faster &an other
metals.Castiron and coatedcast
ironcookwareis slowtoabsorb
heat, but generallycooksevenlyat
LOWor MEDIUM settings. Steel
pansmaycookunevedy ifnot
combinedwith otier metals.
cooti. Flatground~roceram”
saucepansor still.etscoatedon the
bottomwith aluminum generally
cook
~V~rdY.
2.
Toconsene tie mosttooting
energy,pansshouldbe flat on the
bottom,havestraightsidesandtight
fittinglids. Matchthe sizeofthe
sauc;pan tothe sizeofthe surface
unit. A pan thatextendsmorethan
an inchbe~~ondtheedgeoftl~etrim
ring traps heat whichcauses
“crazing” (finehairlinecracks)on
porcelain, and discoloration
rangingfrombluetodark grayon
chrometrim rings.
Directionsand Setting
tostiti cooMng
Cereal
Cornmeal, grits,
oatmeal
Cocoa HIGH. Stirtogetherwateror
Coffee Percolator
1
Covered
Saucepan
L
Uncovered
Saucepan
~GH. In wered panbring
watertoboilbeforeadding
ce~al.
milk, cocoaingredients.
Bringjust to a boil.
~GH. Atfit perk, switch
heatto LOW.
SettingtoComplete
cooking
LGWorWM, thenaddce~.
Finish timingaccording
topackagedirections.
MED, tocook 1or 2 minutes
tocompletelyblendingredients.
LOWto maintaingentlebut
steady perk.
comments
Cerealsbubble andexpandas
theycook; use Iargeenough
saucepan to preventboilover.
Milk boilsover rapidly.Watchas
boilingpoint approaches.
Percolate8 to 10minutesfor
8cups,lessfor fewercups.
Eggs
Cooked in shell Covered
Fried sunny-side-up If youdo not coverskillet, baste
Fried over easy
Poached HIGH. Incoveti panbring
Scrambledor omele~ MED. Addeggmixture.
mt%ltry
Merits,
Braised: Pot roasts of
beef, lamb or veal;
pork steaksand
chops
Saucepan
Covered
Skillet
Uncovered
Skillet
Covered
Skillet
Uncovered
Skillet
Covered
Saucepan
Covered
Skillet
Uncovered
$killei
HIGH. Covereggswithcool
water.Coverpan, cook
until steaming.
MED HI. Melt butter, add
eggsand coverskillet.
HIGH. Melt butter.
waterto a boil.
HIGH. Heatbutter untillight
goldenin color.
HIGH. Incoved pan bring
fruit and waterto boil.
HIGH. Melt fat, then add
Meat, Switchto MED HI to
brown meat. Add wateror
titherliquid.
21GH.Preheat skillet, then
greaselightly.
LOW.Cookonly3 to4
minutesfor softcooked;
15minutesforhardcooked.
Continuecookingat MED HI
until whi~s arejust set, about
3to5more minutes.
LOW,then addeggs. When
bottomsof ens havejust set,
carefullyturn overto cook
other side.
LOW.Carefullyadd eggs.
Cook uncoveredabout 5
minutesat MED HI.
Cook, stirring to desired
doneness.
LOW.Stir occasionally and
check for sticking,
LOW.Simmer until fork
tender.
MED HI or MED. Brown and
cook to desired doneness,
turning over as needed.
eggswith fatto cook topsevenly.
Removecookede~s withslotted
spoon or pancake turner.
EWScontinueto set slightly after
cooking. For omelet do not stir
last fewminutes.When set, fold
inhalf.
Fresh fruit: Use 1/4to 1/2 c~lp
water per poundof fruit.
Dried fruit: Use water as package
directs. Time depends on whether
fruit hasbeenpresoaked, If not,
allow morecookingtime.
Meat can be seasoned and floured
beforeit is browned, if desired.
Liquid variations for flavor could
be wine, fruit or tomatojuice or
meat broth.
‘~irning:Steals 1to 2-inches: 1to
2 hours. BeefStew: 2 to 3 hou~s.
Pot Roast: 2Yzto 4 hours.
Pan frying is best for thin steaks
and chops. If rare is desired, preheat skillet before adding mea:.
——
— —..—— — . .. . .
Page 13

3.DeepFat F~ing. Donotoverfill
ketilewith fat tia~may spillover
wher}addi~~gfood. Frostyfoods
bubblevigorously.Watchfoods
fryingat HIGH temperaturesarid
keeprangeand hood clean from
accum,~llatedgrease.
--%,
. ----
Fmd
Fnea Chicken
Panfried bacon
Sauteed:Less tender
thinsteaks(chuck,
round, etc.); liver;
thickor whole fish
Simmeredor stewed
meat; chicken;corned
beef;smokedpork;
stewingbeefi tongue;
etc.
Meltingchocolate,
butter,mambmallows
fincakes or
Yrenchtoast
WSm
Noodlesor spaghetti
PressureCooking
Frozen
Sauteed: Onions;
green peppers;
muslmms; celery; etc.
J
i?;ce ilnd Griti;
..
Cookware
Covered
Skillet
Uncovered
Skillet
Covered
Skillet
Covered
DutchOven,
Kettleor
Large
Saucepan
Small
Uncovered
Saucepan.
Use small
surface unit
Skilletor
Griddle
Covered
LargeKettJe
or Pot
Pressure
or
Cooker
Canner
Uncovered
Saucepan
Covered
Saucepan
Covered
Saucepan
Uncovered
Skillet
Covered
S:]ucdpan
———- ....-
Dii%ctiollsand Setting
toSmtcooking
HIGH. Melt fat. Switchto
MED HItobrownchicken.
HIGH. In coldskillet, amnge
baconslices. Cookjust
until startingtosizzle.
HIGH. Melt fat. Switchto
MED to brown slowly.
HIGH. Covermeatwith water
and coverpan or kettle.
Cookuntil steaming.
WM. Allow10to fiminutesto
mek through.Stir tosmooth.
MED HI. Heat skillet 8 to
10minutes.Grease lighdy.
HIGH. In covered kettle, bring
saltedwaterto aboil, uncover
and add pasta slowlyso
boilingdoes not stop.
HIGH. Heat until firstjiggle is
leard.
31GH.Bringjust toboil.
31GH.Measure 1/2to i inch
vaterin saucepan. Add
,altandpreparedvegetable.
n coveredsaucepanbring
oboil.
IIGH. Measure waterand salt
s above,Add frozen block
)fvegc~~ble,Incovered
aucepan bring toboil.
iIGH. In skillet melt fat.
Settingto Complete
Cookiri~
LOW,Coverskilietand
cookuntiltender.
Uncoverlast few minutes.
MED HI. Cook, turning
over as needed.
LOW.Coverandcook
untiltender.
LOW.Cook untilfork
tender.(Watershouid
slowlyboil). For verylarge
loads, mediumheat may
ben=ded.
Cook2 to3minutes~r side.
MED HI. Cookuncovered
until tender.Forlarge
amounts, HIGHmaybe
neededto keepwater at
rollingboil throughout
entire cooking time.
MED HI for foodscooking
10minutesorless. MED for
foodsover 10minutes.
LOW.To finishcooking.
MED. Cook 1pound 10
to 30or more minutes,
dependingon tenderness
of vegetable.
LOW.Cook according to
time on package.
MED. Add vegetable.
Cook until desired
tenderness is reached.
WARM. Coverandcook
according to time.
..—
For crispdry chicken, coveronly
afier switchingtoLOWfor 10
rninut.es.Uncoverandcook,turning
occasionally10to20minutes.
A more attention-freemethod
istostart and cookat MED.
Meat may be breadedor
marinatedin saucebeforefrying.
Addsait or other seasoning
beforecookingif meat hasnot
been smokedor otherwise
cured.
When meltingmarshmallows,add
milk or water.
Thick batter takesslightly longer
time. ~m overpancakes when
bubbles rise to surface.
Use largeenough kettle to
prevent boiiover. Pastadoubles
in sizewhencooked.
—
Cooker shouldjiggle 2 to 3 times
per minute.
Stir frequently to prevent
sticking.
Uncoveredpan requires more
water and longer time.
Break up or stir as needed while
cooking.
Turn overor stir vegewble as
necessary for even brow~~ing.
—
Triple in volume after coolcing.
Time at WARYti.Rice: 1cup rice
and 2 cups water-25 minutes.
Grits: 1cup griis and 4 cups
water—~10minutes.
Page 14

The automatictimerandclockon
..-
—,..
. ..
....-—.--...
-—.
yourrangeare helpfuldevices~hat
serveseveralpurposes.Theknob
locationson some rangemodels
mayvaryand willlook likeone of
the two setsoftimersbelow.
h~odels:RB536J, m46J and
RS47GJ
Tosetclock
~ SET THE CLOCK, push the
center knob in and turn the clock
handsto the correct time. (The
MinuteTimer pointer wiilmove
also, let knobout, turn the Timer
pointer to OFF.)
To set Minute mmer
The Minute Timer has been
combined with the rangeclock.
Use it to time aj~yourprecise
cooking operations. You’ll
recognizethe Minute Timer as the
pointer which is different in color
and shape than the cIockhands.
TO SET THE MINUTE TIMER,
turn the center knob, without
pushing in, until pointer reaches
number of minutesyou wish to
time. (Minutes are marked, up to
60,in the center ring on the clock.)
At the end of the set time, a buzzer
sounds to tellyou time is up. Turn
knob, v~ithoutpushing in, until
pointer reaches OFF and buzzer
stops.
‘Ilnle Bak6uses
Automaticmnler
UsingAutomaticTimer,yOLJcall
TIME BAKEwiththe ovenstarting
immediatelyandturningoffatthe
StopTimeset or setbothDELAY
START(somemodelsmaysay
START) and S~P dia~sto
automaticallystartaridstopoven
at a latertime of day.It takesthe
worryout of notbeinghometo
startor stopthe oven.
Settingthe dials forTIME BAKE
is explainedin detailon page 16.
ModeI RB532GJ
clock and Minute Timer
This modeIhas a time of day clock
and minutetimer butdoes nothave
STARTand S~P dials needed for
TIME BAKE function.
QKBestiomandAmwers
Q. Hovican I llse my Minute
miller
cookingeasier?
A. ‘YourMinuteTimer willhelp
timetotal cookingwhichincludes
timetoboilfoodand change
temperatures.Donotjudgecooking
timebyvisiblesteamonly.Food
willcookin coveredcontainers
eventhoughyoucan’tseeany
steam.
Q. Must the clock be set on
correct time ofday when I wish
to use the Automatic Timer for
baking?
A. Yes,if youwishto setthe
DELAYSTARTor STOPdialsto
turn on and offat set timesduring
timedfunctions.
Q. can I use the Minute Timer
during oven cooking?
A. The MinuteTimer can be used
duringanycookingfunction. The
AutomaticTimers(DELAYSTART
and S~P dials)are used with
TIME BAKEfunctiononly.
Q. can I Changethe C1OQIKwhile
I’m Tinle cooking in the oven?
A. No. The clockcannotbechanged -.
during anyprogram that usesthe
oventimer, Youmust either stop
thoseprograms or wait untilthey
are finished before.changingtime.
tomalLemy surface
.
~:
\
~:
~
[
~
.
~
k
~
\
i
i
I
1
I
---
-—-
-
-
Page 15

,,
.-
properly.Readover-thedirections
fortheAutomatic Oven Timer so
youunderstanditsusewith the
controls.
2. Check oveninterior.Lookat
theshelves.
Take a practice run at
removingandreplactigthemproperly,
to givesure, sturdy support.
3. Readover informationandtips
thatfollow,
4. Keepthis book handy so you can
referto it, especially during the
firstweeksofgettingacquainted
withyourrange.
oven
controls
0$’enInterior Slleivos
The shelve(s)are designedwith
StOp-IOCkS so thatwhe~~plii~~d
correctly
they (a) will stopbeforecoming
completelyfromtheoven,and(b)
willnot tilt whenremovingfood
fromorplacingfoodonthem.
~ REMQ~ shelve(s)fromthe
oven,lift up rear ofshelf,pull
forwardwith stop-locksalongtop
ofshelfsupports.Becertain that
shelfis coolbeforetouching.
~ ~PLACE shelve(s)inoven,
insertshelfwith stop-locksresting
on shelfsupports. Push shelftoward
rear ofoven;it will fallintoplace.
men shelfisinproperposition,
stop-lockson shelfwillrununder
shelfsupportwhen shelfispulled
forward.
on theshelfsupports,
——
~L.__.-y
The lightcomeson automatically
shelfPositiom
The ovenhas four shelf supports
marked A (bottom),B, C and D
(top). Shelfpositionsforcooking
foodare suggested on Baking,
Roastingand Broilingpages.
-—......——-..
!
,
Page 16

;~ ~ f.<~~~eg.
~
\
!
~
1
1
i
~
~)
/’/
>J .
\Vhencookinga food forthe first
timeinyournewoven, usetime
givenon recipesas a guide. Oven
thermostats,overa period of’years,
may“drift” fromthefactorysetting
anddifferencesin timingbetween
an old anda newovenof 5 to 10
minutes are not unusual andyou
maybe inclinedto thinkthat the new
ovenis notperforming correctly.
However,your new ovenhasbeen
setcorrectly at the factoryandis
moreapt to be accurate than the
ovenit replaced.
How to set YoMr Ra~e
for Baking
Step 1:Place food in oven, being
certain to leaveabout 1 inchof
space between pans and wallsof
ovenfor good circulation ofheat.
Close ovendoor. During baking,
avoidfrequent door openingsto
preventundesirable results.
Step 2: Turn OVEN SET knob to
BAKEand OVEN T’EMPknob to
temperature on recipe or on Baking
Guide.
Step 3: Check foodfor doneness
at minirnunltime on recipe. Cook
longer if necessary. Switch off heat
and reil~ovcfoods.
fi+atyouset. ExamplesofImmediate
Start(oventurnson now a~~dyou
set ii to turn offautomatically)or
DelayStartand Stop(sct[ingthe
oventoturn on automaticallyata
latertime and turn offat a preset
stoptime)will be described.
How to&t -e&k
SW” and Automatic stop
N~E: Beforebeginningmake
surethe hands ofthe rangeclock
showthe correct time of day.
ImmediateStart is simplysetting
ovento start bakingnow and turning
offat a later timeautomatically.
Remember, foodscontinuecooking
after controlsare off.
Step 1: Toset Stop Time, push in
hob on STOP dial and turn pointer
to time you want ovento turn offi
for example6:00. The DELAY
STARTdial (some models may say
START)should beat the same
position as the timeofdayon clock.
Step 1: Tosetstarttime, push in
knobon DEI.AYSTARTdialand
turn pointer totime youwantoven
to turn on, for example3:30.
Step 2: To set StopTime, push in
knobon STOPdialand turn pointer
to time you wantovento turn off,
forexample6:00.This means your
recipecalled for two and one-half
hoursofbaking time.
N~E: Time on STOPdial must
be later than time shownon range
clock and DELAYSTARTdial.
Place food in oven, close the door
and automatically the ovenwillbe
turned on and off at the times yoi]
haveset. Turn OVEINSE~toOFF
and remove foodfrom oven.
OVEN INDICA~R L~G~T(s) at
TIME BAKEsetting may work
differently than they do at BAKE
setting. Carefully recheck the steps
given above. If all operations are
done as explained, OVCIIwill
operate as it should.
..
-->,
(: ‘.
...
i
Page 17

Roasting is COOking by clry heat.
.... .. . -—--.——-—--——.--—--—-——-..------
..——.
——-.——
———= . . . . . . . . ---.,---———-
......... ...
—..-.——.————————.. . ..
Tender meat
or poultrycanbe
roasteduncoveredin youroven.
Roastingtemperatures,which
shouldbe lf)wand steady, keep
spatteringto a minimum. When
roasting,itis not necessary to
sear, baste, coveror addwater
toyourmeat.
Roastingisreally a baking
procedureusedformeats.Therefore,
bvencontrolsare settoBAKE.
(Youmayhear a siight clicking
sound,indicatingthe ovenis
workingproperly.) Roastingis
easy;just followthese steps:
======
I
Step 1:Check weightof meat, and
place, fat side up, on roasting rack
in a shallowpan. (Broilerpan with
rack is a good pan forthis.) Line
broilerpanwith durninumfotiwhen
using pan for marinating, cooking
with fruits, cooking heavilycured
meats, or for basting foodduring
cooking. AvoidspiIIingthese
materials on ovenliner or door.
Step 2: Place in ovenon shelf in
A or B position. No preheating is
necessary.
Step 4: Most meatscontinueto
cookslightlywhilestanding,after
beingremovedfromtheoven.
Standingtime recommendedfor
roastsis 10to 20 minutesto allow
roastto firm upand make it easier
to carve. Internaltemperaturewill
riseabout 5° to 10”F.;to compensate
for temperaturerise, if desired,
removeroastfromovenat 5° to 10”F.
lessthan temperatureon guide.
N~E: Youmay wish to useTIME
BAKE,as describedon page 16,to
turn ovenon and offautomatically.
Rememberthat foodwillcontinue
to cook in the hot ovenand therefore
shouldbe removedwhenthedesired
internaltemperaturehasbeen
reached.
For Rozen Ross@
QFrozenroasts ofbeef, pork,
lamb, etc., can be startedwithout
thawing,but allow
10to25minutes
per pound additionaltime (10
minutesper poundfor roasts under
5 pounds, more time for larger
roasts).
@Thaw most frozenpoult~ybefore
roastingto ensure even doneness.
Some commercial frozen poultry
can be cooked successfullywithout
t}lawing,Follow directions given
on packer’slabel.
A. Checkingthefinishedinternal
temperatu~eatthecompilationof
cookingtime is recommended.
Temperaturesare shownin Roasting
Guideon oppositepage. For roasts
over8pounds, cookedat 300”F.
with reducedtime, check with
thermometer at half-hourintervals
after half the time has passed.
Q. v~hy is my !rQastCrumbling
when I try to carve it?
.A.Roastsare easier to sliceif
allowedto cool 10to 20 minutes
after removingfrom oven. Be sure
to cut across the grain ofthe meat.
Q. Do I need to preheat my
oven each time I cook a roast
or poultry?
A. It is rarely necessary to preheat
your oven, only for very small
roasts, which cook a short length
oflime.
Q.when
buy;.llga roast,are
there any specialtipsthatwould
help nle COOIKMmore evenly’?
A. Yes.Buy a roast as even in
thickness as possible, or buy rolled
roasts.
Q. can I seal the sides of my foil
“tent” when roasting a turl<ey?
A. Sealingthe foil will steam the
meat. Leavingitunsealedallowsthe
air to circulate and brow~~the meat.
7‘2
ii?
(“’”—’
Page 18

just beforeroasti~]g.Use meat temperaturerise, ifdesired,remove
probe for more accuratedoneness.
Controlsignalswhen foodhas
Ioastfrom ovenat5°t0100F. less
thantemperatureorIguide.
reached set temperature. (Do not
placeprobe in stuffing.)
Oven
Type
Meat
Tendercuts; rib, highquality
rump ortoproundy
Lamb Legor bone-inshoulder*
Vealshoulder, legor loin* 325°
Pork loin, ribor sh[julder* 325° ;
Ham, precooked
Ham, raw
*Forbonelessrolledroastsover6-inches thick, add5 to 10minutesper pound totimesgiven above.
Poultry
:hicken or Duck
:hicken picccs
rurkey
Sii lointip,
Temperature Doneness
325° Rare: 24-30
325°
325° To Warm:
325° Well Done:
325°
375” WellDone: 35-40
325° WellDone:
Medium: 30-35
WellDone: 35-45
Rare:
Medium: 25-30
WellDone:
WellDone: 35-45
WellDone: 35-45
WellDone:
ApproximateRoastingTime,
in Minutesper Wund
3 toS-lbs.
21-25
30-35
10minutesperpound(anyweight)
Under 10-lbs.
20-30
3 to 5-]bs.
35-40
tO 15-Ibs.
lo
20-25
Internal
Temperature‘F
6 to$-lbs.
18-22 130°-1400
22-25
28-33
20-23
24-28
28-33
30-40
30-40
150°-160”
170°-1850
130°-1400
150”-160°
170°-1850
170’-180°
1700-180°
125°-1300
10to 15-Ibs.
17-20
Over5-lbs.
30-35
Over M-lbs.
15-20
160°
1850-190°
185°-190°
In
thig!l:
185°-190°
Page 19

Broil;ngis cookingfoodbyintense
...—.
r~diantheat from the upperunit in
theoven.Mostfish and tendercuts
ofmeatcan be broiled. Follow
~hesestepstokeep spatteringand
smokingto a minimum.
Step 1:Ifmeathasfatorgristlenear
edge,cut Verticalslashesthrough
bothabout2“apart. If desired, fat
maybetrimmed, leavinglayer
about 1/8”thick.
Step 2: Place meat on broiler rack
inbroiler pan which comeswith
range.Alwaysuse rack so fatdrips
intobroiler pan; otherwisejuices
maybecomehotenoughtocatchfire.
Step3: Wsitionshelfonrecommended
shelfpositionassu~ested inBroiling
Guideon oppositepage.Most
broilingisdone on C position, but
ifyourrange is connectedto 208
volts, you may wish to use higher
position.
Step 4: Leavedoorajar a fewinches
(exceptwhen broiling chicken).
The door staysopen by itse[f,yet
[heproper temperatureismaintained
in the oven.
Step 6: Turn foodonlyonceduring
coolcing.Timefoods for firstside
per BroilingGuide.
Turn food, then usetimesgivenfor
secondsideas a guideto preferred
doneness.(Wheretwothicknesses
and timesare giventogether,use
firsttimesgivenforthinnestfood.)
Step %TurnOVENSET knob
to OFF. Serve foodimmediately,
and leavepan outsideovento cool
duringmeal for easiestcleaning.
use of Aluminum Foil
1. Ifdesired, broilerpan maybe
linedwith foilandbroiler rack may
becoveredwith foil for broiling.
A~%~A~~ ~~ c~~TA]~ ~ M-~~~
FOIL T’HOROUGHLYTO
BROILER RACK, AND SLIT
FOIL ~ CONFORM WITH
SLITSIN RACK. Broilerracksare
designedtominimizesmokingand
spattering, and to keepdrippings
coolduring broiling.Stopping fat
andmeatjuices fromdrainingto
thebroiler pan preventsrack from
serving itspurpose, andjuices may
become hot enoughtocatch fire.
2. DO N~ place a sheetof
aluminum foilon shelf. Todo so
mayresult in improperly cooked
foods, damage toovenfinishand
increase in heat onoutsidesurfaces
oftheoven.
3. If desired, a sheetof aluminum
foi~maybe used on flooroftheoven
u~tderthebakeunit. BE CERTAIN
F~~L DOES NOT TOUCH BAKE
IJhTIT,All]mi~~~~mfoilused inthis
waymaysligl~tlyaffectthebrowning
ofsome foods. ~Changefoilwhen it
becomes soiled.
Chickenistheonlyfooti
A.
recommendedforclosed-door
broiling.Thisisbecausechickenis
relativelythickerthnnother foods
youbroil. Closingthedoorholds
moreheat in theovenwhichallows
chickento cookevenlythroughout.
Q. when broiling, is it necessary
to always use a rack in the pan?
A..Yes.Usingthe rack suspends
themeat overthepan. As the meat
cooks,thejuices fallintothe pan,
thuskeepingmeatdrier. Juices
are protectedbythe rack and stay
cooler, thus preventing excessive
spatterand smoking.
Q. shouldI saltthemeatbefore
broiling?
A..No. Saltdrawsout thejuices
and allowsthemtoevaporate.
Alwayssalt after cooking. Turn
meat with tongs;piercing meat
with a fork also allowsjuices to
escape. When broiling poultry
or fish, brush each side often
with butter.
Q.
my ~~~~Y~~~h~ott~~ti~g
brown as they should?
outas
In some areas, the power
A.
(voltage)to the rangemaybe low.
In these cases, preheat the broil
unit for 10minutesbefore placing
broiler pan with food in oven.
Check to see ifyouare usingthe
recommended shelf position. Broil
for longestperiod o~time indicated
in the Broiling Guide. Turn food
only once dt~ringbroiling.
Q. Do I need to grease mlybroi!e;f
~~~ktoP~~YentEH@tfh”o~~ti~i<ing?
A. No. The broiler rack is designed
to reflect broiler l~eat,tl]t~skeeping
the surface cool enough to prevent
meatsticltingtotilesurface.l~owevez,
Page 20

f$$~d<~~ways us: broilerpartandrack
:
JthdtCOmeSWithyour oven.Itis
2. Ovendoor shouldbe ajar forall
specialpositionondoor which
holdsdoor opencorrectly.
3. For steaksand chops, slashfat
evedy aroundoutsideedgesofmeat.
.,
designedto minimizesmokingand
spatteringby trappingjuices inthe
shieldedlowerpart ofthe pan.
foodsexceptchicken;there isa
Toslash, cut crosswisethrough
outerfatsurface just to the edgeof
the meat. Use tongstoturn meat
overto preventpiercinglneatand
losingjuices.
4. If desired, marinatemeatsor
chickenbeforebroiling.Or brush
with barbecue sauce last 5 to 10
minutesonly.
5. When arrangingfoodonpan,
do not.letfattyedgeshangover
sides, which could soilovenwith
fatdripping.
6. Broilerdoesnotneedto be
preheated.Howeverjforvery thin
foods,or LOincreasebrowning,
preheatifdesired.
“$=Frozeilsteaks can be
conventionallybroiledby
positioningthe ovenshelfat next
lowestshelfpositionand increasing
cookingtime given in this guide
IYztimesper side.
8. If yourovenis connectedto
208Volts,raresteaksmaybe broiled
bypreheatingbroilheaterand
positioningthe ovenshelfone
positionhigher.
Food
I
Bacon
I
GroundBeef
WellDone
I
Rare 1k-in. thick
.&.~
~_&~. Medium
01
WellDone
Quantityandior
Thickness
I
‘A-1b.(about8
thin slices)
I
l-lb. (4patties)
1Ato %-in. thick
I
(2 to2 %-lbs,)
!Chickenls~’’;”e
BakeryI}roduct-s
Brcacl(’roast)or 2to4slices
‘IbastcrPastries
I
ErlglishMuffins
1---
hbs[ur Thils
8-02. COCh)
(6to
I
1pkg.(2)
2 (splil)
[
Z-4
I
Z (Y2 inch)
2 (l-in. thick)
al)our 1lb.
Shelf
Position
I
c
I
c
I
I: I:IE:
A 3’
c
II
c
\
B 13-16
I
c
B
Time, M]nutes
I
I
I
~
I
First
Side
3%
7
1%-2 ‘A
3-4
10 10
13 13
SecondSide
Time, Minutes
I
I
I
I
3%
4-5
10-15
Do not
turn over.
CommenK
Arrangein singlelayer.
Space evenly.
Up to8patties takeaboutsame time.
Steakslessthan 1inch cookthrough
before browning. Panfrying is
recommended.
Slashfat.
Reduce times about 5 to 10minutesper
side forcut-up chicken.Brush each side
with meltedbutter. Broil with skin
downfirst and broil witl]door closed.
Spaceevenly.Place English muffins
cut-side-upand brush with butter, if
desired.
Cut throughback of shell. Spread
open. Brush with meltedbutter
beforeand after half time.
Handie and turn very carefully.
Brush wit!llemon butter beforeand
during cookingif desired. Preheat
broiler to increasebrowning.
Increase times 5 to 10minutesper side
for 1%-inchthick or homecured.
Slash fat.
.
—.
2 (1inch)
~b(}ut10t[~!~OZ.
2 (1Minch)
about 1lb.
c
c
c
~
: 4-7
io
10
17 12-14
10
4-6
Slash fat.
If desired, split sausages in half
lengthwise: cut into 5 to 6-inch pieces,
Page 21

Proper care and cleaningare
..... ..————.-..
importa~ltsoyo~lrrange willgive
youefficientand satisfactory
service. Followthese directions
carefilly in caring foryourrangeto
assuresafeandpropermaintenance.
ovenventDuet
You~rangeisventedthrougha duct
locatedundertherightrear surface
unit. Cleanthe duc~often.
>f
I
The porcelain enamel finishis
sturdybutbreakableif misused.
This finish isacid-resistant.
However,anyacid foodsspilled
(suchas fruitjuices, tomatoor
vinegar)shouldnotbe permitted
toremain on the finish.
cleaningundertheRange
(on models equippedYvith
bottom drawer)
The area under the rangeof models
equipped with a bottomdrawer can
bereached easily for cleaningby
removingthebottomdrawer. To
remove,pull drawer out all the way,
tiltup the front and removeit. To
replace, insert glides at back of
drawerbeyondstopon rangeglides.
Lift drawer if riecessary to insert
easily.Let front of drawer down,
then push into close.
Toremove:
@Make sure unit iscool.
* Lifi up right rear surfaceunit.
@Removedrip pan and ring.
@Lift out ovenventduct.
Toreplace:
@Place the part overthe ovenvent
locatedbelowthe cooktopwith
openingofthe duct under the round
openingin the drip pan. It is
importantthat the duct is in the
correct position so moisture and
vaporsfrom the ovencan be
released during ovenuse. N~E:
Never cover the hole in the oven
ventduct with aluminum foil or
any other material. This prevents
the ovenventfrom working
properly during any cooking cycle.
LampReplacement
(onEnodelssoequipped)
The ovenlamp (bulb)iscovered
witha glassremovablecoverwhich
isheldin place with a bail-shaped
wire.Removeovendoor,ifdesired,
toreach covereasily.
Toremove:
@Hold hand undercoversoit
doesn’tfall when released. With
fingersof samehand, firmly push
back wire bail untilitclears cover.
Lift offcover.DO NOT REMOVE
ANY Screws.
~Replacebulb with 40-watthome
appliancebulb.
To replace
Cover:
~Place it into grooveof lamp
receptacle. Pull wire bail forward
to center of coveruntilit snaps into
place. When in place, wire holds
coverfirmly.Be certain wire bail is
in depression in center of cover.
@Connect electric powerto range.
surface uti@
Clean the area under the drip pans
often. Built-upsoil, especially
grease, may catch fire. To make
cleaning easier, stay-upu~litslifi up
and lock in the up position, and
plug-in units are removable.
-
,-,e.
,, j
. . -
Page 22

.
—————.. ... -—
.—...-....—--. - -—-
Stay-upunitscamot be removed.
Youcan lift a stay-up unit upward
about6“and it will lock in the up
position.
@
Replace the drip pan and trim
ring into the recess in the cooktop.
~Putthe trim ring in place overthe
drip pan. The drip pan must be
underthe trim ring.
~Guide the surface unit intoplace
so it fi~ evenlyintothe trim ring.
Plug-inunitscan be removed.
To
replace a plug-in unit:
@First placethe drip pan, then the
trim ringintothesutiaceunitcavity
foundon top ofthecoohop so the
unitreceptaclecanbe seen through
the openingin thepan.
@Insert theterminals ofthe plug-in
unitthroughthe openingin tie drip
pan and intothe receptacle.
QGuidethe surfaceunitintoplace
soit fitsevenlyintothe trim ring.
Note: The drip pan must be under
the trim ring.
CAUTION
~ Donotattemptto clean plug-in
surfaceunits in an automatic
dishwasher.
@Do not immerse plug-insurface
unitsin liquids of any tind.
@Do not bend the plug-in surface
unitplug terminals.
Toincreasetemperature,turntow~~fi
HI or WISE; todecreaseturn
towardLo or LOWER. Each notch
changestemperature 10degrees.
1. Removebob, andholdso
pointeris attopofbob. Hold
“skjr-t”Ofhob firndy in one hand.
With other hand, turn bob tomove
pointer towardRaiseor Lower.
Pointeris designednotto move
easily.If it is seated so it is difficult
to move, pointer maybe loosened
slightly. bsert a thin screwdriver,
hife blade or similar instrument
and lift up end ofpointer slightly.
2. After adjustment is made, press
pointer firdy againstbob. Return
bob to rar]ge,matching flat area
on hob to range, matching flat
area on knob and shaft. Recheck
ovenperformance before mak~ng
artadditiond adjustment.
WorOtIl@rmlodels
~ Do not attempt to clean, adjust or
in any way repair the plug-in
receptacle.
Page 23

PART
/=
I
..—.7 .. —-
Do not clean thebakeunitor broil unit. Allysoilwill bum offwhentheunit is heated,
NOTE:The bakeunitis hingedandcan bciifted eentlv:0 clean theovenfloor.If
I
] spillover,residue,or ashac;urnu]atesaroundthe~~ke’unit,gentlywipearoundtheunit
withwarmwater.
Broiler %n and Rack
Control~obs:
bilge Topand Oven
OutsideGlass Finish
Nietal,including
Brushed Chrome
Cooktop
PorcelainEnamel
Surface
PaintedSurf2ces
InsideOvenDoor*
OveIILiner*
(CAUTION: Whenin
use, lightbulbscan
becomewarm enough to
breakif touchedwith
mois[cloth or towel.
Whencleaning, avoid
warm lampswithcleaning
cloths if lamp coveris
removecl.)
Shelves
Calrod(u)Surface
UIIil(Uoiis
‘SDilla2c(If :i\iirii}ii(ICs. fruit juices, and bastit]y Iil:Lteri:ilS containing :]cids may C:IUSC discoloration. Spillovers should be wiped Up iinmediatcl:l, with care being
e Soapand Water
e Soap-FilledScouringPad
eCommercialOven Cleaner
~MildSoap and Water
*SoapandWater
~Soap and Water
*Paper Towel
*Dry Cloth
9 SoapandWater
~Soapand Water
*Soapand Water
~Soap-FilledScouringPad
ICommercial OvenCleaner
ISoapandWater
I Soap-FilledScouringPad
CommercialOvenCleaner
gSoapand WaterOvenVentDuct
I
QSoapand Water
~Soap-Filled ScouringPad
OCommercialOvenCleaner
!
- SoapandWater
t
~Soap and Water
~Stiff-Bristled Brush
~Soap-FilledScouriilg Pad
(Non-metallic)
~~Soap and W.iier
I!s[):lp-~il]cdSCOUIin~Pad
I
~’PltisticScouring Rid
~ Dishwasher
I
Drainfat, coolpan andrackslightly.(Do notlet soiledpanand rackstandin oventocool.)
Sprinkleondetergent.Fill the panwith~varmwaterandspreadcloth orpaper towelover
the rack,Letpanand rackstandfora fewminutes.Wash;scour ifnecessary.Rinseanddry.
O~ION: The broilerpanand rackmayalsobe cleanedin a dishwasher.
Pull offknobs.Washgentlybut donot soak. Dry andreturn controlstorangemakingsure
tomatchflat areaon theknoband shaft.
Washall glasswithcloth dampenedin soapywater.Rinse andpolishwith a dry cloth.If
knobsareremoved,donotallowwatertorun downinsidethesu~ce ofglasswhilecleaning.
Wash,rinse, andthen polishwitha dry cloth. DO N~ USE steelwool,abrasives,
ammonia,acids, or commercialovencleaners whichmaydamagethe finish,
Avoidcleaningpowdersor harshabrasiveswhichmayscratchthe enamel. If acidsshould
spill onthe rangewhileit is hot, usea dry paper towelor clothto wipeup right away.
Whentiresurfacehascooled, washand rinse. For other spills, suchas fatsmatterings,etc.,
wash with soapand waterwhen cooledandthen rinse. Polish withdry cloth.
Usea mild solutionof soapand water.Do not useany harshabrasivesor cleaningpowders
whichmayscratchor mar surface.
Tocleanovendoor; removebyopeningto BROILpositionand graspingdoor at sides. Lift
door upand awayfromhinges. Cleanwith soap andwater.Replacebygraspingdoor at
sidesand liningup door withhinges. Pushdoor firmly into place.
Cool beforecleaning.
FOR LIGHT SOIL: Frequent wipingwith mild soapand water(especiallyafier cooking
meat)will prolongthe timebetween majorcleaning. Rinse thoroughly.N(YI%:Soapleft
on linercauses additionalstains whenovenis reheated.
FOR HEAVYSOIL: Choosea non-abrasivecieaner andfollow labelinstructions, using
thin layer of cleaner. Useof rubber glovesis recommended.Wipe or rublightly on
stubbornspots. Rinsewell. Wipeoff anyovencleaner that getson thermostatbulb. When
rinsingovenafter cleaningalso wipe thermostat bulb.
Removethe OvenVentDuct foundunder the right rear surface unit. Washin hot, soapy
waterand dry and replace. (Openingshould matchopening indrip pan.)
Yourshelvescan becleaned byusing anyand all mentionedmaterials. Rinse thoroughlyto
removeall materials after cleaning. NOTE: Some commercialovencleaners cause
darkeningand discoloration. Whenusing for first time, test cleaner onsmall part ofshelf
and checkfor discolorationbeforecompletely cleaning.
Spatters andspills bum awaywhen the coils are heated. At the end ofa meai, removeall
utensils fromtheCalrod@unit andheat the soiled units at HI. Let the soil burn off abouta
minuteand switchthe units to OFF. Avoidgetting cleaningmaterials on thecoils, Wipe off
anycleaning materialswith a damp paper towelbe~oreheatingthe Calrod” unit.
DO NOT handlethe unit beforecompletelycooled.
DO NOTimmerseplug-inunits in any kind ofliquid.
For cleaning, remove drawer bypulling it all the wayopen, tilt up the front and lift out.
—
Wipe withdampcloth or sponge andreplace. Never use harsh abrasivesor scouringpads.
Clean as described belowor in the dishwasher. Wipe all rings after eachcooking so
unnoticedspatter will not “burn on”
usc anyor all cleaning materials mentioned. Rub ~igilriywith scouring PZ~dtoprevent
scratchingof the surface.
Cool pansiightly.Sprinkle on detergentand wash or scour pan with warm water. Rinse
anddry. In addition. pan mayalso be cleaned in the dishwasher.
nexttime youcook. To remove “burned-on” spatters
-..
1.
r
,-
1
I
Page 24

POSSIBLE CAUSE~D MymDY
o%~ENWILLNOTWORK
OVENLIGHT
DOES Nm
wow
FOODDOES Nm
BROIL
FOOD DOES N~ ROAST
ORBAKE PROPERLY
PROPERLY
Plugon rangeisnotcompletely insertedin tie electrical outlet.
The circuit breaker in yourhousehasbeen tripped, or a fuse 1]2sbeen blown.
Ovencontrolsnot properlyset.
Ligl~tbulbisloose.
Bulbis defective.Replace.
Switchoperatingovenlightisbroken. Callfor service.
OVEN SET knob not set at BROIL.
OVEN TEMP knob notsetatBROIL.
Door
notIeftajarasrecommended.
Improper she~fpositionbeingused. Check BroilingGuide.
Necessary preheatingwasnetdone.
Food is beingcookedon hotpan.
Utensilsare not suitedfor broiling.
Aluminum foilused on the broil pan rack has not been fitted properly and slit
as recommended.
OVEN SET knob not setonBA=.
OVEN TEMP knob not setcorrectly.
Shelfposition is incorrect. Check Roastingor BakingGuides.
Oven shelf is not level.
Incorrect cookware or cookwareof improper size isbeing used.
A foil tentwas not used when needed to slowdownbrowningduring roasti~~g.
CALROD@SURFACE UNITS
r
Nm
FuNaIoNING
PRoPER~AY
L
.—.——
Surface units are not pluggedin solidly.
Trim rings/drip pans are not set securely in the rangetop.
Surface unit controls are notproperly set.
Page 25

,-
We’reproudof our serviceand~
W~~t YOUtO be pleased. ]f forsOme
.—
.
reasonyouare not happywith the
serviceyoureceive,here are three
stepsto follow for firther help.
—..
~...5.
..
FIRST,contactthepeoplewho
servicedyourappliance.Explain
whyyouare notpleased. In most
cases, thiswill solve the problem.
NEXT, if you are stillnotpleased,
write allthe details-including
yourphonenumber—to:
.—
i-.--H-—--
—.
FINALLY,if yourproblemis still
not resolved, write:
Major Appliance
Consumer ActionPanel
20 North WackerDrive
Chicago,Illinois 60606
-1:..
k~—..y
---
w“
q::--
_–=_ _-
-––
~>-—.
WI”- -
~.-= _
.... .. ..
,=_
,-.’
/8
..
-+--
...
“;)
“:
27
., --
Page 26

r———
/,-
I
Save proc3fof or~g~nalpurchasedatesuchas your sales slip or cancelled check to establish warranty periocf.
I
WHATISCOVERED
YOURHOTPOINTRANGE
WARRANTY
—.
.—-
FULL ONE-YEARV$ARRANTY This warrantyisextendedto
Forone
yearfromdateoforiginal
purchase,wewillprovide,freeof
charge,partsandservicelabor
inyourhometorepairorreplace
anypartoftherangethatfails
becauseofamanufacturingdefect.
theoriginalpurchaserandany
succeedingownerforproducts
purchasedforordinaryhomeuse
48 mainlandstates,Hawaii
inthe
ar]dWashington,D.C.[nAlaskathe
warrantyisthesameexceptthatitis
LIMITEDbecauseyoumustpayto
shiptheproductto~heserviceshop
orfortheservicetechnician’stravel
coststo your home.
All warrantyservicewill be provided
byour FactoryService Centersor
ourauthorizedCustomerCare”
by
servicersduring normalworKng
hours.
Lookinthe White or YellowPages
of your telephonedirectory for
HOTPOINTFACTORYSERVICE,
GENERAL ELECTRIC-HOTPO!NT
FACTORYSERVICEor HOTPOINT
CUSTOMERCARE@SERVICE.
—
I
~~~~~ !~ NOT e~v~~~~ ~SerVicetripstoyour hometo
Some states do not allow the exclusion or limitation of incidental or consequential damages, so the above limitation or exclusion
may not apply to you. This warranty gives )Iou specific legal rights, and you may also have other rights which vary from state to state.
Toknow what your legal rights are in your state, consult your local or stateconsumer affairs office or your state’sAttorney General.
teach you
Readyour Useand Cam material.
If you then haveanyquestions
about operating the product,
please contact your dealer or our
~onsumer Affairs office at the
address below,or call, toll free:
GE Answer Cente@
800.626.2000
consumer information service
s Improper installation.
Ifyou have an installation problem,
contact your dealer or installer.
Youare responsible for providing
adequateelectrical, gas,exhausting
and other connecting facilities.
how tousetheproduct.
~ Replacement of house fuses or
resettingofcircuitbreakers.
~ Failureof the product if it is used
for other than its intended purpose
or used commercially.
@Damage to product caused
by accident, fire, floods or acts
OfGod.
WARRANTORIS PlOTRESPONSIBLE
FORCONSEQUENTIAL DANIAGES.
.,-..
... ...
,-.
-.
.
 Loading...