Hotpoint PRO 95 GT.01 S User Manual

PRO 95 GT.01 S

English

Operating Instructions

COOKER AND OVEN Contents

Operating Instructions,1 Warnings,3 Assistance,7

Description of the appliance,9 Description of the appliance,11 Installation,12

Start-up and use,15 Precautions and tips,18 Maintenance and care,18

Français

Mode d’emploi

CUISINIÈRE ET FOUR Sommaire

Mode d’emploi,1 Avertissements,3 Assistance,7

Description de l’appareil,9 Description de l’appareil,11 Installation,20

Mise en marche et utilisation,23 Précautions et conseils,26 Nettoyage et entretien,26

Español

Manual de instrucciones

COCINA Y HORNO

Sumario

Manual de instrucciones,1 Advertencias,4 Asistencia,7

Descripción del aparato,9 Descripción del aparato,11 Instalación,28

Puesta en funcionamiento y uso,31 Precauciones y consejos,34 Mantenimiento y cuidados,34

Portuges

Instruções para a utilização

FOGÃO E FORNO

Índice

Instruções para a utilização,1 Advertências,4 Assistência,7

Descrição do aparelho,9 Descrição do aparelho,11 Instalação,36

Início e utilização,39 Precauções e conselhos,42 Manutenção e cuidados,42

يبرع

ليغشتلا تاميلعت

نرفلاو دقوملا

تايوتحملا

1 ،ليغشتلا تاميلعت

4 ،تاريذحت

6 ،ةدعاسملا

8 ،زاهجلا فصو

9 ،زاهجلا فصو

49 ،بيكرتلا

46 ،مادختسلااو ليغشتلا

43 ،حئاصنو رذح لئاسو

43 ،ةيانعلاو ةنايصلا

Warnings

WARNING: The appliance and its accessible parts become hot during use. Care should be taken to avoid touching heating elements. Children less than 8 years of age shall be kept away unless continuously supervised. This appliance can be used by children aged from 8 years and above and persons with reduced physical, sensory or mental capabilities or lack of experience and knowledge if they have been given supervision or instruction concerning use of the appliance in a safe way and understand the hazards involved. Children shall not play with the appliance. Cleaning and user maintenance shall not be made by children without supervision.

WARNING: Unattended cooking on a hob with fat or oil can be dangerous and may result in fire.

NEVER trytoextinguishafirewith water, but switch off the appliance and then coverflamee.g.withalidorafireblanket.

Do not use harsh abrasive cleaners or sharp metal scrapers to clean the oven door glass since they can scratch the surface, which may result in shattering of the glass.

The internal surfaces of the compartment (where present) may become hot.

Never use steam cleaners or pressure cleaners on the appliance.

“Remove any liquid from the lid before opening it.

Do not close the glass cover (if present) when the gas burners or electric hotplates are still hot.”

WARNING: Ensure that the appliance is switched off before replacing the lamp to avoid the possibility of electric shock.

CAUTION: the use of inappropriate hob guards can cause accidents.

! When you place the rack inside, make sure that the stop is directed upwards and in the back of the cavity.

Avertissements

ATTENTION: Cet appareil ainsi que ses parties accessibles deviennent très chauds pendant leur fonctionnement. Il faut faire attention à ne pas toucher les éléments chauffants. Ne pas faire approcher les enfants de moins de 8 ans à moins qu’ils ne soient sous surveillance constante. Le présent appareil peut être utilisé par des enfants de plus de 8 ans et par des personnes présentant des capacités physiques, sensorielles ou mentales réduites ou n’ayant pas l’expérience ou les connaissances indispensables, à condition qu’ils soient sous bonne surveillance ou qu’ils aient reçu les instructions nécessaires pour une utilisation de l’appareil en toute sécurité et à condition qu’ils se rendent compte des dangers encourus. Les enfants ne doivent pas jouer avec l’appareil. Les opérations de nettoyage et d’entretien ne doivent pas être effectuées par des enfants non surveillés.

ATTENTION : laisser un récipient de cuisson contenant de l’huile ou de la graisse sur le foyer est dangereux et risque d’entraîner un incendie.

Il ne faut JAMAIS essayer d’éteindre une flamme ou un incendie avec de l’eau !

Il faut éteindre l’appareil et couvrir la flamme avec un couvercle, par exemple, ou avec une couverture anti-feu.

2

Ne pas utiliser de produits abrasifs ni de spatules métalliques coupantes pour nettoyer la porte du four en verre, sous peine d’érafler la surface et de briser le verre.

Les surfaces intérieures du tiroir (s’il y en a un) peuvent devenir chaudes.

Ne jamais nettoyer l’appareil avec des nettoyeurs vapeur ou haute pression.

Essuyer tout liquide pouvant se trouver sur le couvercle avant de l’ouvrir. Ne pas abaisser le couvercle en verre (s’il y en a un) tant que les brûleurs gaz ou la plaque électrique sont chauds.

ATTENTION : s’assurer que l’appareil est éteint avant de procéder au remplacement de l’ampoule, afin d’éviter tout risque d’électrocution.

ATTENTION : l’utilisation de protections de table inappropriées peut causer des incendies.

! Lors de l’introduction de la grille, s’assurer que l’arrêt est bien tourné vers le haut et se trouve dans la partie arrière de l’enceinte.

encuentran bajo una adecuada vigilancia o si han sido instruidos sobre el uso del aparato de modo seguro y comprenden los peligros relacionados con el mismo. Los niños no deben jugar con el aparato. Las operaciones de limpieza y de mantenimiento no deben ser realizadas por niños sin vigilancia.

ATENCIÓN: Dejar un quemador con grasas o aceites sin vigilancia puede ser peligroso y provocar un incendio.

NUNCA intente apagar una llama/ incendio con agua, se debe apagar el aparato y cubrir la llama, por ejemplo, con una tapa o con una manta ignífuga.

No utilice productos abrasivos ni espátulas de metal cortantes para limpiar la puerta de cristal del horno ya que podrían rayar la superficie y quebrar el cristal.

Lassuperficiesinternasdelcajón(cuando existe) pueden calentarse.

No utilice nunca limpiadores a vapor o de alta presión para la limpieza del aparato.

Elimine eventuales líquidos presentes sobre la tapa antes de abrirla. No cierre la tapa de vidrio (si existe) cuando los quemadores o la placa eléctrica todavía están calientes.

Advertencias

ATENCIÓN: Este aparato y sus partes accesibles se vuelven muy calientes durante el uso. Por lo tanto, es importante evitar tocar los elementos calentadores. Mantenga alejados a los niños menores de 8 años si no son continuamente vigilados. El presente aparato puede ser utilizado por niños mayores de 8 años y por personas con capacidades físicas, sensoriales o mentales disminuidas o sin experiencia ni conocimientos, si se

ATENCIÓN: Antes de sustituir la lámpara controle que el aparato esté apagado para evitar la posibilidad de choques eléctricos.

ATENCIÓN: el uso de protecciones inapropiadas de la placa de cocción puede provocar accidentes.

! Cuando introduzca la parrilla, controle que el tope esté dirigido hacia arriba y en la parte posterior de la cavidad.

3

Advertências

ATENÇÃO: Este aparelho e as suas partes acessíveis aquecem muito durante a utilização. É preciso ter atenção e evitar tocar os elementos que aquecem. Manter afastadas as crianças com menos de 8 anos, caso não estejam a ser vigiadas. O presente aparelho pode ser utilizado por crianças com mais de 8 anos e por pessoas com capacidades físicas, sensoriais ou mentais reduzidas ou com pouca experiência e conhecimentos, caso sejam adequadamente vigiadas ou caso tenham recebido instruções em relação ao uso do aparelho de forma segura e tenham conhecimento dos perigos associados. As crianças não devem brincar com o aparelho. As operações de limpeza e manutenção não devem ser efectuadas por crianças sem vigilância.

ATENÇÃO: Deixar um fogão com gordura e óleo sem vigilância pode ser perigoso e provocar um incêndio.

NUNCA tente apagar as chamas com água. É necessário desligar o aparelho e cobrir as chamas com uma tampa ou com uma manta ignífuga.

Não utilizar produtos abrasivos nem espátulas de metal cortantes para limpar a porta em vidro do forno, uma vez que pode riscar a superfície, provocando a ruptura do vidro.

As superfícies internas da gaveta (se presentes) podem ficar muito quentes.

Nunca utilize equipamento de limpeza a vapor ou de alta pressão para limpar o aparelho.

Elimine os líquidos presentes na tampa antes de abri-la. Não feche a tampa de vidro (se presente) se os queimadores ou a chapa eléctrica ainda estiverem quentes.

ATENÇÃO: Assegure-se de que o aparelho esteja desligado antes de substituir a lâmpada, para evitar a possibilidade de choques eléctricos.

ATENÇÃO: O uso de protecções do plano inadequadas pode causar incidentes.

! Quando inserir a grelha, assegure-se de que o bloqueio esteja voltado para cima e na parte posterior da cavidade.

تاريذحت

ةنخاس ةفوشكملا ءازجلأاو زاهجلا حبصي :ريذحت ةسملام بنجتل صرحلا مازتلا بجي .مادختسلاا ءانثأ 8 نملقلأالافطلأالظينأبجي.نيخستلارصانعلا

.مهل ةرمتسم ةظحلام كانه نكت مل ام نيديعب ماوعأ 8 رمعنملافطلأاةطسوبزاهجلااذهمادختسانكمي ،ةيدسجلاتاقاعلإايوذةطساوبكلذكو،رثكأفتاونس مهيدل نمم وأ ،ةدودحملا ةيلقعلاو ةيسحلا تاردقلا وأ وأ مهداشرإ مت اذإ لاإ ،ةدودحم ةفرعمو ةليلق ةبرجت ةنمآ ةقيرطب زاهجلا مادختساب قلعتي اميف مهبيردت ثبعي لاأ بجي .اهيلع يوطني يتل رطاخملا اومهفو زاهجلاةنايصوفيظنتمتيلاأبجي.زاهجلابلافطلأا

.مهيلع فارشإ نودب لافطلأا ةطساوب

نوهدلامادختسابماعطلايهطيدؤينأنكمي:ريذحت ًارطخ فارشإ نودب نيخستلا فر ىلع تويزلا وأ

.قيرح بوشنل يدؤي دقو نكلو ،ءاملا مادختساب نارينلا دامخإ ًاقلطم لواحت لا وأ ءاطغ مادختساب بهللا ةيطغت مث زاهجلا ءافطإب مق

.لاثمً ةيناطب

4

ةداح ةيندعم ةطشاك وأ ةنشخ ةفظنم داوم مدختست لا شدخت نأ نكمي ثيح ،نرفلا باب جاجز فيظنتل

.جاجزلا عدصتّ ىلإ يدؤي ام وهو حطسلا

)اهب دجوت يتلا( ةنيباكلل ةيلخادلا حطسلأا نوكت دق

.ةنخاس

طغضلابتافظنملاوأراخبلابتافظنملاادبأمدختستلا

.زاهجلا عم

.هحتف لبق ءاطغلا نم لئاسلا يأ جرخأ" قراحمنوكتامنيب )دجونإ(يجاجزلاءاطغلاقلغتلا يئابرهكلا نيخستلا حاولأ تلازام وأ ةلعتشم زاغلا

.ةنخاس

،حابصملالادبتسالبقزاهجلاقلاغإنمدكأت:ريذحت

.ةيئابرهك ةمدص ثودح ةيلامتحا يدافتل كلذو

ففرلأ ةبسانم ريغ ةيطغأ مادختسا يدؤي دق :ريذحت

.ثداوح عوقو ىلإ نيخستلا

ةطقن نأ نم ققحت ،لخادلاب لماحلا عضت امدنع !

.فيوجتلا فلخ يف دجوتو ىلعلأ ةهجتم فيقوتلا

5

Assistance

! Never use the services of an unauthorised technician.

Please have the following information to hand:

The type of problem encountered.

The appliance model (Mod.).

The serial number (S/N).

The latter two pieces of information can be found on the data plate located on the appliance.

Assistance

! Ne jamais faire appel à des techniciens non agréés.

Lui indiquer :

le type d’anomalie;

le modèle de l’appareil (Mod.)

son numéro de série (S/N)

Ces informations figurent sur la plaque signalétique apposée sur l’appareil

Asistencia

! No llame nunca a técnicos no autorizados.

Comunique:

El tipo de anomalía;

El modelo de la máquina (Mod.)

El número de serie (S/N)

Esta información se encuentra en la placa de características colocada en el aparato.

La siguiente información es válida solo para España. Para otros países de habla hispana consulte a su vendedor.

Ampliación de garantía

Llame al 902.363.539 y le informaremos sobre el fantástico plan de ampliación de garantía hasta 5 años.

Consiga una cobertura total adicional de

Piezas y componentes

Mano de obra de los técnicos

Desplazamiento a su domicilio de los técnicos

Y NO PAGUE AVERIAS NUNCA MAS

Servicio de asistencia técnica (SAT)

Llame al 902.133.133 y nuestros técnicos intervendrán con rapidez y eficacia, devolviendo el electrodoméstico a sus condiciones óptimas de funcionamiento.

En el SAT encontrará recambios, accesorios y productos específicos para la limpieza y mantenimiento de su electrodoméstico a precios competitivos.

ESTAMOS A SU SERVICIO

Assistência

! Nunca recorra a técnicos não autorizados.

Comunique:

o tipo de avaria;

o modelo da máquina (Mod.);

o número de série (S/N);

Estas últimas informações encontram-se na placa de identificação situada no aparelho.

ةدعاسملا

.ادبأ لهؤم ريغ يّنف ةدعاسم بلطت لا !

:ةيلاتلا تامولعملا رابتعلاا نيعب ذخ ءاجرلا

.اهتهجاوم تمت يتلا ةلكشملا عون •

.)Mod.( زاهجلا زارط •

.)S/N( يلسلستلا مقرلا • ىلع ةدوجوملا تانايبلا ةحول ىلع نيتريخلأا نيتمولعملا ىلع روثعلا نكمي

.زاهجلا

6


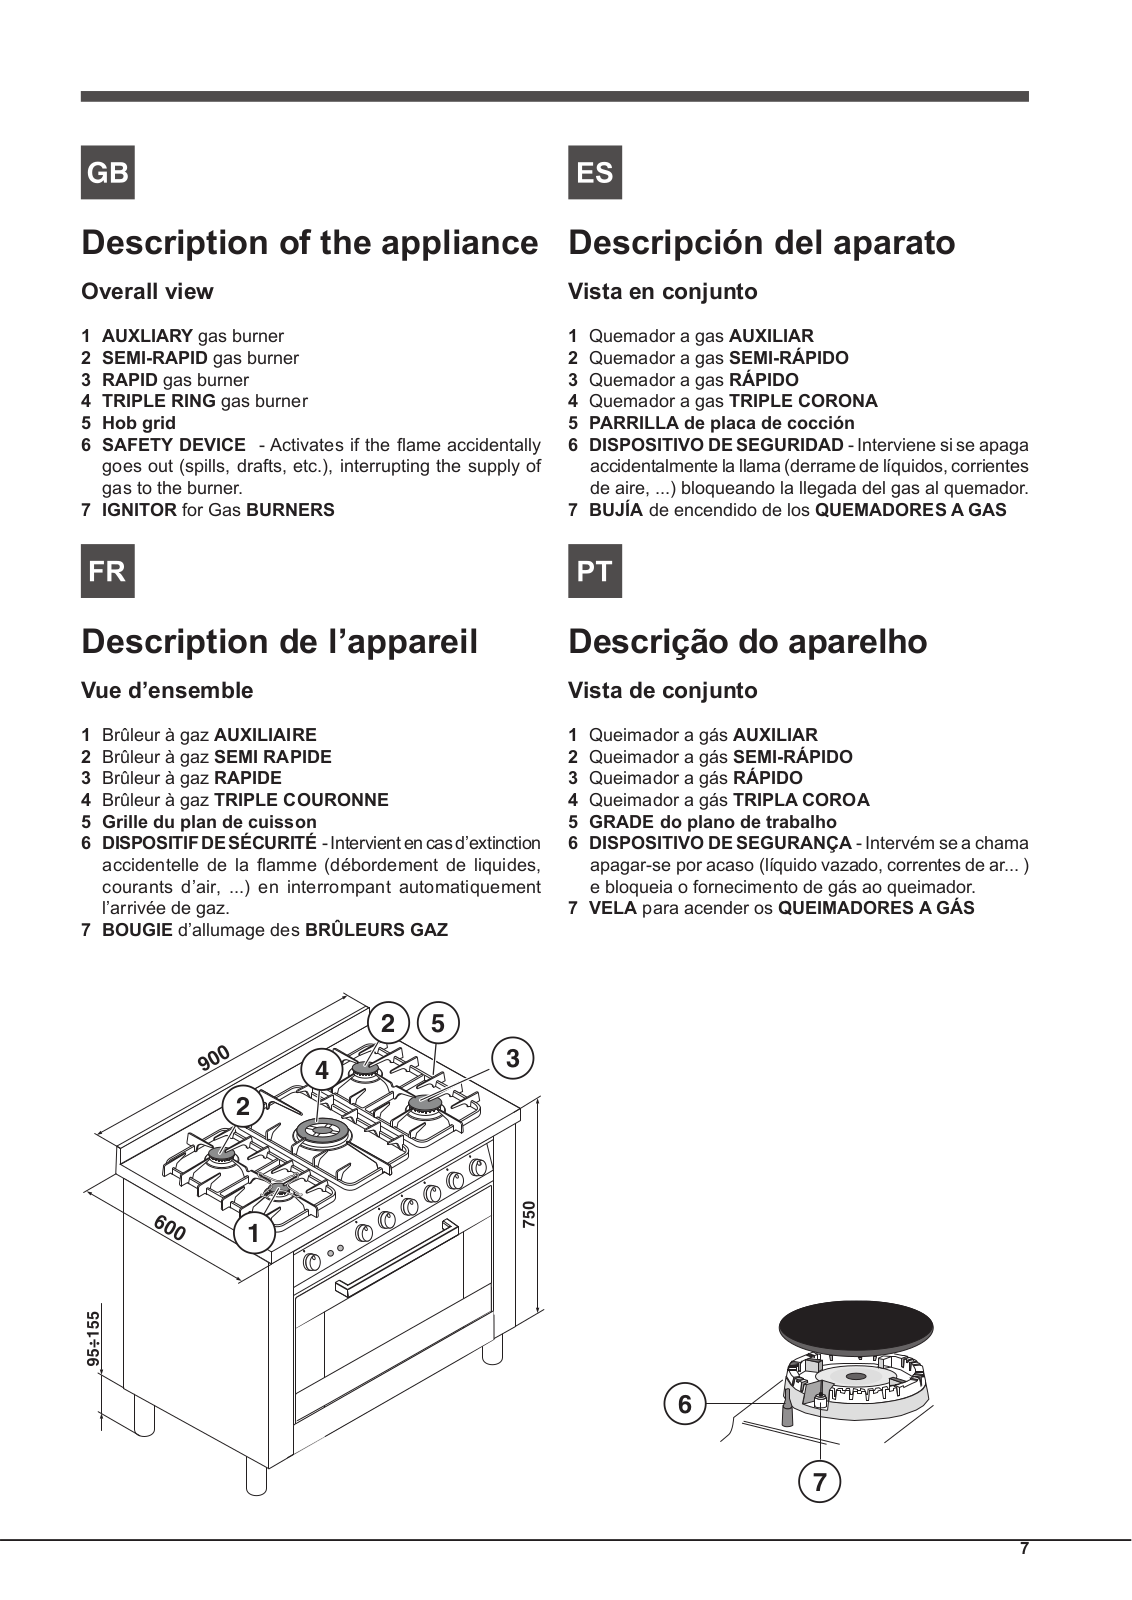
Description of the appliance

Descripción del aparato

Overall view

Vista en conjunto

1

AUXLIARY gas burner

1

Quemador a gas AUXILIAR

2

SEMI-RAPID gas burner

2

Quemador a gas SEMI-RÁPIDO

3

RAPID gas burner

3

Quemador a gas RÁPIDO

4

TRIPLE RING gas burner

4

Quemador a gas TRIPLE CORONA

5

Hob grid

5

PARRILLA de placa de cocción

6

SAFETY DEVICE - Activates if the flame accidentally

6

DISPOSITIVO DE SEGURIDAD - Interviene si se apaga


goes out (spills, drafts, etc.), interrupting the supply of


accidentalmente la llama (derrame de líquidos, corrientes


gas to the burner.


de aire, ...) bloqueando la llegada del gas al quemador.

7

IGNITOR for Gas BURNERS

7

BUJÍA de encendido de los QUEMADORES A GAS


Description de l’appareil

Descrição do aparelho

Vue d’ensemble


Vista de conjunto

1

Brûleur à gaz AUXILIAIRE


1

Queimador a gás AUXILIAR

2

Brûleur à gaz SEMI RAPIDE


2

Queimador a gás SEMI-RÁPIDO

3

Brûleur à gaz RAPIDE


3

Queimador a gás RÁPIDO

4

Brûleur à gaz TRIPLE COURONNE


4

Queimador a gás TRIPLA COROA

5

Grille du plan de cuisson


5

GRADE do plano de trabalho

6

DISPOSITIF DE SÉCURITÉ - Intervient en cas d’extinction

6

DISPOSITIVO DE SEGURANÇA - Intervém se a chama


accidentelle de la flamme (débordement de liquides,


apagar-se por acaso (líquido vazado, correntes de ar... )


courants d’air, ...) en interrompant automatiquement


e bloqueia o fornecimento de gás ao queimador.


l’arrivée de gaz.


7

VELA para acender os QUEIMADORES A GÁS

7

BOUGIE d’allumage des BRÛLEURS GAZ


2

5


4

3


2


1


6


7

7

Hotpoint PRO 95 GT.01 S User Manual

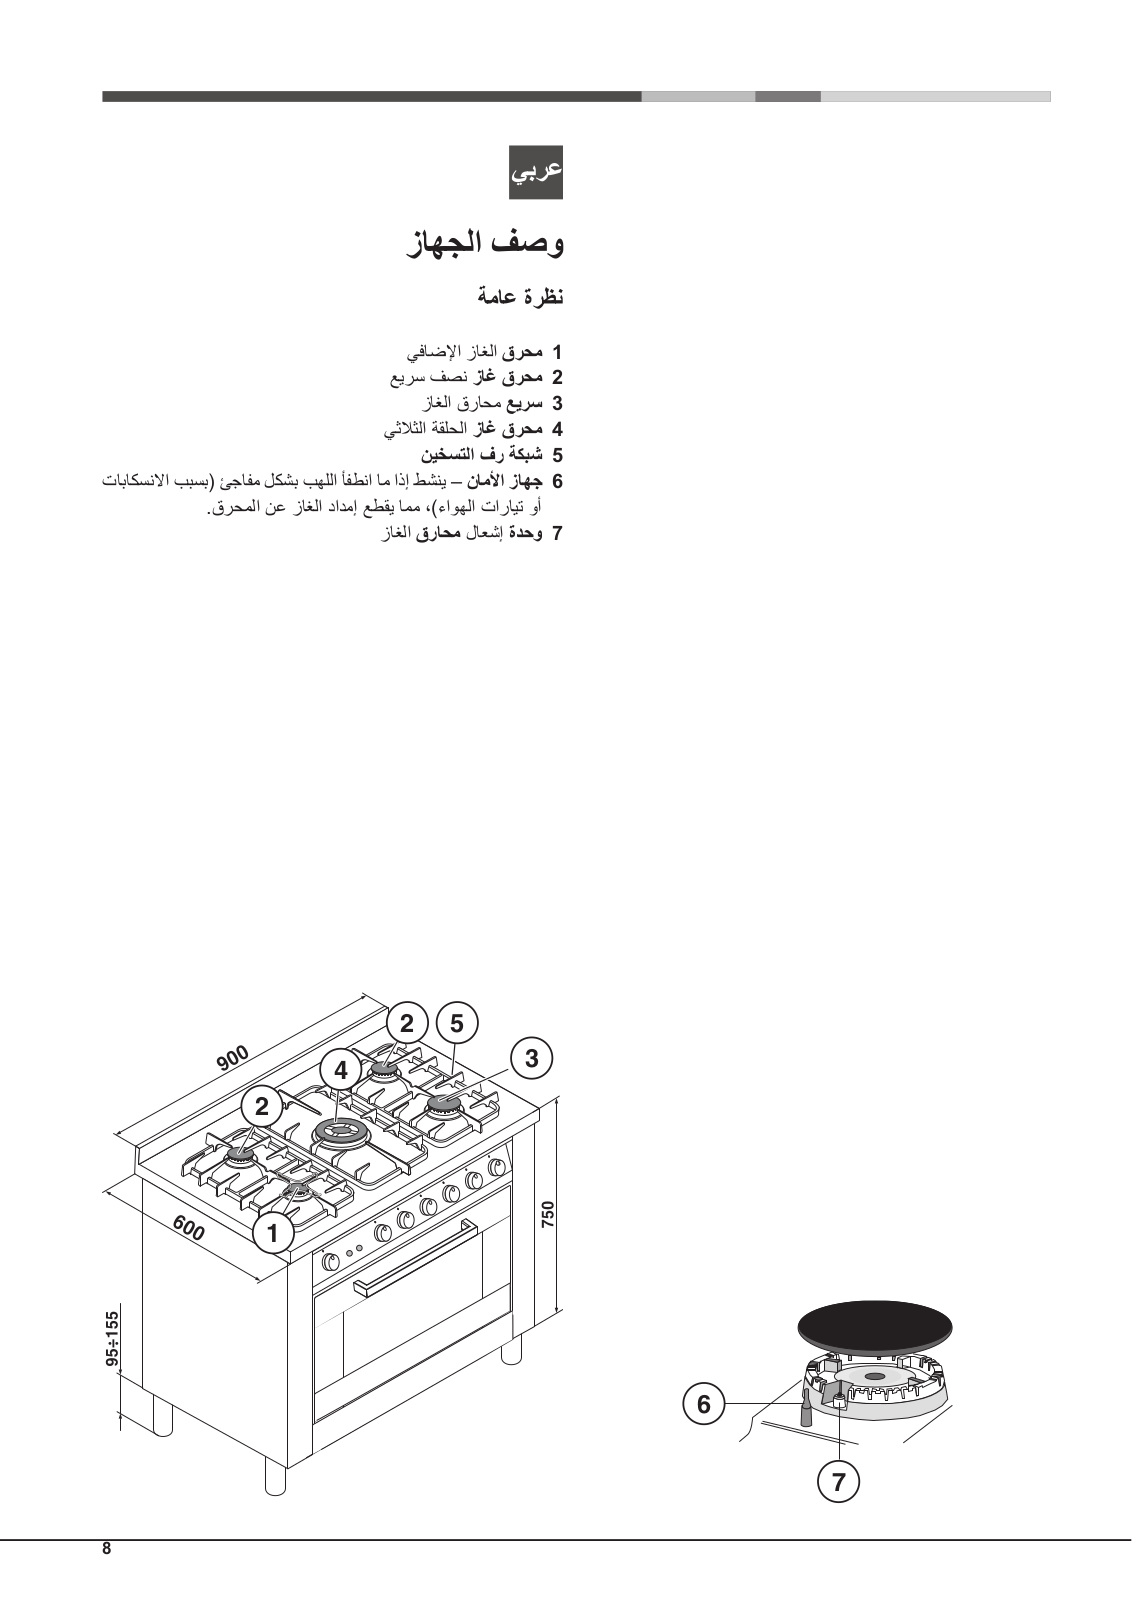
زاهجلا فصو

ةماع ةرظن

يفاضلإا زاغلا قرحم 1 عيرس فصن زاغ قرحم 2 زاغلا قراحم عيرس 3 يثلاثلا ةقلحلا زاغ قرحم 4

نيخستلا فر ةكبش 5

تاباكسنلاا ببسب( ئجافم لكشب بهللا أفطنا ام اذإ طشني – ناملأا زاهج 6

.قرحملا نع زاغلا دادمإ عطقي امم ،)ءاوهلا تارايت وأ زاغلا قراحم لاعشإ ةدحو 7

2 5

4

3


2

1

6

7

8


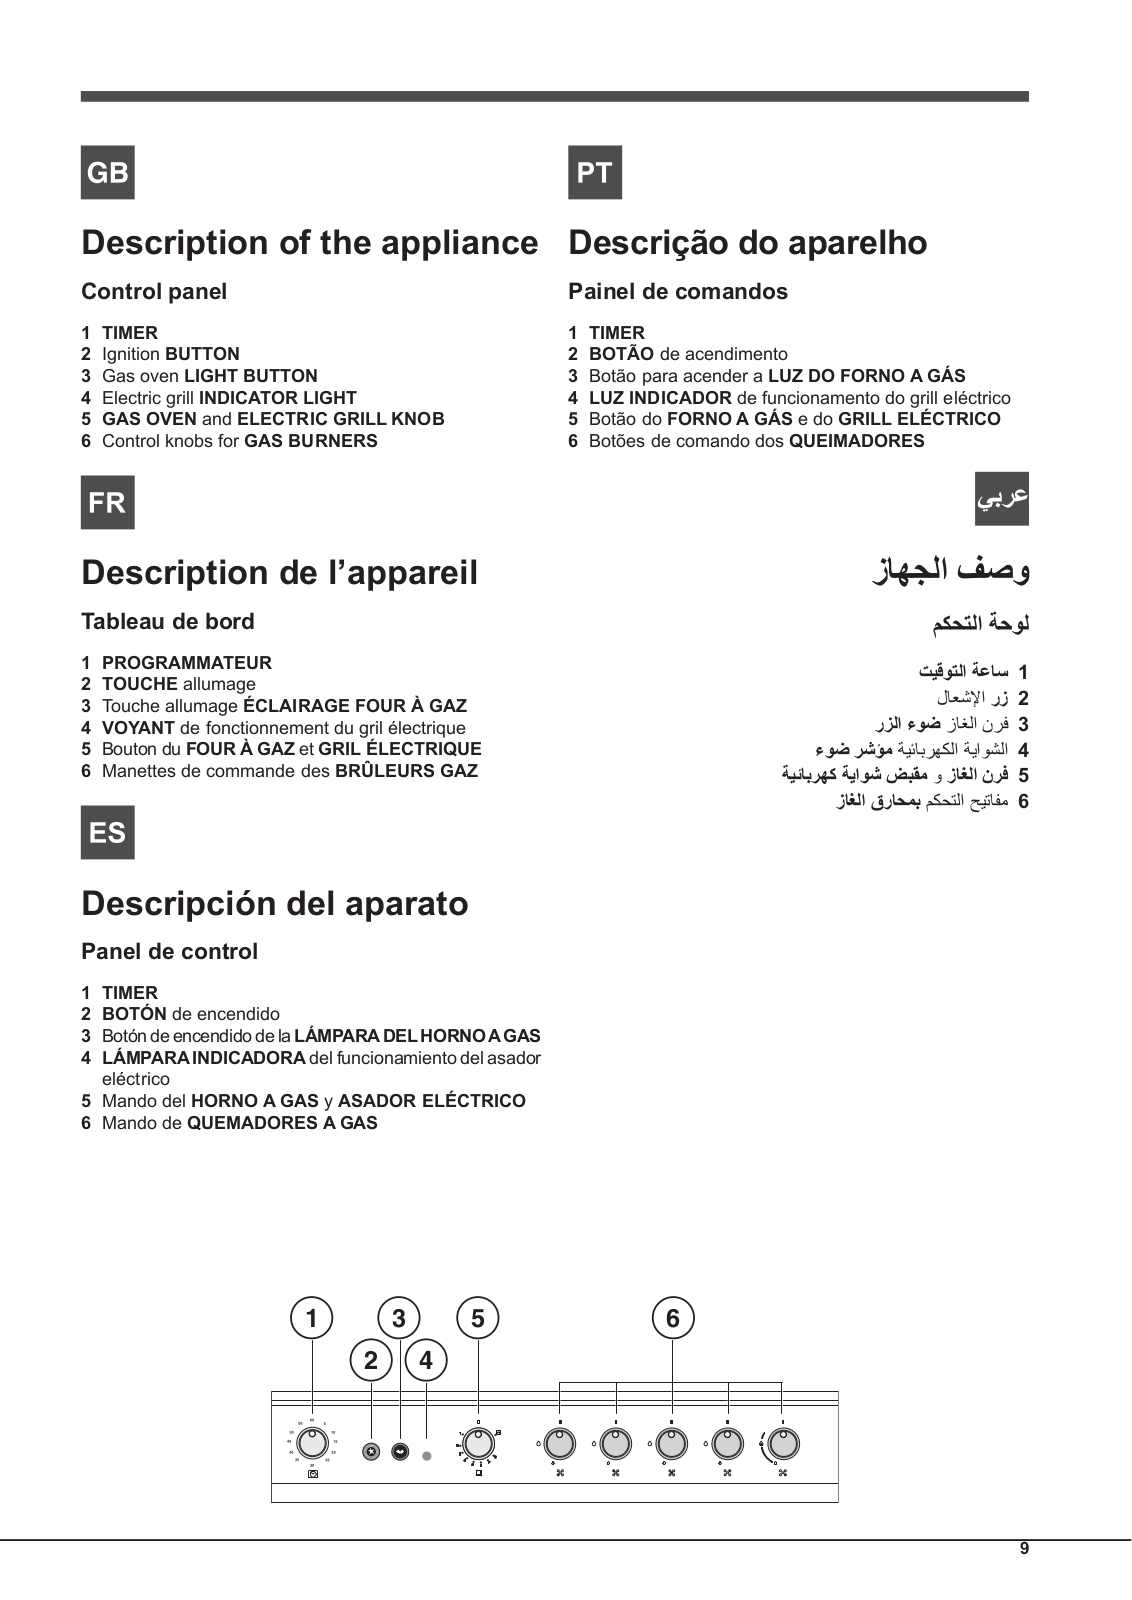
Description of the appliance

Descrição do aparelho

Control panel

Painel de comandos

1

TIMER

1

TIMER

2

Ignition BUTTON

2

BOTÃO de acendimento

3

Gas oven LIGHT BUTTON

3

Botão para acender a LUZ DO FORNO A GÁS

4

Electric grill INDICATOR LIGHT

4

LUZ INDICADOR de funcionamento do grill eléctrico

5

GAS OVEN and ELECTRIC GRILL KNOB

5

Botão do FORNO A GÁS e do GRILL ELÉCTRICO

6

Control knobs for GAS BURNERS

6

Botões de comando dos QUEIMADORES


Description de l’appareil

Tableau de bord

1PROGRAMMATEUR

2TOUCHE allumage

3Touche allumage ÉCLAIRAGE FOUR À GAZ

4VOYANT de fonctionnement du gril électrique

5Bouton du FOUR À GAZ et GRIL ÉLECTRIQUE

6Manettes de commande des BRÛLEURS GAZ

Descripción del aparato

Panel de control

1TIMER

2BOTÓN de encendido

3Botón de encendido de la LÁMPARADEL HORNOAGAS

4LÁMPARA INDICADORA del funcionamiento del asador eléctrico

5Mando del HORNO A GAS y ASADOR ELÉCTRICO

6Mando de QUEMADORES A GAS

زاهجلا فصو

مكحتلا ةحول

تيقوتلا ةعاس 1

لاعشلإا رز 2 رزلا ءوض زاغلا نرف 3 ءوض رشؤم ةيئابرهكلا ةياوشلا 4

ةيئابرهك ةياوش ضبقم و زاغلا نرف 5

زاغلا قراحمب مكحتلا حيتافم 6

1

3

5

6

2 4

9

GB Installation

!Before placing your new appliance into operation please read these operating instructions carefully. It contains important information concerning the safe installation and operation of the appliance.

!Please keep these operating instructions for future reference. Make sure that the instructions are kept with the appliance if it is sold, given away or moved.

!The appliance must be installed by a qualified professional in accordance with the instructions provided.

!Any necessary adjustment or maintenance must be performed after the cooker has been disconnected from the electricity supply.

The cookers have the following technical specifications:

Category: II 2H3+

Room ventilation

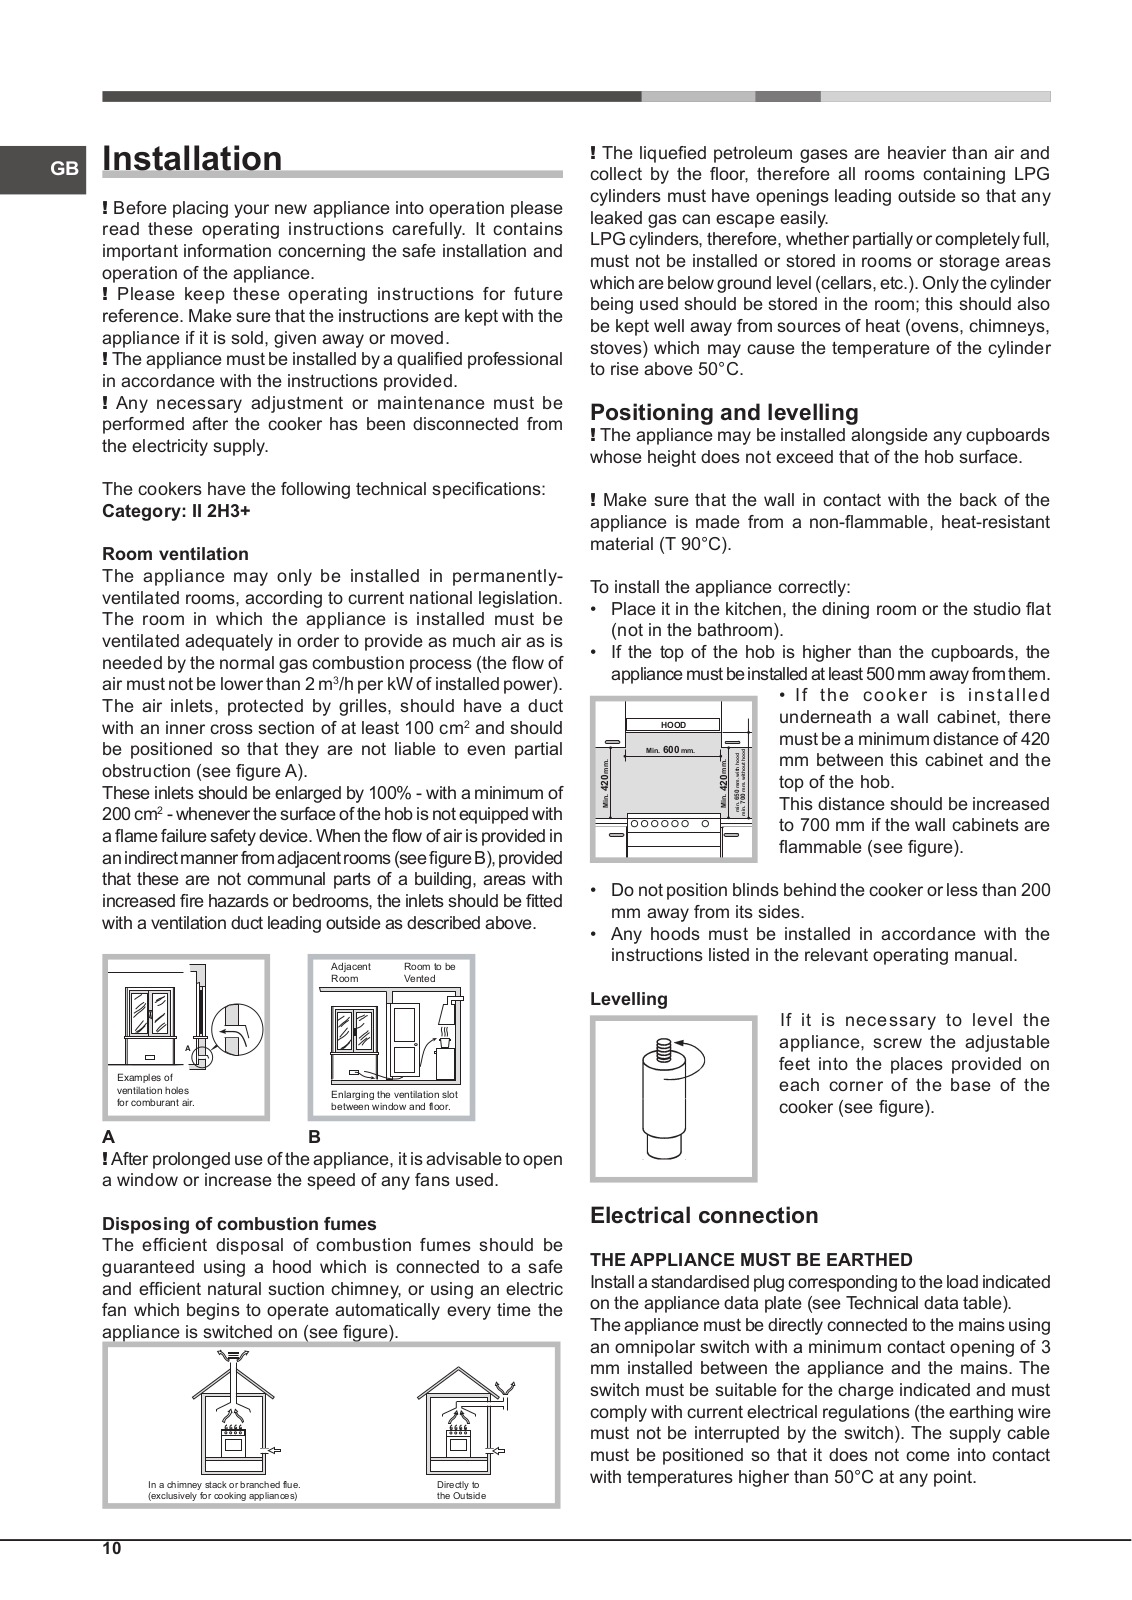
The appliance may only be installed in permanentlyventilated rooms, according to current national legislation. The room in which the appliance is installed must be ventilated adequately in order to provide as much air as is needed by the normal gas combustion process (the flow of air must not be lower than 2 m3/h per kW of installed power). The air inlets, protected by grilles, should have a duct with an inner cross section of at least 100 cm2 and should be positioned so that they are not liable to even partial obstruction (see figure A).

These inlets should be enlarged by 100% - with a minimum of 200 cm2 - whenever the surface of the hob is not equipped with a flame failure safety device. When the flow of air is provided in anindirectmannerfromadjacentrooms(seefigureB),provided that these are not communal parts of a building, areas with increased fire hazards or bedrooms, the inlets should be fitted with a ventilation duct leading outside as described above.

A

Examples of ventilation holes for comburant air.

Adjacent

Room to be

Room

Vented

Enlarging the ventilation slot

between window and floor.

A B

!After prolonged use of the appliance, it is advisable to open a window or increase the speed of any fans used.

Disposing of combustion fumes

The efficient disposal of combustion fumes should be guaranteed using a hood which is connected to a safe and efficient natural suction chimney, or using an electric fan which begins to operate automatically every time the appliance is switched on (see figure).


In a chimney stack or branched flue.

Directly to


(exclusively for cooking appliances)

the Outside


! The liquefied petroleum gases are heavier than air and collect by the floor, therefore all rooms containing LPG cylinders must have openings leading outside so that any leaked gas can escape easily.

LPG cylinders, therefore, whether partially or completely full, must not be installed or stored in rooms or storage areas which are below ground level (cellars, etc.). Only the cylinder being used should be stored in the room; this should also be kept well away from sources of heat (ovens, chimneys, stoves) which may cause the temperature of the cylinder to rise above 50°C.

Positioning and levelling

!The appliance may be installed alongside any cupboards whose height does not exceed that of the hob surface.

!Make sure that the wall in contact with the back of the appliance is made from a non-flammable, heat-resistant material (T 90°C).

To install the appliance correctly:

Place it in the kitchen, the dining room or the studio flat

(not in the bathroom).

If the top of the hob is higher than the cupboards, the

appliance must be installed at least 500 mm away from them.


• If the cooker is installed


underneath a wall cabinet, there


HOOD


must be a minimum distance of 420


Min. 600mm.


650mm. with hood mm. without hood


mm between this cabinet and the


420mm.


420mm.


top of the hob.

Min.


Min.

min. min.700

This distance should be increased


to 700 mm if the wall cabinets are


flammable (see figure).


Do not position blinds behind the cooker or less than 200 mm away from its sides.

Any hoods must be installed in accordance with the instructions listed in the relevant operating manual.

Levelling

If it is necessary to level the appliance, screw the adjustable feet into the places provided on each corner of the base of the cooker (see figure).

Electrical connection

THE APPLIANCE MUST BE EARTHED

Install a standardised plug corresponding to the load indicated on the appliance data plate (see Technical data table). The appliance must be directly connected to the mains using an omnipolar switch with a minimum contact opening of 3 mm installed between the appliance and the mains. The switch must be suitable for the charge indicated and must comply with current electrical regulations (the earthing wire must not be interrupted by the switch). The supply cable must be positioned so that it does not come into contact with temperatures higher than 50°C at any point.

10

Before connecting the appliance to the power supply, make sure that:

The appliance is earthed and the plug is compliant with the law.

The socket can withstand the maximum power of the appliance, which is indicated by the data plate.

The voltage is in the range between the values indicated on the data plate.

The socket is compatible with the plug of the appliance.

If the socket is incompatible with the plug, ask an authorised technician to replace it. Do not use extension cords or multiple sockets.

!Once the appliance has been installed, the power supply cable and the electrical socket must be easily accessible.

!The cable must not be bent or compressed.

!The cable must be checked regularly and replaced by authorised technicians only.

!The manufacturer declines any liability should these safety measures not be observed.

Important: the wires in the mains lead are coloured in accordance with the following code:

Green & Yellow

- Earth

Blue

- Neutral

Brown

- Live

As the colours of the wires in the mains lead may not correspond with the coloured markings identifying the terminals in your plug, proceed as follows:

Connect the Green & Yellow wire to terminal marked “E

or or coloured Green or Green & Yellow. Connect the Brown wire to the terminal marked “L” or coloured Red.

Connect the Blue wire to the terminal marked “N” or coloured Black.

FAILURE TO OBSERVE THE ACCIDENT-PREVENTION REGULATIONS RELIEVES THE MANUFACTURER OF ALL LIABILITY.

Replacing the cable

Use a rubber cable of the type H05VV-F with a cross section of 3 x 1.5 mm². The yellow-green earth wire must be 2 ÷ 3 cm longer than the other wires.

Gas connection

Connection to the gas network or to the gas cylinder may be carried out using a flexible rubber or steel hose, in accordance with current national legislation and after making sure that the appliance is suited to the type of gas with which it will be supplied (see the rating sticker on the cover: if this is not the case see below). When using liquid gas from a cylinder, install a pressure regulator which complies with current national regulations.

! Make sure that the gas supply pressure is consistent with the values indicated in the Table of burner and nozzle specifications (see below). This will ensure the safe operation and durability of your appliance while maintaining efficient energy consumption.

Gas connection using a flexible rubber hose

Make sure that the hose complies with current national GB legislation. The internal diameter of the hose must measure: 8

mm for a liquid gas supply;13 mm for a methane gas supply.

Once the connection has been performed, make sure that the hose:

Does not come into contact with any parts which reach temperatures of over 50°C.

Is not subject to any pulling or twisting forces and that it is not kinked or bent.

Does not come into contact with blades, sharp corners or moving parts and that it is not compressed.

Is easy to inspect along its whole length so that its condition may be checked.

Is shorter than 1500 mm.

Fits firmly into place at both ends, where it will be fixed using clamps which comply with current regulations.

! If one or more of these conditions is not fulfilled or if the cooker must be installed according to the conditions listed for class 2 - subclass 1 appliances (installed between two cupboards), the flexible steel hose must be used instead

(see below).

Connecting a flexible jointless stainless steel pipe to a threaded attachment

Make sure that the hose and gaskets comply with current national legislation.

To begin using the hose, remove the hose holder on the appliance (the gas supply inlet on the appliance is a cylindrical threaded 1/2 gas male attachment).

! Perform the connection in such a way that the hose length does not exceed a maximum of 2 metres, making sure that the hose is not compressed and does not come into contact with moving parts.

Checking the connection for leaks

When the installation process is complete, check the hose fittings for leaks using a soapy solution. Never use a flame.

Adapting to different types of gas

It is possible to adapt the appliance to a type of gas other than the default type (this is indicated on the rating label on the cover).

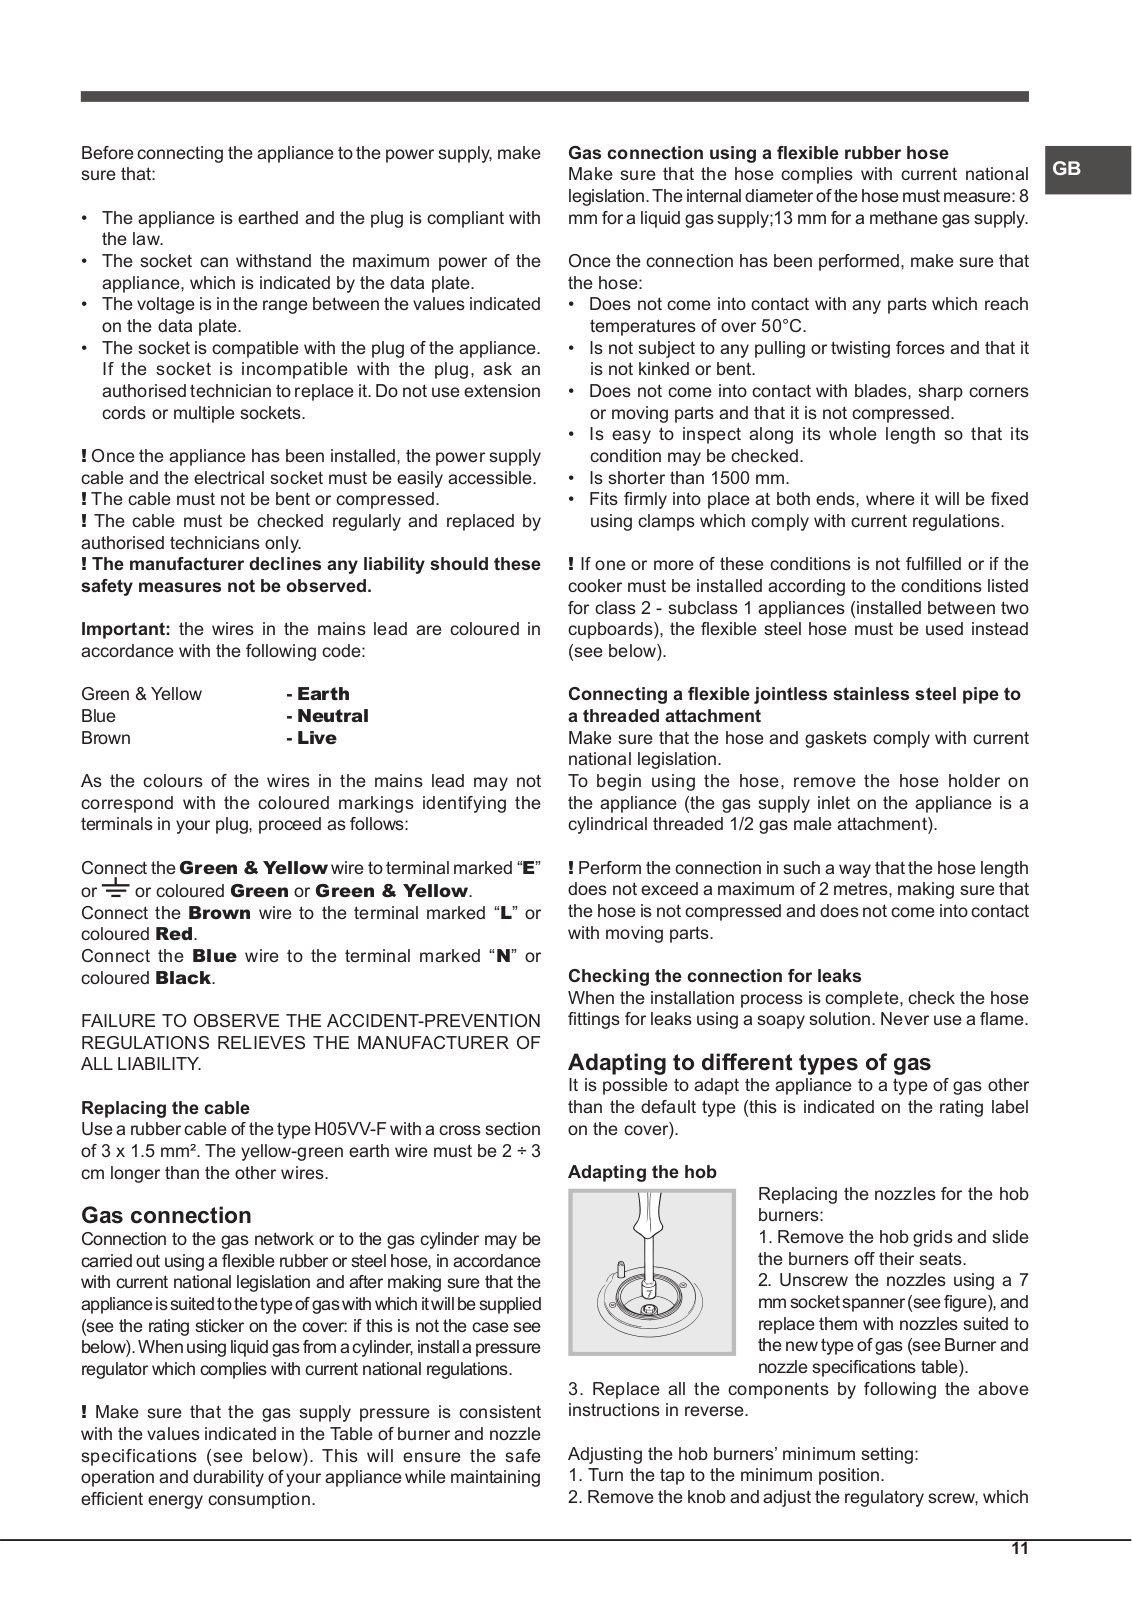
Adapting the hob

Replacing the nozzles for the hob burners:

1. Remove the hob grids and slide

the burners off their seats.

2. Unscrew the nozzles using a 7

mmsocketspanner(seefigure),and

replace them with nozzles suited to the new type of gas (see Burner and nozzle specifications table).

3. Replace all the components by following the above instructions in reverse.

Adjusting the hob burners’ minimum setting:

1.Turn the tap to the minimum position.

2.Remove the knob and adjust the regulatory screw, which

11


is positioned inside or next to the tap pin, until the flame is

GB


small but steady.


! If the appliance is connected to a liquid gas supply, the


regulatory screw must be fastened as tightly as possible.


3. While the burner is alight, quickly change the position of the knob from minimum to maximum and vice versa several times, checking that the flame is not extinguished.

!The hob burners do not require primary air adjustment.

!After adjusting the appliance so it may be used with a different type of gas, replace the old rating label with a new one which corresponds to the new type of gas (these labels are available from Authorised Technical Assistance Centres).

!Should the gas pressure used be different (or vary slightly) from the recommended pressure, a suitable pressure regulator must be fitted to the inlet hose in accordance with current national regulations relating to “regulators for channelled gas”.

Gas oven :

Open the oven door (to reach the oven burner, remove the floor);

loosen the 2 screws which hold the oven burner in place, remove the burner and replace the nozzles “N” with suitable ones for the new type of gas according to the table “Burner and nozzle characteristics”.

re-assemble all the components, regulate the air in the burner as well as the minimum flow of the tap.

Adjusting the low flame

Open the door and remove the oven floor;

puttheovenknobtopositionmaximumandlighttheburner;

close the door and wait for about 15 minutes;

put the knob to position 1 (minimum);

remove the actual knob and regulate the adjusting screw situated above the thermostat spindle;

after regulating the low flame as required, with the burner lit, change from the high to the low flame position abruptly for a few times and close the oven door normally, making sure that the burner does not go out.

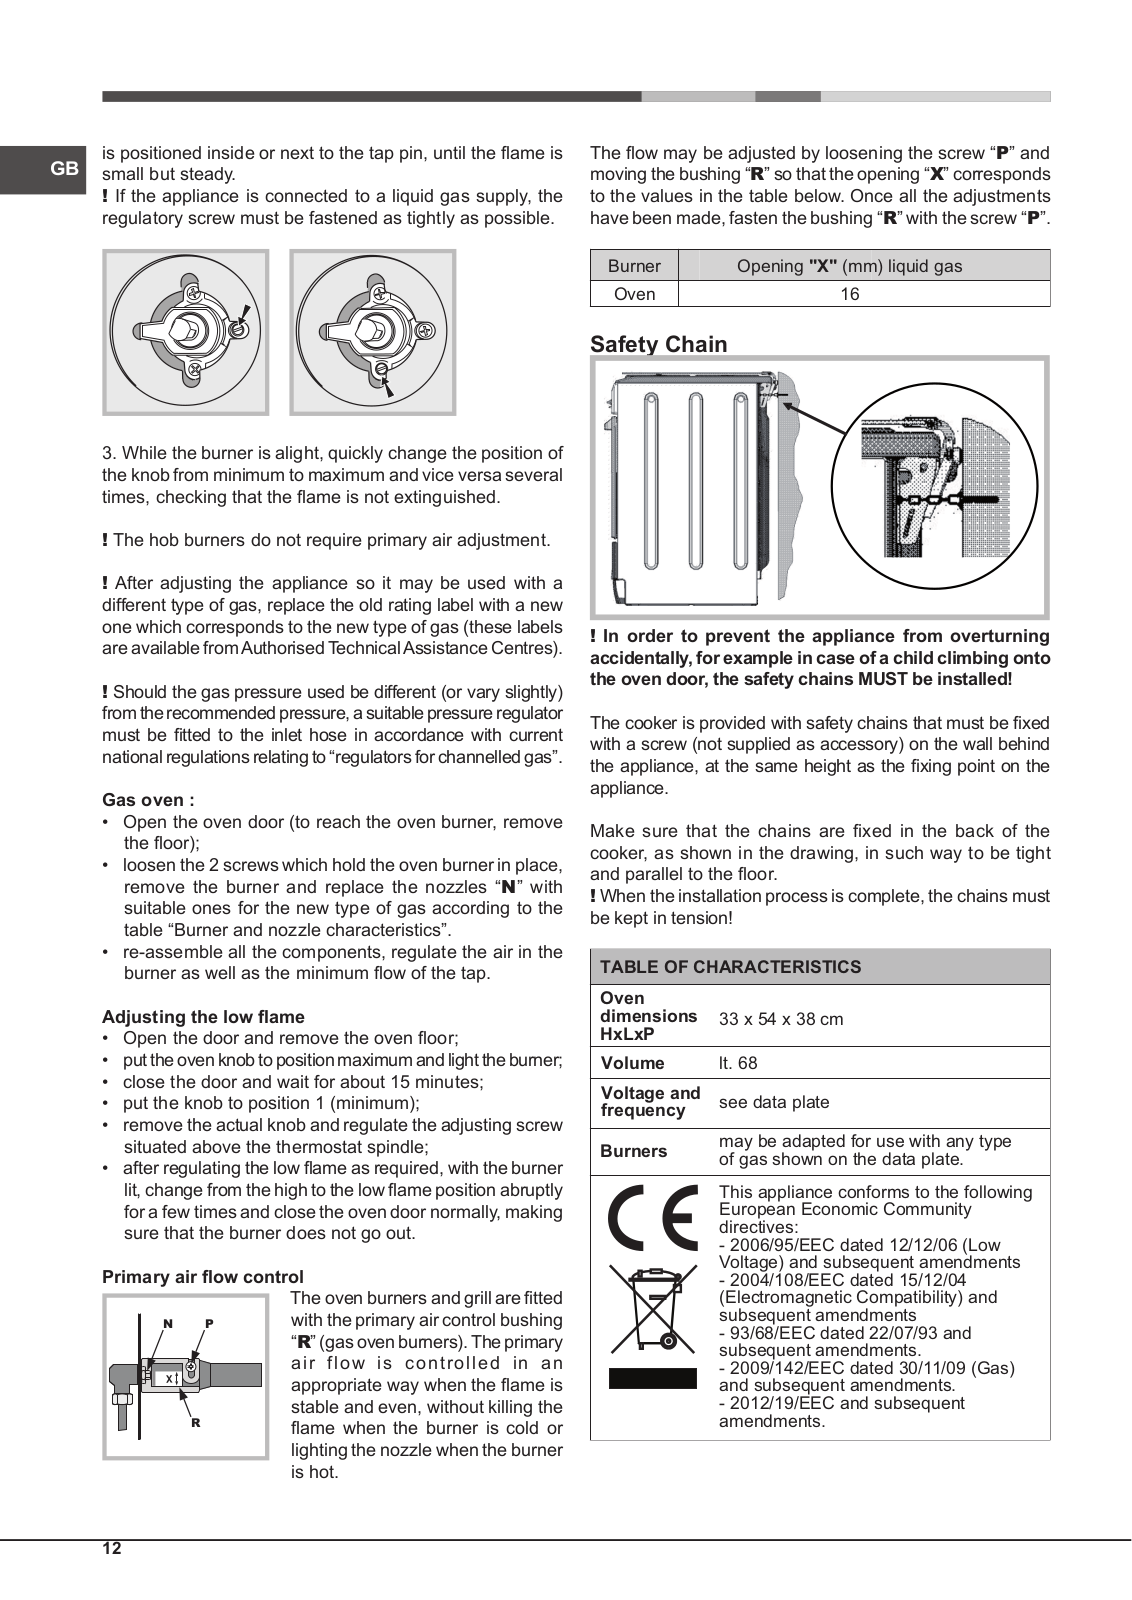
Primary air flow control


The oven burners and grill are fitted

N

P

with the primary air control bushing


R” (gas oven burners). The primary


air flow is controlled in an


appropriate way when the flame is


stable and even, without killing the

Rflame when the burner is cold or lighting the nozzle when the burner is hot.

The flow may be adjusted by loosening the screw “P” and moving the bushing “R” so that the opening “X” corresponds to the values in the table below. Once all the adjustments have been made, fasten the bushing “R” with the screw “P”.

Burner

Opening "X" (mm) liquid gas

Oven

16

Safety Chain

! In order to prevent the appliance from overturning accidentally, for example in case of a child climbing onto the oven door, the safety chains MUST be installed!

The cooker is provided with safety chains that must be fixed with a screw (not supplied as accessory) on the wall behind the appliance, at the same height as the fixing point on the appliance.

Make sure that the chains are fixed in the back of the cooker, as shown in the drawing, in such way to be tight and parallel to the floor.

! When the installation process is complete, the chains must be kept in tension!

TABLE OF CHARACTERISTICS

Oven


dimensions

33 x 54 x 38 cm

HxLxP


Volume

lt. 68

Voltage and

see data plate

frequency


Burners

may be adapted for use with any type

of gas shown on the data plate.


This appliance conforms to the following


European Economic Community


directives:


- 2006/95/EEC dated 12/12/06 (Low


Voltage) and subsequent amendments


- 2004/108/EEC dated 15/12/04


(Electromagnetic Compatibility) and


subsequent amendments


- 93/68/EEC dated 22/07/93 and


subsequent amendments.


- 2009/142/EEC dated 30/11/09 (Gas)


and subsequent amendments.


- 2012/19/EEC and subsequent


amendments.

12


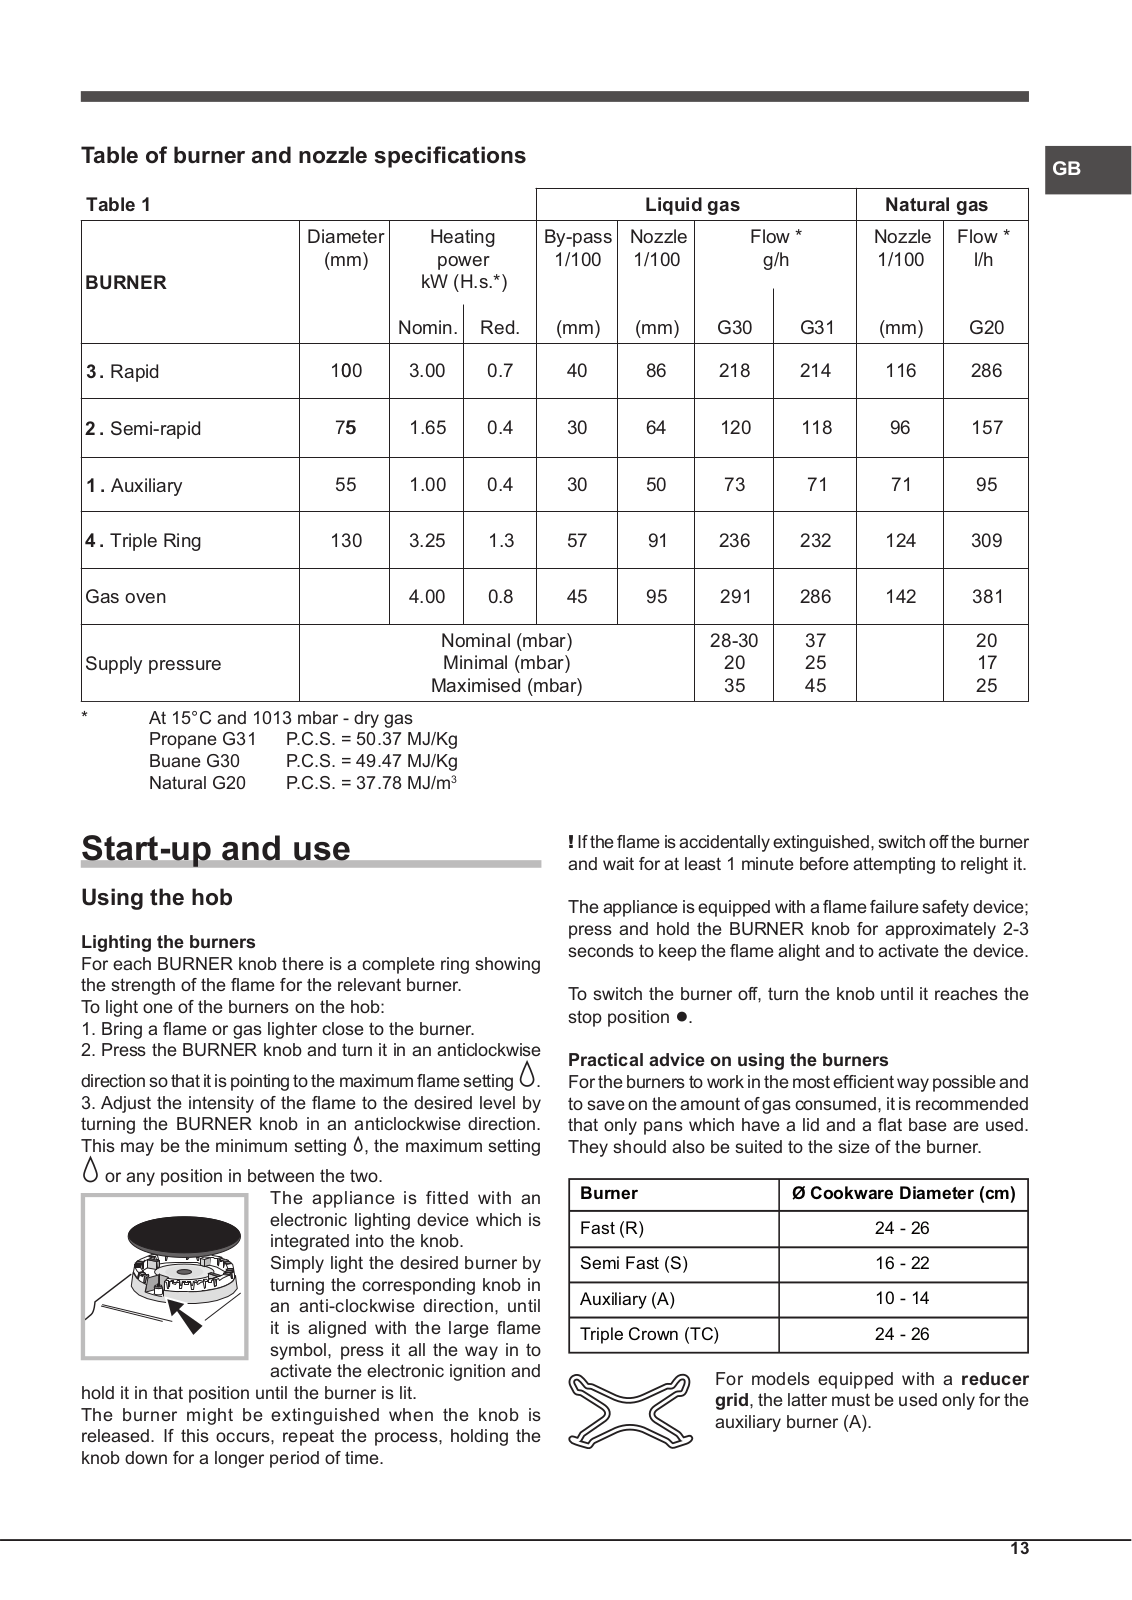
Table of burner and nozzle specifications


GB


Table 1


Liquid gas


Natural gas


Diameter

Heating

By-pass

Nozzle

Flow *

Nozzle

Flow *


(mm)

power

1/100

1/100


g/h

1/100

l/h


BURNER


kW (H.s.*)


Nomin.


Red.

(mm)

(mm)

G30


G31

(mm)

G20


3 . Rapid

100

3.00


0.7

40

86

218


214

116

286


2 . Semi-rapid

75

1.65


0.4

30

64

120


118

96

157


1 . Auxiliary

55

1.00


0.4

30

50

73


71

71

95


4 . Triple Ring

130

3.25


1.3

57

91

236


232

124

309


Gas oven


4.00


0.8

45

95

291


286

142

381


Nominal (mbar)


28-30


37


20


Supply pressure


Minimal (mbar)


20


25


17


Maximised (mbar)


35


45


25


*At 15°C and 1013 mbar - dry gas Propane G31 P.C.S. = 50.37 MJ/Kg Buane G30 P.C.S. = 49.47 MJ/Kg Natural G20 P.C.S. = 37.78 MJ/m3

Start-up and use

Using the hob

Lighting the burners

For each BURNER knob there is a complete ring showing the strength of the flame for the relevant burner.

To light one of the burners on the hob:

1.Bring a flame or gas lighter close to the burner.

2.Press the BURNER knob and turn it in an anticlockwise

directionsothatitispointingtothemaximumflamesetting. 3. Adjust the intensity of the flame to the desired level by turning the BURNER knob in an anticlockwise direction. This may be the minimum setting , the maximum setting

or any position in between the two.

The appliance is fitted with an electronic lighting device which is integrated into the knob.

Simply light the desired burner by

turning the corresponding knob in an anti-clockwise direction, until it is aligned with the large flame symbol, press it all the way in to activate the electronic ignition and

hold it in that position until the burner is lit.

The burner might be extinguished when the knob is released. If this occurs, repeat the process, holding the knob down for a longer period of time.

! Iftheflameisaccidentallyextinguished,switchofftheburner and wait for at least 1 minute before attempting to relight it.

The appliance is equipped with a flame failure safety device; press and hold the BURNER knob for approximately 2-3 seconds to keep the flame alight and to activate the device.

To switch the burner off, turn the knob until it reaches the stop position .

Practical advice on using the burners

Fortheburnerstoworkinthemostefficientwaypossibleand to save on the amount of gas consumed, it is recommended that only pans which have a lid and a flat base are used.

They should also be suited to the size of the burner.

Burner

Ø Cookware Diameter (cm)


Fast (R)

24 - 26


Semi Fast (S)

16 - 22


Auxiliary (A)

10 - 14


Triple Crown (TC)

24 - 26


For models equipped with a reducer grid, the latter must be used only for the auxiliary burner (A).

13

For the best performance of your burners, keep the following GB in mind: All types of pans can be used on the burners. The important thing is that the bottom should be completely even.

Using the oven

pull (2).

WARNING ! The oven is provided with a stop system to extract the racks and prevent them from coming out of the oven (1).

As shown in the drawing, to extract them completely, simply lift the racks, holding them on the front part, and

!Before operating the product, remove all plastic film from the sides of the appliance.

!The first time you use your appliance, heat the empty oven with its door closed at its maximum temperature for at least half an hour. Ensure that the room is well ventilated before switching the oven off and opening the oven door.The appliance may emit a slightly unpleasant odour caused by protective substances used during the manufacturing process burning away.

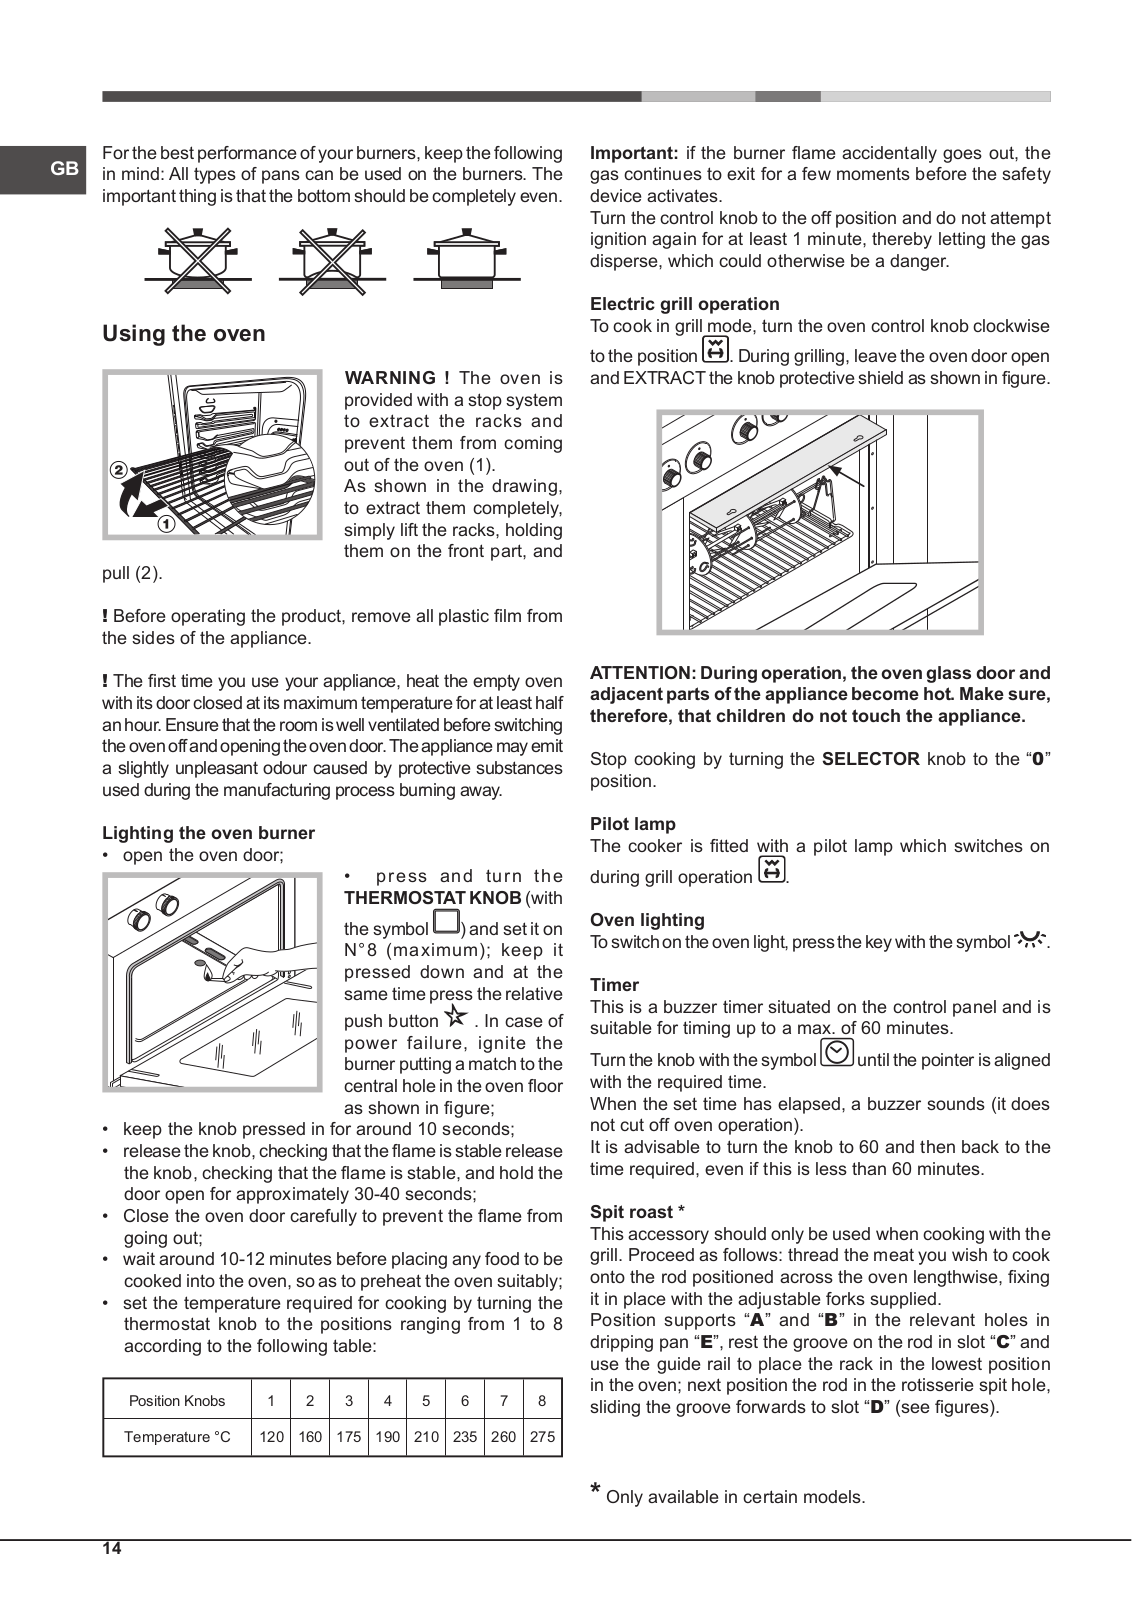
Lighting the oven burner

• open the oven door;

• press and turn the

THERMOSTAT KNOB (with

the symbol ) and set it on

N°8 (maximum); keep it

pressed down and at the same time press the relative

push button . In case of power failure, ignite the burner putting a match to the central hole in the oven floor as shown in figure;

keep the knob pressed in for around 10 seconds;

releasetheknob,checkingthattheflameisstablerelease the knob, checking that the flame is stable, and hold the door open for approximately 30-40 seconds;

Close the oven door carefully to prevent the flame from going out;

wait around 10-12 minutes before placing any food to be cooked into the oven, so as to preheat the oven suitably;

set the temperature required for cooking by turning the thermostat knob to the positions ranging from 1 to 8 according to the following table:

Position Knobs

1

2

3

4

5

6

7

8


Temperature °C

120

160

175

190

210

235

260

275


Important: if the burner flame accidentally goes out, the gas continues to exit for a few moments before the safety device activates.

Turn the control knob to the off position and do not attempt ignition again for at least 1 minute, thereby letting the gas disperse, which could otherwise be a danger.

Electric grill operation

To cook in grill mode, turn the oven control knob clockwise

to the position . During grilling, leave the oven door open andEXTRACTtheknobprotectiveshieldasshowninfigure.

ATTENTION: During operation, the oven glass door and adjacent parts of the appliance become hot. Make sure, therefore, that children do not touch the appliance.

Stop cooking by turning the SELECTOR knob to the “0” position.

Pilot lamp

The cooker is fitted with a pilot lamp which switches on during grill operation .

Oven lighting

To switch on the oven light, press the key with the symbol .

Timer

This is a buzzer timer situated on the control panel and is suitable for timing up to a max. of 60 minutes.

Turn the knob with the symboluntil the pointer is aligned with the required time.

When the set time has elapsed, a buzzer sounds (it does not cut off oven operation).

It is advisable to turn the knob to 60 and then back to the time required, even if this is less than 60 minutes.

Spit roast *

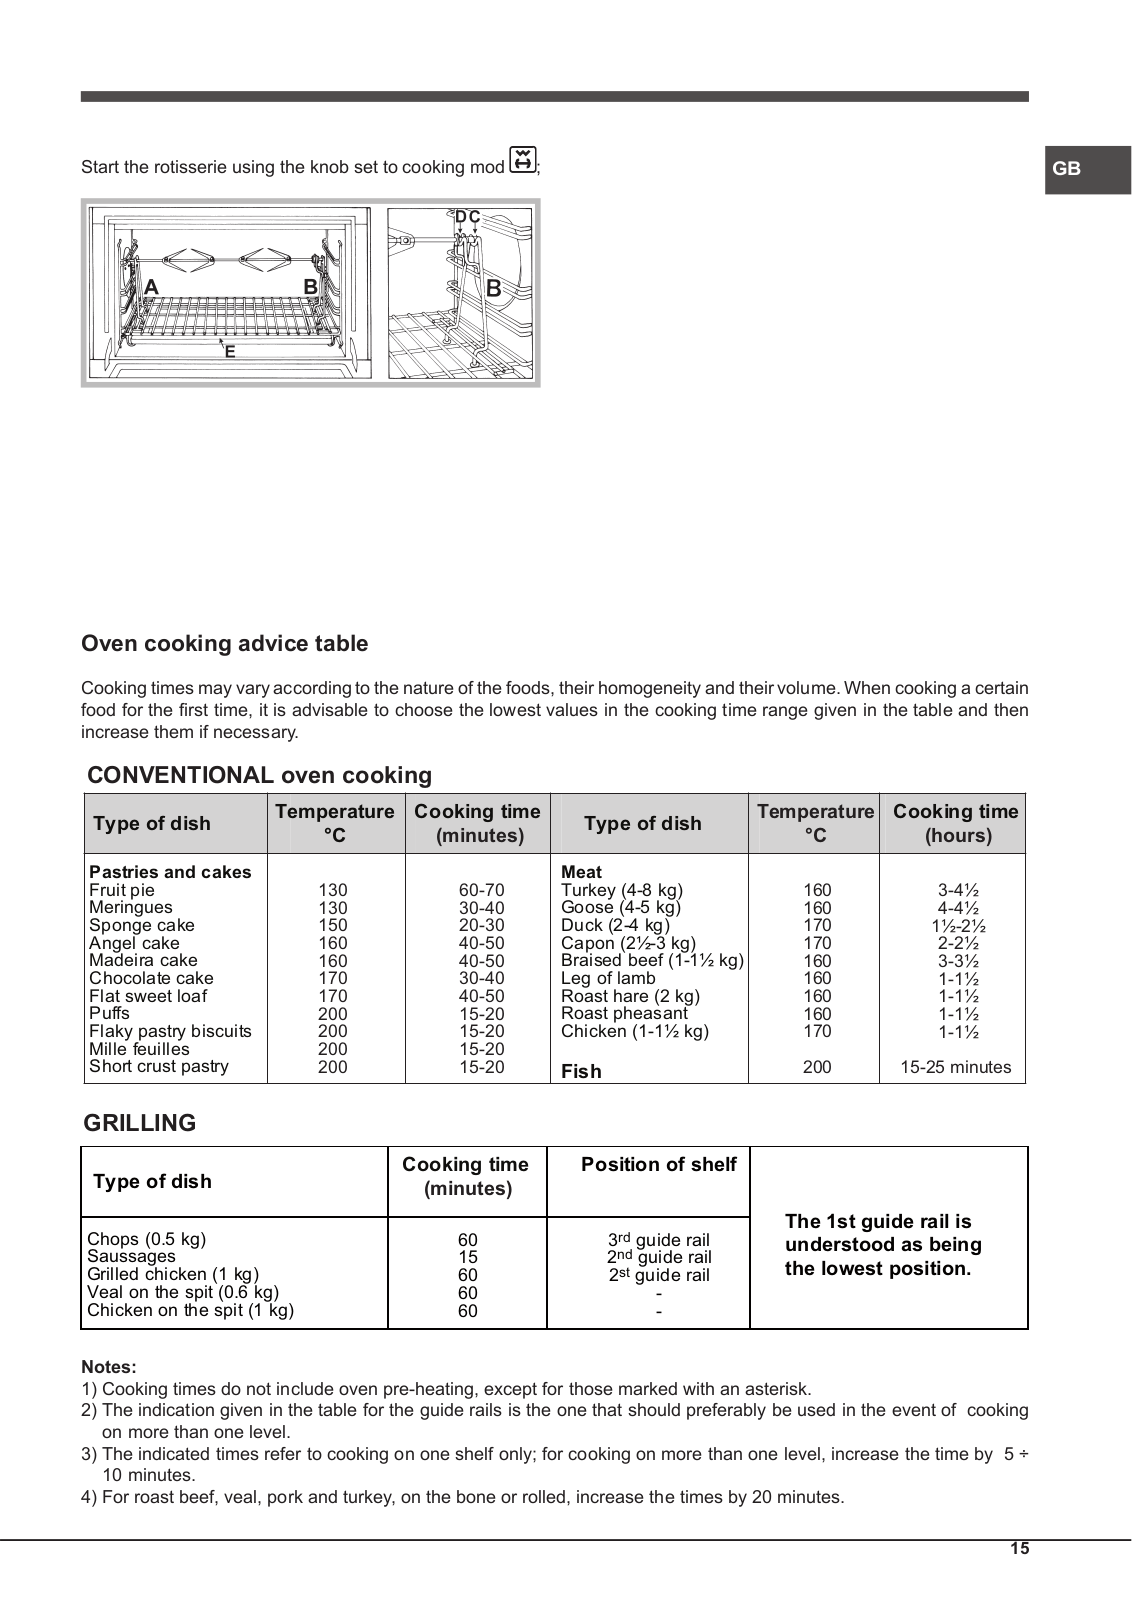
This accessory should only be used when cooking with the grill. Proceed as follows: thread the meat you wish to cook onto the rod positioned across the oven lengthwise, fixing it in place with the adjustable forks supplied.

Position supports “A” and “B” in the relevant holes in dripping pan “E”, rest the groove on the rod in slot “C” and use the guide rail to place the rack in the lowest position in the oven; next position the rod in the rotisserie spit hole, sliding the groove forwards to slot “D” (see figures).

* Only available in certain models.

14

Start the rotisserie using the knob set to cooking mod ;

GB

Oven cooking advice table

Cooking times may vary according to the nature of the foods, their homogeneity and their volume. When cooking a certain food for the first time, it is advisable to choose the lowest values in the cooking time range given in the table and then increase them if necessary.

CONVENTIONAL oven cooking

Type of dish

Temperature

Cooking time

Type of dish

Temperature

Cooking time

°C

(minutes)

°C

(hours)


Pastries and cakes

130

60-70

Meat

160

3-4½

Fruit pie

Turkey (4-8 kg)

Meringues

130

30-40

Goose (4-5 kg)

160

4-4½

Sponge cake

150

20-30

Duck (2-4 kg)

170

1½-2½

Angel cake

160

40-50

Capon (2½-3 kg)

170

2-2½

Madeira cake

160

40-50

Braised beef (1-1½ kg)

160

3-3½

Chocolate cake

170

30-40

Leg of lamb

160

1-1½

Flat sweet loaf

170

40-50

Roast hare (2 kg)

160

1-1½

Puffs

200

15-20

Roast pheasant

160

1-1½

Flaky pastry biscuits

200

15-20

Chicken (1-1½ kg)

170

1-1½

Mille feuilles

200

15-20


Short crust pastry

200

15-20

Fish

200

15-25 minutes

GRILLING

Type of dish

Cooking time

Position of shelf

(minutes)


Chops (0.5 kg)

60

3rd guide rail

Saussages

15

2nd guide rail

Grilled chicken (1 kg)

60

2st guide rail

Veal on the spit (0.6 kg)

60

-

Chicken on the spit (1 kg)

60

-


The 1st guide rail is understood as being the lowest position.

Notes:

1)Cooking times do not include oven pre-heating, except for those marked with an asterisk.

2)The indication given in the table for the guide rails is the one that should preferably be used in the event of cooking on more than one level.

3)The indicated times refer to cooking on one shelf only; for cooking on more than one level, increase the time by 5 ÷

10 minutes.

4)For roast beef, veal, pork and turkey, on the bone or rolled, increase the times by 20 minutes.

15

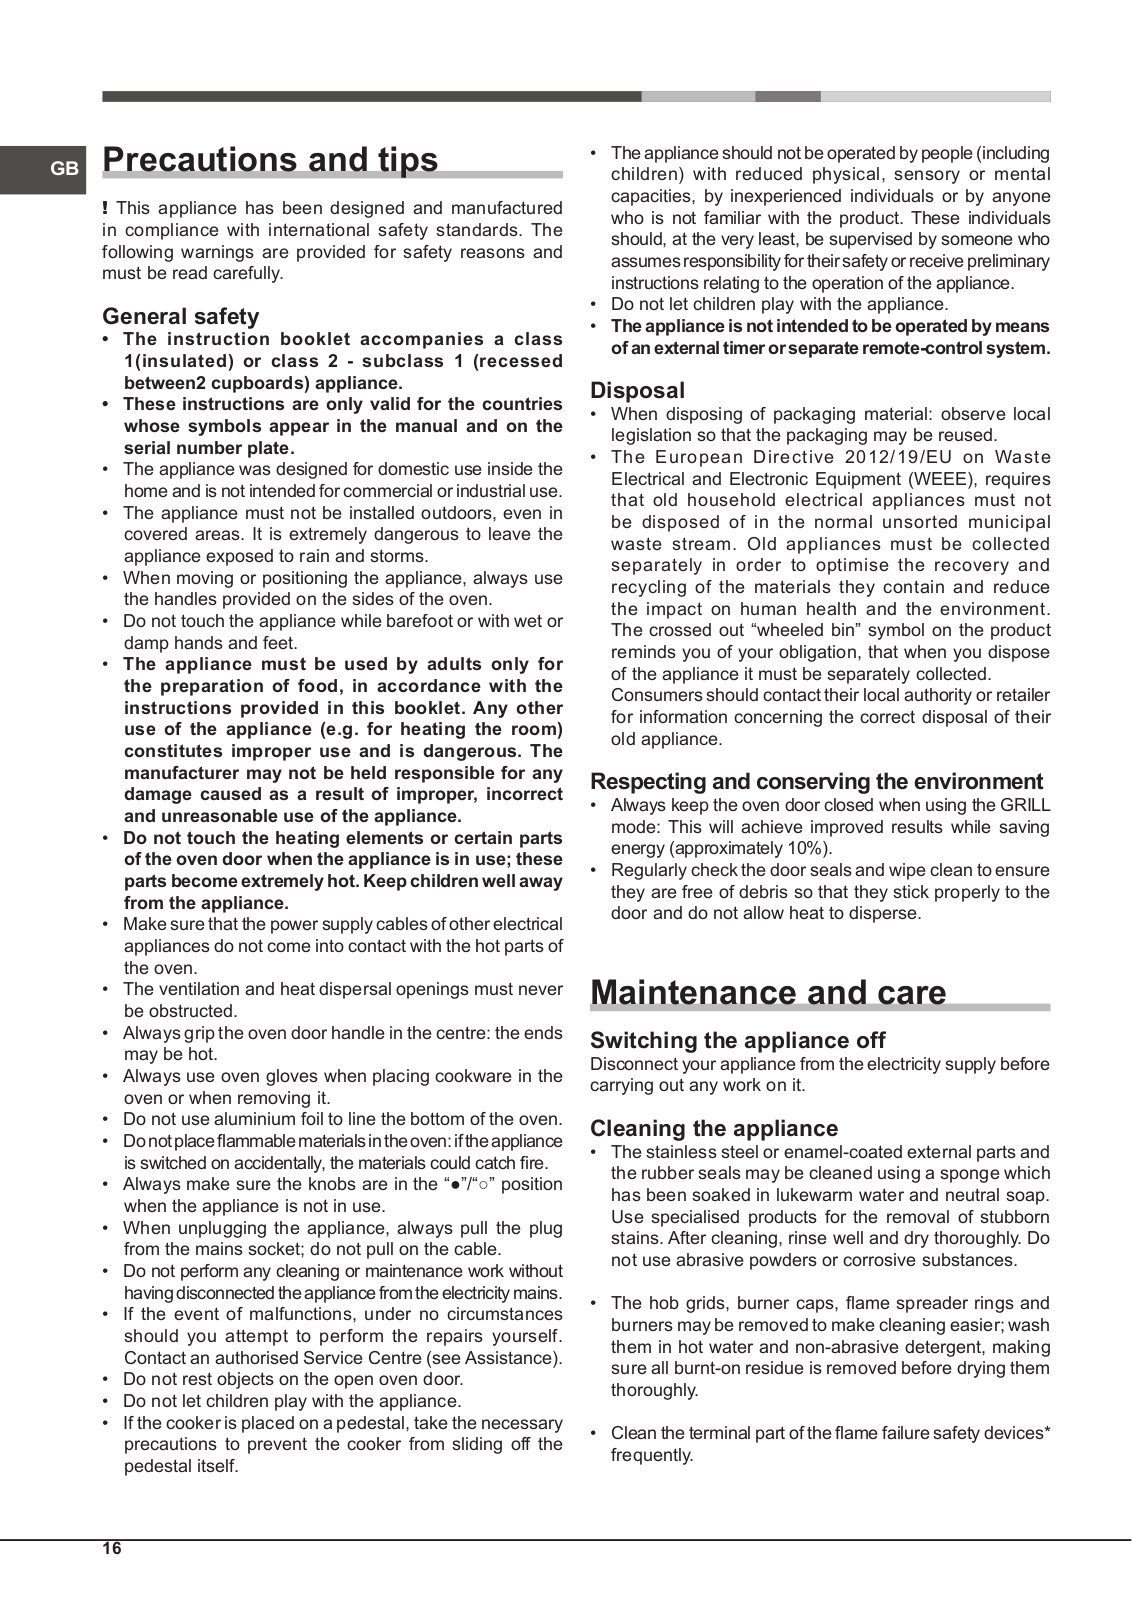
GB Precautions and tips

! This appliance has been designed and manufactured in compliance with international safety standards. The following warnings are provided for safety reasons and must be read carefully.

General safety

The instruction booklet accompanies a class

1(insulated) or class 2 - subclass 1 (recessed between2 cupboards) appliance.

These instructions are only valid for the countries whose symbols appear in the manual and on the serial number plate.

The appliance was designed for domestic use inside the home and is not intended for commercial or industrial use.

The appliance must not be installed outdoors, even in covered areas. It is extremely dangerous to leave the appliance exposed to rain and storms.

When moving or positioning the appliance, always use the handles provided on the sides of the oven.

Do not touch the appliance while barefoot or with wet or damp hands and feet.

The appliance must be used by adults only for the preparation of food, in accordance with the instructions provided in this booklet. Any other use of the appliance (e.g. for heating the room) constitutes improper use and is dangerous. The manufacturer may not be held responsible for any damage caused as a result of improper, incorrect and unreasonable use of the appliance.

Do not touch the heating elements or certain parts of the oven door when the appliance is in use; these partsbecomeextremelyhot.Keepchildrenwellaway from the appliance.

Make sure thatthe power supplycablesofotherelectrical appliances do not come into contact with the hot parts of the oven.

The ventilation and heat dispersal openings must never be obstructed.

Always grip the oven door handle in the centre: the ends may be hot.

Always use oven gloves when placing cookware in the oven or when removing it.

Do not use aluminium foil to line the bottom of the oven.

Donotplaceflammablematerialsintheoven:iftheappliance is switched on accidentally, the materials could catch fire.

Always make sure the knobs are in the “●”/“” position when the appliance is not in use.

When unplugging the appliance, always pull the plug from the mains socket; do not pull on the cable.

Do not perform any cleaning or maintenance work without having disconnected the appliance from the electricity mains.

If the event of malfunctions, under no circumstances should you attempt to perform the repairs yourself. Contact an authorised Service Centre (see Assistance).

Do not rest objects on the open oven door.

Do not let children play with the appliance.

If the cooker is placed on a pedestal, take the necessary precautions to prevent the cooker from sliding off the pedestal itself.

Theapplianceshouldnotbeoperatedbypeople(including children) with reduced physical, sensory or mental capacities, by inexperienced individuals or by anyone who is not familiar with the product. These individuals should, at the very least, be supervised by someone who assumes responsibility for their safety or receive preliminary instructions relating to the operation of the appliance.

Do not let children play with the appliance.

The appliance is not intended to be operated by means ofanexternaltimerorseparateremote-controlsystem.

Disposal

When disposing of packaging material: observe local legislation so that the packaging may be reused.

The European Directive 2012/19/EU on Waste

Electrical and Electronic Equipment (WEEE), requires that old household electrical appliances must not be disposed of in the normal unsorted municipal waste stream. Old appliances must be collected separately in order to optimise the recovery and recycling of the materials they contain and reduce the impact on human health and the environment. The crossed out “wheeled bin” symbol on the product reminds you of your obligation, that when you dispose of the appliance it must be separately collected.

Consumers should contact their local authority or retailer for information concerning the correct disposal of their old appliance.

Respecting and conserving the environment

Always keep the oven door closed when using the GRILL mode: This will achieve improved results while saving energy (approximately 10%).

Regularly check the door seals and wipe clean to ensure they are free of debris so that they stick properly to the door and do not allow heat to disperse.

Maintenance and care

Switching the appliance off

Disconnect your appliance from the electricity supply before carrying out any work on it.

Cleaning the appliance

The stainless steel or enamel-coated external parts and the rubber seals may be cleaned using a sponge which has been soaked in lukewarm water and neutral soap. Use specialised products for the removal of stubborn stains. After cleaning, rinse well and dry thoroughly. Do not use abrasive powders or corrosive substances.

The hob grids, burner caps, flame spreader rings and burners may be removed to make cleaning easier; wash them in hot water and non-abrasive detergent, making sure all burnt-on residue is removed before drying them thoroughly.

Cleantheterminalpartoftheflamefailuresafetydevices* frequently.

16

Loading...
+ 36 hidden pages