

Page 1

Istruzioni per luso
LAVASTOVIGLIE
IT
Italiano, 1
DE
Deutsch, 37
EN
English,13
ES
Español, 49
CS
Èesky, 73
PFTA++ 8H4
FR
Français, 25
PT
Português, 61
Sommario
Installazione, 2-3
Posizionamento e livellamento
Collegamenti idraulici ed elettrici
Avvertenze per il primo lavaggio
Dati tecnici
Descrizione dellapparecchio, 4
Vista dinsieme
Pannello comandi
Caricare i cestelli, 5
Cestello inferiore
Cestello delle posate
Cestello superiore
Avvio e utilizzo, 6-7
Avviare la lavastoviglie
Caricare il detersivo
Opzioni di lavaggio
Programmi, 8
Tabella dei programmi
Brillantante e sale rigenerante, 9
Caricare il brillantante
Caricare il sale rigenerante
Manutenzione e cura, 10
Escludere acqua e corrente elettrica
Pulire la lavastoviglie
Evitare i cattivi odori
Pulire gli irroratori
Pulizia filtro entrata acqua
Pulire i filtri
Se ci si assenta per lunghi periodi
Precauzioni, consigli e Assistenza, 11
Sicurezza generale
Smaltimento
Risparmiare e rispettare lambiente
Assistenza
Anomalie e rimedi, 12
Page 2
Installazione
16
È importante conservare questo libretto per poterlo
consultare in ogni momento. In caso di vendita, di
cessione o di trasloco, assicurarsi che resti insieme
allapparecchio.
Leggere attentamente le istruzioni: ci sono importanti
informazioni sullinstallazione, sulluso
e sulla sicurezza.
In caso di trasloco tenere lapparecchio in posizione
verticale; se fosse necessario, inclinarlo sul lato
posteriore.
Questo apparecchio è progettato per l'uso
domestico o per applicazioni simili, ad esempio:
- aree adibite a cucina per il personale in negozi, uffici
ed altri ambienti di lavoro;
- case coloniche;
- utilizzo da parte di clienti in hotel, motel ed altri
ambienti di tipo residenziale;
- bed and breakfast.
Posizionamento e livellamento
1. Disimballare lapparecchio e controllare che
non abbia subìto danni durante il trasporto.
Se fosse danneggiato non collegarlo e contattare
il rivenditore.
2. Sistemare la lavastoviglie facendo aderire i fianchi o
lo schienale ai mobili adiacenti o alla parete.
Lapparecchio può anche essere incassato sotto a un
piano di lavoro continuo
3. Posizionare la lavastoviglie su un pavimento piano e
rigido. Compensare le irregolarità svitando o avvitando i
piedini anteriori finché lapparecchio non sia
orizzontale. Un accurato livellamento dà stabilità ed
evita vibrazioni, rumori e spostamenti.
* (vedi foglio di Montaggio).
I tubi di carico e di scarico dellacqua
e il cavo di alimentazione elettrica possono essere
orientati verso destra o sinistra per consentire
la migliore installazione.
Collegamento del tubo di carico dellacqua
A una presa dacqua fredda: avvitare bene il tubo di
carico a un rubinetto con bocca filettata da 3/4 gas;
prima di avvitare, far scorrere lacqua finché non sia
limpida affinché le eventuali impurità non intasino
lapparecchio.
A una presa dacqua calda: nel caso di impianto
centralizzato di termosifoni, la lavastoviglie può
essere alimentata con acqua calda di rete purché
non superi la temperatura di 60°C.
Avvitare il tubo al rubinetto come descritto per la
presa dacqua fredda.
Se la lunghezza del tubo di carico non è sufficiente,
rivolgersi a un negozio specializzato
o a un tecnico autorizzato (vedi Assistenza).
La pressione dellacqua deve essere compresa nei
valori riportati dalla tabella Dati tecnici (vedi a lato).
Fare attenzione che nel tubo non ci siano né pieghe
né strozzature.
Collegamento del tubo di scarico dellacqua
collegare il tubo di scarico, senza piegarlo, a una
conduttura di scarico con diametro minimo di 4 cm.
*. Per regolare laltezza del piedino posteriore, agire
4
sulla boccola esagonale di colore rosso presente nella
parte inferiore, frontale, centrale della lavastoviglie, con
una chiave a bocca esagonale apertura 8 mm., girando
in senso orario per aumentare laltezza e in senso
antiorario per diminuirla. (vedere foglio istruzioni
incasso allegato alla documentazione)
Collegamenti idraulici ed elettrici
Ladattamento degli impianti elettrici e idraulici
per linstallazione deve essere eseguito solo
da personale qualificato.
La lavastoviglie non deve appoggiare sui tubi
o sul cavo di alimentazione elettrica.
Lapparecchio deve essere collegato alla rete di
distribuzione dellacqua utilizzando tubi nuovi.
Non riutilizzare i vecchi tubi.
2
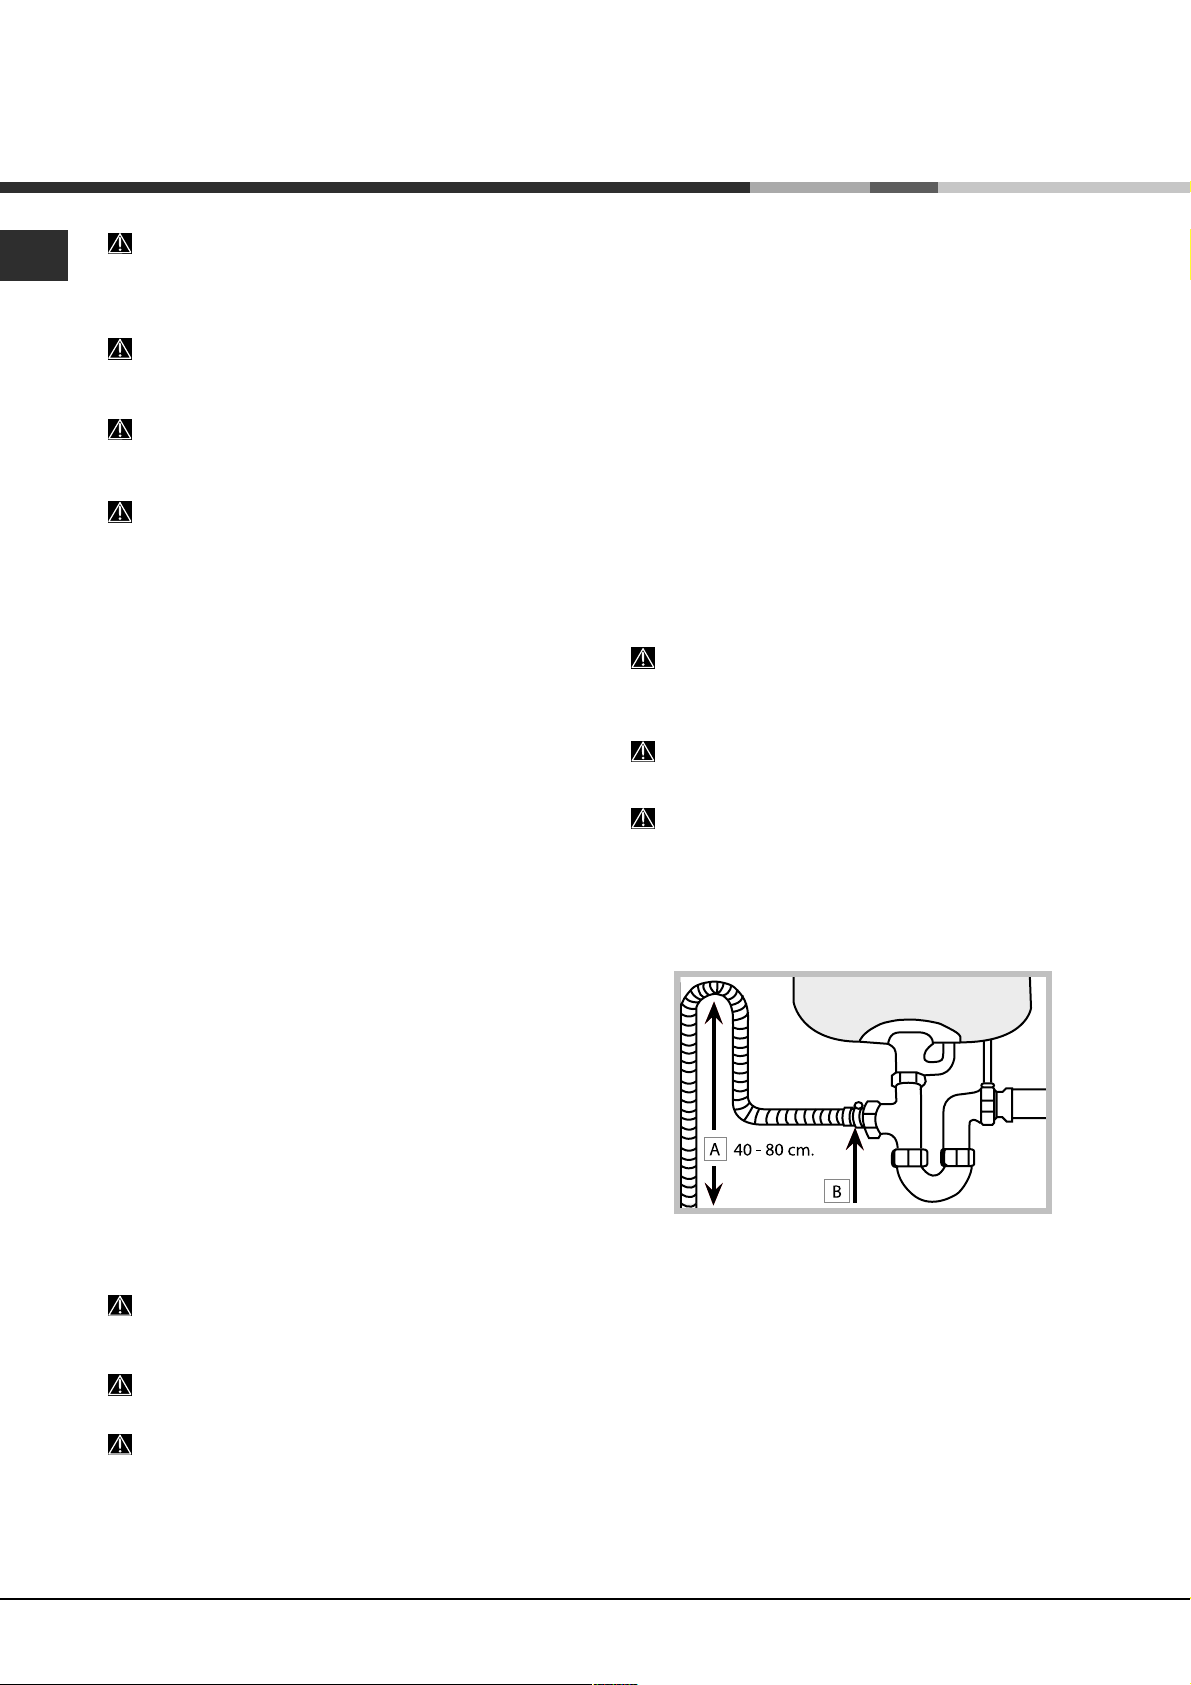
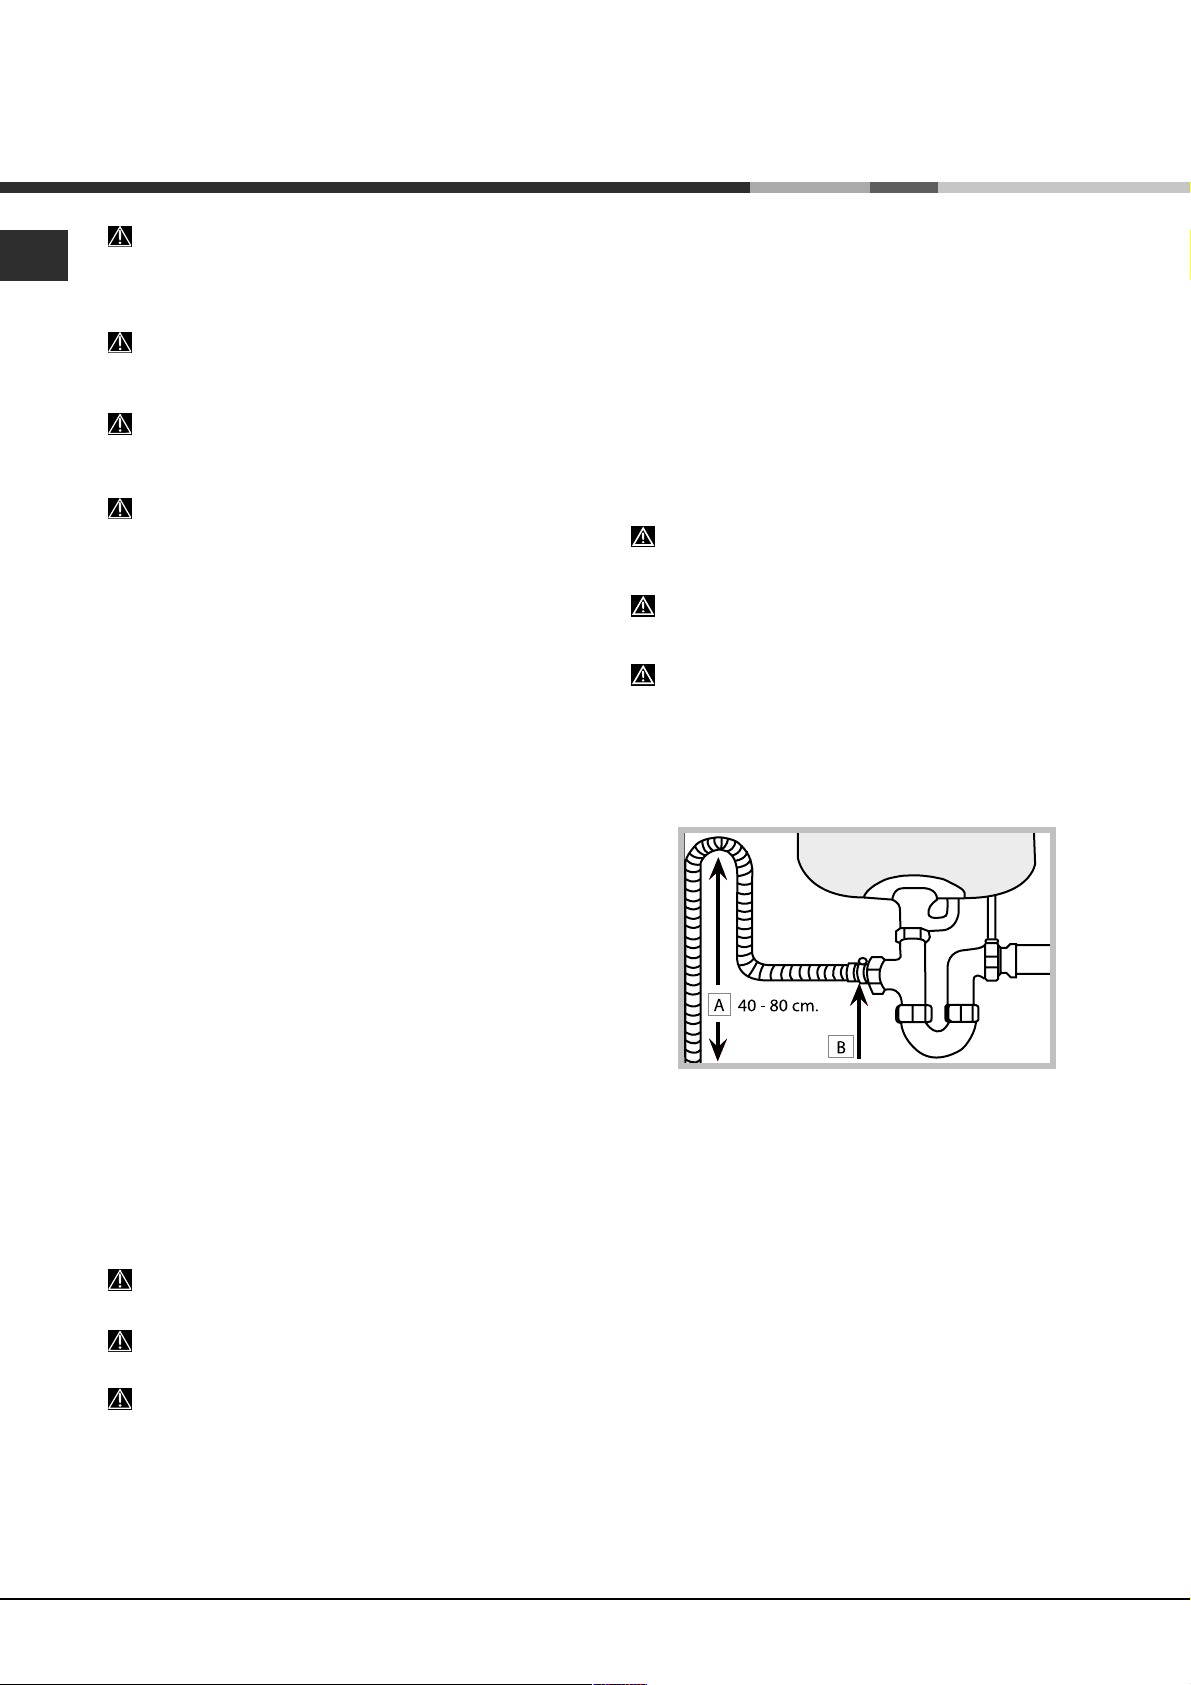
Il tubo di scarico deve essere ad unaltezza compresa
tra 40 e 80 cm. dal pavimento o piano dappoggio della
lavastoviglie (A).
Prima di collegare il tubo di scarico dellacqua al sifone
del lavandino, rimuovere il tappo di plastica (B).
* Presente solo su alcuni modelli.
Page 3
Sicurezza antiallagamento
Per garantire che non si generino allagamenti,
la lavastoviglie:
- è dotata di un sistema che interrompe lingresso
dellacqua nel caso di anomalie o di perdite dallinterno.
Alcuni modelli sono dotati di un dispositivo
supplementare di sicurezza New Acqua Stop*, che
garantisce lantiallagamento anche in caso di rottura del
tubo di alimentazione.
ATTENZIONE: TENSIONE PERICOLOSA!
Il tubo di carico dellacqua, non deve in nessun caso,
essere tagliato in quanto contiene parti sotto tensione.
Collegamento elettrico
Prima di inserire la spina nella presa della corrente,
accertarsi che:
Striscia anticondensa*
Dopo aver incassato la lavastoviglie aprire la porta e
incollare la striscia adesiva trasparente sotto al ripiano in
legno per proteggerlo dalla eventuale condensa.
Avvertenze per il primo lavaggio
Dopo linstallazione, immediatamente prima del primo
lavaggio, riempire completamente dacqua il serbatoio
del sale e solo dopo aggiungere circa 1 Kg di sale (vedi
capitolo Brillantante e sale rigenerante): è normale che
lacqua trabocchi. Selezionare il grado di durezza
dellacqua (vedi capitolo Brillantante e sale rigenerante).
Dopo il caricamento del sale la spia MANCANZA SALE
si spegne.
Il mancato riempimento del contenitore del sale, può
provocare il danneggiamento del dolcificatore dellacqua
e dellelemento riscaldante.
*
16
la presa abbia la messa a terra e sia a norma di
legge;
la presa sia in grado di sopportare il carico massimo
di potenza della macchina, indicato nella targhetta
caratteristiche sulla controporta
(vedi capitolo Descrizione della lavastoviglie);
la tensione di alimentazione sia compresa nei valori
indicati nella targhetta caratteristiche sulla
controporta;
la presa sia compatibile con la spina
dellapparecchio. In caso contrario richiedere la
sostituzione della spina a un tecnico autorizzato (vedi
Assistenza); non usare prolunghe o prese multiple.
Ad apparecchio installato, il cavo di alimentazione
elettrica e la presa della corrente devono essere
facilmente raggiungibili.
Il cavo non deve subire piegature o compressioni.
Se il cavo di alimentazione è danneggiato, deve
essere sostituito dal costruttore o dal suo Servizio di
Assistenza Tecnica, in modo da prevenire ogni rischio.
(Vedi Assistenza)
LAzienda declina ogni responsabilità qualora
queste norme non vengano rispettate.
Dati Tecnici
Larghezza cm. 59,5
Dimensioni
Capacità 14 coperti standard
Pressione acqua
alimentazione
Tensione di
alimentazione
Potenza totale
assorbita
Fusibile vedi targhetta caratteristiche
Altezza cm. 82
Profondità cm. 57
0,05 ÷ 1MPa (0.5 ÷ 10 bar)
7,25 – 145 psi
vedi targhetta caratteristiche
vedi targhetta caratteristiche
Questa apparecchiatura è
conforme alle seguenti
Direttive Comunitarie:
-2006/95/EC (Bassa Tensione)
-2004/108/EC (Compatibilità
Elettromagnetica)
-2005/32/EC (Comm. Reg.
1275/2008) (Ecodesign)
-97/17/EC (Etichettatura)
-2002/96/EC (Smaltimento)
* Presente solo su alcuni modelli.
3
Page 4
Descrizione
dellapparecchio
16
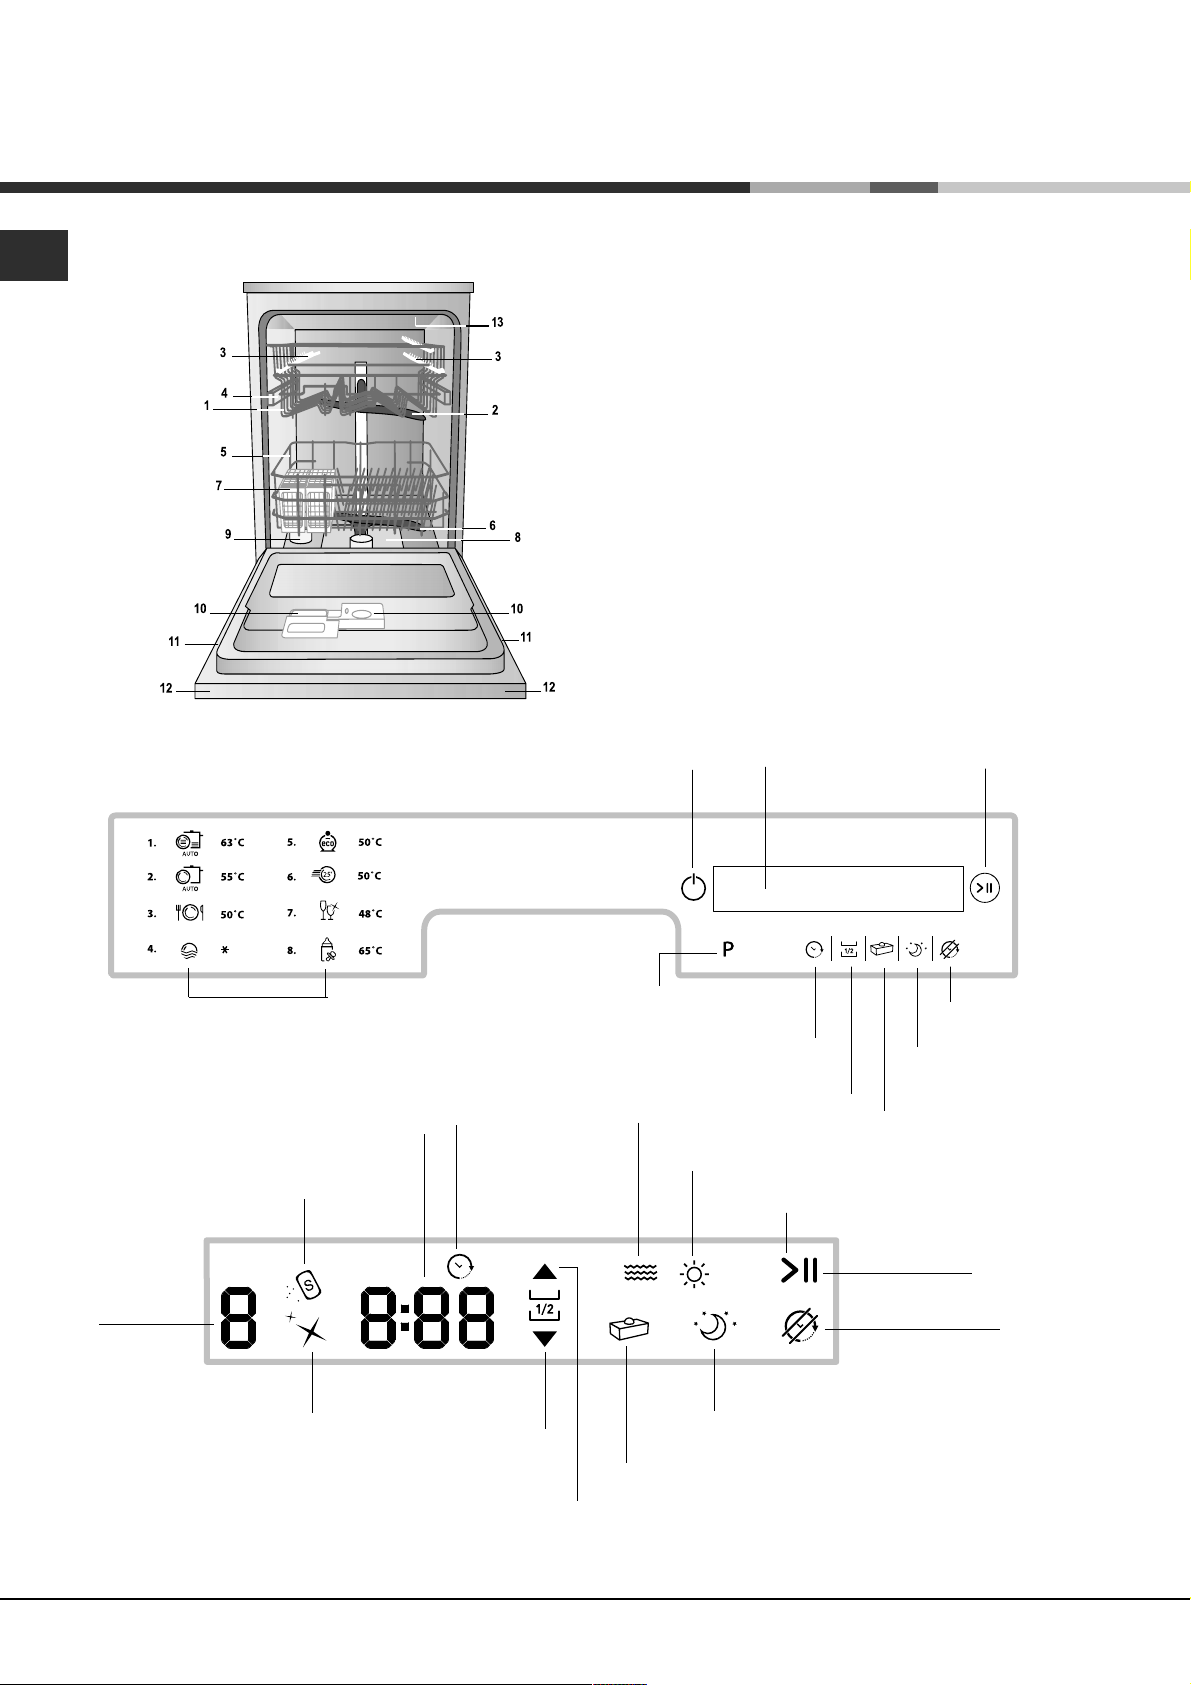
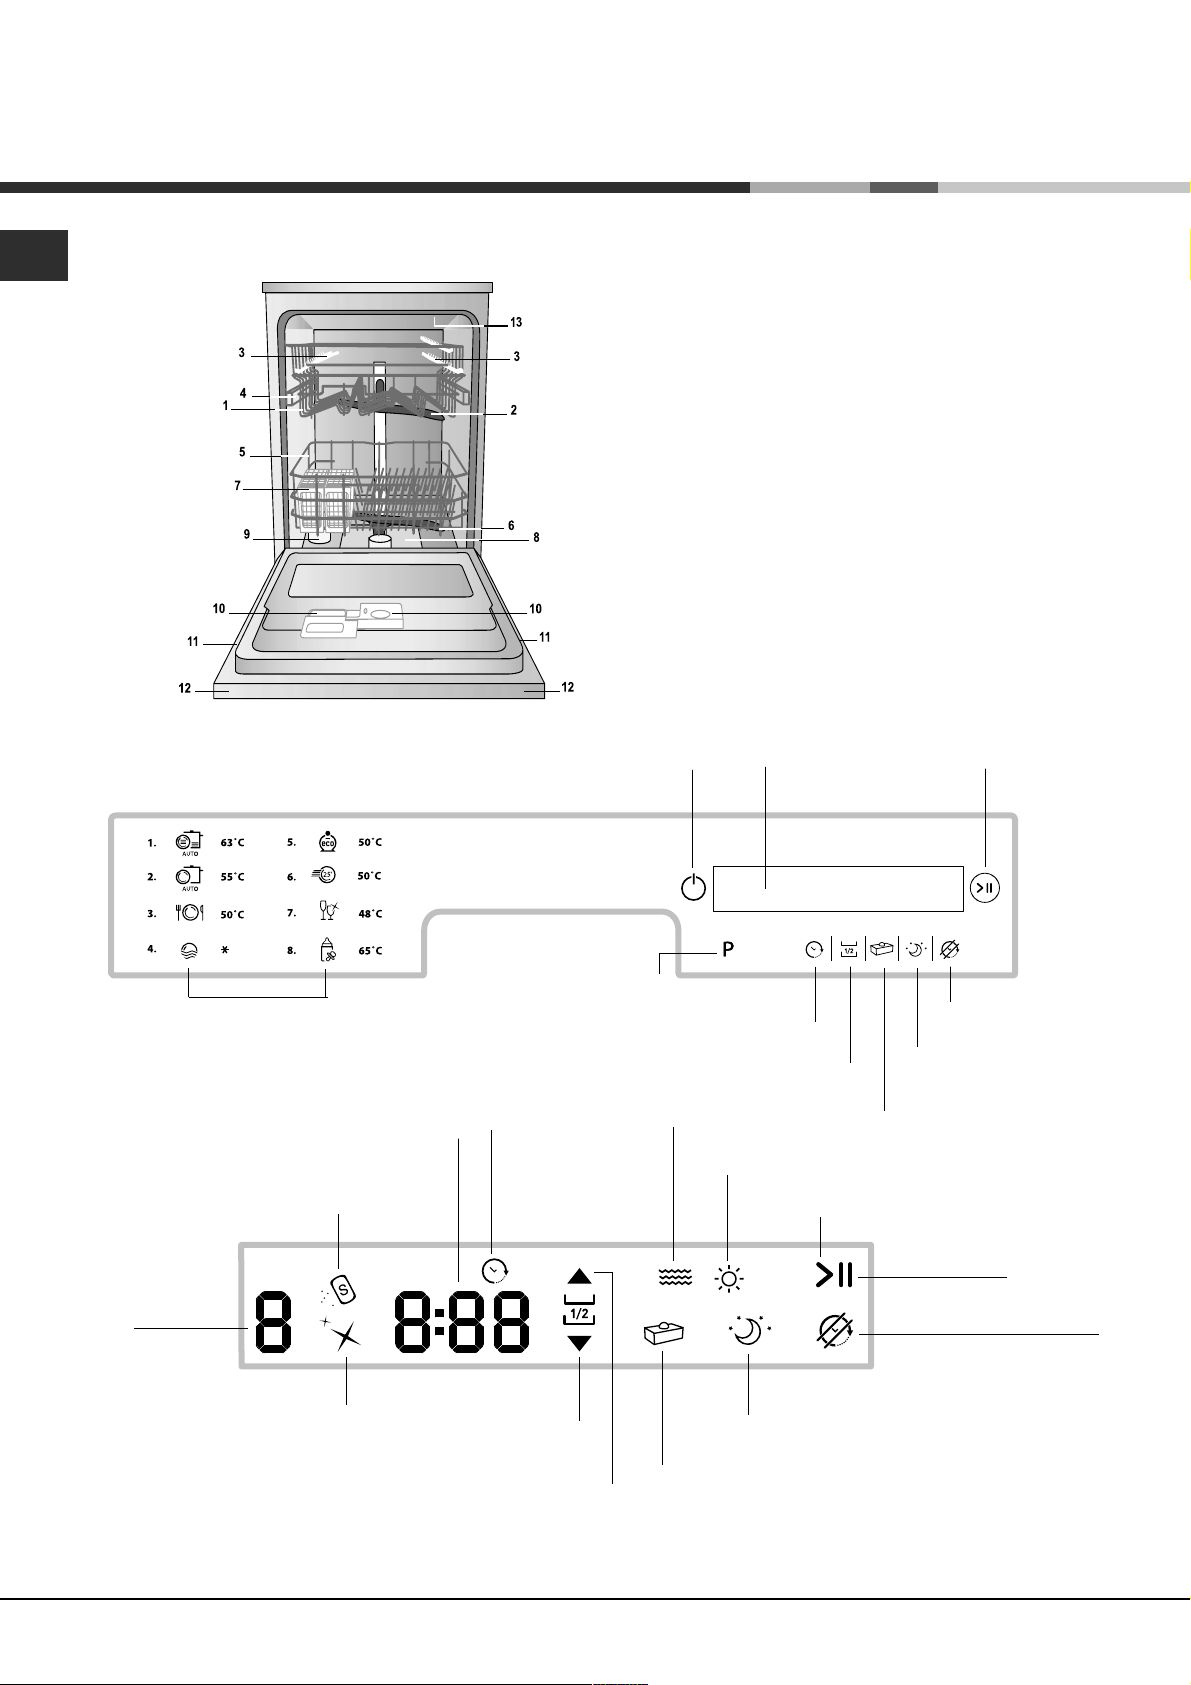
Vista dinsieme
Pannello comandi
1. Cestello superiore
2. Irroratore superiore
3. Ribaltine
4. Regolatore altezza cestello
5. Cestello inferiore
6. Irroratore inferiore
7. Cestello posate
8. Filtro lavaggio
9. Serbatoio sale
10. Vaschette detersivo e serbatoio brillantante
11. Targhetta caratteristiche
12. Pannello comandi
***
13. Ghiera
On-Off/Reset
Avvio/PausaDisplay
Selezione
Programma
Legenda simboli programmi
Display
Indicatore luminoso
tempo residuo, ON,
Mancanza
Numero
Programma
Mancanza
Brillantante
Sale
OFF, END
Simbolo opzione
Mezzo carico cesto
Mezzo carico cesto
Simbolo opzione
Partenza ritardata
inferiore
Simbolo opzione
superiore
Partenza Ritardata
Simbolo
Lavaggio
Simbolo Opzione
Pastiglie multifunzione
Opzione
Opzione
Mezzo carico
Simbolo
Asciugatura
Simbolo Avvio
Simbolo Opzione
Good Night
*** Solo sui modelli ad incasso totale
* Presente solo su alcuni modelli.
Il numero e il tipo di programmi ed opzioni variano in base al modello di lavastoviglie.
Opzione Short Time
Opzione Good Night
Opzione
Pastiglie multifunzione
Simbolo Pausa
Simbolo Opzione
Short Time
4
Page 5
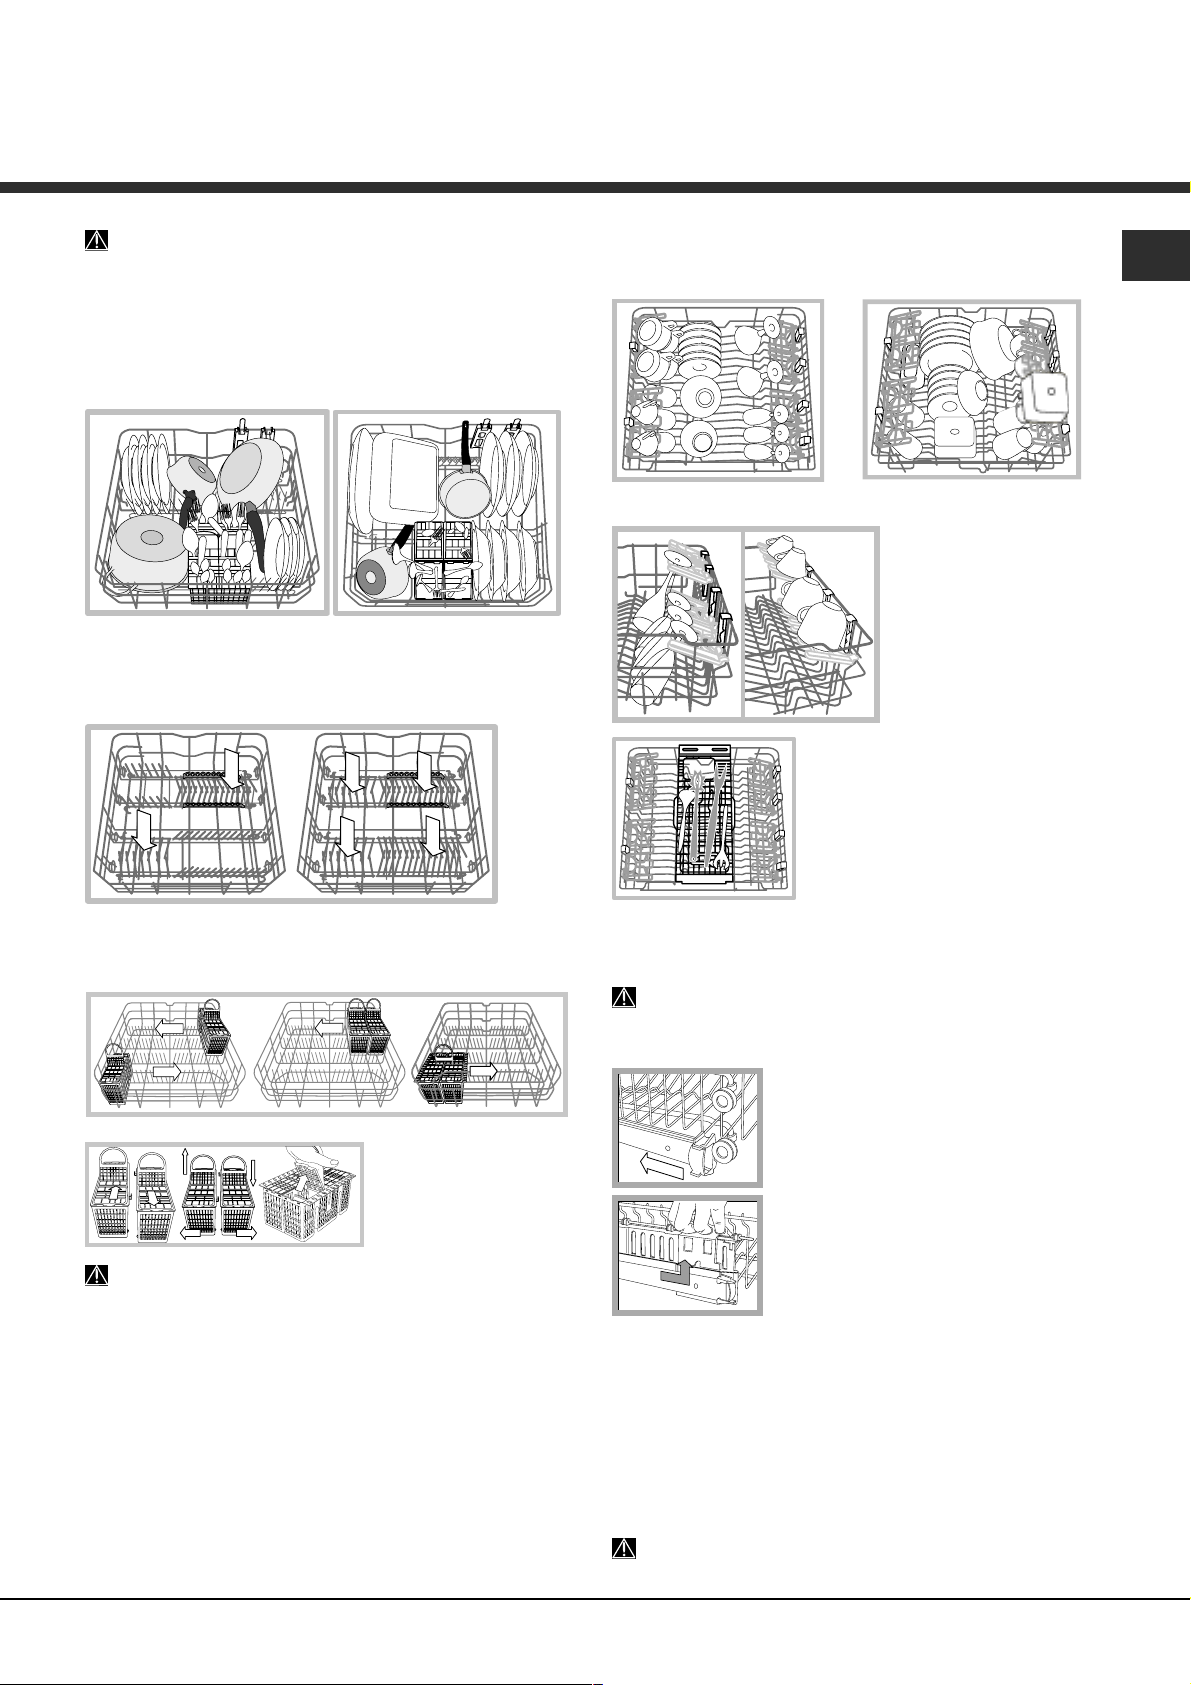
Caricare i cesti
Prima di caricare i cesti, eliminare dalle stoviglie i residui di
cibo e vuotare bicchieri e coppe dei liquidi rimasti.
Dopo aver caricato, controllare che gli irroratori ruotino
liberamente.
Cesto inferiore e cestino posate
Il cesto inferiore può contenere pentole, coperchi, piatti,
insalatiere, posate ecc..Piatti e coperchi grandi vanno sistemati
di preferenza ai lati del cesto.
Alcuni modelli di lavastoviglie, dispongono di settori
reclinabili
per la sistemazione dei piatti oppure in posizione orizzontale
per sistemare pentole, insalatiere e padelle.
*, gli stessi si possono usare in posizione verticale
Cesto superiore
Caricare stoviglie delicate e leggere: bicchieri, tazze, piattini,
insalatiere basse.
Ribaltine a posizione variabile
Le ribaltine sono
posizionabili su due altezze
differenti per ottimizzare la
disposizione delle stoviglie
nello spazio del cesto. I
calici possono essere
posizionati stabilmente alle
ribaltine, inserendo lo stelo
del bicchiere nelle apposite
asole.
Alcuni modelli di lavastoviglie sono
dotati di un vassoio scorrevole che
può essere utilizzato per contenere
posate di servizio o tazze di piccole
dimensioni. Per migliori prestazioni di
lavaggio, evitare di caricare sotto al
vassoio stoviglie ingombranti.
16
Il cestino delle posate può essere di tipo diverso, scomponibile
o non scomponibile a seconda dei modelli di lavastoviglie. Il
cestino non scomponibile deve essere posizionato solonella
parte anteriore del cesto inferiore.
Entrambi sono muniti di
griglie superiori per una
migliore disposizione
delle posate.
I coltelli e gli utensili con punte taglienti devono essere
sistemati nel cestino delle posate con le punte rivolte verso il
basso o sistemati sulle ribaltine del cesto superiore in
posizione orizzontale.
Si consiglia lutilizzo di stoviglie idonee al lavaggio in
lavastoviglie.
* Presente solo in alcuni modelli. Variabili per numero e
posizione.
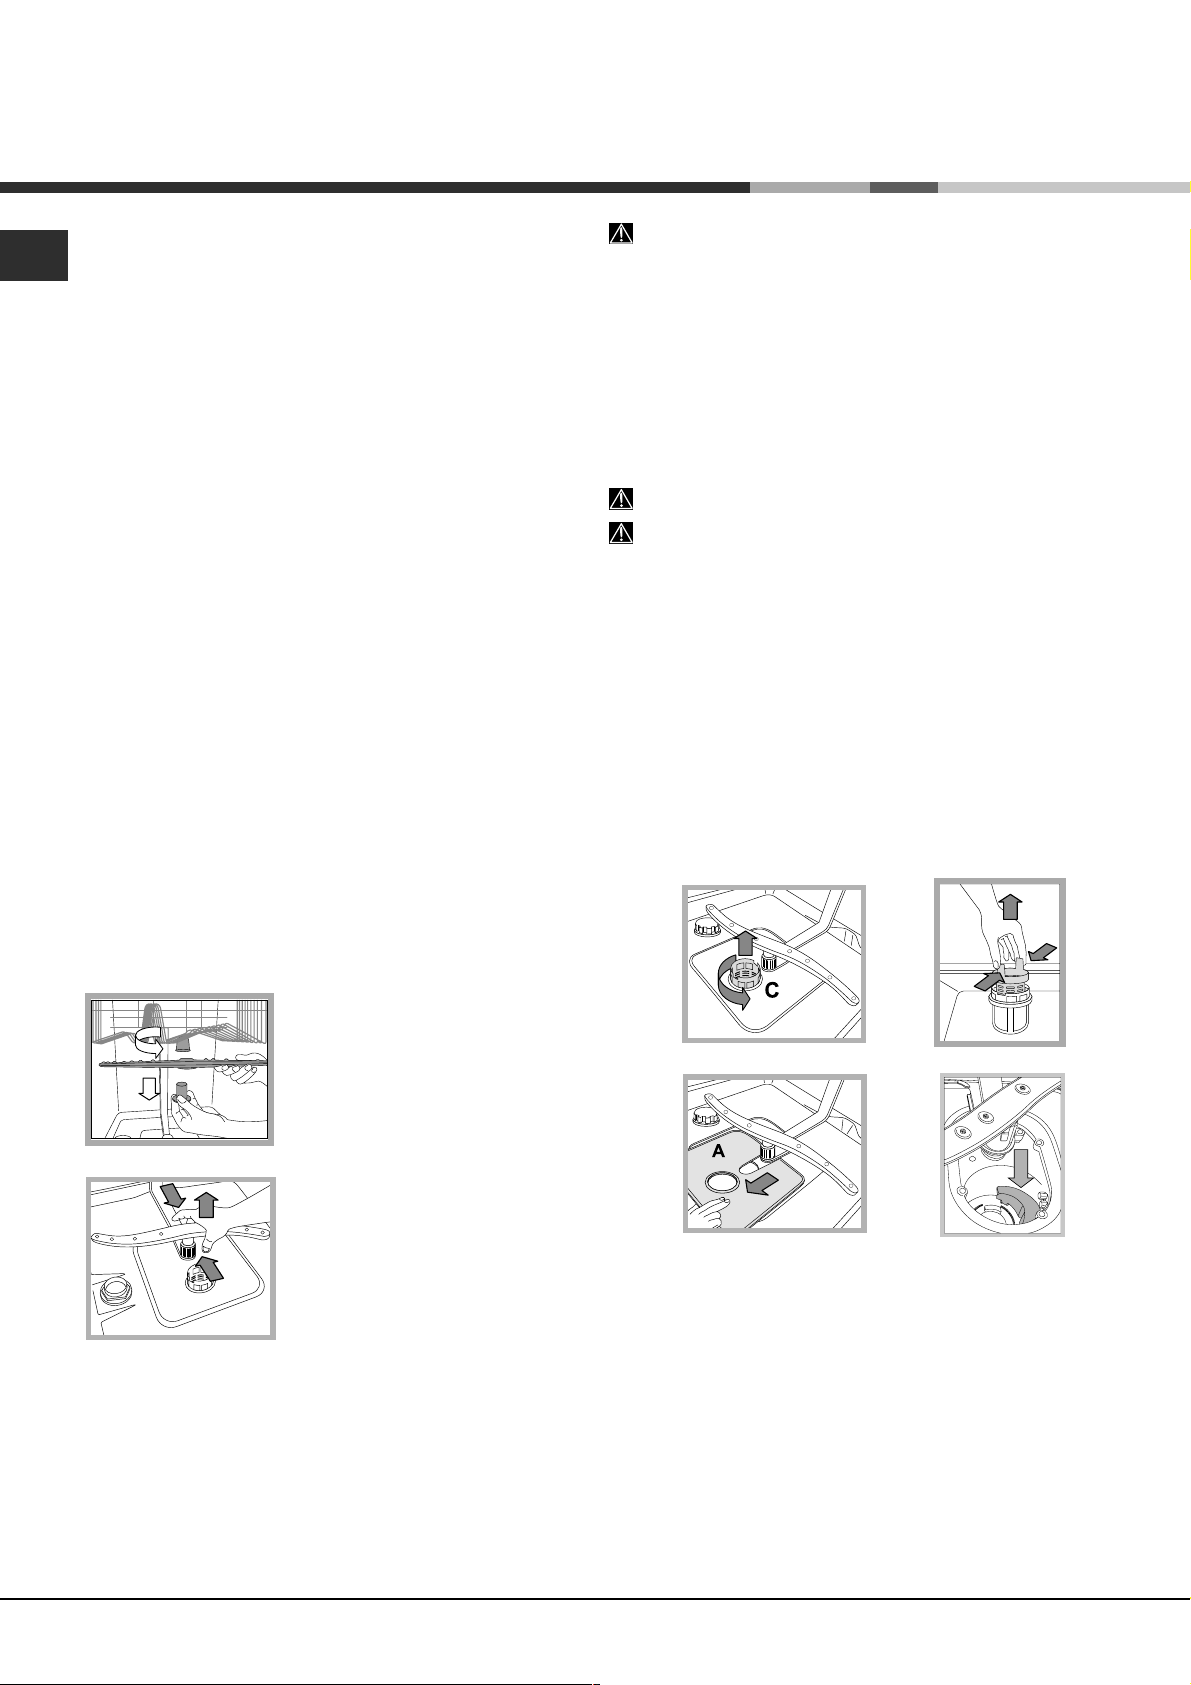
Regolare laltezza del cesto superiore
Per agevolare la sistemazione delle stoviglie, è possibile
sistemare il cesto superiore in posizione alta o bassa.
E preferibile regolare laltezza del cesto superiore a
CESTO VUOTO.
Non sollevare o abbassare MAI il cesto su un solo lato.
Aprire i fermi delle guide del cesto a
destra e a sinistra ed estrarre il cesto;
sistemarlo in alto o in basso, farlo
scivolare lungo le guide fino a far entrare
anche le rotelle anteriori e chiudere i fermi
(vedi figura).
Se il cesto è dotato di maniglie Dual
* (vedi figura), estrarre il cesto
Space
superiore a fine corsa, impugnare le
maniglie ai lati del cesto e muovere verso
lalto o verso il basso; lasciare ricadere il
cesto accompagnandolo.
Stoviglie non adatte al lavaggio in lavastoviglie
Oggetti di legno, con impugnatura in legno o in corno o con
parti incollate.
Oggetti di alluminio, rame, ottone, peltro o stagno.
Stoviglie di plastica non termoresistente.
Porcellane antiche o dipinte a mano.
Argenteria antica. Largenteria non antica può invece essere
lavata con un programma delicato e accertandosi che non sia
a contatto con altri metalli.
5
Page 6
Avvio e utilizzo
16
Il pannello comandi è dotato di sistema Touch
Control; una leggera pressione delle dita sui simboli
attiva il comando.
I simboli nella legenda dei programmi di lavaggio (a
sinistra del pannello comandi), NON si illuminano.
La selezione del programma va fatta premendo il simbolo
P.
La macchina, è dotata di segnali acustici/toni (secondo il
modello d lavastoviglie) che avvisano dellavvenuto
comando: accensione, fine ciclo ecc..
I simboli/spie luminose presenti sul pannello comandi/
display, possono variare di colore. (secondo il modello di
lavastoviglie).
Avviare la lavastoviglie
1. Aprire il rubinetto dellacqua.
2. Premere il simbolo ON-OFF: il display si illumina per alcuni
secondi visualizzando la scritta ON (acceso).
3. Aprire la porta e dosare il detersivo (vedi caricare il
detersivo).
4. Caricare i cestelli (vedi Caricare i cestelli) e chiudere la porta.
5. Premere il simbolo P, per selezionare il programma, in base
alle stoviglie e al loro grado di sporco (vedi tabella dei
programmi)
6. Selezionare le opzioni di lavaggio
7. Premere il simbolo Avvio/Pausa, il simbolo dellAvvio si
illumina sul display. Il numero del programma, i simboli del:
lavaggio, delle eventuali opzioni ed il tempo residuo alla fine
del ciclo vengono visualizzati sul display.
8. A programma terminato, compare sul display il numero del
programma effettuato e la scritta END (FINE). Spegnere
lapparecchio con il simbolo ON-OFF, il display visualizzerà
OFF. Chiudere il rubinetto dellacqua e staccare la spina dalla
presa di corrente.
9. Aspettare alcuni minuti prima di togliere le stoviglie, per
evitare di scottarsi. Scaricare i cesti iniziando da quello
inferiore.
- Per ridurre il consumo di energia elettrica, in
alcune condizioni di NON utilizzo prolungato, la
macchina si spegne temporeaneamente, in modo
automatico.
PROGRAMMI AUTO*:questo modello di lavastoviglie è
dotato di un particolare sensore che può valutare il grado di
sporco e impostare il lavaggio più efficiente ed economico.
La durata dei programmi auto potrà variare per lntervento
del sensore.
Se le stoviglie sono poco sporche o sono state
sciacquate precedentemente sotto lacqua, ridurre
sensibilmente la dose del detersivo.
* (vedi opzioni).
Aggiungere altre stoviglie
Premere il simbolo Avvio/Pausa; il simbolo Pausa si illumina;
aprire la porta facendo attenzione alla fuoriuscita di vapore e
inserire le stoviglie. Premere nuovamente il simbolo Avvio/
Pausa: il simbolo Avvio si illumina e il ciclo riprende.
Premendo il simbolo Avvio/Pausa per mettere la macchina
in pausa, si interrompe temporeaneamente il programma.
In questa fase non si può cambiare il programma.
Interruzioni accidentali
Se durante il lavaggio si apre la porta o si verifica
uninterruzione di corrente elettrica, il programma si interrompe.
Riprende dal punto in cui si era interrotto quando si chiude la
porta o torna la corrente elettrica.
Caricare il detersivo
Il buon risultato del lavaggio dipende anche dal
corretto dosaggio del detersivo, eccedendo non si lava
in modo più efficace e si inquina lambiente.
Utilizzare solo detersivo per lavastoviglie.
NON UTILIZZARE detersivi per lavaggio a mano.
Un utilizzo eccessivo di detersivo può lasciare
residui di schiuma a fine ciclo.
Lutilizzo delle pastiglie è consigliato solo nei
modelli dove è presente lopzione PASTIGLIE
MULTIFUNZIONE.
Le migliori prestazioni di lavaggio ed asciugatura,
si ottengono solo con lutilizzo di detersivo in polvere,
brillantante liquido e sale.
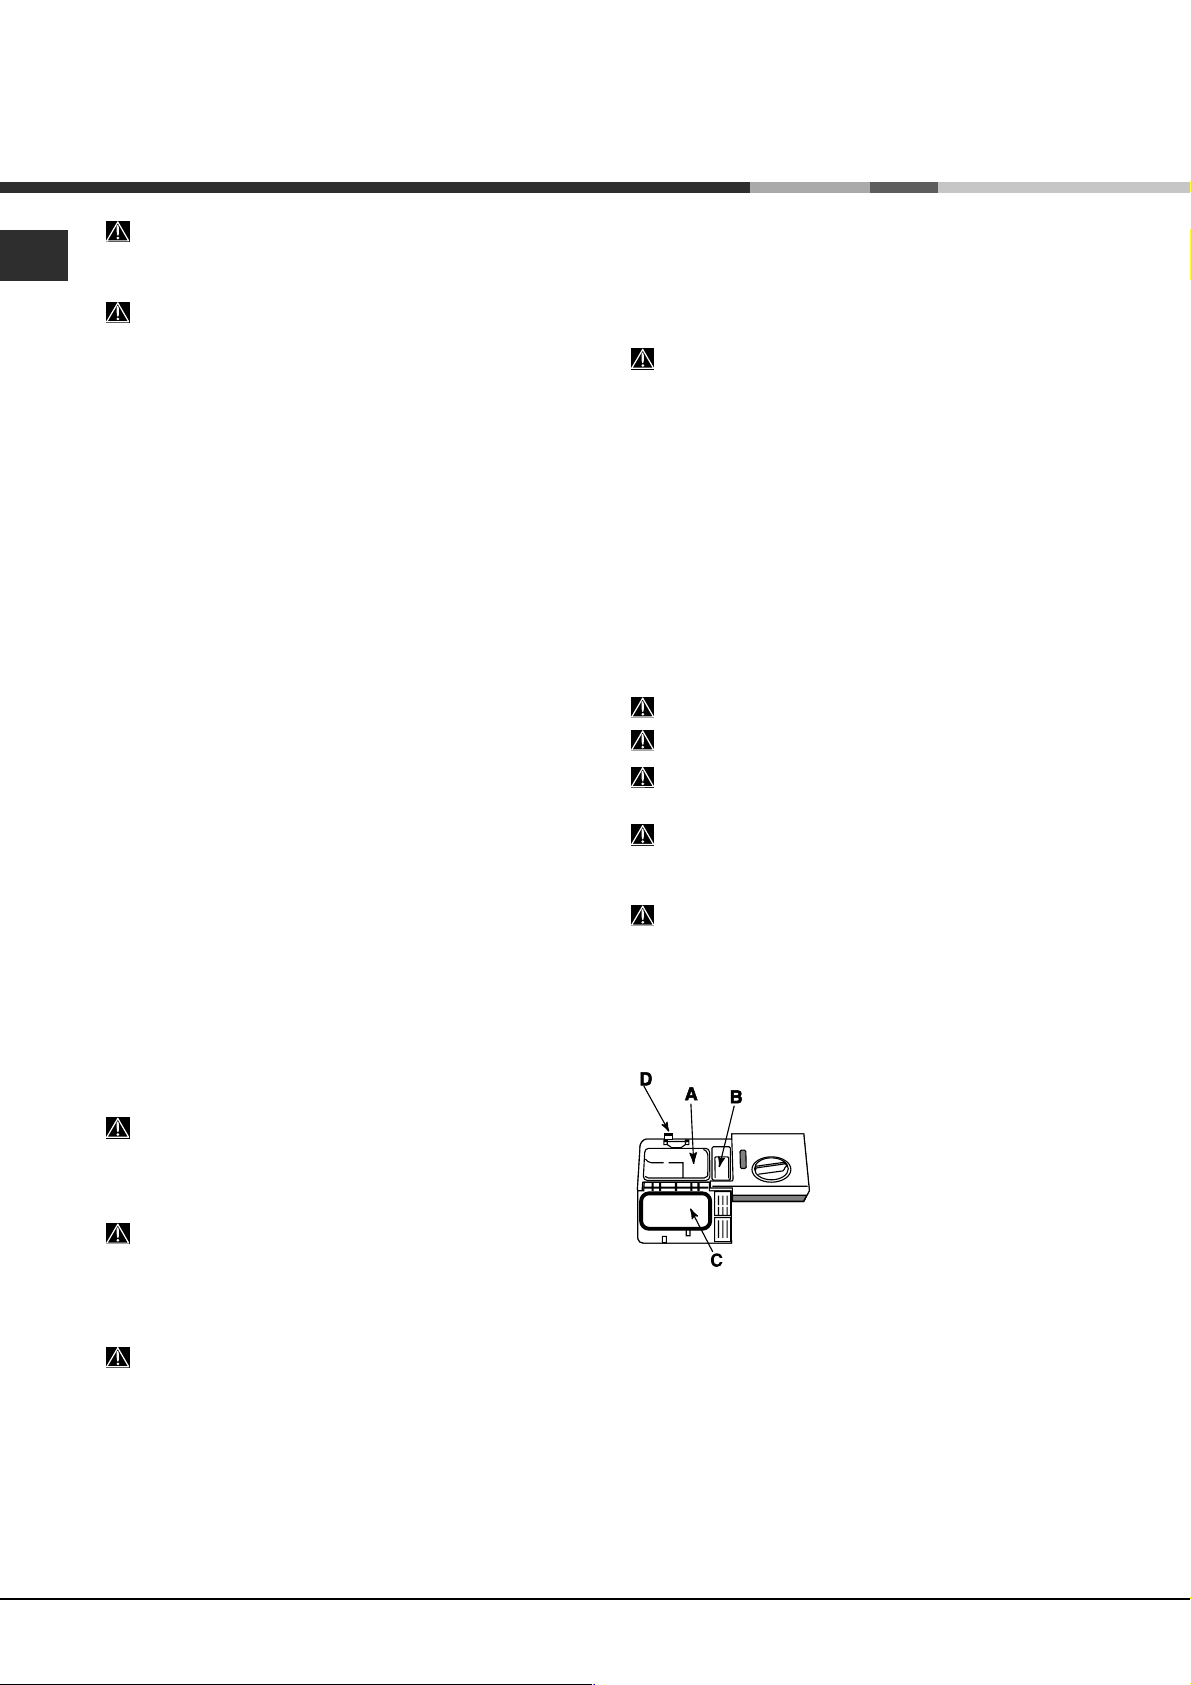
vaschetta A: Detersivo per lavaggio
vaschetta B: Detersivo per prelavaggio
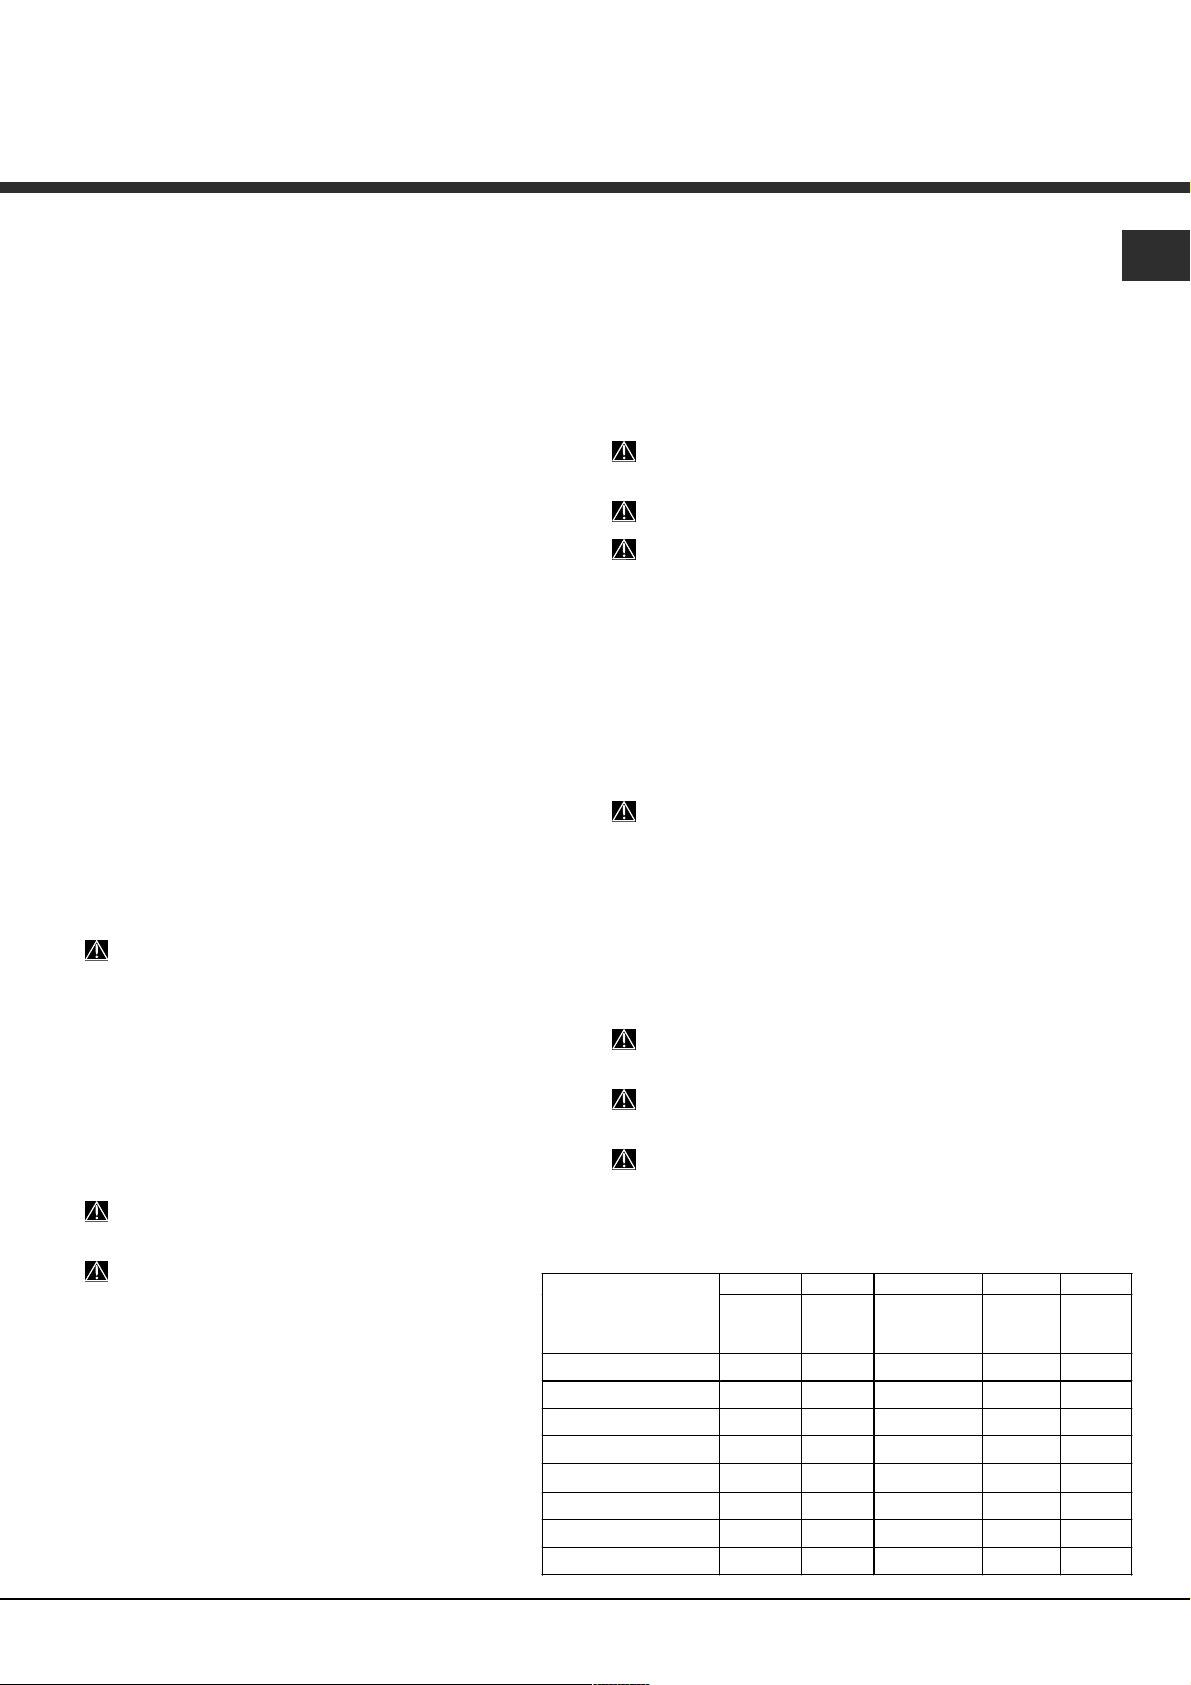
1. Aprire il coperchio C
premendo il pulsante D.
2. Dosare il detersivo
consultando la Tabella dei
programmi:
in polvere: vaschette A e B.
pastiglie: quando il
programma ne richiede 1,
metterla nella vaschetta A e
chiudere il coperchio; quando ne richiede 2, mettere la
seconda sul fondo della vasca.
3. Eliminare i residui di detersivo dai bordi della
vaschetta e chiudere il coperchio fino allo scatto.
Modificare un programma in corso
Se si è selezionato un programma sbagliato è possibile
modificarlo, purché appena iniziato. Per cambiare ciclo di
lavaggio spegnere la macchina con una pressione prolungata
del simbolo ON/OFF/Reset, il display visualizzerà 3-2-1 OFF.
Riaccendere la maccina con lo stesso simbolo e selezionare
nuovamente programma e opzioni desiderati.
6
* Presente solo su alcuni modelli.
Page 7
Opzioni di lavaggio*
Le OPZIONI possono essere impostate, modificate o
azzerate solo dopo aver scelto il programma di
lavaggio e prima di aver premuto il simbolo AVVIO/
PAUSA.
Possono essere selezionate solo le opzioni compatibili al tipo di
programma scelto. Se unopzione non è compatibile con il
programma selezionato, (vedi tabella programmi) il simbolo
relativo lampeggia velocemente 3 volte.
Se viene selezionata unopzione incompatibile con unopzione
precedentemente impostata, questa lampeggia 3 volte, e si
spegne, mentre rimane accesa la prima opzione selezionata.
Per deselezionare unopzione erroneamente impostata,
premere di nuovo sul simbolo corrispondente.
Partenza ritardata*
È possibile posticipare da 1 a 24 ore la partenza del programma:
1. Dopo aver selezionato il programma di lavaggio desiderato
ed altre eventuali opzioni, premere il simbolo PARTENZA
RITARDATA: il simbolo sul display si illumina. Premere il simbolo,
PARTENZA RITARDATA per selezionare quando si desidera far
iniziare il ciclo di lavaggio (da 1 a 24 ore).
2. Confermare la scelta premendo sul simbolo Avvio/Pausa ed
avrà inizio il conto alla rovescia, il ritardo selezionato viene
visualizzato sul display ed il simbolo Avvio smette di pulsare.
3. A tempo scaduto , il simbolo della PARTENZA RITARDATA si
spegne, e il programma si avvia.
Per deselezionarlo premere sul simbolo PARTENZA RITARDATA
fino alla visualizzazione di OFF.
Non è possibile impostare la PARTENZA RITARDATA a
ciclo avviato.
Opzione Short Time*
Questa opzione permette di ridurre la durata dei principali
programmi mantenendo le stesse performance di lavaggio ed
asciugatura.
Dopo aver selezionato il programma, premere il simbolo
Opzione Short Time, laccensione del simbolo sul display
segnalano lavvenuta selezione.
Per deselezionare lopzione, ripremere sullo stesso simbolo.
Mezzo carico cesto superiore/inferiore
Con lopzione del Mezzo Carico, è possibile scegliere di
effettuare il lavaggio sul cesto superiore o inferiore,
risparmiando acqua, energia e detersivo. Selezionare il
programma e premere il simbolo MEZZO CARICO; si illumina il
simbolo del mezzo carico (sul display) e lindicazione del
cesto superiore; con una ulteriore pressione si visualizza il
simbolo del mezzo carico e lindicazione del cesto inferiore. Il
lavaggio si attiva solo sul cesto selezionato.
Ricordarsi di caricare le stoviglie solo sul cesto
selezionato e di dimezzare la quantità di detersivo.
E preferibile utilizzare detersivo in polvere.
Questa opzione non è disponibile con il programma:
Rapido e Baby.
Opzione Good Night*
Questa opzione aumenta la silenziosità allungando la durata
dei programmi, ed è ideale perchè permette di usufruire della
tariffa energetica notturna.
Dopo aver selezionato il programma, premere il simbolo
Opzione Good Night, il simbolo presente sul display si illumina
segnalando lavvenuta selezione.
Per deselezionare lopzione, ripremere sullo stesso simbolo.
Lopzione Good Night, non è compatibile con
lopzione MEZZO CARICO.
Pastiglie Multifunzione* (Tabs)
Con questa opzione viene ottimizzato il risultato di lavaggio ed
asciugatura.
Quando si usano le pastiglie multifunzione premere il simbolo
PASTIGLIE MULTIFUNZIONE, il relativo simbolo si illumina sul
display. Lopzione Pastiglie Multifunzione, comporta
lallungamento del programma.
L opzione PASTIGLIE MULTIFUNZIONE rimane
impostata alle successive accensioni della macchina se
non deselezionata.
Lutilizzo delle pastiglie è consigliato solo dove è
presente lopzione PASTIGLIE MULTIFUNZIONE.
Questa opzione è sconsigliata con i programmi che
non prevedono luso delle pastiglie multifunzione (vedi
tabella delle opzioni).
16
Le Opzioni Short Time e Good Night, non
sono compatibili tra loro.
Le Opzioni Short Time e Good Night, non sono
compatibili con lopzione MEZZO CARICO.
* Presente solo su alcuni modelli.
Tabella Opzioni
1. Auto Super Wash
2. Auto Normale
3. Quotidiano A 60
4. Ammollo
5. Eco 50°C
6. Rapido 25’
7. Cristalli
8. Ciclo Baby
A B C D E
Avvio
Ritardato
SI
SI
SI
SI
SI
SI
SI
SI
Mezzo
Carico
No
No
SI
SI
SI
SI
SI
SI
Pastiglie
Multifunz.
SI
SI
SI
No
SI
SI
SI
No
Good
Night
No
SI
No
No
SI
No
No
No
Short
Time
SI
SI
No
No
No
No
No
No
7
Page 8
Programmi
16
Per le OPZIONI consultare la tabella Opzioni presente nella pagina dellAvvio e Utilizzo.
Il numero e il tipo di programmi ed opzioni variano in base al modello di lavastoviglie.
Indicazioni per la scelta dei
programmi
Stoviglie e pentole molto sporche
(da non usare per pezzi delicati).
Stoviglie e pentole normalmente
sporche. Programma standard
giornaliero.
Sporco quotidiano in quantità
limitata. (4 coperti + 1 pentola +
1 padella).
Lavaggio preliminare in attesa di
completare
il carico al pasto successivo.
Lavaggio ecologico a bassi
consumi energetici, adatto a
stoviglie e pentole.
Ciclo economico e veloce da
utilizzare per stoviglie poco
sporche, subito dopo l'uso. (2
piatti +2 bicchieri +4 posate
+1 pentola + 1 padellino)
Ciclo economico e veloce per
stoviglie delicate, più sensibili alle
alte temperature, subito dopo
l'uso. (calici nel cesto superiore +
piatti delicati, nel cesto inferiore).
Ciclo igienizzante per lavare
biberon, ghiere, tettarelle insieme
a piatti, tazzine, bicchieri e
posate. Caricare le stoviglie solo
sul cesto superiore.
Programma
1. Super Wash
2. Normale
3. Quotidiano
4. Ammollo
*
5. Eco
6. Rapido 25’
7. Cristalli
8. Ciclo Baby
Detersivo
(A) = vaschetta A
(B) = vaschetta B
polvere liquido pastiglie
35 g (A)
29 g (A)
6 g (B)
25 g (A) 25 ml (A) 1 (A)
No
29 g (A)
6 g (B)
25 g (A) 25 ml (A) 1 (A)
35 g (A) 35 ml (A) 1 (A)
20 g (A) 20 ml (A) No
35 ml (A)
29 ml (A)
6 ml (B)
No
29 ml (A)
6 ml (B)
1 (A)
1 (A)
No
1 (A)
Programmi
che
prevedono
l’asciugatura
Si
Si
No
No
Si
No
Si
Si
Durata del
Opzioni
A-B-C-E
A-B-C-D-E
A-B-C
A-B
A-B-C-D
A-C
A-B-C
A
programma
(tolleranza
±10%)
Hrs. Min.
2:25’
1:50’
1:00’
0:08’
3:00’
0:25’
1:30’
1:20'
Note:
le migliori prestazioni dei programmi Quotidiano e Rapido, si ottengono preferibilmente rispettando il numero di
coperti specificati.
* Il programma Eco, rispetta la norma EN-50242, dura più a lungo rispetto ad altri programmi ma presenta un minor
consumo di energia ed in più è rispettoso con lambiente.
Nota per i laboratori di Prove: per informazioni sulle condizioni della prova comparativa EN, farne richiesta allindirizzo:
ASSISTENZA_EN_LVS@indesitcompany.com
Per facilitare il dosaggio del detersivo è bene sapere che:
1 cucchiaio da cucina = 15 g. di polvere = 15 ml di liquido circa. - 1 cucchiaino da cucina = 5 g.di polvere = 5 ml di
liquido circa
8
Page 9
Brillantante e sale
rigenerante
Usare solo prodotti specifici per lavastoviglie.
Non usare sale alimentare o industriale nè detersivi per il
lavaggio a mano.
Seguire le indicazioni riportate sulla confezione.
Se si usa un prodotto multifunzione, non è necessario
aggiungere brillantante, si consiglia invece di aggiungere
sale, specie se lacqua è dura o molto dura. Seguire le
indicazioni riportate sulla confezione.
Non aggiungendo né sale né brillantante è normale
che le spie/simboli MANCANZA SALE
BRILLANTANTE* rimangano accese.
* e MANCANZA
Caricare il brillantante
Il brillantante facilita lasciugatura delle stoviglie facendo
scivolare lacqua dalla superficie, così che non rimangano
striature o macchie.
Il serbatoio del brillantante va riempito:
quando sul pannello/display si accende la spia/simbolo
MANCANZA BRILLANTANTE
1. Aprire il serbatoio ruotando il tappo
(G) in senso antiorario.
2. Versare il brillantante evitando che
fuoriesca. Se accade, pulire subito con
F
un panno asciutto.
3. Riavvitare il tappo.
G
Non versare MAI il brillantante
direttamente allinterno della vasca.
Regolare la dose di brillantante
Se non si è soddisfatti del risultato dellasciugatura, è possibile
regolare la dose di brillantante. Con un cacciavite girare il
regolatore (F) scegliendo tra 6 posizioni (la regolazione di
fabbrica è sul 4):
se sulle stoviglie ci sono striature, girare verso i numeri
bassi (1-3).
se ci sono gocce dacqua o macchie di calcare girare
verso i numeri alti (4-6).
Impostazione durezza dellacqua
Ogni lavastoviglie è corredata di un dolcificatore dellacqua
che, utilizzando del sale rigenerante specifico per
lavastoviglie, fornisce acqua priva di calcare per il lavaggio
delle stoviglie.
Questa lavastoviglie, consente una regolazione che riduce
linquinamento ed ottimizza le prestazioni di lavaggio in
funzione della durezza dellacqua. Il dato è reperibile presso
lEnte erogatore dellacqua potabile.
- Accendere la macchina premendo il simbolo ON/OFF.
- Premere il simbolo P per circa 5 secondi; sul display
lampeggia il numero di regolazione di durezza impostato (Il
decalcificatore è impostato di fabbrica sul n° 3).
e viene visualizzato
- Premere il simbolo P in successione fino al raggiungimento
della durezza desiderata (1-2-3-4-5
acqua).
- Per uscire dalla funzione attendere alcuni secondi o premere
un simbolo delle opzioni
simbolo ON/OFF.
h2o
*;
* Vedi tabella durezza
* o spegnere la macchina con il
Se si utilizzano le pastiglie multifunzione, riempire comunque il
serbatoio del sale.
Tabella Durezze Acqua
livello °dH °fH mmol/l mesi
1 0 - 6 0 - 10 0 - 1
2 6 - 11 11 - 20 1,1 - 2
3 12 - 17 21 - 30 2,1 - 3
4 17 - 34 31 - 60 3,1 - 6
5*
Da 0°f a 10°f si consiglia di non utilizzare sale.
34 - 50 61 - 90 6,1 - 9
Autonomia media
contenitore sale
7 mesi
5 mesi
3 mesi
2 mesi
2/3 settimane
**
* con impostazione 5 la durata può prolungarsi.
** con 1 lavaggio al giorno
(°dH = durezza in gradi tedeschi - °fH = durezza in gradi
francesi - mmol/l = millimol/litro)
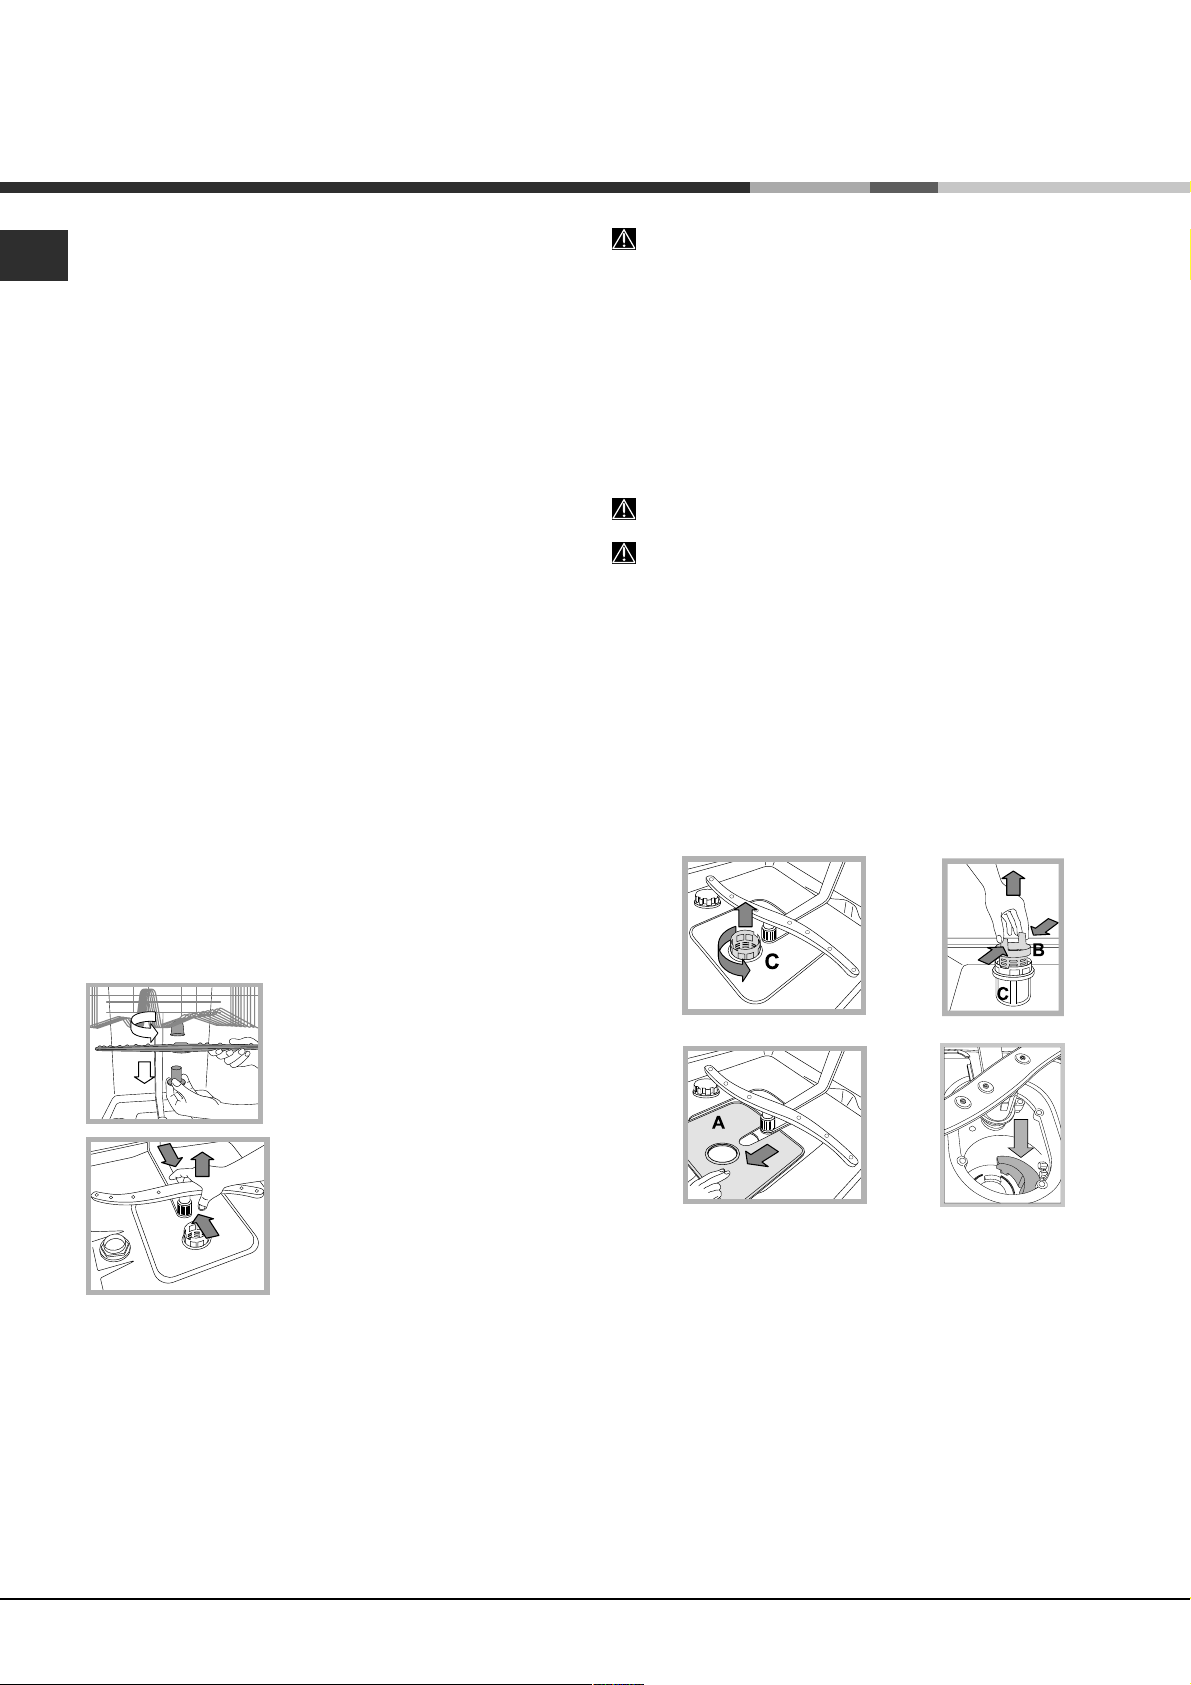
Caricare il sale rigenerante
Per avere buoni risultati di lavaggio è indispensabile verificare
che il serbatoio del sale non sia mai vuoto. Il sale rigenerante
elimina il calcare dallacqua, evitando che si depositi sulle
stoviglie.
Il serbatoio del sale è posto nella parte inferiore della
lavastoviglie (vedi Descrizione) e va riempito:
quando il galleggiante verde
tappo del sale;
quando sul pannello/display si accende la spia/simbolo
MANCANZA SALE
riempire il serbatoio di sale fino al bordo (circa 1 kg); è
normale che trabocchi un po dacqua.
4. Togliere limbuto*, eliminare i residui di sale dallimbocco;
sciacquare il tappo sotto lacqua corrente prima di avvitarlo,
disponendolo a testa in giù e facendo defluire lacqua dalle
quattro fessure disposte a stella nella parte inferiore del tappo.
(tappo con galleggiante verde
E consigliabile effettuare questa operazione ad ogni
caricamento del sale.
Chiudere bene il tappo, affinché nel serbatoio non entri
detersivo durante il lavaggio (potrebbe danneggiarsi
irrimediabilmente il dolcificatore).
Quando si rende necessario, caricare il sale prima di un
ciclo di lavaggio in modo da eliminare la soluzione salina
traboccata dal contenitore del sale.
*;
1. Estrarre il cesto inferiore e svitare il tappo
del serbatoio in senso antiorario.
2. Solo per il primo utilizzo: riempire il
serbatoio di acqua fino al bordo.
3. Posizionare limbuto
* non è visibile osservando il
* (vedi figura) e
*)
16
* Presente solo su alcuni modelli.
9
Page 10
Manutenzione e cura
Escludere acqua e corrente elettrica
16
Chiudere il rubinetto dellacqua dopo ogni lavaggio
per eliminare il pericolo di perdite.
Staccare la spina dalla presa di corrente quando si
pulisce la macchina e durante i lavori di
manutenzione.
Pulire la lavastoviglie
La superficie esterna e il pannello di controllo
possono essere puliti con un panno inumidito con
acqua non abrasivo. Non usare solventi
o abrasivi.
La vasca interna può essere pulita da eventuali
macchie con un panno imbevuto di acqua e poco
aceto.
Evitare i cattivi odori
Lasciare sempre socchiusa la porta per evitare il
ristagno di umidità.
Pulire regolarmente le guarnizioni perimetrali di
tenuta della porta e delle vaschette detersivo con una
spugnetta umida. Si eviteranno così ristagni di cibo,
principali responsabili del cattivo odore.
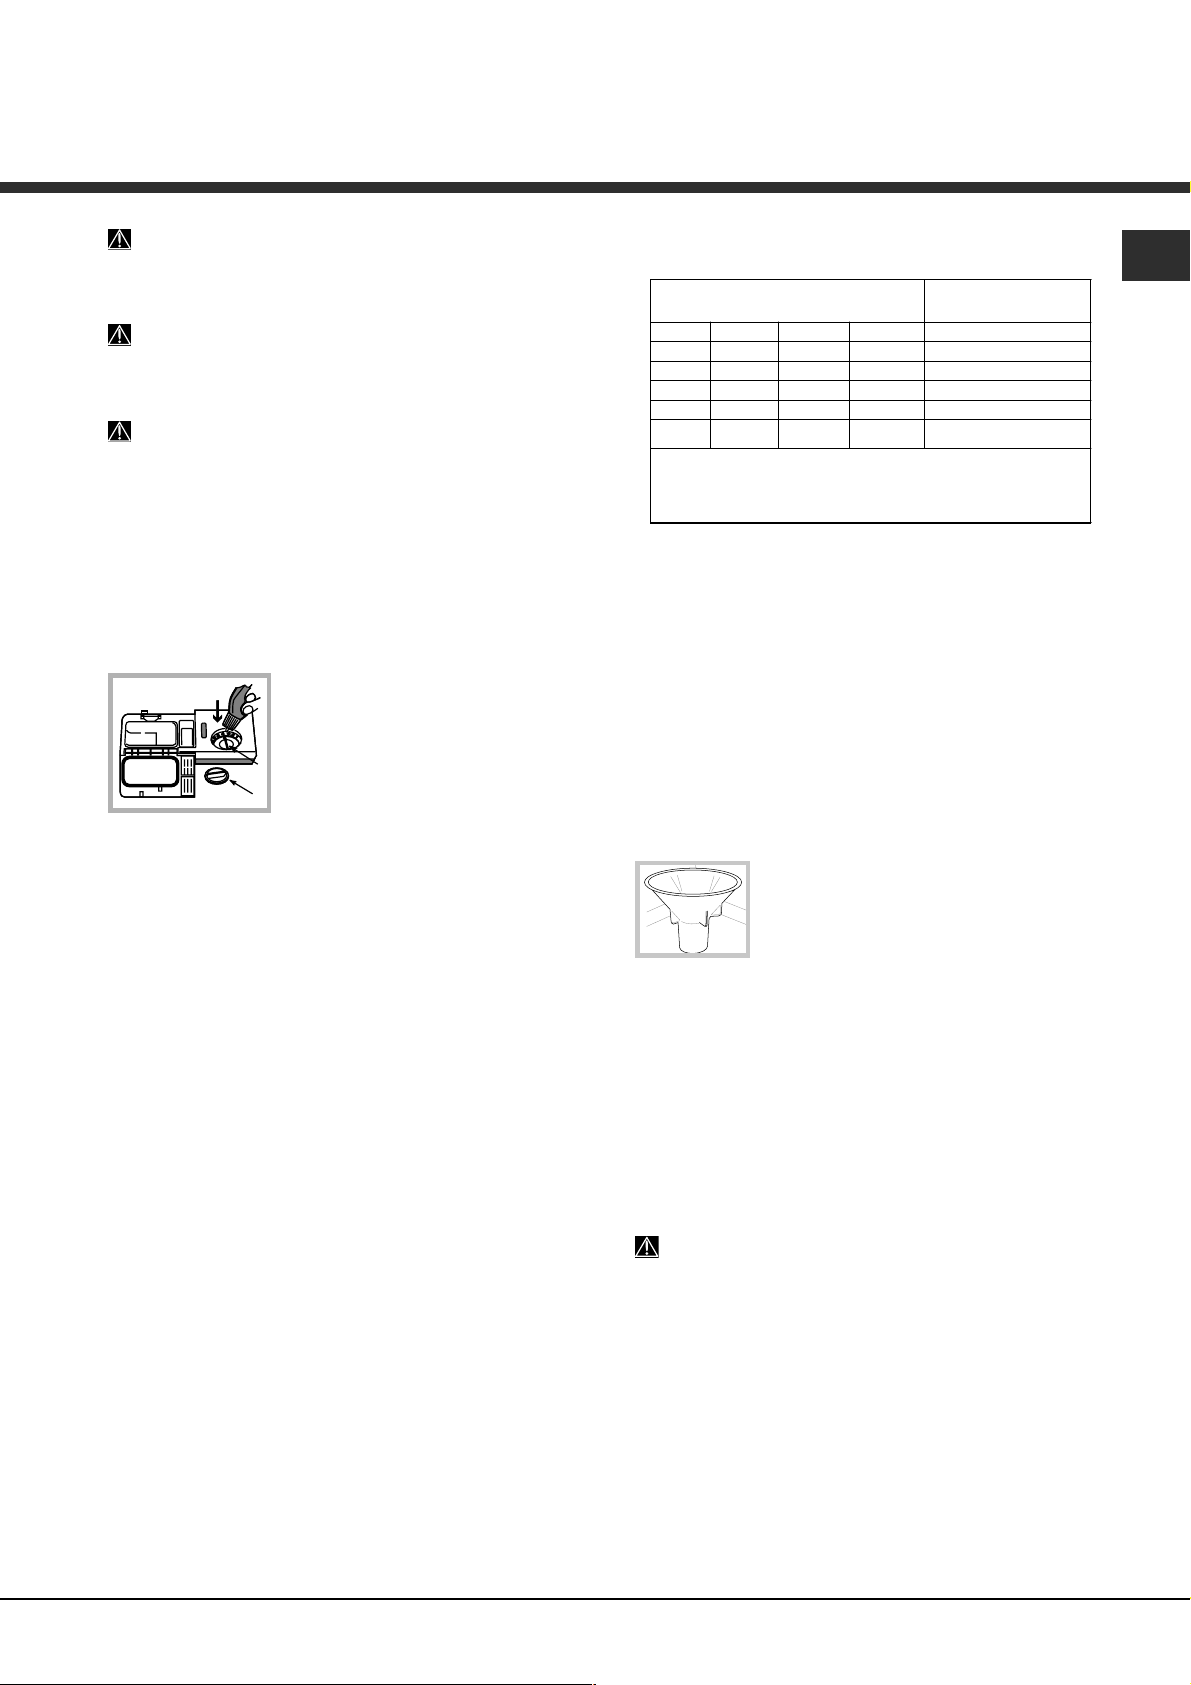
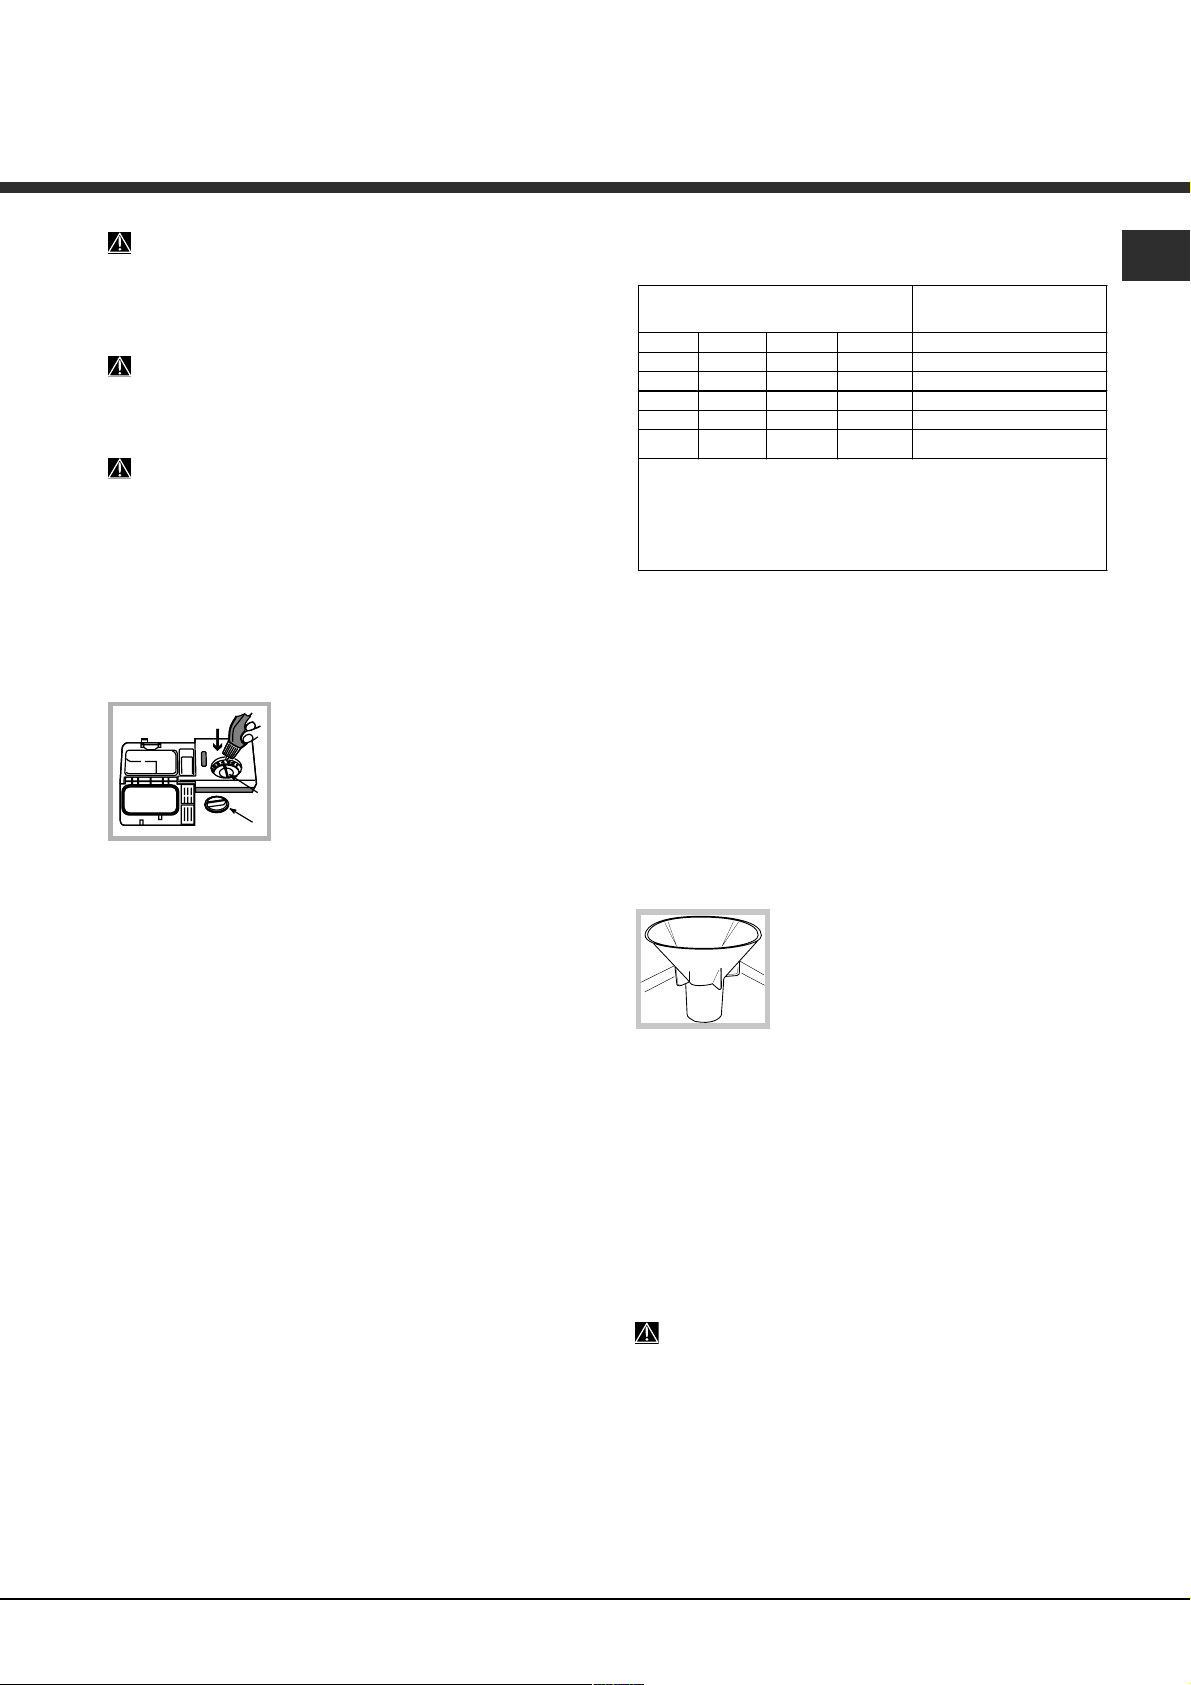
Pulire gli irroratori
Può succedere che residui di cibo si attacchino agli
irroratori e ostruiscano i fori da cui esce lacqua: di tanto
in tanto è bene controllarli e pulirli con uno spazzolino
non metallico.
I due irroratori, sono entrambi smontabili.
Per smontare lirroratore
superiore, occorre svitare
girando in senso antiorario la
ghiera di plastica.Lirroratore
superiore, va rimontato con la
parte con il maggior numero di
fori rivolta verso lalto.
Periodicamente, pulire il filtro entrata acqua posizionato
alluscita del rubinetto.
- Chiudere il rubinetto dellacqua.
- Svitare lestremità del tubo di carico acqua, togliere il filtro e
pulirlo delicatamente sotto un getto di acqua corrente.
- Inserire nuovamente il filtro e avvitare il tubo.
Pulire i filtri
Il gruppo filtrante è formato da tre filtri che puliscono lacqua di
lavaggio dai residui di cibo e la rimettono in circolo: per avere
buoni risultati di lavaggio è necessario pulirli.
Pulire i filtri con regolarità.
La lavastoviglie non deve essere usata senza filtri o con
filtro sganciato.
Dopo alcuni lavaggi, controllare il gruppo filtrante e se
necessario pulirlo accuratamente sotto acqua corrente,
aiutandosi con uno spazzolino non metallico, seguendo le
istruzioni sotto riportate:
1. ruotare in senso antiorario il filtro cilindrico C ed estrarlo
(fig. 1).
2. Estrarre il bicchiere filtro B facendo una leggera pressione
sulle alette laterali (Fig. 2);
3. Sfilare il piatto filtro inox A. (fig. 3).
4. Ispezionare il pozzetto ed eliminare eventuali residui di
cibo. NON RIMUOVERE MAI la protezione della pompa di
lavaggio (particolare di colore nero) (fig.4).
*
+
Lirroratore inferiore si smonta
facendo pressione sulle
linguette poste ai lati e
tirandolo verso lalto.
Pulizia del filtro entrata acqua*
Se i tubi dellacqua sono nuovi o sono rimasti per lungo
tempo inattivi, prima di fare lallacciamento, far scorrere
lacqua fino a che diventi limpida e sia priva di impurit.
Senza questa precauzione, c il rischio che il punto dove
entra lacqua si intasi, danneggiando la lavastoviglie.
10
!
Dopo la pulizia dei filtri, rimontare il gruppo filtrante e
ricollocarlo correttamente nella sua sede; è fondamentale per
un buon funzionamento della lavastoviglie.
"
Se ci si assenta per lunghi periodi
Staccare i collegamenti elettrici e chiudere il rubinetto
dellacqua.
Lasciare socchiusa la porta.
Al rientro, fare un lavaggio a vuoto.
* Presente solo su alcuni modelli.
Page 11

Precauzioni, consigli e
Assistenza
Lapparecchio è stato progettato e costruito in conformità alle
norme internazionali di sicurezza. Queste avvertenze sono fornite
per ragioni di sicurezza e devono essere lette attentamente.
Sicurezza generale
Questo elettrodomestico non può venire usato da persone
(bambini compresi) con ridotte capacità fisiche, sensoriali o
mentali, o mancanza di esperienza e conoscenza, a meno che
non venga loro fornita supervisione o istruzioni riguardanti
l'uso da una persona responsabile della loro sicurezza.
È necessaria la supervisione di un adulto per evitare che i
bambini giochino con l'elettrodomestico.
Lapparecchio è stato concepito per un uso di tipo non
professionale allinterno dellabitazione.
Lapparecchio deve essere usato per il lavaggio delle stoviglie
a uso domestico, solo da persone adulte e secondo le
istruzioni riportate in questo libretto.
Lapparecchio non va installato allaperto, nemmeno se lo
spazio è riparato, perché è molto pericoloso lasciarlo esposto
a pioggia e temporali.
Non toccare la lavastoviglie a piedi nudi.
Non staccare la spina dalla presa della corrente tirando il
cavo, bensì afferrando la spina.
È necessario chiudere il rubinetto dellacqua e staccare la
spina dalla presa della corrente prima di effettuare operazioni
di pulizia e manutenzione.
In caso di guasto, in nessun caso accedere ai meccanismi
interni per tentare una riparazione.
Non toccare mai la resistenza.
Non appoggiarsi o sedersi sulla porta aperta: lapparecchio
potrebbe ribaltarsi.
La porta non deve essere tenuta nella posizione aperta perchè
può rappresentare il pericolo di inciampare.
Tenere il detersivo e il brillantante fuori dalla portata dei
bambini.
Gli imballaggi non sono giocattoli per bambini.
Smaltimento
Smaltimento del materiale di imballaggio: attenersi alle
norme locali, così gli imballaggi potranno essere riutilizzati.
La direttiva Europea 2002/96/CE sui rifiuti di
apparecchiature elettriche ed elettroniche (RAEE), prevede
che gli elettrodomestici non debbano essere smaltiti nel
normale flusso dei rifiuti solidi urbani. Gli apparecchi
dismessi devono essere raccolti separatamente per
ottimizzare il tasso di recupero e riciclaggio dei materiali
che li compongono e impedire potenziali danni per la salute
e lambiente. Il simbolo del cestino barrato è riportato su tutti
i prodotti per ricordare gli obblighi di raccolta separata.
Per ulteriori informazioni, sulla corretta dismissione degli
elettrodomestici, i detentori potranno rivolgersi al servizio
pubblico preposto o ai rivenditori.
Risparmiare e rispettare lambiente
Se il proprio contratto di erogazione dellenergia elettrica
prevede fasce orarie di risparmio energetico, effettuare i
lavaggi negli orari a tariffa ridotta. Lopzione Avvio
ritardato
i lavaggi in tal senso.
* (vedi Avvio e utilizzo) può aiutare a organizzare
Detersivi senza fosfati, senza cloro
e contenenti enzimi
Si consiglia vivamente di usare i detersivi senza fosfati e
senza cloro che sono i più indicati per la tutela
dellambiente.
Gli enzimi sviluppano unazione particolarmente efficace
con temperature prossime ai 50°C, per cui con i detersivi
con enzimi si possono impostare lavaggi a basse
temperature e ottenere gli stessi risultati che si avrebbero a
65°C.
Dosare bene il detersivo in base alle indicazioni del
produttore, alla durezza dellacqua, al grado di sporco e
alla quantità di stoviglie per evitare sprechi. Pur
biodegradabili, i detersivi contengono elementi che
alterano lequilibrio della natura.
Assistenza
Prima di contattare lAssistenza:
Verificare se lanomalia può essere risolta da soli (vedi
Anomalie e Rimedi).
Riavviare il programma per controllare se linconveniente è
stato ovviato.
In caso negativo, contattare il Servizio Assistenza Tecnica
Autorizzato.
Non ricorrere mai a tecnici non autorizzati.
Comunicare:
il tipo di anomalia;
il modello della macchina (Mod.);
il numero di serie (S/N).
Queste informazioni si trovano sulla targhetta caratteristiche
posta sullapparecchio
(vedi Descrizione dellapparecchio).
Assistenza Attiva 7 giorni su 7
Se nasce il bisogno di intervento chiamare il Numero Unico
Nazionale 199.199.199
Un operatore sarà a completa disposizione per fissare un
appuntamento con Centro Assistenza Tecnico autorizzato più
vicino al luogo da cui si chiama.
È attivo 7 giorni su 7, sabato e domenica compresi, e non
lascia mai inascoltata una richiesta.
*.
16
Risparmiare acqua ed energia
Avviare la lavastoviglie solo a pieno carico. In attesa che la
macchina sia piena, prevenire i cattivi odori con il ciclo
Ammollo (vedi Programmi).
Selezionare un programma adatto al tipo di stoviglie e al
grado di sporco consultando la Tabella dei programmi:
- per stoviglie normalmente sporche utilizzare il programma
Eco, che garantisce bassi consumi energetici e di acqua.
- se il carico è ridotto attivare lopzione Mezzo carico
Avvio e utilizzo).
* (vedi
* Presente solo su alcuni modelli.
* Al costo di 14,25 centesimi di Euro al minuto (iva inclusa) dal
Lun. al Ven. dalle 08:00 alle 18:30, il Sab. dalle 08:00 alle 13:00
e di 5,58 centesimi di Euro al minuto (iva inclusa) dal Lun. al
Ven. dalle 18:30 alle 08:00, il Sab. dalle 13:00 alle 08:00 e i
giorni festivi, per chi chiama dal telefono fisso.
Per chi chiama da radiomobile le tariffe sono legate al piano
tariffario delloperatore telefonico utilizzato.
Le suddette tariffe potrebbero essere soggette a variazione da
parte delloperatore telefonico; per maggiori informazioni
consultare il sito www.aristonchannel.com.
11
Page 12

Anomalie e rimedi
Qualora lapparecchio presenti delle anomalie di funzionamento, controllare i seguenti punti prima di
16
rivolgersi allAssistenza.
Anomalie: Possibili cause / Soluzione:
La lavastoviglie non parte o non
risponde ai comandi
• Spegnere la macchina con il tasto ON/OFF, riac cendere dopo un minut o
circa e reimpostare i l programma.
• La spina non è ben inserita nella presa di c orrente.
• La porta della lavastoviglie non è ben chiusa.
La porta non si chiude
La lavastoviglie non scarica
acqua.
La lavastoviglie fa rumore.
Su stoviglie e bicchieri ci sono
depositi calcarei o una patina
biancastra.
Su stoviglie e bicchieri ci sono
striature o sfumature bluastre.
Le stoviglie sono poco
asciutte.
Le stoviglie non sono pulite.
La lavastoviglie non carica
acqua – Allarme rubinetto
chiuso.
(si sentono dei brevi bip)
(lampeggia la spia ON/OFF e il display
visualizza A 6).
Allarme al tubo di carico
dell’acqua/Filtrino entrata
acqua intasato.
(lampeggia la spia ON/OFF e il display
visualizza A 7)
*
• La serratura è scatt ata; spingere energic amente la porta f ino a sentire il
“clack”.
• Il programma non è ancora t erminato.
• Il tubo di scarico dell’acqua è piegat o (vedi Installazio ne).
• Lo scarico del lavello è ostruito.
• Il filtro è intasato da res idui di cibo.
• Le stoviglie sbatt ono tra loro o contro g li irroratori.
• Ec cessiva presenza di schiuma: il deters ivo non è dosato
adeguatamente o no n è idoneo al lavaggio in lavastoviglie. (vedi Avvio e
utilizzo).
• Manca il sale rigenerante o la sua regolazi one non è adeguata alla
durezza dell’acqua (vedi Brillant ante e sale).
• Il tappo del serbatoio del sale non è chiuso bene.
• Il brillantante è esaurito o il dosaggio è insufficiente.
• Il dosaggio del brillantante è eccessivo.
• È stato selezionato un pr ogramma senza asci ugatura.
• Il brillantante è esaurito o il dosaggio è insufficiente (vedi Brillantante e
sale).
• La regolazione del brillantante non è adeguata.
• Le stoviglie sono in materiale antiader ente o in plastica.
• I cestelli sono troppo carichi (vedi Caricare i cestelli).
• Le stoviglie non son o sistemate bene.
• Gli irroratori non so no liberi di ruota re.
• Il programma di lavag gio è troppo blando (vedi Programm i).
• Ec cessiva presenza di s chiuma: il det ersivo non è dosato
adeguatamente o no n è idoneo al lavaggio in lavastoviglie. (vedi Avvio e
utilizzo).
• Il tappo del brillantante n on è stato chiuso correttamente.
• Il filtro è sporco o intasato (vedi Ma nutenzione e cura).
• Manca il sale rigenerante (vedi Brillantante e sale).
• Manca l’acqua nel la rete idrica.
• Il tubo di carico dell’acqua è piegato (v edi Installazione ).
• Aprire il rubinetto e l’apparecchio si avvia dopo pochi minuti.
• L’apparecchio si è bloc cato perché non si è intervenuti al suono dei bip.
Spegnere la macc hina con il tasto ON/OFF, aprire il r ubinetto e dopo 20
secondi riaccendere premendo lo stes so tasto. Riprogram mare la
macchina e riavvi are.
• Spegnere la macchina premendo il tasto ON/OFF. Chiudere il rubinetto
dell’acqua per evitare allagam enti, staccare la spi na della corrente.
Controllare che il f iltro entrata acqua n on sia intasato da im purità.
(vedere capitolo " Manutenzione e Cura" )
* Presente solo su alcuni modelli.
12
Page 13

Operating instructions
DISHWASHER
EN
English, 13
PFTA++ 8H4
Contents
Installation, 14-15
Positioning and levelling
Connecting the water and electricity supplies
Advice regarding the first wash cycle
Technical data
Description of the appliance, 16
Overall view
Control panel
Loading the racks, 17
Lower rack
Cutlery basket
Upper rack
Start-up and use, 18-19
Starting the dishwasher
Measuring out the detergent
Washing options
Wash cycles, 20
Table of wash cycles
Rinse aid and refined salt, 21
Measuring out the rinse aid
Measuring out the refined salt
Care and maintenance, 22
Shutting off the water and electricity supplies
Cleaning the dishwasher
Preventing unpleasant odours
Cleaning the sprayer arms
Cleaning the water inlet filter
Cleaning the filters
Leaving the machine unused for extended periods
Precautions, advice and Assistance, 23
General safety
Disposal
Saving energy and respecting the environment
Assistance
Troubleshooting, 24
Page 14
Installation
EN
Keep this instruction manual in a safe place for future
reference. If the appliance is sold, given away or moved,
please ensure the manual is kept with the machine, so that the
new owner may benefit from the advice contained within it.
Please read this instruction manual carefully: it contains
important information regarding the safe installation, use and
maintenance of the appliance.
If the appliance must be moved at any time, keep it in an
upright position; if absolutely necessary, it may be tilted onto
its back.
This appliance is designed for domestic use or similar
applications, for example:
- staff kitchen areas in shops, offices and other work
environments;
- farmhouses;
- use by guests in hotels, motels and other residential settings;
- bed and breakfasts.
Positioning and levelling
1. Remove the appliance from all packaging and check that it
has not been damaged during transportation.
If it has been damaged, contact the retailer and do not
proceed any further with the installation process.
2. Check the dishwasher by placing it so that its sides or back
panel are in contact with the adjacent cabinets or even with the
wall. This appliance can also be recessed under a single
worktop
* (see the Assembly instruction sheet).
Connecting the water inlet hose
To a suitable cold water connection point: before attaching
the hose, run the water until it is perfectly clear so that any
impurities that may be present in the water do not clog the
appliance; after performing this operation, screw the inlet hose
tightly onto a tap with a ¾ gas threaded connection.
To a suitable hot water connection point: your dishwasher
may be supplied with hot water from the mains supply (if you
have a central heating system with radiators) provided that it
does not exceed a temperature of 60°C.
Screw the hose to the tap as described for connection to a
cold water supply.
If the inlet hose is not long enough, contact a specialist
store or an authorised technician (see Assistance).
The water pressure must be within the values indicated in
the Technical data table (see adjacent information).
The hose should not be bent or compressed.
Connecting the water outlet hose
Connect the outlet hose (without bending it) to a drain duct
with a minimum diameter of 4 cm.
3. Position the dishwasher on a level and sturdy floor. If the
floor is uneven, the front feet of the appliance may be adjusted
until it reaches a horizontal position. If the appliance is levelled
correctly, it will be more stable and much less likely to move or
cause vibrations and noise while it is operating.
4
*. To adjust the height of the rear foot, turn the red hexagonal
bushing on the lower central part at the front of the dishwasher
using a hexagonal spanner with an opening of 8 mm. Turn the
spanner in a clockwise direction to increase the height and in
an anticlockwise direction to decrease it. (see Building-in
instruction sheet attached to the documentation)
Connecting the water and electricity
supplies
Connection to the water and electricity supplies should
only be performed by a qualified technician.
The dishwasher should not stand on top of the water
hoses or the electricity supply cable.
The appliance must be connected to the water supply
network using new piping.
Do not use old piping.
The water inlet and outlet hoses and the electricity supply
cable may be positioned towards the right or the left in order
to achieve the best possible installation.
The outlet hose must be at a height ranging from 40 to 80 cm
from the floor / surface where the dishwasher rests (A).
Before connecting the water outlet hose to the sink drain,
remove the plastic plug (B).
* Only available in selected models.
14
Page 15
Anti-flooding protection
To ensure floods do not occur, the dishwasher:
- is fitted with a special system which blocks the water supply
in the event of malfunctions or leaks from inside the appliance.
Anti-condensation strip*
After installing the dishwasher, open the door and stick the
adhesive transparent strip under the wooden shelf in order to
protect it from any condensation which may form.
EN
Some models are also equipped with the supplementary New
Acqua Stop
protection even in the event of a supply hose rupture.
* safety device, which guarantees anti-flooding
WARNING: HAZARDOUS VOLTAGE!
Under no circumstances should the water inlet hose be cut as
it contains live electrical parts.
Electrical connection
Before inserting the plug into the electrical socket, make sure
that:
The socket is earthed and complies with current
regulations.
The socket can withstand the maximum load of the
appliance, which is indicated on the data plate located on
the inside of the door (see chapter entitled Description of
the appliance).
The power supply voltage falls within the values indicated
on the data plate on the inside of the door.
The socket is compatible with the plug of the appliance. If
this is not the case, ask an authorised technician to replace
the plug (see Assistance); do not use extension cables or
multiple sockets.
Once the appliance has been installed, the power supply
cable and the electrical socket should be easily accessible.
The cable should not be bent or compressed.
If the power supply cable is damaged, it must be
replaced by the manufacturer or its Technical Assistance
Service in order to prevent all potential hazards. (See
Assistance)
The Company shall not be held responsible for any
incidents that occur if these regulations are not observed.
Advice regarding the first wash cycle
After the appliance has been installed, immediately before
running the first wash cycle, completely fill the salt dispenser
with water and add only then approximately 1 kg of salt (see
chapter entitled Rinse aid and refined salt). The water may
overflow: this is normal and is not a cause for concern. Select
the water hardness value (see chapter entitled Rinse aid and
refined salt). After the salt has been poured into the machine,
the LOW SALT indicator light
If the salt container is not filled, the water softener and the
heating element may be damaged as a result.
Technical data
Dimensions
Capacity 14 standard place-settings
Water supply
pressure
Power supply
voltage
Total absorbed
power
Fuse See appliance data plate
* switches off.
Width 59.5 cm
Height 82 cm
Depth 57 cm
0.05 - 1 MPa (0.5 - 10 bar)
7.25 – 145 psi
See appliance data plate
See appliance data plate
This dishwasher conforms to
the following European
Community Directives:
- 2006/95/EC (Low Voltage)
- 2004/108/EC
(Electromagnetic compatibility)
- 2005/32/EC (Comm. Reg.
1275/2008) (Ecodesign)
- 97/17/CE (Labelling)
- 2002/96/CE (Disposal)
* Only available in selected models.
15
Page 16
Description of the appliance
EN
Overall view
Control panel
1. Upper rack
2. Upper sprayer arm
3. Tip-up compartments
4. Rack height adjuster
5. Lower rack
6. Lower sprayer arm
7. Cutlery basket
8. Washing filter
9. Salt dispenser
10. Detergent and rinse aid dispensers
11. Data plate
12. Control panel
***
13. Locking ring
On-Off/Reset
Display
Start/Pause
Wash cycle select
Key to wash cycle symbols
Delayed start option
Half load option
Display
Washing
symbol
Drying
symbol
Start symbol
Good Night option
symbol
Multi-functional tablets
option symbol
Wash cycle
number
Remaining time, ON, OFF,
END indicator light
Low Salt
Low Rinse aid
Delayed start
option symbol
Lower rack half load
option symbol
Upper rack half load
option symbol
*** Only in completely built-in models.
* Only available in selected models.
The number and type of wash cycles and options may vary depending on the dishwasher model.
Short Time option
Good Night option
Multi-functional tablets
option
Pause symbol
Short Time option symbol
16
Page 17
Loading the racks
Before loading the racks, remove all food residue from
crockery and empty liquids from glasses and cups.
After loading the appliance, make sure that the sprayer
arms can rotate freely.
Lower rack and cutlery basket
The lower rack can hold pans, lids, plates, salad bowls, cutlery, etc.
Large plates and lids should ideally be placed at the sides of the rack.
Several dishwasher models are fitted with tip-up sections
which can be used in a vertical position when arranging plates
or in a horizontal position when arranging saucepans, salad
bowls and frying pans.
*,
Upper rack
Load this rack with delicate and lightweight crockery: glasses,
cups, saucers and shallow salad bowls.
Adjustable position tip-up compartments
The tip-up compartments
can be positioned at different
heights, to optimise the
arrangement of crockery
throughout the rack. Wine
glasses can be placed
safely in the tip-up
compartments, by inserting
the stem of each glass into
the corresponding slots.
Some dishwasher models are fitted
with a sliding tray
to hold serving utensils or small cups.
For optimum washing performance,
avoid positioning bulky crockery
directly below the tray.
* which can be used
EN
The type of cutlery basket may vary (modular or non-modular)
according to the dishwasher model. The non-modular basket must
only be positioned at the front of the lower rack.
Both are fitted with
grilles over the top, for
improved cutlery
arrangement.
Knives and other utensils with sharp edges must be placed
in the cutlery basket with the points facing downwards, or
they must be positioned horizontally in the tip-up
compartments on the upper rack.
* Only available in selected models. The number and position
may vary.
Adjusting the height of the upper rack
In order to make it easier to arrange the crockery, the upper rack
may be moved to a higher or lower level.
The height of the upper rack should ideally be adjusted
WHEN THE RACK IS EMPTY.
NEVER raise or lower the rack on one side only.
Open the left and right guide rail stops
and pull out the rack; position it higher or
lower as required, slide it along the guide
rails until the front wheels are in place and
close the stops (see figure).
If the rack is fitted with Dual Space
handles
rack until it reaches its stop point, grip the
handles at the sides of the rack and move
it upwards or downwards, then slowly let
it fall back into place.
* (see figure), pull out the upper
Items that should not be washed in the dishwasher
Wooden items, objects with wooden or horn handles or glued-
on parts.
Items made from aluminium, copper, brass, pewter or tin.
Items made from plastic material which is not heat-resistant.
Antique or hand-painted porcelain.
Antique silver. Silver that is not antique may, however, be
washed in the dishwasher using a delicate wash cycle,
provided that it does not come into contact with other metals.
We recommend the use of crockery which is dishwasher
safe.
17
Page 18
Start-up and use
EN
The control panel features a Touch Control system;
press the symbols lightly with your fingertips to activate
the command.
The symbols in the key to wash cycles (to the left of
the control panel) DO NOT light up.
Wash cycles are selected by pressing the P symbol.
The machine has a buzzer/set of tones (depending on the
dishwasher model) to inform the user that a command has
been implemented: power on, cycle end, etc.
The symbols/indicator lights on the control panel/display
may vary in colour (depending on the dishwasher model).
Starting the dishwasher
1. Turn the water tap on.
2. Press the ON/OFF symbol: the display lights up for a few
seconds, and the text ON appears.
3. Open the door and pour in a suitable amount of detergent
(see Measuring out the detergent).
4. Load the racks (see Loading the racks) and shut the door.
5. Press the P symbol to select the wash cycle in accordance
with the type of crockery and its soil level (see Table of wash
cycles).
6. Select the wash options* (see options).
7. Press the Start/Pause symbol; the Start symbol on the display
lights up. The wash cycle number, the symbols corresponding
to washing, any selected options and the time remaining until the
end of the cycle appear on the display.
8. Once the wash cycle has ended, its corresponding number
appears on the display, along with the text END. Switch off the
appliance using the ON/OFF symbol; the text OFF will appear
on the display. Shut off the water tap and unplug the appliance
from the electricity socket.
9. Wait for a few minutes before removing the crockery, in
order to avoid burns. Unload the racks, beginning with the
lower level.
- The machine will temporarily switch off automatically
during certain extended periods of inactivity, in order to
minimise electricity consumption.
AUTO WASH CYCLES*: This model of dishwasher is
equipped with a special sensor which can be used to assess
the level of soiling and automatically select the most efficient
and economic wash cycle accordingly.
The duration of the auto wash cycles may vary due to the
operation of the sensor.
If the crockery is only lightly soiled or if it has been
rinsed with water before being placed in the dishwasher,
reduce the amount of detergent used accordingly.
Modifying a wash cycle in progress
If a mistake was made during the wash cycle selection process
it is possible to change the cycle, provided that it has only just
begun. To change the wash cycle, switch off the machine by
pressing and holding the ON/OFF/Reset symbol; the text 3-2-1
OFF will appear on the display. Switch the machine back on
using the same symbol and select the wash cycle and any
desired options again.
Adding extra crockery
Press the Start/Pause symbol; the Pause symbol will light up.
Open the door, taking care to avoid the escaping steam, and
place the crockery inside the appliance. Press the Start/Pause
symbol again: the Start symbol lights up and the cycle is
resumed.
Press the Start/Pause symbol to pause the machine; the
wash cycle is stopped temporarily.
At this stage it is not possible to change the wash cycle.
Accidental interruptions
If the door is opened during the wash cycle, or if there is a
power cut, the cycle stops. It starts again from the point at
which it was interrupted once the door has been shut or the
electricity supply is restored.
Measuring out the detergent
A good wash result also depends on the correct amount
of detergent being used; exceeding the stated amount
does not result in a more effective wash and increases
environmental pollution.
Only use detergent which has been specifically
designed for dishwashers.
DO NOT USE washing up liquid.
Using excessive detergent may result in foam residue
remaining in the machine after the cycle has ended.
The use of tablets is only recommended for models
which offer the MULTI-FUNCTIONAL TABLETS option.
To achieve the best results from each washing and
drying cycle, powder detergent, rinse aid liquid and salt
should be used.
compartment A: Washing detergent
compartment B: Pre-wash detergent
1. Open cover C by pressing
button D.
2. Pour in the detergent after
consulting the Table of wash cycles:
For powder detergent: use
compartments A and B.
For detergent in tablet form:
when the cycle requires 1 tablet,
place it in compartment A and close
the cover; when it requires 2, place
the second tablet at the bottom of the appliance.
3. Remove detergent residues from the edges of the
compartment and close the cover until it clicks.
18
* Only available in selected models.
Page 19
Wash options*
The OPTIONS may only be set, modified or reset after the
wash cycle has been selected and before the START/
PAUSE symbol has been pressed.
Only the options which are compatible with the type of wash
cycle set may be selected. If an option is not compatible with
the selected wash cycle (see Table of wash cycles), the
corresponding symbol flashes rapidly 3 times.
Half load using the upper/lower racks
With the Half Load option, it is possible to select whether to
perform the wash on the upper or lower rack,
saving water, energy and detergent. Select the wash cycle
and press the HALF LOAD symbol; the half load symbol (on
the display) and the upper rack indicator will light up; if
pressed again the half load symbol and lower rack indicator
will be displayed. The wash cycle only takes place on the
selected rack.
EN
If an option is selected which is incompatible with another
(previously selected) option, it will flash 3 times and will be
deselected, while the option selected first will remain active.
To deselect an option which has been set by mistake,
press the corresponding symbol again.
Delayed start*
It is possible to delay the start of the cycle for a period of time
between 1 and 24 hours.
1. After selecting the desired wash cycle and any other
options, press the DELAYED START symbol: the symbol on the
display will light up. Press the DELAYED START symbol to
select the time at which you wish the wash cycle to begin (after
a period of 1 to 24 hours).
2. Confirm your selection using the Start/Pause symbol; the
countdown will begin. The selected delay period is displayed
and the Start symbol stops flashing.
3. Once this time has elapsed, the DELAYED START symbol
switches off and the wash cycle begins.
To deselect it, press and hold the DELAYED START symbol
until the text OFF appears.
The DELAYED START function cannot be set once a
wash cycle has been started.
Short Time option*
This option can be used to reduce the duration of the main
wash cycles while maintaining the same washing and drying
performance levels.
After selecting the wash cycle, press the Short Time option
symbol; the illumination of the corresponding symbol on the
display indicates its selection.
To deselect the option, press the same symbol again.
The Short Time and Good Night options are not
compatible with each other.
Remember to load the selected rack only, and to
reduce the amount of detergent accordingly.
It is better to use powder detergent in this case.
This option is incompatible with the following wash
cycle: Rapid and Baby.
Good Night option*
This option reduces the amount of noise made by the machine
and lengthens the wash cycles. It is a useful option because it
enables users to benefit from the night-time energy rate.
After selecting the wash cycle, press the Good Night option
symbol; the corresponding symbol lights up on the display to
indicate its selection.
To deselect the option, press the same symbol again.
The Good Night option is not compatible with the
HALF LOAD option.
Multi-functional tablets* (Tabs)
This option optimises washing and drying results.
When using multi-functional tablets, press the MULTIFUNCTIONAL TABLETS symbol: the corresponding
symbol will light up on the display. The Multi-functional
tablets option results in the lengthening of the wash
cycle.
The MULTI-FUNCTIONAL TABLETS option remains
set for subsequent wash cycles if it is not deselected.
The use of tablets is only recommended when the
MULTI-FUNCTIONAL TABLETS option is available.
This option is not recommended for use with wash
cycles which do not specify the use of multi-functional
tablets (see Table of options).
The Short Time and Good Night options are not
compatible with the HALF LOAD option.
* Only available in selected models.
Table of options
1. Auto Super Wash YES YES
2. Auto Normal
3. A 60 Daily Wash YES YES
4. Soak
5. Eco 50°C
6. Rapid 25’
7. Glassware Wash YES YES
8. Baby Wash
A B C D E
Delayed
Start
Half
Load
YES YES
YES YES
YES YES
YES
YES
No
No
Multi-
functional
Tablets
YES
YES
YES
No
YES
YES
YES
No
Good
Night
YES YES
YES
Short
Time
No YES
No
No
No
No
No
No
No
No
No
No
No
19
Page 20

Wash cycles
EN
For available OPTIONS please refer to the Table of options on the Start-up and use page.
The number and type of wash cycles and options may vary depending on the dishwasher model.
Wash cycle selection
instructions
Heavily soiled dishes and pans
(not to be used for delicate
items).
Normally soiled pans and dishes.
Standard daily wash cycle.
Limited quantity of daily soiling (4
place settings + 1 saucepan +1
frying pan).
Pre-wash for dishes while
awaiting completion of the load
with the dishes from the next
meal.
Environmentally-friendly wash
cycle with low energy
consumption levels, suitable for
pans and dishes.
Economic and fast wash to be
used for lightly soiled dishes, run
immediately after use (2 plates +
2 glasses + 4 pieces of cutlery +
1 saucepan + 1 small frying pan).
Economic and fast wash for
delicate items which are sensitive
to high temperatures, run
immediately after use (glassware
in the upper rack + fragile plates
in the lower rack).
Disinfecting wash cycle suitable
for washing bottles, rings and
teats together with plates, cups,
glasses and cutlery. The crockery
should only be loaded on the
upper rack.
8. Baby Wash
Wash cycle
1. Super Wash
2. Normal
3. Daily Wash
4. Soak
5. Eco*
6. Rapid 25’
7. Glassware
Wash
Detergent
(A) = compartment A
(B) = compartment B
powder
liquid tablets
35 g (A)
29 g (A)
6 g (B)
35 ml (A)
29 ml (A)
6 ml (B)
1 (A)
1 (A)
25 g (A)
No
29 g (A)
6 g (B)
25 g (A)
35 g (A)
25 ml (A)
29 ml (A)
25 ml (A)
35 ml (A)
No
6 ml (B)
1 (A)
No
1 (A)
1 (A)
1 (A)
20 g (A)
20 ml (A)
No
Wash cycles
which include
drying
Yes
Yes
No
No
Yes
No
Yes
Yes
A-B-C-D-E
Options
A-B-C-E
A-B-C
A-B
A-B-C-D
A-C
A-B-C
A
Wash cycle
duration
(tolerance
Hrs. Mins.
±10%)
2:25’
1:50’
1:00’
0:08’
3:00’
0:25’
1:30’
1:20'
Notes:
optimum performance levels when using the Daily wash and Rapid wash cycles can be achieved by observing the maximum
amounts of crockery specified.
* The Eco wash cycle adheres to the regulation EN-50242. Although it has a longer duration than other wash cycles it uses less
energy and is less harmful to the environment.
Note for Test Laboratories: for information relating to comparative EN testing conditions, please send an email to the following
address: ASSISTENZA_EN_LVS@indesitcompany.com
To make it easier to measure out the detergent, it is worth remembering that:
1 tablespoon = 15 g of powder = approximately 15 ml of liquid 1 teaspoon = 5 g of powder = approximately 5 ml of liquid
20
Page 21
Rinse aid and refined salt
Only use products which have been specifically
designed for dishwashers.
Do not use table salt or industrial salt, or washing up
liquid.
Follow the instructions given on the packaging.
If using a multi-functional product it is not necessary to
add rinse aid; however, we recommend that you add salt,
especially if you live in an area where the water is hard or
very hard. Follow the instructions given on the packaging.
If you do not add salt or rinse aid, the LOW SALT*
and LOW RINSE AID* indicator lights/symbols will remain
lit.
Measuring out the rinse aid
Rinse aid makes it easier for the crockery to dry, as water
runs off surfaces more readily and therefore does not leave
streaks or marks.
The rinse aid dispenser should be filled:
When the LOW RINSE AID
panel/display is illuminated;
F
G
NEVER pour the rinse aid directly into the appliance tub.
Adjusting the amount of rinse aid
If you are not completely satisfied with the drying results, you
may adjust the quantity of rinse aid used. Use a screwdriver
to turn the dosage adjuster (F) to one of the 6 pre-set
positions (the default position is set to 4):
If there are streaks on the crockery, set the adjustment
device to a lower number (1-3).
If drops of water remain on the crockery or if there are
limescale marks present after the cycle has finished, set
the adjuster to a higher number (4-6).
Setting the water hardness
Every dishwasher is fitted with a water softener which, by
using refined salt designed especially for this type of
appliance, supplies water without limescale which is then used
to wash the crockery.
This dishwasher offers a setting which helps to reduce
pollution and optimises washing performance in accordance
with the water hardness level in your area. This information can
be obtained from your local water supplier.
- Switch on the appliance by pressing the ON/OFF symbol.
- Press and hold the P symbol for approximately 5 seconds;
the set hardness number will flash on the display (the water
softening system is set by default to number 3) and
appear.
- Press the P symbol repeatedly until the desired hardness level
has been reached (1-2-3-4-5
- To exit the function, wait a few seconds or press one of the
option symbols
symbol.
*, or switch off the machine using the ON/OFF
* indicator light on the control
1. Open the dispenser by turning the
lid (G) in an anticlockwise direction.
2. Pour in the rinse aid, making sure it
does not overflow from the dispenser.
If this happens, clean the spill
immediately with a dry cloth.
3. Screw the lid back on.
h2o will
* see Water hardness table).
Even if using multi-functional tablets, the salt dispenser should
still be filled.
Water Hardness Table
Level °dH °fH mmol/l months
1 0 - 6 0 - 10 0 - 1
2 6 - 11 11 - 20 1,1 - 2
3 12 - 17 21 - 30 2,1 - 3
4 17 - 34 31 - 60 3,1 - 6
5*
For values between 0°f and 10°f, we do not recommend the
use of salt.
34 - 50 61 - 90 6,1 - 9
Average salt container
capacity duration
7 months
5 months
3 months
2 months
2/3 weeks
**
* this setting may cause a slight increase in the duration of
the cycles.
**
for 1 wash cycle per day.
(°dH = hardness measured in German degrees - °f = hardness
measured in French degrees mmol/l = millimoles per litre)
Loading the refined salt
In order to achieve the best possible results using a wash
cycle, make sure that the dispenser is never empty. Refined
salt removes limescale from the water, thus avoiding the
formation of deposits on crockery.
The salt dispenser is located in the lower part of the
dishwasher (see Description) and should be filled:
When the green float* cannot be seen by simply looking at
the cap of the salt dispenser.
When the LOW RINSE AID* indicator light/symbol on the
control panel/display is illuminated.
1. Remove the lower rack and unscrew
the container cap (anticlockwise).
2. The first time you do this: fill the water
tank right up to its edge.
3. Position the funnel
figure) and fill the salt dispenser up to the
edges (approximately 1 kg); it is normal for a little water to leak
out.
4. Remove the funnel* and wipe any salt residue away from the
opening; rinse the cap under running water and then screw it
on, the head facing downwards so as to let the water flow out of
the four cracks which are arranged in a star shape on the lower
part of the cap. (cap with green float*)
It is advisable to perform this procedure every time you
add salt to the container.
Make sure the cap is screwed on tightly, so that no detergent
can get into the container during the wash cycle (this could
damage the water softener beyond repair).
When necessary, measure out the salt before a wash
cycle so that any saline solution which has leaked out of the
salt dispenser is removed.
* correctly (see
* Only available in selected models.
EN
21
Page 22
Care and maintenance
Shutting off the water and electricity
EN
supplies
Turn off the water tap after every wash cycle to avoid leaks.
Always unplug the appliance when cleaning it and when
performing maintenance work.
Cleaning the dishwasher
The external surfaces of the machine and the control panel
may be cleaned using a non-abrasive cloth which has been
dampened with water. Do not use solvents or abrasive
products.
Any marks on the inside of the appliance may be removed
using a cloth dampened with water and a little vinegar.
Preventing unpleasant odours
Always keep the door of the appliance ajar in order to avoid
moisture from forming and being trapped inside the
machine.
Clean the seals around the door and detergent dispensers
regularly using a damp sponge. This will avoid food
becoming trapped in the seals, which is the main cause
behind the formation of unpleasant odours.
Cleaning the sprayer arms
Food residue may become encrusted onto the sprayer arms
and block the holes used to spray the water. It is therefore
recommended that the arms are checked from time to time
and cleaned with a small non-metallic brush.
The two sprayer arms may both be removed.
Clean the water inlet filter at the tap outlet regularly.
- Turn off the water tap.
- Unscrew the end of the water inlet hose, remove the filter and clean
it carefully under running water.
- Replace the filter and screw the water hose back into position.
Cleaning the filters
The filter assembly consists of three filters which remove food
residues from the washing water and then recirculate the water. They
should be cleaned if you wish to achieve the best results in every
wash.
Clean the filters regularly.
The dishwasher should not be used without filters, or if the filter is
loose.
After several washes, check the filter assembly and if necessary
clean it thoroughly under running water, using a non-metallic brush
and following the instructions below:
1. Turn the cylindrical filter C in an anti-clockwise direction and pull it
out (fig. 1).
2. Remove the cup filter B by exerting a slight pressure on the side
flaps (fig. 2).
3. Slide out the stainless steel plate filter A (fig. 3).
4. Inspect the trap and remove any food residue. NEVER REMOVE
the wash cycle pump (black detail) (fig. 4).
To remove the upper sprayer arm,
turn the plastic locking ring in an
anti-clockwise direction. The upper
sprayer arm should be replaced so
that the side with the greater
number of holes is facing upwards.
The lower sprayer arm can be
removed by pressing on the side
tabs and pulling it upwards.
Cleaning the water inlet filter*
If the water hoses are new or have not been used for an
extended period of time, let the water run to make sure it is
clear and free of impurities before performing the necessary
connections. If this precaution is not taken, the water inlet
could become blocked and damage the dishwasher.
1
3
After cleaning the filters, replace the filter assembly and fix
it in position correctly; this is essential for maintaining the
efficient operation of the dishwasher.
2
4
Leaving the machine unused for extended
periods
Disconnect the appliance from the electricity supply and shut off
the water tap.
Leave the door of the appliance ajar.
When you return, run a wash cycle when the dishwasher is empty.
22
* Only available in selected models.
Page 23

Precautions, advice and
Assistance
The appliance was designed and manufactured in
compliance with current international safety standards. The
following information has been provided for safety reasons and
should therefore be read carefully.
General safety
The appliance should not be operated by people (including
children) with reduced physical, sensory or mental capacities,
or by inexperienced people who are not familiar with the
product, unless supervision is provided by someone who
assumes responsibility for their safety.
An adult must supervise children at all times, to prevent
children from playing with the appliance.
The appliance was designed for domestic use inside the home
and is not intended for commercial or industrial use.
The appliance must be used by adults only, to wash domestic
crockery in accordance with the instructions in this manual.
The appliance must not be installed outdoors, even in covered
areas. It is extremely dangerous to leave the machine
exposed to rain and storms.
Do not touch the appliance when barefoot.
When unplugging the appliance always pull the plug from the
mains socket, do not pull on the cable.
The water supply tap must be shut off and the plug should be
removed from the electrical socket before cleaning the
appliance or carrying out any maintenance work.
If the appliance breaks down, do not under any
circumstances touch the internal parts in an attempt to
perform the repair work yourself.
Never touch the heating element.
Do not lean or sit on the open door of the appliance: this may
cause the appliance to overturn.
The door should not be left open as it may create a dangerous
obstacle.
Keep detergent and rinse aid out of reach of children.
The packaging material should not be used as a toy: it can
become a choking or suffocation hazard.
Saving energy and respecting the
environment
Saving water and energy
Only begin a wash cycle when the dishwasher is full. While
waiting for the dishwasher to be filled, prevent unpleasant
odours with the Soak cycle (see Wash Cycles).
Select a wash cycle which is suited to the type of crockery
and to the soil level of the crockery using the Table of wash
cycles:
- For dishes with a normal soil level, use the Eco wash cycle,
which guarantees low energy and water consumption levels.
- If the load is smaller than usual activate the Half load
option (see Start-up and use).
If your electricity supply contract gives details of electricity
saving time bands, run wash cycles during the periods
when a lower tariff is applied. The Delayed start
Start-up and use) helps you organise the wash cycles
accordingly.
Detergents free from phosphates and chlorine
and containing enzymes
We strongly recommend that you use detergents that do not
contain phosphates or chlorine, as these products are
harmful to the environment.
Enzymes provide a particularly effective action at
temperatures around 50°C, and as a result detergents
containing enzymes can be used in conjunction with lowtemperature wash cycles in order to achieve the same
results as a normal 65°C wash cycle.
To avoid wasting detergent, use the product in appropriate
quantities based on the manufacturers recommendations,
the hardness of the water and the soil level and quantity of
crockery to be washed. Even if they are biodegradable,
detergents contain substances which may alter the balance
of nature.
*
* option (see
EN
Disposal
Disposal of packaging materials: observe local legislation so
that the packaging may be reused.
The European Directive 2002/96/EC relating to Waste Electrical
and Electronic Equipment (WEEE) states that household
appliances should not be disposed of using the normal solid
urban waste cycle. Exhausted appliances should be collected
separately in order to optimise the cost of re-using and
recycling the materials inside the machine, while preventing
potential damage to the atmosphere and to public health. The
crossed-out dustbin is marked on all products to remind the
owner of their obligations regarding separated waste
collection.
For further information relating to the correct disposal of
household appliances, owners may contact the relevant public
authority or the local appliance dealer.
Assistance
Before contacting Assistance:
Check whether the problem can be resolved using the
Troubleshooting guide (see Troubleshooting).
Restart the wash cycle to check whether the problem has
ceased to exist.
If the problem persists, contact the Authorised Technical
Assistance Service.
Never use the services of unauthorised technicians.
Please have the following information to hand:
The type of malfunction.
The appliance model (Mod.).
The serial number (S/N).
This information can be found on the appliance data plate (see
Description of the appliance).
* Only available in selected models.
23
Page 24

Troubleshooting
Whenever the appliance fails to work, check for a solution from the following list before calling for Assistance.
EN
Problem: Possible causes / Solutions:
The dishwasher does not start
or cannot be controlled.
The door won’t close.
No water drains out from the
dishwasher.
The dishwasher makes
excessive noise.
The dishes and glasses are
covered in a white film or
limescale deposits.
The dishes and glasses are
streaked or have a bluish
tinge.
The crockery has not been
dried properly.
The dishes are not clean.
The dishwasher does not take
any water in - Tap shut-off
alarm
(several short beeps are emitted)
(the ON/OFF indicator light flashes and
A 6 appears on the display).
Water inlet hose alarm / Water
inlet filter blocked
(the ON/OFF indicator light flashes and
A 7 appears on the display).
*
• Switch off the applianc e by pressing the ON/OFF but ton, switch it bac k
on after approximat ely one minute and res et the program.
• The appliance has not been plugged in properly.
• The dishwasher door h as not been shut properl y.
• The lock was released. Strongly push the door until a “clacking” noise is hea rd.
• The dishwasher cycle h as not yet finished.
• The water inlet hose is bent (see Installation ).
• The drain duct is bloc ked.
• The filter is clogged u p with food residues.
• The dishes are rattli ng against each ot her or against the spray er arms.
• An excessive amount of foam has been produce d: the detergent has not
been measured out c orrectly or it is not suitable for use in di shwashers
(see Start-up and use).
• The level of the refined sal t is low or the dosa ge setting is not suit ed to
the hardness of the water (see Rinse aid and sa lt).
• The lid on the salt di spenser is not closed prope rly.
• The rinse aid has been us ed up or the dosage is too lo w.
• The rinse aid dosage i s too high.
• A wash cycle without a drying program has been s elected.
• The ri nse aid has be en use d up or the dosa ge is too low (se e Rinse ai d and salt ).
• The rinse aid dispense r setting is not suit able.
• The crockery is mad e from non-stick mat erial or plastic.
• The racks are overloaded (see Loading the racks).
• The crockery has not been arranged well.
• The sprayer arms c annot move freely.
• The wash cycle is too gentl e (see Wash cycles).
• An excessive amount of foam has been produce d: the detergent has not
been measured out c orrectly or it is not suitable for use in di shwashers
(see Start-up and use).
• The lid on the rinse ai d compartment has not been shut correctly.
• The filter is dirty or blocked (see Care an d maintenance).
• The refined salt level is low (see Rinse aid and salt).
• There is no water in t he mains supply.
• The water inlet hose is bent (see Installation ).
• Turn on the tap and the appliance will start after a few minutes.
• The appliance lock has been activated bec ause no action was tak en
when the beeps sounde d.
Switch off the applianc e using the ON/OFF button, turn on the tap and
switch the applianc e back on after 20 seconds b y pressing the sam e
button. Re-program the appliance and res tart the wash cycle.
• Switch off the applianc e by pressing the ON/O FF button. Shut off t he
water tap to elimi nate the risk of floodi ng and remove the plug from the
electrical socket .
Make sure the water inlet filter has not becom e blocked by impuri ties
(see “Care and maintenance” chapter).
* Only available in selected models.
24
Page 25

Mode demploi
LAVE-VAISSELLE
FR
Français, 25
PFTA++ 8H4
Sommaire
Installation, 26-27
Mise en place et mise à niveau
Raccordements eau et électricité
Conseils pour le premier lavage
Caractéristiques techniques
Description de lappareil, 28
Vue densemble
Bandeau de commande
Charger les paniers, 29
Panier inférieur
Panier à couverts
Panier supérieur
Mise en marche et utilisation, 30-31
Mettre en marche le lave-vaisselle
Charger le produit de lavage
Options de lavage
Programmes, 32
Tableau des programmes
Produit de rinçage et sel régénérant, 33
Charger le produit de rinçage
Charger le sel régénérant
Entretien et soin, 34
Coupure de larrivée deau et de courant
Nettoyer le lave-vaisselle
Eviter les mauvaises odeurs
Nettoyer les bras de lavage
Nettoyage du filtre dentrée deau
Nettoyer les filtres
En cas dabsence pendant de longues périodes
Précautions, conseils et assistance
technique, 35
Sécurité générale
Mise au rebut
Economies et respect de lenvironnement
Assistance
Anomalies et remèdes, 36
Page 26

Installation
.4
Conserver ce mode demploi pour pouvoir le consulter à
tout moment. En cas de vente, de cession ou de
déménagement, sassurer quil accompagne bien lappareil.
Lire attentivement les instructions : elles contiennent des
conseils importants sur linstallation, lutilisation
et la sécurité de lappareil.
En cas de déménagement, transporter lappareil
verticalement; si besoin est, lincliner sur le dos.
Cet appareil est conçu pour un usage domestique ou
autres applications similaires, telles que :
- lieux aménagés en espace cuisine pour le personnel de
magasins, bureaux et autres lieux de travail ;
- fermes ;
- utilisation par les clients d'hôtels, de motels ou autres locaux
de type résidentiel ;
- chambres d'hôtes.
Mise en place et mise à niveau
1. Déballer lappareil et sassurer quil na pas été endommagé
pendant le transport.
Sil est abîmé, ne pas le raccorder et contacter le revendeur.
2. Installer le lave-vaisselle de manière à ce que les côtés et la
paroi arrière touchent aux meubles adjacents ou au mur.
Lappareil peut être encastré sous un plan de travail continu
(voir feuille de Montage).
3. Installer le lave-vaisselle sur un sol plat et rigide.
Compenser les irrégularités en vissant ou en dévissant les
pieds avant jusquà ce que lhorizontalité de lappareil soit
parfaite. Une bonne horizontalité garantit la stabilité de
lappareil et supprime tout risque de vibrations, bruits et
déplacements.
*. Pour régler la hauteur du pied arrière, agir sur la douille
4
rouge à six pans située dans la partie avant du lave-vaisselle,
en bas et au milieu, à laide dune clé mâle à six pans,
ouverture 8 mm. Tourner dans le sens des aiguilles dune
montre pour augmenter la hauteur et dans le sens inverse
pour la diminuer. (consulter la notice dinstructions encastré
jointe à la documentation)
*
Raccord du tuyau damenée de leau
A une prise deau froide: bien visser le tuyau damenée à un
robinet à embout fileté 3/4 gaz; avant de visser, faire couler
leau jusquà ce quelle devienne limpide et dépourvue
dimpuretés qui pourraient engorger lappareil.
A une prise deau chaude: en cas dinstallation de
chauffage centralisé (radiateurs), le lave-vaisselle peut être
alimenté avec de leau chaude de réseau ne dépassant
pas 60°C.
Visser le tuyau au robinet en procédant comme pour la
prise deau froide.
Si la longueur du tuyau damenée ne suffit pas,
sadresser à un magasin spécialisé ou à un technicien agréé
(voir Assistance).
La pression de leau doit être comprise entre les valeurs
reportées dans le tableau des Caractéristiques techniques (voir
ci-contre).
Faire attention à ce que le tuyau ne soit ni plié ni écrasé.
Raccordement du tuyau d'évacuation de l'eau
raccorder le tuyau d'évacuation, sans le plier, à une
conduite d'évacuation ayant au moins 4 cm de
diamètre.
Le tuyau d'évacuation doit être placé entre 40 et 80 cm
au-dessus du sol ou du plan d'appui du lave-vaisselle
(A).
Avant de raccorder le tuyau d'évacuation de l'eau au
siphon de l'évier, retirer le bouchon en plastique (B).
Raccordements eau et électricité
Ladaptation des installations électriques et les travaux de
plomberie de linstallation doivent être effectués par du
personnel qualifié.
Le lave-vaisselle ne doit pas écraser les tuyaux ou le
câble dalimentation électrique.
Utiliser des tuyaux neufs pour effectuer le raccordement
de lappareil au réseau de distribution de leau.
Ne pas réutiliser les anciens tuyaux.
Les tuyaux damenée et dévacuation de leau et le câble
dalimentation électrique peuvent être orientés vers la droite ou
vers la gauche pour simplifier linstallation.
26
* Présent uniquement sur certains modèles.
Page 27

Sécurité anti-fuite
Pour éviter tout risque dinondation, le lave-vaisselle :
- est équipé dun dispositif qui coupe larrivée de leau en cas
danomalie ou de fuite à lintérieur de lappareil.
Ruban anti-condensation*
Après avoir encastré le lave-vaisselle, ouvrir la porte et coller
le ruban adhésif transparent sous le plan en bois pour le
protéger contre la formation de condensation.
.4
Quelques modèles sont équipés dun dispositif de sécurité
supplémentaire New Acqua Stop
risque dinondation même en cas de rupture du tuyau
damenée de leau.
ATTENTION: TENSION DANGEREUSE!
Il ne faut en aucun cas couper le tuyau damenée de leau car il
contient des parties sous tension.
* qui garantit contre tout
Raccordement électrique
Avant de brancher la fiche dans la prise de courant, sassurer
que:
la prise dispose de mise à la terre et est conforme aux
normes;
la prise est bien apte à supporter la puissance maximale
de lappareil reportée sur la plaque signalétique fixée à la
contre-porte (voir paragraphe Description du lave-
vaisselle);
la tension dalimentation est bien comprise entre les valeurs
figurant sur la plaque signalétique de la contre-porte;
la prise est bien compatible avec la fiche de lappareil.
Autrement, faire remplacer la fiche par un technicien agréé
(voir Assistance); nutiliser ni rallonges ni prises multiples.
Après installation de lappareil, le câble dalimentation
électrique et la prise de courant doivent être facilement
accessibles.
Le câble ne doit être ni plié ni trop écrasé.
Afin déviter tout danger, faire changer le cordon
dalimentation abîmé, par le fabricant ou par son service
après-vente. (Voir Assistance)
Nous déclinons toute responsabilité en cas de non-respect
des normes énumérées ci-dessus.
Conseils pour le premier lavage
Une fois linstallation terminée et tout de suite avant le premier
lavage, remplir complètement deau le réservoir à sel et ajouter
environ 1 kg de sel (voir Produit de rinçage et sel régénérant)
: il est tout à fait normal que de leau déborde. Sélectionner le
degré de dureté de leau (voir Produit de rinçage et sel
régénérant). - Après remplissage du réservoir à sel, le voyant
SEL* s'éteint.
Le manque de remplissage du réservoir à sel, peut
endommager l'adoucisseur d'eau et l'élément chauffant.
Caractéristiques techniques
Dimensions
Capacité 14 couverts standard
Pression eau
d’alimentation
Tension
d’alimentation
Puissance totale
absorbée
Fusible
largeur 59.5 cm
hauteur 82 cm
profondeur 57 cm
0,05 ÷ 1 MPa (0,5 ÷ 10 bar)
7,25 – 145 psi
Voir étiquette des
caractéristiques
Voir étiquette des
caractéristiques
Voir étiquette des
caractéristiques
Cet appareil est conforme aux
Directives Communautaires
suivantes:
- 2006/95/EC (Basse Tension)
-2004/108/EC (Compatibilité
Electromagnétique)
- 2005/32/EC (Comm. Reg.
1275/2008) (Ecodesign)
-97/17/EC (Etiquetage)
- 2002/96/EC (DEEE)
* Présent uniquement sur certains modèles.
27
Page 28

Description de lappareil
.4
Vue densemble
Bandeau de commande
1. Panier supérieur
2. Bras de lavage supérieur
3. Clayettes rabattables
4. Réglage hauteur du panier
5. Panier inférieur
6. Bras de lavage inférieur
7. Panier à couverts
8. Filtre lavage
9. Réservoir à sel
10. Bacs produit de lavage et réservoir à produit
11. Plaque signalétique
12. Bandeau de commande
13. Bague
On-Off/Reset
de rinçage
Afficheur
***
Départ/
Pause
Sélection
programme
Légende symboles des programmes
Option Départ
Option Demi-charge
Afficheur
Symbole
Lavage
Symbole
Séchage
Symbole option
«Good Night»
Symbole option
Tablettes multifonctions
Manque de Sel
Numéro du
Programme
Manque de produit
Indicateur lumineux de
temps restant,
ON, OFF, END
de rinçage
Symbole option
Départ différé
Symbole option
demi-charge dans
le panier inférieur
Symbole option demi-
charge dans le panier
supérieur
*** Uniquement pour modèles « tout intégrable ».
* Présent uniquement sur certains modèles.
Le nombre et les types de programmes varient selon le modèle de lave-vaisselle.
différé
Symbole démarrage
Option « Short Time »
Option « Good Night »
Option Tablettes
multifonctions
Symbole Pause
Symbole option
«Short Time»
28
Page 29

Charger les paniers
Avant de charger les paniers, débarrasser la vaisselle des
déchets plus importants et vider les verres et les coupes.
Après avoir chargé le lave-vaisselle, sassurer que les bras
de lavage tournent librement.
Panier inférieur et panier à couverts
Le panier du bas peut contenir des casseroles, des
couvercles, des assiettes, des saladiers, des couverts etc.Les
assiettes et couvercles de grandes dimensions doivent être de
préférence rangés sur les côtés du panier.
Certains modèles de lave-vaisselle sont pourvus de tiges
rabattables
accueillir les assiettes ou en position horizontale pour accueillir
casseroles, saladiers et poêles.
*, qui peuvent être utilisés en position verticale pour
Panier supérieur
Réservé au chargement de la vaisselle fragile et légère: verres,
tasses, petites assiettes, saladiers bas.
Clayettes rabattables à inclinaison variable
Les clayettes peuvent être
placées à deux hauteurs
différentes afin doptimiser la
disposition de la vaisselle dans
le panier. Les verres à pied
peuvent être placés en position
stable contre les clayettes, en
insérant la tige de leurs pieds
dans les fentes prévues à cet
effet.
Certains modèles de lave-vaisselle sont
dotés dun plateau
être utilisé pour contenir les couverts à
service ou les tasses de petite taille.
Pour de meilleures performances de
lavage, éviter de mettre sous le plateau
de la vaisselle encombrante.
* coulissant qui peut
.4
Le panier à couverts peut varier selon le modèle de lave-vaisselle
et être séparable ou non séparable. Le panier à couverts non
séparable doit être placé obligatoirement dans la partie avant
du panier inférieur.
Ils sont tous deux
équipés de grilles
supérieures permettant
de mieux ranger les
couverts.
Ranger les couteaux et les ustensiles de cuisine pointus
et coupants dans le panier à couverts, pointes tournées vers
le bas, ou, à plat, sur les clayettes rabattables du panier
supérieur.
* Présent uniquement sur certains modèles. Leur nombre et
leur position varient.
Régler la hauteur du panier supérieur
Pour faciliter le rangement de la vaisselle, il est possible de régler
le panier supérieur en position haute ou basse.
Régler de préférence la hauteur du panier supérieur quand
ce dernier est VIDE.
Ne JAMAIS soulever ou abaisser le panier dun seul côté.
Ouvrir les butées des glissières du panier
à droite et à gauche et sortir le panier.
Positionner le panier en position haute ou
basse, le faire glisser le long des glissières
jusquà ce que les roues avant entrent elles
aussi et refermer les butées (voir figure).
Si le panier est équipé de poignées Dual
Space (voir figure), sortir le panier du haut
en fin de corse, saisir les poignées sur les
côtés du panier et déplacer vers le haut ou
vers le bas; laisser redescendre le panier
en laccompagnant.
Vaisselle nallant pas au lave-vaisselle
Objets en bois, avec des manches en bois ou en corne ou
ayant des parties collées.
Objets en aluminium, cuivre, laiton ou étain.
Vaisselle en plastique non thermorésistant.
Porcelaines anciennes ou peintes à la main.
Argenterie ancienne. Les pièces dargenterie non ancienne peuvent
par contre être lavées avec un programme délicat après sêtre
assuré quelles nentrent pas en contact avec dautres métaux.
Nous vous conseillons dutiliser de la vaisselle adapte
pour passer au lave-vaisselle.
29
Page 30

Mise en marche
et utilisation
.4
Le bandeau de commande est équipé dun système
de commandes « Touch Control » ; une légère pression
du doigt suffit pour activer la commande.
Les symboles de la légende des programmes de
lavage (à gauche du bandeau de commande), NE
sallument PAS.
Appuyer sur le symbole P pour sélectionner le programme.
Cet électroménager dispose de signaux sonores/bips
(selon le modèle de lave-vaisselle) qui signalent que la
commande a été activée: allumage, fin de cycle, etc.
Tous les symboles/voyants lumineux du bandeau de
commande/afficheur peuvent avoir des couleurs
différentes. (selon le modèle de lave-vaisselle).
Mettre en marche le lave-vaisselle
1. Ouvrir larrivée deau.
2. Appuyer sur le symbole ON-OFF : lécran sallume
quelques secondes et affiche ON (allumé).
3. Ouvrir la porte et doser le produit de lavage (voir « Charger
le produit de lavage »).
4. Charger les paniers (voir « charger les paniers ») et
fermer la porte.
5. Pour sélectionner le programme selon le type de vaisselle
et son degré de salissure (voir tableau des programmes),
appuyer sur le symbole P.
6. Sélectionner les options de lavage* (voir Options).
7. Appuyer sur le symbole Marche/Pause, le symbole
Marche sallume sur lafficheur. Le numéro du programme,
les symboles du lavage, des options éventuelles et le temps
restant avant la fin du cycle saffichent à lécran.
8. Une fois le programme achevé, lécran affiche le numéro du
programme effectué ainsi que END (FIN). Eteindre lappareil à
laide du symbole ON/OFF, lécran affiche alors OFF. Fermer le
robinet de leau et débrancher la fiche de la prise de courant.
9. Attendre quelques minutes avant de sortir la vaisselle
pour éviter de se brûler. Décharger les paniers en
commençant par celui du bas.
- en cas de NON utilisation prolongée, lappareil
séteint momentanément en automatique pour réduire
sa consommation délectricité.
PROGRAMMES AUTO* : grâce à un capteur spécial, ce
modèle de lave-vaisselle peut évaluer le degré de salissure et
sélectionner le lavage le plus efficace et le plus économique.
La durée des programmes automatiques peut varier du fait
de lintervention du capteur.
En cas de vaisselle peu sale ou précédemment rincée
à leau, réduire considérablement la quantité de produit
de lavage.
Modifier un programme en cours
En cas derreur de sélection dun programme, il est possible
de le modifier, à condition quil vienne tout juste de démarrer.
Pour changer de cycle de lavage, éteindre lappareil par une
pression prolongée sur le symbole ON-OFF/Reset, lécran
affichera alors 3-2-1 OFF. Rallumer à laide du même symbole
et sélectionner à nouveau le programme et les options voulus.
Introduire de la vaisselle en cours de lavage
Appuyer sur le symbole Marche/Pause ; le symbole Pause
sallume ; ouvrir la porte en faisant attention à la vapeur
chaude qui séchappe et introduire la vaisselle. Appuyer à
nouveau sur le symbole Marche/Pause : Le symbole Marche
sallume et le cycle repart.
Toute pression sur le symbole Marche/Pause pour mettre
lappareil en pause, stoppe momentanément le programme.
Pendant cette phase, aucun changement de programme
nest possible.
Interruptions accidentelles
En cas douverture de la porte en cours de lavage ou de
coupure de courant, le programme sarrête. Il redémarre du
point où il a été interrompu dès que le courant revient ou que
la porte est refermée.
Charger le produit de lavage
Un bon résultat de lavage dépend aussi dun bon
dosage du produit de lavage. Un excès de produit de
lavage ne lave pas mieux et pollue lenvironnement.
Nutiliser que du produit de lavage spécial lave-vaisselle.
NE PAS UTILISER de produits pour laver la vaisselle
à la main.
Une utilisation excessive de produit de lavage peut
laisser des résidus de mousse en fin de cycle.
Lutilisation de tablettes de lavage nest conseillée
que pour les modèles qui prévoient loption TABLETTES
MULTIFONCTIONS.
Pour obtenir des performances de lavage et de
séchage optimales, utiliser des produits de lavage en
poudre, du liquide de rinçage et du sel.
bac A : Produit de lavage
bac B : Produit de prélavage
1. Appuyer sur la touche D pour
ouvrir le couvercle C.
2. Pour doser le produit de lavage
se reporter au Tableau des
programmes :
en poudre : bacs A et B.
tablettes : quand le programme
en prévoit 1, placer cette dernière
dans le bac A et fermer le
couvercle. Sil en prévoit 2, mettre
la deuxième dans le fond de la cuve.
3. Eliminer les résidus de produit de lavage sur les bords
du bac et fermer le couvercle jusquau déclic.
* Présent uniquement sur certains modèles.
30
Page 31

Options de lavage*
La sélection, la modification ou lannulation des OPTIONS
nest possible quaprès avoir choisi le programme de
lavage et avant dappuyer sur le symbole MARCHE/PAUSE.
Seules les options compatibles avec le programme choisi
peuvent être sélectionnées. Si une option nest pas compatible
avec le programme sélectionné, (voir tableau programmes) le
symbole correspondant clignote rapidement 3 fois.
En cas de sélection dune option incompatible avec une
option précédemment sélectionnée, celle-ci clignote 3 fois
de suite puis séteint, tandis que la dernière option
sélectionnée reste allumée.
Pour désactiver une option sélectionnée par erreur,
appuyer à nouveau sur le symbole correspondant.
Départ différé*
Le démarrage du programme peut être différé de 1 à 24 heures :
1. après avoir sélectionné le programme de lavage et toute
autre option possible, appuyer sur le symbole DÉPART
DIFFÉRÉ : le symbole sallume sur lafficheur. Appuyer sur le
symbole DÉPART DIFFÉRÉ pour sélectionner à quel moment
faire démarrer le cycle de lavage (de 1 à 24 heures).
2. Confirmer son choix à laide de la touche Marche/Pause pour
faire partir le compte à rebours, le délai dattente sélectionné est
affiché à lécran et le symbole Marche arrête de flasher.
3. A lexpiration du délai dattente, le symbole de DÉPART
DIFFÉRÉ séteint et le programme démarre.
Pour le désactiver appuyer sur le symbole DÉPART
DIFFÉRÉ jusquà affichage de OFF.
Aucune sélection de DÉPART DIFFÉRÉ nest plus
possible en cours de cycle.
Option «Short Time»*
Cette option permet de réduire la durée des principaux
programmes tout en assurant les mêmes performances de
lavage et de séchage
Après avoir sélectionné le programme, appuyer sur le
symbole Option « Short Time », lallumage du symbole
signale que la sélection a eu lieu.
Pour désactiver cette option, appuyer à nouveau sur le
même symbole.
Les Options «Short Time» et «Good Night» ne
sont pas compatibles entre elles.
Demi-charge panier supérieur ou inférieur
Loption Demi-charge permet de choisir de ne laver que
dans le panier supérieur ou que dans le panier inférieur
pour faire des économies deau, délectricité et de produit
de lavage. Sélectionner le programme et appuyer sur le
symbole DEMI-CHARGE. Le symbole de la demi-charge
sallume (sur lafficheur) ainsi que lindication du panier
supérieur. Une autre pression affiche le symbole de la
demi-charge et lindication du panier inférieur. Le lavage
nest activé que dans le panier sélectionné.
Penser à ne ranger la vaisselle que dans le panier
sélectionné et à réduire de moitié la quantité de produit
de lavage.
Utiliser de préférence du produit de lavage en poudre
Cette option nest pas utilisable avec le programme:
Rapide et Baby.
Option «Good Night»*
Cette option permet un fonctionnement encore plus
silencieux en prolongeant la durée des programmes, idéale
car elle permet de profiter du tarif électricité de nuit.
Après avoir sélectionné le programme, appuyer sur le
symbole Option « Good Night », le symbole affiché à lécran
sallume pour signaler que la sélection a eu lieu.
Pour désactiver cette option, appuyer à nouveau sur le
même symbole.
Loption «Good Night» nest pas compatible avec
loption DEMI-CHARGE.
Tablettes Multifonctions* (Tabs)
Cette option permet doptimiser le résultat de lavage et
de séchage.
En cas dutilisation de tablettes multifonctions, appuyer
sur le symbole TABLETTES MULTIFONCTIONS, le
symbole correspondant sallume sur lafficheur. Loption
«Tablettes Multifonctions» prolonge la durée du
programme.
Loption tablettes multifonctions reste mémorisée
lors des allumages suivants de lappareil à moins
quelle nait été désactivée.
Lutilisation de tablettes nest conseillée quen
présence de loption TABLETTES MULTIFONCTIONS.
Cette option est déconseillée pour les programmes
qui ne prévoient pas lutilisation de tablettes
multifonction (voir tableau des options).
.4
Les Options «Short Time» et «Good Night» ne
sont pas compatibles avec loption DEMI-CHARGE.
* Présent uniquement sur certains modèles.
Tableau Options
1. Auto Super Wash OUI
2. Auto Normal
3. Quotidien A 60
4. Trempage
5. Eco 50 ° C
6. Rapide 25 min
7. Cristal
8. Cycle Baby
A B C D E
Départ
différé
OUI
OUI
OUI
OUI
OUI
OUI
OUI
Demi-
charge
OUI
OUI
OUI
OUI
OUI
Non
OUI
Non
Tablettes
Multifon.
OUI
OUI
OUI
Non
OUI
OUI
OUI
Non
Good
Night
Short
Time
Non OUI
OUI OUI
Non Non
Non Non
OUI Non
Non Non
Non Non
Non Non
31
Page 32

Programmes
.4
Pour les OPTIONS, consulter le tableau Options à la page Mise en marche et Utilisation.
Le nombre ainsi que les types de programmes et doptions varient selon le modèle de lave-vaisselle.
Indications sur le choix des
programmes
Vaisselle et casseroles très sales
(déconseillé pour la vaisselle
fragile)
Vaisselle et casseroles
normalement sales. Programme
standard quotidien.
Vaisselle du jour en quantité
réduite. (4 couverts + 1 casserole
+ 1 poêle).
Pour un lavage préliminaire dans
l'attente de compléter
le chargement au repas suivant.
Lavage écologique à faible
consommation d’électricité pour
vaisselle et casseroles.
Cycle économique et rapide pour
vaisselle peu sale, tout de suite
après l’usage. (2 assiettes +2
verres +4 couverts +1 casserole +
1 petite poêle)
Cycle économique et rapide pour
vaisselle fragile ne supportant
pas les hautes températures, tout
de suite après l’usage. (verres à
pied dans panier sup. + assiettes
fragiles dans panier inf.)
Cycle de lavage pour l’hygiène
des biberons, bagues, tétines,
lavés en même temps
qu’assiettes, tasses, verres et
couverts. Charger uniquement le
panier du haut.
8. Cycle Baby
Programme
1. Super Wash
2. Normal
3. Quotidien
4. Trempage
5. Eco*
6. Rapide 25
min
7. Cristal
Produit de lavage
(A) = bac A
(B) = bac B
poudre
liquide tablettes
35 g (A) 35 ml (A) 1 (A) Oui A-B-C-E 2:25’
29 g (A)
6 g (B)
25 g (A) 25 ml (A) 1 (A) Non A-B-C 1:00’
Non Non Non Non A-B 0:08’
29 g (A)
6 g (B)
25 g (A) 25 ml (A) 1 (A) Non A - C 0:25’
35 g (A) 35 ml (A) 1 (A) Oui A-B-C 1:30’
20 g (A) 20 ml (A) Non Oui A 1:20'
29 ml (A)
6 ml (B)
29 ml (A)
6 ml (B)
1 (A) Oui
1 (A) Oui A-B-C-D 3:00’
Programmes
prévoyant le
séchage
Options
A-B-C-D-
E
Durée du
programme
(tolérance
±10%)
h min
1:50’
Remarque:
pour obtenir des performances optimales avec les programmes « Quotidien et Rapide » il est conseillé de
respecter le nombre de couverts indiqué.
* Le programme Eco est conforme à la norme EN-50242. Il dure plus longtemps que dautres programmes mais il
consomme moins délectricité et respecte lenvironnement.
Note pour les laboratoires dessai: pour toutes informations sur les conditions dessai comparatif EN, sadresser à :
ASSISTENZA_EN_LVS@indesitcompany.com
Pour simplifier le dosage du produit de lavage, prendre note que:
1 cuillère à soupe = 15 grammes de poudre = 15 ml de liquide environ. - 1 cuillère à café = 5 grammes de poudre
= 5 ml de liquide environ
32
Page 33

Produit de rinçage et sel régénérant
Nutiliser que des produits de lavage spéciaux lave-
vaisselle.
Ne pas utiliser de sel alimentaire ou industriel ni de
produits vaisselle pour lavage à la main.
Se conformer aux instructions reportées sur lemballage.
En cas dutilisation dun produit multifonction, pas
besoin dajouter de produit de rinçage mais nous
conseillons par contre dajouter du sel, surtout en cas
deau dure ou très dure. Se conformer aux instructions
reportées sur lemballage.
Faute dajouter du sel ou du produit de rinçage, il
est normal que les voyants/symboles SEL
DE RINÇAGE
* restent allumés.
* et PRODUIT
Charger le produit de rinçage
Le produit de rinçage aide au séchage de la vaisselle car il
fait glisser leau de la surface et évite ainsi la formation de
traces ou de taches.
Il faut remplir le réservoir à produit de rinçage :
quand le voyant/symbole PRODUIT DE RINÇAGE
bandeau/afficheur sallume;
1. Ouvrir le réservoir en tournant le
couvercle (G) dans le sens inverse
des aiguilles dune montre.
2. Verser le produit de rinçage sans
F
le faire déborder. Si cela se produit,
nettoyer aussitôt avec un chiffon sec.
G
3. Revisser le couvercle.
Ne JAMAIS verser le liquide de rinçage directement à
lintérieur de la cuve.
Régler la dose de produit de rinçage
Si le résultat du séchage nest pas satisfaisant, le dosage
du produit de rinçage peut être réglé. A laide dun
tournevis agir sur le dispositif de réglage (F) et lamener sur
une des 6 positions au choix (il est réglé en usine sur 4) :
si la vaisselle présente des traces, lamener sur des
chiffres plus bas (1-3).
sil y a des gouttes deau ou des taches de calcaire, le
régler sur des chiffres plus élevés (4-6).
Réglage dureté de leau
Chaque lave-vaisselle est équipé dun adoucisseur deau
qui, grâce à du sel régénérant spécial lave-vaisselle, fournit
de leau de lavage sans calcaire.
Ce lave-vaisselle permet dopérer un réglage pour réduire
la pollution et optimiser les performances de lavage selon la
dureté de leau. Se renseigner auprès de lorganisme
distributeur de leau.
- Appuyer sur le symbole ON/OFF pour allumer lappareil.
- Appuyer 5 secondes de suite sur le symbole P; le numéro
correspondant au degré de dureté sélectionné se met à
clignoter sur lafficheur (ladoucisseur deau est réglé en
usine sur le n° 3) et
- Appuyer sur le symbole P à plusieurs reprises jusquà ce
que le degré de dureté voulu soit atteint (1-2-3-4-5
tableau dureté de leau).
- Pour quitter cette fonction, attendre quelques secondes
ou appuyer sur un symbole des options
h2o est affiché à lécran.
* ou éteindre
* du
* Voir
lappareil à laide du symbole ON/OFF.
En cas dutilisation de tablettes de lavage multifonctions,
remplir tout de même le réservoir à sel.
Tableau de dureté de l’eau
niveau °dH °fH mmol/l mois
1 0 - 6 0 - 10 0 - 1
2 6 - 11 11 - 20 1,1 - 2
3 12 - 17 21 - 30 2,1 - 3
4 17 - 34 31 - 60 3,1 - 6
5*
De 0°f à 10°f nous vous conseillons de ne pas utiliser de sel.
34 - 50 61 - 90 6,1 - 9
Autonomie
moyenne
réservoir à sel
**
7 mois
5 mois
3 mois
2 mois
2/3 semaines
* la sélection 5 peut prolonger la durée.
** avec 1 cycle de lavage par jour.
(°dH = dureté en degrés allemands - °fH = dureté en
degrés français - mmol/l = millimol/litre)
Charger le sel régénérant
Pour obtenir de bons résultats de lavage, sassurer que le
réservoir à sel nest jamais vide. Le sel régénérant élimine le
calcaire présent dans leau et évite ainsi quil ne se dépose
sur la vaisselle.
Le réservoir à sel qui se trouve dans la partie inférieure du
lave-vaisselle (voir Description) doit être rempli:
quand le flotteur vert* nest plus visible à travers le
couvercle du sel;
quand le voyant/symbole SEL* du bandeau/afficheur
sallume;
1. Sortir le panier inférieur et dévisser le
couvercle du réservoir dans le sens
inverse des aiguilles dune montre.
2. Lors de la première mise en service :
remplir le réservoir deau à ras bord.
3. Utiliser lentonnoir
de sel jusquau bord (1 kg environ) ; il est tout à fait normal
que de leau déborde.
4. Enlever lentonnoir*, éliminer les résidus de sel sur le
filetage. Avant de revisser le couvercle, il faut le rincer à
leau courante en le plaçant tête en bas et en faisant couler
leau à travers les quatre fentes en étoile situées dans la
partie inférieure du couvercle. (bouchon avec flotteur vert*)
Nous conseillons deffectuer cette opération à chaque
chargement de sel.
Fermer soigneusement le couvercle pour éviter que du
produit de lavage pénètre à lintérieur du réservoir pendant
le lavage (cela pourrait endommager irrémédiablement
ladoucisseur).
En cas de rajout de sel, effectuer cette opération juste
avant un cycle de lavage pour éliminer aussitôt la solution
saline qui a débordé.
* (voir figure) pour remplir le réservoir
* Présent uniquement sur certains modèles.
.4
33
Page 34

Entretien et soin
Coupure de larrivée deau et de courant
.4
Fermer le robinet de leau après chaque lavage pour éviter
tout risque de fuites.
Débrancher la fiche de la prise de courant lors du
nettoyage de lappareil et pendant tous travaux dentretien.
Nettoyer le lave-vaisselle
Pour nettoyer lextérieur et le bandeau de commande,
utiliser un chiffon humide non abrasif. Nutiliser ni solvants ni
abrasifs.
Pour nettoyer la cuve intérieure et enlever toute tache,
utiliser un chiffon imbibé deau additionnée dun peu de
vinaigre.
Eviter les mauvaises odeurs
Laisser toujours la porte entrouverte pour éviter toute
stagnation dhumidité.
Nettoyer régulièrement les joints détanchéité de la porte et
des bacs à produits de lavage avec une éponge humide.
On évitera ainsi les incrustations de déchets daliment qui
sont les principaux responsables de la formation de
mauvaises odeurs.
Nettoyer, périodiquement le filtre dentrée de leau situé à la sortie
du robinet.
- Fermer le robinet de leau.
- Dévisser lextrémité du tuyau darrivée de leau, retirer le filtre et le
laver soigneusement à leau courante.
- Remettre le filtre en place et visser le tuyau.
Nettoyer les filtres
Les trois filtres qui composent le groupe filtrant débarrassent leau
de lavage des résidus daliments avant de la remettre en circulation :
pour obtenir de bons résultats de lavage, il faut les nettoyer.
Nettoyer les filtres régulièrement.
Ne pas utiliser le lave-vaisselle sans filtres ou avec filtre mal fixé.
Après quelques lavages, contrôler le groupe filtrant et, si
nécessaire, le laver soigneusement à leau courante avec une petite
brosse non métallique en procédant comme suit :
1. tourner le filtre cylindrique C dans le sens inverse des aiguilles
dune montre pour le sortir de son emplacement (fig. 1).
2. Exercer une légère pression sur les ailettes latérales du gobelet
filtre B pour le faire sortir (Fig. 2) ;
3. Dégager le filtre inox A. (fig. 3).
4. Examiner la cavité et éliminer tout résidu de nourriture. NE
JAMAIS RETIRER la protection de la pompe de lavage (pièce noire)
(fig.4).
Nettoyer les bras de lavage
Il peut arriver que des déchets restent collés aux bras de
lavage et bouchent les orifices de sortie de leau : mieux vaut
les contrôler de temps en temps et les nettoyer avec une
petite brosse non métallique.
Les deux bras de lavage sont tous deux démontables.
Pour démonter le bras supérieur, il
faut dévisser sa bague en
plastique en tournant dans le sens
inverse des aiguilles dune montre.
Remonter le bras gicleur supérieur
en veillant à ce que la face percée
du plus grand nombre dorifices
soit bien orientée vers le haut.
Pour démonter le bras de lavage
inférieur, pousser sur les
languettes situées sur les côtés et
tirer vers le haut.
Nettoyage du filtre dentrée deau*
Si les tuyaux de leau sont neufs ou sils sont restés longtemps
inutilisés, avant deffectuer le raccordement, faire couler leau
jusquà ce quelle devienne limpide et dépourvue dimpuretés.
Faute de quoi, un engorgement pourrait se produire au point
darrivée de leau et endommager le lave-vaisselle.
!
Après avoir nettoyé les filtres, remettre soigneusement le groupe
filtrant à sa place, cette opération est fondamentale pour un bon
fonctionnement du lave-vaisselle.
"
En cas dabsence pendant de longues périodes
Débrancher les raccordements électriques et fermer le
robinet de leau.
Laisser la porte entrouverte.
Au retour, effectuer un lavage à vide.
* Présent uniquement sur certains modèles.
34
Page 35

Précautions, conseils
et assistance technique
Cet appareil a été conçu et fabriqué conformément aux
normes internationales de sécurité. Ces avertissements sont
fournis pour des raisons de sécurité, il faut les lire attentivement.
Sécurité générale
Cet électroménager nest pas destiné à être utilisé par des
personnes (enfants compris) dont les capacités physiques,
sensorielles ou mentales sont réduites ou qui ne disposent
pas des connaissances ou de lexpérience nécessaires, à
moins quelles naient été formées et encadrées pour
lutilisation de cet appareil par une personne responsable de
leur sécurité.
Les enfants doivent être surveillés par un adulte pour éviter
quils ne jouent avec lappareil.
Cet appareil est conçu pour un usage de type non
professionnel à lintérieur dune habitation.
Cet appareil est destiné au lavage de vaisselle à usage
domestique, il ne doit être utilisé que par des adultes et selon
les instructions reportées dans cette notice.
Ne pas installer lappareil à lextérieur, même dans un endroit
protégé, car il est extrêmement dangereux de lexposer à la
pluie et aux orages.
Ne pas toucher au lave-vaisselle pieds nus.
Ne jamais tirer sur le câble pour débrancher la fiche de la
prise de courant.
Fermer le robinet de leau et débrancher la fiche de la prise
de courant avant deffectuer tous travaux de nettoyage et
dentretien.
En cas de panne, nessayer en aucun cas daccéder aux
mécanismes internes pour tenter de la réparer.
Ne jamais toucher à la résistance.
Ne pas sappuyer à la porte ouverte ou sy asseoir : lappareil
pourrait basculer.
Ne pas garder la porte ouverte pour éviter de buter contre
elle en risquant de se faire mal.
Garder les produits de lavage et de rinçage hors de la
portée des enfants.
Les emballages ne sont pas des jouets pour enfants.
Economies et respect de
lenvironnement
Faire des économies deau et délectricité
Ne faire fonctionner le lave-vaisselle que quand il est rempli
au maximum de sa capacité. Dans lattente de remplir votre
machine, lancer le cycle de Trempage pour éviter la
formation de mauvaises odeurs (voir Programmes ).
Sélectionner un programme adapté au type de vaisselle et à
son degré de salissure, consulter pour cela le Tableau des
programmes :
- pour de la vaisselle normalement sale, choisir le
programme Eco (économique), il limite la quantité deau et
délectricité utilisée.
- pour une quantité réduite de vaisselle, choisir loption Demicharge
* (voir Mise en marche et utilisation).
Si le contrat de fourniture délectricité prévoit des tranches
horaires à prix réduit, effectuer les lavages pendant ces
heures creuses. Loption Départ différé
marche et utilisation) peut vous aider à organiser vos
lavages dans ce sens.
Produits de lavage sans phosphates, sans
chlore et contenant des enzymes
Il est vivement conseillé dutiliser des produits de lavage
sans phosphates et sans chlore, plus indiqués pour la
protection de lenvironnement.
Les enzymes développent une action particulièrement
efficace à des températures avoisinant 50°C, les produits de
lavage aux enzymes permettent donc de sélectionner des
lavages à de basses températures et dobtenir les mêmes
résultats quà une température de 65°C.
Pour bien doser le produit de lavage, il faut tenir compte des
indications du fabricant, de la dureté de leau, de la quantité
de vaisselle et de son degré de salissure pour éviter tout
gaspillage. Bien que biodégradables, les produits de lavage
contiennent des éléments qui altèrent léquilibre de la nature.
* (voir Mise en
.4
Mise au rebut
Mise au rebut du matériel demballage : se conformer aux
réglementations locales, les emballages pourront ainsi être
recyclés.
La Directive Européenne 2002/96/EC sur les Déchets des
Equipements Electriques et Electroniques (DEEE), exige que
les appareils ménagers usagés ne soient pas jetés dans le
flux normal des déchets municipaux Les appareils usagés
doivent être collectés séparément afin doptimiser le taux de
récupération et le recyclage des matériaux qui les composent
et réduire limpact sur la santé humaine et lenvironnement Le
symbole de la « poubelle barrée » est apposé sur tous les
produits pour rappeler les obligations de collecte séparée.
Pour de plus amples renseignements sur la mise au rebut
des électroménagers, les possesseurs peuvent sadresser
au service public prévu à cet effet ou aux commerçants.
Assistance
Avant dappeler le service dassistance
technique:
Vérifier sil est possible de résoudre lanomalie soi-même (voir
Anomalies et remèdes).
Faire repartir le programme pour sassurer que linconvénient
a été résolu.
Si ce nest pas le cas, contacter un Service dAssistance
Technique agréé.
Ne jamais faire appel à des techniciens non agréés.
Communiquer:
le type danomalie ;
le modèle de lappareil (Mod.) ;
le numéro de série (S/N).
Ces informations figurent sur la plaque signalétique apposée
sur lappareil (voir Description de lappareil).
* Présent uniquement sur certains modèles.
35
Page 36

Anomalies et remèdes
Si lappareil présente des anomalies de fonctionnement, procéder aux contrôles suivants avant de prendre
.4
contact avec le service dassistance technique.
Anomalies: Causes / Solutions possibles :
Le lave-vaisselle ne démarre
pas ou n’obéit pas aux
commandes
• Eteindre l’appareil à l'aide de la touche ON-OFF, rallumer au b out d’une
minute environ et p résélectionner le programme.
• La fiche n’est pas bien branchée dans la prise de courant.
• La porte du lave-vais selle n’est pas bien fermée.
La porte ne ferme pas
Le lave-vaisselle ne vidan ge
pas.
Le lave-vaisselle est bru yant.
La vaisselle et les verre s
présentent des dépôts de
calcaire ou une couche
blanchâtre.
La vaisselle et les verres présentent
des traces blanches ou des reflets
bleuâtres.
La vaisselle n’est pas sèche.
La vaisselle n’est pas propre.
Il n’y a pas d’arrivée d’eau Alarme robinet fermé.
(des bips courts retentissent)*
(le voyant ON/OFF clignote et l’écran
affiche A 6).
Alarme sur le tuyau d’arrivée
de l’eau/Filtre arrivée eau
bouché.
(le voyant ON/OFF clignote et l’écran
affiche A 7)
• La serrure est enclenchée ; pousser énergiquement sur la porte jusqu’au « clic ».
• Le programme n’est pas encore terminé.
• Le tuyau d’évacuati on de l’eau est plié (voir Installation).
• L’évacuation de l’évier est bouchée.
• Le filtre est bouché par des déchets de nourrit ure.
• La vaisselle s’ent rechoque ou butte cont re les bras de lavage.
• Excédent de mousse : le produit de la vage n’est pas bien dosé ou n’est
pas approprié. (voir Mise en marche et utilisation).
• Il manque du sel régénérant ou son réglage n’est pas adapté à la dureté
de l’eau (voir Produit de rinçage et se l).
• Le couvercle du réservoir à sel n’est pas bien fermé.
• Il n’y a pl us de produit de ri nçage ou son dosage est insuffisant.
• Le dosage du produit de rinçage est excessif.
• Un programme sans séchage a été sélectionné.
• Il n’y a pl us de produit de ri nçage ou son dosage est insuffisant (voir
Produit de rinçage et s el).
• Le réglage du produit de rinçage n’est pas approprié.
• La vaisselle est en m atériau antiadhés if ou en plastique.
• Les paniers sont tro p chargés (voir Charger les paniers).
• La vaisselle n’est pas bien rangée.
• Les bras de lavage ne t ournent pas librement .
• Le programme de lavag e n’est pas assez puissant (voir Programm es).
• Excédent de mousse : le produit de la vage n’est pas bien dosé ou n’est
pas approprié. (voir Mise en marche et utilisation).
• Le couvercle du réservoir à produit de ri nçage n'est pas bien fermé.
• Le filtre est sale ou bouché (voir Entretien et soin).
• Il manque du sel régénérant (voir Prod uit de rinçage et sel ).
• Il y a une coupure d’eau.
• Le tuyau d’arrivée d e l’eau e st plié (voir Installation).
• Ouvrir le robinet, l’appareil se met en marche au bout de quelques
minutes.
• L’app areil s’est bloqué car vous n’avez pas donné s uite aux bips
d’avertissem ent.
Eteindre l’appareil à l’aide de la touche ON/ OFF, ouvrir le robi net et au
bout de 20 secondes ral lumer en appuyant à nou veau sur la même
touche. Reprogramm er l’appareil et le remettre en march e.
• Appuyer sur la touche ON/ OFF pour éteindre l’appareil. Fermer le robinet
de l’eau pour éviter tout risque d’inondation, débrancher la fiche de la
prise de courant.
S’ass urer que le filtre d’arrivée de l’eau n’est pas bouché par des
impuretés. (voir chapitre "Entre tien et Soin")
* Présent uniquement sur certains modèles.
36
Page 37

Gebrauchsanleitung
GESCHIRRSPÜLER
DE
Deutsch, 37
PFTA++ 8H4
Inhaltsverzeichnis
Installation, 38-39
Aufstellung und Ausrichtung
Wasser- und Elektroanschlüsse
Hinweise zur ersten Inbetriebnahme
Technische Daten
Beschreibung des Gerätes, 40
Geräteansicht
Schalterblende
Beschickung der Körbe, 41
Unterkorb
Besteckkorb
Oberkorb
Inbetriebsetzung und Gebrauch, 42-43
Starten des Geschirrspülers
Einfüllen des Spülmittels
Zusatzfunktionen
Spülprogramme, 44
Programmtabelle
BKlarspüler und Regeneriersalz, 45
Einfüllen des Klarspülers
Einfüllen des Regeneriersalzes
Reinigung und Pflege, 46
Abstellen der Wasser- und Stromversorgung
Reinigung des Geschirrspülers
Vermeidung von Geruchsbildung
Reinigung der Sprüharme
Reinigung des Wasserfilters
Die Filter reinigen
Was tun, bevor Sie für längere Zeit verreisen
Vorsichtsmaßregeln, Hinweise und
Kundendienst, 47
Allgemeine Sicherheit
Entsorgung
Energie sparen und Umwelt schonen
Kundendienst
Störungen und Abhilfe, 48
Page 38

Installation
,-
Es ist äußerst wichtig, diese Bedienungsanleitung
sorgfältig aufzubewahren, um sie jederzeit zu Rate
ziehen zu können. Sorgen Sie dafür, dass sie im Falle
eines Umzugs oder Übergabe an einen anderen
Benutzer das Gerät stets begleitet.
Lesen Sie bitte folgende Hinweise aufmerksam
durch, sie liefern wichtige Informationen hinsichtlich der
Installation, des Gebrauchs und der Sicherheit.
Im Falle eines Umzugs sollte das Gerät möglichst in
vertikaler Position transportiert werden, falls erforderlich,
neigen Sie das Gerät zur Rückseite hin.
Dieses Gerät ist für den Hausgebrauch oder
ähnliche Anwendungen, zum Beispiel:
- Küchenbereiche für das Personal von Geschäften,
Büros und andere Arbeitsumgebungen;
- Bauernhäuser;
- Nutzung durch Kunden in Hotels, Motels und anderen
Wohnbereichen;
- Bed and Breakfast.
Positionierung und Nivellierung
1. Nehmen Sie das Verpackungsmaterial ab und prüfen
Sie Ihr Gerät auf eventuelle Transportschäden.
Schließen Sie das Gerät im Falle einer Beschädigung
bitte nicht an, sondern fordern Sie den Kundendienst an.
2. Stellen Sie das Gerät so auf, dass es mit den
Seitenteilen oder mit der Rückwand an den anliegenden
Möbeln oder an der Wand anlehnt. Das Gerät kann auch
unter einer durchlaufenden Arbeitsplatte eingebaut
werden* (siehe Montageanleitung).
3. Stellen Sie den Geschirrspüler auf einem ebenen und
festen Boden auf. Gleichen Sie eventuelle
Unregelmäßigkeiten durch Anziehen oder
Losschrauben der vorderen Stellfüße aus, bis das Gerät
eben ausgerichtet ist. Eine präzise Nivellierung verleiht
dem Gerät die erforderliche Stabilität, durch die
Vibrationen, Betriebsgeräusche und ein Verrücken des
Gerätes vermieden werden.
Der Wasserzulaufschlauch, der Wasserablaufschlauch
und das Netzkabel können sowohl nach rechts als auch
nach links ausgerichtet werden, wodurch eine optimale
Installation gewährleistet wird.
Anschluss des Zulaufschlauchs
An einen Kaltwasserhahn: Schrauben Sie den
Wasserzulaufschlauch fest an einen mit ¾Gewindeanschluss versehenen Hahn; bevor Sie ihn
jedoch anschrauben, lassen Sie Wasser auslaufen,
bis klares Wasser austritt, um das Gerät vor Verstopfen
durch Unreinheiten zu bewahren.
An einen Warmwasserhahn: Im Falle einer
Zentralheizungsanlage kann der Geschirrspüler auch
durch heißes Leitungswasser gespeist werden,
vorausgesetzt dass die Temperatur 60°C nicht
übersteigt.
Schrauben Sie den Schlauch an den Wasserhahn, so
wie für den Anschluss an den Kaltwasserhahn
beschrieben.
Sollte der Zulaufschlauch nicht lang genug sein,
dann wenden Sie sich bitte an einen Fachhändler oder
an einen autorisierten Techniker (siehe Kundendienst).
Der Wasserleitungsdruck muss innerhalb der in der
Tabelle der technischen Daten (siehe seitlich )
angegebenen Werte liegen.
Der Schlauch darf nicht eingeklemmt oder
abgeknickt werden.
Anschluss des Ablaufschlauchs
Schließen Sie den Ablaufschlauch, ohne ihn zu
krümmen, an eine Ablaufleitung mit Mindestdurchmesser
von 4 cm an.
4. Regulieren Sie den hinteren Stellfuß durch Einwirken
mittels eines 8mm-Sechskantschlüssels auf die rote
Sechskantbuchse (befindlich unter der Frontseitenmitte
des Geschirrspülers). Durch Drehen nach rechts wird
die Höhe erhöht, durch Drehen nach links wird sie
herabgesetzt (siehe beigefügtes Einbaublatt).
Wasser- und Elektroanschlüsse
Die Anpassung der Elektro- und Wasseranlagen zur
Installation des Gerätes darf nur von Fachpersonal
durchgeführt werden..
Der Geschirrspüler darf nicht auf Rohrleitungen
oder auf dem Netzkabel aufstützen.
Für den Anschluss des Gerätes an die
Wasserversorgung müssen neue Schläuche verwendet
werden.
Die alten Schläuche sollten niemals erneut verwendet
werden.
38
Der Ablaufschlauch muss sich in einer Höhe von 40 bis
80 cm vom Boden oder von der Standfläche der
Spülmaschine (A) befinden.
Vor dem Anschließen des Ablaufschlauchs an den
Siphon des Spülbeckens den Plastikdeckel (B)
abnehmen.
* Nur an einigen Modellen
Page 39

Schutz vor Überschwemmungen
Um Überschwemmungen auszuschließen, wurde der
Geschirrspüler:
- mit einem System versehen, dank dessen der
Wasserzulauf bei Anomalien oder internem
Wasserverlust unterbrochen wird.
Einige Modelle sind mit einem zusätzlichen New Acqua
Stop
* Sicherheitssystem ausgestattet, das auch bei
Schlauchdefekten vor Überschwemmung schützt.
ACHTUNG: GEFÄHRLICHE SPANNUNG!
Der Versorgungsschlauch darf auf keinen Fall
abgeschnitten werden: er enthält nämlich Strom
führende Teile.
Stromanschluss
Vor Einfügen des Netzsteckers in die Steckdose ist
sicherzustellen, dass:
die Steckdose über eine normgerechte Erdung
verfügt;
die Netzsteckdose die auf dem Typenschild
(befindlich auf der Innentür) angegebene max.
Leistungsaufnahme des Gerätes trägt (siehe
Abschnitt Beschreibung Ihres Geschirrspülers);
die Versorgungsspannung den auf dem Typenschild
(auf der Innentür) vermerkten Werten entspricht;
die Steckdose mit dem Netzstecker des Gerätes
kompatibel ist. Andernfalls muss der Netzstecker von
einem autorisierten Techniker ausgetauscht werden
(siehe Kundendienst), verwenden Sie bitte keine
Verlängerungen oder Vielfachstecker.
Der Netzstecker, das Netzkabel und die Steckdose
sollten bei installiertem Gerät leicht zugänglich sein.
Das Netzkabel darf nicht gebogen bzw.
eingeklemmt werden.
Sollte das Speisekabel beschädigt sein, muss es vom
Hersteller oder seiner technischen Kundendienststelle
ausgetauscht werden, um Unfallrisiken vorzubeugen.
(Siehe Kundendienst)
Der Hersteller übernimmt keinerlei Haftung, sollten
diese Vorschriften nicht genau beachtet werden.
Kondensationsschutzstreifen*
Öffnen Sie nach dem Einbau des Geschirrspülers die
Gerätetür und bringen Sie den transparenten
Klebestreifen unter dem Holzbord an, um es vor
eventuellem Kondenswasser zu schützen.
Hinweise zur ersten Inbetriebnahme
Füllen Sie nach der Installation des Gerätes und direkt
vor dem ersten Spülgang den Salzbehälter ganz mit
Wasser und fügen Sie ca. 1 kg Salz hinzu (siehe
Klarspüler und Regeneriersalz): Es ist völlig normal, dass
Wasser austritt. Stellen Sie den Härtegrad des Wassers
ein (siehe Abschnitt Klarspüler und Regeneriersalz). Nach dem Einfüllen des Salzes erlischt die
SALZNACHFÜLLANZEIGE
Das Nichtfüllen des Salzbehälters kann eine
Beschädigung des Wasserenthärters und des
Heizwiderstandes bewirken.
Technische Daten
Abmessungen
Fassungsvermögen 14 Maßgedecke
Wasserversorgungsdruck
Versorgungsspannung Siehe Typenschild
Maximale
Leistungsaufnahme
Schmelzsicherung Siehe Typenschild
*.
Breite 59.5 cm
Höhe 82 cm
Tiefe 57 cm
0,05 ÷ 1MPa (0,5 ÷10 bar)
7,25 – 145 psi
Siehe Typenschild
Dieses Gerät entspricht
folgenden EG-Richtlinien:
- 2006/95/EC
(Niederspannung)
- 2004/108/EC
(elektromagnetische
Verträglichkeit)
- 2005/32/EC (Comm. Reg.
1275/2008) (Ecodesign)
-97/17/EC (Etikettierung)
- 2002/96/EC
,-
* Nur an einigen Modellen
39
Page 40

Beschreibung des Gerätes
,-
Geräteansicht
Schalterblende
1. Oberkorb
2. Oberer Sprüharm
3. Hochklappbare Ablagen
4. Einstellung der Korbhöhe
5. Unterkorb
6. Unterer Sprüharm
7. Besteckkorb
8. Spülsiebe
9. Salzbehälter
10. Spülmittelkammern und Klarspülerbehälter
11. Typenschild
12. Steuerpult
***
13. Zwinge
On-Off/Reset
Display
Start/Pause
Legende Programmsymbole
Display
Programmnummer
*** Nur bei komplett integrierten Modellen.
* Nur bei einigen Modellen.
Die Anzahl und die Art der Spülprogramme und -optionen sind abhängig vom jeweiligen Geschirrspülermodell.
Restzeit, ON, OFF, END
Leuchtanzeige
Salz fehlt
Klarspüler fehlt
Programmauswahl
Symbol Option
Startzeitvorwahl
Symbol Option halbe
Nachfüllung Unterkorb
Symbol Option halbe
Nachfüllung Oberkorb
Startzeitvorwahl
Option
Option Halbe
Füllmenge
Symbol Spülgang
Symbol Trockengang
Symbol Zusatzfunktion Nacht
Symbol Option
Multifunktions-Tabs
Option Kurzzeit
Zusatzfunktion Nacht
Option Multifunktions-Tabs
Symbol Start
Symbol Pause
Symbol Option Kurzzeit
40
Page 41

Beschickung der
Körbe
Bevor Sie das Geschirr in den Geschirrspüler einräumen, befreien
Sie es von Speiseresten und entleeren Sie Gläser und Schalen.
Stellen Sie nach Einräumen des Geschirrs sicher, dass sich
die Sprüharme frei bewegen können.
Unterer Korb und Besteckkorb
Der Unterkorb kann mit Töpfen, Deckeln, Tellern, Schüsseln,
Besteck etc. befüllt werden.Räumen Sie große Teller und Deckel
vorzugsweise am Rand des Korbs ein.
Einige Geschirrspülermodelle verfügen über klappbare
Bereiche
Tellern oder in waagerechter Stellung zum Einräumen von
Töpfen, Schüsseln und Pfannen verwendet werden können.
*, die in senkrechter Stellung zum Einsortieren von
Oberer Korb
In den oberen Geschirrkorb sortieren Sie empfindliches und
leichtes Geschirr ein: Trinkgläser, Tassen, kleine Teller, flache
Schüsseln.
Verstellbare Ablagen
Die Ablagen können auf zwei
verschiedenen Höhen positioniert
werden, um beim Einräumen des
Geschirrs den Platz im Korb
optimal auszunutzen. Stielgläser
können an den Ablagen stabilisiert
werden, indem sie mit dem Stiel in
die vorgesehene Aussparung
gestellt werden.
Einige Geschirrspülermodelle sind mit
einem verschiebbaren Behälter
ausgestattet
oder kleine Tassen gelegt werden
können. Für ein besseres
Spülergebnis positionieren Sie unter
dem Behälter kein großflächiges
Geschirr.
*, in den Servierbesteck
,-
Der Besteckkorb kann je nach Geschirrspülermodell teilbar oder
nicht teilbar sein. Der nicht teilbare Besteckkorb darf nur im
vorderen Teil des unteren Korbes eingesetzt werden.
Beide sind oben mit
Gittern versehen, um
das Besteck auf
Abstand zu halten.
Messer und andere Küchenutensilien mit scharfen
Spitzen sind mit nach unten gerichteten Spitzen in den
Besteckkorb einzuordnen oder waagerecht auf die Ablagen
des oberen Geschirrkorbs zu legen.
Es empfiehlt sich, spülmaschinenfestes Geschirr zu
verwenden.
* Nur bei einigen Modellen. In unterschiedlicher Anzahl und
Platzierung.
Höheneinstellung des Oberkorbes
Um das Einordnen des Geschirrs zu vereinfachen, kann der
Oberkorb je nach Bedarf in Hoch- oder Niedrigstellung eingeschoben
werden.
Es empfiehlt sich, die Höhe des Oberkorbes bei LEEREM
KORB zu regulieren.
Heben oder senken Sie den Korb NIEMALS nur an einer Seite.
Öffnen Sie die rechte und linke Arretierung der
Korbführungen und ziehen Sie den Korb heraus;
schieben Sie ihn in Hoch- oder Niedrigstellung
ein; lassen Sie ihn über die Führungen gleiten, bis
auch die Vorderräder eingeschoben sind, und
schließen Sie die Arretierungen (siehe
Abbildung).
Ist der Korb mit Dual Space-Griffen ausgestattet
(siehe Abbildung), ziehen Sie den Oberkorb bis
zum Anschlag heraus, fassen die an den
Korbseiten befindlichen Griffe mit den Händen,
ziehen diese nach oben bzw. drücken sie nach
unten und lassen den Korb daraufhin hinab (hierbei
festhalten).
Nicht spülmaschinenfestes Geschirr
Gegenstände aus Holz, mit Holz- oder Horngriffen oder mit
geklebten Teilen.
Gegenstände aus Aluminium, Kupfer, Messing oder Zinn.
Nicht hitzefestes Geschirr aus Kunststoff.
Antikes oder handbemaltes Porzellan.
Antike Silberwaren. Nicht antike Silberwaren dagegen können im
Geschirrspüler gespült werden. Stellen Sie ein sanftes Programm ein und
stellen Sie sicher, dass es nicht mit anderem Metall in Berührung kommt.
41
Page 42

Inbetriebsetzung
und Gebrauch
,-
Die Bedienblende ist mit einem Touch Control-
System versehen; ein leichter Fingerdruck auf die
Symbole aktiviert den Befehl.
Die Symbole in der Spülprogrammlegende (links
neben der Bedienblende), leuchten NICHT auf.
Das Programm wird durch das Drücken des Symbols P
ausgewählt.
Das Gerät ist (je nach Geschirrspülermodell) mit akustischen
Signalen/Tönen versehen, die auf den gegebenen Befehl
hinweisen: Start, Ende des Spülgangs usw.
Die Symbole/Kontrollleuchten auf der Bedienblende/
Display können unterschiedliche Farben aufweisen. (Je
nach Geschirrspülermodell).
Starten des Geschirrspülers
1. Öffnen Sie den Wasserhahn.
2. Drücken Sie auf das Symbol ON-OFF: Das Display leuchtet
einige Sekunden lang auf und zeigt ON (eingeschaltet) an.
3. Öffnen Sie die Geschirrspülertür und füllen Sie das
Spülmittel ein (siehe Einfüllen des Spülmittels).
4. Befüllen Sie die Geschirrspülerkörbe (siehe
Beschickungsbeispiele) und schließen Sie die Gerätetür.
5. Drücken Sie auf das Symbol P, um das Spülprogramm je
nach Geschirrart und Verschmutzungsgrad auszuwählen
(siehe Spülprogrammtabelle).
6. Wählen Sie die Spüloptionen* (siehe Optionen).
7. Drücken Sie auf das Symbol Start/Pause; das Startsymbol auf
dem Display leuchtet auf. Die Programmnummer, die Symbole
des Spülgangs und der etwaigen Optionen sowie die Restzeit
werden am Ende des Zyklus auf dem Display angezeigt.
8. Nach Beendigung des Programms werden auf dem Display
die Anzahl des durchgeführten Programms sowie END (ENDE)
angezeigt. Schalten Sie das Gerät mit dem Symbol ON-OFF
aus; auf dem Display wird OFF angezeigt. Schließen Sie den
Wasserhahn und ziehen Sie das Stromkabel.
9. Warten Sie einige Minuten, bevor Sie das Geschirr herausnehmen.
Sie könnten sich daran verbrennen. Räumen Sie die
Geschirrspülerkörbe aus, beginnen Sie dabei mit dem Unterkorb.
- Zur Senkung des Stromverbrauchs bei längerem Stillstand
des Geräts schaltet sich das Gerät unter gewissen Bedingungen
gleichzeitig und automatisch aus.
AUTOMATIK-PROGRAMME*: Dieses Geschirrspülgerät
ist mit einem Spezialfühler ausgestattet, der in der Lage ist,
den Verschmutzungsgrad zu erfassen, diesen auszuwerten
und demnach das effektiv und wirtschaftlich geeignetste
Spülprogramm einzustellen.
Die Dauer der Automatikprogramme kann aufgrund der
Einwirkung des Sensors variieren.
Bei nur leicht verschmutztem Geschirr oder bei
Geschirr, das vorher unter laufendem Wasser abgespült
wurde, kann die Spülmittelmenge erheblich reduziert
werden.
Sie das Gerät über dasselbe Symbol erneut ein und wählen Sie
die gewünschten Programme und Optionen.
Hinzufügen von weiterem Geschirr
Drücken Sie auf das Symbol Start/Pause; das Symbol Pause
leuchtet auf; öffnen Sie die Gerätetür (Vorsicht, es kann heißer
Dampf austreten!) und räumen Sie das zusätzliche Geschirr ein.
Drücken Sie erneut auf das Symbol Start/Pause; das Symbol Start
auf dem Display leuchtet auf und der Spülgang wird fortgesetzt.
Durch das Drücken auf das Symbol Start/Pause, womit das Gerät
angehalten wird, wird gleichzeitig auch das Programm angehalten.
In dieser Phase kann das Spülprogramm nicht geändert werden.
Unbeabsichtigtes Unterbrechen des Spülprogramms
Wird während des Spülgangs die Gerätetür geöffnet oder sollte ein
Stromausfall stattfinden, wird der Spülgang unterbrochen. Wird die
Gerätetür wieder geschlossen oder kehrt der Strom zurück, läuft
das Programm an der Stelle weiter, an der es unterbrochen wurde.
Einfüllen des Spülmittels
Ein gutes Spülergebnis hängt auch von einer korrekten
Spülmitteldosierung ab. Eine zu hohe Dosierung ist nicht
gleichzusetzen mit einem besseren Spülergebnis, man
belastet dadurch nur die Umwelt.
Verwenden Sie bitte ausschließlich Spülmittel für
Geschirrspüler.
VERWENDEN SIE BITTE KEIN HANDSPÜLMITTEL.
Bei übermäßiger Spülmittelverwendung können
Schaumreste am Ende des Spülgangs zurückbleiben.
Zum Einsatz von Tabs wird nur dann geraten, wenn
das Modell die Zusatzfunktion MULTIFUNKTIONS-TABS
vorsieht.
Die besten Spül- und Trockenergebnisse erhalten Sie
nur durch Einsatz von Spülmitteln in Pulverform,
flüssigen Klarspülern und Salz.
Kammer A: Spülmittel für den Hauptspülgang
Kammer B: Spülmittel für den Vorspülgang
1. Öffnen Sie den Deckel C und
drücken Sie die Taste D.
2. Hinsichtlich der Dosierung
verweisen wir auf die Programmtabelle:
Spülpulver: Kammern A und B.
Spültabs: Erfordert das
Spülprogramm 1 Tab, geben Sie
diesen in Kammer A und schließen
den Deckel. Erfordert es 2 Tabs,
geben Sie den zweiten Tab auf den Geräteboden.
3. Entfernen Sie eventuelle Spülmittelrückstände von den Kanten
der Kammern und schließen Sie den Deckel so, dass er einrastet.
Änderung eines laufenden Programms
Sollten Sie irrtümlich ein falsches Programm gewählt haben, kann
es noch geändert werden, vorausgesetzt, es wurde gerade erst
in Gang gesetzt. Um den Spülzyklus zu ändern, schalten Sie
das Gerät durch langes Drücken auf das Symbol ON/OFF/
Reset aus; auf dem Display wird 3-2-1 OFF angezeigt. Schalten
42
* Nur bei einigen Modellen.
Page 43

Spüloptionen*
Die OPTIONEN können nur dann eingestellt, geändert oder
gelöscht werden, nachdem das Spülprogramm ausgewählt
und bevor auf das Symbol START/PAUSE gedrückt wurde.
Es können lediglich die Optionen zugeschaltet werden, die auch
mit dem gewählten Programmtyp kompatibel sind. Ist eine
Option mit dem eingestellten Programm nicht kompatibel (siehe
Spülprogrammtabelle), blinkt die entsprechende LED 3 Mal auf.
Halbe Füllung im Ober- oder Unterkorb
Bei Einstellung der Option Halbe Füllung kann der Spülgang im
Ober- oder im Unterkorb durchgeführt werden.
Somit sparen Sie Wasser, Energie und Spülmittel. Wählen Sie das
Programm und drücken Sie auf das Symbol HALBE FÜLLUNG; das
Symbol der halben Füllung und die Anzeige des Oberkorbes
leuchten auf dem Display auf; mit einem weiteren Druck werden das
Symbol der halben Füllung und die Anzeige des Unterkorbes
angezeigt. Der Spülgang wird nur beim ausgewählten Korb aktiviert.
,-
Wird eine Option gewählt, die mit einer bereits zugeschalteten
Option nicht kompatibel ist, blinkt diese 3 Mal auf und erlischt
wieder. Nur die zuerst gewählte Einstellung bleibt eingeschaltet.
Möchten Sie eine irrtümlich eingestellte Option wieder
löschen, drücken Sie erneut auf das entsprechende Symbol.
Startzeitvorwahl *
Der Start des Spülprogramms kann um 1 bis 24 Std.
verschoben werden.
1. Nach der Wahl des gewünschten Spülprogramms und
eventueller weiterer Optionen drücken Sie auf das Symbol
STARTZEITVORWAHL. Das Symbol auf dem Display
leuchtet auf. Drücken Sie auf das Symbol
STARTZEITVORWAHL, um auszuwählen, wann das
Programm starten soll (zwischen 1 und 24 Stunden).
2. Bestätigen Sie die Auswahl mit dem Symbol Start/Pause,
damit wird auch der Countdown in Gang gesetzt. Die
eingestellte Startverzögerungszeit wird auf dem Display
angezeigt und das Symbol Start/Pause hört auf zu blinken.
3. Ist die Zeit abgelaufen, erlischt das Symbol der
STARTZEITVORWAHL und das Spülprogramm startet.
Um sie zu deaktivieren, drücken Sie auf das Symbol
STARTZEITVORWAHL, bis OFF angezeigt wird.
Bei bereits in Gang gesetztem Programm ist eine
STARTZEITVORWAHL nicht mehr möglich.
Option Kurzzeit*
Diese Option ermöglicht eine Verkürzung aller Hauptprogramme
unter Beibehaltung derselben Spül- und Trocknungsergebnisse.
Drücken Sie nach der Wahl des gewünschten Spülprogramms
das Optionssymbol Kurzzeit. Die Aktivierung des Symbols auf
dem Display bestätigt die Zuschaltung dieser Option.
Zur Deaktivierung der Option drücken Sie erneut auf
dasselbe Symbol.
Die Optionen Kurzzeit und Nacht sind nicht
miteinander kompatibel.
Die Optionen Kurzzeit und Nacht sind nicht
kompatibel mit der Spüloption HALBE FÜLLUNG.
* Nur bei einigen Modellen.
Achten Sie darauf, nur den Geschirrkorb zu füllen, der
gewählt wurde, und geben Sie nur die Hälfte des Spülmittels ein.
In diesem Fall empfiehlt sich der Einsatz von
Spülmitteln in Pulverform.
Diese Option ist nicht zuschaltbar zu dem
Programm: Kurz und Baby.
Zusatzfunktion Nacht*
Durch diese Zusatzfunktion wird das Betriebsgeräusch noch
weiter herabgesetzt, die Programmdauer wird jedoch erhöht.
Drücken Sie nach der Wahl des gewünschten Spülprogramms
das Optionssymbol Nacht. Die Aktivierung des Symbols auf
dem Display bestätigt die Zuschaltung dieser Option.
Zur Deaktivierung der Option drücken Sie erneut auf dasselbe
Symbol.
Die Option Nacht ist nicht mit der Option HALBE
FÜLLUNG kompatibel.
Multifunktions-Tabs* (Tabs)
Diese Option trägt zur Optimierung des Spül- und
Trocknungsergebnisses bei.
Sollten Sie Multifunktions-Tabs verwenden, drücken
Sie auf das Symbol MULTIFUNKTIONS-TABS; die
entsprechende Kontrollleuchte schaltet sich ein. Die
Option Multifunktions-Tabs bewirkt eine
Verlängerung des Spülprogramms.
Die Option MULTIFUNKTIONS-TABS bleibt auch für
die nachfolgenden Spülgänge eingestellt, wenn sie
nicht deaktiviert wird.
Zum Einsatz von Tabs wird nur dann geraten, wenn die
Zusatzfunktion MULTIFUNKTIONS-TABS vorgesehen ist.
Von der Nutzung dieser Option wird bei Programmen,
die den Einsatz von Multifunktions-Tabs nicht vorsehen,
abgeraten (siehe Tabelle Spüloptionen).
A B C D E
Tabelle Spüloptionen
1. Auto Super Wash
2. Auto Täglicher
Abwasch
3. Täglicher Gebrauch
A 60
4. Einweichen
5. Eco 50 °C
6. Kurzprogramm 25'
7. Kristallgläser
8. Zyklus für
Babygeschirr
Startzeit
vorwahl
JA JA JA Nein JA
A JA JA JA JA
JA JA JA Nein Nein
JA JA Nein Nein Nein
JA JA JA JA Nein
JA Nein JA Nein Nein
JA JA JA Nein Nein
JA Nein Nein Nein Nein
Halbe
Füllmenge
Multi
funktions-
Tabs
Nacht Kurzzeit
43
Page 44

Programme
,-
Hinsichtlich der SPÜLOPTIONEN verweisen wir auf die Tabelle Spüloptionen, befindlich im Abschnitt Start und
Inbetriebnahme.
Die Anzahl und die Art der Spülprogramme und -optionen ist abhängig vom jeweiligen
Geschirrspülermodell.
Hinweise zur Programmwahl
Stark verschmutztes Geschirr,
Töpfe und Pfannen (nicht
geeignet für empfindliches
Geschirr).
Normal verschmutztes Geschirr
und Töpfe. Normaler täglicher
Abwasch.
Tägl. Abwasch geringfügiger
Mengen (4 Maßgedecke + 1 Topf
+ 1 Pfanne).
Abspülen des Geschirrs, das erst
später, zusammen mit weiterem
Geschirr, gespült werden soll.
Öko-Programm mit niedrigem
Energieverbrauch, geeignet für
Geschirr und Töpfe.
Kurzes Sparprogramm für nur
leicht verschmutztes, sofort nach
dem Gebrauch gespültes
Geschirr (2 Teller + 2 Gläser + 4
Bestecke + 1 Topf + 1 kleine
Pfanne).
Kurzes Sparprogramm für
temperaturempfindliches, sofort
nach dem Gebrauch zu
reinigendes Geschirr (Kelchgläser
im Oberkorb + heikle Teller im
Unterkorb).
Hygieneprogramm für
Babyflaschen, Sauger und
Schnuller zusammen mit Tellern,
Tassen, Gläsern und Besteck.
Nur Oberkorb-Befüllung.
3URJUDPP3URJUDPP
1. Super Wash
2. Normal
3. Täglich
4. Einweichen
5. Eco*
6.
Kurzprogramm
25'
7. Kristallgläser
8. Zyklus für
Babygeschirr
Spülmittel
(A) = Dosierkammer A
(B) = Dosierkammer B
Pulver flüssig Tabs
35 g (A)
29 g (A)
6 g (B)
35 ml (A)
29 ml (A)
6 ml (B)
25 g (A)
Nein
29 g (A)
6 g (B)
25 g (A)
35 g (A)
20 g (A)
25 ml (A)
29 ml (A)
25 ml (A)
35 ml (A)
20 ml (A)
Nein
6 ml (B)
Programmda
(Toleranz ±
10 %)
Std. Min.
uer
2:25’
1:50’
1:00’
0:08’
3:00’
0:25’
1:30’
1:20'
Programme,
die einen
Trockengang
vorsehen
1 (A)
1 (A)
1 (A)
Nein
1 (A)
1 (A)
1 (A)
Nein
Ja
Ja
Nein
Nein
Ja
Nein
Ja
Ja
Optionen
A-B-C-E
A-B-C-D-E
A-B-C
A-B
A-B-C-D
A-C
A-B-C
A
Hinweis:
Die optimale Leistung der Programme Täglicher Abwasch und Kurz ist dann gewährleistet, wenn die Anzahl der
angegebenen Maßgedecke eingehalten wird.
* Das Sparprogramm Eco (Öko), das den Anforderungen der Norm EN 50242 entspricht, hat eine längere Dauer im
Vergleich zu den übrigen Programmen. Trotzdem handelt es sich um das Programm mit dem niedrigsten
Energieverbrauch, das die Umwelt nicht belastet.
Hinweis für die Prüflabors: Informationen hinsichtlich der Bedingungen des EN-Vergleichstests sind unter
nachfolgender Adresse anzufordern: ASSISTENZA_EN_LVS@indesitcompany.com
Zur Vereinfachung der Spülmitteldosierung berücksichtigen Sie bitte Folgendes:
1 Esslöffel = ca. 15 g Spülpulver = ca. 15 ml Flüssigspülmittel. - 1 Esslöffel = ca. 5 g Spülpulver = ca. 5 ml Flüssigspülmittel.
44
Page 45

Klarspüler und Regeneriersalz
Verwenden Sie bitte nur Spezialspülmittel für
Geschirrspüler.
Verwenden Sie bitte kein Koch- oder Industriesalz und
auch keine Handspülmittel.
Bitte befolgen Sie die auf der Verpackung befindlichen
Anweisungen.
Sollten Sie ein Multifunktionsprodukt verwenden, ist ein
Hinzufügen von weiterem Klarspüler nicht erforderlich. Der
Zusatz von Regeneriersalz ist jedoch ratsam, besonders bei
hartem oder sehr hartem Wasser. Bitte befolgen Sie die auf der
Verpackung befindlichen Anweisungen.
Da weder Salz noch Klarspüler eingefüllt wird, ist es
ganz normal, dass die Kontrollleuchten/Symbole der
SALZNACHFÜLLANZEIGE* und der
KLARSPÜLERNACHFÜLLANZEIGE* weiterhin leuchten.
Einfüllen des Klarspülers
Der Klarspüler fördert das Trocknen des Geschirrs, da das
Wasser von der Geschirroberfläche abläuft; es verbleiben
weder Streifen noch Flecken.
Der Klarspülerbehälter muss aufgefüllt werden:
wenn auf der Bedienblende/Display die Kontrollleuchte/
Symbol der KLARSPÜLERNACHFÜLLANZEIGE* aufleuchtet;
1. Behälter durch Drehen des Stöpsels
(G) gegen den Uhrzeigersinn öffnen.
2. Klarspüler einfüllen, er darf nicht
überlaufen. Andernfalls sofort mit einem
F
trockenen Tuch abwischen.
3. Schrauben Sie die
G
Verschlussschraube wieder ein.
Füllen Sie den Klarspüler NIEMALS direkt ins Innere des
Geschirrspülers.
Klarspülerdosierung
Sollte das Trockenergebnis nicht zufriedenstellend sein,
kann die Klarspülerdosierung neu eingestellt werden.
Drehen Sie den Regler (F) mithilfe eines Schraubenziehers auf
eine der sechs Einstellungen (werkseitig eingestellt auf 4):
wenn das Geschirr Streifen aufweist, drehen Sie den
Regler auf eine niedrige Einstellung (1-3).
Befinden sich Wassertropfen oder Kalkflecken darauf,
drehen Sie den Regler auf höhere Einstellungen (4-6).
Einstellen der Wasserhärte
Jeder Geschirrspüler ist mit einem Wasserenthärter
ausgestattet, der durch Verwendung von speziell für
Geschirrspüler vorgesehenem Regeneriersalz den
Geschirrspüler mit kalkfreiem Wasser versorgt.
Dieser Geschirrspüler kann so eingestellt werden, dass die
Umweltbelastung reduziert und die Spülleistungen
entsprechend der Wasserhärte optimiert werden. Angaben
zur Wasserhärte erhalten Sie bei Ihrem Wasserwerk.
- Schalten Sie das Gerät über das Symbol ON/OFF ein.
- Drücken Sie etwa fünf Sekunden lang auf das Symbol P.
Die dem eingestellten Wasserhärtegrad entsprechende
Kontrollleuchte blinkt. (Der Entkalker ist ab Werk auf den
Wert 3 eingestellt). Es wird h2o angezeigt.
- Drücken Sie mehrmals hintereinander auf das Symbol P,
bis Sie den Härtegrad erreichen, den Sie einstellen möchten
(1-2-3-4-5
- Zum Verlassen der Funktion warten Sie bitte einige
* siehe Tabelle Wasserhärte).
Sekunden oder drücken Sie auf ein Symbol der Optionen*
oder schalten Sie das Gerät über das Symbol ON/OFF aus.
Wenn Multifunktions-Tabs verwendet werden, ist trotzdem
der Salzbehälter zu füllen.
Tabelle zur Wasserhärte
Stufe
Von 0 °f bis 10 °f wird empfohlen, kein Salz zu verwenden.
°dH °fH mmol/l
1 0 - 6 0 - 10 0 - 1
2 6 - 11 11 - 20 1,1 - 2
3 12 - 17 21 - 30 2,1 - 3
4 17 - 34 31 - 60 3,1 - 6
5*
34 - 50 61 - 90 6,1 - 9
Salzbehälter reicht
durchschnittlich für
Monate
7 Monate
5 Monate
3 Monate
2 Monate
2-3 Wochen
**
* mit der Einstellung 5 kann sich die Haltbarkeit verlängern.
** bei einem Spülzyklus pro Tag.
(°dH = Grad deutsche Härte - °fH = Grad französische
Härte - mmol/l = Millimol/Liter)
Einfüllen des Regeneriersalzes
Um ein optimales Spülergebnis zu gewährleisten, sollte der
Salzbehälter niemals leer sein. Durch das Regeneriersalz wird das
Wasser entkalkt; demnach setzt sich kein Kalk auf Ihrem Geschirr ab.
Der Salzbehälter befindet sich im Geschirrspülerboden
(siehe Beschreibung) und muss aufgefüllt werden:
wenn der grüne Schwimmer* durch den Salzstöpsel
hindurch nicht sichtbar ist;
wenn auf der Bedienblende/Display die Kontrollleuchte/
Symbol der SALZNACHFÜLLANZEIGE* aufleuchtet;
1. Ziehen Sie den Unterkorb heraus und
schrauben Sie den Salzbehälterdeckel
gegen den Uhrzeigersinn ab.
2. Nur bei der erstmaligen
Inbetriebnahme: Füllen Sie den Behälter
bis zum Rand mit Wasser.
3. Setzen Sie den mitgelieferten Trichter auf (siehe Abbildung)
und befüllen Sie den Behälter bis zum Rand mit Salz (ca. 1
kg). Es ist normal, wenn etwas Wasser ausläuft.
4. Nehmen Sie den Trichter* heraus und entfernen Sie die
Salzreste vom Öffnungsrand; spülen Sie den Deckel unter
fließendem Wasser ab, bevor Sie ihn wieder aufschrauben.
Halten Sie ihn hierzu kopfüber unter den Wasserstrahl und
lassen Sie das Wasser aus den vier Schlitzen im unteren Bereich
des Deckels abfließen. (Salzdeckel mit grünem Schwimmer*)
Es wird empfohlen, diesen Vorgang bei jedem
Nachfüllen von Salz zu wiederholen.
Schrauben Sie den Deckel fest auf, damit während des
Spülgangs keine Spüllauge eintreten kann. (Diese könnte
den Enthärter dauerhaft beschädigen).
Sollte das Nachfüllen von Salz erforderlich sein, sollte
dies sofort vor der Durchführung eines Spülgangs erfolgen,
damit die übergelaufene Salzlösung sofort entfernt wird.
* Nur bei einigen Modellen.
,-
45
Page 46

Reinigung und Pflege
Abstellen der Wasser-und Stromversorgung
,-
Drehen Sie den Wasserhahn nach jedem Spülgang
zu, um Schäden durch eventuelles Austreten von
Wasser auszuschließen.
Ziehen Sie den Netzstecker aus der Steckdose,
bevor Sie Ihren Geschirrspüler reinigen oder
Wartungsmaßnahmen getroffen werden.
Reinigung des Geschirrspülers
Die Gehäuseteile und die Bedienblende können mit einem
mit Wasser angefeuchteten, weichen Tuch gereinigt
werden. Vermeiden Sie Löse- und Scheuermittel.
Zur Beseitigung von evtl. Flecken im Innenraum des
Gerätes verwenden Sie ein feuchtes Tuch, auf das
Sie etwas weißen Essig träufeln.
Vermeidung von Geruchsbildung
Lassen Sie die Gerätetür stets nur angelehnt; auf diese
Weise kann sich keine Feuchtigkeit ansammeln.
Die Dichtungen der Tür und der Reinigerkammern
sollten regelmäßig mit einem feuchten Tuch gereinigt
werden. Sie vermeiden so die Ansammlung von
Speiseresten, der hauptsächlichen Ursache von
Geruchsbildung im Geschirrspüler.
Reinigung der Sprüharme
An den Sprüharmen könnten Speiserückstände festkleben
und die Wasserdüsen verstopfen. Ab und zu sollten diese
demnach kontrolliert und mit einem Bürstchen, das nicht
aus Metall sein darf, gereinigt werden.
Beide Sprüharme können abgenommen werden.
Zur Abnahme des oberen
Sprüharmes drehen Sie den
Kunststoffring gegen den
Uhrzeigersinn ab. Der obere
Sprüharm ist mit jener Seite nach
oben wieder einzusetzen, die die
meisten Löcher aufweist.
- Schließen Sie den Wasserhahn.
- Schrauben Sie den Wasserschlauch ab, nehmen Sie den Filter
heraus und reinigen Sie ihn vorsichtig unter fließendem Wasser.
- Setzen Sie den Filter wieder ein und verschrauben Sie den
Schlauch.
Reinigung der Filter
Die Siebgruppe setzt sich aus drei Filtern zusammen, die
Spülwasser reinigen, von Speiseresten befreien und wieder
in Umlauf bringen. Um optimale Spülergebnisse zu
gewährleisten, müssen diese gereinigt werden.
Reinigen Sie die Filtersiebe regelmäßig.
Der Geschirrspüler darf nie ohne Filtersiebe oder mit
ausgehängten Filtern in Betrieb genommen werden.
Kontrollieren Sie nach einigen Spülgängen die
Filtersiebgruppe. Ggf. ist diese sorgfältig unter laufendem
Wasser auszuspülen. Nehmen Sie hierzu ein kleines
Bürstchen (das nicht aus Metall sein darf) zu Hilfe.
Verfahren Sie wie folgt:
1. Drehen Sie das zylinderförmige Filtersieb C gegen den
Uhrzeigersinn heraus (Abb. 1).
2. Ziehen Sie den Siebbecher B durch leichten Druck auf
die seitlichen Flügel heraus (Abb. 2).
3. Nehmen Sie den Siebteller A aus rostfreiem Stahl ab (Abb. 3).
4. Kontrollieren Sie den Hohlraum und befreien Sie diesen
von eventuellen Speiseresten. Das Spülpumpenschutzteil
(schwarzes Teil) DARF NICHT ABGENOMMEN WERDEN
(Abb.4).
Um den unteren Sprüharm
abzunehmen, drücken Sie die
beiden seitlichen Zungen
nach unten und ziehen dann
den Arm nach oben hin ab.
Reinigen des Wasserzufuhr-Filtersiebes*
Falls es sich um neue oder für einen längeren Zeitraum
nicht benutzte Wasserschläuche handeln sollte, ist
sicherzustellen, dass das Wasser auch klar und frei von
Verunreinigungen ist. Lassen Sie es hierzu einige Zeit
lang fließen. Es kann nämlich ansonsten passieren, dass
die Anschlussstelle verstopft wird und Ihr Geschirrspüler
dadurch Schaden nimmt.
Reinigen Sie regelmäßig den Wasserzulauffilter am
Zufuhrhahn.
46
!
Setzen Sie die Siebgruppe nach der Reinigung der
Filtersiebe wieder korrekt in ihren Sitz ein; dies ist äußerst
wichtig, um eine ordnungsgemäße Betriebsweise des
Geschirrspülers zu gewährleisten.
"
Was tun, bevor Sie für längere Zeit verreisen
Schalten Sie sämtliche Elektroanschlüsse ab und
schließen Sie den Wasserhahn.
Lassen Sie die Gerätetür leicht aufstehen.
Lassen Sie nach Ihrer Rückkehr einen Spülgang ohne
Geschirr durchlaufen.
* Nur bei einigen Modellen.
Page 47

Vorsichtsmaßregeln, Hinweise und
Kundendienst
Das Gerät wurde entsprechend den strengsten
internationalen Sicherheitsvorschriften entworfen und gebaut.
Nachstehende Hinweise sind aus Sicherheitsgründen
abgegeben und sollten aufmerksam gelesen werden
Allgemeine Sicherheit
Dieses Gerät ist nicht zur Verwendung durch Personen
(einschließlich Kinder) mit eingeschränkten körperlichen, geistigen
oder sensorialen Fähigkeiten oder ohne ausreichende Erfahrung
und Kenntnis geeignet, es sei denn, sie werden durch eine für ihre
Sicherheit verantwortliche Person beaufsichtigt und eingewiesen.
Es ist die Aufsicht eines Erwachsenen erforderlich, um zu
vermeiden, dass Kinder mit dem Gerät spielen.
Dieses Gerät ist für den nicht professionellen Einsatz in
privaten Haushalten bestimmt.
Das Gerät darf nur zum Spülen von Haushaltsgeschirr
verwendet werden und nur durch Erwachsene sowie gemäß
den Anleitungen dieses Handbuchs bedient werden.
Das Gerät darf nicht im Freien aufgestellt werden, auch nicht,
wenn es sich um einen geschützten Platz handelt. Es ist äußerst
gefährlich, das Gerät Regen und Gewittern auszusetzen.
Berühren Sie den Geschirrspüler nicht, wenn Sie barfuß sind.
Ziehen Sie den Netzstecker nicht am Netzkabel aus der
Steckdose, sondern nur am Netzstecker selbst.
Vor Reinigungs- und Wartungsmaßnahmen muss der
Wasserhahn zugedreht und der Netzstecker aus der
Steckdose gezogen werden.
Versuchen Sie bei etwaigen Störungen bitte keinesfalls,
Innenteile selbst zu reparieren.
Berühren Sie bitte niemals den Heizwiderstand.
Setzen oder lehnen Sie sich nicht auf die geöffnete Tür. Das
Gerät könnte dadurch umkippen.
Die Gerätetür sollte nicht offen gelassen bleiben, da man
darüber stolpern könnte.
Bewahren Sie das Spülmittel und den Klarspüler außerhalb
der Reichweite von Kindern auf.
Verpackungsmaterial ist kein Spielzeug für Kinder.
Entsorgung
Entsorgung des Verpackungsmaterials: Befolgen Sie die lokalen
Vorschriften; Verpackungsmaterial kann wiederverwertet werden.
Die europäische Richtlinie 2002/96/EG über Elektro- und
Elektronik-Altgeräte (WEEE) sieht vor, dass Haushaltsgeräte
nicht mit dem normalen Hausmüll entsorgt werden dürfen. Die
Altgeräte müssen getrennt gesammelt werden, um die
Rückführung und das Recycling der Materialen zu optimieren,
aus denen die Geräte hergestellt sind, und um mögliche
Belastungen der Gesundheit und der Umwelt zu verhindern.
Das Mülleimersymbol ist auf allen Produkten dargestellt, um an
die Verpflichtung zur getrennten Abfallsammlung zu erinnern.
Für weitere Informationen zur korrekten Entsorgung können sich
die Besitzer von elektrischen Haushaltsgeräten an die zuständige
öffentliche Stelle oder an den jeweiligen Händler wenden.
Wählen Sie ein für das zu spülende Geschirr und den
Verschmutzungsgrad geeignetes Programm. Ziehen Sie
hierzu die Programmtabelle zu Rate:
- Verwenden Sie für normal verschmutztes Geschirr das
umweltfreundliche Sparprogramm Eco, das einen
niedrigen Wasser- und Stromverbrauch gewährleistet.
- Bei nur geringfügiger Beschickung aktivieren Sie die
Option Halbe Füllung (siehe Start und Inbetriebnahme).
Sieht Ihr Stromliefervertrag Billigstromzeiten vor, empfiehlt
sich, das Gerät in diesen Niedrigtarifzeiten in Betrieb zu
setzen. Die Option Startzeitvorwahl* (siehe Start und
Inbetriebnahme) ist Ihnen in diesem Fall eine wertvolle Stütze.
Spülmittel ohne Phosphate, ohne Chlor
und mit Enzymen
Wir empfehlen dringend den Einsatz von phosphat- und
chlorfreien Spülmitteln, da diese die Umwelt nicht zu sehr
belasten.
Die optimale Wirkung der Enzyme ist bei einer Temperatur
von ca. 50 °C gegeben, demnach können bei
enzymhaltigen Spülmitteln Spülgänge bei
Niedrigtemperaturen eingestellt und dennoch dieselben
Ergebnisse erzielt werden, wie bei 65 °C-Programmen.
Dosieren Sie Spülmittel sparsam je nach Angabe des
Herstellers, Wasserhärte, Verschmutzungsgrad und
Menge des Geschirrs, um Verschwendungen zu
vermeiden. Obwohl sie biologisch abbaubar sind,
beinhalten sie dennoch Stoffe, die die Umwelt belasten.
Kundendienst
Bevor Sie den Kundendienst anfordern:
sollten einige Kontrollen vorab selbst durchgeführt werden
(siehe Störungen und Abhilfe).
Starten Sie das Programm erneut, um sicherzustellen,
dass die Störung behoben wurde.
Ist dies nicht der Fall, wenden Sie sich bitte an den
autorisierten Kundendienst.
Wenden Sie sich auf keinen Fall an nicht autorisierte
Techniker.
Geben Sie bitte Folgendes an:
die Art der Störung
das Gerätemodell (Mod.)
die Seriennummer (S/N).
Diese Informationen können Sie auf dem am Gerät befindlichen
Typenschild ablesen (siehe Beschreibung Ihres Geschirrspülers).
,-
Energie sparen und Umwelt schonen
Wasser und Strom sparen
Setzen Sie den Geschirrspüler nur bei voller Ladung in Betrieb.
Um in der Zwischenzeit, d. h. bis das Gerät ganz gefüllt ist, die
Bildung unangenehmer Gerüche zu vermeiden, setzen Sie den
Einweichzyklus in Gang (siehe Spülprogramme).
* Nur bei einigen Modellen.
47
Page 48

Störungen und Abhilfe
Sollten Betriebsstörungen auftreten, kontrollieren Sie bitte folgende Punkte, bevor Sie sich an den
,-
Kundendienst wenden.
Störungen: Mögliche Ursachen/Lösung :
Die Spülmaschine startet nicht
oder reagiert nicht auf die
Bedienungseingaben.
Die Gerätetür schließt nicht.
• Schalten Sie das Gerät durch Drücken der ON/OFF-Taste aus und nach etwa einer
Minute wieder ein und wiederholen Sie die Programmeinstellung.
• Der Stecker ist nic ht richtig in der Stec kdose.
• Die Gerätetür ist nicht ganz geschlossen.
• Das Schloss ist ber eits eingerastet; drücken Sie die Tür energisch, bis
ein „Klicklaut“ zu hören ist.
Der Geschirrspüler pumpt das
Wasser nicht ab.
Der Geschirrspüler ist zu laut.
Auf dem Geschirr und auf den
Gläsern befinden sich
Kalkablagerungen oder ein
weißer Belag.
Das Geschirr und die Gläser
weisen weiße Streifen bzw.
bläuliche Schattierungen auf.
Das Geschirr ist nicht gan z
trocken.
Das Geschirr ist nicht sau ber
geworden.
• Das Spülprogramm ist noch nicht ganz abg elaufen.
• Der Ablaufschlauch ist geknickt (s iehe Installation).
• Der Ablauf des Spülbeckens ist verstopft.
• Im Filtersieb haben s ich Speisereste anges ammelt.
• Das Geschirr schlägt aneinander oder gegen die Sprüharme.
• Es hat sich zu viel Schaum gebildet: Das Spülmittel wurde unkorrekt dosiert oder es ist
ungeeignet für Geschirrspüler. (Siehe Start und Inbetriebnahme).
• Es fehlt Regeneriers alz bzw. die Dosier ung entspricht nic ht der
Wasserhärte (sieh e Klarspüler und Regene riersalz ).
• Der Deckel des Sal zbehälters ist nicht ordnungsgemäß geschlossen.
• Es fehlt Klarspülmittel oder es wi rd unzureichend dosier t.
• Der Klarspüler wurde zu hoch dosiert .
• Es wurde ein Spülprogramm, das keinen Trockengang vorsieht, eingestellt.
• Es fehlt Klarspülmittel oder es wi rd unzureichend dosier t (siehe
Klarspüler und Reg eneriersalz).
• Die Klarspüler-Dosiereinstellung is t nicht angemessen.
• Das Geschirr besteht aus Antihaftmaterial oder aus Kunststoff.
• Die Körbe wurden zu voll geladen (si ehe Beschickung de r Körbe).
• Das Geschirr wurde nicht korrekt eingeräumt.
• Die Sprüharme kön nen sich nicht frei bew egen.
• Das Spülprogramm ist zu schwach (sie he Spülprogramme ).
• Es hat sich zu viel Schaum gebildet: Das Spülmittel wurde unkorrekt dosiert oder es ist
ungeeignet für Geschirrspüler. (Siehe Start und Inbetriebnahme).
• Der Stöpsel des Klarspülerbehälters wurde nicht korrekt geschlossen.
• Das Filtersieb ist s chmutzig oder verstop ft (siehe Wartung und P flege).
• Es fehlt Regeneriers alz (siehe Klarspül er und Regenerie rsalz).
Der Geschirrspüler lädt kein
Wasser – Alarm Wasserhahn
geschlossen.
(Sie vernehmen kurze Signaltöne.)
(Die ON/OFF-Kontrollleuchte blinkt und
das Display zeigt A 6.)
Alarm am WasserZulaufschlauch.
Wasserzulauffilter ver stopft.
(Die ON/OFF-Kontrollleuchte blinkt und
das Display zeigt A 7.)
* Nur bei einigen Modellen.
48
*
• Es besteht eine Unter brechung der Wasserz ufuhr.
• Der Zufuhrschlauch i st geknickt (s iehe Installation).
• Öffnen Sie den Wasserhahn; das Gerät setzt sich nach wenigen Minuten in Gang.
• Das Gerät hat auf Sperre geschaltet, weil nach Erklingen der Bip-Töne
kein Eingriff erfolgte.
Schalten Sie das Gerät über die ON/OFF-Taste aus, öffnen Sie den Wasserhahn und
schalten Sie das Gerät nach 20 Sekunden über dieselbe Taste wieder ein. Wiederholen
Sie die Geräteeinstellung und starten Sie das Spülprogramm erneut.
• Schalten Sie das Gerät über die ON/OFF-Taste aus. Drehen Sie den
Wasserhahn zu, um Überschwemmungen zu v ermeiden, ziehen S ie den
Netzstecker aus de r Steckdose.
Prüfen Sie den Wasserzulauffilter. (Siehe Kapitel „Reinigung und Pflege“).
Page 49

Manual de Instrucciones
LAVAVAJILLAS
ES
Español, 49
PFTA++ 8H4
Sumario
Instalación, 50-51
Colocación y nivelación
Conexiones hidráulicas y eléctricas
Advertencias para el primer lavado
Datos técnicos
Descripción del aparato, 52
Vista de conjunto
Panel de control
Cargar los cestos, 53
Cesto inferior
Cesto de los cubiertos
Cesto superior
Puesta en funcionamiento y uso, 54-55
Poner en funcionamiento el lavavajillas
Cargar el detergente
Opciones de lavado
Programas, 56
Tabla de programas
Abrillantador y sal regeneradora, 57
Cargar el abrillantador
Cargar la sal regeneradora
Mantenimiento y cuidados, 58
Interrumpir el agua y la corriente eléctrica
Limpiar el lavavajillas
Evitar los malos olores
Limpiar los rociadores
Limpieza del filtro de entrada de agua
Limpiar los filtros
Si se ausenta durante largos períodos
Precauciones, consejos y Asistencia
Técnica, 59
Seguridad general
Eliminación
Ahorrar y respetar el medio ambiente
Asistencia Técnica
Anomalías y soluciones, 60
Page 50

Instalación
-5
Es importante conservar este manual para poder
consultarlo en cualquier momento. En caso de venta, de
cesión o de traslado, controle que permanezca junto con el
aparato.
Lea atentamente las instrucciones: contienen información
importante sobre la instalación, sobre el uso y sobre la
seguridad.
En caso de traslado mantenga el aparato en posición
vertical; si fuera necesario inclinarlo, hágalo hacia la parte
posterior.
Este aparato ha sido proyectado para uso doméstico y
para aplicaciones similares, por ejemplo:
- Áreas destinadas a cocina para el personal de tiendas,
oficinas y otros ambientes de trabajo
- Casas agrícolas
- Uso por parte de clientes de hoteles, moteles y otros
ambientes residenciales
- Bed and breakfast.
Colocación y nivelación
1. Desembale el aparato y controle que no haya sufrido daños
durante el transporte.
Si estuviera dañado, no lo conecte y llame al revendedor.
2. Coloque el lavavajillas haciendo adherir los costados o la
parte posterior a los muebles adyacentes o a la pared. El
aparato también se puede empotrar debajo de una superficie
de trabajo continua
* (ver la hoja de Montaje).
Conexión del tubo de carga de agua
A una toma de agua fría: enrosque bien el tubo de carga a
un grifo con boca roscada de ¾ gas; antes de enroscarlo,
haga correr agua hasta que salga límpida para que las
impurezas que pudiera contener no obstruyan el aparato.
A una toma de agua caliente: en el caso de una instalación
centralizada de radiadores, el lavavajillas se puede
alimentar con agua caliente de la red, mientras no supere
una temperatura de 60ºC.
Enrosque el tubo al grifo de la misma forma descrita para la
toma de agua fría.
Si la longitud del tubo de carga no es la adecuada,
diríjase a un negocio especializado o a un técnico autorizado
(ver Asistencia Técnica).
La presión del agua debe estar comprendida entre los
valores indicados en la tabla de Datos técnicos (ver al lado).
Controle que en el tubo no hayan pliegues ni
estrangulaciones.
Conexión del tubo de descarga de agua
Conecte el tubo de descarga, sin plegarlo, a una tubería
de descarga con un diámetro mínimo de 4 cm.
3. Coloque el lavavajillas sobre un piso plano y rígido.
Compense las irregularidades desenroscando o enroscando
las patas delanteras hasta que el aparato esté en posición
horizontal. Una cuidadosa nivelación brinda estabilidad y evita
vibraciones, ruidos y desplazamientos.
*. Para regular la altura de la pata posterior, accione el
4
casquillo hexagonal rojo que se encuentra en la parte inferior
frontal y central del lavavajillas, utilizando una llave de boca
hexagonal con una apertura de 8 mm. girando en sentido
horario para aumentar la altura y en sentido antihorario para
disminuirla. (ver la hoja de instrucciones para empotramiento
anexada a la documentación).
Conexiones hidráulicas y eléctricas
La adaptación de las redes eléctricas e hidráulicas para
la instalación debe ser realizada sólo por personal
especializado.
El lavavajillas no se debe apoyar en los tubos ni en el
cable de alimentación eléctrica.
El aparato debe conectarse a la red de distribución de
agua empleando tubos nuevos.
No reutilice los tubos viejos.
El tubo de descarga debe estar a una altura
comprendida entre 40 y 80 cm. del piso o de la
superficie de apoyo del lavavajillas (A).
Antes de conectar el tubo de descarga del agua al sifón
del lavabo, quite el tapón de plástico (B).
Los tubos de carga y de descarga de agua y el cable de
alimentación eléctrica se pueden orientar hacia la derecha o
hacia la izquierda para permitir una mejor instalación.
50
* Presente sólo en algunos modelos.
Page 51

Dispositivo de seguridad contra inundación
Para garantizar que no se produzcan inundaciones, el
lavavajillas:
- posee un sistema que interrumpe la entrada de agua en el
caso de anomalías o de pérdidas desde el interior.
Algunos modelos poseen un dispositivo adicional de
seguridad New Acqua Stop*, que los protege contra
inundaciones aún en el caso de rotura del tubo de
alimentación.
ATENCIÓN: ¡VOLTAJE PELIGROSO!
En ningún caso se debe cortar el tubo de carga de agua
porque contiene partes conectadas a una fuente eléctrica.
Conexión eléctrica
Antes de introducir el enchufe en la toma de corriente, controle
que:
Cinta anticondensación*
Después de haber empotrado el lavavajillas, abra la puerta y
pegue la cinta adhesiva transparente debajo de la superficie
de madera para protegerla de una posible condensación.
Advertencias para el primer lavado
Después de la instalación e inmediatamente antes del primer
lavado, llene completamente de agua el depósito de sal y
agregue aproximadamente 1 kg. de sal (ver el capítulo
Abrillantador y sal regeneradora): es normal que el agua se
derrame. Seleccione el grado de dureza del agua (ver el
capítulo Abrillantador y sal regeneradora).
carga de sal, la luz indicadora de FALTA DE SAL
Cuando no se llena el contenedor de sal, se puede dañar
el ablandador de agua y el elemento que produce calor.
- Después de la
* se apaga.
-5
la toma posea conexión a tierra y que sea conforme con la
ley;
la toma sea capaz de soportar la carga máxima de
potencia de la máquina indicada en la placa de
características ubicada en la contrapuerta (ver el capítulo
Descripción del lavavajillas);
la tensión de alimentación esté comprendida dentro de los
valores indicados en la placa de características ubicada en
la contrapuerta;
la toma sea compatible con el enchufe del aparato. Si no es
así, solicite la sustitución del enchufe a un técnico
autorizado (ver Asistencia Técnica); no utilice
prolongaciones ni tomas múltiples.
Una vez instalado el aparato, el cable de alimentación
eléctrica y la toma de corriente deben ser fácilmente
accesibles.
El cable no se debe plegar ni comprimir.
Si el cable de alimentación está dañado, deberá ser
cambiado por el fabricante o por su servicio de asistencia
técnica a fin de prevenir riesgos. (Ver Asistencia)
La Empresa declina toda responsabilidad cuando no se
hayan respetado estas normas.
Datos técnicos
ancho: 59,5 cm
Dimensiones
Capacidad 14 cubiertos estándar
Presión del agua
de alimentación
Tensión de
alimentación
Potencia total
absorbida
Fusible Ver la placa de características
altura: 82 cm
profundidad: 57 cm
0,05 ÷ 1MPa (0,5 ÷ 10 bar)
7,25 – 145 psi
Ver la placa de características
Ver la placa de características
Este aparato es conforme a las
siguientes Directivas de la
Comunidad:
-2006/95/EC (Bajo Voltaje2004/108/EC (Compatibilidad
Electromagnética)
-2005/32/EC (Comm. Reg.
1275/2008) (Ecodesign)
-97/17/EC (etiquetado)
-2002/96/EC (DEEE)
* Presente sólo en algunos modelos.
51
Page 52

Descripción del aparato
-5
Vista de conjunto
Panel de control
1. Cesto superior
2. Rociador superior
3. Cestos adicionales
4. Regulador de la altura del cesto
5. Cesto inferior
6. Rociador inferior
7. Cesto para cubiertos
8. Filtro de lavado
9. Depósito de sal
10. Cubetas de detergente y depósito de
abrillantador
11. Placa de características
12. Panel de control
***
13. Arandela
On-Off/Reset
Display
Puesta en marcha/
Pausa
Selección de
Programa
Leyenda símbolos programas
Display
Indicador luminoso de tiempo
residual, ON, OFF, END
Falta de Sal
Número de
Programa
Falta de
Abrillantador
***Sólo en los modelos con empotramiento total.
* Presente sólo en algunos modelos.
La cantidad y el tipo de programas y opciones varían según el modelo de lavavajillas.
Símbolo de opción
Media carga cesto
Media carga cesto superior
Símbolo de opción
Inicio retrasado
inferior
Símbolo de opción
Símbolo de Opción Pastillas
multifunción
Opción Inicio
Retrasado
Opción Media
carga
Símbolo de Lavado
Símbolo de Secado
Símbolo Arranque
Símbolo de Pausa
Símbolo de Opción Short Time
Símbolo de Opción
Good Night
Opción Short Time
Opción Good Night
Opción Pastillas
multifunción
52
Page 53

Cargar los cestos
Antes de cargar los cestos, elimine de la vajilla los residuos
de alimentos y vacíe los vasos y copas.
Después de haber realizado la carga, controle que los
rociadores giren libremente.
Cesto inferior y cesto para cubiertos
El cesto inferior puede contener ollas, tapas, platos,
ensaladeras, cubiertos, etc.Los platos y cubiertos grandes se
deben colocar preferentemente a los costados del cesto.
Algunos modelos de lavavajillas poseen sectores
reclinables
para colocar los platos o en posición horizontal
para colocar ollas, ensaladeras y sartenes.
*, los mismos se pueden utilizar en posición vertical
Cesto superior
Cargue la vajilla delicada y liviana: vasos, tazas, platitos,
ensaladeras bajas.
Cestos adicionales con posición variable
Los cestos adicionales se
pueden colocar a dos alturas
diferentes para optimizar la
disposición de la vajilla en el
cesto. Las copas se pueden
colocar de forma estable en los
cestos adicionales,
introduciendo el pie en las
ranuras correspondientes.
Algunos modelos de lavavajillas
poseen una bandeja
se puede utilizar para contener
cubiertos para servir o tazas de
pequeñas dimensiones. Para mejores
prestaciones de lavado, evite cargar
vajilla voluminosa debajo de la
bandeja.
* deslizable que
-5
El cesto de los cubiertos puede ser descomponible o no según el
modelo de lavavajillas. El cesto no descomponible se debe colocar
sólo en la parte delantera del cesto inferior.
Ambos poseen rejillas
superiores para una
mejor disposición de los
cubiertos.
Los cuchillos y utensilios con puntas cortantes deben
colocarse en el cesto para cubiertos con las puntas hacia
abajo o dispuestos en los cestos especiales adicionales del
cesto superior en posición horizontal.
Se aconseja el uso de vajilla adecuada para el lavado en
lavavajillas.
* Presente sólo en algunos modelos. Cantidad y posición
variables.
Regular la altura del cesto superior
Para facilitar la colocación de la vajilla, se puede ubicar el cesto
superior en posición alta o baja.
Es preferible regular la altura del cesto superior con el
CESTO VACÍO.
NO levante ni baje el cesto de un solo lado.
Abra los sujetadores de las guías del
cesto, hacia la izquierda y hacia la
derecha y extraiga el cesto; colóquelo
arriba o abajo, hágalo deslizar a lo largo
de las guías hasta hacer entrar también
las ruedas delanteras y cierre los
sujetadores (ver la figura).
Si el cesto posee manijas Dual Space
(ver la figura), lleve el cesto superior
hasta el final del recorrido, coja las
manijas a los costados del cesto y
muévalo hacia arriba o hacia abajo; deje
caer el cesto acompañándolo.
Vajilla no adecuada para el lavado en lavavajillas
Objetos de madera, con empuñadura de madera o de
cuerno o con partes encoladas.
Objetos de aluminio, cobre, latón, peltre o estaño.
Vajilla de plástico que no sea termorresistente.
Porcelanas antiguas o pintadas a mano.
Vajilla de plata antigua. La vajilla de plata que no es antigua,
en cambio, se puede lavar con un programa delicado y
controlando que no esté en contacto con otros metales.
53
Page 54

Puesta en funcionamiento
y uso
-5
El panel de control posee un sistema Touch
Control; una ligera presión con los dedos sobre los
símbolos activa el mando.
Los símbolos en la leyenda de programas de lavado
(a la izquierda del panel de control), NO se iluminan.
La selección del programa se debe realizar presionando
el símbolo P.
La máquina dispone de señales sonoras/tonos(según el
modelo de lavavajillas) que indican la presión del mando:
encendido, fin de ciclo, etc.
Los símbolos/indicadores luminosos presentes en el
panel de control/pantalla, pueden variar de color. (según
el modelo de lavavajillas).
Poner en funcionamiento el lavavajillas
1. Abra el grifo de agua.
2. Pulse el símbolo ON-OFF: la pantalla se ilumina durante
algunos segundos visualizando el mensaje ON (encendido).
3. Abra la puerta y dosifique el detergente (ver cargar el
detergente).
4. Cargue los cestos (ver Cargar los cestos) y cierre la puerta.
5. Pulse el símbolo P, para seleccionar el programa según la
vajilla y su grado de suciedad (ver la tabla de programas)
6. Seleccione las opciones de lavado* (ver las opciones).
7. Pulse el símbolo Puesta en funcionamiento/Pausa, el símbolo
de Puesta en funcionamiento se ilumina en la pantalla. El
número del programa, los símbolos del: lavado y eventuales
opciones y el tiempo residual al finalizar el ciclo se visualizan
en la pantalla.
8. Finalizado el programa aparece en la pantalla el número
del programa efectuado y el mensaje END (FIN). Apague el
aparato con el símbolo ON-OFF, en la pantalla se visualizará
OFF. Cierre el grifo de agua y desconecte el aparato de la
toma de corriente.
9. Espere algunos minutos antes de quitar la vajilla para
evitar quemarse. Descargue los cestos comenzando por el
inferior.
- Para disminuir el consumo de energía eléctrica, en
algunos casos en los que NO se utiliza por mucho tiempo,
la máquina se apaga temporalmente y de modo automático.
PROGRAMAS AUTO*: este modelo de lavavajillas puede
evaluar el grado de suciedad a través de un sensor particular
y seleccionar luego, el lavado más eficiente y económico.
La duración de los programas auto podrá variar debido a la
intervención del sensor.
Si la vajilla está poco sucia o ha sido aclarada
precedentemente bajo el agua, recuerde disminuir la
dosis de detergente.
Modificar un programa en curso
Si no se ha seleccionado el programa deseado, es posible
modificarlo, siempre que haya comenzado recién. Para
cambiar el ciclo de lavado, apague la máquina presionando
de modo prolongado el símbolo ON/OFF/Reset, la pantalla
visualizará 3-2-1 OFF. Vuelva a encender la máquina con el
mismo símbolo y seleccione nuevamente el programa y las
opciones deseadas.
Agregar vajilla
Pulse el símbolo Puesta en funcionamiento/Pausa; el símbolo
Pausa se iluminará; abra la puerta teniendo cuidado con el
escape de vapor e introduzca la vajilla. Pulse nuevamente el
símbolo Puesta en funcionamiento/Pausa: el símbolo Puesta
en funcionamiento se iluminará y el ciclo se reanudará.
Pulsando el símbolo Puesta en funcionamiento/Pausa para
poner la máquina en pausa, se interrumpe temporalmente el
programa.
En esta fase no se puede cambiar el programa.
Interrupciones accidentales
Si durante el lavado se abre la puerta o se produce una
interrupción de corriente eléctrica, el programa se
interrumpe. Cuando se cierra la puerta o vuelve la corriente
eléctrica, el programa se reanudará a partir del punto en el
que se había interrumpido.
Cargar el detergente
Los buenos resultados de un lavado dependen también
de la correcta dosificación del detergente, si se excede,
no se lava más eficazmente y se contamina el medio
ambiente.
Utilice sólo detergente para lavavajillas.
NO UTILICE detergentes para lavado a mano.
Al finalizar el ciclo, un uso excesivo de detergente
puede dejar residuos de espuma.
El uso de las pastillas se aconseja sólo en los modelos
que poseen la opción PASTILLAS MULTIFUNCIÓN.
Las mejores prestaciones de lavado y secado se
obtienen sólo con el uso de detergente en polvo,
abrillantador líquido y sal.
cubeta A: Detergente para lavado
cubeta B: Detergente para prelavado
1. Abra la tapa C presionando el
botón D.
2. Dosifique el detergente
consultando la Tabla de programas:
en polvo: cubetas A y B.
en pastillas: cuando el
programa necesita una, colóquela
en la cubeta A y cierre la tapa; si
necesita dos, coloque la segunda
en el fondo de la cuba.
3. Elimine los residuos de detergente de los bordes de la
cubeta y cierre la tapa hasta el enganche.
* Presente sólo en algunos modelos.
54
Page 55

Opciones de lavado*
Las OPCIONES pueden ser elegidas, modificadas o
anuladas sólo después de haber elegido el programa de
lavado y antes de haber pulsado el símbolo PUESTA EN
FUNCIONAMIENTO/PAUSA.
Pueden seleccionarse sólo las opciones compatibles con el
tipo de programa elegido. Si una opción no es compatible
con el programa seleccionado, (ver la tabla de programas)
el símbolo correspondiente centelleará velozmente 3 veces.
Si se selecciona una opción incompatible con otra
precedentemente elegida, ésta centellea 3 veces y se apaga,
mientras permanece encendida la primera opción seleccionada.
Para deseleccionar una opción erróneamente elegida,
pulse de nuevo sobre el símbolo correspondiente.
Media carga cesto superior e inferior
Con la opción Media Carga es posible elegir si realizar el
lavado en el cesto superior o en el inferior ahorrando agua,
energía y detergente. Seleccione el programa y pulse el
símbolo MEDIA CARGA; en la pantalla se iluminará el
símbolo de media carga y la indicación del cesto superior;
pulsando nuevamente, se visualizará el símbolo de media
carga y la indicación del cesto inferior. El lavado se activa
solo en el cesto seleccionado.
Recuerde cargar la vajilla sólo en el cesto seleccionado
y disminuir la cantidad de detergente a la mitad.
Es preferible utilizar detergente en polvo.
Esta opción no está disponible con el programa:
Rápido y Baby.
-5
Comienzo retrasado*
Es posible postergar el comienzo del programa, de 1 a 24 horas:
1. Después de haber seleccionado el programa de lavado
deseado y otras opciones, pulse el símbolo del INICIO
RETRASADO: se iluminará el símbolo en la pantalla. Pulse el
símbolo de INICIO RETRASADO para seleccionar cuando
desea que comience el ciclo de lavado (de 1 a 24 horas).
2. Confirme la elección pulsando sobre el símbolo Puesta en
funcionamiento/Pausa y comenzará la cuenta al revés, el retraso
seleccionado se visualizará en la pantalla y el símbolo Puesta en
funcionamiento dejará de centellear.
3. Una vez cumplido el tiempo, el símbolo del INICIO RETRASADO
se apagará y comenzará el programa.
Para anular la selección, pulse sobre el símbolo INICIO
RETRASADO hasta la visualización de OFF.
No es posible seleccionar el INICIO RETRASADO
después que el ciclo ha comenzado.
Opción Short Time*
Esta opción permite disminuir la duración de los principales
programas manteniendo los mismos rendimientos en el
lavado y en el secado.
Después de haber seleccionado el programa, pulse el
símbolo Opción ShorTime. Para indicar que se ha realizado
dicha selección, se encenderá el símbolo en la pantalla.
Para anular la selección de la opción, vuelva a pulsar sobre
el mismo símbolo.
Las Opciones ShortTime y Good Night no son
compatibles entre sí.
Las Opciones ShortTime y Good Night, no son
compatibles con la opción MEDIA CARGA.
* Presente sólo en algunos modelos.
Opción Good Night*
Esta opción aumenta el silencio y la duración de los programas,
es ideal porque permite aprovechar la tarifa energética nocturna.
Después de haber seleccionado el programa, pulse el
símbolo Opción Good Night. Para indicar que se ha realizado
dicha selección, se iluminará el símbolo en la pantalla.
Para anular la selección de la opción, vuelva a pulsar sobre
el mismo símbolo.
La opción Good Night no es compatible con la
opción MEDIA CARGA.
Pastillas Multifunción* (Tabs)
Con esta opción se optimiza el resultado del lavado y
del secado.
Si va a utilizar las pastillas multifunción pulse el
símbolo PASTILLAS MULTIFUNCIÓN, en la pantalla se
iluminará el símbolo correspondiente. La opción
Pastillas Multifunción alarga el programa.
Si la opción PASTILLAS MULTIFUNCIÓN no se
deselecciona, cuando se vuelve a encender la máquina
permanece seleccionada.
El uso de las pastillas se aconseja sólo cuando
existe la opción PASTILLAS MULTIFUNCIÓN.
No se aconseja utilizar esta opción con los programas
que no prevén el uso de pastillas multifunción (ver la
tabla de las opciones).
Tabla de Opciones
1. Auto Super Wash
2. Auto Normal
3. Cotidiano A 60
4. Remojo
5. Eco 50°C
6. Rápido 25'
7. Cristalería fina
8. Ciclo Baby
A B C D E
Inicio
Retrasado
SI
SI
SI
SI
SI
SI
SI
SI
Media
Carga
SI
SI
SI
SI
SI
No
SI
No
Pastillas
Multifunción*
SI
SI
SI
No
SI
SI
SI
No
Good
Night
No
SI
No
No
SI
No
No
No
Short
Time
SI
SI
No
No
No
No
No
No
55
Page 56

Programas
-5
Para las OPCIONES consulte la tabla de Opciones que se encuentra en la página de Puesta en funcionamiento
y Uso.
La cantidad y el tipo de programas y opciones varían según el modelo de lavavajillas.
Indicaciones para la selección
de programas
Vajilla y ollas muy sucias (no usar
para vajilla delicada).
Vajilla y ollas normalmente
sucias. Programa estándar diario.
Vajilla con la suciedad diaria en
cantidad limitada. (4 cubiertos +
1 olla + 1 sartén).
Lavado preliminar a la espera de
completar
la carga en la próxima comida.
Lavado ecológico de bajo
consumo energético, adecuado
para vajilla y ollas.
Ciclo económico y veloz que se
utiliza inmediatamente después
del uso para vajilla poco sucia. (2
platos + 2 vasos + 4 cubiertos + 1
olla + 1 sartén pequeña)
Ciclo económico y veloz que se
utiliza inmediatamente después del
uso, para vajilla delicada más
sensible a las altas temperaturas.
(copas en el cesto superior + platos
delicados en el cesto inferior)
Ciclo higiénico para lavar
biberones, arandelas y tetinas
junto con platos, tacitas, vasos y
cubiertos. Cargue la vajilla sólo
en el cesto superior.
6. Rápido 25'
Programa
1. Super Wash
2. Normal
3. Lavado
Cotidiano
4. Remojo
5. Eco*
7. Cristalería
fina
8. Ciclo Baby
Detergente
(A) = cubeta A
(B) = cubeta B
polvo
líquido
35 g (A) 35 ml (A) 1 (A)
29 g (A)
6 g (B)
25 g (A) 25 ml (A) 1 (A) No A-B-C 1:00’
29 ml (A)
6 ml (B)
en
pastillas
1 (A) Si A-B-C-D-E 1:50’
Programas
que prevén el
secado
Si
Opciones
A-B-C-E 2:25’
No No No No A-B 0:08’
29 g (A)
6 g (B)
25 g (A) 25 ml (A) 1 (A) No A - C 0:25’
35 g (A) 35 ml (A) 1 (A) Si A-B-C 1:30’
29 ml (A)
6 ml (B)
1 (A) Si A-B-C-D 3:00’
20 g (A) 20 ml (A) No Si A 1:20'
Duración del
programa
(tolerancia
±10%)
Hs. Mín.
Notas:
las mejores prestaciones de los programas Cotidiano y Rápido se obtienen preferiblemente respetando la
cantidad de cubiertos especificados.
* El programa Eco respeta la norma EN-50242, tiene una duración mayor que la de otros programas pero es el que
produce el menor consumo de energía y además respeta el medio ambiente.
Nota para los Laboratorios de Pruebas: para obtener información detallada sobre las condiciones de la prueba
comparativa EN, consulte la siguiente dirección: ASSISTENZA_EN_LVS@indesitcompany.com
Para facilitar la dosificación del detergente, es importante saber que:
1 cucharada = 15 gr. de polvo = 15 ml. de líquido aproximadamente. 1 cucharadita = 15 gr. de polvo = 5 ml. de
líquido aproximadamente.
56
Page 57

Abrillantador y sal regeneradora
Use solamente productos específicos para lavavajillas.
No use sal de cocina o industrial ni detergente para
lavar a mano.
Respete las indicaciones contenidas en el envase.
Si utiliza un producto multifunción, no es necesario
agregar abrillantador pero se aconseja agregar sal,
especialmente si el agua es muy dura. Respete las
indicaciones contenidas en el envase.
Si no se agrega ni sal ni abrillantador, es normal que
los pilotos/símbolos FALTA DE SAL* y FALTA DE
ABRILLANTADOR* continúen encendidos.
Cargar el abrillantador
El abrillantador facilita el secado de la vajilla haciendo
deslizar el agua por la superficie para que no se produzcan
estrías o manchas.
El depósito del abrillantador se debe llenar:
cuando en el panel de control/pantalla se enciende el
piloto/símbolo FALTA DE ABRILLANTADOR*;
1. Abra el depósito girando el tapón
(G) en sentido antihorario.
2. Vierta el abrillantador evitando que
se derrame. Si esto sucede, limpie
F
rápidamente con un paño seco.
3. Vuelva a enroscar el tapón.
G
No vierta NUNCA el abrillantador
directamente en el interior de la cuba.
Regular la dosis de abrillantador
Si no está satisfecho con el resultado del secado, puede
regular la dosis de abrillantador. Con un destornillador gire
el regulador (F) eligiendo entre 6 posiciones (la regulación
de fábrica es en la posición 4):
si en la vajilla se producen estrías blancas, gire el
regulador hacia los números bajos (1-3).
si hay gotas de agua o manchas de caliza, gire el
regulador hacia los números altos (4-6).
Selección de la dureza del agua
Cada lavavajillas está acompañado por un ablandador de
agua que, utilizando sal regeneradora específica para
lavavajillas, suministra agua sin caliza para el lavado.
Este lavavajillas permite ser regulado para disminuir la
contaminación y optimizar las prestaciones del lavado en
función de la dureza del agua. El dato se puede encontrar
en la Administración que suministra el agua potable.
- Encienda la máquina pulsando el símbolo ON/OFF.
- Pulse el símbolo P durante 5 segundos aproximadamente;
en la pantalla centelleará el número que indica la dureza
seleccionada (El descalcificador está regulado en fábrica
en el nº 3). y se visualiza h2o
- Pulse el símbolo P varias veces hasta alcanzar la dureza
deseada (1-2-3-4-5
- Para salir de la función se puede: esperar algunos
segundos, pulsar un símbolo de las opciones
máquina con el símbolo ON/OFF.
* Ver la tabla de dureza de agua).
* o apagar la
Aunque se utilicen las pastillas multifunción, llene el depósito
de sal.
Tabla de Durezas del Agua
nivel °dH °fH mmol/l meses
1 0 - 6 0 - 10 0 - 1
2 6 - 11 11 - 20 1,1 - 2
3 12 - 17 21 - 30 2,1 - 3
4 17 - 34 31 - 60 3,1 - 6
5*
De 0ºf a 10ºf se aconseja no utilizar sal.
34 - 50 61 - 90 6,1 - 9
Autonomía media
recipiente de sal
7 meses
5 meses
3 meses
2 meses
2/3 semanas
**
* regulado en 5, la duración puede prolongarse.
** con 1 ciclo de lavado por día..
(°dH = dureza en grados alemanes - °fH = dureza en grados
franceses - mmol/l = milimol/litro)
Cargar la sal regeneradora
Para obtener buenos resultados en el lavado, es indispensable
verificar que el depósito de sal no esté nunca vacío. La sal
regeneradora elimina la caliza del agua evitando que se
deposite sobre la vajilla.
El depósito de sal está ubicado en la parte inferior del
lavavajillas (ver Descripción) y se debe llenar:
cuando, observando el tapón de sal, no se ve el flotador
verde*;
cuando en el panel de control/pantalla se enciende el
piloto/símbolo FALTA DE SAL*;
1. Extraiga el cesto inferior y
desenrosque el tapón del depósito
girando en sentido antihorario.
2. Sólo la primera vez que se utiliza: llene
el depósito de agua hasta el borde.
3. Coloque el embudo
sal hasta el borde (aproximadamente 1 kg.); es normal que
se derrame un poco de agua.
4. Saque el embudo*, elimine los residuos de sal de la boca
de entrada; enjuague el tapón bajo el agua corriente antes
de enroscarlo, colóquelo cabeza abajo y haga fluir el agua
por las cuatro ranuras dispuestas en forma de estrella en la
parte inferior del tapón. (tapón con flotador verde*)
Es aconsejable realizar esta operación cada vez que se
carga la sal.
Cierre bien con el tapón para evitar que en el depósito
entre detergente durante el lavado (podría dañarse
irremediablemente el suavizador).
Cuando sea necesario, cargue la sal antes de un ciclo
de lavado para eliminar la solución salina derramada del
recipiente de sal.
* (ver la figura) y llene el depósito de
-5
* Presente sólo en algunos modelos.
57
Page 58

Mantenimiento y
cuidados
Interrumpir el agua y la corriente
-5
eléctrica
Cierre el grifo de agua después de cada lavado
para eliminar el riesgo de pérdidas.
Desenchufe el aparato antes de limpiarlo y durante
los trabajos de mantenimiento.
Limpiar el lavavajillas
La superficie externa y el panel de control se pueden
limpiar con un paño no abrasivo empapado en agua.
No utilice disolventes ni productos abrasivos.
Se pueden eliminar las manchas de la cuba interna con
un paño empapado en agua y un poco de vinagre.
Evitar los malos olores
Deje siempre semicerrada la puerta para evitar la
estancación de humedad.
Limpie regularmente las juntas perimétricas de la
puerta y de las cubetas de detergente con una
esponja húmeda. De este modo se evitarán
estancamientos de comida que son los principales
responsables del mal olor.
Limpiar los rociadores
Puede suceder que algunos residuos de comida se
adhieran a los brazos rociadores y obstruyan los orificios
por los que debe salir el agua: cada tanto es importante
controlarlos y limpiarlos con un cepillo no metálico.
Ambos rociadores son desmontables.
Periódicamente limpie el filtro de entrada de agua
colocado a la salida del grifo.
- Cierre el grifo de agua.
- Desenrosque el extremo del tubo de carga de agua, quite el
filtro y límpielo delicadamente bajo un chorro de agua corriente.
- Introduzca nuevamente el filtro y enrosque el tubo.
Limpiar los filtros
El grupo filtrante está formado por tres filtros que eliminan
del agua de lavado los residuos de alimentos y la vuelven a
poner en circulación: para obtener buenos resultados en el
lavado, es necesario limpiarlos.
Limpie los filtros regularmente.
El lavavajillas no se debe utilizar sin filtros o con el filtro
desenganchado.
Después de algunos lavados, controle el grupo filtrante y
si es necesario límpielo con cuidado bajo el agua corriente
y con la ayuda de un cepillo no metálico, respetando las
siguientes instrucciones:
1. gire en sentido antihorario el filtro cilíndrico C y extráigalo (fig. 1).
2. Extraiga el cartucho del filtro B ejerciendo una ligera
presión sobre las aletas laterales (Fig. 2);
3. Extraiga el plato del filtro de acero inoxidable A. (fig. 3).
4. Inspeccione el sumidero y elimine los residuos de
comida. NO QUITE NUNCA la protección de la bomba de
lavado (detalle de color negro) (fig.4).
Para desmontar el rociador
superior, es necesario
desenroscar en sentido
antihorario la virola de plástico.
El rociador superior se vuelve a
montar con la parte que tiene el
mayor número de orificios
dirigida hacia arriba.
El rociador inferior se
desmonta haciendo presión
sobre las lengüetas ubicadas
a los costados y tirándolo
hacia arriba.
Limpieza del filtro de entrada de agua*
Si los tubos de agua son nuevos o permanecieron
inactivos durante mucho tiempo, antes de realizar la
conexión, haga correr el agua para verificar que sea
límpida y que no contenga impurezas. Sin esta
precaución, existe el riesgo de que el lugar por donde
entra el agua se obstruya, dañando el lavavajillas.
!
Después de la limpieza de los filtros, vuelva a montar el
grupo filtrante y a colocarlo correctamente en su lugar. Esto
es fundamental para el buen funcionamiento del
lavavajillas.
"
Si se ausenta durante largos períodos
Desenchufe el aparato y cierre el grifo de agua.
Deje la puerta semicerrada.
Al regresar, haga un lavado con el lavavajillas vacío.
58
* Presente sólo en algunos modelos.
Page 59

Precauciones, consejos
y Asistencia Técnica
El aparato ha sido proyectado y fabricado en conformidad
con las normas internacionales sobre seguridad. Estas
advertencias se suministran por razones de seguridad y
deben ser leídas atentamente.
Seguridad general
Este electrodoméstico no puede ser utilizado por los niños
ni por personas con discapacidades físicas, sensoriales o
psíquicas, así como con falta de experiencia o
conocimiento del mismo, a menos que estén supervisados
o capacitados para el uso por parte de una persona
responsable de su seguridad.
Los niños requieren la supervisión de un adulto para evitar
que jueguen con el electrodoméstico.
El aparato ha sido fabricado para un uso de tipo no
profesional en el interior de una vivienda.
El aparato debe ser utilizado para el lavado de la vajilla de
uso doméstico, sólo por personas adultas y según las
instrucciones contenidas en este manual.
El aparato no se debe instalar al aire libre, ni siquiera si el
lugar está reparado porque es muy peligroso dejarlo
expuesto a la lluvia o a las tormentas.
No toque el lavavajillas si está descalzo.
No desenchufe el aparato tirando del cable sino sujetando
el enchufe.
Es necesario cerrar el grifo de agua y desenchufar el
aparato antes de realizar operaciones de limpieza y
mantenimiento.
En caso de avería, no acceda nunca a los mecanismos
internos para intentar su reparación.
No toque nunca la resistencia.
No se apoye ni se siente sobre la puerta abierta: el aparato
podría volcarse.
La puerta no debe dejarse abierta porque puede significar
un obstáculo con el que tropezar.
Conserve el detergente y el abrillantador fuera del alcance
de los niños.
Los embalajes no son juguetes para los niños.
Ahorrar y respetar el medio ambiente
Ahorre agua y energía
Ponga en funcionamiento el lavavajillas sólo con plena
carga. A la espera de que la máquina esté llena,
prevenga los malos olores con el ciclo Remojo (ver
Programas).
Seleccione un programa adecuado al tipo de vajilla y al
grado de suciedad consultando la Tabla de programas:
- para vajilla normalmente sucia utilice el programa Eco
que garantiza un bajo consumo energético y de agua.
- si la carga es poca, active la opción Media carga* (ver
Puesta en funcionamiento y uso).
Si el suministro de energía eléctrica prevé horarios de
ahorro energético, realice los lavados en los horarios con
tarifa reducida. La opción Comienzo retrasado* (ver
Puesta en funcionamiento y uso) puede ayudar a
organizar los lavados en ese sentido.
Detergentes sin fosfatos y sin cloro
y que contengan enzimas
Se aconseja usar detergentes sin fosfatos y sin cloro que
son los más indicados para proteger el medio ambiente.
Las enzimas desarrollan una acción particularmente eficaz
con temperaturas próximas a los 50ºC, por lo tanto,
utilizando detergentes con enzimas se pueden elegir
lavados a bajas temperaturas y obtener los mismos
resultados que si se realizaran a 65ºC.
Para evitar derroches, dosifique bien el detergente,
teniendo en cuenta las indicaciones del fabricante, la
dureza del agua, el grado de suciedad y la cantidad de
vajilla que debe lavar. Aún siendo biodegradables, los
detergentes contienen elementos que alteran el equilibrio
de la naturaleza.
-5
Eliminación
Eliminación del material de embalaje: respete las normas
locales para que los embalajes puedan ser reutilizados.
La norma Europea 2002/96/CE sobre desechos de equipos
eléctricos y electrónicos (RAEE), prevé que los
electrodomésticos no se deben eliminar junto con los
residuos sólidos urbanos normales. Los aparatos
eliminados deben ser recogidos en forma separada para
optimizar la tasa de recuperación y reciclado de materiales
que los componen e impedir que provoquen daños a la
salud y el medio ambiente. El símbolo del cesto tachado se
encuentra en todos los productos para recordar la
obligación de recolección separada.
Para mayor información sobre la correcta eliminación de los
electrodomésticos, los poseedores de los mismos podrán
dirigirse al servicio público encargado de la recolección o a
los revendedores.
Asistencia Técnica
Antes de llamar al Servicio de Asistencia
Técnica:
Verifique si la anomalía puede ser resuelta por Ud. mismo
(ver Anomalías y Soluciones).
Vuelva a poner en funcionamiento el programa para
controlar si el inconveniente ha sido resuelto.
Si no es así, llame al Servicio de Asistencia Técnica
Autorizado.
No llame nunca a técnicos no autorizados.
Comunique:
el tipo de anomalía;
el modelo de la máquina (Mod.);
y el número de serie (S/N).
Esta información se encuentra en la placa de características
ubicada en el aparato (ver Descripción del aparato).
* Presente sólo en algunos modelos.
59
Page 60

Anomalías y soluciones
Si el aparato presenta anomalías de funcionamiento, controle los siguientes puntos antes de llamar al
-5
Servicio de Asistencia Técnica.
Anomalías: Posibles causas / Solución:
El lavavajillas no arranca o no
responde a los mandos
La puerta no se cierra
El lavavajillas no descarga agua.
• Apague la máquina con el botón ON/OFF, vuelva a encenderla después
de un minuto aproximadamente y elija el programa.
• El enchufe no está bien introducido en la t oma de corriente.
• La puerta del lavavajillas no está bien cerr ada.
• Se disparó la cerradura; empuje enérgicamente la puerta hasta escuchar
el característico so nido (clack).
• El programa aún no ha terminado.
• El tubo de descarga de a gua está plegado (ver Instalación).
• La descarga del lava bo está obstruida.
• El filtro está obst ruido con residuos de comi da.
El lavavajillas hace ruido.
En la vajilla y en los vasos
quedan depósitos calcáreos o
una pátina blanque cina.
En la vajilla y en los vasos
quedan estrías o matices
azulados.
La vajilla no queda bien seca.
La vajilla no queda limpia.
• Los elementos de la vajilla se golpean entre sí o contra los rociadores.
• Exc esiv a es puma: el deter gente no est á dosificado adecuadam ente o no es
adecuado para lavar en lavavajillas. (ver Puesta en funcionamiento y uso).
• Falta la sal regenerad ora o su regulación no es la adecuada para la
dureza del agua (ver Abrillantador y sal).
• El tapón del d epós ito de sal no está bien cerrado.
• El abrillantador se ha termin ado o la dosis es insuficiente .
• La dosis de abrillan tador es excesiva.
• Se ha seleccionado un programa sin secado.
• El abrillantador se ha termin ado o la dosificación es insuficiente (ver
Abrillantador y sal).
• La regulación del abrillantador no es la adecuada.
• La vajilla es de material anti adherente o de plástico.
• Los cestos están demasiado cargados (ver Cargar los cestos).
• La vajilla no está bi en distribuida.
• Los rociadores no gi ran libremente.
• El programa de lavado n o es suficientemente enérgico (ver Program as).
• Excesiva es puma: el detergente no está dosificado adecuadamente o no es
adecuado para lavar en lavavajillas. (ver Puesta en func ionamiento y uso).
• El tapón del a brillantador no s e ha cerrado correct amente.
• El filtro está suc io u obstruido (ver Manteni miento y cuidados).
• Falta sal regenerad ora (ver Abrillantador y sal).
El lavavajillas no carga agua Alarma por grifo cerrado.
(se escuchan breves sonidos)
(centellea el piloto
ENCENDIDO/APAGADO y en la
pantalla se visualiza A 6).
Alarma por el tubo de carga de
agua / Filtro de entrada de
agua obstruido
(centellea el piloto
ENCENDIDO/APAGADO y en la
pantalla se visualiza A - 7).
*
* Presente sólo en algunos modelos.
60
• Falta agua en la red hídrica.
• El tubo de carga de agua es tá plegado (ver Instalación).
• Abra el grifo y el apar ato comenzará a funcionar en pocos mi nutos.
• El aparato se ha bloq ueado porque no se h a intervenido al sonar l a alarma.
Apague la máquina con el botón ENCENDIDO/APAGADO (ON/OFF), abra el
grifo y después de 20 segundos vuelva a encenderla presionando el mi smo
botón. V uelva a programar la m áquina y póngal a en funcionamien to.
• Apague la máquina presionando el botón ENCENDIDO/APA GADO
(ON/OFF). Cierre el grif o de agua para evitar inun daciones y desenc hufe
el aparato.
Cont role que el filtro d e entrada de agua no esté obstruido con
impurezas. (ver el capítulo “Mantenimiento y Cuidados”)
Page 61

Instruções de uso
MÁQUINA DE LAVAR LOUÇA
PT
Português, 61
PFTA++ 8H4
Índice
Instalação, 62-63
Posicionamento e nivelamento
Ligações hidráulicas e eléctricas
Advertências para a primeira lavagem
Dados técnicos
Descrição do aparelho, 64
Visão de conjunto
Painel de comandos
Carregar os cestos, 65
Cesto inferior
Cesto dos talheres
Cesto superior
Início e utilização, 66-67
Ligar a máquina de lavar louça
Carregar o detergente
Opções de lavagem
Programas, 68
Tabela dos programas
Abrilhantador e sal regenerante, 69
Carregar o abrilhantador
Carregar o sal regenerante
Manutenção e cuidados, 70
Excluir a água e a corrente eléctrica
Limpar a máquina de lavar louça
Evitar cheiros desagradáveis
Limpar os braços aspersores
Limpeza do filtro de entrada da água
Limpar os filtros
Longos períodos de ausência
Precauções, conselhos e Assistência, 71
Segurança geral
Eliminação
Economizar e respeitar o ambiente
Assistência técnica
Anomalias e soluções, 72
Page 62

Instalação
26
É importante conservar este manual para poder
consultá-lo em qualquer momento. Em caso de venda,
cessão ou mudança, certifique-se que o mesmo fique
junto ao aparelho.
Leia atentamente as instruções: há informações
importantes sobre a instalação, o uso
e a segurança.
No caso de mudança mantenha o aparelho em
posição vertical; se for necessário, deite-o para trás.
Este aparelho foi projectado para o uso doméstico
ou para aplicações simples, como por exemplo:
- áreas dedicadas à cozinha para funcionários em lojas,
escritórios e outros ambientes de trabalho;
- casas de férias;
- uso por parte de clientes em hotéis, motéis e outros
ambientes de tipo residencial;
- bed and breakfast.
Posicionamento e nivelamento
1. Desembale o aparelho e controle que não tenha
sofrido danos durante o transporte.
Se estiver danificado, não o acenda e contacte o
revendedor.
2. Posicione a máquina de lavar louça fazendo aderir as
laterais ou o fundo aos móveis adjacentes ou a uma
parede. O aparelho pode ser encaixado embaixo de um
plano de trabalho contínuo
* (veja a folha de Montagem).
Ligação do tubo de carregamento da água
A uma entrada de água fria: parafusar bem o tubo de
carregamento a uma torneira com boca rosqueada
de 3/4 gás; antes de parafusar, deixe correr a água
até que esteja límpida para que as eventuais
impurezas não obstruam o aparelho.
A uma entrada de água quente: no caso de sistema
centralizado de esquentador, a máquina de lavar
louça poderá ser alimentada com água quente da
rede desde que não ultrapasse os 60ºC.
Parafuse o tubo à torneira como descrito para a
entrada de água fria.
Se o comprimento do tubo de carregamento não for
suficiente, contacte uma loja especializada ou um
técnico autorizado (veja Assistência).
A pressão da água deve estar incluída entre os
valores indicados na tabela dos Dados técnicos (veja ao
lado)..
Preste atenção para que o tubo não esteja dobrado
ou amassado.
Ligação do tubo de descarregamento da água
ligar o tubo de descarregamento, sem dobrá-lo, a um
conduto de descarga com diâmetro mínimo de 4 cm.
3. Posicione a máquina de lavar louça sobre um
pavimento plano e rígido. Compense as irregularidades
desparafusando ou parafusando os pés anteriores até
que o aparelho se encontre em posição horizontal. Um
nivelamento cuidadoso dá estabilidade e evita
vibrações, ruídos e deslocamentos.
*. Para regular a altura do pezinho traseiro, actue na
4
posterior, actue no casquilho hexagonal vermelho
presente na parte inferior, dianteira, central da máquina
de lavar louça, com uma chave hexagonal de 8 mm de
abertura, girando no sentido horário para aumentar a
altura e anti-horário para diminui-la (veja a folha de
instruções para o encaixe, em anexo à documentação).
Ligações hidráulicas e eléctricas
A adaptação das instalações eléctricas e
hidráulicas para a instalação deve ser efectuada
somente por pessoal qualificado.
A máquina de lavar louça não deve ficar apoiada
sobre tubos ou sobre o cabo de alimentação eléctrica.
O aparelho terá de ser conectado à rede de
distribuição de água mediante tubos novos.
Não usar tubos já existentes.
O tubo de descarregamento deve estar a uma altura
entre os 40 e os 80 cm do piso ou do plano de apoio da
máquina de lavar louças (A).
Antes de ligar o tubo de descarregamento da água ao
sifão da pia, remova a tampa de plástico (B).
Os tubos de carregamento e de descarregamento da
água e o cabo de alimentação eléctrica podem ser
virados para a direita ou para a esquerda para consentir
uma melhor instalação.
62
* Presente somente em alguns modelos.
Page 63

Segurança contra alagamentos
Para garantir que não se verifiquem alagamentos, a
máquina de lavar louça:
- é equipada com um sistema que interrompe a entrada
da água no caso de anomalias ou vazamentos no
interior.
Alguns modelos dispõem de um dispositivo de
segurança suplementar New Acqua Stop
a protecção contra alagamentos mesmo em caso de
quebra do tubo de alimentação.
ATENÇÃO: TENSÃO PERIGOSA!
O tubo de alimentação da água não deve ser cortado
em nenhum caso: contém partes sob tensão.
*, que garante
Ligação eléctrica
Antes de colocar a ficha eléctrica na tomada, certifiquese de que:
a tomada tenha a ligação de terra e que esteja
conforme às normas de lei;
a tomada possa suportar a carga máxima de potência
da máquina, indicada na placa das características
colocada na contra porta (veja Descrição da
máquina de lavar louça);
a tensão de alimentação esteja incluída nos valores
indicados na placa das características colocada na
contra porta;
a tomada seja compatível com a ficha do aparelho.
Caso contrário, peça a substituição da ficha a um
técnico autorizado (veja Assistência); não use
extensões ou tomadas múltiplas.
Uma vez que a máquina estiver instalada, o cabo de
alimentação eléctrica e a tomada deverão ser
facilmente alcançáveis.
O cabo não deve ficar dobrado ou compresso.
Caso o cabo de alimentação resultar danificado, a
sua substituição terá de ser efectuada pelo fabricante
ou pelo Serviço de Assistência Técnica para evitar
qualquer tipo de risco. (Veja a Assistência).
A Empresa declina qualquer responsabilidade no
caso em que estas normas não sejam respeitadas.
Fita contra a condensação*
Depois de ter encaixado a máquina de lavar louça, abra
a porta e cole a fita adesiva transparente embaixo da
prateleira de madeira para protegê-la contra eventual
condensação.
Advertências para a primeira lavagem
Após a instalação, imediatamente antes da primeira
lavagem, encha completamente de água o reservatório
do sal e somente depois acrescente aproximadamente
1 kg de sal (veja o capítulo Abrilhantador e sal
regenerante): é normal que a água saia do reservatório.
Seleccione o grau de dureza da água (veja o capítulo
Abrilhantador e sal regenerante). - Depois de ter deitado
o sal, o indicador luminoso FALTA SAL
O não enchimento do recipiente do sal, pode
danificar o amaciador de água e do elemento
aquecedor.
Dados técnicos
largura 59,5 cm
Dimensões
Capacidade 14 pessoas padrão
Pressão da água
na alimentação
Tensão de
alimentação
Potência total
absorvida
Fusível Veja a placa das características
altura 82 cm.
profundidade 57 cm
0,05 ÷ 1 MPa (0,5 ÷ 10 bar)
7,25 – 145 psi
Veja a placa das características
Veja a placa das características
Esta aparelhagem é em
conformidade com as seguintes
Directivas Comunitárias:
-2006/95/EC (Baixa Tensão)
-2004/108/EC (Compatibilidade
Electromagnética)
-2005/32/EC (Comm. Reg.
1275/2008) (Ecodesign)
-97/17/EC (Aplicação de
rótulos)
-2002/96/CE (REEE)
* irá desligar-se.
26
* Presente somente em alguns modelos.
63
Page 64

Descrição do aparelho
26
Visão de conjunto
Painel de comandos
1. Cesto superior
2. Braço aspersor superior
3. Peças basculantes
4. Regulação da altura do cesto
5. Cesto inferior
6. Braço aspersor inferior
7. Cesto dos talheres
8. Filtro de lavagem
9. Reservatório do sal
10. Recipientes detergente e reservatório
abrilhantador
11. Placa das características
12. Painel de comandos
***
13. Aro
On-Off/Reset
Início/PausaDisplay
Selecção do
Legenda símbolos programas
Programa
Opção Início
Retardado
Opção Meia carga
Opção Pastilhas
multifunção
Opção Short Time
Opção Good Night
Display
Indicador luminoso
tempo residual, ON,
Falta Sal
Número do
Programa
Falta
Abrilhantador
***Somente nos modelos totalmente encaixáveis.
* Presente somente em alguns modelos.
O número e o tipo de programas e as opções variam conforme o modelo de máquina de lavar louça.
OFF, END
Símbolo opção Meia
Carga cesto inferior
Símbolo opção Meia Carga
Símbolo opção
Início Posterior
cesto superior
Símbolo Lavagem
Símbolo Secagem
Símbolo Início
Símbolo Pausa
Símbolo Opção Short Time
Símbolo Opção Good Night
Símbolo Opção Pastilhas
multifunção
64
Page 65

Carregar os cestos
Antes de carregar os cestos, elimine os resíduos de
comida das louças e esvazie os copos e as taças dos resíduos
de líquido.
Depois de ter carregado, controle se os aspersores rodam
livremente.
Cesto inferior e cesto dos talheres
O cesto inferior pode conter panelas, tampas, pratos, tigelas,
talheres, etc.Pratos e tampas grandes devem ser posicionados
de preferência aos lados do cesto.
Alguns modelos de máquina de lavar louça dispõem de
sectores reclináveis
posição vertical para posicionar os pratos ou em posição
horizontal para posicionar panelas, tigelas e frigideiras.
*, estes sectores podem ser usados em
Cesto superior
Carregue as louças delicadas e leves: copos, xícaras, pratos,
tigelas baixas.
Peças basculantes com posição variável
As peças basculantes podem
ser posicionadas em duas
alturas diferentes para optimizar
a disposição das louças no
espaço do cesto. Os cálices
podem ser posicionados de
modo estável nas peças
basculantes, inserindo a haste
do copo na específica abertura.
Alguns modelos de máquina de lavar
louça dispõem de uma bandeja
deslizante que pode ser utilizada para
conter talheres de serviço ou xícaras
de pequenas dimensões. Para um
melhor desempenho da lavagem,
procure não colocar abaixo da
bandeja louças voluminosas.
*
26
O cesto dos talheres pode ser de tipo diferente, decomponível ou
não decomponível, conforme o modelo de máquina de lavar louça.
O cesto não decomponível deve ser posicionado somente na
parte anterior do cesto inferior.
Ambos possuem grelhas
superiores para uma
mais fácil disposição dos
talheres.
As facas bem como os utensílios cortantes terão de ser
alojados no cesto para os talheres de pontas para baixo ou
posicionados nas pestanas do cesto superior em posição
horizontal.
Aconselha-se o uso de louças idóneas à lavagem à
máquina de lavar louças.
* Há somente em alguns modelos. Variáveis por número e
posição.
Regule a altura do cesto superior.
Para facilitar o posicionamento das louças, é possível colocar o
cesto superior em posição alta ou baixa.
De preferência, regule a altura do cesto superior quando
estiver VAZIO.
Nunca levante ou abaixe o cesto por um só lado.
Abra os trincos das guias do cesto à direita e
à esquerda e retire o cesto; disponha-o no
alto ou em baixo, faça-o deslizar ao longo das
guias até entraram também as rodinhas
anteriores e feche novamente os trincos (veja
a figura).
Se o cesto for dotado de pegas Dual
Space (veja a figura), retire o cesto
superior no fim do curso, segure nas
pegas aos lados do cesto e mova para
cima ou para baixo; deixe cair o cesto,
acompanhando-o com as mãos.
Louças não adaptas à lavagem em máquina de lavar
louça
Objectos de madeira, com cabos de madeira ou osso ou com
partes coladas.
Objectos de alumínio, cobre, latão, peltre ou estanho
Louças de plástico não termorresistente.
Porcelanas antigas ou pintadas à mão.
Prataria antiga. A prataria não antiga pode ser lavada com um
programa delicado e controlando que não entre em contacto
com outros metais.
65
Page 66

Início e utilização
26
O painel de comandos dispõe de um sistema Touch
Control; uma leve pressão dos dedos sobre os
símbolos activa o comando.
Os símbolos na legenda dos programas de lavagem
(à esquerda do painel de comandos) NÃO se iluminam.
A selecção do programa deve ser efectuada premindo o
símbolo P.
A máquina emite sinais acústicos/tons (conforme o
modelo de máquina de lavar louça) que avisam que o
comando foi efectuado: ligação, fim do ciclo, etc.
Os símbolos/indicadores luminosos presentes no painel
de comandos/display, podem variar de cor. (conforme o
modelo de máquina de lavar louça).
Ligar a máquina de lavar louça
1. Abra a torneira da água.
2. Prima no símbolo ON-OFF: o display ilumina-se por
alguns segundos visualizando a escrita ON (aceso).
3. Abrir a porta e dosear o detergente (veja Carregar o
detergente).
4. Carregar os cestos (veja Carregar os cestos) e fechar a
porta.
5. Carregue no símbolo P, para seleccionar o programa em
função das louças e de quanto estiverem sujas (veja a
tabela dos programas).
6. Seleccionar as opções de lavagem* (veja opções).
7. Pressione o símbolo Início/Pausa, o símbolo do Início
ilumina-se no display. O número do programa, os símbolos
de: lavagem, eventuais opções e o tempo resíduo para o fim
do ciclo são visualizados no display.
8. Quando o programa terminar, aparecerá no display o
número do programa efectuado e a palavra END (FIM).
Desligar o aparelho premindo o símbolo ON-OFF, o display
visualizará OFF. Feche a torneira da água e desligue a ficha
de tomada eléctrica.
9. Aguarde alguns minutos antes de retirar as louças, para
evitar queimaduras. Descarregar os cestos, começar pelo
inferior.
- Para reduzir o consumo de energia eléctrica, em
algumas condições de NÃO utilização prolongada, a
máquina irá desligar-se momentaneamente de modo
automático.
PROGRAMAS AUTO*: este modelo de máquina de lavar
louça é equipado com um sensor especial capaz de avaliar
o nível da sujidade e definir qual é a lavagem mais eficiente
e económica.
A duração dos programas auto poderá variar por causa de
uma intervenção do sensor.
Se a louça estiver pouco suja ou tiver antes sido
enxaguada com água, diminuir bastante a dose de
detergente.
Modificação do programa em curso.
Se foi seleccionado um programa errado, é possível
modificá-lo desde que tenha começado há pouco tempo.
Para modificar o ciclo de lavagem, desligue a máquina com
uma pressão prolongada do símbolo ON/OFF/Reset, o
display visualizará 3-2-1 OFF. Ligar novamente a máquina
pressionando o mesmo símbolo e seleccionar novamente
programa e opções desejados.
Acrescentar mais louça
Carregue na tecla Início/Pausa; o símbolo Pausa ilumina-se;
abra a porta prestando atenção à saída de vapor e
introduza as louças. Pressione novamente o símbolo Início/
Pausa: o símbolo Início ilumina-se e o ciclo recomeça.
Ao pressionar o símbolo Início/Pausa para colocar a
máquina em pausa, interrompe-se momentaneamente o
programa.
Nesta fase não será possível mudar o programa.
Interrupções acidentais
Se durante a lavagem for aberta a porta ou houver uma
interrupção da corrente eléctrica, o programa irá
interromper-se. Reiniciará do ponto em que foi interrompido
quando a porta for fechada ou a electricidade voltar.
Carregar o detergente
O bom resultado da lavagem depende também da
dosagem correcta do detergente, uma dose excessiva
não lava em modo mais eficaz e polui o ambiente.
Utilize apenas detergente para a máquina de levar
louça.
NÃO UTILIZE detergentes para a lavagem à mão.
Um uso excessivo de detergente pode deixar
resíduos de espuma no fim do ciclo.
O uso das pastilhas é aconselhado somente nos
modelos que dispõem da opção PASTILHAS
MULTIFUNÇÃO.
As melhores performances de lavagem e secagem
são obtidas somente se empregar detergente em pó,
abrilhantador líquido e sal.
recipiente A: Detergente para a lavagem
recipiente B: Detergente para a pré-lavagem
1. Abra a tampa C carregando no
botão D.
2. Dose o detergente consultando
a Tabela dos programas:
em pó: recipientes A e B.
pastilhas: quando o programa
pedir uma pastilha, colocá-la no
recipiente A e fechar a tampa;
quando pedir duas, colocar a
segunda no fundo do tambor.
3. Elimine os resíduos de detergente das beiradas do
recipiente e feche a tampa até o clique.
* Presente somente em alguns modelos.
66
Page 67

Opções de lavagem*
As Opções podem ser programadas, mudadas ou
anuladas somente depois de ter escolhido o programa
de lavagem e antes de ter carregado no símbolo Início/
Pausa.
Podem ser seleccionadas apenas as opções compatíveis
com o tipo de programa escolhido. Se uma opção não for
compatível com o programa seleccionado, (veja a tabela
dos programas) o respectivo símbolo irá piscar
rapidamente 3 vezes.
Se for seleccionada uma opção incompatível com uma
opção programada em precedência, esta irá piscar por 3
vezes, e irá desligar-se, enquanto ficará acesa a última
opção escolhida.
Para desmarcar uma opção seleccionada por engano,
carregue novamente no símbolo correspondente.
Início posterior*
É possível adiar de 1 a 24 horas o início do programa:
1. Depois de escolher o programa de lavagem que desejar
e outras eventuais opções, carregue no símbolo INÍCIO
POSTERIOR: o símbolo no display acende-se. Pressione o
símbolo INÍCIO POSTERIOR para seleccionar quando
deseja fazer iniciar o ciclo de lavagem (de 1 a 24 horas).
2. Confirme a escolha pressionando o símbolo Início/Pausa
e começará a contagem regressiva, o atraso seleccionado é
visualizado no display e o símbolo Início irá parar de piscar.
3. Quando terminar este tempo, o símbolo do INÍCIO
POSTERIOR apaga-se e o programa inicia.
Para desseleccionar, pressione o símbolo INÍCIO
POSTERIOR até visualizar OFF.
Não é possível escolher o Início Posterior depois do
ciclo ter começado.
Opção Short Time*
Esta opção consente reduzir a duração dos principais
programas mantendo as mesmas performances de lavagem
e secagem.
Após ter seleccionado o programa, pressione o símbolo
Opção Short Time, o símbolo irá acender-se no display para
sinalizar a selecção.
Para desmarcar a opção, pressione novamente o mesmo
símbolo.
As Opções Short Time e Good Night, não são
compatíveis entre si.
Meia carga no cesto superior e inferior
Com a opção da Meia Carga, é possível escolher se
realizar uma lavagem no cesto superior ou no inferior,
economizando água, energia e detergente. Seleccione o
programa e prima o símbolo MEIA CARGA; ilumina-se o
símbolo da meia carga (no display) e a indicação do cesto
superior; com mais uma pressão do símbolo visualiza-se o
símbolo da meia carga e a indicação do cesto inferior. A
lavagem inicia apenas no cesto seleccionado.
Lembrar-se de carregar as louças apenas no cesto
seleccionado e de reduzir para a metade a quantidade
de detergente.
É preferível utilizar detergente em pó.
Esta opção não é disponível com o programa:
Rápido e Baby.
Opção Good Night*
Esta opção aumenta a silenciosidade prolongando a
duração dos programas, e é ideal para aproveitar a tarifa
energética nocturna. Após ter seleccionado o programa,
pressione o símbolo Opção Good Night, o símbolo irá
acender-se no display para sinalizar a selecção.
Para desmarcar a opção, pressione novamente o mesmo
símbolo.
A opção Good Night não é compatível com a opção
MEIA CARGA.
Pastilhas Multifunção* (Tabs)
Com esta opção é optimizado o resultado da lavagem
e da secagem.
Quando empregar pastilhas multifunção pressione o
símbolo PASTILHAS MULTIFUNÇÃO, o respectivo símbolo
luminoso se acenderá no display. A opção Pastilhas
Multifunção comporta um aumento do tempo de
duração do programa.
A opção PASTILHAS MULTIFUNÇÃO permanecerá
programada nas seguintes ligações da máquina se não
for anulada.
O uso das pastilhas é aconselhado somente nos
modelos que dispõem da opção PASTILHAS
MULTIFUNÇÃO.
Esta opção é desaconselhada com os programas
que não prevêem o uso das pastilhas multifunção (veja
a tabela das opções).
26
As Opções Short Time e Good Night, não são
compatíveis com a opção MEIA CARGA.
* Presente somente em alguns modelos.
Tabela Opções
1. Auto Super Wash
2. Auto Normal
3. Quotidiano A 60
4. Molho
5. Eco 50°C
6. Rápido 25'
7. Cristais
8. Ciclo Baby
A B C D E
Início
Retardado
Sim Sim Sim Não Sim
Sim Sim Sim Sim Sim
Sim Sim Sim Não Não
Sim Sim Não Não Não
Sim Sim Sim Sim Não
Sim Não Sim Não Não
Sim Sim Sim Não Não
Sim Não Não Não Não
Meia
carga
Pastilhas
multifunção
Good
Night
Short
Time
67
Page 68

Programas
26
Para as OPÇÕES consulte a tabela Opções presente na página de Início e Utilização.
O número e o tipo de programas e as opções variam conforme o modelo de máquina de lavar louça.
Duração do
programa
(tolerância
Indicações para escolha de
programas
Louça e tachos muito sujos (não
usar com louça delicada).
Louça e tachos normalmente
sujos. Programa normal diário.
Sujidade quotidiana em
quantidade limitada. (4 pessoas
+ 1 panela + 1 frigideira)
Lavagem preliminar na espera de
ser completada a carga na
próxima refeição.
Lavagem ecológica com baixos
consumos energéticos adapta
para louças e panelas.
Ciclo económico e veloz a ser
utilizado para louça pouco suja,
logo depois de usada. (2 pratos +
2 copos + 4 talheres + 1 panela +
1 panelinha) 6. Rápido 25'
Ciclo económico e veloz a ser
utilizado para louça delicada,
mais sensível às altas
temperaturas, logo depois de
usada. (cálices no cesto superior
+ pratos delicados no cesto
inferior).
Ciclo higienizante para lavar
mamadeiras, aros e chupetas,
junto a pratos, chávenas, copos e
talheres. Carregar as louças
somente no cesto superior.
Programa
1. Super Wash
2. Normal
3. Quotidiano
4. Molho
*
5. Eco
7. Cristais
8. Ciclo Baby
Detergente
(A) = recipiente A
(B) = recipiente B
pó líquido pastilhas
35 g (A)
29 g (A)
6 g (B)
25 g (A) 25 ml (A) 1 (A)
Não
29 g (A)
6 g (B)
25 g (A) 25 ml (A) 1 (A)
35 g (A) 35 ml (A) 1 (A)
20 g (A) 20 ml (A) Não
35 ml (A)
29 ml (A)
6 ml (B)
Não
29 ml (A)
6 ml (B)
1 (A)
1 (A)
Não
1 (A)
Programas
que prevêem
a secagem
Sim
Sim
Não
Não
Sim
Não
Sim
Sim
Opções
A-B-C-E
A-B-C-D-E
A-B-C
A-B
A-B-C-D
A - C
A-B-C
A
±10%)
Horas
Minutos
2:25’
1:50’
1:00’
0:08’
3:00’
0:25’
1:30’
1:20'
Observações:
o melhor desempenho dos programas Quotidiano e Rápido obtém-se preferencialmente respeitando o número
máximo de louças especificado.
* O programa Eco, respeita a norma EN-50242, tem uma duração mais longa respeito a outros programas, todavia
é aquele que apresenta o menor consumo de energia e é o que mais respeita o meio ambiente.
Nota para os Laboratórios de Ensaio: para informações sobre as condições do ensaio comparativo EN, solicitar
ao endereço: ASSISTENZA_EN_LVS@indesitcompany.com
Para facilitar a dosagem do detergente é bom saber que:
uma colher de cozinha =15 gramas de pó=15 ml de líquido, aproximadamente uma colher de chá = 5 gramas de
pó = 5 ml de líquido, aproximadamente
68
Page 69

Abrilhantador e sal regenerante
Use somente produtos específicos para máquinas
de lavar louça.
Não use sal de cozinha ou industrial nem detergentes
para a lavagem à mão.
Siga as indicações escritas na embalagem.
Se utilizar um produto multifunção, não será necessário
acrescentar abrilhantador e aconselha-se a adição de sal,
especialmente se a água for dura ou muito dura. Siga as
indicações escritas na embalagem.
Se não forem adicionados o sal e o abrilhantador é
normal que os indicadores luminosos/símbolos FALTA
DE SAL * e FALTA DE ABRILHANTADOR* continuem
acesos.
Carregar o abrilhantador
O abrilhantador facilita a secagem das louças fazendo
escorregar a água da superfícies, de modo que não se
formem listras brancas ou manchas.
O recipiente do abrilhantador deve ser enchido:
quando no painel/display acende-se o indicador
luminoso/símbolo FALTA ABRILHANTADOR *;
1. Abra o recipiente rodando a tampa
(G) na direcção anti-horária.
2. Deite o abrilhantador evitando que
vaze. Se vazar, limpe logo com um
F
pano seco.
3. Atarraxe novamente a tampa.
G
NUNCA deitar abrilhantador
directamente dentro da máquina.
Regule a dose de abrilhantador.
Se não ficar satisfeito com o resultado da secagem, será
possível regular a dose de abrilhantador. Com uma chave
de fendas, gire o regulador (F) escolhendo entre 6
posições (a regulação de fábrica é 4):
se na louça lavada houver listras, girar o regulador para
números mais baixos (1-3).
se houver gotas de água ou manchas de calcário, gire
em números mais altos (4-6).
Configuração da dureza da água
A máquina de lavar louça é dotada de um amaciador de
água que, utilizando um sal regenerante específico para
máquinas de lavar louça, fornece água sem calcário para a
lavagem as louças.
Esta máquina de lavar louça consente uma regulação que
reduz a poluição e optimiza o desempenho de lavagem em
função da dureza da água. O dado pode ser informado
pela Entidade fornecedora de água potável.
- Ligue a máquina pressionando o símbolo ON/OFF.
- Pressione o símbolo P por aproximadamente 5 segundos;
no display írá piscar o número de regulação da dureza
configurado (O dispositivo para descalcificar está
configurado no 3). e será visualizado h2o
- Pressione o símbolo P várias vezes até alcançar a dureza
desejada (1-2-3-4-5
- Para sair da função, aguarde alguns segundos ou
pressione um símbolo das opções
* Veja a tabela da dureza da água).
* ou ainda desligue a
máquina com o símbolo ON/OFF.
Se utilizar as pastilhas multifunção, encha do mesmo jeito o
recipiente do sal.
Tabela da dureza d a água
nível
°dH °fH mmol/l
1 0 - 6 0 - 10 0 - 1
2 6 - 11 11 - 20 1,1 - 2
3 12 - 17 21 - 30 2,1 - 3
4 17 - 34 31 - 60 3,1 - 6
34 - 50 61 - 90 6,1 - 9
5*
De 0°f a 10°f aconselha-se não utilizar o sal.
Autonomia média**
recipiente do sal
meses
7 meses
5 meses
3 meses
2 meses
2/3 semanas
* com a configuração 5, a duração pode ser prolongada.
com 1 ciclo de lavagem por dia.
**
(°dH = dureza em graus alemães - °fH = dureza em graus
franceses - mmol/l = milimol p/litro)
Carregar o sal regenerante
Para ter bons resultados de lavagem, é indispensável
verificar que o recipiente do sal não fique nunca vazio. O
sal regenerante elimina o calcário da água, evitando que se
deposite sobre as louças.
O recipiente do sal está colocado na parte inferior da
máquina de lavar louças (veja Descrição) e deve ser
enchido:
quando a bóia verde* não for visível observando a
tampa do sal;
quando no painel/display acende-se o indicador
luminoso/símbolo FALTA DE SAL *;
1. Extraia o cesto inferior e desatarraxe a
tampa do reservatório no sentido antihorário.
2. Somente para a primeira utilização:
encha o reservatório de água até a beira.
3. Posicione o funil
sal até a beira (aproximadamente 1 kg); é normal que saia
um pouco de água.
4. Remova o funil*, elimine os resíduos de sal da boca do
reservatório; enxagúe a tampa sob água corrente antes de
parafusá-la, colocando-a de cabeça para baixo e deixando
defluir a água através das quatro fendas disposta em
estrela na parte inferior da tampa. (tampa com bóia verde*)
Recomenda-se realizar esta operação a cada
carregamento de sal.
Atarraxe bem a tampa, para que no reservatório não entre
detergente durante a lavagem (o dispositivo para
descalcificar poderia ser danificado irremediavelmente).
Quando necessário, carregue o sal antes de um ciclo
de lavagem de forma a eliminar a solução salina que vazou
do recipiente do sal.
* (veja a figura) e encha o recipiente de
* Presente somente em alguns modelos.
26
69
Page 70

Manutenção e cuidados
Excluir a água e a corrente eléctrica
26
Feche a torneira da água após cada lavagem para
eliminar o risco de vazamentos.
Desligue a ficha da tomada quando limpar a
máquina e durante os serviços de manutenção.
Limpar a máquina de lavar louça
A superfície externa e o painel de comandos
podem ser limpos com um pano não abrasivo
embebido de água. Não usar solventes nem
abrasivos.
O tambor interno pode ser limpo de eventuais
manchas com um pano embebido de água e um
pouco de vinagre.
Evitar cheiros desagradáveis
Deixe a porta sempre entreaberta para evitar
estagnações de humidade.
Limpe regularmente as guarnições perimetrais de
vedação da porta e dos recipientes de detergente
com uma esponja húmida. Deste modo, se evitarão
estagnações de alimentos, principais responsáveis
pelos cheiros desagradáveis.
Limpar os braços aspersores
Pode acontecer que restos de comida grudem-se nos
braços aspersores e tampem os furos através dos
quais a água deve passar: de vez em quando é bom
controlá-los e limpá-los com uma escovinha não de
metal.
Ambos os aspersores são desmontáveis.
Periodicamente, limpe o filtro de entrada da água
posicionado na saída da torneira.
- Feche a torneira da água.
- Desparafuse a extremidade do tubo de alimentação da
água, remova o filtro e limpe-o delicadamente sob um jacto
de água corrente.
- Insira novamente o filtro e parafuse o tubo.
Limpar os filtros
O grupo filtrante é formado por três filtros que limpam a
água de lavagem dos resíduos de comida e a colocam
novamente em circulação: para ter bons resultados de
lavagem é necessário limpá-los.
Limpar os filtros com regularidade.
A máquina de lavar louça não deve ser utilizada sem
filtros nem com o filtro desenganchado.
Após algumas lavagens, controle o grupo filtrante e se
necessário, limpe-o cuidadosamente com água corrente,
com a ajuda de uma escovinha não de metal, seguindo as
instruções abaixo:
1. gire no sentido anti-horário o filtro cilíndrico C e removao (fig.1).
2. Remova o copinho filtro B fazendo uma ligeira pressão
nas abas laterais (Fig. 2).
3. Desfie o prato filtro inox A (Fig. 3).
4.Inspeccione o depósito e elimine os eventuais resíduos
de comida. NUNCA REMOVA a protecção da bomba de
lavagem (detalhe de cor preta) (fig.4).
Para desmontar o braço
aspersor superior é necessário
desparafusar o aro de plástico,
virando no sentido anti-horário.
O braço aspersor superior
deve ser remontado como lado
com o maior número de furos
virado para cima.
Para desmontar o aspersor
inferior faça pressão sobre as
abas situadas nos lados e
puxe-o para cima.
Limpeza do filtro de entrada da água*
Se os tubos de água forem novos, ou se tiverem
permanecido muito tempo não utilizados, antes de
realizar a ligação, deixe escorrer água para certificarse que seja límpida e isenta de impurezas. Sem esta
precaução, há riscos de que o ponto de entrada da
água se entupa, causando danos à máquina de lavar
louça.
!
Após a limpeza dos filtros, monte novamente o grupo
filtrante e coloque-o correctamente na sua posição; isto é
fundamental para o bom funcionamento da máquina de
lavar louças.
"
Longos períodos de ausência
Desligue as ligações eléctricas e a feche a torneira da
água.
Deixe a porta entreaberta.
Na volta, realize uma lavagem com a máquina vazia.
* Presente somente em alguns modelos.
70
Page 71

Precauções, conselhos e
Assistência
Este aparelho foi projectado e fabricado em
conformidade com as regras internacionais de segurança.
Estas advertências são fornecidas por razões de
segurança e devem ser lidas com atenção.
Segurança geral
Este electrodoméstico não pode ser utilizado por
pessoas (incluso crianças) com reduzidas capacidades
físicas, sensoriais ou mentais, ou com falta de
experiência e conhecimento, a não ser que lhes seja
fornecida supervisão ou instruções relativas ao uso por
parte de uma pessoa responsável pela sua segurança.
É necessária a supervisão de um adulto para evitar que
as crianças brinquem com o electrodoméstico.
O aparelho foi concebido para um uso de tipo não
profissional dentro do ambiente doméstico.
O aparelho deve ser utilizado para a lavagem de louças
de utilização doméstica, exclusivamente por pessoas
adultas e conforme as instruções escritas neste manual.
Esta máquina de lavar louça não pode ser instalada ao
aberto, nem mesmo num lugar protegido por um telhado:
é muito perigoso deixá-la exposta à chuva e aos
temporais.
Não toque a máquina com os pés descalços.
Não tire a ficha da tomada de corrente puxando o cabo,
mas segure a ficha.
É necessário fechar a torneira da água e tirar a ficha da
tomada da corrente eléctrica antes de efectuar
operações de limpeza e manutenção.
Em caso de avarias, jamais aceda aos mecanismos
internos para tentar consertar sozinho.
Não toque a resistência.
Não se apoie ou sente na porta aberta: o aparelho
poderia capotar.
A porta não pode ficar aberta ao fim de evitar o perigo
de tropeçar.
Guarde o detergente e o abrilhantador fora do alcance
das crianças.
As embalagens não são brinquedos para crianças.
Economizar e respeitar o ambiente
26
Economizar água e energia
Use a máquina de lavar louça somente com carga plena.
Enquanto espera que a máquina fique cheia, previna os
maus cheiros com o ciclo de Molho (veja Programas).
Seleccione um programa adapto ao tipo de louças e ao
grau de sujeira consultando a Tabela dos programas:
- para louças normalmente sujas, utilize o programa Eco,
que garante baixos consumos energéticos e de água.
- se a carga for reduzida, utilize a opção Meia carga*
(veja Início e utilização).
Se o próprio contrato de fornecimento de energia
eléctrica previr faixas horárias de economia energética,
efectue as lavagens nos horários com tarifa reduzida. A
opção Início posterior * (veja Início e utilização) pode
ajudar a organizar as lavagens com base nos horários.
Detergentes sem fostatos, sem cloro
e com enzimas
Aconselha-se vivamente utilizar os detergentes sem
fosfatos e sem cloro pois são os mais indicados para a
tutela do meio ambiente.
As enzimas desenvolvem uma acção particularmente
eficaz com temperaturas próximas aos 50ºC, portanto
com os detergentes com enzimas podem-se programar
lavagens com baixas temperaturas e obter os mesmos
resultados que se obteriam com lavagens a 65ºC.
Dose bem o detergente conforme as indicações do
produtor, a dureza da água, o grau de sujeira e a
quantidade de louças para evitar desperdícios. Mesmo
sendo biodegradáveis, os detergentes contém
elementos que alteram o equilíbrio da natureza.
Eliminação
Eliminação do material de embalagem: respeite a normas
locais, assim as embalagens poderão ser
reaproveitadas.
A directiva Europeia 2002/96/CE relativa aos resíduos de
equipamentos eléctricos e electrónicos (REEE) prevê
que os electrodomésticos não devem ser eliminados no
normal fluxo dos resíduos sólidos urbanos. Os
aparelhos não mais utilizados devem ser recolhidos
separadamente para optimizar a taxa de recuperação e
reciclagem dos materiais que os compõem e impedir
potenciais danos à saúde e ao meio ambiente. O símbolo
da lixeira cancelada está indicado em todos os produtos
para lembrar o dever de colecta selectiva.
Para maiores informações sobre a correcta eliminação
dos electrodomésticos, os proprietários poderão
contactar o serviço de colecta público ou os
revendedores.
Assistência
Antes de contactar a Assistência:
Verifique se pode resolver sozinho a anomalia (veja
Anomalias e Soluções).
Reinicie o programa para controlar se o inconveniente foi
resolvido.
Em caso negativo, contacte o Serviço de Assistência
Técnica Autorizado.
Nunca recorra a técnicos não autorizados.
Comunique:
o tipo de defeito;
o modelo da máquina (Mod.);
o número de série (S/N).
Estas informações encontram-se na placa de identificação
situada no aparelho (veja Descrição do Aparelho).
* Presente somente em alguns modelos.
71
Page 72

Anomalias e soluções
No caso em que o aparelho apresente anomalias de funcionamento, controle os seguintes itens antes de
26
contactar a Assistência Técnica.
Anomalias: Possíveis causas / Solução:
A máquina de lavar louça n ão
começa a funcionar ou não
responde aos comandos
A porta não se fecha
A máquina de lavar louça n ão
descarrega a água.
A máquina de lavar louça fa z
ruído.
Nas louças e nos copos
permanecem depósito s de calcário
ou uma camada branca.
Nas louças e nos copos há listras
brancas ou manchas azuis.
As louças estão pouco secas.
• Desligar a máquina com a tecla ON/OFF, ligar novamente após um minuto e
reprogramá-la no vamente.
• A ficha não foi inserida cor rectamente na tomada de corrente .
• A porta da máquina de lavar louça não está bem fech ada.
• O fecho da porta disparou: empurre com força a porta até ouvir um “cla ck”.
• O pr ograma ainda não terminou.
• O tu bo de descarre gamento da água está dobrado (veja Instalação).
• A descarga do lav abo está obstruída.
• O filt ro está obstruído por resíduos de comida.
• As louças chocam-se ente si ou contra os aspersores.
• Excessiva presença de espuma: o detergente não foi doseado adequadamente ou
não é adapto para máquinas de lavar. (veja Início e utilização).
• F alta sal regene rante ou a sua reg ulação não é adequada à dureza da água (veja
Abrilhantador e sal).
• A tampa do recipiente de sal não es tá bem fechada.
• O abrilhantador acabou ou a dosagem é insuficiente.
• A dosagem do abrilhantador é excessiv a.
• F oi seleccionado um programa sem sec agem.
• O abrilhantador acabou ou a dosagem é insuficiente (veja Abrilhantador e sal).
• A regulação do abrilhantador não é adequada.
• • As louças são de material antiaderente ou de plástico.
As louças não estã o limpas.
A máquina de lavar louça n ão
carrega a água - Alarme torneira
fechada.
(ouvem-se “bips” breves)*
(o indicador luminoso ON/OFF é intermitente
e no display é visualizado A6).
Alarme no tubo de carregamento
da água/Filtro de entrada da água
entupido.
(o indicador luminoso ON/OFF é intermitente
e no display é visualiza do A7).
• Os cestos estão demasiadamente carregados (veja Carregar os cestos).
• As louças não foram bem posicionadas.
• Os aspersores não têm livre rotação.
• O pr ograma de lava gem é delicado demais (veja Programas).
• Excessiva presença de espuma: o detergente não foi doseado adequadamente ou
não é adapto para máquinas de lavar. (veja Início e utilização).
• A tampa do recipiente para o abrilhantador não foi fechada correctamente.
• O filt ro está sujo ou obstruído (veja Manutenção e cuidados).
• Falta o sal regenerante (veja Abrilhantador e sal).
• Falta água na rede hídrica.
• O tubo de carregamento da água está dobrado (veja Instal ação).
• Abra a torneira e o aparelho irá reiniciar depois de poucos minutos.
• O aparelho bloqueou-se porque não se interveio com o som dos sinais acústicos.
Desligue a máquina com a tecla ON/OFF, abra a torneira e, depois de 20
segundos, para ligar novamente a máquina, carregue na mesma tecla. Programe
novamente a máquina e reinicie.
• Para desligar a máquina carregue na tecla ON/OFF. Feche a torneira da água
para evitar alagamentos e depois retire a ficha da tomada de corrente.
Controle que o filtro de entrada da água não esteja en tupido p or impure zas. (veja
o capítulo “Manutenção e Cuidados”).
* Presente somente em alguns modelos.
72
Page 73

Pokyny k pouití
MYÈKA NÁDOBÍ
CS
Èesky, 73
PFTA++ 8H4
Obsah
Instalace, 74-75
Ustavení a vyrovnání do vodorovné polohy
Pøipojení kelektrické síti a krozvodu vody
Upozornìní pro první mytí
Technické údaje
Popis zaøízení, 76
Celkový pohled
Ovládací panel
Plnìní koù, 77
Spodní ko
Koík na pøíbory
Horní ko
Uvedení do èinnosti a pouití, 78-79
Uvedení myèky do èinnosti
Dávkování mycího prostøedku
Volitelné funkce mytí
Programy, 80
Tabulka programù
Letidlo a regeneraèní sùl, 81
Dávkování letidla
Dávkování regeneraèní soli
Údrba a péèe, 82
Uzavøení pøívodu vody a vypnutí elektrického napájení
Èitìní myèky nádobí
Zabránìní vzniku nepøíjemných zápachù
Èitìní ostøikovacích ramen
Èitìní filtru pøívodu vody
Èitìní filtrù
Opatøení vpøípadì dlouhodobé neèinnosti
Opatøení, rady a servisní sluba, 83
Základní bezpeènostní pokyny
Likvidace
Jak uetøit a brát ohled na ivotní prostøedí
Servisní sluba
Poruchy a zpùsob jejich odstranìní, 84
Page 74

Instalace
+5
Je velmi dùleité tento návod uschovat, aby jej bylo moné
kdykoli dle potøeby konzultovat. Vpøípadì prodeje, darování
nebo pøestìhování zaøízení se ujistìte, e návod zùstane
uloen vjeho blízkosti.
Pozornì si pøeètìte uvedené pokyny: Obsahují dùleité
informace týkající se instalace, pouití
a bezpeènosti pøi práci.
Pøi stìhování udrujte zaøízení dle moností ve svislé
poloze; dle potøeby je mùete naklonit na zadní stranu.
Toto zaøízení bylo navreno pro pouití v domácnosti nebo
pro podobné aplikace, jako napøíklad:
- prostory urèené pro kuchyò personálu vobchodech, úøadech
a jiných pracovních prostøedích;
- hospodáøská stavení;
- pouití zákazníky vhotelu, motelu nebo jiných prostøedích
rezidenèního typu;
- penziony typu bed and breakfast.
Ustavení a vyrovnání do vodorovné
polohy
1. Po rozbalení zaøízení zkontroluje, zda bìhem pøepravy
nedolo kjeho pokození.
Vpøípadì, e je pokozeno, je nezapojujte a obrate se na
prodejce.
2. Umístìte myèku tak, aby se boèními stìnami nebo zadní
stìnou dotýkala pøilehlého nábytku nebo stìny. Tento model
myèky lze rovnì vestavìt pod dlouhou pracovní plochu
montání pokyny).
* (viz
Pøívodní hadice a vypoutìcí hadice vody a kabel elektrického
napájení musí být nasmìrovány smìrem doprava nebo doleva
scílem umonit co nejlepí instalaci.
Pøipojení hadice pro pøívod vody
Krozvodu studené vody: Øádnì zaroubujte pøívodní hadici
ke kohoutku shrdlem se závitem 3/4 plyn; pøed
zaroubováním nechte vodu odtékat, dokud nebude
prùzraèná, aby pøípadné neèistoty neucpaly zaøízení.
K rozvodu teplé vody: Vpøípadì centrálního topení mùe být
myèka pøipojena krozvodu teplé vody za pøedpokladu, e
teplota vody nepøesahuje 60°C.
Zaroubujte hadici ke kohoutku zpùsobem popsaným pro
pøívod studené vody.
Vpøípadì, e délka pøívodní hadice nebude dostateèná, se
obrate na specializovanou prodejnu nebo na autorizovaný
technický personál (viz Servisní sluba).
Tlak vrozvodu vody se musí pohybovat vrozmezí hodnot
uvedených vtabulce Technických údajù (viz vedle).
Dbejte na to, aby hadice nebyla pøíli ohnutá ani stlaèená.
Pøipojení hadice vypoutìní vody
Pøipojte vypoutìcí hadici do odpadového potrubí sminimálním
prùmìrem 4 cm, ani byste ji ohýbali.
3. Umístìte myèku na rovnou a pevnou podlahu.
Vykompenzujte nerovnosti odroubováním nebo
zaroubováním pøedních noièek a do dosaení vodorovné
polohy zaøízení. Dokonalé vyrovnání do vodorovné polohy
zabezpeèí stabilitu zaøízení a zamezí vzniku vibrací, hluku a
posunù bìhem èinnosti.
4
*. Seøízení výky zadní noièky se provádí prostøednictvím
hexagonálního pouzdra èervené barvy, nacházejícího se ve
spodní, èelní, centrální èásti myèky, klíèem na hexagonální
rouby o velikosti 8 mm; otáèením ve smìru hodinových ruèièek
dosáhneme zvìtení výky a otáèením proti smìru hodinových
ruèièek jejího sníení. (viz montání pokyny pro vestavìní,
pøiloené kdokumentaci).
Pøipojení kelektrické síti a krozvodu
vody
Pøizpùsobení elektrického rozvodu a rozvodu vody pro
instalaci musí být provedeno kvalifikovaným personálem.
Myèka nádobí nesmí být opøena o potrubí ani o kabel
elektrického napájení.
Zaøízení musí být pøipojeno krozvodu vody spouitím
nových hadic.
Nepouívejte staré hadice.
Vypoutìcí hadice se musí nacházet ve výce od 40 do 80 cm
od podlahy nebo od plochy, na které je uloena myèka (A).
Pøed pøipojením vypoutìcí hadice ksifonu umývadla odstraòte
plastový uzávìr (B).
%"
* Pouze u nìkterých modelù.
Page 75

Bezpeènostní opatøení proti vytopení
Aby bylo zaruèeno, e nedojde kvytopení, je myèka:
- Vybavena systémem, který pøeruí pøívod vody vpøípadì
poruch nebo jejího úniku dovnitø myèky.
Pás proti tvorbì kondenzátu*
Po vestavìní myèky otevøete dvíøka a pøilepte pod døevìnou
polici prùsvitný samolepicí pás, který bude polici chránit pøed
pøípadným kondenzátem.
+5
Nìkteré modely jsou vybaveny pøídavným bezpeènostním
zaøízení New Acqua Stop
vytopení i vpøípadì pøetrení pøívodní hadice.
*, které zaruèuje ochranu proti
UPOZORNÌNÍ: NEBEZPEÈNÉ NAPÌTÍ!
Pøívodní hadice vody nesmí být vádném pøípadì pøeøezána,
protoe obsahuje souèásti pod napìtím.
Pøipojení kelektrickému rozvodu
Pøed zasunutím zástrèky do zásuvky elektrického rozvodu se
ujistìte, e:
Je zásuvka uzemnìna a e vyhovuje normám;
je zásuvka schopna snést maximální zátì odpovídající
jmenovitému pøíkonu zaøízení, uvedenému na títku
sjmenovitými údaji, umístìném na vnitøní stranì dvíøek (viz
kapitola Popis myèky);
napájecí napìtí odpovídá hodnotám uvedeným na títku
sjmenovitými údaji, umístìném na vnitøní stranì dvíøek;
zásuvka je kompatibilní se zástrèkou zaøízení. Vopaèném
pøípadì poádejte o výmìnu zástrèky autorizovaného
technika (viz Servisní sluba); nepouívejte prodluovací
òùry ani rozvodky.
Po instalaci zaøízení musí kabel elektrického napájení a
zásuvka elektrického rozvodu zùstat snadno pøístupné.
Kabel nesmí být ohnutý ani stlaèený.
Vpøípadì pokození musí být napájecí kabel vymìnìn
výrobcem nebo jeho støediskem Servisní sluby, aby se
pøedelo jakémukoli riziku. (Viz Servisní sluba)
Firma neponese ádnou odpovìdnost za následky
nerespektování uvedených pokynù.
Upozornìní pro první mytí
Po instalaci a bezprostøednì pøed prvním mytím zcela naplòte
vodou nádrku na sùl a pøidejte pøiblinì 1 kg soli (viz kapitola
Letidlo a regeneraèní sùl): Je zcela bìným jevem, e voda
pøeteèe. Zvolte stupeò tvrdosti vody (viz Letidlo a
regeneraèní sùl). - Je zcela bìné, e po nadávkování soli
bude kontrolka CHYBÌJÍCÍ SÙL
cyklù.
Nenaplnìní zásobníku soli mùe zpùsobit
pokození dekalcifikátoru vody a topného èlánku.
Technické údaje
Rozměry
Kapacita
Tlak vody v pŕívodním
potrubí
Napájecí napětí Viz štítek s jmenovitými údaji
Celkový pŕíkon Viz štítek s jmenovitými údaji
Pojistka Viz štítek s jmenovitými údaji
* i nadále blikat po dobu nìkolika
Šířka 59,5 cm
Výška 82 cm
Hloubka 57 cm
14 standardních souprav
nádobí
0,05 ÷ 1 MPa (0,5 ÷ 10 bar)
7,25 – 145 psi
Toto zařízení je ve shodě
s následujícími směrnicemi
Evropské unie:
-2006/95/EC (Nízké napětí)
- 2004/108/EC (Elektromagne
tická kompatibilita)
-2005/32/EC (Comm. reg.
1275/2008) (Ecodesign)
- 97/17/EC (Energetick ttkovn
myek ndob)
-2002/96/EC
* Pouze u nìkterých modelù.
%#
Page 76

Popis zaøízení
+5
Celkový pohled
Ovládací panel
1. Horní ko
2. Horní ostøikovací rameno
3. Sklopné dráky
4. Mechanismus nastavení výky koe
5. Spodní ko
6. Spodní ostøikovací rameno
7. Koík na pøíbory
8. Mycí filtr
9. Nádrka na sùl
10. Pøihrádky na mycí prostøedek a nádrka na letidlo
11. títek sjmenovitými údaji
12. Ovládací panel***
13. Kruhová matice
Zapnutí-Vypnutí (On-Off)/
Vynulování (Reset)
Displej
Start/Pauza
Vysvìtlivky ksymbolùm programù
Displej
Svìtelný indikátor zbývající doby, ZAPNUTÍ
(ON), VYPNUTÍ (OFF), KONEC (END)
Nedostatek soli
Èíslo programu
Nedostatek
letidla
Symbol volitelné funkce Polovièní
Symbol volitelné
funkce Polovièní náplò
Volba programu
Volitelná funkce Odloený start
Volitelná funkce Polovièní náplò
Symbol volitelné
funkce Odloený
start
spodního koe
náplò horního koe
Volitelná
funkce
Short Time
(Rychlý
cyklus)
Volitelná funkce Good
Night (Noèní cyklus)
Volitelná funkce
Multifunkèní tablety
Symbol mytí
Symbol suení
Symbol Uvedení do èinnosti
Symbol pauzy
Volitelná funkce Short
Time (Rychlý cyklus)
Volitelná funkce Good
Night (Noèní cyklus)
Volitelná funkce
Multifunkèní tablety
*** Pouze u modelù urèených pro úplné vestavìní.
* Pouze u nìkterých modelù.
Poèet a druh programù se mìní vzávislosti na modelu myèky.
%$
Page 77

Plnìní koù
Pøed plnìním koù odstraòte z nádobí zbytky jídla a vylijte ze
sklenic a pohárù tekutiny, které vnich zùstaly.
Po naplnìní zkontrolujte, zda se ostøikovací ramena
mohou volnì otáèet.
Spodní ko a koík na pøíbory
Do spodního koíku lze ukládat hrnce, víka, talíøe, salátové mísy,
pøíbory apod.Talíøe a velká víka je tøeba umístit po krajích koe.
Nìkteré modely myèek nádobí jsou vybaveny sklopnými dráky
stejnými, které lze pouít i ve svislé poloze pro umístìní jídel nebo
ve vodorovné poloze pro umístìní hrncù, salátových mís a pánví.
Koík na pøíbory mùe být odliného typu, ozkládací nebo
nerozkládací, podle modelu myèky. Nerozkládací koík musí být
umístìn pouze v pøední èásti spodního koe.
Oba jsou vybaveny
horními møíkami pro lepí
umístìní pøíborù.
Noe a nástroje sostrými hroty musí být uloeny do koíku
na pøíbory hroty obrácenými smìrem dolù nebo musí být uloeny
do vodorovné polohy na sklopné dráky horního koe.
Doporuèuje se pouívat nádobí vhodné pro mytí v myèce
nádobí.
* Pouze u nìkterých modelù. Mìní se v závislosti na poètu a
poloze.
Horní ko
Do horního koe ukládejte choulostivé a lehké nádobí: sklenice,
álky, podálky a nízké salátové mísy.
Sklopné dráky spromìnlivou polohou
Sklopné dráky lze umístit do
dvou odliných výek kvùli
optimalizaci umístìní nádobí v
prostoru koe. Poháry lze
*,
Nìkteré modely myèek jsou vybaveny
posuvným tácem
uloení servírovacího pøíboru nebo
álkù malých rozmìrù. Za úèelem
dosaení nejlepích vlastností mytí
neplòte pod uvedený tác neskladné
nádobí.
umístit stabilnì na sklopné
dráky zasunutím stopky
poháru do pøísluných
podélných otvorù.
*, který lze pouít pro
Nastavení výky horního koe
Horní ko mùe být nastaven do spodní nebo do horní polohy
scílem usnadnit ukládání nádobí.
Je lépe nastavit výku horního koe pøi PRÁZDNÉM KOI.
NIKDY nezvedejte nebo nespoutìjte ko pouze z jedné
strany.
Otevøete pojistky vodicích dráek koe na
pravé i na levé stranì a vytáhnìte ko;
umístìte jej do horní nebo spodní polohy a
zasunujte jej podél vodicích dráek, dokud
se do dráky nedostanou i pøední koleèka,
a poté zajistìte pojistky (viz obrázek).
Kdy je ko vybaven rukojemi Dual
Space (viz obrázek), vytáhnìte horní ko
a na doraz, uchopte za rukojeti
nacházející se po stranách a posuòte jej
smìrem nahoru nebo dolù; poté jej nechte
spustit dolù a drte jej pøitom.
Nádobí nevhodné na mytí vmyèce nádobí
Døevìné pøedmìty, pøedmìty sdøevìnou rukojetí nebo
srukojetí zrohoviny nebo pøedmìty slepenými souèástmi.
Pøedmìty zhliníku, mìdi, mosazi, plsti nebo cínu.
Plastové nebo tepelnì neodolné nádobí.
Staroitný nebo ruènì malovaný porcelán.
Staroitné støíbro. Støíbro, které nepatøí mezi staré a vzácné, se
mùe mýt spouitím jemného programu, pøièem je tøeba se
ujistit, e nepøichází do styku sjinými kovy.
+5
%%
Page 78

Uvedení do
èinnosti a pouití
+5
Ovládací panel je vybaven systémem Touch Control;
mírné pøitlaèení symbolu prsty aktivuje pøísluný ovládací
pøíkaz.
Symboly ve vysvìtlivkách mycích programù (nalevo
od ovládacího panelu) se NEROZSVÍTÍ.
Volba programu se provádí stisknutím symbolu P.
Stroj je vybaven akustickými signály/tóny (podle modelu
myèky), které avizují realizovaný ovládací pøíkaz: zapnutí,
ukonèení cyklu apod.
Symboly/kontrolky pøítomné na ovládacím panelu/
displeji mohou mìnit svou barvu. (podle modelu myèky).
Uvedení myèky do èinnosti
1. Otevøete kohoutek pøívodu vody.
2. Stisknìte tlaèítko ZAP.-VYP. (ON-OFF): Displej se na nìkolik
sekund rozsvítí a zobrazí se na nìm nápis ZAP. (ON) (zapnuto).
3. Otevøete dvíøka a nadávkujte mycí prostøedek (viz
dávkování mycího prostøedku).
4. Naplòte koe (viz Plnìní koù) a zavøete dvíøka.
5. Zvolte program podle druhu nádobí a stupnì jeho
zneèitìní (viz tabulka programù) stisknutím tlaèítka P.
6. Zvolte volitelné funkce mytí* (viz níe).
7. Stisknìte symbol Start/Pauza; na displeji se rozsvítí symbol
Start. Na displeji bude zobrazeno èíslo programu, symboly
mytí, pøípadné volitelné funkce a doby zbývající do konce cyklu.
8. Po ukonèení programu se na displeji zobrazí èíslo provedeného
programu a nápisEND (KONEC). Vypnìte zaøízení stisknutím
symbolu ZAP.-VYP. (ON-OFF); na displeji se zobrazí VYP. (OFF).
Zavøete kohoutek pøívodu vody a odpojte zástrèku ze zásuvky
elektrického rozvodu.
9. Pøed vyjmutím nádobí vyèkejte nìkolik minut, abyste se
vyhnuli popálení. Vylote koe poèínaje spodním koem.
- Pro sníení spotøeby elektrické energie se
zaøízení vnìkterých podmínkách delího NEPOUÍVANÍ
automaticky vypne.
PROGRAMY AUT.*: tento model myèky mùe pomocí
zvlátního senzoru posoudit stupeò zneèitìní a nastavit tak
co nejúèinnìjí a co nejvíce ekonomický mycí cyklus.
Doba trvání programù auto (automatických) se mùe mìnit
následkem zásahu senzoru.
Kdy je nádobí málo zneèitìné nebo kdy se
pøedem oplachovalo pod vodou, snite výraznì
mnoství mycího práku.
Pøidání nádobí
Stisknìte tlaèítko Start/Pauza (podsvícení tlaèítka bude blikat);
otevøete dvíøka a dávejte pøitom pozor na unikající páru. Poté
vlote nádobí. Znovu stisknìte symbol Start/Pauza: Dojde
krozsvícení symbolu Uvedení do èinnosti a kobnovení cyklu.
Stisknutím symbolu Start/Pauza za úèelem pøeruení
èinnost zaøízení dojde kdoèasnému pøeruení programu.
V této fázi není moné provádìt zmìnu programu.
Náhodné pøeruení
Kdy se bìhem mytí otevøou dvíøka nebo kdy dojde kpøeruení
dodávky elektrické energie, program bude pøeruen. Po zavøení
dvíøek nebo po obnovení dodávky elektrické energie bude
program pokraèovat zbodu, ve kterém byl pøeruen.
Dávkování mycího prostøedku
Dobrý výsledek mytí závisí také na správném dávkování
mycího prostøedku, pøièem platí, e pøi pøekroèení
doporuèeného mnoství nedojde ke zvýení úèinnosti
mytí, ale pouze kvyímu zneèitìní ivotního prostøedí.
Pouívejte výhradnì mycí prostøedky pro myèky nádobí.
NEPOUÍVEJTE mycí prostøedky pro mytí vrukou.
Nadmìrné pouití mycích prostøedkù mùe
zpùsobit pøítomnost pìny na konci cyklu.
Pouití tablet se doporuèuje pouze u modelù, které
mají kdispozici volitelnou funkci MULTIFUNKÈNÍ TABLETY.
Úèinnìjího mytí a suení je moné dosáhnout
spouitím mycího práku, tekutého letidla a soli.
nádobka A: Mycí prostøedek pro mytí
nádobka B: Mycí prostøedek pro pøedmytí
1. Stisknutím tlaèítka C otevøete kryt
D.
2. Nadávkujte mycí prostøedek;
konzultujte Tabulku programù:
prákový: nádobky A a B.
ve formì tablet: Kdy program
vyaduje pouití 1 tablety, vlote ji
do nádobky A a zavøete kryt; kdy
vyaduje pouití 2 tablet, polote
druhou na dno mycího prostoru.
3. Odstraòte zbytky mycího prostøedku zokrajù nádobky a
zavøete kryt a po zacvaknutí.
Zmìna probíhajícího programu
Kdy byl zvolen nesprávný program, je moné jej bezprostøednì
po startu zmìnit. Pro zmìnu mycího cyklu vypnìte zaøízení
delím stisknutím symbolu ZAP./VYP./Vynulování (ON/OFF/
Reset); na displeji se zobrazí 3-2-1 VYP. (OFF). Znovu zapnìte
zaøízení stisknutím stejného symbolu a znovu zvolte poadovaný
program a volitelné funkce.
%&
* Pouze u nìkterých modelù.
Page 79

Volitelné funkce mytí*
VOLITELNÉ FUNKCE mohou být nastaveny, mìnìny
nebo vynulovány teprve po provedení volby mycího
programu a pøed stisknutím symbolu START/PAUZA.
Mohou být zvoleny pouze volitelné funkce kompatibilní se
zvoleným programem. Kdy nìkterá volitelná funkce není
kompatibilní se zvoleným programem, (viz tabulka programù)
pøísluný symbol tøikrát rychle zabliká.
Kdy bude zvolena volitelná funkce, která není kompatibilní snìkterou
z pøedem nastavených volitelných funkcí, tato zabliká tøikrát a zhasne,
zatímco zùstane rozsvícena poslední nastavená volba.
Za úèelem zruení chybnì nastavené volitelné funkce
stisknìte znovu pøísluný symbol.
Odloený start*
Zahájení programu lze odloit o 1 a 24 hodin:
1. Po volbì poadovaného mycího programu a pøípadných
dalích volitelných funkcí stisknìte symbol ODLOENÝ
START: Dojde k rozsvícení symbolu na displeji.
Prostøednictvím stejného symbolu zvolte, kdy má být zahájen
mycí cyklus (od 1 do 24 hodin).
2. Potvrïte volbu tlaèítkem Start/Pauza a dojde kzahájení
odeèítání zbývající doby, kzobrazení zvolené doby odloení
na displeji a ke zruení blikání tlaèítka Start/pauza (stálé
svìtlo).
3. Po uplynutí uvedené doby zhasne symbol ODLOENÉHO
STARTU a spustí se program.
Zruení volby se provádí stisknutím symbolu ODLOENÉHO
STARTU a do zobrazení VYP. (OFF).
Není moné nastavit ODLOENÝ START bìhem ji
probíhajícího cyklu.
Volitelná funkce Short Time (Rychlý cyklus)*
Tato funkce umoòuje sníit dobu trvání hlavních programù za
udrení stejných výsledkù mytí a suení.
Po provedení volby programu stisknìte symbol volitelné
funkce Short Time; symbol pøítomný na displeji se rozsvítí,
aby signalizoval provedenou volbu.
Zruení této volitelné funkce se provádí opìtovným stisknutím
stejného symbolu.
Volitelné funkce Short Time a Good Night nejsou
vzájemnì kompatibilní.
Polovièní náplò vhorním/spodním koi
Pri pouití volitelné funkce Polovicní nápln je moné zvolit
provedení mytí vhorním nebo spodním koi a uetrit tak vodu,
energii a mycí prostredek. Zvolte program a stisknete symbol
POLOVICNÍ NÁPLN; rozsvítí se symbol polovicní náplne (na
displeji) a oznacení horního koe; pri dalím stisknutí dojde
kzobrazení symbolu polovicní náplne a oznacení spodního
koe. Dojde kaktivaci mytí ve zvoleném koi.
Pamatujte na naloení nádobí na zvolený ko a na
pouití polovièního mnoství mycího prostøedku.
Je lepí pouít prákový mycí prostøedek.
Tato volitelná funkce není kdispozici sprogramem:
Rychlý cyklus a cyklus Baby.
Volitelná funkce Good Night* (Noèní praní)
Tato volitelná funkce sniuje hluènost chodu prodlouením
programù a je ideální pro vyuití úspornìjího noèního tarifu
za elektrickou energii.
Po provedení volby programu stisknìte symbol volitelné
funkce Good Night; symbol pøítomný na displeji se rozsvítí,
aby signalizoval provedenou volbu.
Zruení této volitelné funkce se provádí opìtovným stisknutím
stejného symbolu.
Volitelná funkce Good Night není kompatibilní
svolitelnou funkcí POLOVIÈNÍ NÁPLÒ.
Multifunkèní tablety* (Tabs)
Pøi pouití této volitelné funkce bude optimalizován
výsledek mytí i suení.
Pøi pouití multifunkèních tablet stisknìte symbol
MULTIFUNKÈNÍ TABLETY. Dojde krozsvícení
pøísluného symbolu na displeji. Pouití volitelné
funkce Multifunkèní tablety bude mít za následek
prodlouení trvání programu.
Volitelná funkce MULTIFUNKÈNÍ TABLETY zùstane
nastavena pøi následujících zapnutích zaøízení, a to a
do jejího vypnutí.
Pouití tablet se doporuèuje pouze u modelù, které
mají kdispozici volitelnou funkci MULTIFUNKÈNÍ TABLETY.
Pouití této volitelné funkce se nedoporuèuje u
programù, u kterých se nepøedpokládá pouití
multifunkèních tablet (viz tabulka volitelných funkcí).
+5
Volitelné funkce Short Time a Good Night nejsou
kompatibilní svolitelnou funkcí POLOVIÈNÍ NÁPLÒ.
Tabulka Volitelných
funkcí
1. Auto mytí Super Wash
2. Auto běžné mytí
3. Každodenní A 60
4. Namáčení
5. Eko 50°C
6. Rychlé mytí 25'
7. Mytí skla
8. Cyklus Baby
* Pouze u nìkterých modelù.
A B C D E
Odložený
start
ANO
ANO
ANO
ANO
ANO
ANO
ANO
ANO
Poloviční
náplň
ANO
ANO
ANO
ANO
ANO
Ne
ANO
Ne
Multifunkční
tablety
ANO
ANO
ANO
Ne
ANO
ANO
ANO
Ne
Good Night
(Noční cyklus)
Ne
ANO
Ne
Ne
ANO
Ne
Ne
Ne
Short Time
(Rychlý
cyklus)
ANO
ANO
Ne
Ne
Ne
Ne
Ne
Ne
%'
Page 80

Programy
+5
Informace týkající se VOLITELNÝCH FUNKCÍ najdete vtabulce Volitelných funkcí na stranì Uvedení do èinnosti a pouití.
Poèet a druh programù a volitelných funkcí se mìní vzávislosti na modelu myèky.
Indikace k volbě programu Program
Silně znečištěné nádobí a hrnce (
nevhodný pro choulostivé nádobí)
Běžně znečištěné nádobí a hrnce
. Standardní denní program.
Každodenní nečistota v omezené
m množství (4 soupravy + 1 hrne
c + 1 pánev)
Předběžné mytí, kdy se očekává
doplnění náplně po dalším jídle.
Ekologické mytí při nízké energeti
cké spotřebě, vhodný pro nádobí
a hrnce.
Úsporný a rychlý mycí cyklus, po
užívaný u mírně znečištěného ná
dobí ihned po použití. (2 talíře + 2
sklenice + 4 příbory + 1 hrnec +
1 malá pánev)
Rychlý a úsporný cyklus pro chou
lostivé nádobí, citlivé na vysoké t
eploty, který se používá bezprostř
edně po použití tohoto nádobí (po
háry v horním koši + jemné talíře
ve spodním koši). 7. Mytí skla
Hygienizační cyklus na mytí kojen
eckých lahví, upevňovacích objím
ek a dudlíků spolu s talíři, sklenic
emi a příborem. Nádobí naložte
pouze do horního koše.
1. Super Wash
2. Běžné mytí
3. Každodenní
mytí
4. Namáčení
5. Eko
*
6. Rychlé mytí
8. Cyklus Baby
Mycí prostŕedek
(A) = nádobka A
(B) = nádobka B
práškový tekutý
35 g (A)
29 g (A)
6 g (B)
25 g (A) 25 ml (A) 1 (A)
Ne
29 g (A)
6 g (B)
25 g (A) 25 ml (A) 1 (A)
35 g (A) 35 ml (A) 1 (A)
20 g (A) 20 ml (A) Ne
35 ml (A)
29 ml (A)
6 ml (B)
Ne
29 ml (A)
6 ml (B)
ve formě
tablet
1 (A)
1 (A)
Ne
1 (A)
Programy, jeji
chž součástí j
e sušení
Ano
Ano
Ne
Ne
Ano
Ne
Ano
Ano
Volitelné f
unkce
A-B-C-E
A-B-C-D-E
A-B-C
A-B
A-B-C-D
A-C
A-B-C
A
Doba trvání
(tolerance ±1
programu
0%)
hod min
2:25’
1:50’
1:00’
0:08’
3:00'
0:25’
1:30’
1:20'
Poznámky:
Nejlepích vlastností programù Kadodenní mytí a Rychlé mytí je moné dosáhnout, kdy bude dle moností
dodren poèet uvedených souprav.
* Program Eko (Eco) pracuje za dodrení normy EN-50242, vyznaèuje se delí dobou trvání vzhledem kostatním
programùm, pøedstavuje vak nejnií spotøebu energie a nejvyí ohled na ivotní prostøedí.
Poznámka pro zkuební laboratore: Pro informace o zkuebních podmínkách srovnávací zkouky EN napite na
adresu: ASSISTENZA_EN_LVS@indesitcompany.com
Kusnadnìní dávkování mycího prostøedku je tøeba vìdìt, e:
1 kuchyòská líce = 15 g práku = pøiblinì 15 ml tekutiny. - 1 kuchyòská líce = 15 g práku = pøiblinì 5 ml tekutiny.
&
Page 81

Letidlo a regeneraèní sùl
Pouívejte pouze specifické mycí prostøedky pro
myèky nádobí.
Nepouívejte kuchyòskou ani prùmyslovou sùl ani
mycí prostøedky pro mytí v rukou.
Dodrujte pokyny uvedené na obalu.
Pouíváte-li multifunkcní produkt, není treba pridávat
letidlo, avak doporucuje se pridat sul, zejména
vprípade, e je voda tvrdá nebo velmi tvrdá. Dodrujte
pokyny uvedené na obalu.
Kdy se nepøidá sùl ani letidlo, je zcela zøejmé, e
kontrolky NEDOSTATEK SOLI
zùstanou i nadále rozsvícené.
* a NEDOSTATEK LETIDLA*
Dávkování letidla
Letidlo usnadòuje suení nádobí tím, e voda kloue
zpovrchu, a proto na nádobí nezùstávají zbytky ani skvrny.
Nádobka na letidlo se plní:
kdy na ovládacím panelu/displeji bliká kontrolka/symbol
NEDOSTATEK LETIDLA*;
1. Otevøete nádobku otáèením
uzávìru (G) proti smìru hodinových
ruèièek.
2. Nalijte letidlo tak, aby nepøeteklo.
F
Dojde-li ktomu, oèistìte jej suchým
hadrem.
G
3. Zaroubujte zpìt uzávìr.
NIKDY neaplikujte letidlo pøímo dovnitø mycího prostoru.
Nastavte dávku letidla
Nejste-li spokojeni svýsledkem mytí nebo suení, je moné
provést regulaci mnoství letidla. Prostøednictvím roubováku
otáèejte regulátorem (F) a zvolte jednu ze 6 poloh (regulátor je
zvýrobního závodu pøednastaven do polohy 4):
Jsou-li na nádobí bílé zbytky, pootoète regulátor smìrem
kniím hodnotám (1-3).
Jsou-li na nádobí kapky vody nebo skvrny vodního kamene,
pootoète regulátor smìrem kvyím hodnotám (4-6).
Nastavení tvrdosti vody
Kadá myèka je vybavena zaøízením na zmìkèení vody, které
spouitím regeneraèní soli, specifické pro myèky, dodává
vodu pro mytí nádobí, která je zbavena vodního kamene.
Tato mycka umonuje regulaci, která sniuje znecitování a
optimalizuje výkon mytí vzávislosti na tvrdosti vody. Údaj lze
zjistit u organizace zabývající se dodávkou pitné vody.
- Zapnìte zaøízení stisknutím tlaèítka ZAP./VYP. (ON/OFF).
- Stisknìte symbol P pøiblinì na 5 sekund; na displeji bude blikat
nastavené èíslo stupnì tvrdosti (Zmìkèovací zaøízení je
zvýrobního závodu nastaveno na è. 3) a dojde kzobrazení h2o
- Víckrát po sobì stisknìte tlaèítko P, dokud nedosáhnete
poadované tvrdosti vody (1-2-3-4-5
vody).
- Pro ukonèení dané funkce vyèkejte nìkolik sekund,
stisknìte nìkteré ztlaèítek volitelných funkcí* nebo vypnìte
zaøízení tlaèítkem ZAP./VYP. (ON/OFF).
Pøi pouití multifunkèních tablet vkadém pøípadì naplòte
nádobku na sùl.
* Viz tabulka tvrdosti
Tabulka tvrdosti vody
úroveň °dH
1 0 - 6 0 - 10 0 - 1
2 6 - 11 11 - 20 1,1 - 2
3 12 - 17 21 - 30 2,1 - 3
4 17 - 34 31 - 60 3,1 - 6
5*
Od 0°f do 10°f se doporučuje nepoužívat sůl.
při nastavení 5 může dojít k prodloužení doby.
*
při 1 mycím cyklu denně.
**
(°dH = tvrdost v nìmeckých stupních - °fH = tvrdost ve
francouzských stupních - mmol/l = milimol/litr)
°fH mmol/l
34 - 50 61 - 90 6,1 - 9
Průměrná autonomie
nádobky na sůl
měsíce
7 měsíců
5 měsíců
3 měsíce
2 měsíce
2/3 týdny
Dávkování regeneraèní soli
Kdosaení dobrých výsledkù mytí je nezbytné kontrolovat
stav soli v nádobce tak, aby nádobka nikdy nezùstala
prázdná. Regeneraèní sùl odstraòuje vodní kámen z vody a
tím zabraòuje vytváøení nánosù na nádobí.
Zásobník soli se nachází ve spodní èásti myèky nádobí (viz
Popis) a je tøeba jej naplnit:
Kdy pøi kontrole uzávìru nádobky na sùl není vidìt
zelený plovák* ;
kdy na ovládacím panelu/displeji bliká kontrolka/symbol
NEDOSTATEK SOLI*;
1. Vytáhnìte spodní ko a odroubujte
uzávìr nádobky jeho otáèením proti smìru
hodinových ruèièek.
2. Pouze pøi prvním pouití: Naplòte
nádobku vodou a po okraj.
3. Umístìte trychtýø
a po okraj (pøiblinì 1 kg); vyteèení malého mnoství vody
je zcela bìným jevem.
4. Odlote trychtýø*, odstraòte zbytky soli zhrdla; pøed
zaroubováním uzávìru jej opláchnìte pod tekoucí vodou,
místìte jej pøitom hlavou dolù a nechte odtéci vodu ze ètyø
záøezù umístìných do hvìzdy, nacházejících se ve spodní
èásti uzávìru. (uzávìr sezeleným plovákem*)
Doporuèujeme provést tento úkon pøi kadém
doplòování soli.
Dobøe dotáhnìte uzávìr, aby se do nádobky na sùl bìhem
mytí nedostal mycí prostøedek (mohlo by tak dojít ktrvalému
pokození dekalcifikátoru).
Vpøípadì potøeby naplòte sùl jetì pøed mycím cyklem,
aby dolo kodstranìní solného roztoku, který vytekl
znádobky na sùl.
* (viz obrázek) a vyplòte nádobku na sùl
**
+5
* Pouze u nìkterých modelù.
&
Page 82

Údrba a péèe
Uzavøení pøívodu vody a vypnutí elektrického
+5
napájení
Po kadém mytí uzavøete kohoutek pøívodu vody,
abyste se vyhnuli nebezpeèí únikù.
Pøi èitìní zaøízení a bìhem operací údrby odpojte
zástrèku napájecího kabelu ze zásuvky elektrického
rozvodu.
Èitìní myèky nádobí
Vnìjí povrch a ovládací panel se mùe èistit
neabrazivním hadrem navlhèeným ve vodì.
Nepouívejte rozpoutìdla ani abrazivní prostøedky.
Stìny vnitøního mycího prostoru se dají vyèistit od
pøípadných skvrn hadrem navlhèeným ve vodì
smalým mnostvím octa.
Zabránìní vzniku nepøíjemných zápachù
Dvíøka nechte pokadé pootevøená, aby se zabránilo
hromadìní vlhkosti.
Pravidelnì èistìte obvodová tìsnìní dvíøek a
nádobek na mycí prostøedek spouitím mokré
houby. Zabrání se tak hromadìní zbytkù jídla, které
jsou hlavními pùvodci nepøíjemného zápachu.
Èitìní ostøikovacích ramen
Mùe se stát, e se na ostøikovacích ramenech zachytí
zbytky jídla a ucpou otvory, kterými vytéká voda: Èas
od èasu je tøeba je zkontrolovat a vyèistit nekovovým
kartáèkem.
Obì ostøikovací ramena jsou demontovatelná.
Pravidelnì èistìte vstupní filtr rozvodu vody, umístìný na
výstupu zvodovodního kohoutu.
- Zavøete kohout pøívodu vody.
- Odroubujte koncovou èást pøívodní hadice vody, sejmìte
filtr a opatrnì jej vyèistìte pod proudem tekoucí vody.
- Vlote filtr zpìt na pùvodní místo a zaroubujte hadici.
Èitìní filtrù
Filtraèní jednotka je tvoøena tøemi filtry, které èistí vodu
pouitou kmytí od zbytkù jídla a opìtovnì ji uvádìjí do obìhu:
Kzabezpeèení trvale dobrých výsledkù mytí je tøeba filtry èistit.
Pravidelnì èistìte filtry.
Myèka nádobí se nesmí pouívat bez filtrù nebo
sodpojeným filtrem.
Po nìkolika mytích zkontrolujte filtraèní jednotku a dle potøeby
ji dùkladnì umyjte pod tekoucí vodou. Pomozte si pøitom
nekovovým kartáèkem a postupujte dle níe uvedených pokynù:
1. Otáèejte válcovým filtrem C proti smìru hodinových
ruèièek a vytáhnìte jej (obr. 1).
2. Vytáhnìte nádobku filtru B mírným zatlaèením na boèní
jazýèky (obr. 2);
3. Vyvleète nerezový talíø filtru A (obr. 3).
4. Zkontrolujte jamku a odstraòte pøípadné zbytky jídla.
NIKDY NEODSTRAÒUJTE ochranný kryt mycího èerpadla
(souèástka èerné barvy) (obr.4).
Demontá horního ostøikovacího
ramena vyaduje odroubování
plastové kruhové matice proti
smìru hodinových ruèièek. Horní
ostøikovací rameno je tøeba
namontovat èástí s vìtím
poètem otvorù obrácenou
smìrem nahoru.
Demontá spodního
ostøikovacího ramena se
provádí stisknutím jazýèkù,
nacházejících se po stranách,
smìrem nahoru.
Èitìní filtru pøívodu vody*
Jestlie jsou hadice pøívodu vody nové nebo pokud
zùstaly delí dobu vneèinnosti, pøed pøipojením je
tøeba nechat odtéci vodu, dokud nebude prùzraèná a
zbavená neèistot. Bez uvedeného opatøení mùe dojít
kucpání pøívodu vody a pokození myèky.
!
Po vyèitìní filtrù proveïte zpìtnou montá filtraèní jednotky
a její správné umístìní do jejího uloení; pøedstavuje
nezbytný pøedpoklad správné èinnosti myèky.
"
Opatøení vpøípadì dlouhodobé neèinnosti
Odpojte napájecí kabel zaøízení ze zásuvky elektrického
rozvodu a zavøete kohoutek pøívodu vody.
Nechte pootevøená dvíøka.
Po vaem návratu proveïte jeden mycí cyklus naprázdno.
&
* Pouze u nìkterých modelù.
Page 83

Opatøení, rady a servisní sluba
Zaøízení bylo navreno a vyrobeno vsouladu splatnými
mezinárodními bezpeènostními pøedpisy. Tato upozornìní jsou
uvádìna zbezpeènostních dùvodù a je tøeba si je pozornì pøeèíst.
Základní bezpeènostní pokyny
Tento elektrický spotøebiè nemùe být pouíván osobami
(vèetnì dìtí) se sníenými fyzickými, senzorickými nebo
duevními schopnostmi svýjimkou pøípadù, kdy je jim
poskytnut dozor nebo pokyny týkající se pouití osobou
odpovìdnou za jejich bezpeènost.
V kadém pøípadì je potøebný dozor dospìlé osoby, aby se
zabránilo pouití daného elektrospotøebièe k dìtským hrám.
Toto zaøízení bylo navreno výhradnì pro neprofesionální
pouití v domácnosti.
Zaøízení mohou pouívat pouze dospìlé osoby na mytí nádobí
v domácnosti podle pokynù uvedených vtomto návodu.
Zaøízení nesmí být nainstalováno venku, a to ani vpøípadì, e
by se jednalo o místo chránìné pøed nepøízní poèasí, protoe
je velmi nebezpeèné vystavit jej pùsobení detì a bouøí.
Nedotýkejte se myèky nádobí bosýma nohama.
Nevytahujte zástrèku ze zásuvky elektrického rozvodu
tahem za kabel, ale uchopením za zástrèku.
Pøed provedením operací èitìní a údrby je tøeba zavøít
kohoutek pøívodu vody a odpojit zástrèku ze zásuvky
elektrického rozvodu.
Pøi výskytu poruchy se vádném pøípadì nepokouejte o
opravu vnitøních èástí zaøízení.
Nikdy se nedotýkejte rezistoru.
Neopírejte se o otevøená dvíøka a nesedejte si na nì. Mohlo
by dojít kpøevrácení zaøízení.
Dvíøka nesmí zùstat votevøené poloze, protoe by mohla
pøedstavovat nebezpeèí zakopnutí.
Udrujte mycí prostøedek a letidlo mimo dosah dìtí.
Obaly nejsou hraèky pro dìti!
Likvidace
Likvidace obalových materiálù: Pøi jejich odstraòování postupujte
vsouladu smístním pøedpisy a dbejte na monou recyklaci.
Evropská smìrnice 2002/96/ES o odpadu tvoøeném
elektrickými a elektronickými zaøízeními (RAEE) pøedpokládá,
e elektrospotøebièe nesmí být likvidovány vrámci bìného
pevného mìstského odpadu. Vyøazená zaøízení musí být
sesbírána zvlá za úèelem zvýení poètu recyklovaných a
znovu pouitých materiálù, ze kterých jsou sloena, a za
úèelem zabránìní moným ublíením na zdraví a kodám na
ivotním prostøedí. Symbolem je pøekrtnutý ko, který je
uveden na vech výrobcích scílem pøipomenout povinnosti
spojené se separovaným sbìrem.
Podrobnìjí informace týkající se správného zpùsobu vyøazení
elektrospotøebièù zprovozu mohou jejich dritelé získat tak, e
se obrátí na navrenou veøejnou instituci nebo na prodejce.
Zvolte program vhodný pro druh nádobí a stupeò
zneèitìní; konzultujte Tabulku programù:
- Pro bìnì zneèitìné nádobí pouijte program Eko (Eco),
který zaruèuje nízkou spotøebu energie a vody.
- pøi mením mnoství nádobí pouijte volitelnou funkci
Polovièní náplò* (viz Uvedení do èinnosti a pouití).
Vpøípadì, e vae smlouva na dodávku elektrické energie
pøedpokládá pouívání èasových pásem pro etøení
elektrickou energií, provádìjte mytí vèasových pásmech
se sníenou sazbou. Volitelná funkce Odloený start* (viz
Uvedení do èinnosti a pouití) mùe napomoci organizaci
mycích cyklù uvedeným zpùsobem.
Mycí prostøedky bez fosfátù, bez chloru
a obsahující enzymy
Doporuèuje se pouívat mycí prostøedky bez fosfátù a bez
chloru, které berou ohled na ivotní prostøedí.
Enzymy jsou mimoøádnì úèinné pøi teplotách kolem 50°C,
proto je pøi pouití mycích prostøedkù senzymy moné
nastavit mytí pøi niích teplotách a dosáhnout stejných
výsledkù jako pøi 65°C.
Správné dávkování mycího prostøedku na základì pokynù
výrobce sohledem na tvrdost vody, stupeò zneèitìní a
mnoství mytého nádobí zabraòuje plýtvání. I kdy se jedná
o biodegradabilní látky, mycí prostøedky naruují pøirozenou
rovnováhu vpøírodì.
Servisní sluba
Døíve, ne se obrátíte na servisní slubu:
Zkontrolujte, zda nejste schopni poruchu odstranit sami
(viz Poruchy a zpùsob jejich odstranìní<P>).
Znovu uveïte do chodu mycí program scílem ovìøit, zda
byla porucha odstranìna.
Vpøípadì negativního výsledku se obrate na
Autorizovanou servisní slubu.
Nikdy se neobracejte s ádostí o pomoc na
neautorizované techniky.
Pøi hláení poruchy uveïte:
druh poruchy;
model zaøízení (Mod.);
výrobní èíslo (S/N).
Tyto informace jsou uvedeny na títku sjmenovitými údaji,
umístìném na zaøízení. (viz Popis zaøízení).
+5
Jak uetøit a brát ohled na ivotní prostøedí
etøení vodou a energií
Uvádìjte myèku nádobí do chodu pouze tehdy, kdy je naplnìna.
Bìhem èekání na naplnìní zaøízení zabraòte vzniku
nepøíjemného zápachu pouitím cyklu Namáèení (viz Programy).
* Pouze u nìkterých modelù.
&!
Page 84

Poruchy a zpùsob jejich
195095626.01
odstranìní
Kdy se na zaøízení vyskytnou poruchy vèinnosti, zkontrolujte døíve, ne se obrátíte na Servisní slubu,
+5
následující body.
Poruchy: Možné pŕíčiny / Řešení:
09/2011 - Xerox Fabriano
Nedochází k uvedení myčky d
o chodu nebo myčka nereagu
je na ovládací povely
Není možné zavŕ ít dvíŕka • Došlo k zamknutí zámku; energicky zavřete dvíř ka, dokud neuslyšíte c
Myčka nevypouští vodu.
Myčka je hluč ná. • Nádobí naráží vzájemně na sebe nebo na ostř ikovací ramena.
Na nádobí a na sklenicích jso
u viditelné nánosy vodního k
amene nebo bílý povlak.
Na nádobí a na sklenicích jso
u patrné bílé zbytky nebo mo
drý povlak.
Nádobí je málo suché. • Byl zvolen program bez sušení.
• Vypněte zař ízení tlač ítkem ZAP./VYP. (ON/OFF), zapněte jej znovu
po uplynutí přibližně jedné minuty a znovu nastavte požadovaný
program.
• Zástrčka není řádně zastrč ena v zásuvce elektrického rozvodu.
• Dvířka myč ky nejsou ř ádně zavřená.
vaknutí.
• Program ještě neskončil.
• Vypouště cí hadice je ohnutá (viz Instalace).
• Odpadové potrubí umyvadla je ucpané.
• Filtr je ucpán zbytky jídla.
• Nadměrná př ítomnost pěny: Mycí prostř edek není vhodně dávkován
nebo není vhodný pro mytí v myč kách. (viz Uvedení do č innosti a
použití).
• Chybí regenerační sů l nebo její nastavení neodpovídá tvrdosti použív
ané vody (viz Leštidlo a sů l).
• Uzávěr nádobky na sů l není dobře uzavřen.
• Leštidlo bylo spotř ebováno nebo jeho dávkování není dostatečné.
• Dávkování leštidla je nadbytečné.
• Leštidlo bylo spotřebováno nebo jeho dávkování není dostatečné (viz
Leštidlo a sů l).
• Regulace leštidla neodpovídá potřebě .
• Nádobí je z antiadhezivního materiálu nebo z plastu.
Nádobí není dostatečn ě čisté. • Koše jsou př íliš naplněné (viz Plnění košů).
Myčka nenapouští vodu – Ala
rm zavŕeného kohoutu.
(je slyšet krátká pípnutí)*
(bliká kontrolka ZAP./VYP. (ON/OFF)
a na displeji je zobrazeno A 6).
Alarm pŕívodní hadice vody/u
cpání vstupního filtru.
(bliká kontrolka ZAP./VYP. (ON/OFF)
a na displeji je zobrazeno A 7).
• Nádobí není dobř e rozmístěno.
• Ostřikovací ramena se nemohou pohybovat volně.
• Mycí program je příliš mírný (viz Programy).
• Nadměrná př ítomnost pěny: Mycí prostř edek není vhodně dávkován
nebo není vhodný pro mytí v myč kách. (viz Uvedení do č innosti a
použití).
• Uzávěr leštidla nebyl správně uzavř en.
• Filtr je zneč ištěný nebo ucpaný (viz Údržba a péče ).
• Chybí regenerač ní sůl (viz Leštidlo a sůl).
• Chybí voda v rozvodu vody.
• Přívodní hadice na vodu je ohnutá (viz Instalace).
• Otevřete kohoutek a zař ízení bude uvedeno do chodu v průb ěhu ně kol
ika málo minut.
• Došlo k zablokování zařízení následkem chybějícího zásahu po
pípnutích. Vypněte zařízení tlačítkem ZAP./VYP. (ON/OFF), otevřete k
ohoutek přívodu vody a po 20 sekundách znovu zapněte stisknutím st
ejného tlačítka. Opě t nastavte mycí program a spusť te zař ízení.
• Vypněte zař ízení stisknutím tlačítka ZAP./VYP. (ON/OFF). Zavřete ko
hout př ívodu vody, abyste zabránili vytopení, a vytáhněte zástrč ku ze
zásuvky elektrického rozvodu. Zkontrolujte, zda není vstupní filtr rozv
odu vody ucpán nečistotami. (viz kapitola „Údržba a péče“).
* Pouze u nìkterých modelù.
&"
 Loading...