

Page 1

1
EN
Contents
Information for the user, 2
Installation, 4
Description, 6
Use, 10
Maintenance and cleaning, 24
Troubleshooting, 25
Efficiency test, 26
Instructions for use
EN
English
Page 2
2
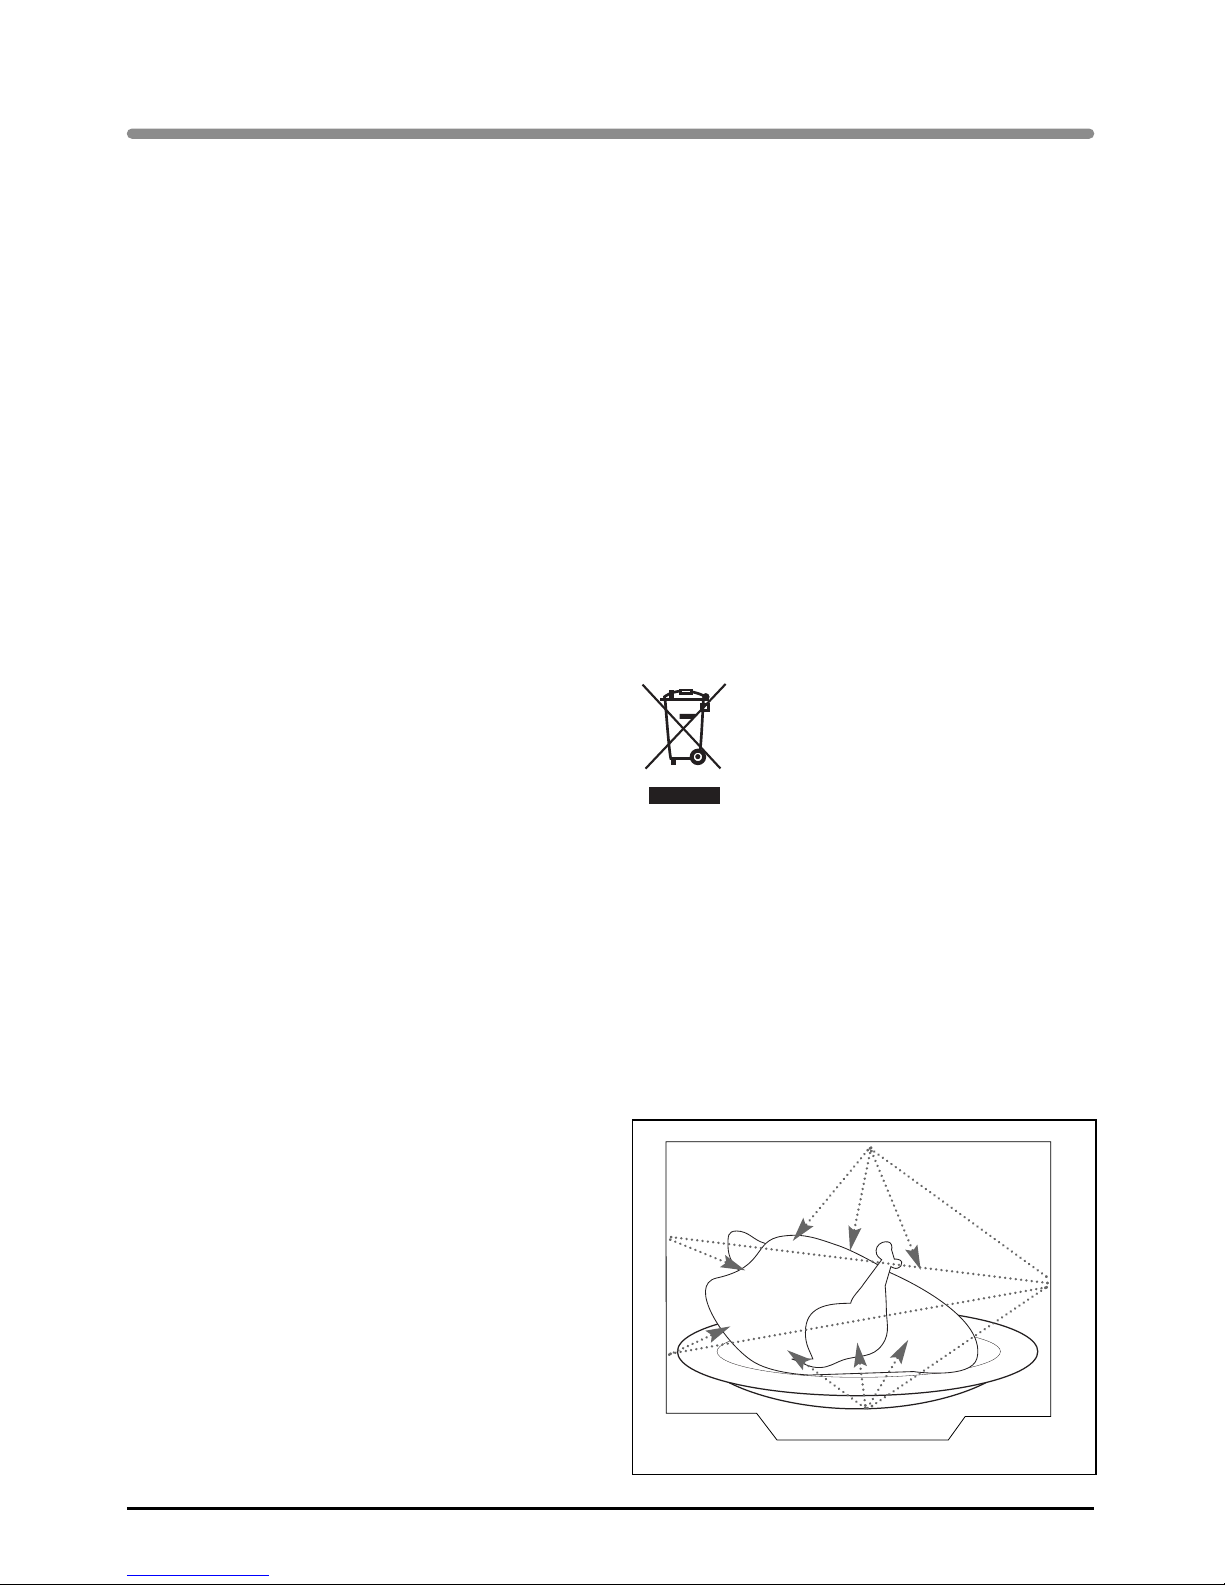
The microwaves used for cooking are electromagnetic waves. They are present naturally in
the environment in the form of radio waves, or
light or infrared rays.
Their frequency is in the 2,450 MHz range.
Their properties:
- They are reflected by metal.
- They travel through all other materials.
- They absorb water, fat and sugar
molecules.
When food is exposed to microwaves, the
molecules are shaken rapidly, generating heat.
The microwaves penetrate the food up to a
depth of around 2.5 cm. If food items are thicker,
they will be cooked through to the centre by
heat conduction, as in traditional cooking.
It is important to know that microwaves trigger a
simple thermal reaction within the food and that
they are not harmful.
The packaging for your appliance is made from
recyclable materials. Recycle them and help to
protect the environment by disposing of them in
the council receptacles provided for this
purpose.
Your appliance also contains various
recyclable materials. It is therefore
marked with this logo to inform you
that worn-out appliances should not
be disposed of with other waste.
Appliance recycling organised by
your manufacturer will thus be carried out in
optimum conditions, in accordance with
European directive 2002/96/EC on waste
electrical and electronic equipment. Please
contact your local council or your dealer for
information on the worn-out appliance
collection points nearest to your home. We
thank you for your help in protecting the
environment.
operating principle protecting the environment
Thank you for choosing a HOTPOINT combination microwave. Making this product easy to use and
simple
t
to operate was the main factor considered in its development.
This combined microwave oven brings to
g
gether the characteristics of a microwave with those of a
traditional oven.
The various settings ava
i
ilable allow you to choose the exact cooking method that you wish to use.
This oven is designed to e
n
nsure that the control buttons are easy to use.
The controls are arranged in a practical way on the
c
control panel. The display provides information
and helps you to adjust settings.
Information for the user
Page 3

3
EN
Information for the user
IMPORTANT SAFETY INSTRUCTIONS -
READ CAREFULLY AND RETAIN FOR
FUTURE USE.
If the appliance is ever sold or transferred to
another person, ensure that the new owner
receives this user guide. Please read these
guidelines before installing and using your
appliance. They were written for your safety and
the safety of others.
safety recommendations
Your appliance is designed for standard
household use for cooking, reheating and
defrosting foods. The manufacturer declines any
responsibility in the case of inappropriate use of
the appliance.
This appliance is not intended for use by
individuals (including children) with impaired
physical, sensorial or mental abilities, or persons
lacking in knowledge or experience, unless they
receive prior supervision or instructions on using
the appliance from a person responsible for their
safety.
Please make sure children do not play with the
appliance.
WARNING: Only allow children to use the oven
without supervision, if adequate instructions have
been given, so that the child is able to use the
oven safely and understands the dangers of
incorrect use.
WARNING: Liquids and other foods should not be
heated in sealed containers because they might
explode.
Use only utensils suitable for use in microwave
ovens.
When heating food items in plastic or paper
containers, keep an eye on the oven contents,
since there is a risk of ignition.
WARNING: If the door or door seal is damaged,
the oven should not be used until it has been
repaired by a qualified person.
WARNING: It is dangerous for anyone other than
a qualified person to perform maintenance or
repairs that require the removal of the cover
providing protection against exposure to
microwave energy.
WARNING: The accessible parts of the appliance
may become hot during use. Be careful not to
touch the heating elements inside the oven. It is
recommended that you keep young children at a
safe distance. If the appliance is being used in
combination mode, it is recommended that
children only use the oven under adult supervision
due to the temperatures involved.
If smoke appears, stop or unplug the oven and
leave the door closed to smother any flames that
might appear.
Heating eggs in their shells or whole hardboiled
eggs in a microwave oven is not recommended, as
they may explode, even after cooking has ended.
Heating beverages in a microwave oven can
cause sudden and/or delayed splashing of boiling
liquid, so precautions must be taken when
handling containers.
The contents of baby bottles and baby food jars
should be shaken or stirred and their temperature
checked before consumption, to avoid burns.
Never heat a baby bottle with the teat on (risk of
explosion). The use of metal cookware, forks,
spoons, knives or metal staples or fasteners on
defrosting bags is not recommended.
Always use oven mitts to remove dishes from the
oven. Some dishes absorb the heat from foods and
can therefore become very hot.
If cooking small quantities of food (a sausage,
croissant, etc.), place a glass of water next to the
food.
Excessive cooking times may dry out foods and
burn them. To prevent this happening, never use
the same times as recommended for cooking in a
traditional oven. To avoid damaging your
appliance, never operate it while empty or without
the turntable. Do not leave any accessories in your
oven when it is switched off.
Page 4

4
Warning:
Ensure that your appliance has not been
damaged during transport (broken seal or door,
etc.
)
). If you notice any kind of damage, contact
your retailer before use.
Ensure that:
- the electrical installation is of an adequate
voltage.
- the power cable is in good condition,
- the diameter of the wires complies with
installation requirements,
- your electrical installation is equipped with
protection rated at 16 amperes minimum.
If in doubt, consult an electrician.
The electrical connections must be made before
installing the appliance in its housing.
Electrical safety must be guaranteed by correct
installation in the housing. During installation
and maintenance operations, the appliance
must be unplugged from the mains; the circuitbreaker tripped or the fuses removed.
The appliance must be connected using a
(standardised) power cable equipped with
3 1.5 mm² conductors (phase + neutral + earth),
connected to a single phase 220-240V ~ system
using an IEC 60083 standardised socket (phase
+ neutral + earth) or in accordance with
installation requirements. The green/yellow
safety conductor is connected to the
appliance’s terminal and must be connected to
the installation’s earth system.
In order to easily locate the reference
information for your appliance, we recommend
that you make a note of it on the “After-Sales
Service” page.
If the appliance has an electrical plug, it must
remain accessible after the appliance has been
built in.
The oven’s neutral conductor (blue wire) must
be connected to the system’s neutral conductor.
It must be possible to disconnect the appliance
from the power supply, either using a plug or by
fitting a switch on the fixed wiring system in
accordance with installation rules.
If the power cable is damaged, it should be
replaced by the manufacturer, its after-sales
service department or by a similar qualified
person, to avoid danger.
Warni
n
ng:
We cannot be held responsible for any
accident resulting from a non-existent, faulty or
incorrec
t
t earth.
If there are any problems with the oven, unplug
it or remove the fuse corresponding to the
o
oven
supply wire.
before connection
electrical connections
Installation
Page 5
5
EN
550
595
400
23
378
450
560
550
560
550
450
456
445
20
50
10
50
Fig. 1
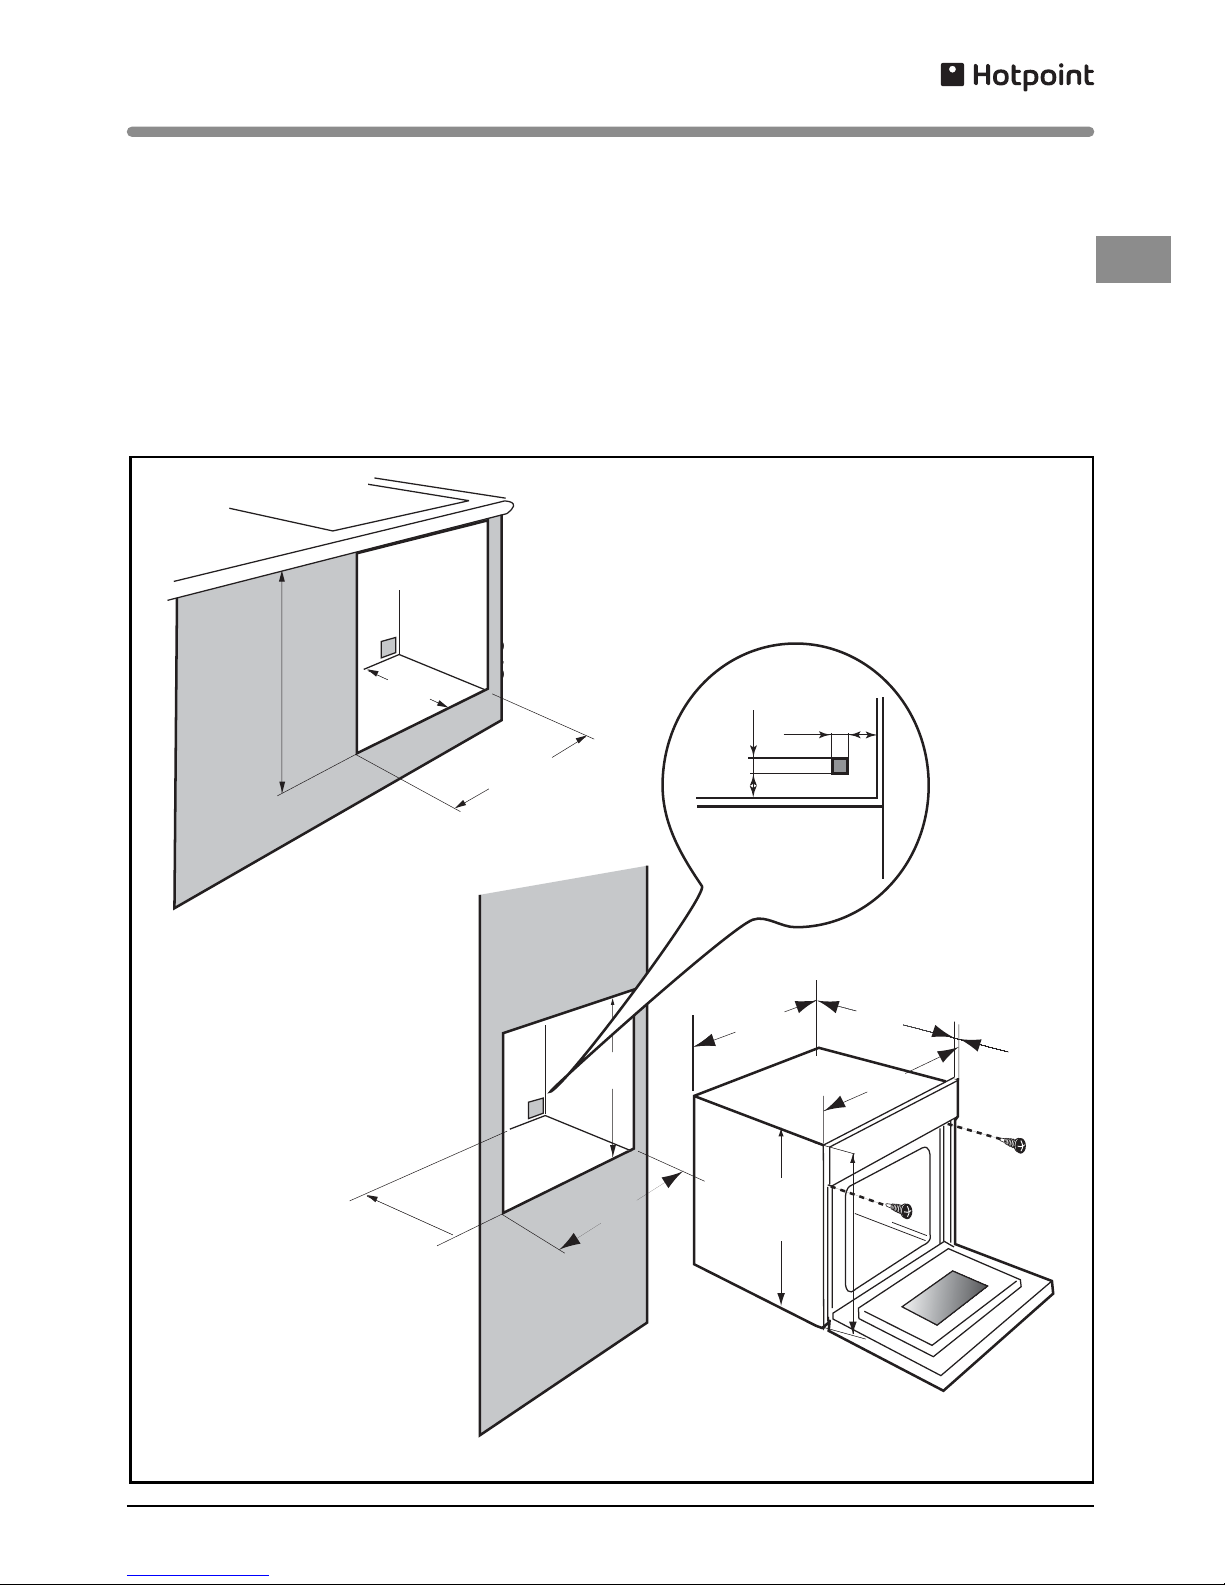
The appliance may be installed under a worktop or in a tall kitchen unit (open or closed) that has the
appropriate dimensions for built-in installation (Fig. 1).
Never use the appliance immediately (wait 1 to 2 hours) after moving it from a cold place to a warm
place because condensation could cause a malfunction.
building in
Installation
Page 6
6
appliance
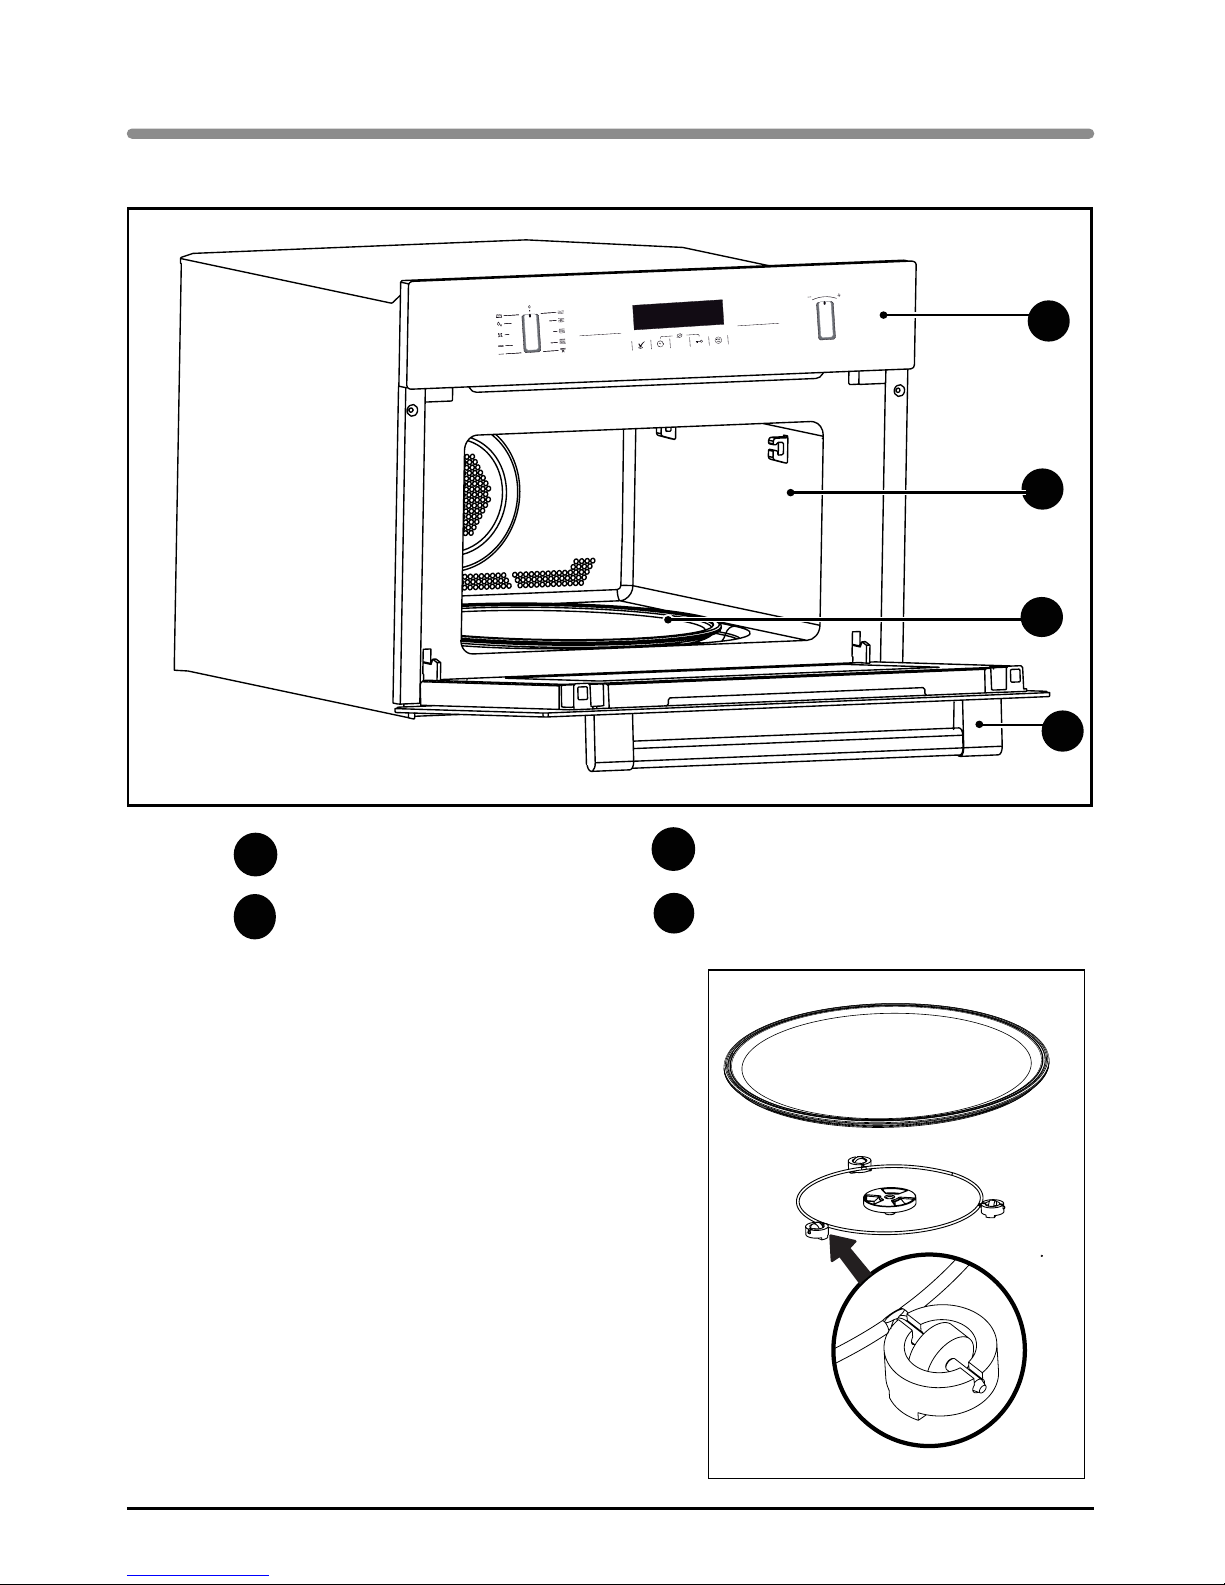
Control panel
Oven cavity
A
B
D
Fig. 1
B
C
C
Turntable
Door handle
Description
A
D
Turntable: for the even cooking of foods with no
handling required.
It rotates in both directions. If the turntable does
not rotate, ensure that all components are
correctly positioned.
Do not try to rotate it manually as this might
damage the turning gear.
It can also be used as a cooking dish. To remove
it, pick it up using the access zones provided in
the cavity.
The support with drive spindle: guides the glass
turntable as it rotates (Fig. 2).
The support wheels: The wheels must be oriented
in the right direction (Fig. 2).
If they do not turn correctly, check for any foreign
bodies underneath.
Fig. 2
Page 7
7
EN
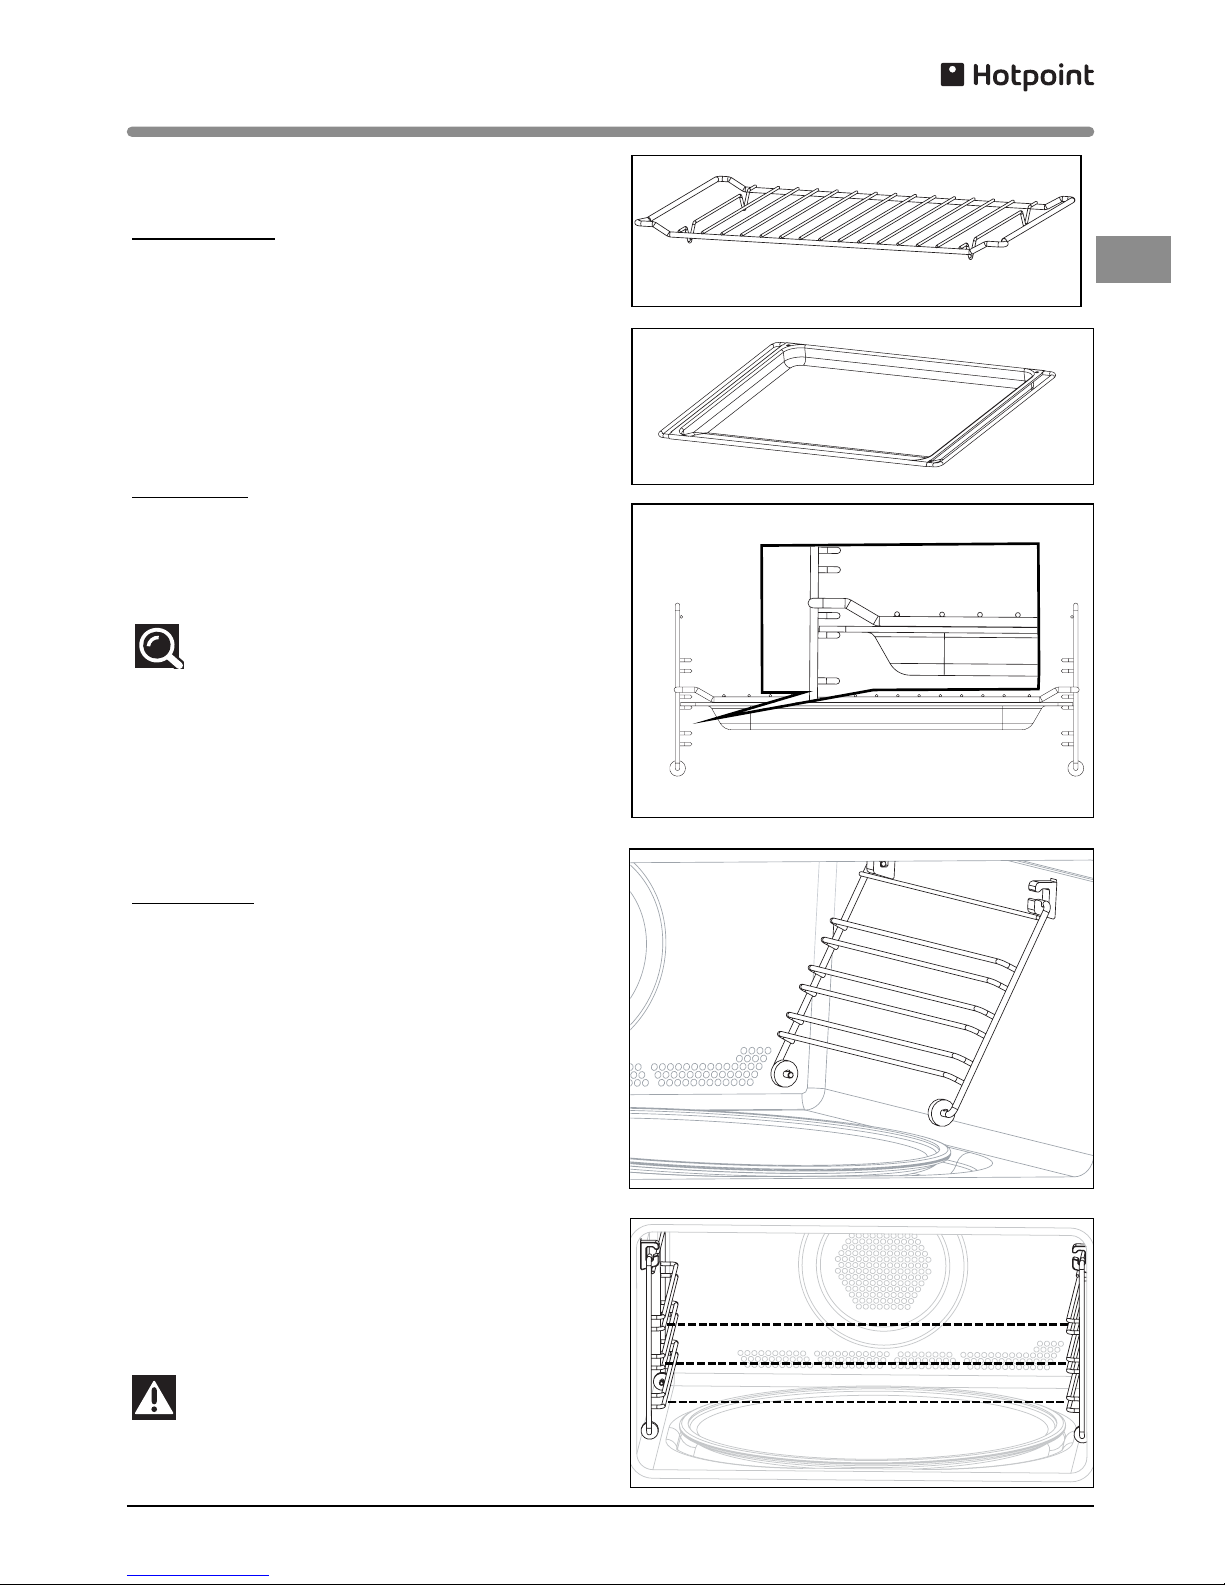
The wire shelf
(Fig. 1): allows you to brown or
grill food. The shelf should not, under any
circumstances, be used with other metal
cookware when using the microwave, grill +
microwave or fan + microwave settings.
However, you may heat food in an aluminium tray
providing it is separated from the shelf by a
plate.
Enamel dish
(Fig. 2):
this can be used as a bain-marie filled with
water to mid-height, for fan-assisted cooking. It
may also be used as a cooking dish.
Comments
:
Ensure that the enamel dish is positioned
correctly in the middle of the shelf to allow air to
circulate freely. Do not use
the enamel dish for
combined conventional and microwave cooking
.
.
There is a risk of damage.
The shelf + the enamel dish:
to roast and collect the cooking juices, place the
shelf over the en
amel dish (Fig. 3).
Side shelves
(Fig. 4): 2 shelf supports fitted with
hooks allow you to use the accessories at
three heights.
There are three possible levels, depending on
the cooking method and type of food (Fig. 4/5).
With the Grill or Grill + Microwave settings, the
accessories are placed on the first level for thick
foods like roasts and on the third level for thinner
foods like chops and sausages.
With the fan oven setting you can use the shelf
or the enamel dish on the first or second level as
a cooking dish.
Fig. 1
accessories
Fig. 4
Fig. 5
1
2
3
Fig. 2
Fig. 3
Warning:
Do not use the enamel dish for combined
conventional and microwave cooking. There is a
risk of damag
e
e.
Description
Page 8
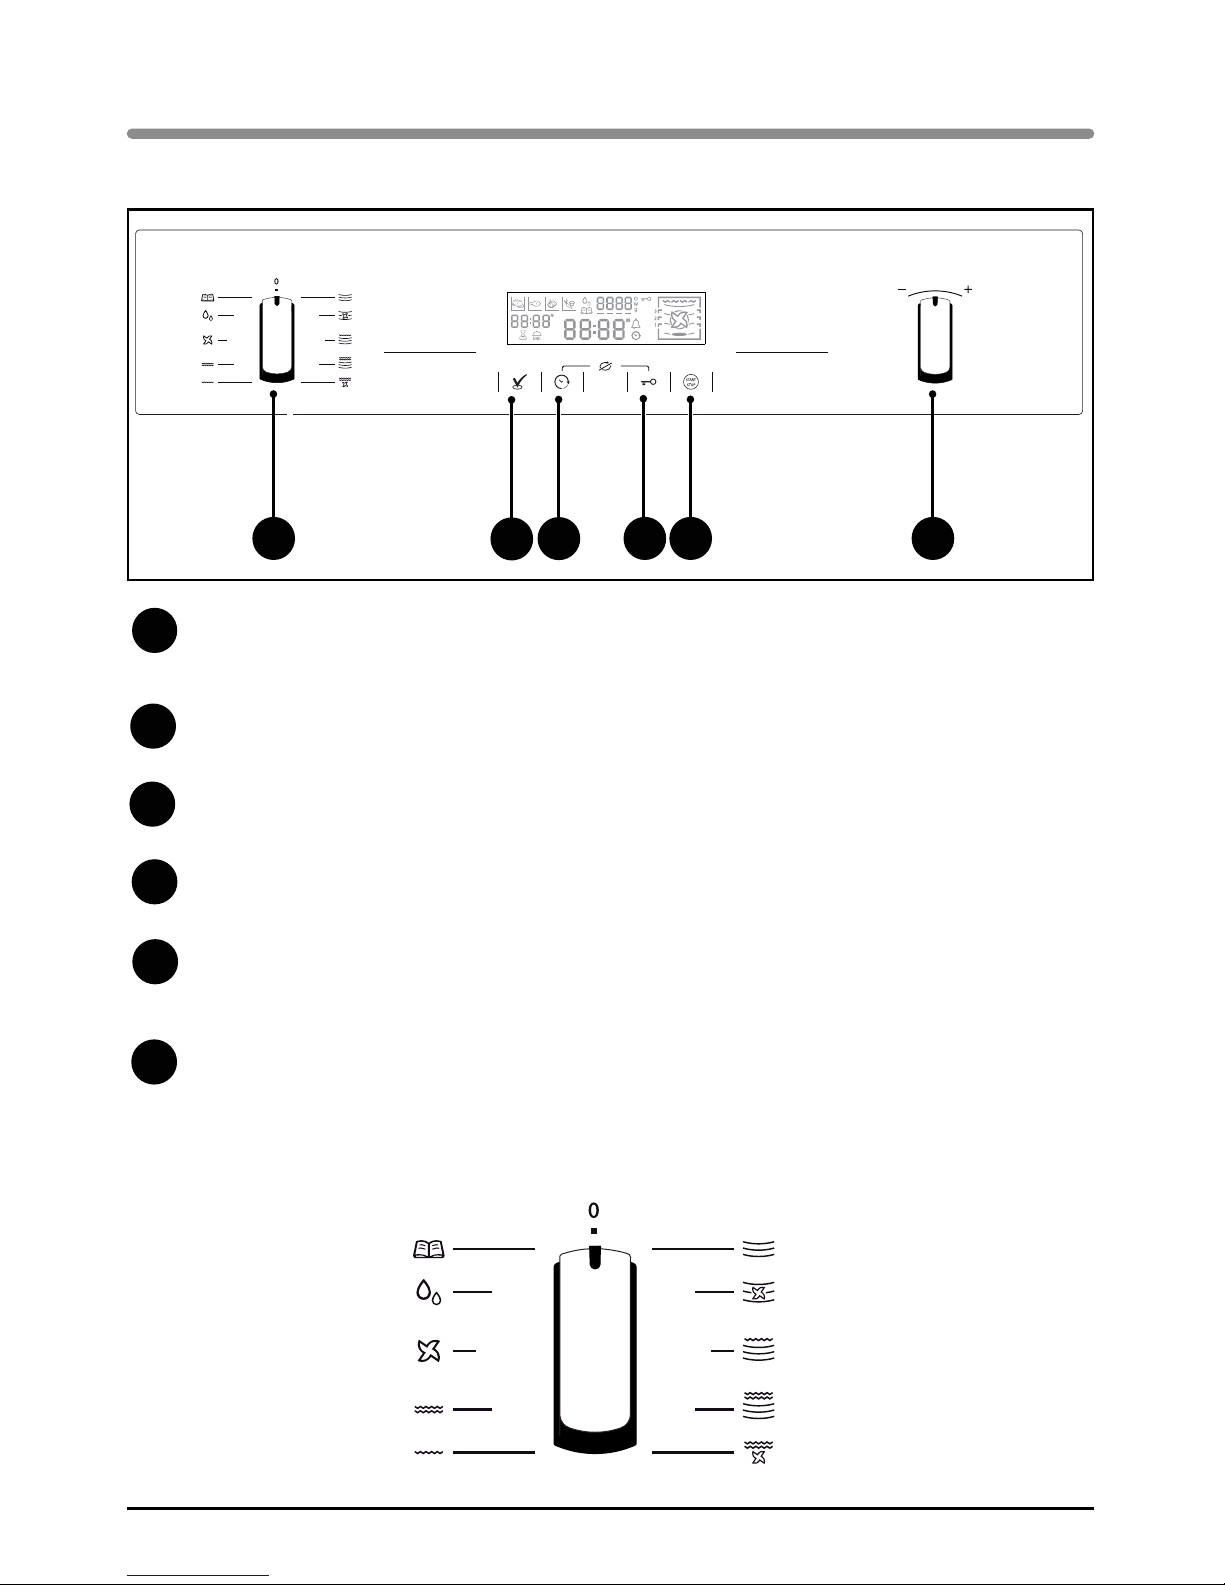
8
FUNCTION/AUTOMATIC PROGRAMMING selector knob:
Used for selecting the various cooking modes or type of programme according to the
type of food (meat - fish - vegetables - cooked dishes - vegetables).
CONFIRMATION button:
Used for adjusting the power level and the temperature and confirming the values
selected.
CLOCK button:
Used for accessing the time and cooking time adjustments.
LOCK button:
Prevents use of the oven.
S
START-STOP button.
Used for starting a programme and interrupting or cancelling the current programme.
Control Knob + / -:
Used for adjusting the time, cooking time, temperature and power level.
C
A
D
control panel
E
E
F
Description
B
C
FA D
B
cooking function selector
Automatic cooking
Automatic defrosting
Fan assisted heating
High grill
Medium grill
Microwaves
Microwave and fan heating
Microwave + High grill
Microwave + Medium grill
Fan assisted grill
Page 9
9
EN
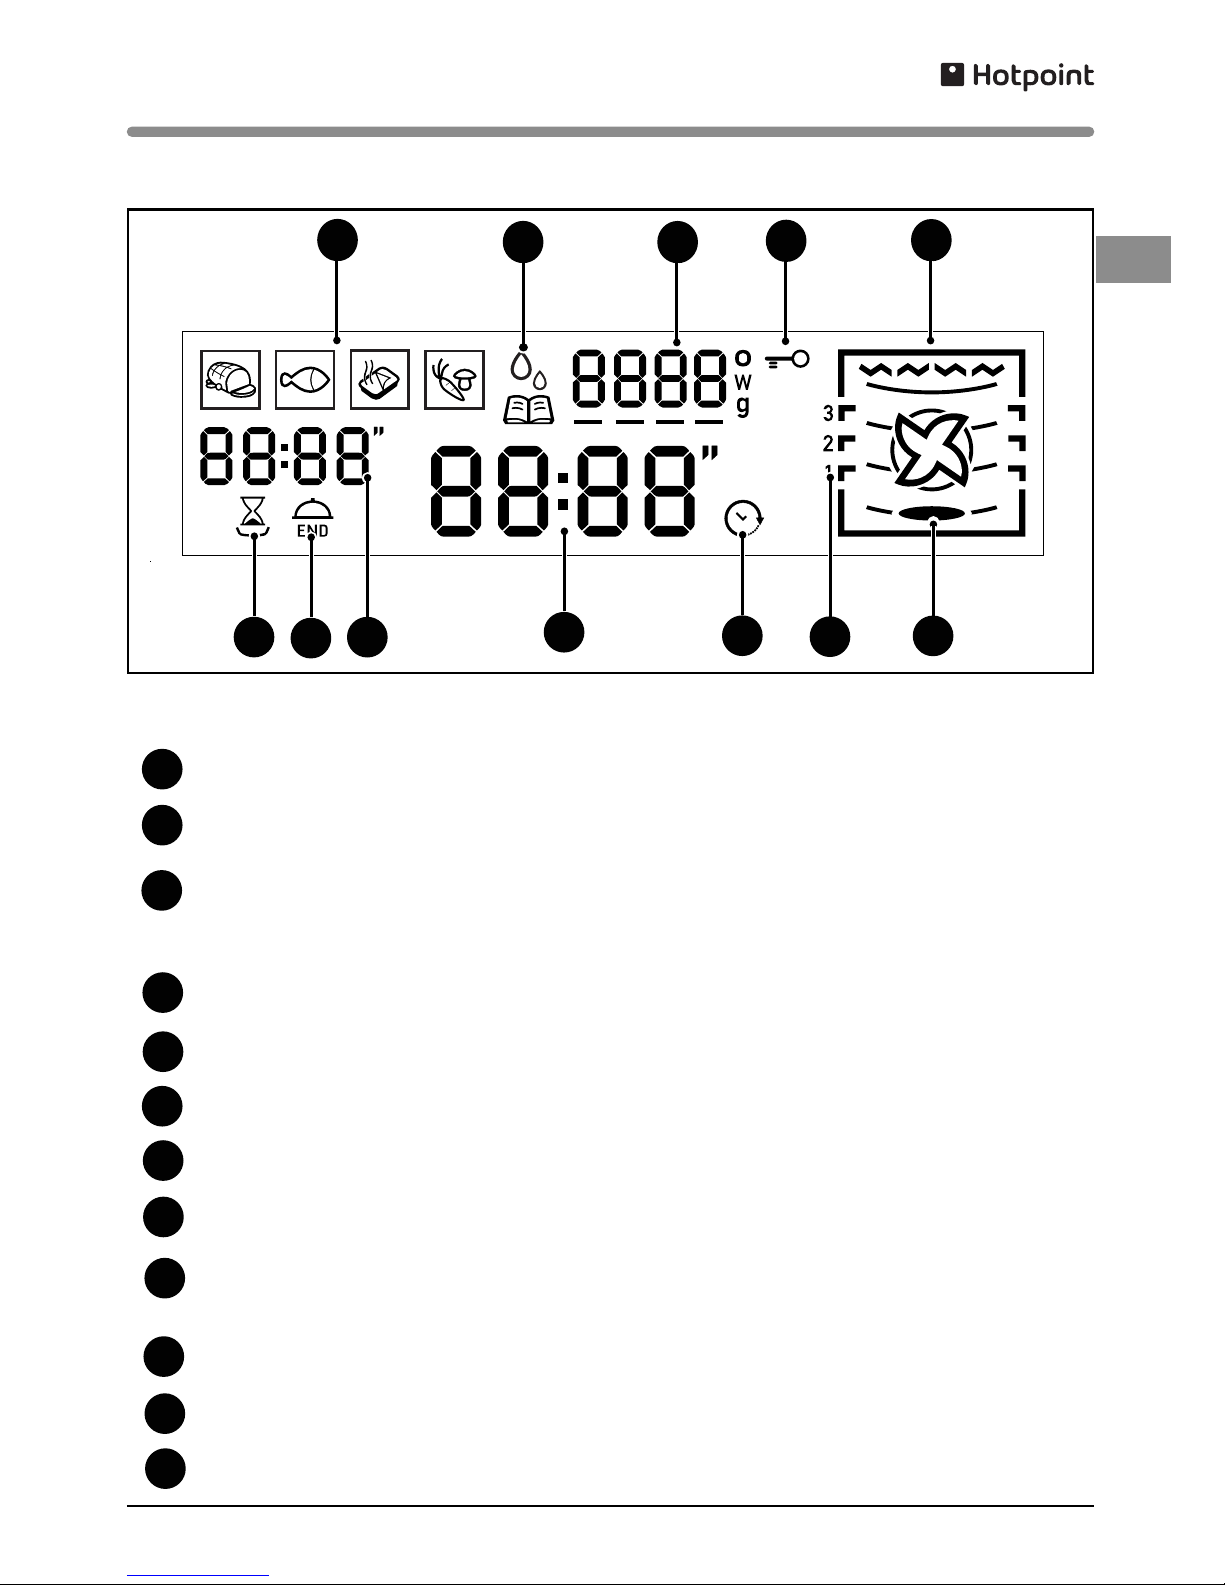
The display guides you through programming the various settings:
Food categories for automatic programming (meat - fish - cooked dishes - vegetables).
Automatic programming (cooking and defrosting)
Temperature (degrees Celsius)
Microwave power level (Watts)
Food weight (grams)
Locking the controls
Cooking modes display
Cooking time icon
End of cooking symbol (with delayed start)
Programme time
Time
Automatic defrost indicator (AUTO)
Time set symbol
Shelf level indicator
Turntable symbol
A
display
L
I
A
C
B
C
D
D
E
Description
E
J
B
F
G
H
F
G
H
I
J
K
L
K
Page 10
10
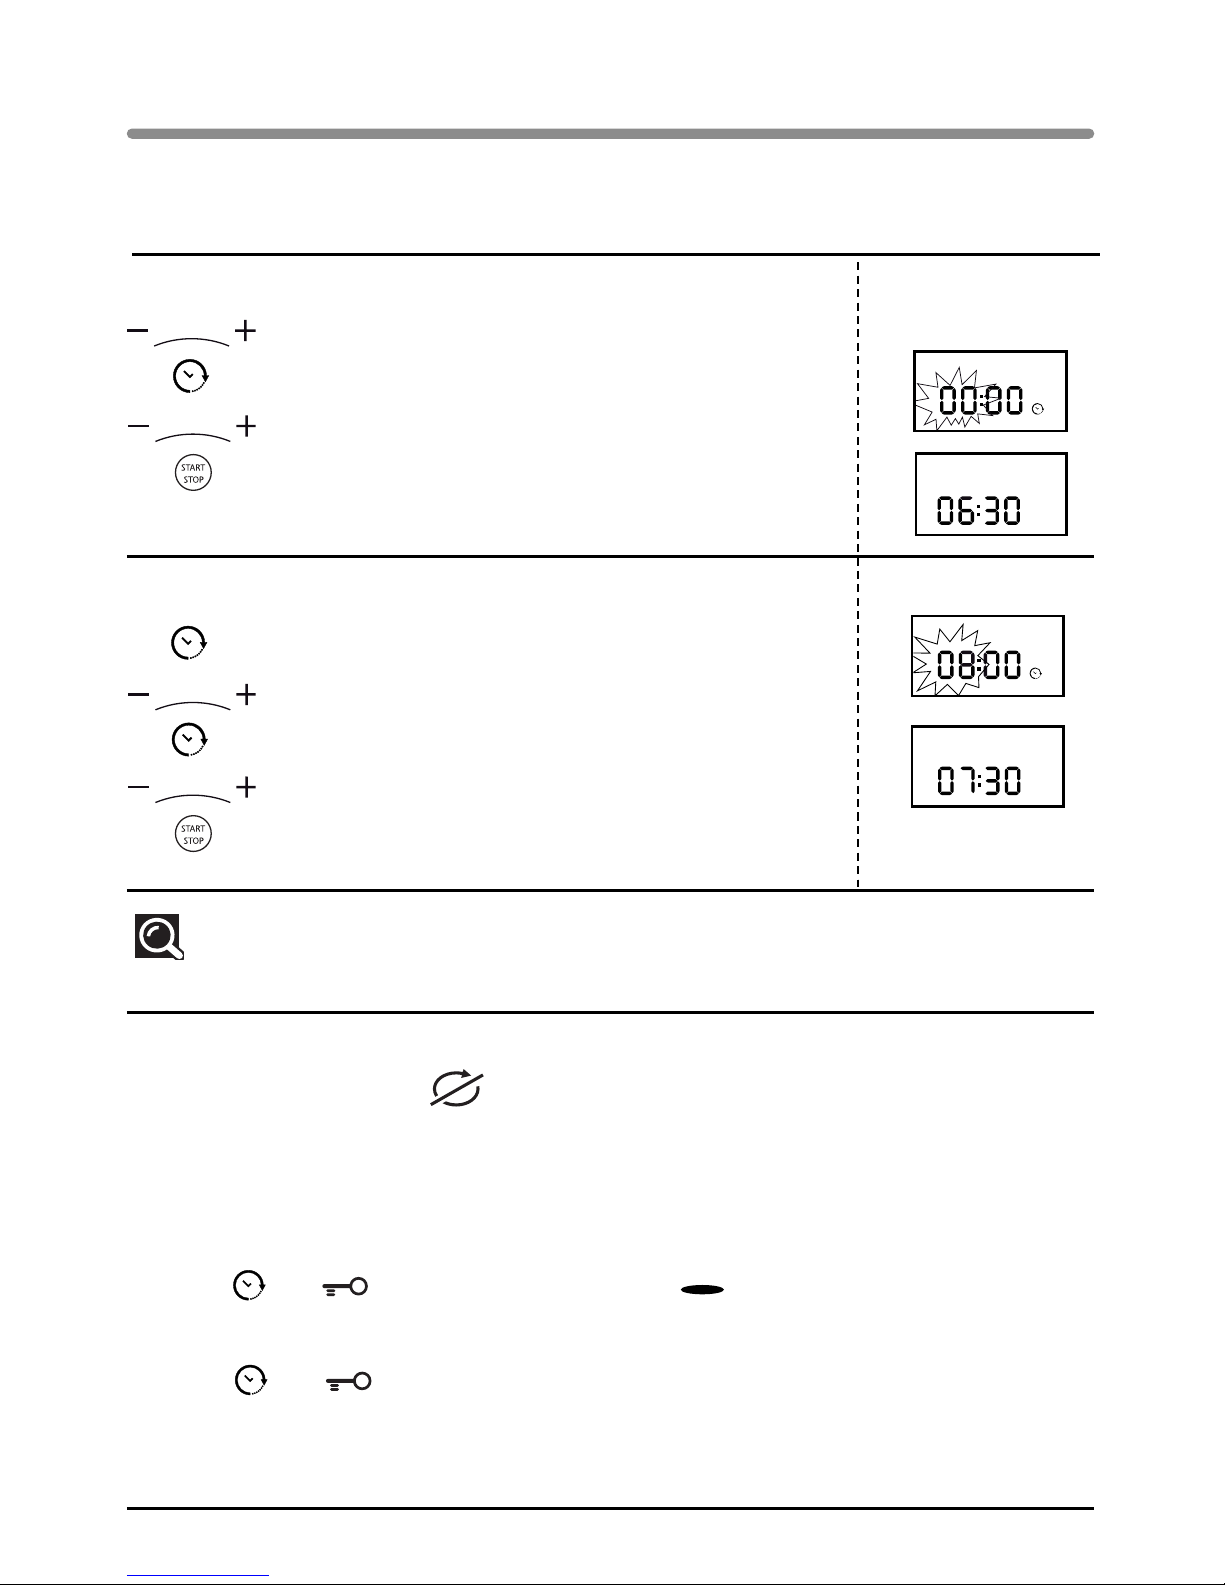
When you switch on your appliance or after an extended power cut, 00:00 flashes on the display.
To set the time, example: 06:30 Display
Turn the + / - knob to set the desired time (06).
Confirm by pressing CLOCK.
Then set the minutes (30) with the + / - knob.
Press the START-STOP button.
A beep sounds to confirm that the time has been set.
To change the time Display
Press the CLOCK button. The time display flashes.
Set the new time, using the + / - knob.
Confirm by pressing the CLOCK button.
Then set the minutes with the + / - knob.
Confirm by pressing START-STOP.
A beep sounds to confirm that the new time has been set.
Comments
: If you do not press the clock button, the time displayed is automatically saved after
10 seconds.
If you think that there is not enough space for it to rotate freely in the oven, select the turntable stop
function before or during the programme.
N.B.: the turntable cannot be stopped during an automatic defrost programme.
To activate this option:
Press the and buttons simultaneously and the symbol switches off in the display and
the turntable stops rotating.
To cancel:
Press the and buttons.
You must turn the cookware and stir its contents half way through the programme if the TURNTABLE
STOP FUNCTION is used.
setting/changing the time
stopping the turntable
Use
Page 11
11
EN
MICROWAVE POWER OUTPUT: 1000W
Your appliance is now switched on and the correct time is set.
Use the handle to open the door. Put the food inside and close the door.
If the door is not closed properly, the appliance will not operate.
If the door is opened during a programme, the programme is not cancelled, just interrupted. To restart
the oven, close the door and press the button again.
If, after programming, there is no action for 10 seconds, the display shows the time with reduced
brightness.
To enter a second programme at the end of the first one, press , open the door and then close it
again.
Press and hold the button for 2 seconds to cancel a current programme or turn the selector knob
to 0 (OFF then appears in the display).
Three beeps sound to signal the end of each programme.
If the door is left open, the light turns off after 3 minutes.
To remove moisture, your appliance has a delayed fan function. Depending on the cooking mode
chosen (solo/grill/combined), the oven fan may continue to run at the end of the programme. It will
stop automatically.
programming
using the power levels
Use
Power level Use
1000W / 900W
Quick heating of drinks, water and food that contains a lot of liquid.
Cooking very watery foods (soups, sauces, tomatoes, etc.).
800W / 700W Cooking fresh and frozen vegetables.
600W Melting chocolate.
500W
Cooking fish and shellfish. Heating on 2 levels.
Cooking dry vegetables on a low heat. Heating or cooking delicate
egg-based foods.
400W / 300W Slow cooking dairy products and preserves.
200W Manual defrost. Softening butter and ice cream.
100W Defrosting pastries containing cream.
Page 12
12
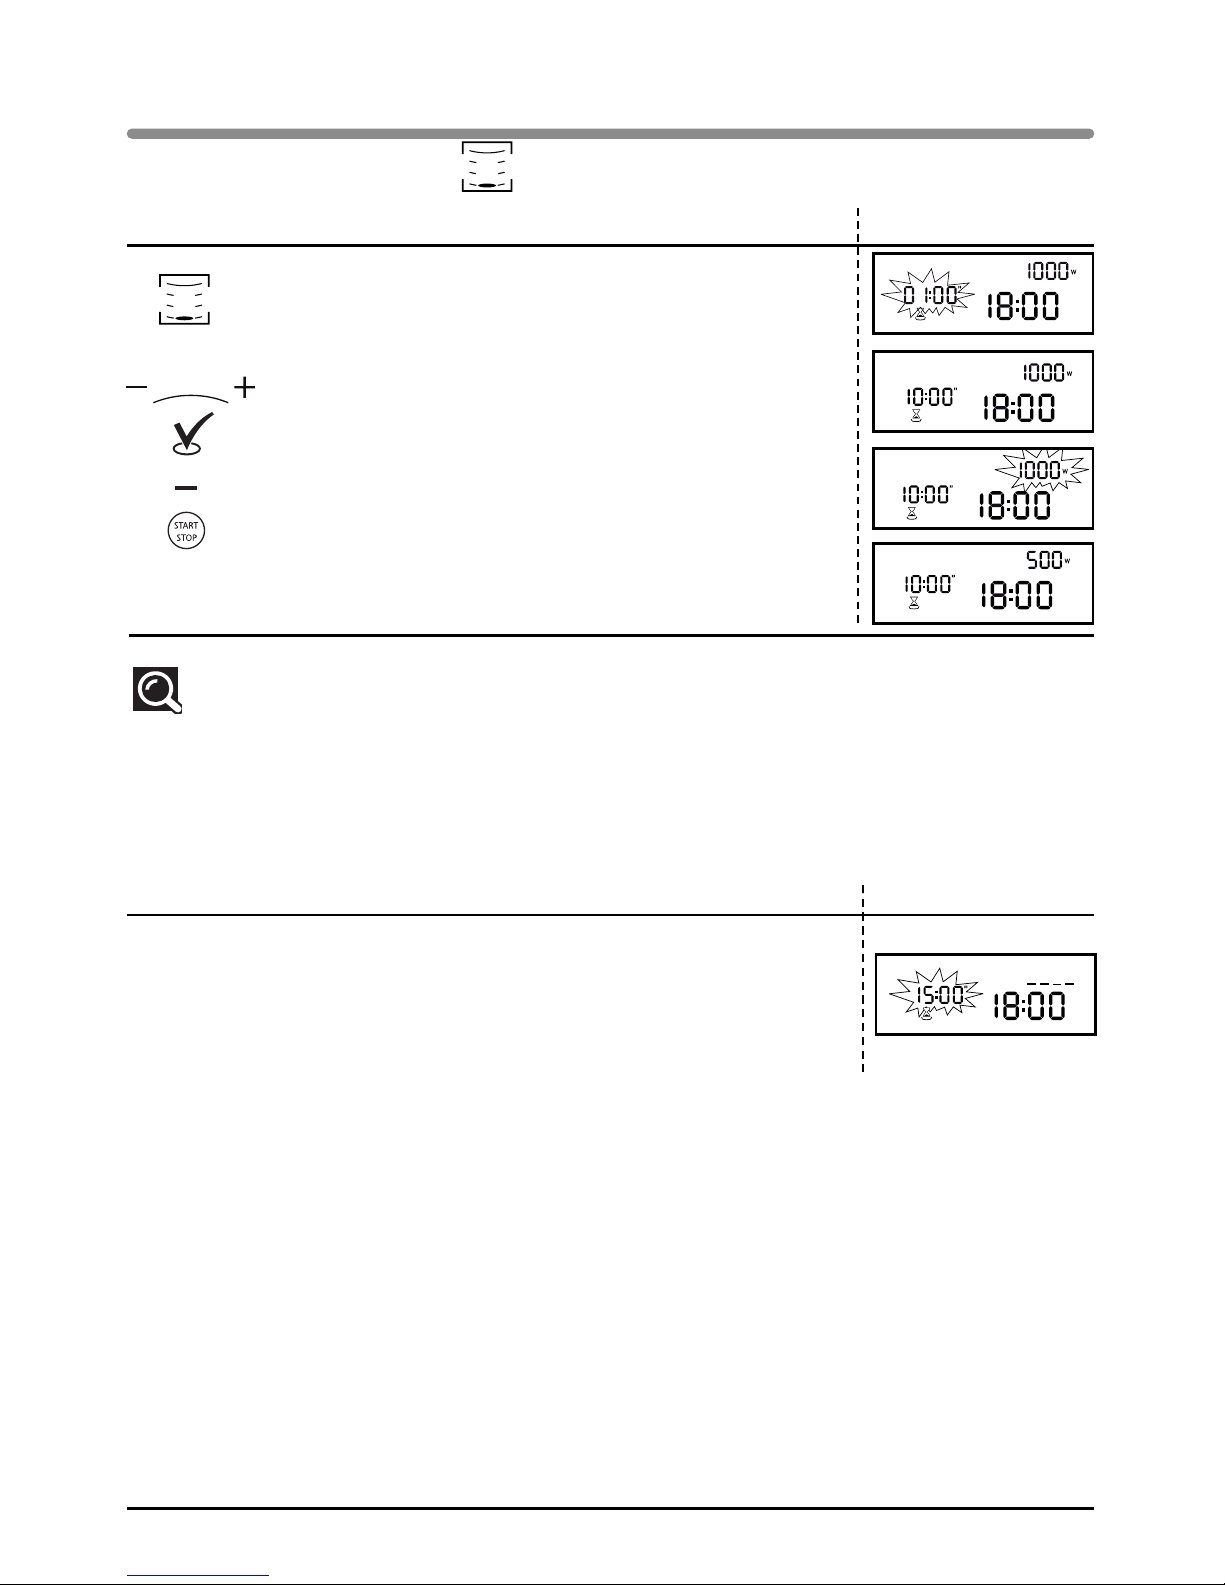
Programming by power level Display
Turn the selector button to choose the MICROWAVE
function.
The maximum power level, 1000W, appears in the display
and the cooking time numbers flash 01:00”.
Set the cooking time with the + / - knob, for example:
10 minutes.
Press the VALIDATION button.
You can then reduce the power of the microwaves using
the + / - knob, for example 500W.
Confirm the selection by pressing START-STOP.
The oven switches on and the programme starts.
Note
:
If the door is opened during cooking, the oven stops and the remaining programme time is displayed.
To continue the programme, simply close the door again and press
START-STOP.
The length of time may be adjusted at any time by simply turning the + / - button.
microwave function
keeping food warm
keeping food warm Display
If you leave your dish in the oven at the end of a
microwave programme without opening the door, a
function called “heat and hold” starts after 2 minutes and
keeps your dish warm. Three beeps sound after
15 minutes to announce the end of the “heat and hold”
programme.
Use
Page 13
13
EN
Thanks to the automatic cooking function, the cooking mode and duration are automatically
programmed based on the type of food and the weight.
Four automatic cooking settings are available via the selector knob.
Fresh meat.
Fresh fish
Chilled, cooked dishes.
Fresh vegetables.
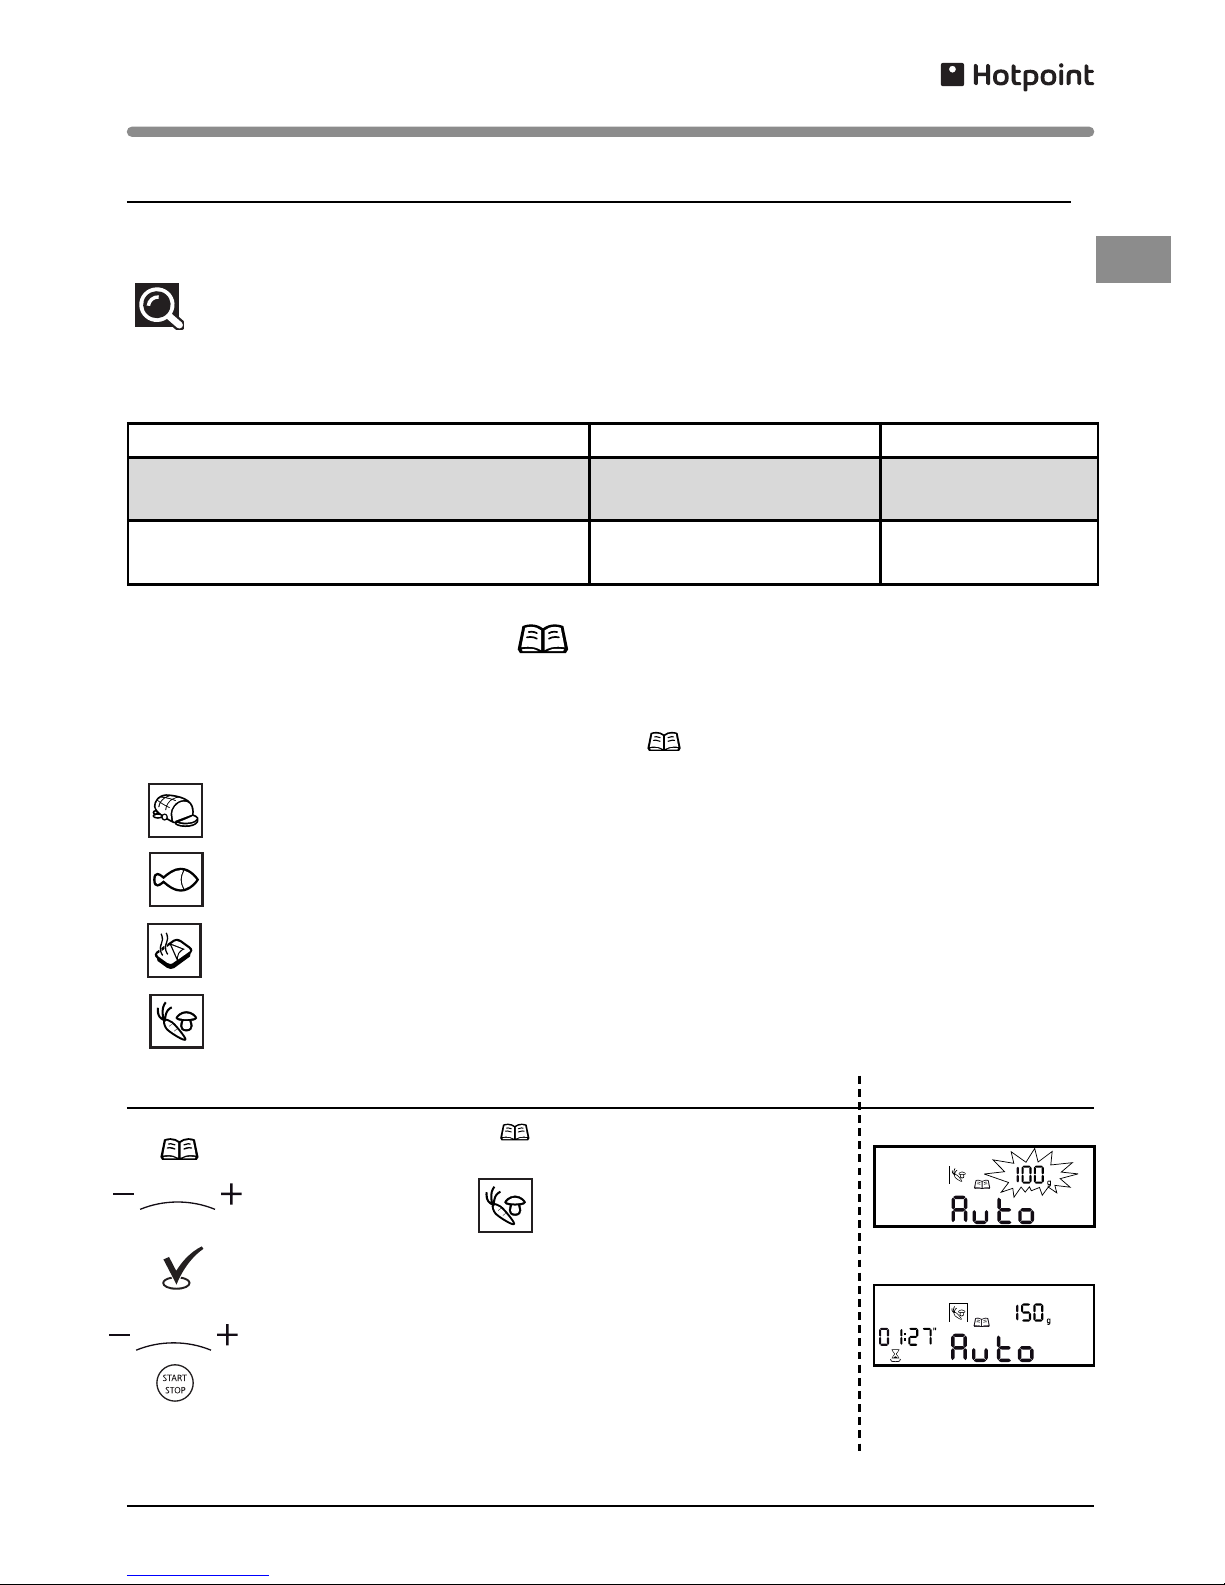
Programming the automatic cooking time according to weight Display
Turn the selector knob to then select the type of food that
you wish to cook using the + / - knob,
e.g. fresh vegetables.
Press the VALIDATION button.
The minimum weight (100 g) appears on the display and
starts flashing.
Adjust the weight, e.g. 150 g, using the + button. Confirm by
pressing START-STOP.
The length of time required is calculated automatically. This
time is shown on the display and the programme starts.
automatic cooking functions
For better results when heating up 2 dishes at the same time, use the microwave function on
500 Watts. Put one plate on the turntable and another on the shelf on level 3.
Recommendations:
Cover the plates with microwave food wrap or with an inverted plate. The times indicated
below apply if you are heating refrigerated food or food stored at room temperature.
Type of food Quantity Time
Foods with a uniform texture (mashed
potatoes, peas, celery, etc.)
2 x 200 g plates 4 - 6 minutes
Foods with an uneven texture, such as
cassoulet, stews, ravioli, etc.
2 x 300 g plates 6 - 8 minutes
heating on two levels
Use
Page 14
14
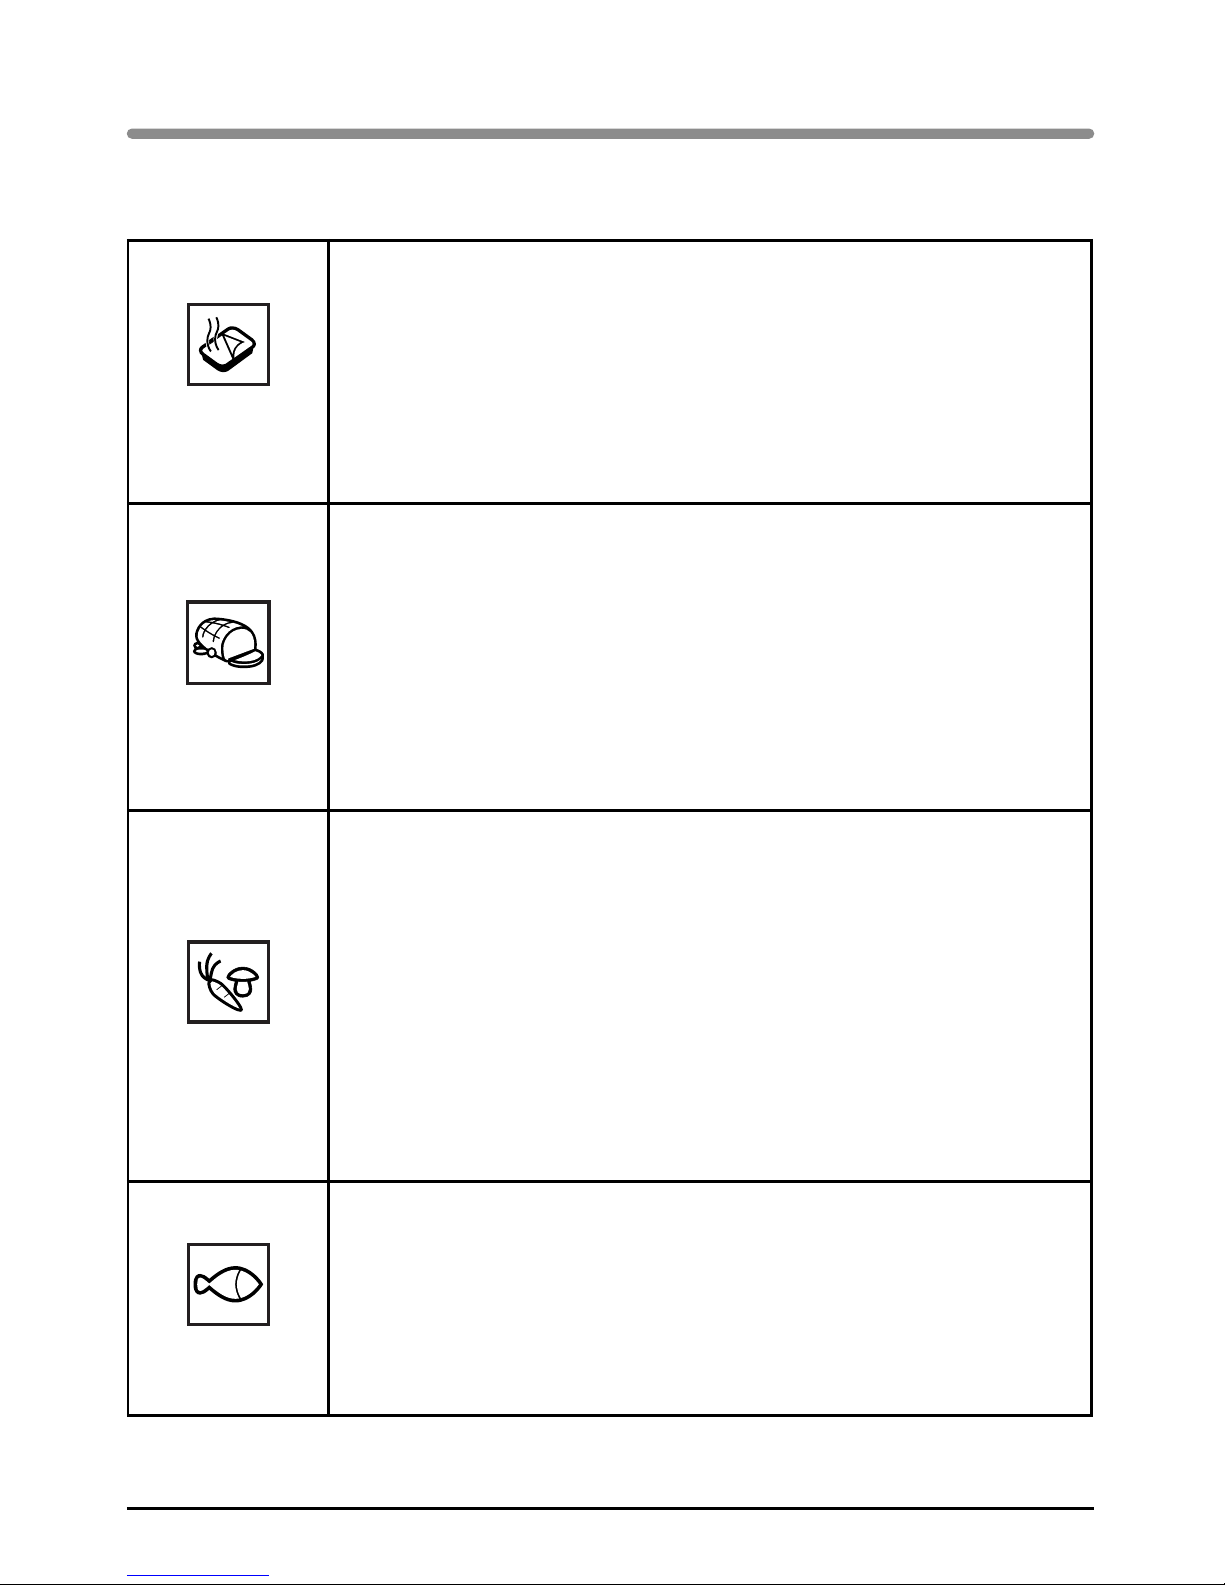
guide to automatic functions
Use
Chilled
ready-meals
This function is used for reheating chilled, cooked dishes (lasagne, dauphinois potatoes,
shepherd’s pie, fish pie, etc.) between 100 g and 1,000 g.
Dishes are reheated on the microwave setting.
Remove the product from its packaging and place in a suitably-sized, heat-resistant,
microwave safe dish. For better results, cover the microwave-safe dish with microwave
food wrap or an inverted plate.
Place the dish on the turntable. Wait two minutes before serving to allow the heat to
distribute evenly.
Fresh meat
This function is used for joints weighing between 500 g and 2,000 g.
Cooking is done on the combined microwave oven + circulating heat setting.
Use a microwave-proof, heat-resistant dish, preferably made of terracotta (fewer splashes
than with a glass dish).
If possible, cook roasts without barding fat to prevent smoke and fat splashes. You will get
the best results with roasts that are not too thick.
Take the meat out of the refrigerator and leave it at room temperature for 1 hour before
putting it in the oven. Place the dish on the shelf at level 2.
After cooking, wrap the roast in aluminium foil and leave it to rest for 10 minutes. This will
help relax the meat fibres and the roast will be more succulent.
Fresh vegetables
This function is used for cooking vegetables weighing between 100g and 1,000g.
The vegetables are cooked on the microwave setting.
Choose fresh vegetables and, before cooking, add:
- up to 200 g: 2 tablespoons of water
- up to 500 g: 0.5 dl water
- up to 1,000 g: 1 dl water
Use a dish suitable for the volume of vegetables and cover it (except when cooking
mushrooms). Place the dish on the glass turntable.
Half way through the automatic defrost programme for food weighing more than 350 g, a
beep sounds to remind you that you need to turn the food over for best results and “
turn
“ is
displayed.
After cooking, wait a few minutes before serving the vegetables.
Fresh fish
This function is used for fish weighing between 100 g and 1,000 g.
Cooking is done on the microwave setting.
Use a microwave-proof, heat-resistant dish, preferably made of terracotta (fewer splashes
than with a glass dish).
Place the dish on the turntable.
Page 15
15
EN
Defrosting frozen vegetables in your microwave oven saves you a great deal of time. To defrost food,
use the AUTOMATIC DEFROST function or the MICROWAVE function with the power set to 200W.
Tips:
Small pieces of meat or fish can be cooked straight after defrosting. Larger pieces such as meat
joints or whole fish will still be slightly frozen after the defrost programme.
We recommend that you let the food stand for a period of time at least equal to the defrosting time
to ensure an even temperature.
Food covered with ice crystals will take longer to defrost. In this case, you should increase the
defrosting time.
Recommendations:
The defrosting time depends on the type of oven. It also depends on the shape, size, starting
temperature and quality of the food.
In most cases, food must be removed from its packaging. Remember to remove any metal staples
from the packaging.
Halfway through defrosting, the pieces of food should be turned over, stirred and separated if they
were frozen together.
If you are defrosting large pieces of meat or fish that prevent rotation of the turntable, use the
turntable stop function. In this case, turn the food regularly.
Defrost meat or fish by putting it on an upside-down saucer on top of a plate to let the juices run. If
they stay in contact with the food, they will overheat.
Never refreeze food before cooking it.
Defrost programme time:
The defrost programme time is calculated for food frozen at -18 °C. This gives you an indication of
the time needed for defrosting but the actual time may vary depending on the thickness, shape, size
and packaging of the food.
defrosting
Use
Page 16
16
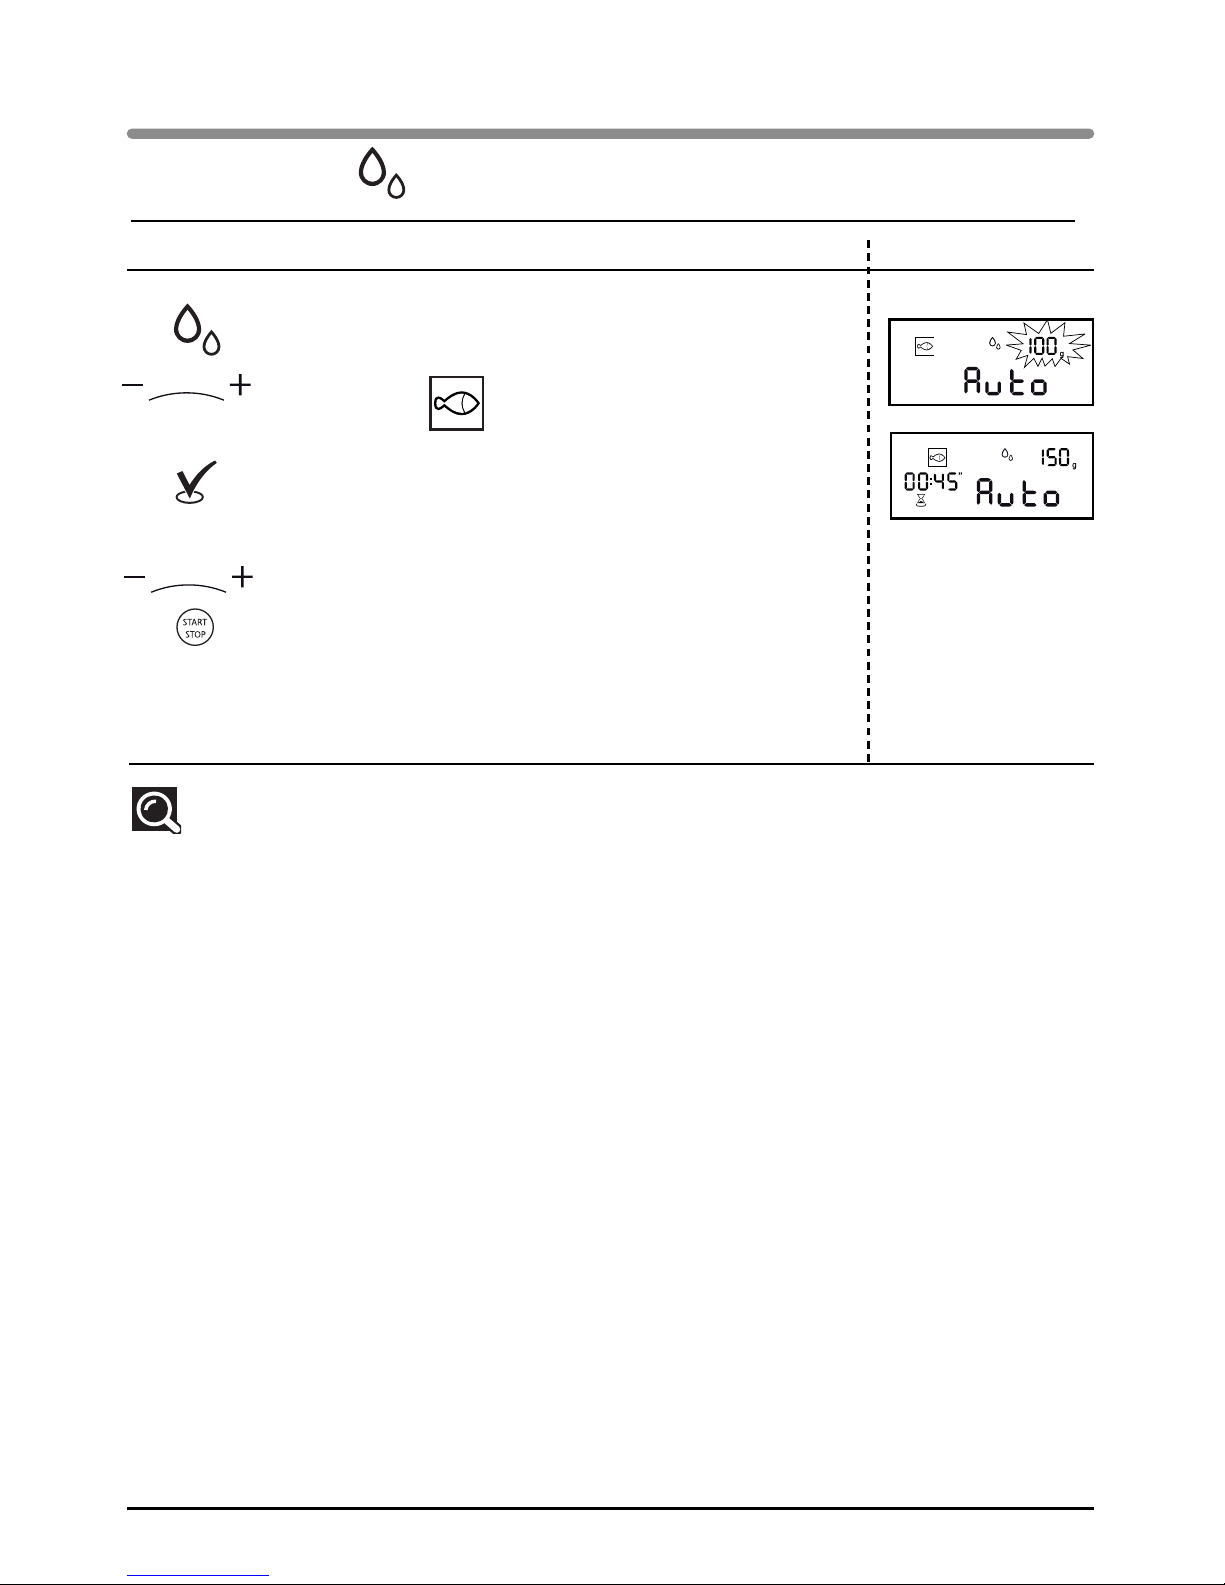
Automatic defrost Display
Turn the selector knob to “automatic defrost“ then select
the type of food that you wish to cook using the + / - knob,
e.g. fresh fish.
Press the ENTER button.
The minimum weight, 100 g, appears in the display.
Turn the + /- selector , if you wish to adjust the food weight,
e.g. 150g.
Confirm by pressing START-STOP.
The required time is calculated automatically.
The programme time appears on the display and the
defrost programme starts.
Comments
:
The defrost time is calculated automatically according to the weight of the food. The defrost
time required may vary depending on the starting temperature of the food (times are calculated for
food frozen at -18 °C).
Half way through the automatic defrost programme for food weighing more than 350 g, a beep
sounds to remind you that you need to turn the food over for the best results and “
turn
” is displayed.
Close the door again after turning the food and press START-STOP to continue the defrosting
programme.
With the automatic defrost function, the defrost time cannot be modified.
To ensure even results, the TURNTABLE STOP function cannot be used with the automatic defrost
function.
defrost function
Use
Page 17
17
EN
This function is used for cooking and browning food such as gratins or meat.
It may be used before or after cooking, depending on the recipe.
Note:
This appliance is designed to cook with the door closed.
The accessible areas of the oven
m
may become hot when the grill is used.
Children should be kept at a safe distance.
When using the gr
i
ill, you must protect your hands when handling dishes and use cookware that is
suitable for use at h
i
igh temperatures, such as heat-resistant glass or porcelain.
There are 2 grill settings: medium or h
i
igh grill.
As a general rule, we recommend that you use the high grill for meat and fish and the med
i
ium grill for
gratins and browning more delicate dishes. Position the shelf according to the height
o
of the dish or
the food.
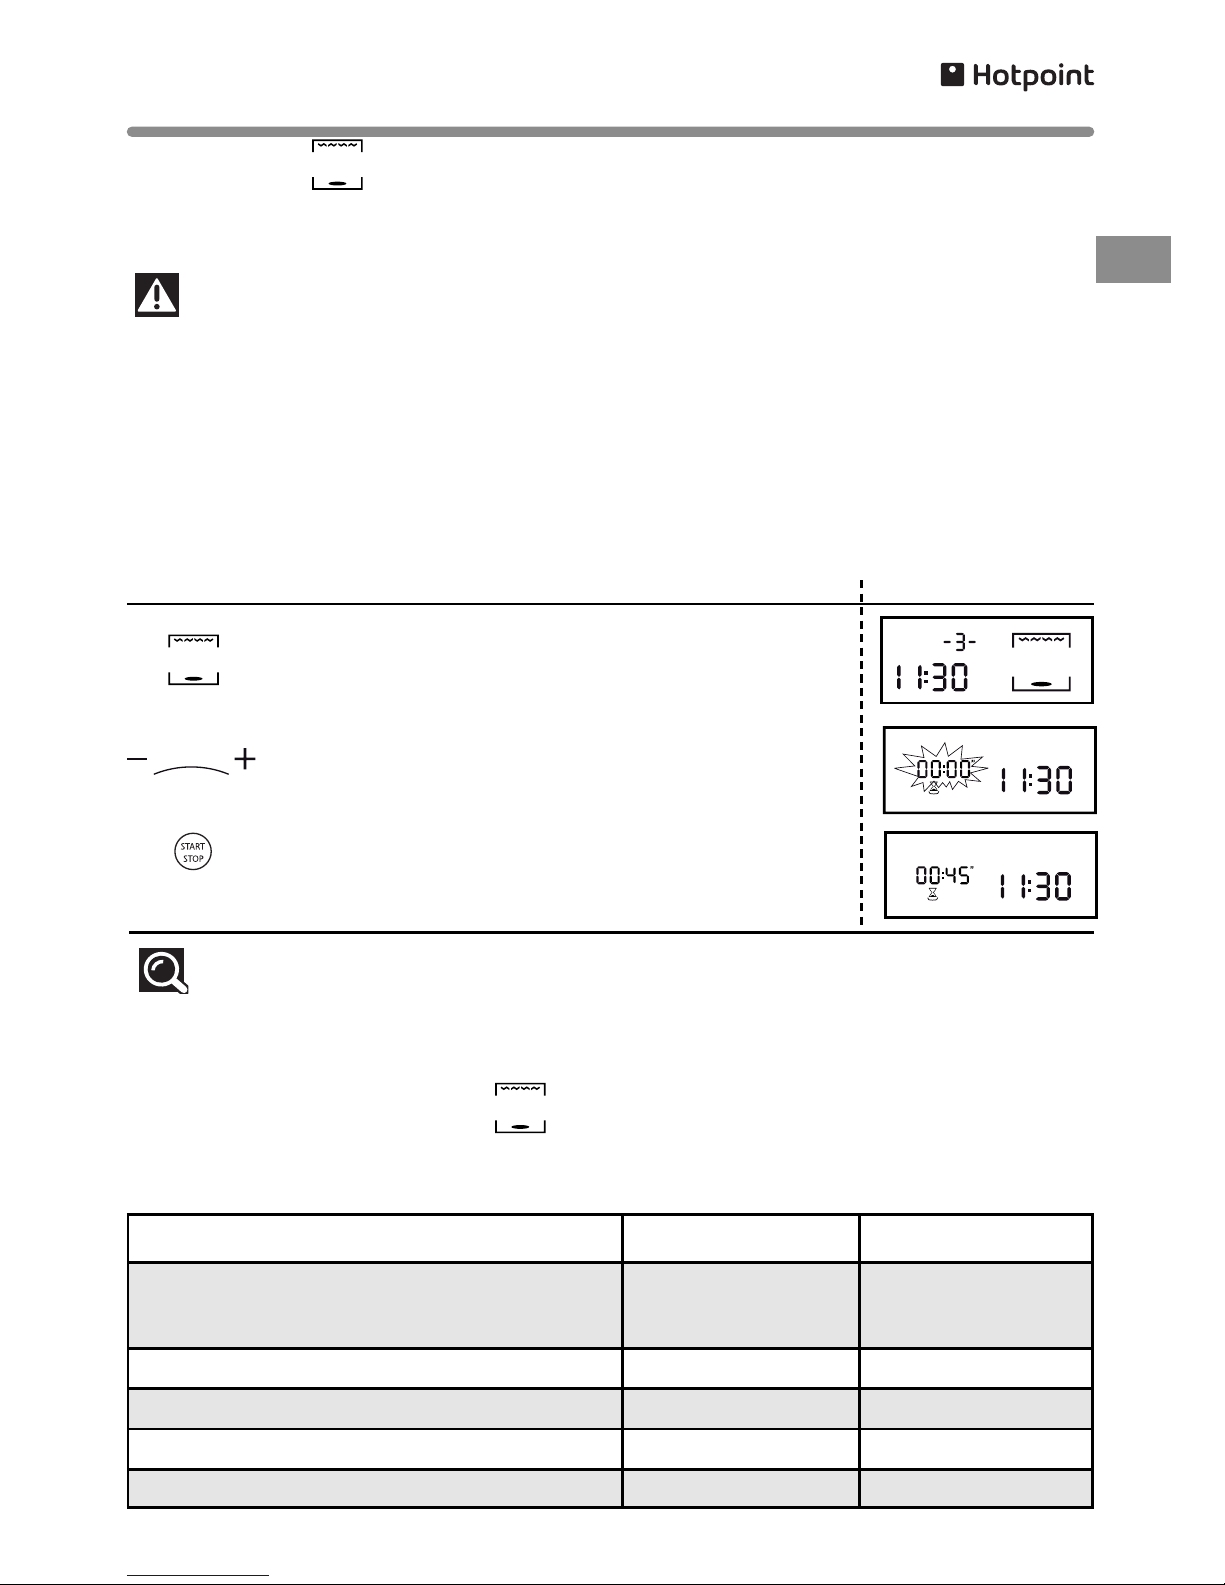
Programming the GRILL function Display
Select the MEDIUM GRILL (2) or HIGH GRILL (3) function,
using the selector knob.
The cooking time starts to flash in the display.
Set the cooking time using the + and - buttons.
Confirm the selection by pressing START-STOP; the oven
switches on and the programme begins.
Note:
The cooking time may be adjusted at any moment:
Do this by simply turning the + / - kn
o
ob.
grill function
grill position cooking guide
Use
Put the food on the shelf, position the enamel dish below (to collect the cooking juices) and position
in the oven on level 3. Turn the food half way through cooking.
Food Quantity Time
Andouillettes, black pudding, sausages
(pierce with a fork)
4 - 6 units 22 - 30 minutes
Pork chops 4 units 27 - 32 minutes
Lamb chops 4 units 15 - 17 minutes
Beef rib 800 g 23 - 25 minutes
Smoked bacon 4 - 6 rashers 18 - 25 minutes
Page 18
18
This setting allows you to use the grill function + fan assistance at the same time, allowing thick foods
to be cooked evenly.
The cooking temperature is adjustable between 50 and 200°C in increments of 10°C.
fan assisted grill function
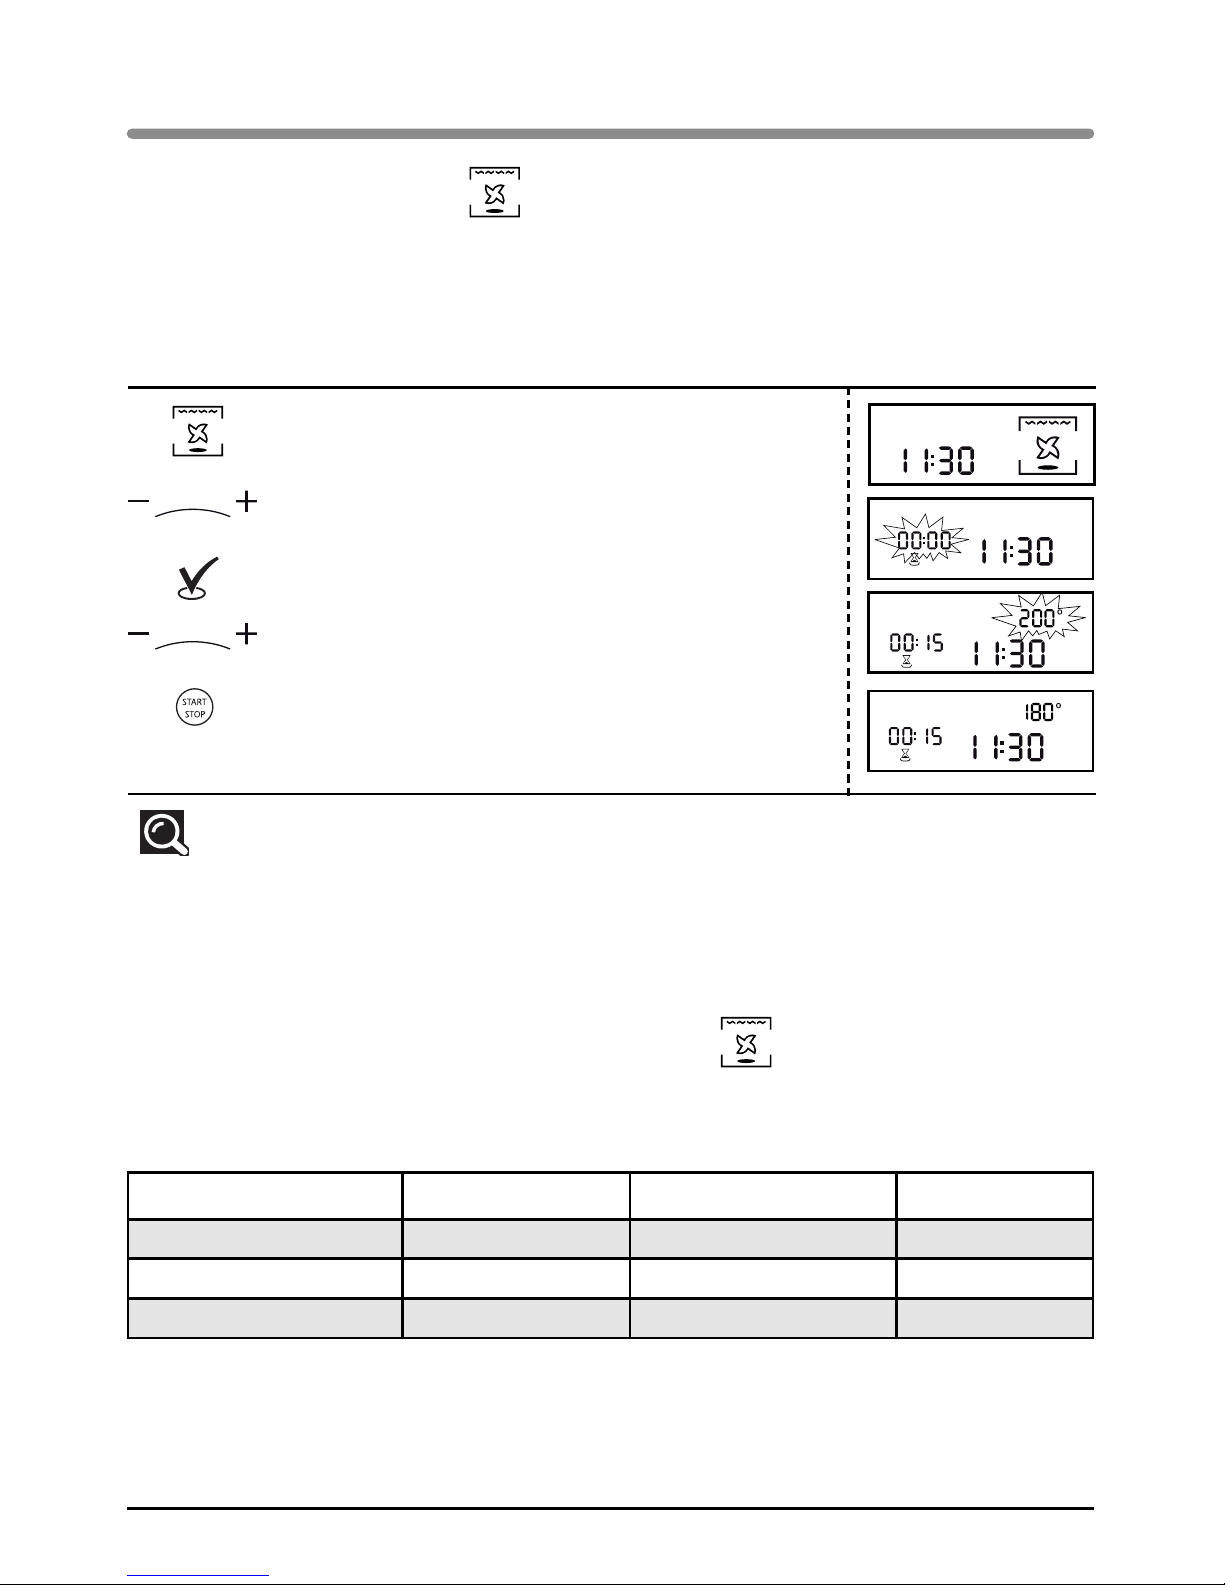
Programming the FAN ASSISTED GRILL function Display
Select the FAN ASSISTED GRILL function by turning the
selection knob.
Set the necessary cooking time with the + / - knob,
e.g. 15 minutes.
Confirm by pressing the VALIDATION button.
Set the cooking temperature using the + / - knob,
e.g. 180°.
Confirm by pressing START-STOP.
The oven switches on and the programme starts.
Note
:
The cooking time may be adjusted at any moment:
Do this by simply turning the + / - k
n
nob.
Use
Food Quantity Temperature Time
Roast beef 1,000 g 190°C 36 - 38 minutes
Whole chicken 1,200 g 180°C 75 - 80 minutes
Roast pork 1,000 g 170°C 90 minutes
cooking guide for the fan assisted grill position
Place the food in a dish on the shelf on level 1.
Turn the food over half way through cooking.
Page 19
19
EN
This function allows you to use the grill and microwave modes at the same time, making cooking
quicker. You can use either of the two grill levels with one of the microwave power levels up to 700W.
microwave + grill function
cooking guide for micro-wave + grill function
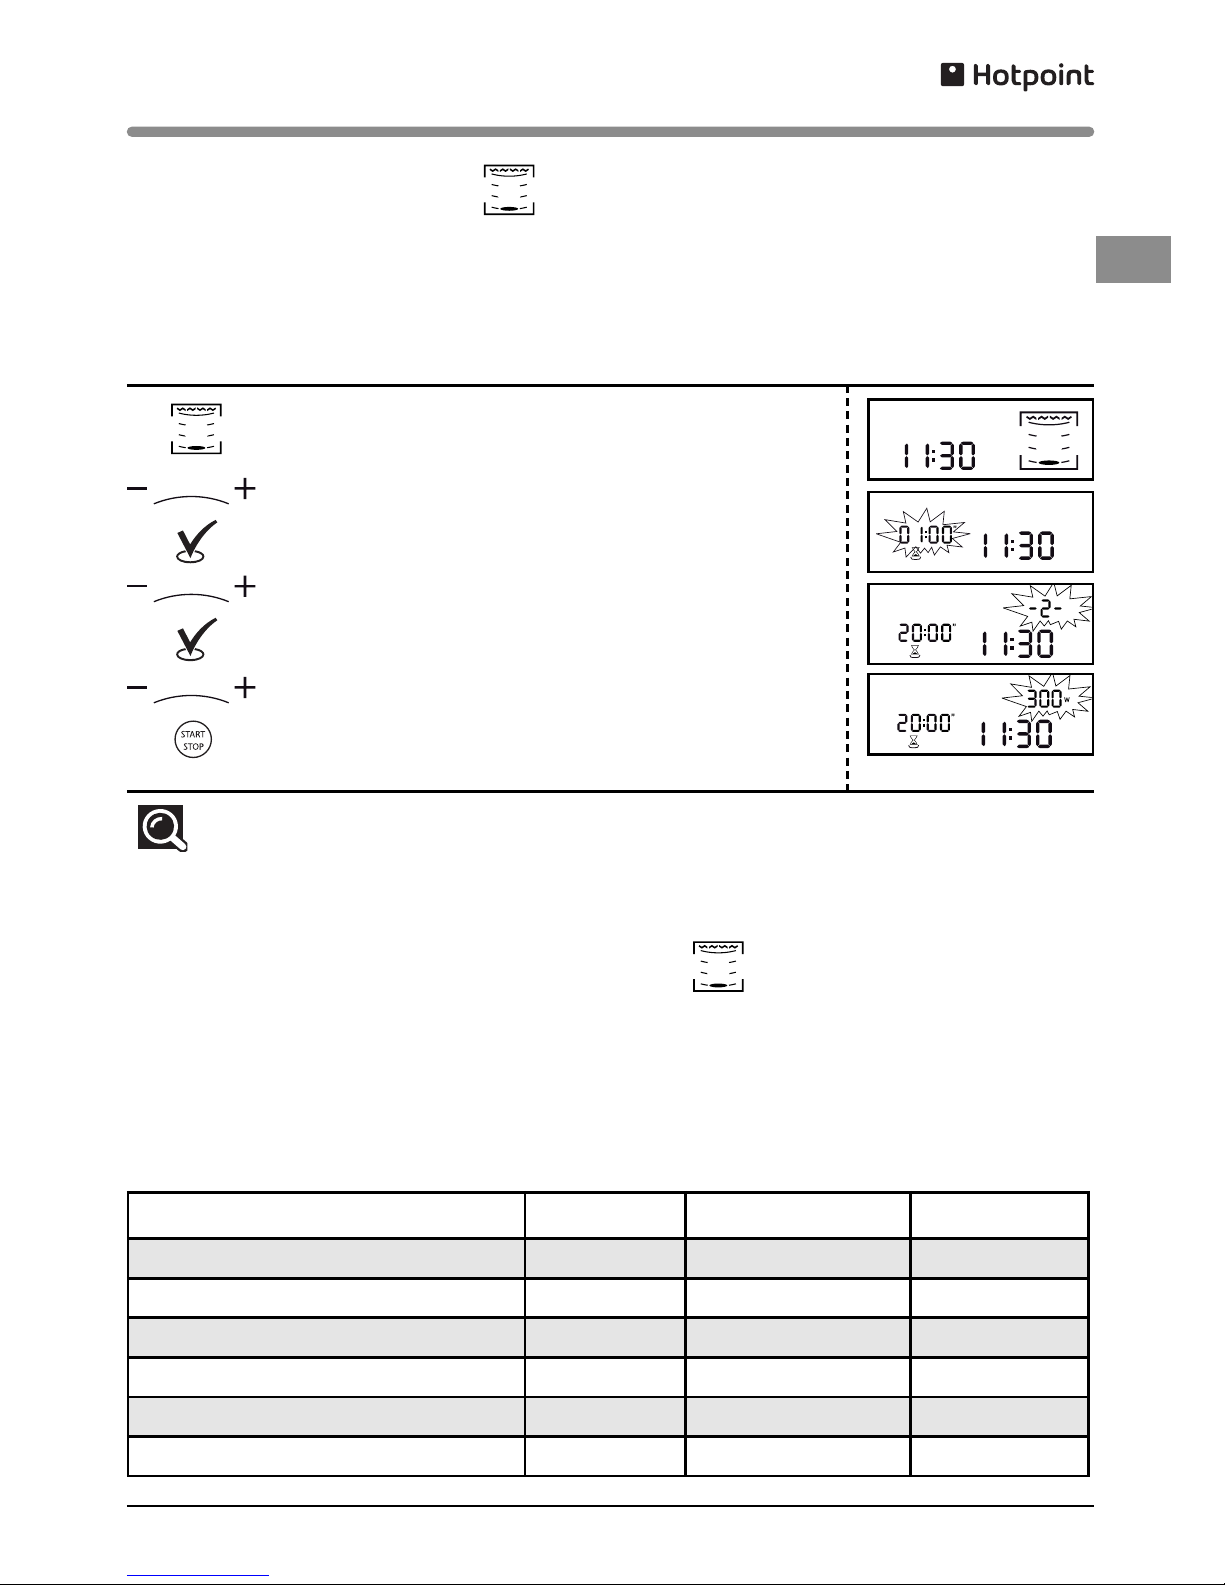
Programming the GRILL + MICROWAVE function Display
Select the GRILL + MICROWAVE function by turning the
selection knob.
Set the necessary grill + microwave cooking time with
the + / - knob,
e.g. 20 minutes.
Confirm by pressing the VALIDATION button.
Set the grill’s power level (1 to 3), e.g. 2 with the + / knob, then confirm with the VALIDATION button.
Then set the power level. Set the power, using the + / knob,
for example 300W.
Confirm by pressing START-STOP.
The oven switches on and the programme starts.
Note
:
The cooking time may be adjusted at any moment:
Do this by simply turning the + / - kno
b
b.
Use
Food Quantity Programming Time
Shoulder of lamb (boned and strung) 1,300 g 200W + High grill 40 - 45 minutes
Entrecôte steak 800 g 200W + High grill 18 - 23 minutes
Chicken, guinea fowl 1,200 g 500W + High grill 25 - 27 minutes
Roast turkey 800 g 300W + High grill 27 - 32 minutes
Roast pork 1,000 g 300W + High grill 35 - 40 minutes
Veal joint 1,200 g 300W + Medium grill 50 - 55 minutes
Use a microwave-proof, heat-resistant dish, preferably made of terracotta (less splashing than with
a glass dish).
Put the food on a dish and put it on the shelf at level 1. Turn the food half way through cooking.
If possible, cook roasts without barding fat to prevent smoke and fat splashes.
After cooking, season the joint, wrap it in aluminium foil and leave it for 10 minutes. This will help relax
the meat fibres and the roast will be more succulent.
Page 20
20
The fan oven function lets you cook and brown food like in a traditional oven.
fan oven cooking mode
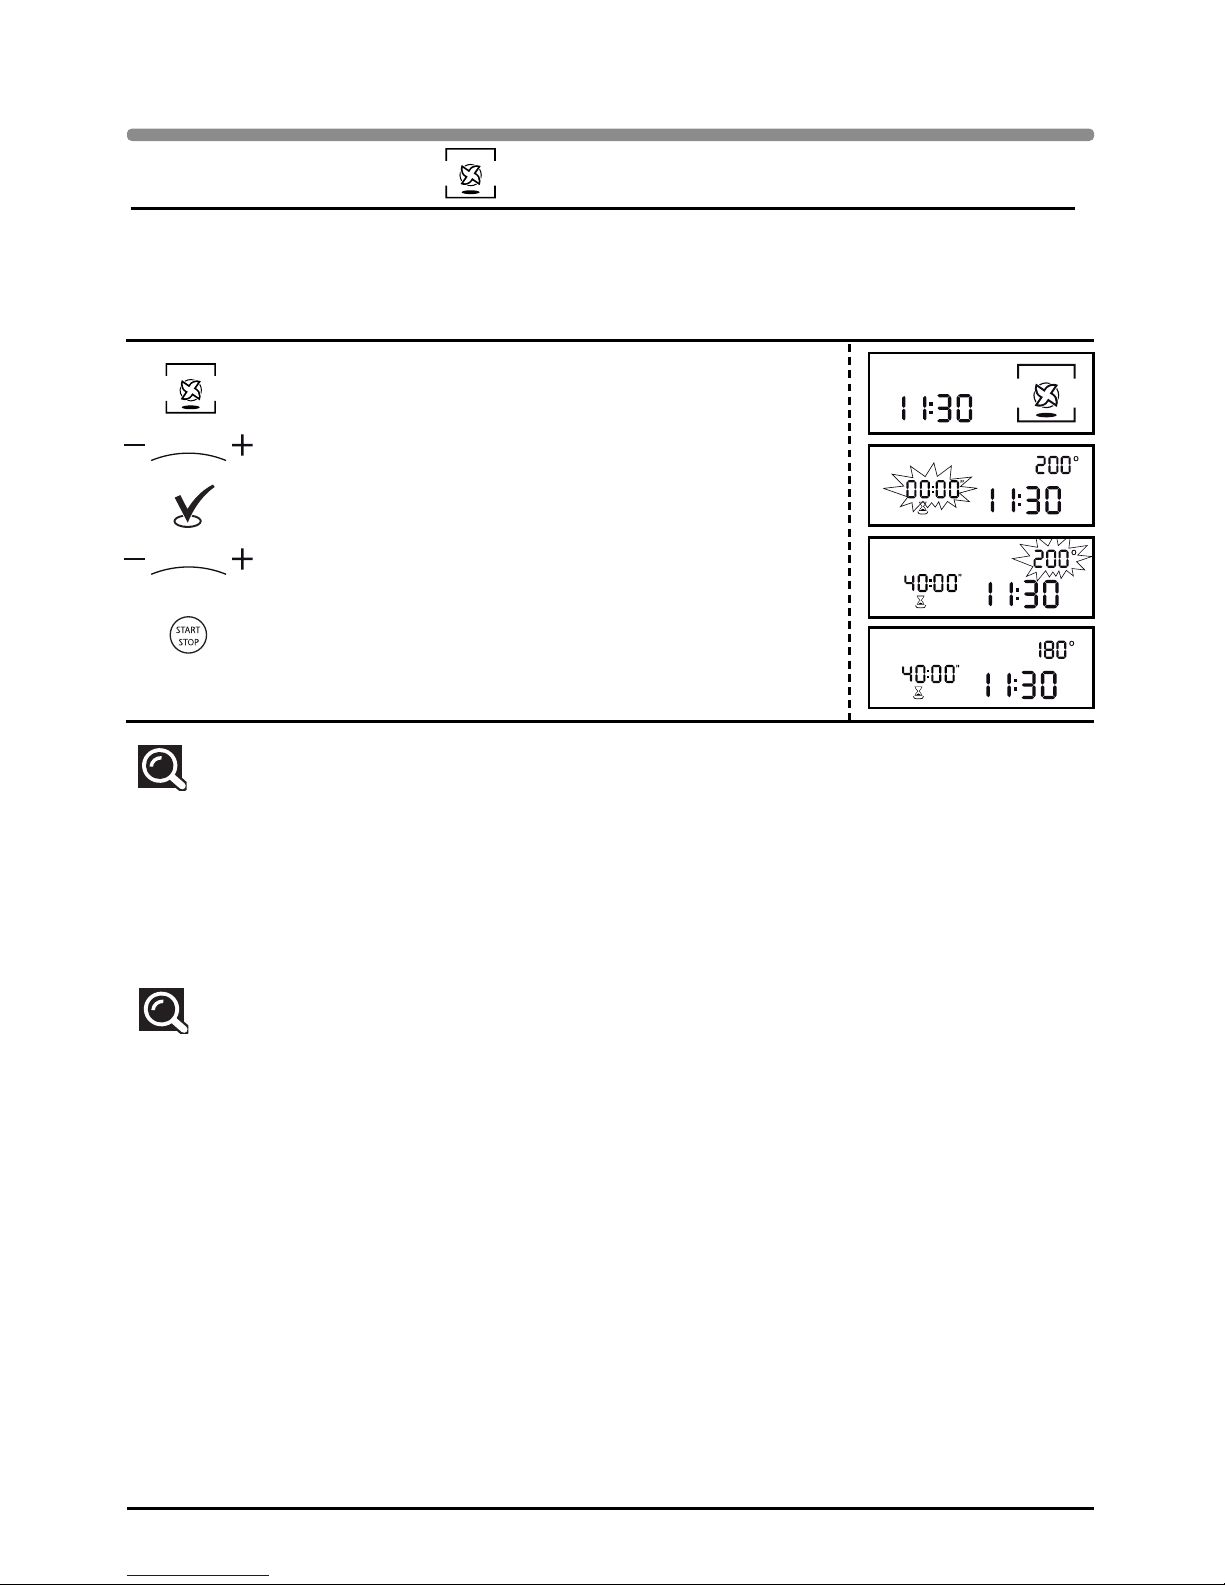
Programming the FAN OVEN cooking function Display
Select the FAN OVEN COOKING function by turning the
selection knob.
Set the required cooking time with the + / - knob,
for example 40 minutes.
Confirm by pressing the ENTER button.
Set the cooking temperature using the + / - knob,
e.g. 180°.
Confirm the selection by pressing START-STOP; the oven
switches on and the programme begins.
Note:
The cooking time may be adjusted at any moment:
To do this simply set by turning the + / - selector.
You can preheat your microwave oven just as you would for a fan oven programme.
A beep sounds to indicate that the programmed temperature has been reached.
Recommendations:
The cooking time can be set to between 50 and 250°C in increments of 10°C.
The cooking time can be set from 0 to 9 hours 59 minutes.
It is better to set the minimum time and then increase it, if necessary. Check the colour of the
food.
Always position the accessories (the shelf or the enamel dish) on level 1 or 2 as this will optimise heat distribution and cooking quality.
Use heat-resistant cookware.
Protect your hands when handling dishes as they may be very hot.
If you want to defrost food after using the fan oven function, we recommend that you let the
oven cool down for 10 minutes ; this will give you better results.
To cook 2 apple pies at the same time: 60-90 minutes at 200°C. We suggest that you put the first
pie in the enamel dish and the second in a pie dish placed on the shelf at level 3. Switch the
two dishes half way through cooking.
Use
Page 21
21
EN
* Preheat the oven to the indicated temperature.
Use
Food Temperature Shelf level Time
Meat
Roast pork (1 kg)
Roast veal (1 kg)
Roast beef (1 kg)
Lamb (leg, shoulder, 1.5 kg)
Poultry (1.2 kg)
Large poultry
Rabbit
160°C
180°C
220°C*
180°C
180°C
180°C
230°C
On the shelf on level 2
On the shelf on level 2
On the shelf on level 2
In the enamel dish on level 2
On the shelf on level 1
On the shelf on level 1.
In the enamel dish on level 2
90 min
70 - 75 min
38 - 40 min
50 - 60 min
70 - 75 min
90 - 120 min
40 - 45 min
Fish (1.2 kg)
Whole (red snapper, salmon,
hake)
180°C In the enamel dish on level 2 35 - 45 min
Vegetables
Potatoes au gratin
Lasagne
Stuffed tomatoes
180°C
180°C
180°C
On the shelf on level 2
On the shelf on level 2
On the shelf on level 2
50 - 55 min
40 - 45 min
45 - 55 min
Pastries
Angel food cake
Sponge cake
Swiss roll
Cake
Biscuits
Cookies
Cream
Small cakes
Pound cake
Cheesecake
Kügelhopf
Choux pastry
Shortcrust pastry tart
Puff pastry tart
150°C
150°C
150°C
160°C
180°C
160°C
160°C
170°C
170°C
170°C
180°C
180°C
200°C
250°C*
On the shelf on level 2
On the shelf on level 1
In the enamel dish on level 2
On the shelf on level 1
In the enamel dish on level 2
In the enamel dish on level 2
On the shelf on level 2
In the enamel dish on level 2
On the shelf on level 2
On the shelf on level 1
spring-form mould,
26 cm diameter
On the shelf on level 1
in a special tin
In the enamel dish on level 2
On the shelf on level 2
On the shelf on level 2
35 - 45 min
35 - 45 min
20 - 25 min
40 - 50 min
18 - 22 min
20 - 25 min
35 - 45 min
bain marie
20 - 30 min
40 - 50 min
65 - 75 min
45 - 50 min
35 - 40 min
depending on size
40 - 45 min
30 - 40 min
Other
Pâté (1 kg)
Savoury tart
Casseroles
(hotpot, stew)
Bread (500 g flour)
190°C
170°C
160°C
220°C*
On the shelf on level 1
On the shelf on level 2
20 cm tin
On the shelf on level 1,
depending on the dish.
On the shelf on level 2
90 min
55 - 65 min
90 - 180 min
25 - 30 min
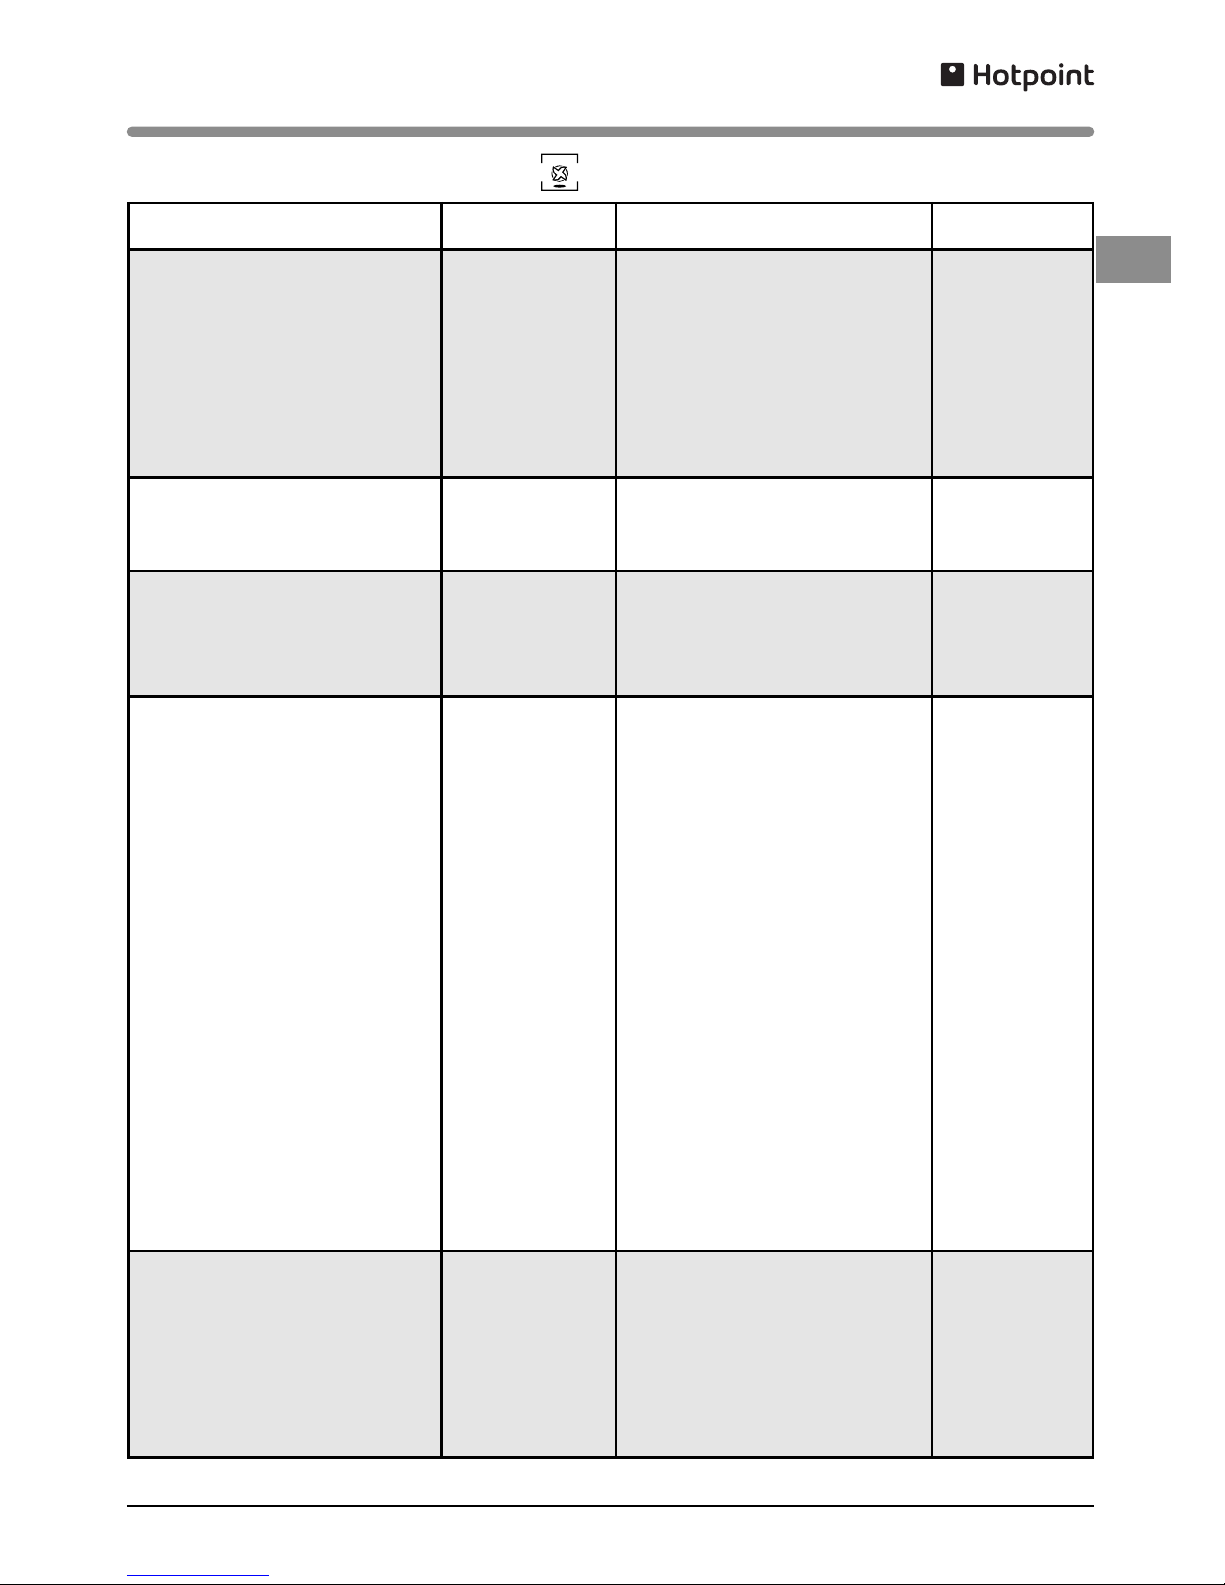
cooking guide for fan oven mode
Page 22
22
fan oven + micro-wave cooking function
The fan + microwave function lets you combine microwave cooking with fan oven cooking, saving you a
great deal of time. The following microwave power levels are available: 100-200-300W or 100-200-300-400500W, depending on the model.
The cooking time can be set to between 50 and 250°C in increments of 10°C.
The cooking time can be set between 0 and 60 minutes.
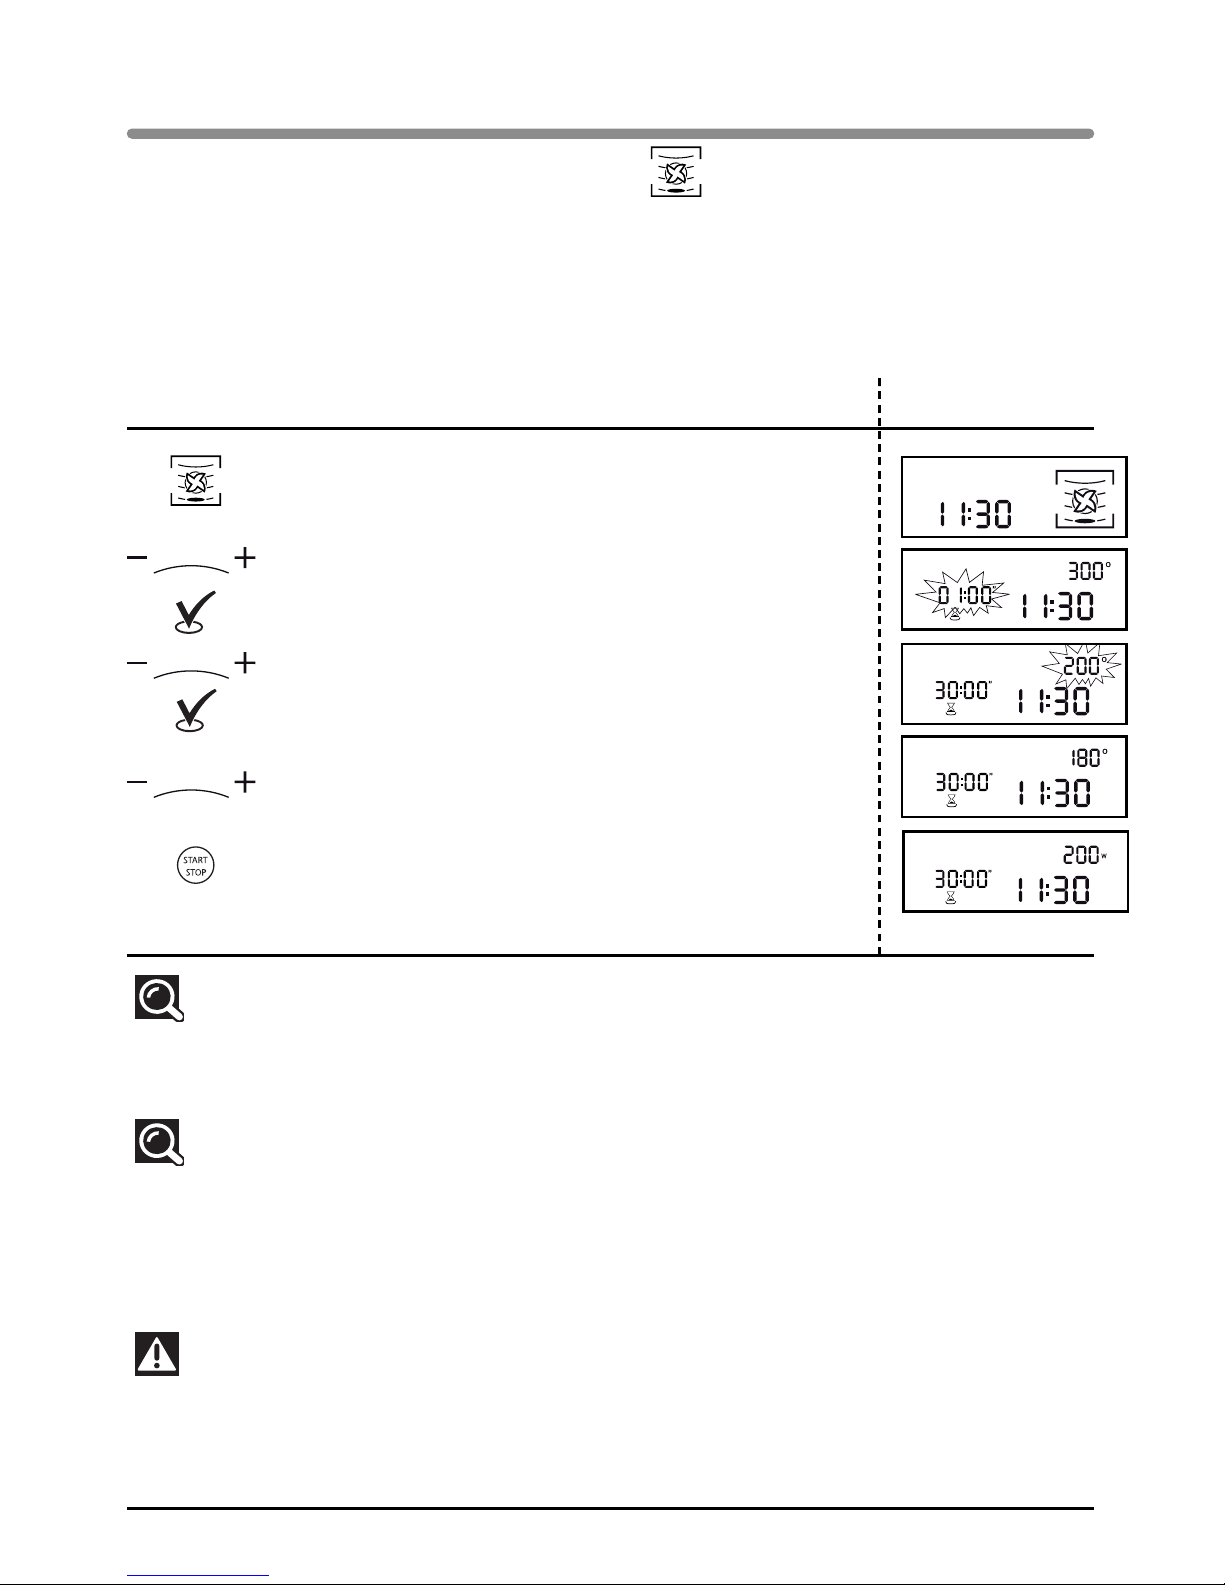
Programming the FAN OVEN cooking function Display
+ microwave
Select the FAN OVEN + MICROWAVE COOKING function
by turning the selection knob.
Set the required cooking time with the + / - knob,
for example 30 minutes.
Confirm by pressing the ENTER button.
Set the cooking temperature using the + / - knob,
e.g. 180°.
Confirm by pressing the ENTER button.
Then set the microwave power level. Adjust the power,
using the + and - buttons, for example 200W.
Confirm the selection by pressing START-STOP; the oven
switches on and the programme begins.
Comments:
The cooking time may be adjusted at any moment:
To do this simply set by turning the + / - selector.
Recommendations:
If you are using the oven in the combined fan + microwave mode, do not use metal cookware.
Cooking on 2 levels:
To cook two things at the same time, e.g. an 800 g veal joint and 800 g of dauphinois potatoes, use
the following setting: 55 minutes at 170°C, microwave power 300W. We recommend that you put the
potatoes on the turntable and the veal joint in a dish with the shelf on level 3.
Please note
:
Never preheat your oven in the fan oven + microwave mode because this could damage
the
appliance.
Use
Page 23
23
EN
cooking guide in fan oven
+ microwave mode
You can use the “CHILD LOCK” function to prevent use of the microwave oven.
T
o activate this option: Hold the button pressed for five seconds, until the key symbol appears in the
display. A beep sounds to confirm that your microwave oven is temporarily locked. No programmes are
then available.
T
o cancel: Follow the same procedure: Press the button for 5 seconds. The key symbol disappears
and the clock is displayed. A beep sounds to confirm the procedure.
child safety lock
Use
programmed cooking with delayed start and chosen end of cooking time
Your appliance allows you to programme cooking, so that it finishes at the time you choose. This
applies to all cooking modes except
Defrost
.
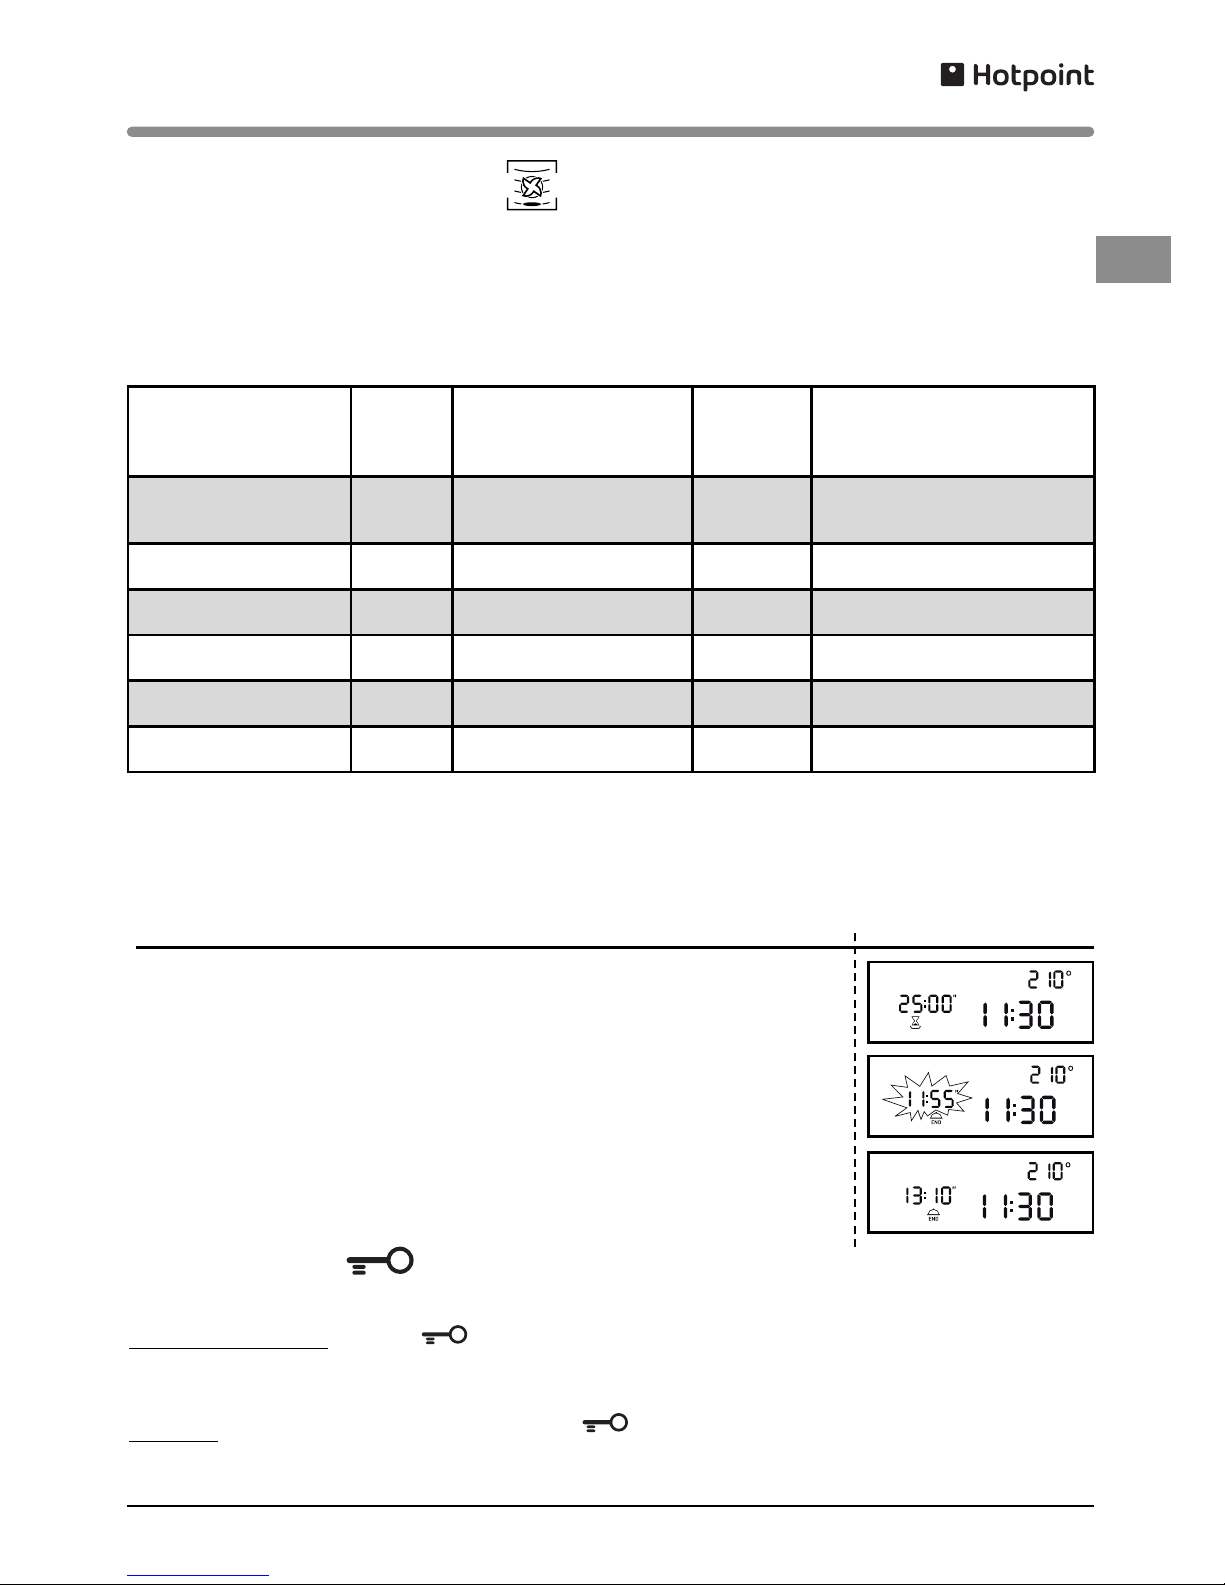
Display
Select the desired cooking mode, for example FAN OVEN; set the cooking
time, adjust the temperature and confirm using the ENTER button.
Press the CLOCK button twice, so that the end of cooking time indicator
flashes and and then set the desired time using the + / - knob, e.g. 13:10 hr.
Confirm by pressing START-STOP.
The start of heating will be delayed and cooking will finish at 13:10 hr.
Food Qty
Programming
MW + FAN OVEN
Time
(min)
Recommendations
Use level 2
Lamb shoulder on
the bone
1,300 g 200W + 200°C 32 - 37 In a dish, on the shelf
Entrecôte steak 800 g 200W + 200°C 23 - 28 In a dish, on the shelf
Chicken/guinea fowl 1,200 g 200W + 200°C 35 - 40 In a dish, on the shelf, level 1
Roast turkey 800 g 300W + 180°C 32 - 37 In a dish, on the shelf
Roast pork 1,200 g 300W + 180°C 47 - 52 In a dish, on the shelf
Veal joint 1,000 g 300W + 180°C 37 - 42 In a dish, on the shelf
Use a microwave-proof, heat-resistant dish, preferably made of terracotta (less splashing than with a glass
dish).
If possible, cook roasts without barding fat to prevent smoke and fat splashes.
After cooking, season the joint, wrap it in aluminium foil and leave it for 10 minutes. This will help relax the
meat fibres and the roast will be more succulent.
Page 24
24
We recommend that you clean the oven
regularly and remove any deposits of food
inside and outside of the appliance. Use a damp
sponge and a little soap. If the appliance is not
cleaned regularly, its surface could become
damaged, permanently affecting the appliance’s
lifespan and possibly causing a safety hazard. If
the door or door seal are damaged, the oven
should not be used until it has been repaired by
a qualified person.
Do not clean the appliance with a steam
cleaner.
The use of abrasive products, alcohol or
thinners is not recommended as they are likely
to damage the appliance.
Do not use abrasive maintenance products or
hard metal scrapers to clean the oven door as
they may scratch the surface or break the glass.
If the oven smells bad or is dirty, boil a cup of
water with lemon juice for 2 minutes and clean
the walls with a small amount of washing up
liquid.
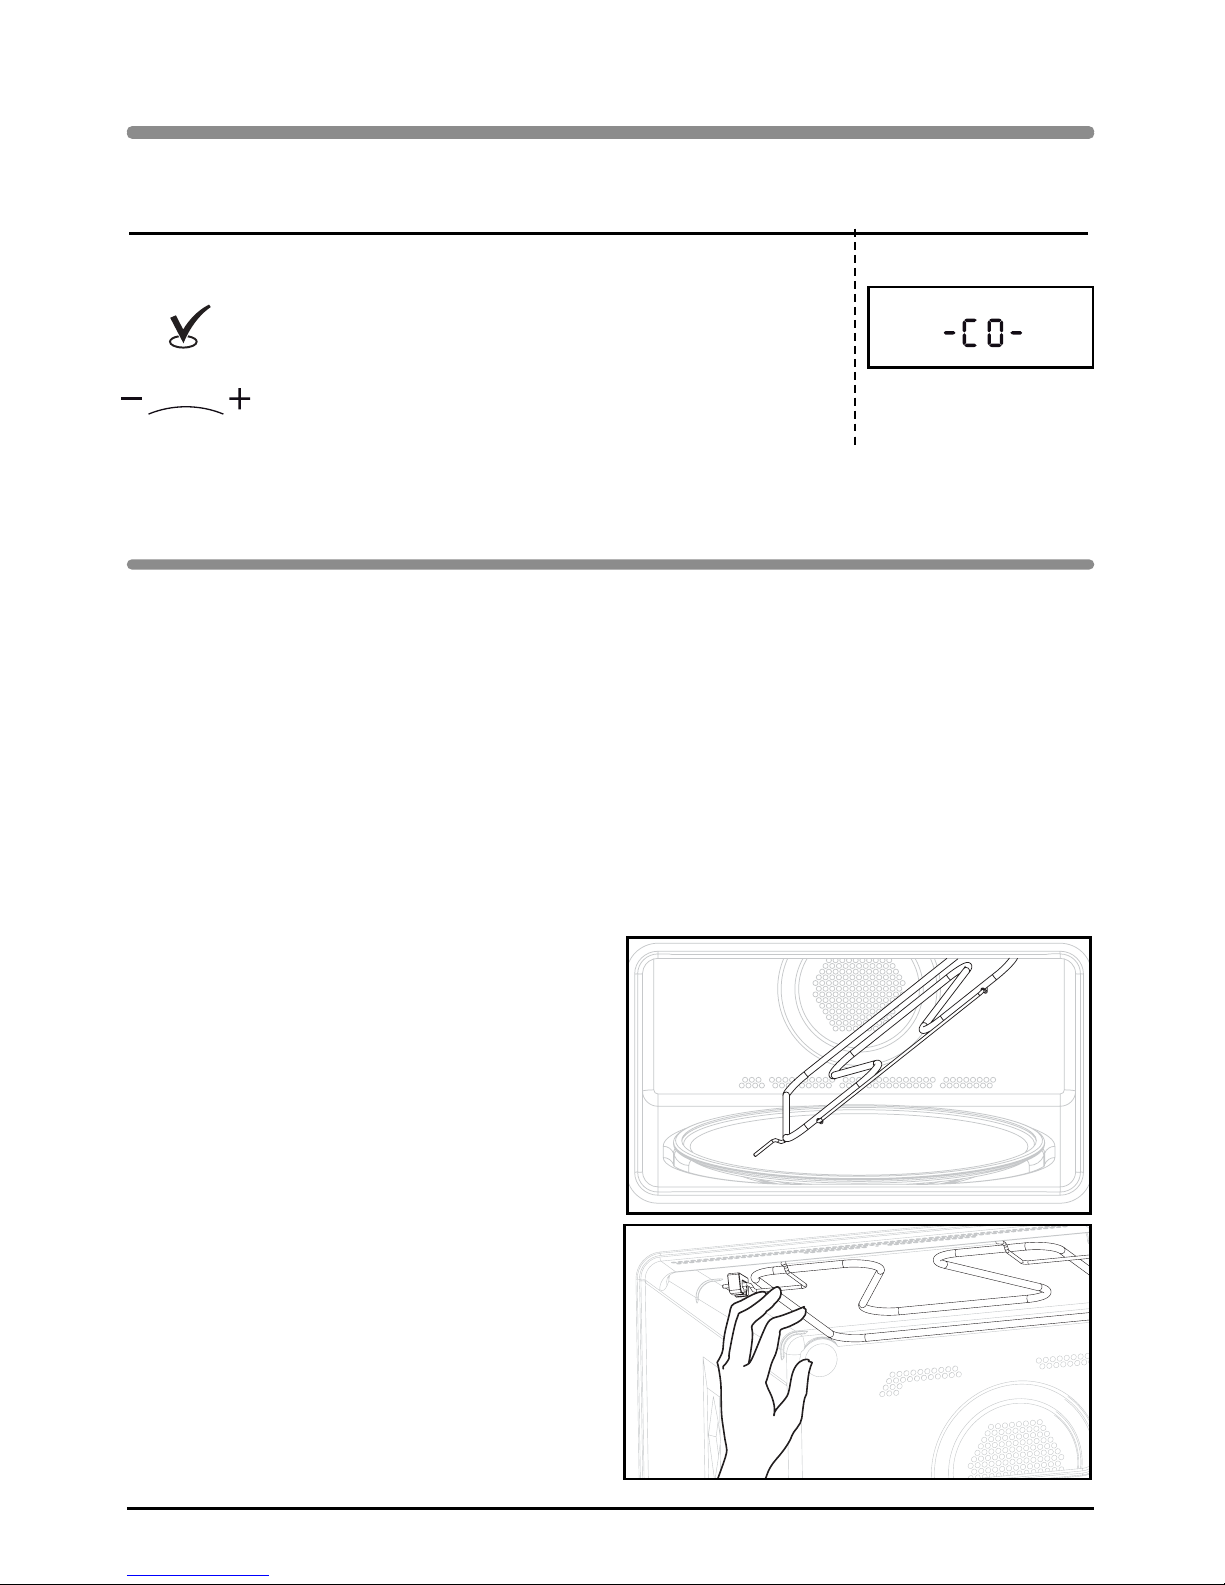
To clean the top of the cavity, remove the grill
element (Fig. 1).
Unhook the grill element by pushing on the pin in
the top left (Fig. 2).
The turntable can be removed for easy cleaning.
To remove it, pick it up using the access zones
provided for this purpose. If you take out the
support with the drive spindle, make sure you do
not let water get into the motor spindle orifice.
Remember to put back the support, the support
wheels and the turntable.
Fig. 1
Fig. 2
Maintenance & Cleaning
Use
setting the brightness of the display
Programming Display
You can adjust the brightness of the display.
Set the time to 00:10.
Press and hold the ENTER button for 5 seconds.
-CO- is shown in the display.
Adjust the brightness using the + / - knob.
Confirm by pressing the ENTER button.
Page 25
25
Troubleshooting
If you have doubts about the correct operation of your appliance, it does not necessarily mean that
there is a fault. In all cases, check the following:
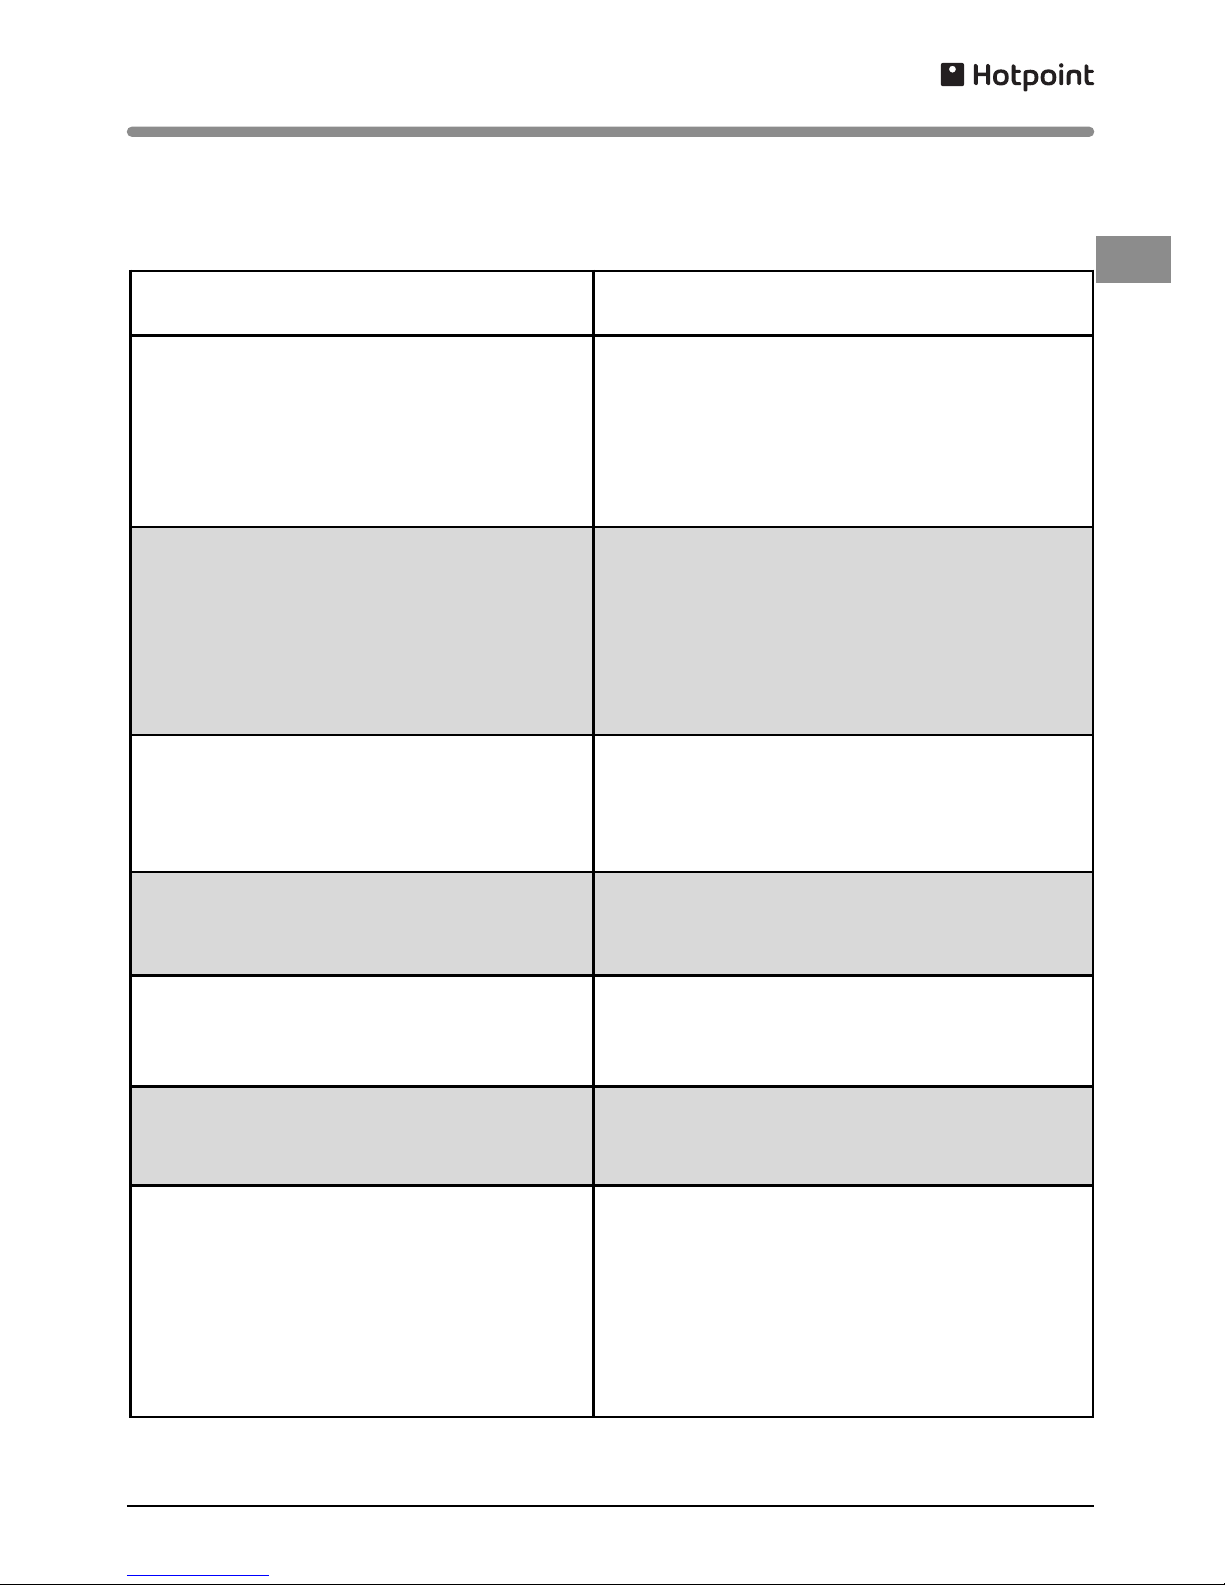
You notice that Solution
The appliance does not switch on.
Check that your appliance is connected correctly.
Check that the oven door is properly closed.
Check that the child lock is not on.
The appliance continues to make noise after
the programme has finished.
To remove moisture, your appliance has a
delayed fan function. Depending on the
cooking mode chosen (solo/grill/combined),
the oven fan may continue to run at the end of
the programme.
The appliance is noisy.
The turntable does not rotate properly.
Clean the support wheels and the rolling area
under the turntable.
Check that the wheels are positioned correctly.
You notice steam on the glass. Wipe off the condensation using a cloth.
Dishes do not heat up on the microwave
setting.
Check that the cookware is suitable for
microwave use and that the power level is set
correctly.
Smoke is coming out of the grill at the start of
the programme.
Remove all food residues from the heating
element before each use.
There are sparks coming from the appliance.
Clean the appliance thoroughly:
remove any traces of grease, bits of food, etc.
Make sure that there are no metal objects
close to the oven walls.
Never use metal objects with the shelf.
Never operate your oven when it is empty.
EN
Page 26
26
Efficiency test
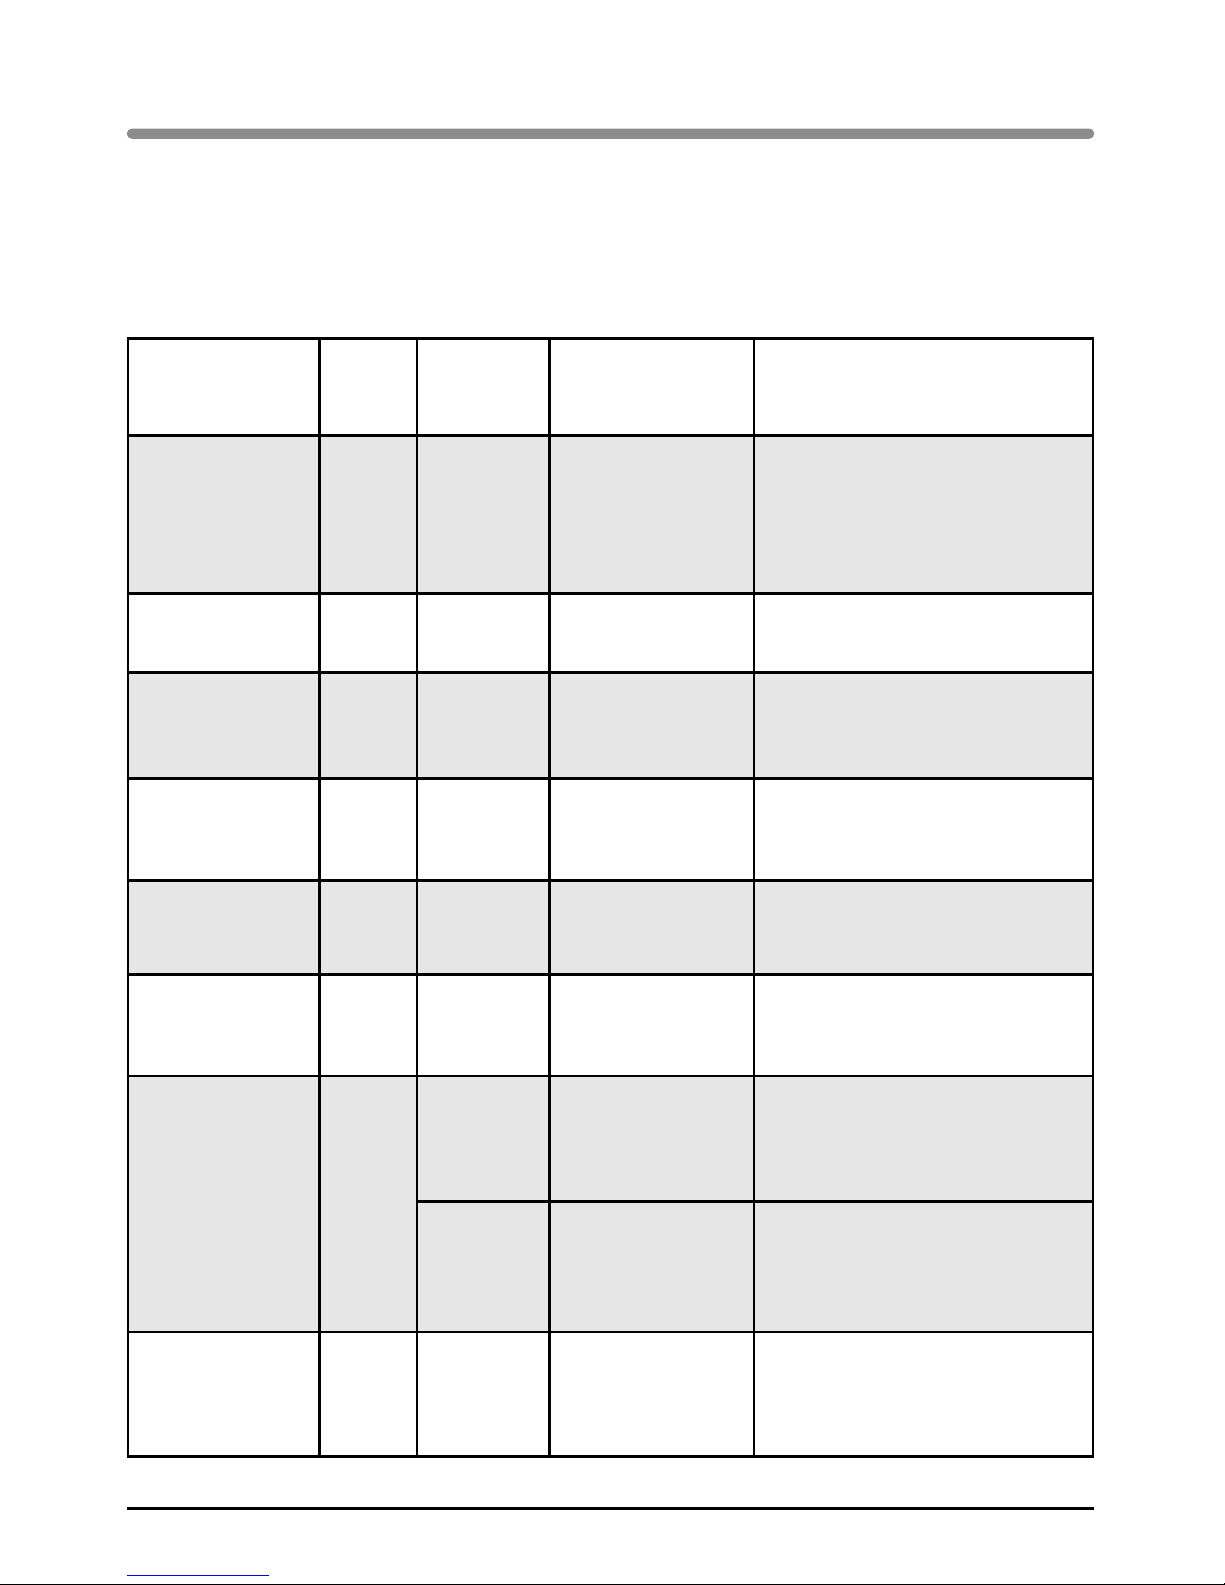
Methods for measuring suitability for use in accordance with standards IEC/EN/NF EN 60705.
The International Electrotechnical Commission, SC.59K, has drawn up a standard relating to the
comparative performance checks carried out on different microwave ovens.
We recommend the following for this appliance:
Test Load
Approx.
time
Power
level
Cookware/
Recommendations
Custard
(12.3.1)
1,000 g
750 g
16 - 18 min
13 - 15 min
500W
Pyrex 227
On the turntable
Pyrex 220
On the turntable
Angel food cake
(12.3.2)
475 g 6 - 7 min 700W
Pyrex 827
On the turntable
Meatloaf
(12.3.3)
900 g 14 min 700W
Pyrex 838
Cover with cling film
On the turntable
Defrosting
meat
(13.3)
500 g 11 - 12 min 200W On the turntable
Defrosting
raspberries
(B.2.1)
250 g 6 - 7 min 200W
On a flat plate
On the turntable
Potatoes au gratin
(12.3.4)
1,100 g 23 - 25 min
Low power grill
+ 700W
Pyrex 827
On the turntable
Chicken
(12.3.6)
1,200 g
24 - 26 min
High grill
+ 500W
Put it in a dish on the shelf
fitted 1 level up
from the bottom
Turn half way through cooking
35 - 40 min
Fan oven
200°C
+ 200W
Use an earthenware dish
Put on the shelf on the first level
up from the bottom
Cakes
(12.3.5)
700 g 20 min
Fan oven
220°C
+ 200W
Pyrex 828
Put on the shelf on level 1
Page 27

CZ5700950 - 03/11
 Loading...