

Page 1
MTM 0821 F
English English
English
English English
Türkçe Türkçe
Türkçe
Türkçe Türkçe
Operating Instructions
2-DOOR FRIDGE
Contents
Operating Instructions, 1
Assistance,2
Description of the appliance, 3
Installation, 5
Start-up and use, 6
Maintenance and care, 7
Precautions and tips, 17
Troubleshooting, 8
ЕллзнйкЬ
ПдзгЯет гйб фз чсЮуз
ШХГЕЙП ДЙРПСФП
Ресйечьменб
ПдзгЯет гйб фз чсЮуз, 1
ФечнйкЮ ХрпуфЮсйоз,2
РесйгсбцЮ фзт ухукехЮт, 3
ЕгкбфЬуфбуз, 9
ЕккЯнзуз кбй чсЮуз, 9
УхнфЮсзуз кбй цспнфЯдб, 10
РспцхлЬоейт кбй ухмвпхлЭт, 11
БнщмблЯет кбй лэуейт, 12
Kullaným talimatlarýKullaným talimatlarý
Kullaným talimatlarý
Kullaným talimatlarýKullaným talimatlarý
Iki kapýlý buzdolabýIki kapýlý buzdolabý
Iki kapýlý buzdolabý
Iki kapýlý buzdolabýIki kapýlý buzdolabý
ÝçindekilerÝçindekiler
Ýçindekiler
ÝçindekilerÝçindekiler
Kullaným talimatlarý, 1
Teknik Servis, 2
Cihazýn tanýmý, 4
Kapýlarýn açýlýþ yönünün deðiþtirilmesi, 4
Montaj, 13
Çalýþtýrma ve kullaným,14
Bakým ve özen, 15
Önlemler ve öneriler, 15
Arýzalar ve onarýmlar, 16
Page 2
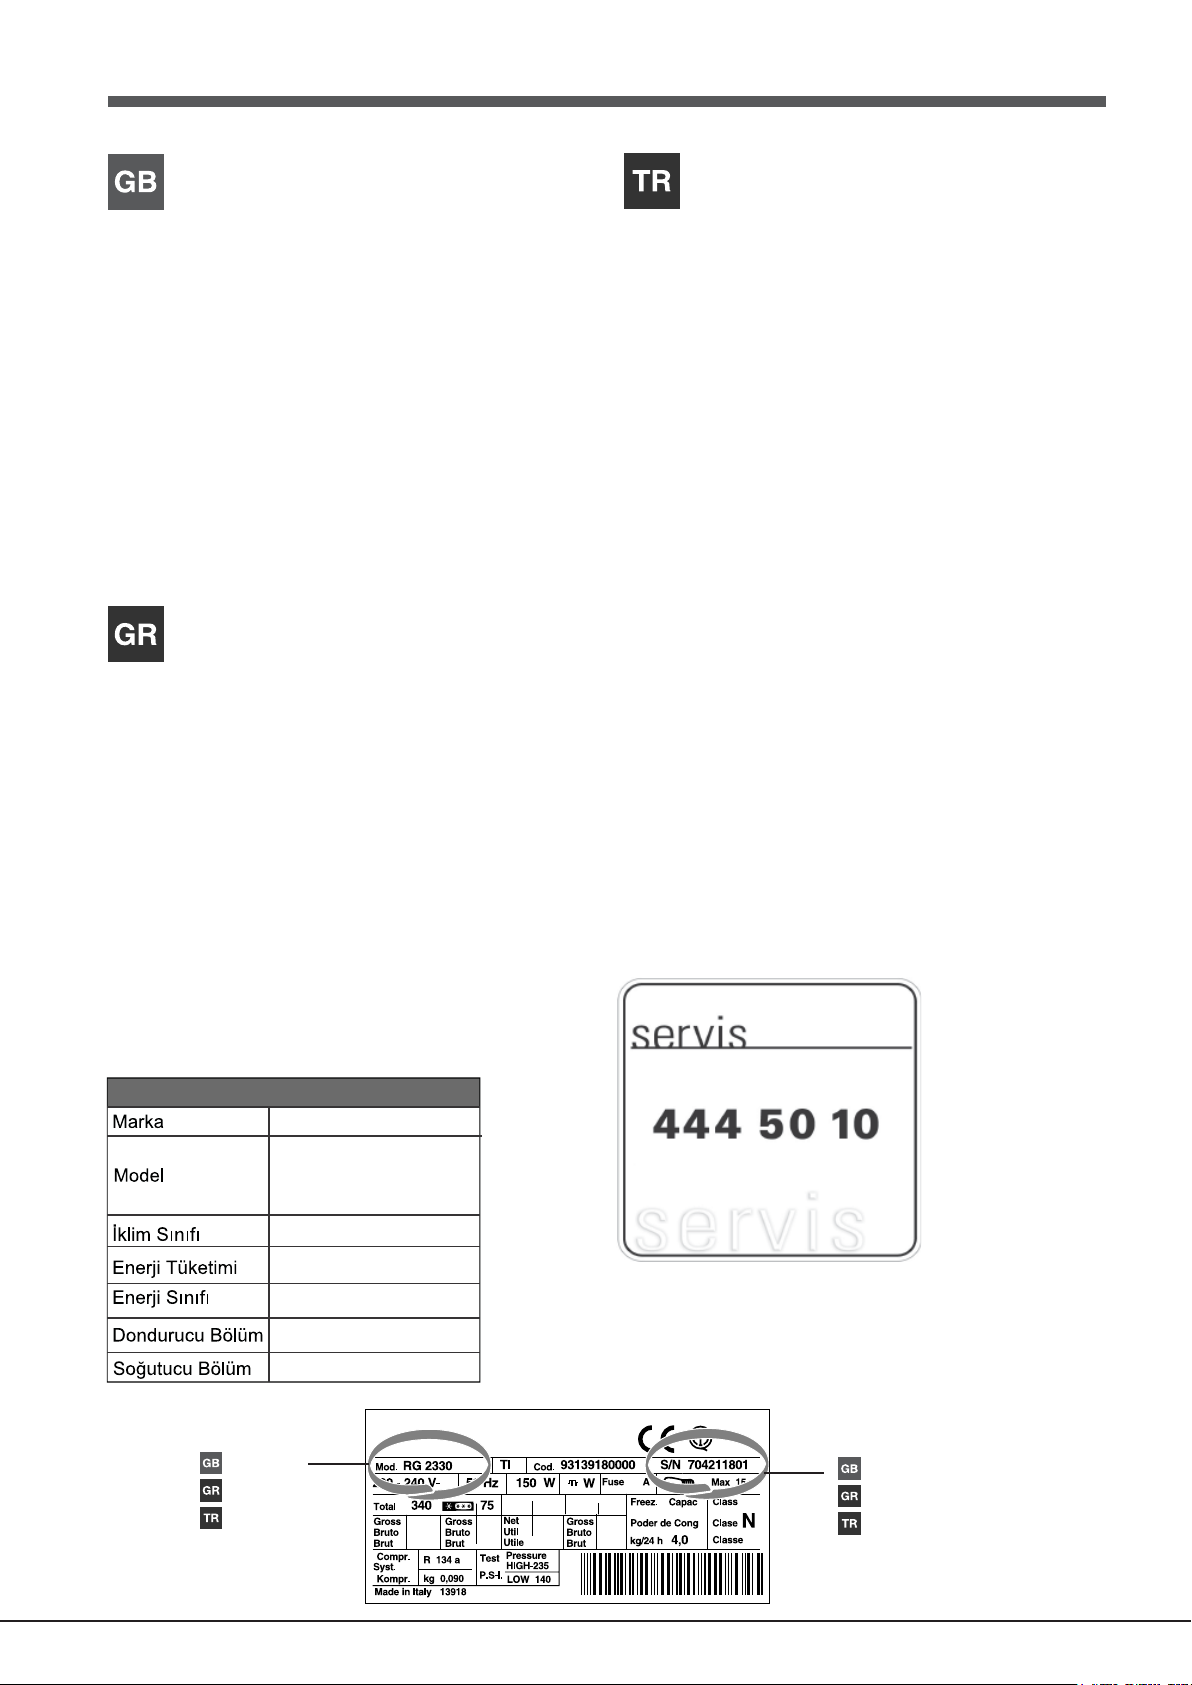
Assistance
Before calling for Assistance:
•
Check if the malfunction can be solved on your own (
Troubleshooting
• If after all the checks, the appliance still does not operate or the
problem persists, call the nearest Service Centre
Communicating:
• type of malfunction
• appliance model (Mod.)
• serial number (S/N)
This information can be found on the data plate located on the
bottom left side of the refrigerator compartment.
Never call on unauthorized technicians and always refuse
spare parts which are not originals.
).
see
ФечнйкЮ ХрпуфЮсйоз
Рсйн брехихниеЯфе уфзн ФечнйкЮ ХрпуфЮсйоз:
• ВевбйщиеЯфе бн з бнщмблЯб мрпсеЯ нб бнфймефщрйуфеЯ бхфьнпмб
(влЭре БнщмблЯет кбй лэуейт).
• Бн рбсЬ фпхт ьлпхт елЭгчпхт, з ухукехЮ ден лейфпхсгеЯ кбй фп
рсьвлзмб рпх дйбрйуфюубфе ухнечЯжей нб хцЯуфбфбй, кблЭуфе фп
рлзуйЭуфесп КЭнфсп ФечнйкЮт ХрпуфЮсйозт.
ГнщуфпрпйЮуфе:
• фпн фэрп фзт бнщмблЯбт
• фп мпнфЭлп фзт мзчбнЮт (Mod.)
• фпн бсйимь уейсЬт (S/N)
Пй рлзспцпсЯет бхфЭт всЯукпнфбй уфзн фбмрелЯфуб чбсбкфзсйуфйкюн
уфп дйбмЭсйумб шхгеЯпх кЬфщ бсйуфесЬ.
TT
eknik Serviseknik Servis
T
eknik Servis
TT
eknik Serviseknik Servis
TT
eknik Servis ile irtibata geçmeden önce:eknik Servis ile irtibata geçmeden önce:
T
eknik Servis ile irtibata geçmeden önce:
TT
eknik Servis ile irtibata geçmeden önce:eknik Servis ile irtibata geçmeden önce:
• Servise baþvurmadan çözülebilecek bir arýza olup olmadýðýný
kontrol ediniz (
• Sonucun olumsuz olmasý durumunda, en yakýn Teknik Servis
ile irtibata geçiniz.
Aþaðýdaki bilgileri bildiriniz:Aþaðýdaki bilgileri bildiriniz:
Aþaðýdaki bilgileri bildiriniz:
Aþaðýdaki bilgileri bildiriniz:Aþaðýdaki bilgileri bildiriniz:
• arýza tipi
• cihazýn modeli (Mod.)
• seri numarasý (S/N)
Bu bilgiler, soðutucu bölmesi içinde aþaðýda solda bulunan teknik
veriler etiketi üzerinde bulunmaktadýr.
Kesinlikle sadece yetkili teknik elemanlara baþvurunuzKesinlikle sadece yetkili teknik elemanlara baþvurunuz
Kesinlikle sadece yetkili teknik elemanlara baþvurunuz
Kesinlikle sadece yetkili teknik elemanlara baþvurunuzKesinlikle sadece yetkili teknik elemanlara baþvurunuz
ve her zaman orijinal yedek parçalarý kullanýnýz.ve her zaman orijinal yedek parçalarý kullanýnýz.
ve her zaman orijinal yedek parçalarý kullanýnýz.
ve her zaman orijinal yedek parçalarý kullanýnýz.ve her zaman orijinal yedek parçalarý kullanýnýz.
Arýza ve Onarým bölümüne bakýnýz
).
INDESIT COMPANY BEYAZ EÞYA PAZARLAMA
A.Þ.
Karahasan Sok. No:11 Balmumcu 34349
Beþiktaþ/Ýstanbul
TEL: (+90) 212 355 53 00
FAKS: (+90) 212 212 95 59
WEB: www.indesit.com.tr
INDESIT COMPANY BEYAZ EÞYA SANAYÝ VE
TÝCARET A.Þ.
Organize Sanayi Bölgesi 45030 / MANÝSA
:
:
TEL
: (+90) 236 233 19 05 – 233 18 20
:
:
:::
FAKS
(+90) 236 233 16 52
:
:
Мзн рспуфсЭчефе рпфЭ уе мз еопхуйпдпфзмЭнпхт фечнйкпэт
кбй нб бснеЯуие рЬнфб фзн егкбфЬуфбуз бнфбллбкфйкюн мз
бхиенфйкюн.
Teknik Bilgiler
HOTPOINT-ARISTON
MTM 0821 F
T
309 kWh/y
A+
58
284 l t
- model
- мпнфЭлп
- model - model
- model
- model - model
- serial number
- бсйимьт уейсЬт
- seri numarasý - seri numarasý
- seri numarasý
- seri numarasý - seri numarasý
2
Page 3
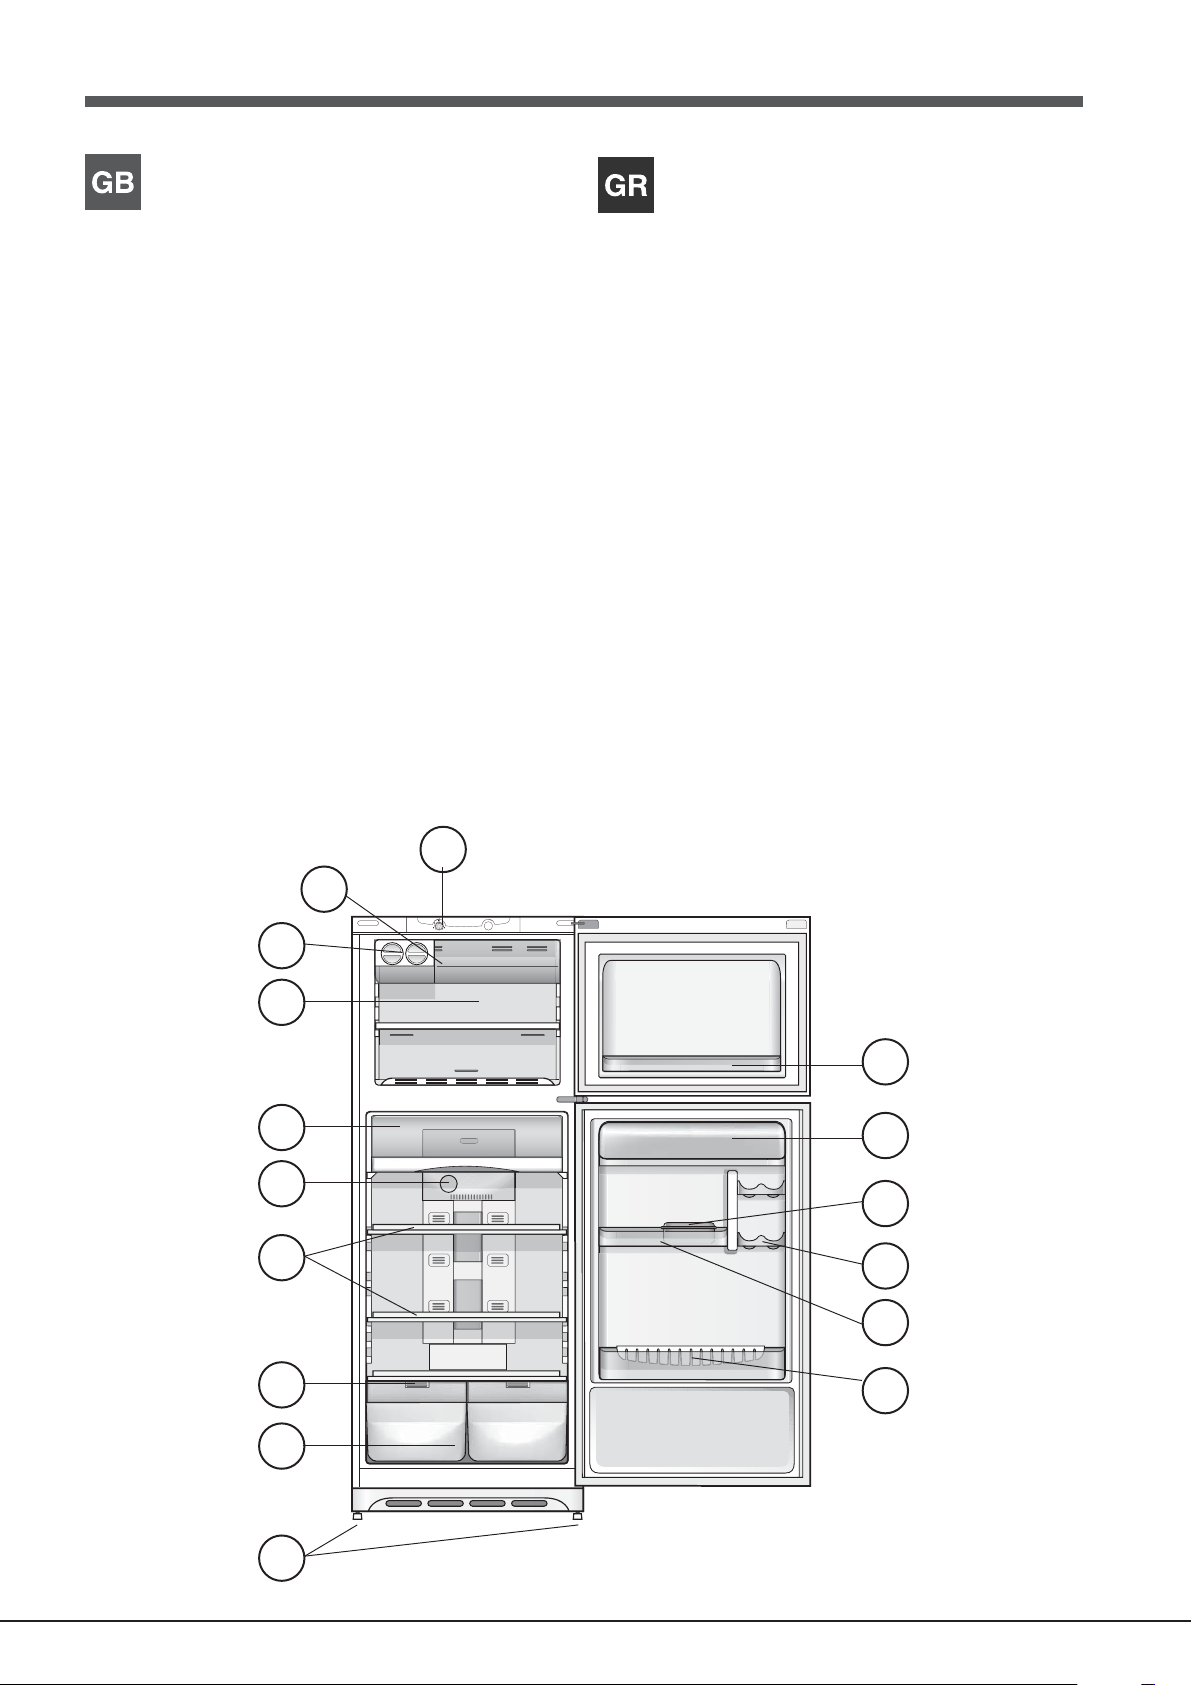
Description of the appliance
РесйгсбцЮ фзт ухукехЮт
Overall view
The instructions contained in this manual are applicable to different
model refrigerators. The diagrams may not directly represent the
appliance purchased. For more complex features, consult the
following pages.
1 Levelling FEET
2 FRUIT and VEGETABLE bin
3 MOISTIRE adjusted
4 SHELVES
5 REFRIGERATOR OPERATION Knob
6 FRESH BOX Compartment
7 FREEZER and STORAGE compartment
8 ICE DEVICE
9 FAST FREEZER compartment*
10 FREEZER OPERATION Knob
11 Removable multipurpose SHELVES•
12 Removable lidded shelf with EGG TRAY
13 BUTTER dish*
14 BEVERAGE CAN shelves
15 Removable multipurpose SHELVES.
16 BOTTLE shelf
*
*
*
*
* Varies by number and/or position,Available only on certain
models.
10
УхнплйкЮ ейкьнб
Пй пдзгЯет чсЮузт йучэпхн гйб дйЬцпсб мпнфЭлб прьфе мрпсеЯ з
ейкьнб нб рбспхуйЬжей лерфпмЭсейет дйбцпсефйкЭт уе учЭуз ме
екеЯнет фзт ухукехЮт рпх брпкфЮубфе. З ресйгсбцЮ фщн рлЭпн
уэниефщн бнфйкеймЭнщн всЯукефбй уфйт бкьлпхиет уелЯдет.
1 РПДБСБКЙ сэимйузт
2 ЛекЬнз ЦСПХФЩН кбй ЛБЧБНЙКЩН
3 Кблэммбфб цспхфплекбнюн ме схимйуфЭт хгсбуЯбт
4 СБЦЙ
5 ЕрйлпгЭбт ЛЕЙФПХСГЙБУ ШХГЕЙПХ
6 ИЬлбмпт FRESH BOX
7 ИЬлбмпт КБФБШХОЗУ кбй УХНФЗСЗУЗУ
8 ICE DEVICE
9 FAST FREEZER*
10 ЕрйлпгЭбт ЛЕЙФПХСГЙБУ КБФБШХКФЗ
11 Брпурюменп сбцЬкй ГЙБ БНФЙКЕЙМЕНБ
12 ДПЧЕЙП ВПХФХСПХ*
13 бхгпиЮкз*
14 СбцЬкй КПХФЙЩН БНБШХКФЙКЩН
15 Брпурюменп сбцЬкй гйб БНФЙКЕЙМЕНБ
16 СбцЬкй ЦЙБЛЩН
*
*
*
*
*РпйкЯлпхн щт рспт фпн бсйимь Ю/кбй фз иЭуз,ХрЬсчей мьнп уе
псйумЭнб мпнфЭлб.
9
8
7
11
6
12
5
13
4
14
15
3
16
2
481eps
1
3
Page 4
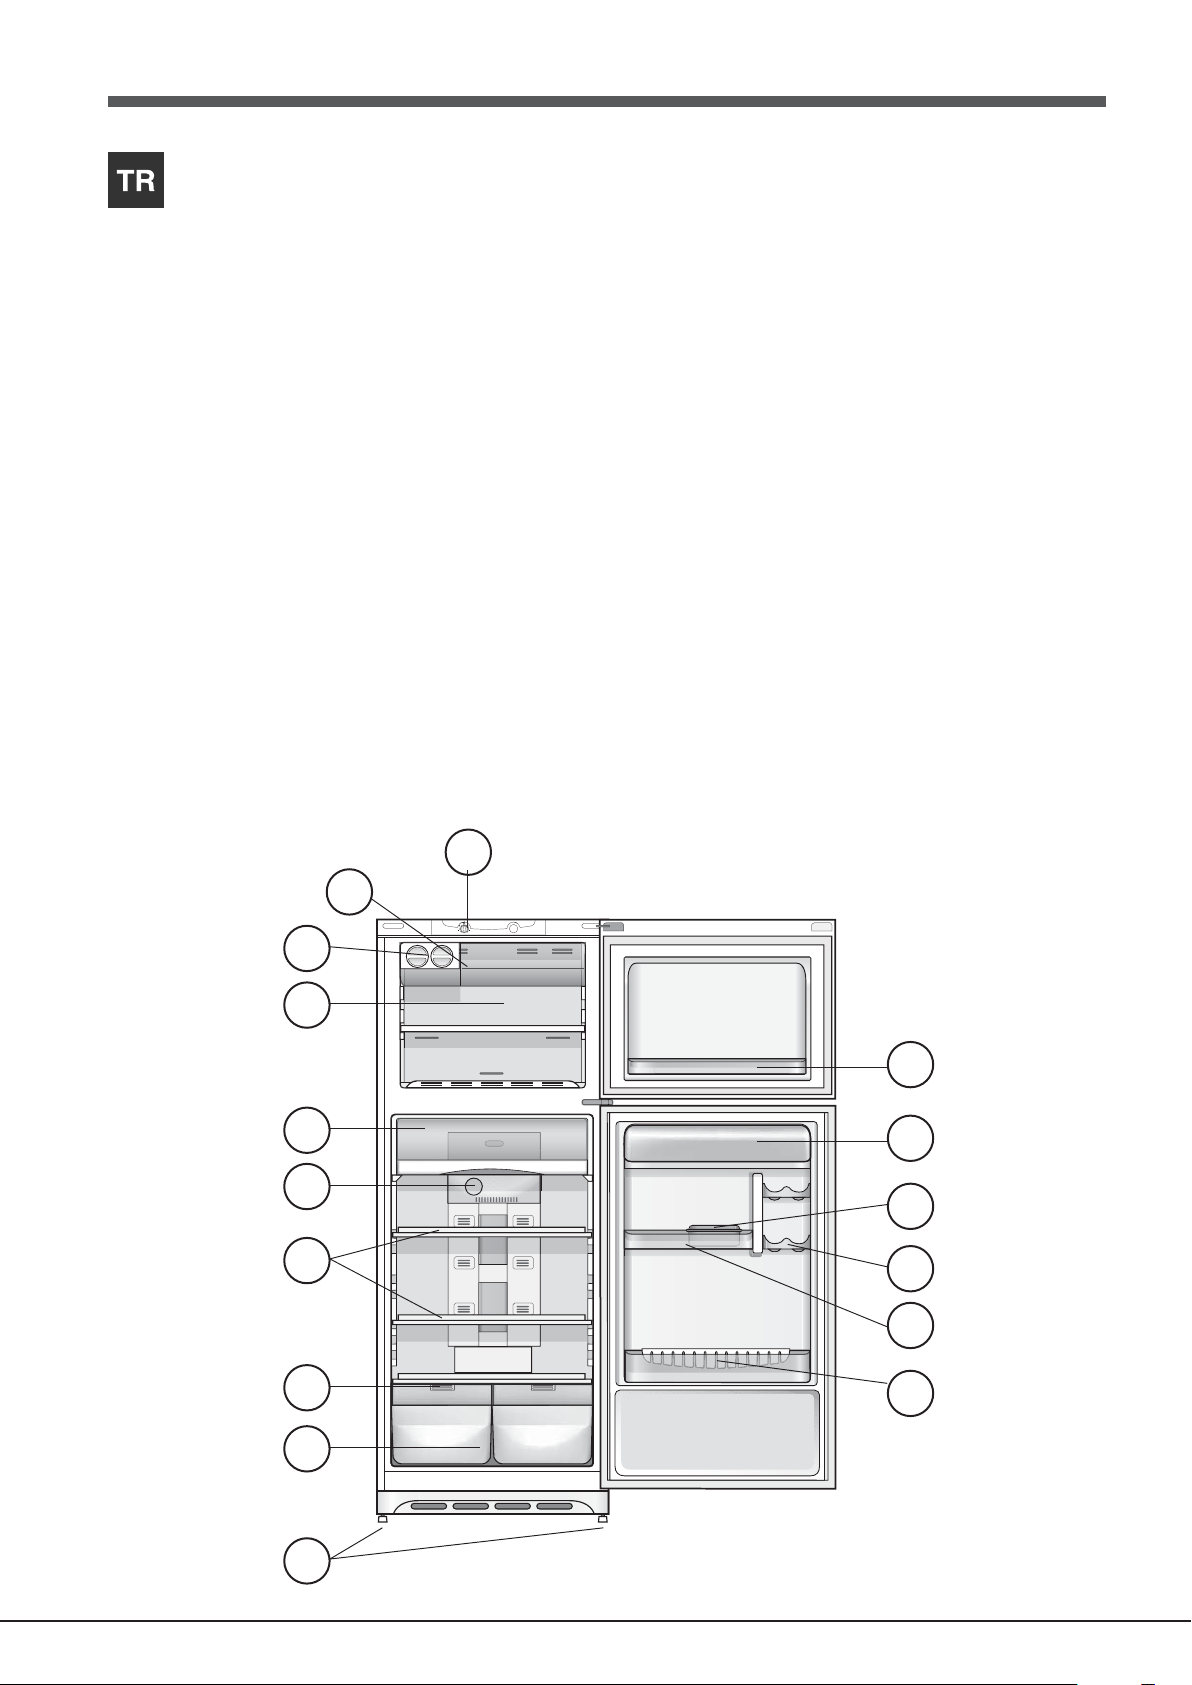
Cihazýn tanýmýCihazýn tanýmý
Cihazýn tanýmý
Cihazýn tanýmýCihazýn tanýmý
Genel görünümGenel görünüm
Genel görünüm
Genel görünümGenel görünüm
Kullaným talimatlarý birkaç model için geçerli olduðu için þekil satýn
aldýðýnýz cihazda olmayandeðiþik ayrýntýlarý gösterebilir. Sonraki
sayfalarda en karýþýk cisimler açýklanmýþtýr.
11
AA
YY
AKAK
1
A
Y
AK
11
AA
YY
AKAK
22
MEYVEMEYVE
2
MEYVE ve
22
MEYVEMEYVE
33
3 Rutubet ayarý
33
44
RAFRAF
4
RAF
44
RAFRAF
55
SOÐUTUCU KONTROLSOÐUTUCU KONTROL
5
SOÐUTUCU KONTROL ayar düðmesi
55
SOÐUTUCU KONTROLSOÐUTUCU KONTROL
66
FRESH BOXFRESH BOX
6
FRESH BOX bölümü
66
FRESH BOXFRESH BOX
77
DONDURMADONDURMA
7
DONDURMA ve
77
DONDURMADONDURMA
88
ICE DEVICEICE DEVICE
8
ICE DEVICE
88
ICE DEVICEICE DEVICE
99
9 Hýzlý dondurma iþlemi için
99
1010
DONDURUCU KONTROLDONDURUCU KONTROL
10
DONDURUCU KONTROL ayar düðmesi
1010
DONDURUCU KONTROLDONDURUCU KONTROL
11
11
1
1 Çýkarýlabilen
11
11
12 12
12 Çýkarýlabilen
12 12
1313
TT
ereyað kutusuereyað kutusu
13
T
ereyað kutusu
1313
TT
ereyað kutusuereyað kutusu
1414
KUTU MEÞRUBA KUTU MEÞRUBA
14
KUTU MEÞRUBA
1414
KUTU MEÞRUBA KUTU MEÞRUBA
15 15
15 Çýkarýlabilen
15 15
16 ÞÝÞE16 ÞÝÞE
16 ÞÝÞE tutucusu
16 ÞÝÞE16 ÞÝÞE
SEBZESEBZE
SEBZE çekmecesi
SEBZESEBZE
*
bölmesi*
KAPI RAFIKAPI RAFI
KAPI RAFI
KAPI RAFIKAPI RAFI
KAPKAP
KAP
KAPKAP
KAPI RAFIKAPI RAFI
KAPI RAFI*
KAPI RAFIKAPI RAFI
SAKLAMASAKLAMA
SAKLAMA bölmesi
SAKLAMASAKLAMA
FF
ASTAST
FREEZE FREEZE
F
AST
FREEZE
FF
ASTAST
FREEZE FREEZE
*
AKLIAKLI
AKLI raf
AKLIAKLI
*
TT
T tutucusu*
TT
* Sayýsý ve/ya pozisyonu deðiþebilir,Sadece bazý modellerde
mevcuttur.
10
9
8
7
11
6
12
5
13
4
14
15
3
16
2
481eps
1
4
Page 5
Installation
! Before placing your new appliance into operation please read
these operating instructions carefully. They contain important
information for safe use, for installation and for care of the
appliance.
! Please keep these operating instructions for future reference.
Pass them on to possible new owners of the appliance.
Positioning and connection
Positioning
1. Place the appliance in a well-ventilated humidity-free room.
2. Do not obstruct the rear fan grills. The compressor and
condenser give off heat and require good ventilation to operate
correctly and save energy.
3. Leave a space of at least 10 cm between the top part of the
appliance and any furniture above it, and at least 5 cm between
the sides and any furniture/side walls.
4. Ensure the appliance is away from any sources of heat (direct
sunlight, electric stove, etc.).
5. In order to maintain the correct distance between the appliance
and the wall behind it, fit the spacers supplied in the installation
kit, following the instructions provided.
Levelling
1. Install the appliance on a level and rigid floor.
2. If the floor is not perfectly horizontal, adjust the refrigerator by
tightening or loosening the front feet.
Electrical connections
After the appliance has been transported, carefully place it
vertically and wait at least 3 hours before connecting it to the
electricity mains. Before inserting the plug into the electrical socket
ensure the following:
• The appliance is earthed and the plug is compliant with the law.
• The socket can withstand the maximum power of the appliance,
which is indicated on the data plate located on the bottom left
side of the fridge (e.g. 150 W).
• The voltage must be in the range between the values indicated on
the data plate located on the bottom left side (e.g. 220-240V).
• The socket is compatible with the plug of the appliance. If the
socket is incompatible with the plug, ask an authorised
technician to replace it (
cords or multiple sockets.
see Assistance
). Do not use extension
1. Insert the plug into the socket and ensure that the green
POWER indicator light illuminates (the FREEZER
COMPARTMENT knob must not be on OFF).
2. Turn the REFRIGERATOR OPERATION knob to an average
value. After a few hours you will be able to put food in the
refrigerator.
Using the refrigerator to its full potential
fridge
The temperature inside the refrigerator compartment automatically
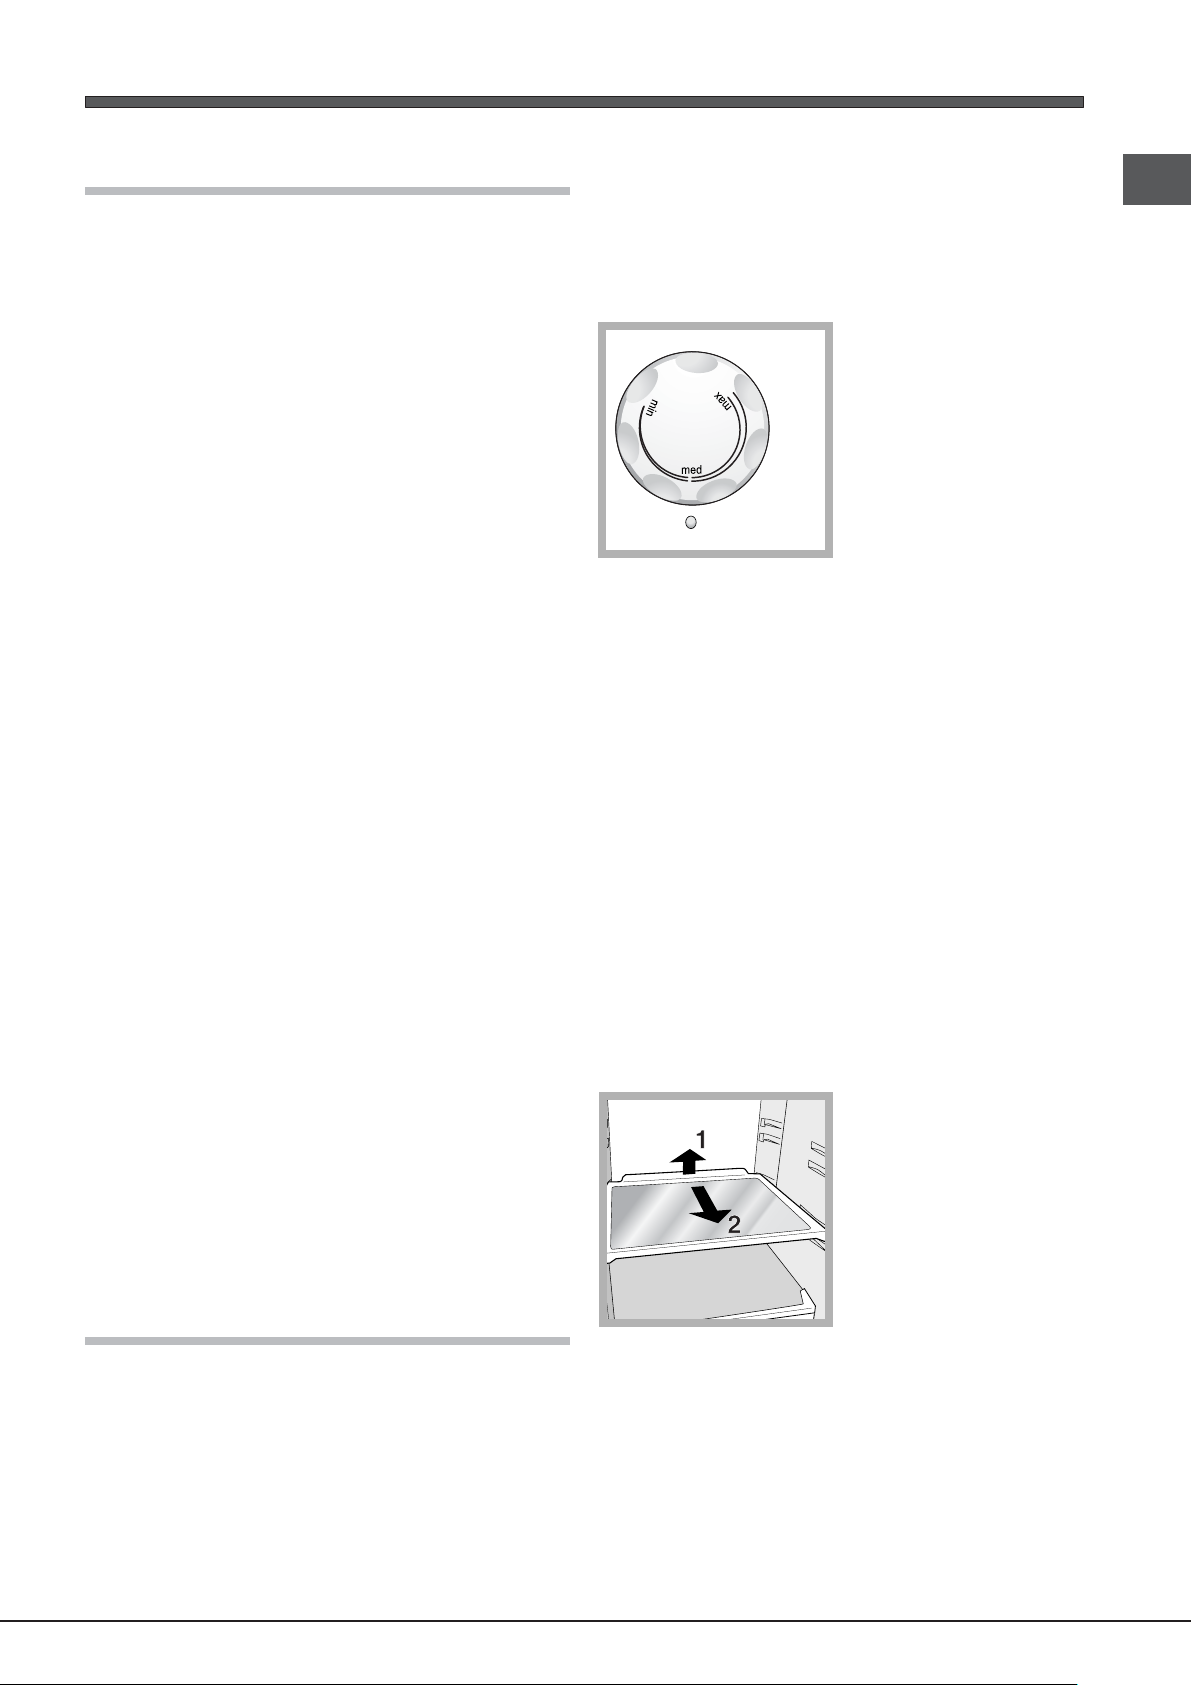
adjusts itself according to the position of the thermostat knob.
min = warmest
max = coldest
It is recognisable by aeration cells located on the back walls of the
compartments.
The No Frost system circulates cold air continuously to collect
humidity and prevent ice and frost formation. The system maintains
an optimal humidity level in the compartment, preserving the
original quality of the food, preventing the food from sticking
together and making defrosting a thing of the past.
• Do not block the aeration cells by placing food or containers in
direct contact with the refrigerating back panel.
• Close bottles and wrap food tightly.
• Place only cold or lukewarm foods in the compartment, not hot
foods (
see Precautions and tips
• Remember that cooked foods do not last longer than raw foods.
SHELVES: with or without grill.
Due to the special guides the shelves are removable and the height
is adjustable (
containers and food. Height can be adjusted without complete
removal of the shelf.
see diagram
), allowing easy storage of large
).
GB
! Once the appliance has been installed, the power supply cable
and the electrical socket must be easily accessible.
! The cable must not be bent or compressed.
! The cable must be checked regularly and replaced by authorised
technicians only (see Assistance).
! The manufacturer declines any liability should these safety
measures not be observed.
Start-up and use
Starting the appliance
! Before starting the appliance, follow the installation
instructions (
! Before connecting the appliance, clean the compartments and
accessories well with lukewarm water and bicarbonate.
! The appliance comes with a motor protection control system which
makes the compressor start approximately 8 minutes after being
switched on. The compressor also starts each time the power supply
is cut off whether voluntarily or involuntarily (blackout).
see Installation
).
FRESH BOX: for fresh meat and fish. Due to the compartment’s
low temperature (the coldest in the refrigerator) and to the clear
door that provides protection against oxidation and blackening,
food can be stored for even up to one week. It can also be used for
“cold meals.”
5
Page 6

GB
FRUIT and VEGETABLE bin
The salad crispers fitted inside the fridge have been specially
designed for the purpose of keeping fruit and vegetables fresh
and crisp. Open the humidity regulator (position B) if you want to
store food in a less humid environment, or close it (position A) to
store food in a more humid environment.
The easy-to-open lids (all you have to do is pull the crisper out)
make it easy to put food in and take out.
BEVERAGE CAN shelves.
The can rack on the inner door allows you to store not only cans,
but also yoghurt, butter and other containers, according to your
requirements.
adjusts itself according to the position of the thermostat knob.
1 = warmest
MAX = coldest
We recommend, however, a medium position.
is the optimal temperature for energy saving levels.
OFF switches the appliance off, including the refrigerator.
• Do not re-freeze food that is defrosting or that has already been
defrosted. These foods must be cooked and eaten (within 24
hours).
• Fresh food that needs to be frozen must not come into contact
with food that has already been defrosted.
• Do not place glass bottles which contain liquids, and which are
corked or hermetically sealed in the freezer because they could
break.
• The maximum quantity of food that may be frozen daily is
indicated on the plate containing the technical properties located
on the bottom left side of the refrigerator compartment (for
example: Kg/24h: 4)
! Do not open the door during freezing.
! If there is a power cut or malfunction, do not open the freezer
door. This will help maintain the temperature inside the freezer,
ensuring that foods are conserved for at least 9 -14 hours.
! To avoid blocking the air circulation inside the freezer, it is
advisable not to obstruct the ventilation holes with food or
containers.
ICE DEVICE
After pouring water in the special ice cups, place them in their
places in the ice device. After about 2 hours, the ice cubes will be
ready. In order to get the ice cubes, it will be sufficient to turn the
two buttons to the right. The ice cubes will fall in to the tray below,
ready to be used.
Using the freezer to its full potential
The temperature inside the freezer compartment automatically
Maintenance and care
Switching the appliance off
During cleaning and maintenance it is necessary to disconnect the
appliance from the electricity supply.
It is not sufficient to set the FREEZER OPERATION knob on OFF
(appliance off) to eliminate all electrical contact.
Cleaning the appliance
• The external and internal parts, as well as the rubber seals may
be cleaned using a sponge that has been soaked in lukewarm
water and bicarbonate of soda or neutral soap. Do not use
solvents, abrasive products, bleach or ammonia.
• The removable accessories may be soaked in warm water and
soap or dishwashing liquid. Rinse and dry them carefully.
• The back of the appliance may collect dust which can be
removed by delicately using the hose of a vacuum cleaner set
on medium power. The appliance must be switched off and the
plug must be pulled out before cleaning the appliance.
6
Page 7

Avoiding mould and unpleasant odours
• The appliance is manufactured with hygienic materials which are
odour free. In order to maintain an odour free refrigerator and to
prevent the formation of stains, food must always be covered or
sealed properly.
• If you want to switch the appliance off for an extended period of
time, clean the inside and leave the doors open.
Replacing the light bulb
To replace the light bulb in the refrigerator compartment, pull out
the plug from the electrical socket. Follow the instructions below.
Access the light bulb by removing the cover as indicated in the
diagram. Replace it with a similar light bulb within the power range
indicated on the cover (10W).
Precautions and tips
! The appliance was designed and manufactured in compliance
with international safety standards. The following warnings are
provided for safety reasons and must be read carefully.
This appliance complies with the following Community Directives:
- 73/23/EEC of 19/02/73 (Low Voltage) and subsequent amendments;
-89/336/EEC of 03.05.89 (Electromagnetic Compatibility) and
subsequent amendments;
- 2002/96/CE..
General safety
• The appliance was designed for domestic use inside the home
and is not intended for commercial or industrial use.
• The appliance must be used to store and freeze food products
by adults only and according to the instructions in this manual.
• The appliance must not be installed outdoors, even in covered
areas. It is extremely dangerous to leave the appliance exposed
to rain and storms.
• Do not touch the appliance with bare feet or with wet or moist
hands and feet.
• Do not touch the internal cooling elements: this could cause skin
abrasions or frost/freezer burns.
• When unplugging the appliance always pull the plug from the
mains socket, do not pull on the cable.
• Before cleaning and maintenance, always switch off the
appliance and disconnect it from the electrical supply. It is not
sufficient to set the FREEZER OPERATION knob on OFF
(appliance off) to eliminate all electrical contact.
• In the case of a malfunction, under no circumstances should you
attempt to repair the appliance yourself. Repairs carried out by
inexperienced persons may cause injury or further
malfunctioning of the appliance.
• Do not use any sharp or pointed utensils or electrical equipment
- other than the type recommended by the manufacturer - inside
the frozen food storage compartments.
• Do not put ice cubes taken directly from the freezer into your
mouth.
• This appliance is not intended for use by persons (including
children) with reduced physical, sensory or lack of experience
and knowledge unless they have been given supervision or
instruction concerning use of the appliance by a person
responsible for their safety. Children should be supervised to
ensure that they do not play with the appliance.
• Keep packaging material out of the reach of children! It can
become a choking or suffocation hazard.
Disposal
• Observe local environmental standards when disposing
packaging material for recycling purposes.
• The European Directive 2002/96/EC on Waste Electrical and
Electronic Equipment (WEEE), requires that old household
electrical appliances must not be disposed of in the normal
unsorted municipal waste stream. Old appliances must be
collected separately in order to optimise the recovery and
recycling of the materials they contain and reduce the impact on
human health and the environment. The crossed out “wheeled
bin” symbol on the product reminds you of your obligation, that
when you dispose of the appliance it must be separately
collected. Consumers should contact their local authority or
retailer for information concerning the correct disposal of their
old appliance.
Respecting and conserving the environment
• Install the appliance in a fresh and well-ventilated room. Ensure
that it is protected from direct sunlight and do not place it near
heat sources.
• Try to avoid keeping the door open for long periods or opening
the door too frequently in order to conserve energy.
• Do not fill the appliance with too much food: cold air must
circulate freely for food to be preserved properly. If circulation is
impeded, the compressor will work continuously.
• Do not place hot food directly into the refrigerator. The internal
temperature will increase and force the compressor to work
harder and will consume more energy.
• Defrost the appliance if ice forms (
layer of ice makes cold transference to food products more
difficult and results in increased energy consumption.
• Regularly check the door seals and wipe clean to ensure they
are free of debris and to prevent cold air from escaping (
Maintenance
).
see Maintenance
). A thick
see
Troubleshooting
If the appliance does not work, before calling for Assistance (see
Assistance), check for a solution from the following list.
The internal light does not illuminate.
• The plug has not been inserted into the electrical socket, or not far
enough to make contact, or there is no power in the house.
• The FREEZRT OPERATION knob is in the OFF position
The motor does not start.
• The appliance comes with a motor protection control (
and use
).
The refrigerator and the freezer do not cool well.
• The doors do not close properly or the seals are damaged.
• The doors are opened too frequently.
• The TEMPERATURE ADJUSTMENT knob is not in the correct
position.
• The refrigerator or the freezer have been over-filled.
The food inside the refrigerator is beginning to freeze.
• The TEMPERATURE ADJUSTMENT knob is not in the correct
position.
see Start-up
GB
7
Page 8

GB
The motor runs continuously.
• The door is not closed properly or is continuously opened.
• The outside ambient temperature is very high.
The appliance makes a lot of noise.
• The appliance has not been installed on a level surface (
see
Installation).
• The appliance has been installed between cabinets that vibrate
and make noise.
• The internal refrigerant makes a slight noise even when the
compressor is off. This is not a defect, it is normal.
Some of the external parts of the refrigerator become hot.
• These raised temperatures are necessary in order to avoid the
formation of condensation on certain parts of the product.
8
Page 9

ЕгкбфЬуфбуз
! ЕЯнбй узмбнфйкь нб дйбфзсЮуефе фп егчейсЯдйп бхфь гйб нб мрпсеЯфе
нб фп ухмвпхлеэеуфе прпйбдЮрпфе уфйгмЮ. Уе ресЯрфщуз рюлзузт,
рбсбчюсзузт Ю мефбкьмйузт, вевбйщиеЯфе ьфй бхфь рбсбмЭней мбжЯ ме
фз ухукехЮ гйб фзн рлзспцьсзуз фпх нЭпх йдйпкфЮфз гйб фз
лейфпхсгЯб кбй фйт учефйкЭт рспейдпрпйЮуейт.
! ДйбвЬуфе рспуекфйкЬ фйт пдзгЯет: хрЬсчпхн узмбнфйкЭт
рлзспцпсЯет гйб фзн егкбфЬуфбуз, фз чсЮуз кбй фзн буцЬлейб.
ФпрпиЭфзуз кбй уэндеуз
ФпрпиЭфзуз
1. ФпрпиефЮуфе фз ухукехЮ уе чюспт кблЬ бесйжьменп кбй чщсЯт
хгсбуЯб.
2. Мзн цсЬжефе фйт рЯущ гсЯлйет бесйумпэ: п ухмрйеуфЮт кбй п
ухмрхкнщфЮт екрЭмрпхн иесмьфзфб кбй брбйфпэн кбль бесйумь
гйб нб лейфпхсгпэн кблЬ кбй нб ресйпсЯжефбй з кбфбнЬлщуз
злекфсйкпэ.
3. БцЮуфе мйб брьуфбуз фпхлЬчйуфпн 10 cm мефбоэ фпх ерЬнщ
мЭспхт фзт ухукехЮт кбй фщн ендечьменщн хрескеЯменщн
ерЯрлщн кбй фпхлЬчйуфпн 5 cm мефбоэ фщн рлбънюн кбй
рлехсйкюн ерЯрлщн/фпЯчщн.
4. З ухукехЮ рсЭрей нб всЯукефбй мбксйЬ брь рзгЭт иесмьфзфбт
(Ьмеуп злйбкь цщт, злекфсйкЮ кпхжЯнб).
5. Гйб фз дйбфЮсзуз фзт вЭлфйуфзт брьуфбузт фпх рспъьнфпт брь фп
рЯущ фпЯчщмб, мпнфЬсефе фпхт брпуфЬфет рпх хрЬсчпхн уфп кйф
егкбфЬуфбузт бкплпхиюнфбт фйт пдзгЯет фпх бнфЯуфпйчпх цэллпх.
ПсйжпнфЯщуз
1. ЕгкбфбуфЮуфе фз ухукехЮ уе дЬредп Яуйп кбй бниекфйкь.
2. Бн фп дЬредп ден еЯнбй брьлхфб ерЯредп, бнфйуфбимЯуфе
оевйдюнпнфбт Ю вйдюнпнфбт фб рсьуийб рпдбсЬкйб.
ЗлекфсйкЮ уэндеуз
МефЬ фз мефбцпсЬ, фпрпиефЮуфе фз ухукехЮ кбфбкьсхцб кбй
ресймЭнефе фпхлЬчйуфпн 3 юсет рсйн фз ухндЭуефе уфзн злекфсйкЮ
егкбфЬуфбуз. Рсйн вЬлефе фп вэумб уфзн злекфсйкЮ рсЯжб,
вевбйщиеЯфе ьфй:
• з рсЯжб дйбиЭфей геЯщуз кбй фзсеЯ фйт ек фпх ньмпх рспдйбгсбцЭт
• з рсЯжб еЯнбй уе иЭуз нб дечфеЯ фп мЭгйуфп цпсфЯп йучэпт фзт
мзчбнЮт, рпх цбЯнефбй уфзн фбмрелЯфуб чбсбкфзсйуфйкюн уфп
дйбмЭсйумб шхгеЯпх кЬфщ бсйуфесЬ (р.ч. 150 W)
• з фЬуз фспцпдпуЯбт кхмбЯнефбй енфьт фщн фймюн фзт фбмрелЯфубт
чбсбкфзсйуфйкюн, рпх всЯукефбй кЬфщ бсйуфесЬ (р.ч. 220-240 V)
• з рсЯжб еЯнбй ухмвбфЮ ме фп вэумб фзт ухукехЮт.
Уе бнфЯиефз ресЯрфщуз жзфЮуфе фзн бнфйкбфЬуфбуз фпх вэумбфпт
брь еопхуйпдпфзмЭнп фечнйкь (влЭре ФечнйкЮ ХрпуфЮсйоз). Мз
чсзуймпрпйеЯфе рспекфЬуейт кбй рплэрсйжб.
! Ме фзн егкбфЬуфбуз фзт ухукехЮт, фп злекфсйкь кблюдйп кбй з
злекфсйкЮ рсЯжб рсЭрей нб еЯнбй еэкплб рспувЬуймет.
! Фп кблюдйп ден рсЭрей нб дйрлюней Ю нб ухмрйЭжефбй.
! Фп кблюдйп рсЭрей нб елЭгчефбй ресйпдйкЬ кбй нб бнфйкбиЯуфбфбй
мьнп брь еопхуйпдпфзмЭнпхт фечнйкпэт (влЭре ФечнйкЮ
ХрпуфЮсйоз).
! З ерйчеЯсзуз брпрпйеЯфбй кЬие ехиэнзт ьфбн ден фзспэнфбй пй
кбньнет бхфпЯ.
Ьнбммб. Бхфь ухмвбЯней кбй мефЬ брь кЬие дйбкпрЮ злекфсйкЮт
фспцпдпуЯбт, екпэуйбт Ю бкпэуйбт (black out).
1. ВЬлфе фп вэумб уфзн рсЯжб кбй вевбйщиеЯфе ьфй бнЬвей фп рсЬуйнп
ендейкфйкь цщфЬкй ФСПЦПДПУЙБУ (п ерйлпгЭбт ЛЕЙФПХСГЙБ
КБФБШХКФЗ ден рсЭрей нб еЯнбй уфп OFF).
2. УфсЭшфе фпн ерйлпгЭб ЛЕЙФПХСГЙБ КБФБШХКФЗ уе мйб меубЯб
фймЮ. МефЬ брь месйкЭт юсет иб мрпсеЯфе нб ейуЬгефе фсьцймб уфп
шхгеЯп.
Рют нб чсзуймпрпйеЯфе кблэфесб фп шхгеЯп
fridge
З иесмпксбуЯб уфп еущфесйкь фпх дйбмесЯумбфпт шхгеЯпх схимЯжефбй
бхфьмбфб ме вЬуз фз иЭуз фпх ерйлпгЭб фпх иесмпуфЬфз.
min = лйгьфесп шэчпт
max = ресйууьфесп шэчпт УхнйуфЬфбй, прщудЮрпфе, мйб ендйЬмеуз
èÝóç.
Фп No Frost дйбчейсЯжефбй мйб ухнечЮ спЮ шхчспэ бЭсб рпх
ухллЭгей фзн хгсбуЯб кбй рбсемрпдЯжей фп учзмбфйумь рЬгпх кбй
рЬчнзт: уфп дйбмЭсйумб шхгеЯпх дйбфзсеЯ фз ущуфЮ уфЬимз хгсбуЯбт
кбй, чЬсз уфзн брпхуЯб рЬчнзт, дйбфзсеЯ фзн бсчйкЮ рпйьфзфб фщн
фспцЯмщн. Уфп дйбмЭсйумб шхгеЯпх брпупвеЯ фп учзмбфйумь рЬгпх
кбийуфюнфбт ресйффЭт фйт енЭсгейет брьшхозт кбй рбсемрпдЯжей фз
мефбоэ фпхт ухгкьллзуз фщн фспцЯмщн.
• Мз иЭфефе фсьцймб Ю дпчеЯб уе Ьмеуз ербцЮ ме фп рЯущ шхкфйкь
фпЯчщмб, гйб нб мз впхлюуефе фйт прЭт бесйумпэ кбй дйехкплхниеЯ
Эфуй п учзмбфйумьт ухмрхкнюмбфпт.
• Нб клеЯнефе фйт цйЬлет кбй нб фхлЯгефе фб фсьцймб.
• ЕйуЬгефе мьнп ксэб фсьцймб Ю члйбсЬ, ьчй жеуфЬ (влЭре
РспцхлЬоейт кбй ухмвпхлЭт).
• Нб ихмьубуфе ьфй фб мбгейсемЭнб фсьцймб ден дйбфзспэнфбй
ресйууьфесп брь фб щмЬ.
СБЦЙБ: рлЮсз Ю ме рлЭгмб.
ЕЯнбй брпурюменб кбй схимйжьменб уе эшпт чЬсз уфпхт
бнфЯуфпйчпхт пдзгпэт (влЭре ейкьнб), гйб фзн ейубгщгЮ дпчеЯщн Ю
фспцЯмщн мегЬлщн дйбуфЬуещн. Гйб фз сэимйуз фпх эшпхт ден
чсейЬжефбй нб вгЬлефе фелеЯщт фп сЬцй.
GR
ЕккЯнзуз кбй чсЮуз
ЕккЯнзуз фзт ухукехЮт
! Рсйн еккйнЮуефе фз ухукехЮ, бкплпхиЮуфе фйт пдзгЯет гйб
фзн егкбфЬуфбуз (влЭре ЕгкбфЬуфбуз).
! Рсйн ухндЭуефе фз ухукехЮ кбибсЯуфе кблЬ фпхт иблЬмпхт кбй фб
боеупхЬс ме члйбсь несь кбй дйффбнисбкйкь.
! З ухукехЮ дйбиЭфей Энб чейсйуфЮсйп елЭгчпх фпх кйнзфЮсб рпх
еккйнеЯ фпн ухмрйеуфЮ мьнп мефЬ брь ресЯрпх 8 лерфЬ брь фп
FRESH BOX: гйб цсЭукп ксЭбт кбй шЬсй. П иЬлбмпт ерйфсЭрей фзн
ухнфЮсзуз гйб мегЬлб чспнйкЬ дйбуфЮмбфб, мЭчсй кбй мйб евдпмЬдб,
чЬсз уфз чбмзлЮ иесмпксбуЯб – фзн рлЭпн шхчсЮ фпх шхгеЯпх– уфп
дйбцбнЭт кбрЬкй рпх рспуфбфеэей брь цбйньменб поеЯдщузт кбй
мбхсЯумбфпт. МрпсеЯ нб чсзуймпрпйзиеЯ кбй гйб “ксэб рйЬфб”.
9
Page 10

GR
ЛекЬнет лбчбнйкюн
Пй лекЬнет цспэфщн кбй лбчбнйкюн фйт прпЯет дйбиЭфей фп шхгеЯп еЯнбй
кбфЬллзлб учедйбумЭнет ме укпрь нб дйбфзспэнфбй цсЭукб кбй
мхсщдЬфб фб цспэфб кбй фб лбчбнйкЬ. БнпЯофе фп схимйуфЮ хгсбуЯбт
(иЭуз В) бн ерйихмеЯфе нб дйбфзсЮуефе фб фсьцймб уе ресйвЬллпн ме
лйгьфесз хгсбуЯб, Ю клеЯуфе фпн (иЭуз Á) гйб мйб ухнфЮсзуз уе
ресйвЬллпн ме ресйууьфесз хгсбуЯб. Фп еэкплп Ьнпйгмб фщн
кбрбкйюн, бскеЯ нб фсбвЮоефе фз лекЬнз рспт фб Эощ, дйехкплэней фзн
ейубгщгЮ кбй фзн еобгщгЮ фщн фспцЯмщн.
Ýùò MAX (ресйууьфесп шэчпт).
УхнйуфЬфбй, прщудЮрпфе, мйб ендйЬмеуз иЭуз.
еЯнбй з вЭлфйуфз иесмпксбуЯб уе чбмзлЮ кбфбнЬлщуз.
OFF увЮней фз ухукехЮ, ухмресйлбмвбнпмЭнпх фпх шхгеЯпх.
• Мзн кбфбшэчефе рЬлй фсьцймб рпх брпшэчпнфбй Ю брпшхгмЭнб. Фб
фсьцймб бхфЬ рсЭрей нб еЯнбй мбгейсемЭнб гйб нб кбфбнблщипэн
(енфьт 24 щсюн).
• Фб цсЭукб фсьцймб рспт кбфЬшхоз ден рсЭрей нб Эсчпнфбй уе
ербцЮ ме фб Юдз кбфешхгмЭнб.
• Мз вЬжефе уфпн кбфбшэкфз гхЬлйнет цйЬлет рпх ресйЭчпхн хгсЬ, ме
рюмбфб Ю есмзфйкЬ клейуфЭт, гйбфЯ иб мрпспэубн нб урЬупхн.
• З мЭгйуфз змесЮуйб рпуьфзфб фспцЯмщн рспт кбфЬшхоз бнбцЭсефбй
уфзн фбмрелЯфуб чбсбкфзсйуфйкюн, рпх всЯукефбй уфп дйбмЭсйумб
шхгеЯпх кЬфщ бсйуфесЬ (рбсЬдейгмб: Kg/24h 4).
! КбфЬ фзн кбфЬшхоз брпцеэгефе нб бнпЯгефе фзн рьсфб.
! Мзн бнпЯгефе фзн рьсфб фпх кбфбшэкфз, уе ресЯрфщуз дйбкпрЮт
сеэмбфпт Ю влЬвзт: ме фпн фсьрп бхфьн фб кбфешхгмЭнб, фбчеЯбт кбй
всбдеЯбт кбфЬшхозт, иб ухнфзсзипэн чщсЯт бллпйюуейт гйб
ресЯрпх 9 -14 юсет.
! гйб нб мзн рбсемрпдЯжефбй з кхклпцпсЯб фпх бЭсб уфп еущфесйкь
фпх кбфбшэкфз, ухуфЮнефбй нб мзн емцсЬууефе фйт прЭт бесйумпэ ме
фсьцймб Ю укеэз.
ICE DEVICE
РЬсфе кбй гемЯуфе ме несь фйт ейдйкЭт рбгпиЮкет кбй
ербнбфпрпиефЮуфе фйт фзн ресйпчЮ фпх Icedevice. МефЬ брь
ресЯрпх 2 юсет фб рбгЬкйб иб еЯнбй Эфпймб. Гйб нб рЬсефе фпн рЬгп
бскеЯ нб уфсЭшфе деойЬ фпхт дэп ерйлпгеЯт: фб рбгЬкйб иб рЭупхн
уфп хрпкеЯменп дпчеЯп, Эфпймб нб уесвйсйуфпэн.
Брпурюменп сбцЬкй гйб бнфйкеЯменб
З рбспхуЯб фзт иЮкзт кпхфйюн бнбшхкфйкюн рЯущ брь фзн рьсфб
дЯней фз дхнбфьфзфб брьиеузт ьчй мьнп кпхфйюн бнбшхкфйкюн, бллЬ
кбй гйбпхсфйпэ, впхфэспх кбй Ьллщн ухукехбуйюн, чсзуймпрпйюнфбт
фз бнЬлпгб ме фйт бнЬгкет убт.
Рют нб чсзуймпрпйеЯфе кблэфесб фпн кбфбшэкфз
ЕрйлпгЭбт ЛЕЙФПХСГЙБУ КБФБШХКФЗ гйб фз сэимйуз фзт
иесмпксбуЯбт фпх дйбмесЯумбфпт кбфбшэкфз:
áðü 1 (лйгьфесп шэчпт)
УхнфЮсзуз кбй цспнфЯдб
Дйбкьшфе фзн рбспчЮ злекфсйкпэ сеэмбфпт
КбфЬ фйт есгбуЯет кбибсйумпэ кбй ухнфЮсзузт еЯнбй брбсбЯфзфп нб
брпмпнюуефе фз ухукехЮ брь фп дЯкфхп фспцпдпуЯбт вгЬжпнфбт фп
вэумб брь фзн рсЯжб: Ден бскеЯ нб цЭсефе фпн ерйлпгЭб гйб фз
сэимйуз фзт иесмпксбуЯбт уфз иЭуз OFF (ухукехЮ увзуфЮ) гйб
еопхдефЭсщуз злекфсйкЮт ербцЮт.
КбибсЯуфе фз ухукехЮ
• Фб еощфесйкЬ мЭсз, фб еущфесйкЬ мЭсз кбй фб лбуфйчЭнйб
ресйвлЮмбфб кбибсЯжпнфбй ме Энб уцпхггбсЬкй всегмЭнп уе
члйбсь несь кбй дйффбнисбкйкь нЬфсйп Ю пхдЭфесп убрпэнй. Мз
чсзуймпрпйеЯфе дйблэфет, брпохуфйкЬ, члщсЯнз Ю бммщнЯб.
• Фб брпурюменб боеупхЬс мрпспэн нб феипэн уе мрЬнйп
жеуфпэ неспэ кбй убрпхнйпэ Ю брпссхрбнфйкпэ рйЬфщн.
ОевгЬлфе фб кбй уфегнюуфе фб ерймелют.
• Фп рЯущ мЭспт фзт ухукехЮт феЯней нб кблэрфефбй брь укьнз, рпх
мрпсеЯ нб брпмбксхниеЯ чсзуймпрпйюнфбт рспуекфйкЬ, бцпэ Эчефе
увЮуей фз ухукехЮ кбй фзн вгЬлбфе брь фзн злекфсйкЮ рсЯжб, фп
мбксэ уфьмйп фзт злекфсйкЮт укпэрбт, уе меубЯб йучэ.
10
Page 11

Брпмбксэнефе мпэчлб кбй дхупумЯет
• З ухукехЮ еЯнбй кбфбукехбумЭнз ме хлйкЬ хгйейнЮт рпх ден
мефбдЯдпхн пумЭт. Гйб фз дйбфЮсзуз фпх чбсбкфзсйуфйкпэ бхфпэ рсЭрей
фб фсьцймб нб еЯнбй рЬнфб рспуфбфехмЭнб кбй кблЬ клейумЭнб. Бхфь иб
брпфсЭшей ерЯузт кбй фп учзмбфйумь лекЭдщн.
• Уфзн ресЯрфщуз рпх иЭлефе нб увЮуефе фз ухукехЮ гйб мегЬлп
чспнйкь дйЬуфзмб, кбибсЯуфе фп еущфесйкь кбй бцЮуфе фйт рьсфет
бнпйчфЭт.
БнфйкбфЬуфбуз фзт лхчнЯбт
Гйб фзн бнфйкбфЬуфбуз фзт лхчнЯбт цщфйумпэ фпх дйбмесЯумбфпт
шхгеЯпх, вгЬлфе фп вэумб брь фзн злекфсйкЮ рсЯжб. БкплпхиЮуфе фйт
рбсбкЬфщ пдзгЯет. РлзуйЬуфе фз лхчнЯб бцбйсюнфбт фп
рспуфбфехфйкь ьрщт цбЯнефбй уфзн ейкьнб.
БнфйкбфбуфЮуфе фз ме мйб бнфЯуфпйчзт йучэпт ме екеЯнз рпх
хрпдейкнэефбй уфп рспуфбфехфйкь (10 W).
РспцхлЬоейт кбй ухмвпхлЭт
! З ухукехЮ учедйЬуфзке кбй кбфбукехЬуфзке уэмцщнб ме фпхт
дйеинеЯт кбньнет буцЬлейбт. Пй рспейдпрпйЮуейт бхфЭт рбсЭчпнфбй гйб
льгпхт буцблеЯбт кбй рсЭрей нб дйбвбуфпэн рспуекфйкЬ.
З ухукехЮ бхфЮ еЯнбй уэмцщнз ме фйт бкьлпхиет КпйнпфйкЭт ПдзгЯет:
- 73/23/CEE фзт 19/02/73 (ЧбмзлЮ ФЬуз) кбй мефбгенЭуфесет
фспрпрпйЮуейт.
- 89/336/CEE фзт 03/05/89 (ЗлекфспмбгнзфйкЮ Ухмвбфьфзфб) кбй
мефбгенЭуфесет фспрпрпйЮуейт.
- 2002/96/CE.
ГенйкЮ буцЬлейб
• З ухукехЮ учедйЬуфзке гйб мз ербггелмбфйкЮ чсЮуз уфп
еущфесйкь кбфпйкЯбт.
• З ухукехЮ рсЭрей нб чсзуймпрпйеЯфбй гйб фз ухнфЮсзуз кбй
кбфЬшхоз фспцЯмщн, мьнп брь енЮлйкб Ьфпмб кбй уэмцщнб ме фйт
пдзгЯет рпх бнбцЭспнфбй уфп рбсьн егчейсЯдйп.
• З ухукехЮ ден егкбиЯуфбфбй уе еощфесйкь чюсп, бкьмз кй бн п
чюспт укерЬжефбй, гйбфЯ еЯнбй рплэ ерйкЯндхнп нб фзн бцЮнефе
екфеиеймЭнз уфз вспчЮ кбй уфзн кбкпкбйсЯб.
• Мзн бггЯжефе фз ухукехЮ ме гхмнЬ рьдйб Ю ме фб чЭсйб Ю фб рьдйб
всегмЭнб.
• Мзн бггЯжефе фб еущфесйкЬ шхкфйкЬ мЭсз: хрЬсчей кЯндхнпт
егкбэмбфпт Ю фсбхмбфйумпэ.
• Мз вгЬжефе фп вэумб брь фп сеэмб фсбвюнфбт фп кблюдйп, бллЬ
рйЬнпнфбт фп вэумб.
• Рсйн брь прпйбдЮрпфе енЭсгейб кбибсйумпэ кбй ухнфЮсзузт
еЯнбй бнбгкбЯп нб вгЬжефе фп вэумб брь фзн рсЯжб. Ден бскеЯ нб
цЭсефе фпн ерйлпгЭб гйб ЛЕЙФПХСГЙБУ КБФБШХКФЗ уфз иЭуз
OFF (ухукехЮ увзуфЮ) гйб еопхдефЭсщуз кЬие злекфсйкЮт
ербцЮт.
• Уе ресЯрфщуз влЬвзт, уе кбмЯб ресЯрфщуз мзн еремвбЯнефе
уфпхт еущфесйкпэт мзчбнйумпэт гйб ерйукехЮ.
• Мз чсзуймпрпйеЯфе уфп еущфесйкь фщн дйбмесйумЬфщн
ухнфЮсзузт кбфешхгмЭнщн фспцЯмщн, есгблеЯб кпцфесЬ кбй
бйчмзсЬ Ю злекфсйкЭт ухукехЭт бн бхфЭт ден еЯнбй фпх фэрпх рпх
егксЯней п кбфбукехбуфЮт
• Мз вЬжефе уфп уфьмб кэвпхт рпх мьлйт вгЬлбфе брь фпн
кбфбшэкфз.
• H ухукехЮ бхфЮ ден еЯнбй кбфЬллзлз гйб чсЮуз брь Ьфпмб
(ухмресйлбмвбнпмЭнщн фщн рбйдйюн) ме мейщмЭнет цхуйкЭт,
бйуизуйбкЭт Ю нпзфйкЭт йкбньфзфет Ю чщсЯт емрейсЯб кбй гнюуз,
екфьт кй бн ерйфзспэнфбй Ю Эчпхн екрбйдехфеЯ учефйкЬ ме фз чсЮуз
фзт ухукехЮт брь Ьфпмп хреэихнп гйб фзн буцЬлейЬ фпхт. Фб
рбйдйЬ иб рсЭрей нб ерйфзспэнфбй гйб нб еЯуфе уЯгпхспй ьфй ден
рбЯжпхн ме фз ухукехЮ.
• Пй ухукехбуЯет ден еЯнбй рбйчнЯдйб гйб рбйдйЬ.
ДйЬиеуз
• ДйЬиеуз фпх хлйкпэ ухукехбуЯбт: нб фзсеЯфе фпхт фпрйкпэт
кбньнет, Эфуй пй ухукехбуЯет иб мрпспэн бн
ербнбчсзуймпрпйзипэн.
• З ехсщрбъкЮ пдзгЯб 2002/96/EK гйб фб Брьвлзфб Злекфсйкпэ кбй
Злекфспнйкпэ Еопрлйумпэ (БЗЗЕ), брбйфеЯ ьфй пй рблбйЭт пйкйбкЭт
злекфсйкЭт ухукехЭт ден рсЭрей нб брпвЬлпнфбй мбжЯ ме фб
хрьлпйрб брьвлзфб фпх дзмпфйкпэ дйкфэпх. Пй рблбйЭт ухукехЭт
рсЭрей нб ухллечипэн чщсйуфЬ рспкеймЭнпх нб велфйуфпрпйзипэн
з брпкбфЬуфбуз кбй з бнбкэклщуз фщн хлйкюн рпх ресйЭчпхн кбй
ме укпрь фз меЯщуз фщн влбвесюн ерйрфюуещн уфзн бнисюрйнз
хгеЯб кбй фп ресйвЬллпн. Фп уэмвплп ме фп дйегсбммЭнп “дпчеЯп
брпвлЮфщн” уфп рспъьн хренихмЯжей уе убт фзн хрпчсЭщуЮ убт,
рщт ьфбн ерйихмеЯфе нб рефЬоефе фз ухукехЮ ,рсЭрей нб
ухллечиеЯ чщсйуфЬ.
Пй кбфбнблщфЭт иб рсЭрей нб брехиэнпнфбй уфйт фпрйкЭт бсчЭт Ю
уфб кбфбуфЮмбфб лйбнйкЮт гйб рлзспцпсЯет рпх бцпспэн фз ущуфЮ
дйЬиеуз фщн рблбйюн злекфсйкюн ухукехюн.
Еопйкпньмзуз кбй уевбумьт уфп ресйвЬллпн
• ЕгкбфбуфЮуфе фз ухукехЮ уе дспуесь кбй кблЬ бесйжьменп
ресйвЬллпн, рспуфбфеэуфе фз брь фзн Ьмеуз Экиеуз уфйт злйбкЭт
бкфЯнет, мз фзн фпрпиефеЯфе рлзуЯпн рзгюн иесмьфзфбт.
• Гйб нб ейуЬгефе Ю нб еоЬгефе фб фсьцймб, бнпЯгефе фйт рьсфет фзт
ухукехЮт гйб ьуп мйксьфесп дйЬуфзмб гЯнефбй. КЬие Ьнпйгмб фщн
ихсюн рспоенеЯ узмбнфйкЮ кбфбнЬлщуз енЭсгейбт.
• Мз гемЯжефе ме рпллЬ фсьцймб фз ухукехЮ: гйб кблэфесз ухнфЮсзуз,
фп шэчпт рсЭрей нб кхклпцпсеЯ елеэиесб. Бн рбсемрпдйуфеЯ з
кхклпцпсЯб, п ухмрйеуфЮт иб дпхлеэей ухнечют.
• Мзн ейуЬгефе жеуфЬ фсьцймб: иб бнЭвбжбн фзн еущфесйкЮ
иесмпксбуЯб бнбгкЬжпнфбт фп ухмрйеуфЮ уе хресвплйкь цьсфп
есгбуЯбт, ме хресвплйкЮ кбфбнЬлщуз злекфсйкЮт енЭсгейбт.
• Брпшэофе фз ухукехЮ бн учзмбфйуфеЯ рЬгпт (влЭре УхнфЮсзуз).
¸нб рбчэ уфсюмб рЬгпх кбийуфЬ дхукпльфесз фзн екчюсзуз фпх
шэчпхт уфб фсьцймб кбй бхоЬнефбй з кбфбнЬлщуз енЭсгейбт.
• ДйбфзсеЯфе брпфелеумбфйкЬ кбй кбибсЬ фб ресйвлЮмбфб, Эфуй рпх
нб ецбсмьжпхн кблЬ уфйт рьсфет кбй нб мзн бцЮнпхн фп шэчпт
нб еоЭлией (влЭре УхнфЮсзуз).
БнщмблЯет кбй лэуейт
МрпсеЯ нб фэчей нб мз лейфпхсгеЯ з ухукехЮ. Рсйн фзлецщнЮуефе
уфзн ФечнйкЮ ХрпуфЮсйоз (влЭре ФечнйкЮ ХрпуфЮсйоз), елЭгофе бн
рськейфбй гйб рсьвлзмб рпх бнфймефщрЯжефбй еэкплб ме фз впЮиейб
фпх бкьлпхипх кбфбльгпх.
З лхчнЯб еущфесйкпэ цщфйумпэ ден бнЬвей.
• Фп вэумб ден Эчей мрей уфзн злекфсйкЮ рсЯжб Ю ден кЬней кблЮ
ербцЮ, Ю уфп урЯфй ден хрЬсчей сеэмб.
• П ерйлпгЭбт ЛЕЙФПХСГЙБ КБФБШХКФЗ ден рсЭрей нб еЯнбй уфп
OFF.
П кйнзфЮсбт ден оекйнЬей.
• З ухукехЮ дйбиЭфей Элегчп фпх кйнзфЮсб (влЭре ЕккЯнзуз кбй
чсЮуз).
GR
11
Page 12

GR
Фп шхгеЯп кбй п кбфбшэкфзт шэчпхн лЯгп.
• Oй рьсфет ден клеЯнпхн кблЬ Ю пй фуймпэчет еЯнбй цибсмЭнет
• Oй рьсфет бнпЯгпхн рплэ ухчнЬ
• П ерйлпгЭбт гйб фз СХИМЙУЗ ФЗУ ИЕСМПКСБУЙБУ ден еЯнбй
уфз ущуфЮ иЭуз
• Фп шхгеЯп Ю п кбфбшэкфзт гемЯубне хресвплйкЬ.
Уфп шхгеЯп фб фсьцймб рбгюнпхн.
• П ерйлпгЭбт гйб фз СХИМЙУЗ ФЗУ ИЕСМПКСБУЙБУ ден еЯнбй
уфз ущуфЮ иЭуз
• Фб фсьцймб еЯнбй уе ербцЮ ме фп рЯущ мЭспт.
П кйнзфЮсбт лейфпхсгеЯ бдйблеЯрфщт.
• З рьсфб ден еЯнбй кблЬ клейумЭнз Ю бнпЯгей ухнечют.
• З иесмпксбуЯб фпх еощфесйкпэ ресйвЬллпнфпт еЯнбй рплэ хшзлЮ.
З ухукехЮ екрЭмрей рплэ иьсхвп.
• З ухукехЮ ден егкбфбуфЬизке уе ерЯредп дЬредп (влЭре
ЕгкбфЬуфбуз).
• З ухукехЮ егкбфбуфЬизке мефбоэ ерЯрлщн Ю бнфйкеймЭнщн рпх
дпнпэнфбй кбй екрЭмрпхн ипсэвпхт.
• Фп еущфесйкь шхкфйкь бЭсйп рбсЬгей Энб елбцсэ иьсхвп бкьмз
кбй ьфбн п ухмрйеуфЮт еЯнбй бненесгьт: ден еЯнбй елЬффщмб, еЯнбй
цхуйплпгйкь.
З иесмпксбуЯб псйумЭнщн еощфесйкюн месюн фпх шхгеЯпх
еЯнбй хшзлЮ
• Пй хшзлЭт иесмпксбуЯет еЯнбй бнбгкбЯет гйб фзн брпцхгЮ
учзмбфйумпэ ухмрхкнюмбфпт уе псйумЭнет ресйпчЭт фпх
рспъьнфпт.
12
Page 13

MontajMontaj
Montaj
MontajMontaj
!!
! Bu kitapçýðý gerektiði her an danýþabilmeniz için özenle saklayýnýz.
!!
Satýþ, devir yada taþýnma halinde, çalýþma sistemi ve bununla ilgili
uyarýlar konusunda cihazýn yeni sahibinin bilgilenmesi için bu
kitapçýðýn cihazla birlikte kalmasýný saðlayýnýz.
! !
! Talimatlarý dikkatlice okuyunuz: montaj, kullaným ve güvenliðe
! !
iliþkin önemli bilgiler içermektedir.
Cihazýn yerleþtirilmesi ve baðlanmasýCihazýn yerleþtirilmesi ve baðlanmasý
Cihazýn yerleþtirilmesi ve baðlanmasý
Cihazýn yerleþtirilmesi ve baðlanmasýCihazýn yerleþtirilmesi ve baðlanmasý
KonumlandýrmaKonumlandýrma
Konumlandýrma
KonumlandýrmaKonumlandýrma
1. Cihazý nemsiz ve havadar bir yere yerleþtiriniz.
2. Arkadaki havalandýrma ýzgaralarýný kapatmayýnýz: kompresör ve
kondenser ýsý yayar, bu yüzden cihazýn iyi çalýþmasýný ve tüketiminin
azalmasýný saðlamak için iyi bir havalandýrma gerektirirler.
3. Cihazýn üst kýsmý ile üstüne konacak mobilya arasýnda en az 10
cm, mobilya/duvar yanýna yerleþtirilmesi durumunda ise en az 5
cm açýklýk býrakýnýz
4. Cihazэ эsэ kaynaklarэndan uzak tutunuz (цr. doрrudan gьneю эюэрэ,
elektrikli ocak).
5. Ürünün arka kýsmýyla duvar arasýnda uygun bir mesafe
býrakmak için, verilen belge üzerinde bulunan kullaným
talimatlarýna uygun olarak montaj kitinde mevcut olan
uzaklaþtýrýcý çubuklarý monte ediniz.
Cihazýn ayný seviyeye getirilmesiCihazýn ayný seviyeye getirilmesi
Cihazýn ayný seviyeye getirilmesi
Cihazýn ayný seviyeye getirilmesiCihazýn ayný seviyeye getirilmesi
1. Buzdolabýnýzý düz ve sert bir zemin üzerine yerleþtiriniz.
2. Zeminin düz olmamasý durumunda ayarlanabilir ön ayaklarý
gevþeterek veya sýkarak cihazýn tamamen zemine oturmasýný
saðlayýnýz.
Elektrik baðlantýsýElektrik baðlantýsý
Elektrik baðlantýsý
Elektrik baðlantýsýElektrik baðlantýsý
Taþýma sonrasýnda cihazý dik olarak yerleþtiriniz ve elektrik
tesisatýna baðlamadan önce en az 3 saat bekleyiniz. Fiþi prize
takmadan önce aþaðýdaki hususlara dikkat ediniz:
• Prizin topraklamasý yürürlükteki normlara uygun olmalýdýr;
• elektrik prizi, soðutucu bölmesinin sol tarafýnýn aþaðýsýnda
bulunan özellik etiketinde belirtilen makinenin maksimum güç
yükünü çekebilmelidir (örn. 150 W);
• besleme gerilimi, soðutucu bölmesinin sol tarafýnýn aþaðýsýnda
bulunan özellik etiketinde belirtilen deðerler kapsamýnda olmalýdýr
(ör. 220-240 V);
• priz ve cihazýn fiþi, birbiriyle uyumlu olmalýdýr.
Aksi takdirde fiþin yenisi ile deðiþtirilmesi için yetkili Servise
(
Teknik Servis bölümüne bakýnýz
kablosu ya da çoklu priz kullanmayýnýz.
) baþvurmanýz gerekir; uzatma
1. Cihazýn fiþini elektrik prizine takýnýz ve yeþil BESLEME uyarý
lambasýnýn yanmasýný saðlayýnýz.
2. SOÐUTUCU KONTROL ayar düðmesini orta bir deðere
ayarlayýnýz. Birkaç saat geçtikten sonra buzdolabýnýza gýdalarýn
yerleþtirilmesi mümkün olacaktýr.
Buzdolabýnýzý en iyi þekilde kullanýnýzBuzdolabýnýzý en iyi þekilde kullanýnýz
Buzdolabýnýzý en iyi þekilde kullanýnýz
Buzdolabýnýzý en iyi þekilde kullanýnýzBuzdolabýnýzý en iyi þekilde kullanýnýz
fridge
Soðutucu bölmesinde ýsý ayarlarýnýn otomatik olarak termostatýn
konumuna göre yapýlmasý saðlanýr.
minmin
min = daha az soðuk
minmin
maxmax
max = daha çok soðuk
maxmax
Orta bir deðere ayarlanmasý tavsiye edilir.
NO FROST soðutma sistemiNO FROST soðutma sistemi
NO FROST soðutma sistemi
NO FROST soðutma sistemiNO FROST soðutma sistemi
No frost sistemi ile devamlý soðuk hava dolaþýmý saðlanýr. Böylece
nem toplanýr, buz ve çiy oluþmasý engellenir: soðutucu bölmesinde
gerekli olan nem oraný saðlanýr ve çiy oluþmasýný engellediði için
gýdalarýn besin özelliklerinin korunmasý saðlanýr; dondurucu
bölmesinde ise buz çözme iþlemine gerek kalmadan ve gýdalarýn
birbiriyle yapýþmamasý saðlanarak buz oluþmasý engellenir. Gýda
veya kap arka soðutma duvarý ile direk temasa geçmemelidir.
Havalandýrma delikleri kapatýlmasý kondens suyu oluþmasýna sebep
olur.
Þiþeleri kapatýnýnz ve gýdalarý sarýnýz.
Sadece soðuk, ýlýk ve sýcak olmayan gýda yerleþtirilebilir (Önlemler
ve öneriler bölümüne bakýnýz).
Piþmiþ gýda çið gýdadan daha uzun süre saklanmaz.
RAFLARRAFLAR
RAFLAR
RAFLARRAFLAR
Büyük kaplar veya fazla yer kaplayan gýdalarýn yerleþtirilmesi için
mevcut olan kýlavuzlar sayesinde çýkarýlabilir ve yüksekliði
ayarlanabilir (
ayarlanabilir.
::
*
: tepsi veya tel.
::
þekle bakýnýz
). Yükseklik, raf tamamen çýkarýlmadan
TR
!!
! Cihaz monte edildikten sonra elektrik kablosu ve priz kolay bir
!!
þekilde eriþilebilir olmalýdýrlar.
!!
! Kablo kývrýlmalara veya ezilmelere maruz kalmamalýdýr.
!!
!!
! Kablonun periyodik olarak kontrol edilmesi ve sadece yetkili teknik
!!
personel tarafýndan deðiþtirilmesi gerekir (Teknik Servis bölümüne
bakýnýz).
! Üretici firma yukarýdaki normlarýn dikkate alýnmamasý! Üretici firma yukarýdaki normlarýn dikkate alýnmamasý
! Üretici firma yukarýdaki normlarýn dikkate alýnmamasý
! Üretici firma yukarýdaki normlarýn dikkate alýnmamasý! Üretici firma yukarýdaki normlarýn dikkate alýnmamasý
durumunda hiçbir sorumluluk kabul etmeyecektirdurumunda hiçbir sorumluluk kabul etmeyecektir
durumunda hiçbir sorumluluk kabul etmeyecektir
durumunda hiçbir sorumluluk kabul etmeyecektirdurumunda hiçbir sorumluluk kabul etmeyecektir
Çalýþtýrma ve kullanýmÇalýþtýrma ve kullaným
Çalýþtýrma ve kullaným
Çalýþtýrma ve kullanýmÇalýþtýrma ve kullaným
Cihazýn çalýþtýrýlmasýCihazýn çalýþtýrýlmasý
Cihazýn çalýþtýrýlmasý
Cihazýn çalýþtýrýlmasýCihazýn çalýþtýrýlmasý
! Cihazý çalýþtýrmadan önce, kurulum talimatlarýný yerine! Cihazý çalýþtýrmadan önce, kurulum talimatlarýný yerine
! Cihazý çalýþtýrmadan önce, kurulum talimatlarýný yerine
! Cihazý çalýþtýrmadan önce, kurulum talimatlarýný yerine! Cihazý çalýþtýrmadan önce, kurulum talimatlarýný yerine
getiriniz (Montaj bölümüne bakýnýz).getiriniz (Montaj bölümüne bakýnýz).
getiriniz (Montaj bölümüne bakýnýz).
getiriniz (Montaj bölümüne bakýnýz).getiriniz (Montaj bölümüne bakýnýz).
!!
! Cihazý elektrik þebekesine baðlamadan önce, tüm bölmeleri ve
!!
aksesuarlarý bikarbonat kullanarak ýlýk su ile iyice temizleyiniz.
!!
! Cihaz, çalýþmaya baþladýktan yaklaþýk 8 dakika sonra kompresörü
!!
devreye sokan aþýrý yüklemeyi devreden çýkarma kontrolüne sahiptir.
Ýstenilen ya da istenilmeyen (black out) sebeplerden dolayý, elektrik
her kesildikten sonra da ayný iþlem tekrarlanýr.
..
.
..
13
Page 14

TR
FRESH BOXFRESH BOX
FRESH BOX bölümü taze et ve balýk saðlamak için tasarlanmýþtýr. Bu
FRESH BOXFRESH BOX
bölme; içerdeki soðukluk deceresi (buzdolabýn en soðuk bölmesidir) ve
oksidasyon ve kararma proseslerini engelleyen þeffaf kapaðý sayesinde
gýdalarýn uzun süre, bir haftaya kadar, saklamasýný saðlar Ayrýca ‘Soðuk
tabaklar’ için kullanýlabilir.
KUTU MEÞRUBAKUTU MEÞRUBA
KUTU MEÞRUBA
KUTU MEÞRUBAKUTU MEÞRUBA
Kutu meþrubat tutucusunun kapýnýn iç tarafýnda olmasý ihtiyaçlarýnýzý
karþýlayacak þekilde sadece kutu meþrubat deðil, yoðurt, tereyað
gibi baþka kaplarý da yerleþtirmenizi saðlar.
TT
T* tutucusu
TT
11
1 = daha az soðuk
11
maxmax
x = daha çok soðuk
ma
maxmax
Orta bir deðere ayarlanmasý tavsiye edilir.
düþük tüketim için optimal ýsý derecesidir.
OFFOFF
OFF soðutucu dahil olmak üzere cihazý kapatýr.
OFFOFF
• Erimiþ veya erimek üzere olan yiyecekleri bir daha
dondurmayýnýz, bu gýdalar (24 saat içinde) tuketilmesi için
piþirilmelidir.
• Dondurulacak taze yiyecekler, daha önce donmuþ olanlarla
temas etmemelidir.
• Dondurucu içinde sývý olan kapaðý kapatýlmýþ þiþe koymayýnýz,
patlayabilir.
• Günlük en fazla yiyecek dondurma miktarý soðutucu içinde
aþaðýda saðda bulunan teknik veriler etiketi üzerinde yazýlýdýrlar
(örneðin: Kg/24h 4).
• Dondurmak için (dondurucu çalýþýr vaziyetteyken): SUPER
FREEZE (hýzlý dondurma) tuþuna basýp (ilgili sarý lamba yanar)
gýdalarý yerleþtiriniz ve kapaðý kapatýnýz. 24 saat geçtikten sonra
veya en uygun ýsý derecesine ulaþýnca fonksiyon otomatik olarak
kapanýr (uyarý lambasý yanmýyor);
! Dondurma iþlemi sýrasýnda kapaðý acmamaya özen gösteriniz.
! Elektrik kesintisi veya ariza durumunda kapaðý açmayýnýz:
dondurulmuþ gýdalar 9-14 saate kadar, hiç bir degisikliðe uðramadan
korunurlar.
! Dondurucu bölmesi içerisinde hava dolaþýmýný saðlamak için
gýdalarýn havalandýrma deliklerini kapatmayacak þekilde
yerleþtirilmesi gerekir.
MEYVE VE SEBZEMEYVE VE SEBZE
MEYVE VE SEBZE çekmecesi
MEYVE VE SEBZEMEYVE VE SEBZE
Buzdolabýnda mevcut olan meyve ve sebze çekmeceleri içerde
saklanan meyve ve sebzeleri taze ve kokulu saklamak üzere
tasarlanmýþtýr. Gýdalarý daha az nemli bir ortamda saklamak için nem
ayarýný B konumuna getiriniz, daha nemli bir ortam için ise A
konumuna getiriniz. Kapaklarýn kolay açýlmasý (dýþarýya doðru
çekilir) gýdalarýn yerleþtirilmesi ve çýkarýlmasýný kolaylaþtýrýr.
Dondurucunun en iyi þekilde kullanýlmasýDondurucunun en iyi þekilde kullanýlmasý
Dondurucunun en iyi þekilde kullanýlmasý
Dondurucunun en iyi þekilde kullanýlmasýDondurucunun en iyi þekilde kullanýlmasý
DONDURUCU KONTROLDONDURUCU KONTROL
DONDURUCU KONTROL ayarý ile dondurucu bölmesindeki ýsý
DONDURUCU KONTROLDONDURUCU KONTROL
derecesi ayarlanýr.
BUZMABUZMA
BUZMA
BUZMABUZMA
Mevcut olan buz kaplarýný alýp su ile doldurduktan sonra buzmatik
bölgesine tekrar yerleþtiriniz. Yaklaþýk 2 saat sonra buz küpleri hazýr
olur. Buzu alabilmek için mevcut olan kollarý saða doðru çevirmeniz
yeterdir: buz küplarý altaki kaba düþer ve hizmete hazýr olur.
Bakým ve özenBakým ve özen
Bakým ve özen
Bakým ve özenBakým ve özen
Elektrik akýmýný kesinizElektrik akýmýný kesiniz
Elektrik akýmýný kesiniz
Elektrik akýmýný kesinizElektrik akýmýný kesiniz
Temizlik ve bakým iþlemi sýrasýnda cihazýn fiþini prizden çýkararak
elektrik baðlantýsýný kesiniz.
Buzdolabýnýn tüm elektrik baðlantýlarýný kesmek için ISI AYAR
DÜÐMESÝNÝ
deðildir.
Cihazý temizleyinizCihazý temizleyiniz
Cihazý temizleyiniz
Cihazý temizleyinizCihazý temizleyiniz
• Buzdolabýnýn dýþ, iç duvarlarý ve contalarý, karbonat (yemek
sodasý) veya nötr sabun eklenmiþ ýlýk su ile ýslatýlmýþ yumuþak bir
sünger ile temizlenebilir. Aþýndýrýcý, çözücü, amonyak veya
beyazlatýcý maddeler kullanmayýnýz.
• Sökülebilen aksesuarlar, bulaþýk deterjaný veya sabun eklenmiþ
ýlýk su içine batýrýlabilir. Çalkalayýnýz ve dikkatlice kurulayýnýz.
• Buzdolabýnýzýn arkasý toz dolu ise, cihazý kapatýp elektrik
baðlantýsýný kestikten sonra elektrik süpürgesini orta vat’a
ayarlayarak uzun ucu ile arkasýndaki tozlarý iyice alýnýz.
**
TÝKTÝK
*
TÝK
TÝKTÝK
**
OFFOFF
OFF konumuna (cihaz kapalý) getirmek yeterli
OFFOFF
14
Page 15

Ýstenmeyen kokularý ve küfü önleyinizÝstenmeyen kokularý ve küfü önleyiniz
Ýstenmeyen kokularý ve küfü önleyiniz
Ýstenmeyen kokularý ve küfü önleyinizÝstenmeyen kokularý ve küfü önleyiniz
• Cihaz, kokularý önleyici hijyenik malzemelerle üretilmiþtir. Bu
özelliði kaybetmemek için gýdalarýn her zaman iyice sarýlýp
kapatýlmasý gerekir. Böylece leke oluþmasý engellenecektir.
• Cihazýn uzun süre devre dýþý býrakýlmak istenmesi durumunda,
içini iyice temizleyiniz ve kapýlarýný açýk býrakýnýz.
Lambanýn yenisi ile deðiþtirilmesiLambanýn yenisi ile deðiþtirilmesi
Lambanýn yenisi ile deðiþtirilmesi
Lambanýn yenisi ile deðiþtirilmesiLambanýn yenisi ile deðiþtirilmesi
Soðutucu bölmesinin ampulünü deðiþtirmeden önce buzdolabýnýn
fiþini prizden çýkarýnýz. Aþaðýdaki talimatlarý yerine getiriniz.
Þekilde gösterildiði gibi koruma zarýný çýkardýktan sonra ampulü
açýnýz. Koruma zarýnda belirtilen (10 W) güce eþit olan bir ampulle
deðiþtiriniz.
Önlemler ve önerilerÖnlemler ve öneriler
Önlemler ve öneriler
Önlemler ve önerilerÖnlemler ve öneriler
!!
! Cihaz, uluslararasý emniyet kurallarýna uygun olarakC tasarlanmýþ
!!
ve üretilmiþtir. Bu uyarýlar, emniyet gerekçeleri nedeniyle yapýlýr ve
dikkatli bir þekilde okunmalýdýr.
Bu cihaz, aþaðýdaki Yönetmeliklere uygundur:
- 19/02/73 tarihli 73/23/CEE (Düþük Voltaj Yönergesi) ve müteakip
deðiþiklikler;
- 03/05/89 tarihli 89/336/CEE (Elektromanyetik Uyum) ve müteakip
deðiþiklikler;
- 2002/96/CE.
Genel güvenlik uyarýlarýGenel güvenlik uyarýlarý
Genel güvenlik uyarýlarý
Genel güvenlik uyarýlarýGenel güvenlik uyarýlarý
• Cihaz, meskenlerde kullanýlmak üzere tasarlanmýþ olup
profesyonel kullaným amaçlý deðildir.
• Cihaz, sadece yetiþkin kiþiler tarafýndan ve bu kitapçýkta aktarýlan
talimatlara göre, gýdalarý saklamak ve dondurmak için
kullanýlmalýdýr.
• Cihaz, üzeri kapalý bile olsa açýk alanlara monte edilmemelidir,
çünkü yaðmur ve fýrtýnaya maruz kalmasý son derece tehlikelidir.
• Cihaza ayaklarýnýz çýplakken yada elleriniz veya ayaklarýnýz
ýslak yada nemliyken dokunmayýnýz.
• Buzdolabýnýn soðutma yapan iç kýsýmlarýna dokunmayýnýz:
yanma veya yaralanma tehlikesi vardýr.
• Fiþi prizden çekerken kablosundan deðil fiþin kendisinden tutarak
çekiniz.
• Temizlik ve bakým iþlemlerini gerçekleþtirmeden önce fiþ elektrik
þebekesinden çýkarýlmalýdýr. Buzdolabýnýn tüm elektrik
baðlantýlarýný kesmek için ISI AYAR DÜÐMESÝNÝ
(cihaz kapalý) getirmek yeterli deðildir.
• Arýza halinde, onarmak amacýyla iç mekanizmalarý hiçbir þekilde
kurcalamayýnýz.
• Dondurulmuþ gýda saklama kaplarýnda üretici tarafýndan tavsiye
edilen tip hariç ucu sivri ve keskin aletleri kullanmayýnýz.
• Buz küplerini dondurucu bölmesinden çýkarýr çýkarmaz aðzýnýza
sokmayýnýz.
• Bu cihaz fiziksel, duyumsal veya mental kapasite azlýðýna sahip,
veya tecrübe ve bilinçten yoksun kiþilerin (çocuklar dahil)
kullanýmý için uygun deðildir, emniyetlerinden sorumlu bir kiþi
OFFOFF
OFF konumuna
OFFOFF
tarafýndan cihazýn kullanýmý konusunda eðitim almamýþ kiþiler
tarafýndan da kullanýma uygun olarak amaçlanmamýþtýr.
Çocuklar, cihaz ile oynamamalarý saðlanarak, denetlenmelidirler.
• Ambalajlar çocuklar için oyuncak deðildir.
Atýklarýn tasfiye edilmesiAtýklarýn tasfiye edilmesi
Atýklarýn tasfiye edilmesi
Atýklarýn tasfiye edilmesiAtýklarýn tasfiye edilmesi
• Ambalaj malzemelerinin tasfiye edilmesi: yerel yasalara uyunuz,
bu þekilde ambalajlarýn geri dönüþümü saðlanabilecektir.
• Elektrik ve elektronik cihazlarýn atýklarý hakkýndaki 2002/96/CE
sayýlý Avrupa Konseyi yönetmeliðinde (RAEE); beyaz eþyalarýn
kentsel katý atýk genel yöntemi ile tasfiye edilmemesi
öngörülmüþtür. Kullanýlmayan cihazlarýn, madde geri kazaným ve
geri dönüþüm oranýný en yüksek seviyeye yükseltmek, çevre ve
insan saðlýðýna olasý zararlarý engellemek amacýyla ayrý ayrý
toplanmasý gerekir. Tüm ürünlerin üzerinde; ayrý toplama
hükümlerini hatýrlatmak amacýyla üstünde çarpý iþareti olan sepet
sembolü aktarýlmaktadýr.
Elektrikli ev aletlerinin doðru bir þekilde tasfiye edilmesi
konusunda daha geniþ bilgi almak için, cihaz sahipleri mevcut
müþteri hizmetine veya satýþ noktalarýna baþvurabilirler.
TT
asarrufa yöneliniz ve çevreye saygýlýasarrufa yöneliniz ve çevreye saygýlý
T
asarrufa yöneliniz ve çevreye saygýlý
TT
asarrufa yöneliniz ve çevreye saygýlýasarrufa yöneliniz ve çevreye saygýlý
olunuzolunuz
olunuz
olunuzolunuz
• Buzdolabэ doрrudan gьneю эюэрэna maruz kalmayacak, serin ve
havadar uygun bir yere yerleюtiriniz. Ayrэca, эsэ kaynaklarэndan
uzakta olmalэdэr.
• Gýdalarý almak ya da yerleþtirmek için cihazýn kapaðýný mümkün
olduðu kadar az açýk tutunuz.
Buzdolabýnýn kapaðý her açýldýðýnda enerji tüketilir.
• Cihazý fazla gýda ile doldurmayýnýz: gýdalarýn iyi saklanmasý için
soðuk hava dolaþýmýnýn saðlanmasý gerekir. Hava dolaþýmýnýn
engellenmesi durumunda kompresör devamlý çalýþmak zorunda
kalacaktýr.
• Buzdolabýnýn içine sýcak gýda koymayýnýz: ýsý derecesi yükselir,
kompresör yoðun çalýþmak zorunda kalýr ve enerji büyük
miktarda tüketilir.
• Buz oluþumu halinde dondurucu bölmesindeki buzu eritiniz (
Bakým bölümüne bakýnýz ); Kalýn bir buz tabakasý soðutma
iþlemini engellediði için daha fazla enerji tüketilir.
Arýzalar ve onarýmlarArýzalar ve onarýmlar
Arýzalar ve onarýmlar
Arýzalar ve onarýmlarArýzalar ve onarýmlar
Buzdolabýnýz bazen çalýþmayabilir. Teknik Servis ile irtibata
geçmeden önce (
yardýmýyla kolaylýkla çözülebilecek bir problem olup olmadýðýný
kontrol ediniz.
Ýç lamba yanmýyorÝç lamba yanmýyor
Ýç lamba yanmýyor
Ýç lamba yanmýyorÝç lamba yanmýyor
• Fiþ prize takýlý deðil veya kontaða girecek kadar takýlý deðil veya
evdeki elektrik akýmý kesik.
Motor çalýþmaya baþlamýyorMotor çalýþmaya baþlamýyor
Motor çalýþmaya baþlamýyor
Motor çalýþmaya baþlamýyorMotor çalýþmaya baþlamýyor
• Cihaz motor kurtarma aygýtýna sahiptir (Çalýþtýrma ve kullanma
bölümüne bakýnýz).
Soðutucu ve dondurucu az soðutma yapýyorSoðutucu ve dondurucu az soðutma yapýyor
Soðutucu ve dondurucu az soðutma yapýyor
Soðutucu ve dondurucu az soðutma yapýyorSoðutucu ve dondurucu az soðutma yapýyor
• Kapaklar tamamen kapanmýyor veya contalar bozuk.
• Kapaklar sýk sýk açýlýyor.
• ISININ AYAR düðmesini doðru þekilde ayarlanmamýþ.
• Soðutucu veya dondurucu fazla doldurulmuþ.
Soðutucu bölmesinde gýdalar donuyorSoðutucu bölmesinde gýdalar donuyor
Soðutucu bölmesinde gýdalar donuyor
Soðutucu bölmesinde gýdalar donuyorSoðutucu bölmesinde gýdalar donuyor
• ISININ AYAR düðmesini doðru þekilde ayarlanmamýþ.
• Gli alimenti sono a contatto con la parete posteriore.
Motor devamlý çalýþýyorMotor devamlý çalýþýyor
Motor devamlý çalýþýyor
Motor devamlý çalýþýyorMotor devamlý çalýþýyor
• Kapak tam kapalý deðil veya devamlý açýlýp kapatýlýyor.
• Dýþ ortam sýcaklýðý çok yüksek.
• Buzlanma kalýnlýðý 2-3 mm’yi geçiyor (Bakým bölümüne bakýnýz ).
Teknik Servis bölümüne bakýnýz
..
.
..
..
.
..
..
.
..
..
.
..
), aþaðýdaki liste
..
.
..
TR
15
Page 16

195103506.00
05/2012
TR
Cihaz çok ses yapýyorCihaz çok ses yapýyor
Cihaz çok ses yapýyor
Cihaz çok ses yapýyorCihaz çok ses yapýyor
• Cihaz tamamen düz bir zemine montaj edilmemiþ (Montaj
bölümüne bakýnýz).
• Cihaz ses ve sarsýntý yapan mobilya veya eþya arasýna
yerleþtirilmiþ.
• Ýçindeki gaz kompresör çalýþmadýðý zamanda hafif bir ses
yapmýyor: bir ariza deðildir, normaldýr.
Buzdolabýnýn bazý dýþ kýsýmlarýnýn ýsýsý yüksekBuzdolabýnýn bazý dýþ kýsýmlarýnýn ýsýsý yüksek
Buzdolabýnýn bazý dýþ kýsýmlarýnýn ýsýsý yüksek
Buzdolabýnýn bazý dýþ kýsýmlarýnýn ýsýsý yüksekBuzdolabýnýn bazý dýþ kýsýmlarýnýn ýsýsý yüksek
• Yüksek ýsý ürünün bazý özel bölgelerinde nem oluþmasýný
engellemek için gereklidir.
Soðutucu bolmesinin tabanýnda ýslaklýk varSoðutucu bolmesinin tabanýnda ýslaklýk var
Soðutucu bolmesinin tabanýnda ýslaklýk var
Soðutucu bolmesinin tabanýnda ýslaklýk varSoðutucu bolmesinin tabanýnda ýslaklýk var
• Su boþaltma deliði týkalýymýþ (Bakým bölümüne bakýnýz)
..
.
..
..
.
..
16
 Loading...