

Page 1

EN
English
Instructions for use
OVEN
Contents
Steam cooking
What your oven looks like
Accessories
Installing your oven
Electrical connection
Fitting
Using your oven
Setting the clock
Display lock
Display stand-by mode
Programming for immediate cooking
Water management
Programming cooking with a delayed start
Using the timer
Description of the functions
Cooking chart
Caring for your oven
Changing the bulb
What to do in the event of problems
Important safety instructions.
Read carefully and retain for future use.
Page 2
2
EN
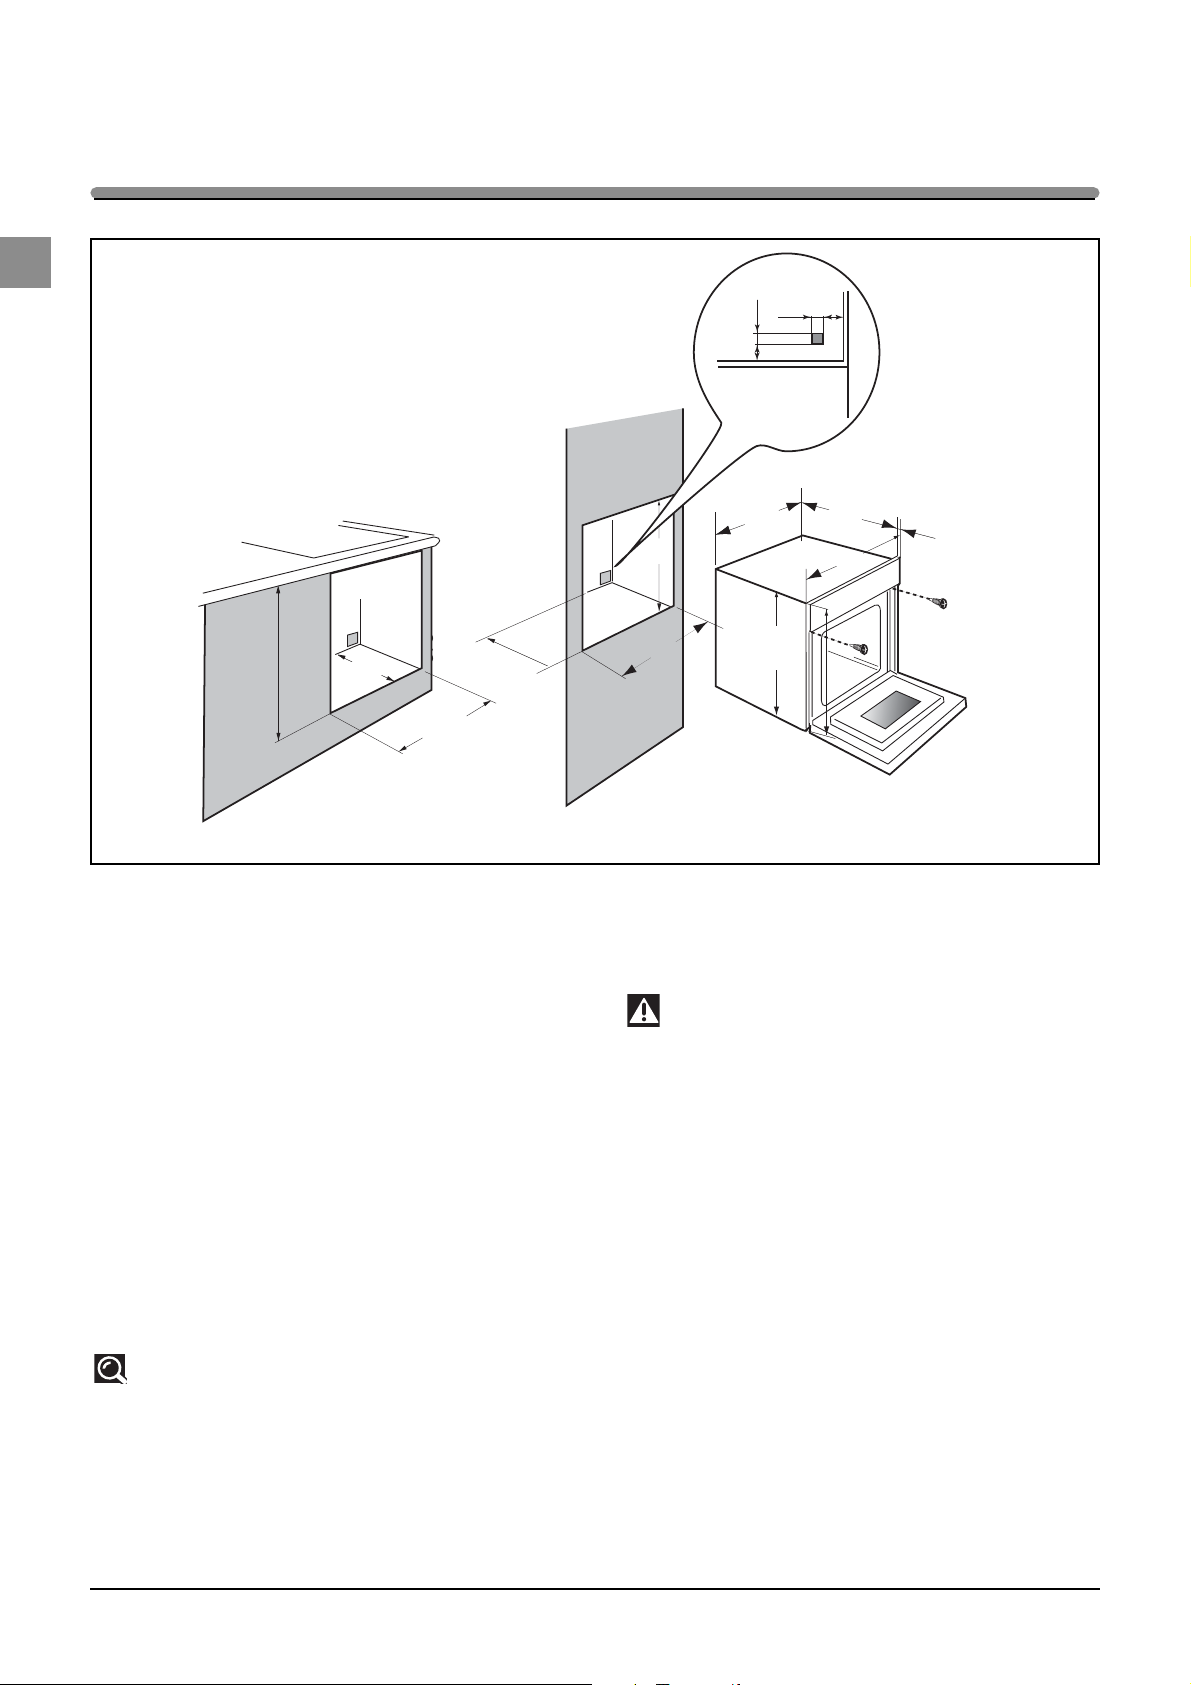
Installing your appliance
CHOICE OF LOCATION
The above diagrams show the dimensions required for a cabinet
to contain your oven.
The oven may be installed either under a worktop or in a full-height
unit (open or closed) that has the appropriate dimensions for
built-in installation.
• For greater stability, secure the oven in the cabinet with two
screws through the holes provided for this purpose on the side
panels.
1) Drill a pilot hole in the cabinet panel to avoid splitting the wood.
2) Secure the oven with the two screws.
Tip
To be certain that you have installed your
appliance correctly, do not hesitate to contact a
household appliance specialist.
Note
We cannot be held responsible for any accident
resulting from a non-existent, defective or
incorrect earth connection..
If the electrical installation in your residence
requires any changes for connecting your
appliance, call a qualified electrician.
If the oven malfunctions in any way, unplug the
appliance or remove the fuse for the circuit to
which the oven is connected.
50
10
50
20
450
550 mini
378
560
mini
550
550
450
560
400
26
595
445
456
Page 3
3
EN
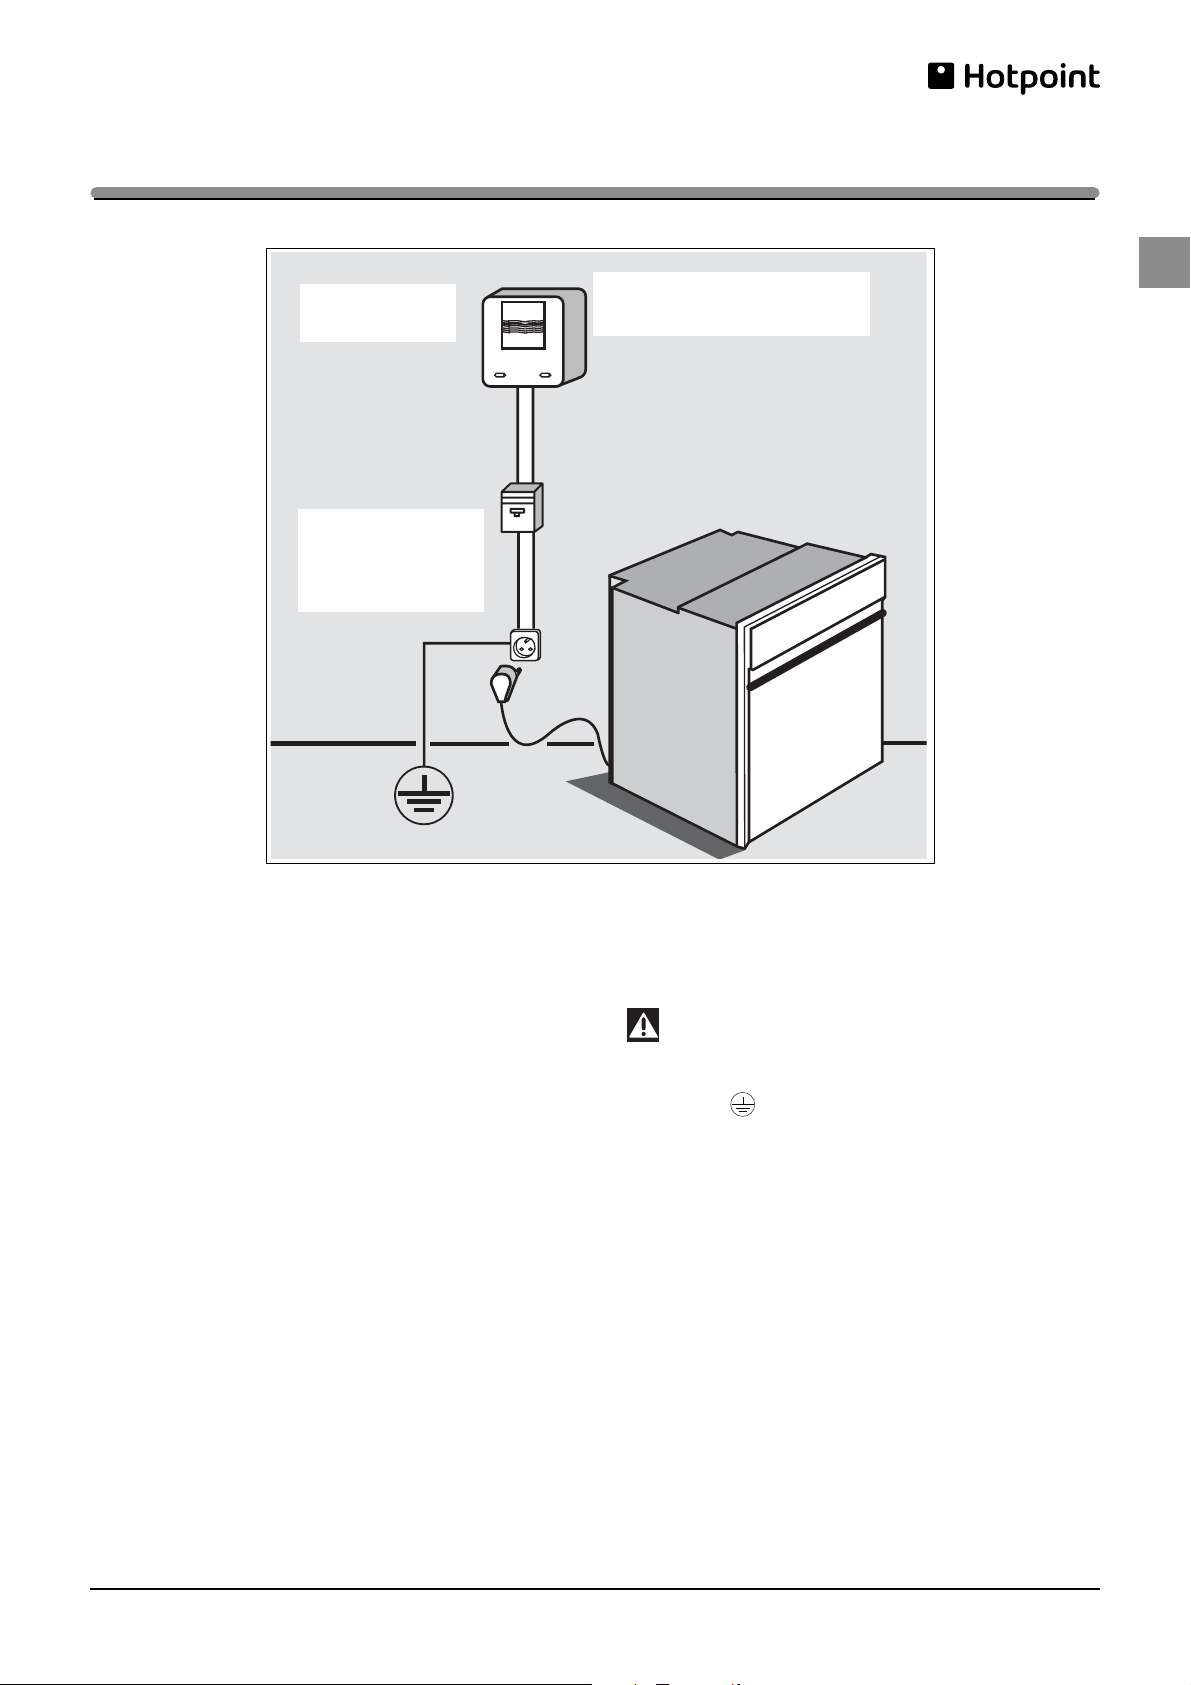
ELECTRICAL CONNECTION
Single-phase 20A Meter
220-240V~50 Hz
Electrical socket
2 pin + earth
to IEC 60083
standard
220-240 V
~
single-phase line
Power
supply cable
length 1.50 m
approx.
10A fuse or residual
current circuit breaker
The appliance must be fitted correctly to ensure electrical safety.
During fitting and maintenance operations, the appliance must be
unplugged from the electrical system; fuses must be switched off
or removed.
The electrical connections are made before the appliance is
installed in its housing.
Ensure that:
- the electrical installation has sufficient power,
- the electrical wires are in good condition,
- the diameter of the conductors complies with the requirements
of the installation.
Your oven must be connected with a (standardised) power cable
with three conductors of 1 mm² (1ph + 1N + earth) which must be
connected to a 220-240V~single-phase supply via a
1ph + 1 neutral + earth IEC 60083 standardised power socket or
via an all-pole cut-off device in compliance with installation rules.
Installing your appliance
Note
The safety wire (green-yellow) is connected to the
appliance’s terminal and must be connected to
the electrical installation’s earth system.
Where connected to a wall socket, the socket must
remain accessible after installation.
The circuit should be protected with a 10 Amp fuse.
If the power cable is damaged, it must be replaced by
the manufacturer, its After-Sales Service Department
or a similarly qualified person to prevent danger.
Page 4

Description of the appliance
4
EN
Control
panel
Tan k
Display
Steam
generator
Water intake
tube
Gutter
Overview
DISPLAY
+ button
– button
Control locking button
Defrost mode
Time
setting
Temperature
setting
Down
arrow
Up
arrow
Cooking mode
selected
Control panel lock
indication
Selected menu
indication
Time, Cooking time,
End of
cooking
Temperature
indication
indique :
Minuterie
Fin de cuisson
ON/OFF
lche
Haut
lce
a
Sélection du
mode Décongélation
Indication du
menu sélectionné
AFFICHEUR
Réglage
Temperature
églage
Tem ps
Indication
verrouillage clavier
indique :
Heure,Durée de cuisson
Touche
verrouillage commandes
Touche +
Touche -
Indication de
Température
Mode de cuisson
sélectionnée
START/
STOP
Page 5
Accessories
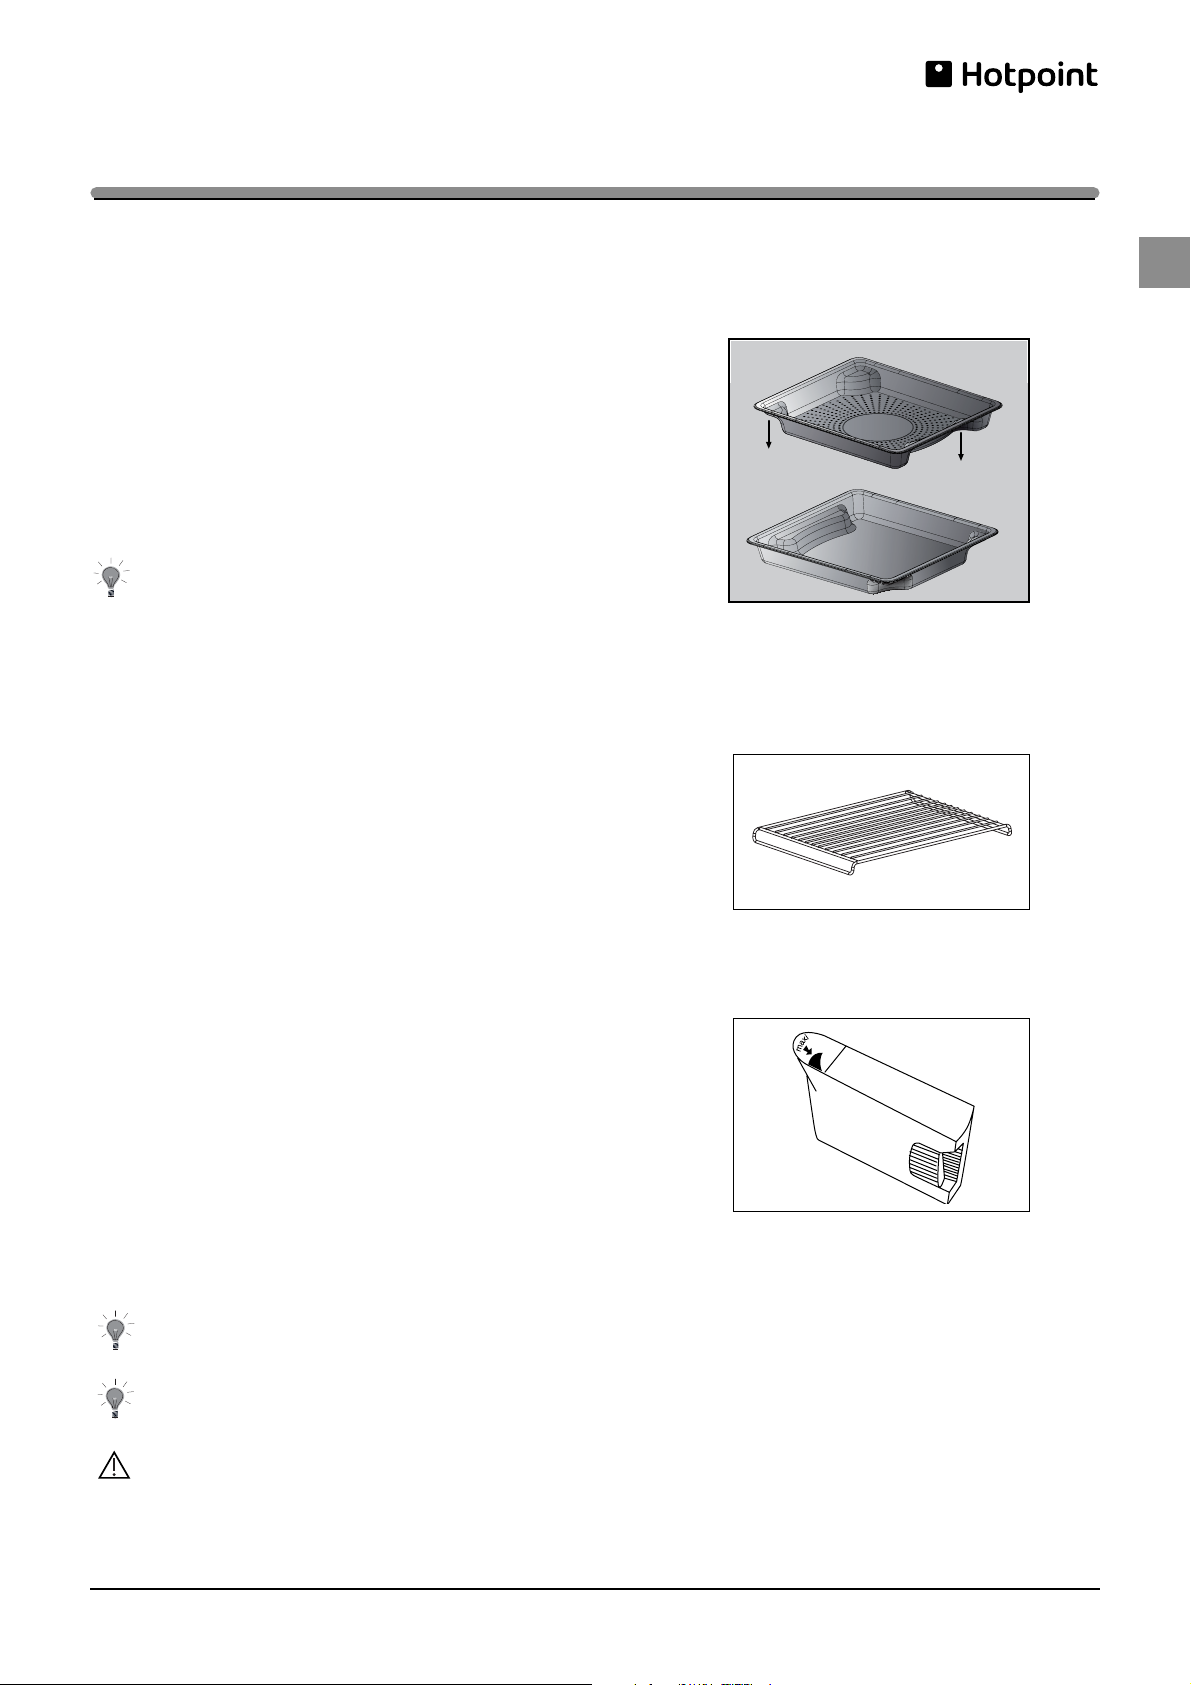
ACCESSORIES
•
5
EN
• Food dish (fig.1)
Perforated stainless steel dish preventing contact between the food and
condensation water.
• Condensate dish (fig.2)
Stainless steel dish for the recovery of condensation water.
• Shelf (fig.3)
Stainless steel removable shelf: must be used when cooking.
• Removable tank (fig.4)
Tank for the independent water supply to the oven.
Its capacity is approximately one litre (maximum level).
Using softer water will make it easier to care for your oven.
The use of demineralised water is prohibited (not food
quality). The use of softened water may deteriorate the
surface of the steam generator, Bottled mineral water
should be used for preference.
The dishes may be cleaned in a dishwasher.
fig.3
fig.1
fig.2
fig.4
When cooking, place the dish in fig. 1 on the dish in fig.2
counter to each other, so that that they do not nest (see
diagram opposite).
For storage, fit the dish in fig. 1 into the dish in fig. 2, so that
they nest.
Page 6

6
EN
Steam is also appropriate for blanching, defrosting and
reheating or even keeping foods warm, especially sauces.
First use a very small amount of fat to heat meats like poultry,
veal and pork so that they take on an appetising browned
appearance. Then finish cooking them using the steam
method.
Cut into pieces, food cooks faster and more evenly than if left
whole.
Operating principle
The water contained in the tank arrives in the cavity via a pipe.
This water is transformed into steam when it comes into contact
with the hot surface of the floor of the cavity: this is the steam
generator.
There is no need to add water to the cooking dish. To ensure
REAL STEAM COOKING, your oven is supplied with specially
designed cookware that will produce perfect cooking.
General
There are only advantages to steam cooking, if you follow the
instructions for use. Healthy and natural, steam cooking
preserves the full flavour of foods. A delicate sauce or
aromatic herb seasoning adds that something extra that
makes the difference.
This kind of cooking produces no cooking smells. There is no
need to season the cooking water with herbs or spices;
however, you can flavour a fish by placing it on a bed of
seaweed or make a savoury poultry dish by adding a bunch of
rosemary or tarragon.
You can cook meat, fish and vegetables simultaneously.
Steam cooking gently reheats pasta, rice and mashed
potatoes with no risk of food sticking or drying out.
It facilitates cooking custard creams and tarts, rice
pudding...covered with aluminium foil, food is not wetted by
condensation water.
There is no need to add salt before cooking, not even the
steam water.
To make meat look more appetising, quickly brown it on all
sides in a frying pan using hot butter.
Compared to boiling, steaming offers only advantages:
It is quick: cooking starts immediately whereas for food in a
water-filled dish, the cook time only begins counting down
once the water returns to a full boil.
It is healthy: vitamins (those that are water soluble) and
minerals are well preserved because they scarcely dissolve in
the condensation water that touches the food.
Moreover, no fats are used for this type of cooking.
Steam maintains the taste of food. It does not add odours, nor
the taste of the grill or the pan. Furthermore, it takes nothing
away because the food is not diluted in the water.
Words of advice: there is no point in using this cooking
method to prepare fish that is not fresh or vegetables left in
the refrigerator for a week: the results will be catastrophic!
Steam does not spread tastes or odours therefore do not
hesitate to save both time and money by cooking items side by
side, but without touching. For example, you can cook a fish
next to a dessert.
Steam cooking
Warning
You MUST fill the water tank to the max.level before
cooking. Return the tank to its housing by firmly
pushing ALL THE WAY until you feel it LOCK INTO
POSITION.
Warning
When in use, the appliance becomes hot. Hot steam
will escape when you open the door of the appliance.
Keep children at a distance.
Page 7

Important
Keep this user guide with your appliance. If
the appliance is ever sold or transferred to
another person, ensure that the new owner
receives this user guide. Please familiarise
yourself with these instructions before installing
and using your appliance. They were produced
for your safety and the safety of others.
SAFETY INSTRUCTIONS
— This oven was designed for use by private persons in
their homes. It is intended solely for cooking foodstuffs.
This oven does not contain any asbestos-based
components.
— This appliance is not intended to be used by persons
(including children) with physical, sensory or mental
disabilities, or those lacking experience or awareness,
unless supervised by someone responsible for their
safety, or they have received suitable instruction on
how to use the appliance.
— When you receive the appliance, unpack it or have it
unpacked immediately. Check its overall condition.
Make a note of any concerns or reservations on the
delivery slip and make sure that you keep a copy.
— Your appliance is intended for standard household
use. Do not use it for commercial or industrial purposes
or for any purpose other than that for which it was
designed.
— Do not modify or attempt to modify any of the
characteristics of this appliance. This would be
dangerous for your safety.
— Keep young children away from the appliance while it
is in operation. That way, you will avoid the danger of
them being burned by knocking over cooking pans.
— Never pull your appliance by the door handle.
— During cooking, ensure that the door of your oven is
properly closed so that the seal can do its job properly.
— Please ensure that children do not play with the
appliance.
— When in use, the appliance becomes hot. Do not
touch the heating elements inside the oven. You would
run the risk of serious burns.
— When placing dishes inside or removing them from
the oven, use heat-protective kitchen gloves.
— At the end of cooking, do not touch dishes with bare
hands.
— When you remove the condensation tray, it contains
very hot (boiling) water; take great care when handling.
— Do not place heavy weights on an open oven door and
make sure that children cannot climb or sit on it.
— The oven must be turned off when cleaning the inside.
— Intensive and prolonged use of the appliance may give
rise to the need for additional ventilation, by opening a
window, or by increasing the power of the mechanical
fan.
— Apart from the accessories supplied with your oven,
only use dishes which are suitable for use at high
temperatures (follow the manufacturer’s instructions).
— After using your oven, make sure that all controls are
returned to the ‘off’ position.
— Never use steam or high-pressure devices to clean the
oven (electrical safety requirement).
Information for the user
7
EN
Page 8

8
EN
CARING FOR THE ENVIRONMENT
— This appliance’s packing materials are recyclable. Please
recycle the packaging and help protect the environment by
depositing it in municipal containers provided for the purpose.
— Your appliance also contains various recyclable
materials. It therefore carries this logo to indicate that
used appliances should not be disposed of together
with other waste. The manufacturer will arrange for the
appliance to be recycled properly, in accordance with
European Directive 2002/96/EC on Waste Electrical and
Electronic Equipment. Contact your local council or your retailer to
find out details of your closest used appliance collection point.
—Thank you for helping to protect the environment.
Information for the user
Warning
This appliance should only be installed by qualified
installers and technicians.
This appliance complies with the following European
directives:
- Low Voltage Directive 73/23/EEC modified by directive
93/68/EEC for the insertion of the CE marking.
- Electromagnetic Compatibility Directive 89/336/EEC
modified by directive 93/68/EEC for the application of
CE marking.
- EC regulation no. 1935/2004 concerning materials and
items intended to come into contact with food products.
Page 9

Getting started
and using your oven
Prolonged pressure on the - and + buttons causes
the display to scroll quickly through the set lists and values.
Oven lighting
The display switches off after 2 minutes without a button
being pressed.
Using your oven for the first time
After connecting the oven to the mains and switching on for
the first time, activate the control panel by pressing the
button
TIMER Setting the timer
TIME Setting the clock
SOUND Touchpad volume
EXIT Exit from the menu
Setting the time
To set the time, first press the button to switch on the
oven.
1. Set the time using the + and - buttons.
2. Press “ ” to confirm.
3. Set the minutes using the + and - buttons.
4. Press “ ” to confirm.
Child safety function
The child safety function can be used to lock the oven
controls.
To activate it, press the button, the symbol appears
in the display. To de-activate it, repeat the operation until the
symbol disappears from the display. The child safety function
may be activated whether the oven is on or off. The child
safety function may be deactivated when the oven has
finished cooking and in all situations described above.
9
EN
Page 10

10
EN
Immediate cooking
MANUAL cooking programme
In MANUAL mode, it is possible to adjust the cooking time
as well as the temperature (from 100° to 50°).
1. Press the button to switch on the control panel.
2. Make your selection using the buttons:
3. Press the “ ” button to start cooking.
4. During cooking, it is possible to change the temperature
at any time, by pressing the “°C” button. Adjust using the +
and - buttons and press “ ” to confirm.
- programme the cooking time;
- stop cooking by pressing the “ ” button;
- set the timer;
- switch off the oven by pressing the button.
5. In the event of a power cut, if the oven temperature is not
too low, a special facility causes the programme to restart at
the point where it was was interrupted. However, any
programmes that have not yet started must be
reprogrammed once the power returns.
Automatic defrosting
Press the button:
55°C, pre-programmed time: 30 min
Min. time: 5 min, max.: 60 min
Defrosting fish fillets before breading.
Berries that must remain cool (for pies and sauces).
Defrosting meats before grilling (e.g.: sausages).
Reheating
100°C, Pre-programmed time: 25 min
Min. time: 5 min, max.: 60 min
Meat, vegetables.
Whole fish
85°C, Pre-programmed time: 15 min
Min. time: 5 min, max.: 60 min
For cooking delicate food. Whole fish (trout).
Pre-cooked dishes
95°C, Pre-programmed time: 30 min
Min. time: 5 min, max.: 60 min
Terrines, chicken livers. Reheating cooked dishes.
Flan 90°C, Pre-programmed time: 20 min
Min. time: 5 min, max.: 60 min
Cocotte eggs; stuffed tomatoes that hold their shape.
Ramekins, custard creams, etc.
Chocolate
80°C, Pre-programmed time: 15 min
Min. time: 5 min, max.: 60 min
Melted chocolate, butter. Fruit which is just warm for immediate
consumption.
Getting started &
and using your oven
You MUST fill the water tank to the max. level
before cooking. Return the tank to its
housing by firmly pushing ALL THE WAY until
you feel it LOCK INTO POSITION.
When in use, the appliance becomes hot. Hot
steam will escape when you open the door
of the appliance. Keep children at a distance.
Page 11

Setting a cooking programme
with delayed start
Changing the cooking temperature
Press the button.
Adjust by pressing the + and – buttons.
Save your selection by pressing the “”button.
Changing the cooking time
During cooking, you can adjust the cooking time by
pressing and the + and - buttons.
Press START to start cooking.
Cancelling cooking in progress
You can stop the cooking at any time by pressing “” (for
approximately 1 second).
If steam generation has not yet begun (approximately one
minute), the oven stops immediately and the time display
disappears.
If steam generation has already begun, the time changes to
3 minutes, a countdown begins and the steam escapes
before the door is opened
.
Setting a cooking programme with delayed
start
Set the desired cooking mode, the time and adjust the
temperature if necessary,
Example: position Steam Cooking Temperature 85°C.
Press the button and select the cooking time using the
+ and - buttons, for example 30 min.
For example, it is 12:30.
You have programmed a 30-minute cooking cycle.
The displayed end of cooking time is 13:00.
Using the buttons, select end of cooking and the
end of cooking time is displayed.
Adjust the end time using the + and - buttons.
Example 14:00
Confirm by pressing “”to start the programme.
After these steps, oven heating is delayed so that cooking
ends at 14:00.
When the cooking cycle is finished, a series of beeps is
emitted for several minutes.
You can stop the beeps by pressing “”for one second.
You MUST empty the tank.
To ensure good oven reliability, the fan
continues to function for a short period after
cooking is complete.
At the end of cooking
In the event of a water circuit-related problem during cooking, the
“no water” indicator appears, a beep is emitted and a “Fill your
water tank” message appears in the display.
This error is specifically associated with:
- an empty tank.
- a poorly seated tank.
After checking these two points, close the door and press “”.
The oven restarts.
Water management
11
EN
Page 12

12
EN
Precautions
and recommendations
FUNCTIONS
Temperature
°C
COOKING COOKING EXAMPLES
Steam cooking mode most
often used
Vegetables and meats.
For cooking
fragile food
Delicate whole fish (trout).
Meat has a sheen to it,
the collagen is not apparent.
Cooking delicate fish
(sardine fillets, red mullet).
For cooking
fragile food, fruit, compotes
Cocotte eggs; stuffed tomatoes
that hold their shape.
Ramekins, custard creams, etc.
Terrines, chicken livers.
Reheating cooked dishes.
Low heat
Melted chocolate, butter.
Slightly warm fruit for immediate serving.
Slow defrosting without
cooking
Defrosting fish fillets before breading.
Berries that must remain cool
(for pies and sauces).
Defrosting meats before grilling
(e.g.: sausages).
100
85
75
90
95
80
55
Page 13

Cooking chart
Time
40 to 45 min.
35 to 40 min.
18 min.
20 to 22 min.
25 to 30 min.
15 to 20 min.
15 min.
30 to 35 min.
30 to 35 min.
10 to 15 min.
20 min.
35 min
30 min.
22 min.
30 to 35 min
15 to 20 min.
20 -25 min.
25 min.
25 min.
40 to 45 min.
10 to 12 min.
20 to 25 min.
25 min.
30 to 35 min.
10 to 15 min.
25 min.
10 min.
13 to 15 min.
20 to 25 min.
20 min.
15 to 20 min.
15 min.
20 min.
15 min.
25 to 30 min.
15 min.
20 min.
15 to 20 min.
10 to 12 min
20 to 25 min.
20 to 25 min.
15 to 30 min.
25 min.
20 to 25 min.
25 min.
20 min.
7 min.
5 to 6 min.
8 min.
10 to 12 min.
30 min.
25 min.
Preparations
placed upside down in the dish
for tips only, decrease cooking time
in small bunches
in thin, round slices
in thin slices
in cubes
in thin strips
Brussels sprouts
Cauliflower in small florets
in round slices
(fresh) stir while cooking
(frozen) stir while cooking
core removed and cut
in two along the length
cut in half
in cubes
cut in half
cut in round slices
whole
with seasoning
with seasoning
depending on weight
whole, peeled
fruit in strips
in ramekins
steaks (180 g)*
whole (1 kg)
whole (200g)
steaks (180 g)
depending on thickness
whole (250g)
fillets
whole (200g)
thick steaks (6 to 10 cm in length)
steaks (180/200 g)
fillets
steaks (180/200 g)
whole (200 g) 13 to 15 min.
100 g rinsed rice - 20 cl milk
2 tablespoons sugar
200 g (¼ litre water)
Notes
• These times depend on the
type, size and freshness of
the vegetables. Follow the
indications that appear in
the
“Preparations”
column.
• The cooking time remains
the same regardless of the
quantity to be cooked.
For
example
: 1 or 4 artichokes
require the same cooking
time.
• To check the level of
cooking, insert the tip of a
knife into the thickest part
of the vegetable; if it is
cooked there should be no
resistance.
• Place the shellfish on the
grid of the glass dish, add
aromatic herbs.
• Place them on a bed of
seaweed.
• Times depend on ripeness.
•
*Steaks: round slices of fish
of 2 to 3 cm in thickness
(180/200 g) per person.
•
Insist on very fresh products.
•
Place whole fish in the dish
as is or on bay leaves, fennel
or other aromatic herbs.
As soon as cooking is
complete, remove the skin,
which will detach easily.
•
Then brown under the grill
in another dish.
• Fluff with a fork when
cooking is complete.
Boiled: placed directly on the grid.
Sunny side up: broken in an individual dish placed on the shelf and covered
with cooking foil.
Cocotte: see detailed recipes.
Place directly in a dish then cover with water or milk. The steam is not sufficient to saturate these inflating
foods. Place a sheet of aluminium foil on the dish to prevent water droplets from falling on to the food.
Roast 800 g.: 55 to 60 min.
Chicken thighs: 35 to 40 min.
Roast turkey: 50 to 60 min.
Morteau sausage: 400 g
°C
100
100
100
100
100
100
100
100
100
100
100
100
100
100
100
100
100
100
100
100
90
95
95
95
90
95
90
85
85
85
85
80
85
75
80
80
85
85
75
100
100
100
100
100
95
90
100
100
100
100
100
100
Food
Artichokes (small)
Asparagus
Broccoli
Carrots
Celeriac
Pumpkin
Mushrooms
Cauliflower
Courgettes
Spinach
Chicory
Fennel
Green beans
Turnips
Fresh peas
Leeks
Potatoes
Scallops
Mussels/whelks
Crabs
Lobsters
Apples/peaches/pears
Compote
Cream desserts
Cod/hake
Sea bream
Herring
Coley, pollack
Monkfish
Mackerel
Whiting/Cod
Skate
Red mullet
Rock salmon
Salmon
Bottom heating
Tuna
Whole trout (1 kg)
Beef
Pork (tenderloin)
Poultry (breast)
(stuffed)
Sausages
Start with very fresh eggs
kept at room temperature.
Rice, pasta, semolina
Rice pudding
Semolina
13
EN
Page 14

14
EN
Cleaning and
Maintenance
Maintenance
• Cavity (after each use)
Wipe the cavity with a dry cloth after the steam generator has
cooled or let the cavity air-dry by leaving the door open.
• Water intake tube
Remove the water intake tube by unscrewing it.
Remove any hard-water deposits that may be inside (using a
thin, pointed object such as a thin skewer or a knitting needle).
• Steam generator
Pour ½ a cup of white spirit vinegar on the generator.
Allow to sit for a few minutes, then clean and rinse with water.
Do not use sponges or abrasive powders, nor coffee maker
cleaning agents.
Cleaning the gutter
Remove the gutter by pulling it upward. Wipe it off and return
it to its position using the three notches provided.
The oven should not be cleaned with a steam cleaner. Do not use abrasive products or metal scrapers to
clean the oven door as they may scratch the surface or break the glass.
Page 15

15
EN
Cleaning and
Maintenance
CLEANING THE OUTER SURFACES
To clean both the electronic programmer window and the oven
door, use a window cleaning product applied with a soft cloth.
Do not use abrasive creams or scouring pads.
Changing the bulb
- Turn the lamp glass a quarter turn to the left.
- Unscrew the bulb in the same direction.
Bulb specification:
- 15 W - 220 -240 V
- 300°C - E 14 cap
- Replace the bulb then reposition the lamp glass, making
sure the seals are correctly positioned.
- Reconnect the oven.
The bulb is located at the back right of your
oven’s cavity.
Disconnect the oven before accessing the bulb
to avoid any risk of electric shock.
Page 16

16
EN
What to do in the event
of problems
WHAT SHOULD
YOU DO?
POSSIBLE
CAUSES
Display does not light.
The bulb is not
working.
Water or steam leak
around the door
during cooking.
Oven not connected
to a power source.
Electronic board not
functioning.
- Check that the
appliance is receiving
electricity (fuse OK).
- Call the After-Sales
Service Department.
- Change the bulb.
- Connect the oven.
- Change the circuit
fuse.
Bulb has blown.
The oven is not
connected.
The fuse has blown.
The door is not
properly closed.
The door seal is
defective.
- Call the After-Sales
Service Department.
YOU NOTICE THAT
In all situations, if you canno
t solve t
he problem yourself,
contact the After-Sales Service Department without delay.
SERVICE CALLS
Any repairs to your appliance must be made by a qualified
professional, authorised to work on the brand. When you call,
provide your appliance’s complete reference information
(model, type, serial number). This information appears on the
manufacturer’s nameplate (Fig.1).
fig.1
CZ5700845_EN 06/11
MADE IN FRANCE
230V ~ 50 Hz
BRANDT APPLIANCES SAS
7 rue Henri Becquerel
92500 RUEIL MALMAISON
 Loading...