

GGBB
IT
GB FR
ES
PT NL
RU
Italian English French
Spanish Portuguese Dutch
Russian
Instructions for use
OVEN
Contents
Installation
Placement
Electrical connection
Description of the appliance
Overview
Control panel
Display
Switching on and using your oven
Using your oven for the first time
Setting the clock
Switching on the oven
Immediate start
Programming a cooking cycle
Child safety function
Adjusting the brightness
Cooking chart
Precautions and advice
General safety
Economy and respect for the environment
Cleaning and maintenance
PYROLYSIS cleaning
Switching off
Cleaning the appliance
Cleaning the door
Assistance
Important safety instructions.
Read carefully and retain for future use.
* depending on model
2
GB
Installing your appliance
Building in
To do this :
1) Drill a pilot hole in the cabinet panel to avoid splitting the wood.
2) Attach the oven with the two screws.
CHOICE OF LOCATION
The diagrams above determine the dimensions of a cabinet that will be able to hold your oven.
The oven can be installed under a work top or in a column unit (open* or closed) of suitable dimensions for built-in installation (see diagram opposite).
Your oven has optimised air circulation that allows it to achieve remarkable cooking and cleaning results if the following guidelines are
followed:
• Centre the oven in the cabinet so as to guarantee a minimum distance of 10 mm between the appliance and the neighbouring cabinet.
• The material or coating of the cabinet must be heat-resistant.
• For greater stability, attach the oven in the cabinet with two screws through the holes provided for this purpose on either side of the
front inner panel (fig 1).
fig.1
Tip
To be certain that you have installed your appliance correctly, do not hesitate to contact a household appliance specialist.
560
560
450
450
550
560
457
595
22
70
549
560
3
GB
CONNECTING TO THE POWER SUPPLY
Single phase 20A Meter
220-240V~50 Hz
Electrical outlet
2 prong receptacle +earth
to IEC 60083 standard
220-240 V~ single-phase line
Power
supply cable
length 1.50 m
approx.
16A fuse or differential
circuit breaker
The appliance must be recess-fitted correctly to ensure electrical
safety. During fitting and maintenance operations, the appliance
must be unplugged from the electrical system; fuses must be
switched off or removed.
The electrical connections are made before the appliance is
installed in its housing.
Ensure that:
- the electrical installation has sufficient power,
- the electrical wires are in good condition,
- the diameter of the conductors complies with the requirements
of the installation.
Your oven must be connected via a (standard) 3 x 1.5 mm
2
power
cable (Ph + N + earth) which must be connected to a 220-240V
~
single-phase supply via a single phase + neutral + earth standard
power socket to IEC 60083 or via an all-pole isolator complying
with the requirements of the installation.
Warning
The safety wire (green-yellow)
is connected to the appli-
ance’s terminal and must be connected to the electrical
installation’s earth terminal.
It must be possible to disconnect the appliance from the mains
after installation.
Disconnection may be achieved by providing an accessible plug
or by incorporating a switch in the fixed supply cabling, complying with installation rules.
The installation’s fuse must be rated at 16A.
If the power cable is damaged, it must be replaced by the manufacturer, its after-sales service department or similar qualified
personnel, to prevent any danger.
Warning
We cannot be held responsible for any accident or incident resulting from non-existent, defective or incorrect earthing.
If the electrical installation in your residence requires any
changes for connecting your appliance, call a qualified electrician.
If the oven malfunctions in any way, unplug the appliance or
remove the fuse for the circuit to which the oven is connected.
Installing your appliance
Description of the appliance
4
GB
/
Uparrow
Down
arrow
Programme
selection
Temperature
setting
Cleaning
- button
Control lock
button
Time
setting
+ button
Selected menu
indication
Temperature
indication
Door locked indication
Selected cooking mode
Indicates oven shelf level
End of cooking
Indicates the time
ON/OFF
Flèche
Haut
Indication du
menu sélectionné
Durée de cuisson
Indique
Fin de cuisson
Flèche
Bas
Sélection de
la programmation
Nettoyage
Réglage
Temperature
Indication de
Température
AFFICHEUR
Touche
vérouillage
commandes
Réglage
Temps
Indication
Porte vérrouillée
Touche +
Touche-
Mode de cuisson
sélectionnée
Indique le niveau
d'enfournement préconisé
START
STOP
Indique l’Heure
Getting started
and using your oven
5
GB
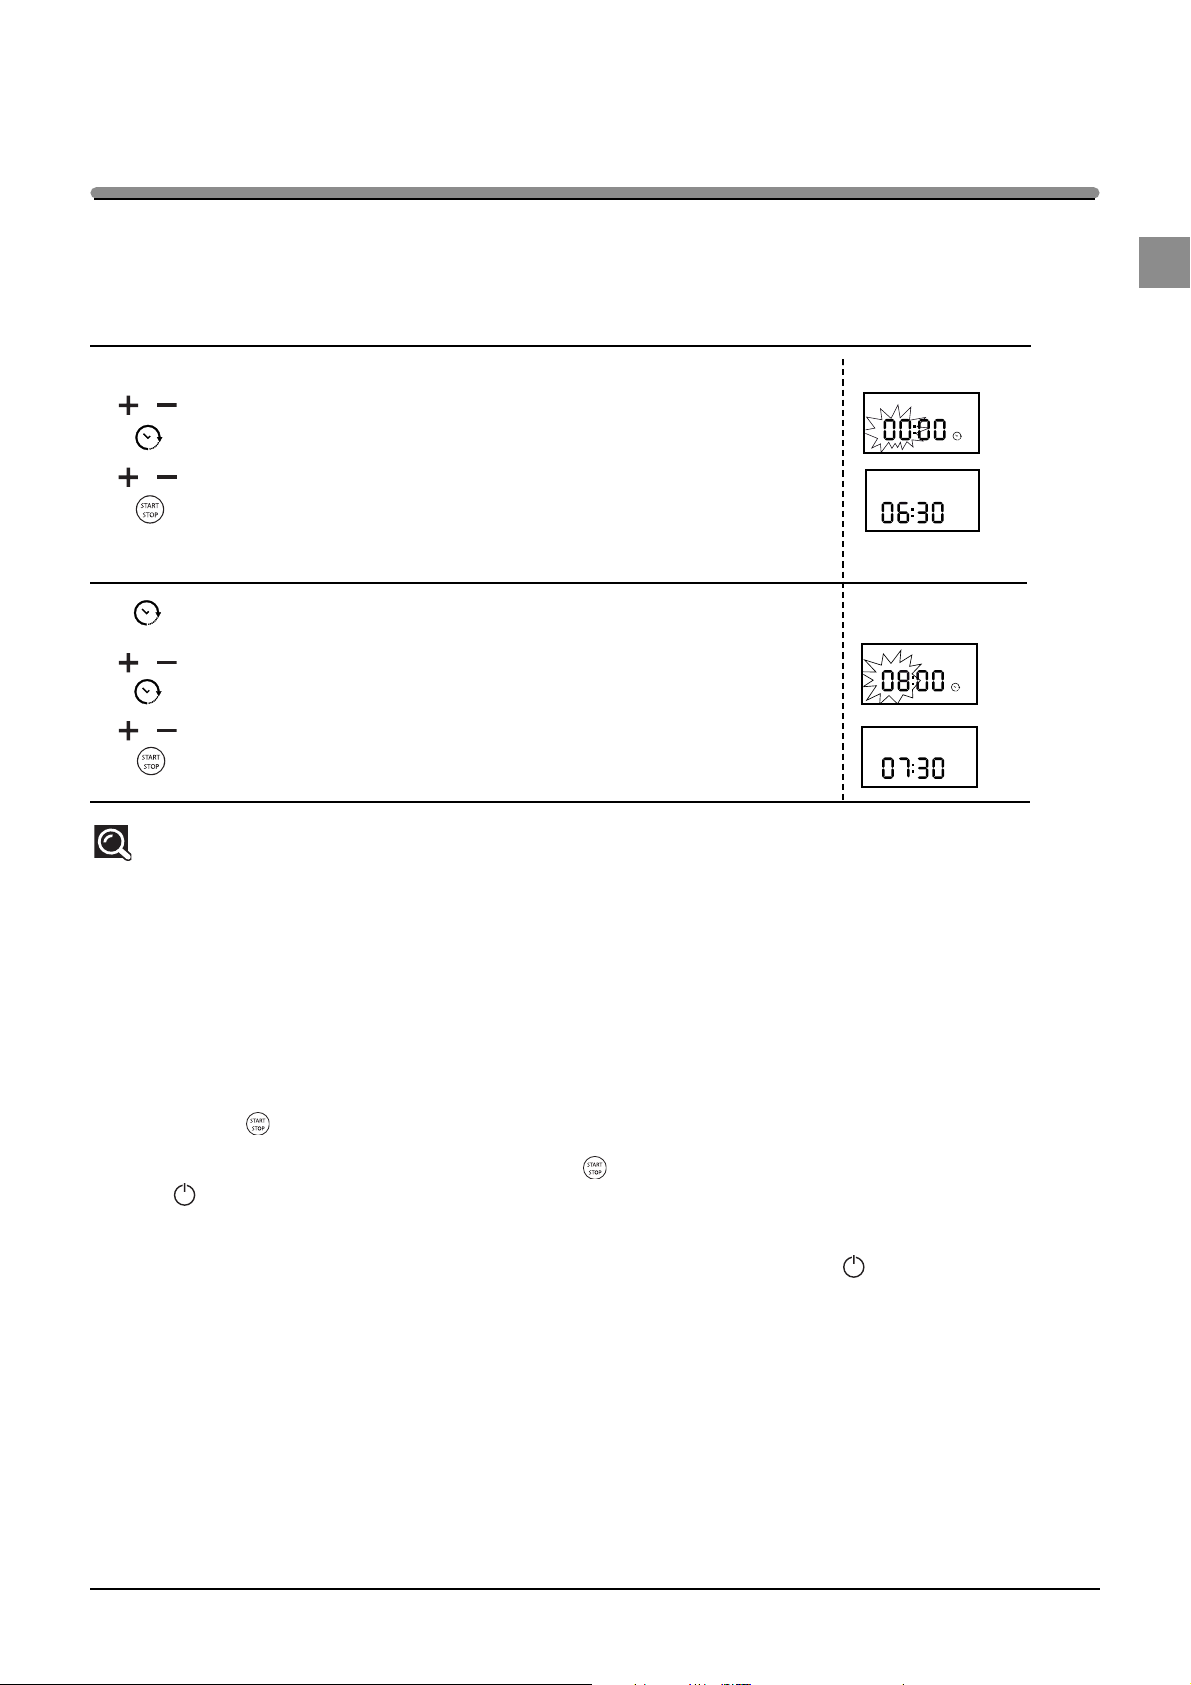
After connecting your appliance or after an extended power cut, 00:00 flashes in the display.
To set the time, example: 06:30 Display
Press the + or - buttons to set the desired time (06).
Confirm by pressing CLOCK.
Then set the minutes (30) by pressing + or -.
Confirm by pressing START-STOP.
A beep sounds to confirm that the time has been set.
To change the time Display
Press the CLOCK button. The time display
flashes.
Set the new time, using the + or - buttons
Confirm by pressing the CLOCK button.
Then set the minutes (30) by pressing + or -.
Confirm by pressing START-STOP.
There is a beep to confirm that
the new time has been set.
Comments: If you do not press the clock button, the time displayed is automatically saved after 10 seconds.
Setting/changing the time
Your appliance is now connected and the correct time is set.
Use the handle to open the door. Put the food inside and close the door.
If the door is not closed properly, the appliance will not work.
If the door is opened during a programme, the programme is not cancelled, just interrupted. To restart the oven, close the
door and press the button again.
If, after programming, there is no action for thirty minutes, the display shows the time with reduced brightness.
To enter a second programme at the end of the first one, press , open the door and then close it again.
Press the button to cancel a programme in progress (OFF is shown in the display).
Three beeps sound to signal the end of each programme.
If the door is left open, the light turns off after 3 minutes.
When your appliance goes into standby after thirty minutes, you can re-activate it by pressing the button (ON is then
shown in the display).
To remove moisture, your appliance has a delayed fan function. Depending on the cooking mode chosen (solo/grill/combined), the oven fan may continue to run at the end of the programme. It will stop automatically.
Programming

6
GB
Getting started
and using your oven
Programming by power level Display
Use the selection keys to choose the HEAT
CIRCULATION function.
The recommended temperature of 190°C is displayed and
thecooking time figures flash and show 00:00.
Set the cooking time using the + and - buttons,
for example: 10 minutes.
Confirm by pressing the CLOCK button.
Press the °C button to set the desired cooking temperature
using the + and - buttons, e.g. 180°C.
Confirm the selection by pressing START-STOP.
The oven lights up and the programme starts.
Comments
:
If the door is opened during cooking, the oven stops and the remaining cooking time is
displayed. To end the programme, simply close the door and press
START-STOP
.
The programme time can be changed at any time simply by pressing the clock button followed
by the +/- buttons.
heat circulation function
Immediate start
Immediate start Display
Press the
key to set a cooking mode - the over
displays the recommended temperature.
.
Press START-STOP to start cooking.
You can define the cooking time using the + and - buttons
before starting cooking.
Comments:
The cooking time may be adjusted at any moment:
Just press the button and adjust it using the
+ and - buttons and confirm with START-STOP.
You can preheat your oven just as you would for a circulating heat programme.
A beep sounds to indicate that the set temperature has been reached.
Recommendations:
The cooking time can be adjusted from 35°C to 250°C in increments of 5°C.
The cooking time can be set from 0 to 9 hours 59 minutes.
It is better to set the minimum time and then increase it, if necessary. Check the colour of
the food.
Always position the accessories (the shelf or the enamel dish) at level 1 or 2 as this will
optimise heat distribution and cooking quality.
Use heat-resistant cookware.
Protect your hands when handling dishes as they may be very hot.
If you want to defrost food after using the fan oven function, we recommend that you let
the oven cool down for 10 minutes. This will give you better results.
To cook 2 apple pies at the same time: 60-90 minutes at 200°C. We suggest that you put
the first pie in the enamel dish and the second in a pie dish placed on the shelf at level 3.
Switch the two dishes half way through cooking.

7
GB
Getting started
and using your oven
Using the automatic cooking function, the cooking time and mode are automatically programmed according to the type of food.
Four automatic cooking settings are available using the selection button.
White meat position
Red meat
Fresh fish
Chilled, cooked dishes.
Programming automatic cooking time based on food weight Display
Press then choose the type of food you want to cook,
using the buttons,
e.g. Fresh fish
The weight (1000 g) appears on the display and starts flashing.
Adjust the weight, e.g. 1500 g, using the + button. Confirm
by pressing START/STOP.
The length of time required is calculated automatically. This
time is shown on the display and the programme starts.
automatic cooking functions

88
8
GGBB
Getting started
and using your oven
This function is used for cooking and browning food such as gratins or meat.
It can be used before or after cooking, depending on the recipe.
Warning:
This appliance is designed to cook with the door closed.
The accessible areas of the oven may become hot when the grill is used.
Children should be kept at a safe distance.
When using the grill, you must protect your hands when handling dishes and use cookware
that is suitable for use at high temperatures, such as heat-resistant glass or porcelain.
There are two grill power levels: medium or high.
As a general rule, we recommend that you use the high grill setting for meat and fish and the
medium grill for gratins and for browning more delicate dishes. Position the shelf according
to the height of the dish or the food.
Programming the GRILL function Display
Select MEDIUM GRILL (2) or HIGH GRILL (4), using the
function buttons.
The cooking time starts to flash in the display.
Set the cooking time using the + and - buttons.
Confirm the selection by pressing OK; the oven turns on
and the programme begins.
Note:
The cooking time may be adjusted at any moment:
To do this, just press the button and adjust it using the + and - buttons then confirm
by pressing START-STOP.
Put the food on the grid, placed in the enamel dish (to recover the cooking juice) and insert
it all at level 2 or 3. Turn the food over half way through cooking.
Food Quantity Cooking time
Chitterling sausage, black pudding, sausages
(pierce with a fork)
4 - 6 22 - 30 min
Pork chops 4 27 - 32 min
Lamb chops 4 15 - 17 min
Beef ribs 800 g 23 - 25 min
Smoked belly pork 4 - 6 slices 18 - 25 min
Grill function
Grill function cooking guide

9
GB
Getting started
and using your oven
You can programme the “CHILD SAFETY LOCK” to prevent use of your oven.
T
o activ
ate this op
tion: Hold the button pressed for 5 seconds, until the key symbol appears in
the display. A beep sounds to confirm that your oven is temporarily locked. No programmes are
then available.
T
o cancel: Follow the same procedure: Press the button for 5 seconds. The key symbol dis-
appears and the clock is displayed. A beep sounds to confirm the procedure.
Child lock
programmed cooking with delayed start and chosen cooking end time
Your appliance allows you to programme cooking, so that it finishes at the time you choose.
This applies to all cooking modes.
Display
Select the desired cooking mode, for example CIRCULATING HEAT;
set the cooking time, adjust the temperature and confirm using the
ENTER button.
Press the CLOCK button twice, so that the end of cooking time indica-
tor flashes and then set the desired time using the + and - buttons, e.g.
13:10 hr.
Confirm by pressing CLOCK.
The start of heating will be delayed and cooking will finish at 13:10 hr.
setting the brightness of the display
Programming Display
You can adjust the brightness of the display.
Set the time to 00:10.
Press and hold the °C button for 5 seconds.
-CO- is shown in the display.
Adjust the brightness using the + and- buttons.
Confirm by pressing °C.

10
GB
Getting started
and using your oven
*
Sequence(s) used to obtain the results indicated on the energy label in compliance with European standard EN 50304 and in accordance with
European Directive 2002/40/EC.
CIRCULATING HEAT
(recommended temperature 190°C min 35°C max 250°C)
•
Cooking is controlled by the heating element located at the back of the oven and by the fan.
•
Rapid temperature increase: Some dishes can be placed in the oven while it is still cold.
•
This is recommended to retain moisture in white meat, fish and vegetables.
For cooking multiple items on up to 2 levels.
CONVECTION
(recommended temperature 200°C, min. 35°C max. 275°C).
• Cooking controlled by the upper and lower heating elements.
• This position saves energy while maintaining the quality of the cooking.
• The ECO position is used for energy label performance.
• All types of cooking are done without preheating.
MEDIUM and HIGH GRILL
(recommended settings 2 or 4 - min 1 - max 4)
•
Cooking controlled by the upper element.
•
The double grill covers the entire grid surface. The medium grill is as effective as the high grill for smaller quantities.
•
Recommended for grilling cutlets, sausages, slices of bread, prawns placed on the grill.
TURBO GRILL
(recommended temperature 190°C min 100°C max 250°C)
•
Cooking is controlled, alternately, by the upper element and by the fan.
•
Preheating is unnecessary. Succulent roasts and poultry that are crisp all over.
•
Slide the drip tray on to the bottom shelf support.
•
Recommended for all roasted poultry or meat, for sealing and thoroughly cooking a leg or a rib of beef. To retain the moist
texture of fish steaks.
COMBINED HEAT
(recommended temperature 180°C min 35°C max 230°C)
•
Cooking controlled by the upper and lower heating elements and by the fan.
•
Three combined sources of heat: a lot of heat from the bottom, a little circulating heat and a touch from the grill for
browning.
•
Recommended for quiches, pies, tarts with juicy fruits, preferably in an earthenware dish.
PULSED BOTTOM HEATING ELEMENT
(recommended temperature 180°C min 75°C max 250°C)
•
Cooking controlled by the upper and lower heating elements and
by the fan.
DEFROSTING
(recommended temperature 35°C min 35°C max 75°C)
•
Dishes are defrosted using a limited amount of heat and the fan.
•
Ideal for delicate dishes (fruit tart, custard pie, etc.).
•
Meat, buns, etc. are defrosted at 50°C (meat should be placed under the grill with a dish underneath to catch drips from
the defrosting which are not edible).
*
*
cooking modes

SSAAFFEETTYY GGUUIIDDEELLIINNEESS
— This oven was designed for use by private individuals in
their homes. It is intended solely for cooking foodstuffs.
This oven does not contain any asbestos-based components.
— Children must be supervised to prevent them from playing with the appliance.
— When you receive the appliance, unpack it or have it
unpacked immediately. Give it an overall inspection. Make
a note of any concerns or reservations on the delivery slip
and make sure that you keep a copy.
— Your appliance is intended for standard household use.
Do not use it for commercial or industrial purposes or for
any purpose other than that for which it was designed.
— Do not modify or attempt to modify any of the characteristics of this appliance. This would be dangerous for your
safety.
— WARNING: accessible parts may become hot during use.
It is advisable to keep small children away from the appliance.
— Never pull your appliance by the door handle
— Before using your oven for the first time, heat it while
empty for approximately 15 minutes. Ensure that the room
is sufficiently ventilated. You may notice a slight smell or a
few fumes. This is quite normal.
— WARNING: accessible parts may become hot when the
grill is used. It is advisable to keep children away from the
appliance.
— When in use, the appliance becomes hot. Be careful not
to touch the heating elements inside the oven.
— When placing dishes inside or removing them from the
oven, do not place your hands close to the upper heating
elements, use heat-protective kitchen gloves.
— During pyrolysis, the exposed surfaces become hotter than during normal use. It is advisable to keep small children away from
the oven.
— Before beginning a pyrolysis cleaning cycle in your oven,
remove all parts of your grids, trays and accessories and
remove major spill residue. During pyrolysis, exposed surfaces become hotter than during normal use. It is advisable
to keep small children away from the oven.
— At the end of cooking, do not pick up dishes (shelf, rotisserie, etc.) with bare hands.
— Never place aluminium foil directly in contact with the
oven shelf (see the chapter on oven description), the accumulated heat may cause deterioration of the enamel.
— Do not place heavy weights on an open oven door and
make sure that children cannot climb or sit on it.
— The oven must be turned off for all attempts to clean the
cavity.
— This appliance is not intended for use by persons
(including children) with impaired physical, sensory or
mental capacities, or by inexperienced or untrained persons, except if they have been instructed in its operation by a person responsible for their safety.
— Apart from the accessories supplied with your oven,
only use dishes which are suitable for use at high temperatures (follow the manufacturer’s instructions).
— After using your oven, make sure that all the controls
are returned to the ‘off’ position.
— Do not use your oven as a larder or to store any items
after use.
— Never use steam or high-pressure devices to clean the
oven (electrical safety requirement).
— All types of cooking are done with the door closed.
—
((
Depending on model)
For your safety, your oven
is equipped with an AUTOMATIC STOP, if you forget to
turn off your oven by mistake. After 23 hours and 30
minutes of continuous use, the AS (Automatic Stop) feature will be activated and your oven will turn itself off.
AS or Auto Stop will be displayed instead of the time
and a succession of beeps will sound for a short time.
WWaarrnniinngg
KKeeeepp tthhiiss uusseerr gguuiiddee wwiitthh yyoouurr aapppplliiaannccee.. IIff tthhee aapppplliiaannccee
iiss eevveerr ssoolldd oorr ttrraannssffeerrrreedd ttoo aannootthheerr ppeer
rssoonn,, eennssuurree tthhaatt tthhee
nneeww oowwnneerr rreecceeiivveess tthhee uusseerr gguuiiddee.. PPlleeaassee ffaammiilliiaarriissee yyoouurrsseellff
wwiitthh tthheessee iinnssttr
ruuccttiioonnss bbeeffoorree iinnssttaalllliinngg aanndd uussiinngg yyoouurr oovveenn..
TThheeyy wweerree pprroodduucceedd ffoorr yyoouurr ssaaffeettyy aanndd tthhee ssaaffeettyy ooff
ootthheerrss..
WWaarrnniinngg
IInnssttaallllaattiioonn sshhoouulldd oonnllyy bbee ppeerrffoorrmmeedd bbyy iinnssttaalllleerrss aanndd
qquuaalliiffiieedd tteecchhnniicciiaannss..
TThhiiss aapppplliiaannccee ccoommpplliie
ess wwiitthh tthhee ffoolllloowwiinngg EEuurrooppeeaann ddiirreecc--
ttiivveess::
-- LLooww VVoollttaaggee DDiirreeccttiivvee 22000066//9955//EECC ffoorr aaffffiixxiinngg tthhee EECC m
maarrkk..
-- EElleeccttrroommaaggnneettiicc CCoommppaattiibbiilliittyy DDiirreeccttiivvee 8899//333366//EEEECC mmooddii--
ffiieedd bbyy ddiirreeccttiivvee 9933//6688//EEEECC ffoorr tthhee
aapppplliiccaattiioonn ooff CCEE mmaarrkkiinngg..
-- EECC rreegguullaattiioonn nnoo.. 11993355//22000044 ccoonncceerrnniinngg mmaatteerriiaallss aanndd iitteemmss
iinntteennddeedd ttoo
ccoommee iinnttoo ccoonnttaacctt wwiitthh ffoooodd pprroodduuccttss..
CARE FOR THE ENVIRONMENT
— This appliance’s packing materials are recyclable.
Please recycle the packaging and help protect the
environment by placing it in the recycling bins provided by your local council.
— Your appliance also contains various recyclable
materials. It is therefore marked with this logo to indicate that used appliances should not be mixed with other
waste. The manufacturer will arrange for the appliance to be
recycled properly, in accordance with European directive
2002/96/EC on Waste Electrical and Electronic Equipment.
Contact your local council or your retailer to find out details of
your closest used appliance collection point.
— We thank you for your help in protecting the environment.
Precautions
and recommendations
11
GB

Programming delayed pyrolysis
It is possible to delay the time when pyrolysis is to start. For details, see section “programmed cooking
with delayed start and selected end time” (p.9)
Programming the Pyrolyse function Display
Press 2 pyrolysis levels are available.
1. Economy (ECO): 1 hour 30 minutes duration
2. Intensive (INT): 2 hours duration;
Select the desired pyrolysis level. Its duration is preset and
cannot be changed using the + and - buttons.
e.g. Pyro eco, duration 1 hr 30 mins.
Press start. The time is shown on the display and the programme starts. After a fews minutes the door locks. The
icon is shown on the display.
12
GB
Cleaning and
Maintenance
Warning:
During the PYROLYSIS programme, the temperature inside the oven reaches 500°C and starts the
pyrolysis process, in other words the carbonisation of food residues The residues are literally incinerated. During pyrolysis, the surfaces can become very hot: keep children away. You may occasionally see
particles light up through the glass: this is instantaneous combustion, a completely normal phenomenon
which presents no dangers. Before activating PYROLYSIS:
Remove excess residues with a damp sponge. Do not use detergents; remove all accessories, the telescopic runners and brackets. Do not place towels or potholders on the oven handle. If the oven is very
hot, pyrolysis may not start. Wait for it to cool down. The programme only activates after the oven door
has been closed.
Pyrolysis cleaning
Safety mechanisms
The door locks automatically when the temperature reaches high levels. If a malfunction occurs, the
power to the heating elements is automatically cut. Once the door has been locked, it is not possible to change
the duration and end time. Programming can only be carried out after the PYROLYSE programme has been
selected.
When pyrolysis has finished:
The oven door unlocks when the temperature inside the oven has come down to safe levels. White dust may
be found around the inside of the oven. Remove it using a damp sponge after the appliance has cooled completely. Why not take advantage of the stored heat to start cooking without worrying about the dust residues.
They are completely harmless.

13
GB
Cleaning and
Maintenance
CCLLEEAANNIINNGG TTHHEE OOUUTTEERR SSUURRFFAACCEESS
To clean both the electronic programmer window and the
oven door, use a window cleaning product applied with a
soft cloth.
Do not use abrasive creams or scouring pads.
- Open the door completely and block it open using the two red
stops (fig.1).
They are supplied in the plastic pouch that came with your oven.
CCLLEEAANNIINNGG TTHHEE IINNSSIIDDEE OOFF TTHHEE DDOOOORR
fig.3
- To remove the frame and glass assembly, proceed as follows:
Insert the two red stops in the A slots designed for this (fig.2).
- Lever the assembly to detach the frame and the glass (fig.3).
WWaarrnniinngg
Before unclipping the glass, allow the appliance to
cool.
fig.1
••
DDiissmmaannttlliinngg tthhee ddoooorr
A
fig. 2
SSWWIITTCCHHIINNGG OOFFFF TTHHEE PPOOWWEERR
Before any cleaning or maintenance operation, disconnect the oven’s power supply.

14
GB
- Lever the assembly to detach the
frame and the glass (fig.3).
- Remove the frame and the glass (fig.4).
- Remove all the door’s interior windows by
turning them.
This assembly comprises 2 glass windows,
the 1
st
of which has 2 rubber stops on the
2 front corners. (fig. 5).
- Clean the glass using a soft sponge
and washing-up liquid.
Do not immerse the window in water.
Do not use abrasive creams or scouring
pads. Rinse with clean water and dry
with a lint-free cloth.
- After cleaning, replace the first oneReposition the 2 black rubber stops on the front
corners of the 2
nd
glass, making sure that
the it says:
in the top left: L
and in the top right: R
Then replace the door and the 2nd glass,
positioning it on the first (fig.6).
WWaarrnn iinn gg
DD oo nn oo tt uu ss ee aa bb rr aa ss iivv ee cclleeaa nnii nngg
pp rr oodduu ccttss oo rr hh aarr dd mm eett aall ssccrr aapp ee rrss ff oorr
ccll eeaannii nngg tthhee oovv eenn’’ss ggll aa ss ss dd oooo rr ,, aass t
thhee yy
ccoouu lldd ss ccrr aa tt cchh tt hh ee ss uu rrff aa cc ee aa nndd cc aa uussee
tthhee gg ll aa ss ss tt oo ss hhaatttt eerr
.
fig.4
fig.5
fig.6
LL
RR
Cleaning and
Maintenance

15
GB
fig.9
WWaarrnn iinn gg
DDoo nn oott uuss ee aabb rr aa ss ii vv ee ccll eeaanniinngg pprroo dd uuccttss oorr hhaarrdd
mmeettaall ssccrr aapp ee rr ss ffoo rr cc llee aa nniinn gg tt hh ee oovv eenn’’ss ggll aa ss ss ddoo oo rr ,,
aass t
thhee yy ccoo uulldd ss ccrr aa tt cchh tthhee ss uu rr ff aa cc ee aa nndd cc aa uussee tt hhee
gg llaass ss tt oo ss hhaatttt ee rr
.
Place the glass frame assembly back in the door (fig. 7).
- Take care to correctly slot the frame in the hinge using
the the lug (fig.8).
- Attach the frame by squeezing it into the door. Do not
press on the frame alone. (fig.9).
Your appliance can now be used again.
fig.7
fig.8
CLAC
CLAC

16
GB
SERVICE CALLS
Any repair made to your appliance must be carried out by a
qualified professional authorised to work on the brand.
When you call, state your appliance’s complete reference
information (model, type, serial number). This information
appears on the manufacturer’s nameplate (Fig.1).
Cleaning and
Maintenance
CZ5700917_EN 06/11
 Loading...