

Page 1
DAILY REFERENCE
WWW
GUIDE
EN
THANK YOU FOR PURCHASING AN
ARISTON PRODUCT
To receive more comprehensive help and
support, please register your product at
www. aristonchannel. com
Before using the appliance carefully read the Health and Safety guide.
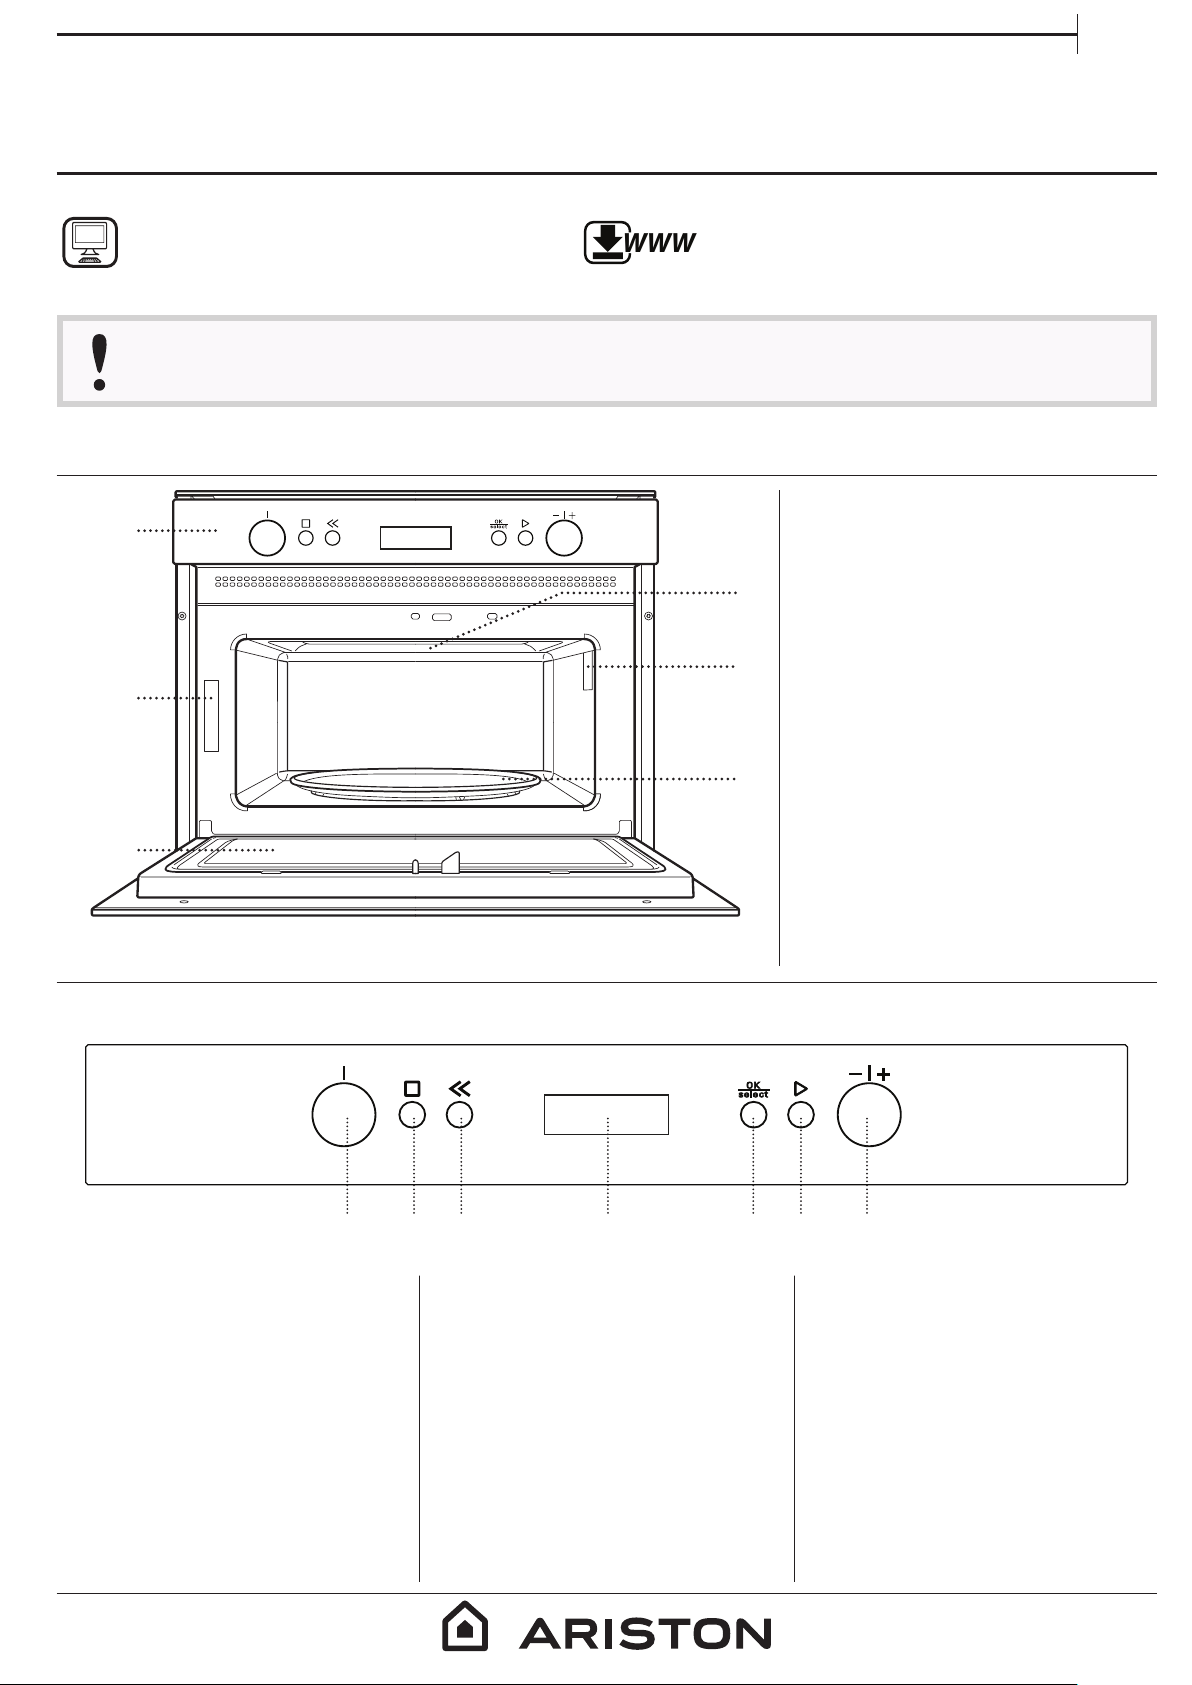
PRODUCT DESCRIPTION
1
2
You can download the Safety Instructions
and the Use and Care Guide by visiting our
website www. aristonchannel. com and
following the instructions on the back of
this booklet.
1. Control panel
2. Identification plate
(do not remove)
4
5
6
3. Door
4. Upper heating element/grill
5. Light
6. Turntable
3
CONTROL PANEL
1 2 3 4 5 6 7
1. SELECTION KNOB
For switching the oven on by
selecting a function. Turn to the
“0” position to switch the oven off.
2. STOP
For stopping the function that is
currently active at any time and
putting the oven into standby
mode.
3. BACK
For returning to the previous
menu.
4. DI SPLAY
5. CONFIRMATION BUTTON
For confirming a selected function
or a set value.
6. START
For immediately starting a
function. When the oven is
switched off, it activates the “Jet
Start” microwave function.
7. ADJUSTMENT KNOB
For scrolling through the menus
and applying or changing settings.
Please note: All knobs are pushactivated knobs. Push down on the
centre of the knob to release it from
its seating.
1
Page 2
ACCESSORIES
WWW
Download the Use and Care Guide from
www. aristonchannel. com for more information
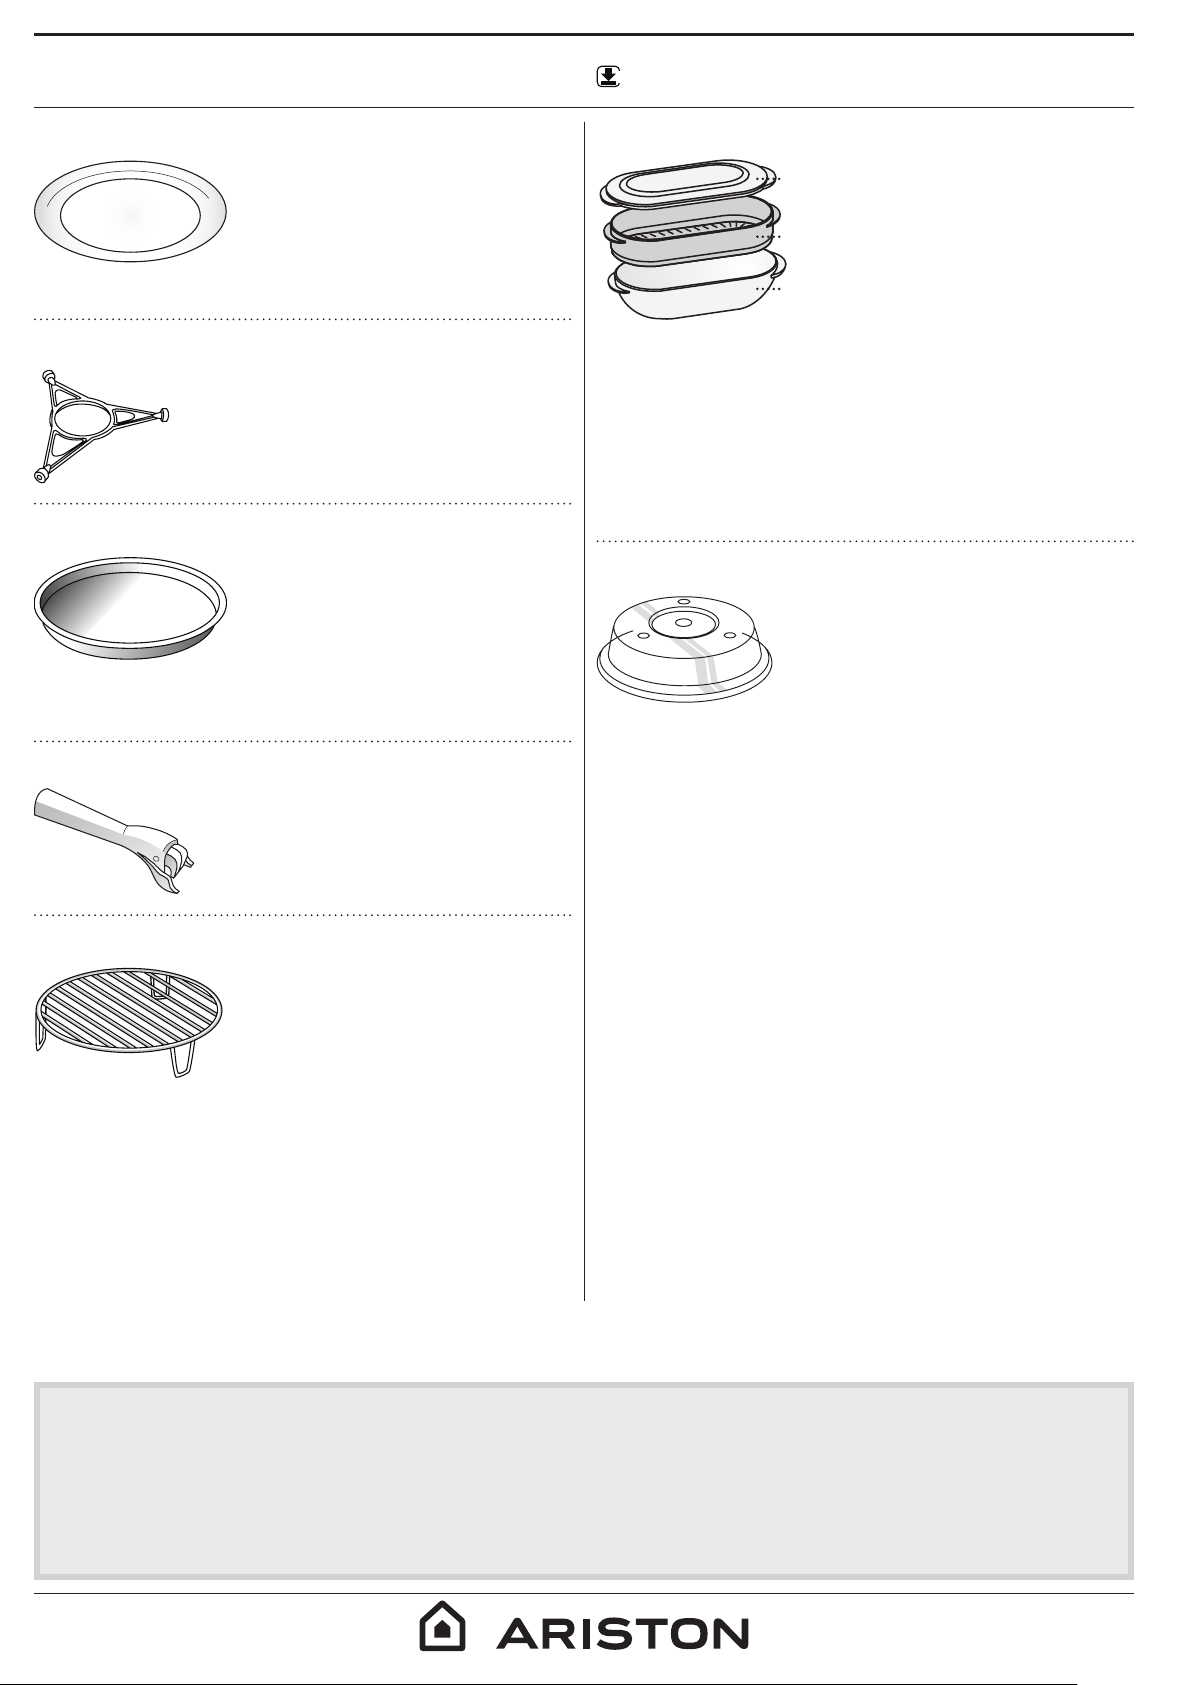
TURNTABLE
Placed on its support, the glass
turntable can be used with all
cooking methods.
The turntable must always
be used as a base for other
containers or accessories, with
the exception of the rectangular baking tray.
TURNTABLE SUPPORT
Only use the support for the glass
turntable. Do not rest other accessories
on the support.
CRISP PLATE
Only for use with the specific
“Crisp Dynamic” function.
The Crisp plate must always be
placed in the centre of the glass
turntable and can be pre-heated
when empty, using the special
function for this purpose only. Place the food directly
on the Crisp plate.
HANDLE FOR THE CRISP PLATE
Useful for removing the hot Crisp
plate from the oven.
STEAMER
To steam foods such as fish or
1
vegetables, place these in the
basket (2) and pour drinking
water (100 ml) into the bottom
2
of the steamer (3) to achieve the
right amount of steam.
3
To boil foods such as pasta, rice
or potatoes, place these directly
on the bottom of the steamer (the basket is not
required) and add an appropriate amount of drinking
water for the amount you are cooking.
For best results, cover the steamer with the cover (1)
provided.
Always place the steamer on the glass turntable and
only use it with the appropriate cooking functions, or
with microwave functions.
COVER
Useful for covering food while
it is cooking or heating in the
microwave.
The cover reduces splashes, keeps
foods moist and can also be used
to create two cooking levels.
It is not suitable for use in convection cooking or with
any of the grill functions (including “Crisp Dynamic”).
WIRE SHELF
This allows you to place food
closer to the grill, for perfectly
browning your dish and for
optimal hot air circulation. Place
the wire shelf on the turntable,
making sure that it does not
come into contact with other surfaces.
The number of accessories may vary according to which model is purchased.
Other accessories can be purchased separately from the After-sales Service.
There are a number of accessories available on
the market. Before you buy, ensure they are
suitable for microwave use and resistant to oven
temperatures.
Metallic containers for food or drink should never
be used during microwave cooking.
Always ensure that foods and accessories do not
come into contact with the inside walls of the oven.
Always ensure that the turntable is able to turn
freely before starting the oven. Take care not to
unseat the turntable whilst inserting or removing
other accessories.
2
Page 3
FUNCTIONS
WWW
EN
Download the Use and Care Guide from
www. aristonchannel. com for more information
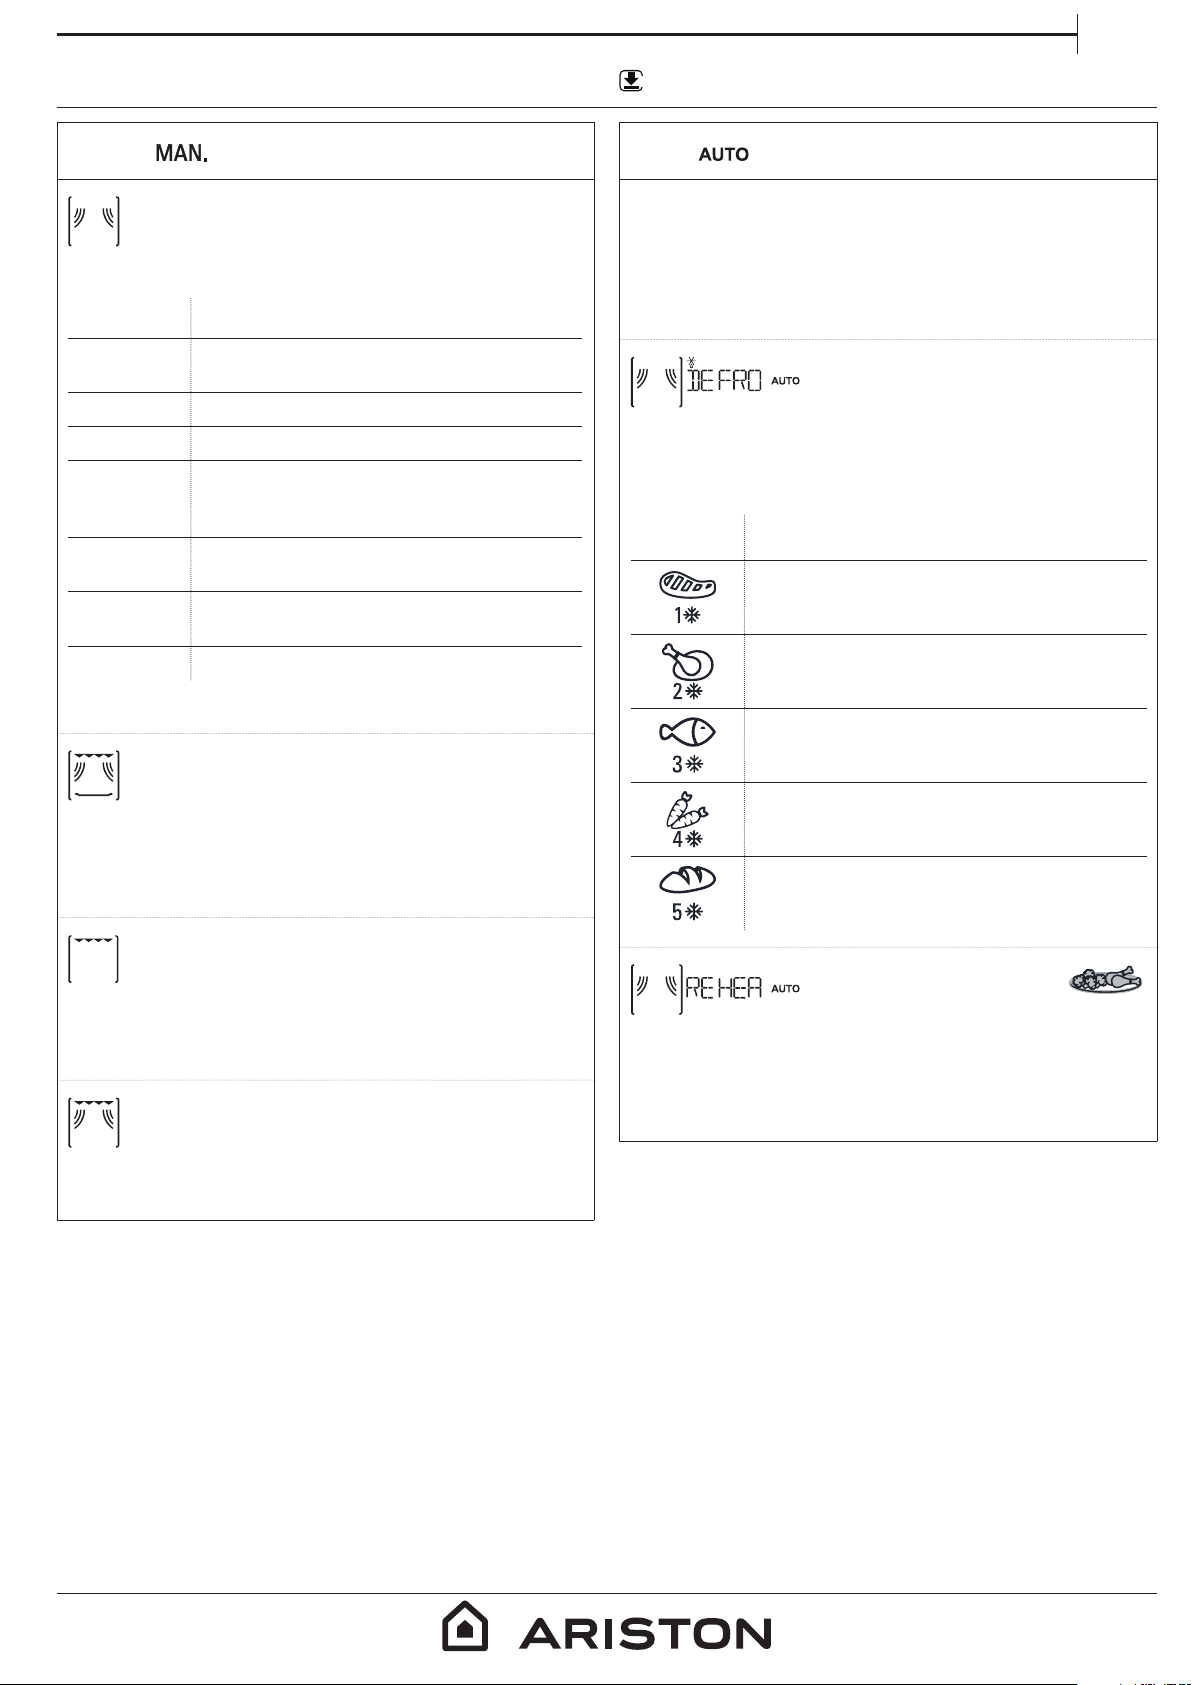
MANUAL FUNCTIONS
MICROWAV ES
For quickly cooking and reheating food or
drinks.
POWER SUGGESTED USE
900 W
750 W
650 W
500 W
350 W
160 W
90 W
Recommended accessories: Cover
CRISP DYNAMIC
For perfectly browning a dish, both on the top
and bottom of the food. This function must only be
used with the special crisp plate.
Required accessories: Crisp plate, handle for the Crisp
plate
Quickly reheating drinks or other foods
with a high water content
Cooking vegetables
Cooking meat and sh
Cooking meaty sauces, or sauces
containing cheese or egg. Finishing o
meat pies or pasta bakes
Slow, gently cooking. Perfect for melting
butter or chocolate
Defrosting frozen foods or softening
butter and cheese
Softening ice cream
AUTOMATIC FUNCTIONS
With the automatic functions, simply select the type and
weight or quantity of food to achieve the best results.
The oven will automatically calculate the optimum
settings and continue to change them as cooking
progresses. The total time does not include preparation
or preheating phases.
DEFROST DYNAMIC
For quickly defrosting various
different types of food simply by specifying their
weight.
Food should be placed directly onto the glass
turntable. Turn the food when prompted.
CATEGORY RECOMMENDED FOODS WEIGHT
MEAT
(mince, cutlets, steaks, roasting
joints)
POULTRY
(whole chicken, pieces, llets)
FISH
(whole, steaks, llets)
VEGETABLES
(mixed vegetables, peas,
broccoli, etc.)
BREAD
(loaves, buns, rolls)
100 g - 2 kg
100 g - 2.5 kg
100 g - 1.5 kg
100 g - 1.5 kg
100 g - 2 kg
GRILL
For browning, grilling and gratins. We
recommend turning the food during cooking.
For best results, preheat the grill for 3-5 minutes.
Recommended accessories: Wire shelf
GRILL + MICROWAVES
For quickly cooking and gratinating dishes,
combining the microwave and grill functions.
Recommended accessories: Wire shelf
REHEAT DYNAMIC
For reheating readymade food that is either frozen or at room
temperature. The oven automatically calculates
the settings required to achieve the best results
in the shortest amount of time. Place food on a
microwave-safe and heatproof dinner plate or dish.
3
Page 4
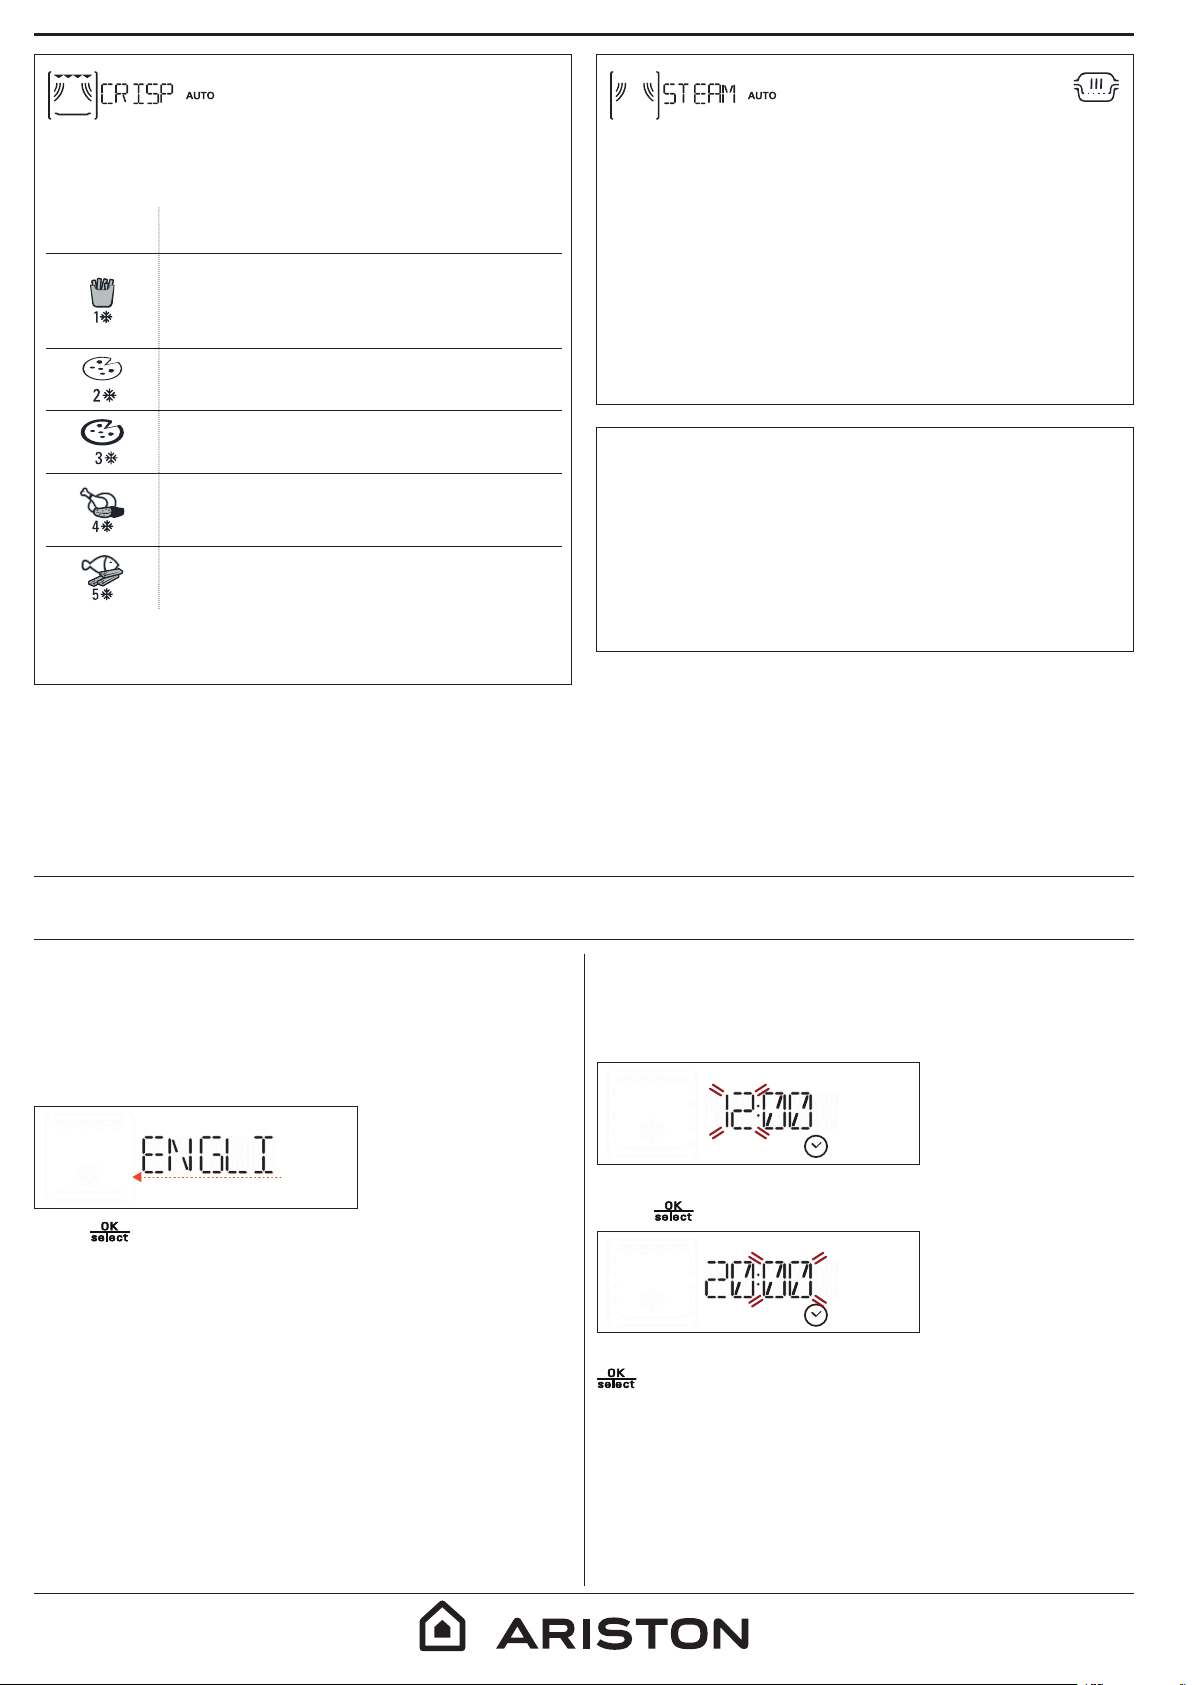
CRISP DYNAMIC
For quickly reheating and
cooking frozen foods and giving them a golden,
crunchy top. Only use this function with the crisp
plate provided. Turn the food when prompted.
CATEGORY RECOMMENDED FOODS WEIGHT
FRENCH FRIES
(spread out in a single layer
and sprinkle with salt before
cooking)
PIZZA, THIN CRUST 250 - 500 g
300 - 600 g
STEAM DYNAMIC
For steam-cooking foods
such as vegetables or fish, using the steamer
provided. An initial preparation phase automatically
generates steam, bringing the water poured into
the bottom of the steamer to the boil. Timings for
this phase may vary. The oven then proceeds with
steam-cooking the food, according to the time set.
Some indicative cooking times are as follows:
• FRESH VEGETABLES (250-500 g): 4-6 minutes;
• FROZEN VEGETABLES (250-500 g): 5-7 minutes;
• FISH FILLETS (250-500 g): 4-6 minutes.
Required accessory: Steamer
PIZZA, THICK CRUST 300 - 800 g
CHICKEN WINGS, CHICKEN
PIECES
(Lightly oil the plate)
FISH FINGERS
(Crisp plate must be preheated)
Required accessories: Crisp plate, handle for the crisp
plate
300 - 600 g
200 - 600 g
SETTI
(language, Eco mode, brightness, audible signal
volume, clock).
Please note: When Eco mode is active, the brightness
of the display will be reduced after a few seconds to
save energy. The display is reactivated automatically
whenever any of the buttons are pressed, etc.
SETTINGS
For changing the oven settings
USING THE APPLIANCE FOR THE FIRST TIME
1. SELECT THE LANGUAGE
You will need to set the language and the time
when you switch on the appliance for the first
time. ENGLISH will scroll along the display: Turn the
adjustment knob to scroll through the list of available
languages and select the one you require.
2. SET THE TIME
After selecting the language, you will need to set the
current time: The two digits for the hour will flash on
the display.
Press to confirm your selection.
Please note: The language can subsequently be changed
from the “Settings” menu.
4
Turn the adjustment knob to set the correct hour and
press
: the minutes will flash on the display.
Turn the adjustment knob to set the minutes and press
to confirm.
Please note: You may need to set the time again following
lengthy power outages.
Page 5
DAILY USE
EN
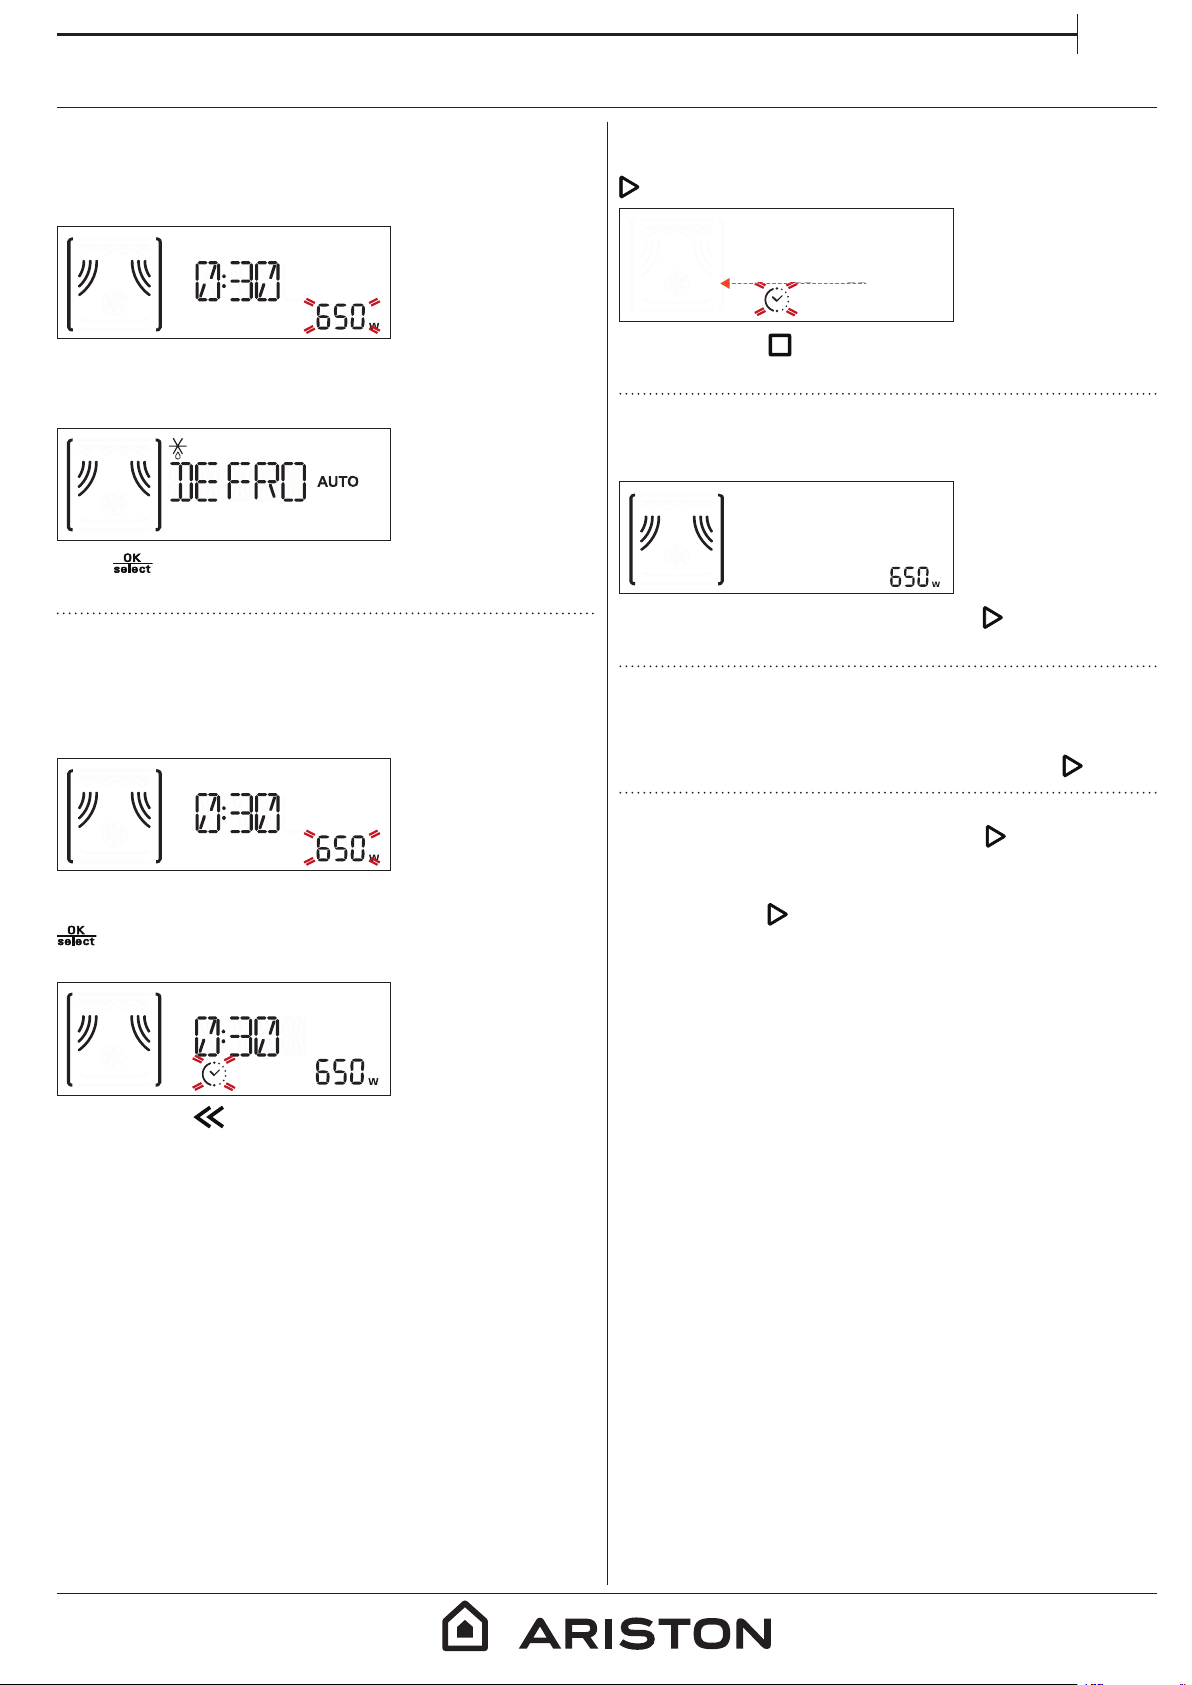
1. SELECT A FUNCTION
Turn the selection knob until the function you require
is shown on the display: the display will show the icon
for the function and its basic settings.
To select an item from the menu (the display will
show the first available item), turn the adjustment
knob until the item you require is shown.
Press to confirm your selection: the display will
show the basic settings.
2. SET THE FUNCTION
After having selected the function you require, you
can change its settings.
The display will show the settings that can be
changed in sequence.
3. ACTIVATE THE FUNCTION
Once you have applied the settings you require, press
to activate the function.
PRESS
You can press at any time to pause the function
that is currently active.
. SAFETY LOCK
This function is automatically activated to prevent the
oven from being switched on accidentally.
DOOR
Open and close the door, then press to start the
function.
.PAUSE
To pause an active function, for example to stir or turn
the food, simply open the door.
To start it up again, close the door and press
.
With the setting flashing on the display, turn the
adjustment knob to change the setting, then press
to confirm and continue with the settings that
follow.
Note: Pressing allows you to change the previous
setting again.
. JET START
When the oven is switched off, press
cooking with the microwave function set at full power
(900 W) for 30 seconds.
Every time the
time will be increased by a further 30 seconds.
button is pressed again, the cooking
to activate
5
Page 6
. AUTOMATIC FUNCTIONS
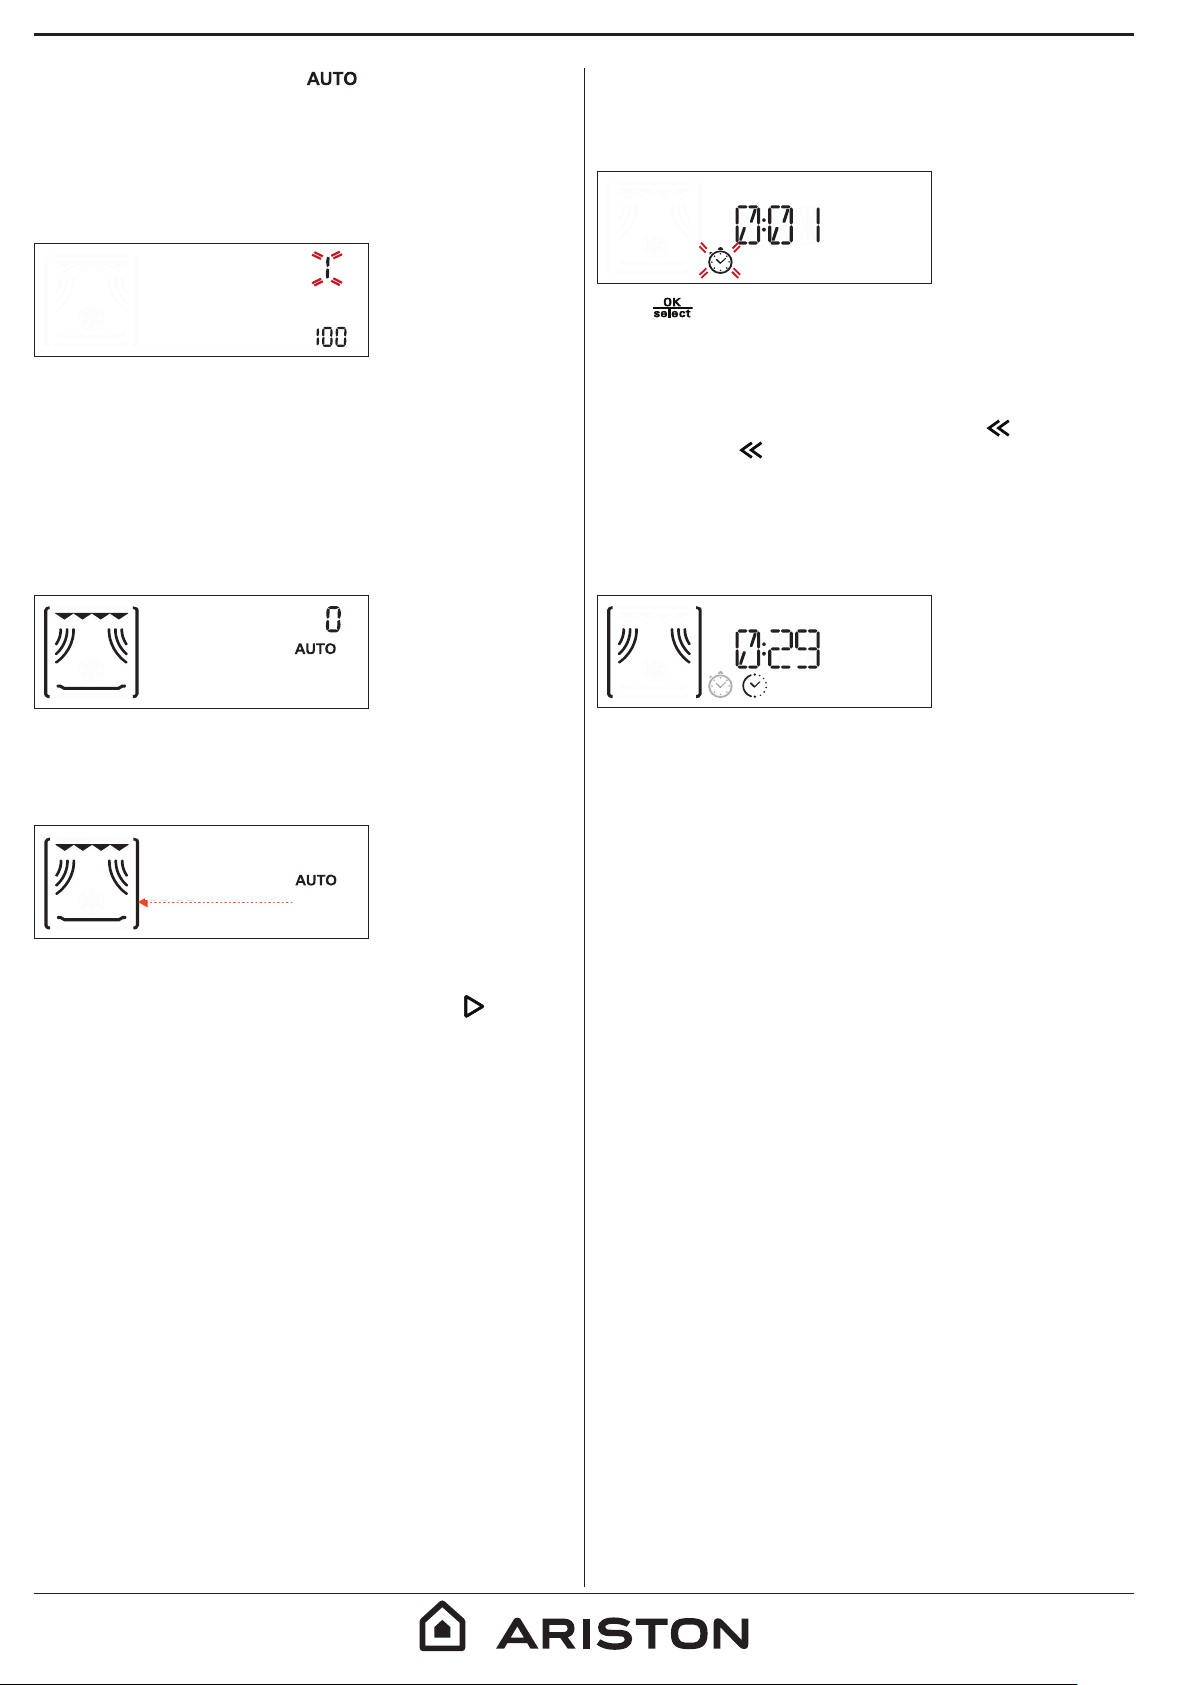
g
CATEGORIES
When using certain automatic functions, you will
need to select a category for the food you are
cooking in order to achieve the best results.
The reference category corresponds to the number
indicated at the top right of the display.
. TIMER
When the oven is switched off, the display can be
used as a timer. To activate the function and set the
length of time you require, turn the adjustment knob.
FOOD
Refer to the table containing descriptions of the
functions for information on all of the categories.
DEGREE OF DONENESS
Most of the automatic functions will prompt you to
select how well done you require the food to be.
The degree of doneness can be altered during
the first 20 seconds of operation after activating
the function: activate the function, then turn the
adjustment knob to select the setting you require.
MID
ACTIONS (STIRRING OR TURNING FOOD)
Certain automatic functions require you to turn or stir
the food, for example, and will pause in order for you
to do so.
Press to activate the timer: An audible signal will
sound and the display will indicate once the timer has
finished counting down the selected time.
Please note: The timer does not activate any of the
cooking cycles.
To change the time set for the timer, press to pause it
and then press twice to go back to viewing the current
time.
Once the timer has been activated, you can activate
a function as well: The timer will continue to count
down the selected time automatically without having
any effect on the function.
TURN
Once the oven has paused cooking, open the door
and carry out the action you are prompted to perform
before closing the door again and pressing
continue with cooking.
Please note: When using the “Defrost Dynamic” function,
the function will start again automatically after two
minutes, even if you have not turned or stirred the food.
to
6
Page 7
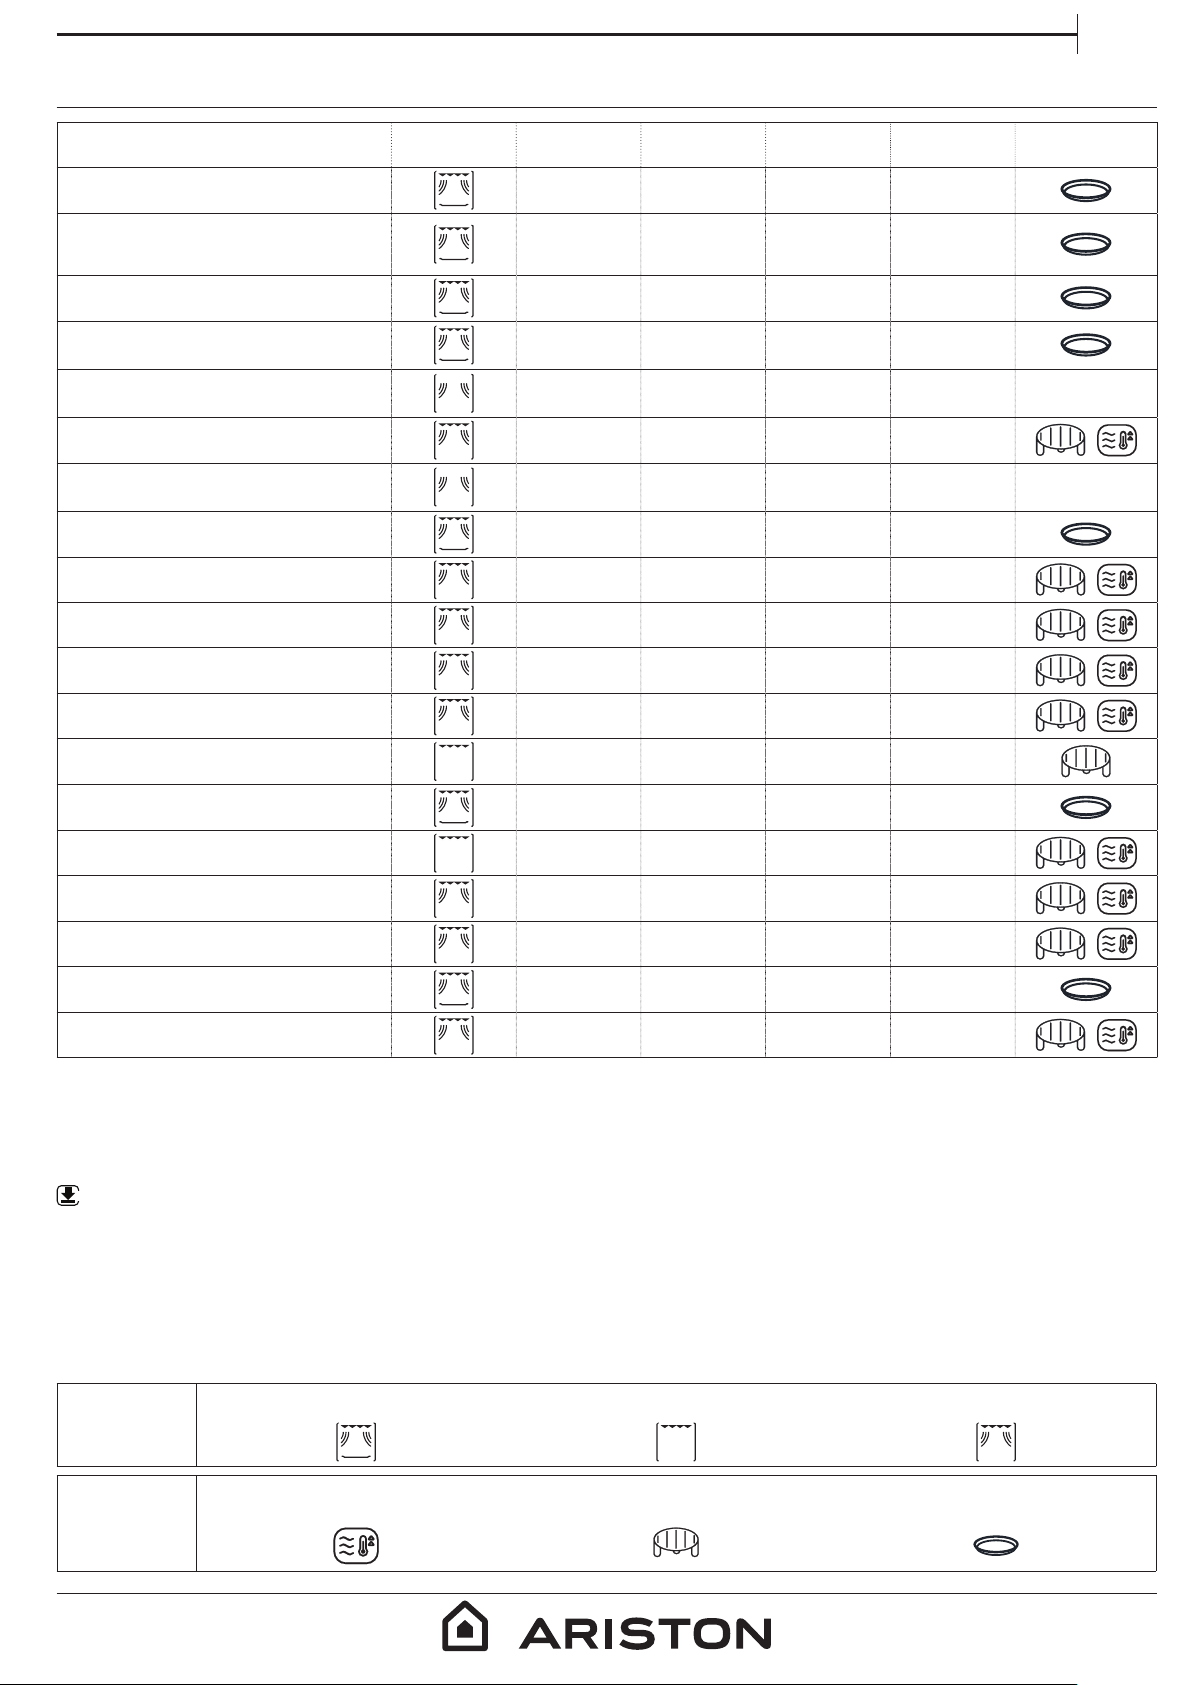
COOKING TABLE
FOOD FUNCTION HE ATING UP GRILL LEVEL POWER (W) TIME (MIN) ACCESSORIES
Sponge cake - - - 7 - 15
Fruit pie - - - 12 - 20
Biscuits - - - 5 - 10
EN
Savoury bakes or
quiche lorraine
(1 - 1.2 kg)
Ready meals
(250 - 500 g)
Lasagne/pasta bake
Frozen lasagne
(500 - 700 g)
Pizza (300 g)
- - - 18 - 25
- - 750 4 - 7 -
- 2 350 - 500 15 - 40
- - 500 - 750 14 - 20 -
- - - 14 - 16
Meat (chops, steak) - 3 500 10 - 15
Poultry (whole, 800 g - 1.5 kg) - 3 350 - 500 30 - 45 *
Chicken llets or pieces
- 3 350 - 500 10 -17
Roasts - 2 350 - 500 25 - 40 *
Sausages/kebabs - 2 / 3 - 20 - 40 *
Sausages/hamburgers
Yes ** - - 6 - 16 *
Fish (steaks or llets) Yes 3 160 - 350 15 - 30 *
Whole sh - 3 160 - 350 20 - 40 *
Baked potatoes - 2 350 - 500 30 - 50 *
Potato wedges - - - 25 - 30
Baked apples - 2 160 -350 15 -25
* Turn the food halfway through cooking ** Preheat the Crisp plate for 3-5 minutes
WWW
Download the Use and Care Guide from www. aristonchannel. com for the table of tested recipes, compiled for
the certication authorities in accordance with the standards IEC 60705 and IEC 60350.
Crisp Grill Grill + Microwaves
FUNCTIONS
ACCESSORIES
Heatproof plate/container suitable
for use in microwaves
Wire shelf Crisp plate
7
Page 8
CLEANING
Make sure that the appliance has cooled down
before carrying out any maintenance or cleaning.
Do not use steam cleaners.
INTERIOR AND EXTERIOR SURFACES
• Clean the surfaces with a damp microfibre cloth.
If they are very dirty, add a few drops of pH-neutral
detergent. Finish off with a dry cloth.
• Clean the door glass with a suitable liquid detergent.
• At regular intervals or in case of spills, remove the
turntable and its support to clean the bottom of the
Do not use wire wool, abrasive scourers or abrasive/
corrosive cleaning agents, as these could damage
the surfaces of the appliance.
ACCESSORIES
All accessories are dishwasher safe with the exception
of the crisp plate.
The crisp plate should be cleaned using water and
a mild detergent. For stubborn dirt, rub gently with
a cloth. Always leave the crisp plate to cool down
before cleaning.
oven, removing all food residue.
• The grill does not need to be cleaned as the intense
heat burns away any dirt: Use this function on a
regular basis.
TROUBLESHOOTING
WWW
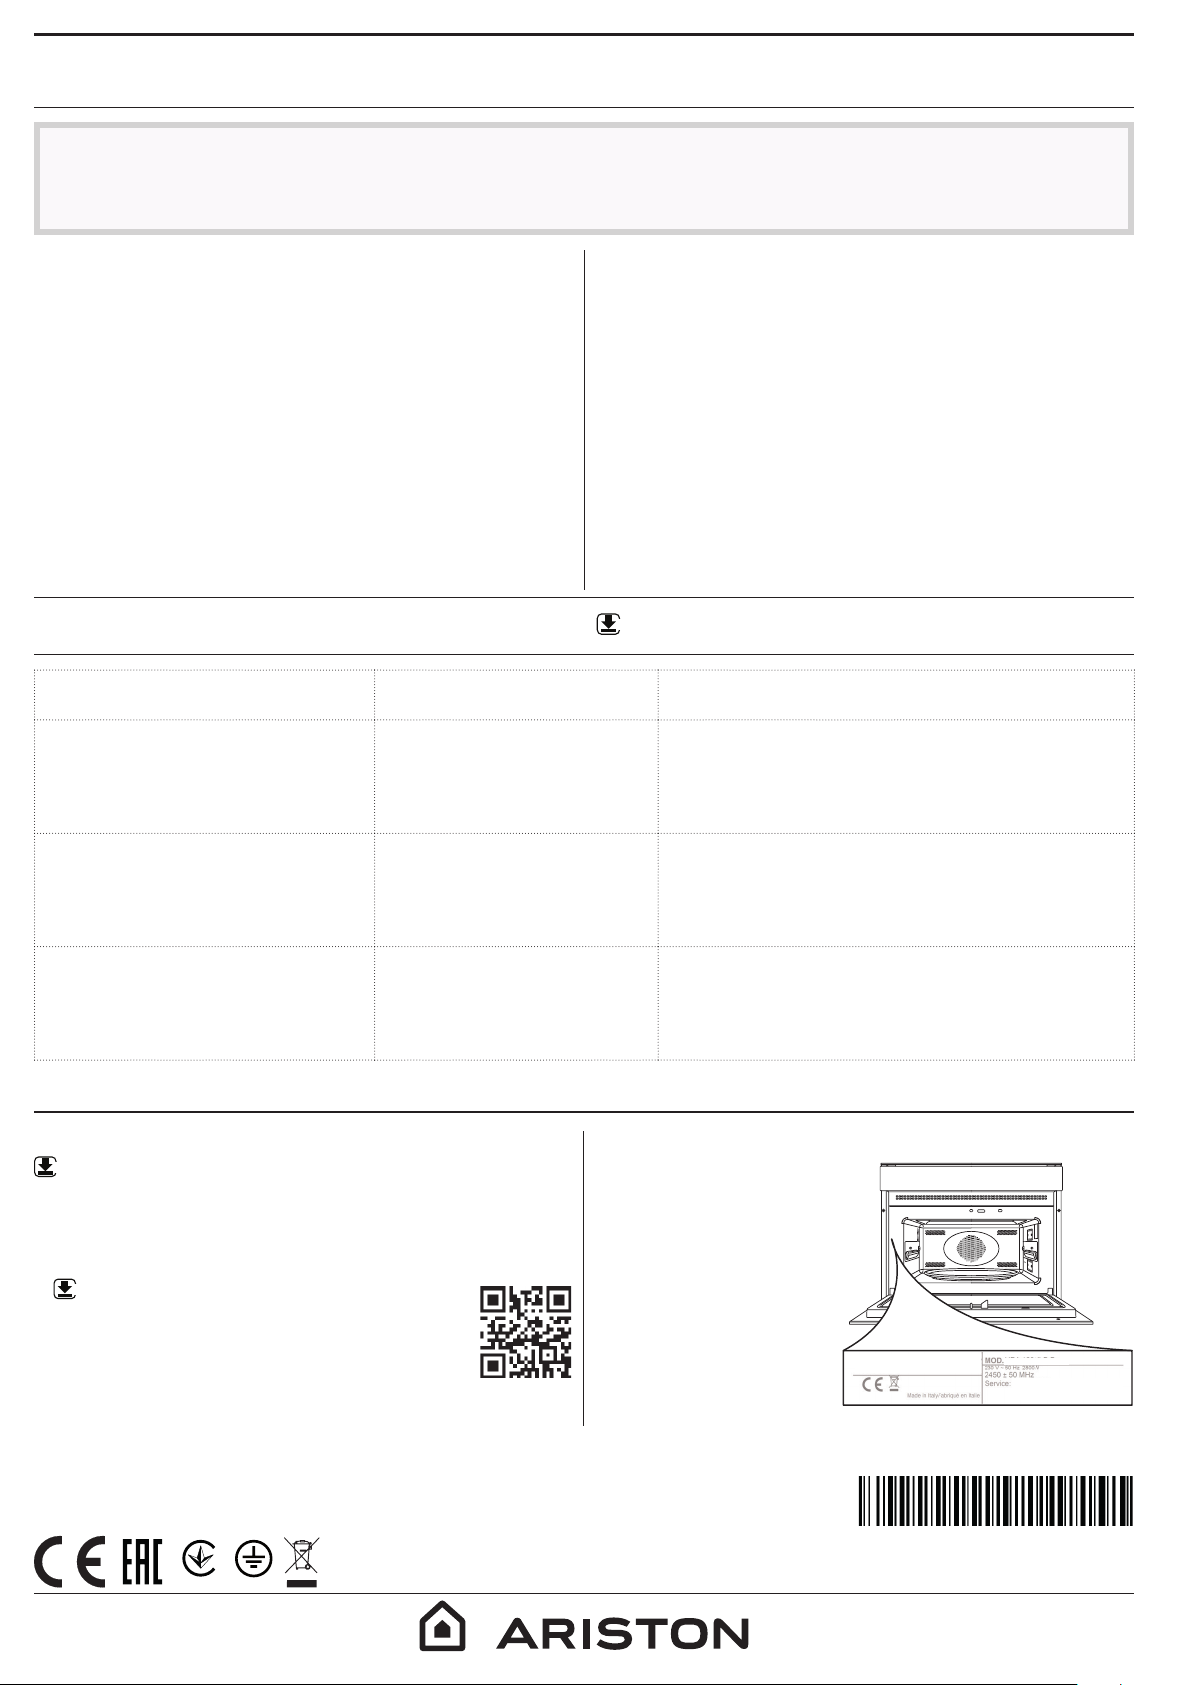
Problem Possible cause Solution
Download the Use and Care Guide from
www. aristonchannel. com for more information
The oven is not working.
Power cut.
Disconnection from the
mains.
The oven makes noises, even
Cooling fan active. Open the door or wait until the cooling process
when it is switched off.
The display is showing “Err”.
Software fault. Contact you nearest After-sales Service Centre
PRODUCT FICHE
WWW
The product fiche with energy data of this
appliance can be downloaded from our website
www. aristonchannel. com
HOW TO OBTAIN THE USE AND CARE GUIDE
WWW
>
Download the Use and Care Guide
from our website www. aristonchannel. com
(you can use this QR Code), specifying the
product’s commercial code.
> Alternatively, contact our Client After-sales Service.
Check for the presence of mains electrical power
and whether the oven is connected to the
electricity supply. Turn o the oven and restart it
to see if the fault persists.
has nished.
and state the letter or number that follows “Err”.
CONTACTING OUR AFTER-SALES SERVICE
You can find our
contact details in the
warranty manual. When
contacting our Client
After-sales Service,
please state the codes
provided on your
product's identification
plate.
XXXXXXXXXXXX
XXXXXXXXXXXX
XXX/XXX
001
8
Printed in I taly
400010882381
 Loading...