

Page 1

Istruzioni per luso
COMBINATO FRIGORIFERO/CONGELATORE
Italiano, 1
PT
Portuges, 37
MBP 1912 F
GBI NL
Nederlands
CS
Ðóсский, 49
Sommario
I
Installazione, 2
Posizionamento e collegamento
Reversibilità apertura porte
, 25English,13
Descrizione dellapparecchio, 3-4
Pannello di controllo
Vista d’insieme
Accessori, 5
Vano frigorifero
Vano congelatore
Avvio e utilizzo, 6-7
Avviare l’apparecchio
Come muoversi nel display
Sistema di raffreddamento
Utilizzare al meglio il frigorifero
Utilizzare al meglio il congelatore
Manutenzione e cura, 8
Escludere la corrente elettrica
Pulire l’apparecchio
Evitare muffe e cattivi odori
Sostituire la lampadina
Sostituire filtro Anti-odori
Precauzioni e consigli, 9
Sicurezza generale
Smaltimento
Risparmiare e rispettare l’ambiente
Anomalie e rimedi, 10
Assistenza, 11
Assistenza attiva 7 giorni su 7
Page 2

Installazione
! È importante conservare questo libretto per poterlo
I
consultare in ogni momento. In caso di vendita,
di cessione o di trasloco, assicurarsi che resti insieme
all’apparecchio per informare il nuovo proprietario
sul funzionamento e sui relativi avvertimenti.
! Leggere attentamente le istruzioni: ci sono importanti
informazioni sull’installazione, sull’uso e sulla
sicurezza.
Posizionamento e collegamento
Posizionamento
1. Posizionare l’apparecchio in un ambiente ben aerato
e non umido.
2. Non ostruire le griglie posteriori di ventilazione:
compressore e condensatore emettono calore e
richiedono una buona aerazione per funzionare bene e
contenere i consumi elettrici.
3. Lasciare una distanza di almeno 10 cm tra la parte
superiore dell’apparecchio ed eventuali mobili
sovrastanti e di almeno 5 cm tra le fiancate e mobili/
pareti laterali.
4. Lasciare l’apparecchio lontano da fonti di calore (la
luce solare diretta, una cucina elettrica).
5. Per mantenere una ottimale distanza del prodotto
dalla parete posteriore, montare i distanzieri presenti
nel kit di installazione seguendo le istruzioni presenti
sul foglio dedicato.
Collegamento elettrico
Dopo il trasporto, posizionare l’apparecchio
verticalmente e attendere almeno 3 ore prima
di collegarlo all’impianto elettrico. Prima di inserire
la spina nella presa della corrente, accertarsi che:
• la presa abbia la messa a terra e sia a norma di legge;
• la presa sia in grado di sopportare il carico massimo
di potenza della macchina, indicato nella targhetta
caratteristiche posta nel vano frigorifero in basso
a sinistra (es 150 W);
• la tensione di alimentazione sia compresa nei valori
indicati nella targhetta caratteristiche, posta in
basso a sinistra (es 220-240 V);
• la presa sia compatibile con la spina
dell’apparecchio.
In caso contrario richiedere la sostituzione della
spina a un tecnico autorizzato (
non usare prolunghe e multiple.
! Ad apparecchio installato, il cavo elettrico e la presa
della corrente devono essere facilmente raggiungibili.
! Il cavo non deve subire piegature o compressioni.
! Il cavo deve essere controllato periodicamente
e sostituito solo da tecnici autorizzati (
! Lazienda declina ogni responsabilità qualora
queste norme non vengano rispettate.
vedi Assistenza
vedi Assistenza
);
).
Livellamento
1. Installare l’apparecchio su un pavimento piano e rigido.
2. Se il pavimento non fosse perfettamente orizzontale,
compensare svitando o avvitando i piedini anteriori.
Reversibilità apertura porte
Nel caso sia necessario cambiare il verso di apertura
delle porte, rivolgersi al servizio di Assistenza Tecnica.
2
Page 3
Descrizione
dellapparecchio
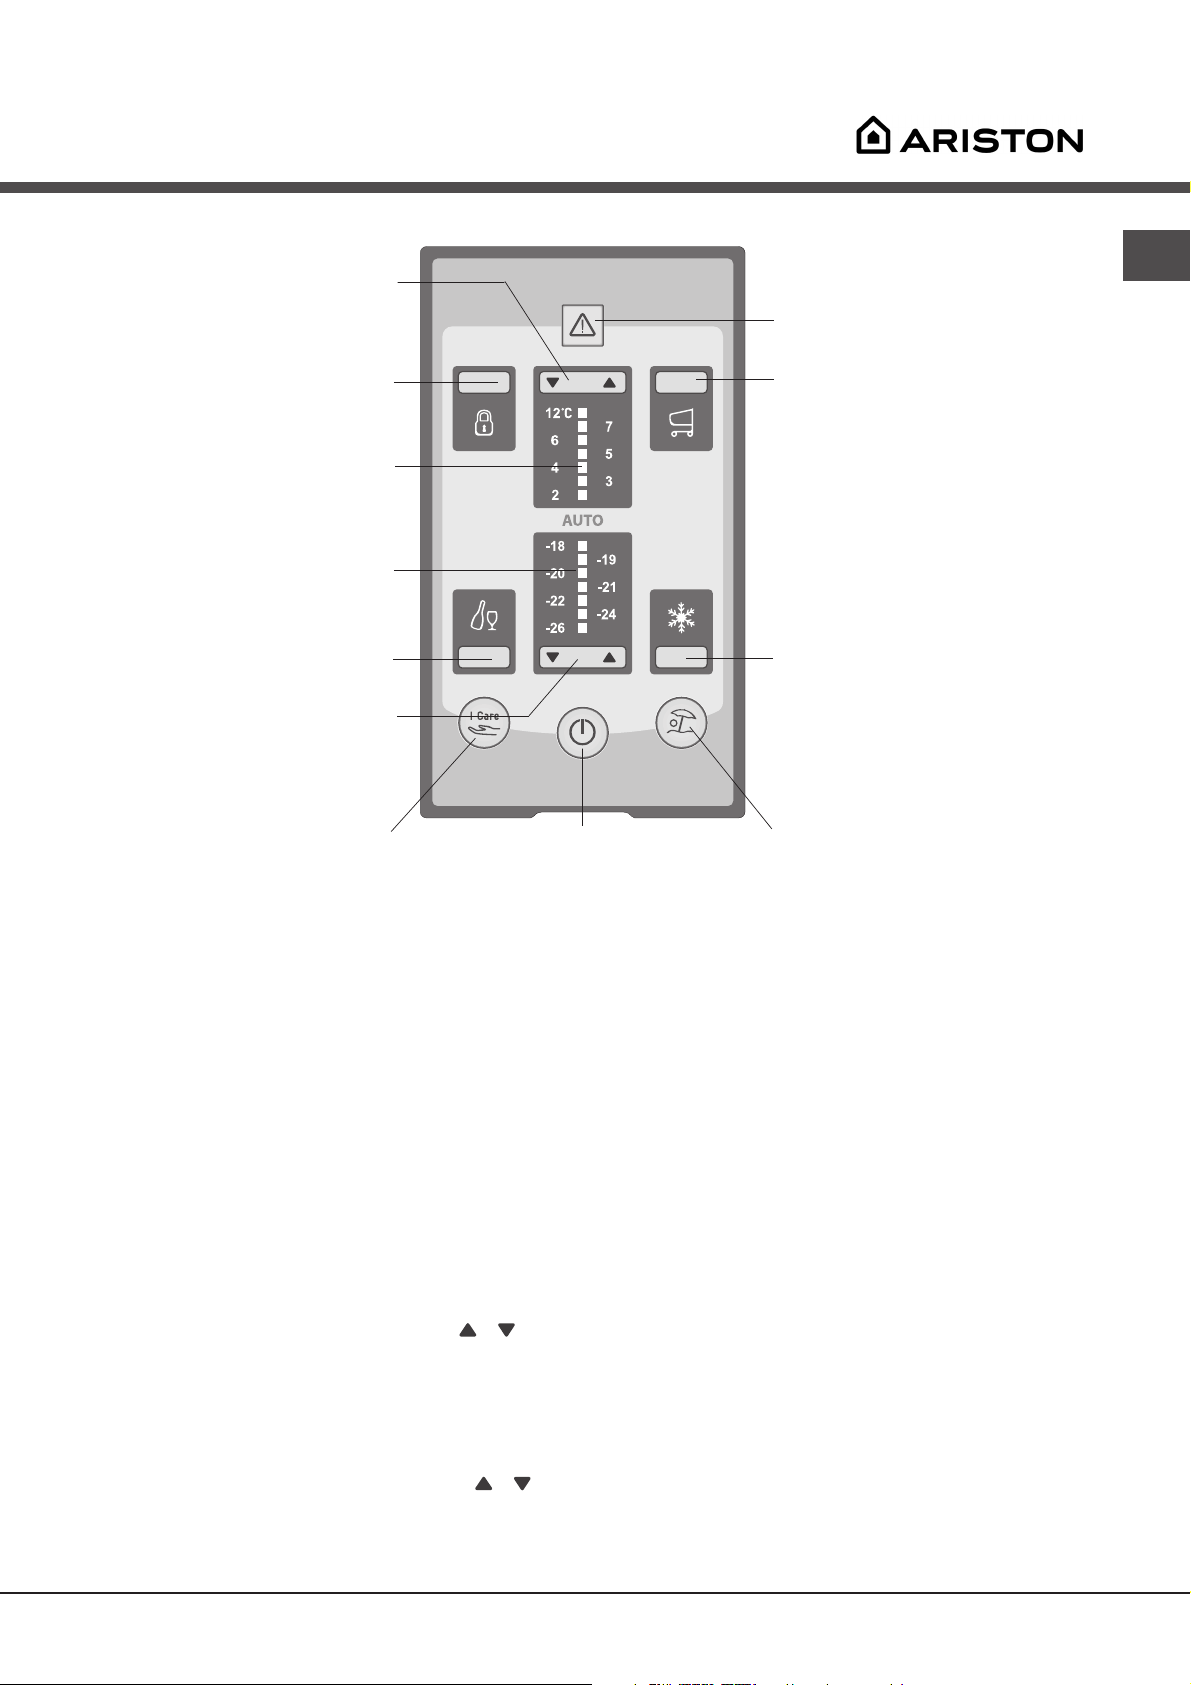
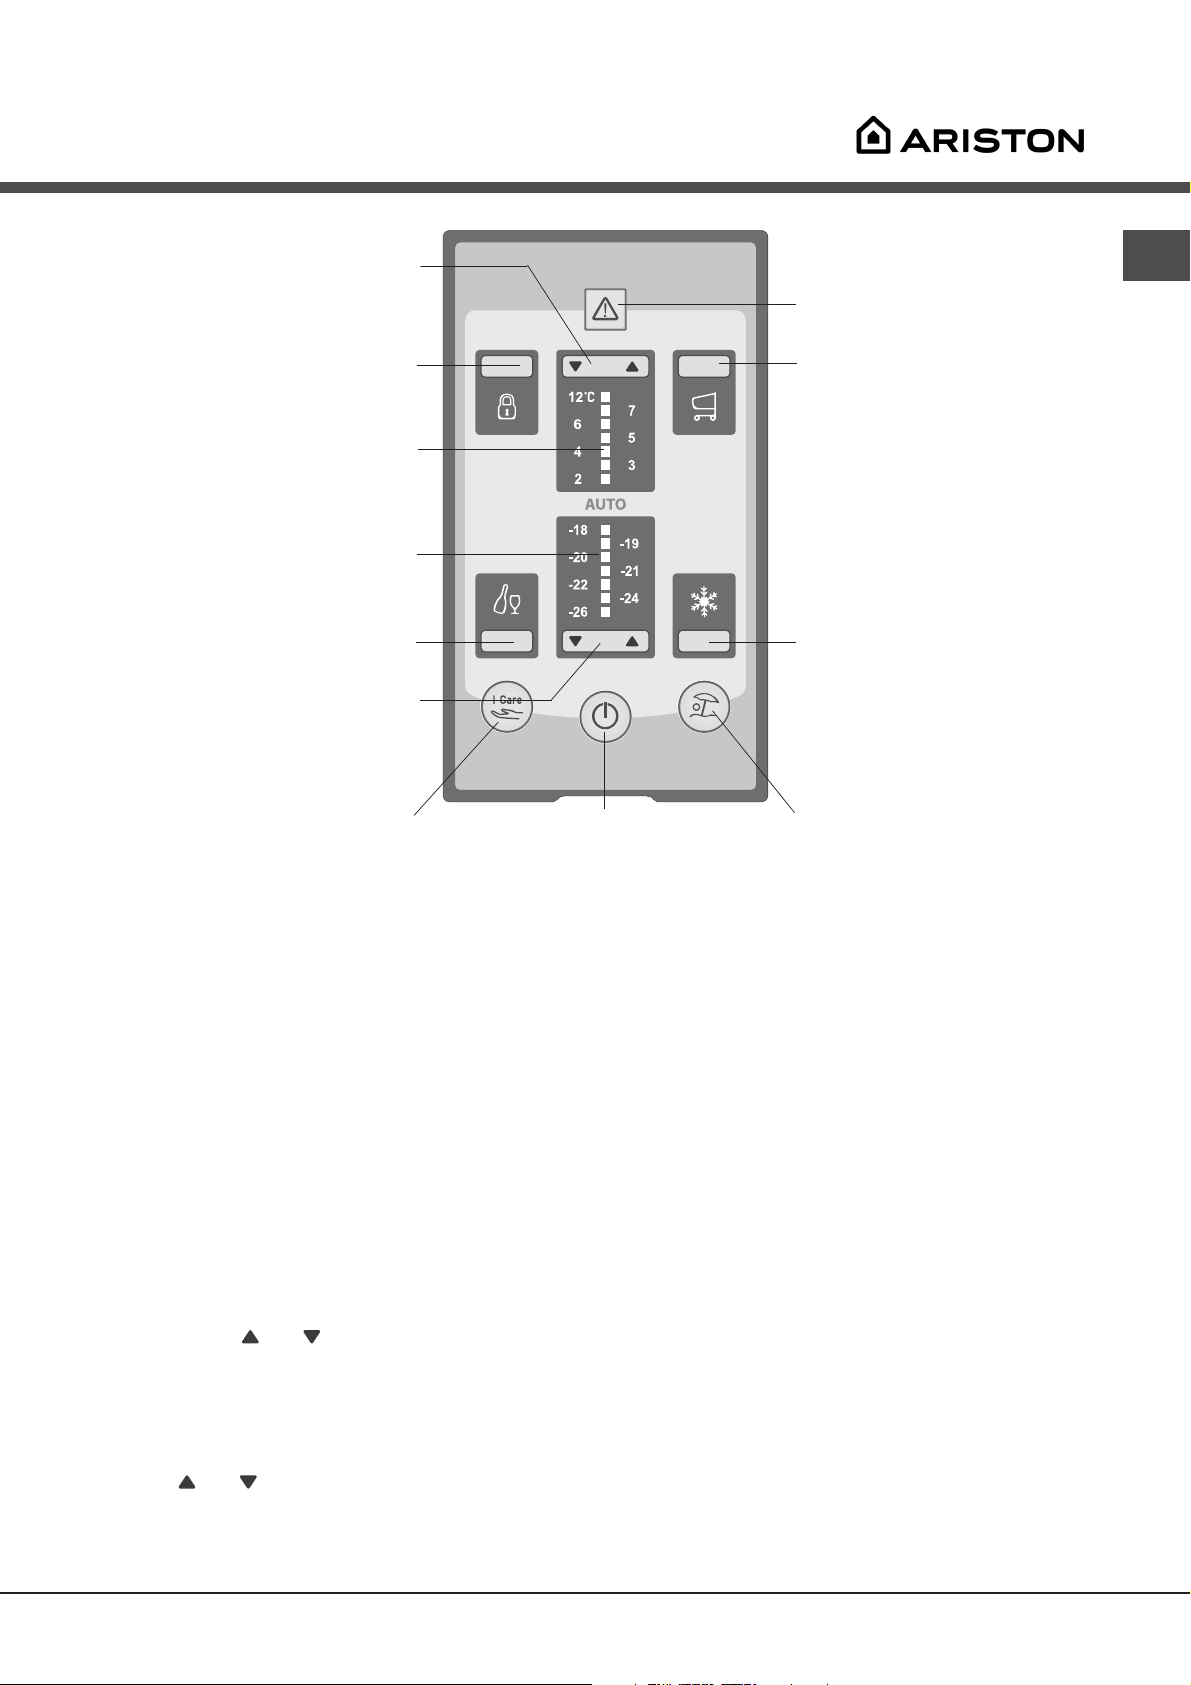
Pannello di controllo
Regolazione
temperatura
FRIGORIFERO
CHILD LOCK
Barra Grafica
FRIGORIFERO
Barra Grafica
CONGELATORE
ICE PARTY
Regolazione
temperatura
CONGELATORE
I
ALLARMI
SUPER COOL
SUPER
FREEZE
I CARE
ON/OFF
Premendo questo tasto è possibile accendere l’intero
prodotto (sia vano frigo che vano freezer). Il LED rosso
indica che il prodotto è spento, il LED verde che è in
funzione. Per spegnere il prodotto occorre premere per
almeno 2 secondi il tasto ON/OFF.
I CARE
Gestisce l’attivazione e la disattivazione della funzione I
Care (la temperatura ottimale a bassi consumi).
All’attivazione di questa funzione, si accendono
contemporaneamente il LED AUTO ed il LED I Care.
ALLARMI
Consente la segnalazione e la gestione di tutti gli allarmi
connessi al funzionamento del prodotto.
Child Lock
Consente di attivare o disattivare il blocco dei tasti del
pannello di controllo onde evitare involontarie attivazioni
da parte dei bambini.
Regolazione Temperatura FRIGORIFERO e
Consentono la modifica dell’impostazione della
temperatura del frigorifero, con relativa conferma sulla
barra grafica della temperatura selezionata. Attraverso
questi tasti è anche possibile disattivare il solo vano
frigorufero.
ON/OFF
HOLIDAY
Barra grafica FRIGORIFERO
Indica la temperatura impostata nel vano frigo o la sua
disattivazione (in questo caso la barra grafica è spenta).
Barra grafica CONGELATORE
Indica la temperatura impostata nel vano freezer.
SUPER COOL
Consente di attivare o disattivare la funzione SUPER COOL
(raffreddamento rapido). Si accende il led SUPER COOL.
SUPER FREEZE
Consente di attivare o disattivare la funzione SUPER
FREEZE (congelamento rapido). Si accende il led SUPER
FREEZE.
HOLIDAY
Consente di attivare o disattivare la funzione HOLIDAY (si
accende il LED AUTO e il led HOLIDAY).
ICE PARTY
Consente di attivare o disattivare la funzione ICE PARTY
(riduce la temperatura del congelatore per il tempo
necessario a raffreddare una bottiglia). Si accende il led
ICE PARTY.
Regolazione Temperatura CONGELATORE e
Consentono la modifica dell’impostazione della
temperatura del congelatore, con relativa conferma sulla
barra grafica della temperatura impostata.
3
Page 4

Descrizione
dellapparecchio
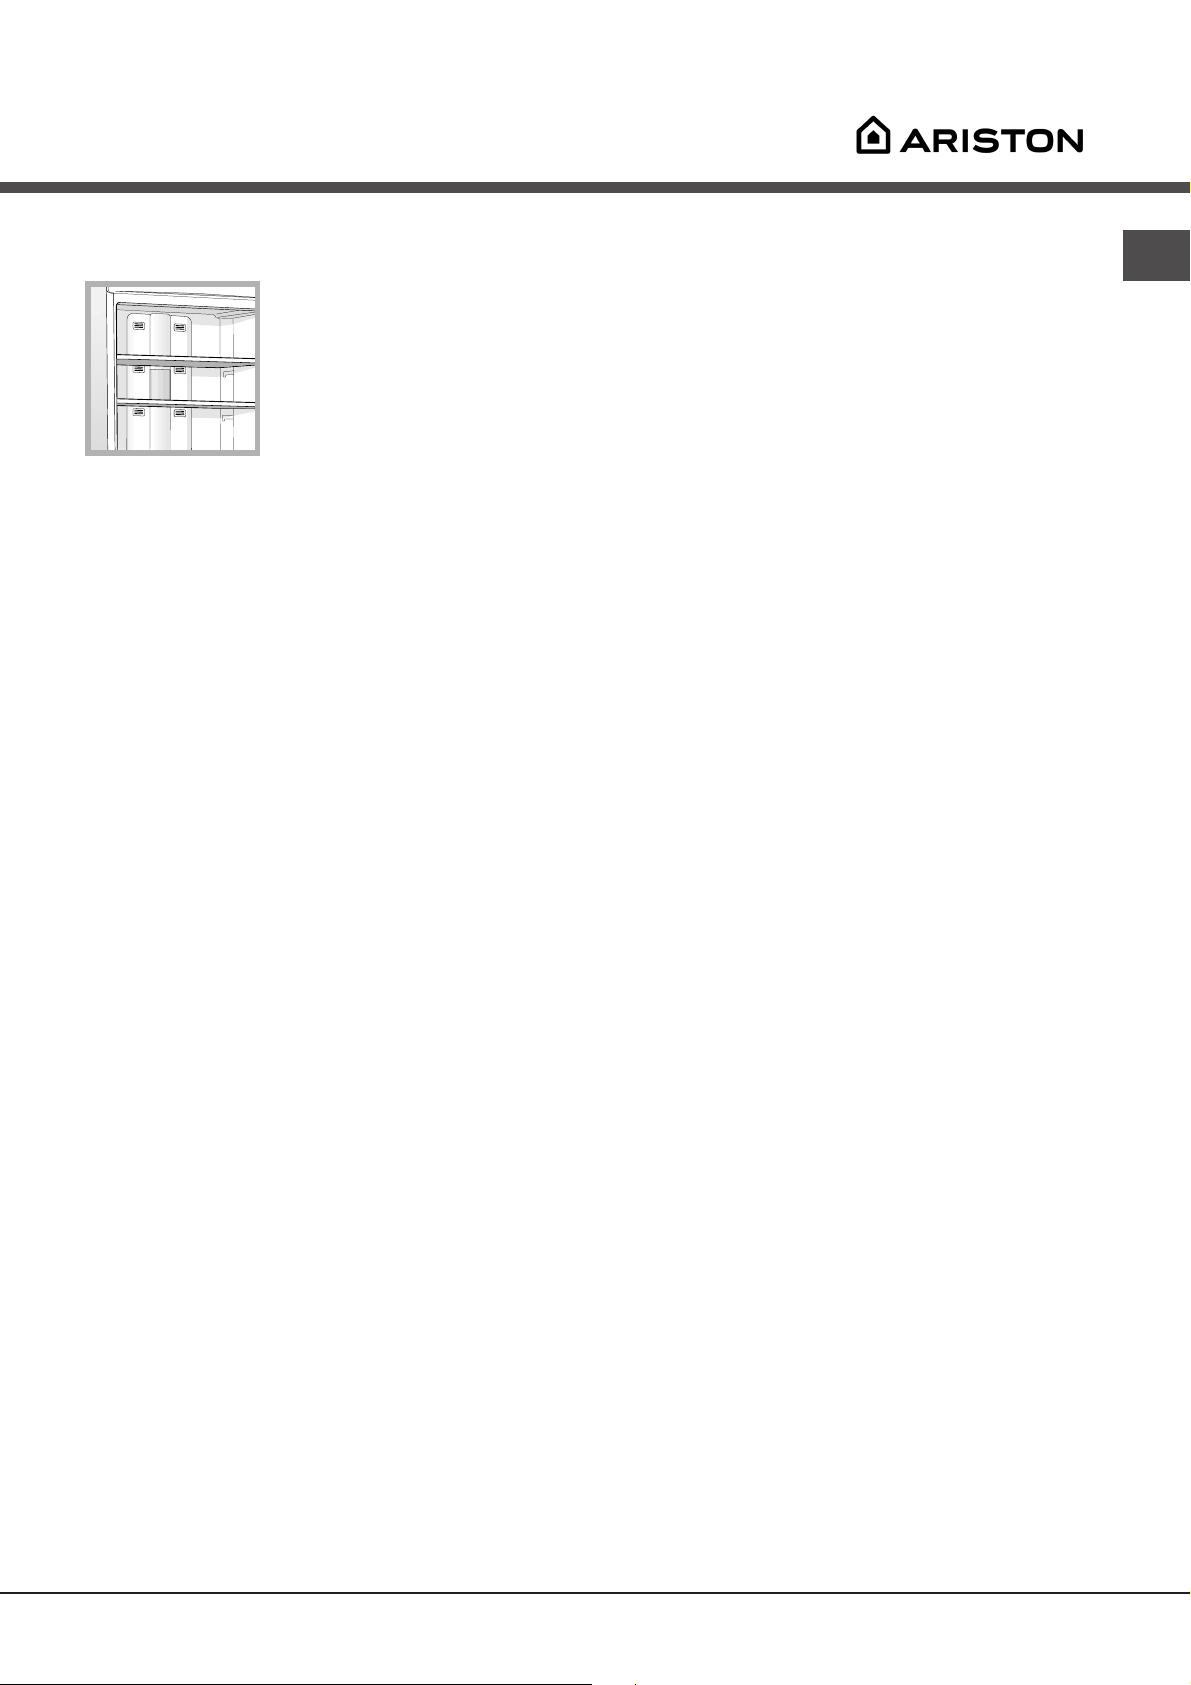
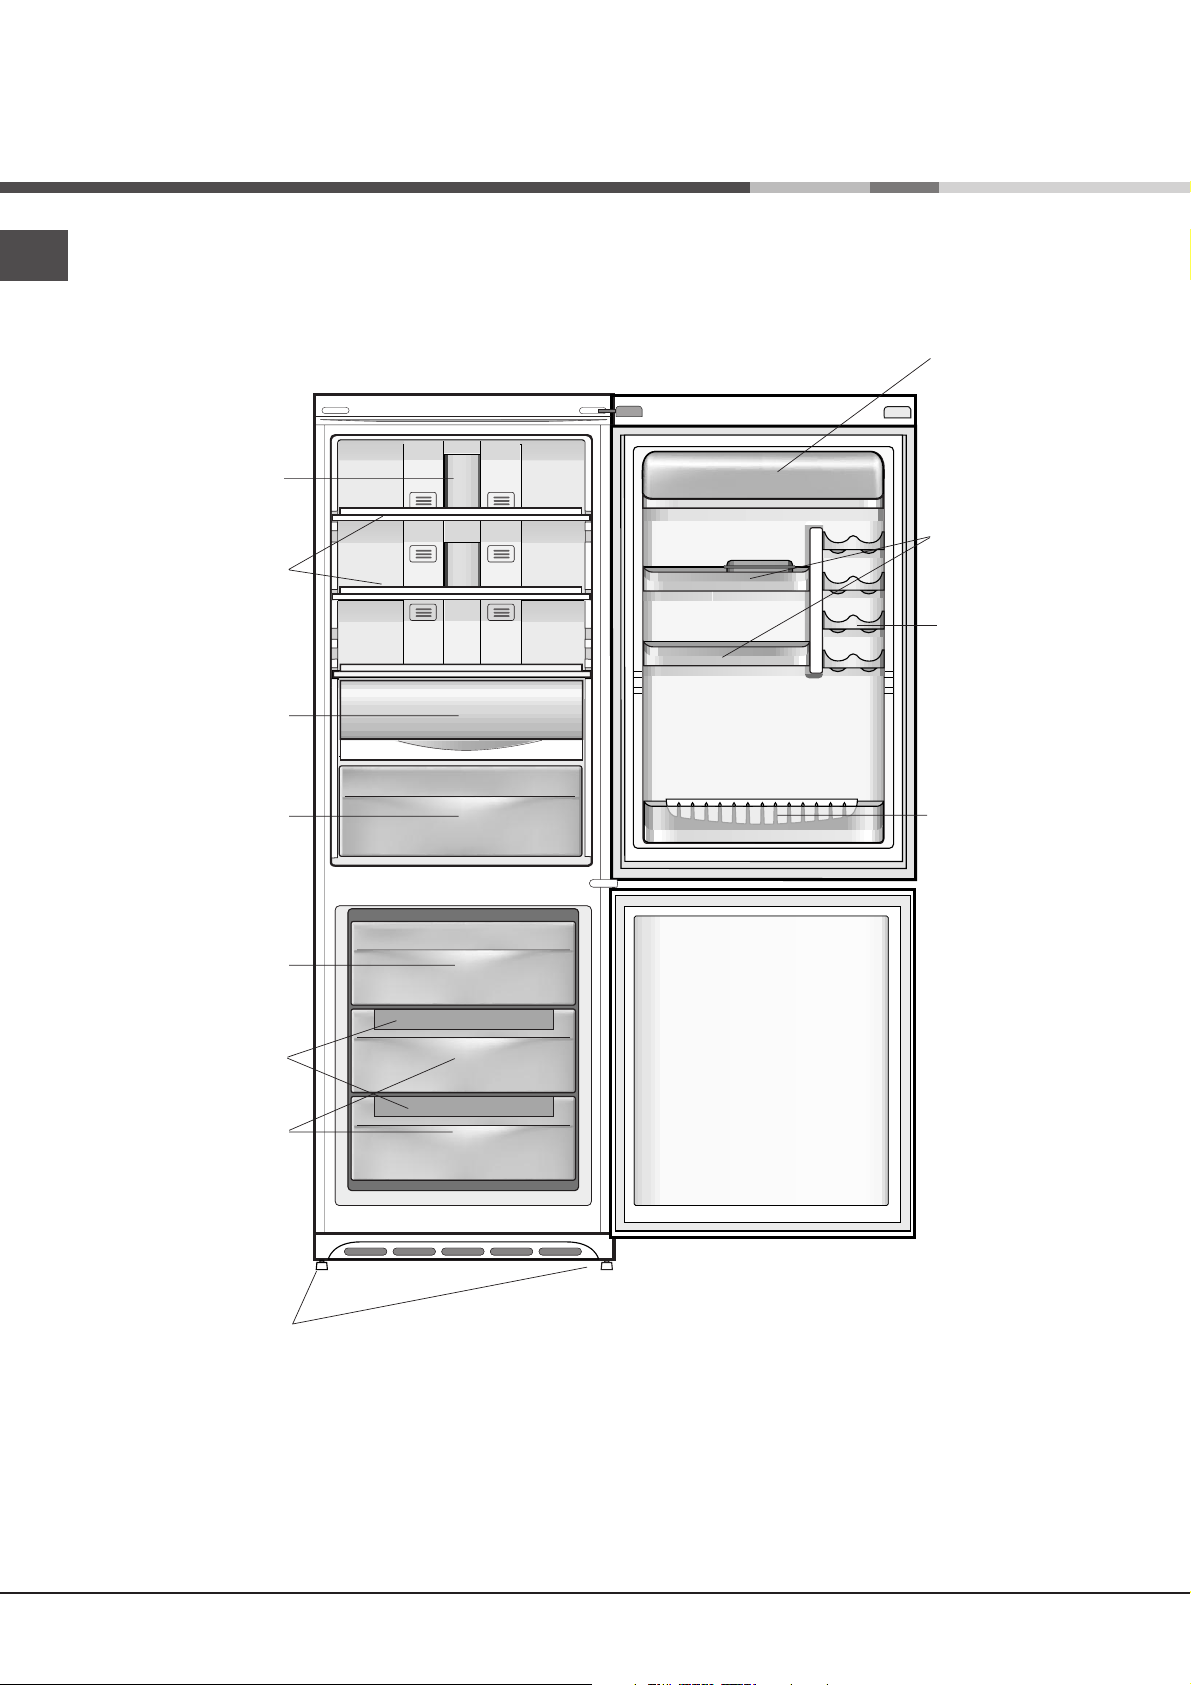
Vista dinsieme
I
LAMPADINA
vedi Manutenzione
(
RIPIANI
)
Balconcino estraibile
con coperchio e
con PORTAUOVA
Balconcino
PORTAOGGETTI
Scomparto
FRESK BOX
Cassetto
FRUTTA e
VERDURA
Vano
CONGELAMENTO e
CONSERVAZIONE
Bacinella
GHIACCIO
Vani
CONSERVAZIONE
Balconcini
PORTALATTINE
Balconcino
BOTTIGLIE
PIEDINI
di regolazione
Variabili per numero e/o per posizione.
4
Page 5
Accessori
Vano frigorifero
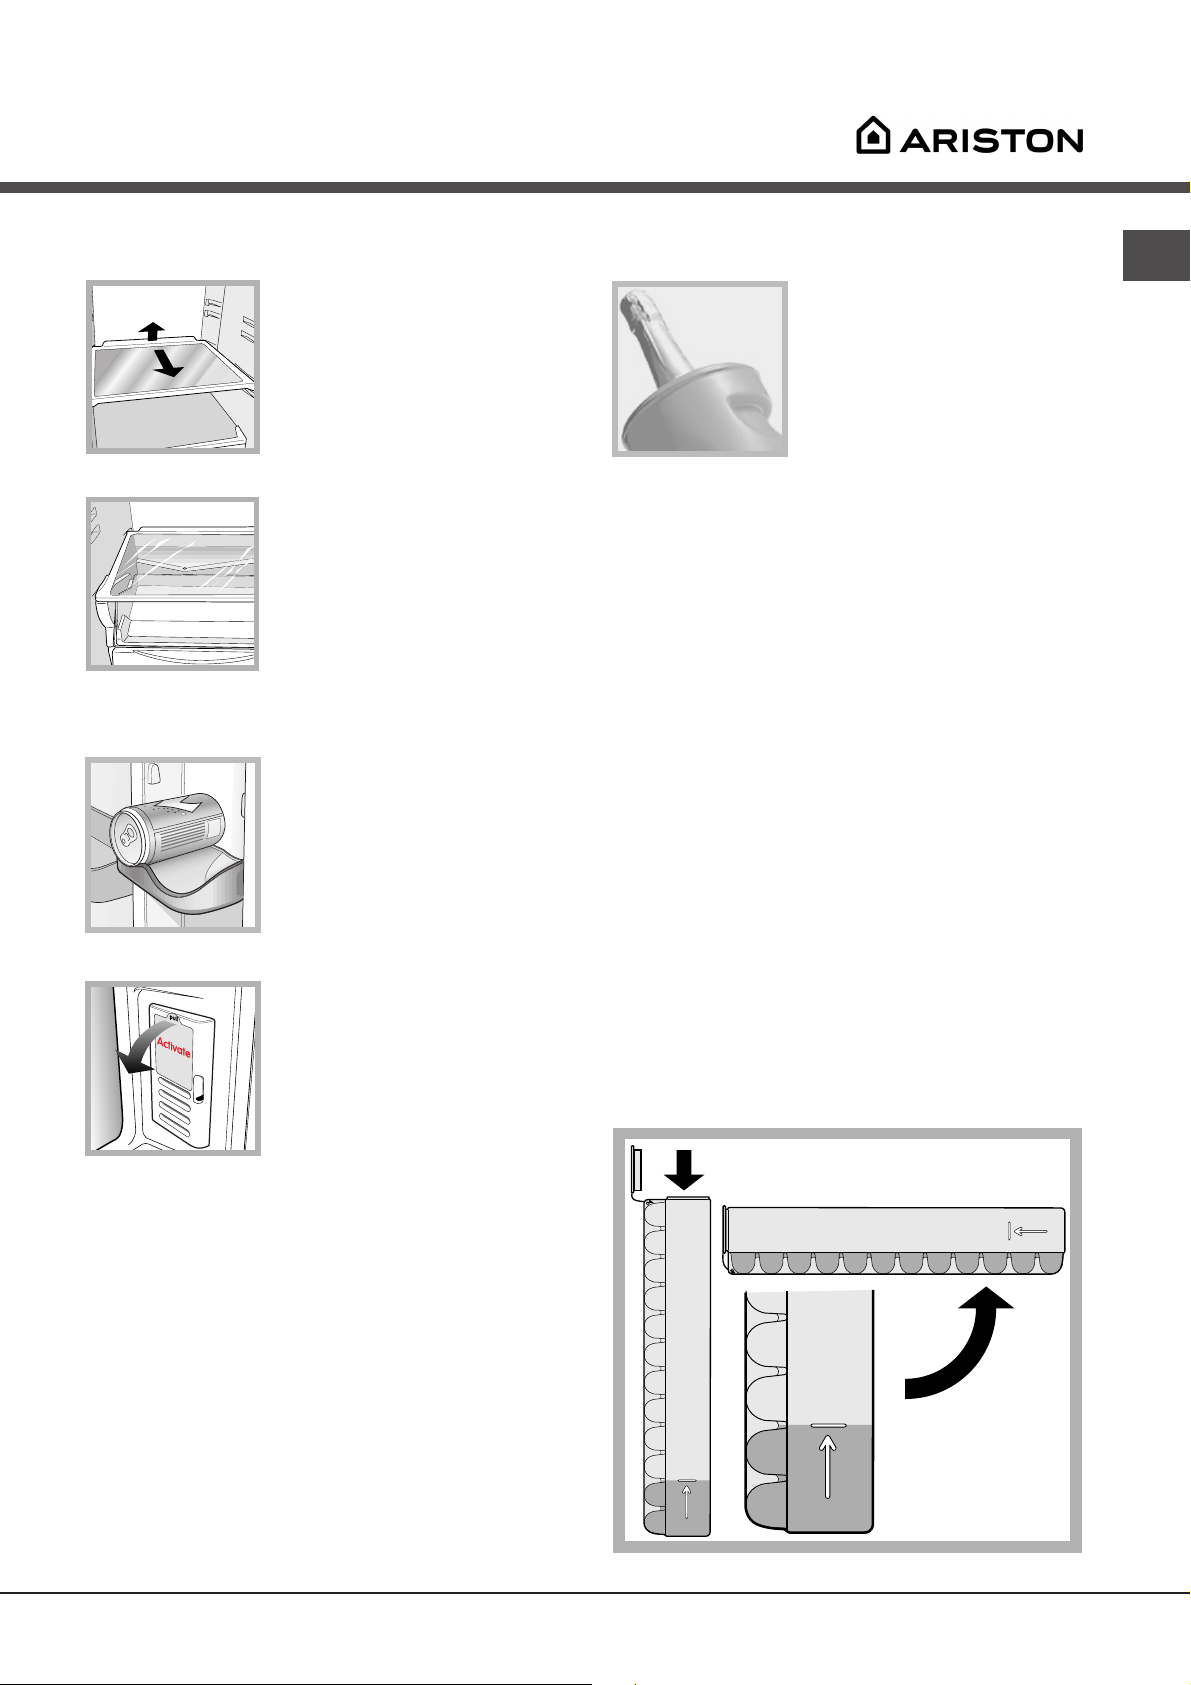
RIPIANI: sono estraibili e
1
2
protegge da fenomeni di ossidazione e annerimento.
Può essere utilizzato anche per “piatti freddi”.
l’adesivo dalla bocchetta (
regolabili in altezza grazie alle
apposite guide (
vedi figura
),
per l’inserimento di contenitori
o alimenti di notevole
dimensione. Per regolare
l’altezza non è necessario
estrarre completamente il ripiano.
FRESH BOX: per carne e
pesce freschi. Lo scomparto
consente lunghi tempi di
conservazione, fino anche a
una settimana, grazie alla
bassa temperatura – la più
fredda del frigorifero – e allo
sportello trasparente che
Balconcino PORTALATTINE:
per riporre orizzontalmente più
lattine (
vedi figura
). Vi si
possono riporre anche yogurt,
burro o contenitori in genere.
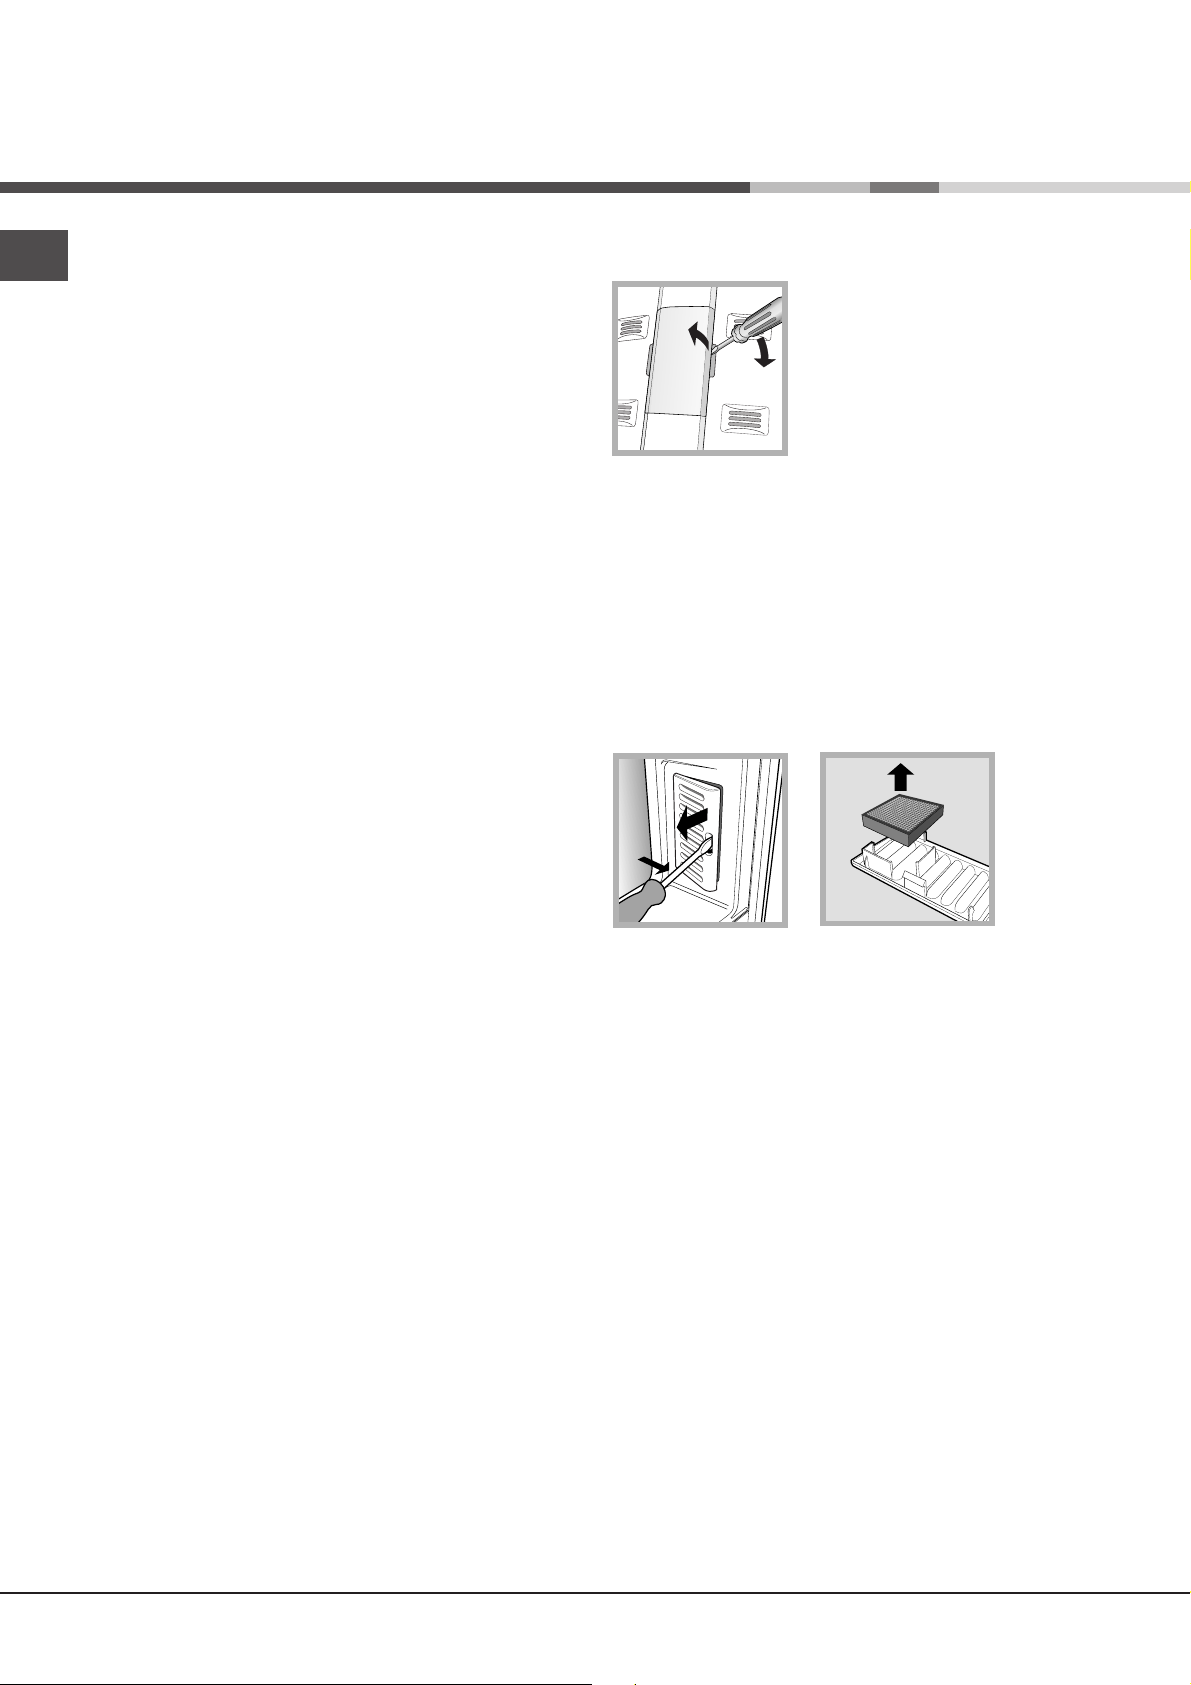
FILTRO ANTI-ODORI
:
*
alcuni modelli sono dotati di
un filtro anti-odori a carboni
attivi, che assicura una
migliore qualità dell’aria
all’interno del frigorifero.
Il filtro è collocato in basso a
destra, dentro la bocchetta di
aerazione: per attivarlo togliere
vedi figura
).
Vano congelatore
ICE PARTY: per portare a
giusta temperatura una
bottiglia di spumante o
champagne.
Inserire la bottiglia nel
secchiello già congelato
all’interno del vano
CONGELAMENTO e
CONSERVAZIONE e selezionare la funzione. Estrarre
la bottiglia quando segnalato.
Il secchiello può essere utilizzato per servire la
bottiglia mantenendola fresca.
Bacinella ghiaccio Ice
Il fatto di essere poste sulla parte superiore dei cassetti
riposti nel vano freezer assicura una maggiore pulizia: (il
ghiaccio non viene più a contatto con gli alimenti) ed
ergonomia (non si sgocciola in fase di caricamento).
1. Estrarre la bacinella spingendola verso l’alto.
Verificare che la bacinella sia completamente vuota
e riempirla d’acqua attraverso l’apposito foro.
2. Fare attenzione a non superare il livello indicato
(MAX WATER LEVEL). Troppa acqua ostacola la
fuoriuscita dei ghiaccioli (se succede, attendere che
il ghiaccio si sciolga e svuotare la bacinella).
3. Ruotare la bacinella di 90°: l’acqua riempie le forme
per il principio dei vasi comunicanti (
4. Chiudere il foro con il coperchio in dotazione e
riporre la bacinella, inserendo la parte superiore
nell’apposita sede e facendola ricadere.
5. Quando il ghiaccio sarà formato (tempo minimo
circa 8 ore) battere la bacinella su una superficie
dura e bagnarne l’esterno per far staccare i
ghiaccioli; farli poi uscire dal foro.
Care.
vedi figura
).
MAX
WATER LEVEL
I
Presente solo su alcuni modelli
*
WATER LEVEL
MAX
WATER LEVEL
MAX
5
Page 6
Avvio e utilizzo
Avviare lapparecchio
I
! Dopo il trasporto, posizionare l’apparecchio
verticalmente ed attendere circa 3 ore prima di
collegarlo alla presa di corrente per favorire un buon
funzionamento.
• Prima di mettere gli alimenti nel frigorifero pulite
bene l’interno con acqua tiepida e bicarbonato.
• Tempo protezione motore.
L’apparecchio è provvisto di un controllo
salvamotore che fa avviare il compressore solo
dopo circa 8 minuti dall’accensione. Questo accade
anche dopo ogni interruzione dell’alimentazione
elettrica, volontaria o involontaria (black out).
Scomparto congelatore
All’accensione del prodotto (pressione per più di due
secondi del pulsante ON/OFF) il comparto congelatore
si porta nell’impostazione standard di 18°C. Si
consiglia di inserire la funzione SUPER FREEZE (Sulla
barra grafica del CONGELATORE continua ad essere
visualizzata la temperatura impostata
precedentemente) per accelerare il raffreddamento del
vano; quando quest’ultimo avrà raggiunto la sua
temperatura ottimale, la funzione si disattiverà e
potrete introdurre nel congelatore i surgelati.
Scomparto frigorifero
All’accensione del prodotto il comparto frigorifero si
porta nell’impostazione standard di +5°C. Si consiglia
di inserire la funzione SUPER COOL (Sulla barra
grafica del FRIGORIFERO continua ad essere
visualizzata la temperatura impostata
precedentemente) per accelerare il raffreddamento del
vano: dopo qualche ora potrete mettere i cibi nel
frigorifero.
Come muoversi nel display
Impostazione delle temperature
Se il prodotto è acceso, le barre grafiche del vano
frigorifero e congelatore visualizzeranno le temperature
impostate in quel momento. Per modificarle è
sufficiente premere i tasti
si vuol cambiare la temperatura. In particolare ogni
pressione dei tasti incrementa o diminuisce la
temperatura di 1° ed in maniera equivalente anche il
livello di freddo relativo. Le temperature del vano frigo
selezionabili sono +12°, +7°, +6°, +5°, +4°, +3°, +2°,
quelle del freezer sono –18°, -19°,-20°, -21°, -22°, -24°,
-26°.
Le temperature automaticamente impostate sono +5°C
per il comparto frigorifero e 18°C per il comparto
:
e relativi al vano in cui
congelatore e sono quelle standard di conservazione.
Quando è attiva la funzione “I Care” il prodotto regola
automaticamente le temperature in base alle
condizioni interne ed esterne al frigo, ciò viene
segnalato dall’accensione della scritta AUTO.
Qualora fosse necessario attivare la funzione “I Care”
con temperature differenti da quelle standard di
conservazione, è necessario, all’attivazione della
funzione, tenere premuto il tasto “I Care” e impostare
mediante i tasti
condizioni le temperature impostabili sono 4°, 5° e 6°
per il vano frigo e –18°, -19° e –20° per il vano freezer.
Quando è attiva la funzione HOLIDAY non sono
possibili regolazioni di temperatura, ma il prodotto si
posiziona automaticamente alla regolazione ottimale
per la situazione: +12°C per il comparto frigorifero e
-18°C per il comparto congelatore, tale condizione è
inoltre segnalata dall’accensione della scritta “AUTO”.
Per attivare e disattivare le funzioni è sufficiente
premere il relativo tasto e l’accensione o lo
spegnimento del relativo LED, segnalerà lo stato della
funzione.
Alcune funzioni (SUPER COOL, SUPER FREEZE, ICE
PARTY, ICE CARE) sono incompatibili con altre
(HOLIDAY,..), in questo caso si tiene conto di una
priorità già stabilita in modo da aiutarvi nella gestione
del prodotto.
Al termine della funzione Ice Party occorre premere il
tasto ICE PARTY per interrompere il lampeggio del led
relativo e il segnale sonoro. Il lampeggio e il segnale
sonoro indica il termine della funzione e la necessità di
rimuovere la bottiglia dal vano freezer.
Child Lock
Per poter attivare la funzione Child Lock, è necessario
tenere premuto il tasto Child Lock per 2 secondi,
l’attivazione del blocco dei tasti viene confermata da
un suono breve e dall’accensione del led relativo. Per
disattivare la funzione premere il tasto Child Lock per 2
secondi, la disattivazione viene confermata da un
suono breve e dallo spegnimento del led relativo.
! La barra grafica del CONGELATORE serve anche
per segnalare un anomalo aumento di temperatura nel
vano congelatore (
e le nuove temperature. In queste
vedi anomalie e rimedi
).
6
Page 7
Sistema di raffreddamento
No Frost
È riconoscibile dalla presenza
di celle d’aerazione poste sulle
pareti posteriori dei vani.
Il No Frost gestisce un flusso
continuo di aria fredda che
raccoglie l’umidità e impedisce
la formazione di ghiaccio
e brina: nel vano frigorifero mantiene il giusto livello
di umidità e, grazie all’assenza di brina, preserva le
qualità originarie degli alimenti; nel vano congelatore
evita la formazione di ghiaccio rendendo superflue le
operazioni di sbrinamento ed evitando che gli alimenti
si attacchino tra loro.
! Non mettere alimenti o contenitori a diretto contatto
con la parete refrigerante posteriore, per non ostruire i
fori di aerazione e facilitare la formazione di condensa.
Utilizzare al meglio il congelatore
I
• Regolare la temperatura tramite il pannello di controllo.
• Per congelare i cibi nel modo più corretto e sicuro
occore procedere come di seguito indicato.
- Introdurre gli alimenti nel vano superiore
“CONGELAMENTO e CONSERVAZIONE”, facendo
attenzione che questi non vengano a contatto con i
cibi già presenti; premere il tasto SUPER FREEZE
(congelamento rapido, si accende il relativo LED), e
chiudere la porta; la funzione si disattiva
automaticamente trascorse 24 ore o raggiunte la
temperatura ottimale (LED si spegne).
• Non ricongelare alimenti che stanno per scongelare
o scongelati; tali alimenti devono essere consumati
entro 24 ore o ricongelati previa cottura.
• Gli alimenti freschi da congelare non devono essere
posti a contatto con quelli già congelati.
! Chiudere le bottiglie e avvolgere gli alimenti.
Utilizzare al meglio il frigorifero
•
Regolare la temperatura tramite il display.
• Premere il tasto SUPER COOL (raffreddamento
rapido) per abbassare la temperatura in poco
tempo, per esempio quando il vano viene riempito
dopo una grossa spesa. La funzione si disattiva
automaticamente trascorso il tempo necessario.
• Inserire soltanto alimenti freddi o appena tiepidi, non
vedi Precauzioni e consigli
caldi (
• Ricordarsi che gli alimenti cotti non si mantengono
più a lungo di quelli crudi.
• Non inserire liquidi in recipienti scoperti:
provocherebbero un aumento di umidità con
conseguente formazione di condensa.
).
• Non mettere nel congelatore bottiglie di vetro
contenenti liquidi, tappate o chiuse ermeticamente,
perché potrebbero rompersi.
• La quantità massima giornaliera di alimenti da
congelare è indicata sulla targhetta caratteristiche,
posta nel vano frigorifero in basso a sinistra
(esempio: Kg/24h 4).
! Durante il congelamento evitare di aprire la porta.
! In caso di interruzione di corrente o di guasto, non
aprire la porta del congelatore: in questo modo congelati
e surgelati si conserveranno senza alterazioni per circa 914 ore.
! Per evitare di ostacolare la circolazione dell’aria
all’interno del congelatore, si raccomanda di non
ostruire con cibi o contenitori i fori di areazione.
7
Page 8
Manutenzione e cura
Escludere la corrente elettrica
I
Durante i lavori di pulizia e manutenzione è necessario
isolare l’apparecchio dalla rete di alimentazione:
1. Tenere premuto il tasto ON/OFF per circa due
secondi, finché il display si spegne tutto eccetto il
led rosso del tast ON/OFF.
2. Staccare la spina dalla presa.
! Se non si segue questa procedura può scattare
l’allarme: esso non è sintomo di anomalia. Per ripristinare
il normale funzionamento è sufficiente tenere premuto il
tasto ON/OFF per più di due secondi. Per isolare
l’apparecchio procedere seguendo i punti 1 e 2.
Pulire lapparecchio
• Le parti esterne, le parti interne e le guarnizioni in
gomma possono essere pulite con una spugnetta
imbevuta di acqua tiepida e bicarbonato di sodio o
sapone neutro. Non usare solventi, abrasivi,
candeggina o ammoniaca.
• Gli accessori estraibili possono essere messi a
bagno in acqua calda e sapone o detersivo per
piatti. Sciacquarli e asciugarli con cura.
• Il retro dell’apparecchio tende a coprirsi di polvere,
che può essere eliminata utilizzando con
delicatezza, dopo aver spento l'apparecchio e
staccato la presa di corrente, la bocchetta lunga
dell’aspirapolvere, impostato su una potenza media.
Sostituire la lampadina
Per sostituire la lampadina di
illuminazione del vano
frigorifero, staccare la spina
dalla presa di corrente.
Accedere alla lampada come
indicato (
sostituirla con una analoga, di
potenza non superiore a 10 W.
vedi figura
) e
Sostituire filtro Anti-odori
Il filtro dovrebbe essere sostituito dopo circa 6-8 mesi
dalla sua attivazione, tempo che può variare a
seconda del tipo di alimenti conservati. Per avere
indicazioni su dove poter acquistare il filtro di ricambio
contattare l’Assistenza (
il filtro agire come indicato (
A
vedi Assistenza
vedi figure A e B
B
). Per sostituire
).
Evitare muffe e cattivi odori
• L’apparecchio è fabbricato con materiali igienici
che non trasmettono odori. Per mantenere questa
caratteristica è necessario che i cibi vengano
sempre protetti e chiusi bene. Ciò eviterà anche
la formazione di macchie.
• Nel caso si voglia spegnere l’apparecchio per un lungo
periodo, pulire l’interno e lasciare le porte aperte.
8
Page 9
Precauzioni e consigli
! L’apparecchio è stato progettato e costruito
in conformità alle norme internazionali di sicurezza.
Queste avvertenze sono fornite per ragioni
di sicurezza e devono essere lette attentamente.
Questa apparecchiatura è conforme
alle seguenti Direttive Comunitarie:
- 73/23/CEE del 19/02/73 (Bassa Tensione)
e successive modificazioni;
- 89/336/CEE del 03/05/89 (Compatibilità
Elettromagnetica) e successive modificazioni;
- 2002/96/CE..
Sicurezza generale
• L’apparecchio è stato concepito per un uso di tipo
non professionale all’interno dell’abitazione.
• L’apparecchio deve essere usato per conservare
e congelare cibi, solo da persone adulte e secondo
le istruzioni riportate in questo libretto.
• L’apparecchio non va installato all’aperto, nemmeno
se lo spazio è riparato, perché è molto pericoloso
lasciarlo esposto a pioggia e temporali.
• Non toccare la macchina a piedi nudi o con le mani
o i piedi bagnati o umidi.
• Non toccare le parti interne raffreddanti:
c’è pericolo di ustionarsi o ferirsi.
• Non staccare la spina dalla presa della corrente
tirando il cavo, bensì afferrando la spina.
• È necessario staccare la spina dalla presa prima di
effettuare operazioni di pulizia e manutenzione.
Non è sufficiente premere per più di due secondi
il tasto ON/OFF sul display per eliminare ogni
contatto elettrico.
• In caso di guasto, in nessun caso accedere ai
meccanismi interni per tentare una riparazione.
• Non utilizzare, all’interno degli scomparti
conservatori di cibi congelati, utensili diversi dal
raschietto fornito in dotazione o apparecchi elettrici
se non sono del tipo raccomandato dal costruttore.
Smaltimento
• Smaltimento del materiale di imballaggio: attenersi
alle norme locali, così gli imballaggi potranno essere
riutilizzati.
• La direttiva Europea 2002/96/CE sui rifiuti di
apparecchiature elettriche ed elettroniche (RAEE),
prevede che gli elettrodomestici non debbano
essere smaltiti nel normale flusso dei rifiuti solidi
urbani. Gli apparecchi dismessi devono essere
raccolti separatamente per ottimizzare il tasso di
recupero e riciclaggio dei materiali che li
compongono ed impedire potenziali danni per la
salute e l’ambiente. Il simbolo del cestino barrato è
riportato su tutti i prodotti per ricordare gli obblighi di
raccolta separata.
Per ulteriori informazioni, sulla corretta dismissione
degli elettrodomestici, i detentori potranno rivolgersi
al servizio pubblico preposto o ai rivenditori.
Risparmiare e rispettare lambiente
• Installare l’apparecchio in un ambiente fresco e ben
aerato, proteggerlo dall’esposizione diretta ai raggi
solari, non disporlo vicino a fonti di calore.
• Per introdurre o estrarre gli alimenti, aprire le porte
dell’apparecchio il più brevemente possibile.
Ogni apertura delle porte causa un notevole
dispendio di energia.
• Non riempire con troppi alimenti l’apparecchio:
per una buona conservazione, il freddo deve
poter circolare liberamente. Se si impedisce la
circolazione, il compressore lavorerà continuamente.
• Non introdurre alimenti caldi: alzerebbero la
temperatura interna costringendo il compressore a
un grosso lavoro, con grande spreco di energia
elettrica.
• Mantenere efficienti e pulite le guarnizioni, in modo
che aderiscano bene alle porte e non lascino uscire
il freddo (
vedi Manutenzione
).
I
• Non mettere in bocca cubetti appena estratti dal
congelatore.
• Non permettere ai bambini di giocare con
l’apparecchio. In nessun caso devono sedersi sui
cassetti o appendersi alla porta.
• Gli imballaggi non sono giocattoli per bambini.
9
Page 10

Anomalie e rimedi
Può accadere che l’apparecchio non funzioni. Prima di telefonare all’Assistenza (
I
che non si tratti di un problema facilmente risolvibile aiutandosi con il seguente elenco.
Anomalie:
Il display è spento.
Il motore non parte.
Il display è debolmente acceso.
Suona lallarme, è acceso il led
ALLARMI e la lampadina nel vano
frigorifero lampeggia.
Suona lallarme, è acceso il led
ALLARMI e i led della barra
grafica del congelatore si
accendono in sequenza.
Possibili cause / Soluzione:
• La spina non è inserita nella presa della corrente o non abbastanza da
fare contatto, oppure in casa non c’è corrente.
• L’apparecchio è dotato di un controllo salvamotore (
• Staccare la spina e reinserirla nella presa dopo averla girata su se stessa.
• La porta del frigorifero è rimasta aperta per più di due minuti.
Il segnale acustico cessa alla chiusura della porta o premendo il tasto
ALLARMI.
• L’apparecchio segnala un riscaldamento eccessivo del congelatore.
Il congelatore si manterrà a una temperatura intorno a 0°C per non far
ricongelare gli alimenti, permettendo di consumarli entro 24 ore o di
ricongelarli previa cottura.
Per spegnere il segnale acustico premere il tasto ALLARMI. Premere una
seconda volta per visualizzare sulla barra grafica del congelatore il valore
impostato, spegnere il led ALLARMI e ripristinare il normale funzionamento.
vedi Assistenza
), controllare
vedi Avvio e utilizzo
).
Suona lallarme, lampeggia ol led
ALLARMI e i led della barra
grafica del congelatore
lampeggiano continuamente.
Il frigorifero e il congelatore
raffreddano poco.
Nel frigorifero gli alimenti si gelano.
Il motore funziona di continuo.
Lapparecchio emette
molto rumore.
• L’apparecchio segnala un riscaldamento pericoloso del congelatore:
gli alimenti non devono essere consumati. Il congelatore si manterrà a
una temperatura intorno a -18°C.
Per spegnere il segnale acustico premere il tasto ALLARMI. Premere
una seconda volta per visualizzare sulla barra grafica del congelatore il
valore impostato, spegnere il led ALLARMI e ripristinare il normale
funzionamento.
• Le porte non chiudono bene o le guarnizioni sono rovinate.
• Le porte vengono aperte molto spesso.
• Si è impostata una temperatura troppo calda (
• Il frigorifero o il congelatore sono stati riempiti eccessivamente.
• Si è impostata una temperatura troppo fredda (
• Sono attive le funzioni SUPER COOL e/o SUPER FREEZE e/o ICE PARTY.
• La porta non è ben chiusa o viene aperta di continuo.
• La temperatura dell’ambiente esterno è molto alta.
• L’apparecchio non è stato installato ben in piano (
• L’apparecchio è stato installato tra mobili o oggetti che vibrano
ed emettono rumori.
• Il gas refrigerante interno produce un leggero rumore anche quando
il compressore è fermo: non è un difetto, è normale.
vedi Avvio e utilizzo
vedi Avvio e utilizzo
vedi Installazione).
).
).
Termine anticipato delle funzioni.
I led della barra grafica del
congelatore non segnalano la
temperatura impostata, e sono
accese in modo fisso.
10
• Disturbi elettrici sulla rete o brevi interruzioni della tensione di alimentazione
• Contattare l’assistenza tecnica.
Page 11
Assistenza
Prima di contattare lAssistenza:
•
Verificare se l’anomalia può essere risolta autonomamente (
vedi Anomalie e rimedi
).
• In caso negativo, contattare il Numero Unico Nazionale 199.199.199.
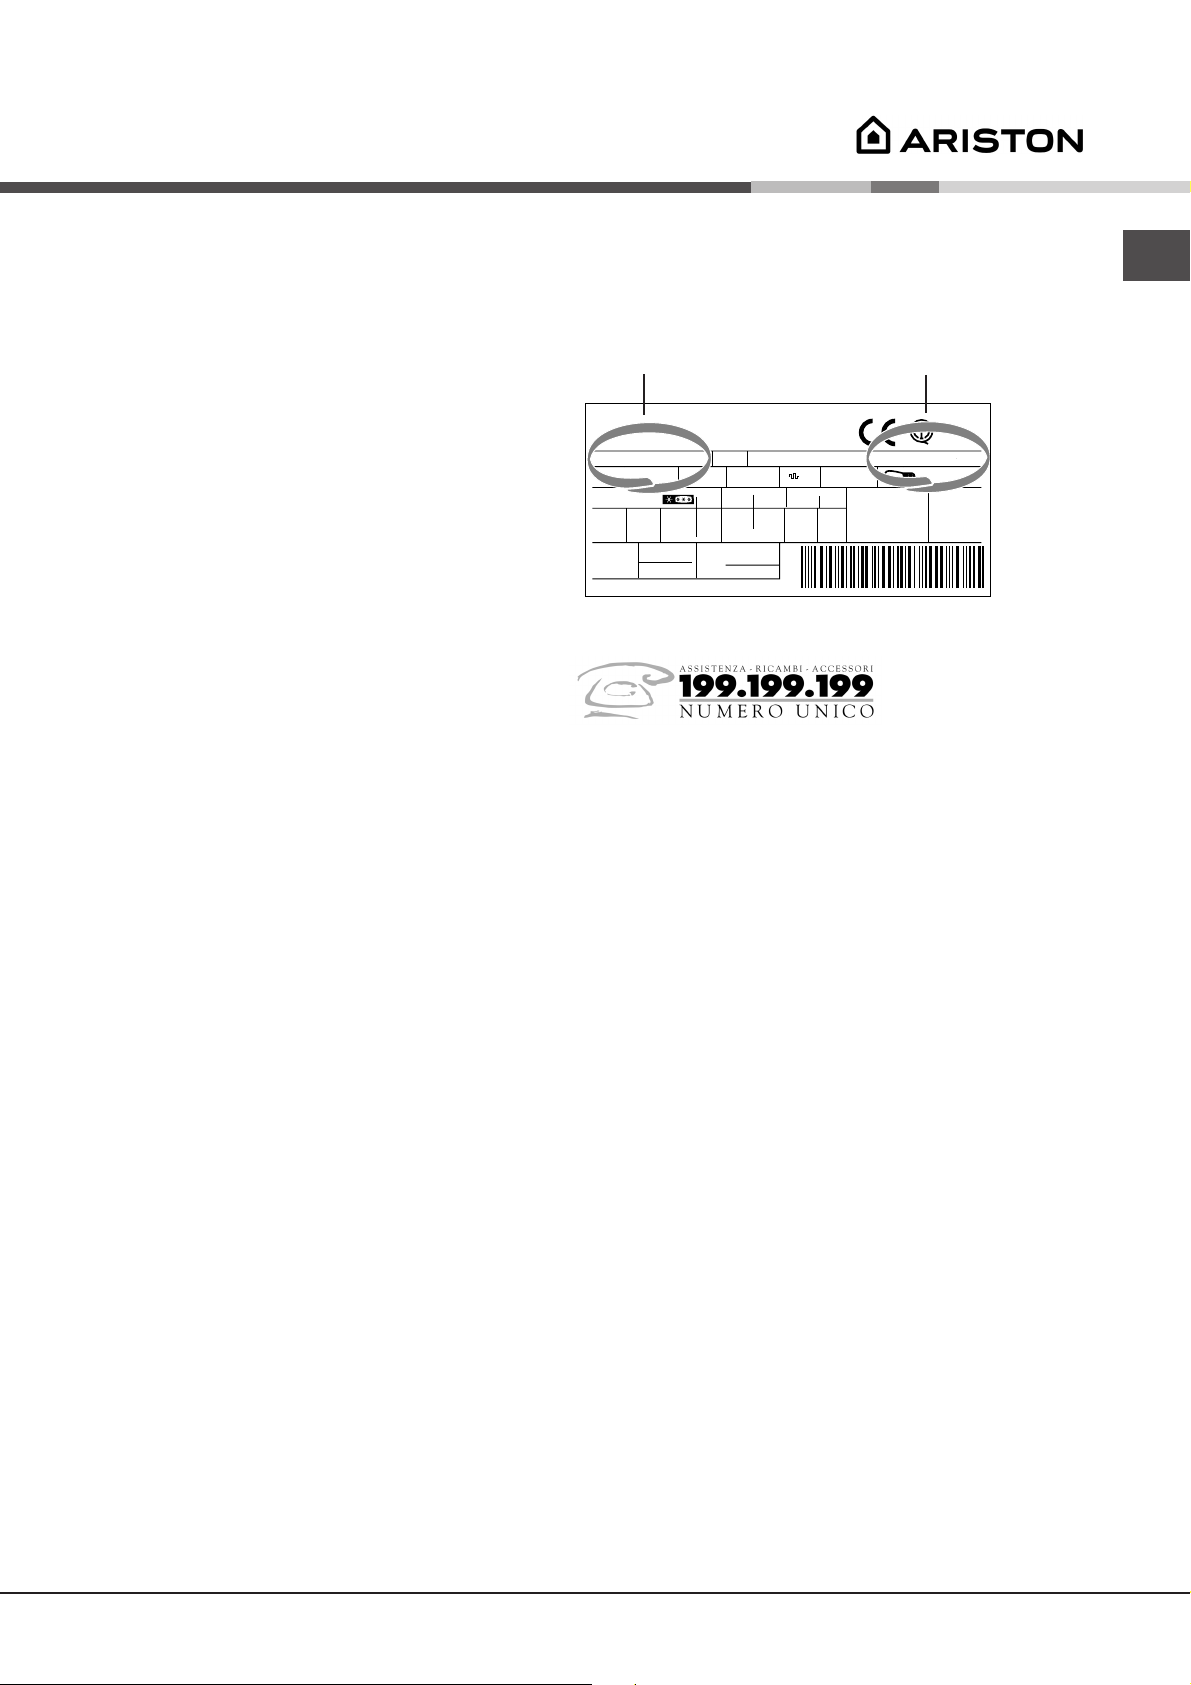
modello
numero di serie
Comunicare:
• il tipo di anomalia
• il modello della macchina (Mod.)
• il numero di serie (S/N)
Queste informazioni si trovano
sulla targhetta caratteristiche posta
nel vano frigorifero in basso a sinistra.
Gross
Bruto
Brut
TI
75
Test
P.S-I.
RG 2330
Mod.
220 - 240 V- 50 Hz 150 W
340
Total
Gross
Bruto
Brut
Compr.
R 134 a
Syst.
kg 0,090
Kompr.
Made in Italy 13918
93139180000 S/N 704211801
Net
Util
Utile
Pressure
HIGH-235
LOW 140
Cod.
Gross
Bruto
Brut
Fuse
W
A
Freez. Capac
Poder de Cong
kg/24 h
4,0
Max 15 w
Class
Clase
Classe
N
Assistenza Attiva 7 giorni su 7
Se nasce il bisogno di assistenza o manutenzione basta chiamare il Numero Unico Nazionale 199.199.199*
per essere messi subito in contatto con il Centro Assistenza Tecnica più vicino al luogo da cui si chiama.
È attivo 7 giorni su 7, sabato e domenica compresi, e non lascia mai inascoltata una richiesta.
I
* Al costo di 14,25 centesimi di Euro al minuto (iva inclusa) dal Lun. al Ven. dalle 08:00 alle 18:30, il Sab. dalle
08:00 alle 13:00 e di 5,58 centesimi di Euro al minuto (iva inclusa) dal Lun. al Ven. dalle 18:30 alle 08:00, il Sab.
dalle 13:00 alle 08:00 e i giorni festivi, per chi chiama dal telefono fisso.
Per chi chiama da radiomobile le tariffe sono legate al piano tariffario dell’operatore telefonico utilizzato.
Le suddette tariffe potrebbero essere soggette a variazione da parte dell’operatore telefonico; per maggiori
informazioni consultare il sito www.aristonchannel.com.
11
Page 12

195056517.00
03/2006
I
12
Page 13
Operating Instructions
REFRIGERATOR/FREEZER COMBINATION
Italiano, 1
PT
Portuges, 37
MBP 1912 F
GBI NL
Nederlands
CS
Ðóсский, 49
Contents
GB
Installation, 14
Positioning and connection
Reversible doors
, 25English,13
Description of the appliance, 15-16
Control panel
Overall view
Accessories, 17
Refrigerator compartment
Freezer compartment
Start-up and use, 18-19
Starting the appliance
Using the display
Chiller system
Using the refrigerator to its full potential
Using the freezer to its full potential
Maintenance and care, 20
Switching the appliance off
Cleaning the appliance
Avoiding mould and unpleasant odours
Replacing the light bulb
Changing the odour filter
Precautions and tips, 21
General safety
Disposal
Respecting and conserving the environment
Troubleshooting, 22
Assistance, 23
13
Page 14

Installation
GB
! Before operating your new appliance please read
these instructions carefully. They contain important
information for safe use, installation and care of the
appliance.
! Please keep these operating instructions for future
reference. Pass them on to possible new owners of the
appliance.
Positioning and connection
Positioning
1. Place the appliance in a well-ventilated humidity-free
room.
2. Do not obstruct the rear fan grills. The compressor and
condenser give off heat and require good ventilation to
operate correctly and save energy.
3. Leave a space of at least 10 cm between the top part
of the appliance and any furniture above it, and at
least 5 cm between the sides and any furniture/side
walls.
4. Ensure the appliance is away from any sources of heat
(direct sunlight, electric stove, etc.).
5. In order to maintain the correct distance between the
appliance and the wall behind it, fit the spacers
supplied in the installation kit, following the
instructions provided.
Levelling
1. Install the appliance on a level and sturdy floor.
2. If the floor is not perfectly horizontal, adjust the
refrigerator by tightening or loosening the front feet.
Electrical connections
After transportation of the appliance, carefully place it
in an upright position and wait at least 3 hours before
connecting it to the electricity mains. Before inserting
the plug into the electrical socket ensure the following:
• The appliance is earthed and the plug is compliant
with the law.
• The socket can withstand the maximum power of the
appliance (this is indicated on the data plate in the
bottom left section of the refrigerator compartment),
for example 150 W).
• The voltage is in the range of values indicated on
the data plate located on the bottom left section
(e.g. 220-240V).
• The socket is compatible with the plug of the
appliance.
If the socket is incompatible with the plug, ask an
authorised technician to replace it (
Do not use extension cords or multiple sockets.
! Once the appliance has been installed, the power
supply cable and the electrical socket must be easily
accessible.
! The cable must not be bent or compressed.
! The cable must be checked regularly and replaced
by authorised technicians only (
! The manufacturer declines any liability should
these safety measures not be observed.
see Assistance
see Assistance
).
).
Reversible doors
If it is necessary to change the direction in which the
doors open, please contact the Technical Assistance
Centre.
14
Page 15
Description
of the appliance
Control panel
REFRIGERATOR
Temperature
Adjustment
CHILD LOCK
REFRIGERATOR
status bar
FREEZER
status bar
ICE PARTY
FREEZER
Temperature
Adjustment
I CARE
ON/OFF
GB
ALARMS
SUPER COOL
SUPER
FREEZE
HOLIDAY
ON/OFF
It is possible to switch the whole product (both the
refrigerator and freezer compartments) on by pressing
this button. The red LED indicates that the product is
switched off, while the green LED shows that it is
operating. To switch the product off, press and hold the
ON/OFF button for at least two seconds.
I CARE
This is used to activate and deactivate the I Care
function (the optimal temperature for energy saving
levels). When activated, the AUTO LED and the I Care
LED illuminate simultaneously.
ALARMS
This controls all the alarm signals connected to product
operation.
CHILD LOCK
Activates or deactivates the control panel button lock in
order to avoid the risk of the various functions being
activated accidentally by children.
REFRIGERATOR and Temperature Adjustment
Enable the temperature setting of the refrigerator to be
modified, with the relative confirmation of the
temperature selected shown on the display. It is also
possible to use these buttons to deactivate the
refrigerator compartment only (the display shows “- -”).
REFRIGERATOR status bar
Indicates the set temperature relating to the refrigerator
compartment or shows that it has been deactivated (in
this case the status bar is disabled).
FREEZER status bar
Shows the set temperature relating to the freezer
compartment.
SUPER COOL
Activates or deactivates the SUPER COOL function (rapid
cooling). The SUPER COOL LED illuminates.
SUPER FREEZE
Activates or deactivates the SUPER FREEZE function
(rapid freezing). The SUPER FREEZE LED illuminates.
HOLIDAY
Activates or deactivates the HOLIDAY function (the
AUTO LED and HOLIDAY LED illuminates).
ICE PARTY
Activates or deactivates the ICE PARTY function (It
reduces the temperature of the freezer for the period of
time required to cool a bottle.). the ICE PARTY
illuminates)
FREEZER
Enable the temperature setting of the freezer to be
modified, with the relative confirmation of the
temperature selected shown on the display.
and Temperature Adjustment
15
Page 16
Description of the appliance
GB
Overall view
LAMP
see Maintenance
(
SHELVES
FRESH BOX
Compartment
FRUIT and
VEGETABLE
compartment
Removable shelf
with lid and
EGG TRAY
)
Storage SHELF
CAN RACK
shelves
BOTTLE shelf
FREEZER and
STORAGE
compartment
ICE TRAYS Ice Care
STORAGE
compartments
Levelling FEET
• Number and/or position may vary.
16
Page 17

Accessories
WATER LEVEL
MAX
WATER LEVEL
MAX
WATER LEVEL
MAX
Refrigerator compartment
SHELVES: the shelves are
1
2
stored for even up to one week. It can also be used
for “cold meals.”
activate it, remove the sticker from the opening (
diagram
).
removable and their height may
be adjusted thanks to special
rails (
see diagram
), allowing
easy storage of large
containers and bulky food. The
height may be adjusted without
removing the shelf completely.
FRESH BOX*: for fresh meat
and fish. Due to the
compartment’s low
temperature (the coldest in the
refrigerator) and to the clear
door that provides protection
against oxidation and
blackening, food can be
CAN RACK shelf: stores cans
horizontally (
see diagram
).
Yoghurt, butter or general
containers may also be stored
here.
ODOUR FILTER
: some
*
models are fitted with a new
active carbon odour filter,
which ensures better air quality
inside the refrigerator.
The filter is located on the
bottom right-hand side, inside
the ventilation opening. To
see
Freezer compartment
ICE PARTY: ensures bottles of
sparkling wine or champagne
reach the right temperature.
Place the bottle in the bucket
provided inside the FREEZER
and STORAGE compartment.
The bucket may be used to
serve the bottle and keeps it
cool outside the appliance.
ICE CARE tray
The fact that they are situated on the top part of the
freezer drawers ensures greater cleanliness: the ice no
longer comes into contact with the food placed inside
the freezer compartment; furthermore, the dripping of
the water during filling is avoided (a lid to cover up the
hole after filling with water is also provided).
1. Pull out the tray by pushing it up.
Check that the tray is ompletely empty and fill it with
water through the opening provided.
2. Take care not to exceed the level indicated (MAX
WATER LEVEL). Excess water prevents the ice
cubes from dispensing (if this happens, wait for the
ice to melt and empty the tray).
3. Turn the tray 90°: due to the connected
compartments each mould fills with water (
diagram
).
4. Close the opening with the lid provided and put the
tray back, placing the top part in the corresponding
housing and allowing it to drop in again.
5. When the ice has formed (minimum time
approximately 8 hours) knock the tray against a hard
surface and wet the outside so that the ice cubes
come loose and take them out through the opening.
see
GB
Available only on certain models.
*
17
Page 18

Start-up and use
Starting the appliance
GB
! After transportation of the appliance, carefully place it in
an upright position and wait at least 3 hours before
connecting it to the electricity mains, to make sure it
operates as it should.
• Clean the inside of the refrigerator well using warm
water and bicarbonate of soda before placing food
inside it.
The appliance comes with a motor protection control
•
system which makes the compressor start
approximately 8 minutes after being switched on.
The compressor also starts each time the power
supply is cut off whether voluntarily or involuntarily
(blackout).
Freezer Compartment
When the product is switched on (the ON/OFF button is
pressed for more than two seconds) the freezer
compartment is set to its default value of -18°C. We
recommend that the SUPER FREEZE function is set (the
freezer status bar continues to display the set value) in
order to accelerate the cooling process of the
compartment; when the inside of the compartment has
reached its optimal temperature the function will be
deactivated and the food may be placed inside.
Refrigerator Compartment
When the appliance is switched on the refrigerator
compartment is set to its default value of +5°C. We
recommend that the SUPER COOL function is set (the
refrigerator status bar continues to display the set value)
in order to accelerate the cooling process of the
compartment. After a few hours it will be cool enough for
food to be placed inside.
The temperatures are automatically set to +5°C for the
refrigerator compartment and -18°C for the freezer
compartment (these are standard food storage values.
When the “I Care” function is active, the appliance
automatically adjusts the temperatures according to the
conditions inside and outside the refrigerator; the operation
of this function is signalled by the text “AUTO”.
Whenever it is necessary to activate the “I Care” function at
temperatures that are different to the standard storage
values, the “I Care” button must be pressed as soon as the
function is activated and held down while the new
temperatures are set using the
these conditions, the temperatures may be set to 4°C, 5°C
and 6°C for the refrigerator compartment and -18°C, -19°C
and -20°C for the freezer compartment.
When the HOLIDAY function is active the temperature may
not be adjusted, however the appliance adjusts itself
automatically so that the optimal settings for the situation are
used: +12°C for the refrigerator compartment and -18°C for
the freezer compartment. This function is indicated by the
text.
To activate and deactivate the functions simply press the
relevant button and the function status will be signalled by
the corresponding LED switching on or off.
Several functions (SUPER COOL, SUPER FREEZE, ICE
PARTY, I CARE) are incompatible with others
(HOLIDAY,...); remember that there is a pre-set order of
priority which will help you to use the product in the best
possible way.
When the Ice Party function has finished, press the ICE
PARTY button to stop the corresponding LED from flashing
and to silence the sound signal. This flashing and sound
signal indicates that the function is complete and that the
bottle should be removed from the freezer compartment.
and buttons. Under
Navigating the display
Setting the temperatures:
If the product is switched on, the refrigerator and freezer
status bars will indicate the temperatures set at that
moment. To change them, simply press the
buttons corresponding to the compartment for which you
wish to change the set temperature. More specifically,
each time one of the buttons is pressed the temperature is
increased or decreased by 1°, and the level of cold is
adjusted accordingly.The temperature values that may be
selected for the refrigerator compartment are +12°C,
+7°C, +6°C, +5°C, +4°C, +3°C and +2°C, while the
values that may be set for the freezer are -18°C, -19°C, 120°C, -21°C, -22°C, -24°C and -26°C.
18
and
Child Lock
In order to activate the Child Lock function, the Child Lock
button must be pressed for 2 seconds; the activation of the
button lock is confirmed by a short beep and the illumination
of the corresponding LED.
To deactivate the function, press the Child Lock button for 2
seconds; deactivation will be confirmed by a short beep
and by the corresponding LED switching off.
! The FREEZER status bar is also used to indicate an
unusual temperature increase in the freezer
compartment (
see Troubleshooting
).
Page 19

Chiller system
No Frost
This system can be recognised
by the aeration cells located on
the back walls of each
compartment.
The No Frost system circulates
cold air continuously to collect
humidity and prevent ice and
frost formation. The system
maintains an optimal humidity level in the compartment,
preserving the original quality of the food, preventing
the food from sticking together and making defrosting a
thing of the past.
! Do not block the aeration cells by placing food or
containers in direct contact with the refrigerating back
panel.
! Close bottles and wrap food tightly.
Using the refrigerator to its full
potential
• Adjust the temperature using the display.
• Activate the SUPER COOL function to lower the
temperature quickly, for example, when you place a
large number of new food items inside a fridge and
the internal temperature rises slightly. This function
quickly cools the groceries by temporarily reducing
the temperature until it reaches the ideal level.
• Place only cold or lukewarm foods in the
compartment, never hot foods (
).
tips
• Remember that cooked foods do not last longer than
raw foods.
see Precautions and
Using the freezer to its full potential
GB
• Adjust the temperature using the display.
• To freeze foods in safely and correctly, follow the
instructions below: place the food in the FREEZER
and STORAGE compartment, making sure that it
does not come into contact with any food that has
already been frozen; press the rapid-freezing
SUPER FREEZE button (the corresponding LED
lights up) and close the door. The function
deactivates automatically after 24 hours or when the
inside of the compartment has reached the optimal
temperature (the LED switches off).
• Do not re-freeze food that is defrosting or that has
already been defrosted. These foods must be
cooked and eaten (within 24 hours).
• Fresh food that needs to be frozen must not come
into contact with food that has already been
defrosted.
• Do not place glass bottles which contain liquids,
and which are corked or hermetically sealed in the
freezer because they could break.
• The maximum quantity of food that may be frozen daily
is indicated on the plate containing the technical
properties located on the bottom left side of the
refrigerator compartment (for example: Kg/24h: 4).
! Do not open the door during freezing.
! If there is a power cut or malfunction, do not open the
freezer door. This will help maintain the temperature
inside the freezer, ensuring that foods are conserved for
at least 9 -14 hours.
! To avoid blocking the air circulation inside the freezer, it
is advisable not to obstruct the ventilation holes with food
or containers.
• Do not store liquids in open containers: they will
increase the level of humidity in the refrigerator and
cause condensation to form.
19
Page 20

Maintenance and care
Switching the appliance off
GB
During cleaning and maintenance it is necessary to
disconnect the appliance from the electricity supply:
1. Hold the ON/OFF button down for more than two
seconds until OFF appears on both indicator
displays (refrigerator and freezer).
2. Pull the plug out of the socket.
! If this procedure is not followed, the alarm may
sound. This alarm does not indicate a malfunction. To
restore normal operation, hold the ON/OFF button
down for more than two seconds. To disconnect the
appliance, follow points 1 and 2 above.
Cleaning the appliance
• The external and internal parts and the rubber seals
may be cleaned using a sponge that has been
soaked in lukewarm water and bicarbonate of soda
or neutral soap. Do not use solvents, abrasive
products, bleach or ammonia.
• The removable accessories may be soaked in warm
soapy water or dishwashing liquid. Rinse and dry
them carefully.
• The back of the appliance may collect dust. This can
be removed by carefully using the hose of a vacuum
cleaner set on medium power. The appliance must
be switched off and the plug disconnected from the
electricity mains before it is cleaned.
Replacing the light bulb
To replace the light bulb in the
refrigerator compartment,
disconnect the plug from the
electricity mains.
Access the light bulb as shown
see diagram
(
with a similar light bulb, the
power of which should not
exceed 10 W.
) and replace it
Changing the odour filter
The filter should be replaced approximately 6-8 months
after it has been activated. This period may vary
depending on the type of food stored inside the
refrigerator. For information on where a replacement
filter may be purchased, contact Assistance (
Assistance
see diagrams A and B
(
A
). To replace the filter, follow the instructions
).
B
see
Avoiding mould and unpleasant odours
• The appliance is manufactured with hygienic, odour
free materials. Food should be wrapped well and
containers closed properly in order to maintain this
hygiene. This will also prevent the formation of
stains.
• If you wish to switch the appliance off for an
extended period of time, clean the inside and leave
the doors open.
20
Page 21

Precautions and tips
! The appliance was designed and manufactured in
compliance with international safety standards. The
following warnings are provided for safety reasons and
must be read carefully.
This appliance complies with the following
European Community Directives:
- 73/23/EEC dated 19/02/73 (Low Voltage) and
subsequent amendments;
-89/336/EEC dated 03.05.89 (Electromagnetic
Compatibility) and subsequent amendments;
- 2002/96/CE.
General safety
• The appliance was designed for domestic use
inside the home and is not intended for commercial
or industrial use.
• The appliance must be used by adults only to store
and freeze food products according to the
instructions in this manual.
• The appliance must not be installed outdoors, even
in covered areas. It is extremely dangerous to leave
the appliance exposed to rain and storms.
Disposal
GB
• Observe local environmental standards when
disposing of packaging material as some of this
material may be recycled.
• The European Directive 2002/96/EC on Waste
Electrical and Electronic Equipment (WEEE),
requires that old household electrical appliances
must not be disposed of in the normal unsorted
municipal waste stream. Old appliances must be
collected separately in order to optimise the
recovery and recycling of the materials they contain
and reduce the impact on human health and the
environment. The crossed out “wheeled bin” symbol
on the product reminds you of your obligation, that
when you dispose of the appliance it must be
separately collected.
Consumers should contact their local authority or
retailer for information concerning the correct
disposal of their old appliance.
Respecting and conserving the
environment
• Do not touch the appliance when barefoot or with
wet or damp hands and feet.
• Do not touch the internal cooling elements: this
could cause skin abrasions or frost/freezer burns.
• When unplugging the appliance always pull the plug
from the mains socket, do not pull on the cable.
• Always switch the appliance off and disconnect it
from the electrical supply before cleaning it or
carrying out maintenance work. It is NOT sufficient
to hold the ON/OFF button down for more than two
seconds to eliminate all electrical contact.
• In case of malfunction, under no circumstances should
you attempt to repair the appliance yourself. Repairs
carried out by inexperienced persons may cause
injury or further malfunctioning of the appliance.
• Do not use utensils other than the scraper provided,
or electrical equipment which is not of the type
specified by the manufacturer, inside the frozen
food storage compartments.
• Do not put ice cubes taken directly from the freezer
into your mouth.
• Install the appliance in a cool, well-ventilated room.
Ensure that it is protected from direct sunlight and
do not place it near sources of heat.
• Try to avoid keeping the door open for long periods.
A significant amount of energy is used every time
the door is opened.
• Do not over-fill the appliance: cold air must circulate
freely for food to be preserved properly. If air
circulation is impeded, the compressor will work
continuously.
• Do not place hot food in the refrigerator. The internal
temperature will increase, forcing the compressor to
work harder and consume more energy.
• Regularly check the door seals and wipe clean to
ensure they are free of debris and to prevent cold air
from escaping (
see Maintenance
).
• Do not allow children to tamper with the controls or
play with the appliance. Under no circumstances
should they be allowed to sit on the bins or to hang
from the door.
• Keep packaging material out of reach of children.
21
Page 22

Troubleshooting
If the appliance does not work, before calling for Assistance (
GB
Malfunctions:
The display is completely switched off.
The motor does not start.
The display is on but it is dim.
The alarm sounds, the ALARM LED
lights up and the refrigerator
compartment light flashes.
The alarm sounds, the ALARM LED
lights up and the freezer status bar
LEDs light up in sequence.
The alarm sounds, the ALARM LED
flashes and the freezer status bar
LEDs flash simultaneously.
Possible causes / Solutions:
• The plug has not been inserted into the electrical socket, or not far enough to
• The appliance comes with a motor protection control (
• Pull out and reverse the plug before putting it back in the socket.
• The refrigerator door has been open for more than two minutes.
• The temperature inside the freezer is too high. The freezer will maintain a
• The temperature of the freezer is dangerously high: the food inside must not be
see Assistance
make contact, or there is no power in the house.
The buzzer stops when the door is closed or when the ALARM button is
pressed.
temperature of around 0°C so that the food will not refreeze, allowing you to
eat it within 24 hours or to refreeze it after it has been cooked.
To switch off the buzzer, press the ALARM button. Press a second time to
display the set value on the freezer status bar, switch off the ALARM LED and
restore normal operation.
eaten. The freezer will maintain a temperature of approximately 0°C.
To switch off the buzzer, press the RESET ALARM button. Press a second time
to display the set value on the freezer status bar, switch off the ALARM LED and
restore normal operation.
), check for a solution from the following list.
see Start-up and use
).
The refrigerator and the freezer do not
cool well.
The food inside the refrigerator is
beginning to freeze.
The motor runs continuously.
The Aircooler fan does not rotate
The appliance makes a lot of noise.
Early ending of functions
• The doors do not close properly or the seals are damaged.
• The doors are opened too frequently.
• The temperature that has been set is too high (
• The refrigerator or the freezer have been over-filled.
• The temperature that has been set is too low (
• The SUPER FREEZE button has been pressed (rapid freezing): the yellow
SUPER FREEZE light is on or flashing (
• The door is not closed properly or is continuously opened.
• The outside ambient temperature is very high.
• The thickness of the frost exceeds 2-3 mm (
• The refrigerator door is open.
• The Aircooler system is only activated automatically when it becomes
necessary to restore perfect operational conditions inside the refrigerator
compartment.
• The appliance has not been installed on a level surface (
• The appliance has been installed between cabinets that vibrate and make
noise.
• The internal refrigerant makes a slight noise even when the compressor is off.
This is not a defect, it is normal.
• Electrical disturbance on the network or brief interruptions of the power supply.
see Description
see Start-up and use
see Start-up and use
).
see Maintenance
see Installation).
).
).
).
The freezer status bar LEDs do not
indicate the set temperature, and are
lit in a constant manner.
22
• Contact the Technical Assistance Centre.
Page 23

Assistance
Before calling for Assistance:
•
Check if the malfunction can be solved on your own (
see Troubleshooting
).
• If after all the checks, the appliance still does not operate or the problem persists, call the nearest Service
Centre
model
serial number
Communicating:
• type of malfunction
• appliance model (Mod.)
• serial number (S/N)
This information can be found on the data
plate located on the bottom left side of the
refrigerator compartment.
Gross
Bruto
Brut
TI
75
Test
P.S-I.
RG 2330
Mod.
220 - 240 V- 50 Hz 150 W
340
Total
Gross
Bruto
Brut
Compr.
R 134 a
Syst.
kg 0,090
Kompr.
Made in Italy 13918
93139180000 S/N 704211801
Net
Util
Utile
Pressure
HIGH-235
LOW 140
Cod.
Gross
Bruto
Brut
Fuse
W
A
Freez. Capac
Poder de Cong
kg/24 h
4,0
Max 15 w
Class
Clase
Classe
N
Never call on unauthorized technicians and always refuse spare parts which are not originals.
GB
23
Page 24

GB
195056517.00
03/2006
24
Page 25

Gebruiksaanwijzingen
Inhoud
Installatie, 26
I
Italiano, 1
PT
GB
CS
NL
Nederlands
, 25English,13
Plaatsen en aansluiten
Draairichting deuren verwisselbaar
Beschrijving van het apparaat, 27-28
Bedieningspaneel
Aanzichttekening
KOEL/VRIESCOMBINATIE
NLNL
NL
NLNL
Portuges, 37
MBP 1912 F
Русский, 49
Toebehoren, 29
Koelgedeelte
Vriesgedeelte
Starten en gebruik, 30-31
Het apparaat starten
Gebruik van het display
Koelsysteem
Optimaal gebruik van de koelkast
Optimaal gebruik van de vrieskast
Onderhoud en verzorging, 32
De elektrische stroom afsluiten
Het apparaat reinigen
Het vermijden van schimmel en vervelende luchtjes
Het lampje vervangen
Antireuk filter vervangen
Voorzorgsmaatregelen en advies, 33
Algemene veiligheid
Afvalverwijdering
Het milieu sparen en respecteren
Storingen en oplossingen, 34
Service, 35
25
Page 26

Installatie
NL
! Bewaar dit boekje zorgvuldig voor eventuele
toekomstige raadpleging. Wanneer u het product
weggeeft, verkoopt of wanneer u verhuist, dient u dit
boekje bij het apparaat te bewaren zodat alle nodige
informatie voorhanden blijft.
! Lees de gebruiksaanwijzingen zorgvuldig door: er
staat belangrijke informatie in over installatie,
gebruik en veiligheid.
Plaatsen en aansluiten
Plaatsen
1. Plaats het apparaat in een goed geventileerd en
droog vertrek.
2. Laat de ventilatieroosters aan de achterzijde vrij:
de compressor en de condensator geven warmte
af en vereisen een goede ventilatie om goed te
functioneren en het elektriciteitsverbruik te
beperken.
3. Laat een afstand van minstens 10 cm vrij tussen
de bovenkant van het apparaat en eventuele
bovenstaande meubels. Laat ook een afstand van
minstens 5 cm tussen de zijkanten en
nevenstaande meubels/wanden.
4. Houd het apparaat ver van hittebronnen vandaan
(direct zonlicht, elektrisch gasfornuis).
5. Om de juiste afstand tussen het apparaat en de
achterwand te behouden, moet u de
afstandhouders monteren die zich in de
installatiekit bevinden, volgens de instructies op
het speciale instructieblad.
Elektrische aansluiting
Zet het apparaat na het transport verticaal en wacht
minstens 3 uur voordat u het aansluit op het
elektriciteitsnet. Voordat u de stekker in de
contactdoos steekt, dient u zich ervan te verzekeren
dat:
• het stopcontact geaard is en voldoet aan de
geldende normen;
• het stopcontact in staat is het maximale vermogen
van het apparaat te dragen, zoals aangegeven op
het typeplaatje dat zich onderin links in het
koelgedeelte bevindt (bv. 150 W);
• de spanning zich bevindt tussen de waarden die
staan aangegeven op het typeplaatje, dat zich
onderin links bevindt (bv. 220-240 V);
• het stopcontact en de stekker overeenkomen. Als
dat niet het geval is, dient een erkende monteur
de stekker te vervangen (
geen verlengsnoeren of dubbelstekkers.
! Wanneer het apparaat geïnstalleerd is, moeten de
elektrische kabel en het stopcontact makkelijk te
bereiken zijn.
! De kabel mag niet worden gebogen of samengedrukt.
! De kabel moet van tijd tot tijd worden gecontroleerd
en mag alleen door erkende monteurs worden
vervangen (
! De fabrikant kan niet verantwoordelijkheid
worden gesteld wanneer deze normen niet
worden nageleefd.
zie Service
zie Service
).
); gebruik
Nivellering
1. Plaats het apparaat op een rechte en stevige
vloer.
2. Mocht de vloer niet volledig horizontaal zijn, draai
dan aan de stelvoetjes aan de voorkant om het
apparaat waterpas te krijgen.
Draairichting deuren verwisselbaar
In het geval u de draairichting van de deuren wilt
verwisselen dient u contact op te nemen met de
Technische Dienst.
26
Page 27

Beschrijving
van het apparaat
Bedieningspaneel
Grafische Aanwijzer
Grafische Aanwijzer
Regelen
Temperatuur
KOELKAST
CHILD LOCK
KOELKAST
VRIESKAST
ICE PARTY
Regelen
Temperatuur
VRIEZER
I CARE
ON/OFF
ALARM
SUPER COOL
SUPER
FREEZE
HOLIDAY
NLNL
NL
NLNL
ON/OFF
Als u deze toets minstens twee seconden lang
ingedrukt houdt, schakelt u het hele apparaat (zowel
koelkast als vrieskast) in of uit. De rode LED geeft
aan dat het apparaat uit is, de groene LED geeft aan
dat hij werkt.
minstens 2 seconden op de ON/OFF toets.
I CARE
Bedient het in- en uitschakelen van de I Care functie.
Bij het inschakelen van deze functie gaan gelijkertijd
de LED AUTO en de LED I Care aan.
ALARM
Hiermee worden alle alarmen vermeld en beheerd die
betrekking hebben op de werking van het apparaat.
Child Lock
Hiermee schakelt u de blokkering van de toetsen van het
bedieningspaneel in of uit zodat kinderen het niet per
ongeluk kunnen activeren.
Regelen Temperatuur KOELKAST en
Hiermee wijzigt u de temperatuurinstellingen van de
koelkast, met betreffende bevestiging op het display
van de geselecteerde temperatuur. Door middel van
deze toetsen is het bovendien mogelijk alleen het
koelgedeelte uit te schakelen.
Regelen Temperatuur VRIEZER
Hiermee wijzigt u de temperatuurinstellingen van de
Om het apparaat uit te zetten drukt u
en
vriezer, met betreffende bevestiging op het display
van de ingestelde temperatuur.
Grafische aanwijzer KOELKAST
Geeft de temperatuur aan van het koelgedeelte of geeft
aan dat hij is uitgeschakeld
aanwijzer uit).
Grafische aanwijzer VRIESKAST
Toont de ingestelde temperatuur voor het
vriesgedeelte.
SUPER COOL
Hiermee schakelt u de functie SUPER COOL in of uit
(snelle afkoeling). De led SUPERKOELING gaat aan.
SUPER FREEZE
Hiermee schakelt u de functie SUPER FREEZE in of uit
(snel invriezen). De led SUPERVRIEZEN gaat aan.
HOLIDAY
Hiermee schakelt u de functie HOLIDAY in of uit
LED AUTO en de LED HOLIDAY gaan aan).
ICE PARTY
Hiermee schakelt u de functie ICE PARTY in of uit
(Verlaagt de temperatuur van de vrieskast lang genoeg
om een fles af te laten koelen
aan.
(in dit geval is de grafische
(de
). De led ICE PARTY gaat
27
Page 28

Beschrijving van
het apparaat
NL
Aanzichttekening
zie Onderhoud
(
DRAAGPLATEAUS
GROENTE- en
LAMPJE
Vak
FRESH BOX
FRUITLADE
Uitneembaar vak met
deksel en EIERREK
)
OPBERGVAK
BLIKREKJES
FLESSENVAK
INVRIES- en
BEWAARVAK
IJSBLOKBAKJES
BEWAARVAK
STELVOETJES
Variëren qua aantal en/of positie.
28
Page 29

Toebehoren
Koelgedeelte
DRAAGPLATEAUS: deze
1
2
deksel wordt het voedsel beschermd tegen oxidatieen verkleuringverschijnselen. Het kan ook worden
gebruikt voor “koude gerechten”.
kunnen dankzij de speciale
geleiders worden verwijderd of
in hoogte geregeld (
afbeelding
), voor het invoeren
zie
van grote verpakkingen of
etenswaren. Het is niet
noodzakelijk het draagplateu
volledig te verwijderen om de
hoogte ervan te regelen.
FRESH BOX: voor vers vlees
en verse vis. Dankzij de lage
temperaturen kunt u
levensmiddelen in dit vak
langere tijd (tot een week)
bewaren, - dit is het koudste
gedeelte van de koelkast.
Dankzij het doorzichtige
BLIKREKJE: voor het
horizontaal bewaren van blikjes
zie afbeelding
(
). U kunt hier ook
yoghurt, boter, of andere
verpakkingen bewaren.
ANTIREUK FILTER*: enkele
modellen beschikken over een
antireuk filter met actieve kool.
Dit zorgt voor een betere
luchtkwaliteit in de koelkast.
Het filter zit onderin rechts, in
de ventilatieopening: om het
filter te activeren dient u de
sticker van de opening af te
halen (
zie afbeelding
).
Diepvriesgedeelte
ICE PARTY: om
champagneflessen op de juiste
temperatuur te brengen. Plaats
de fles in de speciale emmer in
het INVRIES- en
BEWAARGEDEELTE.
De emmer kan worden gebruikt
om de fles op te dienen en koel
te houden.
Ijsblokjeshouder.
Het feit dat ze bovenop de laden van de freezer zijn
geplaatst zorgt voor de beste ergonomie en
reinheid: de ijsblokjes komen niet meer in contact
met de etenswaren in de freezer: bovendien wordt
water knoeien tijdens het opvullen vermeden (ook de
deksel voor het afsluiten van het gat na het opvullen
is bijgeleverd).
1. Haal de ijsblokjeshouder uit de deur door hem
eerst naar de houders door middel van de
communicerende vaten (
zie afbeelding
2. Zorg ervoor nooit het aangegeven niveau te
overschrijden (MAX WATER LEVEL). Teveel water
belemmert het loskomen van de ijsblokjes (mocht
dit gebeuren, wacht dan tot het ijs gesmolten is
en leeg de houder).
3. Draai de houder 90°: het water vult de houders
door middel van de communicerende vaten (
afbeelding
).
4. Sluit de opening af met bijgeleverde dop en zet de
houder weer op zijn plaats. Plaats eerst de
bovenkant en laat hem dan naar beneden zakken.
5. Als het ijs is gevormd (minstens 8 uur) moet u de
houder tegen een hard oppervlak stoten en de
buitenkant ervan natmaken. Op deze manier raken
de ijsblokjes los en kunt u ze er door de opening
uithalen.
MAX
WATER LEVEL
).
zie
NLNL
NL
NLNL
Alleen op enkele modellen aanwezig.
*
WATER LEVEL
WATER LEVEL
MAX
MAX
29
Page 30

Starten en gebruik
NL
Het inschakelen van de koel-/vrieskast
! Na het transport plaatst u het apparaat verticaal en
wacht u ongeveer 3 uur voordat u het aansluit op het
elektriciteitsnet. Dit is noodzakelijk om een goede
werking te kunnen garanderen.
• Voor u de etenswaren in de koelkast plaatst dient u
de binnenkant goed te reinigen met lauw water en
soda.
• Tijdsduur motorbescherming.
Dit model is voorzien van een motorbeschermende
controle. Maakt u zich dus niet ongerust als de
compressor niet onmiddellijk start nadat u het
apparaat heeft uitgeschakeld (bijvoorbeeld voor het
reinigen of ontdooien van de vriezer). Hij zal na
ongeveer 8 minuten automatisch weer aanslaan.
Vriesgedeelte
Bij het inschakelen van de vriezer (als u meer dan
twee seconden op de knop ON/OFF drukt) gaat het
vriesgedeelte automatisch naar de stand 18°C. We
raden u aan de functie SUPER FREEZE in te
schakelen (Op de grafische aanwijzer van de
VRIESKAST blijft de voorheen ingestelde
temperatuur verschijnen) zodat de vriezer sneller
afkoelt; als de temperatuur optimaal is gaat de
functie uit en kunt u de etenswaren inladen.
Koelgedeelte
Bij het inschakelen van het apparaat wordt het
koelgedeelte op de standaard temperatuur van +5°C
ingesteld. We raden u aan de functie SUPER COOL
in te schakelen (Op de grafische aanwijzer van de
KOELKAST blijft de voorheen ingestelde temperatuur
verschijnen) voor het sneller afkoelen van het
koelgedeelte: na enkele uren kunt u de etenswaren
in de koelkast plaatsen.
Gebruik van het display
Instellen van de temperaturen:
Als het apparaat aan is zullen het display van het
koelgedeelte en het vriesgedeelte de temperaturen
tonen die op dat moment zijn ingesteld. Om ze te
wijzigen is het voldoende de toetsen
drukken van het gedeelte waarvan u de temperatuur
wilt aanpassen. De temperaturen die u in het
koelgedeelte kunt selecteren zijn +12°, +7°, +6°,
+5°, +4°, +3°, +2°, die van de vriezer zijn –18°, 19°,-20°, -21°, -22°, -24°, -26°.
De automatisch ingestelde temperaturen zijn +5°C
voor het koelgedeelte en 18°C voor het
en in te
vriesgedeelte. Dit zijn tevens de standaard
bewaartemperaturen.
Als de functie “I Care” actief is zal het apparaat
automatisch de temperaturen regelen aan de hand
van de temperaturen binnen de koelkast en buiten.
Dit wordt aangegeven door de tekst “AUTO”.
Indien het noodzakelijk is de functie “I Care” in te
schakelen met temperaturen die verschillen van de
standaard bewaartemperaturen moet u tijdens het
inschakelen de toets “I Care” indrukken en door
middel van
instellen. Op deze manier is het mogelijk de
temperaturen 4°, 5° en 6° voor het koelgedeelte in te
stellen en -18°, -19° en -20° voor het vriesgedeelte.
Als de HOLIDAY functie actief is kunt u de
temperatuur niet regelen. Het apparaat gaat
automatisch over op de instelling die voor de
betreffende situatie optimaal is: +12°C voor het
koelgedeelte en -18°C voor het vriesgedeelte. Deze
functie wordt bovendien aangegeven door het
verschijnen van de tekst “AUTO”.
Om de functies in of uit te schakelen is het
voldoende de betreffende toets in te drukken. Het
aan- of uitgaan van de LED geeft aan of de functie inof uitgeschakeld is.
Enkele functies (SUPER COOL, SUPER FREEZE,
ICE PARTY, I CARE) kunnen niet tegelijkertijd met
andere worden geactiveerd (HOLIDAY...). In dit
geval wordt een bepaalde prioriteit aangehouden die
u helpt bij het beter beheren van het apparaat.
Child Lock
Om de functie Kinderslot te kunnen activeren dient u
de toets Kinderslot 2 seconden lang ingedrukt te
houden. Het inschakelen van de toetsenblokkering
wordt bevestigd door en kort geluidssignaal en het
ontsteken van de betreffende led. Om deze functie
uit te schakelen drukt u 2 seconden op de toets
Kinderslot. Het uitschakelen wordt bevestigd door
een kort geluidssignaal en het uitgaan van de
betreffende led.
! De grafische aanwijzer van de VRIESKAST geeft
ook een eventuele abnormale
temperatuursverhoging aan in het diepvriesgedeelte
zie storingen en oplossingen
(
en de nieuwe temperaturen
).
30
Page 31

Koelsysteem
Optimaal gebruik van de vrieskast
NLNL
NL
NLNL
No Frost
Dit systeem herkent u aan de
ventilatieopeningen op de
achterwand van het apparaat.
Het No Frost systeem
garandeert een doorlopende
koude luchtstroom die vocht
verzamelt en ijsvorming
voorkomt: in het koelgedeelte
behoudt het systeem de juiste vochtigheidsgraad en
bewaart het, dankzij de totale afwezigheid van ijs,
de oorspronkelijke eigenschappen van de
levensmiddelen. In het vriesgedeelte voorkomt het
de ijsvorming, waardoor u dit deel niet meer hoeft te
ontdooien en voorkomt dat etenswaren aan elkaar
vast blijven zitten.
! Zet geen etenswaren of verpakkingen in direct
contact met de achterkant van het apparaat; zo
vermijdt u dat de ventilatieopeningen verstopt raken
en er condensvorming plaatsvindt.
! Sluit flessen af en omwikkel levensmiddelen.
Optimaal gebruik van de koelkast
• Regel de temperatuur door middel van het display.
• Regel de temperatuur door middel van het
display.
• Voor het op juiste en veilige wijze invriezen van
levensmiddelen gaat u als volgt te werk.
- Plaats de levensmiddelen in het bovenste vak
"INVRIEZEN en BEWAREN". Zorg ervoor dat deze
niet in contact komen met de reeds aanwezige
etenswaren. Druk op SUPERVRIEZEN (snel
invriezen, de betreffende LED gaat aan) en sluit de
deur. Wanneer de optimale temperatuur is bereikt,
of in ieder geval na 24 uur, wordt deze functie
automatisch uitgeschakeld (de LED gaat uit).
• Vries nooit etenswaar in die op het punt staat te
ontdooien of al is ontdooid; dergelijke etenswaar
moet binnen 24 uur worden opgegeten of na het
koken weer worden ingevroren.
• Verse etenswaren die moeten worden ingevroren
mogen nooit in contact raken met etenswaren die
al bevroren zijn.
• Plaats nooit glazen flessen met vloeistof in de
vrieskast, vooral niet als er een dop op zit of als
ze hermetisch zijn afgesloten, ze zouden kunnen
barsten.
• De maximum hoeveelheid die men dagelijks kan
invriezen is aangegeven op het typeplaatje links
onderin de koelkast (voorbeeld: Kg/24h 4).
• Activeer de functie SUPERKOELING om de
temperatuur snel te verlagen, bijvoorbeeld
wanneer u de koelkast vult met verse
boodschappen. Als er voldoende tijd is verstreken
wordt deze functie automatisch uitgeschakeld.
• Zet alleen koude of lauwe levensmiddelen in de
koelkast, nooit warme (
en advies
• Denk eraan dat u gekookte etenswaren niet langer
kunt bewaren dan rauwe.
• Zet geen vloeistoffen in open flessen of bakken in
de koelkast: dit brengt een toename van de
vochtigheidsgraad teweeg en een daaropvolgende
condensproductie.
).
zie Voorzorgsmaatregelen
! Open de deur van de vrieskast niet tijdens het
invriezen.
! Wanneer de stroom wegvalt of wanneer er een
storing optreedt, dient u de deur van de vrieskast
niet te openen: de levensmiddelen blijven op deze
manier nog ongeveer 9 à 14 uur goed bewaard.
! Voor goed circuleren van de koude lucht in de
freezer mogen de ontluchtingsopeningen niet worden
belemmerd door etenswaren of dozen.
31
Page 32

Onderhoud en verzorging
NL De elektrische stroom afsluiten
Tijdens schoonmaak of onderhoud moet u het
apparaat afsluiten van de elektrische stroom:
1. druk iets langer dan twee seconden op de toets
ON/OFF, totdat de tekst OFF verschijnt op beide
aanwijzers van koelkast en vrieskast.
2. haal de stekker uit het stopcontact.
! Als u dit niet doet kan het alarm afgaan: dit alarm
is geen storing. Om de normale werking te herstellen
is het voldoende de toets ON/OFF iets langer dan
twee seconden ingedrukt te houden. Om het
apparaat af te sluiten volgt u de punten 1 en 2.
Het apparaat reinigen
• De buitenkant, de binnenkant en de rubberen
afdichtingen kunnen worden schoongemaakt met
een lauwe spons en soda of een neutraal
schoonmaakmiddel. Gebruik geen oplosmiddelen,
schuurmiddelen, chloor of ammonia.
• Het uitneembare toebehoren kan worden
afgewassen met warm water en schoonmaak- of
afwasmiddelen. Spoel en droog alles goed af.
• De achterkant van het apparaat vangt veel stof
op. Na het apparaat te hebben uitgezet en de
stroom te hebben afgesloten kunt u dit opzuigen
met de lange buis van de stofzuiger, op
middelmatig vermogen.
Het lampje vervangen
Om het lampje van het
koelgedeelte te vervangen,
dient u eerst de stekker uit het
stopcontact te halen.
Verwijder het lampje zoals
aangegeven (
vervang het met een zelfde
soort lampje, met een vermogen
van niet meer dan 10 W.
zie afbeelding
Antireuk filter vervangen
Het filter moet na circa 6-8 maanden worden
vervangen. Deze tijd hangt af van het type
etenswaren dat u normaal in de koelkast bewaart.
Om te weten waar u een nieuw filter kunt
aanschaffen kunt u contact opnemen met de
Servicedienst (
vervangen moet u de instructies opvolgen zoals
aangegeven (
A
zie Service
zie afbeeldingen A en B
). Om het filter te
B
).
), en
Het vermijden van schimmel en
vervelende luchtjes
• Het apparaat is vervaardigd uit hygiënisch
materiaal dat geen luchtjes absorbeert. Teneinde
deze eigenschappen te behouden moet u
levensmiddelen altijd goed bewaren en afsluiten.
Hierdoor vermijdt u ook het vormen van vlekken.
• Als u het apparaat voor langere tijd uitzet moet u
de binnenkant reinigen en de deuren openlaten.
32
Page 33

Voorzorgsmaatregelen en advies
! Het apparaat is ontworpen en vervaardigd volgens
de geldende internationale veiligheidsvoorschriften.
Deze aanwijzingen zijn geschreven voor uw veiligheid
en u dient ze derhalve goed door te nemen.
Dit apparaat voldoet aan de volgende EU
Richtlijnen:
- 73/23/EEG van 19/02/73 (Laagspanning)
en daaropvolgende wijzigingen;
- 89/336/EEG van 03/05/89
(Elektromagnetische Compatibiliteit)
en daaropvolgende wijzigingen;
- 2002/96/EG
Algemene veiligheid
• Dit apparaat is vervaardigd voor niet-professioneel
gebruik binnenshuis.
• Het apparaat dient te worden gebruikt voor het
bewaren en het invriezen van levensmiddelen. Het
dient uitsluitend door volwassenen te worden
gebruikt, volgens de aanwijzingen die aangegeven
zijn in dit instructieboekje.
• Het apparaat dient niet buitenshuis te worden
geplaatst, ook niet in overdekte toestand. Het is
erg gevaarlijk als het in aanraking komt met regen
of als het onweert.
• Raak het apparaat niet blootsvoets of met natte
handen of voeten aan.
• Raak nooit de koelelementen aan de binnenkant
aan: u zou zich kunnen verbranden of verwonden.
• Haal de stekker nooit uit het stopcontact door aan
het snoer te trekken.
• Maak de koelkast niet schoon of voer geen
onderhoud uit als de stekker nog in het
stopcontact zit. Het is niet voldoende twee
seconden lang de toets ON/OFF op het display
ingedrukt te houden om elke elektrische
verbinding te verbreken.
• Als het apparaat defect is, mag u nooit aan het
interne systeem sleutelen om een reparatie
proberen uit te voeren.
• Gebruik aan de binnenkant van het koel-/
vriesgedeelte nooit andere apparaten of
gereedschap dan bijgeleverd schrapertje.
• Plaats nooit ijsblokjes die net uit de diepvrieskast
komen in uw mond.
• Laat kinderen niet met het apparaat spelen. Ze
mogen in ieder geval nooit op de lades zitten of
aan de deur hangen.
Afvalverwijdering
• Verwijdering van het verpakkingsmateriaal: houdt u
aan de plaatselijke normen, zodat het
verpakkingsmateriaal hergebruikt kan worden.
• De Europese richtlijn 2002/96/EG betreffende
afgedankte elektrische en elektronische
apparatuur (AEEA) voorziet dat huishoudelijke
apparaten niet met het normale afval mogen
worden meegegeven. De afgedankte apparatuur
moet apart worden opgehaald om het terugwinnen
en recyclen van de materialen waaruit ze bestaan
te optimaliseren en te voorkomen dat er eventuele
schade voortvloeit voor de gezondheid en het
milieu. Het symbool van de afvalemmer met een
kruis staat op alle producten om de consument
eraan te herinneren dat dit gescheiden afval is.
Om meer informatie betreffende een juiste
verwijdering van huishoudapparaten te verkrijgen,
kan de consument zich richten tot de
gemeentelijke reinigingsdienst of de verkopers.
Het milieu sparen en respecteren
• Plaats het apparaat in een koele, goed
geventileerde ruimte, behoed het voor directe
zonnestralen, plaats het niet dichtbij
warmtebronnen.
• Laat de deur, wanneer u etenswaren in de koel- of
vrieskast zet of eruit haalt, zo kort mogelijk
openstaan. Elke keer dat de deur opengaat
ontstaat een aanzienlijk energieverlies.
• Vul het apparaat niet met teveel etenswaren: voor
een optimale conservering moet de koude
luchtstroom vrijuit kunnen circuleren. Als u de
circulatie belemmert, zal de compressor constant
blijven werken.
• Zet geen warme levensmiddelen in het apparaat:
deze zouden de binnentemperatuur verhogen
waardoor de compressor harder werkt en er een
groter elektrisch verbruik ontstaat.
• Houd de afdichtingen efficiënt en schoon, zodat ze
goed aan de deuren sluiten en de kou niet laten
ontsnappen (
zie Onderhoud
).
NLNL
NL
NLNL
• Het verpakkingsmateriaal is geen speelgoed voor
kinderen.
33
Page 34

Storingen en
oplossingen
NL
Het zou kunnen gebeuren dat het apparaat niet functioneert. Voordat u de Servicedienst belt (
u controleren dat het geen probleem is dat u zelf kunt oplossen met behulp van volgende lijst.
Het display is uit.
De motor start niet.
Het display geeft slechts een zwak
licht.
Het alarmsignaal gaat af, de ALARM
led gaat aan en het lampje in de
koelkast knippert.
Het alarmsignaal gaat af, de ALARM
led gaat aan en de leds van de
grafische aanwijzer van de vrieskast
gaan achter elkaar aan.
Het alarmsignaal gaat af, de ALARM
led knippert en de leds van de
grafische aanwijzer van de vrieskast
gaan voortdurend knipperen.
• De stekker zit niet in het stopcontact, of niet voldoende om contact te
maken. Wellicht zit het hele huis zonder stroom.
• Het apparaat is voorzien van een motorbeschermende controlefunctie
(
zie Starten en gebruik
• Haal de stekker uit het stopcontact en doe hem er weer in nadat u hem
180° heeft gedraaid.
• De deur van de koelkast is meer dan twee minuten open geweest.
Het geluidssignaal houdt op als u de deur dicht doet of als u op de toets
ALARM drukt.
• Het apparaat geeft aan dat de vrieskast te warm is.
Teneinde de etenswaren niet meer te laten invriezen blijft de temperatuur
in de vrieskast rond de 0°C staan, zodat u ofwel de etenswaren binnen
24 uur kunt opeten of ze nogmaals in kunt vriezen nadat u ze heeft
gekookt.
Voor het uitschakelen van het geluidssignaal drukt u op de toets ALARM. Druk
nogmaals op de grafische aanwijzer van de vrieskast om de ingestelde waarde te
zien verschijnen, schakel de ALARM led uit en herstel de normale werking.
• Het apparaat geeft aan dat de vrieskast gevaarlijk warm is: u kunt de
etenswaren niet meer eten. De vrieskast gaat naar een temperatuur van 18°C.
Voor het uitschakelen van het geluidssignaal drukt u op de toets ALARM.
Druk nogmaals op de grafische aanwijzer van de vrieskast om de
ingestelde waarde te zien verschijnen, schakel de ALARM led uit en
herstel de normale werking.
).
zie Service
), moet
De koelkast en de vrieskast zijn niet
koud genoeg.
In de koelkast bevriezen de
etenswaren.
De motor blijft voortdurend
functioneren.
Het apparaat maakt veel lawaai.
Voortijdige beëindiging van de functies
De leds van de grafische aanwijzer
van de vrieskast geven de ingestelde
temperatuur niet aan en blijven
constant ontstoken.
• De deuren sluiten niet goed ar of de afdichtingen zijn versleten.
• De deuren worden vaak geopend.
• U heeft een te hoge temperatuur ingesteld (
• De koelkast of de vrieskast zijn overmatig gevuld.
• U heeft een te lage temperatuur ingesteld (
• De functies SUPERKOELING en/of SUPERVRIEZEN en/of ICE PARTY zijn
ingeschakeld.
• De deur is niet goed dicht of wordt voortdurend geopend.
• De buitentemperatuur is erg hoog.
• Het apparaat staat niet waterpas (
• Het apparaat staat tussen meubels of voorwerpen die trillen of geluid
maken.
• Het verkoelingsgas maakt een licht geluid ook wanneer de compressor
stil staat: dit is normaal, het is geen storing.
• Elektrische storingen op het elektriciteitsnet of korte onderbrekingen van
de spanning
• Neem contact op met de technische dienst.
zie Installatie).
zie Starten en gebruik
zie Starten en gebruik
).
).
34
Page 35

Service
Voordat u de Servicedienst belt:
• Controleer of u de storing zelf kunt oplossen (
zie Storingen en oplossingen
).
• Als dat niet het geval is, kunt u contact opnemen met de Technische Servicedienst.
model
serienummer
U moet doorgeven:
• het type storing
• het model apparaat (Mod.)
• het serienummer (S/N)
Deze informatie bevindt zich op het typeplaatje links
onderin het koelgedeelte.
Gross
Bruto
Brut
TI
75
Test
P.S-I.
RG 2330
Mod.
220 - 240 V- 50 Hz 150 W
340
Total
Gross
Bruto
Brut
Compr.
R 134 a
Syst.
kg 0,090
Kompr.
Made in Italy 13918
93139180000 S/N 704211801
Net
Util
Utile
Pressure
HIGH-235
LOW 140
Cod.
Gross
Bruto
Brut
Fuse
W
A
Freez. Capac
Poder de Cong
kg/24 h
4,0
Max 15 w
Class
Clase
Classe
N
Wendt u nooit tot onbevoegde installateurs en weiger altijd de installatie van niet originele onderdelen.
NLNL
NL
NLNL
35
Page 36

NL
195056517.00
03/2006
36
Page 37

Instruções para a utilização
COMBINADO FRIGORÍFICO/CONGELADOR
I
Italiano, 1
PT
Portuges, 37
MBP 1912 F
GB
CS
Ðóсский, 49
NL
Nederlands
Índice
PT
Instalação, 38
Posicionamento e ligação
Reversibilidade da abertura das portas
, 25English,13
Descrição do aparelho, 39-40
Painel de comandos
Vista geral
Acessórios, 41
Início e utilização, 42-43
Iniciar o aparelho
Como deslocar-se no ecrã
Sistema de refrigeração
Utilize melhor o frigorífico
Utilize melhor o congelador
Manutenção e cuidados, 44
Interromper a corrente eléctrica
Limpar o aparelho
Evite bolor e maus cheiros
Substituição da lâmpada
Substituição filtro contra odores
Precauções e conselhos, 45
Segurança geral
Eliminação
Economizar e respeitar o meio ambiente
Assistência, 46
Anomalias e soluções, 47
Page 38

Instalação
PT
! É importante guardar este folheto para poder
consultá-lo a qualquer momento. No caso de venda,
cessão ou mudança, assegure-se que o mesmo
permaneça junto com o aparelho para informar ao
novo proprietário sobre o funcionamento e as suas
respectivas advertências.
! Leia com atenção as instruções: há informações
importantes sobre a instalação, a utilização e a
segurança.
Posicionamento e ligação
Posicionamento
1. Posicione o aparelho num ambiente bem ventilado
e não húmido.
2. Não tape as grades traseiras de ventilação: o
compressor e o condensador emitem calor e
necessitam de uma boa ventilação para
funcionarem bem e os consumos de electricidade
diminuírem.
3. Deixe uma distância de pelo menos 10 cm. entre a
parte superior do aparelho e os móveis que houver
acima, e de pelo menos 5 cm. entre as laterais e os
móveis/paredes aos lados.
4. Deixe o aparelho longe de fontes de calor (a luz do
sol directa, um fogão eléctrico).
5. Para manter uma distância ideal entre o produto e a
parede posterior, montar os distanciadores
presentes no kit de instalação seguindo as
instruções presentes na folha dedicada.
Ligação eléctrica
Depois do transporte, posicione o aparelho na vertical
e aguarde pelo menos 3 horas antes de ligar o
sistema eléctrico. Antes de colocar a ficha na tomada
eléctrica, certifique-se que:
• a tomada tenha uma ligação à terra e seja em
conformidade com a legislação;
• a tomada tenha a capacidade de suportar o carga
máxima.
de potência da máquina, indicada na placa de
identificação situada no compartimento frigorífico
em baixo à esquerda (p. ex.: 150 W);
• a tensão de alimentação seja entre os valores
indicados na placa de identificação, situada
embaixo à esquerda (p. ex.: 220-240 V);
• a tomada seja compatível com a ficha do aparelho.
Em caso contrário peça a substituição da ficha a
um técnico autorizado (
utilize extensões nem tomadas múltiplas.
! Com o aparelho instalado, deve ser fácil o acesso ao
cabo eléctrico e à tomada eléctrica.
! O cabo não deve ser dobrado nem sofrer pressões.
! O cabo deve ser verificado periodicamente e
substituído somente por técnicos autorizados (veja a
Assistência).
! A empresa exime-se de qualquer
responsabilidade se estas regras não forem
obedecidas.
veja a Assistência
); não
Nivelamento
1. Instale o aparelho sobre um piso plano e rígido.
2. Se o pavimento não for perfeitamente horizontal,
para compensar, desatarraxe ou atarraxe os pés
dianteiros.
Reversibilidade da abertura das portas
No caso em que se torne necessário inverter o
sentido de abertura das portas, contacte o serviço de
Assistência Técnica.
38
Page 39

Descrição do
aparelho
Painel de comandos
Regulação da
Temperatura do
FRIGORÍFICO
CHILD LOCK
Barra Gráfica
FRIGORÍFICO
Barra Gráfica
CONGELADOR
ICE PARTY
Regulação da
Temperatura do
CONGELADOR
I CARE
ON/OFF
PT
ALARMES
SUPER COOL
SUPER
FREEZE
HOLIDAY
Botão ON/OFF
Pressionando esta tecla é possível ligar e desligar o inteiro
aparelho (quer o compartimento frigorífico, quer o
compartimento congelador). O LED vermelho indica que o
aparelho está desligado, o LED verde que está a
funcionar. Para desligar o aparelho deve-se pressionar por
mais de 2 segundos o botão ON/OFF.
I CARE
Realiza a gestão da activação e a desactivação da
função I Care (a temperatura ideal com consumos
baixos). Quando esta função for activada, acendem-se
contemporaneamente o LED AUTO e o LED I Care.
ALARMES
Possibilita a sinalização e a gestão de todos os alarmes
coligados ao funcionamento do aparelho.
Child Lock
Consente bloquear as teclas do painel de comandos para
evitar involuntárias activações por parte das crianças.
Regulação da Temperatura do FRIGORÍFICO e
Possibilitam modificar a configuração da temperatura do
frigorífico, com a respectiva confirmação no display da
temperatura seleccionada. Mediante estas teclas
também é possível desactivar apenas o compartimento
frigorífico.
Barra gráfica FRIGORÍFICO
Indica a temperatura configurada no compartimento
frigorífico ou que está desactivada (neste caso a barra de
espaço está desligada).
Barra gráfica CONGELADOR
Visualiza a temperatura definida para o compartimento
congelador.
SUPER COOL
Possibilita activar ou desactivar a função SUPER COOL
(refrigeração rápida). Acende-se o led SUPER COOL.
SUPER FREEZE
Possibilita activar ou desactivar a função SUPER FREEZE
(congelação rápida). Acende-se o led
HOLIDAY
Possibilita activar ou desactivar a função HOLIDAY
(acende-se o led AUTO e o led HOLIDAY).
ICE PARTY
Possibilita activar ou desactivar a função ICE PARTY
(reduz a temperatura do congelador durante o tempo
necessário a esfriar uma garrafa). Acende-se o led ICE
PARTY.
SUPER FREEZE.
Regulação da Temperatura do CONGELADOR e
Possibilitam modificar a configuração da temperatura do
congelador, com a respectiva confirmação no display da
temperatura configurada.
39
Page 40

Descrição do
aparelho
PT
Visão geral
Estas instruções sobre a utilização são válidas para vários modelos, portanto é possível que na figura haja
pormenores diferentes do aparelho que adquiriu. Há uma descrição dos assuntos mais complexos nas páginas
seguintes.
Prateleira extraível da
porta com tampa e
PORTA OVOS
LÂMPADA
veja a Manutenção
(
PRATELEIRA
Scomparto
FRESH BOX
)
Prateleira extraível da
porta VÃO PARA
GUARDAR
OBJECTOS
Prateleiras
PORTA-LATINHAS
Gaveta para
FRUTAS e
HORTALIÇAS
Compartimento para
CONGELAÇÃO e
CONSERVAÇÃO
Recipiente para gelo
Ice Care
Compartimento para
CONSERVAÇÃO
PEZINHO
de regulação
Prateleira para
GARRAFAS
Variáveis em número e/ou na posição.
40
Page 41

Acessórios
Compartimento frigorífico
PRATELEIRAS: vidro ou de
1
2
retirar inteiramente a prateleira.
contra fenómenos de oxidação e escurecimento.
Também pode ser utilizada para “pratos frios”.
bocal de ventilação: para activá-lo retire o adesivo
que há no bocal (
grade. Podem ser extraídas e
têm altura regulável mediante
as guias para este fim (
), para introduzir
figura
recipientes ou alimentos de
tamanho grande. Para regular
a altura não é necessário
FRESH BOX: para carne e
peixe fresco. O compartimento
consente longos prazos de
conservação, de até uma
semana, por causa da
temperatura baixa – a mais fria
do frigorífico – e da porta
transparente que protege
Prateleira PORTA-LATINHAS:
para guardar deitadas várias
latinhas (
veja a figura
se guardar também iogurte,
manteiga ou recipientes em
geral.
Filtro contra odores
modelos são equipados com
um filtro de carvão activo
contra odores, que assegura
uma qualidade melhor do ar
ao redor do frigorífico.
Este filtro está colocado
embaixo à direita, dentro do
veja a figura
).
veja a
). Podem-
: Alguns
*
Compartimento congelador
ICE PARTY para guardar na
temperatura exacta uma
garrafa de espumante ou
champanha. Posicione-a no
específico balde dentro do
compartimento
CONGELAMENTO e
CONSERVAÇÃO. O balde pode
ser utilizado também para servir a garrafa mantendo-a
fria.
Recipiente para gelo Ice Care
A posição na parte superior das gavetas no vão do
freezer assegura uma limpeza maior (o gelo não entra
mais em contacto com os alimentos) e ergonomia
(não goteja quando for carregado).
1. Para retirar o recipiente empurre-o para
cima.Certifique-se que o recipiente esteja
inteiramente vazio e encha-o de água pelo furo
para este fim.
2. Preste atenção para não ultrapassar o nível
indicado (MAX WATER LEVEL). Água demais
dificulta a extracção do gelo (se acontecer,
aguarde o gelo derreter-se e esvazie o recipiente).
3. Rode o recipiente 90°: a água enche as formas
pelo princípio dos vasos comunicantes (
).
figura
4. Tape o furo com a tampa fornecida e guarde o
recipiente, introduzindo a parte superior na
respectiva sede e deixe-o suspenso.
5. Quando se tiver formato gelo (tempo mínimo
aproximadamente 8 horas) bata o recipiente sobre
uma superfície dura e molhe-o por fora para o gelo
soltar-se; em seguida deixe-o sair pelo furo.
veja a
MAX
WATER LEVEL
PT
Presente somente em alguns modelos.
*
WATER LEVEL
MAX
WATER LEVEL
MAX
41
Page 42

Início e utilização
PT
Como iniciar o aparelho duplo
! Depois do transporte, posicione o aparelho
verticalmente e aguarde cerca de 3 horas antes de
ligá-lo à tomada eléctrica para facilitar o bom
funcionamento.
• Antes de guardar alimentos no frigorífico limpe-o
bem por dentro com água morna e bicarbonato.
•
Este aparelho é equipado com um controlo para
protecção do motor que deixa o compressor iniciar
somente cerca da 8 minutos depois de ser ligado.
Isto acontece também depois de qualquer
interrupção na alimentação eléctrica, voluntária ou
involuntária (corte).
Compartimento congelador.
Quando ligar este aparelho (carregue mais de dois
segundos no botão ON/OFF ) o compartimento
congelador passa para a definição padrão de 18°C.
É aconselhável activar a função SUPER FREEZE (na
barra gráfica do CONGELADOR continua a ser
visualizada a temperatura programada
precedentemente) para acelerar a refrigeração do
compartimento; quando o mesmo tiver chegado à
temperatura ideal, esta função se desactivará e será
possível guardar congelados no congelador.
Compartimento frigorífico.
Quando ligar este aparelho, o compartimento
frigorífico passa para a definição padrão de +5°C. É
aconselhável activar a função SUPER COOL (na
barra gráfica do FRIGORÍFICO continua a ser
visualizada a temperatura programada
precedentemente) para acelerar a refrigeração do
compartimento: depois de algumas horas será
possível guardar alimentos no frigorífico.
Como deslocar-se no ecrã
Definição das temperaturas:
Quando este aparelho for ligado, no display do
compartimento frigorífico e no do congelador
aparecem as temperaturas que estiverem
configuradas no momento. Para modificá-las é
suficiente carregar nas teclas
ao compartimento do qual se desejar mudar a
temperatura. Cada pressão das teclas incrementa ou
decrementa a temperatura de 1ºC e em modo
equivalente também o número de barras laterais
acesas. Podem ser seleccionadas para o
compartimento frigorífico as seguintes temperaturas:
+12°, +7°, +6°, +5°, +4°, +3°, +2°; e para o
congelador: -18°, -19°,-20°, -21°, -22°, -24°, -26°.
e correspondentes
As temperaturas automaticamente definidas são de
+5°C para o compartimento frigorífico e 18°C para o
compartimento congelador, são as padrões para
conservação. A CoolCare Zone é automaticamente
configurada para –12°C.
Quando a função “I Care” estiver activada, este
aparelho regulará automaticamente as temperaturas
em função das condições internas e externas do
frigorífico, isto será indicado pela escrita “AUTO” que
se acende.
Se for necessário activar a função “I Care” com
temperaturas diferentes das padrão de conservação,
será necessário, quando activar a função, manter
pressionada a tecla “I Care” e mediante as teclas
definir as novas temperaturas. Nestas condições
as temperaturas que podem ser configuradas são 4°,
5° e 6° para o compartimento frigorífico, e –18°, -19° e
–20° para o compartimento congelador.
Quando estiver activa a função HOLIDAY não serão
possíveis regulações de temperatura, mas o aparelho
passará automaticamente para a regulação ideal para
a situação: +12°C para o compartimento frigorífico e
18°C para o compartimento congelador, esta
condição também é indicada pela escrita “AUTO” que
se acende.
Para activar e desactivar as funções é suficiente
carregar na respectiva tecla e o respectivo LED
acende-se ou apaga-se para indicar o estado da
função.
Algumas funções (SUPER COOL, SUPER FREEZE,
ICE PARTY, I CARE) são incompatíveis com outras
(HOLIDAY, ..), nestes casos será levada em
consideração uma prioridade já estabelecida para
ajudar-lhe na gestão do aparelho.
No fim da função Ice Party deve-se carregar na tecla
ICE PARTY para interromper a intermitência do
respectivo led. A intermitência sinaliza o fim da
função e a necessidade de remover a garrafa do
compartimento congelador.
Child Lock
Para poder activar a função de Child Lock, é
necessário manter 2 segundos pressionada a tecla
Child Lock, a activação do bloqueio das teclas é
confirmada por um som breve e pela iluminação do
respectivo led. Para desactivar a função, premir a
tecla Child Lock por 2 segundos, a desactivação é
confirmada por um som breve e pela desligação do
respectivo led.
! A barra gráfica do CONGELADOR também serve
para avisar se houver um aumento anómalo de
temperatura no compartimento congelador
Anomalias e soluções).
(veja as
e
42
Page 43

Sistema de refrigeração
O aparelho dispõe do seguinte
sistema de refrigeração:
No Frost
Pode ser reconhecido pela
presença de celas de
ventilação situadas nas
paredes traseiras dos
compartimentos.
O No Frost realiza a gestão de um fluxo contínuo de ar
frio que colecta a humidade e impede a formação de
gelo: no compartimento frigorífico mantém um nível
certo de humidade e, por causa da ausência de gelo,
preserva as qualidades originárias dos alimentos; no
compartimento congelador evita a formação de gelo e
dispensa as operações de degelo e evita que os
elementos grudem uns nos outros.
! Não coloque alimentos ou recipientes encostados
directamente com a parede refrigerante traseira, para
não tampar os furos de ventilação nem facilitar a
formação de condensação.
! Feche as garrafas e embrulhe os alimentos.
Utilize melhor o frigorífico
• Regule a temperatura através do display.
• Prima a tecla de SUPER COOL (refrigeração rápida) para
baixar a temperatura em pouco tempo, por exemplo
quando encher o compartimento depois de muitas
compras. A função desactiva-se automaticamente depois
que tiver passado o tempo necessário.
• Coloque somente alimentos frios ou levemente mornos,
mas não quentes (
• Lembre-se que os alimentos cozidos não se mantêm
mais tempo do que os crus.
• Não guarde líquidos em recipientes destampados:
poderão provocar aumento de humidade com
consequente formação de condensação.
veja Precauções e conselhos
).
Utilize melhor o congelador
PT
• Regule a temperatura através do display.
• Para conservar os alimentos do modo mais
correcto e seguro deve-se proceder da seguinte
maneira.
- Introduzir os alimentos no compartimento superior
"CONGELAMENTO e CONSERVAÇÃO", prestando
atenção para que não entrem em contacto com os
alimentos já presentes; pressionar a tecla SUPER
FREEZE (congelação rápida, acende-se o
respectivo LED) e fechar a porta; a função irá
desactivar-se automaticamente após 24 horas ou
quando alcançar a temperatura ideal (o LED
desliga-se).
• Não congele novamente alimentos que estiverem a
descongelar-se ou descongelados; estes alimentos devem
ser cozidos para ser consumados (dentro de 24 horas).
• Os alimentos frescos a serem congelados não devem ser
colocados encostados nos já congelados.
• Não coloque no congelador garrafas de vidro contendo
líquidos, tampadas ou fechadas hermeticamente, porque
poderão partir-se.
• A quantidade máxima diária de alimentos a ser congelada
é indicada na placa de identificação, situada no
compartimento frigorífico, embaixo à esquerda (por
exemplo: Kg/24h 4).
• A fim de obter um espaço maior no compartimento
congelador, é possível tirar as gavetas das suas
posições (excepto aquela mais baixa ou a eventual
gaveta COOL CARE ZONE com temperatura variável)
e guardar os alimentos directamente nas chapas de
evaporação.
! Para evitar criar obstáculos para a circulação de ar,
no interior do congelador, é recomendável não tampar
os furos de ventilação com alimentos nem recipientes.
! Durante a congelação evite abrir a porta.
! Em caso de interrupção de corrente ou de avaria, não
abra a porta do congelador: desta maneira os alimentos
congelados em casa ou industriais não sofrerão alterações
durante aproximadamente 9 ~ 14 horas.
43
Page 44

Manutenção e cuidados
Assistência
PT
Interromper a corrente eléctrica
Durante as operações de limpeza e manutenção é
necessário isolar o aparelho da rede eléctrica:
1. Mantenha pressionado o botão ON/OFF por
aproximadamente dois segundos, até que o
display se desliga completamente, excepto o Led
vermelho do botão ON/OFF.
2. desligue a ficha da tomada eléctrica.
! Se não se obedecer este processo, o alarme poderá
disparar: mas isto não será um sintoma de anomalia.
Para restabelecer o normal funcionamento, é suficiente
manter pressionado o botão on/off por mais de dois
segundos. Para isolar o aparelho realize as operações
apresentadas nos pontos 1 e 2.
Limpar o aparelho
• As partes externas, as partes internas e as
guarnições de borracha podem ser limpadas com
uma esponja molhada de água morna e
bicarbonato de sódio ou sabão neutro. Não
empregue solventes, abrasivos, água de javel nem
amoníaco.
• Os acessórios removíveis podem ser colocados de
molho em água quente e sabão ou detergente para
pratos. Enxagúe-os e enxugue-os com cuidado.
• Na parte de trás do aparelho tende a acumular-se
poeira, que pode ser eliminada, depois de ter
desligado o aparelho e retirado a ficha da tomada
eléctrica, utilizando delicadamente o bocal comprido
de um aspirador de pó, regulado numa potência
média.
Substituição da lâmpada
Para substituir a lâmpada de
iluminação do compartimento
frigorífico, desligue a ficha da
tomada de corrente.
Para chegar à lâmpada faça da
maneira indicadas (
) e substitua-a por uma
figura
análoga, de potência não
superior a 10 W.
veja a
Substituição filtro contra odores
Este filtro deve ser substituído depois de
aproximadamente 6 ~ 8 meses após a sua activação,
este prazo pode variar em função do tipo de
alimentos guardados. Para obter indicações sobre
onde há a venda filtros de reposição, contacte a
Assistência técnica (
substituir um filtro realize as operações indicadas
veja as figuras A e B
(
A
veja a Assistência
B
).
). Para
Evite bolor e maus cheiros
• Este aparelho foi fabricado com materiais
higiénicos
que não transmitem odores. Para manter esta
característica é necessário os alimentos serem
sempre protegidos e bem fechados. Isto também
evitará a formação de manchas.
• Se for deixar o aparelho muito tempo desligado,
limpe-o por dentro e deixe as portas abertas.
44
Page 45

Precauções e conselhos
! Este aparelho foi projectado e fabricado em
conformidade com as regras internacionais de
segurança. Estas advertências são fornecidas para
razões de segurança e devem ser lidas com atenção.
Esta aparelhagem é em conformidade com a
seguintes Directivas da Comunidade
Europeia:
- 73/23/CEE do 19/02/73 (Baixa Tensão) e
sucessivas modificações;
- 89/336/CEE do 03/05/89 (Compatibilidade
Electromagnética) e sucessivas
modificações.
Segurança geral
• Este aparelho foi concebido para uma utilização de
tipo não profissional, no âmbito de uma morada.
• Este aparelho deve ser utilizado somente por pessoas
adultas, para conservar e congelar alimentos,
segundo as instruções apresentadas neste folheto.
• Este aparelho não deve ser instalado ao ar livre
mesmo se num sítio abrigado, porque é muito
perigoso deixá-lo exposto à chuva e temporais.
• Não toque neste aparelho com os pés descalços nem
com as mãos ou os pés molhados ou húmidos.
• Não toque nas partes de refrigeração internas:
há perigo de queimaduras e feridas.
• Não puxe o cabo eléctrico para desligar a ficha da
tomada, mas pegue pela ficha.
• É necessário desligar a ficha da tomada antes de
realizar operações de limpeza e manutenção. Não é
suficiente colocar os selectores de regulação da
temperatura na posição OFF (aparelho desligado)
para eliminar todos os contactos eléctricos.
• No caso de avaria, nunca mexa nos mecanismos
internos para tentar reparar.
• Não utilize, no interior dos compartimentos para
guardar alimentos congelados, utensílios diferentes
da espátula fornecida ou dispositivos eléctricos se
não forem do tipo recomendado pelo construtor.
• Não coloque na boca cubos de gelo assim que os
retirar do congelador.
• Não permita que crianças brinquem com este
aparelho. Em nenhum caso pode-se sentar-se nas
gavetas ou pendurar-se na porta.
• Os embalagens não são brinquedos para as
crianças.
Eliminação
• Eliminação do material de embalagem: obedeça as
regras locais, ou reutilize as embalagens.
• A directiva Europeia 2002/96/CE referente à gestão
de resíduos de aparelhos eléctricos e electrónicos
(RAEE), prevê que os electrodomésticos não
devem ser escoados no fluxo normal dos resíduos
sólidos urbanos. Os aparelhos desactualizados
devem ser recolhidos separadamente para
optimizar a taxa de recuperação e reciclagem dos
materiais que os compõem e impedir potenciais
danos para a saúde humana e para o ambiente. O
símbolo constituído por um contentor de lixo
barrado com uma cruz deve ser colocado em todos
os produtos por forma a recordar a obrigatoriedade
de recolha separada.
Os consumidores devem contactar as autoridades
locais ou os pontos de venda para solicitar
informação referente ao local apropriado onde
devem depositar os electrodomésticos velhos.
Economizar e respeitar o meio
ambiente
• Instale este aparelho num ambiente fresco e bem
ventilado, proteja-o contra a exposição directa aos
raios do sol, não o coloque perto de fontes de
calor.
• Para colocar ou retirar alimentos, abra as portas
deste aparelho o mais rapidamente possível.
Cada vez que abrir as portas causa um notável
gasto de energia.
• Não encha este aparelho com alimentos demais:
para uma boa conservação, o frio deve poder
circular livremente. Se impedir-se a circulação, o
compressor funcionará continuamente.
• Não coloque dentro alimentos quentes: aumentarão
a temperatura interna forçando o compressor a
funcionar muito, com grande desperdício de
energia eléctrica.
• Descongele este aparelho quando se formar gelo
veja a Manutenção
(
torna mais difícil a transmissão do frio aos
alimentos e aumenta o consumo de energia.
• Mantenha as guarnições eficientes e limpas, de
maneira que adiram bem nas portas e não deixem
o frio sair (
veja a Manutenção
); uma camada grossa de gelo
).
PT
45
Page 46

Anomalias e soluções
PT
Pode acontecer que este aparelho não funcione. Antes de telefonar à Assistência técnica (
verifique se não se trata de um problema fácil de resolver com a ajuda da seguinte lista.
Anomalias:
O display está inteiramente
apagado.
O motor não inicia.
O display está aceso fraco.
Toca o alarme, está aceso o led
ALARMES e a lâmpada no
compartimento frigorífico pisca.
Toca o alarme, está aceso o led
ALARMES e os leds da barra
gráfica do congelador acendemse em sequência.
Possíveis causas / Solução:
• A ficha não está ligada na tomada eléctrica ou não está bem ligada e
portanto não há contacto, ou então não há corrente em casa.
• Este aparelho é equipado com um controlo de protecção para o motor
veja Início e utilização
(
• Desligue a ficha e ligue-a novamente na tomada, depois da tê-la rodada
para inverter os pinos.
• A porta do frigorífico permaneceu aberta mais do que dois minutos.
O aviso acústico pára de tocar quando a porta for fechada ou carregando
no botão ALARM.
• Este aparelho avisa se houver aquecimento excessivo do congelador.
Para não congelar novamente os alimentos, o congelador mantém-se a
uma temperatura ao redor de 0°C, para possibilitar-lhe os alimentos dentro
de 24 horas ou para cozê-los e congelá-los.
Para desligar o sinal acústico carregar no botão ALARMES. Carregar uma
segunda vez para visualizar na barra gráfica do congelador o valor
programado, desligar o led ALARMES e restabelecer o normal funcionamento.
).
veja a Assistência
),
Toca o alarme, está aceso o led
ALARMES e os leds da barra
gráfica do congelador piscam
continuamente.
O frigorífico e o congelador
refrigeram pouco.
Os alimentos congelam-se no
frigorífico.
O motor está a funcionar
continuamente.
O aparelho está a fazer ruído.
Final antecipado das funções.
• Este aparelho avisa se houver aquecimento perigoso do congelador: os
alimentos não devem ser consumidos. O congelador irá manter-se a uma
temperatura ao redor dos 18ºC.
Para desligar o sinal acústico carregar no botão ALARMES. Carregar uma
segunda vez para visualizar na barra gráfica do congelador o valor
programado, desligar o led ALARMES e restabelecer o normal
funcionamento.
• As portas não se fecham bem ou as guarnições estão estragadas.
• As portas são abertas com frequência excessiva.
• Foi programada uma temperatura muito alta (
• O frigorífico ou o congelador foram enchidos demais.
• Foi programada uma temperatura muito baixa (
• Estão activas as funções SUPER COOL e/ou SUPER FREEZE e/ou ICE
PARTY.
• A porta não está bem fechada ou é aberta continuamente.
• A temperatura do ambiente externo está muito alta.
• O aparelho não foi instalado bem plano (
• O aparelho foi instalado entre móveis ou objectos que vibram e emitem ruídos.
• O gás refrigerante interno produz um ruído leve mesmo quando o
compressor estiver parado: não é um defeito, é normal.
• Distúrbios eléctricos na rede ou breves interrupções da tensão de alimentação.
veja “Início e utilização”
veja “Início e utilização”
veja a Instalação
).
).
).
Os leds da barra gráfica do
congelador não sinalizam a
temperatura configurada, e estão
acesos em modo fixo.
46
Contacte a Assistência Técnica.
•
Page 47

Assistência
Antes de contactar a Assistência técnica:
•
Verifique se pode resolver sozinho a anomalia (
veja as Anomalias e Soluções
).
• Se, apesar de todos os controlos, o aparelho não funcionar e o inconveniente detectado continuar, contactar o
Centro de Assistência mais próximo.
modelo
número de série
Comunique:
• o tipo de anomalia
• o modelo da máquina (Mod.)
• o número de série (S/N)
Estas informações encontram-se na placa
de identificação situada no compartimento
frigorífico embaixo à esquerda.
Gross
Bruto
Brut
TI
75
Test
P.S-I.
RG 2330
Mod.
220 - 240 V- 50 Hz 150 W
340
Total
Gross
Bruto
Brut
Compr.
R 134 a
Syst.
kg 0,090
Kompr.
Made in Italy 13918
93139180000 S/N 704211801
Net
Util
Utile
Pressure
HIGH-235
LOW 140
Cod.
Gross
Bruto
Brut
Fuse
W
A
Freez. Capac
Poder de Cong
kg/24 h
4,0
Max 15 w
Class
Clase
Classe
N
Nunca recorrer a técnicos não autorizados e negar sempre a instalação de peças sobresselentes não
originais para reposição.
PT
47
Page 48

PT
195056517.00
03/2006
48
Page 49

Руководство по эксплуатации
КОМБИНИРОВАННЫЙ ХОЛОДИЛЬНИК С МОРОЗИЛЬНОЙ КАМЕРОЙ
Italiano, 1
PT
Portuges, 37
MBP 1912 F
GBI NL
Nederlands
CS
Русский, 49
Содержание
CS
Установка, 50
Расположение и подсоединение
Перенавешивание дверей
, 25English,13
Описание изделия, 51-52
Панель управления
Общий вид
Аксессуары, 53
Холодильная камера
Морозильная камера
Включение и эксплуатация, 54-55
Включение изделия
Как пользоваться дисплеем
Система охлаждения
Оптимальное использование холодильной камеры
Оптимальное использование морозильной камеры
Техническое обслуживание и уход, 56
Отключение электропитания
Чистка изделия
Предотвращение появления плесени и неприятных
запахов
Замена лампочки
Фильтр против неприятных запахов
Предосторожности и рекомендации, 57
Общие правила безопасности
Утилизация
Экономия электроэнергии и охрана окружающей среды
Неисправности и методы их
устранения, 58
Техническое обслуживание, 59
Page 50

Установка
CS
! Важно сохранить данное руководство для
последующих консультаций. В случае продажи,
передачи изделия или при переезде на новую
квартиру необходимо проверить, чтобы руководство
оставалось вместе с изделием, для того чтобы его
новый владелец мог ознакомиться с правилами
эксплуатации холодильника и с соответствующими
предупреждениями.
! Внимательно прочитайте инструкции: в них
содержатся важные сведения об установке,
эксплуатации и безопасности изделия.
Расположение и подсоединение
Расположение
1. Установите изделие в сухом помещении с
хорошей вентиляцией. .
2. Не закрывайте вентиляционные решетки,
расположенные в задней части изделия:
компрессор и конденсатор вырабатывают тепло,
и для их исправного функционирования требуется
хорошая вентиляция, что позволяет также
сократить расход электроэнергии.
3. Оставьте расстояние не менее 10 см между
верхней панелью изделия и возможными
навесными шкафами, и не менее 5 см между
боковыми панелями и расположенными рядом
кухонными элементами или стенами.
4. Не устанавливайте изделие рядом с источниками
тепла. (прямой солнечный свет, кухонные плиты).
5. Для оптимального расстояния между задней
стенкой холодильника и стеной установите
распорные детали из крепежного комплекта,
следуя прилагающимся инструкциям.
Выравнивание
1. Установите изделие на ровный и твердый пол.
2. Если пол не является идеально ровным,
компенсируйте перекос при помощи передних
регулируемых ножек изделия.
Электрическое подсоединение
После доставки изделия установите его в
вертикальное положение и подождите не менее 3
часов перед его подсоединением к сети
электропитания. Перед подсоединением вилки
изделия к электрической розетке необходимо
проверить следующее:
электрическая розетка должна быть соединена с
заземлением и соответствовать нормативам;
электрическая розетка должна быть расчитана на
максимальную мощность изделия, указанную на
табличке с техническими характеристиками,
расположенной в левом нижнем углу внутри
холодильной камеры (например, 150 Вт);
напряжение электропитания должно быть в
пределах, указанных на табличке с техническими
характеристиками, расположенной в левом
нижнем углу внутри холодильной камеры
(например, 220-240 В);
электрическая розетка должна быть совместима с
вилкой изделия.
В противном случае поручите замену вилки
изделия уполномоченному технику (ñì.
Обслуживание); не используйте удлинители и
тройники.
! Изделие должно быть установлено таким образом,
чтобы электрический провод и электророзетка были
легко доступны.
! Электрический провод изделия не должен быть
согнут или сжат.
! Регулярно проверяйте состояние электрического
провода изделия и при необходимости поручайте
его замену только уполномоченным техникам (ñì.
Обслуживание).
! Фирма снимает с себя всякую ответственность
в случае несоблюдения вышеописанных
правил.
Перенавешивание дверей
50
При необходимости перенавесить дверцы
обращайтесь в Центр технического обслуживания.
Page 51

Описание
изделия
Панель управления
Регуляция температуры
ХОЛОДИЛЬНОЙ КАМЕРЫ
CHILD LOCK
Температурная шкала
ХОЛОДИЛЬНОГО
ОТДЕЛЕНИЯ
Температурная шкала
ХОЛОДИЛЬНОГО
ОТДЕЛЕНИЯ
ICE PARTY
Регуляция температуры
МОРОЗИЛЬНОЙ КАМЕРЫ
CS
Сигнализ
SUPER COOL
SUPER
FREEZE
I CARE
ÂÊË/ÂÛÊË
При помощи этой кнопки включается все изделие
(холодильная и морозильная камеры). Красный
индикатор означает, что изделие выключено, зеленый
что изделие включено. Для отключения изделия
необходимо нажать кнопку ON/OFF на 2 секунды.
I CARE
Служит для включения и отключения функции I Care
(оптимальная температура, позволяющая сократить
расход электроэнергии). При включении этой функции
одновременно загорается индикатор АВТОМ. и
индикатор I Care.
Сигнализации
Включает сигнализацию и управляет всеми
сигналами, связанными с работой изделия.
Child Lock
Эта функция позволяет заблокировать или
разблокировать кнопки на панели управления во
избежание случайного включения детьми.
Регуляция температуры ХОЛОДИЛЬНОЙ КАМЕРЫ и
Служат для изменения температуры в холодильной
камере с соответствующим подтверждением заданной
температуры на дисплее. При помощи этих кнопок
возможно также отключить только холодильную камеру.
Регуляция температуры МОРОЗИЛЬНОЙ КАМЕРЫ и
Служат для изменения температуры в морозильной
камере с соответствующим подтверждением заданной
температуры на дисплее.
ÂÊË/ÂÛÊË
HOLIDAY
Температурная шкала ХОЛОДИЛЬНОГО ОТДЕЛЕНИЯ
Показывает температуру, заданную в холодильной
камере, или ее отключение (в данном случае
температурная шкала отключена).
Температурная шкала МОРОЗИЛЬНОГО ОТДЕЛЕНИЯ
Показывает температуру, заданную в морозильной
камере.
SUPER COOL
Служит для включения или отключения функции
SUPER COOL (быстрое охлаждение). Загорается
индикатор SUPER COOL.
SUPER FREEZE
Служит для включения или отключения функции
SUPER FREEZE (быстрое замораживание).
Загорается индикатор SUPER FREEZE.
HOLIDAY
Служит для включения или отключения функции
HOLIDAY (загораются индикаторы AUTO и HOLIDAY).
ICE PARTY
Служит для включения или отключения функции ICE
PARTY (в морозильной камере понижается температура
на время, необходимое для охлаждения бутылки).
Загорается индикатор ICE PARTY.
51
Page 52

Описание изделия
CS
Общий вид
Руководство по эксплуатации относится к нескольким моделям, поэтому возможно, что на рисунке показаны детали, отличные от
приобретенного вами изделия. Описание наиболее сложных комплектующих приведено на следующих страницах.
Съемный балкончик с
крышкой с
ПОДСТАВКОЙ ДЛЯ
ЯИЦ
Лампа освещения
(см. Техническое
обслуживание)
ПОЛКА
Отделение
FRESH BOX
Съемный балкончик
ДЛЯ ПРОДУКТОВ
Полки для банок
ßùèê ДЛЯ ФРУКТОВ
è ОВОЩЕЙ
Отделение для
ЗАМОРАЖИВАНИЯ è
ХРАНЕНИЯ
Форма для льда
Ice Care
Отделение для
ХРАНЕНИЯ
НОЖКА
для выравнивания
Балкончик для
БУТЫЛОК
Детали, которые могут варьироваться по количеству и/или по расположению.
52
Page 53

Аксессуары
Холодильная камера
ПОЛКИ: сплошные или
1
2
положения полок их не нужно полностью вынимать из
холодильника.
холодильной камеры и прозрачной крышке,
предохраняющей продукты от окисления и потемнения.
Отделение может быть использовано также для
хранения готовых холодных блюд.
внизу справа, внутри вентиляционного отверстия. для
приведения его в рабочее состояние, снимите
наклейку с отверстия (см. рисунок).
решетки
Полки могут быть вынуты и
установлены на различных
уровнях на специальных
направляющих (см. рисунок)
для размещения в
холодильнике больших
¸мкостей. Для изменения
FRESH BOX (Коробка для
хранения мяса): для хранения
свежего мяса и рыбы. Это
отделение позволяет сохранять
продукты свежими в течение
долгого времени вплоть до
недели благодаря низкой
температуре более низкой по
сравнению с остальной частью
Полка для банок,
расположенная в дверце,
служит для размещения не
только банок, но также йогурта,
масла и прочих емкостей,
используя полку в
соответствии с вашими
нуждами.
Фильтр против неприятных
запахов
Некоторые модели оснащены
фильтром с активированным
углем против образования
неприятных запахов, который
обеспечивает лучшее качество
воздуха внутри холодильной
камеры. Фильтр расположен
*
Морозильная камера
ICE PARTY: служит для
охлаждения бутылок с
напитками или шампанским до
оптимальной температуры.
Поместите бутылку в
специальное ведерко в камере
ЗАМОРАЖИВАНИЯ и
ХРАНЕНИЯ. Ведерко может
быть использовано для подачи
бутылки на стол, сохраняя ее охлажденной.
Формы для льда:
Их расположение в верхней части ящиков
морозильной камеры обеспечивает большую
эргономику и чистоту (лед не поступает в контакт с
продуктами и не капает в процессе загрузки).
1. Вы можете вынуть форму, вытолкнув ее вверх.
Проверьте, чтобы формы была полностью
порожняя, и залейте в нее воду через специальное
отверстие.
2. Обращайте внимание, чтобы не превысить
максимальный уровень (MAX WATER LEVEL).
Излишек воды препятствует выходу кубиков льда
(если это произойдет, подождите, пока лед растает и
опорожните форму).
3. Поверните форму на 90°: вода заполняет отделения
по принципу сообщающихся сосудов (см. рисунок).
4. Закройте отверстия прилагающейся пробкой и
вставьте форму в дверцу сверху в специальное
гнездо.
5. После образования льда (минимальное время
примерно 8 часов) постучите формой по любой
твердой поверхности или подставьте ее под струю
воды, чтобы облегчить отсоединение кубиков льда,
затем высыпьте кубики через отверстие.
MAX
WATER LEVEL
CS
Имеется только в некоторых моделях
*
WATER LEVEL
MAX
WATER LEVEL
MAX
53
Page 54

Включение и
эксплуатация
CS
Порядок включения двухкамерного
холодильника
! После доставки изделия покупателю установите
холодильник в вертикальное положение. Для
исправного функционирования изделия необходимо
подождать примерно 3 часа перед его подключением
к сети электропитания.
Перед помещением в холодильник продуктов
тщательно протрите камеры изнутри теплой водой с
содой.
Время предохранения двигателя.
Данная модель оснащена предохранением
двигателя, поэтому если после принудительного
выключения компрессора (например, для чистки
или размораживания морозильной камеры)
компрессор не запускается сразу же, не
беспокойтесь, он автоматически запустится
примерно через 8 минут.
Морозильная камера
При включении изделия (нажмите примерно на две
секунды кнопку ÂÊË./ÂÛÊË.) морозильная камера
переходит в стандартный режим 18°C.
Рекомендуется включить функцию SUPER FREEZE
(На температурной шкале МОРОЗИЛЬНОЙ КАМЕРЫ
показывается ранее заданная температура) для
ускоренного охлаждения камеры. По достижении
заданной температуры функция отключается, и Вы
можете поместить в морозильную камеру продукты.
Холодильная камера
После включения изделия холодильная камера
охлаждается до стандартной заданной температуры
+5°C. Рекомендуется включить функцию SUPER
COOL (На температурной шкале ХОЛОДИЛЬНОЙ
КАМЕРЫ показывается ранее заданная температура)
для ускоренного охлаждения камеры: по прошествии
нескольких часов вы можете поместить в
холодильную камеру продукты.
автоматически настраивает температуру в зависимости
от условий внутри и снаружи холодильника, что
показывается сообщением «АВТОМ».
При необходимости включить функцию I Care с
температурой хранения, отличной от стандартной, при
включении этой функции держите нажатой кнопку I
Care и задайте при помощи кнопкой
температуру. В этих условиях возможные значения
температуры: 4°С, 5°С и 6°С для холодильной камеры,
и 18°С, -19°С и 20°С для морозильной камеры.
Когда включена функция HOLIDAY, невозможно
регулировать температуру, изделие автоматически
переходит в режим оптимальной температуры в данных
условиях: +12°C в холодильной камере и -18°C в
морозильной. Этот режим показывается сообщением
«АВТОМ».
Для включения и отключения функций достаточно
нажать соответствующую кнопку, и включение или
выключение соответствующего индикатора покажет
состояние функции.
Некоторые функции (SUPER COOL, SUPER FREEZE,
ICE PARTY, I CARE) несовместимы с другими
(HOLIDAY...). В этом случае учитывается заданная
приоритетность для более удобного использования
изделия.
После отключения функции Ice Party необходимо
нажать кнопку ICE PARTY для отключения мигания
соответствующего индикатора и звукового сигнала.
Мигающий индикатор и звуковой сигнал означают
отключение функции. После этого необходимо
вынуть бутылку из морозильной камеры.
Child Lock
Для включения функции Child Lock нажмите кнопку Child
Lock на 2 секунды. Блокировка кнопок подтверждается
коротким звуковым сигналом и включением
соответствующего индикатора. Для отключения функции
нажмите кнопку Child Lock на 2 секунды. Разблокировка
кнопок подтверждается коротким звуковым сигналом,
соответствующий индикатор гаснет.
и - новую
Как пользоваться дисплеем
Настройка температуры:
Если изделие включено, на дисплеях холодильной и
морозильной камер показывается температура,
заданная на данный момент. Для ее изменения
достаточно нажать кнопки
камеры. В холодильной камере можно задать
следующую температуру: +12°, +7°, +6°, +5°, +4°, +3°,
+2°, а в морозильной камере - 18°, -19°,-20°, -21°, 22°, -24°, -26°
Автоматически устанавливаемая температура +5°C в
холодильной камере и 18°C в морозильной камере.
Эти значения являются стандартными для хранения
продуктов. Температура в отсеке CoolCare Zone
автоматически настраивается на 12°C.
Когда включена фукция I Care, изделие
54
и - соответствующей
! Температурная шкала МОРОЗИЛЬНОЙ КАМЕРЫ
служит также для сигнализации аномального
повышения температуры в морозильной камере (см.
Неисправности и методы их устранения).
Page 55

Система охлаждения
Система No Frost
Эта система отличается
наличием вентиляционных
решеток, расположенных в
верхней части камер
холодильника.
Система No Frost обеспечивает
непрерывную циркуляцию
холодного воздуха, удаляющего
влагу и препятствующего образованию наледи и инея:
в холодильной камере поддерживается надлежащий
уровень влажности, и благодаря отсутствию инея
продукты сохраняют свои качества. В морозильной
камере эта система препятствует образованию наледи
и смерзания продуктов между собой, и освобождает
пользователя от необходимости производить
регулярную разморозку.
! Не прислоняйте продукты или ¸мкости к задней
охлаждающей стенке камеры во избежание
закрывания вентиляционных решеток и образования
конденсата.
! Закрывайте бутылки и заворачивайте продукты.
Оптимальное использование
холодильной камеры
Для регуляции температуры используйте рукоятку
РЕГУЛЯТОРА ХОЛОДИЛЬНОЙ КАМЕРЫ (ñì.
Описание).
Нажмите кнопку SUPER COOL (быстрое
охлаждение) для быстрого понижения температуры,
например, когда вы заполняете холодильную камеру
большим количеством продуктов. Эта функция
автоматически отключается, по истечении
установленного времени.
Помещайте в холодильник только холодные или
едва теплые продукты, но не горячие (ñì.
Предосторожности и рекомендации).
Помните, что приготовленные продукты хранятся не
дольше сырых.
Не помещайте в холодильник жидкости в ¸мкостях
без крышки: это приводит к повышению влажности в
холодильной камере с последующим образованием
конденсата.
Оптимальное использование
морозильной камеры
Отрегулируйте температуру на панели управления.
Для оптимального и правильного замораживания
продуктов необходимо следовать приведенным ниже
инструкциям:
- Поместите продукты в верхний отсек
«ЗАМОРАЖИВАНИЕ и ХРАНЕНИЕ», обращая
внимание, чтобы свежие продукты не касались
уже находящихся там продуктов. Нажмите кнопку
SUPER FREEZE (быстрое замораживание,
загорится соответствующий индикатор) и
закройте дверцу. Функция автоматически
отключается по прошествии 24 или по
достижении оптимальной температуры
(индикатор гаснет).
Не замораживайте повторно полностью или
частично размороженные продукты, так как они
должны быть приготовлены и употреблены в пищу в
течение 24 часов после их разморозки.
Не помещайте свежие замораживаемые продукты
рядом с уже замороженными.
Не помещайте в морозильную камеру герметично
закрытые стеклянные бутылки с жидкостью, так как
они могут взорваться.
На табличке с техническими характеристиками,
расположенной в левом нижнем углу холодильной
камеры, указан максимальный объем
замораживаемых продуктов в день (например: кг/24
ч 4).
! Во избежание создания препятствий для циркуляции
воздуха внутри холодильной камеры не рекомендуется
закрывать продуктами или емкостями вентиляционные
отверстия.
! Избегайте открывания двери морозильной камеры в
процессе замораживания.
! В случае внезапного отключения электропитания или
неисправности не открывайте дверь морозильной
камеры: таким образом замороженные продукты
сохранятся без вреда примерно в течение 9-14 часов.
CS
55
Page 56

Техническое обслуживание
и уход
CS
Отключение электропитания
Перед началом чистки или технического обслуживания
изделия необходимо отключить изделие от сети
электропитания:
1. Держите нажатой кнопку ON/OFF примерно в
течение двух секунд, до тех пор, пока на дисплее
не погаснут все индикаторы, кроме красного ON/
OFF.
2. выньте вилку изделия из электрической розетки.
! Если это условие не будет соблюдено, может
сработать сигнализация: это не является сигналом
неисправности. Для возврата в рабочий режим
установите рукоятку РЕГУЛЯТОРА МОРОЗИЛЬНОЙ
КАМЕРЫ на нужное значение. Для отключения изделия
от сети электропитания выполните операции,
описанные в пунктах 1 и 2.
Уход за изделием
Наружные, внутренние элементы и резиновые
прокладки можно протирать губкой, смоченной в
теплом содовом растворе или в растворе
нейтрального моющего средства. Не используйте
растворители, абразивные чистящие средства,
отбеливатели или аммиак.
Съемные детали можно мыть под горячей водой с
мылом или со средством для мытья посуды.
Ополосните и тщательно высушите.
В задней части изделия скапливается пыль, которую
необходимо осторожно удалять, отключив изделие
от сети электропитания, вынув вилку из
электрической розетки, при помощи пылесоса с
длинной узкой насадкой на средней мощности.
Замена лампочки
Для замены лампочки
освещения в холодильной
камере, выньте вилку изделия
из электрической розетки.
Следуйте приведенным ниже
инструкциям в зависимости от
модели вашего изделия.
Откройте плафон с лампочкой,
как показано на рисунке (ñì.
рисунок) и замените ее на
новую такого же типа, мощностью не более 10 Вт.
Фильтр против неприятных запахов
Следует заменять фильтр каждые 6-8 месяцев в
зависимости от типа продуктов хранящихся в
холодильнике. Обращайтесь в Центр технического
обслуживания (см. Техническое обслуживание) за
информацией касательно приобретения новых
фильтров. Для замены фильтра следуйте показанным
на рисунке инструкциям (см. рисунки A и B).
A
B
Предотвращение появления плесени и
неприятных запахов
Изделие изготовлено из гигиеничных материалов, не
задерживающих запахи. Для сохранения этой
характеристики важно, чтобы продукты были всегда
плотно закрыты в своих упаковках. Это помогает
также избежать образования пятен.
Если требуется отключить изделие на длительный
период, вымойте его изнутри и оставьте двери
открытыми.
56
Page 57

Предосторожности и
рекомендации
! Изделие спроектировано и изготовлено в
соответствии с международными нормативами
безопасности. Необходимо внимательно прочитать
настоящие предупреждения, составленные в целях
вашей безопасности.
Данное изделие соответствует следующим
Директивам Европейского Сообщества:
-73/23/CEE от 19/02/73 (Низкое напряжение) с
последующими изменениям;
- 89/336/CEE от 03/05/89 (Электромагнитная
совместимость) с последующими
изменениями;
- 2002/96/CE.
Общие правила безопасности
Данное изделие предназначается для
непрофессионального использования в домашних
условиях.
Изделие предназначено для хранения и
замораживания продуктов, может быть использовано
только взрослыми людьми в соответствии с
инструкциями, приведенными в данном техническом
руководстве.
Запрещается устанавливать изделие на улице, даже
под навесом, так как воздействие на него дождя и
грозы является чрезвычайно опасным.
Не прикасайтесь к изделию влажными руками, а также
находясь босиком или с мокрыми ногами.
Не прикасайтесь к внутренним комплектующим
циркуляции хладагента: существует опасность ожегов
или порезов.
Не тяните за провод электропитания для отсоединения
вилки изделия из электрической розетки, возьмитесь
за вилку рукой.
Перед началом чистки или технического обслуживания
изделия необходимо вынуть вилку из электророзетки.
Недостаточно нажать на две секунды кнопку ON/OFF
на дисплее для полного отключения электропитания.
В случае неисправности категорически запрещается
открывать внутренние механизмы изделия с целью
самостоятельного ремонта.
Не используйте внутри морозильных отсеков
инструменты, отличные от прилагающегося скребка,
или электроприборы, если они не рекомендованы
производителем холодильника.
Не кладите в рот кубики льда, только что вынутые из
морозильной камеры.
Не разрешайте детям играть с изделием.
Категорически запрещается садиться на выдвижные
ящики холодильника или опираться на двери.
Не разрешайте детям играть с упаковочными
материалами.
Утилизация
CS
Уничтожение упаковочных материалов: соблюдайте
местные нормативы по утилизации упаковочных
материалов.
Европейская директива 2002/96/EC об утилизации
электрического и электронного оборудования
(WEEE) устанавливает правила утилизации
вышедших из строя бытовых электроприборов.
В целях минимизации отрицательного воздействия
утилизованных приборов на окружающую среду,
снижения рисков для здоровья населения, а также
оптимизации процесса переработки и повторного
использования материалов, сбор изношенного
оборудования должен осуществляться вне рамок
общегородских систем сбора и утилизации мусора.
Символ «перечеркнутого мусорного ведра»,
нанесенный на продукцию, напоминает об
обязанности соблюдения специальной процедуры
утилизации бытовой техники.
Потребитель может сдать изношенное оборудование
в специальных пунктах приема или, если это
разрешено национальными законодательствами,
возвратить компании при покупке нового,
аналогичного продукта.
На сегодняшний день все ведущие производители
бытовой техники активно работают над созданием
систем сбора и утилизации изношенной бытовой
техники.
Экономия электроэнергии и охрана
окружающей среды
Установите изделие в нежарком помещении с
хорошей вентиляцией, вдали от прямого
воздействия солнечного света и источников тепла.
При открывании дверей холодильнка старайтесь
держать их открытыми как можно меньше.
При каждом открывании дверей происходит
значительный расход электроэнергии.
Не помещайте в холодильник слишком много
продуктов. для надлежащего хранения продуктов
необходимо обеспечить свободную циркуляцию
холода между ними. В случае отсутствия такой
циркуляции компрессор будет работать непрерывно.
Не помещайте в холодильник горячие продукты: это
приведет к повышению температуры внутри
холодильника со значительной нагрузкой на
компрессор и значительным расходом
электроэнергии.
Следите за состоянием уплотнителей и прочищайте
их при необходимости. Уплотнители должны хорошо
прилегать к дверям, не пропуская холод (ñì.
Техническое обслуживание).
57
Page 58

Неисправности и методы их
устранения
Если ваш холодильник не работает. Прежде чем обратиться в Центр Технического обслуживания (см. Техническое обслуживание),
CS
проверьте, можно ли устранить неисправность, используя рекомендации, приведенные в следующем перечне.
Неисправности:
Возможные причины / Методы устранения:
Дисплей выключен.
Компрессор не запускается.
Дисплей включен в слабом режиме.
Включается звуковая сигнализация,
индикатор СИГНАЛИЗАЦИЯ, и мигает
ламочка внутри холодильной камеры.
Включается сигнализация, загорается
индикатор СИГНАЛИЗАЦИИ и
последовательно загораются
индикаторы на температурной шкале
морозильной камеры
Включается сигнализация, загорается
индикатор СИГНАЛИЗАЦИИ, и
непрерывно мигают индикаторы на
температурной шкале морозильной
камеры
Вилка не соединена с электрической розеткой или соединена плохо и
не обеспечивает контакта, или отключилось электропитание.
Изделие оснащено предохранителем компрессора (см. Включение и
эксплуатация).
Выньте вилку из розетки, переверните ее и вновь воткните в
электророзетку.
Дверь холодильника открыта более двух минут.
Звуковая сигнализация отключается при закрывании дверцы или при
нажатии кнопки ALLARMI.
Сигнализация опасно высокой температуры в морозильной камере.
В морозильной камере поддерживается температура около 0°C,
препятствующая повторному замораживанию продуктов. Эти продукты
должны быть употреблены в пищу в течение 24 часов или вновь
заморожены после их приготовления.
Для отключения звукового сигнала нажмите кнопку ALLARMI. Вновь
нажмите эту кнопку для визуализации на температурной шкале
морозильной камеры заданного значения, для отключения индикатора
СИГНАЛИЗАЦИЯ и возврата изделия в рабочий режим.
Сигнализация опасного повышения температуры в морозильной
камере: продукты не могут быть употреблены в пищу. В морозильной
камере будет поддерживаться температура около -18°C.
Для отключения звукового сигнала нажмите кнопку СИГНАЛИЗАЦИЯ.
Вновь нажмите эту кнопку для визуализации на температурной шкале
морозильной камеры заданного значения, для отключения индикатора
СИГНАЛИЗАЦИЯ и возврата изделия в рабочий режим.
Холодильная и морозильная камера
вырабатывают мало холода.
Продукты в холодильной камере
замерзают.
Компрессор работает непрерывно.
Холодильник работает слишком шумно.
Преждевременное завершение
функций.
Индикаторы на температурной шкале
морозильной камеры не показывают
заданную температуру и горят, не мигая.
Двери плохо закрываются или повреждены уплотнители.
Двери холодильника открываются слишком часто.
Если была задана слишком высокая температура (см. Включение и
эксплуатация).
Холодильная или морозильная камеры переполнены продуктами.
Если была задана слишком низкая температура (см. Включение и
эксплуатация).
Были включены функции SUPER COOL и/или SUPERFREEZE и/или
ICE PARTY.
Дверь плохо закрыта или часто открывается.
Слишком высокая температура в помещении.
Изделие установлено неровно (см. Установка).
Изделие установлено между вибрирующими или шумоиздающими
кухонными элементами или предметами.
Хладагент в циркуляции производит легкий шум также при
остановленном компрессоре: это не является неисправностью, а
нормальным явлением.
Электрические помехи в сети электропитания или кратковременное
падение напряжения
Обратитесь в центр технического обслуживания.
58
Page 59

Техническое
обслуживание
Перед тем как обратиться в Центр Технического обслуживания:
проверьте, можно ли устранить неисправность самостоятельно (см. Неисправности и методы их
устранения).
Если после проверки холодильник не работает, или проблемы остаются, свяжитесь с сервисным центром.
модель
серийный номер
При обращении в Центр Технического
Обслуживания необходимо сообщить:
тип неисправности
модель изделия (Мод.)
номер тех. паспорта (серийный ¹)
Все эти данные вы найдете на табличке с
техническими характеристиками,
расположенной в левом нижнем углу
холодильной камеры.
RG 2330
Mod.
220 - 240 V- 50 Hz 150 W
340
Total
Gross
Bruto
Brut
Compr.
R 134 a
Syst.
kg 0,090
Kompr.
Made in Italy 13918
Gross
Bruto
Brut
75
Test
P.S-I.
TI
Net
Util
Utile
Pressure
HIGH-235
LOW 140
93139180000 S/N 704211801
Cod.
Gross
Bruto
Brut
W
Fuse
A
Freez. Capac
Poder de Cong
kg/24 h
4,0
Max 15 w
Class
Clase
Classe
N
Не пользуйтесь услугами лиц, не уполномоченных производителем.
При ремонте требуйте использования оригинальных запасных частей.
CS
59
Page 60

CS
195056517.00
03/2006
60
 Loading...