

Page 1

Combinato frigo/freezer
Installazione e uso
Fridge/freezer combined
Installation and use
Комбинированный холодильникморозильник
Установка и использование
Page 2

MBAA 4032 CV
Combinato frigo/freezer 1
I
Istruzioni per l'installazione e l'uso
Fridge/freezer combined 11
GB
Instructions for installation and use
Комбинированный холодильник-морозильник
CSI
Инструкции по установке и использованию
25
Per garantire l’efficienza e la sicurezza di questo elettrodomestico:
- rivolgetevi esclusivamente a centri di assistenza tecnica autorizzati
- richiedete sempre l’utilizzo di parti di ricambio originali
To maintain the EFFICIENCY and SAFETY of this appliance, we recommend:
- call only the Service Centers authorized by the manufacturer
- always use original Spare Parts
Производитель оставляет за собой право без предупреждения вносить зменения
в конструкцию, не ухудшающие эффективность работы борудования.
- Некоторые параметры, приведенные в этой инструкции, являются приблизительными.
- Производитель не несет ответственности за незначительные отклонения от указанных
величин.
Page 3

La sicurezza, una buona abitudine
ATTENZIONE
Leggete attentamente le avvertenze contenute nel presente libretto in quanto forniscono importanti indicazioni riguardanti la sicurezza di installazione, d’uso e di manutenzione.
Questa apparecchiatura è conforme alle seguenti Direttive Comunitarie:
- 73/23/CEE del 19/02/73 (Basse Tensioni) e successive
modificazioni;
- 89/336/CEE del 03/05/89 (Compatibilità Elettromagnetica)
e successive modificazioni.
1. Questo apparecchio non va installato all’aperto, nemmeno se lo spazio è riparato da una tettoia; è molto pericoloso
lasciarlo esposto alla pioggia e ai temporali.
2. Deve essere usato soltanto da adulti ed esclusivamente
per conservare e congelare i cibi, seguendo le istruzioni d’uso
scritte in questo manuale.
3. Non toccate né manovrate mai l’apparecchio a piedi nudi
o con le mani o i piedi bagnati.
4. Sconsigliamo di ricorrere a prolunghe e prese multiple. Se
il frigorifero è installato tra i mobili, controllate che il cavo
non subisca piegature o compressioni pericolose.
5. Non tirate mai il cavo né il frigorifero per staccare la spina
dalla presa a muro: è molto pericoloso.
6. Non toccate le parti interne raffreddanti soprattutto con
le mani bagnate poiché potreste ustionarvi o ferirvi. Né met-
tete in bocca cubetti di ghiaccio appena estratti dal freezer
poiché rischiate di ustionarvi.
7. Non fate né pulizia né manutenzione senza aver prima
staccato la spina; non basta, infatti, portare le manopole
per la regolazione della temperatura sulla posizione " "
per eliminare ogni contatto elettrico.
8. Prima di farvi ritirare il vecchio frigorifero, mettete fuori
uso l’eventuale serratura per evitare che i bambini, giocando, possano rimanere chiusi dentro l’apparecchio.
9. In caso di guasto, prima di chiamare il servizio-assistenza,
controllate al capitolo “C’è qualche problema?” per verificare se è possibile eliminare l’eventuale inconveniente. Non
tentate di riparare il guasto, cercando di accedere alle parti
interne.
10. In caso di sostituzione del cavo di alimentazione rivolgersi ai nostri Centri di Assistenza. In alcuni casi le connessioni sono eseguite con terminali speciali, in altri è richiesto
l’uso di un utensile speciale per accedere ai collegamenti.
11. Non usate apparecchi elettrici all'interno dello scomparto conservatore di cibi, se questi non sono del tipo raccomandato dal costruttore.
12. Al termine della vita funzionale dell'apparecchio, contenente gas ciclopentano nella schiuma isolante ed eventualmente gas R600a (isobutano) nel circuito refrigerante, lo stesso dovrà essere messo in sicurezza prima dell'invio in discarica. Per questa operazione rivolgetevi al vostro negoziante
o all'Ente Locale preposto.
Installazione
Per garantire un buon funzionamento e un consumo
contenuto di elettricità è importante che l’installazione sia eseguita correttamente.
L’aerazione
Il compressore ed il condensatore emettono calore e richiedono perciò una buona aerazione. Sono poco adatti ambienti con una non perfetta ventilazione. L’apparecchio va
quindi installato in un ambiente servito da un’apertura (finestra o portafinestra) che assicuri il necessario ricambio dell’aria e che non sia troppo umido.
Fare attenzione, durante l'installazione, a non coprire od
ostruire le griglie che permettono la buona ventilazione dell'apparecchio.
Per una buona aerazione dell'apparecchio occorre lasciare:
- una distanza di almeno 10 cm tra la parte superiore ed
eventuali mobili sovrastanti;
- una distanza di almeno 5 cm tra le fiancate ed eventuali
mobili/pareti laterali.
Lontano dal calore
Evitare di posizionare l'apparecchio in un luogo direttamente esposto alla luce solare, accanto alla cucina elettrica o
similari.
In piano
L'apparecchio deve essere ben in piano; se il pavimento non
è livellato, è possibile intervenire con gli appositi piedini regolabili posti anteriormente.
Collegamento elettrico e messa a terra
Prima di procedere al collegamento elettrico, controllare che
il voltaggio indicato sulla targhetta caratteristiche, posta in
basso a sinistra accanto alla verduriera, corrisponda a quello del vostro impianto di casa, e che la presa sia dotata di
una regolare messa a terra, come prescrive la legge sulla
sicurezza degli impianti 46/90. Se manca la messa a terra, la
Casa Costruttrice declina ogni responsabilità. Non usate prese multiple o adattatori.
Posizionare l’apparecchio in modo che la presa, a cui è
collegato, sia accessibile.
La potenza è insufficiente?
La presa elettrica deve essere in grado di sopportare il carico
massimo di potenza dell’apparecchio, indicato sulla targhetta
caratteristiche posta in basso a sinistra accanto alla verduriera.
Prima di collegarlo elettricamente
Dopo il trasporto posizionare l’apparecchio verticalmente
ed attendere almeno 3 ore prima di collegarlo alla presa per
consentire un corretto funzionamento.
1
I
Page 4
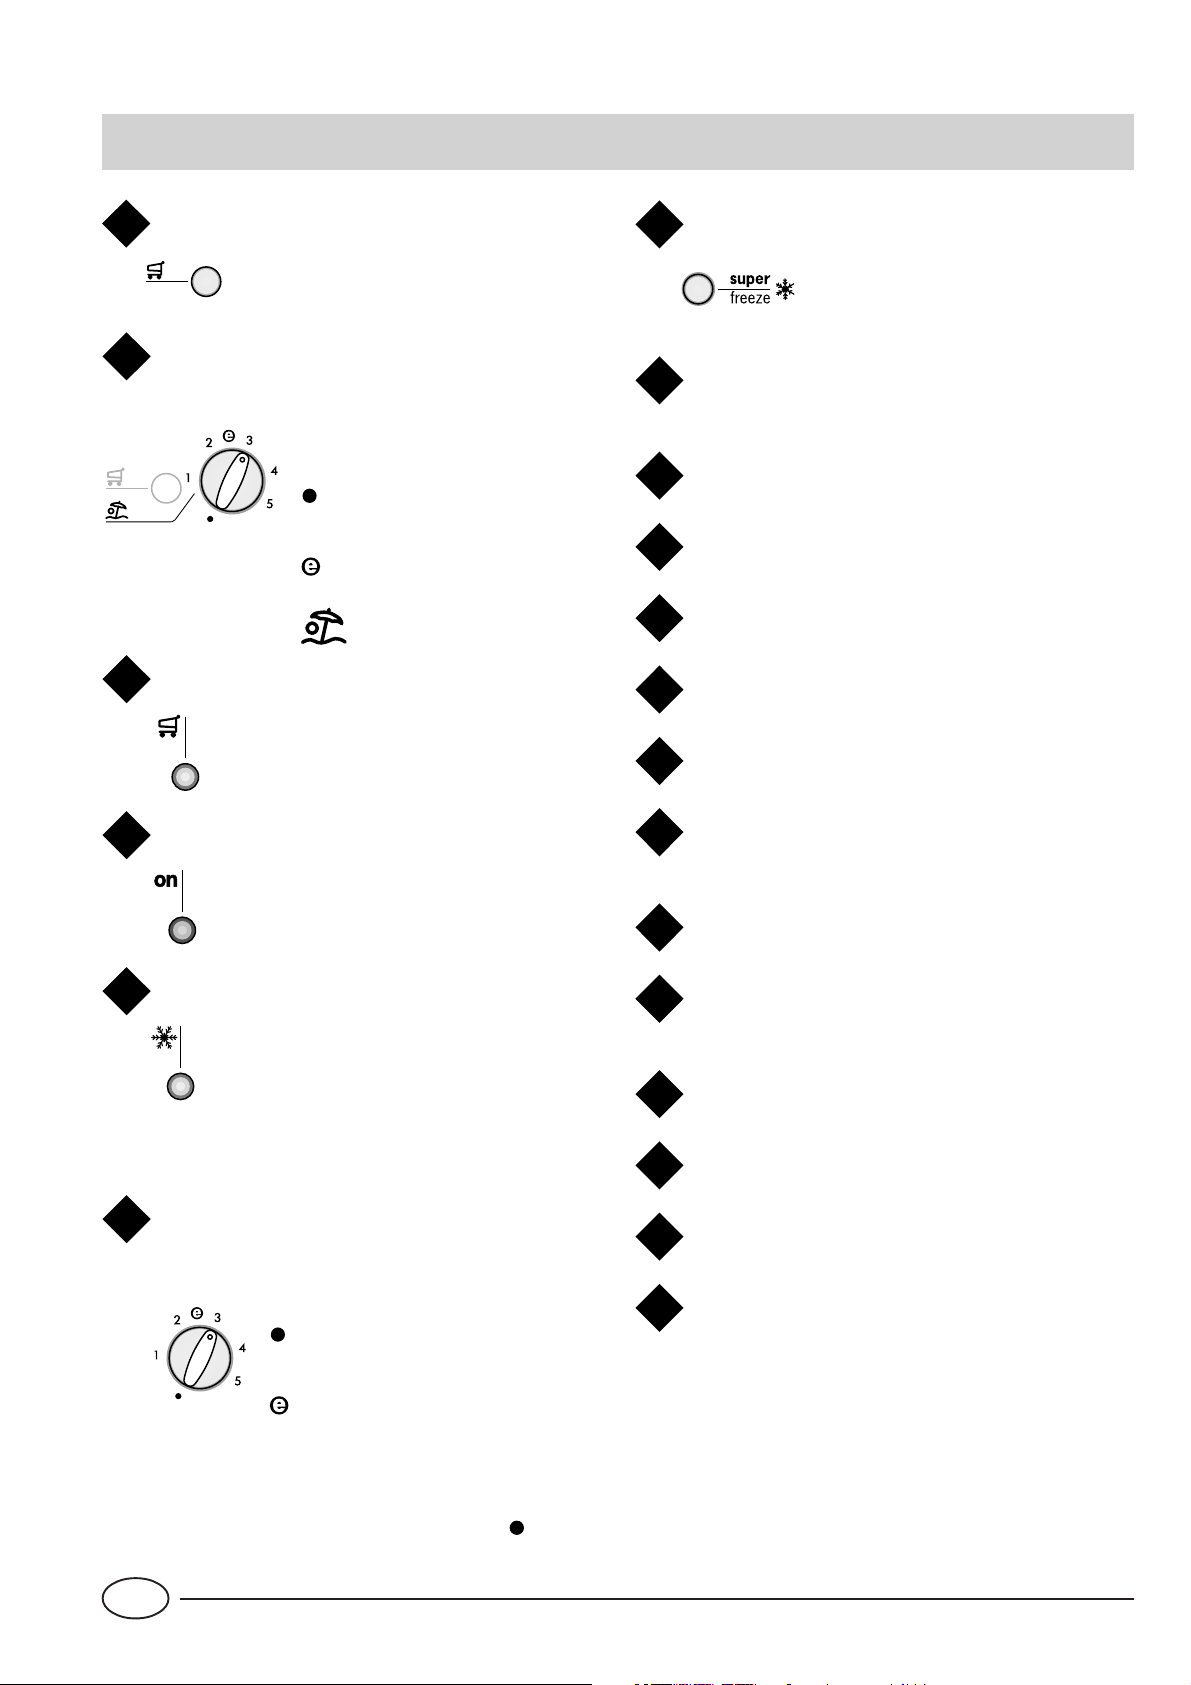
Visto da vicino
Pulsante per il raffreddamento rapido
A
Premuto (si accende la spia gialla "C")
permette di abbassare al minimo la
temperatura nel vano frigo.
Manopola per la regolazione della temperatura
B
dello scomparto frigorifero
Questa manopola consente di regolare la temperatura del frigorifero su
diverse posizioni:
il frigo è spento;
1 meno freddo;
5 più freddo;
temperatura ottimale a bassi
consumi:
funzione vacanza attivata.
Spia gialla di raffreddamento rapido
C
Questa spia gialla si accende quando si
attiva il raffreddamento rapido premendo il
pulsante "A"
Pulsante per il congelamento rapido
G
Premuto (si accende la spia gialla
"E") permette il congelamento di
cibi freschi.
Balconcino estraibile con coperchio, con
H
portauova e scatola burro
Balconcino estraibile portaoggetti
I
Ferma bottiglie
J
Balconcino bottiglie
K
Bacinelle per la produzione di ghiaccio
L
Piedini di regolazione
M
Spia verde
D
Quando questa spia verde è accesa vuol dire
che l'apparecchio è collegato alla rete di alimentazione.
Spia di congelamento rapido
E
Questa spia gialla si accende quando si
preme il pulsante di congelamento rapido
"G".
Nota: queste tre spie servono anche per segnalare un
anomalo aumento di temperatura nel vano congelatore (vedi paragrafo "Allarmi sonori e visivi").
Manopola per la regolazione della temperatura
F
dello scomparto congelatore
Questa manopola consente di regolare la temperatu-
ra del congelatore su diverse posizioni:
il frigo è spento;
1 meno freddo;
5 più freddo;
temperatura ottimale a bassi
consumi:
Sistema "drain" per l'eliminazione dell'acqua di
N
sbrinamento
Vani per la conservazione
O
Vano utilizzabile per il congelamento e la
P
conservazione
Cassetti per frutta e verdura
Q
Scomparto "Fresh box" per carni e pesci
R
Ripiani estraibili e regolabili in altezza
S
"A.I.R. System"
T
(Ariston Integrated Refrigeration)
Ricordate, inoltre, che potete interrompere il funzionamento di tutto l'apparecchio (frigo compreso) portando questa manopola nella posizione " ".
I
2
Page 5
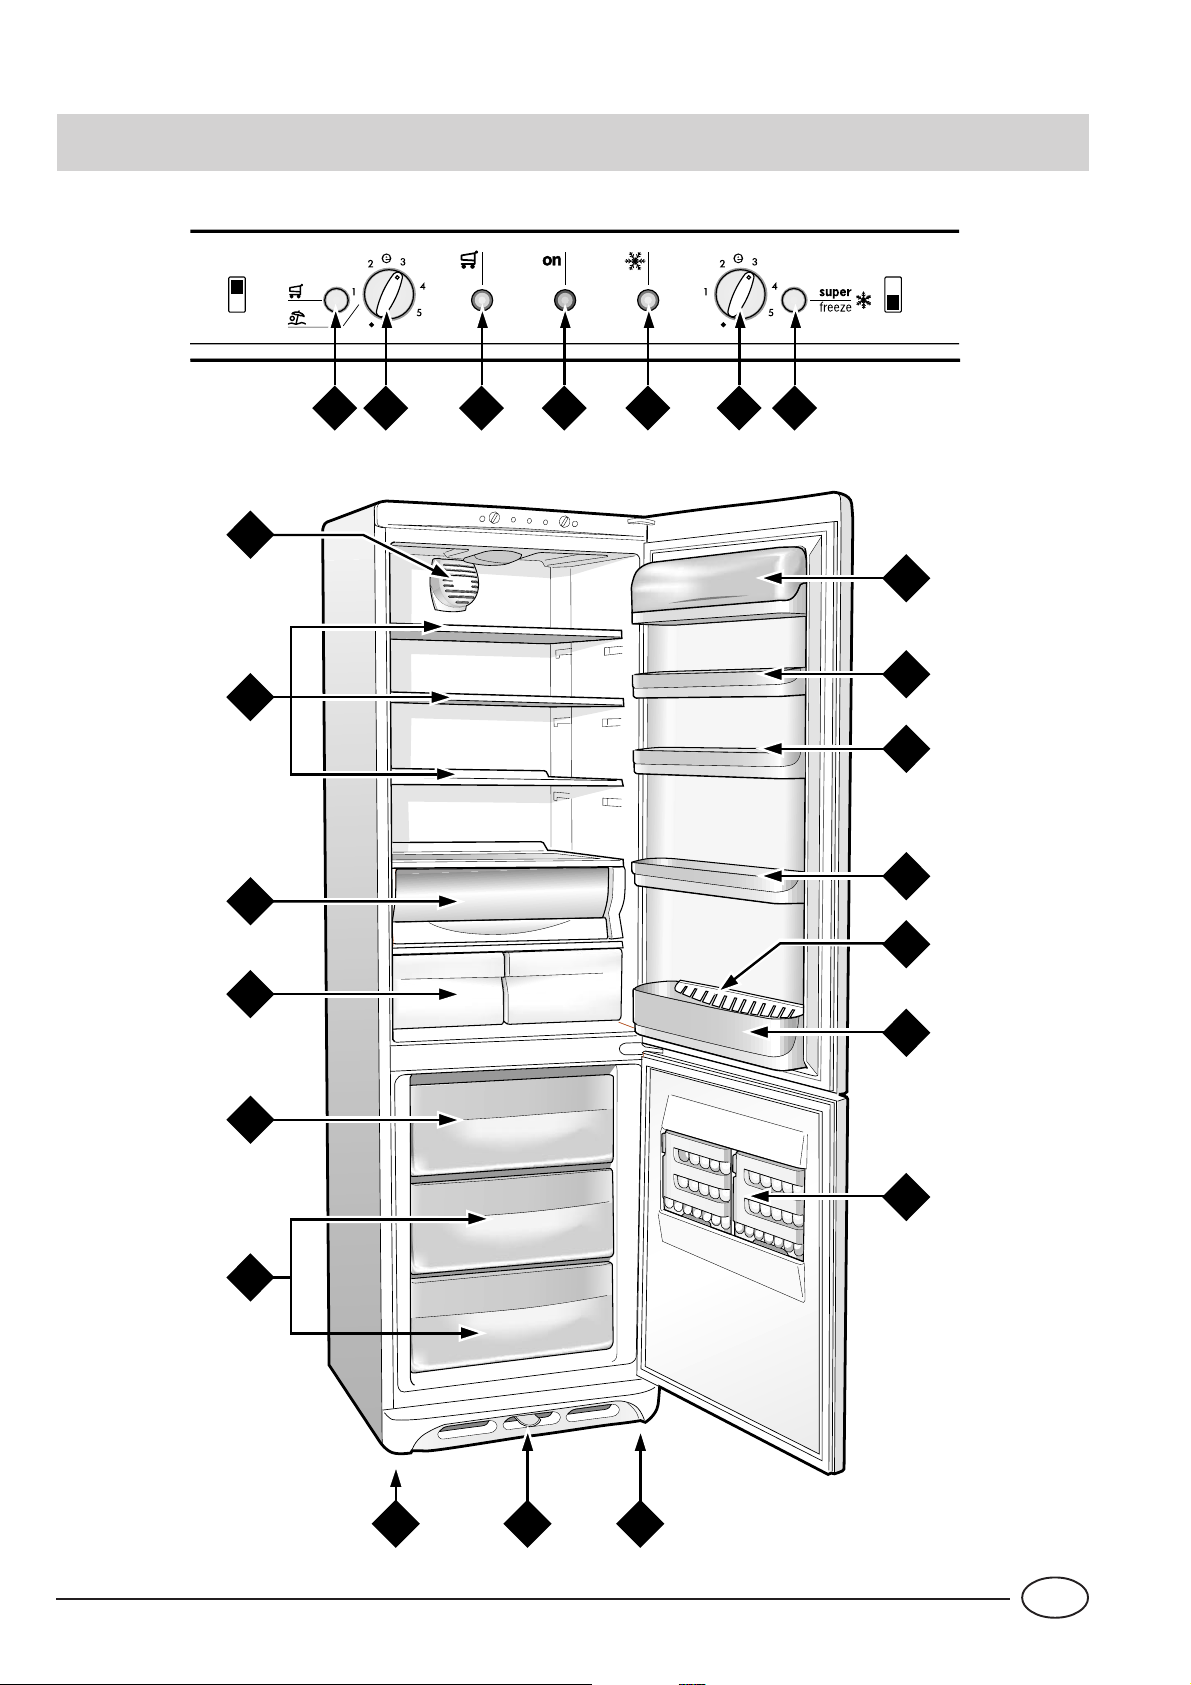
T
S
R
A
B C
D
E
F G
H
I
I
I
J
Q
P
O
K
L
NM
M
3
I
Page 6
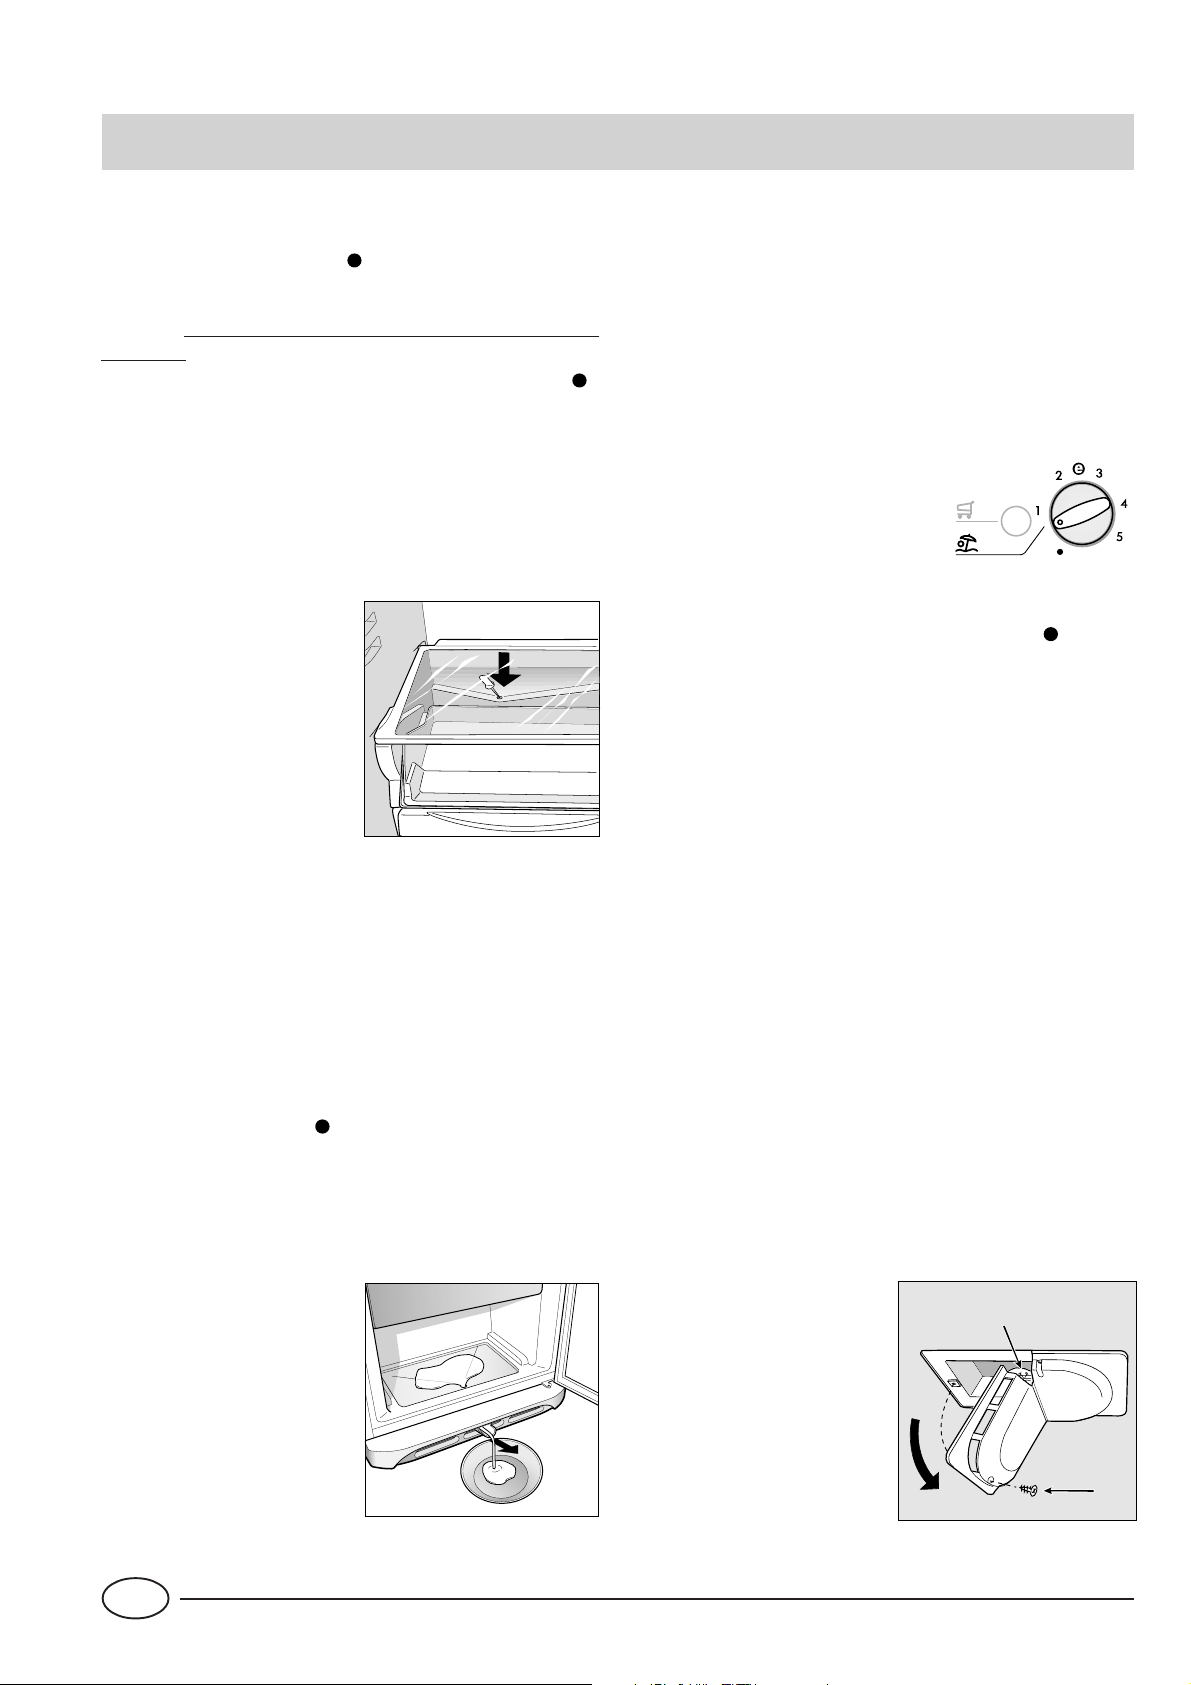
Come avviare il combinato
1
2
ATTENZIONE
Dopo il trasporto, posizionare l’apparecchio verticalmente ed attendere circa 3 ore prima di collegarlo alla
presa di corrente per favorire un buon funzionamento.
Prima di mettere gli alimenti nel frigorifero pulite bene l’interno con acqua tiepida e bicarbonato.
Tempo protezione motore.
Questo modello è provvisto di un controllo
salvamotore, pertanto se all’installazione il compressore non parte immediatamente non preoccupatevi
perché si attiverà automaticamente dopo circa 8 minuti. Così accadrà dopo ogni interruzione dell’alimentazione, sia a causa di un black-out che per uno spegnimento da voi impostato (ad esempio per la pulizia o lo
sbrinamento del freezer).
Dopo aver collegato la spina alla presa di corrente accertarvi
che la spia verde "D" sia accesa e che la manopola del conge-
latore "F" non sia nella posizione di "
Scomparto frigorifero
Ruotate la manopola "B" su una posizione media e dopo
qualche ora potrete mettere i cibi nel frigorifero.
Scomparto congelatore
Ruotate la manopola "F" su una posizione media e premete
il pulsante "G" del congelamento rapido (la spia gialla "E"
si accenderà). Quando il congelatore avrà raggiunto la temperatura ottimale, la spia gialla "E" si spegnerà. A questo
punto potrete introdurre nel congelatore i surgelati.
".
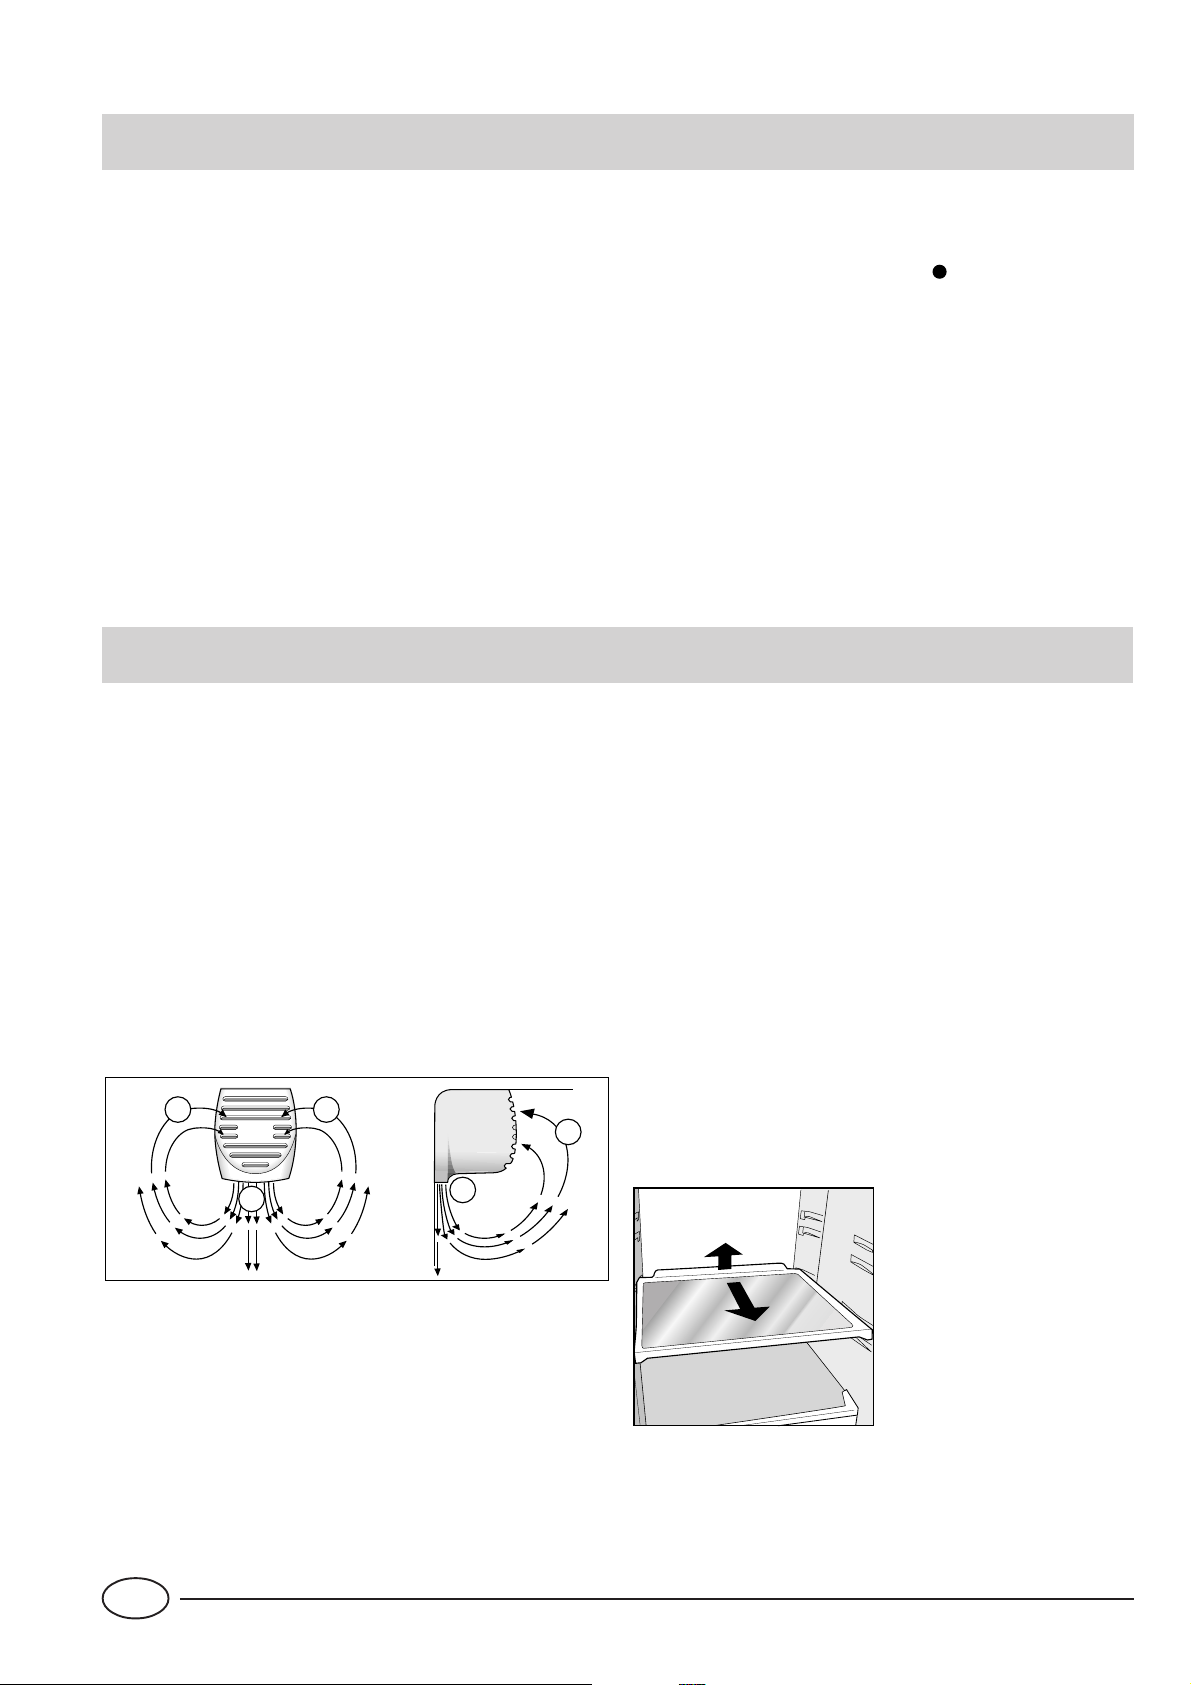
Come utilizzare al meglio il reparto frigorifero
La temperatura all'interno del reparto frigorifero si regola
automaticamente in base alla posizione della manopola per
la regolazione della temperatura.
1 = meno freddo
5 = più freddo
Il reparto frigorifero del suo apparecchio è dotato di un dispositivo di "A.I.R. System" (Ariston Integrated Refrigeration)
che consente un'ottima conservazione degli alimenti ed un
utilizzo semplificato dell'apparecchio grazie a:
- un ripristino veloce della temperatura: dopo l'apertura della porta le temperature raggiungono valori ottimali velocemente, per una migliore conservazione.
- una distribuzione omogenea della temperatura che consente di riporre alimenti in qualsiasi ripiano.
B
B
B
mente.
Seguite attentamente i nostri consigli sulla durata massima
della conservazione: qualsiasi cibo, anche il più fresco, non
rimane intatto molto a lungo.
Contrariamente a quanto si crede, i cibi cotti non si mantengono più a lungo di quelli crudi.
Lo scomparto frigorifero è dotato di pratici ripiani estraibili e
regolabili in altezza grazie alle apposite guide (Fig. 1). Per
questo è possibile inserire anche grandi contenitori e cibi di
notevoli dimensioni. La forma innovativa dei ripiani consente la regolazione in altezza senza estrarre completamente il
ripiano.
Inserite soltanto alimenti freddi o, al massimo, appena tiepidi, evitando di inserire quelli caldi: alzerebbero subito la temperatura interna costringendo il compressore ad un surlavoro
che spreca tanta energia elettrica.
Non inserite i liquidi in recipienti scoperti perché provocherebbero l’aumento di umidità all’interno del frigorifero e di
conseguenza la formazione di brina.
A
A - Aria soffiata che si raffredda a contatto della parete fredda
B - Aria più calda aspirata
Quando il vano frigo viene riempito dopo una grossa spesa,
utilizzate la funzione Raffreddamento rapido (attivata premendo il pulsante "A") in modo da raggiungere rapidamente
un'ottima condizione di funzionamento. Una volta trascorso il tempo necessario la funzione si disattiva automatica-
A
I
Fig. 1
4
Page 7
Wine Area (se previsto): è il portabottiglie dedicato al vino
che consente di posizionare comodamente, ed in condizioni
di massima stabilità, sino a 3 bottiglie di vino (dimensioni
standard) all’interno del frigo (Fig. 2). La “Wine Area”, grazie alla sua particolare struttura, consente la libera circolazione dell’aria tra le bottiglie, assicurandone un rapido ed
adeguato raffreddamento. Questo sistema evita inutili ingombri e spreco di spazio interno. Se non necessaria può
essere facilmente chiusa liberando completamente lo spazio sul ripiano (Fig. 3).
Fig. 2
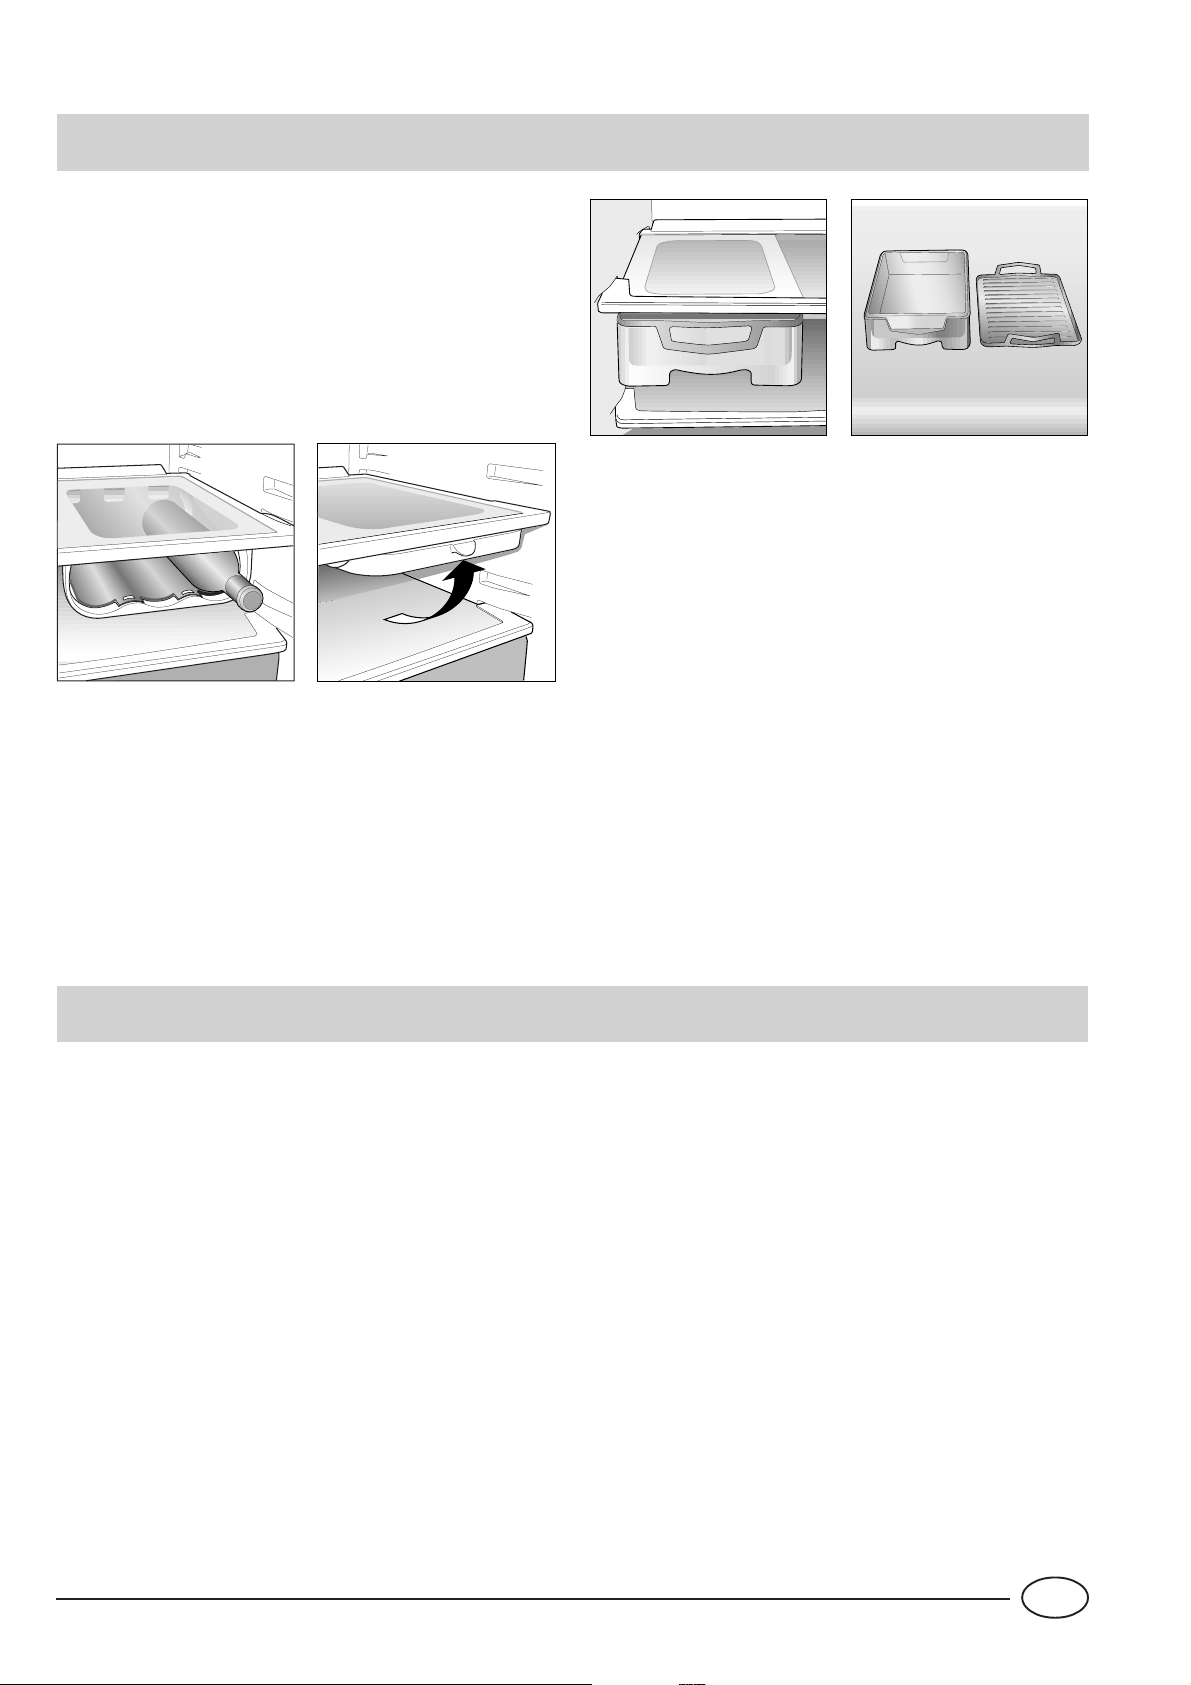
Breakfast Box (se previsto): è il contenitore dedicato agli
alimenti per la prima colazione (Fig. 4). Può contenere burro, latte, marmellata, succhi di frutta, sandwich ecc. che,
grazie alla particolare forma, una volta portati in tavola manterranno più a lungo la loro freschezza. Utilizzando le apposite maniglie, il coperchio può diventare anche un pratico
vassoio (Fig. 5). La “Breakfast Box” può essere anche usata
come una comune scatola multiuso e, se si ha bisogno di più
spazio sul ripiano, può essere rimossa.
Fig. 3
Fig. 4
Fig. 5
Uso dello scomparto "Fresh box" per carni e
pesci
Questo scomparto è stato studiato per poter consentire tempi
di conservazione più lunghi per la carne ed il pesce freschi
(anche fino ad una settimana).
Ciò è possibile in quanto all’interno di questo vano è disponibile la temperatura più fredda di tutto il frigorifero
Lo sportello trasparente protettivo dello scomparto evita i
fenomeni di ossidazione o di annerimento caratteristici della
carne e del pesce esposti alla circolazione di aria.
Lo scomparto "Fresh box", inoltre, può anche essere usato
per poter raffreddare piatti che normalmente si consumano
“freddi”; prosciutto e melone, fichi e prosciutto, mozzarelle
e pomodori.
Come utilizzare al meglio il reparto congelatore
Per la preparazione dei cibi da congelare consultare
un manuale specializzato.
Un alimento scongelato, anche solo parzialmente, non deve
mai essere ricongelato: lo dovete cuocere per consumarlo
(entro 24 ore) oppure per ricongelarlo.
Gli alimenti freschi da congelare non devono essere posti a
contatto con quelli già congelati o surgelati ma vanno messi
nel vano superiore "P" dove la temperatura scende sotto i
-18°C ed è l'ideale per congelar bene i cibi. Non bisogna
infatti dimenticare che la buona conservazione degli alimenti
congelati dipende dalla velocità di congelazione.
La quantità massima giornaliera da congelare è indicata sulla targhetta caratteristiche posta all'interno dello scomparto frigorifero.
La prima volta, o dopo che il congelatore è stato inattivo,
potete congelare i cibi solo dopo aver fatto funzionare al
massimo l’apparecchio.
Quando l'apparecchio è già in funzione la congelazione può
essere fatta in due modi:
1. Per piccole quantità, inferiori alla capacità massima indicata sulla targhetta caratteristiche, premete semplicemente
il pulsante di congelamento "G" (lampada gialla "E" accesa) e introducete i cibi da congelare. Dopo 24 ore, o una
volta raggiunte le temperature ottimali, la funzione di congelamento rapido si disinserisce automaticamente (lampada gialla "E" spenta).
2. Per grossi quantitativi di cibi da congelare (fino al carico
massimo indicato nella targhetta delle caratteristiche) tenete premuto il pulsante di congelamento "G" fino a quando
la lampada gialla "E" non inizia a lampeggiare velocemen-
te. Dopo 24 ore la lampada gialla cesserà di lampeggiare
(luce fissa); a questo punto potete introdurre i cibi da congelare. Dopo altre 24 ore il pulsante si disinserisce automaticamente (lampada gialla spenta).
5
I
Page 8
Durante il congelamento evitate di aprire la porta del freezer.
Per ottenere una conservazione e un successivo
scongelamento ottimali è consigliabile dividere i cibi in piccole porzioni così da poterli congelare rapidamente e in modo
omogeneo. Sulle confezioni riportate le indicazioni sul contenuto e sulla data di congelamento.
Al fine di ottenere un spazio maggiore nel reparto freezer
potete togliere il cassetto centrale, sistemando gli alimenti
direttamente sulla piastra evaporante. Verificare, dopo l'introduzione del carico, che la porta chiuda correttamente.
Non aprite la porta del freezer in caso di mancanza di corrente o di un guasto, ritarderete così l’aumento della temperatura al suo interno. In questo modo i surgelati e i congelati si conserveranno senza alterazioni per circa 9-14 ore.
Non mettete nel congelatore bottiglie piene: potrebbero rompersi poiché, gelandosi, tutti i liquidi aumentano di volume.
Drink Party (se previsto): è il pratico sistema per appoggiare le bottiglie dei superalcolici (Vodka, Limoncello ecc.)
che vanno serviti molto freddi. Può anche essere usato per
contenere e raffreddare i bicchieri per i vostri drink (Fig 6).
Fig. 6
Quick Store
Questo cassettino (Fig. 7), è stato concepito per poter riporre piccole quantità di cibo (frutta di piccole dimensioni quali
more, fragole, amarene, gelati etc.) che si vogliono congelare e tenere separate dagli altri surgelati/congelati riposti
nei cassetti. In questo modo viene assicurata una migliore
conservazione e un più facile ritrovamento di questi cibi.
Bacinelle ghiaccio
Questo nuovo concetto di bacinelle ghiaccio, è un brevetto
esclusivo Merloni. Il fatto di essere poste sulla controporta
del vano freezer assicura maggiore ergonomia e pulizia: il
ghiaccio non viene più a contatto con i cibi riposti nel vano
freezer; inoltre si evita lo sgocciolamento dell’acqua nella
fase di caricamento (in dotazione anche il coperchio per chiudere il foro dopo l’operazione di carico dell’acqua).
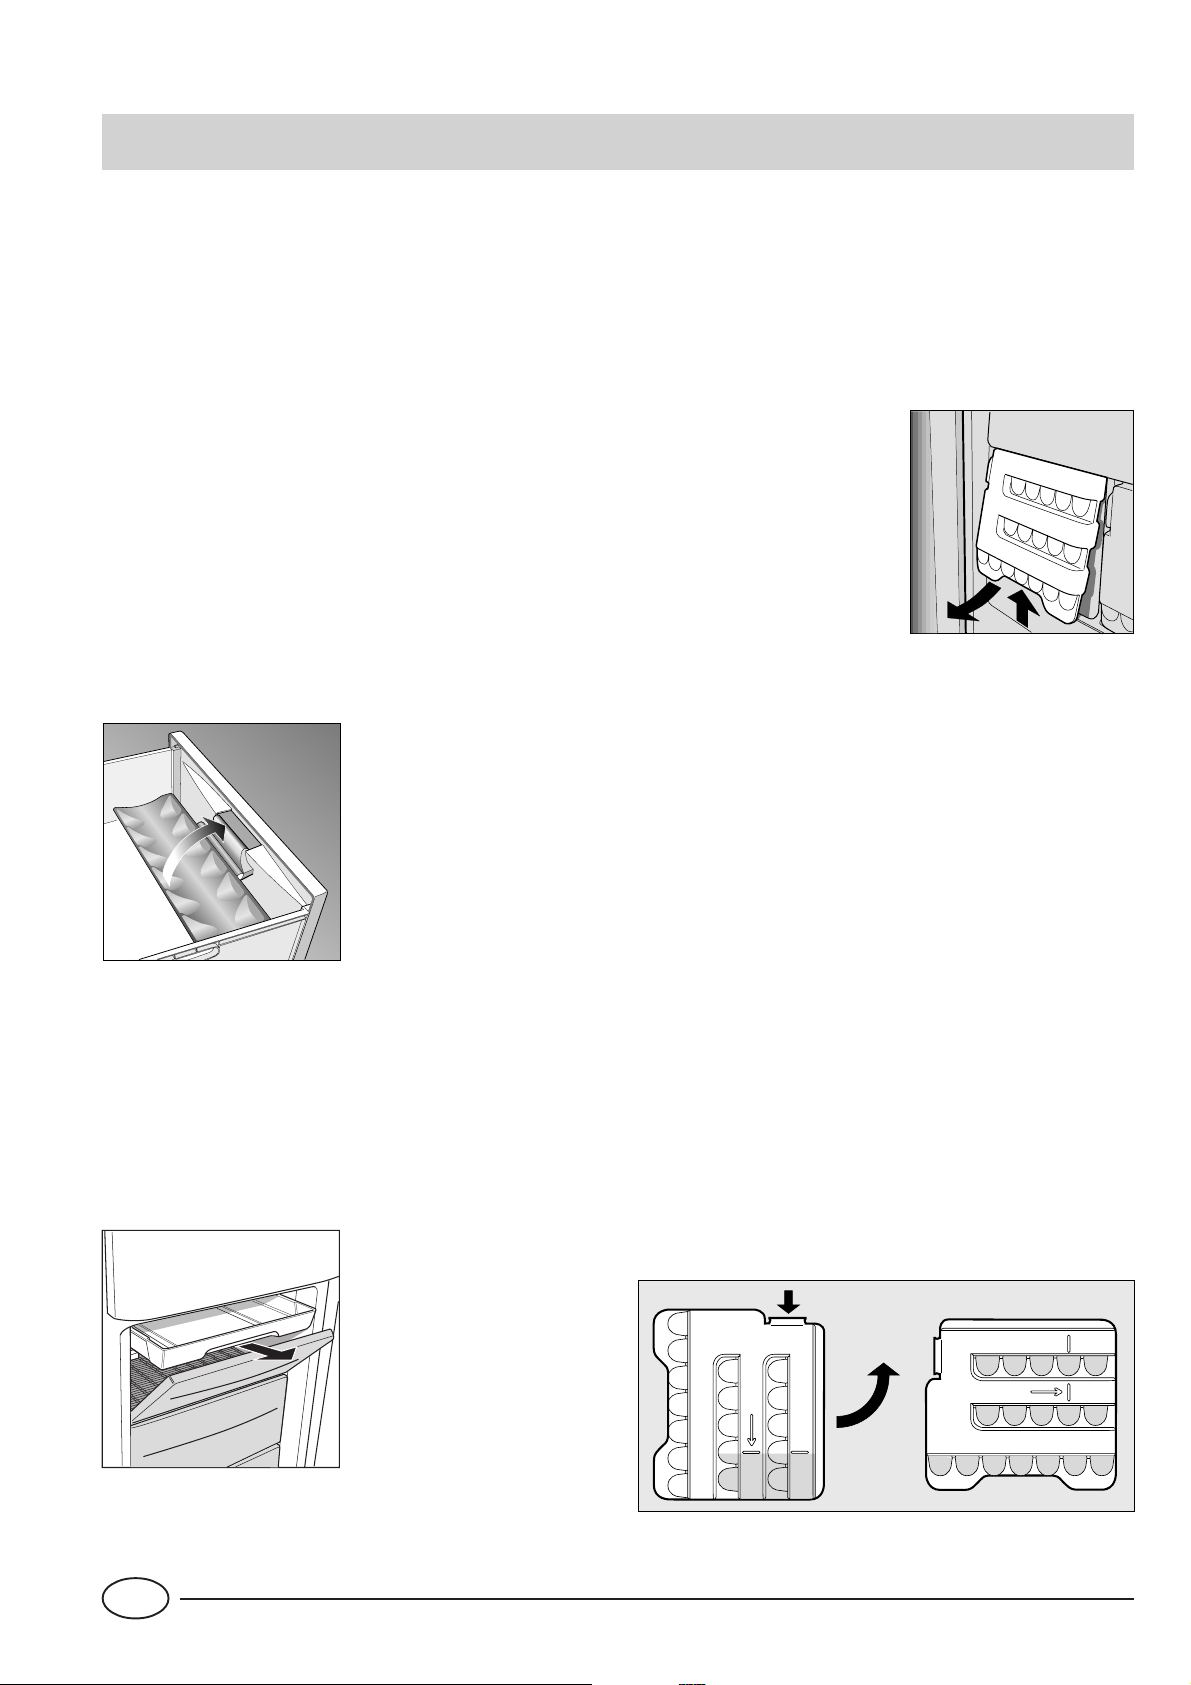
Per estrarre le bacinelle ghiaccio dalla loro sede, spingere la
bacinella verso l'alto e poi
estrarre (fig. 8). Per riporre la
bacinella, inserire la parte superiore nell'apposita sede e,
una volta messa in verticale,
lasciarla ricadere.
Fig. 8
Modalità d’uso (Fig. 9)
Riempite la bacinella con acqua attraverso l’apposito foro
fino al livello indicato (MAX WATER LEVEL), prestando attenzione a non superarlo: l’inserimento dell’acqua in quantità superiore a quella necessaria, comporterà una tale formazione di ghiaccio che potrebbe ostacolare la fuoriuscita
dei ghiaccioli.
Nel caso in cui abbiate utilizzato una quantità eccessiva di
liquido, bisognerà attendere che il ghiaccio si sciolga, svuotare la bacinella, e ripetere l’operazione di carico.
Una volta effettuata l’operazione di carico attraverso il foro
indicato, ruotate la bacinella di 90°. Per il principio dei vasi
comunicanti l’acqua va a riempire le apposite forme,
dopodichè si potrà chiudere il foro con l’apposito tappo ed
allocare la bacinella nella controporta.
Dopo che il ghiaccio si sarà formato, basterà battere la bacinella su una superficie dura affinché i ghiaccioli si stacchino
dalle loro sedi e siano fatti uscire dallo stesso foro da cui è
stata introdotta l’acqua. Per migliorare l’uscita dei ghiaccioli
bagnare con acqua l’esterno della bacinella.
ATTENZIONE: ogni volta che si effettua il caricamento con
acqua, verificare che la bacinella sia completamente vuota e
non siano presenti residui di ghiaccio.
Il tempo minimo necessario per una ottimale formazione di
ghiaccio è circa 8 ore.
Fig. 7
WATER LEVEL
MAX
Fig. 9
I
6
MAX
WATER LEVEL
Page 9
Guida all'utilizzo del reparto freezer
Carni e pesci
Tipo Confezionamento
Arrosto e bollito di
manzo
Agnello Avvolto in foglio di alluminio 1 / 2 6 Non necessario
Arrosto di maiale Avvolto in foglio di alluminio 1 6 Non necessario
Arrosto e bollito di
vitello
Bistecche e braciole di
maiale
Fettine e cotolette di
agnello o manzo
Carne macinata
Cuore e fegato In sacchetti di politene 3 Non necessario
Avvolto in foglio di alluminio 2 / 3 9 / 10 Non necessario
Avvolto in foglio di alluminio 1 8 Non necessario
Ogni fetta avvolta in politene e quindi in
foglio di alluminio in numero di 4-5
Ogni fetta avvolta in politene e quindi in
foglio di alluminio in numero di 4-5
In contenitori di alluminio ricoperti con
politene
Frollatura
(giorni)
Freschissi-
ma
Conservazione
(mesi)
6 Non necessario
6 Non necessario
2 Lentamente in frigorifero
Scongelamento
Salsicce In fogli di politene o alluminio 2 A seconda dell’uso
Polli e tacchini Avvolti in fogli di alluminio 1 / 3 9 Lentamente in frigorifero
Anatre e oche In fogli di alluminio 1 / 4 6 Lentamente in frigorifero
Anatre selvatiche,
fagiani e pernici
Conigli e lepri In fogli di alluminio 3 / 4 6 Lentamente in frigorifero
Cervo e capriolo In fogli di alluminio o politene 5 / 6 9 Lentamente in frigorifero
Pesci grossi In fogli di alluminio o politene 4 / 6 Lentamente in frigorifero
Pesci piccoli In buste di politene 2 / 3 Non necessario
Crostacei In buste di politene 3 / 6 Non necessario
Molluschi
Pesci cotti In fogli di alluminio o politene 12 In acqua calda
In fogli di alluminio 1 / 3 9 Lentamente in frigorifero
In contenitori di alluminio o plastica
ricoperti con acqua e sale
3 Lentamente in frigorifero
Pesci fritti In sacchetti di politene 4 / 6 Direttamente in padella
7
I
Page 10
Frutta e verdura
Tipo Preparazione
Mele e pere
Albicocche, pesche,
ciliege e prugne
Fragole, more e
mirtilli
Frutta cotta
Succhi di frutta
Cavolfiori
Cavolo e cavolini
Piselli Sbucciare e lavare 2’ In sacchetti di politene 12 Non necessario
Fagiolini
Sbucciare e tagliare a
pezzetti
Snocciolare e pelare 1’ / 2’
Pulire, lavare e lasciare
asciugare
Tagliare, cuocere e
passare
Lavare, tagliare e
schiacciare
Spezzettare e scottare
in acqua e succo di
limone
Pulire e lavare
(spezzettare)
Lavare e tagliare a
pezzetti
Scottatura
(min)
2’
2’ In sacchetti di politene 12 Non necessario
1’ / 2’ In sacchetti di politene 10 / 12 A temperatura ambiente
2 In sacchetti di politene 10 / 12 Non necessario
Confezionamento
In contenitori ricoperti di
sciroppo
In contenitori ricoperti di
sciroppo
In contenitori ricoperti di
zucchero
In contenitori,
aggiungere 10% di
zucchero
In contenitori, zucchero
a piacere
Conservazione
(mesi)
12 Lentamente in frigorifero
12 Lentamente in frigorifero
10 / 12 Lentamente in frigorifero
12 Lentamente in frigorifero
10 / 12 Lentamente in frigorifero
Scongelamento
Carote, peperoni e
rape
Funghi e asparagi Lavare e tagliare 3’ / 4’ In sacchetti o contenitori 6 A temperatura ambiente
Spinaci Lavare e tagliuzzare 2’ In sacchetti di politene 12 A temperatura ambiente
Verdure varie per
minestra
Cibi vari Preparazione Scottatura Confezionamento
Pane In sacchetti di politene 4
Torte In fogli di politene 6
Panna In contenitori di plastica 6
Burro
Cibi cotti,
minestrone
Tagliare a fette,
pelare, lavare
Lavare e tagliare a
pezzetti
3’ / 4’ In sacchetti di politene 12 Non necessario
3’
In sacchetti in piccole
porzioni
Nel suo incarto originale
avvolto in alluminio
Suddiviso in contenitori
di plastica o vetro
6 / 7 A temperatura ambiente
Conservazione
(mesi)
6 In frigorifero
3 / 6
Scongelamento
A temperatura ambiente o
nel frigorifero
A temperatura ambiente e
cuocere a 100/200°C
A temperatura ambiente o
nel frigorifero
A temperatura ambiente e
in acqua calda
Uova
I
Congelare senza guscio
in piccoli contenitori
8
10
A temperatura ambiente o
nel frigorifero
Page 11
Consigli per risparmiare
- Installatelo bene
E cioè lontano da fonti di calore, dalla luce diretta del sole,
in un locale ben aerato e con le distanze indicate nel paragrafo "Installazione/L'aerazione".
- Il freddo giusto
Il troppo freddo fa aumentare i consumi
- Non riempitelo troppo
Per conservare bene i cibi il freddo deve circolare liberamente all’interno del frigorifero. Riempirlo troppo significa impedire questa circolazione facendo lavorare di continuo il
compressore.
- A porte chiuse
Aprite il vostro frigorifero il meno possibile perché ogni volta
che lo fate va via gran parte dell’aria fredda. Per ristabilire la
temperatura il motore deve lavorare a lungo consumando
molta energia.
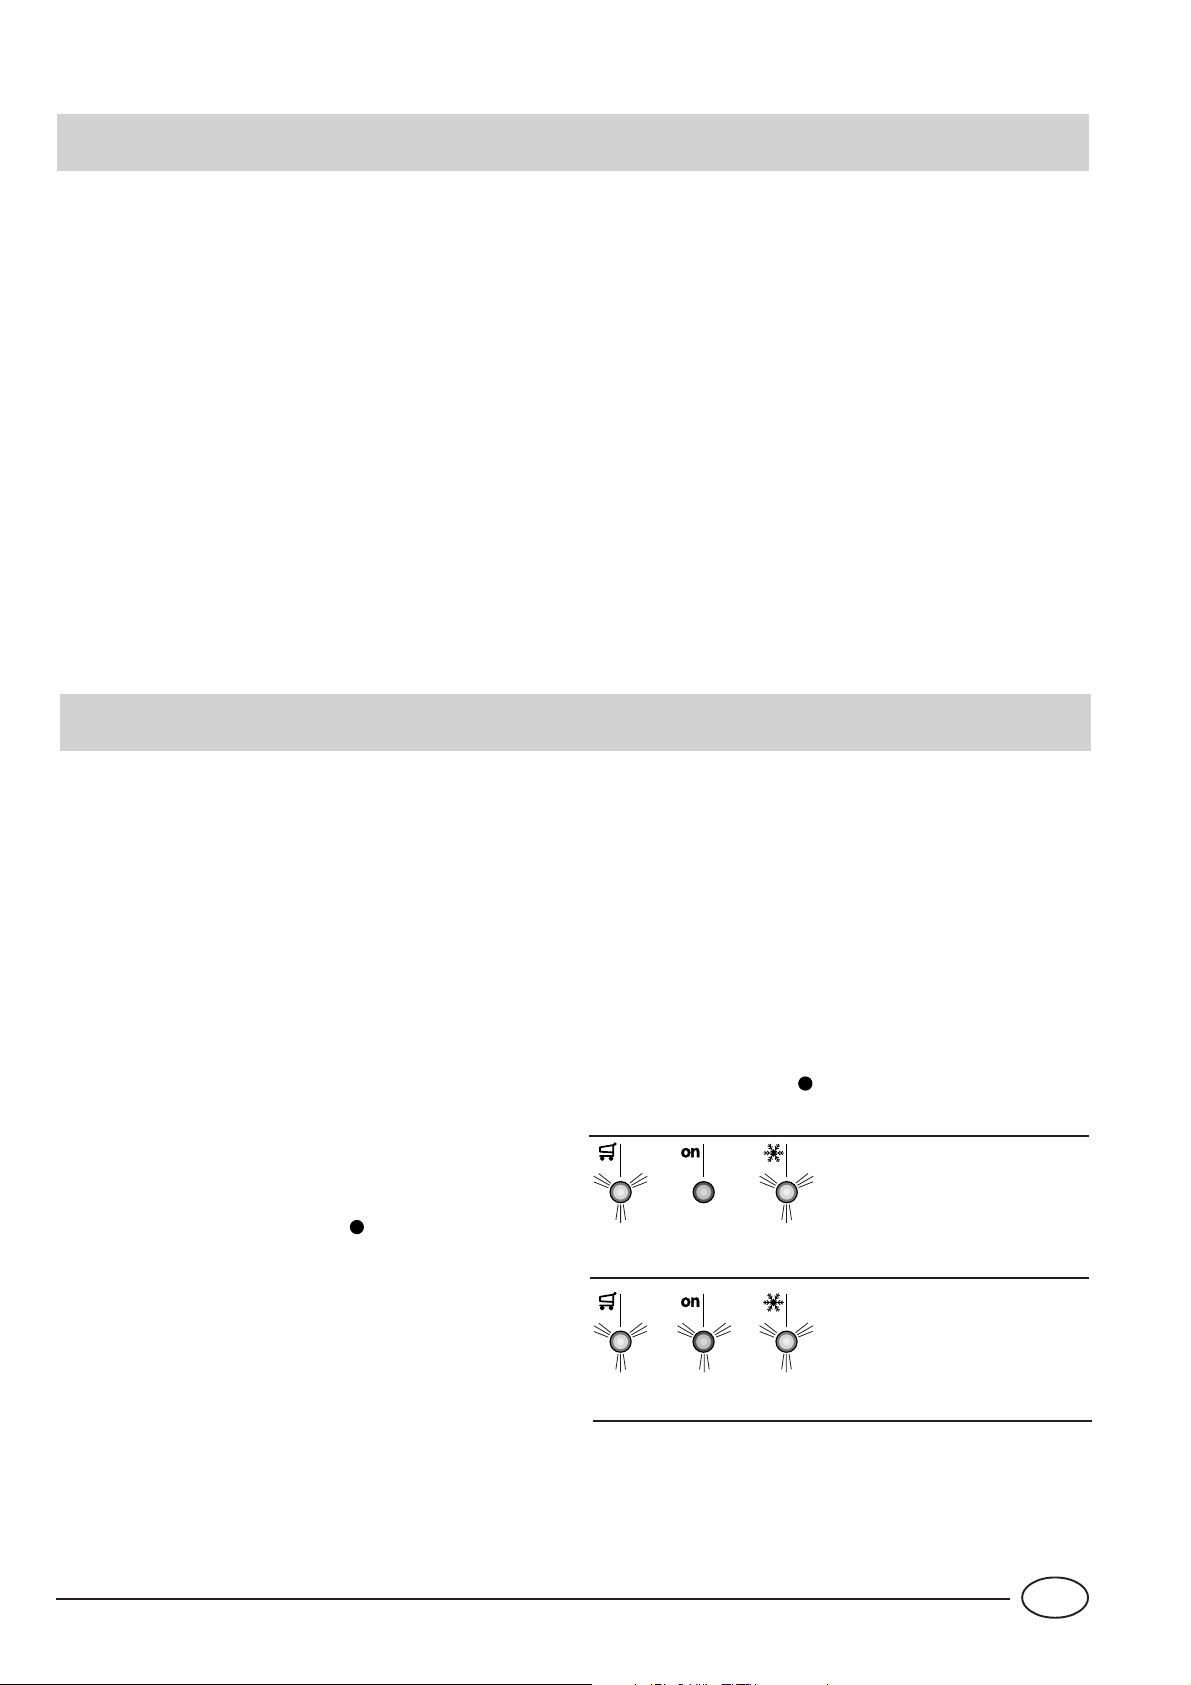
Allarmi sonori e visivi
Allarme per porta aperta
Nel caso in cui la porta del frigorifero rimane aperta per un
tempo superiore ai due minuti viene emesso un segnale acustico. Il suono cessa alla chiusura della porta.
Allarme per riscaldamento anomalo del
freezer
1. Per segnalare un eccessivo riscaldamento del freezer vie-
ne emesso un segnale acustico ed iniziano a lampeggiare
le due spie gialle "C" e "E" a segnalare un pericoloso
riscaldamento. Per non far ricongelare il cibo, il freezer si
manterrà ad una temperatura intorno a 0°C, permettendovi di consumare gli alimenti entro le 24 ore o di
ricongelarli previa cottura. Tramite l'apposita procedura
di tacitazione allarme (aprire e chiudere la porta del frigo)
si può spegnere il segnale acustico. Per tornare al normale funzionamento si dovrà invece portare la manopola
del freezer "F" nella posizione " " (frigorifero spento) e
successivamente riaccendere il prodotto.
- Occhio alle guarnizioni
Mantenetele efficienti e pulite in modo che aderiscano bene
alle porte; solo così non lasceranno uscire nemmeno un po’
di freddo.
- Niente cibi caldi
Una pentola calda messa nel frigorifero alza immediatamente
la temperatura di diversi gradi, lasciatela raffreddare a temperatura ambiente prima di introdurla nel frigorifero.
- Brina nel freezer
Controllate lo spessore della brina sui ripiani del freezer ed
effettuate subito lo sbrinamento se lo strato è diventato troppo spesso (Vedi più avanti “Come tenerlo in forma”).
2. Se la temperatura continua a salire verso valori eccessiva-
mente alti viene emesso nuovamente il segnale acustico
ed iniziano a lampeggiare le due spie gialle "C" e "E"
insieme a quella verde "D" a segnalare l'eccessivo riscaldamento. Si consiglia di verificare lo stato del cibo, potrebbe essere necessario gettarlo. In ogni caso il cibo non
va ricongelato se non dopo cottura. Per non far ricongelare
il cibo, il freezer verrà mantenuto ad una temperatura
intorno a 0°C. Tramite l'apposita procedura di tacitazione
allarme (aprire e chiudere la porta del frigo) si può spegnere il segnale acustico. Per tornare al normale funzionamento si dovrà invece portare la manopola del freezer
"F" nella posizione " " (frigorifero spento) e successivamente riaccendere il prodotto.
Riscaldamento
pericoloso
+ segnale acustico
+ segnale acustico
9
Riscaldamento
eccessivo
I
Page 12
Come tenerlo in forma
Prima di procedere a qualsiasi operazione di pulizia o
sbrinamento staccare l'apparecchio dalla rete di alimentazione (posizionare su " " la manopola "F" e poi
disinserire la spina). Nel caso in cui tale procedura non
sia eseguita, si potrebbe verificare una condizione di
allarme. ATTENZIONE: tale allarme non è sintomo di
anomalia. Per ripristinare il corretto funzionamento del
prodotto portare la manopola "F" nella posizione " "
e successivamente nella posizione voluta.
Sbrinamento
ATTENZIONE: non danneggiare il circuito refrigerante.
Fare attenzione a non usare dispositivi meccanici o altri utensili per accelerare il processo di sbrinamento,
oltre a quelli raccomandati dal costruttore.
Come sbrinare il reparto frigorifero.
Questo apparecchio ha lo
sbrinamento automatico e
l’acqua viene convogliata verso la parte posteriore da un apposito scarico (fig. 10) dove il
calore prodotto dal compressore la fa evaporare. L’unico intervento che dovete fare periodicamente consiste nel pulire il foro di scarico affinché
l’acqua passi regolarmente.
Come sbrinare lo scomparto congelatore
- Eliminate ogni tanto la brina con l’apposito raschietto in
dotazione (niente coltelli od oggetti metallici).
- Se la brina ha superato i 5 mm bisogna fare un vero e proprio
sbrinamento. Procedete così: un giorno prima premere il pulsante di congelamento "G" fino all'accensione della lampada
gialla "E"; serve a dare agli alimenti un salutare “colpo di
freddo” in più. Dopo 24 ore la funzione di congelamento si
disinserisce automaticamente ma potete disinserirla voi premendolo di nuovo il pulsante. Portate la manopola del termostato "F" nella posizione " ". ATTENZIONE: questa operazione spegne tutto l'apparecchio (reparto frigorifero compreso).
Avvolgete tutti i surgelati e i congelati in carta da giornale mettendoli o in un altro frigorifero o in un luogo fresco. Lasciate
aperta la porta in modo che la brina si sciolga del tutto, aiutandola con dei contenitori pieni di acqua tiepida.
L'apparecchio è dotato di un
apposito sistema che permette la raccolta dell'acqua di
sbrinamento in un contenitore da porre sotto l'apparecchio
(agire come illustrato nella figura 11).
Pulire ed asciugare con cura prima di riavviare l'apparecchio.
Ricordatevi che il motore
non parte immediatamente
ma dopo circa 8 minuti.
Fig. 10
Fig. 11
Pulizia e manutenzioni particolari
FUNZIONE VACANZE. Quello delle muffe e cattivi odori che si formano all'interno del frigorifero spento quando si parte per le vacanze, non è più un problema: basta attivare la funzione Holiday (posizionando opportunamente la manopola "B"). In questo modo, con un
basso consumo, si mantiene la temperatura nel vano
frigo nell'intorno di 15°C (potete conservare ad esempio trucchi e cosmetici) e si lascia funzionare il congelatore al minimo, indispensabile
per la conservazione dei cibi.
Un doppio breve segnale acustico vi confermerà l'attivazione
della funzione, mentre la
disattivazione sarà indicata da
uno singolo.
Prima di pulire il frigorifero posizionare su " " la ma-
nopola "F" e successivamente disinserire la spina.
- I materiali con i quali è stato fabbricato il vostro apparecchio sono igienici e non trasmettono odori ma per mantenere queste qualità è necessario che i cibi vengano sempre
protetti e ben chiusi, per evitare macchie difficilmente rimovibili o la creazione di cattivi odori.
- Solo acqua e bicarbonato. Per pulire sia l’interno che l’esterno usate una spugnetta con acqua tiepida e bicarbonato di
sodio che, tra l’altro, è anche un buon disinfettante. Se non
l’avete in casa potete impiegare del sapone neutro (quello
di Marsiglia ad esempio).
- Cosa non usare. Mai abrasivi, mai candeggina, mai ammoniaca. Proibitissimi i solventi e altri prodotti simili.
- Tutto ciò che si può togliere, mettetelo a bagno in acqua
calda con sapone o detersivo per i piatti. E prima di rimetterlo a posto, risciacquatelo e asciugatelo bene.
- E per il retro? Qui la polvere si ferma e si concentra provocando qualche problema al buon funzionamento dell’apparecchio. Usate la bocchetta lunga del vostro aspirapolvere,
alla potenza media per eliminarla. E con molta delicatezza!
- Quando sta fermo a lungo. Se decidete di fermare il frigorifero durante il periodo estivo, bisogna pulire l’interno e lasciare
le porte aperte.
- Come sostituire la lampadina interna.
Per sostituire la lampada di illuminazione dello scomparto
frigorifero staccate l'apparecchio dalla rete di alimentazione
e cambiate la lampada
avariata con un'altra di potenza non superiore a 15 W.
Per accedere alla lampada
"A", svitare la vite di fissaggio centrale "B" posizionata
nella parte posteriore del
coprilampada, come indicato
in Fig. 12.
Fig. 12
A
B
I
10
Page 13

C'è qualche problema?
La spia verde non si accende
Avete controllato se:
· l’interruttore generale dell’appartamento è disinserito;
· la spina non è correttamente inserita nella presa di corren-
te;
· la presa non è efficiente; provate a collegare la spina ad
un'altra presa del locale.
Il motore non parte
Avete controllato se:
· sono trascorsi 8 minuti dopo l’accensione?
Questo modello, infatti, è dotato di un controllo
salvamotore che lo fa avviare solo dopo circa 8 minuti
dall’accensione.
Le spie sono debolmente accese
Provate a invertire la spina nella presa, ruotandola
Il frigorifero e il congelatore raffreddano poco
Avete controllato se:
· le porte non chiudono bene o le guarnizioni sono rovinate;
· le porte vengono aperte molto spesso;
· le manopole di regolazione della temperatura non sono in
posizione corretta;
· il frigorifero o il congelatore sono stati riempiti eccessivamente.
Sul fondo del frigorifero c'è dell'acqua
Avete controllato se:
· Il foro dello scarico dell'acqua di sbrinamento è otturato
Se, nonostante tutti i controlli, l’apparecchio non funziona e
l’inconveniente da voi rilevato continua ad esserci, chiamate
il Centro di Assistenza più vicino, comunicando queste informazioni: il tipo di guasto, la sigla del modello (Mod.) e i
relativi numeri (S/N) scritti sulla targhetta delle caratteristiche posta in basso a sinistra, accanto alla verduriera (vedi
esempi nelle figure seguenti).
93139180000 S/N 704211801
Cod.
Gross
Bruto
Brut
W
Fuse
A
Freez. Capac
Poder de Cong
kg/24 h
4,0
Max 15 w
Class
Clase
N
Classe
75
Test
P.S-I.
TI
Net
Util
Utile
Pressure
HIGH-235
LOW 140
RG 2330
Mod.
220 - 240 V- 50 Hz 150 W
340
Total
Gross
Bruto
Brut
Compr.
Syst.
Kompr.
Made in Italy 13918
Gross
Bruto
Brut
R 134 a
kg 0,090
Non ricorrete mai a tecnici non autorizzati e rifiutate
sempre l’installazione di pezzi di ricambio non originali.
Nel frigorifero gli alimenti si gelano troppo
Avete controllato se:
· la manopola di regolazione della temperatura non è in
posizione corretta;
· gli alimenti sono a contatto con la parte posteriore, la più
fredda.
Il motore funziona di continuo
Avete controllato se:
· l'interruttore di congelamento è stato premuto (lampada
gialla accesa o lampeggiante);
· la porta non è ben chiusa o è stata aperta di continuo;
· la temperatura esterna è molto alta;
· lo spessore della brina supera i 2-3 mm.
L’apparecchio emette troppo rumore.
Avete controllato se:
· Il frigorifero non è posto ben in piano:
· è stato installato tra mobili o oggetti che vibrano ed emet-
tono rumori;
· il gas refrigerante interno produce un leggero rumore anche quando il compressore è fermo (non è un difetto).
11
I
Page 14

Page 15

Safety - a good habit to get into.
ATTENTION
Read your manual carefully since it contains instructions
which will ensure safe installation, use and maintenance of
your appliance.
Your Refrigerator is built to International safety standards
(EN60) ans has been awarded the European approval mark
(IMQ) for compliance with UK electrical safety requirements.
It also meets the EC standards on the prevention and elimination of readio interference (EC directive 87/308 - 02.06.89).
1. This appliance must not be installed outdoors - not even in
an area protected by a roof. It is extremely dangerous to leave
it exposed to rain or storms.
2. It must only be used by adults and exclusively to refrigerate
and freeze foodstuffs, following the instructions for use contained in this manual.
3. Do not ever touch or handle the appliance with bare feet or
with wet hands or feet.
4. It is highly recommended that you do not use extension cords
or multiple socket adapters. If the refrigerator is installed between cabinets, make sure that the cord is not bent or dangerously pinched or compressed.
5. Never pull on the cord or the refrigerator to remove the plug
from the wall socket - this is very dangerous.
6. Never touch the cooling components within the appliance,
especially with wet hands because this could result in injury.
Never put ice cubes just removed from the freezer into your
mouth because they could stick to your mouth and cause burns.
7. Do not carry out any cleaning or maintenance operations
without first having disconnected your appliance from the mains
power supply (by unplugging it or turning off the cut-out switch
in your home); turning the thermostat knob to " " is not
enough to eliminate all electric contacts.
8. Before having your old refrigerator picked up for disposal,
remove or make inoperable any locking devices to prevent children who might play in or around the appliance from being
locked inside.
9. Before calling for service/assistance in the case of malfunction, consult the chapter entitled “Is There a Problem? to determine whether it is possible to eliminate the problem. do not try
to repair the problem by trying to access the internal components of the appliance.
10. If damaged, the power supply cord on this appliance must
necessarily be replaced by our service centre because special
tools are required for replacement.
11. Do not use electric appliances inside the compartment for
food storage, if these are not those recommended by the
manufacturer.
12. At the end of the functional life of your appliance –
containing cyclopentane gas in the insulation foam and perhaps
gas R600a (isobutane) in the refrigeration circuit – the latter
should made safe before being sent to the dump.
For this operation, please contact your dealer or the Local
Organisation in charge of waste disposal.
Installation
Proper installation of the appliance is essential to ensure the best and most efficient performance of your
appliance.
Ventilation
The compressor and condenser generate heat and, therefore, need to be ventilated properly. Rooms with less than
perfect ventilation are not very suited for installation of the
appliance. Therefore, it should be installed in a room with
an opening (window or French window) that provide the
appropriate amount of air re-circulation. It is also important
that the room not be too humid.
During installation, make sure not to cover or obstruct the
grates that allow for proper ventilation of the appliance.
For proper ventilation of the appliance, you must leave:
- a space of at least 10 cm between the top part and any
cabinets above it;
- a space of at least 5 cm between the sides of the appliance
and any adjacent cabinets/walls.
Away from Heat
Avoid positioning the appliance in a place where it is directly
exposed to sunlight or near an oven, cook top or the like.
Levelling
The floor should be perfectly level; if not, you can adjust the
feet at the front of the appliance.
Earthing
Before making the electrical connection, check that the voltage shown on the data plate, that you will find on the bottom left hand side of the appliance next to the crisper, corresponds to that of your home and that the socket is earthed
in compliance with all current electrical regulations. If the
system is not earthed, the manufacturer declines all liability
for consequent damages or losses. Do not use adapters or
multiple sockets.
Position the appliance in such a way that you can access
the socket where it is plugged in.
Check the power load
The electrical socket must support the maximum power load
of the appliance shown on the data plate (on the bottom
left hand side of the appliance next to the crisper).
Before plugging the appliance to the mains
Stand the appliance upright and wait at least 3 hours before
plugging the appliance into the mains to ensure proper performance.
13
GB
Page 16

Close-up view
Quick cool button
A
Press it (yellow indicator light "C" comes on)
to lower the temperature of the refrigerator
compartment to its minimum setting.
Temperature regulator knob for the fridge
B
compartment
This knob allows you to adjust the
fridge temperature to different
positions;
the fridge is switched off;
1 minimum refrigeration setting;
5 maximum refrigeration setting.
optimal temperature at low
consumption levels;
Holiday function enabled.
Quick cool yellow indicator light
C
This yellow indicator light comes on when
the quick cool is enabled by pressing button
"A".
Rapid freezing button
G
Press it (yellow indicator light "E"
comes on) to freeze fresh food.
Removable lidded shelf, with egg tray and
H
butter dish
Removable miscellaneous shelf
I
Bottle trap
J
Removable door shelf for bottles
K
Ice tray
L
Adjustable feet
M
Green indicator light
D
When this green indicator light is on, it indicates
that the appliance is connected to the electricity
network.
Rapid freezing indicator light
E
This yellow indicator light comes on when
you press the rapid freezing button "G".
Note: these three indicator lights also signal an abnormal
increase in the temperature of the freezer compartment
(see "Alarm buzzers and visual warnings" paragraph).
Temperature regulator knob for the freezer
F
compartment
This knob allows you to adjust the freezer
temperature to different positions:
the fridge and freezer are switched off;
1 minimum refrigeration setting;
5 maximum refrigeration setting.
optimal temperature at low
consumption levels;
Remember that you can also interrupt the operation
of the whole appliance (fridge included) by setting
the knob to position " ".
"Drain" System for the removal of defrosting
N
water
Compartment for storing frozen foods
O
Compartment for freezing fresh foods and
P
storing frozen foods
Fruit and Vegetable Crispers
Q
"Fresh box" compartment for meat and fish
R
Removable/Adjustable Shelves
S
"A.I.R." Sysrem
T
(Ariston Integrated Refrigeration)
GB
14
Page 17

T
S
R
A
B C
D
E
F G
H
I
I
I
J
Q
P
O
K
L
NM
M
15
GB
Page 18

How to Start the Appliance
1
2
NOTICE
After the appliance has been delivered, stand it in the
upright position and wait approximately 3 hours before connecting it to the electrical outlet to guarantee
that it operates properly.
Before placing foodstuffs in the refrigerator or freezer, clean
the interior well with warm water and baking soda.
Motor protection delay
This model is provided with a motor protection control
system. Therefore, if the compressor does not start
immediately upon installation, do not worry as it will
start automatically after approximately 8 minutes.
This is also what will happen every time the power
supply is interrupted, both due to a power failure or
should you switch it off yourself (to clean or defrost
your freezer, for example).
After having plugged the appliance in, make sure that pilot
lamp "D" is lit. If not, make sure that the freezer knob "F" is not
on position "
Refrigerator compartment
Set knob "B" onto a medium position and you can place
food in the fridge after only a few hours.
Freezer compartment
Set knob "F" to a medium position and press the rapid
freezing button "G" (indicator light "E" will come on and a
temperature of -35°C will appear on the freezer display).
When the freezer has reached the optimum temperature,
yellow indicator light "E" will come off. Now you can place
frozen food in the freezer.
".
How to use the refrigerator compartment...
The thermostat automatically regulates the temperature inside the appliance
1 = less cold
5 = colder
It is recommended that a medium setting be used.
The refrigerator compartment of your appliance is equipped with
"Aircooler" which makes it possible to achieve optimal food
storage while simplifying the use of the refrigerator thanks to
the following features:
- Fast temperature reset: after the doors heve been opened,
the internal temperatures return to optimal values faster,
improving food storage.
- More uniform temperature distribution: this makes it
possible to place any type of food on any shelf.
- Higher humidity level: this allows you to store food longer.
B
A
B
B
A
Remember to follow our instructions on the storage life of
foods: If not stored correctly, even the freshest food will
deteriorate quite quickly.
Contrary to popular belief, cooked foods do not keep longer
than fresh food.
Be careful not to place containers (plastic or glass), food
or other objects in direct contact with the cooling area
of the back wall of the refrigerator. This could harm
the food, increase energy consumption and facilitate
the formation of condensate (on food, containers, etc.).
The refrigerator compartment of your appliance is fitted with
practical removable shelves (Fig. 1) whose height can be
adjusted to allow storage of large containers. This shelves
can also be tilted for storage of opened bottles.
Remember to cool hot food before storing otherwise the
temperature inside the appliance will increase, causing the
compressor to work harder and use more energy.
Do not store liquids in unsealed containers since this will
increase the humidity and lead to the formation of frost in
the refrigerator.
A - Blown air which is cooled when it comes into contact
with the refrigeration panel
B - Hotter air is drawn in
When the fridge compartment is filled up after a heavy
shopping spree, use the Quick Cool function (press button
"A" to enable it) in order to reach optimum operating
conditions quickly. Once the necessary time has elapsed, the
function is disabled automatically.
GB
Fig. 1
16
Page 19

Wine Area (if included): the bottle rack which is dedicated
to wine and which allows you to place up to 3 (standard
size) bottles of wine inside the fridge comfortably and with
maximum stability (Fig. 2). Thanks to its special structure,
the “Wine Area” allows air to circulate freely in between
the bottles, guaranteeing a rapid and sufficient cooling. With
this system, useless clutter is avoided and no internal space
is wasted. If you do not need it, it may be easily closed,
thereby freeing the space on the shelf completely (Fig. 3).
Fig. 2
Breakfast Box (if included): a container dedicated to
breakfast foods (Fig. 4). Thanks to its special shape, it can
contain, butter, milk, jam, fruit juices, sandwiches etc.; this
ensures that the food remains fresher for longer when it is
brought to the table. The lid can turn into a practical tray by
using the handles provided (Fig. 5). The “Breakfast Box” may
also be used as a normal multi-purpose box and, if you need
more space on the shelf, it can be removed.
Fig. 3
Fig. 4
Fig. 5
Using the "Fresh box" compartment for meat
and fish
This compartment was designed to allow for longer
preservation times for fresh meat and fish (for as long as a
week).
This is possible as the coldest temperature of the entire fridge
is available inside this specific compartment.
The clear protective door to open the compartment avoids
any oxidation or blackening to occur, which are typical of
meat and fish when exposed to air.
Moreover, the "Fresh box" compartment can also be used
to cool dishes that are normally eaten "cold", such as melon
and Parma ham, figs and ham, mozzarella and tomatoes.
How to use the freezer compartment...
For the preparation of food to be frozen, please consult a specialized manual.
Food that has be thawed, even partially, must not be refrozen: you must cook it in order to consume it (within 24
hours) or to freeze it once again.
When freezing fresh foods, remember that they should not
touch other previously frozen or deep frozen foods. Place
the food that you wish to freeze in the top compartment
"P" where the temperature will fall below -18°C, which is
ideal for freezing food properly. Remember that proper conservation depends on the speed of freezing.
The maximum amount of food you can freeze per day is
indicated on the data plate situated inside the refrigerator
compartment.
The first time, or after the freezer has been inactive, you can
only freeze food after having let the appliance function at
maximum.
When the appliance is already on, freezing can be done in
two ways:
1. for small quantities, less than the maximum capacity
indicated on the data plate, just press the freezing button
“G” (yellow lamp “E” lit) and insert the food to be frozen.
After 24 hours, or once the optimum temperatures have
been reached, the rapid freezing function will switch itself
off automatically (yellow lamp “E” off).
2. For large quantities of food to be frozen (up until the
maximum load indicated on the data plate), keep the freezing
button “G” pressed down until the yellow lamp starts flashing
quickly. After 24 hours, the yellow lamp will stop flashing
(permanently lit); you can now insert the food to be frozen.
After 24 hours, the button will switch itself off automatically
(yellow lamp off).
17
GB
Page 20

During the freezing process, avoid opening the door of the
freezer.
In order to freeze and then thaw foods optimally, it is recommended that you divide food into small portions so that
they freeze quickly and uniformly. The packages should be
clearly marked with the content and the date they were
frozen.
In order to obtain a larger amount of space in the freezer
compartment, you can remove the central drawer, and place
the food directly onto the evaporator plate. Make sure that,
after having inserted the load, the door closes correctly.
Do not open the freezer door in the event of a power failure
or malfunction. This precaution will slow the rise in temperature within the compartment. If the door is not opened,
frozen and fast-frozen foods will remain in their current state
for approximately 9-14 hours.
Do not place full bottles in the freezer: they could easily
burst because all liquids increase in volume when they freeze.
Ice trays
This new concept of ice trays is an exclusive Merloni patent.
The fact that they are situated on the inner door of the
freezer compartment ensures greater ergonomics and
cleanliness: the ice no longer comes into contact with the
food placed inside the freezer compartment; furthermore,
the dripping of the water during filling is avoided (a lid to
cover up the hole after filling with water is also provided).
To remove the ice trays from
their housings, push the tray
upwards and then pull it out
(fig. 84). To put the tray back
in place, insert the top part
into the special housing and,
once in a vertical position,
just let it drop into place.
Drink Party (if included): the practical place to rest bottles
of liqueur (Vodka, Limoncello etc.) which must be served
chilled. It may also be used to store and chill glasses for your
drinks (Fig. 6).
Fig. 6
Quick Store
This small drawer (Fig. 7) was devised for you to store small
quantities of food (small fruit and berries such as blackberries,
strawberries, black cherries, ice creams etc.) you wish to
freeze and keep separate from other frozen foods stored in
the freezer compartment.
This ensures the improved preservation of your food and
makes it easier for you to find these smaller items quickly.
Fig. 8
Instructions for use (Fig. 9)
Fill up the tray with water via the special hole up to the level
indicated (MAX WATER LEVEL), taking care not to exceed it:
inserting more water than is necessary will lead to the
formation of ice which could obstruct the exit of the ice cubes.
If you have used an excessive amount of water, you will have
to wait until the ice has melted, empty out the tray and re-fill
it with water.
Once you have filled the ice tray up with water through the
hole indicated, turn it by 90 °. Thanks to the connected
compartments, the water fills up the special shapes, after
which you can cover the hole up with the special cap and
place the ice tray in the inner door of the freezer
compartment.
Once the ice has formed, all you need to do is to knock the
tray against a hard surface so that the ice cubes come away
from their housing and come out of the same hole used to
fill the tray with water. To make it easier for the ice cubes to
come out, wet the outside of the tray.
WARNING: every time you fill up the ice tray with water ,
make sure that the same is completely empty and that there
are no traces of ice left inside it.
The minimum time required for ice to form well is
approximately 8 hours.
Fig. 7
GB
18
Fig. 9
WATER LEVEL
MAX
MAX
WATER LEVEL
Page 21

Guide to Using the Freezer
Meat and Fish
Food Wrapping
Beef Roast Tinfoil 2 / 3 9 / 10 Not required.
Lamb Tinfoil 1 / 2 6 Not required.
Pork Roast Tinfoil 1 6 Not required.
Veal Roast Tinfoil 1 8 Not required.
Veal/Pork Chops
Veal/Lamb Cutlets
Minced Meat
Heart and Liver Plastic Baggies 3 Not required.
Each piece wrapped in cling wrap and then
in tinfoil (4 to 6 slices)
Each piece wrapped in cling wrap and then
in tinfoil (4 to 6 slices)
In aluminium containers covered with cling
wrap.
Tenderising
(days)
Freshly
minced
Storage
(months)
6 Not required.
6 Not required.
2 Slowly in refrigerator.
Thawing Time
Sausages Cling Wrap or Tinfoil 2 As necessary.
Chicken and Turkey Tinfoil 1 / 3 9 Very slowly in refrigerator.
Duck and Goose Tinfoil 1 / 4 6 Very slowly in refrigerator.
Pheasant, Partrige and
Wild Duck
Hare and Rabbit Tinfoil 3 / 4 6 Very slowly in refrigerator.
Venison Tinfoil or Cling Wrap 5 / 6 9 Very slowly in refrigerator.
Large Fish Tinfoil or Cling Wrap 4 / 6 Very slowly in refrigerator.
Small Fish Plastic Baggies 2 / 3 Not required.
Crustaceans Plastic Baggies 3 / 6 Not required.
Shellfish
Tinfoil 1 / 3 9 Very slowly in refrigerator.
Store in salted water in aluminium
containers or plastic containers.
3 Very slowly in refrigerator.
Boiled Fish Tinfoil or Cling Wrap 12 In hot water.
Fried Fish Plastic Baggies 4 / 6 Directly in pan.
19
GB
Page 22

Fruits and Vegetables
Food Preparation
Apples and Pears Peel and cut into slices. 2’
Apricots, Peaches,
Cherries and Plums
Strawberries
Blackberries and
Raspberries
Cooked Fruit Cut, cook and strain.
Fruit Juice Wash, cut and crush.
Cauliflower
Cabbage and Brussel
Sprouts
Peas Shell and wash. 2’ Plastic Baggies 12 Not required.
Peel and pit. 1’ / 2’
Rinse and fry.
Remove leaves, cut head into
small pieces and blanch in
water and a little lemon
juice.
Wash and cut into small
pieces.
Blanching
Time
2’ Plastic Baggies 12 Not required.
1’ / 2’ Plastic Baggies 10 / 12 At room temperature.
Wrapping
In Containers (cover
with syrup)
In Containers (cover
with syrup)
In Containers (cover
with sugar)
In Containers (add
10% sugar)
In Containers (sugar
to taste)
Storage
(months)
12
12
10 / 12
12
10 / 12
Thawing Time
In refrigerator very
slowly.
In refrigerator very
slowly.
In refrigerator very
slowly.
In refrigerator very
slowly.
In refrigerator very
slowly.
French Beans Wash and slice if required. 2 Plastic Baggies 10 / 12 Not required.
Carrots, Peppers and
Turnips
Mushrooms and
Asparagus
Spinach Wash and mince. 2’ Plastic Baggies 12 At room temperature.
Vegetable for Soups
Various Foods Preparation
Bread Plastic Baggies 4
Cakes Plastic Baggies 6
Cream Plastic Containers 6
Butter
Peel, wash and slice if
necessary.
Wash, peel and cut up. 3’ / 4’
Wash and cut up in small
pieces.
3’ / 4’ Plastic Baggies 12 Not required.
3’
Blanching
Time
Plastic Baggies or
Containers
Plastic Baggies or
Containers
Wrapping
In original wrapping
or tinfoil
6 At room temperature.
6 / 7 Not required.
Storage
(months)
6 In refrigerator.
Thawing time
At room temperature
and in the oven.
About 10 minutes at
room temperature, cook
at 100/200°C.
At room temperature or
in refrigerator.
Boiled Food or
Vegetable Soup
Eggs
GB
Plastic or Glass
Containers
Freeze without shells
in small containers
20
3 / 6
10
At room temperature or
in hot water.
At room temperature or
in refrigerator.
Page 23

Tips on Saving Energy
- Install it well
And therefore far from heat sources, from direct sunlight, in
a well aired place and according to the distances indicated
in the section on "Installation/Aeration".
- Just the right cold
Too cold a compartment increases energy consumption.
- Do not Overfill
To conserve food properly, the cold air must circulate freely
within the refrigerator. If it is overfilled, this will prevent proper
air circulation, forcing the compressor to work continuously.
- Close the Doors
Open your refrigerator as little as possible because each time
you do so you loose much of the cold air. To raise the temperature to the proper level again, the motor must work for
a long time, consuming energy.
- Keep an Eye on the Seals
Keep the seals clean and make sure that they adhere well to
the door. This alone will ensure that no cold air escapes.
- No Hot Foods
A hot pot or pan placed in the refrigerator immediately raises
the temperature several degrees. Let hot cookware and food
cool to ambient temperature before placing them in the refrigerator.
- Defrost the Freezer
Check the thickness of the frost on the walls of the freezer
and immediately defrost it if the layer of frost is too thick.
(see the section entitled, “Keeping your Appliance in Shape”).
Alarm buzzers and visual warnings
Door open alarm
If the refrigerator door is left open for more than two
minutes, a buzzer will sound. The buzzer will stop sounding
when you shut the door.
Abnormal freezer heating alarm
1. To signal an excessive heating on the part of the freezer,
a buzzer will sound and the two yellow indicator lights
"C" and "E" will start flashing to indicate a dangerous
state of overheating. To prevent food from refreezing,
the freezer will try to maintain a temperature of 0°C, thus
allowing you to use up the food within 24 hour or to
refreeze it after cooking it. Using the special alarm
silencing procedure (open and shut the refrigerator door),
you can turn off the buzzer. To go back to normal
operating conditions, set the freezer knob "F" to position
" " (refrigerator off) and then turn the appliance back
on.
2. If the temperature inside the freezer continues to rise to
excessively high values, the buzzer will sound yet again
and the two yellow indicator lights "C" and "E" together
with the green one "D" will start flashing to indicate an
excessive heating. We recommend you check the
conditions of the food, as it may be necessary to throw it
away. In all cases, food should not be refrozen unless you
cook it first. To prevent food from refreezing, the freezer
will maintain a temperature of 0°C. Using the special alarm
silencing procedure (open and shut the refrigerator door),
you can turn off the buzzer. To go back to normal
operating conditions, set the freezer knob "F" to position
" " (refrigerator off) and then turn the appliance back
on.
+ buzzer
Dangerous
overheating
+ buzzer
21
Excessive
heating
GB
Page 24

Keeping Your Appliance in Shape
Prima di procedere a qualsiasi operazione di pulizia o
sbrinamento staccare l’apparecchio dalla rete di alimentazione (posizionare su “ ” la manopola “F” e poi
disinserire la spina). Nel caso in cui tale procedura non
sia eseguita, si potrebbe verificare una condizione di
allarme. ATTENZIONE: tale allarme non è sintomo di
anomalia. Per ripristinare il corretto funzionamento del
prodotto portare la manopola “F” nella posizione “ ”
e successivamente nella posizione voluta.
Defrosting
WARNING: do not damage the refrigeration circuit.
Do not use mechanical devices or other tools to speed
up the defrosting process, unless they have been recommended by the manufacturer.
How to Defrost the Refrigerator
This appliance defrosts automatically and the water is channeled to the back toward the drain installed for this purpose
(fig. 10). Here, the heat produced by the compressor will make
it evaporate. The only thing you must do is to periodically
check and clean the hole of the drain, which is located behind
the vegetable crispers, so that the water drains properly.
How to defrost the freezer compartment
- Remove the frost from time to time with the aid of the
special scraper provided (do not use knives or metal objects).
- If the frost is more than 5 mm thick, then you must defrost
the freezer completely. Proceed as follows: one day
beforehand, press the freezing button "G" until the yellow
lamp "E" comes on; it helps give the food a healthy extra
"cold shock". After 24 hours, the button switches itself off
automatically, yet you can switch it off yourself just be
pressing it again. Set the thermostat knob "F" on position
" ". WARNING: this operation switches off the whole
appliance (including the fridge compartment).
Wrap all frozen foods in newspaper and place them either
in another refrigerator or in a cool place. Leave the door
open, so as to allow all the frost to melt completely, helping
it along with containers filled with lukewarm water.
The unit is provided with a system which allows the defrost
water to be collected in a container to be placed beneath
the unit (proceed as illustrated in fig. 11).
Clean and dry thoroughly before restarting the appliance.
Remember that the motor will not start immediately,
but rather after approximately 8 minutes.
Cleaning and maintenance
HOLIDAY FUNCTION. Mould and bad odours forming
inside your unused fridge when you go on holiday need
no longer be a problem: just enable the Holiday
function (by setting knob "B" accordingly). This way,
with limited energy consumption, the temperature of
the refrigerator compartment is kept at around 15°C
(you can store your make up and beauty products in it,
for example) and the freezer is operated at its minimum
setting, which is essential for food preservation.
A brief double buzzer will sound
to confirm the function has been
enabled, whereas a single buzzer
indicates it has been disabled.
Prima di pulire il frigorifero posizionare su “ ” la manopola “F” e successivamente disinserire la spina.
- Your appliance is manufactured with hygienic odourless
materials. To preserve these characteristics, always use sealed
containers for strong smelling foods to avoid the formation
of odours that are difficult to remove.
- Use only a water and bicarbonate solution: Clean the
internal and exterior of your appliance with a sponge soaked
with a warm water and sodium bicarbonate solution, which
is also a good disinfectant. If you do not have any sodium
bicarbonate at home, use neutral detergent.
- What not to use: Do not use abrasive detergents, bleach or
detergents containing ammonia. Never use solvent based
products.
- All the removable parts can be cleaned by soaking in hot
soapy water or detergent. Remember to dry thoroughly
before replacing them.
- What about the back panel? Dust may deposit on the back
panel and affect the proper running of the appliance. To
remove dust, vacuum away the dust very carefully using the
appropriate vacuum cleaner accessory.
- When the appliance is left unused for an extended amount of
time. If you decide to switch your appliance off during the summer
months, clean it on the inside and leave the doors open.
- Replacing the light bulb.
When replacing the light of
the refrigerator compartment unplug the unit from
the power supply and chang
the used lamp with another
one of not more than 15 W.
For access ti lamp "A", remove the centre screw "B"
at the back of the lamp
cover, as indicated in fig. 12.
A
B
Fig. 10
GB
Fig. 12
Fig. 11
22
Page 25

Is There a Problem?
Green LED does not light up
Have you checked whether:
• The main switch for the electricity to the apartment or
home has been turned off;
• The plug is properly inserted in the outlet;
• The outlet is adequate; try inserting the plug into another
outlet in the room.
The motor does not start
Have you checked whether:
· 8 minutes have passed since you switched the appliance
on?
This model is in fact provided with a motor protection
control system which means that it will only start
approximately 8 minutes after being switched on.
Warning lights are weak
Check that:
· Invert the plug in the outlet to see if this still happens.
The refrigerator and the freezer do not cool
properly.
Have you checked whether:
• The doors do not close well or the seals are faulty;
• The doors are left open too long;
• The thermostat knob is not on the proper setting;
• The refrigerator or freezer is overfilled.
The food in the refrigerator becomes too cold.
The appliance makes too much noise.
The gas refrigerant produces a slight noise even when the
compressor is not running (this is not a defect).
Have you checked whether:
• The refrigerator is level.
• The appliance was installed between cabinets or objects
that vibrate and make noise.
There is water on the bottom of the refrigerator.
Have you checked whether:
• The hole for draining the water from the frost is clogged.
If after all the checks, the appliance still does not operate or
the problem persists, call the nearest Service Centre and
inform them of: the type of problem, the abbreviation of
the model name (Mod.) and the relative numbers (S/N) written on the rating plate located at the bottom left next to
the vegetable crisper (see example in the figure below).
93139180000 S/N 704211801
Cod.
Gross
Bruto
Brut
W
Fuse
A
Freez. Capac
Poder de Cong
kg/24 h
4,0
Max 15 w
Class
Clase
N
Classe
75
Test
P.S-I.
TI
Net
Util
Utile
Pressure
HIGH-235
LOW 140
RG 2330
Mod.
220 - 240 V- 50 Hz 150 W
340
Total
Gross
Bruto
Brut
Compr.
Syst.
Kompr.
Made in Italy 13918
Gross
Bruto
Brut
R 134 a
kg 0,090
Have you checked whether:
• The thermostat knob is on the proper setting;
• The food is in contact with the back wall - which is the
coldest part.
The motor runs continuously.
Have you checked whether
· the freezer switch has been pressed (yellow lamp lit or
flashing);
• The doors are not closed well or have remained open too
long;
• The ambient temperature is too high;
• The thermostat knob is not on the proper setting.
Never call on unauthorized technicians and always
refuse spare parts which are not originals.
23
GB
Page 26

Page 27

Безопасность хорошая привычка
Внимательно прочитайте данное руководство: оно поможет Вам
ознакомиться с возможностями холодильника, правилами его
монтажа, использования и обслуживания.
Ваш холодильник изготовлен в соответствии с международными
стандартами безопасности (EN 60). За удовлетворение требований
электробезопасности Великобритании холодильник был отмечен
маркой соответствия (IMQ). Оборудование отвечает требованиям
ЕС (директива ЕС 87/308 от 02.06.89) о предотвращении и
устранении радиопомех.
1. Холодильник разработан для использования внутри помещений. Ни при каких обстоятельствах не используйте оборудование на улице.
2. Холодильник должен использоваться в домашних условиях
для замораживания свежих продуктов и хранения замороженных продуктов в соответствии с инструкциями данного
руководства.
3. Не касайтесь оборудования мокрыми или сырыми руками. Не
пользуйтесь холодильником босиком.
4. Не используйте для подключения холодильника удлинители
и тройники. Если холодильник установлен между предметами
мебели, убедитесь, что провод не перекручен и не прижат.
5. Никогда не тяните за провод или за сам холодильник, чтобы
отсоединить его от розетки. Это очень опасно.
6. Не касайтесь внутренних охлаждающих элементов холодильника, особенно влажными руками, чтобы не получить местное
обморожение. Не берите сразу в рот кубики льда, вынутые из
морозильного отделения Вы можете обжечься.
7. Перед выполнением любых работ по мойке или обслуживанию отсоедините холодильник от сети, вынув вилку из розетки.
Имейте в виду, что установки термостата в положение "
недостаточно для полного отключения электропитания холодиль-
íèêà.
8. Прежде чем избавиться от старого холодильника необходимо сломать или снять с него запирающие приспособления, чтобы
обезопасить детей, которые могут закрыть себя внутри во время
игры.
9. При возникновении нестандартной ситуации отключите
холодильник от сети и позвоните в сервисный центр, телефон
которого напечатан в гарантийном документе (сервисном
сертификате, сервисной книжке). Перед звонком в сервисный
центр прочитайте раздел «Устранение неисправностей». Возможно Вы сами решите возникшую проблему. Не пытайтесь самостоятельно чинить холодильник, если требуется вмешательство
в его внутренние компоненты.
10. Если необходимо заменить питающий кабель, обратитесь в
сервисный центр (в любом случае при подсоединении кабеля
должны использоваться специальные контакты и инструменты).
Запрещается изменение конструкции холодильника и вмешательство лиц, не уполномоченных производителем на
гарантийный ремонт.
11. Не используйте электроприборы, предназначенные для
приготовления пищи, для ее хранения в холодильнике, если это
не рекомендовано производителем.
12. Если Вы решили больше не использовать Ваш холодильник,
перед тем как выбросить, позаботьтесь об его утилизации. Ваш
холодильник содержит циклопентановый газ в изоляционной пене
и, возможно, изобутан (R600) в охлаждающем контуре в последнем
случае Вам необходимо связаться с местной организацией,
ответственной за утилизацию.
"
Установка
Правильная установка необходима для обеспечения
надежной и наиболее эффективной работы холодильника.
Вентиляция
Компрессор и конденсатор холодильника в процессе работы нагреваются, поэтому необходимо обеспечить достаточную вентиляцию. Холодильник должен быть установлен в
хорошо проветриваемом помещении с нормальной влажностью. Запрещено устанавливать холодильники в помещениях с повышенной влажностью, например, ванных
комнатах, подвалах. Следите, чтобы во время эксплуатации доступ воздуха к отверстиям для вентиляции не был
перекрыт или затруднен:
расстояние между верхней частью холодильника и мебелью должно быть не менее 10 см;
расстояние между стенками холодильника и мебели (стенами) должно быть не менее 5 см.
Не располагайте вблизи источников тепла
Не следует устанавливать холодильник так, чтобы он находился под воздействием прямых солнечных лучей или рядом с источниками тепла (кухонными плитами, духовками и
т.п.).
Выравнивание
Для хорошей работы холодильника важно, чтобы он находился на ровной плоскости. После установки холодильника
на место отрегулируйте его положение путем вращения
ножек в его передней части.
Подключение к электросети
Перед подключением к электросети убедитесь, что напряжение сети соответствует данным, указанным в таблице,
которая находится на левой стороне холодильного отделения рядом с ящиками для хранения овощей и фруктов;
розетка заземлена в соответствии с нормами безопасности.
Запрещено использование переходников и удлинителей, так
как они создают опасность возгорания.
Оборудование, подключенное с нарушением требований
безопасности бытовых приборов большой мощности, изложенных в данной инструкции, является потенциально
опасным. Производитель не несет ответственности за ущерб
здоровью и собственности, если он вызван несоблюдением указанных норм установки.
Холодильник должен быть установлен таким образом,
чтобы Вы всегда имели доступ к розетке.
Розетка
Розетка должна выдерживать полную электрическую нагрузку холодильника, которая указана в табличке характеристик
оборудования.
Перед подключением к электросети
Установите холодильник вертикально и подождите примерно 3 часа перед подключением его к электросети это необходимо для правильной работы холодильника.
2525
CSI
Page 28

Описание
Кнопка быстрого охлаждения
A
При нажатии кнопки (загорится желтый индикатор "C") температура холодильного
отделения понижается до минимального
значения.
Термостат холодильного отделения
B
Рукоятка термостата спользуется для
регулирования температуры в холодильном отделении:
холодильное отделение
выключено;
1 минимальное охлаждение;
5 максимальное охлаждение
оптимальный температурный
режим (пониженный расход энергии)
включение функции "Holiday".
Желтый индикатор
C
быстрого охлаждения
Индикатор загорается при включении режима
быстрого охлаждения холодильного отделения
нажатием кнопки "A".
мораживания свежих продуктов.
Съемная полка с лотком для яиц и масленкой
H
Съемная полка для разных продуктов
I
Держатель бутылок
J
Съемная дверная полка для бутылок
K
Лоток для льда
L
Регулируемые ножки
M
Дренажная система для отвода оттаявшей воды
N
Отделение для хранения замороженных
O
продуктов
Зеленый индикатор
D
Горящий зеленый индикатор показывает, что
холодильник подключен к электросети.
Индикатор быстрого замораживания
E
Этот желтый индикатор горит при включении
режима быстрого замораживания нажатием кнопки
"G".
Примечание: эти три индикатора также сообщают об аномальном возрастании температуры в морозильном отделении (см. гл.
Звуковые сигналы и визуальные предупреждения").
Термостат морозильного отделения
F
Рукоятка термостата позволяет регулировать температуру в
морозильном отделении в следующих позициях:
морозильное отделение выключено;
1 минимальное охлаждение;
5 максимальное охлаждение
оптимальный температурный ре-жим -
пониженный расход электроэнергии
Помните, что Вы можете полностью выключить
холодильник (холодильное и морозильное
отделения) установкой рукоятки в позицию "
".
Отделение для замораживания свежих
P
продуктов и хранения замороженных
продуктов
Ящики для овощей и фруктов
Q
Отделение "Fresh Box" для хранения рыбы и
R
ìÿñà
Съемные, регулируемые по высоте полки
S
Система охлаждения воздуха "A.I.R. System"
T
(«Интегрированная система охлаждения Аристон»)
CSI
Кнопка быстрого замораживания
G
Используйте кнопку (при ее нажатии загорится желтый индикатор "E") äëÿ çà-
26
Page 29

T
S
R
A
B C
D
E
F G
H
I
I
I
J
Q
P
O
K
L
NM
M
2727
CSI
Page 30

Включение
ПРИМЕЧАНИЕ:
после доставки поставьте холодильник вертикально и
подождите примерно 3 часа прежде, чем включать его
в сеть это необходимо для нормальной работы оборудования.
Перед помещением продуктов в холодильное и морозильное отделения промойте холодильник изнутри теплой водой с пищевой содой.
После включения холодильника в сеть, убедитесь, что индикатор
"D" горит. Если нет, проверьте, не находится ли рукоятка
термостата морозильной камеры "F" в положении " ".
Холодильное отделение
Установите рукоятку термостата "B" в среднее положение,
через несколько часов Вы можете поместить продукты в
холодильное отделение.
Морозильное отделение
Система защиты компрессора
Ваш холодильник оборудован системой защиты компрессора. Эта система предотвратит немедленный старт
компрессора после включения холодильника в сеть, не
волнуйтесь, компрессор начнет работать примерно через 8 минут. Система защиты компрессора будет срабатывать каждый раз после отключения электроэнергии
(например, вследствие перебоев в электроснабжении
или при отключении для обслуживания и ухода).
Установите рукоятку термостата морозильного отделения
"F" в среднее положение и нажмите кнопку быстрого замораживания "G" (загорится индикатор "E" и на дисплее
морозильного отделения появится значение температуры
-35°C). Когда в морозильном отделении будет достигнута
оптимальная температура, желтый индикатор "E" погаснет.
Теперь вы можете закладывать замороженные продукты в
морозильное отделение.
Использование холодильного отделения
Температура внутри холодильника автоматически регулируется в соответствии позицией рукоятки термостата:
1 наименьшее охлаждение;
5 наибольшее охлаждение.
Мы рекомендуем устанавливать термостат в среднюю позицию.
Холодильное отделение Вашего холодильника оснащено
системой охлаждения воздуха «Aircooler», которая позво-
ляет достигать оптимального режима хранения продуктов
и, в то же время, упрощает процесс использования холодильника благодаря следующим функциям:
- Быстрое восстановление температуры: после открывания дверцы внутренняя температура возвращается к
оптимальному значению быстрее, улучшая режим хранения продуктов.
- Ровное распределение температуры: позволяет поме-
щать любые продукты на любые полки.
- Высокий уровень влажности: увеличивает срок хранения
продуктов.
B
B
B
Когда холодильное отделение переполнено (например,
после больших закупок), для быстрого достижения оптимального режима включите функцию Quick Cool function
("Быстрое охлаждение") нажатием кнопки "A". По истечении необходимого времени функция отключится автоматически.
Следуйте инструкции по хранению: при неправильном хранении даже самые свежие продукты быстро испортятся.
Вопреки общеизвестному мнению помните, что приготовленные продукты можно хранить меньшее время, чем
свежие.
Холодильное отделение оборудовано практичными съемными полками (Рис. 1), высота которых может регулироваться, это позволяет размещать крупные упаковки и
большие емкости. Полки могут быть наклонены для хранения открытых бутылок.
Дайте пище остыть, перед тем как помещать ее в холодильник. Это позволит избежать повышения температуры в
холодильнике, а следовательно, дополнительной нагрузки
на компрессор и дополнительного расхода электроэнергии.
Не ставьте в холодильник жидкости в открытых емкостях,
это увеличит влажность и приведет к формированию инея
на стенках.
A
A - выдуваемый воздух, охлаждающийся
при соприкосновении с холодной панелью;
B - втягиваемый нагретый воздух.
CSI
A
1
2
Ðèñ. 1
28
Page 31

Wine Area (подставка для бутылок) (если имеется): эта
подставка, устанавливаемая внутри холодильника, служит
для хранения бутылок с вином, в ней можно удобно и
надежно разместить вплоть до 3 бутылок с вином
(стандартного размера) (Рис. 2). Благодаря особой
конструкции Wine Area (подставки для бутылок) между
бутылками свободно циркулирует воздух, обеспечивая их
быстрое и правильное охлаждение. Эта система позволяет
рационально использовать полезную ¸мкость холодильника.
Если подставка для бутылок не нужна, ее можно легко
закрыть, полностью освобождая место на полке (Рис. 3).
коробки со специальными ручками может быть использована
как удобный поднос (Рис. 5).
Коробка для завтрака может
также использоваться как универсальный контейнер
и может быть вынута, если вам требуется больше
места на полке холодильника.
Ðèñ. 4
Использование отделения
для хранения рыбы и мяса "Fresh Box" (S)
Ðèñ. 2
Breakfast Box (Коробка для завтрака) (если имеется):
данная коробка предназначена для хранения продуктов для
завтрака (Рис. 4). Благодаря особой форме этой коробки в
ней можно хранить масло, молоко, джем, фруктовые соки,
бутерброды и т.д. Коробка вынимается из холодильника и
может служить для сервировки стола, сохраняя свежесть
ее содержимого в течение длительного времени. Крышка
Ðèñ. 3
Данное отделение разработано для хранения сырого мяса
и рыбы (в течение недели).
"Fresh Box" - это специальное низкотемпературное
отделение холодильной камеры.
Прозрачная защитная дверца отделения предохраняет
мясо и рыбу от окисления и потемнения, типичных для этих
продуктов при их контакте с воздухом.
Кроме того, отделение может использоваться для охлаждения блюд, которые принято есть холодными дыня,
ветчина, инжир, помидоры с сыром и пр.
Использование морозильного отделения
Для подготовки продуктов к замораживанию смотрите
специальную инструкцию.
Продукты, хотя бы частично размороженные, не следует
замораживать повторно: используйте их для приготовления блюд, которые следует либо употребить в течение 24
часов, либо заморозить после приготовления.
Когда замораживаете свежие продукты, не допускайте,
чтобы они касались ранее замороженных или глубоко
замороженных продуктов. Поместите продукты, которые
вы хотите заморозить, в верхнее отделение морозильной
камеры "P", где температура опуститься ниже -18°С температуры, идеальной для замораживания продуктов. Помните, что сохранность продуктов зависит от скорости их
замораживания.
Максимальное количество продуктов, которое вы можете
заморозить в день, указано в табличке, расположенной
внутри холодильного отделения.
В первый раз или, если морозильное отделение было отключено, вы можете замораживать продукты только после
установки холодильника на максимальный режим.
Когда холодильник включен, вы можете замораживать продукты двумя способами:
1. Для небольшого количества, не превышающего максимальный объем, указанный в таблице, просто нажмите
кнопку быстрого замораживания "G" (загорится желтый ин-
дикатор "E") и положите продукты в морозильное отделение "Q". Через 24 часа продукты будут заморожены и режим
быстрого замораживания автоматически отключится (индикатор быстрого замораживания "E" погаснет).
2. Для большого количества продуктов, соответствующего
максимальному объему, указанному в таблице, нажмите
кнопку быстрого замораживания "G" и держите нажатой до
тех пор, пока желтый индикатор "E" не начнет быстро
мигать. Через 24 часа индикатор "E" перестанет мигать (ос-
танется гореть), теперь вы можете поместить продукты в
морозильное отделение. Через 24 часа продукты
будут заморожены и режим быстрой заморозки автоматически отключится (желтый индикатор "E" погаснет).
Ðèñ. 5
2929
CSI
Page 32

Старайтесь не открывать дверь морозильного отделения
во время замораживания.
Для оптимального хранения и легкости последующего размораживания рекомендуем разделить продукты на небольшие порции, чтобы они замораживались быстро и
равномерно. На упаковках укажите содержимое и дату
замораживания.
Для того, чтобы освободить больше пространства в морозильном отделении, Вы можете удалить среднюю секцию и
положить продукты прямо на пластину испарителя. После
размещения продуктов удостоверьтесь, что дверь закрывается плотно.
В случае отключения/сбоев в электропитании не открывайте
дверцу морозильного отделения. Эта предосторожность
замедлит повышение температуры в отделении и поможет сохранить продукты, по крайней мере, в течение 9-14
часов.
Не помещайте в морозильник полные бутылки: они могут
легко лопнуть, так как при замораживании объем жидкости
увеличивается.
Drink Party (держатель для спиртных напитков) (если
имеется): эта удобная конструкция служит для хранения
бутылок со спиртными напитками (водка, ликеры и т.д.),
которые требуют сильного охлаждения. Кроме того может
быть использована для охлаждения стаканов для ваших
коктейлей
(Ðèñ. 6).
Ðèñ. 6
Quick Store
Этот маленький ящик служит для замораживания
небольшого количества мелких продуктов (ягод: ежевики,
клубники, вишни, мороженого и т.д.), которые требуется
хранить отдельно от остальных мороженых продуктов в
ящиках морозильной камеры.
Таким образом обеспечивается оптимальная сохранность
продуктов и удобство их расположения.
Лотки для льда
Новая система устройства форм для льда запатентована
компанией Мерлони Элеттродоместичи.
Они располагаются на внутренней поверхности дверцы морозильного отделения, что обеспечивает большую эргономичность и чистоту: лед не соприкасается с продуктами,
помещенными в морозильное отделение. Более того, исключается пролив воды во время заполнения (после заполнения закройте прилагаемой крышкой).
Чтобы удалить лотки из их
гнезд, подтолкните лоток
вверх и затем выньте (Рис.
8). Чтобы обратно установить лоток, держите его
вертикально и вставьте сначала верхнюю часть в гнездо, и только затем опустите
лоток на место.
Ðèñ. 8
Инструкции по использованию (Рис. 9)
Заполните лоток водой через специальное отверстие до
указанного уровня (МАХ WATER LEVEL максимальный
уровень воды), превышение уровня может привести к тому,
что извлечение льда из формы будет затруднено.
Если Вы все-таки превысили максимально допустимый
уровень, подождите пока лед растает, опорожните форму
и заполните еще раз.
После того, как Вы заполнили форму до указанного уровня, поверните ее на 90 градусов. Благодаря сообщающимся отделениям вода заполнит форму, после этого закройте
ее крышкой и поместите форму на внутреннюю поверхность
дверцы морозильного отделения.
Когда лед будет готов, постучите формой о твердую поверхность, чтобы кубики льда вышли из формовочных гнезд,
затем вытрясите их через заливное отверстие. Готовые кубики льда будет легче вытряхнуть, если вы намочите
внешнюю поверхность формы.
ПРЕДУПРЕЖДЕНИЕ: каждый раз перед использованием
формы убедитесь, что она совершенно пуста и в ней не
остались кусочки льда.
Минимальное время, необходимое для приготовления льда
примерно 8 часов.
Ðèñ. 5
CSI
30
Ðèñ. 9
WATER LEVEL
MAX
MAX
WATER LEVEL
Page 33

2-3 9-10
1-2 6
16
18
3
2
1-3 9
1-4 6
1-3 9
3-4 6
5-6 9
6
6
2
4-6
2-3
3-6
12
4-6
3
3131
CSI
Page 34

1 -2
1-2 10-12
2 12
2
2 12
(
(
(
12
12
10-12
12
10-12
2 10-12
3-4 12
3-4
2 12
6
6-7
4
6
6
6
3-6
10
CSI
32
Page 35

Рекомендации по экономии электроэнергии
- Правильно установите холодильник
На расстоянии от источников тепла, вне досягаемости
прямых солнечных лучей, в хорошо проветриваемом помещении и с соблюдением расстояний, указанных в гл. "Установка" (§ "Вентиляция").
- Только оптимальное охлаждение
Установка излишне низкой температуры увеличит расход
электроэнергии.
- Не переполняйте
Для сохранности продуктов важна достаточная циркуляция
воздуха. Переполнение продуктами мешает должной циркуляции
воздуха, заставляя мотор работать непрерывно.
- Закрывайте дверцы
Открывайте дверцы только при необходимости, помните,
что каждое открывание дверцы несколько повышает температуру внутри холодильника. Для восстановления прежней температуры мотор должен работать длительное
время, потребляя дополнительную электроэнергию.
- Следите за уплотнителями
Следите за тем, чтобы резиновые уплотнители оставались
чистыми и плотно прилегали к дверцам, это позволит избежать утечки холодного воздуха.
- Не помещайте горячую пищу
Горячие продукты, помещенные в холодильник, немедленно повышают температуру на несколько градусов. Дайте
остыть продуктам и посуде до комнатной температуры
перед тем, как помещать их в холодильник.
- Размораживайте морозильное отделение
Проверяйте толщину инея на стенках морозильника, и
немедленно разморозьте его, если слой инея слишком
толстый (см. гл. «Обслуживание и уход»).
Звуковые сигналы и визуальные предупреждения
Сигнал тревоги открыта дверца
Если дверца холодильного отделения остается открытой
более 2-х минут, раздастся звуковой сигнал. Сигнал прекратится, когда дверца будет закрыта.
Сигнал тревоги перегревание
морозильного отделения
1. Если произошло перегревание морозильного отделения,
раздастся звуковой сигнал и два желтых индикатора "Ñ"
è "Å" начнут мигать, указывая состояние опасного
перегревания.
Чтобы предотвратитьповторное замораживание
продуктов, в морозильном отделении будет
держаться температура 0°C, позволяющая Вам использовать продукты в течение 24-х часов или приготовить
их и повторно заморозить. Для прекращения звукового
сигнала тревоги откройте и закройте дверцу холодильника. Чтобы вернуться к нормальному рабочему режиму, установите рукоятку термостата морозильного
отделения "F" в позицию " " (холодильник выключен) и
затем снова включите оборудование.
2. Если температура в морозильном отделении продолжает чрезмерно расти, звуковой сигнал прозвучит снова и
два желтых индикатора "C" è "E" и зеленый индикатор
"D" начнут мигать, указывая на чрезмерное повышение
температуры в отделении. Мы рекомендуем проверить
состояние продуктов, возможно их придется выбросить.
В любом случае продукты можно замораживать повторно
только после их приготовления. Чтобы предотвратить
повторное замораживание продуктов, в морозильном отделении будет держаться температура 0°C. Для прекращения звукового сигнала тревоги откройте и закройте
дверцу холодильника. Чтобы вернуться к нормальному
рабочему режиму, установите рукоятку термостата морозильного отделения "F" в позицию "
выключен) и затем снова включите оборудование.
" (холодильник
Опасное
перегревание
+ звуковой сигнал
+ звуковой сигнал
3333
Чрезмерное
перегревание
CSI
Page 36

Обслуживание и уход
Перед проведением любых операций по разморозке или уходу
за холодильником требуется отключить его от электросети
(вернуть кнопку F в положение "
розетки). При выполнении данной операции возможно
срабатывание сигнала тревоги. ПРЕДУПРЕЖДЕНИЕ: это не
является сигналом ненормальной работы. Для включения
холодильника требуется поставить кнопку F в положение
а далее выберите режим по вашему желанию.
Размораживание
Предупреждение: чтобы не повредить систему охлаждения
не используйте для ускорения процесса размораживания не
рекомендованные производителем механические и др.
инструменты.
Как разморозить холодильное отделение
Холодильное отделение размораживается автоматически; конденсированная вода стекает по задней стенке через желоб в дренажное
отверстие (Рис. 10), где от тепла компрессора испаряется.
Единственное, что Вам нужно делать периодически проверять и
прочищать дренажное отверстие, расположенное позади ящиков для
овощей и фруктов.
Как разморозить морозильное отделение
- Периодически удаляйте наросший иней специальным скребком
(входит в комплект поставки оборудования), не используйте для этих
целей ножи и металлические предметы.
- При толщине инея более 5 мм следует полностью разморозить
морозильное отделение следующим образом:
За день до того, как Вы собираетесь разморозить морозильное
отделение, нажмите кнопку быстрого замораживания "G", загорится
желтый индикатор быстрого замораживания "E", продукты будут
подвергнуты дополнительной экстра заморозке, что поможет
сохранить их во время разморозки отделения. Через 24 часа холодильник перейдет автоматически в нормальный режим работы,
тем не менее Вы можете выключить режим быстрого
замораживания до истечения этого времени нажав снова кнопку
"G". Установите термостат в положение "
ПРЕДУПРЕЖДЕНИЕ: это действие отключает оборудование
целиком, включая морозильное отделение.
На время размораживания оберните замороженные продукты
газетой и поместите их в другой холодильник или в холодное место. Оставьте дверцу открытой äëÿ того,
чтобы иней растаял полностью, для ускорения размораживания
поместите в морозильник емкость с теплой водой. Холодильник
оснащен дренажной системой, позволяющей отводить оттаявшую
воду поставьте для воды подходящую емкость, как показано на
Рис. 11. Вымойте и тщательно высушите камеры перед повторным включением оборудования.
Помните, что мотор начнет работать примерно через
8 минут после включения холодильника.
", затем вынуть вилку из
,
".
Функция "HOLIDAY". Плесень и неприятные запахи, образующиеся в холодильнике, когда Вы им долго не пользуетесь, больше не являются проблемой: просто включите
функцию "Holiday", установив рукоятку термостата холодильного отделения "В" в соответствующую позицию. Таким образом вместе с ограничением расхода энергии
температура в холодильном отделении поддерживается в
пределах 15°C (Вы можете хранить, например, свою косметику) и холодильник работает при минимальном установочном значении, что существенно для сохранения
продуктов.
Активизация функции будет подтверждена коротким двойным звуковым сигналом, отключение же
функции обозначит одиночный звуковой сигнал.
Перед мойкой холодильника установите кнопку F в
положение , затем отключите электропитание.
· Ваш холодильник изготовлен из гигиенических материалов. Для
сохранения их характеристик, всегда используйте для сильно
пахнущих продуктов плотно закрывающиеся контейнеры, чтобы
избежать образования запахов, которые потом будет сложно
удалить.
· Внутренние и внешние поверхности холодильника мойте губкой
или мягкой тканью, смоченной в растворе пищевой соды в теплой
воде (сода также является хорошим дезинфектором). При
отсутствии пищевой соды используйте нейтральное моющее
средство.
· Никогда не используйте абразивные моющие средства,
отбеливатели, растворители и аммиакосодержащие вещества.
· Все съемные части можно мыть раствором мыла или моющего
средства в горячей воде. Также их можно мыть в посудомоечной
машине. Помните, что перед обратной установкой все съемные
части необходимо тщательно высушить.
· Пыль может скапливаться на задней панели холодильника и
препятствовать его нормальной работе. Пропылесосьте
осторожно заднюю стенку холодильника, используя подходящие
насадки.
· Если вы не собираетесь использовать холодильник продолжительное время, вымойте его изнутри, высушите и оставьте дверь
приоткрытой, чтобы избежать образования неприятного запаха
и плесени.
Замена лампы освещения
(данная процедура не является гарантийным ремонтом).
Отключите холодильник от сети, вынув вилку из розетки.
Выверните лампу и замените ее аналогичной (мощностью не
более 15 Вт). Для доступа к
лампе "À", отверните
центральный винт "Â" на
задней части плафона, как показано на Рис. 12.
A
Ðèñ. 10
CSI
B
Ðèñ. 12
Ðèñ. 11
34
Page 37

Устранение неисправностей
Не горит зеленый индикатор
Проверьте:
· в доме отключено электричество;
· вилка плохо вставлена в розетку;
· розетка неисправна: попробуйте подключиться к другой
розетке.
Не запускается мотор
Проверьте:
· прошло ли 8 минут после включения оборудования?
Эта модель оснащена системой защиты мотора, запускающей
его только спустя 8 минут после включения холодильника.
Индикаторы тревоги слабо светятся
Проверьте:
· выньте вилку из розетки, чтобы посмотреть в чем причина,
вставьте ее заново.
Холодильное и морозильное отделения
плохо охлаждают продукты
Проверьте:
· дверцы плохо закрыты или повреждены уплотнители на
дверцах;
· дверцы остаются открытыми слишком долго;
· рукоятки термостатов установлены в неправильном положении;
· холодильное и морозильное отделения переполнены.
Продукты в холодильном отделении
слишком преохлаждаются
Проверьте:
· правильно ли установлен термостат;
· продукты касаются задней стенки холодильника она самая
холодная.
Постоянно работает мотор
Проверьте:
· нажата кнопка быстрого замораживания (желтый индикатор
горит или мигает);
· дверцы плохо закрыты или остаются открытыми слишком
долго;
· температура в помещении слишком высокая;
· рукоятка термостата в неправильном положении.
Холодильник слишком шумит при работе
Хладагент издает слабый шум, даже если компрессор не
работает (это не является дефектом).
Проверьте:
· холодильник плохо выровнен;
· холодильник установлен между вибрирующими и издающими
шум предметами или мебелью.
Вода скапливается на дне холодильного отделения
Проверьте:
· Не забито ли дренажное отверстие для стока воды.
Если после проверки холодильник не работает, или проблемы остаются,
свяжитесь с сервисным центром и при звонке сообщите следующую
информацию: номер гарантийного документа (сервисной книжки, сервисного
сертификата и т.п.), неисправность, модель (Mod.), серийный номер (S/
N), обозначенные на информационной табличке, расположенной слева за ящиком
для овощей и фруктов (см. примеры на ðèñ. íèæå).
75
Test
P.S-I.
TI
Net
Util
Utile
Pressure
HIGH-235
LOW 140
RG 2330
Mod.
220 - 240 V- 50 Hz 150 W
340
Total
Gross
Bruto
Brut
Compr.
Syst.
Kompr.
Made in Italy 13918
Gross
Bruto
Brut
R 134 a
kg 0,090
93139180000 S/N 704211801
Cod.
Gross
Bruto
Brut
W
Fuse
A
Freez. Capac
Poder de Cong
kg/24 h
4,0
Max 15 w
Class
Clase
N
Classe
· Не пользуйтесь услугами лиц, не уполномоченных
производителем.
· При ремонте требуйте использования оригинальных
запасных частей.
Продукция сертифицирована Код органа
на соответствие ГОСТам: по сертификации
Ð ÌÝÊ 335-1-94
Ð ÌÝÊ 335-2-24-94 ÌÅ 53
23511-79
Ð 50033-92
Merloni Elettrodomestici spa
Срок службы
10 ëåò
со дня изготовления
Производитель оставляет за собой право без предупреждения
вносить изменения в конструкцию и комплектацию, не ухудшающие эффективность работы оборудования. Некоторые
параметры, приведенные в этой инструкции, являются приблизительными. Производитель не несет ответственности
за незначительные отклонения от указанных величин.
3535
CSI
Page 38

Reversibilità apertura porte
Reversing the door opening
1
2
3
Page 39

4
5
∅ 3
mm
Page 40

Via Aristide Merloni, 47
60044 Fabriano (AN) Italj
tel. +39 0732 6611
www.merloni,com
04/2004 - 195044019.00 - Xerox Business Services DocuTech
 Loading...