

Page 1

Combinato frigo/freezer
Installazione e uso
Frigorífico-freezer combinado
Instalación y uso
Kühl/Gefrier-Kombination
Installation und Gebrauch
Fridge/freezer combined
Installation and use
Page 2

MB 3832 NF
I
Combinato frigo/freezer 1
Istruzioni per l'installazione e l'uso
Frigorífico-freezer combinado 11
E
Instrucciones para la instalación y uso
Kühl/Gefrier-Kombination 21
D
Installation- und Gebrauchshinweise
Fridge/freezer combined 32
GB
Instructions for installation and use
Per garantire l’efficienza e la sicurezza di questo elettrodomestico:
- rivolgetevi esclusivamente a centri di assistenza tecnica autorizzati
- richiedete sempre l’utilizzo di parti di ricambio originali
Para garantizar la eficacia y seguridad de este electrodoméstico:
- Diríjase exclusivamente al Servicio Técnico Oficial del Fabricante.
- Solicite siempre la utilización de recambios originales.
Um die Leistungsfähigkeit und Sicherheit dieses Gerätes zu gewährleisten,
bitte folgendes beachten:
- wenden Sie sich ausschließlich an unsere autorisierten Service-Stellen
- verlangen Sie, daß nur Original-Ersatzteile verwendet werden
To maintain the EFFICIENCY and SAFETY of this appliance, we recommend:
- call only the Service Centers authorized by the manufacturer
- always use original Spare Parts
Page 3

La sicurezza, una buona abitudine
ATTENZIONE
Leggete attentamente le avvertenze contenute nel presente libretto in quanto forniscono importanti indicazioni riguardanti la sicurezza di installazione, d’uso e di manutenzione.
Questa apparecchiatura è conforme alle seguenti Direttive Comunitarie:
- 73/23/CEE del 19/02/73 (Basse Tensioni) e successive
modificazioni;
- 89/336/CEE del 03/05/89 (Compatibilità Elettromagnetica)
e successive modificazioni.
1. Questo apparecchio non va installato all’aperto, nemmeno se lo spazio è riparato da una tettoia; è molto pericoloso
lasciarlo esposto alla pioggia e ai temporali.
2. Deve essere usato soltanto da adulti ed esclusivamente
per conservare e congelare i cibi, seguendo le istruzioni d’uso
scritte in questo manuale.
3. Non toccate né manovrate mai l’apparecchio a piedi nudi
o con le mani o i piedi bagnati.
4. Sconsigliamo di ricorrere a prolunghe e prese multiple. Se
il frigorifero è installato tra i mobili, controllate che il cavo
non subisca piegature o compressioni pericolose.
5. Non tirate mai il cavo né il frigorifero per staccare la spina
dalla presa a muro: è molto pericoloso.
6. Non toccate le parti interne raffreddanti soprattutto con
le mani bagnate poiché potreste ustionarvi o ferirvi. Né met-
tete in bocca cubetti di ghiaccio appena estratti dal freezer
poiché rischiate di ustionarvi.
7. Non fate né pulizia né manutenzione senza aver prima
staccato la spina; non basta, infatti, portare le manopole
per la regolazione della temperatura sulla posizione " "
per eliminare ogni contatto elettrico.
8. Prima di farvi ritirare il vecchio frigorifero, mettete fuori
uso l’eventuale serratura per evitare che i bambini, giocando, possano rimanere chiusi dentro l’apparecchio.
9. In caso di guasto, prima di chiamare il servizio-assistenza,
controllate al capitolo “C’è qualche problema?” per verificare se è possibile eliminare l’eventuale inconveniente. Non
tentate di riparare il guasto, cercando di accedere alle parti
interne.
10. In caso di sostituzione del cavo di alimentazione rivolgersi ai nostri Centri di Assistenza. In alcuni casi le connessioni sono eseguite con terminali speciali, in altri è richiesto
l’uso di un utensile speciale per accedere ai collegamenti.
11. Non usate apparecchi elettrici all'interno dello scomparto conservatore di cibi, se questi non sono del tipo raccomandato dal costruttore.
12. Al termine della vita funzionale dell'apparecchio, contenente gas ciclopentano nella schiuma isolante ed eventualmente gas R600a (isobutano) nel circuito refrigerante, lo stesso dovrà essere messo in sicurezza prima dell'invio in discarica. Per questa operazione rivolgetevi al vostro negoziante
o all'Ente Locale preposto.
Installazione
Per garantire un buon funzionamento e un consumo
contenuto di elettricità è importante che l’installazione sia eseguita correttamente.
L’aerazione
Il compressore ed il condensatore emettono calore e richiedono perciò una buona aerazione. Sono poco adatti ambienti con una non perfetta ventilazione. L’apparecchio va
quindi installato in un ambiente servito da un’apertura (finestra o portafinestra) che assicuri il necessario ricambio dell’aria e che non sia troppo umido.
Fare attenzione, durante l'installazione, a non coprire od
ostruire le griglie che permettono la buona ventilazione dell'apparecchio.
Per una buona aerazione dell'apparecchio occorre lasciare:
- una distanza di almeno 10 cm tra la parte superiore ed
eventuali mobili sovrastanti;
- una distanza di almeno 5 cm tra le fiancate ed eventuali
mobili/pareti laterali.
Lontano dal calore
Evitare di posizionare l'apparecchio in un luogo direttamente esposto alla luce solare, accanto alla cucina elettrica o
similari.
In piano
L'apparecchio deve essere ben in piano; se il pavimento non
è livellato, è possibile intervenire con gli appositi piedini regolabili posti anteriormente.
Collegamento elettrico e messa a terra
Prima di procedere al collegamento elettrico, controllare che
il voltaggio indicato sulla targhetta caratteristiche, posta in
basso a sinistra accanto alla verduriera, corrisponda a quello del vostro impianto di casa, e che la presa sia dotata di
una regolare messa a terra, come prescrive la legge sulla
sicurezza degli impianti 46/90. Se manca la messa a terra, la
Casa Costruttrice declina ogni responsabilità. Non usate prese multiple o adattatori. Posizionare l’apparecchio in
modo che la presa, a cui è collegato, sia accessibile.
La potenza è insufficiente?
La presa elettrica deve essere in grado di sopportare il carico
massimo di potenza dell’apparecchio, indicato sulla targhetta
caratteristiche posta in basso a sinistra accanto alla verduriera.
Prima di collegarlo elettricamente
Dopo il trasporto posizionare l’apparecchio verticalmente
ed attendere almeno 3 ore prima di collegarlo alla presa per
consentire un corretto funzionamento.
1
I
Page 4
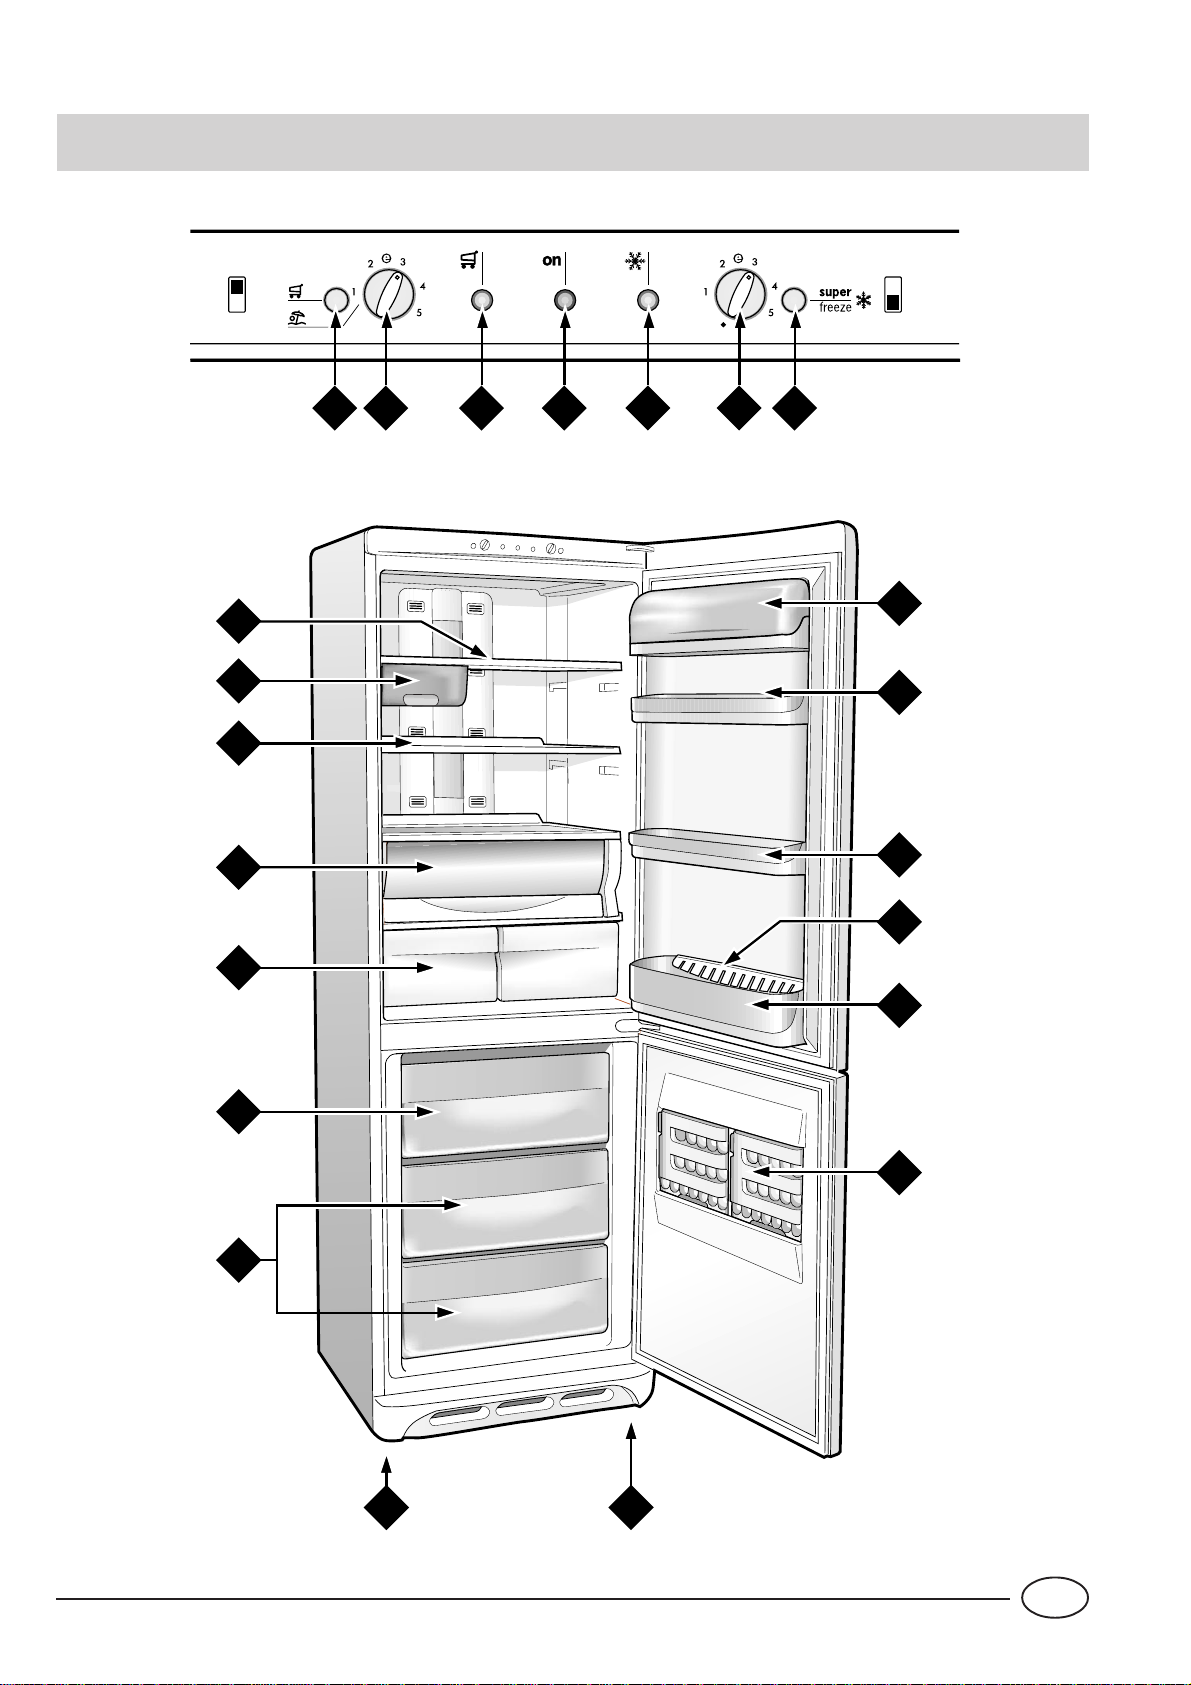
Visto da vicino
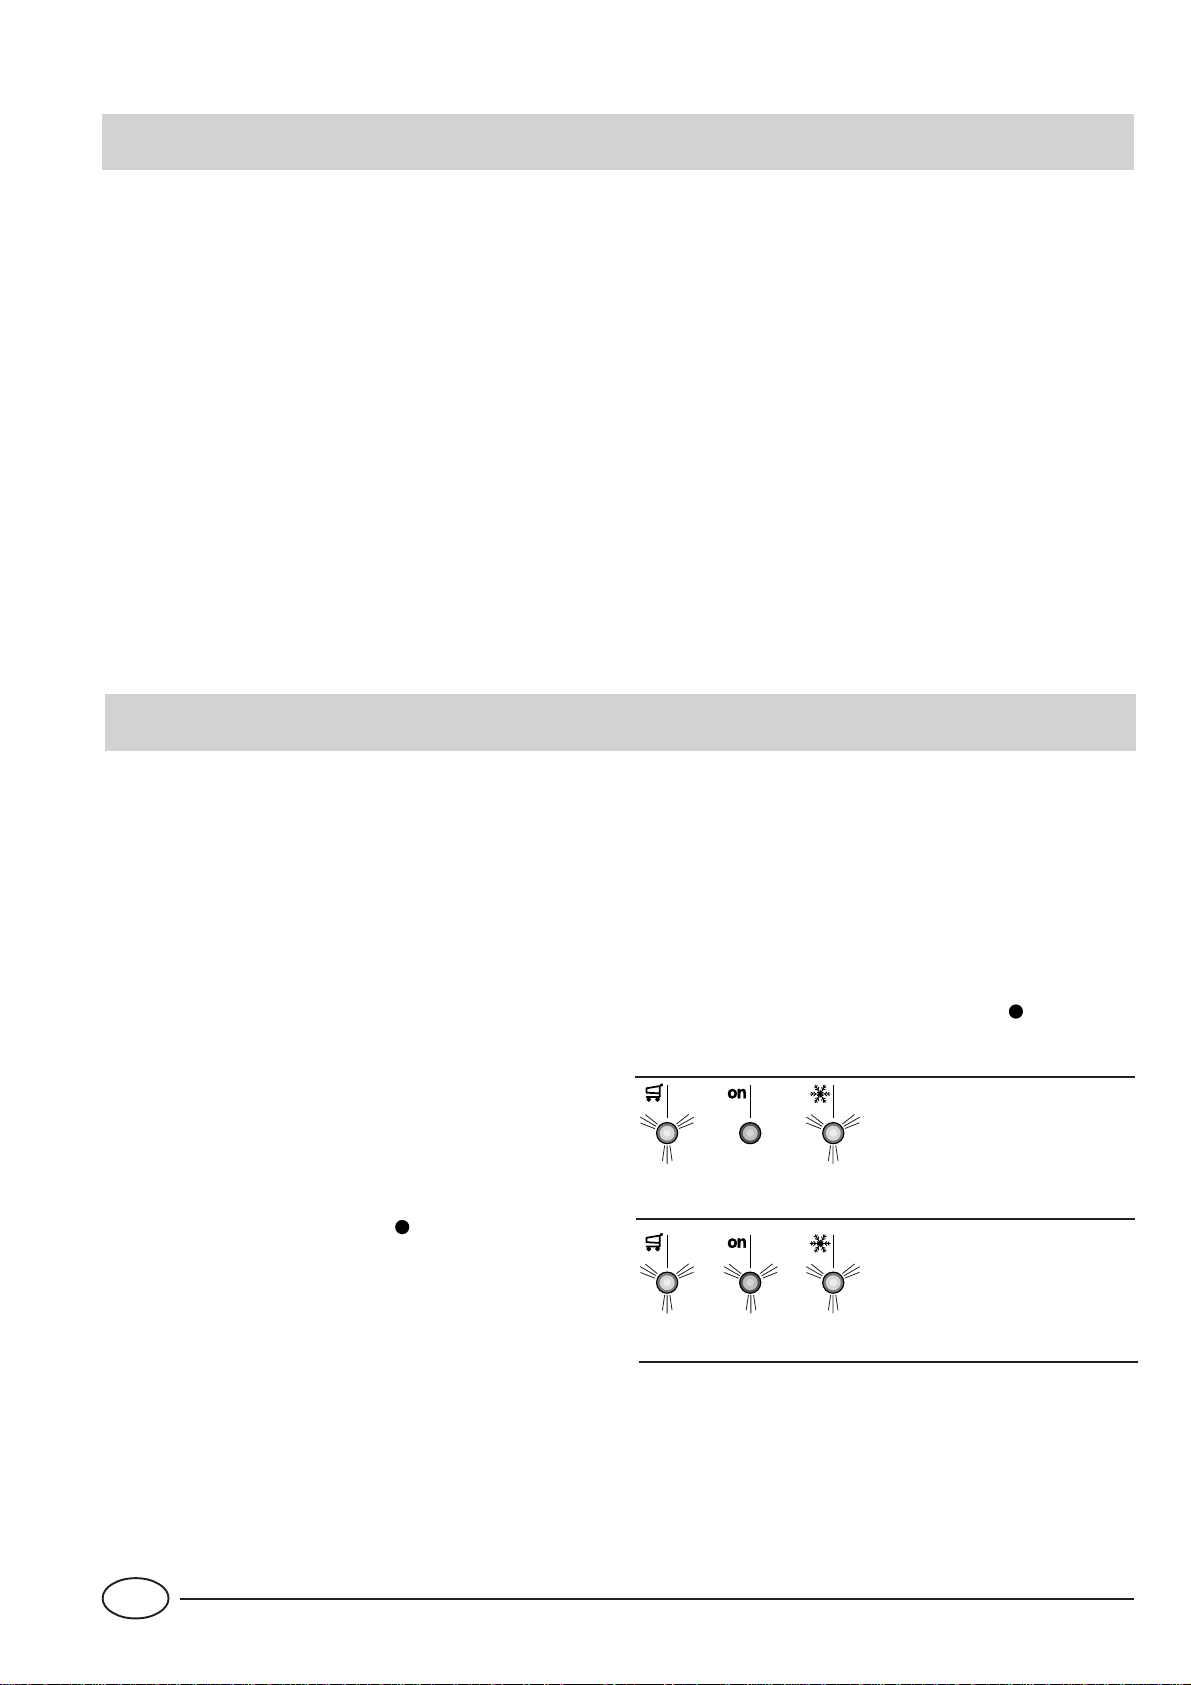
Pulsante per il raffreddamento rapido
A
Premuto (si accende la spia gialla "C")
permette di abbassare al minimo la
temperatura nel vano frigo.
Manopola per la regolazione della temperatura
B
dello scomparto frigorifero
Questa manopola consente di regolare la temperatura del frigorifero su
diverse posizioni:
1 meno freddo;
5 più freddo;
temperatura ottimale a bassi
consumi:
funzione vacanza attivata.
Spia gialla di raffreddamento rapido
C
Questa spia gialla si accende quando si
attiva il raffreddamento rapido premendo il
pulsante "A"
Pulsante per il congelamento rapido
G
Premuto (si accende la spia gialla
"E") permette il congelamento di
cibi freschi.
Balconcino estraibile con coperchio, con
H
portauova e scatola burro
Balconcino estraibile portaoggetti
I
Ferma bottiglie
J
Balconcino bottiglie
K
Bacinelle per la produzione di ghiaccio
L
Piedini di regolazione
M
Spia verde
D
Quando questa spia verde è accesa vuol dire
che l'apparecchio è collegato alla rete di alimentazione.
Spia di congelamento rapido
E
Questa spia gialla si accende quando si
preme il pulsante di congelamento rapido
"G".
Nota: queste tre spie servono anche per segnalare
un anomalo aumento di temperatura nel vano
congelatore (vedi paragrafo "Allarmi sonori e
visivi").
Manopola per la regolazione della temperatura
F
dello scomparto congelatore
Questa manopola consente di regolare
la temperatura del congelatore su diverse posizioni:
l'apparecchio è spento;
1 meno freddo;
5 più freddo;
temperatura ottimale a bassi consumi:
Ricordate che portando la manopola nella posizione
" " interrompete il funzionamento di tutto l'apparecchio (frigo compreso).
Vani per la conservazione
N
Vano utilizzabile per il congelamento e la
O
conservazione
Cassetti per frutta e verdura
P
Scomparto "Fresh box" per carni e pesci
Q
Ripiani estraibili e regolabili in altezza
R
Scatola scorrevole per formaggi e salumi
S
I
2
Page 5
A
B C
D
E
F G
R
S
R
Q
P
O
H
I
I
J
K
L
N
M
M
3
I
Page 6
Come avviare il combinato
ATTENZIONE
Dopo il trasporto, posizionare l’apparecchio verticalmente ed attendere circa 3 ore prima di collegarlo alla
presa di corrente per favorire un buon funzionamento.
Prima di mettere gli alimenti nel frigorifero pulite bene l’interno con acqua tiepida e bicarbonato.
Tempo protezione motore.
Questo modello è provvisto di un controllo
salvamotore, pertanto se all’installazione il compressore non parte immediatamente non preoccupatevi
perché si attiverà automaticamente dopo circa 8 minuti. Così accadrà dopo ogni interruzione dell’alimentazione, sia a causa di un black-out che per uno spegnimento da voi impostato (ad esempio per la pulizia o lo
sbrinamento del freezer).
Dopo aver collegato la spina alla presa di corrente accertarvi
che la spia verde "D" sia accesa e che la manopola del conge-
latore "F" non sia nella posizione di "
Scomparto frigorifero
Ruotate la manopola "B" su una posizione media e dopo
qualche ora potrete mettere i cibi nel frigorifero.
Scomparto congelatore
Ruotate la manopola "F" su una posizione media e premete
il pulsante "G" del congelamento rapido (la spia gialla "E"
si accenderà). Quando il congelatore avrà raggiunto la temperatura ottimale, la spia gialla "E" si spegnerà. A questo
punto potrete introdurre nel congelatore i surgelati.
".
Come utilizzare al meglio il reparto frigorifero
La temperatura all'interno del reparto frigorifero si regola
automaticamente in base alla posizione della manopola per
la regolazione della temperatura.
1 = meno freddo
5 = più freddo
Quando il vano frigo viene riempito dopo una grossa spesa,
utilizzate la funzione Raffreddamento rapido (attivata premendo il pulsante "A") in modo da raggiungere rapidamente
un'ottima condizione di funzionamento. Una volta trascorso il tempo necessario la funzione si disattiva automaticamente.
Seguite attentamente i nostri consigli sulla durata massima
della conservazione: qualsiasi cibo, anche il più fresco, non
rimane intatto molto a lungo.
Contrariamente a quanto si crede, i cibi cotti non si mantengono più a lungo di quelli crudi.
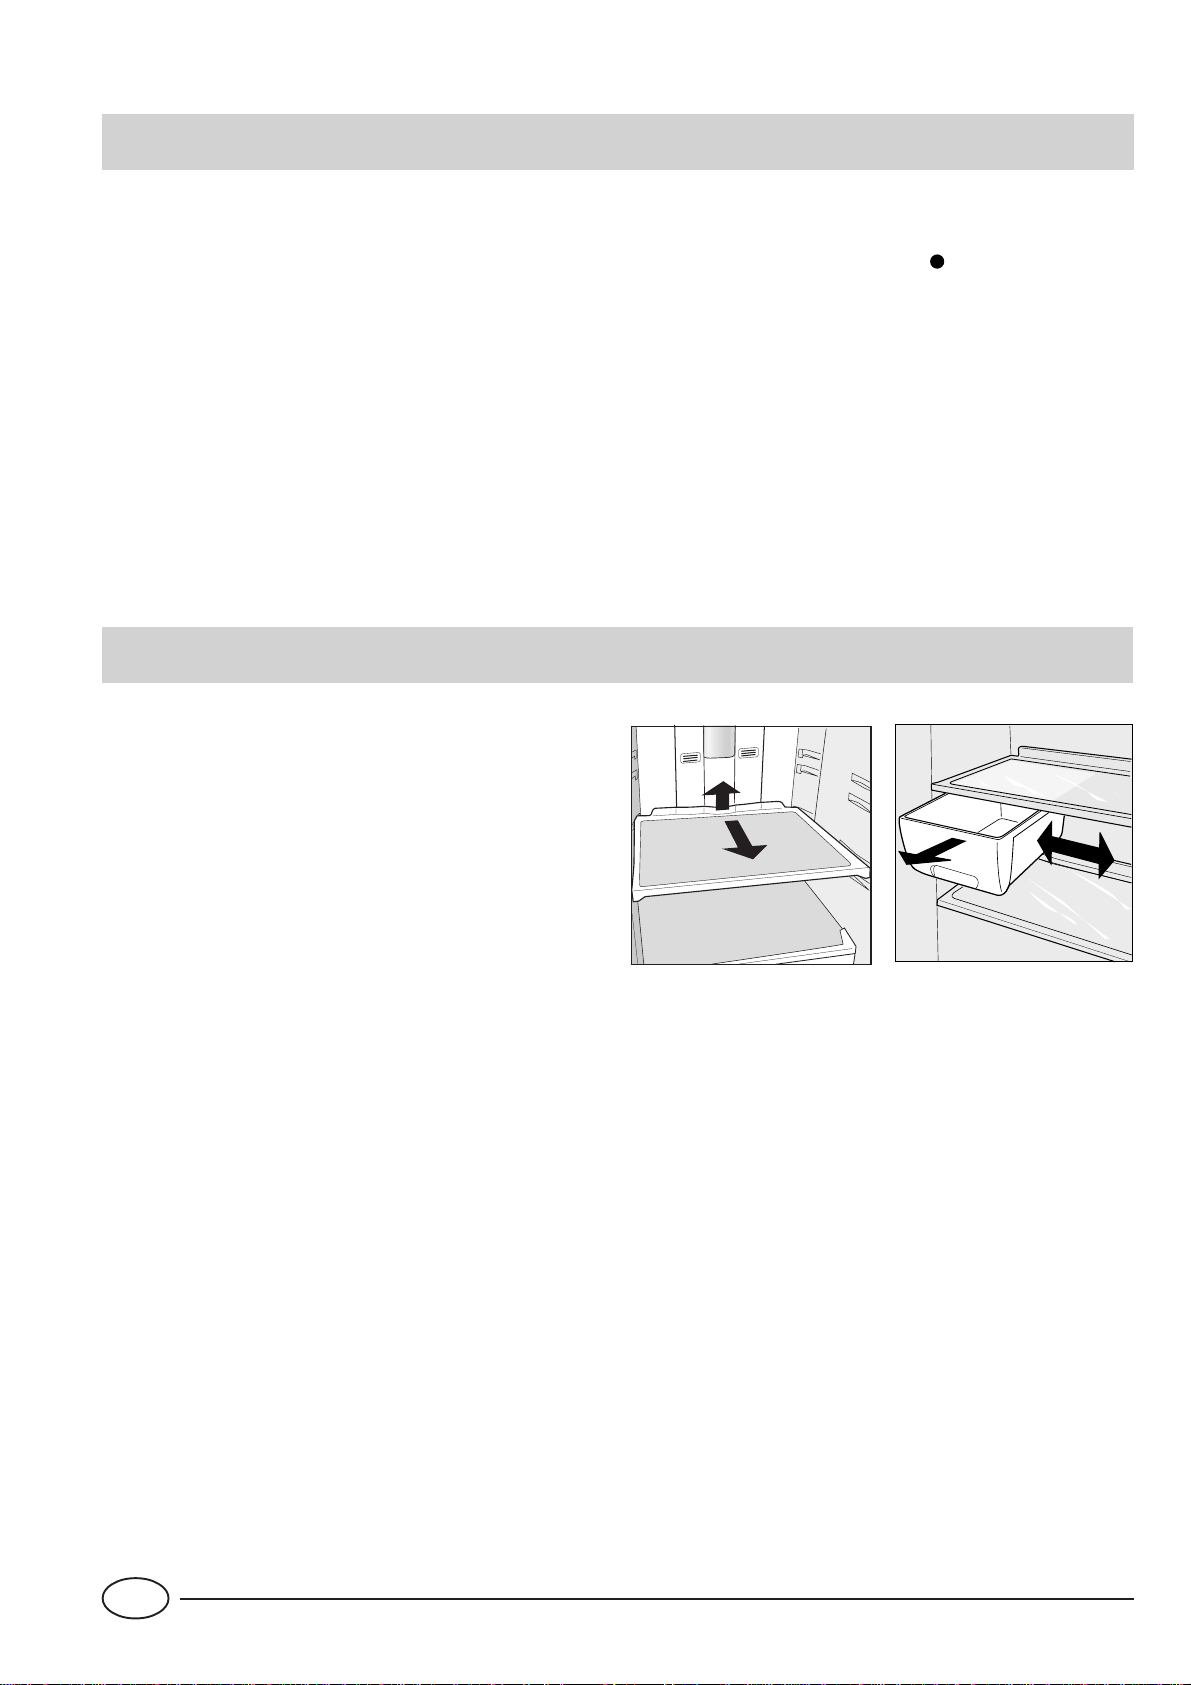
Lo scomparto frigorifero è dotato di pratici ripiani estraibili e
regolabili in altezza grazie alle apposite guide (Fig. 1). Per
questo è possibile inserire anche grandi contenitori e cibi di
notevoli dimensioni. La forma innovativa dei ripiani consente la regolazione in altezza senza estrarre completamente il
ripiano.
Inserite soltanto alimenti freddi o, al massimo, appena tiepidi, evitando di inserire quelli caldi: alzerebbero subito la temperatura interna costringendo il compressore ad un surlavoro
che spreca tanta energia elettrica.
Non inserite i liquidi in recipienti scoperti perché provocherebbero l’aumento di umidità all’interno del frigorifero e di conseguenza la formazione di brina.
La scatola formaggie salumi appesa per essere utilizzata va
estratta dal ripiano. La stessa, per ottimizzare lo spazio secondo necessità, può essere spostata in senso laterale (Fig.2).
Fig. 1
AVVERTENZA: per evitare di ostacolare la circolazione
dell'aria all'interno del frigorifero, si raccomanda di non
ostruire con cibi o contelitori i fori di ereazione.
Uso dello scomparto "Fresh box" per carni e
pesci
Questo scomparto è stato studiato per poter consentire tempi
di conservazione più lunghi per la carne ed il pesce freschi
(anche fino ad una settimana).
Ciò è possibile in quanto all’interno di questo vano è disponibile la temperatura più fredda di tutto il frigorifero
Lo sportello trasparente protettivo dello scomparto evita i
fenomeni di ossidazione o di annerimento caratteristici della
carne e del pesce esposti alla circolazione di aria.
Lo scomparto "Fresh box", inoltre, può anche essere usato
per poter raffreddare piatti che normalmente si consumano
“freddi”; prosciutto e melone, fichi e prosciutto, mozzarelle
e pomodori.
1
2
Fig. 2
I
4
Page 7
Come utilizzare al meglio il reparto congelatore
Per la preparazione dei cibi da congelare consultare
un manuale specializzato.
Un alimento scongelato, anche solo parzialmente, non deve
mai essere ricongelato: lo dovete cuocere per consumarlo
(entro 24 ore) oppure per ricongelarlo.
Gli alimenti freschi da congelare non devono essere posti a
contatto con quelli già congelati o surgelati ma vanno messi
nel vano superiore "O" dove la temperatura scende sotto i
-18°C ed è l'ideale per congelar bene i cibi. Non bisogna
infatti dimenticare che la buona conservazione degli alimenti
congelati dipende dalla velocità di congelazione.
La quantità massima giornaliera da congelare è indicata sulla targhetta caratteristiche posta all'interno dello scomparto frigorifero.
La prima volta, o dopo che il congelatore è stato inattivo,
potete congelare i cibi solo dopo aver fatto funzionare al
massimo l’apparecchio.
Premete il pulsante di congelamento "G" (lampada gialla
"E" accesa) e introducete i cibi da congelare. Dopo 24 ore,
o una volta raggiunte le temperature ottimali, la funzione di
congelamento rapido si disinserisce automaticamente (lampada gialla "E" spenta).
Durante il congelamento evitate di aprire la porta del freezer.
Per ottenere una conservazione e un successivo
scongelamento ottimali è consigliabile dividere i cibi in piccole porzioni così da poterli congelare rapidamente e in modo
omogeneo. Sulle confezioni riportate le indicazioni sul contenuto e sulla data di congelamento.
Non aprite la porta del freezer in caso di mancanza di corrente o di un guasto, ritarderete così l’aumento della temperatura al suo interno. In questo modo i surgelati e i congelati si conserveranno senza alterazioni per circa 9-14 ore.
Non mettete nel congelatore bottiglie piene: potrebbero rompersi poiché, gelandosi, tutti i liquidi aumentano di volume.
AVVERTENZA: per evitare di ostacolare la circolazione
dell'aria all'interno del congelatore, si raccomanda di
non ostruire con cibi o contelitori i fori di ereazione.
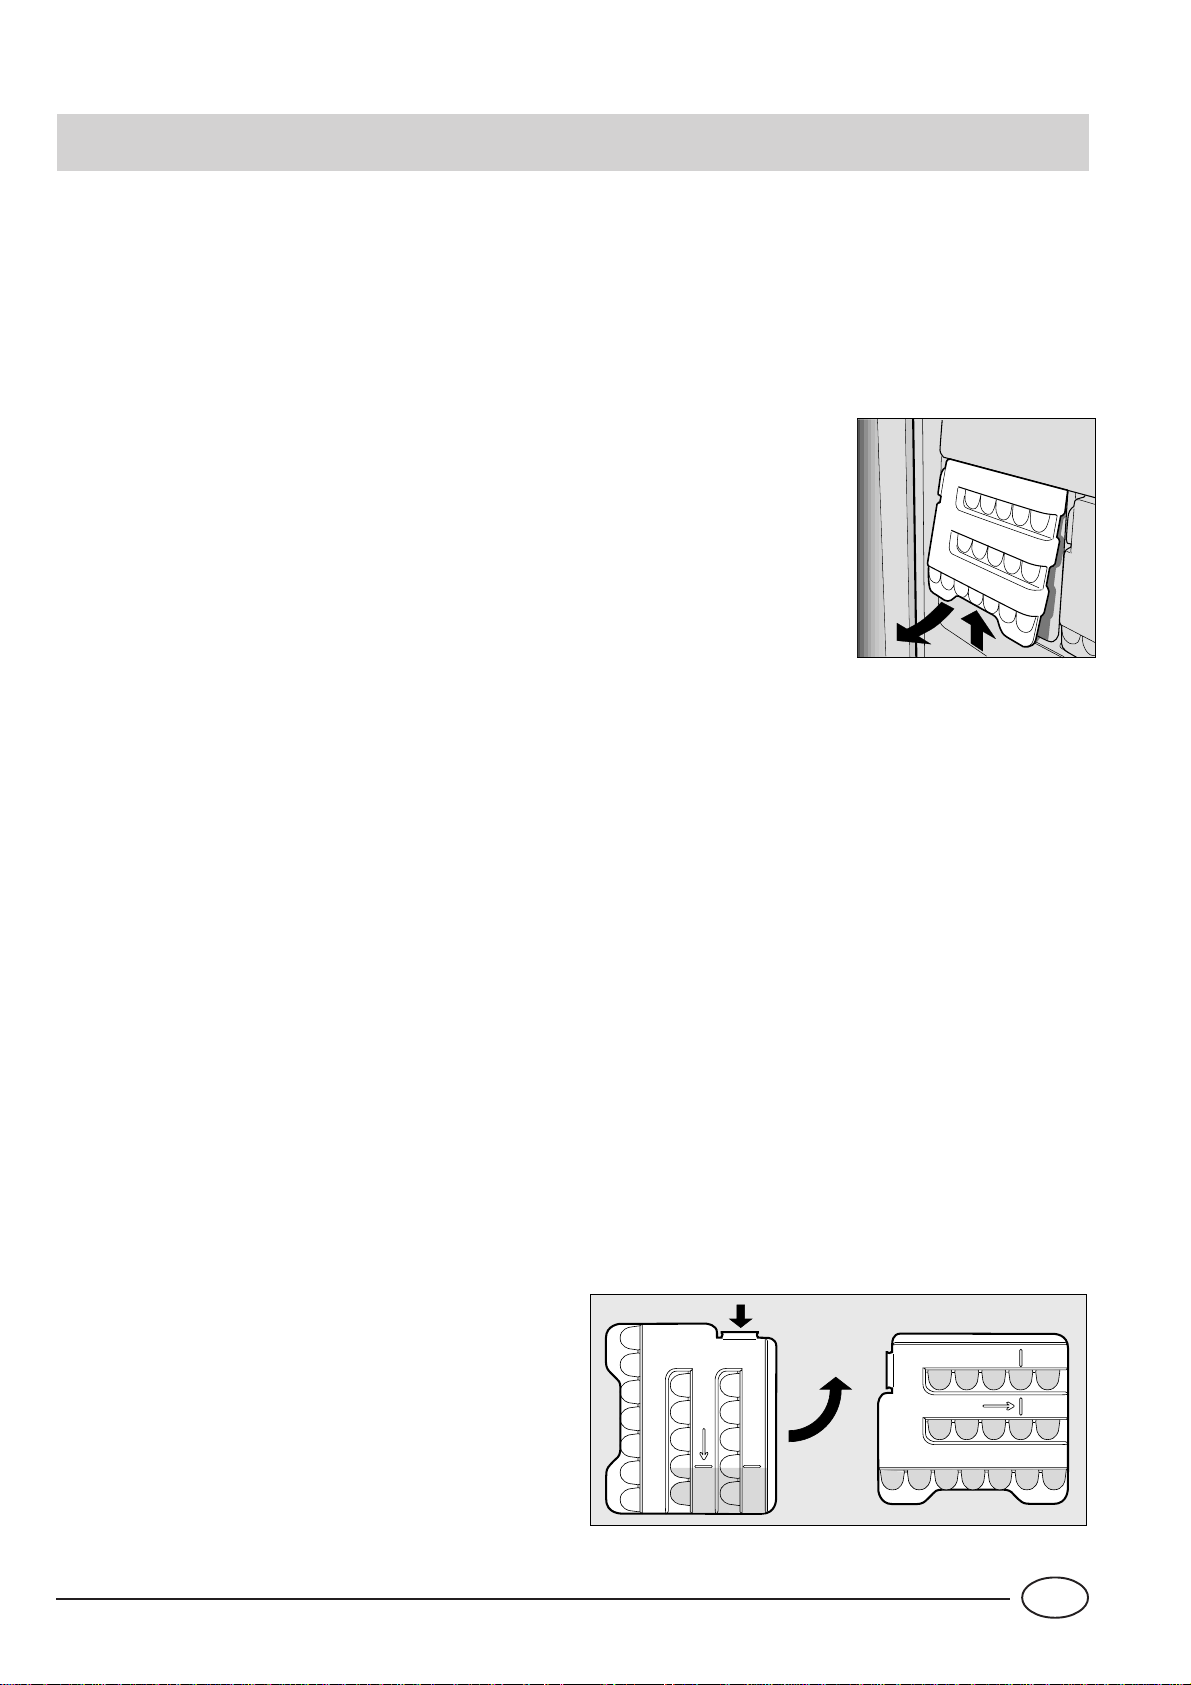
Bacinelle ghiaccio
Questo nuovo concetto di bacinelle ghiaccio, è un brevetto
esclusivo Merloni. Il fatto di essere poste sulla controporta
del vano freezer assicura maggiore ergonomia e pulizia: il
ghiaccio non viene più a contatto con i cibi riposti nel vano
freezer; inoltre si evita lo sgocciolamento dell’acqua nella
fase di caricamento (in dotazione anche il coperchio per chiudere il foro dopo l’operazione di carico dell’acqua).
Per estrarre le bacinelle ghiaccio dalla loro sede, spingere
la bacinella verso l'alto e poi
estrarre (fig. 3). Per riporre la
bacinella, inserire la parte superiore nell'apposita sede e,
una volta messa in verticale,
lasciarla ricadere.
Fig. 3
Modalità d’uso (Fig. 4)
Riempite la bacinella con acqua attraverso l’apposito foro
fino al livello indicato (MAX WATER LEVEL), prestando attenzione a non superarlo: l’inserimento dell’acqua in quantità superiore a quella necessaria, comporterà una tale formazione di ghiaccio che potrebbe ostacolare la fuoriuscita
dei ghiaccioli.
Nel caso in cui abbiate utilizzato una quantità eccessiva di
liquido, bisognerà attendere che il ghiaccio si sciolga, svuotare la bacinella, e ripetere l’operazione di carico.
Una volta effettuata l’operazione di carico attraverso il foro
indicato, ruotate la bacinella di 90°. Per il principio dei vasi
comunicanti l’acqua va a riempire le apposite forme,
dopodichè si potrà chiudere il foro con l’apposito tappo ed
allocare la bacinella nella controporta.
Dopo che il ghiaccio si sarà formato, basterà battere la bacinella su una superficie dura affinché i ghiaccioli si stacchino
dalle loro sedi e siano fatti uscire dallo stesso foro da cui è
stata introdotta l’acqua. Per migliorare l’uscita dei ghiaccioli
bagnare con acqua l’esterno della bacinella.
ATTENZIONE: ogni volta che si effettua il caricamento con
acqua, verificare che la bacinella sia completamente vuota
e non siano presenti residui di ghiaccio.
Il tempo minimo necessario per una ottimale formazione di
ghiaccio è circa 8 ore.
5
Fig. 4
WATER LEVEL
MAX
MAX
WATER LEVEL
I
Page 8
Guida all'utilizzo del reparto freezer
Carni e pesci
Tipo Confezionamento
Arrosto e bollito di
manzo
Agnello Avvolto in foglio di alluminio 1 / 2 6 Non necessario
Arrosto di maiale Avvolto in foglio di alluminio 1 6 Non necessario
Arrosto e bollito di
vitello
Bistecche e braciole di
maiale
Fettine e cotolette di
agnello o manzo
Carne macinata
Cuore e fegato In sacchetti di politene 3 Non necessario
Avvolto in foglio di alluminio 2 / 3 9 / 10 Non necessario
Avvolto in foglio di alluminio 1 8 Non necessario
Ogni fetta avvolta in politene e quindi in
foglio di alluminio in numero di 4-5
Ogni fetta avvolta in politene e quindi in
foglio di alluminio in numero di 4-5
In contenitori di alluminio ricoperti con
politene
Frollatura
(giorni)
Freschissi-
ma
Conservazione
(mesi)
6 Non necessario
6 Non necessario
2 Lentamente in frigorifero
Scongelamento
Salsicce In fogli di politene o alluminio 2 A seconda dell’uso
Polli e tacchini Avvolti in fogli di alluminio 1 / 3 9 Lentamente in frigorifero
Anatre e oche In fogli di alluminio 1 / 4 6 Lentamente in frigorifero
Anatre selvatiche,
fagiani e pernici
Conigli e lepri In fogli di alluminio 3 / 4 6 Lentamente in frigorifero
Cervo e capriolo In fogli di alluminio o politene 5 / 6 9 Lentamente in frigorifero
Pesci grossi In fogli di alluminio o politene 4 / 6 Lentamente in frigorifero
Pesci piccoli In buste di politene 2 / 3 Non necessario
Crostacei In buste di politene 3 / 6 Non necessario
Molluschi
Pesci cotti In fogli di alluminio o politene 12 In acqua calda
In fogli di alluminio 1 / 3 9 Lentamente in frigorifero
In contenitori di alluminio o plastica
ricoperti con acqua e sale
3 Lentamente in frigorifero
Pesci fritti In sacchetti di politene 4 / 6 Direttamente in padella
I
6
Page 9
Frutta e verdura
Tipo Preparazione
Mele e pere
Albicocche, pesche,
ciliege e prugne
Fragole, more e
mirtilli
Frutta cotta
Succhi di frutta
Cavolfiori
Cavolo e cavolini
Piselli Sbucciare e lavare 2’ In sacchetti di politene 12 Non necessario
Fagiolini
Sbucciare e tagliare a
pezzetti
Snocciolare e pelare 1’ / 2’
Pulire, lavare e lasciare
asciugare
Tagliare, cuocere e
passare
Lavare, tagliare e
schiacciare
Spezzettare e scottare
in acqua e succo di
limone
Pulire e lavare
(spezzettare)
Lavare e tagliare a
pezzetti
Scottatura
(min)
2’
2’ In sacchetti di politene 12 Non necessario
1’ / 2’ In sacchetti di politene 10 / 12 A temperatura ambiente
2 In sacchetti di politene 10 / 12 Non necessario
Confezionamento
In contenitori ricoperti di
sciroppo
In contenitori ricoperti di
sciroppo
In contenitori ricoperti di
zucchero
In contenitori,
aggiungere 10% di
zucchero
In contenitori, zucchero
a piacere
Conservazione
(mesi)
12 Lentamente in frigorifero
12 Lentamente in frigorifero
10 / 12 Lentamente in frigorifero
12 Lentamente in frigorifero
10 / 12 Lentamente in frigorifero
Scongelamento
Carote, peperoni e
rape
Funghi e asparagi Lavare e tagliare 3’ / 4’ In sacchetti o contenitori 6 A temperatura ambiente
Spinaci Lavare e tagliuzzare 2’ In sacchetti di politene 12 A temperatura ambiente
Verdure varie per
minestra
Cibi vari Preparazione Scottatura Confezionamento
Pane In sacchetti di politene 4
Torte In fogli di politene 6
Panna In contenitori di plastica 6
Burro
Cibi cotti,
minestrone
Tagliare a fette,
pelare, lavare
Lavare e tagliare a
pezzetti
3’ / 4’ In sacchetti di politene 12 Non necessario
3’
In sacchetti in piccole
porzioni
Nel suo incarto originale
avvolto in alluminio
Suddiviso in contenitori
di plastica o vetro
6 / 7 A temperatura ambiente
Conservazione
(mesi)
6 In frigorifero
3 / 6
Scongelamento
A temperatura ambiente o
nel frigorifero
A temperatura ambiente e
cuocere a 100/200°C
A temperatura ambiente o
nel frigorifero
A temperatura ambiente e
in acqua calda
Uova
Congelare senza guscio
in piccoli contenitori
7
10
A temperatura ambiente o
nel frigorifero
I
Page 10
Consigli per risparmiare
- Installatelo bene
E cioè lontano da fonti di calore, dalla luce diretta del sole,
in un locale ben aerato e con le distanze indicate nel paragrafo "Installazione/L'aerazione".
- Il freddo giusto
Il troppo freddo fa aumentare i consumi
- Non riempitelo troppo
Per conservare bene i cibi il freddo deve circolare liberamente all’interno del frigorifero. Riempirlo troppo significa impedire questa circolazione facendo lavorare di continuo il
compressore.
- A porte chiuse
Aprite il vostro frigorifero il meno possibile perché ogni volta
che lo fate va via gran parte dell’aria fredda. Per ristabilire la
temperatura il motore deve lavorare a lungo consumando
molta energia.
Allarmi sonori e visivi
Allarme per porta aperta
Nel caso in cui la porta del frigorifero rimane aperta per un
tempo superiore ai due minuti viene emesso un segnale acustico. Il suono cessa alla chiusura della porta.
Allarme per riscaldamento anomalo del
freezer
1. Per segnalare un eccessivo riscaldamento del freezer vie-
ne emesso un segnale acustico ed iniziano a lampeggiare
le due spie gialle "C" e "E" a segnalare un pericoloso
riscaldamento. Per non far ricongelare il cibo, il freezer si
manterrà ad una temperatura intorno a 0°C, permettendovi di consumare gli alimenti entro le 24 ore o di
ricongelarli previa cottura. Tramite l'apposita procedura
di tacitazione allarme (aprire e chiudere la porta del frigo)
si può spegnere il segnale acustico. Per tornare al normale funzionamento si dovrà invece portare la manopola
del freezer "F" nella posizione " " (frigorifero spento) e
successivamente riaccendere il prodotto.
- Occhio alle guarnizioni
Mantenetele efficienti e pulite in modo che aderiscano bene
alle porte; solo così non lasceranno uscire nemmeno un po’
di freddo.
- Niente cibi caldi
Una pentola calda messa nel frigorifero alza immediatamente
la temperatura di diversi gradi, lasciatela raffreddare a temperatura ambiente prima di introdurla nel frigorifero.
2. Se la temperatura continua a salire verso valori eccessiva-
mente alti viene emesso nuovamente il segnale acustico
ed iniziano a lampeggiare le due spie gialle "C" e "E"
insieme a quella verde "D" a segnalare l'eccessivo riscaldamento. Si consiglia di verificare lo stato del cibo, potrebbe essere necessario gettarlo. Tramite l'apposita procedura di tacitazione allarme (aprire e chiudere la porta
del frigo) si può spegnere il segnale acustico. Per tornare
al normale funzionamento si dovrà invece portare la manopola del freezer "F" nella posizione " " (frigorifero
spento) e successivamente riaccendere il prodotto.
Riscaldamento
pericoloso
+ segnale acustico
Riscaldamento
eccessivo
+ segnale acustico
I
8
Page 11
Come tenerlo in forma
Prima di procedere a qualsiasi operazione di pulizia
staccare l'apparecchio dalla rete di alimentazione (posizionare su " " la manopola "F" e poi disinserire la
spina). Nel caso in cui tale procedura non sia eseguita,
si potrebbe verificare una condizione di allarme. ATTENZIONE: tale allarme non è sintomo di anomalia. Per
ripristinare il corretto funzionamento del prodotto
portare la manopola "F" nella posizione " " e successivamente nella posizione voluta.
FUNZIONE VACANZE. Quello
delle muffe e cattivi odori che
si formano all'interno del frigorifero spento quando si parte per le vacanze, non è più un
problema: basta attivare la
funzione Holiday (posizionando opportunamente la
manopola "B"). In questo modo, con un basso consu-
mo, si mantiene la temperatura nel vano frigo nell'intorno di 15°C (potete conservare ad esempio trucchi e
cosmetici) e si lascia funzionare il congelatore al minimo, indispensabile per la conservazione dei cibi.
Un doppio breve segnale acustico vi confermerà l'attivazione della funzione, mentre la disattivazione sarà
indicata da uno singolo.
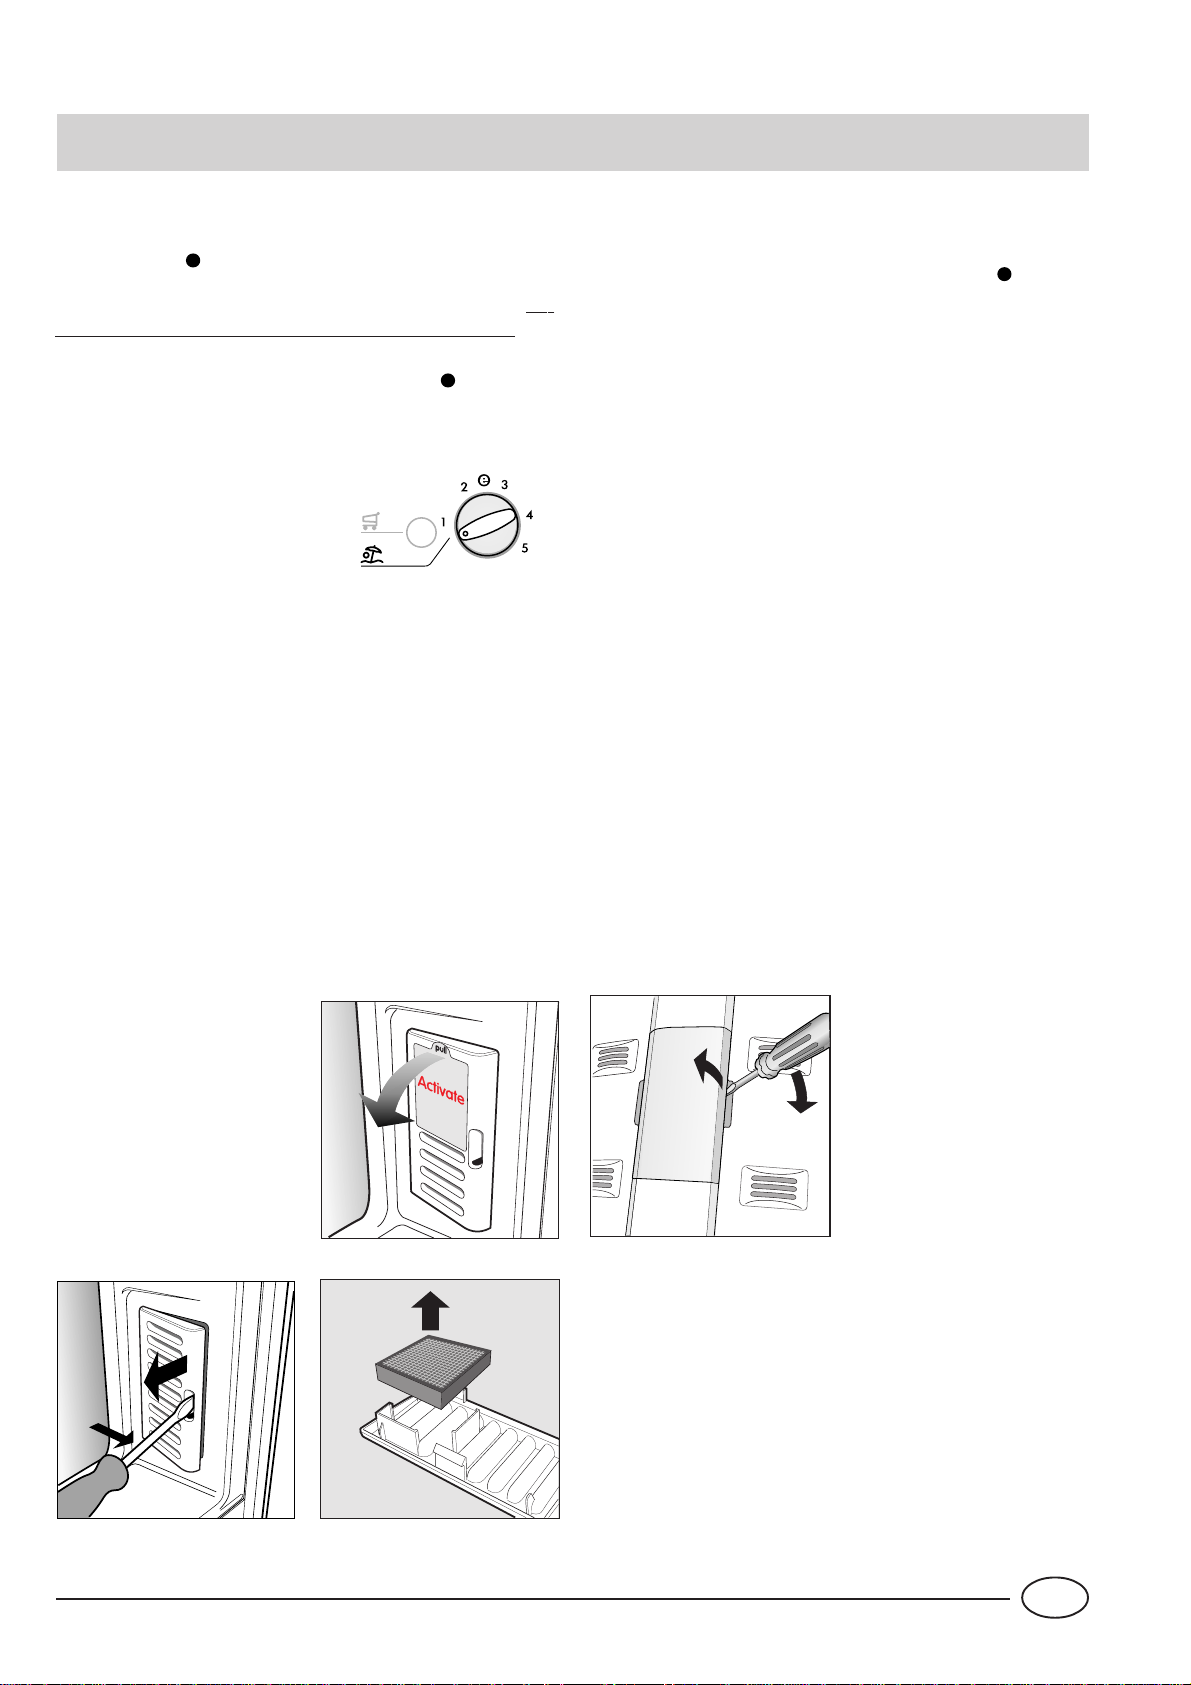
“Il nuovo filtro anti-odori assicura una migliore qualità dell’aria all’interno del frigorifero. Il filtro è collocato in basso a
destra, all’interno della bocchetta di aerazione. Il filtro a carboni attivi può essere attivato togliendo l’adesivo dalla
bocchetta (Fig. 5). In generale, per assicurare una costante
purificazione dell’aria, il filtro dovrebbe essere sostituito dopo
circa 6-8 mesi dalla sua attivazione (Fig. 6 e 7). La durata può comunque variare a
seconda dei cibi conservati.
Per la sostituzione, sufficiente contattare il Centro Assistenza”.
Pulizia e manutenzioni particolari
Prima di pulire il frigorifero posizionare su " " la manopola "F" e successivamente disinserire la spina.
- I materiali con i quali è stato fabbricato il vostro apparecchio sono igienici e non trasmettono odori ma per mantenere queste qualità è necessario che i cibi vengano sempre
protetti e ben chiusi, per evitare macchie difficilmente rimovibili o la creazione di cattivi odori.
- Solo acqua e bicarbonato. Per pulire sia l’interno che l’esterno usate una spugnetta con acqua tiepida e bicarbonato di
sodio che, tra l’altro, è anche un buon disinfettante. Se non
l’avete in casa potete impiegare del sapone neutro (quello
di Marsiglia ad esempio).
- Cosa non usare. Mai abrasivi, mai candeggina, mai ammoniaca. Proibitissimi i solventi e altri prodotti simili.
- Tutto ciò che si può togliere, mettetelo a bagno in acqua
calda con sapone o detersivo per i piatti. E prima di rimetterlo a posto, risciacquatelo e asciugatelo bene.
- E per il retro? Qui la polvere si ferma e si concentra provocando qualche problema al buon funzionamento dell’apparecchio. Usate la bocchetta lunga del vostro aspirapolvere,
alla potenza media per eliminarla. E con molta delicatezza!
- Quando sta fermo a lungo. Se decidete di fermare il frigorifero durante il periodo estivo, bisogna pulire l’interno e lasciare
le porte aperte.
- Come sostituire la lampadina interna.
Per sostituire la lampada di illuminazione dello scomparto
frigorifero staccate l'apparecchio dalla rete di alimentazione
e cambiate la lampada avariata con un'altra di potenza non
superiore a 10 W.
Per accedere alla lampada agire come indicato in Fig. 8.
Fig. 6
Fig. 5
Fig. 7
9
Fig. 8
I
Page 12
C'è qualche problema?
La spia verde non si accende
Avete controllato se:
· l’interruttore generale dell’appartamento è disinserito;
· la spina non è correttamente inserita nella presa di corren-
te;
· la presa non è efficiente; provate a collegare la spina ad
un'altra presa del locale.
Il motore non parte
Avete controllato se:
· sono trascorsi 8 minuti dopo l’accensione?
Questo modello, infatti, è dotato di un controllo
salvamotore che lo fa avviare solo dopo circa 8 minuti
dall’accensione.
Le spie sono debolmente accese
Provate a invertire la spina nella presa, ruotandola
Il frigorifero e il congelatore raffreddano poco
Avete controllato se:
· le porte non chiudono bene o le guarnizioni sono rovinate;
· le porte vengono aperte molto spesso;
· le manopole di regolazione della temperatura non sono in
posizione corretta;
· il frigorifero o il congelatore sono stati riempiti eccessivamente.
Se, nonostante tutti i controlli, l’apparecchio non funziona e
l’inconveniente da voi rilevato continua ad esserci, chiamate
il Centro di Assistenza più vicino, comunicando queste informazioni: il tipo di guasto, la sigla del modello (Mod.) e i
relativi numeri (S/N) scritti sulla targhetta delle caratteristiche posta in basso a sinistra, accanto alla verduriera (vedi
esempi nelle figure seguenti).
93139180000 S/N 704211801
Cod.
Gross
Bruto
Brut
W
Fuse
A
Freez. Capac
Poder de Cong
kg/24 h
4,0
Max 15 w
Class
Clase
N
Classe
75
Test
P.S-I.
TI
Net
Util
Utile
Pressure
HIGH-235
LOW 140
RG 2330
Mod.
220 - 240 V- 50 Hz 150 W
340
Total
Gross
Bruto
Brut
Compr.
Syst.
Kompr.
Made in Italy 13918
Gross
Bruto
Brut
R 134 a
kg 0,090
Non ricorrete mai a tecnici non autorizzati e rifiutate
sempre l’installazione di pezzi di ricambio non originali.
Nel frigorifero gli alimenti si gelano troppo
Avete controllato se:
· la manopola di regolazione della temperatura non è in
posizione corretta;
· gli alimenti sono a contatto con la parte posteriore, la più
fredda.
Il motore funziona di continuo
Avete controllato se:
· l'interruttore di congelamento è stato premuto (lampada
gialla accesa o lampeggiante);
· la porta non è ben chiusa o è stata aperta di continuo;
· la temperatura esterna è molto alta.
L’apparecchio emette troppo rumore.
Avete controllato se:
· Il frigorifero non è posto ben in piano:
· è stato installato tra mobili o oggetti che vibrano ed emet-
tono rumori;
· il gas refrigerante interno produce un leggero rumore anche quando il compressore è fermo (non è un difetto).
I
10
Page 13

La seguridad, una buena costumbre
ATENCIÓN
Lea atentamente las advertencias contenidas en este folleto,
pues le proporcionará importantes indicaciones sobre la seguridad de la instalación, de uso y de mantenimiento.
Este aparato ha sido fabricado en conformidad con las normas internacionales de seguridad, cuyo objeto es proteger al
consumidor.
Ha obtenido además la marca IMQ, otorgada por los técnicos
del Instituto Italiano de Calidad, solo a los aparatos que cumplen las normas del CEI (Comité Electrotécnico Italiano)
- El fabricante se reserva el derecho de alterar las características de los modelos sín previo avise.
- Algunos modelos pueden no disposer de todos los accesorios indicados
1. Este aparato no se debe instalar al aire libre, ni siquiera si el
lugar está al resguardo de un cobertizo; es muy peligroso dejarlo expuesto a la lluvia o a las tormentas.
2. Lo deben usar solamente los adultos y exclusivamente para
conservar y congelar alimentos siguiendo las instrucciones de
uso escritas en este manual.
3. No tocar ni maniobrar nunca el aparato con los pies desnudos o con las manos o pies mojados.
4. No se aconseja usar prolongaciones o enchufes múltiples. Si
el refrigerador se instala entre muebles, controlar que el cable
no sufra pliegues o compresiones peligrosas.
5. No tirar nunca del cable o del refrigerador para desconectar
la clavija de la toma de corriente de la pared: es muy peligroso.
6. No tocar las partes internas refrigerantes, sobre todo con las
manos mojadas, ya que se pueden quemar o herir. No introducir en la boca cubitos de hielo apenas secados del congelador ya
que se corre el riesgo de quemaduras.
7.
No realizar limpieza ni mantenimiento sin haber desconectado antes el aparato respecto de la red de alimentación (desconectando el enchufe o el interruptor general del circuito
eléctrico del apartamento);
de regulación de la temperatura a la posición "
nar todo contacto eléctrico.
8. Antes de hacer retirar el refrigerador anterior, poner fuera de
uso su eventual cerradura para evitar que los niños, jugando,
puedan quedar encerrados dentro del aparato.
9. En caso de avería, antes de llamar al servicio de asistencia
técnica, controlar el capítulo “Algunos problemas” para verificar si es posible eliminar el eventual inconveniente. No intentar
reparar la avería tratando de acceder a las partes internas.
10. Cuando se deba sustituir el cable de alimentación, dirigirse a
nuestros Centros de Asistencia. En algunos casos las conexiones
se realizan con terminales especiales, en otros casos es necesario el
uso de una herramienta especial para acceder a las conexiones.
11. No use aparatos eléctricos dentro del compartimiento
conservador de alimentos si los mismos no son del tipo
recomendado por el fabricante.
12. Al finalizar la vida funcional del aparato – que contiene gas
ciclopentano en la espuma aislante y eventualmente gas R600a
(isobutano) en el circuito refrigerante – el mismo se deberá
asegurar contra pérdidas antes de enviarlo al basurero. Para esta
operación dirigirse al comerciante o al Ente Local encargado.
en efecto no basta llevar el botón
" para elimi-
Instalación
Para garantizar un buen funcionamiento y un mínimo
consumo de electricidad es importante que la instalación se realice correctamente.
La aireación
El compresor y el condensador emiten calor y por ello requieren una buena aireación. No son adecuados los ambientes
con poca ventilación. Por lo tanto, el aparato se debe instalar
en un ambiente que posea una apertura (ventana o puertaventana) que asegure el necesario intercambio de aire. Y que
no sea demasiado húmedo.
Tener cuidado, durante la instalación, de no cubrir u obstruir
las rejillas que permiten la buena ventilación del aparato.
Para una buena aireación del aparato es necesario dejar:
- una distancia de 10 cm. como mínimo entre la parte superior y eventuales muebles situados encima;
- una distancia de 5 cm. como mínimo entre los costados y
eventuales muebles/paredes laterales.
Lejos del calor
Evitar colocar el aparato en un lugar expuesto directamente a
la luz solar, junto a la cocina eléctrica o similares.
En un lugar plano
El aparato debe estar en un lugar bien plano; si el piso no está
nivelado, se puede intervenir con las patitas regulables correspondientes colocadas anteriormente.
.
Conexión eléctrica y toma de tierra
Antes de proceder a la conexión eléctrica, controlar que el
voltaje indicado en la placa de características, colocada abajo
y a la izquierda junto al recipiente para verduras, corresponda
con la de la instalación de su casa, y que la toma de corriente
posea una regular toma de tierra, de acuerdo a lo prescripto
por la ley sobre la seguridad de las instalaciones 46/90. Si no
existe la toma de tierra, el Fabricante declina toda responsabilidad. No usar tomas múltiples o adaptadores.
Coloque el aparato de modo tal que se pueda acceder
fácilmente al toma al cual está conectado.
¿La potencia es insuficiente?
La toma de4 corriente eléctrica debe ser capaz de soportar la
carga máxima de potencia del aparato, indicada en la placa de
características ubicada abajo y a la izquierda junto al recipiente de verduras.
Antes de conectarlo eléctricamente
Después del transporte, colocar el aparato verticalmente y esperar 3 horas como mínimo antes de conectarlo al
tomacorriente, para permitir un correcto funcionamiento.
Reversibilidad de apertura de la puerta
Caso pretenda cambiar el sentido de apertura de la puerta,
consulte el Servicio de Asistencia Técnica de sua zona, cuyo
numero de telefono encontrara en el correspondiente folleto.
11
E
Page 14

Visto de cerca
Botón para el enfriamiento rápido
A
Presionado (se enciende la luz testigo amarilla
"C") permite bajar al mínimo la temperatura
en el compartimiento refrigerador.
Mando para la regulación de la temperatura del
B
compartimiento refrigerador
Este mando permite regular la temperatura del refrigerador según varias
posiciones:
1 menos frío;
4 más frío.
temperatura óptima con bajo
consumo:
función vacaciones activada.
Luz testigo amarilla de enfriamiento rápido
C
Esta luz testigo amarilla se enciende cuando
se activa el enfriamiento rápido pulsando el
botón "A".
Botón para el congelamiento rápido
G
Presionado (se enciende la luz
testigo amarilla "E") permite el
congelamiento de comida fresca.
Balconcito extraible con tapa, con huevera y
H
recipiente para manteca
Balconcillo extraíble porta-objetos
I
Sujetabotellas
J
Balconcillo extraíble para botellas
K
Bandejas para cubitos de hielo
L
Luz testigo verde
D
Cuando esta luz indicadora verde está encendida quiere decir que el aparato está conectado a la red de alimentación.
Luz testigo de congelamiento rápido
E
Este luz testigo amarilla se enciende al
presionar el botón de congelamiento rápido
"G".
Nota: estas tres luces testigo sirven también para indicar un
anómalo aumento de temperatura en el congelador
(ver el párrafo "Alarmas sonoras y visuales").
Mando para la regulación de la temperatura del
F
compartimiento congelador
Este mando permite regular la temperatura del congelador según varias posiciones:
el refrigerador está apagado;
1 menos frío;
4 más frío.
temperatura óptima con bajo
consumo:
Patas regulables
M
Espacios para la conservación
N
Espacios utilizables para la congelación y la
O
conservación
Cajones para frutas y verduras
P
Compartimiento "Fresh box" para carnes y
Q
pescados
Reijlas extraíbles y regulables en altura
R
Recipiente para fiambres y quesos
S
Recuerden, no obstante, que pueden interrumpir el
funcionamiento de todo el aparato (refrigerador incluido) disponiendo el mando en posición " "
E
.
12
Page 15
A
B C
D
E
F G
R
S
R
Q
P
O
H
I
I
J
K
L
N
M
13
M
E
Page 16

Puesta en marcha
ATENCIÓN
Después del transporte, para permitir un correcto funcionamiento, colocar el aparato en posición vertical y
esperar unas 3 horas antes de conectarlo a la toma de
corriente. Antes de introducir alimentos en el frigorífico,
limpie bien su interior con agua templada y bicarbonato.
Tiempo de protección del motor
Este modelo posee un control de protección contra
sobrecargas, por lo tanto, si después de la instalación,
el compresor no arranca inmediatamente, no se
preocupe porque se activará automáticamente después
de 8 minutos aproximadamente.
Así sucederá después de cada interrupción de la
alimentación, ya sea debido a una interrupción general
de corriente o a que Ud. lo haya apagado (por ejemplo:
para la limpieza o el descongelamiento del freezer).
Después de haber conectado el enchufe a la toma de
corriente, asegurarse que el testigo verde "D" se encienda;
en caso contrario cerciorarse de que el mando del congelador
"F" no esté en la posición " ".
Compartimiento refrigerador
Disponer el mando "B" en una posición media; después de
algunas horas será posible introducir los alimentos en el
refrigerador.
Compartimiento congelador
Gire la perilla "F" a una posición intermedia y pulse el botón
"G" para el congelamiento rápido (la luz testigo amarilla
"E" se encenderá ). Cuando el congelador habrá alcanzado
la temperatura óptima, la luz testigo amarilla "E" se apagará. A continuación es posible introducir en el congelador los
alimentos precongelados.
Como utilizar lo mejor posible la sección nevera
El termóstato regula automáticamente la temperatura en
el interior del aparato.
1 = menos frÍo
= temperatura óptima con bajo consumo
5 = más frÍo
Se aconseja, siempre, una posición intermedia
Cuando el refrigerador se llena después de una gran compra, utilice la función Enfriamiento rápido (activada pulsando el botón "A") para alcanzar rápidamente una condición de funcionamiento óptima. Una vez transcurrido el tiempo necesario, la función se desactiva automáticamente.
Una vez transcurrido el tiempo necesario, la función se
desactiva automáticamente.
Siga atentamente nuestros consejos sobre la duración máxima de conservación: ningún alimento, ni aún el más fresco,
se mantiene inalterable durante mucho tiempo.
Contrariamente a lo que suele creerse, los alimentos cocinados no se conservan más tiempo que los crudos.
El compartimiento frigorifico está equipado con prácticas
rejillas extraibles que pueden regularse en altura utilizando
las distintas guías (Fig. 1). De este modo, es posible introducir incluso grandes recipientes, además de alimentos de notables dimensiones.
Introduzca sólo alimentos fríos o, como máximo, apenas tibios,
evitando colocar alimentos calientes: ellos alzarían inmediatamente la temperatura interna obligando al compresor a realizar
un mayor trabajo que desperdiciaría tanta energía eléctrica.
No introduzca líquidos en recipientes destapados, pues
aumentaría así la humedad en el interior del frigorífico y, por consiguiente, la formación de escarcha.
Para utilizar el recipiente para fiambres/quesos suspendido,
se debe extraer del estante. El mismo, para optimizar el
espacio de acuerdo a las necesidades, se puede desplazar
en sentido lateral (Fig. 2).
Fig. 1
Advertencia: para evitar obstaculizar la circulación de
aire en el interior del congelador, se recomienda no
obstruir los orificios de aireación con alimentos o
recipientes..
Uso del compartimiento "Fresh box" para
carnes y pescados
Este compartimiento fue estudiado para poder permitir
tiempos de conservación mayores para la carne y el pescado
frescos (incluso hasta una semana).
Esto es posible ya que la temperatura en el interior de este
compartimiento es la más baja de todo el refrigerador
La puerta transparente protectora del compartimiento evita
los fenómenos de oxidación o de ennegrecimiento
característicos de la carne y del pescado expuestos a la
circulación de aire.
El compartimiento "Fresh box", puede además, ser usado
para poder enfriar platos que normalmente se consumen
"fríos"; jamón y melón, higos y jamón, tomates y mozzarella
.
1
2
Fig. 2
E
14
Page 17

Como utilizar lo mejor posible la sección congelador
Para la preparación de alimentos a congelar, consultar
un manual especializado.
No congele de nuevo un alimento descongelado, aunque
sólo sea parcialmente: cocínelo para consumirlo (en 24 horas) o para volverlo a congelar.
Los alimentos frescos a congelar no deben ser colocados en
contacto con aquellos ya congelados, sino que se deben
ubicar en el compartimiento superior "O", donde la temperatura desciende por debajo de los -18°C que es la temperatura ideal para congelar bien los alimentos. No olvide que
la buena conservación de los alimentos congelados depende de la velocidad de congelación.
Congele únicamente la cantidad en kg indicada en la placa
de características que encontrará a la izquierda del cajón
para frutas y verduras.
La primera vez que lo utilice, o cuando el congelador haya
estado inactivo, haga funcionar al máximo el aparato
Simplemente presione el botón de congelamiento “G”
(lámpara amarilla “E” encendida) e introduzca los alimentos
que debe congelar. Después de 24 horas, o una vez alcanzada
la temperatura óptima, la función de congelamiento rápido
se desactiva automáticamente (lámpara amarilla “E”
apagada).
Durante la congelación, evite abrir la puerta del congelador.
Para conseguir una conservación y una descongelación óptimas, se aconseja repartir los alimentos en pequeñas cantidades, así se congelarán rápidamente y de forma homogénea.
Indique en los envases su contenido y la fecha de congelación.
Con la finalidad de obtener un mayor espacio en el
compartimiento del congelador, se puede extraer el cajón
central, colocando los alimentos directamente en el estante.
Después de realizar la carga, verifique, que la puerta cierre
correctamente.
No abra la puerta del congelador en caso de interrupción del
suministro eléctrico o de avería: así retrasará la elevación de
la temperatura en su interior y los congelados se conservarán sin alteraciones de 9 a 14 horas.
No introduzca en el congelador botellas llenas: podrían romperse, ya que todos los líquidos al congelarse aumentan de
volumen.
Advertencia: para evitar obstaculizar la circulación de
aire en el interior del congelador, se recomienda no
obstruir los orificios de aireación con alimentos o
recipientes..
Cubetas de hielo
Este nuevo concepto de cubetas de hielo, es una patente
exclusiva Merloni. El hecho de estar colocadas en la
contrapuerta del congelador asegura mayor ergonomía y
limpieza: el hielo no está más en contacto con los alimentos
ubicados en el congelador; además se evita el goteo de agua
en el momento de la carga (se suministra también la tapa para
cerrar el orificio después de la operación de carga de agua).
Para extraer las cubetas de
hielo de su alojamiento,
empuje la cubeta hacia arriba
y luego extráigala (fig. 3). Para
volver a colocar la cubeta,
introduzca la parte superior
en el alojamiento
correspondiente y, una vez
puesta en posición vertical,
déjela caer.
Fig. 3
Modo de uso (Fig. 4)
Llene la cubeta con agua a través del orificio correspondiente
hasta el nivel indicado (MAX WATER LEVEL), teniendo
cuidado de no superarlo: la introducción de agua en cantidad
superior a la necesaria, provocará una formación de hielo tal
que podría obstaculizar la salida de los cubitos.
Si se ha introducido una cantidad excesiva de líquido, se
deberá esperar que el hielo se derrita, vaciar la cubeta, y
repetir la operación de llenado
Una vez efectuada la operación de carga a través del orificio
indicado, gire la cubeta 90 °. Por el principio de vasos
comunicantes, el agua llena las distintas formas de la cubeta,
después de lo cual, se podrá cerrar el orificio con el tapón
correspondiente y colocar la cubeta en la contrapuerta.
Después que se formó el hielo, bastará golpear la cubeta
sobre una superficie dura para que los cubitos se despeguen
de sus alojamientos y puedan salir por el mismo orificio por
el cual se ha introducido el agua. Para facilitar la salida de
los cubitos, vierta agua en el exterior de la cubeta.
ATENCIÓN: cada vez que efectúa la carga con agua, verifique
que la cubeta esté completamente vacía y que no hayan
quedado residuos de hielo.
El tiempo mínimo necesario para una mejor formación de
hielo es de aproximadamente 8 horas.
15
Fig. 4
WATER LEVEL
MAX
MAX
WATER LEVEL
E
Page 18

Guía para el uso del compartimiento congelador
Carnes y pescados
Tipo Confección
Asado y cocido de
novillo
Cordero Envuelto en hojas de aluminio 1 / 2 6 No necesario
Asado de cerdo Envuelto en hojas de aluminio 1 6 No necesario
Asado y cocido de
ternera
Bistec de cerdo
Lonchas y costillas de
cordero o novillo
Carne picada
Corazón y hígado En bolsitas de politeno 3 No necesario
Envuelto en hojas de aluminio 2 / 3 9 / 10 No necesario
Envuelto en hojas de aluminio 1 8 No necesario
Cada loncha tiene que ser envuelta en
politeno y luego en hojas de aluminio en
número de 4-5
Cada lonchaa tiene que ser envuelta en
politeno y luego en hojas de aluminio en
número de 4-5
En recipientes de aluminio cubierto con
politeno
Macerado de
la carne (dias)
Fresquísima 2
Duración
(meses)
6No necesario
6No necesario
Descongelación
Lentamente en
frigorífico
Salchichas En hojas de politeno o aluminio 2 Según el empleo
Pollos y pavos Envuelto en hojas de aluminio 1 / 3 9
Patos y gansos En hojas de aluminio 1 / 4 6
Patos salvajes, faisanes
y perdices
Conejos y liebres En hojas de aluminio 3 / 4 6
Ciervo y corzo En hojas de aluminio o politeno 5 / 6 9
Pescados muy grandes En hojas de aluminio o politeno 4 / 6
Pescados pequeños En sobres de politeno 2 / 3 No necesario
Mariscosos En sobres de politeno 3 / 6 No necesario
Moluscos
En hojas de aluminio 1 / 3 9
En recipientes de aluminio o plástico cubiertos
con agua y sal
3
Lentamente en
frigorífico
Lentamente en
frigorífico
Lentamente en
frigorífico
Lentamente en
frigorífico
Lentamente en
frigorífico
Lentamente en
frigorífico
Pescados cocidos En hojas de aluminio o politeno 12 En agua caliente
Pescados fritos En sobres de politeno 4 / 6
E
16
Directamente en la
sartén
Page 19

Fruta y verdura
Tipo Confección
Manzanas y peras
Albaricoques, melocotones,
cerezas y ciruelas
Fresas, moras y arándanos
Fruta cocida
Jugos de fruta Lavar, cortar y aplastar
Coliflores
Coles y coles de Bruselas Limpiar y lavar (partir) 1' / 2' En bolsitas de politeno 10 / 12
Guisantes Pelar y lavar 2' En bolsitas de politeno 12 No necesario
Judías verdes
Zanahorias, pimientos y
nabos
Pelar y cortar en
pedacitos
Deshuesar y pelar 1' / 2'
Limpiar, lavar y dejar
secar
Cortar, cocinar y
tamizar
Partir y calentar en
agua y jugo de limón
Lavar y cortar en
pedacitos
Cortar en rebanadas,
pelar y lavar
Cocci-
ón
3' / 4' En bolsitas de politeno 12 No necesario
Confección
En recipientes, cubiertos
2’
de almíbar
En recipientes, cubiertos
de almíbar
En recipientes, cubiertos
de azúcar
En recipientes, agregar
el 10% de azúcar
En recipientes, azúcar
según los gustos
2' En bolsitas de politeno 12 No necesario
2 En bolsitas de politeno 10 / 12 No necesario
Duración
(meses)
12
12
10 / 12
12
10 / 12
Descongelación
Lentamente en
frigorífico
Lentamente en
frigorífico
Lentamente en
frigorífico
Lentamente en
frigorífico
Lentamente en
frigorífico
A temperatura
ambiente
Setas y espárragos Lavar y cortar 3' / 4' En bolsitas o recipientes 6
Espinacas Lavar y desmenuzar 2' En bolsitas de politeno 12
Verduras varias para sopa
Tipo Confección
Pan En bolsitas de politeno 4
Tortas En hojas de politeno 6
Nata
Mantequilla
Comidas cocidas, sopa de
legumbres
Lavar y cortar en
pedacitos
Scott-
atura
En bolsitas en pequeñas
3'
porciones
Confección
En recipientes de
plástico
En el envoltorio original
y en aluminio
Divididos en recipientes
de plástico o vidrio
6 / 7
Duración
(meses)
3 / 6
A temperatura
ambiente
A temperatura
ambiente
A temperatura
ambiente
Descongelación
A temperatura
ambiente y en el horno
A temperatura
ambiente y cocer a
100/200°C
6
6 En frigorífico
A temperatura
ambiente o en el
frigorífico
A temperatura
ambiente o en agua
caliente
Huevos
Congelar sin cáscara en
pequeños recipientes
17
10
A temperatura
ambiente o en el
frigorífico
E
Page 20

Consejos para ahorrar
- Instale el aparato correctamente.
Es decir, lejos de fuentes de calor, de la luz directa del sol y
en un lugar bien aireado.
- El frío justo
Demasiado frío hace aumentar los consumos
- No llene demasiado el aparato.
Para conservar bien los alimentos, el frío debe circular libremente en el interior del frigorífico. Si lo llena demasiado,
impedirá la circulación, y el compresor tendrá que trabajar
de forma continuada.
- Mantenga la puerta cerrada.
Abra el combinado lo menos posible, porque cada vez que
lo haga se escapará parte del aire frío. Para restablecer la
temperatura, el motor tendrá que trabajar mucho tiempo y
consumirá mucha energía.
Alarmas sonoras y visuales
- Preste atención a las juntas.
Vigile que las juntas permanezcan elásticas y limpias, para
que se adhieran bien a las puertas y no dejen escapar ni
siquiera un poco de frío.
- No introduzca alimentos calientes.
La introducción de una olla caliente en el frigorífico eleva de
inmediato la temperatura varios grados, déjela enfriar a temperatura ambiente antes de introducirla en el frigorífico.
Alarma por la puerta abierta
En el caso en que la puerta del refrigerador permanezca
abierta durante un tiempo superior a dos minutos se emite
una señal acústica. El sonido cesa cuando se cierra la puerta.
Alarma por calentamiento anómalo del
congelador
1.Para indicar un excesivo calentamiento del congelador se
emite una señal acústica y comienzan a centellear las dos
luces testigo amarillas "C" y "E" que indican un peligroso
calentamiento. Para no volver a congelar los alimentos,
el congelador se mantendrá a una temperatura de
alrededor de 0°C, permitiéndole consumirlos dentro de
las 24 horas o volver a congelarlos, previa cocción. Mediante el procedimiento especial para acallar alarmas (abrir
y cerrar la puerta del refrigerador) se puede apagar la
señal acústica. Para volver al normal funcionamiento se
deberá llevar la perilla del congelador "F" a la posición
" " (refrigerador apagado) y posteriormente volver a
encenderlo.
2. Si la temperatura continúa aumentando hacia valores
excesivamente altos, se emite nuevamente la señal
acústica y comienzan a centellear las dos luces testigo
amarillas "C" y "E" junto con la verde "D" para indicar
un excesivo calentamiento. Es aconsejable verificar el
estado de los alimentos, podría ser necesario tirarlos.
Cualquiera sea el caso, los alimentos no se deben volver
a congelar, si no se cocinan primero. Para no volver a
congelar los alimentos, el freezer se mantendrá a una
temperatura de alrededor de 0°C. Mediante un
procedimiento especial para acallar alarmas (abrir y cerrar
la puerta del refrigerador) se puede apagar la señal
acústica. Para volver al normal funcionamiento se deberá
llevar la perilla del congelador "F" a la posición
" "(refrigerador apagado) y posteriormente volver a
encenderlo.
Calentamiento
+ señal acústica
E
Calentamiento
+ señal acústica
18
Page 21

Cómo mantenerlo en buen estado
Antes de proceder a cualquier operación de limpieza,
desconecte el aparato de la red de alimentación eléctrica
(coloque en “ ” la perilla “F” y luego desenchúfelo). Si
dicho procedimiento no se realizara, se podría activar una
alarma. ATENCIÓN: dicha alarma no es un síntoma de
anomalía. Para restablecer el correcto funcionamiento del
producto, lleve la perilla “F” a la posición “ ” y posteriormente a la posición deseada.
FUNCIÓN VACACIONES. La
producción de moho y olores feos
en el interior del refrigerador
apagado cuando partimos de
vacaciones, no es más un problema: basta activar la función
Holiday (colocando oportunamente la perilla "B"). De
este modo, con un bajo consumo, se mantiene la temperatura en el compartimiento del refrigerador
alrededor de 15°C (puede conservar, por ejemplo,
maquillaje y cosméticos) y se deja funcionar el
congelador al mínimo, indispensable para la
conservación de los alimentos.
Una doble señal acústica breve le confirmará la
activación de la función mientras la desactivación estará
indicada por una señal simple.
El nuevo filtro antiolores asegura una mejor calidad del aire
en el interior del refrigerador. El filtro está colocado abajo a
la derecha, dentro del orificio de aireación. El filtro de carbón activo se puede activar quitando el adhesivo del orificio
(Fig. 5). En general, para asegurar una constante purificación del aire, el filtro se debería sustituir después de
aproximadamente 6-8 meses
de su activación (Fig. 6 y 7).
De todos modos, la duración
puede variar según los alimentos conservados. Para su
sustitución, es suficiente contactar el Centro de Asistencia.
Limpieza y operaciones de mantenimiento
particulares
Antes de limpiar el refrigerador, coloque en “ ” la
perilla “F” y posteriormente desenchúfelo.
- Los materiales utilizados en la fabricación de este aparato
son higiénicos y no transmiten olores, pero, para mantener
estas cualidades, es necesario que los alimentos estén siempre protegidos y bien cerrados, con el fin de evitar manchas
difíciles de quitar o la aparición de malos olores.
- Sólo agua y bicarbonato: Para limpiar tanto el interior como
el exterior, utilice una esponja con agua templada y bicarbonato sódico, que es además un buen desinfectante. Si no
tiene en casa, puede emplear jabón neutro.
- Qué no debe usarse: No utilice nunca abrasivos, lejía, ni
amoníaco. Están totalmente prohibidos los disolventes y otros
productos similares.
- Todos los elementos extraíbles pueden lavarse en agua
caliente con jabón o detergente para vajillas. Antes de volverlos a colocar, séquelos bien.
- ¿Y para la parte posterior? Aquí se deposita y se concentra
el polvo, provocando algunos problemas para el buen funcionamiento del aparato. Usar la abertura larga de su aspiradora, a una potencia intermedia, para eliminarlo. ¡Y con
mucha delicadeza!
- Cuando permanece sin funcionar un largo período. Si decide no hacer funcionar el refrigerador durante el período
estival, hay que limpiar su interior y dejar las puertas abiertas.
- Como sustituir la lámpara interna. Si se debe sustituir,
desconectar el aparato de la red eléctrica, desenroscar la
lámpara que no funciona y sustituirla con otra de una
potencia inferior a 10 W operando como se muestra en la
figura 8.
Fig. 6
Fig. 5
Fig. 7
19
Fig. 8
E
Page 22

Solución de problemas
La lámpara verde no se enciende
Compruebe que:
· El interruptor general de la casa esté conectado;
· El enchufe esté correctamente conectado a la toma de co-
rriente.
· La toma funcione: pruebe a conectar el enchufe en otra
toma.
El motor no arranca
Controle si:
·
han transcurrido 8 minutos después del encendido
En efecto, este modelo, está dotado de un control de
protección contra sobrecargas que lo hace arrancar sólo
después de 8 minutos del encendido, aproximadamente.
Las lámparas se encienden débilmente
· Pruebe a invertir el enchufe en la toma.
El frigorífico y el congelador enfrían poco
Compruebe que:
· Las puertas cierren bien y las juntas no estén estropeadas;
· Las puertas no se abran muy a menudo.
· El mando de regulación esté en la posición correcta.
· El frigorífico y el congelador no se hayan llenado en exceso.
Si, no obstante se hayan realizado todos los controles, el
aparato no funciona y el inconveniente detectado existe
todavía, llamar al Centro de Asistencia Técnica más cercano, comunicando las siguientes informaciones: el tipo de
avería, la sigla del modelo (Mod.) y los relativos números (S/
N) escritos en la placa de características ubicada abajo y a la
izquierda, junto al recipiente para verduras (ver los ejemplos
en las siguientes figuras),
93139180000 S/N 704211801
Cod.
Gross
Bruto
Brut
W
Fuse
A
Freez. Capac
Poder de Cong
kg/24 h
4,0
Max 15 w
Class
Clase
N
Classe
75
Test
P.S-I.
TI
Net
Util
Utile
Pressure
HIGH-235
LOW 140
RG 2330
Mod.
220 - 240 V- 50 Hz 150 W
340
Total
Gross
Bruto
Brut
Compr.
Syst.
Kompr.
Made in Italy 13918
Gross
Bruto
Brut
R 134 a
kg 0,090
No se dirija nunca a técnicos no autorizados y rechace
siempre la instalación de piezas de repuesto no originales.
En el frigorífico los alimentos se hielan demasiado
Compruebe que:
· El botón de regulación de la temperatura esté en la posición
correcta.
· Los alimentos no estén en contacto con la parte posterior, la
más fría.
El motor no para de funcionar
Compruebe que:
·
el interruptor de congelación haya sido presionado (luz
amarilla encendida con luz fija o intermitente);
· Las puerta esté bien cerrada o que no ha sido abierta continuamente.
· La temperatura externa no sea muy alta.
· El grosor de la escarcha no supere 2-3 mm.
El aparato hace demasiado ruido
Compruebe que:
· El frigorífico esté bien nivelado.
· El frigorífico no esté instalado entre muebles y objetos que
vibren y emitan ruido.
· El gas refrigerante interno produce un ligero ruido incluso
cuando el compresor está parado (no es un defecto).
E
20
Page 23

Page 24

Die Sicherheit - Eine gute Gewohnheit und unsere Verpflichtung
ACHTUNG
Lesen Sie bitte vor Inbetriebnahme aufmerksam die
nachstehenden Sicherheitshinweise dieser Anleitung. Sie
enthalten wichtige Angaben über die Sicherheit bei der
Installation, Benutzung und Instandhaltung des Gerätes.
Dieses Gerät wurde gemäß der internationalen
Sicherheitsregelung zum Schutz des Verbrauchers
konstruiert. Das Gerät weist das IMQ Qualitätszeichen auf,
ausgegeben vom Istituto Italiano di Qualità (Ital. Institut zur
Qualitätsüberprüfung). Dieses Zeichen wird nur den Geräten
zuteil, die den Normen des CEI, Comitato Elettrotecnico
Italiano (Elektrotechn. Komitat Italiens ) entsprechen.
Dieses Gerät eignet sich zum Kühlen und Gefrieren von
Lebensmitteln und zur Eisbereitung.
Es ist für die Verwendung im privaten Haushalt bestimmt.
Bei Einsatz im gewerblichen Bereich sind die für das Gewerbe
gültigen Bestimmungen zu beachten.
1. Sollte das Gerät wider Erwarten auf dem Transport zu
Ihnen beschädigt worden sein, nehmen Sie es nicht in Betrieb
ohne zuvor Rücksprache mit Ihrem Lieferanten gehalten zu
haben.
2. Es darf nur von Erwachsenen benutzt werden und
ausschließlich zur Konservierung und zum Einfrieren von
Speisen unter Beachtung der hier aufgeführten Anleitung.
3. Berühren oder bedienen Sie niemals das Gerät mit nassen
Händen oder barfuß, wenn Sie auf feuchtem oder nassem
Bodenbelag stehen.
4. Wir raten vom Einsatz von Mehrfachsteckern,
Adaptersteckern oder Verlängerungen ab.
5. Trennen Sie das Gerät bei Störungen, Wartung und
Reinigung vom Stromnetz, oder schalten Sie die
entsprechende Sicherung aus. Ziehen Sie bitte bei Entfernen
des Netzkabels nie am Kabel, sondern bitte immer am
Netzstecker.
6. Reinigen Sie das Gerät niemals, oder nehmen Sie keine
Instandhaltungsarbeiten vor, ohne vorher den Stecker
gezogen zu haben; es genügt nicht, die beiden TemperaturReglerknöpfe aufReinigen Sie das Gerät niemals, oder
nehmen Sie keine Instandhaltungsarbeiten vor, ohne vorher
den Stecker gezogen zu haben; es genügt nicht, den
Temperaturregler auf “•“ gestellt zu haben, um jeglichen
elektrischen Kontakt zu unterbrechen.
7. Berühren Sie nicht die inneren Kühlteile, besonders nicht
mit nassen Händen; Sie könnten sich verbrennen oder
verletzen. Nehmen Sie niemals frisch entnommene Eiswürfel
oder gefrorenes Speiseeis in den Mund, Sie könnten sich
durch die sehr starken Temperaturunterschiede verbrennen.
8. Vor der Entsorgung Ihres alten Kühlschranks entfernen
Sie das Schloß, soweit vorhanden, um zu verhindern, daß
spielende Kinder eingesperrt werden könnten.
9. Reparaturen an Elektrogeräten dürfen nur von Fachkräften
ausgeführt werden. Durch unsachgemäße Reparaturen
können erhebliche Gefahren für den Benutzer entstehen.
10. Lagern Sie hochprozentigen Alkohol nur dicht
verschlossen und stehend, durch austretende Alkoholdämpfe
kann Explosionsgefahr bestehen.
11. Vermeiden Sie Beschädigungen an Teilen des
Kältemittelkreislaufes, zum Beispiel durch Aufstechen von
Kältemittelkanälen mit scharfen Gegenständen usw.
12. Lagern Sie keine Flüssigkeiten in Flaschen oder Dosen,
insbesondere mit kohlensäurehaltigen Flüssigkeiten, im
Gefrierteil des Gerätes. Ihr Gerät könnte durch platzende
Gebinde beschädigt werden.
13. Sollte Ihr Gerät nicht funktionieren oder einen Defekt
aufweisen, lesen Sie zuerst das Kapitel “Gibt's ein Problem?”,
bevor Sie den technischen Service anrufen; eventuell kann
der Fehler so behoben werden. Versuchen Sie nicht, in das
Innere der Kombination zu gelangen, um den Defekt zu
reparieren.
14. Im Falle einer Beschädigung des Gerätespeisekabels muß
dieses zwangsläufig durch unseren Kundendienst
ausgewechselt werden, da hierzu Spezialwerkzeuge benötigt
werden.
15. Bitte verwenden Sie im Innern des Lagerfachs für Speisen
keine Elektrogeräte, die nicht ausdrücklichst von der
Herstellerfirma empfohlen wurden.
16. Vor der Entsorgung eines Altgerätes - das ZyklopentaneGas im Isolierschaum, und eventuell R600a - Gas (Isobutan)
im Kühlkreis enthält - muss dieses sichergestellt werden,
bevor es der Entsorgung zugeführt wird.
Wenden Sie sich hierzu an Ihren Händler oder an die
zuständige kommunale Entsorgungsstelle.
Entsorgung Ihres Altgerätes sowie der Verpackung des
Neugerätes.
Ältere Kühl- und Gefriergeräte enthalten im Kältekreis und
in der Isolation Fluorchlorkohlenwasserstoffe (FCKW). Dieses
FCKW kann, wenn es freigesetzt wird, die Ozonschicht der
Atmosphäre schädigen.
Nehmen Sie deshalb zum Entsorgen des Altgerätes Ihre
zuständige kommunale Entsorgungsstelle in Anspruch.
Achten Sie bitte darauf, daß die Rohrleitungen Ihres
Kältegerätes bis zum Abtransport zu einer sachgerechten
und umweltfreundlichen Entsorgung nicht beschädigt
werden.
In der Bundesrepublik Deutschland können Sie die
Verpackung Ihres Neugerätes zur weiteren stofflichen
Verwendung Ihrem Händler zurückgeben.
21
D
Page 25

Installationshinweise
Um eine optimale und langfristige Funktion sowie einen möglichst geringen Stromverbrauch zu erzielen,
ist es wichtig, das Gerät korrekt zu installieren.
Die Be- und Entlüftung
Der Kompressor sowie der Kondensator strahlen Wärme aus,
weshalb sich eine gute Lüftung als notwendig erweist. Das
Gerät muß deshalb in einem trockenen Raum aufgestellt werden, in dem eine Öffnung (Fenster oder Balkontür) für den
nötigen Luftaustausch sorgt. Achten Sie bitte bei der Installation darauf, die Luftgitter, die eine gute Belüftung des Gerätes ermöglichen, zu verdecken oder zu verstopfen.
Um eine gute Belüftung des Gerätes zu gewährleisten, muß
das Gerät außerdem in einem Abstand
- von mindestens 10 cm zu den eventuell darüber installier-
ten Hängeschränken, und
- von mindestens 5 cm zu den eventuellen Möbelwänden
bzw. Zimmerwänden installiert werden.
Für eine Installation zwischen einzelnen Möbelteilen
befolgen Sie bitte die Anleitungen auf dem
beiliegenden Blatt.
Von Hitzequellen fernhalten
Vermeiden Sie, das Gerät dort aufzustellen, wo es der direkten Einwirkung von Sonnenstrahlen ausgesetzt ist, oder in
der Nähe des Elektroherdes oder ähnlichen Wärmespendern.
Eben aufstellen
Der Boden muß eben sein; ist dies nicht der Fall, können Sie
den Stand des Gerätes mittels der vorderen Verstellfüßchen
eben regulieren.
Elektroanschluß und Erdung
Vor dem Stromanschluß kontrollieren Sie bitte, ob die Voltangaben auf dem Schild links neben dem Gemüsefach den
Stromdaten Ihrer Wohnung entsprechen, und ob die Steckdose über eine ordnungsgemäße, dem Stromanlagensicherheitsgesetz 46/90 entsprechende Erdung aufweist. Fehlt
diese Erdung, lehnt der Hersteller jegliche Verantwortung und
Gewährleistung ab. Benutzen Sie keine Mehrfachstecker oder
Adapter.
Stellen Sie das Gerät bitte so auf, dass der
Anschlussstecker gut zugänglich ist.
Ist die Stromleistung ausreichend?
Die Steckdose muß die Höchststromleistung des Gerätes, die
auf dem Schild unten links neben dem Gemüsefach angegeben ist, aufnehmen können.
Vor dem Stromanschluß
Stellen Sie das Gerät nach dem Transport senkrecht auf und
warten Sie mind. 3 Stunden, bevor Sie es an den Stromkreis
anschließen, um eine einwandfreie Funktionsweise zu garantieren.
D
22
Page 26

Aus der Nähe betrachtet
A
B C
Taste Schnellkühlen
A
Wird diese gedrückt (gelbe Kontrollleuchte
"C" eingeschaltet) kann die Temperatur der
Kühlzone auf die kälteste Stufe (Minimum)
herabgesetzt werden.
Drehknopf für die Temperaturregulierung des
B
Kühlteils
Mit diesem Knopf können Sie folgende
unterschiedliche Temperaturen für das
Kühlabteil wählen:
1 minimale Kühltemperatur;
5 maximale Kühltemperatur
das Gerät wählt die optimale
Temperatur in Bezug auf Befüllung
und Raumtemperatur
(Energiesparfunktion)
Funktion HOLIDAY aktiviert.
Gelbe Schnellkühl-Kontrollleuchte
C
.
D
E
Licht für Schnellgefrieren
E
Temperaturregler für das Gefrierteil
F
Mit diesem Knopf können Sie folgende
unterschiedliche Temperaturen für das Gefrierabteil
wählen:
Beachten Sie bitte, daß Sie sowohl Kühl-, als auch
Gefrierteil ausschalten, wenn Sie den Regler auf die
Position " " stellen.
F G
Dieses Licht leuchtet nach drücken des
Knopfes "G" für Schnellgefrieren
das Gerät ist ausgeschaltet;
1 minimale Gefriertemperatur;
5 maximale Gefriertemperatur
das Gerät wählt die optimale
Temperatur in Bezug auf Befüllung und
Raumtemperatur (Energiesparfunktion)
Grünes Licht
D
Diese gelbe Kontrollleuchte schaltet sich ein,
wenn die Funktion Schnellkühlen mittels der
Taste "A" eingeschaltet wird
Bei Aufleuchten besteht
Spannungsversorgung
23
Licht für Schnellgefrieren
G
Dieses Licht leuchtet nach drücken des
Knopfes "E" für Schnellgefrieren
D
Page 27

Abnehmbares Abstellbord mit Deckel, mit
H
Eierablage und Butterdose
Abnehmbares Abstellbord
I
Flaschenhalter
J
Flaschenbord
K
Eiswürfelschalen
L
Abnehmbare und höhenverstellbare Ablagen
R
Verschiebbare Frischhaltedose für Käse und
S
Wurstwaren
Höhenverstellbare
M
Stellfüße
Schalen zum Lagern
N
Schale zum Gefrieren und
O
Lagern
Obst- und Gemüseschalen
P
"Fresh-box"-
Q
Frischhaltefach für Fleisch,
Fisch und Käse
R
S
R
Q
P
O
H
I
I
J
K
L
D
N
M
24
M
Page 28

Die erste Inbetriebnahme des Gerätes
ACHTUNG
Bitte warten Sie nach dem Aufstellen, bzw. nach einem
Transport ca. 3 Stunden, bevor Sie das Gerät
anschließen, um eine optimale Funktionsweise zu
gewährleisten. Bevor Sie das erste Mal Nahrungsmittel in
den Kühlschrank legen, reinigen Sie bitte den Innenraum
mit lauwarmem Wasser und Bicarbonat.
Motorschutzzeit
Dieses Modell ist mit einem
Motorschutzkontrollsystem ausgestattet. Sollte der
Kompressor demnach nicht sofort nach der Installation
anlaufen, so ist das kein Grund zur Besorgnis, denn er
startet erst nach ungefähr 8 Minuten. Dasselbe
geschieht nach jeder Stromunterbrechung wegen
Stromausfall oder wenn Sie das Gerät abschalten (z.B.
zur Reinigung oder zum Abtauen der Gefrierzelle).
Nach Einstecken des Steckers in die Steckdose vergewissern
Sie sich, daß das Licht "D" leuchtet. Wenn nicht, kontrollieren
Sie, daß der Regler "F" nicht auf der Position " " ist.
Kühlabteil
Stellen Sie den Regler "B" auf eine mittlere Position und
nach Ablauf einiger Stunden können Sie Nahrungsmittel in
den Kühlteil legen.
Gefrierabtel
Stellen Sie den Regler "F" auf eine mittlere Position und
drücken Sie den Knopf "G" für Schnellgefrieren (das gelbe
Licht "E" leuchtet). Wenn das Gefrierteil die optimale
Temperatur erreicht hat,erlischt das rote Alarmlicht "E". Jetzt
können Sie das Gefriergut im Gefrierteil plazieren.
Richtiger Gebrauch des Kühlschranks
Die Temperatur im Kühlabteil stellt sich automatisch nach
der eingestellten Position des Temperaturreglers ein.
1 = Minimum
= Energiesparfunktion
5 = Maximum
1
Wird die Kühlzelle aufgrund eines Großeinkaufs sehr gefüllt,
ist es ratsam, die Funktion Schnellkühlen (mittels der Taste
"A") einzuschalten, damit die optimalen Betriebsbedingungen
kurzfristig erreicht werden. Nach Ablauf der erforderlichen
Zeit schaltet sich die Funktion automatisch ab.
Befolgen Sie unbedingt unsere Ratschläge für die maximalen
Aufbewahrungszeiten, denn alle Nahrungsmittel, auch die
frischesten, sind nur begrenzt haltbar.
Beachten Sie bitte auch, daß es ein Irrtum ist, daß sich
gekochte Speisen länger halten als rohe.
Der Kühlteil ist mit praktischen herausziebahren Abstellrosten
(Abb. 1) versehen. Diese sind auch höhenverstellbar und
ermöglichen eine Veränderung der Innenraumaufteilung
gemäß Ihren Bedürfnissen.
Warme Speisen sollten abgekühlt sein, bevor sie in den
Kühlschrank gestellt werden, um einen höheren
Stromverbrauch zu vermeiden.
Stellen Sie Flüssigkeiten niemals in offenen Behältern
in den Kühlschrank, um zu verhindern, daß sich zuviel
Feuchtigkeit und demzufolge übermäßig viel Reif
bildet.
Die aufgehängte Frischhaltedose für Käse und Wurstwaren
muss zum Füllen herausgezogen werden. Diese kann aus
Platzgründen gegebenenfalls auch in Längsrichtung
verschoben werden (Abb. 2).
2
Abb. 1
Hinweis:
Um die Frischluftzirkulation im Innern des Gefrierschrankes nicht zu behindern, sollten die Belüftungsöffnungen nicht durch Lebensmittel oder Behältnisse
zugestellt werden..
Einsatz des "Fresh box"-Frischhaltefachs für
Fleisch und Fisch
Dieses Fach wurde geschaffen, um längere
Aufbewahrungszeiten für Fleisch und frischen Fisch (bis zu
einer Woche) zu gewährleisten.
Dies ist möglich, da in diesem Fach die niedrigste (kälteste)
Temperatur der gesamten Kühlzone zur Verfügung steht.
Dank der durchsichtigen Schutztür des Fachs werden Fleisch
und Fisch vor Luft geschützt, was verhindert, dass
unappetitliche Verfärbungen an Fleisch und Fisch auftreten.
Das "Fresh box"-Fischhaltefach kann auch zum Kühlen von
solchen Speisen verwendet werden, die kalt serviert werden,
wie Schinken mit Melone, Feigen mit Schinken, Mozzarella
mit Tomaten.
Abb. 2
25
D
Page 29

So friere ich richtig ein ...
Für das Verpacken von einzufrierenden Nahrungsmitteln sollte ein spezielles Handbuch zu Rate gezogen
werden.
Eine einmal, auch nur teilweise aufgetaute Speise darf auf
keinen Fall noch einmal eingefroren werden: Sie muß (innerhalb 24 Stunden) verbraucht, d.h. gekocht werden. Das
gekochte Gericht kann dann wieder eingefroren werden.
Wenn Sie frische Nahrungsmittel einfrieren möchten, achten Sie bitte darauf, daß diese nicht mit bereits eingefrorenen oder tiefgefrorenen Speisen in Kontakt kommen. Lagern Sie frische Nahrungsmittel daher zunächst in das obere Fach ein, in welchem eine Gefrier-Temperatur bis unter 18°C herrscht; die ideale Temperatur für richtiges Einfrieren. Vergessen Sie nicht, daß die Haltbarkeit der Tiefkühlkost davon abhängt, wie schnell sie eingefroren wurde.
Die täglich einfrierbare, maximale Lademenge ist auf dem
Typenschild (befindlich im Kühlraum) aufgeführt.
Bei erstmaligem Gebrauch, oder nach längerem Stillstand
der Gefrierzone ist das Gerät auf seine maximale Einstellstufe in Betrieb zu setzen, und zwar solange erst dann können frische Lebensmittel eingefroren werden.
Drücken Sie den Knopf “G” (das gelbe Licht “E” leuchtet)
und legen Sie die Nahrungsmittel in den Gefrierteil. Nach
24 Stunden, oder sobald die optimale temperatur erreicht
ist, schaltet sich die Schnellgefrieren-Funktion automatisch
ab (das gelbe Licht "E" erlischt).
Während des Einfrierens vermeiden Sie ein Öffnen des
Gefrierteils.
Um eine optimale Konservierung und nachträglich ein optimales Auftauen zu gewährleisten, empfehlen wir, die Speisen in kleine Portionen abzufüllen; auf diese Weise tauen
sie schnell und gleichmäßig auf.
Bitte öffnen Sie bei einem Stromausfall oder Defekt nicht
die Tür des Gefrierteils; so zögern Sie einen Temperaturanstieg im Inneren hinaus. Die eingefrorenen bzw. tiefgekühlten Speisen halten sich so unverändert ca. 9 - 14 Stunden
Stellen Sie keine vollen Glasflaschen ins Gefrierfach, da gefrierende Flüssigkeiten das Glas zum Explodieren bringen.
Hinweis:
Um die Frischluftzirkulation im Innern des Gefrierschrankes nicht zu behindern, sollten die Belüftungsöffnungen nicht durch Lebensmittel oder Behältnisse
zugestellt werden..
Eiswürfelbehälter
Bei diesem neuen Eiswürfelkonzept handelt es sich um ein
Exklusivpatent der Fa. Merloni. Dank der Positionierung
dieses Behälters an der Gefrierfach-Innentür ist größere
Ergonomie und Sauberkeit gewährleistet: Die Berührung mit
dem gelagerten Gefriergut wird vermieden, wie auch ein
Verschütten von Wasser beim Füllen des Behälters (ein
entsprechender Verschluss, mit dem die Öffnung nach Füllen
verschlossen werden kann, wird mitgeliefert).
Um die Eiswürfelschalen aus
ihrem Sitz zu nehmen,
schieben Sie diese zuerst nach
oben und ziehen sie dann
heraus (Abb. 3). Um die
Schale wieder einzusetzen,
stecken Sie den oberen Teil in
den entsprechenden Sitz und
lassen sie dann aus der
vertikalen Lage nach unten
gleiten.
Gebrauchsanweisung (Abb. 4)
Füllen Sie den Behälter durch die entsprechende Öffnung
bis zu dem angegebenen Stand (MAX WATER LEVEL) mit
Wasser. Durch Einfüllen von zuviel Wasser, d.h. über diese
Anzeige hinaus, würde eine derartige Menge an Eis gebildet,
die das Herausnehmen der Eiswürfel erschweren könnte.
Sollten Sie doch zuviel Wasser eingefüllt haben, dann warten
Sie, bis das Eis geschmolzen ist, entleeren den Behälter und
füllen ihn dann erneut. Nach dem Füllen ist der Behälter um
90° zu drehen. Aufgrund der kommunizierenden Röhren
werden die entsprechenden Formen mit Wasser gefüllt.
Schließen Sie die Öffnung durch den Stöpsel und bringen Sie
den Behälter daraufhin vorschriftsmäßig an der Innentür unter.
Durch leichtes Aufschlagen des Behälters auf ein harte
Oberfläche fallen die geformten Eiswürfel aus ihren Sitzen
heraus und können so durch die Öffnung, durch die das
Wasser eingefüllt wurde, herausgenommen werden. Die
Eiswürfel fallen leichter heraus, wenn der Behälter vorher
kurz unter fließendes Wasser gehalten wird.
ACHTUNG: Stellen Sie vor jedem erneuten Füllen des
Behälters sicher, dass sich keine Eisreste mehr darin befinden.
Die zur optimalen Eisbildung erforderliche Mindestzeit
beträgt ungefähr 6 Stunden.
Abb. 3
D
26
Abb. 4
WATER LEVEL
MAX
MAX
WATER LEVEL
Page 30

Anleitung zum Gebrauch des Gefriergerätes
Fleisch und Fisch
Lebensmittel Verpackung Abhängen
Rindfleisch Aluminiumfolie 2 / 3 9 / 10 Nicht nötig
Hammelfleisch Aluminiumfolie 1 / 2 6 Nicht nötig
Schweinefleisch Aluminiumfolie 1 6 Nicht nötig
Kalbfleisch Aluminiumfolie 1 8 Nicht nötig
Kalb-oder
Schweinekotelett
Hammelkotelett
Hackfleisch Alubehälter und Plastikfolie Frisch 2 Langsam im Kühlschrank
Leber Plastikbeutel 3 Nicht nötig
Plastikfolie zwischen den einzelnen
Scheiben anschließend 4-6 Stück in
Alufolie
Plastikfolie zwischen den einzelnen
Scheiben anschließend 4-6 Stück in
Alufolie
Lagerdauer
(Monate)
6 Nicht nötig
6 Nicht nötig
Auftauen
Wurst Plastik- oder Alufolie 2 Je nach Gebrauch
Geflügel Alufolie 1 / 3 9 Langsam im Kühlschrank
Gans - Ente Alufolie 1 / 4 6 Langsam im Kühlschrank
Wild Alufolie 1 / 3 9 Langsam im Kühlschrank
Hasen - Kanichen Alufolie 3 / 4 6 Langsam im Kühlschrank
Hirsch Alufolie oder Plastikfolie 5 / 6 9 Langsam im Kühlschrank
Große Fische Alufolie oder Plastikfolie 4 / 6 Langsam im Kühlschrank
Kleine Fische Plastikbeutel 2 / 3 Nicht nötig
Schalentiere Plastikbeutel 3 / 6 Nicht nötig
Muscheln Alu- oder Plastikbehälter mit Salzwasser 3 Langsam im Kühlschrank
Gekochter Fisch Alufolie oder Plastikfolie 12 In warmem Wasser
Bratfisch Plastikbeutel 4 / 6 Direkt in der Bratpfanne
27
D
Page 31

Obst und Gemüse
Lebensmittel Vorbereitung
Äpfel und Birnen
Aprikosen, Pfirsiche,
Kirschen, Zwetschgen
Erdbeeren, Heidelbeeren,
Johannisbeeren,
Himbeeren
Gekochtes Obst
Obst
Blumenkohl
Rosenkohl
Erbsen
Bohnen, grüne
Waschen,schälen und
in Stücke schneiden
Waschen und
entkernen
Waschen, verlesen,
gut abtropfen lassen
Waschen, In Stücke
schneiden
Waschen, In Stücke
schneiden
Putzen, verlesen,
blanchieren in
Zitronenwasser
Putzen, waschen, in
Stücke schneiden
Waschen und
auslesen
Waschen, inStücke
schneiden
Blanchierzeit
(Minuten)
2'
1' / 2'
2' Plastikbeutel 12 Nicht nötig
1' / 2' Plastikbeutel 10 / 12 Bei Raumtemperatur
2' Plastikbeutel 12 Nicht nötig
3' Plastikbeutel 10 / 12 Nicht nötig
Verpackung
Behälter mit Zuckersirup
bedecken
Behälter mit Zuckersirup
bedecken
Behälter mit Zuckersirup
bedecken
Behälter 10% Zucker
zugeben
Behälter nach Belieben
zuckern
Lagerdauer
(Monate)
12
12
10 / 12
12
10 / 12
Auftauen
Langsam im
Kühlschrank
Langsam im
Kühlschrank
Langsam im
Kühlschrank
Langsam im
Kühlschrank
Langsam im
Kühlschrank
Karotten, Paprika
Pilze, Spargel
Spinat
Suppengemüse
Verschiedene Speisen Vorbereitung Blanchierzeit Verpackung
Brot Plastikbeutel 4
Torten In Plastikfolien 6
Sahne Behälter 6
Butter
Gekochte Lebensmittel
Waschen schülen,
scheiben schneiden
Waschen und
schneiden
Waschen und
zerschneiden
Waschen und
zerschneiden
3' / 4' Plastikbeutel 12 Nicht nötig
3' / 4' Plastikbeutel - Behälter 6 Bei Raumtemperatur
2' Plastikbeutel 12 Bei Raumtemperatur
3'
Verpackt in kleinen
Portionen
Originalverpackung
Alufolie
Aufgeteilt in
entsprechenden
Behältern
6 / 7 Bei Raumtemperatur
Lagerdauer
(Monate)
3 / 6 Kühlschrank
Auftauen
Bei Raumtemperatur
oder im Backofen
Bei Raumtemperatur
und bei 100/200°C
backen
Bei Raumtemperatur
oder im Kühlschrank
6 Kühlschrank
Eier
D
In kleinen Behältern
ohne Schale
28
10
Raumtemperatur
oder Kühlschrank
Page 32

Tips zum Energiesparen
- Die richtige Installation
Das heißt fern von Hitzequellen, von direkter
Sonneneinwirkung, in einem gut belüfteten Raum und unter
Beachtung der im Abschnitt "Installationshinweise/Be- und
Entlüftung" angegebenen Abstände.
- Die richtige Kühltemperatur
Zu große Kälte erhöht den Stromverbrauch.
- Lagern Sie niemals zuviel ein
Um eine einwandfreie Aufbewahrung der Speisen zu
gewährleisten, muß die Kälte frei im Inneren des Kühlraumes
zirkulieren können. Bei unsachgemäßer Befüllung ist dies
nicht möglich und der Kompressor kühlt ständig nach.
- Halten Sie die Türen geschlossen
Öffnen Sie die Türen Ihres Kombigerätes nur wenn es
unbedingt nötig ist, denn bei jedem Öffnen geht Kälte
verloren. Um die richtige Temperatur erneut zu erreichen,
kühlt der Kompressor nach, was ebenfalls zu erhöhtem
Stromverbrauch führt.
- Kontrollieren Sie die Dichtungen
Halten Sie diese elastisch und sauber, kontrollieren Sie, daß
sie gut an die Türen anliegen, nur so lassen sie keine Kälte
entweichen.
- Niemals warme Speisen
Ein Topf mit warmen Speisen erhöht sofort die Temperatur
um einige Grade; lassen Sie erst auf Raumtemperatur
abkühlen, bevor Sie sie in den Kühlschrank stellen.
Akustische und schriftliche Alarmanzeige
Alarm wegen offenstehender Tür
Bleibt die Kühlschranktür für mehr als 2 Minuten offen, ertönt
ein akustisches Alarmsignal. Dieses schaltet sich aus, sobald
die Tür geschlossen wird.
Alarm wegen unnormalen Temperaturanstiegs
in der Gefrierzone
1.Ein gefährlicher Temperaturanstieg in der Gefrierzone wird
durch ein Alarmsignal und durch Blinken der beiden
gelben Kontrollleuchten "C" und "E" angezeigt. Um zu
vermeiden, dass das Gefriergut erneut eingefroren wird,
wird in der Gefrierzone eine Temperatur von ungefähr
0°C gehalten, wodurch Ihnen die Möglichkeit gegeben
wird, die Lebensmittel innerhalb 24 Stunden zu
verbrauchen, oder diese in gekochtem Zustand wieder
einzufrieren. Mittels der üblichen Prozedur (Öffnen und
Schließen der Tür) kann das Alarmsignal wieder abgestellt
werden. Um auf die normale Betriebsweise
zurückzukehren, muss der Gefrierzonen-Reglerknopf "F"
jedoch auf Position " " (Kühlschrank ausgeschaltet)
gebracht werden; gleich darauf ist der Kühlschrank dann
wieder einzuschalten.
2.Steigt die Temperatur jedoch weiterhin auf zu hohe Werte
an, ertönt das Alarmsignal erneut, die beiden gelben
Kontrollleuchten "C" und "E" sowie die grüne
Kontrollleuchte "D" blinken, um diesen zu hohen
Temperaturanstieg anzuzeigen. Es empfiehlt sich, das
Gefriergut zu überprüfen, gegebenenfalls ist es nicht mehr
zu verwenden. Auf keinen Fall darf es neu eingefroren
werden, es sei denn, es wird gekocht. Um zu vermeiden,
dass das Gefriergut erneut eingefroren wird, wird in der
Gefrierzone eine Temperatur von ungefähr 0°C gehalten.
Mittels der üblichen Prozedur (Öffnen und Schließen der
Tür) kann das Alarmsignal wieder abgestellt werden. Um
auf die normale Betriebsweise zurückzukehren, muss der
Gefrierzonen-Reglerknopf "F" jedoch auf Position
" "(refrigerador apagado) (Kühlschrank ausgeschaltet)
gebracht werden; gleich darauf ist der Kühlschrank dann
wieder einzuschalten.
Gefährlicher
Temperaturanstiegpeligroso
+ akustisches Signal
+ akustisches Signal
29
Zu hoher
Temperaturanstiegexcesivo
D
Page 33

So halte ich das Gerät in Topform
Bevor Sie Ihr Gerät reinigen oder abtauen muss es vom
Stromnetz getrennt werden (halten Sie die ON/OFF-Taste
A für etwas länger als zwei Sekunden gedrückt, bis die
Anzeige OFF für beide Zonen, d.h. Kühl- und Gefrierzone,
eingeblendet wird. Ziehen Sie daraufhin den Stecker aus
der Steckdose). Das Unterlassen dieser Vorsichtsmaßnahme könnte eine Alarmsituation für Ihr Gerät darstellen.
ACHTUNG: Dieser Alarm ist kein Zeichen für eine eventuelle Störung. Zur Wiederherstellung der ordnungsgemäßen Funktionsweise drücken Sie für etwas länger als zwei
Sekunden die ON/OFF-Taste A, um das Gerät auszuschalten, schalten Sie es daraufhin wieder ein und stellen
Sie die gewünschten Temperaturen ein.
FUNKTION HOLYDAY Bildung
von Schimmel und schlechten
Gerüchen im abgeschalteten
Kühlschrank während der Ferienzeit? Dieses Problem existiert
nicht mehr: Schalten Sie ganz einfach (über das Display) die Funktion Holyday ein. Auf
diese Weise wird im Kühlschrank, bei niedrigstem
Stromverbrauch, eine Temperatur von ungefähr 12°C
gehalten (praktisch auch zur Aufbewahrung Ihrer Kosmetik und Schminksachen), die Gefrierzone läuft auf
der zur Konservierung des Gefrierguts erforderlichen
Minimumeinstellung weiter.
Der neue Geruchsfilter sorgt für eine bessere Luftqualität im
Kühlschrank. Er ist unten rechts im Kühlschrank innerhalb
der kleinen Lüftungsöffnung angebracht. Der Aktivkohlefilter kann durch Abziehen der Folie von der Öffnung aktiviert werden(Abb. 5). Um eine konstant hohe Qualität der
Luftreinigung zu gewährleisten, sollte der Filter im Allgemeinen nach ungefähr sechs bis
acht Monaten ausgewechselt
werden (Abb. 6 und 7). Die
Lebensdauer des Filters kann
sich jedoch in Abhängigkeit
von der Art der im Kühlschrank aufbewahrten Speisen verkürzen oder verlängern. Für den Austausch des
Filters kontaktieren Sie bitte
den Kundendienst.
Abb. 5
Außerordentliche Reinigung und Wartung
Vor der Reinigung Ihres Kühlschranks stellen Sie bitte
den Schalterknopf “F” auf Einstellung “ ” und ziehen
Sie daraufhin den Stecker aus der Steckdose.
- Das Material, aus dem Ihr Gerät hergestellt wurde, ist
hygienisch einwandfrei und überträgt keine Geruchsstoffe.
Um diese Qualitäten beizubehalten, ist es jedoch notwendig,
die Nahrungsmittel immer gut verschlossen zu lagern, um
nur schwer entfernbare Flecken und die Bildung
unangenehmer Gerüche zu vermeiden. .
- Nur Wasser und Bicarbonat: Um innen und außen zu
reinigen, benutzen Sie einen weichen Schwamm, getränkt
mit lauwarmem Wasser und Natriumbicarbonat welches
außerdem auch ein ausgezeichnetes Desinfektionsmittel ist.
Wenn Sie keins zur Hand haben, nehmen Sie eine neutrale
Seife (z. B. Marseille-oder Kern-Seife).
- Benutzen Sie zur Reinigung niemals flüssige oder
pulverförmige Scheuermittel, niemals Weißmacher und auf
keinen Fall Ammoniak, Benzin oder sonstige Lösungsmittel.
Benutzen Sie auch niemals irgendwelche Wundermittel,
wenn Ihnen die Inhaltsstoffe nicht bekannt sind. Beachten
Sie bitte, daß der Einsatz von falschen Reinigungsmitteln zur
Zerstörung Ihres Gerätes führen kann.
- Sollte das Gerät für längere Zeit abgeschaltet werden, z.B.
während der Sommerferien, ist es ratsam, dieses innen
sorgfältig zu reinigen und die Tür vorstehen zu lassen, um
Schimmelbildung oder die Bildung schlechter Gerüche zu
vermeiden.
- Wie tauscht man die Innenlampe aus? Bevor Sie diese
austauschen, ziehen Sie den Stecker aus der Steckdose;
schrauben Sie hierauf die defekte Birne heraus und ersetzen
Sie diese durch eine neue, die nicht stärker als 10 Watt sein
darf. (Siehe Abb. 8).
Abb. 8
Abb. 6
D
Abb. 7
30
Page 34

Gibt’s ein Problem?
Das Gerät funktioniert nicht
Bitte kontrollieren Sie, ob:
• die Hauptsicherung eingeschaltet ist;
• der Stecker richtig in der Steckdose steckt;
• die Steckdose in Ordnung ist defekt ist; kontrollieren Sie dies,
indem Sie den Stecker in eine andere Steckdose stecken.
Der Motor startet nicht
Bitte kontrollieren Sie, ob:
· 8 Minuten vergangen sind, seit Sie das Gerät eingeschaltet
haben.
Dieses Gerät ist mit einem Motorschutz ausgestattet,
wodurch der Motor erst nach ca. 8 Minuten zu arbeiten
beginnt.
Kühl- und Gefrierteil kühlen unzureichend
Bitte kontrollieren Sie, ob:
• die Türen richtig schließen oder die Dichtungen beschädigt
sind;
• die Türen vielleicht zu lange offenstehen;
• der Temperaturregler richtig eingestellt ist;
• der Kühl- oder der Gefrierteil nicht überladen wurde.
Sollte trotz aller Kontrollen das Gerät nicht funktionieren
und der von Ihnen festgestellte Fehler weiter bestehen bleiben, dann fordern Sie bitte den nächstgelegenen technischen Kundendienst an und teilen Sie dort zusammen mit
Ihrer Fehlerbeschreibung folgende Daten mit: die Modellbezeichnung (Mod.), die entsprechenden Nummern (S/N),
die auf dem Schild unten links neben dem Gemüsefach angegeben sind (siehe untenstehende Beispiele).
75
Test
P.S-I.
TI
Net
Util
Utile
Pressure
HIGH-235
LOW 140
RG 2330
Mod.
220 - 240 V- 50 Hz 150 W
340
Total
Gross
Bruto
Brut
Compr.
Syst.
Kompr.
Made in Italy 13918
Gross
Bruto
Brut
R 134 a
kg 0,090
93139180000 S/N 704211801
Cod.
Gross
Bruto
Brut
W
Fuse
A
Freez. Capac
Poder de Cong
kg/24 h
4,0
Max 15 w
Class
Clase
N
Classe
Beauftragen Sie auf keinen Fall einen nicht befugten
Kundendienst und lassen Sie ausschließlich OriginalErsatzteile einbauen.
Der Kühlschrank kühlt zu stark
Bitte kontrollieren Sie, ob:
· eine zu niedrige (bzw. nicht optimale) Temperatur
eingestellt wurde;
•
die Nahrungsmittel an die Rückwand (Kühlzelle) anstoßen.
Der Motor läuft ständig
Bitte kontrollieren Sie, ob:
· der Schnellgefrier-Knopf gedrückt wurde (gelbes Licht
leuchtet oder blinkt);
• die Türen richtig geschlossen sind, oder für längere Zeit
offengeblieben sind;
• die Außentemperatur sehr hoch ist;
• der Temperaturregler richtig eingestellt ist.
Das Gerät macht zu viel Lärm
Das im Inneren des Gerätes befindliche Kühlgas erzeugt ein
leichtes Geräusch, auch bei Stillstand des Kompressors (das
ist kein Defekt).
Bitte kontrollieren Sie, ob:
• Ihr Gerät gerade steht;
• es zwischen Möbelteilen oder Gegenständen steht, die
vibrieren und daher Lärm verursachen.
31
D
Page 35

Safety - a good habit to get into.
ATTENTION
Read your manual carefully since it contains instructions
which will ensure safe installation, use and maintenance of
your appliance.
Your Refrigerator is built to International safety standards
(EN60) ans has been awarded the European approval mark
(IMQ) for compliance with UK electrical safety requirements.
It also meets the EC standards on the prevention and elimination of readio interference (EC directive 87/308 - 02.06.89).
1. This appliance must not be installed outdoors - not even in
an area protected by a roof. It is extremely dangerous to leave
it exposed to rain or storms.
2. It must only be used by adults and exclusively to refrigerate
and freeze foodstuffs, following the instructions for use contained in this manual.
3. Do not ever touch or handle the appliance with bare feet or
with wet hands or feet.
4. It is highly recommended that you do not use extension
cords or multiple socket adapters. If the refrigerator is installed
between cabinets, make sure that the cord is not bent or dangerously pinched or compressed.
5. Never pull on the cord or the refrigerator to remove the
plug from the wall socket - this is very dangerous.
6. Never touch the cooling components within the appliance,
especially with wet hands because this could result in injury.
Never put ice cubes just removed from the freezer into your
mouth because they could stick to your mouth and cause burns.
7. Do not carry out any cleaning or maintenance operations
without first having disconnected your appliance from the
mains power supply (by unplugging it or turning off the cutout switch in your home); turning the thermostat knob to " "
is not enough to eliminate all electric contacts.
8. Before having your old refrigerator picked up for disposal,
remove or make inoperable any locking devices to prevent children who might play in or around the appliance from being
locked inside.
9. Before calling for service/assistance in the case of malfunction, consult the chapter entitled “Is There a Problem? to determine whether it is possible to eliminate the problem. do not
try to repair the problem by trying to access the internal components of the appliance.
10. If damaged, the power supply cord on this appliance must
necessarily be replaced by our service centre because special
tools are required for replacement.
11. Do not use electric appliances inside the compartment for
food storage, if these are not those recommended by the
manufacturer.
12. At the end of the functional life of your appliance –
containing cyclopentane gas in the insulation foam and perhaps
gas R600a (isobutane) in the refrigeration circuit – the latter
should made safe before being sent to the dump.
For this operation, please contact your dealer or the Local
Organisation in charge of waste disposal.
Installation
Proper installation of the appliance is essential to ensure the best and most efficient performance of your
appliance.
Ventilation
The compressor and condenser generate heat and, therefore, need to be ventilated properly. Rooms with less than
perfect ventilation are not very suited for installation of the
appliance. Therefore, it should be installed in a room with
an opening (window or French window) that provide the
appropriate amount of air re-circulation. It is also important
that the room not be too humid.
During installation, make sure not to cover or obstruct the
grates that allow for proper ventilation of the appliance.
For proper ventilation of the appliance, you must leave:
- a space of at least 10 cm between the top part and any
cabinets above it;
- a space of at least 5 cm between the sides of the appliance
and any adjacent cabinets/walls.
Away from Heat
Avoid positioning the appliance in a place where it is directly
exposed to sunlight or near an oven, cook top or the like.
Levelling
The floor should be perfectly level; if not, you can adjust the
feet at the front of the appliance.
Earthing
Before making the electrical connection, check that the voltage shown on the data plate, that you will find on the bottom left hand side of the appliance next to the crisper, corresponds to that of your home and that the socket is earthed
in compliance with all current electrical regulations. If the
system is not earthed, the manufacturer declines all liability
for consequent damages or losses. Do not use adapters or
multiple sockets.
Position the appliance in such a way that you can access
the socket where it is plugged in.
Check the power load
The electrical socket must support the maximum power load
of the appliance shown on the data plate (on the bottom
left hand side of the appliance next to the crisper).
Before plugging the appliance to the mains
Stand the appliance upright and wait at least 3 hours before
plugging the appliance into the mains to ensure proper performance.
GB
32
Page 36

Close-up view
A
B C
Quick cool button
A
Press it (yellow indicator light "C" comes
on) to lower the temperature of the
refrigerator compartment to its minimum
setting.
Temperature regulator knob for the fridge
B
compartment
This knob allows you to adjust the
fridge temperature to different
positions;
1 minimum refrigeration setting;
5 maximum refrigeration setting.
optimal temperature at low
consumption levels;
Holiday function enabled.
Quick cool yellow indicator light
C
This yellow indicator light comes on when
the quick cool is enabled by pressing button
"A".
D
E
Rapid freezing indicator light
E
Note: these three indicator lights also signal an
abnormal increase in the temperature of the freezer
compartment (see "Alarm buzzers and visual
warnings" paragraph).
Temperature regulator knob for the freezer
F
compartment
This knob allows you to adjust the freezer temperature to different positions:
consumption levels;
Remember that you can also interrupt the operation
of the whole appliance (fridge included) by setting
the knob to position " ".
F G
This yellow indicator light comes on when you
press the rapid freezing button "G".
the fridge and freezer are switched
off;
1 minimum refrigeration setting;
5 maximum refrigeration setting.
optimal temperature at low
Green indicator light
D
When this green indicator light is on, it
indicates that the appliance is connected to
the electricity network.
33
Rapid freezing button
G
Press it (yellow indicator light "E"
comes on) to freeze fresh food.
GB
Page 37

Removable lidded shelf, with egg tray and
H
butter dish
Removable miscellaneous shelf
I
Bottle trap
J
Removable door shelf for bottles
K
Ice tray
L
Adjustable feet
M
R
Compartment for storing
N
frozen foods
S
Removable/Adjustable Shelves
R
Sliding box for cheese and cold cuts
S
H
I
Compartment for freezing
O
fresh foods and storing
frozen foods
Fruit and Vegetable
P
Crispers
"Fresh box" compartment
Q
for meat and fish
R
Q
P
O
N
I
J
K
L
GB
M
34
M
Page 38

How to Start the Appliance
NOTICE
After the appliance has been delivered, stand it in the
upright position and wait approximately 3 hours before connecting it to the electrical outlet to guarantee
that it operates properly.
Before placing foodstuffs in the refrigerator or freezer, clean
the interior well with warm water and baking soda.
Motor protection delay
This model is provided with a motor protection control
system. Therefore, if the compressor does not start
immediately upon installation, do not worry as it will
start automatically after approximately 8 minutes.
This is also what will happen every time the power
supply is interrupted, both due to a power failure or
should you switch it off yourself (to clean or defrost
your freezer, for example).
After having plugged the appliance in, make sure that pilot
lamp "D" is lit. If not, make sure that the freezer knob "F" is not
on position "
Refrigerator compartment
Set knob "B" onto a medium position and you can place
food in the fridge after only a few hours.
Freezer compartment
Set knob "F" to a medium position and press the rapid
freezing button "G" (indicator light "E" will come on and a
temperature of -35°C will appear on the freezer display).
When the freezer has reached the optimum temperature,
yellow indicator light "E" will come off. Now you can place
frozen food in the freezer.
".
How to use the refrigerator compartment...
The thermostat automatically regulates the temperature inside the appliance
1 = less cold
optimal temperature at low consumption levels
5 = colder
1
When the fridge compartment is filled up after a heavy
shopping spree, use the Quick Cool function (press button
"A" to enable it) in order to reach optimum operating
conditions quickly. Once the necessary time has elapsed, the
function is disabled automatically.
Remember to follow our instructions on the storage life of
foods: If not stored correctly, even the freshest food will
deteriorate quite quickly.
Contrary to popular belief, cooked foods do not keep longer
than fresh food.
The refrigerator compartment of your appliance is fitted with
practical removable shelves (Fig. 1) whose height can be
adjusted to allow storage of large containers. This shelves
can also be tilted for storage of opened bottles.
Remember to cool hot food before storing otherwise the
temperature inside the appliance will increase, causing the
compressor to work harder and use more energy.
Do not store liquids in unsealed containers since this
will increase the humidity and lead to the formation
of frost in the refrigerator.
To use the cold cuts/cheese box, unhook it and remove it
from the shelf. To optimise space according to your needs,
the same can be moved laterally (Fig. 2).
2
Fig. 1
WARNING: to avoid blocking the air circulation inside
the refrigerator, it is advisable not to obstruct the
ventilation holes with food or containers.
Using the "Fresh box" compartment for meat
and fish
This compartment was designed to allow for longer
preservation times for fresh meat and fish (for as long as a
week).
This is possible as the coldest temperature of the entire fridge
is available inside this specific compartment.
The clear protective door to open the compartment avoids
any oxidation or blackening to occur, which are typical of
meat and fish when exposed to air.
Moreover, the "Fresh box" compartment can also be used
to cool dishes that are normally eaten "cold", such as melon
and Parma ham, figs and ham, mozzarella and tomatoes.
Fig. 2
35
GB
Page 39

How to use the freezer compartment...
For the preparation of food to be frozen, please consult a specialized manual.
Food that has be thawed, even partially, must not be refrozen: you must cook it in order to consume it (within 24
hours) or to freeze it once again.
When freezing fresh foods, remember that they should not
touch other previously frozen or deep frozen foods. Place
the food that you wish to freeze in the top compartment
"O" where the temperature will fall below -18°C, which is
ideal for freezing food properly. Remember that proper conservation depends on the speed of freezing.
The maximum amount of food you can freeze per day is
indicated on the data plate situated inside the refrigerator
compartment.
The first time, or after the freezer has been inactive, you can
only freeze food after having let the appliance function at
maximum.
Press the freezing button “G” (yellow lamp “E” lit) and insert
the food to be frozen. After 24 hours, or once the optimum
temperatures have been reached, the rapid freezing function
will switch itself off automatically (yellow lamp “E” off).
2. For large quantities of food to be frozen (up until the
maximum load indicated on the data plate), keep the freezing
button “G” pressed down until the yellow lamp starts
flashing quickly. After 24 hours, the yellow lamp will stop
flashing (permanently lit); you can now insert the food to be
frozen. After 24 hours, the button will switch itself off
automatically (yellow lamp off).
During the freezing process, avoid opening the door of the
freezer.
In order to freeze and then thaw foods optimally, it is recommended that you divide food into small portions so that
they freeze quickly and uniformly. The packages should be
clearly marked with the content and the date they were
frozen.
In order to obtain a larger amount of space in the freezer
compartment, you can remove the central drawer, and place
the food directly onto the evaporator plate. Make sure that,
after having inserted the load, the door closes correctly.
Do not open the freezer door in the event of a power failure
or malfunction. This precaution will slow the rise in temperature within the compartment. If the door is not opened,
frozen and fast-frozen foods will remain in their current state
for approximately 9-14 hours.
Do not place full bottles in the freezer: they could easily
burst because all liquids increase in volume when they freeze.
Ice trays
This new concept of ice trays is an exclusive Merloni patent.
The fact that they are situated on the inner door of the
freezer compartment ensures greater ergonomics and
cleanliness: the ice no longer comes into contact with the
food placed inside the freezer compartment; furthermore,
the dripping of the water during filling is avoided (a lid to
cover up the hole after filling with water is also provided).
To remove the ice trays from
their housings, push the tray
upwards and then pull it out
(fig. 3). To put the tray back
in place, insert the top part
into the special housing and,
once in a vertical position,
just let it drop into place.
Fig. 3
Instructions for use (Fig. 4)
Fill up the tray with water via the special hole up to the level
indicated (MAX WATER LEVEL), taking care not to exceed it:
inserting more water than is necessary will lead to the
formation of ice which could obstruct the exit of the ice cubes.
If you have used an excessive amount of water, you will have
to wait until the ice has melted, empty out the tray and re-fill
it with water.
Once you have filled the ice tray up with water through the
hole indicated, turn it by 90 °. Thanks to the connected
compartments, the water fills up the special shapes, after
which you can cover the hole up with the special cap and
place the ice tray in the inner door of the freezer
compartment.
Once the ice has formed, all you need to do is to knock the
tray against a hard surface so that the ice cubes come away
from their housing and come out of the same hole used to
fill the tray with water. To make it easier for the ice cubes to
come out, wet the outside of the tray.
WARNING: every time you fill up the ice tray with water ,
make sure that the same is completely empty and that there
are no traces of ice left inside it.
The minimum time required for ice to form well is
approximately 8 hours.
WARNING: to avoid blocking the air circulation inside
the refrigerator, it is advisable not to obstruct the
ventilation holes with food or containers.
GB
36
Fig. 4
WATER LEVEL
MAX
MAX
WATER LEVEL
Page 40

Guide to Using the Freezer
Meat and Fish
Food Wrapping
Beef Roast Tinfoil 2 / 3 9 / 10 Not required.
Lamb Tinfoil 1 / 2 6 Not required.
Pork Roast Tinfoil 1 6 Not required.
Veal Roast Tinfoil 1 8 Not required.
Veal/Pork Chops
Veal/Lamb Cutlets
Minced Meat
Heart and Liver Plastic Baggies 3 Not required.
Each piece wrapped in cling wrap and then
in tinfoil (4 to 6 slices)
Each piece wrapped in cling wrap and then
in tinfoil (4 to 6 slices)
In aluminium containers covered with cling
wrap.
Tenderising
(days)
Freshly
minced
Storage
(months)
6 Not required.
6 Not required.
2 Slowly in refrigerator.
Thawing Time
Sausages Cling Wrap or Tinfoil 2 As necessary.
Chicken and Turkey Tinfoil 1 / 3 9 Very slowly in refrigerator.
Duck and Goose Tinfoil 1 / 4 6 Very slowly in refrigerator.
Pheasant, Partrige and
Wild Duck
Hare and Rabbit Tinfoil 3 / 4 6 Very slowly in refrigerator.
Venison Tinfoil or Cling Wrap 5 / 6 9 Very slowly in refrigerator.
Large Fish Tinfoil or Cling Wrap 4 / 6 Very slowly in refrigerator.
Small Fish Plastic Baggies 2 / 3 Not required.
Crustaceans Plastic Baggies 3 / 6 Not required.
Shellfish
Tinfoil 1 / 3 9 Very slowly in refrigerator.
Store in salted water in aluminium
containers or plastic containers.
3 Very slowly in refrigerator.
Boiled Fish Tinfoil or Cling Wrap 12 In hot water.
Fried Fish Plastic Baggies 4 / 6 Directly in pan.
37
GB
Page 41

Fruits and Vegetables
Food Preparation
Apples and Pears Peel and cut into slices. 2’
Apricots, Peaches,
Cherries and Plums
Strawberries
Blackberries and
Raspberries
Cooked Fruit Cut, cook and strain.
Fruit Juice Wash, cut and crush.
Cauliflower
Cabbage and Brussel
Sprouts
Peas Shell and wash. 2’ Plastic Baggies 12 Not required.
Peel and pit. 1’ / 2’
Rinse and fry.
Remove leaves, cut head into
small pieces and blanch in
water and a little lemon
juice.
Wash and cut into small
pieces.
Blanching
Time
2’ Plastic Baggies 12 Not required.
1’ / 2’ Plastic Baggies 10 / 12 At room temperature.
Wrapping
In Containers (cover
with syrup)
In Containers (cover
with syrup)
In Containers (cover
with sugar)
In Containers (add
10% sugar)
In Containers (sugar
to taste)
Storage
(months)
12
12
10 / 12
12
10 / 12
Thawing Time
In refrigerator very
slowly.
In refrigerator very
slowly.
In refrigerator very
slowly.
In refrigerator very
slowly.
In refrigerator very
slowly.
French Beans Wash and slice if required. 2 Plastic Baggies 10 / 12 Not required.
Carrots, Peppers and
Turnips
Mushrooms and
Asparagus
Spinach Wash and mince. 2’ Plastic Baggies 12 At room temperature.
Vegetable for Soups
Various Foods Preparation
Bread Plastic Baggies 4
Cakes Plastic Baggies 6
Cream Plastic Containers 6
Butter
Peel, wash and slice if
necessary.
Wash, peel and cut up. 3’ / 4’
Wash and cut up in small
pieces.
3’ / 4’ Plastic Baggies 12 Not required.
3’
Blanching
Time
Plastic Baggies or
Containers
Plastic Baggies or
Containers
Wrapping
In original wrapping
or tinfoil
6 At room temperature.
6 / 7 Not required.
Storage
(months)
6 In refrigerator.
Thawing time
At room temperature
and in the oven.
About 10 minutes at
room temperature, cook
at 100/200°C.
At room temperature or
in refrigerator.
Boiled Food or
Vegetable Soup
Eggs
GB
Plastic or Glass
Containers
Freeze without shells
in small containers
38
3 / 6
10
At room temperature or
in hot water.
At room temperature or
in refrigerator.
Page 42

Tips on Saving Energy
- Install it well
And therefore far from heat sources, from direct sunlight, in
a well aired place and according to the distances indicated
in the section on "Installation/Aeration".
- Just the right cold
Too cold a compartment increases energy consumption.
- Do not Overfill
To conserve food properly, the cold air must circulate freely
within the refrigerator. If it is overfilled, this will prevent proper
air circulation, forcing the compressor to work continuously.
- Close the Doors
Open your refrigerator as little as possible because each time
you do so you loose much of the cold air. To raise the temperature to the proper level again, the motor must work for
a long time, consuming energy.
- Keep an Eye on the Seals
Keep the seals clean and make sure that they adhere well to
the door. This alone will ensure that no cold air escapes.
- No Hot Foods
A hot pot or pan placed in the refrigerator immediately raises
the temperature several degrees. Let hot cookware and food
cool to ambient temperature before placing them in the refrigerator.
Alarm buzzers and visual warnings
Door open alarm
If the refrigerator door is left open for more than two
minutes, a buzzer will sound. The buzzer will stop sounding
when you shut the door.
Abnormal freezer heating alarm
1. To signal an excessive heating on the part of the freezer,
a buzzer will sound and the two yellow indicator lights
"C" and "E" will start flashing to indicate a dangerous
state of overheating. To prevent food from refreezing,
the freezer will try to maintain a temperature of 0°C,
thus allowing you to use up the food within 24 hour or to
refreeze it after cooking it. Using the special alarm
silencing procedure (open and shut the refrigerator door),
you can turn off the buzzer. To go back to normal
operating conditions, set the freezer knob "F" to position
" " (refrigerator off) and then turn the appliance back
on.
2. If the temperature inside the freezer continues to rise to
excessively high values, the buzzer will sound yet again
and the two yellow indicator lights "C" and "E" together
with the green one "D" will start flashing to indicate an
excessive heating. We recommend you check the
conditions of the food, as it may be necessary to throw it
away. In all cases, food should not be refrozen unless you
cook it first. To prevent food from refreezing, the freezer
will maintain a temperature of 0°C. Using the special alarm
silencing procedure (open and shut the refrigerator door),
you can turn off the buzzer. To go back to normal
operating conditions, set the freezer knob "F" to position
" " (refrigerator off) and then turn the appliance back
on.
+ buzzer
Dangerous
overheating
+ buzzer
39
Excessive
heating
GB
Page 43

Keeping Your Appliance in Shape
Before performing any cleaning, unplug the appliance
from the mains electricity supply (keep ON/OFF button
“A” pressed down for more than two seconds, until OFF
is displayed in both fridge and freezer compartments,
then unplug the appliance). Should you fail to follow this
procedure, an alarm condition may arise.
alarm is not a sign of an anomaly. To restore your
appliance’s normal operating conditions, keep ON/OFF
button “A” pressed down for more than two seconds to
turn the appliance off and then turn it back on and set
the required temperatures.
HOLIDAY FUNCTION. Mould and
bad odours forming inside your
unused fridge when you go on
holiday need no longer be a
problem: just enable the Holiday
function (from the display). This way, with limited
energy consumption, the temperature of the
refrigerator compartment is kept at around 12°C (you
can store your make-up and beauty products in it, for
example) and the freezer is operated at its minimum
setting, which is essential for food preservation.
The new odour filter assures better quality of the air inside
the refrigerator. The filter is located on the bottom righthand side, inside the ventilation opening. The filter with active carbons can be activated by removing the sticker (Fig.
5). In general, to ensure constant air purification, the filter
should be replaced after approximately 6-8 months from
when it is activated (Fig. 6
and 7). However, the duration may vary depending on
the types of foods stored in
the refrigerator. To replace it,
all you have to do is contact
a Service Centre.
WARNING: this
Cleaning and maintenance of the parts
Before cleaning your refrigerator, set knob “F” to
position “ “ and then unplug the appliance.
- Your appliance is manufactured with hygienic odourless
materials. To preserve these characteristics, always use sealed
containers for strong smelling foods to avoid the formation
of odours that are difficult to remove.
- Use only a water and bicarbonate solution: Clean the internal
and exterior of your appliance with a sponge soaked with a
warm water and sodium bicarbonate solution, which is also a
good disinfectant. If you do not have any sodium bicarbonate
at home, use neutral detergent.
- What not to use: Do not use abrasive detergents, bleach or
detergents containing ammonia. Never use solvent based
products.
- All the removable parts can be cleaned by soaking in hot
soapy water or detergent. Remember to dry thoroughly before
replacing them.
- What about the back panel? Dust may deposit on the back
panel and affect the proper running of the appliance. To
remove dust, vacuum away the dust very carefully using the
appropriate vacuum cleaner accessory.
- When the appliance is left unused for an extended amount of
time. If you decide to switch your appliance off during the summer
months, clean it on the inside and leave the doors open.
- Replacing the light bulb.
When replacing the lamp, disconnect the appliance from
the mains, unscrew the burned out lamp and replace it with
another following the steps illustrated in figure 10. Make
sure that the wattage is not greater than 8W.
Fig. 6
GB
Fig. 5
Fig. 7
Fig. 8
40
Page 44

Is There a Problem?
Green LED does not light up
Have you checked whether:
• The main switch for the electricity to the apartment or
home has been turned off;
• The plug is properly inserted in the outlet;
• The outlet is adequate; try inserting the plug into another
outlet in the room.
The motor does not start
Have you checked whether:
· 8 minutes have passed since you switched the
appliance on?
This model is in fact provided with a motor protection
control system which means that it will only start
approximately 8 minutes after being switched on.
Warning lights are weak
Check that:
· Invert the plug in the outlet to see if this still happens.
The refrigerator and the freezer do not cool
properly.
If after all the checks, the appliance still does not operate or
the problem persists, call the nearest Service Centre and
inform them of: the type of problem, the abbreviation of
the model name (Mod.) and the relative numbers (S/N) written on the rating plate located at the bottom left next to
the vegetable crisper (see examples in the figures below).
93139180000 S/N 704211801
Cod.
Gross
Bruto
Brut
W
Fuse
A
Freez. Capac
Poder de Cong
kg/24 h
4,0
Max 15 w
Class
Clase
N
Classe
75
Test
P.S-I.
TI
Net
Util
Utile
Pressure
HIGH-235
LOW 140
RG 2330
Mod.
220 - 240 V- 50 Hz 150 W
340
Total
Gross
Bruto
Brut
Compr.
Syst.
Kompr.
Made in Italy 13918
Gross
Bruto
Brut
R 134 a
kg 0,090
Never call on unauthorized technicians and always
refuse spare parts which are not originals.
Have you checked whether:
• The doors do not close well or the seals are faulty;
• The doors are left open too long;
• The thermostat knob is not on the proper setting;
• The refrigerator or freezer is overfilled.
The food in the refrigerator becomes too cold.
Have you checked whether:
• The thermostat knob is on the proper setting;
• The food is in contact with the back wall - which is the
coldest part.
The motor runs continuously.
Have you checked whether
· the freezer switch has been pressed (yellow lamp lit or
flashing);
• The doors are not closed well or have remained open too
long;
• The ambient temperature is too high;
• The thermostat knob is not on the proper setting.
The appliance makes too much noise.
The gas refrigerant produces a slight noise even when the
compressor is not running (this is not a defect).
Have you checked whether:
• The refrigerator is level.
• The appliance was installed between cabinets or objects
that vibrate and make noise.
41
GB
Page 45

Reversibilità apertura porte
Reversibilidad abiertura puertas
Reversibilitaet der Tueroeffnungen
Reversing the door opening
1
2
3
Page 46

4
5
∅ 3
mm
Page 47

Page 48

Via Aristide Merloni, 47
60044 Fabriano (AN) Italj
tel. +39 0732 6611
www.merloni,com
04/2004 - 195044549.00 - Xerox Business Services DocuTech
 Loading...