

Hotpoint LTF11M121OUK Service Information
Indesit Company UK Ltd
© 2014 Reg. Office: Peterborough PE2 9JB Registered in London: 106725
Service
Information
Hotpoint
Fully Integrated
DISHWASHER
with Display and
O3 Active Oxygen
Models Covered
LTF11M121OUK 82906
Using DEA700 power module.
5407758 Issue 2 Jan. 2014
SM003860 ~ C00303163

2 of 40
Service Manual UK
Indesit Company
English
SAFETY NOTES & GENERAL SERVICING ADVICE
1. This manual is NOT intended as a comprehensive repair/maintenance guide to the appliance.
2. It should ONLY be used by suitably qualified persons having technical competence a pplicable product
knowledge and suitable tools and test equipment.
3. Servicing of electrical appliances must be undertaken with the appliance disconnected (unplugged)
from the electrical supply.
4. Servicing must be preceded by Earth Continuity, Earth Resistance and Insulation Resistance checks.
5. Personal safety precautions must be taken to protect against accidents caused by sharp edges on
metal and plastic parts.
6. After Servicing the appliance must be rechecked for Electrica l Safety. In the case of appliances which
are connected to a water supply (i.e.: Washing Machines, Dishwashers & Food Centres etc.) checks
must be made for leaks from seals gaskets and pipe work and rectification carried out where
necessary.
7. It can be dangerous to attempt ‘DIY’ repairs / maintenance on complex equipment and the Company
recommends that any problem with the appliance is referred to its own Service Organisation.
8. Whilst the Company has endeavoured to ensure the accuracy of the data within this publication they
cannot hold themselves responsible for any inconvenience or loss occasioned by any error within.
INDEX
Safety Notes & General Servicing Advice. . . . . . . . . . . . . . . . . . . . . . . . . . . . . . . . . . . . . . . . . . 2
Production Changes . . . . . . . . . . . . . . . . . . . . . . . . . . . . . . . . . . . . . . . . . . . . . . . . . . . . . . . . . . . 2
Technical Specifications . . . . . . . . . . . . . . . . . . . . . . . . . . . . . . . . . . . . . . . . . . . . . . . . . . . . . . . 3
Model Matrix . . . . . . . . . . . . . . . . . . . . . . . . . . . . . . . . . . . . . . . . . . . . . . . . . . . . . . . . . . . . . . . . . 4
General Information and Console Panel. . . . . . . . . . . . . . . . . . . . . . . . . . . . . . . . . . . . . . . . .5 - 7
Programme Guide & Options. . . . . . . . . . . . . . . . . . . . . . . . . . . . . . . . . . . . . . . . . . . . . . . . . . . . 8
Setting the Water Hardness . . . . . . . . . . . . . . . . . . . . . . . . . . . . . . . . . . . . . . . . . . . . . . . . . . . . . 9
Basic Machine Use . . . . . . . . . . . . . . . . . . . . . . . . . . . . . . . . . . . . . . . . . . . . . . . . . . . . . . . . . . . 10
Component Description . . . . . . . . . . . . . . . . . . . . . . . . . . . . . . . . . . . . . . . . . . . . . . . . . . . .11 - 19
Auto Test Cycle . . . . . . . . . . . . . . . . . . . . . . . . . . . . . . . . . . . . . . . . . . . . . . . . . . . . . . . . . . . . . . 20
Fault Codes & Diagnostics. . . . . . . . . . . . . . . . . . . . . . . . . . . . . . . . . . . . . . . . . . . . . . . . . .21 - 25
Wiring Diagram . . . . . . . . . . . . . . . . . . . . . . . . . . . . . . . . . . . . . . . . . . . . . . . . . . . . . . . . . . . . . . 26
Module Programming . . . . . . . . . . . . . . . . . . . . . . . . . . . . . . . . . . . . . . . . . . . . . . . . . . . . . .27 - 28
Servicing Notes & Dismantling Instructions . . . . . . . . . . . . . . . . . . . . . . . . . . . . . . . . . . .29 - 34
General Dishwashing Information. . . . . . . . . . . . . . . . . . . . . . . . . . . . . . . . . . . . . . . . . . . .35 - 38

3 of 40
Indesit Company
Service Manual UK English
TECHNICAL SPECIFICATIONS
Introduction Date 2013
Energy Class A++
Washing Class A
Drying Class A
Noise Level 41 dB.
Country of Origin EU
Dimensions Height Adjustable from 820 mm to 900 mm
Width 595 mm
Depth 570mm
Weight 43 kg
Capacity 14 place settings
Electrical Supply 230/240 Volts AC @ 50Hz
Energy Consumption 0.93kW/h
Water Consumption Standard Cycle: 9 litres
Drying Residual Heat Drying (Natural)
Controls DEA700
Tub Stainless Steel
Heater Flow through type with built in safety cut out and fuse
Heater Wattage 1.8 kW @ 230V AC
Heater Resistance 29.20Ω
Circulation Motor:
Type BLDC "Flexipower" Motor
Motor RPM Variable
Motor Power Consumption Variable
Detergent Dispenser Capacity 25g + 5g
Rinse Aid Dispenser Capacity 140ml
Fill Valve Resistance 3.72KΩ approx.
Water Pressure 0.56 bar (Max 10 bar)
Regeneration Valve 4.1KΩ approx.
Drain Pump BLAC variable speed
Power Consumption: "Left On" Consumption 5 Watts
"Off" mode Consumption 0.5 Watts
Thermistor Sump Mounted
Wash Programmes 11 Cycles
Wash Temperatures 45°C, 52°C, 48°C
Salt Refill Indicator Warning on Display
Rinse Aid Indicator Warning on Display
Furniture Door Height 720 mm maximum

4 of 40
Service Manual UK
Indesit Company
English
MODEL MATRIX
LTF11M1120UK
Product Type User
Interface
Programmes Interior Flexi-
power
Energy Noise Features Market
Dishwasher Total
Integrated
F = Digit
B = Basic
Knob
K = Knob
D = LCD
11 Medium
14
places
1 =
Yes
0 = No
1 = A+
2 = A++
3 =
A+++
1 =
41db
2 =
42db
to
9 =
49db
O = Active
Oxygen
7 = 7
Litres
C =
Cutlery
Tray
5 of 40
Indesit Company
Service Manual UK English
GENERAL INFORMATION
These models are integrated front loading dishwashers providing a choice of eleven wash
programmes to suit load requirements.
The programme selection button, On/Off switch and Programme Display and Option Buttons are
mounted along the top edge of the door panel.
The programmes are selected by depressing the programme selection button (P). The programme
can be cancelled at any time by h olding down the On/Off button until the buzzer sounds three times
- resetting the programme.
The selected programme is indicated by a number displayed on the top edge of the door panel.
At the end of the programme the buzzer sounds twice and the selected programme flashes once a
second to indicate the end of the programme.
Water hardness is adjusted by the user before the machine is first used.
ECODESIGN REGULATION
The ECO wash cycle is the standard cycle to which the energy label data refers. It can be used to
wash crockery with a normal soil level and is the most efficient cycle in terms of energy and water
consumption for this type of crockery.
To reduce consumption even further, only run the dishwasher when it is full.
Standby consumption: Left-on mode consumption: 5 W - Off mode consumption: 0.5 W
Consumption data table for the main cycles:
*Cycle data refers to the values recorded in a laboratory in accordance with European standard EN 50242.
** Data is obtained by recording values when the app liance is operational and loaded with user crockery.
Standard conditions* User conditions**
Energy
consumption
(kWh/cycle)
Water
consumption
(litres/cycle)
Duration
(min/
cycle)
Energy
consumption
(kWh/cycle)
Water
consumption
(litres/cycle)
Duration
(min/cycle)
INTENSIVE 1,50 15 150 1,30 14 135
NORMAL 1,20 15 120 1,05 1 4 110

6 of 40
Service Manual UK
Indesit Company
English
CONSOLE PANEL
ON-OFF / Reset Button
Press this button to switch the appliance on.
To Reset a programme hold down the On/Off Reset button until the machine emits 1 long beep.
ON-OFF Indicator Light
This light informs that the dishwasher is on.
Wash Cycle Selector (P) Button
Each time this button is pressed the number in the display will sequence through the available
programmes.
Display
Located on the top of the console, it displays the following information:
• The set programme number during a Cycle
• The programme number flashing at the end of the cycle indicates the cycle is complete.
• If the on/off indicator is flashing as well as a number in the display, this indicates a fault
code.
• Low Rinse Aid Warning.
• Low Salt Warning.
• Delayed Time
• Basket Selected
Delayed Start Button
The Programme can be delayed between 1 and 12 hours.
Not compatible with all cycles.
Every time the Delay start button is pressed the next period of delay is hi lighted until the desired
time is displayed.
Multi Function Tablet Button
Button LED on when selected.
Selected when the customer is using Multi-Function Tablets. The Programme profile is altered
to make full use of the tablet.
Select wash cycle button
Active Oxygen button
and indicator light
Extra dry button
and indicator light
Salt indicator light
Rinse aid indicator light
Multi-functional tablets
button and indicator light
Wash cycle number and
remaining time indicator light
Delayed start button
Zone Wash button
ON-OFF/Reset button
and indicator light
Zone Wash
indicator lights
Delayed start indicator light

7 of 40
Indesit Company
Service Manual UK English
ZONE WASH
This option allows for performing the wash cycle only on the selected rack. Select the
wash cycle, press the ZONE WASH button in a sequence: the selected rack lights up
and washing is activated only on the selected rack; press the button again to deselect
the option.
The option is available with the the following wash cycles:
Intensive and Normal.
Select the option and the wash cycle Intensive to activate the POWER ZONE wash cycle.
This wash cycle is a useful option for a soiled, mixed load, su ch as pans and saucepans, dishes
with burnt-on residues or crockery that are difficult to wash (grater, vegetable mill, very soiled
cutlery). The spraying pressure is reinforced and the washing temperature is increased to
guarantee the best washing on very soiled crockery.
Select the option and the wash cycle Normal to activate the GREEN ZONE wash cycle.
This function reduces the water and energy consumption. Excellent washing and drying results;
thee cycle time is extended.
Remember to load the crockery only on the selected rack.
EXTRA DRY BUTTON
Pressing the Button will turn on the LED.
The Final Rinse Temperature is incre ased and the Drying Phase is extend ed to improve Drying
Performance.
ACTIVE OXYGEN
This Option should be used between cycles when the Dishwasher is loaded with soiled crockery.
The Active Oxygen Option improves the hygienic conditio ns inside the dishwasher and controls
the onset of odours. The Option is available for 24 hours or until the Wash Cycle is started.
8 of 40
Service Manual UK
Indesit Company
English
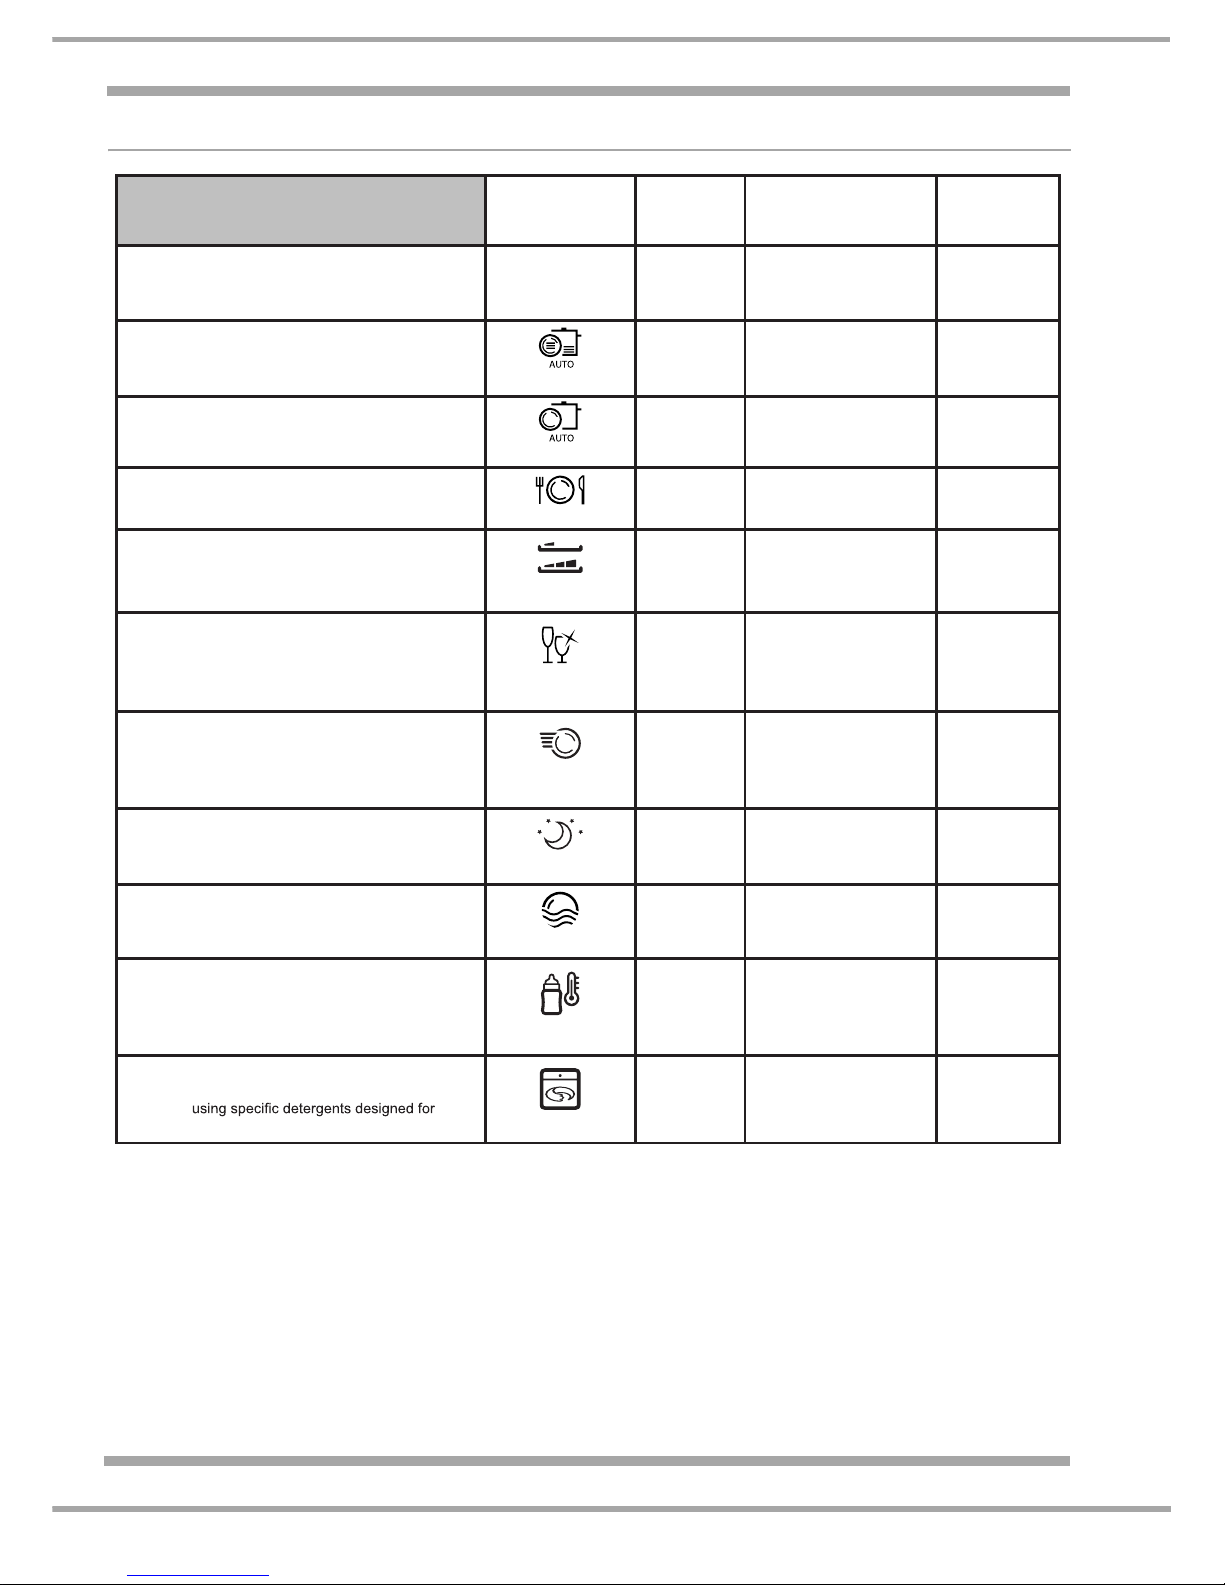
PROGRAMME CHART
**
Quantity of pre-washing detergent.
Instructions on wash-cycle selection and
detergent dosage
Wash cycle
Wash cycles
with
drying
Options
Approximate
duration of
wash cycles
Environmentally-friendly wash cycle with low energy
consumption levels, suitable for pans and dishes.
29 gr/ml + 6 gr/ml** – 1 Tab
1. Eco
*
Yes
Delayed start – Tabs –
Extra Dry 3:10’
Heavily soiled dishes and pans (not to be used for
delicate items).
35 gr/ml – 1 Tab
2. Auto Intensive
Yes
Delayed start – Tabs –
Extra Dry Zone wash
2:30’
Normally soiled pans and dishes. Standard daily wash
cycle.
29 gr/ml + 6 gr/ml** – 1 Tab
3. Auto Normal
Yes
Delayed start – Tabs –
Extra Dry – Zone wash 2:00’
Limited quantity of daily soiling
(4 place settings + 1 saucepan +1 frying pan).
25 gr/ml – 1 Tab
4. Auto Fast
No
Delayed start – Tabs
1:00’
Wash spread over the three* racks: normal in the upper
rack and third rack for cutlery and glasses, heavy-duty
in saucepans in the lower rack.
35 gr/ml – 1 Tab
5. Duo wash
Yes
Delayed start – Tabs –
Extra Dry
2:00’
Economical and fast wash for delicate items which are
sensitive to high temperatures - run immediately after
use (glassware in the upper rack + fragile plates in the
lower rack).
35 gr/ml – 1 Tab
6. Delicates
Yes
Delayed start – Tabs –
Extra Dry
1:40’
Economical and fast wash to be used for lightly soiled
dishes - run immediately after use (2 plates + 2 glasses
+ 4 pieces of cutlery + 1 saucepan + 1 small frying
pan).
25 gr/ml – 1 Tab
7. Express 30’
No Delayed start - Tabs 0:30’
This guarantees optimal performance, reduced
consumption levels and silent operation. It is ideal for
night-time operation of the appliance.
35 gr/ml – 1 Tab
8. Good Night
Yes
Delayed start – Tabs –
Extra dry
3:30’
Pre-wash for dishes while awaiting completion of the
load with the dishes from the next meal.
No detergent
9. Soak
No Delayed start 0:12’
Disinfecting wash cycle suitable for washing bottles,
rings and teats together with plates, cups, glasses and
cutlery. The crockery should only be loaded on the
upper rack.
30 gr/ml - 1 Tab
10. Sanitizing
Yes Delayed start 1:20’
Disinfecting cycle for cleaning the inside of the
dishwasher, to be carried out only when the dishwasher
is EMPTY
dishwasher maintenance.
11. Self clean
No Delayed start 0:50’

9 of 40
Indesit Company
Service Manual UK English
SETTING THE WATER HARDNESS
These models have 5 Water Hardness Settings depe nding on the water su pply wh ere th e machi ne
is located.
The Water Hardness Setting must be set:
- before the machine is used for the first time,
- if a new Module has been fitted or if the machine is moved to a different water area.
Use the above water hardness setting table to determine Water Hardness and do the following:
1. Switch on and off the dishwasher using the ON/OFF button.
2. Press and hold the P button for a few seconds until you hear a beep.
3. Switch on the dishwasher with the ON/OFF button, the set level appears on the display (the
water softening system is set by default to level 3).
4. Adjust the water hardness level with the P button, (1-2-3-4-5* see water hardness table) up to a
max. of 5 levels.
5. Press the ON/OFF button to save the adjustment setting.
Note: Even if using multi-functional tablets, the salt dispenser should still be filled.
RINSE AID ADJUSTMENT
The Rinse Aid Setting has to be Electronically set.
Starting condition:
Make certain the machine is Off at the Console but power is applied at the wall socket.
1. Switch the machine on (On/Off button)
2. Switch the machine off (On/Off button)
3. Press the Start/Pause Button 3 times
4. Switch the machine on (On/Off button)
5. Adjust the level of rinse aid using the knob
6. Confirm by switching the machine off (On/Off button)
Note: if the machine is not switched off by pressing the On/Off button, then at the end of a 10-
second Time Out the appliance will abort the procedure automatically, without any change to the
previous rinse aid setting.
Select wash cycle button
Salt indicator light
Rinse aid indicator light
Water Hardness Setting
ON-OFF/Reset button
and indicator light
Water hardness setting table:
Display
No.
Hardness
(Clarke)
Notes
1 0 - 7 Salt not needed
2 7.7 - 14 Add Salt
3 14.7 - 21 Add Salt
4 21.7 - 42 Add Salt
5 42 - 63 Add Salt
10 of 40
Service Manual UK
Indesit Company
English
BASIC MACHINE USE
Setting a Programme
1. Open the door and turn the machine On.
2. Press the P button, after each press, the display number will cycle to the next programme
number, until the desired Programme is shown.
3. Close the door, The machine will Start a fter about 10 seconds.
Cancelling a Programme in progress
1. Press and Hold the On/Off button until the machine beeps and the lamps all go out.
The programme is now cancelled.
End of Cycle
The Programme number will flash in the display when the final drying part of the programme is
completed.
Note: If the machine is silent and when the door is opened and the Programme Number is
permanently displayed, the cycle has not finished. Close the door and allow the programme
to continue. During the final part of the Drying Cycle the machine is paused.
On/Off Lamp Flashing
If the ON-OFF Lamp is flashing as well as a programme number the machine has a fault, see
Fault Codes and Diagnostics.
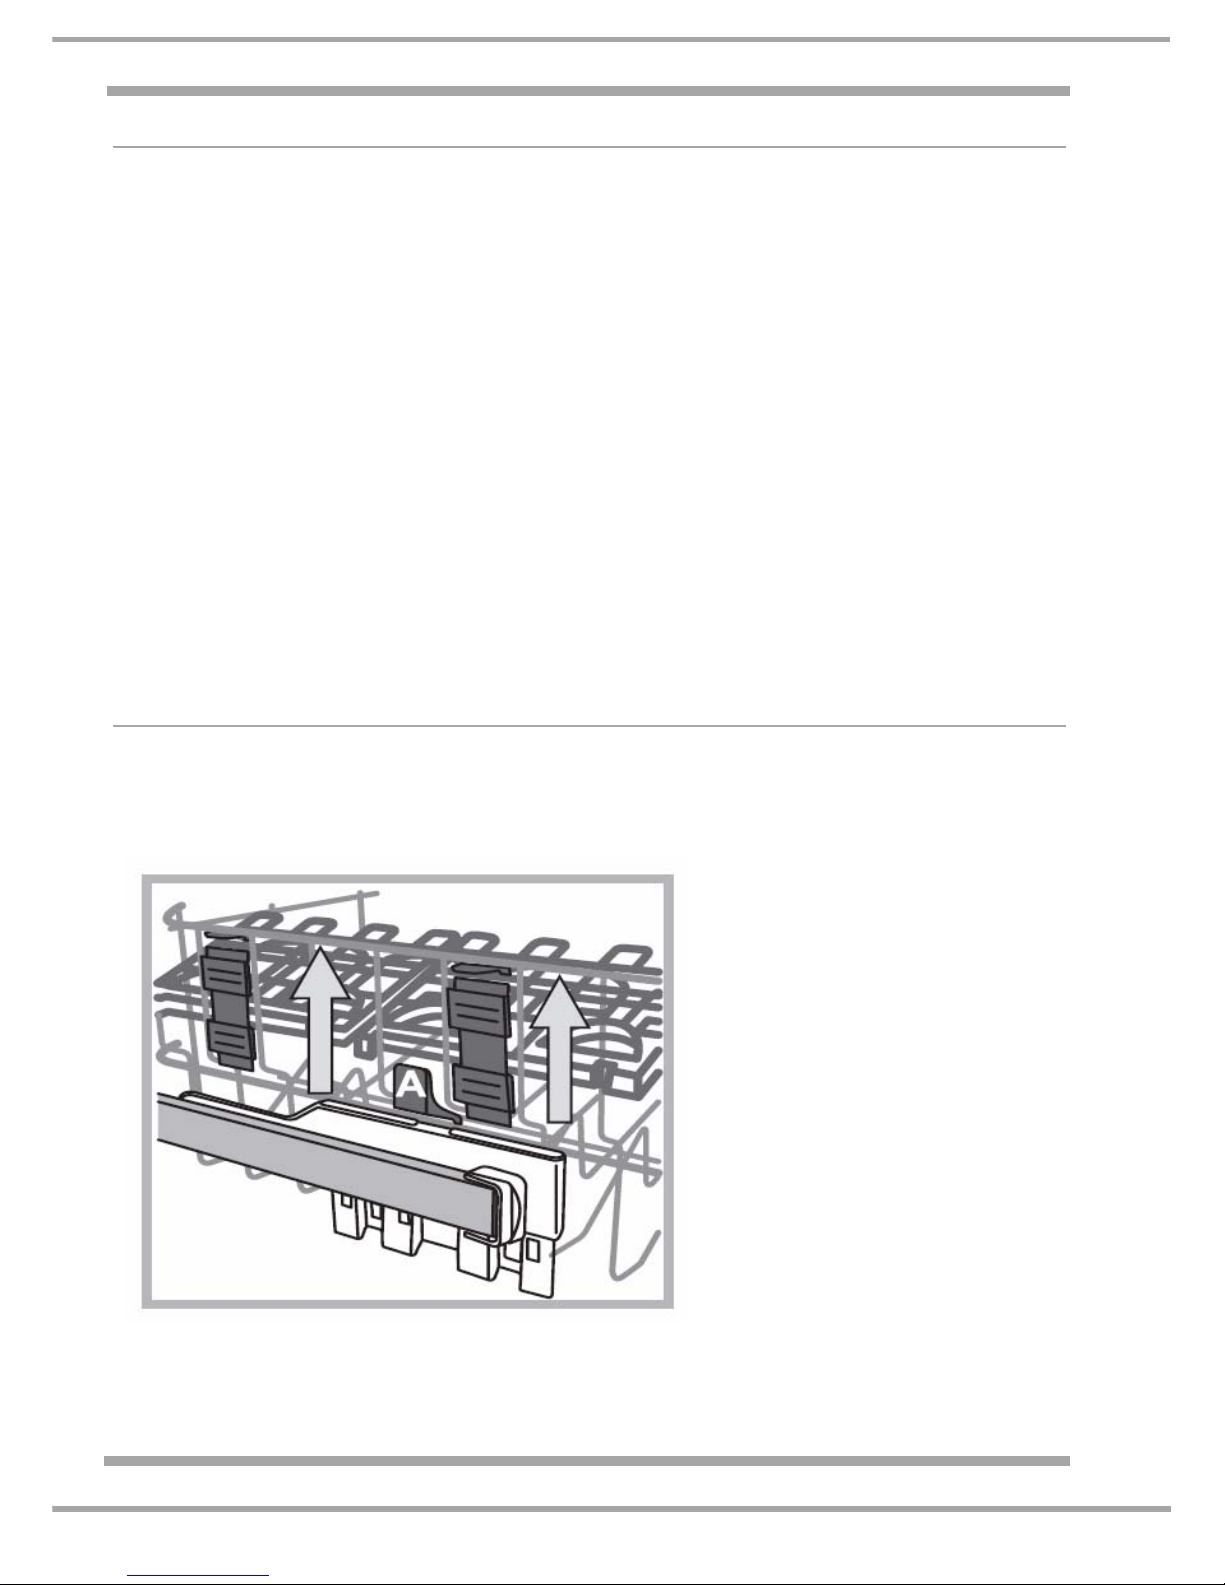
Adjusting the height of the upper rack
In order to make it easier to arrange the crockery, the upper rack may be moved to a higher or lower
position.
The height of the upper rack should be adjusted WHEN THE RACK IS EMPTY.
NEVER raise or lower the rack on one side only.
If the rack is equipped with a Lift-Up device* (see figure), lift it up by holding its sides. To restore the
lower position, press the levers (A) at the sides of the rack and follow the rack down.
11 of 40
Indesit Company
Service Manual UK English
COMPONENT DESCRIPTION
Aqua Stop Inlet Valve
Water Turbine
This is situated at the bottom of the Air Break. Consisting of a fixed reed switch and a magnet fitted
to an impeller. Unlike previous control systems , water fill is no longer dep endant on the operation of
the pressure switch. The turbine generates a series of impulses as the water rotates the impeller
vanes.
The control module translates these impulses into litres of fill water (217 impulses is equal to 1 litre
of water). The turbine also regulates the maximum amount of water that can enter the tub, therefore
acting as an overflow device.
MODULE:
Mounted behind the plinth, this is an electronic device that monitors and controls all devices within
the appliance. If replacing this module, refer to the Module Programming section on in this manual.
DEA700 Module
The pressure and door switches and associated wiring are Low voltage (12 Volts and 10mA) with
RAST 2.5 connector.
VIRTUAL SENSORS:.
The pressure switch has been replaced by a system of "Virtual Sensors"
that will detect the presence or absence of water in the tub.
In practice, these sensors are the BLAC Wash Pump and the BLAC Drain
Pump.
The Virtual Sensors are able to detect full or empty conditions by
monitoring the operation of the BLAC wash pump and the BLAC drain
pump: By measuring the effort (energy consumption) expended power by
these motors, the Main Module can identify the exact operating situation.
See Tables below.
The Aqua stop inlet water valve is located in
the tap end of the fill hose.
In the event of a split fill hose or the machine
leaking, water will fill the base tray and
operate the base float switch, which will
signal the module to switch off the inlet
valve.
WASH PUMP DRAIN PUMP
0 Empty Sensor 0 Empty Sensor
1 Full Sensor to Wash 1 2 Full Sensor to activate Heating Element 2 Full Sensor
3 Dirty Filters/Foam (unsuitable situation) 3 4 Washing Pump Stopped 4 Drain Pump Stopped
5 Speed Reduction 5 6 State Transition 6 State Transition
Protected outer
sheath of fill hose
Inlet valve
Hose
connector
12 of 40
Service Manual UK
Indesit Company
English
Virtual Sensor (BLAC WASH PUMP) Sensing Blocked Filter
If, during the wash cycle, the Wash Pump (functioning as Virtual Sensor) senses a Clogged Filters/
Suds situation, the main board will reduce the motor rpm by 20%.
If the situation stabilizes, the problem will be identified as “Suds” and the pump continues operating at
the new speed.
If the pump continues to struggle (condition 3: build-up of suds or filters clogged),
the speed will be reduced by a further 20% and the problem identified as “Clogged Filters”. If the
situation stabilizes, the pump will continue operating at the new speed.
If the problem persists, the machine will begin to top up with water until there are
5.5 litres in the tub or until the problem is overcome (whichever occurs first).
If the problem still persists (even after 5.5 litres of water have entered), the machine
will drain and the program skips to the next step of the cycle.
Drain Pump
The new Drain Pump has a BLAC motor.
The speed of this pump is control led by the Power Module in response
to the different conditions prevailing at any given moment.
The BLAC Drain Pump's main function is to drain water from the
machine.
In addition, the BLAC drain pump (in combination with the BLAC Wash
Pump) operate as a virtual sensors.
Anti Flood Device
Consisting of a polystyrene float and microswitch. An excess of water in the base operates the float
switch sending a signal to the control module operating the drai n pump and displaying a fa ult code on
the console.
 Loading...