

Page 1
ISHWASHER
D
Quick guide to your
dishwasher
This manual explains pleasantly all your new electric
household appliance has to offer. In addition, you will
discover a world of useful hints and handy tips to help
you get a better wash from your dishwasher and to make
it last longer.
1. Installation and moving (p. 19)
Installation, after delivery or your moving house, is the most important
procedure for the correct operation of your dishwasher. Always check:
1. That the electricity system is in accordance with norms;
2. That the water inlet and outlet hoses are connected correctly;
3. That the dishwasher is level on the ground. It is worth it: for the longer
life span and the correct operation of your dishwasher.
2. Control panel at your orders (p.13)
Learn to get to know the parts which make up your dishwasher, you will
use it better for it. This is where you will find the description of the
controls and the internal parts.
3. How to load your dishes (p.14)
This page includes useful tips to help you load your dishwasher correctly
and make the most of all the available space.
4. How to start your dishwasher (p. 15)
8. Safety for you and your family (p.20)
After loading the dishes, you need to select the right wash cycle and
measure out the correct dose of detergent and rinse aid. Reading these
pages will help you through all the wash phases.
5. Salt: an important ally (p. 18)
Using the right salt and in the right quantity will help you maintain your
dishwasher in top condition, to wash better and to avoid possible damage
caused by limescale.
Read this chapter carefully, as it will provide you with useful information
on installation, use and maintenance safety. To avoid nasty surprises.
9. Special care and maintenance (p.21)
Once in a while, once a month, spend a little time on the filter assembly
and the sprayer arms. This is where you can learn how.
10. Keeping your dishwasher in shape (p.21)
6. Advice and suggestions to help you make savings
as well (p. 18)
This is where you will find small tips on how to wash your dishes better
and to help make savings by selecting a wash cycle which best suits the
type of load.
Respect the few rules you will find here, and the result will be an enduring
top-shape dishwasher.
11. Technical characteristics (p. 13)
All your appliance's technical data, in accordance with norms and
regulations as always.
7. Troubleshooting (p.20)
Before calling the technician, have a look here: a lot of problems can
have an immediate solution. If you can't manage to solve it yourself,
then call the Ariston helpline and any problem will be solved as quickly as
possible.
12
ARISTON DISHWASHER - Instructions for installation and use
12. Ariston is still with you after purchase (p.22)
Ariston supports its products by means of after-sales services and
assistance, offering you special guarantees, professional assistance as
well as quality spare parts and accessories. To find out more, call the
Ariston Freefone Number.
Page 2
ISHWASHER
A
B
M
P
D
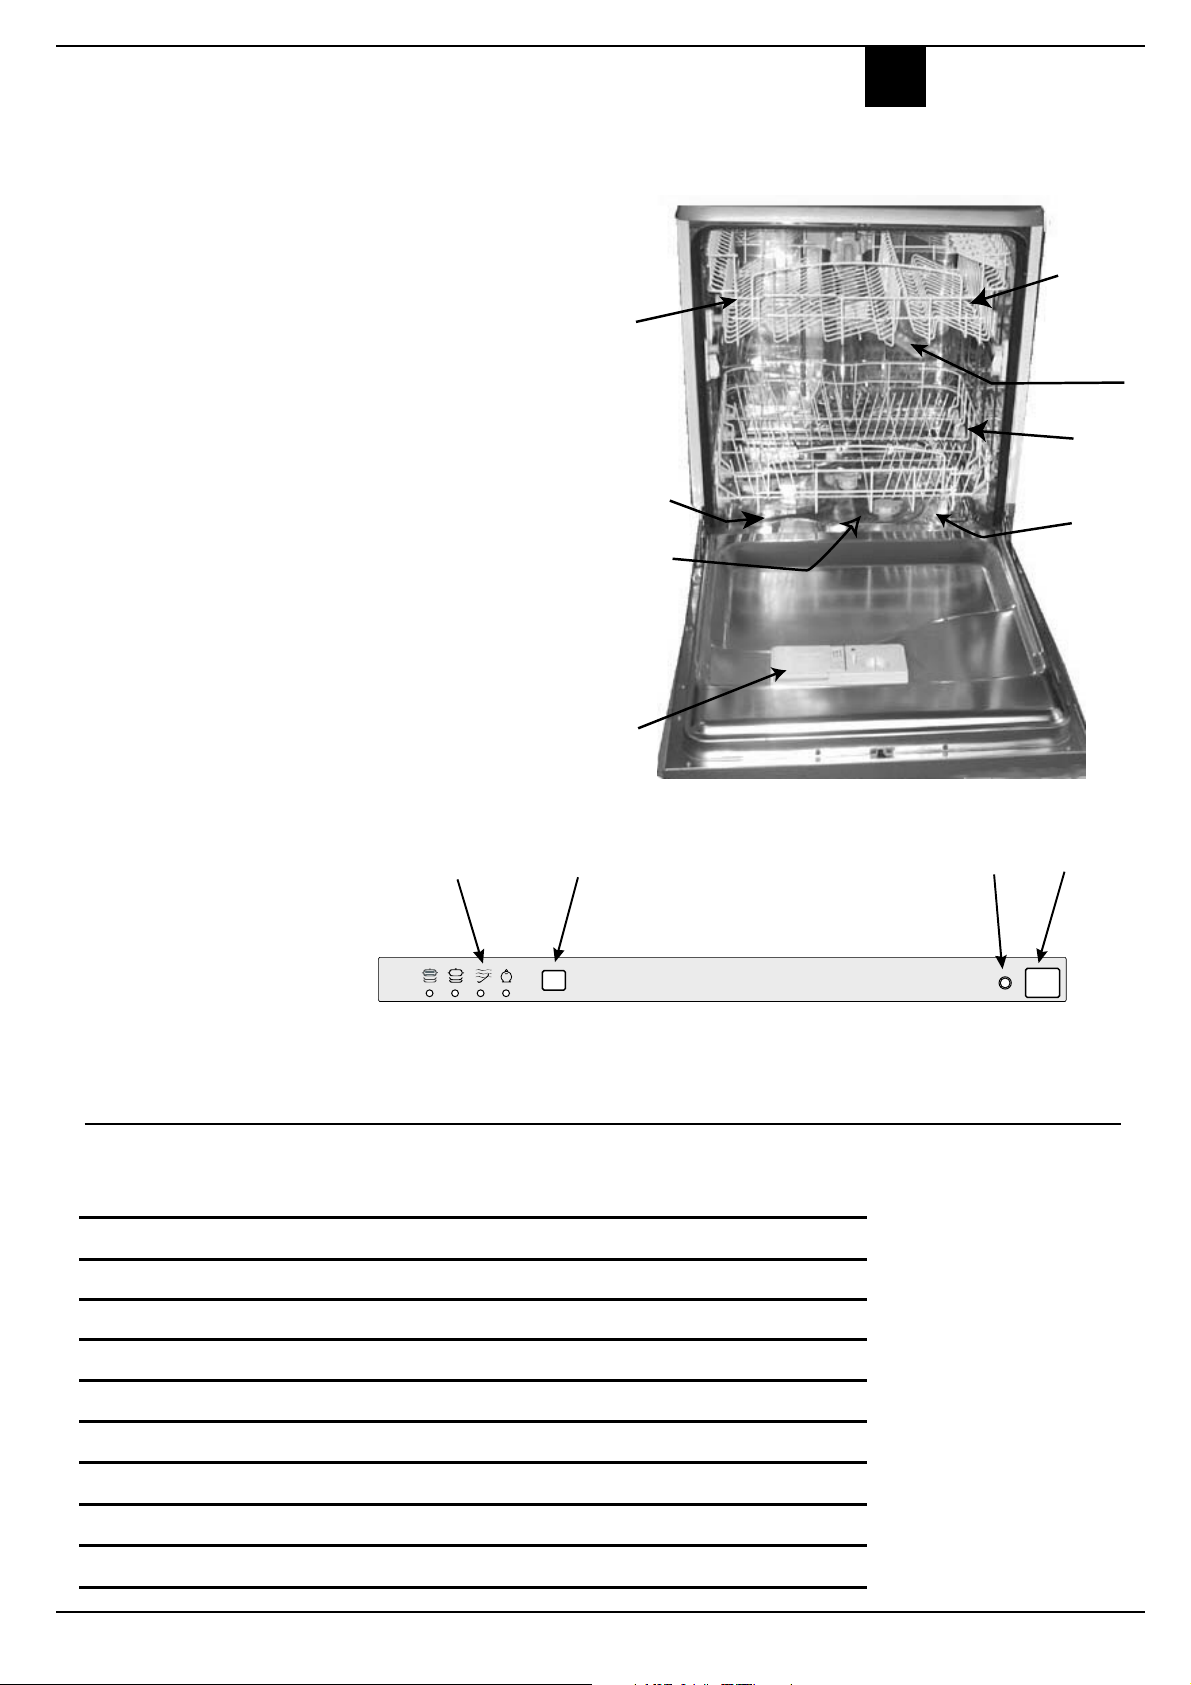
Let's open up your dishwasher together
How is it made?
Learn to get to know the parts which make up
your dishwasher, you will use it better for it.
G
E
E. Upper rack
F. Top sprayer arm
G. Rack height adjuster
H . Lower rack
I. Bottom sprayer arm
J. Salt container cap
K . Washing filter
L. Detergent and rinse
aid dispenser
Control panel at your orders
A. ON-OFF Button
Press this button to
switch the appliance on.
B.ON-OFF Indicator
light
This light informs you
that the dishwasher is on.
P. Cycle select button
Each time this button is
pressed, one of the cycle
indicator lights M will
come on in sequence.
M.Cycle indicator light
This light informs you
which cycle you have
selected or the one in
progress.
F
H
J
K
I
L
Technical Characteristics
Technical characteristics
Width cm. 59,5
Depth cm. 57
Height cm. 82
Capacity 12 stan dard place settings
Mains water pressure 30 KPa÷ 1MPa (0,3 ÷10 bar)
Power voltage See data plate
Total absorber power See data plate
Fuse See data plate
ARISTON DISHWASHER - Instructions for installation and use
This dishwasher
conforms to the
following European
Community
Directives:
73/23/EC
(Low Voltage
Directive) and
subsequent
amendments;
89/336/EC
(Electromagnetic
Compatibility) and
subsequent
amendments.
97/17/EC
(Labelling)
13
Page 3
ISHWASHER
D
How to load your dishes
Before washing, a few small steps can help you get a better wash and keep your dishwasher for longer.
Remove the largest scraps of food left over on your plates, soak saucepans and frying pans with tough
incrustations. After loading your dishes, make sure the blades on the sprayer arm turn well
First of all.
Before placing the dishes in the
racks, remove the largest scraps
of food left over on your plates, you
will thus avoid blocking the filter,
which would reduce the efficacy
of the wash.
If the saucepans and frying pans
are very dirty, allow them to soak
before being washed. To make it
easier to load your dishes, pull the
racks out.
What goes into the
lower rack?
We recommend you place the most
difficult dishes to wash into the
lower rack: saucepans, lids, soup
dishes and plates (a load example
is shown in the photo).
Serving dishes and large
lids: place them on the sides
of the rack.
Saucepans, salad bowls:
must always be placed upside
down
Very deep dishes: place
them obliquely, thus allowing
water to run down them and
cleaning them better
The cutlery basket is equipped with
two removable grids: insert the
cutlery one by one into the slots,
with the handles at the bottom.
Knives and utensils with sharp
blades or tips should be positioned
with the sharp parts at the bottom..
Position them so that they don't
touch.
The appliance can also be equipped
with one or two tip-up compartments onto which you can place
mugs and cups, as well as long sharp
knives and serving cutlery.
What goes into the
upper rack?
Place delicate and lightweight dishes in the upper rack: glasses, tea
cups and coffee cups, saucers - but
plates too - shallow salad bowls,
slightly dirty frying pans and
shallow pans (the photo illustrates
a few examples).
Position lightweight dishes in such
a way as to avoid their being moved by the spray of water.
After loading the dishes, remember to check that the blades on the
sprayer arms can turn freely without knocking against any dishes.
How to adjust the top
rack.
The upper rack can be set in high
or low position to enable you to
organise your dishes effortlessly.
1
Fig.F
Open the rail stop flaps and pull the
rack out completely. Now place it in
high or low position, then slide it
along the guide rails until the front
wheels also go in. Now close the rail
A1
stop flaps. Follow the sequence of
actions illustrated in figure "F".
3
2
4
lower rack
Load examples
upper rack
14
ARISTON DISHWASHER - Instructions for installation and use
Page 4
Starting the dishwasher
Ready, steady, go!
You have loaded your dishes and you now have
to set the wash cycle. It takes just one minute
to learn how
ISHWASHER
D
First of all.
After performing all the operations
described in the previous paragraphs, turn the water tap on completely, open the appliance door and
press ON-OFF button "A": indicator light "B" comes on. Your appliance is now on and awaiting instructions.
Selecting the wash
cycle.
Select the wash cycle by pressing
button "P". Each time this button
is pressed, one of the indicator
lights "M" will come on in sequence,
select the wash cycle you deem
most suitable for the type of dishes
to wash (take a look at page 17,
where you will find the wash cycle
table). Close the appliance door and
after a few seconds, you will hear
a short beep: the wash cycle has
begun.
Modifying a wash cycle in
progress.
But if you have chosen the wrong
cycle, not to worry! You can modify
the wash cycle in progress, if it has
only just started. Open the appliance door carefully to avoid any
hot water splashes, then keep button "P" pressed for approximately
5 seconds, until you hear a short
beep. Indicator light "M" will come
off and at this point, all the settings
will have been cancelled. You are
now free to re-set the correct wash
cycle.
You've left out a dish?
Well, it happens to everyone. Interrupt the wash cycle by opening the
appliance door with the utmost
care, as usual, then insert the dish
you had forgotten. When you shut
the appliance door, the cycle will
start up from where you interrupted
it.
Finished?
The end of the wash cycle is indicated by a double beep and the flashing of the wash cycle indicator light
"M". Open the dishwasher door,
press the ON-OFF button as well,
thus cutting off the electricity supply to the appliance.
Turn off the water tap.
Wait a few minutes before unloading the dishes: they are very hot! If
you wait a little while, they dry
better thanks to the steam.
Empty the lower rack first.
Make sure the
wash cycle has
ended before
removing the
dishes!
There's been a power failure? Have you opened the
dishwasher door?
The wash cycle stops and then restarts when the electricity comes
back on or when you shut the door.
Everything is under control!
You can cancel
the wash cycle
in progress, if it
has only just
started.
If opening the
door soon after
the end of the
programme,or
during it, stand
away from the
Dishwasher, to
avoid possible
injury from hot
steam.
ARISTON DISHWASHER - Instructions for installation and use
15
Page 5
ISHWASHER
D
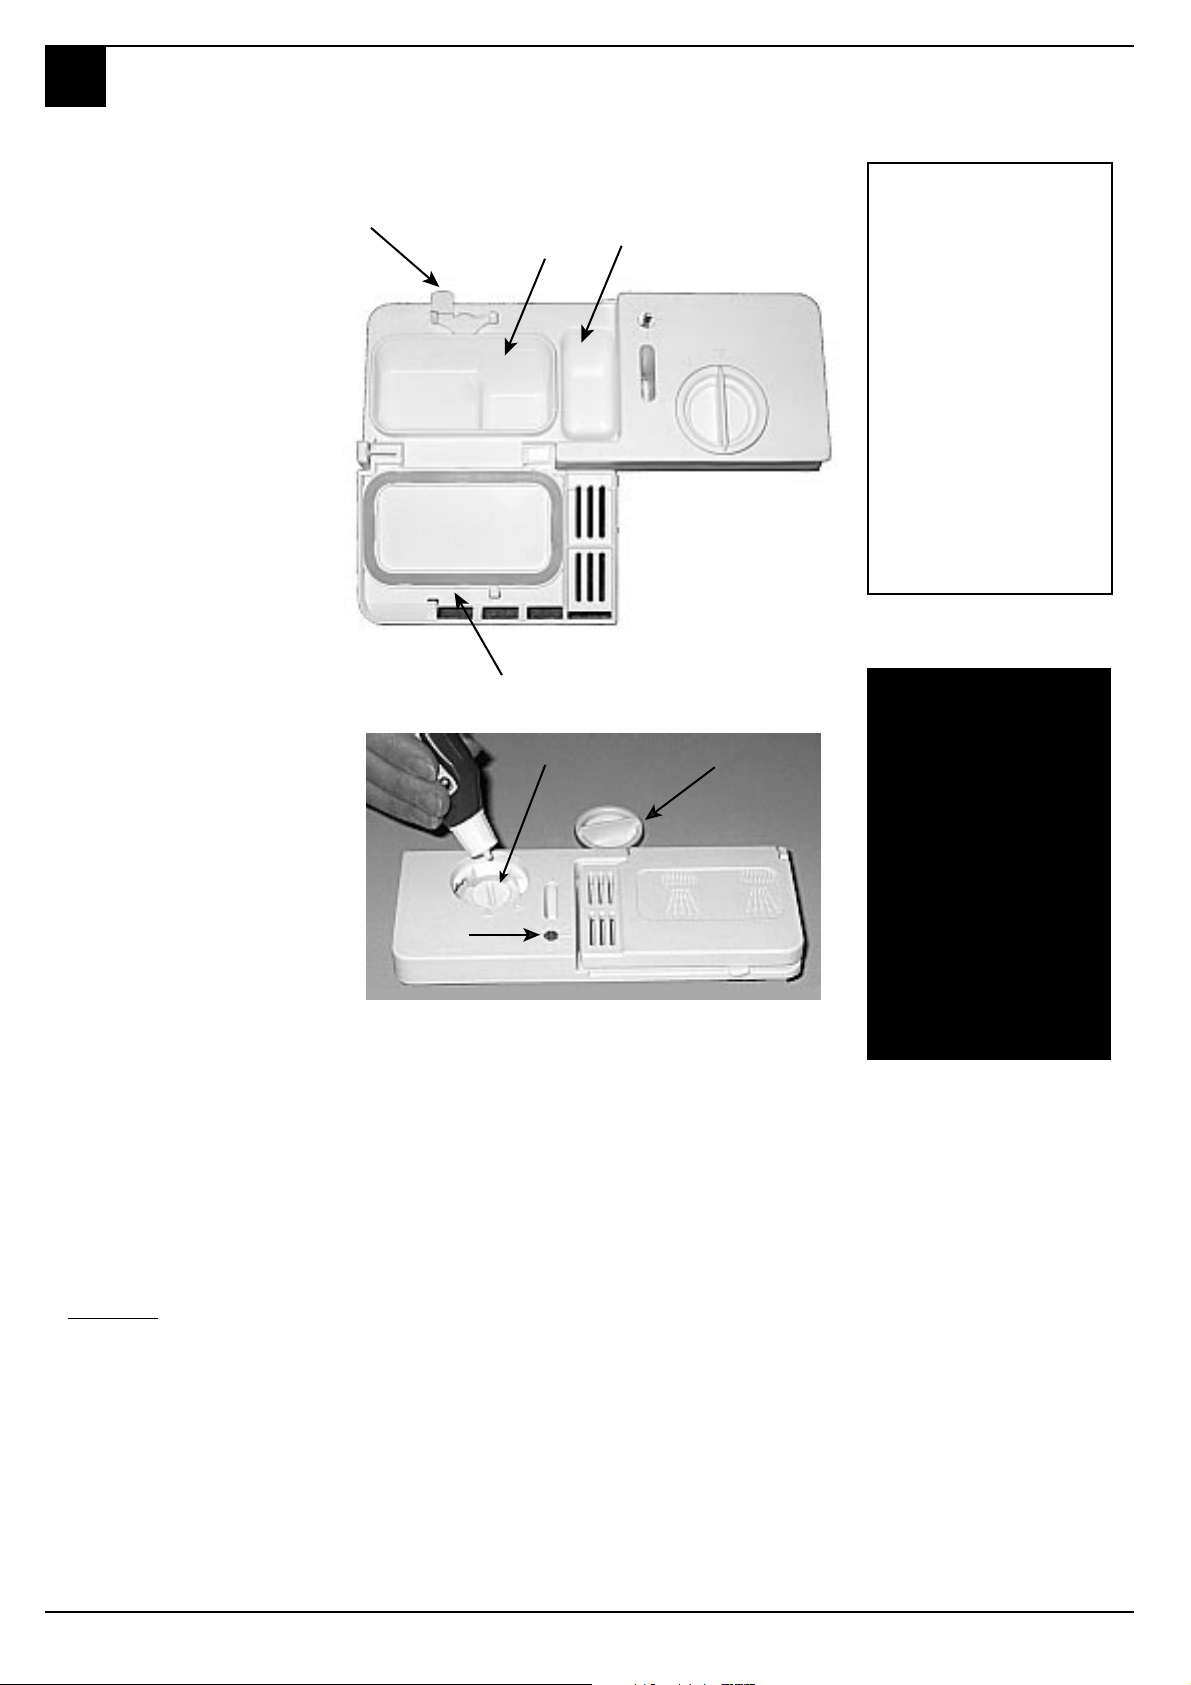
Only use specific dishwasher detergents. Pour the detergent into the
dispenser on the inside of the door. Before the wash cycle starts!
The detergent
Loading the detergent
To open lid A, press button B. The
detergent should be poured into the
two containers C and D up to the
rim.
Now you can close the lid: press it
down until you hear it click.
If you prefer to use the detergent
in tablet form, then place one inside
the container D and close the lid.
It won't close!
Check whether there is any
detergent residue on the edges of
the dispenser. It is due to this residue that the lid won't close. Get rid
of it and you'll see that it closes.
Detergent and rinse aid
Useful tips
Use the right
B
25 gr
D
.
5 gr.
C
Keep your
amount of
detergent: if you
use too much,
you will not get
cleaner dishes,
but just more
environmental
pollution.
dishwasher
detergent and
rinse aid in a
cool, dry place
and away from
children.
The rinse aid.
This product makes dishes sparkle
more as it improves their drying.
The rinse aid container is situated
on the inside of the appliance door;
you should refill it when you see
the container is empty by means
of indicator light D.
(If your dishwasher is fitted with a
low rinse aid indicator light, fill
the container up when the indicator
light flashes or lights up).
Loading the rinse aid.
To open the dispenser, turn cap C
anticlockwise. Take care when you
pour in the rinse aid to avoid it
overflowing. You can adapt the
amount of rinse aid used by the
dishwasher: regulate the adjuster
F which you will find under lid C.
A
F
D
You can choose from six different positions.
It is normally set to 4.
C
Proper dosage of
the rinse aid
improves drying.
If drops of water
remain on the
dishes or spotting
occurs, turn the
dosage adjuster to
a higher setting.
If, on the other
hand, the dishes
have white
streaks, then turn
the dosage
adjuster down to
a lower setting.
Warning
Three-in-one dishwasher tablets are now available on the market, and combine the detergent, salt and rinse aid
all in one. If the water in your area is hard or very hard, we still recommend you pour extra salt into the
relevant dispenser to prevent the formation of white streaks on your dishes or on the appliance interior.
Add rinse aid to the corresponding container only if you are dissatisfied with the results on your dishes.
In any case, please read the manufacturer's instructions provided on the packet.
If you use only these products, it is normal for the salt and rinse aid indicator lights to flash permanently after
a certain number of cycles.
16
ARISTON DISHWASHER - Instructions for installation and use
Page 6
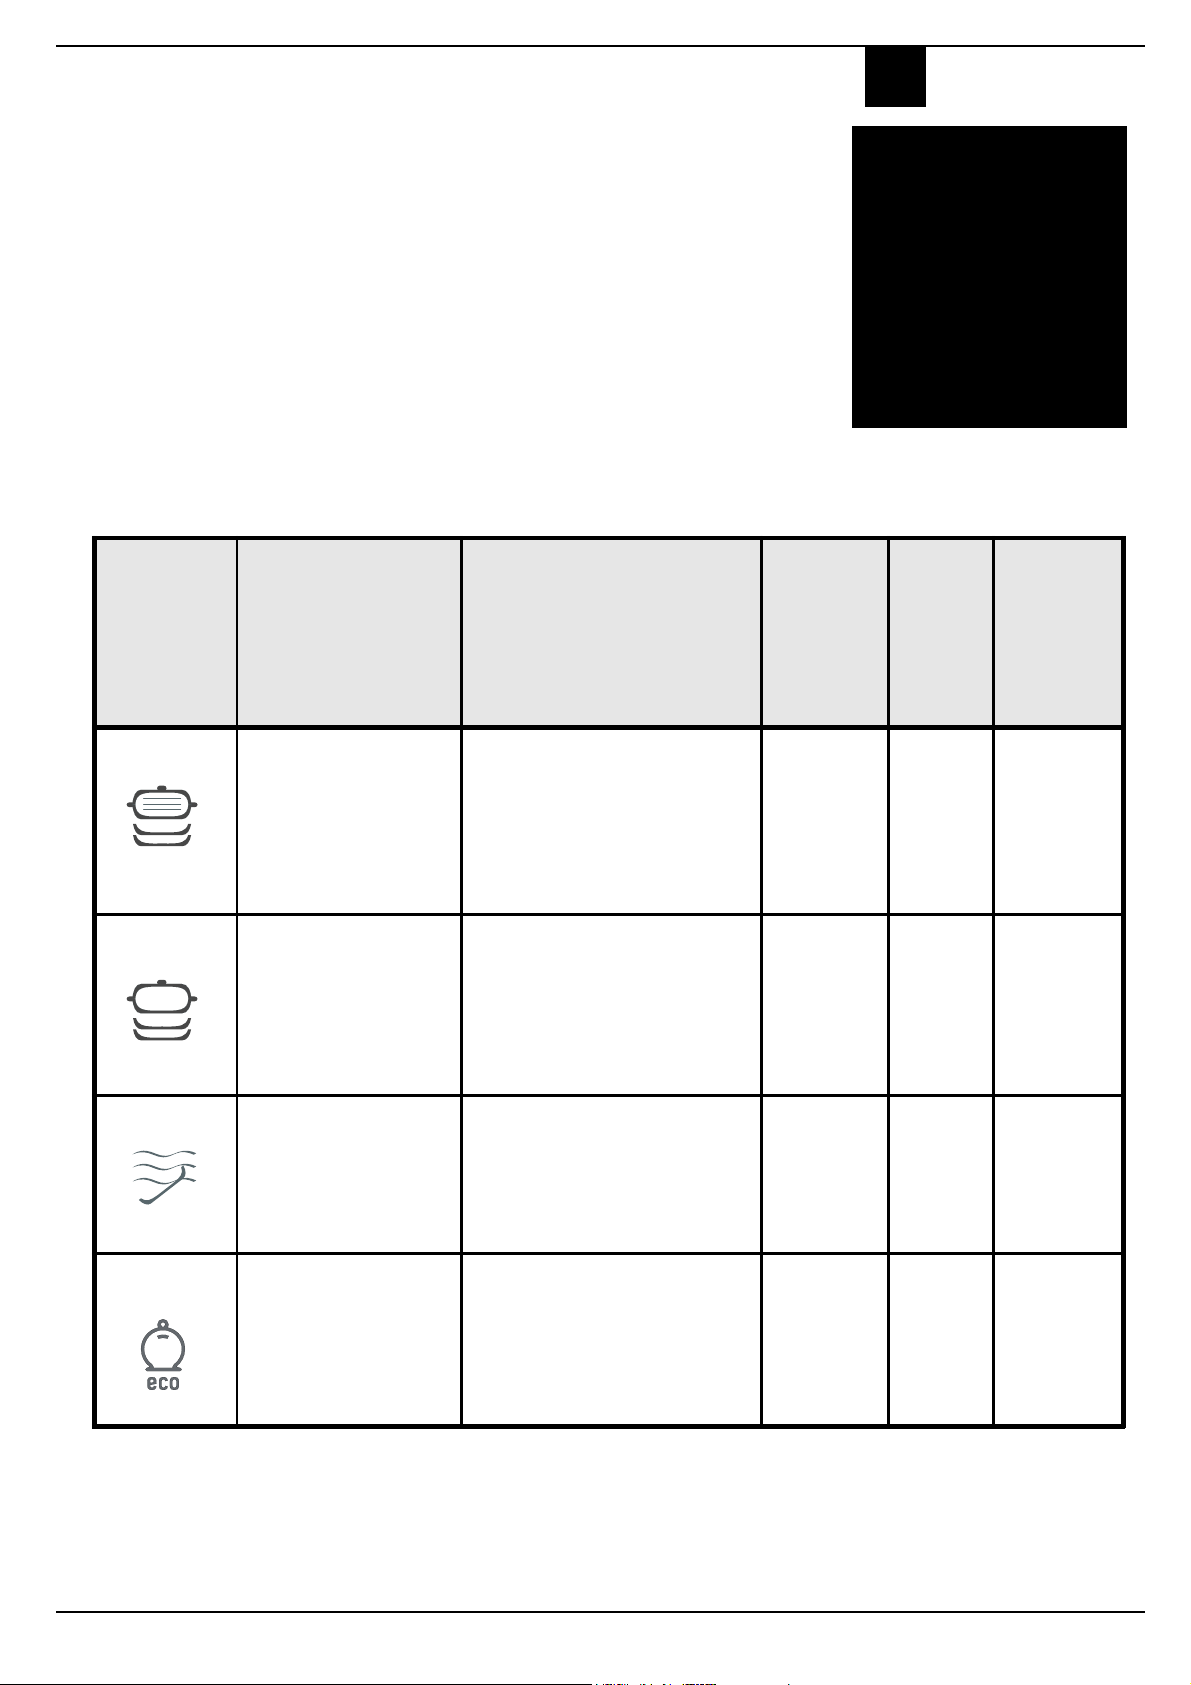
Select the right wash cycle
A wash cycle for every
degree of soil
Salt, rinse aid, the right amount of detergent and the correct wash
cycle: this is the formula to get the best results and to keep your
dishwasher in shape
'HWHUJHQW
IRUSUHZDVK
ZDVK
&\FOH
&\FOH VHOHFWLRQ
LQVWUXFWLRQV
&\FOHGHVFULSWLRQ
ISHWASHER
D
Select the right
wash cycle for
your dishes.
Selecting the
most suitable
wash cycle for
the load ensures
clean dishes and
a more
convenient use of
water and
electricity.
:DVKF\FOH
GXUDWLRQ
WROHUDQFH
5LQVH$LG
ZLWKRXWH [WUD
GU\LQJ
,QWHQVLYH
:D V K
'DLO\:DVK
6RDNLQJ
Very dirty dishes and pans
(not to be used for
delicate items)
Cycle for no rmally dirty
pans and dishes. Standard
daily cycle.
Preliminary wash cycle for
dishes while awaiting
completion of the load
with the dishes from the
next mea l.
Environmentally-friendly
cycle, with low energy
co ns umpt ion le ve ls,
suitable for normally dirty
pans and dishes.
Pre-wash with hot water at 40 °C
Extended wash at 65°C
2 Rinses with cold wate r
Rinse with hot water at 65 °C
Drying
Extended wash at 50°
Cold rinse
Rinse with hot water at 70 °C
Drying
Short cold wash to prevent food
from drying onto the dishes
2 Cold pre-washes
Extended wash at 50°C
Hot r inse at 6 5 °C
Drying
J
J
J
ARISTON DISHWASHER - Instructions for installation and use
17
Page 7
ISHWASHER
D
Never without salt
Water in your home
Water hardness varies according to where you live. If the water in your home is
hard, without water softening, incrustations would form on your dishes. Your
dishwasher is fitted with a water softener which uses special salt to get rid of
To prevent rust
from forming, load
the salt just before
beginning a wash
limescale in the water.
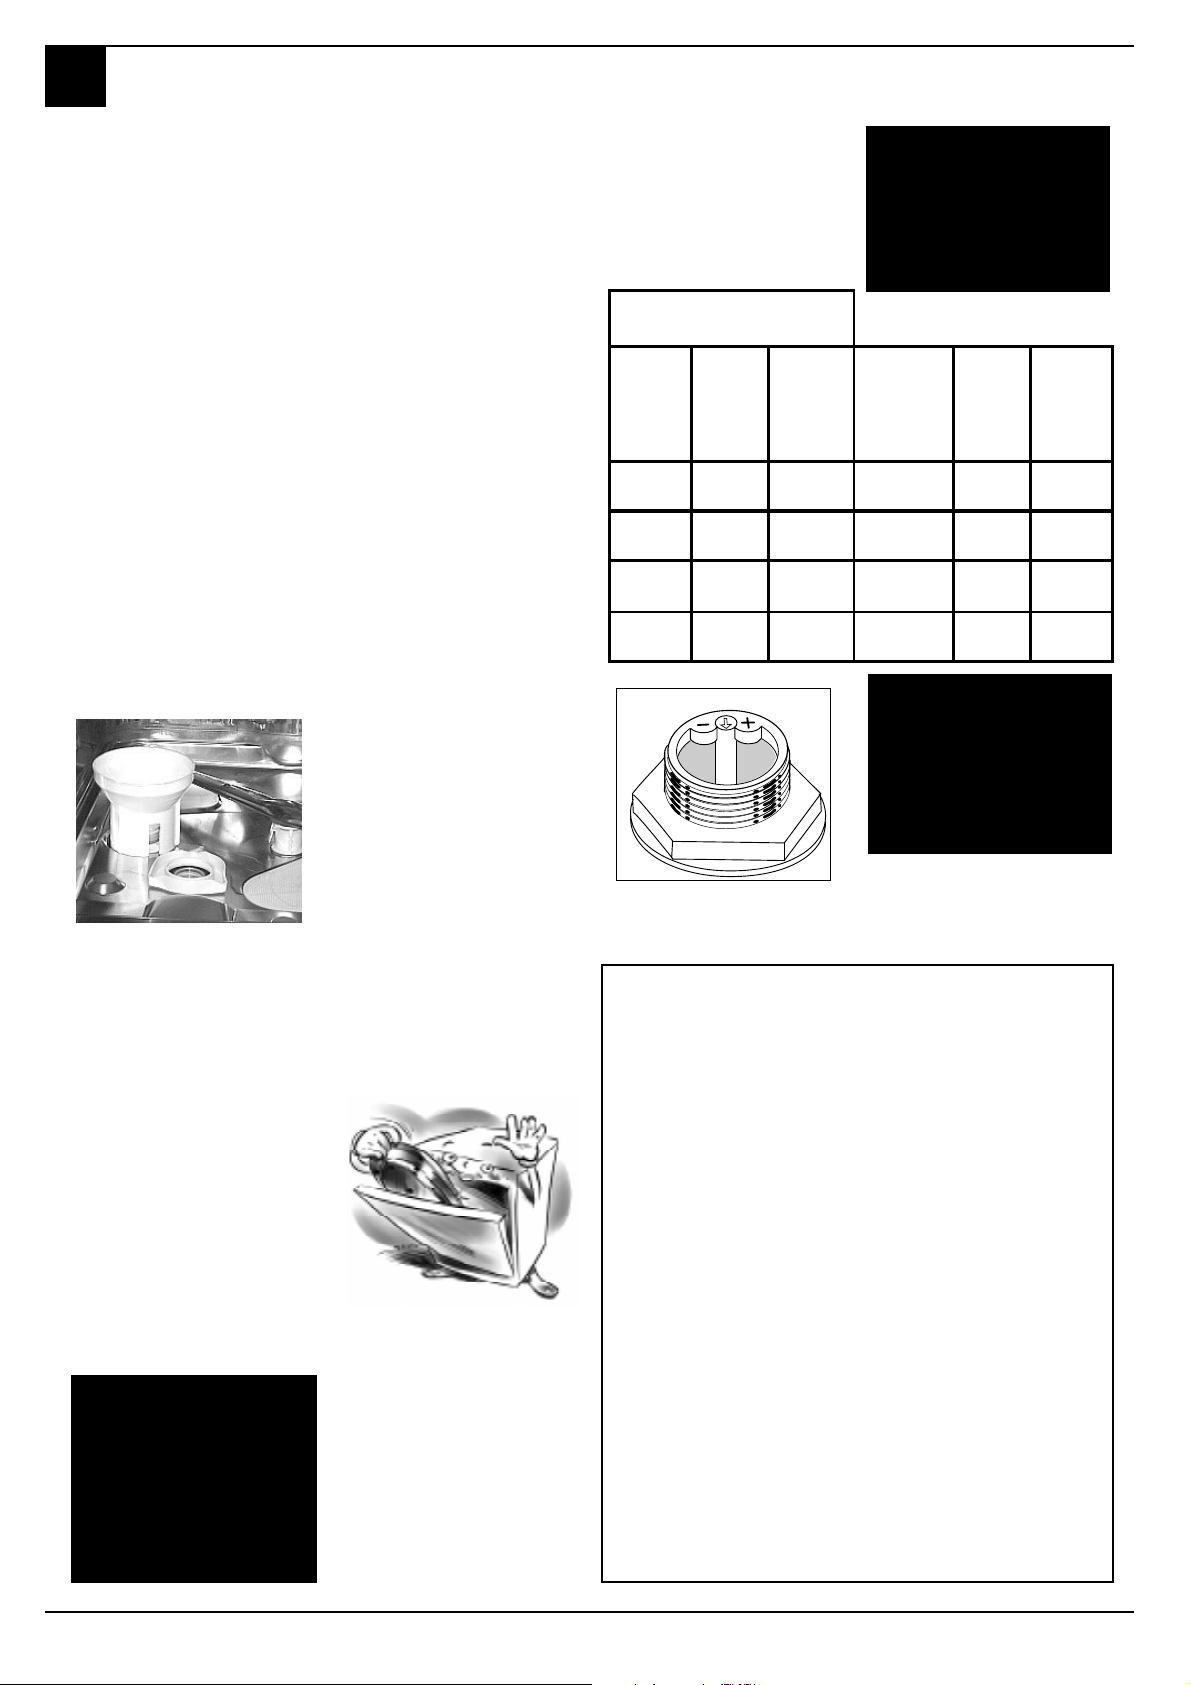
Loading the salt.
Always use salt which is intended
for dishwasher use.
The salt container is situated
underneath the lower rack, fill it
up as follows:
1.Pull out the lower rack
completely, unscrew and
remove the container cap
2. Is it the first time you load the
salt? First fill the container up
with water (you won't have to
do this again next time)
3. Put the dishwasher funnel on the
hole and pour in approximately
two kilos of salt. It is normal
that some water comes out of
the container.
4. Screw the cap back in place
carefully.
Low Salt Indicator
This green device is located at the
centre of the cap for the
decalcification cartridge and it
indicates whether the container is
full.
When the indicator is not visible it
means that the supply of salt must
be replenished .
Salt adjustment
Your dishwasher can adjust its salt
consumption according to the hardness of the water in your home.
This way, you can optimise and
customise your dishwasher's salt
consumption (not too much, nor too
little).
To adjust salt consumption, do as
follows:
1. Unscrew the salt container cap
2. There is an arrow on the neck of
the container (see figure): if
necessary, turn the arrow anticlockwise from the "-" setting
to the "+" setting.
Select the arrow position
depending on the water hardness,
referring to the table provided.
Water Hardness
Clarke
degrees
0 - 14 0 - 17 0 - 1,7 / 0 /
14 - 36 18 - 44 1,8 - 4,4 "-" 20 60
36 - 71 45 - 89 4,5 - 8,9 MED 40 40
>71 > 89 > 8,9 "+ " 60 25
°fH mmol/l
Selector
position
You don't know
water in your
home is? Ask the
company that
supplies water in
cycle.
Salt
consumption
(grams/cycle)
how hard the
your area.
Autonomy
(cycles\2kg)
Suggestions and advice for you.
How to look after and protect
Savings are easy
the dishes you hold dear
■ Almost all silverware can be
cleaned in a dishwasher.
There are two exceptions: old
silverware and silverware
decorated with an oxidising
agent. Hot water can loosen
the handles on old silverware
ad wear off the decorations on
the other.
Never let silverware come into
contact with other metals: you
will thus avoid stains and
blackening
Apart from
making you save
time and energy,
your dishwasher
disinfects your
dishes, washing
them at a high
temperature.
■ Silver plates and serving dishes
should be washed immediately
after use, especially if they have
contained salt, eggs, olives,
mustard, vinegar, fruit juices
and cooked vegetables.
■ For particularly delicate dishes,
we recommend you use the
specific wash cycle offered by
your dishwasher.
Using your electric household appliances
wisely helps you make savings and is
good for the environment.
Maximum load.
To optimise consumption levels, try to use the
dishwasher with a full load only. If it takes
quite some time to fill up your dishwasher,
use the soak cycle to avoid the formation of
bad odours and caked-on food.
The right wash cycle.
Select the most suitable wash cycle for the
type of load you have placed in the dishwasher.
The choice of wash cycle depends on the type
of dishes to wash and on how dirty they are.
To select the right wash cycle, please consult
the wash cycle table on page 17.
18
ARISTON DISHWASHER - Instructions for installation and use
Page 8
Installation and moving
Your dishwasher has arrived
After having bought or moved your dishwasher to another home, a
correct installation ensures that your dishwasher will operate
smoothly and efficiently.
Choose where you want to install
your dishwasher, you can even
place it so that its sides or back
panel are side by side with furniture
or up against the wall. The
dishwasher is provided with water
supply and drain hoses, which can
be directed towards the left or right
to facilitate appropriate
installation.
Levelling.
Once the appliance is positioned,
adjust the feet by screwing them in
or out depending on how high you
want it and to level it so that it is
horizontal. Make sure that it is not
inclined more than 2 degrees. If the
appliance is level, it will help ensure
its correct operation.
tightly onto the tap (see fig. 2).
If the water pipes are new or have
not been used for an extended
period of time, let the water run to
make sure that the water is clear
and free of impurities. If this
precaution is not taken, there is a
risk that the water inlet can get
blocked and damage the appliance.
A
Fig.2
ISHWASHER
D
Adjusting the back Feet
Insert the appliance into the cutout
and then adjust the height using the
screws located on the front bottom
part of the machine. Use a
screwdriver to turn the screws in
the clockwise or anti-clockwise
direction to increase or decrease
the height respectively.
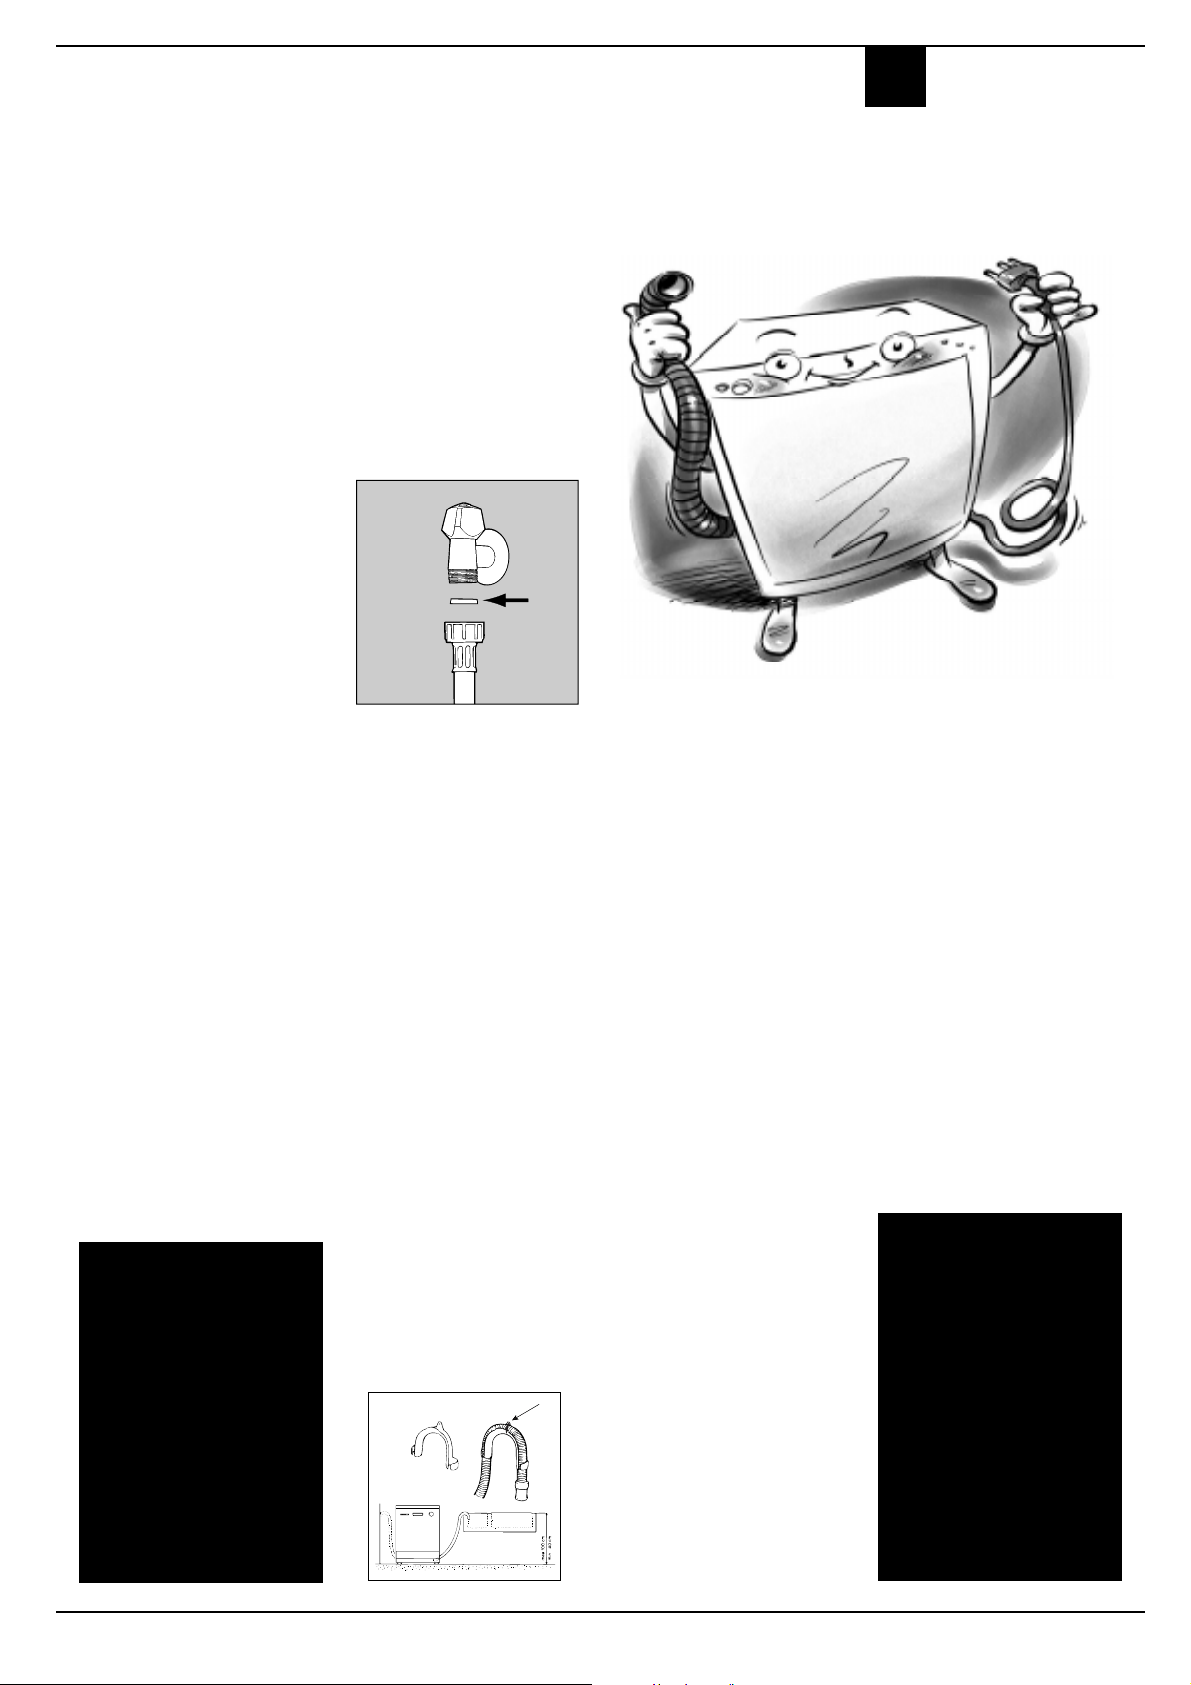
Cold water connection.
This electric household appliance
should be connected to the water
mains using the cold water supply
hose provided with the appliance
only. Do not use a different hose. In
the event of replacements, use
original spare parts only.
Connect the cold water supply
hose to a 3/4 gas threaded connection, placing the small filter
provided between the hose and
connection, taking care to screw it
If the power
socket to which
the appliance is
connected is not
compatible with
the plug, replace
it with a suitable
plug rather than
using adapters or
multiple plugs as
these could cause
overheating or
burns.
Hot water connection.
Your dishwasher can be supplied
with hot water from the mains
supply (if you have a central heating
system with radiators) at a temperature of no more than 60°C.
In this case, the wash cycle time
will be about 15 minutes shorter
and the wash will be slightly less
effective.
The connection must be made to
hot water supply following the
same procedures as those indicated
for the cold water connection.
Drain hose connection.
Fit the drain pipe into a drain line
with a minimum diameter of 4 cm
or place it over the sink. Avoid
restricting or bending it. Use the
special plastic elbow provided (see
figure) to position it in the best
possible way. The part of the pipe
marked with the letter A should be
between 40 and 100 cm above the
ground.
The pipe should not be immersed
in water.
A
Electrical connection.
First of all, check that the mains
voltage and frequency values
correspond to those stated on the
rating plate located on the stainless
steel inner door of the appliance
and that the electrical system to
which the dishwasher is connected
is sized for the maximum current
indicated on said rating plate.
Earth: indispensable
safety.
Only now can you plug the
appliance into a socket provided
with an efficient earth connection
(the system's earthing is a
guarantee of safety provided for by
law, make sure your system has
it).
Power supply wire.
Check the power supply wire on a
regular basis; if it is damaged, we
recommend you have it replaced
by an authorised technical
Assistance service centre.
Condensation-proof tape.
On some models, a transparent
condensation-proof adhesive tape
has been provided.
It should be stuck onto the lower
side of your wooden worktop to
protect it from the formation of
condensation.
When not provided, this tape can
be requested as a spare part from
authorised retailers.
The special
plastic elbow
should be
fastened firmly
onto the wall to
prevent the drain
hose from
moving and
allowing water to
spill outside the
drain.
ARISTON DISHWASHER - Instructions for installation and use
19
Page 9
ISHWASHER
D
Troubleshooting
If you have a problem, read this
Your dishwasher may not work or not function properly. In many cases, these are problems which can be
solved without having to call for a technician. Before calling the service centre, always check the points
below.
The dishwasher won't start
■ Is the water supply tap turned
on?
■ Is the water supply tap
connected to the hose properly?
■ Has the water in your home
been cut off?
■ Is the pressure of the water
supply sufficient?
■ Is the hose bent?
■ Is the filter on the water supply
hose blocked?
■ Is the dishwasher door open?
The dishes are not clean.
■ Have you put the right amount
of detergent into the dispenser?
■ Is the wash cycle suitable for
the dishes you have placed
inside the appliance?
■ Are the filter and microfilter
clean?
■ Can the sprayer arms turn
freely?
The dishwasher won't
drain.
■ Is the drain hose bent?
Limescale deposits or a
white film form on the
dishes.
■ Is the lid on the salt container
closed properly?
■ Is the rinse aid dosage correct?
Error messages
Your dishwasher is equipped with
a safety system which is able to
detect any operating anomalies.
These anomalies are reported by
one or two wash cycle indicator
lights "M" flashing rapidly. Take a
note of which lights are flashing,
turn the appliance off and call for
technical assistance.
Tap off alarm
If you have forgotten to turn the
water tap on, your appliance will
remind you of this by sounding a
few short beeps for a few minutes.
Turn the tap on and your appliance
will start up again after a few minutes. Were you to be absent when
these beeps are sounded, the ap-
pliance will be blocked automatically and wash cycle 2 and 3
indicator lights (daily and soak)
will flash rapidly. Turn the appliance
off at the ON-OFF button, turn on
the water tap and wait approximately 20 seconds before turning
the appliance back on.
Re-select a wash cycle as indicated in the "Selecting the wash
cycle" paragraph and the appliance
will start.
Clogged filter alarm
If the appliance is blocked and
wash cycle1 and 3 indicator lights
(intensive and soak) flash rapidly,
this means the filter is clogged by
large particles of food residue. Turn
the appliance off, clean the filter
thoroughly and reposition it in its
seat as illustrated on page 21. Then
turn the appliance back on.
Re-select a wash cycle as indicated in the "Selecting the wash
cycle" paragraph and the appliance
will start.
Water load solenoid valve
malfunction alarm.
If indicator light 2 (Daily wash)
flashes rapidly, TURN the
dishwasher OFF AND BACK ON
AGAIN after one minute. If the
alarm persists, first turn off the
water tap to avoid any flooding
and then cut off the electricity
supply and call for technical
assistance.
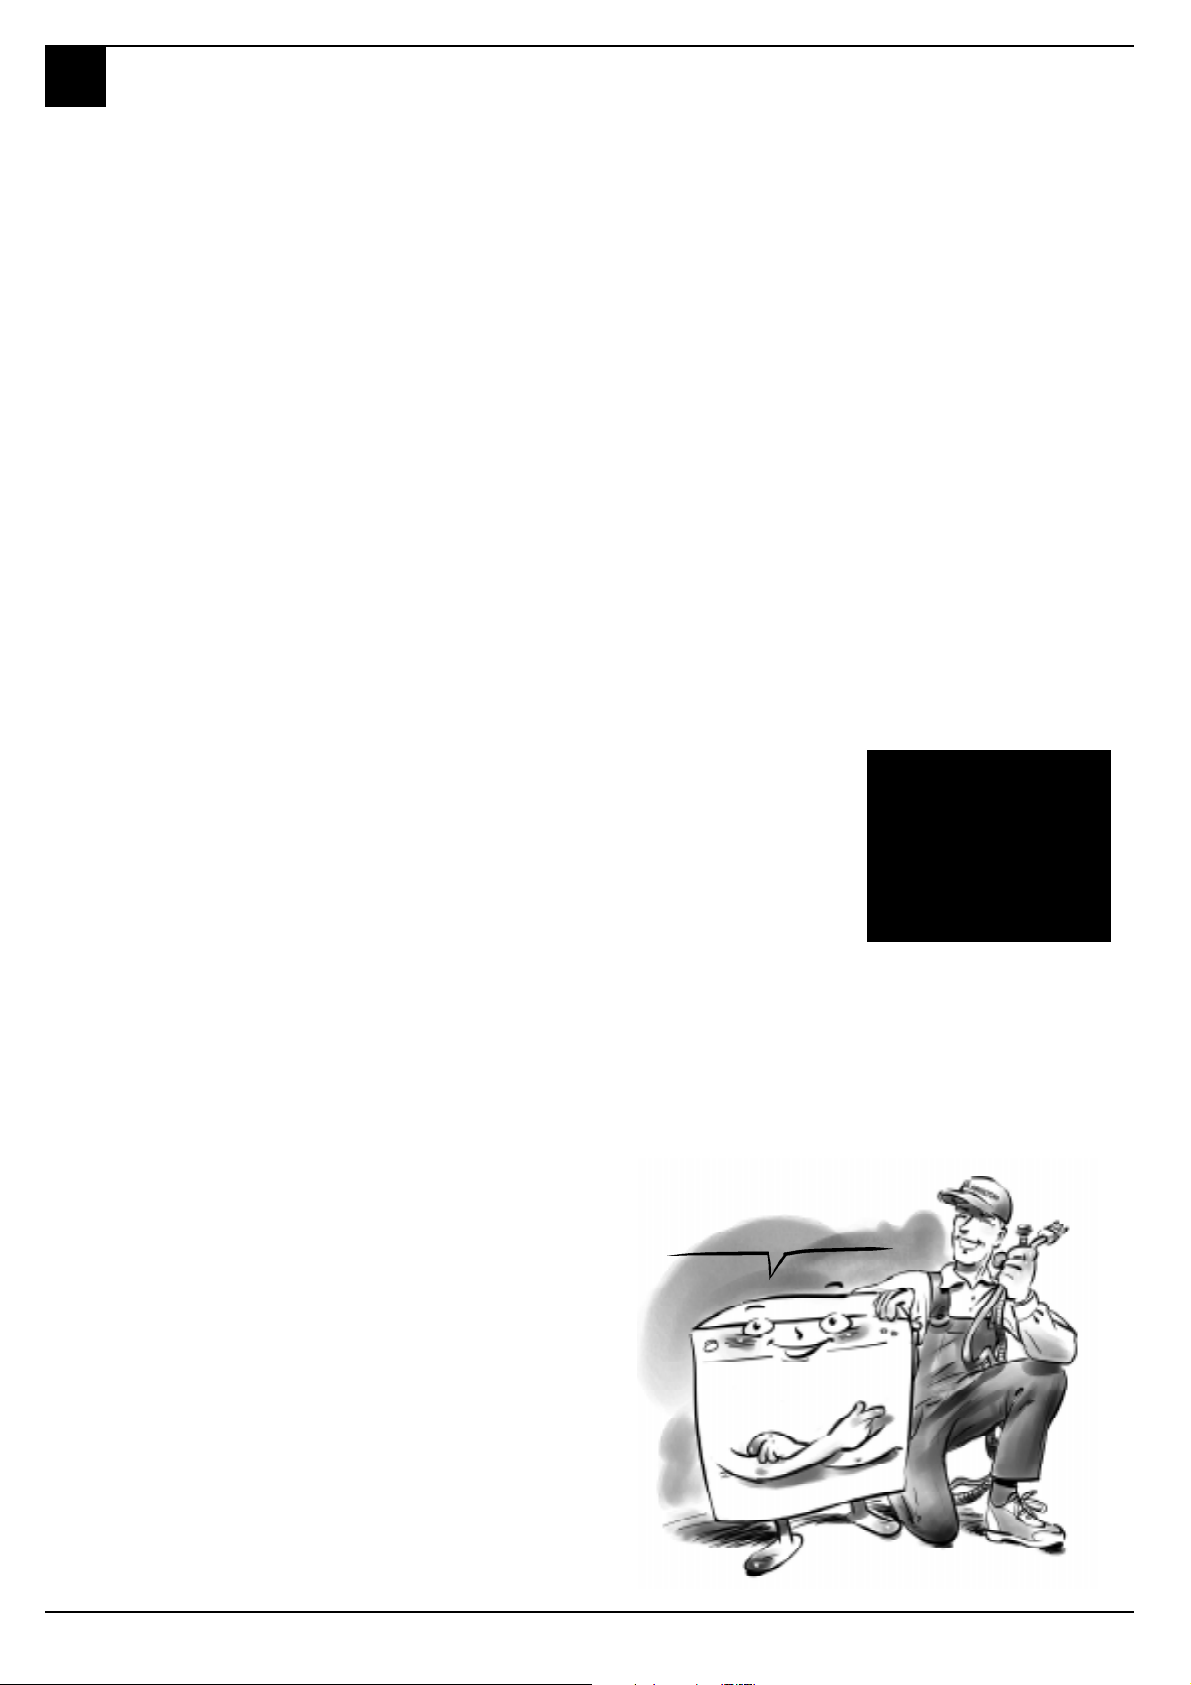
You have checked
everything, but the
dishwasher still doesn't
work and the problem
persists?
Call an authorised service centre
near you and remember to mention:
the type of malfunction
the model mark (Mod.) and the
serial number (S/N.) indicated on
the rating plate located on the inner
door, to one side.
Never call upon
the services of
unauthorised
technicians and
always refuse
spare parts that
are not originals.
Safety within your home
Your dishwasher was built in accordance with the strictest international safety regulations. They protect
you and your family. Read the instructions and information contained in this manual: they will provide
you with useful hints as to installation, use and maintenance safety. To avoid nasty surprises.
1. Dispose of the packaging
material carefully (follow the
instructions on how to divide
your rubbish up provided by
your local Council)
2. After removing the
packaging, check to make
sure your appliance is intact.
If in doubt, contact a qualified
professional.
3. Your dishwasher must only be
used by adults and for washing
household dishes, according to
the instructions included in
this manual. Do not touch the
appliance with wet hands or
feet or barefoot.
4. We discourage the use of
extension leads and multiple
plugs. If the electricity supply
wire is not long enough, then
have it replaced with one of
the correct length and
remember that it should be
free of bends or dangerous
kinks.
5. If the appliance is not operating
properly or if maintenance
operations are necessary,
disconnect the dishwasher
from the mains power supply
(unplug it!).
6. Keep children away from the
dishwasher when it is open and
keep detergents out of their
reach.
7. Your dishwasher is not to be
installed outdoors, not even if
the area is covered by a roof:
it is extremely dangerous to
leave it exposed to rain and
thunderstorms.
8. Do not touch the heating
element during or straight
after a wash cycle.
9. Do not lean or sit on the door
when it is open, as this could
overturn the dishwasher.
10. If the appliance malfunctions,
turn off the water inlet tap and
disconnect the plug from the
wall socket. Then try
consulting the section entitled
"I you have a problem, read
this". If you cannot resolve the
problem, then call the service
centre.
I only want an authorised
specialised technician with original
Ariston guaranteed spare parts
11. Once taken out of use,
appliances must be made
inoperable: cut the power
supply wire and damage the
door lock.
20
ARISTON DISHWASHER - Instructions for installation and use
Page 10
Care and maintenance
Cleaning and special maintenance
The filter assembly
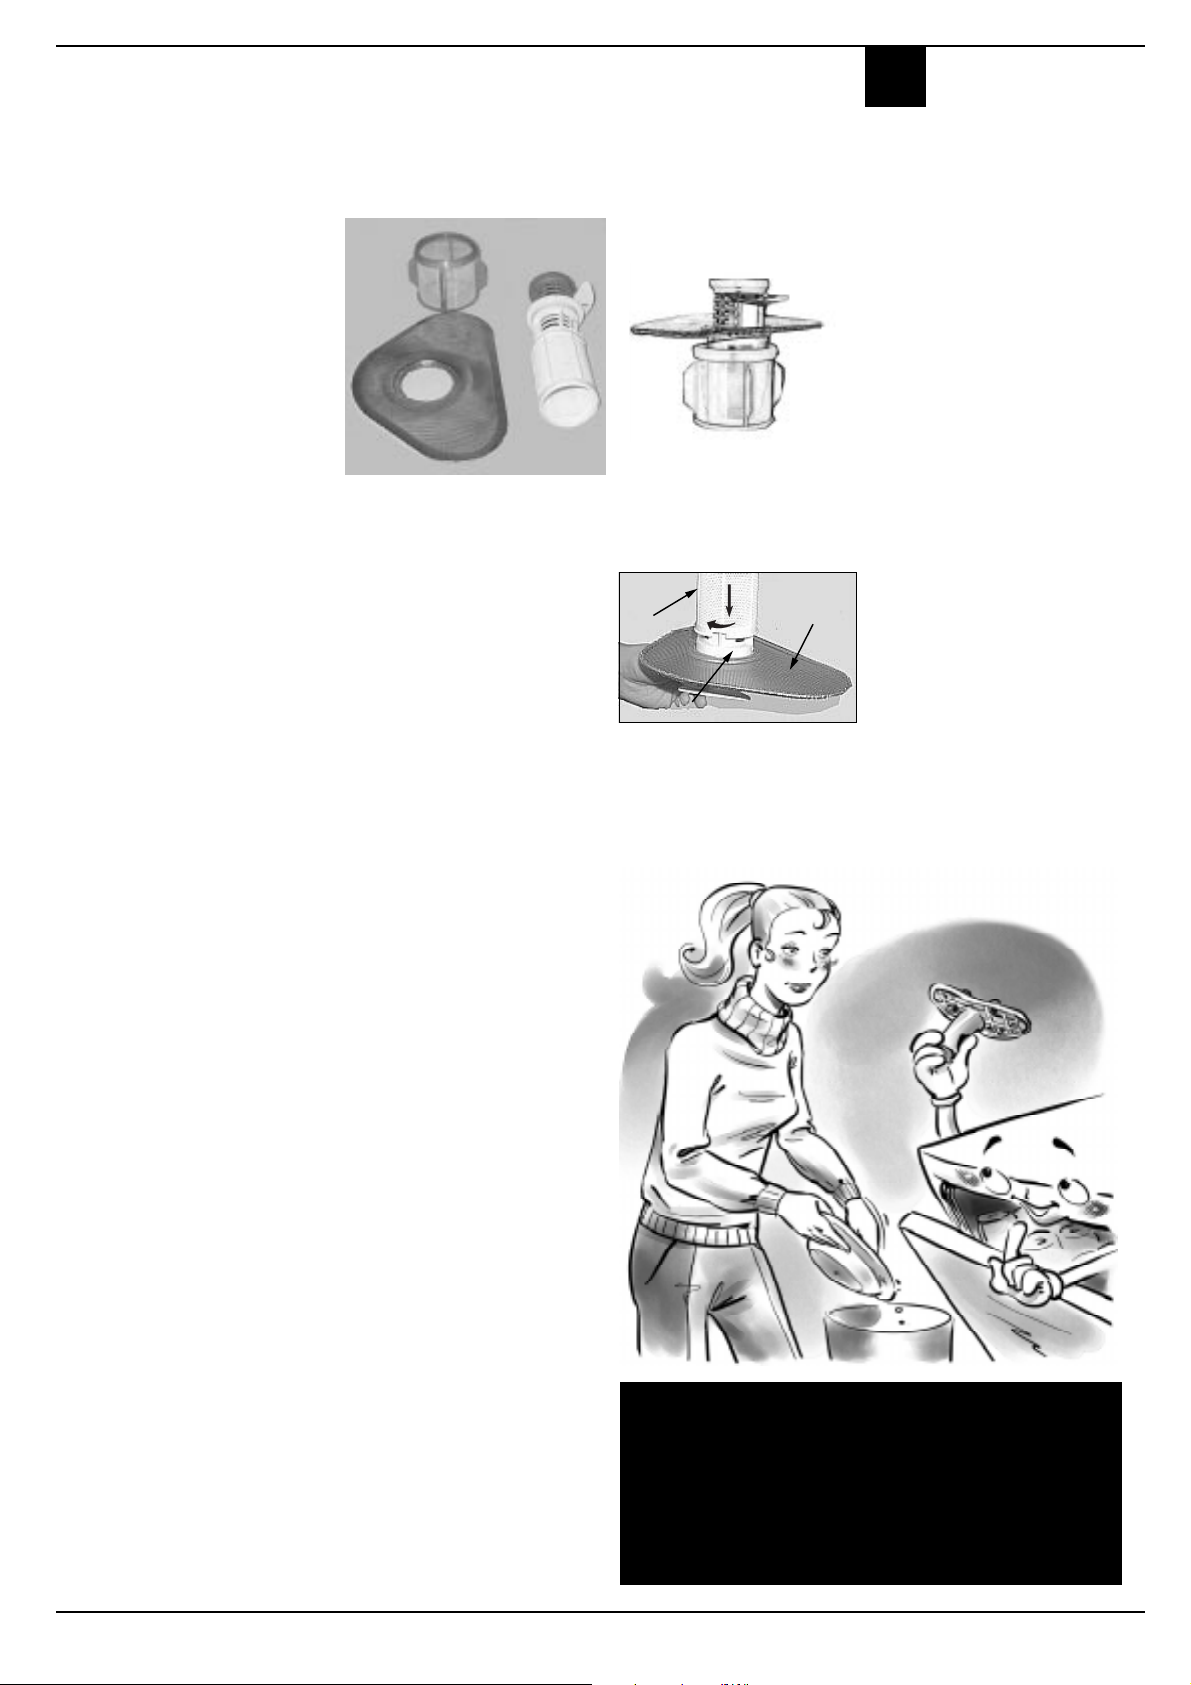
If you want consistent good results
from your dishwasher, you need to
clean the filter assembly.
The food particles are removed
from the wash water, allowing it to
be recirculated during the cycle,
filtered perfectly. For this reason,
it is a good idea to remove the larger food particles trapped inside the
semi-circular filter A and cup
Cafter each wash; to remove the
filter assembly, pull the cup handle
upwards. All you need to do is rinse
them under running water.
The entire filter assembly should
be cleaned thoroughly once a month: semi-circular filter A + cup C +
cylindrical filter B+ microfilter D.
To remove filter B, turn it anticlockwise. Use a small non-metallic brush for cleaning.
Reassemble the filter parts (as shown in the figure) and reinsert the
whole assembly into the dishwasher. Position it into its housing and
press downwards.
The dishwasher is not to be used
without filters. Improper replacement of the filters may reduce the
efficiency of the wash and even
damage your dishwasher.
D
A
C
B
1
B
2
C
A
Keep your dishwasher in shape
ISHWASHER
D
Once in a while,
once a month,
spend a little time
on the filter
assembly and the
sprayer arms.
Cleaning the sprayer
arms.
Food residue may become
encrusted onto the sprayer arms
and block the holes where water
comes out. Check the sprayer
arms regularly and clean them
once in a while (letters F and I How
is it made?).
Cleaning the Water Inlet
Filter
Periodically clean the water inlet
filter (see figure 2 under
"Installation") located on the outlet
of the water supply tap. After
turning off the water tap, unscrew
the end of the water supply hose,
remove the filter and clean it
carefully under running water.
Then, return the filter to its place
and tighten the water supply hose
back into position.
Respecting these few rules ensures you will always
have a reliable work companion by your side.
After every wash.
When the wash cycle has ended,
always remember to turn off the
water supply tap and to leave the
appliance door ajar. This way,
moisture and bad odours will not
be trapped inside.
Unplug the appliance.
Before carrying out any cleaning
or maintenance on the dishwasher,
always remove the plug from the
electricity socket. Do not run risks.
No solvents! No abrasives!
To clean the exterior and rubber
parts of your appliance, do not use
solvents or abrasive cleaning
products. Use a cloth dampened
with lukewarm soapy water only.
If there are any stains on the
surface of the appliance interior,
use a cloth dampened with water
and a little white vinegar, or a
cleaning product specifically made
for dishwashers.
Going on holiday?
When you go away for an extended
period of time, we recommend you
do the following:
run a cycle with the dishwasher
empty
turn off the water inlet tap.
leave the appliance door ajar
This will help the seals last longer
and prevent unpleasant odours
from forming inside the appliance.
Moving the appliance.
Should the appliance have to be
moved, try to keep it in a vertical
position. If absolutely necessary, it
can be positioned on its back.
The seals.
One of the factors that cause
unpleasant odours to form inside
the dishwasher is food that remains
trapped in the seals. Periodic
cleaning using a damp sponge will
prevent this from occurring.
Your dishwasher is not a waste
disintegrator!
Do not worry about removing every
single bit of food residue from your
dishes, but do get rid of bones, peel and
rind and any other left-overs before
placing them in the racks. Empty out
all glasses and cups.
ARISTON DISHWASHER - Instructions for installation and use
21
Page 11
ISHWASHER
D
Stay in touch
THANK YOU for choosing an Ariston appliance. We are confident
you have made a good choice and that your new appliance will give
many years of excellent service.
And we're there when you need us.
Register your purchase
now
This will confirm your entitlement to free spare parts for five years,
and you could also be lucky enough to recover the cost of your purchase
in our quarterly prize draw.
Simply complete and return the Registration Form supplied with
the appliance documents, using the FREEPOST envelope supplied.
Or call the Registration Hotline on 0870 010 4305.
Enjoy complete peace of mind. By registering now, you automatically
qualify for a full year's guarantee on parts and labour PLUS free
functional parts cover for a further 4 years, provided they are
genuine Ariston spare parts fitted by an Ariston Service Engineer.
We're as close to you as your telephone
For direct access to Genuine Ariston Spare Parts and Accessories,
call 0870 558 5850 and speak to our skilled staff who can help you to identify and purchase the item you require.
For a Rapid Response to a problem with your appliance, call 0870 607 0805. We're open from Monday to
Saturday (8am - 5.30pm weekdays, 9am - 5pm Saturday). We have our own department of highly trained Ariston
service staff. For most calls, our Service Engineer can fix the problem on the first visit.
Please have the following details to hand when you ring us:
The nature of the problem, the Model Number and the Serial Number.
These numbers can be found on the appliance and on the portion of the Registration Card which you retain.
22
ARISTON DISHWASHER - Instructions for installation and use
 Loading...