

Page 1
Instructions for Installation and Use
Electric Hood
Page 2

CE marking certifies that this appliance conforms to the
following EEC directives:-
- Low Voltage Equipment 72/23/EEC
- Electromagnetic Compatibility 89/336/EEC
Retention of this Instruction Book
This Instruction Book must be kept handy for reference as it contains important details on the safe and proper use
of the appliance.
If you sell or pass the appliance to someone else, or move house and leave it behind, make sure this Book is
also provided so the new owner can become familiar with the appliance and safety warnings.
If the Book is lost or damaged a copy may be obtained from:
Indesit Company, Morley Way , Peterborough, PE2 9JB
2
Page 3
9
9
15
11
11
10
15
Installation
1
7
2
2
3
3
16F
16F
6
7
8
8
13A
12A
12F
12F
13F
F
B
5
5
4a
4a
4b
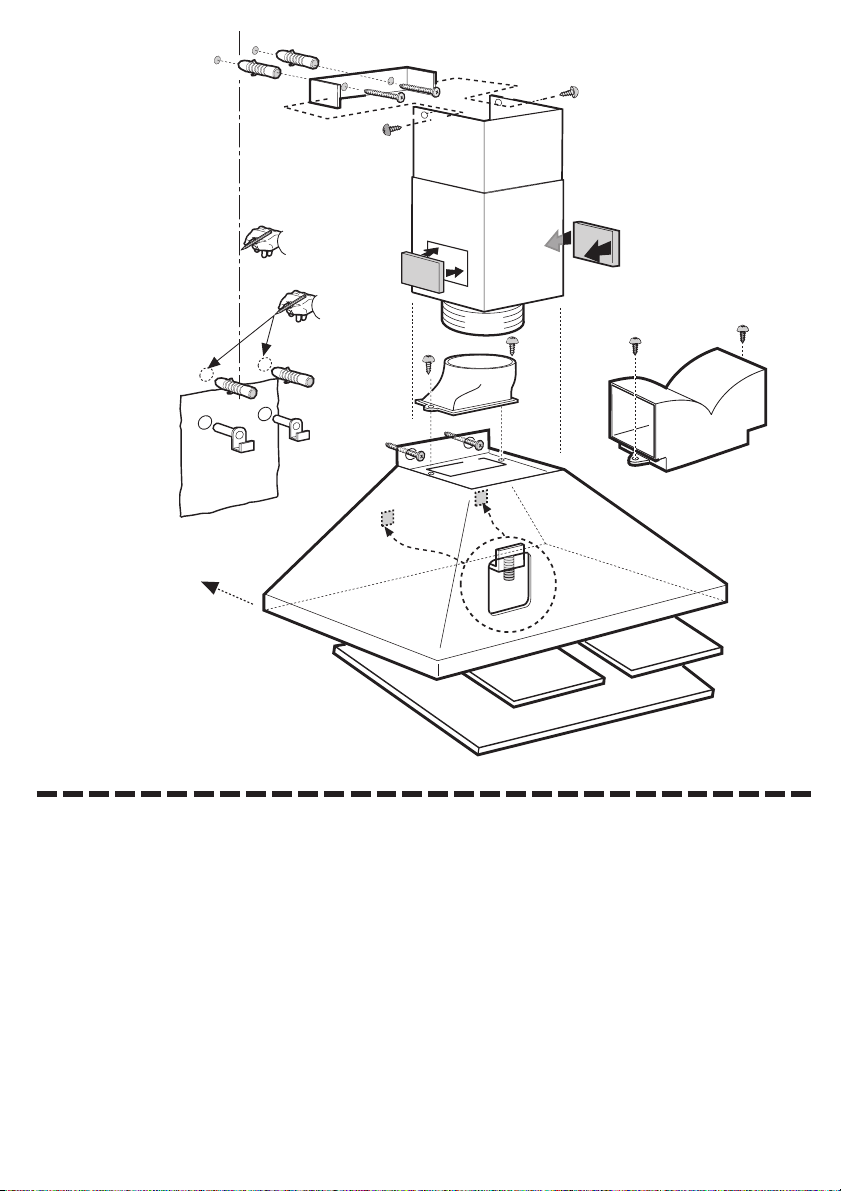
Warning! The position of the hook points (5 Rectangular perforations) or the compulsory fastening points (8 circular drill holes)
may be inverted! Therefore check the back of the cooker hood in your possession to verify the position.
3
Page 4
Z1
O
C
G
N
Z2
C
G
K
M
CLOSED
J
CLOSED
OPEN
OPEN
L
L
P
E
4
E
Page 5
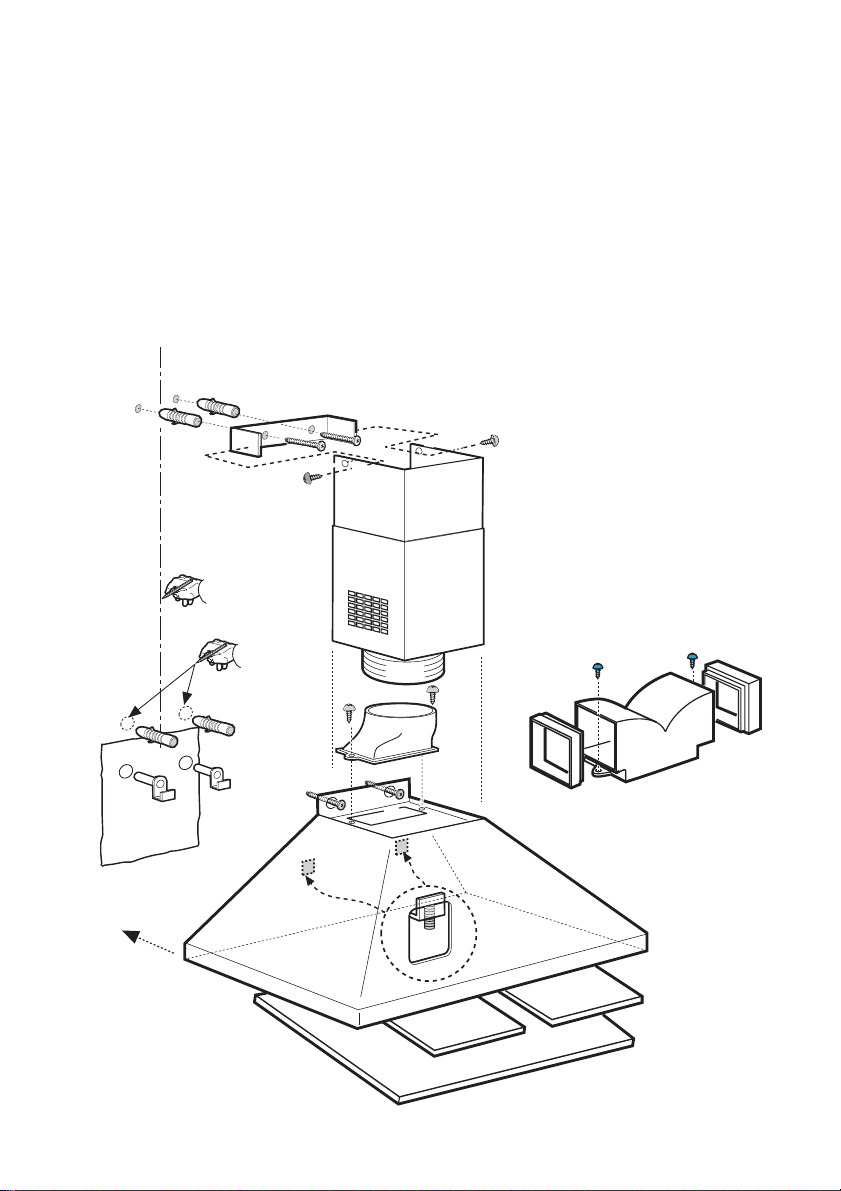
Installation - only for model with recirculation version fume outlet slots formed directly on the chimney (with no plastic grills)
9
9
15
1
6
7
7
2
2
3
3
11
10
11
13A
12A
8
8
15
12F
F
12F
13F
H
H
5
5
4b
4a
4a
5
Page 6
GB
Consult the designs in the front pages referenced in the text by
alphabet letters. Closely follow the instructions set out in
this manual. Merloni does not accept responsability for any
damage caused through non complying with the instructions in
this manual.
INSTRUCTION ON MOUNTING AND USE
Installation
The cooker hood must be placed at a minimum distance of
60 cm from the cooking plane for electric cookers and 70cm
for gas or mixed cookers. The hood can be installed above
these heights but for optimum performance it should be
installed at the distance quoted for the appropriate heat
source.
Do not tile, grout or silicone this appliance to the wall. Surface
mounting only.
Do not fix chimney flue to furniture or fly over shelves unless
the chimney flue can be easily removed, in case maintenance
is ever required.
Use
The cooker hood is provided with an upper air exit B for
discharging fumes externally for models including chimney
flue C (see designs) (Suction Version A- exhaust pipe 13A
not supplied).
In the instance where it is not possible to discharge cooking
fumes and vapours externally even if utilising the model with
chimney flue C, the cooker hood may be used in the filter
version F by mounting two active carbon filters E, the fumes
and vapours are then recycled via the upper grill G
(depending on the model the grill may be directly placed on
the chimney flue or via the mounting of two small grills 16F).
If in possession of a model with grill placed on chimney flue
then two H extensions must be placed on the deflector 13F.
Electrical connection
The supply voltage must correspond to the voltage label
inside the cooker hood.
Where provided, connect the plug directly into the main
socket.
Where an electrical plug is not provided (for direct connection
to electrical network) place a standards approved bipolar
switch with an aperture distance of not less than 3mm
(accessible) from the contacts.
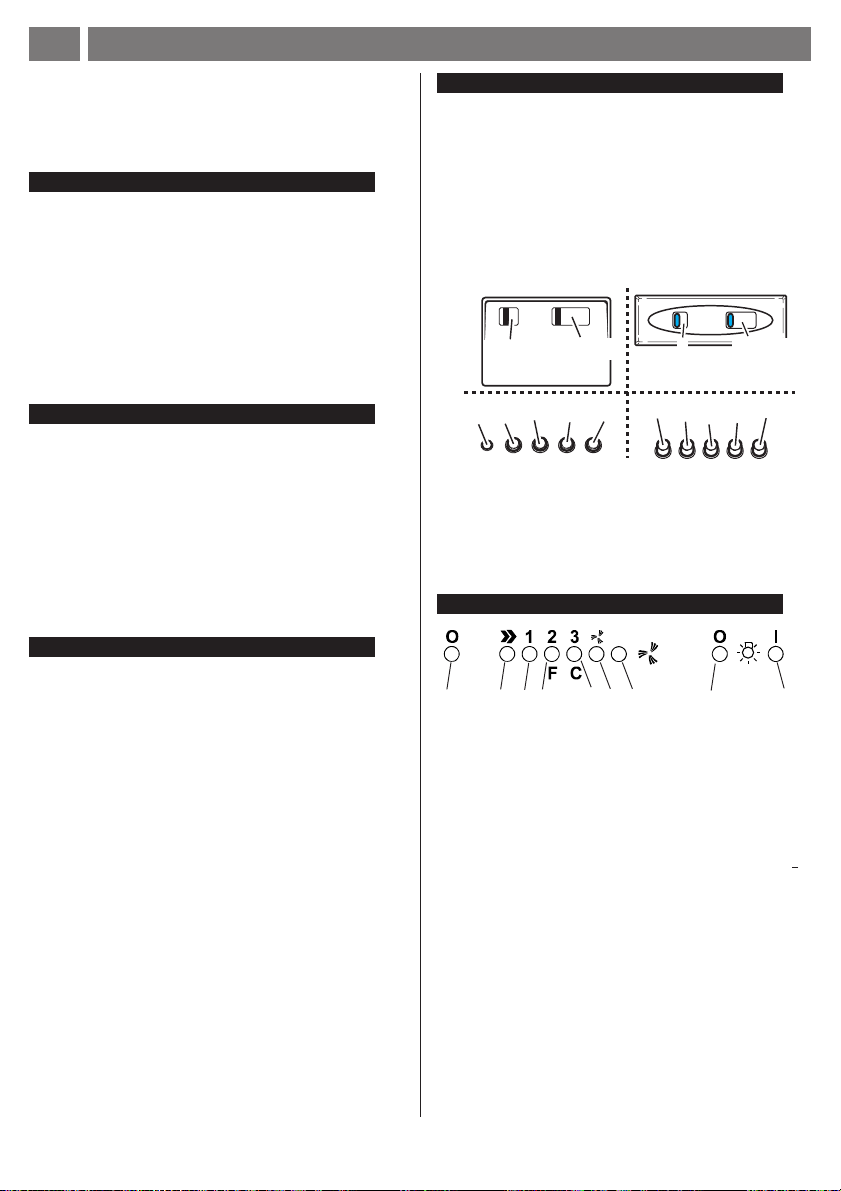
Operation
The cooker hood is provided with a key or pushbutton control
panel situated of the frontal part of the cooker hood, depending
on the basis of the cooker hood type in possession. For
proper operation consult the text below and the relative
illustration:
a. ON/OFF lighting
b. OFF motors/Valve
c. - d. - e. Minimum suction power/ON Valve (c.), medium
(d.), maximum (e.).
f. Operation warning light (where present).
a
b-c-d-e
d
a b-c
f
Use the high suction speed in cases of concentrated kitchen
vapours. It is recommended that the cooker hood suction
is switched on for 5 minutes prior to cooking and to leave
in operation during cooking and for another 15 minutes
approximately after terminating cooking.
Model with electronic controls
2
1
6
34
1- Motor OFF button
2- ON button and motor speed selection button 1 - 2 - 3 -
1 - 2 - . . . .
3- Speed 1 LED
4- Speed 2 LED and metal grease filter saturation LED (in
this latter case, the LED will flash - See instructions on
grease filter cleaning).
5- Speed 3 LED and active carbon filter saturation LED (in
this latter case, the LED will flash - See instructions on
active carbon filter replacement).
Warning!
The active carbon filter saturation LED is not activated.
In order to activate the active carbon filter saturation
indicator, press buttons 2 and 7 simultaneously for 3
seconds. Initially, only LED 4 will flash, then after the
3 seconds have passed, LED 5 will also start flashing,
indicating that the active carbon filter saturation control
system is active.
To switch off the system, re-press the same two
buttons: after 3 seconds LED 5 will stop flashing and
the device will be switched off.
6 - Intensive speed LED
7 - Intensive speed ON switch
This speed should be used when the concentration of
e
56
a
a
b
c
7
89
b-c-d-e
e
d
Page 7

GB
INSTRUCTION ON MOUNTING AND USE
cooking fumes or odours is particularly strong (for
example when frying, cooking fish etc.). T h e
fast speed will run for about 5 minutes and then return
to the speed previously set automatically (1, 2 or 3),
or switch off if no speed was selected. T o
turn off the fast speed, before the end of the 5 minutes,
press button 1 or button 2 (see page 13).
8 - OFF lamp button
9 - ON lamp button
Apply one on each side covering both grills protecting the
motor propeller, then turn the filter central handles P clockwise.
In order to dismantle turn the central handle P anti-clockwise
for each filter.
Only for model with electronic control panel:
Once you have replaced the charcoal filter, press button 1
(see preceding page) for about 3 seconds until you hear the
acoustic signal (beep).
LED 5 will now stop flashing.
If the hood fails to operate correctly, briefly disconnect it from
the mains power supply for about 5 sec. by pulling out the
plug or switching it off at the main supply. Then plug it in again
and try once more before contacting the Technical Assistance
Service.
Maintenance
Prior to any maintenance operation ensure that the cooker
hood is disconnected from the electrical outlet.
Cleaning
The cooker hood should be cleaned regularly internally and
externally.
For cleaning use a cloth moistened with denatured alcohol
or neutral liquid detergents. Avoid abrasive detergents.
Warning:
Failure to carry out the basic standards of the cleaning of the
cooker hood and replacement of the filters may cause fire
risks. Therefore we recommend oserving these instructions.
Anti-grease Filter
If situated inside the support grill, it may be one of the following
types:
Paper filter must be replaced once a month or if colouring
appears on upper side, in such cases the colouring is evident
through the grill openings.
Sponge filter should be washed with hot soapy water once
a month and replaced every 5 to 6 washes.
Metallic filter must be cleaned once a month, with non
abrasive detergents, by hand or in dishwasher on low
temperature and short cycle.
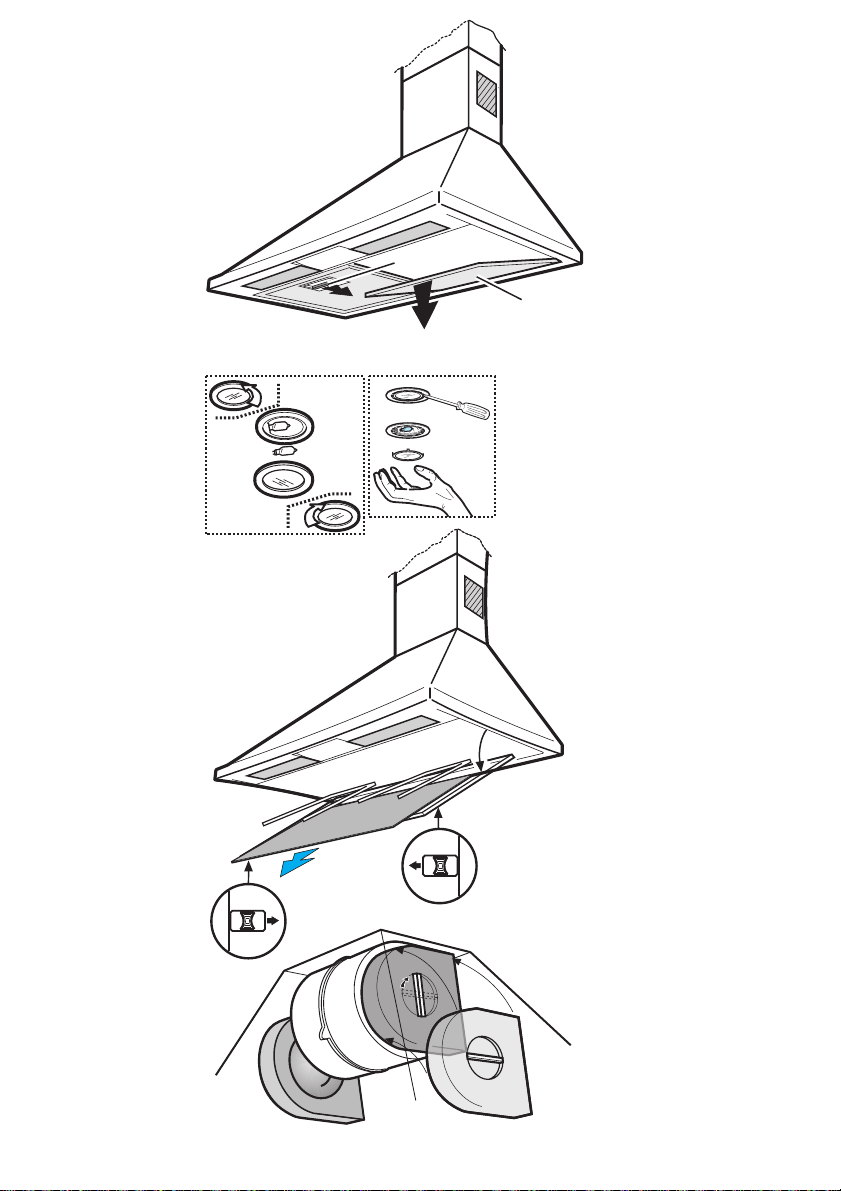
To obtain access to the grease filter J open the grill K via
the hooks L and free the grill from the stoppers M.
Some models are provided with a metal filter N without
support grill, this filter should be washed as instructions
noted for metallic filter above and is removed from its placing
by pushing the handles O towards the back and sliding the
filter N downwards.
When washed in a dish-washer, the grease filter may
discolour slightly, but this does not affect its filtering capacity.
Only for model with electronic control panel:
Once the grease filters have been cleaned, press button 1
(see preceding page) for about 3 seconds until you hear the
acoustic signal (beep): the LED 4 will now stop flashing.
Carbon Filter
(2 pieces only for filter version)
The active carbon filters E are not washable nor regenerative.
It should be changed every 6 months in normal use.
The active carbon filters capture unpleasant cooking
odours.
Replacing lightbulbs
Remove the anti-grease filter support grill or the anti-grease
filter to attain access to the lightbulb area. Remove the
damaged lightbulb and replace with an incandescent oval
bulb max. 40W E14.
If the cooker-hood comes with a halogen light, take off its
protection by unscrewing (Z1) or by removing it (Z2 lifting
with a small flat edged screwdriver). Remove the damaged
bulb and substitute it with a max 20W halogen bulb (G4).
Caution
This appliance is designed to be operated by adults. Children
should not be allowed to tamper with the controls or play with
the appliance.
Do not use the cooker hood where the grill is not correctly
fixed! The suctioned air must not be conveyed in the same
channel used for fumes discharged by appliances powered
by other than electricity. The environment must always be
adequately aerated when the cooker hood and other
appliances powered by other than electricity are used at the
same time. Flambé cooking with a cooker hood is
prohibited. The use of a free flame is damaging to the filters
and may cause fire accidents, therefore free flame cooking
must be avoided. Frying of foods must be kept under close
control in order to avoid overheated oil catching fire. Carry
out fumes discharging in accordance with the regulations in
force by local laws for safety and technical restrictions.
7
Page 8

After Sales Service
"No company is better positioned to offer an after sales service on a
Hotpoint appliance than us - the manufacturer"
As part of our commitment to you, all Hotpoint appliances have the added benefit of a fully inclusive
parts and labour guarantee for the first 12 months. In addition to this you also have the advantage of
engineer. When the 12 months parts and labour guarantee expires we offer the following after sales
Note: Our operators will require the Model number and the Serial number of your appliance
Available 364 days a year with a fast, effective and value for money service. We have the largest
white goods repair service in the UK with over 1000 of our own fully trained engineers. All repairs
If you require any information or have any questions about your appliance, our operators are on hand
Whether you have just one or a number of Hotpoint appliances in your kitchen, we offer two service
●
Repair Protection Plan - FREE service repairs for a single Hotpoint appliance during the
●
Kitchen Cover - FREE service repairs for all your Hotpoint appliances less than
free replacement parts for the first 5 years when fitted by a Hotpoint
service options:
Repair Service and Information Help Desk
UK: 08709 066066
www.hotpointservice.co.uk
Republic of Ireland: 1850 302 200
include a parts and labour guarantee for 12 months from the date of the repair.
with help and advice.
All this ensures that you will receive the best available after sales service possible.
Extended Warranties
UK: 08709 088 088
www.hotpointservice.co.uk
Republic of Ireland: 1850 502 200
cover plans to give you total peace of mind.
period of cover.
8 years old.
Genuine Parts and Accessories
UK: 08709 077 077
www.hotpointservice.co.uk
A wide range of genuine parts and accessories are available from our hotline or through our website.
Genuine parts and accessories, extended warranties and service repairs are all
GB91 0
Republic of Ireland: (01) 842 6836
available on our web-site at:
8
Page 9

Guarantee
"Satisfaction guaranteed or your money back"
We give you a unique 'satisfaction guaranteed' promise - valid for 90 days - after you have
purchased your Hotpoint appliance. If there is a technical problem simply call Hotpoint Repair
service or visit our web-site at
for an engineer to call. If the technical problem is not resolved under this guarantee, we will
replace your machine or, if you prefer, give you your money back.
All Hotpoint appliances carry a fully inclusive 12 month parts and labour guarantee as well as free
replacement parts for the first 5 years (except microwaves, selected integrated appliances and
cooker hoods, which have a one year guarantee) provided that they are fitted by a Hotpoint
engineer.
Guarantee terms and conditions
Your guarantee is only applicable in the United Kingdom or Republic of Ireland and is subject to
the following provisions that your appliance:
•Hasbeeninstalledandusedcorrectlyinaccordancewiththisinstructionbooklet.
•Hasbeenusedsolelyfordomesticpurposesandislocatedondomesticpremises(ie.not
for commercial or trade use).
•Hasbeenproperlyconnectedtoasuitableelectricalsupplyvoltageasstatedonthe
appliance rating plate.
•Hasnotbeensubjecttomisuse,accident,modifiedorrepairedbyanyoneotherthanone
of our own service engineers.
www.hotpointservice.co.uk andwherenecessary,wewillarrange
For pre purchase information on any other Hotpoint product call: 08701 50 60 70
or visit: www.hotpoint.co.uk
Recycling & Disposal Information
As part of Hotpoint's continued commitment to helping the environment, Hotpoint reserves the
right to use quality recycled components to keep down customer costs and minimise material
wastage.
Please dispose of packaging and old appliances carefully.
To minimise risk of injury to children, remove the plug and cut mains cable off flush with the
appliance. Dispose of these parts separately to ensure that the appliance can no longer be
plugged into a mains socket.
9
Page 10

Page 11

Page 12
Key Contacts
After Sales Service
Over 1200 trained specialists, directly employed by us, ensure that you can have complete
confidence in both the appliances and services we offer.
Repair Service and Information Desk
(Open 8 to 8 Mon - Fri, 8 to 6 Sat, 10 to 4 Sun & Bank Holidays)
Republic of Ireland: 1850 302 200
Note: Our operators will require the following information:
Republic of Ireland: 1850 502 200
Genuine Parts and Accessories
(Open 8-30 to 5-30 Mon - Fri & 9 to 12 Sat)
RepublicofIreland:(01)8426836
UK: 08709 066 066
www.hotpointservice.co.uk
Model number:
Serial number:
Extended Warranties
UK: 08709 088 088
(Open 8 to 8 Mon - Sun)
www.hotpointservice.co.uk
UK: 08709 077 077
www.hotpointservice.co.uk
LI2I2A Ed. 10/04
Indesit Company, Morley Way , Peterborough, PE2 9JB
 Loading...