

Page 1

Operating instructions
DISHWASHER
EN
English,1
DA
Dansk, 37 Suomi, 49
NO
Norsk, 13 Svenska, 25
FI
LKF 720
SE
Contents
Installation, 2-3
Positioning and levelling
Connecting the water and electricity supplies
Advice regarding the first wash cycle
Technical data
Description of the appliance, 4
Overall view
Control panel
Loading the racks, 5
Lower rack
Cutlery basket
Upper rack
Start-up and use, 6-7
Starting the dishwasher
Measuring out the detergent
Wash options
Wash cycles, 8
Table of wash cycles
Rinse aid and refined salt, 9
Measuring out the rinse aid
Measuring out the refined salt
Care and maintenance, 10
Shutting off the water and electricity supplies
Cleaning the dishwasher
Preventing unpleasant odours
Cleaning the sprayer arms
Cleaning the water inlet filter
Cleaning the filters
Leaving the machine unused for extended periods
Precautions, advice and Assistance, 11
General safety
Disposal
Saving energy and respecting the environment
Before contacting Assistance
Troubleshooting, 12
Page 2
Installation
EN
Keep this instruction manual in a safe place for future
reference. If the appliance is sold, given away or moved,
please ensure the manual is kept with the machine, so that the
new owner may benefit from the advice contained within it.
Please read this instruction manual carefully: it contains
important information regarding the safe installation, use and
maintenance of the appliance.
If the appliance must be moved at any time, keep it in an
upright position; if absolutely necessary, it may be tilted onto
its back.
Positioning and levelling
1. Remove the appliance from all packaging and check that it
has not been damaged during transportation.
If it has been damaged, contact the retailer and do not
proceed any further with the installation process.
2. Check the dishwasher by placing it so that its sides or back
panel are in contact with the adjacent cabinets or even with the
wall. This appliance can also be recessed under a single
worktop
3. Position the dishwasher on a level and sturdy floor. If the
floor is uneven, the front feet of the appliance may be adjusted
until it reaches a horizontal position. If the appliance is levelled
correctly, it will be more stable and much less likely to move or
cause vibrations and noise while it is operating.
4
appliance
a hexagonal spanner (red color) with an opening of 8 mm in a
clockwise direction to increase the height or in an
anticlockwise direction to decrease the height.
* (see the Assembly instruction sheet).
*. Adjust the height of the rear foot from the front of the
* on the central lower part of the dishwasher, turning
Connecting the water inlet hose
To a suitable cold water connection point: before attaching
the hose, run the water until it is perfectly clear so that any
impurities that may be present in the water do not clog the
appliance; after performing this operation, screw the inlet
hose tightly onto a tap with a ¾ gas threaded connection.
To a suitable hot water connection point: your dishwasher
may be supplied with hot water from the mains supply (if
you have a central heating system with radiators) provided
that it does not exceed a temperature of 60°C.
Screw the hose to the tap as described for connection to a
cold water supply.
If the inlet hose is not long enough, contact a specialist
store or an authorised technician (see Assistance).
The water pressure must be within the values indicated in
the Technical data table (see adjacent information).
The hose should not be bent or compressed.
Anti-flooding protection
To ensure floods do not occur, the dishwasher:
- is provided with a special system which blocks the water
supply in the event of anomalies or leaks from inside the
appliance.
Some models are also equipped with the supplementary
safety device New Acqua Stop
flooding protection even in the event of a supply hose rupture.
*, which guarantees anti-
Connecting the water and electricity
supplies
Connection to the water and electricity supplies should
only be performed by a qualified technician.
The dishwasher should not stand on top of the water
hoses or the electricity supply cable.
The appliance must be connected to the water supply
network using new hoses.
Do not use old hoses.
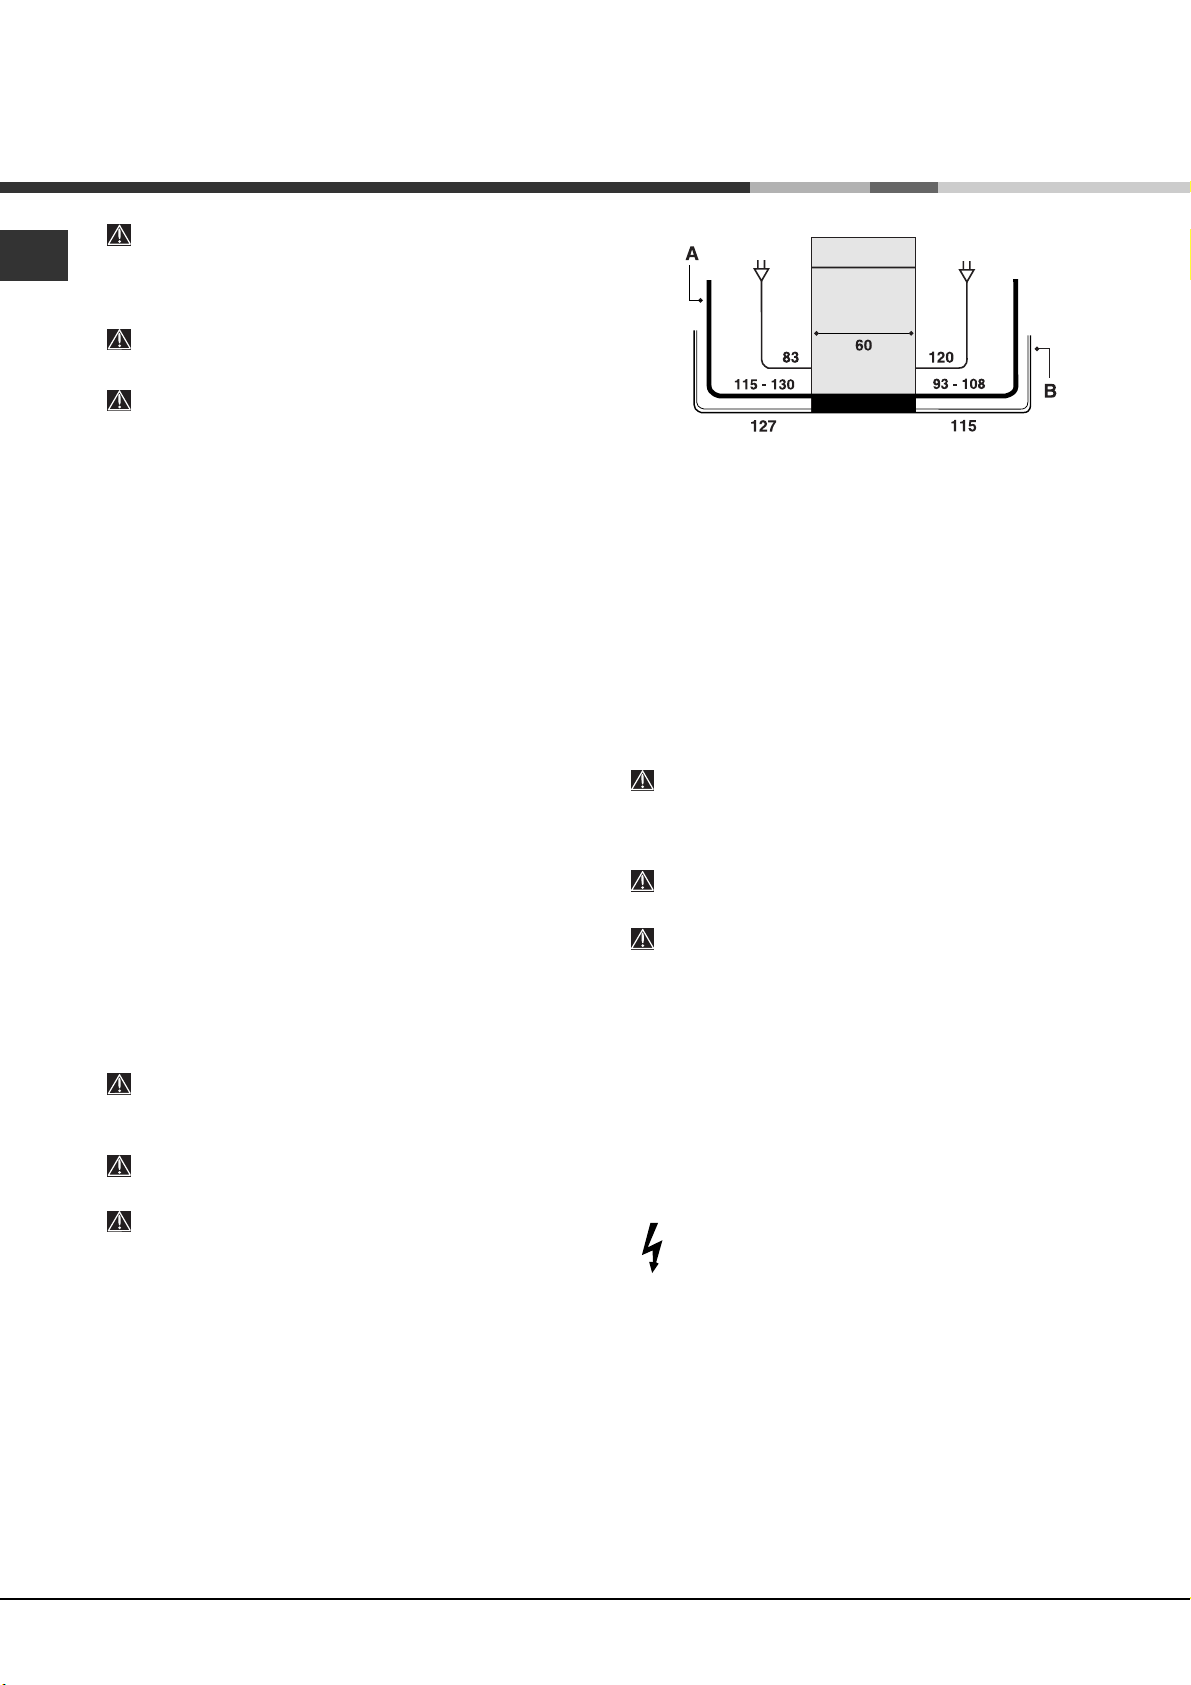
The water inlet (A) and outlet (B) hoses and the electricity
supply cable may be positioned towards the right or the left in
order to achieve the best possible installation (see figure).
WARNING: HAZARDOUS VOLTAGE!
Under no circumstance should the water inlet hose be cut as it
contains live electrical parts.
* Only available in selected models.
2
Page 3

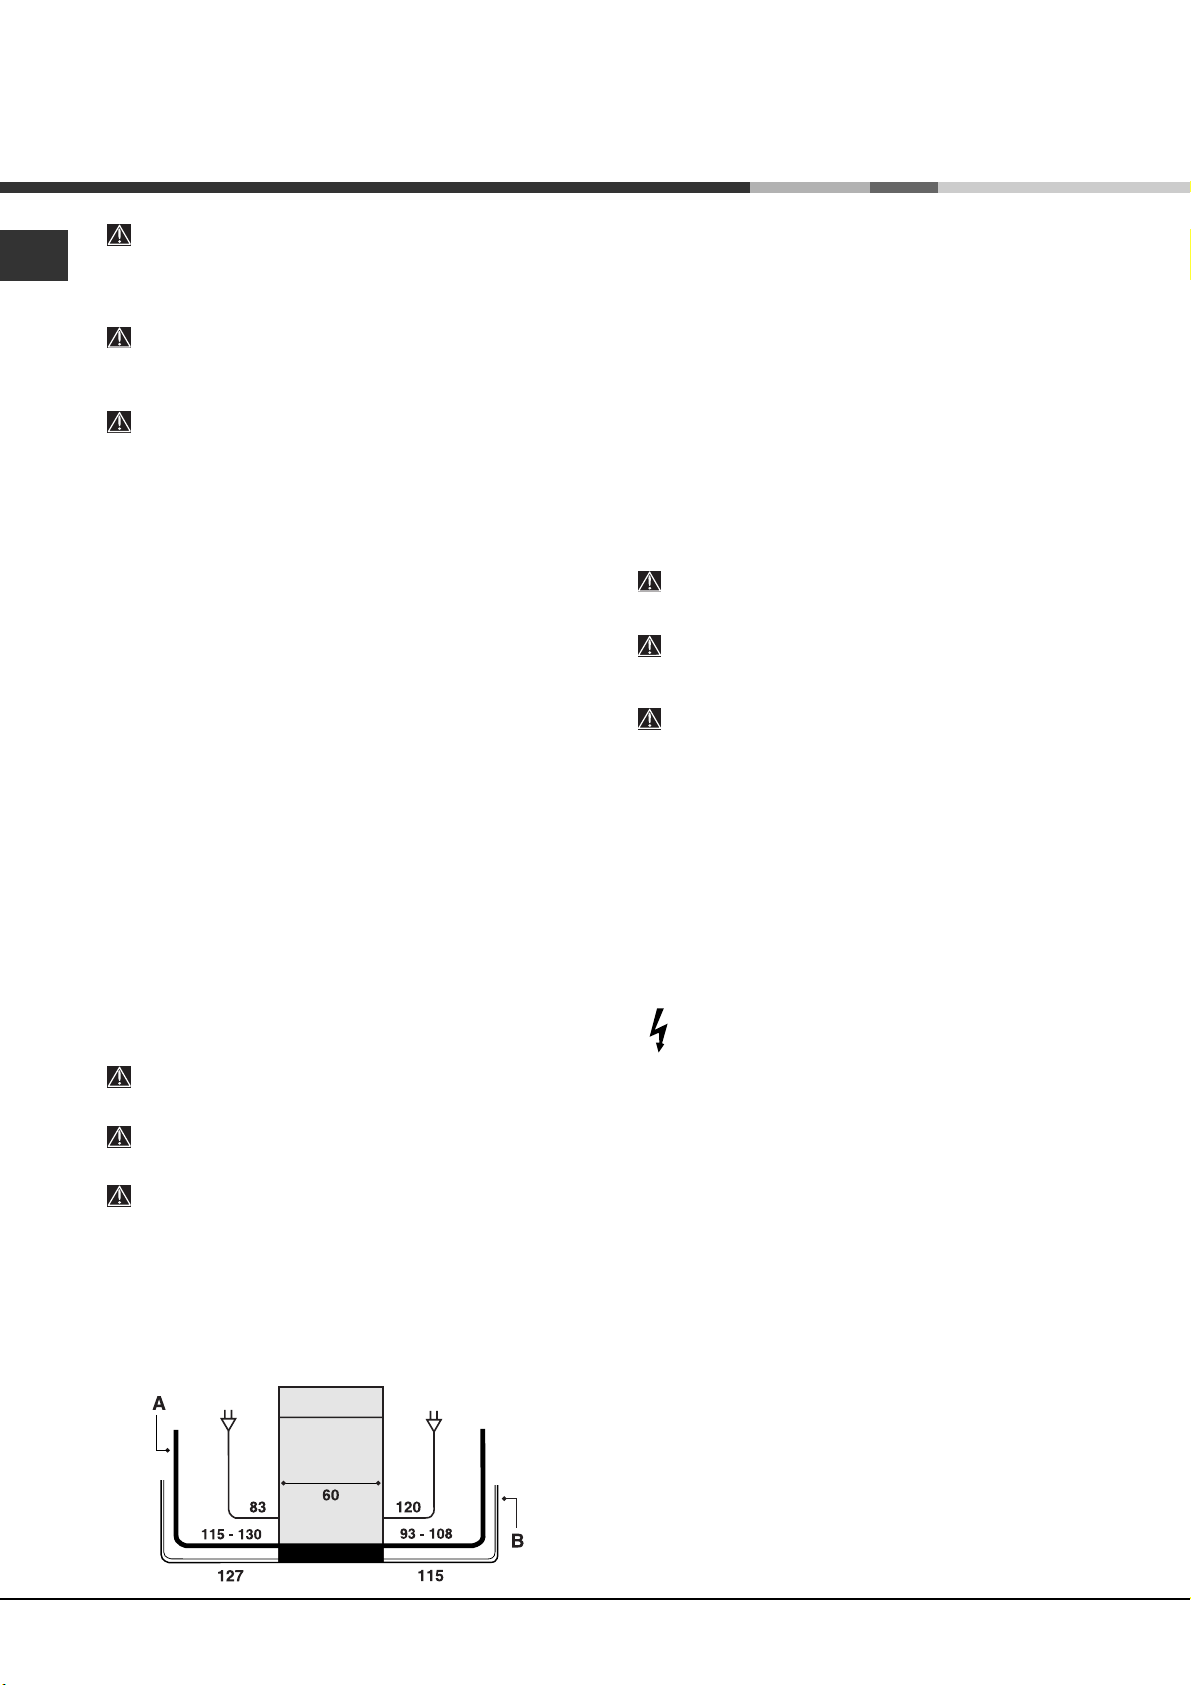
Connecting the water outlet hose
Connect the outlet hose (without bending it) to a drain duct
with a minimum diameter of 4 cm. Alternatively, rest it over a
sink or tub; the free end of the hose should not remain
immersed in water.
The special plastic elbow
A
makes it easier to find the best
layout: fix the elbow to the wall
securely in order to prevent the
outlet hose from moving and
spilling the dirty water.
The part of the hose marked
with the letter A should be
between 40 and 100 cm above
the ground (see figure).
We advise against the use of hose extensions.
*
Electrical connection
Before inserting the plug into the electrical socket, make sure
that:
The socket is earthed and complies with current
regulations.
The socket can withstand the maximum load of the
appliance, which is indicated on the data plate located on
the inside of the door (see chapter entitled Description of
the appliance).
The power supply voltage falls within the values indicated
on the data plate on the inside of the door.
The socket is compatible with the plug of the appliance. If
this is not the case, ask an authorised technician to replace
the plug (see Assistance); do not use extension cables or
multiple sockets.
Once the appliance has been installed, the power supply
cable and the electrical socket should be easily accessible.
Anti-condensation strip*
After installing the dishwasher, open the door and stick the
adhesive transparent strip under the wooden shelf in order to
protect it from any condensation which may form.
Advice regarding the first wash cycle
After the appliance has been installed, immediately before
running the first wash cycle, completely fill the salt dispenser
with water and add only then approximately 1 kg of salt (see
chapter entitled Rinse aid and refined salt). The water may
overflow: this is normal and is not a cause for concern. Select
the water hardness value (see chapter entitled Rinse aid and
refined salt).
machine, the LOW SALT indicator light
If the salt container is not filled, the water softener and the
heating element may be damaged as a result.
Technical data
Dimensions
Capacity 12 standard place-settings
Water supply
pressure
Power supply
voltage
Total absorbed
power
Fuse See appliance data plate
- After the salt has been poured into the
* switches off.
width 60 cm
height 85 cm
depth 60 cm
0,05 ÷ 1MPa (0.5 ÷ 10 bar)
4.3 psi – 145 psi
See appliance data plate
See appliance data plate
EN
The cable should not be bent or compressed.
If the power supply cable is damaged, it must be replaced
by the manufacturer or its Technical Assistance Service in order
to prevent all potential hazards. (See Assistance)
The Company shall not be held responsible for any
incidents that occur if these regulations are not observed.
This dishwasher conforms to
the following European
Community Directives:
-73/23/EEC dated 19/02/73
(Low Voltage) and subsequent
modifications
-89/336/EEC dated 03/05/89
(Electromagnetic Compatibility)
and subsequent modifications
-97/17/EC (Labelling)
-2002/96/ CE Waste Electrical
and Electronic Equipment
(WEEE)
* Only available in selected models.
3
Page 4

Description of the
appliance
EN
Overall view
1. Upper rack
2. Upper sprayer arm
3. Tip-up compartments
4. Rack height adjuster
5. Lower rack
6. Lower sprayer arm
7. Cutlery basket
8. Washing filter
9. Salt dispenser
10. Detergent and rinse aid dispensers
11. Data plate
12. Control Panel
***
Control panel
ON/OFF
indicator light
ON/OFF/RESET
button
Low Rinse aid
indicator light*
Low Salt
indicator light*
button and indicator light*
Select wash
cycle knob
Half load
button and
indicator light*
Multi-functional tablets
Delayed start
button and
indicator light*
Washing and 3h.
Delayed start
indicator light*
Drying and
6h.Delayed start
indicator light*
End and 9h.
Delayed start
indicator light*
Start/Pause button
and indicator light*
***Only in completely built-in models.
* Only available in selected models.
4
Page 5
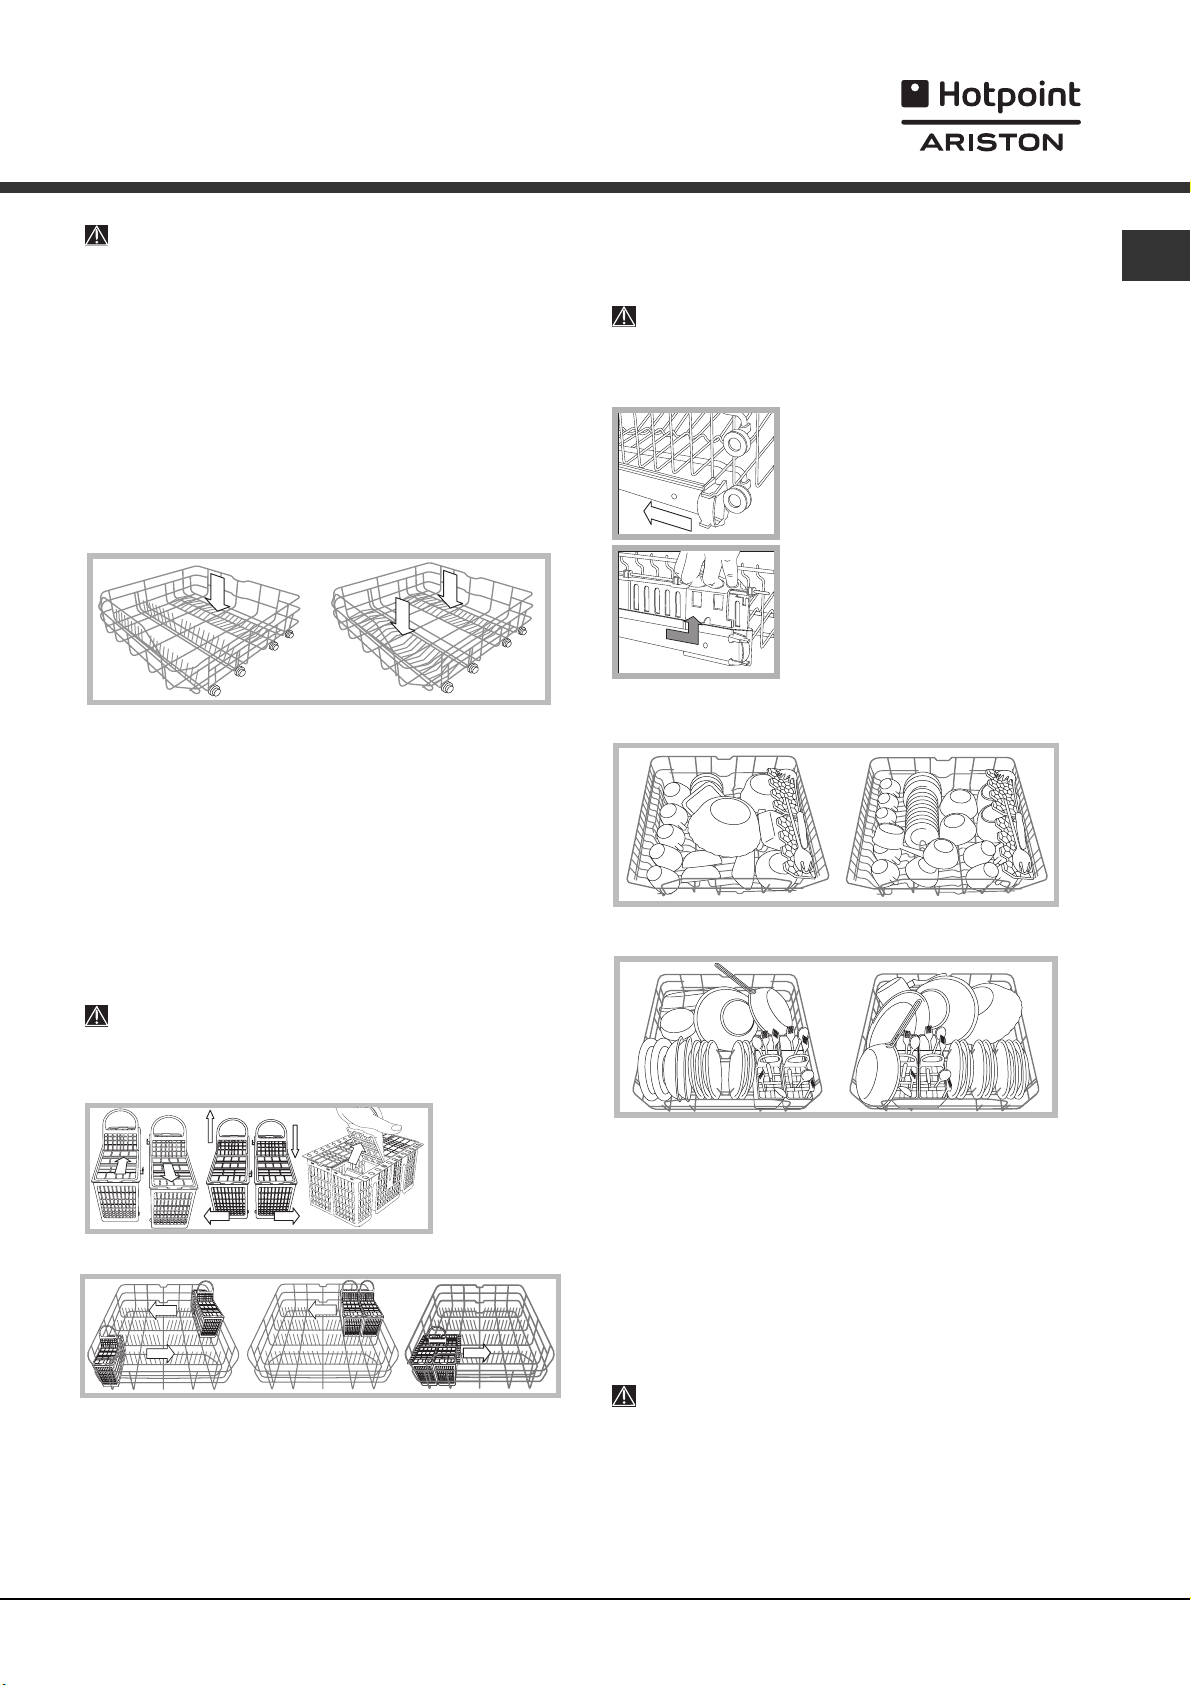
Loading the racks
Before loading the racks, remove all food residues from
the crockery and empty liquids from glasses and cups.
After loading the appliance, check that the sprayer arms
can rotate freely.
Lower rack
The lower rack can hold pans, lids, plates, salad bowls,
cutlery, etc. as seen in the Loading examples.
Plates and large covers should be placed at the sides of the
rack, ensuring that they do not block the rotation of the upper
sprayer arm.
Some dishwasher models are fitted with tip-up sections
which can be used in a vertical position when arranging
plates or in a horizontal position when arranging pans and
salad bowls.
*,
Cutlery basket
The type of cutlery basket may vary according to the
dishwasher model: it may be modular, non-modular or a sliding
version. The non-modular basket must only be positioned at
the front of the lower rack.
The modular basket may be separated into two parts, a solution
which is recommended when performing a half load wash (only
in models offering this option), is available in a sliding version
(positioned at any point on the lower rack by sliding it between
the fixed or tip-up inserts.
- Both versions are fitted with a collapsible sliding system which
means the cutlery can be arranged in the best possible way.
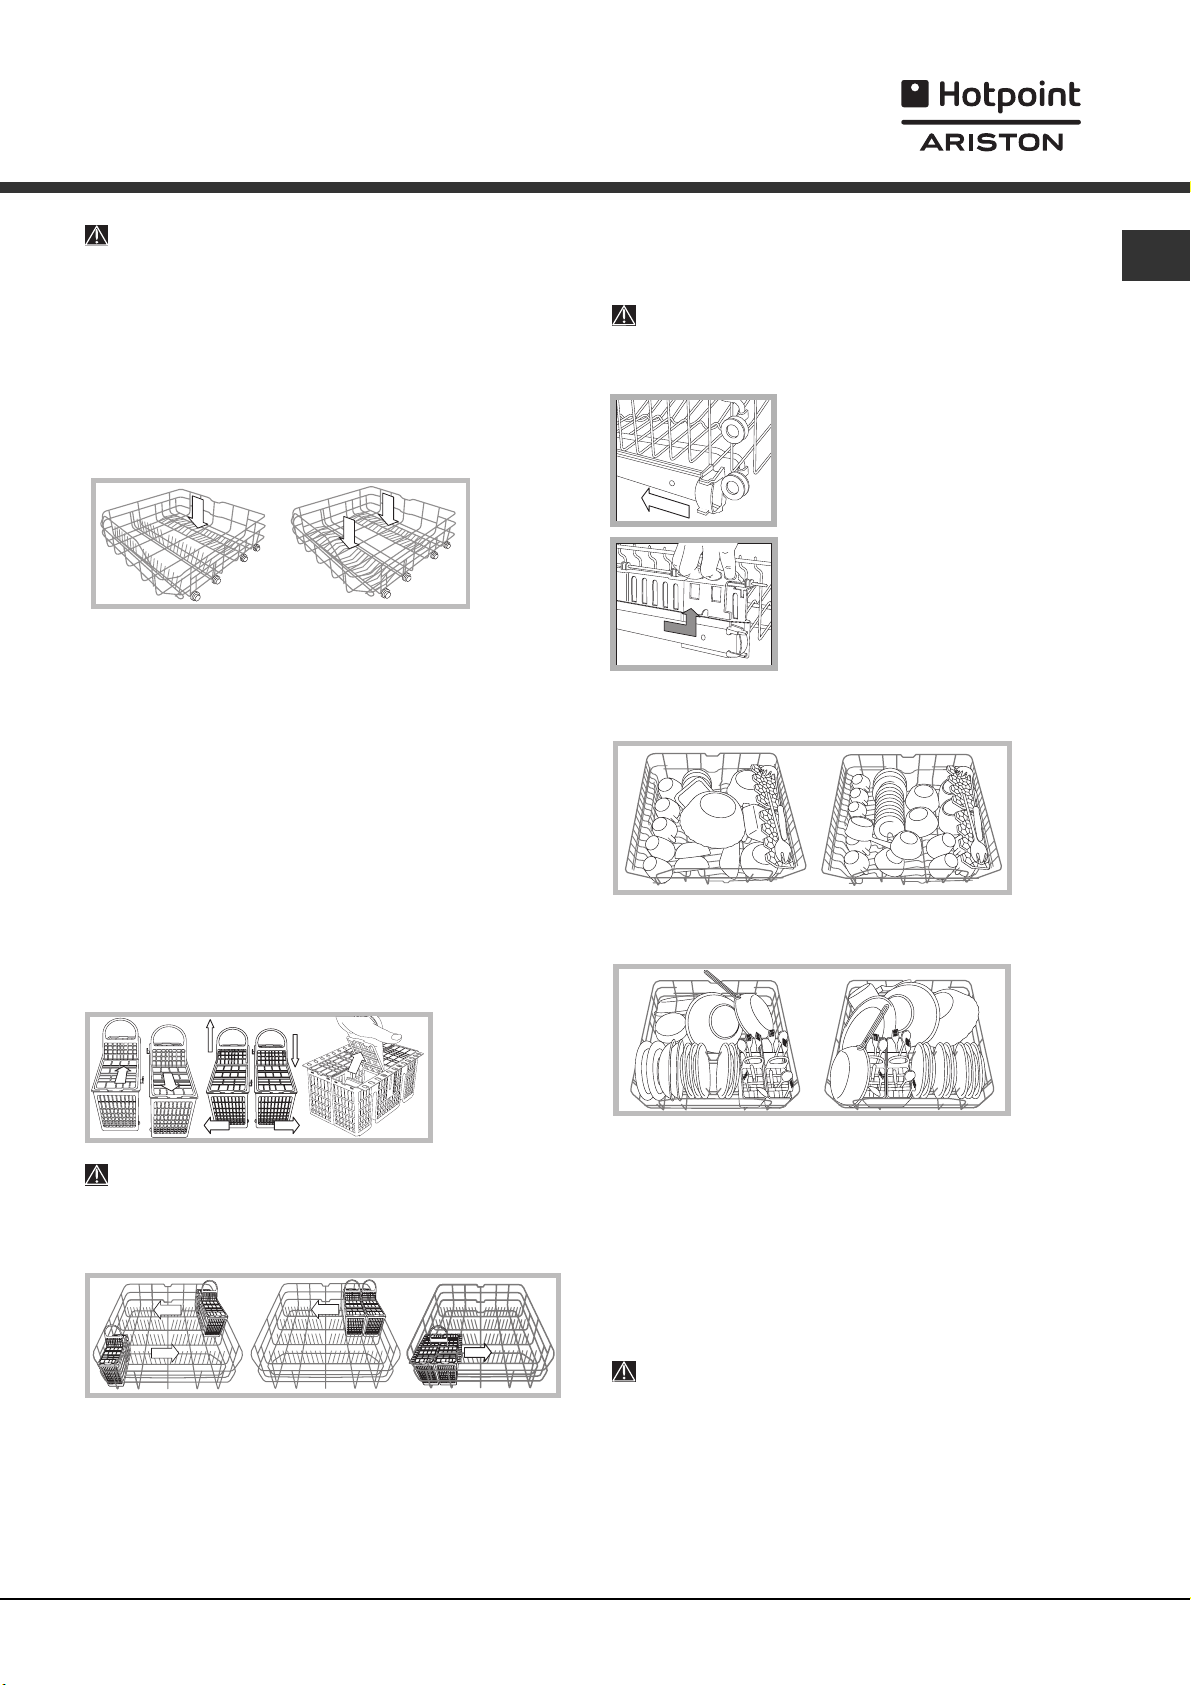
Adjusting the height of the upper rack
In order to make it easier to arrange the crockery, the upper
rack may be moved to a higher or lower level. (in models which
The height of the upper rack should ideally be adjusted
WHEN THE RACK IS EMPTY.
Never lift or lower the rack on one side only.
Open the left and right guide rail stops
and pull out the rack; position it higher or
lower as required, slide it along the guide
rails until the front wheels are in place
and close the stops (see figure).
If the rack is fitted with Dual Space
handles
rack until it reaches its stop point, grip the
handles at the sides of the rack and move
it upwards or downwards, then slowly let it
fall back into place.
* (see figure), pull out the upper
Loading examples for the upper rack
Loading examples for the lower rack
EN
Knives and other utensils with sharp edges must be
placed in the cutlery basket with the points facing
downwards, or they must be positioned horizontally in the tipup compartments on the upper rack.
Cutlery basket positioning examples
Upper rack
Load this rack with delicate and lightweight crockery:
glasses, tea and coffee cups, saucers, small salad bowls,
saucepans and small saucepans which are not too soiled,
using the Loading examples as a guide.
Mugs and cups: place these on the tip-up compartments
Long sharp knives and serving utensils: place these on the
tip-up compartments
**.
**.
Items which should not be washed in the
dishwasher
Wooden items, objects with wooden or horn handles or
glued-on parts.
Items made from aluminium, copper, brass, pewter or tin.
Items made from plastic material which is not heat-resistant.
Antique or hand-painted porcelain.
Antique silver. Silver which is not antique may, however, be
washed in the dishwasher using a delicate wash cycle,
provided that it does not come into contact with other metals.
We recommend the use of crockery which is dishwasher
safe.
*Only available in selected models.
** The number and position may vary.
5
Page 6
Start-up and use
EN
Starting the dishwasher
1. Turn the water tap on.
2. Press the ON/OFF button: all the indicator lights on
the control panel will light up for a few seconds.
3. Open the door and pour in a suitable amount of
detergent (see below).
4. Load the racks (see Loading the racks) and shut the
door.
5. Select the wash cycle by turning the WASH CYCLE
SELECT knob in a clockwise direction: align the notch
on the knob with the number or symbol representing
the desired wash cycle. The START/PAUSE indicator
light will flash.
6. Select the wash options
information).
7. Start the cycle by pressing the START button; the
indicator light will light up and remain lit in a fixed
manner. The indicator light corresponding to the wash
phase will switch on, signalling that the wash cycle
has begun.
8. At the end of the wash cycle the END indicator light
will switch on (fixed light). Switch off the appliance by
pressing the ON/OFF button, shut off the water valve
and unplug the appliance from the electricity socket.
9. Wait for a few minutes before removing the
crockery, in order to avoid burns. Unload the racks,
beginning with the lower level.
Modifying a wash cycle in progress
If a mistake was made during the wash cycle selection
process it is possible to change the cycle, provided that
it has only just begun: once the wash cycle has started,
switch off the machine by pressing and holding the ON/
OFF/Reset button. Switch it back on using the same
button and select the desired wash cycle and options.
Adding extra crockery
Press the Start/Pause button (the corresponding
indicator light will flash). Open the door, taking care to
avoid the escaping steam, and place the crockery inside
the appliance. Press the Start/Pause button (fixed light):
the cycle starts from the point at which it was interrupted.
* (see adjacent
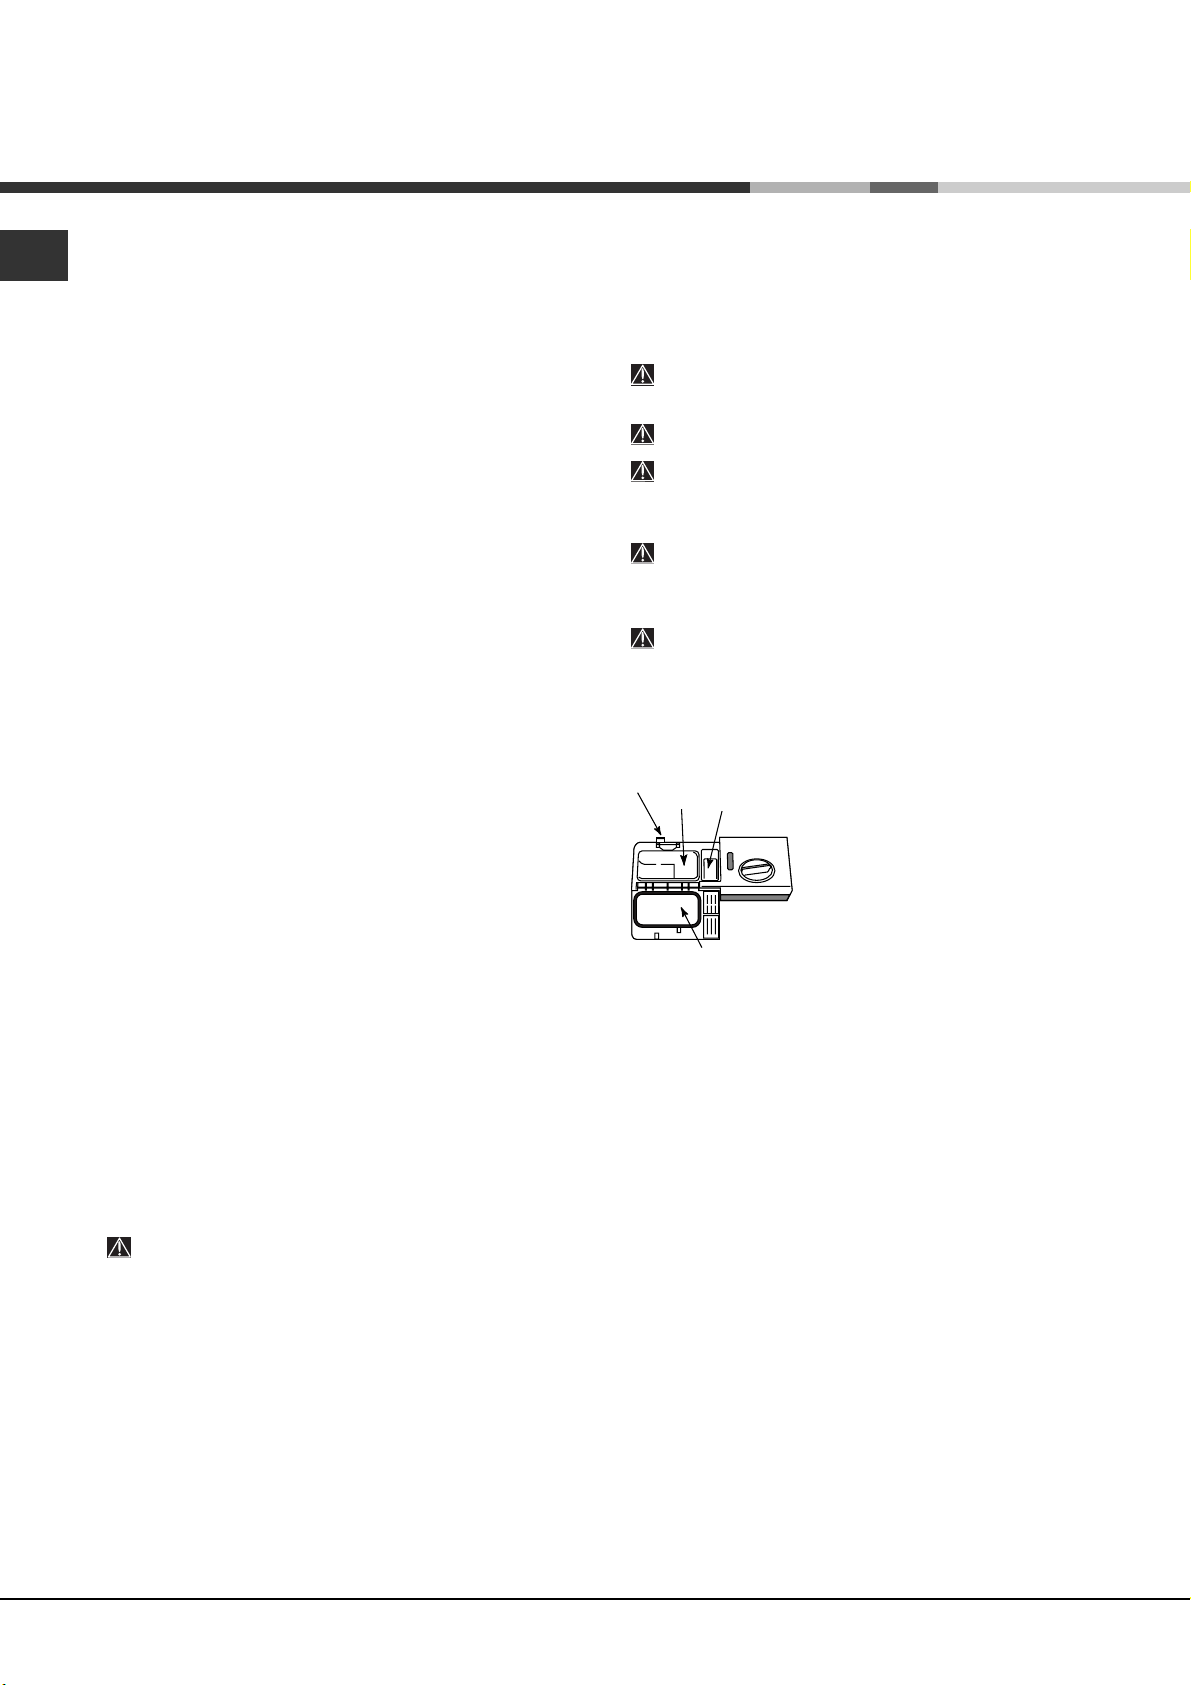
Measuring out the detergent
A good wash result also depends on the correct
amount of detergent being used; exceeding the stated
amount does not result in a more effective wash and
increases environmental pollution.
Only use detergent which has been
specifically designed for dishwashers.
DO NOT USE washing up liquid.
Using excessive detergent may result in foam
residue remaining in the machine after the cycle
has ended.
The use of tablets is only recommended for
models which offer the MULTI-FUNCTIONAL
TABLETS option.
To achieve the best results from each washing and
drying cycle, powder detergent, rinse aid liquid and
salt should be used.
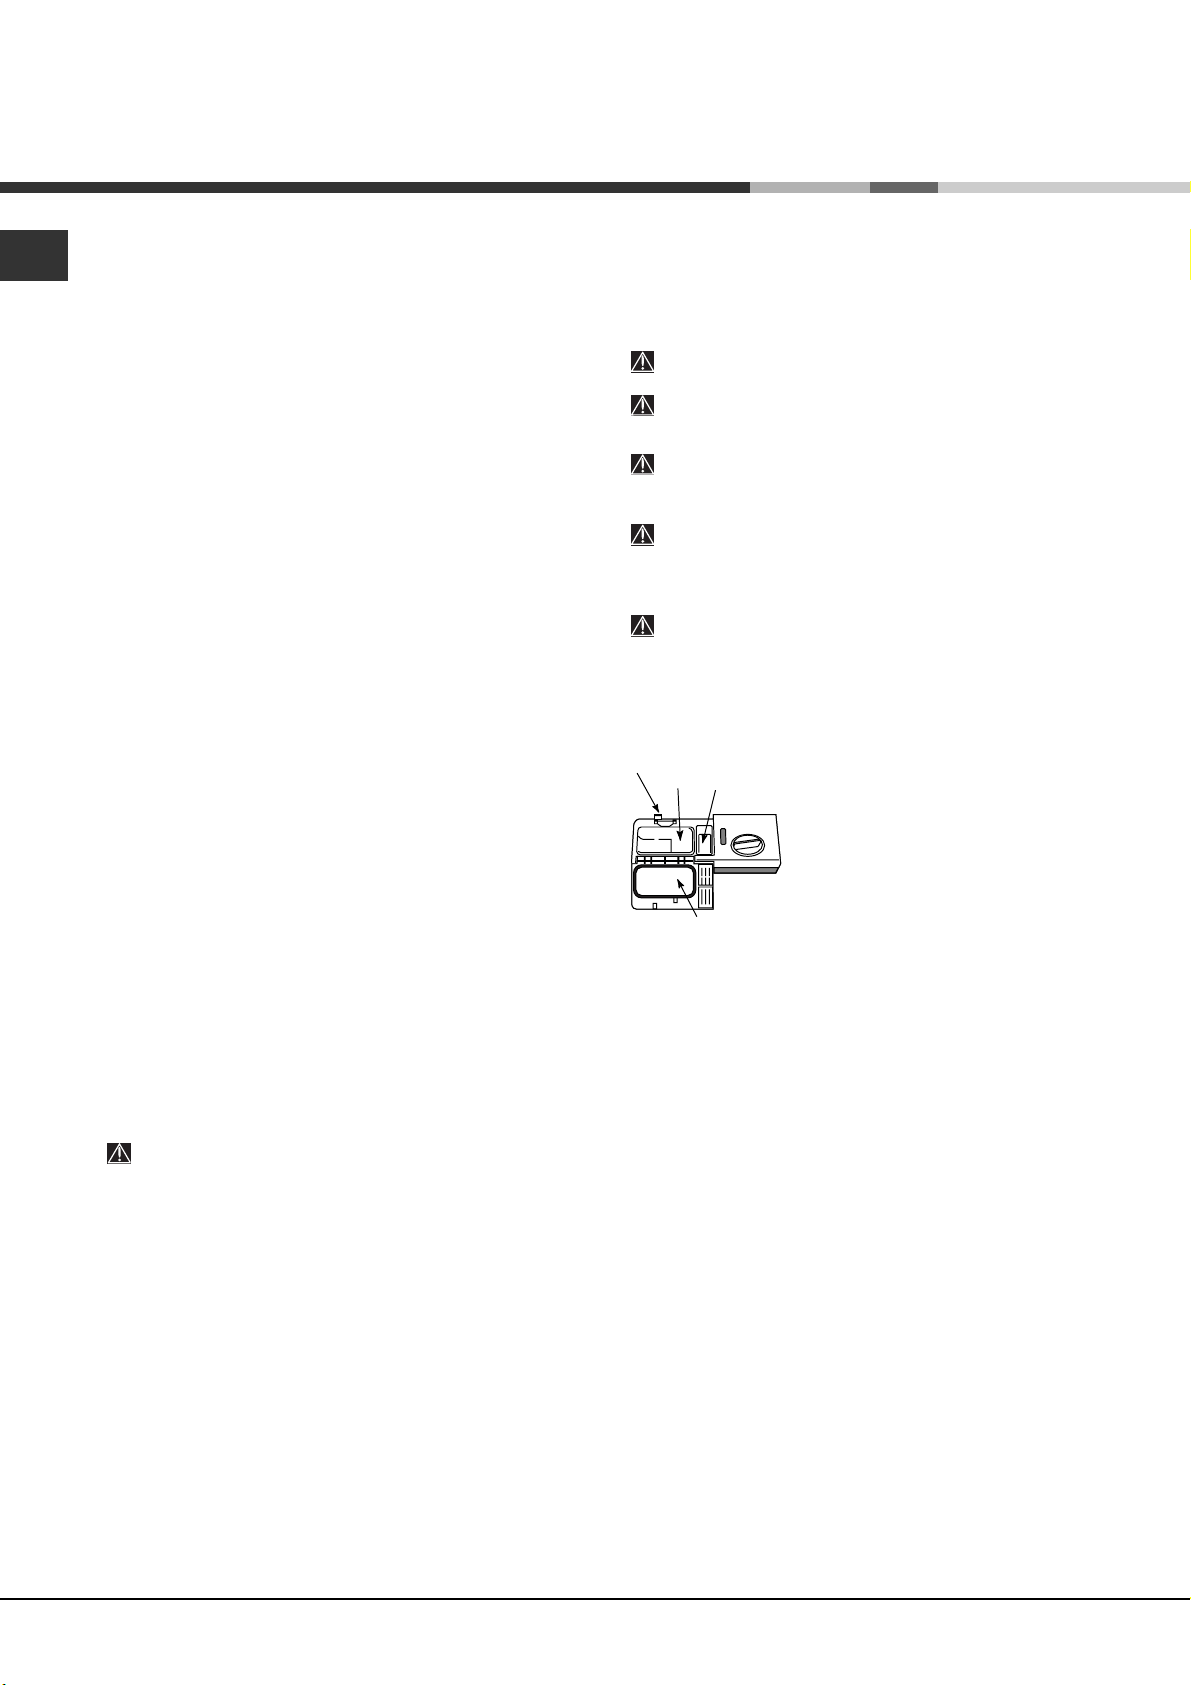
Compartment A: Washing detergent
Compartment B: Pre-wash detergent
D
A
B
C
when the cycle requires 1 tablet, place it in compartment
A and close the cover; when it requires 2, place the
second tablet at the bottom of the appliance.
3. Remove detergent residues from the edges of the
compartment and close the cover until it clicks.
1. Open cover C by pressing
button D.
2. Pour in the detergent after
consulting the Table of wash
cycles:
For powder detergent use
compartments A and B.
For detergent in tablet form:
Wash options*
The OPTIONS may only be set, modified or reset
after the wash cycle has been selected and before
the Start/Pause button has been pressed.
If the Start/Pause button is pressed so as to pause the
machine, the wash cycle or the Delayed Start function
(if selected) is interrupted.
At this stage it is not possible to change the wash cycle.
Accidental interruptions
If the door is opened during the wash cycle, or if there is
a power cut, the cycle stops. It starts again from the point
at which it was interrupted once the door has been shut
or once the electricity supply is restored.
6
Only the options which are compatible with the type of
wash cycle set may be selected. If an option is not compatible with the selected was cycle (see Table of wash
cycles), the corresponding LED flashes rapidly 3 times.
If an option is selected which is incompatible with another option or wash cycle selected previously, the incompatible option light will flash 3 times and switches
off, while the most recently selected setting remains lit.
To deselect an option which has been set by mistake, press the corresponding button again.
* Only available in selected models.
Page 7
Half load*
If there are not many dishes to be washed, a half load
cycle may be used in order to save water, electricity
and detergent. Select the wash cycle and press the
HALF LOAD button: the indicator light will illuminate.
Remember to halve the amount of detergent.
It is better to use powder detergent in this case.
This option is incompatible with the following
wash cycle: Speed wash.
Delayed start*
It is possible to delay the start time of the wash cycle by
3, 6 or 9 hours.
1: After selecting the desired wash cycle and any other
options, press the DELAYED START button. the indicator
light will illuminate.
2: Select the desired delay time by pressing the Delayed Start button repeatedly; the wash phase (3 hours),
the drying phase (6 hours) and end (9 hours) indicator
lights will illuminate in succession.
If the Delayed Start button is pressed again, the option is
deselected and the indicator light switches off.
3. The countdown will begin once the Start/Pause button has been pressed. The selected delay period indicator light flashes and the Start/Pause button stops flashing (the light becomes fixed instead).
3. Once this time has elapsed, the DELAYED START
indicator light switches off and the wash cycle
begins.
The Delayed Start function cannot be set once a
wash cycle has been started.
Multi-functional tablets*
This option optimises washing and drying results.
When using multi-functional tablets, press the MULTIFUNCTIONAL TABLETS button. The corresponding
indicator light will illuminate. The Multi-functional
tablets option results in the lengthening of the wash
cycle.
The MULTI-FUNCTIONAL TABLETS option remains
set for subsequent wash cycles if it is not deselected.
The use of tablets is only recommended when the
MULTI-FUNCTIONAL TABLETS option is available.
This option is not recommended for use with wash
cycles which do not specify the use of multi-functional
tablets (see Table of options).
Table of options*
Intensive
Normal
Daily A 60
Soak
Eco
Speed 25’
Crystal
A B C
Delayed
Start
Half
Load
Tabs
Yes Yes Yes
Yes Yes Yes
Yes Yes Yes
Yes Yes No
Yes Yes Yes
Yes No Yes
Yes Yes Yes
EN
* Only available in selected models.
7
Page 8

Wash cycles
EN
If the crockery is only lightly soiled or if it has been rinsed with water before being placed in the
dishwasher, reduce the amount of detergent used accordingly.
The number and type of wash cycles and options may vary depending on the dishwasher model.
For available OPTIONS please refer to the Table of options on the Start-up and use page.
Wash cycle selection
instructions
Heavily soiled dishes and
pans (not to be used for
delicate items).
Normally soiled pans and
dishes. Standard daily
wash cycle.
Limited quantity of daily
soiling.
(4 place settings + 1
saucepan +1 frying pan).
Pre-wash for dishes while
awaiting completion of the
load with the dishes from
the next meal.
Environmentally-friendly
wash cycle with low energy
consumption levels,
suitable for pans and
dishes.
Economic and fast wash to
be used for lightly soiled
dishes. (Run cycle
immediately after use) (2
plates + 2 glasses + 4
pieces of cutlery + 1
saucepan + 1 small frying
pan).
Economic and fast wash for
delicate items which are
sensitive to high
temperatures. (Run cycle
immediately after use) (12
glasses + delicate plates). Crystal
Wash cycle
Intensive
Normal
Daily A 60
Soak
*
Eco
(A) = compartment A
(B) = compartment B
Powder Liquid Tablets
30 g (A)
25 g (A)
5 g (B)
25 g (A) 25 ml (A) 1 (A)
No
25 g (A)
5 g (B)
25 g (A) 25 ml (A) 1 (A)
30 g (A) 30 ml (A) 1 (A)
30 ml (A)
25 ml (A)
5 ml (B)
25 ml (A)
5 ml (B)
Detergent
No
1 (A)
1 (A)
No
1 (A)
Wash
cycles
which
include
drying
Yes
Yes
No
No
Yes
No
Yes
Options
A-B-C
A-B-C
A-B-C
A-B
A-B-C
A-C
A-B-C
Wash cycle
duration
(tolerance
±10%)
Hrs. Min.
2:15’
1:45’
1:00’
0:08’
2:20’
0:25’
1:30’
Notes:
Optimum performance levels when using the "Daily A 60 wash" and "Speed wash" cycles can be achieved by observing the
maximum amounts of crockery specified.
To make it easier to measure out the detergent, it is worth remembering that:
1 tablespoon = 15 gr. of powder = approximately 15 ml of liquid - 1 teaspoon = 5 gr. of powder = approximately 5 ml of liquid
* The Eco wash cycle adheres to the regulation EN-50242. Although it has a longer duration than other wash cycles it uses less
energy and is les harmful to the environment.
Note for Test Laboratories: for information relating to comparative EN testing conditions, please send an email to the following
address: ASSISTENZA_EN_LVS@indesitcompany.com
8
Page 9
Rinse aid and refined salt
Only use products which have been
specifically designed for dishwashers.
Do not use table salt or industrial salt, or
washing up liquid.
Follow the instructions given on the packaging.
If using a multi-functional product it is not necessary to
add rinse aid; however, we recommend that you add salt,
especially if you live in an area where the water is hard or
very hard. Follow the instructions given on the packaging.
If you do not add salt or rinse aid, the LOW
* and LOW RINSE AID* indicator lights
SALT
remain lit.
Measuring out the rinse aid
Rinse aid makes it easier for the crockery to dry, as water
runs off surfaces more readily and therefore does not leave
streaks or marks.
The rinse aid dispenser should be filled:
When the LOW RINSE AID* indicator light on the control
panel is illuminated;
1. Open the dispenser by turning
the lid (G) in an anticlockwise
direction.
2. Pour in the rinse aid, making
sure it does not overflow from the
dispenser. If this happens, clean
F
the spill immediately with a dry
G
cloth.
3. Screw the lid back on.
NEVER pour the rinse aid directly into the appliance tub.
Adjusting the amount of rinse aid
If you are not completely satisfied with the drying results,
you may adjust the quantity of rinse aid used. Use a
screwdriver to turn the dosage adjuster (F) to one of the 6
pre-set positions (the default position is set to 4):
If there are streaks on the crockery, set the adjustment
device to a lower number (1-3).
If drops of water remain on the crockery or if there are
limescale marks present after the cycle has finished, set
the adjuster to a higher number (4-6).
Setting the water hardness
Every dishwasher is equipped with a water softener which, by
using refined salt designed especially for this type of
appliance, supplies water without limescale which is then used
to wash the crockery.
This dishwasher offers a setting which helps to reduce
pollution and optimises washing performance in accordance
with the water hardness level in your area. This information can
be obtained from the organisation which supplies your
household with water.
- Switch the machine off using the ON/OFF button and open
the door.
- Set the SELECT WASH CYCLE knob first to wash cycle 5,
then to wash cycle 1, then to wash cycle 5 again.
- Press the ON/OFF button; the wash cycle phase indicator
lights will flash. It is now possible to select the water hardness
level. There is a water hardness level for every wash cycle:
E.g.: wash cycle 1, water hardness level 1
wash cycle 2, water hardness level 2, etc. etc., up to a maximum of five
(The default water softener setting is level 3).
- To exit the function, wait approximately 30 seconds or switch
off the machine using the ON/OFF button.
Even if using multi-functional tablets, the salt dispenser should
still be filled.
(°dH = hardness measured in German degrees - °f =
hardness measured in French degrees - mmol/l = millimoles
per litre)
* levels.
Water Hardness Table
°dH °fH mmol/l level
0 6 0 10 0 1 1
6 11 11 20 1.1 2 2
12 17 21 30 2.1 3 3
17 34 31 60 3.1 6 4
34 50 61 90 6.1 9
For values between 0°f and 10°f, we do not
recommend the use of salt.
* this setting may cause a slight increase in the
duration of the cycle.
5
*
Measuring out the refined salt
In order to achieve the best possible results using a wash
cycle, make sure that the dispenser is never empty.
Refined salt removes limescale from the water, thus
avoiding the formation of deposits on crockery.
The salt dispenser is located in the lower part of the
dishwasher (see Description) and should be filled:
When the green float
the cap of the salt dispenser.
When the LOW SALT
illuminated;
1 kg); it is not unusual for a little water to leak out.
4. Remove the funnel* and wipe any salt residue away from the
opening; rinse the cap under running water and then screw it
on, the head facing downwards so as to let the water flow out
of the four cracks which are arranged in a star shape on the
lower part of the cap. (Salt cap with green float
It is advisable to perform this procedure every time you
add salt to the container.
Make sure the cap is screwed on tightly, so that no detergent
can get into the container during the wash cycle (this could
damage the water softener beyond repair).
When necessary, measure out the salt before a wash
cycle so that any saline solution which has leaked out of the
salt dispenser is removed.
* cannot be seen by simply looking at
* indicator light on the control panel is
1. Remove the lower rack and
unscrew the container cap
(anticlockwise).
2. The first time you do this: fill the
water tank right up to its edge.
3. Position the funnel
and fill the salt container right up to its
edge (this should hold approximately
* (see figure)
*)
EN
* Only available in selected models.
9
Page 10

Care and maintenance
Shutting off the water and electricity
EN
supplies
Turn off the water tap after every wash cycle to avoid
leaks.
Always unplug the appliance when cleaning it and
when performing maintenance work.
Cleaning the dishwasher
The external surfaces of the machine and the control
panel may be cleaned using a non-abrasive cloth
which has been dampened with water. Do not use
solvents or abrasive products.
Any marks on the inside of the appliance may be
removed using a cloth dampened with water and a
little vinegar.
Preventing unpleasant odours
Always keep the door of the appliance ajar in order to
avoid moisture from forming and being trapped inside
the machine.
Clean the seals around the door and detergent
dispensers regularly using a damp sponge. This will
avoid food becoming trapped in the seals, which is
the main cause behind the formation of unpleasant
odours.
Clean the water inlet filter at the tap outlet regularly.
- Turn off the water tap.
- Unscrew the end of the water inlet hose, remove the filter and
clean it carefully under running water.
- Replace the filter and screw the water hose back into
position.
Cleaning the filters
The filter assembly consists of three filters which remove food
residues from the washing water and then recirculate the
water. They should be cleaned if you wish to achieve the best
results in every wash.
Clean the filters regularly.
The dishwasher should not be used without filters, or if the
filter is loose.
After several washes, check the filter assembly and if
necessary clean it thoroughly under running water, using a
non-metallic brush and following the instructions below:
1. Turn the cylindrical filter C in an anti-clockwise direction
and pull it out (fig. 1).
2. Remove the cup filter B by exerting a slight pressure on the
side flaps (fig. 2).
3. Slide out the stainless steel plate filter A (fig. 3).
4. Inspect the trap and remove any food residue. NEVER
REMOVE the wash cycle pump (black detail) (fig. 4).
Cleaning the sprayer arms
Food residue may become encrusted onto the sprayer
arms and block the holes used to spray the water. It is
therefore recommended that the arms are checked from
time to time and cleaned with a small non-metallic
brush.
The two sprayer arms may both be removed.
To remove the upper sprayer
arm, rotate the locking ring in
an anti-clockwise direction.
The upper sprayer arm should
be replaced with the holes
facing upwards.
The lower sprayer arm can be
removed by pressing on the
side tabs and pulling it
upwards.
Cleaning the water inlet filter*
If the water hoses are new or have not been used for an
extended period of time, let the water run to make sure it
is clear and free of impurities before performing the
necessary connections. If this precaution is not taken,
the water inlet could become blocked and damage the
dishwasher.
B
C
C
1
2
A
3
After cleaning the filters, replace the filter assembly and fix it in
position correctly; this is essential for maintaining the efficient
operation of the dishwasher.
4
Leaving the machine unused for extended
periods
Disconnect the appliance from the electricity supply and
shut off the water tap.
Leave the door of the appliance ajar.
When you return, run a wash cycle when the dishwasher is
empty.
10
* Only available in selected models.
Page 11

Precautions, advice
and Assistance
This appliance was designed and manufactured in
compliance with current international safety standards. The
following information has been provided for safety reasons
and should therefore be read carefully.
General safety
The appliance was designed for domestic use inside the
home and is not intended for commercial or industrial use.
The appliance must be used by adults only, to wash
domestic crockery in accordance with the instructions in
this manual.
The appliance must not be installed outdoors, even in
covered areas. It is extremely dangerous to leave the
machine exposed to rain and storms.
Do not touch the appliance when barefoot.
When unplugging the appliance always pull the plug from
the mains socket, do not pull on the cable.
The water supply tap must be shut off and the plug should
be removed from the electrical socket before cleaning the
appliance or carrying out any maintenance work.
If the appliance breaks down, do not under any
circumstances touch the internal parts in an attempt to
perform the repair work yourself.
Never touch the heating element.
Do not lean or sit on the open door of the appliance: this
may cause the appliance to overturn.
The door should not be left open as it may create a
dangerous obstacle.
Keep detergent and rinse aid out of reach of children.
The packaging material should not be used as a toy.
Disposal
Disposal of packaging materials: observe local legislation
so that the packaging may be reused.
The European Directive 2002/96/EC relating to Waste
Electrical and Electronic Equipment (WEEE) states that
household appliances should not be disposed of using the
normal solid urban waste cycle. Exhausted appliances
should be collected separately in order to optimise the cost
of re-using and recycling the materials inside the machine,
while preventing potential damage to the atmosphere and
to public health. The crossed-out dustbin is marked on all
products to remind the owner of their obligations regarding
separated waste collection.
Select a wash cycle which is suited to the type of crockery
and to the soil level of the crockery using the Table of wash
cycles:
- For dishes with a normal soil level, use the Eco wash
cycle, which guarantees low energy and water
consumption levels.
- If the load is smaller than usual activate the Half load
option
* (see Start-up and use).
If your electricity supply contract gives details of electricity
saving time bands, run wash cycles during the periods
when a lower tariff is applied. The Delayed start
(see Start-up and use) helps you organise the wash cycles
accordingly.
* button
Phosphate-free and chlorine-free detergents
containing enzymes
We strongly recommend that you use detergents that do
not contain phosphates or chlorine, as these products are
harmful to the environment.
Enzymes provide a particularly effective action at
temperatures around 50°C, and as a result detergents
containing enzymes can be used in conjunction with lowtemperature wash cycles in order to achieve the same
results as a normal 65°C wash cycle.
To avoid wasting detergent, use the product in appropriate
quantities based on the manufacturers recommendations,
the hardness of the water and the soil level and quantity of
crockery to be washed. Even if they are biodegradable,
detergents contain substances which may alter the balance
of nature.
Assistance
Before contacting Assistance:
Check whether the problem can be resolved using
the Troubleshooting guide (see Troubleshooting).
Restart the programme to check whether the problem
has ceased to exist.
If the problem persists, contact the Authorised
Technical Assistance Service.
EN
For further information relating to the correct disposal of
household appliances, owners may contact the relevant
public authority or the local appliance dealer.
Saving energy and respecting the
environment
Saving water and energy
Only begin a wash cycle when the dishwasher is full. While
waiting for the dishwasher to be filled, prevent unpleasant
odours using the Soak cycle (see Wash cycles).
Never use the services of unauthorised technicians.
Please have the following information to hand:
The type of malfunction.
The appliance model (Mod.).
The serial number (S/N).
This information can be found on the appliance data
plate (see Description of the appliance).
* Only available in selected models.
11
Page 12

Troubleshooting
Whenever the appliance fails to work, check for a solution from the following list before calling for
EN
Assistance.
Problem: Possible causes / Solutions:
The dishwasher does not start.
No water drains out from the
dishwasher.
The dishwasher makes
excessive noise.
The dishes and glasses are
covered in a white film or
limescale deposits.
The dishes and glasses are
streaked or have a bluish tinge.
• The plug has not been inserted into the electrical socket properly,
or there is no power in the house.
• The dishwasher door has not been shut properly.
• A delayed start has been programmed (see Start-up and use).
• The dishwasher cycle has not yet finished.
• The water inlet hose is bent (see Installation).
• The drain duct is blocked.
• The filter is clogged up with food residues.
• The dishes are rattling against each other or against the sprayer
arms.
• An excessive amount of foam has been produced: the detergent has
not been measured out correctly or it is not suitable for use in
dishwashers (see Start-up and use).
• The level of the refined salt is low or the dosage setting is not
suited to the hardness of the water (see Rinse aid and salt).
• The lid on the salt dispenser is not closed properly.
• The rinse aid has been used up or the dosage is too low.
• The crockery is made from non-stick material.
• The rinse aid dosage is too high.
The crockery has not been
dried properly.
The dishes are not clean.
The dishwasher does not take
any water in/Tap shut-off alarm
(the Salt, Rinse Aid, Drying and
End indicator lights flash).
Water loading solenoid valve
malfunction alarm
(the Salt, Rinse Aid and Drying
indicator lights flashes).
• A wash cycle without a drying programme has been selected.
• The rinse aid has been used up or the dosage is too low (see Rinse
aid and salt).
• The rinse aid dispenser setting is not high enough.
• The racks are overloaded (see Loading the racks).
• The crockery has not been arranged well.
• The sprayer arms cannot move freely.
• The wash cycle is too gentle (see Wash cycles).
• An excessive amount of foam has been produced: the detergent has
not been measured out correctly or it is not suitable for use in
dishwashers (see Start-up and use).
• The lid on the rinse aid compartment has not been shut correctly.
• The filter is dirty or blocked (see Care and maintenance).
• The refined salt level is low (see Rinse aid and salt).
• There is no water in the m ains supply.
• The water inlet hose is bent (see Installation).
• Turn on the tap and the appliance will start after a few minutes.
• The appliance is locked because no action was taken when the
Salt and Rinse Aid indicator lights were flashing. Switch off the
machine using the ON/OFF button, turn on the tap and switch the
machine back on after 20 seconds by pressing the same button. Reprogramme the machine and restart the wash cycle.
• Switch off the appliance by pressing the ON/OFF button and switch
it back on after a minute. If the alarm continues, shut off the water
tap to eliminate the risk of flooding, remove the plug from the
electrical socket and contact Assistance.
Water inlet hose alarm/Water
inlet filter blocked.
Rinse Aid, Washing, Drying and
End indicator lights flashes).
(the Salt,
12
• Switch off the appliance by pressing the ON/OFF button. Shut off
the water tap to eliminate the risk of flooding and remove the plug
from the electrical socket.
Make sure the water inlet filter has not become blocked by various
impurities. (see “ Care and maintenance” chapter).
Page 13

Bruksanvisning
OPPVASKMASKIN
NO
Norsk, 13
LKF 720
Innholdsfortegnelse
Installasjon, 14-15
Plassering og nivellering
Hydraulisk og elektrisk tilkobling
Advarsler for første gangs vask
Tekniske data
Beskrivelse av apparatet, 16
Oversikt
Betjeningspanel
Laste kurvene, 17
Underkurv
Bestikkurv
Overkurv
Start og bruk, 18-19
Starte oppvaskmaskinen
Ha i oppvaskmiddel
Vaskealternativer
Programmer, 20
Tabell over programmene
Glansmiddel og mykgjøringsmiddel, 21
Ha i glansmiddelet
Ha i saltet
Vedlikehold og ettersyn, 22
Kople fra vann- og strømtilførselen
Rengjøre oppvaskmaskinen
Unngå dårlig lukt
Rengjøre spylearmene
Rengjøring av filter for vanninntak
Rengjøre filtrene
Hvis du reiser bort
Forholdsregler, råd og assistanse, 23
Generell sikkerhet
Avhending
Spare og verne miljøet
Før du kontakter service
Feil og løsninger, 24
Page 14
Installasjon
NO
Det er viktig å ta godt vare på håndboken for å ha
den klar for senere behov. Ved eventuelt salg,
overdragelse eller flytting, må man forsikre seg om at
håndboken følger med maskinen.
Lese anvisningene nøye: Det finnes viktige
opplysninger om installasjon, bruk og sikkerhet.
I tilfelle flytting holde maskinen i loddrett posisjon.
Skulle det være nødvendig, bøye den bakover.
Plassering og nivellering
1. Ta av emballasjen og kontrollere at maskinen ikke har
blitt påført skader under transporten.
Hvis den er skadet, må den ikke tilkoples, men ta kontakt
med forhandleren.
2. Plassere oppvaskmaskinen og sett sidene eller
baksiden inntil møblene ved siden av eller inntil veggen.
Oppvaskmaskinen kan også bygges inn under en hel
arbeidsbenk
3. Plassere vaskemaskinen på et flatt og hardt gulv. Rett
opp eventuelle uregelmessigheter ved å skru føttene ut
eller inn helt til maskinen står helt vannrett. En nøyaktig
nivellering gjør at maskinen står stødig og forhindrer
vibrasjoner, støy og flyttinger.
4
*. For å justere høyden til den bakre støttefoten, bruke
den røde sekskantede bøssingskruen som finnes på den
nedre delen foran midt på oppvaskmaskinen, med en
unbrakonøkkel med munning med åpning på 8 mm. Vri
med urviseren for å øke høyden og mot urviseren for å
minske den. (se arket med innbyggingsanvisninger som
er vedlagt dokumentasjonen)
* (se Monteringsarket).
Tilkobling av slangen for vanntilførsel
Til et kaldtvannsuttak: Skru inntaksrøret godt til en kran
med gjenget munning på 3/4 gass. Før det skrus til, la
vannet renne til det kommer klart ut, slik at eventuelle
urenheter ikke tetter til oppvaskmaskinen.
Til et varmtvannsuttak: Hvis du er tilkoplet et
sentralisert varmeanlegg kan oppvaskmaskinen kan
forsynes med varmt vann såfremt temperaturen ikke
overstiger 60° C.
Koble røret til kranen som beskrevet for
kaldtvannsuttaket.
Dersom lengden på vanninntaksrøret ikke er
tilstrekkelig, må du henvende deg til en
spesialforhandler, eller en autorisert fagperson (se
Assistanse).
Vanntrykket må befinne seg mellom de ytterverdiene
angitt i tabellen over Tekniske data (se ved siden av).
Vær forsiktig så slangen ikke blir bøyd eller klemt.
Vern mot oversvømmelse
Hydraulisk og elektrisk tilkobling
Tilpasningen av det elektriske og det hydrauliske
anlegget for installasjonen må bare utføres av kyndig
personale.
Oppvaskmaskinen må ikke hvile på rørene eller på
den strømførende kabelen.
Apparatet må kobles til vannforsyningsnettet ved
hjelp av nye rør.
Ikke bruke gamle rør på nytt.
Inntaksrørene (A) og utløpsrørene (B) samt den
strømførende kabelen kan dreies til høyre eller venstre
for en bedre installasjon (se figur).
For å verne mot oversvømmelser, er oppvaskmaskinen:
- utstyrt med et system som avbryter inntaket av vann i
tilfelle feil eller lekkasjer fra maskinens indre.
Noen modeller er utstyrt med en ekstra
sikkerhetsanordning New Acqua Stop
oversvømmelse også i tilfelle inntaksslangen går i
stykker.
*, som verner mot
ADVARSEL! FARLIG SPENNING!
Vannets inntaksslange må i alle tilfeller ikke kuttes da den
inneholder deler under spenning.
* Finnes bare på enkelte modeller.
14
Page 15

Tilkobling av slangen for vannutløp
Kople utløpsslangen til et avløpsrør med en minimal
diameter på 4 cm, uten å bøye den. Eller legge den over
kanten til vasken eller badekaret. Enden av
utløpsslangen må ikke ligge under vann.
Den spesielle albuen
A
plast gjør det enklere å sette
alt riktig på plass: Albuen må
festes skikkelig til veggen for
å unngå at slangen beveger
seg og tømmer vannet
utenfor utløpet.
Delen av slangen som er
merket med bokstaven A må
ligge på en høyde mellom
40 og 100 cm fra gulvet (se figuren).
Det anbefales ikke å bruke skjøteslanger.
* i
Elektrisk tilkopling
Før man fører inn støpslet i veggkontakten, må man
forsikre seg om at:
at stikkontakten er jordet og i samsvar med gjeldende
lover.
at kontakten tåler det maksimale strømuttaket fra
apparatet, som angitt på merkeskiltet som er plassert
på motdøren
(se kapittelet Beskrivelse av oppvaskmaskinen);
at matespenningen er innenfor verdiene som er angis
på merkeskiltet som er festet på motdøren;
at stikkontakten passer til apparatets støpsel. I motsatt
tilfelle be om at en godkjent tekniker skifter ut
støpselet (se Assistanse). Ikke bruke skjøteledninger
eller forgreningskontakter.
Når apparatet er installert må el-ledningen og
stikkontakten være lett tilgjengelige.
Kabelen må ikke bøyes eller utsettes for trykk.
Dersom strømkabelen er ødelagt må denne byttes
ut av produsenten eller dennes servicesenter, slik at
enhver fare unngås. (se assistanse)
Stripe som forhindrer kondens*
Etter at oppvaskmaskinen er bygget inn, åpne døren og
lime fast den gjennomsiktige tapestripen under hyllen i
tre for å beskytte den mot eventuell kondens.
Advarsler for første gangs vask.
Etter installasjonen, rett før første vask, fylle salttanken
fullstendig med vann og helle i cirka 1 kg salt (se
kapittelet Glansmiddel og mykgjøringssalt): det er
normalt at vannet renner over. Velge vannets
hardhetsgrad (se kapittelet Glansmiddel og
mykgjøringssalt). Etter at saltet er fylt i vil varsellampen
MANGEL PÅ SALT
Manglende påfylling av saltbeholderen kan
forårsake skader på av vannmyknersystemet og på
varmeelementet.
Tekniske data
Mål
Kapasitet
Vanntrykk
Nettspenning
Total
opptatt kraft
Sikring
* slukkes.
Bredde cm 60
Høyde cm 85
Dybde cm 60
Standard dekketøy til 12
0,05 - 1MPa (0.5 - 10 bar)
4,3 psi – 145 psi
se merkeplaten
se merkeplaten
se merkeplaten
Dette apparatet er i samsvar
med følgende Direktiver fra
den Europeiske Union:
- 73/23/EØS av den 19.02.73
(Lavspenning) og etterfølgende
endringer.
- 89/336/EØS av den 03.05.89
(Elektromagnetisk kompatibilitet)
og etterfølgende endringer.
- 97/17/EØS (Merking).
- 2002/96/EØS
NO
Produsenten fraskriver seg ethvert ansvar dersom
disse forskriftene ikke overholdes.
* Finnes bare på enkelte modeller.
15
Page 16

Beskrivelse av
apparatet
NO
Oversikt
1. Overkurv
2. Øvre spylearm
3. Nedfellbare hyller
4. Regulator for høyde på kurven
5. Underkurv
6. Nedre spylearm
7. Bestikkurv
8. Vaskefilter
9. Salttank
10. Skuffer for vaskemiddel og glansmiddeltank
11. Merkeskilt
12. Betjeningspanel
***
Betjeningspanel
Varsellampe
Mangel på Salt*
Varsellampe
ON-OFF
Tast On-Off/
Reset
Varsellampe
Mangel på
glansmiddel*
BryterValg av
programmer
Tast og
varsellampe
for forsinket
igangsetting*
Tast og
varsellampe
Halv last*
Tast og varsellampe for
multifunksjonstabletter*
Varsellampe Slutt og
forsinket igangsetting 9 t.*
Varsellampe Tørking og
forsinket igangsetting 6 t.*
Varsellampe Vask og
forsinket igangsetting 3 t.*
Tast og
varsellampe for
Start/Pause
16
*** Bare på modeller med total innbygging
* Finnes bare på enkelte modeller.
Page 17
Laste kurvene
Før oppvasken lastes inn, fjerne matrester fra servise,
tømme glass og kopper for væsker.
Etter at oppvasken er lagt inn, kontrollere at spylearmene
roterer fritt.
Underkurv
I den nedre kurven kan du legge inn gryter, lokk, tallerkener,
salatboller, bestikk, osv.i henhold til Eksempler på innlasting.
Tallerkener og store lokk skal helst plasseres på kurvens
sider, uten at de hindrer roteringen av den øverste
spylearmen.
Noen modeller med oppvaskmaskiner er utstyrt merd
nedfellbare deler
plassere tallerkener eller i horisontal (nedfelt) stilling for å
plassere gryter og salatboller.
Bestikkurv
Bestikkurvens type kan variere i henhold til
oppvaskmaskinens modell. ikke fratagbar, fratagbar,
glidbar. Kurven som ikke er fratagbar skal plasseres kuni
den fremre del av den nedre kurven.
Kurven som er fratagbar kan deles inn i to deler, en velegnet
løsning når du vasker med halv last (på de modellene der
dette er mulig), og kan gli, det vil si at bestikkurven kan
plasseres hvor som helst i den nedre kurven ved å la den gli
mellom de faste eller de nedfellbare delene.
- Begge er utstyrt med nedfellbare rister som gjør at
bestikket kan settes inn bedre.
*. Disse kan brukes i vertikal posisjon for å
Justere høyden på overkurven
For å forenkle plasseringen av oppvasken kan overkurven
plasseres i høy eller lav stilling.
Det anbefales å justere høyden til den øvre kurven
med TOM KURV.
Kurven må ALDRI løftes eller senkes på kun én side.
Åpne sperrene til kurvens skinner til
høyre og til venstre og trekke ut kurven.
Plassere kurven i høy eller lav posisjon
og la den gli langs skinnene helt til også
hjulene fremme kommer på plass. Lukk
deretter sperrene (se figur).
Hvis kurven er utstyrt med håndtak Dual
Space
* (se figuren), trekk ut den øvre
kurven til den stopper, ta tak i håndtakene
på siden og bevege opp- eller nedover; la
kurven gli ned igjen idet du ikke slipper tak
i den.
Eksempler på innlasting av overkurven
Eksempler på innlasting av underkurven
NO
Kniver og redskaper med spisse kanter må settes inn i
bestikkurven slik at spissene er vendt nedover eller plassert
i liggende stilling oppe i den øvre kurven.
Eksempler på plassering av bestikkurven
Overkurv
Plassere sart og lett servise: glass, te- og kaffekopper, tefat,
lave salatboller, stekepanner, lave gryter og panner som er
lite skitne, i henhold til Eksempler på innlasting.
krus og små kopper: Plassere dem på de nedfellbare
ristene
**.
lange og spisse kniver, arbeidsbestikk: Plassere dem på
de nedfellbare ristene
**.
Servise som ikke passer til vask i oppvaskmaskin
Gjenstander i tre, med skaft i tre eller horn, eller med pålimte
deler.
Gjenstander i aluminium, kobber, messing, tinn.
Plastservise som ikke tåler varme.
Antikt eller håndmalt porselen.
Antikt sølv. Ikke antikt sølv kan derimot vaskes med et mildt
program såfremt man passer på at det ikke kommer i
kontakt med andre metaller.
Det anbefales å kjøpe servise som passer til vask
oppvaskmaskin.
* Finnes bare på enkelte modeller.
** Kan variere i antall og plassering.
17
Page 18
Igangsetting og bruk
NO
Starte oppvaskmaskinen
1. Åpne vannkranen.
2. Trykk på tasten ON-OFF: alle varsellampene på
betjeningspanelet tennesi noen sekunder.
3. Åpne døren og ha i riktig mengde oppvaskmiddel (se
nedenfor).
4. Last inn oppvasken i kurvene (se Hvordan laste inn i
kurvene) og lukk døren.
5. Velg programmet ved å vri knotten for VALG AV
PROGRAM med urviseren: la knottens hakk samsvare
med nummeret eller symbolet til programmet.
Varsellampen knyttet til tasten START/PAUSE vil blinke.
6. Velge vaskefunksjoner * (se på siden).
7. Sett i gang ved å trykke på tasten START,
varsellampen slutter å blinke og lyser fast. Tenningen av
varsellampen for vasking gir beskjed om at programmet
har startet.
8. Når programmet er ferdig tennes varsellampen SLUTT
(fast lys). Slå av maskinen ved å trykke på tasten ON/
OFF, steng av vannkranen og trekk støpselet ut av
stikkontakten.
9. Vente i noen minutter før du tar ut oppvasken, slik at
du ikke brenner deg. Ta ut oppvasken fra kurvene, start
med å tømme den nedre kurven.
Endre et vaskeprogram som er i gang
Hvis du har valgt feil program er det mulig å endre det,
dersom det nettopp har startet: når oppvaskmaskinen
går, for å endre vaskesyklus, må oppvaskmaskinen slås
av ved å holde tasten ON/OFF/Reset inne en god stund.
Slå så maskinen på igjen ved hjelp av den samme tasten
og velg program på nytt samt ønskede valgmuligheter.
Legg inn mer dekketøy.
Trykk på tasten Start/Pause (tastens lys blinker), åpne
døren, vær varsom da damp kommer ut og legg inn
oppvasken. Trykk på tasten Start/ Pause (fast lys):
Syklusen starter igjen.
Ved å trykke på tasten Start/Pause for å stanse
maskinen for en pause, avbrytes både programmet og
Forsinket start hvis denne er lagt inn.
Under denne fasen er det ikke mulig å endre
programmet.
Ufrivillige avbrudd
Hvis døren åpnes under vask eller et strømbrudd
oppstår, vil programmet stanse. Det gjenopptas fra det
punktet det ble avbrutt nås døren lukkes igjen eller
strømmen kommer tilbake.
Ha i oppvaskmiddel
Et godt vaskeresultat avhenger også av en riktig
dosering av oppvaskmiddelet. Å ha i for mye er ikke
ensbetydende med et godt resultat, derimot
forurenses miljøet.
Bruk bare oppvaskmiddel for oppvaskmaskiner.
IKKE BRUK oppvaskmiddel beregnet på oppvask
for hånd.
Bruk av for mye oppvaskmiddel kan etterlate seg
skumrester etter endt syklus.
Bruk av tabletter anbefales bare for de
modellene der valget FLERFUNKSJONSTABLETTER
finnes.
De beste resultatene for vasking og tørking
oppnås bare med bruk av oppvaskmiddel i pulver,
flytende glansmiddel og salt.
skuff A: Oppvaskmiddel
skuff B: Vaskemiddel for forvask
D
A
B
C
programmet krever 1, ha den i vaskemiddelskuffen A
og lukk igjen lokket; når det krever 2, legg den andre
på bunnen av skuffen.
3. Fjern restene av vaskemiddel fra skuffens kanter og
lukk lokket til det knepper.
1. Åpne lokket C ved å trykke på
knappen D.
2. Mål opp oppvaskmiddelet ved
hjelp av Programtabellen:
i pulver: oppvaskmiddelskuffer A
og B.
tabletter: det vil si når
Vaskealternativer*
ALTERNATIVENE kan stilles inn, endres eller
nullstilles bare etter at vaskeprogrammet er valgt og
før tasten for Start/Pause er trykket inn.
Bare de valgmulighetene som er i samsvar med typen
valgt program, kan velges. Hvis et valg ikke er i
samsvar med valgt program, (se programtabell) vil den
respektive lysemitterende dioden blinke hurtig 3
ganger.
Hvis det utføres et valg som ikke er forenlig med et
valg eller et vaskeprogram som allerede er lagt inn, vil
det førstnevnte valget, som altså ikke er i samsvar,
blinke 3 ganger og slukkes, mens sist valgte innstilling
forblir tent.
18
Trykk på den respektive tasten igjen for å slette et valg
som er lagt inn ved en feil.
* Finnes bare på enkelte modeller.
Page 19

Halv last*
Hvis oppvasken ikke er stor, er det mulig å bruke halv
oppvask og dermed spare vann, energi og
oppvaskmiddel. Velg programmet, trykk på tasten HALV
LAST: varsellampen tennes.
Ikke glem å bruke halv mengde vaskemiddel.
Det anbefales å bruke vaskemiddel i pulverform.
Denne valgmuligheten er ikke tilgjengelig med
programmet: Speed.
Flerfunksjonstabletter*
NO
Med dette valget oppnår man det beste vaske- og
tørkeresultatet..
Når flerfunksjonstablettene brukes, trykker du på tasten
FLERFUNKSJONSTABLETTER. Den respektive
varsellampen tennes. Valget Flerfunksjonstabletter
medfører at programmet forlenges.
Valget FLERFUNKSJONSTABLETTER forblir valgt
ved påfølgende påslåinger av maskinen hvis det ikke
velges bort.
Forsinket igangsetting*
Det er mulig å utsette starten av programmet med 3, 6,
eller 9 timer:
1: Etter å ha valgt ønsket oppvaskprogram og eventuelle
andre valg, trykk på tasten FORSINKET START.
varsellampen tennes.
2: Velg ønsket igangsetting ved å trykke i rekkefølge
på tasten for Forsinket start. Varsellampene for vask (3
timer), tørking (6 timer) og slutt (9 timer) vil tennes i
rekkefølge.
Med et ytterligere trykk på tasten for Forsinket start
kobles valget ut og varsellampen slukker seg.
3. Ved utført valg, idet tasten Start/Pause trykkes på, vil
nedtellingen begynne, valgt forsinkelse vil blinke og
tasten Start/Pause slutter å blinke (fast lys).
3. Ved endt tid vil varsellampen for FORSINKET START
slukkes, og programmet starter.
Det er ikke mulig å stille inn Forsinket start når
syklusen er satt i gang.
Bruk av tabletter anbefales bare for de modellene
der valget FLERFUNKSJONSTABLETTER finnes.
Dette valget frarådes med de programmene som
ikke forutser bruk av flerfunksjonstabletter (se
tabellen med valgmuligheter).
Tabell over Valg
Intensivt
Normalt
Daily A 60 / Daglig
Bløtlegging
Eco
Speed 25’
Krystallglass
Forsinket
igangsetting
A
JA
JA
JA
JA
JA
JA
JA
B
Halv
last
JA
JA
JA
JA
JA
NEI
JA
Flerfunksjons
C
tabletter
JA
JA
JA
NEI
JA
JA
JA
* Finnes bare på enkelte modeller.
19
Page 20

Programmer
NO
Hvis det som skal vaskes opp er lite skittent eller har blitt skylt i vann først, redusere mengden oppvaskmiddel
vesentlig.
Antallet og typen programmer og valgmuligheter varierer på grunnlag av modellen oppvaskmaskin.
For VALGENE se Valgtabellen som finnes på siden for Start og bruk.
Anvisninger for
valg av
vaskeprogrammene
Veldig skittent servise og
panner (skal ikke brukes
til ømtålelige
gjenstander).
Normalt skittent servise
og panner. Daglig
standardprogram.
Daglig skittent dekketøy i
begrenset mengde.
(4 dekkeplasser + 1
kasserolle + 1
stekepanne).
Innledende vask mens du
venter på å fylle
maskinen etter neste
måltid.
Økologisk vaskeprogram
med lavt strømforbruk.
Egnet for servise og
panner.
Hurtig og økonomisk
vaskeprogram som skal
brukes til lite skittent
servise, rett etter bruk. (2
tallerkener + 2 glass + 4
bestikk + 1 kasserolle + 1
liten stekepanne)
Hurtig og økonomisk
vaskeprogram som skal
brukes til gjenstander
som ikke tåler høye
temperaturer, rett etter
bruk. (12 glass med
stetter + skjøre asjetter).
Program
Intensivt
Normalt
Daily A 60
Bløtlegging
*
Eco
Krystallglass
Vaskemiddel
(A) = vaskemiddelskuff A
(B) = vaskemiddelskuff B
Pulver Flytende Tabletter
30 g (A)
25 g (A)
5 g (B)
25 g (A) 25 ml (A) 1 (A)
Nei
25 g (A)
5 g (B)
25 g (A) 25 ml (A) 1 (A)
30 g (A) 30 ml (A) 1 (A)
30 ml (A)
25 ml (A)
5 ml (B)
Nei
25 ml (A)
5 ml (B)
1 (A)
1 (A)
Nei
1 (A)
Program
som
bruker
tørking
Ja
Ja
Nei
Nei
Ja
Nei
Ja
Alternativer
A-B-C
A-B-C
A-B-C
A-B
A-B-C
A-C
A-B-C
Programmets
varighet
(toleranse
±10%)
timer min.
2:15’
1:45’
1:00’
0:08’
2:20’
0:25’
1:30’
Merknader:
De beste resultatene for vasking og tørking med programmene Daily A 60//Daglig og Hurtig/Speed oppnås helst ved å
overholde antallet dekkeplasser som angis.
* Programmet Eco overholder standarden EN-50242, varer lengre enn andre program, men er allikevel det programmet
med lavest energiforbruk og er i tillegg miljøvennlig.
Merknad for testlaboratorier: For opplysninger angående forholdene for sammenligningstesten EN, send
forespørsel til adressen: ASSISTENZA_EN_LVS@indesitcompany.com
For å forenkle doseringen av oppvaskmiddelet er det greit å vite at:
1 spiseskje = 15 gram pulver = 15 ml væske cirka. - 1 teskje = 5 gram pulver = 5 ml væske cirka.
20
Page 21

Glansmiddel og
mykgjøringsmiddel
Bruk bare spesifikke produkter for
oppvaskmaskiner.
Unngå å bruke matsalt eller oppvaskmiddel beregnet
på vask for hånd.
Følg anvisningene som gis på forpakningen.
Hvis du benytter et produkt med flere funksjoner er det
ikke nødvendig å tilføye glansmiddel, men vi anbefaler å
bruke salt, spesielt hvis vannet er hardt eller veldig
hardt. Følg anvisningene som gis på forpakningen.
Hvis verken salt eller glansmiddel helles på, er det
normalt at varsellampene MANGEL PÅ SALT* og
MANGEL PÅ GLANSMIDDEL* forblir tente.
Ha i glansmiddelet
Glansmiddelet forenkler tørkingen av oppvasken fordi det
gjør at vannet glir på overflaten, slik at det ikke blir striper
eller flekker.
Glansmiddelbeholderen skal fylles opp:
Når varsellampen MANGEL PÅ GLANSMIDDEL
tennes på styrepanelet*;
1. Åpne beholderen ved å vri
lokket (G) mot urviseren.
2. Når du fyller på med
glansmiddelet må du unngå
at det renner over. Skulle
F
dette skje, tørke opp med en
tørr klut med én gang.
G
3. Skru lokket på plass igjen.
Hell ALDRI glansmiddelet
direkte inn i skuffen.
Justere mengden glansmiddel
Hvis du ikke er fornøyd med resultatet av tørkingen er det
mulig å justere mengden glansmiddel. Bruke en skrutrekker
for å dreie på regulatoren (F) og velg mellom 6 innstillinger
(den er regulert fra fabrikken på 4):
hvis det finnes striper på oppvasken, drei mot de
lavere tallene (1-3).
Finnes det vanndråper eller kalkflekker drei mot de
høyere tallene (4-6).
Innstilling av vannets hardhetsgrad
Hver oppvaksmaskin er utstyrt med et vannmyknersystem, som
ved bruk av spesifikt mykgjøringsmiddel (salt) for
oppvaskmaskiner gir vann uten kalk for oppvask av dekketøyet.
Denne oppvaskmaskinen tillater en justering som reduserer
forurensing og forbedrer vaskeytelsene på grunnlag av vannets
hardhetsgrad. Du får tilgang til opplysninger gjeldende vannet
ved å kontakte det lokale vannverket.
- Slå av oppvaskmaskinen ved å trykke på tasten ON/OFF og
åpne døren.
- Plassere knotten VALG AV PROGRAM først på 5° program
og deretter i rekkefølge på 1° program og på nytt på 5°.
- Trykk på tasten ON/OFF, varsellampene for syklusfasene
blinker; det er nå mulig å velge vannets hardhetsgrad. Et nivå
av hardhetsgrad tilsvarer hvert program:
F.eks.: 1° program, hardhetsnivå 1
2° program, hardhetsnivå 2 osv..osv... til maksimalt fem
nivåer.
(Avkalkningsinnretningen er stilt inn på nivå 3 fra fabrikken).
- For å gå ut av funksjonen, vent cirka 30 sekunder eller slå av
maskinen ved hjelp av tasten ON/OFF.
Hvis det brukes flerfunksjonstabletter, fyll i alle fall opp
salttanken.
°dH °fH mmol/l Nivå
0 6 0 10 0 1 1
6 11 11 20 1.1 2 2
12 17 21 30 2.1 3 3
17 34 31 60 3.1 6 4
34 50 61 90 6.1 9
For verdier mellom 0°f og 10°f anbefaler vi ikke
bruk av salt.
* denne innstillingen kan føre til en lett økning
av varigheten på syklusen.
(°dH = hardhet uttrykt i tyske grader - °fH = hardhet uttrykt i
franske grader - mmol/l = millimol/liter)
Vannhardhetstabell
*
5
Ha i saltet
For å oppnå gode vaskeresultater er det nødvendig å
kontrollere at saltbeholderen aldri er tom. Saltet fjerner
kalken fra vannet, og unngår at den avleirer seg på
oppvasken.
Saltbeholderen befinner seg i oppvaskmaskinens nedre del
(se Beskrivelse) og skal fylles:
når den grønne flottøren * ikke er synlig når du ser på
saltlokket;
Når varsellampen MANGEL PÅ GLANSMIDDEL tennes
på styrepanelet
munningen. Skyll lokket under rennende vann før det skrus på
plass igjen. Sett det opp ned og la vannet renne ut fra de fire
sprekkene som er plassert på lokkets nedre del. (lokk med
grønn flottør
Det anbefales å utføre dette inngrepet hver gang det fylles
på med salt.
Lukk lokket godt, slik at det ikke kommer oppvaskmiddel inn i
beholderen under vask (det kan oppstå uopprettelige skader
på avkalkingsanordningen).
Når det skulle være nødvendig, fylle på med salt før en
vaskesyklus for å fjerne saltløsningen som har rent over fra
saltbeholderen.
*;
1. Trekk ut underkurven og skru av
beholderens lokk ved å dreie det mot
urviseren.
2. Bare for første gangs bruk: Fyll
beholderen med vann opp til kanten.
3. Plassere trakten* (se figur) og fylle
opp saltbeholderen til kanten (cirka 1
kg). Det er normalt at litt vann renner ut.
4. Ta ut trakten* og fjern saltrester fra
*)
* Finnes bare på enkelte modeller.
NO
*
21
Page 22

Vedlikehold og
ivaretakelse
Koble fra vann og strøm
NO
Skru igjen vannkranen etter hver vask for å fjerne
faren for lekkasjer.
Trekk ut støpselet fra stikkontakten når du rengjør
maskinen, og under vedlikeholdsarbeid.
Rengjøre oppvaskmaskinen
Den ytre overflaten og kontrollpanelet kan rengjøres
med en klut som ikke lager riper og som er fuktet med
vann. Ikke bruk løsemidler
eller slipemidler.
Det indre karet kan rengjøres for eventuelle flekker
ned en klut fuktet med vann og litt eddik.
Unngå dårlig lukt
La alltid døren stå litt åpen for å unngå at fuktighet
samler seg.
Rengjøre pakningene til døren og
oppvaskmiddelskuffene regelmessig med en fuktig
svamp. På denne måten unngår du at det samler
seg opp matrester, som er hovedårsaken til dårlig
lukt.
Rengjøre spylearmene
Det kan hende at noen matrester fester seg til
spylearmene og stopper til hullene der vannet renner ut:
Det lønner seg å kontrollere dem en gang iblant og
rengjøre dem med en ikke-metallisk børste.
De to spylearmene kan begge demonteres.
Rengjøre regelmessig filteret for vanninntak som er plassert
ved kranens utgang.
- Lukk igjen vannkranen.
- Skru løs enden av slangen for vanninntak, ta bort filteret
og rengjør det forsiktig under rennende vann.
- Sett inn filteret på nytt og skru slangen fast.
Rengjøre filtrene
Filterenheten består av tre filtre som renser vaskevannet for
matrester og gjenvinner det: For å oppnå gode
vaskeresultater, er det nødvendig å rengjøre filtrene.
Rengjøre filtrene regelmessig.
Oppvaskmaskinen må ikke brukes uten filtre eller med
løsnet filter.
Etter noen vaskesykluser, kontrollere filterenheten og om
nødvendig, rengjøre den nøye under rennende vann. Bruk en
liten ikke-metallisk børste til dette og følg anvisningene
nedenfor:
1. Vri det sylindriske filteret C mot urviseren og trekk det ut
(fig. 1).
2. Trekk ut filterkoppen B ved å trykke lett på sidevingene
(Fig. 2);
3. Trekk ut filterplaten inox A. (fig. 3).
4. Inspisere sluket og fjern eventuelle matrester. FJERN
ALDRI FJERN ALDRI vaskepumpens beskyttelse (detalj i
svart farge) (fig.4).
For å demontere den øvre
spylearmen må den skrus løs
ved å dreie plastringen mot
urviseren. Den øvre
spylearmen skal monteres på
nytt med den delen med flest
hull vendende oppover.
Den nedre spylearmen
demonteres ved å trykke på
vingene som finnes på siden og
trekke den oppover.
Rengjøring av filter for vanninntak*
Hvis vannrørene er nye, eller ikke har vært i brukt på lang
tid, må du først la vanne renne og se at det er klart og rent før
tilkoplingen utføres. Uten denne forholdsregelen er det fare
at vanninnløpet tilstoppes og ødelegger oppvaskmaskinen.
C
B
C
1
2
A
3
Etter rengjøringen av filtrene må filterenheten monteres og
settes korrekt på plass igjen. Dette er grunnleggende for at
oppvaskmaskinen skal fungere bra.
4
Hvis du er borte en lengre periode
Koble fra strømmen og stenge vannkranen.
La døren stå litt på gløtt.
Når du kommer tilbake, la maskinen utføre en vaskesyklus
på tomgang.
22
* Finnes bare på enkelte modeller.
Page 23

Forholdsregler, råd og
assistanse
Apparatet er prosjektert og fremstilt i overensstemmelse
med internasjonale sikkerhetsstandarder. Disse advarslene
gis av sikkerhetsmessige årsaker og må leses nøye.
Generell sikkerhet
Dette apparatet er ment til hjemmebruk, ikke til
profesjonell bruk.
Apparatet må bare benyttes til vask av dekketøy i en
vanlig husholdning, det skal bare brukes av voksne, og
da i overensstemmelse med anvisningene i denne
håndboken.
Apparatet må ikke installeres utendørs, selv ikke dersom
området er beskyttet, fordi det er veldig farlig å utsette
det for regn og uvær.
Unngå å ta på oppvaskmaskinen når du er barbeint.
Ikke trekk i kabelen for å trekke støpselet ut av
stikkontakten, men ta godt tak i støpselet.
Det er nødvendig å stenge av vannkranen og trekke
støpselet ut av stikkontakten før rengjøring og
vedlikehold utføres på maskinen.
Ved feil må du ikke røre de innvendige mekanismene for
å prøve å reparere.
Ta aldri på motstanden.
Ikke lene deg mot eller sett deg på den åpne døren:
maskinen kan velte.
Døren må ikke holdes i åpen stilling fordi det kan da
være fare for å snuble i den.
Oppbevar oppvaskmiddel og glansmiddel utilgjengelig
for barn.
Emballasjen er ikke leketøy for barn.
Avhending
Kassering av emballasjematerialet: Hold deg til lokale
forskrifter, slik at emballasjen kan brukes om igjen.
Det europeiske direktivet 2002/96/EØF om
Avfallsbehandling av elektrisk og elektronisk utstyr
(WEEE), foreskriver at hvitevarer ikke må avsettes
sammen med vanlig husholdningsavfall. Brukte
apparater må samles inn separat slik at gjenbruk og
gjenvinning av materialene de består av optimeres og for
å unngå mulige skader for helse og miljø. Symbolet med
avfallsdunk med kryss over er satt på alle produkter for
å minne om kravet om separat innsamling.
For ytterligere opplysninger om korrekt avfallsbehandling
av hvitevarer kan man henvende seg til det lokale
renholdsverket eller til forhandlerene.
Hvis din strømkontrakt forutser tider med strømsparing,
bruke oppvaskmaskinen når du betaler mindre. Valget
Forsinket igangsetting* (se Start og bruk) kan være til
hjelp med dette.
Oppvaskmidler uten fosfater, uten klor og med
enzymer
Det anbefales på det sterkeste å bruke oppvaskmidler
uten fosfater og uten klor som er de beste for å verne
miljøet.
Enzymene utvikler en spesielt effektiv vask ved
temperaturer nær 50°C, slik at det ved bruk av
vaskemidler med enzymer er mulig å sette opp vasking
ved lav temperatur og oppnå de samme resultatene som
du ville få ved 65°C.
Dosere oppvaskmiddelet riktig ut i fra produsentens
anvisninger, vannets hardhet, hvor skitten oppvasken er
og mengden oppvask for å unngå sløsing. Til tross for at
vaskemidlene er biologisk nedbrytbare inneholder de
stoffer som endrer naturens balanse.
Assistanse
Før du kontakter Teknisk assistanse:
Undersøke om du kan løse feilen selv (se Feil og
løsninger).
Start opp programmet på nytt for å se om problemet er
blitt løst.
I motsatt fall, ta kontakt med godkjent Teknisk
Assistanse.
Bruk aldri teknikere som ikke er godkjente.
Oppgi:
typen feil;
maskinmodell (Mod.);
serienummeret (S/N).
Disse opplysningene finner du på merkeskiltet som er
plassert på selve apparatet (se Beskrivelse av
apparatet).
NO
Spare og beskytte miljøet
Spare vann og energi
Sett oppvaskmaskinen bare i gang når den er fullastet. I
påvente av at oppvaskmaskinen fylles opp, unngå dårlig
lukt ved hjelp av syklusen Bløtlegging (se Programmer).
Velg et program som passer til typen dekketøy som skal
vaskes opp og graden med smuss ved hjelp av
Programtabellen:
- For normalt skitten oppvask bruk programmet Eco,
som sikrer lavt strøm- og vannforbruk.
- Hvis oppvasken er liten, koble inn funksjonen Halv last*
(se Igangsetting og bruk).
* Finnes bare på enkelte modeller.
23
Page 24

Feil og løsninger
Skulle det oppstå problemer under bruk, kontrollere følgende punkter før du tar kontakt med Teknisk Assistanse.
NO
Feil: Mulige årsaker/løsning:
Oppvaskmaskinen starter ikke.
Oppvaskmaskinen tømmer ikke ut
vannet.
Oppvaskmaskinen bråker.
Det finnes kalkavsetninger eller et
hvitt belegg på serviset og på
glassene.
Det finnes striper eller blålig skjær
på serviset og på glassene.
Serviset er ikke tørt.
Serviset er ikke rent.
Oppvaskmaskinen tar ikke inn
vann/Alarm for lukket kran.
(varsellysene for Salt, Glansmiddel,
Tørking og Slutt blinker).
Alarm for feil i magnetventil.
av slangen for vanninntak
(varsellysene for Salt, Glansmiddel og
Tørking blinker).
Alarm for slangen for vanninntak/
Tett filter for inntak av vann.
(varsellysene for Salt, Glansmiddel,
Vask, Tørking og Slutt blinker).
• Støpselet er ikke ordentlig satt inn i stikkontakten eller
strømtilførselen i huset er brutt.
• Oppvaskmaskinens dør er ikke ordentlig lukket.
• En forsinket syklus er satt i gang (se Start og bruk).
• Programmet er ikke ferdig ennå.
• Vannets tø mmerør er bøyd (se Installasjon).
• Vaskens avløp er tett.
• Filteret er tilstoppet av matrester.
• Oppvasken slår mot hverandre eller mot spylearmene.
• For mye skum: Vaskemiddelet er ikke riktig dosert eller det
passer ikke til bruk i oppvaskmaskin (se Start og bruk).
• Mykgjøringssalt mangler eller justeringen er ikke tilpasset
vannerts hardhet (se Glansmiddel og salt).
• Saltbeholderens lokk er ikke skrudd skikkelig til.
• Glansmiddelet er oppbrukt eller doseringen er utilstrekkelig,
• Oppvasken er i materiale som forhindrer klebing.
• Det brukes for mye glansmiddel.
• Du har valgt et program uten tørking.
• Glansmiddelet er oppbrukt eller doseringen er utilstrekkelig (se
Glansmiddel og salt).
• Justeringen av glansmiddelet er utilstrekkelig.
• Det er lastet for mye oppvask inn i kurvene (se Hvordan laste inn
i kurvene).
• Oppvasken er ikke plassert rett.
• Spylearmene kan ikke rotere fritt.
• Vaskeprogrammet er altfor skånsomt (se Programmer).
• For mye skum: Vaskemiddelet er ikke riktig dosert eller det
passer ikke til bruk i oppvaskmaskin (se Start og bruk).
• Glansmiddelets lokk er ikke skrudd korrekt til.
• Filteret er skittent eller tett (se Vedlikehold og ettersyn).
• Mykgjøringssaltet mangler (se Glansmiddel og salt).
• Det mangler vann i vannettet.
• Vannets innførselsrør er bøyd (se Installasjon).
• Åpne kranen, og etter noen få minutter vil maskinen starte opp
igjen.
• Maskinen har stanset fordi du ikke grep inn idet varsellampene
for Salt og Glansmiddel blinket. Slå av maskinen med tasten
ON/OFF, åpne kranen og etter 20 sekunder slå på maskinen
igjen ved å trykke på den samme tasten. Omprogrammere
maskinen og start den på nytt.
• Slå av ved å trykke på tasten ON/OFF og slå på maskinen igjen
etter et minutt. Hvis alarmen fortsetter, må du først av alt lukke
vannkranen for å unngå oversvømmelse og deretter trekke ut
stikkontakten og ringe etter Teknisk Assistanse.
• Slå av oppvaskmaskinen ved å trykke på tasten ON/OFF. Lukk
igjen vannkranen for å unngå oversvømmelse og trekk ut
støpselet fra stikkontakten.
Kontrollere at filteret for vanninntak ikke er tettet til av
urenheter. (se kapittelet ”Vedlikehold og ettersyn”).
24
Page 25

Bruksanvisning
DISKMASKIN
SE
Svenska, 25
LKF 720
Innehållsförteckning
Installation, 26-27
Placering och nivellering
Anslutningar av vatten och el
Föreskrifter för den första diskningen
Tekniska data
Beskrivning av apparaten 28
Översiktsvy
Manöverpanel
Fyll korgarna 29
Nedre korg
Bestickkorg
Övre korg
Start och användning 30-31
Starta diskmaskinen
Påfyllning av diskmedel
Disktillval
Program 32
Programtabell
Sköljmedel och härdningssalt 33
Påfyllning av sköljmedel
Påfyllning av härdningssalt
Underhåll och skötsel 34
Avstängning av vatten och el
Rengöring av diskmaskinen
Undvik dålig lukt
Rengöring av spolarmarna
Rengöring av vatteninsläppsfiltret
Rengöring av filtren
När du reser bort under längre perioder
Föreskrifter, råd och service 35
Säkerhet i allmänhet
Kassering
Spara energi och respektera miljön
Service
Fel och åtgärder 36
Page 26

Installation
5-
Det är viktigt att förvara denna bruksanvisning så att
den alltid finns till hands. I händelse av försäljning,
överlåtelse eller flytt, ska du försäkra dig om att
bruksanvisningen följer med utrustningen.
Läs noggrant anvisningarna: Där finns viktig
information om installation, användning och säkerhet.
Vid flytt är det bäst om maskinen kan hållas i vertikalt
läge. Om det är nödvändigt kan maskinen lutas ned på
baksidan.
Placering och nivellering
1. Packa upp diskmaskinen och kontrollera att den inte
har skadats under transporten.
Om den skulle finnas skador ska du inte ansluta den
utan kontakta återförsäljaren.
2. Placera diskmaskinen så att dess sidor och bakstycke
står sida vid sida med intillstående möbler eller väggen.
Diskmaskinen kan även byggas in under en hel
arbetsbänk
3. Placera diskmaskinen på ett plant och styvt plan.
Utjämna ojämnheter genom att skruva på justerfötterna
tills maskinen är horisontell. En ordentligt utförd
nivellering ger stabilitet och hindrar uppkomsten av
vibrationer, buller samt att maskinen flyttar sig.
4*. Justera höjden för den bakre stödfoten genom att skruva
på den sexkantiga röda bussningen som sitter nedtill på
framsidan i mitten av diskmaskinen. Använd en 8 mm nyckel.
Vrid medurs för att höja och moturs för att sänka stödfoten.
(se instruktionsbladet som följer med dokumentationen)
* (se monteringsbladet).
Anslutning av vatteninloppsslangen
Till ett kallvattenuttag: Skruva fast
vatteninloppsslangen med gasgänga 3/4. Innan
slangen skruvas fast ska vattnet rinna ut tills det är
klart, så att inga orenheter sätter igen diskmaskinen.
Till ett varmvattenuttag: Diskmaskinen kan anslutas till
varmvattenledningsvatten (om du har ett centraliserat
system med värmeelement) som inte överskrider en
temperatur på 60 °C.
Skruva fast slangen till kranen som beskrivs för
kallvattenuttaget.
Om längden på inloppsslangen inte är tillräcklig ska
du vända dig till fackhandeln eller en auktoriserad
tekniker (se Kundservice).
Vattentrycket ska ligga mellan de värden som anges i
tabellen över Tekniska Data (se här intill).
Se till att slangen inte har några veck eller är
hopklämd.
Översvämningsskydd
Anslutningar av vatten och el
Anpassning av elektriska system och vattensystem
vid installationen ska endast utföras av kvalificerad
personal.
Diskmaskinen ska inte stå på rör eller nätkabeln.
Utrustningen ska anslutas till vattenledningsnätet med nya
rör.
Använd inte gamla rör.
Vatteninloppsslangen (A) och avloppsslangen (B) och
nätkabeln kan riktas åt höger eller vänster för att
underlätta installationen (se figur).
För att garantera att diskmaskinen inte svämmar över:
- Diskmaskinen är försedd med ett system som avbryter
vattentillförseln vid fel eller läckage inuti maskinen.
Vissa modeller är försedda med en extra
säkerhetsanordning New Acqua Stop
översvämningsskydd även om anslutningsslangen går
av.
*, som ger ett
OBSERVERA! FARLIG SPÄNNING!
Vatteninloppsslangen får inte under några förutsättningar
skäras av, eftersom den innehåller spänningssatta delar.
* Finns endast på vissa modeller.
26
Page 27

Anslutning av vatteninloppsslangen
Anslut avloppsslangen (utan att böja den) till ett
avloppsrör med en minimidiameter på 4 cm. I annat fall
kan avloppsslangen läggas i ett handfat eller ett badkar.
Avloppsslangens fria slangände får inte vara nedsänkt i
vatten.
Den speciella rörböjen
A
plast underlättar en korrekt
placering: Fäst rörböjen
ordentligt på väggen för att
undvika att slangen rör sig
och tömmer vattnet utanför
avloppet.
Den del av slangen som är
märkt med bokstaven A
måste befinna sig på en
höjd mellan 40 och 100 cm från marken (se figuren).
Det avrådes från att använda förlängningsslangar.
* av
Kondensskyddsremsa*
Efter att diskmaskinen har byggts in, öppna luckan och
klistra fast den självhäftande genomskinliga remsan
under hyllplan av trä för att skydda det mot kondens.
Föreskrifter för den första diskningen
Efter installationen, direkt före den första diskningen, fyll
saltbehållaren fullständigt med vatten och sedan cirka 1
kg salt (se Sköljmedel och härdningssalt): Det är normalt
att vattnet rinner över. Välj vattnets hårhetsgrad (se
avsnittet Sköljmedel och härdningssalt). Efter att saltet
har fyllts på släcks kontrollampan SALT SAKNAS
Om inte saltbehållaren fylls på kan vattenmjukgöraren
och värmeelementet skadas.
*.
5-
Elektrisk anslutning
Innan du sätter i kontakten i uttaget ska du försäkra dig
om att:
Vägguttaget är jordanslutet och i enlighet med
gällande standard.
Uttaget tål maskinens maxeffekt, som anges på
märkskylten som sitter på dörrens insida.
(se avsnittet Beskrivning av diskmaskinen).
Spänningstillförseln ligger inom de värden som anges
på typskylten på dörrens insida.
Vägguttaget är kompatibelt med apparatens
stickkontakt. I annat fall ska du låta en auktoriserad
tekniker byta ut stickkontakten (se Kundservice).
Använd inte förlängningssladdar och grenuttag.
Nätkabeln och nätuttaget ska vara lättåtkomliga när
utrustningen väl har installerats.
Sladden får inte böjas eller tryckas ihop.
Om matningskabeln är skadad ska den bytas ut av
tillverkaren eller av dess auktoriserade verkstad, för att
undvika alla typer av risker. (Se Kundservice)
Företaget avsäger sig allt ansvar om dessa föreskrifter
inte respekteras.
Tekniska data
Mått
Kapacitet
Vattentryck
Matningsspänning
Total absorberad
effekt
Säkring
Bredd cm 60
Höjd cm 85
Djup cm 60
12 standardkuvert
0,05 – 1 MPa (0,5 - 10 bar)
4,3 psi – 145 psi
Se märkskylten.
Se märkskylten.
Se märkskylten.
Denna apparat
överensstämmer med
följande EU direktiv:
-73/23/EEC utfärdat den
19/02/73 (Lågspänning) och
efterföljande modifieringar;
-89/336/EEC från 89-05-03
(Elektromagnetisk
kompatibilitet) och följande
ändringar.
-97/17/EC (Etikettering)
-2002/96/EC
* Finns endast på vissa modeller.
27
Page 28

Beskrivning av
maskinen
5-
Översiktsvy
1. Övre korg
2. övre spolarm
3. Klaffhyllor
4. Korg höjdjusterare
5. Nedre korg
6. Nedre spolarm
7. Bestickkorg
8. Diskfilter
9. Saltbehållare
10. Diskmedelsfack och sköljmedelsbehållare
11. Märkskylt
12. Kontrollpanel
***
Manöverpanel
Kontrollampa Salt
saknas
ON/OFFkontrollampa
Knapp On-Off/
Reset
*
Kontrollampa
Sköljmedel saknas
VredProgramval
kontrollampa Halv last
*
Knapp och
kontrollampa för
senarelagd start
Knapp och
*
Knapp och kontrollampa
för allt i ett-tabletter
Kontrollampa Slut och
senarelagd start 9 tim.*
Kontrollampa för torkning
*
*
och senarelagd start 6 tim.*
Kontrollampa för
Diskprogram och
senarelagd start 3 tim.*
Knapp och
kontrollampa
för Start/Paus
28
*** Endast på modeller för total inbyggnad
* Finns endast på vissa modeller.
Page 29

Fyll korgarna
Innan disken ställs i korgarna rekommenderas att ta bort
matrester och tömma glas och koppar på dess innehåll.
Kontrollera att spolarmarna roterar fritt efter att all disk
har ställts in.
Nedre korg
Den nedre korgen kan innehålla kastruller, lock, tallrikar,
salladsskålar, bestick o.s.v.enligt Lastningsexemplen.
Stora fat och lock ska placeras på korgens sidor på så sätt
att de inte hindrar den övre spolarmens rotation.
Vissa diskmaskinsmodeller har ställbara sektioner*. Dessa
kan användas i vertikalt läge för att placera tallrikar eller i
horisontellt läge för att placera kastruller och salladsskålar.
Bestickkorg
Bestickkorgen kan vara av olika typ beroende på
diskmaskinsmodell: ej isärtagbar, isärtagbar eller skjutbar.
Den ej isärtagbara bestickkorgen ska endast placeras i den
nedre korgens främre del.
Den isärtagbara bestickkorgen kan delas i två delar. Detta
rekommenderas vid diskning med halvlast (på modeller
försedda med detta tillval). Den kan dessutom placeras var
som helst i korgen genom att skjuta den mellan de fasta eller
vinklingsbara insatserna
- Båda delarna är försedda med skjutbara hyllor för en bättre
placering av besticken.
Reglera höjden för den övre korgen
För att underlätta placeringen av disken kan den övre
korgen placeras i högt eller lågt läge.
Det rekommenderas att justera den övre korgens
höjd med TOM KORG.
Korgen får ALDRIG lyftas upp eller sänkas ned på
endast en sida.
Öppna stoppen för den högra och
vänstra korgskenan och dra ut
korgen. Placera korgen i högt eller lågt
läge, skjut in den på skenorna så att
även de främre hjulen går in och stäng
stoppen (se figuren).
Om korgen är försedd med handtag av
typ Dual Space
den övre korgen så långt det går, ta
tag i handtagen på korgens sidor och
flytta den uppåt eller nedåt. Låt korgen
ramla ned utan att släppa greppet om
den.
* (se figuren). Dra ut
Lastningsexempel för övre korg
5-
Knivar och andra köksgeråd med vassa spetsar ska
sättas i bestickkorgen med spetsarna vända nedåt eller
läggas horisontellt på den övre korgens uppfällbara hylla.
Exempel på placering av bestickkorgen
övre korg
Lasta ömtålig och lätt disk i den övre korgen: Glas, tekoppar,
kaffekoppar, assietter, låga salladsskålar, stekpannor och
låga lättsmutsade kastruller Lastningsexempel.
Glas och koppar: Placera dem på de uppfällbara
hyllorna
Långa och vassa knivar, serveringsbestick: Placera dem
på de uppfällbara hyllorna
**.
**.
Lastningsexempel för nedre korg
Disk som inte är lämplig för diskning i
diskmaskin
Föremål av trä, med handtag av trä eller horn eller med
fastklistrade delar.
Föremål av aluminium, koppar, mässing eller tenn.
Köksgeråd av plast som inte är värmetåliga.
Antikt eller handmålat porslin.
Antikt silver. Silver som inte är antikt kan diskas med ett
skonsamt program och försäkra dig om att det inte
kommer i kontakt med annan metall.
Det rekommenderas att använda diskgods som är
lämplig för att diskas i diskmaskin.
* Finns endast på vissa modeller.
** Variabler för nummer och position.
29
Page 30

Start och användning
5-
Starta diskmaskinen
1. öppna vattenkranen.
2. Tryck på ON/OFF-knappen: Alla kontrollampor på
manöverpanelen tänds i några sekunder.
3. öppna luckan och dosera diskmedlet (se nedan).
4. Ställ in disken i korgarna (se Fyll korgarna) och stäng
luckan.
5. Välj program genom att vrida PROGRAMVALSVREDET
medurs: Vrid vredet så att hacket överensstämmer med
programmets nummer eller symbol. Kontrollampan för
knappen START/PAUS blinkar.
6. Välj disktillval* (se här intill).
7. Starta med knappen START. Kontrollampan slutar att
blinka och börjar lysa med fast sken. Kontrollampan för
diskningen tänds för att visa att programmet startar.
8. I slutet av programmet tänds kontrollampan SLUT (fast
sken). Stäng av maskinen med ON/OFF-knappen, stäng
vattenkranen och dra ur kontakten ur eluttaget.
9. Vänta några minuter innan disken tas ut för att undvika
att du bränner dig. Börja med att ta ut disken från den
nedre korgen.
öndra ett pågående program.
Om ett felaktigt program väljs kan det ändras, även om
det precis har börjat: För att ändra diskprogram efter
diskningen har startats, stäng av maskinen genom att
trycka ned knappen ON/OFF/Reset en längre stund.
Starta sedan diskmaskinen med samma knapp och välj
ett nytt program och önskade tillval.
Ställa in mera disk
Tryck på Start/Paus-knappen (lampans knapp blinkar)
och öppna luckan. Se upp med ångan som kommer ut
och ställ sedan in disken. Tryck på Start/Paus-knappen
(fast sken): Programmet återupptas.
Genom att trycka ned Start/Paus-knappen ställs
maskinen i pausläge och både diskprogrammet och den
senarelagda starten avbryts.
I detta läge går det inte att ändra program.
Avbrott av misstag
Programmet avbryts vid ett strömavbrott eller om luckan
öppnas under diskningen. Programmet återupptas vid
den punkt där det avbrutits, när strömmen återkommer
eller när luckan stängs.
Påfyllning av diskmedel
Ett gott tvättresultat beror även på att tvättmedlet
doseras korrekt. En överdriven dosering innebär inte att
disken blir renare och miljön förorenas.
Använd endast diskmedel som är avsett för
maskindisk.
ANVöND INTE diskmedel för handdisk.
Om för mycket diskmedel används kan skumrester
bli kvar i slutet av programmet.
Det rekommenderas att endast använda tabletter på
modeller som har tillvalet ALLT I ETT-TABLETTER.
Bästa disk- och torkningstresultat erhålls endast om
pulverdiskmedel, flytande sköljmedel och salt används.
Fack A: Diskmedel
Fack B: Diskmedel för fördisk
1. öppna locket C genom att trycka
på knappen D.
2. Dosera diskmedlet, se
Programtabell:
Pulver: Fack A och B.
Tabletter: När programmet kräver
en tablett ska den läggas i fack A och
stäng sedan locket. När programmet
kräver två tabletter ska den andra
tabletten läggas på botten av facket.
3. Ta bort diskmedelsrester på fackets kanter och stäng
locket tills det knäpper till.
Disktillval*
TILLVALEN kan endast ställas in, ändras eller
nollställas efter att diskprogrammet har valts och
innan Start/Paus-knappen har tryckts ned.
Endast tillvalen som är kompatibla med valt program kan
väljas. Om ett tillval inte är kompatibelt med valt program,
(se programtabellen), blinkar respektive lysdiod snabbt 3
gånger.
Om ett tillval väljs som inte är kompatibelt med ett tillval eller
diskprogram som har valts tidigare, blinkar tillvalet som inte
kompatibelt 3 gånger och släcks sedan, medan senaste
inställning förblir tänd.
30
För att ta bort ett felaktigt inställt val, tryck ännu en gång på
respektive knapp.
* Finns endast på vissa modeller.
Page 31

Halv last*
Om endast lite disk ska diskas, kan halv last köras för att
spara vatten, energi och diskmedel. Välj program och
tryck på knappen HALV LAST: Kontrollampan tänds.
Kom ihåg att halvera diskmedelsmängden.
Det rekommenderas att använda diskmedel i
pulverform.
Detta tillval kan inte användas med programmet:
Speed.
Senarelagd start*
Det går att senarelägga starten av programmet med 3, 6
eller 9 timmar.
1:Tryck på knappen SENARELAGD START efter att önskat
diskprogram och andra eventuella tillval har valts:
Kontrollampan tänds.
2: Välj önskad start genom att trycka flera gånger på
knappen Senarelagd start. Kontrollamporna för diskning (3
timmar), torkning (6 timmar) och slut (9 timmar) tänds i följd.
Om knappen Senarelagd start trycks ned ännu en gång,
tas tillvalet bort och kontrollampan släcks.
3. När valet har utförts startar nedräkningen genom att
trycka ned knappen Start/Paus. Den valda
senareläggningen blinkar och knappen Start/Paus slutar att
blinka (fast sken).
3. När denna tid förflutit släcks lampan för SENARELAGD
START och programmet startar.
Det går inte att ställa in Senarelagd start efter att
programmet har startats.
Allt i ett-tabletter*
Med detta tillval optimeras disk- och torkresultatet.
När allt i ett-tabletter används, tryck på knappen ALLT I
ETT-TABLETTER. Respektive kontrollampa tänds.
Tillvalet Allt i ett-tabletter förlänger programmet.
Tillvalet ALLT I ETT-TABLETTER förblir inställt
varje gång som maskinen startas, om funktionen inte
är frånkopplad.
Det rekommenderas att endast använda tabletter
på modeller som har tillvalet ALLT I ETT-TABLETTER.
Detta tillval ska inte användas för programmen
där flerfunktionstabletter inte ska användas (se
tabellen Tillval).
Tillvalstabell
Intensivt
Normalt
Daily A 60 /
Dagligt
Upplösning
Eko
Speed
Kristall
A B C
Senare-
lagd start
Ja
Ja
Ja
Ja
Ja
Ja
Ja
Halv
last
Ja
Ja
Ja
Ja
Ja
Nej
Ja
Allt i
ett-tabletter
Nej
Ja
Ja
Ja
Ja
Ja
Ja
5-
* Finns endast på vissa modeller.
31
Page 32

Program
5-
Om disken är lätt smutsad eller har sköljts under vatten kan diskmedelsdosen minskas betydligt.
Antalet program och programtyper samt tillval varierar beroende på diskmaskinsmodell.
Angående TILLVAL, se tillvalstabellen som finns på sidan Start och Användning.
Anvisningar för
programval
Mycket nedsmutsat porslin
och kastruller (ska inte
användas för ömtåligt
diskgods).
Normalt nedsmutsat porslin
och kastruller. Dagligt
standardprogram.
Dagligt program, lätt
smutsat diskgods.
(4 fack + 1 kastrull + 1
stekpanna).
Inledande diskning i väntan
på full last
efter nästa måltid.
Program
Intensivt
Normalt
Daily A 60
Upplösning
Tvättmedel
(A) = fack A
(B) = fack B
Pulver Flytande Tablett
30 g (A) 30 ml (A) 1 (A)
25 g (A)
5 g (B)
25 g (A) 25 ml (A) 1 (A)
Nej
25 ml (A)
5 ml (B)
Nej
1 (A)
Nej
Program
med
torkning
Ja
Ja
Nej
Nej
Tillval
A-B-C
A-B-C
A-B-C
Programmets
(tolerans
A-B
längd
±10%)
Tim Min
2:15’
1:45’
1:00’
0:08’
Ekologisk diskning med låg
energiförbrukning, lämpligt
för kastruller och diskgods.
Snabbt och ekonomiskt
diskprogram som ska
användas med lätt smutsat
diskgods genast efter
användningen. (2 tallrikar +
2 glas + 4 bestick + 1
kastrull + 1 liten stekpanna)
Snabbt och ekonomiskt
program för ömtåligt
diskgods som är känsligt
för höga temperaturer,
direkt efter användningen.
(12 glas på fot + ömtåliga
tallrikar).
OBS!
*
Eko
Kristall
25 g (A)
5 g (B)
25 g (A) 25 ml (A) 1 (A)
30 g (A) 30 ml (A) 1 (A)
25 ml (A)
5 ml (B)
1 (A)
Ja
Nej
Ja
A-B-C
A-C
A-B-C
2:20’
0:25’
1:30’
För bästa resultat för programmen Daily A 60//Daglig och Speed ska antalet rekommenderade kuvert respekteras.
* Programmet Eco (överensstämmer med standard EN-50242) tar längre tid i förhållande till andra program, men är det
program som förbrukar minst energi och är därmed mest miljövänligt.
Notering för provlaboratorium: För information om villkoren för jämförelseprovningen EN, skriv till e-postadress:
ASSISTENZA_EN_LVS@indesitcompany.com
För att underlätta doseringen av diskmedel är det bra att veta att:
1 matsked = cirka 15 g pulverdiskmedel = cirka 15 ml flytande diskmedel -1 matsked = cirka 5 g pulverdiskmedel = cirka 5 ml
flytande diskmedel
32
Page 33

Sköljmedel och
härdningssalt
Använd endast produkter som är avsedda för
diskmaskiner.
Använd inte livsmedels- eller industrisalt eller
diskmedel för handdisk.
Följ anvisningarna som anges på förpackningen.
Om en flerfunktionsprodukt används är det inte
nödvändigt att fylla på sköljmedel. I stället
rekommenderas att tillsätta salt, i synnerhet om vattnet
är hårt eller mycket hårt. Följ anvisningarna som anges på
förpackningen.
Om inte salt eller sköljmedel fylls på, fortsätter
normalt kontrollamporna SALT SAKNAS
SKÖLJMEDEL SAKNAS
* att lysa.
* och
Påfyllning av sköljmedel
Sköljmedlet underlättar torkningen av disken genom att
vattnet rinner av ytan. På så sätt bildas inga strimmor eller
fläckar.
Glansmedelsbehållaren ska fyllas på:
När kontrollampan SKÖLJMEDEL SAKNAS* tänds på
kontrollpanelen
Reglera diskmedelsdoseringen
Om du inte är nöjd med torkresultatet går det att reglera
sköljmedelsdoseringen. Vrid på doseringsinställningen (F)
med en skruvmejsel. Du kan välja mellan 6 lägen
(diskmaskinen är standardinställd på 4):
Om det förekommer strimmor på disken, vrid till ett lägre
värde (1-3).
Om det förekommer vattendroppar eller kalkfläckar ska
du vrida till ett högre värde (4-6).
Ställa in vattnets hårdhet
Varje diskmaskin är försedd med en vattenmjukgörare som
använder specifikt härdningssalt för diskmaskiner, för att förse
maskinen med kalkfritt vatten för att tvätta disken.
Denna diskmaskin medger en reglering som minskar förorening
och optimerar diskresultatet i förhållande till vattnets hårdhet.
Information om vattnets hårdhet kan erhållas från kommunen.
- Stäng av maskinen med ON/OFF-knappen och öppna
luckan.
- Vrid vredet för PROGRAMVAL först till 5° programmet och
sedan i följd till 1° programmet och sedan åter till 5°.
- Tryck på ON/OFF-knappen och kontrollamporna för
programmets olika faser blinkar. I detta läge kan du välja
hårdhetsgrad. Varje program motsvarar en hårdhetsgrad:
Exempel: 1:a programmet, hårdhetsgrad 1
2:a programmet, hårdhetsgrad 2 o.s.v. upp till max. fem
grader.
(Vattenavhärdaren är standardinställd på grad 3).
*;.
1. öppna behållaren genom att
vrida pluggen (G) moturs.
2. Häll upp sköljmedlet. Undvika
att spilla. Rengör med en torr
trasa om du spiller.
3. Skruva tillbaka pluggen.
F
Häll ALDRIG sköljmedel direkt
i diskutrymmet.
G
- För att lämna funktionen, vänta i cirka 30 sekunder eller
stäng av maskinen med ON/OFF-knappen.
Om flerfunktionstabletter används, ska saltbehållaren ända
fyllas på.
Tabell över vattnets hårdhet
°dH °fH °mmol/l Nivå
0 6 0 10 0 1 1
6 11 11 20 1,1 2 2
12 17 21 30 2,1 3 3
17 34 31 60 3,1 6 4
34 50 61 90 6,1 9
Från 0 °f till 10 °f rekommenderas att inte
använda salt.
*
Med denna inställning kan cyklernas
tidslängd förlängas något.
(°dH = hårdhet i tyska grader - °fH = hårdhet i franska grader mmol/l = millimol/liter)
*
5
5-
Påfyllning av härdningssalt
För bästa möjliga diskresultat är det nödvändigt att
kontrollera att saltbehållaren aldrig är tom. Härdningssaltet
tar bort kalket från vattnet så att det inte lägger sig på
disken.
Saltbehållaren sitter nedtill på diskmaskinen (se
Beskrivning) och ska fyllas på:
När den gröna flottören
saltpluggen.
När kontrollampan SALT SAKNAS
kontrollpanelen
4. Ta bort tratten* och ta bort saltrester från mynningen. Skölj
pluggen under rinnande vatten innan den skruvas fast.
Placera pluggen upp och ned och låt vattnet rinna ut genom
de fyra stjärnformade springorna på pluggens nedre del.
(plugg med grön flottör
Det rekommenderas att utföra detta moment vid varje
saltpåfyllning.
Stäng pluggen ordentligt så att det inte kommer in diskmedel
under diskningen (vattenmjukgöraren kan skadas allvarligt).
Fyll på salt före ett diskprogram för att ta bort
saltlösning som har runnit över från saltbehållaren, om det
är nödvändigt.
*.
* inte syns när du tittar på
* tänds på
1. Dra ut den nedre korgen och
skruva ur behållarens plugg moturs.
2. Endast vid den första
användningen: Fyll vattenbehållaren
upp till kanten.
3. Sätt tratten
och fyll saltbehållaren upp till kanten
(cirka 1 kg). Det är normalt att lite
vatten rinner över.
* (se figuren) på plats
*)
*
* Finns endast på vissa modeller.
33
Page 34

Underhåll och skötsel
Avstängning av vatten och el
5-
Stäng av vattenkranen efter varje diskning för att
undvika läckage.
Ta ur kontakten ur uttaget när du gör rent maskinen
och under underhållsingreppen.
Rengöring av diskmaskinen
Utsidan och kontrollpanelen kan göras rent med en
trasa som inte repar indränkt med vatten. Använd inte
rengöringsmedel
eller slipande medel.
Det inre karet kan rengöras från eventuella fläckar
med en trasa indränk med vatten och lite ättika.
Undvik dålig lukt
Lämna alltid luckan på glänt så att fukten torkar.
Rengör regelbundet tätningspackningarna runt
luckan och diskmedelsfacken med en fuktig svamp.
På så sätt försvinner matrester, en av de faktorer
som gör att dålig lukt bildas.
Rengöring av spolarmarna
Det kan hända att matrester fastnar på spolarmarna och
täpper till hålen där vattnet kommer ut: Kontrollera
spolarmarna regelbundet och rengör dem med en
borste (ej metall).
Båda spolarmarna kan nedmonteras.
För att nedmontera den övre
spolarmen måste ringmuttern av
plast skruvas loss genom att
vrida den moturs. Den övre
spolarmen ska monteras med
delen med flest antal hål vänd
uppåt.
Rengör regelbundet vatteninsläppsfiltret som sitter vid
kranens utsläpp.
- Stäng vattenkranen.
- Skruva loss änden på vattenpåfyllnadsslangen, ta bort filtret
och rengör försiktigt under rinnande vatten.
- Sätt in filtret på nytt och skruva fast slangen.
Rengöring av filtren
Filterdelen består av tre filter som rengör diskvattnet från
matrester och återför vattnet i cirkulation: Det är nödvändigt
att rengöra filtren för bästa diskresultat.
Rengör filtren regelbundet.
Diskmaskinen får inte användas utan filter eller avhakat
filter.
Kontrollera filterdelen efter några diskningar och rengör den
under rinnande vatten om det är nödvändigt. Använd en
borste (ej med metallborst) och följa anvisningarna som följer:
1. Vrid det cylindriska filtret C moturs och dra ut det (fig. 1).
2. Dra ut filterkoppen B genom att trycka lätt på sidotungorna
(Fig. 2).
3. Dra ut den rostfria filterplattan A (fig. 3).
4. Kontrollera brunnen och ta bort eventuella matrester. TA
ALDRIG BORT diskpumpens skydd (svart del) (fig. 4).
+
*
+
Den nedre spolarmen
nedmonteras genom att trycka på
tungorna som sitter på sidorna
och dra spolarmen uppåt.
Rengöring av vatteninsläppsfiltret*
Om vattenslangarna är nya eller inte har använts under
lång tid ska du före anslutningen låta vattnet rinna en stund
tills det är klart och utan orenheter. Utan denna
förebyggande åtgärd finns det risk för att vatteninloppet
täpps till och skadar diskmaskinen.
34
)
!
Montera ihop filterdelen och placera den korrekt i sitt säte
efter att filtren har rengjorts. Detta är viktigt för att
diskmaskinen ska fungera korrekt.
"
När du reser bort under längre perioder
Dra ut alla elanslutningar och stäng vattenkranen.
Lämna luckan på glänt.
Kör ett program utan disk när du kommer hem igen.
* Finns endast på vissa modeller.
Page 35

Föreskrifter, råd och
service
Apparaten är framtagen och konstruerad i enlighet med
internationella säkerhetsföreskrifter. Dessa
säkerhetsföreskrifter bifogas av säkerhetsskäl och ska läsas
noggrant.
Säkerhet i allmänhet
Apparaten är avsedd för en ej yrkesmässig användning i
hemmet.
Maskinen ska användas för att diska disk för
hushållsbruk. Maskinen ska endast användas av vuxna
personer och i enlighet med anvisningarna i denna
bruksanvisning.
Maskinen får inte installeras utomhus (ej heller om
utrymmet är skyddat) eftersom det är mycket farligt att
låta den utsättas för väder och vind.
Ta inte i maskinen om du är barfota.
Ta inte ut stickkontakten ur vägguttaget genom att dra i
elkabeln. Ta istället tag i stickkontakten.
Det är nödvändigt att stänga vattenkranen och dra ut
stickkontakten ur vägguttaget innan rengörings- och
underhållsmoment utförs.
I händelse av fel ska du aldrig utföra ingrepp på inre
mekanismer för att utföra reparationer.
Rör aldrig vid värmeelementet.
Luta dig inte eller sätt dig på den öppna luckan:
Maskinen kan tippa.
Luckan ska inte stå öppen. Du kan snava dig i luckan.
Förvara diskmedel och sköljmedel utom räckhåll för barn.
Emballagematerialet ska inte användas som leksaker för
barn.
Kassering
Kassering av emballagematerial: Respektera gällande
lokala föreskrifter, på så sätt kan emballaget
återanvändas.
EU-direktivet 2002/96/EG om avfall som utgörs av eller
innehåller elektriska eller elektroniska produkter (RAEE)
förutser att hushållsmaskinerna inte ska slängas med de
vanliga hushållssoporna. De kasserade apparaterna ska
samlas upp separat för att optimera återvinningen av
materialet som ingår i apparaten och förhindra potentiella
skador på hälsan och miljön. Den överkryssade
papperskorgen som sitter på alla produkter påminner
om att produkten ska sopsorteras.
Om ditt elabonnemang har särskilda
energiförbrukningstariffer, ska diskningarna göras under
de reducerade tiderna. Tillvalet Senarelagd start* (se
Start och användning) är till stor hjälp för att organisera
diskningarna i denna riktning.
Diskmedel utan fosfater, utan klor och som
innehåller enzymer
Det rekommenderas att använda diskmedel utan fosfater
eller klor, vilka är de mest miljövänliga.
Enzymerna utvecklar en särskilt effektiv verkan vid
temperaturer runt 50 °C. Vid användning av diskmedel
med enzymer kan därför diskningar göras med låga
temperaturer med samma diskresultat som vid diskningar
vid 65 °C.
Genom att dosera diskmedlet rätt i förhållande
tillverkarens anvisningar, till vattnets hårdhet, diskens
smutsgrad och mängd, undviker du slöseri. öven om du
använder ett biodegraderbart diskmedel innehåller det
element som inverkar på jämvikten i naturen.
5AHLE?A
Innan du kontaktar kundservice:
Kontrollera om du kan åtgärda felet på egen hand (se Fel
och åtgärder).
Starta programmet igen för att kontrollera om problemet
är löst.
Om problemet kvarstår, kontakta auktoriserad teknisk
assistans.
Anlita aldrig obehöriga tekniker.
Uppge:
typ av fel,
Maskinmodell (Mod.)
Serienummer (S/N).
Denna informationen anges på märkskylten som sitter på
maskinen (se Beskrivning av maskinen).
5-
För ytterligare information angående korrekt kassering
av hushållsmaskiner kan du vända dig till din lokala
sopstation eller återförsäljare.
Spara energi och värna om miljön
Spara vatten och energi
Starta endast diskmaskinen med full last. I väntan på att
maskinen fylls upp kan du motverka dålig lukt med
Upplösningsprogrammet (se Program).
Välj ett program beroende på vilken typ av disk som ska
diskas och hur smutsig den är, se Programtabellen:
- För normalt smutsad disk, använd programmet Eco
som garanterar låg energi- och vattenförbrukning.
- Välj tillvalet Halv last om maskinen inte är full (se
Start och användning).
* Finns endast på vissa modeller.
35
Page 36

Fel och åtgärder
Om det förekommer funktionsfel på maskinen, kontrollera följande punkter innan du vänder dig till serviceverkstaden.
5-
Fel: Möjliga orsaker/Lösningar:
Diskmaskinen startar inte.
Diskmaskinen tömmer inte ut
vatten.
Diskmaskinen för oväsen.
Det bildas en kalkbeläggning eller
en vit hinna på disken och glas.
Det bildas blåaktiga strimmor eller
nyanser på disken och glas.
Disken är fuktig.
• Stickkontakten ä r inte ordentligt instucken i vägguttaget, i annat
fall kan det saknas ström i huset.
• Luckan för diskmaskinen är inte ordentligt stängd.
• En Senarelagd start har ställts in (se Start och användning).
• Programmet har ä nnu inte avslutats.
• Vattenutloppsslangen är böjd (se Installation).
• Diskbänkens avlopp är igensatt.
• Filtret ä r igensatt med matrester.
• Disken slår mot varandra eller mot spolarmarna.
• Fö r mycket skum bildas: Diskmedlet är inte korrekt doserat eller
inte lä mpligt fö r maskindisk (se Start och användning).
• Hä rdningssalt saknas eller felaktig reglering i förhållande till
vattnets hå rdhet (se Sköljmedel och salt).
• Saltbehållarens plugg är inte ordentligt stängd.
• Sköljmedlet är slut eller otillrä cklig dosering.
• Disken är av nonstick-material.
• Fö r stor mä ngd diskmedel doseras.
• Ett program utan torkning har valts.
• Sköljmedlet är slut eller otillräcklig dosering (se Sköljmedel och salt).
• Felaktig reglering av sköljmedel.
Disken blir inte ren.
Diskmaskinen tar inte in
vatten/Larm "Stängd vattenkran"
(kontrollamporna för salt, sköljmedel,
torkning och slut blinkar).
Larm för fel på magnetventilen
för vattenpåfyllning
(kontrollamporna för salt, sköljmedel
och torkning blinkar).
Larm för
vatteninloppsslangen/Igensatt
vatteninsläppsfilter
(kontrollamporna för salt, sköljmedel,
diskning, torkning och slut blinkar).
• Korgarna är alltför fulla (se Fyll korgarna).
• Disken är inte korrekt placerad.
• Spolarmarna kan inte rotera fritt.
• Vä lj ett starkare diskprogram (se Program).
• Fö r mycket skum bildas: Diskmedlet är inte korrekt doserat eller
inte lä mpligt fö r maskindisk (se Start och användning).
• Sköljmedlets plugg har inte stängts korrekt.
• Filtret ä r smutsigt eller igensatt (se Underhåll och skötsel).
• Hä rdningssalt saknas (se Sköljmedel och salt).
• Det saknas vatten i vattennätet.
• Vatteninloppsslangen är böjd (se Installation).
• Öppna kranen och maskinen startar efter några minuter.
• Utrustningen har blockerats eftersom inget ingrepp har utförts
efter att kontrollamporna Salt och Sköljmedel har börjat blinka.
Stäng av maskinen med ON/OFF-knappen och öppna kranen.
Starta sedan maskinen igen efter 20 sekunder med samma knapp.
Programmera om maskinen och starta på nytt.
• Stäng med ON/OFF-knappen och starta igen efter någon minut.
Om larmet kvarstår, stäng vattenkranen för att hindra
översvämning, dra ur stickkontakten ur vägguttaget och ring
serviceverkstaden.
• Tryck på ON/OFF-knappen för att stä nga av maskinen. Stäng
vattenkranen för att undvika översvämning och dra ur
stickkontakten ur vägguttaget.
Kontrollera att vatteninsläppsfiltret inte ä r igensatt med
orenheter (vedere capitolo "Manutenzione e Cura")(se kapitlet
"Skö tsel och underhåll").
36
Page 37

Brugsanvisning
OPVASKEMASKINE
DA
Dansk, 37
LKF 720
Oversigt
Installation, 38-39
Placering og planstilling
Tilslutning af el og vand
Advarsler inden første opvask
Tekniske data
Beskrivelse af opvaskemaskinen, 40
Samlet oversigt
Betjeningspanel
Fyldning af kurve, 41
Nederste kurv
Kurv til bestik
Øverste kurv
Start og brug, 42-43
Start af opvaskemaskinen
Påfyldning af opvaskemiddel
Tilvalgsfunktioner
Programmer, 44
Programtabel
Afspændingsmiddel og salt, 45
Påfyldning af afspændingsmiddel
Påfyldning af salt
Vedligeholdelse 46
Frakobling af vand og el
Rengøring af opvaskemaskinen
Undgå dårlig lugt
Rengør spulearmene
Rengøring af vandindtagningsfilteret
Rengør filtrene
Hvis man er ude at rejse i længere tid
Forholdsregler, råd og Servicetjeneste 47
Generelt om sikkerheden
Bortskaffelse
Spar på energien og værn om miljøet
Servicetjeneste
Fejl og afhjælpning, 48
Page 38

Installation
,)
Det er vigtigt, at dette hæfte opbevares, så det altid
kan konsulteres. Ved salg eller flytning skal man sørge
for, at hæftet bliver sammen med opvaskemaskinen.
Læs omhyggeligt alle anvisninger: De indeholder
vigtige oplysninger vedrørende installation, brug og
sikkerhed.
Under transporten bør maskinen holdes lodret; læn
maskinen mod bagsiden ved behov.
Placering og planstilling
1. Pak opvaskemaskinen ud, og kontrollér, at den ikke er
blevet beskadiget under transporten.
Hvis den er beskadiget, skal man ikke tilslutte den, men
derimod kontakte forhandleren.
2. Anbring opvaskemaskinen, så siderne eller bagsiden
slutter op til de tilstødende køkkenelementer eller
væggen. Opvaskemaskinen kan også placeres under en
arbejdsflade/køkkenbord
3. Anbring opvaskemaskinen på et jævnt og hårdt
underlag. Maskinen planstilles ved at løsne eller
stramme de forreste ben, så den står vandret. En korrekt
planstilling giver stabilitet og gør, at man undgår
vibrationer, støj og at maskinen flytter sig.
4*. For at justere højden på de bageste ben, skal man
dreje på den sekskantede, røde bøsning nederst på
opvaskemaskinens front midt på ved hjælp af en 8 mm
sekskantsnøgle. Drej højre om for at øge højden, og
drej venstre om for at mindske højden. (se den
medfølgende vejledning)
* (se monteringsoversigten).
Tilslutning af vandtilførselsslangen
Til en hane med koldt vand: Slut slangen til
vandtilførsel til en hane med mundstykke med 3/4
gas. Inden den skrues på skal man lade vandet løbe,
indtil det er klart, så evt. urenheder ikke tilstopper
maskinen.
Til en hane med varmt vand: Hvis man har
centralvarmeanlæg med radiatorer, kan
opvaskemaskinen forsynes med varmt vand fra
forsyningsnettet, hvis temperaturen ikke overstiger
60° C.
Slut slangen til hanen som beskrevet for tilslutning til
koldtvandshane.
Hvis slangen til vandtilførsel ikke er lang nok, skal
man henvende sig til en specialforretning eller en
autoriseret vvser (se Servicetjeneste).
Vandtrykket skal ligge inden for værdierne i tabellen
med Tekniske data (se her ved siden af).
Vær opmærksom på, at slangen ikke bøjer eller
trykkes sammen.
Tilslutning af el og vand
Tilslutning til el- og vandforsyning må udelukkende
udføres af kvalificerede fagfolk.
Opvaskemaskinen må ikke støtte oven på slanger
eller elektriske ledninger.
Apparatet skal tilsluttes vandforsyningen ved hjælp
af nye rør og slanger.
Brug aldrig gamle rør og slanger.
Slangerne til indtag (A) og udtømning (B) af vand samt
det elektriske forsyningskabel kan føres højre eller
venstre om alt efter hvad der er behov for under
installationen (se figuren).
Overløbssikring
For at sikre med eventuelt overløb er opvaskemaskinen
udstyret med følgende sikkerhedsanordninger:
- Et system til afbrydelse af vandindtagelse i tilfælde af
fejl eller utætheder inden i maskinen.
Nogle modeller er udstyret med en ekstra
overløbssikring New Acqua Stop
overløb, også hvis vandforsyningsslangen ødelægges.
*, som modvirker
PAS PÅ: FARLIG SPÆNDING!
Slangen til vandtilførsel indeholder elektriske dele og må
ikke skæres op.
* Findes kun på nogle modeller.
38
Page 39

Tilslutning af afløbsslangen
Tilslut afløbsslangen uden af den bøjes til et afløb med
en minimumdiameter på 4 cm. Eller lad den hvile på
kanten af en håndvask eller en anden beholder.
Enderne på afløbsslangen må ikke være under vand.
Den særlige plastikholder
A
gør, at slangen kan placeres
optimalt. Fastgør holderen
omhyggeligt til væggen for at
undgå, at slangen flytter sig
og der spildes vand ved siden
af afløbet.
Den del af slangen, der er
mærket med bogstavet A, skal
placeres i en højde på
mellem 40 og 100 cm (se figuren).
Det frarådes at bruge forlængerstykker til slangen.
*
Elektrisk tilslutning
Anti-kondens strimmel*
Hvis opvaskemaskinen er placeret under en bordplade,
skal man åbne lågen og påklæbe den gennemsigtige
strimmel under træoverfladen for at beskytte den mod
eventuel kondens.
Advarsler inden første opvask
Efter installation og umiddelbart inden første opvask,
skal man fylde beholderen til salt helt op med vand og
ca. 1 kg salt (se afsnittet om Afspændingsmiddel og salt):
Det er normalt, at vandet løber over. Vælg vandets
hårdhed (se afsnittet om Afspændingsmiddel og salt).
Efter påfyldning af salt slukker kontrollampen for
SALTMANGEL
Hvis saltbeholderen ikke fyldes op, kan det
ødelægge vandblødgøringsanlægget og
varmeelementet.
*.
,)
Inden stikket sættes i stikkontakten skal man sikre sig
følgende:
at stikkontakten har jordforbindelse og opfylder alle
lovkrav
at stikkontakten kan tåle den maksimale effekt fra
maskinen; dette står angivet på typeskiltet på
bagsiden af maskinen
(se afsnittet Beskrivelse af opvaskemaskinen)
at forsyningsspændingen er inden for værdierne, som
er angivet på typeskiltet på bagsiden;
at stikkontakten passer til opvaskemaskinens stik. I
modsat fald skal man få en autoriseret elektriker til at
udskifte stikkontakten (se Servicetjeneste). Brug aldrig
forlængerledninger eller flerdobbelte stikdåser.
Når maskinen er installeret, skal man nemt kunne nå
ind til det elektriske forsyningskabel og stikkontakten.
Kablet må ikke bøjes eller trykkes sammen.
Hvis strømkablet er beskadiget, skal det udskiftes
af producenten eller dennes tekniske servicetjeneste,
så man undgår farlige situationer. (Se Service).
Producenten fralægger sig ethvert ansvar, såfremt
disse normer ikke overholdes.
Tekniske data
Mål
Kapacitet
Vandforsyningstryk
Forsyningsspænding
Samlet optaget effekt
Sikring
Bredde cm. 60
Højde cm. 85
Dybde cm. 60
12 standard-kuverter
0,05 ÷ 1MPa (0,5 ÷ 10 bar)
4,3 psi – 145 psi
Se skiltet med specifikationer
Se skiltet med specifikationer
Se skiltet med specifikationer
Dette apparat er i
overensstemmelse med
følgende EU-direktiver:
-73/23/EØF af 19/02/73
(Lavspænding) og senere
ændringer;
-89/336/EØF af 03/05/89
(Elektromagnetisk
kompatibilitet) og senere
ændringer.
-97/17/EF (Mærkning)
-2002/96/EF
* Findes kun på nogle modeller.
39
Page 40

Beskrivelse af
opvaskemaskinen
,)
Samlet oversigt
1. Øverste kurv
2. Øverste spulearm
3. Klapper
4. Indstilling af kurven i højden
5. Nederste kurv
6. Nederste spulearm
7. Kurv til bestik
8. Filter
9. Beholder til salt
10. Rum til opvaskemiddel og rum til
afspændingsmiddel
11. Typeskilt
12. Betjeningspanel
***
Betjeningspanel
Kontrollampe for
Saltmangel*
Kontrollampe
for ON/OFF
Tasten
On-Off/Reset
Knap til Valg af
program
Kontrollampe for Mangel
på afspændingsmiddel*
Tast og kontrollampe for
Forsinket start*
Tast og
kontrollampe
Halv fyldning*
Tast og kontrollampe for
Multitabletter*
Kontrollampe for Afslutning
og forsinket start 9 h.*
Kontrollampe for tørring
og forsinket start 6 h.*
Kontrollampe for opvask
og forsinket start 3 h.*
Tast og kontrollampe
for Start/pause
40
*** Kun på indbygningsmaskiner.
* Findes kun på nogle modeller.
Page 41

Fyldning af kurve
Inden kurvene fyldes, skal man fjerne madrester i
opvaskemaskinen og tømme glas og kopper.
Efter fyldning skal man kontrollere, om spulearmene kan
dreje frit.
Nederste kurv
Den nederste kurv kan fyldes med gryder, låge, tallerkener,
skåle, bestik osv. i henhold til eksemplerne.
Store tallerkener og grydelåg skal helst anbringes i
siderne af kurven uden at blokere øverste spulearm.
Nogle modeller har elementer, der kan foldes
sammen
tallerkener eller i vandret stilling til at anbringe gryder
og skåle.
Kurv til bestik
Kurven til bestikket kan have forskellig udformning alt
efter modeltypen på opvaskemaskinen: ikke opdelt,
opdelt, glidende. Den ikke opdelte bestikkurv kan kun
anbringes forrest i den nederste kurv.
Den opdelte kurv kan skilles ad i to dele, hvis man kun
vasker med en halvt fyldt maskine (på modeller med
denne funktion), eller den kan flyttes og anbringes et
hvilket som helst sted i den nederste kurv mellem faste
eller flytbare elementer.
- Begge er udstyret med klapper, så bestikket er
nemmere at anbringe.
*. De kan bruges i lodret stilling til at anbringe
Justering af højden på øverste kurv
For nemmere at kunne fylde opvasken i maskinen kan man flytte
den øverste kurv op eller ned.
Det anbefales at højden på den øverste kurv indstilles,
mens KURVEN ER TOM.
Man må IKKE løfte eller sænke kun den ene side af
kurven.
Åbn låsebeslagene på kurvens skinne i
højre og venstre side og træk kurven ud.
Anbring den i øverste eller nederste
position. Lad den glide på plads langs
skinnerne og ind under de forreste hjul, og
luk så låsebeslagene (se figuren).
Hvis kurven er udstyret med Dual Space
håndtag (se figuren), skal man trække den
øverste kurv helt ud, folde klapperne på
siderne af kurven op og flytte den op eller
ned. Lad kurven falde ned på plads igen.
*
Eksempler på fyldning af øverste kurv
Eksempler på fyldning af nederste kurv
,)
Knive og andre skarpe genstande skal placeres i
bestikkurven med den skarpe ende nedad eller i lodret
position i klappen i den øverste kurv.
Eksempler på fyldning af bestikkurven
Øverste kurv
Sæt den ømtålelige og lette opvask i den øverste kurv: Glas,
te- og kaffekopper, små salatskåle, let snavsede små gryder
og pander, som vist i Fyldningseksemplet.
Kopper: Anbring kopperne i klapperne**.
Lange og spidse knive, serveringsbestik: Anbring
kopperne i klapperne
**.
Ikke egnet opvask
Genstande i træ, med træhåndtag eller med sammenlimede
dele.
Genstande i aluminium, kobber, messing, tin eller tinlegering.
Opvask i ikke-varmebestandig plastik.
Antik eller håndmalet porcelæn.
Antik sølvtøj. Ikke-antik sølvtøj kan godt tåle opvask på et
skåneprogram, hvis man sørger for, at det ikke kommer i
kontakt med andre metaller.
Det anbefales, at man køber køkkentøj, der tåler opvask i
maskine.
* Findes kun på nogle modeller.
** Fås i forskelligt antal og placering.
41
Page 42

Start og brug
,)
Start af opvaskemaskinen
1. Åbn vandhanen.
2. Tryk på ON/OFF-tasten: Alle kontrollamper på
betjeningspanelet lyser i nogle sekunder.
3. Åbn lågen, og hæld opvaskemiddel i (se herunder).
4. Fyld kurvene op (se Fyldning af kurve), og luk lågen.
5. Vælg det ønskede program ved at dreje
PROGRAMVÆLGEREN højre om. Anbring hakket på
knappen ud for programnummer eller - symbol.
Kontrollampen ud for tasten START/PAUSE blinker.
6. Vælg tilvalgsfunktion* (se her ved siden af).
7. Start opvaskecyklussen ved at trykke på tasten START.
Kontrollampen stopper med at blinke og lyser.
Kontrollampen ud for opvask tænder og signalerer, at
programmet nu startes.
8. Ved afslutning af programmet tænder kontrollampen
for AFSLUTNING (lyser). Sluk for maskinen ved at trykke
på ON/OFF-tasten, luk for vandhanen og træk stikket ud
af stikkontakten.
9. Vent nogle minutter, inden opvasken tages ud, så du
undgår at brænde dig. Tøm først den nederste kurv.
Ændring af et program under udførelse
Hvis man har valgt et forkert program, er det muligt at
ændre det, hvis det lige er gået i gang. Når opvasken er
sat i gang, ændres opvaskecyklussen ved at slukke
maskinen ved at holde tasten ON/OFF/Reset nede.
Maskinen tændes igen på samme tast, og der vælges
det nye program og de nye tilvalgsfunktioner.
Tilføjelse af ekstra opvask
Tryk på tasten Start/Pause (tasten blinker). Åbn lågen, og
pas på den varme damp, og anbring opvasken i
maskinen. Tryk på tasten Start/Pause (tasten lyser).
Cyklussen går i gang igen.
Ved tryk på tasten Start/Pause sættes maskinen på
pause og både programmet og den forsinkede start
afbrydes, hvis de er indstillet.
I denne fase kan programmet ikke ændres.
Utilsigtede afbrydelser
Hvis lågen åbnes under opvask eller hvis der sker en
strømafbrydelse, afbrydes programmet. Den starter igen,
hvor den blev afbrudt, når lågen lukkes igen eller når
strømmen vender tilbage.
Påfyldning af opvaskemiddel
Et godt resultat afhænger også af en korrekt dosering
af opvaskemiddel. For meget opvaskemiddel medfører
ikke en mere effektiv opvask, og det forurener miljøet.
Anvend udelukkende opvaskemiddel til
opvaskemaskiner.
ANVEND ALDRIG opvaskemiddel til opvask i
hånden.
Overdreven brug af opvaskemiddel kan medføre
skumrester efter opvask.
Det anbefales kun at bruge tabletter i modeller med
tilvalgsfunktionen MULTITABLETTER.
Man opnår den bedste opvask og tørring ved brug
af opvaskemiddel i pulverform, flydende
afspændingsmiddel og salt.
Rum A: Opvaskemiddel
Rum B: Opvaskemiddel til foropvask
1. Åbn låget C ved at trykke på
knappen D.
2. Dosér opvaskemidlet i henhold til
Programtabellen:
I pulverform: Rum A og B.
I tabletform: når programmet
kræver 1, lægges den i rum A og
låget lukkes. Hvis der kræves 2.
lægges den anden i bunden af opvaskemaskinen.
3. Tør overskydende opvaskemiddel af kanterne til
beholderen og luk låget, så det klikker på plads.
Tilvalgsfunktioner*
TILVALGSFUNKTIONERNE kan kun indstilles, ændres
eller nulstilles efter at man har valgt programmet og
inden man har trykket på symbolet Start/Pause.
Det er kun muligt at vælge de tilvalgsfunktioner, der
passer til det valgte program. Hvis en tilvalgsfunktion
ikke fungerer med det valgte program, (se
programtabellen), vil den røde lampe blinke hurtigt 3
gange.
Hvis der vælges en tilvalgsfunktion, der ikke passer
med en anden tilvalgsfunktion eller et program, der
tidligere har været indstillet, vil tilvalgsfunktionen ikke
blinke 3 gange og den slukker, mens den sidste
indstilling forbliver tændt.
42
For at fravælge et forkert valg af tilvalgsfunktion, skal
man trykke igen på den pågældende tast.
* Findes kun på nogle modeller.
Page 43

Halv fyldning*
Hvis man kun har en smule opvask, kan man fylde
maskinen halvt op og spare på både vand, energi og
opvaskemiddel. Vælg programmet, og tryk på tasten
HALV FYLDNING: Kontrollampen tænder.
Husk kun at bruge den halve mængde
opvaskemiddel.
Det foretrækkes, at der bruges opvaskemiddel i
pulverform.
Denne tilvalgsfunktion kan ikke anvendes med
programmet: Speed.
Forsinket start*
Multitabletter*
Denne tilvalgsfunktion giver en bedre opvask og tørring.
Når der anvendes multitabletter, skal man trykke på
tasten MULTITABLETTER. Den pågældende lampe
tænder. Tilvalgsfunktionen Multitabletter giver en
længere programvarighed.
Tilvalgsfunktionen MULTITABLETTER vil være
indstillet, når maskinen tændes efterfølgende, hvis
den ikke fravælges.
Det anbefales kun at bruge tabletter i modeller med
tilvalgsfunktionen MULTITABLETTER.
Denne tilvalgsfunktion anbefales ikke sammen
med programmer, hvor der ikke skal anvendes
multitabletter (se tabellen over tilvalgsfunktioner).
,)
Det er muligt at udskyde starten af det valgte program med
3, 6 eller 9 timer.
1:Efter at have valgt det ønskede opvaskeprogram og evt.
tilvalgsfunktioner, skal man trykke på tasten FORSINKET
START. Kontrollampen tænder.
2: Vælg det ønskede starttidspunkt og tryk
efterfølgende på tasten for forsinket start.
Kontrollamperne (3 timer), tørring (6 timer) og
afslutning (9 timer) tænder efter hinanden.
Hvis man trykker igen på tasten Forsinket start,
fravælges tilvalgsfunktionen, og kontrollampen slukker.
3. Efter indstillingen og ved tryk på tasten Start/Pause
starter nedtællingen, den valgte forsinkelse blinker og
tasten Start/Pause stopper med at blinke (lyser fast).
3. Når tiden løber ud, slukker kontrollampen og
programmet starter.
Man kan ikke indstille til forsinket start, når en
opvask er sat i gang.
Tabel over
tilvalgsfunktioner
Intensiv
Normal
Daily A 60 / Daglig
Iblødsætning
Øko
Speed 25’
Krystal
A B C
Forsinket
start
JA
JA
JA
JA
JA
JA
JA
Halv
fyldning
JA
JA
JA
JA
JA
NEJ
JA
Multi
tabletter
JA
JA
JA
NEJ
JA
JA
JA
* Findes kun på nogle modeller.
43
Page 44

Programmer
,)
opvaskemiddel.
Hvis opvasken kun er lidt snavset eller er blevet skyllet under vand, skal man mindske mængden af
Programnummer og type samt tilvalgsfunktioner varierer alt efter opvaskemaskinemodellen.
Se tabellen på siden under Start og brug for oplysninger om TILVALGSFUNKTIONER.
Program
varighed
(±10%)
Min. timer
Angivelser for valg
af programmer
Meget snavsede gryder
og tallerkener (må ikke
anvendes til ømtålelige
genstande).
Almindeligt snavsede
gryder og tallerkener.
Dagligt standardprogram.
Almindelig daglig snavs i
begrænset omfang
(4 kuverter + 1 gryde + 1
pande).
Forvask, mens der
afventes
mere opvask.
Miljøvenlig opvask med
lavt energiforbrug, egnet
til tallerkener og gryder.
Hurtigt spareprogram, der
skal anvendes til ikke
særlig snavset opvask
lige efter brug. (2
tallerkener +2 glas +4 x
bestik +1 gryde + 1 lille
pande)
Hurtig sparecyklus til
opvask, der er mere
ømtålelige over for høje
temperaturer, lige efter
brug. (12 vinglas +
ømtålelige tallerkener).
Program
Intensiv
Normal
Daily A 60
Iblødsætning
Øko
Krystal
Opvaskemiddel
(A) = rum A
(B) = rum B
Pulver Flydende Multi
30 g (A)
*
25 g (A)
5 g (B)
25 g (A) 25 ml (A) 1 (A)
Nej
25 g (A)
5 g (B)
25 g (A) 25 ml (A) 1 (A)
30 g (A) 30 ml (A) 1 (A)
30 ml (A)
25 ml (A)
5 ml (B)
Nej
25 ml (A)
5 ml (B)
1 (A)
1 (A)
1 (A)
Nej
Programmer
med
tørring
Ja
Ja
Nej
Nej
Ja
Nej
Ja
Tilvalgs
funktioner
A-B-C
A-B-C
A-B-C
A-B
A-B-C
A-C
A-B-C
2:15’
1:45’
1:00’
0:08’
2:20’
0:25’
1:30’
Bemærk:
Man opnår det bedste resultat med programmerne Daily A 60//Daglig og Speed opnår man ved at overholde det angivne
antal kuverter.
* Eco-programmet overholder EN-50242 standarden og har en længere varighed i forhold til andre programmer. Alligevel
bruger programmet mindre energi end de andre og er mere miljøvenligt.
Note til testlaboratorierne: For oplysninger om betingelserne for en EN-testsammenligning, rettes henvendelse til:
ASSISTENZA_EN_LVS@indesitcompany.com
For at gøre doseringen nemmere, er det godt at vide følgende:
1 skefuld = ca. 15 gram i pulverform = ca. 15 ml i flydende form - 1 skefuld = ca. 15 gram i pulverform = ca. 5 ml i
flydende form
44
Page 45

Afspændingsmiddel
og salt
Brug kun opvaskemidler, salt mm., der er beregnet
til opvaskemaskiner.
Brug ikke mad- eller industrisalt eller opvaskemidler
til opvask i hånden.
Følg anvisningerne på emballagen.
Hvis der anvendes multitabletter, er det ikke nødvendigt
at påfylde afspændingsmiddel. Det anbefales dog at
tilføje salt, især hvis vandet er middel til meget hårdt.
Følg anvisningerne på emballagen.
Hvis der ikke påfyldes hverken salt eller
afspændingsmiddel, er det normalt, at kontrollampen
for SALTMANGEL* og MANGEL PÅ
AFSPÆNDINGSMIDDEL
* forbliver tændt.
Påfyldning af afspændingsmiddel
Afspændingsmiddel gør tørringen af opvasken nemmere,
idet vandet glider af overfladen uden at efterlade striber
eller mærker.
Beholderen til afspændingsmiddel skal fyldes:
når kontrollampen for MANGEL PÅ
AFSPÆNDINGSMIDDEL
Fyld ALDRIG afspændingsmiddel direkte i bunden af
maskinen.
Dosering af afspændingsmiddel
Hvis resultatet af tørringen ikke er tilfredsstillende, kan man
regulere doseringen af afspændingsmiddel. Brug en
skruetrækker til at dreje på regulatoren (F), og vælg mellem
de 6 indstillingsmuligheder (maskinen er fra fabrikken
indstillet på 4).
hvis der på opvasken efterlades striber, skal man
indstille til et lavere tal (1-3).
Hvis der er vanddråber eller kalkpletter på
opvasken, skal tallet være højere (4-6).
Indstilling af vandets hårdhed
Alle opvaskemaskiner er udstyret med et blødgøringsanlæg,
som ved hjælp af en særlig type salt til opvaskemaskiner leverer
vand uden kalk til opvask i opvaskemaskiner.
Denne opvaskemaskine kan man foretage indstillinger til
reducering af forurening og optimering af vaskepræstationerne
alt efter vandets hårdhed. Oplysninger om vandets hårdhed fås
hos det lokale vandværk.
* tænder.
1. Åbn beholderen ved at
dreje låget (G) venstre om.
2. Hæld afspændingsmidlet i,
og pas på ikke at spilde det.
Hvis det hældes ved siden af,
F
skal man straks tørre det op
G
med en tør klud.
3. Skru låget på igen.
hårdhedsniveau til hvert program.
For eksempel: program 1, hårdhed 1
program 2, hårdhed 2 osv. ... indtil maks. fem
(Blødgøringsanlægget er fra fabrikken indstillet til niveau 3).
- For at afslutte funktionen skal man vente ca. 30 sekunder
eller slukke maskinen på tasten ON/OFF.
Hvis der bruges multitabletter, skal man alligevel fylde
saltbeholderen.
Tabel over vandets hårdhed
°dH °fH mmol/l niveau
0 6 0 10 0 1 1
6 11 11 20 1,1 2 2
12 17 21 30 2,1 3 3
17 34 31 60 3,1 6 4
34 50 61 90 6,1 9
Mellem 0°f og 10°f anbefales det ikke at bruge
salt.
*
med denne indstilling kan opvaskens
varighed blive forlænget en smule.
(°dH = hårdhed i tyske grader - °fH = hårdhed i franske grader
- mmol/l = millimol/liter)
* niveauer.
*
5
Påfyldning af salt
For at opnå et godt resultat skal man huske at kontrollere, at
saltbeholderen aldrig er tom. Salt fjerner kalk fra vandet, så
det ikke aflejres på opvasken.
Saltbeholderen sidder i bunden af opvaskemaskinen (se
Beskrivelse) og skal fyldes:
når den grønne flydeanordning* ikke er synlig
når kontrollampen for SALTMANGEL
1. Træk den nederste kurv ud og løsn
låget til beholderen ved at dreje det
venstre om.
2. Kun ved første brug: Fyld
beholderen med vand til kanten.
3. Brug den medfølgende tragt (se
figuren), og fyld beholderen med salt
til kanten (ca. 1 kg). Det er normalt, at
lidt af vandet løber ved siden af.
4. Tag tragten* ud og fjern rester af salt ved at skylle dækslet
under løbende vand, inden det sættes på igen. Hold den med
hovedet nedad og lad vandet løbe igennem de fire revner på
den nederste del af dækslet. (prop med grøn
flydeanordning
Det anbefales at rengøre dækslet hver gang der påfyldes
salt.
Skru dækslet godt fast, så der ikke kommer opvaskemiddel
ind i beholderen under opvask (det kan beskadige
blødgøringsanlægget).
Fyld for så vidt muligt salt på, inden en opvask sættes i
gang, så eventuelt spildt salt fra saltbeholderen fjernes.
*)
* tænder.
,)
- Sluk for maskinen på tasten ON/OFF, og åbn lågen.
- Flyt knappen for PROGRAMVALG på program 5 og herefter
på program 1 og så igen på program 5.
- Tryk på tasten ON/OFF. Kontrollamperne for opvaskefaserne
blinker, og nu kan man vælge vandets hårdhed. Der findes et
* Findes kun på nogle modeller.
45
Page 46

Vedligeholdelse
Frakobling af vand og el
,)
Luk for vandhanen efter hver opvask for at undgå
risiko for vandspild.
Træk stikket ud af stikkontakten, når
opvaskemaskinen skal rengøres eller repareres.
Rengøring af opvaskemaskinen
Den udvendige overflade og betjeningspanelet kan
rengøres med en klud opblødt i blødt vand. Brug ikke
opløsningsmidler
eller slibende rengøringsmidler.
Det indvendige af maskinen kan rengøres for evt.
mærker med en klud opblødt i vand og en smule
eddike.
Undgå dårlig lugt
Lad altid lågen stå på klem for at undgå
fugtdannelse.
Rengør jævnligt gummilisterne i siden af lågen og
beholderne til opvaskemidler med en fugtet svamp.
På denne måde får man fjernet evt. madrester, der
er årsag til dårlig lugt.
Rengør spulearmene
Det kan hænde, at madrester sætter sig fast på
spulearmene, og tilstopper de huller, hvor vandet
kommer ud. Kontrollér dem derfor regelmæssigt og
rengør dem med en ikke-metallisk børste.
De to spulearme kan begge tages ud.
Rengør jævnligt vandindtagningsfiltret ved hanens udløb.
- Luk vandhanen.
- Skru vandtilførselsslangen af, tag filtret ud og rengør
forsigtigt filtret under rindende vand.
- Sæt filtret i igen, og skru slangen fast.
Rengør filtrene
Filterenheden består af tre filtre, der rengør vandet for
madrester og recirkulerer det. For at opnå et godt resultat skal
filtrene rengøres.
Rengør jævnligt filtrene.
Opvaskemaskinen må ikke bruges uden filtre eller løst
filter.
Efter et par vask skal man kontrollere filterenheden. Hvis der
er behov for det, skal man rense den under rindende vand
med en ikke-metallisk børste. Benyt følgende
fremgangsmåde:
1. Drej det cylinderformede filter C venstre om, og tag det ud
(fig. 1).
2. Tag filterskålen B ud, idet der presses let på sideklapperne
(fig. 2).
3. Tag filterpladen i rustfri stål A ud (fig. 3).
4. Kontrollér afløbet og fjern eventuelle madrester. FJERN
ALDRIG beskyttelsesanordningen fra pumpen (den sorte
enhed) (fig.4).
For at afmontere den øverste
spulearm skal man løsne den
ved at dreje plastikringen
venstre om. Den øverste
spulearm installeres igen med
den side, der har flest huller,
vendende opad.
Den nederste spulearm
afmonteres ved at trykke på de
to klapper i siden og hive dem
opad.
Rengøring af vandindtagningsfilteret*
Hvis vandslangerne er nye, eller ikke har været brugt i lang
tid, skal man lade vandet løbe, indtil det bliver helt klart og
uden urenheder, før tilslutningen udføres. I modsat tilfælde
kan man risikere, at vandindgangen tilstoppes og maskinen
beskadiges.
+
*
+
)
!
Efter rengøring af filtrene skal man genmontere filterenheden
og anbringe den korrekt i dens holder. Det er afgørende for
opvaskemaskinens funktion.
"
Hvis man er ude at rejse i længere tid
Frakobl strømtilslutningerne, og luk for vandet.
Efterlad lågen på klem.
Når du kommer hjem igen, skal du lade opvaskemaskinen
kører i tom tilstand.
46
* Findes kun på nogle modeller.
Page 47

Forholdsregler, råd og
assistance
Apparatet er konstrueret og bygget i overensstemmelse
med de internationale sikkerhedsregler. Følgende oplysninger
gives af sikkerhedsmæssige årsager, og de skal læses
omhyggeligt.
Generelt om sikkerheden
Apparatet er beregnet til brug i hjemmet.
Apparatet er beregnet til opvask til husholdningsbrug og
må udelukkende betjenes af voksne og i
overensstemmelse med anvisningerne i dette hæfte.
Apparatet må ikke installeres udenfor, heller ikke hvis
stedet er overdækket, idet det er farligt at efterlade det i
regnvejr og uvejr.
Undgå at røre ved opvaskemaskinen, hvis du er
barfodet.
Træk ikke stikket ud af stikkontakten ved at trække i
ledningen, men tag fat om selve stikket.
Vandhanen skal lukkes og stikket skal tages ud af
stikkontakten, hvis der skal udføres rengøring eller
vedligeholdelse af opvaskemaskinen.
I tilfælde af fejlfunktion må man under ingen
omstændigheder åbne op til de indvendige mekanismer
og forsøge at reparere maskinen.
Rør aldrig ved varmeelementet.
Man må ikke støtte sig på eller sidde på den åbne låge.
Apparatet kan vælte.
Lågen må ikke holdes åben, da man kan støde ind i den.
Opbevar opvaskemiddel og afspændingsmiddel uden
for børns rækkevidde.
Emballagen må ikke bruges som legetøj til børn.
Bortskaffelse
Bortskaffelse af emballagemateriale: Følg de lokale
regler, så emballagen kan genbruges.
Det europæiske direktiv 2002/96/EF om affald af elektrisk
og elektronisk udstyr (WEEE) foreskriver, at
husholdningsapparater ikke må smides ud sammen med
almindeligt husholdningsaffald. Kasserede apparater
skal indsamles separat, så man kan genbruge og
genudvinde flest mulige materialer og begrænse
eventuelle sundhedsmæssige og miljømæssige skader.
Symbolet med den overstregede affaldsspand findes på
alle produkter, for at minde om, at de skal indsamles
separat.
For yderligere oplysninger om korrekt bortskaffelse af
husholdningsapparater kan man rette henvendelse til
den offentlige affaldsservice eller til forhandleren.
Hvis der i dit område findes en
energibesparelsesordning med lavere takster for strøm
på bestemte tidspunkter, så udfør opvasken på disse
tidspunkter. Tilvalgsfunktionen Forsinket start* (se Start
og brug) er beregnet til at planlægge opvasken netop
for at spare på energien.
Opvaskemidler uden fosfater og klor og
indeholdelse enzymer
Det anbefales at anvende opvaskemidler uden fosfater
og klor for at beskytte miljøet.
Enzymerne udvikler en særlig grad af effektivitet ved
temperaturer i nærheden af 50° C, og derfor kan man
med enzymholdige opvaskemidler udføre opvasken ved
lavere temperaturer og opnå samme resultat som ved
opvask på 65° C.
Foretag en korrekt dosering af opvaskemidlet i henhold
til anvisningerne fra producenten, vandets
hårdhedsgrad, tilsmudsningsgraden og mængden af
opvask for at undgå at spild af vand og el. Selvom
opvaskemidlet er biologisk nedbrydeligt, indeholder det
elementer, der ændrer naturens balance.
Servicetjeneste
Inden der rettes henvendelse til Servicecentret,
skal man gøre følgende:
Undersøg, om fejlen selv kan afhjælpes (se Fejl og
afhjælpning).
Start programmet for at kontrollere, om fejlen er
udbedret.
Hvis ikke, se kontakt et Autoriseret Teknisk
Servicecenter.
Kontakt aldrig ikke autoriserede teknikere.
Oplys om følgende:
fejlens art,
opvaskemaskinens modeltype (Mod.),
serienummeret (S/N).
Disse oplysninger findes på typeskiltet på apparatet
(se Beskrivelse af opvaskemaskinen).
.
,)
Spar på energien og værn om miljøet
Spar på vand og energi
Start kun opvaskemaskinen, når den er helt fyldt. Mens
man venter på, at maskinen fyldes op, kan man
forebygge mod dårlig lugt med cyklussen Iblødsætning
(se Programmer).
Vælg et egnet program til typen af opvask og mængden
af snavs i henhold til Programtabellen:
- Ved normalt snavset opvask kan man bruge p
ogrammet Eco, som sparer på el- og vandforbrug.
- Hvis maskinen kun er halvt fuld, skal man vælge
Halv fyldning (se Start og brug).
* Findes kun på nogle modeller.
47
Page 48

Fejl og afhjælpning
Hvis opvaskemaskinen ikke fungerer korrekt, skal man altid først kontrollere følgende punkter, inden man henvender til
,)
Servicecentret.
Fejl:
Mulig årsag / Løsning:
Opvaskemaskinen starter ikke.
Opvaskemaskinen tømmer ikke
vand ud.
Opvaskemaskinen støjer.
Der er kalkrester eller hvide
belægninger på opvask og glas.
Der er blålige streger eller
afmærkninger på opvask og glas.
Opvasken er ikke tør.
Opvasken bliver ikke ordentlig ren.
• Stikket er ikke sat ordentligt i stikkontakten, eller der er
strømudfald.
• Lågen til opvaskemaskinen er ikke ordentligt lukket.
• Der er indstillet til Forsinket start (se Start og brug).
• Programmet er ikke færdigt.
• Afløbsslangen er bøjet (se Installation).
• Afløbet er tilstoppet.
• Filteret er tilstoppet med madrester.
• Opvasken støder mod hinanden og mod spulearmene.
• Der er for meget skum: Opvaskemidlet er ikke doseret korrekt
eller er ikke egnet til maskinopvask. (se Start og brug).
• Der mangler salt, eller mængden af salt er ikke afstemt i
henhold til vandets hårdhed (se Afspændingsmiddel og salt).
• Låget til saltbeholderen er ikke lukket ordentligt.
• Der mangler afspændingsmiddel, eller doseringen er
utilstræ kkelig.
• Opvasken kan ikke tåle opvask i maskine.
• Der er fyldt for meget afspændingsmiddel i.
• Der er valgt et program uden tørring.
• Der mangler afspændingsmiddel, eller doseringen er
utilstræ kkelig (se Afspændingsmiddel og salt).
• Doseringen af afspændingsmiddel er forkert.
• Kurvene er overfyldt (se Fyldning af kurve).
• Opvasken er ikke placeret ordentligt.
• Spulearmene kan ikke dreje frit.
• Opvaskeprogrammet er for mildt (se Programmer).
• Der er for meget skum: Opvaskemidlet er ikke doseret korrekt
eller er ikke egnet til maskinopvask. (se Start og brug).
• Låget på afspæ ndingsmiddelbeholderen er ikke lukket korrekt.
• Filteret er snavset eller tilstoppet (se Vedligeholdelse).
• Der mangler salt (se Afspændingsmiddel og salt).
Opvaskemaskinen tager ikke vand
ind / Alarm for lukket hane.
(Kontrollamperne for Salt,
Afspændingsmiddel, Tørring og
Afslutning blinker).
Alarm for fejl på elektroventil
for vandtilførsel.
(Kontrollamperne for Salt,
Afspændingsmiddel og Tørring
blinker).
Alarm for
vandtilførselsslange/Tilstoppet
vandindtagningsfilter.
(Kontrollamperne for Salt,
Afspændingsmiddel, Opvask, Tørring
og Afslutning blinker).
48
• Der mangler vand i vandforsyningen.
• Slangen til vandtilførsel er bø jet (se Installation).
• Åbn for hanen. Opvaskemaskinen starter efter få minutter.
• Maskinen er blokeret, fordi der ikke blev reageret, da
kontrollamperne for
for maskinen på ON/OFF tasten, åbn for vandhanen og tryk på
samme tast efter 20 sekunder. Omprogrammér maskinen og
genstart.
• Sluk for maskinen på ON/OFF tasten, og tænd igen efter et
minut. Hvis alarmen bliver ved, skal man lukke for vandhanen
for at undgå spild, trække stikket ud og ringe til
servicetjenesten.
• Sluk for maskinen på ON/OFF tasten. Luk for vandhanen for at
undgå spild, og træ k stikket ud.
Kontroller, at vandindtagningsfiltret ikke er tilstoppet af snavs.
(se afsnittet om "Vedligeholdelse")
Salt
Afspændingsmiddel
og
blinkede. Sluk
Page 49

Käyttöohjeet
ASTIANPESUKONE
FI
Suomi, 49
LKF 720
Yhteenveto
Asennus, 50-51
Sijoittaminen ja vaaitus
Vesi- ja sähköliitännät
Varoituksia ensimmäiselle pesukerralle
Tekniset tiedot
Laitteen kuvaus 52
Kokonaiskuva
Ohjauspaneeli
Korien täyttäminen, 53
Alakori
Ruokailuvälinekori
Yläkori
Käynnistys ja käyttö, 54-55
Astianpesukoneen käynnistys
Pesuaineen lisääminen
Pesun lisätoiminnot
Ohjelmat, 56
Ohjelmataulukko
Huuhteluaine ja suola, 57
Huuhteluaineen lisääminen
Elvytyssuolan lisääminen
Huolto ja hoito, 58
Veden ja sähkövirran pois sulkeminen
Astianpesukoneen puhdistaminen
Ikävien hajujen välttämiseksi
Suihkuvarsien puhdistaminen
Syöttöveden suodattimen puhdistus
Suodattimien puhdistaminen
Jos olet poissa pitkän aikaa
Varotoimet, suosituksia ja Huoltoapu 59
Yleisturvallisuus
Hävittäminen
Säästä rahaa ja luontoa
Ennen huoltoapuun yhteyden ottamista
Häiriöt ja korjaustoimet, 60
Page 50

Asennus
FIN
On tärkeää säilyttää tämä ohjekirja, jotta sitä
voidaan tutkia tarvittaessa. Myynnin, luovutuksen tai
muuton yhteydessä varmista, että se pysyy yhdessä
laitteen kanssa.
Lue ohjeet huolellisesti: niissä on tärkeitä tietoja
asennuksesta, käytöstä ja turvallisuudesta.
Muuton yhteydessä pidä laite pystyasennossa,
tarvittaessa kallista sitä takalaitaa kohden.
Sijoittaminen ja vaaitus
1. Poista laite pakkauksestaan ja tarkista, ettei se ole
vahingoittunut kuljetuksen aikana.
Jos siinä on havaittavissa vaurioita, älä liitä sitä ja ota
yhteys jälleenmyyjään.
2. Sijoita astianpesukone siten, että sen sivulaidat tai
takalaita koskettavat viereisiä huonekaluja tai seinää.
Laite voidaan myös upottaa jatkuvan työtason alle
(katso Asennusohjeita).
3. Asenna laite tasaiselle ja kovalle lattialle. Tasoita
epätasaisuudet ruuvaten etutukijalkoja auki tai kiinni,
kunnes laite on vaakatasossa. Huolellinen vaaitus antaa
vakautta sekä estää tärinää, äänekkyyttä ja siirtymistä.
4*. Taemman tukijalan säätämiseksi käsittele punaista,
astianpesukoneen alla etukeskiosassa sijaitsevaa,
kuusikulmaista holkkia kuusiokoloavaimella (8mm)
kiertäen myötäpäivään korkeuden lisäämiseksi ja
vastapäivään sen vähentämiseksi. (katso ohjelappua,
joka on asiakirjojen liitteenä)
*
Veden syöttöletkun liittäminen.
Kylmävesiliitäntään: ruuvaa syöttöletku hanaan, jonka
liitinosa on ¾ putkikierteitetty; ennen liittämistä anna
veden juosta, kunnes se on kirkasta, jotta mahdolliset
epäpuhtaudet eivät tuki laitetta.
Liitännät lämminvesihanaan: mikäli on kyseessä
keskitetty lämmitysjärjestelmä lämpöpattereilla,
astianpesukone voidaan liittää lämpimän veden
hanaan, kunhan veden lämpötila ei ylitä 60°C.
Ruuvaa letku hanaan kuten kuvattu kylmän veden
liitännässä.
Jos syöttöletkun pituus ei riitä, käänny erikoisliikkeen
tai valtuutetun teknikon puoleen (katso Huoltoapu).
Vedenpaineen tulee sisältyä arvoihin, jotka kuvataan
Teknisten tietojen taulukossa (katso viereen).
Ole varovainen, että letku ei taitu tai joudu
puristuksiin.
Vesi- ja sähköliitännät
Sähkö- ja vesilaitteistojen sopeuttaminen asennusta
varten tulee suorituttaa ainoastaan pätevällä
henkilöstöllä.
Astianpesukonetta ei tule asettaa letkujen tai
sähköjohtojen päälle.
Laite tulee liittää veden syöttöverkostoon uusia
letkuja käyttäen.
Älä käytä uudelleen vanhoja letkuja.
Veden syöttöletkut (A) ja poistoletkut (B) sekä sähkön
syöttöjohto voidaan suunnata oikealle tai vasemmalle
parhaan mahdollisen asennuksen suorittamiseksi (katso
kuvaa).
Ylivuotosuoja.
Sen takaamiseksi, että ei tapahdu vuotoja,
astianpesukone:
- on varustettu järjestelmällä, joka keskeyttää veden
tulon häiriön tai sisäisten vuotojen tapauksessa.
Jotkut mallit on varustettu ylimääräisellä turvalaitteella,
New Acqua Stop
rikkoutumisen tapauksessa.
*, joka estää vuodot myös syöttöletkun
VAROITUS: VAARALLINEN JÄNNITE!
Veden syöttöletkua ei tule missään tapauksessa leikata,
koska se sisältää jännitteen alaisia osia.
* Olemassa vain tietyissä malleissa.
50
Page 51

Veden poistoletkun liittäminen
Liitä poistoletku taittamatta sitä viemäriputkistoon, jonka
halkaisija on vähintään 4 cm. Tai kiinnitä se lavuaarin tai
kylpyammeen laidalle; poistoletkun vapaa pää ei saa
jäädä veden alle.
Erityinen muovinen
A
kulmakappale* helpottaa
parhaan mahdollisen
asennon löytämistä: kiinnitä
kulmakappale tiukasti
seinään, jotta vältetään
letkun liikkuminen ja veden
joutuminen tyhjennysaltaan
ulkopuolelle.
Letkun osa, joka on merkitty
kirjaimella A, tulee sijoittaa 40 100 cm:n korkeudelle
lattiasta ( katso kuvaa).
Ei suositella käyttämään jatkoletkuja.
Suojaliuska veden tiivistymistä vastaan*
Sen jälkeen kun astianpesukone on upotettu paikalleen,
avaa luukku ja liimaa läpinäkyvä tarraliuska puisen
tason alle sen suojaamiseksi mahdolliselta veden
tiivistymiseltä.
Varoituksia ensimmäiselle pesukerralle
Asennuksen jälkeen, juuri ennen ensimmäistä pesua,
täytä suolasäiliö kokonaan vedellä ja vasta sen jälkeen
lisää noin 1 kg suolaa ( katso Huuhteluaine ja
elvytyssuola): on normaalia, että ylimääräinen vesi
vuotaa pois. Valitse veden kovuusaste (katso kappaletta
Huuhteluaine ja elvytyssuola). Suolan lisäämisen
jälkeen SUOLAN PUUTTUMISEN
Suolasäiliön täyttämättä jättäminen voi
vahingoittaa veden pehmennintä ja lämmittävää
elementtiä.
* merkkivalo sammuu.
FIN
Sähköliitäntä
Ennen pistokkeen työntämistä pistorasiaan varmista, että:
pistorasia on maadoitettu ja että se on lain
vaatimusten mukainen;
pistorasia kestää koneen tehon
enimmäiskuormituksen, joka osoitetaan luukussa
olevassa teknisten tietojen arvokilvessä (katso
Astianpesukoneen kuvaus );
(katso kappaletta Astianpesukoneen kuvaus);
syöttöjännite on luukun sisäpuolella olevassa
arvokilvessä osoitettujen arvojen rajoissa;
pistorasia on yhteensopiva laitteen pistokkeen
kanssa. Päinvastaisessa tapauksessa pyydä, että
valtuutettu teknikko vaihtaa pistokkeen (katso
Huoltoapu); älä käytä jatkojohtoja tai
haaroitusrasioita.
Laitteen asennuksen jälkeenkin sähköjohdon ja
verkkopistorasian tulee sijaita siten, että ne voidaan
saavuttaa helposti.
Johtoa ei saa taittaa tai se ei saa joutua puristuksiin.
Mikäli sähkönsyöttöjohto on vahingoittunut, se tulee
vaihdattaa välittömästi valmistuttajalla tai valtuutetulla
huoltoliikkeellä, jotta voidaan välttää kaikki mahdolliset
riskit. (Katso Huoltoapu)
Tekniset tiedot
Mitat
Täyttömäärä
Syöttöveden paine
Syöttöjännite
Kokonaisottoteho
Sulake
Leveys, cm: 60
Korkeus, cm: 85
Syvyys, cm: 60
12 perusruokailuvälinesarja
0,05 ÷ 1MPa (0.5 ÷ 10 bar)
4,3 psi – 145 psi
katso tietolaattaa
katso tietolaattaa
katso tietolaattaa
Tämä astianpesukone
noudattaa seuraavia
Euroopan yhteisön
direktiivejä:
-73/23/CEE, 19/02/73
(Pienjännite) ja sitä
seuraavat muutokset;
-89/336/EEC, joka on
päivätty 03/05/89
(Sähkömagneettinen
yhteensopivuus) ja siihen
myöhemmin tehdyt
muutokset;
-97/17/CE (Merkintä)
-2002/96/CE
Valmistaja kieltäytyy kaikesta vastuusta, mikäli näitä
määräyksiä ei noudateta.
* Olemassa vain tietyissä malleissa.
51
Page 52

Laitteen kuvaus
FIN
Kokonaiskuva
1. Yläkori
2. Ylempi suihkuvarsi
3. Kääntyvät väliseinämät
4. Korin korkeuden säädin
5. Alakori
6. Alempi suihkuvarsi
7. Ruokailuvälinekori
8. Pesusuodatin
9. Suolasäiliö
10. Pesuainelokerot ja huuhteluainesäiliö
11. Arvokilpi
12. Ohjauspaneeli
***
Ohjauspaneeli
Merkkivalo Suola
puuttuu*
Merkkivalo ON-OFF
Näppäin
On-Off/Reset
Merkkivalo
Huuhteluaine
puuttuu*
NappulaOhjelmien
valinta
Näppäin ja merkkivalo
Viivästetty käynnistys
Näppäin ja merkkivalo
Puolitäyttö*
Näppäin ja
merkkivalo
Monitoimitabletit*
Merkkivalo Loppu ja
viivästetty käynnistys 9 h.*
Merkkivalo Kuivaus ja
viivästetty käynnistys 6 h.*
Merkkivalo Pesu ja
viivästetty käynnistys 3 h.*
Näppäin ja merkkivalo
Start/Tauko
52
*** Vain kokonaan upotettavissa malleissa.
* Olemassa vain tietyissä malleissa.
Page 53

Korien täyttäminen
Ennen korien täyttämistä tulee astiat puhdistaa ruuan
tähteistä sekä lasit ja mukit tyhjentää niihin jääneistä
nesteistä.
Täyttämisen jälkeen tulee tarkistaa, että suihkuvarret
pyörivät vapaasti.
Alempi kori
Alempaan koriin voidaan laittaa kattiloita, kansia, lautasia,
salaattikulhoja, ruokailuvälineitä, jne. sen mukaisesti kuin
näytetään täyttöesimerkeissä.
Lautaset ja isot kannet tulee asettaa mieluiten korin laidoille
varoen samalla, ettei estetä ylemmän suihkuvarren kiertoliikettä.
Jotkut astianpesukonemallit on varustettu kallistuvilla lohkoilla
joita voidaan käyttää pystysuorassa asennossa lautasten
tukemiseen tai vaakasuorassa asennossa kattiloiden ja
salaattikulhojen asettamiseksi.
Ruokailuvälinekori
Ruokailuvälinekori voi olla erilainen astianpesukoneen mallista
riippuen: ei-koottava, koottava, liukuva. Ei-koottava
ruokailuvälinekori voidaan asettaa ainoastaan alakorin
etuosaan.
Koottava ruokailuvälinekori voidaan jakaa kahteen osaan, tätä
ratkaisua suositellaan erityisesti silloin, kun suoritetaan pesu
puolitäytöllä (malleissa, joissa olemassa kyseinen lisätoiminto),
ja se voi olla liukuva, siis se voidaan asettaa mihin tahansa
paikkaan alemmassa korissa luisuttaen sitä kiinteiden tai
kallistuvien liitteiden välissä.
- Se on varustettu liukuvilla väliseinämillä, joiden avulla
ruokailuvälineet saadaan asetettua paremmin.
*,
Säädä yläkorin korkeus
Astioiden laittamisen helpottamiseksi on mahdollista säätää
yläkori ylempään tai alempaan asentoon:
Suositellaan säätämään ylemmän korin korkeus
KORI TYHJÄNÄ.
Älä KOSKAAN nosta tai laske koria vain yhdeltä
puolelta.
avaa korin ohjaimien kiinnikkeet oikealla
sekä vasemmalla ja vedä kori ulos;
aseta se ylä- tai ala-asentoon, anna sen
liukua ohjaimia myöten, kunnes myös
etummaiset pyörät ovat sisällä, lopuksi
sulje kiinnikkeet ( katso kuvaa ).
Jos kori on varustettu kahvoilla Dual
Space
* (katso kuvaa), vedä yläkori
ääriasentoon, ota kiinni korin laidoilla
olevista kahvoista ja siirrä ylös- tai
alaspäin; anna korin pudota takaisin
paikalleen saattaen sitä.
Yläkorin täyttöesimerkkejä
Alakorin täyttöesimerkkejä
FIN
Veitset ja muut terävät esineet tulee asettaa
ruokailuvälinekoriin terävä osa alaspäin tai ne tulee sijoittaa
yläkorin väliseinämiin vaakatasoon.
Ruokailuvälinekorin sijoitusesimerkkejä
Ylempi kori
Herkkien ja kevyiden astioiden lastaaminen: lasit, kahvikupit
ja teemukit, pikkulautaset, matalat salaattiastiat, pannut,
matalat hieman likaiset kattilat, täyttöesimerkkien mukaisesti.
Mukit ja kupit: aseta ne kääntyville väliseinämille
Pitkät ja terävät veitset, tarjoiluvälineet: aseta ne
kääntyville väliseinämille
**.
**.
Konepesuun sopimattomia astioita
Puuesineet tai muut välineet, joiden kädensija on puuta tai
sarvea sekä esineet, joissa on liimattuja osia.
Esineet, jotka on valmistettu alumiinista, kuparista,
messingistä, tinajuotteesta tai tinasta.
Kuumuutta kestämättömät muoviastiat.
Antiikkiset tai käsinmaalatut posliiniesineet
Vanhat hopeaesineet. Sen sijaan uudet hopeaesineet voidaan
pestä hellällä ohjelmalla varmistaen, että ne eivät joudu
kosketuksiin muiden metallien kanssa.
Suositellaan hankkimaan konepesun kestävät astiat.
* Olemassa vain tietyissä malleissa.
** Sekä lukumäärä että sijainti voivat vaihdella.
53
Page 54

Käynnistys ja käyttö
FIN
Astianpesukoneen käynnistys
1. Avaa vesihana.
2. Paina näppäintä ON/OFF: kaikki ohjauspaneelin
merkkivalot syttyvät muutamaksi sekunniksi.
3. Avaa luukku ja annostele pesuaine ( katso alle).
4. Lastaa korit (katso Korien täyttäminen) ja sulje luukku.
5. Valitse ohjelma kiertäen OHJELMIEN VALINNAN
nappulaa myötäpäivään: aseta kohdakkain nappulassa
oleva merkki ohjelman numeron tai tunnuksen kanssa.
START/TAUKO näppäintä vastaava merkkivalo vilkkuu.
6. Valitse pesun lisätoiminnot* (katso viereen).
7. Käynnistä painaen näppäintä START, merkkivalo
lopettaa vilkkumisen ja muuttuu kiinteäksi. Pesun
merkkivalon syttyminen ilmoittaa ohjelman
käynnistyneen.
8. Ohjelman lopuksi syttyy merkkivalo LOPPU (kiinteä
valo). Sammuta laite painaen näppäintä ON-OFF, sulje
vesihana ja irrota pistoke pistorasiasta.
9. Odota muutama minuutti ennen astioiden poistamista,
ettet polta itseäsi. Tyhjennä korit aloittaen alemmasta
korista.
Käynnissä olevan ohjelman muuttaminen
Väärin valittu ohjelma voidaan muuttaa, jos se on juuri
alkanut: pesun käynnistyttyä pesujakson muuttamiseksi
sammuta kone painaen pitkään näppäintä ON/OFF/
Reset ja käynnistä se uudelleen samalla näppäimellä
sekä valitse uudelleen ohjelma ja halutut lisätoiminnot.
Astioiden lisääminen
Paina näppäintä Start/Tauko (näppäimen merkkivalo
vilkkuu). Avaa luukku varoen ulostulevaa höyryä ja lisää
astiat. Paina näppäintä Start/Tauko (kiinteä valo): jakso
käynnistyy uudelleen.
Pesuaineen lisääminen
Pesutulos riippuu myös pesuaineen oikeasta
annostelusta, liika pesuaine ei pese tehokkaammin
vaan saastuttaa ympäristöä.
Käytä ainoastaan astianpesukoneille tarkoitettua
pesuainetta.
ÄLÄ KÄYTÄ käsinpesuun tarkoitettuja pesuaineita.
Pesuaineen liiallinen käyttö voi jättää vaahtojäämiä
jakson lopussa.
Tabletteja suositellaan käyttämään ainoastaan
malleissa, joissa on olemassa lisätoiminto
MONITOIMITABLETIT.
Parhaat pesun ja kuivauksen tulokset saadaan
ainoastaan käytettäessä jauhemaista pesuainetta,
nestemäistä kirkastusainetta ja suolaa.
lokero A: Pesuaine
lokero B: Esipesun pesuaine
1. Avaa kansi C painaen painiketta
D.
2. Annostele pesuaine
Ohjelmataulukon mukaisesti:
jauheena: lokerot A ja B.
tabletteina: kun ohjelma vaatii 1
tabletin, laita se lokeroon A ja
sulje kansi; kun ohjelma vaatii 2
tablettia, laita toinen niistä altaan pohjalle.
3. Poista pesuainejäämät altaan laidoilta ja sulje kansi,
kunnes se napsahtaa kiinni.
Painettaessa näppäintä Start/Tauko koneen
laittamiseksi taukotilaan, keskeytetään sekä ohjelma
että mahdollisesti asetettu viivästetty käynnistys.
Tässä vaiheessa ei voida vaihtaa ohjelmaa.
Vahingossa tapahtuneet keskeytykset
Jos luukku avataan pesun aikana tai tapahtuu
sähkökatkos, ohjelma keskeytyy. Se jatkuu
keskeytyskohdasta, kun luukku suljetaan tai sähkövirta
palautuu.
54
Pesun lisätoiminnot*
LISÄTOIMINTOJA voidaan asettaa, muuttaa tai
peruuttaa ainoastaan sen jälkeen, kun on valittu
pesuohjelma, ja ennen kuin on painettu näppäintä
Start/Tauko.
Voidaan valita ainoastaan valitun ohjelmatyypin
kanssa yhteensopivia lisätoimintoja. Jos lisätoiminto ei
sovi yhteen valitun ohjelman kanssa, (katso
ohjelmataulukko) vastaava merkkivalo vilkkuu nopeasti
3 kertaa.
Jos valitaan lisätoiminto, joka ei sovi yhteen aiemmin
asetetun lisätoiminnon tai pesuohjelman kanssa,
yhteen sopimaton lisätoiminto vilkkuu 3 kertaa ja se
sammuu, kun sen sijaan viimeksi valittu asetus jää
voimaan.
Väärin asetetun lisätoiminnon valinnan peruuttamiseksi
paina uudelleen vastaava näppäintä.
* Olemassa vain tietyissä malleissa.
Page 55

Puolitäyttö *
Jos astioita on vähän, voidaan suorittaa puolitäyttö
säästäen vettä, energiaa ja pesuainetta. Valitse ohjelma
ja sen jälkeen paina näppäintä PUOLITÄYTTÖ:
merkkivalo syttyy.
Muista puolittaa myös pesuainemäärä.
Suositellaan käyttämään jauhemaista pesuainetta.
Tämä lisätoiminto ei ole käytettävissä ohjelman
kanssa: Speed
Viivästetty käynnistys*
Ohjelman käynnistystä voidaan siirtää 3, 6, 9 tuntia:
1: Halutun pesuohjelman ja mahdollisten lisätoimintojen
valinnan jälkeen paina näppäintä VIIVÄSTETTY
KÄYNNISTYS: merkkivalo syttyy.
2: Valitse viivästetty käynnistys painaen peräkkäin
viivästetyn käynnistyksen näppäintä, pesun (3 tuntia),
kuivauksen (6 tuntia) ja lopun (9 tuntia) merkkivalot syttyvät
peräkkäin.
Painamalla vielä kerran viivästetyn käynnistyksen
näppäintä peruutetaan lisätoiminto ja merkkivalo sammuu.
3. Tapahtuneen valinnan jälkeen painettaessa näppäintä
Start/Tauko käynnistyy käänteinen ajanlasku, viivästetty
käynnistys vilkkuu ja näppäin Start/Tauko lakkaa
vilkkumasta (kiinteä valo).
3. Asetetun ajan kuluttua umpeen VIIVÄSTETYN
KÄYNNISTYKSEN merkkivalo sammuu ja ohjelma
käynnistyy.
Jakson käynnistyttyä ei ole mahdollista asettaa
viivästettyä käynnistystä.
Monitoimitabletit*
Tällä lisätoiminnolla optimoidaan pesu- ja kuivaustulos.
Käytettäessä monitoimitablettia paina näppäintä
MONITOIMITABLETIT, vastaava merkkivalo syttyy.
Lisätoiminto Monitoimitabletit pidentää
ohjelman kestoaikaa.
Lisätoiminto MONITOIMITABLETIT jää asetukseksi
seuraavien koneen käynnistysten yhteyteen, mikäli
sitä ei kytketä pois päältä.
Tabletteja suositellaan käyttämään ainoastaan
malleissa, joissa on olemassa lisätoiminto
MONITOIMITABLETIT.
Tätä lisätoimintoa ei suositella ohjelmille, jotka
eivät sisällä monitoimitablettien käyttövaihtoehtoa
(katso lisätoimintojen taulukkoa).
Lisätoimintojen
taulukko
Tehopesu
Normaali
Daily A 60/
Päivittäinen
Liotus
Eco
Speed 25’ /
Pikapesu
Kristallilasi
A
Viivästetty
käynnistys
Kyllä
Kyllä
Kyllä
Kyllä
Kyllä
Kyllä
Kyllä
B
Puolitäyttö
Kyllä
Kyllä
Kyllä
Kyllä
Kyllä
EI
Kyllä
C
Monitoimi
tabletit
Kyllä
Kyllä
Kyllä
EI
Kyllä
Kyllä
Kyllä
FIN
* Olemassa vain tietyissä malleissa.
55
Page 56

Ohjelmat
FIN
Jos astiat ovat vain hieman likaisia tai ne on huuhdeltu vedellä etukäteen, alenna huomattavasti
käytettävää pesuainemäärää.
Ohjelman numero ja tyyppi sekä lisätoiminnot vaihtelevat astianpesukoneen mallin mukaan.
LISÄTOIMINTOJA varten tutustu Lisätoimintojen taulukkoon Käynnistyksen ja käytön sivulla.
Ohjeita ohjelmien
valitsemiseksi
Erittäin likaiset astiat ja
kattilat (Älä käytä herkille
astioille).
Normaalilikaiset astiat ja
kattilat. Päivittäinen
perusohjelma.
Likainen päivittäinen
rajoitetun astiamäärän
kanssa
(4 ruokailuvälinesarjaa +
1 kattila + 1
paistinpannu).
Alustava pesu
odotettaessa
lisäastioita seuraavan
ruokailun yhteydessä
Ekologinen pesu
alhaisella
energiankulutuksella,
sopii astioille ja kattiloille.
Taloudellinen ja nopea
jakso käytettäväksi vähän
likaisten astioiden pesuun
heti käytön jälkeen. (2
lautasta + 2 lasia + 4
ruokailuvälinettä + 1
kattila + 1 pieni
paistinpannu)
Taloudellinen ja nopea
jakso käytettäväksi
herkille, kovaa lämpötilaa
kestämättömille astioille
heti käytön jälkeen. (12
viinilasia + herkkää
lautasta).
Ohjelma
Tehopesu
Normaali
Päivittäinen /
Daily A 60
Liotus
*
Eco
Pikapesu
Kristallilasi
Pesuaine
(A) = lokero A
(B) = lokero B
Jauhe Neste
30 g (A)
25 g (A)
5 g (B)
25 g (A) 25 ml (A)
Ei
25 g (A)
5 g (B)
25 g (A) 25 ml (A)
30 g (A) 30 ml (A)
30 ml (A)
25 ml (A)
5 ml (B)
Ei
25 ml (A)
5 ml (B)
Monitoimit
abletit
1 (A)
1 (A)
1 (A)
Ei
1 (A)
1 (A)
1 (A)
Ohjelmat
, joihin
kuuluu
kuivaus
Kyllä
Kyllä
Ei
Ei
Kyllä
Ei
Kyllä
Lisätoi
minnot
A-B-C
A-B-C
A-B-C
A-B
A-B-C
A-C
A-B-C
Ohjelman kesto
(poikkeama
±10%)
Tuntia Min.
2.15’
1.45’
1.00’
0.08’
2.20’
0.25’
1.30’
Huomaa:
ohjelmien Päivittäinen ja Pikapesu parhaat pesu- ja kuivaustulokset saadaan helpoiten noudattaen annettuja
ruokailuvälinemääriä.
* Eco-ohjelma noudattaa standardia EN-50242 ja se kestää kauemmin kuin muut ohjelmat, tästä huolimatta se kuluttaa
vähemmän energiaa ja kunnioittaa enemmän ympäristöä.
Huomautus testauslaitoksille: yksityiskohtaisten tietojen saamiseksi vertailevan EN testin ehdoista, lähetä pyyntö
sähköpostiosoitteeseen: ASSISTENZA_EN_LVS@indesitcompany.com
Pesuaineen annostelun helpottamiseksi on hyvä tietää, että:
1 ruokalusikka = 15 g jauhemaista pesuainetta = 15 ml nestemäistä pesuainetta -1 ruokalusikka = 5 g jauhemaista pesuainetta =
5 ml nestemäistä pesuainetta
56
Page 57

Huuhteluaine ja
elvytyssuola
Käytä ainoastaan erityisiä konepesuaineita.
Älä käytä ruokasuolaa tai teollisuussuolaa tai
käsipesuaineita.
Noudata pakkauksen ohjeita.
Jos käytetään monitoimituotteita ei ole tarpeen lisätä
kirkastetta, mutta suositellaan lisäämään suolaa
erityisesti, jos vesi on kovaa tai erittäin kovaa. Noudata
pakkauksen ohjeita.
Jos ei lisätä suolaa eikä huuhteluainetta on
normaalia, että SUOLAN PUUTTUMISEN
HUUHTELUAINEEN PUUTTUMISEN
* ja
* merkkivalot
jatkavat vilkkumistaan.
Huuhteluaineen lisääminen
Huuhtelukirkaste helpottaa astioiden kuivausta lisäten
veden luistavuutta astioiden pinnoilla siten, että niille ei jää
juovia tai läikkiä.
Huuhteluainesäiliö tulee täyttää:
kun ohjauspaneeliin syttyy HUUHTELUAINEEN
PUUTTUMISEN
sisälle.
Säädä huuhteluaineen annostelu
Jos et ole tyytyväinen pesu- tai kuivaustulokseen, on
mahdollista säätää huuhteluaineen annostelua. Kierrä
ruuvimeisselillä säädintä (F) valiten 6 asennon välillä
(tehtaalla säädöksi valitaan asento 4):
jos astioissa on havaittavissa valkoisia juovia käännä
pienempiä numeroita kohden (1-3).
jos on havaittavissa vesipisaroita tai kalkkiläikkiä käännä
isompia numeroita kohden (4-6).
Veden kovuuden asettaminen
Astianpesukone on varustettu veden pehmentimellä, joka erityistä
astianpesukoneille tarkoitettua elvytyssuolaa käyttäen toimittaa
kalkitonta vettä astioiden pesuun.
Tässä astianpesukoneessa on säätömahdollisuus, jonka avulla
voidaan vähentää saastumista ja optimoida pesutulokset veden
kovuuden mukaan. Kovuustiedot ovat saatavilla paikalliselta
vesilaitokselta.
- Sammuta kone näppäimellä ON/OFF ja avaa luukku.
- Aseta OHJELMAN VALINTAnappula ensin 5. ohjelman
kohdalle ja sen jälkeen 1. ohjelman kohdalle ja uudelleen 5.
ohjelman kohdalle.
- Paina näppäintä ON/OFF, jakson vaiheiden merkkivalot
vilkkuvat; nyt voidaan valita kovuusaste. Jokaista ohjelmaa
vastaa yksi kovuusaste.
* merkkivalo;
1. Avaa säiliö kiertäen korkkia (G)
vastapäivään.
2. Kaada huuhteluaine varovasti,
jotta se ei loisku yli. Mikäli
tapahtuu näin, puhdista loiskeet
välittömästi kuivalla rievulla.
F
3. Ruuvaa korkki kiinni.
G
Älä KOSKAAN kaada
huuhteluainetta suoraan altaan
Esim.: 1. ohjelma, kovuusaste 1
2. ohjelma, kovuusaste 2 jne... korkeintaan viidelle
(Kalkinpoistolaite on asetettu tehtaalla tasolle 3).
- Toiminnosta poistumiseksi odota noin 30 sekuntia tai sammuta
kone näppäimellä ON/OFF.
Jos käytetään monitoimitabletteja, täytä joka tapauksessa
suolasäiliö.
Veden kovuuksien taulukko
°dH °fH mmol/l taso
0 6 0 10 0 1 1
6 11 11 20 1,1 2 2
12 17 21 30 2,1 3 3
17 34 31 60 3,1 6 4
34 50 61 90 6,1 9
0°f - 10°f suositellaan, että ei käytetä suolaa.
* Tällä asetuksella jaksojen kesto voi hieman
pidentyä.
(°dH = saksalaisina kovuusasteina - °fH = ranskalaisina
kovuusasteina - mmol/l = millimoolia/litra)
* tasolle.
*
5
Elvytyssuolan lisääminen
Hyvän pesutuloksen varmistamiseksi tulee tarkistaa, että
suolasäiliö ei ole koskaan tyhjä. Elvytyssuola poistaa veden
kalkkipitoisuutta estäen siten kalkkijäämien muodostumista
astioihin.
Suolasäiliö on sijoitettu astianpesukoneen alaosaan ( katso
Kuvaus) ja se tulee täyttää:
kun vihreä kelluke* ei ole näkyvissä katsottaessa suolan
korkkia;
kun ohjauspaneeliin syttyy HUUHTELUAINEEN
PUUTTUMISEN* merkkivalo;
1. Vedä alakori ulos ja ruuvaa säiliön
korkki irti kiertäen vastapäivään.
2. Vain ensimmäistä käyttökertaa
varten: täytä säiliö vedellä sen laitoja
myöten.
3. Aseta paikalleen toimitettu
suppilo* (katso kuvaa) ja täytä säiliö
suolalla laitoja myöten (noin 1 kg);
on normaalia, että vesi läikkyy
hieman yli.
4. Ota pois suppilo*, poista suolajäämät aukon suulta; huuhtele
korkki juoksevan veden alla ennen kuin se ruuvataan kiinni
asettaen sen pää alaspäin ja antaen veden virrata neljästä
raosta, jotka ovat tähden muodossa korkin alapuolella. (korkki
vihreän kellukkeen kanssa
Suositellaan, että tämä toimenpide suoritetaan jokaisen
suolan lisäyksen yhteydessä.
Sulje korkki hyvin, jotta säiliöön ei pääse pesuainetta pesun
aikana (se voisi vahingoittaa pysyvästi veden pehmennintä).
Kun tulee lisätä suolaa, täytä säiliö juuri ennen
pesujakson suorittamista, jotta puhdistetaan heti
suolasäiliöstä ulos tullut suolaliuos.
*)
* Olemassa vain tietyissä malleissa.
FIN
57
Page 58

Huolto ja hoito
Veden ja sähkövirran pois sulkeminen
FIN
Sulje vesihana jokaisen pesun jälkeen, jotta vältetään
vuotovaara.
Irrota pistoke sähköpistorasiasta konetta
puhdistaessasi sekä huoltotoimenpiteitä
suoritettaessa.
Astianpesukoneen puhdistaminen
Ulkopinta ja ohjauspaneeli voidaan puhdistaa
pehmeällä veteen kostutetulla liinalla. Älä käytä
liuottimia
tai hankaavia aineita.
Sisäallas voidaan puhdistaa mahdollisista tahroista
liinalla, joka on kostutettu vedellä ja pienellä
etikkamäärällä.
Ikävien hajujen välttämiseksi
Jätä luukku aina hieman avoimeksi, jotta kosteus
haihtuu.
Puhdista säännöllisesti luukun ja
pesuainelokeroiden tiivisteet kostealla sienellä.
Siten voidaan välttää ruuantähteiden kerääntymät,
jotka aiheuttavat helposti ikävää hajua.
Suihkuvarsien puhdistaminen
Voi tapahtua, että ruuantähteet tarttuvat suihkuvarsiin
tukkien reiät, joista veden tulisi tulla ulos: ajoittain on
hyvä tarkistaa ja puhdistaa ne ei-metallisella harjalla.
Molemmat suihkuvarret ovat purettavissa.
Puhdista hanan ulostulossa sijaitseva syöttöveden suodatin
säännöllisin väliajoin.
- Sulje vesihana.
- Ruuvaa auki veden syöttöletkun pää, poista suodatin ja
puhdista se hellävaraisesti juoksevan veden avulla.
- Laita suodatin takaisin ja ruuvaa letku kiinni.
Suodattimien puhdistaminen
Suodattava yksikkö muodostuu kolmesta suodattimesta, jotka
puhdistavat pesuveden ruuantähteistä laskien sen takaisin
kiertoon: hyvän pesutuloksen saamiseksi ne tulee puhdistaa.
Puhdista suodattimet säännöllisin väliajoin.
Astianpesukonetta ei tule käyttää ilman suodattimia tai
suodatin irrallisena.
Muutaman pesukerran jälkeen tarkista suodattava yksikkö
ja tarpeen mukaan puhdista se huolellisesti juoksevan veden
alla ei-metallista harjaa käyttäen ja noudattaen alla kuvattuja
ohjeita:
1. kierrä myötäpäivään sylinterimäistä suodatinta C ja
vedä se ulos (kuva 1).
2. Poista suodatinkuppi B painaen kevyesti sivusiivekkeitä
(Kuva 2);
3. Irrota ruostumaton suodatinlautanen A (kuva 3).
4. Tarkista allas ja poista mahdolliset ruokajäämät. ÄLÄ
POISTA KOSKAAN pesupumpun suojusta (väriltään
musta osa) (Kuva 4).
Ylemmän suihkuvarren
irrottamiseksi tulee ruuvata irti
muoviholkki kiertäen
vastapäivään. Ylempi
suihkuvarsi tulee asentaa
takaisin siten, että ylöspäin
osoittaa puoli, jossa on
enemmän reikiä.
Alempi suihkuvarsi irtoaa
painettaessa kielekkeitä, jotka
sijaitsevat laidoilla, ja vetäen
sitä ylöspäin.
Syöttöveden suodattimen puhdistus*
Mikäli vesiletkut ovat uusia tai ne ovat olleet pois käytöstä
pidemmän aikaa, ennen liitännän suorittamista anna veden
juosta letkujen läpi varmistaaksesi, että ne ovat puhtaat ja
ettei niissä ole tukoksia. Mikäli tätä varotointa ei suoriteta,
on olemassa vaara, että veden sisääntulokohta tukkiutuu
vahingoittaen astianpesukonetta.
C
B
C
1
2
A
3
Suodattimien puhdistuksen jälkeen asenna suodattava
yksikkö takaisin ja yhdistä se oikein sen istukkaan; tämä on
erittäin tärkeää astianpesukoneen hyvän toiminnan
takaamiseksi.
4
Jos olet poissa pitkän aikaa
Irrota sähköliitännät ja sulje vesihana.
Jätä luukku puoliavoimeksi.
Palattuasi suorita ensimmäinen pesu ilman astioita.
58
* Olemassa vain tietyissä malleissa.
Page 59

Varotoimet, suosituksia
ja Huoltoapu
Laite on suunniteltu ja valmistettu kansainvälisten
turvallisuusmääräysten mukaisesti. Nämä varoitukset
toimitetaan turvallisuussyistä ja ne tulee lukea huolellisesti.
Yleinen turvallisuus
Laite on suunniteltu ei-ammattimaiseen käyttöön
asuinhuoneistossa.
Laitetta tulee käyttää astioiden pesuun kotitalouksissa;
sitä tulee käyttää ainoastaan aikuisten henkilöiden tässä
kirjasessa olevien ohjeiden mukaisesti.
Laitetta ei tule asentaa ulos edes suojattuun tilaan, koska
on erittäin vaarallista jättää se alttiiksi sateelle ja
ukkoselle.
Älä kosketa astianpesukonetta paljain jaloin.
Älä irrota pistoketta sähköpistorasiasta johdosta
vetämällä vaan ota kiinni pistokkeesta.
Tulee ehdottomasti sulkea vesihana ja irrottaa
sähköpistoke ennen puhdistus- ja huoltotoimenpiteiden
suorittamista.
Vian tapauksessa älä missään tapauksessa yritä avata
pesukoneen sisäosia korjauksen suorittamiseksi.
Älä koskaan kosketa vastusta.
Älä nojaa tai istu avoimelle luukulle: laite voi kaatua.
Luukkua ei tule pitää aukinaisessa asennossa, koska
siihen voidaan vahingossa kompastua.
Pidä pesu- ja huuhteluaineet lasten ulottumattomissa.
Pakkaukset eivät ole lasten leluja.
Hävittäminen
Pakkaustarvikkeiden hävittäminen: noudata paikallisia
määräyksiä, siten pakkausmateriaalit voidaan käyttää
uudelleen.
Sähköisten ja elektronisten laitteiden muodostamia jätteitä
käsittelevä Euroopan direktiivi (RAEE) 2002/96/CE
määrää, että hävitettäviä kodinkoneita ei tule laittaa
tavallisten kaupunkijätteiden sekaan. Hävitettävät laitteet
tulee kerätä erikseen, jotta optimoidaan materiaalien
kierrätys ja estetään mahdolliset vahingot terveydelle ja
ympäristölle. Ruudutettu roskakoritunnus on liitetty
kaikkiin tuotteisiin muistuttamaan velvollisuudesta lajitella
jätteet.
Pesuaineet ilman fosfaatteja, ilman klooria sekä
entsyymien kanssa.
Suositellaan lämpimästi käyttämään pesuaineita, jotka
eivät sisällä fosfaatteja tai klooria ja jotka siten täyttävät
paremmin ympäristövaatimukset.
Entsyymit kehittävät erityisen tehokkaan vaikutuksen jo
50°C läheisyydessä ja siten entsyymejä sisältävät
pesuaineet mahdollistavat pesun alhaisilla lämpötiloilla
kuitenkin aikaansaaden saman pesutuloksen kuin
saataisiin 65°C:ssa.
Annostele pesuaine valmistajan ohjeiden, veden
kovuuden, astioiden määrän ja likaisuuden mukaan, jotta
voidaan välttää pesuaineen liikakäyttö. Vaikka
pesuaineet ovat biohajoavia, ne sisältävät aineita, jotka
muuttavat luonnon tasapainoa.
Huoltoapu
Ennen huoltoapuun yhteyden ottamista:
Tarkista, voidaanko häiriö poistaa omin voimin (katso
Häiriöt ja korjaustoimet).
Käynnistä ohjelma uudelleen tarkistaaksesi, onko
ongelma jo ratkennut.
Mikäli häiriö ei ole korjaantunut, ota yhtyettä valtuutettuun
tekniseen huoltoliikkeeseen.
Älä koskaan käytä valtuuttamattomia teknikoita.
Ilmoita:
häiriön tyyppi;
koneen malli (Mod.);
sarjanumero (S/N).
Nämä tiedot löytyvät laitteessa olevasta
arvokilvestä ( katso Laitteen kuvaus).
FIN
Kodinkoneiden asianmukaista hävittämistä koskevien
lisätietojen saamiseksi haltijat voivat kääntyä paikallisen
julkisen palvelun tai jälleenmyyjien puoleen.
Säästä ja kunnioita ympäristöä
Säästä vettä ja energiaa
Käynnistä astianpesukone ainoastaan täyteen lastattuna.
Odotettaessa sen täyttymistä, voit estää ikävien hajujen
muodostumisen huuhtelujaksolla (katso Ohjelmat).
Valitse ohjelma pestävien astioiden tyypin ja likaisuuden
mukaan noudattaen ohjelmataulukon suosituksia:
- käytä normaalilikaisille astioille Eco-ohjelmaa, joka takaa
alhaisen energian ja veden kulutuksen.
- jos laite ei ole täysi, käytä puolitäyttöä
Käynnistys ja käyttö).
Jos sopimuksesi sähkölaitoksen kanssa sisältää
halvemman hinnan tiettyinä kellonaikoina, suorita pesut
alhaisen hinnan aikoina. Lisätoiminto viivästetty
käynnistys
suorittamiseksi kyseisinä aikoina.
* (katso Käynnistys ja käyttö) auttaa pesujen
* (katso
* Olemassa vain tietyissä malleissa.
59
Page 60

Häiriöt ja korjaustoimet
04/2008 - Xerox Business Services
Mikäli laitteessa on havaittavissa toimintahäiriöitä, tarkista seuraavat kohdat ennen huoltoapuun soittamista.
FIN
Häiriöt:
Mahdolliset syyt / Ratkais u:
195069078.00
Astianpesukone ei käynnist y.
Astianpesukone ei poista vettä.
Astianpesukone on äänekäs.
Astioihin ja laseihin on jäänyt
kalkkijäämiä tai ohut valkoinen
päällyskerr os.
Astioissa ja laseissa on sinertäviä
juovia tai läikkiä.
Astiat on kuivattu huonosti.
Astiat eivät t ule puhtaiksi.
• Pistoketta ei ole työ nnetty kunnolla pistorasiaan tai talossa ei
ole sä hkö virtaa.
• Astianpesukoneen luukku ei ole kunnolla kiinni.
• On asetettu Viivä s tetty kä ynnistys (
• Ohjelma ei ole vielä päättynyt.
• Veden poistoletku on taittunut (
• Lavuaarin poistoaukko on tukkiutunut.
• Suodatin on tukkiutunut ruuantähteistä.
• Astiat tö rm ä ile vät tois iins a ja s uih kutinvarsiin.
• Liikaa vaahtoa: pesuaineitta ei ole annosteltu oikein tai se ei
sovellu konepesuun.
• Suola puuttuu tai s en annostelu on riittäm ätön kä yte ttä vän
veden kovuuteen nä hden (
• Suolasäiliön korkkia ei ole suljettu kunnolla.
• Huuhteluaine on loppunut tai annostelu on riittäm ätön.
• As tiat ovat luis tam attom asta ma teri aalis ta.
• Huuhteluaineen annostelu on liiallista.
• On valittu ohjelm a ilman kuivausta.
• Huuhteluaine on loppunut tai annostelu on riittäm ätön (
Huuhteluaine ja suola
• Huuhteluaineen säätö ei ole sopiva.
• Korit ovat liian täynn ä (
• Astiat on aseteltu sopimattomasti.
• Suihkutinvarre t eivät voi pyö riä vapaasti.
• Pesuohjelma on liian kevyt (
• Liikaa vaahtoa: pesuaineitta ei ole annosteltu oikein tai se ei
sovellu konepesuun.
• Huuhteluaineen korkkia ei ole suljettu kunnolla.
• Suodatin on likainen tai tukkiutunut (
• Suola puuttuu (katso Huuhteluaine ja suola).
katso Käynnistys ja käyttö
katso Asennus
(Katso Käynnistys ja käyttö).
katso Huuhteluaine ja suola
).
k atso Korien tä yttäminen
katso Ohjelmat
(Katso Käynnistys ja käyttö).
katso Huolto ja hoito
).
).
katso
).
).
).
).
Astianpesukoneeseen ei tule
vettä/Hälytys hana kiinni.
(suolan, huuhteluaineen, kuivauksen
ja lopun merkkivalot vilkkuvat)
Hälyt ys ve dentäytön solenoidin
via n vu ok si
(suolan, huuhteluaineen ja
kuivauksen merkkivalot vilkkuvat)
Veden syöttöletkun
hälytys/Syöttöveden suodatin
tukkeutunut.
(suolan, huuhteluaineen, pesun,
kuivauksen ja lopun merkkivalot
vilkkuvat)
60
• Vesijohtoverkossa ei ole vettä .
• Veden syö ttö letku on taittunut (katso As ennus).
• Avaa hana ja laite käynnistyy muutaman m inuutin kuluttua.
• Laite on lukkiutunut, koska ei ole ryhdytty toimenpiteisiin
suolan ja huuhteluai neen
Sammuta kone nä ppäimellä ON/OFF, avaa hana ja noin 20
sekunnin kuluttua käynnistä se uudelleen painaen samaa
n äppäintä . Ohjelmoi kone uudelleen ja käynnistä.
• Sammuta kone painaen näppäintä ON/OFF ja käynnistä se
uudelleen noin minuutin kuluttua. Jos hä lytys pysyy päällä, su lje
vesihana ylivuotovaaran ehkä isemiseks i, irrota pistoke
pistorasias ta ja soita Huoltoapuun.
• Sammuta kone painaen näppäintä ON/OFF. Sulje vesihana
vuotovaaran ehkäis emiseksi ja irrota sä hköpistoke.
Tarkis ta, että epäpuhtaudet eivä t ole tukkineet s yöttö veden
suodatinta. (katso kappaletta ”Huolto ja hoito”)
merkkivalojen vilkkumisen vuoksi.
 Loading...