

Page 1
LD 87LD 87
TK
GB
Bulaþýk makinesi
Yerleþtirme ve Kullaným Kýlavuzu
Dishwasher
Instructions for installation and use
Page 2
Page 3
ulaþýk makinesi
B
Bulaþýk Makineleri için pratik
rehber
Bu kitapçýk yeni beyaz eþyanýzýn size sunduðu bütün kolaylýklarý
eðlenceli bir þekilde anlatmaktadýr. Okurken bulaþýklarýnýzý daha iyi
ve temiz bir þekilde nasýl yýkayacaðýnýza ve bulaþýk makinenizin daha
uzun ömürlü olmasýný nasýl saðlayacaðýnýza dair püf noktalarý
öðreneceksiniz.
1. Kurma ve taþýma (sayfa.9)
Teslimat ve taþýnmadan sonra yapýlacak kurma iþlemi bulaþýk
makinenizin düzgün çalýþmasý için en önemli iþlemdir. Her
zaman:
1. Elektrik tesisatýnýn uygunluðunu,
2. Su giriþ ve boþaltma hortumlarýnýn doðru bir þekilde baðlanmýþ
olmasýný,
3. Bulaþýk makinenizi koyduðunuz mekanda zeminin düz
olmasýný kontrol ediniz, böylece bulaþýk makinenizin daha uzun
ömürlü ve iyi çalýþmasýný saðlamýþ olursunuz.
2. Kumanda panelinin anlaþýlmasý(sayfa.2)
Bulaþýk makinesini oluþturan kýsýmlarý öðrenirseniz makinenizi
daha kolay kullanýrsýnýz. Kumanda panelinde komutlarýn ve iç
parçalarýn detaylý bir tanýmýný bulabilirsiniz.
3. Bulaþýklar makinenin içine nasýl yerleþtirilmeli (sayfa.3)
Bu sayfada bulaþýk makinesinin en iyi þekilde nasýl yükleneceðini
ve sepetlerin nasýl daha verimli bir þekilde kullanýlacaðýný
göreceksiniz.
4. Bulaþýk makinesinin çalýþtýrýlmasý(sayfa. 4)
Bulaþýk makinesini doldurduktan sonra, uygun programý
seçmeniz, parlatýcý ve deterjaný doðru bir þekilde koymanýz
gerekecektir. Bu sayfalarý okumak yýkama iþleminin her
safhasýnda size yardýmcý olacaktýr.
5. Tuz: önemli bir dost (sayfa. 8)
Tuzun doðru miktarda kullanýmý bulaþýk makinenizin ömrünü
uzatýrken muhtemel kireçlenmeleri önleyerek bulaþýklarýnýzýn
daha iyi yýkanmasýný saðlar.
Ariston Yetkili Servisini arayýn, sorununuz en kýsa sürede servis
tarafýndan giderilecektir.
8. Sizin ve çocuklarýnýzýn emniyeti (sayfa.10)
Bu bölümü dikkatli bir þekilde okuyunuz. Montaj, kullaným ve
bakým emniyeti hakkýnda gerekli bilgileri bu bölümde
bulabileceksiniz.
9. Ýtina ve bakým (Sayfa.11)
Ayda bir filtreleri ve pervaneleri kontrol ediniz. Bu bölümde bunu
nasýl yapacaðýnýzý öðreneceksiniz.
6. Tasarruf saðlayacak faydalý ipuçlarý (sayfa.8)
Bu bölümde bulaþýklarýn temizliðinde daha iyi sonuçlar almaya
ve tasarruf saðlamaya yönelik tavsiyeler bulacaksýnýz.
7. Sorunlar ve çözümleri (sayfa.10)
Bulaþýk makinenizde bir problem varsa Ariston Yetkili Servisini
çaðýrmadan önce bu sayfalarý okuyunuz; bir dizi problem için
çözümleri burada bulabilirsiniz. Eðer sorun devam ederse
10. Bulaþýk makinenizi nasýl koruyacaksýnýz (sayfa.11)
Bu bölümde okuyacaðýnýz kurallara uyarsanýz makinenizin
ömrünü uzatmýþ olursunuz.
11. Teknik özellikler(sayfa.2)
Beyaz eþyanýzýn Avrupa yönetmeliklerine uygun tüm teknik
özelliklerini bu sayfada bulabilirsiniz.
ARISTON BULAÞIK MAKÝNESÝ - Yerleþtirme ve kullaným kýlavuzu 1
Page 4
ulaþýk makinesi
B
Bulaþýk makinenizi beraber açalým
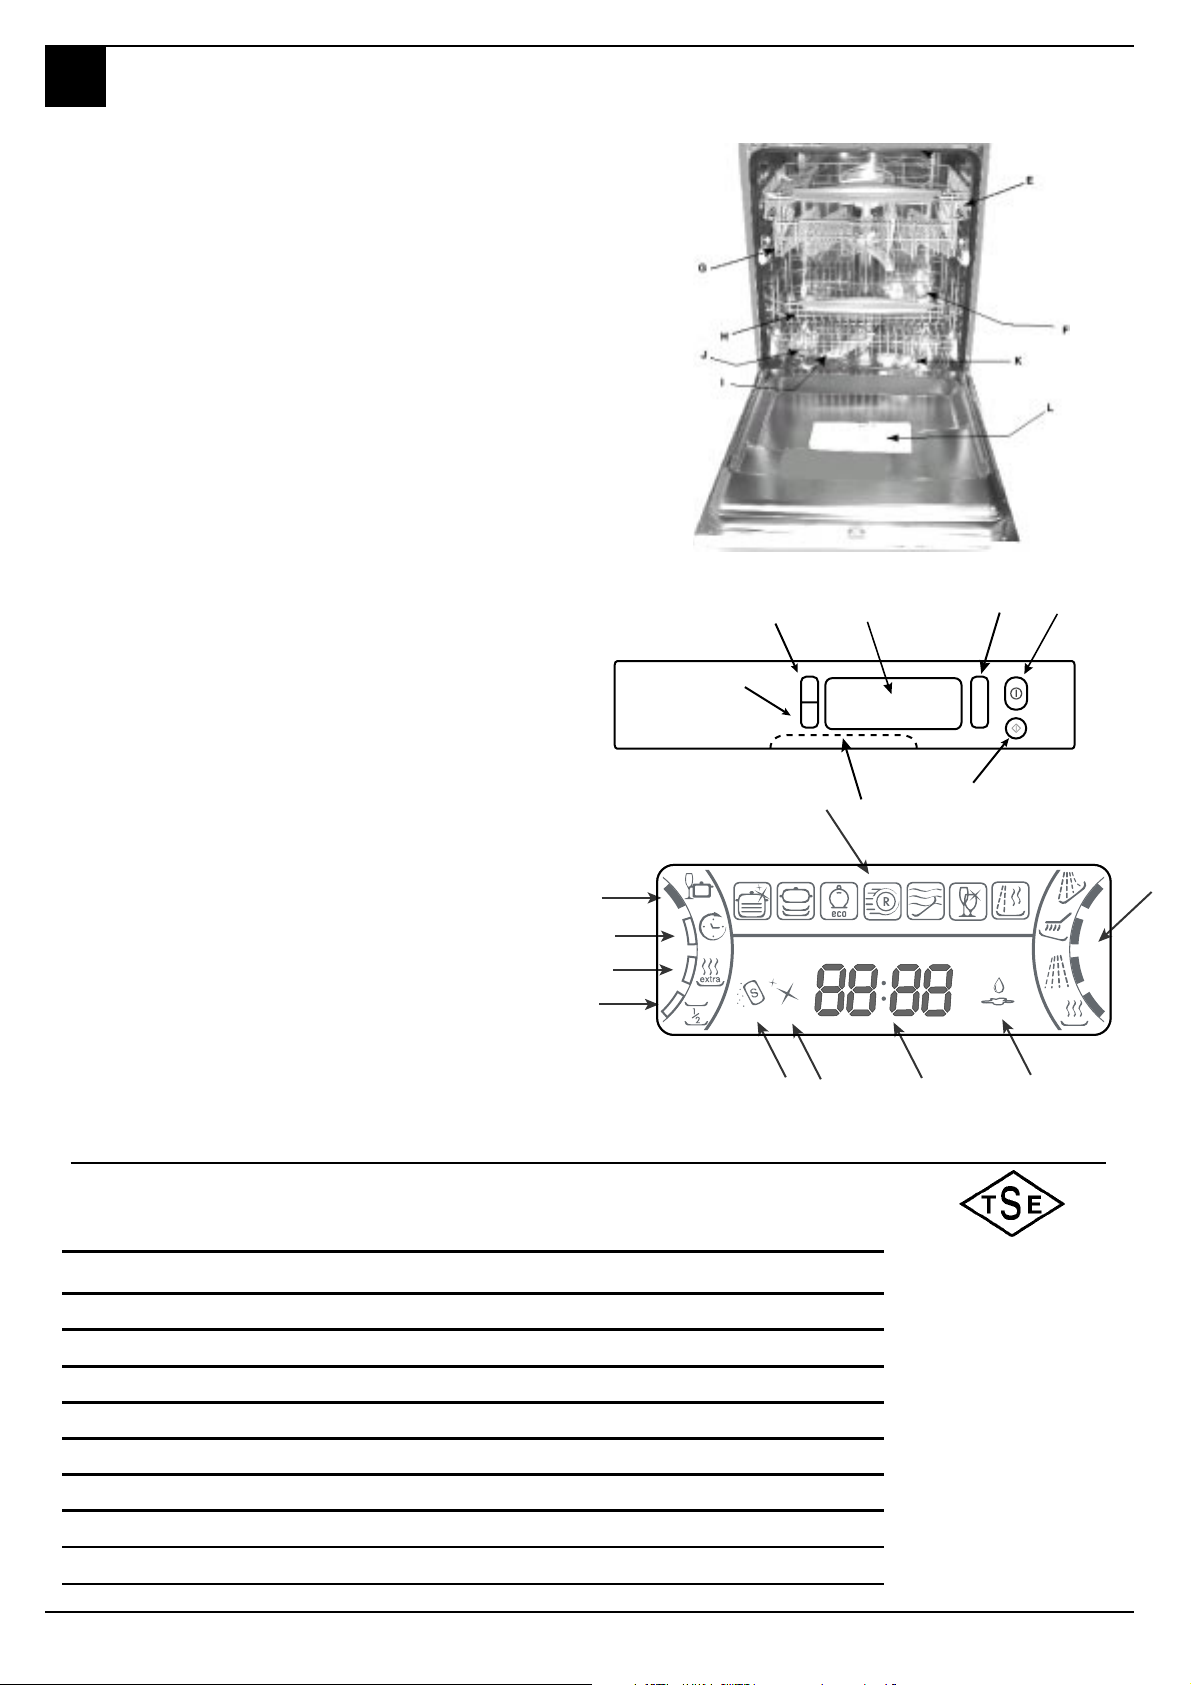
Makinenizin yapýsýný inceleyelim
Bulaþýk makinenizi oluþturan parçalarý tanýmak onu daha iyi
bir þekilde kullanmanýzý saðlayacaktýr.
E. Üst sepet
F. Üst pervane
G. Üst sepet yükseklik ayar
mekanizmasý
H. Alt sepet
I. Alt pervane
J. Tuz haznesi
K. Filtre
L. Deterjan ve parlatýcý haznesi
Kumanda emrinizde
A. Açma-kapama tuþu
Cihazý açmak için bu
düðmeye basýnýz
B. Likit kristal ekran
Yürütülmekte olan iþlemi
gösterir.
C. Kapak açma kulbu
Bulaþýk makinesinin
kapaðýný açmaya yarar.
D. Baþlat/tekrar baþlat tuþu
Baþlat/tekrar baþlat tuþu ile
program çalýþtýrýlýr, Reset ile
yapýlmýþ olan tüm ayarlar
iptal edilir.
M. Mode tuþu
Bu tuþa basmak suretiyle
Duo Yýkama,yýkama
baþlangýç saatini erteleme,
ekstra kurutma,yarým yükle
yýkama fonksiyonlarýný
seçebilirsiniz.
S. Seçim tuþu
Bu tuþa basmak suretiyle þu
iþlemleri ayarlayabilirsiniz:
baþlangýç saatini erteleme,
ekstra kurutma, sepet
seçimi.
P. Program seçim tuþu
Tercih ettiðiniz program
seçimi için bu düðmeye
basýnýz.
E. Otomatik Duo Yýkama
program ýþýklý göstergesi
Duo-Yýkama programýnýn
seçildiðini gösterir.
F. Zaman ayarý göstergesi
G. Ekstra kurutma göstergesi
H. Yýkama aþamalarý
I. Programlarýn iþaretleri
L. Çok iþlevli rakamlý
N. Alt veya üst sepet
T. Tuz göstergesi
U. Parlatýcý göstergesi
Q. Su kaçaklarýný bildiren
Baþlangýç zamanýný
erteleme fonksiyonunun
devrede olduðunu bildirir.
Ekstra kurutma ayarýnýn
yapýlmýþ olduðunu gösterir.
göstergesi
Önyýkama, yýkama,
durulamalar, kurutma.
Geniþ bir yýkama programý
alternatifleri
gösterge
Size program süresi,
baþlama saatine kalan süre
ve muhtelif hata kodlarý
hakkýnda bilgi verir.
göstergesi
Yarým yük için seçilmiþ olan
sepeti gösterir.
Tuz ilave etmek gerektiðini
hatýrlatýr.
Parlatýcý ilave etmek
gerektiðini hatýrlatýr.
gösterge
Su kaçaðý olduðu
konusunda sizi uyarýr.
A
M
S
E
F
G
N
T
B
M
s
I
C
U
L
P
P
D
H
Q
Teknik özellikler
TS11300 EN 60335-2-5
Teknik
Geniãlik 60 cm.
Derinlik 60 cm.
Yákseklik 85 cm.
Kapasite 12 kiãilik yemek takâmâ
Giriã suyu basâncâ 4,3 psi - 145 psi 30 KPaÜ 1MPa (0,3 Ü10 bar)
¬alâãma gerilimi árán plaketine bakân
Toplam gáÌ árán plaketine bakân
Sigorta árán plaketine bakân
2 ARISTON BULAÞIK MAKÝNESi - Yerleþtirme ve kullaným kýlavuzu
Bu bulaþýk makinesi
aþaðýdaki Avrupa Birliði
Normlarýna uygundur:
73/23/CEE
(Düþük gerilim) ve
sonradan yapýlan
düzenlemeler;
89/336/EEC
(elektromanyetik uyum)
ve sonradan yapýlan
düzenlemeler.
97/17/CE
(Etiketleme)
Page 5
ulaþýk makinesi
B
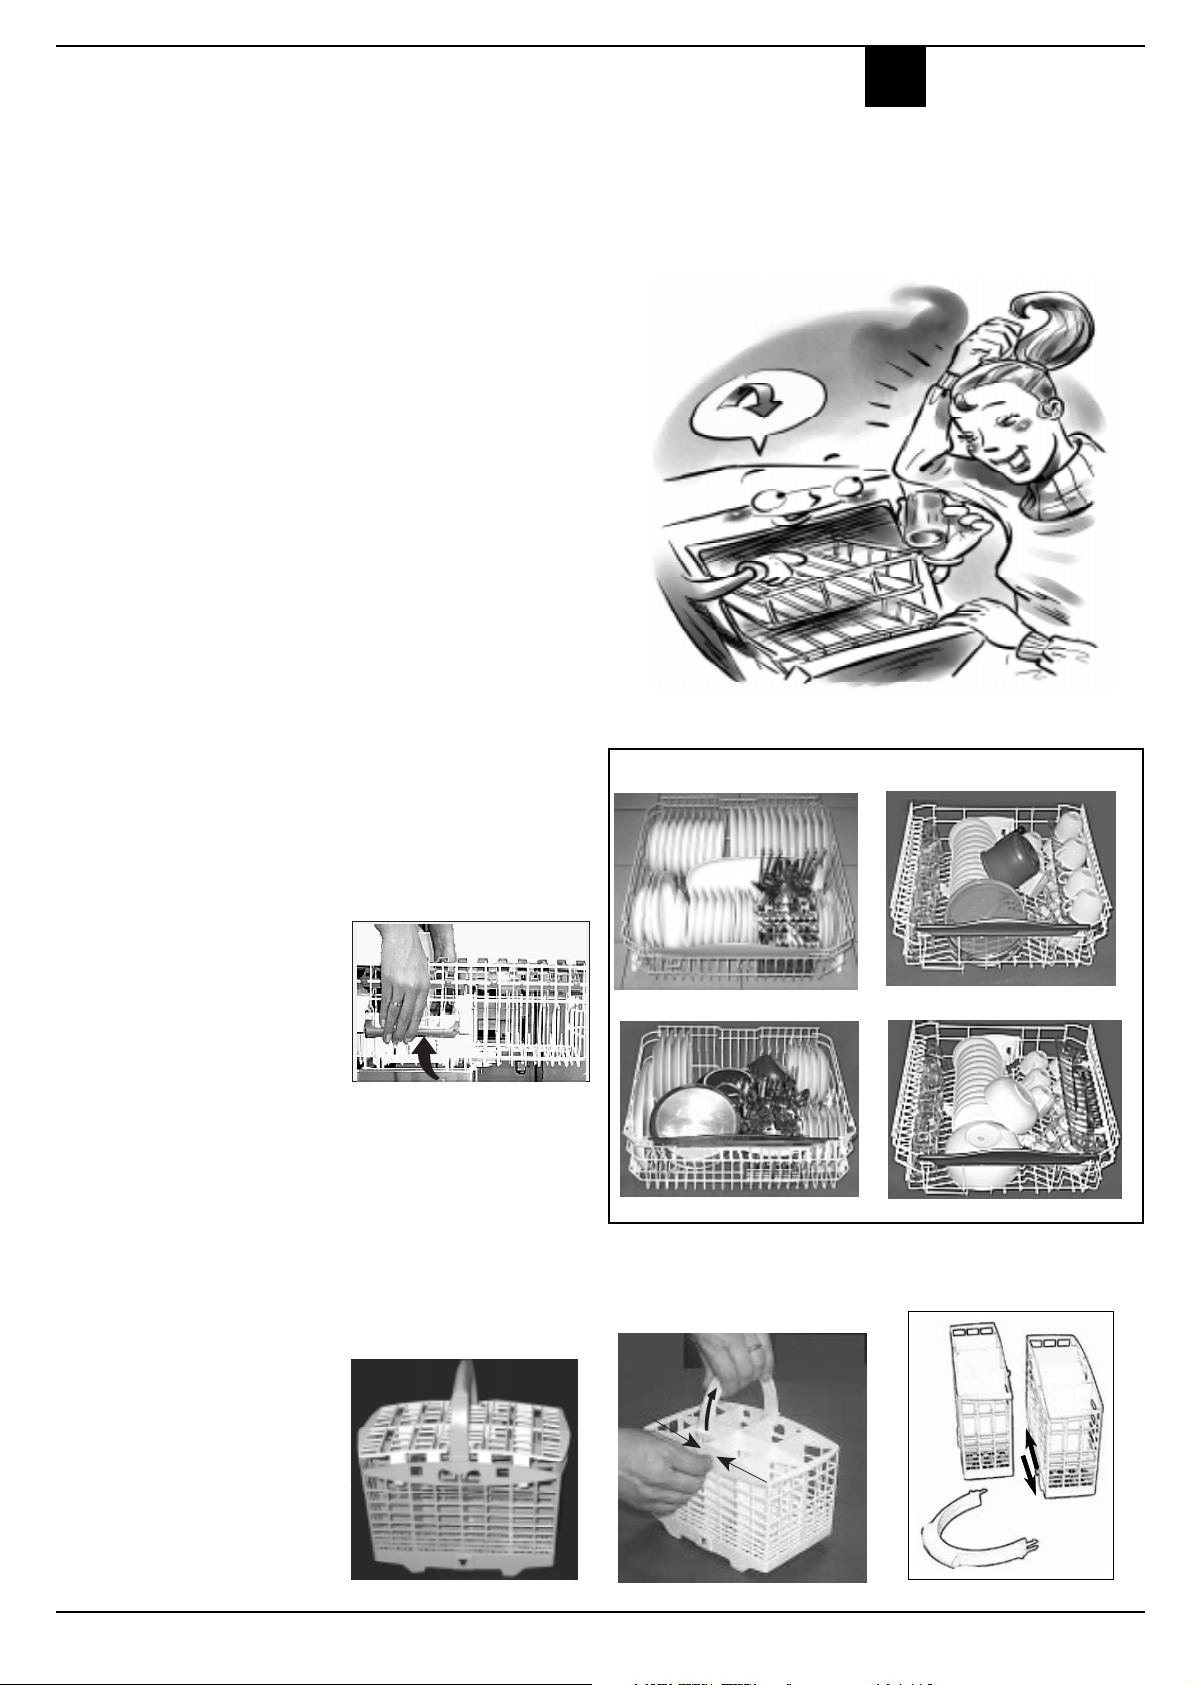
Bulaþýklarýnýzý makinenize nasýl yerleþtirmelisiniz?
Yýkama öncesinde yapacaðýnýz küçük iþlemler daha iyi yýkama sonuçlarý elde etmenizi ve bulaþýk makinenizin daha uzun
ömürlü olmasýný saðlar. Bulaþýklarýn üzerindeki büyük kalýntýlarý temizleyip fazla kurumuþ tencere ve tavalarý ýslatýp makineye
yerleþtiriniz. Bulaþýklarý yerleþtirdikten sonra pervanelerin rahat bir þekilde dönüp dönmediklerini kontrol ediniz.
Herþeyden önce.
Bulaþýklarý sepetlere
yerleþtirmeden önce yemek
kalýntýlarýný temizleyin,
böylece, yýkama veriminin
düþmesine sebep olacak filtre
týkanmalarýný önlemiþ olursun.
Tencere ve tavalarýn dibi
tutumuþsa, bunlarý yýkama
öncesinde suda bekletiniz.
Bulaþýklarý yerleþtirme
iþlemini kolaylaþtýrmak için
sepetleri dýþarý doðru çekiniz.
Alt sepete neler yerleþtirilir?
Alt sepete yýkanmasý daha zor
bulaþýklarý yerleþtirmeni
tavsiye ederiz: tencereler,
çanaklar, düz ve çukur
tabaklar, büyük ve küçük
fincanlarla bardaklar.
(fotoðraflarda yerleþtirme
örnekleri göreceksiniz).
Servis tabaklarý ve büyük
kaplar: sepetin kenarlarýna
yerleþtirilir
Tencereler, salata kaseleri:
her zaman ters çevrilmiþ bir
þekilde yerleþtirilmelidir.
Derin kaseler: eðimli olarak
yerleþtir, böylece suyun,
daha rahat dolaþýmý
saðlanarakdaha derin
temizlik elde edilir.
Bardak ve fincanlar:
þekilde gösterildiði gibi
yerleþtir.
Üst sepete neler yerleþtirilir?
Üst sepete hafif ve hassas
bulaþýklarý yerleþtiriniz:
bardaklar, çay ve kahve
fincanlarý, küçük ve büyük
tabaklar, çukur olmayan salata tabaklarý, derin ve çok kirli
olmayan tencere ve tavalar
(yerleþtirme örneklerini
fotoðraflarda görebilirsiniz).
Hafif bulaþýklarý su
tazyikinden etkilenmeyecek
þekilde yerleþtiriniz.
Üst sepet üzerlerine fincan,
uzun býçak ve servis çatalkaþýðýnýn konulabilmesi için iki
adet özel bölmeye sahiptir.
Bulaþýk makinesini
yerleþtirdikten sonra,
pervanelerin hareketinin
engellenmediðinden emin
olunuz.
Üst sepetin yükseklik ayarý
Büyük bulaþýklarýnýzý daha
rahat yerleþtirebilmek için üst
sepeti aþaðý indirebilir ya da
kaldýrabilirsiniz.
C
alt sepet
üst sepet
Çatal-býçak sepetçiðini, sapýný
ve iki
tarafýný birleþtiren mandallarý
çýkartmak suretiyle ikiye
ayýrabilirsiniz (A ve B þekillerine
bak).
Yýkayacak az çatal-býçaðýn
olduðu zamanlar bu sepetçiðin
tek tarafýný kullanabilirsin.
Bu sepet çýkarýlabilir özellikte iki
ýzgara ile donanýmlýdýr: Çatalkaþýklarý birer birer ýzgaralara
yerleþtiriniz; býçaklar ve keskin
uçlu gereçler uç kýsýmlarý aþaðý
gelecek þekilde yerleþtirilmelidir.
Yerleþtirme sýrasýnda
birbirlerine temas etmemelerine
dikkat ediniz.
Üst sepetin iki yanýnda iki kol yer
almaktadýr. Bu kollarý kullanarak
sepetlerin yüksekliðini ayarlayabilirsiniz.
A
B
ARISTON BULAÞIK MAKÝNESÝ - Yerleþtirme ve kullaným kýlavuzu 3
Page 6
ulaþýk makinesi
B
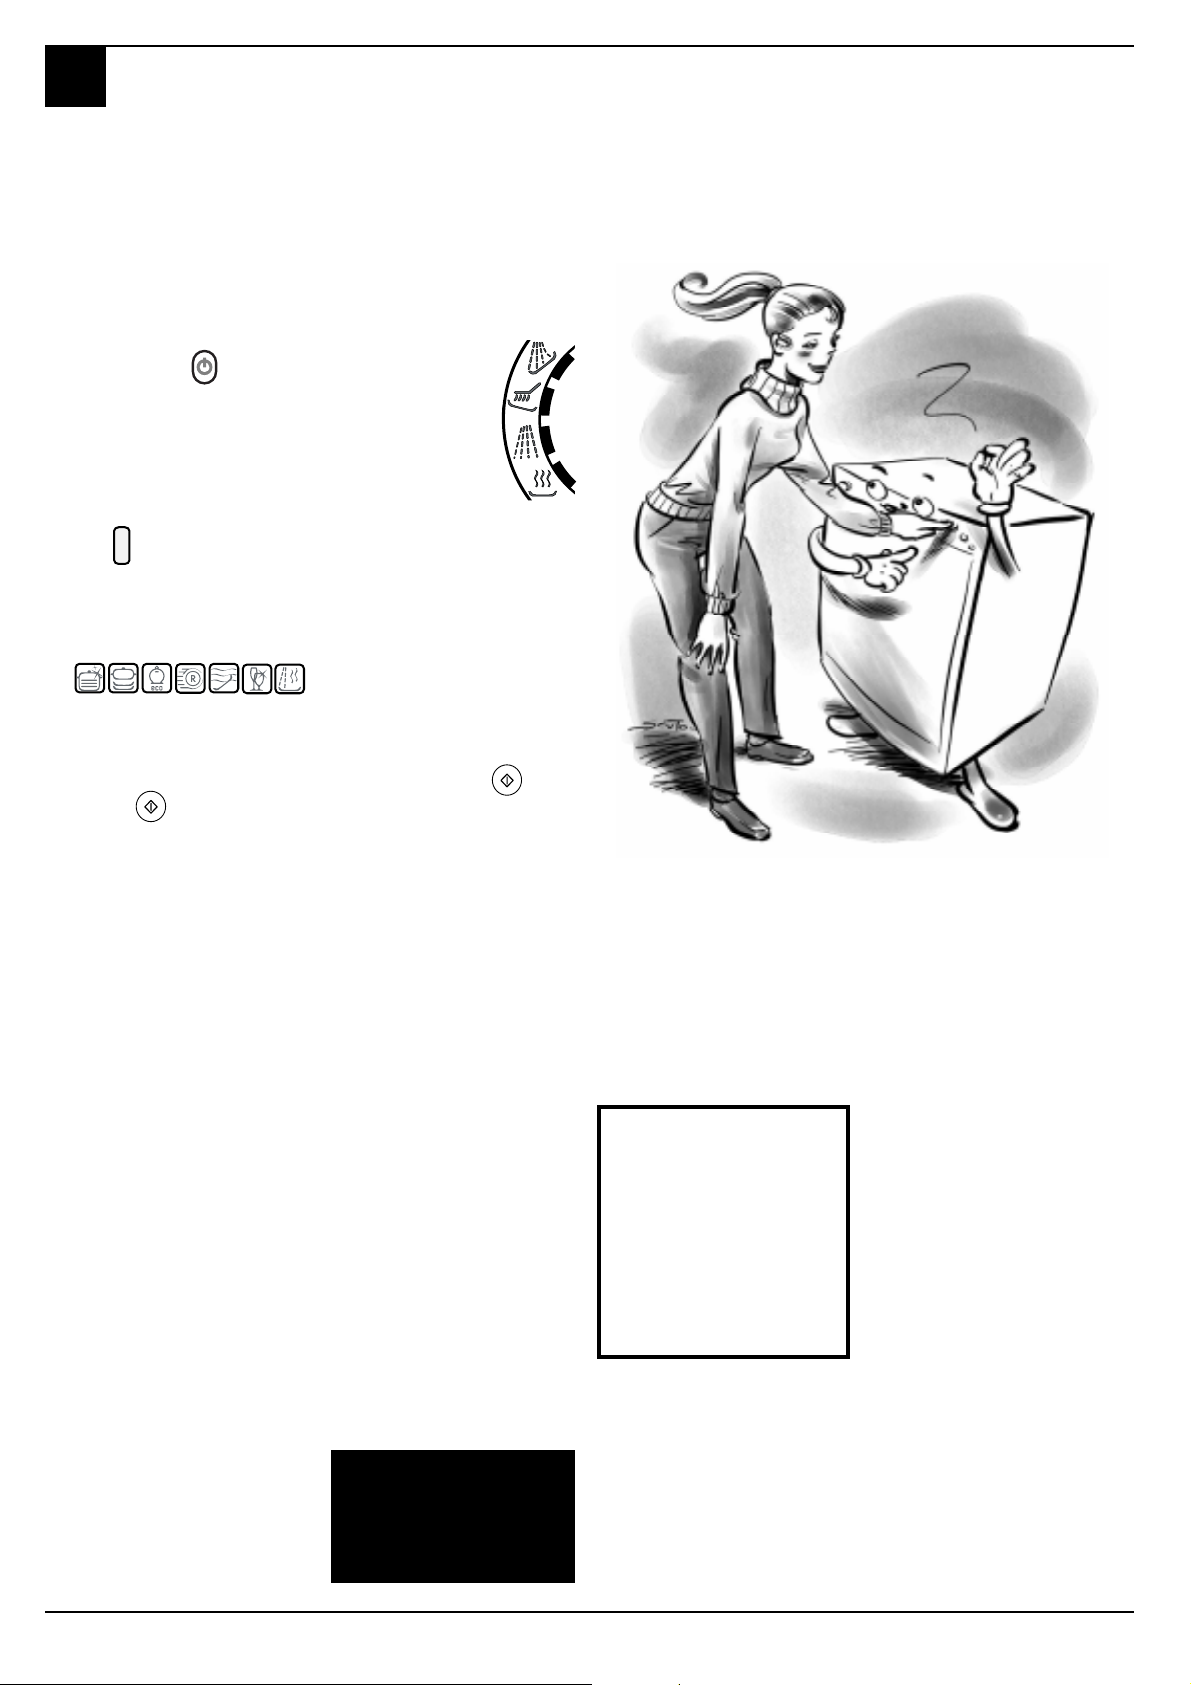
Bulaþýk makinasýný çalýþtýrmak
Hazýr mýsýnýz? Baþlayalým!
Bulaþýklarý yerleþtirdiniz ve þimdi yýkama programýný ayarlamalýsýnýz.
Öðrenmeniz birkaç dakikanýzý alacaktýr.
Herþeyden önce.
Fiþi pirize takýnýz. Su
musluðunu tamamen açýn ve
Açma-kapama tuþuna 2-3sn
basýlý tutunuz:
ekran aktifleþir ve 4 adet çizgi
belirir: bu da bulaþýk
makinesinin programlanmaya
hazýr olduðunu gösterir.
Program seçimi.
Bu P tuþuna basarak
programý seçiniz.
Düðmeye her basýþýnýzda
sesli bir ikaz duyulur ve ilgili
iþaretler arka arkaya yanar:
yýkayacaðýnýz bulaþýða en
uygun programý seçiniz (sayfa
7ya bakýnýz, program
tablosunu bulacaksýnýz).
Baþlat
program devreye girecektir,
ama kapaðý açýk unuttuysanýz
ýþýklý göstergede DOOR
yazýsý görünecek ve sizi
uyaracaktýr, kapaðý kapatýnýz
ve ayni düðmeye tekrar
basýnýz.
Sesli bir ikazdan sonra
program devreye girecek ve
ýþýklý göstergede yalnýzca
seçilmiþ olan programa ait
iþaret görüntülenecektir.
Rakamlý göstergede,
programýn bitiþine kalan
süreyi göreceksiniz. Makine
tahmini bir süreden yola
çýkarak, sensörleri sayesinde,
program ilerledikçe yýkamayý
en iyi þekilde yapacak olan
sistemin muhtelif verilerine
göre program bitimine kalan
süreyi gösterir.
tuþuna basýnýz,
Bulaþýk makinesi sizi
bilgilendirir.
Makineniz ilerleyen
yýkama
aþamalarýný
gösterir.
Ýþte aþamalarýn
iþaretleri :
Bulaþýk makineniz
yýkamanýn her
aþamasýnda hangi
kademede olduðunu size
bildirir.
Seçilmiþ olan programýn
deðiþtirilmesi.
Program seçiminde hata
yaptýysanýz, hiç korkmayýn!
Seçilmiþ olan program, yeni
baþladýysa, deðiþtirme
imkanýnýz vardýr. Tekrar
baþlat tuþuna takriben 2
saniye basýnýz:
uzunca bir sesli ikaz daha
sonra da 3 kýsa bip sesi
duyacaksýnýz. I göstergesi
sönecek ve tüm ayarlarýn iptal
edildiðini bildiren 4 tane çizgi
belirecektir.Þimdi doðru
programý tekrar
ayarlayabilirsiniz.
Yerleþtirmeyi
unuttuðunuz bulaþýk mý
var?
Herkesin baþýna gelebilir.
Açma-kapama tuþuna
basarak yürütülmekte olan
programý durdurunuz,
unuttuðunuz bulaþýklarý
yerleþtiriniz ve tekrar ayný
düðmeye basýnýz. Yýkama
iþlemi durdurulduðu yerden
itibaren tekrar devreye
girecektir.
önce
Bitti mi?
Yýkama iþleminin bittiði 2 kýsa
sesli sinyal ve ýþýklý
göstergede beliren END
yazýsýyla bildirilir.
Dikkat
A düðmesine basarak
ýþýklý göstergeyi
söndürünüz, elektrik giriþini
kesmek için fiþi prizden
çýkartýnýz; bunun için fiþin
rahatlýkla ulaþýlabilecek bir
þekilde olmasý
gerekmektedir.
Makinenin kapaðýný açýk mý
unuttunuz?
Iþýklý göstergede DOOR
yazýsý yanýp sönecektir. Kapaðý
kapatýnýz, programýn devreye
girdiðini göreceksiniz.
Elektrik mi kesildi?
Makinenin kapaðýný mý
açtýnýz?
Program durur, elektrik
geldiðinde veya kapaðý
kapattýðýnýzda tekrar
çalýþmaya baþlar. Herþey
kontrol altýnda!
Su musluðunu kapatýnýz.
Bulaþýklarý çýkartmadan
önce birkaç dakika bekleyin:
Bulaþýklarý çýkartmadan
önce programýn
tamamen bitmiþ
olduðundan emin
olunuz!
4 ARISTON BULAÞIK MAKÝNESi - Yerleþtirme ve kullaným kýlavuzu
yanarsýnýz! Biraz
beklerseniz daha iyi kurutma
performansý ede ederiz.
Önce alt sepeti boþaltýnýz.
Page 7
ulaþýk makinesi
B
Duo Yýkama
programý:
Ýki sepette farklý yýkama
yapabilmeyi saðlayan özel bir
programdýr: üst sepette,
kristal ve bardaklar için
hassas yýkama, altta ise,
tencere ve tavalar için kuvvetli
yýkama.
Mod
Duo-Yýkama iþaretini
seçiniz,þimdi de
tuþuna basýnýz: on ile
seçeceksiniz ve ilgili kare
ýþýklanacak, off ile iptal
edeceksiniz; takriben 5 saniye
sonra menüden, otomatik
olarak, çýkar.
Þimdi Baþlat düðmesine
basýnýz, program bir bip
sesiyle beraber baþlayacaktýr.
Ne zaman çalýþtýracaðýna
siz karar verin.
Bulaþýk makinesini
yerleþtirdiniz, program
seçiminden önce veya sonra
ne zaman çalýþtýrmak
istediðinizi de
ayarlayabilirsiniz.
M (Mod) tuþuna basýnýz ve
zaman ayarý iþaretini seçiniz:
tuþuna basýnýz ve
(Seçim)
görüntülenir.
Fikir mi deðiþtirdiniz?
Fikir deðiþtirdiniz ve baþka bir
saate ayarlamak istiyorsanýz
bu iþlemi Mod ve Seçim
tuþlarýna basmak suretiyle
yapabilirsiniz.
Eðer zaman ayarýný iptal
ederek bulaþýklarýnýzý hemen
yýkamak istiyorsanýz, Seçim
düðmesine, arka arkaya,
sýfýrlayana kadar basman
gerekir. Iþýklý göstergenin
söndüðünü göreceksiniz :
Daha fazla bir
kurutma mý
istiyorsunuz?
Programý çalýþtýrmadan M
(Mod) tuþuna, arka arkaya,
kuvvetli kurutma iþaretini G
seçene kadar basýnýz,
yanýndaki karecik yanar. S
(Seçim) tuþuna basýnýz ve On
pozisyonunu seçerek ekstra
kurutmayý ayarlayýnýz, Off ise
devre dýþý býrakmak içindir.
Unutmayýn ki ekstra kurutma
seçildiðinde yýkama programý
bulaþýklarýný daha iyi
kurutabilmek için, daha uzun
sürecektir.
Yarým yük mü
yýkamak istiyorsunuz?
Deterjan miktarýnýn
da yarýsný kullanmayý
unutmayýnýz
Az bulaþýðýnýz var ve hepsini
bir tek sepete koyarak su,
deterjan ve enerji tasarrufu
yapmaya karar verdiniz. N
iþaretini seçene kadar Mod
tuþuna arka arkaya basýnýz:
yandaki kareciðin ýþýklandýðýný
göreceksiniz. S (Seçim)
tuþunu yarým yükü üst
veya alt sepet için
seзebilirsiniz
Dьрmeye her basэюta bir bip
sesi duyulacak ve ilgili iюaret
эюэklanacaktэr. Iюэklэ
gцstergede seзilen sepetin
эюэрэ yanacaktэr. Off hiзbir
seзim yapэlmadэрэnэ gцsterir
Seзimini yaptэktan sonra
Baюlat tuюuna basarak
programэ зalэюtэrэnэz.
Bu seçenek tüm programlarla
uygulanabilir.
.
yandaki kareciðin söndüðünü
göreceksiniz.Þimdi de S
(Seçim) düðmesine basýnýz,
böyelece yýkamayý 1 ile 24
saat sonrasý arasýnda
yapabilmek için
ayarlayabilirsiniz. Düðmeye
bir defa daha basarsanýz
OFF (seçim yok) yazýsý
belirir.
Düðmeye her basýþta bir bip
sesi duyulur; seçimini
yaptýktan sonra, kapaðýn
kapalý olmasýna dikkat ediniz
ve (BAÞLAT)
basarak programý baþlatýnýz.
Iþýklý göstergede, çalýþamaya
baþlamasý için kalan sürenin
geri sayýmý görüntülenecektir.
Geri sayýmýn sonunda
program devreye girer ve ýþýklý
göstergede programýn
bitimine kalan ortalama süre
tuþuna
Yýkama iþlemi
sürerken veya hemen
bitmiþken bulaþýk
makinesinin kapaðýný
açarsanýz dikkatli
olunuz, çýkan buharla
yanabilirsiniz!
ARISTON BULAÞIK MAKÝNESÝ - Yerleþtirme ve kullaným kýlavuzu 5
Page 8

ulaþýk makinesi
B
Deterjan ve parlatýcý
Bulaþýk makineleri için özel olarak üretilmiþ deterjanlarý kullanýnýz. Yýkama iþlemine baþlamadan
önce deterjaný makinenin kapaðýnýn iç kýsmýnda bulunan hazneye koyunuz.
Deterjan
Deterjaný nasýl koyacaksýnýz
Deterjan haznesinin kapaðýný
(A) açmak için B tuþuna
basýnýz. Deterjan haznesinin
her iki bölümüne C ve Dye
belirtilen miktarda doldurunuz.
Þimdi kapaðý kapatýnýz.
Deterjan haznesinin kapaðý
kapanmýyorsa..
Deterjan haznesinin
kenarlarýnda deterjan
artýklarýnýn olup olmadýðýný
kontrol ediniz. Deterjanlarý
temizlediðinizde kapaðýn
kapandýðýný göreceksiniz.
Parlatýcý
Parlatýcý, bulaþýklarýn
kurumasýný kolaylaþtýrarak,
onlarýn daha parlak olmasýný
saðlar.
Parlatýcýnýn bittiðini ýþýklý
göstergeyle bildiren
modellerde ise, bu gösterge
yandýðýnda veya yanýp
söndüðünde. Doldurma
sýrasýnda,parlatýcý dýþarýya
döküldüðünde,döküleni,bir
sünger vasýtasýyla, iyice silin.
B
C
D
A
F
C
Faydalý tavsiyeler
Bulaþýk makinenizin
deterjan haznesini
sadece makinenizi
kullanacaðýnýz zaman
doldurunuz. Eðer daha
önceden doldurulduysa
deterjan ýslaklýk ve nem
yüzünden bozulabilir ve
temizleme gücünü
kaybeder.
Deterjan miktarýný doðru
bir þekilde ayarlayýnýz:
Eðer fazla koyarsanýz
daha fazla temizlik elde
etmezsiniz.
Kullanýlan parlatýcý
miktarýnýn doðru
iyileþtirmektedir. Eðer
bulaþýklar üzerinde su
damlacýklarý veya
herhangi bir leke
görürseniz parlatýcý
ayarýný daha yüksek
bir konuma getiriniz.
Parlatýcý haznesinin
doldurulmasý
Parlatýcý haznesini açmak için
týpayý (C) saat yönünün tersi
yönüne çeviriniz. Sýzmayý
engellemek için parlatýcýyý
dökerken dikkatli olunuz.
Bulaþýk makineniz tarafýndan
kullanýlan parlatýcýnýn miktarýný
kendiniz belirleyebilirsiniz.
Tornavida veya metal bir para
ile parlatýcý haznesinin
kapaðýnýn altýndaki regülatörü
çeviriniz.
6 ayrý konum bulunmaktadýr. Fabrika
çýkýþý olarak 4. konuma ayarlýdýr.
Tam tersine eðer
çizikler görürseniz
parlatýcý ayarýný daha
olmasý kurutma
iþlemini
bulaþýklarýnýzýn
üzerinde beyaz
düþük konuma
getiriniz.
Dikkat:
Piyasada bulaþýk yýkamak için deterjan, tuz ve parlatýcý içeren ürünler bulabilirsiniz (üçü bir arada).
Eðer kullandýðýnýz su sert yada çok sert ise, bulaþýklar ve haznede beyaz çizgiler oluþmasýný önlemek için her halü karda
kaba tuz koymanýzý öneririz.
Üçü bir arada türünden ürünler kullanýlýyorsa parlatýcý kabýna parlatýcý koymaya gerek yoktur.
Daha iyi bir kurutma isteniyorsa parlatýcý koyulabilir, ancak ayarý no 2 ye getirmek gereklidir.
Ancak her zaman ambalajlar üzerindeki üretici talimatlarýný dikkatle inceleyiniz.
Sadece bu tip temizleyici maddelere baþvuruyorsanýz birkaç yýkama devresi sonunda tuz ve parlatýcý ikaz sinyallerinin
devamlý yanýp sönmesi çok doðal olacaktýr.
6 ARISTON BULAÞIK MAKÝNESi - Yerleþtirme ve kullaným kýlavuzu
Page 9
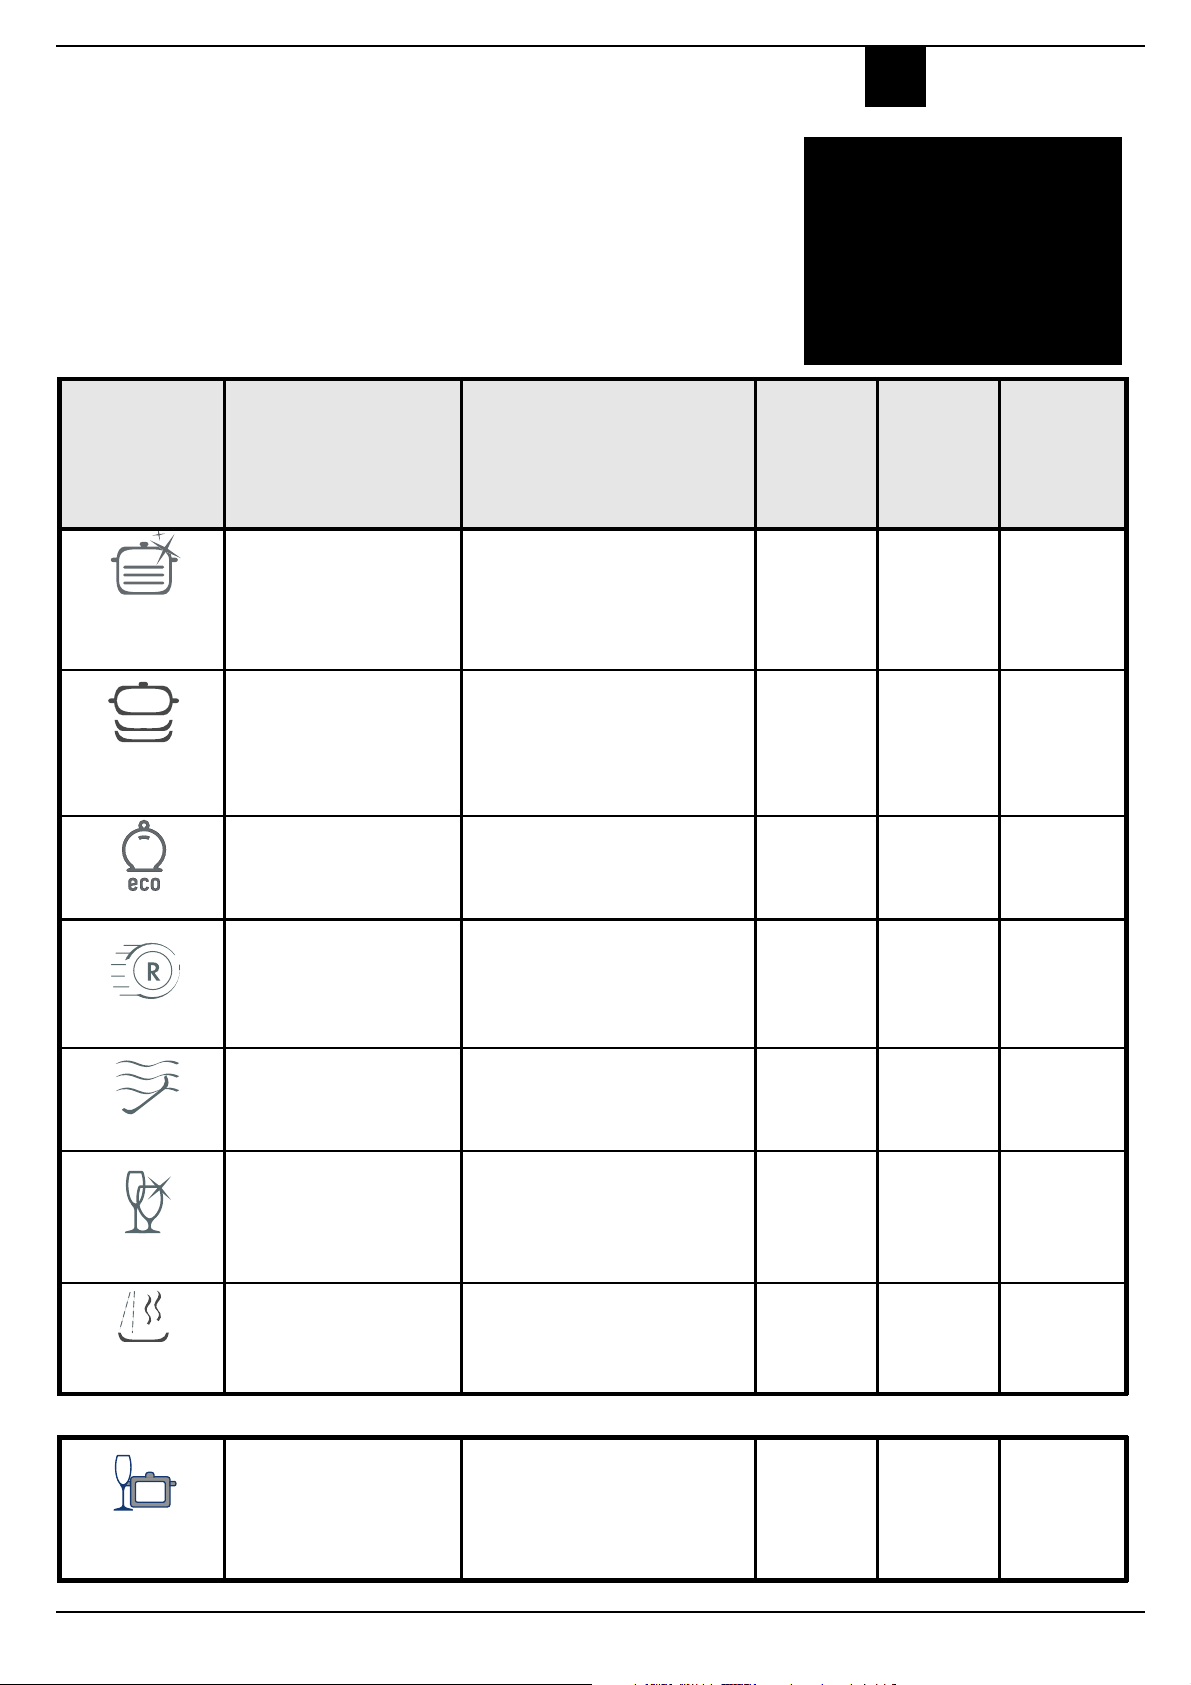
Doðru programý seçiniz
ulaþýk makinesi
B
Her türlü bulaþýk için yýkama
Bulaþýk makinesinde yapacaðýnýz yýkamalarda hijyenik bir ortamýn ve
güvenilir temizliðin garantisini bulacaksýnýz.
Not: Otomatik yýkama programlarýnda sensör bulaþýklarýn kirlilik
derecesini belirleyerek yýkama programýný buna göre düzenler bu
nedenle belirtilen yýkama süreleri deðiþkenlik gösterebilir.
Program
Otomatik
Sáper GáÌlá
Yâkama
Otomatik
Normal
Yâkama
Program seÌimi iÌin
talimatlar
¬ok kirli bulaãâk(hassas
bulaãâklar iÌin
kullanâlmamalâdâr)
Normal kirlilikte
bulaãâklar iÌin.
Gánlák standard
program.
Yâkama aãamalarâ
40C de sâcak suyla Ûn
yâkama ; 65C de uzun sáreli
yâkama;
soÕuk suyla 2 durulama;
70C de sâcak durulama;
K urutm a
50 de kâsa sáreli yâkama
SoÕuk durulama
70C de sâcak durulama
K urutm a
Deterjam
Ûn yâkama
+ yâkama
5+25 gr.
30 gr.
OTOMATIK PROGRAMLAR
Bulaþýk makineniz özel bir
sensör sayesinde yýkanmakta
olan bulaþýðýn kirlilik derecesini
tespit ederek en etkili ve
ekonomik yýkamayý
gerçekleþtirir.
Yâkama
sáresi
Parlatâcâ
*
*
(% 10
deÕiãimle
ekstra
kurulama
olmaks âz ân )
120'
88'
Otomatik
H âz lâ Yâkam a
Duãlama
K ristal Yâka m a
»zel Misafir
Programâ
Normal kirlilikteki
bulaãâklar iÌin, az enerji
sarfiyatâyla ekolojik
yâkama.
K ulla nâm ând a n he m e n
sonra az kirli bulaãâklarân
hâzlâ ve e konom ik
yâkanmasâ iÌin. E kstra
kurulama seÌili deÕil ise
kurutma yapma.
Bir sonraki ÛÕánán
bulaãâklarânâ beklerken
sudan geÌirme.
Yáksek âsâya duyarlâ
hassas eãyalar iÌin,
kullanâmdan he men
sonra, kullanâlabilen
hassas yâkama
Her zaman kullanâlmayan
bulaãâklarân temizliÕi iÌin,
durulama ve kurutma
iãlemi
2 SoÕuk suyla Ûn yâkama
50C de uzun sáreli yâkama
65C de sâcak durulama
K urutm a
47C de kâsa sáreli yâkama,
62C de sâcak durulama
Yemek artâklarânân kap-kaÌaÕa
yapâãmasânâ Ûnlemek iÌin kâsa
sáreli ve soÕuk sulu yâkama
52C de yâkama
4 5 C d e âlâk d urula m a
65C de sâcak durulama
K urutm a
65C de sâcak durulama
K urutm a
OPSÂYONEL PROGRAM
5+25 gr.
25 gr.
25 gr.
*
*
(ekstra
kurulama)
*
*
145'
24'
12 '
98'
36 '
Otomatik Duo
Yâkama
Âki sepette farklâ yâkama :
ástte , kristal ve
bardaklar iÌin hassas,
altta ise tencereler iÌin
kuvvetli yâkam a.
SoÕuk Ûn yâkama
52C de yâkama
4 5 C d e âlâk d urula m a
65C sâcak durulama
K urutm a
ARISTON BULAÞIK MAKÝNESÝ - Yerleþtirme ve kullaným kýlavuzu 7
5+25 gr.
*
108 '
Page 10

ulaþýk makinesi
B
Tuz olmadan asla
Evinizin Suyu
Bulaþýklarýnýz üzerinde
Sularýn sertliði oturulan mevkiiye göre deðiþmektedir. Eðer evinizde kullandýðýnýz su sert
ise bu suyun kireçten arýndýrýlmadan kullanýlmasý bulaþýklar üzerinde lekelere sebep
olacaktýr. Bulaþýk makineleri için olan özel bir tuz kullanýlarak kirecin etkisi yok edilmelidir.
Tuz haznesinin doldurulmasý
Her zaman sadece bulaþýk
makinalarý için özel üretilmiþ
tuzlarý kullanýnýz. Tuz haznesi alt
sepetin altýnda yer almaktadýr.
1. Alt sepeti çýkarýnýz ve tuz
haznesinin kapaðýný gevþetip
çýkarýnýz.
2.Makineye ilk defa tuz
koyuyorsanýz önce tuz
haznesini su ile doldurunuz.
3. Bulaþýk makineniz ile birlikte
verilen huniyi kullanarak
hazneye yaklaþýk 2kg tuz
koyunuz. Hazneden bir miktar
suyun taþtýðýný görmeniz
normaldir.
4. Tuz haznesinin kapaðýný takýp
iyice sýkýþtýrýnýz.
Tuzu ne zaman eklemek
gerek?
Tuz deposu, "T" tuz eksiði sinyali
yandýðý zaman doldurulmalýdýr.
Bulaþýk makinanýz üç yýkama
devresi boyunca bu eksikliði size
hatýrlatacaktýr.
Akýllý tuz
Bulaþýk makineniz evinizde
kullanýlan suyun sertlik
derecesine göre tuz tüketimini
ayarlayabilir. Böylece tuz tüketimi
en aza indirgenmiþ olur.
Tuz tüketimini ayarlamak için:
1. Tuz haznesinin kapaðýný
gevþeterek çýkarýn.
2. Tuz haznesinin üzerinde bir ok
iþareti göreceksiniz (resme
bakýnýz). Eðer gerekiyorsa
saat yönünün tersine
çevirerek iþareti "-" den "+" ya
getiriniz.
Yandaki su sertliði tablosuna
bakarak okun konumunu seçiniz.
0 - 10 0 - 17 0 - 1,7 / 0 /
10- 25 18-44 1,8 - 4,4 - 20 60
25- 50 45- 89 4,5 - 8,9 ORTA 40 40
Su sertliÕi
dH fH mmol/l
> 50 > 89 > 8,9 + 60 25
engellemek için yýkamaya
baþlamadan önce tuz
SeÌici
pozisyonu
sertliðini bilmiyorsanýz su
saðlayan þebekeden
tortu oluþumunu
koyunuz.
Tuz
táketimi
(program
Otono-
(progr-
/gram)
Evinizdeki suyun
bölgenizdeki suyun
sertliðini öðreniniz.
mi
am/
2kg)
Faydalý tavsiyeler
Bulaþýklarýnýzý nasýl korursunuz?
n Hemen hemen tüm gümüþ
eþyalar makinede
yýkanabilir. Sadece antika
gümüþler ve pas yapýcý bir
madde ile süslenmiþ
gümüþler yýkanamaz. Sýcak
su antika olan gümüþlerin
deforme olmasýna, motifli
olanlarýn motiflerinin
kaybolmasýna neden olur.
Gümüþ eþyalarýn diðer
metallerle temasýna engel
olursanýz kararmalarýný ve
lekelenmelerini önlemiþ
olursunuz.
Bulaþýk makinesi size
zaman kazandýrmaktan
öte bulaþýklarýnýzý yüksek
ýsýlarda yýkadýðý için daha
hijyenik bir yýkama
saðlamaktadýr.
■ Gümüþ tabaklar özellikle tuz,
yumurta, zeytinyaðý sirke ile
temas etmiþlerse kullaným
sonrasýnda hemen
yýkanmalýdýr.
■ Çok hassas olan bulaþýklar
için makinenizde mevcut
olan özel programý
kullanýnýz.
Nasýl tasarruf saðlanýr
Beyaz eþyalarý akýllý kullanýrsanýz hem tasarruf edersiniz
hem de doðaya saygýlý olursunuz.
Maksimum yük
Tüketim deðerlerini en aza indirmek için bulaþýk makinenizi
iyice doldurmadan çalýþtýrmayýnýz. Tamamen dolmasý birkaç
gününüzü alýyorsa ýslatma programýný kullanarak
oluþabilecek kötü kokularý yok edebilirsiniz.
Doðru yýkama programý
Bulaþýk makinenize yerleþtirdiðiniz bulaþýklara en uygun
yýkama programýný seçiniz. Program seçimi bulaþýðýn
türüne ve ne kadar kirli olduðuna baðlýdýr. Doðru programý
seçmek için
sayfa 7daki tablodan yararlanýnýz.
8 ARISTON BULAÞIK MAKÝNESi - Yerleþtirme ve kullaným kýlavuzu
Page 11

Kurma ve taþýma
Makineniz eve getirildiðinde
Yeni satýn alýndýðýnda veya bir evden baþka bir eve taþýnýldýðýnda iyi yapýlmýþ
bir montaj, bulaþýk makinenizin daha iyi çalýþmasýný saðlar.
ulaþýk makinesi
B
Bulaþýk makinesine iyi bir yer
seçilmelidir. Makine duvara
yakýn veya mutfak tezgahýnýn
altýna yerleþtirilebilir. Bulaþýk
makinesinin su alma ve
boþaltma iþlemleri için iki ayrý
hortumu bulunmaktadýr.
Bu model bulaþýk makinesi mutfak
tezgahýnýn altýna yerleþtirilebilir (ilgili
talimat bölümünü okuyunuz).
Denge
Makine Ariston Yetkili Servisi
tarafýndan yerine
yerleþtirildikten sonra ayak
ayarlarý yapýlarak zemine iyi
oturmasý saðlanmalýdýr. Ýyi bir
ayarýn yapýlmasý bulaþýk
makinenizin düzgün çalýþmasý
için çok önemlidir.
Soðuk su giriþ baðlantýsý.
Cihazýn su þebekesine
baðlantýsý daima makinanýn
donanýmýnda olan doldurma
borusu vasýtasýyla yapýlmalýdýr,
baþka tip borularý asla
kullanmayýn. Herhangi bir
deðiþim için mutlaka orijinal
yedek parça kullanýn.
Su giriþ borusunu ¾ lük vida diþi
açýlmýþ bir soðuk su musluðuna
baðlayýn. Bu baðlantýyý
gerçekleþtirirken borunun
musluða iyi sýkýlmasýna özen
gösterin. Eðer borular yeni ise
veya uzun süredir kullanýlmadý
ise baðlantýyý yapmadan önce
borulardan su akýtmak sureti ile
borularda kalýntýlar olup
olmadýðý kontrol edilmelidir. Bu
kontrol yapýlmaz ise suyun giriþ
yaptýðý noktada tortu oluþmasý
ve bunun da makineye zarar
verme riski oluþur.
Sýcak su giriþine baðlantý
Bulaþýk makineniz sýcak suya
baðlý olarak da çalýþabilir
(merkezi sýcak su tesisatýnýz var
ise).Ancak su sýcaklýðý 60°C yi
geçmemelidir. Sýcak su
tesisatýnýz var ise yýkama süresi
de 15dk daha azalmýþ olur.
Ancak yýkama etkinliði biraz
azalacaktýr. Sýcak su baðlantýsý
soðuk su baðlantýsý ile ayný
þekilde yapýlmalýdýr.
Su baskýnlarýna karþý
emniyet
Bulaþýk yýkama makinanýz,
makina içinde herhangi bir su
kaybý olduðunda derhal su
giriþini kesen bir sistemle
donatýlmýþtýr. Ayrýca su giriþ
borusu iç içe olan iki borudan
oluþur. Dýþ boru þeffaf olup iç
boru ise kýrmýzýdýr. Her iki boru
da yüksek basýnçlara dayanýklý
olup, iç boruda bir kayýp
olduðunda dýþ boru canlý kýrmýzý
rengine boyanýr. Su
baskýnlarýna karþý emniyet bu
ikinci, þeffaf ve içtekini koruyan
boru tarafýndan saðlanmaktadýr.
Anlaþýldýðý gibi dýþ boruyu
periyodik olarak kontrol etmek
çok önemlidir. Onu canlý kýrmýzý
renge boyanmýþ halde
gördüðünüzde en kýsa
zamanda deðiþtirmeniz
gerektiðini unutmayýn. En kýsa
zamanda yetkili bakým servisine
baçvurun.
Atýk su boþaltma
baðlantýsý.
Atýk su borusunu, evde bulunan
ve çapý minimum 4 cm olan
boþaltma borusuna yada
doðrudan lavaboya yatýrýn.
Boruda boðum yada aþýrý
kývrýmlar olmamasýna dikkat
edin. Gerektiðinde, donanýmda
olan (þekile bak.) plastik dirseði
de kullanabilirsiniz. Borunun A
harfiyle tanýmlanmýþ kýsmý 40
ve 100 cm arasýnda yükseklikte
bulunmalýdýr.
Boru su içinde bulunmamalýdýr.
A
Elektrik baðlantýsý
Herþeyden önce gerilim ve
frekans deðerlerinin makinenin
kapaðýnýn iç tarafýnda bulunan
ürün plaketinin üzerindeki
deðerlere uygunluðunu kontrol
edin.
Topraklý priz:
Makinenizin fiþini topraklý prize
takýnýz. Bu tip bir prize sahip
olup olmadýðýnýzý kontrol ediniz.
Eðer elektrik kablosu zarar
görmüþ ise deðiþtirilmesi için
Ariston Yetkili Servisini arayýnýz.
Bulaþýk makinesi ile
birlikte verilen özel
plastik parça,
boþaltma
hortumunun hareket
etmesini ve suyun
baþka bir yere
boþalmasýný
engellemek için
duvara
sabitlenmelidir.
Eðer priz cihazýn
fiþine uygun türde
deðilse adaptör veya
çoklu priz kullanmak
yerine prizi uygun
tipte olan bir tanesi
ile deðiþtirin.
ARISTON BULAÞIK MAKÝNESÝ - Yerleþtirme ve kullaným kýlavuzu 9
Page 12

ulaþýk makinesi
B
Sorunlar ve çözümleri
Eðer bir sorununuz var ise bu bölümü okuyunuz.
Makinenin çalýþmamasý veya bir problem çýkmasý durumunda Ariston Yetkili Servisini çaðýrmadan önce aþaðýdaki kontrolleri
yapýnýz.
Bulaþýk makinesi
çalýþmýyor
■ Su musluðu açýk mý?
■ Su musluðu su giriþ
hortumuna doðru bir
þekilde baðlanmýþ mý?
■ Evin suyu kesik mi?
■ Su basýncý yeterli mi?
■ Hortum bükülmüþ mü?
■ Su giriþindeki hortum filtresi
týkalý mý?
■ Makinenin kapýsý tam
kapanmamýþ olabilir mi?
Bulaþýklar temiz çýkmýyorsa
■ Deterjan miktarýný iyi
ayarladýnýz mý?
■ Seçmiþ olduðunuz yýkama
programý yüklediðiniz
bulaþýðýn cinsine uygun
mu?
■ Filtre temiz mi?
■ Pervaneler rahatça
dönebiliyor mu?
Bulaþýk makinesi suyu
boþaltmýyor ise
■ Boþaltma hortumu bükülmüþ
olabilir mi?
Bulaþýk makinesinin
içerisinde kalker
kalýntýlarý ve beyaz lekeler
var ise
■ Tuz haznesinin kapaðý iyice
kapatýlmýþ mý?
■ Parlatýcý ayarý doðru
yapýlmýþ mý?
Hata ikazlarý.
Bulaþýk makinenizde, olaðan
dýþý çalýþmalarý size
bildirebilmesi için özel bir
güvenlik sistemi mevcuttur.
Bu olaðan dýþý çalýþma halleri
veya arýzalar ýþýklý
göstergedeki rakam veya
harfli iþaretlerle
görüntülenirler. Hata kodunu
not ettikten sonra, suyu
kapatýnýz, fiþi çekerek
makinenin elektrik
baðlantýsýný kesiniz ve Ariston
Yetkili Servisini arayýnýz.
Kapalý musluk alarmý
Su musluðunu açmayý
unuttuysanýz makine bir dizi
uzun bip sesinin yaný sýra ýþýklý
göstergedeki H2O yazýsýyla
da sizi uyarýr. Musluðu açýnýz
ve birkaç dakika sonra
programýn devreye girdiðini
göreceksiniz.
Bu esnada siz evde deðilseniz
makine alarma geçecek ve
göstergede AL06 yazýsý
görüntülenecektir
Açma-kapama tuþunu
basýlý tutarak ýþýklý göstergeyi
söndürünüz, suyun kesik
olmadýðýný kontrol ediniz ve
musluðu açýnýz; ayný düðmeyi
basýlý tutarak makineyi açýnýz.
Programlama iþlemlerini
tekrarlayýnýz ve Baþlat tuþuna
basarak makineyi çalýþtýrýnýz.
Filtreler týkalý alarmý
Makine bloke olmuþ ve
göstergede AL05 yazýsý
görünüyorsa, filtreler týkanmýþ
demektir. Açma-kapama
tuþunu
göstergeyi söndürünüz,
filtreleri iyice temizledikten
sonra (sayfa gösterildiði
gibi),makineyi tekrar açýnýz.
Programlama iþlemlerini
tekrarlayýnýz ve BAÞLAT
basýlý tutarak
tuþuna basarak makineyi
çalýþtýrýnýz.
Su kaçaðý alarmý
göstergesinin yanmasý
makinenin bir su kaçaðýndan
ötürü bloke olduðu anlamýna
gelir. Su musluðunu kapatýnýz,
elektrik baðlantýsýný kesiniz ve
Ariston Yetkili Servisini
arayýnýz.
Herþeyi kontrol etmenize
raðmen bulaþýk
makineniz hala
çalýþmýyor ve sorun hala
devam ediyor ise
En yakýn Ariston Yetkili Servisini
arayýnýz, arýza tipini ve makinenin
kapaðýnýn iç yan kýsmýnda
yeralan model, seri numarasýný
bildiriniz.
Sadece Ariston Yetkili
Servisine baþvurunuz ve
sadece orjinal yedek
parça kullanýnýz.
Evinizdeki Emniyet
Bulaþýk makineniz uluslararasý emniyet normlarýna uygun bir þekilde üretilmiþtir. Uyarýlarý ve bu kitapçýktaki bilgileri dikkatli bir
þekilde okuyunuz. Kurma, kullanma ve bakým emniyeti için sizlere deðerli bilgiler verilmektedir. Kötü sürprizlerle karþýlaþmamak
için:
1. Ambalajý Ariston Yetkili
Servisi eþliðinde açýnýz.
2. Ambalajý açtýðýnýzda
makineyi kontrol ediniz
eðer herhangi bir hasar
varsa yetkili servisi
uyarýnýz.
3. Bulaþýk makinesi sadece
yetiþkinler tarafýndan
kullanýlmalýdýr. Çýplak
ayakla veya ýslak elle
makineye dokunmayýnýz.
4. Ekli kablo veya çoklu priz
kullanmayýnýz. Eðer
elektrik kablosunun
uzunluðu yeterli deðil ise
daha uzun bir kablo ile
deðiþtiriniz. Kablonun
kývrýlmamasýna veya
aðýrlýk altýnda
kalmamasýna dikkat ediniz.
5. Anormal çalýþma
durumlarýnda veya bakým
esnasýnda fiþini prizden
çekiniz.
6. Çocuklarý deterjandan ve
makinenin kapaðýnýn açýk
olmasý durumunda
makineden uzak tutunuz.
7. Makineniz dýþ ortamda
kurulmamalýdýr.Makineyi
dýþ mekan þartlarýna
(yaðmur, güneþ..) maruz
býrakmak çok tehlikelidir.
8. Yýkama programý sonunda
rezistansa dokunmayýnýz.
9. Açýk kapýya dayanmayýnýz
veya kapýnýn üzerine
oturmayýnýz.
10. Arýza durumunda su
musluðunu kapatýnýz, fiþi
prizden çekiniz ve Ariston
Yetkili Servisini arayýnýz.
11. Makineyi uzun süre
kullanmayacak iseniz fiþi
prizden çekiniz.
Sadece orjinal ve Ariston tarafýndan
garantili yedek parça kullanan uzman
ve yetkili servis teknisyeni istiyorum.
10 ARISTON BULAÞIK MAKÝNESi - Yerleþtirme ve kullaným kýlavuzu
Page 13

Özen ve bakým
Özel temizleme ve bakým
ulaþýk makinesi
B
Filtre grubu
Her zaman mükemmel
yýkama neticeleri elde
edebilmek için filtre gurubunu
temizlemek gerekir.
Yýkama suyu devreye
girmeden önce filtre edilerek
yemek artýklarýndan arýndýrýlýr.
Bu nedenle, her yýkamadan
sonra, yarým ay þeklindeki A
filtresiyle C bölümündeki
yemek artýklarýnýn
temizlenmesi tavsiye olunur;
bu iþlemi gerçekleþtirmek için
C bölümündeki tutamaðý
yukarý doðru çekiniz. Su ile
çalkalamak yeterlidir.
Tüm filtre gurubunun ayda bir
defa temizlenmesi gerekir:
yarým ay þeklindeki A filtresi +
C bölmesi + silindir þeklindeki
B filtresi.
B filtresi sola doðru çevrilerek
çýkartýlýr. Temizlenmesi için
metal olmayan bir fýrça
kullanýnýz.
Parçalarý (resimdeki gibi)
birleþtiriniz ve filtre gurubunu
bulaþýk makinesine
yerleþtiriniz. Yuvasýna
oturtunuz ve bastýrarak
yerleþtiriniz.
1
B
2
C
A
Bulaþýk makinesi filtresiz
olarak kullanýlmamalýdýr.
Filtreleri doðru takmazsanýz,
yýkamalardan iyi netice
alamayacaðýnýz gibi, bulaþýk
makineniz de zarar görebilir.
Bulaþýk Makinenizi Koruyunuz
Pervanelerin temizliði
Bazý yemek kalýntýlarýnýn
pervanelerin üzerine yapýþmak
sureti ile püskürtme
gözeneklerini týkadýðý haller
olabilir. Pervaneleri arasýra
kontrol ediniz ve temizleyiniz.
Birkaç noktaya dikkat ederseniz bulaþýk makinenizi korumuþ olursunuz.
Her yýkama sonrasý.
Yýkama programýnýn sonunda
kapaðý yarým açýk býrakýnýz.
Böylece rutubet ve kötü kokular
oluþmayacaktýr.
Cihazýn fiþini çekiniz.
Bulaþýk makinenizin bakýmýný
ve temizliðini yapmadan önce
elektrik fiþini prizden çekiniz. Bu
sizin herhangi bir tehlikeyle
karþýlaþmanýza engel olacaktýr.
Çözücü veya aþýndýrýcý
malzemeler kullanmayýnýz.
Bulaþýk makinenizin dýþ
kýsýmlarýný ve parçalarýný
temizlemek için ne çözücülere
ne de aþýndýrýcý maddelere
ihtiyacýnýz var. Sadece ýlýk su
ile ýslatýlmýþ bir bez kullanýnýz.
Makinenizin iç yüzeylerinde
lekeler görürseniz
servislerimizden temin
edebileceðiniz bulaþýk
makineleri için özel üretilmiþ
malzemeler kullanýnýz.
Tatile mi gidiyorsunuz?
Uzun bir süre boyunca evden
uzakta olacaksanýz aþaðýdaki
noktalara dikkat ediniz:
Makine boþ halde iken bir
yýkama gerçekleþtiriniz.
Su giriþ musluðunu kapatýnýz.
Kapýyý yarý açýk olarak
býrakýnýz Ýstenmeyen
kokularý önlemiþ olursunuz.
Taþýma
Taþýma esnasýnda makinenin
dikey durumda olmasýna dikkat
ediniz eðer gerekiyor ise arka
tarafa doðru eðebilirsiniz.
Kapý iç contalarý
Bulaþýk makinelerinin içinde
meydana gelen kokularýn en
büyük sorumlularýndan birisi de
contalar arasýnda sýkýþan
yiyecek kalýntýlarýdýr. Contalarý
ýslatýlmýþ bir sünger ile
temizlemeniz yeterli olacaktýr.
Bulaþýk makineniz bir çöp öðütücü deðildir!
Bulaþýklar üzerindeki ufak kalýntýlar bulaþýk
makineniz tarafýndan kolayca temizlenebilir,fakat
kemikleri, kabuklarý ve diðer büyük kalýntýlarý
temizledikten sonra bulaþýklarý makineye
yerleþtirmelisiniz. Bardaklarý içlerindeki sývýyý
boþalttýktan sonra makineye koyunuz.
ARISTON BULAÞIK MAKÝNESÝ - Yerleþtirme ve kullaným kýlavuzu 11
Page 14

ISHWASHER
D
Quick guide to your
dishwasher
This manual explains pleasantly all your new electric household
appliance has to offer. In addition, you will discover a world of useful
hints and handy tips to help you get a better wash from your
dishwasher and to make it last longer.
1. Installation and moving (p. 19)
Installation, after delivery or your moving house, is the most
important procedure for the correct operation of your dishwasher.
Always check:
1. That the electricity system is in accordance with norms;
2. That the water inlet and outlet hoses are connected correctly;
3. That the dishwasher is level on the ground. It is worth it: for the
longer life span and the correct operation of your dishwasher.
2. Control panel at your orders (p.13)
Learn to get to know the parts which make up your dishwasher,
you will use it better for it. This is where you will find the
description of the controls and the internal parts.
3. How to load your dishes (p.14)
This page includes useful tips to help you load your dishwasher
correctly and make the most of all the available space.
4. How to start your dishwasher (p. 15)
8. Safety for you and your family (p.20)
After loading the dishes, you need to select the right wash cycle
and measure out the correct dose of detergent and rinse aid.
Reading these pages will help you through all the wash phases.
Read this chapter carefully, as it will provide you with useful
information on installation, use and maintenance safety. To avoid
nasty surprises.
5. Salt: an important ally (p. 18)
9. Special care and maintenance (p.21)
Using the right salt and in the right quantity will help you maintain
your dishwasher in top condition, to wash better and to avoid
possible damage caused by limescale.
6. Advice and suggestions to help you make
savings as well (p. 18)
This is where you will find small tips on how to wash your dishes
better and to help make savings by selecting a wash cycle which
best suits the type of load.
7. Troubleshooting (p. 20)
Once in a while, once a month, spend a little time on the filter
assembly and the sprayer arms. This is where you can learn how.
10. Keeping your dishwasher in shape (p.21)
Respect the few rules you will find here, and the result will be an
enduring top-shape dishwasher.
11. Technical characteristics (p. 13)
All your appliance's technical data, in accordance with norms and
regulations as always.
Before calling the technician, have a look here: a lot of problems
can have an immediate solution. If you can't manage to solve it
yourself, then call the Ariston helpline and any problem will be
solved as quickly as possible.
12
ARISTON DISHWASHER - Instructions for installation and use
12. Ariston is still with you after purchase
(p.22)
Ariston supports its products by means of after-sales services and
assistance, offering you special guarantees, professional assistance
as well as quality spare parts and accessories. To find out more,
call the Ariston Freefone Number.
Page 15

Let's open up your dishwasher
together
How is it made?
Learn to get to know the parts which make up your
dishwasher, you will use it better for it.
ISHWASHER
D
E. Upper rack
F. Top sprayer arm
G. Rack height adjuster
H. Lower rack
I. Bottom sprayer arm
J. Salt container cap
K. Washing filter
L. Detergent and rinse aid
dispenser
Control panel at your orders
A. Stand-by button
Press this button to turn
the display on
B. Display
Displays the functions in
progress.
C. Door opening handle
Use this handle to open the
dishwasher door.
D. Start/Reset Button
With Start, the wash cycle
begins, whereas all the
settings are cleared with
Reset.
M. Menu Button
Press this button to select
the auto Duo Wash cycle,
the delayed start, the extra drying and the half
load.
S. Sélection Button
Press this button select the
following functions:
delayed start, extra drying,
rack selection.
P. Cycle select button
Press this button to select
the desired cycle.
E. Auto Duo-Wash cycle
indicator light
To remind you that the
Duo-Wash cycle has been
set.
F. Delayed start indicator
light
This indicates that the
delayed start has been set.
G. Extra drying indicator
light
To indicate that the extra
drying has been set.
H. Cycle phase indicator
lights
Pre-wash, wash, rinses,
drying.
I. Wash cycle symbols
A wide range of wash
cycles to choose from.
L. Multifunction numeric
indicator
Informs you as to the
duration of the cycle, the
amount of time left to wait
and any error codes.
N. Upper or lower rack
indicator light
Indicates the rack selected
for the half-load.
T. Low salt indicator light
To tell you that its time to
add more salt.
U. Low rinse aid indicator
light
To tell you that its time to
add more rinse aid.
Q. Water leak indicator
light
To warn you there is a
water leak.
A
M
S
I
E
F
G
N
T
U
B
M
s
C
L
P
P
D
H
Q
Technical Characteristics
7HFKQLFDO FKDUDFWHULVWLFV
:LGWK FP
'HSWK FP
+HLJKW FP
&DSDFLW\ VWDQGDUG SODFH VHWWLQJV
0DLQV ZDWHUSUHVVXUH SVL SVL .3D· 03D · EDU
3RZHUYROWDJH 6HH GDWDSODWH
7R WDO DEVRUEHUSRZHU 6HH GDWDSODWH
)XVH 6HH GDWDSODWH
ARISTON DISHWASHER - Instructions for installation and use
This dishwasher
conforms to the
following European
Community Directives:
73/23/EC
Low Voltage Directive)
(
and subsequent
amendments;
89/336/EEC
(Electromagnetic
compatibility) and
subsequent
amendments.
97/17/CE
(Labelling)
13
Page 16

ISHWASHER
D
How to load your dishes
Before washing, a few small steps can help you get a better wash and keep your dishwasher for longer. Remove the largest scraps
of food left over on your plates, soak saucepans and frying pans with tough incrustations. After loading your dishes, make sure
the blades on the sprayer arm turn well
First of all.
Before placing the dishes in the
racks, remove the largest
scraps of food left over on your
plates, you will thus avoid
blocking the filter, which would
reduce the efficacy of the wash.
If the saucepans and frying
pans are very dirty, allow them
to soak before being washed.
To make it easier to load your
dishes, pull the racks out.
What goes into the
lower rack?
We recommend you place the
most difficult dishes to wash
into the lower rack: saucepans,
lids, soup dishes and plates (a
load example is shown in the
photo).
Serving dishes and large
lids: place them on the sides
of the rack.
Saucepans, salad bowls:
must always be placed
upside down
Very deep dishes: place
them obliquely, thus
allowing water to run down
them and cleaning them
better
The cutlery basket can be split
up by pulling out the handle.
When you only have little cutlery
to wash, you can use just half the
basket; save space for other
crockery or place the other half
of the basket in the upper rack
instead (see figures A and B).
This basket is equipped with two
removable grids: insert the
cutlery one by one into the slots;
knives and utensils with sharp
blades or tips should be
positioned with the sharp parts
at the bottom.
It is best if you place longer
utensils horizontally at the
front of the upper rack.
What goes into the
upper rack?
Place delicate and lightweight
dishes in the upper rack:
glasses, tea cups and coffee
cups, saucers - but plates too shallow salad bowls, slightly
dirty frying pans and shallow
pans (the photo illustrates a few
examples).
The appliance can also be
equipped with one or two tipup compartments onto which
you can place mugs and cups,
as well as long sharp knives and
serving cutlery.
Position lightweight dishes in
such a way as to avoid their
being moved by the spray of
water.
After loading the dishes, remember to check that the
blades on the sprayer arms can
turn freely without knocking
against any dishes.
How to adjust the top
rack.
The upper rack can be set in
high or low position to enable
you to organise your dishes
effortlessly.
Fig.C
There are two handles on the sides of
the upper rack: use these to adjust its
height (see fig. C)
lower rack
Load examples
upper rack
14
ARISTON DISHWASHER - Instructions for installation and use
A
B
Page 17

Starting the dishwasher
Ready, steady, go!
You have loaded your dishes and you now have to set the
wash cycle. It takes just one minute to learn how
ISHWASHER
D
First of all.
Insert the plug into the
electricity socket to power the
dishwasher. Turn on the water
tap completely and press the
Stand-by button
display turns on and 4 dashes
appear: these indicate that the
dishwasher is awaiting
instructions.
Selecting the wash cycle
Select the wash cycle
by pressing this button
Each time you press the button,
a beep will sound and the
corresponding symbols will light up
in sequence:
choose the cycle you deem
most suited to the type of
dishes to be washed (take a
look at page 17, where you will
find the wash cycle table). Keep
the Start button
a few seconds and the wash
cycle begins, but if you have left
the dishwasher door open, the
word DOOR will be displayed;
shut it and press the same button
again.
A beep sounds and then the
wash cycle begins and only the
symbol corresponding to the
wash cycle selected is
displayed.
You can see the amount of time
left until the end of the wash
cycle on the counter. Do not
expect a precise countdown as
the wash cycle starts with an
estimated cycle time that is
updated, thanks to the sensor
it is fitted with, as the cycle
progresses, according to a
number of parameters that
ensure maximum wash
efficiency.
. The
P
pressed for
The dishwasher keeps you
informed.
Your dishwasher is
fitted with indicator
lights (H) which light
up to indicate the
cycle phase under
way.
Here are the symbols
corresponding to
each cycle phase:
At all times, your dishwasher tells
you which cycle phase is under
way.
Modifying a wash cycle in
progress.
But if you have chosen the wrong
cycle, not to worry! You can modify
the wash cycle in progress, if it has
only just started. Keep the Reset
button
seconds: a prolonged beep will
sound, followed by three short
beeps. Indicator light I turns off
and the 4 dashes appear to indicate
that all the settings have been
cancelled. You are now free to reset the correct wash cycle.
Youve left out a dish?
Well, it happens to everyone.
Interrupt the wash cycle by
pressing the Stand-by button, insert
the dish you had forgotten and
press the same button again. The
cycle will start up from where you
interrupted it.
pressed for about 2
Finished?
The end of the wash cycle is
indicated by two short beeps and
the word END flashes on the
display.
Warning:
Turn the display off by pressing
button A, unplug the appliance
from the electricity socket to cut
off the power supply; the power
supply cable should
consequently be easily
accessible.
Turn off the water tap.
Wait a few minutes before
unloading the dishes: they are very
hot! If you wait a little while, they
dry better.
Empty the lower rack first.
Theres been a power
failure? Have you
opened the dishwasher
door?
The wash cycle stops and then
restarts when the electricity comes
back on or when you shut the door.
Everything is under control!
Have you left the
dishwasher door open?
The word DOOR flashes on the
display. Shut the appliance door and
the wash cycle will start up again.
Make sure the wash
cycle has ended before
removing the dishes!
ARISTON DISHWASHER - Instructions for installation and use
15
Page 18

ISHWASHER
D
Duo Wash
Cycle:
This is a special cycle that runs
a differentiated wash on the
two racks: delicate for
glassware and glasses on the
upper rack and heavy duty for
saucepans and frying pans on
the lower rack.
Press the (Mode) button
and select the Duo-Wash
symbol, then press (Select):
on means it is selected and
the corresponding rectangle
will light up, whereas off
means it is disabled; after
approx. 5 seconds, you will
automatically quit the menu.
Now press Start and the wash
cycle starts with a beep.
You decide when
it starts.
When you have loaded the
dishes, you can choose when
to start your dishwasher before
setting the wash cycle desired.
Press button M (Mode) and
then select the symbol
corresponding to the delayed
start:
the corresponding rectangle
will darken. Now press button
S (Select) to delay the wash
cycle start by 1 to 24 hours. If
you press the button again, the
word OFF is displayed (no
selection made).
Once you have made your
selection, make sure the
appliance door is shut and start
the wash cycle by pressing
button START
The countdown to the delayed
start will begin on the display.
.
Once the countdown is up, the
wash cycle begins and the
approximate amount of time
left until the end of the wash
cycle is displayed.
Have you changed your
mind?
If you change your mind and
wish to set a different delay
press the Mode and Select
buttons and repeat the
selection.
If on the other hand you want
to cancel the delay set and you
wish to start the wash cycle
immediately, press the Select
button repeatedly until it is set
to zero.
The following indicator light
will turn off:
Do you want extra
drying?
Before you start the selected
wash cycle, press button M
(Mode) repeatedly until the
extra drying symbol G is
selected, and the
corresponding rectangle lights
up. Press button S (Select)
and select On to enable the
extra drying, or Off to disable
it. Remember that with the
extra drying enabled, the wash
cycle will last longer to provide
you with dryer dishes.
This option is incompatible
with the soak cycle.
You want to wash
just half
Remember to halve the
amount of detergent.
Have you only got a few dishes
that need washing? If so, load
them all on a single rack to save
on water, detergent and
electricity. Press the Mode
button repeatedly until symbol
N is selected: the
corresponding rectangle will
light up. Using button S (select),
you can decide to wash a half-
load on the upper rack
or on the lower one .
Each time you press it, a beep
will sound and the
corresponding symbol will light
up. The symbol for the selected
rack is displayed. Off means no
selection has been made
Once you have made your
selection, start the wash cycle
by pressing START.
This option is available with
all wash cycles.
a load?
The delayed start is
also reset
automatically should
you fail to select the
wash cycle within 15
seconds.
16
ARISTON DISHWASHER - Instructions for installation and use
Page 19

Detergent and rinse aid
ISHWASHER
D
Only use specific dishwasher detergents. Pour the detergent into the dispenser on the inside
of the door. Before the wash cycle starts!
The detergent
Loading the detergent
To open lid A, press button B.
The detergent should be
poured into the two containers
C and D up to the rim.
Now you can close the lid: press
it down until you hear it click.
If you prefer to use the
detergent in tablet form, then
place one inside the container
D and close the lid.
It won't close!
Check whether there is any
detergent residue on the edges
of the dispenser. It is due to this
residue that the lid won't close.
Get rid of it and you'll see that
it closes.
The rinse aid.
This product makes dishes
sparkle more as it improves
their drying. The rinse aid
container is situated on the
inside of the door: It should be
filled up when the low rinse aid
indicator light "U" flashes.
Loading the rinse aid.
To open the dispenser, turn cap
C anticlockwise. Take care
when you pour in the rinse aid
to avoid it overflowing. You can
adapt the amount of rinse aid
used by the dishwasher:
regulate the adjuster F which
you will find under lid C. You
can choose from six different
positions.
B
D
You can choose from six different
positions. It is normally set to 4.
C
A
F
C
Useful tips
Use the right
amount of
detergent: if you use
too much, you will
not get cleaner
dishes, but just more
environmental
pollution.
Keep your
dishwasher
detergent and rinse
aid in a cool, dry
place and away from
children.
Proper dosage of the
rinse aid improves
If drops of water
remain on the dishes
or spotting occurs,
adjuster to a higher
If, on the other hand,
the dishes have white
streaks, then turn the
dosage adjuster down
to a lower setting.
drying.
turn the dosage
setting.
Warning
Three-in-one dishwasher tablets are now available on the market, and combine detergent, salt and rinse aid all in one.
If the water in your area is hard or very hard, we still recommend you pour extra salt into the relevant dispenser to prevent the
formation of white streaks on your dishes or on the interior of the appliance.
Using a three-in-one product means it is no longer necessary to put rinse aid into the relevant container.
If you want to achieve perfectly dry dishes, you may add rinse aid as long as the dosage adjuster is set to no.2.
In any case, please read the manufacturer's instructions on the packet.
If you use only these products, it is normal for the salt and rinse aid indicator lights to flash permanently after a certain number of
cycles.
ARISTON DISHWASHER - Instructions for installation and use
17
Page 20

ISHWASHER
D
Select the right wash cycle
A wash cycle for every
degree of soil
Salt, rinse aid, the right amount of detergent and the correct wash cycle: this is the formula to
get the best results and to keep your dishwasher in shape
Note: in the auto wash cycles, the cycles could undergo some modifications
due to the intervention of the sensor which evaluates how dirty the dishes
"AUTO" wash cycles
This means that your
dishwasher is equipped with
a sensor which evaluate how
dirty your dishes are and
allows these wash cycles to
adjust automatically, to
provide you with a more
efficient and economic wash
are and optimises the cycle in accordance.
'HWHUJHQW
&\FO H
$XWR 6XSHU
:D V K
'DLO\:DVK
&\FO HVHOHFWLRQ
LQVWUXFWLRQV
9 HU\GLUW\GL VKHVDQGSDQV
Q RWWREHXVHGIRU GHO LFDWH
L W HPV
7 \SLFDO ZDVKF\FOHI RUGLUW\
SD QVD QGGLVKHV
&\FOHGH V FULSWLRQ
3UHZDVK ZLWK KRW ZDW HUDW&
:D VK DW&
FROGULQVHV
+RWULQVHDW&
'U\LQJ
:D VK DW
& ROG ULQVH
+RWULQVHDW&
'U\LQJ
IRUSU H
ZD V K
ZD V K
J
J
5L QVH
$LG
cycle.
:DV KF\FOH
GXUDWLRQ
WROHUDQFH
Z L WKRX W
H[WUDGU\LQJ
$XWR
5DSLG
6RDNL QJ
&U \VWDO
6SHFLDO*XHVW
(QYLURQPHQWDOO\I U LHQGO \
F\FO HZLW KO RZHQHUJ\
FRQVXPSWLRQOHYHOV QRUPDO
VWDQGDUGF\FOHIRUGLUW \SDQV
DQGGLVK HV
(FRQRP L FDQGIDVWF\FOHWR
EHXVHGI RUVO LJKW O\GLUW\
GLVK HV5XQ F\FOHL P P HGLDWHO \
DIWH U XV H :LWKR XW GU\LQJ
H[FHSWZKHQWKHH[WUDGU\L QJ
RSWLRQ KDVEHHQVHO HFWHG
3UH OLPLQD U \ZD V K F \FOH IR U
GLVKHV Z KLOH D ZDLWLQJ
FRPSOH WLRQ R I WKHORDG ZLWK
WK HGLVKHVI U RPWKHQH [ W P HDO
6SHFLDO F\FO HWREHX VHGIRU
PRUHGHOLFDWHLWHP VZKLFKDUH
VHQVL W L Y HWRKLJKWHPSHUDWX UHV
5X Q F\FOHLP PHGL DWHO\DIWHU
XVH
5L Q VHDQGGU\LQ JF\FO HIRU
GLVK HVWKDW DUHVHO GRPXVHG
DQGDUHRQO \ GXVW\
&ROGSUHZDVKHV
:D VK DW&
+RWULQVHDW&
'U\LQJ
6K RU W Z DV KDW &
+RWULQVHDW&
6KRUWFROGZDVKWRSUHYHQWIRRGIURP
GU\L Q JRQWRWKHGLVKHV
:D VK DW&
5L Q VHDW&
+RWULQVHDW&
'U\LQJ
+RWULQVHDW&
'U\LQJ
J
J
J
ZLW KWKH
H[WUDGU\
237,21$/: $6+&<&/(
:DV K GLI IHUHQWLDWHG R Q WKH
WZRUDFNVGHOL FDWHI RU
JO DVVZDUHDQGJO DVVHVRQ WKH
XSSHU UDFNDQGKH DY \GX W\
$XWR'XR:DVK
18
ARISTON DISHWASHER - Instructions for installation and use
I RUWKHSDQ VRQWKHORZHU
UDFN
&ROGSUH ZDVK
:D VK DW&
/XNHZDUPULQVHDW&
+RWULQVHDW&
'U\LQJ
J
Page 21

Never without salt
ISHWASHER
D
Water in your home
Water hardness varies according to where you live. If the water in your home is hard, without water
softening, incrustations would form on your dishes. Your dishwasher is fitted with a water softener
To prevent rust from
forming, load the salt
just before beginning a
which uses special salt to get rid of limescale in the water.
Loading the salt.
Always use salt which is intended
for dishwasher use.
The salt container is situated
underneath the lower rack, fill it
up as follows:
1.Pull out the lower rack
completely, unscrew and
remove the container cap
2. Is it the first time you load the
salt? First fill the container up
with water (you won't have to
do this again next time)
3. Put the dishwasher funnel on
the hole and pour in
approximately two kilos of
salt. It is normal that some
water comes out of the
container.
4. Screw the cap back in place
carefully.
When should I load the salt?
The salt container should be
filled up when the low salt
indicator light "T" flashes. Once
you have loaded the salt for the
first time, it is normal that the
low salt indicator light stays on
or flashes for about 5 consecutive cycles.
Salt adjustment
Your dishwasher can adjust its
salt consumption according to
the hardness of the water in your
home. This way, you can optimise
and customise your dishwasher's
salt consumption (not too much,
nor too little).
To adjust salt consumption, do as
follows:
1. Unscrew the salt container cap
2. There is an arrow on the neck
of the container (see figure):
if necessary, turn the arrow
anti-clockwise from the "-"
setting to the "+" setting.
Select the arrow position
depending on the water hardness,
referring to the table provided.
Water Hardness
Clarke
degrees
0 - 14 0 - 17 0 -1,7 / 0 /
14 - 36 18 - 44 1,8 - 4,4 "-" 20 60
36 - 71 45 - 89 4,5 - 8,9 MED 40 40
>71 > 89 > 8,9 "+" 60 25
°fH mmol/l
Selector
position
You don't know how
hard the water in
your home is? Ask
the company that
supplies water in
wash cycle.
Salt
consumption
(grams/cycle)
your area.
Autonomy
(cycles\2kg)
Suggestions and advice for you.
How to look after and protect
the dishes you hold dear
■ Almost all silverware can
be cleaned in a dishwasher.
There are two exceptions:
old silverware and
silverware decorated with
an oxidising agent. Hot
water can loosen the
handles on old silverware
ad wear off the decorations
on the other.
Never let silverware come
into contact with other
metals: you will thus avoid
stains and blackening
Apart from making
you save time and
energy, your
dishwasher disinfects
your dishes, washing
them at a high
temperature.
■ Silver plates and serving
dishes should be washed
immediately after use,
especially if they have
contained salt, eggs, olives,
mustard, vinegar, fruit juices
and cooked vegetables.
■ For particularly delicate
dishes, we recommend you
use the specific wash cycle
offered by your dishwasher.
Savings are easy
Using your electric household appliances
wisely helps you make savings and is good for
the environment.
Maximum load.
To optimise consumption levels, try to use the
dishwasher with a full load only. If it takes quite
some time to fill up your dishwasher, use the soak
cycle to avoid the formation of bad odours and cakedon food.
The right wash cycle.
Select the most suitable wash cycle for the type of
load you have placed in the dishwasher. The choice of
wash cycle depends on the type of dishes to wash
and on how dirty they are. To select the right wash
cycle, please consult the wash cycle table on page 17.
ARISTON DISHWASHER - Instructions for installation and use
19
Page 22

ISHWASHER
D
Installation and moving
Your dishwasher has arrived
After having bought or moved your dishwasher to another home, a correct installation
ensures that your dishwasher will operate smoothly and efficiently.
Choose where you want to
install your dishwasher, you
can even place it so that its
sides or back panel are side by
side with furniture or up against
the wall. The dishwasher is
provided with water supply and
drain hoses, which can be
directed towards the left or
right to facilitate appropriate
installation.
This dishwasher model can be
built under a single worktop
(please read the relevant
instruction sheet).
Levelling.
Once the appliance is
positioned, adjust the feet by
screwing them in or out
depending on how high you
want it and to level it so that it
is horizontal. Make sure that it
is not inclined more than 2
degrees. If the appliance is
level, it will help ensure its
correct operation.
Cold water connection.
This electric household
appliance should be connected
to the water mains using the
cold water supply hose
provided with the appliance
only. Do not use a different
hose. In the event of replacements, use original spare parts
only.
Connect the cold water supply
hose to a 3/4 gas threaded connection, placing the small filter
provided between the hose and
If the power socket
to which the
appliance is
connected is not
compatible with the
plug, replace it with
a suitable plug rather
than using adapters
or multiple plugs as
these could cause
overheating or
burns.
connection, taking care to screw it
tightly onto the tap.
If the water hoses are new or
have been out of use for an
extended period of time, let the
water run to make sure it is
clear and free of impurities
before making the connection.
If this precaution is not taken,
the water inlet could get
blocked, causing damage to
your dishwasher.
Hot water connection.
Your dishwasher can be
supplied with hot water from
the mains supply (if you have a
central heating system with
radiators) at a temperature of
no more than 60°C.
In this case, the wash cycle time
will be about 15 minutes
shorter and the wash will be
slightly less effective.
The connection must be made
to hot water supply following
the same procedures as those
indicated for the cold water
connection.
Anti-flooding
protection
Your dishwasher is provided
with a special system which
blocks the water supply in the
event of leaks inside the
appliance. It is further equipped
with a water inlet hose
comprising an outer clear hose
and an inner red hose, which
can both withstand extremely
high pressures. Should the
inner hose break, the outer
hose will consequently turn red.
Safety in the event of flooding
is ensured by the second clear
hose that contains the former.
It is vital that you check the
outer hose regularly: if you see
it has turned bright red, then
you know you have to replace it as
soon as possible. Call for an
authorised technical engineer to
come and replace it.
Drain hose connection.
Fit the drain pipe into a drain line
with a minimum diameter of 4 cm
or place it over the sink. Avoid
restricting or bending it. Use the
special plastic elbow provided (see
figure) to position it in the best
possible way. The part of the pipe
marked with the letter A should be
between 40 and 100 cm above the
ground.
The pipe should not be immersed
in water.
A
Electrical connection.
First of all, check that the mains
voltage and frequency values
correspond to those stated on the
rating plate located on the stainless
steel inner door of the appliance
and that the electrical system to
which the dishwasher is connected
is sized for the maximum current
indicated on said rating plate.
Earth: indispensable
safety.
Only now can you plug the
appliance into a socket provided
with an efficient earth connection
(the system's earthing is a
guarantee of safety provided for by
law, make sure your system has
it).
Power supply wire.
Check the power supply wire
on a regular basis; if it is
damaged, we recommend you
have it replaced by an
authorised technical Assistance
service centre.
The plug
The dishwasher plug must be
accessible even when the
appliance is installed so that
maintenance can be done safely.
The special plastic
elbow should be
fastened firmly onto
the wall to prevent
the drain hose from
moving and allowing
water to spill outside
the drain.
20
ARISTON DISHWASHER - Instructions for installation and use
Page 23

ISHWASHER
Troubleshooting
D
If you have a problem, read this
Your dishwasher may not work or not function properly. In many cases, these are problems which can be solved without having to call for
a technician. Before calling the service centre, always check the points below.
The dishwasher won't
start
■ Is the water supply tap turned
on?
■Is the water supply tap
connected to the hose
properly?
■ Has the water in your home
been cut off?
■ Is the pressure of the water
supply sufficient?
■ Is the hose bent?
■ Is the filter on the water
supply hose blocked?
■ Is the dishwasher door open?
The dishes are not clean.
■ Have you put the right
amount of detergent into the
dispenser?
■ Is the wash cycle suitable for
the dishes you have placed
inside the appliance?
■ Are the filter and microfilter
clean?
■ Can the sprayer arms turn
freely?
The dishwasher won't
drain.
■ Is the drain hose bent?
Limescale deposits or a
white film form on the
dishes.
■ Is the lid on the salt
container closed properly?
■ Is the rinse aid dosage
correct?
Error messages.
Your dishwasher is equipped
with a safety system which is
able to detect any operating
anomalies.
These anomalies or faults are
signalled by several codes
consisting of letters and numbers
that flash up on the display. Make
a note of the error code that
appears, turn the appliance off,
turn off the water tap and call for
technical assistance.
Tap off alarm
If you have forgotten to turn on
the water tap, your appliance will
remind you with a long series of
prolonged beeps and the
wording H2O will flash up on the
display. Turn the tap on and the
wash cycle will start up after a
few minutes.
If you are not there when this
signal appears, the appliance will
switch to alarm mode and the
code AL06 will flash on the
display.
Turn the display off by keeping
the Stand-by button
pressed, check that there is
water in the mains supply and
turn on the tap; turn the display
back on by keeping the same
button pressed again.
Repeat the programming
operations and start the
dishwasher by pressing the
START button.
Clogged filter alarm
If the appliance is blocked and
the code AL05 is flashing, this
means the filter is clogged by
large particles of food residue.
Turn the display off by keeping
the Stand-by button pressed
then clean the filter thoroughly
and reposition it in its seat as
illustrated on page 21. Then turn
it back on. Repeat the
programming operations and
start the dishwasher by pressing
the START button.
Water leak alarm
If this indicator light is
flashing, this means the
appliance is blocked due to a
water leak. Turn off the water
tap, cut off the electricity supply
and call for technical assistance.
You have checked
everything, but the
dishwasher still
doesn't work and the
problem persists?
Call an authorised service
centre near you and remember
to mention:
the type of malfunction
the model mark (Mod.) and
the serial number (S/N.)
indicated on the rating plate
located on the inner door, to
one side.
Never call upon the
services of
unauthorised
technicians and always
refuse spare parts that
are not originals.
Safety within your home
Your dishwasher was built in accordance with the strictest international safety regulations. They protect you and your family.
Read the instructions and information contained in this manual: they will provide you with useful hints as to installation, use and
maintenance safety. To avoid nasty surprises.
1. Dispose of the packaging
material carefully (follow
the instructions on how to
divide your rubbish up
provided by your local
Council)
2. After removing the
packaging, check to make
sure your appliance is
intact. If in doubt, contact
a qualified professional.
3. Your dishwasher must only
be used by adults and for
washing household dishes,
according to the
instructions included in
this manual. Do not touch
the appliance with wet
hands or feet or barefoot.
4. We discourage the use of
extension leads and multiple plugs. If the electricity
supply wire is not long
enough, then have it
replaced with one of the
correct length and
remember that it should be
free of bends or dangerous
kinks.
5. If the appliance is not
operating properly or if
maintenance operations
are necessary, disconnect
the dishwasher from the
mains power supply
(unplug it!).
6. Keep children away from
the dishwasher when it is
open and keep detergents
out of their reach.
7. Your dishwasher is not to
be installed outdoors, not
even if the area is covered
by a roof: it is extremely
dangerous to leave it
exposed to rain and
thunderstorms.
8. Do not touch the heating
element during or straight
after a wash cycle.
9. Do not lean or sit on the
door when it is open, as
this could overturn the
dishwasher.
10. If the appliance
malfunctions, turn off the
water inlet tap and
disconnect the plug from
the wall socket. Then try
consulting the section
I only want an authorised
specialised technician with
original Ariston guaranteed spare
parts
entitled "I you have a
problem, read this". If you
cannot resolve the
problem, then call the
service centre.
11. Once taken out of use,
appliances must be made
inoperable: cut the power
supply wire and damage
the door lock.
ARISTON DISHWASHER - Instructions for installation and use
21
Page 24

ISHWASHER
D
Care and maintenance
Cleaning and special maintenance
The filter assembly
If you want consistent good
results from your dishwasher,
you need to clean the filter
assembly.
The food particles are removed
from the wash water, allowing
it to be recirculated during the
cycle, filtered perfectly. For this
reason, it is a good idea to
remove the larger food particles
trapped inside the cup C and
the semi-circular filter A after
each wash; pull the cup handle
upwards to remove them. Just
rinse them under running
water.
The entire filter assembly
should be cleaned thoroughly
once a month: cup C + semicircular filter A + cylindrical
filter B. Rotate filter B
anticlockwise to remove it.
For cleaning, use a non metallic
brush.
Reassemble the filter parts (as
shown in the figure) and
reinsert the whole assembly
into the dishwasher. Position it
into its housing and press
downwards.
The dishwasher is not to be
used without filters. Improper
replacement of the filters may
reduce the efficiency of the
wash and even damage your
dishwasher.
1
B
2
C
A
Cleaning the sprayer
arms.
Food residue may become
encrusted onto the sprayer
arms and block the holes where
water comes out. Check the
sprayer arms regularly and
clean them once in a while
(letters F and I How is it
made?).
Once in a while, once a
month, spend a little
time on the filter
assembly and the
sprayer arms.
Keep your dishwasher in shape
Respecting these few rules ensures you will always have a reliable
work companion by your side.
After every wash.
When the wash cycle has
ended, always remember to
turn off the water supply tap
and to leave the appliance door
ajar. This way, moisture and
bad odours will not be trapped
inside.
Unplug the appliance.
Before carrying out any
cleaning or maintenance on the
dishwasher, always remove the
plug from the electricity socket.
Do not run risks.
No solvents! No
abrasives!
To clean the exterior and
rubber parts of your appliance,
do not use solvents or abrasive
cleaning products. Use a cloth
dampened with lukewarm
soapy water only.
If there are any stains on the
surface of the appliance
interior, use a cloth dampened
with water and a little white
vinegar, or a cleaning product
specifically made for
dishwashers.
Going on holiday?
When you go away for an
extended period of time, we
recommend you do the
following:
run a cycle with the
dishwasher empty
turn off the water inlet tap.
leave the appliance door ajar
This will help the seals last
longer and prevent unpleasant
odours from forming inside the
appliance.
Moving the appliance.
Should the appliance have to be
moved, try to keep it in a
vertical position. If absolutely
necessary, it can be positioned
on its back.
The seals.
One of the factors that cause
unpleasant odours to form
inside the dishwasher is food
that remains trapped in the
seals. Periodic cleaning using a
damp sponge will prevent this
from occurring.
Your dishwasher is not a waste disintegrator!
Do not worry about removing every single bit of
food residue from your dishes, but do get rid of
bones, peel and rind and any other left-overs
before placing them in the racks. Empty out all
glasses and cups.
22
ARISTON DISHWASHER - Instructions for installation and use
Page 25

Stay in touch
THANK YOU for choosing an Ariston appliance. We are confident
you have made a good choice and that your new appliance will give
many years of excellent service.
And we're there when you need us.
Register your purchase
now
This will confirm your entitlement to free spare parts for five years,
and you could also be lucky enough to recover the cost of your
purchase in our quarterly prize draw.
Simply complete and return the Registration Form supplied with
the appliance documents, using the FREEPOST envelope supplied.
Or call the Registration Hotline on 0870 010 4305.
ISHWASHER
D
Enjoy complete peace of mind. By registering now, you
automatically qualify for a full year's guarantee on parts and labour
PLUS free functional parts cover for a further 4 years, provided
they are genuine Ariston spare parts fitted by an Ariston Service
Engineer.
We're as close to you as your telephone
For direct access to Genuine Ariston Spare Parts and Accessories,
call 0870 558 5850 and speak to our skilled staff who can help you to identify and purchase the item you
require.
For a Rapid Response to a problem with your appliance, call 0870 607 0805. We're open from Monday
to Saturday (8am - 5.30pm weekdays, 9am - 5pm Saturday). We have our own department of highly trained
Ariston service staff. For most calls, our Service Engineer can fix the problem on the first visit.
Please have the following details to hand when you ring us:
The nature of the problem, the Model Number and the Serial Number.
These numbers can be found on the appliance and on the portion of the Registration Card which you retain.
ARISTON DISHWASHER - Instructions for installation and use
23
Page 26

Page 27

Page 28

Viale Aristide Merloni 47
60044 Fabriano (AN) Italy
T el +39 0732 661 1
www.aristonchannel.com
P02/2005 - 195037606.02 - Xerox Business Services - DocuTech
 Loading...