

Page 1

Instruction booklet
DISHWASHER
EN
English, 1
L 60 T 3 C
T R
Türkçe, 13
Contents
Installation, 2-3
Positioning and levelling
Connecting the water and electricity supplies
Technical data
Description of the appliance, 4
Overall view
Control panel
Loading the racks, 5
Lower rack
Cutlery basket
Upper rack
Start-up and use, 6
Starting the dishwasher
Loading the detergent
Washing options
Wash cycles, 7
Wash cycle table
Rinse aid and refined salt, 8
Loading the rinse aid
Loading the refined salt
Care and maintenance, 9
Shutting off the water and electricity supplies
Cleaning the dishwasher
Preventing unpleasant odours
Cleaning the sprayer arms
Cleaning the filters
Leaving the machine unused for extended periods
Precautions and advice, 10
General safety
Disposal
Saving energy and respecting the environment
Troubleshooting, 11
Assistance, 12
Before calling for Assistance
Page 2
Installation
EN
Keep this instruction manual in a safe place for
future reference. If the appliance is sold, given away
or moved, please ensure the manual is kept with the
machine, so that the new owner may benefit from the
advice contained within it.
Please read this instruction manual carefully: it
contains important information regarding the safe
installation, use and maintenance of the appliance.
If the appliance must be moved at any time, keep
it in an upright position; if absolutely necessary, it
may be tilted onto its back.
Positioning and levelling
1. Remove the appliance from all packaging and
check that it has not been damaged during
transportation.
If it has been damaged, contact the retailer and do
not proceed any further with the installation process.
2. Check the dishwasher by placing it so that its
sides or back panel are in contact with the adjacent
cabinets or even with the wall. This appliance can
also be recessed under a single worktop* (
Assembly instruction sheet
).
see the
Connecting the water inlet hose
• To a suitable cold water connection point: before
attaching the hose, run the water until it is
perfectly clear so that any impurities that may be
present in the water do not clog the appliance;
after performing this operation, screw the inlet
hose tightly onto a tap with a ¾ gas threaded
connection.
• To a suitable hot water connection point: your
dishwasher may be provided with hot water from
the mains supply (if you have a central heating
system with radiators) provided that it does not
exceed a temperature of 60°C.
Screw the hose to the tap as described for
connection to a cold water supply.
3. Position the dishwasher on a level and sturdy floor.
If the floor is uneven, the front feet of the appliance
may be adjusted until it reaches a horizontal position
(the angle of inclination must not exceed 2 degrees).
If the appliance is levelled correctly, it will be more
stable and much less likely to move or cause
vibrations and noise while it is operating.
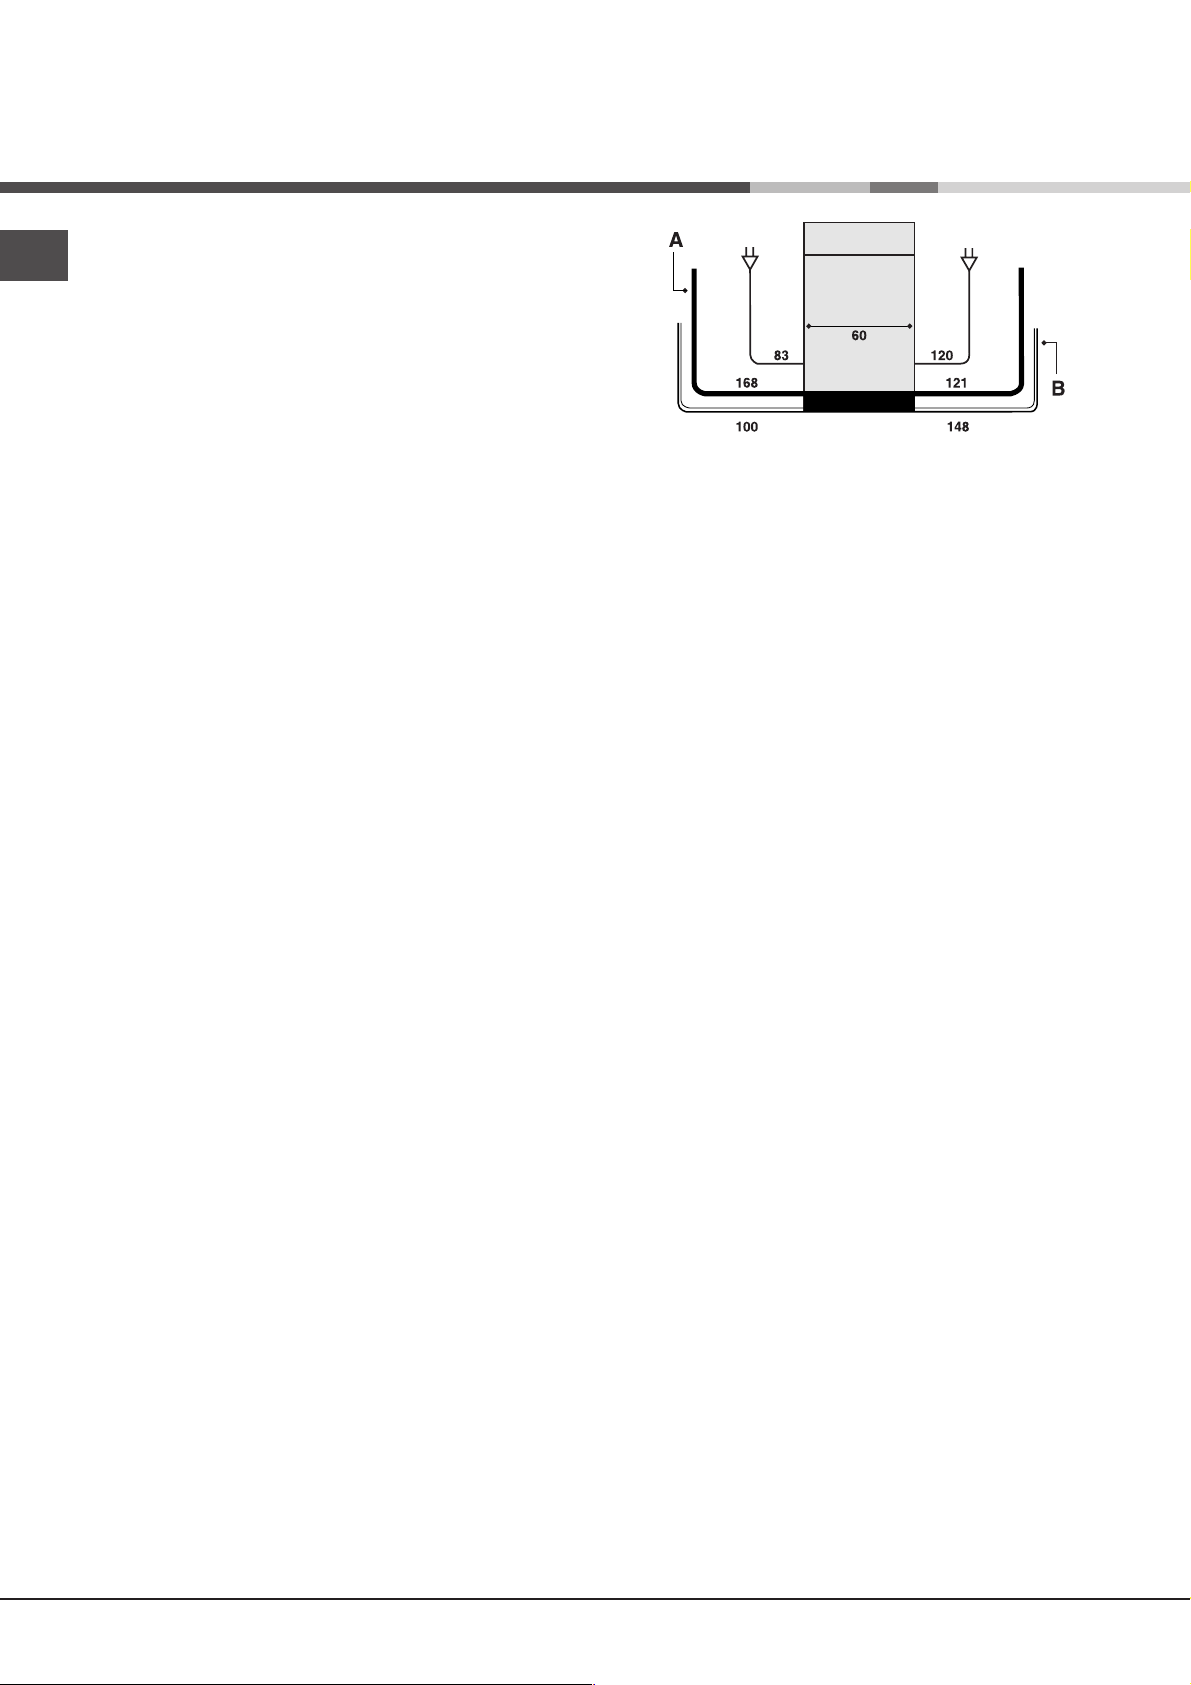
Connecting the water and electricity
supplies
Connection to the water and electricity supplies
should only be performed by a qualified technician.
The dishwasher should not stand on top of the
water hoses or the electricity supply cable.
The water inlet (A) and outlet (B) hoses and the
electricity supply cable may be positioned towards
the right or the left in order to achieve the best
possible installation (
see figure
).
If the inlet hose is not long enough, contact a
specialist store or an authorised technician (
Assistance
The water pressure must be within the values
indicated in the Technical data table (
The hose should not be bent or compressed.
Anti-flooding protection
To ensure floods do not occur, the dishwasher:
- is provided with a special system which blocks the
water supply in the event of anomalies or leaks from
inside the appliance.
- is provided with a
other words it has a water inlet hose that consists of
a transparent hose on the outside and a red hose on
the inside: both the hoses can withstand extremely
high pressure. If the internal hose breaks, the
external hose becomes a bright red colour and
carries the water instead, thus avoiding any leakage.
It is very important to check the external hose
regularly: if it is a bright red colour, it must be
replaced by an authorised technician as soon as
possible (
).
Water Stop
see Assistance
* safety device, in
).
see
see below
).
2
Page 3
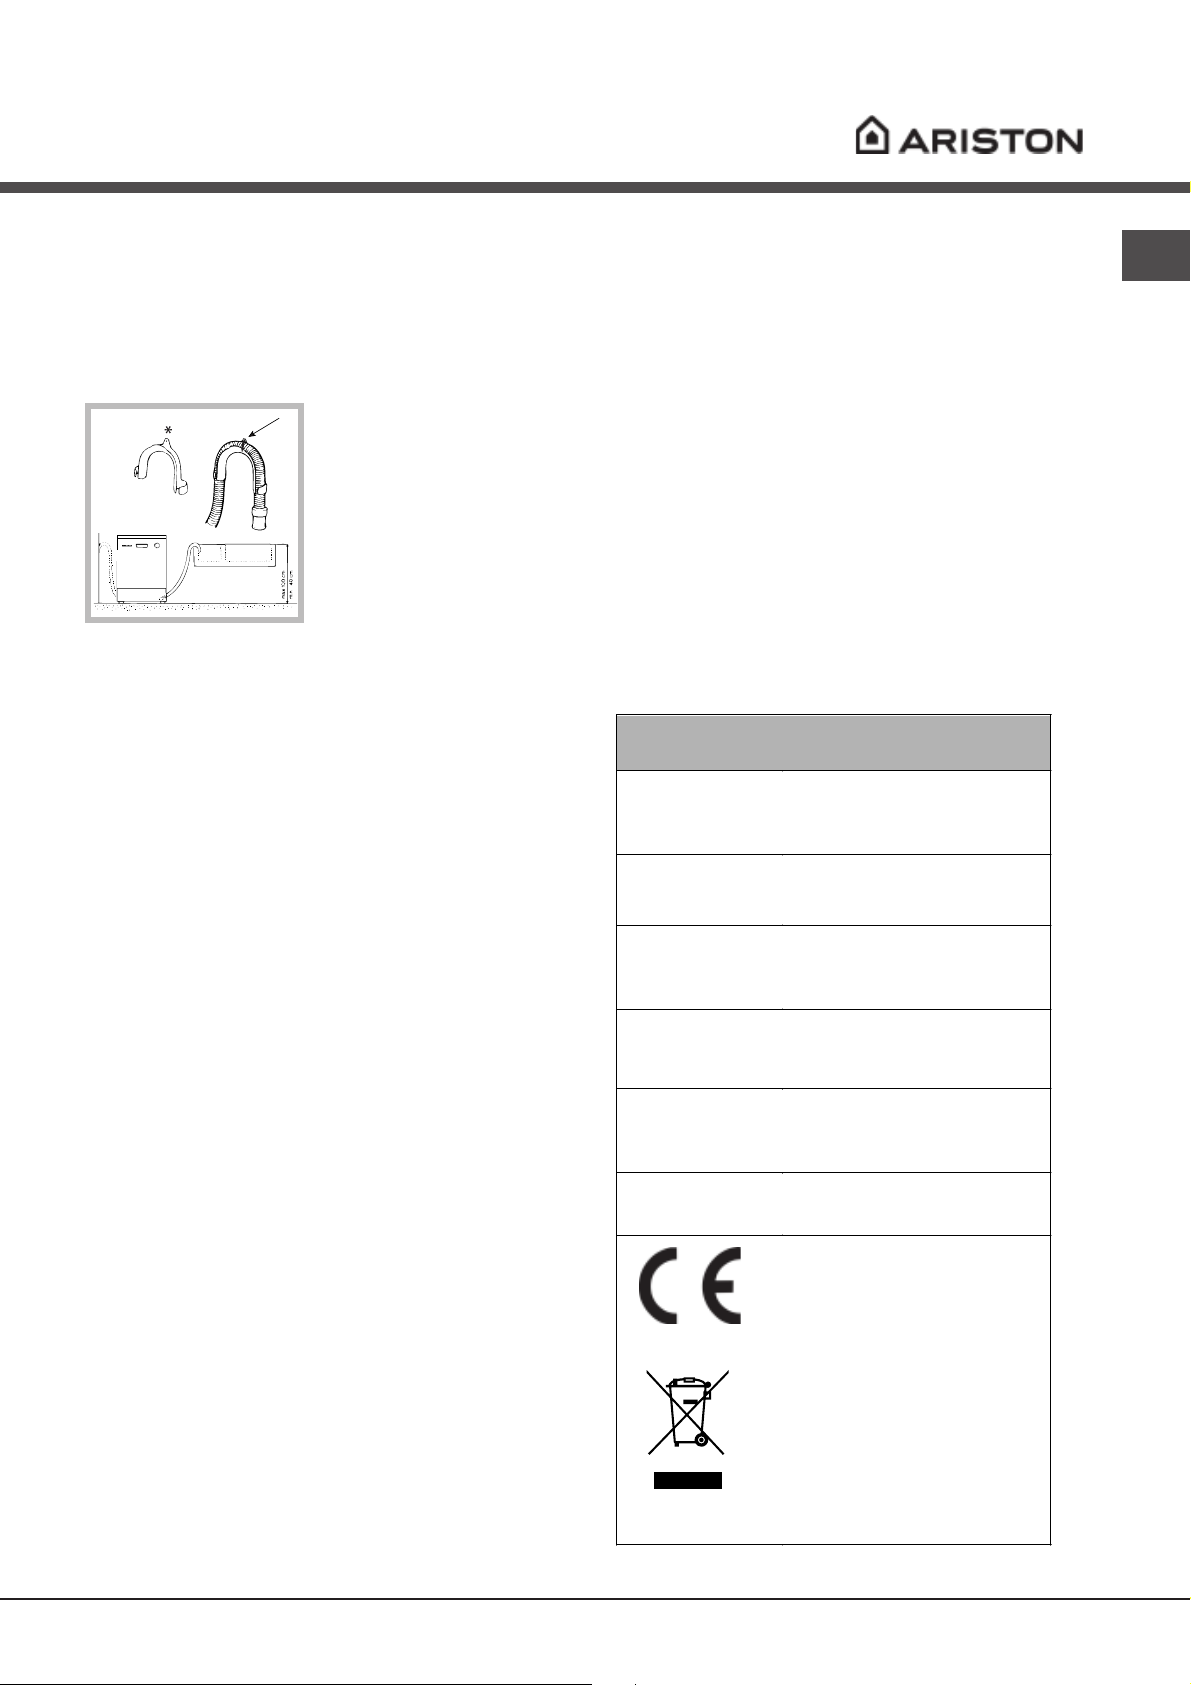
Connecting the water outlet hose
A
Connect the outlet hose (without bending it) to a
drain duct with a minimum diameter of 4 cm.
Alternatively, rest it over a sink or tub; the free end
of the hose should not remain immersed in water.
The special plastic
elbow* makes it easier to
find the best layout: fix
the elbow to the wall
securely in order to
prevent the outlet hose
from moving and spilling
the dirty water.
The part of the hose
marked with the letter A
should be between 40 and 100 cm above the ground
see figure
(
).
We advise against the use of hose extensions.
Electrical connection
Before inserting the plug into the electrical socket,
make sure that:
The Company shall not be held responsible for any
incidents that occur if these regulations are not
observed.
Advice regarding the first wash cycle
After the appliance has been installed, immediately
before running the first wash cycle, completely fill
the salt dispenser with water and add approximately
2 kg of salt (
see Rinse aid and refined salt
). The
water may overflow: this is normal and is not a
cause for concern. It is also normal that the LOW
SALT* indicator light continues to flash for a few
cycles after the salt has been loaded.
Technical data
width 60 cm
Dimensions
height 85 cm
depth 60 cm
EN
• the socket is earthed and complies with current
regulations;
• the socket can withstand the maximum load of
the appliance, which is indicated on the data
plate located on the inside of the door (
Description of the appliance
);
see
• the power supply voltage falls within the values
indicated on the data plate on the inside of the
door;
• the socket is compatible with the plug of the
appliance. If this is not the case, ask an
authorised technician to replace the plug (
Assistance
); do not use extension cables or
see
multiple sockets.
Once the appliance has been installed, the power
supply cable and the electrical socket should be
easily accessible.
The cable should not be bent or compressed.
The cable should be checked regularly and
replaced by authorised technicians only (
Assistance
see
).
Capacity
Water supply
pressure
Power supply
voltage
Total absorbed
power
Fuse
12 standard place-settings
30 Kpa ÷ 1Mpa (0.3 ÷ 10 bar)
4.3 psi – 145 psi
See appliance data plate
See appliance data plate
See appliance data plate
This dishwasher conforms to
the following European
Community Directives:
-73/23/EEC dated 19/02/73
(Low Voltage) and subsequent
modifications
-89/336/EEC dated 03/05/89
(Electromagnetic Compatibility)
and subsequent modifications
-97/17/EC (Labelling)
-2002/96/ CE
Waste
Electrical and Electronic
Equipment (WEEE)
* Only available in selected models.
3
Page 4
Description of the appliance
EN
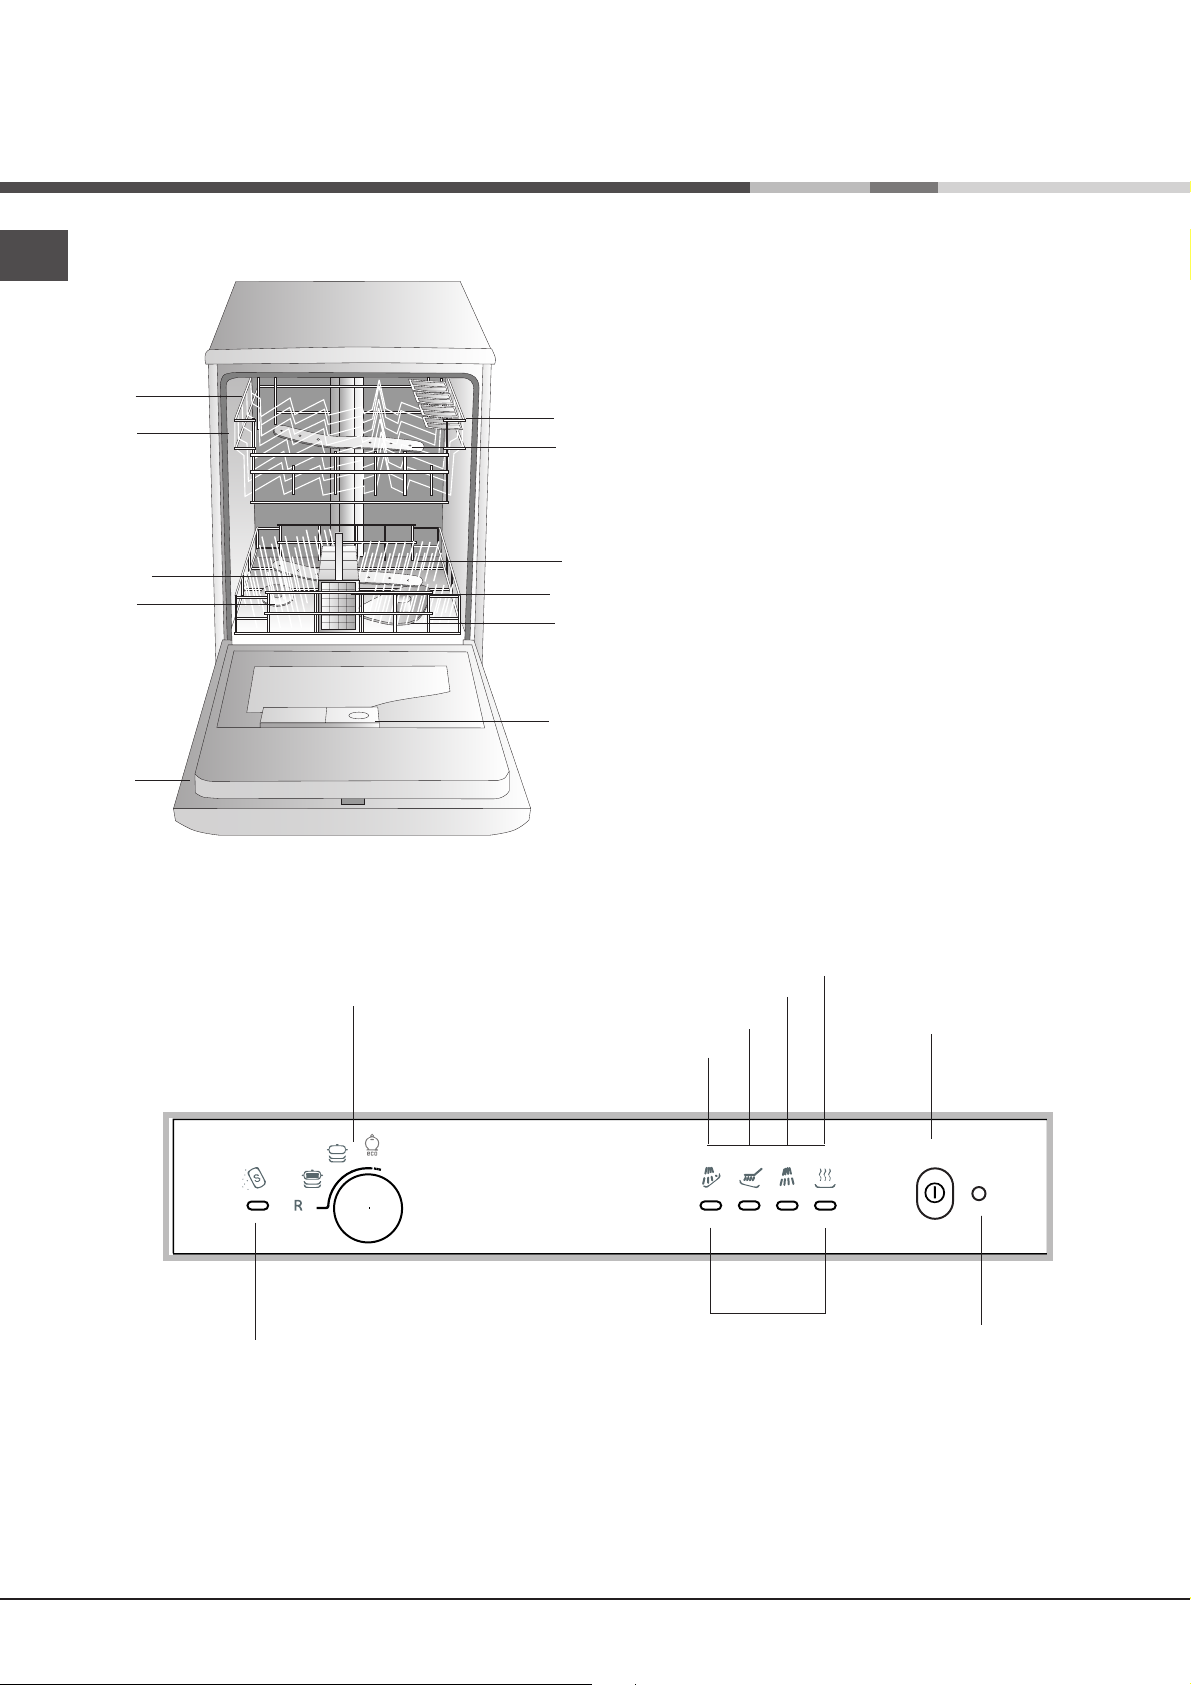
Overall view
1
4
6
9
11
7
10
1. Upper rack
2. Upper sprayer arm
3. Tip-up compartments
4. Rack height adjuster
5. Lower rack
3
2
5
8
6. Lower sprayer arm
7. Cutlery basket
8. Washing filter
9. Salt dispenser
10. Detergent and rinse aid dispensers
11. Data plate
Control panel
LOW SALT
indicator light*
WASH CYCLE
SELECT
knob
WASH
PRE-WASH
WASH CYCLE PHASE
indicator lights
DRYING
RINSE
ON-OFF
button
ON-OFF
indicator light
* Only available in selected models.
4
Page 5
Loading the racks
Before loading the rack, remove all food residue from the
crockery, leave saucepans and frying pans with burnt-on
residue to soak
from cups and glasses. After loading the appliance, check
that the sprayer arms can rotate freely.
in water only and empty all remaining liquid
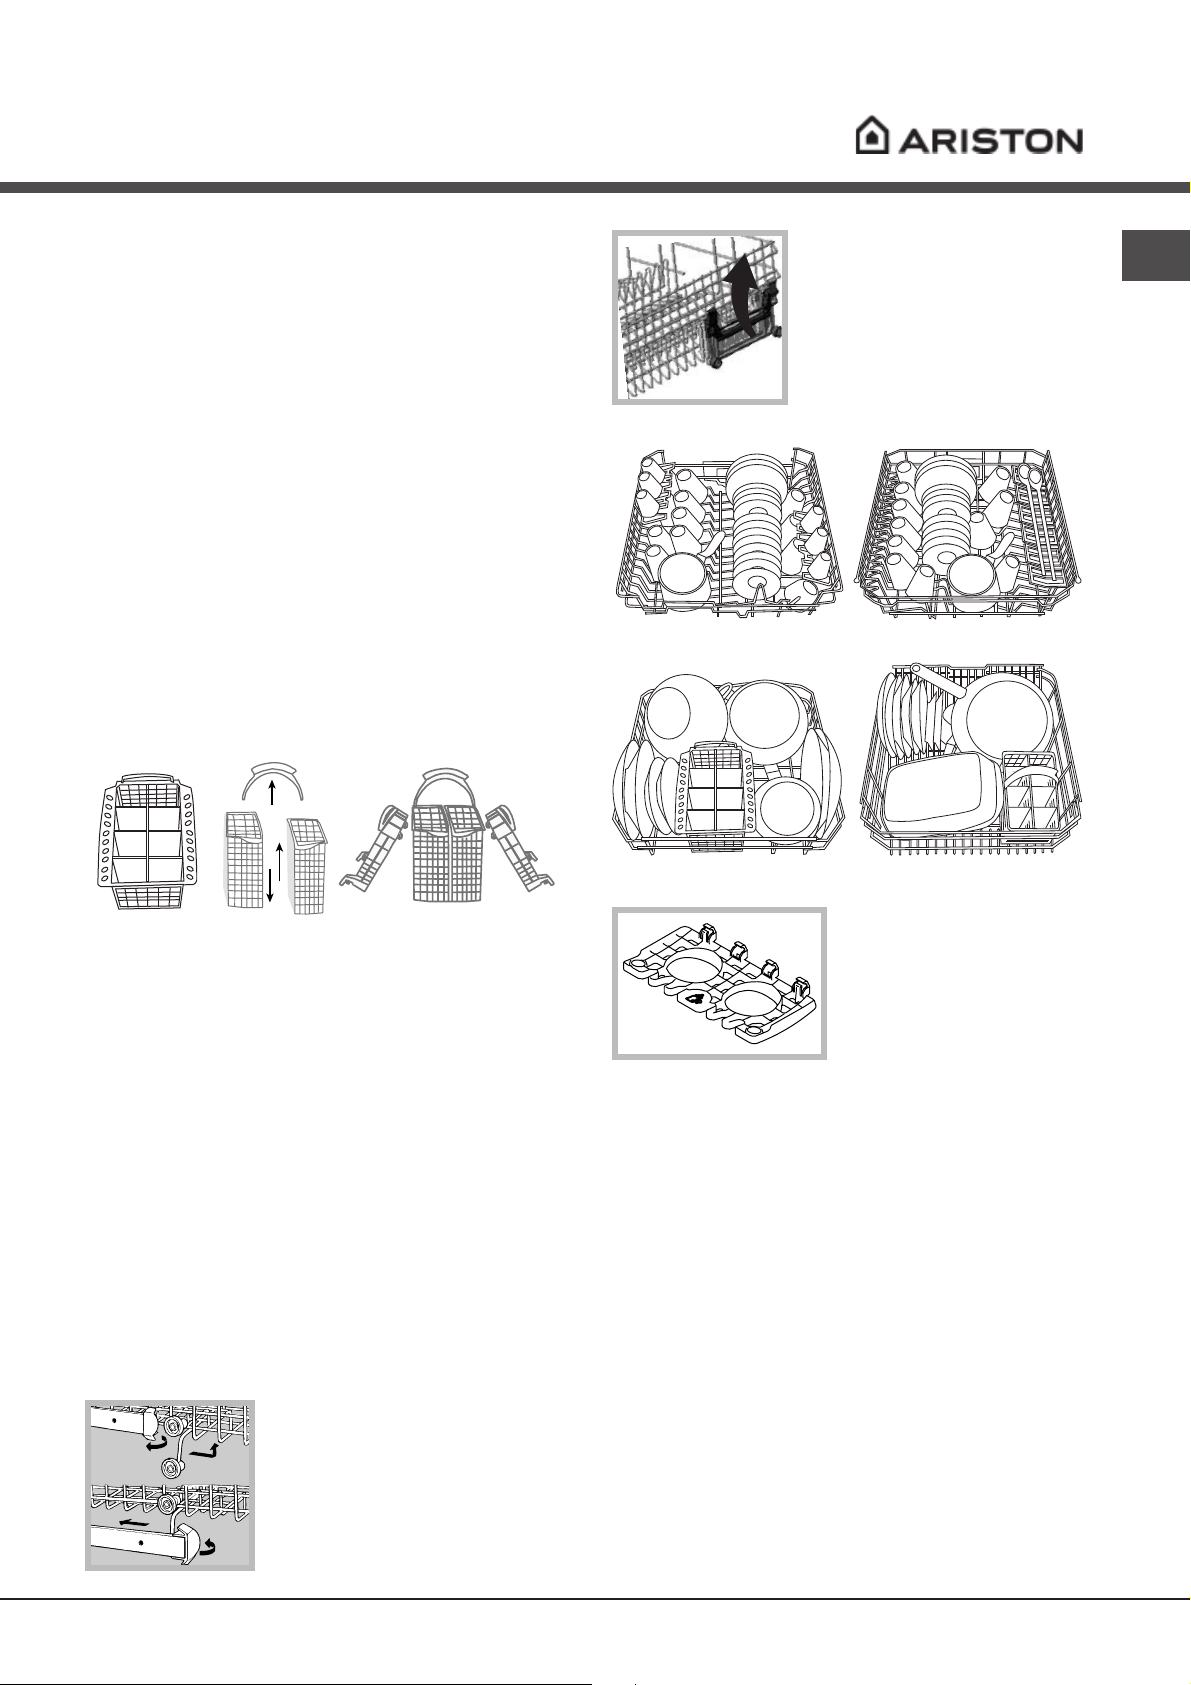
Lower rack
Arrange the more difficult items to wash using the
examples
needed.
as a guide and use the collapsible supports* where
• Serving dishes and lids: place these at the sides
of the rack.
• Saucepans and salad bowls: always turn these
upside down.
• Very deep dishes: position these at an angle.
In order to guarantee the best washing and drying
performance, the surface of the lower rack is more uneven
than that of the upper rack.
Loading
Cutlery basket
The type of cutlery basket may vary according to the
dishwasher model.
Knives and other sharp utensils should be placed in the
cutlery basket with the point facing downwards.
If the rack is equipped with the click
clack handles* (
them upwards or downwards to
adjust the height.
see figure
Loading examples for the upper rack
Loading examples for the lower rack
), pull
EN
To divide the central basket* into two separate pieces: pull out
the handle. The two detachable side compartments* may be
hooked onto the upper or lower rack.
The two grids* may be positioned in the basket to separate
the cutlery: place the pieces of cutlery into the appropriate
compartments with the handles at the bottom.
Upper rack
Load this rack with delicate and lightweight crockery: glasses,
tea and coffee cups, saucers, small salad bowls, saucepans
and small saucepans that are not too soiled, using the
examples
as a guide.
• Lightweight crockery: position these dishes so
that they will not be moved by the jets of water.
• Mugs and cups: place these on the tip-up
compartments**.
• Long sharp knives and serving utensils: place
these on the tip-up compartments**.
Adjusting the height of the upper rack
In order to make it easier to arrange
the crockery, the upper rack may be
1
3
moved to a higher or lower level.
2
Open the left and right guide rail
stops and pull out the rack; position
it higher or lower as required, slide it
along the guide rails until the front
4
wheels are in place and close the
stops (
see figure
).
Loading
Baby Tip-up compartments
**
For dishwasher models with a
Baby Cycle, tip-up
compartments suitable for
washing bottles, rings and
teats are provided.
Items that should not be washed in the dishwasher
• Wooden items, objects with wooden or horn
handles or glued-on parts.
• Items made from aluminium, copper, brass,
pewter or tin.
• Items made from plastic that is not heatresistant.
• Antique or hand-painted porcelain.
• Antique silver. Silver that is not antique may,
however, be washed in the dishwasher using a
delicate wash cycle, provided that it does not
come into contact with other metals.
When buying crockery and cutlery we recommend that you
check whether it can be washed using the dishwasher.
Washing the handles*
To wash the upper and lower rack handles: remove the two
fastening plugs, lift out the handles and rinse them under
running water, then fasten them to the rack using the same
plugs.
* Only available in selected models.
** The number and position may vary.
5
Page 6
A
B
D
C
Start-up and use
EN
Starting the dishwasher
1. Turn the water tap on.
2. Press the ON/OFF button: the indicator light will
illuminate.
3. Open the door and pour in a suitable amount of
detergent (
4. Load the racks (
the door.
5. Select the desired wash cycle depending on the
dishes and how dirty they are (
cycles
6. Select the wash options (
available in selected models).
7. After a few minutes the cycle start and the WASH
CYCLE PHASE indicator lights display the status
of the cycle:
Pre-wash, Wash, Rinse, Drying.
8. At the end of the cycle the DRYING indicator
light will flash.
9. Turn the knob anti-clokwise to RESET in order to
reset all the settings.
10.Switch off the appliance by pressing the ON/OFF
button, shut off the water tap and unplug the
appliance from the electricity socket.
11.Open the door and wait for a few minutes before
removing the crockery, in order to avoid burns.
Unload the racks, beginning with the lower level.
Modifying the duration of a wash cycle already in
progress
If a mistake was made during the wash cycle
selection process it is possible to change the cycle,
provided that it has only just begun: turn the knob
anti-clockwise until it reaches the RESET position.
After a few seconds the WASH CYCLE PHASE
indicator light will switch off: select the new cycle.
see below
), by turning the knob clockwise.
).
see Loading the racks
see table of wash
see below. Only
) and shut
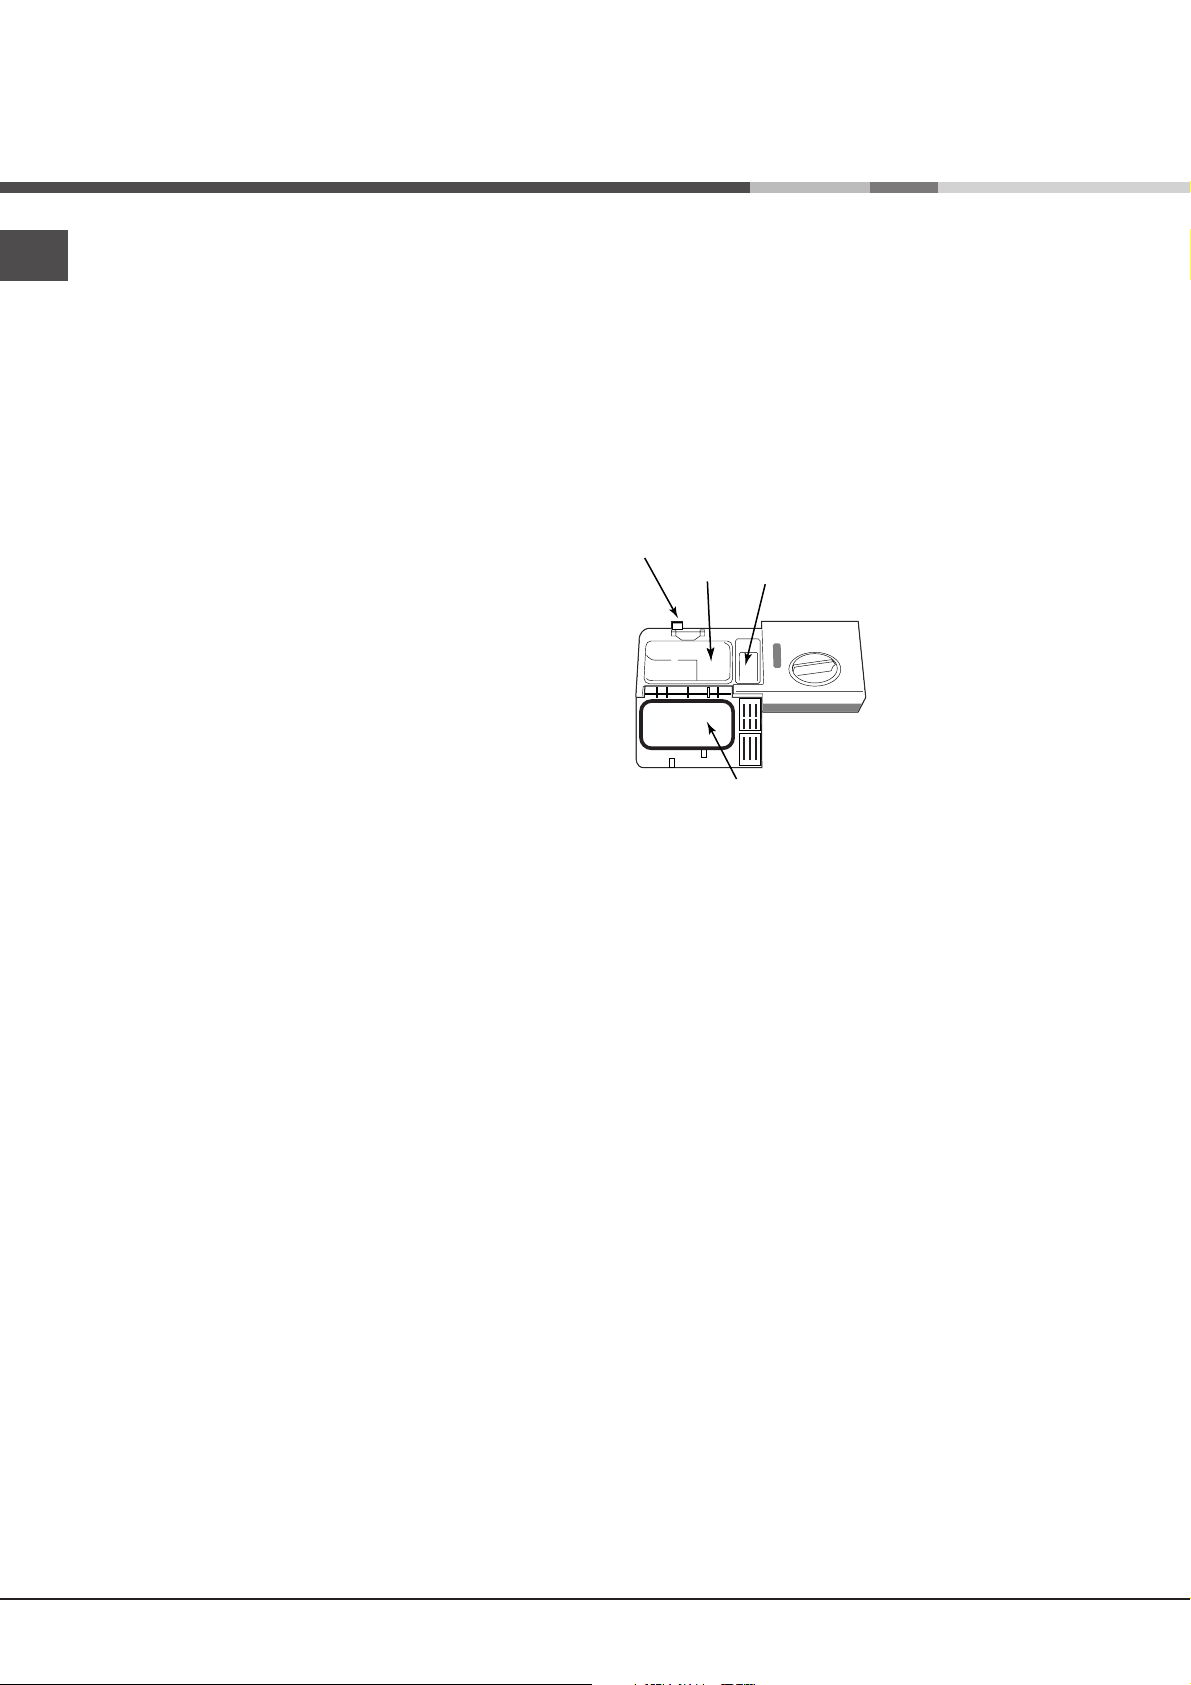
Loading the detergent
A successful wash also depends on the correct
amount of detergent being used, as recommended
by the manufacturer. Exceeding the recommended
amount does not result in a more effective wash and
pollutes the environment.
To obtain the best results from each washing and
drying cycle, powder detergent, rinse aid liquid and
salt should be used.
comparcompar
compar
comparcompar
comparcompar
compar
comparcompar
requires 1 tablet, place it in compartment A and
close the cover; when it requires 2, place the second
tablet at the bottom of the appliance.
3. Remove detergent residues from the edges of the
compartment and close the cover until it clicks.
tment Atment A
tment A: Washing detergent
tment Atment A
tment Btment B
tment B: Pre-wash detergent
tment Btment B
1. Open cover C by
pressing button D.
2. Pour in the detergent
after consulting the
cycle table
• for powder detergent
use compartments A and
B
• for tablets, use
compartment A and the
bottom of the appliance,
i.e. when the cycle
Wash
:
Adding extra crockery
Press the ON/OFF button and open the door, taking
care to avoid the escaping steam, and place the
crockery inside the dishwasher. Press the ON/OFF
button again: the cycle starts from the point at which
it was interrupted.
Accidental interruptions
If the door is opened during the wash cycle, or if
there is a power cut, the cycle stops. It starts again
from the point at which it was interrupted once the
door has been shut or the electricity supply is
restored.
* Only available in selected models.
6
Page 7
Wash cycles
Wash cycle table
Ariston dishwashers are fitted with an automatic filter cleaning system that may increase the cycle duration.
The number and type of wash cycles varies according to the model of dishwasher.
If the crockery is only lightly soiled or if it has been rinsed with water before being placed in the dishwasher,
reduce the amount of detergent used accordingly.
Wash cycle
selection
instructions
Extremely soiled
dishes and pans (not
to be used for
delicate items).
Normally soiled pans
and dishes.
Standard daily wash
cycle.
Environmentallyfriendly wash cycle
with low energy
consumption levels,
suitable for pans and
dishes.
Wash cycle
Intensive
Normal
Eco
Detergent
(A) = compartment A
(B) = compartment B
Powder Liquid Tablets
1 (A)
30 g (A)
5 g (B)
30 g (A) 30 ml (A) 1 (A)
25 g (A)
5 g (B)
30 ml (A)
5 ml (B)
25 ml (A)
5 ml (B)
1 (bottom of
the
appliance)
1 (A)
Pre-wash Drying
•
•
•
•
•
Wash cycle
duration
(tolerance
±10%)
2:00’
1:12’
2:10’
EN
Note
To make it easier to measure out the detergent, it is worth remembering that:
1 tablespoon = 15 grams of powder = approximately 15 ml of liquid
1 teaspoon = 5 grams of powder = approximately 5 ml of liquid
7
Page 8
Rinse aid and refined salt
EN
Only use products that have been specifically
designed for dishwashers.
Do not use table salt or industrial salt.
If using a multi-functional product (2-in-1, 3-in-1, 4-in1,etc.) it is not necessary to add rinse aid; however,
we recommend that you add salt, especially if you
live in an area where the water is hard or very hard. If
you do not add salt or rinse aid, the LOW SALT* and
LOW RINSE AID* indicator lights will flash
continuously.
Loading the rinse aid
Rinse aid makes it easier for the crockery to dry, as
water runs off surfaces more readily and therefore
does not leave streaks or marks.
The rinse aid dispenser should be filled:
• whenever the indicator light (H) signals that it is
empty. Illuminated light: add rinse aid; unlit light:
there is no shortage of rinse aid in the dispenser.
• when the LOW RINSE AID* indicator light on the
panel flashes;
1. Open the dispenser by
H
3. Screw the lid back on.
turning the lid (G) in an
anticlockwise direction.
2. Pour in the rinse aid,
making sure it does not
overflow from the
F
dispenser. If this happens,
G
clean the spill immediately
with a sponge.
NEVER pour the rinse aid directly into the appliance
tub.
Adjusting the amount of rinse aid
If you are not completely satisfied with the washing
or drying results, you may adjust the quantity of
rinse aid used. Use a screwdriver to turn the dosage
adjuster to one of the 6 pre-set positions (the default
position is set to 4):
• if there are bluish streaks on the crockery, set the
adjuster to a lower number (1-3).
• if drops of water remain on the crockery or there
are limescale marks present after the cycle has
finished, set the adjuster to a higher number (4-6).
If you are using multi-functional tablets (2-in-1, 3-in-1,
4-in-1, etc.) and you wish to further improve the
drying performance of the appliance, fill the
dispenser and set the dosage adjuster to 2.
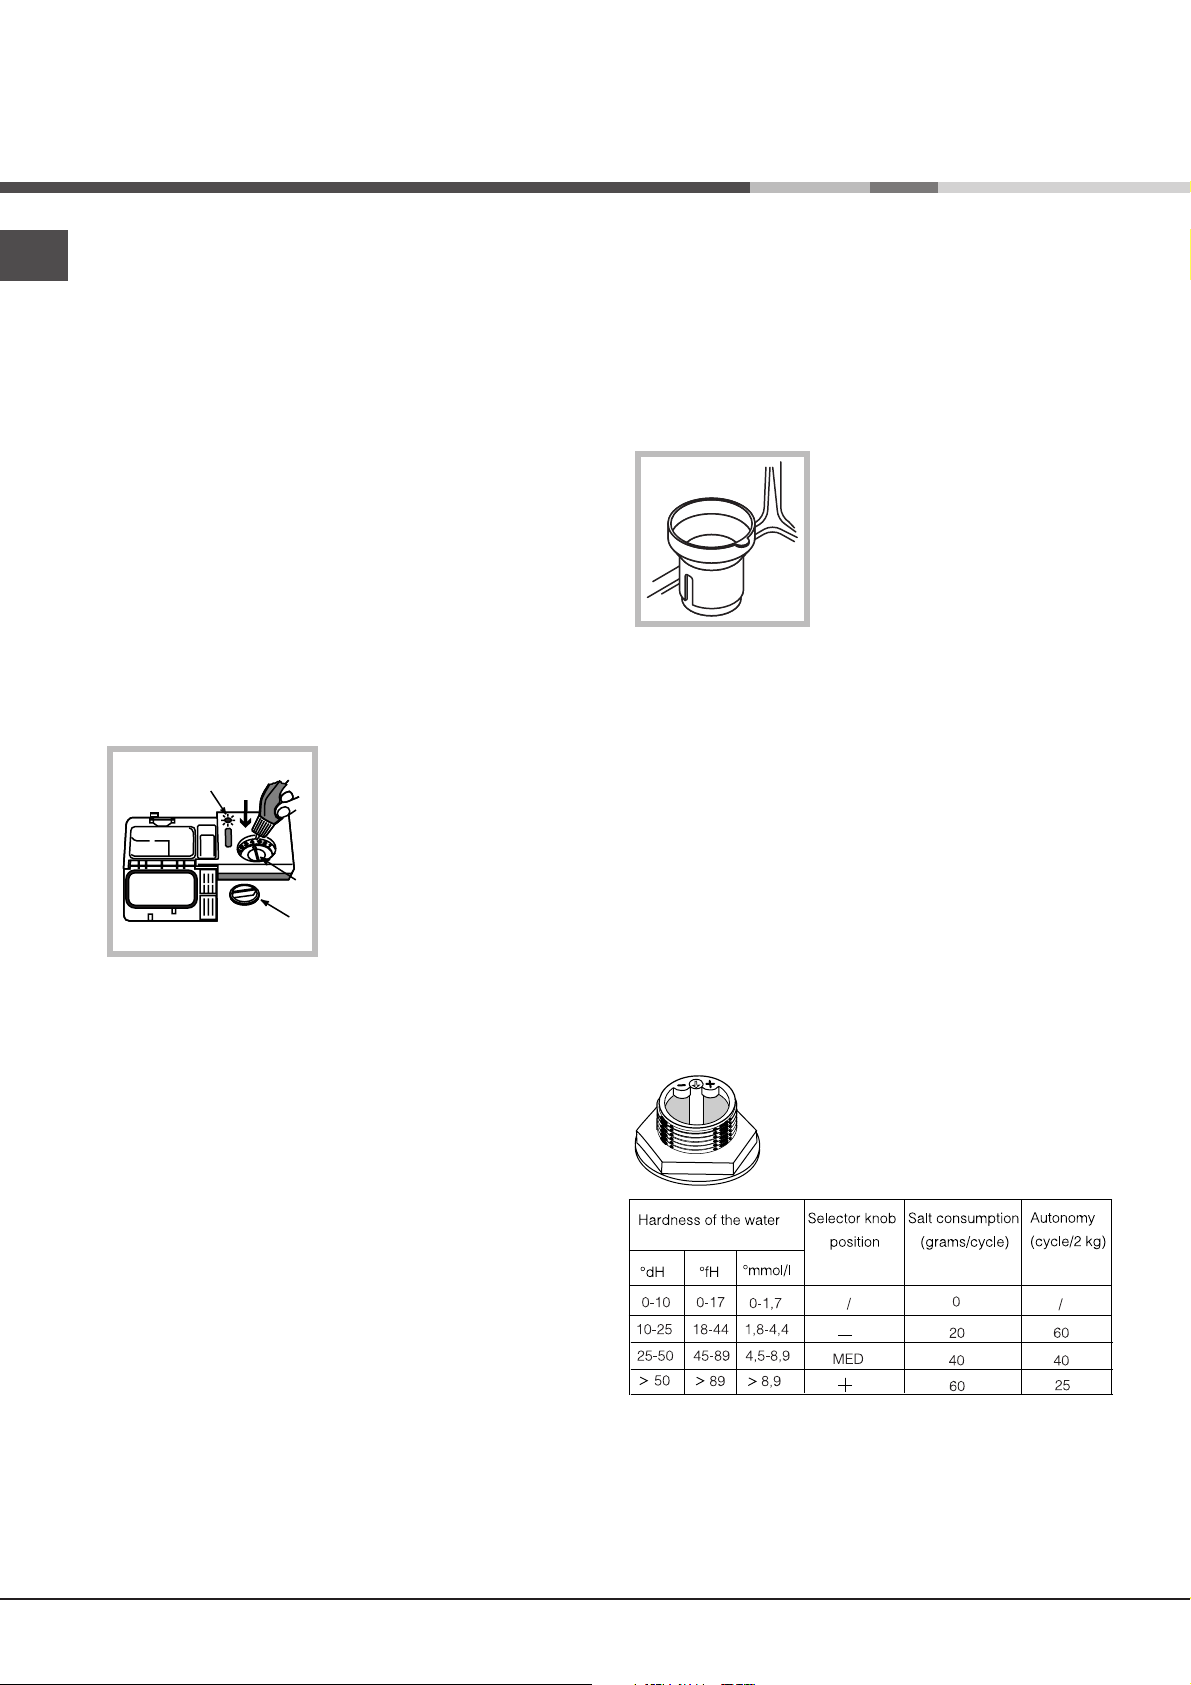
Loading the refined salt
In order to obtain the best possible results from a
wash cycle, make sure that the dispenser is never
empty. Refined salt removes limescale from the
water, thus avoiding the formation of deposits on
crockery. The salt dispenser is located in the lower
part of the dishwasher (
be filled:
• when the green float* cannot be seen by simply
looking at the cap of the salt dispenser;
• when the LOW SALT* indicator light on the panel
flashes;
• if your machine is not equipped with an indicator
light or a green float:
approximately every 30 wash cycles;
correctly (
the edges (approximately 2 kg); it is normal for a
little water to leak out.
4. Remove the funnel, wipe away any salt residue
from the thread and screw the cap on tightly, so that
detergent does not leak into the dispenser during
the wash cycle (this could damage the water
softening system beyond repair).
When salt has been added, run a wash cycle
immediately, without crockery, in order to remove
any salt solution that has leaked out and to avoid
corrosion.
Adjusting the amount of salt*
It is possible to adjust the amount of salt used
according to the hardness of the water in your area
(this information is available from your local water
board).
The default setting of the water softening system is +.
- If using multi-functional tablets (2-in-1, 3-in-1, 4-in-
1,etc.) fill the salt dispenser and set the adjuster to -; if
the hardness of the water is greater than 60°fH, set it
to +.
* Only available in selected models.
see figure
1. Unscrew the dispenser cap.
2. Turn the arrow on the neck of the
dispenser (
+ or - symbols, using the table
below as a guide.
see Description
1. Remove the lower rack and
unscrew the cap of the
dispenser (in an anticlockwise direction).
2. For the first wash cycle
only: fill the dispenser up to
the edges with water.
3. Position the funnel provided
) and fill the salt dispenser up to
see figure
) and should
) towards the
8
Page 9

Care and maintenance
Shutting off the water and electricity
supplies
• Turn off the water tap after every wash cycle to
avoid leaks.
• Remove the plug from the socket when cleaning
the machine and when carrying out maintenance
work.
Cleaning the dishwasher
• The external surfaces of the machine and the
control panel may be cleaned using a nonabrasive cloth which has been dampened with
water. Do not use solvents or abrasive products.
• Any marks on the appliance interior may be
removed using a cloth dampened with water and
a little vinegar.
Preventing unpleasant odours
• Always keep the door of the appliance ajar in
order to avoid moisture from forming and being
trapped inside the machine.
• Clean the seals around the door and detergent
dispensers regularly using a damp sponge. This
will avoid food becoming trapped in the seals,
which is the main cause of the formation of
unpleasant odours.
Cleaning the sprayer arms
Food residue may
become encrusted onto
the sprayer arms and
block the holes used to
spray the water. It is
therefore recommended
that the arms are
checked from time to
time and cleaned with a
small non-metallic
brush.
Cleaning the filters
The filters remove food residue from the water used
in the wash cycle: to obtain the best results from
each wash, they should be cleaned.
Clean the filters regularly.
After cleaning check that the filter assembly has
been replaced correctly.
The dishwasher should not be used without filters
or when the filter is loose.
1. Remove the filters by pulling the handle upwards.
2. Clean the filters:
• after every wash
cycle, remove the
C
1
2
A
B
B
C
A
non-metallic brush to clean these parts.
3. Reconstruct the filter assembly and replace it in
the correct position, following movements 1 and 2 as
shown in the figure, until it clicks into place.
largest pieces of
residue from
semicircular plate A
and glass B (these
may be removed by
pulling the handle) by
rinsing them under
running water.
• The entire filter
assembly should be
cleaned thoroughly
once a month: this
includes the
semicircular plate A,
the glass B and the
cylinder C (this may be
removed by turning it in
an anti-clockwise
direction). Use a small
Leaving the machine unused for
extended periods
• Run a wash cycle when the dishwasher is empty.
EN
• Unplug the appliance and disconnect the water
supply.
• Leave the door of the appliance ajar.
9
Page 10

Precautions and advice
EN
The appliance was designed and manufactured in
compliance with current international safety
standards. The following information has been
provided for safety reasons and should therefore be
read carefully.
General safety
• The appliance was designed for domestic use
inside the home and is not intended for
commercial or industrial use.
• The appliance must be used by adults only, to
wash domestic crockery according to the
instructions in this manual.
• The appliance must not be installed outdoors,
even in covered areas. It is extremely dangerous
to leave the machine exposed to rain and storms.
• Do not touch the appliance when barefoot.
• When unplugging the appliance always pull the
plug from the mains socket, do not pull on the
cable.
• The water supply tap must be shut off and the
plug should be removed from the electrical
socket before cleaning the appliance or carrying
out any maintenance work.
• If the appliance breaks down, do not under any
circumstances touch the internal parts in an
attempt to carry out the repair work yourself.
• Never touch the heating element.
• Do not lean or sit on the open door of the
appliance: this may cause the appliance to
overturn.
• Keep detergent and rinse aid out of reach of
children.
• The packaging material should not be used as a
toy: it can become a choking or suffocation
hazard.
Disposal of old electrical appliances
The European Directive 2002/96/EC on Waste
Electrical and Electronic Equipment (WEEE),
requires that old household electrical appliances
must not be disposed of in the normal unsorted
municipal waste stream. Old appliances must be
collected separately in order to optimise the
recovery and recycling of the materials they contain
and reduce the impact on human health and the
environment. The crossed out "wheeled bin" symbol
on the product reminds you of your obligation, that
when you dispose of the appliance it must be
separately collected.
Consumers should contact their local authority or
retailer for information concerning the correct
disposal of their old appliance.
Saving energy and respecting the
environment
Saving water and energy
• Only start a wash cycle when the dishwasher is
full. While waiting for the dishwasher to be filled,
prevent unpleasant odours with the Soak cycle
see Wash Cycles
(
• Select a wash cycle that is suited to the type of
crockery and to the soil level of the crockery
using the
- for dishes with a normal soil level, use the Eco
wash cycle, which guarantees low energy and
water consumption levels.
- if the load is smaller than usual activate the Half
load option (
• If your electricity supply contract gives details of
electricity saving time bands, run wash cycles
during the periods when a lower tariff is applied.
The Delayed start* button (
helps you organise the wash cycles accordingly.
Phosphate-free and chlorine-free detergents
containing enzymes
• We strongly recommend that you use detergents
that do not contain phosphates or chlorine, as
these products are harmful to the environment.
• Enzymes provide a particularly effective action at
temperatures around 50°C, and as a result
detergents containing enzymes can be used in
conjunction with low-temperature wash cycles in
order to achieve the same results as a normal
65°C wash cycle.
• To avoid wasting detergent, use the product in
appropriate quantities based on the
manufacturer’s recommendations, the hardness
of the water and the soil level and quantity of the
crockery. Even if they are biodegradable,
detergents contain substances that may alter the
balance of nature.
Wash cycle table
).
:
see Start-up and use
see Start-up and use
).
)
10
* Only available in selected models.
Page 11

Troubleshooting
Whenever the appliance fails to work, check for a solution from the following list before calling for Technical
Assistance Centre.
Malfunction: Possible causes / Solutions:
The dishwasher does not start.
No water enters the dishwasher.
No water drains out from the
dishwasher.
The dishwasher makes
excessive noise.
The dishes and glasses are
covered in a white film or
limescale deposits.
The dishes and glasses are
streaked or have a bluish
tinge.
The crockery has not been dried
properly.
The dishes are not clean.
Tap shut-off alarm.
(several short beeps are emitted)
* Only available in selected models.
(the second and third WASH
CYCLE PHASE indicator lights
flash, beginning from the right).
Clogged filter alarm
(the second and fourth WASH
CYCLE PHASE indicator lights
flash, beginning from the right).
Water loading solenoid
valve malfunction alarm
(the third WASH CYCLE PHASE
indicator light flashes, beginning
from the right).
The plug has not been inserted into the electrical socket
properly, or there is no power in the house.
The dishwasher door has not been shut properly.
A delayed start has been programmed (see Start-up and use).
There is no water in the mains supply.
The water inlet hose is bent (see Installation).
The dishwasher cycle has not yet finished.
The water outlet hose is bent (see Installation).
The drain duct is blocked.
The filter is clogged up with food residues.
The dishes are rattling against each other or against the
sprayer arms.
The level of the refined salt is low or the dosage setting is not
suited to the hardness of the water (see Rinse aid and salt).
The lid on the salt dispenser is not closed properly.
The rinse aid has been used up or the dosage is too low.
The crockery is made from non-stick material.
The rinse aid dosage is too high.
The rinse aid has been used up or the dosage is too low (see
Rinse aid and salt).
The rinse aid dispenser setting is not high enough.
A wash cycle without a drying programme has been selected.
The racks are overloaded (see Loading the racks).
The crockery has not been arranged well.
The sprayer arms cannot move freely.
The wash cycle is too gentle (see Wash cycles).
The detergent has not been measured out correctly or it is not
suited to the type of wash cycle (see Start-up and use).
The filter is dirty or blocked (see Care and maintenance).
The refined salt level is low (see Rinse aid and salt).
Turn on the tap and the appliance will start after a few
minutes.
The appliance lock has been activated because no action was
taken when the beeps* sounded. Switch off the machine using
the ON/OFF button, turn on the tap and switch the machine
back on after 20 seconds by pressing the same button. Re-
programme the machine and restart the wash cycle.
Switch off the machine by pressing the ON/OFF button and
clean the filters (see Maintenance), then switch the
dishwasher back on by pressing the same button. Re-
programme the machine and restart the wash cycle.
Switch off the appliance by pressing the ON/OFF button and
switch it back on after a minute. If the alarm continues, shut
off the water tap to eliminate the risk of flooding, remove the
plug from the electrical socket and call Assistance.
EN
11
Page 12

Assistance
EN
Before calling for Assistance:
• Check whether you can solve the problem on
your own (
• Restart the programme to check whether the
problem has been solved;
• If this is not the case, contact an authorised
Technical Assistance Centre on the telephone
number provided on the guarantee certificate.
Always request the assistance of authorised
servicemen.
Notify the operator of:
• the type of problem.
• the appliance model (Mod.).
• the serial number (S/N).
This information can be found on the data plate
situated on the internal edge of the stainless steel
door (see Description of the appliance).
see Troubleshooting
);
12
Page 13

Kullaným kýlavuzu
BULAÞIK MAKÝNESÝ
TR
Türkçe, 13
L 60 T 3C
Içindekiler
Montaj, 14-15
Yerleþtirme ve seviye ayarlama
Elektrik ve su baðlantýlarý
Teknik veriler
Cihazýn tanýtýmý, 16
Genel görünüm
Kontrol paneli
Sepetlerin doldurulmasý, 17
Alt sepet
Çatal Kaþýk Sepeti
Üst sepet
Çalýþtýrma ve kullanma, 18
Bulaþýk makinesinin çalýþtýrýlmasý
Deterjan doldurulmasý
Yýkama seçenekleri*
Programlar, 19
Program çizelgesi
Parlatýcý ve yenileyici tuz, 20
Parlatýcý doldurulmasý
Yenileyici tuz doldurulmasý
Bakým ve temizlik, 21
Elektrik þebekesinin ve su tesisatýnýn devre
dýþý býrakýlmasý
Bulaþýk makinesinin temizlenmesi
Ýstenmeyen kokularýn önlenmesi
Püskürtme kollarýnýn temizlenmesi
Filtrelerin temizlenmesi
Makinenin uzun süre kullanýlmamasý
Önlemler ve öneriler, 22
Genel güvenlik uyarýlarý
Tasarruf ve çevreye saygý
Ariza ve onarým, 23
Teknik Servis, 24
Servis aramadan önce
Page 14

Montaj
TR
Bu kitapçýðý gerektiði her an danýþabilmeniz için
özenle saklayýnýz. Satýþ, devir yada taþýnma
halinde, çalýþma sistemi ve bununla ilgili uyarýlar
konusunda yeni sahibinin bilgilenmesi için bu
kitapçýðýn cihazla birlikte kalmasýný saðlayýnýz.
Talimatlarý dikkatlice okuyunuz: montaj, kullaným
ve güvenliðe iliþkin önemli bilgiler içermektedir.
Taþýma halinde cihazýn dik tutulmasý, ya da
gerekli olduðu takdirde arka tarafa doðru
yatýrýlmasý gerekmektedir.
Yerleþtirme ve seviye ayarlama
1. Cýhazýn ambalajýný çýkarýn ve cihazda nakliyat
sýrasýnda hasar meydana gelip gelmediðini kontrol
edin.
Hasarlý ise, cihazý baðlamadan hemen Teknik
Servise baþvurunuz.
2. Makinenin arka tarafý yada yanlarý duvara yada
yanýndaki mobilyalara dayanacak þekilde
yerleþtiriniz. Cihaz mutfak tezgahýnýn altýna
ankastre edilebilir (Montaj bölümüne bakýnýz* ).
Su besleme hortumunun baðlantýsý
Soðuk su giriþine baðlanmasý: Su besleme
hortumunu 3/4 inç yivli musluða iyice
baðlayýnýz. Hortumu musluða vidalamadan önce
suyun içindeki atýklarýn muluðu týkamamasý için
suyu temiz oluncaya kadar akýtmanýz gerekir.
Sýcak su giriþine baðlanmasý: merkezi ýsýtma
sistemi söz konusu ise; bulaþýk makinesi sýcak
suya baðlý olarak çalýþabilir, ancak suyun
sýcaklýðý 60°Cyi geçmemelidir.
Hortumu, soðuk su giriþine baðlanmasý
bölümünde açýklandýðý gibi musluða
vidalayýnýz.
Su besleme hortumunun uzunluðu montaj için
yeterli deðilse yetkili bir maðazaya ya da
teknisiyene baþvurmanýz gerekir (Teknik Servise
bakýnýz) .
Suyun basýncý Teknik Veriler kýsmýnda belirtilen
sýnýr kapsamýnda olmalýdýr. (aþaðýya bakýnýz).
Hortum kývrýlmamalý, bükülmemeli veya
sýkýþmamalýdýr.
3. Bulaþýk makinesini düz ve sert bir zemine
yerleþtiriniz. Ayarlanabilir ayaklarý gevþeterek ya
da sýkarak cihazýn zemine tamamen oturmasýný
saðlayýnýz (en fazla 2 derece eðilebilir). Cihazýn
seviyesinin dikkatlice ayarlanmasý makinenin
titremesini, ses çýkarmasýný ve yerinden
oynamasýný engeller.
Elektrik ve su baðlantýlarý
Bu cihazýn montajý sýrasýnda her tür elektrik ve su
baðlantý iþleminin sadece vasýflý personel
tarafýndan yapýlmasý gerekir.
Bulaþýk makinesi elektrik kablolarý veya borularý
üzerine yerleþtirimemelidir.
Montajý kolaylaþtýrmak için, su besleme hortumu
(A), atýk su boþaltma hortumu (B) ve elektrik
besleme kablosu saða veya sola döndürülebilir
(aþaðdaki þekile bakýnýz ).
A
Su kaçaklarýna karþý emniyet sistemi
Bulaþýk makinesi, su basmasýný önlemek için
- herhangi bir ariza ya da su kaybý olmasý
durumunda su giriþini durdurma sistemine sahiptir.
- ayrýca Water Stop* emniyetine sahiptir, yani su
besleme hortumu iki hortum cidarýndan oluþur; dýþ
hortum þeffaf, iç hortum ise kýrmýzýdýr, hortumun
ikisi de yüksek basýnca dayanýklýdýr. Ýç hortum
hasar gördüðünde dýþ hortum canlý kýrmýzý
renklenir ve suyu onun içine akýtýr. Böylece kaçak
engellenir.
Dýþ hortumun periyodik olarak kontrol edilmesi
çok önemlidir: kýrmýzý renklendiði takdirde en yakýn
zamanda yetkili Teknik Servis tarafýndan hortumun
deðiþtirlimesi gerekir (Teknik Servis bölümüne
bakýnýz).
* Sadece bazý modellerde mevcuttur.
14
100
60
12083
121168
148
B
Page 15

Atýk su boþaltma hortumunun baðlantýsý
Atýk su boþaltma hortumunu, kývýrmadan iç çapý en
az 4 cm olan bir boþaltma kanalýna baðlayýnýz veya
bir küvvetin ya da lavabonun kenarýna yatýrýn. Atýk
su boþaltma hortumunun ucu suyun içinde
olmamalýdýr.
Özel kavisli plastik
A
kýlavuz* kullanýlarak
hortumun
yerleþtirilmesi
kolaylaþir: özel kavisli
plastik kýlavuzu duvara
sabitleyiniz: böylece
hortumun yerinden
oynamasý ve
dolayýsýyla suyu dýþarý
akýtamasý engellenir.
Hortumun A harfiyle belirtilen kýsmý 40 cm ile - 100
cm arasýndaki bir yükseklikte olmalýdýr (þekile
bakýnýz).
Uzatma hortumlarýnýn kullanýlmamasý tavsiye
edilir.
Elektirik baðlantýsý.
Cihazýn fiþini bir elektrik prizine takmadan önce
aþaðýdaki noktalarý kontrol edin:
priz topraklý tesisata sahip ve yürürlükteki
normlara uygun olmalýdýr;
elektrik prizi özellik etikentinde belirtilen
maksimum yükü taþýyabilmelidir (Cihazýn tanýmý
bölümüne bakýnýz );
besleme gerilimi özellik plakasýnda belirtilen
deðer sýnýrý kapsamýnda olmalýdýr;
priz ve fiþ birbiriyle uyumlu olmalýdýr. Aksi
takdirde cihazýn fiþinin deðiþtirilmesi için yetkili
Servise (Teknik Servis bölümüne bakýnýz)
baþvurmanýz gerekir, uzatma kablosu ya da
çoklu priz kullanmayýnýz.
Cihaz monte edildikten sonra besleme kablosuna
ve elektrik prizine kolayca ulaþýlabilmelidir.
Ýlk kullaným uyarýlarý
Bulaþýk makinesi monte edildikten sonra, ilk kez
kullanýlmadan önce tuz haznesini su ile doldurun
ve yaklaþýk 2 Kg. tuz ilave edin (Parlatýcý ve
yenileyici tuz bölümüne bakýnýz): suyun akmasý
normaldýr. Tuz doldurulduktan sonra da TUZ
EKSÝKLÝÐÝ* uyarý lambasýnýn birkaç devir için
yanýp sönmesi normaldýr.
Teknik veriler
geniºlik cm 60
Boyutlar
Kapasite
ªebeke suyu
basýncý
Besleme gerilimi
Toplam güç:
Sigorta
yükseklik cm 85
derinlik cm 60
12 yer ayarý
30 Kpa ÷ Mpa (0,3 ÷ 10 bar)
4,3 psi – 145 psi
Özellikler etiketine bak
Özellikler etiketine bak
Özellikler etiketine bak
Bu cihaz aþaðýdaki AB
Yönergeleri ile uyumludur:
19/02/73 tarihli EAT 73/23
(Düºük Voltaj Yönergesi) ve
sonraki deðiþiklikler;
03/05/89 tarihli EAT 89/336
(Elektromanyetik Uyum
Yönergesi) ve sonraki
deðiþiklikler;
- 97/17/AT (etiket ket Yönergesi)
- 2002/96/CE
TR
Kablo kývrýlmamalý ve sýkýþtýrýlmamalýdýr.
Kablonun periyodik olarak kontrol edilmesi ve
sadece yetkili personel tafarýndan deðiþtirilmesi
gerekir (Teknik Servis bölümüne bakýnýz).
Üretici firma yukarýdaki normlarýn dikkate
alýnmamasý durumunda hiçbir sorumluluk kabul
etmeyecektir.
* Sadece bazý modellerde mevcuttur.
15
Page 16

Cihazýn tanýtýmý
TR
Genel görünüm
1
4
6
9
11
3
10
1. Üst sepet
2. Üst püskürtme kolu
3. Raflar
4. Sepet yükseklik ayarý
5. Alt sepet
6. Alt püskürtme kolu
2
5
7
8
7. Çatal kaþýk sepeti
8. Yýkama filtresi
9. Tuz haznesi
10. Deterjan kutusu ve parlatýcý haznesi
11. Özellikler plakasý
Kontrol paneli
Program
seçme
düðmesi
TUZ EKSÝKLÝÐÝ
Uyarý lambasý*
KURUTMA
DURULAMA
YIKAMA
ÖN YIKAMA
PROGRAM TAKÝP
uyarý lambasý
ON/OFF
Düðmesi
ON/OFF
Uyarý lambasý
16
* Sadece bazý modellerde mevcuttur.
Page 17

Sepetlerin doldurulmasý
Sepetleri doldurmadan önce büyük yemek artýklarýný
dökünüz, tencerelerdeki yanmýþ yemek atýklarýný
yumuþatýnýz, dolu bardaklarý ve fýncanlarý boþaltýnýz.
Sepetleri doldurduktan sonra püskürtme kollarýnýn serbest
bir þekilde dönebilmesini saðlayýnýz.
Alt sepet
Kaldýrýlabilir raflarý* kullanarak ve Sepet Yerleþtirme
örneðini dikkate alarak çok kirli bulaþýklarý yerleþtiriniz*.
Servis tabaklarý ve büyük kapaklar: sepet kenarýna
dayayýnýz.
Tencereler, salata kaseleri: her zaman aðýzlarý aþaðýya
gelecek þekilde yerleþtiriniz.
Derin kap-kaçak: çapraz duracak þekilde yerleþtiriniz.
Yýkama ve kurulama sonucunun iyi olmasýný saðlamak için
alt sepetin yüzeyi üstekinden daha pürüzlüdür.
Çatal-Kaþýk Sepeti
Çatal-kaþýk sepeti bulaþýk makinesinin modeline göre
deðiþebilir.
Býçaklar ve keskin uçlu gereçler çatal-kaþýk sepetine
uçlarý aþaðýya gelecek þekilde yerleþtirilmelidir.
Sepet click clack* kulplu ise(þekile
bakýnýz), aþaðýya ya da yukarýya
doðru çekilerek sepetin yüksekliði
ayarlanabilir.
Üst sepet yerleþtirme örneði
Alt sepet yerleþtirme örneði
TR
Sepetini ikiye ayýrmak için*: sapýný çýkarýnýz. Sepetin iki yan
mandalý çýkarýlabilir ve üst ya da alt sepete takýlabilir.
Ýki plastik ýzgara* çatal kaþýk takýmýlarýný birbirlerinden ayýrý
tutmak için sepetin üstüne konur: çatal-kaþýk saplarý aþaðýya
gelecek þekilde, birer birer sepetin yuvalarýna yerleþtirilir.
Üst sepet
Üst sepete hafif ve hassas bulaþýklarý yerleþtiriniz:
bardaklar, çay ve kahve fincanlarý, normal ve küçük
tabaklar, fazla çukur olmayan salata kaseleri, fazla çukur
ve çok kirli olmayan tavalar, tencereler, kaplar Sepet
Yerleþtirme örneði dikkate alýnarak yerleþtirilir.
Hafif bulaþýk: hafif bulaþýklarý su püskürmesinde
savrulmayacak þekilde yerleþtiriniz.
Bardak ve fincanlar: raflara yerleþtiriniz**.
Uzun ve keskin býçaklar, kepçe gibi parçalar: raflara
yerleþtiriniz**.
Üst sepetin yükseklik ayarý.
Bulaþýklarý daha kolay yerleþtirebilmek için üst sepeti
yüksek yada alçak konuma
ayarlamak mümkündür.
1
3
üst sepetin ön kýlavuz tahditlerini
2
dýþ tarafa doðru çekiniz ve sepeti
dýþarý çýkarýnýz; sepeti daha alçak
ya da yüksek bir konuma takýn
tamamen girene kadar kýlavuz
4
üzerine kaydýrýnýz ve ön kýlavuz
tahditlerini iç tarafa doðru çekerek
kapatýnýz (þekile bakýnýz).
Bebek raflarý**
Bebek yýkama seçenekli
bulaþýk makinesi biberon
gövdesi, biberon mamasý ve
aksesuarlarý yýkamasýnda
kullanýlan emzik sepetine
sahiptir.
Aþaðýdaki bulaþýklar bu makinede yýkanmak
için uygun deðildir
Ahþap, fildiþi ve boncuk saplý ahþap takýmlarý.
Paslanabilir çelik, bakýr, pirinç, beyaz maden veya
alaþýmlý maddeler.
Isý yalýtýmlý olmayan plastik maddeler.
Antik ya da resmi elle yapýlmýþ porselen.
Antik gümüþler. Antik olmayan gümüþler hafif bir
program kullanýlarak yýkanabilir. Önemli olan makinede
baþka madenlerle temasa geçmemesidir.
Bulaþýk ve çatal býçak satýn alýndýðýnda bulaþýk
makinesinde yýkamaya uygun olup olmadýðýný kontrol edin.
Kulplarýn yýkanmasý
Üst ve alt sepetin kulplarýný yýkamak için: ufak babitleme
baþlýklarýný çýkarýnýz, kulplarý da çýkarýnýz çeþme suyu ile
yýkadýktan sonra yine ayný baþlýklarý sepete tekrar takýnýz.
* Sadece bazý modellerde mevcuttur.
** Sayýsý ve pozisyonu deðiþebilir.
**
*
**
17
Page 18

A
B
D
C
Çalýþtýrma ve kullanma
TR
Çamaþýr makinesinin çalýþtýrýlmasý
1. Su musluðunu açýnýz.
2. AÇMA-KAPAMA tuþuna basýnýz: uyarý lambasý
yanacaktýr.
3. Makinenin kapaðýný açýnýz ve deterjan haznesine
yeterli miktarda deterjan koyunuz (aþaðýya
bakýnýz).
4. Sepetleri doldurunuz (Sepetlerin doldurulmasý
bölümüne bakýnýz) ve kapaðý kapatýnýz.
5. Yýkanacak bulaþýk ve kir seviyesine göre
PROGRAM SEÇÝMÝ düðmesini saatin ters yönünde
çevirerek istenilen programý seçiniz (program
çizelgesine bakýnýz).
Birkaç saniye geçtikten sonra program devreye
girer, PROGRAM TAKÝP uyarý lambasý programýn
durumunu belirtir.
Ön yýkama, Yýkama, Durulama, Kurulama.
7. Program bitiminde Kurulama uyarý lambasý
yanacaktýr.
8. PROGRAM SEÇÝMÝ düðmesini, daha önce
seçilen ayarlarý sýfýrlamak amacýyla RESET
konumuna getiriniz.
9. AÇMA-KAPAMA tuþuna basarak cihazý
kapattýnýz, su musluðunu kapattýnýz ve elektrik
þebekesinden fiþi çekiniz.
10. Makinenin kapaðýný açýnýz ve sýcak buharla
yanmamak için bulaþýklarý çýkarmadan önce birkaç
dakika bekleyiniz. Alt septeten baþlayarak
sepetleri boþaltýnýz.
Deterjan doldurulmasý
Yýkama sonucunun olumsuz etkilenmemesi için
deterjan kutusu üzerindeki üreticinin dozaj
tavsiyelerine uyunuz. Doðru miktardan fazla
deterjan kullanmak yýkama sonucunun olumsuz
etkilemesine ve çevre kirlenmesine neden olur.
A haznesi: Yýkama deterjaný
B haznesi: Ön yýkama deterjaný
1. D düðmesine
basarak C kapaðýný
açýnýz.
2. Program çizelgesine
bakarak deterjan
dozajýný ayarlayýnýz:
toz þeklinde ise: A ve
B haznesine
yerleþtirilmelidir.
tablet þeklinde ise: A
haznesine ve makinenin
dibine yerleþtirilmelidir.
Açýkçasý; programa göre 1 tablet gerekirse A
haznesine, 2 tablet gerekirse makinenin dibine
yerleþtirilecektir.
3. Deterjan kalýntýlarýný tamamen temizleyiniz,
kapaðý kapatýn ve yerine iyice oturuncaya kadar
bastýrýnýz.
Çalýþmakta olan programýn deðiþtirilmesi
Yanlýþ programýn seçilmesi durumunda makine
çalýþtýrýldýktan sonra bir dakika içerisinde
deðiþtirilebilir. PROGRAM SEÇÝMÝ düðmesini
RESET konumuna getirdikten sonra PROGRAM
TAKÝP uyarý lambasýnýn yanýp sönmesi sona erir.
Þimdi istenilen program seçilebilir.
Baþka bulaþýklarýn yerleþtirilmesi
AÇMA-KAPAMA düðmesine basýnýz, makineden
fýþkýran sýcak buhardan kaçýnarak kapaðý dikkatlice
açýnýz ve bulaþýklarý yerleþtiriniz. AÇMA-KAPAMA
tuþuna basýnýz: program tekrar baþlayacaktýr.
Makinenin yanlýþlýkla durdurulmasý
Yýkama sýrasýnda kapak açýlmasý veya elektrik
akýmý kesilmesi durumunda program duracaktýr.
Kapak kapatýldýðý veya elektrik akýmý döndüðü
zaman durdurulduðu yerden çalýþmaya devam
edecektir.
* Sadece bazý modellerde mevcuttur.
18
Page 19

Programlar
Program çizelgesi
! Ariston bulaþýk makineleri programlarýn süresini uzatabilecek otomatik filtre sistemine sahiptir.
! Program sayýsý ve tipi çamaþýr makinesinin modeline göre deðiþir.
Deterjan
Program seçmek
için gereken
bilgiler
Çok kirli bulaþýk ve
tencere (hassas
bulaþýk uygun
deðil).
Normal kirler.
Bulaºik ve tencere.
Standart günlük
programý.
Program
Toz
deterjan
30 gr (A)
5 gr (B)
Yoðun
30 gr (A) 30 ml (A) 1 (A) • 1:12’
Normal
(A) = A haznesi
(B) = B haznesi
Sývý
deterjan
30 ml (A)
5 ml (B)
1 makinenin
Tablet
1 (A)
dibinde
Ön
yýkama
Kurutma
• • 2:00’
TR
Program
süresi
(tolerans
±10% )
Düsük enerji tükemli
ekonomik yýkama
programý. Bulasýk
ve tencere.
Eco
25 gr (A)
5 gr (B)
25 ml (A)
5 ml (B)
1 (A) • • 2:10’
Not:
Deterjan dozunu ayarlamaya yardýmcý olmasý için aþaðýdakilerin dikkate alýnmasý gerekir:
1 yemek kaþýðý = 15 gram toz = yaklaþýk 15 ml deterjan
1 tatlý kaþýðý = 5 gram toz = yaklaþýk 5 ml deterjan
19
Page 20

Parlatýcý ve yenileyici tuz
TR
! Sadece bulaþýk makinesi içinde kullanýma uygun
olarak imal edilmiþ deterjanlarý kullanýnýz.
Endüstriyel ya da yemek tuzu kullanmayýnýz.
! Kombi deterjanlarý (2si1, 3ü1, 4ü1, etc... arada)
kullanýldýðýnda parlatýcýnýn kullanýlmasýna gerek
kalmaz, ama özellikle su sertlik seviyesi yüksek ise
tuz doldurulmasý tavsiye edilir. Tuz ve parlatýcý
doldurulmadýðý sürece TUZ EKSÝKLÝÐÝ* ve PARLATICI
EKSÝKLÝÐÝ* uyarý lambalarýnýn yanýp sönmesi
normaldýr.
Parlatýcý doldurulmasý
Parlatýcý bulaþýk üzerinden suyun akmasýný
saðlayarak bulaþýklarýn kurumasýný kolaylaþtýrýr ve
böylece su lekesi kalmaz.
Parlatýcý haznesi aþaðýdaki durumlarda
doldurulmalýdýr:
(H) uyarý lambasýndan parlatýcý haznesinin boþ
olduðunu görünce. Uyarý lambasý açýk renk ise:
parlatýcý ekleyiniz; uyarý lambasý koyu renk ise:
Parlatýcý yeterlidir;
Panelde PARLATICI EKSÝKLÝÐÝ uyarý lambasý
yanýp söndüðü zaman:
1. (G) kapaðý saatin tersi
H
yönünde çevirerek parlatýcý
haznesini açýnýz.
2. Parlatýcýyý dýþarý
akýtmadan dökünüz. Dýsarý
akmasý durumunda hemen
F
bir süngerle temizleyiniz.
3. Kapaðý çevirerek
G
kapatýnýz.
Parlatýcý dozajýnýn ayarlanmasý
Elde edilen yýkama ve kurutma sonuçlarýna göre
parlatýcýnýn dozunu ayarlayýnýz. 6 konum seçici
düðmesini (F) tornavida vasýtasýyla çevirerek
ayarlayýnýz (dozaj, fabrikada 4. konuma
ayalanmýþtýr):
Yýkanmýþ bulaþýklarda beyaz çizgiler oluþmasý
durumunda, dozaj alçak (1-3) konuma
ayarlanmalýdýr.
Bulaþýklarýn üstünde su damlacýklarý yada kireç
lekesi oluþmasý durumunda, dozaj yüksek konuma
(4-6) ayarlanmalýdýr.
! Kombi deterjanlarý (2si1, 3ü1,4ü1, etc... arada)
kullanýrken daha iyi bir kurutma elde etmek
istendiðinde hazne doldurulmalý ve 2. konuma
ayarlanmalýdýr.
Yenileyici tuz doldurulmasý
Daima iyi yýkama sonuçlarý elde etmek için tuz
haznesi hiçbir zaman boþ olmamalýdýr. Yenileyici tuz
sudaki kireci çözerek bulaþýk üstünde kirecin
kalmasýný engeller. Tuz haznesi bulaþýk makinesinin
alt kýsmýnda bulunur ve (Cihazýn tanýmý bölümüne
bakýnýz)aþaðýdaki durumlarda doldurulmalýdýr:
Tuz haznesinin kapaðýna bakýldýðýnda yeþil bir
þamandra görünmediði zaman;
Panelde TUZ EKSÝKLÝÐÝ* uyarý lambasý yanýp
söndüðü zaman;
uyarý lambasý veya yeþil þamandra görünmediði
zaman:
yaklaþýk 30 yýkamada bir;
1. Alt sepeti çýkarýnýz ve saatin
tersi yönünde çevirerek tuz
haznesinin kapaðýný açýnýz.
2. Sadece ilk yýkama için:
hazneyi kenara kadar su ile
doldurunuz.
3. Makine ile birlikte verilen
huni vasýtasýyla (þekile
bakýnýz) hazneyi tamamen dolduracak kadar tuzu
koyunuz. Suyun azcýk taþmasý normaldýr.
4. Huniyi çýkarýp diþli kýsmýndaki tuz kalýntýlarýný
temizleyiniz ve yýkama sýrasýnda deterjan girmeyecek
þekilde ( kireç çözücü ayarý tamamen bozulabilir)
kapaðý kapatýnýz.
! Tuz doldurulduðunda korozyon olmamasý amacýyla
taþmýþ olan tuzu gidermek için bulaþýk yerleþtirmeden
makineyi çalýþtýrýnýz.
Tuz dozajýnýn ayarlanmasý*
Bulunduðunuz yerdeki su sertliðine göre tuz
ayarlamasýný yapmak mümkündür. Sular idaresi su
sertlik seviyesi hakkýnda sizi bilgilendirebilir.
1. Tuz haznesinin kapaðýný çýkarýnýz.
2. Aþaðýdaki çizelgeyi (þekile
bakýnýz) dikkate alarak kapak iç
kýsmýndaki oku + veya yöne
döldürünüz:
Kireç çözücü ayarý, fabrikada + olarak ayarlanmýþtýr.
Kombi deterjanlarý (2si1, 3ü1, 4ü1, etc... arada)
kullanýldýðýnda tuz haznesini doldurunuz ve olarak
ayarlayýnýz. Su sertlik seviyesi 60°fHden yüksek ise
+ olarak ayarlayýnýz.
* Sadece bazý modellerde mevcuttur.
20
Page 21

A
B
C
Bakým ve temizlik
Elektrik þebekesinin ve su tesisatýnýn
devre dýþý býrakýlmasý
Kaçak tehlikesini engellemek için her
yýkamadan sonra su musluðunu kapatýnýz.
Makinenin temizlik ve bakým iþleminden önce
elektirik fiþini çekiniz.
Bulaþýk makinesinin temizlenmesi
Makinenin dýþ yüzeylerini ve kontrol panelini
sabunlu ve nemli yumuþak bir bezle
temizleyiniz. Aþýndýrýcý maddeler ve çözücü
türü maddeleri kesinlikle kullanmayýnýz.
Leke olmasý durumunda makinenin iç kýsmýný
az sirkeli ve nemli yumuþak bir bezle
temizleyiniz.
Ýstenmeyen kokularýn önlenmesi
Ýstenmeyen kokularýn oluþmasýný önlemek için
makine kapaðý her zaman aralýk býrakýlmalýdýr.
Makine kapaðýnýn ve deterjan haznesinin
etrafýndaki contalarý düzenli olarak nemli bir
bezle silmeye özen gösteriniz. Böylelikle kötü
kokularýn oluþmasýna sebep olan yemek
artýklarýnýn kalmasý engellenir.
Püskürtme kollarýnýn temizlenmesi
Bazen yemek artýklarý
püskürtme kollarýnýn
üstüne yapýþýp geçici
de olsa su çýkýþ
deliklerini týkayabilir:
bu yüzden arada
sýrada temizlenmesi
gerekir. Bunun için
metal telli olmayan bir
fýrçadan
faydalanýlmasý tavsiye
edilir.
Filtrelerin temizlenmesi
Filtre sayesinde yýkama suyu, yiyecek
artýklarýndan arýndýrýlýr ve tekrar tertemiz olarak
devreye girer: iyi yýkama sonuçlarý elde etmek için
filtre grubunun temizlenmesi gerekir.
Filtrelerin düzenli olarak temizlenmesi gerekir.
Temizlik iþleminden sonra filtrenin tamamen
oturup oturmadýðýný kontrol ediniz.
Bulaþýk makinesý filtresiz kullanýlmamalýdýr.
1. Filtreyi yerinden çýkarmak için bardaðýn sapýný
yukarýya doðru çekiniz.
2. Filtrelerin
temizlenmesi:
C
1
2
A
B
olmayan bir fýrçadan faydalanýlmasý tavsiye edilir.
3. Filtre grubunu tekrar monte ediniz ve tamamen
oturuncaya kadar þekildeki 1 ve 2 hareketlerini
yaparak yerine yerleþtiriniz.
Her yýkamadan
sonra filtrenin A
yüzeyini ve B
bardaðýný (bardaðýn
sapý çekilerek çýkarýlýr)
çýkarýp çeþme
suyunun altýna tutarak
iyice çalkalayýnýz.
ayda bir kez filtre
grubu tamamen ve
dikkatlice
temizlenmelidir: yarý
daire düz filtre (A),
filtre bardaðý ve (B)
silindirik þeklinde filtre
(C) ( saatin tersi
yönünde çevirerek
yerinden çýkarýlýr).
Temizlik için metal telli
Makinenin uzun süre kullanýlmamasý
TR
Makineyi bulaþýk koymadan bir kere
çalýþtýrýnýz.
Elektrik ve su baðlantýlarýný kesiniz.
Makine kapaðýný aralýk býrakýnýz.
21
Page 22

Önlemler ve öneriler
TR
Bulaþýk makinesi, uluslararasý güvenlik
normlarýna uygun olarak tasarlanýp üretilmiþtir.
Aþaðýdaki bilgiler, güvenliði saðlamak amacýyla
verilmiþtir. Bu yüzden dikkatlice okunmasý gerekir.
Genel güvenlik uyarýlarý
Cihaz meskenlerde kullanýlmak üzere
tasarlanmýþ olup profesyonel kullaným amaçlý
deðildir.
Cihaz sadece bulaþýk yýkamak için, yetiþkinler
tarafýndan ve bu kitapçýktaki talimatlar
çerçevesinde kullanýlmalýdýr.
Cihaz, üzeri kapalý bile olsa açýk alanlara monte
edilmez, zira yaðmur ve fýrtýnaya maruz
kalmasý son derece tehlikelidir.
Cihazý ayaklarýnýz çýplakken kullanmayýnýz.
Fiþi prizden çekerken kablosundan deðil fiþin
kendisinden tutarak çekiniz.
Temizlik ve bakým iþleminden önce su musluðu
kapatýlmalý ve fiþ elektrik þebekesinden
çýkarýlmalýdýr.
Arýza halinde onarmak amacýyla iç
mekanizmalarý kurcalamayýnýz.
Rezistansa asla dokunmayýnýz.
Makine kapaðý açýkken kapak üzerine
oturmayýnýz ve dayanmayýnýz: Cihaz
devrilebilir.
Deterjaný ve parlatýcýyý çocuklarýn
eriþemeyeceði yerde muhafaza ediniz.
Ambalaj çocuk oyuncaðý deðildir.
Tasarruf ve çevreye saygý
Su ve enerj tasarrufu
Bulaþýk makinesini sadece tamamen doluyken
çalýþtýrýniz. Makinenin doldurulmasýný beklerken
istenmeyen kokularý önlemek amacýyla
Durulama programýný (Program bölümüne
bakýnýz)çalýþtýrýnýz.
Program çizelgesini dikkate alarak bulaþýk
türüne ve kirlilik seviyesine uygun bir program
seçiniz:
- Eco yýkama programý, düþük enerji ve az su
tüketimli, normal kirlilikte bulaþýklara uygundur.
- makine tamamen dolu olmadýðý zaman Yarým
Yük programýný çalýþtýrýnýz (Çalýþtýrýma ve
kullanma bölümüne bakýnýz).
Eðer elektrik kullanýmý kontratýnýz, belirli gün ve
saatlerde enerji tasarrufunu öngörüyorsa,
yýkamalarýnýzý indirimli tarifede yapýnýz.
Geciktirmeli Baþlatma* seçeneðini (Çalýþtýrma
ve kullanma bölümüne bakýnýz) indirimli
tarifelere göre makineyi programlamak için
faydalý olabilir.
Fosfatsýz, klorsuz ve enzimli deterjanlar
Fosfatsýz ve klorsuz deterjanlarýn kullanýlmasý
tavsiye edilir. Bu deterjanlar çevre korumasý
için en uygun deterjanlardýr.
Enzim yaklaþýk 50°C de çok verimli bir etki
gösterir, bu yüzden enzim içeren deterjanlar
kullanýldýðýnda alçak derecelerde 65°Cdeki etki
elde edilebilir.
Deterjan dozajý üreticinin talimatlarýna, su
sertliðine, kir seviyesine ve bulaþýk miktarýna
uygun olmalýdýr. Parçalanabilmesine raðmen
deterjanlar doðanýn dengesini bozan maddeler
içermektedir.
22
* Sadece bazý modellerde mevcuttur.
Page 23

Ariza ve onarým
Makinenin çalýþmasýnda ariza olmasý durumunda Teknik Servise (Teknik Servis bölümüne bakýnýz)
baþvurmadan önce aþaðýdakileri kontrol etmeniz gerekir.
Ariza: Olasý sebep/Çözüm:
Bulaþýk makinesi çalýþmýyor.
Bulaþýk makinesi su alamýyor.
Bulaþýk makinasý atýk sularý
boþaltamýyor.
Bulaþýk makinesi ses yapýyor.
Bulaþýk ve bardaklar üzerinde
kireç kalýntýlarý ve beyaz bir
satýh oluþuyor.
Bulaþýk ve bardaklar üzerinde
çizgi gibi veya mavi bir satýh
oluºuyor.
Bulaþýklar tam kurumamýþ.
Bulaþýklar temiz deðil.
Musluk kapalý alarmý
(kýsa bip sinyali duyulur)
* Sadece bazý modellerde
mevcuttur.
asaðdaki 2. ve 3. PROGRAM
(
TAKÝP uyarý lambasý ).
Filtreler týkalý alarmý
(asaðdaki 1. ve 3.
TAKÝP
uyarý lambasý )
. PROGRAM
Su besleme hortumunun
elektrosupabý bozuk alarmý
(
asaðdaki 2.
TAKÝP
PROGRAM
uyarý lambasý
).
Fiþ prize takýlý deðil veya evdeki elektrik akýmý kesik.
Bulaþýk makinesinin kapaðý tam kapalý deðil.
Geciktirmeli Baþlatma programý ayarlanmýþ (Çalýþtýrma ve
kullanma bölümüne bakýnýz).
ªebekeden su akmýyor.
Su besleme hortumu kývrýlmýþ (Montaj bölümüne bakýnýz).
Program bitmemiº.
Atýk su hortumu kývrýlmýþ (Montaj bölümüne bakýnýz).
Lavabonun tahliye borusu týkalý.
Filtre yemek artýklarý ile týkanmýþ.
Bulaþýklar birbirine veya püskürtme kollarýna çarpýyor.
Yenileyici tuz eksik veya su sertliðine uygun bir þekilde
ayarlanmamýþ (Parlatýcý ve tuz bölümüne bakýnýz).
Tuz haznesinin kapaðý tam kapalý deðil.
Parlatýcý bitti veya dozajý yeterli deðil.
Bulaþýklar yapýþmaz tabanlýdýr.
Parlatýcý dozajý fazla.
Parlatýcý bitti veya dozajý yeterli deðil (Parlatýcý ve tuz
bölümüne bakýnýz).
Parlatýcý dozajý uygun deðil.
Kurutmasýz bir program seçilmiþ.
Sepetler fazlasýyla doldurulmuþ (Sepetlerin doldurulmasý
bölümüne bakýnýz).
Bulaþýklar iyi yerleºtirilmemiº.
Püskürtme kollarý serbestçe dönemiyor.
Çok hafif bir yýkama programý seçilmiþ (
bakýnýz).
Deterjan dozajý uygun miktarda ayarlanmamýþ veya deterjan
tipi uygun deðil (Çalýþtýrma ve kullanma bölümüne bakýnýz).
Filtre kirli veya týkalý (Bakým ve temizlik bölümüne bakýnýz).
Yenileyici tuz eksik (Parlatýcý ve tuz bölümüne bakýnýz).
Musluðu açýnýz: birkaç dakika sonra makine tekrar çalýþmaya
baþayacaktýr.
Bip sinyali* verilince müdahale edilmediði için cihaz
durmuº. AÇMA/KAPAMA düðmesine basarak makineyi
kapatýnýz, musluðu açýnýz ve 20 saniye sonra ayný düðmeye
basarak makineyi çalýþtýrýnýz. Tekrar makineyi programlayýp
çalýþtýrýnýz.
AÇMA/KAPAMA düðmesine basarak makineyi kapatýnýz, filtreyi
temizleyiniz (Bakým bölümüne bakýnýz) ayný düðmeye basarak
makineyi açýnýz. Tekrar makineyi programlayýp çalýþtýrýnýz.
AÇMA/KAPAMA düðmesine basarak makineyi kapatýnýz ve 1
dakika sonra tekrar açýnýz. Eðer alarm hala devam ediyorsa,
önce su basma riskini önlemek için su musluðunu kapatýnýz,
sonra da ceryaný kesip teknik servisi çaðýrýnýz.
Program bölümü ne
TR
23
Page 24

Teknik Servis
06/2006- Xerox Business Services
195058482.00
TR
Servis aramadan önce:
Arýzayý kendiniz çözüp çözemeyeceðinize
bakýnýz (bkz. Arýzalar ve telafileri).
Programý tekrar baþlatarak, sorunun çözülüp
çözülmediðini görünüz.
Aksi takdirde, garanti belgesinde belirtilen
telefon numaralarýndan teknik servisi arayýnýz.
! Kesinlikle, yetkili olmayan tamircilere müracaat
etmeyiniz.
Bildiriniz:
arýza tipini
makinenin modelini (Mod.)
seri numarasýný (S/N)
Makinanýn inox kapýsýnýn yan tarafýnda
bulabileceðiniz modelini ve seri numarasýný
(bkz.Cihazýn tanýtýmý).
24
 Loading...