

Page 1

GB
KIB 644 C E ITKIB 644 C E IT
English
English
EnglishEnglish
GB
Operating Instructions
HOB
Contents
Operating Instructions,1
WARNING,1
Description of the appliance-Control Panel,2
Installation,2
Start-up and use,4
Precautions and tips,9
Care and maintenance,10
Technical description of the models,10
English
EnglishEnglish
GB
WARNING!
•
WARNING: The appliance and its
accessible parts become hot during
use.
• Care should be taken to avoid
touching heating elements.
• Children less than 8 years of age shall
be kept away unless continuously
supervised.
• This appliance can be used by
children aged from 8 years and above
and persons with reduced physical,
sensory or mental capabilities or
lack of experience and knowledge
if they have been given supervision
or instruction concerning use of
the appliance in a safe way and
understand the hazards involved.
Children shall not play with the
appliance. Cleaning and user
maintenance shall not be made by
children without supervision.
• WARNING: Unattended cooking on a
hob with fat or oil can be dangerous
and may result in fire.
• NEVER try to extinguish a fire with
water, but switch off the appliance
and then cover flame e.g. with a lid
or a fire blanket.
• WARNING: Danger of fire: do not
store items on the cooking surfaces.
• WARNING: If the surface in glass-
ceramic is cracked, switch off the
appliance to avoid the possibility of
electric shock.
•Never use steam cleaners or pressure
cleaners on the appliance.
•The appliance is not intended to be
operated by means of an external
timer or separate remote control
system.
• Do not place metal objects (knives,
spoons, pan lids, etc.) on the hob as
they may become hot.
• After use, switch off the hob element
by its control and do not rely on the
pan detector.
1
Page 2
GB
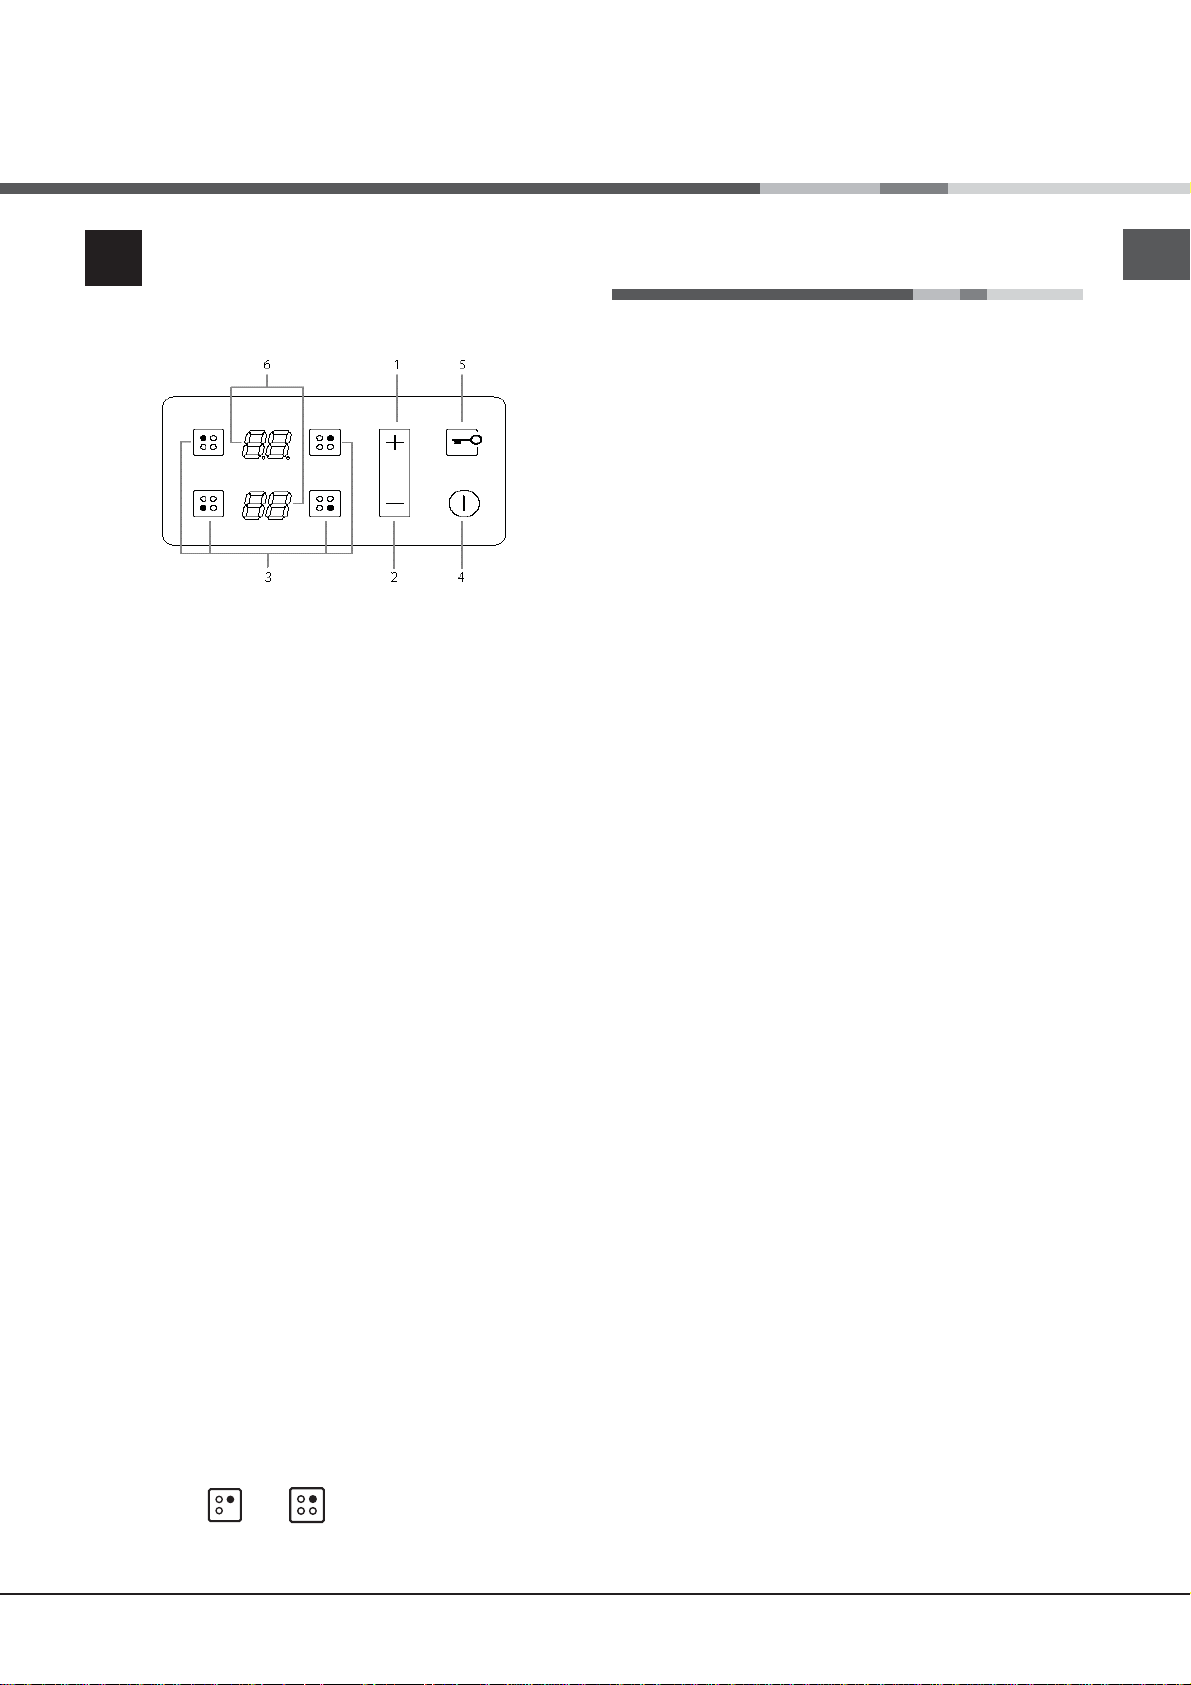
The control panel described in this manual is only a representative
example: it may not exactly match the panelon your appliance.
When using the touch control pannel panel:
Do not use gloves
Use a clean finger
Touch the glass smoothly
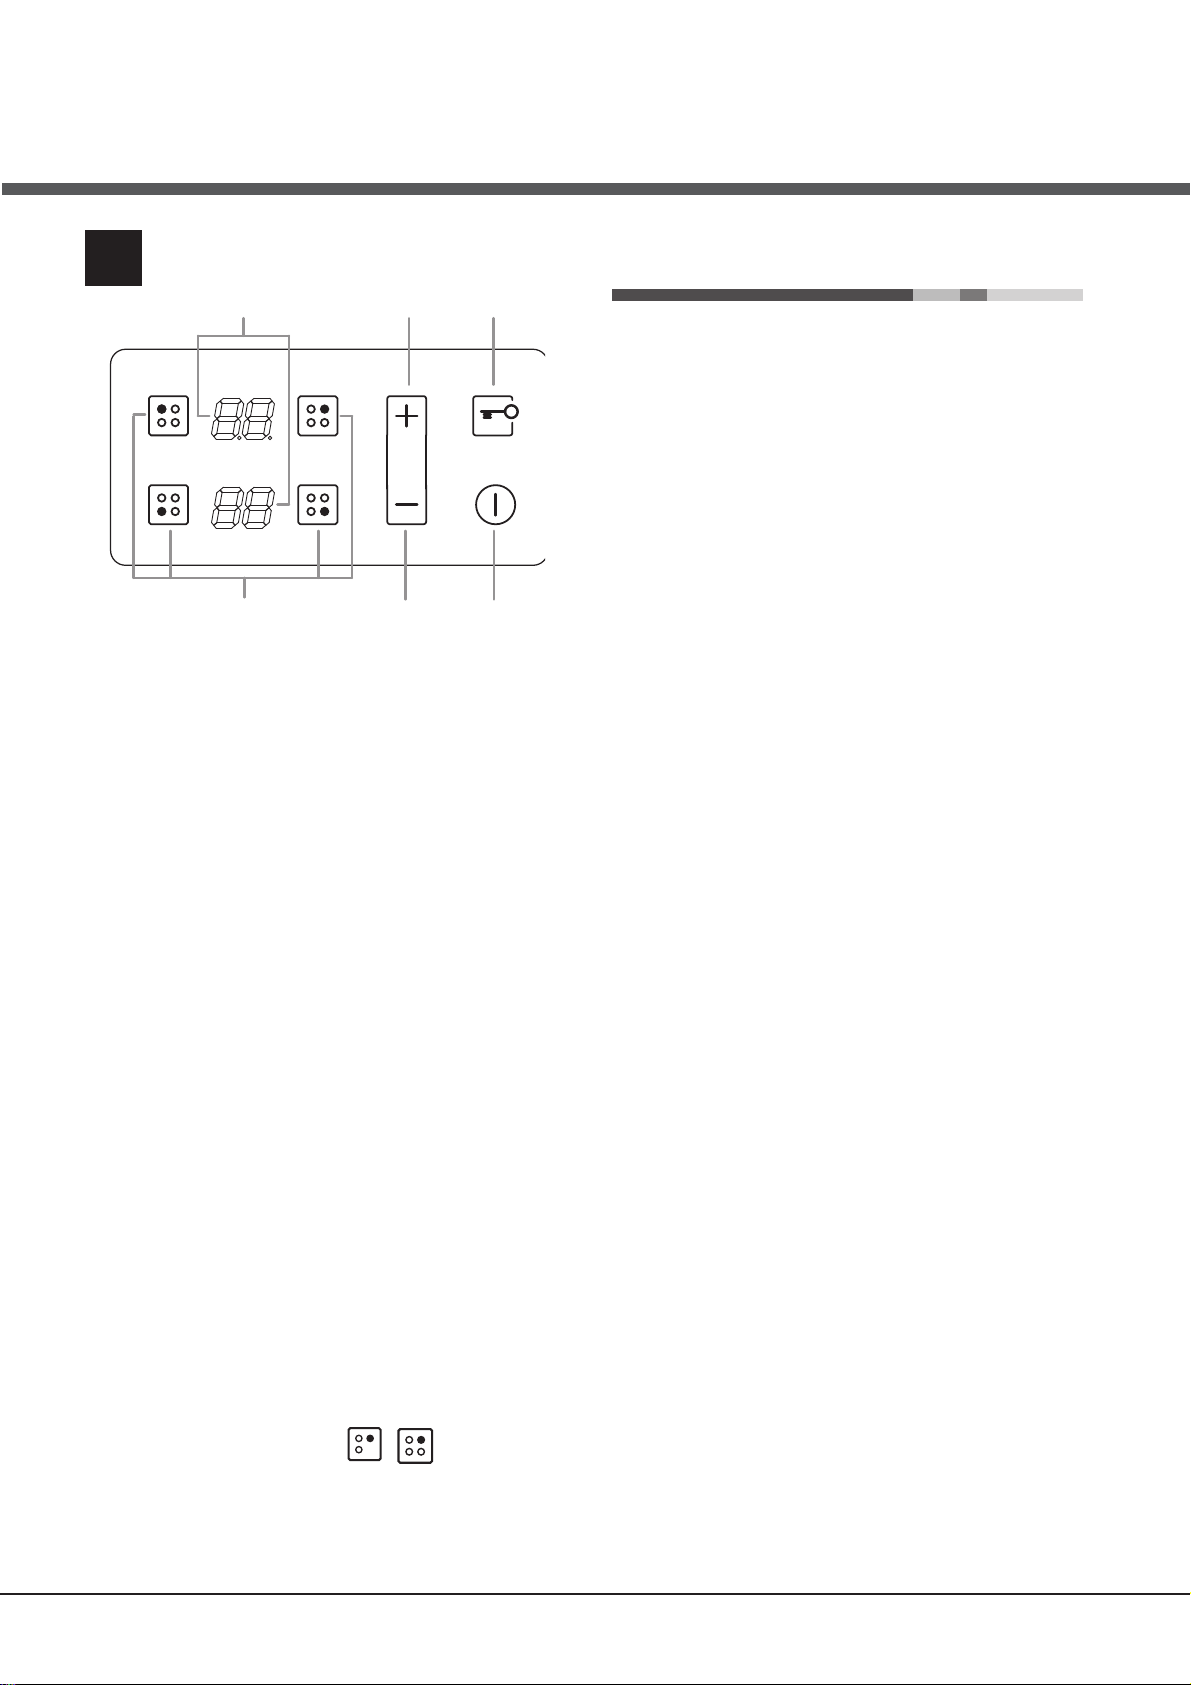
1 INCREASE POWER/ TIME button - controls the power
2 REDUCE POWER/ TIME button controls the power
3 COOKING ZONE SELECTOR button is used to select
4 ON/OFF button switches the appliance on and off.
5 CONTROL PANEL LOCK button prevents accidental
6 HEATER DISPLAY -shows the cooking zone selected,
! For detailed information on the control panel functions
refer to “Start-up and use” section.
! This product complies with the requirements of the
latest European Directive on the limitation of power
consumption of the standby mode.
If no operations are carried out for a period of 2
minutes, after the residual heat indicator lights turn
off and the fan stops (if present), the appliance
automatically switches to the .off mode..
The appliance resumes the operating mode once the
ON/OFF button is pressed.
! Depending on the number of heaters/cooking zones on
the hob the COOKING ZONE SELECTOR BUTTONS may
vary between and
Description of the appliance
Control panel
and time
and time.
the desired cooking zone
changes to the hob settings and shows the control
panel has been locked.
power level, preset time of cooking, booster funcition
activated.
Installation
Before operating your new appliance please read
!
this instruction booklet carefully. It contains important
information concerning the safe operation, installation
and maintenance of the appliance.
!
Please keep these operating instructions for future
reference. Pass them on to any new owners of the
appliance.
Positioning
Keep all packaging material out of the reach of children.
!
It may present a choking or suffocation hazard (see
Precautions and tips).
! The appliance must be installed by a qualified
professional in accordance with the instructions provided.
Incorrect installation may cause harm to people and
animals or may damage property.
Built-in appliance
Use a suitable cabinet to ensure that the appliance
functions properly.
• The supporting surface must be heat-resistant up to a
temperature of approximately 100°C.
• If the appliance is to be installed above an oven,
the oven must be equipped with a forced ventilation
cooling system.
• Avoid installing the hob above a dishwasher:
if this cannot be avoided, place a waterproof
separation device between the two appliances.
Ventilation
To allow adequate ventilation and to avoid overheating of the
surrounding surfaces the hob should be positioned as follows:
• At a minimum distance of 40 mm from the back panel
or any other vertical surfaces.
• So that a minimum distance of 20 mm is maintained
between the installation cavity and the cabinet
underneath.
• Kitchen cabinets adjacent to the appliance and taller
than the top of the hob must be at least 600 mm from
the edge of the hob.
Fixing
The appliance must be installed
supporting surface. Any deformities caused by improper
fixing could affect the features and operation of the hob.
The thickness of the supporting surface
into account when choosing
the fixing hooks:
• 3,5 mm thick: 9,5 mm screws
on a perfectly level
should be taken
the length of the screws for
GB
2
Page 3
GB
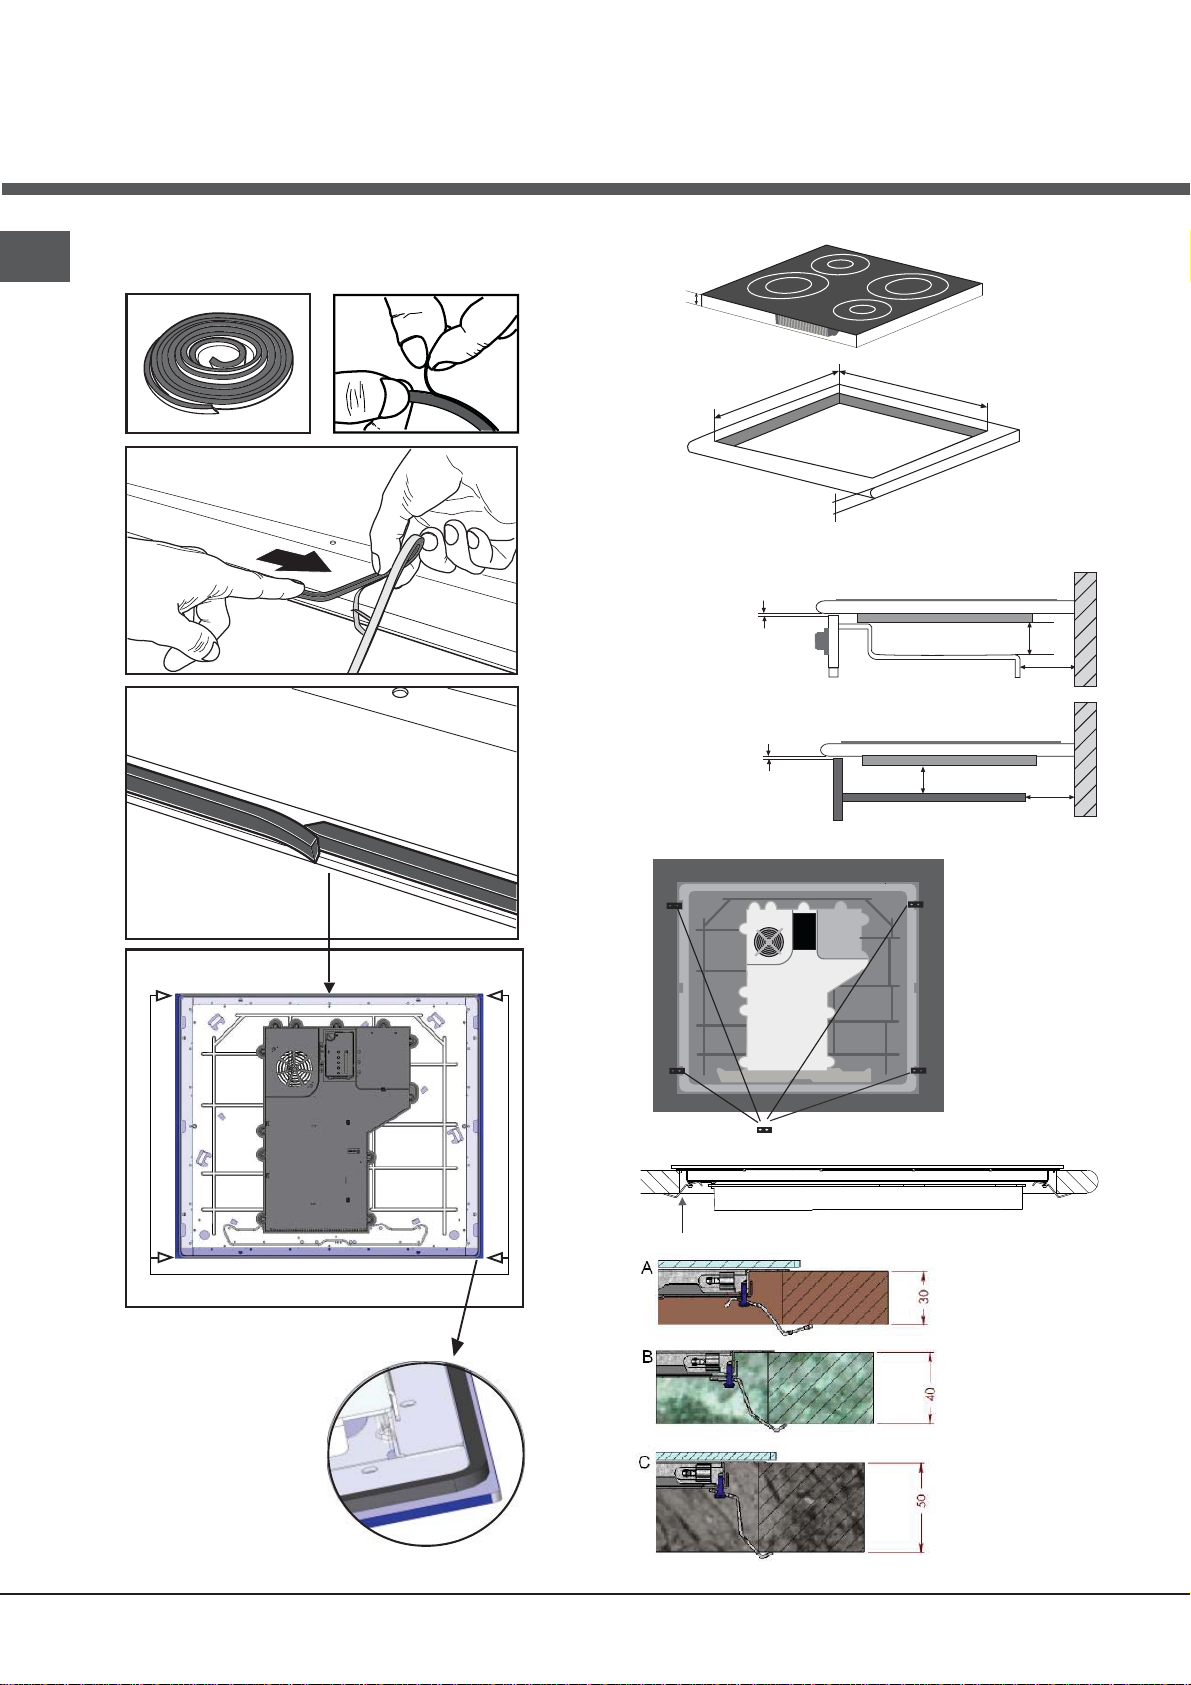
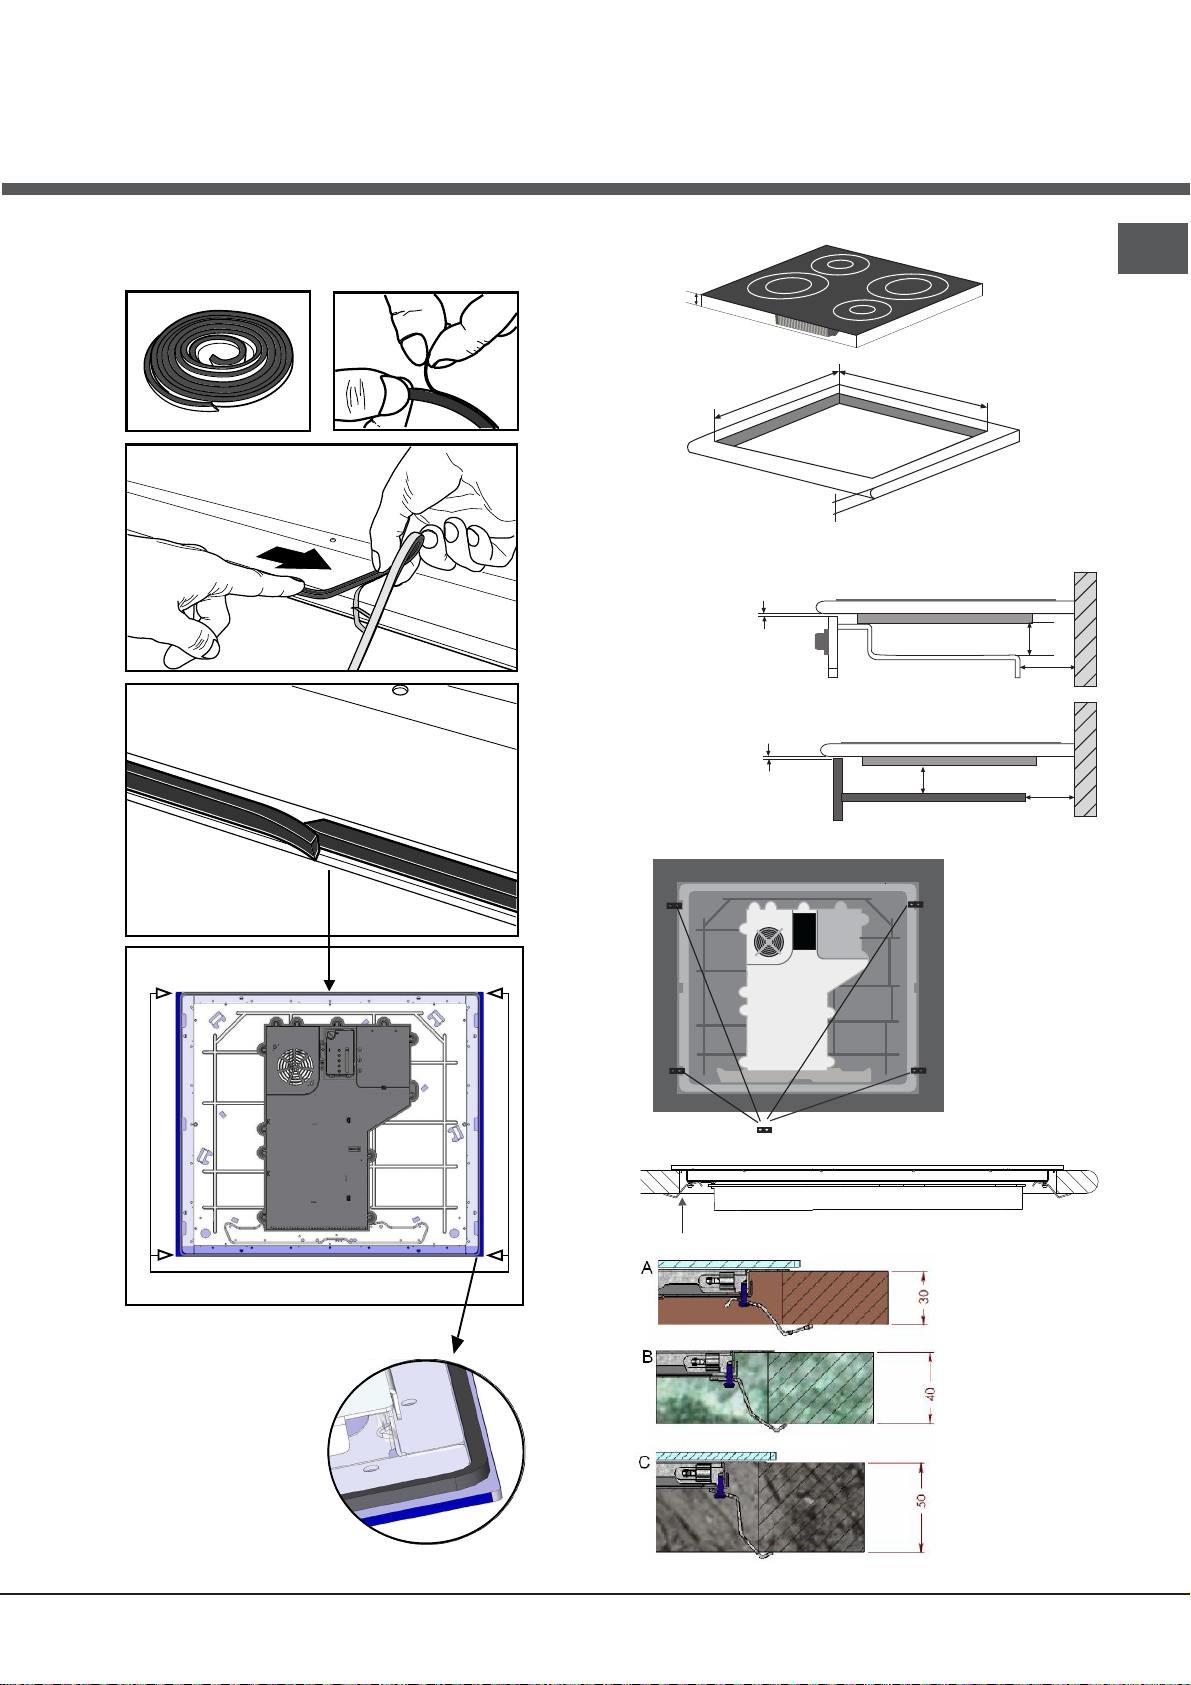
Installation of the safety washer
CABINET DIMENSIONS
1
3
4
2
60
490
Min. 30/Max.50
SAFETY DISTANCES WITH FURNITURE
Min 5mm
Min 5mm
FINAL ASSEMBLY
560
Min 20mm
Min 20mm
30mm
30mm
5
3
Page 4
Fix the hob as follows:
1. Use short flat-bottomed screws to fix the 4 alignment
springs in the holes provided at the central point of each
side of the hob.
2. Place the hob in the cavity, make sure it is in a central
position and push down on the whole perimeter until the
hob is stuck to the supporting surface.
! The screws for the alignment springs must remain
accessible.
! In order to adhere to safety standards, the appliance
must not come into contact with electrical parts once it
has been installed.
! All parts which ensure the safe operation of the
appliance must not be removable without the aid of a tool.
Electrical connection
! The electrical connection for the hob and for any built-
in oven must be carried out separately, both for safety
purposes and to make extracting the oven easier.
Single-phase connection
Voltage and
mains frequency
220-240V 1+N ~
50/60 Hz
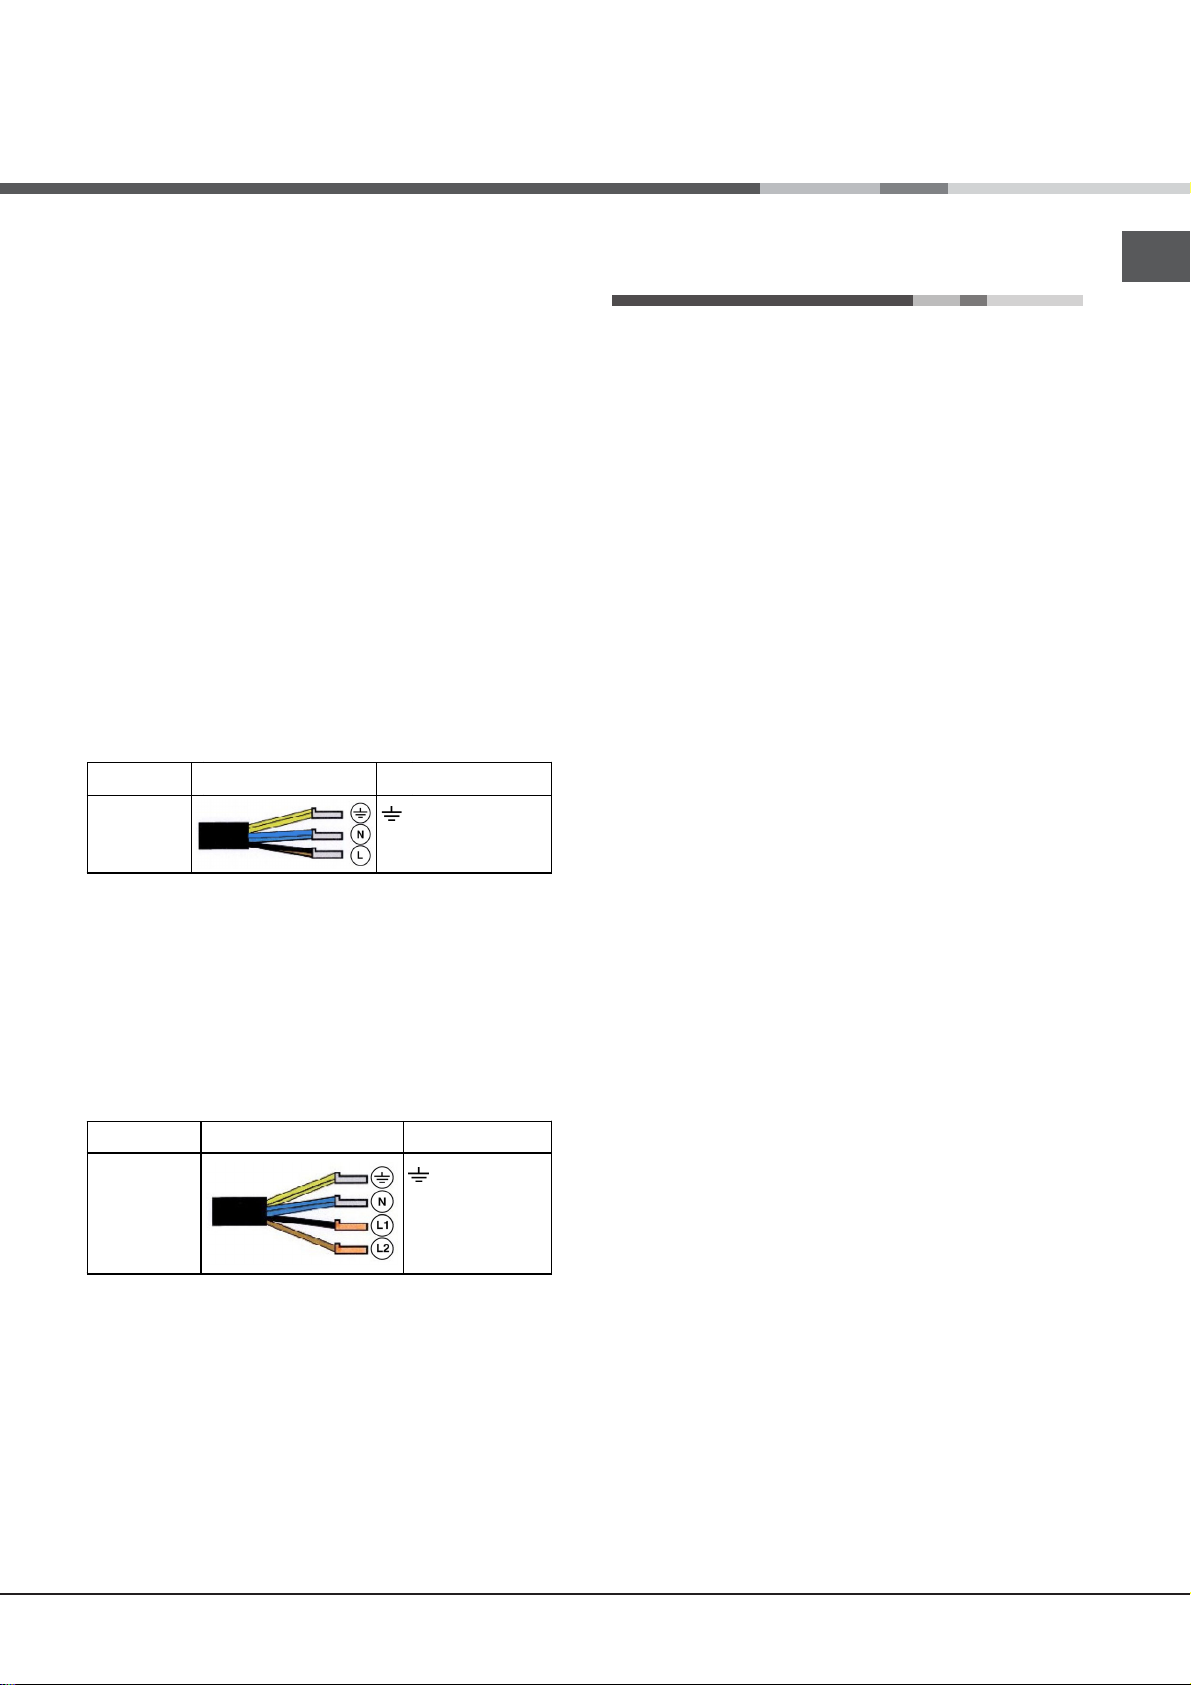
The hob is equipped with a pre-connected electricity supply
cable, which is designed for single-phase connection.
Connect the wires in accordance with the instructions given
in the following table and diagrams:
Other types of connection
Voltage and
mains frequency
400V - 2+N ~
50/60 Hz
220-240V 3 ~
50/60 Hz
If the mains supply corresponds with one of the following:
Voltage and mains frequency
• 400V - 2+N ~ 50/60 Hz
• 220-240V 3 ~ 50/60 Hz
Separate the wires and connect them in accordance with
the instructions given in the following table and diagrams:
Connecting the electricity supply cable to the mains
If the appliance is being connected directly to the electricity
mains an omnipolar switch must be installed with a minimum
opening of 3 mm between contacts.
! The installer must ensure that the correct electrical
connection has been made and that it is fully compliant
with safety regulations.
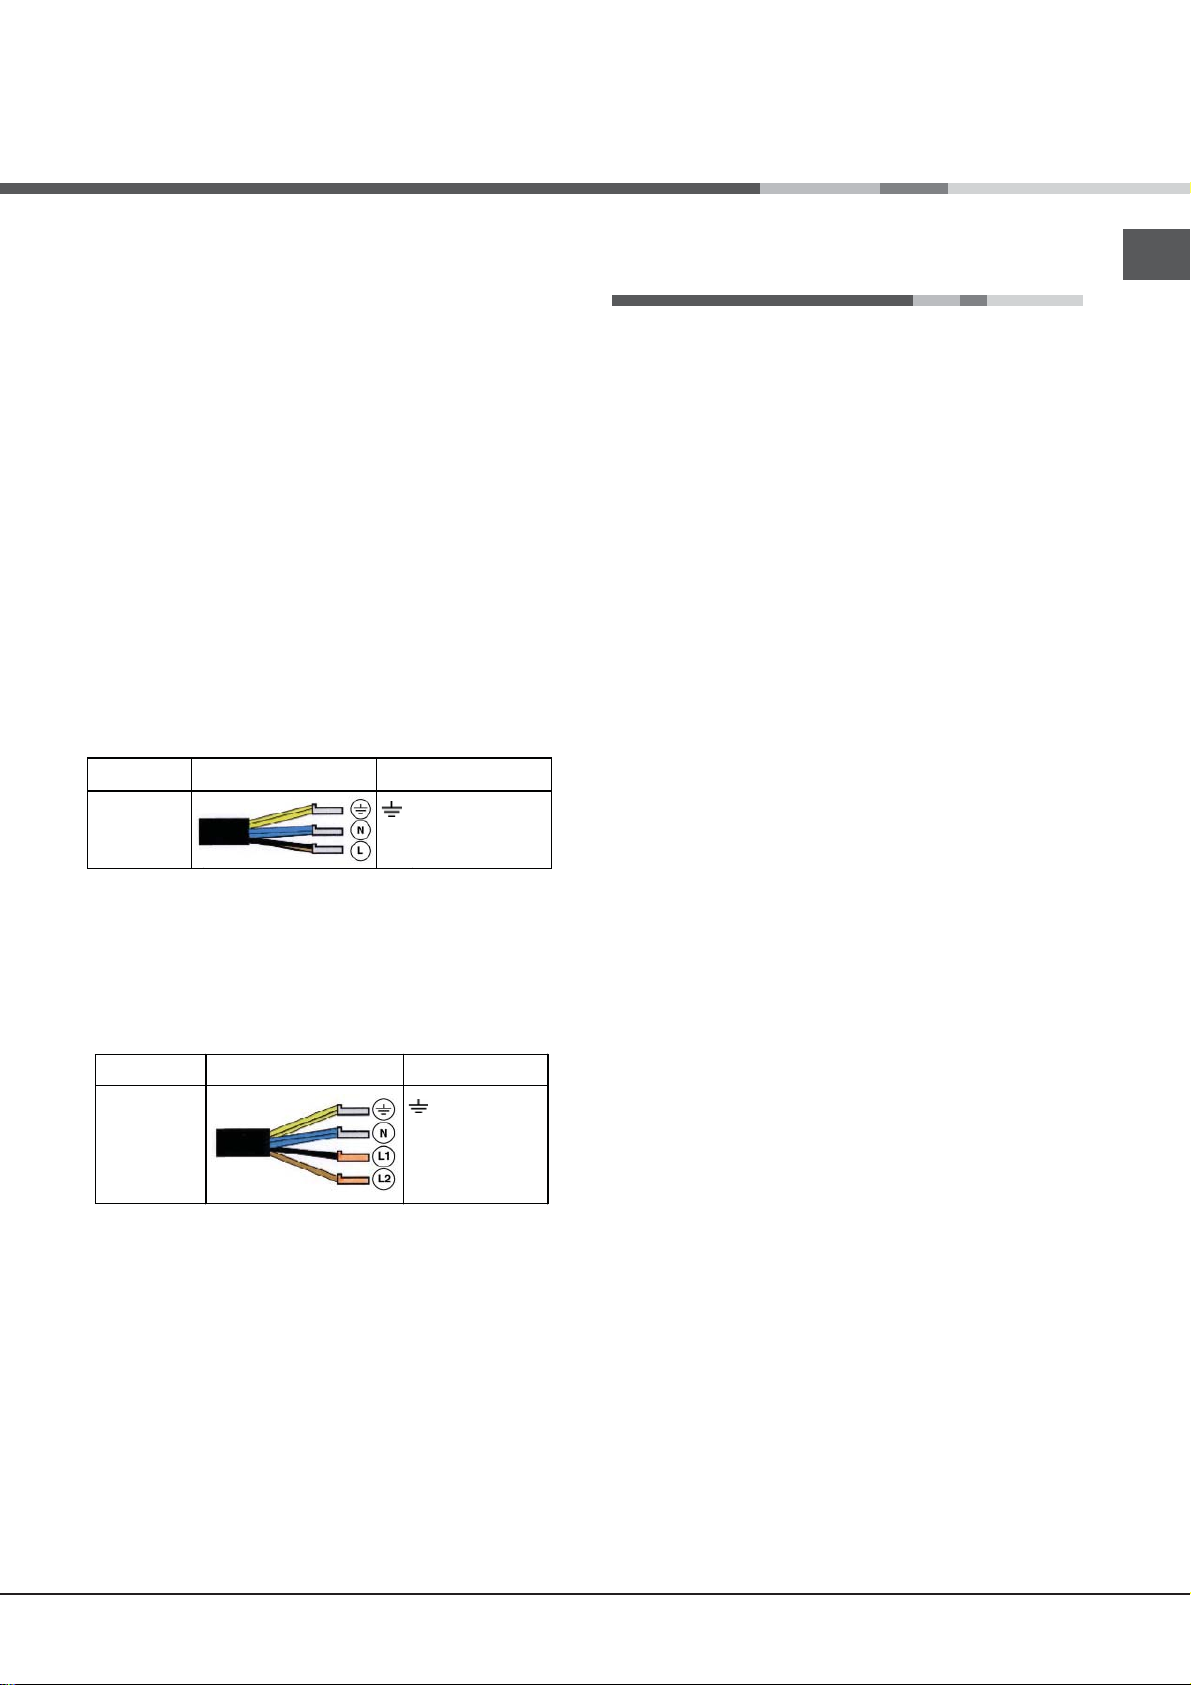
Electrical cable Wire connection
: yellow/green
N: the two blue wires together
L: brown and black together
Electrical cable Wire connection
: yellow/green;
N: the two blue wires
together
L1: black
L2: brown
Start-up and use
Before connecting the appliance to the power supply, make
sure that:
• The appliance is earthed and the plug is compliant with
the law.
• The socket can withstand the maximum power of the
appliance, which is indicated on the data plate located
on the appliance itself.
• The voltage falls within the range of values indicated on
the data plate.
• The socket is compatible with the plug of the appliance. If
the socket is incompatible with the plug, ask an authorised
technician to replace it. Do not use extension cords or
multiple sockets.
! Once the appliance has been installed, the power supply
cable and the electrical socket must be easily accessible.
! The cable must not be bent or compressed.
! The cable must be checked regularly and replaced by
authorised technicians only.
! The manufacturer declines any liability should these
safety measures not be observed.
! Do not remove or replace the power supply cable for any
reason. Its removal or replacement will void the warranty
and the CE marking. INDESIT does not assume liability for
accidents or damage arising from replacement/removal
of the original power supply cable. Replacement can only
be accepted when carried out by personnel authorised
by INDESIT and using an original spare part.
! The glue applied on the gaskets leaves traces of grease
on the glass. Before using the appliance, we recommend
you remove these with a special non-abrasive cleaning
product. During the first few hours of use there may be a
smell of rubber which will disappear very quickly.
! A few seconds after the hob is connected to the electricity
supply, a buzzer will sound. The hob may now be switched
on.
Types of noise during normal hob operation:
• Buzz: due to the vibration of the metallic parts that
make up the induction element and the pot; it is
generated by the electromagnetic field required for
heating and increases as the power of the induction
element increases.
• Soft whistle: heard when the pot placed on the heating
zone is empty; the noise disappears once food or water
is placed into the pot.
• Crackle: produced by the vibration of materials on the
bottom of the pot due to the flow of parasitic currents
caused by electromagnetic fields (induction); can be
more or less intense depending on the material making
up the bottom of the pot, and decreases as the pot
dimensions increase.
GB
4
Page 5

GB
• Loud whistle: heard when two induction elements of
the same group function simultaneously at maximum
power and/or when the booster function is set on
the larger element while the other is auto-adjusted.
Noise is reduced by decreasing the power level of the
auto-adjusted induction element; pot bottom layers
made of different kinds of materials are among the
main causes of this noise.
• Fan noise: a fan is necessary to ensure the hob functions
correctly and to safeguard the electronic unit from
possible overheating. The fan functions at maximum
power when the large induction element is at maximum
power or when the booster function is on; in all other
cases, it works at average power depending on the
temperature detected. Furthermore, the fan may continue
to work even after switching the hob off, if the temperature
detected is high.
The types of noise listed above are due to induction
technology and are not necessarily operational faults.
!
If the (-) or (+)button is pressed for an extended period
of time, the display scrolls quickly though the power
levels and timer minutes.
ays „FL” error and the calibration is suspended. The
error will disappear when satisfactory ambient lighting is detected and the touch control calibration procedure will now complete satisfactorily
After connecting the hob to the electricity mains, the
touch pannel might be automatically locked. To unclock the pannel press and hold the Control Panel
Loock button
To switch the hob on, press and hold the button for
approximately one second.
.
The cooktop is switched On when a beep sound is
emmited and all the cooking zones displays show
the digit point.
When the cooktop is OFF, after 5 sec, the control As
soon as we Touch a key, the KEYLOCK LED
goes ON and we can continue to operate us normal
unlocking the keyboard switches off to reduce the power
consumption.
Initial Light Conditions
When power is initially applied to the Cooktop, the touch control conducts a calibration process for the touch keys, which requires a low level of ambient light in
the area of the touch keys.
If during this calibration process excessive ambient
lighting is detected the User Interface displays „FL”
(Infrared Ambient Light Error) and the control calibration process is suspended. In order to rectify the
process any lighting that could effect the calibration
process should be switched off (e.g. halogen cooker
hood lighting). The error will disappear when satisfactory ambient lighting is detected and the touch control
calibration procedure will now complete satisfactorily.
-The „FL” error can only be generated within approx 3s
of initial power being applied to the cooktop.
-We recommend that the user switches off all cooker
hood lighting and lighting directed towards the cooktop when power is initially applied to the cooktop.
-After the touch control has conducted its initial calibration process, (approx 3s) any cooker hood or other
lighting can be switched on as normal and will not af-
fect the operation of the touch control.
Switching on the hob
When power is initially applied to the Cooktop, the
touch control conducts a calibration process for the
touch keys, which requires a low level of ambient
light in the area of the touch keys. If excessive ambient lighting is detected, the User Interface displo-
Switching off the cooktop is signalled by 3 beep sound
Power Management for ECO Cooktop
For ECO power cook tops, each time the user tries to
increase the power, the total power level of the Cooktop
is calculated. If this total power level is greater than the
Cooktop power limit, the power increase is not allowed.
An error beep sounds and the heater display shows an
‘r’ for 3 seconds .
Switching on the cooking zones
Each cooking zone is controlled using a selector button
and a power adjustment device consisting of a
double(-) and (+) button.
• To begin operating a cooking zone, press the
corresponding control button and set the desired
power level (between 0 and 9) using the buttons (-)
or (+)
Press and hold the (-) button to set the power level
immediately at “9”
Press and hold (+) and (-) buttons simultaneously to
return to power level “0”
If the power level is “0” press and hold the (+) button
to increase the power level quickly
The choice of a cooking zone is signalled by a beep
sound, and then the power level is shown on the
display
If the selection of a heater is not done in 10 seconds,
the cooktop will be turned off automatically.
5
Page 6
Fast Boil- “Booster” function
*
SUITABLE
UNSUITABLE
Cast iron
Enamelled steel
Special stainless steel
Copper,
Aluminium, Glass, Earthenware,
Ceramic, non magnetic Stainless steel
The booster function for some of the cooking zones may be
used to shorten heating-up times.
t may be activated by pressing the (+) button over level
I
9. This function boosts the power to 1600 W or 2000 W,
depending on the size of the relevant cooking zone.
The activation of of the booster is signalled by a beep
sound, and the letter ‘P’ appearing on the display.
The booster works for max 10 minutes. After these 10
minutes a beep sounds and the cooking zone will
return to level “9”
! To change the time for a timed heater, repeat the
process explained above.
!Pressing and holding the + and - keys increases the
speed of time selection
End of Timer countdown.
When the remaining time has run out, the timed heater
is switched off, the heater display shows a blinking ‘0’
and the timer alarm beeps for one minute
The alarm will be cancelled by pressing any key of the
touch control.
GB
With the heater at Booster level, if the [+] key is
Touched an error beep sounds and the cookset
doesn’t change. With the heater at Booster level, if the
[-] key is Touched a beep sounds and the cookset is
reduced to 9.
Switching off the cooking zones
To switch off a cooking zone, select it using the corresponding
selector button
• Press the (-) button: the power of the cooking zone will
progressively decrease until it is switched off.
Once the cooking zone is selected, the heater can
also be switched off by touching the [-] and [+] keys
simultaneously. A beep
sounds and the corresponding display shows “0”.
and:
Using the Timer
! All the cooking zones may be programmed
simultaneously, for a duration between 1 and 99 min.
1. Select the cooking zone using the corresponding
selector button.
2. Adjust the power level of the cooking zone.
3.When required power level is selected, touching again
the corresponding heating zone selector button, a beep
sounds and a ‘t’ letter with dot point appears on the heater
display. The remaining time will be displayed in the opposite
part of timed heater. If timed heating zone is, for example,
in the down part, timed time will appear in up displays.
4. Set the cooking duration using the
buttons
The (-) and the(+) buttons touched simultaneously result|
in returning to the 0 value.
If the time is not selected before 10 seconds, or if the
selected time is 0 after 10 seconds the last touch over
(-)or the (+) button, the timer is switched off.
the
(-) and the(+)
Control panel lock
When the hob is switched on, it is possible to lock the oven
controls in order to avoid accidental changes being made to
the settings (by children, during cleaning, etc.).
Press the button to lock the control panel: -the icon
will illuminate and an audible beep sound will be emmited.
To use any of the controls (e.g. to stop cooking), you
must switch off this function. Press the
few moments, the icon will stop illuminating and the lock
function will be removed.
All the keys on the cooking zone selection will be locked
if :the cooktop is off,,
if the Control Panel Lock is activated or
if an error on a cooktop occurs.
button for a
Switching off the hob
Press the button to switch off the appliance - do not
rely solely on the pan sensor.
If the control panel lock has been activated, the controls
will continue to be locked even after the hob is switched
on again. In order to switch the hob on again, you must
first remove the lock function.
Practical advice on using the appliance
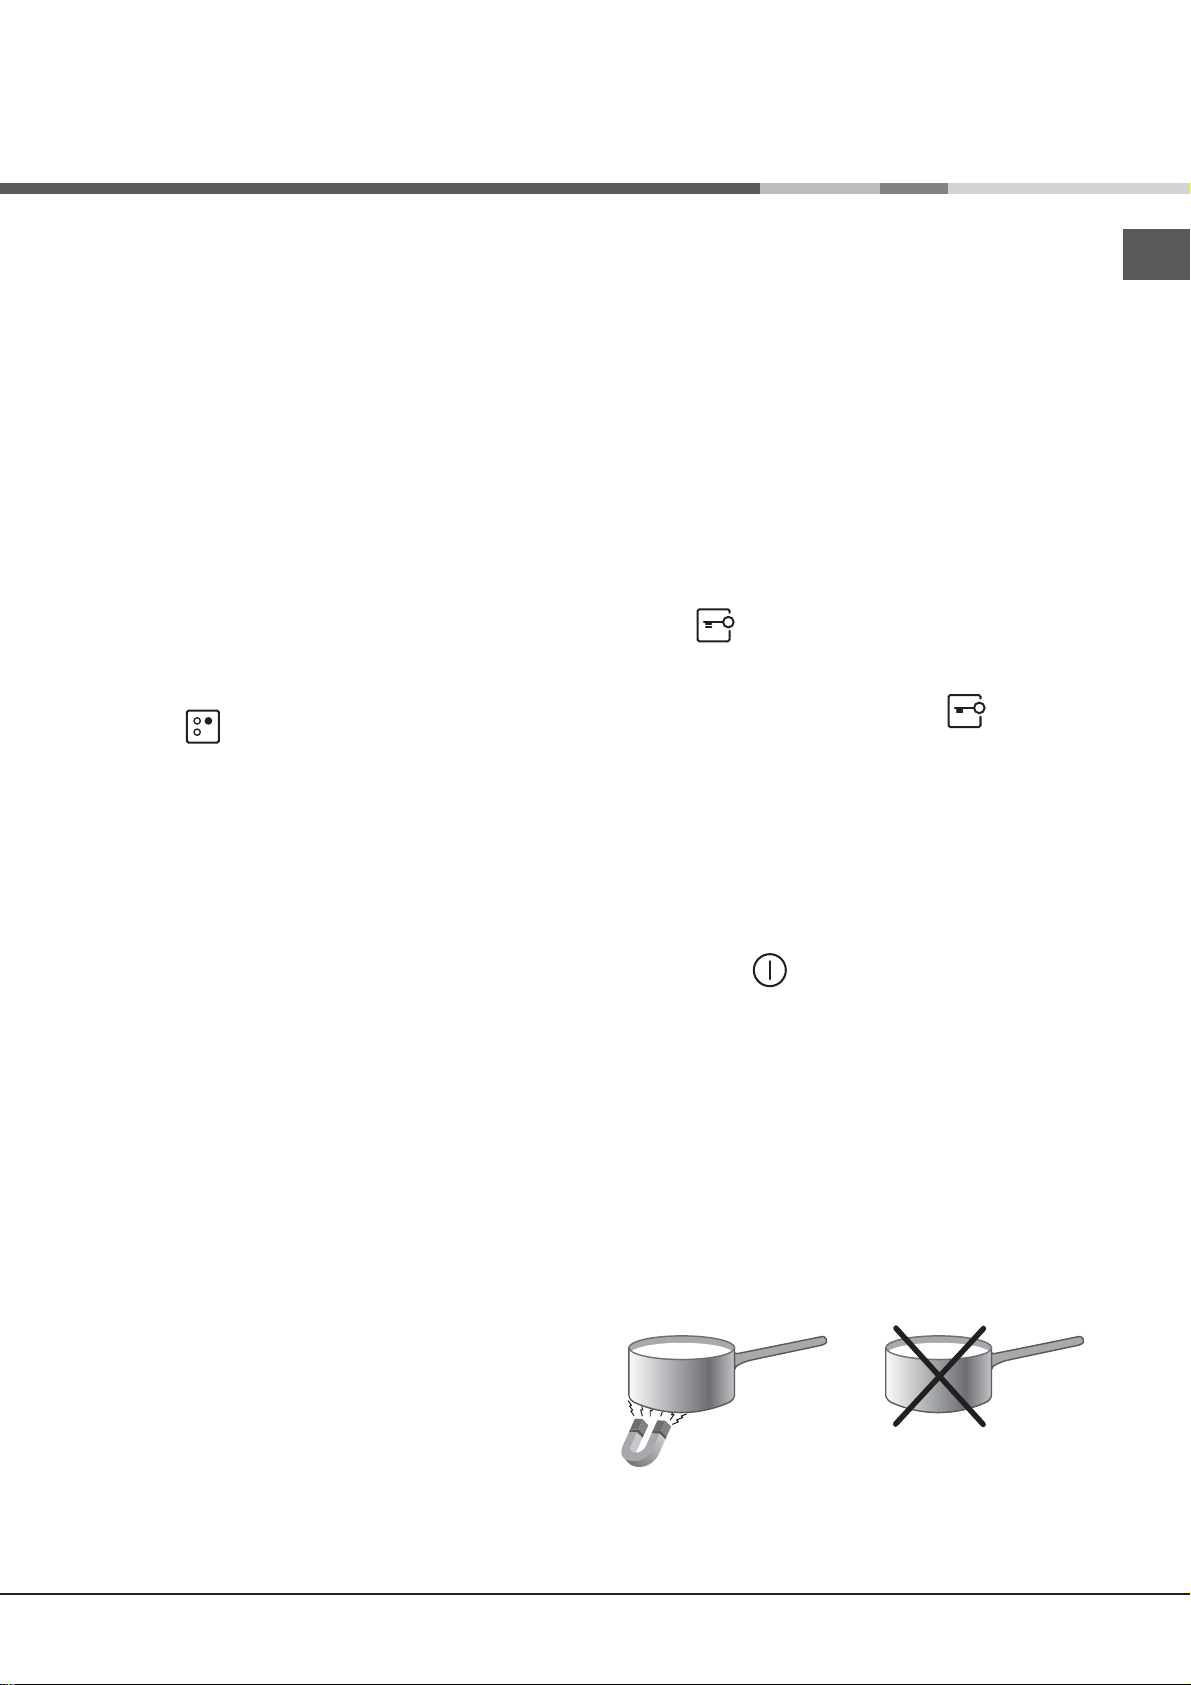
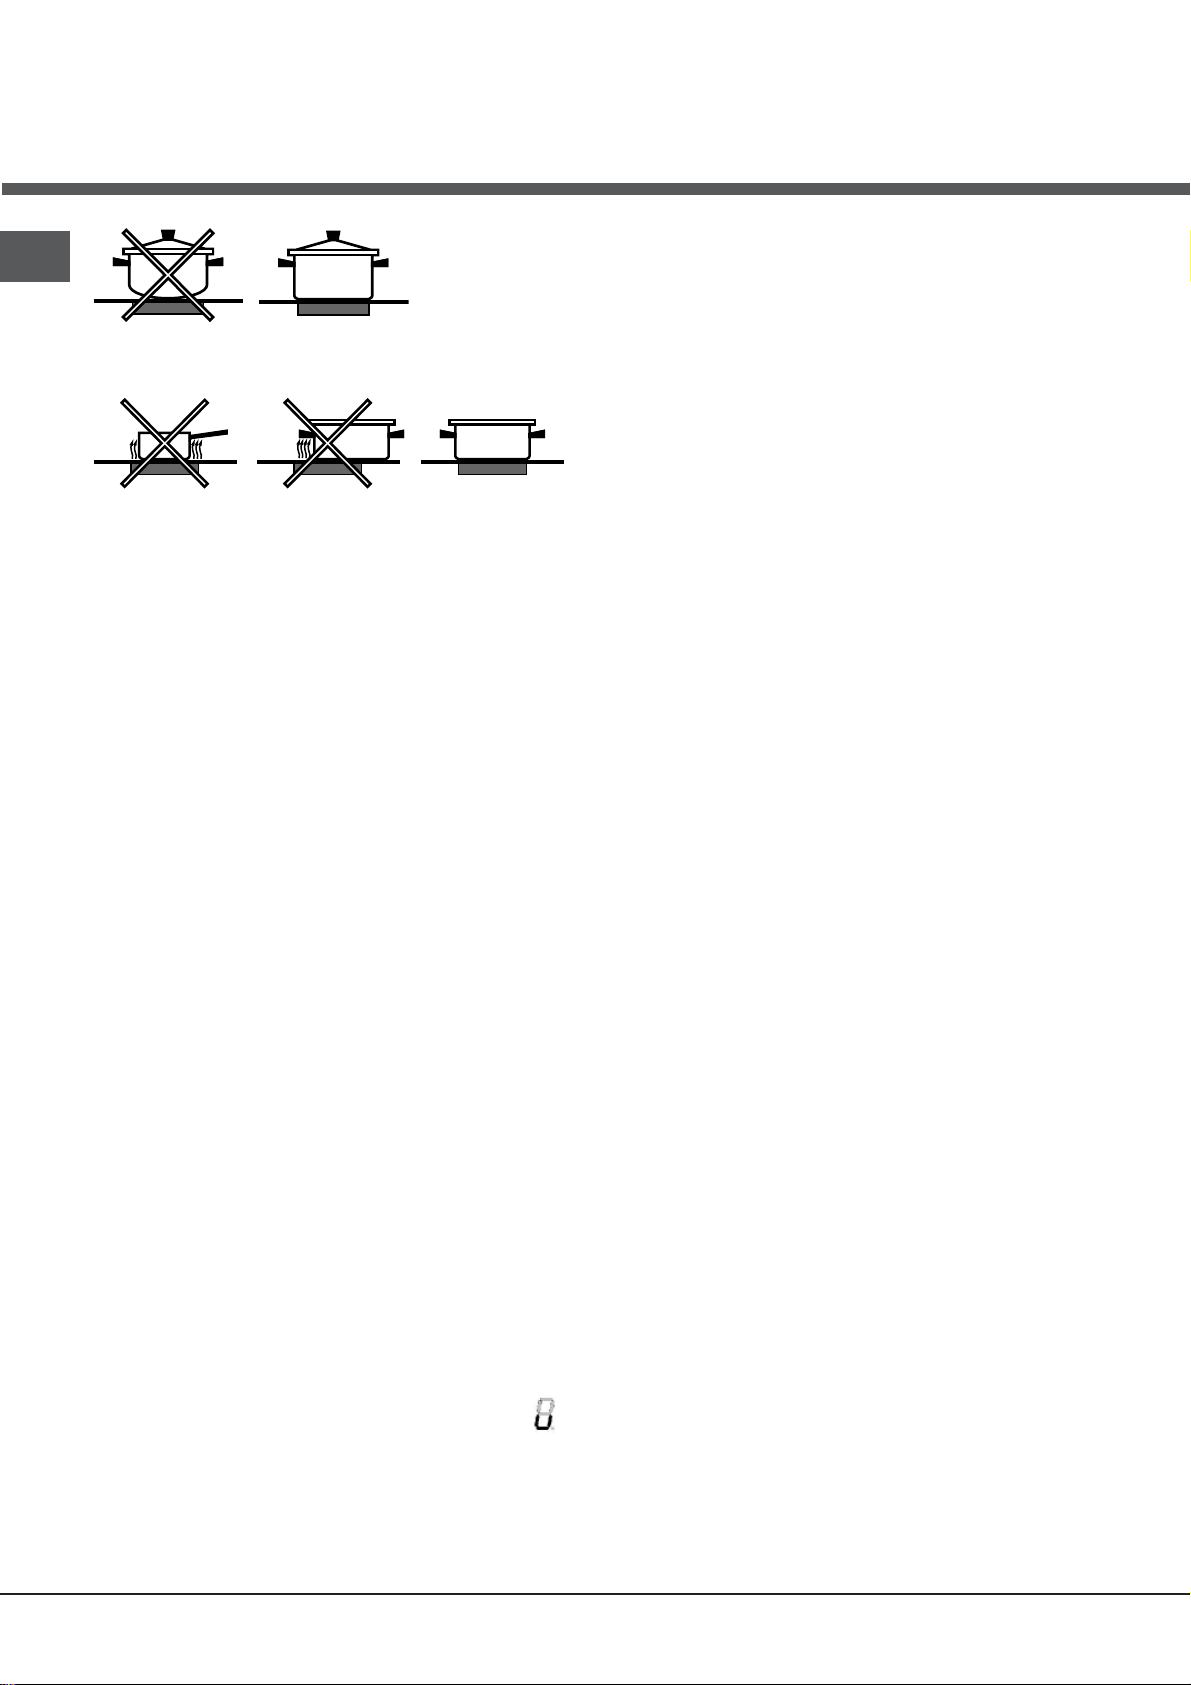
! Use cookware made from materials which are
compatible with the induction principle (ferromagnetic
material). We especially recommend pans made from:
cast iron, coated steel or special stainless steel adapted
for induction. Use a magnet to test the compatibility of
the cookware.
Starting Timer countdown.
The countdown starts when the timer visualization is
finished touching any cooking zone key or
automatically 10 seconds after the last touch over
the [+] or [-] keys. A beep sounds and the heater
display will show the power
level and the dot point showing that the heater is
timed.
In addition, to obtain the best results from your hob:
• Use pans with a thick, flat base in order to fully utilise the
cooking zone.
6
Page 7
GB
• Always use pans with a diameter which is large enough
to cover the hotplate fully, in order to use all the available
heat.
When one or more keys are activated for more than
10 sec. the touch control. switches off
A warning beep sounds is emmited every 10
sec., while the key/s is/are activated.
With all heaters at zero power during 10 sec. the
Cooktop is switched off.
If the switching off is due to an accidental activa-
tion of keys, the touch control actuates as above.
• Make sure that the base of the cookware is always clean
and dry, in order to fully utilise and extend the life of both
the cooking zones and the cookware.
• Avoid using the same cookware which has been used
on gas burners: the heat concentration on gas burners
may distort the base of the pan, causing it not to adhere
correctly.
Safety devices
Pan sensor
Each cooking zone is equipped with a pan sensor device.
The hotplate only emits heat when a pan with suitable
measurements for the cooking zone is placed on it.
The “u” sign on the display appears if after
selecting the cooking zone the pan is not placed on a
heater , or in case of:
• An incompatible pan
• A pan whose diameter is too small
• The pan has been removed from the hotplate.
After 10 sec. with no pan on the heating zone, a warning
beep signal is emmited.
After 60 sec. with no pan on the heating zone,, the heater
switches off.
Buzzer
This can also indicate several irregularities:
• An object (a pan, cutlery, etc.) has been placed on the
control panel for more than 10 seconds.
• Something has been spilt on the control panel.
• A button has been pressed for too long. All of the above
situations may cause the buzzer to sound. Remove the
cause of the malfunction to stop the buzzer. If the cause of
the problem is not removed, the buzzer will keep sounding
and the hob will switch off.
Errors and Alarms
When an error is detected, the whole appliance or the
heater/s are switched off, a beep sounds (only if one or
more heaters are active) and all displays show a ‘F’
letter and the error code (an index number or a letter)
alternately.
If the problem does not disappear by itself, please
contact the Technical Service.
Overheating protection
If the electronic elements overheat, the number signalizing
the power level starts flashing, and the letter “c” appears
on the display. When the temperature has reached a
suitable level, this message disappears and the hob may
be used again.
Safety switch
The appliance has a safety switch which automatically
switches the cooking zones off after they have been in
operation for a certain amount of time at a particular
power level. When the safety switch has been triggered,
the display shows “0”.
For example: the right rear hotplate is set to 5 and will
switch off after 5 hours of continuous operation, while the
front left hotplate is set to 2 and will switch off after 8 hours.
7
Page 8
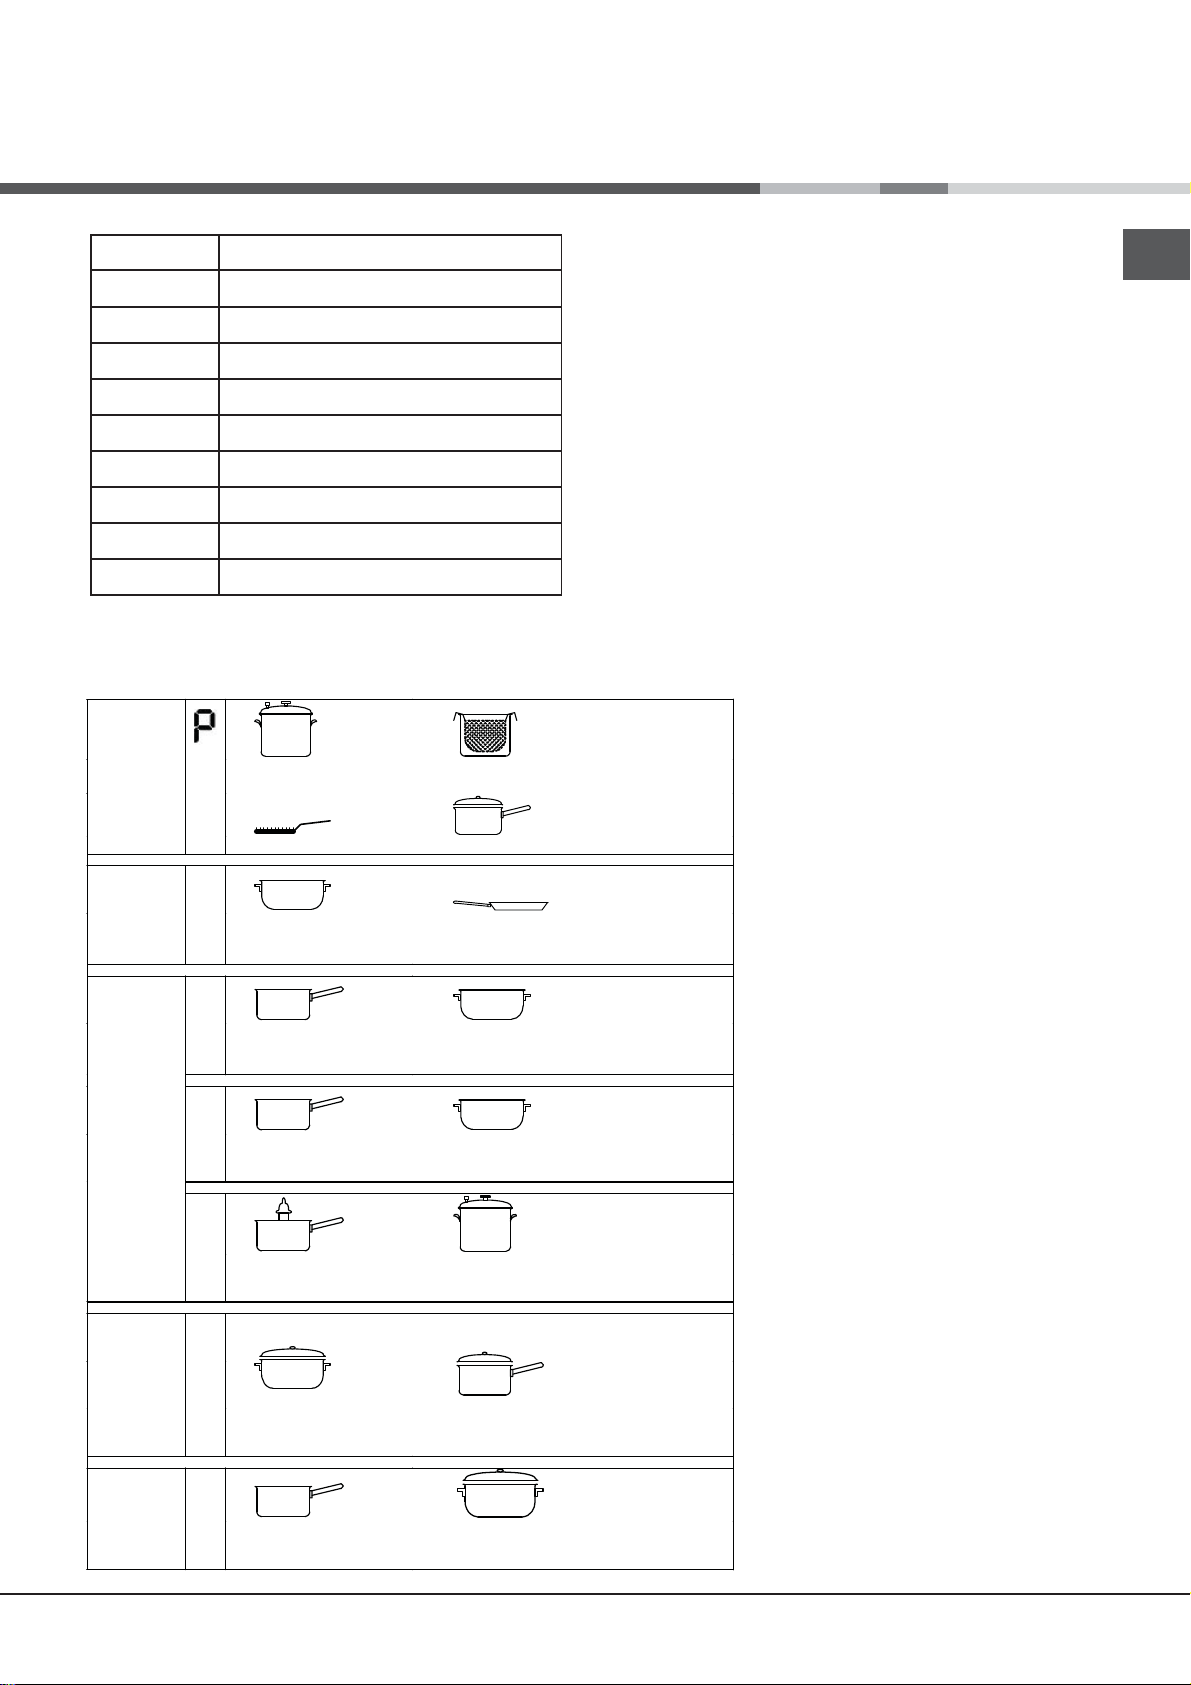
Power level
1
2
3
4
5
6
7
8
9
Maximum operating time in hours
Practical cooking advice
Pressure cooking
Pressure cooker
ª
cooking
Very high-flame
_
Grilling Boiling
GB
10
10
10
10
10
10
10
10
3
Frying
_
cooking
High-flame
¶
¶
§
§
S
Medium-flame cookingLow-flame
S
¢
¢
£
cooking
™
Crêpes Cooking on a high flame and browning
Fast thickening (liquid juices)
Boiling water (pasta, rice, vegetables)
Milk
Slow thickening (dense juices)
Bain-marie cooking Pressure cooking after whistle
Low-flame cooking (stews)
(roasts, steaks, escalopes, fish fillets,
fried eggs)
Reheating dishes
Very
cooking
low-flame
™
Chocolate sauce Keeping food hot
¡
8
Page 9
Precautions and tips
GB
! This appliance has been designed and manufactured
in compliance with international safety standards. The
following warnings are provided for safety reasons and
must be read carefully.
This appliance conforms to the following European
Economic Community directives:
- 2006/95/EEC dated 12/12/06 (Low Voltage) and subsequent
amendments;
- 2004/108/EEC dated 15/12/04 (Electromagnetic
Compatibility) and subsequent amendments;
- 93/68/EEC dated 22/07/93 and subsequent amendments.
- 1275/2008 stand-by/off mode.
General safety
! Make sure that the air inlet behind the fan grille is never
obstructed. The built-in hob should, in fact, be provided
with suitable ventilation for the cooling of the electronic
components used in the appliance.
! We advise against the installation of an induction hob above
an under-the-counter refrigerator (heat) or above a washing
machine (vibrations). In fact, there would be insufficient space
for the ventilation of electronic components.
• The appliance was designed for domestic use inside the
home and is not intended for commercial or industrial use.
• The appliance must not be installed outdoors, even in
covered areas. It is extremely dangerous to leave the
appliance exposed to rain and storms.
• Do not touch the appliance when barefoot or with wet or
damp hands and feet.
• The appliance must be used by adults only for the
preparation of food, in accordance with the instructions
provided in this booklet. Do not use the hob as a worktop
or chopping board.
• The glass ceramic hob is resistant to mechanical shocks,
but it may crack (or even break) if hit with a sharp object
such as a tool. If this happens, disconnect the appliance
from the electricity mains immediately and contact a
Service Centre.
• Ensure that power supply cables of other electrical
appliances do not come into contact with the hot parts of
the hob.
• Remember that the cooking zones remain relatively hot for
at least thirty minutes after they have been switched off.
An indicator light provides a warning when residual heat
is present (see Start-up and use).
• Keep any object which could melt away from the hob,
for example plastic and aluminium objects, or products
with a high sugar content. Be especially careful when
using plastic film and aluminium foil or packaging: if
placed on surfaces which are still hot, they may cause
serious damage to the hob.
• Always make sure that pan handles are turned towards
the centre of the hob in order to avoid accidental burns.
• When unplugging the appliance, always pull the plug
from the mains socket; do not pull on the cable.
• Never perform any cleaning or maintenance work
without having disconnected the appliance from the
electricity mains.
• The appliance should not be operated by people
(including children) with reduced physical, sensory
or mental capacities, by inexperienced individuals or
by anyone who is not familiar with the product. These
individuals should, at the very least, be supervised
by someone who assumes responsibility for their
safety or receive preliminary instructions relating to
the operation of the appliance.
• For the attention of wearers of pacemakers or other
active implants:
The hob complies with all current standards on
electromagnetic interference.
Your induction hob is therefore perfectly in keeping
with legal requirements (89/336/CEE directives). It
is designed not to create interference on any other
electrical apparatus being used on condition that
the apparatus in question also complies with this
legislation.
Your induction hob generates short-range magnetic
fields.
To avoid any interference between your induction
hob and a pacemaker, the latter must be designed to
comply with relevant regulations.
In this respect, we can only guarantee our own
product conformity. Please consult the pacemaker
manufacturer or your doctor concerning its conformity
or any possible incompatibility.
• Do not let children play with the appliance.
• Do not place metal objects (knives, spoons, pan lids,
etc.) on the hob as they may become hot.
• The appliance is not intended to be operated by
means of an external timer or separate remotecontrol system.
Disposal
• When disposing of packaging material: observe local
legislation so that the packaging may be reused.
• The European Directive 2002/96/EC relating to Waste
Electrical and Electronic Equipment (WEEE) states that
household appliances should not be disposed of using
the normal solid urban waste cycle. Exhausted appliances
should be collected separately in order to optimise the cost
of re-using and recycling the materials inside the machine,
while preventing potential damage to the atmosphere and
to public health. The crossed-out dustbin is marked on all
products to remind the owner of their obligations regarding
separated waste collection.
For further information relating to the correct disposal of
exhausted household appliances, owners may contact
the public service provided or their local dealer.
9
Page 10
Care and maintenance
Switching the appliance off
Disconnect your appliance from the electricity supply
before carrying out any work on it.
Cleaning the appliance
Do not use abrasive or corrosive detergents (for
!
example, products in spray cans for cleaning barbecues
and ovens), stain removers, anti-rust products, powder
detergents or sponges with abrasive surfaces: these may
scratch the surface beyond repair.
!
Never use steam cleaners or pressure cleaners on the
appliance.
• It is usually sufficient simply to wash the hob using a
damp sponge and dry it with absorbent kitchen towel.
• If the hob is particularly dirty, rub it with a special
glass ceramic cleaning product, then rinse well and
dry thoroughly
• To remove more stubborn dirt, use a suitable scraper.
Remove spills as soon as possible, without waiting for
the appliance to cool, to avoid residues forming crusty
deposits. You can achieve excellent results by using
a rust-proof steel wire sponge - specifically designed
for glass ceramic surfaces - soaked in soapy water.
• If any plastic or sugary substances are accidentally
melted on the hob, remove them immediately with the
scraper, while the surface is still hot.
• Once it is clean, the hob may be treated with a special
protective maintenance product: the invisible film left
by this product protects the surface from drips during
cooking. This maintenance task should be carried out
while the appliance is warm (not hot) or cold.
• Always remember to rinse the appliance well with clean
water and dry it thoroughly: residues can become
encrusted during subsequent cooking processes.
Stainless steel frame (only in models with outer frame)
Stainless steel can be marked by hard water which has
been left on the surface for a long time, or by cleaning
products containing phosphorus.
After cleaning, it is advisable to rinse the surface well
and dry it thoroughly. If water is spilt on the surface, dry
it quickly and thoroughly.
!
Some hobs have an aluminium frame which is similar to
stainless steel. Do not use any cleaning or degreasing
products which are not suitable for use with aluminium.
Disassembling the hob
If it is necessary to disassemble the hob:
1. Loosen the screws fixing the alignment springs on
each side.
2. Loosen the screws holding the fixing hooks in each
corner.
3. Take the hob out of its installation cavity.
!
Do not attempt to repair the appliance yourself. If the
appliance breaks down, contact a Service Centre.
GB
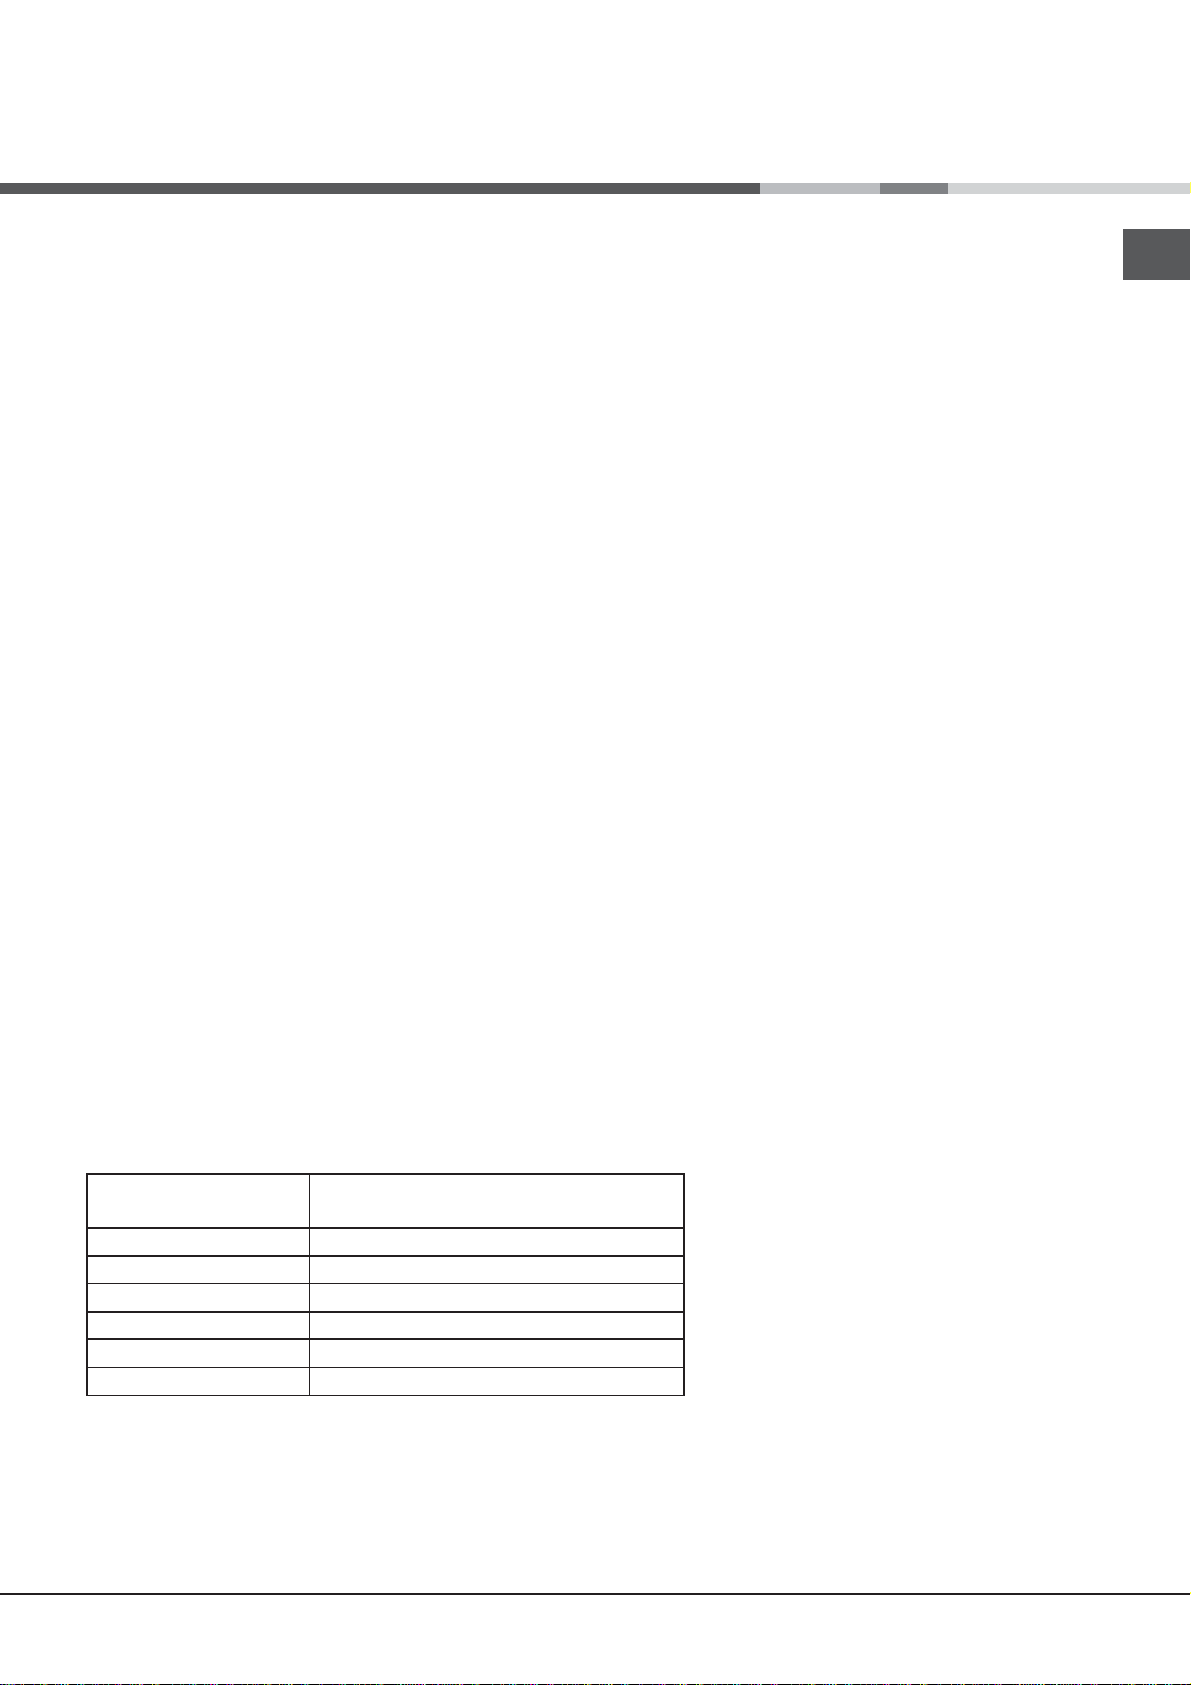
Technical description of the models
The induction system is the quickest existing way of cooking. Unlike traditional hotplates where the cooking zone
heats up, with the induction system heat is generated directly inside pans which have ferromagnetic bases.
Hobs
Cooking zone
Back Left
Back Right
Front Left
Front Right
Total power
Key:
I = single induction cooking zone
KIB 644 C E IT
Power (W)
I 1200 - B1600
I 1500 - B 2000
I 1500 - B 2000
I 1200 - B1600
7200
10
Page 11

KIB 644 C E ITKIB 644 C E IT
Italiano
IT
Istruzioni per l’uso
PIANO COTTURA
Sommario
Istruzioni per l’uso,11
ATTENZIONE,11
Descrizione dell’apparecchio,12
Installazione, 12
Avvio e utilizzo,14
Precauzioni e consigli,19
Manutenzione e cura,20
Descrizione tecnica dei modelli,20
Italiano
IT
ATTENZIONE!
• ATTENZIONE: Questo apparecchio e
le sue parti accessibili diventano molto
caldi durante l’uso.
• Bisogna fare attenzione ed evitare di
toccare gli elementi riscaldanti.
• Tenere lontani i bambini inferiori agli 8
anni se non continuamente sorvegliati.
• Il presente apparecchio puo’ essere
utilizzato dai bambini a partire dagli
8 anni e da persone con ridotte
capacita’ fisiche, sensoriali o mentali
oppure con mancanza di esperienza
e di conoscenza se si trovano sotto
adeguata sorveglianza oppure se sono
stati istruiti circa l’uso dell’apparecchio
in modo sicuro e se si rendono conto
dei pericoli correlati. I bambini non
devono giocare con l’apparecchio. Le
operazioni di pulizia e di manutenzione
non devono essere effettuate dai
bambini senza sorveglianza.
• ATTENZIONE: Lasciare un fornello
incustodito con grassi e olii puo’
essere pericoloso e puo’ provocare un
incendio.
• Non bisogna MAI tentare di spegnere
una fiamma/incendio con acqua, bense
bisogna spegnere l’apparecchio e
coprire la fiamma per esempio con un
coperchio o con una coperta ignifuga
•ATTENZIONE: Rischio di incendio:
non lasciare oggetti sulle superfici di
cottura.
•ATTENZIONE: Se la superficie
vetroceramica e’ incrinata, spegnere
l’apparecchio per evitare la possibilit?
di scossa elettrica.
•Non utilizzare mai pulitori a vapore
o ad alta pressione per la pulizia
dell’apparecchio.
•L’apparecchio non e’ destinato a
essere messo in funzione per mezzo
di un temporizzatore esterno oppure
di un sistema di comando a distanza
separato.
•Non posare oggetti metallici (coltelli,
cucchiai, coperchi, ecc.) sul piano
perche’ possono diventare caldi.
•Dopo l’uso, spegnere il piano cottura
per mezzo del suo dispositivo di
comando e non fare affidamento sul
rivelatore di pentole.
Page 12
Installazione
Descrizione dell'apparecchio
IT
Manopole del piano di cottura
1
56
23 4
Il pannello di controllo descritto nel presente manuale è solo
un esempio rappresentativo: potrebbe non corrispondere
esattamente al pannello del proprio dispositivo.
Quando viene usato il pannello del pannello di controllo:
Non indossare guanti
Usare dita pulite
Toccare il vetro con delicatezza
1 Il pulsante INCREASE POWER/ TIME controlla la
potenza e il tempo
2 Il pulsante REDUCE POWER/ TIME controlla la
potenza e il tempo.
3 Il pulsante COOKING ZONE SELECTOR viene usato
per selezionare la zona di cottura desiderata
4 Il pulsante ON/OFF accende e spegne il dispositivo.
5 Il pulsante CONTROL PANEL LOCK evita modiche
accidentali sulle impostazioni del pannello di cottura e
indica che il pannello di controllo è stato bloccato.
6 HEATER DISPLAY -mostra la zona di cottura
selezionata, il livello di potenza, il tempo predenito di
cottura e la funzione booster attivata.
! Per informazioni dettagliate sulle funzioni del pannello
di controllo rimandiamo alla sezione “Avvio e uso”.
! Questo prodotto è conforme ai requisiti dell'
ultima direttiva europea sulla limitazione del consumo
energetico mentre il dispositivo si trova in modalità standby.
Nel caso in cui non vengano eseguite operazioni per un periodo di 2
minuti, dopo che la spia di indicazione calore residuo si
spegne e la ventola si ferma (ove presente), il
dispositivo passa automaticamente in modalità OFF.
Il dispositivo riprende il suo normale funzionamento alla pressione
del pulsante ON/OFF.
! A seconda del numero di riscaldatori / zone di cottura sul
piano cottura, i PULSANTI SELETTORI DELLA ZONA DI
COTTURA possono variare fra
e
Installazione
!
Prima di usare il nuovo dispositivo leggere con attenzione
questo libretto di istruzioni. Contiene informazioni
importanti relativamente al corretto funzionamento,
alla giusta installazione e alla buona manutenzione del
dispositivo.
!
Conservi le presenti istruzioni per una futura consultazione.
In caso di trasferimento dell'apparecchiatura, consegnarle
ai futuri proprietari.
Posizionamento
Tenere il materiale di imballaggio fuori dalla portata dei
!
bambini. Vi potrebbe essere rischio di soffocamento (cft.
Precauzioni e Suggerimenti).
Il dispositivo deve essere installato da un tecnico
!
qualificato conformemente alle istruzioni fornite in
dotazione. Un'installazione sbagliata potrebbe provocare
danni a persone e animali o danneggiare il prodotto.
Dispositivo integrato
Servirsi di un armadietto adeguato per garantire che le
funzioni del dispositivo operino correttamente.
• La supercie di supporto deve essere resistente al
calore, no a una temperatura di circa 100°C.
• Nel caso in cui il dispositivo venga installato sopra a un
forno, il forno stesso deve essere dotato di un sistema
di raffreddamento con ventilazione forzata.
• Evitare di installare il piano cottura sopra a una
lavatrice: Nel caso in cui ciò non sia possibile, installare
un dispositivo di separazione impermeabile fra i due
dispositivi.
Ventilazione
Per consentire una ventilazione adeguata e per evitare il
surriscaldamento delle superci limitrofe, il piano di cottura
va posizionato come segue:
• A una distanza minima di 40 mm dal pannello posteriore
o da altre superci verticali.
• Di modo che venga mantenuta una distanza minima di
20 cm fra la cavità di installazione e il mobiletto sotto.
• I mobiletti della cucina vicini al dispositivo e più alti
della parte più alta del piano cottura devono essere
ad almeno 600 mm dall'estremità del piano cottura.
Installazione
Il dispositivo deve essere installato su una
perfettamente in piano. Eventuali deformità causate
da un'installazione scorretta potrebbero inuire sulle
caratteristiche e sul funzionamento del piano cottura.
Lo spessore della supercie di supporto
preso in considerazione al momento della scelta della
lunghezza delle viti per i ganci di ssaggio:
superficie
dovrebbe essere
12
• 3,5 mm spessore: 9,5 mm viti
Page 13
Installazione
Installazione della rondella di sicurezza
1
3
4
2
DIMENSIONI ARMADIETTO
60
490
Min. 30/Max.50
DISTANZE DI SICUREZZA DAI MOBILI
Min 5mm
Min 5mm
ASSEMMBLAGGIO FINALE
560
Min 20mm
IT
Min 20mm
30mm
30mm
5
13
Page 14
Installare il piano cottura come segue:
1. Usare delle viti a testa piatta per ssare le 4 molle di
allineamento nei fori al centro di ogni lato del piano cottura.
2. Mettere il piano cottura nella cavità, vericare che sia
centrato, quindi premerlo verso il basso lungo tutto il
perimetro, no a che il piano cottura non sarà bloccato
alla supercie di supporto.
! Le viti delle molle di allineamento devono restare
accessibili.
Per uniformarsi agli standard di sicurezza, il dispositivo
!
non deve entrare in contatto con componenti elettriche
dopo che è stato installato.
Tutte le componenti che garantiscono il corretto
!
funzionamento del dispositivo devono poter essere
rimosse senza ricorrere ad attrezzi
Collegamento elettrico
Il collegamento elettrico del piano cottura e dell'eventuale
!
forno integrato va eseguito separatamente, sia per ragioni
di sicurezza che per semplificare il procedimento di
estrazione del forno.
Collegamento monofase
Il piano cottura è dotato di un cavi di alimentazione precollegato, progettato per un collegamento mono-fase.
Tensione e
frequenza corrente
220-240V 1+N ~
50/60 Hz
Collegare i cavi in conformità con le istruzioni fornite nella
seguente tabella e nei seguenti schemi:
Altri tipi di connessione
Se la tensione della corrente corrisponde a uno dei seguenti
parametri:
Tensione e frequenza di corrente
• 400V - 2+N ~ 50/60 Hz
• 220-240V 3 ~ 50/60 Hz
Separare i cavi in conformità con le istruzioni fornite nella
seguente tabella e nei seguenti schemi:
Tensione e
frequenza corrente
400V - 2+N ~
50/60 Hz
220-240V 3 ~
50/60 Hz
Collegamento della fornitura elettrica ai cavi della
corrente
Se il dispositivo viene collegato direttamente alla presa
elettrica, sarà necessario installare un interruttore omnipolare
con un'apertura minima di 3 mm fra i contatti.
L'installatore deve garantire che sia stato realizzato il
!
collegamento elettrico e che lo stesso sia pienamente
conforme alle normative di sicurezza.
Prima di collegare il dispositivo alla sorgente di alimentazione,
vericare che:
• Il dispositivo sia dotato di messa a terra e che la presa sia
conforme alla legge.
Cavo elettrico Collegamento cavi
: giallo/verde
N
: i due cavi blu insieme
L
: marrone e nero insieme
Cavo elettrico Collegamento cavi
: :
giallo/verde
N:
i due cavi blu insieme
L1: nero
L2: marrone
Avvio e uso
Prima di collegare il dispositivo alla sorgente di alimentazione,
vericare che:
• Il dispositivo sia dotato di messa a terra e che la presa sia
conforme alla legge.
• La presa supporti la potenza massima del dispositivo,
indicata sulla targhetta ssata al dispositivo.
• La tensione rientri nei valori indicati sulla targhetta dei dati.
• La presa sia compatibile con la spina del dispositivo. Nel
caso in cui fossero incompatibili, rivolgersi a un tecnico
autorizzato per la sostituzione. Non usare prese multiple
o prolunghe.
!
Dopo aver installato il dispositivo, il cavo di alimentazione
e la presa elettrica devono restare prontamente accessibili.
!
Il cavo non deve essere piegato o schiacciato.
Il cavo va vericato a intervalli regolari e sostituito
!
unicamente da tecnici autorizzati.
Il costruttore declina ogni responsabilità qualora
!
non siano rispettate le norme di sicurezza
! Non rimuovere o sostituire il cavo di alimentazione
per nessun motivo. La rimozione o la sostituzione
dello stesso invaliderà la garanzia e la marcatura CE.
INDESIT non si assume alcuna responsabilità per
incidenti o danni derivanti dalla sostituzione/rimozione
del cavo di alimentazione originale. La sostituzione può
essere accettata unicamente se eseguita da personale
autorizzato da INDESIT e usando pezzi di ricambio
originali.
! La colla applicata sulle guarnizioni lascia delle tracce di
grasso sul vetro. Prima di usare il dispositivo consigliamo
di rimuoverle con un apposito prodotto detergente non
abrasivo. Durante le prime ore di utilizzo vi potrebbe
essere odore di gomma. Ciò durerà solo alcuni minuti.
Dopo alcuni secondi che il piano cottura sarà stato collegato
!
alla corrente, verrà emesso un rumore tipo segnale acustico.
Ora è possibile accendere il piano cottura.
Tipi di rumore durante il normale funzionamento del
piano cottura:
• Segnale acustico: a causa delle vibrazioni delle parti
metalliche che costituiscono l'elemento di induzione e
la pentola; questo tumore viene generato dal campo
elettromagnetico necessario per produrre il calore e
aumenta mano a mano che la potenza dell'elemento
di induzione aumenta.
• Fischio delicato: si sente quando la pentola collocata
sulla zona di cottura è vuota; il rumore scompare non
appena nella pentola viene messa acqua o vengono
messi degli alimenti.
• Crepitio: prodotto dalla vibrazione dei materiali sulla
parte inferiore della pentola a causa del usso di
correnti parassitiche causato dai campi elettromagnetici
IT
14
Page 15
(induzione); può essere più o meno intenso a seconda
del materiale di cui è composta la parte inferiore
della pentola, e diminuisce con l'aumentare delle
dimensioni della pentola.
• Fischio forte: si sente quando due elementi di
induzione dello stesso gruppo funzionano insieme
a potenza massima e/o quando la funzione booster
è impostata sull'elemento più grande mentre l'altro
viene regolato automaticamente. Il rumore è ridotto
diminuendo il livello di potenza dell'elemento di
induzione autoregolato; gli strati inferiori delle pentole
fatti con vari tipi di materiali sono fra i principali
responsabili di questo rumore.
• Rumore della ventola: una ventola è necessaria
per garantire il corretto funzionamento del forno oltre
che per proteggere l'unità elettronica da un eventuale
surriscaldamento. La ventola funziona a potenza
massima quando il grande elemento di induzione è a
potenza massima o quando la funzione booster è attiva;
in tutti gli altri casi, funziona a potenza media, a seconda
della temperatura selezionata. La ventola potrebbe inoltre
continuare a funzionare anche dopo lo spegnimento del
piano cottura, se la temperatura rilevata è alta.
I tipi di rumore che ci sentono sono dovuti alla tecnologia
dell'induzione e non sono per forza di cose anomalie di
funzionamento del dispositivo.
!
Nel caso in cui il pulsante (-) o (+) venga premuto a
lungo, il display scorre rapidamente su tutti i livelli di
potenza e i minuti del timer.
re le eventuali cappe come si fa normalmente. Questa
operazione non inuirà sul funzionamento del controllo
touch.
Accendere il piano cottura
Quando al piano cottura viene inizialmente data po-
tenza, il controllo touch esegue un processo di calibrazione per i pulsanti touch che richiede un basso
livello di luce ambientale nell'area dei tasti touch. Nel
caso in cui venga rilevato un livello eccessivo di illuminazione ambientale, l'interfaccia Utente visualizza
l'errore „FL” e il processo di calibrazione viene sospeso. L'errore scomparirà non appena vengono trovate
condizioni di illuminazione ambientale soddisfacenti e
non appena la procedura di calibrazione verrà eseguita in modo soddisfacente.
Dopo aver collegato il piano di cottura alla presa di
corrente, il pannello touch potrebbe venire automaticamente bloccato. Per sbloccare il pannello premere
e tenere premuto il pulsante di Blocco del Pannello di
Controllo
Per accendere il piano cottura, premere e tenere premuto il
pulsante
Il piano cottura si accende, e quando viene emesso
un bip, tutte le zone di cottura visualizzano un puntino
con una cifra.
.
per circa 1 secondo.
IT
Condizioni di luce iniziali
Quando al piano cottura viene inizialmente data poten-
za, il controllo touch esegue un processo di calibrazione per i pulsanti touch che richiede un basso livello di
luce ambientale nell'area dei tasti touch.
Nel caso in cui durante il processo di calibrazione venga rilevata una luce ambientale troppo elevata, sull'interfaccia utente compare „FL” (Errore luce ambiente
infrarossi) e il processo di controllo della calibrazione
viene sospeso. Per modicare il processo, consigliamo
di spegnere le eventuali luci che potrebbero interferire
col processo di calibrazione (ad esempio illuminazione
alogena della cappa della cucina). L'errore scomparirà
non appena vengono trovate condizioni di illuminazione
ambientale soddisfacenti e non appena la procedura di
calibrazione verrà eseguita in modo soddisfacente.
-L'errore "FL" può essere generato solo dopo 3s dall'accensione iniziale del piano cottura.
-Consigliamo di spegnere tutte le fonti di illuminazione
della cappa della cucina nonché tutte le luci puntate
sul piano di cottura prima della prima accensione dello
stesso.
-Dopo che il controllo touch ha eseguito il processo di
calibrazione iniziale (circa 3s) sarà possibile riaccende-
Quando il piano cottura è SPENTO, dopo 5 sec, il
controllo, non appena
tocchiamo un tasto, fa ACCENDERE IL LED KEYLOCK
e sarà possibile continuare a usare il dispositivo
come al solito, sbloccando la tastiera per ridurre il
consumo energetico.
Lo spegnimento del piano cottura viene segnalato da un
bip della durata di 3 secondi.
Power Management in piano cottura ECO
Power Management in piano cottura ECO Power Management in piano cottura ECO
Nei piani di cottura tipo ECO, ogni volta che l'utente vuole
aumentare la potenza, il livello di potenza totale del piano
cottura e calcolato. Se questo livello di potenza totale e
maggiore della limite di potenza del piano, l'aumento di
potenza non e permesso.Un segnale acustico di errore
va emesso, e il display mostra 'R' per 3 secondi.
Accensione delle zone di cottura
Ogni zona di cottura viene controllata servendosi di
un pulsante selettore e con un dispositivo di
regolazione della potenza che consiste in un pulsante
(-) e in un pulsante (+).
15
Page 16

IT
• Per avviare il funzionamento di una zona di cottura,
premere il pulsante di comando corrispondente e
impostare il livello di potenza desiderato (fra 0 e 9)
servendosi dei pulsanti (-) o (+)
Premere e tenere premuto il pulsante (-) per impostare
immediatamente il livello di potenza a “9”
Premere e tenere premuti i pulsanti (+) e (-) contemporaneamente per tornare al livello di potenza “0”
Se il livello di potenza è impostato su “0”, premere e tenere premuto il pulsante (+) per aumentare rapidamente
il livello di potenza
La scelta di una zona di cottura viene segnalata da un bip
poi il livello di potenza viene visualizzato sul
display
Se la selezione del riscaldatore non avviene entro 10
secondi, il piano di cottura si spegnerà automaticamente.
Funzione di ebollizione rapida “Booster”
La funzione booster per alcune delle zone cottura può essere
usata per ridurre i tempi di riscaldamento.
Può essere attivata premendo il pulsante (+) oltre al livello 9.
Questa funzione porta la potenza a 1600 W o 2000 W, a
seconda delle dimensioni della zona di cottura rilevante.
L'attivazione del booster viene segnalata da un bip, e la
lettera ‘P’ compare sul display.
Il booster funziona per 10 minuti massimo. Dopo questi
10 minuti viene emesso un bip e la zona cottura torna
al livello "9"
Col riscaldatore sul livello Booster, se viene toccato il
pulsante [+], si sente un suono simile a un bip di errore
e il livello di potenza non cambia. Col riscaldatore sul
livello Booster, se viene toccato il pulsante [-], si sente
un suono simile a un bip e il livello di potenza viene
portato a 9.
3.Dopo aver selezionato il livello di potenza necessario,
toccando ancora la zona di riscaldamento o il selettore
corrispondente, viene emesso un bip e compare la
lettera "t" con un puntino sul display del riscaldatore. Il
tempo restante verrà visualizzato nella parte opposta del
riscaldatore con timer. Se la zona di riscaldamento con
timer si trova ad esempio nella parte inferiore, il conteggio
compare nei display superiori .
4. Denire la durata di cottura usando i pulsanti (-) e (+)
I pulsanti (-) e (+) toccati simultaneamente |
portano al valore 0.
Se il tempo non viene selezionato entro 10 secondi,
oppure se il tempo selezionato è 0 dopo 10 secondi,
l'ultima volta che vengono toccati i tasti (-)o (+) , il timer
viene spento.
Avvio del conto alla rovescia del timer.
Il conto alla rovescia inizia quando la visualizzazione
del timer si è conclusa toccando qualche tasto zona
cottura, oppure
automaticamente 10 secondi dopo l'ultima volta che
sono stati toccati i tasti [+] o [-]. Viene emesso un
bip, e sul display compare il livello di potenza
e un puntino, a indicare che il riscaldatore è sottoposto a timer.
! Per modicare il tempo di un riscaldatore con timer,
ripetere il summenzionato processo.
!Premendo e tenendo premuti i tasti + e - viene aumentata la velocità di selezione del tempo
Fine del conto alla rovescia del timer.
Quando il tempo restante è scaduto, il riscaldatore con
timer viene spento, il display del riscaldatore visualizza
‘0’ lampeggiante e l'allarme del timer emette dei bip per
un minuto
L'allarme verrà annullato premendo un qualsiasi tasto
del controllo touch.
Spegnimento delle zone di cottura
Per spegnere una zona di cottura, selezionarla usando il
pulsante selettore corrispondente
• Premere il pulsante (-) : la potenza della zona di cottura
verrà progressivamente ridotta no a spegnersi.
Dopo aver selezionato la zona di cottura, il riscaldatore
può anche essere spento toccando simultaneamente i
tasti [-] e [+]. Viene emesso un
bip e sul display corrispondente compare la dicitura “0”.
e:
Uso del timer
! Tutte le zone cottura possono essere programmati
simultanemente, per una durata compresa fra 1 e 99 min.
1. Selezionare la zona cottura servendosi del pulsante
selettore corrispondente.
2. Regolare il livello di potenza della zona di cottura.
16
Blocco del pannello di controllo
Quando il piano cottura viene acceso, sarà possibile bloccare
i comandi del forno per evitare modiche accidentali alle
impostazioni (bambini, in fase di pulizia, ecc.).
Premere il pulsante
controllo: -l'icona si illumina e viene emesso un bip.
Per usare uno dei controlli (ad esempio per interrompere
la cottura), sarà necessario disattivare questa funzione.
Premere il pulsante
spegnerà e verrà rimossa la funzione di blocco.
Tutti i tasti sulla selezione della zona di cottura saranno
bloccati
se il piano cottura è spento,
se il blocco del pannello di controllo è attivato o
se si verica un errore sul piano cottura
per bloccare il pannello di
per alcuni secondi; l'icona si
Page 17
IT
Spegnere il piano cottura
Premere il pulsante per spegnere il dispositivo, non
fare afdamento unicamente sul sensore pentole.
Se il blocco del pannello di controllo è stato attivato,
i controlli continueranno a essere bloccati anche alla
riaccensione del piano cottura. Per riaccendere il piano
cottura, sarà come prima cosa necessario rimuovere la
funzione di blocco.
Consiglio pratico per l'uso del dispositivo
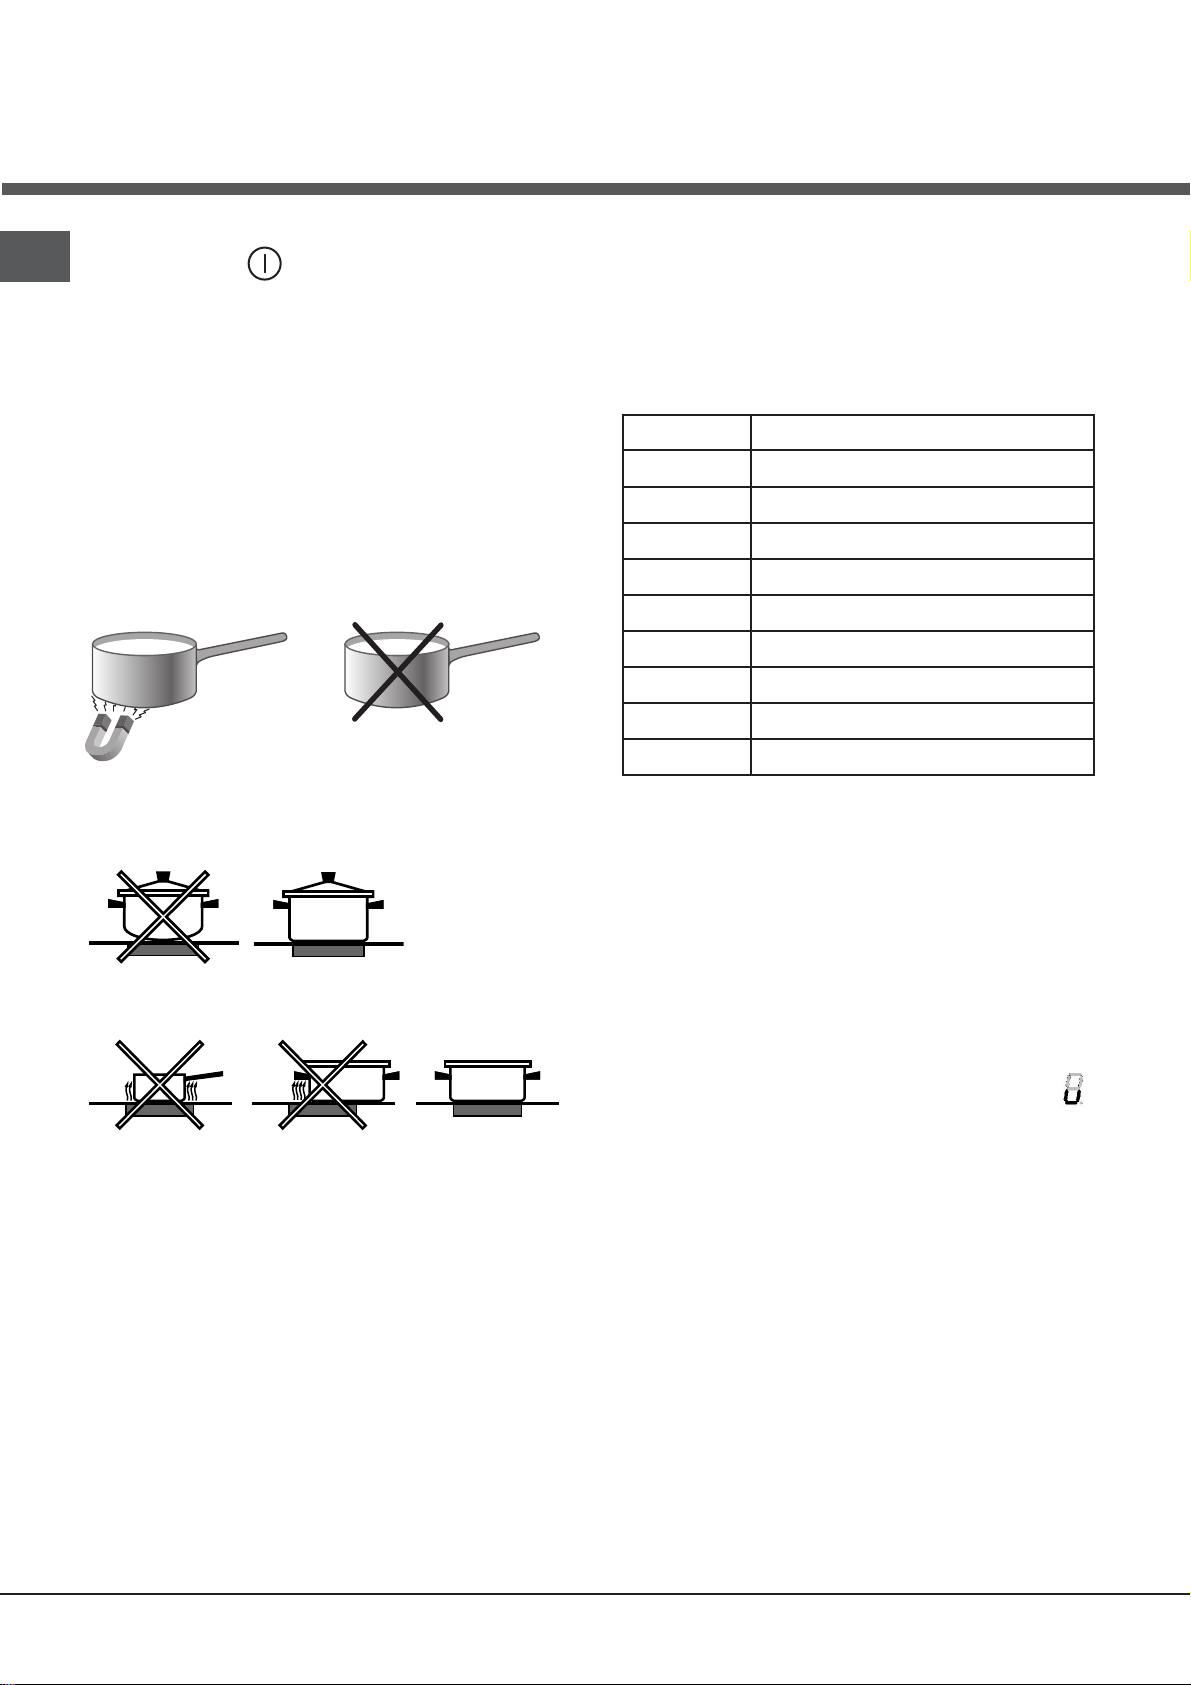
! Usare pentolame realizzato con materiali compatibili
col principio dell'induzione (materiali ferromagnetici).
Consigliamo nello specifico pentole fatte di: ghisa,
acciaio rivestito o acciaio inossidabile speciale adatto
all'induzione. Servirsi di un magnete per testare la
compatibilità della pentola.
ADATTO
*
Acciaio inossidabile speciale
Ghisa
Acciaio smaltato
Inoltre, per ottenere i risultati migliori dal proprio piano cottura:
• Usare pentole con una base spessa e piatta per utilizzare
al meglio la zona di cottura.
NON ADATTO
Rame, Alluminio,
Vetro, Oggetti in terracotta,
Ceramica, Acciaio inossidabile non magnetico
• Pentole incompatibili
• Una pentola il cui diametro è troppo piccolo
• Se la pentola è stata rimossa dalla piastra
Dopo 10 secondi senza pentole sulla zona di cottura viene
emesso un bip di avvertimento.
Dopo 60 secondi senza pentole sulla zona di cottura
viene, il
Power level
riscaldatore si spegne.
Maximum operating time in hours
1
2
3
4
5
6
7
8
9
10
10
10
10
10
10
10
10
3
Protezione da surriscaldamento
Se gli elementi elettronici su surriscaldano, il numero che
indica il livello di potenza inizia a lampeggiare, e la lettera "
compare sul display. Quando la temperatura ha raggiunto
un livello adeguato, questo messaggio scompare e sarà
possibile iniziare a usare nuovamente il piano cottura.
• Usare sempre pentole con un diametro sufcientemente
largo per coprire completamente la piastra, per sfruttare
tutto il calore disponibile.
• Accertarsi che la base della pentola sia pulita e secca per
utilizzarla al meglio e per estendere la durata di vita sia
delle zone di cottura che del pentolame.
• Evitare di usare le stesse pentole usate su bruciatori a
gas: la concentrazione del calore sui bruciatori a gas può
rovinare la base della pentola, causandone un'adesione
scorretta.
Dispositivi di sicurezza
Sensore pentola
Ogni zona di cottura è dotata di un dispositivo che rileva la
presenza della pentola. La piastra riscaldante emette calore
solo quando viene posizionata una pentola delle dimensioni
giuste.
Il simbolo “u” sul display compare se
dopo aver selezionato la zona di cottura la pentola non
viene posizionata o in caso di:
Interruttore di sicurezza
Il dispositivo ha un interruttore di sicurezza che disattiva
automaticamente le zone di cottura dopo che sono state in
funzione per un po' di tempo a una determinata potenza.
Quando l'interruttore di sicurezza viene avviato, sul
display compare “0”.
Per esempio: la piastra posteriore destra è impostata
su 5 e si spegnerà dopo 5 ore di funzionamento continuo,
mentre la piastra anteriore sinistra è impostata su 2 e si
spegnerà dopo 8 ore.
Quando uno o più tasti vengono attivati per più di 10
secondi, il controllo touch si spegne
Viene emesso un bip ogni
sec., mentre il tasto / i tasti viene / vengono attivato /
attivati.
Con tutti i riscaldatori a zero per 10 secondi il piano
cottura viene spento.
Se lo spegnimento è causato da un'attivazione ca-
suale dei tasti, il controllo touch si attiva come sopra
descritto.
Segnale Acustico
Ciò indica varie irregolarità
• Un oggetto (pentola, posata, ecc.) è stato posizionato sul
pannello di controllo per più di 10 secondi.
• È stato rovesciato qualcosa sul pannello di controllo.
17
Page 18
IT
• Un pulsante è stato premuto troppo a lungo. Tutte queste
situazioni possono causare l'emissione di un segnale
acustico. Rimuovere la causa del malfunzionamento per
interrompere il segnale acustico. Nel caso in cui il problema
non venga rimosso, il segnale acustico continuerà a
suonare e il piano cottura verrà spento.
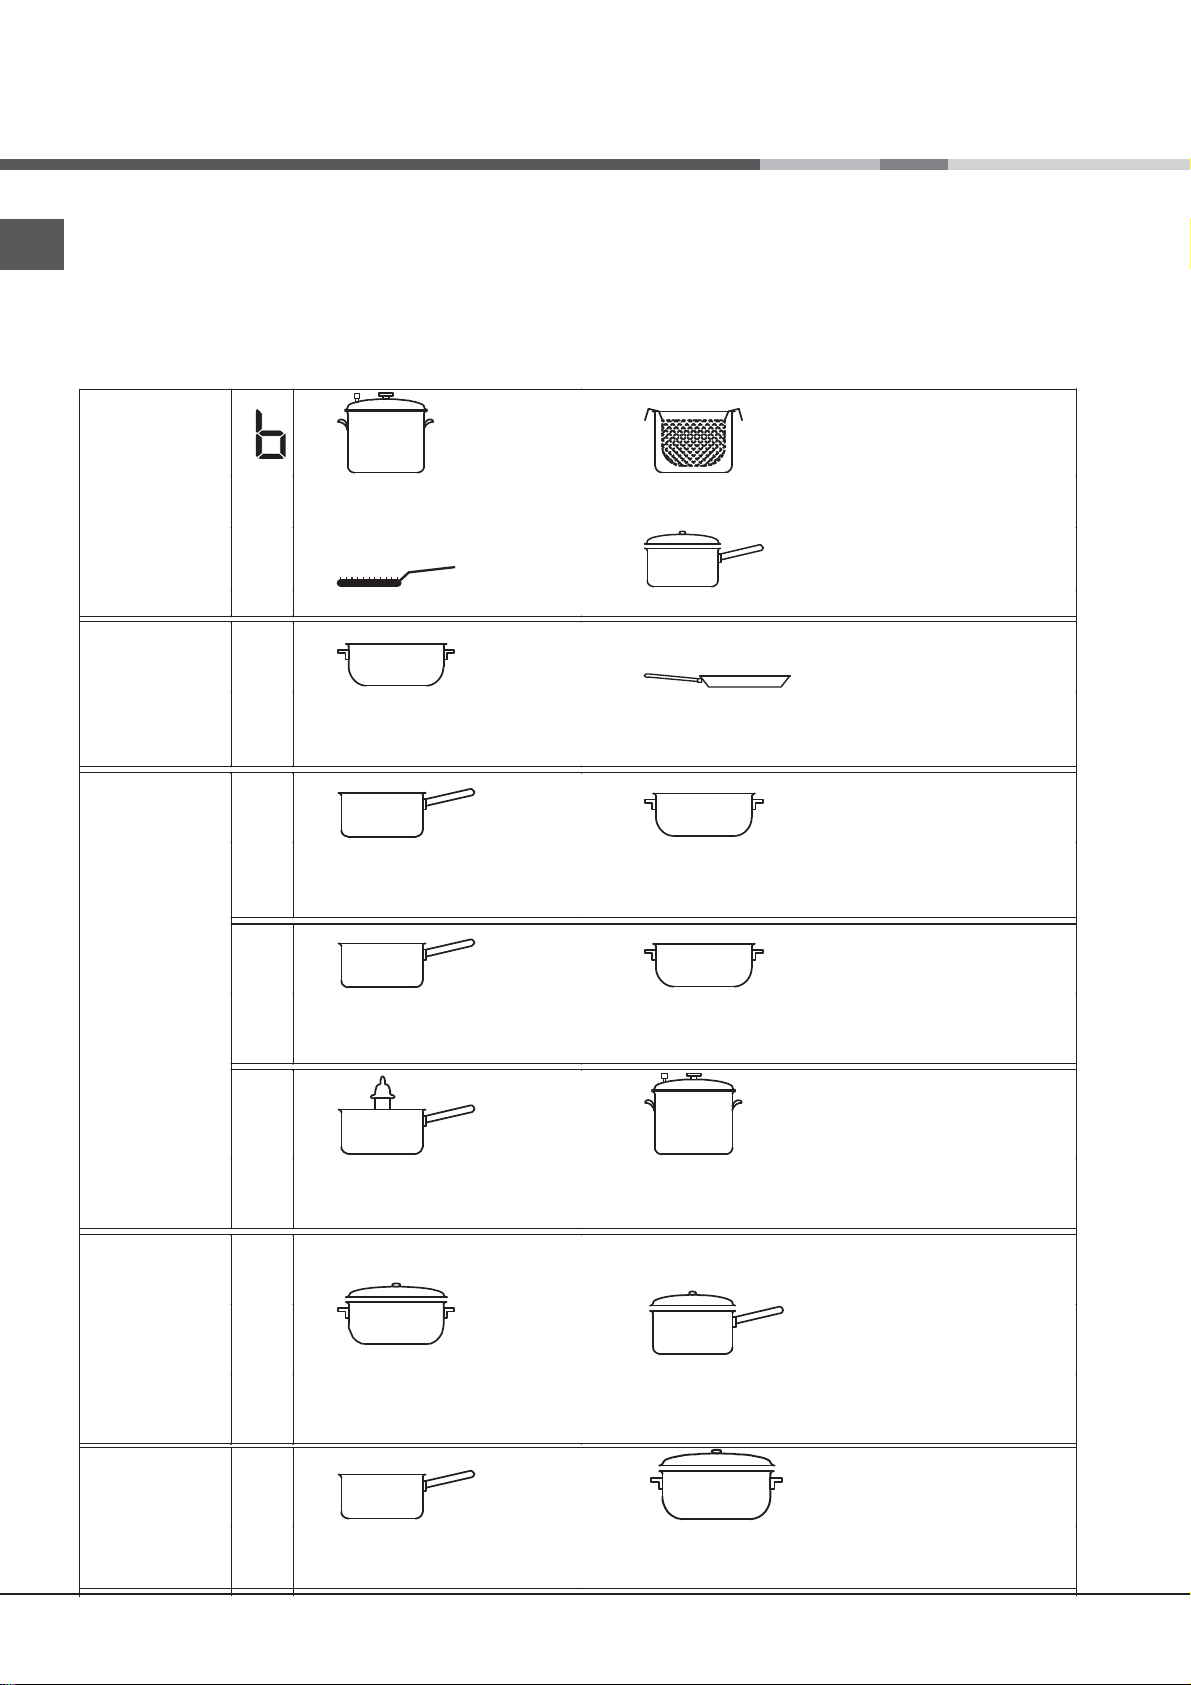
Consigli pratici per la cottura
Errori e Allarmi
Quando viene rilevato un errore, tutto il dispositivo o i
riscaldatori vengono spenti, viene emesso un bip (solo
se uno o
più riscaldatori sono attivi) e tutti i display visualizzano
la dicitura "F" e il codice di errore (un numero di indice o
una lettera) in alternanza.
Nel caso in cui il problema non sparisca da solo, contattare
l'Assistenza Tecnica.
ª
vivissimo
Cottura a fuoco
•
•
Cottura a
fuoco vivo
¶
¶
§
§
S
Cottura a Pressione
Pentola a Pressione
Grigliata Ebollizione
Crêpe Cottura a fuoco vivo e doratura
Addensamento rapido (Sughi liquidi)
Acqua bollente (Pasta, Riso, Verdure)
Latte
Addensamento lento (Sughi consistenti)
Frittura
(Arrosti, Bistecche, Scaloppine, Filetti di
pesce, Uova al tegamino)
18
Cottura a fuoco medioCottura a fuoco
S
¢
¢
lento
£
™
™
fuoco
Cottura a
lentissimo
¡
Cottura a bagnomaria
Cottura a fuoco lento
(Stufati)
Salsa al cioccolato Mantenimento al caldo
Cottura Pentola a pressione dopo il sibilo
Riscaldamento delle pietanze
Page 19
Precauzioni e consigli
!
L’apparecchio è stato progettato e costruito
in conformità alle norme internazionali di sicurezza. Queste
avvertenze sono fornite per ragioni di sicurezza e devono
essere lette attentamente.
Questa apparecchiatura è conforme alle seguenti
Direttive Comunitarie:
- 2006/95/CEE del 12/12/06 (Bassa Tensione) e successive
modificazioni
- 2004/108/CEE del 15/12/04 (Compatibilità
Elettromagnetica) e successive modificazioni
- 93/68/CEE del 22/07/93 e successive modificazioni.
- 1275/2008 stand-by/off mode.
Sicurezza generale
! Controllare che la presa d’aria tramite la griglia del
ventilatore non sia mai ostruita. Il piano da incasso,
infatti, necessita di una corretta aerazione per il
raffreddamento dei componenti elettronici.
! È sconsigliata l’installazione di un piano cottura a
induzione sopra un frigorifero sottotavolo (calore) o sopra
una lavatrice (vibrazioni). Lo spazio necessario per la
ventilazione degli elementi elettronici sarebbe infatti
insufficiente.
• L’apparecchio è stato concepito per un uso di tipo non
professionale all’interno dell’abitazione.
• L’apparecchio non va installato all’aperto, nemmeno se
lo spazio è riparato, perché è molto pericoloso lasciarlo
esposto a pioggia e temporali.
• Non toccare la macchina a piedi nudi o con le mani
o i piedi bagnati o umidi.
• L’apparecchio deve essere usato per cuocere alimenti,
solo da persone adulte e secondo le istruzioni riportate
in questo libretto. Non utilizzare
il piano come superficie di appoggio, né come tagliere.
• Il piano in vetroceramica è resistente agli urti meccanici,
tuttavia può incrinarsi (o eventualmente frantumarsi) se
colpito con un oggetto appuntito, quale un utensile. In
questi casi, scollegare immediatamente l’apparecchio
dalla rete di alimentazione e rivolgersi all’Assistenza.
• Evitare che il cavo di alimentazione di altri
elettrodomestici entri in contatto con parti calde
del piano cottura.
• Non dimenticare che la temperatura delle zone di
cottura rimane piuttosto elevata per almeno trenta minuti
dopo lo spegnimento. Il calore residuo è segnalato
anche da un indicatore (vedi Avvio e utilizzo).
• Tenere a debita distanza dal piano cottura qualsiasi
oggetto che potrebbe fondere, ad esempio oggetti
in plastica, in alluminio o prodotti con un elevato
contenuto di zucchero. Fare particolare attenzione a
imballaggi e pellicole in plastica o alluminio:
se dimenticati sulle superfici ancora calde o tiepide
possono causare un grave danno al piano.
• Assicurarsi che i manici delle pentole siano sempre
rivolti verso l’interno del piano cottura per evitare
che vengano urtati accidentalmente.
• Non staccare la spina dalla presa della corrente
tirando il cavo, bensì afferrando la spina.
• Non fare pulizia o manutenzione senza aver prima
staccato la spina dalla rete elettrica.
• Non è previsto che l’apparecchio venga utilizzato
da persone (bambini compresi) con ridotte
capacità fisiche, sensoriali o mentali, da persone
inesperte o che non abbiano familiarità con il
prodotto, a meno che non vengano sorvegliate da
una persona responsabile della loro sicurezza o
non abbiano ricevuto istruzioni preliminari sull’uso
dell’apparecchio.
• Avvertenza per i portatori di pacemaker o altri
dispositivi medici impiantabili attivi:
Il piano cottura è conforme a tutte le normative
vigenti in materia di interferenze elettromagnetiche.
Questo prodotto è pertanto perfettamente
rispondente a tutti i requisiti di legge (direttive
89/336/CEE). È stato progettato in modo da non
creare inferenze ad altre apparecchiature elettriche
utilizzate, a condizione che anche queste siano
conformi alle suddette normative.
Il piano cottura a induzione genera campi
elettromagnetici a breve portata.
Per evitare ogni rischio di interferenze tra il piano di
cottura e il pacemaker, quest’ultimo dovrà essere
realizzato in conformità alle normative vigenti.
A tale riguardo, possiamo garantire unicamente la
conformità del nostro prodotto. Per informazioni sulla
conformità o eventuali problemi di incompatibilità, si
prega di rivolgersi al proprio medico curante o alla
casa produttrice del pacemaker.
• Evitare che i bambini giochino con l’apparecchio.
• Non posare oggetti metallici (coltelli, cucchiai,
coperchi, ecc.) sul piano perchè possono diventare
caldi.
• L’apparecchio non è destinato a essere messo in
funzione per mezzo di un temporizzatore esterno
oppure di un sistema di comando a distanza
separato.
Smaltimento
• Smaltimento del materiale di imballaggio: attenersi
alle norme locali, così gli imballaggi potranno essere
riutilizzati.
• La direttiva Europea 2002/96/CE sui rifiuti di
apparecchiature elettriche ed elettroniche (RAEE),
prevede che gli elettrodomestici non debbano essere
smaltiti nel normale flusso dei rifiuti solidi urbani.
Gli apparecchi dismessi devono essere raccolti
separatamente per ottimizzare il tasso di recupero e
riciclaggio dei materiali che li compongono ed impedire
potenziali danni per la salute e l’ambiente. Il simbolo del
cestino barrato è riportato su tutti i prodotti per ricordare
gli obblighi di raccolta separata.
Per ulteriori informazioni, sulla corretta dismissione
degli elettrodomestici, i detentori potranno rivolgersi al
servizio pubblico preposto o ai rivenditori.
IT
19
Page 20

Manutenzione e cura
03/2013 -
195109058.00
XEROX FABRIANO
Escludere la corrente elettrica
IT
Prima di ogni operazione isolare l’apparecchio dalla rete di
alimentazione elettrica.
Pulire l’apparecchio
Evitare l’uso di detergenti abrasivi o corrosivi, quali
!
i prodotti in bombolette spray per barbecue e forni, smacchiatori e
prodotti antiruggine, i detersivi in polvere e le spugne con superficie
abrasiva: possono graffiare irrimediabilmente la superficie.
!
Non utilizzare mai pulitori a vapore o ad alta pressione per la
pulizia dell’apparecchio.
• Per una manutenzione ordinaria, è sufficiente lavare il piano con
una spugna umida, asciugando quindi con una carta assorbente
per cucina.
• Se il piano è particolarmente sporco, strofinare con un prodotto
specifico per la pulizia delle superfici
in vetroceramica, sciacquare e asciugare.
• Per rimuovere gli accumuli di sporco più consistenti servirsi
di un apposito raschietto. Intervenire non appena possibile,
senza attendere che l’apparecchio si sia raffreddato, per evitare
l’incrostazione dei residui. Eccellenti risultati si possono ottenere
usando una spugnetta in filo d’acciaio inossidabile - specifica
per piani in vetroceramica - imbevuta di acqua e sapone.
• In caso sul piano cottura si fossero accidentalmente fusi oggetti
o materiali quali plastica o zucchero, rimuoverli con il raschietto
immediatamente, finché la superficie è ancora calda.
• Una volta pulito, il piano può essere trattato
con un prodotto specifico per la manutenzione e la protezione:
la pellicola invisibile lasciata da questo prodotto protegge
la superficie in caso di scolamenti durante la cottura. Si
raccomanda
di eseguire queste operazioni con l’apparecchio tiepido o
freddo.
• Ricordarsi sempre di risciacquare con acqua pulita e
asciugare accuratamente il piano: i residui di prodotti
potrebbero infatti incrostarsi durante la successiva cottura.
Telaio in acciaio inox (solo nei modelli con cornice)
L’acciaio inossidabile può macchiarsi per effetto
di un’acqua molto calcarea lasciata per un periodo
di tempo prolungato a contatto dello stesso oppure a causa di
prodotti per la pulizia contenenti fosforo.
Si consiglia di sciacquare abbondantemente e asciugare con
cura dopo la pulizia del piano. In caso di versamenti d’acqua,
intervenire rapidamente asciugando con cura.
Alcuni piani cottura hanno una cornice in alluminio somigliante
!
all’acciaio inox. Non utilizzare prodotti per la pulizia e lo
sgrassaggio non idonei per l’alluminio.
Smontare il piano
Nel caso si renda necessario smontare il piano cottura:
1. togliere le viti che fissano le molle di centraggio
sui lati;
2. allentare le viti dei ganci di fissaggio sugli angoli;
3. estrarre il piano cottura dal vano del mobile.
Raccomandiamo di evitare di accedere ai meccanismi interni per
!
tentare una riparazione. In caso di guasto, contattare l’Assistenza.
Descrizione tecnica dei modelli
Il sistema a induzione è il procedimento di cottura più rapido che esista. A differenza delle piastre tradizionali,
non è la zona di cottura che si riscalda: il calore viene generato direttamente all’interno della pentola, la quale
dovrà possedere necessariamente un fondo in materiale ferromagnetico.
Piani cottura
Zone di cottura
Posteriore sx
Posteriore dx
Anteriore sx
Anteriore dx
Potenza totale
Legenda:
I = zona di cottura a induzione
semplice
B = booster: la zona di cottura
puo essere sovralimentata
20
KIB 644 C E ITKIB 644 C E IT
Potenza (in W)
I 1200 - B1600
I 1500 - B 2000
I 1500 - B 2000
I 1200 - B1600
7200
 Loading...