

Hotpoint K964GP Use And Care Manual
o
0
0
How
to
get
t
Your
~e
best from
Mmwave
Aluminum Foil
25,30
Model
and Serial
Numbers
Appliance Registration
2
Oven
,8 ~
Useand
Care of
Care and
Cleaning
30-33
Baking, Baking Cuide
,91,;
Bdt-hModel
Clock
10,11
Broili:g,
Broifing C,uide
25,26
Consumer Services 39
Door
Retttoval 32
K964GP
Control Panel
g,<)
Light; Bulb Replacement
31
Energy-Saving Tips
Roasting, Roasting {;uide 23, 24
Features
7-:
Self-(
:leaning
Instructions 27-29
Microwave Oven
12-17
Shelves
18,27,33
Defrosting
13
Thermostat Adjustment
32
Double Duty
‘“
Shelf 16, 17
Timer
11
Hold Timer
12
Vent Duct
31
~
Light; Bulb Replacement
30
Microwave power output
Precautions
2-5
Power Level
14
Problem Solver
34-36
of this oven is 700
watk.*
Reheating
17
Safety Instructions
Temperature Cook
15
Warranty
‘ackc::;:
k
Temperature Probe
15
Time Cook
14
Timer
12
GE Answer Center
a
Microwdvhtg
Tips
6
800.626.2000
Help us help you...
Before using your cooking
center, read this book
carefully.
It is
intended to help you operate
and maintain
your new cooking
center properly.
Keep it handy for answers to your
questions.
If you don’t understand something
or need more help, write (include
your phone number):
Consumer Affairs
Hotpoint
Appliance Park
Louisville, KY 40225
Write down the complete
model and serial numbers.
You’ll find them on a
label
inside
the upper oven on the left.
These numbers are also on the
Consumer Product Ownership
Registration Card that came with
your cooking center. Before
sending in this card, please write
these numbers here:
Model Number
Serial Number
Use these numbers in any
correspondence or service calls
concerning your cooking center.
All these things are normal
with your microwave oven.
● Steam or vapor escaping from
around the door.
● Light reflection around door or
outer case.
● Dimming oven light and change
in blower sound may occur
while
operating at power levels other
than high.
●
Dull thumping sound while
oven
is operating.
● Some TV-Radio interference
might
be noticed while using your
microwave oven. It’s similar to the
interference caused by other small
appliances and does not indicate a
problem with your oven.
2
Be sure your cooking
center is registered.
It is important that we, the
manufacturer, know the location
of your cooking center should a
need occur for adjustments.
Your supplier is responsible for
registering you as the owner.
Please check with your supplier to
be sure he has done so;
also
send
in your Consumer Product
Ownership Registration Card. If
you move, or if you are not the
original purchaser please write to
us, stating model and serial
numbers.
This appliance must be
registered. Please be certain that
it is.
Write to:
Hotpoint
Range Product Service
Appliance Park
Louisville, KY 40225
If you received a damaged
cooking center...
Immediately contact the dealer (or
builder) that sold you the cooking
center.
Save time and money.
Before you request service...
check the Problem Solver in the
back of this book. It lists causes of
minor operating problems that you
can correct yourself.
If you need service...
To obtain service, see the
Consumer Services page in the
back of this book.
We’re proud of our service and
want you to be pleased. If for some
reason you are not happy with the
service you receive, here are three
steps to follow for further help.
FIRST, contact the people who
serviced your appliance. Explain
why you are not pleased. In most
cases, this
will solve
the problem.
NEXT, if you are still not pleased,
write all the details—including
your phone number—to:
Manager, Consumer Relations
Hotpoint
Appliance Park
Louisville, KY 40225
FINALLY, if your problem is still
not resolved, write:
Major Appliance
Consumer Action
Panel
20 North
Wacker
Drive
Chicago, IL 60606
PRECAUTIONS
TO
AVO~
POSSBLE
EXPOSURE TO
EXCESSNE
MICROWAVE
ENERGY
(a) Do Not Attempt
to operate this
oven with the door open since
open-door operation can result in
harmful exposure to microwave
energy. It is important not to defeat
or tamper with the safety interlocks.
(b) Do Not Place
any object
between the oven front face and
the door or allow
soiI
or cleaner
residue to accumulate on sealing
surfaces.
(c)
Do Not Operate
the oven if it
is damaged. It is particularly
important that the oven door close
properly and that there is no
damage to the:
(1) door (bent)
(2) hinges and latches (broken or
loosened)
(3) door seals and sealing surfaces.
(d) The Oven Should Not
be
adjusted or repaired by anyone
except properly qualified service
personnel.

IMPORTANT SAFETY INSTRUCTIONS
Read all instructions before using this appliance.
IMPORTANT
SAFETY NOTICE
The California Safe Drinking
Wtiter
and Toxic Enforcement
Act
requires the Governor of
California to publish
a
list of
substances known to the state to
cause cancer, birth defects or
other reproductive harm, and
requires businesses to warn
customers
of
potential exposure
to such substances.
The fiberglass insulation in
self-
clean ovens gives off a very
small amount of carbon
monoxide during the cleaning
cycle.
Exposure can be
minimized by venting with an
open window or using a
ventilation fan or hood.
When using electrical appliances,
basic safety precautions should be
followed, including the following:
WARNING–TO
reduce
the risk of burns, electric shock,
fire,
injury to persons or exposure
to excessive microwave energy:
● Use this appliance only for
its intended use as described
in this manual.
Do not use
corrosive chemicals or vapors in
this appliance. This cooking center
is specifically designed to heat or
cook food, and is not intended for
laboratory or industrial use.
●
Be
sure your appliance is
properly installed and grounded
by
a
qualified technician in
accordance with the provided
Installation Instructions.
●
This appliance must be
connected to a grounded, metallic,
permanent wiring system, or an
equipment grounding conductor
should be run with the circuit
conductors and connected to the
equipment grounding terminal or
lead
on the appliance.
. This appliance should be
serviced
only
by qualified
service personnel.
Contact nearest
authorized service facility for
examination, repair or adjustment.
●
Do not repair or replace any
part of this appliance
unless
specifically recommended in
this book.
●
Before performing any
service, DISCONNECT THE
OVEN POWER SUPPLY AT
THE HOUSEHOLD
DISTRIBUTION PANEL
BY
REMOVING THE FUSE OR
SWITCHING OFF THE
CIRCUIT
BREA~R.
●
Do not cover or block any
openings on the appliance.
●
Do not store this appliance
outdoors.
Do not use this
product near water—for example,
in a wet basement, or near a
swimming pool.
●
Do not operate this
apptiance
if
it is not working properly, or if it
has been damaged or dropped.
●
As with any appliance, close
supervision is necessary when
used by children.
●
Do not leave children
alone
children should not be left alone
or unattended in area where
appliance is in use. They should
never be allowed to sit or stand
on any part of the appliance.
●
Don’t
allow anyone to climb,
stand or hang on the door,
They could damage the oven.
●
CAUTION: ITEMS OF
INTEREST TO CHILDREN
SHOULD NOT BE STORED
IN CABINETS ABOVE AN
OVEN—CHILDREN
CLIMBING ON THE OVEN
TO REACH ITEMS COULD
BE SERIOUSLY INJURED.
●
Wear proper clothing.
Loose
fitting or hanging garments
should never be worn while
usin~
the appliance. Flammable
material could be ignited if
brought in contact with hot
~
heating elements and may cause
severe burns.
●
Use only dry pot
holders—
moist or damp pot holders on hot
surfaces may
result
in burns from
steam. Do not let pot holders touch
hot heating elements. Do not use a
towel or other bulky cloth.
●
For your safety, never use
your appliance for warming or
heating the room.
●
Do not store or use
combustible materials, gasoline
or other flammable vapors and
liquids in the vicinity of this or
any other appliance.
●
Keep hood and grease filters
clean
to maintain good venting
and to avoid grease fires.
●
Do not let cooking grease
or other flammable materials
accumulate in the oven or
near
iti
. Do not use water on grease
fires. Smother flaming pan on
surface unit by covering pan
completely with well-fitting lid,
cookie sheet or flat tray.
Flaming grease outside a pan
can be put out by covering with
baking soda or, if available, a
multi-purpose dry chemical or
foam type fire extinguisher.
(continLted next /ltI(qlJ)

~PORTANT
SAFETY
~STRUCTIONS
(continued)
●
Do not touch heating
elementi
or interior surface of oven.
These surfaces may be hot enough
to burn even though they are dark
in color. During and after use, do
not touch, or let clothing or other
flammable materials contact any
interior area of the oven; allow
sufficient time for cooling, first.
Potentially hot surfaces include
oven vent openings and surfaces
near the openings, crevices
around the oven door and the
edges of the door window.
Remember:
The inside surface
of the oven may be hot when the
door is opened.
●
When cooking pork,
follow
the directions exactly and always
cook the meat to an internal
temperature of at least
170°F.
This assures that, in the remote
possibility that trichina may be
present in the meat, it will be
killed
and
meat will be safe
to eat.
Microwave Oven:
●
Read and follow the specific
“PRECAUTIONS TO AVOID
POSSIBLE EXPOSURE TO
EXCESSIVE MICROWAVE
ENERGY” found on page 2.
●
To reduce the risk of
~lre
in
the oven cavity:
—Do not overcook food.
Carefully attend appliance if
paper, plastic or other combustible
materials are placed inside the
oven to facilitate cooking.
—Remove wire twist-ties
from
paper or plastic bags before
placing bags in oven.
—Do not use your microwave
oven to dry newspapers.
—Do not use recycled paper
products.
Recycled paper towels,
napkins and wax paper can
4
contain metal flecks which may
cause arcing or ignite. Paper
products containing nylon or
nylon filaments should be
avoided, as they may also ignite.
—Do not pop popcorn in your
microwave oven
unless
in a
special microwave popcorn
accessory or unless you use
popcorn labeled for use in
microwave ovens.
—Do not overcook potitoes.
They
could dehydrate and catch
fire, causing damage to your oven.
—Do not operate the oven
while
empty to avoid damage to the
oven and the danger of fire.
If
by accident the oven should run
empty a minute or two, no harm
is done. However, try to avoid
operating the oven empty at all
times—it saves energy and
prolongs life of the oven.
●
Do not use the oven for storage
purposes.
Do not leave paper
products, cooking utensils, or food
in the oven when not in use.
●
If materials inside the oven
should ignite,
keep oven door
closed, turn oven off, and
disconnect the power cord, or
shut off power at the fuse or
circuit breaker
panel.
●
Some products
such as whole
eggs and sealed containers—for
example, closed glass jars—will
explode and should not be heated
in this oven.
●
See door surface cleaning
instructions in the Care and
Cleaning section(s) of this book.
●
Don’t defrost frozen beverages
in narrow-necked bottles
(especially carbonated beverages).
Even if the container is opened,
pressure can build
up.
This can
cause the container to burst,
possibly resulting in injury.
●
Use metal only as directed in
this book and the cookbook.
Foil strips as used on meat roasts
are helpful when used as shown
in cookbook,
TV dinners maybe microwaved
in foil trays less than 3/4” high;
remove top foil cover and return
tray to box. When using metal in
microwave oven,
keep metal
(except for DOUBLE
DUTYTM
shel~ at least 1 inch away from
sides of oven.
●
Cookware may become hot
because of heat transferred from
the heated food. Pot holders may
be needed to handle the cookware.
●
Sometimes, the oven floor can
become too hot to touch.
Be
careful touching the floor during
and after cooking.
●
Do not use a thermometer
in
food you are microwaving unless
the thermometer is designed or
recommended for use in the
microwave oven.
●
Remove the temperature
probe from the oven when not
in use.
If you leave the probe
inside the oven without inserting
it in food or liquid, and turn on
microwave energy, it can create
electrical arcing in the oven, and
damage oven walls.
●
Avoid heating baby food
in
glass jars, even without their lids;
especially meat and egg mixtures.
●
Do not boil eggs in a microwave
oven.
Pressure will build up inside
the egg yolk and will cause it to
burst, possibly resulting in injury.
●
Foods with unbroken outer
“skin”
such as potatoes, sausages,
tomatoes, apples, chicken livers
and other giblets, and egg yolks
should be pierced to allow steam
to escape during cooking.
●
Plastic
CU()()kware—–Pl~lstic
c>()(lkwarc designed ti(~r
microwave
cooking”
is very useful, but should
bc used cartful Iy. Even
nl
icrowavc-safk plasl
it may not
be
as
[~)leran[ of overcooki” ng
condi lit)ns
as
arc glass
or ceramic
matcri als
and may
soften
or
char
ii
sub;ccled to sh(~i-t periods
of
overc(~okin~.”
In longer
expt]sures
[() ovcrcot)klng, tbc f(~od
and
c(~okwarc could
ignite. For these
t-e;isons:
1 )
(Jse micr(>wave-safe
plastics
only
and use them in strict
ct)nlpl iance
with the
cookware
111:11~111’i~c(lIIeI.’s
l.ecc~[~~lnendatiol~s.
2) DO I1O( subjec(
empty cookware
to
nlicrowavi;~g. 3)
Do
not permit
c’hildrcn I() use
plastic cookware
wittlout cclnlplele supei-vision.
●
Not all
plastic wrap is suitable
for
use in microwave ovens.
[’heck
(hc package Ii)r
proper
Llse.
●
“Boilable” cooking pouches
and
tightly
closed
plastic bags
should
bc SI
if. [~ierced or
vented
as directed on
the
package. If they
are nt)t, p] astic C(JU td
burst during
{~r
in]n~cdi:itc]y after cooki]lg,
I]ossibly
resulting in injury.
Also,
l>las(ic
storage ct)ntainers sh(~utd
be
tit teast partialty
uncovered
because
[hey torn]
a tight seal. When
c(~(~king
with
containers tightty
c{~vered wi[h
plastic
wr:lp,
remove
c(~vering
carefully
and
direct
s[eam
away
i’rt)m
hands
and face.
●
Hot foods
and steam can
cause
burns.
Be
carefttt
when
(~pening
any
containers
of hot
fo(~d,
including popcorn bags,
cooking” [)(}uches tind
boxes. To
prcven[
possibte
injury, direct
s~eanl
away
from
hands
und face,
●
P’oods cooked
in liquids
(such
LIS pasla) nl:Iy Icnd to b(.)i
I
(lver
IIIOIC
rapidly than
fi)ods ct)ntaining
Icss mois(ure. Shoutd
this
occur,
I-clkr (c) p:iges 30 ;Ind 31 fc~r
i]lstruct icjns on how to clean
the
inside f)l’ the OVCII.
●
Spontaneous
boiling—Under
certain special circumstances,
liquids tnay start to boil during
shortly
after
removat
from the
microwave oven.
To
prevent
burns
fr(~m
splashing liquid,
stir the liquid briefly before
or
removing-the
container
from the
microwave oven.
● Use of the
D(JUBLI; DUTY’lM
shelf accessory.
—Remove the shelf from oven
when not in use.
—Do not store or cook with
shelf on floor of oven. Product
damage may result.
—[Jse
pot holders when
handling the shelf and
cookware. They
may
be hot.
—Do not use microwave
browning dish on
shelf.
The
shelf
could overheat.
Self-Cleaning Lower Oven:
●
Stand away from the oven
when opening oven door. The
hot air or steam which escapes
can cause burns to hands, face
and/or eyes.
●
Don’t heat unopened food
containers in the oven. Pressure
could build up and the container
could burst, causing an injury.
●
Keep oven vent ducts
unobstructed.
●
Keep oven free from grease
buildup.
●
Place oven shelf in desired
position while oven is cool.
If
shetves must be handled when
hot, do not let pot holder contact
heating units
in the oven.
●
Pulling out shelf to the shelf
stop is a convenience in lifting
heavy foods. It is also a
precaution against burns from
touching hot surfaces of the
door or oven walls.
●
When using cooking or
roasting bags in oven,
fot
tow
the manufacturer’s directions.
●
Do not use your oven to dry
newspapers.
If
overheated,
they
can catch fire.
●
Do not store anything in your
oven.
These items tnay catch fire,
and
plastic items may melt.
Alwtiys
keep the oven area clear
and
free of items that
may
burn.
●
Do not line oven bottom with
aluminum foil.
Do
not
use
aluminum foil except as suggested
in this
book (see page 30).
●
Do not clean door gasket
before reading special cleaning
instructions
on page
27.
The
door
gasket
is essential for a
good
seal. Care should be taken not to
rub, damage or move the gasket.
●
Do not use oven cleaners.
No
commercial oven cleaner or oven
liner protective coating of
any
kind should be used in or around
any part of the oven.
●
Clean only parts listed in this
Use and Care Book.
●
Before self-cleaning the oven,
remove broiler pan and other
cookware.
●
Listen for fan—a
fan
noise
should be heard sometime during
the cleaning cycle. If not, call
for
service before self-cleaning
again.
SAVE THESE
INSTRUCTIONS
<
Ene~-Sa@
Tips
I
I
Microwave Oven
● Use proper power level as
recommended and DO NOT
OVERCOOK.
● Do not operate the oven while
empty. If by accident the oven
should run empty a minute or two,
no harm is done. However, try to
avoid operating the oven empty at
all
times—it saves energy and
prolongs the life of the oven.
I
I
Lower Oven
“
Preheat the oven only when
necessary. Most foods will cook
satisfactorily without preheating.
If you find preheating is necessary,
listen for the beep and put food in
the oven promptly after the oven is
preheated.
● Always turn oven OFF before
removing food.
● During baking, avoid frequent
door openings. Keep door open as
short a time as possible if it is
opened.
● For self-cleaning oven, be sure to
wipe up excess spillage before
self-cleaning operation.
● Cook complete oven meals
instead of just one food item.
Potatoes, other vegetables and
some desserts will cook together
with a main-dish casserole, meat
loaf, chicken or roast. Choose
foods that cook at the same
temperature in approximately the
same amount of time,
● Use residual heat in oven
whenever possible to finish
cooking casseroles, oven meals,
etc. You may also add rolls or
precooked desserts to warm oven,
using residual heat to warm them.
Microwaving Tips
men
Power is
Connected to the
● Make sure
all
cookware used in —
your microwave oven is suitable
Oven
for microwaving. Most glass
casseroles, cooking dishes,
measuring cups, custard cups,
pottery or china dinnerware which
does not have metallic trim or
glaze with a metallic sheen can be
used. Some cookware is labeled
“suitable for microwaving.”
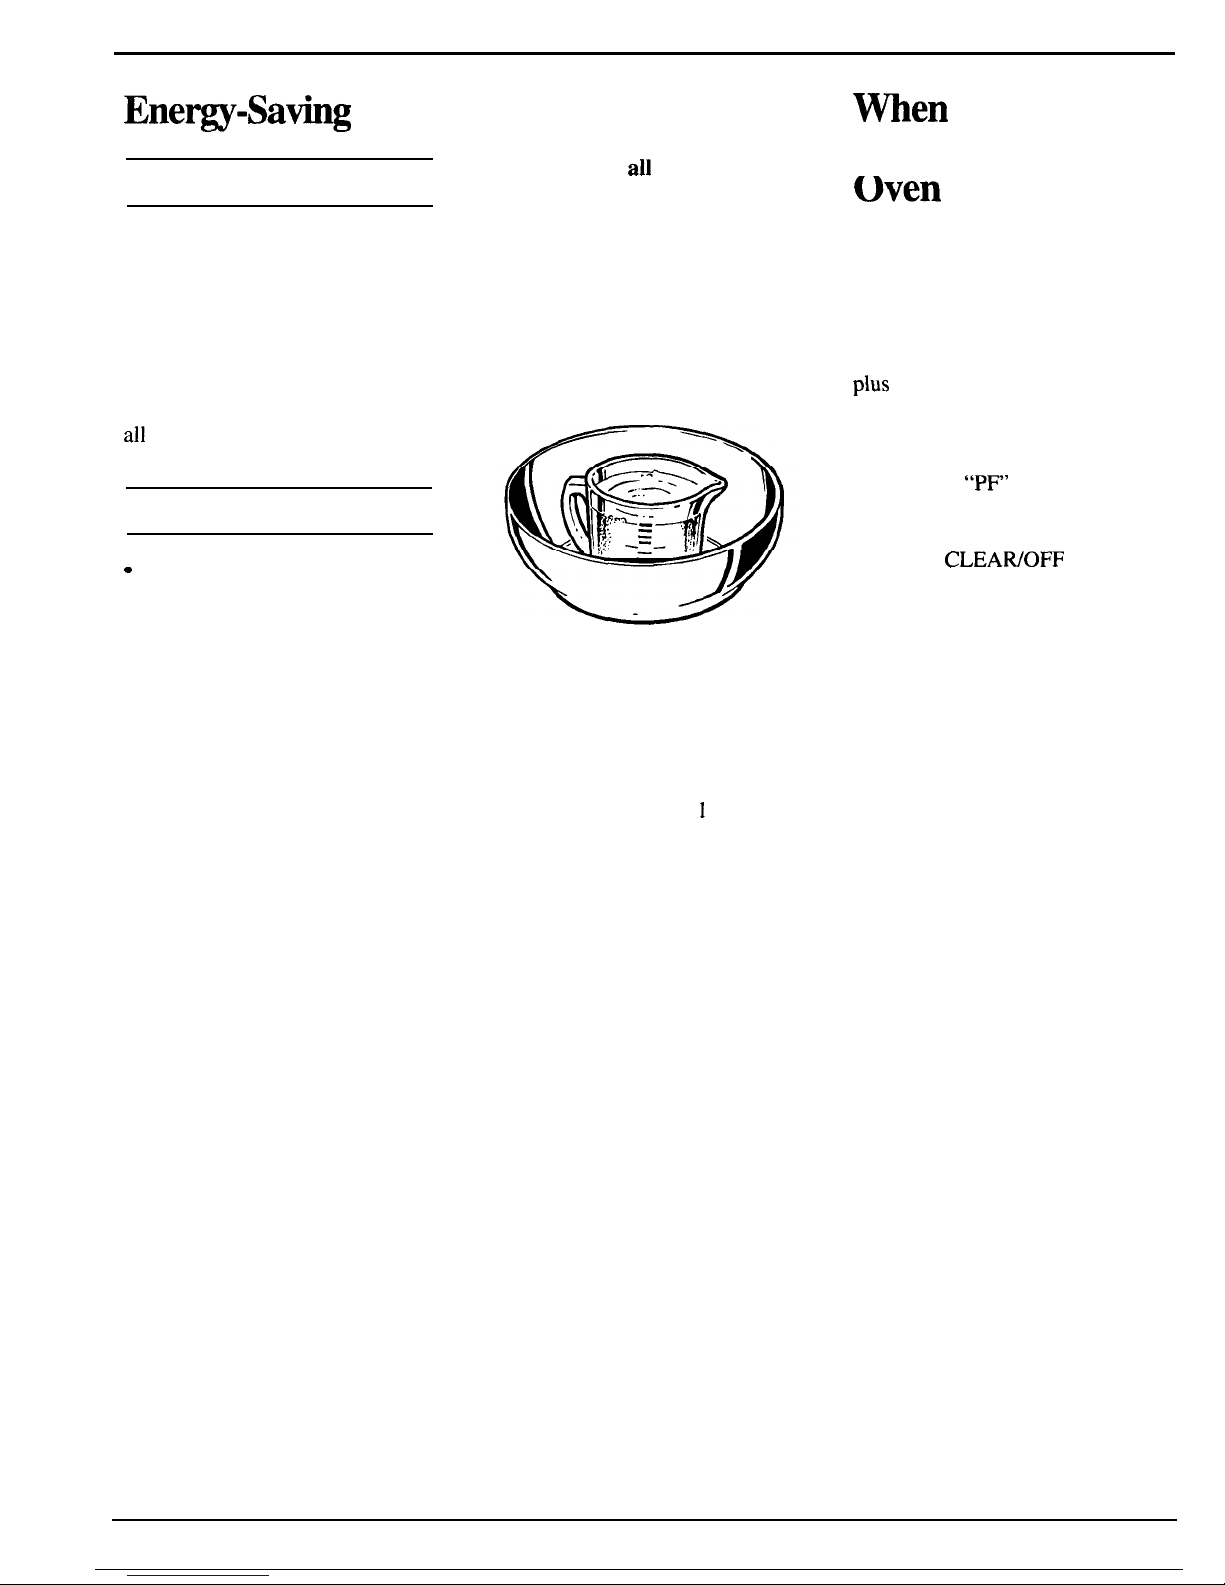
If you are not sure if a dish is
microwave-safe, use this test:
Place in
the oven both the dish you
are testing and a glass measuring
cup filled with one cup water—set
the measuring cup either in or next
to the dish. Microwave
1
minute at
high. If the dish heats, it should not
be used for microwaving. If the
dish remains cool and only the
water in the cup heats, then the
dish is microwave-safe.
●
Paper towels, wax paper and
plastic wrap
can be used to cover
dishes in order to retain moisture
and prevent spattering. Be sure to
vent plastic wrap so steam can
escape.
● Some microwaved foods
require stirring, rotating or
rearranging.
Check the cookbook.
● Steam builds up pressure in
foods that are tightly covered by
a skin or membrane. Pierce
potatoes, egg yolks and chicken
livers to prevent bursting.
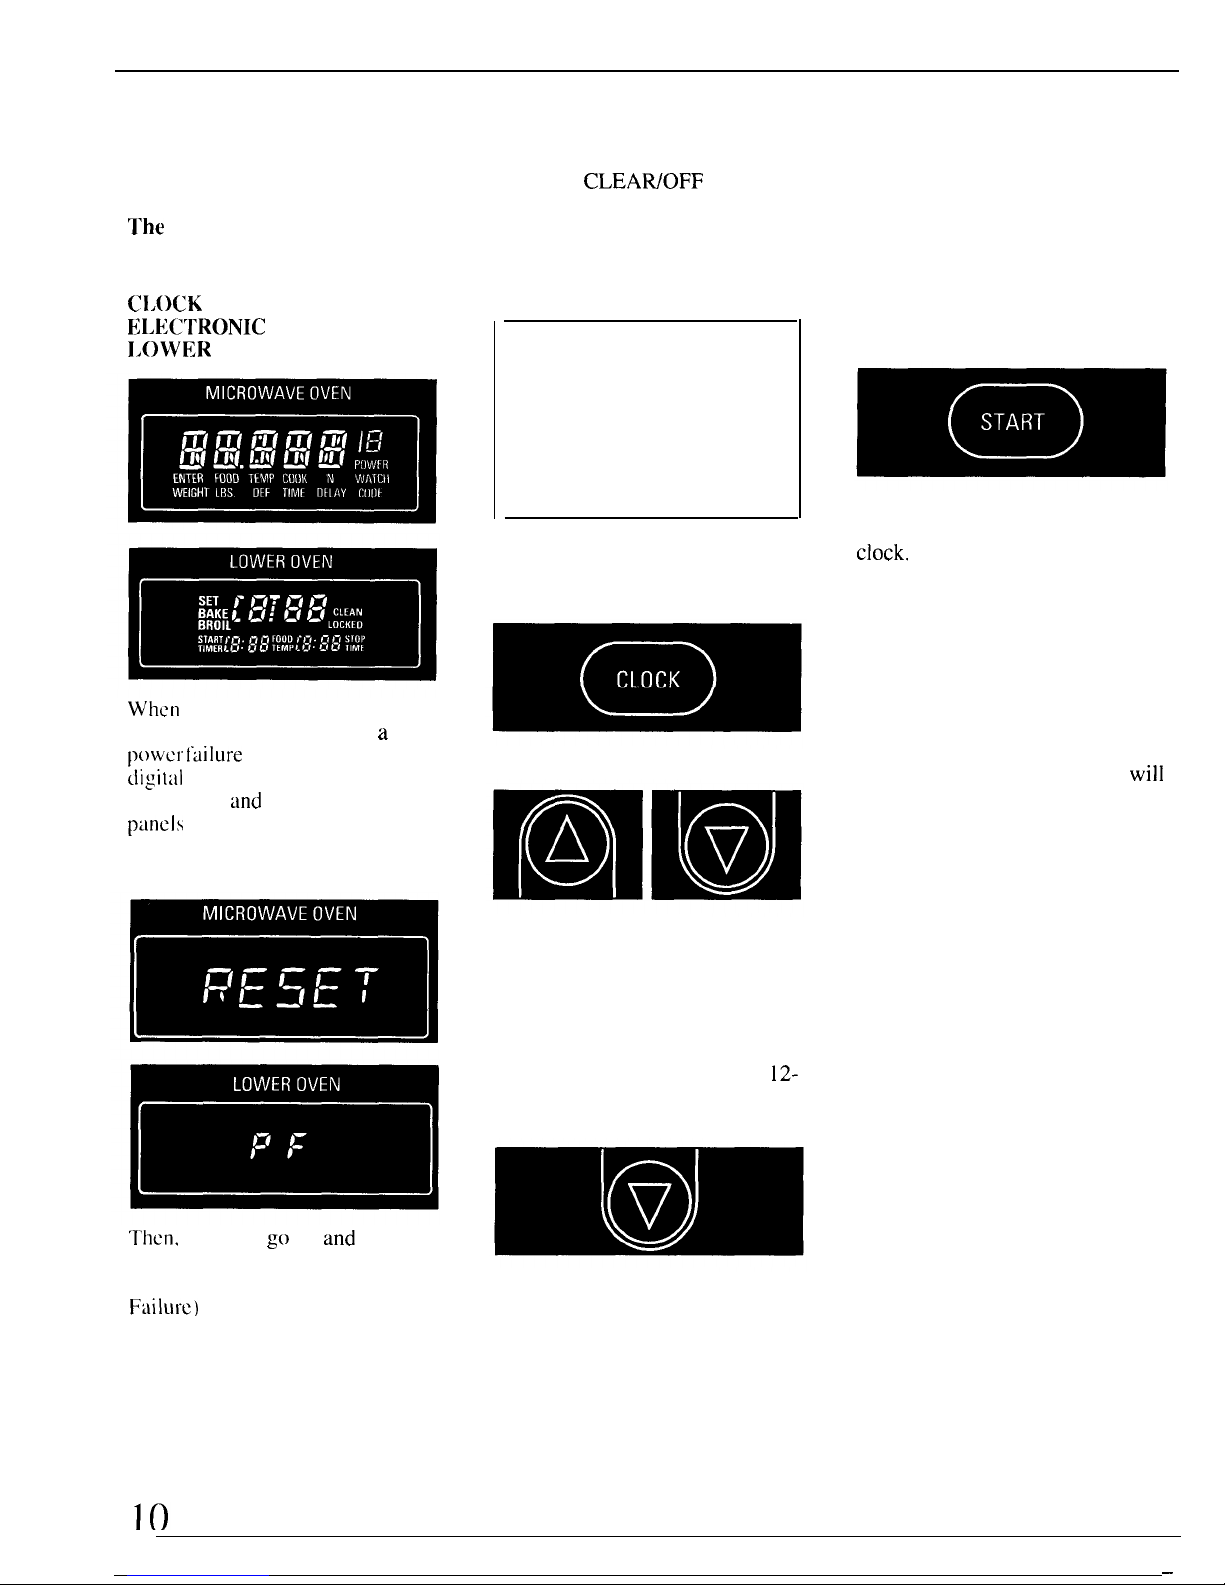
When power is first connected to
your cooking center or after a
power failure of any kind, the
digital display on both the
microwave and lower oven control
panels shows lighted 8’s and 18’s
plus
all oven functions for about
15 seconds.
Then, all lights go off and
“RESET” appears in the upper
display, and
“PF”
(for Power
Failure) appears in the lower
display.
Touch the
CLEAWOFF
pad on the
upper touch control panel and the
microwave oven is ready to use.
Touch the CLOCK pad on the lower
touch control panel, then touch the
INCREASE or DECREASE pads to
set the correct time of day.
6
Features of Your New Electronic Touch Control Cooting Center
I
Microwave Oven
I
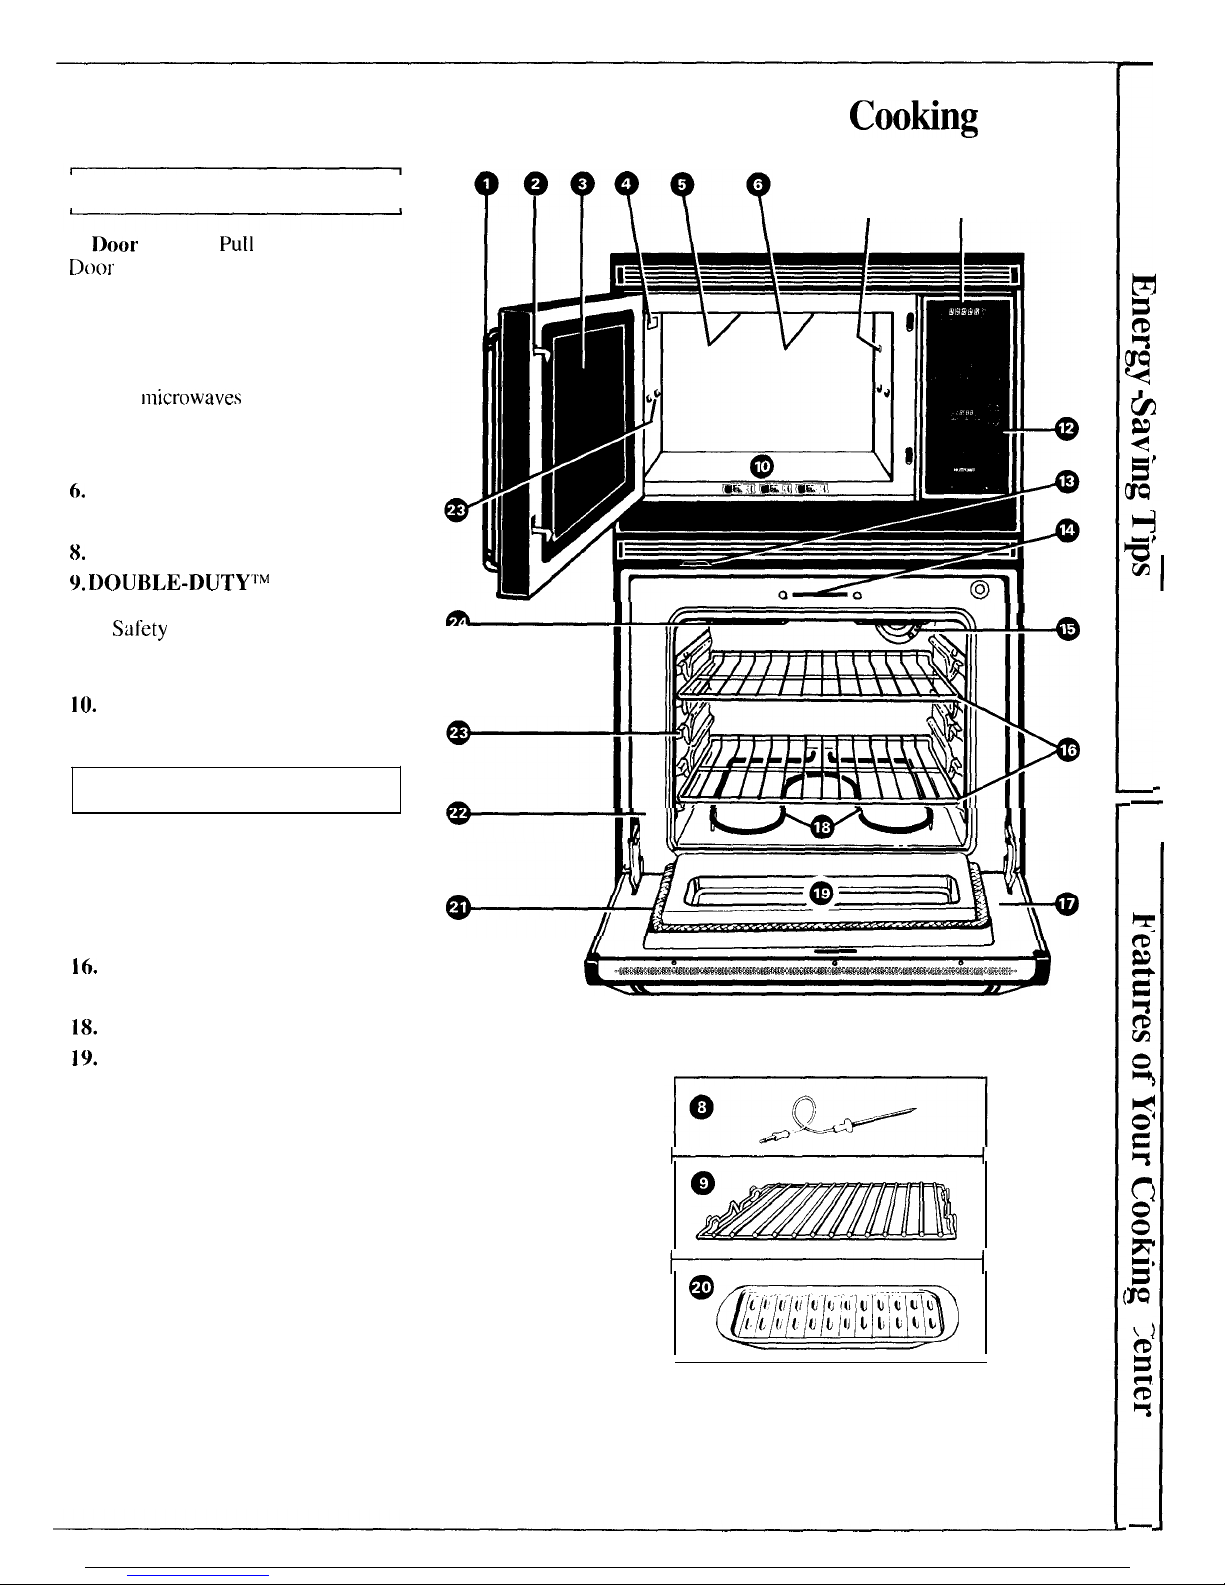
1. Door Handle.
Pu1l
handle to open.
[Ioor
must be securely latched for
oven to operate.
2. Inside Door Latches.
3. Window with Metal Shield.
Allows cooking to be viewed while
keeping
nlicrowaves
confined in oven.
4. Model and Serial Numbers.
5. Light.
6.
Oven Vent.
7. Receptacle for Temperature Probe.
8.
Temperature Probe.
9. DOUBLE-DUTY’l’M
Shelf. Lets
you
microwave several foods at once.
(See
Safety
Tips for special
instructions. ) When this shelf is not in
USC, please remove from the oven.
10.
Oven Floor.
11. Display and Touch Control Pads.
Self-Cleaning Lower Oven
12. Display and Touch Control Pads.
13. Oven Vent.
14. Automatic Oven Door Latch.
15. Interior Oven Light.
16.
oven Shelves.
17. Door Liner.
18.
Bake Unit.
19.
Window.
20. Broiler Pan and Rack.
21. Door Gasket.
22. Oven Frame.
23. Shelf Support.
24. Broil Unit.
@ . . . . . . . . . . . . . . . . . . . . . . . .
-
I
I
7
—

Features of Your Microwave Oven Touch Control Panel
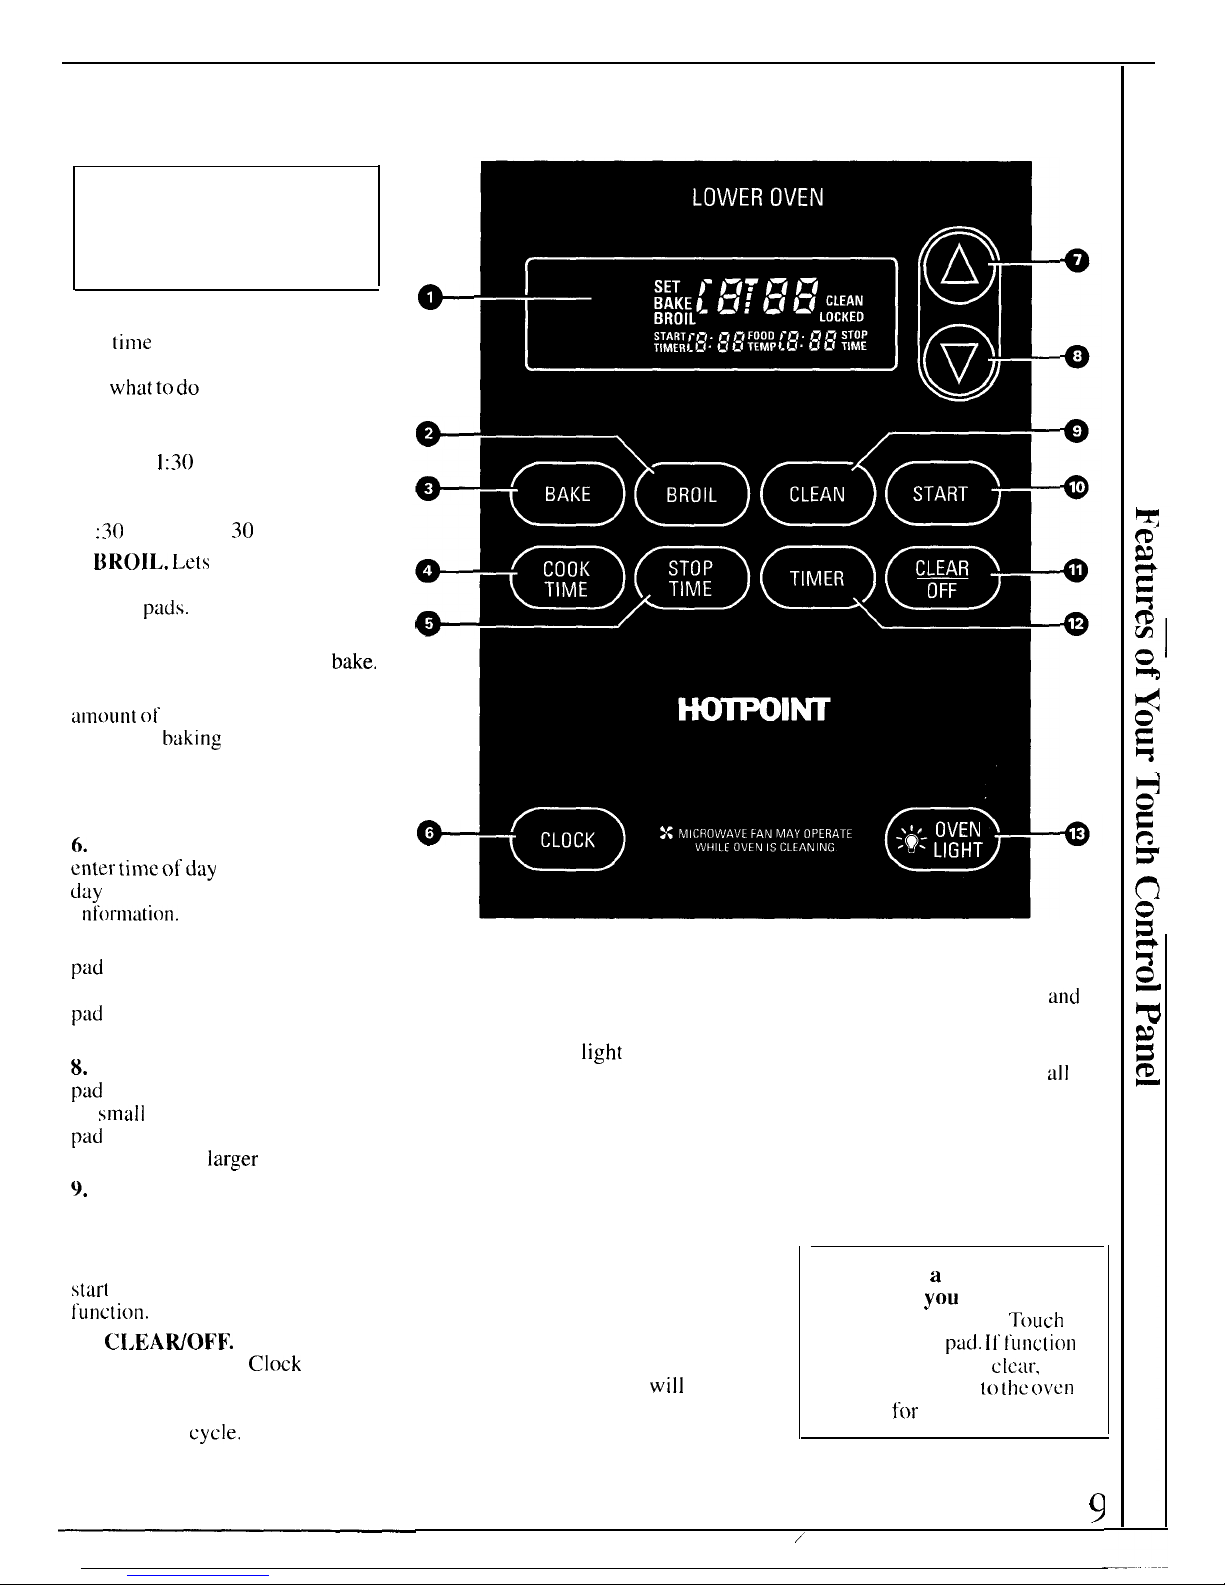
1. DISPLAY.
Displays time
or temperature during cooking
functions, power level being used,
cooking mode and instructions.
Note: Time on
the
microwave
display is shown in minutes and
seconds ( 1
:30
is one minute, 30
seconds). On the lower oven, time
is shown in hours and minutes
(1
:30
is one hour, 30 minutes).
2. TIME DEFROST. Press before
entering time for thawing at
automatic Power Level 3. You may
change the power level after
entering defrosting time.
3. TIME COOK. Press before
entering time for cooking at Power
Level
10.
You may change the
power level after entering
cooking time.
4. NUMBER PADS. Touch these
pads to enter cooking, defrosting
time, temperature and Power Level.
5. HOLD TIMER. Press to set
timer or holding time; does not
turn on microwave energy.
6. POWER LEVEL. Touch this
pad before entering another power
level number if you want to change
from automatic Power Level 10
(HIGH) for cooking or Power
Level 3 (LOW) for defrosting.
7.
TEMP COOK. Use the
temperature probe to cook by using
a temperature that you set. Once
food reaches this temperature,
the
oven switches to Hold setting and
maintains that temperature until
you open the door or touch the
CLEAWOFF
pad.
8. START. After
all
selections are
made, touch this pad to start oven.
9.
CLEAWOFF. When touched, it
shuts off the oven and erases all
settings.
8
——
—-.--.-——.———
——.———
Features of Your Lower Oven Touch Control Panel
Touch controls for your
Lower Oven will not operate
until the digital clock has
been set.
1. DISPLAY.
Displays time of
day.
lime
or temperature during
cooking. cooking mode and tells
you
what to do
next.
Note: Time on the microwave
display is shown in minutes and
seconds (
I :30
is one minute, 30
seconds). On the lower oven, time
is shown in hours and minutes
( I
:30
is one hour, 30 minutes),
2.
BROIL. Lets
you broil at full
power by touching BROIL and
START
pads.
Lets you select Lo
Broil for longer, slower broiling.
3.
BAKE.
Used to set oven to
bake.
4. COOK TIME. Use to enter
amount
ot time required for
automatic
baking
or roasting.
5. STOP TIME. Use when baking
or cleaning to enter the time of day
you want oven to turn off.
6.
CLOCK. Touch this pad to
enter
time
of
day
or check time of
day
when display is showing other
i ntormation.
7. INCREASE. Short taps to this
pad
increase time or temperature
by small amounts. Press& hold
pad
to increase time or temperature
by larger amounts.
8.
DECREASE. Short taps to this
pad
decrease time or temperature
by
small
amounts. Press & hold
pad
to decrease time or
temperature by
larger
amounts.
9.
CLEAN. Use for Self-Cleaning
mode. Lets you enter length of
cleaning operation.
lo. START. Must be touched to
star(
any cooking or cleaning
I.unc(ion.
11.
CLEAWOFF.
Cancels
all programs except
Clock
and
Minute/Second Timer. Also
stops oven signals and stops
self-cleaning
cycle.
*
12. TIMER. Lets you time any
kitchen function.
13. OVEN LIGHT. Touch this
pad to turn oven
light
on and off.
How to Recall a Setting
If you want to check the setting for
any function (such as Bake or
Broil), press the pad and it will
appear briefly.
To change the baking time,
touch the COOK TIME pad
and
immediately enter a new time.
Then press START.
If you want to change the setting,
-
press the pad and immediately
enter the new setting. Then press
the START pad.
For example, to check a baking
time that you set, touch the COOK
TIME pad, and the time
will
show briefly.
To change the time of day,
all
other functions, including the
timer, must be off.
Note: During Recall, the
active function is not affected
until you make a change and
press START.
If “F-” and
a
number flash
on display,
you
have a
function error code.
Touch
CLEAR/OFF
pad. 11’ t’unction
error code does not
clear,
disconnect power [0
(he oven
and call
for
service.
9
/
I
How to Set Your Digital Clock and Timer
Clock
The
electronic digital clock on
your cooking center is an
accurate solid-state device.
C1,OCK
MUST BE SET BEFORE
F;Lk;CrrRONIC
CONTROLS FOR
LOWER OVEN WILL WORK.
When
power is first connected to
your cooking center or after
a
p~)wer failure
of any kind, the
digital
display on both the
microwave
and
lower oven control
panels shows lighted 8’s and 18’s
pills all oven functions for about
I 5 seconds.
Then.
all lights go off
and
“RESET” appears in the upper
display, and “PF” (for Power
F~~ilurc)
appears in the lower oven
display.
Touch the CLEAWOFF pad on the
upper touch control panel and the
microwave oven is ready to use.
How to Set the Clock
Quick Set-Clock
1. Press CLOCK pad.
2. Press INCREASE or
DECREASE pad to enter
the time.
3. Press START pad.
Before using the lower oven,
the digital clock must be set
as follows:
Step 1: Touch the CLOCK pad,
Step 2: Press INCREASE or
DECREASE pad to set the time
of day.
Example: Try setting the time for
three o’clock. Use a combination
of presses and taps to get familiar
with the control. Since this is a
12-
hour clock, there is no need to
worry about AM or PM.
If you accidentally go past three
o’clock, simply press the
DECREASE pad until the time
shows in the display.
“SET TIME” will flash for 3
seconds after you release the
INCREASE or DECREASE pad,
then “START” will flash. “SET
TIME” will reappear if you touch
the INCREASE or DECREASE
pad again, and you can continue to
change the time setting.
Step
3: Touch the START pad.
This enters the time and starts
the
clock.
If “PF” appears in the display,
you had a power failure. When the
power went out, the current time
was stored in the control’s
memory. Then, when the power
was restored, the time of day was
continued.
For example, after a 5-minute
power interruption, your clock
will
be 5 minutes slow.
To reset the clock, touch the
CLOCK pad. “SET TIME” flashes
and the “slow” time-of-day is
displayed. Enter the correct time
of day by pressing INCREASE or
DECREASE pad.
To check the time of day when
display is showing other
information, simply touch the
CLOCK pad. The time of day
shows for as long as your finger
is on the pad, plus 3 additional
seconds.
To correct the time of day, touch
the CLOCK pad and press
INCREASE or DECREASE pad.
—

It’ you have
several
clocks
in
your kitchen,
you
may wish to
blank
the
time
of’ day
on your
oven. 11’ so. press &
hold
the
C’1.()[’K
pad, {ilCll touch the STOP
‘l’l
ME;
[)ad.
Although you cannot
see i[. (he clock main(ains the c(>rl-ect
Iiinc 01” day, [t
will reappear
for
(I1c (Iuratio[l 01”
any
function
that
displays a
star[ time
and stop time.
‘1’ouchii~g the
CLOCK
pad
will
make
(I1c
time
0[. day reappear.
N()’I’F;:
Time 01 day cannot
be
changed during
a lower oven
ct)ok ing operation,
lNCREASE
&
DECREASE Pad Speed
You can change
(I1c response
speed
01 these
pads in
1()
increments.
While the
oven
is
otl’
and the time
of
day
shows
in the display, press both
(I1c IN(”REASE tind
DECREASE
pads at
the same (imc for
2 or
3
seconds.
The speed levels
range
110111 LO to t~l:
LO is
the
slowest
speed
~md Fll
is the
}astest.
(]SC
the INCREASE or DECREASE
pad to change
the
response rate
~)f
lhesc pads,
Press START to store
the
ncw
speed and
return
to the
[inlc-ol’-day
display.
Timer
‘l’he clock doubles as a minute
timer. You
may
program it to
time cooking or other household
activities
for
up to 11 hours and
S9
minutes.
The
timer counts down in
minutes, one minute at a time,
until the last minute is reached.
The seconds will not be displayed
until the last minute of the
countdown is reached. When the
timer
reaches” : (),”
“TIMI;R”
flashes in the display.
How to Set the Timer
Step 1:
Touch
the TIMER
pad.
Step 2: Press INCREASE
or
DECREASE
pud
to set the
umount
of
time on timer.
11
you
make
a mistake,
touch
TIMER
ptid
twice
and begin ~igain.
Step 3:
Touch the START pad.
After pushing START, the flashing
colon tells
you the
clock
is counting
down, although the display does not
change until I minute has passed.
Step
4: When time is up. the oven
beeps until you press the TIMER
pad.
Display then
shows
the time
of day.
Note:
The minute Timer is
independent of all the other
functions and it does not control
the oven. The CLEAR/OFF pad
does
not affect
the timer.
Questions and Answers
Q. When I came home, the
display showed
PF
instead of the
time. What happened’?
A.
Your
home
bud
a
briel’ power
failure while
yOLI
were gone.
Nothing is wrong with
your-
clock-just reset it.
Q. When changing the time
of>
day, if I touch the CI,OCK pad
and then discover that the time
shown is
right,
do I have to reset
the clock?
A. No. The original time of day
will reappear in
a couple ot’
minutes.
Q.
Can
1 change the clock
while I’m cooking food in the
lower oven?
A. No.
The clock cannot be
changed
during
tiny
program that
uses the
oven timer or the display, You must
either
stt>p
those programs or
wait
until they
are
finished before
changing the
time,
Q.
Can 1 check the time of day
while the display is showing timer
function?
A. Yes.
Simply touch the CLOCK
pad
and the time
ot’
day shows
for
as
long
as your
finger
is on the pad,
plus 3 additional seconds.
—
I
I
MICROWAVE OVEN
How to Use the Hold
~mer
The Hold Timer has three timing
functions:
. It operates as a minute timer.
● It can be set to delay cooking.
● It can be used as a hold setting
after defrosting.
The Hold Timer operates without
microwave energy.
How to Time a 3-Minute
Phone Call
1. Touch the HOLD TIMER pad.
2. Touch number pads 3,0 and O
(for 3 minutes and no seconds).
3. Touch the START pad. Display
shows time counting down.
4. When time is up, oven signals
and display flashes “End.”
Using a Holding Time
The Hold Timer can also be used to
program a “holding time” between
microwave cooking functions,
The
time can range from one second to
99 minutes and 99 seconds.
Programming Delayed
Cooking
To delay cooking up to 99 minutes
and 99 seconds, touch either TIME
COOK or
TEMP
COOK pads and
enter cook time or temperature.
Touch HOLD TIMER pad and enter
number of minutes to delay cooking.
When delaying
Temp
Cook, be
sure probe is in food.
Touch the
START pad. Timer will count down
to zero and cooking will begin.
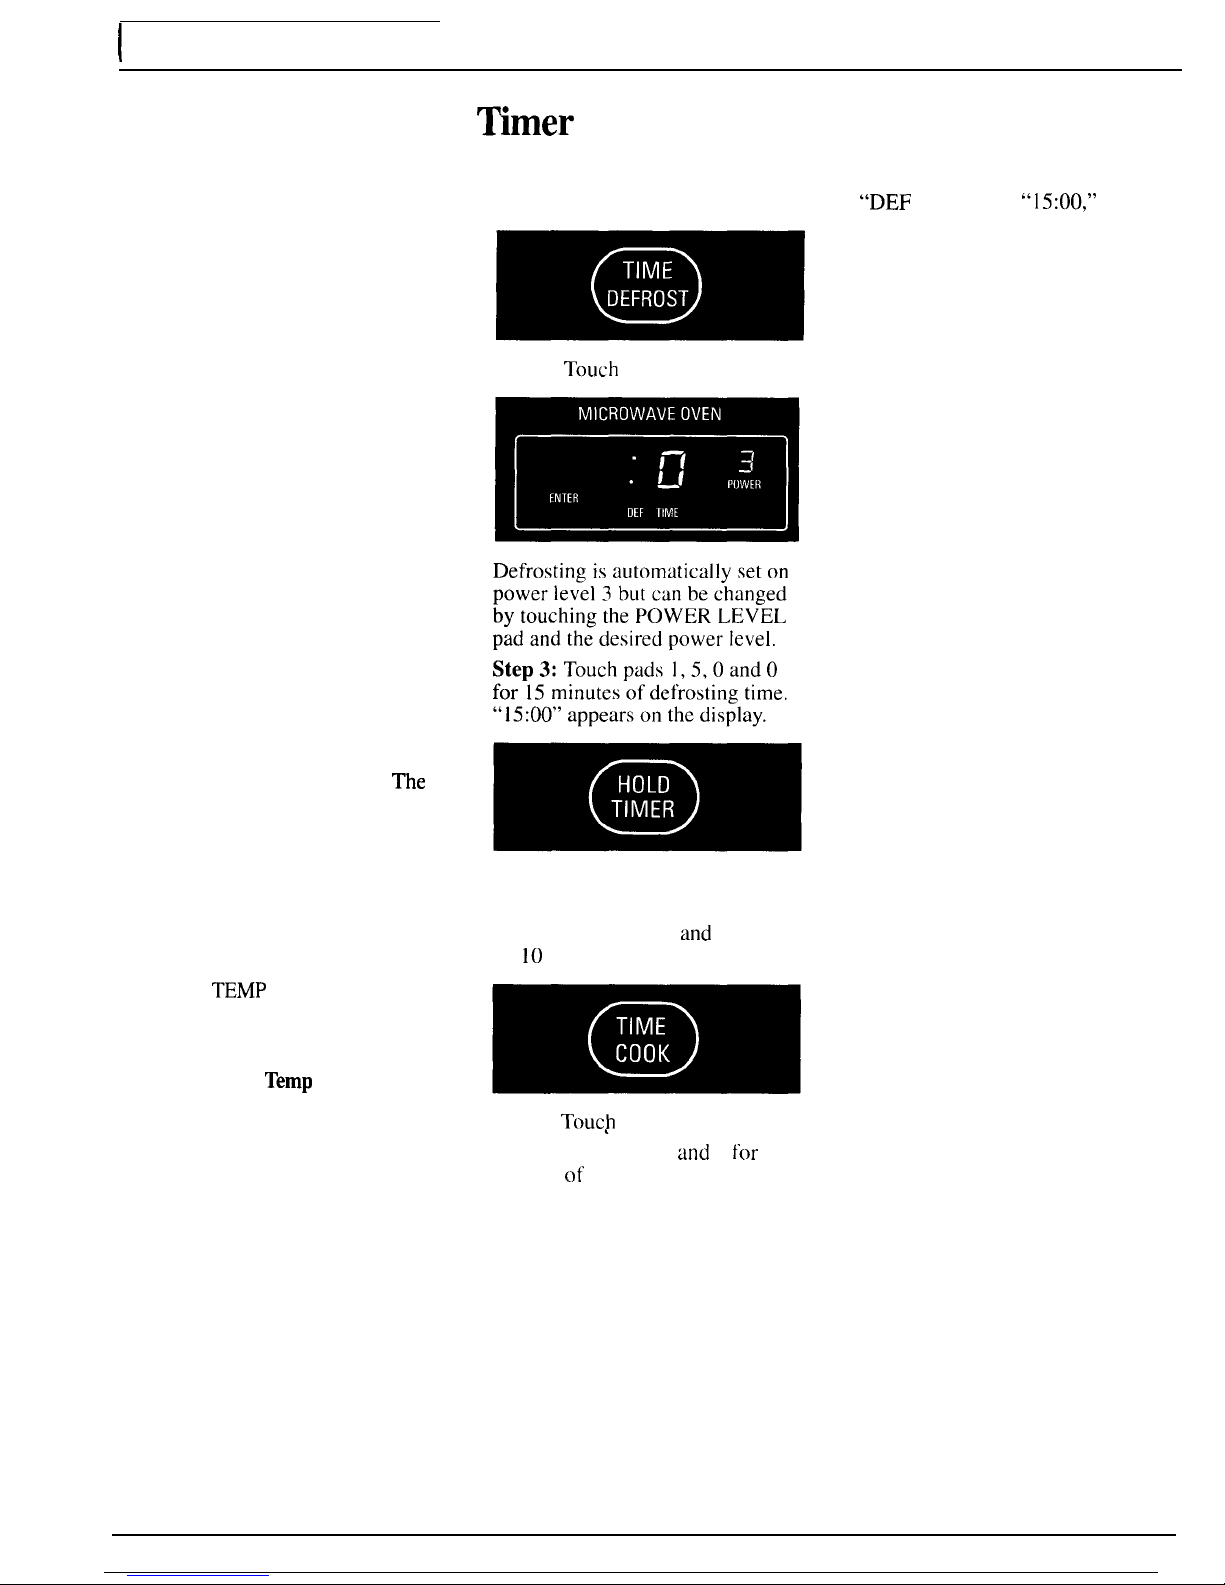
How to Time Defrost, Hold
and Time Cook
Let’s say you want to defrost a
frozen casserole for 15 minutes, hold
for 10 minutes and then Time Cook
for 25 minutes. Here’s how to do it:
Step 1: Take casserole from
freezer and place in oven.
Step 2:
Touch
TIME DEFROST.
Step 4: Set standing or hold time
by touching HOLD TIMER pad.
Step
5: Touch 1, (), ()
and
O to hold
for 10 minutes.
Step 6:
Touc$
the TIME COOK.
Step 7: Touch 2, 5,0
~ind
()
for
25
minutes of cooking time.
Step
8: Touch the START pad.
“DEF TIME” and
“15:00,”
counting down, show on display.
As each function is automatically
performed, the oven display shows
the instructions entered and the
function.
Step 9: When time is up, the oven
signals and the display flashes
“End.” The oven then shuts off.
Questions and Answers
Q. What will happen if I
accidentally reverse my defrost,
hold and cook instructions?
A. The oven will automatically
rearrange your program.
Defrosting will always come first,
then hold, and then the cooking
function.
Q. Can I defrost and hold only?
A. Yes. Sometimes you may only
want to defrost food, hold it and
cook it later. All you need to do is
program in Time Defrost and the
amount of time. Then program
Hold and the amount of time. Be
sure to put the thawed dish in the
refrigerator promptly.
NOTE: Foods that are highly
perishable, such as milk, eggs,
fish, stuffings, poultry and pork,
should not be allowed to sit out
for more than one hour before or
after cooking. Room temperature
promotes growth of harmful
bacteria.
Q. I programmed my oven for
a specific defrosting time but it
defrosted longer than necessary.
What happened?
A.
When instructions conflict, the
oven carries out the last instruction,
You may have set the oven to
Defrost for 4 minutes, hold for 2
minutes, and then defrost for 6
minutes. In this case, the oven
would defrost for 6 minutes and
hold for 2 minutes.
12
 Loading...