

Hotpoint JKP65WV Use And Care Instructions Manual
Howto
get
tkkt
fm
Range
Energy-saving tips
p4
Use and Care
Surface
cooting
instru~ions
p6
Oven
cooting
p15
Self-cleaning oven
p26
Continuous-cleaning oven
p28
.—
..,-~.;-.
:..-. .~-:.
.:.:;=*” .,
Questions?
Use
the Problem Solver
p35

Help us
Contents
Before Using Your Range. .. ....2
Safety Instructions . .........3,4
Energy-Saving Tips . . . ........5
Installing the Range . . . ........5
Leveling the Range. . . . ........5
Surface Cooking . . . . . ........6
Home Canning Tips . . . ........7
Surface Cooking Guide .. ....8,9
The 3-in-1 Unit . ..........10,
13
Griddle . ................10,
13
Automatic Surface Unit .. .....11
Automatic Surface Unit Guide ..12
Automatic Timer and Clock .. ..14
Using Your Oven . . . . . .......15
Baking . . . . . . . . . . . . . . . . . . . .
16
Baking Guide . . . . . . . . . .. ....17
Roasting . . . . . . . . . . . . .......18
Meat Thermometer . . . .......19
Roasting Guide. . . . . . . .......20
Broiling . . . . . . . . . . . . .......21
Broiling with
Meat Thermometer . .......22
Broiling Guide . . . . . . . .......23
Rotisserie . . . . . . . . . . . .......24
Rotisserie Time and
Temperature Guide. . .......25
Operating the
Self-Cleaning Oven. . ....26,27
Continuous-Cleaning
Oven Care. . . . . . . . . .......28
Care and Cleaning. . . . . ....29-31
Cleaning Guide . .........32,33
If You Need Service . . . .......33
Exhaust System . . . . . . .......34
The Problem Solver . . . .......35
Warranty . . . . . . . . . .
.Back
Cover
help you...
Before using your range,
read this book carefully.
It is intended to help you operate and
maintain your new range properly.
Keep it handy for answers to your
questions.
If you don’t understand something
or need more help, write (include
your phone number):
Consumer Affairs
Hotpoint
Appliance Park
Louisville, KY 40225
Write down the model
and serial numbers.
You’ll find them on a label located
on the front of the range behind the
oven door.
These numbers are also on the
Consumer Product Ownership
Registration Card that came with
your range. Before sending in this
card, please write these numbers
here:
Model Number
Serial Number
Use these numbers in any
correspondence or service calls
concerning your range.
If you received
a damaged range . . .
Immediately contact the dealer (or
builder) that sold you the range.
Save time and money.
Before you request
service...
Check the Problem Solver on
page 35. It lists minor causes of
operating problems that you can
correct yourself.
2
lNS’”[’[<[
Oven:
●
Stand away from the range
when opening oven door. The
hot air or steam which escapes
can cause burns to hands, face
and/or eyes.
●
Don’t heat unopened food
containers in the oven. Pressure
could build up and the container
could burst, causing an injury.
●
Keep oven vent ducts
unobstructed.
●
Keep oven free from grease
buildup.
●
Place oven shelves in desired
position while oven is cool. If
shelveslmust
be handled when
hot, do not let potholder contact
heating units in the oven.
●
Pulling out shelf to the shelf
stop is a convenience in
lifiing
heavy foods. It is also a precaution
against burns from touching hot
surfaces of the door or oven walls.
●
when Using
cooking or roasting
bags in the oven, follow the
manufacturer’s directions.
●
Do not use your oven to dry
newspapers. If overheated, they
can catch fire.
Self-Cleaning Oven:
●
Do not clean door gasket.
The
door gasket is essential for a good
seal. Care should be taken not to
rub, damage or move the gasket.
●
Do not use oven cleaners. No
commercial oven cleaner or oven
liner protective coating of any
kind should be used in or around
any part of the oven.
●
Clean only parts listed in this
Use and Care Book.
●
Before self-cleaning the oven,
remove broiler pan and other
utensils.
Surface
Cooting Uni@:
●
Use
proper
Pan
Size—This
appliance is equipped with one or
more surface units of different
size. Select utensils having flat
bottoms large enough to cover the
surface unit heating element. The
use of undersized utensils will
expose a portion of the heating
element to direct contact and may
result in ignition of clothing.
Proper relationship of utensil to
burner will also improve efficiency.
●
Never leave surface units
unat&nded
at high heat settings.
Boilover
causes smoking and
greasy
spillovers
that may catch
on fire.
●
Be sure drip pans and vent ducts
are not covered and are in place,
Their absence during cooking
could damage range parts and
wiring.
●
Don’t use aluminum foil to
line drip pans
or anywhere in the
oven except as described in this
book. Misuse could result in a
shock, fire hazard, or damage to
the range.
●
Only certain types of glass,
glass/ceramic, ceramic, earthenware,
or other glazed containers are
suitable for range-top service;
others may break because of the
sudden change in temperature.
(See Section on “Surface
Cooking” for suggestions.)
●
To minimize burns,
ignition of
flammable materials, and
spillage; the handle of a
conhiner
should be positioned so that it is
turned toward the center of the
range without extending over
nearby surface units.
●
Don’t immerse
or
soak
removable surface units. Don’t
put them in a dishwasher.
●
Always
turn surface unit
tO
OFF before removing utensil.
●
Keep an eye on foods being
fried at HIGH or MEDIUM
HIGH heats.
●
To avoid the possibility of a
burn or electric shock, always be
certain that the controls for all
surface units are at OFF position
and all coils are cool before
attempting to remove the unit.
●
When flaming foods under
the hood, turn the fan off. The
fan, if operating, may spread
the flame.
●
Foods for frying should be as
dry as possible.
Frost on frozen
foods or moisture on fresh foods
can cause hot fat to bubble up and
over sides of pan.
●
Use little fat for effective
shallow or deep-fat frying. Filling
the pan too full of fat can cause
spillovers
when food is added.
●
If a combination of oils or fats
will be used in frying, stir together
before heating, or as fats melt
slowly.
●
Always heat fat slowly,
and
watch as it heats,
●
Use deep fat thermometer
whenever possible to prevent
overheating fat beyond the
smoking point.
4
Installing
kt)ur Range
Your range, like many other
household items, is heavy and
can settle into soft floor coverings
such as cushioned vinyl or
carpeting.
When moving the range
on this type of flooring, use care,
and it is recommended that these
simple and inexpensive instructions
be followed.
Unless it is a built-in off-the-floor
model, the range should be installed
on a sheet of plywood (or similar
material) as follows:
When
the
floor
covering ends at the front of
the
range,
the area that the range
will rest on should be built up with
plywood to the same level or higher
than the floor covering. This will
allow the range to be moved for
cleaning or servicing.
Ixveling the
Range
On models with bottom storage
drawer, leveling screws may be
located on the front two corners of
the base of the range or on
all
four
corners. Remove the bottom drawer
and you can
level
the range on
an uneven floor with the use of
a
nutdriver.
To remove drawer, pull drawer
out all the way, tilt up the front
and take it out.
To
replace
drawer,
insert glides at back of
drawer beyond stop on range glides.
Lift drawer if necessary to insert
easily. Let front of drawer down,
then push in to close.
Ene~y-Savi~
Tips
Surf’ace Cooking
●
Use cookware of medium weight
aluminum, with tight-fitting covers
and flat bottoms which completely
cover the heated portion of the
surface unit.
●
Cook fresh vegetables with a
minimum amount of water in a
covered pan.
. Watch foods when bringing them
quictiy
to cooking temperatures at
HIGH heat. When food reaches
cooking temperature, reduce heat
immediately to lowest setting that
will keep it cooking.
● Use residual heat with surface
cooking whenever possible. For
example, when cooking eggs in the
shell, bring water to boil, then turn
to OFF position to complete the
cooking.
●
Use correct heat for cooking task:
HIGH—to start cooking (if time
allows, do not use HIGH heat to
start).
MEDIUM HI—quick browning.
MEDIUM–slow frying.
LOW—finish cooking most
quantities, simmer—double boiler
heat, and special for
sm~
quantities.
●
When boiling water for tea or
coffee, heat only the amount
needed. It is not economical to boil
a container full of water for one or
two cups.
5
Oven
Cooking
. Preheat oven only when
necessary. Most foods will cook
satisfactorily without preheating. If
you find preheating is necessary,
watch the indicator light, and put
food in the oven promptly after the
light goes out.
- - -
●
Always turn oven OFF before
removing food.
. During baking, avoid frequent
door openings. Keep door open as
short a time as possible when it is
opened.
. Cook complete oven reeds
instead of just one food item.
Potatoes, other vegetables, and
some desserts will cook together
with a main-dish casserole, meat
loaf, chicken or roast. Choose
foods that cook at the same
temperature and in approximately
the same time.
●
Use residual heat in the oven
whenever possible to finish
cooking casseroles, oven meals,
etc. Also add rolls or precooked
desserts to warm oven, using
residual heat to warm them.
Surface Cooking
See Surface Cooking Guide on pages 8-9.
Surfat.e C()()king
with
How to
Set the
Controls”
Infinite Heat ~ontrois
,
Your surface units and controls are
designed to give you an infinite
choice of heat settings for surface
unit cooking.
At both OFF and HIGH positions,
there is a slight niche so control
“clicks” at those positions; “click”
on HIGH marks the highest setting;
the lowest setting is between the
words LOW and OFF. In a quiet
kitchen, you may hear
sligh~
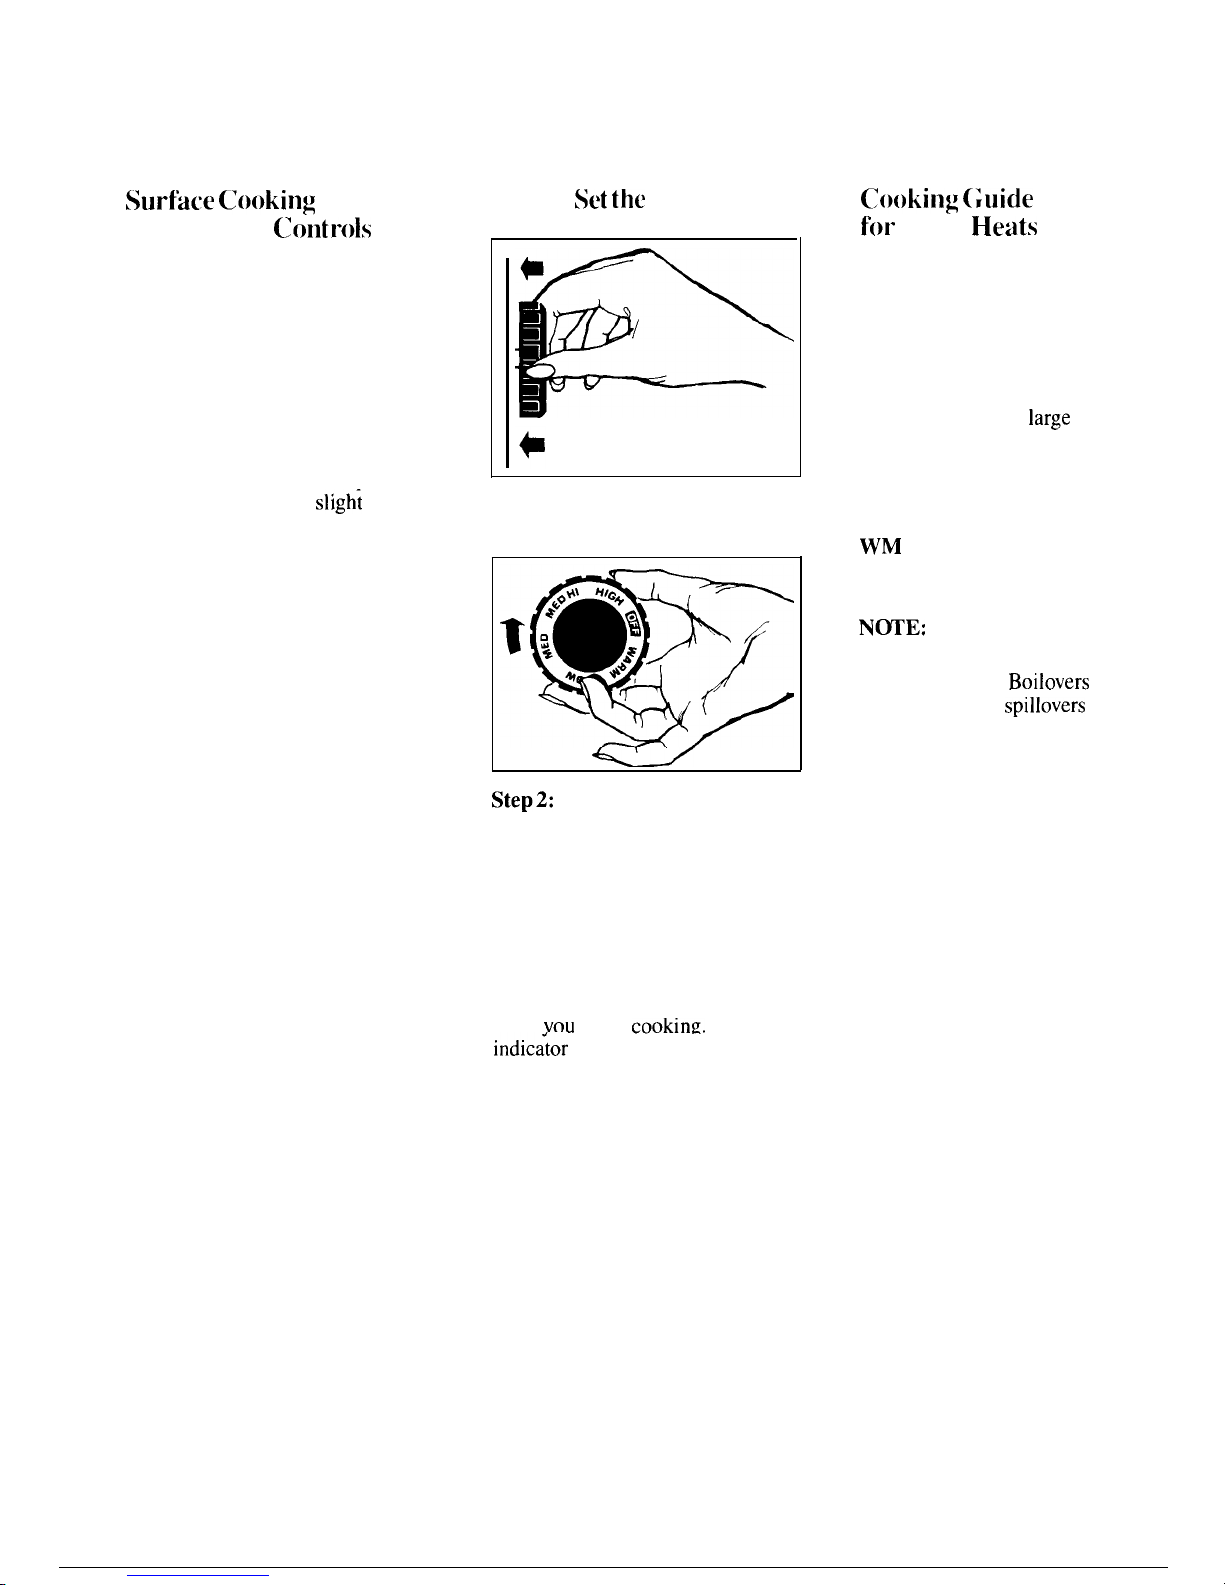
Step 1:
“clicking” sounds during cooking,
Grasp control knob and push in.
indicating heat settings selected
are being maintained.
Switching heats to higher settings
always show a quicker change than
switching to lower settings.
I
Step2:
Turn either clockwise or counter-
clockwise to desired heat setting.
Control must be pushed in to set
only from OFF position. When
control is in any position other
than OFF, it maybe rotated
without pushing in.
Be sure you turn control to OFF
when
vou
finish
cooking.
An
C()()king (Jl]ide
for
Using Heats
HI
MED
HI
MED
LOW
WM
Quick start for cooking;
bring water to boil.
Fast fry, pan broil; maintain
fast boil on large amount of
food.
Saute and brown; maintain
slow boil on
large
amount
of food.
Cook after starting at HIGH;
cook with little water in
covered pan.
Steam rice, cereal; maintain
serving temperature of most
foods.
N~E:
1.
At HIGH, MED HI, never leave
food unattended.
Boilovers
cause
smoking; greasy
spillovers
may
catch fire.
2. At WARM, LOW, melt
chocolate, butter on small unit.
indic~tor
light will glow-when ANY
heat on any surface unit is on.
6

Questions & Answers
Q. May I can foods and preserves
on my surface units?
A. Yes,
but only use utensils
designed for canning purposes. Check
the manufacturer’s instructions and
recipes for preserving foods. Be
sure canner is flat-bottomed and
fits over the center of your
Calrod@
unit. Since canning generates
large
amounts of steam, be careful to
avoid burns from steam or heat.
Canning should only be done on
surface units.
Q.
Can I cover my drip pans with
foil?
A. No. Clean as recommended in
Cleaning Guide.
Q. Can I use special cooking
equipment, like an oriental wok,
on any surface units?
A. Utensils without flat surfaces
are not recommended. The life of
your surface unit can be shortened
and the range top can be damaged
from the high heat needed for this
type of cooking.
Q. Why am I not getting the heat
1
need from my units even though
I have the knobs on the right
setting?
A. After turning surface unit off
and making sure it is cool, check to
make sure that your plug-in units
(on
models
so
equippd)
are securely
fastened into the surface connection.
Q. Why do my utensils tilt when I
place them on the surface unit?
A. Because the surface unit is
not flat. Make sure that the “feet”
on your
Calrod@
units are sitting
tightly in the range top indentation
and the reflector ring is flat on the
range surface.
Q. Why is the porcelain finish on
my containers coming
of~
A. If you set your Calrod” unit
higher than required for the
container material, and leave it, the
finish may smoke, crack, pop, or
burn depending on the pot or pan.
Also, a too high heat for long
periods, and small amounts of dry
food, may damage the finish.
Home Canning Tips
Canning should be done on
cooktop
only.
In surface cooking of foods other
than canning, the use of
large-
diameter utensils (extending more
than l-inch beyond edge of trim ring)
is not recommended. However,
when canning with water-bath or
pressure canner, large-diameter
utensils may be used. This is
because boiling water temperatures
(even under pressure) are not
harmful to
cooktop surfaces
surrounding heating unit.
HOWEVER, DO NOT USE
LARGE DIAMETER CANNERS
OR
~HER
LARGE DIAMETER
UTENSILS FOR FRYING OR
BOILING FOODS OTHER
THAN WATER. Most syrup or
sauce mixtures—and all types of
frying—cook at temperatures much
higher than boiling water. Such
temperatures could eventually
harm
cooktop surfaces surrounding
heating units.
1.
Bring water to boil on HIGH
heat, then after boiling has begun,
adjust heat to lowest setting to
maintain boil (saves energy and
best uses surface unit.)
2. Be sure canner fits over center
of surface unit. If your range does
not allow canner to be centered on
surface unit, use smaller-diameter
containers for good canning results.
3. Flat-bottomed canners give best
canning results. Be sure bottom of
canner is flat or slight indentation
fits snugly over surface unit.
Canners with flanged or rippled
bottoms
(ofien
found in enamelware)
are not recommended.
RIGHT
WONG
7
4. When canning, use recipes from
reputable sources. Reliable recipes
are available from the manufacturer
of your canner; manufacturers of
glass jars for canning, such as Ball
and Kerr; and the United States
Department of Agriculture
Extension Service.
5. Remember, in following the
recipes, that canning is a process
that generates large amounts of
steam. Be careful while canning to
prevent burns from steam or heat.
NOTE: If your range is being
operated on low power (voltage),
canning may take
longer than
expected, even though directions
have been carefully followed. The
process may be improved by:
(1)
using a pressure canner, and
(2) for fastest heating of large
water quantities, begin with
HOT tap water.
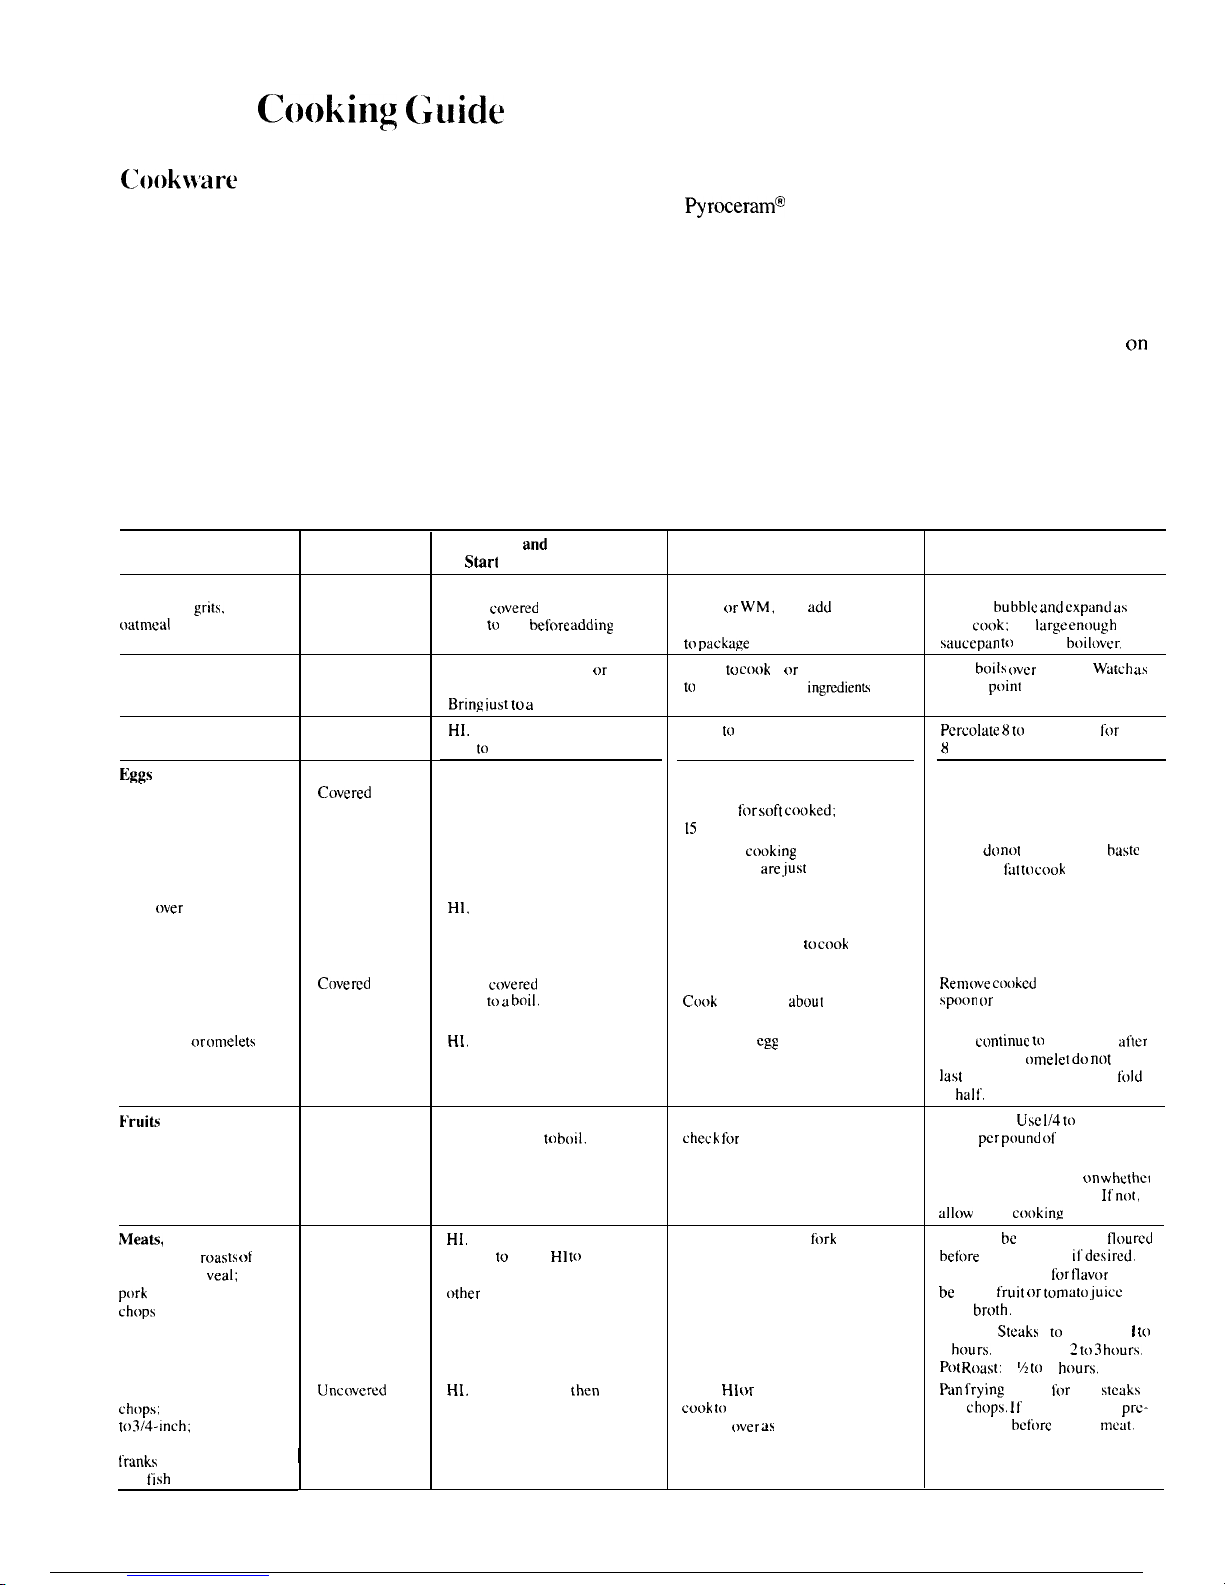
Surface
C()()king
(;uide
C()()k}\are
Tips
Use non-stick or coated metal
cookware. Flat ground
~roceram”
saucepans or skillets coated on the
bottom with aluminum generally
cook evenly. Use glass saucepans
with heat-spreading trivets
available for that purpose.
fitting lids. Match the size of the
saucepan to the size of the surface
unit. A pan that extends more than
an inch beyond the edge of the trim
ring traps heat which causes
“crazing” (fine hairline cracks) on
porcelain, and discoloration
ranging from blue to dark gray
on
chrome trim rings.
1.
Use medium-or heavy-weight
cookware. Aluminum cookware
conducts heat faster than other
metals. Cast iron and coated cast
iron cookware is slow to absorb
heat, but generally cooks evenly at
LOW or MEDIUM settings. Steel
pans may cook unevenly if not
combined with other metals.
2. To conserve the most cooking
energy, pans should be flat on the
bottom, have straight sides and tight
Directions
and
Setting
to
Stirt
Cooking
Setting to Complete
Cooking
Food
Cookware
Comments
Cereal
Cornmeal,
grits.
oatmeal
Covered
Saucepan
HI. In
c(wered
pan bring
water
to
boil
before adding
cereal.
LOW or
WM.
then
add
cereal.
Finish timing according
to package
directions.
Cereals
bubble and expand as
they
cook:
use
large enough
sauceptirr to
prevent
boilover.”
Cocoa
Uncovered
Saucepan
HI. Stir together water
or
milk. cocoa ingredients.
BrinE lust to a
boil,
MED. to
cook”
1 or 2 minutes
tu
completely blend
ingtiients
Milk
boils (wer
rapidly.
Watch as
boiling
point
approaches.
Coffee
ti~~s
Cooked in shell
H].
At first perk, switch
heat to LOW.
LOW
tu
maintain gentle but
steady perk.
LOW. Cook only 3 to 4
minutes
for soft cooked:
15
minutes for hard cooked.
Continue
cooking”
at MED HI
until whites
are ,just
set, about
3 to 5 more minutes.
LOW, then add eggs. When
bottoms of eggs have just set,
carefully turn over
to cook
other side.
LOW. Carefully add eggs.
C()()k
uncovered
abuut
5
minutes at MED HI.
MED. Add
egg
mixture.
Cook, stirring to desired
doneness.
Perculate 8 to
10 minutes
for
8
cups, less for fewer cups.
Cuvered
Saucepan
HI. Cover eggs with cool
water. Cover pan, cook
until steaming.
MED HI. Melt butter, add
eggs and cover skillet.
If you
do not
cover skillet,
haste
eggs with
fat to cook”
tops evenly
Fried sunny-side-up Covered
Skillet
Fried
over
easy
Uncovered
Skillet
HI,
Melt butter.
Poached
Scrambled or omelets
Cnvered
Skillet
HI. In
c(wered
pan bring
water to a
boil,
Remove cooked”
eggs with slotted
spoon” or
pancake turner.
HI.
Heat butter until light
golden in color.
Eggs
cuntinue tn set slightly after
cooking. Fur
omelet do nut
stir
last
few minutes, When set,
told
in hall.
Uncovered
Skillet
E.ruits
Covered
Saucepan
HI. In covered pan bring
fruit and water
to boil.
LOW. Stir occasionally and
check
fur
sticking.
Fresh fruit:
Use 1/4 to
1/2 cup
water
pcr pound of
fruit.
Dried fruit: Use water as package
directs. Time depends
(m whethe!
fruit has been presoaked. If
not,
allow
more
c(mkinu
time.
Meats,
Poultry
Braised: Pot roasts
of
beef, lamb or
veal;
pork
steaks and
cbops
Covered
Skillet
H1.
Melt fat, then add meat
Switch to MED H]
to
brown meat. Add water or
other liquid.
LOW. Simmer until
fork
tender.
Meat can
be
seasoned and
floured
before
it is browned,
if’desired.
Liquid variations
Ii)r flavor
could
bc
wine,
fruit or tomato” juice
or
meat
brotb.
Timing:
Steaks
I to 2-inches: I
[()
2
bours.
Beef Stew: 2 to 3
hours.
Pot Roast:
2 ‘A to 4
hours.
Pan frying
is best
for
thin
steaks
and
chops.
II rare is desired,
pre-
heat skillet
before
adding
meut.
Pan-fried: Tender
chops; thin steaks up
to 3/4-incb;
minute
steaks; hamburgers;
I
Iranks
and sausage;
thin
fish
fillets
Unccwered
Skillet
HI.
Preheat skillet,
lhen
grease lightly.
MED HI or MED. Brown and
cook” to
desired doneness,
turning
over as
needed.
8

RIGHT
3. Deep Fat Frying. Do not overfill
kettle with fat that may spill over
when adding food. Frosty foods
bubble vigorously. Watch foods
frying at HIGH temperatures and
keep range and hood clean from
accumulated grease.
~~
NOT
OVER 1“
Directions and Setting
to
Start
Cooking
Setting to Complete
Cooking
E.()()d
C()()kware
Comments
Fried Chicken
Covered
Skillet
H1. Melt fat.
Switch to MED
HI to
brown
chicken.
LOW.
Cuver
skillet
and
cook”
until tender.
Urrcnver last
few minutes.
For
crisp
dry
chicken,
c(wer mdy
after
switching tn LOW
for 10
minuks. Uncover and c[x)k,
turning
occlsi(mally 10 to 20
minutes.
A
m(~re
attention-free
method
is tn stirt
and cook” at
MED.
Pan broiled hacon
Uncuvered
Skillet
HI. In
cc)ld
skillet.
arrange
hacmr
slices.
C()()k
just
until starting tu sizzle.
HI. Melt
fat.
Switch tn MED
tu hrnwn
slowly.
MED HI.
Cc)ok,
turning
over as
needed.
S~uteed:
Less tender
thin
steaks
(chuck,
round,
etc. );
liver:
thick or whule Iish
Simmered or stewed
meat;
chicken;
corned
beef;
smoked pork;
stewing
hccf; ttmguc;
etc.
Covered
Skillet
LOW.
Cnver and cnnk
until tender.
Meat may
he
hretided ur
marinated in
sauce before
frying.
Covered
Dutch Oven,
Kettle
or
HI.
Cuver
meat with
watel
and cover pan or
kettle.
C()()k
until
stemnirrg.
LOW.
Cook
until
fork
tender.
(Water
should
slowly hoil). For
very
large
It)ads,
medium
heat
may
he needed.
Add salt or
uther seas(ming
hefure cooking
if meat
has not
been
smuked ur utherwisc
cured.
Large
Saucepan
Small
C(wered
Saucepan.
Use small
surfhce
unit
Melting choeoiate,
hutter,
marshmallows
WM.
Allrrw
10 to E minutes
tn
melt through. Stir to
smooth.
When melting marshmallows.
add
milk or water.
Thick batter takes slightly
hmger
time. Turn
(wer
pancakes when
bubbles
rise to
surface.
Pancakes
or
k.rench toast
Skillet or
Griddle
MED HI. Heat skillet 8
tn
10 minutes. Grease lightly.
Cook
2 In 3 minutes
~r
side
Pasta
N(~odlcs or
spaghetti
M ED HI.
C()()k unc(wercd
until tender.
Fnr
large
amounts,
HI
may
be
needed tu
keep
water at
rolling
boil
throughout
entire
cooking
time.
Use
large ent)ugb
kettle
tu
prevent
boilovcr,
Pasta lioublcs
in size when
cooked.”
C(wered
Large kettle
ur Pot
HI.
In
ct)vcrcd
kettle, bring
salted
water to a
bnii. uncover
and add
pasta
sh~wly su
boiling
d[~es
not
stop.
Pressure Cooking
Pressure
Cooker or
Canner
Uncnvered
Saucepan
HI. Heat until first
,jiggie
is
heard.
MED HI
ft)r foods cooking”
10 minutes or less. MED
for
foods”
over 10 minutes.
Cooker
sbnuid jiggle
2 tn 3 times
per minute.
Puddings, Sauces,
Candies,
k.rostings
HI. Bring just tn boil LOW. Tu
finisb
cooking, Stir frequently to prevent
sticking.
Uncovered
ptin requires
more
water and
lunger
time.
Vegetables
Fresh
Ct)vered
Saucepan
HI. Measure i/2 to I inch
water in saucepan. Add
salt and
prepared vegetable.
In
c(wered
saucepan bring
tu bnil.
HI. Measure water
and salt
as above. Add
frozen
block
(If vcgewbic.
In
c(wered
saucepan
hring tu boil.
HI. In skillet melt
fat.
MED.
Cuok
i
pound
10
to 30 or more minutes.
depending
un
tenderness
uf
vegetable.
Frozen
C(wcrcd
Saucepan
LOW.
C()()k accurding to
time (m
package.
Break
up or stir as
needed
while
cc){)king.
Sauteed:
Oni(ms;
green peppers;
musbr[xnns;
celery; etc.
Rice
and (;rits
Uncovered
Skillet
MED.
Add
vegetable.
C()()k
until desired
tenderness is
reached
Turn
uver nr
stir vegetable as
necessary
Ii)r even hmwning.
Cuvercd
Saucepan
HI. Bring salted
water to a
boil.
WM.
Cnver
and
cook
according tn time,
Triple in
volume
after cooking.
Time at WM. Rice: i cup
rice and
2 cups water—25 minutes. Grits:
I
cup
grits
and
4
cups
watcr–
40
minutes,
9
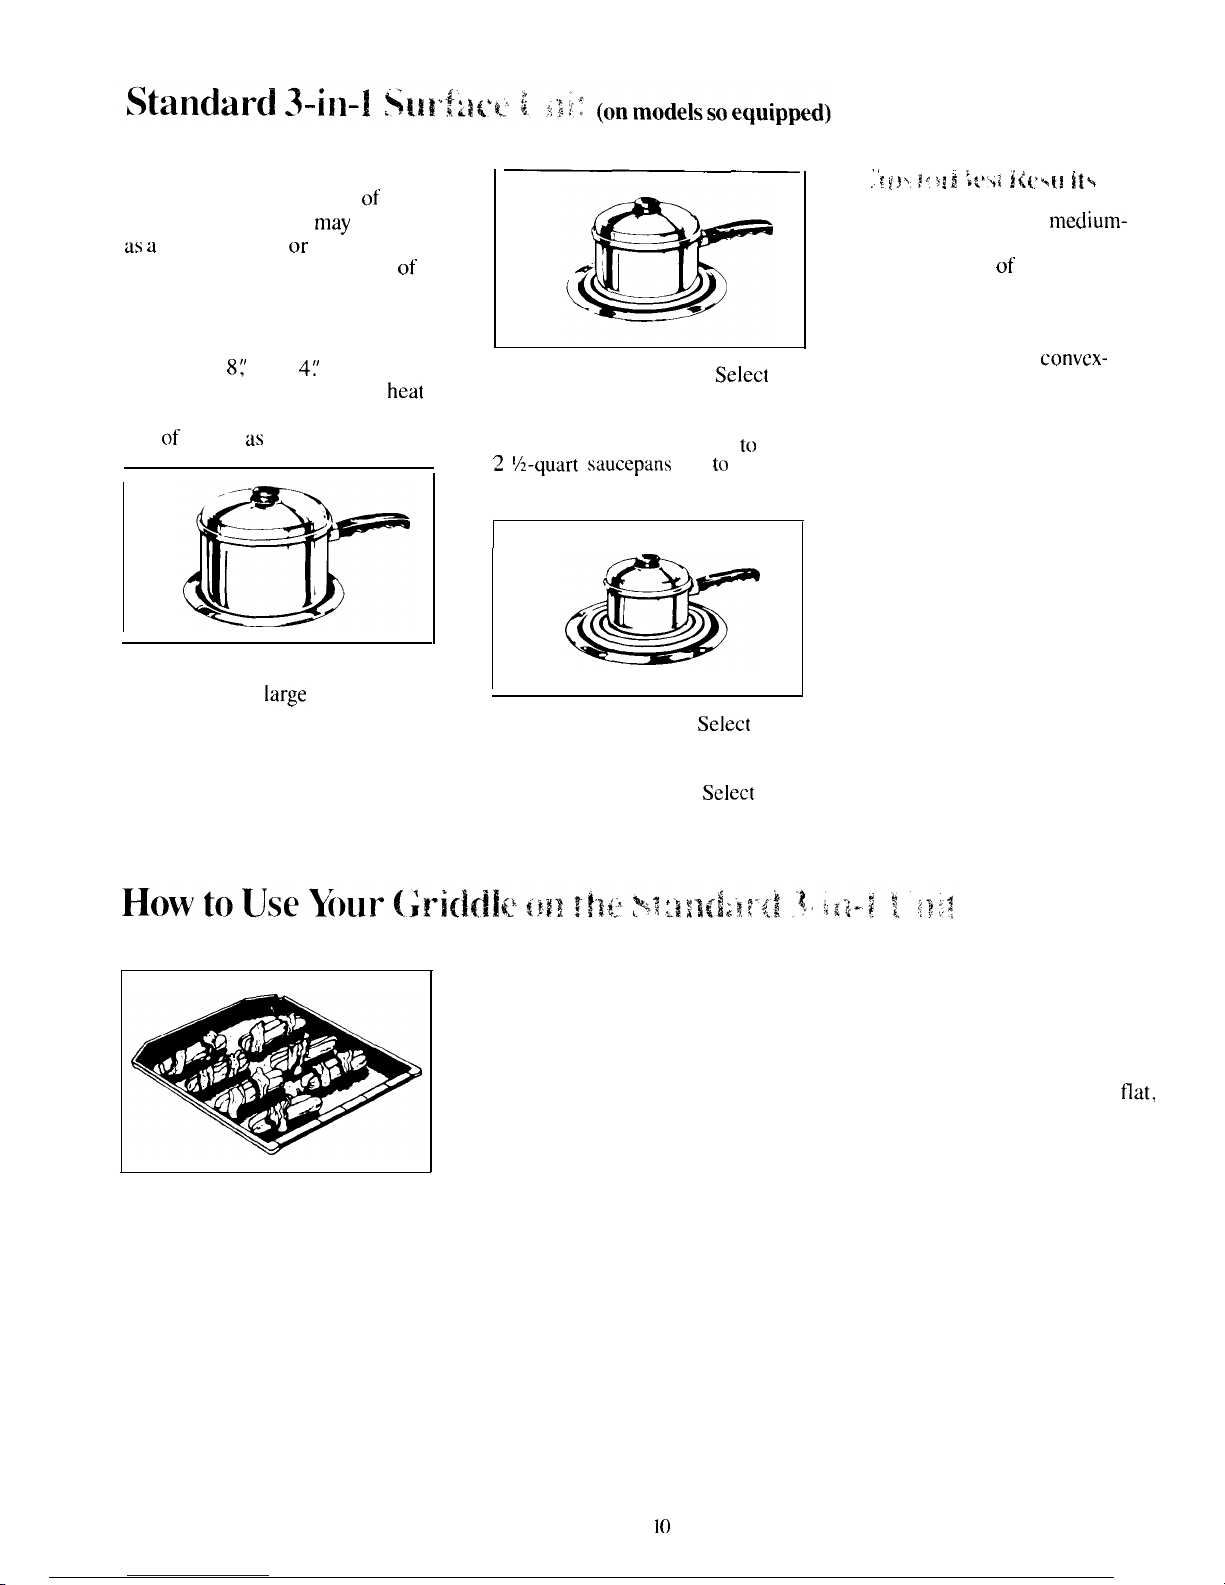
The 3-in-l Stay-Up surface heating
unit offers the convenience of three
units in one. The unit
may
be used
as a
4-inch, 6-inch or 8-inch unit,
to accommodate different sizes of
utensils.
Push or turn the size selector
switch, next to the surface unit
controls, to
8(’
6“ or
4:’
Then turn
surface unit control to desired
heat
setting. Match unit size selection to
size
of
utensil as follows,
&
‘>
I
LARGE—8-inch
unit. Select 8“
size when using
large
utensils that
completely cover the unit (3-quart
to 6-quart saucepans or 8 to 10-inch
skillet). Select desired heat setting.
MEDIUM—6-inch
unit.
Select
6“ size when using medium-sized
cooking utensils that do not
completely cover the unit (2
to
2 ~2_quart saucepans
or 6 to 7-inch
skillets). Select desired heat setting.
&
SMALL—4-inch unit.
Select
4“
size when using small cooking
utensils about 4 inches in diameter
(as a l-quart saucepan).
Select
desired heat setting.
.,
.
!
!}”.
1’:
$i
i
it’”ii ii{;%!! ii%
● Use flat-bottomed,
medium-
weight aluminum utensils, in
relation to size
of unit in use. Use
tight-fitting lids with foods which
require a cover; loose lids or no
cover lengthen cooking time.
Warped, concave or
convex-
bottomed pans are not recommended.
● Use MINUTE TIMER to time
TOTAL cooking, Include time
usually required to bring food to
boil, switching heats, etc. Do not
judge cooking time by visible
steaming only. Food will cook in
covered utensils even though no
steam may be apparent during the
cooking process.
Your griddle has an easy-clean,
nonstick cooking surface. Avoid
using utensils with sharp or rough
points or edges. Do not cut foods
on the griddle. If preferred, foods
may be cooked without greasing
griddle. Use as follows:
1. Place griddle on 3-in-l Unit;
move it back and forth until it falls
into place over unit. The griddle is
designed for easy positioning; it
must be correctly placed to work
properly.
2. Push or turn surface unit
selector to GRIDDLE.
3. Turn surface control knob to
desired heat setting.
4. When cooking is finished, turn
surface control knob to OFF.
5. Let griddle cool on range, or
protect hands with heavy, dry pot
holders before handling. To clean,
see Cleaning Guide, page 33.
To avoid marring nonstick finish,
store griddle upright, or store
flat,
but with no other pans or utensils
on top of the griddle.
10
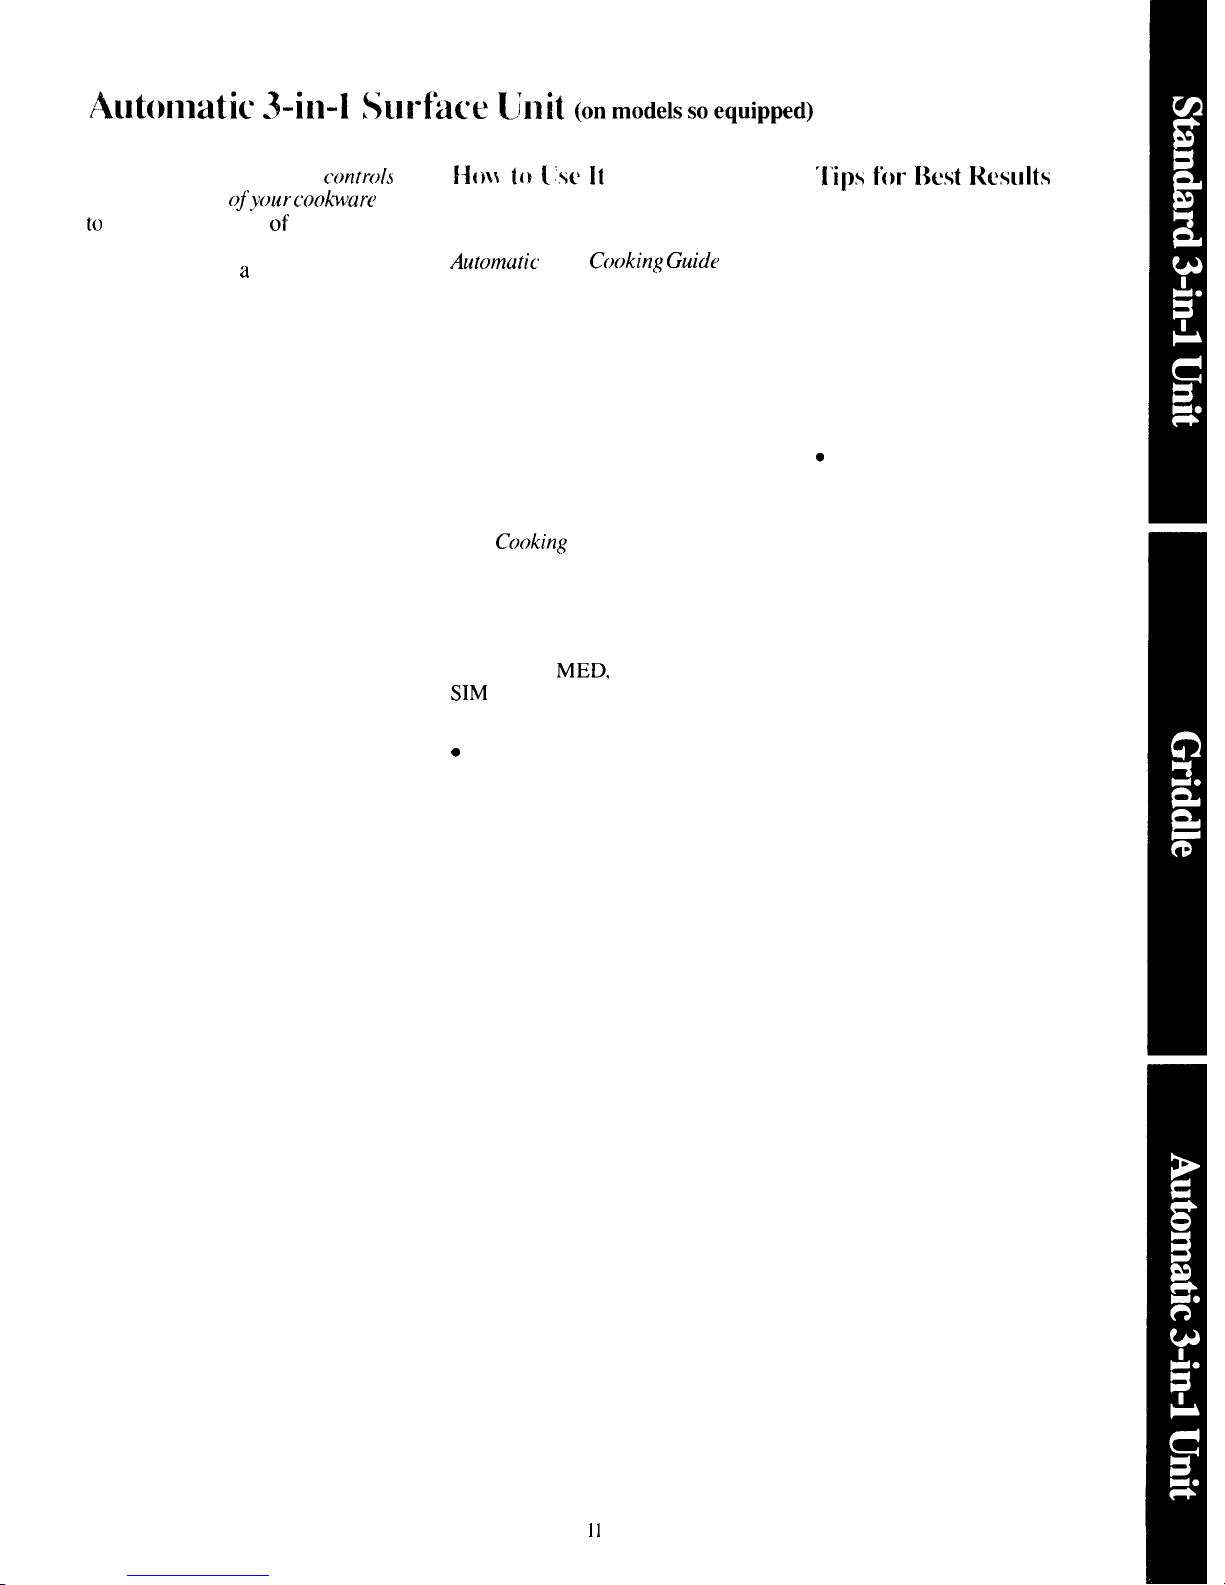
The automatic surface unit
(’(mtrol.s
the temperature
oj’your” coobare
to
give the same
type
of automatic
cooking that you may have
experienced with
a
well-controlled
electric skillet or saucepan.
The spring-mounted sensor,
located in the center of the surface
unit, measures and controls the
heat to the pan on the unit.
1. Set pan on unit. Use a cover
on cookware when suggested on
Automatic
Unit
Cooking Guide
on next page.
2. Turn Automatic Unit Selector
knob to select unit size.
The unit
may be used as an 8-inch, 6-inch or
4-inch unit to accommodate large,
medium-sized or small cookware.
Match unit size selection to size
of cookware as shown on page 10.
3. Select heat setting as
recommended on the
Automatic
Unit
Coc)king
Guide.
(Settings were
chosen using medium-weight
aluminum pans. )
●
For cooking with liquids, use
settings anywhere in the area
marked HI,
MED,
LOW BOIL,
SIM
or setting in between to obtain
desired rate of cooking.
G
For frying operations use settings
anywhere in area numbered 200
to
500.
● For warming operations use
settings marked 200 and the line
just below 200.
‘1’ips ti)l- I]est Reslllts
●
Use flat-bottomed, medium-weight
aluminum cookware, in relation to
size of unit in use. Use tight-fitting
lids with foods which require a
cover; loose lids or no cover
lengthen cooking time. Warped,
concave or convex-bottomed pans
may not touch sensor in center of
Automatic Unit; if not, sensor
cannot control heat supplied to pan.
c
Use amount of water suggested
on Automatic Unit Guide; if more is
used, higher heat setting and longer
cooking time may be required.
● Cookware of other materials
may require different heat settings
and/or cooking time.
● Use a minute timer to time
TOTAL cooking. Include time
usually required to bring food to
boil, switching heats, etc. Do not
judge cooking time by visible
steaming only. Food will cook in
covered cookware even though no
steam may be apparent during the
cooking process.
4. When cooking is finished, turn
Automatic Unit control dial to OFF.
II
 Loading...