

Page 1
IC 644 C RFH
EnglishEnglish
English
GB
Operating Instructions
HOB
Contents
Operating Instructions,1
WARNING,2
Description of the appliance-Control Panel,3
Installation,5
Start-up and use,7
Precautions and tips,11
Care and maintenance,12
Technical description of the models,12
Русский
RS
Руководство по эксплуатации
ВАРОЧНАЯ ПАНЕЛЬ
Содержание
Руководство по эксплуатации,1
ВНИМАНИЕ,2
Описание изделия-Панель управления,3
Монтаж,13
Bарочная панель,15
Предосторожности и рекомендации,19
Техническое обслуживание и уход,20
Техническое обслуживание,21
Русский
Қазақша
KZ
Пайдалану нұсқаулығы
ПЛИТА
Мазмұны
Пайдалану нұсқаулығы, 1
ЕСКЕРТУ, 2
Құрылғы сипаттамасы-Басқару тақтасы, 7
Орнату, 22
Қосу және пайдалану, 24
Сақтандырулар мен кеңестер, 28
Күтім көрсету және техникалық қызмет көрсету, 29
Модельдерді техникалық сипаттамасы, 29
English
EnglishEnglish
GB
WARNING!
• WARNING: The appliance and
its accessible parts become hot
during use.
• Care should be taken to avoid
touching heating elements.
• Children less than 8 years of
age shall be kept away unless
continuously supervised.
• This appliance can be used by
children aged from 8 years and
above and persons with reduced
physical, sensory or mental
capabilities or lack of experience
and knowledge if they have been
given supervision or instruction
concerning use of the appliance
in a safe way and understand the
hazards involved. Children shall not
play with the appliance. Cleaning
and user maintenance shall not
be made by children without
supervision.
• WARNING: Unattended cooking
on a hob with fat or oil can be
dangerous and may result in fire.
• NEVER try to extinguish a fire with
water, but switch off the appliance
and then cover flame e.g. with a lid
or a fire blanket.
• WARNING: Danger of fire: do
not store items on the cooking
surfaces.
• WARNING: If the surface in glass-
ceramic is cracked, switch off the
appliance to avoid the possibility of
electric shock.
•Never use steam cleaners
or pressure cleaners on the
appliance.
•The appliance is not intended to be
operated by means of an external
timer or separate remote control
system.
• Do not place metal objects (knives,
spoons, pan lids, etc.) on the hob
as they may become hot.
• After use, switch off the hob
element by its control and do not
rely on the pan detector.
Page 2

RS
Русский
ВНИМАНИЕ !
• ВНИМАНИЕ: Данное изделие и
его доступные комплектующие
сильно нагреваются в процессе
эксплуатации.
• Будьте осторожны и не касайтесь
нагревательных элементов.
• Не разрешайте детям младше 8
лет приближаться к изделию без
контроля.
• Данное изделие может быть
использовано детьми старше 8
лет и лицами с ограниченными
физическими, сенсорными или
умственными способностями или
без опыта и знания о правилах
использования изделия при условии
надлежащего контроля или обучения
безопасному использованию
изделия с учетом соответствующих
рисков. Не разрешайте детям играть
с изделием. Не разрешайте детям
осуществлять чистку
и уход за
изделием без контроля взрослых.
• ВНИМАНИЕ: Опасно оставлять
включенную конфорку с маслом или
жиром без присмотра, так как это
может привести к пожару.
• НИКОГДА не пытайтесь погасить
пламя/пожар водой. Прежде всего
выключите изделие и накройте
пламя крышкой или огнеупорной
тканью.
• ВНИМАНИЕ: Опасность пожара: не
оставляйте предметов на варочных
поверхностях.
•ВНИМАНИЕ:
Еслстеклокерамическая
поверхность варочной панели
треснула, выключите ее во
избежание ударов током.
• Никогда не используйте паровые
чистящие агрегаты или агрегаты
под высоким давлением для чистки
изделия.
• Изделие не рассчитано на
влючение посредством внешнего
синхронизатора или отдельной
системы дистанционного
управления.
• Не кладите металлические
предметы (ножи, ложки, крышки и
т.д.) на варочную панель, так как
они могут сильно нагреться.
• После использования выключите
варочную панель при помощи
специальной рукоятки, не
полагаясь на сенсор обнаружения
посуды.
Қазақша
KZ
ЕСКЕРТУ!
• ЕСКЕРТУ: Құрылғы мен оның қол жететін
бөліктері жұмыс кезінде қызуы мүмкін.
• Қыздыру элементтеріне тимеуге назар
аударыңыз.
• 8-ге толмаған балаларға үздіксіз бақылау
болмаса, құрылғыдан аулақ ұстау керек.
• Бұл құрылғыны қауіпсіз түрде қолдану
бойынша кеңес не нұсқау берілген
және ықтимал қауіп-қатерлерді түсінетін
жағдайда, оны 8-ге толған балалар мен
дене, сезіну немесе ой қабілеті төмен
немесе тәжірибесі мен білімі жеткіліксіз
адамдар қолдана алады. Балаларға
құрылғымен ойнауға болмайды. Балаларға
бақылаусыз құрылғыны тазалауға және
оған қызмет көрсетуге болмайды.
• ЕСКЕРТУ: Плитада майға тамақ пісірген
кезде бақылап тұрмау қауіпті болуы және
өрт шығуға әкелуі мүмкін.
• Өртті ЕШҚАШАН сумен өшіруші болмаңыз,
оның орнына құрылғыны өшіріп, жалынды
жабыңыз, мысалы қақпақпен немесе
өртенбейтін матамен.
• ЕСКЕРТУ: Өрт қаупі бар: пісіру беттерінде
заттарды сақтамаңыз.
• ЕСКЕРТУ: Шыны мен керамикадан
жасалған бет шатынаған болса, тоқ соғу
мүмкіндігінің алдын алу үшін құрылғыны
өшіріңіз.
• Құрылғыда ешқашан бу тазартқышты
немесе шаңсорғышты пайдаланбаңыз.
• Құрылғы сыртқы таймермен немесе бөлек
қашықтан басқару жүйесімен басқарылуға
арналмаған.
• Металл заттарды (пышақтар, қасықтар,
таба қақпақтары, т.б.) конфоркаға
қоймаңыз, себебі олар қызып кетуі мүмкін.
• Пайдаланғаннан кейін плитаны басқару
элементінің көмегімен өшіріңіз, таба
детекторына сенбеңіз.
2
Page 3
14
3 5
13 1
9 10
15
6
Booster
4
RS
Панель управления, описание которои приводится
ниже, служит только в качестве примера: она может не
в точности соответствовать Вашеи модели
Описание изделия
Панель управления
1 Кнопка УВЕЛИЧЕНИЕ МОЩНОСТИ служит для
включения варочнои зоны и регуляции мощности
нагрева (см. Включение и эксплуатация).
2 Кнопка УМЕНЬШЕНИЕ МОЩНОСТИ служит для
регуляции мощности и выключения варочнои
зоны (см. Включение и эксплуатация).
3 Индикатор ВЫБРАННАЯ ВАРОЧНАЯ ЗОНА
показывает, что соответствующая варочная
зона была выбрана и следовательно возможно
произвести настроики ее функции.
4 Кнопка ВЫБОР ВАРОЧНОИ ЗОНЫ служит для
выбора нужнои варочнои зоны.
5 Индикатор МОЩНОСТЬ: показывает уровень
нагрева.
6 Кнопка ON/OFF (ВКЛ./ВЫКЛ.) служит для
включения и выключения изделия.
7 Индикатор ON/OFF (ВКЛ./ВЫКЛ.): показывает
состояние изделия, включено или выключено.
8 Кнопка ТАИМЕР ПРОГРАММИРОВАНИЯ* служит
для настроики продолжительности приготовления
(см. Включение и эксплуатация).
9 Дисплеи ТАИМЕРА ПРОГРАММИРОВАНИЯ*:
показывает различные настроики
программирования (см. Включение и
эксплуатация).
10 Индикаторы ЗАПРОГРАММИРОВАННЫЕ
ВАРОЧНЫЕ ЗОНЫ*: показывают варочные зоны
после запуска программирования ( см. Включение
и эксплуатация).
11 Кнопка БЛОКИРОВКА УПРАВЛЕНИИ служит
для защиты управлении варочнои панели
от случаиных измнении (см. Включение и
эксплуатация).
12 Индикатор УПРАВЛЕНИЯ ЗАБЛОКИРОВАНЫ
показывает, что управления
заблокированы ( см.
Включение и эксплуатация).
13 Кнопка BOOSTER* служит для включения
дополнительного электропитания – 3000 Вт
– индукционной конфорки (см. Включение и
эксплуатация).
14 Индикатор BOOSTER* показывает, что
функция вольтодобавочного устройства включена.
15 Индикатор ТАИМЕР* показывает, что таимер
включен
! Данное изделие отвечает требованиям новой
Европейской Директивы по ограничению
энергопотребления в режиме энергосбережения.
7
12
2
Если в течение 2-х минут не производится
никаких действий после выключения индикаторов
остаточного тепла и вентилятора (если они
присутствуют), изделие автоматически переходит в
режим «ВЫКЛ.».
Возврат изделия в рабочий режим производится
кнопкой ВКЛ./ВЫКЛ.
Имеется только в некоторых моделях.
*
GB
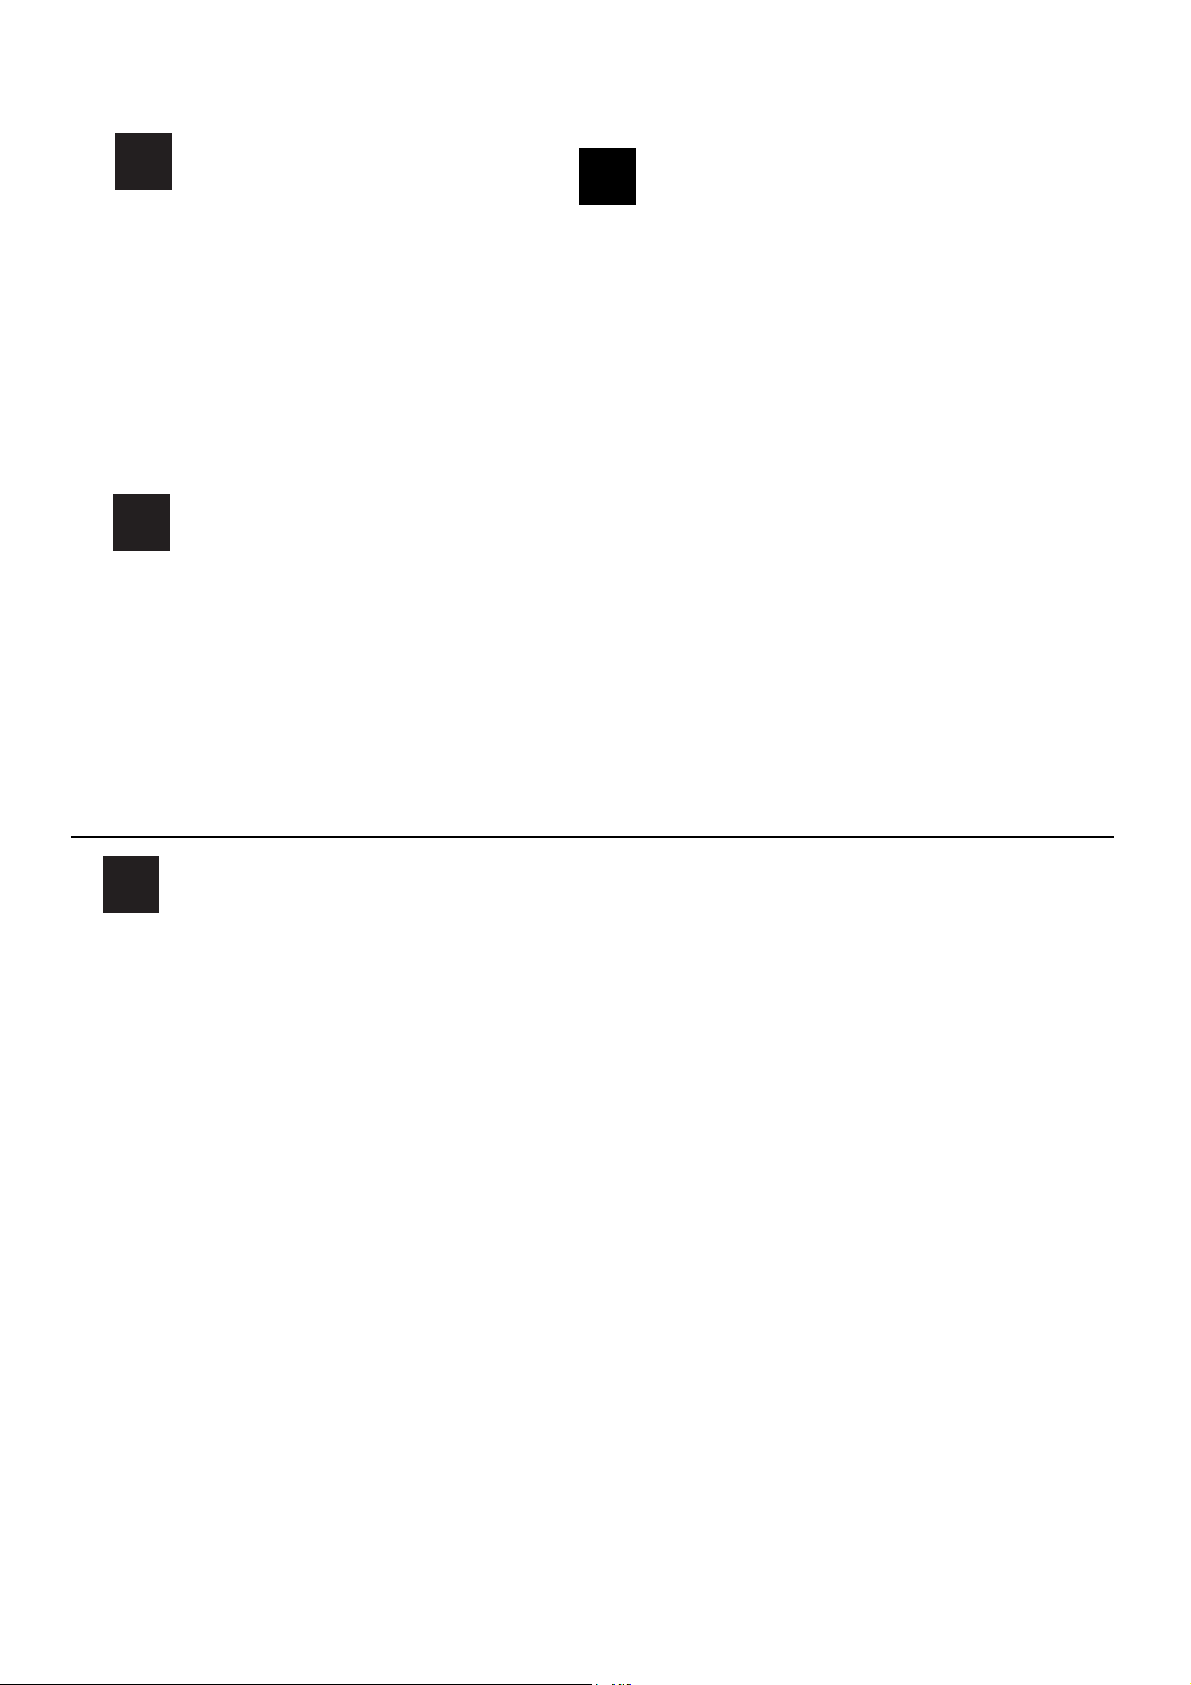
The control panel described in this manual is only a
representative example: it may not exactly match the panelon
your appliance.
Description of the appliance
Control panel
8
11
1 INCREASE POWER button switches on the hotplate
and controls the power (see Start-up and use).
2 REDUCE POWER button controls the power and
switches off the hotplate (see Start-up and use).
3 COOKING ZONE SELECTOR indicator shows a
particular cooking zone has been selected and
therefore various adjustments are possible.
4 COOKING ZONE SELECTOR button is used to
select the desired cooking zone.
5 POWER indicator provides a visual display for the
current heat level.
6 ON/OFF button switches the appliance on and off.
7 ON/OFF indicator light shows whether the appliance
is on or off.
8 PROGRAMME TIMER* button controls the cooking
programme times (see Start-up and use).
9 PROGRAMME TIMER* display shows which
programme has been selected (see Start-up and use).
10 COOKING ZONE PROGRAMMED* indicator lights
show which cooking zones are being used during a
cooking programme (see Start-up and use).
11 CONTROL PANEL LOCK button prevents
accidental changes to the hob settings (see Start-up
and use).
12 CONTROL PANEL LOCK indicator light shows the
control panel has been locked (see Start-up and use).
13 BOOSTER button* activates the booster
function - 3000 W - of the cooking zone (see Start-up
and use).
14 BOOSTER indicator light* shows that the
booster function has been activated.
15 TIMER* indicator light shows that the timer has been
activated
! This product complies with the requirements of the
latest European Directive on the limitation of power
consumption of the standby mode.
If no operations are carried out for a period of 2
minutes, after the residual heat indicator lights turn
off and the fan stops (if present), the appliance
automatically switches to the .off mode..
The appliance resumes the operating mode once the
ON/OFF button is pressed.
*Only on certain models
3
Page 4
3 5
13
14
1
15
9 10
6
Booster
4
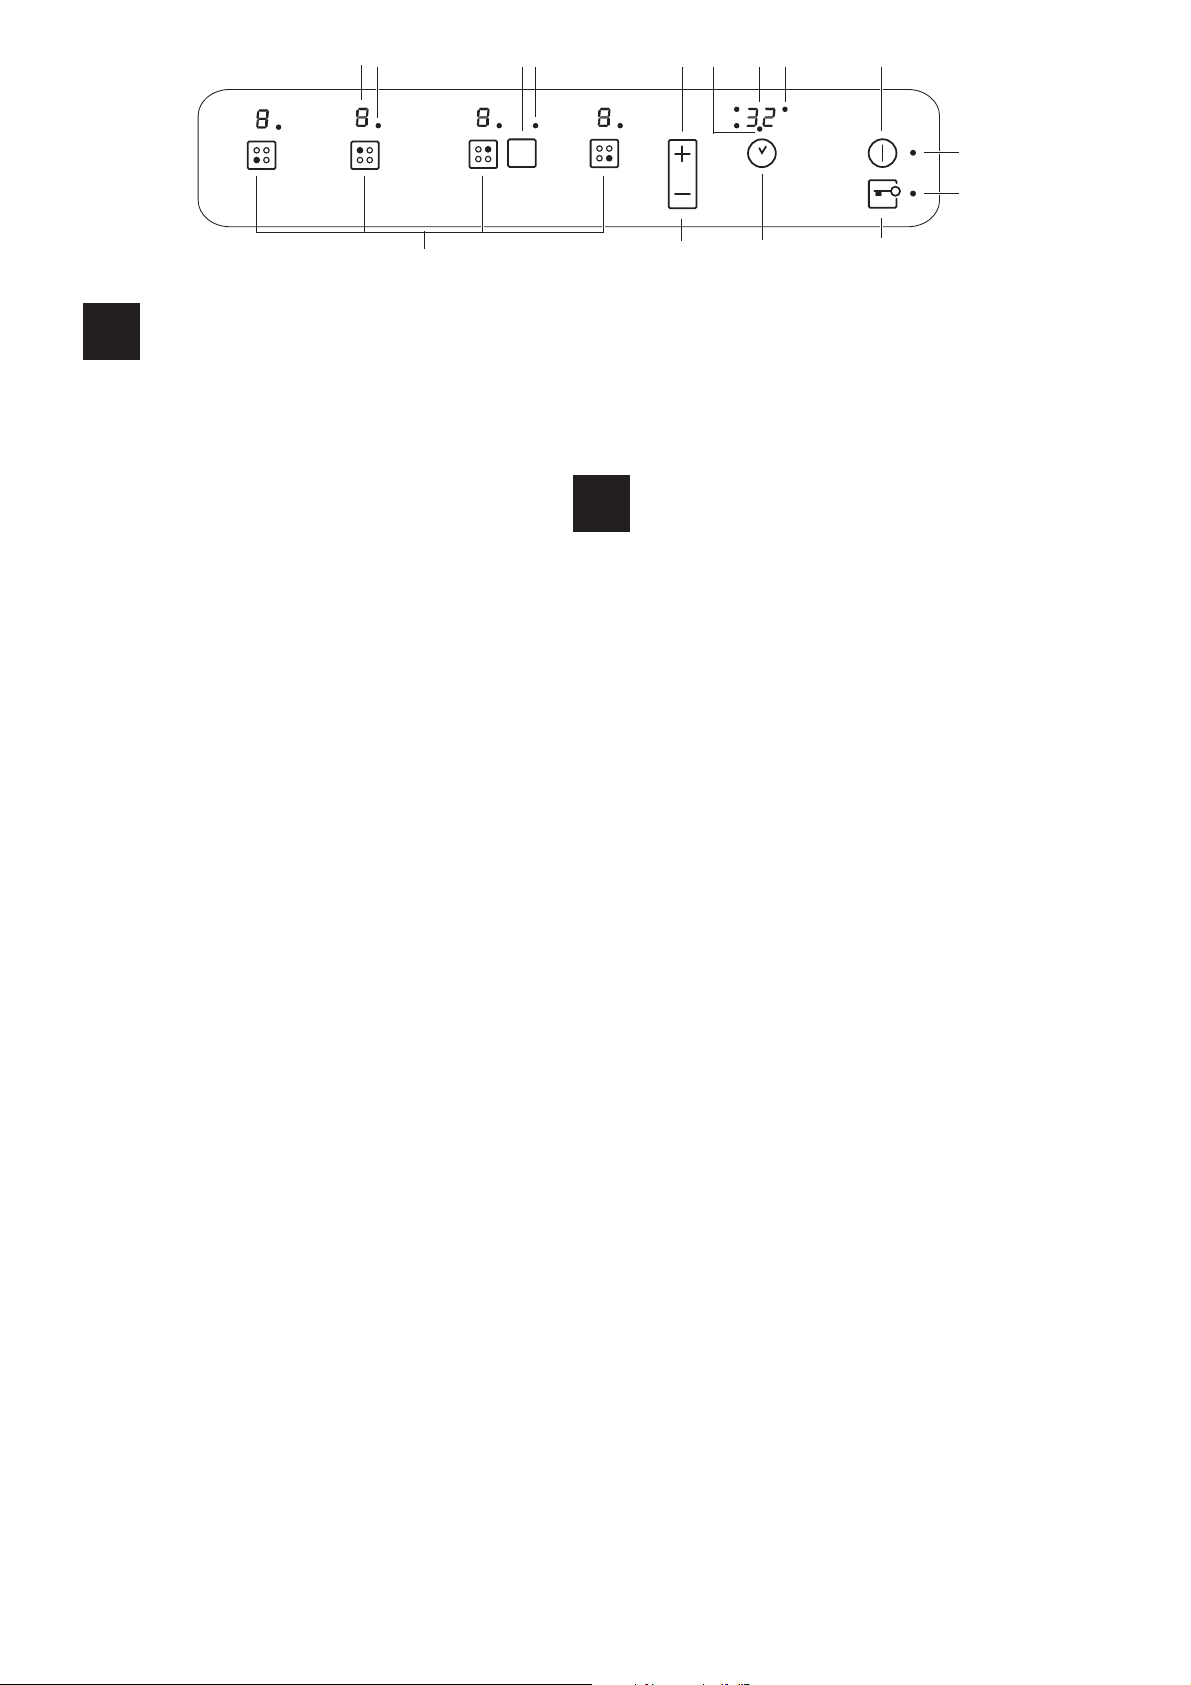
Құрылғы сипаттамасы
KZ
1 ҚУАТТЫ АРТТЫРУтүймесіконфорканықосады
2 ҚУАТТЫ АЗАЙТУтүймесіқуаттыбасқарадыжәне
3 ПІСІРУ АЙМАҒЫН ТАҢДАУ индикаторы
4 ПІСІРУ АЙМАҒЫН ТАҢДАУтүймесіқажеттіпісіру
5 ҚУАТ индикаторыағымдағықызудеңгейін
6 ҚОСУ/ӨШІРУ түймесіқұрылғынықосадыжәне
7 ҚОСУ/ӨШІРУиндикаторшамықұрылғы
8 БАҒДАРЛАМА ТАЙМЕРІ* түймесіпісіру
9 БАҒДАРЛАМА ТАЙМЕРІ* дисплейіқай
10БАҒДАРЛАМАЛАНҒАН ПІСІРУ АЙМАҒЫ*
11БАСҚАРУ ТАҚТАСЫНЫҢ ҚҰЛПЫтүймесіплита
12БАСҚАРУ ТАҚТАСЫНЫҢ ҚҰЛПЫ индикатор
13КҮШЕЙТКІШ түймесі*пісіруаймағыныңкүшейткіш
14КҮШЕЙТКІШ индикаторшамы*күшейткіш
15ТАЙМЕР*индикаторшамытаймерқосылғанын
Басқару тақтасы
жәнеқуаттыбасқарады(«Қосу және пайдалану»
бөлімін қараңыз).
конфорканыөшіреді(«Қосу және пайдалану»
бөлімін қараңыз).
таңдалғанбелгілібірпісіруаймағынкөрсетеді
жәнесондықтанәртүрліреттеумүмкін.
аймағынтаңдауүшінпайдаланылады.
көрсетеді.
өшіреді.
қосылғаныннемесеөшірілгенінкөрсетеді.
бағдарламаларыныңуақыттарынбасқарады
(«Қосу және пайдалану» бөлімін қараңыз).
бағдарламатаңдалғанынкөрсетеді(«Қосу және
пайдалану» бөлімін қараңыз).
индикаторшамдарыпісірубағдарламасы
барысындақайпісіруаймағықолданыстаекенін
көрсетеді(«Қосу және пайдалану» бөлімін
қараңыз).
параметрлерінебайқаусызөзгерісенгізуге
жолбермейді(«Қосу және пайдалану»бөлімін
қараңыз).
шамыбасқарутақтасыныңқұлыпталғанын
көрсетеді(«Қосу және пайдалану» бөлімін
қараңыз).
функциясынқосады-3000Вт(«Қосу және
пайдалану» бөлімін қараңыз).
функциясықосылғанынкөрсетеді.
көрсетеді
7
12
2
8
11
Теккейбірмодельдердеболады.
*
4
Page 5
Installation
Before operating your new appliance please read
!
this instruction booklet carefully. It contains important
information concerning the safe operation, installation
and maintenance of the appliance.
Please keep these operating instructions for future
!
reference. Pass them on to any new owners of the
appliance.
Positioning
!
Keep all packaging material out of the reach of
children. It may present a choking or suffocation
hazard (see Precautions and tips).
!
The appliance must be installed by a qualified
professional in accordance with the instructions
provided. Incorrect installation may cause harm to
people and animals or may damage property.
Built-in appliance
Use a suitable cabinet to ensure that the appliance
functions properly.
• The supporting surface must be heat-resistant up to
a temperature of approximately 100°C.
• If the appliance is to be installed above an oven,
the oven must be equipped with a forced ventilation
cooling system.
• Avoid installing the hob above a dishwasher: if this
cannot be avoided, place a waterproof separation
device between the two appliances.
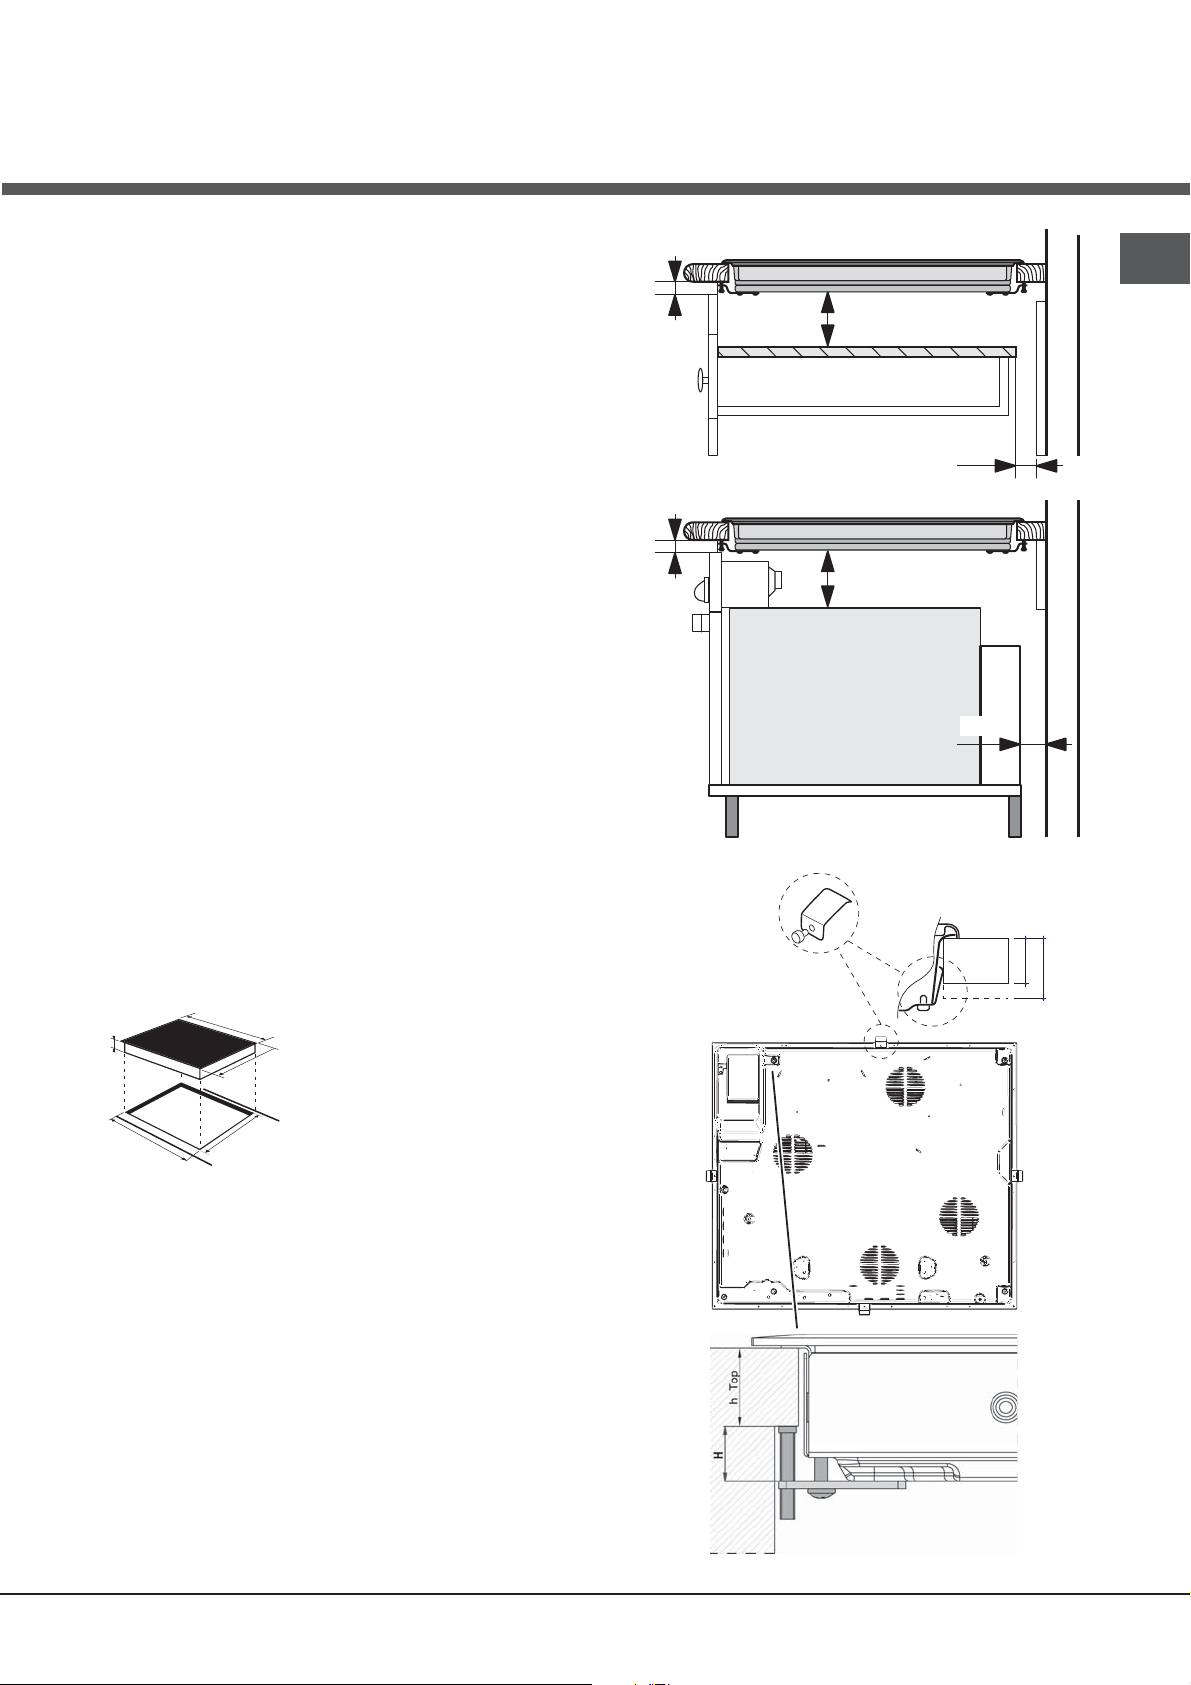
• Depending on the hob you want to install, the
cabinet must have the following dimensions (see
gure):
590
53
520
5 mm
5 mm
UNDERSIDE
OF HOB
min. 20 mm
COMPARTMENT
min. 40 mm
min. 20 mm
FAN-ASSISTED
OVEN
min. 40 mm
FRONT SIDE
OF HOB
SUPPORTING
SURFACE
GB
30
40
560 +/- 1
490 +/- 1
Ventilation
To allow adequate ventilation and to avoid overheating of
the surrounding surfaces the hob should be positioned as
follows:
• At a minimum distance of 40 mm from the back
panel or any other vertical surfaces.
• So that a minimum distance of 20 mm is maintained
between the installation cavity and the cabinet
underneath.
• Kitchen cabinets adjacent to the appliance and taller
than the top of the hob must be at least 600 mm
from the edge of the hob.
5
Page 6
Fixing
The appliance must be installed
GB
on a perfectly level
supporting surface. Any deformities caused by
improper fixing could affect the features and operation
of the hob.
The thickness of the supporting surface
into account when choosing
the length of the screws for
the fixing hooks:
• 30 mm thick: 23 mm screws
• 40 mm thick: 13 mm screws
Fix the hob as follows:
1. Use short flat-bottomed screws to fix the 4 alignment
springs in the holes provided at the central point of each
side of the hob.
2. Place the hob in the cavity, make sure it is in a central
position and push down on the whole perimeter until the
hob is stuck to the supporting surface.
3. For hobs with raised sides: After inserting the hob into
its cavity, insert the 4 fixing hooks (each has its own pin)
into the lower edges of the hob, using the long pointed
screws to fix them in place, until the glass is stuck to the
supporting surface.
The screws for the alignment springs must remain
!
accessible.
In order to adhere to safety standards, the appliance
!
must not come into contact with electrical parts once it
has been installed.
All parts which ensure the safe operation of the
!
appliance must not be removable without the aid of a
tool.
Electrical connection
!
The electrical connection for the hob and for any builtin oven must be carried out separately, both for safety
purposes and to make extracting the oven easier.
should be taken
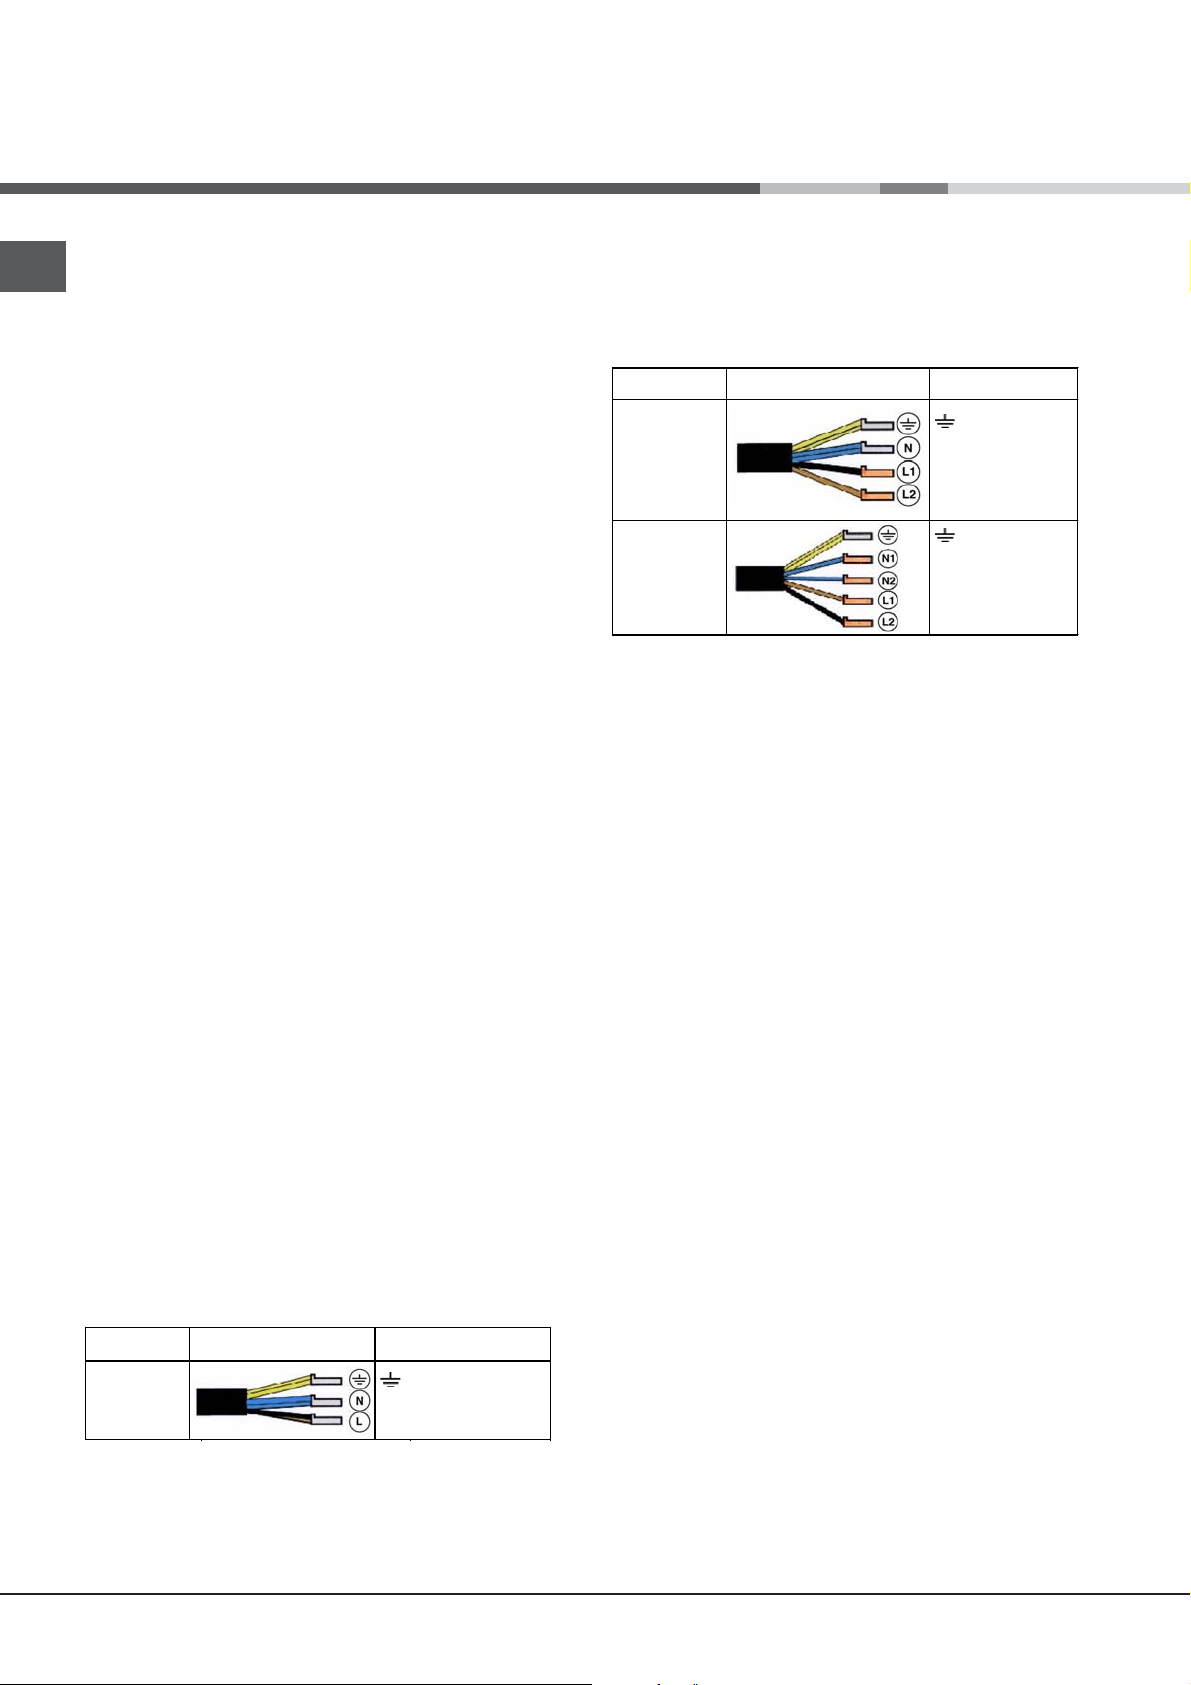
• 400V - 2+N ~ 50 Hz
• 220-240V 3 ~ 50 Hz
• 400V 3 - N ~ 50 Hz
• 400V - 2+2N ~ 50 Hz
Separate the wires and connect them in accordance with
the instructions given in the following table and diagrams:
Voltage and
mains frequency
400V - 2+N ~
220-240V 3 ~
400V 3-N ~
400V - 2+2N ~
50 Hz
50 Hz
50 Hz
50 Hz
Electrical cable Wire connection
: yellow/green;
N: the two blue wires
together
L1: black
L2: brown
: yellow/green;
N1: blue
N2: blue
L1: black
L2: brown
Connecting the electricity supply cable to the mains
If the appliance is being connected directly to the electricity
mains an omnipolar switch must be installed with a minimum
opening of 3 mm between contacts.
! The installer must ensure that the correct electrical
connection has been made and that it is fully compliant
with safety regulations.
Before connecting the appliance to the power supply, make
sure that:
• The appliance is earthed and the plug is compliant with the
law.
• The socket can withstand the maximum power of the
appliance, which is indicated on the data plate located on
the appliance itself.
• The voltage falls within the range of values indicated on the
data plate.
• The socket is compatible with the plug of the appliance. If
the socket is incompatible with the plug, ask an authorised
technician to replace it. Do not use extension cords or
multiple sockets.
Single-phase connection
The hob is equipped with a pre-connected electricity
supply cable, which is designed for single-phase
connection. Connect the wires in accordance with the
instructions given in the following table and diagrams:
Voltage and
mains frequency
220-240V 1+N ~
50 Hz
Electrical cable Wire connection
: yellow/green
N
: the two blue wires together
L
: brown and black together
Other types of connection
If the mains supply corresponds with one of the
following:
Voltage and mains frequency
6
Once the appliance has been installed, the power supply
!
cable and the electrical socket must be easily accessible.
!
The cable must not be bent or compressed.
The cable must be checked regularly and replaced by
!
authorised technicians only.
!
The manufacturer declines any liability should these
safety measures not be observed.
! Do not remove or replace the power supply cable for any
reason. Its removal or replacement will void the warranty
and the CE marking. INDESIT does not assume liability for
accidents or damage arising from replacement/removal
of the original power supply cable. Replacement can only
be accepted when carried out by personnel authorised by
INDESIT and using an original spare part.
Page 7
Start-up and use
!
The glue applied on the gaskets leaves traces of
grease on the glass. Before using the appliance, we
recommend you remove these with a special nonabrasive cleaning product. During the first few hours
of use there may be a smell of rubber which will
disappear very quickly.
Switching on the hob
To switch the hob on, press and hold the button for
approximately one second.
GB
A few seconds after the hob is connected to the electricity
!
supply, a buzzer will sound. The hob may now be switched
on.
Types of noise during normal hob operation:
• Buzz: due to the vibration of the metallic parts that
make up the induction element and the pot; it is
generated by the electromagnetic field required for
heating and increases as the power of the induction
element increases.
• Soft whistle: heard when the pot placed on the
heating zone is empty; the noise disappears once
food or water is placed into the pot.
• Crackle: produced by the vibration of materials on
the bottom of the pot due to the flow of parasitic
currents caused by electromagnetic fields
(induction); can be more or less intense depending
on the material making up the bottom of the pot, and
decreases as the pot dimensions increase.
• Loud whistle: heard when two induction elements of
the same group function simultaneously at maximum
power and/or when the booster function is set on
the larger element while the other is auto-adjusted.
Noise is reduced by decreasing the power level of
the auto-adjusted induction element; pot bottom
layers made of different kinds of materials are
among the main causes of this noise.
• Fan noise: a fan is necessary to ensure the hob
functions correctly and to safeguard the electronic
unit from possible overheating. The fan functions at
maximum power when the large induction element is at
maximum power or when the booster function is on; in
all other cases, it works at average power depending
on the temperature detected. Furthermore, the fan may
continue to work even after switching the hob off, if the
temperature detected is high.
The types of noise listed above are due to induction
technology and are not necessarily operational faults.
Switching on the cooking zones
Each cooking zone is controlled using a selector button
and a power adjustment device consisting of a
-
double
• To begin operating a cooking zone, press the
corresponding control button and set the desired
power level (between 0 and 9) using the buttons
and
and + button.
+
.
-
Booster function*
The booster function for some of the cooking zones may
be used to shorten heating-up times. It may be activated
Booster
by pressing the
above the button will illuminate. This function boosts
the power to 2000 W or 3000 W, depending on the size
of the relevant cooking zone.
The booster stops automatically after 4 minutes. While
the booster for one of the cooking zones is active, the
corresponding front or rear cooking zone will operate
at a reduced power level (e.g. if the booster for the
rear left-hand hotplate has been activated, the power
level of the front left-hand hotplate will be reduced).
For further information, please refer to the Technical
description of the models.
button. The indicator light directly
Switching off the cooking zones
To switch off a cooking zone, select it using the
corresponding selector button and:
• Press the - button: the power of the cooking zone
will progressively decrease until it is switched off.
If the - or + button is pressed for an extended
!
period of time, the display scrolls quickly though the
power levels and timer minutes.
* Only available in certain models.
Programming the cooking duration
! All the cooking zones may be programmed
simultaneously, for a duration between 1 and 99
minutes.
1. Select the cooking zone using the corresponding
selector button.
2. Adjust the power level of the cooking zone.
7
Page 8
3. Press the programming button. The indicator
GB
light corresponding to the selected zone will start
flashing.
and +
4. Set the cooking duration using the
buttons.
5. Confirm by pressing the
selection occurs after 10 seconds.
The timer begins counting down immediately. A buzzer
sounds for approximately 1 minute and the cooking
zone switches off when the set programme has
finished.
Repeat the above procedure for each hotplate you
wish to programme.
Using multiple programmes and the display
-
button or automatic
2. Set the desired duration using the
buttons.
3. Confirm by pressing the button.
The timer begins counting down immediately. When
the time has elapsed, a buzzer will sound (for one
minute).
and +
-
Control panel lock
When the hob is switched on, it is possible to lock the oven
controls in order to avoid accidental changes being made
to the settings (by children, during cleaning, etc.). Press
the
light above the button will switch on.
To use any of the controls (e.g. to stop cooking), you
button to lock the control panel: the indicator
If one or more hotplates are programmed, the display
will show the data for the hotplate with
the least time remaining, and the light
corresponding to the position of the
hotplate will flash. The lights corresponding
to the other hotplates programmed will be switched on.
To visualise the time remaining for the other programmed
hotplates, press the
remaining for each hotplate will be shown sequentially
in a clockwise order, starting from the front left
hotplate.
Changing the programme
1. Press the
wish to change is shown.
2. Use the buttons to set the new duration.
3. Confirm by pressing the
To cancel a programme, follow the above instructions. At
step 2, press the - button: the duration decreases
progressively until it reaches 0 and switches off. The
programme resets and the display exits programming
mode.
button repeatedly until the duration you
button repeatedly: the time
button.
Timer
The hob must be switched on.
The timer can be used to set a duration up to 99 minutes.
1. Press the
indicator light is illuminated
programming button until the timer
.
must switch off this function. Press the
few moments, the indicator light will switch off and the
lock function will be removed.
button for a
Switching off the hob
Press the button to switch off the appliance - do not
rely solely on the pan sensor.
If the control panel lock has been activated, the
controls will continue to be locked even after the hob is
switched on again. In order to switch the hob on again,
you must first remove the lock function.
“Demo” mode
It is possible to set the hob to a demonstration mode where
all the controls work normally but the heating elements do
not switch on. To activate the “demo” mode the hob must
be switched on, with all the hotplates switched off.
+
• Press and hold the
for 6 seconds. When the 6 seconds have elapsed,
the ON/OFF and CONTROLS LOCKED indicator
lights will flash for one second. Release the
buttons and press the button;
-
• The display will show the text DE and MO and the hob
will be switched off.
• When the hob is switched on again it will be set to the
“demo” mode.
To exit this mode, follow the procedure described above.
The display will show the text DE and OF and the hob will
be switched off. When it is next switched on, the hob will
function normally.
and - buttons simultaneously
and
+
8
Page 9
Practical advice on using the appliance
*
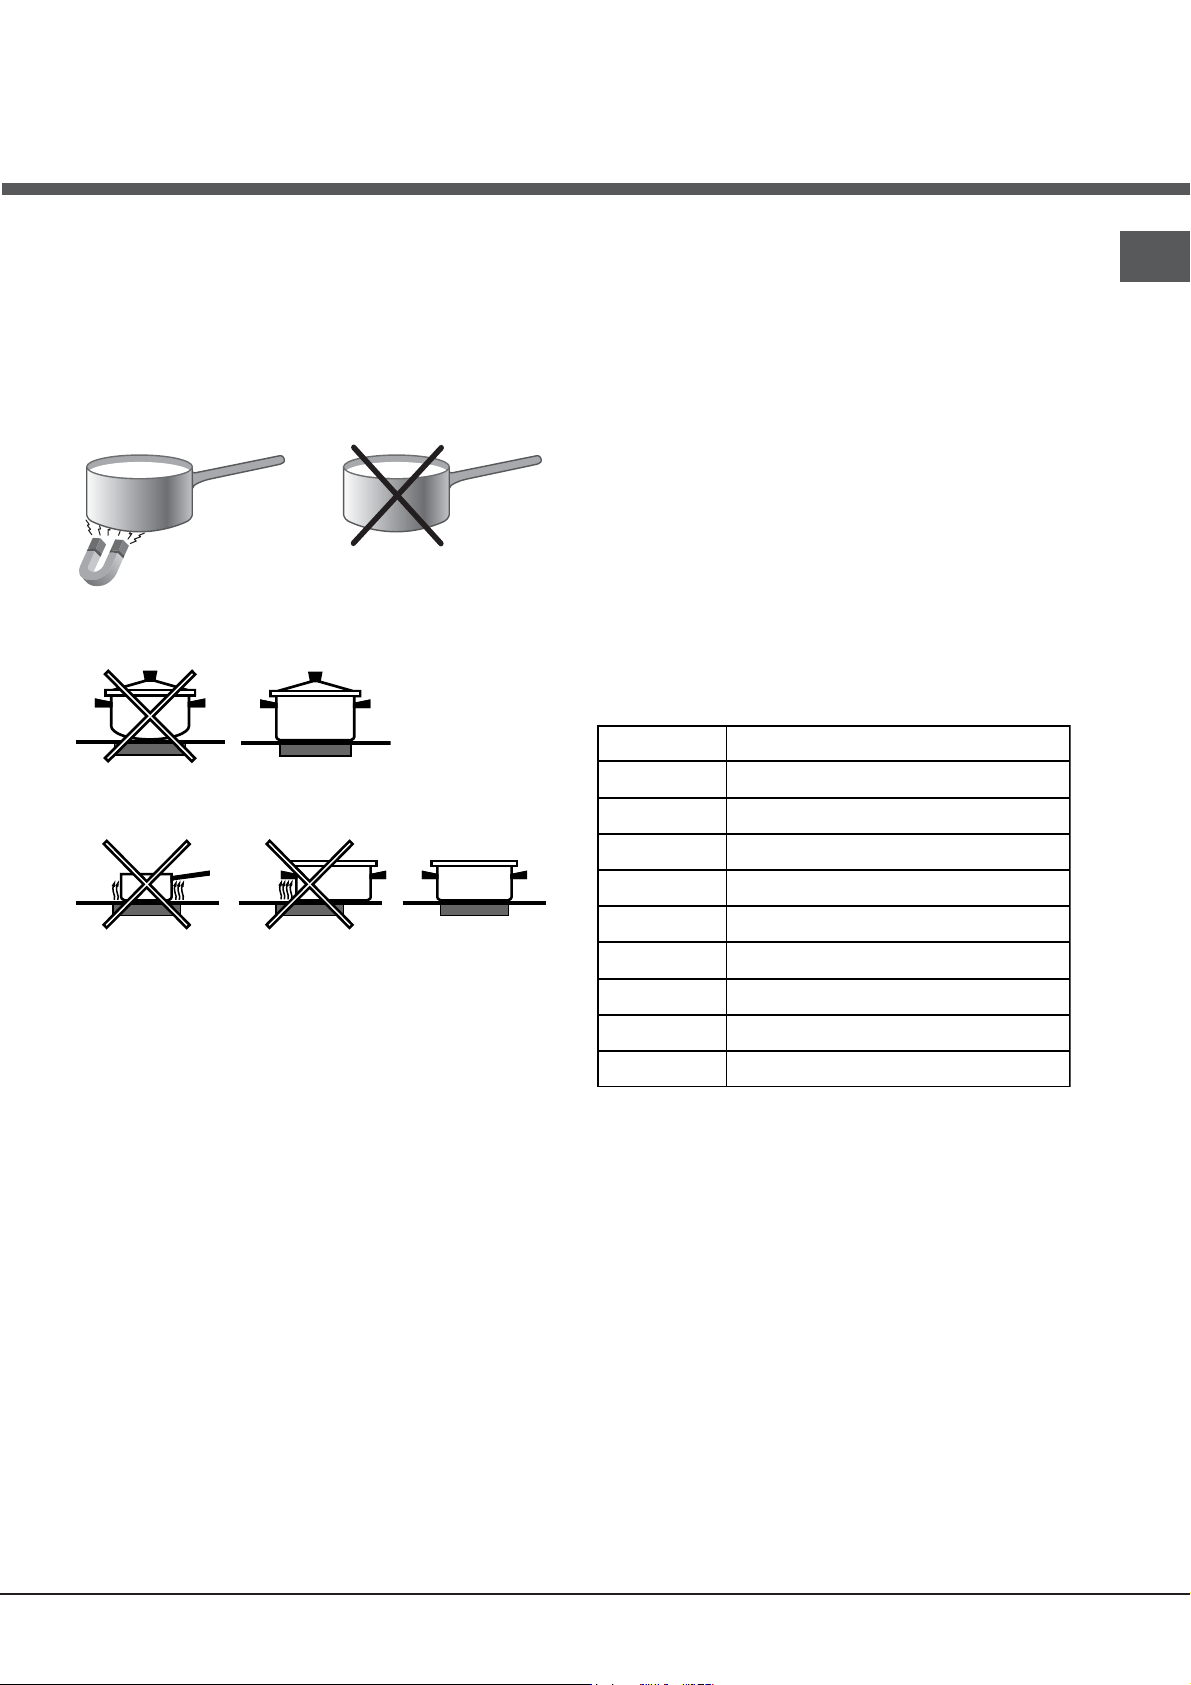
SUITABLE
UNSUITABLE
Cast iron
Enamelled steel
Special stainless steel
Copper,
Aluminium, Glass, Earthenware,
Ceramic, non magnetic Stainless steel
Power level
1
2
3
4
5
6
7
8
9
Maximum operating time in hours
9
8
7
6
5
4
3
2
1
! Use cookware made from materials which are
compatible with the induction principle (ferromagnetic
material). We especially recommend pans made
from: cast iron, coated steel or special stainless
steel adapted for induction. Use a magnet to test the
compatibility of the cookware.
In addition, to obtain the best results from your hob:
• Use pans with a thick, flat base in order to fully utilise the
cooking zone.
• Always use pans with a diameter which is large
enough to cover the hotplate fully, in order to use all the
available heat.
Overheating protection
If the electronic elements overheat, the hob switches off
appears on the display, followed
automatically and
F
by a flashing number. When the temperature has
reached a suitable level, this message disappears and
the hob may be used again.
Safety switch
The appliance has a safety switch which automatically
switches the cooking zones off after they have been in
operation for a certain amount of time at a particular power
level. When the safety switch has been triggered, the
display shows “0”.
For example: the right rear hotplate is set to 5 and will
switch off after 5 hours of continuous operation, while
the front left hotplate is set to 2 and will switch off after
8 hours.
GB
• Make sure that the base of the cookware is always clean
• Avoid using the same cookware which has been used
Safety devices
Pan sensor
Each cooking zone is equipped with a pan sensor device.
The hotplate only emits heat when a pan with suitable
measurements for the cooking zone is placed on it. If the
indicator light is flashing, it may indicate:
• An incompatible pan
• A pan whose diameter is too small
• The pan has been removed from the hotplate.
and dry, in order to fully utilise and extend the life of both
the cooking zones and the cookware.
on gas burners: the heat concentration on gas burners
may distort the base of the pan, causing it not to adhere
correctly.
Buzzer
This can also indicate several irregularities:
• An object (a pan, cutlery, etc.) has been placed on the
control panel for more than 10 seconds.
• Something has been spilt on the control panel.
• A button has been pressed for too long. All of the above
situations may cause the buzzer to sound. Remove the
cause of the malfunction to stop the buzzer. If the cause
of the problem is not removed, the buzzer will keep
sounding and the hob will switch off.
9
Page 10
GB
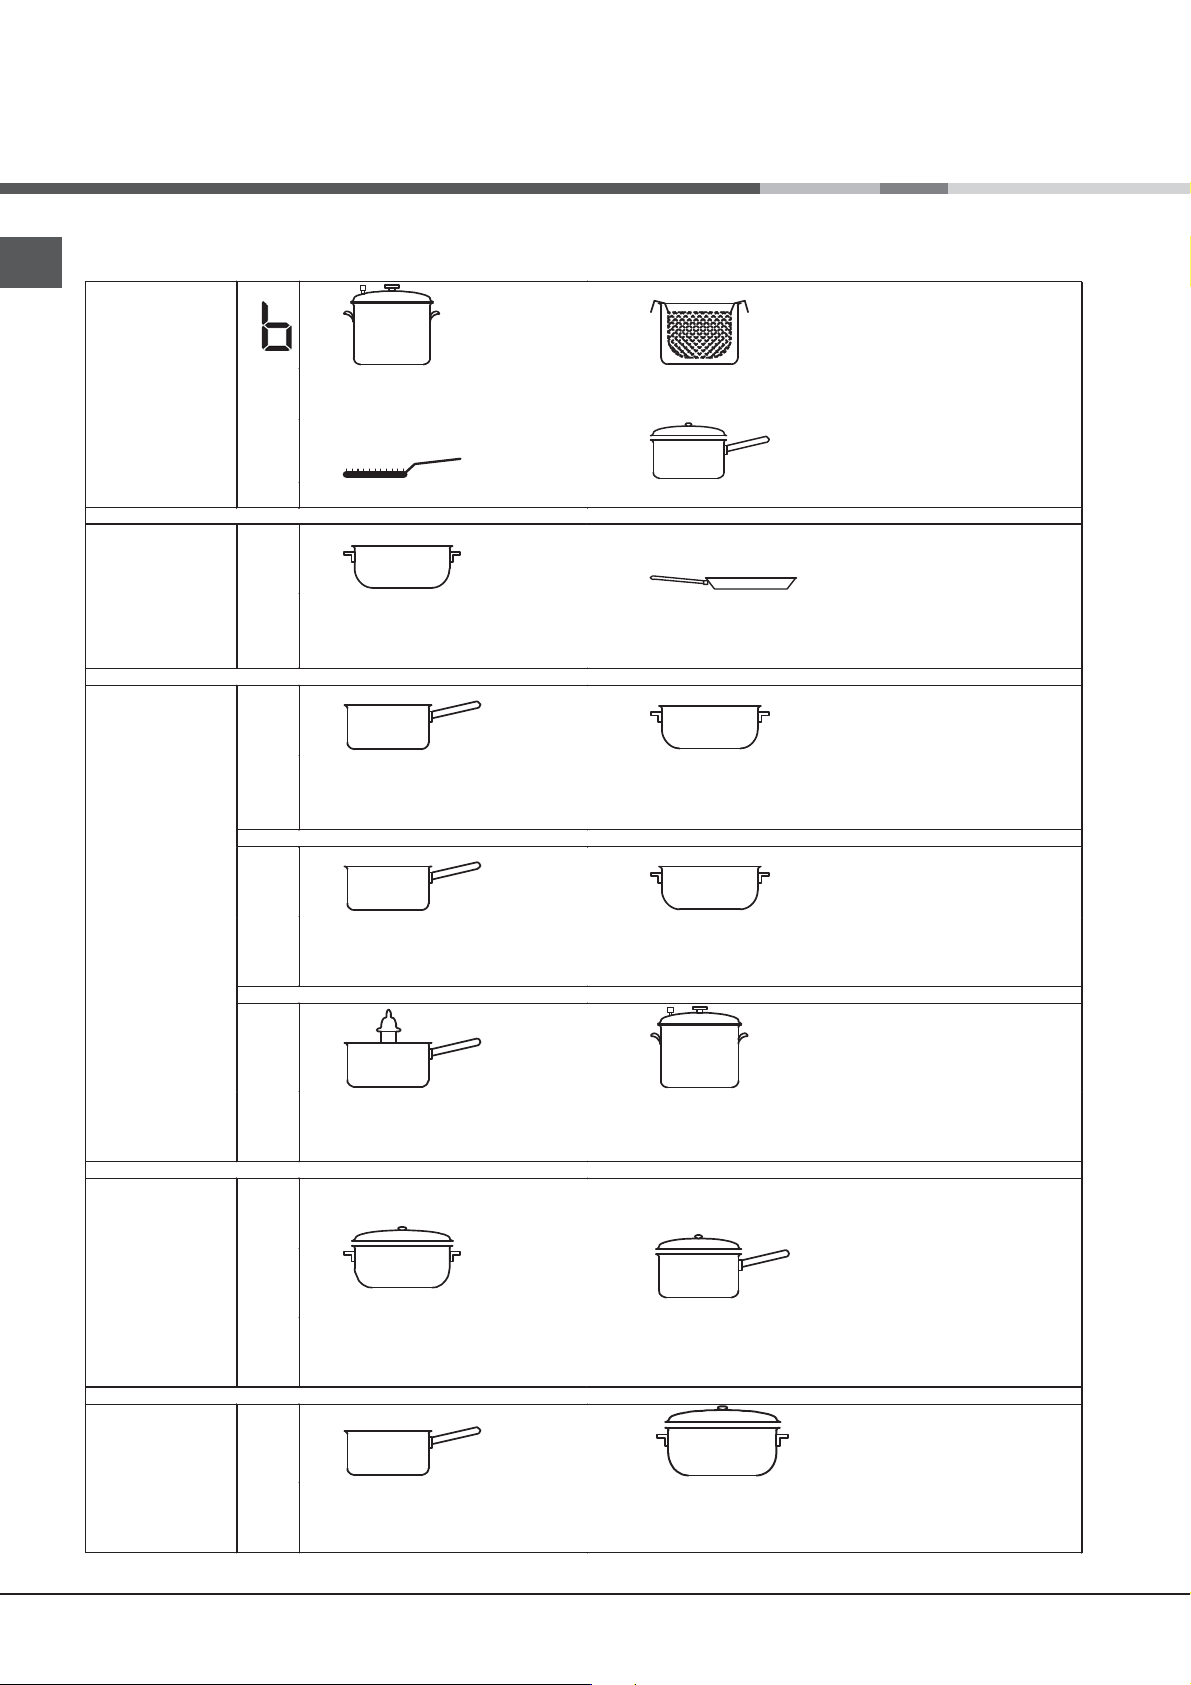
ª
Pressure cooking
Pressure cooker
Frying
Grilling Boiling
Very high-flame
cooking
High-flame
cooking
Medium-flame cookingLow-flame
cooking
Very
low-flame
cooking
•
•
¶
Crêpes Cooking on a high flame and browning
(roasts, steaks, escalopes, fish fillets,
fried eggs)
¶
§
Fast thickening (liquid juices)
Boiling water (pasta, rice, vegetables)
Milk
§
S
Slow thickening (dense juices)
S
¢
Bain-marie cooking
Pressure cooking after whistle
¢
£
™
Low-flame cooking (stews)
Reheating dishes
™
¡
Chocolate sauce Keeping food hot
Practical cooking advice
10
Page 11

Precautions and tips
!
This appliance has been designed and manufactured
in compliance with international safety standards. The
following warnings are provided for safety reasons and
must be read carefully.
This appliance conforms to the following
European Economic Community directives:
- 2006/95/EEC dated 12/12/06 (Low Voltage) and
subsequent amendments;
- 2004/108/EEC dated 15/12/04 (Electromagnetic
Compatibility) and subsequent amendments;
- 93/68/EEC dated 22/07/93 and subsequent amendments.
- 1275/2008 stand-by/off mode.
General safety
Make sure that the air inlet behind the fan grille is
!
never obstructed. The built-in hob should, in fact, be
provided with suitable ventilation for the cooling of the
electronic components used in the appliance.
We advise against the installation of an induction hob
!
above an under-the-counter refrigerator (heat) or above
a washing machine (vibrations). In fact, there would
be insufficient space for the ventilation of electronic
components.
• The appliance was designed for domestic use inside
the home and is not intended for commercial or
industrial use.
• The appliance must not be installed outdoors, even in
covered areas. It is extremely dangerous to leave the
appliance exposed to rain and storms.
• Do not touch the appliance when barefoot or with wet or
damp hands and feet.
• The appliance must be used by adults only for the
preparation of food, in accordance with the instructions
provided in this booklet. Do not use the hob as a
worktop or chopping board.
• The glass ceramic hob is resistant to mechanical
shocks, but it may crack (or even break) if hit with a
sharp object such as a tool. If this happens, disconnect
the appliance from the electricity mains immediately and
contact a Service Centre.
• Ensure that power supply cables of other electrical
appliances do not come into contact with the hot parts
of the hob.
• Remember that the cooking zones remain relatively hot
for at least thirty minutes after they have been switched
off. An indicator light provides a warning when residual
heat is present (see Start-up and use).
• Keep any object which could melt away from the
hob, for example plastic and aluminium objects, or
products with a high sugar content. Be especially
careful when using plastic film and aluminium foil or
packaging: if placed on surfaces which are still hot,
they may cause serious damage to the hob.
• Always make sure that pan handles are turned
towards the centre of the hob in order to avoid
accidental burns.
• When unplugging the appliance, always pull the
plug from the mains socket; do not pull on the cable.
• Never perform any cleaning or maintenance work
without having disconnected the appliance from the
electricity mains.
• The appliance should not be operated by people
(including children) with reduced physical, sensory
or mental capacities, by inexperienced individuals
or by anyone who is not familiar with the product.
These individuals should, at the very least, be
supervised by someone who assumes responsibility
for their safety or receive preliminary instructions
relating to the operation of the appliance.
• For the attention of wearers of pacemakers or other
active implants:
The hob complies with all current standards on
electromagnetic interference.
Your induction hob is therefore perfectly in keeping
with legal requirements (89/336/CEE directives). It
is designed not to create interference on any other
electrical apparatus being used on condition that
the apparatus in question also complies with this
legislation.
Your induction hob generates short-range magnetic
fields.
To avoid any interference between your induction
hob and a pacemaker, the latter must be designed
to comply with relevant regulations.
In this respect, we can only guarantee our own
product conformity. Please consult the pacemaker
manufacturer or your doctor concerning its
conformity or any possible incompatibility.
• Do not let children play with the appliance.
• Do not place metal objects (knives, spoons, pan
lids, etc.) on the hob as they may become hot.
• The appliance is not intended to be operated by
means of an external timer or separate remotecontrol system.
Disposal
• When disposing of packaging material: observe local
legislation so that the packaging may be reused.
• The European Directive 2002/96/EC relating to Waste
Electrical and Electronic Equipment (WEEE) states
that household appliances should not be disposed of
using the normal solid urban waste cycle. Exhausted
appliances should be collected separately in order to
optimise the cost of re-using and recycling the materials
inside the machine, while preventing potential damage
to the atmosphere and to public health. The crossed-out
dustbin is marked on all products to remind the owner of
their obligations regarding separated waste collection.
For further information relating to the correct disposal of
exhausted household appliances, owners may contact
the public service provided or their local dealer.
GB
11
Page 12

Care and maintenance
Switching the appliance off
GB
Disconnect your appliance from the electricity supply
before carrying out any work on it.
Cleaning the appliance
!
Do not use abrasive or corrosive detergents (for
example, products in spray cans for cleaning barbecues
and ovens), stain removers, anti-rust products, powder
detergents or sponges with abrasive surfaces: these may
scratch the surface beyond repair.
!
Never use steam cleaners or pressure cleaners on the
appliance.
• It is usually sufficient simply to wash the hob using a
damp sponge and dry it with absorbent kitchen towel.
• If the hob is particularly dirty, rub it with a special glass
ceramic cleaning product, then rinse well and dry
thoroughly
• To remove more stubborn dirt, use a suitable scraper.
Remove spills as soon as possible, without waiting for
the appliance to cool, to avoid residues forming crusty
deposits. You can achieve excellent results by using a
rust-proof steel wire sponge - specifically designed for
glass ceramic surfaces - soaked in soapy water.
• If any plastic or sugary substances are accidentally
melted on the hob, remove them immediately with the
scraper, while the surface is still hot.
• Once it is clean, the hob may be treated with a special
protective maintenance product: the invisible film left by this
product protects the surface from drips during cooking. This
maintenance task should be carried out while the appliance
is warm (not hot) or cold.
• Always remember to rinse the appliance well with clean
water and dry it thoroughly: residues can become encrusted
during subsequent cooking processes.
Stainless steel frame (only in models with outer frame)
Stainless steel can be marked by hard water which has been
left on the surface for a long time, or by cleaning products
containing phosphorus.
After cleaning, it is advisable to rinse the surface well and dry
it thoroughly. If water is spilt on the surface, dry it quickly and
thoroughly.
Some hobs have an aluminium frame which is similar to
!
stainless steel. Do not use any cleaning or degreasing products
which are not suitable for use with aluminium.
Disassembling the hob
If it is necessary to disassemble the hob:
1. Loosen the screws fixing the alignment springs on each side.
2. Loosen the screws holding the fixing hooks in each corner.
3. Take the hob out of its installation cavity.
!
Do not attempt to repair the appliance yourself. If the
appliance breaks down, contact a Service Centre.
Technical description of the models
The induction system is the quickest existing way of cooking. Unlike traditional hotplates where the cooking zone
heats up, with the induction system heat is generated directly inside pans which have ferromagnetic bases.
Hobs
Cooking zone Power (W)
Back Left
Back Right
Front Left
Front Right
Total power
Key:
I = single induction cooking zone
B = booster: the power level of the cooking zone may be boosted to 3000 W
* = the maximum power level is limited while the booster is activated for the relevant rear cooking zone (see Start-up
and use).
12
I 1400 - B 2000* - 600 if Front Left*
I 2200 - B 3000* - 1600 if Front Right*
I 2200 - B 3000* - 1600 if Back Left*
I 1400 - B 2000* - 600 if Back Right*
IC 644 C RFH
7200
Page 13

Монтаж
Важно сохранить данное руководство для его
последующих консультации. В случае продажи, передачи
изделия или при переезде на новое место жительства
необходимо проверить, чтобы руководство оставалось
вместе с изделием, для того чтобы его новыи владелец
мог ознакомиться с правилами эксплуатации и с
соответствующими предупреждениями.
Внимательно прочитаите инструкции: в них содержатся
!
важные сведения о монтаже изделия, его эксплуатации и
безопасности.
Расположение
Не разрешаите детям играть с упаковочными
!
материалами. Упаковка должна быть уничтожена
в соответствии с правилами сбора мусора (см.
Предосторожности и рекомендации).
Монтаж изделия производится в соответствии с данными
!
инструкциями квалифицированными специалистами.
Неправильный монтаж изделия может стать причиной
повреждения имущества и причинить ущерб людям и
домашним животным.
Встроенный монтаж
Для обеспечения исправного функционирования
встраиваемого изделия кухонный модуль должен иметь
соответствующие характеристики:
• поверхность кухонного топа должна быть из материала,
устойчивого к температуре примерно 100°C;
• если варочная панель устанавливается над духовым
шкафом, он должен быть оснащен системой
охлаждения с принудительной вентиляцией.
• не рекомендуется устанавливать варочную панель
над посудомоечными машинами: при необходимости
установите между варочной панелью и посудомоечной
машиной герметичную разделительную вставку;
• в зависимости от модели варочной панели, которую вы
устанавливаете (см. схемы), размеры ниши
модуле должны быть следующими:
в кухонном
5 mm
5 mm
RS
min. 20 mm
Ящик
min. 40 mm
min. 20 mm
Вентилируемая
min. 40 mm
590
53
560 +/- 1
520
490 +/- 1
Вентиляция
Для обеспечения надлежащей вентиляции и во избежание
перегрева прилегающих поверхностеи варочная панель
должна быть установлена:
• на минимальном расстоянии 40 мм от заднеи стенки
или от любои вертикальнои поверхности;
• между проемом под варочную панель и
расположенным снизу кухонным элементом должно
быть расстояние не менее 20 мм.
• Кухонные элементы, расположенные рядом с кухонной
плитой, высота которых превышает уровень варочной
панели, должны находиться на расстояние не менее 600
края варочной панели.
мм от
13
Page 14

RS
Крепление
Изделие должно быть установлено
на идеально ровнои
поверхности. Возможные деформации, вызванные
неправильным креплением, могут привести к изменениям
характеристик и эксплуатационных качеств варочнои
панели. Длина регуляционного винта крепежных крюков
регулируется перед началом монтажа
по толщине кухонного
топа:
• толщина 30 мм: длина винта 23 мм;
• толщина 40 мм: длина винта 13 мм;
Порядок крепления изделия:
1. При помощи коротких тупых шурупов привинтите 4
центровочные пружины в отверстиях, расположенных по
бокам варочнои панели;
2. Вставьте варочную панель в проем в кухонном
модуле, выровняите и слегка нажмите в центр вплодь до
идеального
прилегания варочнои панели к поверхности
кухонного топа.
3. для варочных панелеи с боковыми профилями: вставив
варочную панели в нишу кухонного модуля, вставьте 4
крепежных крюка (каждыи со своим штифтом) по нижнему
периметру варочнои панели, закручивая их длинными
острыми болтами до тех пор, пока стекло не будет плотно
прилегать к кухонному топу.
Важно, чтобы шурупы центровочных пружин оставались
!
доступными.
В соответствии с правилами безопасности после
!
установки изделия в кухонныи модуль должна быть
исключена возможность касания к электрическими
частями.
!
Все защитные элементы должны быть закреплены таким
образом, чтобы их можно было снять только при помощи
специального инструмента.
Электрическое подключение
Электрическое подключение варочнои панели и
!
возможного встраиваемого духового шкафа должно
выполняться раздельно по причинам безопасности, а так
же для легкого съема духового шкафа.
Монофазное соединение
Варочная панель оснащена сетевым кабелем,
рассчитанным на монофазное электропитание.
Подсоедините провода в соответствии с таблицеи и
приведенным ниже схемам:
Типовое
напряжение и
частота сети
220-240В 1+N ~
50 Гц
Электрический провод
Другие типы соединений
Если электропроводка соответствует однои из следующих
характеристик:
Типовое напряжение и частота сети
• 400В - 2+N ~ 50 Гц
• 220-240В 3 ~ 50 Гц
Подсоединение
проводов
: желто-зеленый;
N: 2 синий провода
вместе на
L: коричневый вместе с
черным
• 400V 3 - N ~ 50 Hz
• 400В - 2+2N ~ 50 Гц
Разделите провода и подсоедините проводники в
соответствии с таблицеи и приведенным ниже схемам:
Типовое
напряжение и
частота сети
400В -2 +N ~
50 Гц
220-240В 3 ~
50 Гц
400V 3-N~ 50 Гц
400В -2 +2N ~
50 Гц
Электрический провод
Подсоединение
проводов
: желто-зеленый,
N: 2 синий провода
вместе на
L1: черный
L2: коричневый
: желто-зеленый;
N1: синий
N2: синий
L1: черный
L2: коричневый
Подсоединение сетевого кабеля изделия к сети
электропитания
В случае прямого подключения изделия к сети
необходимо установить между изделием и электрическои
сетью многополярныи разъединитель с минимальным
расстоянием между контактами 3 мм.
Электромонтер несет ответственность за правильное
!
подключение изделия к электрическои сети и за
соблюдение правил безопасности.
Перед осуществлением электрического подсоединения
необходимо проверить следующее:
• сетевая розетка должна быть соединена с заземлением
и соответствовать нормативам;
• сетевая розетка должна быть расчитана на
максимальную потребляемую мощность изделия,
указанную на паспортнои табличке с техническими
характеристиками;
• напряжение и частота тока сети должны
соответствовать электрическим данным изделия;
• сетевая розетка должна быть совместима со
штепсельнои вилкои изделия. В противном случае
замените розетку или вилку; не используите
удлинители или троиники.
!
Изделие должно быть установлено таким образом, чтобы
сетевои кабель и сетевая розетка были легко доступны.
Сетевои кабель изделия не должен быть согнут или сжат.
!
Регулярно проверяите состояние сетевого кабеля
!
и при необходимости поручаите его замену только
уполномоченным техникам.
Производитель не несет ответственности за
!
последствия несоблюдения перечисленных выше
требовании.
! Категорически запрещается отсоединять и не
заменять сетевой кабель. В случае отсоединения
или замены сетевого кабеля гарантия на изделие
аннулируется, равно как и маркировка ЕС. Компания
INDESIT снимает с себя всякую ответственность
за несчастные случаи или ущерб, вызванный
отсоединением или заменой оригинального
сетевого кабеля. Допускается замена только на
оригинальный сетевой кабель,
выполняемая
техником, уполномоченным Компанией INDESIT.
14
Page 15

Включение и
эксплуатация
На стекляннои поверхности варочнои панели могут быть
!
видны сальные следы от клея, нанесенного на прокладки
Перед началом эксплуатации изделия следует удалить
следы клея при помощи специального неабразивного
моющего средства. В первые часы работы вы можете
почувствовать запах жженои резины, которыи быстро
пропадает.
Через несколко секунд после подсоединения варочнои
!
панели к сети электропитания включается короткии
звуковои сигнал. Только после этого можно включить
варочную панель.
Нормальный шумовой уровень варочной панели:
• Гудение: вызвано вибрацией металлических
элементов, из которых состоит индуктор, и кастрюли,
образуя электромагнитное поле, необходимое для
нагрева. Оно увеличивается по мере повышения
мощности индуктора.
• Легкий свист: слышен в случае помещения на
варочную зону пустой кастрюли. Свист пропадает,
как только в кастрюлю будут положены продукты
налита жидкость.
• Потрескивание: этот звук образуется вибрацией
материала, из которого изоготовлено дно кастрюли,
пронизываемого паразитным током, создаваемым
электромагнитным полем (индукцией). Потрескивание
может быть более или менее сильным в зависимости
от материала, из которого изоготовлено дно кастрюли,
и сокращается в случае кастрюли большого размера.
• Сильный свист: слышен при
двух индукторов, расположенных по одной вертикали,
при максимальной мощности и/или когда на большем
индукторе включена функция вольтодобавочного
устройства, а другой является саморегулируемым.
Свист сокращается при понижении мощности
саморегулируемого индуктора. Особенно он слышен,
когда дно кастрюли изготовлено из солев разных
сплавов.
• Шум вентилятора: для исправной работы варочной
и для защиты электронной части от возможного
панели
перегрева необходимо включать вентилятор.
Вентилятор работает с максимальной мощностью,
когда большой индуктор включен на максимальную
мощность,или когда включено вольтодобавочное
устройство. Во всех остальных случаях вентилятор
работает со средней мощностью в зависимости от
отмечаемой температуры. Кроме того вентилятор
может продолжать работать также после
варочной панели, если ее температура остается
высокой.
одновременной работе
выключения
или
Включение варочной панели
Включите варочную панель, нажав кнопку примерно
на одну секунду.
Включение варочных зон
Каждая зона варочнои панели включается при помощи
кнопки
двоинои кнопки - и +.
• Для включения однои из варочных зон нажмите
соответствующую кнопку и настроите нужную
мощность при помощи кнопок
и регулятора мощности, состоящего из
и +.
-
Вольтодобавочное устройство booster*
Для ускорения нагрева некоторых варочных зон можно
включить вольтодобавочное устройство при помощи
кнопки
функция добавляет мощности до 2000 Вт или 3000 Вт в
зависимости от размера данной варочной зоны.
Вольтодобавочное устройство автоматически отключается
через 4 минуты. До тех пор, пока будет включено
вольтодобавочная функция одной из варочных зон,
соответствующая передняя или задняя варочная зона
будет работать с сокращенной мощностью (например,
если
задней варочной зоны, понижается мощность левой
передней варочной зоны). Более подробные разъяснения
смотрите в Техническом описании моделей.
Booster
. Включается индикатор на кнопке. Эта
включено вольтодобавочное устройство левой
Выключение варочных зон
Для отключения варочнои зоны выберите ее при помощи
соответствующеи кнопки и затем:
• Нажмите кнопку -: мощность варочнои зоны
постепенно понизится вплоть до выключения.
Программирование продолжительности
приготовления
RS
Перечисленные выше шумы присущи индукционной
технологии и не обязательно означают неисправности в
работе изделия.
!
При длительном нажатии на кнопки - и + происходит
быстрая смена уровнеи мощности и минут таимера.
Имеется только в некоторых моделях.
*
! Можно одновременно настроить все варочные зоны на
приготовление от 1 до 99 минут.
1. Выбрать варочную зону при помощи соответствующеи
кнопки выбора.
2. Отрегулируйте уровень мощности варочной зоны.
3. Нажать кнопку
соответствующий выбранной зоне.
4. Настроить нужную продолжительность приготовления
при помощи кнопок - и +.
. Мигает индикатор,
15
Page 16

RS
5. Подтвердить настройки при помощи кнопки
или переключение происходит автоматически через 10
секунды.
Обратный отсчет таймера начинается сразу же. По
завершении заданного приготовления раздается
звуковой сигнал (в течение 1 минуты), и варочная зона
выключается.
Повторите вышеописанную операцию для каждой
варочной зоны, которую требуется запрограммировать.
Визуализация в случае программирования
нескольких варочных зон
,
пока не загорится индикатор таимера .
2. Настроите нужную продолжительность приготовления
и +.
при помощи кнопок
3. Подтвердите настроику при помощи кнопки .
Обратныи отсчет таимера начинается сразу же. По
истечении заданного времени включится звуковои сигнал
(на 1 минуту).
-
Блокировка управлений
В случае программирования одной или нескольких
варочных зон на дисплее показывается
отсчет времени варочной зоны, на которой
приготовление ближе всего к завершению, с
указанием ее положения соответствующим
мигающим индикатором. Индикаторы других
запрограммированных варочных зон остаются
включенными.
Для визуализации оставшегося
времени приготовления остальных
запрограммированных варочных
нажмите несколько раз кнопку
на дисплее последовательно и по часовои стрелке
будет показано время всех запрограммированных
варочных зон, начиная с левои переднеи.
Изменение программирования
1. Нажмите несколько раз кнопку до тех пор, пока не
будет показано время варочнои зоны, которое требуется
изменить.
и + задаите новую
2. При помощи кнопок
продожительность.
3. Подтвердите настроику при помощи кнопки .
Для отмены программирования выполните описанные
выше операции. В пункте 2 нажмите кнопку
продолжительность станет постепенно убывать вплоть
до выключения 0. Программирование будет обнулено, и
дисплеи выидет из режима программирования.
-
зон
:
:
-
В процессе функционирования варочнои панели можно
заблокировать ее управления во избежание случаиного
изменения настроек (дети, в процессе уборки и т.д.).
При помощи кнопки управления блокируются, и
индикатор над этои кнопкои загорается.
Для разблокировки управлении (напр., для прерывания
приготовления) необходимо: нажать кнопку
несколько секунд, индикатор погаснет, и управления
разблокируются.
на
Выключение варочной панели
При нажатии кнопки изделие выключается, не
обращайте внимание на сенсор наличия кастрюль.
Если управления варочнои панели были заблокированы,
они останутся заблокированными также после повторого
включения варочнои панели. Для повторого включения
варочнои панели необходимо сначала разблокировать
управления.
Режим «demo»
Можно задать демонстрационныи режим, в котором
панель управлении работает как обычно (включая кнопки
программирования), но нагревательные элементы не
включаются. Для перехода в режим «демо» варочная
панель должна быть включена, а все варочные зоны
выключены:
• Нажмите и держите одновременно нажатыми кнопки
и - в течение 6 секунд. По истечении 6 секунд
+
индикатор ON/OFF и индикатор БЛОКИРОВКА
УПРАВЛЕНИИ замигают на одну секунду. Отпустите
Таймер
Варочная панель должна быть включена.
Таимер служит для настроики продолжительности
приготовления вплоть до 99 минут.
1. Нажмите кнопку программирования до тех пор,
16
кнопки + и - и нажмите кнопку ;
• на дисплее появится надпись DE и MO, и варочная
панель выключится.
• при последующем включении варочная панель
включается в режиме “demo”.
Для отмены этого режима выполните операции в
описанном выше порядке. На дисплее появится
надпись DE и OF, и варочная панель выключится. При
последующем включении варочная панель включается в
рабочем режиме.
Page 17

Практические советы по эксплуатации
изделия
! Используите посуду из материала, подходящего
для индукционного нагревания (ферромагнитныи
материал). Рекомендуется использовать посуду из:
чугуна, эмалированнои стали или специальнои стали для
индукционного нагревания. Для проверки пригодности
посуды достаточно использовать магнит.
Кроме того для больше эффективности варочнои панели
следует:
• Использовать посуду с плоским толстым дном,
идеально прилегающим к зоне нагрева;
• Использовать посуду с дном такого диаметра, чтобы
полностью закрыть варочную зону для оптимального
использования всего выделяемого тепла.
• Проверить, чтобы дно используемои посуды было
всегда совершенно сухим и чистым для идеального
прилегания к варочнои зоне и для долгого срока
службы как варочнои панели, так и самои посуды.
• Не следует использовать на даннои варочнои панели
посуду, использованную на газовых конфорках.
концентрация тепла на газовых конфорках может
деформировать дно посуды и нарушить прилегание к
варочнои зоне;
Защитные устройства
Сенсор наличия посуды
Каждая варочная зона укомплектована сенсором наличия
посуды. Конфорка выделяет тепло только при наличии
на неи посуды с размерами, соответствующими даннои
конфорке. Мигающии индикатор может означать:
• неподходящая посуда
• посуда неподходящего диаметра
• посуда снята с варочной зоны
Перегрев
В случае перегрева электронных комплектующих
варочная панель автоматически отключается, и
с мигающим кодом. Это
на дисплее появляется
F
сообщение пропадает, и варочная панель возвращается
в рабочии режим, когда температура опускается до
допустимого уровня.
Предохранительный выключатель
Изделие оснащено предохранительным выключателем,
автоматически отключающим варочные зоны по
истечении времени функционирования данного уровня
мощности. В процессе аварииного отключения на дисплее
появляется «0».
Пример: задняя правая варочная зона настроена на
5,
передняя левая варочная зона настроена на 2. Задняя
правая варочная зона отключается через 5 часа работы,
передняя левая через 8 часов.
Уровень мощности
1
2
3
4
5
6
7
8
9
Макс. кол-во часов функционирования
9
8
7
6
5
4
3
2
1
Звуковая сигнализация
Некоторые неисправности такие как:
• какои-либо предмет (посуда, столовыи прибор и т.д.)
находится в зоне управлении более 10 секунд.
• утчека жидкости на зону управлении;
• при длительном нажатии на кнопку может включиться
звуковои сигнал. Устраните причину неисправности
для гашения звуковои сигнализации. Если причина
неисправности не будет устранена, звуковои сигнал
не
гасится, и варочная панель выключается.
RS
17
Page 18

RS
Практические советы по приготовлению блюд
ª
Приготовление
на большом огне
огне
на среднем
Приготовление
•
•
¶
¶
§
§
Приготовление под давлением
Скороварка
Бифштексы Варка
Блины Приготовление на среднем огне,
Быстрое загустени (Жидкие соусы)
Кипячение воды (для варки макарон, риса, овощей)
Кипячение молока
Постепенное загустение (густые соусы)
Фритюр
обжаривание (Жаркое, бифштексы,
эскалопы, рыбное филе, яичница)
S
S
Приготовление на умеренном огнеПриготовление
¢
¢
£
на малом огне
™
™
на самом
малом огне
Приготовление
¡
Приготовление на пару
Приготовление на
малом огне (рагу)
Шоколадный соус Поддержание блюд в горячем состоянии
Продолжение приготовление в скороварке
после первого выпуска пара
Разогревание готовых блюд
18
Page 19

Предосторожности и
рекомендации
могли случаино задеть их.
! Изделие спроектировано и изготовлено в
соответствии с международными нормативами по
безопасности. Необходимо внимательно прочитать
настоящие предупреждения, составленные в целях
вашеи безопасности.
Данное оборудование отвечает требованиям
нижеуказанных Директив Европеиского Сообщества:
- 2006/95/CEE от 12/12/06 (Низкое напряжение) с
последующими изменениями
- 2004/108/СЕЕ от 15/12/04 (Электромагнитная
совместимость) и последующими изменениями
- 93/68/СЕЕ от 22.07.93 с последующими изменениями.
- 1275/2008 stand-by/off mode.
Общие правила безопасности
! Проверьте, чтобы вентиляционная решетка всегда
была открытои. Встраиваемая варочная панель
требует эффективнои вентлияции для охлаждения
электронных компонентов.
! Не рекомендуется устанавливать индукционную
варочную панель над холодильником, встроенным под
кухонным топом (тепло) или над стиральнои машинои
(вибрации). Зазор, необходимыи для вентиляции
электронных компонентов в этих случаях будет
недостаточным.
• Данное изделие
непрофессионального использования в домашних
условиях.
• Запрещается устанавливать изделие на улице, даже
под навесом, так как воздеиствие на него дождя и грозы
является чрезвычаино опасным.
• Не прикасаитесь к изделию влажными руками, босиком
или с мокрыми ногами.
• Изделие предназначено для приготовления пищевых
продуктов, может быть использовано только взрослыми
лицами
в данном техническом руководстве. Не используите
варочную панель в качестве стола или для нарезки
продуктов.
• Стеклокерамическая варочная панель устоичива
к механическим ударам, тем не менее она может
треснуть (или даже разбиться) при ударе острым
предметом или инструментом. В этом случае
незамедлительно отсоедините изделие от сети
электропитания и обратитесь в Центр технического
обслуживания.
• Избегаите касания сетевых шнуров других бытовых
электроприборов к горячим частям варочнои панели.
• Помните, что температура варочных зон остается
очень высокои в течение тридцати минут после их
выключения. Остаточное тепло показывается также
индикатором (см. Включение и эксплуатация).
• Держите на безопасном расстоянии от варочнои
панели любые предметы, которые могут
расплавиться, например, пластмасса, алюминии или
изделия из сахара. Обращаите особое внимание
на упаковочные материалы, полиэтиленовую или
алюминиевую пленку: если оставить эти материалы
на еще горячеи или теплои поверхности, они могут
серьезно повредить варочую панель.
• Следите, чтобы ручки кастрюль на варочнои панели
были всегда повернуты таким
в соответствии с инструкциями, приведенными
предназначается для
образом, чтобы вы не
• Не тяните за сетевои кабель для отсоединения
вилки изделия из сетевои розетки, возьмитесь за
вилку рукои.
• Перед началом чистки или технического
обслуживания изделия всегда вынимаите
штепсельную вилку из сетевои розетки.
• Эксплуатация изделия лицами (включая детеи)
с ограниченными физическими, сенсорными
или умственными
лицами или лицами, незнакомыми с правилами
эксплуатации данного изделия, запрещается
без контроля со стороны лица, отвечающего за
их безопасность, или без обучения правилам
пользования изделием.
• Предупреждение для носителей
электрокардиостимуляторов или других
медицинских имплантированных аппаратов:
Варочная панель полностью соответствует всем
действующим нормативам по электромагнитным
помехам.
Поэтому данное изделие
требованиям закона (директивы 89/336/CEE).
Изделие было изготовлено таким образом, чтобы
не создавать помех электрическим приборам, при
условии, что эти приборы также соответствуют
вышеуказанным нормативам.
Индуктивная варочная панель образует
электромагнитные поля малого диапазона.
Во избежание помех между варочной панелью и
электрокардиостимулятором последний должен
соответствовать действующим нормативам.
Поэтому мы
нормативам только нашего изделия. За
информацией о соответствии и о возможных
проблемах из-за несовместимости обращайтесь
к вашему лечащему врачу или к производителю
электрокардиостимулятора.
• Не разрешайте детям играть с бытовым
электроприбором.
• Не кладите металлические предметы (ножи, ложки,
крышки и т.д.) на варочную панель, так как
сильно нагреться.
• Изделие не рассчитано на влючение
посредством внешнего синхронизатора или
отдельной системы дистанционного управления.
Утилизация
• Уничтожение упаковочных материалов: соблюдаите
местные нормативы с целью повторного использования
упаковочных материалов.
• Согласно Европеискои Директиве 2002/96/СЕ
касательно утилизации электронных и электрических
электроприборов электроприборы не должны
выбрасываться вместе с обычным городским
мусором. Выведенные из строя приборы должны
собираться отдельно для оптимизации их утилизации
и рекуперации составляющих их материалов, а также
для
безопасности окружающеи среды и здоровья.
Символ зачеркнутая мусорная корзинка, имеющиися на
всех приборах, служит напоминанием об их отдельнои
утилизации.
За более подробнои информациеи о правильнои
утилизации бытовых электроприборов пользователи
могут обратиться в специальную государственную
организацию или в магазин.
RS
способностями, неопытными
полностью отвечает всем
можем гарантировать соответствие
они могут
19
Page 20

Техническое
обслуживани и уход
Отключение электропитания
RS
Перед началом какои-либо операции по
обслуживанию или чистке отсоедините изделие от
сети электропитания.
Чистка изделия
!
Не следует пользоваться абразивными или
коррозивными чистящими средствами такими
как спраи для чистки духовок и мангалов,
пятновыводители или средства для удаления
ржавчины, порошковыми чистящими средствами
или абразивными губками: они могут необратимо
поцарапать поверхность изделия.
Не используите паровые чистящие агрегаты
!
или агрегаты под высоким давлением для чистки
изделия.
• В качестве регулярного ухода достаточно
вымыть варочную панель влажнои губкои и
затем протереть насухо кухонным бумажным
полотенцем.
• Если варочная панель сильно загрязнена,
используите специальное чистящее средство для
стеклокерамических поверхностеи, ополосните
водои и протрите насухо.
остатки чистящих средств могут затвердеть при
последующеи готовке.
Структура из нержавеющеи стали (только в
моделях с рамкои)
На поверхности из нержавеющеи стали
могут образоваться пятна от воды с большим
содержанием извести, если она
воздеиствовать на поверхность в течение
длительного времени, или при использовании
чистящих средств, содержащих фосфор.
Рекомендуется тщательно ополоснуть и вытереть
варочную панель после чистки. В случае случаиного
проливания воды незамедлительно удалите ее.
Некоторые варочные панели оснащены
!
алюминиевои рамкои, похожеи на нержавеющую
сталь. Для чистки рамки не используите средства,
непригодные для алюминия.
будет
Порядок демонтажа варочной панели
При необходимости демонтировать варочную
панель:
1. снимите шурупы, крепящие сбоков центровочные
пружины;
2. ослабьте шурупы крепежных крюков по углам;
3. выньте варочную панель из ниши.
• Для
• Если на варочнои панели случаино расплавились
• По завершении чистки варочная панель может
• Следует всегда ополаскивать варочную панель
удаления особо сильных загрязнении
используите специальныи скребок. Удаляите
загрязнения незамедлительно, не дожидаясь
охлаждения изделия, во избежание
затвердевания остатков пищи. Очень удобна для
чистки варочнои панели мочалка из проволоки
из нержавеющеи стали, специально для
стеклокерамических поверхностеи, смоченная в
мыльном растворе.
какие-либо предметы или пластиковые
материалы или сахар, незамедлительно удалите
их скребком с еще горячеи поверхности.
быть обработана специальным защитным
средством для ухода за стеклокерамическими
поверхностями: это средство образует на
поверхности варочнои панели невидимую
защитную пленку, предохраняющую поверхность
в случае утечек пище в процессе приготовления.
Рекомендуется производить чистку, когда
варочная панель едва теплая или холодная.
чистои водои и насухо вытирать: возможные
!
Не рекомендуется открывать внутренние
комплектующие для попытки самостоятельно
выполнить ремонт. В случае неисправности
обращаитесь в Центр технического обслуживания.
20
Page 21

Техническое описание
моделей
Система индукционного нагревания является самой быстрой из существующих технологий нагрева. В отличие
от традициональных конфорок нагрев производится не варочной зоной: нагревается непосредственно
содержимое кастрюли дно которой обязательно должно быть из ферромагнитного материала
RS
Модели варочных
панелей
Варочные зоны
Задняя левая
Задняя правая
Передняя левая
Передняя правая
Общая мощность
IC 644 C RFH
Мощность (Вт)
I 1400 – B 2000* – 600 если Передняя Левая*
I 2200 – B 3000* - 1600 если Передняя Правая*
I 2200 – B 3000* - 1600 если Задняя Левая*
I 1400 – B 2000* – 600 если Задняя Правая*
7200
Условные обозначения:
I = варочная зона с простой
индукцией
B = вольтодобавочное устройство
индукционная варочная зона
может иметь дополнительное
электропитание 3000 Вт
* = максимальная мощность
будет ограничена до тех пор,
пока включено вольтодобавочное
устройство соответствующей задней
индукционной варочной зоны (см.
Включение и эксплуатация).
Изделие: Электрическая рабочая поверхность
Торговая марка:
Торговый знак изготовителя:
Модель:
Изготовитель: Indesit Company
Страна-изготовитель:
Номинальное значение
напряжения электропитания или
диапазон напряжения
Условное обозначение рода
электрического тока или
номинальная частота переменного
тока
Класс зашиты от поражения
электрическим током
В случае необходимости
получения информации по
сертификатам соответствия или
получения копий сертификатов
соответствия на данную технику,
Вы можете отправить запрос по
электронному адресу
cert.rus@indesit.com.
Дату производства данной техники
можно получить из серийного
номера, расположенного под
штрих-кодом (S/N XXXXXXXXX *
XXXXXXXXXXX), следующим
образом:
Производитель:
Импортер:
С вопросами (в России)
обращаться по адресу:
IC 644 C RFH
Польша
220-240/400V 3N~
50
Класс защиты I
Данное изделие соответствует следующим
Директивам Европейского Сообщества: 2006/95/CEE
от 12/12/06 (Низкое напряжение) с последующими
- 2004/108/СЕЕ от 15/12/04 (Электромагнитная
совместимость) с последующими изменениями
- 93/68/СЕЕ от 22/07/93 с последующими
- 2002/96CEE с последующими изменениями
- 1-ая цифра в S/N соответствует последней цифре
года,
- 2-ая и 3-я цифры в S/N - порядковому номеру
месяца года,
- 4-ая и 5-ая цифры в S/N - числу определенного
месяца и года.
Indesit Company S.p.A.
Виале А. Мерлони 47, 60044, Фабриано (АН), Италия
ООО "Индезит РУС"
до 01.01.2011: Россия, 129223, Москва, Проспект Мира,
ВВЦ, пав. 46
с 01.01.2011: Россия, 127018, Москва, ул. Двинцев, дом 12,
корп. 1
изменениями
изменениями.
-1275/2008 (Stand-by/ Off mode)
21
Page 22

KZ
Орнату
Жаңа құрылғыны іске қоспас бұрын нұсқаулық
!
кітапшасын мұқият оқып шығыңыз. Мұнда
құрылғыны қауіпсіз қолдану, орнату және оны күту
туралы маңызды ақпараттар қамтылған.
!
Келешекте анықтама ретінде қарау үшін пайдалану
нұсқаулығын сақтап қойыңыз. Оны құрылғының кез
келген жаңа иесіне беріңіз.
Орналастыру
Орау материалдарын балалардың қолы жетпейтін
!
жерде сақтаңыз. Тынысы тарылу немесе тұншығып
қалу қаупін туғызуы мүмкін («Сақтандырулар мен
кеңестер» бөлімін қараңыз).
Құрылғыны берілген нұсқаулыққа сүйене отырып
!
білікті маман орнатуы қажет. Құрылғы дұрыс
орнатылмаған жағдайда, адамдар мен жануарлар
өміріне қауіп төндіруі немесе мүлікті зақымдауы
мүмкін.
ең азы 20 мм
5 мм
КАМЕРА
ең азы 40 мм
ең азы 20 мм
5 мм
ЖЕЛДЕТКІШІ
БАР ПЕШ
Бекітілген құрылғы
Құрылғының дұрыс жұмыс жасауын қамтамасыз ету
үшін қолайлы шкафты қолданыңыз.
• Құрылғы қойылатын бет шамамен 100°C-қа дейін
қызуға төзімді болуы тиіс.
• Құрылғы пеш үстіне орнатылатын болса, ол
мәжбүрлі желдеткіш салқындату жүйесімен
жабдықталған болуы қажет.
• Плитаны ыдыс жуу машинасының үстіне
орнатпаңыз: бұл мүмкін болмаса, екі құрылғы
арасына оларды бөліп тұратын, су өткізбейтін
құралды қойыңыз.
• Орнатылатын плитаға байланысты, шкаф
мынадай өлшемдерге ие болуы тиіс (суретті
қараңыз):
48
560 +/- 1
590
520
490 +/- 1
Желдету
Тиісті желдетудің болуын қамтамасыз ету және
айналадағы беттердің қызып кетуіне жол бермеу үшін
плитаны төмендегідей орналастыру керек:
ПЛИТАНЫҢ
АСТЫҢҒЫ ЖАҒЫ
ең азы 40 мм
ПЛИТАНЫҢ
АЛДЫҢҒЫ ЖАҒЫ
ТІРЕУІШ БЕТ
30
40
• Артқы қабырғадан кем дегенде 40 мм аралық
болуы тиіс.
• Орнату қуысы мен астындағы шкаф арасында
кем дегенде 20 мм аралық қалуы керек.
• Құрылғы маңында тұрған және плитаның үстіңгі
жағына қарағанда биік ас үйі шкафтары плитаның
шетінен кем дегенде 600 мм-ге алыс орналасуы
тиіс.
22
Page 23

Бекіту
Құрылғыны өте тегіс тіреуіш бетке
орнату қажет.
Дұрыс бекітпеу салдарынан туындаған кез келген
деформациялар плитаның мүмкіндіктері мен
жұмысына әсер етуі мүмкін. Бекіту ілмектеріне
бұралатын бұрандалардың
тіреуіш
беттің қалыңдығын ескеру қажет:
ұзындығын таңдаған кезде
• 30 мм болса: 23 мм бұрандалар
• 40 мм болса: 13 мм бұрандалар
Плитаны төмендегідей бекітіңіз:
1. Плитаның әр бір жағының ортасындағы тесіктерге
4 туралау серіппелерін бекіту үшін қысқа, ұшы тегіс
бұрандаларды қолданыңыз.
2. Плитаны қуысқа орналастырып, ол дәл ортада
тұрғанына көз жеткізіңіз де, плита тіреуіш бетке
бекітілгенше бар жағынан басыңыз.
3. Шеттері көтеріңкі плиталар үшін: Плитаны қуысына
кіргізгеннен кейін, 4 бекіту ілмектерін (әрбірінің өз
шегесі бар) плитаның төменгі жиектеріне кіргізіп, шыны
тіреуіш бетке орныққанша, оларды ұзын әрі ұштары
үшкір бұрандалармен орындарына бекітіңіз.
!
Туралау серіппелерінің бұрандаларына қол жеткізу
мүмкін болуы тиіс.
Қауіпсіздік стандарттарын орындау үшін,
!
орнатылғаннан кейін құрылғы электр бөліктерге
тимеуі тиіс.
!
Құрылғының қауіпсіз жұмыс істеуін қамтамасыз
ететін барлық бөліктері арнайы құралдардың
көмегімен ғана алынуы тиіс.
Токқа жалғау
!
Қауіпсіздік себептеріне сәйкес және пешті алу оңай
болуы үшін плитаны және кез келген ендірілген
пешті токқа жалғау бөлеу жасалуы керек.
Бір фазалық қосылым
Плитада алдын ала жалғанған ток кабелі бар, ол бір
фазалық қосылымға арналған. Сымдарды төмендегі
кесте мен сызбаларда берілген нұсқауларға сәйкес
жалғаңыз:
Кернеу мен электр
желісінің жиілігі
220-240 В 1+N ~
50 Гц
Қосылымдардың басқа түрлері
Ток желісі төмендегілердің біріне сәйкес келсе:
Кернеу мен электр желісінің жиілігі
• 400 В - 2+N ~ 50 Гц
• 220-240 В 3 ~ 50 Гц
• 400 В 3 - N ~ 50 Гц
• 400 В - 2+2N ~ 50 Гц
Электр кабелі Сымдарды жалғау
: сары/жасыл
: екі көк сым бірге
N
L
: қоңыр мен қара бірге
Сымдарды бөліп, оларды төмендегі кесте мен
сызбаларда берілген нұсқауларға сәйкес жалғаңыз:
50 Гц
50 Гц
50 Гц
50 Гц
Электр кабелі Сымдарды жалғау
: сары/жасыл;
N: екі көк сым бірге
L1: қара
L2: қоңыр
: сары/жасыл;
N1: көк
N2: көк
L1: қара
L2: қоңыр
Кернеу мен электр
желісінің жиілігі
400 В - 2+N ~
220-240 В 3 ~
400 В 3-N ~
400 В - 2+2N ~
Электр кабелін желіге қосу
Құрылғы электр желіге тікелей қосылатын болса,
контактілерінің арасында кем дегенде 3 мм аралығы
бар жан-жақты айырып-қосқышты орнату қажет.
Орнатушы дұрыс ток байланысын жасағанына
!
және оның қауіпсіздік шараларына сәйкес екендігіне
сенімді болуы қажет.
Құрылғыны токқа қоспастан бұрын төмендегілерді
тексеріңіз:
• Құрылғы жерге қосылған және штепсельдік ұш заңға
сәйкес болып табылады.
• Розетка құрылғыда орналасқан негізгі деректер
кестесінде көрсетілген құрылғының ең жоғарғы
күшіне төзімді.
• Кернеу негізгі деректер кестесінде көрсетілген
мәндер ауқымында.
• Розетка құрылғының штепсельдік ұшына сәйкес
келеді. Розетка штепсельдік ұшқа сәйкес болмаса,
өкілетті маманнан оны ауыстырып беруді өтініңіз.
Бірнеше розеткалар мен ұзартқыш сымдарын
пайдаланбаңыз.
Құрылғы орнатылғаннан кейін электр кабелі мен
!
розетка жақын жерде болуы қажет.
Кабель иілмеуі немесе қысылмауы қажет.
!
Кабель жиі тексеріліп, тек өкілетті маманның
!
көмегімен ғана алмастырылуы тиіс.
Қауіпсіздік шаралары сақталмаған жағдайда
!
өндіруші жауапкершілікті өз мойнына алудан бас
тартады.
Ток кабелін ешбір себепке байланысты
!
ажыратпаңыз не ауыстырмаңыз. Оны ажырату
немесе ауыстыру кепілдіктің және CE белгісінің
күшін жояды. INDESIT компаниясы бастапқы ток
кабелін ауыстырудан/ажыратудан туындаған
жазатайым оқиғаларға немесе зақымдарға
жауапты болмайды. Ауыстыруды тек INDESIT
компаниясының өкілетті маманы жасаса және
түпнұсқалық бөлшекті қолданса ғана жасауға
болады.
KZ
23
Page 24

Қосу және пайдалану
Аралық қабаттағы желім шыныда май іздерін
!
KZ
қалдырады. Құрылғыны пайдаланбас бұрын оны
қырмайтын тазалағыш затпен алып тастауға кеңес
береміз. Пайдаланудың алғашқы сағаттарында тез
кетіп қалатын резеңкенің иісі шығады.
! Ток желісіне қосылғаннан бірнеше секундтан кейін
сигнал беріледі. Енді плитаны қосуға болады.
Егер - немесе + түймесі ұзақ басылса, дисплейде
!
қуат деңгейлері және таймер минуттары тез өзгереді.
Плитаны қосу
Плитаны қосу үшін түймесін шамамен бір
секунд басып тұрыңыз.
Қыздыру элементтері
Құрылғы үлгісіне байланысты екі түрлі қыздыру
элементі орнатылуы мүмкін: галогендік және жылу
жашқыш элементтер.
Галогендік элементтер ішіндегі галогендік шамдардан
қызуды сәулелендіру арқылы шығарады.
Олар газ жаққыштарға ұқсас сипаттарға ие: оларды
басқару оңай және орнатылған температураларға
жылдам жетеді, солайша қуат деңгейін дереу көруге
мүмкіндік береді.
Жылу жашқыш элементтер тағам пісірілетін
ыдыстың түбінде қызудың бірқалыпты таралуын
қамтамасыз ететін бірнеше шарғыдан тұрады,
солайша баяу жалынмен пісіруді сәтті атқаруға
болады, мысалы бұқтырылған тағамдар, соустар
немесе қайта қыздырылатын тағамдар үшін.
Пісіру аймақтарын қосу
Әрбір пісіру аймағы таңдау түймесімен
басқарылады және қуатты реттеу құралы қос
пен
• Пісіру аймағын қолдануды бастау үшін тиісті
басқару түймесін басып,
көмегімен қажетті қуат деңгейін (0 мен 9
арасында) орнатыңыз.
түймесінен тұрады.
+
- пен + түймелерінің
Пісіру аймақтарын өшіру
Пісіру аймағын өшіру үшін оны тиісті таңдау
түймесімен
•
-
түймесін басыңыз: пісіру аймағының қуаты
өшкенше біртіндеп азаяды.
таңдаңыз да:
Пісіру ұзақтығын бағдарламалау
! Барлық пісіру аймақтарын 1 мен 99 минут аралығындағы
мерзімге бір уақытта бағдарламалауға болады.
-
1. Тиісті таңдау түймесінің көмегімен пісіру аймағын
таңдаңыз.
2. Пісіру аймағының қуат деңгейін реттеңіз.
3.
бағдарламалау түймесін басыңыз. Таңдалған
аймаққа сәйкес келетін индикатор шамы жыпылықтай
бастайды.
4.
пен + түймелерінің көмегімен пісіру ұзақтығын
-
орнатыңыз.
5.
түймесін басу арқылы растаңыз немесе 10
секундтан кейін автоматты түрде таңдау жасалады.
Таймер дереу кері санай бастайды. Шамамен
1 минут сигнал беріліп тұрады да, орнатылған
бағдарлама аяқталған кезде пісіру аймағы өшеді.
Бағдарламалағыңыз келетін әрбір конфорка үшін
жоғарыдағы процедураны қайталаңыз.
Бірнеше бағдарламаны пайдалану және дисплей
Егер бір немесе бірнеше конфорка бағдарламаланса,
дисплейде ең аз уақыты қалған конфоркаға қатысты
деректер көрсетіледі және конфорканың орнына
сәйкес келетін шам жыпылықтайды.
Бағдарламаланған басқа конфоркаларға сәйкес
келетін шамдар жанып тұрады.
24
Page 25

Бағдарламаланған басқа конфоркалардың қалған
уақытын көрсету үшін
конфоркалардың қалған уақыты алдыңғы сол жақ
конфоркадан басталып, сағат тілі бағытымен бірінен
кейін бірі көрсетіледі.
Бағдарламаны өзгерту
1. Өзгерткіңіз келетін ұзақтық
көрсетілгенше
2. Жаңа ұзақтықты орнату үшін
пайдаланыңыз.
3.
түймесін басу арқылы растаңыз.
Бағдарламадан бас тарту үшін жоғарыдағы
нұсқауларды орындаңыз.
2-қадамда,
0-ге жетеді де, өшеді. Бағдарлама бастапқы қалпына
келеді де, дисплей бағдарламалау режимінен шығады.
-
түймесін басыңыз: ұзақтық біртіндеп азайып,
түймесін қайта-қайта басыңыз:
түймесін қайта-қайта басыңыз.
түймелерін
Таймер
Плита қосылған болуы тиіс.
Таймерді 99 минутқа дейінгі ұзақтықты орнату үшін
қолдануға болады.
1.
бағдарламалау түймесін таймердің индикатор
шамы жанғанша
басып тұрыңыз.
Плитаны өшіру
Құрылғыны өшіру үшін түймесін басыңыз.
Егер басқару тақтасының құлпы қосылған болса,
плита қайта қосылған кезде де, басқару элементтері
әлі құлыпталып тұрады. Плитаны қайтадан қосу үшін
алдымен құлып функциясын өшіру керек.
«Demo» режимі
Плитаны демонстрация режиміне орнатуға болады,
бұл кезде барлық басқару элементтері әдеттегідей
жұмыс істейді, бірақ қыздыру элементтері
қосылмайды. «Демо» режимді қосу үшін плитаны
конфоркалардың барлығын өшіріп қосу керек.
•
пен - түймелерін бір уақытта 6 секунд
+
басып, ұстап тұрыңыз. 6 секунд өткеннен кейін
ҚОСУ/ӨШІРУ және БАСҚАРУ ЭЛЕМЕНТТЕРІ
ҚҰЛЫПТАУЛЫ индикатор шамдары бір секунд
жыпылықтайды.
түймесін басыңыз;
• Дисплейде «DE» және «MO» мәтіні көрсетіледі
де, плита өшеді.
• Плита қайтадан қосылғанда, ол «демо» режиміне
орнатылады.
Бұл режимнен шығу үшін жоғарыдағы процедураны
орындаңыз. Дисплейде «DE» және «OF» мәтіні
көрсетіледі де, плита өшеді. Ол келесі рет қосылған
кезде, плита әдеттегідей жұмыс істейді.
+
пен - түймелерін жіберіп,
KZ
2. Қажетті ұзақтықты
көмегімен орнатыңыз.
3.
түймесін басу арқылы растаңыз.
Таймер дереу кері санай бастайды. Уақыт біткенде
дыбыс сигналы беріледі (бір минут).
-
пен + түймелерінің
Басқару тақтасының құлпы
Плита қосулы кезде, параметрлерге байқаусыз
өзгеріс енгізуге (балалар енгізбеуі үшін, тазалау
кезінде енгізбеу үшін және т.б.) жол бермеу үшін
пештің басқару элементтерін құлыптауға болады.
Басқару тақтасын құлыптау үшін
басыңыз: түйменің үстіндегі индикатор шамы жанады.
Басқару элементтерінің кез келгенін қолдану үшін
(мысалы пісіруді тоқтату үшін) бұл функция өшіру
қажет.
индикатор шамы өшеді де, құлып функциясы
алынады.
түймесін біраз басып тұрыңыз, сонда
түймесін
Құрылғыны пайдалану бойынша кеңестер
Плита көмегімен жақсы нәтиже алу үшін:
• Пісіру аймағын толығымен қолдану үшін асты
тегіс, қалың табаларды пайдаланыңыз.
• Қызуды толық пайдалану үшін конфорканы толық
жабатындай диаметрі үлкен табаны пайдаланыңыз.
• Толығымен пайдалану және пісіру аймақтары
мен тағам пісіретін ыдыстың қызмет ету мерзімін
ұзарту үшін тағам пісіретін ыдыстың асты таза әрі
құрғақ болуын әрдайым қамтамасыз етіңіз.
• Газ оттығында пайдаланылған ыдысты
пайдаланбаңыз: газ оттығындағы қызу табаның
қалпын бұзып, оның толық тимеуіне себеп болады.
25
Page 26

Қызып кетуден қорғау
KZ
Егер электрондық элементтер қызып кетсе, плита
автоматты түрде өшеді және дисплейде алдымен
әрпі, одан кейін жыпылықтаған сан көрсетіледі.
F
Температура қолайлы деңгейге жеткенде бұл
хабарлама өшеді де, плитаны қайта пайдалану
мүмкін болады.
Қауіпсіздік айырып-қосқышы
Құрылғыда белгілі бір қуат деңгейінде, белгілі бір
уақыт бойы жұмыс істеп тұрған пісіру аймақтарын
автоматты түрде өшіретін қауіпсіздік айырыпқосқышы бар. Қауіпсіздік айырып-қосқышы қосылған
кезде, дисплейде «0» көрсетіледі.
Мысалы: артқы оң жақ конфорка 5-ке орнатылды
және 5 сағат үзіліссіз жұмыс істегеннен кейін өшеді,
ал алдыңғы сол жақ конфорка 2-ге орнатылды және
8 сағаттан кейін өшеді.
Қуат деңгейі
1
2
3
4
5
6
7
8
9
Ең көп жұмыс істеу уақыты, сағат
9
8
7
6
5
4
3
2
1
Сигнал
Бұл да бірнеше әдеттен тыс жағдайды білдіруі
мүмкін:
• Бір зат (таба, ыдыс-аяқ, т.б.) басқару тақтасына 10
секундтан көп уақытқа қойылды.
• Басқару тақтасына бірдеңе төгілді.
• Бір түйме тым ұзақ басылып тұрды. Жоғарыдағы
жағдайлардың барлығы сигналдың берілуіне
себеп болуы мүмкін. Сигналды өшіру үшін
ақаулықтың себебін жойыңыз. Ақаулықтың себебі
жойылмаса, сигнал беріліп тұра береді де, плита
өшеді.
26
Page 27

Тағам дайындау бойынша кеңес
ª
•
•
¶
¶
§
§
S
S
¢
¢
£
™
™
¡
KZ
Өте қатты
жалынмен пісіру
пісіру
Қатты
жалынмен
Қысыммен пісіру
Қысыммен пісіру ыдысы
Грильдеу
Құймақ
Тез қоюланатын (сұйық шырындар)
Қайнап жатқан су (паста, күріш, көкөністер)
Сүт
Баяу қоюланатын (қою шырындар)
Қуыру
Қайнату
Қатты жалынмен пісіру жəне қызарту
(қуырылған ет, стейктер, эскалоптар,
балық белдемелері, қуырылған
жұмыртқалар)
Орташа жалынмен пісіру
Буға пісіру
пісіру
Аз жалынмен
Аз жалынмен пісіру
(бұқтырылған тағамдар)
пісіру
Өте аз
жалынмен
Шоколад соусы Тамақты ыстық күйде ұстау
Ысқырықтан кейін қысыммен пісіру
Тағамдарды қайта қыздыру
27
Page 28

Сақтандырулар мен кеңестер
KZ
Бұл құрылғы халықаралық қауіпсіздік стандарттарына
!
сай жасақталып, дайындалған. Төмендегі ескертулер
қауіпсіздік ережелерін ескерту мақсатында берілген
және оны мұқият оқып шығу қажет.
Бұл құрылғы Еуропа экономикалық
қауымдастығының келесі нұсқауларына сай
келеді:
- 2006 жылғы 12-сәуірдегі 73/95/EEC (төмен кернеу
туралы) директивасы және одан кейінгі түзетулер;
- 2004 жылғы 15-желтоқсандағы 2004/108/EEC
(электромагниттік үйлесімділік туралы) директивасы
және одан кейінгі түзетулер;
-1993 жылдың 22 шілдесіндегі 93/68/EEC және одан
кейінгі түзетулер;
- 1275/2008 күту/өшірулі режимге байланысты директива.
Жалпы қауіпсіздік
!
Желдеткіш торының артындағы ауа кіретін жер
ешқашан жабылмауын қамтамасыз етіңіз. Шынында,
ендірілген плитаға, құрылғыда қолданылатын
электрондық құрамдас бөліктерді суыту үшін
қолайлы желдету берілуі тиіс.
Индукциялық плитаны шағын тоңазытқыш (жылу)
!
немесе кір жуғыш машина (дірілдеу) үстіне орнату
дұрыс емес. Шынында, электрондық құрамдас
бөліктерді желдетуге жеткілікті бос орын қалмайды.
• Құрылғы үйде қолдануға арналған, оны коммерциялық
немесе өндірістік тұрғыда қолдануға болмайды.
• Жабық жер болса да, құрылғыны сыртта қолданбау
қажет. Құрылғыны қорғаусыз жаңбыр мен боранда
қалдыру аса қауіпті.
• Құрылғыны жалаң аяқ немесе қол-аяғыңыз ылғал
болғанда ұстамаңыз.
• Құрылғыны кітапшада берілген нұсқауларға сай, тек
ересек адамдар ғана тағам дайындау мақсатында
пайдалануы тиіс. Плитаны үстелдің үстіңгі
тақтайы немесе азық-түлік бөлетін тақтай ретінде
пайдаланбаңыз.
• Шыны керамикалық плита соққыларға шыдамды,
бірақ ол қатты істік затпен ұрғанда жарылып (тіпті
сынып) кетуі мүмкін. Егер мұндай жағдай болса,
құрылғыны дереу электр тоғынан суырып қызмет
көрсету орталығына хабарласыңыз.
• Басқа электр құрылғыларының электр кабельдері
плитаның ыстық бөліктеріне жақындамайтынына көз
жеткізіңіз.
• Пісіру аймақтары сөндірілгеннен кейін кемінде отыз
минут салыстырмалы түрде ыстық болатынын есте
сақтаңыз. Қалдық қызу бар болған кезде индикатор
шамы ескерту береді («Қосу және пайдалану»
бөлімін қараңыз).
• Еритін заттарды плитадан алыс ұстаңыз, мысалы
пластмасса, алюминий немесе құрамында
көп қанты бар өнімдер. Пластикалық үлдірді,
алюминий фольгасын немесе қаптамаларды
қолданғанда аса мұқият болыңыз: егер оларды
әлі ыстық беттерге қойсаңыз, олар плитаны қатты
зақымдауы мүмкін.
• Байқаусыздықтан күйіп қалмау үшін табалардың
тұтқаларын әрдайым плитаның ортасына қарай
бұрып қойыңыз.
• Құрылғыны өшіргенде розеткадан әрдайым
айырғышты ұстап тартыңыз, кабельден тартып
суырмаңыз.
• Құрылғыны электр желісінен ажыратпай ешқашан
тазалау немесе күтім көрсету жұмыстарын
жасамаңыз.
• Құрылғыны физикалық, сезімталдық және
психикалық қабілеттері төмен адамдар (балалар
да кіреді), тәжірибесіз немесе өнімнен хабары
жоқ кез келген адамның қолданбауы тиіс.
Мұндай адамдарға, кем дегенде, қауіпсіздіктерін
қамтамасыз ететін біреулер жетекші болуы керек
немесе құрылғының жұмысына қатысты кіріспе
нұсқаулары берілуі тиіс.
• Электрокардиостимуляторлары немесе басқа
белсенді имплантанттары бар адамдардың
назарына:
Плита электромагниттік кедергі жөніндегі барлық
ағымдағы стандарттарға сәйкес келеді.
Сондықтан, индукциялық пеш заң талаптары
сәйкес келеді (89/336/CEE директивалары). Ол
қолданылатын басқа ешбір электр құралына
кедергі жасамайтындай жасалған, бірақ бұл құрал
да осы заңға сәйкес келуі тиіс.
Индукциялық плита жақын аумақ магниттік
өрістерін түзеді.
Индукциялық плита мен электрокардиостимулятор
арасында ешбір қайшылық болмауы үшін стимулятор
тиісті заңдарға сәйкес жасалған болуы тиіс.
Сондықтан, тек өніміміздің сәйкестігіне ғана
кепілдік бере аламыз. Сәйкестігі немесе кез
келген қайшылықтары туралы мәлімет алу үшін
электрокардиостимулятор өндірушісіне немесе
дәрігеріңізбен ақылдасыңыз.
• Балаларға құрылғымен ойнауға рұқсат етпеңіз.
• Металл заттарды (пышақтар, қасықтар, таба
қақпақтары, т.б.) конфоркаға қоймаңыз, себебі
олар қызып кетуі мүмкін.
• Құрылғы сыртқы таймермен немесе бөлек қашықтан
басқару жүйесімен басқарылуға арналмаған.
Қоқысқа тастау
• Орау материалдарын тастаған кезде: ораманың
қайта пайдаланылуы мүмкін болатындай жергілікті
заңды қадағалаңыз.
• Электр және электроникалық құралдардың
қалдықтарына (WEEE) қатысты 2002/96/EC Еуропа
заңнамасына сәйкес үй құрылғылары қалыпты қатты
қалалық қалдық айналымын пайдаланып жойылмауы
тиіс. Қоршаған орта мен халық денсаулығына тиетін
зиянның алдын ала отырып, жарамсыз құрылғылар
қайта пайдалану мен машина ішіндегі материалдарды
өңдеу құнын оңтайландыру мақсатында бөлек
жиналуы керек. Барлық өнімдердегі сызылған қоқыс
жәшігі өнім иесінің бөлектелген қоқыс жинауға
қатысты міндетін еске салады.
Жарамсыз үй құрылғыларын дұрыс жоюға қатысты
қосымша ақпарат алу үшін өнім иелері халыққа
қызмет көрсету орталығына немесе олардың
жергілікті өкілдеріне хабарласа алады.
28
Page 29

Күтім және техникалық
қызмет көрсету
Құрылғыны өшіру
Кез келген бір жұмысты бастамастан бұрын
құрылғыны токтан ажыратыңыз.
Құрылғыны тазалау
!
Қырғыш немесе таттандыратын тазартқыш
заттарды (мысалы, барбекю жасайтын құралдар
мен пештерді тазалауға арналған спрейлер), дақ
кетіргіштерді, тат кетіргіштерді, ұнтақ тазартқыш
заттарды немесе қырғыш беттері бар губкаларды
пайдаланбаңыз: олар құрылғы беттерін біржола
сызып тастауы мүмкін.
!
Құрылғыны ешқашан бу тазартқышымен немесе
шаңсорғышпен тазаламаңыз.
• Әдетте, плитаны дымқыл губкамен жуып, сорғыш
ас үй сүлгісімен құрғату жеткілікті.
• Плита өте кір болса, оны арнайы шыны
керамиканы тазалау затымен ысқылап, одан кейін
жақсылап шайыңыз да, кептіріңіз.
• Сонда да кетпей қойған кірден тазалау үшін
қолайлы қырғышты пайдаланыңыз. Төгілген
тамақ қатып қалмауы үшін, құрылғының суығанын
күтпей-ақ, оны дереу сүртіп алыңыз. Шыны
керамикалық беттерге арналған, тот баспайтын
болат сымдарынан жасалған губканы сабын суға
малып жуу арқылы жақсы нәтижеге қол жеткізе
аласыз.
• Егер плита үстінде пластикалық немесе
құрамында қант бар заттар байқаусыз ерітілсе,
плита беті әлі ыстық кезде оларды қырғышпен
дереу алып тастаңыз.
• Тазалағаннан кейін, плитаны арнайы қорғағыш
күтім өнімімен өңдеуге болады: бұл өнім
қалдыратын көзге көрінбейтін үлдір плитаның
бетін пісіру кезінде таматын тамшылардан
қорғайды. Бұл күтім процедурасын құрылғы жылы
(ыстық емес) немесе суық кезде орындау керек.
• Құрылғыны таза сумен шайып, жақсылап кептіруді
ұмытпаңыз: қалдықтар кейін пісірген кезде
жабысып, қатып қалуы мүмкін.
Тот баспайтын жақтау (тек сыртқы жақтауы бар
модельдерде)
Тот баспайтын болатқа оның бетінде ұзақ уақыт
тұрған қаттылығы жоғары су немесе құрамында
фосфор бар тазалағыш заттар дақ түсіруі мүмкін.
Тазалағаннан кейін, бетті жақсылап шайып,
кептірген жөн. Бетке су төгілсе, оны тез әрі
жақсылап кептіріңіз.
Кейбір плиталарда тот баспайтын болатқа ұқсас
!
алюминийден жасалған жақтау болады. Алюминийге
қолдануға келмейтін ешбір тазалағыш немесе май
жоятын өнімдерді пайдаланбаңыз.
Плитаны бөлшектеу
Плитаны бөлшектеу қажет болса:
1. Әр жағында туралау серіппелерін ұстап тұрған
бұрандаларды босатыңыз.
2. Әр бұрышында бекіту ілмектерін ұстап тұрған
бұрандаларды босатыңыз.
3. Плитаны орнату қуысынан шығарып алыңыз.
!
Құрылғыны өз басыңызбен жөндеуге тырыспаңыз.
Құрылғы бұзылса, қызмет көрсету орталығына
хабарласыңыз.
Үлгілердің техникалық сипаттамасы
Индукциялық жүйе тағам пісірудің ең жылдам жолы
болып табылады. Пісіру аймағы қызатын дағдылы
конфоркаларға қарағанда индукциялық жүйе
жылуды тікелей түбі ферромагнитті материалдан
жасалған таба ішінде түзеді.
Шартты белгілер:
I = бір индукциялық пісіру аймағы
B = күшейткіш: пісіру аймағының қуат деңгейін 3000
Вт-қа дейін арттыруға болады
* = тиісті артқы пісіру аймағы үшін күшейткіш
қосылған кезде максималды қуат деңгейі
шектеледі (Іске қосу және пайдалану бөлімін
қараңыз).
KZ
Плиталар
Пісіру аумағы
Артқы сол жақ
Артқы оң жақ
Алдыңғы сол жақ
Алдыңғы оң жақ
Толық қуат
I 2200 – B 3000* - 1600 если Передняя Правая*
KEC 647 B
Қуат (Вт)
I 1400 – B 2000* – 600 если Передняя Левая*
I 2200 – B 3000* - 1600 если Задняя Левая*
I 1400 – B 2000* – 600 если Задняя Правая*
7200
29
Page 30

30
Page 31

31
Page 32

01/2013 - 195105416.01
XEROX FABRIANO
32
 Loading...