

Hotpoint HTS18JCPARWW, HTS18JCPARCC, HTS18JBPARWW, HTS18JBPARCC, HTS18CCSARWW Owner’s Manual
...
vvwvv.Hotpoint.com
Safely Instructions .......... 2-4
Operating Instructions
Additional Features ............ 9
Automatic Icemaker .......... 10
Controls ..................... 5
Crispers and Pans ........... 8, 9
Shelves and Bins ............ 6, 7
Care and Cleaning ....... 11, 12
Replacing the Light Bulbs ...... 12
Installation Instructions
Preparing to Install
the Refrigerator .............. 13
Reversing the Door Swing ...18-22
Water Line Installation ..... 14-17
Models 18& 19
Troubleshooting Tips ...... 23-26
Normal Operating Sounds ..... 23
Consumer Support
Consumer Support .... Back Cover
Product Registration ....... 27, 28
Warranty ................... 31
Write themodeland serialnumbershere:
Model #
Serial#
Find these numbers on the gray label
on the left side, near the top of the
refi'igerator compartment.
162D6747PO04 39-60246 02-03JR
IMPORTANTSAFETYINFORMATION.
READALLINSTRUCTIONSBEFOREUSING.
WARNING#
Use this appliance only for its intended purpose as described in this Owner's ManuaL
SAFETYPRECAUTIONS
When using electrical appliances, basic safety precautions should be followed, including the following:
{ This refrigerator must be properly installed
and located in accordance with tile Installation
Instructions before it is used.
{_ Do not allow children to climb, stand or hang
on @e shelves in the refrigerator. They could
damage @e refiigerator and seriously injure
themselves.
{ Do not touch tile cold surfaces in tile freezer
compartment when hands are damp or wet.
Skin may stick to these extremely cold surfaces.
{_ Do not store or use gasoline or other flammable
vapors and liquids in the vicinity of this or any
o@er appliance.
{ In refiigerators with automatic icemakers,
avoid contact with tile moving parts of the
ejector mechanism, or with tlle heating element
located on tlle bottom of the icemake_: Do
not place fingers or hands on tlle automatic
icemaking mechanism while the refiigerator
is plugged in.
@ Keep fingm.-sout of the "pinch point" areas;
clearances between tlle doors and between
the doors and cabinet are necessarily small.
Be care{hi closing doors when children are
in tlle area.
_ Unplug the refiigerator be{bre cleaning and
making repairs.
NOTE:Westronglyrecommendthatanyservicingbe
performedbyaqualifiedindividual
_ Setting either or tsoth controls (some models
only have one control) to the 0 (Off) position
does not remove power to the light circuit.
@ Do not refreeze frozen foods which have
thawed completely.
2
ww_.Ho_point.com
A DANGER!RISKOFCHILDENTRAPMENT
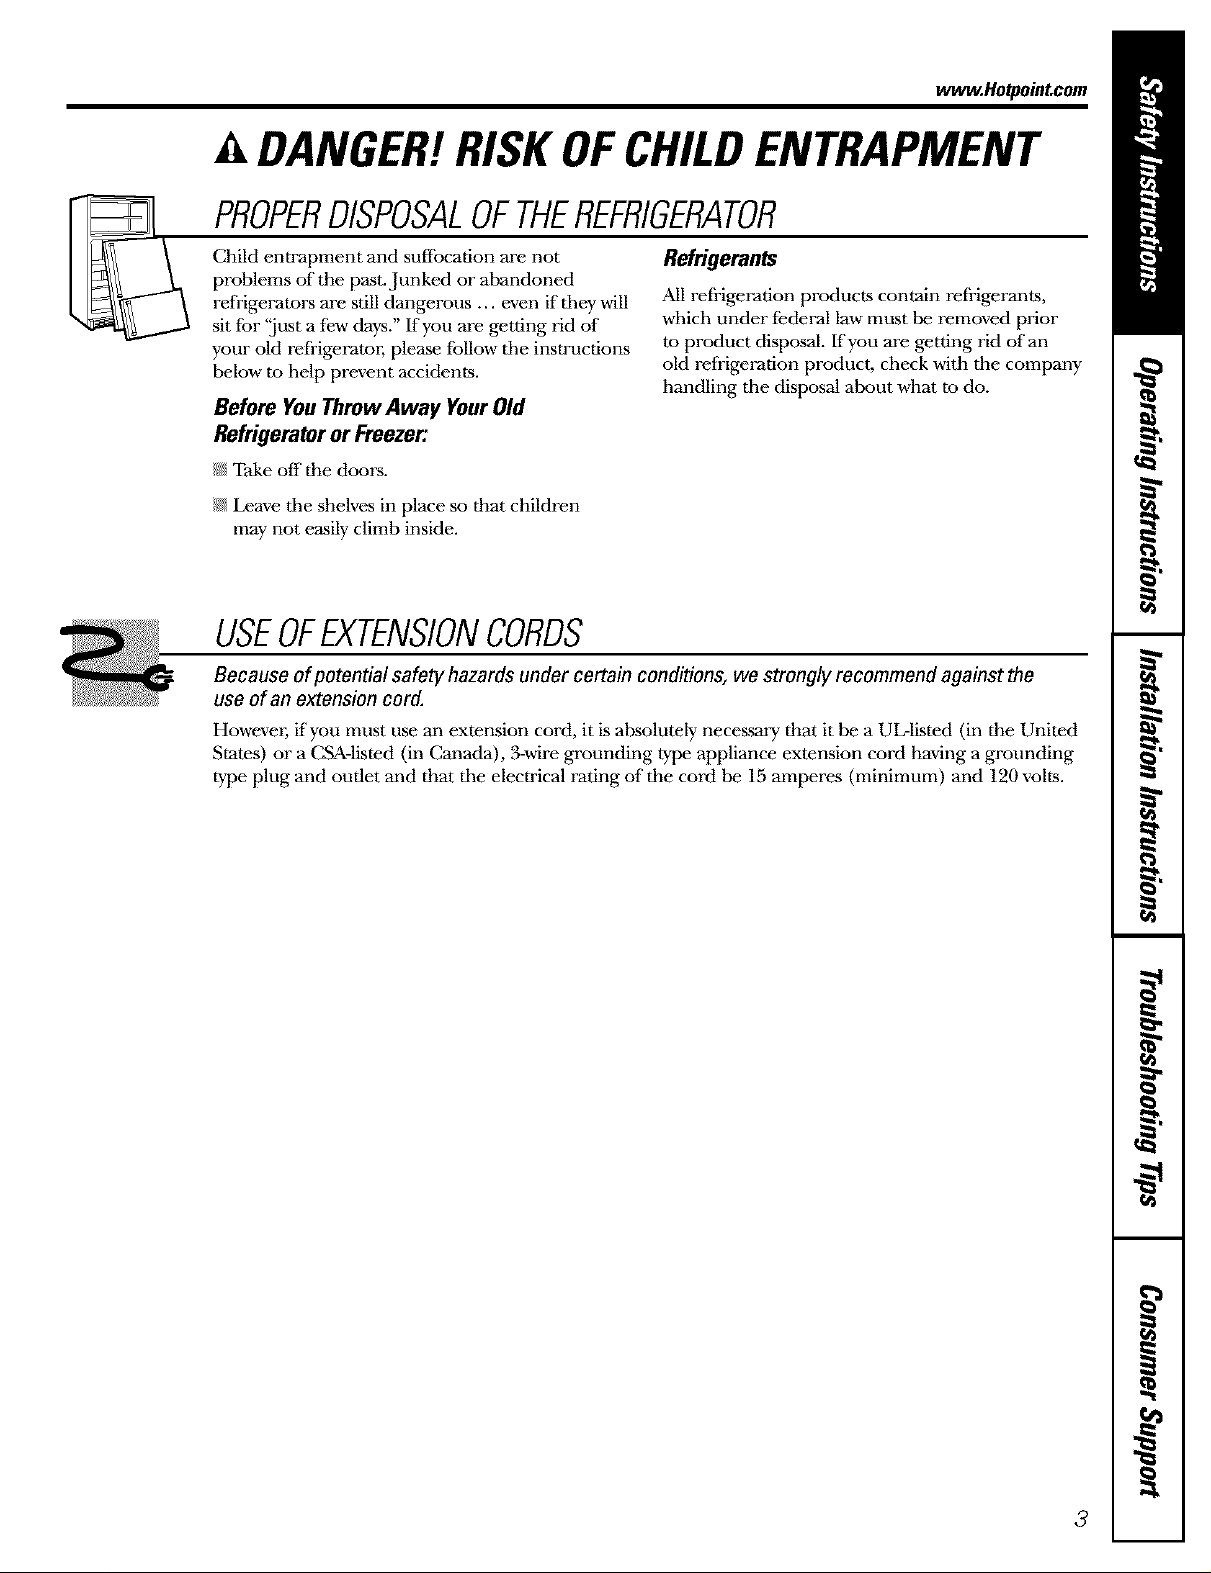
PROPERDISPOSALOFTHEREFRIGERATOR
Child entrapment and suffocation are not
problems of"the past. Junked or abandoned
refrigerators are still dangerous ... even if they will
sit for 'just a few days." If you are getting rid of
your old refiigerato_; please fbllow the instructions
below to help prevent accidents.
Refrigerants
All refrigeration products contain refrigerants,
which under federal law must be removed prior
to product disposal. If you are getting rid of an
old refrigeration product, check with the company
handling the disposal about what to do.
Before YouThrew Away YourOld
Refrigeratoror Freezer.
N Take off the doors.
/;55Leave tile shelves in place so that children
may not easily climb inside.
USEOFEXTENSIONCORDS
Because of potential safety hazards under certain conditions, we strongly recommend against the
use of an extension cord.
However; if you must use an extension cord, it is absolutely necessary that it be a UL-listed (in the United
States) or a CSA-listed (in Canada), 3-wdre grounding type appliance extension cord having a grounding
type plug and outlet and that the elecnical rating of the cord be 15 amperes (minimum) and 120 volts.
3
IMPORTANTSAFETYINFORMATION.
READALLINSTRUCTIONSBEFOREUSING.
A WARNING!
HOWTOCONNECTELECTRICITY
Do not, under any circumstances, cut or remove the third (ground) prong from the power cord.
Forpersonal safe_ this appfiance must be properly grounded.
The power cord of this appliance is equipped with
a 3-prong (grounding) plug which mates with
a standard 3-prong (grounding) wall outlet to
minimize the possibility of electric shock hazard
from this appliance.
Have tile wall outlet and circuit checked by
a qualified electrician to make sure tile outlet
is properly grounded.
Where a standard 2-prong wall oudet is
encountered, it is your personal responsibility
and obligation to have it replaced with a properly
grounded 3-prong wall outlet.
The refrigerator should always be plugged into its
own individual electrical oudet which has a voltage
rating that matches the rating plate.
This provides tile best performance and also
prevents overloading house wiring circuits which
could cause a fire hazard from overheated wires.
Never unplug your refrigerator by pulling on the
power cord. _Mwaysgrip plug firmly and pull
sn'aight out from tile outlet.
Repair or replace immediately all power cords that
have become frayed or odmrwise damaged. Do not
use a cord tllat shows cracks or abrasion damage
along its lengtll or at ekher end.
When moving dm refiigerator away from tile
wall, be careful not to roll over or damage the
power cord.
USEOFADAPTERPLUGSgAdapterpl,gsnotpermittedinCanada)
Because of potential safety hazards under certain conditions, we strongly recommend against the
use of an adapter plug.
Howevm; if you must use an adapter, where local
codes permit, a temporary connection may be made
to a properly grounded 2-prong wall outlet by use
era UL-listed adapter a'_ailable at most local
hardware stores.
The larger slot in tile adapter must be aligned wkh
tile larger slot in dm wall outlet to provide proper
polarity in the connection of the power cord.
When disconnecting tile power cord from the
adapter, al,a-ayshold tile adapter in place with one
hand while pulling tile power cord plug with tile
other hand. If this is not done, tile adapter ground
terminal is very likely to break with repeated use.
If the adapter ground terminal breaks, DO NOT USE
tlle refrigerator until a proper ground has been
established.
Attachingtheadaptergroundterminaltoa wall outlet
coverscrewdoesnotgroundtheapplianceunlessthe
coverscrewis metal,not insulated,andthewalloutlet is
groundedthroughthehousewiring. Youshouldhavethe
circuitcheckedbya quafifiedelectricianto makesurethe
outletisproperlygrounded.
READANDFOLLOWTHISSAFETYINFORMATIONCAREFULLY.
SAVETHESEINSTRUCTIONS
4
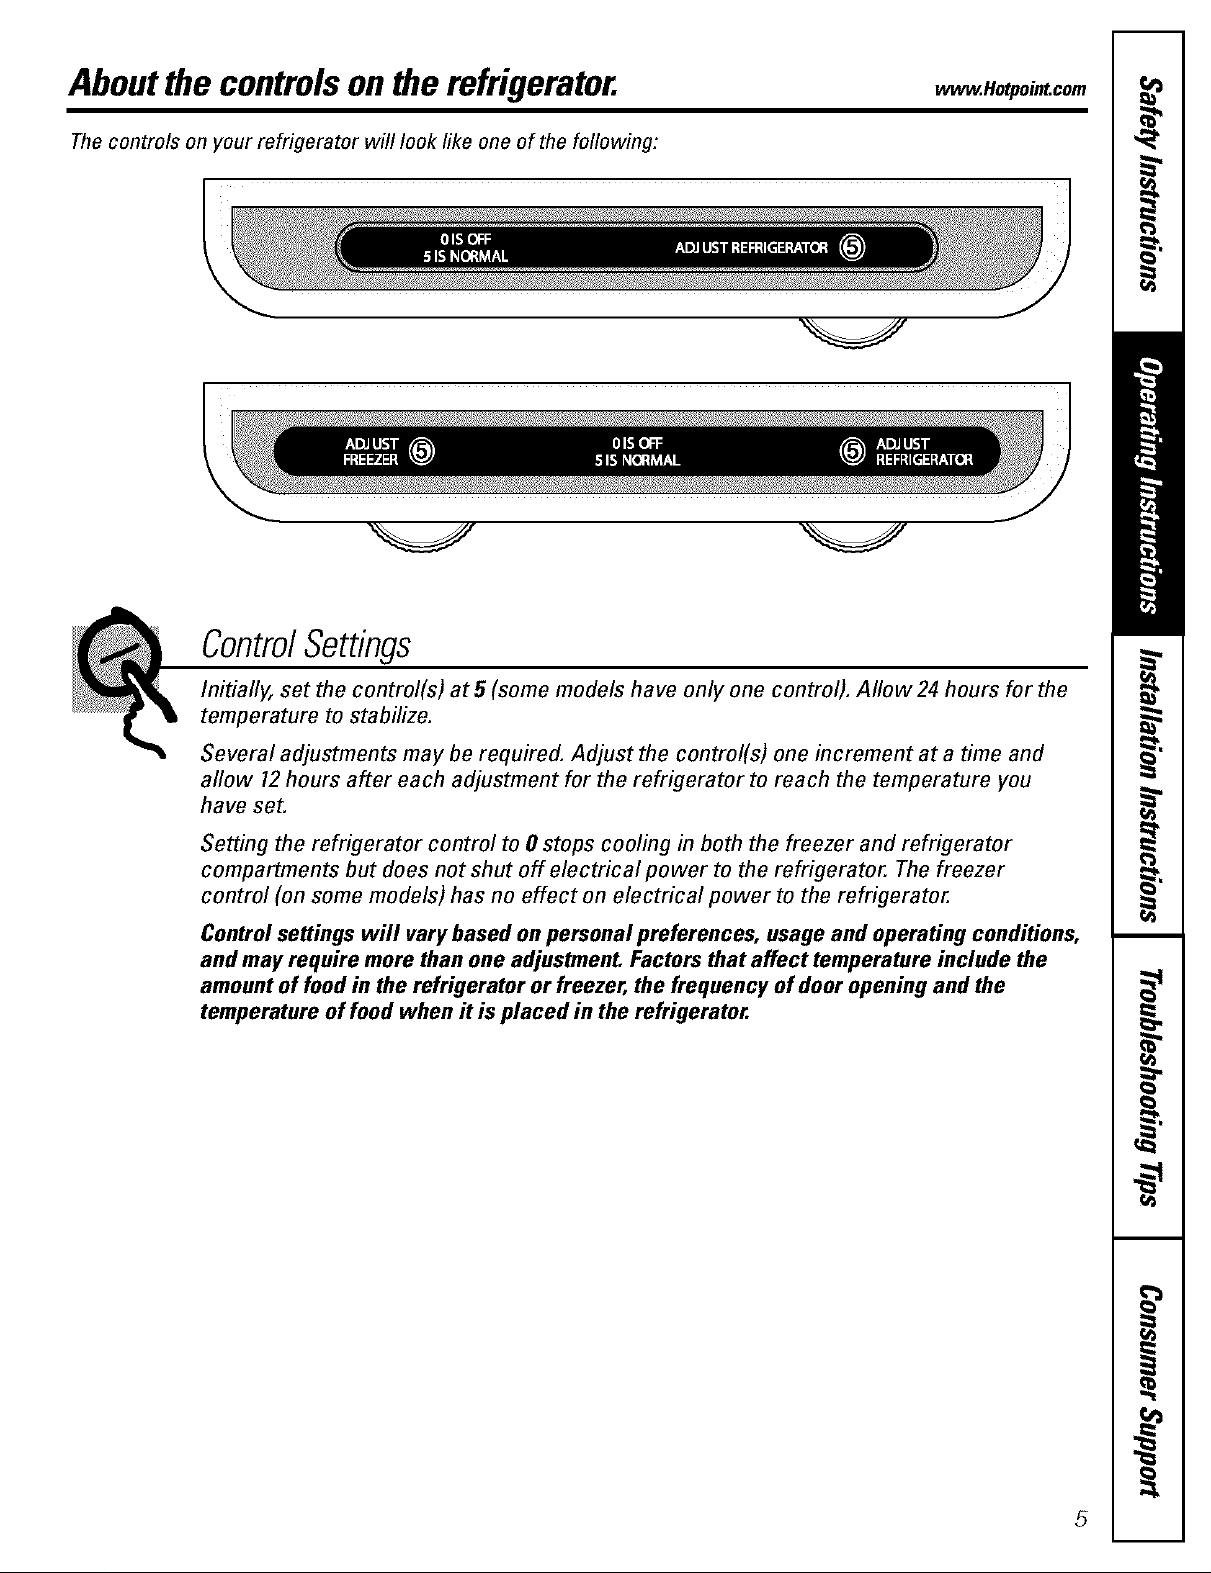
Aboutthe controlson therefrigerator.
Thecontrols on your refrigerator will look like one of the following:
ControlSettings
www.Ho_omLcom
Initially, set the control(s) at5 (some models have only one control). Allow24 hours for the
temperature to stabilize.
Several adjustments may be required. Adjust the control(s) one increment at a time and
allow 12hours after each adjustment for the refrigerator to reach the temperature you
have set.
Setting the refrigerator control to 0 stops cooling in both the freezer and refrigerator
compartments but does not shut off electrical power to the refrigerator. The freezer
control (on some models) has no effect on electrical power to the refrigerator.
Control settings will varybased onpersonal preferences, usage and operating conditions,
and may require more than one adjustment. Factors that affect temperature include the
amountof food in the refrigerator or freezer, the frequency of door opening and the
temperature of food when it is placed in the refrigerator.
5
Abouttheshelvesand bins.
Not all features are on all models.
Rearranging the Shelves
Shelves in tbe refrigerator and freezer compartments are adjustable.
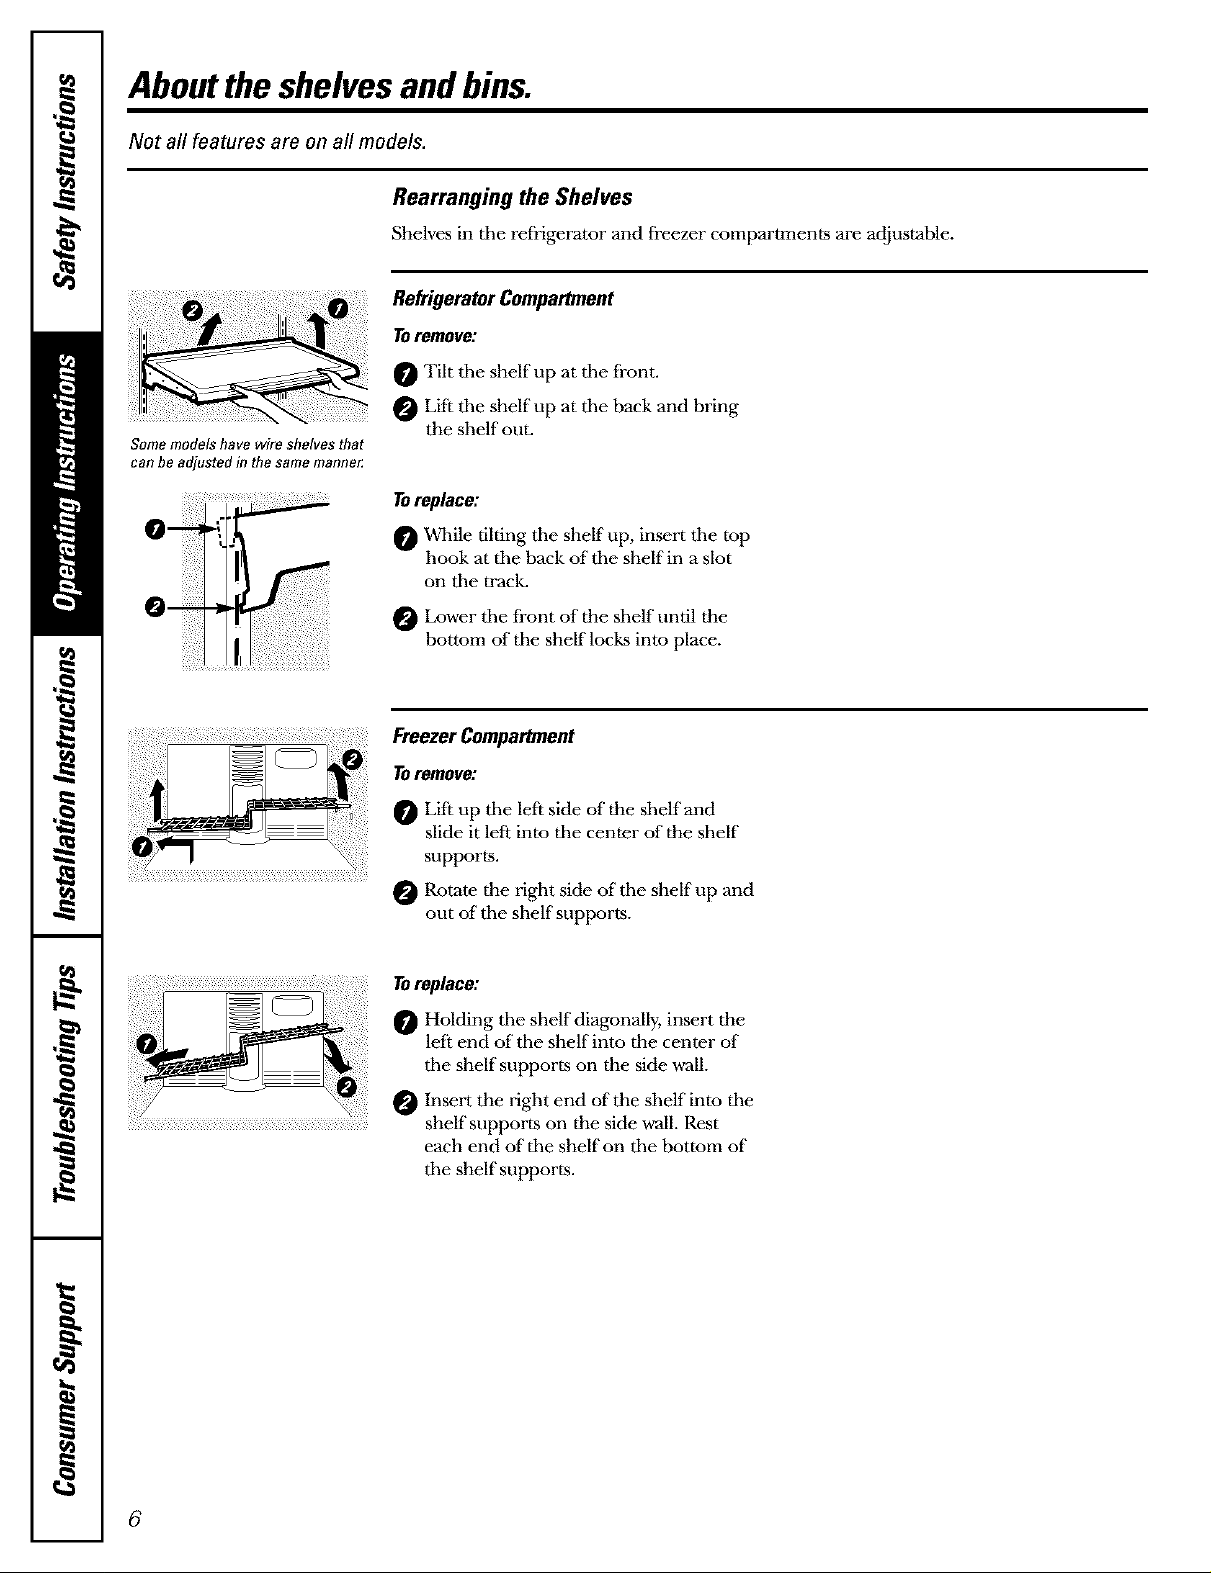
Refrigerator Compartment
Toremove:
0 Tilt tbe shelf up at tbe front.
Lift tbe shelf up at tbe back and bring
Somemodels have wire shelves that
can be adjusted in the same manne_
¸5¸¸5¸¸5¸
the shelf out.
Toreplace:
L.
0 *While tiltin g tbe shelf up, insert tbe top.
hook at tile back oftbe shelf in a slot
on tbe track.
Lower tbe front of the shelf until the
bottom of tbe shelf locks into place.
Freezer Compartment
Toremove:
0 Lift up tile left side of the sbelfand
slide it left into tbe center of the shelf
supports.
Rotate the rigbt side oftbe shelf up and
out of"tbe shelf supports.
Toreplace:
0 Holding tbe shelf diagonally, insert the
left end of tbe shelf into the center of
tbe shelf supports on the side wall.
Insert the right end of the shelf into tim
shelf supports on tim side wall. Rest
each end oftbe shelf on tim bottom of
tim shelf supports.
6
, Spillproof Shelves (onsomemodels)
' Spillproof shelves have special edges to
help prevent spills fronl dripping m lower
shelves. To remove or replace tile shelves,
see Rearrangingthe Shelves.
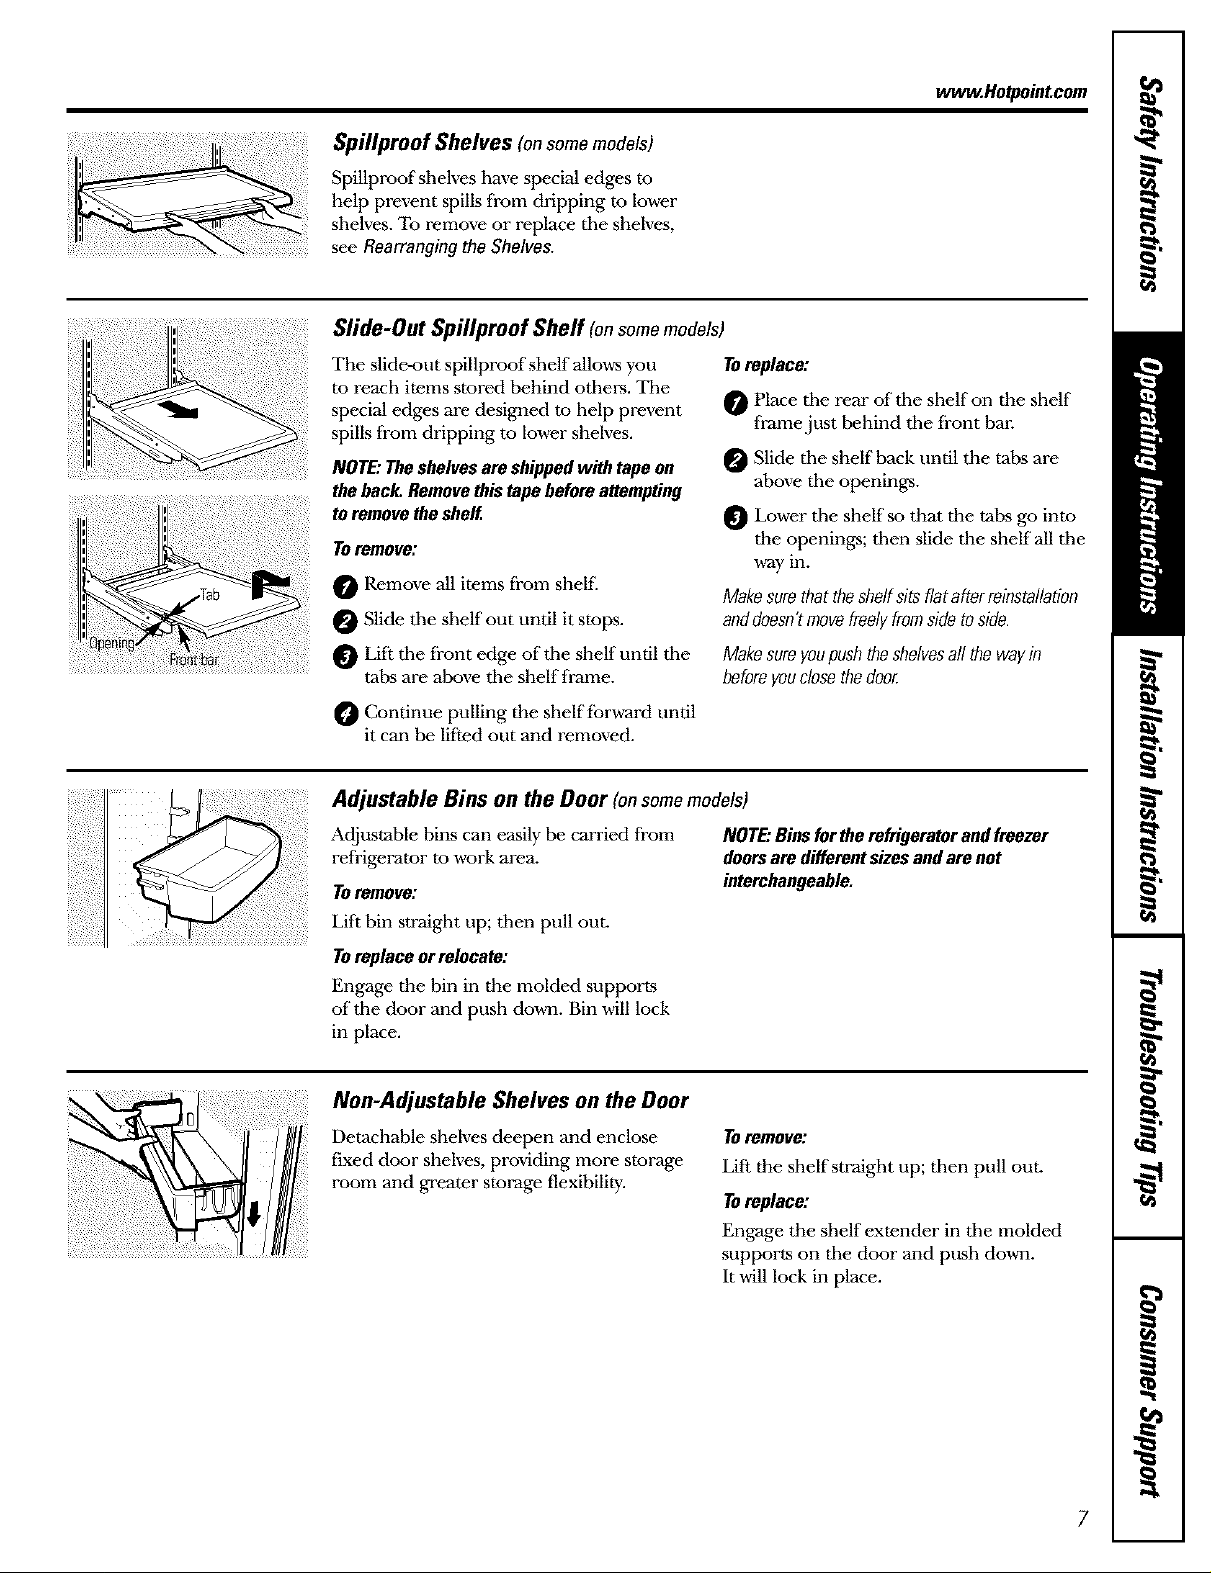
Slide-Out Spillproof Sheff (onsomemodels)
The slide-out spillproof shelf allows you
to reach items stored behind otllel.-s.Tile
special edges are designed to help prevent
spills fronl dripping to lower shelves.
NOTE:Theshelvesareshippedwith tapeon
theback.RemovethistapebeforeaUempting
toremovetheshelf.
TOremove:
O Remove all items from shel£
Slide tile shelf out until it stops.
Lift tile front edge of the shelf until tile
tabs are above tile shelf frame.
ww_.Ho_point.com
Toreplace:
Place tile rear of the shelf on the shelf
O
frame just behind the fi'ont bal:
Slide the shelf back until the tabs are
above the openings.
Lower the shelf so that the tabs go into
the openings; then slide the shelf all the
way in.
Makesurethattheshelfsitsflatafterreinstallation
anddoesn'tmovefreelyfromsidetoside.
Makesureyoupushtheshelvesall thewayin
beforeyouclosethedoor.
Continue pulling the shelf fbrward until
it can be lifted out and removed.
Adjustable Bins on the Door (onsomemodels)
Adjustable bins can easily be carried from
refrigerator to work area.
Toremove:
Lift bin st_'aight up; then pull out.
Toreplaceorrelocate:
Engage the bin in the molded supports
of the door and push down. Bin will lock
in place.
NOTE:Binsfortherefrigeratorandfreezer
doorsare differentsizesandarenot
interchangeable.
Non-Adjustable Shelves on the Door
Detachable shelves deepen and enclose
fixed door shelves, providing more storage
room and greater storage flexibility.
TOremove:
Lift the shelf st_'aight up; then pull ouL
TOreplace:
Engage the shelf extender in the molded
supports on the door and push dov_ql.
It will lock in place.
Aboutthe crispersandpans.
Not all features are on all models.
Fruit and Vegetable Crispers
Excesswater that may accumulate in the
bottom of the drawers or under the drawers
should be wiped dry.
Adjustable Humidity Crisper (onsomemodels)
Slide the control all the way to tile
HIGHsetting to provide high humidivy
recommended for most vegetables.
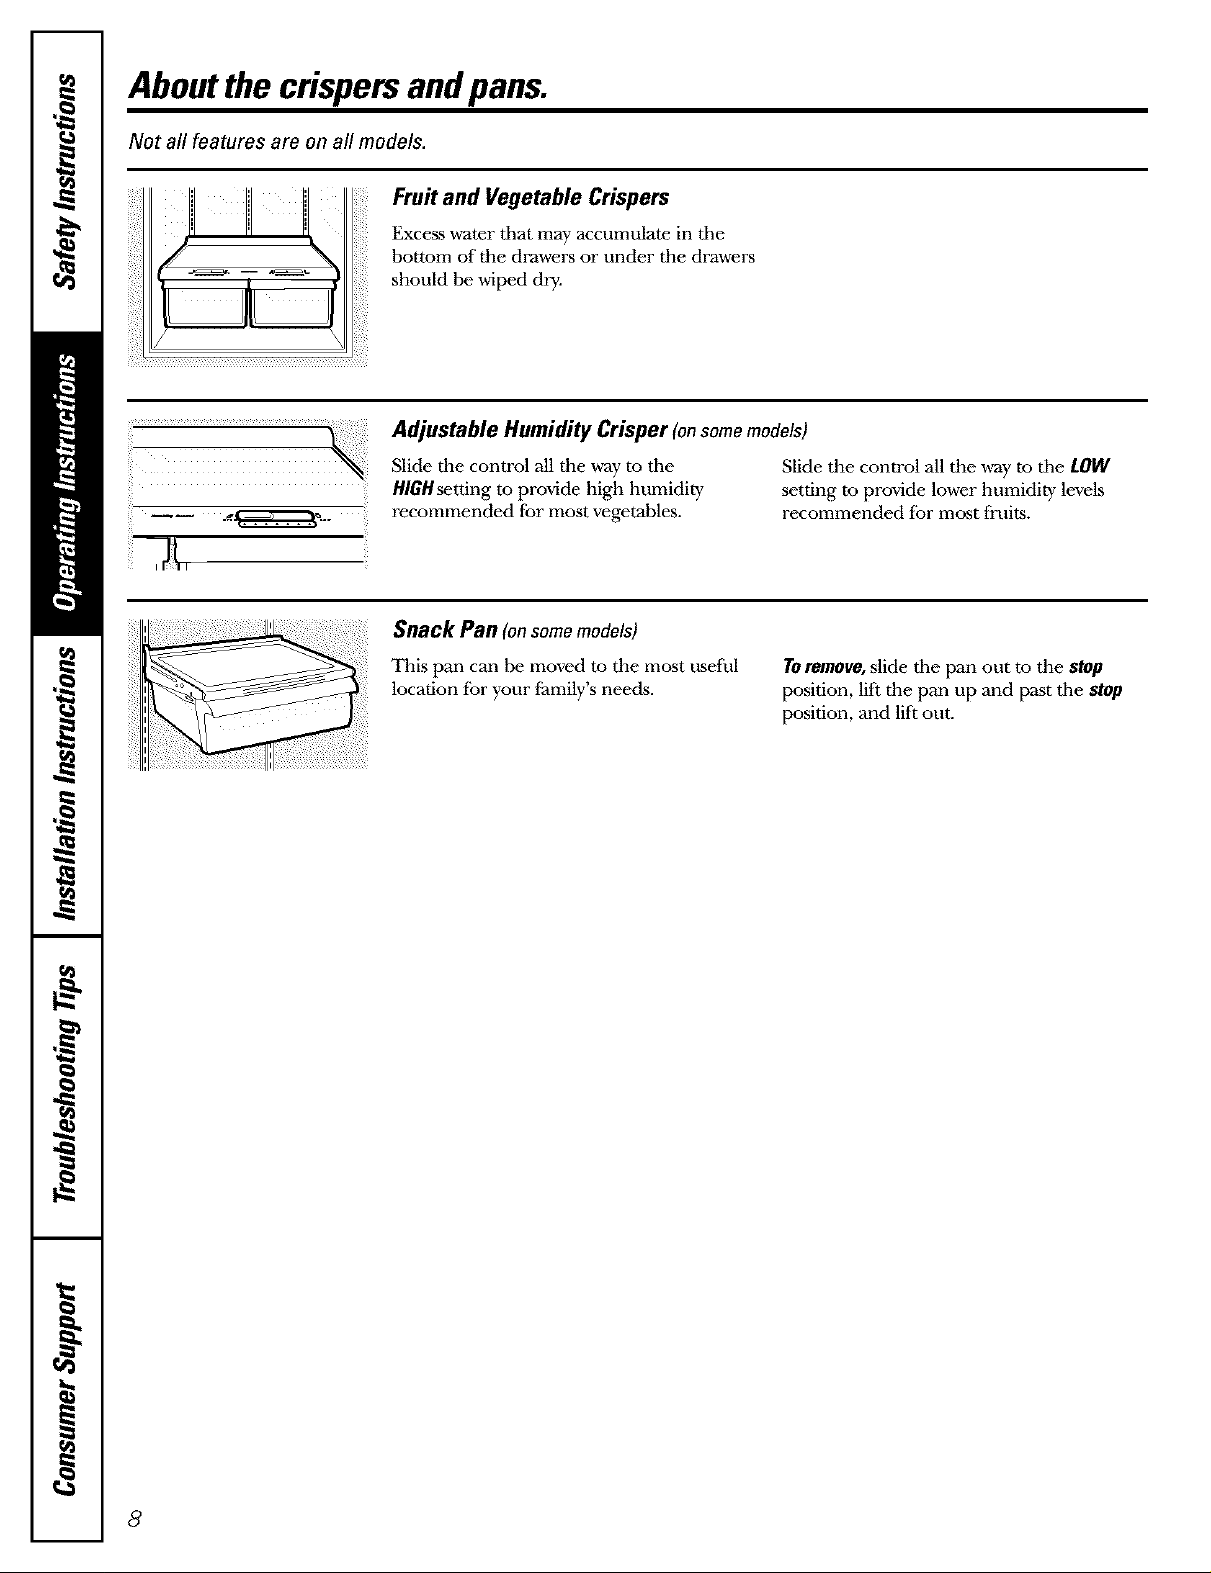
Snack Pan (on somemodels)
This pan can be moved to the most useful
location for your i_amily'sneeds.
Slide the control all the way m tile LOW
setting m provide lower humidity levels
recommended for most fruits.
TOremove, slide tile pan out to the stop
position, lift the pan up and past the stop
position, and lift out.
8
Aboutcrisperremoval. eotpointcom
Not all features are on all models.
i'l/ <,
Removingthe glass cover
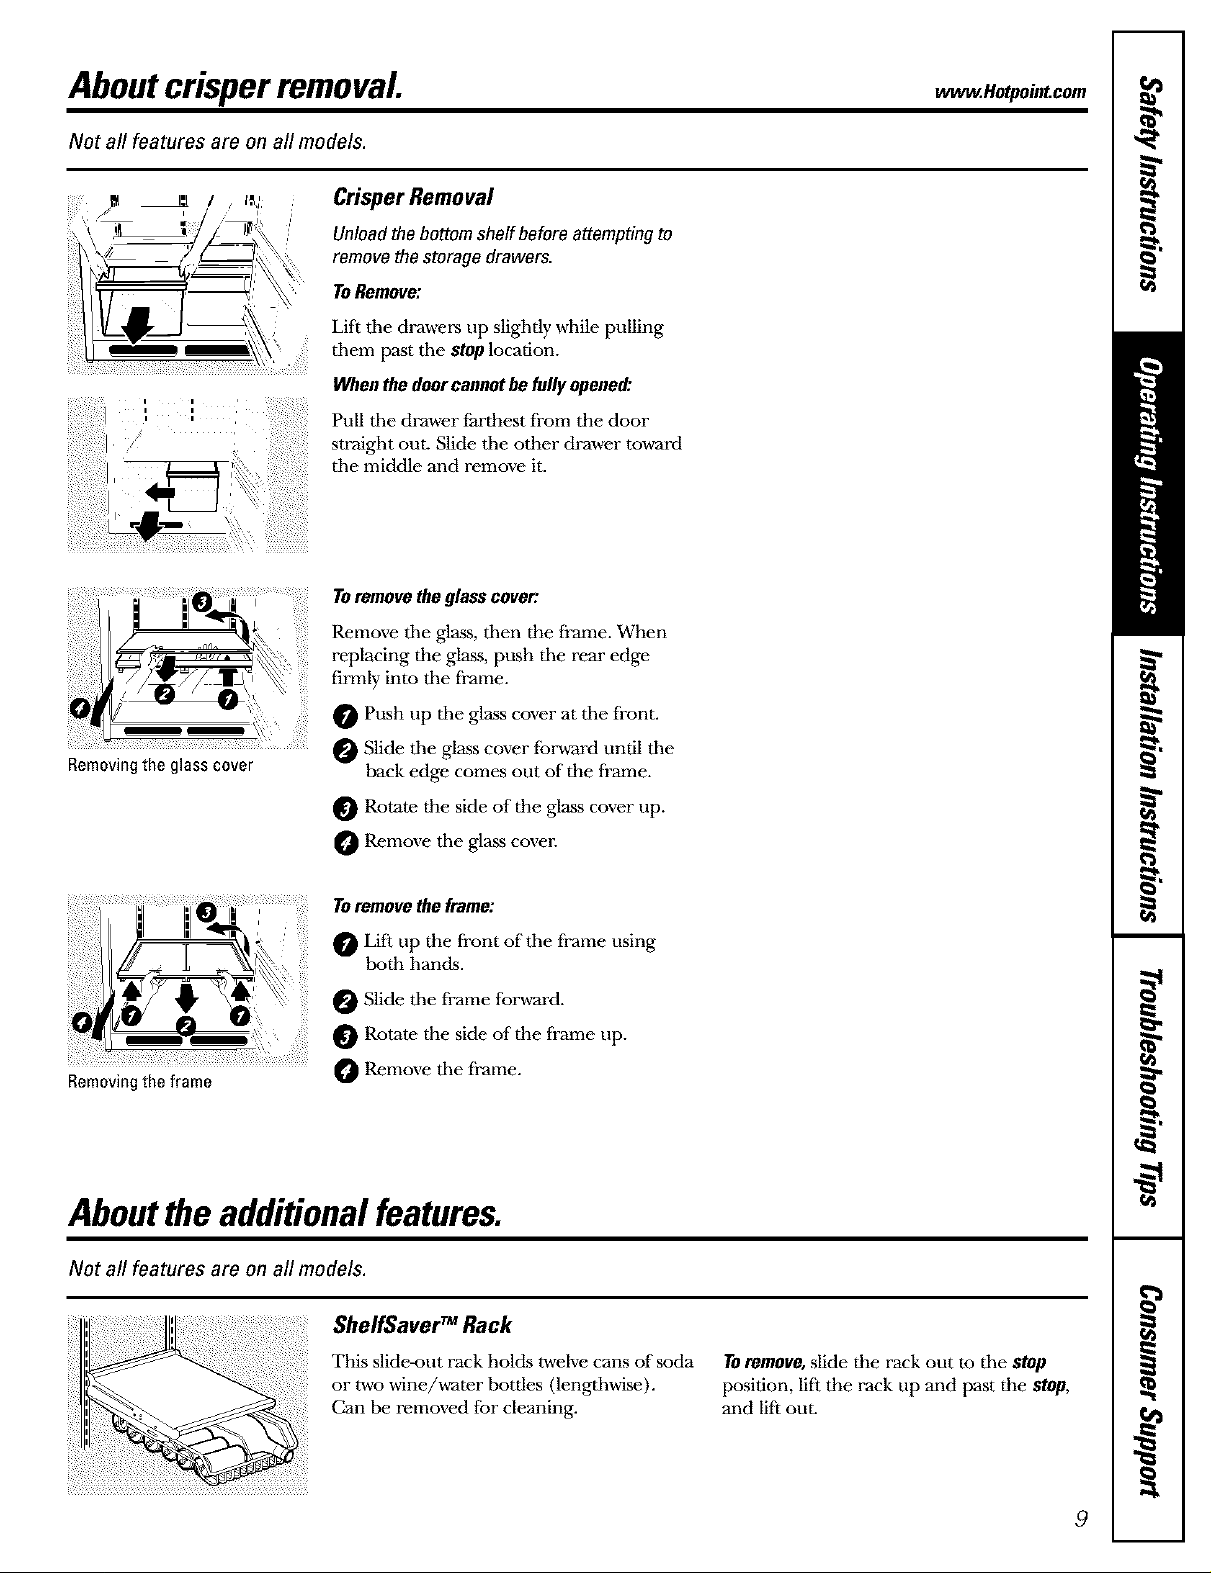
Crisper Removal
Unloadthe bottom shelf beforeattemptingto
removethestoragedrawers.
ToRemove:
Lift tile drawers up slightly while pulling
them past tile stoplocation.
Whenthedoorcannotbefullyopened:
Pull the drawer farthest from the door
straight out. Slide tile other drawer toward
tile middle and remove it.
Toremovetheglasscover:
Remove tile glass, then the frame. When
replacing the glass, push tile real" edge
firmly into tile frame.
O Push up tile glass cover at tile front.
Slide tile glass cover f;_rward until tile
back edge comes out of the frame.
Rotate the side of the glass cover up.
Remove the glass cover.
Toremovetheframe:
Lift up the front of the frame using
both hands.
Slide the frame forvcard.
Rotate the side of the frame up.
Removingthe frame
Remove the frame.
Aboutthe additionalfeatures.
Not all features are on all models.
ShelfSaver TM Rack
This slide-out rack holds twelve cans of soda
or two wine/water t>ottles (lengthwise).
Can be removed for cleaning.
TOremove,slide the rack out to the stop
position, lift the rack up and past the stop,
and lift out.
9
Aboutthe automaticicemaker.
A newly-installed refrigerator may take 12-24 hours to begin making ice.
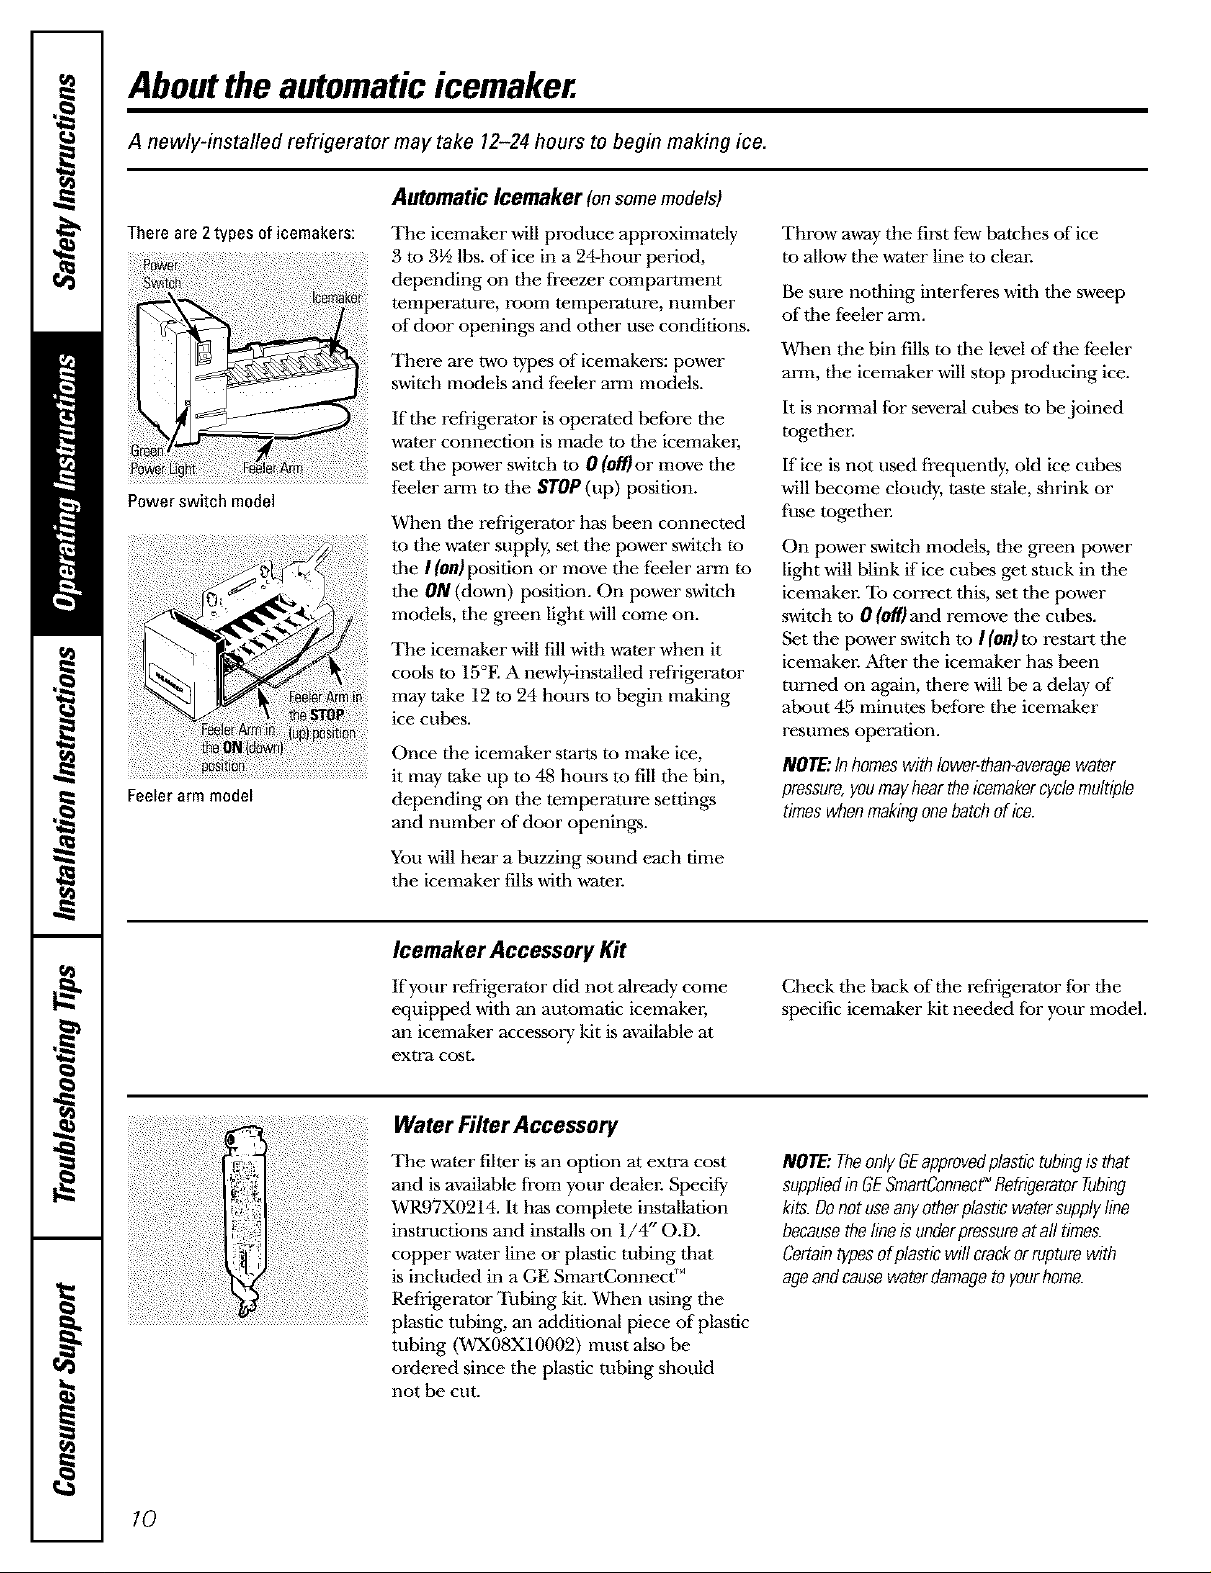
Automatic Icemaker (onsomemodels)
There are 2types of icemakers:
Power switch model
Feelerarm model
The icemaker will produce approximately
3 to 3½ lbs. of ice in a 24-hour period,
depending on the freezer compartment
temperature, room temperature, number
of door openings and other use conditions.
There are two types of icemakers: power
switch models and feeler arm models.
If the refrigerator is operated hefbre the
water connection is made to tile icemakm;
set tile power switch to 0 (06*)or move the
feeler arm ro the STOP (tip) position.
When the refrigerator has been connected
to the v_-ater supply, set the power switch to
the/(0n)position or move the fizeler arm to
the ON (down) position. On power switch
models, the green light will come on.
The icemaker will fill with water when it
cools to 15°E A newly-installed refrigerator
may take 12 to 24 hours to begin making
ice cubes.
Once the icemaker starts to make ice,
it may take tip to 48 hours to fill the bin,
depending on the temperature settings
and number of door openings.
You will hear a buzzing sound each time
the icemaker fills with water.
Throw away the first few batches of"ice
to allow the water line to clear.
Be sure nothing interferes with the sweep
of the fizeler arm.
When the bin fills to the level of the fizeler
arm, the icemaker will stop producing ice.
It is normal for several cubes to be joined
together.
If ice is not used frequently, old ice cubes
will become cloudy, taste stale, shrink or
fhse together.
On power switch models, the green power
light will blink if ice cubes get stuck in the
icemaker. To correct this, set the power
switch to 0 (Off)and remove the cubes.
Set the power switrh to I(on)to restart the
icemakm: After the icemaker has been
turned on again, there will be a delay of"
about 45 minutes before the icemaker
resumes operation.
NOTE:Inhomeswithlower-than-averagewater
pressure,youmayheartheicemakercyclemultiple
timeswhenmakingonebatchofice.
Icemaker Accessory Kit
lfyour refrigerator did not already come
equipped with an automatic icemakm;
an icemaker accessory kit is a'_ailable at
extra cost.
Water Filter Accessory
The water filter is an option at extra cost
and is available from your dealm: Specify
WR97X0214. It has complete installation
insrructions and installs on 1/4" O.D.
copper water line or plastic tubing that
is included in a GE SmartConnect '"
Refrigerator Tubing kit. When using the
....................................................................................plastic tubing, an additional piece of plastic
tubing (WX08X10002) must also be
ordered since the plastic tubing should
not be cut.
10
Check the back of the refrigerator for the
specific icemaker kit needed for your model.
NOTE:TheonlyGEapprovedplastictubingisthat
suppliedinGESmartConnecf_RefrigeratorTubing
kits.Denetuseanyotherplasticwatersupplyline
becausethelineisunderpressureatall times.
Certaintypesefplasticwillcrackorrupturewith
ageandcausewaterdamageto yourhome.

Careandcleaning of therefrigerator. Hotpointcom
Cleaning the Outside
The door handles and trim. Clean with
a cloth dampened with soapy water.
Dry with a soft cloth.
Keep the outside clean. Wipe with a clean
cloth lightly dampened with kitchen
appliance wax or mild liquid dish
detergent. Dry and polish with a clean,
soft cloth.
Cleaning the Inside
TOhelp prevent odors, leave an open box of
baking soda in the fresh food and freezer
compartments.
Unplug the refrigerator before cleaning. If this
is not practical, w_:mg excess moisture out
of sponge or cloth when cleaning around
switches, lights or controls.
Use rearm water and baking soda solution--
about a tablespoon (15 ml) of baking soda
to a quart (1 liter) of water. This both cleans
and neun'alizes odors. Thoroughly rinse
and wipe dry.
Donotwipetherefrigeratorwithasoileddishcloth
orwettowel Thesemayleavea residuethat
canerodethepainLDonotusescouringpads,
powderedcleaners,bleachorcleanerscontaining
bleachbecausetheseproductscanscratchand
weakenthepaintfinish.
Avoidcleaningcoldglassshelves[onsomemodels)
withhotwaterbecausetheextremetemperature
differencemaycausethemtobreak.Handleglass
shelvescarefully.Bumpingtemperedglasscan
causeit to shatter
Donotwashanyplasticrefrigeratorpartsinthe
dishwasher
Donotcleanwithanyproductscontainingdetergent,
bleachorammonia.Theymaydamagethe
refrigerato_
Condenser
There is no need tar routine condenser
cleanings in normal home operating
environments. Howevm; in environments
that may be particularly dusty or greasy, the
condenser should be cleaned periodically
tar efficient refrigerator operation.
For models with a base grille, the grille must
be removed in order to clean the condenser.
Toremovethebasegrille:
Grasp it about 6" from each end and pull
its bottom edge toward you.
Toreplacethebasegrille:
Insert the tops of the metal clips into the
oval vents, making sure one of the plastic
tabs on the back of the grille goes into each
of the oval vents. Then push the bottom of
the grille forward until it snaps into place.
Behind the Refrigerator
Be careful when moving the reti'igerator
avcay from the w_l. All types of floor
coverings can be damaged, particularly
cushioned coverings and those with
embossed surfaces.
Pull the refrigerator straight out and return
it to position by pushing it straight in.
Cleaning the condenser.
Sweep away or vacuum up dust.
Formodels with a base grille, reach the
condenser by inserting a brush or wacuum
hose into the oval holes.
For models without a base grille, reach the
condenser by inserting a brush or vacuum
hose under the bottom of the refrigeratol:
For best results, use a brush specially
designed tbr this purpose. It is available
at most appliance parts stores.
Moving the refrigerator in a side direction
may result in damage to the floor covering
or reti'igerato_:
Whenpushingtherefrigeratorback,makesureyou
don'trolloverthepowercordoricemakersupplyline
[onsomemodels).
11

Careand cleaning of therefrigerator.
Preparing for Vacation
For long vacations or absences, remove
food and unplug tile refiigeraton Move
tile refrigerator control to tile 0 (Off)
position and clean tile interior witb a
baking soda solution of one tablespoon
(15 ml) of baking soda to one quart
(1 liter) ofwaten Leave the doors open.
Preparing to Move
Set tile icemaker power switeh to tile 0 (Off)
position or move the feeler arm to the
STOP (up) position (depending on model)
and shut offthe water supply to the
refrigerator.
If the temperature can drop below freezing,
have a qualified smwicer drain the v_-ater
supply system (on some models) m prevent
serious property damage due to flooding.
Secure all loose items such as grille,
shelves and drawers by taping tbem
securely in place to prevent damage.
Besuretherefrigeratorstaysinanuprightposition
duringmoving
Replacingthelight bulbs.
Setting either or both controls to 0 (off) does not remove power to the light circuit.
Refrigerator Compartment--Upper Light
_ Replace witb an appliance bulb of
the same or lower wattage.
Plug the refiigerator back in.
After replacing with an appliance bulb
of the same or lower wattage, replace
tbe shield.
Plug the refrigerator back in.
!_!_i_i!_!!ii_!!_;)_i__ o _i!iii_ii_i_ii_ij_!_i_!!_;;_;_
Somemodels have only one light.
A CAUTlON:Light u smay ehot.
O Unplug the refrigerator.
The bulbs are located at the top of tim
compartment near tbe opening.
Freezer Compartment Dome Light (on some modols)
A CAUTlON:Light u smay ehot.
Unplug tim refiigeraton
The bulb is located behind a light
shield at tim back of tim freezer
compartment. To remove, squeeze
tbe top and bottom of tim shield and
pull tbe shield off
12

Installation
Refrigerator
Instructions
Models 18and 19
I ffyou have questions,call 800.GE.CARES(800.432.2737)orvisitore" Website at: www.Hotpointcom I
BEFORE YOU BEGIN
Read these instructions completely and carefully.
• IMPORTANT - Savethese
instructions for local inspector's use.
• IMPORTANT - Obse ,,eall
governing codes and ordinances.
• Note to Installer - Be sure to leave these
instructions with the Consumes:
• Note to Consumer - Keepthese instructions
for future reference.
• Skill level - Installation of this appliance requires
basic mechanical skills.
• Completion time - Refrigerator Installation
15 minutes.
• Proper installation is the responsibility of the
installm:
• Product failure due to improper installation is not
covered under the Warranty.
WATER SUPPLY TO THE ICEMAKER
(ON SOME MODELS)
If the refrigerator has an icemakm, it will have to be
connected to a cold w-ater line. AGE water supply kit
(containing tubing, shutoffvalve, fittings and
instructions) is available at extra cost from your dealer
or by visiting our Website at GEAppliances.com or
Parts and Accessories, 800.626.2002.
REFRIGERATOR LOCATION
• Do not install the refrigerator where the temperature
will go below 60°F (16°C) because it will not run often
enough to maintain proper temperatures.
• Do not install the refrigerator where the temperature
will go above 100°F (37°C) because it will not perform
properly.
• Install it on a floor strong enough to support it fully
loaded.
CLEARANCES
Allow the followdng clearances for ease of insvallation,
proper air circulation and plumbing and electrical
connections.
• Sides 1/8" (3 mm)
• Top 1" (25 mm)
• Back 1" (25 mm)
If the refrigerator is to be installed next to a wall on the
hinge side, allow 5/16" (8 mm) door clearance.
ROLLERS (ON SOME MODELS)
The rollers have 3 purposes:
• Rollers adjust so the door closes easily when opened
about 45°.
• Rollers adjust so the refrigerator is firmly positioned on
the floor and does not wobble.
• Rollers allow you to move the refrigerator away from the
v_dl tbr cleaning.
NOTE: When rollers are properly adjusted, the top
of the refrigerator will not be level but will have a slight
backw_ard tilt.
For models with a base grille, the grille must be removed
to access the roller adjusting screws.
To remove the base gTille:
Grasp it about 6" from each
end and pull its bottom edge
toward you.
To replace the base grille:
Insert the tops of the metal
clips into the oval vents,
making sure one of the
plastic tabs on the back of"
the grille goes into each of
the oval vents. Then push the
bottom of the grille tbrward
until it snaps into place.
To adjust the rollers, turn
the two front roller adjusting
screws clockwise to raise the
front of the refi'igeratol;
cotmterdockwise to lower it.
'.lw
13

Installation Instructions
INSTALLING THE WATER LINE (ON SOME MODELS)
BEFORE YOU BEGIN
Recommended copper water supply kits are WX8X2,
WX8X3 or WX8X4, depending on the amount of
tubing you need. Approved plastic ,a-ater supply lines
are GE SmartConnect '' Reliigeramr Tubing
(WX08X10002, WX08X10006, WX08X10015 and
WX08X10025).
When connecting your refrigerator to a GE Reverse
Osmosis Water System, the only approved installation
is with a GE RVKit. For other reverse osmosis ,a-ater
systems, follow the manufacturer's recommendations.
This water line installation is not warranted by the
refrigerator or icemaker manufacturen Follow these
instructions carefully to minimize the risk of expensive
water damage.
Water hammer (water banging in the pipes) in house
plumbing can cause damage to refrigerator parts and
lead to water leakage or flooding. Call a qualified
plumber to correct water hammer before installing the
water supply line to the refrigeraton
To prevent burns and product damage, do not hook
up the w-ater line to the hot water line.
If you use your refrigerator before connecting the
water line, make sure the icemaker power switch is in
the 0 (Off} position (on power switch models) or the
feeler arm is in the SlOP (up) position (on feeler arm
models).
Do not install the icemaker tubing in areas where
temperatures fall below freezing.
When using any electrical device (such as a power
drill) during installation, be sure the device is double
insulated or grounded in a manner to prevent the
hazard of electric shock, or is battery powered.
All installations must be in accordance with local
plumbing code requirements.
WHAT YOU WILL NEED
• Copper or GE SmartConnect TM Refrigerator Tubing
kit, 1/4" outer diameter to connect the refrigerator
to the water supply. If using coppm; be sure both ends
of the tubing are cut square.
To determine how much tubing you need: Measure
the distance from the ,a-ater valve on the back of the
refrigerator to the water supply pipe. Then add 8"
(2.4 m). Be sure there is sufficient extra tubing (about
8" [2.4 m] coiled into 3 turns of about 10" [25 cm]
diameter) to allow the refi'igerator to move out fi'om
the wall after installation.
GE SmartConnect "_Refrigerator Tubing Kits are
available in the follo,Mng lengths:
2" (.6 m) - WXO8XlO002
6" (1.8 m) - WXO8XIO006
15" (4.6 m) -WXO8XIO015
25" (7.6 m) -WXO8XlO025
Be sure that the kit you select allo,a_ at least 8" (2.4 m)
as described above.
NOTE: The only GE approved plastic tubing is that
supplied in GE SmartConnect TM Refrigerator Tubing
kits. Do not use any other plastic water supply line
became the line is under pressure at all times. Certain
types of plastic will crack or rupture with age and cause
water damage to your home.
14

Installation Instructions
WHAT YOU WILL NEED (CONT.)
Install the shutoffvalve on the nearest frequently used
drinking water line.
• AGE water supply kit (containing tubing, shutoff
valve and fittings listed below) is available at extra
cost fi'om your dealer or fi'om Parts and Accessories,
800.626.2002.
• A cold water supply. The water pressure must be
between 20 and 120 p.s.i. (1.4_L1 bar).
• Power drill.
• 1/2" or adjustable wrench.
• Straight and Phillips blade screwdriver.
• Two 1/4" outer diameter compression nuts and
2 ferrules (sleeves)--to connect the copper robing to
the shutoff valve and the refrigerator water valve.
OR
[] SHUT OFF THE MAIN WATER
SUPPLY
Turn on the nearest faucet long enough to clear
the line of water.
[] CHOOSE THE VALVE LOCATION
Choose a location for the valve that is easily
accessible. It is best to connect into the side of a
vertical water pipe. When it is necessa W to connect
into a horizontal w-ater pipe, make the connection
to the top or side, rather than at the bottom, to
avoid drawing off any sediment from the w-ater pipe.
• If you are using a GE SmartConnecC' Refrigerator
Tubing kit, the necessary fittings are preassembled to
the tubing.
• If your existing copper water line has a flared fitting
at the end, you will need an adapter (available at
plumbing supply stores) to connect the water line to
the refi'igerator OR you can cut off the flared fitting
with a tube cutter and then use a compression fitting.
Do not cut formed end from GE SmartConnect '_
Refi'igerator tubing.
• Shutoff valve to connect to tile cold water line.
The shutoff valve should have a water inlet with a
minimum inside diameter of 5/32" at tile point of
connection to the COLD WATER LINE. Saddle-type
shutoffvalves are included in many water supply kits.
Before purchasing, make sure a saddle-type valve
complies with your local plumbing codes.
[] DRILL THE HOLE FOR THE VALVE
Drill a 1/4" hole in the v_-ater pipe (even if using a
self-piercing valve), using a sharp bit. Remove any
burrs resulting fi'om drilling the hole in the pipe.
Take care not to allow water to drain into the drill.
Failure to drill a 1/4" hole may resuh in reduced
ice production or smaller cubes.
15
Installation Instructions
INSTALLING THE WATER LINE (CONT.)
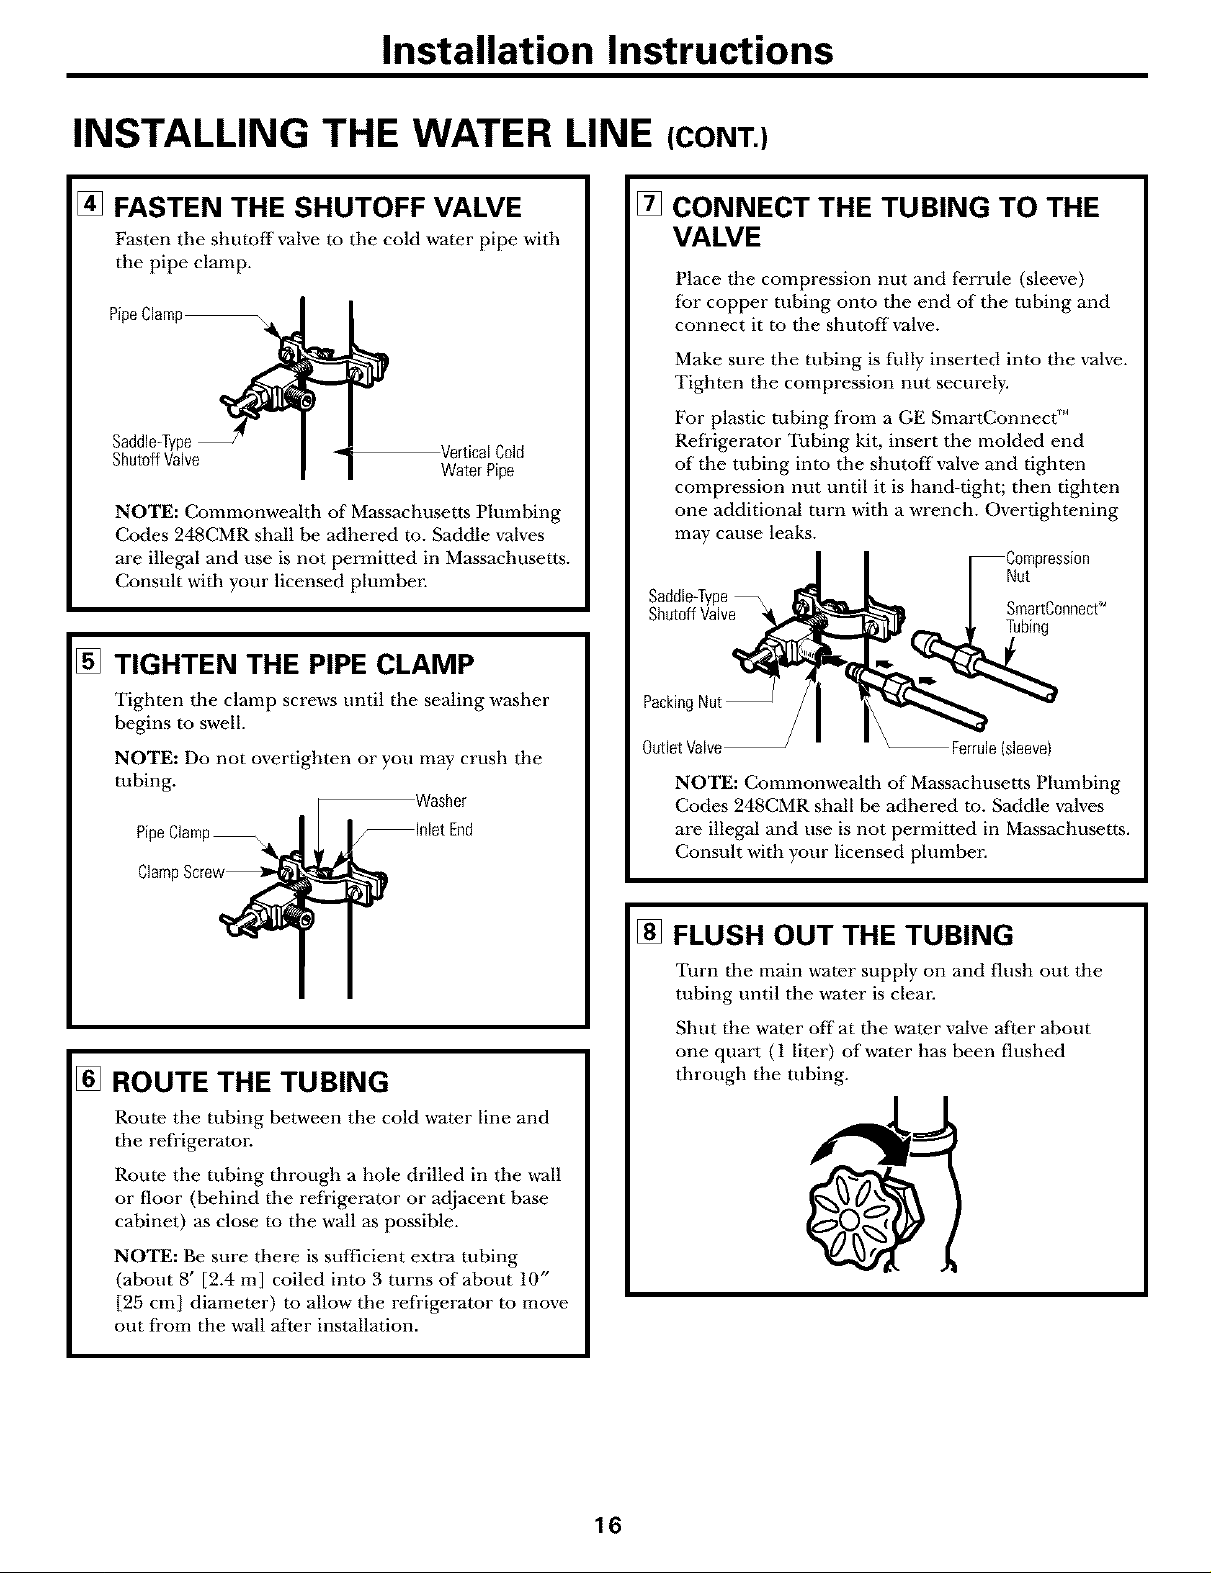
[] FASTEN THE SHUTOFF VALVE
Fasten the shutofl'valve to the cold water pipe with
the pipe clamp.
ShutoffValve
NOTE: Commonwealth of Massachusetts Plumbing
Codes 248CMR shall be adhered m. Saddle valves
are illegal and use is not permitted in Massachusetts.
Consult with your licensed plumbm:
VerticalCold
WaterPipe
[] TIGHTEN THE PIPE CLAMP
Tighten the clamp screws until the sealing washer
begins to swell.
NOTE: Do not overtighten or you may crush the
tubing.
PipeClamp--\, _]nlet End
[] CONNECT THE TUBING TO THE
VALVE
Place the compression nut and ferrule (sleeve)
for copper tubing onto the end of the tubing and
connect it to the shutoffvalve.
Make sure the tubing is flllly inserted into the valve.
Tighten the compression nut securely.
For plastic tubing from a GE SmartConnect _
Refrigerator Tubing kit, insert the molded end
of the tubing into the shutoffvalve and tighten
compression nut until it is hand-tight; then tighten
one additional turn with a wrench. Overtightening
may cause leaks.
Nut
Saddle4ype
ShutoffValve SrnartO°nnect_
Tubing
PackingNut
OutletValve / \: Ferrule(sleeve)
NOTE: Commonwealth of Massachusetts Plumbing
Codes 248CMR shall be adhered to. Saddle valves
are illegal and use is not permitted in Massachusetts.
Consult with your licensed plumber.
cla_pScrew_
Washer
[] ROUTE THE TUBING
Route the tubing between the cold water line and
tile refrigerator.
Route the tubing through a hole drilled in the v_-all
or floor (behind tile refrigerator or adjacent base
cabinet) as close to the wall as possible.
NOTE: Be sure there is sufficient extra tubing
(about 8' [2.4 m] coiled into 3 turns of about 10"
[25 cm] diameter) m allow the refrigerator to move
out from the wall after installation.
[] FLUSH OUT THE TUBING
Turn the main water supply on and flush out the
tubing until the water is clear.
Shut the water offat the water valve after about
one quart (1 liter) of water has been flushed
through the tubing.
16
Installation Instructions
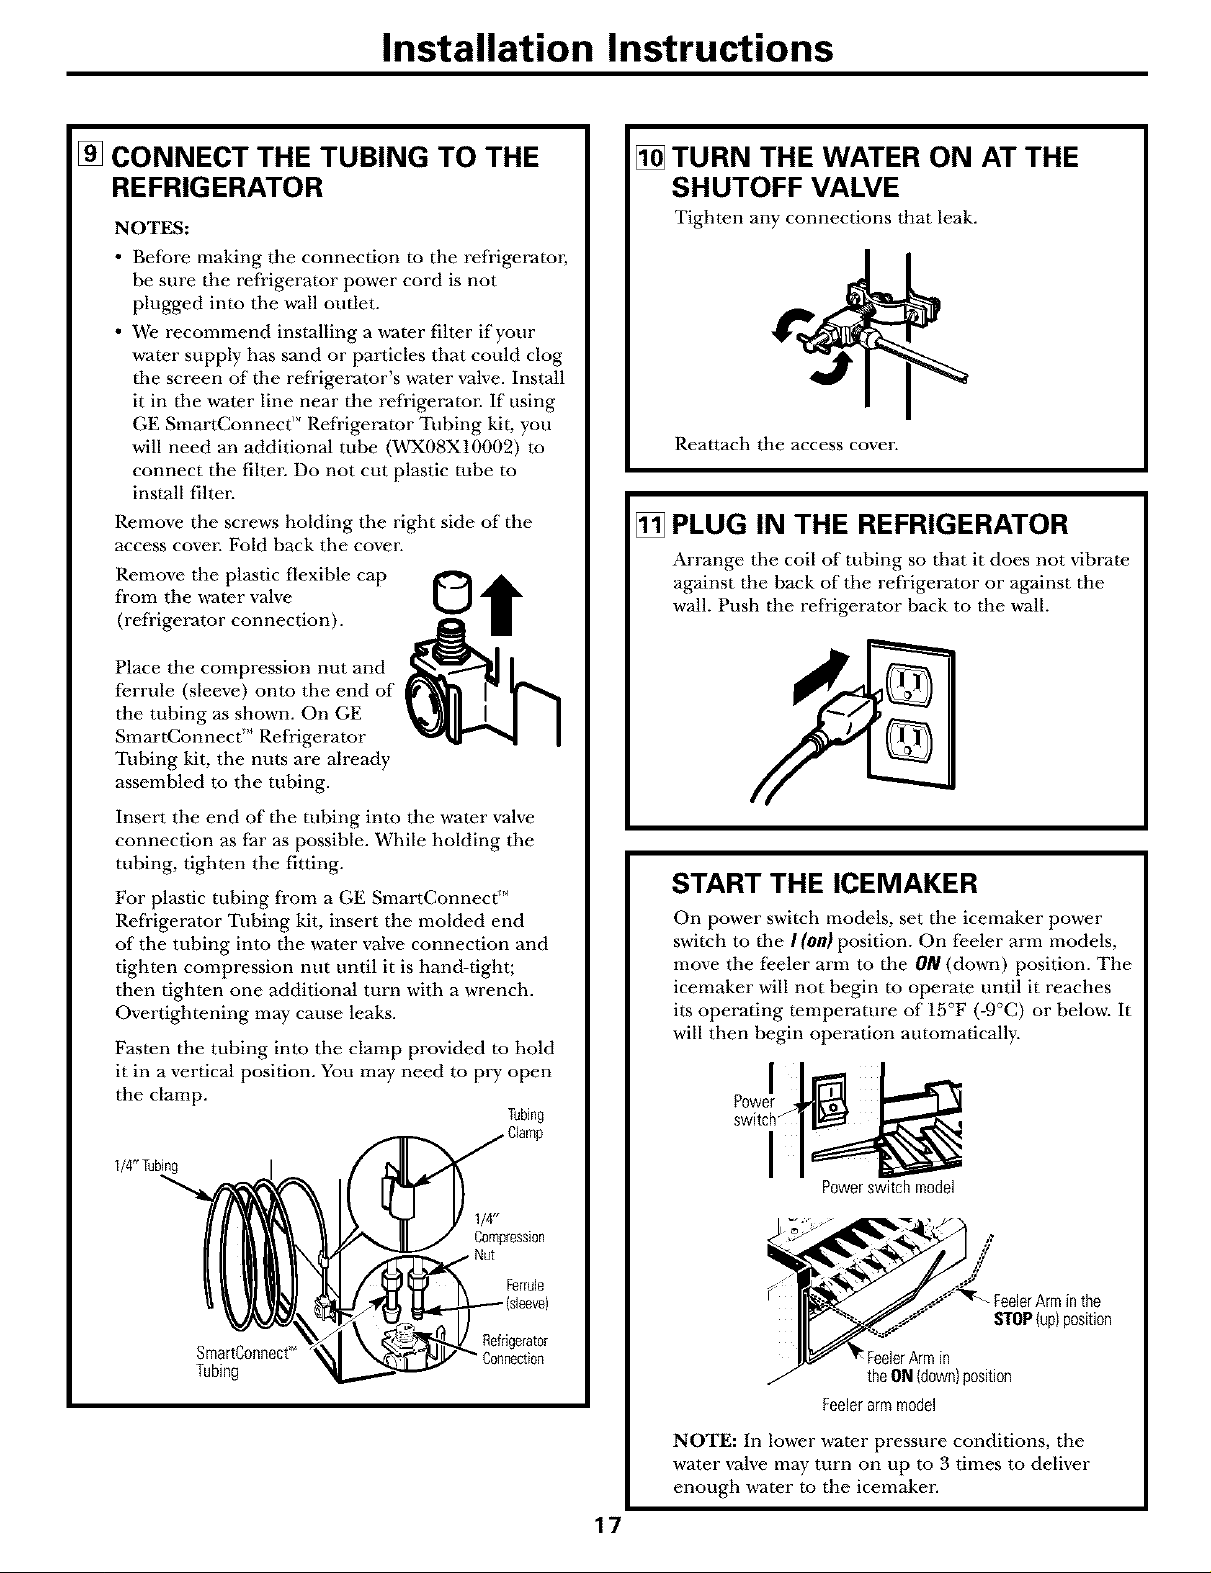
[] CONNECT THE TUBING TO THE
REFRIGERATOR
NOTES:
• Before making the connection to the refrigerator,
be sure the refrigerator power cord is not
plugged into the ,a-all outlet.
• We recommend installing a w-ater filter if your
w-ater supply has sand or particles that could clog
tile screen of tile refrigerator's water valve. Install
it in tile water line near the refrigerator: If using
GE SmartConnect _'Refrigerator Tubing kit, you
will need an additional tube (WX08X10002) to
connect the filter. Do not cut plastic tube to
install fihen
Remove the screws holding the right side of the
access covm: Fold back the cover.
Remove the plastic flexible cap
from the ,a-ater valve
(refrigerator connection).
Place the compression nut and
ferrule (sleeve) onto the end of
the tubing as shown. On GE
SmartConnec( "_Refrigerator
Tubing kit, the nuts are already
assembled to the tubing.
[] TURN THE WATER ON AT THE
SHUTOFF VALVE
Tighten any connections that leak.
Reattach the access coven
[] PLUG IN THE REFRIGERATOR
Arrange the coil of tubing so that it does not vibrate
against the back of the refrigerator or against the
wall. Push the refrigerator back to the wall.
Insert the end of tile tubing into the water valve
connection as far as possible. While holding the
tubing, tighten the fitting.
For plastic tubing from a GE SmartConnecC'
Refrigerator Tubing kit, insert the molded end
of the tubing into the water valve connection and
tighten compression nut until it is hand-tight;
then tighten one additional turn with a wrench.
Overtightening may cause leaks.
Fasten the tubing into the clamp provided to hold
it in a vertical position. You may need to pry open
the clamp.
Tubing
1/4"Tubing
1/4"
Compression
Ferrule
SmartConnecP_
Tubing
Refrigerator
START THE ICEMAKER
On power switch models, set the icemaker power
switch to the I(on) position. On feeler arm models,
move the feeler arm to the ON (down) position. The
icemaker will not begin to operate until it reaches
its operating temperature of 15°F (-9°C) or below. It
will then begin operation automatically.
Powerswitchmodel
in the
STOP(up)position
rArm in
theON(down)position
Feelerarmmodel
17
NOTE: In lower water pressure conditions, the
water valve may turn on up to 3 times to deliver
enough w-ater to the icemaken
Installation Instructions
REVERSING THE DOOR SWING
IMPORTANT NOTES
When reversing the door swing:
• Read the instructions all tile way through before
starting.
• Handle parts carelhlly to avoid scratching paint.
• Set screws down by their related parts to avoid using
them in the wrong places.
• Provide a non-scratching work surface for
the doors.
IMPORTANT: Once you begin, do not move the
cabinet until door-swing reversal is completed.
These instructions are for changing the hinges from
the right side to the left side--if you ever want to change
the hinges back to tile right side, follow these same
instructions and reverse all references to left and right.
Unplug the refrigerator from its electrical outlet.
Empty all door shelves, including the dairy
compartment.
TOOLS YOU WILL NEED
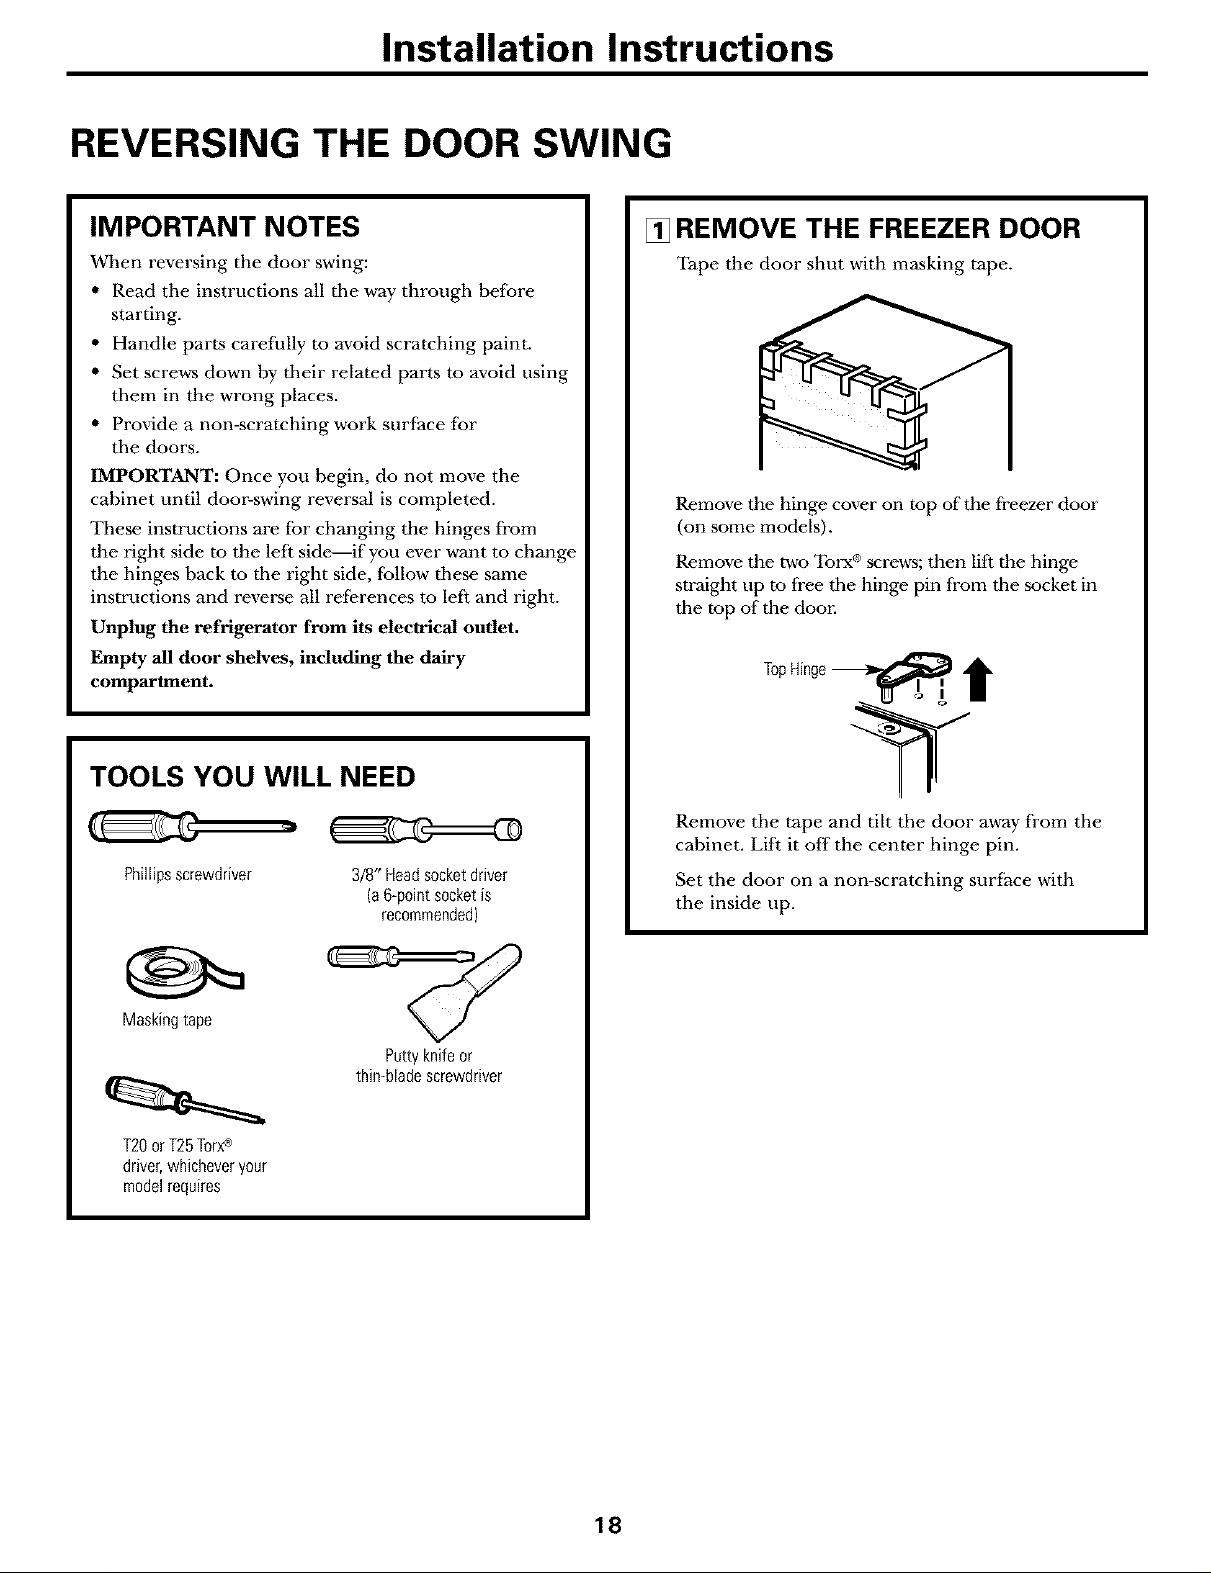
[] REMOVE THE FREEZER DOOR
Tape the door shut with masking tape.
Remove the hinge cover on top of the freezer door
(on some models).
Remove the two Torx® screws; then lift the hinge
straight tip to free the hinge pin from the socket in
the top of the door.
TopHinge_ I
Phillipsscrewdriver
Maskingtape
T20or T25Torx®
driver,whicheveryour
modelrequires
3/8" Headsocketdriver
(a6-point socketis
recommended)
Puttyknifeor
thin-bladescrewdriver
Remove the tape and tilt the door away from the
cabinet. Lift it off the center hinge pin.
Set the door on a non-scratching surface with
the inside up.
18

Installation Instructions
[] REMOVE THE REFRIGERATOR
DOOR
Tape the door shut with masking tape.
Remove tile center hinge pin with a 3/8" socket
and ratchet.
PlasticWasher
HingePin-- ,-_
CenterHinge_ _1
Bracket I
FreshFoodDoor
Remove tile tape and tilt tile door away from the
cabinet. Remove and save tile vcasher on tile hinge pin.
Lift tile door straight up m free its bottom socket from
tile pin in the bottom hinge bracket.
Set the door on a non-scratching surface with tile
inside up.
I
I
[] TRANSFER TOP HINGE TO
THE LEFT
Interchange hinge and screws at top right with screws
at the mp left of cabinet.
Do not tighten screws on hinge side at this time.
CAUTION: Do not let door drop to the floor. To do so
could damage tile door stop.
19
Installation Instructions
REVERSING THE DOOR SWING (CONT.)
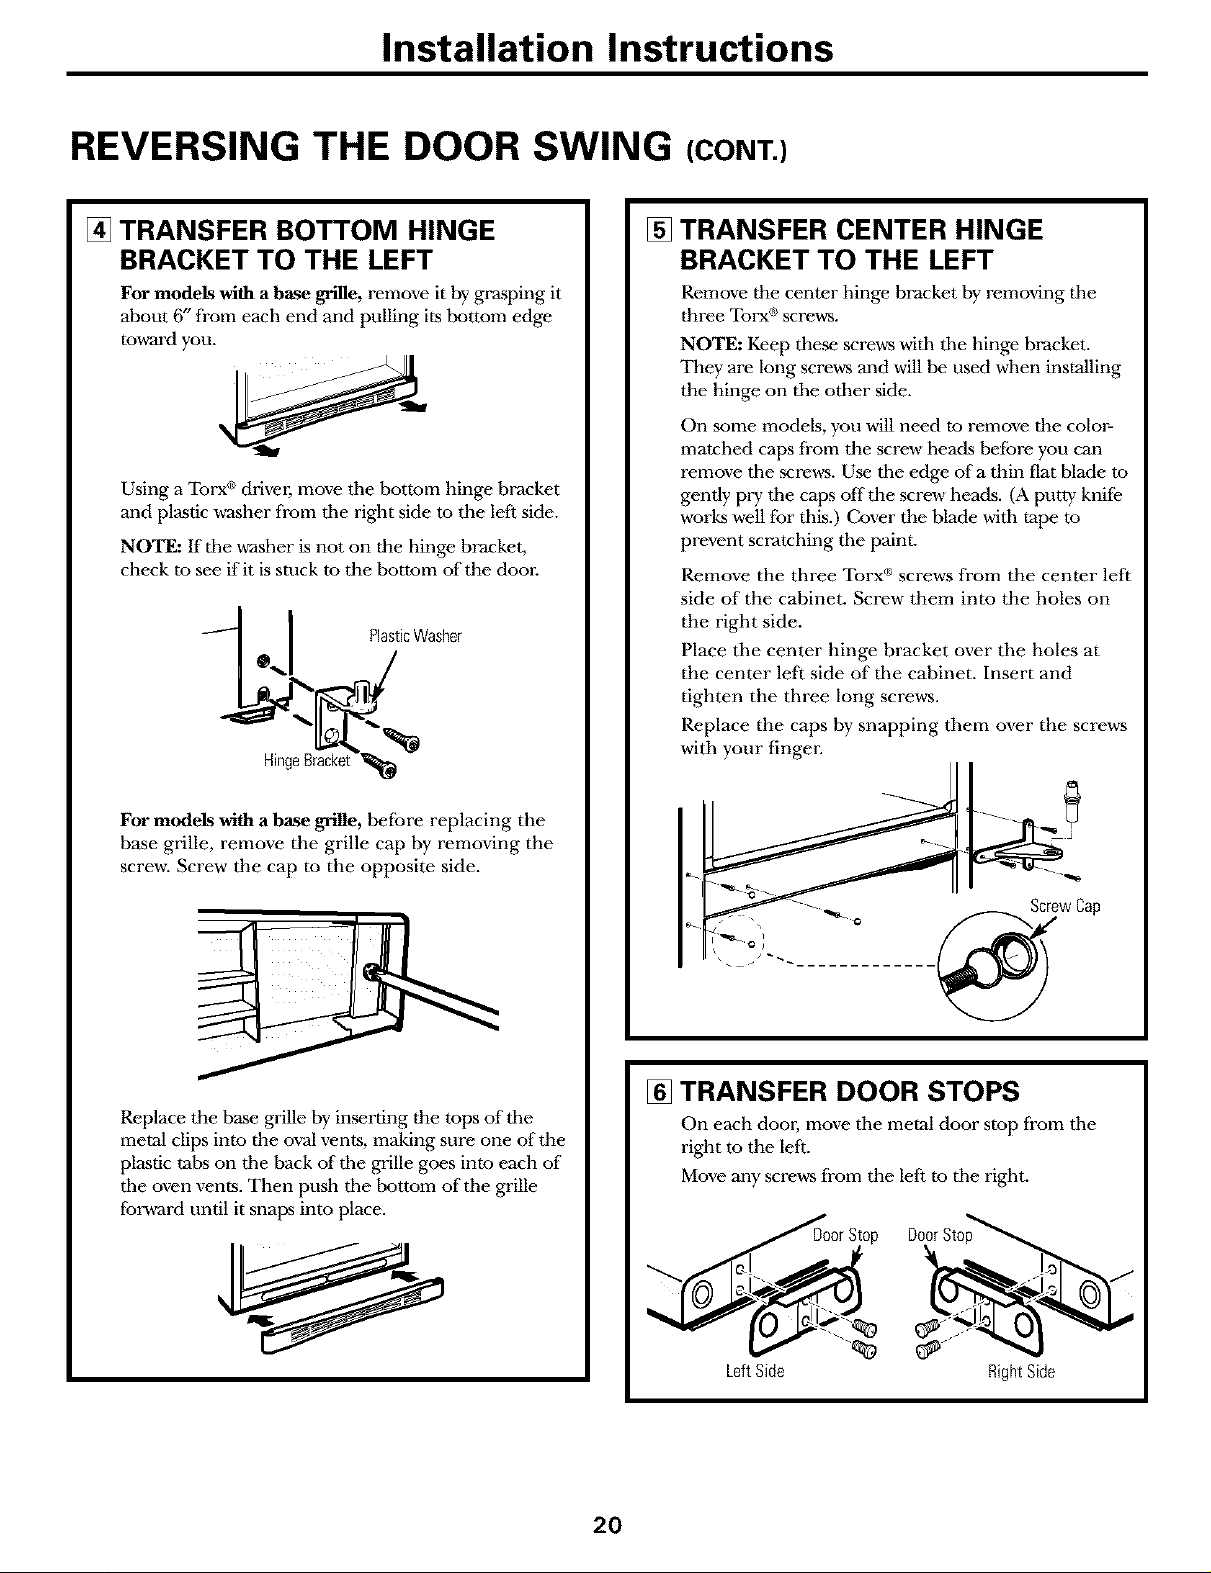
[] TRANSFER BOTTOM HINGE
BRACKET TO THE LEFT
For models with a base grille, remove it by grasping it
about 6" from each end and pulling its bottom edge
to_ard you.
Using a Torx ®drivm; move tile bottom hinge bracket
and plastic w-asher from tile right side to the left side.
NOTE: lithe washer is not on the hinge bracket,
check to see if it is stuck to the bottom of the door.
Hinge8racke
[] TRANSFER CENTER HINGE
BRACKET TO THE LEFT
Remove the center hinge bracket by removing tile
three Torx ®screws.
NOTE: Keep these screws with tile hinge bracket.
They are long screws and will be used when installing
the hinge on tile other side.
On .some models, you will need to remove tile color-
matched caps from tile screw heads befbre you can
remove tile screv_. Use tile edge of a thin flat blade to
gently pry tile caps offthe screw heads. (A putty knife
works well for this.) Cover tile blade with rape to
prevent scratching tile paint.
Remove the three Torx ®screws from the center left
side of the cabinet. Screw them into the holes on
the right side.
Place the center hinge bracket over the holes at
the center left side of tile cabinet. Insert and
tighten the three long screws.
Replace the caps by snapping them over the screws
with your finger.
For models with a base grille, beibre replacing the
base grille, remove the grille cap by removing the
screw. Screw the cap to the opposite side.
Replace the base grille by inserting the tops of tile
metal clips into the owalvents, making sure one of the
plastic tabs on tile back of the grille goes into each of
tile oven vents. Then push tile bottom of tile grille
forward until it snaps into place.
___ wCap
[] TRANSFER DOOR STOPS
On each door, move tile metal door stop from tile
right to the left.
Move any screws from the left to the right.
DoorStc
LeftSide RightSide
2O
Installation Instructions
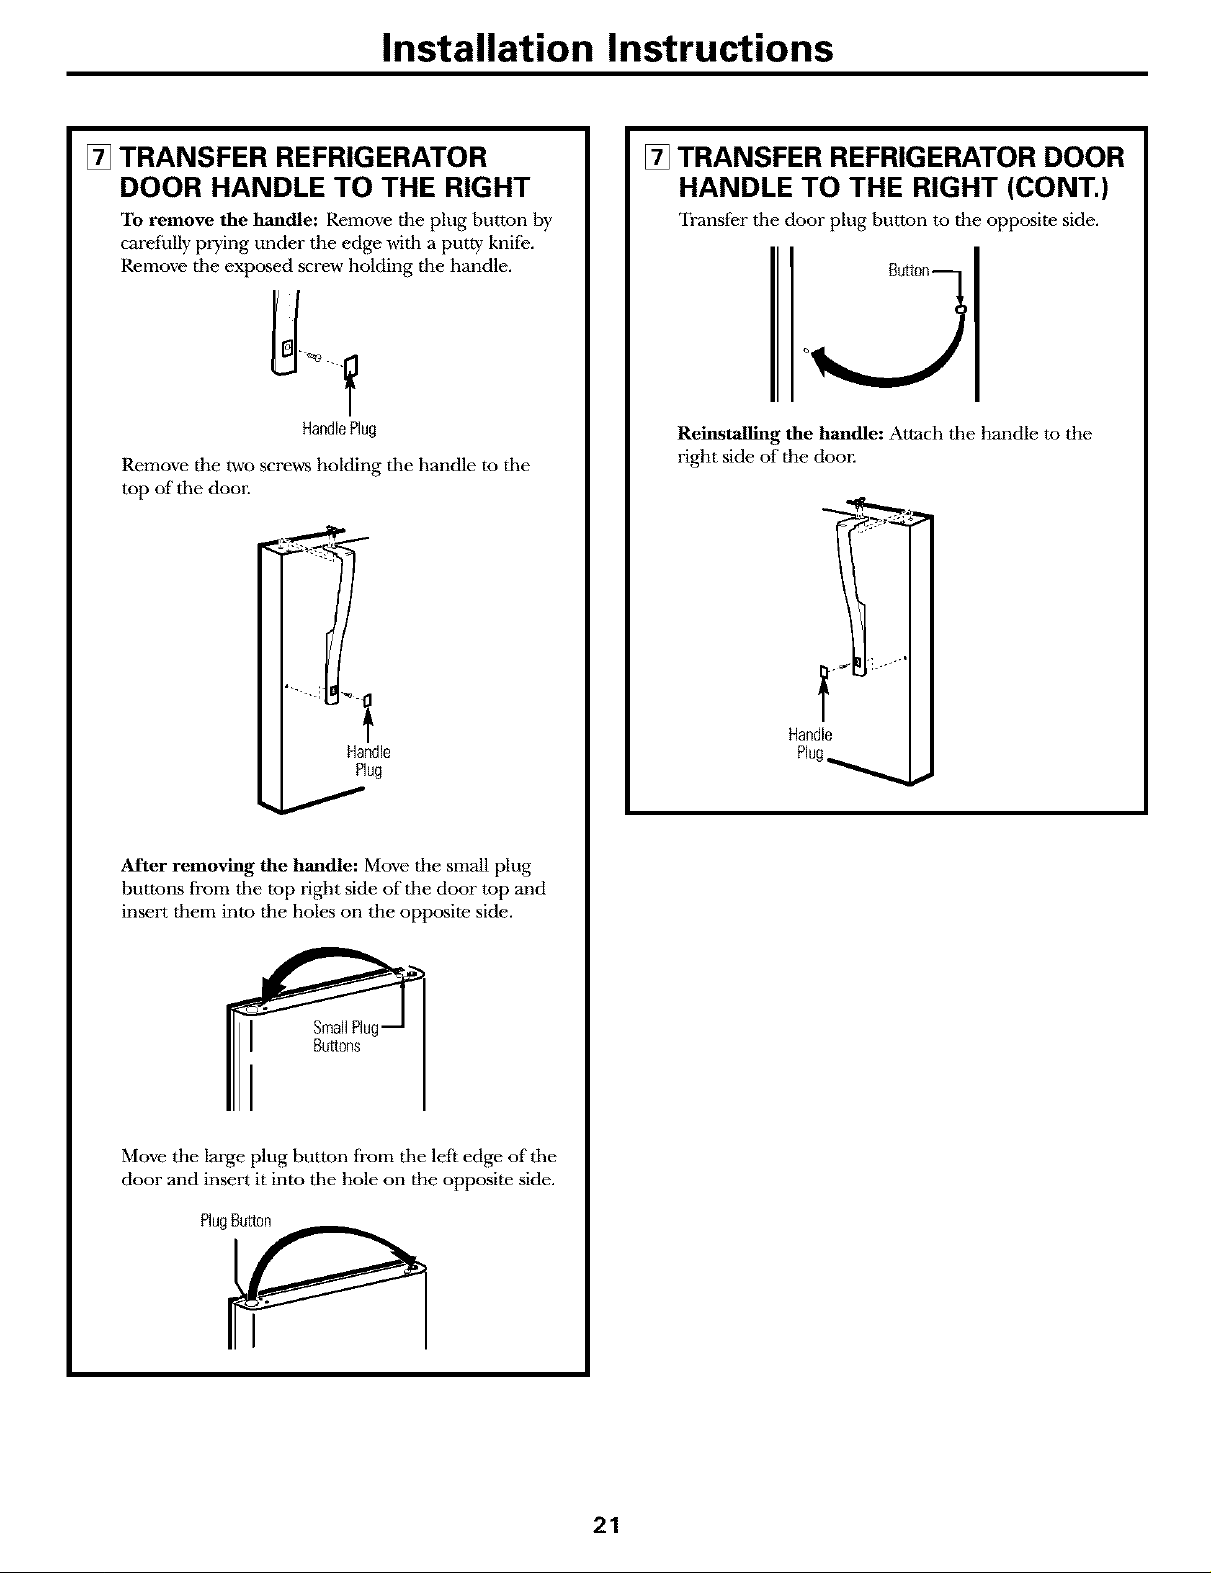
[] TRANSFER REFRIGERATOR
DOOR HANDLE TO THE RIGHT
To remove the handle: Remove the plug button by
carefully prying under the edge with a putty knife.
Remove tile exposed screw holding the handle.
HandlePlug
Remove the two screws holding tile handle to tile
top of tile door.
[] TRANSFER REFRIGERATOR DOOR
HANDLE TO THE RIGHT (CONT.)
Transfer tile door plug button to the opposite side.
Reinstalling the handle: Attach tile handle to the
right side of the door.
Handle
After removing the handle: Move the small plug
buttons from tile top right side of the door top and
insert them into the holes on the opposite side.
Small Plu
Buttons
Move the large plug button from tile left edge of the
door and insert it into tile hole on the opposite side.
PlugButton
Plug_
21

Installation Instructions
REVERSING THE DOOR SWING (CONT.)
[] TRANSFER FREEZER DOOR
HANDLE TO THE RIGHT
Remove the screws holding the handle to the top and
bottom of tile dooi: Remove handle.
Move tile plug button on the right side of the door to
tile handle screw hole on tile left side.
Reattach the handle on the opposite side using tile
holes closest to tile edge of the door.
[] REHANG THE REFRIGERATOR
DOOR
Lower the refrigerator door onto the bottom
hinge pin.
6
Plastic
Straighten the door and line it up with tile center
hinge bracket.
Reinstall the center hinge pin with a 3/8" socket.
Turn it until it extends through the hinge bracket
and into the door.
PlasticWasher
Hingl
CenterHinge
Bracket
RefrigeratorDoor
[] REHANG THE FREEZER DOOR
Lower tile freezer door onto the center hinge pin.
Be sure the washer is in place.
PlasticV__g/ I ePin
Lift the top hinge so the pin fits into the door socket.
Support the door on the handle side and make sure
the door is straight and the gap hetween the doors is
even acroaa the front. While holding the door in
place, tighten the top hinge screws.
22

Normal operating sounds. . eo oi,,com
Newer refrigerators sound different from older refrigerators. Modem refrigerators
have more features and use newer technology.
Do you hear what I hear? These sounds are normal
HUMMM...
WHOOSH...
• The new high efficiency compressor may run faster
and longer than your old refrigerator and you may
hear a high-pitched hum or pulsating sound while
it is operating.
• You may hear a whooshing sound when the dom.'s close.
This is due to pressure equalizing within the refrigerator.
CLICKS, POPS,
CRACKS and CHIRPS
• You may hear cracking or popping sounds when the
refrigerator is first plugged in. This happens as the
refrigerator cools to the correct temperature.
• The compressor may cause a clicking or chirping
sound when attempting to restart (this could take
up to 5 minutes).
• Expansion and contraction of cooling coils during
and after defrost can cause a cracking or popping
sound.
• On models with an icemakm; after an icemaking
cycle, you may hear the ice cubes dropping into
the ice bucket.
14q/ !
• You may hear the fans spinning at high speeds.
This happens when the refrigerator is first plugged
in, when the doors are opened frequently or when
a large amount of food is added to the refrigerator
or freezer comparmlents. The fans are helping to
maintain the correct temperatures.
WATERSOUNDS
6
The flow of refrigerant through the freezer cooling
coils may make a gurgling noise like boiling water.
Water dropping on the defrost heater can cause a
sizzling, popping or buzzing sound during the
defrost cycle.
A w-ater dripping noise may occur during the defrost
cycle as ice melts from the evaporator and flows into
the drain pan.
Closing the door may cause a gurgling sound due to
pressure equalization.
23
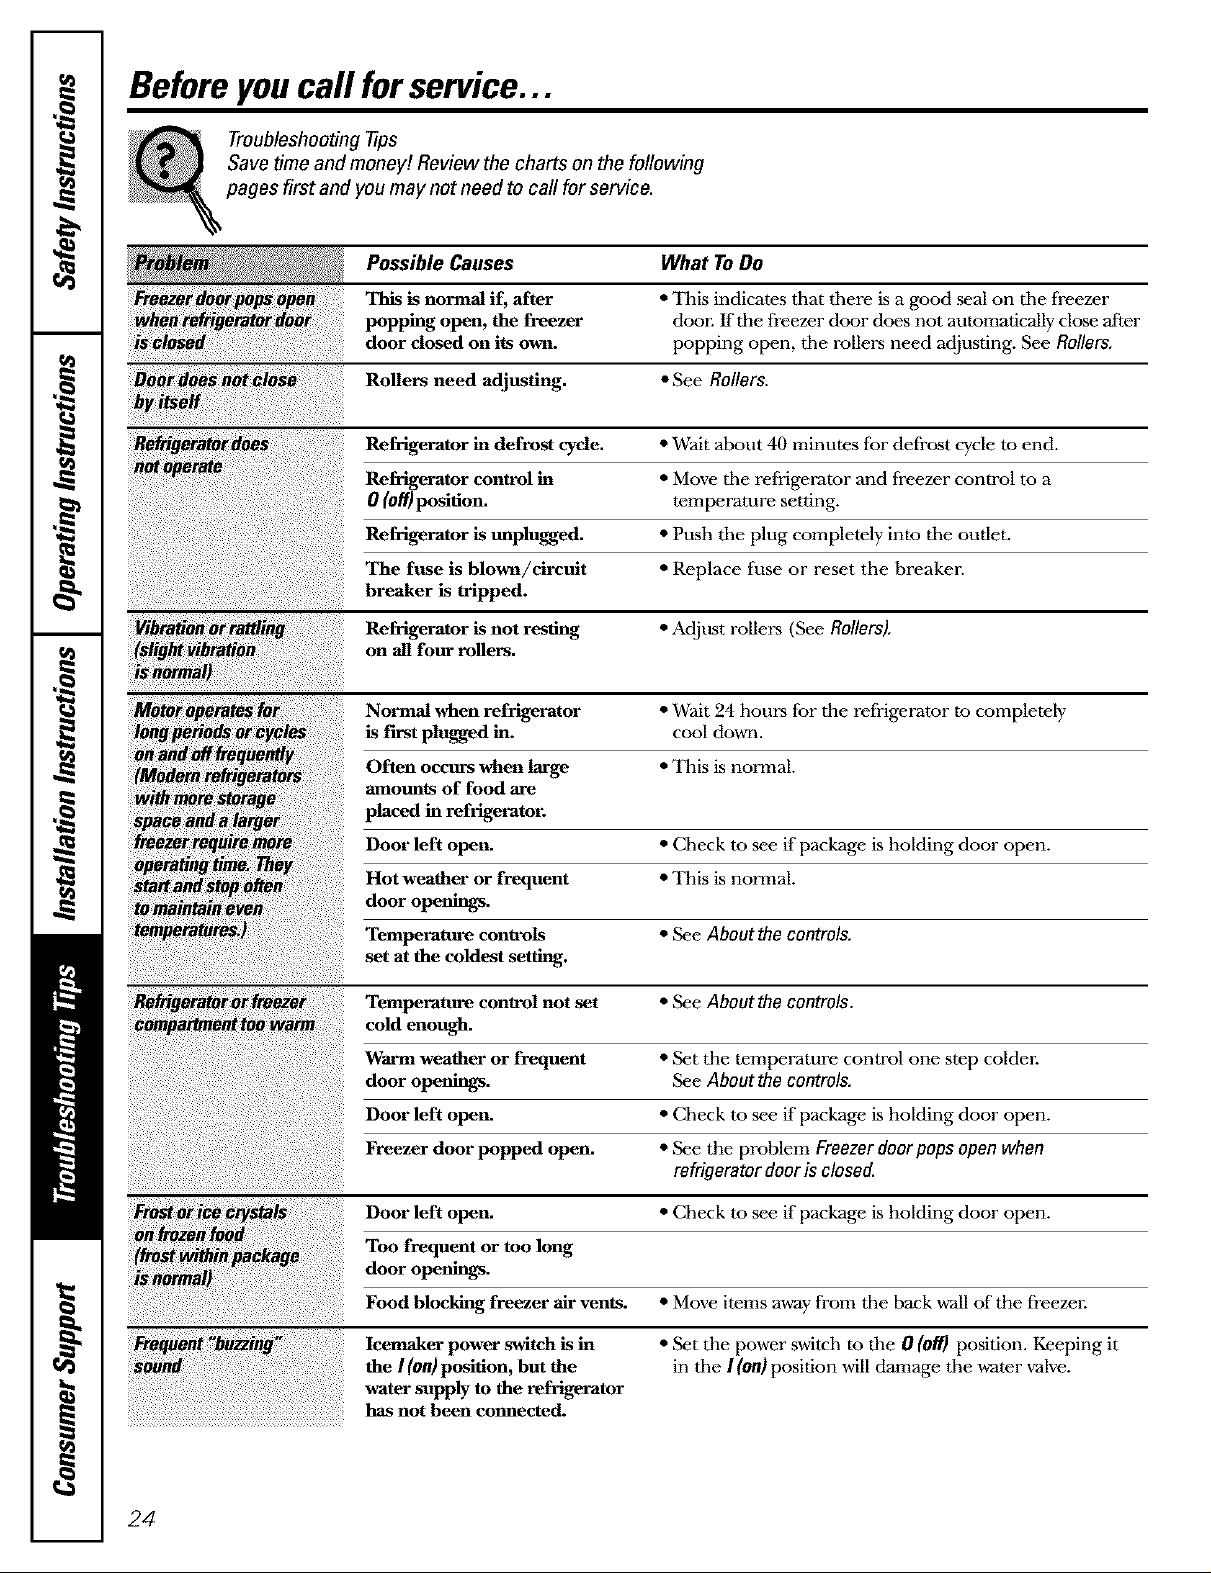
Before youcall forservice...
Troubleshooting tips
Save time and money! Review the charts on the following
pages first and you may not need to call for service.
Possible Causes What ToDo
This is normal if, after * This indicates that there is a good seal Oil the freezer
popping open, the freezer dote g the freezer door does not automatically close after
door closed on its own. popping open, the rollers need adjusting. See Rollers.
Rollers need adjusting. • See Rollers.
Refrigerator in defrost cycle. * Wait about 40 minutes for defrost cycle to end.
Refrigerator control in * Move the refrigerator and freezer control to a
0 (Off)position, temperature setting.
Refrigerator is unplugged. * Push the plug completely into the outlet.
The fuse is blown/circuit * Replace fuse or reset the breaker.
breaker is tripped.
Refrigerator is not resting * Adjust rollers (See Rollors).
on all four rollers,
Normal when refrigerator * Wait 24 hours for the refrigerator to completely
is first plugged in. cool down.
Often occurs when large * This is normal.
amounts of food are
placed in ref "t_emtor.
Door left open. * Check to see if package is holding door open.
Hot weather or frequent * This is normal.
door openings.
Temperature controls * See About the controls.
set at the coldest setting.
Temperature control not set * See Aboutthe controls.
cold enough.
Warm weather or frequent * Set the temperature control one step colder:
door openings. See About the controls.
Door left open. * Check to see if package is holding door open.
Freezer door popped open. * See the problem Freezer door pops open when
refrigerator door is closed.
Door left open. * Check to see if package is holding door open.
Too frequent or too long
door openings.
Food blocldng freezer air vents. * Move items away from the back wall of the ti'eezel:
iiFrequen_i!!"buzzing !:! i!i!:!i!!!ii!iiiIili!i!!iii
24
Icemaker power switch is in
the I (on) position, but the
water supply to the refrigerator
has not been connected.
• Set the power switch to the 0 (Off) position. Keeping it
in the I (on)position will damage the water valve.
www.Ho_oint.com
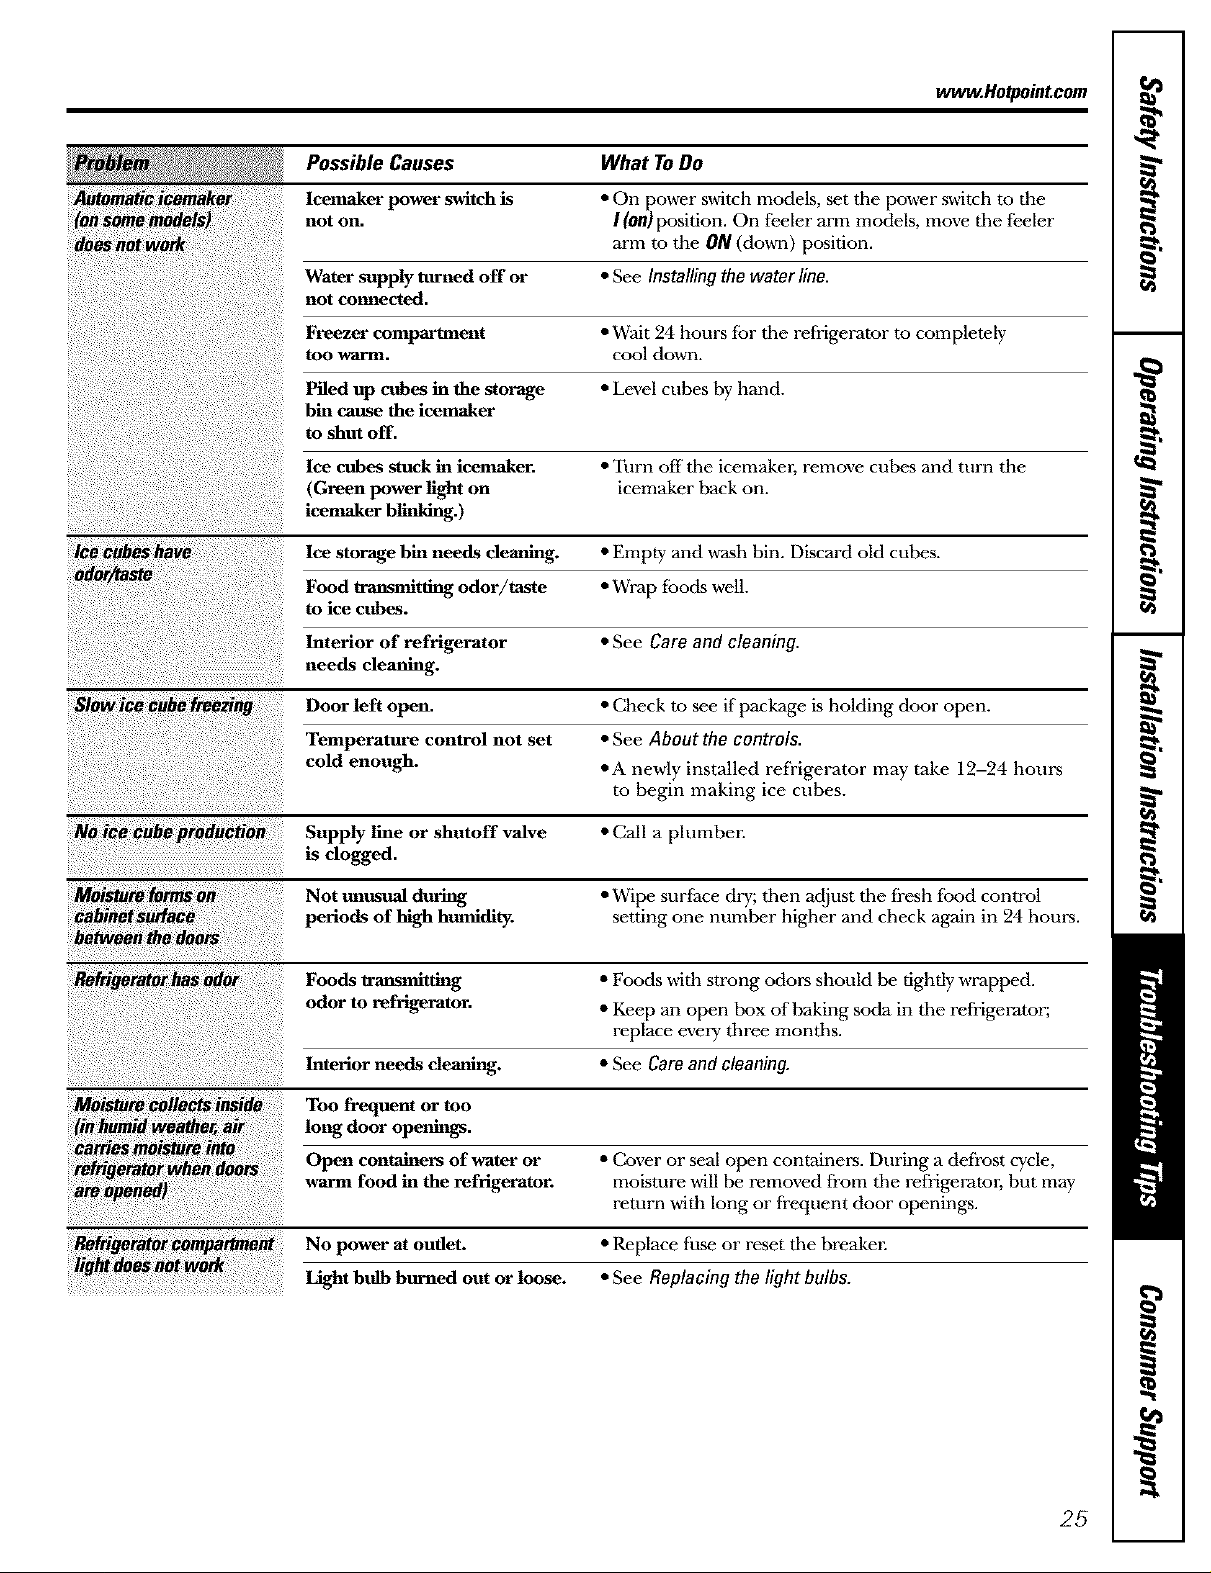
Possible Causes What ToDo
Icemaker power switch is • On power switch models, set the power switch to the
not on. I(on) position. On feeler arm models, move the feeler
arm to the 0/V (down) position.
Water supply turned off or • See Installing the water line.
not connected.
Freezer compartment •Wait 24 hours for the refrigerator to completely
tOO warm. cool down.
Piled up cubes in the storage • Level cubes by hand.
bin cause the icemaker
to shut off.
Ice cubes stuck in icemaker. • Turn off tile icemakm, remove cubes and turn the
(Green power fight on icemaker back on.
icemaker blinking.)
Ice storage bin needs denning. • Empty and wash bin. Discard old cubes.
Food tral]smit ting odor/taste • Wrap leeds welL
to ice cubes.
Interior of refrigerator • See Care and cleaning.
needs cleaning.
$1o_ic_ub_#oezing Door left open. • Check to see if package is holding door open.
Temperature control not set • See About the controls.
cold enough. • A newly installed refrigerator may take 12-24 hours
to begin making ice cubes.
Supply line or shutoff valve • CMI a plumbe,:
isclo ged
Not unusual during • Wipe surface &T; then adjust the fresh thud control
periods of high humidity, setting one number higher and check again in 24 hom_.
Foods transmitting • Foods with strong odors should be tightly wrapped.
odor to refrigerator. • Keep an open box of baking soda in the refrigerator;
replace every three months.
Interior needs cleaning. • See Care and cleaning.
Too frequent or too
long door openings.
Open containers of water or • Cover or seal open containing. During a defl'ost cycle,
warm food in the refrigerator, moisture will be removed from the refrigerator, but may
return with long or frequent door openings.
No power at outlet. • Replace fuse or reset the breakeE
light does _bt work
Light bulb burned out or loose. • See Replacing the light bulbs.
25

Before youcall forservice...
Possible Causes What ToDo
Normal air flow cooling
motor. In the refrigeration
process, it is normal that
heat be expelled in the
area under the refrigerator.
Some floor coverings will
discolor at these normal
and safe temperatures.
Food too dose to the air vent • Move tile food away from the air vent (neat" the controls).
at the back of the refrigerator.
Refrigerator control is set • Move tbe refi'igerator control to a warmer
too cold. temperature setting one increment at a time.
range _1o_ Defrost heater is on. • Tbis is normal.
!th
The freezer door bins are • Try to install the bins in both doors.
a different size than the
refrigerator door bins.
Some models do not have a • Check for a semi-clear dome light shield in the
freezer right, freezer ceiling. If the dome is opaque white, tbe
model does not have a freezer light. Check for a
door activated light switch on the right side of tbe
freezer. If there is only a cap in place of a switch,
the model does not have a fi'eezer light.
Light bulb burned out • See Replacing the light bulbs.
or loose.
_O_troIs_ Some models do not have • If you can read wbite numbers oll tbe control setting,
righted controls, the model does not have lighted controls.
Refrigerator right bulb burned • See Replacing the light bulbs.
out or loose.
The freezer shelf is in the • Place the shell" in the lower posidon. See Rearranging
top position, the shelves.
26
GE Service Protection Plus TM
GE, a name recognized worldwide for quality and dependability, offers you
Smwice Protection Plus T_' comprehensive protection on all your appliances--
No Matter What Brand! We'll CoverAnFAppliance.
Benefits Include:
• Backed by GE Anywhere. Anytime.*
• All brands covered
• Unlimited service calls
• All parts and labor costs included
• No out-of-pocket expenses
• No hidden deductibles
• One 800 number to call
You will be completely satisfied with our seFvice protection or you may request your money back
on the remaining value of your contract. No questions asked. It's that simple.
Protect your refrigerator, dishwashm; washer and drym; range, TV, VCR and much more--any brand!
Plus there's no extra charge for emergency smwice and low monthly financing is available. Even icemaker
coverage and food spoilage protection is offered. You can rest easy, knowing that all your valuable
household products are protected against expensive repairs.
Place your confidence in GE and call us in the U.S. toll-free at 800.626.2224
for more information.
* 9
All braI_ds cover,:d, up to _0 years old, in the confinel_tal U.S.
_,,,_ Cnt here
Pleaseplace in envelopeand mail to:
General Electric Company
Warranty Registration Department
P.O. Box 32150
Louisville, KY 40232-2150
27

Consumer Product Ownership Registration
Dear Customer:
Thank you for purch_ing our product and thank you tbr placing your confidence in us.
We are proud to have you as a customer!
Follow these three steps to protect your new appliance investment:
Complete and mail
your Consumer
Product Ownership
Registration today.
Have the peace of
mind of knowing we
can contact you ill
the unlikely event of
a s_ety modification.
2
After mailing the
registration beh)w,
store this document
in a saff' place. It
contains intormation
you will need should
you require service.
Our service number is
800.GE.CARES
(800.432.2737).
Model Number Serial Number
I I I I I I I I I I I
Important: If you did not get a registration card with your
product, detach and return the form below to
ensure that your product is registered, or register
online at www.Hotpoint.com.
Consumer Product Ownership Registration
Read your Owner's
Manual carefhlly.
It will help you
operate your new
appliance properly.
IIIIIII
_. Cut here
I I I I I I I I I I I I I I I I I
Model Number Serial Number
Mr._ Ms._ Mrs._ Miss_
Ei_st I I_st I
Name I l I I I I I I I Name I I I I I I I I I I I I
Street ]
Address I I I I I I I I I I I I I I I I I I I I I I I I
Apt. # ] I I I I I I I E-mail Address*
City ] ] I I ] I ] ] ] ] ] I ] ] State I I Code I I I ] I
Daie Placed
Month ] I I I I I I
* Please prmdde your e-mail address to receive, da e-mail, discounts, special ottk:rs mad other
important comlnunications from GE Appliances (GEA).
177Check here if you do not want to receixe communications from GEA's carefully selected parmet_.
GEConsm_er products
Gene_l Elecwic Company
Louis_itle, Kentucky
wwvv:GE._ppliances.cnm
GEAppliances
HOTPOINT
Numbei ]
ZipI I I
28

Notes.
e.
_h
z_
e.
e.
q
29

m
"- Notes.
m
m
gel
m
q_
m
m
3O

RefrigeratorWarranty.
All warranty service provided by our Factory Service Centers,
or an authorized Customer Care®technician. Toschedule service,
on-line, 24 hours a day, visit us at www.Hotpoint.com, or call
800.GE.CARES (800.432.2737).
We Will Replace:
Anypartof the refrigerator which fails due to a defect in materials or workmanship.
During this full one-year warranty,we will also provide, free ofcharge, all labor
and in-home service to replace tile defective part.
Any part of the sealed refrigerating system(the compressor, condensm; evaporator
and all connecting tubing) which fails due to a defect in materials or workmanship.
During this full fivo-year sealed refrigersting la,stem warrang,, we will also provide,
free efcha_e, all labor and in-home service to replace the defective part.
_ Service trips to your home to teach you how to use
the product.
N Improper installation, delivery or maintenance.
_ Failure of the product if it is abused, misused, or used
for other than the intended p_ or used
eomnlerc_ly.
la Loss of food due to sponge.
_ Damage caused after delivery.
Staple your receipt here.
Proof of the original purchase
date is needed to obtain service
under the warrant_
_ Replacement of house fuses or resetting of circuit
breakers.
la Replacement of the light bulbs.
_ Damage to the product caused by accident, fire, floods or
acts of God.
_ Incidental or consequential damage caused by possible
defects with tl_ appliance.
This warranty is extended to the original purchaser and any succeeding owner for products purchased for home
use within the USA. In Alaska, the warranty excludes the cost of shipping or service calls to your home.
Some states do not allow the exclusion or limitation of incidental or consequential damages. This warranty gives
you specific legal rights, and you may also have other rights which vary from state to state. To know what your
legal rights are, consult your local or state consumer affairs office or your state's Attorney General
Warrantor: General Electric Company.Louisville, KY 40225
31
ConsumerSupport.
HotpointWebsite
Have a question or need assistance with your appliance? Try the Hotpoint Website 24 hours a day,
any day of the year! You can also shop for more great Hotpoint products and take ad'_antage of all
of our on-line support services designed for your convenience.
ScheduleService
Expert Hotpoint repair service is only one step away from your dool: Get on-line and schedule your service
at your convenience 24 hours any day of the year! Or call 800.GE.CARES (800.432.2737) during normal
business hours.
www.Hotpointcom
www.Hotpointcom
RealLifeDesignStudio www.GEAppliances.com
GE supports the Universal Design concept--products, services and environments that can be used by
people of all ages, sizes and capabilities. We recognize the need m design for a wide range of physical and
mental abilities and impairments. For details of GE's Universal Design applicadons, including kitchen
design ideas for people with disabilides, check out our Website today. For the hearing impaired, please call
800.TDD.GEAC (800.833.4322).
ExtendedWarranties
www.GEAppliances.com
k,................_
Purchase a Hotpoint extended warranty and learn about special discounts that are a'_ailable while your
warranty is sdll in efiect. You can purchase it on-line anytime, or call 800.626.2224 during normal business
hours. Hotpoint Consumer Home Set,rices will still be there after your warranty expires.
PartsandAccessories
IndividuMs qualified to ser,dce their own appliances can have parts or accessories sent directly to their
homes (VISA, MasterCard and Discover cards are accepted). Order on-line today, 24 hours every day or
by phone at 800.626.2002 during normal business hours.
Instructionscontainedin thismanualcoverproceduresto beperformedbyanyuser.Otherservicinggenerally
shouldbereferredtoqualifiedservice personnelCautionmustbe exercisedsinceimproperservicingmaycause
unsafeoperation.
ContactUs
If you are not satisfied with the service you receive from Hotpoint, contact us on our Website with all the
details including your phone number, or write to: General Manager, Customer Relations
Hotpoint, Appliance Park
Louis_dlle, FLY40225
www.Hotpointcom
www.Hotpointcom
RegbterYourAppliance www.Hotpointcom
Register your new appliance on-fine---at your convenience! Timely product registration will allow fbr
enhanced communication and prompt serxdce under the terms of your warranty, should the need arise.
You may also mail in the pre-printed registration card included in the packing material.
_ Printedin the UnitedStates
_'_Printedon RecyclefiPaper
 Loading...