

Hotpoint HTS18BCPSRWW, HTS18BCPSLWW, HTS18BCPRLWW, HTS18BBPSLWW Owner’s Manual
www.Hotpo&t.com
Safety Instruc_tions .......... 2-4
©
N
©
©
Operating Instructions
Additional Featmes ............ 9
Automatic Icemaker . ......... 10
Controls ..................... 5
Crispers ai]d Pans ........... 8, 9
Shelves and Bins ............ 6, 7
Care and Cleaning ....... t 1, 12
Replaci_]g the Light Bulbs ...... 12
Installation Instructions
Preparii_g to Install
the Refiigerator . ............. 13
Reversing the Door Swh]g . . .t8-22
Water JLi_]elI]stallati(,] ..... 14-17
Troubleshooting Tips ...... 23-26
Normal Operati_]g Som]ds ..... 23
Consumer Support
(;onstm_ei Suppoit .... Back (:o_ei
Produ(t Registrati(m ....... 27, 28
_Aarn:m w
Models 18& 19
@
Write the model and serial numbers here:
Model #
Serial #
Fim_d these mm_bers (m tile gray ]abe]
(m the ]ef} side, m_ear the top of the
refrigerator corn parm_elm
fO206747POO6 39-80385 05°05JR
IMPORTANTSAFETYINFORMATION.
READALLINSTRUCTIONSBEFOREUSING.
WARNING!
Use this appliance only for its intended purpose as described in this Owner's Manual.
SAFETYPRECAUTIONS
When using electrical appliances, basic safety precautions should be followed, including the following:
This refl-igerator must be properl) installed
and located in accordance with the Installation
hlstrucfions before it is used.
Do not allow children to climb, st;rod or hang
on the shelves in the refrigeratm: They could
damage the refrigerator and seriously iqiure
themselves.
Do not touch the cold surfi_ces in the fl'eezer
compartment when hands are damp or wet.
Skin ma _, stick to these extremely cold surfilces.
Do not store or use gasoline or other flammable
wq)()_s and liquids in the vicinity of this or anv
other appliance.
In reliigerato_ with automatic icemake_,
avoid contact with the moving parts ot the
ejector mechanism, or with the heating element
located on the bottom of the icemake_: Do
not place finge_s or hands on the automatic
icemaking mechanism while the refl_igerator
is plugged in.
Keep finge_s out of the "pinch point" areas;
clearances between the doms and between
the (loo_s and cabinet are necessarily small.
Be careflfl closing doo_s when children are
in the area.
Unplug the refl'igerator betore cleaning and
making repai_.
NOTE: Westrong/}/recommendthat anyservicingbe
performedbya quafified individual
Setdng either or both controls (some models
only have one control) to the 0 (Off)position
does not remove power to the light circuit.
Do not reti'eeze fl'ozen ti)()ds which have
thawed completel>
www.Hotpoint.com
DANGER!RISKOFCHILDENTRAPMENT
PROPERDISPOSALOFTHEREFRIGERATOR
Child entrapment and sufli)cation are not
i)rol)lems of the past, Junked or abandoned
refrigerators are still dangerous ... even if they will
sit fin" "just a few days." If you are getting rid of
your old reli_igerato_; please fidlow the instructions
below to hel I) prevent accidents.
Refrigerants
_dl refrigeration products contain refiigerants,
which under ti_deml law must be removed prior
to product disposal. If you are getting rid of an
old refi_igeration product, check with the company
handling the disposal about what to do.
Before YouThrowAway YourOld
Refrigeratoror Freezer:
Take off the doo_.
i,ea_e the shelves in place so that children
may not easil_ climb inside.
USEOFEXTENSIONCORDS
Because of potential safety hazards under certain conditions, we strongly recommend against the
use of an extension cord.
However; if you must use an extension cord, it is absolutely necessa_ T that it be a UiAisted (in the United
States) or a CSA-listed (in Canada), 3-wire grounding type appliance extension cord having a grounding
type i)lug and outlet and that the electrical rating of the cord be 15 amperes (minimum) and 120 w_lts.
3
IMPORTANTSAFETYINFORMATION.
READALLINSTRUCTIONSBEFOREUSING.
WARNING!
HOWTOCONNECTELECTRICITY
Do not, under an}, circumstances, cut or remove the third (ground) prong from the power cord.
For personal safe_ this appliance must be properly grounded.
The power cord of this appliance is equipped with
a 3-prong (grounding) plug which mates with
a standard 3-prong (grotmding) wall outlet to
minimize the possibili F of electric shock haa_rd
fl'om this appliance.
Have the wall outlet and circuit checked by
a qualified electrician to make sure the outlet
is properly grounded.
Where a standard 2-prong wall outlet is
encountered, it is your personal responsibility
and obligation to have it replaced with a properly
grounded 3-prong wall outlet.
The refl-igerator should alwa D be plugged into its
own individual electrical outlet which has a w)lmge
rating that matches the rating plate.
This provides the best pe_l'ommnce and also
I)re'_ents oxerloading, house wiring circuits which
could cause a fire hazard from oxerheated wires.
Never unplug your refl-igerator by pulling on the
power cord. Mways grip plug firefly and pull
straight out fl'oln the outlet.
Repair or replace immediately all power cords that
have become fl'ayed or otherwise damaged. Do not
use a cord that sho_vs cracks or abrasion damage
along its length or at either end.
When moving the refligerator away from the
wall, be carefld not to roll over or damage the
power cord.
READANDFOLLOWTHISSAFETYINFORMATIONCAREFULLY.
SAVETHESEINSTRUCTIONS
4
Aboutthe controlsonthe refrigerator, w Hot.oi,t.com
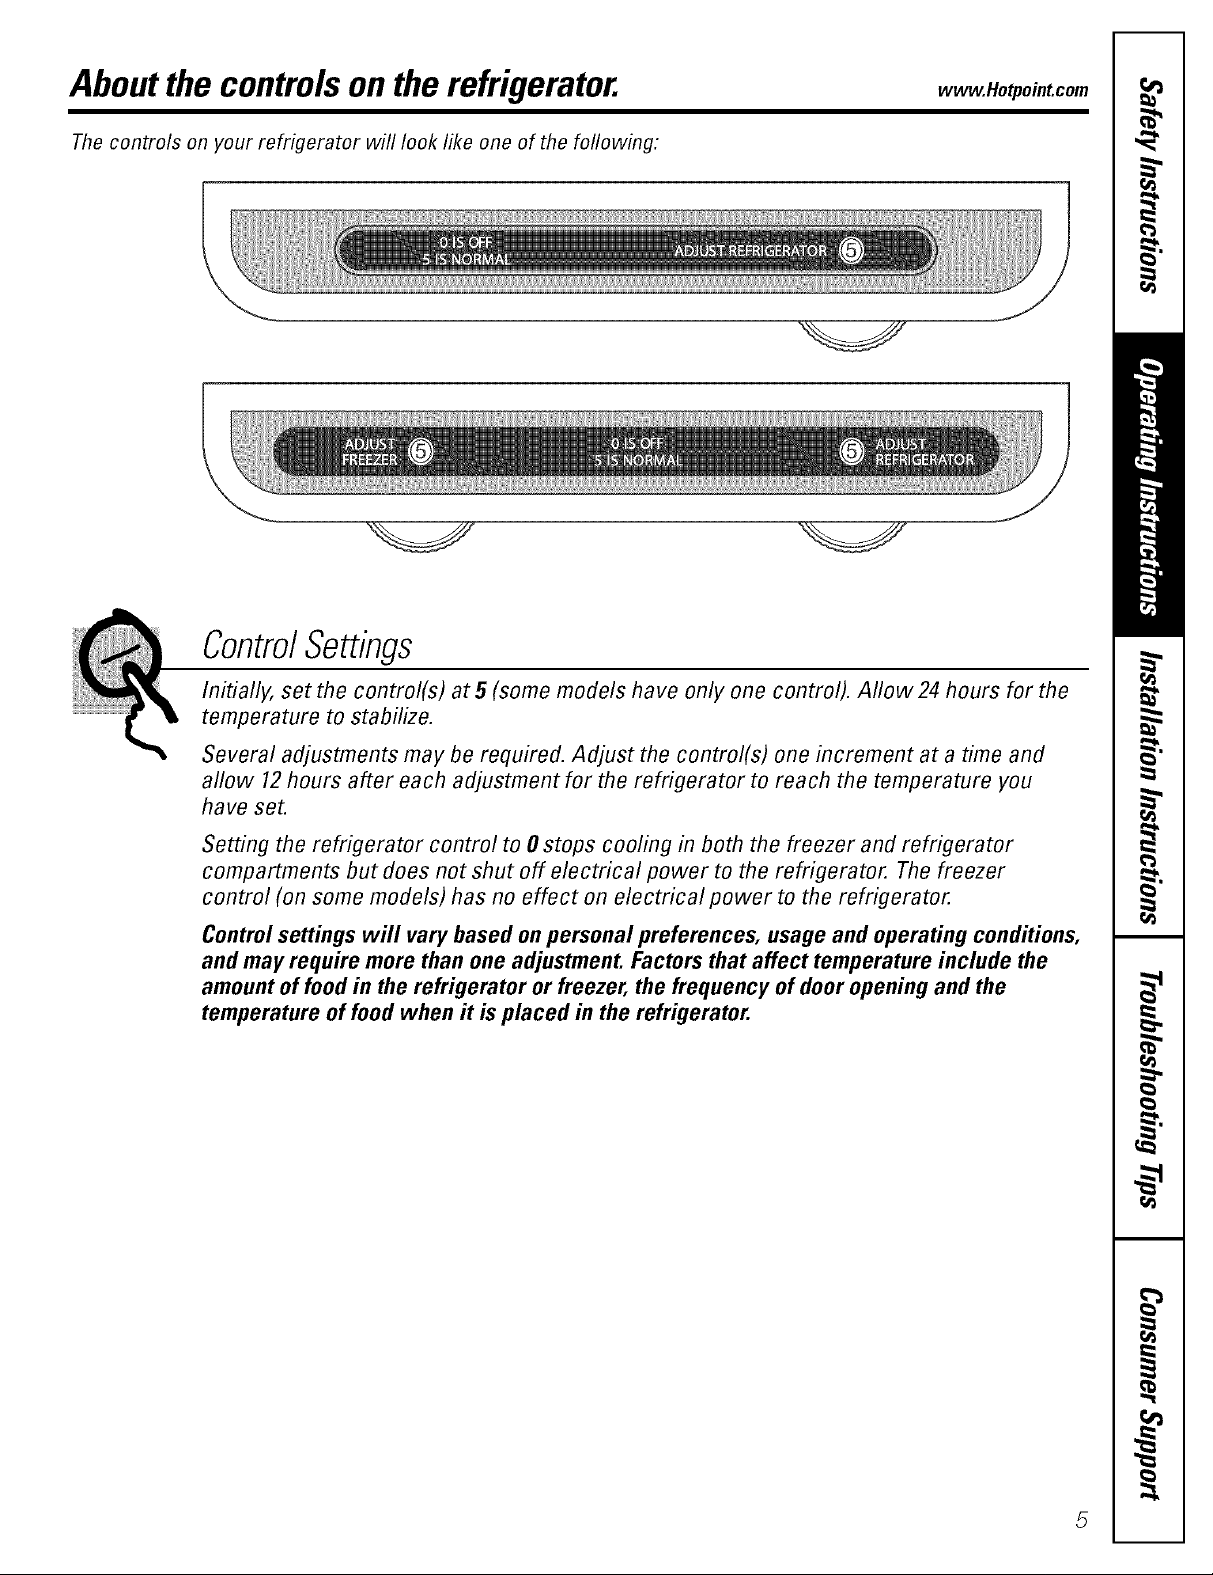
Thecontrols on your refrigerator will look like one of the following:
ControlSettings
Initially, set the control(s) at 5 (some models have only one control). Allow 24 hours for the
temperature to stabilize.
Several adjustments may be required. Adjust the control(s) one increment at a time and
aflow 12hours after each adjustment for the refrigerator to reach the temperature you
have set.
Setting the refrigerator control to 0 stops cooling in both the freezer and refrigerator
compartments but does not shut off electrical power to the refrigerator. The freezer
control (on some models) has no effect on electrical power to the refrigerator.
Controlsettings will vary based on personal preferences, usage and operating conditions,
and may require more than one adjustment. Factors that affect temperature include the
amount of food in the refrigerator or freezer, the frequency of door opening and the
temperature of food when it is placed in the refrigerator.
Aboutthe shelvesandbins.
Not all features are on all models.
Rearranging the Shelves
Shel;es in the refrigerator and h'eezer con_l)arm_ents are a(!iustnble.
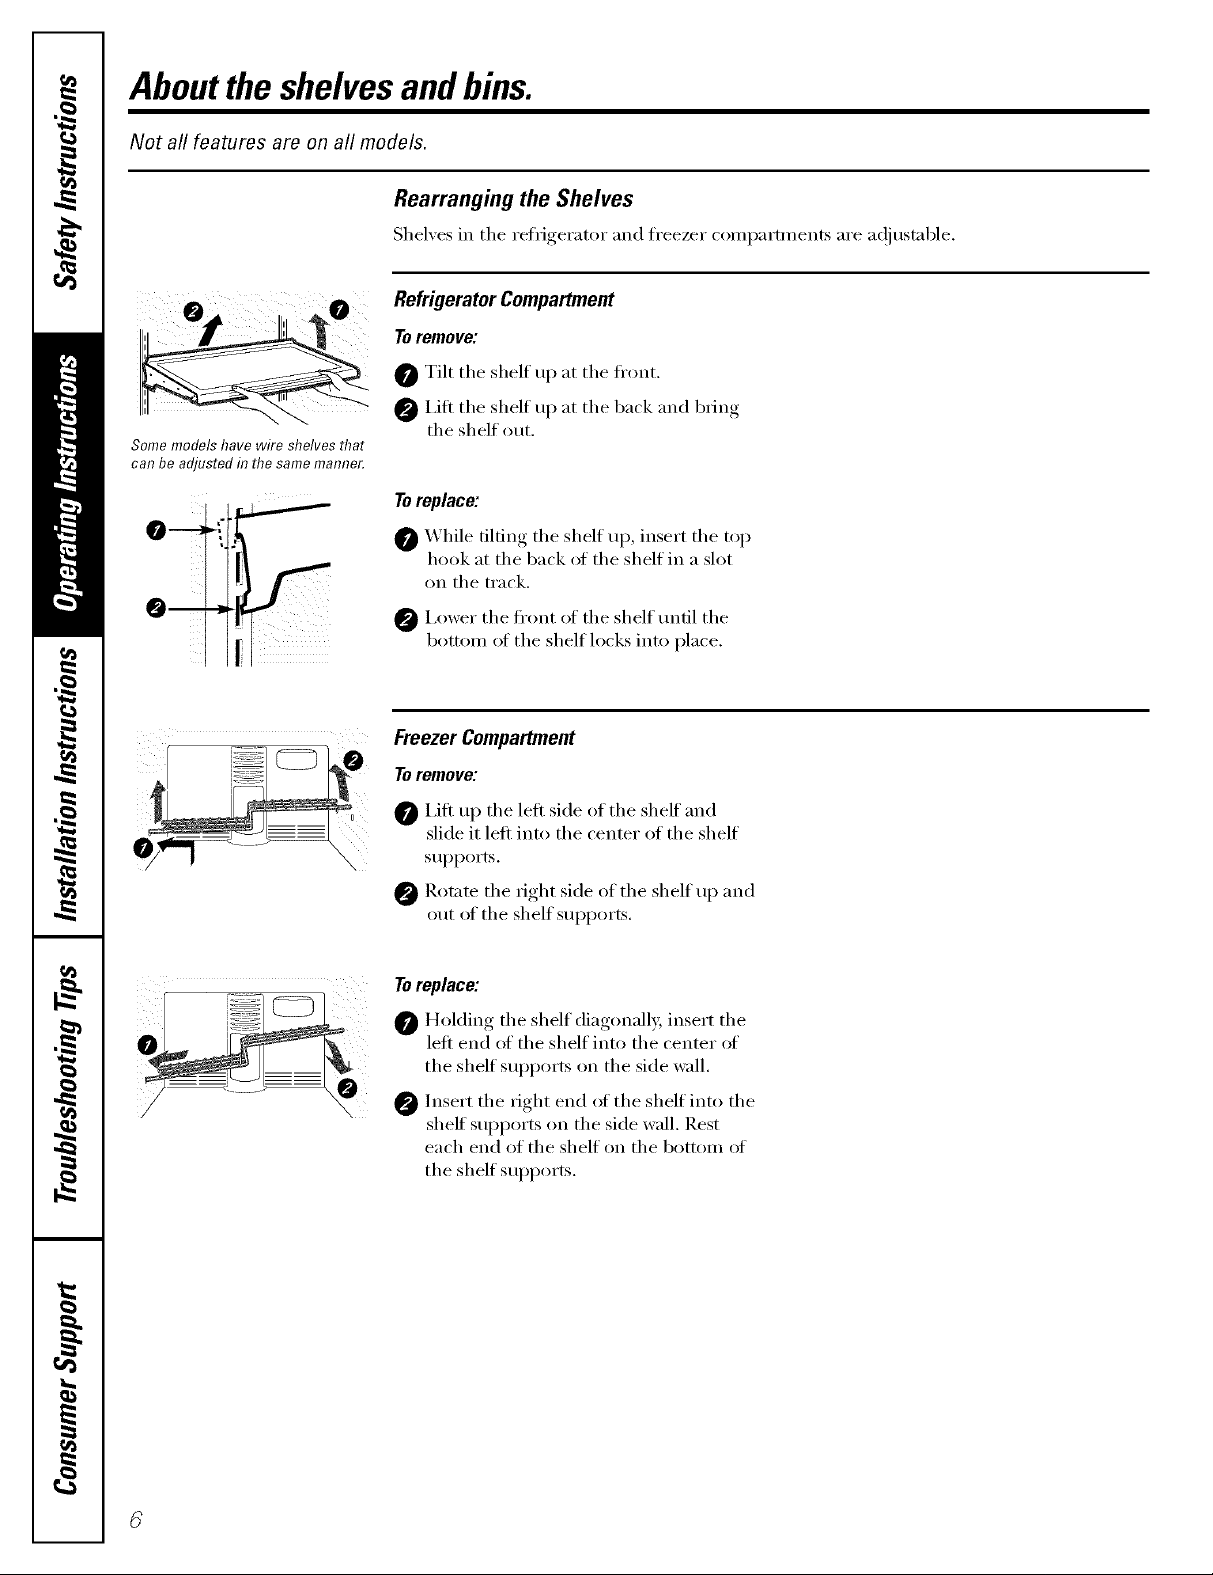
Refrigerator Compartment
o ,2o
Some models have wire shelves that
can be adjusted in the same mamTer.
To remove:
0 Tilt the shelf up at the fl'ont.
0 I,ifl the shelf up at the back and bring
the shelf out.
f
i
i.
0
iii;i;i ii
Toreplace:
0 _'_hile tilting the shelf Ul), insert the top
hook at the back of the shelf in a slot
on the track.
0 I,ower the fl'ont of the shelf tmfil the
bottom of the shelf locks into place.
Freezer Compartment
To remove:
I,ifl u I) the left side ot the shelf and
slide it left into the center of the shelf
SUl)ports.
Rotnm the right side of the shelf up and
out of the shelf supports.
Toreplace:
0 Holding the shelf diagonally, insert the
left end of the shelf into the center of
the shelf sui)ports on the side wall.
0 Insert the right end of the shelf into the
shelf supports on the side wall. Rest
each end of the shelf on the bottom oI
the shelf supports.
Front bar
Spillproof Shelves (onsomemodels)
Spillproof shel',es have special edges to
hel I) pre_ent spills fl'om dripping to lower
shelves. To remme or replace the shelves,
seeRearrangingtheShelves.
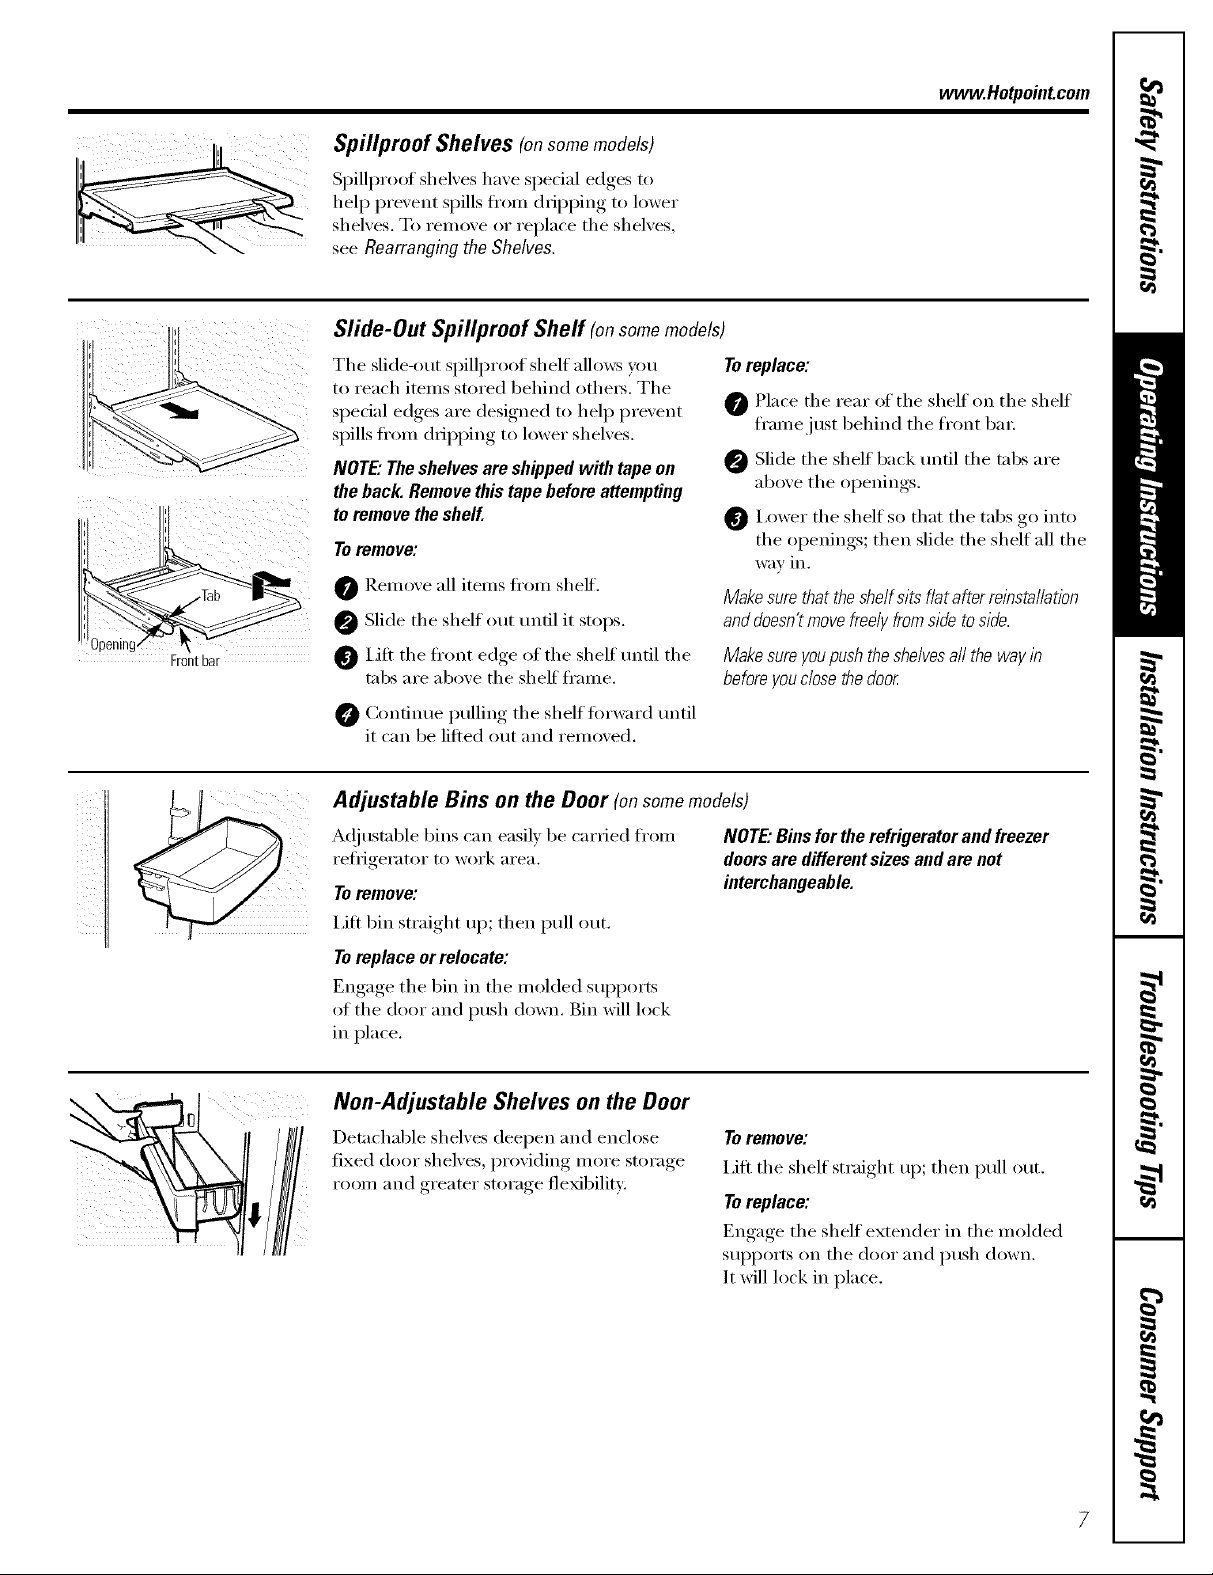
Slide-Out Spillproof Shelf (onsomemodels)
The slide-out spillproof shelf allo_vs )_m
to reach items stored behind othe_. The
spedal edges are designed to hel I) prevent
spills fl'om dripping to lower shelves.
NOTE."The shelves are shipped with tape on
the back. Remove this tape before attempting
to remove the shelf.
Toremove:
Remoxe all items fl'om sheff.
@ Slide the shelf out tmfil it stops.
Lift the fl'ont edge of the shelf tmfil the
tabs are aboxe the shelf fl'ame.
Confimm I)ullim*_ the shelf fin'ward tmtil
it can be lified out and remoxed.
www.Hotpoint.com
Toreplace:
0 Place the rear of the shelf on the shelf
fl'amejust behind the fl'ont ba_;
Slide the shelf back tmfil the tabs are
above the openings.
0 I,ower the shelf so that the tabs go into
the openings; then slide the shelf all the
way ill.
Makesurethattheshelfsitsflatafterreinstallation
anddoesn'tmovefreelyfromsidetoside.
Makesureyoupushtheshelvesaftthewayin
before you dose the door
Adjustable Bins on the Door (onsomemodels)
A(!justable bins can easily be carried fl'om
reflJgerator to work area.
Toremove:
I,ifl bin straight up; then pull out.
To replace or relocate:
Engage the 1)in in the molded sui_ports
of the door and push down. Bin will lock
in place.
NOTE."Binsfortherefrigeratorandfreezer
doorsare differentsizesandare not
interchangeable.
Non-Adjustable Shelves on the Door
Detachable shelves deepen and enclose
fixed door shelves, providing inore storage
room and greater storage flexibility:
Toremove:
I,ifl the shelf straight up; then pull out.
Toreplace:
Engage the shelf extender in the molded
sui_ports on the door and push down.
It will lock in place.
Aboutthe crispersandpans.
Not all features are on all models.
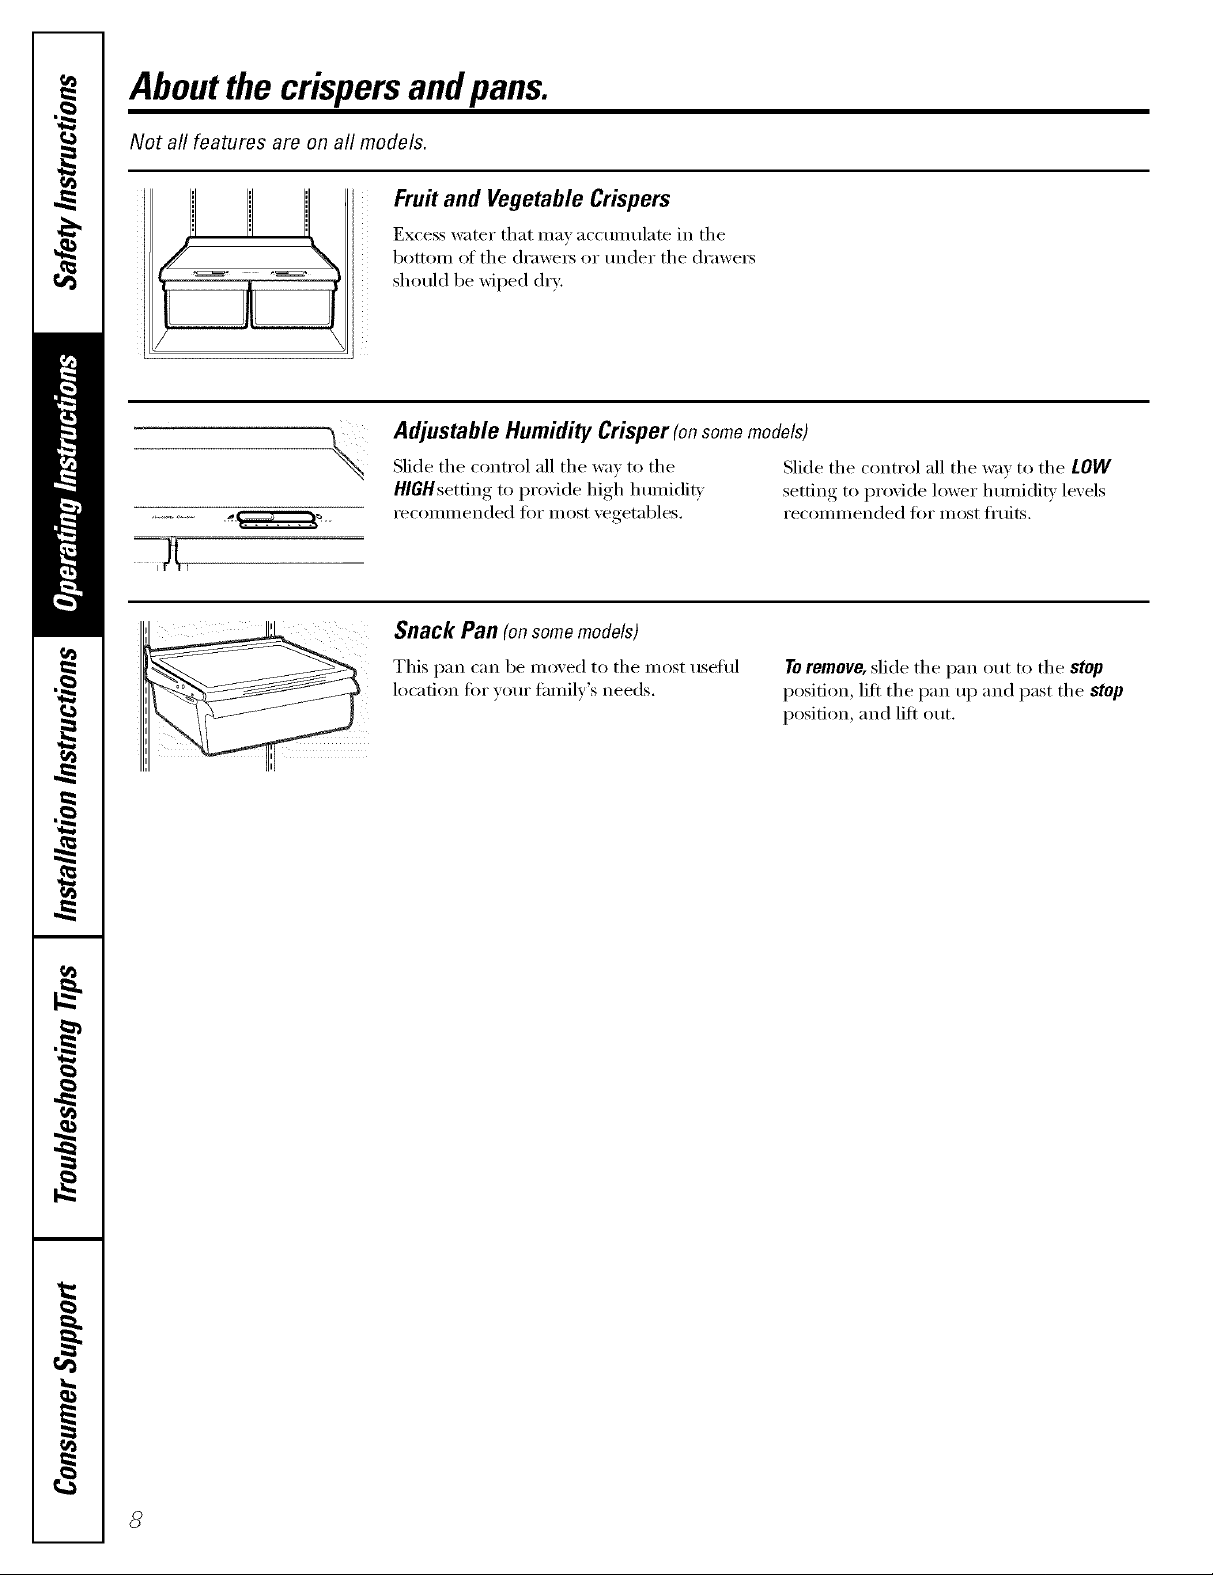
Fru# and Vegetable Crispers
Excess water that may accumulate in the
bottom of the (h'awe_ or under the (h'awe_
should be wiped dry:,
Adjustable Humidity Crisper (onsomemodels)
Slide the control all the wa) to the
HlGHsetfing to proqde high humidi b
recommended fi)r most xegetables.
Snack Pan (onsomemodels)
Slide the control all the wax to the LOW
setting, to I)r°xi(le lower lmmi(lit_ levels
recoinnlended fi)r inost fl'uits.
This pan can be moved to the most tlseitll
location fi)r your family's needs.
Toremove, slide the pan out to the stop
position, lift the pan up and past the stop
position, and lift ()tit.
Aboutcrisperremoval w eetpoi,tcom
Not all features are on all models.
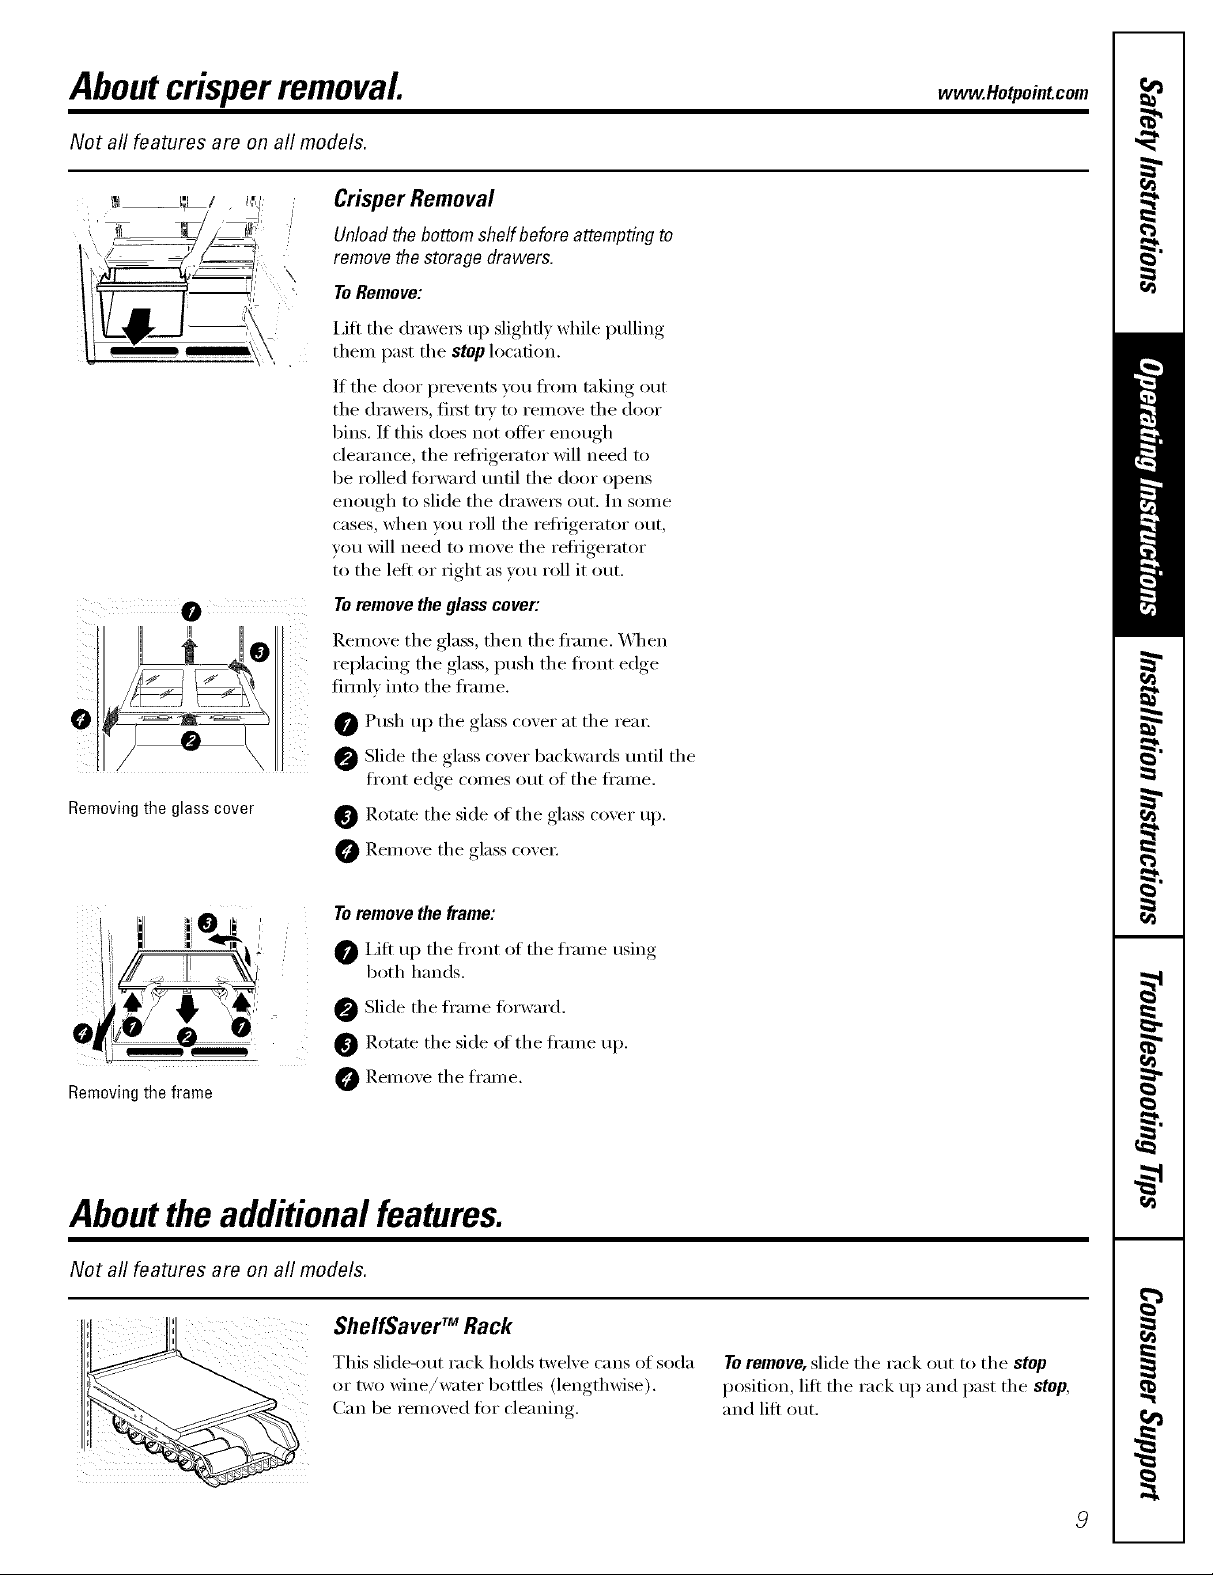
Crisper Removal
Unload the bottom shelf before attempting to
remove the storage drawers.
ToRemove:
i,ifl the (h'awe_3 up slightly while pulling
them past the stop location.
If the door prevents you from taking out
the (h'awe_, fi_t try to remove the door
bins. If this does not offer enough
clearance, the refl]gerator will need to
be rolled fin'ward tmtil the door opens
enough to slide the (h'awe_ out. In some
cases, when you roll the refl_igerator out,
you will need m move the refl_igerator
to the lett or right as you roll it out.
Toremove the glass cover:
Remove the glass, then the fl'ame. _._]_en
replacing the glass, push the fl'ont edge
fimflv into the fl'ame.
o
Removing the glass cover
@ Push up the glass cover at the rear:
Slide the glass cover backwards tmtil the
fl'ont edge comes otlt of the fl'ame.
Rotate the side ot the glass cover up.
Remove the glass covet:
ill i @
II i,J "_'_,.
,&i w '_ =
Removing the frame
Toremove the frame:
@ I,ift up the ti'ont ot the ti'ame using
both hands.
@ Slide the fl'ame fin'ward.
@ Rotate the side ot the fl'ame up.
0 Remove the fl'ame.
Aboutthe additional features.
Not all features are on all models.
ShelfSaver rMRack
This slide-out rack holds twelve cans ot soda
or two wine/water bottles (lengthwise).
Can be removed fin" cleaning.
Toremove, slide the rack out to the stop
position, lift the rack up and past the stop,
and lift out.
Aboutthe automaticicemaker.
A newly-installed refrigerator may take 12-24 hours to begin making ice.
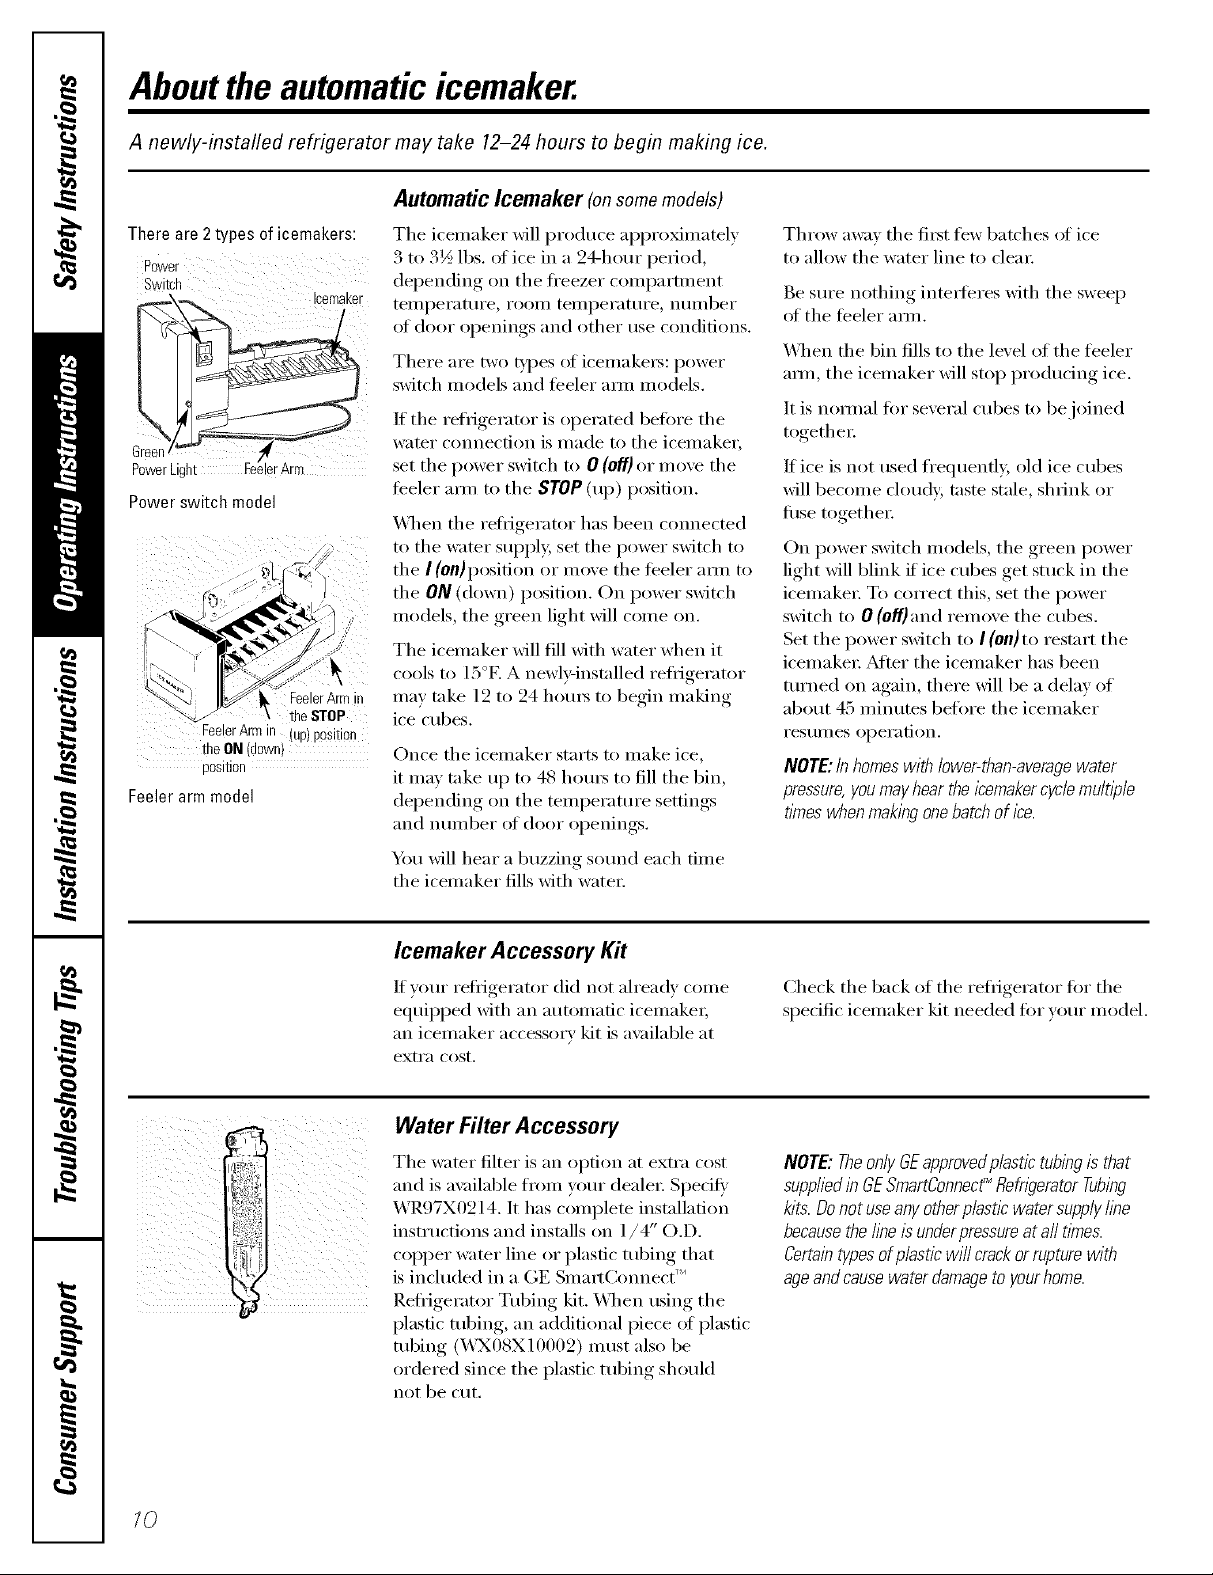
Automatic Icemaker (onsomemodels)
There are 2 types of icemakers:
Switch
\
PoWerLight I l
Power switch model
FeelerArmill up position
the.ON down)
posmon
Feeler arm model
Icemaker
FeelerArmin
theSTOP
The icemaker will produce al)pro_nmtely
3 to 3½ lbs. alice in a 24-hour period,
depending on the fl'eezer comI)amnent
tellll)ei'atui'e , i'OOlll tellll)ei'atui'e , ntlll/beF
at door openings and other rise conditions.
There are two _'pes of icemake_: power
switch models and teeler aml models.
If tile refl_igerator is operated beffwe tile
water cmmection is made to tile icemaker,
set tile power switch to 0 (ell) or move tile
feeler am/ to tile STOP (up) position.
_Al/en tile reti_igerator has been comlecmd
to tile water sui)ply, set tile power switch to
tile ] (on) position or move tile teeler aml to
the ON (down) position. On power switch
models, tile green light will come on.
The icemaker will fill with water when it
cools to 15°E A newl>installed refligerator
may take 12 to 24 hom_ to begin making
ice cubes.
Once tile icemaker starts to make ice,
it may take up to 48 hom_ to fill tile bin,
del)ending, on tile temperature.setfimm_.
[llld ntlll/beI" of door ol)enings.
You will hear a buzzing sound each time
the icemaker fills with water:
Throw awm tile fi_t few batches of ice
to allow tile water line to clem:
Be sm'e nothing inte_%res with tile sweep
of tile teeler amL
\Allen tile bin fills to tile level of tile teeler
am/, the icemaker will stop producing ice.
It is natural t0r several cubes to be joined
together:
If ice is not used fl'equenfl> old ice cubes
will become cloudy, taste stale, shrink or
fiBe together:
On power switch models, tile green power
light will blink if ice cubes get stuck in the
icemake_: To con'ect this, set tile power
switch to 0 (off)and remove tile cubes.
Set tile power switch to I (On)to restart tile
icemake_: _Mter tile icemaker has been
turned on again, there will be a delay of
about 45 minutes before tile icemaker
I'eS/lI//es opei'ation.
NOTE:In homeswith lower-than-averagewater
pressure,you mayhear the l?emakercycle multi)de
times when maklbgonebatch of ice.
10
Icemaker Accessory Kit
If your refl_igerator did not ah'ead_ come
equil)ped with an automatic icemake_;
an icemaker accessory kit is ax filable at
extra cost.
, WaterFilterAccessory
i
Tile water filter is an option at extra cost
and is available from }am" deale_: Specit}
X,\R97X0214. It has complete installation
instructions and installs on 1/4 ( .D.
COl)per water line or plastic tubing that
is included m a GE Smatt(xmnect
Refligerator Tubing kit. XAqmn using the
plastic tubing, an additional piece of plastic
tubing (_A'X08X 10002) I/ltlSt also be
ordered since tile plastic tubing should
not be cut.
tr )
Check tile back of tile refligerator fiw tile
specific icemaker kit needed for ",'our model.
NOTE:TheonlyGEapprovedp/astictubingisthat
suppliedi# GESmartConnect_Refn)emtorTubing
kits.Donotuseanyotherplasticwatersupply/be
becausethei/beis underpressureatafttimes.
Certaintypesofplasticwi//crackorrupturewith
ageandcausewaterdamagetoyourhome.
 Loading...