

Hotpoint HTS17GCSERWW Owner’s Manual

N
:13
0
wwvv.Hotpoint.com
Safety Information
Connecting Electricity ........... 3
Extension Cords ............... 2
Safety Precautions .............. 2
Operating Instructions
Automatic Icemaker ............ 8
Care and Cleaning .......... 9, 10
Shelves ..................... 5, 6
Storage Drawers .............. 6, 7
Temperanlre Controls ........... 4
4,,,a
Installation Instructions
Preparing to Install
the Refligerator .............. 11
Reversing the Door Swing ... 16-22
V\amr Line Installation ...... 12-16
Troubleshooting Tips
Before You (:all
For Service ................ 24, 25
Normal Operating Sounds ...... 23
Consumer Support
Consumer Support .... Back Co_r
Product Regdstration ........ 29, 30
_4arranty' .................... 31
Write the model and serial numbers here:
Model #
Serial #
You can find them on a label on the upper
left side of the fresh ii>od compartment.
16206736P009 39-60417 11-05JR
iMPORTANTSAFETYiNFORMATiON.
READALL iNSTRUCTiONSBEFOREUSING.
WARNING!
Use this appliance only for its intended purpose as described in this Owner's Manual.
SAFETYPRECAUTIONS
When using electrical appfiances, basic safety precautions should be followed, including the foflowing:
_:_This refrigerator must be properl} installed
and located in accordance with the Installation
InstHictions before it is used.
i_¢'Do not allow children to climb, stand or hang
on the shelves in the refl'igerator. They could
damage the refl'igerator and seriously ii_jm'e
themselves.
%Do not touch the cold suriaces in the freezer
compartment when hands are damp or wet.
Skin may stick to these extremely cold
S//I'J[;I ces.
::17Do not store or use gasoline or other flammable
vapors and liquids in tile vicinity of this or any
other appliance.
_::_Keep finge_s out of tile "pinch point" areas;
clearances between the doo_s and between
tile doors and cabinet are necessarily small.
Be careflfl closing doors when children are
in the area.
:)_ln refl'igeratots with automatic icemakers,
avoid contact with the moving parts of the
ejector mechanism, or with the heating
element that releases the cubes. Do not place
finge_s or hands on the automatic icemaking
mechanism while the refl'igerator is plugged in.
:)_ Unplug tile refl'igerator befln'e cleaning and
making repairs.
NOTE:Westronglyrecommendthatanyservicingbe
performedbyaquafifiedindividual.
i)::Tm'ning tile control to tile 0 position does
not remove power to tile light circuit.
:_/)Do not refl'eeze ti'ozen foods which have
thawed completely.
DANGER!RISKOFCHILDENTRAPMENT
PROPERDISPOSALOFTHEREFRIGERATOR
Child entrapment and suffocation are not
problems of tile past. ,Junked or abandoned
refl'igerators are still dangerous...even if they
will sit fl_r "just a few days." If wm are getting
rid of wmr old refl'igerator, please fi_llow the
inst_ uctions below to hel I) prevent accidents.
Before You ThrowAway YourOld
Refrigerator or Freezer:
_; Take off tile doors.
iJi::I,eaxe tile shelxes in place so that children
max not easilx climb inside.
Refrigerants
All refl'igeration products contain refrigerants,
which under fi_cleral law must be removed prior
to product disposal. If you are getting rid of an
old refl'igeration product, check with the
company handling tile disposal about what
to (lo.
USEOFEXTENSIONCORDS
Because of potential safety hazards under certain conditions, we strongly recommend against
the use of an extension cord.
However, if you must use an extension cord, it is absolutely necessarx that it be a UiAisted,
3-wire gmtmding type appliance extension cord haxing a ,gr°unding, tX,'l)e l)lug, and outlet and
that the electrical rating of the cord be 15 amperes (minimum) and 12(1 xolts.
www.Hotpointcom
WARNING!
HOWTOCONNECTELECTRICITY
Do not, under any circumstances, cut or remove the third (ground) prong from the power cord.
For personal safety, this appfiance must be properly grounded.
The power cord of this appliance is equipped
with a 3-prong (grounding) plug which mates
with a standard 3-prong (grounding) wall outlet
to minimize the possibility of electric shock
hazard from this appliance.
Have the wall outlet and circuit checked bv a
qualified electrician to make sm'e the outlet is
properly grounded.
Where a standard 2-prong wall outlet is
encotmtered, it is y()ur pers()nal resp()nsibility
and obligati()n t() have it replaced with a
properly grotmded 3-prong wall outlet.
The refrigerator sh(mld always be pltlgged into
its own individual electrical outlet which has a
voltage rating that matches the rating plate.
This provides the best peril)finance and also
prexents oxerloading house wiring circtfits which
cotfld cause a fire hazard from oxerheated wires.
Never tmphlg your refrigerator by pulling on the
power cord. Always grip pltlg firmly and ptfll
straight out fl'om the outlet.
Repair or replace immediately all power cords
that have become frayed or otherwise damaged.
Do not use a cord that shows cracks or abrasion
damage along its length or at either end.
When moving the refl'igerator away fl'om the
wall, be careflfl not to roll over or damage the
power cord.
READAND FOLLOWTHISSAFETYINFORMATIONCAREFULLY.
SAVETHESEINSTRUCTIONS
3
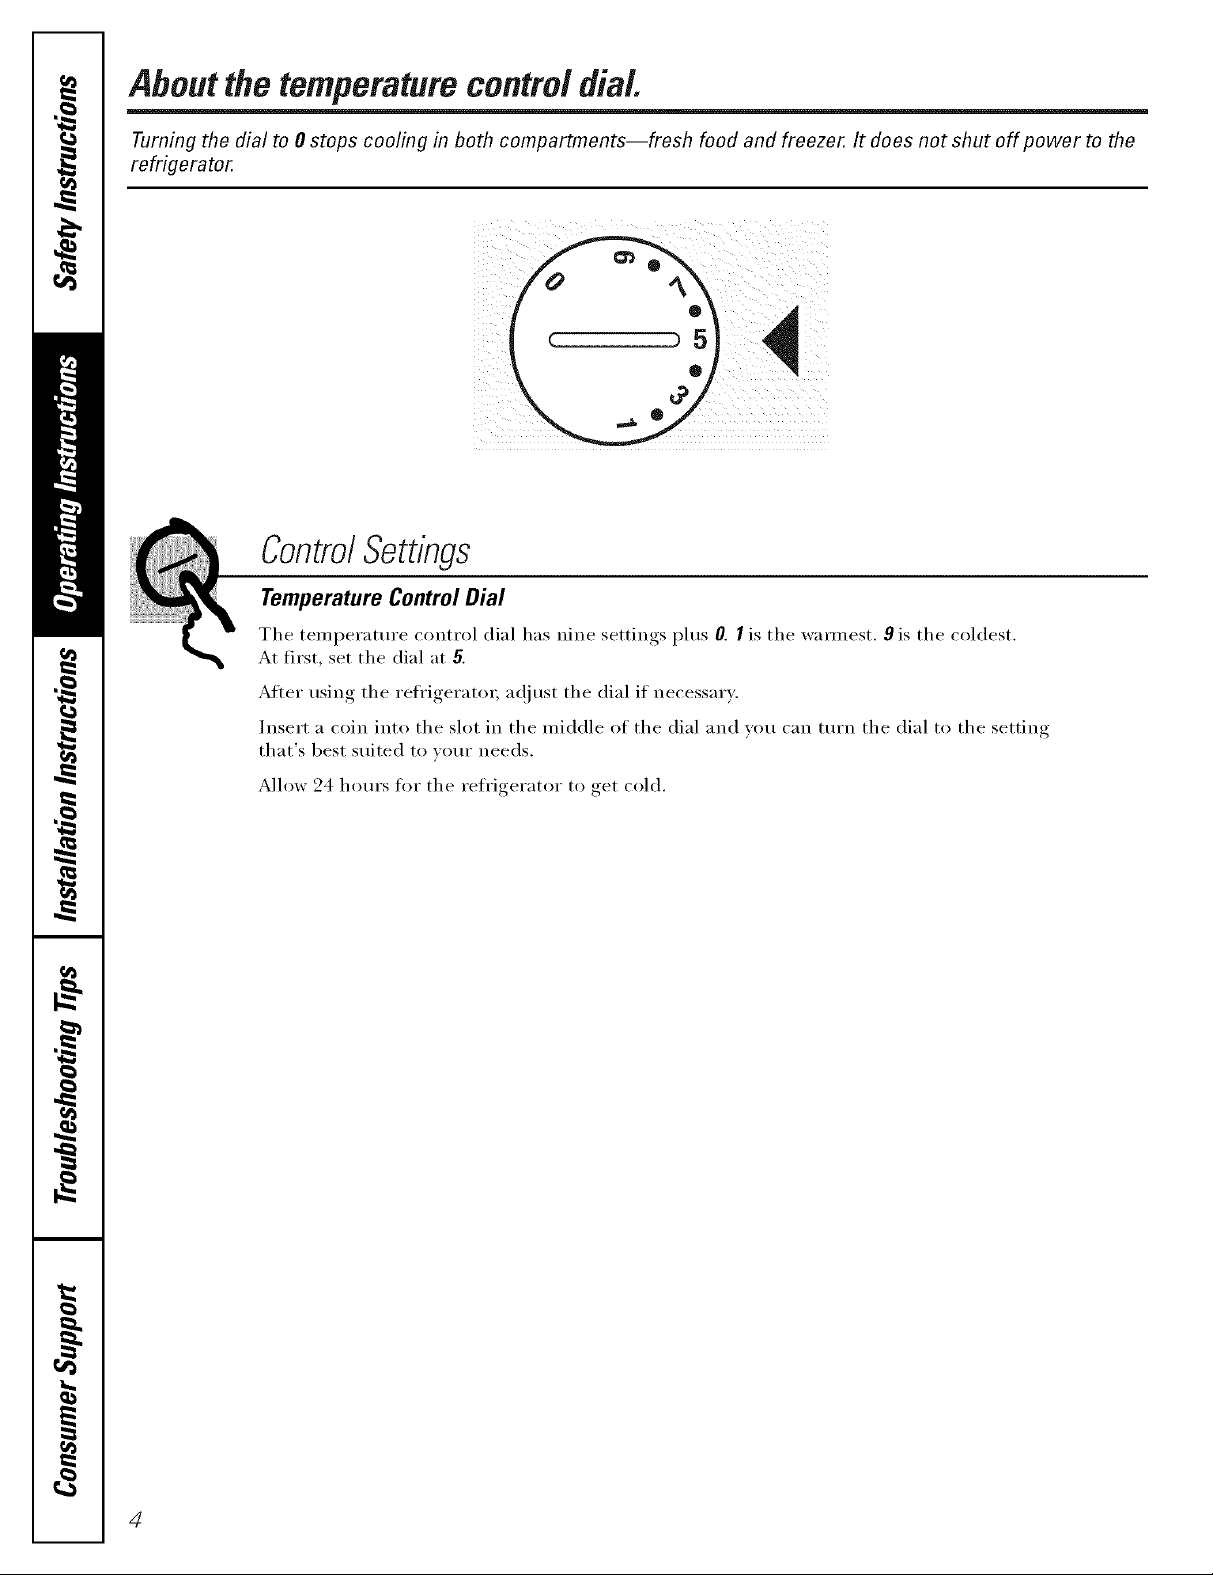
Aboutthe temperaturecontroldial.
Turning the dial to 0 stops cooling in both compartments--fresh food and freezer. It does not shut off power to the
refrigerator.
ControlSettings
Temperature Control Dial
The temperature control dial has nine settings plus 0. I is the wam_est. 9 is the coldest.
At first, set the dial at 5.
After using the refrigerator; a(!just the dial if necessary.
Insert a coin into the slot in the middle of the dial and w)u can [tlI'n the dial to the setting
that's best suited to votlr needs.
Allow 24 horn's ti)r the reti'igerator to get cold.
4
Aboutthe freshfoodcompartmentshelves, w Hetpeint.cem
Shelf supports at various levels allow you to custom-space your shelves. Not all features are on all models.
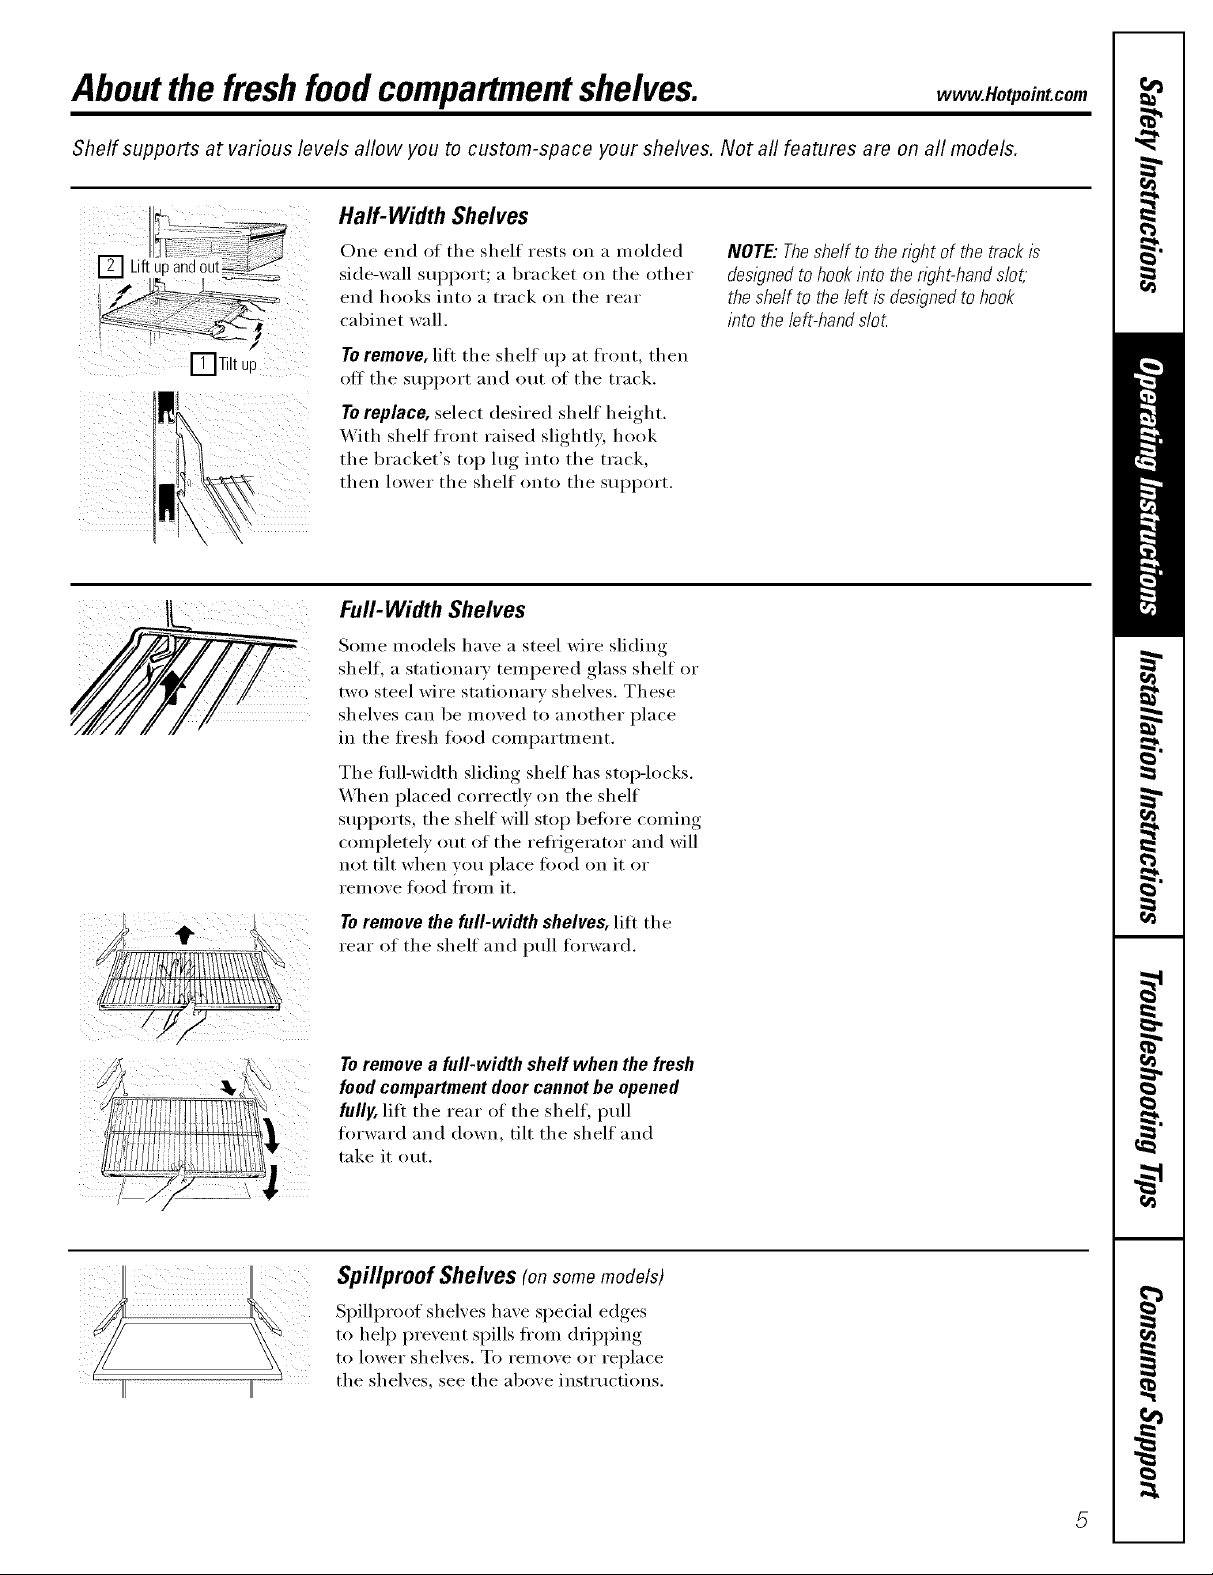
Half-Width Shelves
irT1
I
One end of the shelf rests on a molded
side-wall Stll)l)OI't; _1bracket on the other
end hooks into a track on the rear
cabinet wall.
NOTE:Theshelfto theright of thetrackis
designedtohookinto theright-hands/ot;
theshelf to theleft isdesignedtohook
into theleft-hands/o_
[_Tilt up
Toremove, lift the shelf uI) at front, then
off the sui_port and out of the track.
Toreplace, select desired shelf height.
_._ith shelf front raised slightly, hook
the bracket's toi _ lug, into the track,
then lower the shelf onto the support.
Full-Width Shelves
Some models have a steel wire sliding
shelf, a stationary tempered glass shelf or
two steel wire stationary shelves. These
shelves can be moved to another place
in the ti'esh li)od compartment.
The flfll-width sliding shelf has stoi>locks.
_,_]_en placed correctly on the shelf
suI_ports, the shelf will stop heft)re coming
completely out of the refi'igerator and will
not tilt when you place tood on it or
rein ove Ii)od fl'om it.
To remove the full-width shelves, lift the
rear of the shelf and ptfll forward.
Toremove a full-width shelf when the fresh
food compartment door cannot be opened
fully, lift the rear (>I the shelf, pull
forward and down, tilt the shelf and
take it out.
/
Spillproof Shelves (onsomemodels)
Spillproof shelves have special edges
to hel I) prevent spills ti'om dripping
to lower shelves. To remove or replace
II
the shelves, see the above instructions.
About the freezer compartment shelves.
Some models have an ice-tray shelf and some have a full-width step shelf.
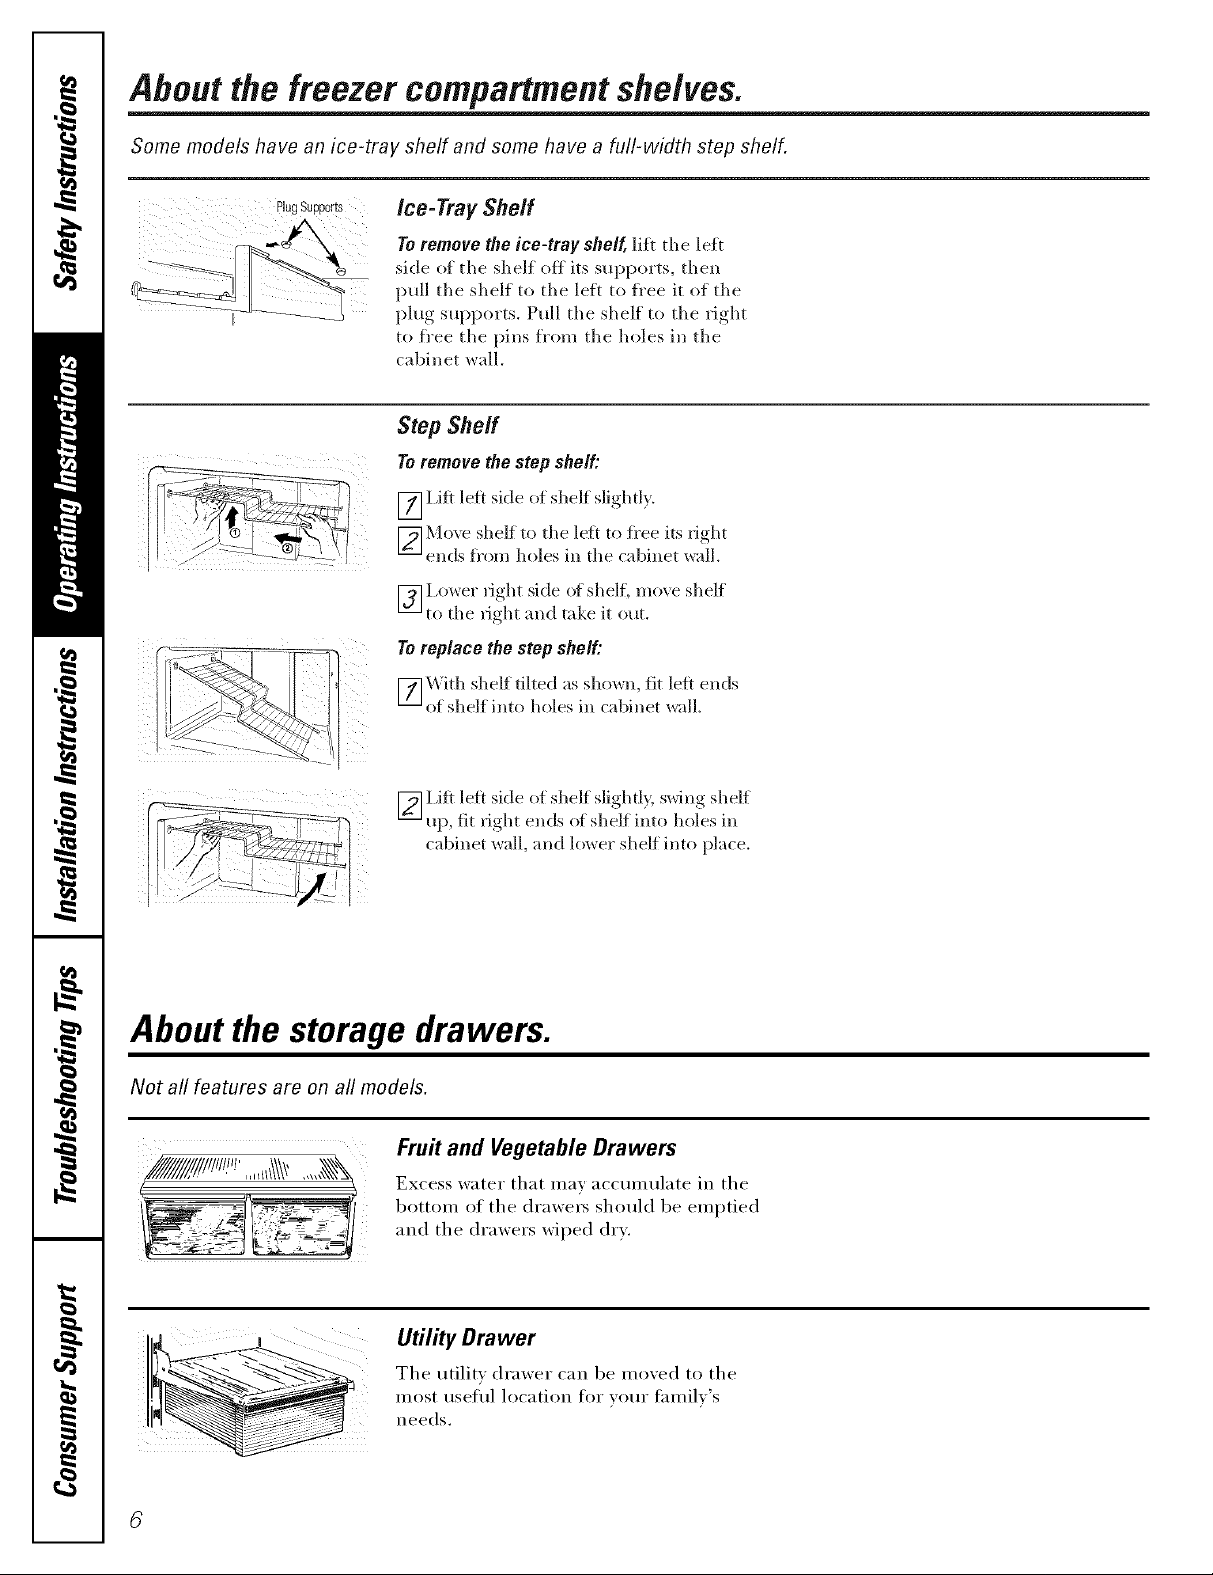
Ice-Tray Sheff
Toremove the ice-tray shelf, li_t tile left
side ot tile sheli off its supports, then
pull tile silelf to tile left to fl'ee it of tile
plug supports. Pull tile shelf to tile rigilt
to fl'ee tile pins fl'om tile holes in tile
cabinet wall,
StepShelf
Toremove the step shelf:
[_I,ifl left side ot shelf sligiltl?.
[_ Mo'_e silelf to tile left to fl'ee its fight
ends fl'om holes in tile cabinet wall.
Lower fight side of shelf, moxe shelf
[] to tile fight and take it out.
Toreplace the step shelf:
F_] \'Vith sileif tilted as shown, fit left ends
]
of shelf into holes in cabinet wall
!¸
[_I,ifl left side of shelf slightl?, swing shelf
up, fit right ends of shelf into lloles in
cabinet _,_all, and iox_er shelf into place.
About the storage drawers.
Not all features are on all models.
Fru# and Vegetable Drawers
Excess water that may accumulate in tile
bottom of tile drawe_ should be emptied
and tile drawers wiped dry.
Tile utili D drawer can be mined to tile
Utility Drawer
About storage drawer and cover removal, vvvvvv.Hotpointcom
Not all features are on all models.
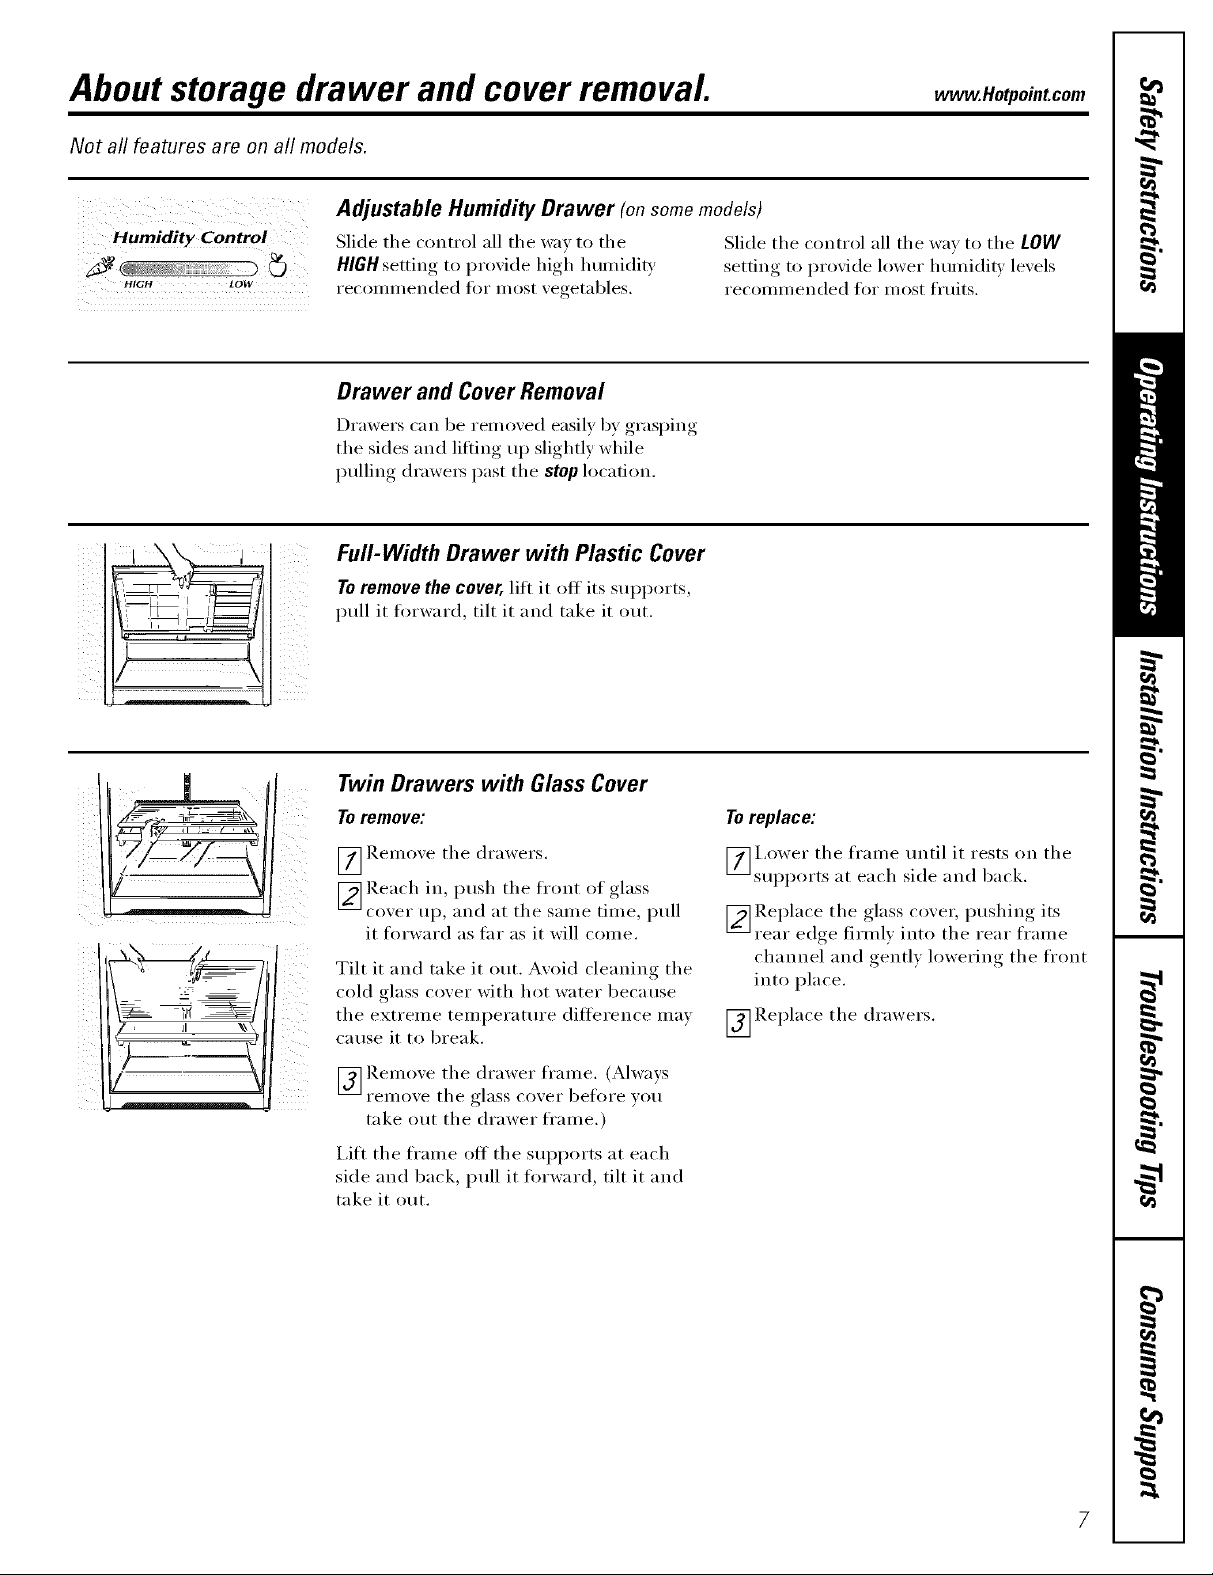
Adjustable Humidity Drawer (onsomemodels)
Slide the control all the way to the Slide the control all the way to the LOW
HIGH LOW
HIGH setting to proxide high humidity setting to provide lower humidit_ levels
rec(nmnended fin" most xegetables, recommended for most fruits.
Drawer and Cover Removal
Drawers can be removed easily by grasping
the sides and lifting up slightly while
pulling (h'awe_ past tile stop location.
Full-Width Drawer with Plastic Cover
To remove the cover, lift it off its sui)ports,
pull it fin'ward, tilt it and take it out.
JI \\\
Twin Drawers with Glass Cover
To remove:
_] Remoxe the drawers.
_ Reach in, push the front of glass
coxer up, and at the same time, pull
it forward as tar as it will conle.
Tilt it and take it out. Avoid cleaning tile
cold glass cover with hot water because
the extreme temperature difference may
Catlse it to break.
[_] Remoxe tile drawer frame. (Always
FeI//oxe tile glass coxer before }ou
take out the drawer fl'ame.)
I,ift the fl'ame off the supports at each
side and back, pull it fin'ward, tilt it and
take it out.
To replace:
_] i,ower tile frame tmtil it rests on tile
suI_ports at each side and back.
V_ Re I)lace tile ,glass cox er, I)ushin°_ its
rear edge firml) into tile rear frame
channel and oentE lowering tile front
into place.
_]Replace tile drawers.

About the automatic icemaker.
A newly-installed refrigerator may take 12to 24 hours to begin making ice.
Automatic Icemaker (on some models)
Switch Icemaker
Powerswitch model
FeelerArmin
theSTOP
FeelerArm in (up)position
tile ON (down)
pos_t_on
Feelerarm model
The icemaker will produce seven cubes
per cycle--ai)i)roxinlately 100-130 cubes
in a 24-hem" period, depending on
fl'eezer coml)artn/ent temperature,
I'OOIll teillpei'attti'e, nttI/tbeI" of dooI"
openings and other use conditions.
There are two bpes of icemaket_: power
switch models and teeler arm models.
If the refl{gerator is operated befin'e
the water connection is made to the
icemakei; set the power switch to 0 (off)
or move the feeler aml to the STOP(up)
position.
When the refl_gerator has been
connected to the water SUl)l)ly, set the
power switch to the I (0n)position or move
tile teeler aml to the ON (down) position.
(-)n power switch models, the green light
will come on,
You will hear a buzzing sotmd each time
the icemaker fills with water.
The icemaker will fill with water when
it cools to ] 5°E A newly-installed
refl'igerator mav take ] 2 to 24 hours
to begin making ice cubes.
Throw away the first few batches of ice
to allow the water line to clear.
Be sure nothing interferes with the
sweep of the feeler arm.
When the bin fills to the level of the
feeler arm, tile icemaker will stop
producing ice.
It is normal fin" several cubes to be joined
together.
If ice is not used fl'equently, old ice cubes
will become cloudy, taste stale and shrink.
On power switch models, the green power
light will blink if ice cubes get stuck in the
icemaket: To correct this, set the power
switch to 0 (off)and remove the cubes. Set
the power switch to I (0/1) to restart the
icemaket: ,Mter the icemaker has been
turned on again, there will be a delay of
about 45 minutes before the icemaker
i'eStlliles oi)el'ation.
NOTE: In homes with lower-than-average water
pressure, you may hear the icemaker cycle
multipletimes when makingone batch of ice.
lcemaker Accessory Kit
If yam" refl'igerator did not already come
equipped with an automatic icemake_;
an icemaker accessory kit is a_;dlable at
exti';i cost.
Check the back of the refl-l_elat_ t for
the specific icemal<er kit needed for
}our model.
Care and cleaning of the refrigerator. .eotpoint.com
Cleaning the Outside
The door handles and trim (on some
models). Clean with a cloth (lanq)ened
with soapy water. Dry with a soft cloth.
Keep the outside clean. Wipe with a clean
cloth lightly danli)ened with kitchen
appliance wax or mild liquid dish
detergent. Dry and polish with a clean,
soft cloth.
The stainless steel panels and door handles
(oil sortie models) can be cleaned witl_
a conmlerciallv availal)le stainless steel
cleaner. Do not use appliance wax or
polish on the stainless steel.
Cleaning the Inside
To help prevent odors, leave an open bo×
ot baking soda in the fresh fl)od and
fl'eezer coml)artn/ents.
Unplug the refrigerator before cleaning.
If this is not i)ra(tical, wring excess
moisture ()tit of sponge or cloth when
cleaning around switches, lights or
controls,
Donot wipetherefrigeratorwith a soileddish
cloth orwet towel.Thesemayleavearesidue
that canerodethepainLDonot usescouring
pads,powderedcleaners,bleachorcleaners
containingbleachbecausetheseproductscan
scratchand weakenthepaintflelsh.
Avoidcleaningcoldglassshelves(onsome
models)with hot waterbecausetheextreme
temperaturedifferencemaycausethemto
break.Handleglassshelvescarefully.Bumping
temperedglasscancauseit toshatter
Donot washanyplasticrefrigeratorpartsin
thedishwasher
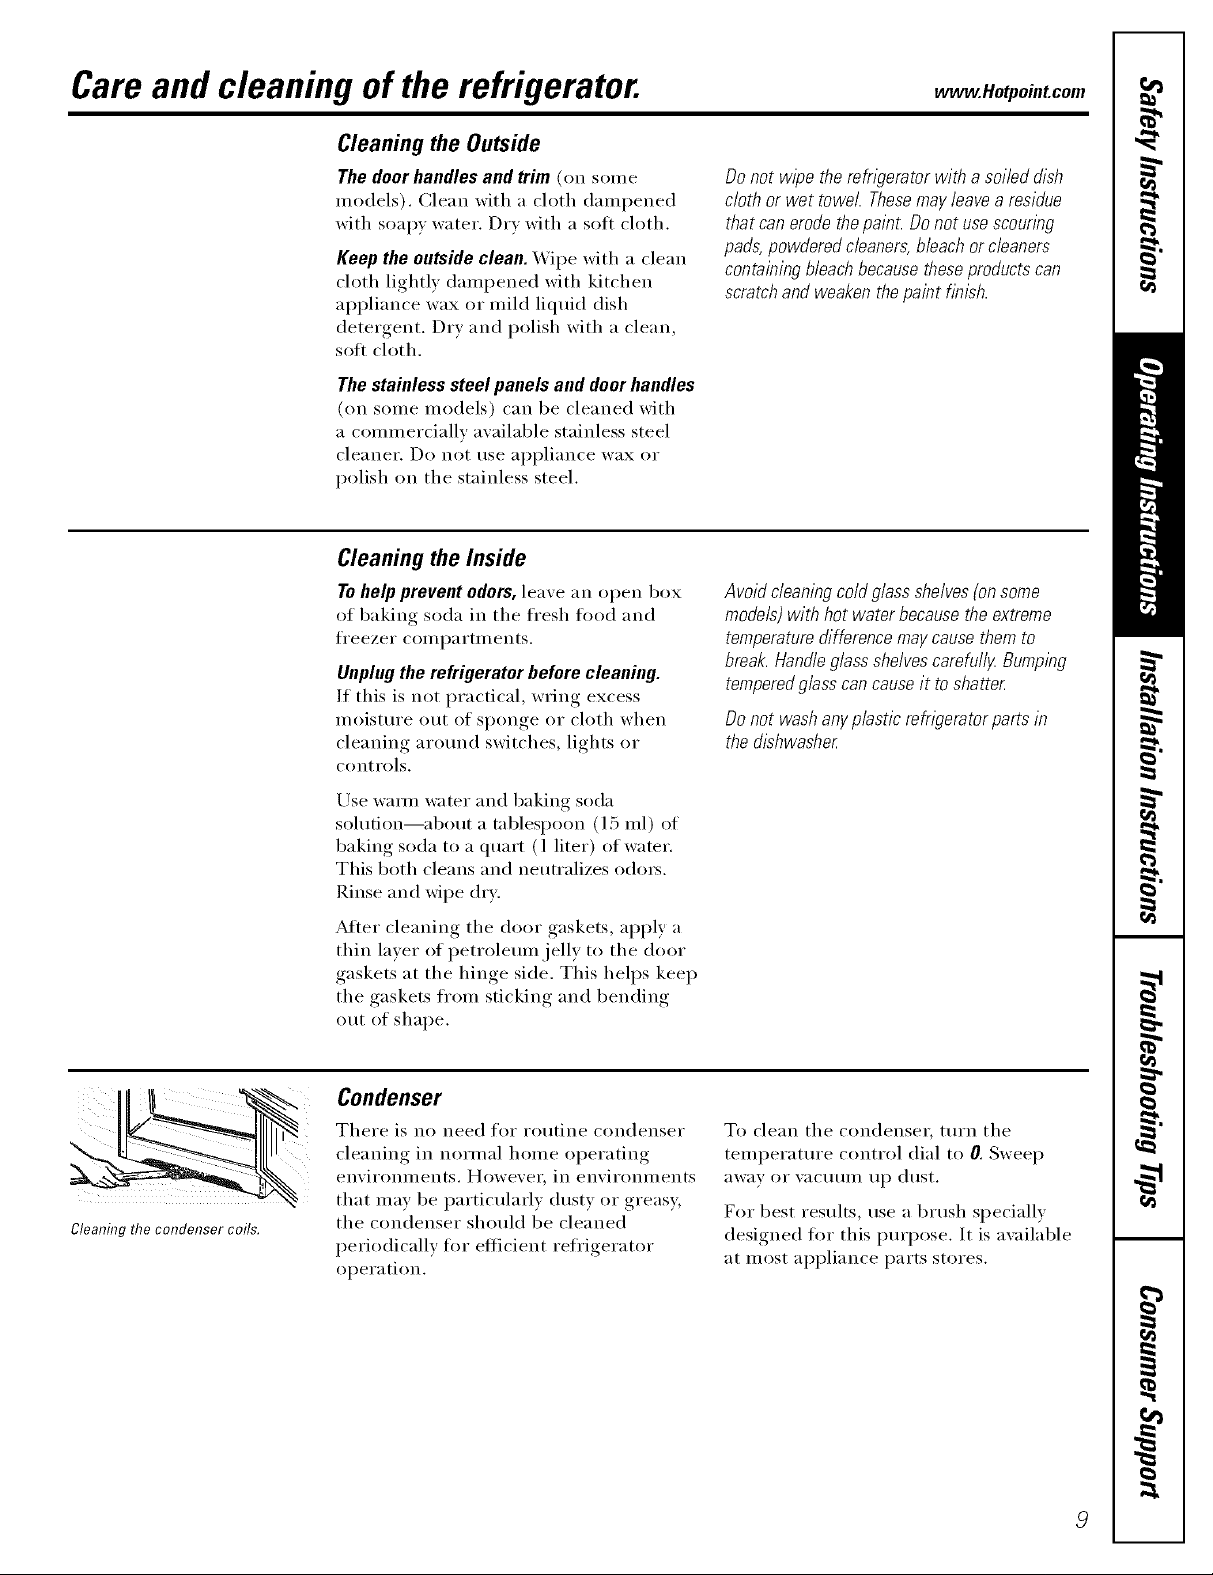
CleanflTgthe condenser coils.
Use waml water and baking soda
solution--about a tablesl)oon (l 5 ml) of
baking soda to a quart (l liter) ot water,
This both cleans and neutralizes odors.
Rinse and wipe (lrv:
After cleaning the door gaskets, apply a
thin laver of i)etrolemn.jelly to the door
gaskets at the hinge side. This helps kee I)
the gaskets fl'()m sticking and bending
()tit of shape.
Condenser
There is no need for routine condenser
cleaning in normal lmme operating
environnlents. However. in environn/ents
that may be particularly dusty or greasy;
the condenser should be cleaned
periodically fl)r efficient refl'igerator
operation.
To clean the con(lensei; turn the
teml)erature control dial to 0. Sweep
}IW}IV 0I" V}IC/IIIIII 1117 dust.
For best results, use a bIush specially
designed fl)r this imrpose. It is available
at most appliance parts stores.
Care and cleaning of the refrigerator.
Behind the Refrigerator
Be careful when moving the refl'igerator
away from tile wall. All types of floor
coverings call be damaged, particularly
cushioned coverings and those with
eI//bossed stlr_lces.
Turn tile leveling legs at each fl'ont corner
of tile refligerator counterclockwise tmtil
tile rolle_ support tile ret}'igeratol: Pull tile
refl_igexwtor straight out and return it to
position by pushing it straight in. Moving
tile refl_igemtor in a side direction may
result in damage to tile floor coveting or
refligemtor.
Light Bulb Replacement
To replace a burned-out bulb, unplug
the refi'igerator fl'om its electrical outlet,
unscrew tile bulb when cool and replace
it with an appliance bulb of the same or
lower wattage.
When pushing the refngerator back, make sure
you don't rofl over the power cord or icernaker
supply/1be (onsome models).
After rolling tile refl'igerator back into
place, turn tile legs (h)rkwise until tile
legs again bear the weight of the
refi'igerator.
Turningthe centre/to the0 positiondoesnot
removepowerto the//_Thtcircuit.
Preparing for Vacation
For long vacations or nbsenres, remo\ e
fl)od and unplug tile refi'igeratm: Move
the temperature control dial to tile 0
position, and clean the interior with a
baking soda solution of one tablespoon
(15 ml) of baking soda to one quart
(1 liter) of water. Leave tile doors open.
Preparing to Move
Secure all loose items such as grille,
shelves and drawers by taping them
securely in place to prevent damage.
Set the icemaker power switch to tile
O(Off) position or move the feeler arm to
tile STOP (up) position (depending on
model) and shut off tile water supply to
tile reti'igerator.
If tile temperature can drop below
fl'eezing, have a qualified servicer drain
tile water supply system (on some models)
to prevent serious property damage (Isle
to flooding.
Be sure the refn)erator stays in an upr/)ht
position dunbg rnov/bg.
70
 Loading...