

Hotpoint HTN40 User Manual

COOKER HOOD
USER HANDBOOK FOR
INSTALLATION AND OPERATION
MODEL HTN40

Your new Cooker Hood
Using your new Cooker Hood is very simple. Nevertheless, to get the best results it is
important that you read this handbook thoroughly before installing and using your
appliance for the first time.
Electrical Requirements
Any permanent electrical installation must comply with the latest I.E.E. Regulations and
local electricity company regulations. For your own safety, this should be undertaken by a
qualified electrician eg. your local electricity company or a contractor who is on the roll of
the National Inspection Council for Electrical Installation Contracting (NICEIC).
Please ensure that when the appliance is installed it is easily accessible for the engineer
in the event of a breakdown.
INCORRECT INSTALLATION COULD AFFECT THE SAFETY OF THE APPLIANCE
If the Cooker Hood is permanently wired in, it must be via a suitable double pole isolating
switch placed in a readily accessible position adjacent to the unit.
Electrical Connection
Before connecting to the mains supply ensure that the mains voltage corresponds to the
voltage on the rating plate,inside the Cooker Hood.
WARNING:THIS APPLIANCE MUST NOT BE EARTHED!
It is fitted with a 2 core mains supply cable and must be permanently connected to the
electricity supply via a double pole switch having 3mm minimum contact gap on each
pole. A Switched Fuse Connection Unit to BS 1363 Part 4,is a recommended mains supply
connection accessory to ensure compliance with the Safety Requirements applicable to
fixed wiring instructions.
DISCONNECT THE COOKER HOOD FROM THE MAINS SUPPLY BEFORE CARRYING OUT ANY
KIND OF MAINTENANCE OR CLEANING.
WARNING:
CHILDREN SHOULD NOT BE ALLOWED TO PLAY WITH THE APPLIANCE OR TAMPER WITH
THE CONTROLS.
CE marking certifies that this appliance conforms to the following EEC directives:Low Voltage Equipment - 72/23/EEC
Electromagnetic Compatibility - 89/336/EEC
2

Contents
Page
Electrical Requirements 2
Get to know your Cooker Hood 4
Installing your Cooker Hood 5-9
Installation for Recirculation
Installation for Extraction
Mounting Height
Mounting between Cabinets
Fitting the Decor Panel
Operating your Cooker Hood 10
The Controls
Do’s and Don’ts
Caring for your Cooker Hood 11-12
Filters and their Replacement
Cleaning
How to Replace the Light
Troubleshooting 13
Key Contacts Back Cover
Appliance manufactured in EU.
Retention of the Instruction Book
This Instruction Book must be kept handy for reference as it contains important details on the
safe and proper use of the appliance.
If you sell or pass the appliance to someone else,or move house and leave it behind,make sure
this Book is also provided so the new owner can become familiar with the appliance and safety
warnings.
If the book is lost or damaged a copy may be obtained from:
GDA Ltd.,Morley Way, Peterborough,PE2 9JB
3
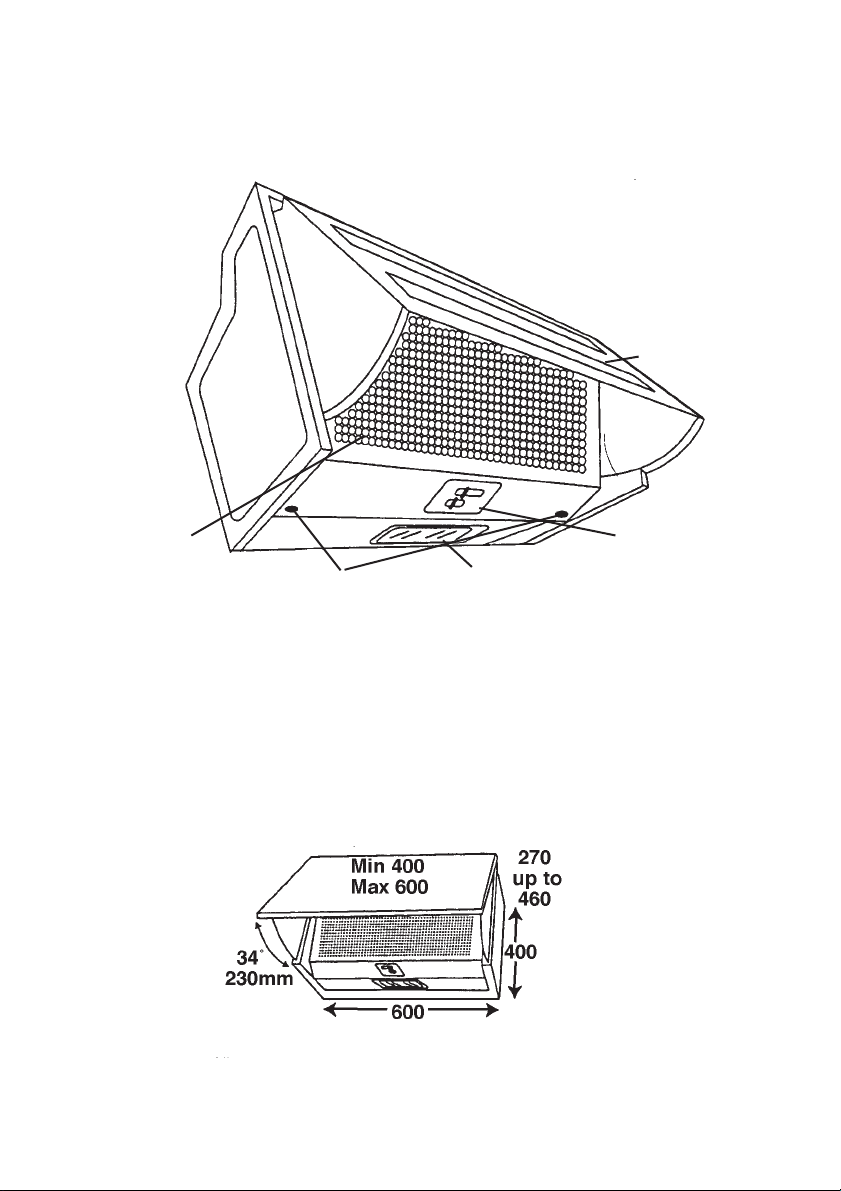
Get to know your Cooker Hood.
Unpacking
Before installation, ensure that you have removed all packing pieces.
Fitted Door
(not supplied
Door support
Filter Grille
Grille release
Dimensions
Height 400mm (15
Width 600mm (235/8in)
Depth adjustable from: 270mm (10
excluding the decor panel thickness.
All measurements are in millimetres.
3
/4in)
Light
5
/8in) up to 460mm (18in),
Controls
4
Installing your Cooker Hood
Your new Cooker Hood can be installed either
for recirculation or extraction through an
outside wall. (All fitting supplied)
Installation for Recirculation:
If it is not possible to exhaust to the outside,
the hood can be used to filter and recirculate
the air (Fig.1).
Fig.1
Your hood can be fitted with a carbon filter
(optional extra) to remove odours (for fitting,
see page 11).
The carbon (charcoal) filter can then be fitted.
NOTE: The hood is more efficient in the
exhaust mode, therefore this position
should be selected during the warmer
months of the year when no heating is
being used. When the room is being
heated,if the recirculation position is
selected heat will not be wasted.
To obtain the best performance it is
advisable to switch on the hood a few
minutes before you start cooking and leave
it running approximately 15 minutes after
finishing.
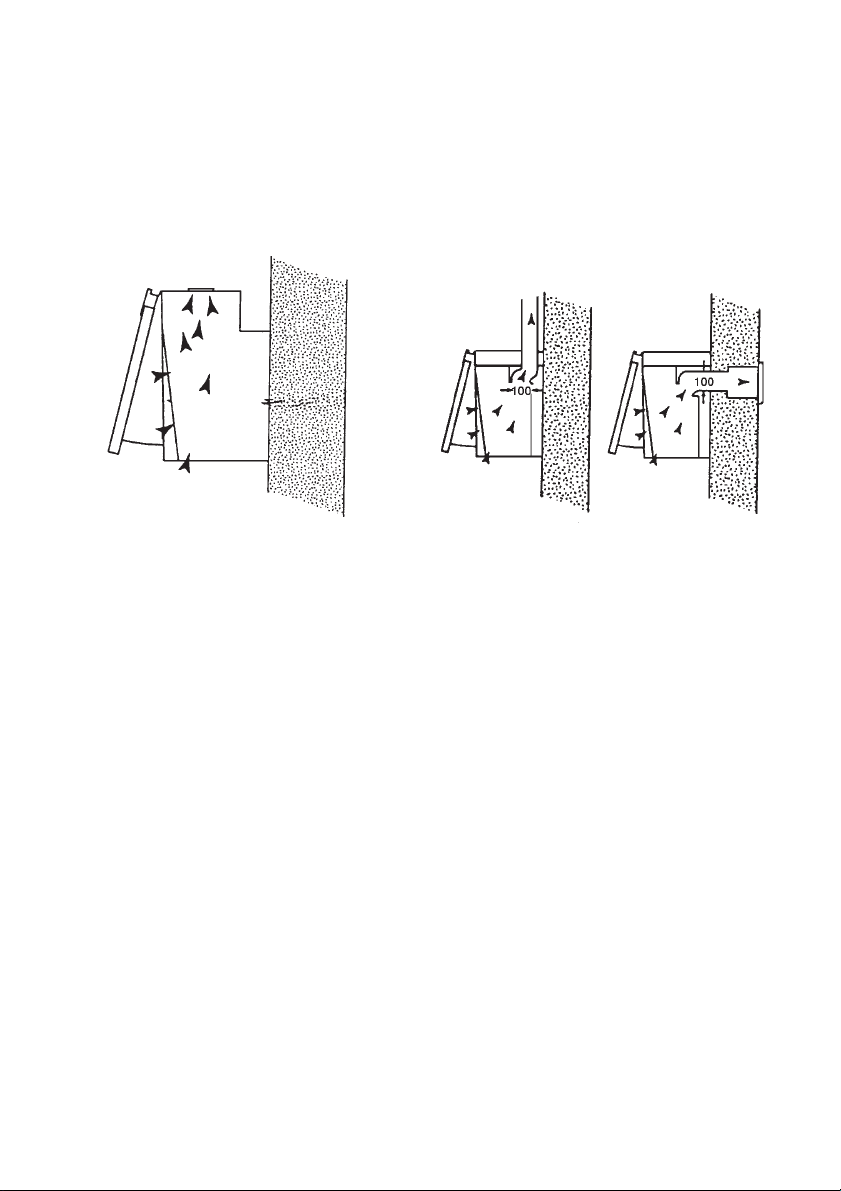
Installation for Extraction:
This method is recommended if at all possible.
Fumes and grease laden air are drawn into the
underside of the hood and expelled outside
the kitchen. The air can be expelled either
upwards through a ventilating shaft (Fig.2) or
directly through a wall to the outside (Fig.3).
Ducting will be required if the Cooker Hood is
mounted away from the outside vent.
Fig.2
IMPORTANT: The exhaust air must not be
expelled through a smoke or waste-gas
chimney which is in use or through a shaft
used for ventilating rooms or into the
cavity of a cavity wall.
If the room contains a flued fuel burning
appliance,such as a gas or oil fired central
heating boiler,which is not of the ‘Balanced
Flue’type,you should make sure that there
is adequate air inlet into the room at all
times so that fumes from the boiler are not
drawn back into the room by the Cooker
Hood.
NOTE: All installations must comply with
local authorities and building regulation
requirements for the discharge of exhaust
air into the atmosphere.
Fig.3
5
 Loading...