

Hotpoint HTM18IBPNRSA, HTM18IBPMRSA, HTM18IBPLRSA Owner’s Manual
www.HotpoinLcom
Safety htstructions ........... 2-4,
N
O
0
Operating bzstructions
Addilional Featmes ........... 10
Aulc, malic Iccmaker , ............ 1l
Con u ols .......................... 5
Shelves and Bins ............. 6-8
Crispers and Pans ............ 9, 10
Care and Cleaning
Cmc and Cleaning .......... t2, 13
Replacing lhe Light Bulbs ....... 13
htstallation hlslructions
Preparing to Install
the Refiigerator. ............... 14
Reversing the Dora Swing ..... 19-23
Water Line Installation ...... 15-19
Troubleshooting Tips ......... 24-27
Normal Operating Smmds ........ 24
Consumer Support
Consumer Support ..... Back Covez
Producl Registration
tot Canadian Customers ....... 31, 32
Product Registralion
lbr U,S, Cusmmms ............ 29, 30
WarzmHy tot
Canadian Customers ............... 33
Warranty tbr US Customers ..... 34
Modd_ !8 & 19
Congdlateur sup6rieur
R4frig6rateurs
ta sectiontran_aise commence_ lapage 35
Congelador superior
Refrigeradores
La secci_n en espafiol empieza en la p_gina 67
Writethemodelandserial numbers here:
Model #
Serial#
Find these nnmbels on the g)ay label
on the lett side, near the top el the
relrigerato_ compaz _mento
162D6747PO05 39-60360 02-05 JR
IMPORTANTSAFETYINFORMATION.
READALLiNSTRUCTIONSBEFOREUSING.
WARNING:
Use this appliance only for its intended purpose as described in this Owner's Manual+
SAFETYPRECAUTIONS
When using electrical appliances, basic safety precautions should be followed, including the following:
lhis leli'igexam_ must be propmly inst_dled
and localed in accordance with the tnstaUadon
Insu+ucdotls beibre it is used,
Do not _dtowchildren to climb, maim or hang
on lhe shelves in die rcliigmator [hey coukl
damage lhe refiigmatot and seriously iqiure
lJ lelllSdV(_S
; Do not touch the cold sur|aces in dte fieezer
compm tment when hands are dmnp ot wet,
Skin may slick to these exuemcly cokl stu thces,
:3:Do not store o_ use g_soline ol other ilammabk_
,,_q3ot,'sand liquids iri die vicinity ol tiffs oi any
other appliance
In reliigetamrs with automatic icemake_s,
avoid contact widt the moving pmis of the
eiecioi tnechmiisnl, or wiih the heating element
located on die bottom o! the icemaker; Do not
place fingcI,'Sol hands on dm alltOtllatic
icemaldng ntechanism while die retiigeiatot
is phtgged in
Keep fingers out ol tim "pinch point" m'eas;
clemances between the (loots and between tim
doom arid cabinet are necessarily sm;dl Be carcthl
closing doors when children ate iq die area
:: Unphtg the refligetatol belbre dealfing and
ntaldng repairs
NOTE:Westronglyrecommendthatanyservicingbe
performedbya qualifiedindividual
Selfing eidm, oI 1)odi controls (some niodels only
have otie contlol) to die O(0ff)position does ilot
I+elilove powel to die light circuit
Do not relieeze frozen Ibods which have
thmved completely
www.Hotpoint.com
A DANGER!RISKOFCHILDENTRAPMENT
PROPERDISPOSALOFTHEREFRIGERATOR
Child enu apment and suflbcation are not
problems el tim past Junked el abandoned
zetiiwlaloz_ aze still danwJ ous even il they _411
sit tbl 'ijusl a lbw {lays" If you me getdng zid ot
yore old tefrigmuloi; ple;tse tbltow the inslJtlctions
below to help p_cvenl accklenls
Before YouThrowAway YourOld
RefrigeratororFreezer:.
Jhke off tim dool_
Leave the shelves in place so dmt chil(hen
may not easily climb inside
Refrigerants
All zetiigemdon products contain lel_igmmlts,
which tmde_ t_dmal lmv Illtlst be _emoved pdo_
to product dispmal. 1tyet! are gelling _id o[ an
old zeli{,e_zaLionproduct, check ",vilJzthe company
handling the disposal about what to do
USEOFEXTENSIONCORDS
Because of potential safety hazards under certain conditions, we strongly recommend against the
use of an extension cord,
Howevm; il you must use an exlension cord, i! is absolutely ,mcessazT that it be a UL-listed (in lhe United
Stales) ot a CSA-lismd (in Canada), _4-wiregn'ounding {}])eapplia,lce extension col'd having a g_ounding
type plug and outlet and dial the electrical ,ating of the cotd be 15 amperes (mi,tinmm) and 120 vohs
3
IMPORTANTSAFETYINFORMAtiON.
READALLINSTRUCtiONS BEFOREUSING.
A WARNING!
HOWTOCONNECTELECTRICITY
Do not, under any c#cumstances, cut or remove the third (ground) prong from the power cord
Forpersonal safety, this appliance must be properly grounded
Ilm powe_ cord o! this appliance is equipped with
a 3-prong (gaounding) plug whicll mares wilh a
standard 3-prong (ga_ounding) wait outlet to
minimize tile possibility ot elecuic shock hazard
Iiom tiffs appliance.
Have the wall outlet and circuit clmcked by a
qualitied electlician to lllake SIIl'e the Oiltlet is
properly gmtmded
V_qmle a siandmxl 2-prong wall outlet is
encountered, it is yam pensonal responsibility and
obligation to have it replaced with a propel ly
grounded _prong w;fll outlet
Ihe iefiigeratot should alwa),_ be plugged into its
own indMdual elecuical oudet which hw_a voltage
rating that matches tile iafing plate
Hfis provides Ihe best pm Ibmlanee and also
prevents ovm loading house wiring circuits which
could cause a fire hazard li'om ovefimaled wires
Nevm unphig yore retiigenuor by imlting on the
powel cord Always gqip plug [iHnly and pull
smfighl ()/it li'om lhe oullet
Repail o_ replace immedimely all powez cords di!!
have become liayed oJ oflmrMse damaged, Do ilot
tfse it COltl that shows c_acl,2sor alniksioit damage
along ils lengdl oi ill eithe, end
When mo\_ng the vetiige_aloi awW from dm
wall, be careiid not m mlI ovm ol damage the
poWex cord
USEOFADAPTERPLUGS:Ad,pt_,plug,notp,,_ittedi,,Canada)
Because of potential safety hazards under certain conditions, we strongly recommend against the
use of an adapter plug,
Howevel; il you must use an adapteq where laced
c_×lespermit, atemporaryconnectionmay be nmde
m a prol_rly grounded 2-proqg w_d!oudet by use
o[ a UDlisted adapler ax_tilal)le at most laced
hazdwm_e stores,
Ihe targel slot in dm adapte_ must be afligned wifl_
the hugel slot in tim wall outlet to provide proper
polmit 7 in the connection ot tim powel cord
When disconnecting die power cozfl fi'om dm
adaptet; _dwaystiold the adapter in place with one
hand while lmlling tim powel cord plug with dm
olher liand, II dfis is no! done, die adaptm ground
temfinal is ve_3, likely to bre_d<with repealed use
I! tlle adaptel gn'otmd ter'min;d break,;, DO NOTUSE
the retiigetatol until a prope_ ground htLs been
established
Attachingthe adaptergroundterminaltoa waftoutlet
coverscrewdoesnotgroundtheappfianceunlessthe
coverscrewis metal not insulatedand the wall outletis
groundedthroughthehousewiring Youshouldhavethe
circuitcheckedbya quafifiedelectriciantomakesurethe
outlet is properlygrounded
READANDFOLLOWTHISSAFETYINFORMATIONCAREFULLY.
SAVETHESEINSTRUCTIONS
4

Aboutthe controlsontherefrigerator.
The controls on your refrigerator will took like one of the following:
L
ControlSettings
www.HotpoinLcom
Initially, set the control(s) at 5 (some models have only one control)_ Allow 24 hours for the
temperature to stabilize,.
Several adjustments may be required. Adjust the control(s) one increment at a time and
allow 12hours after each adjustment for the refrigerator to reach the temperature you
have set,
Setting the refrigerator control to 0 stops cooling in both the freezer and refrigerator
compartments, but does not shut off electrical power to the refrigerator The freezer
control (on some models) has no effect on electrical power to the refrigerator_
Control settings will vary based on personal preferences, usage and operating conditions,
and may require more than one adjustment. Factors that affect temperature include the
amount of food in the refrigerator or freezer, the frequency of door opening and the
temperature of food when it is placed in the refrigerator.
5
Abouttheshelvesandbins.
...................... u,,i , .........................................................
Not all features are on alt modelso
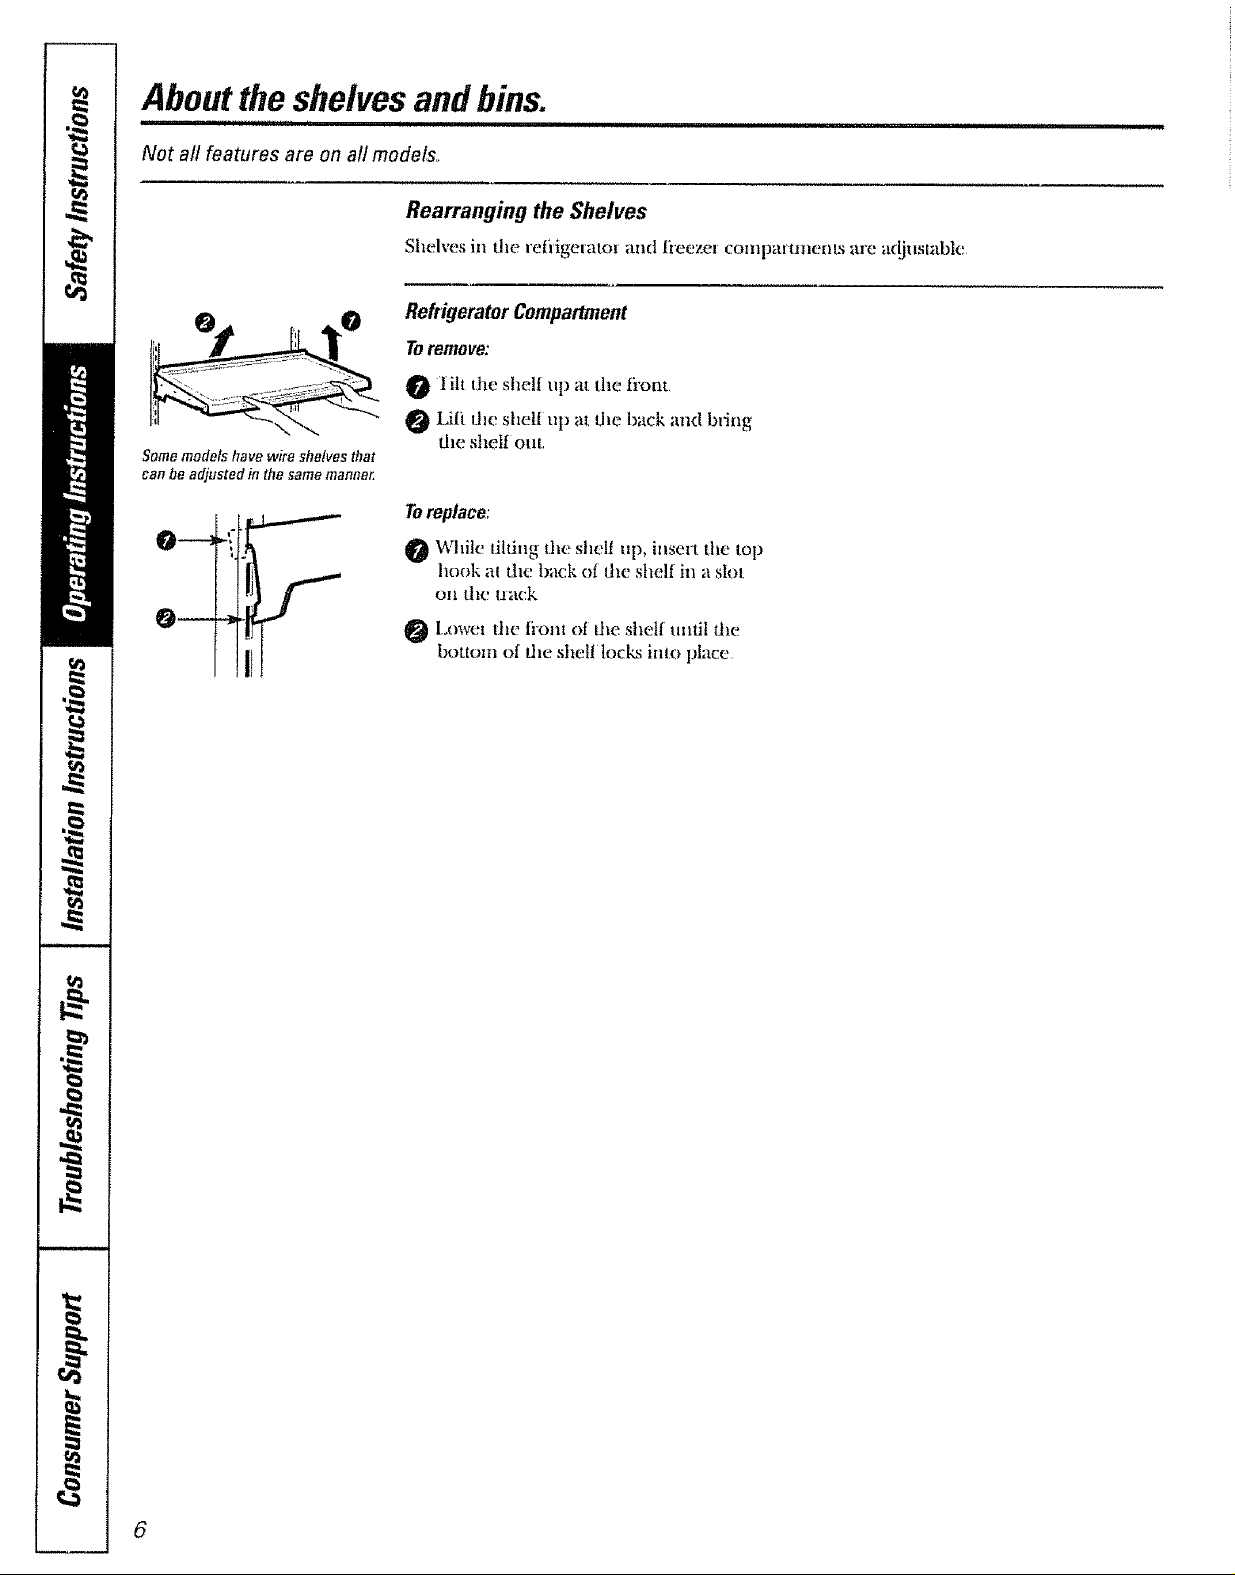
Rearranging the Shelves
Shdves in dm reiiigelalm and !]eezel compmmmnLs arc adjustable
Refrigerator Compartment
Toremove:
lilt the shell up al the fi'ont
Liii dm shell up at dm back and bring
Somemodels have wire shelves that
can be adjusted ie the samemanner.
dm shetI out
Toreplace:
While dhing the sheli up, insert the lop
hook at dm back oI dm shell in a slot
on the f_a(:k
l.owel the tiont oi die sheU undl the
bottom of dm shell locks into place
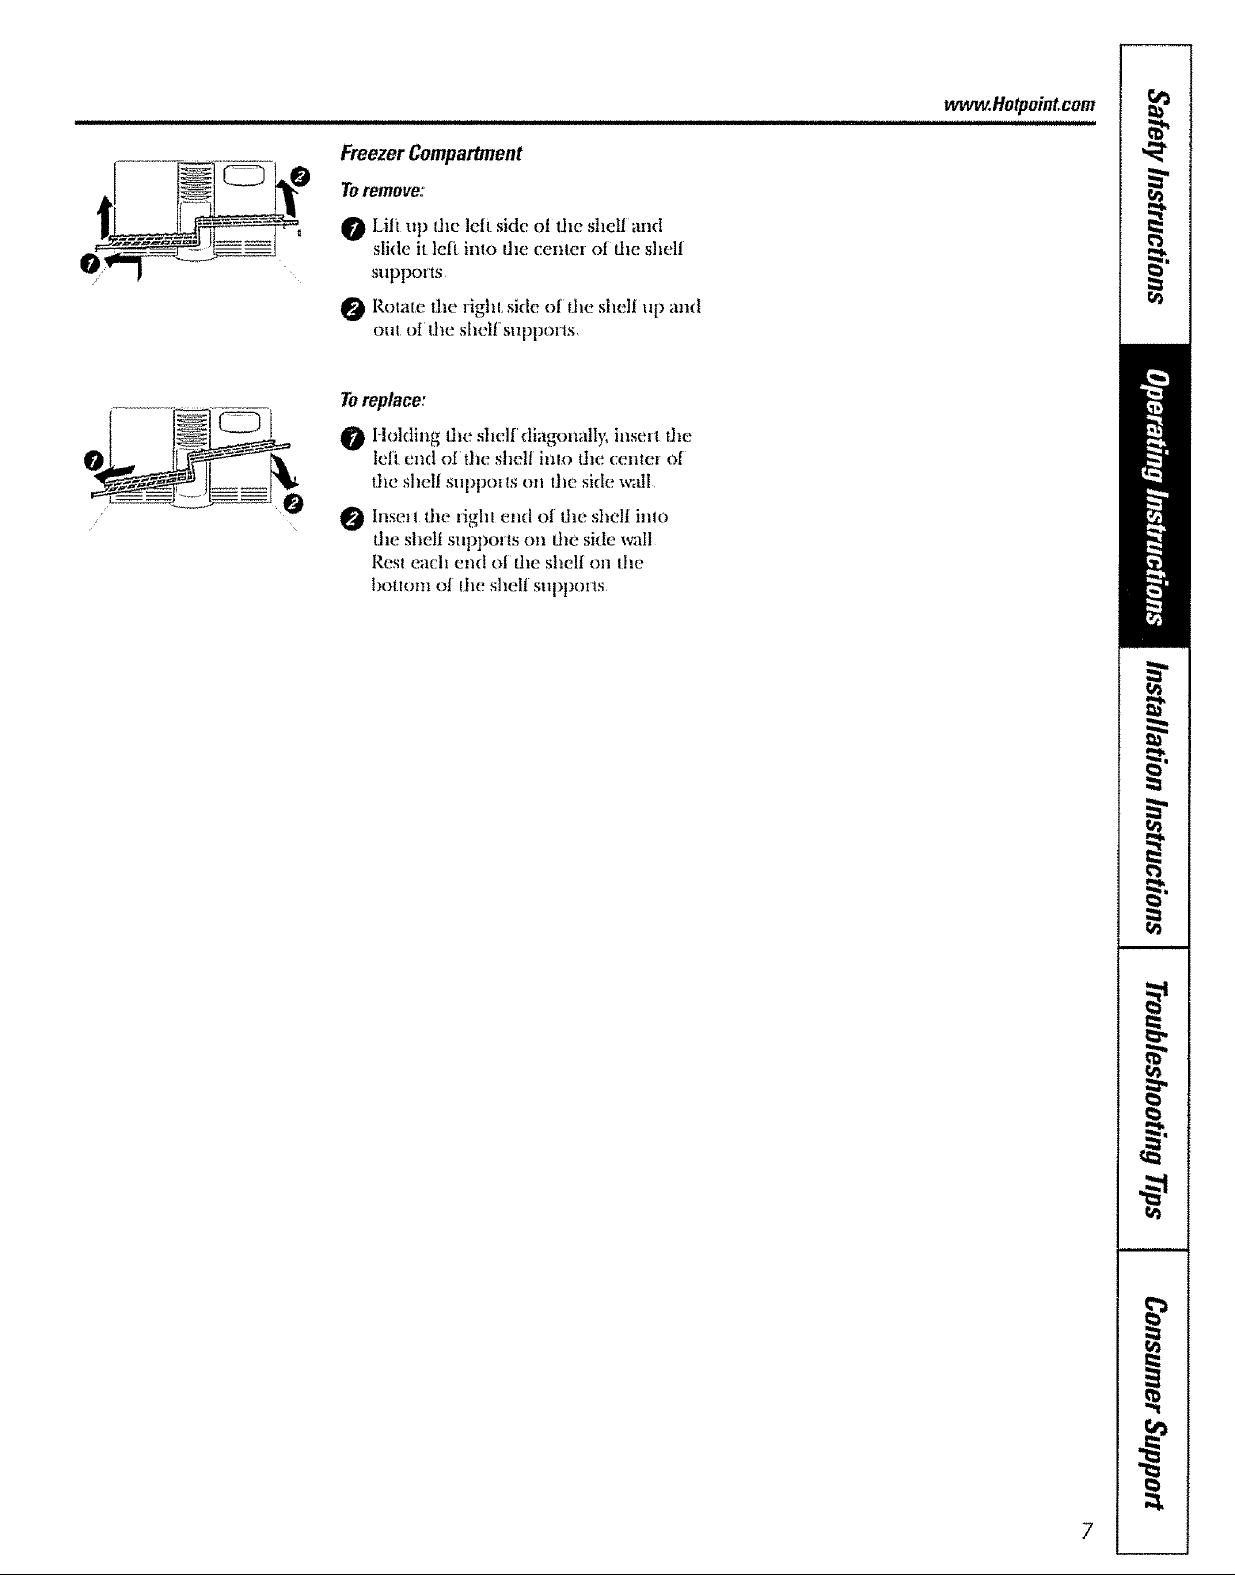
Freezer Compartment
Toremove:'
Lift up ihe ]eft side ot the shdi and
slide it le[i imo die celll(.'l o[ [tle shelf
supports
Rotate lhe right side o! lhe shelf up and
out oI the shel[ suppol"ls,
Toreplace:
Holding fl_eshelf diagonally, inse_I _he
leli end ofthe shell inu) the (:entez ot
lhc shell suppoi Is on llle side wall
Insm ! the riglHend ol llm shell inlo
the shell suppolts on the side wall
Resl each end otthe shelf on lhe
bottom ol Ihe shell SUl)l)OHs
www.Hotpoint.com
,,,,,,,,,,,,,,,,,,,,,,,,,,,,,,,,,, ,,,,,,,,,,,,,,,,,,,,,, ,,,,
Abouttheshelvesand bins.
Not all features are on all models.
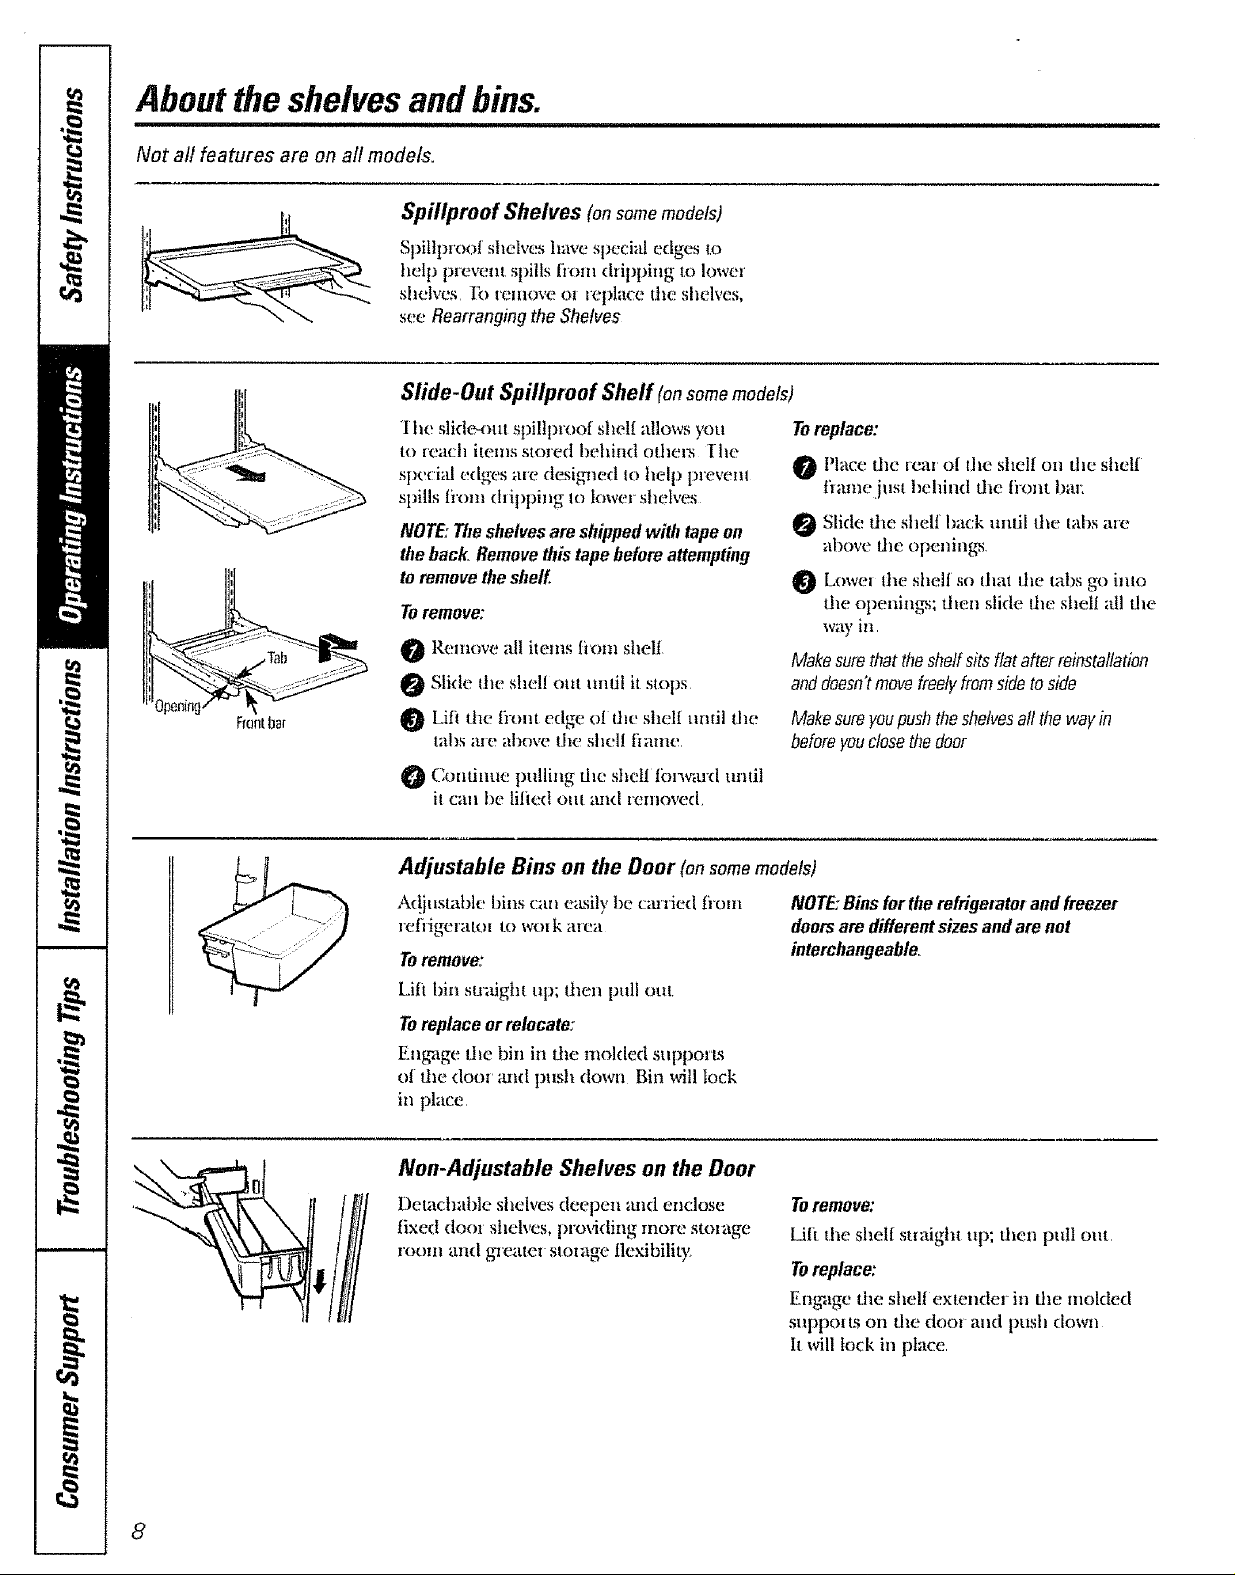
Spillproof Shelves (onsomemodels)
Spiltprool shek,es have special edges to
help prevem spills fronl dripping to lower
shelves Ib lemove ol _eptace t.heshelves,
see Rearrangingthe Shelves
Slide-Out Spillproof Sheff (onsomemodels)
]lie slide-out spillproof sllell allows you
to _each items stored behind o|ll(:iLs [ lie
speci:d edges a_e designed Io help plevenl
spills ti'om diipping Io lower shelves
NOTE:The shelves are shipped with tape on
the back, Remove this tape before altempting
to remove the shelf
Toremove:
O Remove all imms fiom shell
0 Slide the shell pill unlil it stops
Frontbar
Liti rite li-{mtedge ol the shell nndl (lie
t_tllS ill{" ;ll}ove tile shell tiame,
Toreplace:
Place tile rein o[ the shelf on tim shelf
flame just behind file hont hal:
0 Slide dm shelf back unlll the labs ale
above file openings
0 [owei lhe shell so thai Ihe tabs go inlo
the openings; ttieii slide lhe shell all the
way in
Makesuretbattilesheffsitsflatafterreinstaftation
anddoesn'tmovefreelyfromsidetoside
Makesureyoupushtheshelvesaftthewayin
beforeyouclosethedoor
0 Continue pulling die shel! tbrwmd until
il Call bo lilied Olil and lenioved.
Adjustable Bins on the Door (onsomemodels)
A{!juslabk_ bins can elksilybe carried fl'Olii
relligeralOI I.o wolk alea
Toremove:
NOTE:Binsfortherefrigetatmandfreezer
doorsaredifferentsizesandarenot
interchangeable,
Lifi bin smdght Ul); then pull out
Toreplaceorrelocate:
Eng_lgetim bin ill die tllolded supports
o! tim dora mid push down Bin will lock
in place
Non-Adjustable Shelves on the Boor
Detachable shelves deepen and enclose
tixed dool shelves, pro\4ding morn SmlaW
Toremove:
I.ili tile shell stiaight tip; theli pull out,
rooln and gzeatei sloia W flexibility,
Toreplace:
Engage the shell exlender in die niolded
suppo! is on the dooi and push dowii
It will lock in place,
8
Aboutthe crispersandpans. . .Ho,poi.t.oom
Not all features are on all models,
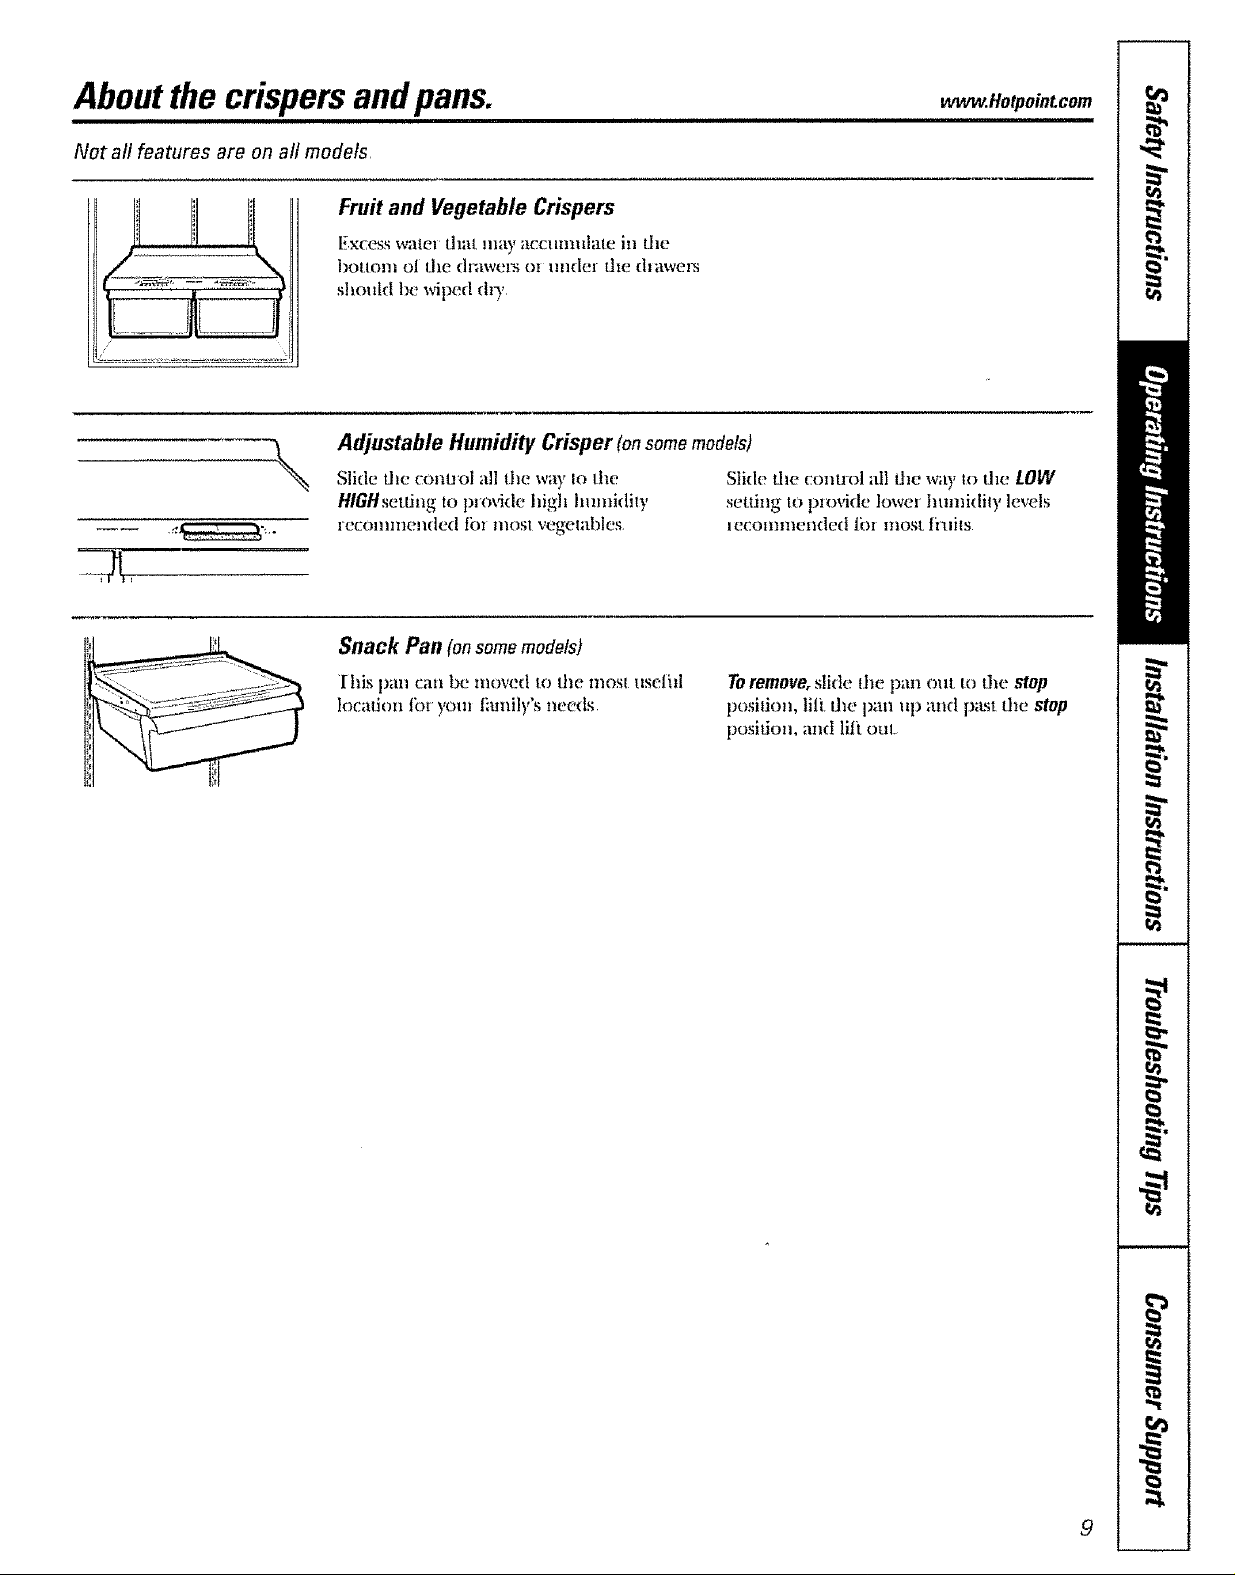
Fruit and Vegetable Crispers
,,
\
Excess watt= that may accumulate izz the
boltom ol the dzawez_ oz under the dn_we_
should be wiped dD,,
Adjustable Humidity Crisper (onsomemodels)
Slkle tile conuol all tile way to dm
HtGHsetfing to provide high humidiv_'
recommended tb_ most vegetables
Snack Pan (onsomemodels)
Slide the conuol all tim way to dm LOW
setting to pmvkle lower humidi W levels
lecolflmeildcd Ibzmost ti'llils
[his pan can be moved to the mos_ uselifl
localion lbl you, liunily's needs
Toremove, slide the pan out Io Lhe stop
position, lilt. die pan up and past dm stop
position, and lilt out
9
 Loading...