

Hotpoint HTN17BBTRWW, HTH17BBTLWW, HTH17BCTLWW Owner's Manual
Q Refr ige rs
ge.com
Top-Freezer
Refrigerators
Mo(bls 16,17,18
Safety Instructions . ......... 2, 3
Operating Instructions
Automatic Icemaker ............ 5
(;are and Cleaning ............. 6
Shelves ....................... 4
Storage Drawers ............. 4, 5
Temperature Controls .......... 4
Installation Instructions
Preparing to Install
the Refrigerator ............... 7
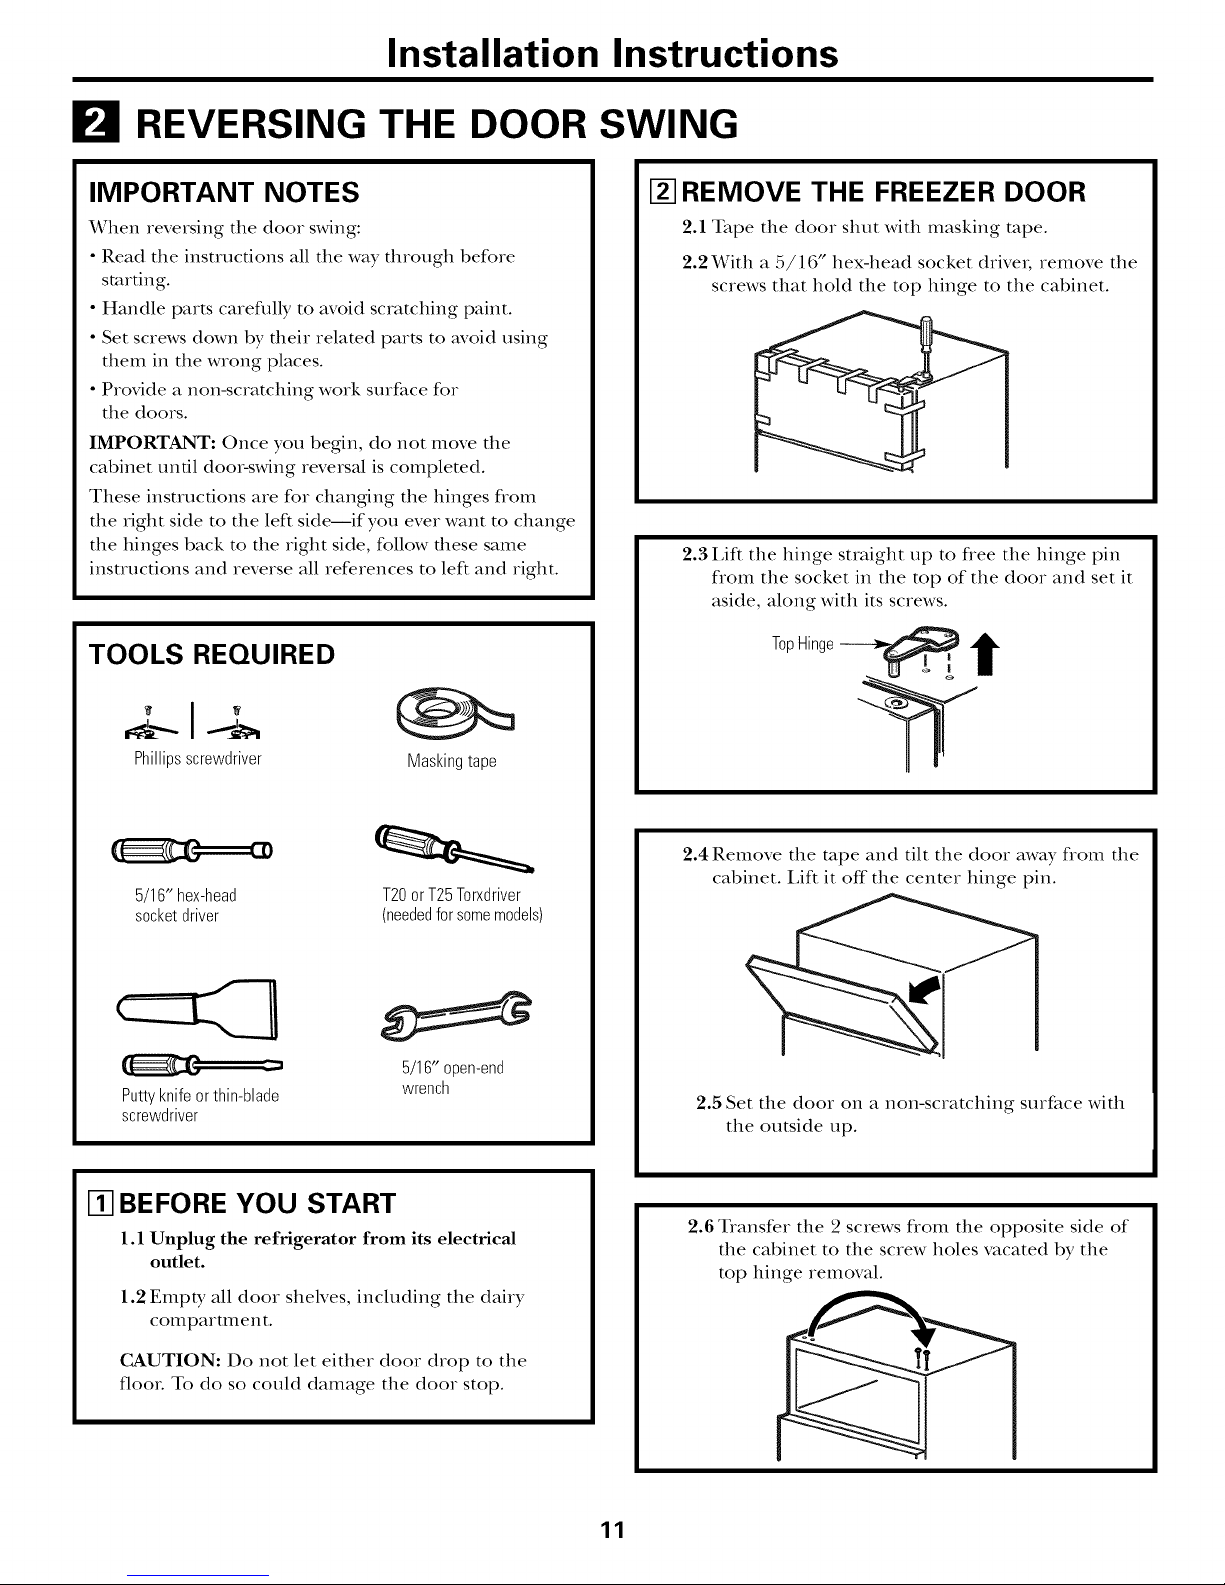
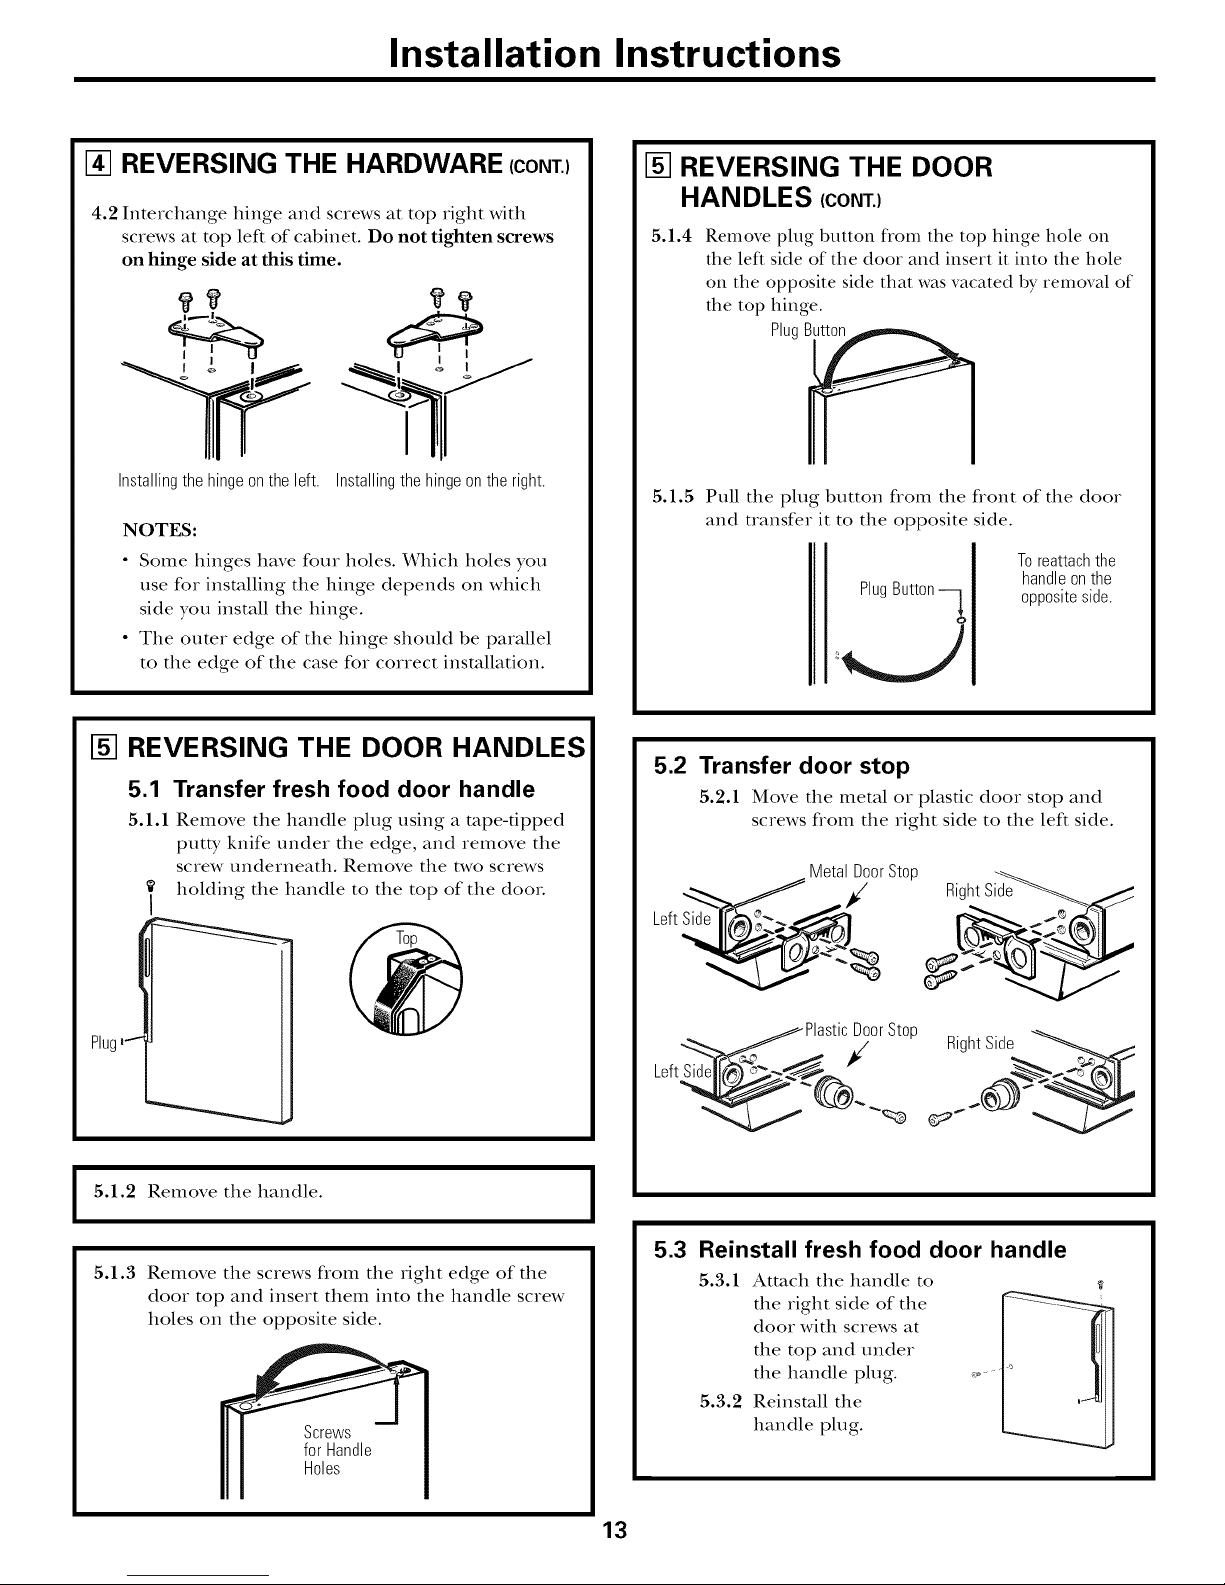
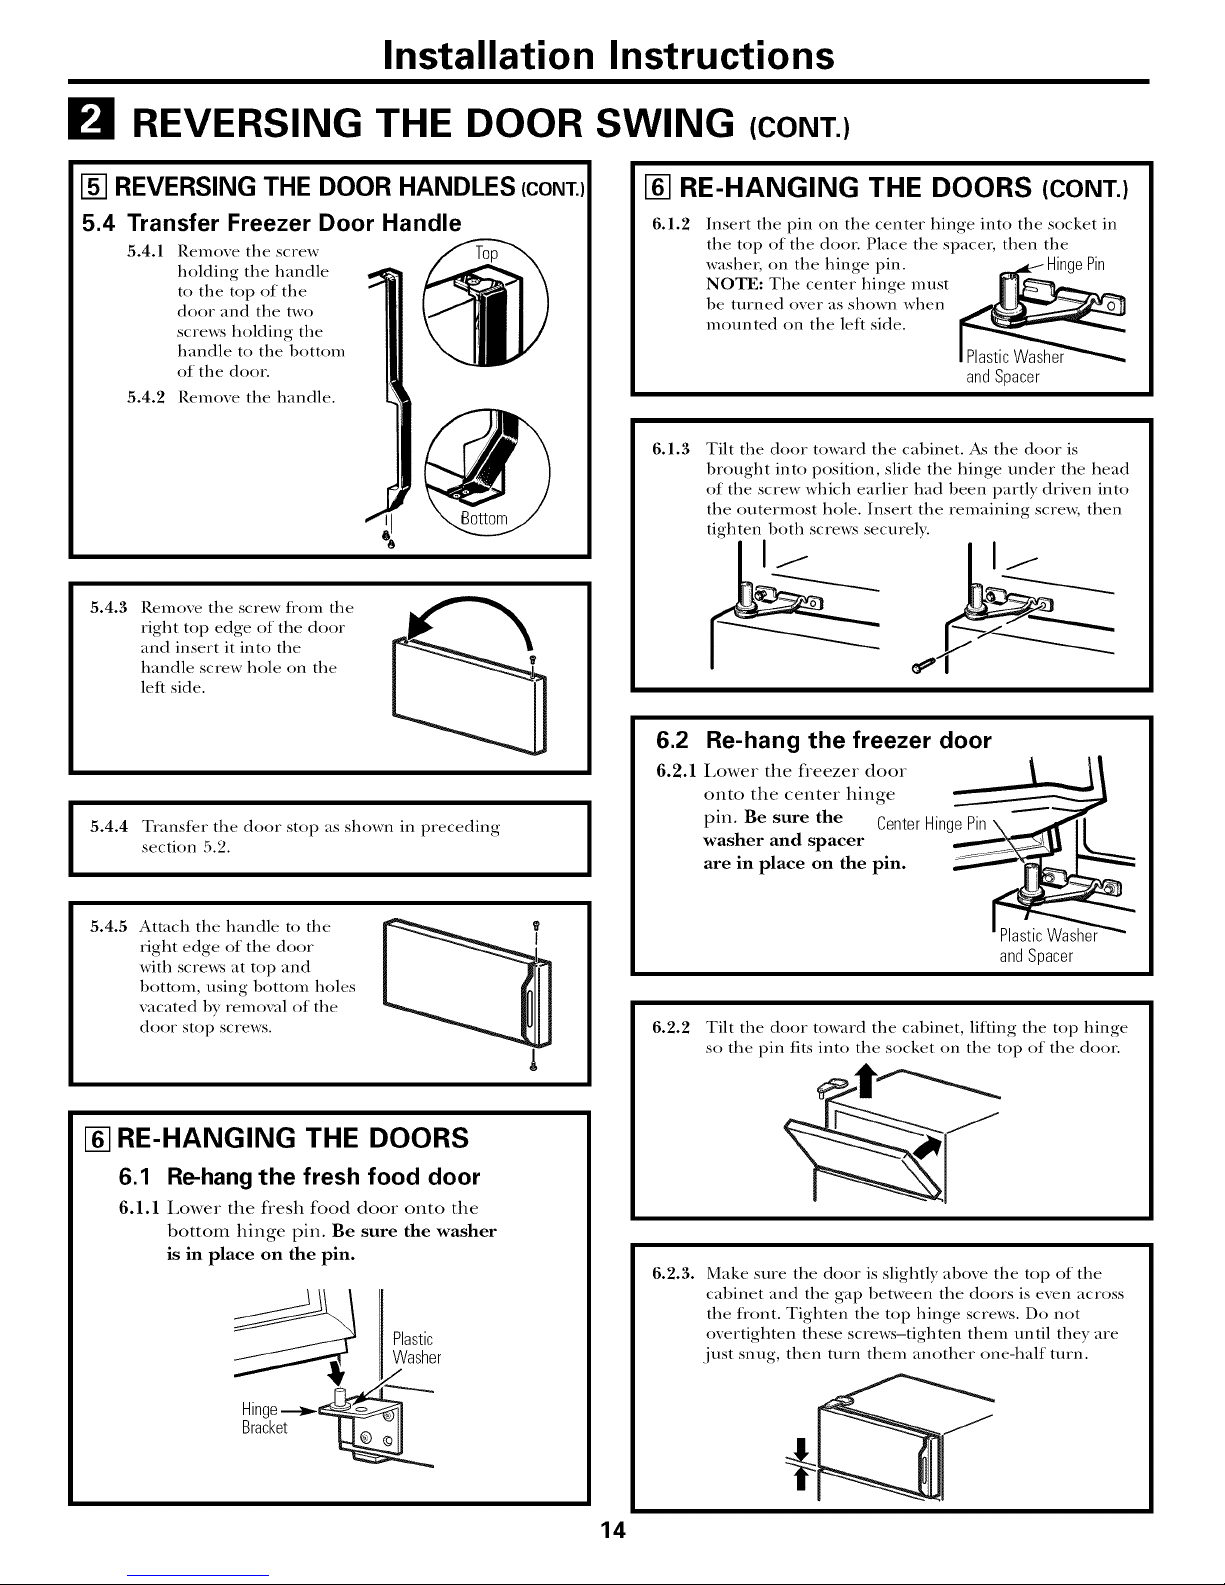
Reversing the Door Swing ...11-14
Water i,ine Installation ....... 8-10
Troubleshooting Tips
Befi)re You (;all For Service .. 15, 16
Normal Operating Sounds ...... 15
Con_dlateur supdrieur
Rdfrigdrateurs
La section frangaise commence a la page 22
Mesures de s_curit_ ....... 22-23
Instructions de fonctionnement
Bacs de rangement ......... 25, 26
(;layettes ................. 24, 25
Commandes de
la tempdrature ............... 24
Entretien et nettoyage ......... 27
Machine 'a glaqons
automatique ................. 26
Instructions d'installation
Installation de la
conduite d'eau ............ 29-32
Inversion de
l'ouverture des portes ....... 33-37
Pr@aration 'a l'installation
du rOfrig&ateur .............. 28
• Congelador superior
Refrlgeradores
La seccion en espaKol empieza en la pagina 44
Informaci6n de seguridad. . . 44-45
Instrucciones de operaci6n
Control ..................... 46
Cuidado y limpieza ........... 49
Estantes .................. 46, 47
Gavetas de
almacenamiento ........... 47, 48
Mfiquina de
hielos automfitica ............. 48
Instrucciones para la instalaci6n
C6mo invertir el
vaivdn de la puerta ......... 56-57
Instalacidn de la
tuberfa del agua ........... 51-55
Preparacidn para
instalar el reffigerador ......... 50
Consumer Support
Consumer Support .... Back Cover
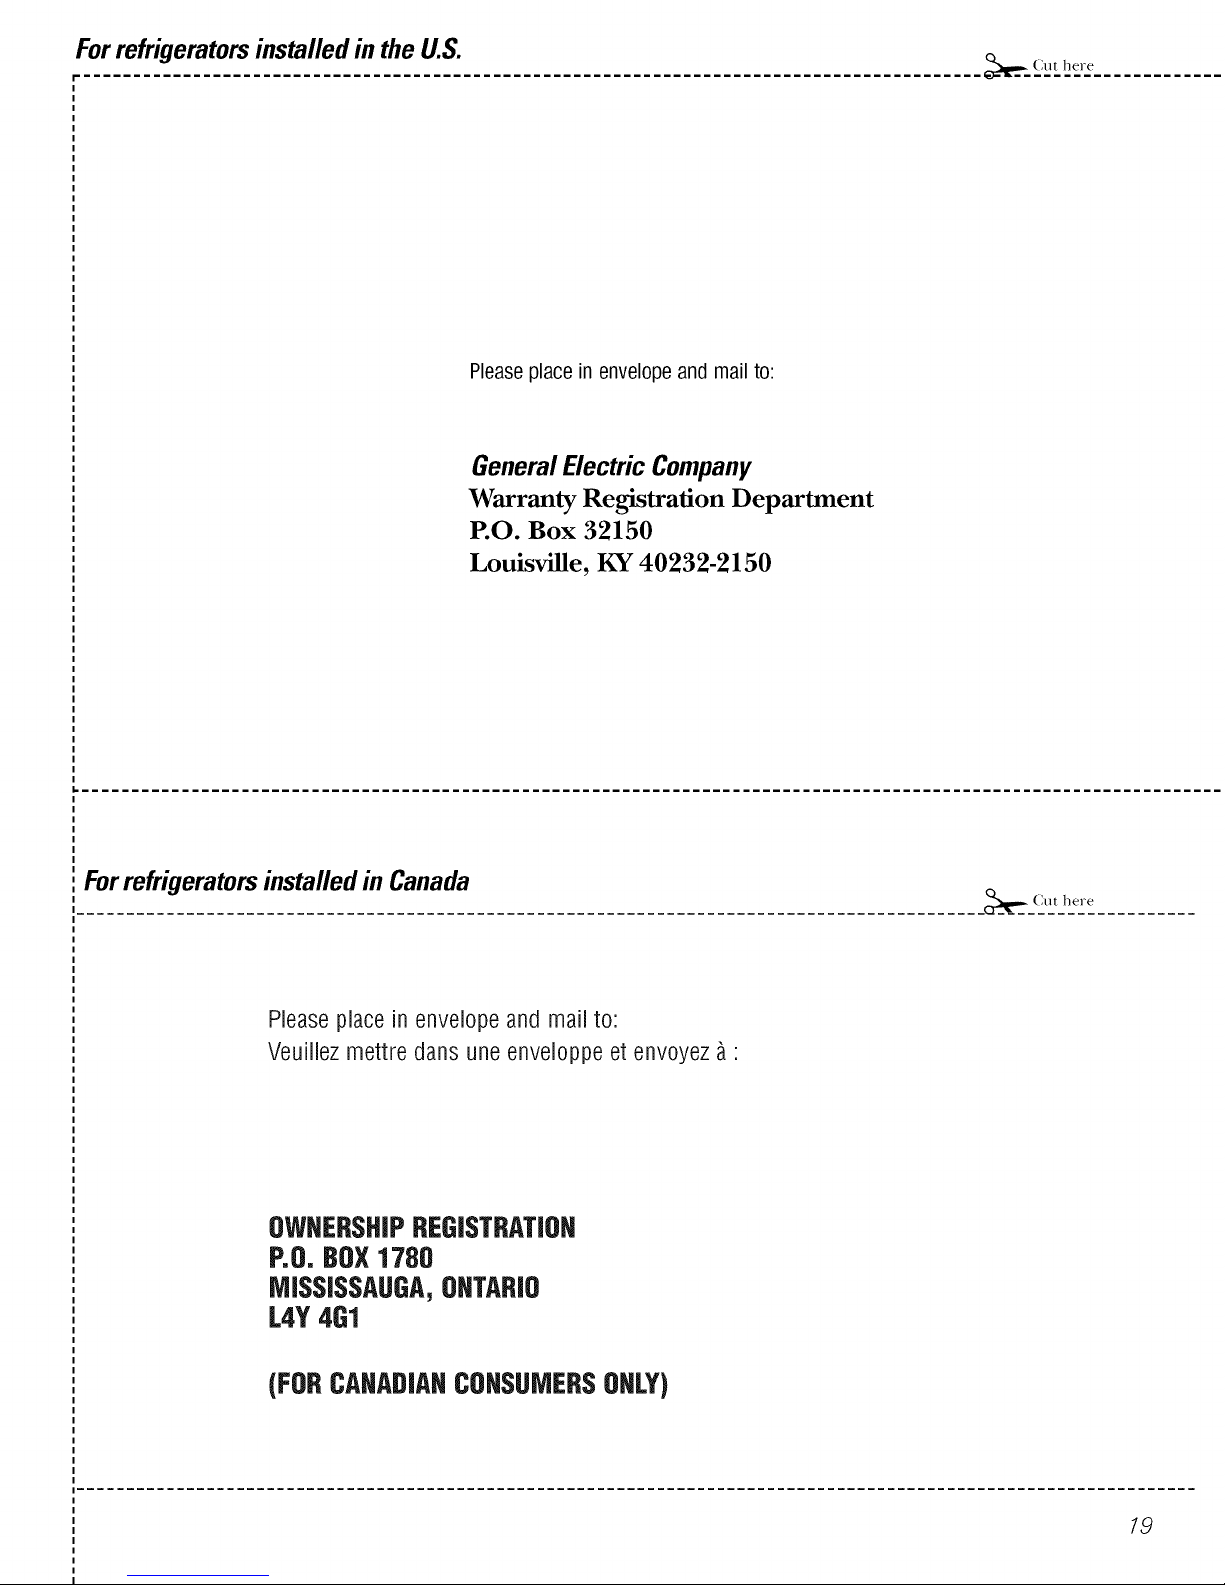
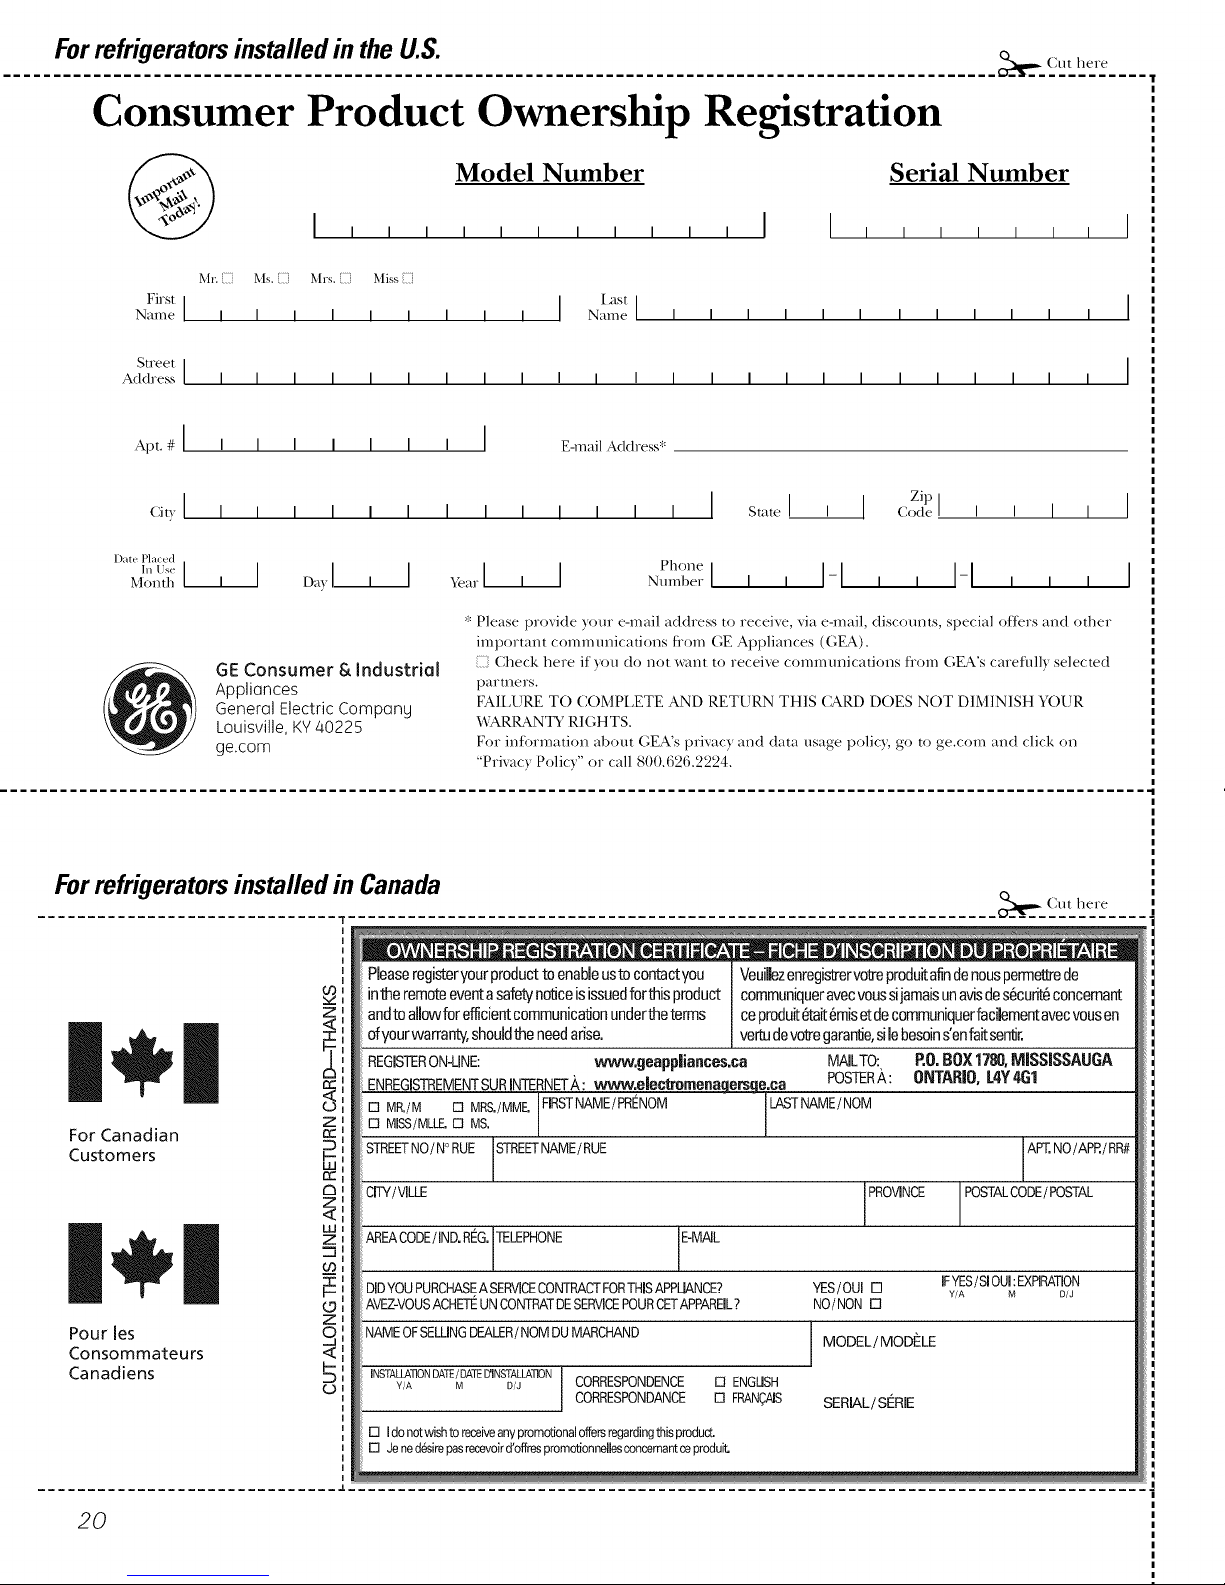
Product Registration
(Canadian) ............... 19, 20
Product Registration (U.S.) . 18-20
Warranty fi)r
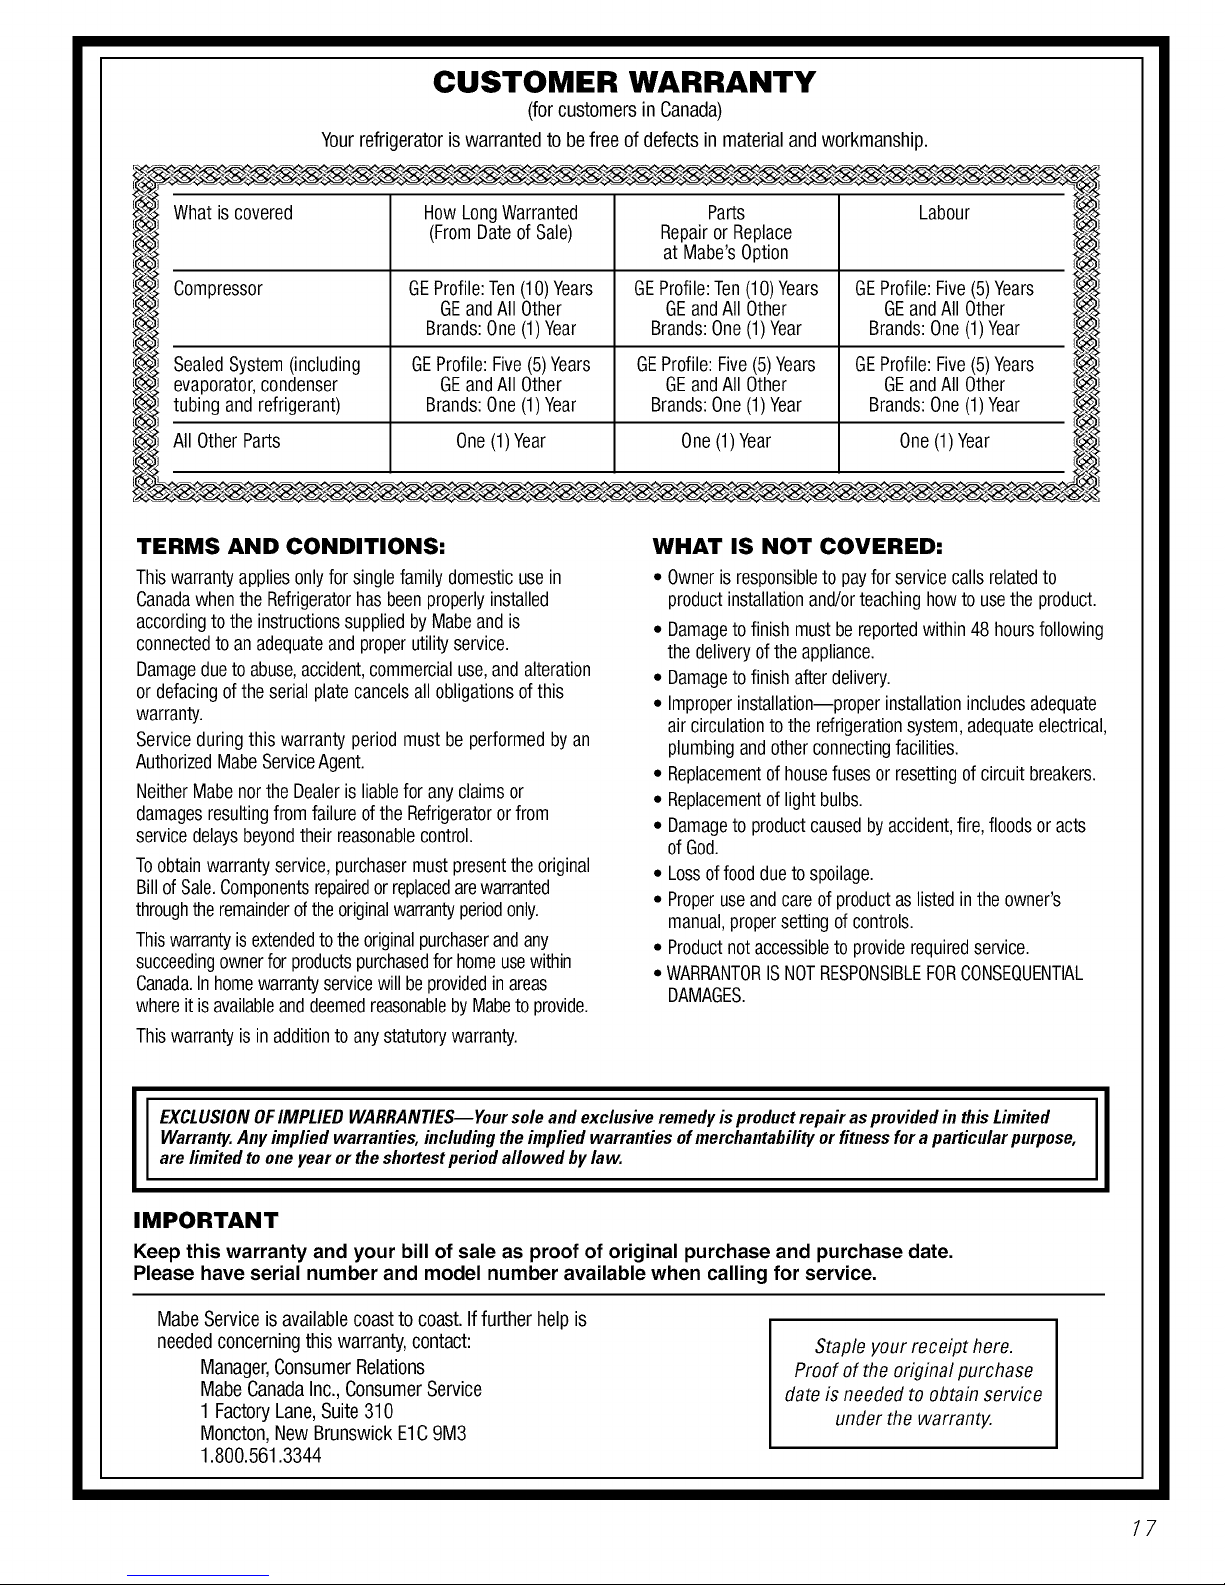
Canadian Customers .......... 17
Warranty for U.S. Customers ... 21
Writethemodelandserial
numbershere:
Model #
Serial #
You can find them on a label on
the upper left side of the flesh food
compartment.
En cas de panne
Avant d'appeler
un r@arateur .............. 40, 41
Bruits normaux
de fonctionnement ............ 39
Soutien au consommateur
Garantie ..................... 42
Soutien au consommateur ...... 43
k'cfivez ici le numerede modeleet le
numerede serie:
Modele #
Serie #
Vous les trouvez sur une _tiquette
darts le coin sup_rieur gauche du
compartiment r_flig_rateuL
Consejos para la soluci6n
de problemas
Antes de solicitar
un servicio ................ 58, 59
Sonidos normales
de operacidn ................. 58
Soporte al consumidor
Garant/a .................... 62
Soporte al consumidor ......... 63
Escribaaqui el modeloy el numere
de serie:
Modelo #
Serie #
Encuenue estos nOmeros en la efiqueta
en el lado izquierdo de la parte superior
del comparfimiento del refligeradoL
197D5226PO05 49-60512-1 08-08 Jfl
IMPORTANTSAFETYINFORMATION.
READALLINSTRUCTIONSBEFOREUSING.
WARNING'!
Use this appliance only for its intended purpose as described in this Owner's Manual
SAFETYPRECAUTIONS
When using electrical appliances, basic safety precautions should be followed, including the following:
This refrigerator must be properly installed
and located in accoMance with the Installation
Instructions before it is used.
Do not allow children m climb, stand or hang
on the shelves in the refrigerator. They could
damage the refrigerator and seriously i_jure
themseNes.
Do not touch tile cold stnTaces in tile fleezer
compartment when hands are damp or wet.
Skin may stick to these extremely cold surfaces.
{{_iDo not store or use gasoline or other flammable
vapors and liquids in tile vicinity of this or any
other appliance.
In refrigerators wifll automatic icemakers,
avoid contact with tile moving parts of tile
ejector mechanism, or with the heating element
located on tile bottom of the icemake_. Do not
place finge_s or hands on tile automatic
icemaking mechanism while tile refligemmr
is plugged in.
Keep fingers out of file "pinch point" areas;
clearances between the doors and between
tile dooIs and cabinet are necessarily small.
Be carefifl closing doors when children are
in the area.
{{_iUnplug tile refligemtor before cleaning and
making repaii_.
NOTE:Westronglyrecommendthatanyservicingbe
performedbyaqualifiedindividual.
{{_iTurning tile control to tile 0 position does
not remove power to tile light circuit.
{{_iDo not refleeze flozen foods which have
thawed completel):
.4,DANGER! RISK OF CHILDENTRAPMENT
PROPERDISPOSALOFTHEREFRIGERATOR
Child enm_pment and suffbcation are not
problems of the p_tst.Junked or abandoned
refligeramI_ are still dangerous...even if tile), will
sit for '_justa few days." If you are getting rid of
your old refrigerator; please follow the insmlctions
below m help prevent accidents.
Before You ThrowAway Your Old
Refrigerator or Freezer:
_Take offthe doo_s.
I_eave tile shelves in place so that children may
not easily climb inside.
2
Refrigerants
All refrigeration products contain refligerants,
which under federal law must be removed prior
m product disposal. If you are getting rid of an
old refrigeration product, check with the company
handling the disposal about what m do.
IMPORTANTSAFETYINFORMATION.
READALLINSTRUCTIONSBEFOREUSING.
A WARNING!
HOWTOCONNECTELECTRICITY
Do not, under any circumstances, cut or remove the third (ground) prong from the power cord.
Forpersonal safety, this appfiance must be properly grounded.
The power cord of tiffs appliance is equipped wifll
a ,%prong (grounding) plug which mates widl a
standard 3-prong (grounding) wall outlet to
minimize the possibility of elecu-ic shock hazard
flom this appliance.
Have the wall outlet and circuit checked by a
qualified electrician to make sure the outlet is
properly grounded.
Where a standard 2-prong wall outlet is
encounmred, it is your personal responsibilit T and
obligauon m have it replaced with a properly
grounded 3-prong wall outlet.
The refligeiv_tor should always be plugged into its
own individual electrical outlet which has a voltage
_v_tingthat matches the _v_dngplate.
This provides the best performance and also
prevents overloading house wiring circuits which
could cause a fire hazard flom overheated wires.
Never unplug your refl-igerator by pulling on the
power cord. Ahvays giip plug firefly and pull
straight out flom the outlet.
Repair or replace immediamly all power cords dlat
have become flayed or otherwise damaged. Do not
use a cord that shows cracks or abrasion damage
along its length or at either end.
x_qlen moving the refligerator away flom the
wall, be careflfl not to roll over or damage the
power cord.
ge.com
USEOFEXTENSIONCORDS
Because of potential safety hazards under certain conditions, we strongly recommend against
the use of an extension cord.
However, if you must use an extension cord, it is absolutely necessary that it be a UL-listed (in the United
States) or a GSAqisted (in (;anada), _wire grounding 1),peappliance extension cord having a grounding
type plug and outlet and that the electric_fl _v_tingof the cord be 115amperes (minimum) and 120 volts.
READANDFOLLOWTHISSAFETYINFORMATIONCAREFULLY.
SAVETHESEINSTRUCTIONS
3
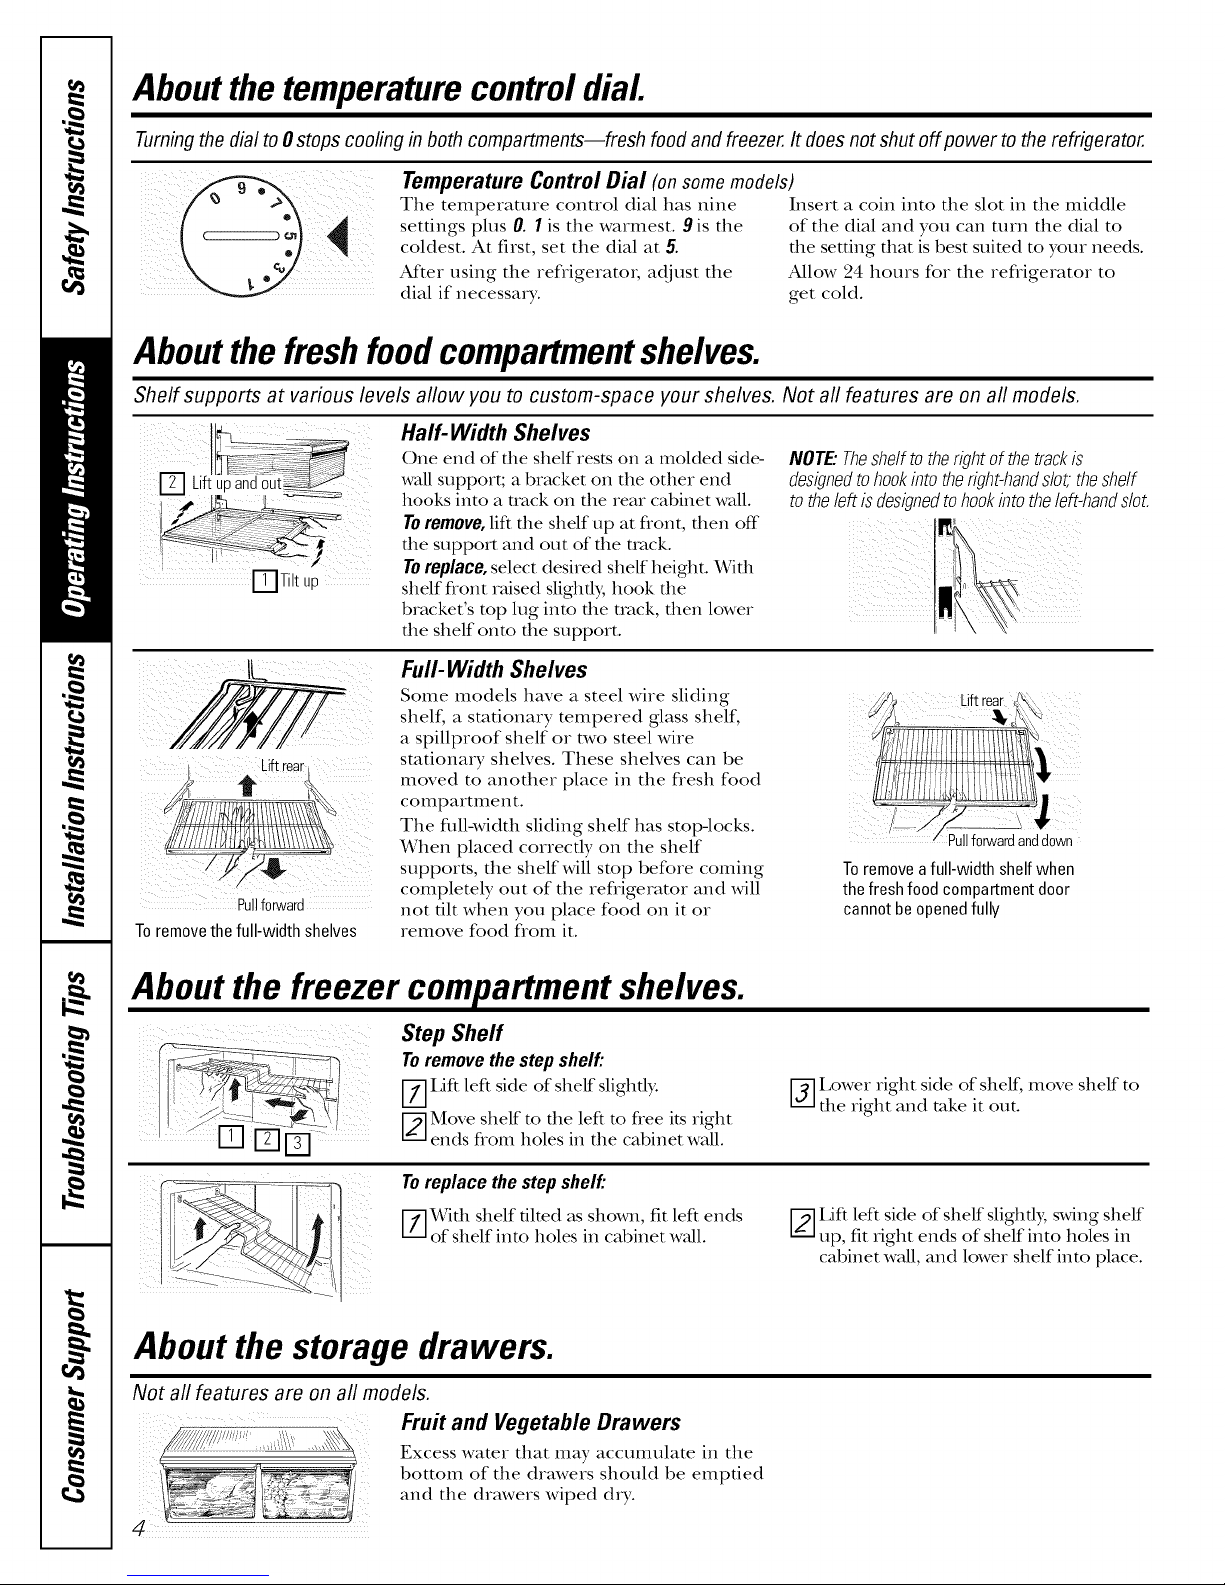
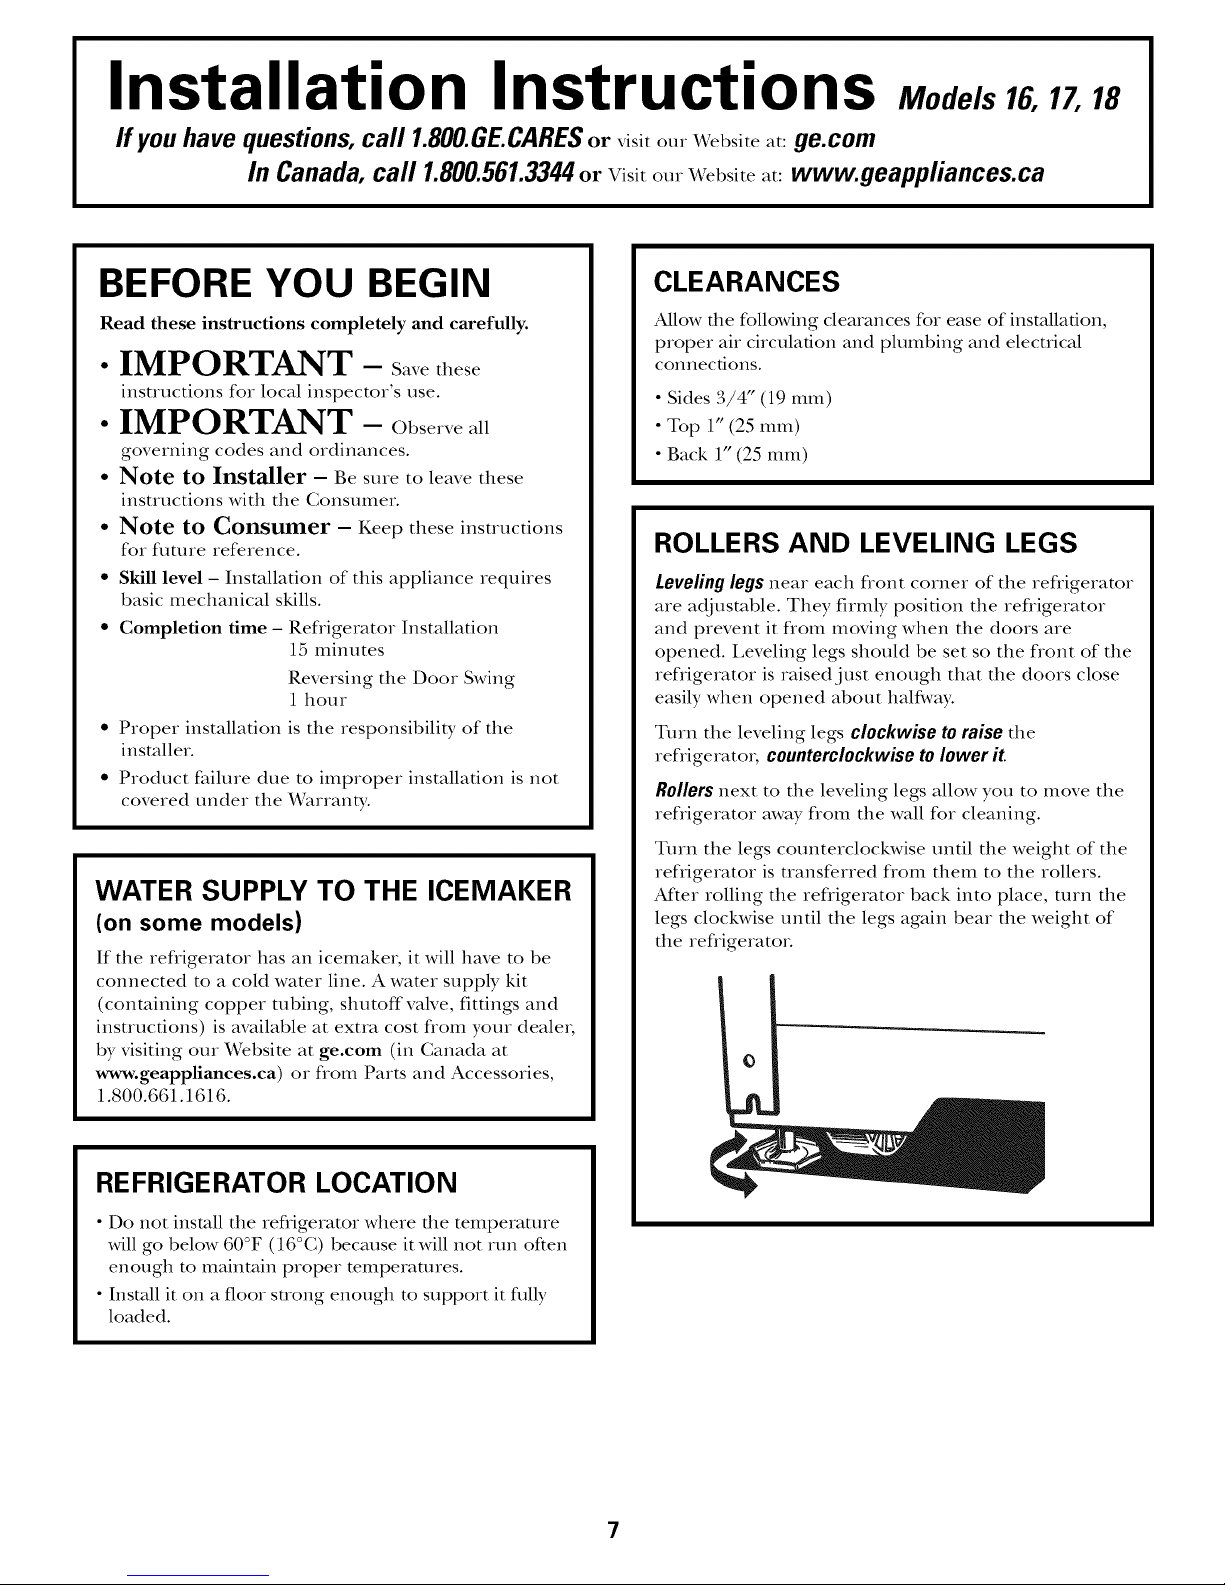
Aboutthe temperaturecontroldial
Turningthe dial to 0 stops coofing in both compartments--fresh food and freezer. It does not shut off power to the refrigerator.
Temperature Control Dial (onsomemodels)
The temperature control dial has nine Insert a coin into the slot in the middle
settings plus 0. 1is the warmest. 9 is the of the dial and you can turn the dial to
coldest. At first, set the dial at 5. the setting that is best suited to your needs.
Atker using the refligeratox, adjust the Allow 24 hours for the refligerator to
dial if necessary, get cold.
Aboutthe freshfoodcompartmentshelves.
Shelf supports at various levels allow you to custom-space your shelves. Not all features are on all models.
Half- Width Shelves
[] Lift uoanu
[] Tiltuu
Lift rear
Pullfo_vard
Toremovethe full-width shelves
One end of the shelf rests on a molded side-
wall support; a bracket on the other end
hooks into a track on the rear cabinet wall.
TOremove, lift the shelf up at flont, then off"
the support and out of the mink.
Toreplace, select desired shelf height. With
shelf flont raised slightly, hook the
bracket's mp lug into the track, then lower
the shelf Ohm the support.
Full- Width Shelves
Some models have a steel wire sliding
shelf, a stationary tempered glass shelf,
a spillproof shelf or two steel wire
stationary shelves. These shelves can be
moved to another place in the flesh food
compartment.
The flfll-width sliding shelf has stopqocks.
When placed correctly on the shelf
supports, the shelf will stop before coming
completely out of the refligerator and will
not flit when you place food on it or
remove food flom it.
NOTE"Theshelftotherightof thetrackis
designedtohookintotheright-handslot,theshelf
totheleft isdesignedtohookinto theleft-handslot.
Toremove afull-width shelfwhen
the fresh food compartmentdoor
cannot beopenedfully
About the freezer compartment shelves.
Step Shelf
Toremovethestepshelf:
I--if]Lift left side of shelf slightb:
f_-]Move shelf to the left to flee its right
Toreplacethestepshelf:
"' of shelf into holes in cabinet wall.
i i i
About the storage drawers.
Not all features are on all models.
Fru# and Vegetable Drawers
Excess water that may accumulate in the
bottom of the drawers should be emptied
and the drawers wiped dxT.
ends flom holes in the cabinet wall.
With shelf tilted as shown, fit left ends
f-_I_ower right side of shelf, move shelf to
the right and rake it out.
f_-]Lift left side of shelf slightly, swing shelf
up, fit right ends of shelf into holes in
cabinet wall, and lower shelf into place.
About the storage drawers, gecom
Not aft features are on all models.
Snacks Drawer
The snacks drawer can be moved to tim
most useflfl location for your family's
needs.
About storage drawer and cover removal.
Not all features are on all models.
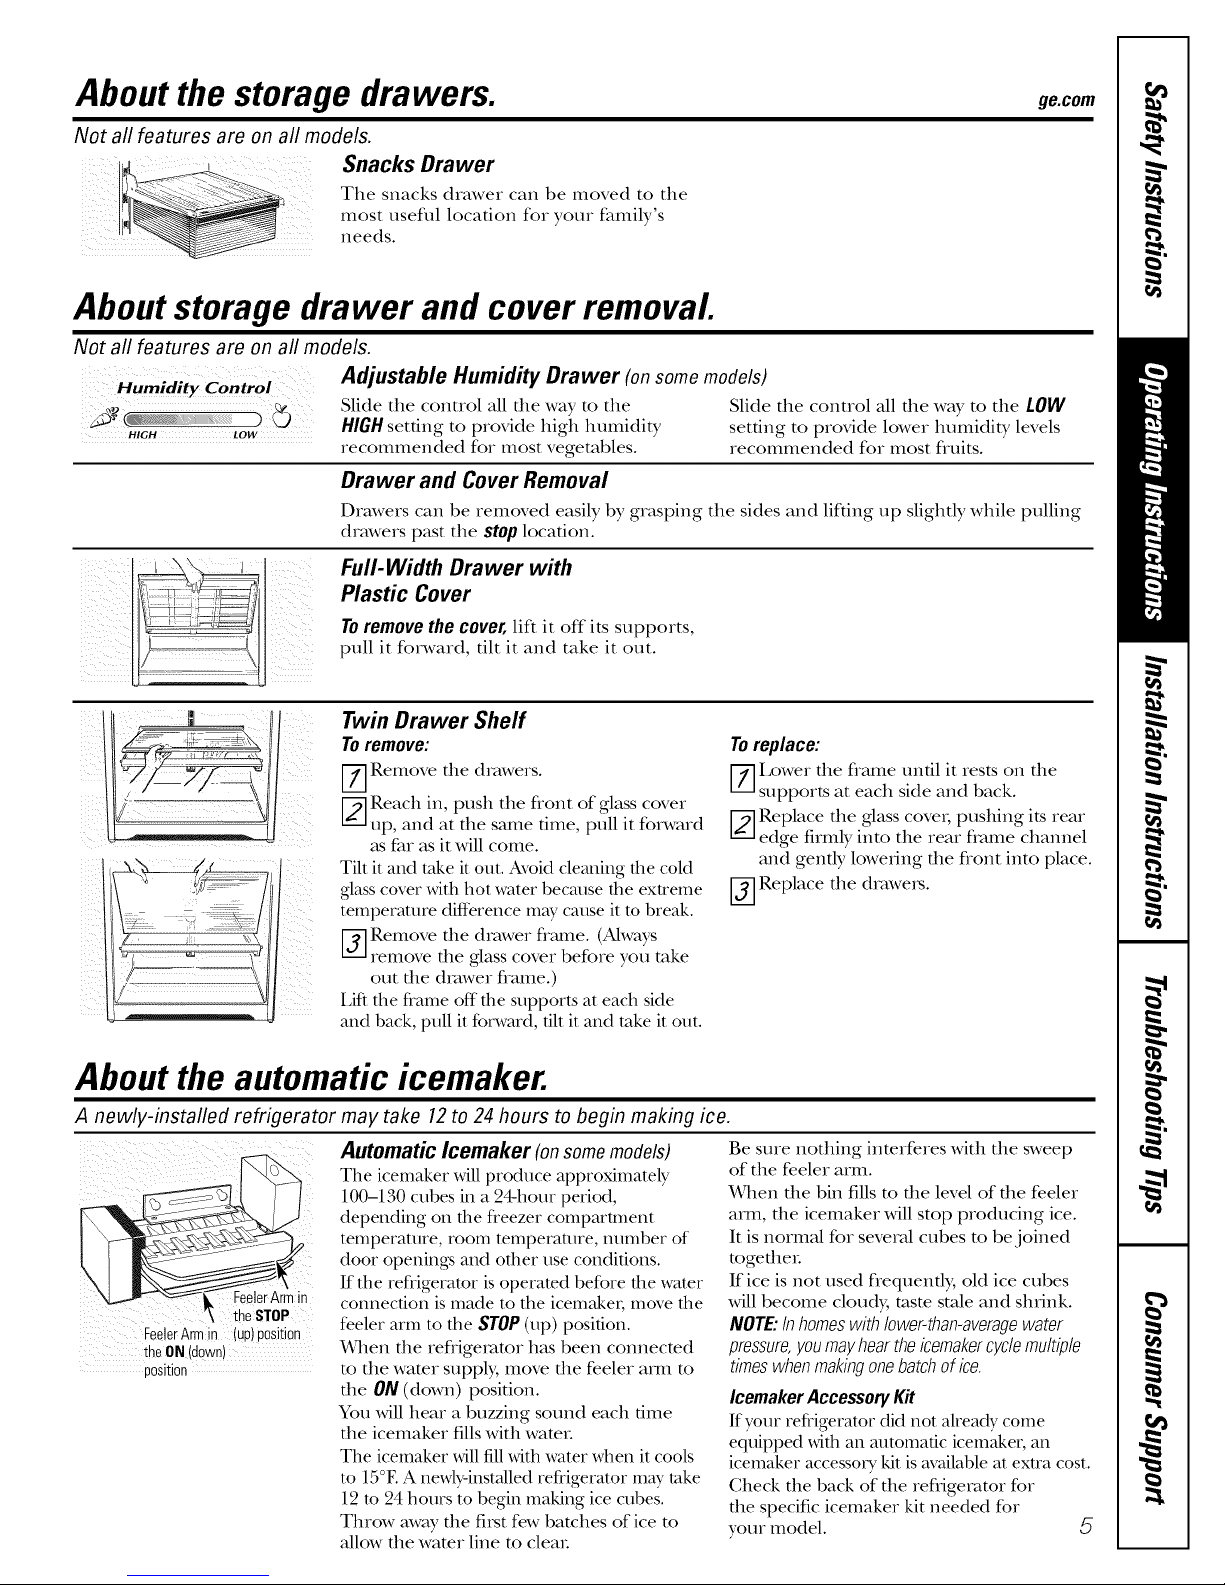
Humidity Control
HIGH LOW
Adjustable Humidity Drawer (onsomemodels)
Slide the control all die way to the Slide the control all die way to the LOW
HIGHsetdng to provide high humidity setting to provide lower humidity levels
recommended for most vegetables, recommended for most fl_uits.
Drawer and Cover Removal
Drawers can be removed easily by grasping the sides and lifting tap slighdy while pulling
drawers past the stop location.
Full-Width Drawer with
Plastic Cover
Toremovethecover,lift it off its supports,
pull it forward, tilt it and rake it out.
Twin Drawer Shelf
Toremove:
[-'7] Remove tile drawers.
[_-] Reach in, push the flont of glass cover
up, and at tile same time, pull it forward
as far as it will come.
Tilt it and take it out. Avoid cleaning the cold
glass covet" with hot water becmlse the exu'eme
temperature ditference mW cause it m break.
[-_] Remove tile drawer fl_une. (Always
remove tile ,glass cover before you rake
out the drawer fiame.)
Lift the fi'mne off the supports at each side
and back, pull it forward, flit it and take it out.
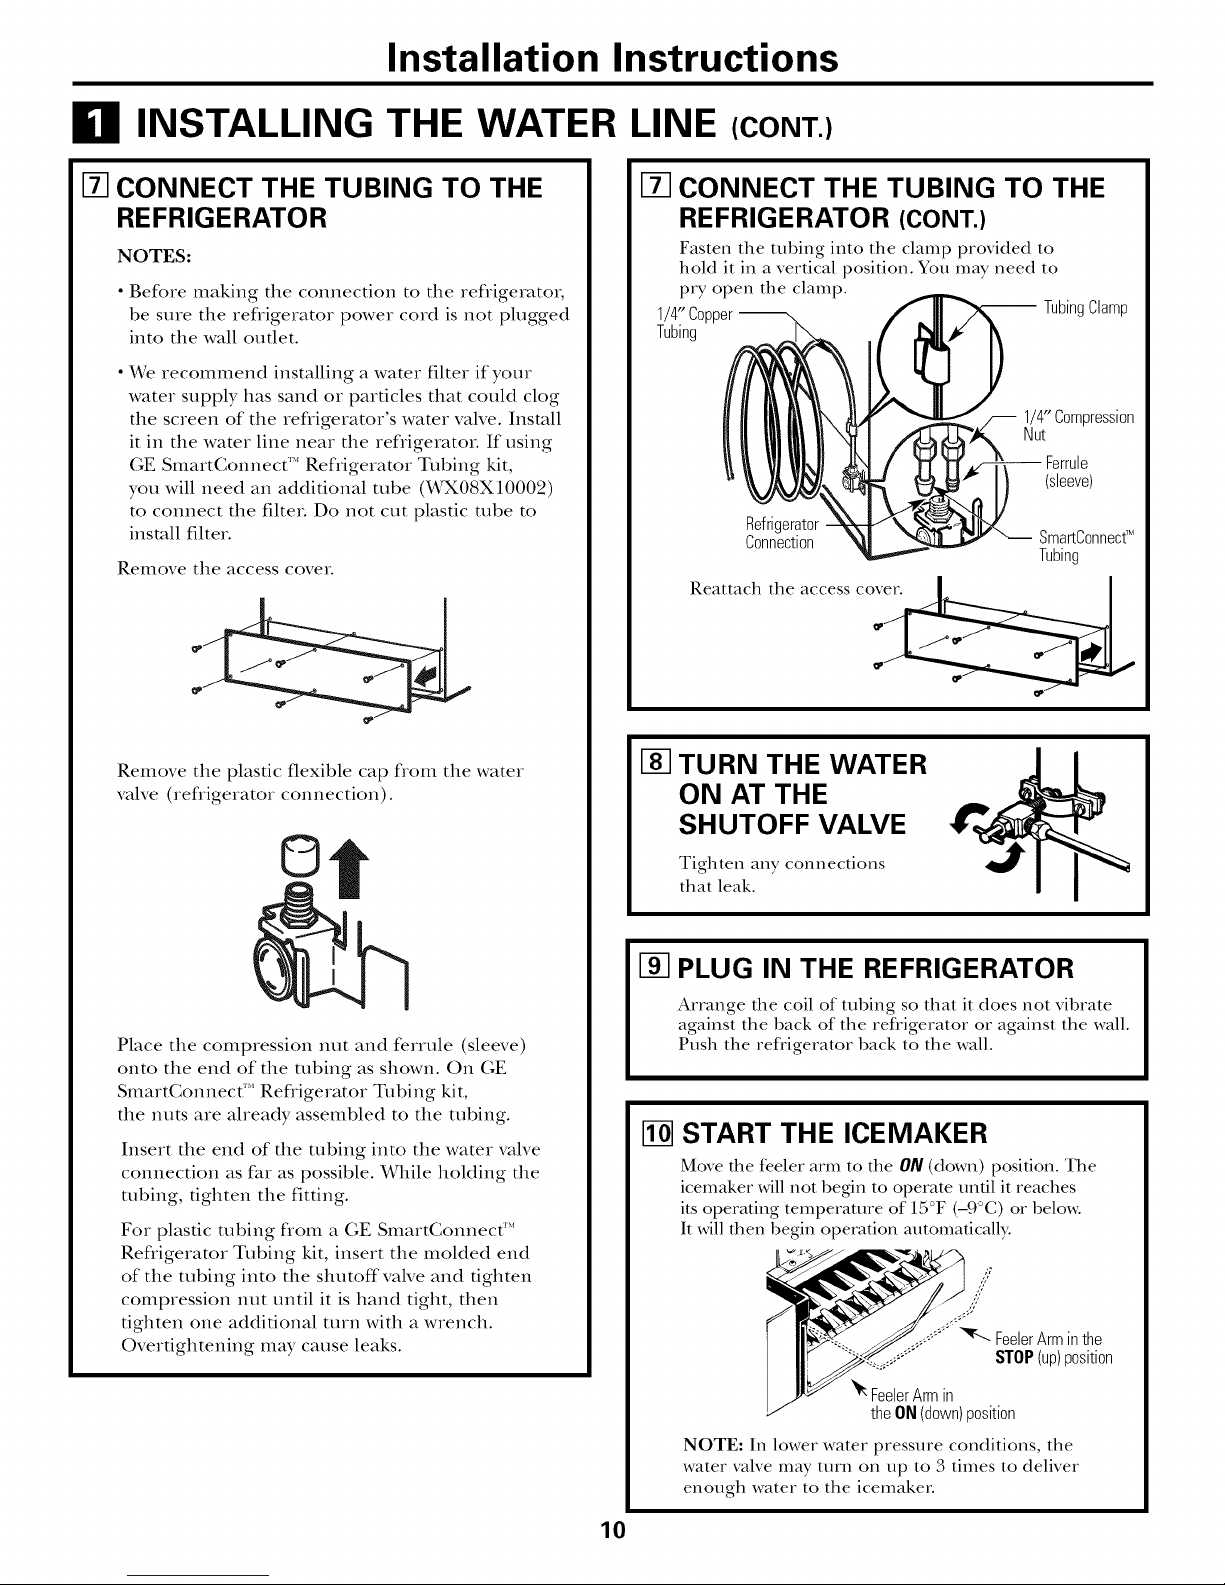
About the automatic icemaker.
A newly-installed refrigerator may take 12to 24 hours to begin making ice.
ij)(( j ¸/i/
,qerArmin
le STOP
FeelerArmin (Up)position
theON (down)
position
Automatic Icemaker (onsomemodels)
The icemaker will produce approximately
100-130 cubes in a 24-hour period,
depending on the fl'eezer compai'unent
temperature, room temperature, number of
door openings mad other ttse conditions.
If the refl'igeramr is operamd before the water
connection is made to the icemaket; move tile
feeler arm to the STOP(up) position.
When the refrigerator has been connecmd
m the wamr supply, move tile feeler am1 m
the ON (down) position.
You will hear a buzzing sound each time
the icemaker fills with wamt.
The icemaker willfill with water when it cools
to 15°E A newly-installed refi'igerator mW rake
12 m 24 hours to begin making ice cubes.
Throw away the fi_t few batches of ice m
allow the wamr line m cleat.
Toreplace:
F_ Lower the frame until it rests on the
supports at each side and back.
[_--]Replace tile glass covet; pushing its rear
edge firmly into the rear flame channel
and gendy lowering tile flont into place.
[j] Replace tile drawers.
Be sure nothing inmrferes with the sweep
of the feeler arm.
When the bin fills m the level of the feeler
arm, the icemaker will stop producing ice.
It is normal for several cubes m be joined
together.
If ice is not used fiequendy, old ice cubes
will become cloudy, tasm stole and shrink.
NOTE:Inhomeswithlower-than-averagewater
pressure,youmayheartheicemakercyclemultiple
timeswhenmakingonebatchofice.
Icemaker Accessory Kit
If your refi'igerator did not ah'eady come
equipped with an mltomafic icemaket; an
icemaker accesso W kit is available at extra cost.
Check the back of the refligerator for
tile specific icemaker kit needed for
your model. 5


 Loading...