

Hotpoint HSS25IETAWW Owner’s Manual
° Side by
Refrlgerato l g
Hotpointcom
Skle by Side
Refrigerators
Modda 20. 2Z 25
Safety Information
Conne( t Ele(tricity ............. 3
Extension Cords ............... 2
Proper Disposal ................ 2
Satbly Precantions .............. 2
Operating Instructions
Automatic I(emaker . ......... 7-8
Controls ..................... 6
Crispers and Pans .............. 5
How to Install Features .......... 4
Ice and Water Dispenser . ....... 8
Shelves and Bins ............... 4
Water Fiher Cartridg_ ........... 7
Care and Cleaning
Cleaning ...................... 9
Light Bulbs ................... 9
Installation Instructions
Pleparing to Install ........... 10
Water Line Installation ...... 11-13
Troubh,shooting Tips
Before You Call
For Selvice ................ 14-16
Normal Operating Sounds ...... 14
Consumer Support
Consumer Support .... Back Cover
Perfl_rmxnce Dam Sheet ....... 19
Product Registration
(Canadian) ............... 21, 22
Product Registration
(E .S.) .................... 20, 21
State o[ C_llifornia Wxter
Treatment Devic{ Certificate .... 19
_A_rran ty (Canadian) .......... 17
Warranty (U.S.) ............... 18
C6te fic6te
Rdfrigdrateurs
Lasection frae_aise commencea la page 23
:l/lesur_ de s_curit_5
Commellt vous d{q_ml_sser
colp, ellablemellt de votr(
ancien r_5ti-ig&-ateur ................ 23
Cordons prolongateu is .............. 23
M_stays de s_curit(_ ................. 23
Raccordement _lectl klue ............ 24
Fonctionnement
Bacs il l_gumes ..................... 26
Cartouche du fihre _1<au ............ 28
C1xyettes et bacs .................... 25
Installation des accessoircs ........... 25
Lc distribumur d'eau <t de gla_ons .... 2{)
Les commandes .................... 27
Machine _'1gla¢ons antomatique ..... 2,q,-29
Entretien et _*ettoyage
Netto3 age ......................... 30
R_replacement des ampouk s ........ 30
Installation
Installation de la
conduite d'eau .................. 32-34
Pr(:pal-,_tion ........................ 31
Co_*seilsde d_pannage
.\wmt d'appelcr un rOpaFatcm . .... 3."_-38
Bluits de ionctionnement
IIOFIIIXIlX .......................... _')
Service & la cli_ttble
Fcuillel de (l(mn_es relativ(s fi la
pertbrmance de la
carlouche I I_TF .................... 40
Gamntie pour 1_1
clientble au Canada ................. 39
Service _'1la clienffq_ ................ 41
Lado a lado
Refrigeradores
La seccion en espafiolempiezaenla pagina 42
h_formaci6n de seguridad
Cables de _xtensidn ................ 42
Conectar 1aelectficidad ............. 43
Deshacel-se debi(lan_ rite
de su reh-igerador . ................. 42
Precanciones de segm-idad ........... 42
h,strurxqom_ de al_,raci6n
Cm-tucho del fihro de agua .......... 47
Controles del refligel-ador ........... 46
Dispensador . ...................... 48
Disposition) antom_ilico
pare hacer hielo ................. 47q8
Entrepaflos y recipienlt s ......... 4445
(;avems de ahnac_ namiento ......... 45
]nsmlacidn de 1as caracterf_,ticas ...... 44
Cuidado y limpi_-oa
Limpieza ....................... 49-30
Reemplazo de bombillas ............ 50
h,struecqonesde htstalad6n
]nsl;dacidn de 1alfnea
de agua ........................ 5_'-56
Prcl_m-,M6n pm-,_
instalar el refrigerador. .......... 51-52
Soludonar problemas
Ames de solicitm- un setxicio ...... 57_;0
Sonidos nonnales
de la opemci&_ .................... 57
&_-oicioal consmnidor
Gm'antia pare con_,umidores
en los E',lados [ nidos ............... 61
I Ioja de datos de
thncionami_ nto ................... 62
Serdcio al consunfidor .............. 63
Write your model and serial numbers here:
Model#
Serial #
Find th(se numbers on a label inside
the reti-igerator compartment at the top
on th_ right sid_ behind the controls.
162D6746P011 39-60479 08-06JH
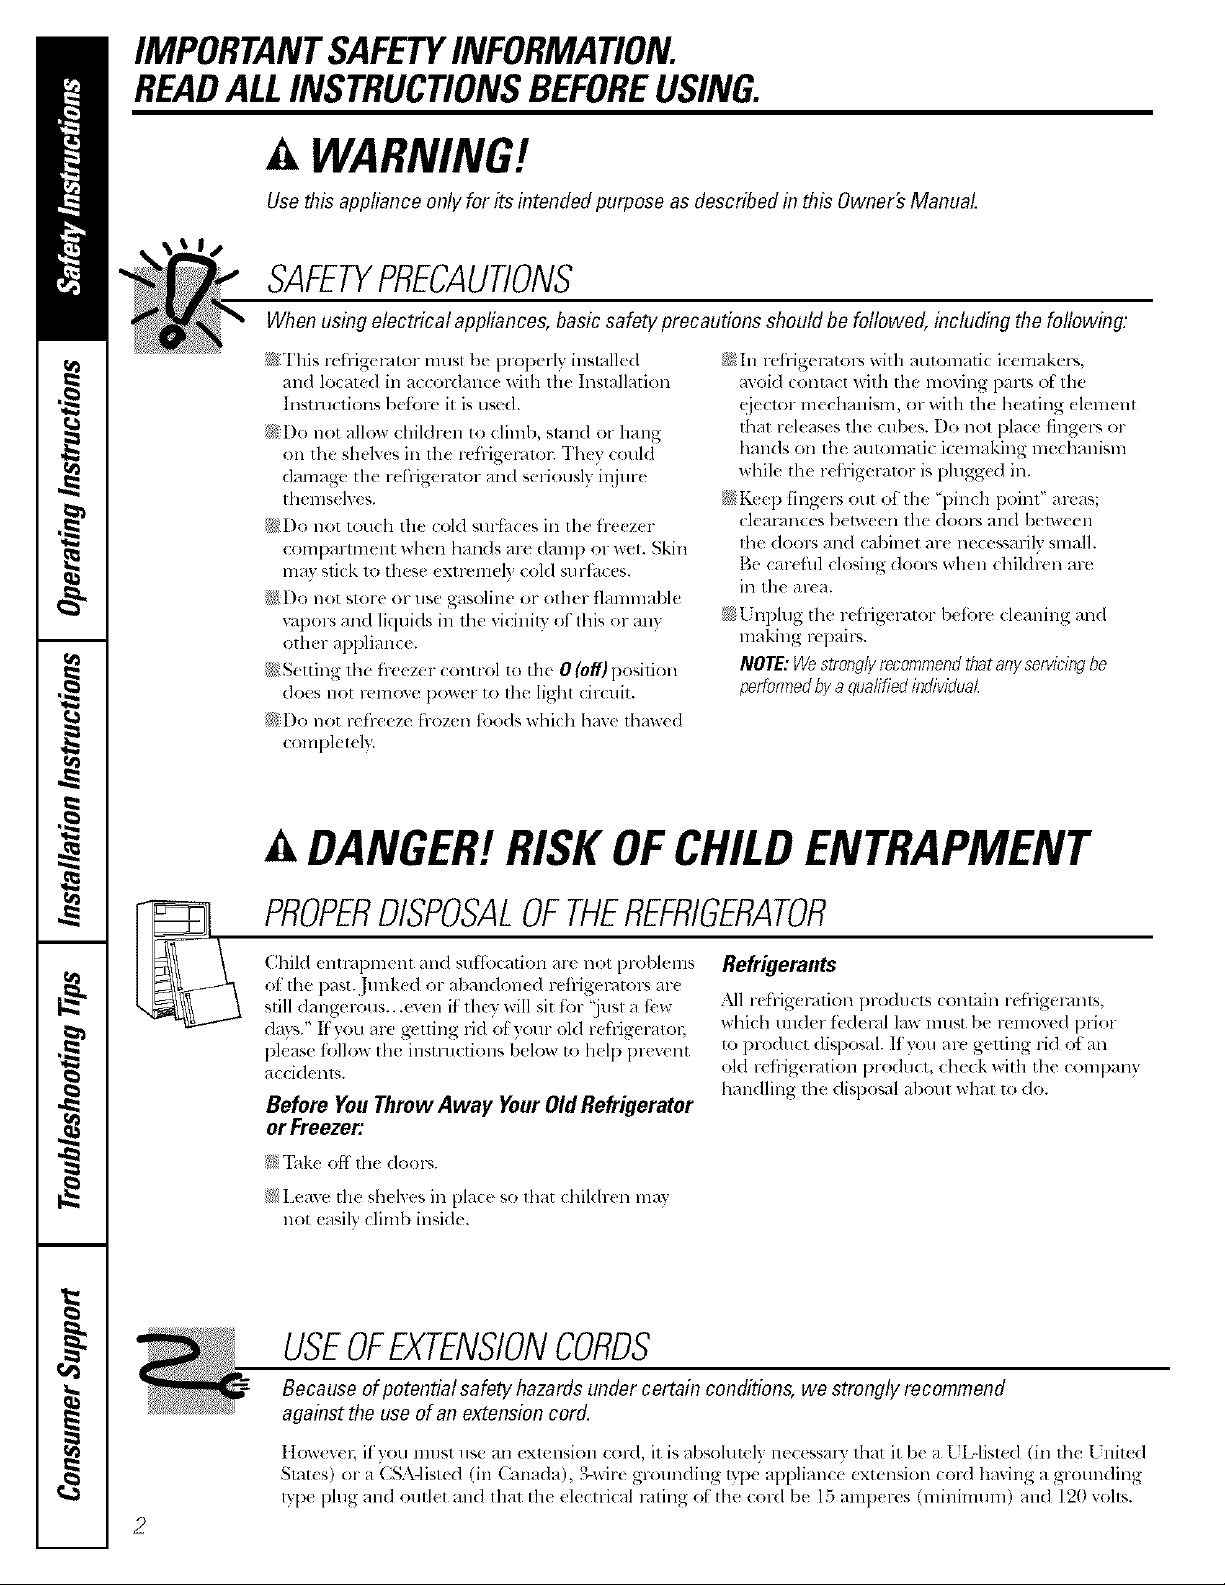
IMPORTANTSAFETYINFORMATION.
READALLINSTRUCTIONSBEFOREUSING.
WARNING!
Use this appliance only for its intended purpose as described in this Owner's Manual
SAFETYPRECAUTIONS
When using electrical appliances, basic safety precautions should be followed, including the foflowing.
_UI'llis refl_ig(mlor nmsl be lm:)perly inslalled
and kxat(d in a((or(lan(( "_ilh tile: Installation
lnslm(lions b( t;:)re it is used.
_:Do not allow children to (:limb, stand or hang
<m the shelves in tile refrigev, m)t: They could
damage the refiigec4tor and seriously illjure
[helllS( I_ ('S,
_5,!!¢[)o not touch the toM surthc(s in tile fre(zer
coml)armaent when hml(ls are damp or wet. Skin
may stick to these extremel} (old surfflces.
_Do not slure or use gasoline or oilier flammable
w/pots and liquids in the vicinity of this or anv
other appliance.
NS(tting the freezer control to tile 0 (off] position
does not remca,e power to ll_e lighl circuit.
_:[)o not refreeze frozen foods which lmve thmved
completely.
i?_In refligemtors with automatic icemakers,
avoid contact with the moving parts ot tile
ejeclor mechanisna, or willl tile heating element
that releases tile cubes. Do not place ring(f; or
hml(ls on the automatic icemaking mechanism
while the reh-iger_Ju)r is plugged in.
i?_t_xep ring(p, out of the "pinch point" areas;
clealall(es/)( tw( ell tile doors and belween
the doors and cabinet are necessarily small.
Be car(fill closing doolx when chiMren are
in tile al-_a.
1_nplug the refrigerator betore cleaning and
lnaking repairs.
NOTE:Westrow/yrecommendtilatanyservicingbe
f_effonnedhyaquaff[ledfiWvidua_
DANGER!RISKOFCHILDENTRAPMENT
PROPERDISPOSALOFTHEREFRIGERATOR
ChiM entc, ll)ment and sutl;_cation are not problems
of tile past..Junked or al)andoned retiigerators ar(
still dangerous...even ii the} will sit tot 'just a fi.,w
days." It w)u a lv geuing rk/ot )our oM refrigeratol;
please ti£11owthe instructions below to help prevent
accidenls.
Refrigerants
All rel¥igerafion products contain refrigerants,
which trader _bdeml lmv nnlst be remoxed prior
to product disposal. If ?_m ar_ geuing rid ot an
old refl'igec, ltion [>ro(luct, check with the company
handling the dispo_d about what t_ do.
Before You ThrowAway Your OldRefrigerator
orFreezer:
ib;"E_ke off Ill( dool"<
i{_iLeave tile sheh,es in place so fllat chiMren may
not _asily (lim/) inside.
USEOFEXTENSIONCORDS
Because of potential safety hazards under certain conditions, we strongly recommend
against the use of an extension cord.
Ilox_ex(_; if you nmsl use an ( Xlellsion cord, il is absolut(ly n¢ (xssat T lhat it be a L [Aisted (in lhe L nit(d
Slat(s) or a ( SA-list(d (in Canada), S-xqre groml(/ing tylx al)plianc( extension (ord hming a grounding
lype l)lug and outlet and lhal tile eleclrical ruling of' file cord be 15 amp( res (minimum) and 120 vohs.
2
ww_.Hotpoint.com
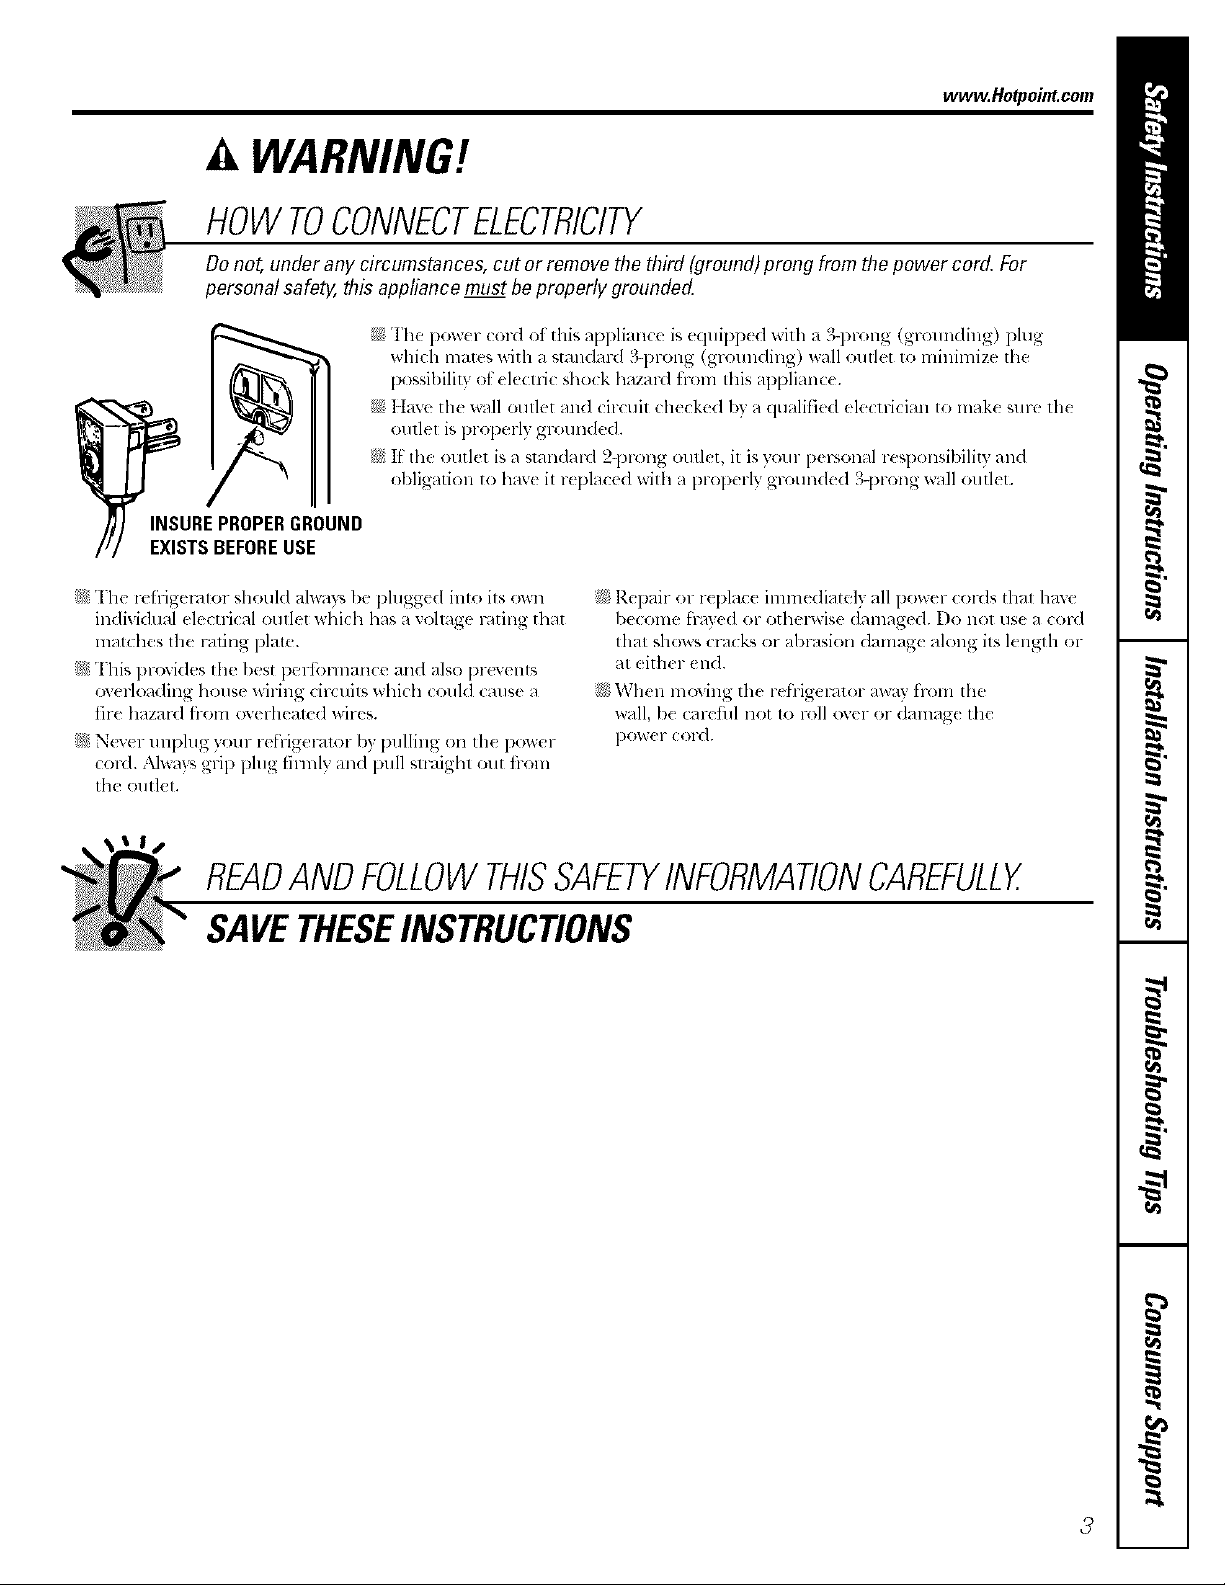
WARNING!
HOWTOCONNECTELECTRICITY
Do not, under any circumstances, cut or remove the third (ground) prong from flTepower cord. For
personal safety, this appliance must be properly grounde_
The pow(r cord of this applian( e is equipp(d with a 3-prong (grounding) plug
which mates with a standard 3-prong (grounding) wall outlet to minimize lhe
possibility ot elecnic shock hazard h-ore this applianc(.
Have the wall outlet and circuit checked by a qualified electrician to make sure the
outlel is properly grounded.
i}_If tile outlet is a standa_*129tong oudet, it is your personal responsibility and
obligation to have it replaced with a properly grounded 3-prong wall outlet.
_, The refrigm',_lor should always lyephlgged into its own
indivklual electrical oullet which has a xolmge rating that
matches tile rating plate.
_, This provides tile best perfi'mnance and also l)revents
ov(rloading house wiling circuits which could cruise a
fire haza_*l fl-om overheamd wires.
_' N(v(r unphlg your refrigeralor by F,ulling (mth{ pov,,er
cord. ,klwavs _ll°Ti) )lug, lhmly and pull sll'aighl out tl-oln
the outlel.
READANDFOLLOWTHISSAFETYINFORMATIONCAREFULLY.
SAVETHESEINSTRUCTIONS
Repair or replac( immediately all power cords thai have
be(ome [m3ed or othem-ise damaged. Do not use a cord
that shows crack _,or abrasion damage along its length or
at _ith(r end.
V',qlen moving the reh'igeralor away trom ll'm
wall, b( caretill not to roll ov(r or (lamag( th,:
pow(r cord.
3
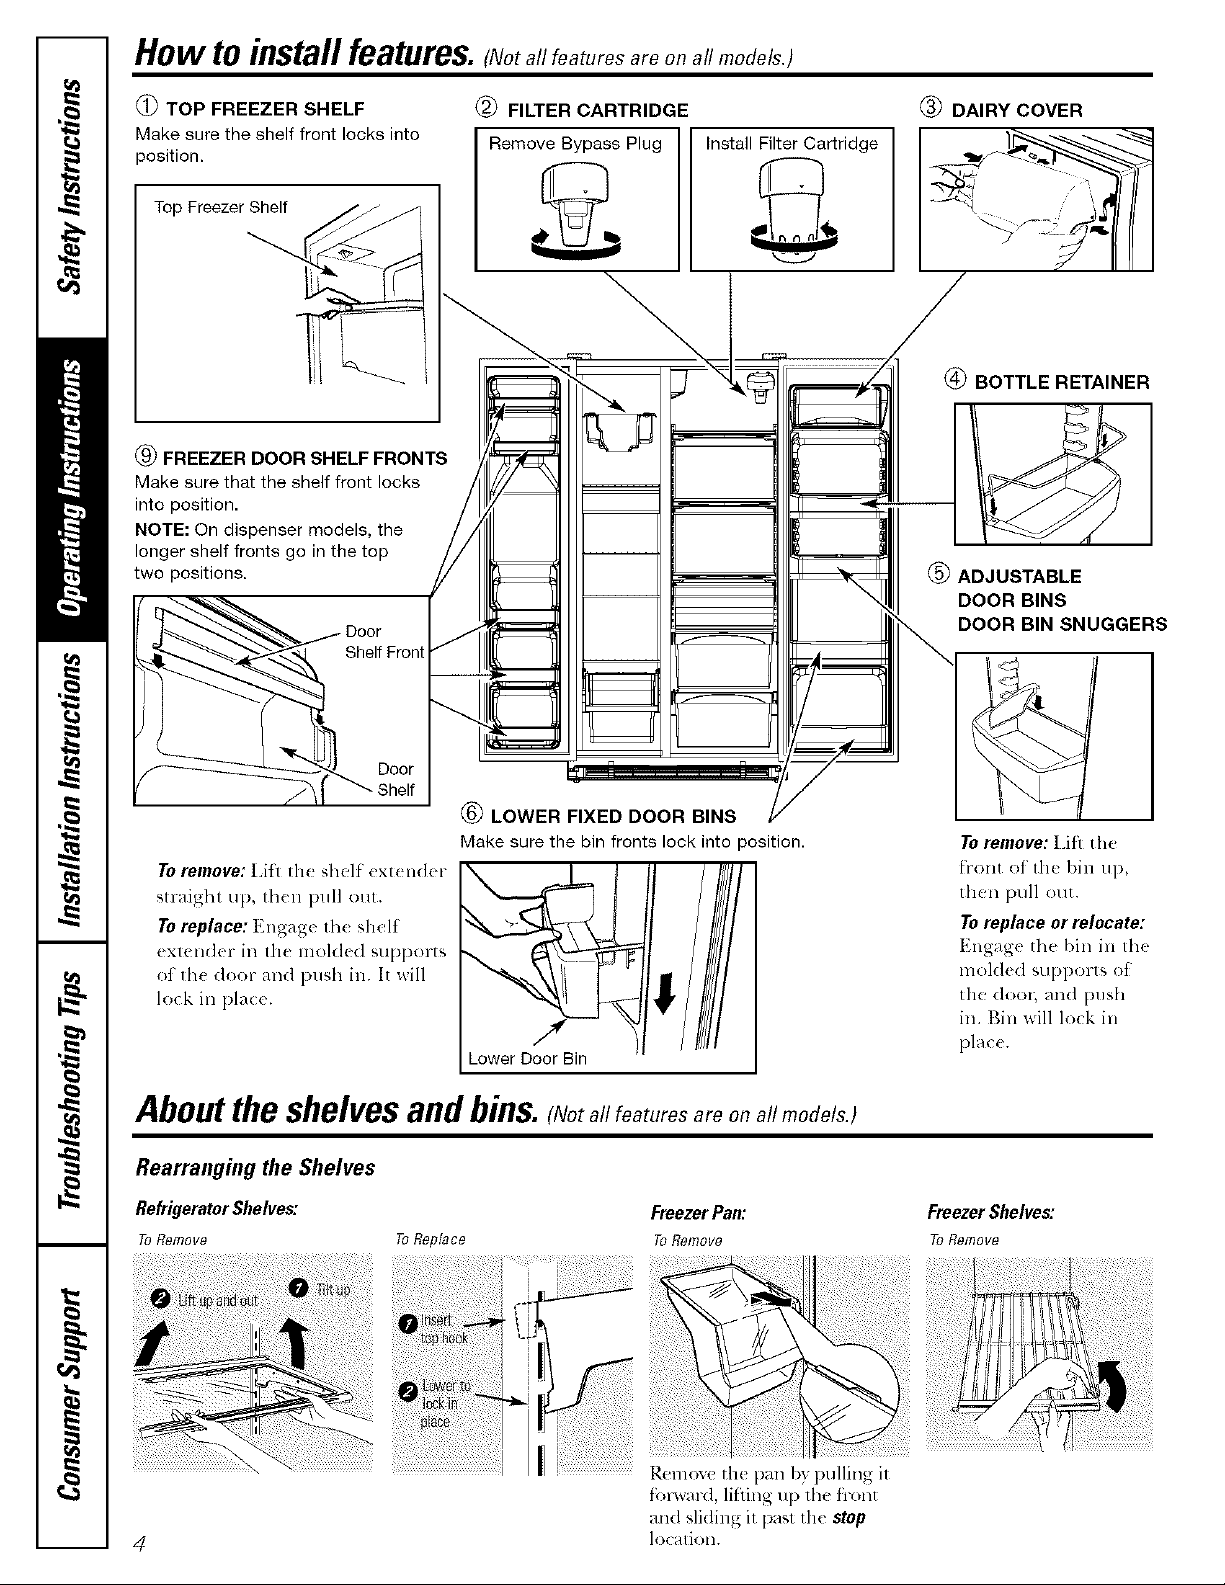
HOW to install feature& (Not all features are on aHmodels,)
TOP FREEZER SHELF
Make sure the shelf front locks into
position.
Top Freezer Shelf
@ FREEZER DOOR SHELF FRONTS
Make sure that the shelf front locks
into position.
NOTE: On dispenser models, the
longer shelf fronts go in the top
two positions.
Door
Shelf Front
@ FILTER CARTRIDGE
Remove Bypass Plug Install Filter Cartridge
S
@ DAIRY COVER
@ BOTTLE RETAINER
@ ADJUSTABLE
DOOR BINS
DOOR BIN SNUGGERS
Door
(_) LOWER FIXED DOOR BINS
Make sure the bin fronts lock into position.
Toremove:Lifi lIle shelt extender
straight up, th(n pull out.
Toreplace:Engage th( shelf
extender in tile molded supports
of Ill( door and push in. It will
lock in place.
Lower Door Bin
i
/
Aboutthe shelvesandbins. Netallfeaturesare on all models.)
Rearranging the Shelves
Refrigerator Shelves:
ToRemove ToReplace
FreezerPan:
ToRemove
Toremove:IJfi the
fl'ont of tile I)in tip,
then pull out.
Toreplaceor relocate:
Engage the bin in the
molded supports of
the (loo_; and push
in. Bin will lock in
place.
FreezerShelves:
ToRemove
Remove the pan by pulling it
f'o)avard, lifting up the fiont
an(I sli(ling it past the stop
4
lo(ation.
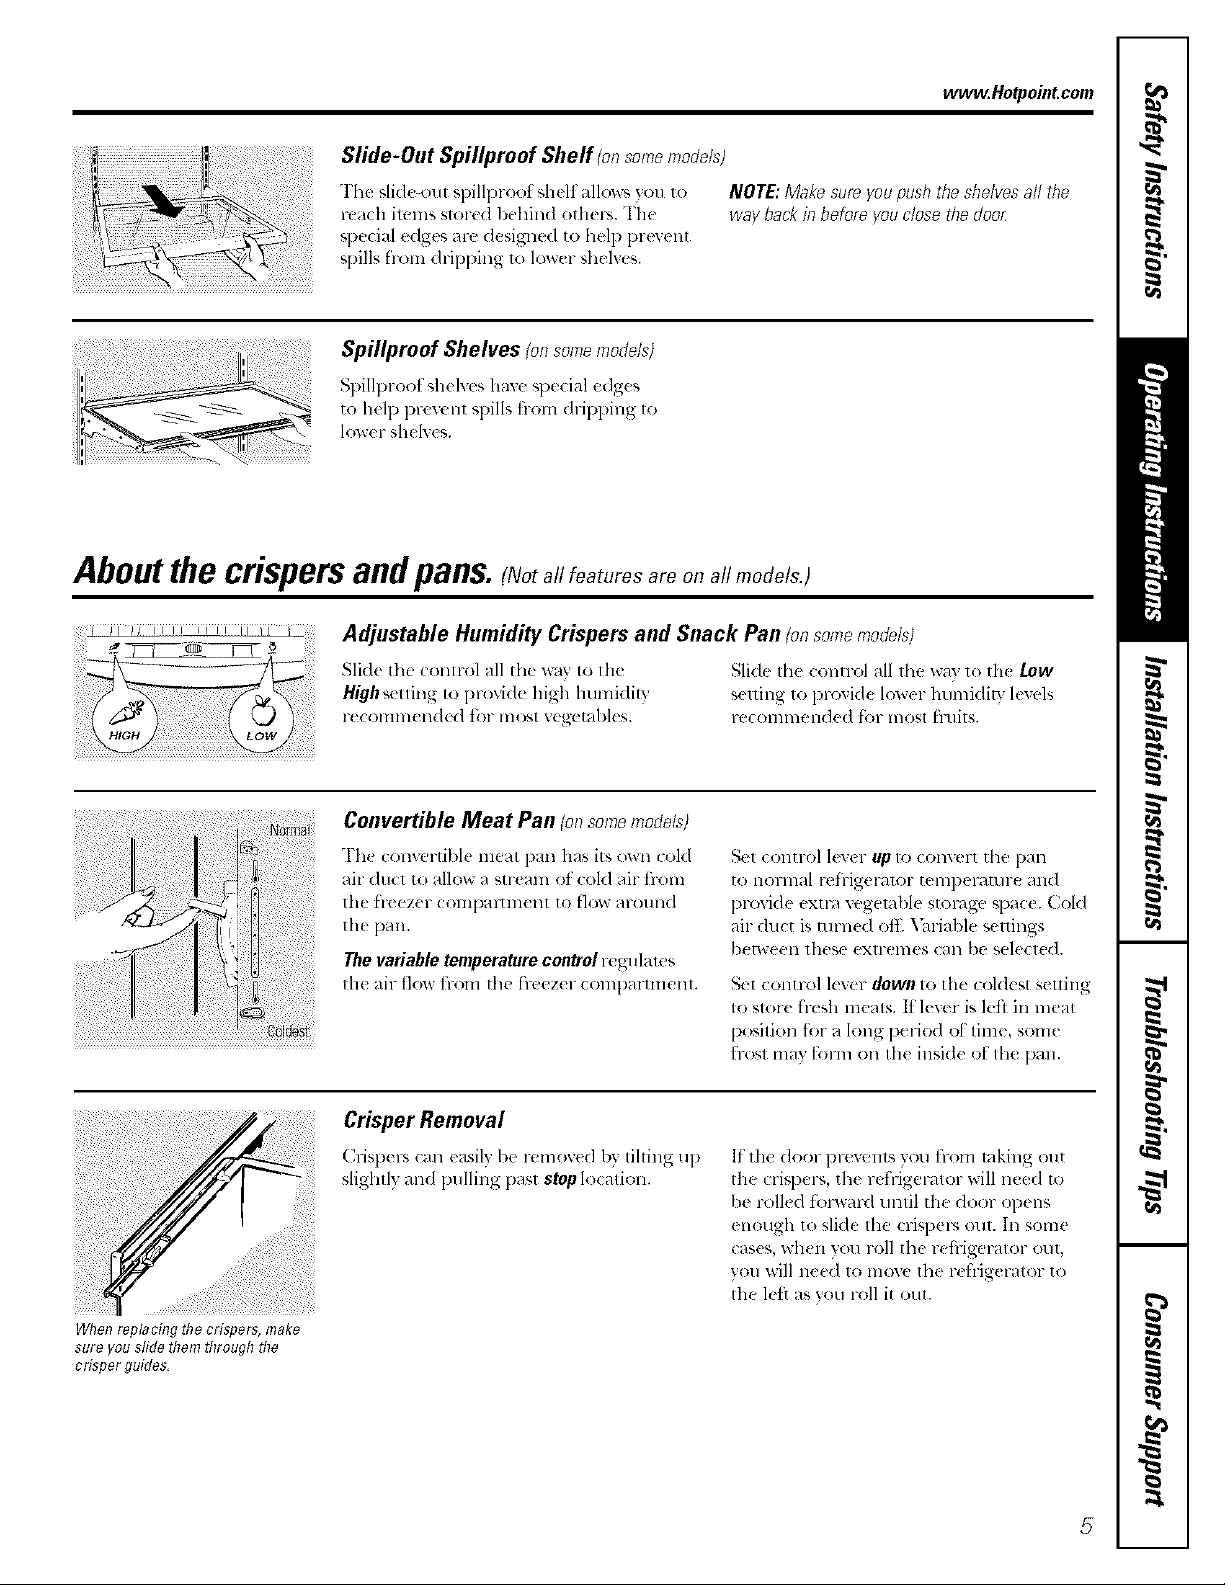
Sfide-Out Spillproof Shelf fen somemodels)
The qide-ou t spillproot shelf allows you to
reach items slored behind othel's. The
special edges rex" designed to help prevent
spills f'rom dripping 1o lower shelw*s.
NOTE:Makesoreyoupushtheshelvesall the
waybackinbeforeyouclosethedoor
Spillproof Shelves (onsomemodels)
Spillproot shehvs haxe special e(lg(s
to help prevent spills fi-om dripping to
lower shelves.
Aboutthecrispersandpans. a,featuresare on all model&)
Adjustable Humidity Crispers and Snack Pan (onsomemodels)
Slide the control nil the _lv to tile
Highsetting to provide high humidity
recommended tot ln_t vegetables.
Slide the control all the way to th( Low
seuing to proxide lower humidit T levcls
recommended Rw most fluits.
www.Hntpoint.com
When replacing the crispers, make
sure you slide them through the
crisper guides,
Convertible Meat Pan Ionsomemodd_)
Th_ convertible meat pan has its owl; cold
air duct to allow a stream ot cold air from
the f'lvez(r conq_:utnmnt to flow around
the pan.
Thevariable temperature control regulaws
the air flow from the fieezer COml)armlent.
Crisper Removal
Crislwrs can easily Ix, removed by tihing up
slightly and pulling past stop location.
Set control lever up to convert the pan
to normal reirigeralor tenlpemmre and
proxi(le extl',l vegetable storage q)ace. Cold
air duct is turned ofl Variable seuings
/)ep,veen these extremes can be select(&
Set control lever down to the coldest setting
to slore hesh meats. It lever is lei] in meat
po',ition tot a long period el time, some
trost may form on the insid( el the [)ml.
If the door prevenls you from taking out
the crispel% the refrigerator will need to
be rolled tbl_vaxsl until the door opens
enough to slide the crispers out. In some
cases, when you roll the refligerator out,
you will nee(I to move the r(frigerator to
the lett as you roll it out.
5
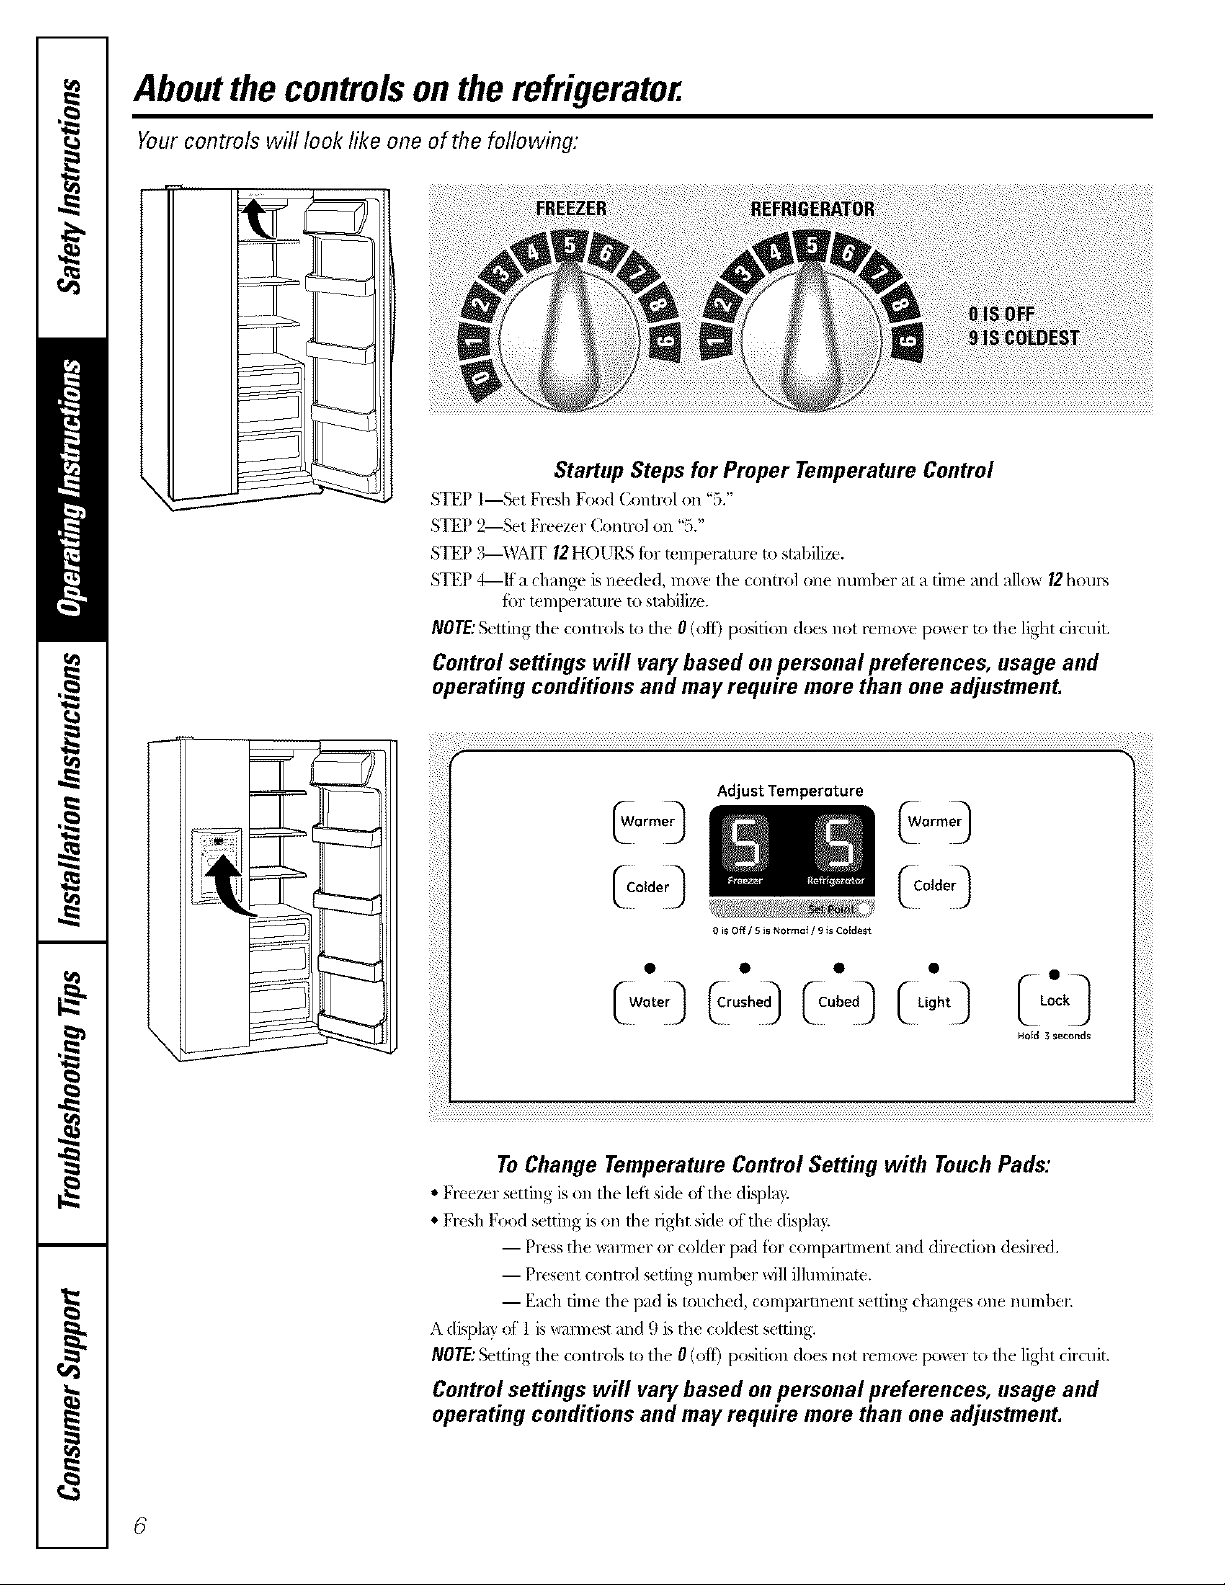
Aboutthe controlsontherefrigerator.
Yourcontrols will look like one of the following:
Startup Steps for Proper Temperature Control
STEP l_qet Fresh Food (_ontrol on "5."
STEP 2I_-t Freezer Control on "5."
STEP3 WAIT 12HO[JRS for temwram re to stabili_'*.-.
STEP 4_ff a change is needed, move the control one number at a time and allow 12hou/_
for tempeF, mlte to staNliz_.
NOTE:Setting the controls to the 0 (off) position does not remo*,e power to tile light circuit.
Control settings will vary based on personal preferences, usage and
operating conditions and may require more than one adjustment.
Adjust Temperature
0 is Off / 5 is Norm_t / 9 is CoIdes_
Hold 3 seconds
ToChange Temperature Control Setting with TouchPads:
• Free_'_'rscUing ison the left side of d_edisplay.
• Fresh Food setting is on the right skle of tilt" displ_J}:
I Press the warmer or colder pad fbr compaVLment and direction desired.
I Present control setting numl_r _]11illuminate.
I Each time the pad is touched, compat mmnt setting changvs one number.
A displ W of l is walmest and 9 is tile coldest setting.
NOTE:,Setting the controls to the 0 (o{f) position does not remove [xm-e_ to tile light circtdt.
Control settings will vary based on personal preferences, usage and
operating conditions and may require more than one adjustment.
6
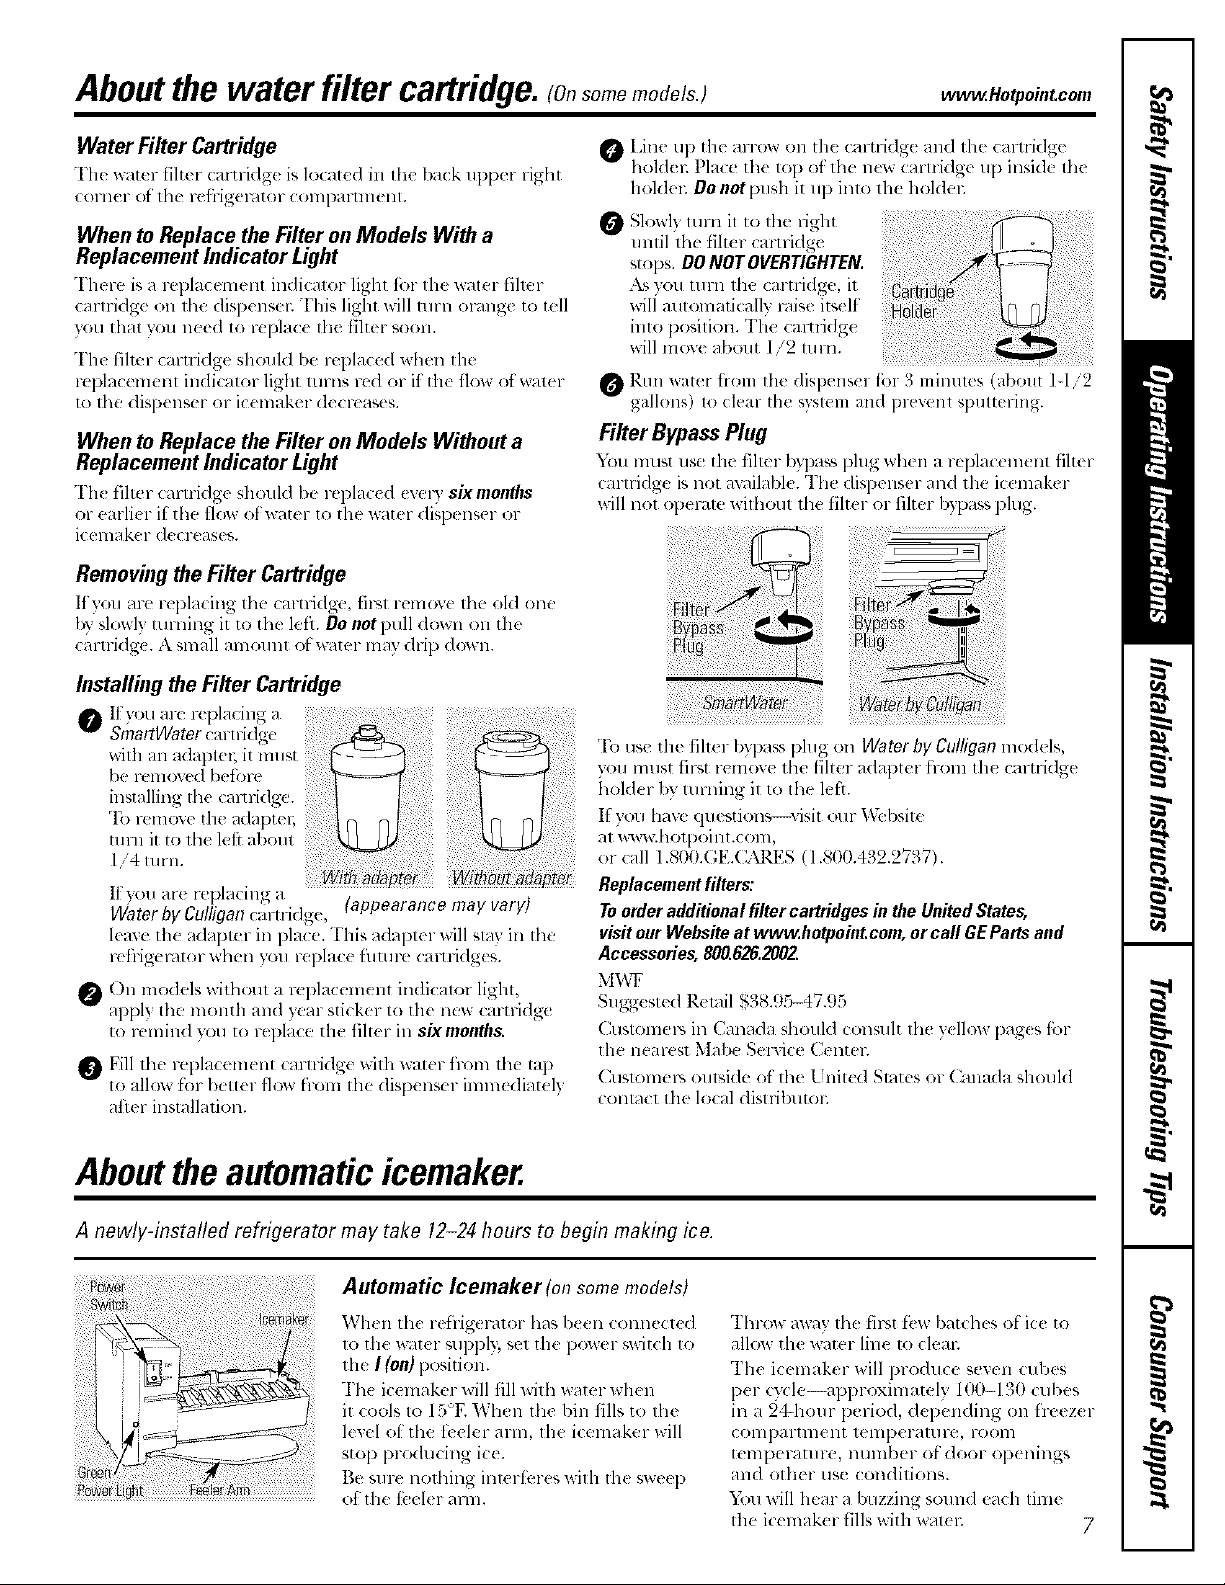
Aboutthewater filter cartridge, somemedelsO w. .Hetpaint.com
Water Rlter Cartridge
The wat{r filt{r Gmridg( is locat{ d in Ih( ba(k Uplxr right
COl'H( 1" Of lhe l'( [}ig(!l'Htof ('_,)l)ll)al-Hllelll.
When to Replace the Filter on Models With a
Replacement Indicator Light
There is a r(l)lacemeltt indi(axor light ibr tll( ,,,,ater fiher
(arlridge on lhe dispensel; This light ',,,ill turn ormlg(! to tell
you that w:m ne{d to rq)lac( Ihe filt{r soon.
The fiher camidge shouM be tel)laced when file
reF,[ncc meltl indi(ator light ltlrlls red or if the flow at waler
to lhe (]isl)enser or i( ( lllak( 1- (l( Cl-( ases.
When to Replace the Filter on Models Without a
Replacement Indicator Light
Th( fiher { aruklgc shouM/)e rq)la((d every sixmonths
or earli(r if' the t]o,A of water to the ,.,41ter disl;,enser or
i{x lllak( r de( reases.
Removing the Filter Cartridge
If',ou m-e repl;idltg th,.' cmnklge, fir',t remove th,.' aM on{'
by slowl} turning it to the left. Do not pull down Oll the
(_lrtl klg(. A small amount el _._/tel m_ly drip down.
htstalling theFilter Cartri& e
Ityou are r(l)lacing a
SmartWater carn-klge
with an adaptel; it m'dst
be remove(1 betore
installing the (am:i(lgc.
To, remove th(! ad_ll)tel;
m rn it to the left about
1/4 turn.
]iyou at( replacing a (appearance may vary)
Water by Cul/igan cn rtridge,
lcaxe the adapter ill l)lace. This a(lal)t( r will Sl_l\'ill the
rel)'igemtor xdmn you rel)lace filmre camq(lge&
On models wilhoul a rei)lacem(nt indicator light,
apply the month and ye a s (ke- e v.'_ (artridge
to remind you to rel)lace the fiher in sixmonths.
Fill lhe replacement Gn-lridg( wilh waler tl-om lhe tap
to allow 12w bettc r flow h-iml the dislx ns,.:r innn((liatel}
after installalion.
aline up the arrow on th( cartlidg( and lh( caruidge
hold(l: Place th( lop of lla{ II(T_7(artrklge tip insM{ the
hold(m Do not push it u1) inlo Ill(! hoMel;
Slowl) mrn il to the fight
until the fiher cartridge
stops. O0 NOTOVERrlaHrEN.
_\syou turn the cartrklge, it
will mltomaticallv l-aise itself
iiiii!iiiiiiii!iii i i !! ii!! ! i! !!; ;iiiiiiii!iiii!ii I
into l)O@ion. Tl_e cam-k/ge
will move about 1/2 turn.
Rtlll W,/t{T{1"O111Illtt dispens_ I tbr a nil,rotes (about 1-1/2
gallons) to clear the system and prexenl spultering.
FilterBypassPlug
xfi:)umust use the fihcr b)l)a_._ phlg wh(n ;I rcplacenmnt filter
cartridge is not a_lilable. The dispenser and the icemaker
will not opeFale wifl]out the filter or filter bypass plug.
To use the fllt(r b?I)ass phlg on Water by Cutligan medals,
you must first remove the filter adapter fl-i)lll the caruidge
ilolder by mining it to tile left.
If you have questions---visit our Website
at www.hotpoinl.conl,
or (:all 1.800.GE.CARI{S (1.800.432.2737).
Replacement filters:
Toorder additional filter cartridges in the United States,
visit our Website at www.hotpoint.com, or call GEParts and
Accessories, 800.626.2002.
M_A,T
•S/Ig,)'g( sled R(lnil S38.,k}--4A):_" ( " _ ( _
Custonml_ ill Canada shouM consult Ill{! y(llow l}ag(s fi.w
Ill(' IIUaFeSI N]al){ Self, ice Cull[(!l;
(21slonleD, outside of Ill(! [ niled Slates (;r (_anada should
conta(l the lo(al dislril)utol;
Abouttheautomaticicemaker.
A new!y-installed refrigerator may take 12-24 hours to begin making ice.
Automatic Icemaker (on some models)
Wh{n the refrigt rater has been connect(d
Io tile _ltel- suppl}, set tile l)ower _witch to
the I (on} position.
The icemaker will iill with water when
it cools to 15"E When the bin fills to tile
level of the tbeler arm, llle icemaker will
stop producing ice.
Be sure nothing interl}..res wilh the sweep
of the t_.!ekr arm.
Thr{:}_ away the first f{w batdms of i{:( to
aIloxx th{ xaater line Io cleal2
The icemaker will produce seven cubes
per cy,_le--approxinlately 100-130 cubes
ill a 2ghour period, depending on f'rvez( r
COlllp_ll-tlllellt tellll)el-_lttlF(, _ l-OOl]]
telllliel-_ltllie , ll!llll/)el" el door Ol)ellillgs
and other use conditions.
_'))u will hear a buzzing sound each tim(
tile ic{ mak( r fills with ",,,at(n2 7
Abouttheautomaticicemaker.
It is nom_al %r sexeml cubes to be joined logethel:
If ice is not used t)-equentl3; old ice cubes will
b(come cloudy, taste stale, mild shrink.
NOTE,"le homeswith Iower4han-averagewater pressare,
youmayhearthe icetnakercyclemultiple tllnes _ztlee
makingone batch of ice
Icemaker A ccessory Kit
It _om rd'rigerator did not (ome ahcadv
equipped with all autonmfic icemakc h an
icenlaker accessol_" kit is ax_lilable at extra cost.
Ch(ck tile back otthe refiigerator ibr tile speciiic
ic( lnaker kit needed tk)l-war mod(l.
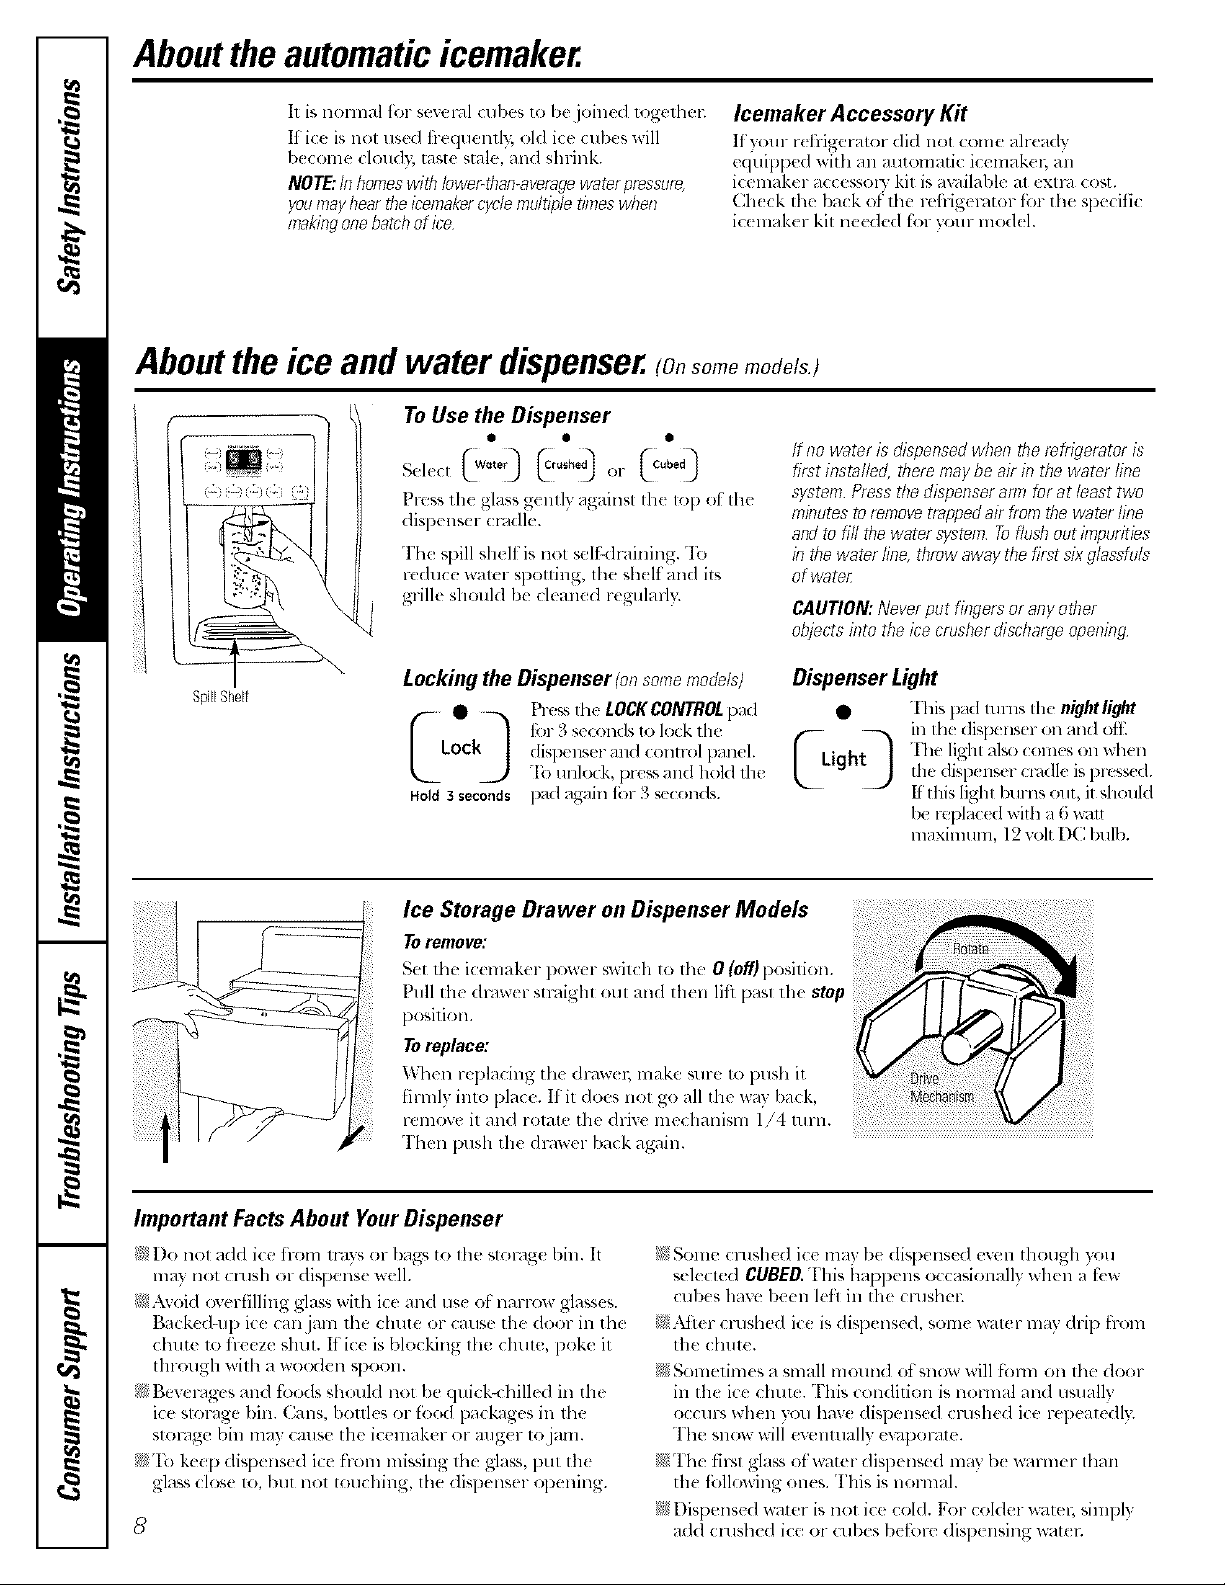
Abouttheiceandwaterdispenser.(a modo
To Use the Dispenser
If no wateris dispensedwhen therefrigeratoris
firstinstalled,d?ere/naybeair in the waterfine
systemPressthedispenserarmforat [east two
minutestoremovetrappedairfromd?ewaterline
andtofill thewatersystemToflushoutimpurities
b d?ewaterline,throwawaythe firstsixglassfuls
of water
CAUTION: Never put fiegef_ or any other
objects #?to the ice crusher discharge opening
Dispenser Light
SpillShelf
eI., 0]o,-
:o
Pre,,s tile glass gently against the top of tile
dispenser cF,idle.
The spill shell is not self-draining. To
reduce wamr spotting, tile sh(lt mid its
grille should be cleaned regularly.
Locking the Dispenser fensomemodels)
• t_-e,_sthe LOCKCONTROLpad
• This pad lurns Ihe nightlight
LOC disl)enser and control l)anel.
k] t_ 's_( ldstolo(kflle
To unh×k, press and hold the
H01d3seconds pad again {br 3 seconds.
Ice Storage Drawer on Dispenser Models
Toremove:
Set die icemaker power switch to tile 0 (Off) position.
Pull tile (Imwer straight out and then lif_ past tile stop
position.
Toreplace:
_Aqlcn rcpladng tilt. draw(l; make surc to push it
firnlly into [)lace. If it does not go all the way back,
remove it and rotate the drive mechanism 1/4 toni.
Then push the drawer back again.
Important Facts About Your Dispenser
i!i:"I)o not add ice from rafts or bags to file storage bin. It
Ilia} llOt c lllsh o1" dispense well.
i{i_..\void overfilling glass with ice ml(I use of narrow glasses.
Backed-up ice can jam the chute or cause tile doc, r in tht
chute u) freeze shut. ff i(:_ is blocking tile chute, poke it
fln-ough with a we(Men spoon.
;'_Bevel-agvs and fi)ods shouM not be qui(k-chilled in tile
ice storage l)in. Cans, boules or foo(/packages in tile
storage bin may cause tile icemaker or mlg(r to jam.
N'I'o keep dispensed ice fi-onl missing tile g]ass, put th_
glass close u), but not touching, file dispenser opening.
8
igh The lighl alsx)(:(nnes on when
the dislx ns_ r cmdk is presscd.
If'this light burns out, it should
[m replac_ d with a 6 _,_tlf
nlaxinlum, 12u)lt DC bulb.
i_iSome cmsh(d ice may be dispensed even though you
selected CUBED.This happens occasionally when a ti,w
cub(s have been leh in the crasher:
_5_M'ter cashed ice is dispensed, some water may drip fix)m
tilt, chute.
!_5Sometimes a small mound ot snow will fi_mn on tile door
ill tile ice chut(. This condition is hernial and usuall}
occurs when w)u. hay( dispensed crushed ice repeatedly.
Th( SIIOW will evenlually (vapomt(.
_7"I'he fip, t glass ot water dispensed may b( warnler than
tile fbllowing ones. This is normal.
!_5Dispensed water is not ice cold. For colder watel; simpl 3
add cmsh_ d ice c,r cubes b(f;olv (lisi)( rising wat_ 1;
Careand cleaning of the refrigerator, w eutpointcom
Cleaniug the Outside
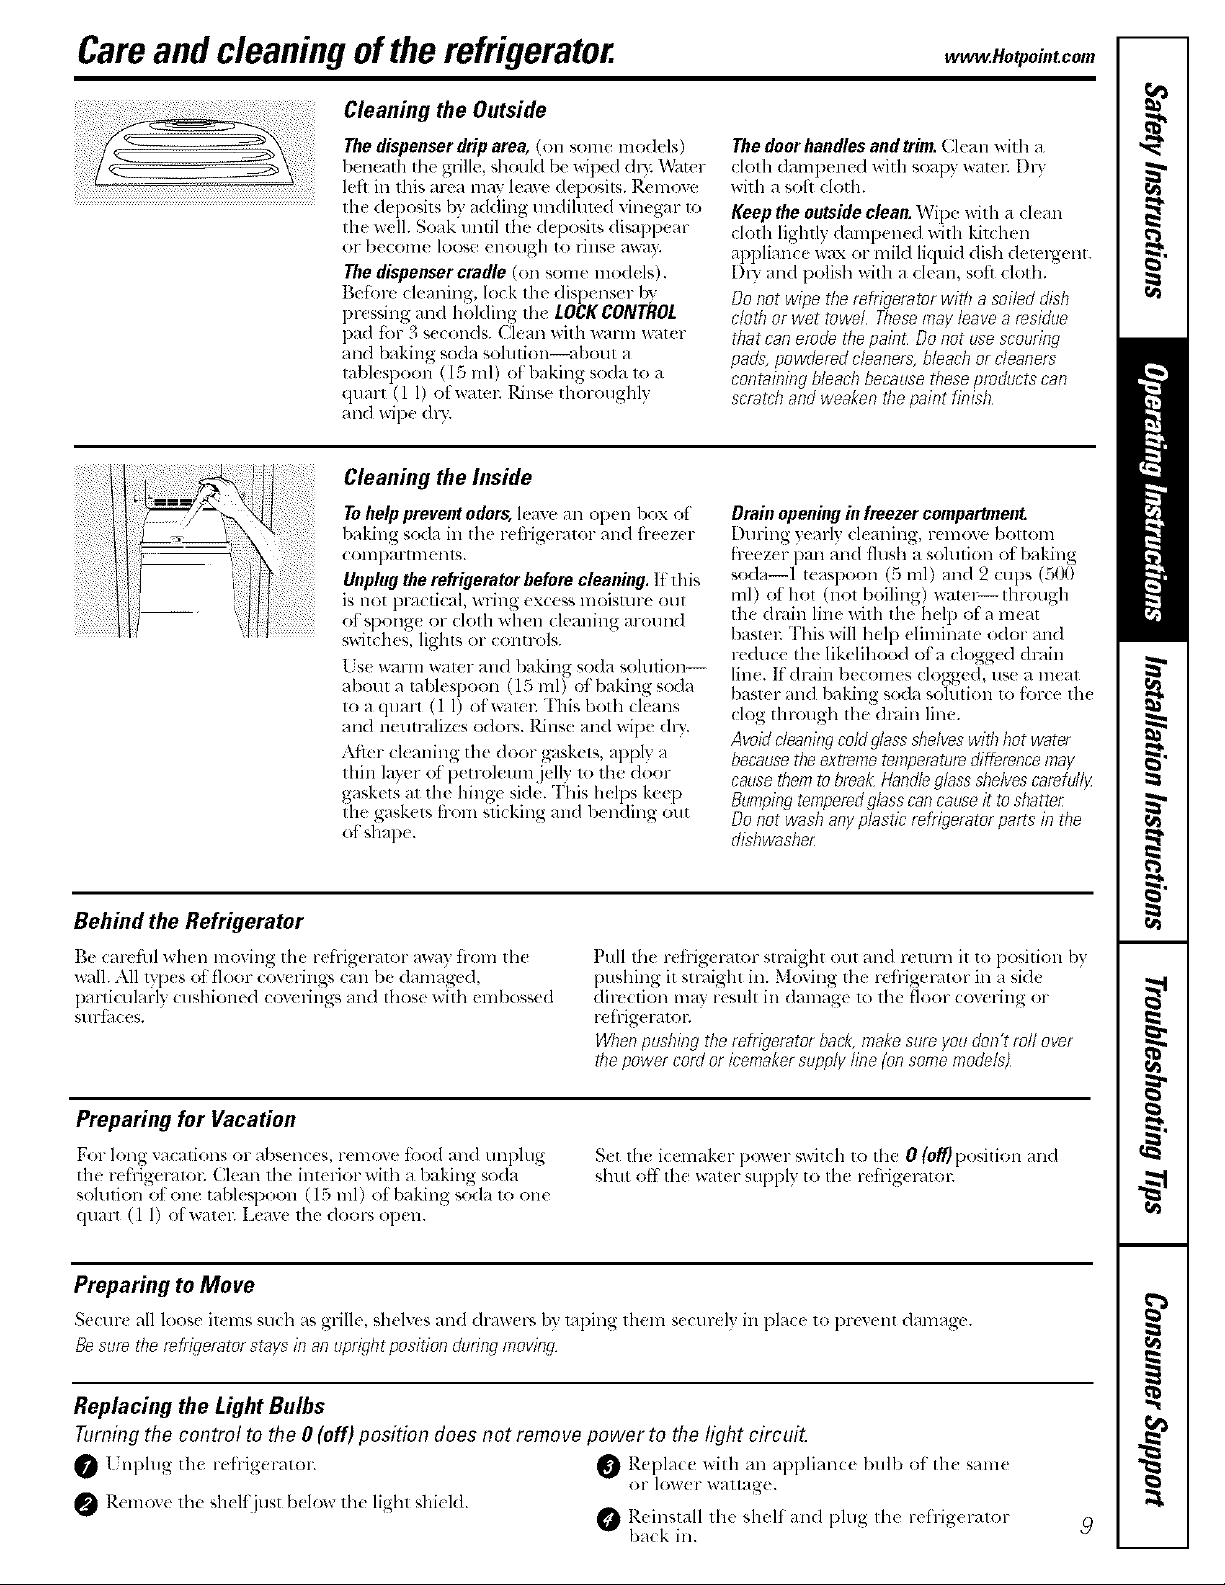
Thedispenserdriparea,(on some m()dels)
I)(n(alla the gillie, should be wilxd dlT,:\\_ater
kfl in 1his area may leave deF,osils. Remove
tlaedeposits by adding undihm,d vinegar to
the well. So;Ik matil the deposils disappem
or b('colxxe loose ('Hough [0 riXXS( _t_,VH_,
Thedispensercradle(on some lnod(Is).
Before de;ruing, lock the dispenser by
pressing and holding the LOCKCONTROL
pad ti_r 3 s( rends. Clean with warm v,ater
and baking soda solution--about a
tablespoon (15 ml) of baking soda to a
quart (1 1)at walen Rinse lhoroughl}
and wipe dlT.
Cleaniug the Inside
Thedoorhandlesandtrim.Clea n with a
cloth dmnpened with soatu w_ltel; DIT
with a soft cloth.
Keeptheoutsideclean,Wipe with a (lean
cloth lightly dampened with kit(hen
appliance wax or mild liquid dish demlgent.
DIT and polish with a clean, soft cloth.
Donotwipe therefrigeratorwith a soileddish
cledlor wet towel These.mayleavea residue
tbat canerodetbe pathLDo notusescourleg
pads,powderedcleaners,bleachorcleaners
contathlegbleachbecausetbeseproductscan
scratchand weakenthepaint fthisb
Tohelppreventodors,leavean open box of
b_tking soda hx the rcfiigerator and fi-cczer
( OIIXl )Hl-[nlelllS.
Unplugtherefrigeratorbeforecleaning.It this
is not lWacti(al, wxing excc_,smoisture out
of sl)onge or cloth when cleaning around
switches, lights or conHx)ls.
Lse warm water and baking soda solution--
about a tablespoon (15 ml) of baking scOa
to a quart (l 1) ofx_atel; This both cleans
and neutralizes odop< Rinse an(I wipe (hy.
Allot cl(aning the (lear gaskets, apply a
thin layer of petroleum.jelly u_ tile door
gaskets at the hinge si(le. This helps kee D
tim gaskel,, from sticking and b( n(/ing out
of shap(.
Behind the Refrigerator
Be carefifl when moving the refi-igeralor awa} flom the
wall. All lypes of floor covelings Call be damaged,
particularl) cushioned coverings and those with embossed
surl5( es.
Drainopeninginfreezercompartment
During yearly cleaning, remove bottom
h-cezer pm'_and flush a sohlfion el b_&ing
soda--I teaspoon (5 ml) and 2 cups (5(_)
ml) ot hot (hal boiling) ware1_-- flnough
the (h'din line with the help of a meat
bastel: This will help eliminate odor and
reduce the likelihood of a clogg(d drain
line. If drain becomes clogged, use a meat
baster and baking soda sohltiolx to f_r('e th(
clog through tim drain line.
AvoidcleanOTgcoldglessshelveswithhot water
becausetheextremetemperataredifl_rencemay
causethemtobreak Handleglassshelvescarefallg
Bamplegtemperedglasscancauseit tosbatter
Oonotwashanyplastic"refrigeratorparts'in tbe
dishwasher
Pull the rd'rigex-dtor straight out and rcmm it to position by
pushing it stlaight in. Moving tile refiigel-dtor in a side
direction max resuh in damage 1o the floor raveling or
ref rigeralol;
When pusbiag the refrigeretor back, make sore you don't roll over
the power cod or icemaker supply line (onsome models)
Preparing Dr Vacation
Fox"long xa<alions or absences, remove ti_od and tmplug
the ref'rigerdlon Clean the interior with a baking soda
sohltion plane tabl(q)oon (15 ml) of baking soda to one
quaxt (1 1) ofwatel: Leave the door:, op(n.
Preparing to Move
Sc(urc all loose items such as glillc, shelves and chmver_ b? lal)ing them sccurd} in pla(c to [)r(w*nt(lmnagv.
Besuretherefrigeratorstaysin anuprightpositionduringmoving
Set the icemaker power sxdtch to the 0 (O_)l)osition and
shut off the water supply to the rctiig(mton
Replacing the Light Bulbs
Turning the control to the 0 (off) position does not remove power to the light circuit.
I lxphlg tlx(! r(:['rig(wator. _ Rel)la( e with an al)pliall(:e bllll) Of" Ih( saHle
Remov( the shelf just [)dew the light shield.
or lower "tgallage.
Reinstall 1h€ shelf and plug Ill( re['x-igeralor
back in.
9
Installation Instructions Moa ,,,o,,Z,,
Questions?Call800.GE.CARES(800.432.2737)orvi<t o.r xw/,_i. _: www.HotpoinLcom
In Canada, call 1.800.361.3400or visit ,,,r Web_iteat: www.geappfiances.ca
BEFORE YOU BEGIN
Read these instructions completely and carefully.
• IMPORTANT - s.,, th, {
instru(tions for lo(al insp{ (lor's us(.
• IMPORTANT - Ol,,erveall
goxel-llillg (odes all(1 ol-dill_lllc('s.
• Note to Installer _ P,e sure 1o leave th_se
instru(tions with the Collstlll]er.
• Note to Consumer _ Keep these instruclions
t;:)r l_klture referem e.
• Skill level - Installation of this appliance requires
basic m{ chanical skills.
• Completion time- ReMgerator Installation
15 lllitlllles
• Proper installation is lhe responsibilit} of:installel;
• Product i_dlure due to improper installation is 11o1
covered llllder th{ _\:arl-al117,,
REFRIGERATOR LOCATION
• Do not install the reflig{ P,ltor where the tempeP, lture
will go below 60°F (16°C) becmlse it will not run
ot_en enough to maintain proper tempeDmn-es.
• Install it on a floor strong enough 1o support it tillly
loaded.
ROLLERS
The rollers have 3 purposes:
• Rollers adjusl so the door closes easily when opened
about llaliwaJ?_
• Rollers a_ljusl so the reiiigec,_tor is thinly positioned
on the floor and does not wobble.
• Rollers allow you to move the refligtq-,ttor away from
th_ x_allt;.w(leaning.
To adjust the rollem, remove the base grille by pulling it
out at the bottonL
WATER SUPPLY TO THE ICEMAKER
(on some models)
It the rcli'igcr_ltor has ;111i<cm_lkc_; it will h;ixt, to be
connecled to a cold waler line. A (;E water supply kit
is axailahle at extra cost irom }our d{ alel; by xisiting
our'vgcbsit{ at www.Hotpoint.com (in Canada, at
u_,_:geappliances.ca), or flom Paris and Acc_ ssories,
800.626.2002.
CLEARANCES
_Mlowthe following cl( arances l_n-ease ol installation,
pr,.)p,.:rair circulatioll 5111{1plunl/)ing and el{ctrical
COllll{ ctioIIS.
• Sides 1/8 (4 ram) *Top 1" (25 lnlIl) • Back 1" (25 ram)
_\{1() (1( _an(((t3/4 (l{.)mm)is ae{{l{(l_ }0 (l((
01){ llillg whi(h p]'(Md{ s 1){ ttel- a((ess tO t'O{KI SlOlage _lr{ {/.
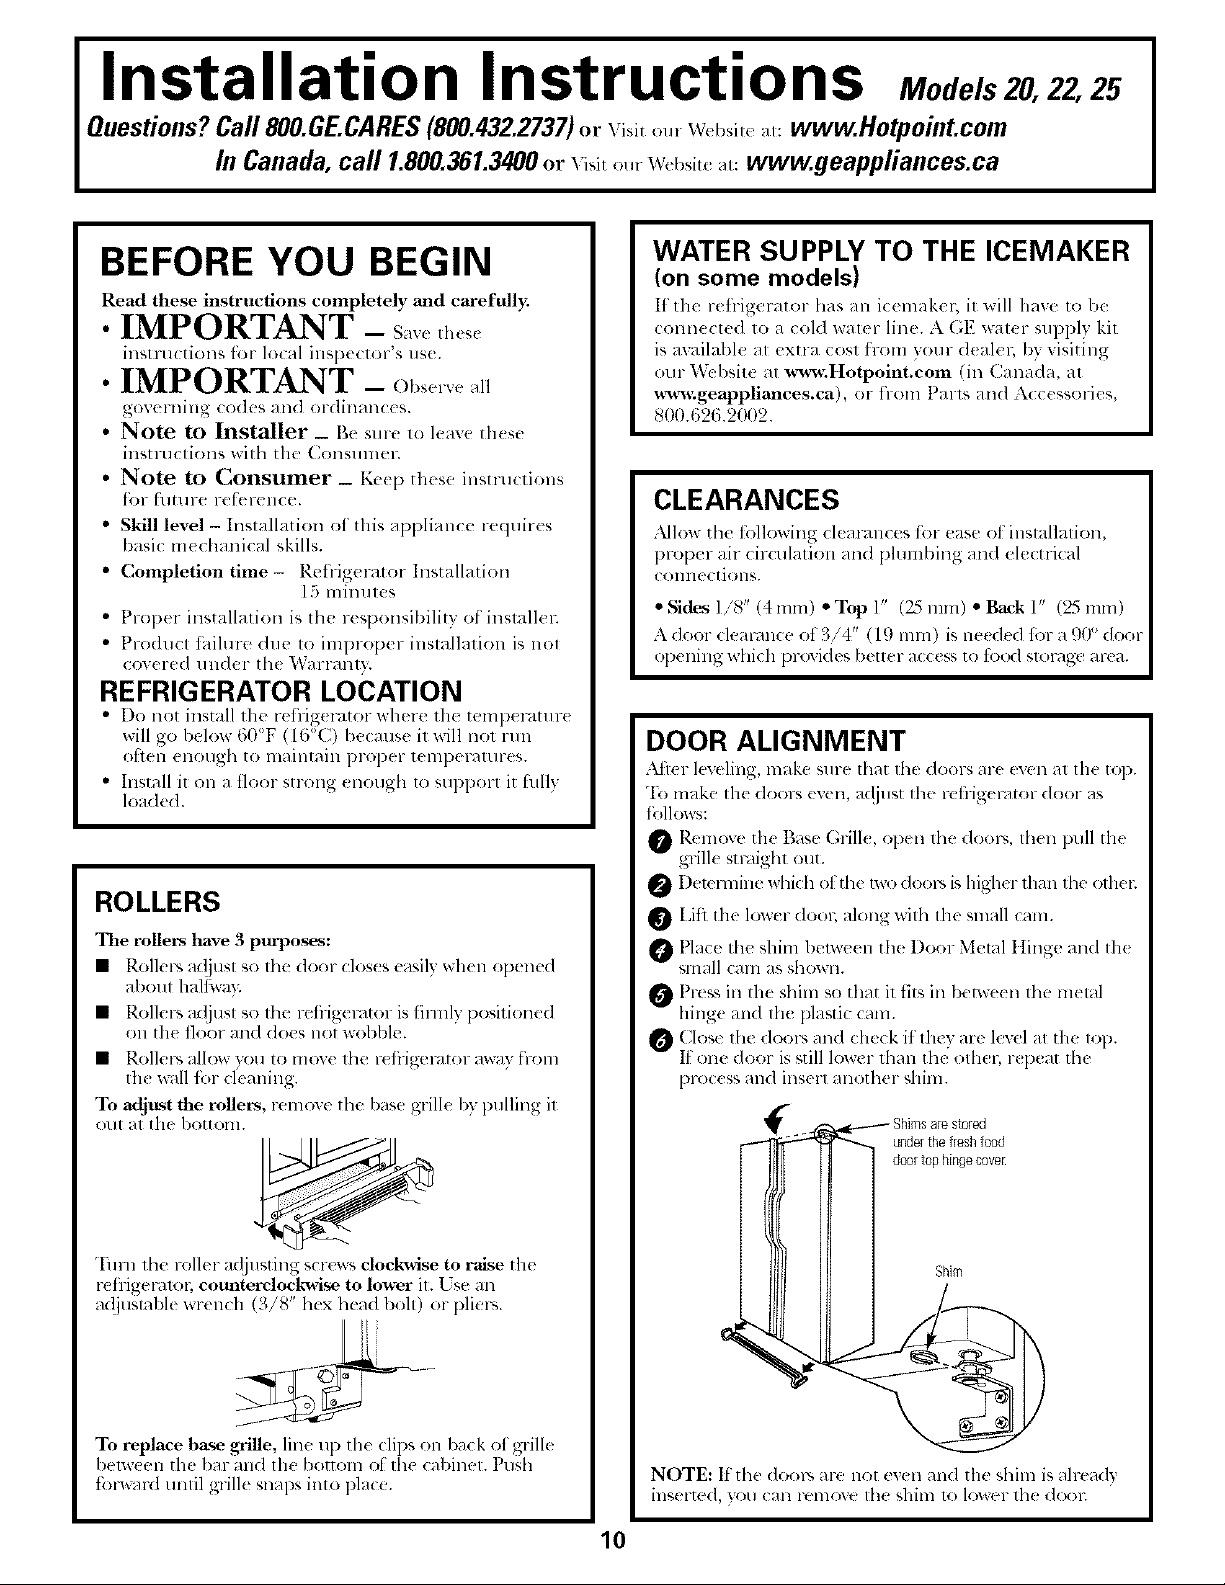
DOOR ALIGNMENT
.M'ler leveling, m;Ike sure theft lilt' doors are even _t lhe top.
"Ik)make tile doors exen, av{justfile refrigerator door as
follows:
_ Remove the Base (;rill{, open 1he dool_, Ihell pull the
grill{ Sll-_lighl O!lt.
Detel mine which otthe two dool_sis higher than the (xhen
Lift the lower {lode along with the snlall cam.
)
t lac{ the shim/)elxveen the I)oor Melal IIinge and th{
-- small cam as shown.
_ Press in tll_ shhn so that il fits ill beP,veen 1he metal
hinge and Ihe plastic cam.
_ Clos{ in{! dools alld (h{{k if" tllev ar{ level _11the lop.
It one door is still lower than th{_other, r{p{at the
[)ro{('ss alld insert another shim.
• / t*
underthefreshfood
doortophingecoveE
'I_lrn the roller adjusting screws dock-wise to raise the
reflJgelvllol; counterclockwise to lower it. [se an
adjustable wrench (3/8" hex head boh) or pliers.
To replace base _lle, line up tile clips on back of grill_
I)el_,veen the bar and tile/)ottoln o_' Ihe t-:al)in01. Push
t{)lx_ar(I tlnlil glille sn_ll)S into place.
Shim
NOTE: If the (Ioo1_,are not even and the shinl is alread)
illS{ l'[(!d, y(}tl (;Ill l'(_l]l(}v( file shim 1o lower lhe doo]2
10
Installation Instructions
INSTALLING THE WATER LINE
BEFORE YOU BEGIN
Recommender1 copper water supply kits are WX8X2,
WXSX3 or TVXSX4, depending (}11the amount o[
ml)ing you need. Approxcd plastic wat(r suppl) lira's arc
GE SmartConnc( t;" Refrigerator Tubing (WX08X10(t02
B_08X10006, WX08X 10015 and WX08X 10025).
When comlccting your refrigerator to a GE Reverse
Osmosis Wat(r System, the only approv(d installation
is with a GE l_3,T2it. For other reverse osmosis water
systems, follow the mamltacmrer's r( commendations.
If the _ater supply to tile rctrigelator is tl-om a R(verse
Osmosis Water Filtration Svstem AND the rd_igerator
also has a water tlhel; us( Ill(: reMgeralor's t]lter bypass
plug. tsing the retrigerator's water llltration cartridge in
conjtnlction with the RO tilter can result in hollow ice
cubes and slower water flow fl-om th( water dispenser.
This water line installation is not warranted 1V th(
reh-igerator or it(maker mamltacmren Follow these
instructions carefully to minimize th( risk of CXlX nsivc
water (lalllag(.
TVater hammer (war( r t)anging in the pipes) in house
phmlbing call cruise damage to retrigerator parts and
lend to water l(akage or flooding. Call a qualitied
plumber to correct water hammer boil}re installing
the water suppl) line 1o the refrigeraton
"Ib prevent burns and product damage, do not hook
up tile water line to tile hot water lille.
If you use your retrigemtor before connecting tile waler
lille, make sur{ tile icemak{ r power switch is in the 0
(0_) position.
Do not install the icemaker robing in areas where
temperatures tbll below trcezing.
All installations must lye in accordance with local
plumbing code requirements.
WHAT YOU WILL NEED (CONT.}
NOTE: The only GE approved plastic tubing is that
supplied in GE SmartConnect TM Refrigerator Tubing
kits. Do not use any other plasdc water supply line
because tbe line is under pressure at all times. Certain
types of plastic will crack or rupture wiib age and
cause water damage to your home.
• AGE water supply kit (c{mtaining tubing, slmtoff
valve and fittings listed below) is available at extra
cost from your d(aler or from Parts and Ac(essories
800.626.2002.
• A cold _ter supply'. The water pressure must be
belw(en 20 and 120 p.s.i. (1.4-8.2 bar) on mo&ls
without a water filter and between 40 an(1 120 p.s.i.
(2.8-8.2 bar) oil rood(Is with a wat(r flitch
• Power (kill.
• 1/2" or adjustable wrench.
• Straight and Phillips blade screwdriver.
• Two 1/4" outer diameter compression nuts auld
2 ferrules (sleeves)--to connect the copper robing
to tile shutot] valxe and tile refrigerator water valve.
OR
• It )ou are using a GE SmartConnect 1xl RcMgerator
Tubing kit, the necessary fittings arm l)reasseml)led to
tile tubing.
WARNING - c{,,.,.tt,, l)otal}l{x at{r
suppl) onl);
WHAT YOU WILL NEED
• Copper or GE SmartConnect _"Refrigerator Tubing
Mt, 1/4" outer dimneter 1o conne(t tile reMgenltor
to tile water sui}l}ly. It using copper, l)( sure both
(rids of the tubing are cut square.
"Ib determine how mu(:ll tubing you nee(l: measure
the distance fron] Ill( water valve on the back ot the
retHgerator to the water supply pipe. Then add 8'
(2.4 m). Be sure there is sulticient exua tubing (about
8' [2.4 m] coil(d into 3 turns of at)out 10" [25 cm]
diameter) to alh>w the retrigerator to move out floln
the wall after installation.
GE Sn]artConnect _'' Refi-igerator Tubing Kith ar(
mailable in the tbllowing lengths:
2' (0.6 m) -WX08X10002
it' ( 1.8 m ) - WX08X 10006
15' (4.6 m) - WX08XI0015
25' (7.6 Ill) - WX08XI0025
Be sur( that the kit you select allows at least 8' (2.4 m)
ms dcscrib(d abow.
• If)our existing copper water line has a flared fitting
at the end, you will need all adapter (available at
phnnbing suppl) stores) to connect tile water line to
tilt' l-efrigerator OR yotl Call tilt ofI tlv2 flared titling
with a tube cutter and then use a compression
lilting. Do not cut formed end from (;E
SmartConnect TM ReMgerator robing.
• Shutoff valve to connect lo tile cold water line.
The shutot} vaN( should haw: a water inlet with a
mininmn] inside dianleter of 5/32" at the point ot
connection to the COLD WATER LINE. Saddle-type
shutot_ valxes are included in many water supply kits.
Before purchasing, make sure a saddl(4ype valve
complies with your local plumbing codes. Install the
shutoff valxe on th( nearesl h-equently used drinking
water lille.
11
Installation Instructions
I[_ SHUT OFF MAIN WATER SUPPLY I
[] DRILL THE HOLE FOR THE VALVE
Choose a lo(ation for the xalvc that is easily
a((essible. It is l)(st t(;>(onne(t hlto the si(l( of a
_(rtical wat(r pip(. Wh(n it is n( ( (ssaxy to (onn(ct
illto a hoFizolltal _,vat(,r pil)e , lllakc th( COlll]( (tiOll
to the top or side, rath(r Ihan at th( boltom,
to avoid drawing off any sedim(nl from th(
water pip(.
Drill a 1/4" hole in Ih_ wat(r pipe (even il using a
self-pi(rcing valve) using a sharp bit. Renlove any
braTS r(suhing fronl <hilling th( hol( ill file pip(.
Take care not to allow water to &'ain into the drill
Failmx Io drill a 1/4" hol( mav r(suh in r(du((d
i(( pro(lu(tion or small(r (ub(s.
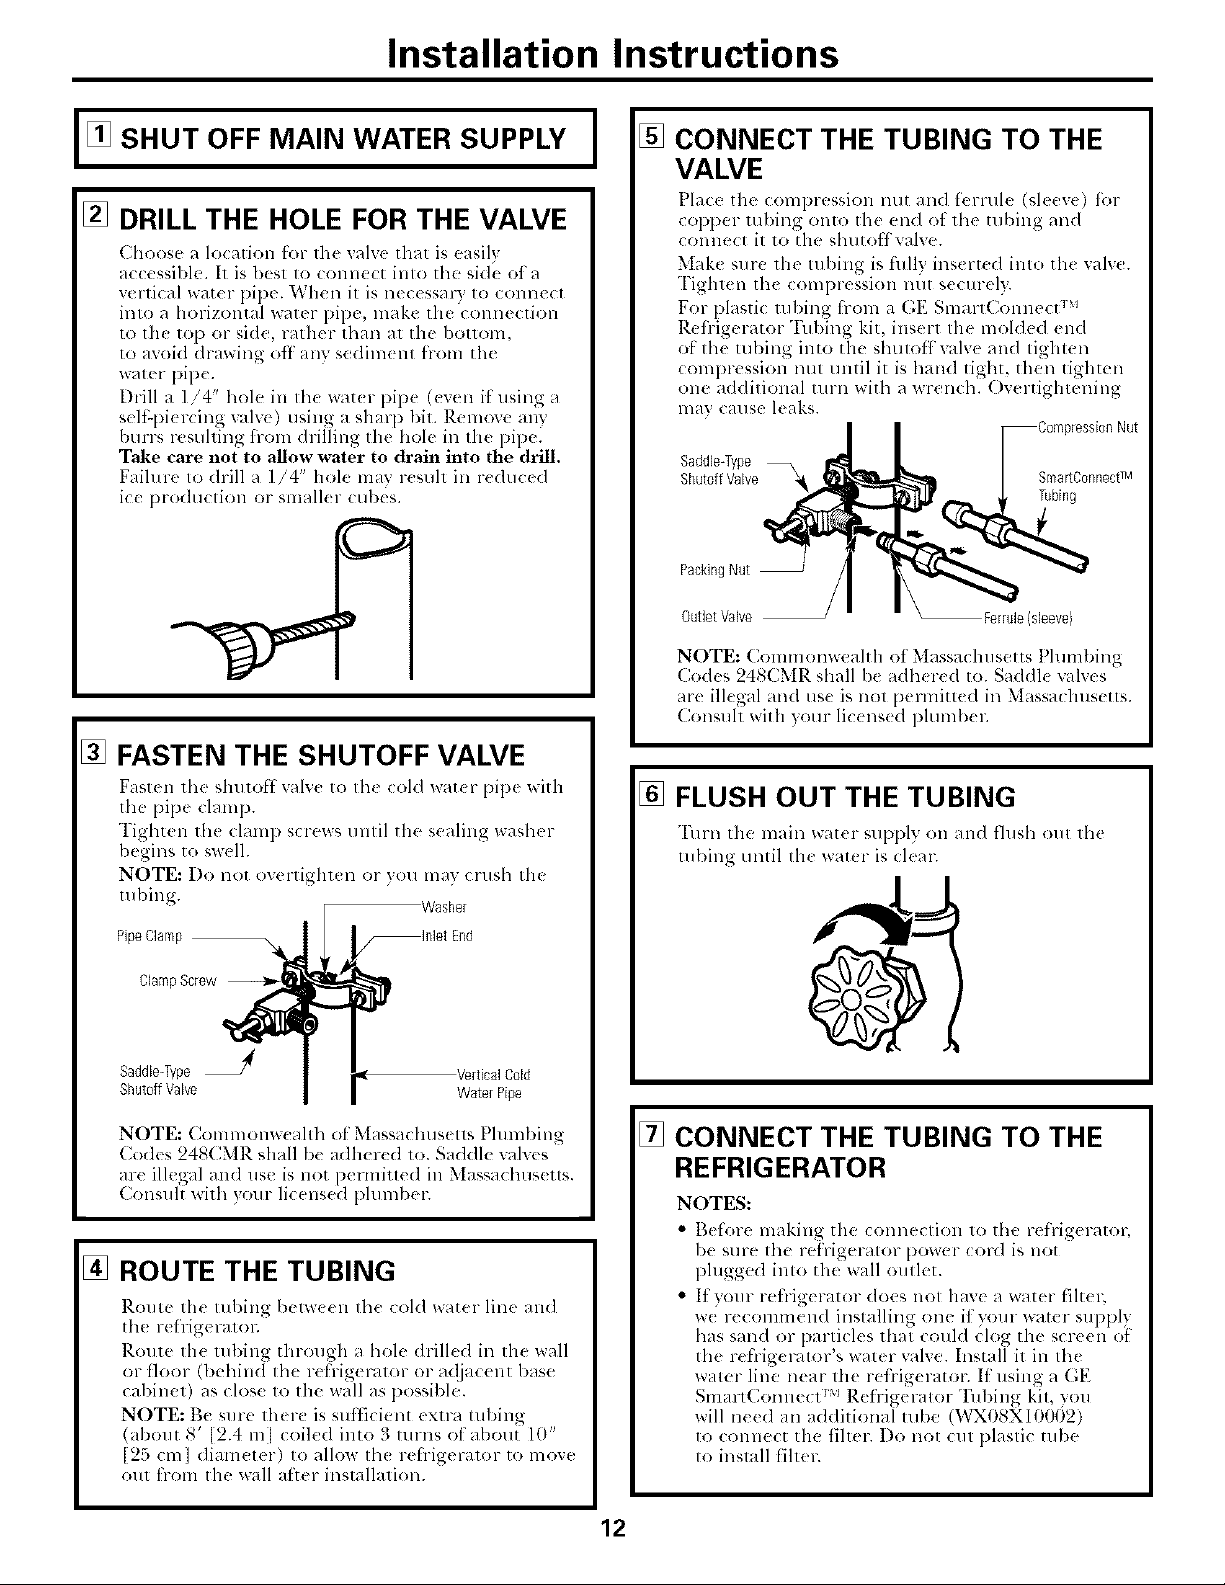
CONNECT THE TUBING TO THE
VALVE
Place tile compression nut and ferrule (sleeve) %r
copper ml)ing onto tile end ot tile tubing and
commct it to tile slmtoffvalve.
Make sure the tubing is filll} insert(d into tile vane.
Tighten the compression lltlt securel}.
For plastic tul)ing fionl a GE SmartConnect rM
Refi-igerator "Iid)ing kit, insert the molded end
of the tubing into the shmoffxalve and tighten
(:ompression nut until it is hand tight, then tighten
one additional turn with a wrench. Overtightening
may cause leaks.
Saddle-Type
ShutoffValve
PackingNut [
OutletValve / Ferrule(sleeve)
NOTE: (:ommonwcalth ot Massa( husctts Plumbing
Codes 248CMR shall be adh(red to. Saddl( valves
are illegal and use is not permitted in Massachusetts.
Consuh with yore lic(ns(d plumb(l;
SmartConnectTM
Tubing
[] FASTEN THE SHUTOFF VALVE
Fasten tile shutof} _alv( to th( cold wat(r pipe with
the pipe clamp.
Tighten the clamp s( rews tmtil tile sealing washer
begins to swell.
NOTE: Do not overtighten or you may crush tile
mbing. Washer
PipeClamp
ClampScrew
Saddle4ype _ VerticalCold
ShutoffValve WaterPipe
NOTE: Commonw(ahh of Massachusett_ Phlmbing
Codes 248CMR shall be adhered to. Saddle valves
are illegal and use is not pmmitted in Massachus(tts.
Consult with your licensed phnnber.
[] ROUTE THE TUBING
Route tile robing belw((n th( cold water line and
tl_( r('frigcraton
Route Ill( tul)ing through a hole drilled in tile wall
or floor (behind tile refrigerator or a(!jacent base
cabinet) as close to the wall as possible.
NOTE: Be sme there is sufficient extra tubing
(about 8' [2.4 m[ coiled into 3 turns ot about 10"
[2;'} cm] diam(ter) to allow lh( refrigerator to mo_e
out from tile wall aRer inslallation.
FLUSH OUT THE TUBING
Turn the main wat(r supply on and fhlsh o111 Ill(!
tubing until Ill( water is clear.
CONNECT THE TUBING TO THE
REFRIGERATOR
NOTES:
• Befin-e making the connection to tile refYigerator,
be sure tile refrigerator power cord is not
plugged into the wall outlet.
• It your refrigerator does not have a water filt(L
w( recommend installing one it your water supply
has sand or particles that could clog the screen of
the refrigerator's water valve. Install it in the
water line near the refi-igerator. If using a GE
SmartC, onnect rMRefrigerator Tubing kit, you
will need all additional tube (Vv_X08X10002)
1o connect the filter. Do nol cut plastic robe
to install f'iltel:
12
Installation Instructions
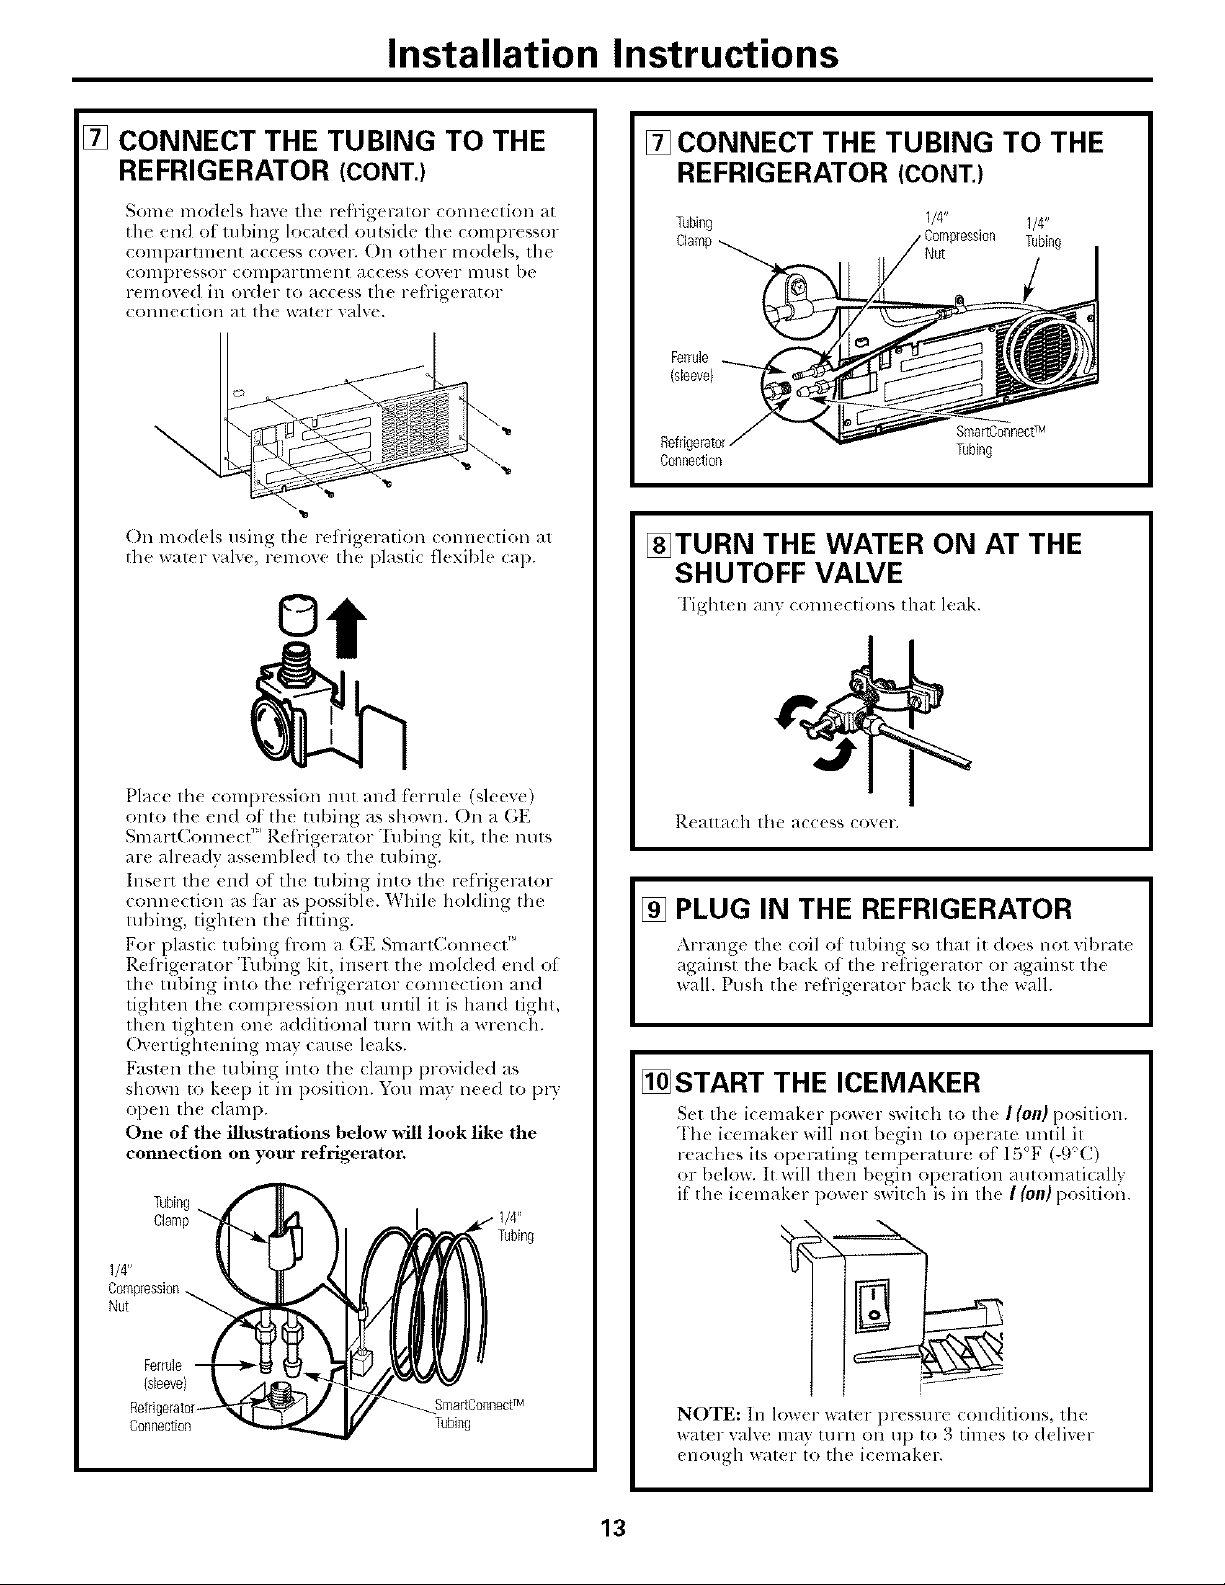
[] CONNECT THE TUBING TO THE
REFRIGERATOR (CONT.)
Some models have tile reh-igerator connection at
the end ot tubing located outside the eompr( ssor
compartment a(c( ss cover. On olher models, the
compressor compartlnent access cover musl be
remoxed in order to access the refrigerator
connection at th_ water valve.
c2'
On models using the retrig{ ration connection at
the wal{r valve, remove Ih( plastic tl(xible cap.
©
[] CONNECT THE TUBING TO THE
REFRIGERATOR (CONT.)
Tubing 1/4" 1/4"
Ferrule
(sleeve)
Smar[ConnectTM
Refrigerator Tubing
Connection
Tubing
[_TURN THE WATER ON AT THE
SHUTOFF VALVE
Tighten any connections that leak.
Place tile COml)ression nut and l'_rrule (sleeve)
onto tile end ot Ill( tubing as shown. On a GE
SmartCommct" Retrigerator Tubing kit, the nuts
are already assembled 1o the tubing.
Ins( rt the end of the tubing into the refrig( rater
connection as lhr as possible. While holding the
tubing, tighlen tile titling.
For plastic tu/)ing fl-om a GE Smarl(](mnect"
Retrigerator Tubing kit, insert th( molded end of
the tubing into the refrigerator comlection and
tight( n the compression mlt until it is hand tight,
then tighten one additional turn with a wrench.
Overtightening may cruise leaks.
Fasten the lubing into lhe clamp pro_ided as
shown to keep it in position. You may ne{d to plT
open tll{ clamp.
One of the illustrations below will look like the
connection on your refrigerator.
Tubing
Clamp
I/4"
Compression
Nut
Ferrule
(sleeve)
Connection Tubing
Sma_ConnectTM
Tubing
R{ attach the access cov( 1-.
[] PLUG IN THE REFRIGERATOR
Arrange the coil of tul)ing so thai it does not vii)rate
against Ill( ba(k of Ih_ retrigeralor or against Ill(
wall. Push the l-el'l-igel-alOF back 1o Ill{? wall.
[_START THE ICEMAKER
Set the icemakcr p(mcr switch to the I(on) position.
"['he i_cmakcr will not bugin to olmratu mltil it
rcaclu's its operating t(mpcrature of 15°F (-9(/)
or below. It will then begin oi)eration automatically
if' the icelnaker power switch is in the ! (on} positiofi.
NOTE: In lower water pressure conditions, tile
water valve may turn on up to 3 times to delixer
enough water 1o the icemaker.
13
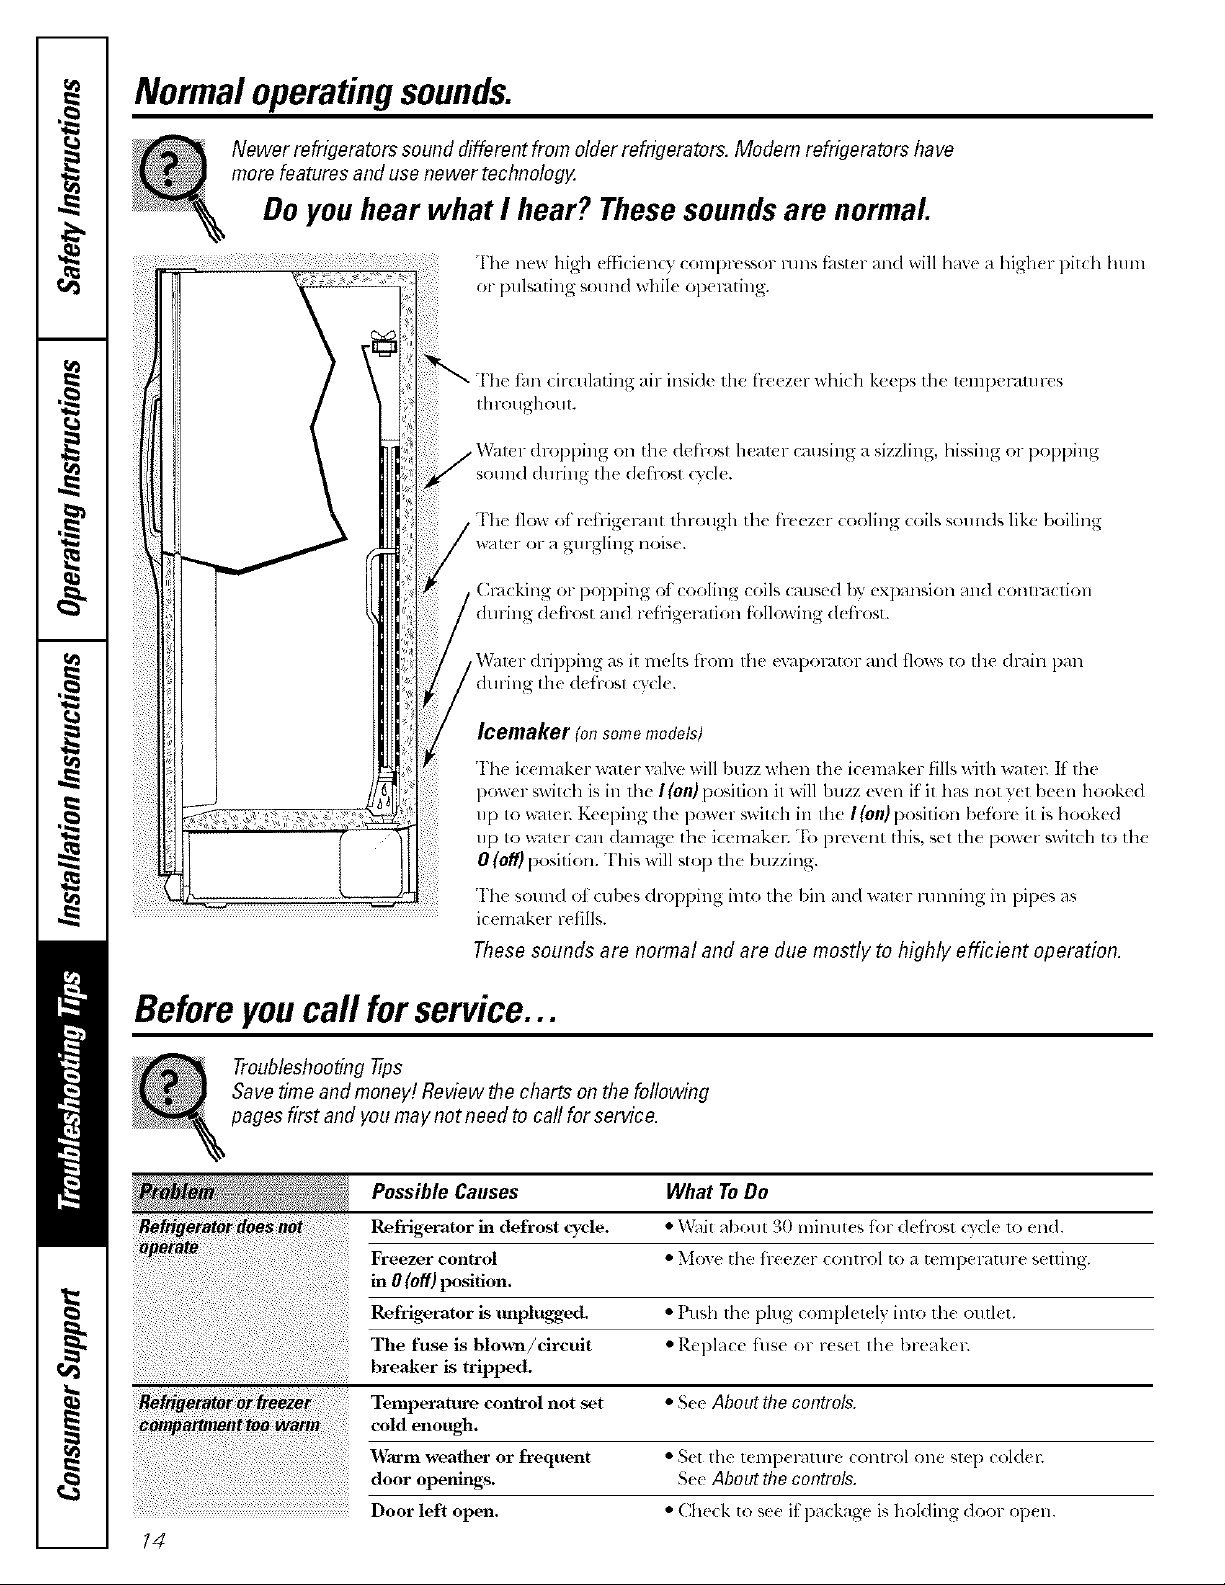
Normaloperatingsounds.
Newer refrigerators sound different from older refrigerators. Modem refrigerators have
more features and use newer technologg
Doyouhear what I hear? Thesesoundsare normal.
These sounds are normal and are due mostly to highly efficient operation.
Beforeyoucall forservice...
Troubleshoo#ng tips
Save time and money! Review the charts on the following
pages first and you may not need to call for service.
Possible Causes What To Do
Refrigerator in defrost cycle. • Wait about 30 nfinut_ s frw dt'f'rost iv(It 1o t'nd.
Freezer confrol • Move the h-t_ezer COil[re| [0 a temperature setting.
in 0 (off) position.
Refrigerator is tmplugged. • Push th( plug compl(l(ly into th( outlet.
The fuse is blown/circuit • Replace filse or r(s(t th( breaker.
breaker is tripped.
Temperature control not set • S(e About the controls.
cold enough.
_ral-m weather or frequent • Set the teml_(r, mue (ontrol one slc I) t ol(lel:
door openiH_s. See About the controls.
Door left open. • Che(:k 1o see it package is h(flding door open.
!4
ww_.Hotpoint.com
Possible Causes What ToDo
Front rollers need adjusfir, g. * St*(. Rollers. Slight vibl",ltion is n(:)lmal.
Normal _Then refrigerator * _hit 24 boule, tot the r( fl igm-,m n-to coml)lctel 3
is fh'st plugged in. (ool down.
Often occm's _len hu'ge * This is norm_ll.
amounts of food are
placed in refrigerator.
Door lefl open. • Check to see if package is holding door open.
Hot weathel" or frequent • This is normal.
door openings.
Temperature controls • Se( About the controls.
set at die coldest
setting.
Door left open. • Check to see if package is holding door el)on.
Too frequent or too long
door openings.
Automatic energy _,_aver • This helps prevent condensation on the oulside.
system circulates vmrm
liquid arotmd front edge
of freezer compartment.
Icemaker pouter switch • Set the pow(r switch 1o th{ I (on) position.
is ha the 0 (off) poKltion.
Water supply tunaed off or **See Installing the water line.
not connected.
Freezer compartment • Wait 24 houl_ for the refrigel_ltor to completely
tOO _arm. cool dOXVII.
Piled up cubes in flae storage • Lexel (ubes b)" hand.
bill cause icemaker to shut off.
Ice cubes stuck ha icemaker. • Ttn-n off the icemakel; remove ( ul)es, and un-n the
(Green power light on icemaker back on.
icemaker blinldng'.)
Ice storage bin needs cleaning. " Empty and wash I)in. Discalxl old Cllb(s.
Food ia-arLsmitthg odor/taste * X_Vl'ap fl.n)ds w(ll.
to ice cubes.
Interior of refrigerator • See Care and cleaning.
needs clea_.
Water Filter doKged. • Rcpla_ c fiher cartridge with new (artlklg( or with phlg.
Door left open. • (_h( ck to s(_ if l:)a(kag( is holding door open.
cold,omperat eco*elDotseteno b . e( Abouttbeeo,tro,e
Door gasket on hinge side '*Apply p( tr(,leum j(lly on fhc( (,f gask( t.
stiddl_ or folding oveg
Defrost beater is on. • This is normal.
Icemaker or water supply" •'lhm on i(emaker or waler supply.
turned off.
Ice cubes are frozen to • Rclnove (ubcs.
icemaker feeler arm.
• Freezer may I)e leo wmm. Adjust the trcezer (ontrol
storagelrregularcontainer.iCeclumps in • Bl-(,_lkFelll_lil]illgupwith(hllllps.l]llgel[i])1:)l-eSSl/1"(_ll(] dis( ard
Dispenser is LOCKED. • Plxss and hold th( IX)CK CONTROI_ pad tor 3 seconds.
to a colder selling, ()11( position al a time, unlil (hnnps
do not timln.
/fi
Beforeyoucallforservice...
Possible Causes What To Do
Water dispenser has not been '*1)ispcnsc _ater until all water ill system is rcl)lenishcd.
ttsed for a long time.
Normal vdaen refrigerator * Wait 24 hom-_ tin- tile refYigeFdtor to conlpletely
is first installed, cool down.
Water dispenser has not been • Disp_ nse water until all water ill system is r_ pl_ nished.
used for a long time.
Water system has been drained. • Allow sevcFdl hour_ t_w replenished supply to chill.
Water supply" line turned • See hTstalling No waterline.
off or not connected.
Water filter dogged. • Rq)lac( tilter cartridge or remov( fiher and install phlg.
Air may be trapped in the '*Pr(ss th( disl)cnser arm for al least l_vo mimlt(s.
water ,system.
Dispenser is LOCKED. • Press and hold the LO(K CONFROL pad for 3 seconds.
Newly-installed filter cartridge. • Run _atcr lrom th( dispcns( r for 3 lllilllll(S (a])Olll
l,¥ater hi reservoir is frozen. " (:all for selMce.
Supplylhm or shutoff • (:all a plumbcL
valve is clogged.
Water filter clogged. • R{ plac{ filt_r (artrklge or r_ mov_ fiher and install phlg.
Dispenser is LOCKED. • Press and hold tile LOCK CONFROL pad for 3 seconds.
Foods transmitting • Foods with strong odor_ should be lightly W_-dpped.
odor to refrigeraton •Ke< 1) an op(n box of baking s(Ma in lhe reh-igemtor;
Interior needs cleaning. • S(_ Care and cleaning.
Defrost water drainage *S_e Care and cleaning.
system needs cleaning.
Not mmsual (luting • !_7"1p( Stll-t_tte (ll_L
periods of high hmmidity.
Mois re iaside
!iii!iiiiiiiii!i)iii!iii!iiiilili!ili!i!iii!iii!iii iilliiili i!!i}!!i!ill
int_rio_ lightdo_k
work
_o_ from b_ttom
re#ig r.to
Too frequent or too
long door opetfit_s.
No power at outlet. '*R_ pla(_ fuse or reset tile brcaken
Light bulb burned out. • Se_ Replacing the light bulbs.
Drain in the bottom of •See Care a/td cleaning.
the freezer do_ged.
Cubes jammed in clmte. • Poke ic( through with a wooden spoon.
Normal air flow cooling motor.
In the rely•ration process,
it is normal that lmat be expelled
in the area under the refrigerator.
Some floor coverings are sensitive
and will discolor at these normal
m_d ,sate temperatures.
1½ gallons).
rcplac_ evcl} three lnOllths,
_ CRUSHEDICE was
dispens_ (o__om__dels)
L_st _ltil_ w_s CRUSHEDICE. • A f;.'w cubes were left in tile crusher flom tile pr< vious
seUing. This is normal.
Icemaker power s_vitch is in dm '*S(t lh( power switch to the 0 (off) l)osilion. K( ( l)ing it ill
I (On)position but the water supply" file I (on) posilion will damage the x_ater vah'e.
to the refrigerator has not been
cozmected.
CUSTOMER WARRANTY
(for customersin Canada)
Yourrefrigeratoris warrantedto befree ofdefectsin materialandworkmanship.
Whatis covered HowLongWarranted Parts Labour
(FromDateofSale) RepairorReplace
at Mabe'sOption
Oornpressor GEProfile:Ten(1O)Years GEProfile:Ten(1O)Years GEProfile:Five(5)Years
GEandAllOther GEandAll Other GEandAll Other
Brands:One(1)Year Brands:One(1)Year Brands:One(1)Year
SealedSystem(including GEProfile:Five(5)Years GEProfile:Five(5)Years GEProfile:Five(5)Years
evaporator,condenser GEandAll Other GEandAll Other GEandAll Other
tubingand refrigerant) Brands:One(1)Year Brands:One(1)Year Brands:One(1)Year
_,11OtherParts One(1)Year One(1)Year One(1)Year
TERMS AND CONDITIONS:
Thiswarrantyappliesonlyfor singlefamilydomesticusein
CanadawhentheRefrigeratorhasbeenproperlyinstalled
accordingtothe instructionssuppliedbyMabeandis
connectedto anadequateandproperutilityservice.
Damagedueto abuse,accident,commercialuse,andalteration
or defacingoftheserial platecancelsallobligationsofthis
warranty.
Serviceduringthiswarranty periodmustbe performedbyan
AuthorizedMabeServiceAgent.
NeitherMabenorthe Dealerisliableforanyclaimsor
damagesresultingfromfailureof theRefrigeratororfrom
servicedelaysbeyondtheirreasonablecontrol.
Toobtainwarrantyservice,purchasermustpresenttheoriginal
BillofSale.Componentsrepairedorreplacedarewarranted
throughtheremainderof theoriginalwarrantyperiodonly.
Thiswarrantyisextendedto theoriginalpurchaserandany
succeedingownerforproductspurchasedforhomeusewithin
Canada.Inhomewarrantyservicewill beprovidedinareas
whereit isavailableanddeemedreasonablebyMabe
WHAT IS NOT COVERED:
• Ownerisresponsibleto payforservicecallsrelatedto
productinstallationand/orteachinghowto usetheproduct.
• Damageto finishmustbereportedwithin48 hoursfollowing
thedeliveryofthe appliance.
• Damageto finishafterdelivery.
• Improperinstallation--properinstallationincludesadequate
air circulationtotherefrigerationsystem,adequateelectrical,
plumbingandotherconnectingfacilities.
• Replacementofhousefusesor resettingofcircuitbreakers.
• Replacementoflight bulbs.
• Damageto productcausedbyaccident,fire,floodsoracts
of God.
• Lossoffooddueto spoilage.
• Properuseandcareof productaslistedinthe owner's
manual,propersettingof controls.
• Productnot accessibleto providerequiredservice.
• WARRANTORISNOTRESPONSIBLEFORCONSEQUENTIAL
DAMAGES.
toprovide.
Thiswarrantyis inadditiontoanystatutorywarranty.
J
Warranty.Anyimpliedwarranties,includingtheimpliedwarranties ofmerchantabilityorfitnessforaparticularpurpose,
arelimitedtooneyearortheshortestperiodallowedbylaw.
I EXCLUS__N_F_MPL_E_WARRANT_ES_Y_urs__ean_exc_usiveremedyispr_ductrepaira_pr_videdinthis_imit__
IMPORTANT
Keep this warranty and your bill of sale as proof of original purchase and purchase date.
Please have serial number and model number available when calling for service.
MabeServiceis availablecoasttocoast.Iffurther helpis
neededconcerningthis warranty,contact:
Manager,ConsumerRelations
MabeCanadaInc.,ConsumerService
1 FactoryLane,Suite 310
Moncton,New BrunswickElC 9M3
Staple your receipt here.
Proof of the original purchase
date is needed to obtain service
under the warrant_
1.800.361.3400
17
RefrigeratorWarranty.(Forcustomers in the United States)
All warranty service provided by our Factory Service Centers,
or an authorized Customer Care_ technician. To schedule service,
on-line, 24 hours a day, visit us at wwwHotpoin_com, or call
800.GE.CARES (800.432.2737).Please have serial number and
model number available when calling for service.
We Will Replace:
Anypart ol the rcfiig('rator whidl tbils duc to a (lcl_(t in mat('lials or workmanshil_.
During this limited one-year warranty, we will also pl-o_ide, free ofcharoe, all labor and
rcl_ltcd scl'd(e to rq)lac_ the d_fe(tivc pm_.
Anypartot the water tihcr cartlidge which ihils due to a del_.ct in mawrials or workmanship.
I)uring I[lis limited thirtDday warranty,w{ will also proxid{, free of charge, a l'(!l)l_tC(ltlenl wal(?l-
filter cartridg_.
!_;_:Service triDs to your home to teach you how to use
the product.
!_;_:hnproper installation, delivery or maintenance.
_ Failure of the product if it is abused, misused, or used for
other than die intended purpose or used commercially.
_ Loss of food due to spoilage.
i!!_Replacement of house fuses or resetting of circuit
breakers.
3_Damage caused after delivery.
Staple your receipt here.
Proof of the original purchase
date is needed to obtahl service
under the warranty.
!+_!Replacement of the xwater filter cartridge, if included,
due to water pressttre that is outside the specified
operating range or due to excessive sediment in the
"_-ater suppl?:
!_;_Replacement of the light bulbs, if included, or _ter f'flter
cartridge, if included, other thml _s noted above.
_ Damage to the product caused by"accident, fire, floods
or acts of God.
_ Incidental or consequential damage caused by po_it)le
defects with tiffs applimlce.
3_7Product not accessible to provide required service.
EXCLUSION OFIMPLIED WARRANTIES--Your sole and exclusive remedy isproduct repair as provided in this
Limited Warranty. Any implied warranties, including the implied warranties of merchantability or fitness for a
particular purpose, are limited to one year or the shortest period allowed by law.
I
This warranty is extended to the original purchaser and any succeeding owner for products purchased for home
use within the USA. If the product is located in an area where service by a GEAuthorized Servicer is not available,
you may be responsible for a trip charge or you may be required to bring the product to an Authorized GEService
location for service. In Alaska, the warranty excludes the cost of shipping or service calls to your home.
Some states do not allow the exclusion or limitation of incidental or consequential damages. This warranty gives
you specific legal rights, and you may also have other rights which vary from state to state. Toknow what your
legal rights are, consult your local or state consumer affairs office or your state's Attorney General
Warrantor: General Electric Company.Louisville, KY 40225
18
Performance Data Sheet
SmartWater Filtration System
MWF Cartridge
This system has been tested according to NSF/ANS142/53 for reduction of the substances listed below.
The concentration of the indicated substances in water entering the system was reduced to a concentration
less than or equal to the permissible limit for water leaving the system, as specified in NSF/ANS142/53.*
100%safety faetors built in for unmetered usage)
Standalx| No. 42: Aesthetic Effects
Parameter USEPA hffluent Influent
MCL Challenge C.oncentrafion Average
( hlofine -- 2.0 m_¢L + 10% 1,96 m_¢L
Effluent
Average Maximtml
0,06 mgi[, 0.l 1 mgi1,
Average Mh_nlnn
96.77% {)4.74%
T&O -- -- --
Paniculate _i_ -- ->10,000 i)arficlcs/ml, 6,400,000 #iml
58,833 #/mL 150,000 #/mi,
{_).14% {!7.97%
Standard No. 53: Health Effects
Pm_ameter
Turbid( b
(.ysls
Asl)esms
lzad at pH 6.5
lzad at pH 8..'t
Mcl(tn_ it pH 6.5
Mel(tn_ it pH 8.5
Aladflor
1.indane
2,gI)
T(_xaphene
( aflx)filran
1,4dichloroI×mzene
Ahazine
USEPA
MCL
0.5 NqU
->{)9.95% Reduction
->{}9%P,cducdon
0.015 mgi1,
0.015 mgi1,
0.002 mgi1,
0.002 mgi1,
0.002 mg/l
0,0002 mg/L
0.070 rag/l,
0.003 mgi1,
0.005 mgi1,
0.0_) rag/l,
0.075mgi1,
0.003 mg/l
Influent
Chanenge Concentration
11 + 1 NTU**::
Minimum 50,0(X) i,
] 07 63 [ 08 fibm'_i1 ; > 10pro
0.15 mgi1,+ 10%
0.15 mgi1,+ 10%
0.006 mgii, + 10%
0.006 mgii, + 10%
0.04 lngil + 10%
0.002 rag/I, + 10%
0.2] 0 mg/L + 10%
0.015 mg/i, + 10%
0.015 mg/i, + 10%
0.080 rag/I, + 10%
0225 mg/i, + 10%
0.009 mg/L + 10%
hlfluent
Avel_e
10.5 NT(
l ]8,750 #,1
57 MF/L
0.1567 mg/l,
0.1433 ng/l,
0.0(159 ilgi1,
0.0(1_',7mgi][,
0.0367mgil,
().0020 mgi][,
0.2033 mgiL
().01ti0 I/Igi][,
0.0145 I/Igi][,
0.0830 I/Igil,
0.2283 I_N/1,
0.0(}87 I_N/1,
Effluent
Average Maximlml
0.14 NTU (}.28NT[
< ] #/1, 4#/1,
0,996 MFiI, < 1 MFiI,
< 0,00] mgil < 0.001 lng/l
< 0,00] mgil < 0.001 lng/l
0.000350 mg/[, 0.(1607 lngil
0.000325 mg/[, 0.(1606 lngil
(}.116023mgi1, 0.01,_14mg,'l,
<0.(_1002 mg,'i, < 0.0(,_102rag, l,
0.00337 lng/l, 0.01 ]000 mgi1,
0.00]00 lng/l, 0.00]000 mgi1,
0.000500 mgi[, (}.(}1,_)500mgi1,
0.001000 mg/[, 0.001000 mgi1,
0.000500 mg/[, 0.0(,_)500 mgi1,
< 0.0005 mgii, < 0.0005 mgil
Average Min_num
98.54% 97.20q_
> {_).991i, >99.99%
99.60% 99.391_
99.36_ 99.29%
99.301_ 99.29%
94.70% 87.50C_
93.20% 89.29q_
99.341_ 98.67%
99.00% 98.95%
98.32% 94.50%
{)3.44% 91.67%
96.51% 95.83%
{)8.78% 98.65%
99.78% 99.77%
{)4.22% 93.33%
Tested using a flow rate of 0.50 gpm, prossuro of 80 psig, pH of 7.5 + 0.5, temp. of 88°-+5°F 120°+ 3%')
_ Measurement in Particles/mL Particles used were 0.5-1 microns
__ NTU-Nephelometric Turbidity units
OperathtO Specifications
• Cal)a( itv'. (crlified fin-.u[) 1o .400g,aligns (l [:.'5 1). Ill[k.Io six .
St Ire of Caliibnfia
Depaltmmit of l lcalth _ vices
Water Treatment Device
Certificate Number
months fin moth Is without u 1"( _la,.( m( lit hller lndl( _/tor hoht;
11) 1o OIle xc_tr fin lllodcls with ;J_replm Clllelll tiher ill(]i(illo_F light
) " " N 9
• ] F('SMII'e1"1<llll-(qll('llt: 40--120 psi (2.,-8._ bar), non-',hock
Dae ls ued: _ebmtry 22(_)5
• [Cml)Cldtulc. 3.,--100 F (0.(_-D8 (,)
• Flow l'utt': t)._'_ gpm (1.9 lpm)
General htstallation/Operatian/Mahttenance Requirements
• Fhlsh n_w <alal-idge ;atfidl flow fin-3 lnin!lt_ s to purg_ Otll
ll'apl:)ed all:
• Re dace carlridg( xxh(n lhe indicator light flashes or water
tlo{xrole is re( uce( on non-in( (ca(or u_fits.
Special Notices
Installatkm instructions, )aFIsflll(I S(?IWiC(availabilip,, and slandard
warranty are included Wiih th_ l)rodu( 1 _sllen shipl)_xl.
/ r ad_mar k/Model De_l_narton Rt_laeenlt'nt Ele_nts
MWF MWF
ManuPat'tu rer: _ae_[ F_ L.c _:,_m c_'a_
[lie _ ater It (_,lllll (qll (It'l leel_ ISI(_O (ill Ill 1'_c_tiflcute Ila_ t. inet Ihe t_/hlg le( uirelnonls pursuant 1o 3*.t 111_11
116gl0 o_ the ]leaRh and _;a_c tx (_adz _r the (olh_in_ health reIated eon_aminaats;
M kr M_iologicM f ontamalants and _ o r bidR_
Fui b_&ly
• Tiffs drhfldng waler system nlusl be maintained according I0
lllalltl_a( IIIl-_ 1-S IlIS[I-II([IOllS, lll(hldlll_ F(plait ( lllell[ O_ _l]l_ 1"( _tl'tl'l(]ges.
• Do not us_ with Wa;Lerthai is microbio_ou-icallv unsaR, or oI tmknown
qualilv V:ilhoul ade(luat_ disinfe( lion beh_'n-,,or after the wstem.
S\-,tems c{ llifie(I for (xsl reductkm may be us(d on disinfecled waler
that may contain filtei_d)le cv_,ts.
• The coiKaminanls or othel- substances removed or reduc_ d by this
water treatment s3stem are not necessalily in 3our water:
• Checl_. for compliance wilh Ihe state all(I local laxvs and regulations.
• Nole thai while th_ testing wa _,perfomaed lllld{ r standard lab,.n-,mn-v
conditions, actual perlommnce ram, vm3: Svslems must I)( inslalled'an(I
O)elWt{(1 ill _lCCOlX]all(e with lll_lllll_[_(-l/ll-( I:'S leCOllllll(lld(d M'OC{!dllFeS
[ : . [
and _uldehn< s.
T_x_l_mc
94E
% Reduction
% Reduction
115- 1698
Min. Reqoh'ed
Reduction
> 50%
_>85%
Mha. Reqtfired
Reduction
0.5 NTU
->99.95%
2 99%
0.010 i_g/1,
0.010 i_g/1,
0.002 ngil
0.002 nNil
0.0002 rag/I,
0,070 mgil
0,003 mgil
0,005 mgil
0.04 mgi1,
1t,1t75mgil
0,003 mgil
Syst< m T_ sted and Cmtified bx NSF hlternati(mal againsl
ANSIiNSF Standald 42 & 5,3 for tile reduction o1:
Standard No. 42: Aesfliefic Effects
( heroical Unh
Chloline "Iaste and Odor
Mechanical Filt/atiola Unil
Pa/liculate Reduction, (_la_ /
Stmadard No. 53: Health Effects
Chemical P.eductioi_ tnit
Alachlor and Am_zine Reduction
Benzene and Carbolllla/i Redllcliol/
1.4 dichlo/ob( n/( im and '-),t[) Redu( lion
l.cad and Lindane Reduction
mel-(tll_" and Toxaphl ne Redllclion
Mechmfical Film_tion (nit
Tulbidit_ P.eduction
(:v>l an({ Xq)esms Reduction
Manut Klured _r: General Electric Cotnpan}; [.ouisville, KY 40225
EP& E.C,'I_No, 07059_MN4101
/9
GE Service Protection Plus'"
GE, a nan_e :(( )gmztd _*()*l(h 1(1_ fi)r q alit? and (1_ 1 (ndabflll, ofli.ws you
Servi(e Proteclion Plus:'--(om I :_1:_nslx_ p:( t_(non on all xour apl ham_ s--
No Matter What Brand: We'll CoverAnyAppliance.
Benefits Include:
• Backed by GE
• All brainls covered
• Unlimited service calls
• All parts and labor costs included
• No out-of-pocket expenses
• No hidden deductibles
• One 800 nmnber to call
You will lie compl(t(ly salisfied with our seF,'ice protcclion or you may req:lesl your money back
on dw remaining vahl_ ol yore- conll-DCl. No (llleslions asked. It's Ihal simple.
Protect yore- reii-igeratol; dishwashel; washer and dryel; rang_, 'I"_ VCR and much more--any brand!
Plus there's no exm_ ( hm-ge tiw _mergency selvic_ _md low momhly iinancing is awlilable. Even icem_lker
cover_lge and t;ood spoilage prot_ (tion is oflhred. _.)m c_111rest __s?,; knowing that all your wlhlable
househ_dd products _lre prote(ted against expensive repairs.
Plat(your conl]denc_ in (;E and callus in the I:.S.toll-fr_e a,800.626.2224
[?Of lnor( ill[?Ol'lnation.
Anywhere. Anytime.*
*\H I)l /lld8 (/)gl'r('d I1[) Io _(} y('al old, itl dl(' (OlllJilUII{:IJ I.]_
Consumer Product Ownership Registration
Dear (,u tomcr:
Thank you Ibr purchasing our producl and thank you for placing your confidence in us.
Wc at( proud to have you as a customer:
Follow these three steps to protect your new appliance investment:
S
*roduct Ownership
Registration today.
Have the peace of
milld Of klll)wiilg wc
c311 c()nt3ct vo/I h/
_he unlikeh' even_ of
After mailing the
hehm,
this document
n a sa_ place.
It COrltains intorn/ation
yon will need should
VOtl leqtlire service,
OIIi ¸ servic_ ii/ll/d3el ¸
ill the USA is:
,_()0.(;E.CARES
(800.432.2737).
2O
Model Number Serial Number
I I I I I I I I I I I I I I I I I I
 Loading...