

DAILY REFERENCE
GUIDE
EN
THANK YOU FOR BUYING A HOTPOINT PRODUCT.
In order to receive a more complete assistance, please
register your appliance on: www.hotpoint.com/register
Before using the appliance carefully read Safety Instructions guide.
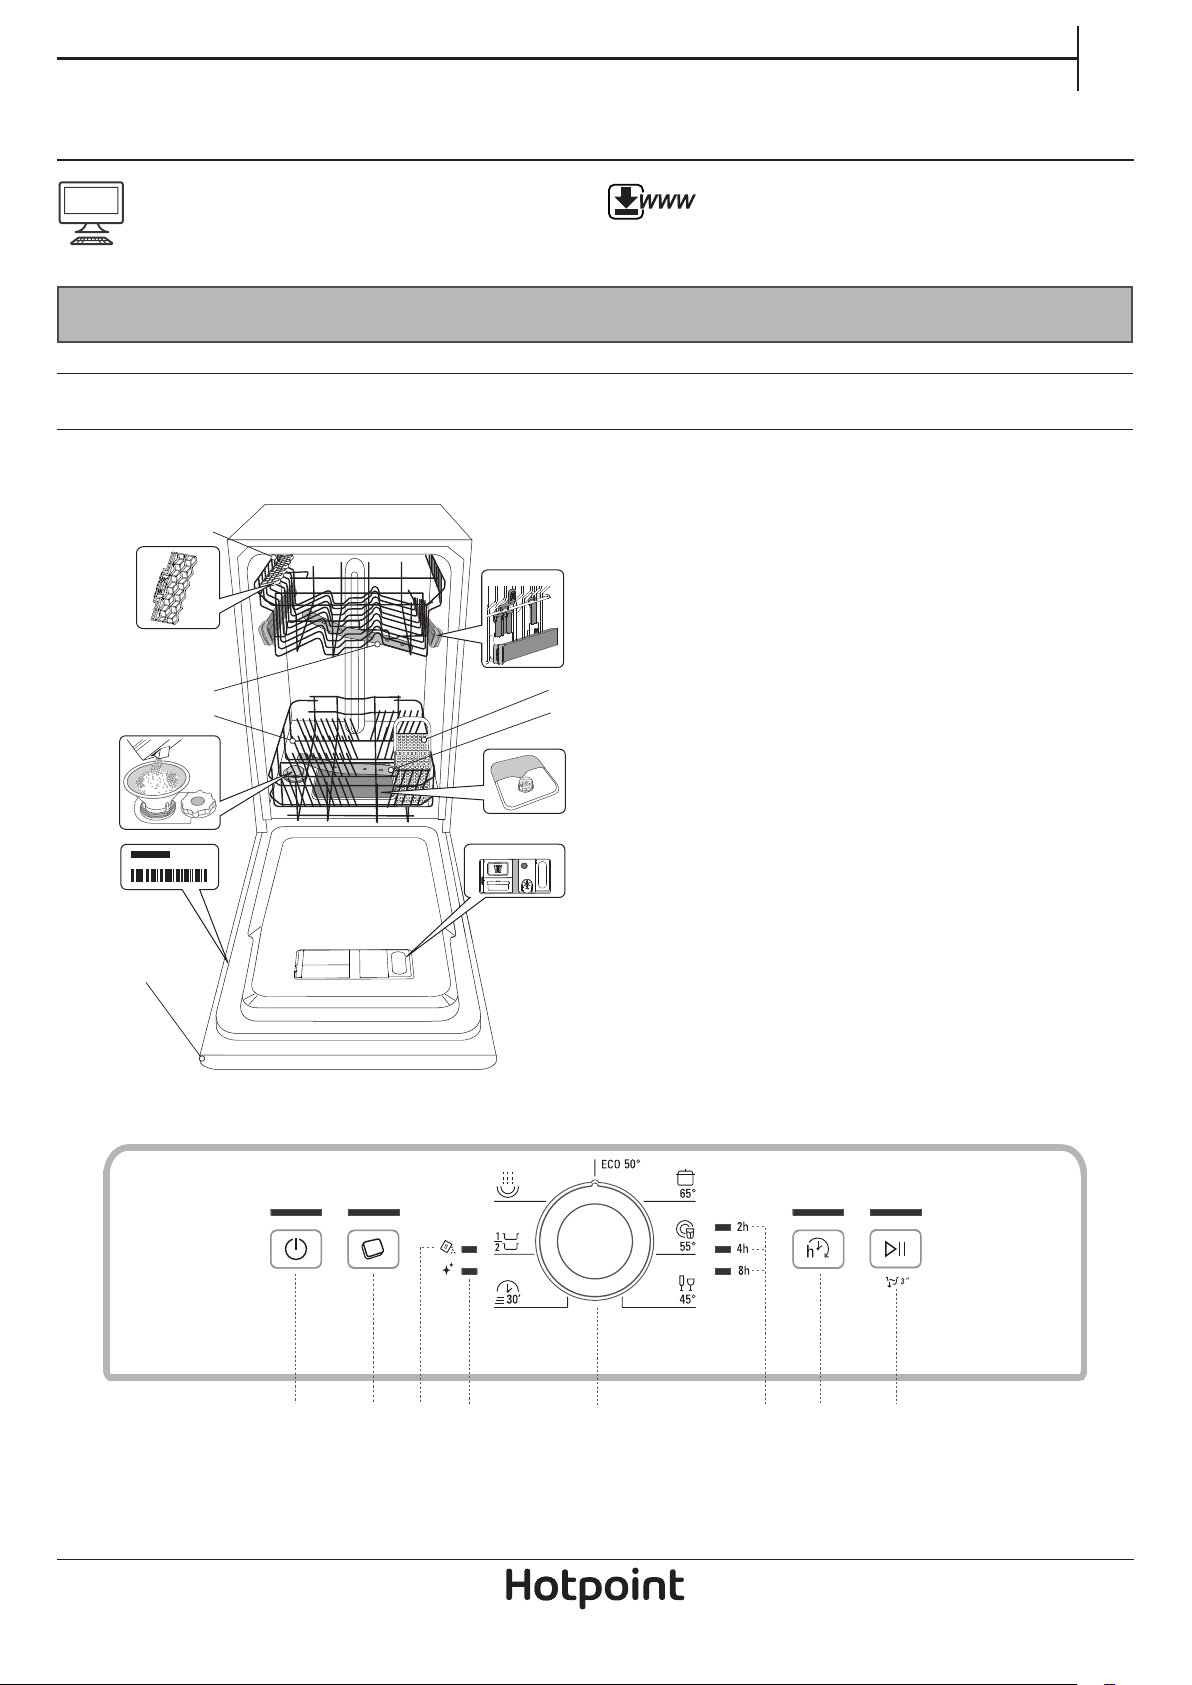
PRODUCT DESCRIPTION
APPLIANCE
1
2
4
5
9
Service:
0000 000 00000
You can download the Safety Instructions and the User
Manual, by visiting our website docs.hotpoint.eu and
following the Instructions on the back of this booklet.
1. Upper rack
2. Foldable aps
3
6
7
8
1011
3. Upper rack height adjuster
4. Upper spray arm
5. Lower rack
6. Cutlery basket
7. Lower spray arm
8. Filter Assembly
9. Salt reservoir
10. Detergent and Rinse Aid dispensers
11. Rating plate
12. Control panel
12
CONTROL PANEL
1 2 3 4
1. On-O/Reset button with indicator light
2. Tablet (Tab) button with indicator light
3. Salt rell indicator light
4. Rinse Aid rell indicator light
5
5. Program selection knob
6. Delay indicator light
7. Delay button with indicator light
8. Start/Pause button with indicator light / Drain out
6 7 8
1
FIRST TIME USE
B
SALT, RINSE AID AND DETERGENT
ADVICE REGARDING THE FIRST TIME USE
After installation, remove the stoppers from the racks and the retaining
elastic elements from the upper rack.
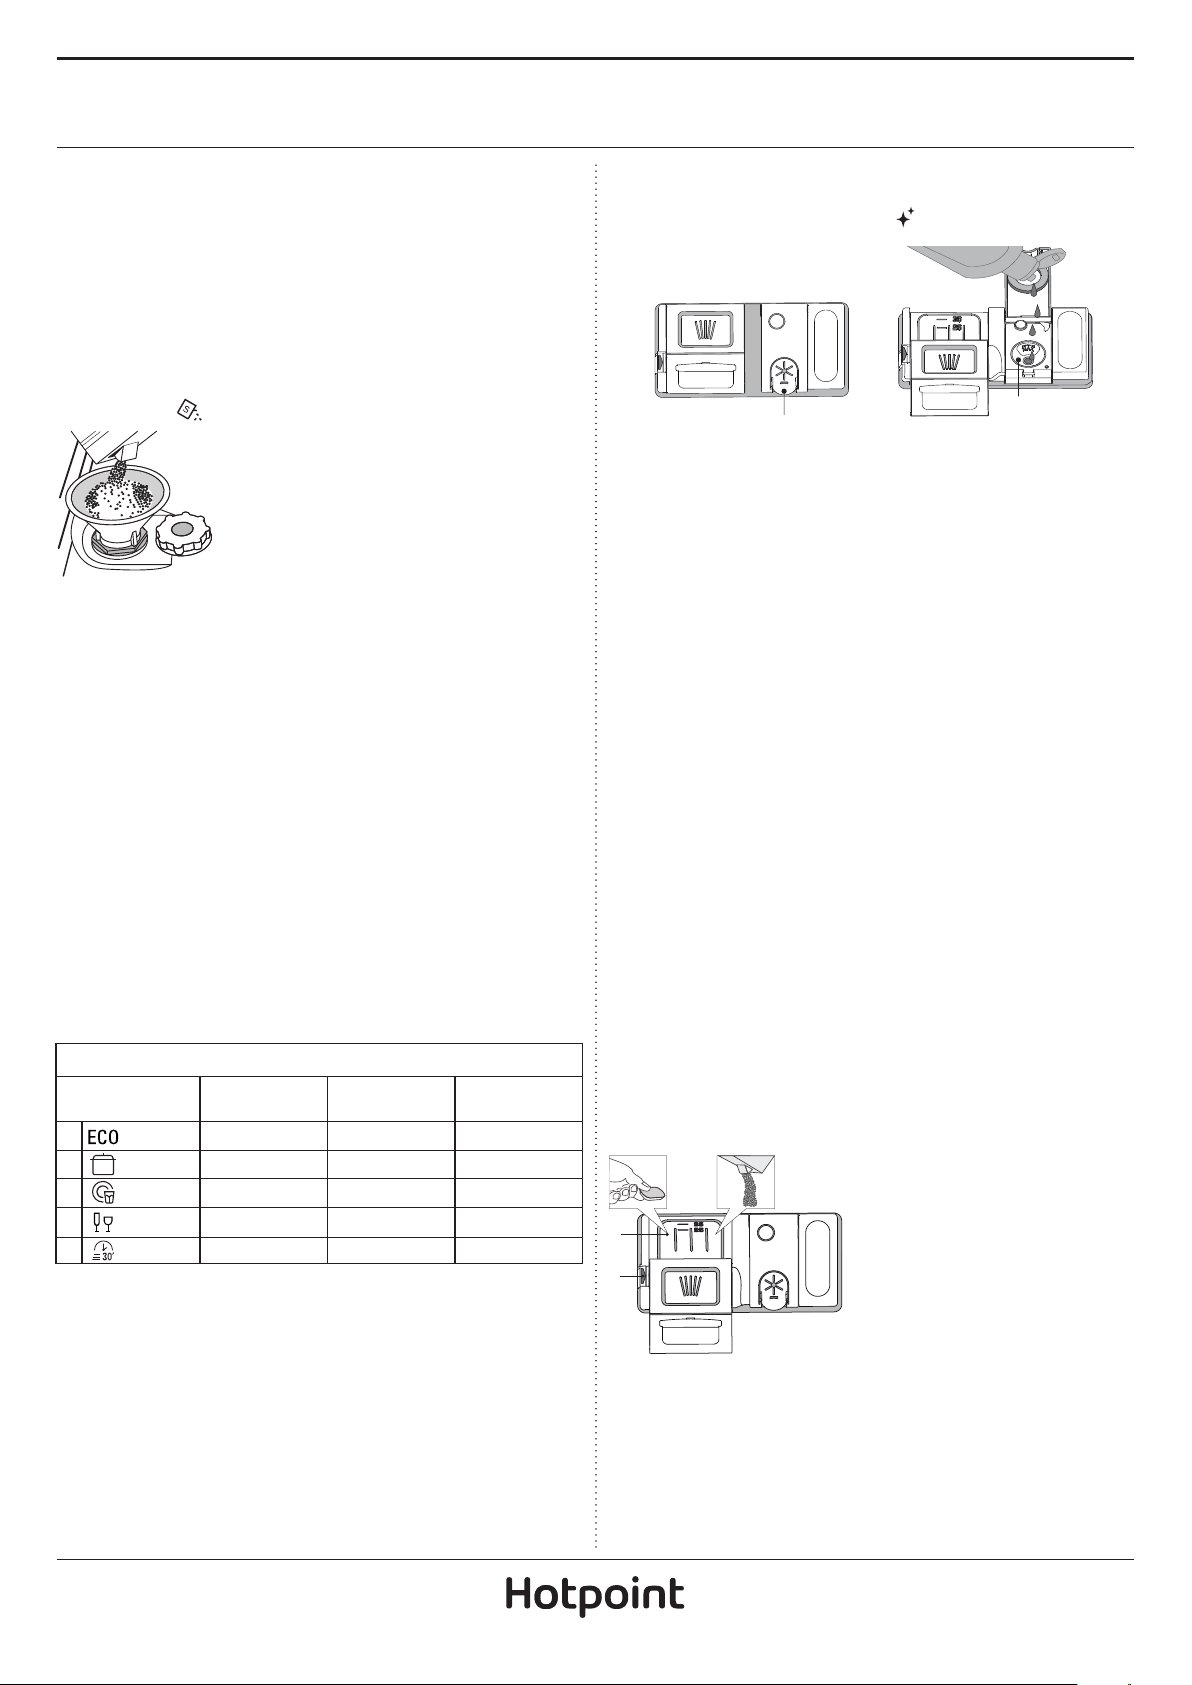
FILLING THE SALT RESERVOIR
The use of salt prevents the formation of LIMESCALE on the dishes
and on the machine’s functional components.
• It is mandatory that THE SALT RESERVOIR NEVER BE EMPTY.
• It is important to set the water hardness.
The salt reservoir is located in the lower part of the dishwasher
(see PRODUCT DESCRIPTION) and must be lled when the SALT REFILL
indicator light in the control panel is lit .
1. Remove the lower rack and unscrew the
reservoir cap (anticlockwise).
2. Only the rst time you do this: ll the salt
reservoir with water.
3. Position the funnel (see gure) and ll the salt
reservoir right up to its edge (approximately
1 kg); it is not unusual for a little water to leak
out.
4. Remove the funnel and wipe any salt residue
away from the opening.
Make sure the cap is screwed on tightly, so that no detergent can
get into the container during the wash program (this could damage
the water softener beyond repair).
Whenever you need to add salt, it is mandatory to complete
the procedure before the beginning of the washing cycle to avoid
corrosion.
SETTING THE WATER HARDNESS
To allow the water softener to work in a perfect way, it is essential that
the water hardness setting is based on the actual water hardness in your
house. This information can be obtained from your local water supplier.
The factory sets the default value for the water hardness:
• Switch on the appliance by pressing the ON/OFF button.
• Switch o the appliance by pressing the ON/OFF button.
• Hold down button START/Pause for 5 seconds, until you hear a beep.
• Switch on the appliance by pressing the ON/OFF button.
• The ON/OFF LED light will ash as many times as the level that was set.
• Set the desired water hardness level using the PROGRAM SELECTION
knob (see WATER HARDNESS TABLE).
Water Hardness Table
Level
1 Soft 0 - 6 0 - 10 0 - 7
2 Medium 7 - 11 11 - 20 8 - 14
3 Average 12 - 16 21 - 29 15 - 20
4 Hard 17 - 34 30 - 60 21 - 42
5 Very hard 35 - 50 61 - 90 43 - 62
• Switch o the appliance by pressing the ON/OFF button.
Setting is complete!
As soon as this procedure is complete, run a program without loading.
Only use salt that has been specically designed for dishwashers.
After the salt has been poured into the machine, the SALT REFILL
indicator light switches o.
If the salt container is not lled, the water softener and the heating
element may be damaged as a result of limescale accumulation.
Using of Salt is recommended with any type of dishwasher
detergent.
°dH
German degrees
°fH
French degrees
°Clark
English degrees
FILLING THE RINSE AID DISPENSER
Rinse aid makes dish DRYING easier. The rinse aid dispenser A should
be lled when the RINSE AID REFILL indicator light in the control
panel is lit.
A
1. Open the dispenser B by pressing and pulling up the tab on the lid.
2. Pour in the rinse aid (max.110 ml), making sure it does not overow
from the dispenser. If this happens, clean the spill immediately with
a dry cloth.
3. Press the lid down until you hear a click to close it.
NEVER pour the rinse aid directly into the appliance tub.
ADJUSTING THE DOSAGE OF RINSE AID
If you are not completely satised with the drying results, you can
adjust the quantity of rinse aid used.
• Switch the dishwasher on using the ON/OFF button.
• Switch it o using the ON/OFF button.
• Press button START/Pause three times - a beep will be heard.
• Switch it on using the ON/OFF button.
• The START LED light will ash as many times as the level that was set.
• Set the level of rinse aid quantity to be supplied using the PROGRAM
SELECTION knob (see PROGRAMS TABLE).
• Switch it o using the ON/OFF button
Setting is complete!
If the rinse aid level is set to 1 (ECO), no rinse aid will be supplied.
A maximum of 5 levels can be set according to the dishwasher model.
The factory setting is specic to the model, please follow instruction
above to check this for your machine
• If you see bluish streaks on the dishes, set a low number (2-3).
• If there are drops of water or limescale marks on the dishes, set a mid-
range number (4-5).
FILLING THE DETERGENT DISPENSER
To open the detergent dispenser use the opening device C.
Introduce the detergent into the dry dispenser D only. Place
the amount of detergent for pre-washing directly inside the tub.
1. When measuring out the detergent
refer to the mentioned earlier
information to add the proper
quantity. Inside the dispenser
D
C
The detergent dispenser automatically opens up at the right time
according to the program.
If all-in-one detergents are used, we recommend using the TABLET
button, because it adjusts the program so that the best washing and
drying results are always achieved.
Usage of detergent not designed for dishwashers may cause
malfunction or damage to the appliance.
D there are indications to help
the detergent dosing.
2. Remove detergent residues from
the edges of the dispenser and close
the cover until it clicks.
3. Close the lid of the detergent
dispenser by pulling it up until
the closing device is secured
in place.
2
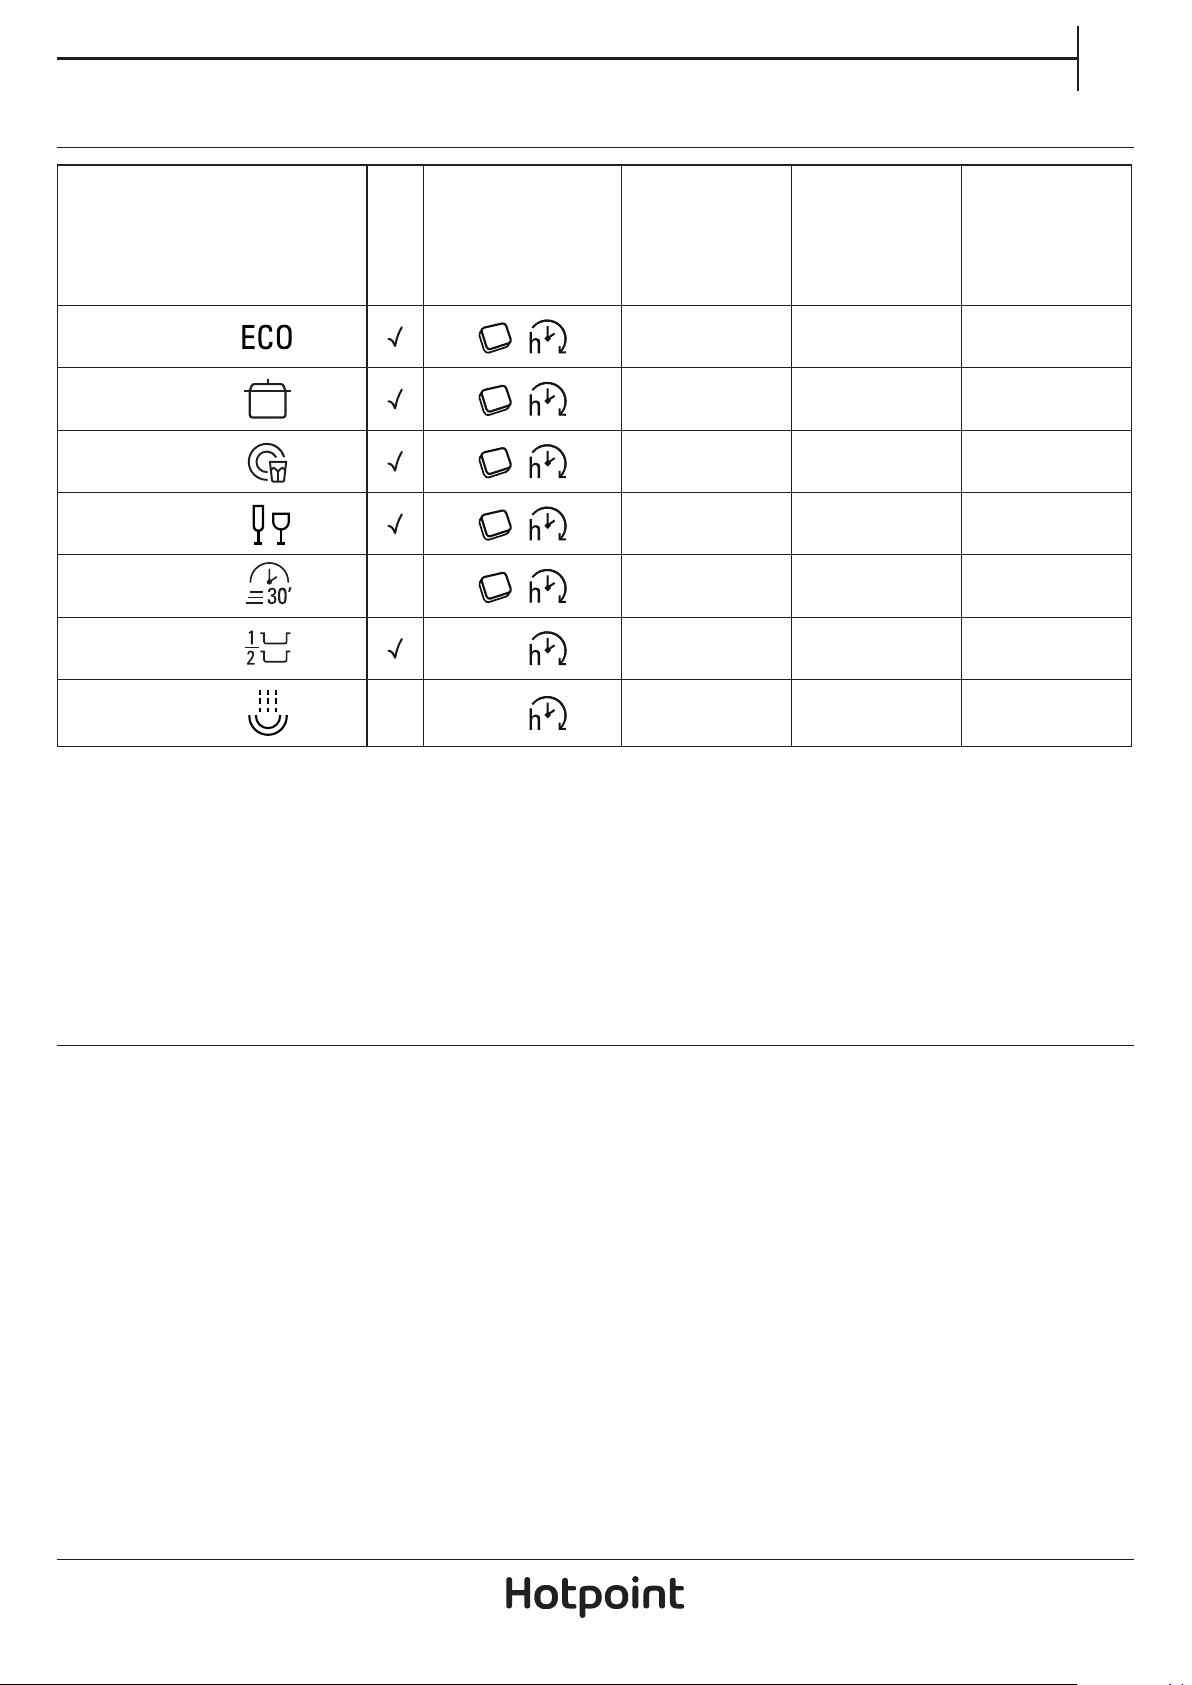
PROGRAMS TABLE
EN
Duration of wash
Program
1. Eco 50°
2. Intensive 65°
3. Mixed 55°
4. Delicates 45°
5. Rapid 30’ 50°
6. Half Load 50°
7. Soak
ECO program data is measured under laboratory conditions according to European Standard EN 60436:2020.
Note for Test Laboratories:
For information on comparative EN testing conditions, please send an email to the following address: assistenza_en_lvs@indesitcompany.com
Pre-treatment of the dishes is not needed before any of the programs.usly.
*) Values given for programs other than the program Eco are indicative only. The actual time may vary depending on many factors such as temperature
and pressure of the incoming water, room temperature, amount of detergent, quantity and type of load, load balancing, additional selected options
and sensor calibration. The sensor calibration can increase program duration up to 20 min.
- -
Available options
Drying phase
-
*)
program
*)
(h:min)
4:00 11.5 0.84
2:30 15.0 1.50
2:30 15.0 1.30
1:40 11.5 1.00
0:30 8.5 0.50
1:15 11.0 0.90
0:10 4.5 0.01
Water
consumption
(litres/cycle)
Energy
consumption
(kWh/cycle)
PROGRAMS DESCRIPTION
Instructions on wash cycle selection.
1 ECO
Eco programme is suitable to clean normally soiled tableware, that
for this use, it is the most ecient programme in terms of its combined
energy and water consumption, and that it is used to assess compliance
with the EU Ecodesign legislation.
2 INTENSIVE
Program recommended for heavily soiled crockery, especially suitable
for pans and saucepans (not to be used for delicate items).
3 MIXED
Mixed soil. For normally soiled dishes with dried food residues.
4 DELICATES
Program for delicate items, which are more sensitive to high
temperatures, for example glasses and cups.
5 RAPID 30’
Program to be used for half load of lightly-soiled dishes with no dried
food residues Does not have drying phase.
6 HALF LOAD
Ideal for washing a half load of lightly or normally soiled crockery.
7 SOAK
Use to refresh crockery planned to be washed later. No detergent to be
used with this program.
Notes:
Please note that cycle Rapid 30’ is dedicated for lightly soiled dishes.
3
 Loading...