

Page 1
W11456755A
810F950001492
In or
der to receive a more complete assistance, please
register your product on www.hotpoint.eu.
Page 2

English
Français
REFRIGERATOR USER INSTRUCTIONS ........................................... 3
INSTRUCTIONS D’UTILISATION DU RÉFRIGÉRA
TEUR
..............
.............. 43
2
Page 3

FRENCH DOOR BOTTOM MOUNT REFRIGERA
USE AND CARE GUIDE
able of Contents
T
TOR
REFRIGERA
oper Disposal of Your Old Refrigerator
Pr
P
ARTS AND FEATURES
WHA
T’S NEW BEHIND THE DOORS?
INST
ALLATION INSTRUCTIONS .................................................11
Getting Started
ater Filter Installation
W
Unpack the Refrigerator
Location Requir
Electrical Requir
Remove and Replace Refrigerator Doors
Remove and Replace Fr
Refrigerator Levelling
W
ater Supply Requirements
Connect the W
TERS AND ACCESSORIES
FIL
W
ater Filtration System
Accessories
Assistance or Service
USING THE CONTROLS
Lighting the Refrigerator
REFRIGERA
CONNECTIVITY SETUP
Automatic Set-Up Instructions
—Wi-Fi Pr
ater and Ice Dispensers
W
REFRIGERA
Opening and Closing Doors
Ice Maker and Storage Bin
SHEL
Fr
eezer Storage Compartments
Cleaning
Lights
Holiday and Moving Car
TROUBLESHOOTING - CONNECTED MODELS
TROUBLESHOOTING
PERFORMANCE DA
TOR SAFETY
...............................................................................11
ements
ements
ater Supply
....................................................................................20
TOR CONNECTIVITY FEATURES
otected Setup (WPS)
TOR USE
VES, BINS, AND DRAWERS
.........................................................................................31
..............................................................................................31
..............................................................4
........................................8
................................................................9
........................................10
..................................................................11
................................................................11
..................................................................12
.................................................................12
.....................................14
eezer/Flexi Freeze Door
.....................................................................17
..........................................................17
.............................................................17
...................................................19
..................................................................19
....................................................................20
..............................................................21
................................................................23
...............................................................24
.....................................................24
..............................................................25
..................................................................27
..........................................................27
...........................................................28
...............................................29
....................................................30
e
..............................................................31
..................................................................35
TA SHEET
...................................................41
..........................16
.........................23
......................33
3
Page 4
REFRIGERATOR SAFETY
Your safety and the safety of others are very important.
We have provided many important safety messages in this manual and on your appliance. Always read and obey all safety
messages.
This is the safety alert symbol.
This symbol alerts you to potential hazards that can kill or hurt you and others.
All safety messages will follow the safety alert symbol and either the word “DANGER” or “WARNING.”
These words mean:
You can be killed or seriously injured if you don't immediately
DANGER
WARNING
All safety messages will tell you what the potential hazard is, tell you how to reduce the chance of injury, and tell you what can
happen if the instructions are not followed.
follow instructions.
You
can be killed or seriously injured if you don't
instructions.
follow
4
Page 5
SAFETY INSTRUCTIONS
IMPORTANT TO BE READ AND OBSERVED
Before using the appliance, read these safety
instructions. Keep them nearby for future
reference. These instructions and the appliance
itself provide important safety warnings, to be
observed at all times. The manufacturer declines
any liability for failure to observe these safety
instructions, for inappropriate use of the appliance
or incorrect setting of controls.
Very young children (0-3 years) should be kept
away from the appliance. Young children (3-8
years) should be kept away from the appliance
unless continuously supervised. Children from 8
years old and above and persons with reduced
physical, sensory or mental capabilities or lack of
experience and knowledge can use this appliance
only if they are supervised or have been given
instructions on safe use and understand the
hazards involved. Children must not play with the
appliance. Cleaning and user maintenance must
not be carried out by children without supervision
Children aged from 3 to 8 years are allowed to load
and unload refrigerating appliances.
PERMITTED USE
CAUTION: The appliance is not intended to
be operated by means of an external switching
device, such as a timer, or separate remote
controlled system.
This appliance is intended to be used in
household and similar applications such as: sta
kitchen areas in shops, oces and other working
environments; farm houses; by clients in hotels,
motels, bed & breakfast and other residential
environments.
This appliance is not for professional use. Do
not use the appliance outdoors.
The bulb used inside the appliance is specically
designed for domestic appliances and is not
suitable for general room lighting within the
home (EC Regulation 244/2009).
The appliance is designed for operation in
places where the ambient temperature comes
within the following ranges, according to the
climatic class given on the rating plate. The
appliance may not work properly if it is left for a
long time at a temperature outside the specied
range.
Climatic Class Amb. T. (°C)
SN: From 10 to 32 °C; N: From 16 to 32 °C
ST: From 16 to 38 °C; T: From 16 to 43 °C
This appliance does not contain CFCs. The
refrigerant circuit contains R600a (HC). Appliances
with Isobutane (R600a): isobutane is a natural gas
without environmental impact, but is ammable.
Therefore, make sure the refrigerant circuit pipes
are not damaged, especially when emptying the
refrigerant circuit.
.
WARNING: Do not damage the appliance
refrigerant circuit pipes.
WARNING: Keep ventilation openings, in the
appliance enclosure or in the built-in structure,
clear of obstruction
WARNING: Do not use mechanical, electric or
.
chemical means other than those recommended
by the Manufacturer to speed up the defrost
process.
WARNING: Do not use or place electrical
devices inside the appliance compartments if
they are not of the type expressly authorised by
the Manufacturer.
WARNING: Ice makers and/or water dispensers
not directly connected to the water supply must
be lled with potable water only.
WARNING: Automatic ice-makers and/or water
dispensers must be connected to a water supply
that delivers potable water only, with mains water
pressure between 20 psi and 145psi (1.4 bar and
10bar).
Do not store explosive substances such as
aerosol cans with a ammable propellant in this
appliance.
Do not swallow the contents (non-toxic) of
the ice packs (provided with some models). Do
not eat ice cubes or ice lollies immediately after
taking them out of the freezer since they may
cause cold burns.
For products designed to use an air lter inside
an accessible fan cover, the lter must always be
in position when the refrigerator is in function.
Do not store glass containers with liquids in
the freezer compartment since they may break.
Do not obstruct the fan (if included) with food
items. After placing the food check that the door
of the compartments closes properly, especially
the freezer door.
Damaged gaskets must be replaced as soon as
possible.
Use the refrigerator compartment only for
storing fresh food and the freezer compartment
only for storing frozen food, freezing fresh food
and making ice cubes.
Avoid storing unwrapped food in
direct contact with internal surfaces of
the fresh food or freezer compartments.
Appliances could have special compartments
(Fresh Food Compartment, Zero Degree Box, etc.).
Unless specied in the specic booklet of product,
they can be removed, maintaining equivalent
performances.
Warning: Risk of re/ammable materials
The most appropriate compartments of the
appliance where specic types of food are to be
stored, taking into account dierent temperature
distribution in dierent compartments in the
appliance, are as follows:
- Refrigerator compartment: Store tropical fruit,
5
Page 6

, drinks, eggs, sauces, pickles, butter, jam,
cans
cheese, milk, dairy food, yoghurt. You may also
store cold cuts, desserts, meat and sh,
cheesecake, fresh pasta, sour cream, pudding and
cream cheese.
Fruit & vegetable drawer at the bottom of the
refrigerator compartment: Store vegetables and
fruits (excluding tropical fruits).
Chiller compartment: Only store meat and sh in
the coldest drawer
- Freezer compartment:
is suitable for freezing foodstus from ambient
temperature and for storing frozen food as the
temperature is evenly distributed throughout
the entire compartment. Purchased frozen food
has the storage expiration date stated on the
packaging. This date takes into account the type of
food being stored and therefore this date should
be respected. Fresh food should be stored for the
following time periods: 1-3 months for cheese,
shellsh, ice cream, ham/sausage, milk, fresh
liquids; 4 months for steak or chops (beef, lamb,
pork); 6 months for butter or margarine, poultry
(chicken, turkey); 8-12 months for fruits (except
citrus), roast meat (beef, pork, lamb), vegetables.
Expiration dates on the packaging of foods must
be respected. To avoid food contamination, please
observe the following:
– Opening the door for long periods can cause
a signicant increase of the temperature in the
compartments of the appliance.
– Regularly clean surfaces that may come into
contact with food and accessible drainage
systems.
– Clean water tanks if they have not been used for
48 h; ush the water system connected to a water
supply if water has not been drawn for 5 days.
– Store raw meat and sh in suitable containers
in the refrigerator, so that it does not come into
contact with or drip onto other food.
In the Convertible Zone
storage should be as followed:
+10°C : store white wine
+4°C: store vegetables and fruits (excluding
tropical fruits)
0°C: only store meat and sh
All set points below zero: store frozen foodstu as
for freezer cavity
– Two-star frozen food compartments are suitable
for storing pre-frozen food, storing or making ice
cream and ice cubes.
– Do not freeze fresh food in one, two or threestar compartments.
– If the refrigerating appliance is left empty for
long periods, switch o, defrost, clean, dry, and
leave the door open to prevent mould developing
inside the appliance.
INSTALLATION
The appliance must be handled and installed by
two or more persons- risk of injury. Use protective
gloves to unpack and install- risk of cuts.
nstallation, including water supply (if any)
I
and electrical connections, and repairs must
be carried out by a qualied technician. Do not
repair or replace any part of the appliance unless
specically stated in the user manual. Keep
children away from the installation site.
After unpacking the appliance, make sure that
it has not been damaged during transport. In
the event of problems, contact the dealer or
your nearest After-sales Service. Once installed,
packaging waste (plastic, styrofoam parts etc.)
must be stored out of reach of children - risk of
suocation. The appliance must be disconnected
from the power supply before any installation
operation - risk of electric shock. During
installation, make sure the appliance does not
damage the power cable - risk of re or electric
shock. Only activate the appliance when the
installation has been completed.
Be careful not to damage the oors (e.g.
parquet) when moving the appliance. Install the
appliance on a oor or support strong enough
to take its weight and in a place suitable for its
size and use. Make sure the appliance is not near
a heat source and that the four feet are stable and
resting on the oor, adjusting them as required,
and check that the appliance is perfectly level
using a spirit level. Wait at least two hours before
switching the appliance on, to ensure that the
refrigerant circuit is fully ecient.
WARNING: When positioning the appliance,
ensure the supply cord is not trapped or damaged.
WARNING: To avoid a hazard due to instability,
positioning or xing of the appliance must be done
in accordance with the manufacturer instructions.
It is forbidden to place the refrigerator in such
way that the metal hose of gas stove, metal gas or
water pipes, or electrical wires are in contact with
the refrigerator back wall (condenser coil).
To guarantee adequate ventilation, leave a
space on both sides and above the appliance. The
distance between the rear of the appliance and
the wall behind the appliance should be 50mm,
to avoid access to hot surfaces. A reduction of this
space will increase the Energy consumption of
product.
f it is necessary to replace the doors, please
I
contact the Technical Assistance Center.
n 'Approved' single check valve or some other
A
no less eective backow prevention device
providing backow prevention protection to at
least uid category two shall be tted at the point
of connection(s) between the water supply and
the fitting or appliance.
6
Page 7

FOR AUSTRAL IA ONL Y: A backflow device WaterMark approved (not included, responsibility of the
plumbing) is required to be installed upstream in
accordance with the WaterMark cer-tification and
in accordance to AS/NZS 3500.1.2 and complying
with AS/NZS 2845.1.
ELECTRICAL WARNINGS
t must be possible to disconnect the appliance
I
from the power supply by unplugging it if plug
is accessible, or by a multi-pole switch installed
upstream of the socket in accordance with the
wiring rules and the appliance must be earthed
in conformity with national electrical safety
standards.
D
o not use extension leads, multiple sockets
or adapters. The electrical components must not
be accessible to the user after installation. Do not
use the appliance when you are wet or barefoot.
Do not operate this appliance if it has a damaged
power cable or plug, if it is not working properly,
or if it has been damaged or dropped.
f the supply cord is damaged, it must be replaced
I
with an identical one by the manufacturer, its
service agent or similarly qualied persons in
order to avoid a hazard- risk of electric shock.
WARNING: Do not locate multiple portable
socket-outlets or portable power supplies at the
rear of the appliance
CLEANING AND M
WARNING: Ensure that the appliance is
.
AINTENANCE
switched o and disconnected from the power
supply before performing any maintenance
operation; never use steam cleaning equipmentrisk of electric shock.
o not use abrasive or harsh cleaners such as
D
window sprays, scouring cleansers, ammable
uids, cleaning waxes, concentrated detergents,
bleaches or cleansers containing petroleum
products on plastic parts, interior and door liners
or gaskets. Do not use paper towels, scouring
pads, or other harsh cleaning tools.
DISPOSAL OF P
he pack
T
recycle symbol
he various parts of the packaging must therefore be disposed of
T
responsibly and in full compliance with local authority regulations
governing waste disposal.
aging material is 100% recyclable and is marked with the
ACKAGING MATERIALS
.
DISPOSAL OF HOUSEHOLD APPLIANCES
his appliance is manufactured with recyclable or reusable materials.
T
Dispose of it in accordance with local waste disposal regulations.
For further information on the treatment, recovery and recycling of
household electrical appliances, contact your local authority, the
collection service for household waste or the store where you purchased
the appliance. This appliance is marked in compliance with European
Directive 2012/19/EU, Waste Electrical and Electronic Equipment
(WEEE). By ensuring this product is disposed of correctly, you will help
prevent negative consequences for the environment and human health.
The symbol
indicates that it should not be treated as domestic waste but must be
taken to an appropriate collection center for the recycling of electrical
and electronic equipment.
ENER
nstall the appliance in a dry, well ventilated room far away from any
I
heat source (eg. radiator, cooker, etc.) and in a place not exposed directly
to the sun. If required, use an insulating plate.
To guarantee adequate ventilation follow installation instructions.
Insucient ventilation at the back of the product increases energy
consumption and decreases cooling eciency.
Frequent door opening might cause an increase in Energy Consumption.
The internal temperature of the appliance and the Energy Consumption
may be aected also by the ambient temperature, as well as location
of the appliance. Temperature setting should take into consideration
these factors.
Reduce door opening to a minimum.
When thawing frozen food, place in the refrigerator. The low temperature
of the frozen products cools the food in the refrigerator. Allow warm
food and drinks to cool down before placing in the appliance.
Positioning of the shelves in the refrigerator has no impact on the
ecient usage of energy. Food should be placed on the shelves in such
way to ensure proper air circulation (food should not touch each other
and distanc
You can increase storage capacity of frozen food by removing baskets
and
, if present, Stop Frost shelf.
Do not worry about noises coming from the compressor which are
described as normal noises in this product's Quick Guide.
on the pr
GY SAVING TIPS
e between food and rear wall should be kept).
oduct or on the accompanying documentation
7
Page 8
Proper Disposal of Your Old
Refrigerator
DANGER : Risk of child entrapment. Before you throw away
your old refrigerator or freezer:
■ Take off the doors.
■ Leave the shelves in place so that children cannot easily climb
inside.
WARNING
Suffocation Hazard
Remove doors from your old refrigerator.
Failure to do so can result in death or
brain damage.
IMPORTANT: Child entrapment and suffocation are not problems
of the past. Scrapped or abandoned refrigerators are still
dangerous—even if they will sit for “just a few days.” If you are
getting rid of your old refrigerator, please follow these instructions
to help avoid accidents.
Important information to know about disposal of
refrigerants:
Dispose of refrigerator in accordance with Federal and Local
regulations. Refrigerants must be evacuated by a licensed,
EPA certified refrigerant technician in accordance with
established procedures.
8
Page 9
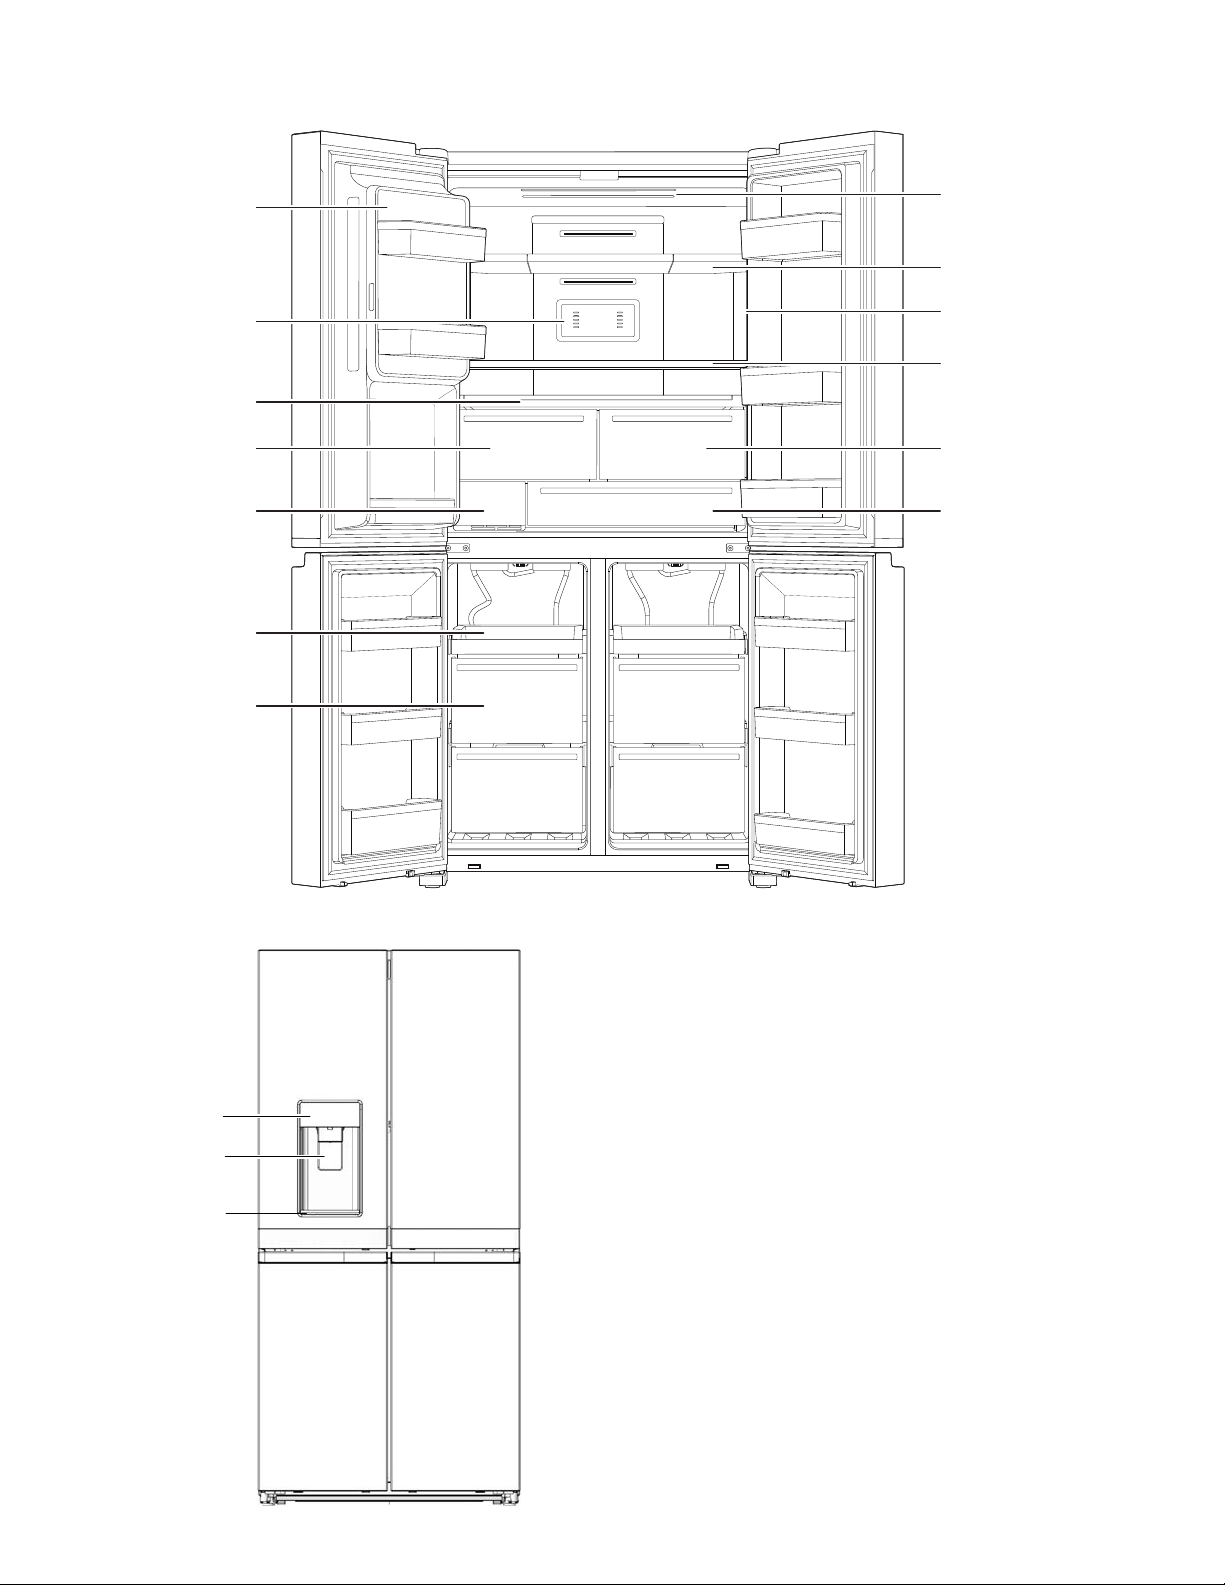
PARTS AND FEATURES
In-door Ice Maker
and Ice Bucket
Activ e Oxygen
2 top Light Strips
Adjustable Shelf
2 side Light Strips
Adjustable Shelf
A
Pull Out Platter
Fresh Box
Water Filter Delicates Pantry Drawer
Easy Access T
Fast Freeze Drawers
ray
B C
Fr
esh Box
A. Refrigerator
B. Fr
C. Flexi Freeze
eezer
User Interface
ater
Ice and W
Dispense Paddles
Pull out
ray
Dripping T
Storage Capacity:
Please check the rating label in the back of the product.
9
Page 10

WHA
In-Door
The ice maker and ice storage bin ar
access to ltered ice while freeing up valuable shelf space inside
and adding additional door bins for more usable space.
®
Storage Bin
-Ice
T’S NEW BEHIND THE DOORS?
e located in the door for easy
Panoramic LED lighting
Multiple strips of LED lights inside the refrigerator compartment,
freezer compartment, and interior drawers minimize shadows and
evenly distribute light throughout the refrigerator.
Freeze Shield
This feature minimizes moisture migration in the frozen food and
reduces the freezer burn occurrence.
Pull out Platter
This full-width side-out shelf tucked between the crispers and the
lowest shelf is perfect for leftover family-sized casserole dishes,
pizza boxes, and large party platters.
Delicates Pantry Drawers
To store things like meat, deli items, and drinks to keep in their
ideal cooling environment.
Water Dispenser with Measured Fill
The Measured Fill feature allows you to dispense a desired
amount of ltered water in handy increments like 0.2 liter, 0.5 liter
and 1.0 liter.
Convertible Zone
Switch from freezer to fridge in one touch by selecting among the
6+ preset temperatures and create the space you want according
to your evolving needs.
Active Oxygen
Hygiene, with innovative device releasing ozone to reduce odours
and prevent the proliferation of bacteria inside the cabinet,
improving the air quality for a better environment.
10
Page 11
INST
Electrical Power
INSTALLATION INSTRUCTIONS
Getting Started
ALLATION CHECKLIST
WARNING
Electrical Shock Hazard
Plug into a grounded 3 prong outlet.
Do not remove ground prong.
Do not use an adapter.
Do not use an extension cord.
Failure to follow these instructions can result in death,
fire, or electrical shock.
■ Plug refrigerator into a earthed socket.
Doors
If doors need to be r
■
“Remove and Replace Refrigerator Doors” and “Remove and
Replace Freezer Door Fronts” sections.
Doors seal completely
■
■
Refrigerator is level. Adjust leveling feet so they ar
against the oor.
■
Doors ar
necessary).
Final Checks
■
Remove all shipping material.
■
Set temperatur
■
Save instructions and other literatur
In or
■
register your product on www.hotpoint.eu.
e even across the top. (Use door alignment feature if
der to receive a more complete assistance, please
W
n
Locate the water lter compartment in the lower left-hand side
efrigerator compartment. Push on the right side of the
of the r
lter door to open.
n Align the arr
the lter housing and insert lter.
Once the lter is inserted, tur
n
turn) until it locks into the housing.
Push water lter door closed to latch.
n
n
Flush 3 gallons (11.4 L) of water thr
clear air from the water line and to keep the dispenser from
dripping and/or avoiding decreased dispenser ow.
n
Reset the lter counter via user interface. See the pr
to reset the lter in the User Controls section.
ow on the water lter cap with the cutout notch in
emoved during installation, see the
.
e snug
e controls to the recommended setting.
e.
ater Filter Installation
n the lter clockwise 90° (1/4
ough the water system to
ocedure
NOTE: If the lter is not installed corr
a lower ow rate and there will be slower ice production. Improper
lter installation may also cause the water lter housing to leak.
ectly, water may dispense at
Unpack the Refrigerator
WARNING
Excessive Weight Hazard
Use two or more people to move and install
refrigerator.
Failure to do so can result in back or other injury.
Refrigerator Delivery
A minimum door opening of 838 mm (33") is r
opening is 914 mm (36") or less, then removal of doors, drawer
and hinges is required.
Cart the refrigerator from the side for all door openings.
When Moving Your Refrigerator:
Your refrigerator is heavy. When moving the refrigerator for
cleaning or service, be sure to cover the oor with
cardboard or hardboard to avoid oor damage. Always pull
the refrigerator straight out when moving it. Do not wiggle or
“walk” the refrigerator when trying to move it, as oor
damage could occur.
Remove the Packaging
Remove tape and glue r
■
turning on the refrigerator. Rub a small amount of liquid dish
detergent over the adhesive with your ngers. Wipe with warm
water and dry.
Do not use sharp instruments, rubbing alcohol, ammable
■
uids, or abrasive cleaners to r
products can damage the surface of your refrigerator.
■
Dispose of/r
Clean Before Using
After you remove all of the packaging materials, clean inside of
your refrigerator before using it. See cleaning instructions in the
“Refrigerator Care” section.
ecycle all packaging materials.
esidues from surfaces before
emove tape or glue. These
Important information to know about glass shelves
and covers:
Do not clean glass shelves or covers with warm water when
they are cold. Shelves and covers may break if exposed to
sudden temperature changes or impact, such as bumping.
Tempered glass is designed to shatter into many small,
pebble-size pieces. This is normal. Glass shelves and covers
are heavy. Use both hands when removing them to avoid
dropping.
equired. If door
11
Page 12

Location Requir
ements
Electrical Requir
ements
WARNING
Explosion Hazard
Keep flammable materials and vapors, such as
gasoline, away from refrigerator.
Failure to do so can result in death, explosion, or fire.
T
o ensure proper ventilation for your refrigerator, allow for a
1.25 cm space on each side and at the top. Allow for a 5 cm
space behind the refrigerator. If your refrigerator has an ice maker,
allow extra space at the back for the water line connections.
When installing your refrigerator next to a xed wall, leave a 9.5
cm minimum space between the refrigerator and wall to allow the
door to swing open.
NOTE: This refrigerator is intended for use in a location where
the temperature ranges from a minimum of 10°C to a maximum
of 43°C. The preferred room temperature range for optimum
performance, which reduces electricity usage and provides
superior cooling, is between 15°C and 32°C. It is recommended
that you do not install the refrigerator near a heat source, such as
an oven or radiator.
1.25 cm
WARNING
Electrical Shock Hazard
Plug into a grounded 3 prong outlet.
Do not remove ground prong.
Do not use an adapter.
Do not use an extension cord.
Failure to follow these instructions can result in death,
fire, or electrical shock.
IMPOR
be carried out by a qualied technician according to the
manufacturer’s instructions and in compliance with the local
safety regulations.
Before you move your refrigerator into its nal location, it is
important to make sure you have the proper electrical connection:
Recommended Earthing Method
220-240 V 50 Hz, 220 V 60 Hz, or 230/240 V 50 Hz AC only 10 A
fused and earthed electrical supply is required.
TANT: Installation and electrical connection must
■
The r
efrigerator is designed to operate on a separate
220-240 V, 10 A, 50-60 Hz circuit.
Make sur
■
corresponds to that of your home.
■
It must be possible to disconnect the appliance fr
power supply by unplugging it or by means of a main two pole
switch installed upstream of the socket.
If the supply cor
■
manufacturer, its service agent or similarly qualied persons in
order to avoid a hazard.
e the voltage specied on the rating plate
om the
d is damaged, it must be replaced by the
12
9.5 cm
T
Type B
Type I
For Australia and New Zealand:
Your new appliance has been especially manufactured to meet all
Australian Standards and Conditions.
Some notations in the installation instructions may refer to
electrical requirements in other countries, so we draw your
particular attention to these specic notes.
Your appliance needs to be plugged into a 230/240 V 50 Hz AC
only 10 A earthed socket.
Type E and F
Type M
ype N
Type G
Page 13
Electrical Requirements (Great Britain and Ireland only)
Temperature
IMPORTANT: This refrigerator must be earthed.
Fuse Replacement
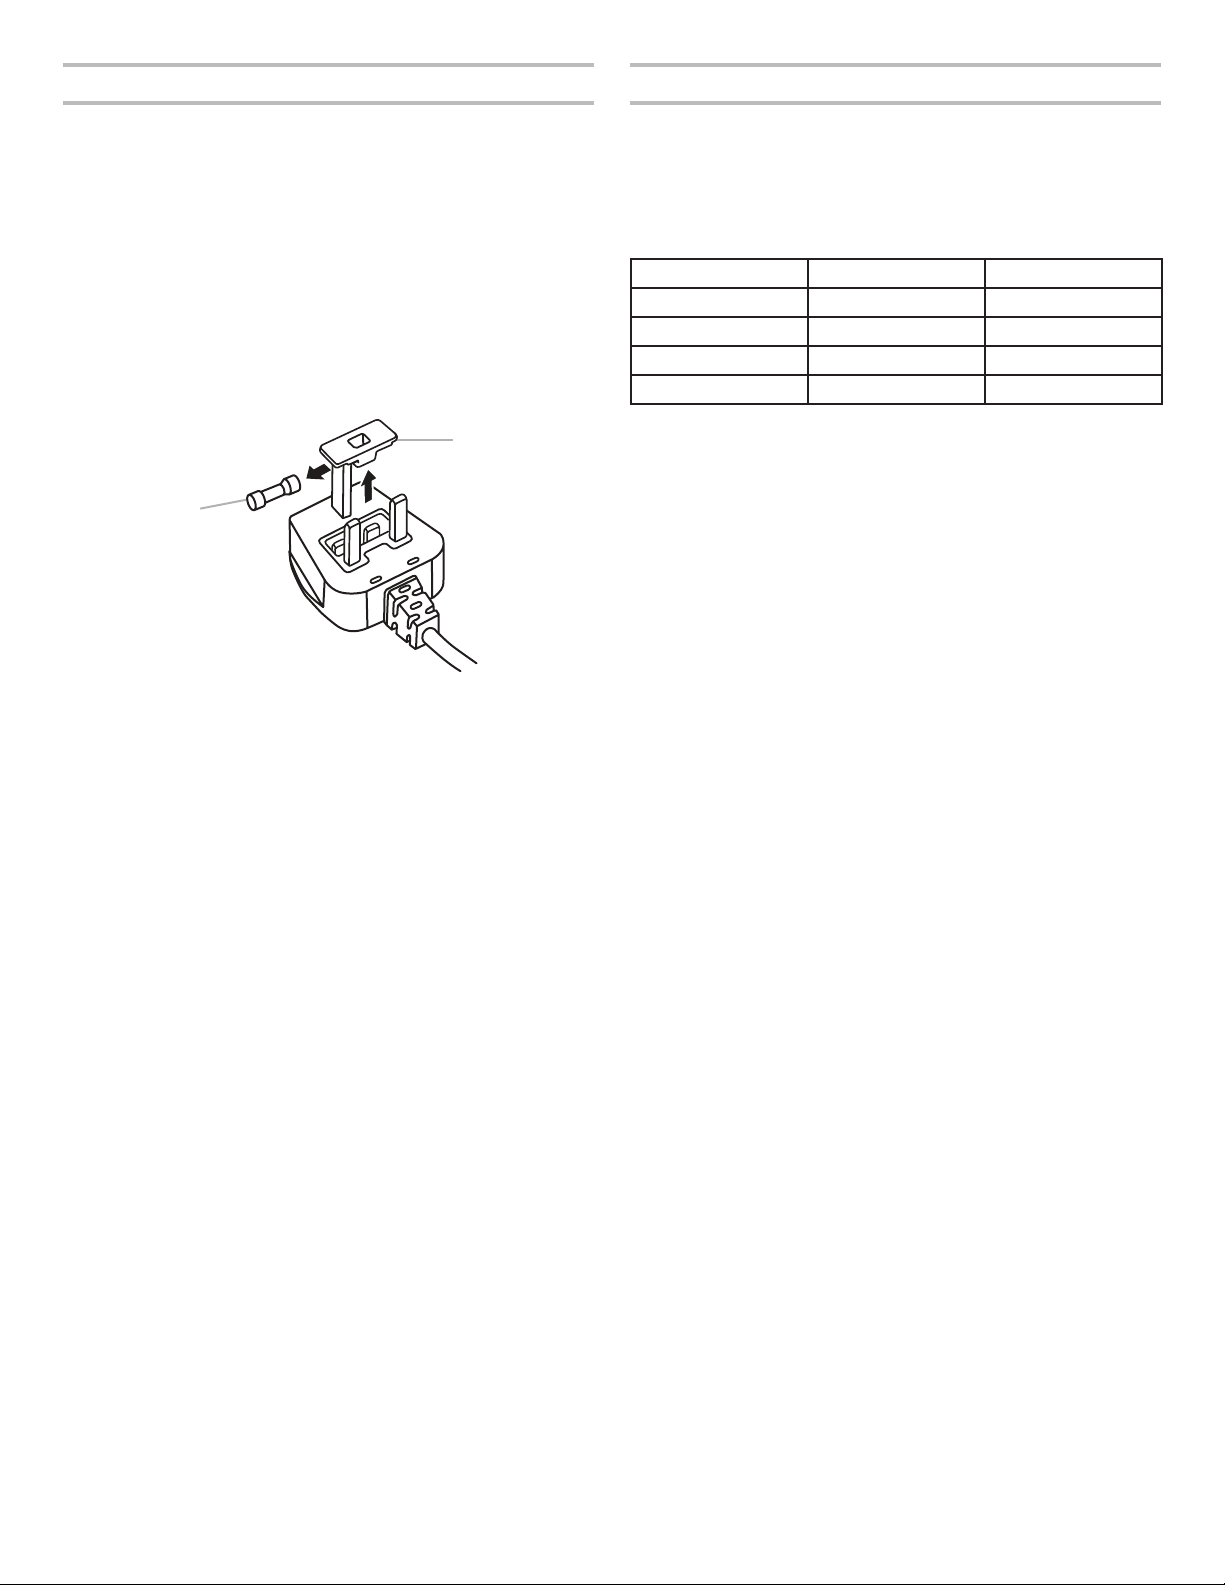
If the main lead of this refrigerator is tted with a BS1363A,
13 A fused plug, to replace a fuse in this type plug use an A.S.T.A.
approved fuse to BS 1362 type and proceed as follows:
1. Remove the fuse cover (A) and fuse (B).
2. Fit replacement 13 A fuse into the fuse cover.
3. Reinsert both the fuse and its cover into the plug.
IMPORTANT: The fuse cover must be retted when changing a
fuse. If fuse cover is lost, the plug must not be used until a correct
replacement cover is tted. A correct replacement is identied by
the colour insert or colour “word” embossed on the base of the
plug. Replacement fuse covers are available at your local
electrical shop.
A
B
A. Fuse cover
B. Fuse
This refrigerator is designed for operation in places where the
temperature comes within the following ranges, according to
climatic class shown on the rating plate. The refrigerator may not
work properly if it is left for a long time at a temperature outside
the specied range.
NOTE: It is recommended that you do not install the refrigerator
near a heat source, such as an oven or radiator.
Climatic Class Amb. T. (°C) Amb. T. (°F)
SN From 10 to 32 From 50 to 90
N From 16 to 32 From 61 to 90
ST From 16 to 38 From 61 to 100
T From 16 to 43 From 61 to 110
For the Republic of Ireland (only):
The information given in respect of Great Britain will frequently
apply, but a third type of plug and socket is also used, the 2-pin,
side earth type.
Socket/Plug (valid for both countries):
If the tted plug is not suitable for your socket, please contact
After-sales Service for further instruction. Please do not
attempt to change the plug yourself. This procedure needs
to be carried out by a qualied technician in compliance with
the manufacturer’s instructions and current standard safety
regulations.
13
Page 14

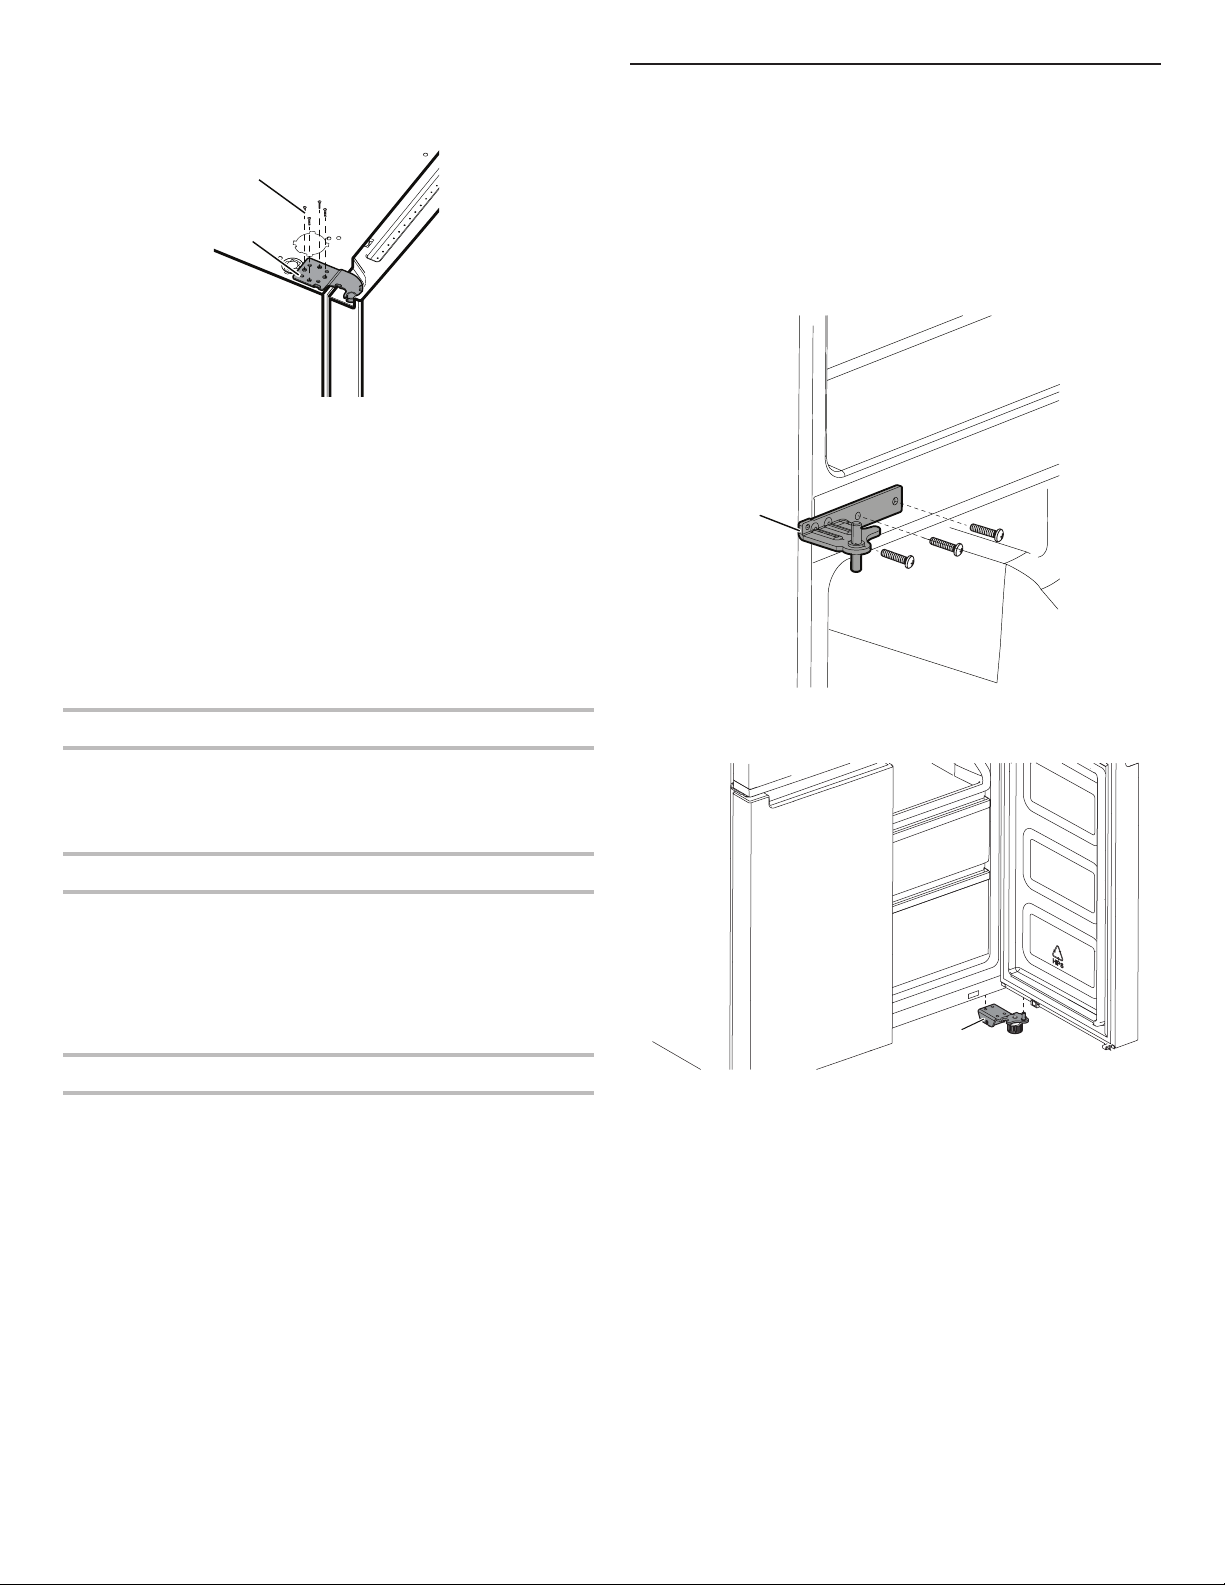
Remove and Replace Refrigerator Doors
NOTE: Measur
your home. If door removal is necessary, see the following instructions.
IMPORTANT: If refrigerator was previously installed and you are moving it out of the home, turn refrigerator control off before you begin
removing the doors. Unplug refrigerator or disconnect power. Remove food and adjustable door or utility bins from doors.
Gather required tools and read all instructions before removing doors.
TOOLS NEEDED: 6 mm socket wrench, 5 mm socket wrench and #2 Phillips screwdriver.
e the width of your door opening to see whether or not you need to remove refrigerator doors to move refrigerator into
WARNING
Electrical Shock Hazard
Disconnect power before removing doors.
Failure to do so can result in death or electrical shock.
ater Dispenser
W
Tubing Connection
A
A. Outer ring
op Left Hinge Cover
T
A
B
op Hinge Cover screws
A. T
B. Top Hinge Cover
T
op Right Hinge Cover
op Hinge Cover screws
A. T
B. Top Hinge Cover
A
B
Wiring Plug
T
op Right Hinge
A
op Left Hinge
T
A
A. 5 mm socket scr
ews
14
A. 5 mm socket scr
Middle Left Hinge
A
A. Hinge
ews
Middle Right Hinge
A
A. Hinge
Page 15
WARNING
Excessive Weight Hazard
Use two or more people to lift the refrigerator door.
Failure to do so can result in back or other injury.
Remove Left-Hand Door
IMPORTANT: The wiring for UI run through left-hand door hinge,
so they must be disconnected before removing the door.
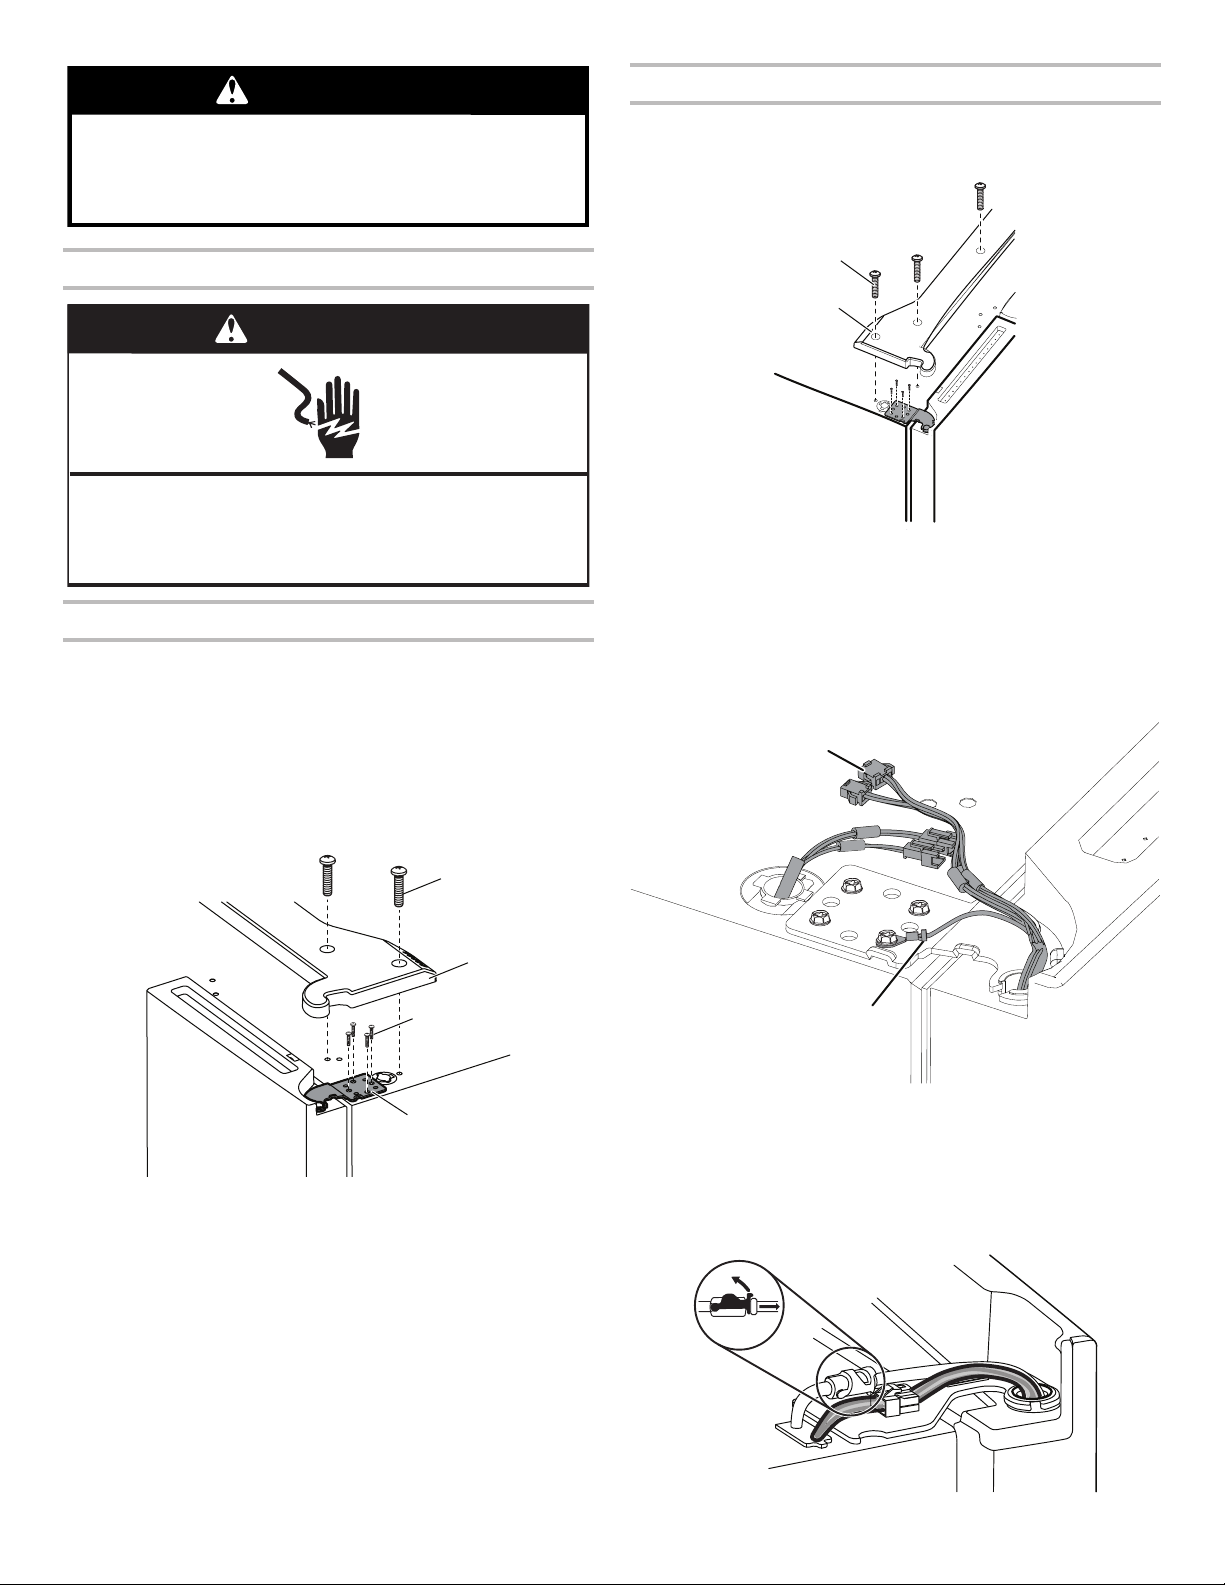
1. Using a Phillips screwdriver, remove cover from top hinge.
Remove Refrigerator Doors
WARNING
Electrical Shock Hazard
Disconnect power before removing doors.
Failure to do so can result in death or electrical shock.
Remove Right-Hand Door
1. Unplug refrigerator or disconnect power.
2. Keep refrigerator doors closed until you are ready to lift them
free from the cabinet.
NOTE: Provide additional support for refrigerator door while the
hinges are being removed. Do not depend on the door gasket
magnets to hold the door in place while you are working.
3. Using a Phillips screwdriver, remove cover from top hinge.
4. Using 5 mm socket wrench, remove four screws from top
hinge and set aside.
A
B
A. Top hinge cover screw
B. Top hinge cover
2. Disconnect two wiring plugs located on top of the door hinge.
■ Grasp each side of wiring plugs. With your left thumb,
press down to release the catch and pull the sections of
the plugs apart.
A
A
B
C
D
A. Top hinge cover screw
B. Top hinge cover
5. Lift refrigerator door from the middle hinge pin. The top hinge
will come away with the door.
C. 5 mm socket screws
D. Top hinge
B
A. Wiring Plug
B. Ground (earth) connector
3. Disconnect the water dispenser tubing located on top of the
door hinge. Firmly pull up on the clasp. Then, pull the tubing
out of the fitting.
NOTE: The water dispenser tubing remains attached to the
left-hand refrigerator door.
15
Page 16
4. Using 5 mm socket wrench, remove four internal screws from
top hinge and set aside.
A
B
A. 5 mm socket screws
B. Top Hinge
NOTE: Provide additional support for refrigerator door while
hinges are being removed. Do not depend on the door gasket
magnets to hold the door in place while you are working.
5. Lift refrigerator door from bottom hinge pin. The top hinge will
come away with door.
NOTE: It may not be necessary to remove bottom hinges and
brake feet assemblies to move the refrigerator through a doorway.
■ Only if necessary, use 6 mm socket wrench and #2 Phillips
screwdriver to remove middle hinge.
Replace Right-Hand Refrigerator Door
1. Set right-hand door onto middle hinge pin.
2. Insert top hinge pin into open hole in top of refrigerator door.
3. Using four 5 mm socket screws, fasten hinge to cabinet. Do
not tighten screws completely.
Remove and Replace Freezer/Flexi
Freeze Door
1. Keep freezer doors closed until you are ready to lift them free
from cabinet.
NOTE: Provide additional support for freezer door while hinges
are being removed. Do not depend on door gasket magnets to
hold door in place while you are working.
■ Using a #2 Phillips screwdriver and 6 mm socket wrench to
remove middle hinge from cabinet.
A
A. Middle hinge
■ Lift freezer door from the bottom hinge pin.
Replace Left-Hand Refrigerator Door
1. Set left-hand door onto middle hinge pin.
2. Using four 5 mm socket screws, fasten hinge to cabinet. Do
not tighten screws completely.
3. Reconnect electrical wiring.
■ Push together two sections of wiring plug.
■ Reconnect earth wire to hinge screw.
Final Steps
1. Completely tighten eight 5 mm socket screws.
2. Replace top hinge covers.
A
A. Bottom hinge
16
Page 17
Final Steps
WARNING
Electrical Shock Hazard
Plug into a grounded 3 prong outlet.
Do not remove ground prong.
Do not use an adapter.
Do not use an extension cord.
Failure to follow these instructions can result in death,
fire, or electrical shock.
1. Plug into an grounded (earthed) socket.
2. Return all removable parts and food to the drawers.
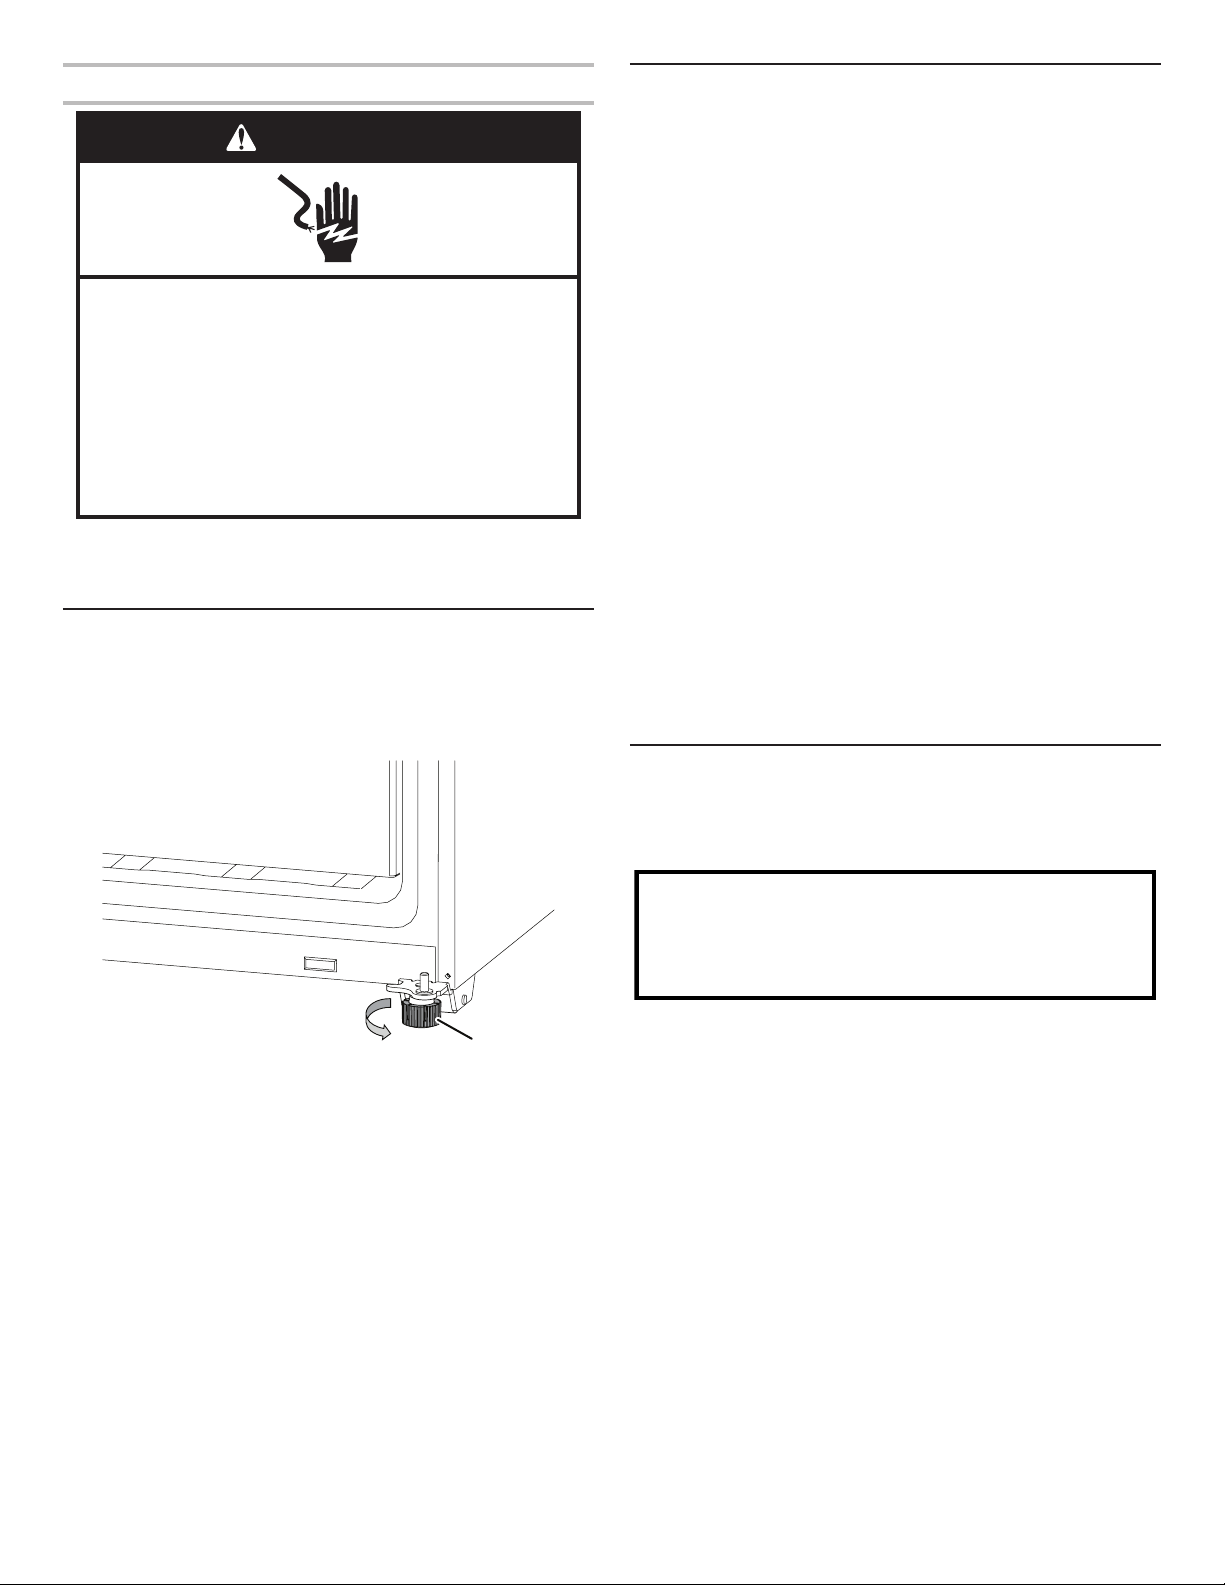
Refrigerator Levelling
1. Move refrigerator to its nal location.
2. Using hand, rotate the brake feet. Turn them counterclockwise
until the rollers are off the oor and both brake feet are snug
against the oor. This keeps refrigerator from rolling forward
when opening the doors.
Water Supply Requirements
A cold water supply with water pressure between 20 psi and
145 psi (138 kPa and 1000 kPa) is required to operate the water
dispenser and ice maker. If you have questions about your water
pressure, call a licensed, qualied plumber.
NOTE: If the water pressure is less than what is required, the ow
of water from the water dispenser could decrease or ice cubes
could be hollow or irregular shaped.
Reverse Osmosis Water Supply
IMPORTANT: The pressure of the water supply coming out
of a reverse osmosis system and supplying the water inlet valve
of the refrigerator needs to be between 20 psi and 145 psi
(138 kPa and 1000 kPa).
If a reverse osmosis water ltration system is connected to
your home cold water supply, the water pressure to the reverse
osmosis system needs to be a minimum of 40 to 60 psi (276 to
414 kPa).
■ Check to see whether the sediment lter in the reverse
osmosis system is blocked. Replace the lter if necessary.
■ Allow the storage tank on the reverse osmosis system to rell
after heavy use. The tank capacity could be too small to keep
up with the requirements of the refrigerator.
NOTE: Faucet-mounted reverse osmosis systems are not
recommended.
■ If your refrigerator has a water lter, it may further reduce
the water pressure when used in conjunction with a reverse
osmosis system. Remove the water lter. See the “Water
Filtration System” section.
If you have questions about your water pressure, call a licensed,
qualied plumber.
Connect the Water Supply
Read all directions before you begin.
IMPORTANT:
■ Connect to potable water supply only.
A. Brake feet
A
IMPORTANT: If you need to make further adjustments
involving brake feet, you must turn both brake feet same
amount to keep the refrigerator level.
3. Use a level to make sure refrigerator is level from side to side
and front to back.
Do not use with water that is microbiologically unsafe or
of unknown quality without adequate disinfection before
or after the system. Systems certified for cyst reduction
may be used on disinfected waters that may contain
filterable cysts.
■ Plumbing must be installed in accordance with the
International Plumbing Code and any local codes and
ordinances.
■ Copper and PEX tubing connections from the household
water line to the refrigerator are acceptable and will help
avoid off-taste or odor in your ice or water. Check for leaks.
If PEX tubing is used instead of copper, we recommend the
following: 7 ft (2.14 m) jacketed PEX, 5 ft (1.52 m) PEX, or
25 ft (7.62 m) PEX.
■ Install tubing only in areas where temperatures will remain
above freezing.
Tools Needed:
Gather the required tools and parts before starting installation.
■ Flat-blade screwdriver
■ 7/16" and 1/2" open-end wrenches or 2 adjustable wrenches
■ 1/4" nut driver
NOTE: Do not use a piercing-type or 3/16" (4.76 mm) saddle
valve, which reduces water ow and clogs easier.
17
Page 18
Connect to Water Line
Connect to Refrigerator
IMPORTANT: If you have turned the refrigerator on before the
water was connected, turn off the ice maker.
1. Unplug refrigerator or disconnect power.
2. Turn off main water supply. Turn on nearest faucet long
enough to reduce water pressure in the water line.
3. Use a 3/4-14" shut-off valve or equivalent. The refrigerator is
provided with a household supply line with the installation kit
that connects to the shut-off valve and to the refrigerator.
NOTE: Appliance is equipped with a water installation kit. To
assure proper connection to your water supply, use proper sealing
material in the connection. Check if connection is sealed properly
after some hours of operation.
A
B
C
D
A. Sleeve
B. Nut
C. Copper tubing (to refrigerator)
D. Household supply line
Follow the connection instructions specic to your model.
1. Remove plastic cap from water valve inlet port. Attach the
copper tubing to the valve inlet using a compression nut
and sleeve as shown. Tighten the compression nut. Do not
overtighten. Conrm copper tubing is secure by pulling on
copper tubing.
2. Create a service loop with the copper tubing. Avoid kinks
when coiling the copper tubing. Secure copper tubing to
refrigerator cabinet with a “P” clamp.
A
B
C
D
4. Now you are ready to connect the copper tubing to the
shut-off valve. Use 1/4" (6.35 mm) O.D. (outside diameter)
soft copper tubing to connect the shut-off valve and the
refrigerator.
■ Ensure that you have the proper length needed for the job.
Be sure both ends of the copper tubing are cut square.
■ Slip compression sleeve and compression nut onto copper
tubing as shown. Insert end of tubing into outlet end squarely
as far as it will go. Screw compression nut onto outlet end
with adjustable wrench. Do not overtighten.
A
B
C
A. Compression sleeve
B. Compression nut
C. Copper tubing
5. Place the free end of the tubing into a container or sink and
turn on main water supply to ush out tubing until water is
clear. Turn off shut-off valve on the water pipe.
NOTE: Always drain the water line before making the nal
connection to the inlet of the water valve to avoid possible
water valve malfunction.
6. Bend the copper tubing to meet the water line inlet, located
on the back of the refrigerator cabinet as shown. Leave a coil
of copper tubing to allow the refrigerator to be pulled out of
the cabinet or away from the wall for service.
A. Copper tubing
B. “P” clamp
C. Compression nut
D. Compression sleeve
3. Turn on water supply to refrigerator and check for leaks.
Correct any leaks.
4. If ice is desired, turn on the ice maker.
Note: Allow 24 hours to produce the rst batch of ice. Discard
the rst three batches of ice produced. Allow three days to
completely ll the ice storage bin.
18
Page 19
FILTERS AND ACCESSORIES
Water Filtration System
Do not use with water that is microbiologically unsafe or
of unknown quality without adequate disinfection before
or after the system. Systems certified for cyst reduction
may be used on disinfected waters that may contain
filterable cysts.
Replace and Install the Water Filter
The water lter should be replaced every 6 months based on
a ow rate of 0.50 gpm-0.60 gpm (1.89 lpm-2.27 lpm) that lters
200 gallons (757 L) of water.
To order a replacement lter, contact us. See the “Accessories”
section in the Use and Care Guide for information on ordering.
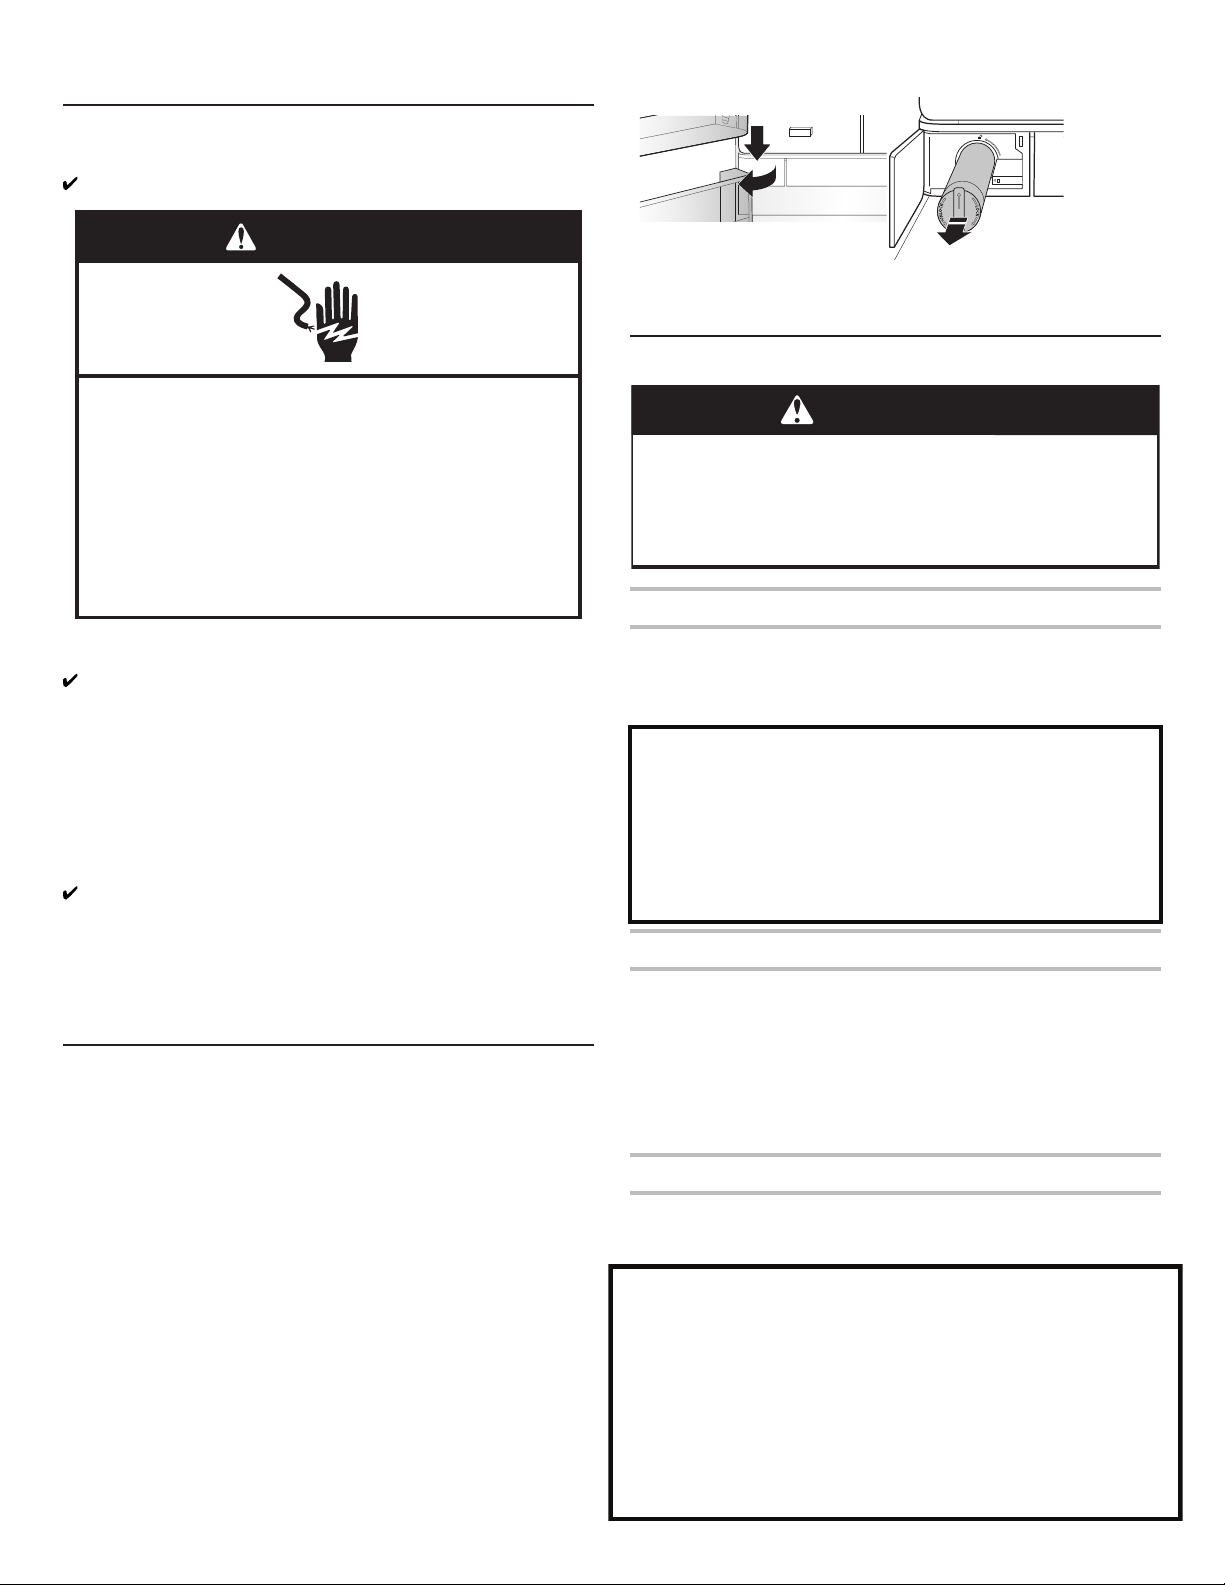
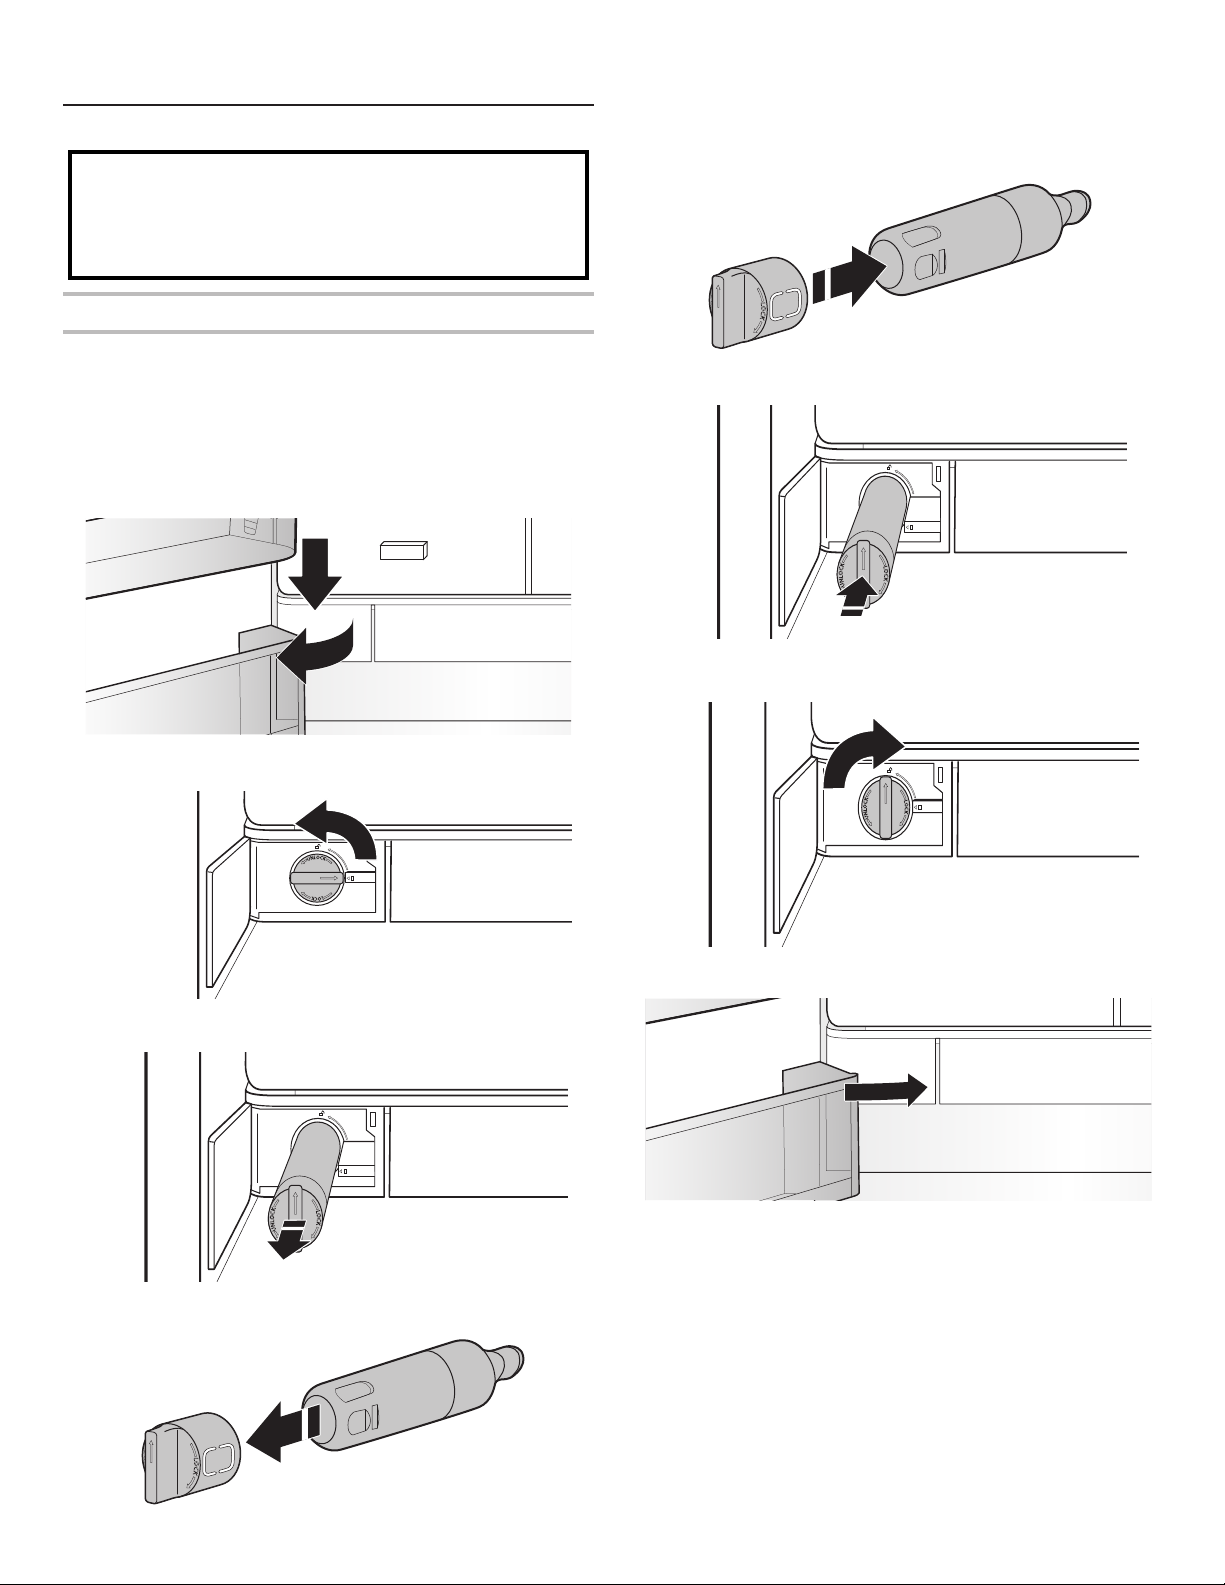
1. Push the water lter door to open, located bottom left of
refrigerator compartment.
4. Install the water lter cap onto the new lter. Be sure to align
the arrows so the groves in lter align with ribs in lter cap.
5. Insert the lter into the housing.
2. Twist the water lter and turn 90° counterclockwise to unlock.
3. Pull the lter out of the housing.
6. Twist the water lter and turn 90° clockwise until it locks into
place and the arrows are aligned.
7. Push the water lter door closed.
8. Reset the lter counter via user interface. See the procedure
to reset the lter in the User Control section.
Remove the water lter cap from the water lter being replaced.
19
Page 20
The W
ater Filter Status Lights
The Water Filter status lights will help you know when to change
your water lter.
n
ORDER FIL
water lter. “Order Filter” display is ON all of the time but
OFF in Showroom mode.
n REPLACE FIL
are dispensing water, “Replace Filter” will blink 7 times and
an alert tone will sound 3 times.
NOTE: “REPLACE FILTER” will remain illuminated if the lter
is not reset on the user interface (UI).
n
RESET FIL
reset water lter. The display will do a 3-second countdown,
then ash the icon and play a tone.
Replace and Install the Active Oxygen
It is recommended to replace the Active Oxygen every 3 years as
the ozone generate degrades over time, reducing its impact on
food preservation. At the beginning of life, it generates an average
of 0.06 ppm.
To order and replace the Active Oxygen, please contact us. See the
“Accessories” section for information on ordering.
TER (yellow) - It is almost time to change the
TER (red) - Replace the water lter. While you
TER - Touch "Filter Reset" button for 3 seconds to
Accessories
o order accessories, contact the dealer from whom you
T
purchased your refrigerator.
Assistance or Service
Befor
e calling for assistance or service, please check the
"Troubleshooting" section. It may save you the cost of a service
call. If you still need help, follow the instructions below.
If you need replacement parts
To locate factory-specied replacement parts in your area,
contact the dealer from whom you purchased your refrigerator.
Warranty
Contact the dealer from whom you purchased refrigerator for
warranty information.
Keep this book and your sales slip together for future
reference. You must provide proof of purchase or installation
date for in-warranty service.
Write down the following information about your appliance to help
you obtain assistance or service if you ever need it. You will need
to know your complete model number and serial number. You
can nd this information on the model and serial number label,
located on the inside wall of the fresh food compartment.
Dealer name
Serial number
Address
Phone number
Model number
Purchase date
Refer to www.hotpoint.eu to contact.
20
Page 21
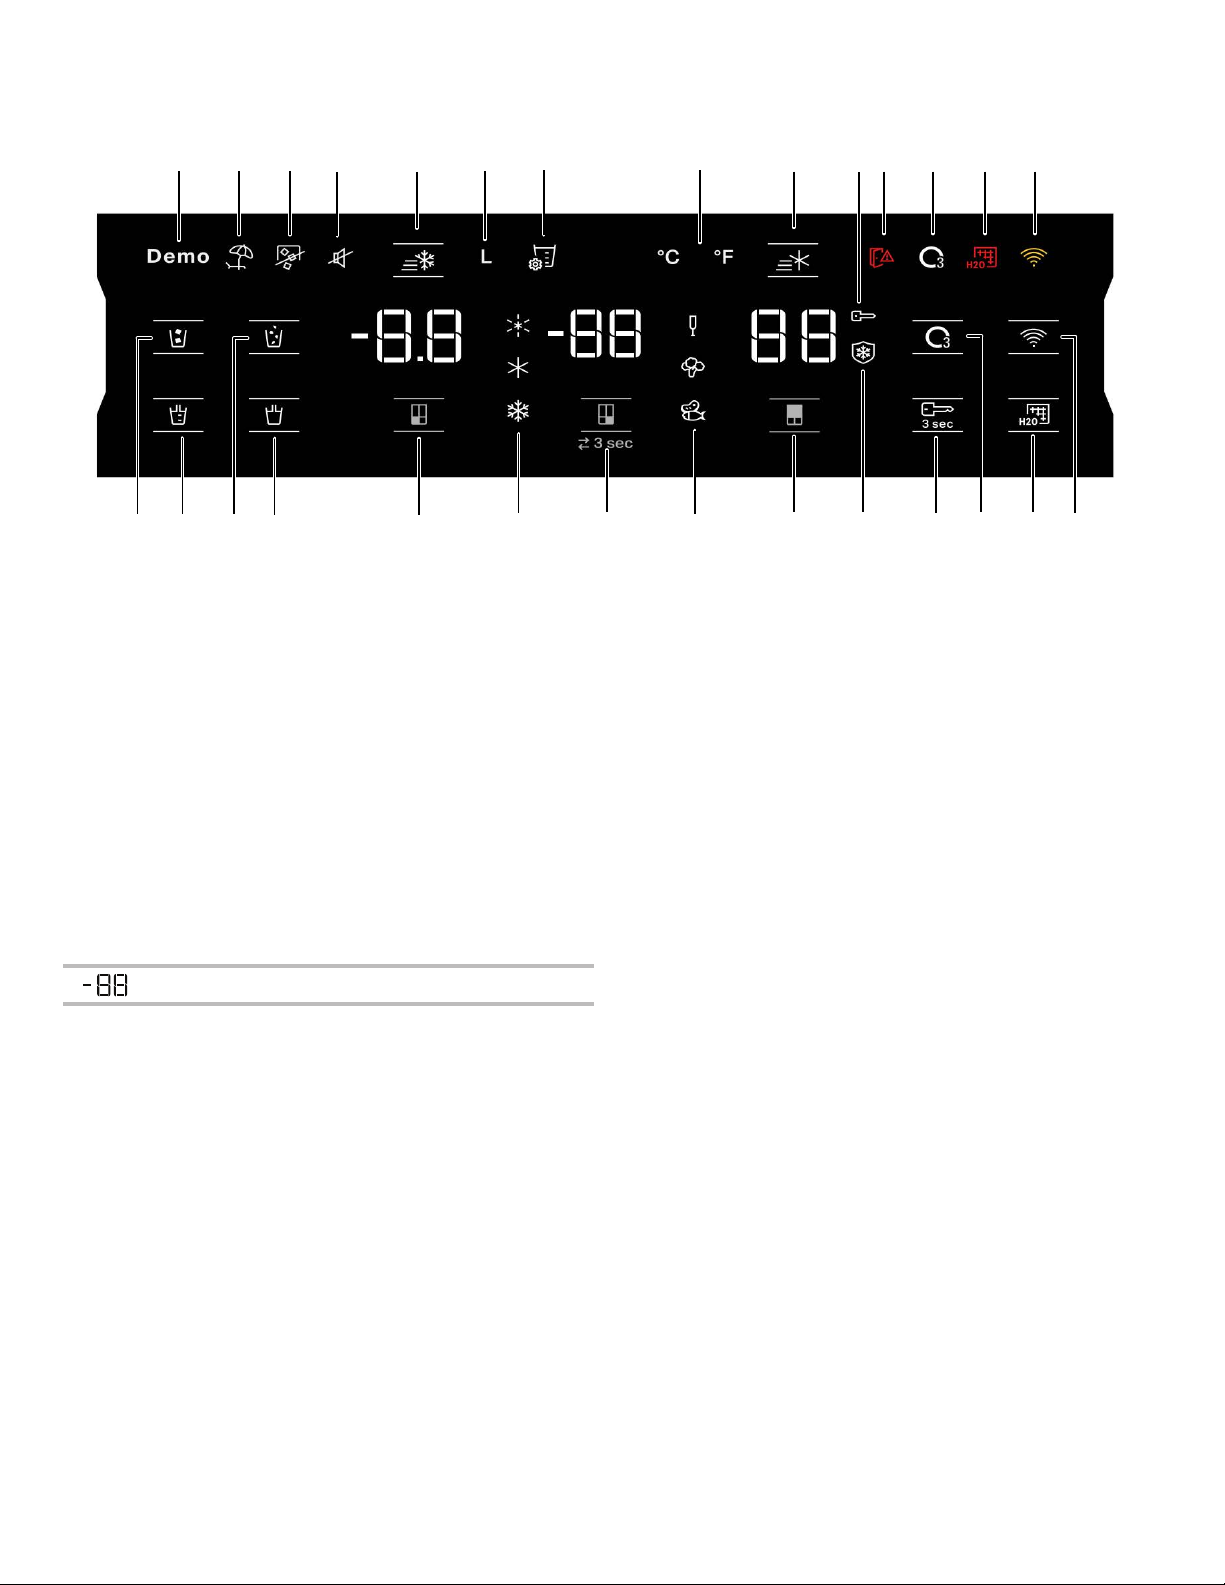
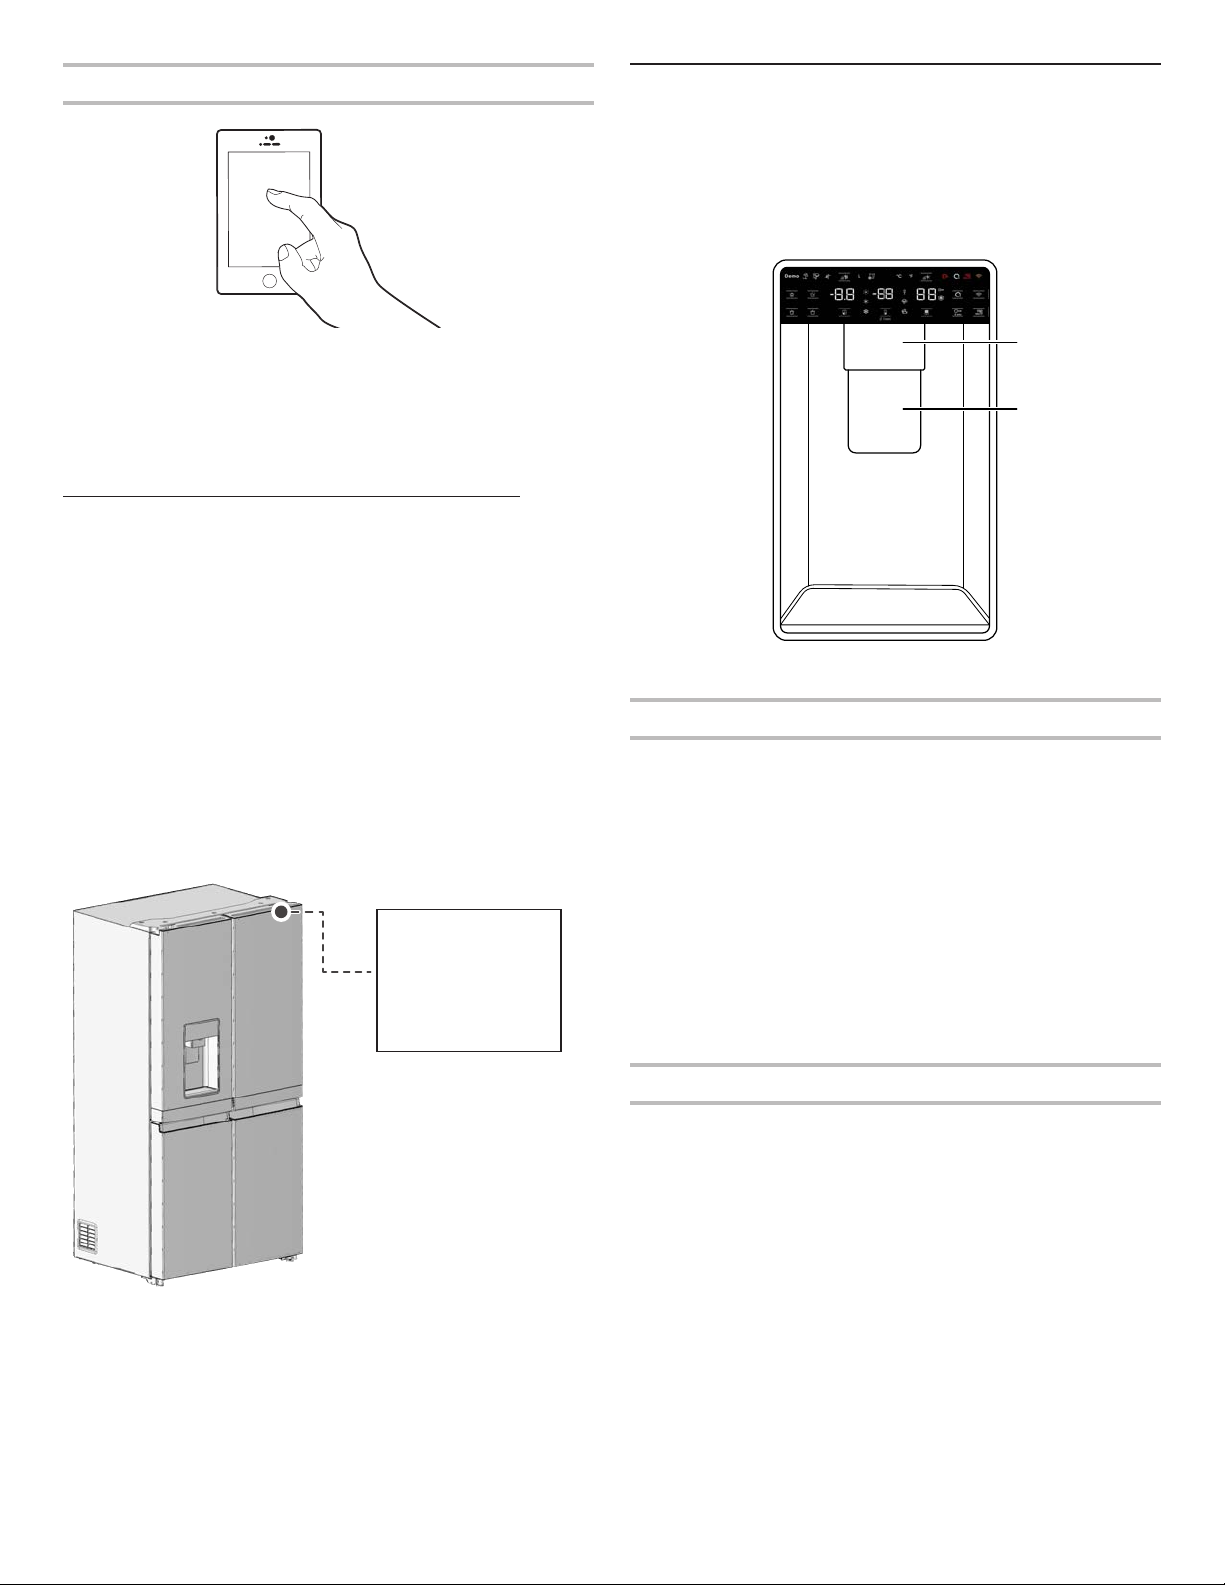
USING THE CONTROLS
The touch-activated controls are located on the left hand refrigerator door. The control panel includes information about various buttons
and indicators. Refrigerator and freezer temperature indicator shows last temperature set point.
28
26
27 25
24
23
22
21
20
18 17 16 1519
1
2
3
4
1. Cubed Ice BUTTON & INDICA
2. Measur
ed Fill BUTTON & INDICATOR
3. Crushed Ice BUTTON & INDICA
4. Dispense W
5. Fr
eezer Compartment BUTTON & INDICATOR
6. Fr
eezer Mild Freeze Fast Chill INDICATORS
ater BUTTON & INDICATOR
TOR
TOR
5
7. Convertible Z one BUTTON & INDICATOR
8. Wine, V
9. Refrigerator Compartment BUTTON & INDICA
10. Fr
11. Lock and Celsius/Fahr
eggies, Meat & Fish INDICATORS
TOR
eeze Shield (No Freezer Burn) INDICATOR
enheit BUTTON
12. Active Oxygen Indicator BUTTON & INDICATOR
13. W
ater Filter Reset BUTTON
14. Wi-Fi BUTTON & INDICA
15. Wi-Fi Err
or INDICATOR
TOR
6 7 8
16. Replace W
17. Replace Active Oxygen INDICATOR
18. Door Open INDICA
19. Lock INDICA
20. Fast Cool BUTTON & INDICA
Celsius/Fahr
21.
Calibrate Fill INDICA
22.
Liters INDICA
23.
Fast Fr
24.
Sound Of
25.
Ice maker Of
26.
Holiday Mode INDICA
27.
Demo Mode INDICA
28.
eeze BUTTON & INDICATOR
9 10 11 1312 14
ater Filter INDICATOR
TOR
TOR
TOR
enheit INDICATOR
TOR
TOR
f INDICATOR
f INDICATOR
TOR
TOR
The Control Panel will automatically turn off after one minute of inactivity. To turn on the control panel, press any key.
Viewing and Adjusting Temperature Set Points
NOTE: Ar
eas such as a garage, basement or porch may have
higher humidity or extreme temperatures. You may need to
Adjusting Fresh Food and Freezer Compartment Temperature:
For your convenience, your refrigerator and freezer controls are
preset at the factory.
When you rst install your refrigerator, make sure that the
controls are still set to the recommended set points. The factory
recommended set points are 3°C for the refrigerator and -18°C for
the freezer.
adjust the temperature away from the recommended settings
to accommodate for these conditions.
W
■
ait at least 24 hours between adjustments. Recheck the
temperatures before other adjustments are made.
NOTE: To toggle the temperature between degrees Celsius and
Fahrenheit, touch and hold "Max Ice" and "Max cool" buttons for
3 seconds and the temperature display will change.
Pressing Refrigerator or Freezer Temperature button will toggle
through temperature set points in Celsius (°C).
IMPORTANT:
ait 24 hours before you put food into refrigerator. If you add
■
W
food before refrigerator has cooled completely, your food may
spoil.
NOTE: Adjusting the set points to a colder
-than
recommended setting will not cool compartments any faster.
■
If the temperatur
e is too warm or too cold in the refrigerator
or freezer, rst check the air vents to be sure they are not
blocked before adjusting the controls.
■
The r
ecommended settings should be correct for normal
household use. The controls are set correctly when milk or
juice is as cold as you like and when ice cream is rm.
21
Page 22
Convertible Zone Setting
Holiday Mode
Convertibility function allows you to toggle pr
eset temperature
for Convertible Compartment. While toggling, the selected
temperature displays in the user interface. Press and hold the
convertible zone temperature button for 3 seconds to change
between refrigerator and freezer presets.
Symbol Function T
T
raditional Freezer: Food
already frozen and fresh food
emperature
-16°C to -22°C
for maximum 12 month
eezer: Food already
Mild Fr
frozen for maximum 1 month
Soft Fr
eezer: Food already
-12°C
-7°C
frozen for maximum 1 week
Wine 10°C
V
eggies 4°C
Meat and Fish 0°C
When adjusting temperatur
e set points, use the following
chart as a guide:
CONDITION TEMPERA
TURE ADJUSTMENT
Refrigerator too cold Refrigerator setting 1° higher
Refrigerator too warm Refrigerator setting 1° lower
Freezer too cold Freezer setting 1° higher
Freezer too warm/
Freezer setting 1° lower
too little ice
This mode is designed to avoid your appliance fr
om wasting
energy during times when it's not in regular use (when you are on
holiday for example).
By selecting this function the temperature of fresh food
compartment will automatically be set to 12°C.
o use the Holiday mode, press mode button until Holiday
T
■
mode indicator is lit on the display.
To exit the Holiday mode, press the mode button until no
■
mode icon is lit on the display.
■
Adjusting the r
efrigerator temperature will automatically turn
off the Holiday Mode feature.
IMPORTANT: If this mode is selected then all food and drinks
must be removed from fresh food compartment.
Sound ON-OFF
Press and hold “Filter Reset” and “Active Oxygen” buttons for 3
seconds to toggle the sound ON-OFF. If you turn on the sound,
the “Sound” icon will light up on the display.
Key Lock
ess and hold the Lock button for 3 seconds to activate lock
Pr
■
feature.
o deactivate lock, press and hold the Lock button for 3
T
■
seconds.
The lock feature will ignore all interaction with control panel and
dispenser pads until the user unlocks the control panel. This
feature is meant to avoid unintentional changing of settings.
Demo Mode
Fast Cool
The Fast Cool featur
e assists with periods of high refrigerator use,
full grocery loads, or temporarily warm room temperatures.
■
To turn on the Fast Cool feature, press and hold the
Refrigerator Temperature button
featur
e is activated, the Fast Cool icon will be illuminated. The
for 3 seconds. When
Fast Cool feature will remain on for 2 hours unless manually
turned off.
o manually turn off the Fast Cool feature, press and hold the
■
T
Refrigerator Temperature button
Cool icon will tur
Adjusting r
■
n off when feature is not activated.
efrigerator temperature will automatically turn off
for 3 seconds. The Fast
the Fast Cool feature.
Fast Fr
eeze
The amount of fresh food (in kg) that can be frozen in 24 hours is
indicated on the appliance rating plate.
ess Freezer Temperature button
Pr
■
Fast Fr
eeze Indicator lights up), 30 hours before placing fresh
for 3 seconds (until the
food in the freezer. After placing fresh food in the freezer,
30 hours on Fast Freeze function is generally sufcient; After
50 hrs the fast freeze function automatically deactivates.
o manually turn off the Fast Freeze feature, press and hold
■
T
the Freezer Temperature button
eeze icon will turn off.
Fr
■
Adjusting the fr
eezer temperature will automatically turn off
for 3 seconds. The Fast
the Fast Freeze feature.
Freeze Shield Mode
The Freeze Shield minimizes moisture migration in the frozen food
and reduces the freezer burn occurrence. The feature is active in
any freezer setpoint and for the convertible compartment for any
of the freezer mode setpoints.
This mode is used when refrigerator is on display in a retail shop
or if you want to turn the cooling off and deactivate all other
functions (except interior lighting).
Demo mode can be used when going on extended holiday.
See the “Holiday and Moving Care” section for proper steps on
leaving your refrigerator in this mode for long periods of time.
If you tur
■
n on Demo mode, the “Demo” icon will light up on
the display.
Enter or exit Demo mode by pressing and holding
■
the "Measured Fill" and "Water Filter Reset" button
simultaneously for 3 seconds.
Active Oxygen
The refrigerator has a Ozone generator located in the center of
the air tower. The Active Oxygen can be enabled or disabled.
Once the Active Oxygen Button light is on, press the button to
n
turn the Active Oxygen off. Toggle the button to enable/disable
the Active Oxygen.
The Active Oxygen expires in 3 years of usage. Once the 3 years life
is reached, the Active Oxygen icon will turn on. After changing the
Active Oxygen, the alarm can be reset.
Pressing the Active Oxygen reset button for 3 seconds will reset
n
the counter and turn off the Active Oxygen Replace Indicator
Additional Featur
es
Door Ajar Alarm
The Door Ajar Alarm feature sounds an alarm when the
refrigerator door(s) or freezer drawer is open for 5 minutes and
cooling is turned on. The alarm will repeat every 2 minutes. Close
all doors and drawer to turn it off.
NOTE: To mute the audible alarm while keeping the doors open,
such as while cleaning the inside of the refrigerator, touch any
button on the control panel. The alarm sound will be temporarily
turned off, but the Door Ajar icon will still be displayed on the
dispenser control panel.
22
Page 23

W
ater Filter Reset and Indicator
Displays the status of the water lter. To reset the lter, press
Water lter reset button for 3 seconds. After countdown, the icon
will blink 3 times and the lter reset operation is completed.
The Water Filter status lights on the internal controls will let you
know when to change your water lter.
n
ORDER FILTER (Yellow): Order a replacement water lter.
REPLACE FIL
n
TER (RED): Replace the water lter. While
you are dispensing water, "Replace Filter" icon will ash
constantly from beginning to the end of dispensing. After 14
days without replacing the water lter, the "Replace Filter"
icon will blink 7 times and an alert tone will sound 3 times
at the end of dispensing. See the "Water Filtration System"
section.
NOTE: REPLACE FILTER will remain illuminated if a lter reset is
not done.
Lighting the Refrigerator
The r
efrigerator has an interior light that comes on any time door
is opened.
NOTE: The light is LED which does not need to be replaced. If the
LED does not illuminate when the door is opened, call service.
REFRIGERA
TOR CONNECTIVITY FEATURES
(ON SOME MODELS)
Wi-Fi connectivity allows your Smart Refrigerator to connect to the Internet and interact with the Hotpoint® app fr
or mobile device. This connection opens up several Smart options to you — options intended to save you valuable time and energy.
Refer to the “Troubleshooting—Connected Models” section of this Use & Care Guide, check any connection instructions for your
specic router.
NOTE: Requires Wi-Fi and account creation. App features and functionality subject to change. Subject to Terms of Service available on
Hotpoint website.
Fast Fr
eeze
What it does: Allows you to control your freezer remotely from
your mobile device via the Hotpoint
What it does for you: Lets you tur
n on/off Fast Freeze remotely
to increase ice production. Reduces the set temperature to the
lowest possible setting for 24 hours to maximize ice production.
SMART FEATURES
Smart Features help make your everyday a little more efcient
by letting you remotely monitor, manage, and maintain your
refrigerator.
Remote T
What it does: Allows you to contr
from your mobile device via the Hotpoint
What it does for you: Lets you contr
emperature Control
ol your refrigerator remotely
®
app.
ol temperatures in your
refrigerator, freezer, and temperature-controlled pantry remotely—
not just when you are standing in front of it.
ater Filter Status
W
What it does: Gives you a look at the life r
emaining for your water
lter before replacement is needed. This allows you to reset the
lter.
What it does for you: Helps you be more efcient in planning
for ordering and replacing lters.
Auto Reor
What it does: Allows you to order replacement lters,
consumables, and accessories via the Hotpoint
delivery dir
der App
ectly to your home.
®
app for
What it does for you: Simplies ordering correct water and air
lters—no trips to the store searching for the correct lters.
Door Ajar Alert
What it does: Sends you a notication when one of the doors of
the r
efrigerator has been left open.
What it does for you: Alerts you to door-open status so you
can close the door(s) or call home to ask someone else to close
door(s) before over-temperature situation arises.
Fast Cool
What it does: Allows you to control your refrigerator remotely
from your mobile device via the Hotpoint
What it does for you: Lets you tur
remotely to make temperatures colder in the refrigerator in
anticipation of loading newly purchased grocery items. Lowers
internal temperatures for 24 hours.
®
app.
n on/off Fast Cool options
®
Freeze Shield
Mode Contr
What it does: Allows you to receive status of your refrigerator
remotely to your mobile device via the Hotpoint
What it does for you: Informs you whether Fr
is active in your refrigerator to reduce freezer burn and help frozen
items maintain their appearance and taste.
Holiday Mode
What it does: Allows the refrigerator to cool efciently and
save energy during holiday mode. Allows you to turn on and off
remotely from your mobile device via the Hotpoint
What it does for you: Lets you tur
Remotely.
Ice Maker On/Off
What it does: Allows you to turn on and off the Ice maker in your
refrigerator remotely on your mobile device via the Hotpoint
app.
What it does for you: Lets you tur
remotely.
Lock Mode
What it does: Allows you to lock and unlock the user interface
on your refrigerator remotely on your mobile device via the
Hotpoint
®
app.
What it does for you: Lets you lock and unlock the user
interface r
emotely for easy cleaning and or to avoid unintentional
dispensing by small children or pets.
GET STARTED
To connect your new refrigerator to internet, please download
Hotpoint Home Net App, create an account and then follow
the in App instructions on how to connect your appliance.
Check the Hotpoint
®
app fr
and features.
Requires Wi-Fi and account creation. App features and
functionality subject to change. Subject to Terms of Service
available on Hotpoint website and inside the App. Data rates
may apply.
ol
n on/off Holiday mode options
n on/off your Ice maker
equently for additional information
om your smartphone
®
app.
®
eeze Shield® mode
app.
®
app.
®
23
Page 24
CONNECTIVITY SETUP
(ON SOME MODELS)
IMPORTANT: Proper installation of your refrigerator prior to use is your responsibility. Be sure to read and follow the User Instructions
that came with your refrigerator.
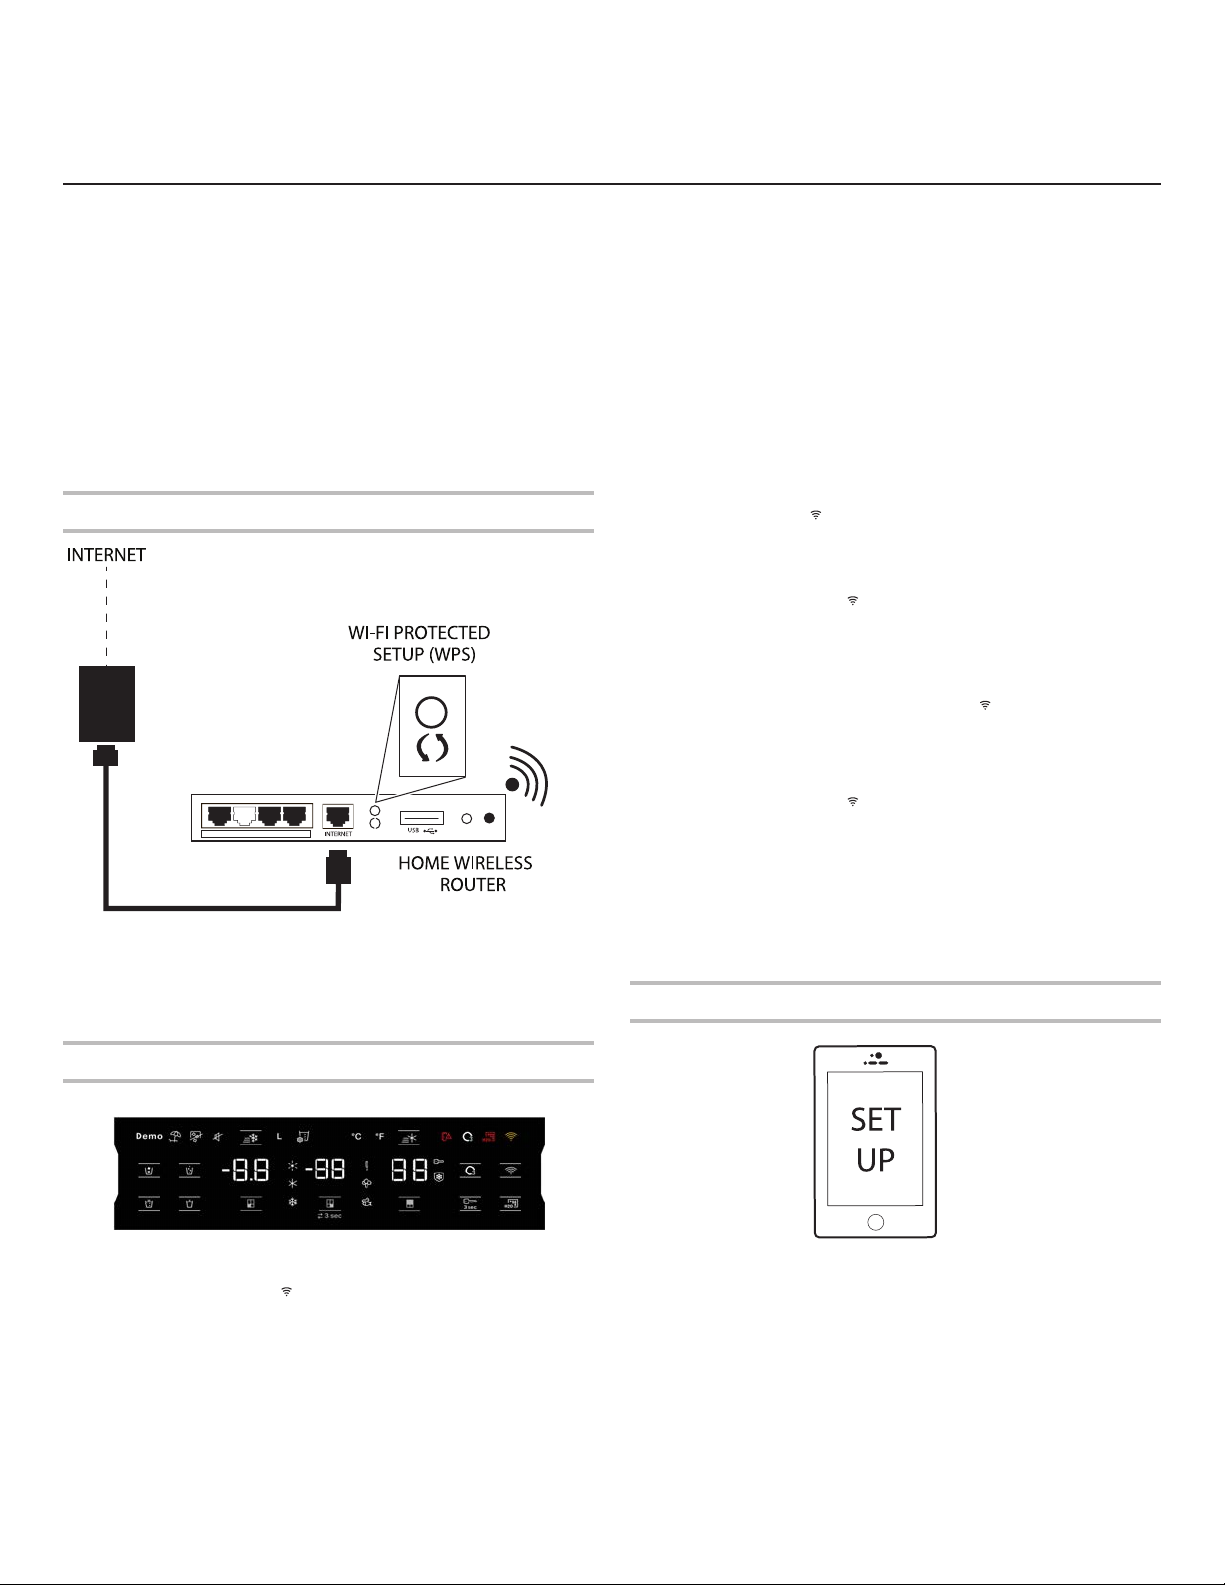
Automatic Set-Up Instructions—Wi-Fi Pr
Y
ou will need:
A home wir
n
be ON and have a live Internet connection.
NOTE: Router needs to be 2.4 GHz. Refrigerator shall not be able
to connect to 5 Ghz
n
The Smart Appliance Identication Number (SAID) fr
refrigerator. This is located on a sticker on the front side of the
right-hand hinge cover of the refrigerator.
NOTE: If your home wireless router is not equipped with a WPS
button, please check the user manual of your router to conrm
if it is WPS capable. If not, alternate set-up instructions are
available in the app.
Setup router
Press the WPS button on the router. An indicator light will
begin blinking.
HELPFUL TIP: The WPS function on your router is active
for 2 minutes. Complete the next step within that timeframe
or you will need to reinitiate WPS.
eless router capable of WPS. The router should
om your
.
otected Setup (WPS)
If Y
our Refrigerator Doesn’t Connect:
If your refrigerator and router fail to connect after 2 minutes,
the Wi-Fi status indicator will blink rapidly for 5 seconds
and then turn off. Refer to the “Troubleshooting—Connected
Models” section of this Use & Care Guide, check any connection
instructions for your specic router, and refer to alternate
instructions in the mobile App.
NOTE: If this is your rst Smart Appliance, you will need to
download the Hotpoint
If you already have the app and a user account, please skip
ahead to Step 4 “Register your refrigerator in your user account.”
To disconnect Wi-Fi, press and hold Connect button for more
than 15 seconds, the (
disabled the Wi-Fi radio.
To reconnect Wi-Fi, press and hold Connect button for 3 seconds
on the Home screen.
The Wi-Fi status indicator (
blink slowly while your refrigerator and router attempt to connect.
If the connection is successful, the Wi-Fi status indicator will
come on and remain lit.
To disconnect your refrigerator from your router, press and hold
CONNECT for more than 15 seconds. The (
indicating that your refrigerator is completely disconnected from
Wi-Fi and your router.
To re-connect your refrigerator to your router and reconnect Wi-Fi,
press and hold CONNECT for 3 seconds on the Home screen.
The Wi-Fi status indicator (
blink slowly while your refrigerator and router attempt to connect.
If the connection is successful, the Wi-Fi status indicator will
come on and remain lit.
Press the WPS button on the router. An indicator light will begin
blinking.
HELPFUL TIP: The WPS function on your router is active for 2
minutes. Complete the next step within that time-frame or you will
need to re-initiate WPS.
Download Hotpoint
.
®
app and cr
) icon will tur
) on the r
) on the r
®
app and set up user account
eate an online user account.
n off, indicating that you have
efrigerator control panel will
) icons will tur
efrigerator control panel will
n off,
Setup refrigerator (time-sensitive step)
Press and hold Connect button for 3 seconds on Home screen.
The Wi-Fi status indicator ( ) on the refrigerator control panel will
blink slowly while your refrigerator and router attempt to connect.
If the connection is successful, the Wi-Fi status indicator will
come on and remain lit.
24
From your mobile device, smartphone or tablet, go to the App
store and download and install Hotpoint Home Net App.
Once installed, tap the Hotpoint® app icon to open the app.
ou will be guided through the steps to set up a user account.
Y
The app will make sure to get the necessary personal and home
information as well as information about your energy company.
Page 25
Register your r
efrigerator in your user account
Registering your refrigerator in your account is a necessary step
in order for you to take full advantage of the Smart features. When
prompted by the app, enter the SAID (case sensitive), which can
be found on a sticker on the front side of the right hand hinge
cover of the refrigerator.
My Smart Appliance ID# is:
ater and Ice Dispensers
W
IMPOR
TANT:
n
Allow 3 hours for the r
Allow 24 hours to pr
n
efrigerator to cool down and chill water.
oduce the rst batch of ice. Discard the
rst 3 batches of ice produced.
The dispensing system will not operate if the left-hand
n
efrigerator door is open.
r
A
B
n
The Wi-Fi status indicator on the r
efrigerator control panel
will blink slowly while your refrigerator and router attempt to
connect.
n Note that this blinking only applies to rst-time r
egistration
after provisioning. No blinking behavior for automatic
reconnection after a connection is established.
Once you’ve connected your r
n
efrigerator to your home
Wi-Fi network, it will remain linked even if the power goes out,
you move the appliance, or if you put it in storage for
a while.
n If you r
eplace your wireless router (or get a different
Smart refrigerator), you will need to repeat this connectivity
set-up process.
Note: During product registration, mobile phone and appliance
have to be connected to the same Wi-Fi network
The Smart Appliance
Identication Number
(SAID) is located on
a sticker on the front
side of the right-hand
hinge cover of the
r
efrigerator.
A. Water dispenser paddle
B. Ice dispenser paddle
Flush the Water System
Air in the water dispensing system can cause the water dispenser
to drip. After connecting the refrigerator to a water source or
replacing the water lter, ush the water system.
Flushing the water dispensing system forces air from the water
line and lter and prepares the water lter for use. Additional
ushing may be required in some households.
NOTE: As air is cleared from the system, water may spurt out of
the dispenser.
1. Using a stur
dy container, depress and hold the water
dispenser paddle for 5 seconds.
2. Release the dispenser paddle for 5 seconds. Repeat steps
1 and 2 until water begins to ow
3. Once water begins to ow
.
, continue depressing and releasing
the dispenser pad (5 seconds on, 5 seconds off) until a total
of 3 gal. (12 L) has been dispensed.
Calibrate Measured Fill
Household water pressure may affect the accuracy of the
Measured Fill feature. So, for optimum performance of your
water dispenser, you must rst calibrate Measured Fill.
IMPORTANT:
n
Flush the water system befor
For best r
n
esults, calibration should be performed when water
e calibrating Measured Fill.
is not being used in the house.
25
Page 26

1. Place a sturdy measuring cup (1-cup [0.2 L] size) on the
dispenser tray centered in front of the ice/water dispenser
paddle.
NOTE: Depending on your model, a measuring cup may be
provided.
A
B
C
A. Water dispenser paddle
B. Ice dispenser paddle
C. Measuring cup (1 cup)
Ensure that you do not have any Measured Fill preset selected.
2. Touch and hold the Measured Fill button for 3 seconds
to enter into Calibration mode. The Calibration icon and
Measured Fill icon will illuminate and remain lit while the
Measur
ed Fill feature is being calibrated.
NOTE: You may touch MEASURED FILL to exit at any time in
Calibration mode. The Calibration and Measured Fill icons will
disappear.
3. Press and hold the water dispenser paddle, as needed, to
dispense water to the 1-cup ll line in the measuring cup.
NOTE: If overlling or spilling occurs, discard the water and
estart the calibration process.
r
4. When 1 cup of water has been correctly dispensed into
the measuring cup, touch MEASURED FILL to conrm the
calibration.
5. When Measured Fill calibration has been conrmed, the
Calibration icon will disappear and the display will return
to the home screen.
Dispensing
Touch CUBED ICE or CRUSHED ICE for your ice selection.
NOTES:
For crushed ice, cubes are crushed before being dispensed.
n
This may cause a slight delay when dispensing crushed ice.
Noise from the ice crusher is normal and pieces of ice may
vary in size.
n
When changing from crushed to cubed, a few ounces of
crushed ice will be dispensed along with the rst cubes.
Dispensing Water
IMPORT
ANT:
n
Dispense at least 1 qt (1 L) of water every week to maintain
a fresh supply.
n
If the ow of water from the dispenser decreases, it could
be caused by low water pressure.
n With the water filter removed, dispense 1 cup (0.2 L)
of water. If 1 cup (0.2 L) of water is dispensed in
8 seconds or less, the water pressure to the refrigerator
meets the minimum requirement.
n If it takes longer than 8 seconds to dispense 1 cup
(0.2 L) of water, the water pressure to the refrigerator is
lower than recommended. See the “Water Supply
Requirements” and “Troubleshooting” sections for
suggestions.
To Dispense Water - Standard:
1. Press a sturdy glass against the water dispenser paddle.
2. Remove the glass to stop dispensing.
NOTE: The Dispense Water button does not enable standard
dispensing. It only functions in Measured Fill mode.
T
o Dispense Water - Measured Fill:
Measured Fill allows you to dispense a specied amount
of water with the touch of a few buttons.
1. Put a sturdy glass under water spout. Touch
MEASURED FILL to activate.
NOTE: The amount of water you select will be dispensed.
Make sure the container can hold the entire volume. If ice
is in the container, you may need to adjust your selection.
ouch MEASURED FILL to turn on, then touch to select
2. T
8 oz (0.2 L), 16 oz (0.5 L), or 32 oz (1L). Touch the fourth time
to exit Measured Fill display.
3. Touch DISPENSE WATER (center button) or press paddle and
the selected amount of water will be dispensed.
NOTES:
The Measured Fill dispenser will automatically time out after
n
1 minute of inactivity.
n
You can rell several glasses with the same measurement by
continuing to touch DISPENSE W
ATER (center button) after
each glass ll.
Measured Fill options are listed in the following chart:
Units
Ounces 8 16
Cups 1 2
Liters 0.2 0.5
Most coffee cups (commonly 4 to 6 oz [118 to 177 mL]
NOTE:
32
4
1
per cup) are not the same size as a measuring cup (8 oz [0.2
L]). You may need to recalibrate Measured Fill to underfill or to
avoid unintentionally overfilling coffee cups.
4. Dispense water.
NOTE: While dispensing water, the ow of water will
automatically stop once the desir
ed volume has been
dispensed.
n
Press a sturdy glass against the dispenser paddle below
the water spout.
OR
n
Place the glass below the water spout and touch
DISPENSE WATER for hands-free dispensing.
5. To pause dispensing before the selected volume has been
dispensed, touch DISPENSE WATER a second time or touch
the water dispenser paddle. T
ouch DISPENSE WATER or
paddle again to resume dispensing remaining amount.
NOTE: If you stop dispensing before the desired volume has
been dispensed, the display will turn off after 1 minute. If you
have not resumed by then, it will reset back to the original
amount.
6. To select a new volume or start dispensing the same volume
again, you must rst nish dispensing the selected volume or
turn off the Measur
ed Fill feature (either by waiting 1 minute,
so it will automatically turn off, or by touching CUBED ICE
or CRUSHED ICE to manually turn it off), and then select
Measured Fill again.
26
Page 27

REFRIGERATOR USE
Opening and Closing Doors
Ther
e are two fresh food compartment doors. The doors can
be opened and closed either separately or together. There is a
vertically hinged seal on left refrigerator door.
■
When left-side door is opened, hinged seal automatically folds
d so that it is out of the way.
inwar
■
When both doors are closed, the hinged seal automatically
forms a seal between two doors.
NOTE: When closing the door, the hinged seal should be in
correct position (be bent inside). Otherwise it will hit the right door
or the xing shaft.
A
A. Hinged seal
The fresh food compartment door switch is located in top left and
right hinge cover.
For Freezer and Convertible Z one, door switch is located in
■
the bottom mullion.
■
The door switch uses magnet to sense door opening/closing.
e there are no magnet or electronic devices (Speaker,
Ensur
■
Coolvox
NOTE: The light will not tur
®
etc.) within 7.62 cm of the hinge cap.
n on if door opening is not detected.
A
Shelf Height Adjustment
Shelf height can be adjusted by changing its location fr
om bottom
support to upper support and vice versa.
■
Open right side door and left side door till 130º.
130°
130°
The Ice Dispenser
IMPOR
TANT:
n
If the ice cubes ar
e hollow or have an irregular shape, it could
be because of low water pressure. See the “Water Supply
Requirements” section.
n Ice travels fr
om the ice storage bin through the dispenser
chute to the dispenser. To turn off the ice maker, see the
“Ice Maker and Storage Bin” section.
The dispenser may continue to make noise and ice may
n
continue to dispense for several seconds after r
eleasing
the dispenser button or paddle.
To Clean the Ice Dispenser Chute:
Humidity causes ice to naturally clump together. Ice particles can
build up until the ice dispenser chute becomes blocked.
If ice is not dispensed regularly, it may be necessary to empty the
ice storage bin and clean the ice delivery chute, the ice storage
bin, and the area beneath the storage bin every 2 weeks.
If necessary
n
, remove the ice clogging the storage bin and
delivery chute using a plastic utensil.
n
Clean the ice delivery chute and the bottom of the ice storage
bin using a warm, damp cloth, and then dry thor
oughly.
To Dispense Ice - Paddle Dispensing
1. Select the desir
ed type of ice by pressing CUBED ICE or
CRUSHED ICE.
WARNING
A. Hinge cover
Cut Hazard
Use a sturdy glass when dispensing ice.
Failure to do so can result in cuts.
2. Pr
ess a sturdy glass against the dispenser paddle. Hold the
glass close to the dispenser opening, so ice does not fall
outside of the glass.
IMPORTANT: You do not need to apply a lot of pressure to
the paddle to activate the ice dispenser. Pressing hard will not
make the ice dispense faster or in greater quantities.
27
Page 28

3. Remove the glass to stop dispensing.
NOTE: Ice may continue to dispense for several seconds after
removing the glass from the dispenser paddle. The dispenser may
continue to make noise for a few seconds after dispensing.
The Dispenser Drip Tray
The drip tray can be removed for cleaning. Start the following
steps from the pulled in position.
n
Lift up on the fr
ont edge of the tray and pull forward to
remove.
Ice Maker and Storage Bin
IMPOR
ush the water system before turning on the ice maker. See the
“Water Dispenser” section.
The ice maker is located on the left door behind the bins. Ice
cubes are ejected into the ice storage bin located on the left-hand
refrigerator door.
Remove and Replace the Ice Storage Bin
To open the Ice Maker box, pull the ice maker door lever until the
door releases.
TANT: To avoid low ice production and poor quality ice,
Following installation, allow 24 hours to pr
n
oduce the rst
batch of ice. Discard the rst 3 batches of ice produced.
Allow 2 to 3 days to ll the ice storage bin.
n
The quality of your ice will be only as good as the quality of
the water supplied to your ice maker
. Avoid connecting the ice
maker to a softened water supply. Water softener chemicals
(such as salt) can damage parts of the ice maker lead to poor
quality ice. If a softened water supply cannot be avoided,
make sure the water softener is operating properly and is wellmaintained.
n If the ice in the storage bin clumps together
, break up ice
using a plastic utensil and discard. Do not use anything sharp
to break up the ice. This can cause damage to the ice bin and
the dispenser mechanism.
Do not stor
n
e anything in the ice storage bin.
Style 1 - Ice Maker in the Refrigerator
n
Pull the tray out angled to the top fr
ont direction.
To install it back follow the two steps below.
n Position the tray horizontally on the rails with some space at
ear part.
the r
n
Push downwar
d and pull towards you to engage to the rail.
The drip tray can be pulled out to accommodate larger containers
for measured ll.
The Dispenser Light
1. When you use the dispenser
, the light will automatically
turn on.
2. The dispenser light also serves as an automatic night light.
Once the ambient light in the r
oom is reduced, the auto
sensor will cause the dispenser light to illuminate.
28
n
Remove the ice storage bin by inserting your ngers into the
hole at the base of the bin and pulling the latch to r
elease the
bin from the compartment. Lift the storage bin up and pull it
straight out.
Replace the storage bin inside the ice compartment and push
n
down to make sur
e it is rmly in place.
Ice Production Rate
Your ice maker should produce approximately 3.5 lbs (1.6 kg)
n
of ice per day under normal operation.
Turn the Ice Maker On/Off
To turn the ice maker on, press and hold “Crush” and
n
“Cubed” buttons on the display. The “Ice maker off” indicator
will blink 3 times and turn off.
n T
o manually turn the ice maker off, press and hold “Ice maker
off” button on the display. The “Ice maker off” indicator will
blink 3 times and remain lit on the display screen.
NOTES:
our ice maker has an automatic shutoff. The sensor will
n Y
automatically stop ice production if the storage bin is full or
the door is open. The control will remain in the On position.
Page 29

SHELVES, BINS, AND DRAWERS
Shelves and Shelf Frames
The shelves in your refrigerator are adjustable to meet your
individual storage needs.
Storing similar food items together in your refrigerator and
adjusting the shelves to t different heights of items will make
nding the exact item you want easier. It will also reduce the
amount of time the refrigerator door is open and save energy.
Shelf Height Adjustment
Shelf height can be adjusted by changing the adjustable shelf
mounts between their vertical and horizontal positions.
1. Carefully lift the shelf off the shelf mounts and turn the ipper
to the desired orientation.
2. Repeat for remaining shelf mounts.
3. Apply pressure to the top of the shelf to ensure the shelf is
properly seated on the shelf mounts.
3. Push the clip up from the bottom with your nger.
4. After both clips have been disengaged, carefully remove
the pull-out platter toward the front of the refrigerator.
Crisper Drawers
To remove and replace the drawers:
1. Grasp the handle at the bottom of the drawer and slide the
drawer straight out to the stop. Lift the drawer off the bottom
guide.
2. Replace the drawer by placing it on the bottom drawer guide
and pushing it past the drawer stop into position.
NOTES:
n You will need to remove middle shelf rst before removing
top shelf.
4. Remove the bottom shelf by lifting it up and out of the
shelf supports. Then pull the shelf forward and tilt up to a
vertical position. Turn the shelf at an angle and pull out of
the refrigerator.
5. Replace the bottom shelf by putting the shelf in the
refrigerator at an angle with the shelf up. Lift the front of the
shelf down and in until rear shelf drops into the shelf supports.
Lower the front of the shelf and make sure that
the shelf is in position.
Pull out platter Removal
To remove and replace pull-out platter:
NOTE: Refrigerator doors will need to be removed to remove Pull
out platter. See the “Remove and Replace Refrigerator Doors”
section for more information.
1. Pull the pull-out platter to the fully open position or when
it stops.
2. Locate the pull-out platter retention clips on both sides.
These are in the side under the pull-out platter.
Refrigerator Door Bins
The bins on your refrigerator door are adjustable to meet your
individual storage needs. The bins make it easy to customize door
storage to hold gallon containers.
Door Bin Divider (on some models)
This divider ts in the door bin to divide the bin and elevate
smaller items at the back of the bin.
29
Page 30

eezer Storage Compartments
Fr
Convertible Zone
Easy Access T
ray
Easy Access T
Easy Access tray is useful to easily access frequently used
products, freeze or simply store leftovers or small items.
Freezer Drawers
Fast Freeze
Drawers
Convertible Z one
ray
Drawers
Use this drawers to fr
n
eeze a bigger amount of fresh or cooked
food (in the best or in the fastest way)
n
Use Convertible Z one to store all kinds of food in the ideal
preservation environment. Adjusting the settings it can be
used to store wine (10°C), fruits and veggies (4°C), Meat
and sh (0°C), weekly meals (-7°C), ice cream and desserts
(-12°C) and hard freeze food (-16°C or less).
Refrigerator Door Bins
The bins on your refrigerator door are removable to meet your
individual storage needs.
Fast Freeze compartment
■
Use this drawers to fr
eeze a bigger amount of fresh or cooked
food (in the best or in the fastest way).
■ Fast Fr
eeze option allows you to store all your frozen food
safely and transparently.
NOTE: Freezer temperature might be cooled down to be same as
Flexible Freezer Compartment temperature, when Freezer set to
warmer than Flexible Freezer compartment.
For maximum freezer capacity, you may remove the freezer
drawer to expose the freezer shelf.
To remove the upper drawer:
1. Grasp handle of the drawer and slide drawer straight out to
the stop. Lift drawer of
f the bottom guide.
2. Replace/putting back drawer stop into position.
30
Page 31

REFRIGERA
TOR CARE
Cleaning
WARNING
Explosion Hazard
Use nonflammable cleaner.
Failure to do so can result in death, explosion, or fire.
All of the Refrigerator, Freezer and Convertible Z one sections
ost automatically. However, clean all the sections about once
defr
a month to avoid build-up of odours. Wipe up spills immediately.
Exterior Cleaning
Please see the exterior cleaning information specic to your
model.
Fingerprint-Resistant Stainless
IMPORTANT:
void exposing stainless steel appliances to caustic or
■
A
corrosive elements such as high-salt, high-moisture, or highhumidity environments. Damage due to exposure to these
elements is not covered under the warranty.
DO USE DO NOT USE
Soft, clean cloth
arm, soapy water with
W
a mild detergent
NOTES:
If unintentional contact does occur
■
sponge and mild detergent in warm water. Dry thoroughly with
a soft cloth.
■
Just because a cleaner is a liquid does not mean it is nonabrasive. Many liquid cleansers formulated to be gentle on tile
and smooth surfaces still damage stainless steel.
■
Citric acid permanently discolours stainless steel.
■
T
o avoid damaging the nish of your stainless steel
refrigerator:
Do not allow these substances to remain on the nish:
Mustard
T
omato juice
Marinara sauce
Abrasive cloths
Paper towels or newsprint
Steel-wool pads
Abrasive powders or liquids
Window sprays
Ammonia
Acidic or vinegar
Oven cleaners
Flammable uids
, clean plastic part with a
Citrus-based sauces
Citrus-based pr
-based cleaners
oducts
Interior Cleaning
IMPOR
are not dishwasher safe.
1. Unplug r
2. Hand wash, rinse, and dry r
NOTE: Do not use abrasive or harsh cleaners such as window
3. Plug in r
This refrigerator has skin condenser on both sides of refrigerator.
It is normal to feel warm on the sides.
TANT: Refrigerator shelves with under-shelf, LED lighting
efrigerator or disconnect power.
surfaces thoroughly. Use a clean sponge or soft cloth and a
mild detergent in warm water.
sprays, scouring cleansers, ammable uids, cleaning waxes,
concentrated deter
petroleum products on plastic parts, interior and door liners,
or gaskets.
efrigerator or reconnect power.
Condenser
gents, bleaches, or cleansers containing
emovable parts and interior
Lights
The lights in both the fr
LEDs which do not need to be replaced. If the lights do not
illuminate when the door is opened, contact the dealer from
whom you purchased your refrigerator.
esh food and freezer compartments are
Holiday and Moving Care
Holidays
ou Choose to Leave the Refrigerator On While You’re
If Y
Away:
1. Use up any perishables and fr
2. If your r
3. If you have an automatic ice maker
4. Empty the ice bin.
If Y
ou Choose to Turn Off the Refrigerator Before You Leave:
NOTE: Put refrigerator in Demo Mode while on Holiday. See the
“Using the Controls” section.
1. Remove all food fr
2. If your r
3. Empty ice bin.
4. T
5. Clean r
6. T
efrigerator has an automatic ice maker and is
connected to the household water supply, turn off the water
supply to the refrigerator. Property damage can occur if the
water supply is not turned off.
ess the switch to Off (O) for the door ice maker.
Pr
■
om the refrigerator.
efrigerator has an automatic ice maker:
■ Turn off water supply to the ice maker at least 1 day ahead
of time.
When last load of ice dr
■
(O) for display to be unlit on the top inside of the
refrigerator, depending on your model.
urn off temperature controls. See the “Using the Controls”
section.
efrigerator, wipe it and dry well.
ape rubber or wood blocks to the tops of both doors to prop
them open far enough for air to get in. This stops odours and
mould from building up.
eeze other items.
, turn off the ice maker.
ops, press the switch to Off
31
Page 32

Moving
When you are moving your refrigerator to a new home, follow
these steps to prepare it for the move.
1. If your refrigerator has an automatic ice maker:
■ Turn off water supply to the ice maker at least 1 day ahead
of time.
■ Disconnect water line from the back of the refrigerator.
■ When last load of ice drops, press the switch to Off (O)
either on the ice maker or the control, depending on your
model.
2. Remove all food from refrigerator and pack all frozen food in
dry ice.
3. Empty ice bin.
4. Unplug refrigerator.
5. Clean, wipe and dry thoroughly.
6. Take out all removable parts, wrap them well and tape them
together so they don’t shift and rattle during the move.
7. Depending on the model, raise the front of the refrigerator so
it rolls more easily or raise the levelling screws so they do not
scrape the oor. See the “Adjust the Doors” or “Refrigerator
Levelling and Door Closing” sections.
8. Tape doors closed and tape the power cable to the back of
the refrigerator.
When you get to your new home, put everything back and refer to
the “Installation Instructions” section for preparation instructions.
Also, if your refrigerator has an automatic ice maker, remember to
reconnect the water supply to the refrigerator.
32
Page 33

TROUBLESHOOTING - CONNECTED MODELS
First try the solutions suggested here. If you need further assistance or more recommendations that may help you avoid a service call,
refer to the warranty page in this manual.
Please include a daytime phone number in your correspondence.
Connection Status Contr
ol Panel Indicator Lights
Refrigerator is not connected. Wi-Fi White icons are both OFF.
Refrigerator is attempting to connect to home Wi-Fi router. Wi-Fi White icon is blinking fast.
Refrigerator connected to home Wi-Fi router and is attempting to
connect to Hotpoint Cloud.
Refrigerator is connected to home Wi-Fi router, but not connected to the
Hotpoint cloud.
Hotpoint
Refrigerator is connected to home Wi-Fi router and the Wi-Fi icon is ON.
Hotpoint
Refrigerator is connected to home Wi-Fi r
®
app does not work.
®
app works.
outer and the Wi-Fi icon is ON.
Refrigerator is in the process of a software update.
Hotpoint
®
app works.
Wi-Fi White icon is blinking slowly.
Wi-Fi Orange icon is ON.
Wi-Fi White icon is blinking slowly
Wi-Fi Orange icon is ON.
Wi-Fi White icon is ON.
Wi-Fi White icon is ON and ashing continuously while
softwar
e updates.
If you experience Possible Causes Solution
The refrigerator may be in Standby
mode.
Touch and hold Connect button together for
3 seconds to see the Wi-Fi icon blinking, then
lights are ON solid. All indicator lights are OFF
when in Standby mode.
The refrigerator has never been
See the “Connectivity Setup” section.
connected to the home Wi-Fi router.
Refrigerator is not connected to home
outer. (Wi-Fi icon is OFF.)
Wi-Fi r
Lost connection to home Wi-Fi router . Check whether the router is ON and working
with other computers or devices in the home
(able to access the Internet).
Weak signal strength or signal
interference between the refrigerator and
router.
The refrigerator is already connected to
another WiFi Router.
Try to place the wireless router closer to the
refrigerator. It may be necessary to install a
Wi-Fi range extender.
See the “Connectivity Setup” section to
disconnect the Refrigerator from the Wi
router and try reconnecting again.
Unplug or disconnect refrigerator power for
30 seconds. Return power. Repeat Wi-Fi
Wi-Fi icon does not light at all after
touching and holding CONNECT.
Something may be wrong with the
refrigerator.
connecting process.
Verify that the refrigerator operates correctly,
except for not being able to connect. Call for
possible additional troubleshooting.
Connection to the Hotpoint® app may
Check Inter
net.
be unavailable.
Refrigerator is connected to home Wi-Fi
router, but Hotpoint
®
app does not work.
User account has not been properly
set up or the refrigerator has not been
registered in an account.
See the “Connectivity Setup” section or the
Hotpoint
refrigerator registration instructions.
Verify that the refrigerator is paired with your
account in the app.
®
app dir
Verify correct email address, mobile number,
and notication preferences.
Router is not connected to Internet. Check other devices connected to Internet
through same router.
Check other devices connected to
Internet through same router.
Wi-Fi disconnected. Touch and hold Connect button for 3 seconds
to enable Wi-Fi. Power off service breaker for
30 or more seconds, power back on, and then
use alternate set-up instructions available in
the Hotpoint mobile App.
.
ectly for account setup and
33
Page 34

TROUBLESHOOTING
First try the solutions suggested here to possibly avoid a service call.
WARNING
Electrical Shock Hazard
Plug into a grounded 3 prong outlet.
Do not remove ground prong.
Do not use an adapter.
Do not use an extension cord.
Failure to follow these instructions can result in death,
fire, or electrical shock.
If you experience Possible Causes Solution
Refrigerator Operation
The refrigerator will not
operate.
The motor seems to run
too much.
Check electrical supply. Plug the power cable into an earthed socket.
Do not use an extension cable.
Make sure there is power to the socket. Plug in a lamp to see if
the socket is working.
Reset a tripped circuit breaker. Replace any blown fuses.
NOTE: If problems continue, contact an electrician.
Check controls. Make sure the controls are turned on. See the “Using the
New installation. Allow 24 hours following installation for refrigerator to cool
Refrigerator control is in Demo mode
(on some models).
High-efciency compressor and fans. Larger, more efcient refrigerators run longer at lower, more
The room or outdoor temperature is
hot.
A large amount of warm food has
been recently added.
The door(s) are opened too frequently
or for too long.
The refrigerator door or freezer drawer
is open.
The refrigerator control is set too cold. Adjust refrigerator control to a less-cold setting until the
The door or drawer gasket is dirty,
worn, or cracked.
Controls” section.
completely.
NOTE: Adjusting the temperature controls to the coldest setting
will not cool either compartment more quickly.
If refrigerator is in Demo mode, cooling is turned off and
“Demo” will be illuminated on the control panel. See the “Using
the Controls” section for more information.
energy efcient speeds.
It is normal for refrigerator to work longer under these
conditions. For optimum performance, place refrigerator in an
indoor, temperature-controlled environment. See the “Location
Requirements” section.
Warm food will cause refrigerator to run longer until the air cools
to the desired temperature.
Warm air entering refrigerator causes it to run more. Open the
door less often.
Make sure refrigerator is level. See the “Refrigerator Levelling
and Door Closing” section. Keep food and containers from
blocking the door.
refrigerator temperature is as desired.
Clean or change the gasket. Leaks in the door seal will
cause refrigerator to run longer in order to maintain desired
temperatures.
34
Page 35

TROUBLESHOOTING
First try the solutions suggested here to possibly avoid a service call.
If you experience Possible Causes Solution
The lights do not work. Your refrigerator is equipped with
The Temperature Control UI does
not turn on.
Unable to adjust setting on The
Temperature Control UI.
Unusual Noise
To listen to normal refrigerator sounds, go to the Product Help/FAQ section of the brand website and search for “normal sounds.”
Below are listed some normal sounds with explanations.
The refrigerator seems noisy. The compressor in your new
Sound of the compressor running
longer than expected.
Pulsating/Whirring Fans/compressor adjusting to
Popping Contraction/expansion of inside
Hissing/Dripping Flow of refrigerant or ow of oil in
Vibration The refrigerator may not be steady. Adjust the levelling screws and lower the levelling foot rmly
Sizzling Water dripping on the heater during
Water running/Gurgling May be heard when ice melts
LED lighting which does not need
to be replaced.
Doors have been open longer than
10 minutes.
The door switch is not sensing the
door opening.
The Temperature Control UI went
to sleep.
The Temperature Control UI
buttons are not working well.
The Temperature Control UI is not
receiving power.
Door is open and Door ajar alarm is
activated.
refrigerator regulates temperature
more efciently while using less
energy and operates quietly.
High-efciency compressor and
fans.
optimize performance during
normal compressor operation.
walls, especially during initial cool
down.
the compressor.
Defrost cycle.
during the Defrost cycle and water
runs into the drain pan.
If there is power to the refrigerator and the lights do not
illuminate when a door or drawer is opened, call for service
or assistance.
Close the doors and drawer to reset and open to resume
lighted task.
Ensure there are no magnets or electronic devices within 7.6
cm (3") of the hinge cover.
Press any button on the UI to wake up the The Temperature
Control UI.
Try cycling power on the refrigerator to make the buttons
reset. If problem continuous, call for service or assistance.
Check the wiring harness at the door hinge.
Close the door.
Due to this reduction in operating noise, you may notice
unfamiliar noises that are normal.
Larger, more-efcient refrigerators run longer at lower, more
energy efcient speeds.
This is normal.
This is normal.
This is normal.
against the oor. See the “Refrigerator Levelling and Door
Closing” section.
This is normal.
This is normal.
35
Page 36

TROUBLESHOOTING
First try the solutions suggested here to possibly avoid a service call.
If you experience Possible Causes Solution
Temperature and Moisture
Temperature is too warm. The refrigerator has just been
Temperature is too cold in the
refrigerator/crisper.
Temperature is too cold in the
temperature controlled drawer.
There is interior moisture buildup.
NOTE: Some moisture build-up
is normal.
There is frost/ice build-up in the
freezer compartment.
installed.
The controls are not set
correctly for the surrounding
conditions.
The door(s) are opened often
or not closed completely.
Allows warm air to enter
refrigerator.
A large load of food was
recently added.
Demo mode is on. Turn off the Demo mode. See the "Using the Control" section.
Holiday mode is on. Turn off the Holiday mode. See the "Using the Control" section.
The refrigerator air vent(s)
are blocked.
The controls are not set
correctly for the surrounding
conditions.
The control is not set
correctly for the items stored
in drawer.
The room is humid. A humid environment contributes to moisture build-up.
The door(s) are opened often
or not closed completely.
Allows humid air to enter the
refrigerator.
The door(s) are blocked
open.
A bin or shelf is in the way. Push bin or shelf back into the correct position.
Storing liquid in open
containers.
The door is opened often or
left open.
The door has poor door seal. Ensure door seals are making full contact with the refrigerator
Temperature controls are not
set correctly.
Allow 24 hours following installation for refrigerator to cool
completely.
Adjust the controls a setting colder. Check the temperature in 24
hours. See the “Using the Controls” section.
Minimize door openings and keep doors fully closed.
Allow several hours for refrigerator to return to normal temperature.
If the air vent located in the middle rear of the fresh food
compartment is blocked by items placed directly in front of it, the
refrigerator will get too cold. Move items away from the air vent.
Adjust the controls a setting warmer. Check the temperature in 24
hours. See the “Using the Controls” section.
Adjust the temperature setting. See the “Using the Controls” in the
“Refrigerator Use” section.
Minimize door openings and close doors completely.
Move food packages away from door.
This adds humidity to refrigerator interior. Keep all containers tightly
covered.
Minimize door openings and close drawer completely after use.
cabinet to allow for an adequate seal.
See the “Using the Controls” section for recommended
temperature settings.
36
Page 37

TROUBLESHOOTING
First try the solutions suggested here to possibly avoid a service call.
If you experience Possible Causes Solution
Ice and W
The ice maker is not producing ice or is not
producing enough ice.
The ice cubes are hollow or small.
NOTE: This is an indication of low water
pressure.
Off-taste, odor, or gray color in the ice or
water
ater
The refrigerator is not connected to a water
supply or the water supply shut-off valve is
not turned on.
There is a kink in the water source line. A kink in the line can reduce water ow.
The ice maker is not turned on. Make sure the ice maker is ON. See the
The refrigerator has just been installed. Wait 24 hours after ice maker installation
The refrigerator door is not closed
completely.
A large amount of ice was recently
removed.
The water shut-off valve is not fully open. Turn the water shut-off valve fully open.
There is a kink in the water source line. A kink in the line can reduce water ow.
A water lter is installed on the refrigerator. Remove lter and operate ice maker. If ice
A reverse osmosis water ltration system is
connected to the cold water supply.
Questions remain regarding water pressure. Call a licensed, qualied plumber.
Newly installed refrigerator requires ush of
water system.
Recently installed or replaced plumbing
connections. New plumbing connections
can cause discolored or off-avored ice
and water.
Using a water supply connection type other
than recommended
The ice has been stored too long. Discard ice and wash ice storage bin. Allow
The water has been stored too long. Dispense at least 1 qt (1 L) of water per
Odor from stored food has transferred to
the ice.
There are minerals (such as sulfur)
in the water.
There is a water lter installed on the
refrigerator.
The water lter needs to be replaced. Replace the disposable water lter at least
Connect refrigerator to water supply and
turn water shut-off valve to fully open.
Straighten the water source line.
“Ice Maker and Storage Bin” section.
for ice production to begin. Wait 3 days for
full ice production.
Close the door rmly. If it does not close
completely, see “The doors will not close
completely” in this table.
Allow sufcient time for ice maker to
produce more ice. See the “Ice Maker and
Storage Bin” section for ice production
rates.
Straighten the water source line.
quality improves, then the lter may be
clogged or incorrectly installed. Replace
lter or reinstall it correctly.
This can decrease water pressure. See the
“Water Supply Requirements” section.
Flush the water system. See the “Water
and Ice Dispensers” section for water
system ushing instructions.
Discard ice and wash the ice storage bin.
Flush the water system with 3 gal. (12 L)
of water. Allow 24 hours for the ice maker
to make new ice and discard the rst 3
batches of ice produced.
It is recommended to use copper tubing
or Hotpoint
8212547RP
Supply” section.
24 hours for ice maker to make new ice.
week to maintain a fresh supply.
Use airtight, moisture-proof packaging to
store food.
A water lter may need to be installed to
remove the minerals.
Gray or dark discoloration in ice may
indicate that the water ltration system
needs additional ushing. Flush the water
system after installing and before using a
new water lter. See the “Water and Ice
Dispensers” section for water lter ushing
instructions.
every 6 months or when indicated. See the
“Water Filtration System” section.
®
supply line, Part Number
. See the “Connect the Water
37
Page 38

TROUBLESHOOTING
First try the solutions suggested here to possibly avoid a service call.
If you experience Possible Causes Solution
Ice and Water (cont.)
The water and ice dispenser will not
operate properly.
The water and ice dispenser will not
operate properly. (cont.)
Ice bin is difcult to remove from door. Ice level in bin may be high and
The ice dispenser
jams while dispensing crushed ice.
Water is leaking or dripping from the
dispenser system.
NOTE: A few drops of water after
dispensing
is normal.
Ice continues to ow from the
dispenser.
NOTE: A few cubes dispensed after
releasing the dispenser lever is normal.
The refrigerator is not connected to a
water supply or the water supply shutoff valve is not turned on.
There is a kink in the water source line. A kink in the water line can reduce water ow
The refrigerator has just been installed. Flush and ll the water system. See the “Water
The water pressure to the house is not
at or above 35 psi (241 kPa).
A reverse osmosis water ltration
system is connected to the cold water
supply.
The water lter may be clogged. Remove the water lter and operate dispenser.
The water lter is installed incorrectly. Remove the water lter and reinstall. See the
The refrigerator door or freezer drawer
is not closed completely.
The refrigerator doors were recently
removed.
Ice is clogged in the ice storage bin or
ice is blocking the ice delivery chute.
uneven from normal ice production and
augering of ice during dispensing.
Crushed ice is blocking the ice delivery
chute.
The glass was not held under the
dispenser long enough.
The glass was not held under the
dispenser long enough.
Connect the refrigerator to the water supply, and
turn the water shut-off valve to fully open.
from the water dispenser and result in hollow or
irregular shaped ice. Straighten the water source
line.
and Ice Dispensers” section.
The water pressure to the house determines the
ow from the dispenser. See the “Water Supply
Requirements” section.
A reverse osmosis water ltration system can
decrease water pressure. See the “Water Supply
Requirements” section.
If water ow increases, your lter is clogged and
needs to be replaced.
See the “Water Filtration System” section.
“Water Filtration System” section.
Close the door or drawer rmly. If it does not
close completely, see “The doors will not close
completely.”
Make sure the water dispenser wire/tube assembly
has been properly reconnected at the top of the
refrigerator door. See the “Remove and Replace
Refrigerator Doors” section.
Remove the ice clogging the storage bin and
delivery chute, using a plastic utensil if necessary.
Clean the ice delivery chute and the bottom of the
ice storage bin using a warm, damp cloth, then
dry both thoroughly. To avoid clogging and to
maintain a fresh supply of ice, empty the storage
bin and clean both the storage bin and delivery
chute every 2 weeks.
Dispense 2-3 glasses of ice, then try removing the
ice bin.
Switch from crushed ice to cubed ice to clear the
ice dispenser. Then switch back to crushed ice.
Hold the glass under the dispenser 2 to 3 seconds
after releasing the dispenser lever.
Hold the glass under the dispenser 2 to 3 seconds
after releasing the dispenser lever.
38
Page 39

TROUBLESHOOTING
First try the solutions suggested here to possibly avoid a service call.
If you experience Possible Causes Solution
Ice and Water (cont.)
Water continues to drip from the
dispenser beyond the rst few drops.
Water is leaking from the back of the
refrigerator.
Crushed or cubed ice misses the glass
when dispensing ice.
Water from the dispenser is warm. Water from the dispenser is chilled to
The refrigerator has just been installed. Flushing the water system removes the air from
The water lter was recently installed or
replaced.
There may be a loose water
connection.
The water line connections were not
fully tightened.
Recently removed the doors and did
not fully tighten water line connection.
The glass is not held close enough to
where the ice exits the chute.
50°F (10°C).
The refrigerator has just been installed. Allow 24 hours after installation for the water
A large amount of water was recently
dispensed.
Water has not been recently dispensed. The rst glass of water may not be cool. Discard
The refrigerator is not connected to
a cold water pipe.
the lines which causes the water dispenser to
drip. Flush the water system.
See the “Water and Ice Dispensers” section.
Flushing the water system removes the air from
the lines which causes the water dispenser to
drip. Flush the water system.
See the “Water and Ice Dispensers” section
Check for water in bottom of refrigerator
compartment, hinge area, or by household
connection in back of product.
See the “Connecting the Water” section.
See the “Remove and Replace Refrigerator
Doors” section.
Hold the glass close to where the ice exits the
chute.
This is normal.
supply to cool completely.
Allow 3 hours for the water supply to cool
completely.
the rst glass
of water dispensed.
Make sure the refrigerator is connected to a cold
water pipe.
See the “Water Supply Requirements” section.
39
Page 40

TROUBLESHOOTING
First try the solutions suggested here to possibly avoid a service call.
WARNING
Explosion Hazard
Use nonflammable cleaner.
Failure to do so can result in death, explosion, or fire.
To view an animation showing how to adjust and align the doors, refer to the Product Help/FAQ section of the brand website and
search for “Door Closing and Door Alignment.”
If you experience Possible Causes Solution
Doors
The doors will not close
completely.
The doors are difcult to
open.
The doors appear to be
uneven.
The refrigerator is unsteady
or it rolls forward when
opening and closing doors.
The door is blocked open. Move food packages away from door.
A bin or shelf is in the way. Push bin or shelf back into the correct position.
Recently installed Remove all packaging materials.
The door gaskets are dirty or sticky. Clean gaskets and contact surfaces with mild soap and warm
The doors need to be aligned or the
refrigerator needs to be levelled.
The refrigerator brake feet are not
snug against the oor.
water. Rinse and dry with soft cloth.
If you need to align door please call for service.
Turn both brake feet (one on each side) counterclockwise, the
same amount, until they are snug against the oor. See the
“Refrigerator Levelling and Door Closing” section.
40
Page 41

PERFORMANCE DATA SHEET
Water Filtration System
Model P9WB2L/P9RFWB2L/EDR2RXD1 Capacity 200 Gallons (757 Liters)
System tested and certied by NSF International against
NSF/ANSI Standard 42, Standard 53, Standard 401, and
CSA B483.1 for the reduction of contaminants specied on
the Performance Data Sheet.
This system has been tested according to NSF/ANSI Standards 42, 53, 401, and CSA B483.1 for the reduction of the substances listed below. The
concentration of the indicated substances in water entering the system was reduced to a concentration less than or equal to the permissible limit for
water leaving the system, as specied in NSF/ANSI Standards 42, 53, 401, and CSA B483.1. This system has been tested according to Ministerial Decree
No 174, article 9 of legislative decree n 31 of 2001, Regulations (EC) no 1935/2004, WRAS BS6920 and ACS Circulaire 2002/571.
Substance Reduction Aesthetic Effects Inuent Challenge Concentration Maximum Permissible
Chlorine Taste/Odor Particulate Class I* 2.0 mg/L ± 10% At least 10,000
Contaminant Reduction Inuent Challenge Concentration Maximum Permissible Product Water
Lead: @ pH 6.5/ @ pH 8.5 0.15 mg/L ± 10% 0.010 mg/L >99.3% / 98.6%
Benzene 0.015 mg/L ± 10% 0.005 mg/L 96.0%
p - Dichlorobenzene 0.225 mg/L ± 10% 0.075 mg/L >99.8%
Carbofuran 0.08 mg/L ± 10% 0.040 mg/L 91.9%
Toxaphene 0.015 ± 10% 0.003 mg/L 93.3%
Atrazine 0.009 mg/L ± 10% 0.003 mg/L 92.4%
Asbestos 10
Asbestos 50,000/L min. 99.95% >99.99%
Live Cyst
Lindane 0.002 ± 10% 0.0002 mg/L 98.9%
Tetrachloroethylene 0.015 mg/L ± 10% 0.005 mg/L >96.6%
O-Dichlorobenzene 1.8 mg/L ± 10% 0.60 mg/L >99.9%
Ethylbenzene 2.1 mg/L ± 10% 0.70 mg/L 99.4%
1,2,4-Trichlorobenzene 0.210 mg/L ± 10% 0.07 mg/L >99.8%
2,4 - D 0.210 mg/L ± 10% 0.07 mg/L 93.8%
Styrene 2.0 mg/L ± 10% 0.1 mg/L 99.8%
Toluene 3.0 mg/L ± 10% 1.0 mg/L 87.9%
Endrin 0.006 mg/L ± 10% 0.002 mg/L >96.6%
Atenolol 200 ± 20% 30 ng/L >95.9%
Trimethoprim 140 ± 20% 20 ng/L >96.9%
Linuron 140 ± 20% 20 ng/L >96.4%
Estrone 140 ± 20% 20 ng/L >97.0%
Nonylphenol 1400 ± 20% 200 ng/L >97.4%
Carbamazepine 1400 ± 20% 200 ng/L >97.9%
Phenytoin 200 ± 20% 30 ng/L 93.8%
Naproxen 140 ± 20% 20 ng/L 96.1%
Bisphenol A 2000 ± 20% 300 ng/L >99.2%
†
particles/mL
7
to 108 bers/L
11 NTU ± 10% 0.5 NTU 99.0%
††
Product Water Concentration
50% reduction 85% reduction 97.2% 99.5%
Concentration
99% >99%
Test Parameters: pH = 7.5 ± 0.5 unless otherwise noted. Flow = 0.6 gpm (2.27 Lpm). Pressure = 60 psig (413.7 kPa). Temp. = 68°F to 71.6°F (20°C to
22°C). Rated service capacity = 200 gallons (757 liters).
The compounds certied under NSF 401 have been deemed as “emerging compounds/incidental contaminants.” Emerging compounds/incidental
contaminants are those compounds that have been detected in drinking water supplies at trace levels. While occurring at only trace levels, these
compounds can affect the public acceptance/perception of drinking water quality.
n It is essential that operational, maintenance, and lter replacement
requirements be carried out for the product to perform as advertised.
Property damage can occur if all instructions are not followed.
n The disposable cartridge must be changed at least every 6 months.
n Use replacement lter P9RFWB2L, part #EDR2RXD1/EDR2RXD1B.
2015 suggested retail price of $49.99 U.S.A./$49.99 Canada. Prices
are subject to change without notice.
n The lter monitor system measures the amount of water that passes
through the lter and alerts you when it is time to replace the lter.
Refer to the “Using the Controls” or “Water Filtration System” section
(in the User Instructions or User Guide) to learn how to check the
water lter status.
n After changing the water lter, ush the water system. See “Water and
Ice Dispensers” or “Water Dispenser” in the User Instructions or User
Guide.
Average% Reduction
Average%Reduction
41
Page 42

n These contaminants are not necessarily in your water supply. While
testing was performed under standard laboratory conditions, actual
performance may vary.
n The product is for cold water use only.
n The water system must be installed in compliance with state and
local laws and regulations.
n Do not use with water that is microbiologically unsafe or of unknown
quality without adequate disinfection before or after the system.
Systems certied for cyst reduction may be used on disinfected
waters that may contain lterable cysts.
EPA Est. No. 082047-TWN-001
n Refer to the “Warranty” section (in the User Instructions or User
Guide) for the Manufacturer’s limited warranty, name and telephone
number.
n The refrigerator when dispensing water acts as drinking water
treatment equipment.
n This equipment requires regular periodic maintenance in order
to guarantee the drinking water treatment requirements and the
maintenance of the improvements every 6 months.
Application Guidelines/Water Supply Parameters
Water Supply Potable City or Well
Water Pressure 30 - 120 psi (207 - 827 kPa)
Water Temperature 33° - 100°F (0.6° - 37.8°C)
Service Flow Rate 0.6 GPM (2.27 L/min.) @ 60 psi
(413.7 kPa)
n Your water ltration system will withstand up to 120 pounds
per square inch (psi) water pressure. If your water supply is
higher than 80 psi, install a pressure reducing valve before
installing the water ltration system.
42
©2020 All rights reserved.
Page 43

RÉFRIGÉRA
TEUR AVEC PORTE À DOUBLE BATTANT
ET CONGÉLATEUR EN BAS GUIDE D’UTILISATION ET
D’ENTRETIEN
able des matières
T
SÉCURITÉ DU RÉFRIGÉRA
Mise au rebut du vieux réfrigérateur
PIÈCES ET CARACTÉRISTIQUES
QUOI DE NEUF EN COULISSE?
INSTRUCTIONS D’INST
Pour commencer
Installation Du Filtr
Déballage du r
Exigences d’emplacement
Spécicationsélectriques
Retrait et r
Enlever et r
Nivellement du r
Spécications de l’alimentation en eau
Raccor
dement à la canalisation d’eau
FIL
TRES ET ACCESSOIRES
Système de ltration de l’eau
Accessoir
Assistance ou service
UTILISA
Éclairage du r
CARACTÉRISTIQUES DE CONNEXION DU
RÉFRIGÉRATEUR ......................................................................
CONFIGURATION DE LA CONNECTABILITÉ
Instructions de conguration automatique
– Conguration protégée Wi-Fi
Distributeurs d’eau et de glaçons
UTILISA
Ouvertur
Machine à glaçons et bac d’entr
T
Compartiments de rangement du congélateur
Nettoyage
Lampes
Pr
DÉP
DÉP
FICHE DE DONNÉES RELA
GARANTIE
TION DES COMMANDES
TION DU RÉFRIGÉRATEUR
e et fermeture des portes
ABLETTES, BALCONNETS ET TIROIRS
........................................................................................
écautions à prendre pour les vacances ou le déménagement
ANNAGE – MODÈLES AVEC CONNEXION
ANNAGE
.........................................................................
e À Eau
éfrigérateur
éinstallation des portes du réfrigérateur
eplacer la porte du congélateur/Flexi Freeze
éfrigérateur
es
..................................................................................
éfrigérateur
.....................................................................................
...............................................................................
..................................................................................
TEUR.............................................
............................................
............................................
...............................................
ALLATION
...........................................................
...........................................................
..........................................................
............................................................
........................................................
..................................................................
.............................................................
...........................................
.....................
............
.......................................
........................................
.....................................................
......................................................
............................................
..........................
....................................................
................................................
..............................................
eposage
TIVES AU RENDEMENT..............
........................................
..................................
................................
...........................
......................
44
48
49
50
51
51
51
51
52
52
54
56
57
57
57
59
59
60
60
61
63
63
64
64
66
68
68
69
70
71
72
72
72
74
76
80
82
43
Page 44

SÉCURITÉ DU RÉFRIGÉRA
TEUR
Votre sécurité et celle des autres est très importante.
Nous donnons de nombreux messages de sécurité importants dans ce manuel et sur votre appareil ménager. Assurez-vous de
toujours lire tous les messages de sécurité et de vous y conformer.
Voici le symbole d’alerte de sécurité.
Ce symbole d’alerte de sécurité vous signale les dangers potentiels de décès et de blessures graves à vous
et à d’autres.
Tous les messages de sécurité suivront le symbole d’alerte de sécurité et le mot “DANGER” ou
“AVERTISSEMENT”. Ces mots signifient :
Risque possible de décès ou de blessure grave si vous ne
DANGER
AVERTISSEMENT
Tous les messages de sécurité vous diront quel est le danger potentiel et vous disent comment réduire le risque de blessure et
ce qui peut se produire en cas de non-respect des instructions.
suivez pas immédiatement les instructions.
Risque possible de décès ou de blessure grave si vous
ne suivez pas les instructions.
44
Page 45

INSTR
IMPORT
e ces instructions de sécurité avant d’utiliser
Lir
UCTIONS DE SÉCURITÉ
ANT: À LIRE ET À RESPECTER
l’appareil. Conservez ces instructions pour
référence ultérieure. Ces instructions et l’appareil
lui-même fournissent d’importants avertissements
de sécurité qui doivent être respectés en tout
temps. Le fabricant décline toute responsabilité si
ces instructions de sécurité ne sont pas respectées
et en cas de mauvaise utilisation du produit ou de
mauvais réglage des commandes.
es très jeunes enfants (0 à 3 ans) devraient
L
être tenus loin de l’appareil. Les jeunes enfants
(3 à 8 ans) devraient être tenus loin de l’appareil,
sauf s’ils sont supervisés en tout temps. Les
enfants de 8 ans et plus, ainsi que les personnes
à capacités physiques, sensorielles ou mentales
réduites, ou possédant un manque d’expérience et
de connaissances ne peuvent utiliser cet appareil
que s’ils sont supervisés ou qu’ils ont reçu des
instructions concernant l’utilisation sécuritaire
de l’appareil et comprennent les risques liés à
l’utilisation de l’appareil. Les enfants ne doivent pas
jouer avec l’appareil. Le nettoyage et l’entretien ne
doivent pas être effectués par des enfants laissés
sans supervision
Les enfants âgés de 3 à 8 ans peuvent mettre des
articles ou en retirer des appareils de réfrigération.
UTILISA
A
TION PERMISE
TTENTION: Cet appareil n’est pas conçu pour
.
être utilisé à l’aide d’un dispositif de commutation
externe comme une minuterie ni par un système
de commande à distance.
C
et appareil est destiné à un usage domestique
et à d’autres usages similaires comme: coins cuisine
réservés au personnel des boutiques, des bureaux
et d’autres environnements professionnels,
maisons d’hôtes, chambres d’hôtel, motels, gîtes
touristiques et autres installations d’hébergement.
et appareil n’est pas conçu pour une utilisation
C
professionnelle. Ne pas utiliser l’appareil à
l’extérieur.
L
’ampoule utilisée dans l’appareil est
spécialement conçue pour les électroménagers
domestiques, elle n’est pas conçue pour l’éclairage
d’une pièce de la maison (réglementation
EC 244/2009).
Cet appareil est conçu pour être utilisé dans un
endroit où la température se trouve dans les limites
des plages suivantes, et selon la classe climatique
indiquée sur la plaque signalétique. Il est possible
que l’appareil ne fonctionne pas correctement
s’il est resté exposé pendant longtemps à une
température en dehors de la plage indiquée.
Classe climatique T (°C)
SN : D
ST : D
e 10 à 32°C;
e 16 à 38°C;
N: D
T: D
e 16 à 32°C
e 16 à 43°C
Cet appareil ne contient pas de CFC. Le circuit
de réfrigération contient du R600a (HC). Appareils
contenant de l’isobutane (R600a): L’isobutane est
un gaz naturel sans impact pour l’environnement,
mais inflammable. Il faut donc s’assurer que les
tubes du circuit réfrigérant de l’appareil ne sont
pas endommagés, particulièrement lorsqu’on
vide le circuit réfrigérant.
AVERTISSEMENT : Ne pas endommager les
tubes du circuit réfrigérant de l’appareil.
AVERTISSEMENT: Garder les évents à l’intérieur
de l’enceinte de l’appareil ou de la structure
encastrée exempte d’obstacles
VERTISSEMENT: Ne pas employer de procédé
A
.
mécanique, électrique ou chimique autre que
celui recommandé par le fabricant pour accélérer
le processus de décongélation.
AVERTISSEMENT: Ne pas utiliser ou placer de
dispositif électrique à l’intérieur des compartiments
de l’appareil si ce dispositif ne correspond pas au
type de dispositif expressément autorisé par le
fabricant.
A
VERTISSEMENT : Les machines à glaçons
ou distributeurs d’eau automatiques dont le
raccordement à l’alimentation en eau est indirect
doivent être approvisionnés uniquement en eau
potable.
VERTISSEMENT : Les machines à glaçons
A
et distributeurs d’eau doivent être raccordés
uniquement à une arrivée d’eau potable dont la
pression est comprise entre 20lb/po
2
et 145
lb/po
2
(1,4 bar et 10 bars).
Ne pas en
treposer de substances explosives
comme des aérosols avec agent propulseur
inflammable dans cet appareil.
Ne pas avaler le contenu (non toxique) des
blocs réfrigérants (offerts sur certains modèles).
Ne pas manger de glaçons ou sucettes glacées
immédiatement après les avoir retirés du
congélateur : elles peuvent causer des brûlures
dues au froid.
our les produits conçus pour utiliser un
P
filtre à air situé dans un couvercle de ventilateur
accessible, le filtre doit toujours être en place
lorsque le réfrigérateur est alimenté.
Ne pas r
anger de contenants en verre contenant
des liquides dans le compartiment de congélation
puisqu’ils pourraient éclater. Ne pas obstruer le
ventilateur (si inclus) avec des alimentaires. Après
avoir rangé les aliments, vérifier que les portes de
compartiments ferment bien, particulièrement la
porte du congélateur.
es joints endommagés doivent être remplacés
L
le plus vite possible.
tiliser le compartiment de réfrigération
U
uniquement pour la conservation d’aliments
frais et le compartiment de congélation pour la
conservation d’aliments surgelés, la congélation
d’aliments frais et la fabrication de glaçons.
45
Page 46

viter de placer des aliments non emballés au
É
contact direct avec des aliments frais et les surfaces
internes du compartiment de congélation.
Les appareils peuvent être munis de
compartiments spécialisés (compartiment à
aliments frais, boîte à zéro degré, etc.). Sauf si
mentionné dans le livret spécifique du produit,
ces compartiments peuvent être enlevés sans
nuire au rendement de l’appareil.
A
vertissement: Risque d’incendie/matériaux
inflammables. Pour les compartiments les
plus appropriés de l’appareil où des aliments
spécifiques seront conservés, tenir compte des
températures des différents compartiments de
l’appareil comme suit:
–Compartiment de réfrigération: Fruits tropicaux,
boîtes, boissons, œufs, sauces, cornichons, beurre,
confiture, fromage, lait, produits laitiers, yogourt.
Il est aussi possible de ranger des charcuteries, des
desserts, de la viande et du poisson, du gâteau au
fromage, des pâtes fraîches, de la crème sure, des
poudings et du fromage à la crème.
Tiroir pour fruits et légumes au bas du
compartiment de réfrigération: Légumes et fruits
(sauf les fruits tropicaux).
Compartiment de refroidissement: Ne ranger la
viande et le poisson que dans le tiroir le plus froid
–Compartiment du congélateur:
Convient pour congeler les aliments à température
de la pièce et pour ranger les aliments surgelés
puisque la température est répartie uniformément
dans tout le compartiment. Les aliments surgelés
achetés en magasin sont munis d’une date de
péremption imprimée sur l’emballage. Cette date
tient compte du type d’aliments qui y est contenu
et devrait donc être respectée. Les aliments
frais devraient être conservés selon la période
suivant: 1 à 3 mois pour le fromage, les fruits de
mer, la crème glacée, les saucisses et la viande
hachée, le lait, les liquides frais; 4 mois pour les
biftecks ou les côtes (bœuf, porc, agneau); 6
mois pour le beurre ou la margarine, la volaille
(poulet, dinde); 8 à 12 mois pour les fruits (sauf les
agrumes), les viandes rôties (bœuf, porc, agneau)
et les légumes. Les dates de péremption sur les
emballages d’aliments doivent être respectées.
Pour éviter de contaminer les aliments, suivre les
directives suivantes:
– Ouvrir la porte pour une longue période
peut faire augmenter de façon significative la
température dans les compartiments de l’appareil.
–Nettoyer régulièrement les surfaces qui peuvent
entrer en contact avec des aliments et les systèmes
de vidange accessibles.
–nettoyer les contenants d’eau s’ils n’ont pas été
utilisés pendant 48h; vidanger le système d’eau
raccordé à l’alimentation en eau si de l’eau n’a pas
été distribuée pendant 5 jours.
– ranger la viande et le poisson cru dans des
contenants convenables dans le réfrigérateur
pour qu’ils n’entrent pas en contact ou ne coulent
pas sur d’autres aliments.
Le rangement dans la zone convertible
devrait respecter les conditions suivantes :
+10°C: vin blanc
+4°C: légumes et fruit (sauf les fruits tropicaux)
0°C: viandes et poissons
Tous les réglages sous zéro : aliments surgelés
comme dans le congélateur
–Les compartiments deux étoiles pour aliments
surgelés conviennent pour ranger des aliments
déjà surgelés et ranger ou préparer de la crème
glacée ou des glaçons.
– Ne pas faire congeler des aliments dans les
compartiments à une, deux ou trois étoiles.
– Si l’appareil de réfrigération est laissé vide
pendant une longue période, l’éteindre, le
dégivrer, le nettoyer, le sécher et laisser la porte
ouverte pour prévenir l’apparition de moisissure
à l’intérieur.
INSTALLATION
Cet appareil doit être déplacé et installé par
deux personnes ou plus – risque de blessures.
Utiliser des gants de protection pour déballer et
installer le produit – risque de coupure.
’installation, incluant le raccordement à
L
l’entrée d’eau (au besoin) et les connexions
électriques, ainsi que les réparations doivent
être effectuées par un technicien qualifié. Ne pas
réparer ou remplacer une pièce de l’appareil si ce
n’est pas spécifiquement indiqué dans le guide
d’utilisation. Garder les enfants loin de la zone
d’installation.
Après avoir déballé l’appareil, s’assurer qu’il n’a
pas été endommagé par le transport. En cas de
problème, communiquer avec le fournisseur de
service après-vente le plus près de chez vous. Une
fois l’appareil installé, le matériel d’emballage à
recycler (plastique, pièces en polystyrène, etc.)
doit être placé hors de la portée des enfants
– risque de suffocation. L’appareil doit être
débranché de l’alimentation électrique avant
toute installation – risque de décharge électrique.
Pendant l’installation s’assurer que l’appareil
n’endommage pas le cordon d’alimentation –
risque d’incendie et de décharge électrique.
Ne mettre l’appareil en marche qu’une fois
l’installation terminée.
46
Page 47

aire attention à ne pas endommager le
F
plancher (p. ex., parquet) lorsqu’on déplace
l’appareil. Installer l’appareil sur un plancher ou
une surface qui pourra en supporter le poids
et dans un espace adapté à ses dimensions et à
l’utilisation qui en est faite. S’assurer que l’appareil
n’est pas situé près d’une source de chaleur et que
les quatre pieds sont stables et bien à plat au sol,
ajuster les pieds au besoin et vérifier que l’appareil
est bien au niveau en utilisant un niveau à bulle
d’air. Attendre au moins deux heures avant de
mettre en marche l’appareil afin de s’assurer que
le circuit réfrigérant est parfaitement fonctionnel.
AVERTISSEMENT: Lors du positionnement de
l’appareil, s’assurer que le cordon d’alimentation
n’est pas coincé ou endommagé.
VERTISSEMENT : Pour éviter un danger
A
provoqué par l’instabilité, le positionnement ou
l’arrimage de l’appareil, respecter les instructions
du fabricant. Il est interdit de placer le réfrigérateur
de telle manière que le tuyau d’entrée de gaz
d’une cuisinière, les conduits d’eau ou de gaz en
métal ou les fils électriques entrent en contact
avec le dos du réfrigérateur (serpentons du
condensateur).
our garantir une ventilation adéquate, laisser
P
un espace de chaque côté et au-dessus de
l’appareil. La distance entre le dos de l’appareil et
le mur arrière devrait être de 50mm pour éviter
l’accès à des surfaces chaudes. Un espace inférieur
augmentera la consommation d’électricité de
l’appareil.
S
’il est nécessaire de remplacer la porte,
communiquer avec le centre de service technique.
Un seul clapet an
ti-retour « approuvé » ou
un autre dispositif de prévention de reflux aussi
efficace offrant une protection contre le reflux
pour les liquides de catégorie deux (au minimum)
devrait être installé au point de raccordement
entre l’alimentation en eau et le raccordement à
l’appareil.
AVERTISSEMENTS – ÉLECTRICITÉ
I
l doit être possible de couper l’alimentation
électrique de l’appareil en le débranchant si la
prise est accessible ou à l’aide d’un interrupteur
bipolaire accessible monté en amont de la
prise secteur en conformité avec les normes de
sécurité nationales. L’appareil doit être mis à la
terre en conformité avec les normes de sécurité
nationales.
Ne pas utiliser une e
xtension, un parasurtenseur
ou un adaptateur. Les composants électriques ne
doivent pas être accessibles par l’utilisateur après
l’installation. Ne pas utiliser l’appareil lorsqu’on
est mouillé ou pieds nus. Ne pas utiliser ce produit
si la fiche ou le cordon est endommagé, s’il ne
fonctionne pas correctement ou s’il a subi une
chute ou a été endommagé de quelque façon
que ce soit.
Si le cordon d’alimentation est endommagé, il
doit être remplacé par un cordon identique par
le fabricant, son agent de réparation ou toute
autre personne qualifiée afin d’éviter tout danger
– risque de décharge électrique.
A
VERTISSEMENT : Ne pas installer un
parasurtenseur ou un bloc d’alimentation portatif
derrière l’appareil
NETTOYAGE ET ENTRETIEN
AVERTISSEMENT : S’assurer que l’appareil
.
est arrêté et que l’alimentation électrique est
débranchée avant d’effectuer tout entretien; ne
jamais utiliser d’équipement de nettoyage à la
vapeur – risque de décharge électrique.
Ne pas utiliser de nettoyants puissants
ou abrasifs tels que les nettoyants à vitre en
atomiseurs, nettoyants à récurer, liquides
inflammables, cires nettoyantes, détergents
concentrés, agents de blanchiment ou nettoyants
contenant du pétrole sur les pièces en plastique,
les garnitures intérieures et garnitures de portes
ou sur les joints de portes. Ne pas utiliser d’essuietout, de tampons à récurer ou un autre outil de
nettoyage abrasif.
RECYCLAGE DES MATÉRIAUX D’EMBALLAGE
L
es ma
tériaux d’emballage sont entièrement recyclables et sont munis
des symboles de recyclage .
Les différents matériaux d’emballage doivent donc être mis au recyclage
de façon responsable et en respectant les réglementations locales en
matière de recyclage.
MISE AUX REBUTS DES APPAREILS MÉNAGERS
C
et appareil est fabriqué de matériaux recyclables et réutilisables.
Jeter l’appareil conformément aux règlements locaux en matière de
déchets. Pour plus d’informations sur le traitement, la récupération et
le recyclage des appareils ménagers électriques, contacter le bureau
local pertinent, le service de traitement des déchets domestiques ou la
boutique dans laquelle l’appareil a été acheté. Cet appareil est conforme
à la directive européenne2012/19/EU relative aux appareils électriques
et électroniques usagés (WEEE). En s’assurant que cet appareil est mis
aux rebuts de la bonne façon, on s’assure de prévenir les conséquences
néfastes sur l’environnement et la santé humaine.
Le symbole
ne doit pas être considéré comme un déchet domestique, mais qu’il
doit être transféré vers un centre de traitement des déchets approprié
et conçu pour le recyclage des appareils électriques et électroniques.
situé sur le produit ou les documents joints indique qu’il
47
Page 48

CONSEILS ÉCONERGIQUES
I
nstaller l’appareil dans une pièce sèche et bien aérée, loin de toute
source de chaleur (p. ex.: radiateur, cuiseur, etc.) ou des rayons directs
du soleil. Au besoin, utiliser un panneau isolant.
Pour garantir une bonne ventilation, suivre les instructions
d’installation. Une mauvaise ventilation derrière le produit augmente la
consommation d’énergie et réduit l’efficacité de refroidissement.
L’ouverture fréquente de la porte peut causer une augmentation de la
consommation électrique. La température interne de l’appareil et la
consommation d’énergie peuvent aussi être affectées par la température
ambiante, ainsi que par l’emplacement de l’appareil. Le réglage de la
température devrait être effectué en considérant ces facteurs.
Réduire le plus possible les ouvertures de porte.
Placer les aliments à décongeler dans le réfrigérateur. La température
des aliments congelés refroidit les aliments dans le réfrigérateur. Laisser
les boissons et aliments refroidir avant de les placer dans l’appareil.
Le positionnement des tablettes dans le réfrigérateur n’a aucune
incidence sur l’utilisation efficace de la consommation d’énergie. Les
aliments devraient être placés sur les tablettes de façon à permettre
une bonne circulation de l’air (les aliments ne devraient pas se toucher
et un espace devrait être conservé entre les aliments et la paroi arrière).
Il est possible d’augmenter la capacité de stockage d’aliments congelés
en enlevant les paniers et, si elle est présente, la tablette Stop Frost.
Ne pas s’en faire avec les bruits du compresseur, ceux-ci sont normaux
et décrits dans le guide rapide du produit.
Mise au r
DANGER : Un enfant peut r
réfrigérateur ou congélateur:
Enlever les portes.
■
Laisser les tablettes en place de sorte que les enfants ne
■
puissent pas y pénétr
ebut du vieux réfrigérateur
ester piégé. Avant de jeter l’ancien
er facilement.
AVERTISSEMENT
Risque de suffoquer
Enlever les portes de votre vieux réfrigérateur.
Le non-respect de cette instruction peut causer
un décès ou des lésions cérébrales.
IMPORTANT: Le risque qu’un enfant puisse se retrouver coincé
et suffoquer n’est pas chose du passé. Les réfrigérateurs jetés ou
abandonnés restent dangereux, même s’ils ne restent à l’extérieur
que pour «quelques jours seulement». Si l’ancien réfrigérateur
doit être mis au rebut, suivre les instructions suivantes afin d’aider
à éviter les accidents.
Renseignements importants à propos de la mise au
rebut des fluides réfrigérants :
Mettre le réfrigérateur au rebut conformément à la
réglementation fédérale et locale. Les fluides réfrigérants
doivent être évacués par un technicien certifié et agréé par
l’EPA conformément aux procédures établies.
48
Page 49

PIÈCES ET CARACTÉRISTIQUES
Machine à glaçons et bac
à glaçons de la porte
Active Oxygen
Tablette amovible
Boîte fraîche
Filtre à eau Garde-manger délicat
Plateau à accès facile
Tiroirs de
congélation rapide
A
B C
2 barres lumineuses
supérieures
Tablettes ajustables
2 barres lumineuses
latérales
Tablettes ajustables
Boîte fraîche
A. Réfrigérateur
B. Congélation
C. Compartiment Flexi Fr
eeze
Interface utilisateur
Levier de distribution
d’eau et de glaçons
Plateau d’égouttement
amovible
Capacité de stockage:
Vérifier l’étiquette signalétique à l’arrière du produit.
49
Page 50

QUOI DE NEUF EN COULISSE?
Bac à glaçons In-Door
La machine à glaçons et le bac d’entr
porte pour permettre un accès facile aux glaçons tout en libérant
de l’espace de tablettes à l’intérieur et en ajoutant des balconnets
de porte supplémentaires pour offrir plus d’espace d’utilisation.
-Ice
®
eposage sont situés dans la
Lumière DEL panoramique
De multiples bandes lumineuses à DEL situées à l’intérieur
du compartiment réfrigérateur, du compartiment congélateur
et des tiroirs intérieurs réduisent les ombres et répartissent
uniformément la lumière partout dans le réfrigérateur.
Protection contre le gel
Cette caractéristique réduit le transfert de l’humidité dans les
aliments surgelés et réduit les brûlures de congélation.
Tablette amovible
Cette tablette pleine largeur entièrement coulissante se glisse
entre les tiroirs à légumes et la tablette du bas. Elle est parfaite
pour les restes, les plats pour la famille, les boîtes de pizza et les
grands plats de fête.
Garde-manger pour aliments sensibles
Pour ranger des aliments comme de la viande, des produits de
spécialité et des boissons et les conserver à leur température
idéale.
Distributeur d’eau avec Measured Fill (remplissage mesuré)
La fonction Measured Fill (remplissage mesuré) vous permet de
distribuer une quantité désirée d’eau filtrée à coups de 0,2 L,
0,5 L ou 1,0 L.
Zone convertible
Passe d’une zone de congélation en une zone de réfrigération
à l’aide d’une touche en sélectionnant parmi les 6+ réglages de
température et crée l’espace souhaité en fonction des besoins du
moment.
Active Oxygen (contrôle de pureté)
Crée un environnement hygiénique avec un appareil innovateur
qui produit de l’ozone pour réduire les odeurs et prévenir la
prolifération des bactéries à l’intérieur de l’appareil, ce qui
améliore la qualité de l’air pour créer un environnement de qualité.
50
Page 51

Pour commencer
LISTE DE VÉRIFICA
Alimentation électrique
AVERTISSEMENT
INSTRUCTIONS D’INST
TION POUR L’INSTALLATION
ALLATION
Risque de choc électrique
Brancher sur une prise de terre (reliée à la masse).
Ne pas retirer la broche de terre.
Ne pas utiliser d’adaptateur.
Ne pas utiliser de rallonge.
Le non-respect de ces instructions peut entraîner la
mort, un incendie ou un choc électrique.
■
Brancher le r
Portes
Si les portes doivent êtr
■
reporter aux sections «Retirer et replacer les portes» et
«Retirer et replacer l’avant de la porte du congélateur».
■
Les portes ferment complètement hermétiquement.
éfrigérateur est de niveau. Ajuster les pieds de nivellement
Le r
■
de façon à ce qu’ils soient en contact avec le plancher.
■
Les portes sont alignées à leurs rives supérieur
fonction d’ajustement de la porte au besoin.)
Dernières vérifications
Retirer tout l’emballage d’expédition.
■
■
Régler les commandes de température aux réglages
recommandés.
■
Conserver les instructions et autr
Pour obtenir plus d’aide, enr
■
www.hotpoint.eu.
éfrigérateur dans une prise avec mise à la terre.
e retirées lors de l’installation, se
es. (Utiliser la
es documents éventuels.
egistrer le produit au
REMARQUE: Si le filtr
débit d’eau sera plus faible et la production de glaçons plus
lente. La mauvaise installation d’un filtre peut aussi laisser fuir le
compartiment du filtre.
e n’est pas installé correctement, le
Déballage du réfrigérateur
AVERTISSEMENT
Risque du poids excessif
Utiliser deux ou plus de personnes pour déplacer et
installer le réfrigérateur.
Le non-respect de cette instruction peut causer
une blessure au dos ou d'autre blessure.
Livraison du r
Une ouverture de porte minimum de 838mm (33po) est
nécessaire. Si l’ouverture est inférieure ou égale à 914mm
(36po), il faudra enlever les portes, tiroirs et charnières.
Pousser le chariot avec le réfrigérateur de côté pour toutes les
ouvertures de porte.
Déplacement de votre réfrigérateur :
Votre réfrigérateur est lourd. Lors du déplacement de votre
réfrigérateur pour le nettoyage ou un entretien ou réparation,
veiller à recouvrir le plancher avec du carton ou un panneau
de fibres dures pour éviter qu'il ne subisse tout dommage.
Toujours tirer le réfrigérateur tout droit lors de son
déplacement. Ne pas incliner le réfrigérateur d’un côté ou de
l’autre ni le “faire marcher” en essayant de le déplacer car le
plancher pourrait être endommagé.
éfrigérateur
Installation Du Filtr
n
n
n
n
n Rincer le système de distribution d’eau à l’aide de 3gallons
n
er le compartiment du filtre à eau sur le côté gauche
Repér
inférieur du réfrigérateur. Appuyer sur le côté droit de la porte
du filtre pour l’ouvrir.
Aligner la flèche sur le capuchon du filtr
du logement du filtre et insérer le filtre dans le logement.
ès l’avoir inséré, tourner le filtre dans le sens horaire de
Apr
90° (1/4 tour) jusqu’à ce qu’il s’emboîte dans le logement.
Refermer la porte du filtr
(11,4 L) d’eau pour évacuer l’air de la canalisation d’eau et
pour empêcher le distributeur de goutter ou de r
du distributeur.
Réinitialiser le compteur du filtr
utilisateur. Consulter la procédure pour réinitialiser le filtre de
la section «Commandes de l’utilisateur».
e à eau pour la verrouiller.
e en utilisant l’interface
e À Eau
e à eau avec l’encoche
éduire le débit
Retrait des matériaux d’emballage
■ Enlever tout r
avant de mettre en marche votre tiroir de réfrigération.
Frotter une petite quantité de détergent liquide à vaisselle sur
l’adhésif avec les doigts. Rincer à l’eau tiède et sécher.
■ Ne pas utiliser d’instruments coupants, d’alcool à friction,
de liquides inflammables ou de nettoyants abrasifs pour
enlever le ruban adhésif ou la colle. Ces pr
endommager la surface du réfrigérateur.
Éliminer/r
■
ésidu de ruban adhésif et de colle des surfaces
oduits peuvent
ecycler tous les matériaux d’emballage.
51
Page 52

Nettoyage avant utilisation
Apr
ès avoir enlevé tous les matériaux d’emballage, nettoyer
l’intérieur du réfrigérateur avant de l’utiliser. Voir les instructions
de nettoyage dans la section «Entretien du réfrigérateur».
Importants renseignements à savoir au sujet des tablettes
et des couvercles en verre :
Ne pas nettoyer les tablettes ou couvercles en verre avec de
l’eau tiède quand ils sont froids. Les tablettes et les
couvercles peuvent se briser s'ils sont exposés à des
changements soudains de température ou à un impact tel
que coup brusque. Le verre trempé est conçu pour éclater
en d’innombrables pièces minuscules. Ceci est normal. Les
tablettes et les couvercles en verre sont lourds. Les saisir à
deux mains lors de leur dépose afin d'éviter de les faire
tomber.
Exigences d’emplacement
Spécificationsélectriques
AVERTISSEMENT
Risque de choc électrique
Brancher sur une prise de terre (reliée à la masse).
Ne pas retirer la broche de terre.
Ne pas utiliser d’adaptateur.
Ne pas utiliser de rallonge.
Le non-respect de ces instructions peut entraîner la
mort, un incendie ou un choc électrique.
AVERTISSEMENT
Risque d'explosion
Garder les matériaux et les vapeurs inflammables, telle
que l'essence, loin du réfrigérateur.
Le non-respect de cette instruction peut causer
un décès, une explosion ou un incendie.
Pour obtenir une aération appr
un espace de 1,25cm de chaque côté et au sommet. Laisser
un espace de 5cm derrière le réfrigérateur. Si le réfrigérateur
comporte une machine à glaçons, s’assurer qu’un espace
additionnel est prévu à l’arrière pour permettre les raccordements
des conduits d’eau. En cas d’installation du réfrigérateur près
d’un mur fixe, laisser un minimum de 9,5cm entre le réfrigérateur
et le mur pour permettre à la porte de s’ouvrir librement.
REMARQUE: Ce réfrigérateur est conçu pour être utilisé dans
un endroit où la température est comprise entre un minimum
de 10°C et un maximum de 43°C. La plage de température
ambiante idéale pour un rendement optimal est comprise
entre 15°C et 32°C. Il est recommandé de ne pas installer le
réfrigérateur près d’une source de chaleur comme un four ou un
radiateur.
opriée pour ce réfrigérateur, laisser
IMPOR
être réalisés par un technicien qualifié, conformément aux
instructions du fabricant et aux règlements de sécurité locaux.
Avant de placer le réfrigérateur à son emplacement final, il
est important de s’assurer d’avoir la connexion électrique
appropriée:
Méthode recommandée de mise à la terre
Alimentation de 220-240 V CA à 50Hz, 220 V CA à 60Hz ou
230/240 V CA à 50Hz seulement avec fusible de 10 A et mise à la
terre requis.
TANT: L’installation et le raccordement électrique doivent
■ Le réfrigérateur est prévu pour fonctionner sur un circuit
distinct de 220-240 V à 10 A et 50-60Hz.
■
S’assur
er que la tension indiquée sur la plaque signalétique
correspond à celle de votre domicile.
Il doit êtr
■
de l’appareil en débranchant sa prise ou au moyen d’un
interrupteur bipolaire monté en amont de la prise secteur.
■
Si le cor
remplacé par le fabricant, son agent de réparation ou toute
autre personne qualifiée afin d’éviter tout danger.
e possible de couper l’alimentation électrique
don d’alimentation est endommagé, il doit être
Type B
Type E et F
Type N
52
1.25 cm
9.5 cm
Type I
Australie et Nouvelle-Zélande :
Ce nouvel appar
satisfaire à toutes les normes et conditions australiennes.
Certaines annotations dans les instructions d’installation peuvent
faire référence aux spécifications électriques d’autres pays; nous
attirons donc l’attention de l’utilisateur sur ces remarques.
Votre appareil doit être branché à une prise avec mise à la terre
de 230/240 V CA, 50Hz, 10 A seulement.
eil ménager a été spécialement conçu pour
Type M
Type G
Page 53

Exigences électriques (Grande-Br
etagne et Irlande
seulement)
IMPORTANT: Ce réfrigérateur doit être relié à la terre.
Remplacer un fusible
Le cordon d’alimentation du réfrigérateur est muni d’une
ficheBS1363A avec fusible de 13 A, pour remplacer un fusible
dans ce type de fiche, utiliser un fusible approuvé A.S.T.A. de
type BS1362 et suivre la procédure suivante:
1. Enlever le couver
2. Placer le fusible 13 A de r
cle du fusible (A) et le fusible (B).
emplacement sur le couvercle de
fusible.
3. Placer le fusible et son couver
cle sur la fiche.
IMPORTANT: Le couvercle de fusible doit être replacé lorsqu’on
remplace un fusible. Si on perd le couvercle, la fiche ne peut être
utilisée avant qu’un couvercle de remplacement soit utilisé. Un
bon couvercle de remplacement sera identifié par une insertion
de couleur ou le nom de la couleur gravé en relief à la base de la
fiche. Des couvercles de fusible de remplacement sont offerts
chez votre marchand de fournitures électriques local.
A
B
T
empérature
Ce réfrigérateur est conçu pour être utilisé dans un endroit où la
température se trouve dans les limites des plages suivantes, et
selon la classe climatique indiquée sur la plaque signalétique. Il
est possible que le réfrigérateur ne fonctionne pas correctement
s’il est resté exposé pendant longtemps à une température en
dehors de la plage indiquée.
REMARQUE: Il est recommandé de ne pas installer le
réfrigérateur près d’une source de chaleur comme un four ou un
radiateur.
Classe climatique Ambiant T (°C) Ambiant T (°F)
SN De 10 à 32 De 50 à 90
N De 16 à 32 De 61 à 90
ST De 16 à 38 De 61 à 100
T De 16 à 43 De 61 à 110
A. Couvercle du fusible
B. Fusible
Pour la république d’Irlande (seulement) :
enseignements concernant la Grande-Bretagne s’appliquent
Les r
généralement, mais un troisième type de fiche et prise avec 2
broches et mise à la terre sur le côté est aussi utilisé.
Fiche/prise (pour les deux pays) :
Si la prise et la fiche sont de dif
férents types, communiquer
avec le service à la clientèle pour obtenir plus d’instructions. Ne
pas essayer de changer la fiche vous-même. Cette modification
doit être effectuée par un technicien qualifié en respectant les
instructions du fabricant et les réglementations de sécurité
standard actuelles.
53
Page 54

Retrait et r
REMARQUE: En fonction de la lar
geur de l’ouverture de la porte, il faudra peut-être retirer les portes du réfrigérateur pour pouvoir
éinstallation des portes du réfrigérateur
introduire le réfrigérateur dans le domicile. Si les portes doivent être retirées, consulter les instructions suivantes.
IMPORTANT: Si le réfrigérateur est déjà installé et qu’il doit être déplacé à l’extérieur de la maison, fermer les commandes du
réfrigérateur avant de commencer à enlever les portes. Débrancher le réfrigérateur ou déconnecter la source de courant électrique.
Retirer les aliments et les balconnets des portes du réfrigérateur.
Rassembler les outils nécessaires et lire toutes les instructions avant de retirer les portes.
OUTILS REQUIS: Clés à douille de 5mm et 6mm, tournevis cruciforme no2.
AVERTISSEMENT
Risque de choc électrique
Déconnecter la source de courant électrique avant d'enlever les portes.
Le non-respect de cette instruction peut causer un décès ou un choc électrique.
Raccord de tuyau du
distributeur d’eau
A
A. Bague externe
Couvercle de charnière
supérieure gauche
A
B
A. Vis du couvre-charnière supérieur
B. Couvre-charnière supérieur
Couvercle de charnière
supérieure droit
A. Vis du couvre-charnière supérieur
B. Couvre-charnière supérieur
A
B
Fiche de câblage
Charnière supérieure droite
A
Charnière supérieure
gauche
A
A. Vis à tête creuse de 5mm
54
A. Vis à tête creuse de 5mm
Charnière du milieu gauche
A
A. Charnière
Charnière du milieu droite
A
A. Charnière
Page 55

AVERTISSEMENT
Risque du poids excessif
Utiliser deux ou plus de personnes pour soulever la
porte du réfrigérateur.
Le non-respect de cette instruction peut causer
une blessure au dos ou d'autre blessure.
Retrait de la porte de gauche
IMPOR
TANT: Le câblage de l’IU passe par la charnière de la
porte de gauche, il doit être déconnecté avant de retirer la porte.
1. À l’aide d’un tour
nevis cruciforme, retirer le couvre-charnière
de la charnière supérieure.
A
Retrait des portes du r
éfrigérateur
AVERTISSEMENT
Risque de choc électrique
Déconnecter la source de courant électrique avant
d'enlever les portes.
Le non-respect de cette instruction peut causer
un décès ou un choc électrique.
Retrait de la porte de droite
1. Débrancher le r
courant électrique.
2. Laisser les portes du r
de les détacher de la caisse.
REMARQUE: Prévoir un support supplémentaire pour la porte
du réfrigérateur pendant le retrait des charnières. La force
d’attraction des aimants de la porte ne suffit pas à la maintenir en
place pendant la manutention.
3. À l’aide d’un tour
de la charnière supérieure.
4. À l’aide de la clé à douille de 5mm, r
charnière supérieure et les garder de côté.
éfrigérateur ou déconnecter la source de
éfrigérateur fermées jusqu’au moment
nevis cruciforme, retirer le couvre-charnière
etirer les quatre vis de la
B
A. Vis du couvr
B. Couvre-charnière supérieur
e-charnière supérieur
2. Débrancher les deux fiches de câblage situées sur le dessus
de la char
■
nière de la porte.
Saisir chaque côté des fiches de câblage. A
vec le pouce
gauche, appuyer sur le loquet pour le dégager et écarter
les deux sections des fiches.
A
A
B
C
D
A. Vis du couvr
B. Couvre-charnière supérieur
5. Soulever la porte du r
e-charnière supérieur
éfrigérateur de l’axe de la charnière du
C. Vis à tête creuse de 5mm
D. Charnière supérieure
centre. La charnière supérieure se dégage en même temps
que la porte.
B
A. Fiche de câblage
B. Connecteur de mise à la terr
e
3. Débrancher le tube du distributeur d’eau situé sur la char
de la porte. Tirer fermement l’attache vers le haut. Tirer
ensuite le tuyau hors du raccord.
REMARQUE: Le tuyau du distributeur d’eau reste fixé à la
porte de gauche du réfrigérateur.
nière
55
Page 56

4. À l’aide de la clé à douille de 5mm, retirer les quatre vis
internes de la charnière et les garder de côté.
A
B
Enlever et r
eplacer la porte du
congélateur/Flexi Freeze
1. Laisser les portes du congélateur fermées jusqu’au moment
de les détacher de la caisse.
REMARQUE: Pr
du congélateur pendant le retrait des charnières. La force
d’attraction des aimants de la porte ne suffit pas à la maintenir en
place pendant la manutention.
■ Utiliser un tour
6mm pour enlever la charnière du milieu de la caisse.
évoir un support supplémentaire pour la porte
nevis cruciforme no2 et une clé à douille de
A. Vis à tête cr
B. Charnière supérieure
euse de 5mm
REMARQUE: Prévoir un support supplémentaire pour la porte
du réfrigérateur pendant le retrait des charnières. La force
d’attraction des aimants de la porte ne suffit pas à la maintenir en
place pendant la manutention.
5. Soulever la porte du réfrigérateur de l’axe de la charnière
inférieure. La charnière supérieure se dégage en même temps
que la porte.
REMARQUE: Il ne sera peut-être pas nécessaire d’enlever les
charnières inférieures et les pieds de stabilisation pour faire
passer le réfrigérateur dans un cadre de porte.
Si nécessair
■
e, utiliser une clé à douille de 6mm et un
tournevis cruciforme no2 pour enlever la charnière du
milieu.
Réinstallation de la porte de droite du réfrigérateur
1. Placer la porte de dr
2. Insér
er l’axe de la charnière supérieure dans le trou du
oite sur l’axe de la charnière du milieu.
sommet de la porte du réfrigérateur.
3. À l’aide de 4 vis â tête cr
euse de 5mm, serrer la charnière sur
l’appareil. Ne pas complètement serrer les vis.
Réinstallation de la porte de gauche du réfrigérateur
1. Placer la porte de gauche sur l’axe de la char
2. À l’aide de 4 vis â tête cr
euse de 5mm, serrer la charnière sur
nière du milieu.
l’appareil. Ne pas complètement serrer les vis.
3. Rebrancher le câblage électrique.
Remboîter deux sections de la fiche de câblage.
■
Rebrancher la mise à la terr
■
e à la vis de charnière.
A
A. Charnière du milieu
Soulever la porte du congélateur de l’axe de la charnière
■
inférieure.
A
nière inférieure
A. Char
Étapes finales
1. Serr
er à fond les 8 vis à tête creuse de 5mm.
2. Réinstaller les couvr
56
e-charnière supérieurs.
Page 57

Étapes finales
AVERTISSEMENT
Risque de choc électrique
Brancher sur une prise de terre (reliée à la masse).
Ne pas retirer la broche de terre.
Ne pas utiliser d’adaptateur.
Ne pas utiliser de rallonge.
Le non-respect de ces instructions peut entraîner la
mort, un incendie ou un choc électrique.
1. Brancher sur une prise r
2. Replacer toutes les pièces amovibles et tous les aliments
dans les tir
oirs.
Nivellement du r
1. Déplacer le r
vec la main, faire pivoter les pieds de stabilisation. Les
2. A
tourner dans le sens antihoraire, jusqu’à ce que les roulettes
ne touchent plus le sol et que les deux pieds de stabilisation
soient fermement en appui sur le sol. Ceci permet
d’empêcher le réfrigérateur de rouler vers l’avant à l’ouverture
des portes.
éfrigérateur jusqu’à son emplacement final.
eliée à la terre.
éfrigérateur
Spécifications de l’alimentation en eau
Une alimentation en eau fr
et 145lb/po
fonctionner le distributeur d’eau et la machine à glaçons. Pour
toute question au sujet de la pression de l’eau, faire appel à un
plombier qualifié agréé.
REMARQUE: Si la pression en eau est inférieure aux critères
minimaux, le débit du distributeur d’eau pourrait diminuer ou
entraîner la formation de glaçons creux ou de forme irrégulière.
Alimentation en eau par osmose inverse
IMPORTANT: La pression de l’alimentation en eau entre le système
d’osmose inverse et le robinet d’arrivée d’eau du réfrigérateur doit
être entre 20lb/po² et 145lb/po² (138kPa à 1000kPa).
Si un système de filtration de l’eau par osmose inverse est
raccordé à l’alimentation en eau froide, la pression de l’eau au
système doit être d’un minimum de 40 à 60lb/po² (276 à 414kPa).
■
V
inverse n’est pas obstrué. Remplacer le filtre si nécessaire.
■
Laisser le r
après une utilisation intense. La capacité du réservoir est
peut-être trop faible pour répondre aux spécifications du
réfrigérateur.
REMARQUE: Un système d’osmose inverse monté sur
robinet est déconseillé.
■
Si le r
réduire la pression de l’eau lorsqu’il est utilisé avec un
système d’osmose inverse. Enlever le filtre à eau. Consulter la
section «Système de filtration de l’eau».
Pour toute question au sujet de la pression de l’eau, faire appel à
un plombier qualifié agréé.
Raccor
Lire toutes les instructions avant de commencer.
IMPORTANT:
■
Brancher sur une alimentation en eau potable uniquement.
2
(138kPa et 1000kPa) est nécessair
érifier que le filtre à sédiment dans le système à osmose
éservoir du système d’osmose inverse se remplir
éfrigérateur comporte un filtre à eau, celui-ci peut
dement à la canalisation d’eau
oide avec une pression entre 20lb/po
e pour faire
2
A. Pieds de stabilisation
IMPOR
suite et si cela comprend les pieds de stabilisation, les deux
pieds de stabilisation doivent être tournés de façon égale
pour conserver l’aplomb du réfrigérateur.
3. À l’aide d’un niveau, vérifier que le r
transversalement et d’avant en arrière.
TANT: Si des ajustements sont nécessaires par la
éfrigérateur est d’aplomb
A
Ne pas utiliser
microbiologiquement polluée ou de qualité inconnue en
l’absence d’un dispositif de désinfection adéquat en amont
ou en aval du système. Les systèmes certifiés pour la
réduction des kystes peuvent être utilisés pour une eau
désinfectée susceptible de contenir des kystes filtrables.
■
Réaliser l’installation de plomberie conformément aux
escriptions du International Plumbing Code et des normes
pr
et codes locaux en vigueur.
Il est possible d’utiliser des raccor
■
polyéthylène réticulé pour le raccordement de la canalisation
d’eau du domicile au réfrigérateur; ils contribuent à éviter que
l’eau ait un goût ou une odeur désagréable. Vérifier qu’il n’y a
pas de fuites.
Si on utilise un tuyau en polyéthylène réticulé (PEX) au lieu
d’un tuyau de cuivre, nous recommandons les suivants:
PEX chemisé de 7pi (2,14m), PEX de 5pi (1,52m) ou PEX de
25pi (7,62m).
Installer des tuyaux seulement là où les températures
■
resteront au-dessus du point de congélation.
Outils requis:
Rassembler les outils et pièces nécessaires avant d’entreprendre
l’installation.
ournevis à tête plate
T
■
■
Clés plates de 7/16 po et 1/2 po ou 2 clés à molette
ourne-écrou de 1/4 po
■ T
REMARQUE: Ne pas employer de robinet d’arrêt à étrier de
3/16po (4,76mm) ou de type à percer, car cela réduit le débit
d’eau et augmente le risque d’obstruction.
ce produit pour filtrer une eau
ds en cuivre ou en
57
Page 58

Raccor
C
dement à la canalisation d’eau
IMPORTANT: Si le réfrigérateur est mis en marche avant de
raccorder la canalisation d’eau, mettre la machine à glaçons à
l’arrêt.
1. Débrancher le r
éfrigérateur ou déconnecter la source de
courant électrique.
2. Couper l’alimentation principale en eau. Ouvrir le r
obinet le
plus proche suffisamment longtemps pour réduire la pression
de l’eau dans la canalisation d’eau.
3. Utiliser un r
obinet d’arrêt de 3/4-14po ou équivalent. Le
réfrigérateur est accompagné d’une trousse d’installation
avec canalisation d’alimentation domestique pour raccorder le
robinet d’arrêt au réfrigérateur.
REMARQUE: L
’appareil est accompagné d’une trousse
d’installation de l’alimentation en eau. Pour assurer un bon
raccordement à l’alimentation en eau, utiliser le bon produit
d’étanchéité au raccordement. Vérifier que le raccordement est
bien étanche après quelques heures d’utilisation.
A
B
5. Placer l’extrémité libre de la canalisation dans un contenant
ou un évier et rétablir l’alimentation principale en eau pour
nettoyer le tuyau jusqu’à ce que l’eau soit limpide. Fermer le
robinet d’arrêt sur le tuyau d’alimentation en eau.
REMARQUE: Toujours vidanger le tuyau d’alimentation en
eau avant de faire le raccordement final sur l’entrée du robinet
pour éviter tout mauvais fonctionnement éventuel du robinet.
6. Courber le tuyau de cuivr
e de façon à le raccorder à l’arrivée
de la canalisation d’eau située à l’arrière de la caisse du
réfrigérateur, comme illustré. Laisser une partie du tube en
cuivre enroulée pour permettre de dégager le réfrigérateur de
l’armoire ou du mur en cas de dépannage.
Raccordement au réfrigérateur
Suivre les instructions relatives au modèle utilisé pour le
raccordement.
1. Ôter le bouchon de plastique de l’orifice d’entr
ée d’eau.
Raccorder la canalisation en cuivre au robinet d’arrivée
d’eau à l’aide d’un écrou et d’une bague de compression,
comme illustré. Serrer l’écrou de compression. Ne pas serrer
excessivement. Vérifier la solidité du raccordement en tirant
sur la canalisation en cuivre.
éer une boucle de service avec la canalisation en cuivre.
2. Cr
Éviter de déformer la canalisation en cuivre en l’enroulant.
Fixer la canalisation en cuivre à la caisse du réfrigérateur à
l’aide d’une bride «P».
A
B
D
A. Bague
B. Écrou
4. Il est maintenant possible de connecter le tuyau en cuivr
robinet d’arrêt. Utiliser une canalisation en cuivre de 1/4 po
(6,35mm) (diamètre externe) pour raccorder le robinet d’arrêt
au réfrigérateur.
■
S’assur
installationcorrecte.
Il faut s’assurer que les deux extrémités du tuyau en cuivre
sont bien coupées à angle droit.
Installer la bague et l’écr
■
cuivre comme indiqué. Insérer l’extrémité du tuyau aussi
profondément que possible dans l’extrémité de sortie et à
l’équerre. Visser l’écrou de compression sur l’extrémité de
sortie du raccord à l’aide d’une clé à molette. Ne pas serrer
excessivement.
C. Canalisation en cuivre (jusqu’au réfrigérateur)
D. Canalisation d’alimentation en eau du domicile
er d’avoir la longueur nécessaire pour une
ou à compression sur le tuyau en
A
B
e au
C
D
e
A. Canalisation en cuivr
B. Bride «P»
3. Ouvrir l’arrivée d’eau alimentant le r
C. Écrou à compression
D. Bague de compression
éfrigérateur et vérifier
l’absence de fuites. Éliminer toute fuite détectée.
4. Si des glaçons sont souhaités, mettr
e la machine à glaçons
en marche.
Remarque: Prévoir un délai de 24 heures pour la production du
premier lot de glaçons. Jeter les trois premiers lots de glaçons
produits. Prévoir un délai de 3 jours pour le remplissage complet
du bac d’entreposage.
58
A. Bague de compr
B. Écrou de compression
ession
C
C. Canalisation en cuivre
Page 59

TRES ET ACCESSOIRES
FIL
Système de filtration de l’eau
Ne pas utiliser
microbiologiquement polluée ou de qualité inconnue en
l’absence d’un dispositif de désinfection adéquat en amont
ou en aval du système. Les systèmes certifiés pour la
réduction des kystes peuvent être utilisés pour une eau
désinfectée susceptible de contenir des kystes filtrables.
Remplacer et installer le filtr
Le filtre à eau devrait être remplacé tous les 6 moins en fonction
d’un débit de 0,50 à 0,60gal/min (1,89 à 2,27 L/min) pour un total
de 200 gallons (757L) d’eau filtrée.
Pour commander un filtre de rechange, nous contacter. Consulter
la section «Accessoires» du Guide d’utilisation et d’entretien
pour obtenir des renseignements sur le processus de commande.
1. Pousser sur la porte du filtr
gauche du réfrigérateur pour l’ouvrir.
ce produit pour filtrer une eau
e à eau
e à eau située dans le coin inférieur
4. Retir
5. Installer le capuchon de filtr
6. Placer le filtre dans le compartiment.
er le capuchon du filtre à eau qui doit être remplacé.
e à eau sur le nouveau filtre.
Aligner correctement les flèches pour que les rainures du filtre
soient alignées avec les nervures du capuchon.
2. Pivoter le filtr
pour le déverrouiller.
3. Retir
er le filtre du compartiment.
e à eau et tourner de 90° dans le sens antihoraire
7. Pivoter le filtr
pour le verrouiller en place et aligner les flèches.
8. Refermer la porte du filtr
e à eau et tourner de 90° dans le sens horaire
e à eau.
59
Page 60

9. Réinitialiser le compteur du filtre en utilisant l’interface
utilisateur. Consulter la procédure pour réinitialiser le filtre de
la section «Commandes de l’utilisateur».
Témoin lumineux du filtre à eau
Le témoin lumineux de l’état du filtre à eau vous aidera à savoir
quand changer le filtre à eau.
n
COMMANDER FIL
changer le filtre à eau. L’icône «Order Filter» (commander
filtre) s’affiche en tout temps, mais est éteinte en Showroom
mode (mode Exposition).
n
REMPLACER FIL
cours de la distribution d’eau, «Replace Filter» (remplacer
filtre) clignote sept fois et un signal d’alerte retentit trois fois.
REMARQUE: L’icône «REPLACE FILTER» (remplacer filtre)
reste allumée si le filtre n’est pas réinitialisé sur l’interface
utilisateur (IU).
n
RÉINITIALISA
Reset» (réinitialisation du filtre) pendant 3secondes pour
réinitialiser le filtre à eau. L’affichage exécutera un compte
à rebours de 3secondes, puis fera clignoter l’icône et fera
entendre un signal.
Remplacer et installer le générateur Active Oxygen (contrôle
de pureté)
Il est recommandé de remplacer le générateur Active Oxygen
(contrôle de pureté) tous les 3 ans puisque l’ozone produit
se dégrade avec le temps, ce qui réduit son incidence sur la
conservation des aliments. Au début de sa durée de vie, il produit
en moyenne 0,06ppm.
Pour commander et remplacer le générateur Active Oxygen
(contrôle de pureté), communiquer avec nous. Consulter
la section «Accessoires» pour connaître le processus de
commande.
TRE (jaune) – Il est presque temps de
TRE (rouge) – Remplacer le filtre à eau. Au
TION DU FILTRE – Appuyer sur le bouton «Filter
Assistance ou service
A
vant de faire un appel d’assistance ou de service, consulter
la section «Dépannage». Cette vérification peut vous faire
économiser le coût d’une intervention de dépannage. Pour de
l’aide supplémentaire, suivre les instructions ci-dessous.
Si vous avez besoin de pièces de rechange
Pour localiser des pièces de rechange spécifiées par l’usine dans
votre région, contacter le revendeur auprès duquel le réfrigérateur
a été acheté.
Garantie
Contacter le marchand auprès duquel le réfrigérateur a été acheté
pour des renseignements au sujet de la garantie.
Conservez ce manuel et le reçu de vente au même endroit
pour référence ultérieure. Pour un entretien ou une réparation
sous garantie, un document attestant de la date d’achat ou
d’installation doit être fourni.
Inscrire les renseignements suivants concernant l’appareil
ménager pour obtenir de l’aide ou une intervention de dépannage
en cas de besoin. Vous devrez fournir le numéro de modèle et
le numéro de série au complet. Ces renseignements se trouvent
sur la plaque signalétique située sur la paroi intérieure du
compartiment des aliments frais.
Nom du revendeur
Numér
o de série
Adr
Numér
Numér
Date d’achat ______________________________________________
Consulter le hotpoint.eu pour obtenir les coordonnées.
__________________________________________________
esse
o de téléphone
o de modèle
_________________________________________
___________________________________________
______________________________________
________________________________________
Accessoir
Pour commander des accessoires, contacter le marchand chez
qui le réfrigérateur a été acheté.
es
60
Page 61

UTILISA
Les commandes tactiles sont situées sur la porte gauche du réfrigérateur. Le tableau de commande comprend des renseignements sur
les différents boutons et témoins. Le témoin de température du réfrigérateur et du congélateur indique les derniers points de consigne
de température.
28
26
27 25
TION DES COMMANDES
22
24
23
21
20
18 17 16 1519
1
2
3
4
1. BOUTON et TÉMOIN Cubed Ice (glaçons)
2. BOUTON et TÉMOIN Measur
3. BOUTON et TÉMOIN Crushed Ice (concassage de glaçons)
4. BOUTON et TÉMOIN Dispense W
5. BOUTON et TÉMOIN Fr
6. TÉMOINS Fr
moyenne refroidissement rapide)
7. BOUTON et TÉMOIN Zone Convertible
8. TÉMOINS Wine, V
poisson)
9. BOUTON et TÉMOIN Refrigerator Compartment (r
10. TÉMOIN Fr
protection contre les brûlures de congélation)
11. BOUTON Lock (verr
12. BOUTON et TÉMOIN Active Oxygen (contrôle de pureté)
13. BOUTON W
14. BOUTON et TÉMOIN Wi-Fi
15. TÉMOIN Wi-Fi Err
Le panneau de commande s’éteindra automatiquement apr
sur une touche.
Af
Réglage de la température du compartiment des aliments
frais et du congélateur:
À titre de commodité, les commandes du réfrigérateur et du
congélateur sont préréglées à l’usine.
Lors de l’installation initiale du réfrigérateur, s’assurer que les
commandes sont encore préréglées aux points de réglage
recommandés. Les points de réglage recommandés à l’usine sont
de 3°C pour le réfrigérateur et -18°C pour le congélateur.
Appuyer sur le bouton de température du réfrigérateur ou
du congélateur pour permuter entre les points de réglage de
température en Celsius (°C).
IMPORTANT:
Attendr
■
le réfrigérateur. Si on ajoute des aliments avant que le
réfrigérateur ne soit complètement refroidi, les aliments
risquent de se gaspiller.
REMARQUE: Placer les points de r
plus froid que celui qui est recommandé ne refroidira pas les
compartiments plus rapidement.
eezer Mild Freeze Fast Chill (congélation
eggies, Meat & Fish (vin, légumes, viande et
eeze Shield (No Freezer Burn) (fonction de
ouillage) et Celsius/Fahrenheit
ater Filter Reset (réinitialisation du filtre à eau)
or (erreur Wi-Fi)
fichage et modification des points de réglage
de températur
e 24heures avant d’ajouter des aliments dans
e
ed Fill (remplissage mesuré)
ater (distribution d’eau)
eezer Compartment (congélateur)
5
églage à un réglage
6 7 8
éfrigérateur)
ès une minute d’inactivité. Pour activer le tableau de commande, appuyer
9 10 11 1312 14
16. TÉMOIN Replace W
17. TÉMOIN Replace Active Oxygen (remplacement du générateur
18. TÉMOIN Door Open (porte ouverte)
19. BOUTON et TÉMOIN Lock (verr
20. BOUTON et TÉMOIN Fast Cool (r
21.
22.
23.
24.
25.
26.
27.
28.
■
■
REMARQUE: Dans des zones comme un garage, un sous-
■
REMARQUE: Pour basculer entre les réglages de température
Celsius et Fahrenheit, maintenir enfoncé les boutons Max Ice
(production de glaçons maximale) et Max Cool (refroidissement
maximal), l’affichage changera après 3 secondes.
ôle de pureté)
contr
TÉMOIN Celsius/Fahr
TÉMOIN Calibrate Fill (r
TÉMOIN Liters (litr
BOUTON et TÉMOIN Fast Fr
TÉMOIN Sound Of
TÉMOIN Ice maker Of
TÉMOIN Holiday Mode (mode vacances)
TÉMOIN Demo Mode (mode de démonstration)
Si la températur
réfrigérateur ou le congélateur, vérifier d’abord les évents
pour s’assurer qu’ils ne sont pas bloqués, avant de régler les
commandes.
Les r
églages recommandés devraient être corrects pour
une utilisation domestique normale. Les réglages sont faits
correctement lorsque le lait ou le jus sont aussi froids que
désiré et lorsque la crème glacée est ferme.
sol ou un por
d’humidité supérieur à celui de votre domicile. Il peut s’avérer
nécessaire de modifier la température à d’autres réglages que
les réglages recommandés afin de s’adapter à ces conditions.
Attendr
e au moins 24heures entre chaque modification.
Vérifier à nouveau les températures avant de procéder à
d’autres modifications.
ater Filter (remplacement du filtre à eau)
ouillage)
efroidissement rapide)
enheit
emplissage mesuré)
es)
eeze (congélation rapide)
f (sourdine)
f (machine à glaçons désactivée)
e est trop tiède ou trop froide dans le
che, la température peut être extrême ou le taux
61
Page 62

Réglages du compartiment convertible
Fast Fr
eeze (congélation rapide)
La fonction convertible permet de permuter entre les réglages
de température du compartiment convertible. Lorsqu’on passe
d’un réglage à l’autre, la température est affichée à l’interface
utilisateur. Maintenir le bouton de température de la zone
convertible pendant 3 secondes pour passer du réglage de
réfrigération au réglage de congélation.
Symbole Fonction Température
raditional Freezer (congélateur
T
traditionnel): Aliments déjà
-16°C à
-22°C
congelés et aliments frais pour un
maximum de 12 mois
Mild Freezer (congélation
-12°C
moyenne): Aliments déjà congelés
pour un maximum de 1 mois
eezer (congélation faible):
Soft Fr
-7°C
Aliments déjà congelés pour un
maximum de 1 semaine
Wine (vin) 10°C
eggies (légumes) 4°C
V
Meat and Fish (viande et poisson) 0°C
Pour modifier les points de réglage de température,
utiliser le tableau suivant comme guide :
CONDITION RÉGLAGE DE LA TEMPÉRATURE
Réfrigérateur trop froid Réfrigérateur réglage 1° plus élevé
Réfrigérateur trop tiède Réfrigérateur réglage 1° plus bas
Congélateur trop froid Congélateur réglage 1° plus élevé
Congélateur trop tiède/
Congélateur réglage 1° plus bas
trop peu de glaçons
Fast Cool (r
efroidissement rapide)
La caractéristique de Fast Cool (refroidissement rapide) est utile
lors de périodes d’utilisation intense du réfrigérateur, de l’ajout
d’une grande quantité d’aliments ou de l’élévation temporaire de
la température de la pièce.
■
Pour désactiver la fonction Fast Cool (r
efroidissement rapide),
appuyer sur la touche de température du réfrigérateur
pendant 3 secondes. Lorsque la caractéristique est activée,
l’icône Fast Cool (r
efroidissement rapide) s’allume. La fonction
Fast Cool (refroidissement rapide) reste activée pendant
2heures à moins d’être désactivée manuellement.
■
Pour désactiver manuellement la fonction Fast Cool
(refroidissement rapide), appuyer sur la touche de température
du réfrigérateur
pendant 3 secondes. L
’icône Fast Cool
(refroidissement rapide) s’éteint lorsque cette caractéristique
est désactivée.
■
églage de la température du réfrigérateur aura pour
Le r
effet de désactiver automatiquement la fonction Fast Cool
(refroidissement rapide).
La quantité d’aliments frais (en kg) qui peuvent être congelés en
24 heures est indiquée sur la plaque signalétique de l’appareil.
■
Appuyer sur le bouton de températur
e du congélateur
pendant
3 secondes (jusqu’à ce que le témoin Fast Freeze [congélation
rapide] s’allume), 30 heures avant de placer des aliments frais
dans le congélateur. Après avoir placé des aliments frais dans le
congélateur, 30 heures en mode Fast Freeze (congélation rapide)
sont généralement suffisantes; après 50 heures, la fonction Fast
Freeze (congélation rapide) se désactive automatiquement.
■
Pour désactiver manuellement la fonction Fast Freeze
(congélation rapide), appuyer sur la touche de température
du congélateur
pendant 3 secondes. L
’icône Fast Freeze
(congélation rapide) s’éteint.
églage de la température du congélateur aura pour effet
Le r
■
de désactiver automatiquement la fonction Fast Freeze
(congélation rapide).
Freeze Shield Mode (mode protection contre le gel)
Le mode Freeze Shield (protection contre le gel) réduit le transfert
de l’humidité dans les aliments surgelés et réduit les brûlures de
congélation. Cette caractéristique est active dans tous les points
de réglage du congélateur et pour le compartiment convertible
pour tous les points de réglage de congélation.
Holiday Mode (mode vacances)
Ce mode est conçu pour empêcher votr
e appareil de
consommer trop d’électricité pendant les périodes où il n’est pas
régulièrement utilisé (p. ex., pendant les vacances).
En sélectionnant cette fonction, la température du compartiment
des aliments frais est automatiquement placée à 12°C.
■ Pour utiliser Holiday Mode (mode vacances), appuyer sur le
bouton mode jusqu’à ce que le témoin Holiday (vacances)
s’allume.
Pour quitter Holiday Mode (mode vacances), appuyer sur le
■
bouton mode jusqu’à ce que le témoin Holiday (vacances)
s’éteigne.
églage de la température du réfrigérateur aura pour effet
■
Le r
de désactiver automatiquement le mode vacances.
IMPORTANT: Si ce mode est sélectionné, les aliments et boissons
doivent être enlevés du compartiment pour aliments frais.
Son ON/OFF (activé/désactivé)
Maintenir enfoncé les boutons «Filter Reset» (r
éinitialisation du
filtre» et Active Oxygen» (contrôle de pureté) pendant 3 secondes
pour activer/désactiver le son. Si le son est activé, le mot
«Sound» (son) s’allume sur l’affichage.
Key Lock (verrouillage des touches)
■
Appuyer sur le bouton Lock (verr
ouillage) pendant 3 secondes
pour activer la fonction de verrouillage.
Pour désactiver le verr
■
ouillage, appuyer sur le bouton Lock
(verrouillage) pendant 3 secondes.
La fonction de verrouillage ignore toutes les interactions avec le
tableau de commande et les leviers de distribution jusqu’à ce que
l’utilisateur déverrouille le panneau. Cette fonction est conçue
pour empêcher une modification accidentelle des réglages.
62
Demo Mode (mode de démonstration)
Ce mode est utilisé lorsque le réfrigérateur est exposé dans un
magasin de détail ou si on souhaite désactiver le refroidissement
et toutes les autres fonctions sauf l’éclairage intérieur.
Demo Mode (mode de démonstration) peut être utilisé pendant
de longues vacances. Voir la section «Précautions à prendre
pour les vacances ou le déménagement» pour en savoir plus sur
la procédure à suivre pour laisser le réfrigérateur dans ce mode
pendant des périodes prolongées.
Page 63

■ Si le mode de démonstration est activé, le mot «Demo
(démonstration)» s’allume sur l’affichage.
Accéder et quitter le mode de démonstration en appuyant
■
simultanément sur les boutons «Measur
mesuré) et «Water Filter Reset» (réinitialisation du filtre à eau)
pendant 3 secondes.
Active Oxygen (contrôle de pureté)
Le réfrigérateur est muni d’un générateur d’ozone situé au centre
de la colonne d’air. Le générateur Active Oxygen (contrôle de
pureté) peut être activé ou désactivé.
n Lorsque le témoin Active Oxygen (contrôle de pureté) est
activé, appuyer sur le bouton pour désactiver le générateur
Le bouton permet d’activer et de désactiver le générateur
Active Oxygen (contrôle de pureté).
Le générateur Active Oxygen (contrôle de pureté) a une durée
d’utilisation de 3 ans. Après les 3 ans d’utilisation, l’icône Active Oxygen
(contrôle de pureté) s’allume. Après avoir remplacé le générateur Pure
Control (contrôle de pureté), l’alarme peut être réinitialisée.
n
Appuyer sur le bouton de réinitialisation du générateur Active
Oxygen (contrôle de pureté) pendant 3 secondes réinitialisera
le compteur et éteindra le témoin de r
générateur Active Oxygen (contrôle de pureté)
Caractéristiques supplémentaires
ed Fill» (remplissage
.
emplacement du
REMARQUE: Pour que l’alarme sonore cesse de retentir tout
en gardant les portes ouvertes, comme pendant le nettoyage de
l’intérieur du réfrigérateur, appuyer sur n’importe quel bouton du
tableau de commande. Le son de l’alarme sera temporairement
fermé, mais l’icône Door Ajar (porte entrouverte) restera affichée
sur le tableau de commande du distributeur.
Témoin et réinitialisation du filtre à eau
Affiche l’état du filtre à eau. Pour réinitialiser le filtre, appuyer
sur le bouton Water filter reset (réinitialisation du filtre) pendant
3 secondes. Après le décompte, l’icône clignote 3 fois et la
réinitialisation du filtre est terminée.
Les témoins lumineux de l’état du filtre à eau situés sur les
commandes externes vous aideront à savoir quand changer le
filtre à eau.
COMMANDER FILTRE (jaune): Commander un filtre à eau de
n
remplacement.
REMPLACER FIL
n
L’icône «Replace Filter» (remplacement du filtre) clignote
pendant toute la période de distribution d’eau. Si après
14 jours, le filtre à eau n’est pas encore remplacé, l’icône
«Replace Filter» (remplacement du filtre) clignote 7 fois et
une alarme sonore retentit 3 fois à la fin de la distribution.
Consulter la section «Système de filtration de l’eau».
REMARQUE: REPLACE FILTER (remplacer filtre) reste allumé si
aucun filtre n’est installé.
TRE (ROUGE): Remplacer le filtre à eau.
Alarme de porte entrouverte
La fonction d’alarme de porte entrouverte fait retentir un signal
d’alarme lorsqu’une porte ou un tiroir du congélateur est ouvert
pendant 5minutes et que le refroidissement est activé. L’alarme
retentit toutes les 2minutes. Fermer le tiroir et toutes les portes
pour désactiver l’alarme.
Éclairage du r
éfrigérateur est muni d’une lampe intérieure qui s’allume
Le r
chaque fois que la porte est ouverte.
REMARQUE: La lampe est à DEL et n’a pas besoin d’être
remplacée. Si la DEL ne s’allume pas quand on ouvre la porte,
appeler le service de dépannage.
éfrigérateur
CARACTÉRISTIQUES DE CONNEXION DU
RÉFRIGÉRA
(SUR CER
La connectivité Wi-Fi permet au réfrigérateur intelligent de se connecter à l’Internet et d’interagir avec l’application Hotpoint® sur son
téléphone intelligent ou appar
pour économiser du temps précieux et de l’énergie. Consulter la section «Dépannage – modèles avec connexion» de ce guide
d’utilisation et d’entretien et vérifier les instructions de connexion du routeur.
REMARQUE: Connexion Wi-Fi et création d’un compte requis. Les fonctions de l’application peuvent changer. Assujetti aux conditions
décrit dans l'application mobile Hotpoint.
FONCTIONS INTELLIGENTES
Les fonctions intelligentes aident à r
plus simple en laissant la possibilité à l’utilisateur de surveiller,
gérer et entretenir son réfrigérateur à distance.
Commande de la température à distance
Description: Permet de commander le r
partir de l’application Hotpoint
Avantages: Permet de régler la température du réfrigérateur, du
congélateur et du garde-manger à distance, pas seulement en se
tenant près de l’appareil.
État du filtr
Description: Permet de connaîtr
à eau avant qu’un remplacement soit nécessaire. Permet de
réinstaller le filtre.
Avantages: Aide à planifier de façon plus efficace la commande
de filtres neufs et leur remplacement.
e à eau
eil mobile. Cette connexion ouvre plusieurs options intelligentes pour l’utilisateur – des options conçues
endre la vie de tous les jours
®
installée sur un appar
e l’autonomie restante du filtre
éfrigérateur à distance à
TAINS MODÈLES)
eil mobile.
TEUR
Application de r
Description: L’application Hotpoint® permet de commander des
filtr
es de rechange, des pièces consomptibles et des accessoires
pour une livraison directement à domicile.
Avantages: Simplifie la commande de filtres à eau et à air
appropriés (plus besoin d’aller chercher les filtres corrects dans
un magasin).
Avertissement de porte entrouverte
Description: Envoie une notification lorsqu’une des portes du
éfrigérateur n’a pas été refermée.
r
Avantages: Informe l’utilisateur qu’une porte est entrouverte
pour qu’il puisse la fermer ou appeler à la maison pour que
quelqu’un d’autre ferme la porte avant qu’un problème de
température ne se produise.
Fast Cool (refroidissement rapide)
Description: Permet de commander le réfrigérateur à distance à
partir de l’application Hotpoint
Avantages: Permet de mettre en marche et d’arrêter l’option
Fast Cool (refroidissement rapide) pour abaisser la température
du réfrigérateur en vue d’ajouter de nouveaux aliments. Abaisse la
température pendant 24 heures.
Fast Freeze (congélation rapide)
Description: Permet de commander le congélateur à distance à
partir de l’application Hotpoint
enouvellement automatique
®
installée sur un appar
®
installée sur un appar
eil mobile.
eil mobile.
63
Page 64

Avantages: Permet de mettre en marche et d’arrêter l’option
Fast Freeze (congélation rapide) pour augmenter la production
de glaçons. Utilise le plus bas réglage de température possible
pendant 24 heures pour maximiser la production de glaçons.
Commande du mode Freeze Shield
®
(sans brûlur
e de
congélation)
Description: Permet de recevoir l’état du réfrigérateur à distance
sur l’application Hotpoint
Avantages: Indique si le mode Freeze Shield
®
installée sur un appar
eil mobile.
®
(sans brûlur
e
de congélation) est actif dans le réfrigérateur pour réduire
les brûlures de congélation et faire en sorte que les aliments
congelés conservent leur apparence et leur goût.
Holiday Mode (mode vacances)
Description: Permet au réfrigérateur de refroidir correctement et
d’épargner de l’énergie pendant l’utilisation de ce mode. Permet
de l’activer et de le désactiver à distance à partir de l’application
Hotpoint
®
installée sur un appar
eil mobile.
Avantages: Permet de mettre en marche et d’arrêter à distance
l’option du Holiday Mode (mode vacances).
Machine à glaçons – Marche/Arrêt
Description: Permet d’activer et de désactiver la machine à
glaçons de votre réfrigérateur à distance à partir de l’application
Hotpoint
®
installée sur un appar
eil mobile.
Avantages: Permet de mettre en marche et d’arrêter la machine
à glaçons à distance.
Lock Mode (mode de verrouillage)
Description: Permet de verrouiller et de déverrouiller l’interface
utilisateur du réfrigérateur à distance à partir de l’application
Hotpoint
®
installée sur un appar
eil mobile.
Avantages: Permet de verrouiller et de déverrouiller l’interface
utilisateur à distance pour rendre le nettoyage facile ou pour
la distribution accidentelle par un jeune enfant ou un animal
domestique.
PREMIERS PAS
Pour connecter le nouveau réfrigérateur à Internet, télécharger
l’application Hotpoint Home Net App, créer un compte, puis
suivre les instructions de l’application qui expliquer la façon de
connecter l’appareil.
®
Consulter régulièrement l’application Hotpoint
enseignements et des fonctions supplémentaires.
r
pour obtenir des
Connexion Wi-Fi et création d’un compte requis. Les fonctions
de l’application peuvent changer. Conditionnel aux conditions
d’entretien accessible sur le site Web de Hotpoint et dans
l’application. Des frais de transfert de données peuvent
s’appliquer.
CONFIGURA
TION DE LA CONNECTABILITÉ
(SUR CERTAINS MODÈLES)
IMPOR
d’utilisation qui accompagne le réfrigérateur.
Il vous faudra :
REMARQUE: Il faut un routeur à 2,4GHz. Le réfrigérateur n’est
pas en mesure de se connecter à 5GHz
REMARQUE: Si votre routeur sans fil domestique n’est pas
muni d’un bouton de configuration protégée Wi-Fi (WPS),
consulter le manuel d’utilisation du routeur pour confirmer
qu’il peut utiliser ce protocole. Si ce n’est pas le cas, utiliser
les instructions de configuration alternative décrit dans
TANT: Il est de la responsabilité de l’utilisateur de bien installer le réfrigérateur avant de l’utiliser. Bien lire et suivre le guide
Instructions de configuration automatique – Configuration pr
outeur sans fil domestique avec protocole Configuration
n
Un r
protégée Wi-Fi. Le routeur devra être en marche et connecté
à Internet.
’identifiant Smart Appliance Identification Number (SAID) de
n
L
ce réfrigérateur. L’identifiant figure sur l’autocollant appliqué
sur la partie avant du couvercle de la charnière de droite du
réfrigérateur.
l'application mobile Hotpoint.
Configuration du routeur
INTERNET
CONFIGURATION
PROTÉGÉE WI-FI (WPS)
ROUTEUR DOMESTIQUE
SANS FIL
64
otégée Wi-Fi
Appuyer sur le bouton de configuration pr
Un témoin lumineux clignotera.
CONSEIL UTILE: Cette fonction de votre routeur s’active
pendant 2minutes. Il est important d’effectuer la prochaine
étape dans cette période pour ne pas devoir recommencer cette
procédure.
Configuration du réfrigérateur (étape avec temps limité)
Dans l’écran d’accueil, appuyer sur le bouton Connect
(connecter) pendant 3 secondes.
Le témoin d’état de connexion Wi-Fi (
éfrigérateur clignotera lentement pendant le processus de
r
connexion entre le réfrigérateur et le routeur.
Si la connexion réussit, le témoin d’état de connexion Wi-Fi
s’allume et reste allumé.
Si la connexion échoue:
Si la connexion entre le réfrigérateur et le routeur échoue après
2minutes, l’indicateur d’état de connexion Wi-Fi clignotera
rapidement pendant 5secondes puis s’éteindra. Consulter la
section «Dépannage – modèles avec connexion» de ce guide
d’utilisation et d’entretien, vérifier les instructions de connexion
de votre routeur ainsi que les instructions décrit dans l'application
mobile Hotpoint.
REMARQUE: S’il s’agit de votre premier appareil Smart
Appliance, le téléchargement de l’application Hotpoint
éation d’un compte d’utilisateur en ligne seront nécessaires.
cr
S’il ne s’agit pas de votre premier appareil intelligent, passer
à l’étape4, «Enregistrer votre appareil dans votre compte
d’utilisateur».
otégée Wi-Fi du routeur.
) de la commande du
®
et la
Page 65

Pour déconnecter le Wi-Fi, appuyer sur le bouton Connect
(connecter) pendant plus de 15 secondes, l’icône (
) s’éteint,
indiquant que le Wi-Fi est désactivé.
Dans l’écran d’accueil, appuyer sur le bouton Connect
(connecter) pendant 3 secondes pour r
Le témoin d’état de connexion Wi-Fi (
éfrigérateur clignotera lentement pendant le processus de
r
econnecter le Wi-Fi.
) de la commande du
connexion entre le réfrigérateur et le routeur.
Si la connexion réussit, le témoin d’état de connexion Wi-Fi
s’allume et reste allumé.
Pour déconnecter le réfrigérateur du routeur, appuyer sur
CONNECT (connecter) pendant plus de 15 secondes. Les icônes
) s’éteignent indiquant que le r
(
éfrigérateur est complètement
déconnecté du réseau Wi-Fi et du routeur.
Pour reconnecter le réfrigérateur au routeur et reconnecter le
Wi-Fi, appuyer sur CONNECT (connecter) pendant 3 secondes
dans l’écran d’accueil. Le témoin d’état de connexion Wi-Fi (
la commande du r
éfrigérateur clignotera lentement pendant le
) de
processus de connexion entre le réfrigérateur et le routeur. Si la
connexion réussit, le témoin d’état de connexion Wi-Fi s’allume et
reste allumé.
Appuyer sur le bouton de configuration protégée Wi-Fi du routeur.
Un témoin lumineux clignotera.
CONSEIL UTILE: Cette fonction de votre routeur s’active
pendant 2minutes. Il est important d’effectuer la prochaine
étape dans cette période pour ne pas devoir recommencer cette
procédure.
®
Téléchargement de l’application Hotpoint
et configuration
du compte d’utilisateur
Mon identifiant Smart Appliance est:
Le témoin d’état de connexion Wi-Fi de la commande du
n
éfrigérateur clignotera lentement pendant le processus de
r
connexion entre le réfrigérateur et le routeur.
n
Noter que ce clignotement ne se pr
oduit que lors du
premier enregistrement après la mise à disposition.
Aucun clignotement ne se produit pendant la reconnexion
automatique une fois la connexion établie.
n
Une fois le r
éfrigérateur connecté au réseau Wi-Fi
domestique, la connexion restera active même si une panne
de courant se produit, l’appareil est déplacé ou l’appareil est
entreposé pour une longue période.
ocessus de connexion devra être répété en cas de
Le pr
n
remplacement du routeur ou d’achat d’un nouveau
réfrigérateur intelligent.
Remarque: Pendant le processus d'enregistrement du produit,
le téléphone portable et le réfrigérateur doivent être connectés
au même réseau Wi-Fi.
L
’identiant Smart
Appliance Identication
Number (SAID) gure sur
l’autocollant appliqué
sur la partie avant
du couvercle de la
charnière de droite du
réfrigérateur.
À l’aide de votr
e appareil mobile, téléphone intelligent ou tablette,
visiter le l'App Store et télécharger et installer l'application Hotpoint
Home Net.
®
Une fois installée, toucher l’icône de l’application Hotpoint
l’ouvrir
. Suivre les étapes de configuration du compte d’utilisateur.
pour
L’application s’assure d’obtenir les renseignements personnels et
du domicile nécessaires, ainsi que les renseignements au sujet de
votre fournisseur d’électricité.
Enregistrement de votre réfrigérateur dans votre compte
d’utilisateur
Il est nécessaire d’enregistrer le réfrigérateur dans son compte
d’utilisateur pour tirer plein avantage des fonctions intelligentes.
Lorsque l’application le demande, enregistrer l’identifiant SAID
(sensible à la case) inscrit sur un autocollant situé sur le côté
avant du couvercle de charnière droit du réfrigérateur.
65
Page 66

Distributeurs d’eau et de glaçons
IMPORT
ANT:
n
Attendre 3heur
es pour que le réfrigérateur et l’eau
refroidissent.
Prévoir un délai de 24 heur
n
es pour la production du premier
lot de glaçons. Jeter les 3premières quantités de glaçons
produites.
n
Le système de distribution ne fonctionne pas lorsque la porte
gauche du réfrigérateur est ouverte.
A
B
Calibration de la fonction Measured Fill (r
emplissage
mesuré)
La pression en eau du domicile peut affecter la précision de
la fonction de Measured Fill (remplissage mesuré). Pour un
rendement optimal du distributeur d’eau, il faut d’abord calibrer la
fonction de remplissage mesuré.
IMPORTANT:
Purger le cir
n
cuit d’eau avant de calibrer le remplissage
mesuré.
Pour de meilleurs résultats, le calibrage doit êtr
n
e effectué
lorsque personne n’utilise d’eau dans le domicile.
1. Placer une tasse à mesurer robuste (format 1tasse [0.2 L
])
sur le plateau d’égouttement du distributeur, centrée devant la
plaque de distribution d’eau/de glaçons.
REMARQUE: Pour certains modèles, une tasse à mesurer
est incluse.
A
B
A. Plaque du distributeur d’eau
B. Plaque de distribution de glace
Rinçage du cir
cuit d’eau
De l’air piégé dans le système de distribution d’eau peut
faire dégoutter le distributeur d’eau. Après avoir raccordé le
réfrigérateur à une source d’alimentation en eau ou remplacé le
filtre à eau, vidanger le circuit d’eau.
Le fait de rincer le système de distribution d’eau évacue l’air de la
canalisation et du filtre et conditionne le filtre à eau. Un amorçage
supplémentaire peut s’avérer nécessaire dans certains domiciles.
REMARQUE: Pendant l’évacuation de l’air du système, de l’eau
peut gicler du distributeur.
1. Utiliser un récipient robuste pour appuyer sur la plaque du
distributeur d’eau pendant 5secondes.
2. Relâcher la plaque du distributeur pendant 5secondes.
Répéter les étapes1 et 2, jusqu’à ce que l’eau commence à
couler.
3. Une fois que l’eau commence à couler, continuer d’appuyer
et de relâcher la plaque du distributeur (appui pendant
5secondes, relâchement pendant 5secondes) jusqu’à ce
qu’un total de 3gal (12L) ait été distribué.
C
A. Plaque du distributeur d’eau
B. Plaque de distribution de glace
C. T
asse à mesur
er (1 tasse)
Veiller à ne pas sélectionner de préréglage pour la fonction
Measured Fill (remplissage mesuré).
2. Appuyer sur le bouton Measured Fill (r
emplissage mesuré)
pendant 3secondes pour entrer dans le mode de calibration.
Les icônes Calibration (calibration) et Measured Fill
(remplissage mesuré) s’allument et restent allumées pendant
le calibrage de la fonction Measured Fill (remplissage mesuré).
REMARQUE: Appuyer sur le bouton MEASURED FILL
(remplissage mesuré) pour sortir du mode de calibration à tout
moment. Les icônes Calibration (calibration) et Measured Fill
(remplissage mesuré) s’éteignent.
3. Maintenir enfoncée la plaque du distributeur à eau, aussi
longtemps que nécessaire, pour remplir la tasse d’eau jusqu’à
la ligne de r
emplissage de 1tasse.
REMARQUE: Si un remplissage excessif ou un renversement
se produit, jeter l’eau et réinitialiser le processus de calibrage.
4. Une fois qu’une tasse d’eau a été correctement versée dans
la tasse à mesur
er, appuyer sur le bouton MEASURED FILL
(remplissage mesuré) pour confirmer le calibrage.
5. Une fois le calibrage de la fonction Measured Fill (remplissage
mesuré) confirmé, l’icône Calibration (calibration) disparaît et
l’af
fichage revient à l’écran d’accueil.
66
Page 67

Distribution
Appuyer sur la touche CUBED ICE (glaçons) ou CRUSHED ICE
(glace concassée) pour la sélection de glaçons.
REMARQUES:
Pour de la glace concassée, les glaçons sont concassés
n
avant d’êtr
e distribués. Cette action peut causer un court
délai lors de la distribution de glace concassée. Le bruit du
broyeur de glaçons est normal et la dimension des morceaux
de glace peut varier
Lorsqu’on passe du mode glace concassée au mode glaçons,
n
.
quelques onces de glace concassée sont distribuées avec les
emiers glaçons.
pr
Distribution d’eau
IMPORTANT:
n
Distribuer au moins 1pte (1L) d’eau chaque semaine pour
maintenir un approvisionnement en eau fraîche.
La diminution du débit en provenance du distributeur peut
n
être causée par une faible pression en eau.
n
A
vec le filtr
e à eau r
é, verser l’équivalent d’une (1) tasse
etir
d’eau (0.2 L). Si l’équivalent d’une tasse (0.2 L) d’eau
est distribué en 8secondes ou moins, cela signifie que
la pression en eau alimentant le réfrigérateur répond au
critère minimal.
n
S’il faut plus de 8secondes à la machine pour distribuer
l’équivalent d’une tasse (0.2 L) d’eau, cela signifie que la
ession en eau alimentant le réfrigérateur est inférieur
pr
e au
niveau recommandé. Consulter la section «Spécifications
de l’alimentation en eau» et «Dépannage» pour des
suggestions sur la marche à suivre.
Distribution d’eau– Normale:
1. Appuyer un verre résistant contre la plaque du distributeur
d’eau.
2. Retirer le verre pour arrêter la distribution.
REMARQUE:
Le bouton Dispense Water (distribution d’eau) ne
permet pas la distribution normale. Il ne fonctionne qu’en mode
Measured Fill (remplissage mesuré).
Unités
Onces 8 16
Tasses 1 2
Litre 0,2 0,5
32
4
1
REMARQUE: La plupart des tasses à café (généralement de
4 à 6oz [118 à 177ml] par tasse) ne sont pas de la même taille
qu’une tasse à mesurer (8oz [0.2 L]). Il peut être nécessaire de
modifier le volume du remplissage mesuré pour éviter un
remplissage excessif non intentionnel des tasses à café.
4. Distribuer de l’eau.
REMARQUE: Pendant la distribution d’eau, le débit d’eau
s’arrête automatiquement une fois que le volume désiré a été
distribué.
n Appuyer un verre robuste contre la plaque de distribution
sous le bec verseur
.
OU
Placer le verre sous le bec verseur et appuyer sur le
n
bouton DISPENSE WATER (distribution d’eau) pour une
distribution sans mains.
5. Pour mettre la distribution en attente avant que la quantité
sélectionnée n’ait été atteinte, appuyer sur DISPENSE
WATER (distribution d’eau) une deuxième fois ou sur la
plaque de distribution. Appuyer de nouveau sur DISPENSE
W
ATER (distribution d’eau) ou sur la plaque pour reprendre la
distribution de la quantité d’eau restante.
REMARQUE: Si on arrête la distribution avant que la quantité
d’eau désirée soit atteinte, l’affichage se ferme après 1
minute. Si la distribution ne reprend pas pendant ce laps de
temps, elle se réinitialise à la quantité initiale.
6. Pour sélectionner un nouveau volume ou relancer la distribution
d’un volume identique, il faut d’abord finir de distribuer le
volume sélectionné ou désactiver la fonction Measured Fill
(r
emplissage mesuré) (en attendant 1minute que la machine
s’éteigne automatiquement ou en appuyant sur CUBED ICE
(glaçons) ou CRUSHED ICE (glace concassée) pour l’éteindre
manuellement) et la réactiver ensuite.
Distribution d’eau – Measured Fill (remplissage mesuré):
La fonction Measured Fill (remplissage mesuré) permet de
distribuer une quantité d’eau précise en appuyant simplement sur
quelques boutons.
1. Placer un verre robuste sous le bec verseur. Appuyer sur
MEASURED FILL (remplissage mesuré) pour activer.
REMARQUE:
La quantité d’eau distribuée correspondra à la
quantité sélectionnée. Vérifier que le récipient peut contenir la
totalité du volume. Si de la glace se trouve dans le récipient, il
faut peut-être modifier la sélection.
2. Appuyer sur MEASURED FILL (remplissage mesuré) pour
activer la fonction, puis toucher pour sélectionner 8oz (0,2L)
16oz (0,5L) ou 32oz (1L). Appuyer une quatrième fois pour
quitter l’affichage du remplissage mesuré.
3. Appuyer sur DISPENSE WATER (distribution d’eau) (bouton
central) sou sur la plaque pour distribuer la quantité d’eau
souhaitée.
REMARQUES:
Le distributeur Measured Fill (remplissage mesuré) s’arr
n
êtera
automatiquement après 1minute d’inactivité.
Il est possible de remplir plusieurs verres en utilisant la même
n
mesure en continuant d’appuyer sur la touche DISPENSE
W
ATER (distribution d’eau) (bouton central) après chaque
remplissage.
Les options Measured Fill (remplissage mesuré) sont indiquées
dans le tableau suivant:
67
Page 68

UTILISATION DU RÉFRIGÉRATEUR
Ouvertur
e et fermeture des portes
Il y a deux portes pour le compartiment des aliments frais.
Les portes peuvent êtr
e ouvertes et fermées séparément ou
ensemble. Il y a sur la porte de gauche du réfrigérateur un joint à
charnière verticale.
Lors de l’ouverture de la porte du côté gauche, le joint à
■
charnière se replie automatiquement vers l’intérieur pour qu’il
n’y ait pas d’interférence.
Lorsque les deux portes sont fermées, le joint à char
■
nière
assure automatiquement l’étanchéité entre les deux portes.
REMARQUE: Le joint à charnière devrait être à la bonne position
(plié vers l’intérieur) lorsque la porte est fermée. Si ce n’est pas le
cas, il frappera la porte de droite ou l’axe de fixation.
A
A
A. Couvr
e-charnière
Ajuster la hauteur de tablettes
La hauteur des tablettes peut êtr
e ajustée en changeant
leur position, des supports du bas aux supports du haut ou
inversement.
■
Ouvrir complètement les portes de gauche et de dr
oite de 130°.
A. Joint à charnière
Le commutateur de la porte du compartiment des aliments frais
est situé dans le coin supérieur gauche et le couvercle de la
charnière de droite.
■
Pour le congélateur et la zone convertible, le commutateur est
situé dans le montant du bas.
■
Le commutateur de porte utilise un aimant pour capter
l’ouvertur
■
S’assur
CoolVox
e et la fermeture de la porte.
er qu’aucun aimant ou appareil électronique (enceinte,
®
, etc.) ne se tr
ouve à moins de 7,62cm du couvre-
charnière.
REMARQUE: L’éclairage ne se met pas en marche s’il n’y a pas
de détection d’ouverture de porte.
130°
130°
Distributeur à glaçons
IMPORTANT:
n Des glaçons cr
eux ou dont la forme est irrégulière peuvent
être causés par une faible pression d’eau. Voir la section
«Spécifications de l’alimentation en eau».
Les glaçons passent du bac d’entr
n
eposage à glaçons au
distributeur par le goulet du distributeur. Pour éteindre la
machine à glaçons, consulter la section «Machine à glaçons
et bac d’entreposage».
n Il est possible que le distributeur continue à faire du bruit et
à distribuer des glaçons pendant plusieurs secondes après
avoir relâché le bouton ou la plaque du distributeur.
Nettoyage du goulot du distributeur à glaçons:
L’humidité entraîne l’agglomération des glaçons. Des particules
de glace peuvent s’accumuler et obstruer le goulot du distributeur
à glaçons.
Si on n’a pas besoin de distribuer des glaçons régulièrement, il
peut s’avérer nécessaire de vider le bac d’entreposage à glaçons
et de nettoyer à la fois le goulot de distribution des glaçons,
le bac d’entreposage à glaçons et la zone située sous le bac
d’entreposage toutes les 2semaines.
n
Si nécessair
e, retirer les glaçons obstruant le bac
d’entreposage et le goulot de distribution des glaçons à l’aide
d’un ustensile en plastique.
n Nettoyer le goulot de distribution des glaçons et le fond du
bac d’entr
eposage à glaçons à l’aide d’un chiffon tiède et
humide, puis sécher soigneusement ces deux sections.
68
Page 69

Distribution de glaçons – plaque de distribution
1. Sélectionner le type de glace désir
ICE (glaçons) ou CRISHED ICE (glace concassée).
é en appuyant sur CUBED
AVERTISSEMENT
Risque de coupure
Utiliser un verre solide pour la distribution des glaçons.
Le non-respect de cette instruction peut provoquer des
coupures.
2. Appuyer un verre robuste contre la plaque de distribution.
Tenir le verre près de l’ouverture du distributeur pour que les
glaçons ne tombent pas à côté du verre.
IMPORTANT: Il n’est pas nécessaire d’exercer une pression
importante sur la plaque pour activer le distributeur de
glaçons. Une pression forte ne donne pas une distribution
plus rapide de glaçons ou des quantités plus grandes.
3. Retir
REMARQUE: La distribution de glaçons peut se poursuivre
pendant plusieurs secondes après que le verre a été retiré de la
plaque du distributeur. Le distributeur peut continuer à faire du
bruit pendant quelques secondes après la distribution.
er le verre pour arrêter la distribution.
n
Placer l’avant du plateau en angle vers le haut pour le tirer.
Pour le réinstaller, suivre les deux étapes suivantes.
n Placer le plateau à l’horizontale sur les rails en laissant un peu
d’espace à la partie arrière.
n
Pousser vers le bas et tir
rails.
Le plateau d’égouttement peut être retiré pour remplir un
contenant plus grand avec le remplissage mesuré.
er vers soi pour l’engager sur les
Plateau d’égouttement du distributeur
Le plateau d’égouttement peut être retiré pour être nettoyé.
Utiliser les étapes suivantes à partir de la position tirée.
n
Soulever l’avant du plateau et tir
er vers l’avant pour le retirer.
Lumière du distributeur
1. Lorsqu’on utilise le distributeur, l’éclairage s’allume
automatiquement.
2. La lumièr
automatique la nuit. Une fois la lumière ambiante de la pièce
tamisée, le capteur automatique permettra à la lumière du
distributeur de s’allumer.
e du distributeur peut aussi servir de veilleuse
Machine à glaçons et bac
d’entr
IMPOR
des glaçons de mauvaise qualité, vidanger le circuit d’eau avant
de mettre en marche la machine à glaçons. Consulter la section
«Distributeur d’eau».
TANT: Afin d’éviter une faible production de glaçons ou
évoir un délai de 24heures après l’installation pour la
n
Pr
production des premiers glaçons. Jeter les 3premières
quantités de glaçons produites.
Accorder 2 à 3jours au bac d’entreposage des glaçons pour
qu’il se remplisse.
n
La qualité des glaçons dépend de la qualité de l’eau four
à la machine à glaçons. Éviter de connecter la machine à
glaçons à une alimentation en eau adoucie. Les produits
chimiques adoucisseurs d’eau (comme le sel) peuvent
endommager certaines pièces de la machine à glaçons et
entraîner une mauvaise qualité de glaçons. Si l’alimentation en
eau adoucie ne peut être évitée, s’assurer que l’adoucisseur
d’eau fonctionne bien et qu’il est bien entretenu.
n Si des glaçons sont agglomér
les briser à l’aide d’un ustensile en plastique et les jeter. Ne
pas utiliser d’objet pointu pour briser les glaçons. Ceci peut
endommager le bac d’entreposage et le mécanisme du
distributeur.
n
Ne rien conserver à l’intérieur du bac à glaçons.
eposage
nie
és dans le bac d’entreposage,
69
Page 70

Style1 – Machine à glaçons dans le r
La machine à glaçons est située dans la porte de gauche,
derrière les balconnets. Les glaçons sont éjectés dans le
bac d’entreposage à glaçons situé sur la porte de gauche du
réfrigérateur.
Retrait et réinstallation du bac d’entreposage à glaçons
Pour ouvrir le bac de la machine à glaçons, tirer le levier de porte
de la machine à glaçons jusqu’à ce que la porte soit dégagée.
éfrigérateur
n Retirer le bac d’entreposage à glaçons en insérant les doigts
dans le trou situé à la base du bac et en tirant le loquet pour
libérer le bac du compartiment. Soulever le bac d’entreposage
à glaçons en le soulevant et en le dégageant en ligne droite.
Réinstaller le bac d’entr
n
glaçons et appuyer dessus pour s’assurer qu’il est bien en
place.
Taux de production des glaçons
n Dans des conditions d’utilisation normales, votr
glaçons devrait produire environ 3,5lb (1,6kg) de glaçons par
jour.
Mise en marche/arrêt de la machine à glaçons
Pour mettr
n
enfoncés les boutons «Crush» (concassé) et «Cubed»
(glaçons) de l’affichage. Le témoin «Ice maker off» (machine
à glaçons désactivée) clignote 3 fois et s’éteint.
n
Pour éteindr
enfoncé le bouton «Ice maker off» (éteindre la machine à
glaçons) de l’affichage. Le témoin «Ice maker off» (machine à
glaçons éteinte» clignote 3 fois, puis reste affichée.
REMARQUES:
n
La machine à glaçons comporte un système d’arrêt
automatique. Le détecteur arrête automatiquement la
production de glaçons si le bac d’entreposage est plein, si
la porte est ouverte. La commande restera en position de
marche.
e en marche la machine à glaçon, maintenir
e manuellement la machine à glaçons, maintenir
eposage dans le compartiment à
e machine à
T
ABLETTES, BALCONNETS ET TIROIRS
ablettes et cadres de tablettes
T
Les tablettes de réfrigérateur sont ajustables afin de s’adapter à
vos besoins de rangement.
Afin de pouvoir trouver plus facilement l’article recherché, on peut
remiser ensemble des aliments semblables dans le réfrigérateur
et ajuster les tablettes pour les adapter aux différentes tailles
d’articles. Ceci réduira également la durée d’ouverture de la porte
du réfrigérateur et permettra d’économiser de l’énergie.
Ajuster la hauteur de tablettes
La hauteur de tablette peut être ajustée en repositionnant
les supports ajustables de tablettes sur leurs axes vertical et
horizontal.
1. Retir
2. Répéter l’opération pour les supports de tablette r
3. Appliquer une pr
er doucement la tablette en la soulevant de ses supports,
puis tourner la languette selon l’orientation souhaitée.
estants.
ession sur le haut de la tablette pour vérifier
qu’elle est correctement appuyée sur les supports de tablette.
5. Replacer la tablette du bas en la plaçant dans le r
en utilisant un angle, l’avant de la tablette vers le haut. Incliner
l’avant de la tablette jusqu’à ce que l’arrière de la tablette
se place sur les supports de tablette. Abaisser l’avant de la
tablette et s’assurer que la tablette est bien en position.
Retrait de la tablette amovible
Enlever et réinstaller une tablette amovible:
REMARQUE: Les portes du réfrigérateur doivent être enlevées
afin de pouvoir retirer la tablette amovible. Voir la section
«Enlever et remplacer les portes du réfrigérateur» pour plus
d’informations.
1. Tir
er sur la tablette amovible jusqu’à ce qu’elle soit en position
ouverte complète.
2. Localiser les pinces de r
de chaque côté.
Elles sont situées sous la tablette amovible.
3. Appuyer sur les pinces du bas à l’aide de vos doigts.
4. Une fois les pinces désengagées, r
amovible.
etenue de la tablette amovible situées
etirer avec soins la tablette
éfrigérateur
REMARQUES:
n
La tablette du milieu doit êtr
4. Ôter la tablette du bas en la soulevant pour la sortir des
supports de tablette. Tir
à la verticale vers le haut. Incliner la tablette à un angle et la
retirer du réfrigérateur.
70
e retirée avant celle du haut.
er ensuite sur la tablette en l’inclinant
Bacs à légumes
Retrait et réinstallation des tiroirs:
1. Saisir la poignée au bas du tir
jusqu’à passer la butée du tiroir et extraire le tiroir en le faisant
glisser vers l’extérieur jusqu’à la butée. Retirer le tiroir des
guides inférieurs.
oir et soulever l’avant du tiroir
Page 71

2. Replacer le tiroir en le plaçant sur la glissière inférieure du
tiroir et en le poussant au-delà de la butée d’arrêt du tiroir.
Tir
oirs du congélateur
Balconnets de porte du réfrigérateur
Les balconnets dans les portes du réfrigérateur sont réglables
afin de s’adapter à vos besoins de rangement. Les balconnets
permettent de facilement personnaliser l’espace de rangement
des portes pour y ranger des bouteilles de grande taille.
Séparateur de balconnets de porte (sur certains modèles)
Le séparateur peut être utilisé dans les balconnets de porte pour
les diviser et soulever les articles plus petits rangés à l’arrière du
balconnet.
Compartiments
de congélation
rapide
Compartiment de congélation rapide
■
Utilisez ces tir
oirs pour congeler une grande quantité
d’aliments frais ou cuisinés (de la meilleure façon ou de la
façon la plus rapide).
’option Fast Freeze (congélation rapide) permet de ranger en
L
■
toute sécurité et transparence vos aliments surgelés.
REMARQUE: La température du congélateur peut atteindre
celle du compartiment Flexible Freezer lorsqu’elle est placée à un
réglage plus chaud que celui du compartiment Flexible Freezer.
Zone convertible
Utilisez ces tir
n
oirs pour congeler une grande quantité
d’aliments frais ou cuisinés (de la meilleure façon ou de la
façon la plus rapide)
Utiliser la zone convertible pour ranger toutes sortes
n
d’aliments dans un envir
onnement de conservation idéal.
Le réglage peut être modifié pour ranger du vin (10°C), des
fruits et des légumes (4°C), de la viande et du poisson (0°C),
les repas de la semaine (-7°C), de la crème glacée et des
desserts (-12°C) et des aliments surgelés (-16°C ou moins).
iroirs à zone
T
convertible
Compartiments de rangement
du congélateur
Tablette à accès facile
T
ablette à accès facile
La tablette à accès facile est pratique pour facilement accéder
aux produits les plus utilisés, congeler ou simplement ranger les
restants et les petits articles.
Balconnets de porte du réfrigérateur
Les balconnets dans les portes du réfrigérateur sont amovibles
afin de s’adapter à vos besoins de rangement.
Pour obtenir une capacité de rangement maximum, il est possible
d’enlever le tiroir du congélateur pour utiliser la tablette.
Pour retirer le tiroir supérieur:
1. Saisir la poignée du tir
oir et le tirer jusqu’à la butée. Retirer le
tiroir des guides inférieurs.
2. Replacer/r
emettre en place la buté de tiroir.
71
Page 72

ENTRETIEN DU RÉFRIGÉRA
TEUR
Nettoyage
AVERTISSEMENT
Risque d’explosion
Utiliser un produit nettoyant ininammable.
Le non-respect de cette instruction peut entraîner la
mort, une explosion ou un incendie.
T
outes les sections du réfrigérateur, du congélateur et de la
zone convertible se dégivrent automatiquement. Toutefois,
nettoyer tous les compartiments environ une fois par mois pour
éviter une accumulation d’odeurs. Essuyer les renversements
immédiatement.
Nettoyage des surfaces externes
Consulter les instructions de nettoyage extérieur relatives à votre
modèle.
Acier inoxydable résistant aux traces de doigts
IMPORTANT:
Ne pas exposer les électr
■
à des éléments caustiques ou corrosifs tels que le sel, un
niveau élevé d’humidité ou des environnements très humides.
Les dommages causés par l’exposition à de tels éléments ne
sont pas couverts par la garantie.
UTILISER NE P
Chif
fon doux
et propre
Eau tiède et
savonneuse avec
gent doux
déter
REMARQUES:
En cas de contact non intentionnel, nettoyer la pièce de
■
plastique avec une éponge et un déter
l’eau tiède. Sécher soigneusement avec un chiffon doux.
Un nettoyant sous forme liquide ne signifie pas for
■
qu’il n’est pas abrasif. Beaucoup de nettoyants liquides
formulés pour nettoyer le carrelage et autres surfaces lisses
en douceur peuvent tout de même endommager l’acier
inoxydable.
■
L
’acide citrique décolore l’acier inoxydable de façon définitive.
■
Afin d’éviter d’endommager le fini en acier inoxydable du
r
éfrigérateur:
Ne pas laisser les produits suivants pendant une durée
prolongée sur le revêtement:
Moutarde
Jus de tomate
Sauce marinara
72
oménagers en acier inoxydable
AS UTILISER
fons abrasifs
Chif
Essuie-tout ou papier jour
Tampon en laine d’acier
es ou liquides abrasifs
Poudr
Nettoyants à vitr
Ammoniaque
Nettoyants acides ou à base de vinaigr
Nettoyants à four
Liquides inflammables
Sauces à base d’agrumes
Pr
oduits à base d’agrumes
e en atomiseurs
nal
gent doux dans de
cément
e
Nettoyage de l’intérieur
IMPOR
DEL par en dessous ne sont pas lavables au lave-vaisselle.
1. Débrancher le r
2. Laver à la main, rincer et sécher les pièces amovibles et les
REMARQUE: Ne pas utiliser de nettoyants puissants
3. Brancher le r
Ce réfrigérateur est muni de chaque côté de condenseurs par
surface. Il est normal de sentir de la chaleur sur les côtés.
TANT: Les tablettes du réfrigérateur équipées d’éclairage
courant électrique.
surfaces inter
ou un linge doux et un détergent doux dans de l’eau tiède.
ou abrasifs tels que les nettoyants à vitre en atomiseurs,
nettoyants à récurer, liquides inflammables, cires nettoyantes,
détergents concentrés, agents de blanchiment ou nettoyants
contenant du pétrole sur les pièces en plastique, les garnitures
intérieures et garnitures de portes ou sur les joints de portes.
électrique.
Condenseur
éfrigérateur ou déconnecter la source de
nes soigneusement. Utiliser une éponge propre
éfrigérateur ou reconnecter la source de courant
Lampes
Les lampes du compartiment pour aliments frais et du
congélateur sont à DEL et n’ont pas besoin d’êtr
Si la lampe ne s’allume pas à l’ouverture de la porte, contacter le
marchand chez qui le réfrigérateur a été acheté.
écautions à prendre pour les
Pr
e remplacées.
vacances ou le déménagement
Vacances
Si le réfrigérateur est laissé en marche pendant une absence:
1. Consommer toutes les denr
autres articles.
2. Si le r
3. Si votr
4. Vider le bac à glaçons.
Si l’utilisateur choisit d’arr
absence:
REMARQUE: Placer le réfrigérateur en mode de démonstration
lors d’une absence. Voir la section «Utilisation des commandes».
1. Enlever tous les aliments du r
2. Si le r
3. Vider le bac à glaçons.
4. Éteindr
5. Nettoyer le r
6. À l’aide d’un ruban adhésif, placer des blocs de caoutchouc ou
éfrigérateur comporte une machine à glaçons automatique
et qu’il est raccordé à la source d’approvisionnement en eau
du domicile, fermer la source d’approvisionnement en eau du
réfrigérateur. Des dommages matériels peuvent subvenir si
l’alimentation en eau n’est pas coupée.
e machine à glaçons est automatique, éteindre la
machine à glaçons.
■
Mettr
e le commutateur de la machine à glaçons de la
porte sur arrêt (O).
éfrigérateur est équipé d’une machine à glaçons
automatique:
■
Fermer l’appr
glaçons au moins un jour à l’avance.
Lorsque les der
■
commutateur de fermeture (O) pour éteindre l’affichage du
haut, à l’intérieur du réfrigérateur, selon le modèle.
e les commandes de température. Voir la section
«Utilisation des commandes».
de bois dans la partie supérieure de chaque porte de façon à
ce qu’elles soient suffisamment ouvertes pour permettre à l’air
d’entrer et d’éviter l’accumulation d’odeur ou de moisissure.
ovisionnement en eau de la machine à
niers glaçons tombent, appuyer sur le
éfrigérateur, l’essuyer et bien le sécher.
ées périssables et congeler les
êter le réfrigérateur avant son
éfrigérateur.
Page 73

Déménagement
En cas de déménagement et de déplacement du r
éfrigérateur
dans une nouvelle habitation, suivre ces étapes pour préparer le
déménagement.
1. Si le r
éfrigérateur est équipé d’une machine à glaçons
automatique:
■
Fermer l’appr
ovisionnement en eau de la machine à
glaçons au moins un jour à l’avance.
Débrancher la canalisation d’eau de l’arrière du
■
réfrigérateur.
Lorsque les der
■
niers glaçons tombent, appuyer sur le
commutateur (O) pour fermer la machine à glaçons de la
porte ou les commandes, selon le modèle.
2. Retir
er tous les aliments du réfrigérateur et placer tous les
aliments congelés dans de la neige carbonique.
3. Vider le bac à glaçons.
4. Débrancher le r
éfrigérateur.
5. Bien nettoyer
6. Retir
er toutes les pièces amovibles, bien les envelopper et
, essuyer et sécher.
les attacher ensemble avec du ruban adhésif pour qu’elles ne
bougent et ne s’entrechoquent pas durant le déménagement.
7. Selon le modèle, soulever l’avant du r
éfrigérateur pour qu’il
roule plus facilement ou soulever les pieds de nivellement
pour qu’ils n’égratignent pas le plancher. Consulter la section
«Ajustement des portes» ou «Fermeture et alignement des
portes».
8. Fermer les portes à l’aide de ruban adhésif et fixer le cor
don
d’alimentation à la partie arrière du réfrigérateur.
Lors de l’arrivée au nouveau domicile, remettre tout en place
et consulter la section «Instructions d’installation» pour les
instructions de préparation. Aussi, si le réfrigérateur comporte une
machine à glaçons automatique, ne pas oublier de rebrancher
l’approvisionnement en eau au réfrigérateur.
73
Page 74

DÉP
ANNAGE – MODÈLES AVEC CONNEXION
Essayer d’abord les solutions suggérées ici. Pour obtenir de l’aide ou des recommandations supplémentaires pour éviter un appel de
service, reportez-vous à la page de garantie de ce guide.
Veuillez indiquer dans votre correspondance un numéro de téléphone où l’on peut vous joindre dans la journée.
État de la connexion T
émoins lumineux du panneau de commande
Le réfrigérateur n’est pas connecté. Les deux icônes Wi-Fi blanches sont éteintes.
Le réfrigérateur essaie de se connecter au routeur Wi-Fi domestique. L’icône Wi-Fi blanche clignote rapidement.
Le réfrigérateur est connecté au routeur Wi-Fi domestique et tente de se connecter
à Cloud.
Le réfrigérateur est connecté au routeur Wi-Fi domestique, mais n’est pas connecté
à Cloud.
L’application Hotpoint
Le réfrigérateur est connecté au routeur Wi-Fi domestique et l’icône Wi-Fi est
allumée. L’application Hotpoint
®
ne fonctionne pas.
®
fonctionne.
Le réfrigérateur est connecté au routeur Wi-Fi domestique et l’icône Wi-Fi est allumée.
Le réfrigérateur est dans le processus de mise à jour du logiciel.
L’application Hotpoint
Si les pr
oblèmes suivants surviennent Causes possibles Solution
®
fonctionne.
Le réfrigérateur peut être en mode
Attente.
L’icône Wi-Fi blanche clignote lentement.
L’icône Wi-Fi orange est allumée.
’icône Wi-Fi blanche clignote lentement.
L
L’icône Wi-Fi orange est allumée.
L
’icône Wi-Fi blanche est allumée.
L
’icône Wi-Fi blanche est allumée et clignote
de façon continue pendant les mises à jour du
logiciel.
Appuyer sur le bouton Connect (connecter) pendant
3secondes pour voir l’icône Wi-Fi clignoter, puis
s’allumer complètement. Tous les témoins lumineux
sont éteints pendant le mode Attente.
Le réfrigérateur n’a encore jamais
été branché au routeur Wi-Fi
Consulter la section «Configuration de la
connectivité».
domestique.
Le réfrigérateur n’est pas connecté au
routeur Wi-Fi domestique. (L’icône Wi-Fi
est éteinte.)
Perte de la connexion avec le
routeur Wi-Fi domestique.
Signal faible ou interférence entre
le réfrigérateur et le routeur.
Vérifier si le routeur est en marche et fonctionne en
utilisant d’autres ordinateurs ou appareils de la maison
(capables d’accéder à Internet).
Essayer de positionner le routeur sans fil plus près du
réfrigérateur. Il pourrait être nécessaire d’installer un
amplificateur Wi-Fi.
Le réfrigérateur est déjà
connecté`à un autre routeur Wi-Fi.
Consulter la section «Configuration de la
connectivité» pour déconnecter le réfrigérateur du
routeur Wi-Fi et essayer de le reconnecter.
Débrancher le réfrigérateur ou déconnecter la
L’icône Wi-Fi ne s’allume pas après
avoir appuyé sur le bouton CONNECT
(connexion).
Il peut y avoir un problème avec le
réfrigérateur.
source de courant électrique pendant 30secondes.
Rebrancher. Répéter le processus de connexion Wi-Fi.
Vérifier que le réfrigérateur fonctionne correctement
(sauf pour le problème de connexion). Appeler pour un
éventuel dépannage supplémentaire.
La connexion à l’application
Hotpoint
®
peut ne pas êtr
e
Vérifier Internet.
accessible.
Le réfrigérateur est connecté au routeur
Wi-Fi domestique, mais l’application
Hotpoint
®
ne fonctionne pas.
Le compte d’utilisateur n’a pas
été correctement configuré ou le
réfrigérateur n’a pas été enregistré
pour ce compte.
Consulter la section «Configuration de la
connectivité» ou l’application Hotpoint
connaîtr
e les instructions de configuration du compte
et d’enregistrement du réfrigérateur.
Vérifier que le réfrigérateur est jumelé à votre compte
dans l’application.
®
pour
Vérifier que le courriel, le numéro d’appareil mobile et
les préférences de notification sont corrects.
Vérifier que d’autres appareils peuvent
se connecter à Internet en utilisant le
même routeur.
Le routeur n’est pas connecté à
Internet.
Wi-Fi déconnecté. Appuyer sur le bouton Connect (connecter)
Vérifier que d’autres appareils peuvent se connecter à
Internet en utilisant le même routeur.
pendant 3 secondes pour activer le Wi-Fi. Fermer
le disjoncteur pendant environ 30 secondes ou
plus, puis le réenclencher. Utiliser ensuite les
instructions instructions dans l'application
Hotpoint Home Net.
74
Page 75

DÉPANNAGE
Essayer d’abord les solutions suggérées ici pour éviter une intervention de dépannage.
AVERTISSEMENT
Risque de choc électrique
Brancher sur une prise de terre (reliée à la masse).
Ne pas retirer la broche de terre.
Ne pas utiliser d’adaptateur.
Ne pas utiliser de rallonge.
Le non-respect de ces instructions peut entraîner la
mort, un incendie ou un choc électrique.
Si les pr
suivants surviennent
Fonctionnement du réfrigérateur
Le réfrigérateur ne
fonctionne pas.
Le moteur semble
fonctionner
excessivement.
oblèmes
Causes possibles Solution
Inspecter l’alimentation
électrique.
Inspecter les commandes. S’assurer que les commandes sont activées. Voir la section «Utilisation
Nouvelle installation. Accorder 24heures après l’installation pour que le réfrigérateur se
Les commandes du réfrigérateur
sont en mode de démonstration
(sur certains modèles).
Compresseur et ventilateur à
rendement élevé.
La température de la pièce ou
la température extérieure est
élevée.
Une grande quantité d’aliments
tièdes a été récemment ajoutée.
Les portes sont ouvertes
fréquemment ou pendant trop
longtemps.
La porte du réfrigérateur ou du
tiroir du congélateur est ouverte.
La commande du réfrigérateur
est placée à un réglage trop froid.
Le joint de la porte ou du tiroir
est sale, usagé ou craquelé.
Brancher le cordon d’alimentation dans une prise reliée à la terre.
Ne pas utiliser de rallonge.
S’assurer que la prise est alimentée. Brancher une lampe pour voir si la
prise fonctionne.
Réarmer le disjoncteur déclenché. Remplacer tout fusible grillé.
REMARQUE: Si le problème persiste, appeler un électricien.
des commandes».
refroidisse complètement.
REMARQUE: Le fait de placer les commandes de température sur le
réglage le plus froid ne refroidira pas le compartiment plus rapidement.
Si le réfrigérateur est en mode de démonstration, le refroidissement
est désactivé et «Demo» (démonstration) s’allume sur le tableau de
commande. Consulter la section «Utilisation des commandes» pour plus
de renseignements.
Un réfrigérateur éconergique de grande taille fonctionne à une vitesse
inférieure et plus éconergique que d’autres appareils.
Il est normal que le réfrigérateur fonctionne pendant plus longtemps dans
ces conditions. Pour un rendement optimal, placer le réfrigérateur dans un
environnement d’intérieur à température stable. Voir la section «Exigences
d’emplacement».
Lorsqu’on place des aliments tièdes dans le réfrigérateur, l’appareil fonctionne
plus longtemps: jusqu’à ce que l’air soit refroidi à la température désirée.
L’air tiède qui entre dans le réfrigérateur prolonge son fonctionnement.
Ouvrir la porte moins souvent.
Vérifier que le réfrigérateur est de niveau. Consulter la section «Fermeture
et alignement des portes». Empêcher les aliments et les récipients
d’obstruer la porte.
Placer la commande du réfrigérateur à un réglage moins froid jusqu’à ce
que la température du réfrigérateur souhaitée soit atteinte.
Nettoyer ou remplacer le joint d’étanchéité. Si le joint de la porte présente
des fuites, le réfrigérateur fonctionnera plus longtemps pour maintenir la
température souhaitée.
75
Page 76

DÉP
Essayer d’abord les solutions suggérées ici pour éviter une intervention de dépannage.
ANNAGE
Si les pr
surviennent
L’éclairage ne fonctionne pas. Votre réfrigérateur est muni de DEL
L’IU des commandes de
température ne s’allume pas.
Incapable d’effectuer les réglages
sur l’IU des commandes de
température.
Sons inhabituels
Pour écouter des bruits qui font partie du fonctionnement normal du réfrigérateur, consulter la section Aide avec le produit/FAQ du site
Web de notre marque à la section «Bruits normaux». Voici une liste de sons normaux, accompagnée d’explications.
Le réfrigérateur semble bruyant. Le compresseur de votre nouveau
Bruit du compresseur qui
fonctionne plus longtemps que
prévu.
Pulsation/bruissement Les ventilateurs/le compresseur
Éclatement Contraction/expansion des
Sifflement/égouttement Écoulement de liquide réfrigérant
Vibration Le réfrigérateur n’est peut-être pas
Grésillement De l’eau tombe sur l’élément de
Écoulement d’eau/gargouillement Peut se produire lorsque la glace
oblèmes suivants
Causes possibles Solution
qui ne doivent pas être remplacées
par l’utilisateur.
Les portes ont été ouvertes
pendant plus de 10minutes.
Le contacteur de la porte ne
détecte pas l’ouverture de la porte.
L’IU des commandes de
température est en veille.
Les boutons de l’IU des
commandes de température ne
fonctionnent pas bien.
L’IU des commandes de
température n’est pas alimenté.
La porte est ouverte et l’alarme de
porte entrouverte est activée.
réfrigérateur régule la température
plus efficacement tout en utilisant
moins d’énergie; il fonctionne aussi
plus silencieusement.
Compresseur et ventilateur à
rendement élevé.
qui se règlent pour optimiser
le rendement durant le
fonctionnement normal du
compresseur.
parois internes, surtout lors du
refroidissement initial.
ou d’huile dans le compresseur.
stable.
chauffage durant le programme de
dégivrage.
fond lors du programme de
dégivrage et que l’eau s’écoule
dans le plateau de dégivrage.
Si le réfrigérateur est alimenté, mais que les DEL ne
fonctionnent pas lorsqu’une porte ou un tiroir est ouvert,
communiquer avec le service pour obtenir de l’aide.
Fermer les portes et le tiroir à réinitialiser, puis les rouvrir
pour reprendre la tâche illuminée.
S’assurer qu’aucun aimant ou appareil électronique ne se
trouve à moins de 7,6cm (3po) du couvre-charnière.
Appuyer sur un bouton de l’IU pour activer l’IU des
commandes de température.
Essayer d’éteindre, puis de rallumer le réfrigérateur pour
réinitialiser les boutons. Si le problème continu, faire un
appel pour obtenir un entretien ou de l’aide.
Vérifier le faisceau de câblage dans la charnière de porte.
Fermer la porte.
Les bruits de fonctionnement étant moins importants, il sera
possible de remarquer des bruits inconnus qui sont en réalité
normaux.
Les réfrigérateurs plus gros et efficaces fonctionnent plus
longtemps à des vitesses inférieures et plus éconergiques.
Ceci est normal.
Ceci est normal.
Ceci est normal.
Ajuster les vis de nivellement et abaisser le pied de
nivellement avant de façon à ce qu’il soit bien en contact
avec le plancher. Consulter la section «Fermeture et
alignement des portes».
Ceci est normal.
Ceci est normal.
76
Page 77

DÉPANNAGE
Essayer d’abord les solutions suggérées ici pour éviter une intervention de dépannage.
Si les pr
surviennent
Température et humidité
La température est trop élevée. Le réfrigérateur vient d’être
La température est trop basse
dans le réfrigérateur/tiroir à
légumes.
La température est trop basse
dans le tiroir à température
contrôlée.
Il y a de l’humidité à l’intérieur.
REMARQUE: Il est normal
qu’un peu d’humidité
s’accumule à l’intérieur.
Du givre ou de la glace s’est
accumulé dans le compartiment
de congélation.
oblèmes suivants
Causes possibles Solution
installé.
Le réglage des commandes
n’est pas adapté à
l’environnement de
l’appareil.
La/les portes sont ouvertes
fréquemment ou ne sont
pas complètement fermées.
Ceci permet à l’air chaud de
pénétrer dans le réfrigérateur.
Une grande quantité
d’aliments a été récemment
ajoutée.
Mode de démonstration
activé.
Le mode vacances est
activé.
L’ouverture/les ouvertures
d’évacuation du réfrigérateur
est/sont bloquée(s).
Le réglage des commandes
n’est pas adapté à
l’environnement de
l’appareil.
Le réglage des commandes
n’est pas adapté aux articles
rangés dans le tiroir.
La pièce est humide. Un environnement humide contribue à l’accumulation d’humidité.
La/les portes sont ouvertes
fréquemment ou ne sont pas
complètement fermées. Cela
permet à l’air humide de
pénétrer dans le réfrigérateur.
Une porte est bloquée en
position ouverte.
Un compartiment ou une
tablette bloque le passage.
Entreposage de liquides
dans des récipients ouverts.
La porte est fréquemment
ouverte ou est laissée
ouverte.
Mauvaise étanchéité du joint
de la porte.
Les commandes de
température ne sont pas
correctement réglées.
Accorder 24heures après l’installation pour que le réfrigérateur se
refroidisse complètement.
Régler les commandes à un degré plus froid. Vérifier la
température au bout de 24heures. Voir la section «Utilisation des
commandes».
Réduire les ouvertures de porte et garder la porte complètement
fermée.
Attendre quelques heures pour permettre au réfrigérateur de revenir
à une température normale.
Désactiver le mode de démonstration. Voir la section «Utilisation
des commandes».
Désactiver le mode vacances. Voir la section «Utilisation des
commandes».
Si l’ouverture d’évacuation située au milieu à l’arrière du
compartiment pour les aliments frais est obstruée par des articles
placés directement devant, le réfrigérateur sera trop froid. Éloigner
les objets de l’ouverture d’évacuation.
Régler les commandes à un cran plus chaud. Vérifier la
température au bout de 24heures. Voir la section «Utilisation des
commandes».
Modifier le réglage de température. Consulter la partie «Utilisation
des commandes» dans la section «Utilisation du réfrigérateur».
Réduire les ouvertures de porte et garder les portes complètement
fermées.
Déplacer les emballages d’aliments pour libérer la porte.
Replacer le compartiment ou la tablette correctement.
Cela ajoute de l’humidité à l’intérieur du réfrigérateur. Bien fermer
tous les récipients.
Réduire les ouvertures de la porte et garder le tiroir complètement
fermé après utilisation.
S’assurer que les joints de porte sont en parfait contact avec la
caisse du réfrigérateur pour que l’étanchéité soit assurée.
Consulter la section «Utilisation des commandes» pour connaître
les réglages de température recommandés.
77
Page 78

DÉP
Essayer d’abord les solutions suggérées ici pour éviter une intervention de dépannage.
ANNAGE
Si les pr
suivants surviennent
La machine à glaçons
ne produit pas ou
pas suffisamment de
glaçons.
Les glaçons sont
creux ou petits.
REMARQUE: Cela
indique une faible
pression d’eau.
Mauvais goût,
mauvaise odeur ou
couleur grise des
glaçons ou de l’eau
oblèmes
Glaçons et eau
Causes possibles Solution
Le réfrigérateur n’est pas raccordé
à l’alimentation en eau ou le robinet
d’arrêt d’eau n’est pas ouvert.
La canalisation de la source d’eau du
domicile comporte une déformation.
La machine à glaçons n’est pas
allumée.
Le réfrigérateur vient d’être installé. Attendre 24 heures après l’installation de la machine à glaçons pour
La porte du réfrigérateur n’est pas
complètement fermée.
Une grande quantité de glaçons a été
récemment prélevée.
Le robinet d’arrêt de la canalisation
d’eau n’est pas complètement ouvert.
La canalisation de la source d’eau du
domicile comporte une déformation.
Un filtre à eau est installé sur le
réfrigérateur.
Un système de filtration de l’eau
par osmose inverse est raccordé à
l’alimentation en eau froide.
D’autres questions concernant la
pression de l’eau?
Lorsqu’on vient d’installer un
réfrigérateur, le système de distribution
d’eau doit être rincé.
Raccords de plomberie récemment
installés ou remplacés. Des raccords
de plomberie neufs peuvent entraîner
une décoloration ou un mauvais goût
des glaçons et de l’eau.
La canalisation d’alimentation en
eau est différente de celle qui est
recommandée
Les glaçons ont été conservés pendant
trop longtemps.
L’eau a été conservée pendant trop
longtemps.
Les glaçons ont pris l’odeur des
aliments.
L’eau contient des minéraux (tels que
le soufre).
Un filtre à eau est installé sur le
réfrigérateur.
Le filtre à eau doit être remplacé. Remplacer le filtre à eau jetable au moins tous les 6mois ou lorsque
Brancher le réfrigérateur à l’alimentation en eau et ouvrir le robinet
d’arrêt d’eau complètement.
Une déformation dans la canalisation peut réduire l’écoulement
d’eau. Redresser la canalisation d’eau.
S’assurer que la machine à glaçons est en marche. Voir la section
«Machine à glaçons et bac d’entreposage».
que la production de glaçons commence. Attendre 3jours pour que
la production de glaçons soit complète.
Bien fermer la porte. Si elle ne ferme pas complètement, consulter
la partie «Les portes ne ferment pas bien» plus loin dans cette
section.
Attendre suffisamment pour que la machine à glaçons produise
plus de glaçons. Consulter la section «Machine à glaçons et bac
d’entreposage» pour connaître le taux de production de glaçons.
Ouvrir le robinet d’arrêt complètement.
Une déformation dans la canalisation peut réduire l’écoulement
d’eau. Redresser la canalisation d’eau.
Enlever le filtre et faire fonctionner la machine à glaçons. Si la qualité
des glaçons s’améliore, le filtre est probablement obstrué ou mal
installé. Remplacer le filtre ou le réinstaller correctement.
Ceci peut réduire la pression de l’eau. Voir la section
«Spécifications de l’alimentation en eau».
Appeler un plombier agréé et qualifié.
Rincer le système de distribution d’eau. Consulter la section
«Distributeurs d’eau et de glaçons» pour des instructions sur le
rinçage du système de distribution d’eau.
Jeter les glaçons et laver le bac d’entreposage à glaçons. Rincer le
circuit d’eau avec 3gal (12L) d’eau. Attendre 24heures pour que
la machine à glaçons produise de nouveaux glaçons et jeter les
3premiers lots de glaçons produits.
L’utilisation d’une canalisation en cuivre ou d’une canalisation
d’alimentation en eau Hotpoint
de pièce8212547RP. Consulter la section «Raccordement à la
canalisation d’eau».
Jeter les glaçons et laver le bac d’entreposage à glaçons. Attendre
24 heures pour la fabrication de nouveaux glaçons.
Distribuer au moins 1pte (1L) d’eau chaque semaine pour maintenir
un approvisionnement en eau fraîche.
Utiliser des emballages hermétiques et à l’épreuve de l’humidité
pour conserver les aliments.
L’installation d’un filtre à eau peut être requise afin d’enlever les
minéraux.
Une décoloration grise ou foncée des glaçons indique que le
système de filtration de l’eau nécessite un rinçage supplémentaire.
Rincer le circuit d’eau avant d’installer ou d’utiliser un nouveau filtre
à eau. Consulter la section «Distributeurs d’eau et de glaçons»
pour des instructions sur le rinçage du filtre à eau.
signalé. Consulter la section «Système de filtration de l’eau».
®
ecommandée – numéro
est r
78
Page 79

DÉP
Essayer d’abord les solutions suggérées ici pour éviter une intervention de dépannage.
ANNAGE
Si les pr
Le distributeur d’eau et de glaçons ne
fonctionne pas correctement.
Le distributeur d’eau et de glaçons ne
fonctionne pas correctement. (suite)
Le bac à glaçons est difficile à retirer de la
porte.
Le distributeur de glaçons se bloque
lorsqu’il distribue de la glace concassée.
De l’eau suinte ou dégoutte du système
de distribution.
REMARQUE: Il est normal que quelques
gouttes s’écoulent de la machine après la
distribution d’eau.
Distribution continue de glaçons.
REMARQUE: Le distributeur peut laisser
passer quelques glaçons après que le
bras ait été relâché, c’est normal.
oblèmes suivants surviennent Causes possibles Solution
Glaçons et eau (suite)
Le réfrigérateur n’est pas raccordé
à l’alimentation en eau ou le robinet
d’arrêt d’eau n’est pas ouvert.
La canalisation de la source
d’eau du domicile comporte une
déformation.
Le réfrigérateur vient d’être installé. Rincer et remplir le système de distribution d’eau.
La pression en eau du domicile est
inférieure à 35lb/po² (241kPa).
Un système de filtration de l’eau
par osmose inverse est raccordé à
l’alimentation en eau froide.
Le filtre à eau est peut-être obstrué. Enlever le filtre à eau et faire fonctionner le
Le filtre à eau est mal installé. Enlever le filtre à eau et le réinstaller. Consulter la
La porte du réfrigérateur ou du tiroir
du congélateur est entrouverte.
Les portes du réfrigérateur ont été
récemment enlevées.
Des glaçons obstruent le bac
d’entreposage ou le goulet de
distribution des glaçons.
La quantité de glaçons dans le
bac peut être élevée et inégale en
comparaison à une production de
glaçons normale, la glace peut ainsi
créer de la pression sur les parois.
De la glace concassée obstrue le
goulet de distribution de glaçons.
Le verre n’a pas été maintenu sous
le distributeur assez longtemps.
Le verre n’a pas été maintenu sous
le distributeur assez longtemps.
Brancher le réfrigérateur à l’alimentation en eau et
ouvrir complètement le robinet d’arrêt d’eau.
Une déformation dans la canalisation d’eau peut
réduire le débit au distributeur d’eau et entraîner
la formation de glaçons creux ou de forme
irrégulière. Redresser la canalisation d’eau.
Consulter la section «Distributeurs d’eau et de
glaçons».
La pression en eau du domicile détermine la taille
du débit depuis le distributeur. Voir la section
«Spécifications de l’alimentation en eau».
Un système de filtration de l’eau par osmose
inverse peut réduire la pression de l’eau. Voir la
section «Spécifications de l’alimentation en eau».
distributeur. Si le débit d’eau augmente, cela
signifie que votre filtre est obstrué et doit être
remplacé.
Consulter la section «Système de filtration de
l’eau».
section «Système de filtration de l’eau».
Bien fermer la porte ou le tiroir. Si elle ne ferme
pas complètement, voir la section «Les portes ne
ferment pas complètement».
S’assurer que l’assemblage câble/tuyau du
distributeur d’eau a été correctement reconnecté
au sommet de la porte du réfrigérateur. Voir la
section «Enlever et remplacer les portes du
réfrigérateur».
À l’aide d’un ustensile en plastique, si nécessaire,
retirer les glaçons obstruant le bac d’entreposage
ou le goulet de distribution des glaçons.
Nettoyer le goulet de distribution et le fond du
bac d’entreposage à l’aide d’un chiffon tiède et
humide, puis sécher soigneusement ces deux
sections. Pour éviter toute obstruction et maintenir
un approvisionnement frais en glaçons, vider le
bac d’entreposage et nettoyer à la fois le bac
d’entreposage et le goulet de distribution toutes
les 2semaines.
Distribuer 2 à 3 verres de glaçons, puis essayer
d’enlever le bac.
Pour dégager le distributeur à glaçons, passer
de la glace concassée au mode glaçons. Revenir
ensuite à la glace concassée.
Maintenir le verre sous le distributeur2 à
3secondes après avoir relâché le levier du
distributeur.
Maintenir le verre sous le distributeur2 à
3secondes après avoir relâché le levier du
distributeur.
79
Page 80

DÉP
Essayer d’abord les solutions suggérées ici pour éviter une intervention de dépannage.
ANNAGE
Si les pr
De l’eau continue de dégoutter du
distributeur – plus que quelques gouttes.
De l’eau fuit par l’arrière du réfrigérateur. Les raccords de la canalisation d’eau
De la glace concassée ou des glaçons
tombent à côté du verre pendant la
distribution.
L’eau du distributeur est tiède. L’eau du distributeur est réfrigérée à
oblèmes suivants surviennent Causes possibles Solution
Glaçons et eau (suite)
Le réfrigérateur vient d’être installé. Le fait de rincer le circuit d’eau permet d’éliminer
Le filtre à eau a été récemment installé
ou changé.
Une connexion d’eau peut ne pas être
bien serrée.
n’ont pas été complètement serrés.
Les portes ont été récemment retirées
et le raccord de la canalisation en eau
n’a pas été complètement serré.
Le verre n’est pas tenu suffisamment
près de la chute de glaçons.
50°F (10°C).
Le réfrigérateur vient d’être installé. Attendre 24heures après l’installation pour que
Une grande quantité d’eau a été
récemment distribuée.
On n’a pas distribué d’eau récemment. Le premier verre d’eau peut ne pas être froid.
Le réfrigérateur n’est pas raccordé à
une canalisation d’arrivée d’eau froide.
l’air retenu dans les canalisations, ce qui entraîne
l’égouttement du distributeur. Rincer le système
de distribution d’eau.
Consulter la section «Distributeurs d’eau et de
glaçons».
Le fait de rincer le circuit d’eau permet d’éliminer
l’air retenu dans les canalisations, ce qui entraîne
l’égouttement du distributeur. Rincer le système
de distribution d’eau.
Consulter la section «Distributeurs d’eau et de
glaçons»
Vérifier la présence d’eau dans le compartiment
inférieur du réfrigérateur, dans la zone de
la charnière ou près de la connexion à la
canalisation d’alimentation domestique à l’arrière
du réfrigérateur.
Consulter la section «Raccordement à la
canalisation d’eau».
Voir la section «Enlever et remplacer les portes
du réfrigérateur».
Tenir le verre plus près de la chute de glaçons.
Ceci est normal.
l’alimentation en eau refroidisse complètement.
Accorder 3heures pour que l’alimentation en eau
refroidisse complètement.
Jeter le premier verre d’eau distribué.
S’assurer que le réfrigérateur est raccordé à la
canalisation d’arrivée d’eau froide.
Voir la section «Spécifications de l’alimentation
en eau».
80
Page 81

DÉP
Essayer d’abord les solutions suggérées ici pour éviter une intervention de dépannage.
ANNAGE
AVERTISSEMENT
Risque d’explosion
Utiliser un produit nettoyant ininammable.
Le non-respect de cette instruction peut entraîner la
mort, une explosion ou un incendie.
Pour voir une vidéo détaillant l’ajustement et l’alignement des po
notre marque et chercher «Fermeture et alignement des portes».
Si les pr
surviennent
Portes
La porte ne ferme pas
complètement.
Les portes sont difficiles à
ouvrir.
Les portes semblent mal
alignées.
Le réfrigérateur est instable
ou roule vers l’avant
lorsqu’on ouvre ou ferme
les portes.
oblèmes suivants
Causes possibles Solution
La porte est bloquée en position
ouverte.
Un compartiment ou une tablette
bloque le passage.
Récemment installé Enlever tous les matériaux d’emballage.
Les joints de la porte sont collants
ou sales.
Les portes doivent être alignées ou
l’aplomb du réfrigérateur effectué.
Les pieds de nivellement ne sont
pas fermement en appui sur le sol.
rtes, consulter la section Aide avec le produit/FAQ du site Web de
Déplacer les emballages d’aliments pour libérer la porte.
Replacer le compartiment ou la tablette correctement.
Nettoyer les joints et les surfaces de contact au savon doux et à
l’eau tiède. Rincer et sécher avec un linge doux.
Communiquer avec le service si la porte doit être alignée.
Tourner les deux pieds de stabilisation (un de chaque côté) du
même nombre de tours dans le sens antihoraire, jusqu’à ce
qu’ils soient fermement en appui sur le sol. Consulter la section
«Fermeture et alignement des portes».
81
Page 82

FICHE DE DONNÉES RELATIVES AU RENDEMENT
Système de filtration d’eau
ModèleP9WB2L/P9RFWB2L/EDR2RXD1 d’une capacité de 200 gallons (757 litr
es)
Système testé et homologué par NSF Inter
des normes NSF/ANSI42, 53 et 401, ainsi que CSAB483.1
pour la réduction de contaminants spécifiés sur la fiche de
données de performance.
Ce système a été testé selon les normes NSF/ANSI 42, 53, 401 et CSAB483.1 pour la r
La concentration des substances indiquées dans l’eau entrant dans le système a été réduite à une concentration inférieure ou égale à la limite permissible
éduction des substances énumérées ci-dessous.
national en vertu
pour l’eau qui quitte le système, comme spécifié par les normes ANSI/NSF42, 53 et 401, ainsi que CSAB483.1.
Substance Reduction Aesthetic Ef
Chlorine Taste/Odor Particulate Class I* 2.0 mg/L ± 10% At least 10,000
Contaminant Reduction Inuent Challenge Concentration Maximum Permissible Product Water
Lead: @ pH 6.5/ @ pH 8.5 0.15 mg/L ± 10% 0.010 mg/L >99.3% / 98.6%
Benzene 0.015 mg/L ± 10% 0.005 mg/L 96.0%
p - Dichlorobenzene 0.225 mg/L ± 10% 0.075 mg/L >99.8%
Carbofuran 0.08 mg/L ± 10% 0.040 mg/L 91.9%
Toxaphene 0.015 ± 10% 0.003 mg/L 93.3%
Atrazine 0.009 mg/L ± 10% 0.003 mg/L 92.4%
Asbestos 10
Asbestos 50,000/L min. 99.95% >99.99%
Live Cyst
Lindane 0.002 ± 10% 0.0002 mg/L 98.9%
T
O-Dichlorobenzene 1.8 mg/L ± 10% 0.60 mg/L >99.9%
Ethylbenzene 2.1 mg/L ± 10% 0.70 mg/L 99.4%
1,2,4-Trichlorobenzene 0.210 mg/L ± 10% 0.07 mg/L >99.8%
2,4 - D 0.210 mg/L ± 10% 0.07 mg/L 93.8%
Styrene 2.0 mg/L ± 10% 0.1 mg/L 99.8%
Toluene 3.0 mg/L ± 10% 1.0 mg/L 87.9%
Endrin 0.006 mg/L ± 10% 0.002 mg/L >96.6%
Atenolol 200 ± 20% 30 ng/L >95.9%
Trimethoprim 140 ± 20% 20 ng/L >96.9%
Linuron 140 ± 20% 20 ng/L >96.4%
Estrone 140 ± 20% 20 ng/L >97.0%
Nonylphenol 1400 ± 20% 200 ng/L >97.4%
Carbamazepine 1400 ± 20% 200 ng/L >97.9%
Phenytoin 200 ± 20% 30 ng/L 93.8%
Naproxen 140 ± 20% 20 ng/L 96.1%
Bisphenol A 2000 ± 20% 300 ng/L >99.2%
†
etrachloroethylene 0.015 mg/L ± 10% 0.005 mg/L >96.6%
This system has been tested accor
fects Inuent Challenge Concentration Maximum Permissible
particles/mL
7
to 108 bers/L
11 NTU ± 10% 0.5 NTU 99.0%
††
Product Water Concentration
50% reduction 85% reduction 97.2% 99.5%
Concentration
99% >99%
ding to Ministerial Decree No 174, article 9 of legislative decree n 31 of 2001, Regulations (EC) no 1935/2004, WRAS
Average% Reduction
Average%Reduction
BS6920 and ACS Circulaire 2002/571. Test Parameters: pH = 7.5 ± 0.5 unless otherwise noted. Flow = 0.6 gpm (2.27 Lpm). Pressure = 60 psig (413.7
kPa). Temp. = 68°F to 71.6°F (20°C to 22°C). Rated service capacity = 200 gallons (757 liters).
The compounds certied under NSF 401 have been deemed as “emer
ging compounds/incidental contaminants.” Emerging compounds/incidental
contaminants are those compounds that have been detected in drinking water supplies at trace levels. While occurring at only trace levels, these
compounds can affect the public acceptance/perception of drinking water quality.
It is essential that operational, maintenance, and lter r
n
requirements be carried out for the product to perform as advertised.
eplacement
Property damage can occur if all instructions are not followed.
n
The disposable cartridge must be changed at least every 6 months.
eplacement lter P9RFWB2L, part #EDR2RXD1/EDR2RXD1B.
Use r
n
2015 suggested retail price of $49.99 U.S.A./$49.99 Canada. Prices
are subject to change without notice.
The lter monitor system measur
n
through the lter and alerts you when it is time to replace the lter.
Refer to the “Using the Controls” or “Water Filtration System” section
(in the User Instructions or User Guide) to learn how to check the
water lter status.
After changing the water lter
n
Ice Dispensers” or “Water Dispenser” in the User Instructions or User
Guide.
es the amount of water that passes
, ush the water system. See “Water and
82
Page 83

n These contaminants are not necessarily in your water supply. While
testing was performed under standard laboratory conditions, actual
performance may vary.
n
The pr
oduct is for cold water use only.
n
The water system must be installed in compliance with state and
local laws and r
n
Do not use with water that is micr
quality without adequate disinfection before or after the system.
Systems certied for cyst reduction may be used on disinfected
waters that may contain lterable cysts.
EPA Est. No. 082047-TWN-001
n
Refer to the “W
Guide) for the Manufacturer’s limited warranty, name and telephone
number.
n
The refrigerator when dispensing water acts as drinking water
treatment equipment.
This equipment r
n
to guarantee the drinking water treatment requirements and the
maintenance of the improvements every 6 months.
egulations.
obiologically unsafe or of unknown
arranty” section (in the User Instructions or User
equires regular periodic maintenance in order
Application Guidelines/W
ater Supply Parameters
Water Supply Potable City or Well
Water Pressure 30 - 120 psi (207 - 827 kPa)
Water Temperature 33° - 100°F (0.6° - 37.8°C)
Service Flow Rate 0.6 GPM (2.27 L/min.) @ 60 psi
(413.7 kPa)
Y
n
our water ltration system will withstand up to 120 pounds
per square inch (psi) water pressure. If your water supply is
higher than 80 psi, install a pressure reducing valve before
installing the water ltration system.
NOTE: Refer page no. 43 for water lter test r
esults.
W11456755A
810F950001492
©2020 T
ous droits réservés.
83
 Loading...