

Page 1

25
IMPORTANT SAFETY INSTRUCTIONS
• WARNING: to avoid a hazard due
to instability, positioning or fixing
of the appliance must be done in
accordance with the manufacturer
instructions.
• WARNING: keep the appliance
ventilation openings clear of
obstruction..
• WARNING: do not damage the
appliance refrigerant circuit pipes.
• WARNING: Do not use
mechanical, electric or chemical
means other than those
recommended by the
Manufacturer to speed up the
defrost process.
• WARNING: Do not use or place
electrical devices inside the
appliance compartments if they
are not of the type expressly
authorised by the Manufacturer.
• WARNING: ice-makers and/or
water dispensers not directly
connected to the water supply
must be filled with potable water
only.
Information: This appliance does
not contain CFCs. The refrigerant
circuit contains R134a (HFC) or
R600a (HC) (see the rating plate
inside the appliance).
• Appliances with Isobutane
(R600a): isobutane is a natural gas
without environmental impact, but
is flammable. Therefore, make
sure the refrigerant circuit pipes
are not damaged. Keep special
attention in case of damaged pipes
emptying the refrigerant circuit.
• This product may contain
Fluorinated Greenhouse Gases
covered by the Kyoto Protocol;
the refrigerant gas is inside a
hermetically sealed system.
Refrigerant gas: R134a has a
Global Warming Potential of
(GWP) 1300.
• C-Pentane is used as blowing
agent in the insulation foam and it
is a flammable gas. Pay special
attention during disposal
operations.
• This appliance is intended to be
used in household and similar
applications such as
- staff kitchen areas in shops,
offices and other working
environments;
- farm houses and by clients in
hotels, motels and other
residential type environments;
- bed and breakfast type
environments;
- catering and similar non-retail
applications
• Do not store explosive substances
such as aerosol cans with a
flammable propellant in this
appliance.
• This appliance can be used by
children aged from 8 years and
above and persons with reduced
physical, sensory or mental
capabilities or lack of experience
and knowledge if they have been
given supervision or instruction
concerning use of the appliance in
a safe way and understand the
hazards involved.
• Cleaning and user maintenance
shall not be made by children
without supervision.
Page 2

26
• To avoid the risk of children
becoming trapped and suffocating,
do not allow them to play or hide
inside the appliance.
• It must be possible to disconnect
the appliance from the power
supply by unplugging it if plug is
accessible, or by means of an
accessible multi-pole switch
installed upstream of the socket in
conformity with national safety
standards.
• Plug the appliance into a grounding
socket: the appliance must be
correctly connected to an
approved earthing system.
• Do not use single/multi adapters
or extension cords.
• During installation, make sure the
appliance does not damage the
power cable.
• Do not pull the aplliance power
cable
• The appliance must be handled
and installed by two or more
persons.
• Installation and maintenance
including replacement of the
supply cord must be carried out
by the manufacturer or a qualified
technician, in compliance with the
manufacturer’s instructions and
the local safety regulations in
force. In order to avoid a hazard
do not repair or replace any part
of the appliance including the
supply cord, unless specifically
stated in the user manual.
SAFEGUARDING THE ENVIRONMENT
1. Packing
The packing material is 100% recyclable and bears
the recycling symbol . For disposal, comply with
the local regulations. Keep the packing materials
(plastic bags, polystyrene parts, etc.) out of the
reach of children, as they are a potential source of
danger.
2. Scrapping/Disposal
The appliance is manufactured using recyclable
material.
This appliance is marked in compliance with
European Directive 2002/96/EC on Waste
Electrical and Electronic Equipment (WEEE). By
ensuring the correct disposal of this appliance, you
can help prevent potentially negative consequences
for the environment and the health of persons.
The symbol on the appliance, or on the
accompanying documents, indicates that this
appliance should not be treated as domestic waste
but must be taken to a special collection centre for
the recycling of electrical and electronic equipment.
When scrapping the appliance, make it unusable by
cutting off the power cable and removing the doors
and shelves so that children cannot easily climb
inside and become trapped.
Scrap the appliance in compliance with local
regulations on waste disposal, taking it to a special
collection centre; do not leave the appliance
unattended even for a few days, since it is a
potential source of danger for children.
For further information on the treatment, recovery
and recycling of this product, contact your
competent local office, the household waste
collection service or the shop where you
purchased the appliance.
Declaration of conformity
• This appliance has been designed for preserving
food and is manufactured in compliance with
Regulation (CE) No. 1935/2004.
• This appliance has been designed, manufactured
and marketed in compliance with:
- safety objectives of the “Low Voltage”
Directive 2006/95/CE (which replaces
73/23/CEE and subsequent amendments);
- the protection requirements of Directive
“EMC” 2004/108/EC.
Page 3
27
BEFORE USING THE APPLIANCE
To ensure best use of your appliance, carefully
read the operating instructions which contain
a description of the product and useful advice.
Keep these instructions for future reference.
1. After unpacking the appliance, make sure it is
not damaged and that the door closes properly.
Any damage must be reported to the dealer
within 24 hours of delivery of the appliance.
2. Wait at least two hours before switching the
appliance on, to ensure that the refrigerant
circuit is fully efficient.
3. Clean the inside of the appliance before using it.
PRECAUTIONS AND GENERAL RECOMMENDATIONS
INSTALLATION
• Be careful not to damage the floors (e.g.
parquet) when moving the appliance.
• Make sure the appliance is not near a heat
source.
• Install and level the appliance on a floor strong
enough to take its weight and in a place suitable
for its size and use.
• The appliance is arranged for operation in places
where the temperature comes within the
following ranges, according to the climatic class
given on the rating plate. The appliance may not
work properly if it is left for a long time at a
temperature outside the specified range.
• Make sure the voltage specified on the rating
plate corresponds to that of your home.
SAFE USE
• Do not store or use petrol, flammable liquids or
gas in the vicinity of this or other electrical
appliances. The fumes can cause fires or
explosions.
• Do not swallow the contents (non-toxic) of the
ice packs (in some models).
• Do not eat ice cubes or ice lollies immediately
after taking them out of the freezer since they
may cause cold burns.
• For products designed to use an air filter inside
an accessible fan cover, the filter shall be always
in position when the refrigerator is in function.
• Before carrying out any maintenance or cleaning
operation, unplug the appliance or disconnect it
from the power supply.
• Use the refrigerator compartment only for
storing fresh food and the freezer compartment
only for storing frozen food, freezing fresh food
and making ice cubes.
• Do not store glass containers with liquids in the
freezer compartment since they may break.
• Avoid storing unwrapped food in direct contact
with internal surfaces of the refrigerator or
freezer compartments.
• “The bulb used inside the appliance is specifically
designed for domestic appliances and is not
suitable for general room lighting within the
home (EC Regulation 244/2009)”.
The Manufacturer declines any liability for
injury to persons or animals or damage to
property if the above advice and precautions
are not respected.
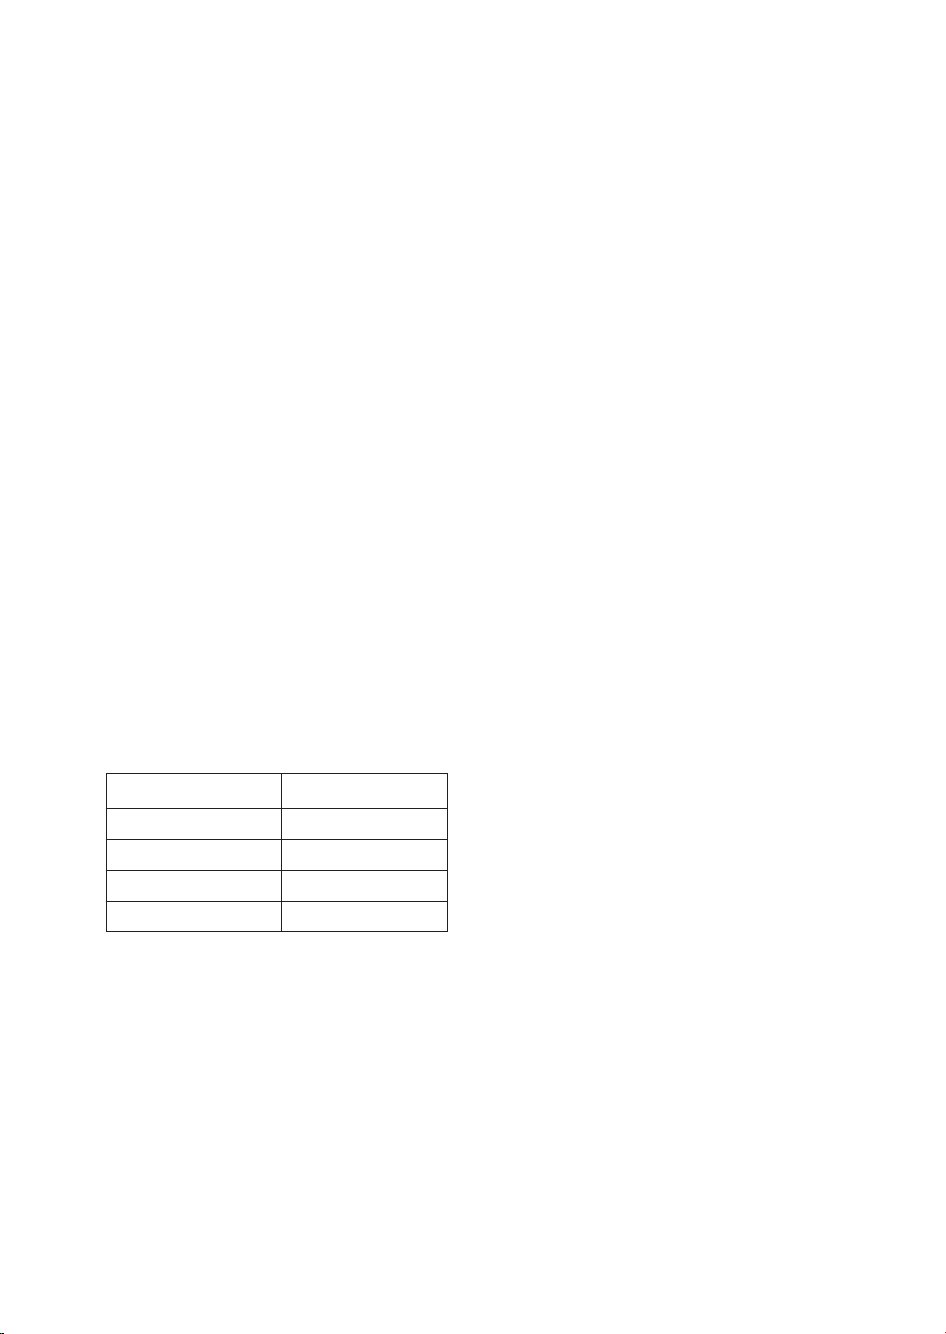
Climatic Class Amb. T. (°C)
SN From 10 to 32
N From 16 to 32
ST From 16 to 38
T From 16 to 43
Page 4

28
ENERGY-SAVING TIPS
• Install the appliance in a dry, well ventilated
room far away from any heat source (e.g.
radiator, cooker, etc.) and in a place not exposed
directly to the sun. If required, use an insulating
plate.
• To guarantee adequate ventilation follow
installation instructions.
• Insufficient ventilation on back of the product
increases energy consumption and decreases
cooling efficiency.
• The internal temperatures of the appliance may
be affected by the ambient temperature,
frequency of door opening, as well as location of
the appliance. Temperature setting should take
into consideration these factors.
• Allow warm food and drinks to cool down
before placing in the appliance.
• Do not obstruct the fan (if available) with food
items.
• After placing the food check if the door of
compartments closes properly, especially the
freezer door.
• Reduce to a minimum door opening.
• When thawing frozen food, place them in the
refrigerator. The low temperature of the frozen
products cools the food in the refrigerator.
• Appliances could have special compartments
(Fresh Food Compartment, Zero Degree
Box,...). In case not differently specified in the
specific booklet of product, they can be
removed, maintaining equivalent performances.
• Positioning of the shelves in the refrigerator has
no impact on the efficient usage of energy. Food
should be placed on the shelves in such way to
ensure proper air circulation (food should not
touch each other and distance between food and
rear wall should be kept).
• You can increase storage capacity of frozen food
by removing baskets and, if present, Stop Frost
shelve, maintaining an equivalent energy
consumption.
• Damaged gasket must be replaced as soon as
possible.
• High energy class products are fitted with
highefficiency motors that remain operational for
longer, but have a low power consumption. Do
not worry if the engine continues to run for
longer periods.
• "Night sensor" and "Screensaver" in active mode
and "Door Handle LEDs" in OFF position will
lead to energy saving.
Page 5
29
BEFORE USING YOUR FRIDGE
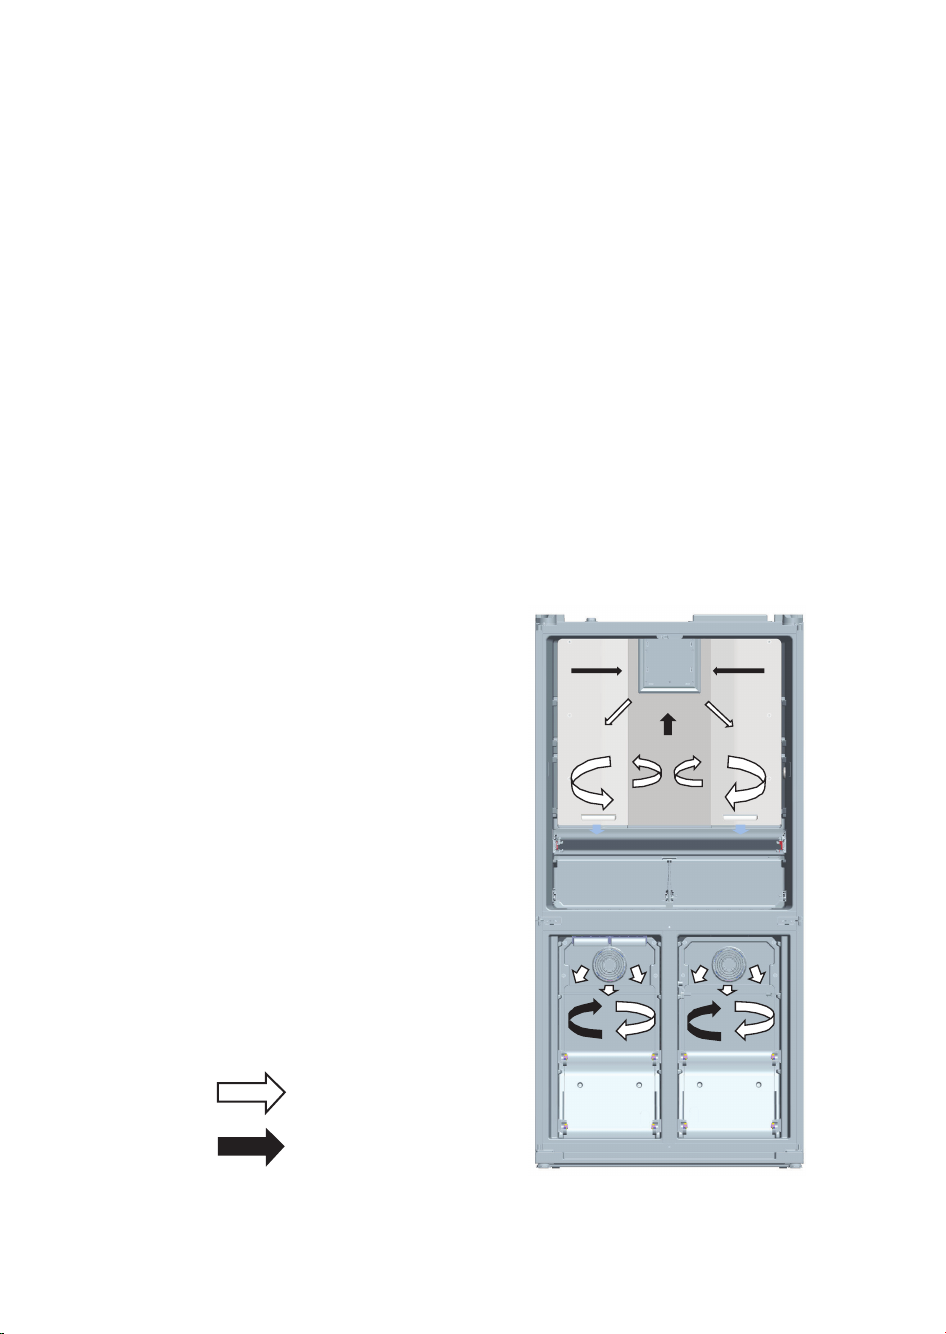
General information about new NO FROST technology
New No-Frost fridges differ from other static fridges in their operating principle.
In normal fridges, the humidity entering the fridge in the door openings and the humidity of the food
causes freezing in the freezer compartment.
To defrost the snow and ice in the freezer department, you should turn off the fridge, take the food that
needs to be kept in a constant temperature off the fridge, and remove the ice gathered in the freezer
department periodically.
The situation in the freezer compartment is completely different in no-frost fridges.
Dry and cool air is blown through the freezer compartments via fan.
Cold air dispersed homogeneously between the shelves cools all your food equally and uniformly, thus
prevents humidity and freezing.
The freezer compartment is cooled by statically. The air is distributed homogeneously between the racks
in the cooling section with the fan, and all your foods can be cooled evenly and properly.
As there is no air passage between the sections, the smells on the 3 different parts of your refrigerator do
not mix.
Therefore your New No-Frost fridge allows you ease of use, besides its huge volume and stylish
appearance.
Blow cold air
Returning hot air
Page 6
30
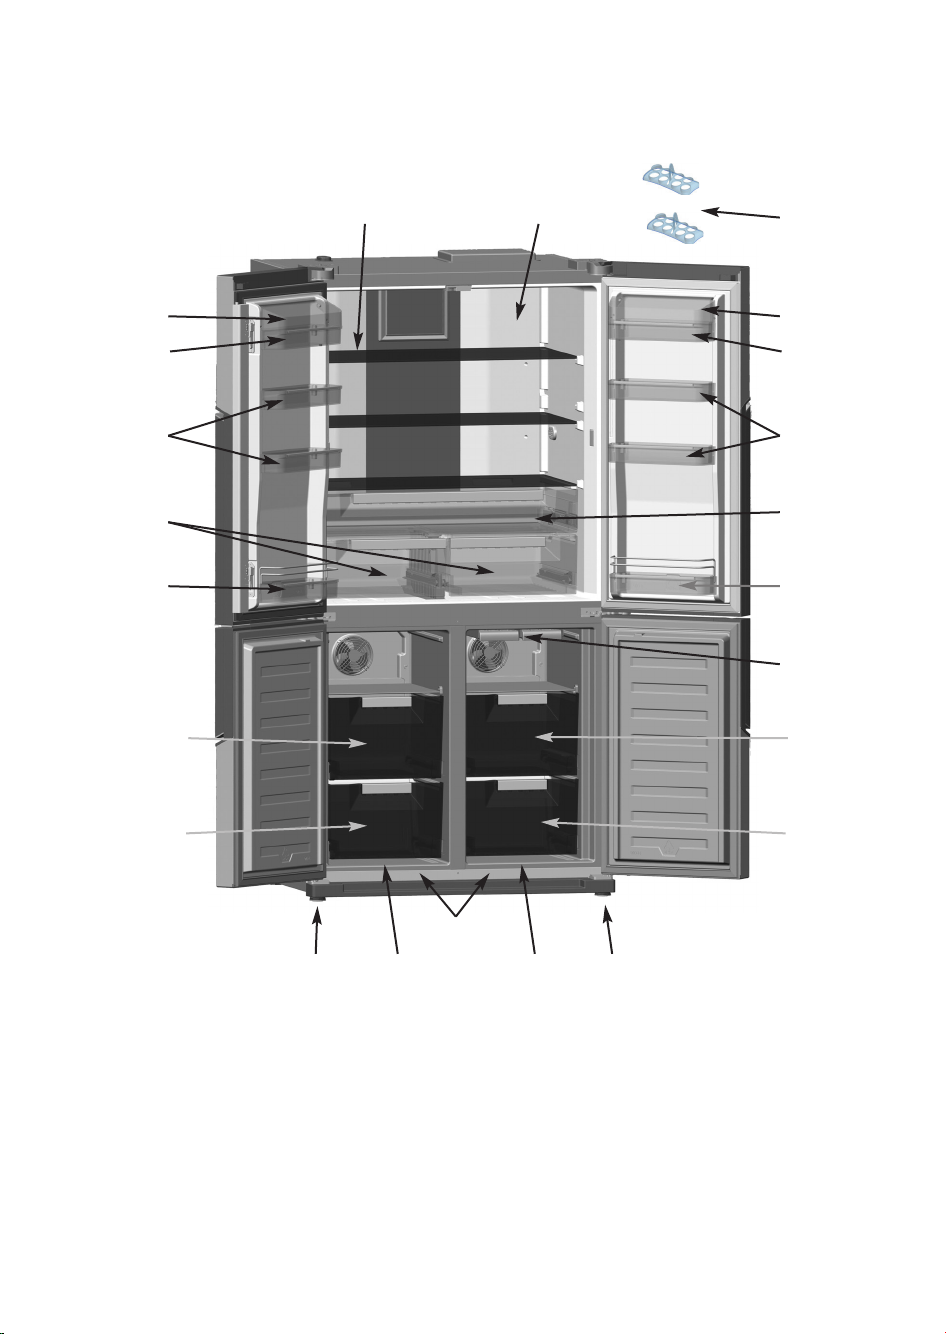
PRODUCT DESCRIPTION
A1
4
6
8
10
11
5
B
B112 B2
A. Cooler Compartment
B. Fridge / Freezer Compartment
B1. Zone-1
B2. Zone-2
1. Fridge compartment shelves
2. Chiller (breakfast) compartment
3. Crispers
4. Cheese-Butter shelf covers
5. Cheese, butter shelf
6. Door shelves
7. Eggcups
8. Door bottle shelves
9. Iceboxes
10. Freezer / Cooler top baskets
11. Freezer / Cooler bottom baskets
12. Adjustable stays
The purpose of this presentation is informing you about the parts of your appliance. The parts may vary
depending on the model of the appliance.
3
4
6
8
10
11
5
7
9
2
12
Page 7
31
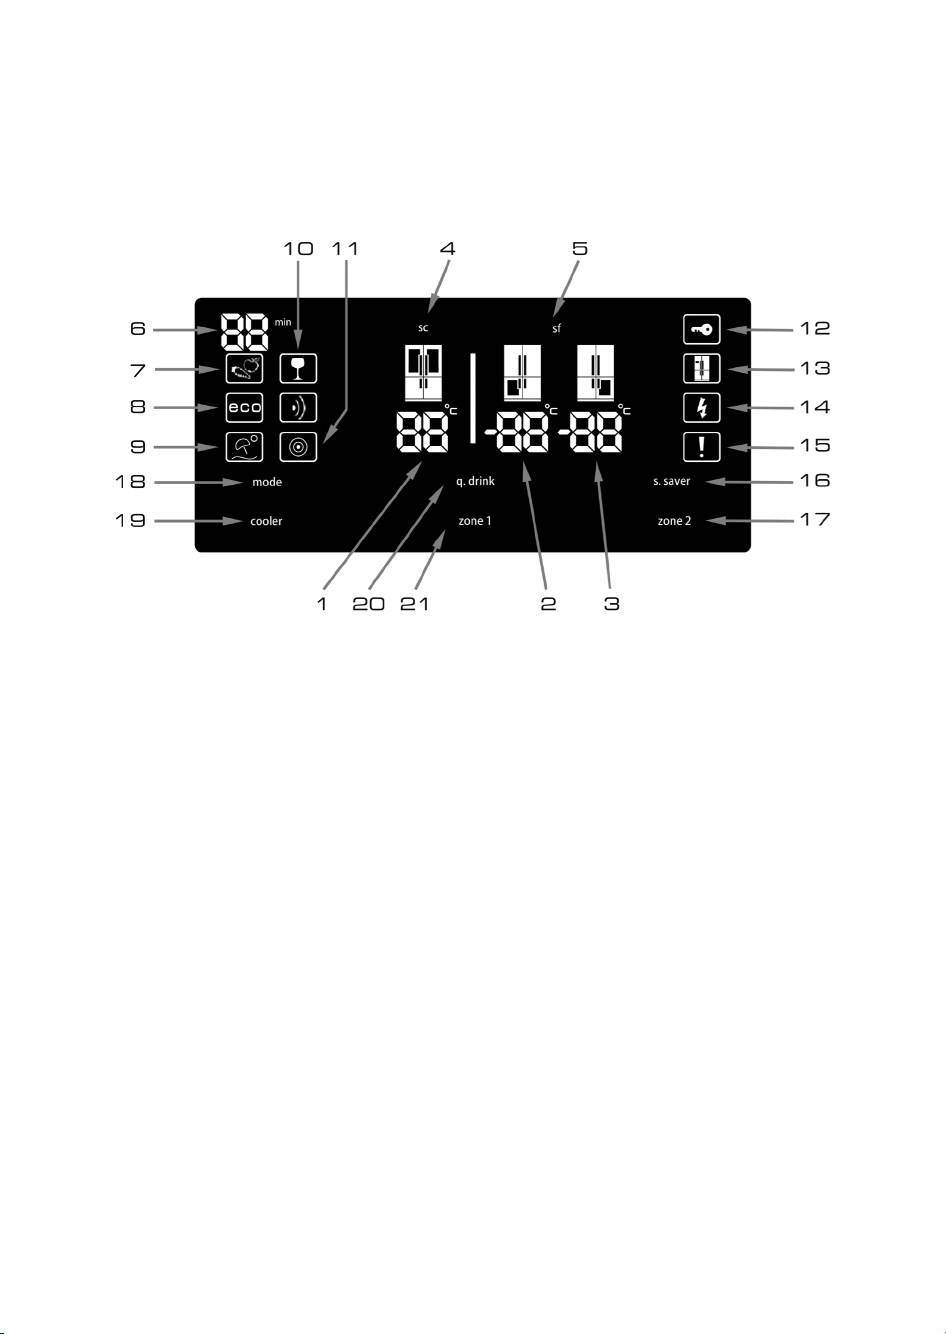
DISPLAY
1. Fridge Compartment Temperature indicator
2. Left Freezer Compartment Temperature
indicator
3. Right Freezer Compartment Temperature
indicator
4. Super cooling light
5. Super freezing light
6. Qdrink alarm counter
7. Active Chill mode
8. Economy mode
9. Holiday mode
10. Qdrink light
11. Night sensor
12. Child lock
13. Dealer-Demo mode
14. Low voltage warning
15. Alarm
16. Screensaver button
17. Zone 2 (Right freezer) button
18. Mode button
19. Cooler button
20. Qdrink mode button
21. Zone 1 (Left freezer) button
The values on the screen indicate temperature values specified by the consumer.
Page 8

32
ACTIVE CHILL mode
ACTIVE CHILL mode works to protect the flavor,
texture, and appearance of food. By maintaining
ideal temperature and humidity levels, pre-set to
optimize the freshness of fruits and vegetables, we
create the conditions for longer shelf-life. To select
ACTIVE CHILL mode, Zone1 section should be
cooler. To switch the appliance to ACTIVE CHILL
mode, you should just press [mode] button until
“ACTIVE CHILL symbol” light comes on. Zone 1
button will be off and user can not change Zone1
compartment temperature.
If Zone 1 is used as freezer, user should observe
below rules before usage of ACTIVE CHILL mode.
Important: If Zone1/Zone2 compartment will be
converted from freezer to cooler:
• You should empty the food in the related
compartment and clean the compartment . You
should leave the door close for 4 hours. Then,
food will be placed in the relevant compartment.
• Baskets and/or shelves removed from the
compartment should be re-fitted.
Note: ACTIVE CHILL mode shouldn’t be activated
if Zone 1 is used as freezer.
Note: Foods should not be put in front of the fan.
ACTIVE CHILL mode keeps fruits and vegetables
fresh and helps vitamin and nutritional values of
fruits and vegetables to protect by maintaining ideal
humidity and temperature conditions.
Maximum storage conditions of some fruits
and vegetables
FRUITS & VEGETABLES STORAGE TIME
Lettuce 10 days
Green leaves 10 days
Tomato 7 days
Cucumber 7 days
Lemon 15 days
Cherry 15 days
Orange 20 days
Strawberry 5 days
Carrot 20 days
Broccoli 10 days
Spinach 10 days
Squash 15 days
Apple 25 days
Grapes 20 days
Artichoke 15 days
Note: These conditions illustrate an maximum rate
of decay of some fruits and vegetables stored
properly with ACTIVE CHILL mode. All storage
times are suggestion. Storage times of fruits and
vegetables depend on the quality of the food,
postharvest conditions and uninterrupted
refrigeration from harvest until storage in a ACTIVE
CHILL mode appliance. Individual cases may vary.
Note: Packaged fruits and vegetables are consumed
until expire dates of produces.
Economic mode [eco]
It ensures that your refrigerator runs within ideal
temperatures. In order to activate “ECO” mode,
you should just press [mode] button until “eco and
e” light is on.
Holiday mode (H)
It is represented by an umbrella and sun. If you will
go to holiday for a long time during which you will
not use cooler compartment, you may activate this
mode. To switch the appliance to holiday mode, you
should just press [mode] button until “holiday
symbol and H” light comes on.
Night sensor
Thanks to this function that is activated when you
press night sensor [mode] and [s.saver] buttons for
3 seconds, your refrigerator’s lights will be OFF in
case of sufficient illumination, therefore you will save
energy.
Child lock (Key Symbol)
In order to activate child lock, you need to press
[cooler]+[zone 2] buttons simultaneously for 5
seconds. When the child lock is active, other
buttons will be deactivated, and therefore changing
the settings you have made will be prevented. In
order to deactivate child lock, you, again, need to
press [cooler]+[zone 2] buttons simultaneously for
5 seconds.
Dealer Demo mode
It is a mode used by service and not related to the
use of refrigerator.
Alarm
Once an alarm light comes on, you should contact a
service.
If you press [s.saver] button when there is an alarm
and an exclamation mark on the display, the alarm
sound will turn off, however the exclamation mark
will stay on the digital indicator panel until error is
fixed.
PRODUCT DESCRIPTION
Page 9

33
Screensaver [s.saver]
Thanks to this function that is activated when you
press [s.saver] button for 3 seconds, you save
energy by utilizing digital indicator panel with its
lights off. In order to deactivate the mode, repress
[s.saver] button for 3 seconds.
Zone 2 (Right freezer)
It is temperature setting button for bottom-right
compartment. By pressing [zone 2] button freezing
value of bottom-right part can be set as -16, -17,
-18, -19, -20, -21, -22, -23, -24 Celsius temperature
values. If you want to use bottom-right part as
cooler, press [zone 2] button for 3 seconds to
switch to this mode, and set to 2, 3, 4, 5, 6, 7, 8
Celsius temperature values.
Cooler [COOLER]
It is used for temperature setting of cooler
compartment. By pressing [cooler] button, you can
set the values of cooler part to 2, 3, 4, 5, 6, 7, 8
Celcius temperature values.
Qdrink mode (QDRINK)
[q.drink] button should be pressed to activate
beverage cooling mode. Each press will increment
the time for 5 minutes up to 30 minutes, and then it
returns to zero. You can view the time zone you
want to set on "Qdrink alarm counter" section.
Qdrink mode only lets the refrigerator release an
audible alert after a specific period.
Important: It should not be confused with cooling.
You must adjust the time according to the
temperature of the bottles before you put them in
zone1 and/or zone2 compartments. For example,
you can set the time as “5 minutes” in the beginning.
After this time, if the cooling is insufficient, you
might set another 5 or 10 minutes.
While using this mode, you must check the
temperature of the bottles regularly. When the
bottles are cool enough, you must take them out of
the appliance. If you forget bottles in Q.DRINK
mode, bottles may explode.
Important: If you are using Zone1 and Zone2
compartments for cooling, this mode will not be
activated.
Zone 1 (Left freezer)
It is temperature setting button for bottom-left
compartment. By pressing [zone 1] button freezing
value of bottom-left part can be set as -16, -17, -18,
-19, -20, -21, -22, -23, -24 Celsius temperature
values. If you want to use bottom-left part as cooler,
press [zone1] button for 3 seconds to switch to this
mode, and set to 2, 3, 4, 5, 6, 7, 8 Celsius
temperature values.
Quick freezing (SF SUPERFREEZE)
You should press on [zone1] and/or [zone2] buttons
until "sf" letters are displayed on the display.
Once “sf” letters are viewed, a beep sound will be
released if you press no button and the mode will
be selected. You can use this mode to freeze
prepared meals or freeze large amounts of food
quickly. You should active this function 6 hours
before to place the foods to be frozen in the
compartment. Quick freezing mode will
automatically be deactivated after 30 hours or once
the freezer compartment temperature sensor feels
sufficient temperature.
For quick freezing, you should divide the food
to frozen evenly in zone1 and zone2
compartments.
Quick cooling (SC SUPERCOOL)
Press cooler button until “sc” letters are viewed on
the display. Once “sc” letters are viewed, a beep
sound will be released if you press no button and
the mode will be selected. You can use this mode to
cool prepared meals or cool large amounts of food
quickly. Quick cooling mode will be automatically
cancelled after 4 or 6 hours depending on the
environmental temperature or when the cooler
compartment reaches a sufficiently low
temperature.
Door lights On/Off (DOOR LIGHT ON/OFF)
Illumination system hidden in the door handles of
the product should be used based on demand. In
order to activate illumination system on the door
handles, you need to press [mode] button for 3
seconds. For deactivation, press [mode] button for 3
seconds again.
In case of "ON" position, door illuminations will
always be on.
Using a Freezer Compartment as Cooler
Compartment Based On Demand
The bottom-right and -left compartments on the
appliance can be used either as freezer and cooler.
Preferably, you need to press [zone 1] button for 3
seconds to use bottom-left part as cooler or [zone
2] button for 3 seconds to use bottom-right part as
cooler.
Important : If Zone1/Zone2 compartment will be
converted from freezer to cooler:
• You should empty the food in the related
compartment and leave the door close for 4
Page 10

34
hours. Then, food will be placed in the relevant
compartment.
• Baskets and/or shelves removed from the
compartment should be re-fitted.
Similarly, in order to utilize any of bottom
compartments used as cooler as freezers again, you
need to press the related compartment button for 3
seconds.
Important : If Zone1/Zone2 compartment will be
converted from cooler to freezer:
• You should empty the food in the related
compartment and leave the door close for 2
hours. Then, food will be placed in the relevant
compartment.
• When zone 1 and zone 2 compartments used as
cooler are switched to Holiday or Economic
setting value, it will keep on running as cooler.
Important
• If you want to use zone compartments as
cooler, please give priority to Zone 1
compartment for energy saving.
• Do not use Zone 2 compartment as freezer at
ambient temperatures over 38°C.
Compartment On-Off mode
You can wholly cancel compartments you do not
need nor want by checking through indicator panel.
In order to turn off Zone 2 and cooler at the same
time, hold [mode] and [zone 2] buttons pressed
simultaneously for 5 seconds, and all figures
indicating the part turned off will disappear on the
digital indicator panel.
In order to turn off Zone 1 compartment, hold
[mode] and [zone 1] buttons pressed simultaneously
for 5 seconds, and all figures indicating the part
turned off will disappear on the digital indicator
panel.
In order to turn off just the cooler, hold [mode] and
[cooler] buttons pressed simultaneously for 5
seconds, and all figures indicating the part turned off
will disappear on the digital indicator panel.
In order to reactivate the turned-off compartment,
use the same combination of buttons.
Page 11

35
REFRIGERATOR COMPARTMENT
Chiller / Breakfast
When this compartment is used as 0°C compartment (chiller), it ensures that your food is preserved at
0°C. You can keep the frozen foods that you take out of the deepfreeze compartment in order to defrost
them or you can keep the meats and cleaned fishes (in plastic bags or packets) etc. which you will use
within 1-2 days without need for freezing.
Note: Water is frozen in 0°C but the foods including salt or sugar can be frozen in colder environments.
Please do not put the food you would like frozen or iceboxes in this partition.
Chiller / Breakfast
Crisper
Page 12

Crisper air setting button
Turn the air adjustment knob between crisper and chiller to open position when the crisper is filled
excessively. This way, the air intake into the crisper is adjusted and food remains fresh for a longer period
of time.
Visual and text descriptions on the accessories section may vary according to the model of your
appliance.
36
Crisper air adjustment button
Page 13

37
Cooler Compartment
• Under normal operation conditions, it is enough to set the temperature of cooler compartment
to +4 / +6 °C.
• In order to avoid frosting, humidification and odour, food should be placed to the fridge in closed
containers or covered with appropriate material.
• Hot food and beverages should be cooled to room temperature before being placed in the fridge.
• Vegetables and fruits can be placed into crisper by packaging with clean and if possible, spongy plastic
bags.
• Storing fruits and vegetables seperately helps ethylene sensitive vegetables (green leafy, broccoli, carrot
etc.) not to affect ethylene releaser fruits (banana, peach, apricot, fig etc.)
• You should not put wet vegetables into the refrigerator.
• Storage time for all food produces depends on food initial quality and uninterrupted refrigeration cycle
before refrigerator storage.
• You should not store meat products and fruits&vegetables in the same places not to contaminate.
Water leaking in meat can be contamination in the refrigerator. You should package meat products and
clean leakages on the shelves.
• You should not put food in front of air flow passage.
• Storage time for all food produces depends on food initial quality and uninterrupted refrigeration cycle
before refrigerator storage.
• You should consume packaged foods until expire date.
Important Note:
• Cover the liquid and stews when you put them on fridge. Otherwise, the humidity amount inside the
fridge increases. And, this causes the fridge to operate more. Covering the food and beverages also
allow you to protect their taste and flavour.
• Potatoes, onion and garlic shouldn’t be kept in the fridge. Some suggestions on the placing and storing
of your food in the fridge compartment are supplied below.
PLACING THE FOOD
Food Maximum Storing time
Where to place in the
fridge department
Vegetables and fruits 1 week Vegetable bin
Meat and fish 2 - 3 Days
Wrapped in plastic foil or bags or
in a meat container
(on the glass shelf)
Fresh cheese 3 - 4 Days In special door shelf
Butter and margarine 1 week In special door shelf
Bottled products
milk and yoghurt
Until the expiry date
recommended by the producer
In special door shelf
Eggs 1 month In the egg shelf
Cooked food All shelves
Page 14

38
FREEZER COMPARTMENT
• The freezer compartment is used for storing frozen foods for a long time or for producing ice.
• If you leave the door of freezer open for a long time, frosting will appear on the lower stage of freezer.
Thus, air circulation will be obstructed. In order to avoid this, first unplug the cord and wait until thawed.
After ice melts, you should clean the freezer.
• You can take off baskets, cover, etc. to increase storing volume of freezer.
• Volume specified on the product label shows the value without baskets, covers, etc.
IMPORTANT
Please never refreeze frozen food after thawing them.
It may be hazardous to your health as it may lead to food poisoning.
• Do not place hot food to the freezer before cooling them. This may cause other frozen food in the
freezer to get decayed.
• When buying frozen food, make sure that it was frozen under appropriate conditions and its package is
not torn.
• In case of humidification on package of frozen food and a smelly odour, food may have been stored under
inappropriate conditions beforehand and it may have gotten decayed. Do not buy those kinds of food.
• Storing time for frozen food may differ according to the ambient temperature, frequency of door
openings, thermostat adjustments, type of food and the time between the buying of the food and placing
of the food in the freezer. Always follow instructions on the package and do not exceed storing period.
• Note: If frozen food taken out of freezer of refrigerator is placed into bottom compartment one day
before, it promotes refrigerator by preserving its temperature there, so energy will be saved. If you put
the material in the deep freeze to an open area, energy loss occurs.
Some spices in cooked food (aniseed, basil, dill, vinegar, spice mix, ginger, garlic, onion, mustard, thyme,
marjoram, black pepper, bologna sausage etc.) may have a foul taste when stored for a long time. Therefore,
frozen food should be spiced just a little or spice should be added after the food is thawed.
The storing time for the food depends on the oil used. Margarines, veal fat, olive oil and butter are suitable,
peanut oil and lard are not suitable.
Cooked food in liquid form should be frozen in plastic containers, other food should be frozen wrapped in
plastic foil or in plastic bags.
Some suggestions on the placing and storing of your food in the freezer compartment are supplied on the
following pages.
Icebox
• Remove the icebox by grasping its front side.
• Fill ¾ of icebox with water and insert it.
• You can take ice after 2 hours approximately. You can
service by extracting icebox.
Note: When placing the icebox after filling with water, make
sure that you position it horizontally without tilting. Otherwise,
water inside icebox may pour on the basket.
Icebox
Page 15

39
PLACING THE FOOD
Meat and fish Preparation
Maximum storing time
(month)
Steak Wrapping in a foil 6 - 8
Lamb meat Wrapping in a foil 6 - 8
Veal roast Wrapping in a foil 6 - 8
Veal cubes In small pieces 6 - 8
Lamb cubes In pieces 4 - 8
Minced meat In packages without using spices 1 - 3
Giblets (pieces) In pieces 1 - 3
Bologna sausage/salami
Should be packaged even if it has
membrane
Chicken and turkey Wrapping in a foil 4 - 6
Goose and Duck Wrapping in a foil 4 - 6
Deer, Rabbit, Wild Boar In 2.5 kg portions and as fillets 6 - 8
Fresshwater fishes
(Salmon, Carp, Siluroidea)
After cleaning the bowels and
scales of the fish, wash and dry it;
and if necessary, cut the tail and
head.
2
Lean fish; bass, turbot, flounder 4
Fatty fishes (Tunny, Mackarel,
bluefish, anchovy)
2 - 4
Shellfish Cleaned and in bags 4 - 6
Caviar
In its package, aluminium
or plastic container
2 - 3
Snail
In salty water, aluminum
or plastic container
3
Page 16

40
Vegetables and Fruits Preparation
Maximum storing time
(month)
String beans and beans
Wash and cut to small pieces and
boil in water
10 - 13
Beans Hull and wash and boil in water 12
Cabbage Cleaned and boil in water 6 - 8
Carrot
Clean and cut to slices
and boil in water
12
Pepper
Cut the stem, cut into two
pieces and remove the core
and boil in water
8 - 10
Spinach Washed and boil in water 6 - 9
Cauliflower
Take the leaves apart, cut the heart
into pieces, and leave it in water
with a little lemon juice for a while
10 - 12
Eggplant Cut to pieces of 2cm after washing 10 - 12
Corn
Clean and pack with its stem
or as sweet corn
12
Apple and pear Peel and slice 8 - 10
Apricot and Peach
Cut into two pieces and remove
the stone
4 - 6
Strawberry and
Blackberry
Wash and hull 8 - 12
Cooked fruits
Adding 10 % of sugar in the
container
12
Plum, cherry Wash and hull the stems 8 - 12
Page 17

41
Dairy Products Preparation
Maximum Storing
time (months)
Storing Conditions
Packet
(Homogenize) Milk
In its own packet 2 - 3
Pure Milk – In its own
packet
Cheese-excluding
white cheese
In slices 6 - 8
Original package may
be used for short
storing period.
It should be wrapped
in foil for longer
periods.
Butter, margarine In its package 6
Maximum Storing
time (months)
Thawing time in
room temperature
(hours)
Thawing time in oven
(minutes)
Bread 4 - 6 2 - 3 4-5 (220-225 °C)
Biscuits 3 - 6 1 - 1,5 5-8 (190-200 °C)
Pastry 1 - 3 2 - 3 5-10 (200-225 °C)
Pie 1 - 1,5 3 - 4 5-8 (190-200 °C)
Phyllo dough 2 - 3 1 - 1,5 5-8 (190-200 °C)
Pizza 2 - 3 2 - 4 15-20 (200 °C)
CARE AND MAINTENANCE
• Make sure to unplug the fridge before starting to clean it.
• Do not wash your fridge by pouring water.
• You can wipe the inner and outer sides of your appliance with a soft cloth or a sponge using warm and
soapy water.
• Remove the parts individually and clean with soapy water. Do not wash in washing machine.
• Never use flammable, explosive or corrosive material like thinner, gas, acid for cleaning.
• The condenser (the back part with black wings) should be cleaned using a vacuum cleaner or a dry
brush at least once a year. This will help your freezer to operate more efficiently and will enable you to
save energy.
Cleaning evaporation bowl
• Your fridge defrosts automatically. Water produced by defrosting flows to evaporating container passing
through water collecting groove, and vaporizes here by itself.
Replacing LED lights used for illumination
For replacing LED lights used for illumination, do contact an authorized service.
Page 18

42
INSTALLATION
• We do not take the responsibility of the damages that occur due
to ungrounded usage.
• Place your fridge in a place that it would not be exposed to direct
sunlight.
• Install the distance adjustment plastic (the part with black vanes at
the rear) by turning it 90° as shown in the figure to prevent the
condenser from touching the wall.
• Refrigerator should be placed against a wall with a free distance
not exceeding 75 mm.
• Your appliance should be at least 50 cm away from stoves, ovens
and heater cores, and should be at least 5 cm away from electrical
ovens.
• It should never be used outdoors or left under the rain.
• When your fridge is placed next to a deep freezer, there should be at least 2 cm between them to
prevent humidity on the outer surface.
• Do not place anything on your fridge, and install your fridge in a suitable place so that at least 15 cm is
available on the upper side.
• The adjustable front legs should stabilized in an appropriate height to allow your fridge operate in a
stable and proper way. You can adjust the legs by turning them clockwise (or in the opposite direction).
This should be done before placing food in the fridge.
• Before using your fridge, wipe all parts with warm water added with a tea spoonful of sodium
bicarbonate, and then rinse with clean water and dry. Place all parts after cleaning.
• No carpets, rugs, etc. which may obstruct air circulation should be laid under the refrigerator.
Shipment and repositioning
• Original package and foam may be kept for re-
transportation (optionally).
• You should fasten your fridge with thick
package, bands or strong cords and follow the
instructions for transportation on the package
for re-transportation.
• Remove movable parts (shelves, accessories,
vegetable bins etc.) or fix them into the fridge
against shocks using bands during repositioning and transportation.
• An ambient sensor, main board and hinge
covers are available on your refrigerator.
During cleaning, make sure no fluid enters this
area.
Carry your refrigerator with 4 people as
indicated in the figure.
Ambient
sensor
Main board
box
Hinge cover
Page 19

43
Check Warnings;
Your fridge warns you if the temperatures for cooler and freezer are in improper levels or when a
problem occurs in the appliance. You can see these warnings on the indicator display.
TROUBLESHOOTING GUIDE
ERROR DISPLAY ERROR TYPE REMARK DO’s
and audible warning
Error warning
One or more equipment
of the product has been
deactivated or there is
cooling problem.
Contact a service as
soon as possible.
Freezer department
is not cold enough
May arise due to
longperiod energy cut-off
or failure of cooling
equipment.
1. In case of melted
product in
compartment, do not
refill and consume up
as soon as possible.
2. Until temperature of
compartment returns
to normal (warning
disappears), operate
in a lower temperature
or in Super Freeze
Mode.
3. Do not place fresh
food in compartment
unless this warning
disappears.
Freezer department
is not cold enough
Cooler has lost its ideal
temperature.
1. Until temperature of
compartment returns
to normal (warning
disappears), operate
in a lower temperature
or in Super Cool
Mode.
2. Do not open door until
this error disappears.
Cooler compartment
is overcool.
Our product in cooler
compartment are in risk
of freezing.
1. If Super Cool is
active, cancel it.
2. Operate under lower
setting value.
Mains voltage has
decreased under 170V.
This is not an error, it is
intended for warning and
precaution.
When mains voltage
restores to normal
value, the warning will
disappear.
_
Page 20

44
Check Warnings;
If your fridge is not operating;
• Is there any electrical faults?
• Is your appliance plugged?
• Is the fuse of the receptacle that the plug is plugged or the main fuse blown?
• Is there any fault in the socket? Examine this by plugging your fridge into a socket outlet which you are
sure that is working.
If your fridge is operating too loudly
Normal Noises;
Cracking (Ice cracking) Noise:
• During automatic defrosting.
• When the appliance is cooled or warmed (due to expansion of appliance material).
Short cracking: Heard when the thermostat switches the compressor on/off.
Valve sound: Ticking sound is normal when your refrigerator runs. This sound is released from a valve
behind your refrigerator.
Vacuuming sound: After your refrigerator’s doors are opened and closed, a short sound may be heard
due to pressure difference. That is normal exactly.
Normal motor noise: This noise means that the compressor operates normally. Compressor may cause
more noise for a short time when it is activated.
Bubbling noise and splash: This noise is caused by the flow of the refrigerant in the tubes of the system.
Water flow noise: Normal flow noise of water flowing to the evaporation container during defrosting.
This noise can be heard during defrosting.
Air blow noise: Normal fan noise. This noise can be heard in No-Frost fridge during normal operation of
the system due to the circulation of air.
If humidity builds up inside the fridge;
• Are all food packed properly? Are the containers dried before placing them in the fridge?
• Are the fridge doors opened frequently? Humidity of the room gets in the fridge when the doors are
opened. Humidity build up will be faster when you open the doors more frequently, especially if the
humidity of the room is high.
If the doors are not opened and closed properly;
• Do the food packages prevent closing of the door?
• Are the door compartments, shelves and drawers placed properly?
• Are door joints broken or torn?
• Is your fridge on a level surface?
IMPORTANT NOTES:
• After sudden power breakdowns or after unplugging the appliance, Thermal protector will cut off the
power of compressor temporarily because the gas in the cooling system is not stabilized yet. Your
fridge will start after 4 or 5 minutes, there is nothing to worry about.
• If you will not use your fridge for a long time (e.g. in summer holidays) unplug it. After defrosting, clean
your fridge and leave the door open to prevent humidity and smell.
• If the problem persists after you have followed all the instructions above, please consult to the nearest
Authorized Service.
• The appliance you bought is designed for home type use and can be used only at home and for the
stated purposes. It is not suitable for commercial or common use. If the consumer use the appliance in
a way that does not comply with these features, we emphasize that the producer and the dealer shall
not be responsible for any repair and failure within the guarantee period.
Page 21

45
Before contacting After Sales Service:
1. See if you can solve the problem yourself with
the help of the “Troubleshooting guide”.
2. Switch the appliance on again to see if the
problem persists.
If it does, switch off and wait for about an hour
before switching on.
3. If the problem persists after this course of action,
contact After-sales Service.
Specify:
• the nature of the problem,
• the model,
• the Service number (the number after the word
SERVICE on the rating plate on the inside of the
appliance),
• your full address,
• your telephone number and area code.
Note:
The direction of door opening can be changed.
If this operation is performed by After-sales
Service it is not covered by the warranty.
AFTER-SALES SERVICE
1) For Great Britain only
Warning - this appliance must be earthed
Fuse replacement
If the mains lead of this appliance is fitted with a BS 1363A
13amp fused plug, to change a fuse in this type of plug use an
A.S.T.A. approved fuse to BS 1362 type and proceed as
follows:
1. Remove the fuse cover (A) and fuse (B).
2. Fit replacement 13A fuse into fuse cover.
3. Refit both into plug.
Important:
The fuse cover must be refitted when changing a fuse and if
the fuse cover is lost the plug must not be used until a correct
replacement is fitted.
Correct replacement are identified by the colour insert or the
colour embossed in words on the base of the plug.
Replacement fuse covers are available from your local electrical store.
2) For the Republic of Ireland only
The information given in respect of Great Britain will frequently apply, but a third type of plug and socket
is also used, the 2-pin, side earth type.
3) Socket outlet / plug (valid for both countries)
If the fitted plug is not suitable for your socket outlet, please contact Whirlpool Service for further
instruction. Please do not attempt to change plug yourself. This procedure needs to be carried out by a
qualified Whirlpool technician in compliance with the manufactures instructions and current standard
safety regulations.
ELECTRICAL CONNECTION
 Loading...