

Page 1
Wir danken Ihnen, dass Sie dieses sichere und äußerst leicht zu bedienende Ariston-Gerät gewählt haben. Um sich
mit diesem vertraut zu machen und es auf optimale Art zu gebrauchen lernen, empfehlen wir Ihnen, dieses Handbuch
vor Inbetriebnahme des Gerätes aufmerksam zu lesen, da es wichtige Hinweise hinsichtlich der Sicherheit bei der
Installation, dem Gebrauch und der W artung liefert. Bewahren Sie dieses Handbuch sorgfältig auf , damit Sie es jederzeit
zu Rate ziehen können. Dank e .
Aus der Nähe betrachtet
I
G
D
A
D
12
11
10
9
8
7
H
1
12
12
2
2
11
11
3
3
10
10
4
4
9
9
5
5
8
8
7
7
6
6
F
1
12
2
2
11
3
3
10
4
4
9
5
5
8
7
6
6
L
E
A
M
C
8
B
7
1
2 3 4 5 6
A
9
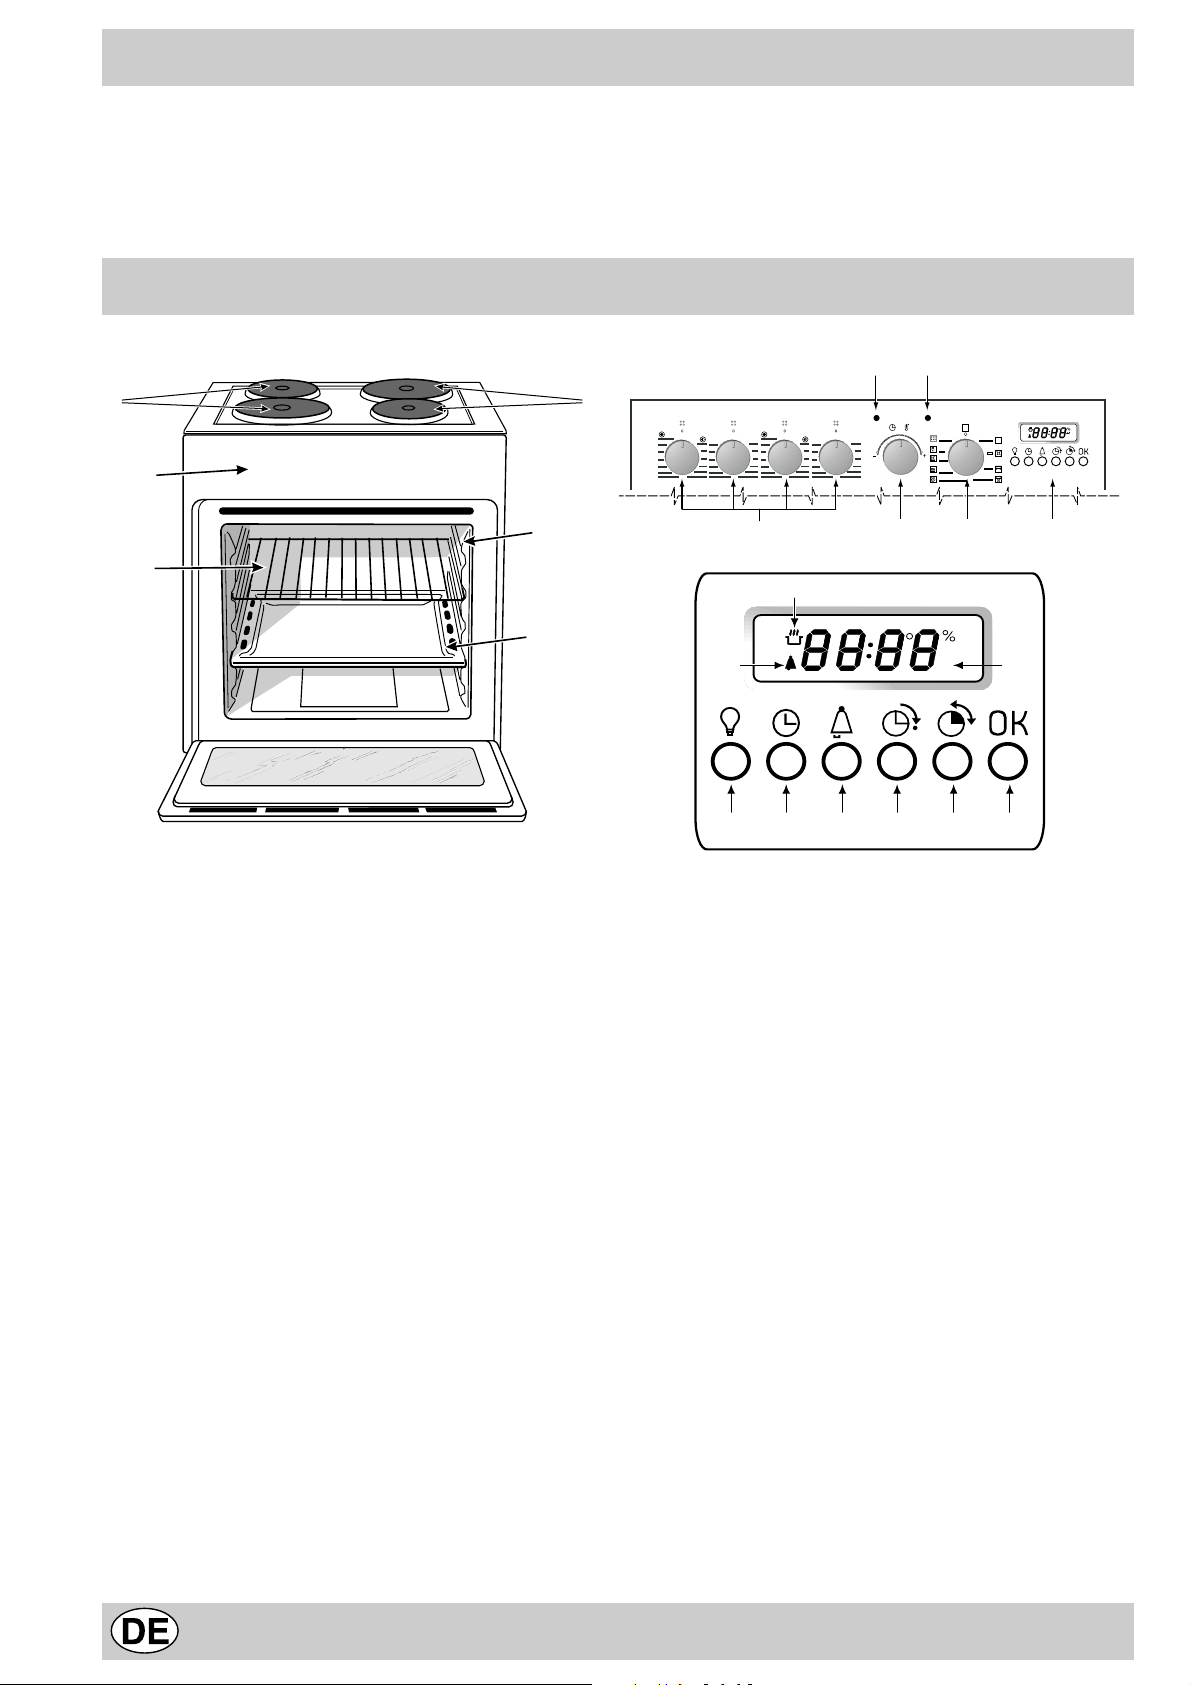
A. Schalterblende
B. Fettpfanne bzw. Bac kblech
C. Backofenrost
D. Elektroplatte
E. Drehknopf Garfunktionen
F. Elektroplatten-Reglerknöpfe
G. Elektroplatten-Betriebsanzeigeleuchte
H. Gleitführungen für Backblech und Bac kof enroste
I. Backofen-Betriebsanzeigeleuchte (nur an einigen
Modellen) - Diese bleibt während der Aufheizphase bis
zum Erreichen der Temperatur eingeschaltet.
L. Drehknopf Gartemperaturen
M. Elektronischer Garzeitprogrammierer - Mit dieser
Zeitschaltautomatik kann durch Eingabe der Garzeit
und der als Garende vorgesehenen Uhrzeit jede
mögliche Garfunktion programmiert werden. Sie kann
auch als Kurzzeitwec ker eingesetzt w erden.
1. Backofenbeleuchtung
2. Einstellung der Uhr
3. Einstellung des Kurzzeitweckers
4. Garende
5. Garzeit (Dauer)
6. Bestätigung der Einstellung
7. Zeitanzeige
8. Anzeige Vorheizen (m blinkt) oder Garvorgang (m
Dauerlicht) läuft ab
9. Anzeige Garvorgang wurde programmiert
10.Anzeige blockierte Tür
2
Page 2

Inbetriebnahme des Gerätes
Der
‚7 Cuochi‘
die Vorzüge der herkömmlichen Backöf en mit „statischem“Wärmeübergang und die der modernen „Heißluft“-Backöfen
mit Wärmeströmung.
Es handelt sich um ein äußerst vielseitiges Gerät, das es
Ihnen ermöglicht, zwischen 7 einfachen und sicheren Brat-/
Backmethoden wählen zu können. Eingestellt werden diese
verschiedenen Funktionen über den Funktionswähler „E“ der
Schalterblende.
V orsicht: Bei erstmaliger Inbetriebnahme sollte der leere
Backofen für etwa 30 Minuten bei Höchsttemperatur und
geschlossener Backofentür in Betrieb genommen werden.
Nach Ablauf dieser Zeit schalten Sie den Backof en aus, öffnen die Backofentür und lüften die Küche. Der hierbei evtl.
entstehende Geruch wird durch das Verdunsten der zum
Schutz des Backofens während des Zeitraums zwischen
Produktion und erster Inbetriebnahme aufgetragenen Stoffe verursacht.
Einstellen der Digitaluhr
Die Einstellung der Uhrzeit ist nur möglich, wenn der Drehknopf „E“ auf 0 steht.
Nach dem Netzanschluss oder nach einem Stromausfall
blinkt auf dem Display die Anz eige: 0.00.
Zum Einstellen der Uhr drehen Sie den Knopf „L“ und
drücken dann zum Bestätigen auf OK. Drehen Sie erneut
den Knopf „L“, um die Minuten einzustellen, und drücken
Sie abschließend OK, um die Einstellung zu bestätigen.
Um die vorgenommenen Einstellungen zu ändern, betätigen Sie die Taste 2 und gehen Sie wie oben beschrieben
vor.
Kurzzeitwecker-Funktion
Der Kurzzeitwec ker steuert weder das Ein- noch das Ausschalten des Backofens; nach abgelaufener Zeit ertönt
nur ein akustisches Signal, das durch Drücken einer beliebigen Taste abgestellt werden kann.
Zum Einstellen des Kurzzeitweckers drücken Sie zunächst
die Taste 3 und stellen Sie dann mit Hilfe des Drehknopfes
„L“ die gewünschte Zeit ein. Betätigen Sie anschließend die
T aste OK, um die Einstellung zu bestätigen. Die Ikone n erinnert Sie daran, dass der Timer aktiviert wurde.
Ist die Zeit abgelaufen, vernehmen Sie ein kurzes Tonsignal,
das sich nach Drücken einer beliebigen Taste nach 1 Sekunde abschaltet.
Die Backofenbeleuchtung
Bei ausgeschaltetem Backof en kann die Beleuchtung jederzeit durch Drücken der Taste 1 eingeschaltet werden.
Kühlluftgebläse
Um die Temperaturen an den äußeren Teilen des Backofens abzusenken, sind einige Modelle mit einem Kühlluftgebläse ausgestattet, welches einen Luftstrahl erzeugt,
der zwischen Frontb lende und Bac kof entür austritt.
Anmerkung: Nach Absc hluss des Garvorgangs bleibt
das Gebläse solange in Betrieb, bis der Bac kofen ausreichend abgekühlt ist.
Anmerkung: Beim Intensivbacken „Fast cooking“ aktiviert
sich das Gebläse erst bei heißem Backof en automatisch.
V or sicht: Das Gerät ist mit einem Diagnose-System ausgestattet, dank dessen eventuelle Betriebsstörungen erfasst
werden können. Dem Verbraucher werden diese durch An-
-Backofen vereint in einem einzigen Gerät
zeigen des Typs „Fn Fm“ (n und m=einstellige Zahlen) gemeldet. In diesen Fällen ist der K undendienst anzuf ordern,
da der Backof en nicht funktioniert.
Gebrauch des Backofens
Durch Drehen des Drehknopfes „E“ kann das gewünschte
Garprogramm ausgewählt werden. Der Back ofen beginnt
sofort mit der Vorwärmphase, während der auf dem Dis-
play die Ikone m blinkt und die dem ausgewählten Gar-
programm entsprechende Gartemperatur erscheint. Soll-
te diese nicht der von Ihnen gewünschten Temperatur
entsprechen, können Sie sie einfach durch Drehen des
Knopfes „L“ ändern.
Ist die Aufheizphase abgeschlossen, schaltet die Ikone
m auf Dauerlicht. Nun kann das Gargut in den heißen
Backofen eingeschoben w erden.
Anmerkung: Die Funktionen F AST COOKING und GRILL
besitzen keine Vorheizphase. Beachten Sie, dass während
des Garvorganges folgende Einstellungen jederzeit vorgenommen werden können:
• Änderung des Programms durch Betätigen des Drehknopfes „E“;
• Änderung der Temperatur, und zwar über den Drehknopf
„L“;
• Programmieren der Programmdauer und des Programmendes (siehe Abschnitt „Garzeit-Programmierung“).
• Unterbrechen des Garprogrammes zu jedem beliebigen
Zeitpunkt (stellen Sie hierzu den Drehknopf „E“ auf Position
0).
Anmerkung: Für jede Garfunktion ist aus Sicherheitsgrün-
den eine Garzeit von 2 Std. voreingestellt. Wird diese
Garzeit nicht abgeändert, schaltet sich der Backofen automatisch nach Ablauf dieser Zeit aus.
V orsic ht: Verwenden Sie bitte die erste (die unterste) Führungsschiene nur für die Fettpfanne , d.h. zum A uffangen des
abtropfenden Fleischsaftes und/oder F ettes beim Grillen oder
bei Einsatz des Bratspießes (nur an einigen Modellen). Für
alle anderen Gararten ist diese Führungsschiene nicht zu
verwenden. Stellen Sie bei in Betrieb befindlichem Backofen
auch niemals Kochgeschirr auf den Backofenboden, Sie
könnten hierdurch das Email beschädigen. Stellen Sie Ihr
Kochgeschirr (Auflaufformen, Alufolien, usw.) stets auf die
ordnungsgemäß in die Führungsschienen eingesetzten, mit
dem Gerät gelieferten Backofenroste.
T raditionell a
Thermostatenknopf „L“: zwischen 40°C und 250°C.
Bei dieser Einstellung schalten sich die beiden Heizelemente,
das untere und das obere, ein. Dies ist der klassische
Backofen unserer Großmütter, der jedoch, was
Wärmeverteilung und Energieeinsparung anbelangt, auf ein
außergewöhnliches Niveau gebracht wurde . Der traditionelle
Backofen ist unübertrefflich bei der Zubereitung von
Eintopfgerichten wie: Kohl mit Schw einerippchen, Stockfisch
auf spanische Art, Stockfisch mit Tomatensoße,
Kalbsgeschnetzeltes mit Reis usw.... Ausgezeichnete
Resultate erzielen Sie bei der Zubereitung von Rind- und
Kalbfleischgerichten wie: Schmorbraten, Ragout, Gulasch,
Wild, Lammkeule, Schweinslende usw., die eine lange
Garzeit und ständige Hinzugabe von Flüssigkeit erfordern.
3
Page 3

Der traditionelle Backofen bietet immer noch das beste
System zum Backen von Kleingebäck und Kuchen, zum
Garen von Obst, sowie zum Garen von A uflaufgerichten bzw.
Gerichten in geschlossenen Backformen. Bei Einsatz des
traditionellen Backof ens schieben Sie bitte jedes Mal nur ein
Backblech ein, da ein gleichzeitiges Garen bzw . Back en auf
mehreren Ebenen keine gleichmäßige Hitzeverteilung
gewährleistet. Je nach Einsatz der verschiedenen
Einschubhöhen, kann die Unter- bzw. Oberhitze optimal
genutzt werden. Verwenden Sie die obere Einschubhöhe,
wenn mehr Oberhitze verlangt wird, und die untere, wenn
mehr Unterhitze verlangt wird.
Multi-Cooking b
Thermostatenknopf „L“: zwischen 40°C und 250°C.
Die Heizelemente schalten sich abwechselnd ein, und das
Gebläse wird in Betrieb genommen. Dank der k onstant gehaltenen und im Backofen gleichmäßig verteilten Heißluft
werden die Speisen sehr gleichmäßig gegart bzw. gebacken. Es können auch gleichzeitig mehrere Gerichte unterschiedlicher Art gegar t werden, vorausgesetzt es werden
keine unterschiedlichen Gartemperaturen verlangt. Es können bis zu 2 Einschubhöhen gleichzeitig verwendet werden.
Beachten Sie hierzu die Hinweise des Abschnitts „Gleichzeitiges Garen auf mehreren Einschubhöhen“.
Diese Funktion eignet sich besonders für Gratin-Gerichte,
wie auch für Speisen, die längere Garzeiten erfordern, wie:
Lasagna, Nudelaufläufe, Brathähnchen mit Kartoffeln usw.
Bei Fleischgerichten eignen sich ganz besonders Braten zum
Garen im Heißluftbackofen. Dank der optimalen
Hitzev erteilung können niedrigere T emperaturen eingestellt
werden, es tritt weniger Fleischsaft aus, das Fleisch bleibt
demnach zarter und der Gewichtsverlust wird eingeschränkt.
Besonders geschätzt wird die Multi-Cooking-Funktion bei der
Zubereitung von Fisch, der auf diese W eise mit wenig Zutaten
gegart werden kann, wodurch Aussehen und Geschmack
unveränderlich erhalten bleiben. Auch für Beilagen wie
Zucchini, Auberginen, P aprikaschoten, T omaten us w. eignet
sich der Heißluftbackofen ausgez eichnet.
Dessert: Hefekuchen gelingen ganz besonders im
Heißluftbackofen.
Die “Multi-Cooking”-Funktion kann auch zum schnellen Auftauen von weißem oder rotem Fleisch sowie v on Brot eingesetzt werden. Stellen Sie hierzu den Thermostaten auf 80°C
ein. Zum A uftauen empfindlicher Speisen stellen Sie entweder eine Temperatur von 60°C ein oder aber Sie verwenden
nur die kalte Umluft (Thermostateneinstellung demnach auf
0°C).
Grill 2
Thermostatenknopf „L“: zwischen 50% und 100%.
Das obere Heizelement schaltet sich ein, und der Bratspieß
(falls vorhanden) wird in Betrieb gesetzt.
Durch die äußerst hohe Temperatur und die direkt auf das
Grillgut gerichtete Hitze wird das Fleisch auf der Oberseite
rasch gebräunt, somit tritt kein Fleischsaft aus und das
Fleisch bleibt zarter. Die Grillfunktion eignet sich ganz
besonders für solche Speisen, die eine äußerst hohe
Oberhitze verlangen: Rinder- und Kalbssteaks, Entrecôte,
Fleischfilet, Hamburger usw . ...
Grillen Sie bei halb offenstehender Backofentür, ausgenommen es wird der Bratspieß in Betrieb genommen.
Der Abschnitt „Praktische Back-/Brathinweis“ enthält einige
Beispiele zum Einsatz des Backofens .
Drehen Sie den Schalterknopf „L“, werden auf dem Display Leistungswerte zwischen einem Minimum von 50%
und einem Maximum von 100% angezeigt.
Gratin T
Thermostatenknopf „L“: zwischen 40°C und 250°C.
Das obere Heizelement schaltet sich ein, und das Gebläse
sowie der Bratspieß (falls v orhanden) werden in Betrieb gesetzt.
Außer der einseitigen Strahlungshitze zirkuliert Heißluft im
Innern des Backofens. Hierdurch wird ein Verbrennen der
Speisenoberflächen verhindert, die Hitze dringt tiefer in die
Speisen ein. Der Umluftgrill garantiert ein absolutes Gelingen von: Fleisch/Gemüsespießen, Br atwürsten, Schweinerippchen, Lammkoteletts, pikantes Huhn, W achteln mit Sal-
bei, Schweinefilet usw . ...
Gratinieren Sie bitte bei geschlossener Backofentür .
Die „Gratin“-Funktion ist unübertrefflich bei der Zubereitung
folgender Fischgerichte: Barsch-, Thunfisch- und
Schwertfischschnitten, gefüllte Tintenfische usw . ...
Pizza w
Thermostatenknopf „L“: zwischen 40°C und 250°C.
Das untere und das runde Heizelement schalten sich ein
und das Gebläse wird in Betrieb genommen. Durch diese
Kombination wird aufgrund der hohen abgegebenen Leistung
(2800 W) mit einer hauptsächlich von unten aufsteigenden
starken Hitzezufuhr der Backof en sehr schnell erhitzt.
Diese Funktion eignet sich besonders für die Speisen, die
hohe Gartemperaturen verlangen, wie: Pizza oder aber besonders große Fleischbraten. Verwenden Sie bitte nur ein
Backblech oder -rost. Sollte mehr als ein Backrost eingesetzt werden, dann sind ihre Einschubhöhen nach Ablauf
der halben Garzeit auszuwechseln.
Backen u
Thermostatenknopf „L“: zwischen 40°C und 250°C.
Das hintere Heizelement schaltet sich ein und das Gebläse
wird in Betrieb genommen, wodurch eine äußerst delikate,
im Backofen gleichmäßig v erteilte Wärme gewährleistet wird.
Diese Funktion eignet sich zum Garen zarter Speisen, insbesondere jedoch zum Backen von Hefeteigen, sowie zur
Zubereitung von Kleingebäck auf 3 Ebenen gleichzeitig.
Nachstehend einige Beispiele: Bignè, Kekse, Blätterteiggebäck, Biskuitrolle, gratiniertes Gemüse (Tomaten, Auberginen usw .)
„Fast-Cooking“ v
Thermostatenknopf „L“: zwischen 40°C und 250°C.
Die Heizelemente schalten sich ein und das Gebläse wird in
Betrieb genommen, wodurch eine äußerst delikate, im Backofen gleichmäßig verteilte, konstante Wärme gewährleistet
wird.
Ideal für schnelles Garen (Vorheizen ist nicht erforderlich)
von Fertiggerichten (zum Beispiel: tiefgekühlte Fertiggerichte) oder „hausgemachte Fertiggerichte“.
Beschicken Sie beim Intensivbacken, Funktion „Fastcooking“, nur eine Ebene (die 2. von unten), dies ermöglicht
bessere Resultate, siehe Tabelle „Praktische Back/Brat-Hinweise)
4
Page 4

Auftauen U
D
B
B
C
C
Thermostatenknopf „L“: beliebige Einstellung
Dank des an der Backofenrückwand installierten Geblä-
ses zirkuliert Luft in Raumtemperatur um das aufzutauende Gut. Auf diese Weise können alle Ar ten von Speisen aufgetaut werden, vor allem jedoch empfindliche Speisen, die keine Hitze vertragen, wie beispielsweise: Eistorten, Creme- oder Sahnetorten, Obsttorten usw. A uf diese
Weise ersparen Sie die Hälfte der Zeit, die Sie
normalerweisezum Auftauen benötigen. Bei Fisch, Fleisch
oder Brot können Sie das Auftauen mit Hilfe der „MultiCooking“-Funktion beschleunigen. Stellen Sie hierzu eine
Temperatur von 80° - 100°C ein.
Automatische Reinigung mittels F ast Clean
V
Zur vollständigen Reinigung Ihres Backofens.
Informationen zu dieser Funktion entnehmen Sie bitte dem
Abschnitt „Automatische Reinigung mittels F ast Clean“.
Bratspieß (nur an einigen Modellen)
Zur Inbetriebnahme des Bratspießes verfahren Sie wie f olgt:
a) Schieben Sie die Fettpfanne auf die 1. (unterste) Füh-
rung;
b) schieben Sie die Bratspießhalterung auf die 3. Führung
(von unten) und stecken Sie den Spieß durch das entsprechende Loch in die an der Backofenrückwand befindliche Vorrichtung;
c) Setzen Sie den Bratspieß in Betrieb, indem Sie den Dreh-
knopf „E“ auf die Position 2 / T stellen.
Abb. C
A Elektroplatten aus Gusseisen
B Kochz onen mit Strahlungsbeheizung
C Kochzonen mit Str ahlungsbeheizung und Doppelkochzone
D Restwärmeanzeige für jede einzelne Kochzone . Für alle Koch-
zonen wird einzeln angezeigt, ob sie noch heiß sind (mehr als
60°C), auch nach Ausschalten des Heizelementes (nur an einigen Modellen).
E Spezialschalter
F T raditionelle Schalter
12
11
10
9
8
7
12
2
11
3
10
4
9
5
8
7
6
1
12
2
11
3
10
4
9
5
8
7
6
12
2
11
3
10
4
9
5
8
7
6
1
2
3
4
5
6
Beschreibung
Der Herd kann in Kombination mit K ochmulden mit 4 Elektroplatten
(Abb. A), mit herkömmlichen Glaskeramik-Kochfeldern (Abb. B) und
mit Glaskeramik-K ochfeldern mit Doppelkochzonen (Ab b . C) eingesetzt werden.
AA
B
B
A
B
A
B
D
Abb.A Abb. B
E
F
E
F
Beschreibung der Heizelemente
Die traditionellen Strahlungsbeheizungselemente bestehen aus
Ringheizkörpern mit extrem kurzer Aufglühzeit (nur w enige Sekunden nach dem Einschalten).
Strahlungsbeheizungselemente mit Doppelkochzone
Zweckmäßig ähnlich wie die Elemente der traditionellen Strahlungsbeheizung, sie verfügen jedoch über zwei Heizzonen (siehe Abb .
C). Es besteht die Möglichkeit, entweder nur eine oder beide einzuschalten.
l Schalterknöpfe für die traditionellen Kochzonen. Jede
Kochz one hat ihren eigenen Schalterknopf, mit dem 12 unterschiedliche T emperaturen (v om Mindestwert 1 bis zum Höchstwert 12) eingestellt werden können.
l Schalterknöpfe für die Spezial-Kochzonen. Dieser Schalter-
knopf ermöglicht die Wahl zweier Leistungsstuf en, jede davon
regulierbar von Minimum 1 bis Maximum 12. Durch Drehen
des Schalterknopfes im Uhrzeigersinn von 1 - 12 stellen Sie die
niedrigere der beiden Leistungsstufen ein. Drehen Sie den
Schalterknopf bis zum Anschlag (A), durch, hörbar durch kurzes Klicken, wird die höhere der beiden Leistungsstuf en eingestellt, die wiederum, durch Drehen des Schalters gegen den
Uhrzeigersinn, von 12 - 1 reguliert werden kann. Um zu der
ursprünglichen Leistungsstufe zurückzuk ehren, drehen Sie den
Schalterknopf auf Einstellung 0. Bei Glask eramik-Kochfeldern
mit Doppelleistungskochzonen (siehe Abb . C), wird mit der ersten Schalterdrehung die kleinere (innere) Kochzone eingeschaltet; möchten Sie beide einschalten, um eine größere K ochzone zur Verfügung zu haben, drehen Sie den Schalterknopf
zuerst auf Einstellun (A) und hierauf auf den gewünschten Wert
von 12 bis 1.
5
Page 5
Pos. Strahlerplatte
0
Ausgeschaltet
1
Zum Schmelzen von Butte r und Scho kolade
2
Zum Aufwärmen von Milch, Wasser usw.
3
4
Für Cremesuppen und Saucen
5
6
Zum Sieden
7
8
Für Fleischbraten
9
10
Für Suppenfleisch
11
12
Zum Fritieren
Einschalten beider Koc hfelde r
A
Elektroplatten-Betriebsanzeigeleuchte (G)
Diese schaltet sich ein, sobald irgendein Kochfeld-Heiz element in
Betrieb gesetzt wird.
Hinweise zum Einsatz des Glaskeramik-Kochfeldes
Ihr Kochf eld gibt Ihnen sein Bestes, wenn Sie beim Kochen bzw. bei
der Zubereitung von Speisen einige grundlegende Regeln beachten.
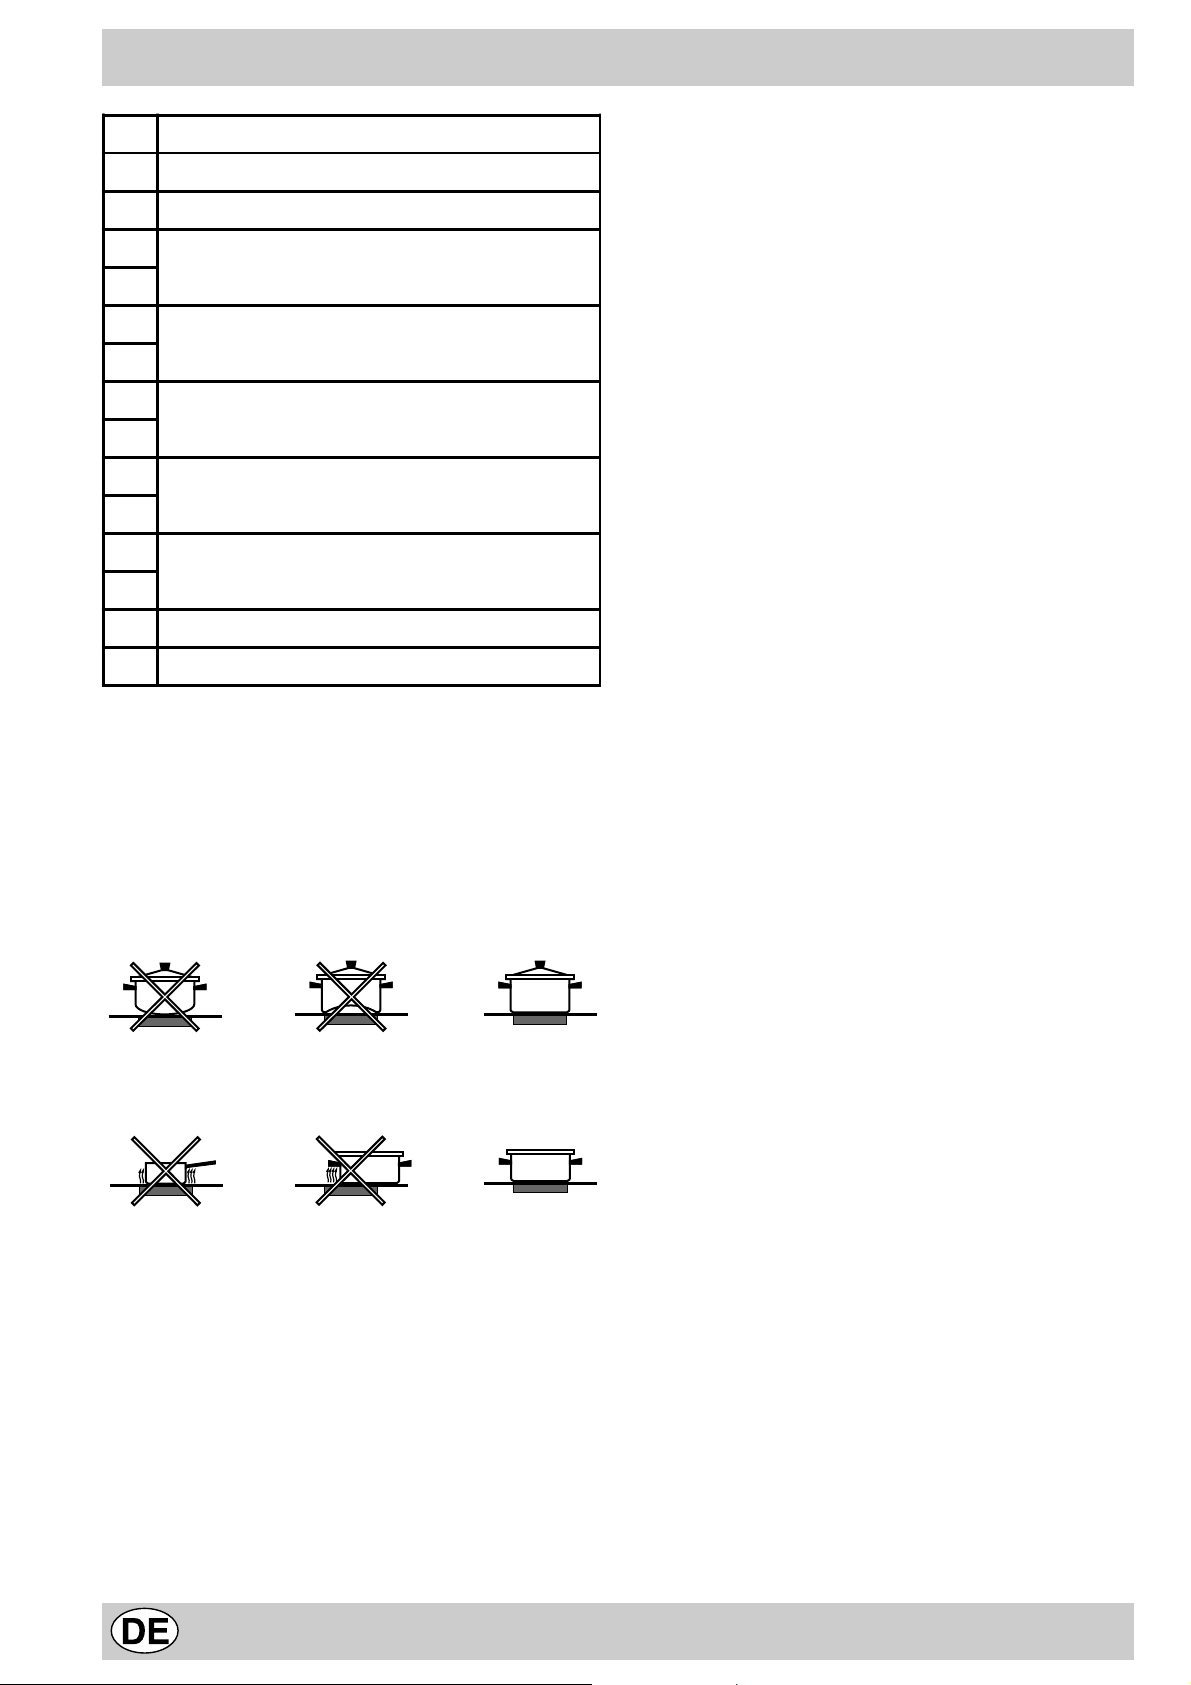
l Benutzen Sie nicht dasselbe K ochgeschirr, das Sie für Gasher-
de einsetzen. Die äußerst hohe Hitzekonzentration der Gasbrenner könnte die T opfböden leicht v erformen, demnach würden bei Einsatz desselben Geschirrs auf Glaskeramik-Kochfeldern die gewünschten optimalen Ergebnisse niemals erreicht.
l Lassen Sie niemals eine Kochzone eingeschaltet, wenn k ein
T opf darauf steht. Auf diese Weise würde die K ochzone in kürzester Zeit auf Höchsttemperatur gebracht, was Schäden an
den Heizelementen zur Folge haben könnte .
l Bitte berücksichtigen Sie, dass die K ochzonen noch für minde-
stens eine halbe Stunde nach Ausschalten heiß bleiben; achten Sie deshalb darauf, dass nichts unbeabsichtigt auf diese
heißen Flächen abgelegt bzw. abgestellt wird.
l Schalten Sie die Kochzonen nicht ein, wenn auf dem K ochfeld
Alu- oder Klarsichtfolie liegen sollte.
l Stützen Sie sich nicht auf heiße Kochz onen.
l Hinweis zur ersten Inbetriebnahme:
Der für die Dichtungen eingesetzte Leim könnte während der
Lagerung Fettspuren auf dem Glas hinterlassen haben. Wir
empfehlen Ihnen, diese vor Einsatz des Gerätes mit einem
herkömmlichen Reinigungsmittel (eine nicht scheuernde Poliercreme) zu entfernen. Während der ersten Betriebsstunden ist
ein leichter Geruch verbrannten Gummis zu vernehmen. Dies
wird sich nach kurzer Zeit geben.
l Das Glaskeramik-Kochf eld ist stoßfest und verträgt auch plötz-
liche T emperaturw echsel. Dennoch kann es durch Stöße bzw .
Aufprall v on spitzen Gegenständen zerbrechen. Schalten Sie
das Gerät in diesem Falle umgehend v om Stromnetz und wenden Sie sich zwecks Reparatur des K ochfeldes an eine zuständige Kundendienststelle.
l Benutzen Sie K ochgeschirr mit flachem Boden, um sicher zu
sein, dass er ganz auf der Heizfläche aufliegt.
l Benutzen Sie K ochgeschirr, dessen Durchmesser mit dem der
Elektroplatte übereinstimmt, d.h. dessen Boden die Elektroplatte
ganz bedeckt, und somit die gesamte Wärme genutzt wird.
l Stellen Sie sicher, dass die Geschirrböden stets sauber und
trocken sind, damit ein optimaler Kontakt und eine lange Lebensdauer der Kochplatten und des K ochgeschirrs gewährleistet wird.
6
Page 6
Garzeit-Programmierung
Garende und/oder -dauer werden programmiert, nachdem
Sie eine Garfunktion ausgewählt haben.
Programmieren der Gardauer
Drücken Sie die Taste 5 und stellen Sie dann mittels
Drehen des Knopfes C die Gardauer ein. Durch Betätigen
der Taste OK wird die Einstellung gespeicher t, und auf
dem Display wird abwechselnd die eingestellte
Temperatur, die über den Drehknopf C geändert werden
kann, sowie die bis zum Garende noch verbleibende
Restzeit angezeigt.
Bei Ende der Gardauer erscheint auf dem Display die
Anzeige “end”, und eine Reihe akustischer Signale weist
darauf hin, dass der Garvorgang abgeschlossen ist.
• Drücken Sie eine beliebige Taste, um das Tonsignal
auszuschalten.
• Stellen Sie den Schalter B zurück auf 0. Die Anzeige
“end” wird daraufhin ausgeblendet.
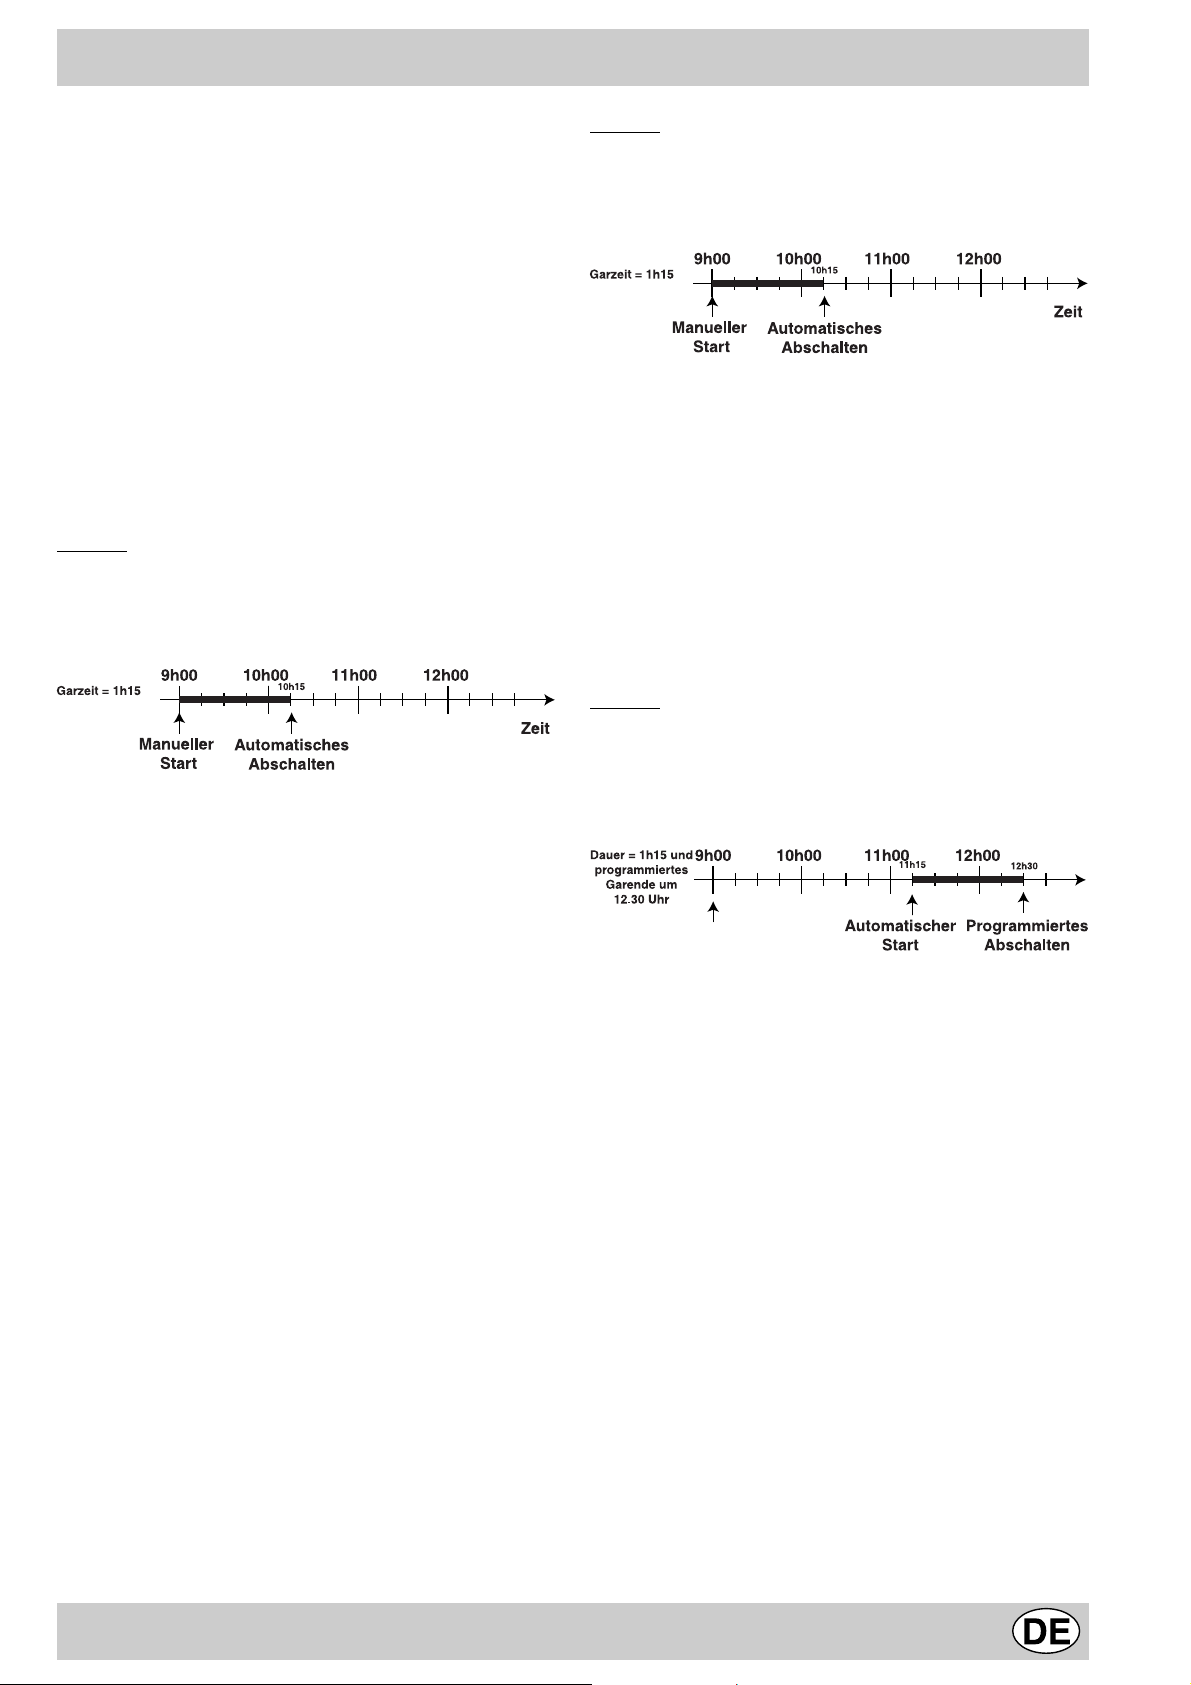
Beispiel
Es ist 9:00 und es wird eine Garzeit von 1 Std. und 15
Min. progr ammiert. Der Garvorgang wird automatisch um
10:15 Uhr beendet.
Beispiel
Es ist 9:00 Uhr und als Ende des Garvorgangs wird die
Uhrzeit 10:15 eingestellt. Der Garvorgang dauert 1 Std.
und 15 Minuten.
V orwahl eines Garv or gangs
Drücken Sie die Taste 5 und stellen Sie dann mittels
Drehen des Knopfes C die Gardauer ein. Durch Betätigen
der Taste OK wird die Einstellung gespeichert, und auf
dem Display wird abwechselnd die Temperatur sowie die
zuvor gewählte Zeit angezeigt.
Drücken Sie die T aste 4 und stellen Sie dann durch Drehen
des Knopfes C die Uhrzeit ein, an dem der Garvorgang
abgeschlossen sein soll. Durch Betätigen der Taste OK
wird die Einstellung gespeichert, und auf dem Display wird
abwechselnd die als Ende des Garvorgangs vorgesehene
Uhrzeit und die eingestellte Temperatur angezeigt.
Beispiel
Es ist 9:00 und es wird eine Garzeit von 1 Std. und 15
Min. und 12:30 Uhr als Ede der Garz eit programmiert. Der
Garvorgang startet automatisch um 11:15 Uhr.
Programmieren des Garendes
Drücken Sie die Taste 4 und stellen Sie dann mittels
Drehen des Knopfes C das Garende ein. Durch Betätigen
der Taste OK wird die Einstellung gespeicher t, und auf
dem Display wird abwechselnd die eingestellte T emperatur
sowie die bis zum Ende des Garvorgangs noch
verbleibende Restzeit angez eigt.
Wird die als Ende der Garzeit vorgesehene Uhrzeit
erreicht, erscheint auf dem Display die Anzeige “end”, und
eine Reihe akustischer Signale weist darauf hin, dass der
Garvorgang abgeschlossen ist.
• Drücken Sie eine beliebige Taste, um das Tonsignal
auszuschalten.
• Stellen Sie den Schalter B zurück auf 0. Die Anzeige
“end” wird daraufhin ausgeblendet.
Die Ikone A erinnert Sie daran, dass die Gardauer und
das Garende programmiert wurden.
Annullieren einer Programmierung
Zum Löschen bereits eingegebener W erte drehen Sie den
Schalterknopf “B” auf Position “0”.
7
Page 7

Automatische Reinigung mittels Fast Clean
Bei Aktivierung der Funktion fast clean erreicht die
Temperatur im Backofenraum 500ºC. Bei derartigen
Temperaturen verkohlen die im Ofen zurückgebliebenen
Speisereste. Durch das Glas der Ofentür kann beobachtet
werden, wie aufgrund des Pyrolyseverfahrens einige
Speisereste bei Kontakt mit den Heizelementen verkohlen
und aufglimmen: Es handelt sich um eine spontane
Verbrennung, um einen normalen V organg, der keinerlei
Risiken birgt.
V orsic htsmaßnahmen:
1- Entfernen Sie größere Speisereste zuerst mit einem
feuchten Schwamm. V erwenden Sie auf k einen Fall Spülmittel
oder spezielle Ofenreinigungsmittel.
2- Nehmen Sie sämtliches Zubehör aus dem Backofen:
Es hält derart hohen Temperaturen nicht stand.
Darüberhinaus könnten einige Zubehörteile das
Reinigungsergebnis beeinträchtigen, indem sie die
gleichmäßige Zirkulation der heißen Luft im Ofeninnern
verhindern. Das Zubehör lässt sich problemlos wie normales
Geschirr reinigen (auch in der Spülmaschine).
3- Hängen Sie keine Geschirrtücher zum Trocknen an den
Ofentürgriff.
Zur Beachtung: Während der automatischen Reinigung
können einzelne Ofenteile sehr heiß werden. Halten Sie
daher Kinder vom Ofen f ern.
So aktivieren Sie den fast clean-Reinigungsvor gang
– Schließen Sie die Ofentür .
– Drehen Sie den Funktionswähler auf V
– Zur Programmierung der Dauer und/oder der als Ende
des Fast Clean Reinigungsprogr amms vorgesehenen
Uhrzeit befolgen Sie bitte die Hinweise des Abschnittes
“Programmierung der Fast Clean Reinigung”. Bitte
beachten Sie, dass Reinigungszyklen unterschiedlicher
Dauer (60 - 120 Minuten) gewählt werden können, je
nach Verschmutzung Ihres Backofens.
Sicherheitsvorrichtungen
Angesichts der hohen Temperaturen, die hierbei erreicht
werden, ist der Ofen mit einigen Sicherheitsvorrichtungen
ausgestattet:
• bei Erreichen höherer Temperaturen wird die Ofentür
automatisch gesperrt, um jegliche Gefahr von
V erbrennungen auszuschließen.
• Bei jedweder Störung bzw. Anomalie wird v orbeugend
die Stromversorgung der Heizelemente
unterbrochen.
• Nach erfolgter Sperre der Backofentür können die
erfolgten Einstellungen (Dauer, Ende und Timer) nicht
mehr geändert werden.
Was geschieht nach Ablauf des automatisc hen
Reinigungsvorgangs?
Nach Ablauf des Selbstreinigungsvorgangs erscheint auf
dem Display die Anzeige “end” und es ertönt ein
akustisches Signal, letzteres kann durch Druck auf eine
beliebige Taste ausgeschaltet werden. Durch Drehen des
Knopfes “B” auf Position “0” wird die Anzeige “end”
ausgeblendet.
Die Backofentür kann jedoch nicht sof ort geöffnet werden,
sondern erst dann, wenn die Backofentemperatur auf ein
annehmbares Niveau gesunken ist.
An den Ofenwänden und auf dem Backofenboden könnte
sich während der Reinigung etwas weißer Staub abgelagert
haben. Entfernen Sie diesen mittels eines feuchten
Schwamms, nachdem der Ofen v ollständig erkaltet ist.
Möchten Sie jedoch die noch vorhandene Ofenwärme zum
Garen nutzen, dann ist es nicht erforderlich, diese
Staubablagerungen sofort zu entfernen; sie sind absolut
unschädlich.
KEINE SORGE WENN
1 bei Beginn des Fast Clean Reinigungsvorgangs das
Kühlluftgebläse nur sehr langsam läuft;
2 während des Fast Clean Reinigungsvorgangs der
Leistungsschutzschalter der Hausanlage anspricht:
das Stromnetz wurde überlastet (bei gleichzeitigem
Einsatz anderer Elektrogeräte);
3 während des Fast Clean Reingungsvorgangs die
Backofentür nicht geöffnet werden kann: die
Backofentür wird dank einer GeräteSicherungsvorrichtung gesperrt und kann nur nach
gänzlichem Erkalten des Backofens geöffnet werden;
4 nach dem Fast Clean Zyklus noch geringfügige Flecken
auf den Innenflächen des Backof ens zurückbleiben: es
empfiehlt sich, gröbere Verkrustungen vor dem
Einstellen des Selbstreinigungszyklus zu entfernen,
und eine dem V erschmutzungsgrad entsprechende Zeit
bzw. Dauer für den Reinigungsvorgang einzustellen;
5 nach Abschluss des Garvorgangs noch für eine kurze
Zeit Luft aus dem Backofen austritt: diese wird durch
die zur Abkühlung des Backofeninnern dienende
Kühlphase erzeugt;
6 bei “Grill”-Betrieb der obere Heizwiderstand nicht
ständig rot glüht: die Betriebsweise wird durch einen
Thermostaten gesteuert;
7 bei Öffnen der Backofentür während des Garvorgangs
starker Dampf austritt;
8 Wassertropfen oder Dampf im Backof en erzeugt wird,
wenn das Gargut nach Abschluss des Garvorgangs
im Backof en belassen wird.
8
Page 8

Programmierung der Fast Clean Selbstreinigung
V or der Programmierung der Dauer und/oder der als Ende
des Fast Clean Reinigungsprogramms vorgesehenen
Uhrzeit muss die Funktion F ast Clean eingestellt werden.
Programmierung der Dauer Fast Clean Reinigung
Drücken Sie die Taste 5 und stellen Sie dann mittels
Drehen des Knopfes C die Dauer ein. Durch Betätigen
der Taste OK wird die Einstellung gespeicher t, und auf
dem Display wird die bis zum Abschluss des Fast Clean
Zyklus noch verbleibende Zeit angezeigt.
Nach Ablauf der Zeit erscheint auf dem Display die
Anzeige “end” und eine Reihe akustischer Signale weist
darauf hin, dass der Reinigungsvorgang abgeschlossen
ist.
• Drücken Sie eine beliebige Taste, um das Tonsignal
auszuschalten.
• Stellen Sie den Schalter B zurück auf 0. Die Anzeige
“end” wird daraufhin ausgeblendet.
Beispiel
Es ist 9:00 und es wird eine Reinigungsdauer von 1 Std.
und 15 Min. programmiert. Der Fast Clean Vorgang wird
automatisch um 10:15 Uhr abgeschlossen.
Beispiel
Es ist 9:00 Uhr und als Ende des Reinigungsvorgangs
wird die Uhrzeit 10:15 eingestellt. Der Fast Clean Zyklus
dauert 1 Std. und 15 Minuten.
Vorwahl einer Fast Clean Selbstreinigung
Drücken Sie die T aste 5 und stellen Sie dann durch Drehen
des Knopfes C die Dauer ein. Durch Betätigen der Taste
OK wird die Einstellung gespeichert und auf dem Display
angezeigt.
Drücken Sie die T aste 4 und stellen Sie dann durch Drehen
des Knopfes C die Uhrzeit ein, an dem der Fast Clean
Zyklus abgeschlossen sein soll. Durch Betätigen der Taste
OK wird die Einstellung gespeichert und auf dem Display
erscheint abwechselnd die als Ende des
Reinigungsprozesses vorgesehene Uhrzeit und die
eingestellte Dauer.
Beispiel
Es ist 9:00 und es wird eine Reinigungsdauer von 1 Std.
und 15 Min., und 12:30 Uhr als Ende des Vorgangs
programmiert. Der Reinigungsvorgang beginnt
automatisch um 11:15 Uhr.
Programmieren der als Ende der Fast Clean
Selbstreinigung vorgesehenen Uhrzeit
Drücken Sie die Taste 4 und stellen Sie mittels Drehen
des Knopfes C die Uhrzeit ein. Durch Betätigen der Taste
OK wird die Einstellung gespeichert, und auf dem Display
wird die bis zum Abschluss des Fast Clean Zyklus noch
verbleibende Zeit angezeigt.
Wird die als Ende des Reinigungsvorgangs programmierte
Uhrzeit erreicht, erscheint auf dem Display die Anzeige
“end” und eine Reihe akustischer Signale weist darauf hin,
dass der Fast Clean Reinigungsvorgang abgeschlossen
ist.
• Drücken Sie eine beliebige Taste, um das Tonsignal
auszuschalten.
• Stellen Sie den Schalter B zurück auf 0. Die Anzeige
“end” wird daraufhin ausgeblendet.
Die Ikone A erinnert Sie daran, dass die Dauer und/oder
die als Ende des Reinigungsvorgangs vorgesehene
Uhrzeit programmiert wurde.
Annullieren einer Programmierung
Zum Löschen bereits eingegebener W erte drehen Sie den
Schalterknopf “B” auf Position “0”.
9
Page 9

So halte ich das Gerät in Topform
V or jeder Reinigung und Pflege muß das Gerät vom Stromnetz getrennt werden.
Um eine lange Lebensdauer des Backofens zu gewähr leisten, muß er regelmäßig gründlic h gereinigt werden.
Berücksichtigen Sie hierbei, dass:
• Verwenden Sie zur Reinigung bitte keine
Dampfgeräte.
• die Oberflächen aus Email oder Edelstahl mit lauwarmem W asser zu reinigen sind; v erwenden Sie bitte keine
Scheuermittel oder scharfe Reiniger, die diese hochw ertigen Oberflächen beschädigen könnten. Auf Edelstahl
könnten sich Flecken bilden. Sollten diese nur schwer
zu entfernen sein, empfehlen wir den Einsatz der im Handel erhältlichen Spezialreinigungs- und Pflegemittel. Es
ist ratsam, diese Teile nach der Reinigung gut nachzuspülen und trockenzureiben;
• der noch lauwarme Backof en möglichst nach jedem Gebrauch mit warmem W asser und Spülmittel gereinigt, mit
klarem W asser nachgespült und mit einem weichen Tuch
sorgfältig abgetrocknet werden sollte. V ermeiden Sie den
Einsatz von Scheuermitteln (zum Beispiel Pulver-Reinigern usw .) und Scheuerschwämmen, oder Säuren (z.B.
Antikalklösungen usw .), diese könnten das Email beschädigen. Verwenden Sie bei besonders hartnäckigen Verschmutzungen die üblicherweise zur Reinigung des Backofens bestimmten Spezialreiniger . Halten Sie sich jedoch
genau an die auf der Pac kung angegebenen Gebrauchsanleitungen;
• sich bei längerer Betriebszeit des Backofens Kondenswasser bilden könnte. Reiben Sie dieses mit einem weichen T uch trocken;
• die rund um die Backofenöffnung befindliche Dichtung
die korrekte Funktionsweise des Backofens garantiert.
Der Zustand dieser Dichtung sollte demnach regelmäßig überprüft werden. Gegebenenf alls ist diese zu reinigen, wobei jedoch keine Scheuermittel oder -produkte
zu verwenden sind. W enden Sie sich im Falle einer Beschädigung dieser Dichtung an Ihre nächstgelegene
Kundendienststelle. Es empfiehlt sich, den Back ofen bis
zur erfolgten Reparatur nicht in Gebrauch zu nehmen;
• der Backof enboden niemals mit Alufolie ausgelegt werden darf, da der hierdurch verursachte Wärmestau den
Garvorgang gefährden und auch das Email beschädigen würde.
• das Glas des Backofenfensters mit einem milden Reiniger und einem weichen Schwammtuch gereinigt und anschließend mit einem weichen T uch trockengerieben werden muss.
• die Elektroplatten mit einem feuchten Tuch zu reinigen
sind und dass sie, wenn sie noch lauwarm sind, mit
etwas Öl eingerieben werden müssen;
Abnehmen der Backofentür
Um den Backofen mühelos gründlich reinigen zu können,
kann die Backofentür abgenommen werden. Verfahren Sie
hierzu wie folgt:
• die Tür ganz öffnen;
• klappen Sie die seitlich an den beiden Scharnieren befindlichen Hebel hoch und drehen Sie diese nach links;
• fassen Sie die Tür an den beiden äußeren Seiten und
schließen Sie sie langsam, jedoch nicht ganz;
• ziehen Sie die Tür zu sich hin aus ihrer Lagerung heraus.
In umgekehrter Reihenfolge wird die Tür wieder angebr acht.
132
Austausch der Back ofenlampe
• Vor jedem Eingriff ist der Backofen entweder durch
Herausziehen des Steckers oder durch Abschalten des
zum Anschluss des GerŠtes an die Hausanlage
verwendeten Schalters stromlos zu machen.
• Nehmen Sie unter Zuhilfenahme eines schmalen und
flachen Werkzeuges (Schraubenziehen, Lšffelgriff
usw.) die Glasabdeckung ab.
• Schrauben Sie die Lampe aus und ersetzen Sie sie
durch eine neue gleicher Eigenschaften.
- Spannung 230/240 V
- Leistung 15 W
- Sockel E 14
• Bringen Sie die Glasabdeckung wieder an; achten Sie
hierbei darauf, dass die Dichtung ordnungsgemŠ§
eingelegt wird.
Backofenraum
Lampe
Dichtung
Glasscheibe
Reinigung der Kochfeldes
Reinigen Sie das Kochfeld vor Kochbeginn mit einem
feuchten Tuch, um Staub oder alte Essensreste zu
beseitigen. Die Oberflächen des gesamten Kochfeldes
sind regelmäßig mit lauwarmer milder Spüllauge zu
reinigen. Glask eramikfelder sollten von Zeit zu Zeit auch
mit einem entsprechenden, im Handel erhältlichen
Spezialreiniger behandelt werden. Entfernen Sie zuerst
sämtliche Speisereste und Fettspritzer mit einem
geeigneten Klingenschaber, z.B . B (siehe Abb. A)
(nicht mitgeliefert). Reinigen Sie das Kochfeld, wenn es
noch lauwarm ist, verwenden Sie hierzu ein weiches
Papiertuch und ein geeignetes Reinigungsmittel (siehe
Abb. B). Reiben Sie es dann mit einem feuchten Tuch nach
und trocknen Sie es gründlich.
10
Page 10

Spezialreinigungsmittel für
Glaskeramik-Kochfelder
Wo sind diese
erhältlich ?
Abb. A Abb. B
Versehentlich geschmolzene Alufolie, Plastikteile oder
Kunststoffe, sowie Zuckerreste oder stark zuckerhaltige
Speisereste müssen sofort mit einem Schaber von der
noch heißen Kochzone entf ernt werden.
Spezialreiniger bilden eine durchsichtige Schutzschicht,
die den Staub abstößt. Diese schützt die Oberfläche auch
vor eventuellen Schäden, die durch stark zuckerhaltige
Speisen verursacht werden könnten. Verwenden Sie
absolut keine Scheuerschwämme oder sonstige
Scheuermittel. Auch scharfe Reinigungsmittel wie
Backof enspra ys oder Flec k enmittel sind zu v ermeiden.
Klingenschaber und
Ersatzklingen
Stahl-Fix
SWISSCLEANER
WK TOP
Andere Produkte f.Glas keram ik
Haushaltwaren
Warenhäusern
Haushaltwaren
Hobbyläden
Warenhäusern
Supermärkten
11
Page 11

Praktische Back-/Brathinweise
Der Backofen stellt Ihnen eine umfangreiche Programmpalette zur Verfügung, um jede Speise optimal garen zu
können. Im Laufe der Zeit werden Sie dieses vielseitige
Gerät optimal zu nutzen wissen. Demnach gelten die nachstehenden Anleitungen nur als Richtlinie, die Sie durch
Ihre persönliche Erfahrung erweitern können.
Gleichzeitiges Garen auf mehreren Einschubhöhen
Soll auf mehreren Ebenen gegart werden, dann wählen
Sie die Funktion „Backen“ u oder die Funktion „Multi-
Cooking“ b nur diese ermöglichen ein solches Garen.
Zum Garen empfindlicher Speisen auf mehreren Ebenen,
verwenden Sie die Funktion „Backen“ u welche ein
gleichzeitiges Garen auf drei Ebenen erlaubt (auf der 1.,
3. und 5. Ebene). Der Abschnitt „Praktische Back-/
Brathinweis“ enthält einige Beispiele zum Einsatz des
Backofens.
Zum Garen aller anderen Speisen auf mehreren Einschubhöhen verwenden Sie die Funktion „Multi-Cooking“ b
Berücksichtigen Sie jedoch Folgendes:
• Ihr Backofen besitzt insgesamt fünf Einschubhöhen.
Beim Heißluftgaren verwenden Sie bitte nur zwei der
drei mittleren Einschubhöhen, da die oberste und die
unterste der Heißluft zu direkt ausgesetzt sind, wodurch
empfindliche Gerichte leicht verbrennen könnten.
• Verwenden Sie bitte im Allgemeinen die 2. und die 4.
Einschubhöhe von unten, wobei die 2. Einschubhöhe
für solche Speisen verwendet werden sollte, die mehr
Hitze verlangen. Bereiten Sie zum Beispiel gleichzeitig mit anderen Speisen einen Fleischbraten zu, dann
sollte dieser auf der 2. Führungsschiene und die zarteren Gerichte auf der 4. Führungsschiene eingeschoben werden.
• Beim gleichzeitigen Garen von Speisen, die unterschiedliche Gartemperaturen bzw. -zeiten verlangen,
stellen Sie eine Durchschnittszeit ein, schieben Sie das
empfindlichere Gericht auf die 4. Einschubhöhe und
nehmen Sie das Gericht mit der kürzeren Garzeit zuerst aus dem Backofen.
• Verwenden Sie das Backblech auf der unteren, das
Rost auf der oberen Einschubhöhe.
Verwendung der Funktion „Intensivbac ken“
Eine praktische und schnelle Funktion für all diejenigen,
die Fertiggerichte (tiefgekühlt oder nicht) vorziehen. Nützliche Hinweise diesbezüglich finden Sie auch in der Tabelle „Praktische Back-/Brathinweise“.
Gebrauch des Grills
Ihr „7 Cuochi“-Backofen bietet Ihnen unterschiedliche
Grillmöglichkeiten.
Grillen Sie mit Hilfe der Funktion 2 „Grill“ bei halb of-
fenstehender Backofentür, legen Sie das Grillgut auf
die Mitte des Backrostes und schieben Sie dieses auf die
3. oder 4. Einschubhöhe von unten.
Schieben Sie die Fettpf anne zum A uffangen der Fleischsoße und/oder des abtropfenden F ettes auf die 1. (unterste) Führung.
Bei der Verwendung dieser Funktion empfiehlt es sich,
die höchste Energiestufe zu verw enden, auch wenn nied-
rigere Stufen leicht durch Drehen des Thermostatenreglers
auf die gewünschte Temperatur eingestellt werden können.
Bei den mit Bratspieß 2, ausgerüsteten Modellen kann
bei Einsatz der „Grill“-Funktion der mitgelieferte Spießsatz
verwendet werden. In diesem Falle braten Sie bitte bei
geschlossener Backofentür. Verwenden Sie für den
Spießsatz die 3. Führung (von unten) und für die
Fettpfanne, zum Auffangen des Fleischsaftes bzw. des
abtropfenden Fettes, die 1. (unterste) Einschubhöhe.
Die Verwendung der „Gratin”-Funktion T ausschließ-
lich bei geschlossener Backofentür, ist äußerst prak-
tisch für rasches Grillen. Die v om Grill ausgestrahlte Heißluft wird besser verteilt, wodurch gleichzeitig die Oberseite gebräunt und die Unterseite gegart wird.
Auf dieser Einstellung können auch bereits gegarte Gerichte noch kurz überbacken werden (Nudelaufläufe us w .).
Setzen Sie den Grillrost auf die 2. oder 3. Führ ung von
unten (siehe Tabelle) und schieben Sie die Fettpfanne auf
die erste, d.h. unterste Schiene, um abtropfendes Fett
aufzufangen und Rauchbildung zu vermeiden.
Wichtig: Garen Sie mit der Funktion „Gratin“ nur bei
geschlossener Backofentür . Dadurch erzielen Sie nicht
nur optimale Ergebnisse, sondern sparen auch Energie
(ca. 10%).
Bei V erwendung dieser Funktion sollte der Thermostat auf
200°C eingestellt werden; nur so arbeitet der Grill, der
mittels Ausstrahlung von Infrarotstrahlen heizt, auf optimale W eise. Dies bedeutet jedoch nicht, dass, falls erforderlich, nicht auch niedrigere Temperaturen eingestellt
werden können. Drehen Sie den Thermostaten ganz einfach auf die gewünschte Temperatur.
Bei den mit Bratspieß Tausgerüsteten Modellen kann
bei der „Gratin“-Funktion der mitgelieferte Spießsatz
verwendet werden. In diesem Falle v erwenden Sie die 3.
Führung (von unten) für den Spießsatz und die 1.
(unterste) für die Fettpfanne , um den Fleischsaft und/oder
das abtropfende Fett aufzuf angen.
Die besten Resultate erzielen Sie durch Einschieben
des Grillrostes auf die unteren Führungen (siehe Tabelle); schieben Sie die Fettpfanne unter das Grillgut
(unterste Führung), um abtropfendes Fett aufzufangen und Rauchbildung zu vermeiden.
Backen
Schieben Sie das Backwerk immer in den heißen Backofen. Öffnen Sie während des Backens nicht die Backofentür, um ein Zusammenfallen des Kuchens zu verhindern.
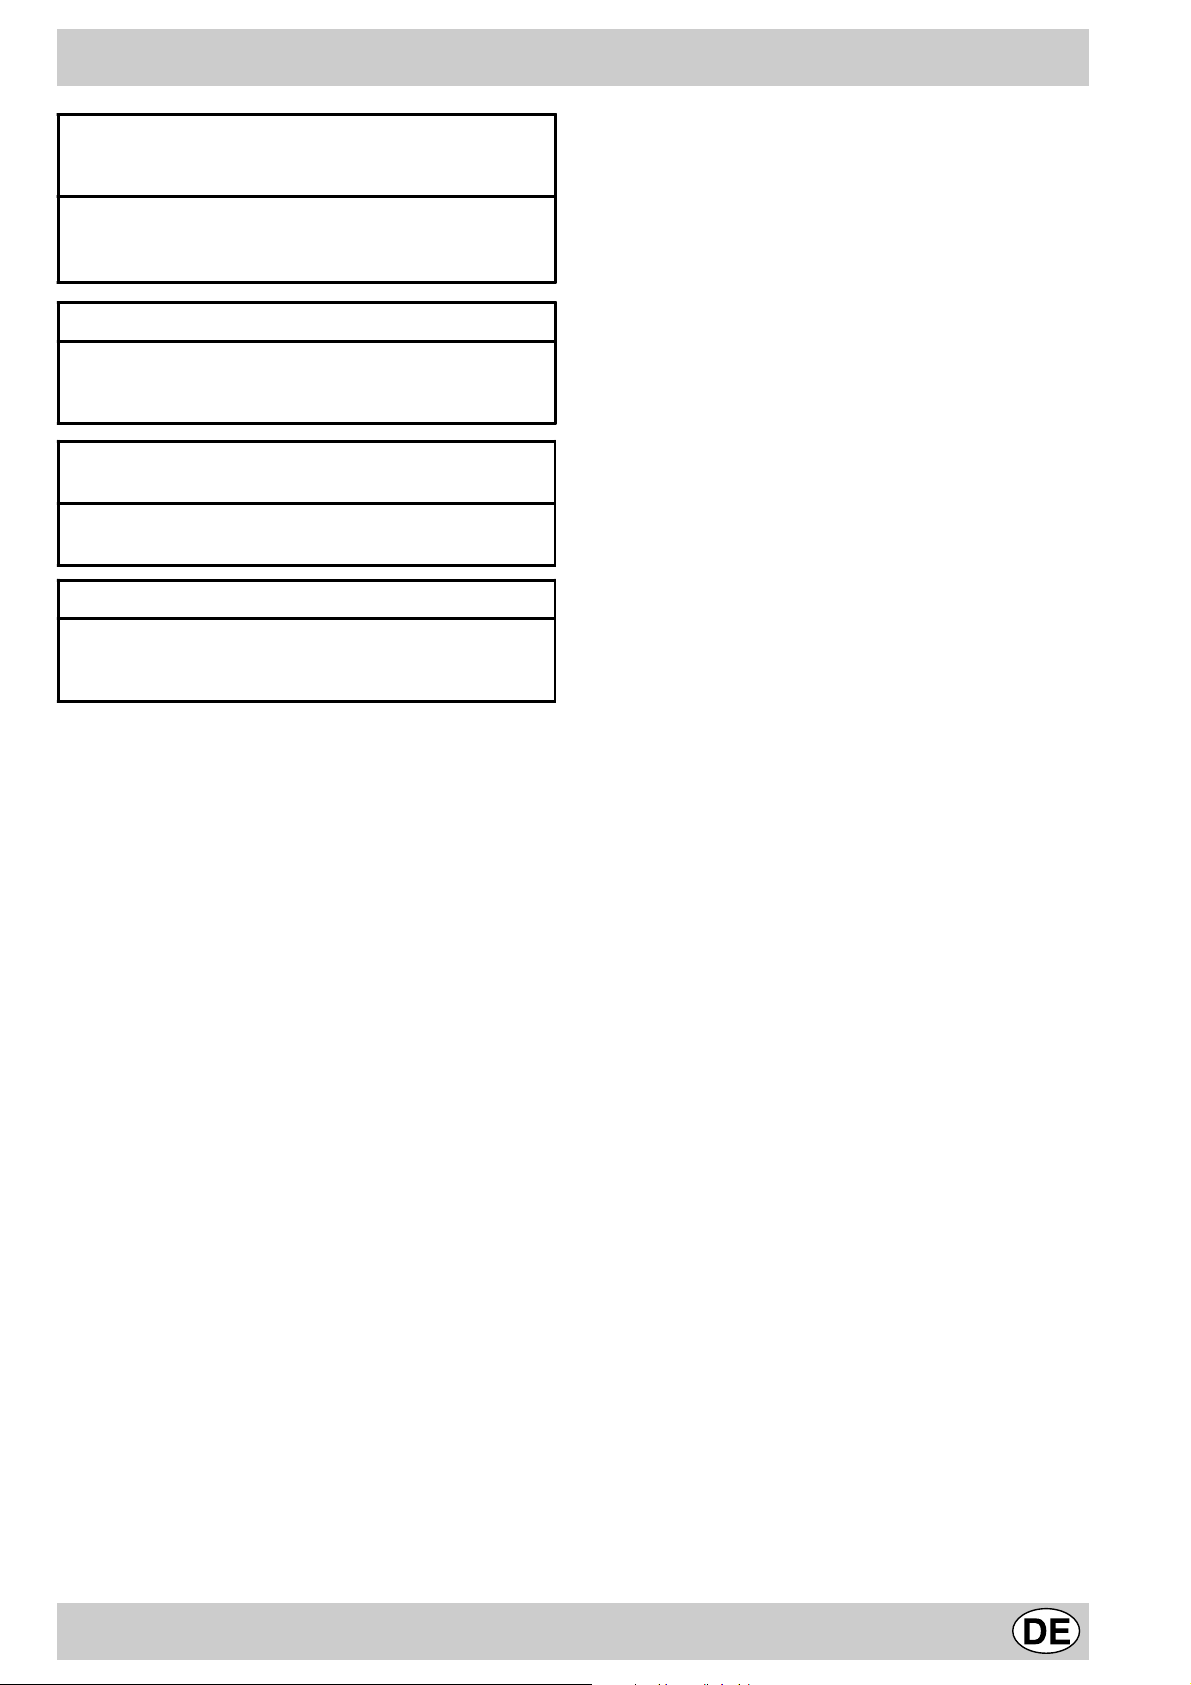
Was tun wenn:
Der Kuchen zu trocken ist ?
Das nächste Mal stell en Sie eine um 10°C höh ere
Temperatur ein und verk ürzen S ie die Ba ckzeit .
Der Kuchen zusammenfällt ?
Verwenden Sie weniger Flüs sigkei t oder stelle n Sie
eine um 10°C niedrigere Temp eratu r ein.
12
Page 12
Bei Heißluftbetrieb auf me hreren Ebenen
gebacken bzw. gebraten wurde, und nicht alle
Gerichte gleichförmig gar sind ?
Stellen Sie eine ni edrigere Temper atur ein. Es ist
nicht erforderlic h die a uf meh reren Ebenen gegar ten
Speisen gleichzei tig aus dem O fen zu neh men.
Der Kuchen an der Oberseite zu dunkel ist ?
Wählen Sie eine niedrig ere Eins chubhö he, e ine
niedrigere Temperatur und verl änger n Sie die
Backzeit.
Der Kuchen außen gut gebacken aber innen noch
klebrig ist ?
Verwenden Sie wenige r Flüssi gkeit, reduz ieren Sie
die Temperatur, verlänge rn Sie die Backz eit.
Der Kuchen sich nicht aus der Form löst ?
Fetten Sie die Kuchenform gut ein un d bestäuben S ie
sie mit etwas Mehl oder lege n Sie Bac kpapi er in die
Form.
Fisch und Fleisch
Für Geflügel und Fisch stellen Sie eine Temperatur von
180 °C - 200 °C ein.
Für Rinderbraten, der außen gut angebraten, innen jedoch saftig bleiben soll, empfiehlt es sich, das Fleisch bei
hoher Temperatur (200°C-220°C) rasch anzubraten, um
dann auf eine niedrigere Temperatur überzugehen.
Als Richtlinie gilt: je größer der Br aten, desto niedriger die
Temperatur und um so länger die Bratzeit. Legen Sie den
Braten in die Mitte des Rostes und schieben Sie die Fettpfanne unter den Rost, um das abtropfende Fett aufzufangen.
Den Rost so einschieben, dass sich der Braten auf der
mittleren Einschubhöhe befindet. Wird mehr Unterhitze
gewünscht, muss der Braten auf eine niedrigere Ebene
eingeschoben werden. Belegen Sie das Fleisch (insbesondere bei Entenbraten und Wild) mit Speckscheiben;
das garantiert besonders schmackhafte Braten. Schieben
Sie den Braten so ein, dass er möglichst viel Oberhitze
bekommt.
Backen einer Pizza
Zum optimalen Backen einer Pizza wählen Sie die
Backof enfunktion „ Pizza“ w :
• Heizen Sie den Backofen mindestens 10 Minuten lang
vor.
• Verwenden Sie eine Leichtmetallform und stellen Sie
diese direkt auf den Backrost. Bei V erwenden des Bac kblechs bzw . der F ettpfanne wird die Garzeit v erlängert,
und man wird kaum eine knusprige Pizza erhalten.
• Während des Backens sollte die Backofentür nicht zu
häufig geöffnet werden.
• Bei reich belegten Pizzas (Capricciosa, Quattro Stagioni) sollte der Mozzarella erst nach Verstreichen der
halben Backzeit auf die Pizza gelegt werden.
• Bei gleichzeitigem Garen auf mehreren Ebenen (höchstens 2) empfiehlt es sich, die Funktion „Multi-Cooking“
b einzustellen, da mit der Funktion „Pizza“ w die
unterste Pizza zu rasch gegart würde.
13
Page 13

Position
Funktions-wähler
Gerichte Gew.
(kg)
Einschub-H-
öhe von
unten
Vorheizd auer
(M in .)
Position
Therm ostate-
n-Regler
Garzeit
(M in .)
1 Tra d itio n ell
a
2 M u lti-C o o k in g
b
3 G rill
2
4 G ratin
T
5 Pizza
w
6 Back en
u
7 Intensivbacken
v
8 Au ftauen
Bei den angegebenen G arzeiten handelt es sich um Richtw erte, die je nach W unsch geändert werden können.
NB:
B e i E in s a tz d e s G r ills o d e r b e i E in s te llu n g d e r F u n k tio n „ G r a tin " is t d ie F e ttp f a n n e a u f d ie u n te r s te F ü h r u n g z u
schieben.
U
Ente
Kalbs- oder Rinderbraten
Schw eineb raten
G ebäck
M ürbeteigkuchen
Pizza (auf 2 E benen)
Lasagne
Lam m
Brathähnchen + K artoffeln
M akrelen
Plum cake
W indbeutel (auf 2 E benen)
G ebäck (auf 2 Eb enen)
Biskuitböden (auf 1
Ebene)
Biskuitböden (auf 2
Ebenen)
Quiche
Seezungen und
Tintenfische
Tintenfisch- und
Krebsspieße
Tintenfische
Ka belja ufilet
G e g rillt e G e m ü s e
Kalbsteaks
Bratwürste
Hamburger
Makrelen
Toast (oder getoastetes
Brot)
M it Bratspieß (fa lls
vorhanden)
Kalbfleisch am Spieß
Hähn chen am Spieß
Lam m am S pieß
G e g rillt e s H ä h n c h e n
Tintenfische
M it Bratspieß (fa lls
vorhanden)
Kalbfleisch am Spieß
Lam m am S pieß
Hähnchen (am Spieß) +
Röstkartoffeln (auf dem
Backblech)
Pizza
Kalbs- oder Rinderbraten
Hähn chen
M ürbeteigkuchen
O bstkuchen
Plum cake
Biskuitböden
G efüllte Crêpes (auf 2
Ebenen)
Kleingebäck (auf 2
Ebenen)
M it Käse gefülltes
Blätterteiggebäck (auf 2
Ebenen)
W indbeutel (auf 3 E benen)
G ebäck (auf 3 Eb enen)
Baisers (auf 3 E benen)
Tiefkühlgerichte
Pizza
Zucchini un d Krebse
überbacken
Quiche
G e fü llte T e ig w a r e n
Lasagne
G o ld g e lb e B ro t la ib e
Hühnchen
Fertiggerichte
Geflügel
Frische Fertiggerichte
G ebäck
Plum cake
M it Käse gefülltes
Blätterteiggebäck
Alle tiefgefrohrenen
Speisen
1
1
1
-
1
1
1
1
1+1
1
1
0.5
0.5
0.5
1.0
1.5
0.7
0.6
0.6
0.8
0.4
0.8
0.6
0.6
1
n.° 4-6
1.0
1.5
1.0
1.5
1.5
1.5
1.5
1.5
-
0.5
1
1
0.5
1
0.7
0.5
1.2
0.6
0.4
0.7
0.7
0.5
0.3
0.4
0.5
0.3
0.5
0.4
0.4
0.4 2 - 200 20-25
0.3
0.6
0.2
3
3
3
3
3
2-4
3
2
2-4
2
2
2-4
2-4
2
2-4
3
4
4
4
4
3/4
4
4
4
4
4
-
-
-
2
2
-
-
-
2
3
2
2/3
3
2/3
3
3
2-4
2-4
4
1-3-5
1-3-5
1-3-5
2
2
2
2
2
2
2
2
2
2
15
15
15
15
15
15
10
10
15
10
10
10
10
10
10
15
10
10
10
10
10
10
15
10
10
15
15
15
15
15
15
15
15
15
15
200
200
200
180
180
230
180
180
200
180
170
190
180
170
170
200
-
-
-
-
-
-
-
-
-
-
-
-
-
-
-
-
-
-
-
-
-
-
-
100%
100%
100%
100%
100%
100%
100%
100%
100%
100%
100%
100%
100%
200
200
200
200
200
200
220
220
180
180
180
180
160
200
190
210
180
180
90
250
200
220
200
200
180
220
200
180
210
65-75
70-75
70-80
15-20
30-35
15-20
30-35
40-45
60-70
30-35
40-50
20-25
10-15
15-20
20-25
25-30
10-12
8-10
10-15
10-15
15-20
15-20
15-20
10-12
15-20
3-5
80-90
70-80
70-80
55-60
30-35
70-80
70-80
70-75
70-75
15-20
25-30
60-70
20-30
40-45
40-50
25-30
30-35
20-25
15-20
20-25
20-25
180
12
20
30-35
25
35
25-30
15-20
15-18
45
10-12
14
Page 14

Die Sicherheit - Eine gute Gewohnheit
Um die Leistungsfähigkeit und Sicherheit dieses Gerätes zu gewährleisten, bitte f olgendes beachten:
• wenden Sie sich ausschließlich an unsere anerkannten Kundendienst-Zentren
• verlangen Sie, dass nur Original-Ersatzteile verwendet werden.
• Bedienen Sie sich zur Positionsveränderung des
Geräts stets der an den Seiten des Ofens
eingekerbten Griffe. Sie vermeiden auf diese W eise
Schäden an Personen oder am Gerät selbst.
• Das Gerät ist für den Einsatz im privaten Haushalt bestimmt; seine Eigenschaften dürfen nicht verändert
werden.
• Die Anweisungen gelten nur für die Bestimmungsländer, deren Symbole im Handb uch und auf dem Typenschild angegeben sind.
• Die elektrische Sicherheit dieses Gerätes wird nur dann
gewährleistet, wenn es sachgemäß und gemäß den
einschlägigen Sicherheitsvorschriften an eine leistungsfähige Erdungsanlage angeschlossen wird.
• Bei in Betrieb befindlichem Gerät werden die
Heizelemente und einige Ofentürteile sehr heiß.
Vermeiden Sie demnach, diese zu berühren und
halten Sie Kinder vom Ofen fern.
Folgende Gefahrenquellen sollten für Kinder und
unfähige Personen nicht zugänglich sein:
- die Bedienungselemente und das Gerät im allgemeinen;
- die Verpackung (Plastikbeutel, Nägel us w.)
- das Gerät während des Gebrauchs und auch sofort
nach dem Gebrauch, da es sehr heiß werden kann;
- das Altgerät (bei einem solchen muss auch dafür gesorgt werden, dass keines seiner Bestandteile mehr
eine Gefahrenquelle darstellen kann).
Vermeiden Sie bitte:
- das Gerät mit feuchten Körperteilen zu berühren;
- das Gerät barfuß zu benutzen;
- den Stecker am Kabel oder am Gerät selbst aus der
Steckdose zu ziehen;
- unsachgemäße und demnach gefährliche Eingriffe;
- die Be- und Entlüftungsschlitze zu verstopfen;
- dass das Kabel kleiner Elektrogeräte mit heißen Teilen des Backof ens in Berührung kommt;
- das Gerät der Witterung (Regen, Sonne usw.) auszusetzen;
- den Backofen als Lagerungsstätte zu verwenden;
- den Gebrauch brennbarer Flüssigkeiten in seiner Nähe;
- den Einsatz von Adapter n, Vielfachsteckdosen und/
oder V erlängerungen;
- Installations- und Reparationsversuche, ohne F achpersonal anzufordern.
Fordern Sie absolut Fachper sonal an:
- für die Installation (gemäß den Anweisungen des Herstellers);
- bei Zweifeln hinsichtlich der Funktionsweise;
- wenn die Steckdose ausgetauscht werden muss, f alls
diese mit dem Gerätestecker nicht übereinstimmen
sollte.
Fordern Sie den Einsatz von Technikern der vom
Hersteller anerkannten Kundendienststellen an bei:
- Zweifeln hinsichtlich der Unversehrtheit des Gerätes
nach Abnahme des Verpackungsmaterials;
- Beschädigung oder Austausch des Zufuhrkabels;
- Störungen oder schlechter Betriebsweise, und verlangen Sie den Einsatz von Original-Ersatzteilen.
Folgendes sollte befolgt werden:
- Verwenden Sie das Gerät für keine anderen Zwecke,
als zum Garen von Speisen.
- Überzeugen Sie sich nach Abnahme der V erpackung,
dass das Gerät auch nicht beschädigt wurde.
- Trennen Sie das Gerät bei Betriebsstörungen, vor der
Wartung und Reinigung vom Stromnetz.
- Schalten Sie das Gerät vom Stromnetz ab, und drehen Sie den Gashahn (wenn vorgesehen) ab, wenn
das Gerät nicht in Betrieb ist.
- V erwenden Sie Bac kofenhandschuhe.
- Fassen Sie den Griff stets in der Mitte an, da die Seitenteile durch eventuellen Heißluftaustritt äußerst heiß
sein könnten.
- V ergewissern Sie sich stets, daß sich die Reglerknöpfe
auf Position “• ”/”o” befinden, wenn sich das Gerät nicht
in Gebrauch befindet.
- Schneiden Sie bitte vor der Entsorgung Ihres Altgerätes
das (vom Stromnetz getrennte!) Elektrokabel ab .
• Der Hersteller kann für eventuelle, durch fehlerhafte
Installation, oder unsachgemäßen, falschen oder unangemessenen Gebrauch nicht haftbar gemacht werden.
15
Page 15

INSTALLIERUNG
Die Installation ist von Fachper sonal und gemäß den Anweisungen des Herstellers durchzuführen. Eine unsach-
gemäße Installation kann zu Schäden an Personen, Tieren
oder Gegenständen führen, für die der Hersteller nicht zur
Verantwortung gezogen werden kann.
Wichtig: Vor jeder Einstellung, Wartung usw. muss der Backofen vom Stromnetz getrennt werden.
Installation der Einbaubacköfen
PUm eine einwandfreie Betriebsweise des Gerätes zu gewährleisten, muss der Umbauschrank geeignete Merkmale
aufweisen. Auf nachstehender Abbildung sind die jeweils für
den Einbau in einen Unterbau oder in einen Hochschrank
erforderlichen Abmessungen ersichtlich.
555
580
560
min
+4 -0
min
min
45
575-585
+4 -0
480
23
572
558
543545
500
39
15
595
595
NB: Installation zwecks Energiedeklaration
Um eine korrekte Zentrierung zu gewährleisten, müssen die
4 seitlich am Backofen befindlichen Klampen mit den 4 Löchern des Rahmens in Übereinstimmung gebracht werden.
Im Besonderen muss, bei einer Stärke der Umbauschrankwand von:
•
20 mm: der bewegliche Teil der Klampe abgenommen
werden (Abb. A);
•
18 mm: die erste, werkseitig bereits angebrachte Rille
genutzt werden (Abb . B);
•
16 mm: die zweite Rille genutzt w erden (Fig. C).
Abb. A Abb. B
Um eine einwandfreie Belüftung zu gewährleisten, muss die
Rückwand des Schrankumbaus abgenommen werden. Der
Backofen sollte möglichst so installiert werden, dass er auf
zwei Holzleisten aufliegt; sollte eine durchgehende Fläche
als Auflage vorhanden sein, m uss diese mit einem Ausschnitt
von mindestens 45 x 560 mm versehen werden.
45 mm.
560 mm.
Die an den Backofen angrenzenden Schrankwände müssen aus hitzebeständigem Material beschaffen sein. Dies
gilt besonders für Möbel aus Furnierholz, deren Leim einer
Temperatur von 100 °C standhalten muss.
Gemäß den Sicherheitsvorschriften muss nach erfolgtem
Einbau die Möglichkeit einer Berührung mit den Elektroteilen
ausgeschlossen sein.
Alle zum Schutz dienenden Teile müssen so befestigt werden, dass ein Entfernen derselben ohne ein Werkzeug zu
Hilfe nehmen zu müssen, nicht möglich ist.
Abb. C
Zur Befestigung des Backofens am Möbel öffnen Sie die
Backofentür und befestigen Sie ihn dann mittels 4 Holzschrauben, die in die 4 im Backofenr ahmen befindlichen Löcher einzuschrauben sind.
Elektroanschluss
Der Anschluss an das Stromnetz ist am Herd vorzunehmen.
Das Kochfeld wird mittels eines geeigneten Verbinders an
den Herd angeschlossen. Die Herde sind für den Betrieb mit
Wechselstrom mit der auf dem Typenschild angegebenen
V ersorgungsspannung und -frequenz ausgelegt.
16
Page 16

EINBAU-KOCHFELD
NL
230V 1N~
H07RN-F 3x4 CEI-UNEL 35364
1
3
2
4
5
NL2L3
L1
P
Nur bei
einigen
Modellen
WEISS ROT GELBBLAU GRÜN
EINBAUHERD
Verlegen des Netzkabels
Öffnen des Klemmengehäuses:
• Heben Sie unter Zuhilfenahme eines Schraubenziehers
die seitlichen Zungen des Klemmengehäusedeckels an.
• Ziehen Sie den Deckel des Klemmengehäuses ab .
Abb. E
Abb. F
400V 2N~
H05RR-F 4x2.5 CEI-UNEL 35363
NL2L1
V erlegen Sie nun das Versorgungskabel wie folgt:
• schrauben Sie die Schraube der Kabelklemme sowie die
der Kontakte aus;
Anmerkung: Die Brücken werden vom Hersteller für
einen 400V Dreiphasenanschluss (Abb. D)
vorgesehen.
• Zur Durchführung der elektrischen Anschlüsse der Abb.
F und G sind die beiden Brücken aus dem Gehäuse
zu verwenden (Abb. E - Bezugspunkt “P”).
• das Versorgungskabel in der entsprechenden
Kabelklemme befestigen und den Deck el schließen.
400V 3N~
H05RR-F 5x2.5 CEI-UNEL 35363
NL3L1L2
5
3
4
1
2
Abb. D
5
3
4
1
2
Abb. G
Anschluß des V ersorgungskabels an das Stromnetz
Versehen Sie das Kabel mit einem Normstecker für die auf
dem Typenschild angegebene Belastung; wird das Gerät direkt an das Stromnetz angeschlossen, ist ein allpoliger Schalter mit einer Mindestöffnung von 3 mm, der der Strombelastung und den geltenden Richtlinien entspricht,
zwischenzuschalten (der Erdleiter darf nicht durch den Schalter unterbrochen werden).
Das Versorgungskabel muß so verlaufen, daß es an keiner
Stelle eine Temperatur erreicht, die 50°C über der Raumtemperatur liegt.
Bev or der Anschluß vorgenommen wird, beachten Sie, daß:
• Die elektrische Sicherheit dieses Gerätes nur dann
gewährleistet ist, wenn es sachgemäß und gemäß den
geltenden Sicherheitsvorschriften an eine leistungsfähige
Erdungsanlage angeschlossen wird. Die Gegebenheit
dieser grundlegenden Sicherheitsanforderung muß
überprüft werden, im Zweifelsf alle ist eine Kontrolle durch
Fachpersonal anzufordern. Der Hersteller kann für
eventuelle durch F ehlen einer Erdungsanlage verursachte
Schäden nicht zur Verantwortung gezogen werden.
• V or Anschluß des Gerätes kontrollieren Sie bitte, daß die
auf dem Typenschild (befindlich auf dem Gerät und/oder
auf der V erpackung) angegebenen Daten mit denen des
Stromversorgungsnetzes übereinstimmen.
17
Page 17

• V ergewissern Sie sich davon, daß die elektrische Leistung
der Anlage und der Steckdosen der maximalen, auf dem
Typenschild angegebenen Höchstleistung des Gerätes
entspricht. Im Zweifelsfalle ziehen Sie bitte einen
Fachmann zu Rate .
• Falls Steckdose und Stecker des Gerätes nicht
übereinstimmen sollten, ist die Steckdose von einem
Fachmann durch eine andere geeigneten Typs zu
ersetzen. Derselbe muß bei der Gelegenheit auch
überprüfen, daß der Steckdosen-Kabelquerschnitt der
Leistungsaufnahme des Gerätes entspricht. Allgemein
Technische Eigenschaften
ist die V erwendung von Adpatern, Vielfachsteckdosen und/
oder V erlängerungen nicht ratsam. Falls deren Gebrauch
jedoch unvermeidlich sein sollte, dürfen n ur Einfach- oder
Vielfachadapter und V erlängerungen verwendet werden,
die den geltenden Sicherheitsvorschriften entsprechen;
achten Sie darauf, daß die auf dem Einf achadapter und
den V erlängerungen angegebene Stromleistungsgrenze
und die auf dem Vielfachadapter angegebene
Höchstleistungsgrenze nicht überschritten wird. Stecker
und Steckdose müssen leicht zugänglich sein.
Nutzabmessungen des Backofens:
Breite: cm 43,5
Tiefe: cm 40
Höhe: cm 32
Nutzvolumen des Backofens:
Liter 56
ENERGIE-ETIKETT
Richtlinie 2002/40/CE über die Etikettierung von
Elektrobacköfen
Norm EN 50304
Energieverbr auch Natürliche Konv ektion
Heizfunktion: a T raditionell
Deklarierte Energieverbrauchsklasse Erzwungene Kon vektion
Heizfunktion: u Bac k en
Versor gungsspannung und -frequenz:
230/400V ~ 3N 50Hz 9200W
7
Dieses Gerät entspricht den folgenden EGRichtlinien:
- 73/23/EWG vom19.02.73 (Niederspannung) und
nachfolgenden Änderungen;
- 89/336/EWG vom 03.05.89 (elektromagnetische
V erträglichkeit) und nachfolgenden Änderungen;
- 93/68/EWG vom 22.07.93 und nachfolgenden
Änderungen.
18
Page 18
Congratulations on choosing an Ariston appliance, which you will find is dependable and easy to use. We recommend
that you read the instructions in this owner’ s manual carefully before use for the best perf ormance and to extend the lif e
of your appliance, as it will provide you with all the instructions you require to ensure its safe installation, use and
maintenance. Always k eep this owner’ s manual close to hand since you may need to ref er to it in the future. Thank you.
Close-up view
I
G
D
A
D
12
11
10
9
8
7
H
1
12
12
2
2
11
11
3
3
10
10
4
4
9
9
5
5
8
8
7
7
6
6
F
1
12
2
2
11
3
3
10
4
4
9
5
5
8
7
6
6
L
E
A
M
C
8
B
7
1
2 3 4 5 6
A
9
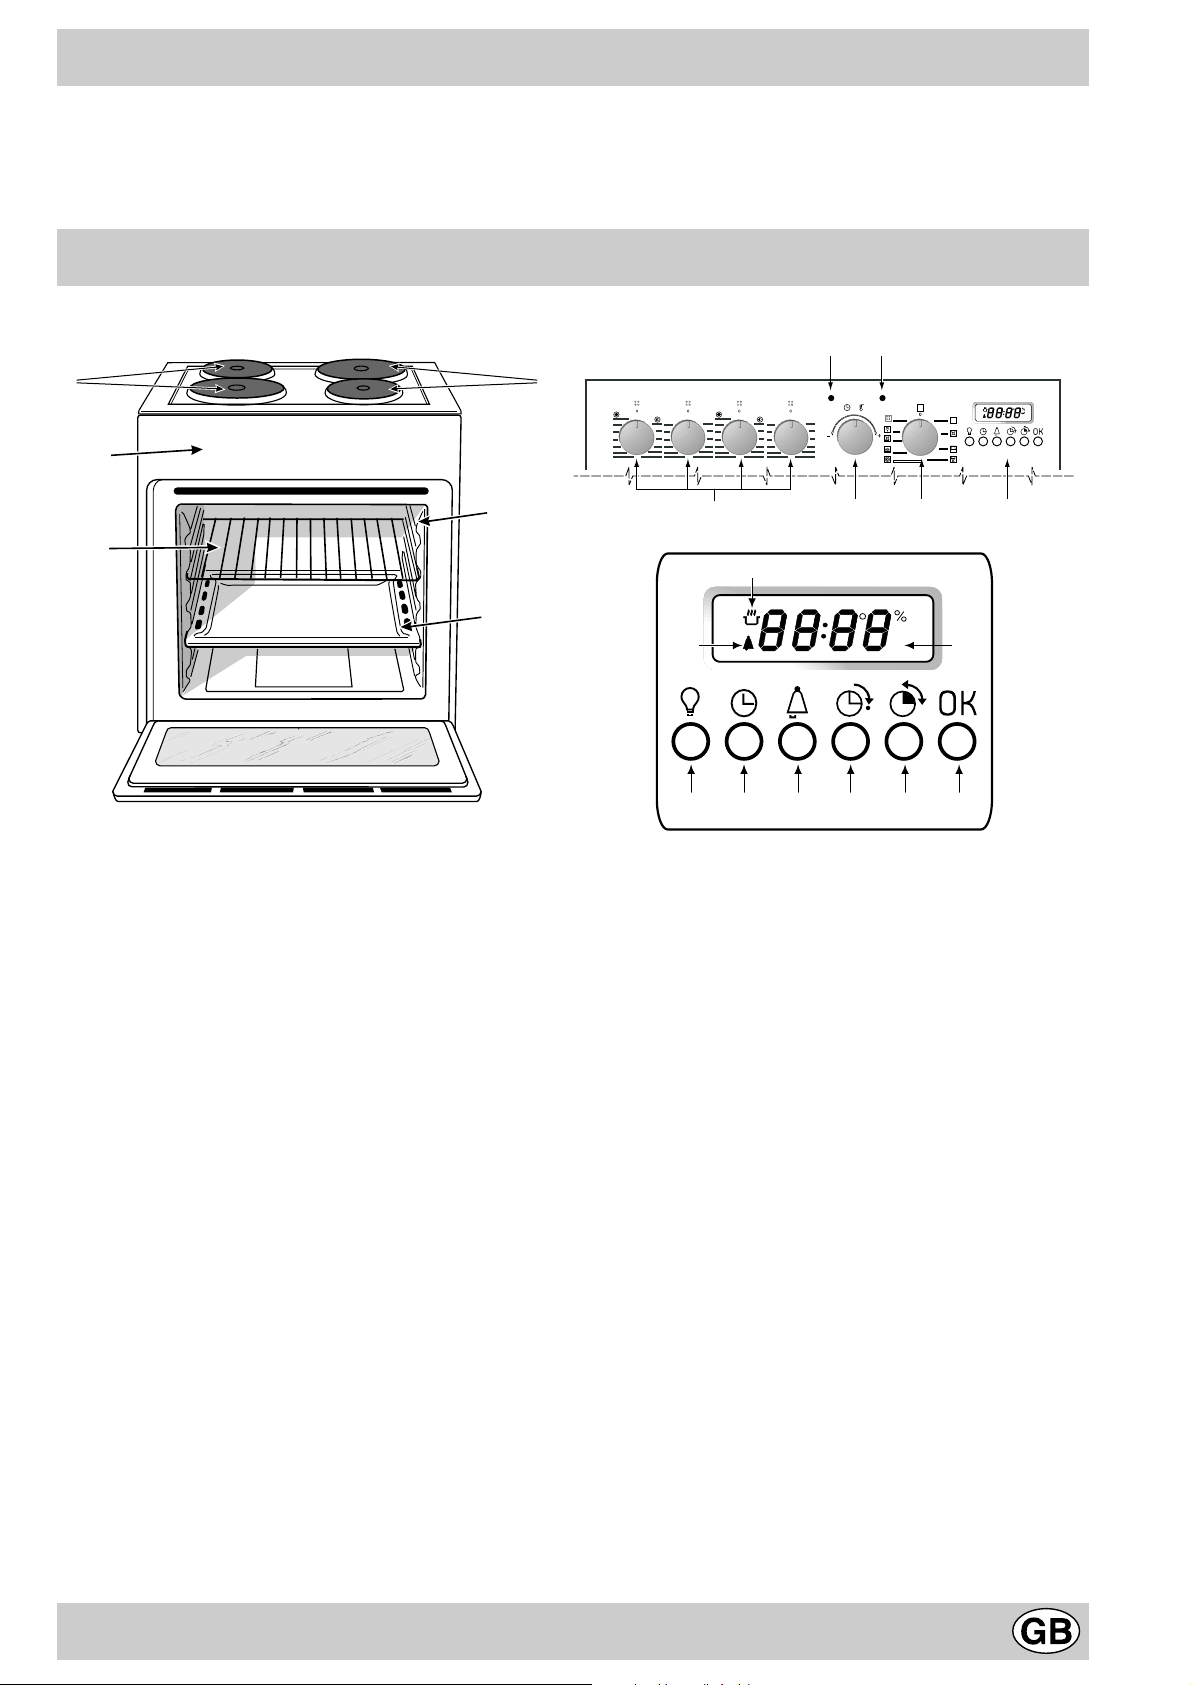
A. Control Panel
B. Dripping Pan or Baking Sheet
C. Oven Rack
D. Electric hotplate
E. Cooking mode selection knob
F. Electric hotplate knobs
G. Electric hotplate indicator light
H. Guides for sliding the racks or dripping pan in and
out
I. Oven indicator light (only on certain models) - When
lit, it indicates the oven is heating up to the temperatu-
re set.
L. Cooking temperature selection knob
M. Electronic programmer - Allows you to programme
the desired cooking mode by selecting the cooking time
and the end cooking time. It can also be used as a
timer.
1. Oven Light
2. Clock adjustment
3. Timer adjustment
4. End cooking time
5. Cooking time
6. Setting confirmation
7. Timer indicator
8. Pre-heating (m flashing) or cooking (m on) under
way indicator
9. Programming complete indicator
10.Door lock indicator
19
Page 19

How to use your appliance
The
7 Cuochi
convection ov ens with those of the more modern fan assisted
models in a single appliance.
It is an extremely versatile appliance that allo ws you to choose
easily and safely between 7 different cooking modes. The
various features offered b y the ov en are selected by means
of selector knob “E” situated on the control panel.
Reminder: The first time you use your appliance, we
recommend that you set the thermostat to the highest setting
and leave the o ven on f or about half an hour with nothing in
it, with the oven door shut. Then, open the ov en door and let
the room air. The odour that is often detected during this
initial use is due to the evaporation of substances used to
protect the oven during storage and until it is installed.
Setting the digital clock
The time can only be set on the clock when knob “E” is in
position 0.
After the appliance has been connected to the power supply ,
or when the power has gone out, the clock display will
automatically reset to 0:00 and begin to blink. 0.00.
Turn knob “L” to set the hours and then press OK to
confirm. Turn knob “L ” again to set the minutes and then
press OK to confirm the time definitively. Any changes
can be made by pressing button 2 and follo wing the above
procedure.
Timer Feature
The timer does not control the starting or stopping of the
oven, it merely sounds a buzzer when the time is up and
can be interrupted at any time just by pressing a button.
To set the timer, press button 3, adjust it using knob “L” and
then press the OK button to confirm. The n icon will remind
you the timer is on.
Once the countdown is over , a buzzer will sound, and will stop
doing so after 1 minute or if you press any button whatsoe ver .
The oven light
It can be turned on/off at any time with the oven turned
off, simply by pressing b utton 1.
Cooling ventilation
In order to reduce the temperature of the exterior of the
oven, some models are fitted with a cooling fan that
generates a flow of air that can be heard exiting betw een
the oven door and the control panel.
Note: When cooking is done , the fan stays on until
the oven cools down sufficiently.
Note: In “F ast cooking” mode, the f an comes on automatically
only when the oven is hot.
Reminder: the appliance is fitted with a diagnosis system
which detects any malfunctions. The user is inf ormed of the
latter by messages such as “Fn m” that come up on the displa y
(n and m = single digit numbers). In these cases , you need
to call for technical assistance as the ov en is faulty.
How T o Use Y our Oven
Tur n knob “E” to select the desired cooking mode. The
oven will immediately start the pre-heating phase, during
which the icon m will flash on the displa y , and the cooking
temperature associated with the mode selected will be
oven combines the advantages of tr aditional
displayed: should this value not be the one you desire,
you can modify it simply by turning knob C.
Once pre-heating is complete, the icon m will come on
permanently, and at this stage you can place the food to
be cooked inside the pre-heated oven.
Note: the FAST COOKING and GRILL modes do not inclu-
de a pre-heating phase. Please remember that you can
always do the follo wing when cooking is under wa y:
• change the cooking mode by turning knob “E”;
• change the temperature by turning knob “L”;
• programme the cooking time and end cooking time (see
paragraph entitled “Prog ramming the cooking mode”).
• stop it at any time by setting knob “E” back to 0.
Note: For safety reasons, a cooking time of 2 hours is set
for each cooking mode by default. Should this time fail to
be adjusted, the oven will be automatically turned off once
this time is up.
Notice: Place the ov en tra y provided on the bottom shelf of
the oven to pre v ent an y sauce and/or grease from dripping
onto the bottom of the oven only when grilling food or when
using the turnspit (only available on certain models). F or all
other types of cooking, never use the bottom shelf and ne ver
place anything on the bottom of the oven when it is in
operation because this could damage the enamel coating.
Always place your cookware (dishes , aluminium foil, etc. etc.)
on the grid provided with the appliance inserted especially
along the oven guides.
Convection Oven a
Position of thermostat knob “L”: Between 40°C and 250°C.
On this setting, the top and bottom heating elements come
on. This is the classic, traditional type of oven which has
been perfected, with exceptional heat distribution and reduced
energy consumption. The convection o ven is still unequalled
when it comes to cooking dishes made up of several
ingredients, e.g. cabbage with ribs, local stockfish recipes,
tender veal with rice, etc. Excellent results are achieved when
preparing meat-based dishes as well: braised meats, ste w,
goulash, game, ham etc. which need to cook slowly and
require basting or the addition of liquid. It nonetheless remains
the best system for baking cakes and pastries as well as
fruit and cooking casseroles. When cooking in convection
mode, use only one rack, as the temperature would not be
distributed evenly on se v er al rac ks . Using the different rack
heights available, you can balance the amount of heat
between the top and the bottom of the oven. Select from
among the various rack heights based on whether the dish
needs more or less heat from the top.
Multi-Cooking Mode b
Position of thermostat knob “L”: Between 40°C and 250°C.
The heating elements and the fan come on alternately . Since
the heat remains constant and uniform throughout the oven,
the air cooks and browns food unif ormly over its entire surface.
With this mode, you can also cook various dishes at the
same time, as long as their respective cooking temperatures
are the same. A maximum of 2 racks can be used at the
same time, following the instructions in the section entitled:
“Cooking On More Than One Rack”.
This cooking mode is particularly recommended for dishes
requiring a gratin finish or for those requiring considerably
20
Page 20

prolonged cooking times, such as for example: lasagne, pasta
bakes, roast chicken and potatoes, etc… Moreover, the
excellent heat distribution makes it possible to use lower
temperatures when cooking roasts. This results in less loss
of juices, meat which is more tender and a decrease in the
loss of weight for the roast. The Multi-cooking mode is
especially suited for cooking fish, which can be prepared
with the addition of a limited amount of condiments, thus
maintaining their flavour and appearance . Excellent results
can be attained when cooking vegetable-based side dishes
like courgettes, aubergines, peppers , etc.
Desserts: this mode is also perfect for baking lea vened cakes.
Moreover , this mode can also be used to thaw quickly white
or red meat and bread by setting the temperature to 80 °C.
To thaw more delicate foods, set the thermostat to 60°C or
use only the cold air circulation feature by setting the
thermostat to 0°C.
Grill 2
Position of thermostat knob “L”: Between 50% and 100%.
The top heating element and the turnspit (where present)
come on.
The extremely high and direct temperature of the grill make s
it possible to brown the surface of meats and roasts while
locking in the juices to keep them tender. The grill is also
highly recommended for dishes that require a high
temperature on the surface: such as beef steaks, veal, rib
steak, filets, hamburgers etc...
Always leave the oven door ajar during cooking, except
when using the turnspit.
Some grilling examples are included in the “Practical Cooking
Advice” paragraph.
Tur n knob “L” and the display will indicate the different
energy percentages which represent the minimum (50%)
and maximum (100%) settings.
Gratin T
Position of thermostat knob “L”: Between 40°C and 250°C.
The top heating element, the fan and the turnspit (where
present) come on.
This combination of features increases the effectiv eness of
the unidirectional thermal radiation of the heating elements
through forced circulation of the air throughout the ov en. This
helps prevent f ood from burning on the surface, allo wing the
heat to penetrate right into the food. Excellent results are
achieved with kebabs made with meats and vegetables,
sausages, ribs, lamb chops, chicken in a spicy sauce , quail,
pork chops, etc.
All “gratin” cooking must be done with the o ven door shut.
The “gratin” mode is ideal f or cooking grouper steaks , tuna,
swordfish, stuff ed cuttlefish etc.
Baking Mode u
Position of thermostat knob “L”: Between 40°C and 250°C.
The rear heating element and the fan come on, guaranteeing
delicate heat distributed uniformly throughout the oven.
This mode is ideal for baking and cooking delicate foods especially cakes that need to rise - and for the preparation of
certain tartlets on 3 shelves at the same time. Here are a fe w
examples: cream puffs, sweet and sa voury biscuits, savoury
puffs, Swiss rolls and small portions of vegetables au gratin,
etc…..
“Fast cooking” Mode v
Position of thermostat knob “L”: Between 40°C and 250°C.
The heating elements and the fan come on, guaranteeing
constant heat distributed uniformly throughout the oven.
This mode is especially recommended for cooking prepacked f ood quickly (as pre-heating is not necessary), such
as for example: frozen or pre-cooked food) as well as for a
few “home-made” dishes.
The best results when cooking using the “F ast cooking” mode
are obtained if you use one cooking rack only (the second
from the bottom), please see the table entitled “Practical
Cooking Advice”.
“Defrosting” ModeU
Position of thermostat knob “L”: any
The fan located on the bottom of the oven makes the air
circulate at room temperature around the food. This is
recommended for the defrosting of all types of f ood, but in
particular for delicate types of food which do not require
heat, such as for example: ice cream cakes, cream or
custard desserts, fruit cakes. By using the fan, the
defrosting time is approximately halved. In the case of
meat, fish and bread, it is possible to accelerate the
process using the “multi-cooking” mode and setting the
temperature to 80° - 100°C.
Automatic cleaning with the fast c lean function
This function is designed to clean your oven thoroughly.
For details on the fast clean function, please refer to the
paragraph entitled “Automatic cleaning with the fast clean
function”.
The turnspit (only available on certain models)
To start the turnspit, proceed as follows:
a) place the oven tra y on the 1st rac k;
b) insert the special tur nspit support on the 3rd rack and
position the spit by inserting it through the special hole
into the turnspit at the back of the oven;
c) start the turnspit using knob “E” to select setting 2 / T.
V
Pizza Mode w
Position of thermostat knob “L”: Between 40°C and 250°C.
The bottom and circular heating elements, as well as the
fan, will come on. This combination rapidly heats the oven
due to the large amounts of power used by the appliance
(2800 W), which results in the production of considerable
heat coming prevalently from the bottom.
The pizza mode is ideal for foods requiring high temperatures
to cook, like pizzas and large roasts. Only use one oven tr ay
or rack at a time. However, if more than one is used, these
must be switched halfwa y through the cooking process.
21
Page 21
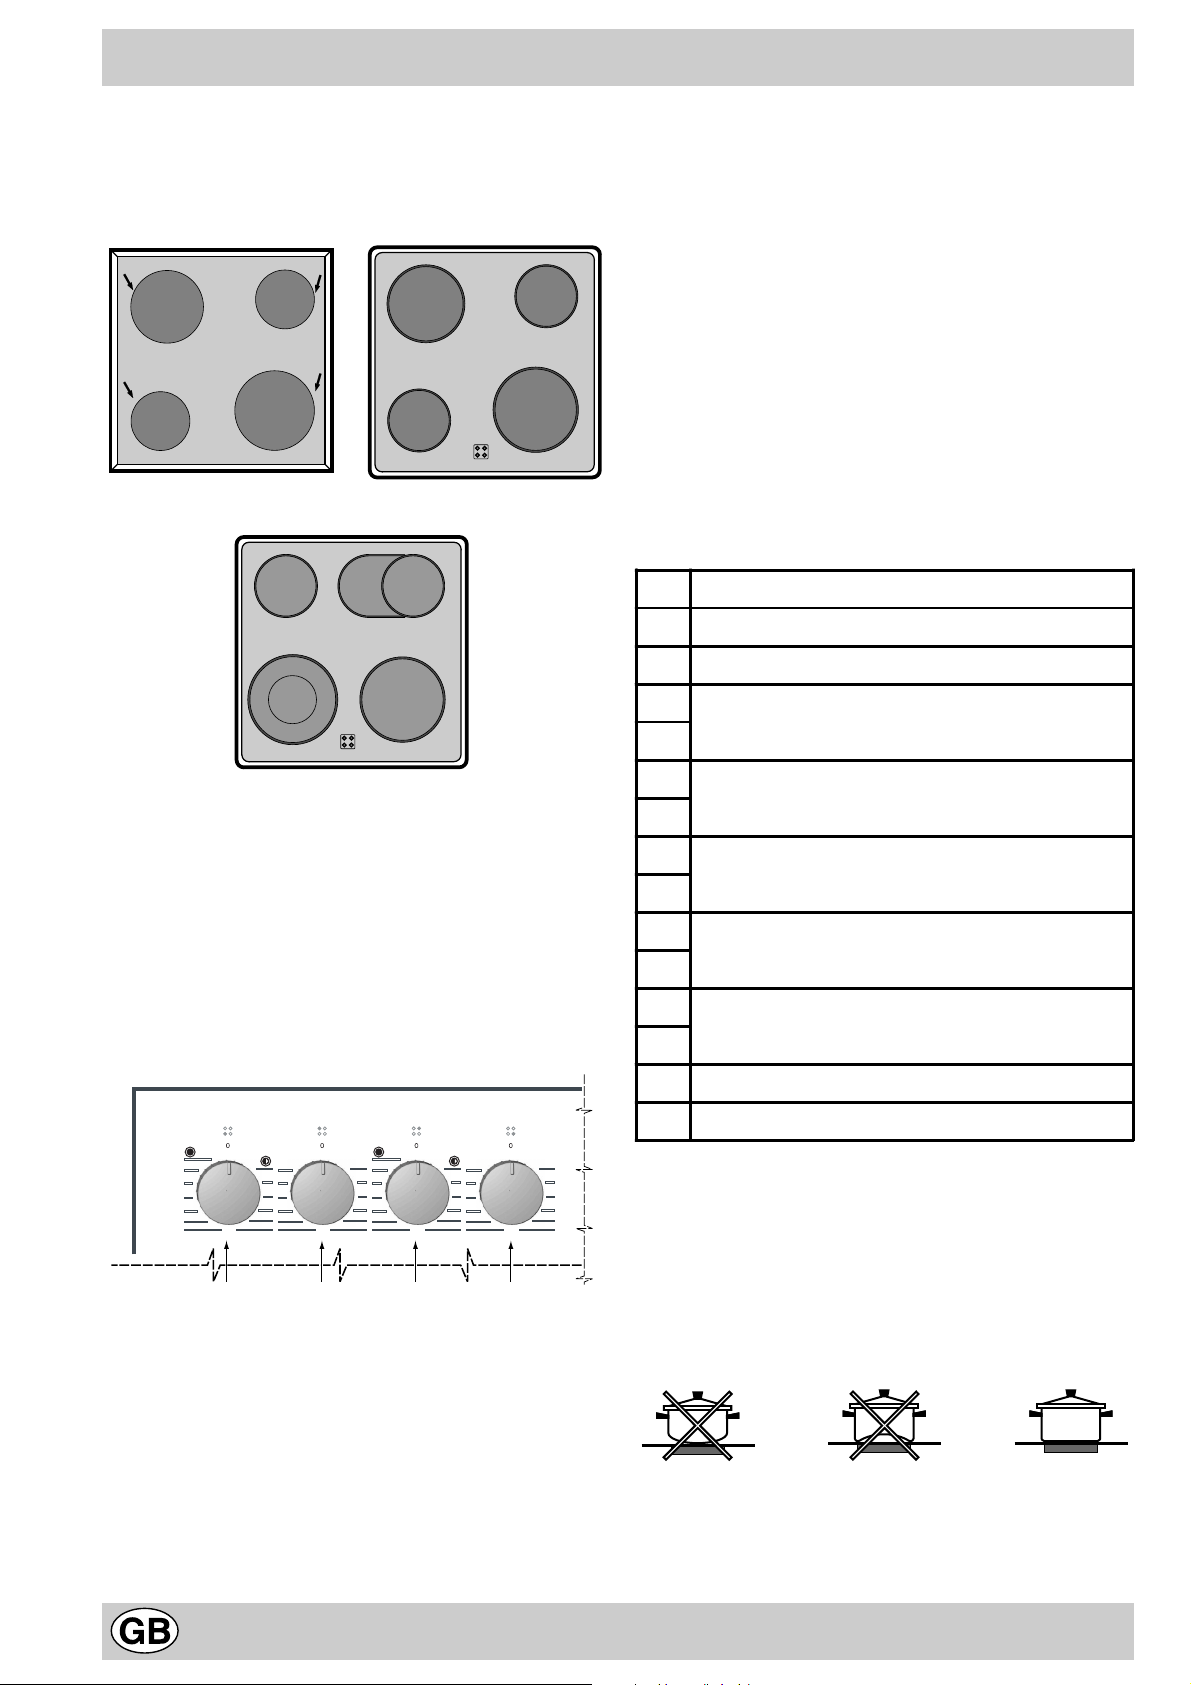
Description
The cooker can be combined with hobs featuring 4 electric
hotplates (Fig. A), with traditional glass cer amic hobs (Fig.
B) or with glass ceramic hobs with extendable cooking
zones (Fig. C).
AA
B
B
A
B
A
B
D
Fig. A Fig. B
to select from 12 different temperature settings from a
minimum of 1 to a maximum of 12.
l Special cooking zone control knobs. These control
knobs allow you to choose from two different power
levels , both adjustable from a minimum setting of 1 to
a maximum setting of 12. Turn the knob clockwise from
1 to 12 to set the lower power level. Turn the knob to
the travel limit stop (A), which is indicated by a slight
click, to enable the maximum po wer lev el, which in turn
can be adjusted between 12 and 1 by turning the knob
anticlockwise. To restore the minimum power level,
turn the knob and set it back to the zero setting. With
glass ceramic hobs featuring extendab le cooking zones
(see Fig. C), the first part of the knob travel enables
the smaller (inner) cooking zone, to enable both
cooking zones and thus have an extended cooking
zone, turn the knob to setting (A) and then select the
desired power lev el from 12 to 1.
B
C
D
C
B
Fig. C
A Cast iron electric hotplates
B Radiant cooking z ones
C Extendab le radiant cooking z ones
D Residual heat indicator lights, one for each cooking
zone: these indicate that the temperature of the
corresponding zone is above 60°C , ev en if the cooking
zone itself is switched off (only available on certain
models)
E Special control knobs
F T raditional control knobs
12
11
10
9
8
7
12
2
11
3
10
4
9
5
8
7
6
E
1
12
2
11
3
10
4
9
5
8
7
6
F
E
12
2
11
3
10
4
9
5
8
7
6
1
2
3
4
5
6
F
Description of the cooking zones
Traditional cooking zones are made up of circular
heating elements. They turn red approximately ten
seconds after they hav e been turned on.
Extendable radiant cooking zones.
These operate in a similar way to tr aditional cooking zones,
and can be recognised for their e xtendab le heating z one
(see Fig. C). You can turn on only the smaller inner cooking
zone or both.
l Traditional cooking zone control knobs. Each
cooking zone is fitted with a control knob allowing you
Set. Radiant Burner
0
Off
1 To melt butter and ch ocolat e.
2
To heat liquids.
3
4
For creams and sauces .
5
6
For cooking at the boili ng point.
7
8
For roasts.
9
10
For boiling large piece s of me at.
11
12
For frying.
For utilising both cook ing ar eas.
A
Electric hotplate indicator light (G)
This light comes on when any of the electrical hotplates
on the hob have been turned on.
Warnings for using the glass ceramic hob
To get the best from your hob, here are a few helpful tips
to keep in mind during cooking or when preparing food.
l Use flat-bottomed pans to ensure the same adhere
fully to the cooking zone.
l Use pans whose diameter is sufficient to cover the
hotplate fully, so as to guarantee the use of all the
available heat.
22
Page 22

l Make sure the bottom of the pan is always clean and
dry, to ensure correct contact and a long life for your
hotplates and pans.
l Do not use the same pans you used on gas burners.
The concentration of heat on gas burners may deform
the bottom of the pan, and so the desired effect will
never be obtained if y ou subsequently use the pan on
the glass ceramic hob.
l Ne v er lea v e a cooking zone on without a pan on it, as
the zone would heat up almost immediately, causing
damage to the heating elements.
l Do not forget that the cooking zone stays hot for at
least half an hour after it has been turned off, take care
not to inadvertently place pans or items on the hot zone.
Programming the cooking mode
l Do not turn the cooking zones on if there is any
aluminium foil or plastic material on the hob.
l Do not get too close to the hot hob.
l Warnings before using your hob for the fir st time:
The glue used for the seals leaves greasy streaks on
the glass during storage. We advise you to remove
these before using the appliance, using an ordinary
detergent (non abrasive cream polish). You may detect
the smell of rubber upon first use; this will disappear
quickly.
l The glass ceramic hob can withstand sudden tempe-
rature changes and shocks. Nevertheless, it may break if you strike it with a sharp object. In this case, unplug
it immediately and call for technical assistance to
request its repair.
The cooking time and/or end cooking time can be
programmed after the desired cooking mode has been
selected.
Programming the cooking time
Press button 5 and then adjust the cooking time by turning
knob C. Press the OK b utton to store the setting. The temperature selected (which can be adjusted using knob C)
and the amount of time left until cooking is complete will
be displayed alternately.
Once this time is up, the word “end” will be displa y ed and
a sequence of acoustic signals will be emitted to indicate
that cooking is complete.
• Press any button to silence the acoustic signal.
• Turn knob B back to position 0 to remove the word
“end” from the displa y.
For e xample
It is 9:00 a.m. and a cooking time of 1 hour and 15 minutes
is programmed. Cooking will stop automatically at 10:15
a.m..
For example
It is 9:00 a.m. and the end cooking time is set at 10:15
a.m.. Cooking will last 1 hour and 15 minutes .
Delayed cooking programming
Press button 5 and then adjust the cooking time by turning
knob C. Press the OK b utton to store the setting. The temperature and the time set previously will be displayed
alternately.
Press button 4 and then adjust the end cooking time by
turning knob C. Press the OK button to store the setting
and the display will remind you of the end cooking time
and of the temperature set alternately.
For example
It is 9:00 a.m. and a cooking time of 1 hour and 15 min utes
and 12:20 as the end cooking time are programmed.
Cooking will start automatically at 11:15 a.m..
Programming the end cooking time
Press button 4 and then adjust by turning knob C. Press
the OK b utton to store the setting. The display will remind
you alternately of the temperature selected and the amount
of time left until cooking is complete.
When the end cooking time selected previously is up , the
word “end” will be displayed and a sequence of acoustic
signals will be emitted to indicate that cooking is complete.
• Press any button to silence the acoustic signal.
• Turn knob B back to position 0 to remove the word
“end” from the displa y.
The icon A will remind you that you hav e programmed the
cooking time and/or the end cooking time.
T o cancel a programmed time
T o cancel an y programming you ha ve made, set knob “B”
to position “0”.
23
Page 23

Automatic cleaning with the fast clean function
When the fast clean function has been enabled, the
temperature inside the oven reaches 500 °C, which is
necessary to burn all food residue that has built up inside it.
If you look through the oven glass, you may notice some
particles that light up as they are destroyed by pyrolysis
upon contact with the heating elements: this is simply
spontaneous combustion: it is perfectly normal and hazard-
free.
A few useful tips before automatic c leaning begins
1- Try to remove large scr aps of food and caked-on dirt with
a damp sponge. Avoid using detergents or an y other special
products recommended for ov en cleaning.
2- Remove all the accessories from the oven, as these
are not designed to withstand such high temperatures. In
addition, some accessories could affect the efficiency of the
automatic cleaning cycle by obstructing the circulation of heat
along all the interior walls of the oven. The accessories can
easily be washed like everyday crockery (even in your
dishwasher).
3- Do not place tea towels ov er the ov en handle .
Notice: during the automatic cleaning cyc le, the surfaces
may become very hot. Keep children well a way.
How to enable the fast clean function
– Shut the oven door .
– Set the selector knob to V.
– To programme the fast clean cycle time and/or cycle
end time, follow the instructions provided in the
paragraph entitled “Fast clean programming”. Please
note that you can choose a cycle time of between 60
and 120 minutes, depending on the degree of soil in
your ov en.
Safety devices
Given the high temperatures reached inside it, the oven is
fitted with several saf ety de vices:
• the door is locked automatically as soon as the temperature exceeds a certain value, to avoid all risk of
burns;
• the heating elements are no longer electrically
powered, as a precautionary measure, should a fault
occur.
• Once the oven door has been locked, you cannot make
any changes to the cycle time, cycle end and timer
settings.
What happens at the end of an automatic cleaning
cycle?
At the end of the automatic cleaning cycle, the word “end”
is displayed and an acoustic signal is sounded, which can
be silenced just by pressing any one of the buttons. Turn
knob “B” to the “0” setting and the word “end” will disappear .
T o open the o ven door, you will have to wait until the temperature inside it has dropped to a suitable value.
You will notice some white dust deposits on the bottom and
sides of your oven; remov e them with a damp sponge once
the oven has cooled down completely.
You may on the other hand prefer to take advantage of the
heat accumulated to start cooking immediately; in this case
the dust can stay where it is: it is completely harmless and
will not affect your f ood in any w a y.
DO NOT WORRY IF
1 the cooling fan is operating at low speed at the start of
the fast clean cycle;
2 the electrical system limiter blows when Fast Clean is
in use: this is due to a mains ov erload (too many electric
household appliances used at the same time);
3 the oven door is locked during the Fast Clean
programme: this is an appliance safety device; the door
will only open when the oven has cooled completely;
4 small stains are left on the interior surface of the oven
after the Fast Clean cycle: we recommend y ou remove
the toughest grease spots and large scraps of food
before the self-cleaning cycle and that you set the cycle
time in accordance with the degree of soil in your oven;
5 you see ventilated air exiting the o ven for a while when
cooking is complete: it is due to the normal cooling
phase of the oven interior;
6 when using the “grill” mode, the top heating element
isn’t always on (red in colour): its operation is controlled
by a thermostat;
7 a blast of hot steam exits the oven when y ou open the
door during cooking;
8 drops of water or steam form inside the oven if you
leave f ood inside the oven after cooking is complete;
24
Page 24

Fast clean programming
The fast clean cycle time and/or cycle end time can be
programmed after selecting the fast clean mode.
Programming the fast clean cyc le time
Press button 5 and then adjust the cycle time by turning
knob C. Press the OK b utton to store the setting. The time
left until the end of the fast clean cycle will be display ed.
Once this time is up, the word “end” will be displayed and
a sequence of acoustic signals will be sounded to indicate that the cleaning cycle is complete.
• Press any button to silence the acoustic signal.
• Turn knob B back to position 0 to remove the word
“end” from the displa y.
For example
It is 9:00 a.m. and a fast clean cycle time of 1 hour and
15 minutes is programmed. The fast clean cycle will end
automatically at 10:15 a.m..
For e xample
It is 9:00 a.m. and the fast clean cycle end time is set at
10:15 a.m.. Fast clean will last 1 hour and 15 minutes.
Delayed fast clean c ycle pr ogramming
Press button 5 and then adjust the cycle time by turning
knob C. Press the OK button to store the setting and
display it.
Press button 4 and then adjust the cycle end time by
turning knob C. Press the OK button to store the setting
and the display will remind you of the cycle end time and
of the actual cycle time set alternately .
For e xample
It is 9:00 a.m. and a f ast clean cycle time of 1 hour and 15
minutes and 12:20 as the cycle end time are programmed.
The fast clean cycle will start automatically at 11:15 a.m..
Programming the fast clean cy cle end time
Press button 4 and then adjust by turning knob C. Press
the OK button to store the setting. The time left until the
end of the fast clean cycle will be displayed.
When the fast clean cycle time previously selected is up ,
the word “end” will be displayed and a sequence of acoustic
signals will be sounded to indicate that the fast clean cycle
is complete.
• Press any button to silence the acoustic signal.
• Turn knob B back to position 0 to remove the word
“end” from the displa y.
The icon A will remind you that you hav e programmed the
fast clean cycle time and/or the cycle end time.
T o cancel a programmed time
T o cancel an y programming you ha ve made , set knob “B”
to position “0”.
25
Page 25
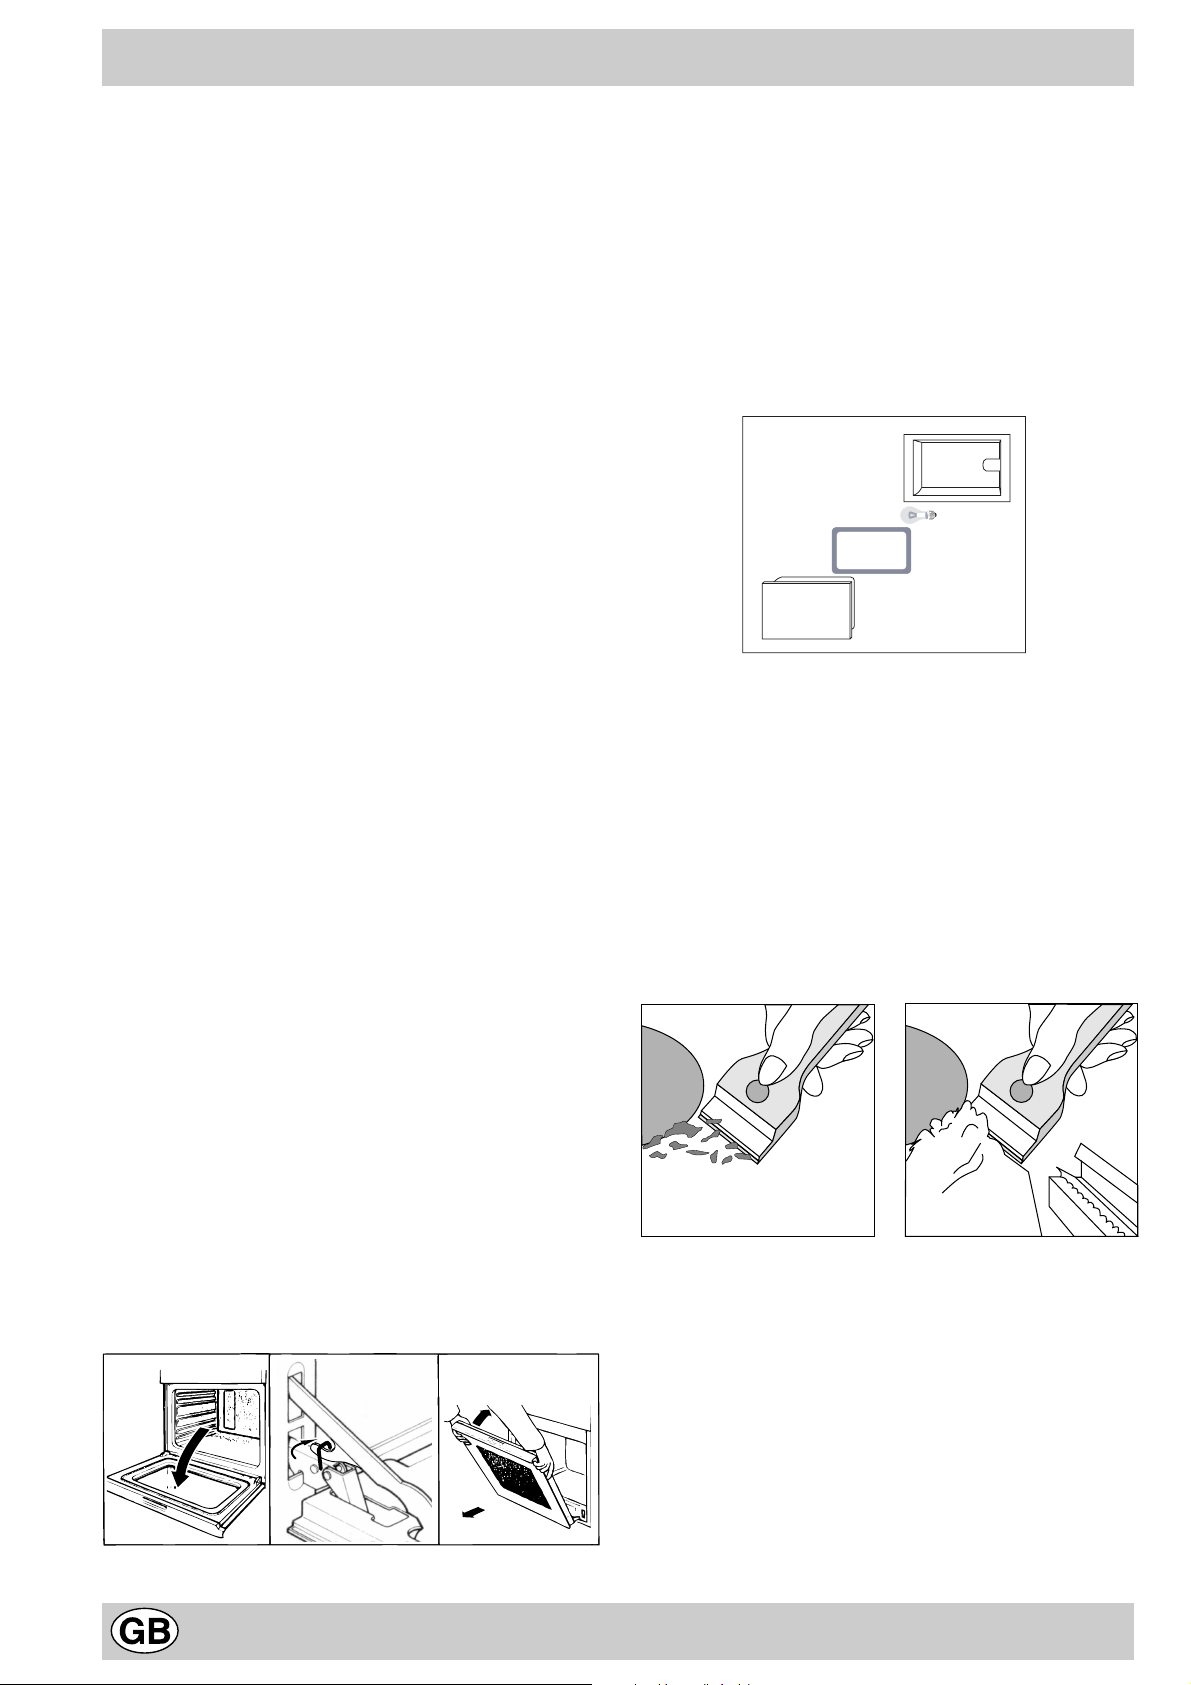
How to Keep Your Oven in Shape
Before cleaning your oven, or performing maintenance,
disconnect it from the power supply.
To extend the life of your oven, it must be cleaned
frequently, keeping in mind that:
• Do not use steam equipment to clean the appliance.
• the enamelled or stainless steel parts should be
washed with lukewarm water without using any abrasive powders or corrosive substances which could ruin
them; Stainless steel could get stained. If these stains
are difficult to remove, use special products available
on the market. After cleaning, it is advisable to rinse
thoroughly and dry .
• the inside of the oven should preferably be cleaned
immediately after use, when it is still warm, with hot
water and soap; the soap should be rinsed away and
the interior dried thoroughly . Avoid using abrasive detergents (for example cleaning powders, etc…) and
abrasive sponges for dishes or acids (such as
limescale-remover , etc…) as these could damage the
enamel. If the grease spots and dirt are par ticularly
tough to remove, use a special product f or oven cleaning, following the instructions provided on the pack et.
• if you use your oven for an extended period of time,
condensation may form. Dry it using a soft cloth.
• there is a rubber seal surrounding the oven opening
which guarantees its perfect functioning. Check the
condition of this seal on a regular basis. If necessary,
clean it and avoid using abrasive products or objects
to do so. Should it become damaged, please contact
your nearest After-sales Service Centre. We recommend you avoid using the oven until it has been repaired.
• never line the oven bottom with aluminium foil, as the
consequent accumulation of heat could compromise
the cooking and even damage the enamel.
• clean the glass door using non-abrasive products or
sponges and dry it with a soft cloth.
• the electr ic hotplates should be cleaned with a damp
cloth and lubricated with a little oil while still warm;
Replacing the oven lamp
• Always unplug the appliance from the mains or switch
off the main switch before all operations .
• With the aid of a narrow, flat item (such as a screwdriver
or a spoon handle, etc...), remove the glass co ver.
• Unscrew the lamp and replace it with another featuring
the same characteristics:
- voltage 230/240 W
- wattage 15 W
- type E 14
• Replace the glass cover and ensure you reposition the
seal correctly.
Oven
compartment
Lamp
Seal
Glass door
Cleaning the hob
Before you start cooking, make sure the hob surface is
clean, wiping it with a damp cloth if necessary to remove
any dust or food residue.
The hob surface must be cleaned regularly with a solution
of warm water and a non-abrasive cleaner. You should
clean glass ceramic hob surfaces regularly , using a special
product. First remove all grease and spills from the hob
surface with an appropriate scraper , such as B (see
Fig. A.) (not pro vided).
Clean the hob while still warm; use a special cleaning
product and some kitchen roll (see Fig. B). Then rub with
a damp cloth and dry thoroughly .
How to remove the oven door
For a more thorough clean, you can remove the oven
door. Proceed as follows:
• open the door fully;
• lift up and tur n the small levers situated on the two
hinges;
• grip the door on the two external sides, shut it slowly
but not completely;
• pull the door towards you, pulling it out of its seat;
Reassemble the door by following the above procedures
backwards.
132
Fig. A Fig. B
Aluminium foil, plastic or synthetic items that may have
been accidentally melted, as well as sugar or highly sugary
food should be remov ed immediately from the hot cooking
zone using a scraper. Special cleaning products lea ve a
clear surface layer which prevents dirt from adhering to
the hob. This layer also protects the surface from any
damage caused by highly sugary foodstuffs. In no case
whatsoever should abr asive sponges or products be used,
nor chemically aggressive cleaning products such as ov en
cleaner sprays or stain remo vers.
26
Page 26

Glass ceramic hob
cleaners
Window scraper Razor bl ade
scrapers
Replacement blades DIY Stores,
COLLO luneta
HOB BRITE
Hob Clean
SWISSCLEANER
Available from
DIY Stores
supermarkets,
chemists
Boots, Co-op stores,
department stor es, Re gion al
Electricity Comp any sho ps,
supermarkets
Practical Cooking Advice
The oven off ers a wide range of alternatives which allow
you to cook any type of food in the best possib le wa y . With
time you will learn to make the best use of this versatile
cooking appliance and the following directions are only a
guideline which may be varied according to your o wn personal experience.
Cooking on More Than One Rack
If you have to cook food using several racks, use either
the “baking” mode u or the “Multi-cooking” mode b, as
these are the only modes that allow you to do so.
When cooking delicate food on more than one rack, use
the “baking” mode u, which allows you to cook on 3
racks at the same time (the 1st, 3rd and 5th from the
bottom). Some examples are included in the “Practical
Cooking Advice” table .
When cooking other food on se veral r acks , use the “Mul-
ti-cooking” mode b keeping the following suggestions
in mind:
• The oven is fitted with 5 racks. During fan assisted
cooking, use two of the three central racks; the lowest
and highest racks receive the hot air directly and
therefore delicate foodstuffs could be burnt on these
racks.
• As a general rule, use the 2nd and 4th rack from the
bottom, placing the foodstuffs that require greater heat
on the 2nd rack from the bottom. For example, when
cooking meat roasts together with other food, place
the roast on the 2nd rack from the bottom and the more
delicate food on the 4th rack from the bottom.
• When cooking food that requires differing times and
temperatures, set a temperature that is somewhere
between the two temperatures required, place the more
delicate food on the 4th rack from the bottom and tak e
the food requiring less time out of the oven first.
• Use the dripping pan on the lower rack and the grid on
the upper;
Using the “Fast Cooking” Mode
Functional, fast and practical for those of you who use
pre-packed products (such as f or e xample: froz en or precooked food) along with other f ood items. Y ou will find useful
suggestions in the “Practical Cooking Advice” table .
Using the Grill
The “7 Cuochi” oven offers you several different grilling
modes.
Use the “grill” mode 2 with the o ven door ajar, placing
the food under the centre of the grill (situated on the 3rd
or 4th rack from the bottom).
T o catch an y fat and/or grease that ma y drip from the rack,
place the dripping pan provided on the first rack from the
bottom.
When using this mode, we recommend you set the energy level to the highest setting, e ven though lo wer le vels
can be set, simply by adjusting the thermostat knob to the
desired level.
In models fitted with a rotisserie 2, you can use the spit
kit provided when using the “grill” mode. In this case, cook
with the oven door shut, placing the spit kit on the third
oven rack from the bottom and the dripping pan on the
bottom rack to collect any sauce and /or dripping fat.
The “Gratin” mode T only with the o ven door shut, is
extremely useful f or grilling foods rapidly , as the distribution
of heat makes it possible not only to brown the surface,
but also to cook the bottom part.
Moreover, it can also be used for browning foods at the
end of the cooking process, such as adding that gratin
finish to pasta bakes, for example.
When using this mode, place the grid on the 2nd or 3rd
oven rack from the bottom (see cooking table) then, to
prevent fat and grease from dripping onto the bottom of
the oven and thus smoke from f orming, place a drippingpan on the 1st rack from the bottom.
Important: always cook in “Gratin” mode with the oven
door shut. This will allow you both to obtain excellent
results and to save on energy (approximately 10%).
When using this mode, we advise you to set the thermostat
to 200°C, as it is the most efficient way to use the grill,
which is based on the use of infrared rays . However , this
does not mean you cannot use lower temperatures , simply
by adjusting the thermostat knob to the desired temperature.
In models fitted with a rotisserie T, you can use the spit
kit provided when using the “gratin” mode. In this case,
place the spit kit on the third oven rack from the bottom
and the dripping pan on the bottom rack to collect any
27
Page 27

sauce and /or dripping fat.
Therefore the best results when using the grill modes
are obtained by placing the grid on the lower racks
(see cooking table) then, to prevent fat and grease
from dripping onto the bottom of the oven and smoke
from forming, place a dripping-pan on the 1st oven
rack from the bottom.
Baking Cakes
When baking cakes, always place them in a preheated
oven. Do not open the ov en door during baking to prev ent
the cake from dropping. In general:
Pastry is too dry
Increase the tem peratur e by 10°C and r educ e the
cooking time.
Pastry dropped
Use less liquid or lower t he temp eratu re by 10° C.
Pastry is too dark on top
Place it on a lower rack, l ower the tem perat ure, a nd
increase the cooking tim e.
Cooked well on the inside but sticky on the
outside
Use less liquid, lower t he tempe ratur e, and i ncre ase
the cooking time.
The pastry sticks to the pan
Grease the pan well and s prinkle it wit h a dust ing of
flour or use greaseproof paper.
Cooking Pizza
For best results when cooking pizza, use the “Pizza Mode ”
w:
• Preheat the oven for at least 10 minutes
• Use a light aluminium pizza pan, placing it on the rack
supplied with the oven. If the dripping pan is used, this
will extend the cooking time, making it difficult to get a
crispy crust;
• Do not open the oven door frequently while the pizza is
cooking;
• If the pizza has a lot of toppings (three or four), we
recommend you add the mozzarella cheese on top
halfway through the cooking process .
• If cooking on more than one rack (up to 2), we advise
you to use the Multi-cooking Mode b, as the Pizza
Mode w would heat the bottom rack more than the
others.
Cooking Fish and Meat
When cooking white meat, fowl and fish, use temperature
settings from 180 °C to 200 °C.
For red meat that should be well done on the outside while
tender and juicy in the inside, it is a good idea to start with
a high temperature setting (200°C-220°C) for a short time,
then turn the oven down afterwards.
In general, the larger the roast, the lower the temperature
setting. Place the meat on the centre of the grid and place
the dripping pan beneath it to catch the fat.
Make sure that the grid is inserted so that it is in the centre
of the oven. If you would like to increase the amount of
heat from below, use the low rack heights. For savoury
roasts (especially duck and wild game), dress the meat
with lard or bacon on the top.
I used more than one level (in the function
"ventilated oven") and they are not a ll at the sam e
cooking point
Use a lower temperat ure set ting. I t is no t nece ssary to
remove the food fr om all the rac ks at the same tim e.
28
Page 28

Preheating time
(m in.)
15
15
15
15
15
15
10
10
15
10
10
10
10
10
10
15
-
-
-
-
-
-
-
-
-
-
-
-
-
10
10
10
10
10
10
15
10
10
15
15
15
15
15
15
15
15
15
15
-
-
-
-
-
-
-
-
-
-
oven bottom
1
1
1
-
1
1
1
1
1
1
1
-
1
1
1
Position of
the rack
from the
3
3
3
3
3
2-4
3
2
2-4
2
2
2-4
2-4
2
2-4
3
4
4
4
4
3/4
4
4
4
4
4
-
-
-
2
2
-
-
-
2
3
2
2/3
3
2/3
3
3
2-4
2-4
2-4
1-3-5
1-3-5
1-3-5
2
2
2
2
2
2
2
2
2
2
Setting made Type of food Weig-
1 Convection
mode
a
2 M u ltic o ttu r a
b
3 G rill
2
4 Gratin
T
5 Pizza
w
6 Baking
u
7 Fast cooking
v
8 Defrosting
co o k in g tim e s a re a p p ro x im a te a nd m a y va r y a c c o rd in g to p er s on a l ta s te . W h e n c o ok in g u s ing t he G rill o r
NB:
Gratin m ode, the dripping pan must always be placed on the 1st oven rack from the bottom .
Duck
Roast veal or beef
P ork ro as t
Biscuits (short pastry)
Tarts
Pizza (on 2 racks)
Lasagne
Lamb
Roast chicken + potatoes
Mackerel
Fruitcake
Cream puffs (on 2 racks)
Biscuits (on 2 racks)
Sponge cake (on 1 rack) )
Sponge cake (on 2 racks)
Savoury pies
Soles and cuttlefish
Squid and prawn kebabs
Cu ttlefish
Cod filet
Grilled vegetables
Veal steak
Sausages
Hamburger
Mackerels
Toasted sandwiches (or
toast)
W ith rotiss er ie
present)
Veal on the spit
Chicken on the spit
Lamb on the spit
G r ille d c h ic k e n
C u ttlefish
W ith rotiss er ie (w he re
present)
Veal on the spit
Lamb on the spit
Chicken (on the spit) +
potatoes (roasted))
Pizza
Roast veal or beef
Chicken
Tarts
Fruit cakes
Fruitcake
Sponge cake
Stuffed pancakes (on 2
racks)
Sm all cakes (on 2 racks)
Che ese puffs (on 2 racks)
Cream puffs (on 3 racks)
Biscuits (on 3 racks)
Meringues (on 3 racks)
Frozen food
Pizza
Courgette and prawn pie
Country style spinach pie
Turnovers
Lasagne
G o ld e n R o lls i
Chicken morsels
Pre-cooked food
Golden chicken wings 0.4 2 - 200 20-25
Fresh Food
Biscuits (short pastry)
Fruitcake
Cheese puffs
All frozen food
U
(w he re
ht (in
kg)
1+1
0.5
0.5
0.5
1.0
1.5
0.7
0.6
0.6
0.8
0.4
0.8
0.6
0.6
n.° 4-6
1.0
1.5
1.0
1.5
1.5
1.5
1.5
1.5
0.5
0.5
0.7
0.5
1.2
0.6
0.4
0.7
0.7
0.5
0.3
0.4
0.5
0.3
0.5
0.4
0.4
0.3
0.6
0.2
Thermostat
se ttin g
200
200
200
180
180
230
180
180
200
180
170
190
180
170
170
200
100%
100%
100%
100%
100%
100%
100%
100%
100%
100%
100%
100%
100%
200
200
200
200
200
200
220
220
180
180
180
180
160
200
190
210
180
180
90
250
200
220
200
200
180
220
200
180
210
Cooking
tim e
(m in.)
65-75
70-75
70-80
15-20
30-35
15-20
30-35
40-45
60-70
30-35
40-50
20-25
10-15
15-20
20-25
25-30
10-12
8-10
10-15
10-15
15-20
15-20
15-20
10-12
15-20
3-5
80-90
70-80
70-80
55-60
30-35
70-80
70-80
70-75
70-75
15-20
25-30
60-70
20-30
40-45
40-50
25-30
30-35
20-25
15-20
20-25
20-25
180
12
20
30-35
25
35
25-30
15-20
15-18
45
10-12
29
Page 29

Safety Is A Good Habit To Get Into
T o maintain the efficienc y and saf ety of this appliance, we recommend that you do the following:
• only call the Service Centres authorised by the manufacturer
• always use original spare parts
• When handling the appliance, we recommend you
always use the purpose pro vided handles recessed
into the sides of the oven to prevent harming
people or damaging the appliance itself.
• This appliance is designed for non-professional, household use and its functions must not be changed.
• These instructions are only valid for the countries
whose symbols appear on the manual and the serial
number plate.
• The electrical system of this appliance can only be used
safely when it is correctly connected to an efficient
earthing system in compliance with current safety
standards.
• When the appliance is in use, the heating elements
and some parts of the oven door become extremely
hot. Make sure you don’t touc h them and keep children well away.
The following items are potentially danger ous, and
therefore appropriate measures must be taken to
prevent children and the disabled from coming into
contact with them:
- Controls and the appliance in general;
- Packaging (bags, polystyrene, nails, etc.);
- The appliance itself, immediately after use of the oven
or grill due to the heat generated;
- The appliance itself, when no longer in use (potentially
dangerous parts must be made safe).
Av oid the following:
- Touching the appliance with wet parts of the body;
- Using the appliance when barefoot;
- Pulling on the appliance or the supply cable to unplug
it from the electrical outlet;
- Improper or dangerous operations;
- Obstructing the ventilation or heat dissipation slots;
- Allowing power supply cables of small appliances to
come into contact with the hot parts of the appliance;
- Exposing the appliance to atmospher ic agents such
as rain, or sunlight;
- Using the oven for storage purposes;
- Using flammable liquids near the appliance;
- Using adapters, multiple sockets and/or extension
leads;
- Attempting to install or repair the appliance without the
assistance of qualified personnel.
Qualified personnel must be contacted in the
following cases:
- Installation (following the manuf acturer’ s instructions);
- When in doubt about operating the appliance;
- Replacing the electrical socket when it is not compatible with the appliance plug.
Service Centres authorised by the manufacturer
must be contacted in the follo wing cases:
- If in doubt about the soundness of the appliance after
removing it from its packaging;
- If the power supply cable has been damaged or needs
to be replaced;
- If the appliance breaks down or functions poor ly; ask
for original spare parts.
It is a good idea to do the following:
- Only use the appliance to cook food and nothing else;
- Check the soundness of the appliance after it has been
unpacked;
- Disconnect the appliance from the electrical mains if it is
not functioning properly and before cleaning or performing maintenance;
- When left unused, unplug the appliance form the electricity mains and turn off the gas tap (if foreseen);
- Use oven gloves to place cookw are in the ov en or when
removing it;
- Always grip the oven door handle in the centre as the
extremities of the same may be hot due to any hot air
leaks;
- Make sure the knobs are in the “•”/”o” position when the
appliance is not in use.
- Cut the power supply cable after disconnecting it from
the mains when you decide not to use the appliance any
longer.
• The manufacturer may not be held responsible for any
damage due to: incorrect installation, improper , incorrect
and irrational use.
30
Page 30

Instalation
The appliance must be installed only by a qualified
person in compliance with the instructions provided.
The manufacturer declines all responsibility f or improper
installation which may harm persons and animals and
damage property.
Important: The power supply to the appliance must be
cut off before any adjustments or maintenance work is
done on it.
Installation of Built-in Ovens
In order to ensure that the built-in appliance functions properly, the cabinet containing it must be appropriate. The
figure below gives the dimensions of the cut-out f or installation under the counter or in a wall cabinet unit.
555
580
560
min
+4 -0
min
min
45
575-585
+4 -0
480
23
572
558
543545
500
39
15
595
595
N.B.: Installation in compliance with the consumption declaration
For the correct centring of your appliance, position the 4
tabs on the sides of the oven in correspondence with the
4 holes on the perimeter of the frame. In particular , if the
cabinet side panel:
• is 20 mm thick: the removable part of the tab must be
removed (Fig. A);
• is 18 mm thick: use the first groove, which is factoryset (Fig. B);
• is 16 mm thick: use the second groove (Fig.C)
Fig. A Fig. B
In order to ensure adequate ventilation, the back panel of
the cabinet unit must be removed. Installing the oven so
that it rests on two strips of wood is preferab le. If the oven
rests on a continuous, flat surface, there must be an aperture of at least 45 x 560 mm.
45 mm.
560 mm.
The panels of the adjacent cabinets must be made of heatresistant material. In particular, cabinets with a v eneer exterior must be assembled with glues which can withstand
temperatures of up to 100 °C.
In compliance with current safety standards, contact with
the electrical parts of the oven must not be possible once
it has been installed.
All parts which ensure the safe operation of the appliance
must be removab le only with the aid of a tool.
Fig. C
To fasten the oven to the cabinet, open the door of the
oven and attach it by inserting the 4 wooden screws into
the 4 holes located on the perimeter of the frame.
Electrical Connection
The cooker must be connected to the mains electricity
supply . The hob is connected to the cook er using a special
connector. The cookers are designed to operate on
alternating current featuring the supply voltage and
frequency indicated on the appliance data plate.
31
Page 31

BUILT-IN HOB
P
Only on
certain models
WHITE RED YELLOWBLUE GREEN
BUILT-IN COOKER
Fitting on a Po wer Suppl y Cable
Opening the terminal board:
• Using a screwdriver, prise on the side tabs of the
terminal board cover;
• Pull open the cover of the terminal board.
NL2L3
L1
Fig. E
230V 1N~
H07RN-F 3x4 CEI-UNEL 35364
NL
5
3
4
Fig. F
1
2
400V 2N~
H05RR-F 4x2.5 CEI-UNEL 35363
NL2L1
To install the cable, proceed as follows:
• unscrew the wire clamp screw and the contact screws
Note: the jumpers are factory-set for a three-phase
400V connection (fig. D).
• to make the electrical connections illustrated in fig. F
and fig. G, use the tw o jumpers housed in the box (fig.
E - reference “P”)
• fasten the supply cable in place with the clamp and
close the cover of the terminal board.
400V 3N~
H05RR-F 5x2.5 CEI-UNEL 35363
NL3L1L2
5
3
4
Fig. D
1
2
5
3
4
1
2
Fig. G
Connecting the supply cable to the mains
Install a standardised plug corresponding to the load indicated on the data plate. When connecting the cable directly to the mains, install an omnipolar circuit-breaker with
a minimum contact opening of 3 mm between the appliance and the mains. The omnipolar circuit break er should
be sized according to the load and should comply with
current regulations (the earth wire should not be interrupted by the circuit breaker).
The supply cable should be positioned so that it does not
reach a temperature of more than 50°C with respect to
the room temperature, anywhere along its length.
Before making the connection, check that:
• The electrical safety of this appliance can only be guaranteed if the cooker is correctly and efficiently earthed,
in compliance with regulations on electrical safety. Always ensure that the earthing is efficient; if you have
any doubts call in a qualified technician to check the
system. The manufacturer declines all responsibility
for damage resulting from a system which has not been
earthed.
• Before plugging the appliance into the mains, check
that the specifications indicated on the date plate (on
the appliance and/or packaging) correspond to those
of the electrical mains system of your home.
32
Page 32

• Check that the electrical capacity of the system and
sockets will support the maximum power of the appliance, as indicated on the data plate. If you have any
doubts, call in a qualified technician.
• If the socket and appliance plug are not compatible,
have the socket replaced with a suitable model by a
qualified technician. The latter, in particular, will also
have to ensure that the cross section of the socket
cables are suitable for the po wer absorbed by the appliance. The use of adapters, multiple sock ets and/or
extensions, is not recommended. If their use cannot
be avoided, remember to use only single or multiple
adapters and extensions which comply with current
safety regulations. In these cases, never exceed the
maximum current capacity indicated on the single
adapter or extension and the maximum power indicated
on the multiple adapter. The plug and socket must
be easily accessible.
Technical Specifications
Inner dimensions of the oven:
Width 43.5 cm
Depth 40 cm
Height 32 cm
Inner Volume of the Oven:
56 litres
ENERGY LABEL
Directive 2002/40/EC on the label of electric ovens
Norm EN 50304
Energy consumption for Natural conv ection
heating mode: a Con v ection
Declared energy consumption for Forced con vection Class
heating mode: u Baking
Voltage and Frequency of Power Suppl y:
230/400V ~ 3N 50Hz 9200W
7
This appliance conforms with the following
European Economic Community directives:
- 73/23/EEC of 19/02/73 (Low V oltage) and subsequent
modifications;
- 89/336/EEC of 03/05/89 (Electromagnetic
Compatibility) and subsequent modifications;
- 93/68/EEC of 22/07/93 and subsequent
modifications.
33
Page 33

Merci d’avoir choisi un produit Ariston, fiable et facile à utiliser. Pour apprendre à bien connaître votre appareil, à
l’utiliser et à le conserver longtemps, lisez attentivement cette notice av ant toute utilisation car elle contient des instructions
très importantes concernant sa sécurité d’installation, d’usage et d’entretien. Conservez av ec soin cette brochure pour
toute consultation ultérieure. Merci.
Vu de près
I
G
D
A
D
12
11
10
9
8
7
H
1
12
12
2
2
11
11
3
3
10
10
4
4
9
9
5
5
8
8
7
7
6
6
F
1
12
2
2
11
3
3
10
4
4
9
5
5
8
7
6
6
L
E
A
M
C
8
B
7
1
2 3 4 5 6
A
9
A. Tableau de bord
B. Lèchefrite ou plateau de cuisson
C. Grille du four
D. Plaque électrique
E. Sélecteur de fonctions
F. Manettes plaques électriques
G. V o y ant f onctionnement plaques électriques
H. Crémaillères pour lèchefrites et grilles
I. Vo y ant de fonctionnement du f our (n’e xiste que sur
certains modèles) - Quand il est allumé il indique la
montée en température jusqu’à la température
sélectionnée.
L. Sélecteur de températures
M. Programmateur électronique - Il permet de
programmer n’importe quelle fonction de cuisson en
sélectionnant la durée et l’heure de fin de cuisson. Il a
aussi une fonction de minuterie.
1. Eclairage du four
2. Réglage horloge
3. Réglage minuteur
4. Fin de cuisson
5. Durée cuisson
6. Confirmation réglage
7. Indicateur minuterie
8. Indicateur préchauffage (m clignotant) ou cuisson
(m fixe) en cours
9. Indicateur programmation effectuée
10.Indicateur porte verrouillée
34
Page 34

Mode d’emploi
Le four
des fours traditionnels à convection naturelle (statiques) à
ceux des fours modernes à air pulsé (ventilés).
Il s’agit d’un appareil extrêmement performant qui vous
permet de choisir facilement et sans vous tromper parmi 7
modes de cuisson. Pour sélectionner les fonctions
disponibles, utilisez le sélecteur “E” du tab leau de bord.
Rappel : Lors de son premier allumage, f aites fonctionner le
four à vide, porte fermée, pendant au moins une demi-heure
en réglant la température à son maximum. Ouvrez ensuite
la porte et ventilez la pièce. L’odeur qui se dégage parfois
pendant cette opération est due à l’évaporation des produits
utilisés pour protéger le four pendant le laps de temps qui
s’écoule entre la fabrication et l’installation du produit.
Mise à l’heure de l’horloge digitale
La mise à l’heure n’est possible que quand le bouton “E” est
positionné sur 0.
Après raccordement à la ligne ou après une coupure de
courant, l’afficheur clignote sur : 0.00.
Tour nez le bouton “L” pour régler l’heure puis appuyez
sur OK pour confirmer. Tournez une nouvelle fois “L” pour
régler les minutes puis appuyez sur OK pour confirmer
définitivement. Pour eff ectuer toute actualisation, appuyez
sur la touche 2 et suivez la procédure susmentionnée.
Fonction minuterie
La minuterie ne contrôle pas l’allumage et l’arrêt du four
mais émet seulement un signal acoustique une fois le
temps écoulé, pour faire cesser l’alarme, appuyez sur une
touche quelconque.
Pour régler la minuterie, appuyez sur la touche 3, utilisez le
bouton “L” pour le réglage puis appuyez sur la touche OK
pour confirmer. L ’icône n vous rappellera que la minuterie est
activée.
Dès que le décompte prend fin, un signal acoustique retentit,
il cessera au bout d’une minute ou en appuyant sur une touche
quelconque.
Eclairage du f our
Four éteint, vous pouv ez l’allumer/l’éteindre à tout moment
à l’aide de la touche 1.
Système de refroidissement
Pour obtenir un abaissement des températures
extérieures, certains modèles sont équipés d’un système
de refroidissement qui envoie de l’air à l’e xtérieur par une
fente située entre le bandeau et la porte du four.
Note: le ventilateur continue à tourner après l’arrêt
du four jusqu’à ce qu’il se soit suffisamment refroidi.
Note: En “F ast cooking” (cuisson rapide) le v entilateur ne se
met automatiquement en marche qu’à four chaud.
Rappel : l’appareil monte un système de diagnostic qui
permet de détecter tout défaut de fonctionnement. L ’utilisateur
en est informé par des messages du genre “Fn m” (n et
m
d’assistance technique car votre four ne f onctionne pas.
Utilisation du four
Tour nez le bouton “E” pour sélectionner le programme
de cuisson souhaité. Le four se placera immédiatement
7 Cuochi
=numéros à 1 chiffre). Dans ce cas , faites appel au service
réunit en un seul appareil les avantages
en phase de préchauffage pendant laquelle l’icône m
clignotera sur l’afficheur qui affichera la température de
cuisson associée au programme sélectionné : si cette
indication n’est pas celle que vous souhaitez, vous pouv ez
la modifier à l’aide du bouton “L”.
Dès que le préchauffage est terminé, l’icône m reste
allumée en permanence, vous pouvez alors enfourner
votre plat dans le four bien chaud.
Note: pour les f onctions F AST COOKING et GRILL, aucune
phase de préchauffage n’est prévue. N’oubliez pas qu’en
cours de cuisson, vous pouvez toujours :
• modifier le programme à l’aide du bouton “E” ;
• modifier la température à l’aide du bouton “L” ;
• programmer la durée et l’heure de fin de cuisson (voir
paragraphe “Comment prog rammer la cuisson”).
• l’interrompre à tout moment en ramenant le bouton “E”
sur 0.
Note: Pour chaque fonction de cuisson, une durée de 2
heures est présélectionnée pour des raisons de sécurité.
Au cas où elle ne serait pas modifiée, le four s’éteint
automatiquement au bout de ce délai.
Rappel : Installez la lèchefrite sur le premier gradin du bas
pour recueillir les graisses et les jus uniquement en cas de
cuissons au gril ou au tournebroche (ce dernier n’est présent
que sur certains modèles). P our les autres modes de cuisson
n’utilisez jamais le gradin du bas et ne posez jamais d’objets à
même la sole du four , vous risqueriez d’abîmer l’émail. Enfournez
toujours vos plats de cuisson (plats pyre x, papier alu, etc. etc.)
sur la grille fournie avec l’appareil et montée dans les g radins
de la crémaillère à l’intérieur de l’enceinte du four .
Four T raditionnel a
Position bouton thermostat “L” : entre 40°C et 250°C.
En effectuant ce choix, vous obtiendrez le br anchement des
deux résistances (sole et voûte) C’est le four traditionnel de
grand-mère revu pour atteindre un niveau exceptionnel de
diffusion de la chaleur et d’économie d’électricité. Rien n’égale
le four traditionnel quand il s’agit de cuisiner des plats garnis
traditionnels tels que : côtes de porc au chou, morue à
l’espagnole, stockfisch à la mode d’Ancône, v eau au riz etc...
V ous obtiendrez des résultats tout aussi excellents pour vos
plats de viande de bœuf ou de veau tels que : bœuf braisé,
ragoût, goulasch, gibier, jambon et longe de porc etc... qui
exigent une cuisson lente et de fréquents ajouts de liquides.
C’est aussi le mode de cuisson recommandé pour les
gâteaux, les fruits et les plats mijotés dans des cocottes avec
couvercle. Lorsque vous utilisez le four tr aditionnel, ne cuisez
que sur un seul niveau pour av oir une meilleure diffusion de
la chaleur. Choisissez le niveau qui v ous permettra de mieux
équilibrer la quantité de chaleur provenant de la voûte et de
la sole. Enfournez, au choix, sur les gradins du haut ou du
bas selon que vous désirez plus de chaleur provenant de la
voûte ou de la sole.
Four Multicuisson b
Position bouton thermostat “L” : entre 40°C et 250°C.
Mise en marche alternative des éléments chauffants ainsi
que de la turbine. La chaleur est constante et bien répartie à
l’intérieur du four, l’air cuit et dore de façon uniforme et en
35
Page 35

tous points. Vous pouvez ainsi procéder à une cuisson
groupée en enfournant plusieurs plats ensemble à condition
qu’ils cuisent à la même température. Pour cuire
simultanément sur 2 niveaux, suiv ez les conseils fournis dans
le paragraphe “Cuisson g roupée sur plusieurs niveaux”.
C’est la fonction qui convient le mieux à des plats gratinés
ou à la cuisson prolongée tels que : lasagnes, gratins de
pâtes, poulet rôti et pommes de terre au four etc... Le choix
de températures plus basses, possible grâce à une meilleure
répartition de la chaleur, vous permettra d’obtenir des rôtis
de viande plus juteux et tendres à souhait avec une moindre
perte de poids. Le Multicuisson convient à merveille à la
cuisson du poisson qui ne subit aucune altération de son
aspect et de son goût car il exige un moindre apport de
condiment. V ous obtiendrez aussi d’excellents résultats lors
de la cuisson des légumes: courgettes, aubergines , poivrons,
tomates etc.
Desserts : vous réussirez à coup sûr vos gâteaux levés.
La fonction “Multicuisson”, réglée à une température de 80
°C sert aussi à décongeler rapidement la viande, rouge ou
blanche, le pain. Pour décongeler des mets plus délicats,
sélectionnez une température de 60°C ou n’utilisez que la
circulation d’air froid en amenant le sélecteur de températures
sur 0°C.
Grill 2
Position bouton thermostat “L” : entre 50% et 100%.
Mise en marche de l’élément chauffant supérieur et du
tournebroche (si l’appareil en est équipé).
La température élevée et directe du gril permet de saisir
l’aliment en surface pour qu’il ne perde pas son jus et reste
tendre à souhait. La cuisson au gril est par ticulièrement
recommandée pour les plats qui exigent une température
élevée à leur surface : côtes de veau et de boeuf , entrecôtes,
filet, hamburgers, etc....
Cuisinez porte du four entrebâillée sauf dans le cas de
cuisson au tournebroche.
V ous trouverez des ex emples d’utilisation dans le paragraphe
“Conseils utiles pour la cuisson”.
Tour nez le bouton “L”, l’afficheur indiquera des niveaux
de puissance compris entre 50% minimum et 100%
maximum.
Gratin T
Position bouton thermostat “ L” : entre 40°C et 250°C .
Mise en marche de l’élément chauffant supérieur, de la turbine et du tournebroche (si l’appareil en est équipé).
L’irradiation thermique unidirectionnelle s’ajoute au brassage
de l’air pour une répartition uniforme de la chaleur dans
l’enceinte du four . Plus de risques de brûler vos aliments en
surface et plus grande pénétration de la chaleur . C’est l’idéal
pour cuire: brochettes de viande et de légumes, saucisses ,
côtelettes de porc, côtelettes d’agneau, poulet à la
crapaudine, cailles à la sauge, filet de porc etc...
Pour vos cuissons au “gratin” gardez la porte du four
fermée.
La fonction “gratin” n’a pas son pareil pour la cuisson de
tranches de mérou, de thon, d’espadon, de sépioles farcies
etc...
Four Pizza w
Position bouton thermostat “L” : entre 40°C et 250°C .
Mise en marche des éléments chauffants, inférieur et
circulaire ainsi que du ventilateur. Cette combinaison permet
une montée en température rapide grâce à sa très grande
puissance (2800 W), l’apport de chaleur étant dans ce cas
plus important dans le bas du four.
Cette fonction “four pizza” est particulièrement indiquée pour
des plats qui exigent une très grosse quantité de chaleur,
tels que: pizza et gros rôtis. N’utilisez qu’une lèchefrite ou
qu’une grille à la fois. Sinon, pensez à les changer de place
à mi-cuisson.
Four Pâtisserie u
Position bouton thermostat “L” : entre 40°C et 250°C .
Mise en marche de l’élément chauffant arrière ainsi que du
ventilateur pour obtenir une chaleur douce et uniforme à
l’intérieur du four.
Cette fonction est particulièrement indiquée pour la cuisson
de mets délicats comme les gâteaux levés et certains petitsfours sur 3 niveaux en même temps. Quelques exemples:
choux à la crème, biscuits sucrés et salés, friands, biscuit
roulé et légumes gratinés, etc.....
Four “Cuisson rapide” v
Position bouton thermostat “L” : entre 40°C et 250°C .
Mise en marche des éléments chauffants ainsi que du
ventilateur pour obtenir une chaleur constante et uniforme à
l’intérieur du four.
Cette fonction est particulièrement indiquée pour les cuissons
rapides (pas besoin de préchauffage) de plats prêts à cuire
(par exemple: surgelés ou précuits) et pour cer taines
“préparations maison”.
Avec la cuisson “Cuisson rapide” v ous obtiendrez d’excellents
résultats en n’utilisant qu’un seul niveau (le 2ème en partant
du bas), voir tableau “Conseils utiles pour la cuisson”.
Four “Décongélation” U
Position bouton thermostat “L” : quelconque
Le ventilateur au fond du f our fait circuler l’air à température
ambiante autour des aliments. Cette fonction convient à
la décongélation de n’importe quel type d’aliment, mais
est particulièrement indiquée pour les aliments délicats
qui souffrent la chaleur comme par exemple: les vacherins,
les gâteaux à la crème ou à la chantilly, les gâteaux aux
fruits. La durée de décongélation est pratiquement réduite
de moitié. Pour la viande, le poisson ou le pain, la
décongélation peut être accélérée grâce à la fonction
“multicuisson” en réglant une température de 80° - 100°C .
Nettoyage automatique par fast c lean
C’est le nettoyage intégral du four. Pour tous
renseignements sur fast clean, consultez le paragraphe
“Le nettoyage automatique par f ast clean”.
Le tournebroche (n’existe que sur certains modèles)
Pour activ er le tournebroche, procédez comme suit :
a) placez la lèchefrite sur le premier gradin ;
b) installez le support du tournebroche sur le 3ème gradin et
introduisez la broche sur le tournebroche positionné dans
le fond du four en la f aisant passer à travers le trou prévu ;
c) branchez le tournebroche en amenant le sélecteur “E”
sur la position 2 / T.
V
36
Page 36

Description
La cuisinière peut être combinée à des plans de cuisson à 4
plaques électriques (Fig. A), à des plans en vitrocéramique
traditionnels (Fig. B) ou à des plans vitrocéramique avec des foy ers
doubles (Fig.C).
AA
B
B
A
B
A
B
D
Fig. A Fig. B
Description des éléments de chauffe
Les éléments radiants sont formés par des résistances
circulaires. Ils deviennent rouges quelques dizaines de secondes
à peine après leur allumage.
Les éléments radiants double diamètre
Semblables aux éléments radiants traditionnels, on les reconnaît
à la présence d’une zone de chauffe (voir Fig. C). Vous pouvez
n’allumer que la zone à l’intérieur ou les deux.
l Les boutons de commande des foyers traditionnels.
Chaque foyer est équipé d’un bouton de commande
permettant de sélectionner 12 températures au choix allant
d’un minimum de 1 à un maximum de 12.
l Les boutons de commande des foyers spéciaux. Le
bouton de commande permet de choisir entre deux niveaux
de puissance, tous deux réglables du minimum 1 au
maximum 12. Tournez le bouton dans le sens des aiguilles
d’une montre pour sélectionner le niveau de puissance le
plus bas. T ournez le bouton à f ond (A), jusqu’au déclic pour
sélectionner la puissance maximum, cette dernière peut à
son tour être réglée entre 12 et 1 en tournant le bouton dans
le sens inverse des aiguilles d’une montre. Pour rétablir le
niveau de puissance minimum, ramenez le bouton à la
position zéro. En cas de plans vitrocéramique avec foyers
double puissance (voir Fig. C), la première partie de la course
branche la zone de cuisson plus petite (interne), pour les
brancher toutes les deux et disposer ainsi d’un foyer plus
grand, amenez le bouton sur (A) puis sélectionnez le niveau
de puissance souhaité entre 12 et 1.
B
C
D
C
B
Fig. C
A Plaques électriques en fonte
B Fo yers radiants
C Fo yers radiants double diamètre
D Voyants de chaleur résiduelle, un pour chaque foyer : ils
indiquent que le fo yer correspondant a une température de
plus de 60°C, même après extinction de l’élément de chauff e
(n’existe que sur certains modèles)
E Boutons de commande spéciaux
F Boutons de commande traditionnels
12
11
10
9
8
7
12
2
11
3
10
4
9
5
8
7
6
1
12
2
11
3
10
4
9
5
8
7
6
12
2
11
3
10
4
9
5
8
7
6
1
2
3
4
5
6
Pos Plaque automatique
0
Éteint
1 Po ur faire fond re le b eurre, l e choc olat
2
Pour réchauffer les liqui des
3
4
Pour crèmes et sau ces
5
6
Pot au feu - Blanquette - Entremet s
7
8
Pâtes - Riz
9
10
Steaks - Poissons - Omel ettes
11
12
Fritures
Allumage des deux zo nes de cuis son
A
V oy ant fonctionnement plaques électriques (G)
Il s’allume chaque fois qu’une résistance électrique du plan de
cuisson se met en marche.
E
F
E
F
Conseils d’utilisation du plan vitrocéramique
Pour obtenir des résultats optim ums de votre plan de cuisson,
suivez certaines règles fondamentales au moment de préparer
ou de cuire les aliments.
37
Page 37

l N’utilisez que des casseroles à fond plat pour qu’elles
adhèrent bien à la zone de cuisson.
l Utilisez des casseroles dont le diamètre couvre entièrement
la plaque de cuisson pour utiliser à plein toute la chaleur
disponible.
l V eillez à ce que le dessous des casseroles soit bien sec et
propre pour garantir un bon contact avec les plaques et la
longévité de ces dernières et de vos casseroles.
Comment programmer la cuisson
l N’utilisez pas les mêmes casseroles que sur les brûleurs à
gaz. Il y a une telle concentration de chaleur sur les brûleurs
à gaz que le fond des casseroles peut se déformer, vous
n’obtiendrez par conséquent jamais le résultat souhaité en
les utilisant ensuite sur des plan de cuisson en vitrocéramique.
l Ne laissez jamais un foyer allumé sans casserole dessus
car vous obtiendriez un réchauffement maximum en très
peu de temps avec risque d’endommagement des éléments
de chauffe.
l N’oubliez pas que le fo yer est encore chaud une demi-heure
au moins après son arrêt; attention à ne pas poser par
mégarde des récipients ou des objets sur la zone encore
chaude.
La programmation de la durée et/ou de l’heure de fin de
cuisson doit avoir lieu après a v oir sélectionné la f onction
que vous souhaitez.
Programmation de la durée de cuisson
Appuyez sur la touche 5, tournez ensuite le bouton C pour
régler la durée de cuisson. Pour mémor iser la sélection,
appuyez sur la touche OK, l’écran affichera à tour de rôle
la température sélectionnée que vous pouvez modifier à
l’aide du bouton C et le temps restant avant la fin de
cuisson.
Une fois ce temps écoulé, l’écran affichera “end” et une
série de signaux acoustiques retentira pour signaler que
la cuisson est terminée.
• Appuyez sur une touche quelconque pour arrêter la
sonnerie.
• Ramenez le bouton B sur 0 pour faire disparaître
l’inscription “end”.
Exemple
Il est 9h00 et vous programmez une durée de cuisson
de 1 heure 15 minutes. La cuisson s’arrêter a
automatiquement à 10h15.
• Ramenez le bouton B sur 0 pour faire disparaître
l’inscription “end”.
Exemple
Il est 9h00 et vous programmez l’heure de fin de cuisson
à 10h15. La cuisson aur a une durée de 1 heure 15 minutes.
Programmation d’une cuisson différée
Appuyez sur la touche 5, tournez ensuite le bouton C pour
régler la durée de cuisson. Pour mémoriser la sélection,
appuyez sur la touche OK, l’écran affichera à tour de rôle
la température et la durée précédemment sélectionnée.
Appuyez sur la touche 4, tournez ensuite le bouton C pour
régler l’heure de fin de cuisson. Pour mémoriser la
sélection, appuyez sur la touche OK, l’écran affichera, à
tour de rôle, l’heure de fin de cuisson et la température
sélectionnée.
Exemple
Il est 9h00 et vous programmez une durée de cuisson de
1 heure 15 minutes et l’heure de fin de cuisson à 12h30.
La cuisson démarrera automatiquement à 11h15.
Programmation de l’heure de fin de cuisson
Appuyez sur la touche 4, tournez ensuite le bouton C pour
régler l’heure. Pour mémoriser la sélection, appuyez sur
la touche OK, l’écran affichera à tour de rôle la température
sélectionnée et le temps restant avant la fin de la cuisson.
Dès que l’heure de fin de cuisson sélectionnée
précédemment est atteinte, l’affichage indiquera “end” et
une série de bips sonores indiquera que la cuisson est
terminée.
• Appuyez sur une touche quelconque pour arrêter la
sonnerie.
Durée = 1h15 et
fin programmée
à 12h30
9h00 10h00 11h00 12h00
11h15
Début
automatique
Fin programmée
12h30
L’icône A vous rappellera que vous avez programmé la
durée et/ou l’heure de fin de cuisson.
Pour annuler une pr ogrammation
Pour annuler toute programmation effectuée, tournez le
bouton “B” jusqu’à la position “0”.
38
Page 38

Le nettoyage automatique par fast clean
Quand vous activez la f onction fast clean, la température à
l’intérieur du four atteint 500 °C qui est la température
nécessaire pour carboniser les résidus. V ous pouv ez v oir à
travers la vitre du f our des particules qui s’illuminent pendant
leur carbonisation par pyrolise en entrant au contact des
résistances : il s’agit d’une combustion instantanée, un
phénomène tout à fait normal qui ne représente aucun
danger.
Quelques conseils utiles avant de lancer le nettoyage
automatique
1- Essayez d’éliminer les résidus plus consistants avec
une éponge mouillée. Evitez absolument l’utilisation de
détergents ou de tout autre produit conseillé pour le nettoyage
des fours.
2- Sortez tous les accessoires, qui ne sont en effet pas
conçus pour résister à des températures aussi élevées. De
plus, certains accessoires pourraient compromettre le résultat
du nettoyage automatique en gênant la circulation de la
chaleur sur toutes les parois. Les accessoires peuv ent être
lavés normalement comme de la vaisselle courante (même
en lave-v aisselle).
3- Ne laissez pas de torchons sur la poignée.
Attention : au cours du nettoyage automatique, les
surfaces peuvent devenir extrêmement chaudes. Gardez
les enfants à distance.
Comment activer la fonction fast clean
– Fermez la porte.
– Amenez le sélecteur sur V.
– Pour programmer la durée et/ou l’heure finale du fast
clean, suivez les instructions fournies dans le
paragraphe “Programmation de F ast clean”. N’oub liez
pas que vous pouvez choisir une durée comprise entre
60 et 120 minutes selon l’état de salissure de votre
four.
Dispositifs de sécurité
Compte tenu de la température très élevée, le f our est équipé
de dispositifs de sécurité :
• la porte est automatiquement verrouillée dès que la
température atteint des valeurs éle vées pour éviter tout
risque de brûlures;
• les éléments chauffants ne sont plus sous tension,
à titre préventif au cas où un évènement anormal
viendrait à se produire.
• Une fois que la porte est verrouillée, aucune
modification de sélection de durée et de fin ou du
programmateur n’est plus possible.
Que se passe-t-il une fois le nettoy a ge automatique
terminé?
A la fin de la pyrolyse, l’affichage indique “end” et un bip
sonore retentit, pour l’arrêter il suffit d’appuyer sur une
touche quelconque. Pour faire disparaître l’inscription
“end”, amenez la manette “B” sur “0”.
Pour pouv oir ouvrir la porte du four, il faudra attendre que
la température du four descende à un niveau acceptab le.
V ous pourrez alors constater des dépôts de poudre blanche
sur la sole et sur les parois du four; enlevez-les avec une
éponge mouillée une fois que le four aura complètement
refroidi.
Si vous voulez par contre profiter de la chaleur accumulée
pour lancer une cuisson, n’hésitez pas car les poudres ne
représentent aucun danger pour les aliments à cuire.
39
Page 39

Programmation de Fast clean
Programmez la durée et/ou l’heure de fin du programme
fast clean uniquement après av oir sélectionné la fonction
fast clean.
Programmation de la durée de fast clean
Appuyez sur la touche 5, tournez ensuite le bouton C pour
régler la durée. Pour mémoriser la sélection, appuyez sur
la touche OK, l’écran affichera le temps restant avant la
fin du programme fast clean.
Une fois ce temps écoulé, l’écran affichera “end” et une
série de bips sonores retentira pour signaler que le cycle
de nettoyage est terminé.
• Appuyez sur une touche quelconque pour arrêter la
sonnerie.
• Ramenez le bouton B sur 0 pour faire disparaître
l’inscription “end”.
Exemple
Il est 9h00 et vous programmez une durée de fast clean
de 1 heure 15 minutes. Le cycle de fast clean s’arrêtera
automatiquement à 10h15.
Exemple
Il est 9h00 et vous programmez l’heure de fin du cycle
fast clean à 10h15. Le fast clean aura une durée de 1
heure 15 minutes.
Programmation d’un fast clean différé
Appuyez sur la touche 5, tournez ensuite le bouton C pour
régler la durée. Appuyez sur la touche OK pour mémoriser
la sélection et l’afficher.
Appuyez sur la touche 4, tournez ensuite le bouton C pour
régler l’heure de fin de cycle. Pour mémoriser la sélection,
appuyez sur la touche OK, l’écran affichera, à tour de
rôle, l’heure de fin de cycle et la durée sélectionnée.
Exemple
Il est 9h00 et vous programmez une durée de fast clean
de 1 heure 15 minutes et l’heure de fin de cycle à 12h30.
Le cycle de fast clean démarrera automatiquement à
11h15.
Programmation de l’heure de fin de fast clean
Appuyez sur la touche 4, tournez ensuite le bouton C pour
régler l’heure. Pour mémoriser la sélection, appuyez sur
la touche OK, l’écran affichera le temps restant avant la
fin du programme fast clean.
Dès que l’heure de fin de fast clean sélectionnée
précédemment est atteinte, l’affichage indiquera “end” et
une série de bips sonores indiquera que le fast clean est
terminé.
• Appuyez sur une touche quelconque pour arrêter la
sonnerie.
• Ramenez le bouton B sur 0 pour faire disparaître
l’inscription “end”.
Durée = 1h15 et
fin programmée
à 12h30
9h00 10h00 11h00 12h00
11h15
Début
automatique
Fin programmée
12h30
L’icône A vous rappellera que vous avez programmé la
durée et/ou l’heure de fin de fast clean.
Pour annuler une pr ogrammation
Pour annuler toute programmation effectuée, tournez le
bouton “B” jusqu’à la position “0”.
40
Page 40

NE VOUS INQUIETEZ PAS SI
1 au début du cycle fast clean le système de
refroidissement fonctionne à faib le vitesse ;
2 durant l’utilisation du programme Fast Clean, le
disjoncteur de votre installation électrique saute : c’est
qu’il y a surcharge de l’installation électrique (trop
d’appareils électriques en fonctionnement en même
temps);
3 la porte de votre four est verrouillée pendant le
programme F ast Clean : c’est un dispositif de sécurité
supplémentaire; la porte ne se déverrouillera qu’après
refroidissement complet du four;
4 après le cycle de Fast Clean il reste de petites taches
sur l’enceinte du four : il est conseillé d’éliminer les
projections plus importantes avant de lancer
l’autonettoyage et de sélectionner un programme d’une
Comment le garder en f orme
Avant toute opération de netto y age ou d’entretien coupez
l’alimentation électrique de l’appareil.
Pour prolonger la durée de vie de votre appareil, nettoyez-le fréquemment, en n’oub liant pas que:
• pour le nettoyage, ne pas utiliser d’appareils à
vapeur
• les par ties extérieures émaillées ou inox doivent être
lavées à l’eau tiède en évitant toute utilisation de poudres abrasives ou de produits corrosifs qui pourraient
les abîmer. L’acier inox peut se tacher. Si les taches
sont difficiles à enlever, utilisez des produits spéciaux
que vous trouverez dans le commerce. Il est conseillé
de rincer abondamment et d’essuyer après le nettoyage.
• l’intérieur du four doit être nettoyé, de préférence après
chaque usage, quand il est encore tiède avec de l’eau
chaude et du détergent, en rinçant et en essuyant ensuite soigneusement avec un chiff on doux. Evitez d’utiliser des produits abrasifs (des poudres par ex emple),
des éponges récurantes ou des acides (détartrants par
ex.) qui pourraient abîmer l’émail. En cas d’incrustations particulièrement difficiles à enlever, utilisez un nettoyant spécial four en suiv ant à la lettre les instructions
indiquées sur l’emballage.
• si la durée d’utilisation du four se prolonge, de la buée
peut se former. Essuyez-la avec un chiffon doux.
• un joint en caoutchouc placé sur l’ouverture du four
assure son bon fonctionnement. Contrôlez par conséquent périodiquement l’état de ce joint. Au besoin, nettoyez-le en évitant d’utiliser des produits ou des objets
abrasifs. S’il est abîmé, adressez-vous au service aprèsvente le plus proche de votre domicile. Mieux vaut ne
pas utiliser le four tant qu’il n’est pas réparé.
• ne tapissez jamais la sole du four de papier aluminium
car l’accumulation de chaleur qui s’en suivrait pourrait
compromettre la cuisson et détériorer l’émail.
• nettoyez la vitre de la porte du four à l’aide de produits
et d’éponges non abrasifs et séchez avec un chiffon
doux.
• nettoyez les plaques électriques à l’aide d’un chiffon
humide et graissez-les avec un peu d’huile quand elles
sont encore tièdes;
durée adaptée au degré de salissure du four;
5 une fois la cuisson terminée, il sort encore de l’air
ventilé pendant un certain temps : il s’agit d’une phase
normale de refroidissement de l’enceinte du four;
6 en mode de fonctionnement “grill” la résistance
supérieure ne reste pas allumée en permanence
(rouge) : son fonctionnement est contrôlé par un
thermostat;
7 de la vapeur s’échappe quand vous ouvrez la porte en
cours de cuisson;
8 des gouttes d’eau ou de la vapeur se forment à
l’intérieur du four quand vous laissez vos préparations
dans le four après leur cuisson ;
Dépose de la porte du four
Pour nettoyer plus à fond, vous pouvez déposer la porte
du four . Procédez comme suit :
• ouvrez la porte complètement ;
• soulevez et faites pivoter les le viers situés sur les deux
charnières ;
• saisissez la porte par les côtés extérieurs, refermez-la
lentement mais pas complètement ;
• tirez-la vers vous en la sortant de son logement;
Remontez la porte en refaisant en sens inverse les opérations indiquées ci-dessus.
132
Remplacement de la lampe du four
• Avant toute opèration, dèconnectez l’appareil en le
dèbranchant ou en agissant sur l’interrupteur gènèral
pour couper l’électricité.
• A l’aide d’un objet étroit et plat (tournevis, manche de
cuillère,...), retirez le couvercle en v erre .
• Dévissez la lampe et remplacez-la par une lampe de
méme type:
- tension 230/240 W
- puissance 15 W
- culot E 14
• Remettez en place la vitre en prenant bien soin de
repositionner correctement le joint.
41
Page 41

cavité
lampe
joint
hublot
Nettoya ge du plan de cuisson
Avant de commencer à cuisiner, nettoyez la surface du
plan à l’aide d’un chiffon humide pour enlev er la poussière
ou les restes d’aliments cuisinés précédemment.
La surface du plan doit être nettoyée régulièrement à l’eau
tiède et avec un produit non abrasif . Utilisez, de temps en
temps, des produits de nettoyage spéciaux pour plans de
cuisson vitrocéramique.
Enlevez d’abord tous les restes d’aliments et les
projections de graisse à l’aide d’un racloir à nettoyer du
type B par e xemple (pas fourni a vec l’appareil) (voir
Fig. A). Nettoyez le plan de cuisson quand il est encore
tiède; utilisez un produit de netto yage adéquat et du papier
cuisine (voir Fig. B). F rottez ensuite av ec un chiffon humide
et essuyez.
Fig. A Fig. B
Des feuilles de papier alu, des objets plastique ou du
matériel synthétique, qui auraient accidentellement fondu,
tout comme du sucre ou des aliments à teneur en sucre
élevée doivent être éliminés immédiatement du foyer
encore chaud à l’aide d’un racloir.
Les produits de nettoyage spéciaux forment une couche
superficielle transparente qui repousse la saleté. Cela sert
aussi à protéger la surface contre les dommages causés
par des aliments à haute teneur en sucre. N’utilisez jamais
d’éponges récurantes ou de produits abrasifs, les
détergents chimiques agressifs tels que les bombes pour
le nettoyage du four ou les produits détachants sont eux
aussi à éviter.
Produits de nettoyage
Où les acheter
spéciaux pour
vitrocéramique
Conseils utiles pour la cuisson
Le four vous offre de nombreuses possibilités de cuisson
appropriées à chaque type d’aliment. Les notes qui suiv ent
ne sont par conséquent qu’indicatives, vous pourrez les
enrichir au gré de votre expérience personnelle.
Cuisson simultanée sur plusieurs niveaux
Seules les fonctions “pâtisserie” u ou la fonction b
“multicuisson” vous permettent de cuire sur plusieurs
niveaux.
Pour la cuisson de v os mets délicats sur plusieurs niveaux,
utilisez la fonction “ pâtisserie” u qui vous permet de cuire
simultanément sur 3 niveaux (1er, 3e et 5e). Vous
trouverez des exemples d’utilisation dans le tableau
“Conseils utiles pour la cuisson”.
Pour les autres cuissons sur plusieurs niv eaux, utilisez la
fonction b “Multicuisson” en tenant compte des conseils
suivants :
• Le four dispose de 5 niveaux. Utilisez deux des trois
Raclette à lames et lame s de
rechange
Stahl-Fix
SWISSCLEANER
WK TOP
Autres produits pour
Bricolage et
quincaillerie
Articles ménagers
Bricolage
Quincaillerie
Supermarchés
vitrocéramique
niveaux du milieu, ce sont les plus indiqués pour la
cuisson ventilée, le premier du bas et le dernier du
haut sont directement frappés par l’air chaud qui
pourrait brûler des mets délicats;
• Utilisez de préférence le 2e et le 4e niveaux en partant
du bas en enfournant sur le 2e les plats qui exigent
plus de chaleur. Si vous cuisinez par exemple un rôti
de viande en même temps que d’autres plats,
enfournez le rôti sur le 2e niveau et vos plats plus
délicats sur le 4e;
• Lors de la cuisson simultanée de plats dont les temps
et les températures de cuisson varient, choisissez une
température intermédiaire, enfournez le plat le plus
délicat sur le 4e niveau et sortez du four, avant les
autres, le plat dont la cuisson est plus rapide;
• Utilisez la lèchefrite sur le niveau du bas et la grille sur
celui du haut ;
Utilisation de la fonction “Cuisson rapide”
Fonctionnelle, rapide et pratique pour tous ceux qui
utilisent des produits “préparés” (par exemple: surgelés
42
Page 42

ou précuits) et autres; vous trouverez des conseils utiles
dans le tableau “Conseils utiles pour la cuisson”.
Utilisation du gril
Le four “7 Cuochi” v ous offre plusieurs modes de cuisson
barbecue.
Utilisez la fonction 2 “grill”, porte entrouverte, placez
le plat au milieu de la grille placée au 3e ou au 4e niveau
en partant du bas.
Placez la lèchefrite fournie avec l’appareil sur le 1e niveau
pour recueillir les graisses et/ou le jus.
Quand vous utilisez cette f onction, il est recommandé de
sélectionner le niveau d’énergie maximum même s’il est
possible de sélectionner des niveaux inférieurs en réglant
tout simplement le bouton du thermostat sur le niveau
désiré.
Sur les modèles équipés de tournebroche 2, vous
pouvez utiliser en fonction “gril” le kit correspondant. Dans
ce cas, fermez la porte du four pendant la cuisson et placez
la broche sur le 3e niveau (en partant du bas) et la
lèchefrite sur le 1e pour recueillir les graisses et/ou le jus.
La fonction T “Gratin”, uniquement porte fermée, est
extrêmement utile pour des grillades rapides, la chaleur
produite par le gril, bien distribuée, permet de dorer en
surface et de cuire en dessous aussi.
Vous pouvez vous en servir pour parfaire la cuisson
d’aliments ayant besoin de dorer en surface, c’est l’idéal
par exemple pour dorer vos gratins de pâtes en fin de
cuisson.
Quand vous choisissez cette fonction, placez la g rille sur
le 2e ou 3e gradin en partant du bas (voir tableau de
cuisson) et placez une lèchefrite sur le premier gradin en
partant du bas pour recueillir les graisses et éviter la
formation de fumée.
Important : pour la cuisson en fonction “Gratin”, la
porte du four doit être fermée, vous obtiendrez de
meilleurs résultats et ferez des économies d’énergie (10%
environ).
Quand vous utilisez cette fonction, nous v ous conseillons
de régler votre thermostat sur 200 °C, le gril dont le
fonctionnement se base sur l’émission d’infrarouges en
sera d’autant plus performant. Ceci ne vous empêche
toutefois pas d’utiliser des températures plus basses que
vous sélectionnerez à l’aide du bouton du thermostat.
Sur les modèles équipés de tournebroche T, vous
pouvez utiliser en fonction “gratin” le kit correspondant.
Dans ce cas, positionnez le kit tournebroche sur le 3e
niveau (en partant du bas) et la lèchefrite sur le 1e pour
recueillir le jus et/ou les graisses.
Pour obtenir d’excellents résultats en cuisson
barbecue, placez la grille sur les derniers gradins en
partant du bas (voir tableau de cuisson) et placez la
lèchefrite fournie sur le premier gradin en partant du
bas pour recueillir les graisses et éviter la formation
de fumée.
Cuisson de la pâtisserie
Enfournez toujours vos gâteaux quand le four est chaud.
N’ouvrez pas la porte en cours de cuisson, votre gâteau
risquerait de s’affaisser . En général :
Pâtisserie trop sèche
La prochaine fois prog rammez une tem pératu re de
10°C supérieure et réd uisez le temp s de cu isson .
Le gâteau s'affaisse
Utilisez moins de liqui de ou bais sez l a tempér atur e de
10°C.
Gâteau foncé sur le dessus
Enfournez-le à un niv eau plus bas, choi siss ez une
température plus bas se et pr olong ez la cu isson
Bonne cuisson extérieure, mais intérieur colla nt
Utilisez moins de liqui de, abais sez la tempé rature,
augmentez le temps d e cuis son.
Le gâteau ne se démoule pas
Beurrez bien votre mo ule et fari nez-le un peu ou bien
utilisez du papier sul furi sé.
"J'ai enfourné sur plusieurs niveaux (en fonction
"ventilé") mais je n'ai pas obtenu sur tous les
mêmes résultats de cuisson".
Sélectionnez une tem péra ture inf érieu re. Il n'e st pas
dit que des plats enfou rnés en mê me tem ps doive nt
obligatoirement être sortis ense mble.
Cuisson de la pizza
Pour une bonne cuisson de la pizza utilisez la f onction w
“four pizza”:
• Préchauffez le four pendant au moins 10 minutes
• Utilisez un plat en aluminium léger, posez-le sur la grille
du four. L’utilisation de la lèchefrite prolonge le temps
de cuisson et vous obtiendrez difficilement une pizza
croustillante.
• N’ouvrez pas souvent le four pendant la cuisson
• Si vos pizzas sont bien garnies (“capr icciosa”, “quattro stagioni”) n’ajoutez la mozzarelle qu’à mi-cuisson.
• Si vous enfournez simultanément plusieurs pizzas (sur
2 niveaux) choisissez de préférence la fonction four
Multicuisson b car la fonction four pizza w ferait cuire
davantage la pizza placée sur le 1er niv eau du bas.
Cuisson du poisson et de la viande
Pour les viandes blanches, les volailles et le poisson
utilisez des températures entre 180°C et 200 °C.
Pour rissoler les viandes rouges à l’e xtérieur et les garder
juteuses à l’intérieur, sélectionnez au départ une
température élevée (200-220°C) pendant un bref laps de
temps puis diminuez-la par la suite.
En général, plus votre rôti est gros , plus vous dev ez choisir
une température basse et prolonger la durée de cuisson.
Placez la viande au milieu de la grille et placez la lèchefrite
en dessous pour recueillir les graisses.
Enfournez la grille de manière à ce que la viande se trouve
au centre du four. Si vous voulez plus de chaleur en
dessous, choisissez les gradins les plus bas. P our obtenir
43
Page 43

des rôtis savoureux (canard et gibier notamment), bardez
votre viande de lard ou de petit salé en faisant en sorte
qu’ils se trouvent sur le dessus de la viande quand vous
l’enfournez.
44
Page 44

Sélection choisie Type d'alim ent P oids
1 Traditionn el
a
2 M ulticuisson
b
3 G ril
2
4 G ratin
T
5 Pizza
w
6 Pâtisserie
u
7 Fast cookin g
(C uisso n
rapide)g
v
8 Décon gélation
U
NB:les temps de cuisson sont purement indicatifs et peuvent être m odifiés selon les goûts de chacun. E n cas de
cuisson au Gril ou au Gratin, placez toujours la lèchefrite sur le 1er gradin en partant du bas.
Canard
Rôti de veau ou de bœ uf
Rôti de porc
Biscuits (pâte brisée)
Tartes
Pizza (sur 2 n ive aux)
Lasagnes
Agneau
Poulet rôti + pom mes de
terre
M aquereau
Plum -cake
Choux à la crèm e (sur 2
niveau x)
Biscuits (sur 2 niveaux)
G énoise (sur 1 niveau)
G énoise (sur 2 niveaux)
Tartes salées
Soles et seiches
Brochettes de calm ars et
de crevettes
Seiches
Tranches de colin
L é g u m e s g rillé s
Steaks de veau
Sa ucisses
Hamburgers
M aquereaux
Croque-m onsieur ou
toa s ts
Avec tournebroche (si
votre appareil en est
équipé)
Veau à la broche
Poulet à la broche
Agneau à la broche
P o u le t g r illé
Seiches
Avec tournebroche (si
votre appareil en est
équipé)
Veau à la broche
Agneau à la broche
Poulet (à la broche) +
pom mes de terre (dans
lèc h efrite )
Pizza
Rôti de veau ou de bœ uf
Poulet
Tartes
Tarte aux fruits
Plum -cake
G énoise
Crêpes farcies (sur 2
niveau x)
Petits gâteaux (sur 2
niveau x)
Friands au fromage (sur 2
niveau x)
Choux à la crèm e (sur 3
niveau x)
Biscuits (sur 3 niveaux)
M eringues (sur 3 niveaux)
Surgelés
Pizza
M élange de courgettes et
crevettes en croûte
F e u ille t é a u x é p in a r d s
Chaussons
Lasagnes
Petits pains dorés
Poulet en m orceaux
Précuits
Ailes de poulet dorées
A lim e n ts F ra is
Biscuits (pâte brisée)
Plum -cake
Friands au fromage
Tous les alim ents
surgelés
(Kg)
1+1
0.5
0.5
0.5
1.0
1.5
0.7
0.6
0.6
0.8
0.4
0.8
0.6
0.6
n.° 4-6
1.0
1.5
1.0
1.5
1.5
1.5
1.5
1.5
0.5
0.5
0.7
0.5
1.2
0.6
0.4
0.7
0.7
0.5
0.3
0.4
0.5
0.3
0.5
0.4
0.4
0.4 2 - 200 20-25
0.3
0.6
0.2
sole du four
1
1
1
-
1
1
1
1
1
1
1
-
1
1
1
Position de
la g rille p a r
rap p ort à la
3
3
3
3
3
2-4
3
2
2-4
2
2
2-4
2-4
2
2-4
3
4
4
4
4
3/4
4
4
4
4
4
-
-
-
2
2
-
-
-
2
3
2
2/3
3
2/3
3
3
2-4
2-4
2-4
1-3-5
1-3-5
1-3-5
2
2
2
2
2
2
2
2
2
2
Préchauffage
(m in .)
15
15
15
15
15
15
10
10
15
10
10
10
10
10
10
15
-
-
-
-
-
-
-
-
-
-
-
-
-
10
10
10
10
10
10
15
10
10
15
15
15
15
15
15
15
15
15
15
-
-
-
-
-
-
-
-
-
-
Sélection
therm ostat
200
200
200
180
180
230
180
180
200
180
170
190
180
170
170
200
100%
100%
100%
100%
100%
100%
100%
100%
100%
100%
100%
100%
100%
200
200
200
200
200
200
220
220
180
180
180
180
160
200
190
210
180
180
90
250
200
220
200
200
180
220
200
180
210
Durée
de la
cuisson
(m in .)
65-75
70-75
70-80
15-20
30-35
15-20
30-35
40-45
60-70
30-35
40-50
20-25
10-15
15-20
20-25
25-30
10-12
8-10
10-15
10-15
15-20
15-20
15-20
10-12
15-20
3-5
80-90
70-80
70-80
55-60
30-35
70-80
70-80
70-75
70-75
15-20
25-30
60-70
20-30
40-45
40-50
25-30
30-35
20-25
15-20
20-25
20-25
180
12
20
30-35
25
35
25-30
15-20
15-18
45
10-12
45
Page 45

La sécurité, une bonne habitude
Pour garantir l’efficacité et la sécurité de ce produit
• adressez-vous exclusivement à des Centres d’assistance technique agréés
• exigez toujours l’utilisation de pièces détachées originales.
• Pour déplacer l’appareil servez-vous toujours des
poignées prévues sur les côtés du four, vous
éviterez ainsi tout risque de blessure ou
d’endommagement de l’appareil.
• Cet appareil a été conçu pour un usage non professionnel, à domicile, et ses caractéristiques ne peuvent être
modifiées.
• Les instructions fournies ne sont applicables qu’aux pays
dont les symboles sont reportés dans la notice et sur la
plaquette d’immatriculation....
• La sécurité de cet appareil n’est garantie que si ce dernier a été correctement raccordé à une installation de
mise à la terre efficace conforme aux normes de sécurité.
• En cours de fonctionnement, les éléments chauffants
et certaines parties de la porte peuvent devenir très
chauds. Attention à ne pas les toucher et à garder
les enfants à distance.
Ce dernier pouvant représenter un danger , évitez que
des enfants ou des incapables aient accès :
- aux commandes et à l’appareil en général ;
- aux emballages (sachets, polystyrène, clous etc.) ;
- à l’appareil, pendant et tout de suite après l’utilisation du
four et du gril, à cause de la surchauffe;
- à l’appareil inutilisé (dans ce cas il faut rendre inoffensives les parties pouvant s’avérer dangereuses)...
Evitez :
- de toucher l’appareil avec des parties du corps humides
;
- de l’utiliser pieds nus ;
- de tirer sur l’appareil ou sur le cordon d’alimentation pour
le débrancher de la prise de courant ;
- toute opération inappropriée et dangereuse ;
- de boucher les fentes d’aération ou de déperdition de la
chaleur ;
- que le cordon d’alimentation de petits électroménagers
touchent à des parties chaudes de l’appareil ;
- l’exposition aux agents atmosphériques (pluie, soleil) ;
- d’utiliser le four comme rangement ;
- d’utiliser des liquides inflammables à proximité ;
- d’utiliser des adaptateurs, des prises multiples et/ou des
rallonges ;
- toute tentative d’installation ou de réparation sans l’intervention de personnel qualifié.
Faites toujours appel à des techniciens qualifiés dans
les cas suivants :
- installation (conforme aux instructions du fabricant) ;
- quand vous avez des doutes sur son f onctionnement ;
- remplacement de la prise en cas d’incompatibilité avec
la fiche de l’appareil.
Faites appel aux centres de service après-vente
agréés par le fabricant dans les cas suivants :
- en cas de doute sur le bon état de l’appareil lors de son
déballage ;
- endommagement ou remplacement du cordon d’alimentation ;
- en cas de panne ou de mauvais fonctionnement, e xigez
des pièces détachées d’origine.
Effectuez les opérations suivantes :
- évitez toute opération autre que la cuisson ;
- vérifiez le bon état de l’appareil lors de son déballage ;
- déconnectez l’appareil en cas de mauvais fonctionnement et avant toute opération de nettoyage ou d’entretien ;
- quand il est inutilisé, débranchez l’appareil de la prise de
courant et fermez le robinet du gaz (s’il y en a un de
prévu) ;
- utilisez des gants de protection pour enfourner ou sortir
des plats du four ;
- saisissez toujours la poignée de porte en son milieu car
à ses extrémités les sorties d’air chaud pourraient la rendre plus chaude ;
- contrôlez toujours si les manettes sont bien sur “•”/”o”
quand l’appareil n’est pas utilisé.
- coupez le cordon d’alimentation après l’avoir débranché
de la prise quand vous décidez de ne plus utiliser votre
appareil.
• Le fabricant décline toute responsabilité en cas de dommages provoqués par : une mauvaise installation, un
usage impropre et erroné.
46
Page 46

INSTALLATION
L’installation doit être effectuée conformément aux
instructions du fabricant et par un professionnel du
secteur. Le f abricant décline toute responsabilité pour tous
dommages causés à des personnes, à des animaux ou à
des choses du fait d’une installation incorrecte de
l’appareil.
Important : déconnectez le four a vant de procéder à toute
opération de réglage, d’entretien etc.
Installation des fours à encastrer
Pour garantir un bon fonctionnement d’un appareil à
encastrer, il faut que le meuble possède des
caractéristiques bien précises. Les dimensions de la niche
à l’intérieur du meuble en cas d’installation sous plan ou
en colonne sont indiquées sur la figure qui suit.
555
580
560
min
+4 -0
min
min
45
575-585
+4 -0
480
23
572
558
543545
500
39
15
595
595
Pour bien le centrer, positionnez les 4 taquets situés sur
les côtés du four en f ace des 4 trous pratiqués sur le cadre
du four . Attention à l’épaisseur des joues du meuble :
• si elle est de 20 mm : enlevez la partie amovible du
taquet (Fig. A) ;
• si elle est de 18 mm : utilisez la première rainure ; déjà
prévu en usine (Fig. B) ;
• si elle est de 16 mm : utilisez la deuxième rainure
(Fig.C).
Fig. A Fig. B
Pour garantir une bonne aération il faut éliminer la paroi
arrière de la niche, il vaut mieux installer le four de manière
à ce qu’il repose sur deux cales en bois; s’il y a par contre
un plan d’appui continu, ce dernier doit avoir une ouverture d’au moins 45 x 560 mm.
45 mm.
560 mm.
Les panneaux des meubles adjacents doivent être
fabriqués dans un matériau résistant à la chaleur . Dans
le cas notamment de meubles en bois plaqué, il faut que
les colles résistent à une température de 100 °C.
Conformément aux normes de sécurité, après
encastrement de l’appareil, il ne doit plus y avoir possibilité
de contact avec les parties électrifiées.
Toutes les parties qui servent de protection doivent être
fixées de manière à ne pouvoir être enlevées qu’a vec l’aide
d’un outil.
Fig. C
Pour fixer le four au meuble, ouvrez la porte du four et
fixez le four à l’aide des 4 vis à bois dans les 4 trous situés
sur le pourtour.
Raccordement électrique
Le raccordement électrique au réseau doit être effectué
sur la cuisinière. Le plan de cuisson est raccordé à la
cuisinière à l’aide d’un connecteur spécial. Les cuisinières
sont prévues pour fonctionnement au courant alternatif à
la tension et à la fréquence d’alimentation indiquées sur
la plaquette signalétique.
47
Page 47

N'existe que
sur certains
modèles
Table à encastrer
P
NL2L3
L1
Fig. E
BLANC ROUGE JAUNEBLEU VERT
CUISINIERE A ENCASTRER
Montage du cordon d’alimentation
Ouverture du bornier:
• Faites pression à l’aide d’un tournevis sur les languettes
latérales du couvercle du bornier;
• Tirez et ouvrez le couvercle du bornier.
Pour monter le cordon d’alimentation, procédez comme
suit:
• dévissez la vis du serre-câble de même que les vis
des contacts
Rappel : les pontets sont montés en usine pour
raccordement à 400V triphasé (fig. D).
• pour effectuer les raccordements électriques illustrés
fig. F et fig. G, utilisez les deux pontets placés dans le
boîtier (fig. E - référence “P”)
• fixez le câble d’alimentation dans le serre-câble
correspondant et fermez le couvercle.
400V 2N~
H05RR-F 4x2.5 CEI-UNEL 35363
NL2L1
5
3
4
Fig. D
1
2
230V 1N~
H07RN-F 3x4 CEI-UNEL 35364
NL
5
3
4
Fig. F
1
2
400V 3N~
H05RR-F 5x2.5 CEI-UNEL 35363
NL3L1L2
5
3
4
Fig. G
Branchement du câble d’alimentation au réseau
électrique
Montez sur le câble une fiche normalisée pour la charge
indiquée sur la plaquette des caractéristiques; en cas de
branchement direct au réseau, intercalez entre l’appareil et
l’installation électrique un interrupteur omnipolaire ayant au
moins 3 mm d’ouverture entre les contacts, dimensionné à
la charge et conforme aux normes applicables (l’interrupteur ne doit pas interrompre le fil de la terre).
Le câble d’alimentation ne doit atteindre, en aucun point,
des températures dépassant de 50°C la température ambiante.
Avant de procéder au branchement, vérifiez que :
• La sécurité électrique de cet appareil n’est assurée que
si ce dernier est correctement raccordé à une installation de mise à la terre conformément aux normes applicables en matière de sécurité électrique. Il est indispensable de vérifier si cette condition fondamentale de sécurité est bien remplie; en cas de doute, faites appel à un
professionnel du secteur pour un contrôle minutieux de
l’installation électrique. Le f abricant ne peut en aucun cas
être considéré responsable des dommages pouvant survenir si l’installation de mise à la terre fait déf aut.
• Avant de brancher l’appareil, vérifiez si les caractéristiques techniques reportées sur les étiquettes (apposées
sur l’appareil et/ou sur l’emballage) correspondent bien
1
2
48
Page 48

à celles de votre installation électrique .
• Vérifiez si la charge électrique de l’installation et des prises de courant est apte à supporter la puissance maximum de l’appareil figurant sur la plaquette. En cas de
doute, faites appel à un prof essionnel du secteur .
• En cas d’incompatibilité entre la prise et la fiche de
l’appareil, faites remplacer cette prise par une autre
appropriée par un professionnel du secteur . Ce dernier
devra aussi vérifier si la section des câbles de la prise est
Caractéristiques T echniques
apte à supporter la puissance absorbée par l’appareil.
En général, il vaut mieux n’utiliser ni adaptateurs, ni prises
multiples ni rallonges. Si leur emploi s’avère indispensable,
n’utilisez que des adaptateurs simples ou multiples et des
rallonges conformes aux normes de sécurité, tout en
veillant à ne pas dépasser la limite de la charge électrique
indiquée sur l’adaptateur simple ou sur les rallonges et
la puissance max. indiquée sur l’adaptateur multiple . La
fiche et la prise doivent être d’un accès facile.
Dimensions utiles du four:
largeur : cm 43,5
profondeur : cm 40
hauteur : cm 32
Volume utile du four:
litres 56
ETIQUETTE ENERGIE
Directive 2002/40/CE sur l’étiquette des fours électriques
Norme EN 50304
Consommation énergie convection naturelle
fonction four : a Traditionnel
Consommation énergie déclarée pour Classe convection f orcée
fonction four : u Pâtisserie
Tension et fréquence d’alimentation :
230/400V ~ 3N 50Hz 9200W
7
Cet appareil est conforme aux Directives
Communautaires suivantes :
- 73/23/CEE du 19/02/73 (Basse Tension) et
modifications successives ;
- 89/336/CEE du 03/05/89 (Compatibilité
électromagnétique) et modifications successives ;
- 93/68/CEE du 22/07/93 et modifications
successives.
49
Page 49

Le agradecemos por haber elegido un producto Ariston, seguro y realmente fácil de usar. Para conocerlo y utilizarlo
bien y por mucho tiempo, le aconsejamos, antes de utilizar el aparato, leer atentamente las advertencias contenidas
en el presente manual, ya que suministran importantes indicaciones referidas a la seguridad, la instalación, el uso y el
mantenimiento. Conservar cuidadosamente este manual para posteriores consultas. Gracias.
Visto de cerca
I
G
D
A
D
12
11
10
9
8
7
H
1
12
12
2
2
11
11
3
3
10
10
4
4
9
9
5
5
8
8
7
7
6
6
F
1
12
2
2
11
3
3
10
4
4
9
5
5
8
7
6
6
L
E
A
M
C
8
B
7
1
2 3 4 5 6
A
9
A. Panel de mando
B. Bandeja o encimera
C. Parrilla del horno
D. Placa eléctrica
E. Perilla para selección de las funciones de cocción
F. Perillas de las placas eléctricas
G. Luz indicadora de funcionamiento de las placas
eléctricas
H. Guías de deslizamiento bandejas y parrillas
I. Luz indicadora de funcionamiento del horno (pre-
sente sólo en algunos modelos) - Si está encendida
indica la fase de calentamiento hasta la temperatura
seleccionada
L. Perilla para la temperatura de cocción
M. Programador electrónico - Permite programar
cualquier función de cocción fijando la duración y la
hora a la que finaliza la cocción. Cumple también una
función de contador de minutos.
1. Luz del horno
2. Regulación del reloj
3. Regulación del contador de minutos
4. Fin de la cocción
5. Duración de la cocción
6. Confirmación de la regulación
7. Indicador del contador de minutos
8. Indicador de precalentamiento (m centelleante) o
de cocción (m fija) en curso
9. Indicador de una programación realizada
10.Indicador de puerta bloqueada
50
Page 50

Cómo utilizarlo
El horno
de los tradicionales hornos de convención natural («convencionales») con las de los modernos hornos de convención
forzada («ventilados»).
Se trata de un aparato sumamente versátil, que permite elegir, de modo fácil y seguro, entre 7 diferentes métodos de
cocción. La selección de las diferentes funciones ofrecidas,
se obtiene con la perilla de selección «E» presente en el
panel de mandos.
Atención: Cuando se enciende por primera v ez, aconsejamos hacer funcionar el horno vacío durante media hora
aproximadamente, con el termostato al máximo y la puerta
cerrada. Una vez transcurrido ese tiempo, apáguelo , abra al
puerta y airee el ambiente. El olor que a veces se advierte
durante esta operación es causado por la evaporación de
substancias empleadas para proteger el horno y el grill durante el lapso de tiempo que transcurre entre fabricación e
instalación del producto.
Puesta en hora del reloj digital
La modificación de la hora es posible sólo con la perilla «E»
en la posición 0.
Después de la conexión a la red o después de un corte de
corriente, el display centellea en: 0.00.
Gire la perilla «L» para modificar la hora y luego pulse
OK para confirmar. Gire nue v amente «L» par a modificar
los minutos y , por último , pulse OK para confirmar definitivamente. Se pueden realizar actualizaciones pulsando
el botón 2 y siguiendo el procedimiento indicado arriba.
Función contador de minutos
El temporizador no controla el encendido y apagado del
horno, solamente emite una alarma sonora, una vez cumplido el tiempo, que se puede detener presionando una
tecla cualquiera.
Para configurar el contador de min utos, pulse el botón 3, regule con la perilla «L» y luego pulse el botón OK para confir-
mar. El icono n le recordará que el temporizador está funcionando.
Al finalizar la cuenta, se escuchará una señal sonora que
durará 1 min. o que terminará después de presionar una tecla cualquiera.
La luz del horno
Con el horno apagado se puede encender/apagar en cualquier momento pulsando el botón 1.
Ventilación de enfriamiento
Para lograr una disminución de la temperatura externa,
algunos modelos poseen un ventilador de enfriamiento
que produce un chorro de aire que sale entre el panel
frontal y la puerta del horno.
Nota: Cuando finaliza la cocción, el ventilador permanece en funcionamiento hasta que el horno esté
suficientemente frío.
Nota: En «Cocción rápida» el v entilador comienza a funcio-
nar automáticamente sólo cuando el horno está caliente.
Atención: el aparato está dotado de un sistema de diagnóstico que permite detectar problemas de funcionamiento.
Se informa sobre los mismos al usuario mediante mensajes
del tipo «Fn m» (n y m = números de 1 cifra). En estos casos ,
7 Cuochi
reúne, en un único aparato, las v entajas
es necesaria la intervención de la asistencia técnica, ya que
el horno no funciona.
Uso del horno
Girando la perilla «E» se puede seleccionar el programa
de cocción deseado. El horno entrará inmediatamente en
la fase de precalentamiento durante la cual centellea en
el display el icono m y aparece la temperatura de coc-
ción asociada al programa seleccionado: si dicho valor
no fuera el que Ud. desea, lo puede modificar simplemente girando la perilla «L».
Una vez completado el calentamiento, se verá el icono
m encendido de modo permanente, a partir de ese mo-
mento, podrá introducir, en el horno bien caliente, la comida que va a cocinar.
Nota: para las funciones COCCIÓN RÁPIDA y GRILL no
está prevista la f ase de precalentamiento. Recuerde que durante la cocción será siempre posible:
• modificar el programa con la perilla «E»;
• modificar la temperatura con la perilla «L»;
• programar la duración y la hora de finalización (véase el
párrafo «Programar la cocción»).
• interrumpirla en cualquier momento llevando la perilla «E»
hasta la posición 0.
Nota: Para cada función de cocción se ha fijado, por
motivos de seguridad, una duración de 2 horas. Si dicha
duración no se modifica, el horno se apagará
automáticamente una vez transcurrido el tiempo fijado.
Atención: Utilice el primer piso, desde abajo , colocando la
bandeja suministrada con el aparato, para recoger jugos y/o
grasa, solamente en el caso de cocciones en el grill o con
asador automático (presente sólo en algunos modelos). Para
otras cocciones no utilice nunca el primer piso, desde abajo ,
y nunca apoy e objetos en el f ondo del horno mientras está
cocinando, porque podría causar daños al esmalte. Coloque siempre sus recipientes de cocción (fuentes para horno, películas de aluminio , etc.) sobre la parrilla suministrada
con el aparato, ubicada en las guías del horno.
Horno T radicional a
Posición de la perilla del termostato «L»: Entre 40°C y
250°C.
En esta posición se encienden los dos elementos
calentadores inferior y superior. Es el clásico horno de la
abuela, pero que se llevó a un excepcional nivel de
distribución de la temperatura y de limitación del consumo.
El horno tradicional es insuperable en los casos en que se
deban cocinar platos cuyos ingredientes estén compuestos
por dos o más elementos que contribuyen a f ormar un plato
único, como por ejemplo: coles con costillas de cerdo,
bacalao a la española, bacalao seco a la anconetana,
medallones de ternera con arroz, etc... Se obtienen óptimos
resultados en la preparación de platos a base de carnes de
vaca o de ternera como: estofados, gulasch, carnes de
animales de caza, pierna y lomo de cerdo, etc... que
necesitan de cocción lenta con un constante agregado de
líquidos. Sigue siendo el mejor sistema de cocción para las
tortas, para la fruta y para las cocciones con recipientes
tapados, específicos para cocinar al horno. Cuando cocine
en el horno tradicional utilice un solo nivel, ya que si se utilizan
51
Page 51

más, se produciría una mala distribución de la temperatura.
Usando los distintos niveles que tiene a disposición, podrá
balancear la cantidad de calor entre la parte superior e inferior.
Si la cocción necesita mayor calor desde abajo o desde
arriba, utilice los niveles superiores o inferiores.
Horno Multicocción b
Posición de la perilla del termostato «L»: Entre 40°C y
250°C.
Se activan alternadamente los elementos calentadores y
entra en funcionamiento el ventilador . Debido a que el calor
es constante y uniforme en todo el horno, el aire cocina y
dora los alimentos de modo uniforme en todos los puntos.
T ambién se pueden cocinar simultáneamente comidas dif erentes entre sí, siempre que las temperaturas de cocción
sean similares. Es posible utilizar hasta un máximo de 2
niveles simultáneamente siguiendo las adv ertencias contenidas en el párrafo «Cocción simultánea en varios niveles».
Esta función está particularmente indicada para platos que
necesitan un gratinado o para platos que necesitan de una
cocción bastante larga, por ejemplo: lasañas, macarrones
sazonados, pollo asado con patatas, etc... Se obtienen
notables ventajas en la cocción de los asados de carne ya
que la mejor distribución de la temperatura permite utilizar
temperaturas más bajas que reducen la dispersión de
líquidos manteniendo la carne más tierna con una menor
pérdida de peso. El horno Multicocción se aprecia
particularmente en la cocción de pescados, porque pueden
cocinarse con muy poco sazonado manteniendo así
inalterado su aspecto y sabor. Para las legumbres de
aderezo, e xcelentes resultados se obtienen en las cocciones
de verduras como calabazas, berenjenas, pimientos,
tomates, etc..
Postres: resultados seguros se obtienen cocinando tortas
con levadura.
La función “Multicocción” se puede también usar para una
descongelación rápida de carnes blancas o rojas y de pan
seleccionando una temperatura de 80 °C. Para descongelar
alimentos más delicados, puede seleccionar 60°C o usar
sólo la circulación de aire frío colocando la perilla del termostato en 0°C.
Grill 2
Posición de la perilla del termostato «L»: Entre 50% y
100%.
Se enciende el elemento calentador superior y se pone en
funcionamiento el asador automático (cuando existe).
La temperatura elev ada y directa del grill permite el inmediato
dorado superficial de los alimentos que, obstaculizando la
salida de los líquidos, los mantiene más tiernos internamente.
La cocción al grill está particular mente aconsejada para
aquellos platos que necesitan de elevada temperatura
superficial: bistecs de ternera y vaca, entrecôte, solomillo,
hamburguesas, etc...
Realice las cocciones con la puerta del horno semiabierta
salvo en el caso de una cocción con asador automático.
Algunos ejemplos de uso se encuentran en el párrafo «Consejos prácticos para la cocción».
Girando la perilla «L», el display indicará niveles de potencia comprendidos entre un mínimo de 50% y un
máximo de 100%.
Gratin T
Posición de la perilla del termostato «L»: Entre 40°C y
250°C.
Se enciende el elemento calentador superior y se ponen en
funcionamiento el ventilador y el asador automático (cuando existe).
Une a la irradiación térmica unidireccional, la circulación forzada del aire en el interior del horno. Esto impide que se
quemen superficialmente los alimentos aumentando el poder de penetración del calor. Utilizando el grill ventilado se
obtienen resultados excelentes en broquetas mixtas de carne y verdura, salchichas, costillas de cerdo , chuletas de cordero, pollo a la diabla, codorniz a la salvia, solomillo de cerdo, etc...
Realice las cocciones al «gratin» con la puerta del horno
cerrada.
El «gratin» es insuperable en la cocción de lonjas de cherna,
de atún, de pez espada, sepias rellenas, etc...
Horno Pizza w
Posición de la perilla del termostato «L»: Entre 40°C y
250°C.
Se activan los elementos calentadores inferior y circular y
entra en funcionamiento el ventilador. Esta combinación
permite un rápido calentamiento del horno gracias a la notable potencia erogada (2800 W), con un fuerte aporte de calor preferentemente desde abajo.
La función horno pizza es particularmente aconsejable para
comidas que requieren una gran cantidad de calor , por ejemplo: la pizza y los asados de grandes dimensiones. Utilice
una sola bandeja o parrilla a la vez, si se utilizara más de
una, es necesario intercambiarlas entre sí en la mitad de la
cocción.
Horno Pastelería u
Posición de la perilla del termostato «L»: Entre 40°C y
250°C.
Se activa el elemento calentador posterior y entra en funcionamiento el ventilador garantizando un calor delicado y uniforme en el interior del horno.
Esta función es aconsejable para la cocción de alimentos
delicados, en especial las tortas que necesitan leudado y
algunas preparaciones «mignon» en 3 niveles simultáneamente. Algunos ejemplos son: bignè, bizcochos dulces y
salados, bizcochitos salados de hojaldre, bizcocho arrolla-
do, pequeños trozos de v erduras al horno , etc....
Horno «Cocción rápida» v
Posición de la perilla del termostato «L»: Entre 40°C y
250°C.
Se activan los elementos calentadores y entra en funcionamiento el ventilador garantizando un calor constante y uniforme en el interior del horno.
Esta función es particularmente aconsejable para cocciones veloces (no necesita precalentamiento) de alimentos
envasados (por ejemplo: congelados o precocidos) y para
algunas «preparaciones caseras».
En el horno «Cocción rápida» los mejores resultados se
obtienen utilizando un sólo nivel (el 2° comenzando desde
abajo), ver la tabla «Consejos prácticos para la cocción».
52
Page 52

Horno «Descongelación» U
D
B
B
C
C
Posición de la perilla del termostato «L»: cualquiera
El ventilador colocado en el fondo del horno, hace circu-
lar el aire a temperatura ambiente alrededor del alimento.
Es aconsejable para la descongelación de cualquier tipo
de alimento, pero en particular para alimentos delicados
que no deben recibir calor, por ejemplo: tortas heladas,
postres o tortas con crema, tortas de fruta. El tiempo de
descongelación se reduce aproximadamente a la mitad.
Cuando se trate de carne, pescado o pan, es posible reducir los tiempos utilizando la función «multicocción» y
seleccionando una temperatura de 80° 100°C.
El asador automático (sólo en algunos modelos)
Para accionar el asador automático proceda del siguiente
modo:
a) coloque la grasera en el 1° piso;
b) introduzca el soporte del asador automático en el 3° piso
y coloque el espetón introduciéndolo, a tra vés del orificio
correspondiente, en el asador automático colocado en
la parte posterior del horno;
c) accione el asador automático seleccionando la posición
/
2
Tcon la perilla «E».
.
Fig. C
A Placas eléctricas de hierro fundido
B Zonas de cocción radiantes
C Zonas de cocción radiantes de doble diámetr o
D Luces testigo de calor residual, una para cada zona
de cocción: indican que la zona correspondiente está
a una temperatura superior a 60°C, aún después que
el elemento calentador haya sido apagado (presente
sólo en algunos modelos)
E Perillas de mando especiales
F Perillas de mando tradicionales
Descripción
La cocina se puede acoplar con encimeras con 4 placas
eléctricas (Fig. A), con encimeras de vidriocerámica tradicionales (Fig. B) o con encimeras de vidriocerámica con
zonas de cocción dobles (Fig. C).
AA
B
B
A
B
A
B
D
Fig. A Fig. B
12
11
10
9
8
7
12
2
11
3
10
4
9
5
8
7
6
E
1
12
2
11
3
10
4
9
5
8
7
6
F
E
12
2
11
3
10
4
9
5
8
7
6
1
2
3
4
5
6
F
Descripción de los elementos calentadores
Los elementos radiantes tradicionales están compuestos por resistencias circulares. Se vuelven rojos
sólo después de algunos segundos de su encendido.
Los elementos radiantes con doble diámetro.
Son funcionalmente similares a los elementos radiantes
tradicionales, y se pueden reconocer por la presencia de
una zona calentadora (ver la Fig. C). Es posible encender
solamente la parte más interna o ambas.
l Las perillas de mando de las zonas de cocción tra-
dicionales. Cada zona de cocción está dotada de una
perilla de mando que permite seleccionar 12 temperaturas diferentes, desde un v alor mínimo de 1 a uno
máximo de 12.
l Las perillas de mando de las zonas de cocción
especiales. La perilla de mando permite elegir entre
dos niveles de potencia, ambos regulables entre un
mínimo de 1 a un máximo de 12. Girando la perilla en
sentido horario de 1 a 12 se fija el nivel de potencia
más bajo. Girando la perilla hasta el tope (A), identifi-
cable por un ligero disparo, se activ a la potencia máxima, que a su vez, se puede regular entre 12 y 1 girando la perilla en sentido antihorario.
l Para restablecer el valor de potencia mínimo es
necesario llevar la perilla a la posición cero. En el
caso de encimeras de vidriocerámica con zonas de
53
Page 53

cocción de doble potencia (ver la Fig. C), la pr imera
parte del recorrido activa la zona de cocción más pequeña (interna), para activarlas a ambas, y tener así a
disposición la zona de cocción más grande, es necesario llevar la perilla a la posición (A) y proceder lue-
go a seleccionar el nivel de potencia deseado entre
12 y 1.
Pos Placa a utomática
0
Apagado
Advertencias para el uso de la encimera de
vidriocerámica
Para obtener los mejores resultados de su encimera, se
deben tomar algunas precauciones fundamentales durante la cocción o en la preparación de las comidas.
l Utilice ollas con fondo plano que aseguren su adhe-
rencia a la zona de cocción.
1 Pa ra derret ir man teca, cho colate
2
Para calentar líq uidos
3
4
Para cremas y sal sas
5
6
Para cocinar a tempe ratur a de her vor
7
8
Para asados
9
10
Para hervir grandes cantid ades de al imento s
11
12 Para freir
Encendido de las z onas de coci na
A
Luz indicadora de funcionamiento de las placas
eléctricas (G)
Resulta encendida cuando se haya puesto en funcionamiento uno cualquiera de los elementos eléctricos calentadores de la encimera.
l Utilice ollas de un diámetro suficiente para cubrir com-
pletamente la placa de cocción, de ese modo se garantiza el uso de todo el calor disponible.
l Verifique que la base de las ollas esté siempre seca y
limpia para garantizar un buen contacto y una mayor
duración de las placas y también de las ollas.
l No utilice la misma v ajilla usada en los quemadores a
gas. La concentración del calor en los quemadores a
gas es tal, que puede deformar el fondo de la olla, y
por lo tanto, no se obtendrá nunca el resultado deseado utilizándola luego sobre una encimera de
Vidriocerámica.
l No deje nunca una zona de cocción encendida sin que
haya una olla encima, porque en ese caso el calentamiento será máximo en muy breve tiempo con posibles daños para los elementos calentadores.
l No olvide que la zona de cocción permanece caliente
durante media hora como mínimo, después que se ha
apagado; tenga cuidado de no apo yar inadvertidamente recipientes u objetos sobre la zona todavía caliente.
l No encienda las zonas de cocción si ha y hojas de alu-
minio o materiales plásticos sobre la encimera.
l No se acerque a las zonas de cocción calientes.
l Advertencia para considerar antes del primer uso:
la cola utilizada para las juntas deja huellas de grasa
en el vidrio durante el período de almacenamiento. Le
aconsejamos eliminarlas, antes del uso del aparato,
con un producto de limpieza común (crema para lustrar no abrasiva). Durante las primeras horas de uso,
se siente un olor a goma, que desaparece rápidamente.
l La encimera de vidriocerámica es resistente a los sal-
tos de temperatura y a los golpes. No obstante, si se
golpea con objetos con punta puede romperse. En ese
caso, desconecte inmediatamente el aparato y llame
a un centro de asistencia técnica autorizado para su
reparación.
54
Page 54

Programar la cocción
La programación de la duración y/o de la hora de
finalización de la cocción se debe realizar después de
haber seleccionado la función que desea utilizar.
Programar la duración de la cocción
Pulse el botón 5 y luego programe la duración girando la
perilla C. Pulsando el botón OK, se memorizará el valor
seleccionado y en el display se visualizarán, alternativamente, la temperatura seleccionada, que se puede variar
con la perilla C, y el tiempo que falta para la finalización
de la cocción.
Una vez transcurrido dicho tiempo , en el display aparecerá
“end” y se emitirá una secuencia de señales sonoras que
indican que la cocción ha finalizado.
• Pulse cualquier botón para interrumpir la señal sonora.
• Lleve la perilla B hasta la posición 0 para hacer
desaparecer la palabra “end”.
Ejemplo:
Son las 9:00 horas y se programa una duración de
cocción de 1 hora y 15 minutos. La cocción se detendrá
automáticamente a las 10:15 horas.
Ejemplo:
Son las 9:00 horas y se selecciona la hora de finalización
de la cocción a las 10:15. La cocción tendrá una duración
de 1 hora y 15 minutos.
Programar una cocción retrasada
Pulse el botón 5 y luego programe la duración girando la
perilla C. Pulsando el botón OK, se memorizará el valor
seleccionado y en el display se visualizarán, alternativamente, la temperatura y el tiempo precedentemente
seleccionado.
Pulse el botón 4 y luego programe la hora de finalización
girando la perilla C. Pulsando el botón OK la selección se
memorizará y el display le recordará, alternativamente,
la hora de finalización y la temperatura seleccionada.
Ejemplo:
Son las 9:00 horas y se programa una duración de cocción
de 1 hora y 15 minutos y las 12:30 como hora de
finalización. La cocción comenzará automáticamente a
las 11:15 horas.
Programar la hora de finalización de la cocción
Pulse el botón 4 y luego realice la programación girando
la perilla C. Pulsando el botón OK, se memorizará la
selección realizada y en el display se visualizarán, alternativamente, la temperatura seleccionada y el tiempo que
falta para la finalización de la cocción.
Cuando llega la hora de finalización de la cocción precedentemente seleccionada, en el display aparecerá la
palabra “end” y se emitirá una secuencia de señales
sonoras para indicar que la cocción ha finalizado.
• Pulse cualquier botón para interrumpir la señal sonora.
• Lleve la perilla B hasta la posición 0 para hacer
desaparecer la palabra “end”.
El icono A le recordará que ha programado la duración y/
o la hora de finalización de la cocción.
Para anular una pr ogramación
Para cancelar cualquier programación efectuada, gire la
perilla “B” hasta la posición “0”.
55
Page 55

La limpieza automática mediante fast clean
Activando la función fast clean, la temperatur a interna del
horno alcanza los 500 °C necesarios para la carbonización
de los residuos. A través de la puerta del horno, se pueden
notar algunas partículas que se iluminan durante su
carbonización por pirólisis al entrar en contacto con las
resistencias: se trata de una combustión instantánea,
fenómeno totalmente normal, que no constituye peligr o
alguno.
Algunos útiles consejos antes de la limpieza
automática
1- Trate de eliminar los residuos de sustancias alimenticias
más consistentes con una esponja húmeda. Evite
estrictamente utilizar detergentes o cualquier otro producto
aconsejado para la limpieza de hornos.
2- Extraiga todos los accesorios ya que los mismos no
pueden resistir temperaturas tan elev adas. Además, algunos
accesorios podrían alterar el resultado de la limpieza
automática obstaculizando la circulación de calor en todas
las paredes. Los accesorios se pueden lavar fácilmente como
una vajilla normal (incluso en lavav ajilla).
3- No deje paños de cocina colgados en la manija.
Atención: durante la limpieza automática, las superficies
pueden calentarse mucho. Mantenga a los niños
alejados de las mismas.
Cómo activar la fast clean
– Cierre la puerta.
– Coloque la perilla de selección en V
– Para programar la dur ación y/o la hora de finalización
de fast clean, siga las instrucciones contenidas en el
párrafo “Programar la Fast clean”. Es importante
recordar que se pueden elegir duraciones
comprendidas entre 60 y 120 minutos, según la
suciedad del horno.
Dispositivos de seguridad
Dada la alta temperatura, el horno posee algunos dispositivos
de seguridad:
• para evitar el riesgo de quemaduras, la puerta se
bloquea automáticamente apenas la temperatura
alcanza valores elev ados;
• como prevención en el caso de que se produzca un
evento anómalo, los elementos calentadores no
están más alimentados eléctricamente.
• Una vez producido el bloqueo de la puerta, ya no es
posible modificar la programación de la duración, la
finalización y el temporizador.
¿Qué sucede al finalizar la limpieza automática?
Al finalizar la limpieza automática, en el display aparece
la palabra “end” y se emite una señal sonora que puede
ser desactivada pulsando un botón cualquiera. Girando
la perilla “B” hasta la posición “0” desaparecerá la palabr a
“end”.
Para poder abrir la puerta del horno será necesario
esperar que la temperatura del horno haya descendido a
un nivel aceptable.
En ese momento, se puede constatar la presencia de
depósitos de polvo blanco en el fondo y en las paredes del
horno; elimínelos con una esponja húmeda una vez que el
horno se ha enfriado completamente.
Si, en cambio, desea aprov echar el calor almacenado para
comenzar una cocción, el polvo puede permanecer en el
horno, ya que no constituye ningún pelig ro para los alimentos
que va a cocinar.
NO SE ALARME SI:
1 al comienzo del ciclo fast clean, el ventilador de
enfriamiento funciona a baja velocidad;
2 durante el uso del Fast Clean salta el limitador de la
instalación eléctrica: se ha producido una sobrecarga
de la red (debido al uso simultáneo de otros aparatos
eléctricos);
3 encuentra la puerta del hor no bloqueada durante el
programa Fast Clean: es un dispositivo de seguridad
del producto; la puerta se abrirá sólo después del completo enfriamiento del horno;
4 después del ciclo Fast Clean, permanecen pequeñas
manchas en la superficie interna del horno: es importante eliminar los residuos de comida más consistentes
antes de la autolimpieza y seleccionar una duración
del programa compatible con el grado de suciedad del
horno;
5 al finalizar la cocción continúa saliendo aire del horno
durante un cierto tiempo: es la fase de enfriamiento
normal de la cavidad del horno;
6 durante el funcionamiento “grill” la resistencia superior
no permanece siempre encendida (color rojo): su
funcionamiento está controlado por un termostato;
7 al abrir la puerta durante la cocción, se escapa
demasiado vapor;
8 cuando se dejan comidas en el horno después de la
cocción, se forman gotas de agua o de vapor en el
interior del mismo;
56
Page 56

Programar la Fast clean
La programación de la duración y/o de la hora de
finalización de la fast clean se debe realizar después de
haber seleccionado la función fast clean.
Programar la duración de la fast clean
Pulse el botón 5 y luego programe la duración girando la
perilla C. Pulsando el botón OK, se memorizará el valor
seleccionado y en el display se visualizará el tiempo que
falta para la finalización de la f ast clean.
Una vez transcurrido dicho tiempo , en el display aparecerá
“end” y se emitirá una secuencia de señales sonoras que
indican que el ciclo de limpieza ha finalizado.
• Pulse cualquier botón para interrumpir la señal sonora.
• Lleve la perilla B hasta la posición 0 para hacer
desaparecer la palabra “end”.
Ejemplo:
Son las 9:00 horas y se programa una duración de fast
clean de 1 hora y 15 minutos. La fast clean se detendrá
automáticamente a las 10:15 horas.
Ejemplo:
Son las 9:00 horas y se selecciona la hora de finalización
de la fast clean a las 10:15. La fast clean tendrá una
duración de 1 hora y 15 minutos.
Programar una fast clean retrasada
Pulse el botón 5 y luego programe la duración girando la
perilla C. Pulsando el botón OK se memorizará el valor
seleccionado y se visualizará en el display.
Pulse el botón 4 y luego programe la hora de finalización
girando la perilla C. Pulsando el botón OK el valor
seleccionado se memorizará y el display le recordará, alternativamente, la hora de finalización y la duración
seleccionada.
Ejemplo:
Son las 9:00 horas y se programa una duración de fast
clean de 1 hora y 15 minutos y las 12:30 como hora de
finalización. La fast clean comenzará automáticamente a
las 11:15 horas.
Programar la hora de finalización de la fast clean
Pulse el botón 4 y luego programe girando la perilla C.
Pulsando el botón OK, se memorizará el valor
seleccionado y en el display se visualizará el tiempo que
falta para la finalización de la f ast clean.
Cuando llega la hora de finalización de la fast clean precedentemente seleccionada, en el display aparecerá la
palabra “end” y se emitirá una secuencia de señales
sonoras para indicar que la fast clean ha finalizado.
• Pulse cualquier botón para interrumpir la señal sonora.
• Lleve la perilla B hasta la posición 0 para hacer
desaparecer la palabra “end”.
El icono A le recordará que ha programado la duración y/
o la hora de finalización de la fast clean.
Para anular una pr ogramación
Para cancelar cualquier programación efectuada, gire la
perilla “E” hasta la posición “0 ”.
57
Page 57

Cómo mantenerlo en buenas condiciones
Antes de efectuar cualquier operación, desconectar el aparato de la alimentación eléctrica.
Para una duración prolongada del horno es indispensable realizar frecuentemente una cuidadosa limpieza
general, teniendo presente que:
• Para la limpieza no utilice aparatos a vapor.
• las partes externas esmaltadas o de acero inoxidable se
deben lavar con agua tibia sin usar polvos abrasivos ni
sustancias corrosivas que podrían arruinarlas. El acero
inoxidable puede quedar manchado . Si las manchas son
difíciles de eliminar use productos específicos que se
encuentran normalmente en el comercio. Se sugiere un
aclarado abundante y secado inmediato después de la
limpieza.
• El interior del horno se debe limpiar, preferentemente
cada vez que se usa, cuando todavía está tibio , usando
agua caliente y detergente, enjuagando y secando luego cuidadosamente con un paño suave. Evite el uso de
detergentes abrasivos (por ejemplo los polvos, etc...) y
de esponjas abrasivas para platos o ácidos (por ejemplo, anticaliza, etc...), porque podrían arruinar el esmalte. Si la suciedad es particular mente difícil de eliminar,
use un producto específico para la limpieza del horno,
siguiendo las instrucciones contenidas en el paquete.
• si usa el horno por un tiempo prolongado se podría formar líquido de condensación. Séquelo usando un paño
suave.
• una junta de goma alrededor de la apertura del horno
garantiza su correcto funcionamiento. P or lo tanto , controle periódicamente el estado de dicha junta. Si es necesario límpiela evitando usar productos o elementos
abrasivos. Si se encontrara dañada llame al Centro de
Asistencia más cercano. Es aconsejable no usar el horno hasta que no haya sido reparado .
• no revista nunca el f ondo del horno con hojas de aluminio, porque la consiguiente acumulación de calor perjudicaría la cocción dañando también el esmalte.
• limpie el vidrio de la puerta del horno utilizando productos y esponjas no abrasivos y séquelo con un paño suave.
• las placas eléctricas se limpian con un paño húmedo
y se untan con un poco de aceite cuando todavía están
tibias;
Cómo extraer la puerta del horno
Para realizar una limpieza más profunda es posib le extraer
la puerta del horno. Proceda del siguiente modo:
• abra completamente la puerta;
• alce y gire las palancas ubicadas en las dos bisagras;
• agarre la puerta de los dos lados externos, ciérrela lentamente pero no completamente;
• tire la puerta hacia Ud. extra yéndola de su alojamiento;
Vuelva a montar la puerta siguiendo el procedimiento
descripto arriba pero en sentido contrario.
Sustitución de la lámpara del horno
• Antes de efectuar cualquier operación, desconecte
eléctricamente el horno, desenchufándolo o
accionando el interruptor utilizado para la conexión del
horno a la instalación eléctrica.
• Con la ayuda de un objeto estrecho y plano
(destornillador, mango de cuchillo, etc.), e xtraiga la tapa
de vidrio.
• Desenrosque la lámpara y sustitœyala con otra de
caracter’ sticas análogas:
- T ensión 230/240 V
- potencia 15 W
- casquillo E 14
• Vuelva a montar la tapa de vidrio teniendo cuidado de
colocar correctamente la junta.
Horno
Lampara
Junta
Vidrio
Limpieza de la encimera
Antes de comenzar a cocinar, la superficie de la encimera
se debe limpiar usando un paño húmedo para eliminar el
polvo o los residuos de comidas cocinadas precedentemente.
La superficie de la placa de cocción se deberá limpiar
regularmente con una solución de agua tibia y detergente no abrasivo. Periódicamente será necesario usar
productos específicos para la limpieza de las encimeras
de vidriocerámica.
Primero, elimine de la encimera, todos los restos de
comidas y salpicaduras de grasa con una raedera para la
limpieza, por ejemplo (no se suministra con el equipo)
B (ver la Fig. A).
Limpie la encimera cuando está tibia; utilice un producto
de limpieza adecuado y papel para cocina (ver la Fig. B).
Luego frote con un paño húmedo y seque.
132
Fig. A Fig. B
Hojas de aluminio, objetos de plástico o material sintético,
que accidentalmente se hayan fundido , así como también
el azúcar o comidas con un alto contenido de azúcar se
deben eliminar inmediatamente de la zona de cocción
cuando todavía está caliente con una raedera.
58
Page 58

Los productos de limpieza específicos forman una capa
superficial transparente repelente a la suciedad. Esto
protege también la superficie de eventuales daños
causados por comidas con un alto contenido de azúcar.
Nunca utilice esponjas o productos abrasivos, se deben
evitar los detergentes químicamente agresiv os como los
aerosoles para horno o productos quitamanchas.
Consejos prácticos para la cocción
Producto de limpieza Lungares de venta
Rasqueta Hojas de
recambio
Clean, Vitroceramic, S idol
Inox
SWISSCLEANER Kuhn-Rikon Española
Bricolage en Grandes
superficies, Ferreterias,
Drogueriás
Grandes superfic ies,
Supermercados,
Drogueriás
El horno ofrece una amplia gama de posibilidades para
guisar cualquier comida de la mejor manera. Con el tiempo el usuario podrá aprovechar muy bien este aparato
ideal para la cocina, por lo que las advertencias que damos a continuación son solo sugerencias que podrán
ampliarse con la experiencia personal de cada uno.
Cocción simultánea en distintos pisos
Si debe cocinar en varios pisos, puede utilizar la función
«pastelería» u o la función b «Multicocción», que
son las únicas que permiten dicha posibilidad.
Para la cocción de comidas delicadas en varios pisos,
utilice la función «pastelería» u que permite cocinar simultáneamente en 3 pisos (1°, 3° y 5°). Algunos ejem-
plos se encuentran en la tabla «Consejos prácticos para
la cocción».
Para otros tipos de cocción en v arios pisos, utilice la función b «Multicocción» teniendo en cuenta las siguien-
tes sugerencias:
• El horno posee 5 pisos. En la cocción ventilada utilice
dos de los tres pisos centrales, el primero de abajo y
el último de arriba son los que reciben directamente el
embate de aire caliente, lo cual podría quemar las
comidas delicadas;
• En general, utilice el 2° y 4° piso desde abajo, colocando en el 2° piso las comidas que requieren mayor
calor. P or ejemplo, cuando se trate de cocción de asados de carne simultáneamente con la de otras comidas, colocar el asado en el 2° piso, dejando el 4° para
los alimentos más delicados;
• Cuando se trate de la cocción simultánea de comidas
que tienen tiempos y temperaturas de cocción diferentes, seleccione una temperatura intermedia entre
ellas, coloque en el 4° piso la comida más delicada y
extraiga antes del horno la comida con tiempo de cocción más breve;
• Utilice la bandeja en el nivel inferior y la rejilla en el
superior.
Uso de la función «Cocción rápida»
Funcional, veloz y práctica no solamente para quienes
utilizan productos «envasados previamente» (por ejem-
plo: congelados o precocidos). En la tabla «Consejos prácticos para la cocción» se encuentran útiles sugerencias.
Uso del grill
El horno «7 Cuochi» pone a su disposición diferentes posibilidades de asar.
Utilice la función 2 “grill”, con la puerta semiabierta,
colocando la comida en el centro de la parrilla ubicada en
el 3° o 4° piso comenzando desde abajo.
Para recoger jugos y/o grasas , coloque la bandeja suministrada con el equipo, en el 1º piso .
Cuando se utiliza dicha función, se recomienda seleccionar el nivel de energía máximo. Se pueden seleccionar
niveles inferiores simplemente colocando la perilla del
termostato en el valor deseado.
En los modelos provistos de asador automático 2, en la
función «grill» se puede utilizar el kit espetón suministra-
do con el equipo. En este caso, realice la cocción con la
puerta del horno cerrada, colocando el kit espetón en el
3° piso (comenzando desde abajo) y la bandeja en el 1°
para recoger jugos y/o grasas.
La función T “Gratin”, exclusivamente con la puerta
del horno cerrada, es muy útil para asados veloces.
Cuando se utiliza, se distribuye el calor emitido por el grill
permitiendo junto con el dorado superficial, obtener también la cocción de la parte inferior.
Puede usarla también en la parte final de la cocción de
los alimentos que necesiten dorado superficial, por ejemplo, es ideal para dorar la pasta al horno, al final de la
cocción.
Cuando utilice dicha función coloque la parrilla en el 2° o
3° piso comenzando desde abajo (ver la tabla de cocción) luego, para recoger la grasa y e vitar la formación de
humo, coloque una bandeja en el 1° piso , desde abajo.
Importante: realice la cocción al «Gratin» con la puerta
del horno cerrada, para obtener, juntamente con los
mejores resultados, un sensible ahorro de energía (10%
aproximadamente).
Cuando se utiliza dicha función, se recomienda colocar
el termostato en 200 °C porque esta es la condición de
rendimiento óptimo basada en la radiación de los rayos
infrarrojos. Pero esto no significa que no se puedan utilizar temperaturas inferiores simplemente lle vando la peri-
59
Page 59

lla del termostato hasta la temperatura deseada.
En los modelos provistos de asador automático T, en
la función «gratin» se puede utilizar el kit espetón sumi-
nistrado con el equipo. En este caso, colóquelo en el 3°
piso (comenzando desde abajo) y la bandeja en el 1° para
recoger jugos y/o grasas.
Por lo tanto, al utilizar las funciones grill, se obtienen
los mejores resultados colocando la parrilla en los
últimos pisos comenzando desde abajo (ver la tabla
de cocción) y luego, para recoger la grasa y evitar la
formación de humo, colocando la bandeja suministrada con el aparato, en el primer piso, desde abajo.
Preparación de postres y repostería en general
En la cocción de dulces, cocine siempre con el horno
caliente. No abra la puerta durante la cocción para evitar
que la torta se baje. En general:
Masa de dulce muy seca
En la próxima oportun idad selec cionar te mperatur a
con 10°C superior y redu cir el tiemp o de cocci ón.
Cuando el bizcocho no fermenta
Usar menos líquido o bajar la temperatura de 10°C.
Torta oscura en la superfi cie
Colocar el molde má s abajo , selec cion ar una
temperatura menor y p rolon gar el tiempo de cocci ón
Buen aspecto por fuera, pegadizo por dentro
Usar menos líquido, reduc ir la temperat ura, a umentar
el tiempo de cocció n
La torta no se desprende del molde
Unte bien el molde y e sparza s obre él un poco de
harina o utilice pape l para hor no.
Cocción de la pizza
Para lograr una buena cocción de la pizza utilice la función w “horno pizza”:
• Precaliente bien el hor no durante 10 minutos, como
mínimo
• Utilice una bandeja para pizza de aluminio liviano apoyándola sobre la parrilla suministrada con el horno.
Utilizando la bandeja del horno aumenta el tiempo de
cocción y difícilmente se obtiene una pizza crocante.
• No abra frecuentemente el horno durante la cocción.
• En el caso de pizzas muy condimentadas (capr ichosa, cuatro estaciones) es aconsejable colocar la mozzarella (queso típico de Italia) en la mitad de la cocción.
• En el caso de una cocción simultánea en varios pisos
(hasta 2) es preferible utilizar la función horno
Multicocción b ya que la función horno pizza w co-
cinaría más en el 1° piso comenzando desde abajo.
Cocción del pescado y de la carne
Para las carnes blancas, las a ves y el pescado utilice temperaturas desde 180 °C a 200 °C.
Para las carnes rojas, que deben estar bien cocidas en la
parte externa, conservando en su interior el jugo, es importante comenzar con una temperatura inicial alta
(200°C-220°C) por un breve tiempo , para después disminuirla.
En general, cuanto más grande es el trozo de asado,
menor deberá ser la temperatura y más largo el tiempo
de cocción. Coloque los trozos de carne en el centro de
la parrilla y la grasera por debajo para recoger jugos y
grasa.
Coloque bien la parrilla de manera que la carne ocupe el
centro del horno. Cuando se necesite calor por debajo,
utilice los pisos más bajos. Para obtener asados sabrosos (en particular pato y animales de caza) condimente
la carne con tocino o panceta y colóquela de modo que
quede en la parte superior.
"Cociné en varios niveles (en la función
"ventilado") y en todos ellos, la cocc ión no está
en el mismo estado de avance "
Seleccione una temp eratu ra infer ior. No
necesariament e aquel los nive les qu e se han
introducido simultán eamen te se d eben ex traer al
mismo tiempo.
60
Page 60

La seguridad como una buena costumbre
Para garantizar la eficiencia y la seguridad de este electrodoméstico:
• diríjase exclusivamente a centr os de asistencia técnica autorizados
• requiera siempre el uso de repuestos originales
• Para mover el aparato y con el fin de e vitar daños a
personas y al mismo aparato, utilice siempre las
manijas especiales que se encuentran en los
costados del horno.
• El aparato está destinado a un uso no profesional en las
viviendas y sus características no se deben modificar.
• Las instrucciones son válidas sólo en los países de destino cuyos símbolos figuran en el manual y en la placa
de características.
• La seguridad eléctrica de este aparato está garantizada
solamente cuando el mismo está correctamente conectado a una eficiente instalación de puesta a tierra de
acuerdo a lo previsto por las normas vigentes sobre seguridad.
• Durante el uso del aparato los elementos calentado-
res y algunas partes de la puerta del horno se calientan mucho. T enga cuidado de no tocarlos y mantenga alejados a los niños.
T ratándose de fuentes de peligr o, evite que los niños
e incapaces se pongan en contacto con:
- los mandos y el aparato en general;
- los embalajes (bolsitas, poliestireno, clav os, etc.);
- el aparato, durante e inmediatamente después del funcionamiento del horno y del grill, debido al
sobrecalentamiento;
- un aparato inutilizado (en este caso, se deben proteger
las partes que podrían ser peligrosas).
Evite las siguientes operaciones:
- tocar el aparato con partes del cuerpo húmedas;
- el uso cuando está descalzo;
- tirar del aparato o del cable de alimentación eléctrica para
desconectarlo del tomacorriente;
- operaciones impropias y peligrosas;
- obstruir los orificios de ventilación o para eliminación del
calor;
- que el cable de alimentación de pequeños electrodomésticos quede en contacto con las partes calientes del aparato;
- la exposición a agentes atmosféricos (lluvia, sol);
- el uso del horno como trastero;
- el uso de líquidos inflamables cerca del aparato;
- el uso de adaptadores, tomas múltiples y/o prolongaciones;
- intentos de instalación o reparación sin la intervención
de personal calificado.
Es absolutamente necesario llamar a personal
especializado en los siguientes casos:
- instalación (según las instrucciones del fabricante);
- cuando se tienen dudas sobre el funcionamiento;
- sustitución del toma en caso de incompatibilidad con el
enchufe del aparato .
Es necesario llamar a centros de asistencia
autorizados por el fabricante, en los siguientes casos:
- dudas sobre la integridad del aparato después de haber
quitado el embalaje;
- daño o sustitución del cable de alimentación;
- avería o mal funcionamiento , solicitando repuestos originales.
Es conveniente efectuar las siguientes operaciones:
- sólo la cocción de alimentos evitando otras operaciones;
- verificar la integridad después de haber quitado el embalaje;
- desconectar el aparato de la red de alimentación eléctrica en caso de mal funcionamiento y antes de efectuar
cualquier operación de limpieza o mantenimiento;
- cuando no se utiliza, desconecte el aparato de la red
eléctrica y cierre la llave de gas (si está pre visto);
- utilice guantes para horno para introducir o extraer recipientes;
- tome siempre la manija de la puerta en el centro debido
a que los extremos podrían estar más calientes con motivo de ev entuales salidas de aire;
- controlar siempre que las perillas estén en la posición
«•»/»o» cuando no se utiliza el aparato.
- cortar el cable de alimentación después de haberlo desconectado de la red eléctrica cuando se decide no utilizar más el aparato.
• El fabricante no se puede considerar responsable por
eventuales daños derivados de: errores en la instalación,
usos impropios, erróneos e irracionales.
61
Page 61

Opción
seleccionada
1 Tradicional
a
2 M ulticocción
b
3 G rill
2
4 G ratin
T
5 P izza
w
6 Pastelería
u
7 Cocción rápida
v
8
Descon gelación
Tipo de com ida Peso
Pato
Asado de ternera o de vaca
Asado de cerdo
Bizcochos (de pastaflora)
Torta glaseada
Pizza (en 2 pisos)
Lasañas
Cordero
Pollo asado + patatas
Caballa
Bizcochos con uvas
Hojaldre relleno con crem a
(en 2 pisos)
Bizcochos (en 2 pisos)
Bizcocho (en 1 piso)
Bizcocho (en 2 pisos)
Tortas saladas
Lenguados y sepias
Broquetas de calam ares y
cangrejos
Sepias
F ile te d e m e rlu z a
Verduras a la parrilla
Bistec de ternera
Salchichas
Ham burguesas
Caballa
Bocadillo caliente con
jam ón y queso (o pan
tostado))
Co n asador autom ático
(cuando existe)
Asado de ternera
Pollo asado
Cordero asado
P o llo a la p a rr illa
Sepias
Co n asador autom ático
(cuando existe)
Asado de ternera
Cordero asado
Pollo (asado) + patatas
(en la bandeja)
Pizza
Asado de ternera o de vaca
Pollo
Torta glaseada
Torta de fruta
Bizcochos con uvas
Bizcocho
Creps rellenos (en 2 pisos)
Tortas pequeñas (en 2
pisos)
Bizcochitos salados de
hojaldre y queso (en 2
pisos)
Hojaldre relleno con crem a
(en 3 pisos)
Bizcochos (en 3 pisos)
M erengue (en 3 pisos)
Alim en tos congelados
Pizza
M ixto de calabacín y
cangrejo
Torta rústica de espinaca
Panzerotti (ravioles grandes
italianos)
Lasañas
Panecillos dorados
Bocaditos de pollo
Precocidos
Alas de pollo doradas
Alim en tos Frescos
Bizcochos (de pastaflora)
Bizcochos con uvas
Bizcochitos salados de
hojaldre y queso
Todos los alim entos
congelados
(Kg )
1+1
n.° 4-6
Posición de
la p ar rilla
con
respecto al
fondo del
horno
1
1
1
-
1
1
1
1
1
1
0.5
0.5
0.5
1.0
1.5
0.7
0.6
0.6
0.8
0.4
0.8
0.6
0.6
1
1.0
1.5
1.0
1.5
1.5
1.5
1.5
1.5
-
0.5
1
1
0.5
1
0.7
0.5
1.2
0.6
0.4
0.7
0.7
0.5
0.3
0.4
0.5
0.3
0.5
0.4
0.4
0.4 2 - 200 20-25
0.3
0.6
0.2
3
3
3
3
3
2-4
3
2
2-4
2
2
2-4
2-4
2
2-4
3
4
4
4
4
3/4
4
4
4
4
4
-
-
-
2
2
-
-
-
2
3
2
2/3
3
2/3
3
3
2-4
2-4
2-4
1-3-5
1-3-5
1-3-5
2
2
2
2
2
2
2
2
2
2
Tiem po de
precalentamiento
(m inutos)
15
15
15
15
15
15
10
10
15
10
10
10
10
10
10
15
-
-
-
-
-
-
-
-
-
-
-
-
-
10
10
10
10
10
10
15
10
10
15
15
15
15
15
15
15
15
15
15
-
-
-
-
-
-
-
-
-
-
Regulación
del
te rm o stato
200
200
200
180
180
230
180
180
200
180
170
190
180
170
170
200
100%
100%
100%
100%
100%
100%
100%
100%
100%
100%
100%
100%
100%
200
200
200
200
200
200
220
220
180
180
180
180
160
200
190
210
180
180
90
250
200
220
200
200
180
220
200
180
210
Du ració-
n de la
cocción
(m in .)
65-75
70-75
70-80
15-20
30-35
15-20
30-35
40-45
60-70
30-35
40-50
20-25
10-15
15-20
20-25
25-30
10-12
10-15
10-15
15-20
15-20
15-20
10-12
15-20
80-90
70-80
70-80
55-60
30-35
70-80
70-80
70-75
70-75
15-20
25-30
60-70
20-30
40-45
40-50
25-30
30-35
20-25
15-20
20-25
20-25
30-35
25-30
15-20
15-18
10-12
8-10
3-5
180
12
20
25
35
45
U
No ta: los tiem po s de cocción son in dicativos y se pued en m odificar en base a sus gustos personales. En las
cocciones al grill o G ratin, la bandeja se colo ca siem p re en el 1° piso a partir de abajo.
62
Page 62

Instalación
La instalación debe efectuarse según las instrucciones
del fabricante y por personal profesionalmente calificado. Una incorrecta instalación puede causar daños a perso-
nas, animales o cosas, con relación a los cuales el fabricante no puede ser considerado responsable.
Importante: cualquier intervención de regulación, mantenimiento, etc. se debe realizar con el horno desconectado de
la red de alimentación eléctrica.
Instalación de los hornos empotrables
Para garantizar un b uen funcionamiento del aparato empotrable,
es necesario que el mueble tenga las características adecuadas. En la siguiente figura se indican las dimensiones del espacio en el mueble cuando el horno se instala bajo encimera y en
columna.
555
580
560
min
+4 -0
min
min
45
575-585
+4 -0
480
23
572
558
543545
500
39
15
595
595
Para un correcto centrado , regule los 4 tacos ubicados en la
parte lateral del horno, a la altura de los 4 orificios del marco.
En particular, si el espesor del costado del mueble es:
• de 20 mm: la parte móvil del taco se debe extraer (Fig.A);
• de 18 mm: utilice la primera ranur a; ya predispuesta de
fábrica (Fig. B);
• de 16 mm: utilice la segunda ranur a (Fig. C).
Fig. A Fig. B
Para gar antizar una b uena aireación es necesario eliminar la
pared posterior del espacio para el horno, es preferible instalarlo de modo que apoye sobre dos listeles de mader a; en el caso
de que sea una superficie continua de apoyo, la misma debe
tener una abertura de 45 x 560 mm como mínimo.
45 mm.
560 mm.
Los paneles de los muebles adyacentes al horno deberán
ser de un material resistente al calor. En particular, en el
caso de muebles de madera chapeada, las colas deberán
ser resistentes a una temperatura de 100 °C. En conformidad con las normas de seguridad, una vez empotrado el
aparato, no se deben producir contactos con las paredes en
las que hay instalaciones eléctricas. Todas las partes que
garantizan la protección se deben fijar de modo tal que no
puedan ser quitadas sin la ayuda de una herramienta.
Fig. C
Para fijar el horno al mueble abra la puerta del horno y fíjelo
mediante 4 tornillos para madera en los 4 orificios ubicados
en el marco.
Conexión eléctrica
La conexión eléctrica a la red se debe realizar a través de la
cocina. La encimera se conecta a la cocina mediante un
conector. Las cocinas están fabricadas para el
funcionamiento con corriente alterna para la tensión y
frecuencia de alimentación indicada en la placa de
características.
63
Page 63

Presente s lo
en algunos
modelos
ENCIMERA EMPOTRABLE
P
NL2L3
L1
Fig. E
AZUL VERDE
BLANCO ROJO
COCINA EMPOTRABLE
AMARILLO
Montaje del cable de alimentación
Apertura del tablero de bornes:
• Con la ayuda de un destornillador, haga palanca en las
lengüetas laterales de la tapa del tablero de bornes;
• Tirar y abrir la tapa del tablero de bornes.
Para la colocación del cable, realizar las siguientes
operaciones:
• aflojar el tornillo de la mordaza de terminal de cable y los
tornillos de los contactos
Nota: los conectores puente están preparados por la
Fábrica para la conexión a 400V trifásica (fig. D).
• para realizar las conexiones eléctricas de las fig. F y
fig. G, utilice los dos conectores puente alojados dentro de la caja (fig. E - referencia “P”)
• fijar el cable de alimentación en el correspondiente
sujetacable y cerrar la tapa.
400V 3N~
H05RR-F 5x2.5 CEI-UNEL 35363
NL3L1L2
5
3
4
Fig. D
1
2
230V 1N~
H07RN-F 3x4 CEI-UNEL 35364
NL
5
3
4
Fig. F
1
2
400V 2N~
H05RR-F 4x2.5 CEI-UNEL 35363
NL2L1
5
3
4
Fig. G
Conexión del cable de alimentación a la red
Instalar, en el cabl e, un enchufe normalizado para la potencia indicada en la placa de características; en caso de conexión directa a la red, es necesario colocar entre el aparato y la red, un interruptor omnipolar con una distancia mínima entre los contactos de 3 mm, adecuado a la potencia y
conforme a las normas en vigencia (el cable a tierra no debe
ser interrumpido por el interruptor).
El cable de alimentación debe colocarse de tal manera que,
en ningún punto alcance una temperatura superior a 50°C
con respecto a la temperatura ambiente.
Antes de efectuar la conexión comprobar que:
• La seguridad eléctrica de este aparato se garantiza sólo
cuando el mismo resulte correctamente conectado a una
eficiente instalación de conexión a tierra conforme a lo
previsto por las normas de seguridad eléctrica. Es necesario verificar este fundamental requisito de seguridad y ,
en caso de duda, solicitar un control cuidadoso de la
instalación por parte de personal profesionalmente especializado. El fabricante no puede ser considerado responsable por los ev entuales daños causados por la falta
de conexión a tierra de la instalación.
• Antes de conectar el aparato, comprobar que los datos
de la placa de características (ubicada en el aparato y/o
en el embalaje) correspondan a los de la red de distribución eléctrica y gas.
1
2
64
Page 64

• Comprobar que la capacidad eléctrica de la instalación y
la de los tomas de corriente resulten adecuadas a la potencia máxima del aparato indicada en la placa de características. En caso de duda, dirigirse a personal
profesionalmente especializado .
• En caso de incompatibilidad entre el toma de corriente y
el enchufe del aparato, llamar a personal técnico para
reemplazar el toma con otro adecuado. El técnico, en
particular, deberá también comprobar que la sección de
los cables del toma de corriente resulte adecuada a la
potencia absorbida por el aparato. En general, no es
aconsejable el uso de adaptadores, tomas múltiples y/o
extensiones. Si su uso fuera indispensab le es necesario
utilizar solamente adaptadores simples o múltiples y
prolongaciones conformes a las normas vigentes de
seguridad, teniendo cuidado de no superar el límite de
capacidad de corriente marcado en el adaptador simple
y en las prolongaciones, y el de máxima potencia marcado
en el adaptador múltiple. El enchufe y el toma de
corriente deben ser fácilmente accesibles.
Características técnicas
Dimensiones útiles del horno:
ancho: 43,5 cm.
profundidad: 40 cm.
altura: 32 cm.
Volumen útil del horno:
litros 56
ENERGY LABEL
Norma 2002/40/CE en la etiqueta de los hornos eléctricos
Norma EN 50304
Consumo de energía por convección Natural
función de calentamiento: a Tradicional
Clase Consumo de energía para funcionamiento por convección
Forzada
función de calentamiento: u P astelería
Tensión y frecuencia de alimentación:
230/400V ~ 3N 50Hz 9200W
7
Este aparato ha sido fabricado conforme con las
siguientes Directivas Comunitarias
- 73/23/CEE del 19/02/73 (Baja Tensión) y sucesivas
modificaciones;
- 89/336/CEE del 03/05/89 (Compatibilidad
Electromagnética) y sucesivas modificaciones;
- 93/68/CEE del 22/07/93 y sucesivas
modificaciones.
65
Page 65

Убт ехчбсйуфпэме рпх ерйлЭобфе Энб рспъьн Ariston, буцблЭт кбй рсбгмбфйкЬ еэкплп уфз чсЮуз. Гйб нб фп гнщсЯуефе,
кбй нб фп чсзуймпрпйеЯфе кблэфесб кбй ерЯ мбксьн, убт ухмвпхлеэпхме, рсйн чсзуймпрпйЮуефе фз ухукехЮ, нб дйбвЬуефе
рспуекфйкЬ фйт рспейдпрпйЮуейт рпх ресйЭчпнфбй уфп рбсьн егчейсЯдйп, бцпэ убт рбсЭчпхн узмбнфйкЭт хрпдеЯоейт
учефйкЬ ме фзн буцЬлейб егкбфЬуфбузт, чсЮузт кбй ухнфЮсзузт. ДйбфзсеЯуфе ме цспнфЯдб фп егчейсЯдйп бхфь гйб кЬие
меллпнфйкЮ ресйбфЭсщ бнбцпсЬ. Ехчбсйуфпэме.
Кпйфюнфбт фп брь кпнфЬ
I
G
D
A
D
12
11
10
9
8
7
H
1
12
12
2
2
11
11
3
3
10
10
4
4
9
9
5
5
8
8
7
7
6
6
F
1
12
2
2
11
3
3
10
4
4
9
5
5
8
7
6
6
L
E
A
M
C
8
B
7
1
2 3 4 5 6
A
9
A. Фбмрль енфплюн
B. ЛйрпухллЭкфзт Ю ерЯредп шзуЯмбфпт
C. РлЭгмб ерйрЭдпх цпэснпх
D. ЗлекфсйкЮ еуфЯб
E. ЕрйлпгЭбт лейфпхсгйюн шзуЯмбфпт
F. ЕрйлпгеЯт злекфсйкюн еуфйюн
G. ЕндейкфйкЮ лхчнЯб лейфпхсгЯбт злекфсйкюн еуфйюн
H. ПдзгпЯ плЯуизузт лйрпухллекфюн кбй рлегмЬфщн
I. ЕндейкфйкЮ лхчнЯб лейфпхсгЯбт фпх цпэснпх
(рбспэуб мьнп уе псйумЭнб мпнфЭлб) - Бн еЯнбй
бнбммЭнз деЯчней фз цЬуз иЭсмбнузт мЭчсй фзн феиеЯуб
иесмпксбуЯб
L. ЕрйлпгЭбт гйб фз иесмпксбуЯб шзуЯмбфпт
M. Злекфспнйкьт рспгсбммбфйуфЮт - ЕрйфсЭрей фпн
рспгсбммбфйумь прпйбудЮрпфе лейфпхсгЯбт
шзуЯмбфпт иЭфпнфбт фзн дйЬскейб кбй фзн юсб фЭлпхт
шзуЯмбфпт. ¸чей ерЯузт лейфпхсгЯб чспнпмЭфспх.
1. Цщт цпэснпх
2. Сэимйуз сплпгйпэ
3. Сэимйуз чспньмефспх
4. ФЭлпт шзуЯмбфпт
5. ДйЬскейб шзуЯмбфпт
6. ЕрйвевбЯщуз сэимйузт
7. ДеЯкфзт чспньмефспх
8. ДеЯкфзт рспиЭсмбнузт (m бнбвпувЮней) Ю
шзуЯмбфпт (m уфбиесь) уе еоЭлйоз
9. ДеЯкфзт феиЭнфпт рспгсбммбфйумпэ
10.ДеЯкфзт буцблйумЭнзт рьсфбт
66
Page 66

Рщт чсзуймпрпйеЯфбй
Ï 7 Cuochi (7 МЬгейспй) ухненюней уе мйб ухукехЮ фб
рлепнекфЮмбфб фщн рбсбдпуйбкюн цпэснщн цхуйкЮт
мефбгщгЮт фзт иесмьфзфбт (уфбфйкпЯ) ме екеЯнб фщн
уэгчспнщн цпэснщн дхнбмйкЮт мефбгщгЮт фзт
иесмьфзфбт (бесьиесмпй).
ЕЯнбй мйб ухукехЮ еобйсефйкЬ ехЭлйкфз рпх ерйфсЭрей фзн
ерйлпгЮ ме еэкплп кбй буцблЮ фсьрп мефбоэ 7
дйбцпсефйкюн меиьдщн шзуЯмбфпт. З ерйлпгЮ фщн
дйбцьсщн рспуцесьменщн лейфпхсгйюн ерйфхгчЬнефбй
енесгюнфбт уфпн ерйлпгЭб ерйлпгЮт E рпх хрЬсчей уфп
фбмрль.
РспупчЮ: Уфп рсюфп Ьнбммб убт ухмвпхлеэпхме нб
лейфпхсгЮуефе фп цпэснп Ьдейп гйб фпхлЬчйуфпн мйуЮ юсб
ме фп иесмпуфЬфз уфп мЭгйуфп кбй ме фзн рьсфб клейуфЮ.
Ме фп рЭсбт фпх чсьнпх бхфпэ увЮуфе фпн, бнпЯофе фзн
рьсфб кбй бесЯуфе фп чюсп. З пумЮ рпх месйкЭт цпсЭт
бнбдэефбй кбфЬ фзн есгбуЯб бхфЮ пцеЯлефбй уфзн еоЬфмйуз
фщн пхуйюн рпх чсзуймпрпйЮизкбн гйб фзн рспуфбуЯб
фпх цпэснпх кбфЬ фп чспнйкь дйЬуфзмб рпх меуплбвеЯ
мефбоэ фзт рбсбгщгЮт кбй фзт егкбфЬуфбузт фпх
рспъьнфпт.
Сэимйуз фпх шзцйбкпэ сплпгйпэ
З сэимйуз фзт юсбт еЯнбй дхнбфЮ мьнп ме фпн ерйлпгЭб
E óôç èÝóç 0.
МефЬ фз уэндеуз уфп дЯкфхп Ю мефЬ брь мйб дйбкпрЮ
сеэмбфпт, з пиьнз бнбвпувЮней уфп: 0.00.
УфсЭшфе фпн ерйлпгЭб L гйб нб схимЯуефе фзн юсб кбй
кбфьрйн рйЭуфе OK гйб нб ерйвевбйюуефе. УфсЭшфе ек нЭпх
L гйб бн схимЯуефе фб лерфЬ кбй фЭлпт рйЭуфе OK ãéá íá
ерйвевбйюуефе псйуфйкЬ. Ендечьменет ензмесюуейт
мрпспэн нб дйенесгпэнфбй рйЭжпнфбт фп кпхмрЯ 2 êáé
бкплпхиюнфбт фзн рбсбрЬнщ дйбдйкбуЯб.
ЛейфпхсгЯб чспньмефспх
Фп timer ден елЭгчей фп Ьнбммб кбй фп увЮуймп фпх
цпэснпх бллЬ екрЭмрей мьнп Энбн зчзфйкь ухнбгесмь
уфз лЮоз чсьнпх рпх мрпсеЯ нб уфбмбфЮуей рйЭжпнфбт
Энб прпйпдЮрпфе кпхмрЯ.
Гйб нб иЭуефе фп чспньмефсп рйЭуфе фп кпхмрЯ 3, схимЯуфе
мЭущ фпх ерйлпгЭб L кбй кбфьрйн рйЭуфе фп кпхмрЯ OK
гйб нб ерйвевбйюуефе. Фп ейкпнЯдйп n убт ихмЯжей ьфй фп
timer еЯнбй енесгь.
Уфп фЭлпт фзт мЭфсзузт иб бкпхуфеЯ Энб зчзфйкь уЮмб
рпх фелейюней мефЬ брь 1 лерфь Ю мефЬ фзн рЯеуз
прпйпхдЮрпфе кпхмрйпэ.
Фп цщт фпх цпэснпх
Ме фп цпэснп увзуфь мрпсеЯ нб бнЬшей прпйбдЮрпфе
уфйгмЮ рйЭжпнфбт фп кпхмрЯ 1 Ю бнпЯгпнфбт фзн рьсфб фпх
цпэснпх.
Бесйумьт шэозт
Гйб фзн ерЯфехоз мйбт меЯщузт фщн еощфесйкюн
иесмпксбуйюн Энбт бнемйуфЮсбт шэозт рбсЬгей сеэмб
бЭсб рпх еоЭсчефбй мефбоэ фзт мефюрзт кбй фзт рьсфбт
фпх цпэснпх.
УзмеЯщуз: Уфп фЭлпт фпх мбгейсЭмбфпт п бнемйуфЮсбт
рбсбмЭней енесгьт мЭчсйт ьфпх п цпэснпт шхчиеЯ
йкбнпрпйзфйкЬ.
УзмеЯщуз: Уе Fast cooking п бнемйуфЮсбт
енесгпрпйеЯфбй бхфьмбфб мьнп ме фп цпэснп жеуфь.
РспупчЮ: з ухукехЮ дйбиЭфей Энб уэуфзмб дйЬгнщузт
рпх ерйфсЭрей фзн бнЯчнехуз ендечьменщн
дхулейфпхсгйюн. П чсЮуфзт рлзспцпсеЯфбй мЭущ
мзнхмЬфщн фпх фэрпх Fn m (n êáé m=бсйимпЯ 1 шзцЯпх).
Уфйт ресйрфюуейт бхфЭт еЯнбй бнбгкбЯб з ерЭмвбуз фзт
фечнйкЮт хрпуфЮсйозт бцпэ п цпэснпт ден лейфпхсгеЯ.
ЧсЮуз фпх цпэснпх
УфсЭцпнфбт фпн ерйлпгЭб E мрпсеЯфе нб ерйлЭоефе фп
ерйихмзфь рсьгсбммб шзуЯмбфпт. П цпэснпт иб феиеЯ
бмЭущт уфз цЬуз рспиЭсмбнузт кбфЬ фзн прпЯб иб
бнбвпувЮней уфзн пиьнз фп ейкпнЯдйп m кбй емцбнЯжефбй
з иесмпксбуЯб шзуЯмбфпт рпх бнфйуфпйчеЯ уфп ерйлегмЭнп
рсьгсбммб: бн з фймЮ бхфЮ ден еЯнбй екеЯнз рпх ерйихмеЯфе,
мрпсеЯфе нб фзн бллЬоефе брлЬ уфсЭцпнфбт фпн ерйлпгЭб
L.
Ме фзн плпклЮсщуз фзт иЭсмбнузт иб бкпэуефе Энб
зчзфйкь уЮмб кбй иб деЯфе фп ейкпнЯдйп m бнбммЭнп
ухнечют, уфп узмеЯп бхфь ейуЬгефе уфпн кблЬ жеуфбмЭнп
цпэснп фп рспт мбгеЯсемб цбгзфь.
УзмеЯщуз: гйб фйт лейфпхсгЯет FAST COOKING êáé GRILL
ден рспвлЭрефбй з цЬуз рспиЭсмбнузт.
ИхмзиеЯфе ьфй кбфЬ фп шЮуймп иб еЯнбй рЬнфб дхнбфь нб:
бллЬоефе фп рсьгсбммб енесгюнфбт уфпн ерйлпгЭб E;
бллЬоефе фз иесмпксбуЯб енесгюнфбт уфпн ерйлпгЭб
L;
рспгсбммбфЯуефе фз дйЬскейб кбй фзн юсб фпх фЭлпхт
(влЭре рбсЬгсбцп Рспгсбммбфйумьт фпх
шзуЯмбфпт).
нб фз дйбкьшефе уе прпйбдЮрпфе уфйгмЮ
ербнбцЭспнфбт фпн ерйлпгЭб E óôç èÝóç 0.
УзмеЯщуз: Гйб кЬие лейфпхсгЯб мбгейсЭмбфпт Эчей феиеЯ
ек фщн рспфЭсщн, гйб льгпхт буцблеЯбт, дйЬскейб 2 щсюн.
Уфзн ресЯрфщуз рпх ден фспрпрпйзиеЯ, п цпэснпт увЮней
бхфьмбфб мефЬ фзн рбсЭлехуз фпх чсьнпх бхфпэ.
РспупчЮ: ЧсзуймпрпйЮуфе фзн рсюфз иЭуз брь кЬфщ,
фпрпиефюнфбт фп лйрпухллЭкфз рпх убт рбсЭчефбй гйб нб
ухллЭоефе чхмпэт Ю/кбй лЯрз, мьнп уфзн ресЯрфщуз
шзуймЬфщн уфп grill Ю ме упэвлб (хрЬсчей мьнп уе
псйумЭнб мпнфЭлб). Гйб фб Ьллб шзуЯмбфб мз
чсзуймпрпйеЯфе рпфЬ фзн рсюфз иЭуз брь кЬфщ кбй мзн
бкпхмрЬфе рпфЭ бнфйкеЯменб уфз вЬуз фпх цпэснпх еню
мбгейсеэефе дйьфй иб мрпспэубфе нб рспкблЭуефе жзмйЭт
уфп умЬлфп. ФпрпиефеЯфе рЬнфб фб укеэз убт шзуЯмбфпт
(рхсЭо, цйлм блпхмйнЯпх, клр. клр.) уфп рлЭгмб рпх убт
рбсЭчефбй ме фз ухукехЮ, ейубгмЭнп кбфЬллзлб уфпхт
пдзгпэт фпх цпэснпх.
Рбсбдпуйбкьт Цпэснпт a
ИЭуз ерйлпгЭб иесмпуфЬфз L: Мефбоэ 40°C êáé 250°C.
Уфз иЭуз бхфЮ бнЬвпхн фб дэп иесмбнфйкЬ уфпйчеЯб, фп
кЬфщ кбй фп ерЬнщ. ЕЯнбй п клбуйкьт цпэснпт фзт гйбгйЬт
рпх ьмщт фпн цЭсбме уе Энб екрлзкфйкь ерЯредп дйбнпмЮт
фзт иесмпксбуЯбт кбй ухгксЬфзузт фзт кбфбнЬлщузт. П
рбсбдпуйбкьт цпэснпт рбсбмЭней боерЭсбуфпт уфйт
ресйрфюуейт рпх иЭлефе нб мбгейсЭшефе цбгзфЬ ме
ухуфбфйкЬ рпх брпфелпэнфбй брь дэп Ю ресйууьфесб
уфпйчеЯб фб прпЯб иб учзмбфЯупхн Энб рйЬфп ьрщт гйб
рбсЬдейгмб: лЬчбнп ме чпйсйнЬ рбъдЬкйб, мрбкблЬ блЬ
урбнйьлб, уфпкбцЯуп блЬ бнкпнефЬнб, фсхцесЬ кпммЬфйб
впдйнпэ ме сэжй клр... ЕобйсефйкЬ брпфелЭумбфб
67
Page 67

ерйфхгчЬнпнфбй уфзн рспефпймбуЯб рйЬфщн ме вЬуз ксЭбфб
впдйнЬ Ю мпучбсЯуйб ьрщт: мрсбжЭ, уфйцЬдп, gulasch,
кхнЮгй, чпйсйнь мрпэфй клр... рпх брбйфпэн бсгь шЮуймп
ме уфбиесЮ рспуиЮкз хгсюн. ПрщудЮрпфе рбсбмЭней
фп кблэфесп уэуфзмб шзуЯмбфпт гйб фб глхкЬ, гйб фб
цспэфб кбй гйб фб шзуЯмбфб ме укеэз укербуфЬ ейдйкЬ гйб
фб шзуЯмбфб уфп цпэснп. Уфп шЮуймп уфпн рбсбдпуйбкь
цпэснп чсзуймпрпйеЯфе Энб мьнп ерЯредп, дйьфй уе
ресйууьфесб ерЯредб иб еЯчбфе мйб кбкЮ кбфбнпмЮ фзт
иесмпксбуЯбт. Чсзуймпрпйюнфбт фб дйЬцпсб дйбиЭуймб
ерЯредб мрпсеЯфе нб уфбимЯуефе фзн рпуьфзфб иесмьфзфбт
мефбоэ фпх ерЬнщ кбй кЬфщ мЭспхт. Бн фп шЮуймп брбйфеЯ
ресйууьфесз иесмьфзфб брь кЬфщ Ю брь рЬнщ,
чсзуймпрпйЮуфе бнфЯуфпйчб фб кЬфщ Ю ерЬнщ ерЯредб.
Цпэснпт Рпллбрлюн ШзуймЬфщн b
ИЭуз ерйлпгЭб иесмпуфЬфз L: Мефбоэ 40°C êáé 250°C.
Енесгпрпйпэнфбй дйбдпчйкЬ фб иесмбнфйкЬ уфпйчеЯб кбй
фЯиефбй уе лейфпхсгЯб п бнемйуфЮсбт. ЕрейдЮ з иесмьфзфб
еЯнбй уфбиесЮ кбй пмпйьмпсцз уе ьлп фп цпэснп, п бЭсбт
шЮней кбй спдпкпккйнЯжей фп цбгзфь пмпйьмпсцб уе ьлб фб
узмеЯб. МрпсеЯфе нб мбгейсЭшефе фбхфьчспнб бкьмз кбй
цбгзфЬ дйбцпсефйкЬ мефбоэ фпхт, бскеЯ пй иесмпксбуЯет
шзуЯмбфпт нб еЯнбй Ядйет. МрпсеЯфе нб чсзуймпрпйЮуефе
мЭчсй Энб мЭгйуфп 2 ерйрЭдщн фбхфьчспнб бкплпхиюнфбт
фйт рспейдпрпйЮуейт фзт рбсбгсЬцпх Фбхфьчспнп шЮуймп
уе ресйууьфесб ерЯредб.
З лейфпхсгЯб бхфЮ ендеЯкнхфбй йдйбЯфесб гйб рйЬфб рпх
брбйфпэн фсбгЬнйумб Ю гйб рйЬфб рпх брбйфпэн
рбсбфефбмЭнп шЮуймп гйб рбсЬдейгмб: лбжЬнйб, рбуфЯфуйп,
кпфьрпхлп кбй рбфЬфет шзфЭт, клр... УзмбнфйкЬ
рлепнекфЮмбфб ерйфхгчЬнпнфбй уфп шЮуймп шзфюн ксЭбфпт
дйьфй з кблэфесз кбфбнпмЮ иесмпксбуЯбт ерйфсЭрей фз
чсЮуз чбмзльфесщн иесмпксбуйюн рпх мейюнпхн фзн
дйбцхгЮ фщн жпхмйюн дйбфзсюнфбт фп ксЭбт рйп мблбкь
ме мйксьфесз брюлейб вЬспхт. П цпэснпт Рпллбрлюн
ШзуймЬфщн екфймЬфбй йдйбЯфесб гйб фп шЮуймп фщн шбсйкюн
рпх мрпспэн нб мбгейсехфпэн ме елЬчйуфз рспуиЮкз
мрбчбсйкюн дйбфзсюнфбт Эфуй бнбллпЯщфз фз геэуз кбй
фзн ьшз. Гйб фйт гбснйфпэсет, еобйсефйкЬ брпфелЭумбфб
ерйфхгчЬнпнфбй уфб шзуЯмбфб лбчбнйкюн мрсбжЭ ьрщт
кплпкхиЬкйб, мелйфжЬнет, рйресйЭт, нфпмЬфет, клр..
Dessert: уЯгпхсб брпфелЭумбфб ерйфхгчЬнпнфбй шЮнпнфбт
кЭйк жэмзт.
З лейфпхсгЯб РпллбрлЬ ШзуЯмбфб мрпсеЯ ерЯузт нб
чсзуймпрпйзиеЯ гйб мйб фбчеЯб брьшхоз лехкпэ кбй
кьккйнпх ксЭбфпт, шщмйпэ, иЭфпнфбт мйб иесмпксбуЯб 80
°C. Гйб нб брпшэоефе рйп ехбЯуизфб фсьцймб мрпсеЯфе нб
иЭуефе 60°C Ю нб чсзуймпрпйЮуефе мьнп фзн кхклпцпсЯб
ксэпх бЭсб иЭфпнфбт фпн ерйлпгЭб фпх иесмпуфЬфз уфпхт
0°C.
Grill 2
ИЭуз ерйлпгЭб иесмпуфЬфз L: Мефбоэ 50% êáé 100%.
БнЬвей фп ерЬнщ кенфсйкь иесмбнфйкь уфпйчеЯп кбй фЯиефбй
уе лейфпхсгЯб з упэвлб (ьрпх хрЬсчей).
З бскефЬ хшзлЮ кбй Ьмеуз иесмпксбуЯб фпх гксйл
ерйфсЭрей фп Ьмеуп ерйцбнейбкь спдпкпккЯнйумб фщн
ксебфйкюн рпх емрпдЯжпнфбт фзн брюлейб фщн чхмюн
(жпхмЯ) фб дйбфзсеЯ рйп фсхцесЬ еущфесйкЬ. Фп шЮуймп уфп
гксйл ухнйуфЬфбй йдйбЯфесб гйб екеЯнб фб цбгзфЬ рпх
брбйфпэн хшзлЮ ерйцбнейбкЮ иесмпксбуЯб: мрсйжьлет
впдйнЭт кбй мпучбсЯуйет, entrecote, цйлЭфп, чЬмрпхсгкес
êëð....
Нб рсбгмбфпрпйеЯфе фп шЮуймп ме фзн рьсфб фпх
цпэснпх мйуЬнпйчфз екфьт фзт ресЯрфщузт
шзуЯмбфпт уфз упэвлб.
ПсйумЭнб рбсбдеЯгмбфб чсЮузт бнбцЭспнфбй уфзн
рбсЬгсбцп РсбкфйкЭт ухмвпхлЭт гйб фп шЮуймп.
УфсЭцпнфбт фпн ерйлпгЭб L, з пиьнз иб деЯоей ерЯредб
йучэпт рпх кхмбЯнпнфбй мефбоэ еньт елЬчйуфпх 50% мЭчсй
Энб мЭгйуфп 100%.
Gratin T
ИЭуз ерйлпгЭб иесмпуфЬфз L: Мефбоэ 40°C êáé 250°C.
БнЬвей фп ерЬнщ иесмбнфйкь уфпйчеЯп кбй фЯиефбй уе
лейфпхсгЯб п бнемйуфЮсбт кбй з упэвлб (ьрпх хрЬсчей).
УхндхЬжей фзн иесмйкЮ бкфйнпвплЯб мйбт кбфеэихнузт ме
фзн дхнбмйкЮ кхклпцпсЯб фпх бЭсб уфп еущфесйкь фпх
цпэснпх. Бхфь рбсемрпдЯжей фп ерйцбнейбкь кЬшймп фщн
фспцЯмщн бхоЬнпнфбт фзн йучэ дйеЯудхузт фзт иесмьфзфбт.
ЕобйсефйкЬ брпфелЭумбфб ерйфхгчЬнпнфбй
чсзуймпрпйюнфбт фп бесьиесмп гксйл гйб бнЬмйкфб
упхвлЬкйб ксЭбфпт кбй чпсфбсйкюн, лпхкЬнйкщн, чпйсйнЬ
рбъдЬкйб, бснЯуйб, кпфьрпхлп блЬ нфйЬвплб, псфэкйб ме
блйцбукйЬ, чпйсйнь цйлЭфп, клр...
Нб рсбгмбфпрпйеЯфе фб шзуЯмбфб уе gratin ме фзн
рьсфб фпх цпэснпх клейуфЮ.
Фп gratin еЯнбй боерЭсбуфп уфп шЮуймп цйлЭфщн влЬчпх
(шЬсй), фьнпх, ойцЯб, гемйуфюн упхрйюн клр...
Цпэснпт РЯфуб w
ИЭуз ерйлпгЭб иесмпуфЬфз L: Мефбоэ 40°C êáé 250°C.
Енесгпрпйпэнфбй фп кЬфщ кбй фп кхклйкь иесмбнфйкь
уфпйчеЯo кбй фЯиефбй уе лейфпхсгЯб п бнемйуфЮсбт. П
ухндхбумьт бхфьт ерйфсЭрей мйб фбчеЯб иЭсмбнуз фпх
цпэснпх чЬсз уфз узмбнфйкЮ чсзуймпрпйпэменз йучэ
(2800 W), ме мйб йучхсЮ рбспчЮ иесмьфзфбт кхсЯщт брь
êÜôù.
З лейфпхсгЯб фпх цпэснпх рЯфуб ендеЯкнхфбй йдйбЯфесб гйб
фсьцймб рпх брбйфпэн хшзлЮ рпуьфзфб иесмьфзфбт, гйб
рбсЬдейгмб: з рЯфуб кбй фб шзфЬ мегЬлщн дйбуфЬуещн.
ЧсзуймпрпйЮуфе мьнп фпн лйрпухллЭкфз Ю фп рлЭгмб кЬие
цпсЬ, уе ресЯрфщуз рпх еЯнбй ресйууьфесет брь мЯб,
рсЭрей нб фйт бллЬоефе мефбоэ фпхт уфз мЭуз фпх
шзуЯмбфпт.
Цпэснпт Глхкюн u
ИЭуз ерйлпгЭб иесмпуфЬфз L: Мефбоэ 40°C êáé 250°C.
ЕнесгпрпйеЯфбй фп рЯущ иесмбнфйкь уфпйчеЯп кбй фЯиефбй уе
лейфпхсгЯб п бнемйуфЮсбт еобуцблЯжпнфбт мйб брблЮ
иесмьфзфб кбй пмпйьмпсцз уфп еущфесйкь фпх цпэснпх.
З лейфпхсгЯб бхфЮ ендеЯкнхфбй гйб фп шЮуймп ехбЯуизфщн
фспцЯмщн, ейдйкьфесб глхкюн рпх брбйфпэн жэмщуз кбй
псйумЭнб укехЬумбфб mignon уе 3 ерЯредб фбхфьчспнб.
ПсйумЭнб рбсбдеЯгмбфб: мрйнйЭ, глхкЬ кбй блмхсЬ
мрйукьфб, блмхсЬ жэмзт, фхлйчфь мрйукьфп кбй кпммбфЬкйб
лбчбнйкюн п гксбфЭн, клр....
Цпэснпт Fast cooking v
ИЭуз ерйлпгЭб иесмпуфЬфз L: Мефбоэ 40°C êáé 250°C.
Енесгпрпйпэнфбй фб иесмбнфйкЬ уфпйчеЯб кбй фЯиефбй уе
лейфпхсгЯб п бнемйуфЮсбт еобуцблЯжпнфбт мйб уфбиесЮ кбй
пмпйьмпсцз иесмьфзфб уфп еущфесйкь фпх цпэснпх.
З лейфпхсгЯб бхфЮ ендеЯкнхфбй йдйбЯфесб гйб гсЮгпсб
68
Page 68

шзуЯмбфб (ден брбйфеЯ рспиЭсмбнуз) ухукехбумЭнщн
D
B
B
C
C
фспцЯмщн (рбсЬдейгмб: : кбфешхгмЭнб Ю рспшзмЭнб) кбй
гйб псйумЭнб пйкйбкЬ укехЬумбфб.
Уфп шЮуймп Fast cooking фб кблэфесб брпфелЭумбфб
ерйфхгчЬнпнфбй чсзуймпрпйюнфбт Энб мьнп ерЯредп (фп
2° оекйнюнфбт брь кЬфщ), влЭре рЯнбкб РсбкфйкЭт
ухмвпхлЭт гйб фп шЮуймп.
Цпэснпт БрьшхозтU
ИЭуз ерйлпгЭб иесмпуфЬфз L: прпйбдЮрпфе
П бнемйуфЮсбт уфп вЬипт фпх цпэснпх кхклпцпсеЯ фпн
бЭсб уе иесмпксбуЯб ресйвЬллпнфпт гэсщ брь фп
фсьцймп. ЕндеЯкнхфбй гйб фзн брьшхоз прпйпхдЮрпфе
еЯдпхт фспцЯмпх, бллЬ ейдйкьфесб гйб фсьцймб ехбЯуизфб
рпх ден иЭлпхн иесмьфзфб ьрщт гйб рбсЬдейгмб: фпэсфет
рбгщфпэ, глхкЬ ксЭмбт Ю ме убнфйгЯ, глхкЬ цспэфщн. П
чсьнпт брьшхозт мейюнефбй ресЯрпх уфп мйуь. Уфзн
ресЯрфщуз ксебфйкюн, шбсйкюн Ю шщмйпэ мрпсеЯфе нб
ерйфбчэнефе чсзуймпрпйюнфбт фз лейфпхсгЯб рпллбрлюн
шзуймЬфщн иЭфпнфбт мйб иесмпксбуЯб 80° - 100°C.
Бхфьмбфпт кбибсйумьт мЭущ fast clean V
ЕЯнбй з лейфпхсгЯб плпклзсщмЭнпх кбибсйумпэ фпх
цпэснпх. Гйб фйт рлзспцпсЯет фйт учефйкЭт ме фп fast clean,
влЭре фзн рбсЬгсбцп П бхфьмбфпт кбибсйумьт мЭущ
ôïõ fast clean.
З упэвлб (хрЬсчей мьнп уе псйумЭнб мпнфЭлб)
Гйб нб енесгпрпйЮуефе фз упэвлб рспчщсЮуфе ме фпн
бкьлпхип фсьрп:
a) фпрпиефЮуфе фп лйрпухллЭкфз уфп 1° ерЯредп
b) ейуЬгефе фп уфЮсйгмб фзт упэвлбт уфп 3° ерЯредп кбй
фпрпиефЮуфе фп упхвлЯ ейуЬгпнфЬт фп, мЭущ фзт
бнфЯуфпйчзт прЮт, уфз упэвлб рпх всЯукефбй уфп рЯущ
мЭспт фпх цпэснпх.
c) енесгпрпйЮуфе фз упэвлб ерйлЭгпнфбт ме фпн ерйлпгЭб
E ôç èÝóç 2 / T.
РесйгсбцЮ
З кпхжЯнб мрпсеЯ нб ухндхбуфеЯ ме ерЯредб 4 злекфсйкюн еуфйюн
(Ейк. A), уфйт рбсбдпуйбкЭт хблпкесбмйкЭт ерйцЬнейет (Ейк. B)
Ю уе хблпкесбмйкЭт ерйцЬнейет ме ресйпчЭт шзуЯмбфпт дйрлЭт
(Åéê. C).
AA
B
B
A
B
A
B
D
Åéê. A Åéê. B
Åéê. C
A ЗлекфсйкЭт еуфЯет брь чхфпуЯдзсп
B БкфйнщфЭт жюнет шзуЯмбфпт
C БкфйнщфЭт жюнет шзуЯмбфпт дйрлЮт дйбмЭфспх
D ЕндейкфйкЬ цщфЬкйб хрплейрьмензт иесмьфзфбт, Энб гйб кЬие
жюнз шзуЯмбфпт: деЯчнпхн ьфй з бнфЯуфпйчз жюнз еЯнбй уе
иесмпксбуЯб бнюфесз фщн 60°C, бкьмз кбй мефЬ фп увЮуймп
фпх иесмбнфйкпэ уфпйчеЯпх (мьнп уе псйумЭнб мпнфЭлб)
E ЕйдйкпЯ ерйлпгеЯт
F РбсбдпуйбкпЯ ерйлпгеЯт
Уэуфзмб кбфЬ фпх кбшЯмбфпт (мьнп уе псйумЭнб
мпнфЭлб)
Уе ресЯрфщуз чсЮузт фзт упэвлбт, нб гнщсЯжефе ьфй п
цпэснпт дйбиЭфей Энб ейдйкь уэуфзмб рпх ерйфсЭрей уфп
цбгзфь нб ухнечЯуей нб уфсЭцефбй бкьмз кбй мефЬ фп рЭсбт
фпх чсьнпх шзуЯмбфпт. Бхфь ден ерйфсЭрей уфз иесмйкЮ
бдсЬнейб фпх цпэснпх нб мрпсеЯ кбфЬ кЬрпйп фсьрп нб
бллпйюней фзн рпйьфзфб фпх фспцЯмпх рпх мьлйт
мбгейсеэфзке.
Нб ихмьубуфе ьфй з упэвлб иб рбсбмЭней уе кЯнзуз мЭчсй
нб цЭсефе фпн ерйлпгЭб E óôç èÝóç 0 Ю мЭчсйт ьфпх п
цпэснпт шхчиеЯ бскефЬ.
12
11
10
9
8
7
12
2
11
3
10
4
9
5
8
7
6
E
1
12
2
11
3
10
4
9
5
8
7
6
F
12
2
11
3
10
4
9
5
8
7
6
E
F
РесйгсбцЮ фщн иесмбнфйкюн уфпйчеЯщн
Фб рбсбдпуйбкЬ иесмбнфйкЬ уфпйчеЯб брпфелпэнфбй брь
кхклйкЭт бнфйуфЬуейт. ГЯнпнфбй кьккйнет мьнп мефЬ брь месйкЭт
декЬдет дехфесплЭрфщн брь фп ЬнбммЬ фпхт.
Фб бкфйнщфЬ уфпйчеЯб ме дйрлЮ дйЬмефсп.
ЛейфпхсгйкЬ Ядйб ме фб бкфйнщфЬ рбсбдпуйбкЬ уфпйчеЯб,
бнбгнщсЯжпнфбй брь фзн рбспхуЯб мйбт иесмбнфйкЮт жюнзт
(влЭре Ейк. C). МрпсеЯфе нб бнЬшефе мьнп фп рйп еущфесйкь
мЭспт Ю бмцьфесб.
l Пй ерйлпгеЯт фщн рбсбдпуйбкюн жщнюн шзуЯмбфпт.
КЬие жюнз шзуЯмбфпт дйбиЭфей Энбн ерйлпгЭб рпх ерйфсЭрей
фзн ерйлпгЮ 12 дйбцпсефйкюн иесмпксбуйюн брь мйб
69
1
2
3
4
5
6
Page 69

елЬчйуфз фймЮ 1 уе мйб мЭгйуфз 12.
l Пй ерйлпгеЯт фщн ейдйкюн жщнюн шзуЯмбфпт. П
ерйлпгЭбт ерйфсЭрей фзн ерйлпгЮ мефбоэ дэп ерйрЭдщн
йучэпт, бмцьфесб схимйжьменб мефбоэ еньт елЬчйуфпх 1 уе
Энб мЭгйуфп 12. УфсЭцпнфбт фпн ерйлпгЭб деойьуфспцб брь
1 Эщт 12 фЯиефбй фп чбмзльфесп ерЯредп йучэпт. УфсЭцпнфбт
фпн ерйлпгЭб мЭчсй фЭлпт дйбдспмЮт (A), рпх бнбгнщсЯжефбй
брь Энб елбцсэ фЯнбгмб, ейуЬгефбй з мЭгйуфз йучэт рпх
мрпсеЯ нб схимйуфеЯ ме фз уейсЬ фзт мефбоэ 12 кбй 1
уфсЭцпнфбт фпн ерйлпгЭб бсйуфесьуфспцб.
Гйб нб ербнбцЭсефе фзн елЬчйуфз фймЮ йучэпт рсЭрей нб
ербнбцЭсефе фпн ерйлпгЭб уфз иЭуз мздЭн. Уе ресЯрфщуз
хблпкесбмйкюн ерйцбнейюн ме жюнет шзуЯмбфпт дйрлЮт
йучэпт (влЭре Ейк. C) фп рсюфп мЭспт фзт дйбдспмЮт ейуЬгей
фзн мйксьфесз жюнз шзуЯмбфпт (еущфесйкЮ), гйб нб
енесгпрпйзипэн бмцьфесет, кбй нб Эчефе Эфуй дйбиЭуймз фзн
мегблэфесз жюнз шзуЯмбфпт рсЭрей нб цЭсефе фпн ерйлпгЭб
óôç èÝóç (A) кбй нб рспчщсЮуефе кбфьрйн уфзн ерйлпгЮ
фпх ерйихмзфпэ ерйрЭдпх йучэпт мефбоэ 12 кбй 1.
РспейдпрпйЮуейт гйб фз чсЮуз фзт хблпкесбмйкЮт
ерйцЬнейбт
Гйб нб Эчефе кблэфесб брпфелЭумбфб брь фз ерйцЬнейб
мбгейсЭмбфпт хрЬсчпхн псйумЭнб вбуйкЬ фечнЬумбфб рпх
рсЭрей нб ецбсмьуефе кбфЬ фп шЮуймп Ю фзн рспефпймбуЯб фщн
цбгзфюн.
l Нб чсзуймпрпйеЯфе кбфубсьлет ме ерЯредз вЬуз гйб нб еЯнбй
уЯгпхсз з ербцЮ фзт кбфубсьлбт уфз жюнз шзуЯмбфпт.
l Нб чсзуймпрпйеЯфе кбфубсьлет фЭфпйбт дйбмЭфспх рпх нб
кблэрфеефбй фелеЯщт з еуфЯб мбгейсЭмбфпт, Эфуй юуфе нб
еобуцблЯжефбй з чсЮуз ьлзт фзт дйбиЭуймзт иесмьфзфбт.
Ендейкфйкь цщфЬкй лейфпхсгЯбт злекфсйкюн еуфйюн (G)
ЕЯнбй бнбммЭнп ьфбн Эчей феиеЯ уе лейфпхсгЯб Энб прпйпдЮрпфе
злекфсйкь иесмбнфйкь уфпйчеЯп фзт ерйцЬнейбт мбгейсЭмбфпт.
Q sh Akt ino bÒloj esta
Sbhst»
0
Gia lièsimo boutÚrou kai sokol£taj
1
2
Gia qrmansh ugrèn
3
4
Gia krmej kai s£ltsej
5
6
Gia magerema sth qermokrasa brasmoÚ
7
8
Gia yht£
9
10
Gia meg£lej posÒthtej brastèn
11
Gia Thg£nisma
12
Energopohsh kai twn duo zwnèn mageirmatoj
A
l ВевбйщиеЯфе ьфй з вЬуз фщн кбфубсплюн еЯнбй рЬнфб уфегнЮ
кбй кбибсЮ, гйб мйб кблэфесз ербцЮ кбй мегблэфесз дйЬскейб
жщЮт фщн еуфйюн кбй фщн Ядйщн фщн кбфубсплюн.
l Мз чсзуймпрпйеЯфе фб Ядйб укеэз гйб кбхуфЮсет бесЯпх. З
ухгкЭнфсщуз фзт иесмьфзфбт уфпхт кбхуфЮсет бесЯпх еЯнбй
фЭфпйб рпх мрпсеЯ нб рбсбмпсцюуей фз вЬуз фзт
кбфубсьлбт, кбй щуфьуп ден иб ерйфехчиеЯ рпфЭ фп
ерйихмзфь брпфЭлеумб чсзуймпрпйюнфбт фз кбфьрйн уфзн
хблпкесбмйкЮ ерйцЬнейб шзуЯмбфпт.
l Мзн бцЮнефе рпфЭ бнбммЭнз мйб жюнз шзуЯмбфпт чщсЯт
кбфубсьлб ерЬнщ фзт, дйьфй уе мйб фЭфпйб ресЯрфщуз з
иЭсмбнуз иб мегйуфпйзиеЯ уе ухнфпмьфбфп чсьнп, ме дхнбфЭт
жзмйЭт гйб фб иесмбнфйкЬ уфпйчеЯб.
l Мзн оечнЬфе ьфй з жюнз шзуЯмбфпт рбсбмЭней жеуфЮ гйб
фпхлЬчйуфпн мйуЮ юсб мефЬ фп увЮуймп. РспуЭофе нб мзн
бкпхмрЬфе укеэз Ю бнфйкеЯменб уфзн, бкьмз, иесмЮ жюнз.
l Мзн бнЬвефе жюнет шзуЯмбфпт бн хрЬсчпхн цэллб
блпхмйнЯпх Ю рлбуфйкЬ хлйкЬ уфзн ерйцЬнейб.
l Мзн рлзуйЬжефе усйт иесмЭт ресйпчЭт шзуЯмбфпт.
l РспейдпрпЯзуз рсйн фзн бсчйкЮ чсЮуз:
з кьлб рпх чсзуймпрпйеЯфбй гйб фйт фуймпэчет, кбфЬ фзн
ресЯпдп брпиЮкехузт, бцЮней Ячнз гсЬупх уфп фжЬмй. Убт
ухмвпхлеэпхме нб фб брпмбксэнефе рсйн фз чсЮуз фзт
ухукехЮт, ме Энб ухнзийумЭнп рспъьн кбибсйумпэ
(гхблйуфйкЮ ксЭмб мз дйбвсщфйкЮ). КбфЬ фйт рсюфет юсет
чсЮузт, иб бйуибниеЯфе мйб пумЮ лЬуфйчпх рпх еобцбнЯжефбй
гсЮгпсб.
l З хблпкесбмйкЮ ерйцЬнейб еЯнбй бниекфйкЮ уфйт бхопмейюуейт
иесмпксбуЯбт кбй уфб чфхрЮмбфб. Щуфьуп бн чфхрзиеЯ ме
бйчмзсЬ бнфйкеЯменб мрпсеЯ нб урЬуей. Уфзн ресЯрфщуз бхфЮ
дйбкьшфе фзн фспцпдпуЯб кбй брехихниеЯфе уе Энб
еопхуйпдпфзмЭнп кЭнфсп фечнйкЮт хрпуфЮсйозт гйб фзн
ерйукехЮ.
70
Page 70

Рспгсбммбфйумьт фпх шзуЯмбфпт
П рспгсбммбфйумьт фзт дйЬскейбт Ю/кбй фзт юсбт фпх
фЭлпхт шзуЯмбфпт дйенесгеЯфбй бцпэ ерйлегеЯ з лейфпхсгЯб
рпх ерйихмеЯфе.
Рспгсбммбфйумьт фзт дйЬскейбт мбгейсЭмбфпт
РйЭуфе фп кпхмрЯ 5 кбй кбфьрйн схимЯуфе фз дйЬскейб
уфсЭцпнфбт фпн ерйлпгЭб C. РйЭжпнфбт фп кпхмрЯ OK ç
сэимйуз иб брпизкехфеЯ кбй уфзн пиьнз иб брейкпнйуфеЯ,
дйбдпчйкЬ, з ерйлегмЭнз иесмпксбуЯб рпх мрпсеЯ нб
бллЬоей ме фпн ерйлпгЭб C кбй п хрплейрьменпт чсьнпт
гйб фп фЭлпт шзуЯмбфпт.
Ме фп рЭсбт фпх чсьнпх бхфпэ уфз пиьнз иб емцбнйуфеЯ
«end» кбй иб рбсбчиеЯ мйб бкплпхиЯб зчзфйкюн узмЬфщн
рпх деЯчней ьфй фп мбгеЯсемб фелеЯщуе.
• РйЭуфе прпйпдЮрпфе кпхмрЯ гйб нб дйбкьшефе фп зчзфйкь
уЮмб.
• ЕрбнбцЭсефе фпн ерйлпгЭб B óôç èÝóç 0 гйб нб
еобцбнйуфеЯ з Эндейоз «end».
РбсЬдейгмб
ЕЯнбй 9:00 з юсб кбй рспгсбммбфЯжефбй мйб дйЬскейб
мбгейсЭмбфпт 1 юсбт кбй 15 лерфюн. Фп мбгеЯсемб иб
уфбмбфЮуей бхфьмбфб уфйт 10:15.
РбсЬдейгмб
ЕЯнбй 9:00 з юсб кбй фЯиефбй з юсб фЭлпхт фпх fast clean
уфйт 10:15. Фп мбгеЯсемб иб дйбскЭуей 1 юсб кбй 15 лерфЬ.
Рспгсбммбфйумьт мбгейсЭмбфпт ме кбихуфЭсзуз
РйЭуфе фп кпхмрЯ 5 кбй кбфьрйн схимЯуфе фз дйЬскейб
уфсЭцпнфбт фпн ерйлпгЭб C. РйЭжпнфбт фп кпхмрЯ OK ç
сэимйуз иб брпизкехфеЯ кбй уфзн пиьнз иб брейкпнйуфеЯ,
дйбдпчйкЬ, з иесмпксбуЯб кбй п чсьнпт рпх ерйлЭчизке
рспзгпхмЭнщт.
РйЭуфе фп кпхмрЯ 4 кбй кбфьрйн схимЯуфе фзн юсб фЭлпхт
уфсЭцпнфбт фпн ерйлпгЭб C. РйЭжпнфбт фп кпхмрЯ OK з
сэимйуз иб брпизкехфеЯ кбй з пиьнз иб убт ихмЯуей,
дйбдпчйкЬ, фзн юсб фЭлпхт кбй фзн феиеЯуб иесмпксбуЯб.
РбсЬдейгмб
ЕЯнбй 9:00 з юсб кбй рспгсбммбфЯжефбй мйб дйЬскейб
мбгейсЭмбфпт 1 юсбт кбй 15 лерфюн кбй з юсб 12:30 щт
юсб фЭлпхт. Фп мбгеЯсемб иб бсчЯуей бхфьмбфб уфйт 11:15.
Рспгсбммбфйумьт фзт юсбт фЭлпхт шзуЯмбфпт
РйЭуфе фп кпхмрЯ 4 кбй кбфьрйн схимЯуфе уфсЭцпнфбт фпн
ерйлпгЭб C. РйЭжпнфбт фп кпхмрЯ OK з сэимйуз иб
брпизкехфеЯ кбй з пиьнз иб убт ихмЯуей, дйбдпчйкЬ, фзн
ерйлегмЭнз иесмпксбуЯб кбй фпн хрплейрьменп чсьнп гйб
фп фЭлпт шзуЯмбфпт.
Ме фп рЭсбт фпх чсьнпх фЭлпхт шзуЯмбфпт рпх Эчей
рспзгпхмЭнщт ерйлегеЯ, уфз пиьнз иб емцбнйуфеЯ «end»
кбй иб рбсбчиеЯ мйб бкплпхиЯб зчзфйкюн узмЬфщн рпх
деЯчней ьфй фп мбгеЯсемб фелеЯщуе.
• РйЭуфе прпйпдЮрпфе кпхмрЯ гйб нб дйбкьшефе фп зчзфйкь
óÞìá.
• ЕрбнбцЭсефе фпн ерйлпгЭб B óôç èÝóç 0 ãéá íá
еобцбнйуфеЯ з Эндейоз «end».
Фп ейкпнЯдйп A иб убт ихмЯуей ьфй Эчефе рспгсбммбфЯуей фз
дйЬскейб Ю/кбй фзн юсб фпх фЭлпхт шзуЯмбфпт.
Гйб фзн бкэсщуз фпх рспгсбммбфйумпэ
Гйб нб бкхсюуефе прпйпндЮрпфе йучхсйумь, уфсЭшфе фпн
ерйлпгЭб B мЭчсй фз иЭуз 0.
71
Page 71

П бхфьмбфпт кбибсйумьт мЭущ фпх fast clean
Енесгпрпйюнфбт фз лейфпхсгЯб fast clean, з еущфесйкЮ
иесмпксбуЯб фпх дйбмесЯумбфпт цпэнспх цфЬней фпхт 500
°C рпх брбйфпэнфбй гйб фзн брбнисЬкщуз фщн
хрплейммЬфщн. Брь фп гхблЯ фзт рьсфбт фпх цпэснпх
мрпсеЯфе нб рбсбфзсЮуефе псйумЭнб ущмбфЯдйб рпх
цщфЯжпнфбй кбфЬ фзн брбнисЬкщуЮ фпхт ме рхсьлхуз
есчьменб уе ербцЮ ме фйт бнфйуфЬуейт: рськейфбй гйб
уфйгмйбЯб кбэуз, цбйньменп брьлхфб кбнпнйкь, рпх
ден ухнерЬгефбй кбнЭнб кЯндхнп.
ПсйумЭнб чсЮуймб фечнЬумбфб рсйн фпн бхфьмбфп
кбибсйумь
1- РспурбиЮуфе нб брпмбксэнефе фб рйп пгкюдз
хрплеЯммбфб фщн фспцЯмщн ме Энб всегмЭнп уцпхггбсЬкй.
Брпцэгефе сзфЬ нб чсзуймпрпйЮуефе брпссхрбнфйкЬ Ю
прпйпдЮрпфе Ьллп рспъьн рпх ухнйуфЬфбй гйб фпн кбибсйумь
фщн цпэснщн.
2- ВгЬлфе ьлб фб боеупхЬс, фб прпЯб, рсЬгмбфй, ден Эчпхн
цфйбчфеЯ гйб нб бнфЭчпхн уе фьуп хшзлЭт иесмпксбуЯет.
Бкьмз, псйумЭнб боеупхЬс иб мрпспэубн нб бллпйюупхн
фп брпфЭлеумб фпх бхфьмбфпх кбибсйумпэ рбсемрпдЯжпнфбт
фзн кхклпцпсЯб фзт иесмьфзфбт уе ьлб фб фпйчюмбфб. Фб
боеупхЬс мрпсеЯ нб рлЭнпнфбй еэкплб убн кбнпнйкЬ укеэз
(бкьмз кбй уфп рлхнфЮсйп рйЬфщн).
3- Мзн бцЮнефе рбнйЬ кпхжЯнбт уфз лбвЮ.
РспупчЮ: кбфЬ фпн бхфьмбфп кбибсйумь, пй
ерйцЬнейет мрпсеЯ нб хресиесмбнипэн. КсбфЬфе
мбксйЬ фб мйксЬ рбйдйЬ.
Рщт енесгпрпйеЯфбй фп fast clean
КлеЯуфе фзн рьсфб.
ФпрпиефЮуфе фпн ерйлпгЭб уфп V
Гйб нб рспгсбммбфЯуефе фз дйЬскейб Ю/кбй фзн юсб
фЭлпхт фпх fast clean, бкплпхиЮуфе фйт пдзгЯет рпх
бнбцЭспнфбй уфзн рбсЬгсбцп Рспгсбммбфйумьт фпх
Fast clean. ЛЬвефе хрьшз убт ьфй мрпсеЯфе нб
ерйлЭоефе мйб дйЬскейб мефбоэ 60 кбй 120 лерфюн
бнЬлпгб ме фп рьуп лесщмЭнпт еЯнбй п цпэснпт убт.
ДйбфЬоейт буцблеЯбт
ДедпмЭнзт фзт хшзлЮт иесмпксбуЯбт, п цпэснпт дйбиЭфей
псйумЭнет дйбфЬоейт буцблеЯбт:
з рьсфб буцблЯжефбй бхфьмбфб мьлйт з иесмпксбуЯб
цфЬуей уе хшзлЭт фймЭт, гйб фзн брпцхгЮ кЬие кйндэнпх
егкбхмЬфщн.
ôá иесмбнфйкЬ уфпйчеЯб ден фспцпдпфпэнфбй рлЭпн
злекфсйкЬ, рсплзрфйкЬ гйб фзн ресЯрфщуз рпх ухмвеЯ
кЬрпйб бнщмблЯб.
Ме фзн буцЬлйуз фзт рьсфбт ден мрпсеЯфе рлЭпн нб
бллЬоефе фйт схимЯуейт фзт дйЬскейбт, фпх фЭлпхт кбй
ôïõ timer.
Фй ухмвбЯней уфп фЭлпт фпх бхфьмбфпх кбибсйумпэ;
Уфп фЭлпт фпх бхфьмбфпх кбибсйумпэ, уфзн пиьнз
емцбнЯжефбй end кбй екрЭмрефбй Энб зчзфйкь уЮмб рпх
мрпсеЯ нб бренесгпрпйзиеЯ рйЭжпнфбт Энб прпйпдЮрпфе
кпхмрЯ. УфсЭцпнфбт фпн ерйлпгЭб B óå èÝóç 0 èá
еобцбнйуфеЯ з Эндейоз end.
Гйб нб мрпсЭуефе нб бнпЯоефе фзн рьсфб фпх цпэснпх иб
чсейбуфеЯ нб ресймЭнефе мЭчсй нб кбфЭвей з иесмпксбуЯб
уе брпдекфЬ ерЯредб.
Уфп узмеЯп бхфь мрпсеЯфе нб дйбрйуфюуефе фзн рбспхуЯб
псйумЭнщн йжзмЬфщн лехкЮт укьнзт уфпн рЬфп кбй уфб
фпйчюмбфб фпх цпэснпх. БцбйсЭуфе фб ме Энб всегмЭнп
уцпхггбсЬкй бцпэ рспзгпхмЭнщт п цпэснпт ксхюуей
êáëÜ.
Бн, бнфЯиефб, ерйихмеЯфе нб ерщцелзиеЯфе брь фз
иесмьфзфб юуфе нб фз чсзуймпрпйЮуефе гйб мбгеЯсемб, пй
укьнз мрпсеЯ нб рбсбмеЯней бцпэ ден хцЯуфбфбй кбнЭнбт
кЯндхнпт гйб фб рспт шЮуймп фсьцймб.
МЗН ФБ ЧБНЕЙУ БН
1 уфзн бсчЮ фпх кэклпх fast clean п бнемйуфЮсбт шэозт
лейфпхсгеЯ уе чбмзлЮ фбчэфзфб
2 кбфЬ фз чсЮуз фпх Fast Clean рЭуей з злекфсйкЮ
буцЬлейб: ухнЭвз мйб хресцьсфйуз фпх дйкфэпх
(уэмрфщуз ме фз чсЮуз Ьллщн злекфсйкюн ухукехюн)
3 всейт фзн рьсфб фпх цпэснпх буцблйумЭнз кбфЬ фзн
екфЭлеуз фпх рспгсЬммбфпт Fast Clean: еЯнбй мЭфсп
буцЬлейбт фпх рспъьнфпт. З рьсфб иб бнпЯоей мьнп
мефЬ фзн рлЮсз шэоз фпх цпэснпх
4 мефЬ фпн кэклп Fast Clean рбсбмЭнпхн мйкспЯ лекЭдет
уфзн еущфесйкЮ ерйцЬнейб фпх цпэснпх: еЯнбй кбль нб
брпмбксэнефе фб рйп пгкюдз хрплеЯммбфб фспцЯмщн
рсйн фп бхфпкбибсйумь кбй нб иЭуефе мйб дйЬскейб фпх
рспгсЬммбфпт ухмвбфЮ ме фп вбимь лесюмбфпт фпх
цпэснпх
5 уфп фЭлпт фпх мбгейсЭмбфпт вгбЯней бкьмз брь фп
цпэснп бЭсбт фпх бнемйуфЮсб гйб кЬрпйп чсьнп: еЯнбй
з ухнЮизт цЬуз шэозт фзт кпйльфзфбт фпх цпэснпх
6 уфз лейфпхсгЯб grill з ерЬнщ бнфЯуфбуз ден рбсбмЭней
рЬнфб бнбммЭнз (кьккйнп чсюмб): з лейфпхсгЯб
елЭгчефбй брь иесмпуфЬфз
7 еоЭсчефбй бфмьт, бнпЯгпнфбт фзн рьсфб кбфЬ фп
мбгеЯсемб
8 учзмбфЯжпнфбй уфбгьнет неспэ Ю бфмпэ уфп еущфесйкь
фпх цпэснпх, бцЮнпнфбт фб фсьцймб уфп цпэснп, мефЬ
фп мбгеЯсемб.
72
Page 72

Рспгсбммбфйумьт фпх Fast clean
П рспгсбммбфйумьт фзт дйЬскейбт Ю/кбй фзт юсбт фпх
фЭлпхт fast clean дйенесгеЯфбй бцпэ ерйлегеЯ з лейфпхсгЯб
fast clean.
Рспгсбммбфйумьт фзт дйЬскейбт фпх fast clean
РйЭуфе фп кпхмрЯ 5 кбй кбфьрйн схимЯуфе фз дйЬскейб
уфсЭцпнфбт фпн ерйлпгЭб C. РйЭжпнфбт фп кпхмрЯ OK ç
сэимйуз иб брпизкехфеЯ кбй уфзн пиьнз иб брейкпнйуфеЯ
п хрплейрьменпт чсьнпт гйб фп фЭлпт фпх fast clean.
Ме фп рЭсбт фпх чсьнпх бхфпэ уфз пиьнз иб емцбнйуфеЯ
«end» кбй иб рбсбчиеЯ мйб бкплпхиЯб зчзфйкюн узмЬфщн
рпх деЯчней ьфй п кэклпт кбибсйумпэ фелеЯщуе.
• РйЭуфе прпйпдЮрпфе кпхмрЯ гйб нб дйбкьшефе фп зчзфйкь
óÞìá.
• ЕрбнбцЭсефе фпн ерйлпгЭб B óôç èÝóç 0 ãéá íá
еобцбнйуфеЯ з Эндейоз «end».
РбсЬдейгмб
ЕЯнбй 9:00 з юсб кбй рспгсбммбфЯжефбй мйб дйЬскейб fast
clean 1 юсбт кбй 15 лерфюн. Фп fast clean иб уфбмбфЮуей
бхфьмбфб уфйт 10:15.
РбсЬдейгмб
ЕЯнбй 9:00 з юсб кбй фЯиефбй з юсб фЭлпхт фпх fast clean
уфйт 10:15. Фп fast clean иб дйбскЭуей 1 юсб кбй 15 лерфЬ.
Рспгсбммбфйумьт еньт fast clean ме кбихуфЭсзуз
РйЭуфе фп кпхмрЯ 5 кбй кбфьрйн схимЯуфе фз дйЬскейб
уфсЭцпнфбт фпн ерйлпгЭб C. РйЭжпнфбт фп кпхмрЯ OK ç
сэимйуз иб брпизкехфеЯ кбй иб емцбнйуфеЯ уфзн пиьнз.
РйЭуфе фп кпхмрЯ 4 кбй кбфьрйн схимЯуфе фзн юсб фЭлпхт
уфсЭцпнфбт фпн ерйлпгЭб C. РйЭжпнфбт фп кпхмрЯ OK ç
сэимйуз иб брпизкехфеЯ кбй з пиьнз иб убт ихмЯуей,
дйбдпчйкЬ, фзн юсб фЭлпхт кбй фзн феиеЯуб дйЬскейб.
РбсЬдейгмб
ЕЯнбй 9:00 з юсб кбй рспгсбммбфЯжефбй мйб дйЬскейб fast
clean 1 юсбт кбй 15 лерфюн кбй з юсб 12:30 щт юсб
фЭлпхт. Фп fast clean иб оекйнЮуей бхфьмбфб уфйт 11:15.
Рспгсбммбфйумьт фзт юсбт фЭлпхт fast clean
РйЭуфе фп кпхмрЯ 4 кбй кбфьрйн схимЯуфе уфсЭцпнфбт фпн
ерйлпгЭб C. РйЭжпнфбт фп кпхмрЯ OK з сэимйуз иб
брпизкехфеЯ кбй уфзн пиьнз иб брейкпнйуфеЯ п
хрплейрьменпт чсьнпт гйб фп фЭлпт фпх fast clean.
Ме фз лЮоз фзт юсбт фЭлпхт фпх fast clean рпх ерйлЭчизке
рспзгпхмЭнщт, уфзн пиьнз иб емцбнйуфеЯ «end» кбй
екрЭмрефбй мйб бкплпхиЯб зчзфйкюн узмЬфщн рпх деЯчней
ьфй фп фЭлпт фпх fast clean.
• РйЭуфе прпйпдЮрпфе кпхмрЯ гйб нб дйбкьшефе фп зчзфйкь
óÞìá.
• ЕрбнбцЭсефе фпн ерйлпгЭб B óôç èÝóç 0 ãéá íá
еобцбнйуфеЯ з Эндейоз «end».
Фп ейкпнЯдйп A иб убт ихмЯуей ьфй Эчефе рспгсбммбфЯуей фз
дйЬскейб Ю/кбй фзн юсб фпх фЭлпхт fast clean.
Гйб фзн бкэсщуз фпх рспгсбммбфйумпэ
Гйб нб бкхсюуефе прпйпндЮрпфе йучхсйумь, уфсЭшфе фпн
ерйлпгЭб E мЭчсй фз иЭуз 0.
73
Page 73

Рщт нб фп дйбфзсеЯфе уе цьсмб
Рсйн брь кЬие енЭсгейб нб брпухндЭефе фз ухукехЮ брь фз
злекфсйкЮ фспцпдпуЯб.
Гйб мйб мегЬлз дйЬскейб жщЮт фпх цпэснпх еЯнбй
брбсбЯфзфп нб екфелеЯфе ухчнЬ мйб учплбуфйкЮ генйкЮ
кбибсйьфзфб, лбмвЬнпнфбт хрьшз ьфй:
Гйб фпн кбибсйумь мз чсзуймпрпйеЯфе ухукехЭт
бфмпэ.
б еощфесйкЬ ерйумблфщмЭнб Ю бнпоеЯдщфб мЭсз рлЭпнфбй
ме члйбсь несь чщсЯт фз чсЮуз брпохуфйкюн кбй
дйбвсщфйкюн пхуйюн рпх иб мрпспэубн нб фб
кбфбуфсЭшпхн. Фп бнпоеЯдщфп бфуЬлй мрпсеЯ нб рбсбмеЯней
лекйбумЭнп. Бн пй лекЭдет еЯнбй дэукплпй гйб нб цэгпхн
чсзуймпрпйЮуфе ейдйкЬ рспъьнфб фпх емрпсЯпхУбт
ухнйуфпэме нб оерлЭнефе ме Ьципнп несь кбй нб уфегнюнефе
мефЬ фпн кбибсйумь.
фп еущфесйкь фпх цпэснпх кбибсЯжефбй, кбфЬ рспфЯмзуз кЬие
цпсЬ мефЬ фз чсЮуз, ьфбн еЯнбй бкьмз члйбсьт,
чсзуймпрпйюнфбт жеуфь несь кбй брпссхрбнфйкь,
оерлЭнпнфбт кбй уфегнюнпнфбт кбфьрйн рспуекфйкЬ ме Энб
брбль рбнЯ. Брпцеэгефе фз чсЮуз брпохуфйкюн
брпссхрбнфйкюн (гйб рбсЬдейгмб фйт укьнет, клр.) кбй фб
брпохуфйкЬ уцпхггбсЬкйб гйб рйЬфб Ю поЭб (гйб рбсЬдейгмб
бцблбфйкЬ, клр...), дйьфй иб мрпспэубн нб кбфбуфсЭшпхн
фп умЬлфп. Бн з всщмйЬ еЯнбй йдйбЯфесб бниекфйкЮ,
чсзуймпрпйЮуфе Энб ейдйкь рспъьн гйб кбибсйумь цпэснпх,
уэмцщнб ме фйт пдзгЯет рпх бнбгсЬцпнфбй уфзн ухукехбуЯб.
бн чсзуймпрпйеЯфе ерЯ мбксьн фпн цпэснп иб мрпспэуе нб
учзмбфйуфеЯ ухмрэкнщмб. УкпхрЯуфе фп ме Энб мблбкь рбнЯ.
гэсщ брь фп Ьнпйгмб фпх цпэснпх, Энб лЬуфйчп дйбуцблЯжей
фз ущуфЮ фпх лейфпхсгЯб. Нб елЭгчефе, лпйрьн, ресйпдйкЬ
фзн кбфЬуфбуз фзт фуймпэчбт бхфЮт. Бн чсейбуфеЯ кбибсЯуфе
фп брпцеэгпнфбт фз чсЮуз рспъьнфщн Ю бнфйкеймЭнщн
брпохуфйкюн. Бн убт рспкэшей цибсмЭнп брехихниеЯфе уфп
рлзуйЭуфесп КЭнфсп ФечнйкЮт ХрпуфЮсйозт. УхнйуфЬфбй нб
мз чсзуймпрпйеЯфе фпн цпэснп мЭчсй фзн ерйукехЮ фпх.
мзн нфэнефе рпфЭ фп цьнфп фпх цпэснпх ме блпхмйньчбсфп,
дйьфй з ухнербгьменз ухууюсехуз фзт иесмьфзфбт иб
дйбкэвехе фп шЮуймп кбфбуфсЭцпнфбт ерЯузт кбй фп умЬлфп.
кбибсЯуфе фп фжЬмй фзт рьсфбт фпх цпэснпх
чсзуймпрпйюнфбт рспъьнфб кбй уцпхггбсЬкйб мз
брпохуфйкЬ кбй уфегнюуфе ме Энб мблбкь рбнЯ.
пй злекфсйкЭт еуфЯет кбибсЯжпнфбй ме Энб рбнЯ хгсь кбй
блеЯцпнфбй ме лЯгп лЬдй ьуп еЯнбй бкьмз члйбсЭт.
Рщт бцбйсеЯфбй з рьсфб фпх цпэснпх
Гйб Энб учплбуфйкь кбибсйумь мрпсеЯфе нб бцбйсЭуефе фзн рьсфб
фпх цпэснпх. РспчщсЮуфе ме фпн бкьлпхип фсьрп:
бнпЯофе фелеЯщт фзн рьсфб
бнбузкюуфе кбй уфсЭшфе фпхт мпчлпэт рпх всЯукпнфбй уфпхт
дэп менфеуЭдет
рйЬуфе фзн рьсфб брь фб дэп еощфесйкЬ рлехсЬ, обнбклеЯуфе
фз бсгЬ бллЬ ьчй фелеЯщт
фсбвЮофе фзн рьсфб рспт фп мЭспт убт вгЬжпнфЬт фзн брь
ôçí Ýäñá ôçò.
ОбнбмпнфЬсефе фзн рьсфб бкплпхиюнфбт фзн рбсбрЬнщ
дйбдйкбуЯб бллЬ бнфЯуфспцб.
132
БнфйкбфЬуфбуз фзт лхчнЯбт фпх цпэснпх
• Рсйн брь прпйбдЮрпфе енЭсгейб, брпухндЭуфе
злекфсйкЬ фп цпэснп, вгЬжпнфбт фп вэумб Ю
енесгюнфбт уфп дйбкьрфз рпх чсзуймпрпйеЯфбй гйб фз
уэндеуз фпх цпэснпх уфзн злекфсйкЮ егкбфЬуфбуз.
• Чсзуймпрпйюнфбт Энб бнфйкеЯменп ерЯредп кбй уфень
(кбфубвЯдй, лбвЮ кпхфблйпэ, клр.), вгЬлфе фп гхЬлйнп
кбрЬкй.
• Оевйдюуфе фз лхчнЯб кбй бнфйкбфбуфЮуфе фз ме мЯб ме
бнЬлпгб чбсбкфзсйуфйкЬ:
- ôÜóç 230/240 W
- йучэт 15 W
- уэндеуз E 14
ОбнбмпнфЬсефе фп гхЬлйнп кбрЬкй рспуЭчпнфбт нб
фпрпиефЮуефе ущуфЬ фзн фуймпэчб.
Кбибсйумьт фзт ерйцЬнейбт мбгейсЭмбфпт
Рсйн оекйнЮуефе нб мбгейсеэефе, з ерйцЬнейб мбгейсЭмбфпт
рсЭрей нб еЯнбй кбибсЮ чсзуймпрпйюнфбт Энб всегмЭнп
рбнЯ гйб фзн бцбЯсеуз фзт укьнзт кбй фщн хрплейммЬфщн
фщн цбгзфюн рпх мбгейсеэфзкбн рспзгпхмЭнщт.
З ерйцЬнейб мбгейсЭмбфпт рсЭрей нб кбибсЯжефбй фбкфйкЬ
ме Энб члйбсь хдбфйкь дйЬлхмб кбй брпссхрбнфйкь мз
брпохуфйкпэ. Иб чсейбуфеЯ, ресйпдйкЬ, мб чсзуймпрпйеЯфе
ейдйкЬ рспъьнфб гйб фпн кбибсуймь фщн хблпкесбмйкюн
ерйцбнейюн мбгейсЭмбфпт.
БсчйкЬ бцбйсЭуфе брь фзн ерйцЬнейб мбгейсЭмбфпт ьлб
фб хрплеЯммбфб фщн бнбшхкфйкюн кбй рйфуйлйумЬфщн лйрюн
ме мйб лЬмб гйб фпн кбибсйумь гйб рбсЬдейгмб B
(влЭре Ейк. A) (ден рбсЭчефбй).
КбибсЯуфе фзн ерйцЬнейб мбгейсЭмбфпт ьуп еЯнбй члйбсЮ.
ЧсзуймпрпйЮуфе Энб рспъьн кбибсйумпэ кбфЬллзлп кбй
чбсфЯ кпхжЯнбт (влЭре Ейк. B). Кбфьрйн уцпхггЯуфе ме Энб
всегмЭнп рбнЯ кбй уфегнюуфе.
74
Page 74

Eidik£ proiÕnta gi£ th
kaqariÕthta tou ualokeramikoÝ
ApoxustikÕ me l£ma kai l£mej
antikat£stashj
Pou mpore te na ta
promhqeute te
Katast¾mata gi£ e dh
Hobby kai sidhrikën
Åéê. A Åéê. B
Блпхмйньчбсфб, рлбуфйкЬ хлйкЬ Ю ухниефйкЬ, рпх кбфЬ
лЬипт лпйюубне, ьрщт ерЯузт жЬчбсз Ю бнбшхкфйкЬ ме
хшзлЮ ресйекфйкьфзфб жЬчбсзт брпмбксэнпнфбй бмЭущт
брь фзн бкьмз иесмЮ жюнз шзуЯмбфпт ме мйб лЬмб.
ЕйдкЬ рспъьнфб кбибсйумпэ учзмбфЯжпхн Энб ерйцбнейбкь
дйбцбнЭт уфсюмб бниекфйкь уфз всщмйЬ. Бхфь
рспуфбфеэей ерЯузт фзн ерйцЬнейб кбй брь ендечьменет
жзмйЭт рспкблпэменет брь бнбшхкфйкЬ хшзлЮт
ресйекфйкьфзфбт уе жЬчбсз. Уе кбмЯб ресЯрфщуз мз
чсзуймпрпйЮуфе уцпхггЬсйб Ю брпохуфйкЬ рспъьнфб,
бкьмз кбй брпссхрбнфйкЬ чзмйкЬ вЯбйб ьрщт фб spray
цпэснпх Ю рспъьнфб кбибсйуфйкЬ брпцеэгпнфбй.
РсбкфйкЭт ухмвпхлЭт гйб фп шЮуймп
П цпэснпт иЭфей уфз дйЬиеуЮ убт мйб ехсеЯб гкЬмб
дхнбфпфЮфщн гйб нб мбгейсеэефе прпйпдЮрпфе цбгзфь ме
фпн кблэфесп фсьрп. Ме фпн кбйсь иб мрпсеЯфе нб
екмефбллехфеЯфе кблэфесб бхфЮ фзн ехЭлйкфз ухукехЮ
шзуЯмбфпт, ухнерют пй бнбцпсЭт рпх рбсбфЯиенфбй
рбсбкЬфщ еЯнбй брлЬ ендейкфйкЭт кбй мрпсеЯфе нб фйт
емрлпхфЯуефе ме фзн рспущрйкЮ убт реЯсб.
Фбхфьчспнп шЮуймп уе дйЬцпсет иЭуейт
Бн рсЭрей нб шЮуефе уе ресйууьфесб ерЯредб мрпсеЯфе
нб чсзуймпрпйЮуефе Ю фз лейфпхсгЯб глхкЬ u Þ ôç
лейфпхсгЯб b РпллбрлЬ шзуЯмбфб, пй мпнбдйкЭт рпх
рспуцЭспхн фз дхнбфьфзфб бхфЮ.
Гйб фп шЮуймп ехбЯуизфщн фспцЯмщн уе ресйууьфесб
ерЯредб, чсзуймпрпйЮуфе фз лейфпхсгЯб глхкЬ u ðïõ
ерйфсЭрей фбхфьчспнп шЮуймп уе 3 иЭуейт (1з, 3з кбй 5з).
ПсйумЭнб рбсбдеЯгмбфб бнбцЭспнфбй уфпн рЯнбкб
РсбкфйкЭт ухмвпхлЭт гйб фп шЮуймп.
Гйб Ьллб шзуЯмбфб уе ресйууьфесб ерЯредб
чсзуймпрпйЮуфе фз лейфпхсгЯб b РпллбрлЬ шзуЯмбфб
лбмвЬнпнфбт хрьшз фйт бкьлпхиет ухмвпхлЭт:
П цпэснпт дйбиЭфей 5 иЭуейт. Уфп шЮуймп ме бесьиесмп
чсзуймпрпйЮуфе дэп брь фб фсЯб кенфсйкЬ ерЯредб, фп
рсюфп кЬфщ кбй фп фелехфбЯп ерЬнщ дЭчпнфбй бр ехиеЯбт
фп иесмь бЭсб рпх иб мрпспэуе нб рспкблЭуей
кбшЯмбфб уфб ехбЯуизфб фсьцймб.
КбнпнйкЬ чсзуймпрпйЮуфе фп 2° кбй 4° ерЯредп брь кЬфщ,
ейуЬгпнфбт уфп 2° ерЯредп фб фсьцймб рпх брбйфпэн
ресйууьфесз иесмьфзфб. Гйб рбсЬдейгмб, уе ресЯрфщуз
шзфюн ксеЬфщн фбхфьчспнб ме Ьллб фсьцймб, ейуЬгефе
фп ксЭбт уфп 2°ерЯредп, бцЮнпнфбт фп 4° уе рйп
Stahl-Fix, SWISSCLEANER, WK
TOP
Alla proiÕnta gi£ ualokeramikÕ Katast¾mata oikiakèn
Hobby, Supermarkets
eidèn
ехбЯуизфб фсьцймб.
Уфп фбхфьчспнп шЮуймп фспцЯмщн рпх Эчпхн чсьнпхт
кбй иесмпксбуЯет шзуЯмбфпт дйбцпсефйкЭт иЭуфе мйб
иесмпксбуЯб ендйЬмеуз мефбоэ фщн дэп, цпхснЯуфе фп
рйп ехбЯуизфп фсьцймп уфп 4° ерЯредп кбй вгЬлфе брь
фпн цпэснп рсюфб фп фсьцймп ме фп ухнфпмьфесп чсьнп
шзуЯмбфпт.
ЧсзуймпрпйеЯфе фпн лйрпухллЭкфз уфп кЬфщ ерЯредп кбй
фп рлЭгмб уфп ерЬнщ.
ЧсЮуз фзт лейфпхсгЯбт Fast cooking
ЛейфпхсгйкЮ, гсЮгпсз кбй рсбкфйкЮ гйб екеЯнпхт рпх
чсзуймпрпйпэн рспухукехбумЭнб рспъьнфб
(рбсЬдейгмб: кбфешхгмЭнб Ю мйупшзмЭнб) кбй ьчй мьнп,
чсЮуймет ухмвпхлЭт бнбцЭспнфбй уфпн рЯнбкб РсбкфйкЭт
ухмвпхлЭт гйб фп шЮуймп.
ЧсЮуз фпх grill
П цпэснпт 7 МЬгейспй убт рспуцЭсей дйЬцпсет
дхнбфьфзфет гксйлйбсЯумбфпт.
ЧсзуймпрпйЮуфе фз лейфпхсгЯб 2 grill, ме мйуЬнпйчфз
рьсфб, фпрпиефюнфбт фп цбгзфь уфп кЭнфсп фпх
рлЭгмбфпт уфп 3° Ю 4° ерЯредп оекйнюнфбт брь кЬфщ.
Гйб нб ухллЭоефе жпхмйЬ Ю/кбй лЯрз, фпрпиефЮуфе фпн
рбсечьменп лйрпухллЭкфз уфзн 1з иЭуз.
¼фбн чсзуймпрпйеЯфе фз лейфпхсгЯб бхфЮ, ухуфЮнефбй нб
иЭфефе фз уфЬимз енесгеЯбт уфп мЭгйуфп бн кбй мрпспэн
нб феипэн чбмзльфесет уфЬимет брлЬ схимЯжпнфбт фпн
ерйлпгЭб фпх иесмпуфЬфз уфзн ерйихмзфЮ.
Уфб мпнфЭлб рпх дйбиЭфпхн упэвлб 2, уфз лейфпхсгЯб
grill мрпсеЯфе нб чсзуймпрпйеЯфе фп кйф упэвлбт рпх убт
рбсЭчефбй. Уфзн ресЯрфщуз бхфЮ, дйенесгЮуфе фп шЮуймп
ме фзн рьсфб фпх цпэснпх клейуфЮ, фпрпиефюнфбт фп кйф
75
Page 75

упэвлбт уфп 3° ерЯредп (оекйнюнфбт брь кЬфщ) кбй фпн
лйрпухллЭкфз уфп 1° гйб фз ухллпгЮ фщн жпхмйюн Ю/кбй
фщн лйрюн.
З лейфпхсгЯб T Gratin, брпклейуфйкЬ ме фзн рьсфб
фпх цпэснпх клейуфЮ, еЯнбй чсзуймьфбфз гйб гсЮгпсб
гксйлйбсЯумбфб, кбфбнЭмей фз иесмьфзфб рпх рбсЬгефбй
брь фп гксйл юуфе мбжЯ ме фп ерйцбнейбкь спдпкпккЯнйумб
нб шЮнефбй кбй фп кЬфщ мЭспт.
МрпсеЯфе ерЯузт нб фз чсзуймпрпйЮуефе уфзн фелйкЮ цЬуз
шзуЯмбфпт фщн цбгзфюн рпх брбйфпэн Энб ерйцбнейбкь
спдпкпккЯнйумб, гйб рбсЬдейгмб еЯнбй йдбнйкЮ гйб фп
спдпкпккЯнйумб фщн жхмбсйкюн цпэснпх уфп фЭлпт
шзуЯмбфпт.
Чсзуймпрпйюнфбт фз лейфпхсгЯб бхфЮ, иЭуфе фп рлЭгмб
уфп 2° Ю 3° ерЯредп оекйнюнфбт брь кЬфщ (влЭре рЯнбкб
шзуЯмбфпт) кбй мефЬ, гйб нб ухллЭоефе фб лЯрз кбй гйб нб
мз рбсбчиеЯ кбрньт, вЬлфе Энбн лйрпухллЭкфз уфп 1°
ерЯредп брь кЬфщ.
Узмбнфйкь: дйенесгЮуфе фп шЮуймп уфп Gratin ìå ôçí
рьсфб фпх цпэснпх клейуфЮ, кй бхфь гйб нб рефэчефе
кблэфесб брпфелЭумбфб кбй мйб бйуизфЮ еопйкпньмзуз
енЭсгейбт (10% ресЯрпх).
¼фбн чсзуймпрпйеЯфе фз лейфпхсгЯб бхфЮ, ухуфЮнефе нб
иЭфефе фпн иесмпуфЬфз уфпхт 200 °C, дйьфй бхфь брпфелеЯ
рспырьиеуз вЭлфйуфзт брьдпузт, рпх вбуЯжефбй уфзн
бкфйнпвплЯб хрЭсхисщн. Бхфь ьмщт ден узмбЯней ьфй ден
мрпспэн нб чсзуймпрпйзипэн чбмзльфесет
иесмпксбуЯет, брлЬ схимЯжпнфбт фпн ерйлпгЭб фпх
иесмпуфЬфз уфзн ерйихмзфЮ иесмпксбуЯб.
Уфб мпнфЭлб рпх дйбиЭфпхн упэвлб T, уфз лейфпхсгЯб
gratin мрпсеЯфе нб чсзуймпрпйЮуефе фп кйф упэвлбт рпх
убт рбсЭчефбй. Уфзн ресЯрфщуз бхфЮ, фпрпиефЮуфе фп кйф
упэвлбт уфп 3° ерЯредп (оекйнюнфбт брь кЬфщ) кбй фпн
лйрпухллЭкфз уфп 1° гйб фзн ухллпгЮ фщн жпхмйюн Ю/кбй
фщн лйрюн.
Щуфьуп фб кблэфесб брпфелЭумбфб, ме фз чсЮуз фщн
лейфпхсгйюн фпх гксйл, ерйфхгчЬнпнфбй фпрпиефюнфбт
фп рлЭгмб уфб фелехфбЯб ерЯредб оекйнюнфбт брь
кЬфщ (влЭре рЯнбкб шзуЯмбфпт) кбй, гйб фз ухллпгЮ
фщн лйрюн кбй фзн брпцхгЮ учзмбфйумпэ кбрнпэ,
фпрпиефеЯфе фпн лйрпухллЭкфз рпх убт рбсЭчефбй уфп
рсюфп ерЯредп брь кЬфщ.
ШЮуймп фщн глхкюн
Уфп шЮуймп фщн глхкюн нб цпхснЯжефе рЬнфб ме цпэснп
жеуфь. Мзн бнпЯгефе фзн рьсфб кбфЬ фп шЮуймп, гйб нб мз
кбиЯуей фп глхкь. ГенйкЬ:
GlukÒ polÚ xerÒ
Thn epÒmenh for£ qste mi£ qermokrasa kat£
10°C
uyhlÒterh kai meièste to crÒno yhsmatoj.
GlukÒ pou "kaqzei"
Crhsimopoiete ligÒtero ugrÒ kai camhlèste th
qermokrasa kat£
10°C.
KalÒ exwterikÒ y»simo, ma eswterik£ koll£ei
Crhsimopoieste ligÒtero ugrÒ, meièste th
qermokrasa, auxeste to crÒno yhsmatoj
Фп глхкь ден оекпллЬей брь фз цьсмб
БлеЯшфе кблЬ фз цьсмб кбй блехсюуфе фз Ю
чсзуймпрпйЮуфе чбсфЯ цпэснпх
¸шзуб уе дйЬцпсб ерЯредб (уфз лейфпхсгЯб
"бес ьиес мпт") ме брпфЭлеумб нб мзн еЯнбй
ьлб фб едЭумбфб уфзн Ядйб кбфЬуфбуз
шзуЯмбфпт
ИЭуфе мйб чбмзльфесз иесмпксбуЯб.
Ден еЯнбй бнбгкбЯп ерЯредб рпх ейуЬгпнфбй
фбхфьчспнб нб рсЭрей нб еобчипэн мбжЯ.
ШЮуймп фзт рЯфубт
Гйб Энб кбль шЮуймп фзт рЯфубт чсзуймпрпйЮуфе фз
лейфпхсгЯб w цпэснпт рЯфуб:
РспиесмЬнефе кблЬ фп цпэснп гйб фпхлЬчйуфпн 10 лерфЬ
ЧсзуймпрпйЮуфе Энб фбшЯ елбцспэ блпхмйнЯпх
фпрпиефюнфбт фп уфп рлЭгмб рпх убт рбсЭчефбй.
Чсзуймпрпйюнфбт фпн лйрпухллЭкфз бхоЬнпхн пй чсьнпй
шзуЯмбфпт кбй дэукплб рефхчбЯнефе мйб рЯфуб фсбгбнЮ
Мзн бнпЯгефе ухчнЬ фп цпэснп кбфЬ фп шЮуймп
Уе ресЯрфщуз ме рЯфует ме рлпэуйб гЭмйуз (кбрсйфуьжб,
фЭууесйт ерпчЭт) ухнйуфЬфбй нб ейуЬгефе фз мпфубсЭлб
уфз мЭуз фпх шзуЯмбфпт.
Уфзн ресЯрфщуз фбхфьчспнпх шзуЯмбфпт уе дйЬцпсет
иЭуейт (мЭчсй 2) еЯнбй рспфймьфесп нб чсзуймпрпйеЯфе
фз лейфпхсгЯб цпэснпх Рпллбрлюн ШзуймЬфщн b
бцпэ з лейфпхсгЯб цпэснпх рЯфуб w иб Эшзне
ресйууьфесп фп 1° ерЯредп брь кЬфщ.
ШЮуймп фщн шбсйкюн кбй фщн ксебфйкюн
Гйб фб лехкЬ ксЭбфб, фб рпхлесйкЬ кбй фб шбсйкЬ
чсзуймпрпйеЯфе иесмпксбуЯет мефбоэ 180 °C кбй 200 °C.
Гйб фб кьккйнб ксЭбфб рпх рсЭрей нб еЯнбй кблпшзмЭнб
еощфесйкЬ дйбфзсюнфбт уфп еущфесйкь фп чхмь, еЯнбй кбль
нб чсзуймпрпйЮуефе мйб хшзлЮ бсчйкЮ иесмпксбуЯб
(200°C-220°C) гйб мйксь чспнйкь дйЬуфзмб, мейюнпнфЬт
фзн кбфьрйн.
ГенйкЬ, ьуп пгкщдЭуфесп фп шзфь фьуп чбмзльфесз
рсЭрей нб еЯнбй з иесмпксбуЯб кбй рйп рбсбфефбмЭнп фп
шЮуймп. ФпрпиефЮуфе фп рспт шЮуймп ксЭбт уфп кЭнфсп
фпх рлЭгмбфпт кбй ейуЬгефе кЬфщ брь фп рлЭгмб фпн
лйрпухллЭкфз гйб фзн ухллпгЮ фщн лйрюн.
ЕйуЬгефе фп рлЭгмб ме фЭфпйп фсьрп юуфе фп цбгзфь нб
всЯукефбй уфп кЭнфсп фпх цпэснпх. Бн иЭлефе ресйууьфесз
иесмьфзфб брь кЬфщ, чсзуймпрпйЮуфе фб чбмзльфесб
ерЯредб. Гйб фзн ерЯфехоз гехуфйкюн шзфюн (ейдйкьфесб
рЬрйб кбй кхнЮгй) блеЯшфе фп ксЭбт ме лбсдЯ Ю лЯрпт кбй
фпрпиефЮуфе фп Эфуй юуфе нб еЯнбй уфп ерЬнщ мЭспт.
GlukÒ skoÚro epifaneiak£
Topoqeteste to camhlètera, qste mia qermokrasa
camhlÒterh kai paratenete to y»simo..
76
Page 76

ЕрйлегеЯуб
сэимйуз
1 Рбсбдпуйбкьт
a
2 Р пллбр лю н
шзуймЬфщн
b
3 Grill
2
4 Gratin
T
Фэрпт фспц Ямпх Â Üñïò
РЬрйб
Øçô ü ì ïó ÷á ñ ßó éï Þ
впдйнь
Шзфь чпйсйнь
Мрйукьфб (цсьлбт)
КспуфЬ фет
РЯфуб (уе 2 иЭуейт)
ЛбжЬнйб
Áñíß
Шзфь кпфьрпхлп + рб фЬфет
УкпхмрсЯ
Plum-cake
Ì ð éí éÝ (óå 2 è Ýóå éò )
Мрйукьфб (уе 2 иЭуейт)
РбнфеурЬнй (уе 1 иЭуз)
РбнфеурЬнй (уе 2
иЭуейт)
БлмхсЬ кЭйк
Глю у ует кб й у пхрйЭ т
УпхвлЬкйб брь
кблбмЬсйб кбй гбсЯдет
УпхрйЭт
ЦйлЭфп мрбкблйЬспх
ЛбчбнйкЬ уфп рлЭгмб
М р с йжьле т мпучб сЯуйе т
ЛпхкЬнйкб
Hamburger
Укпхмрс Я
Фпуф (Ю цсхгбнйЬ)
Ме упэвлб (ьрпх
хрЬсчей)
МпучбсЬкй уфз упэвлб
Кпфьрпхлп уфз упэвлб
Бс нЯ уфз упэвлб
Кпфьрпхлп уфп гксйл
УпхрйЭт
(K g )
1
1
1
-
1
1
1
1
1+1
1
1
0.5
0.5
0.5
1.0
1.5
0.7
0.6
0.6
0.8
0.4
0.8
0.6
0.6
1
n.° 4-6
1.0
1.5
1.0
1.5
1.5
ÈÝóç ôïõ
рлЭгмбфпт
уе учЭуз
ìå ôç âÜóç
ôïõ
цпэснпх
3
3
3
3
3
2-4
3
2
2-4
2
2
2-4
2-4
2
2-4
3
4
4
4
4
3/4
4
4
4
4
4
-
-
-
2
2
чсьнпт
рспиЭсмбнузт
(m in.)
15
15
15
15
15
15
10
10
15
10
10
10
10
10
10
15
-
-
-
-
-
-
-
-
-
-
-
-
-
10
10
Сэимйуз
иесмпуфЬфз
200
200
200
180
180
230
180
180
200
180
170
190
180
170
170
200
100%
100%
100%
100%
100%
100%
100%
100%
100%
100%
100%
100%
100%
200
200
ДйЬскейб
ôïõ
шзуЯмбфпт
(m in.)
65-75
70-75
70-80
15-20
30-35
15-20
30-35
40-45
60-70
30-35
40-50
20-25
10-15
15-20
20-25
25-30
10-12
8-10
10-15
10-15
15-20
15-20
15-20
10-12
15-20
3-5
80-90
70-80
70-80
55-60
30-35
Ме упэвлб (ьрпх хрЬсчей)
МпучбсЬкй уфз упэвлб
Бс нЬкй уфз упэвлб
Кпфьрпхлп (уфз упэвлб ) +
рб фЬфет (уфп лйрпухллЭ кфз)
5 Ð ßôóá
w
6 ГлхкЬ
u
7 Fast cooking
v
8 Брьшхоз
U
УзмеЯщуз: пй чсьнпй шзуЯмбфпт еЯнбй ендейкфйкпЯ кбй мрпспэн нб мефбвЬллпнфбй ме вЬуз фйт рспущ рйкЭт
рс пфймЮуейт. Уфб шзу Ямбфб уфп G rill Ю уфп Gratin, п лйрпу хллЭкфзт фпрпиефеЯфбй рЬ нфб уфп 1° ер Яредп о екйнюнфбт б рь
РЯфуб
Шзфь мпучбсЯуйп Ю впдйнь
Êï ô ü ð ï õ ë ï
КспуфЬ фет
КЭйк цспэфщн
Plum-cake
РбнфеурЬнй
КсЭрет ме гЭмйуз (уе 2
иЭуейт)
М йксЬ кЭйк (уе 2 иЭуейт )
Блмхс Ь жэмзт ме фхс Я
(ó å 2 èÝóå éò )
Ì ð éí éÝ (óå 3 è Ýóå éò )
Мрйукьфб (уе 3 иЭуейт)
Мб сЭгкет (уе 3 иЭуейт)
КбфешхгмЭнб
РЯфуб
КплпкхиЬ кйб кб й
гбсЯдет уе блеэсй
ЧщсйЬфйкз урбнбкьрйфб
Рбнфуе сьфп (еЯдпт
нбр плйфЬнйкпх ц бгзфпэ)
ЛбжЬнйб
ФсбгбнЬ шщмЬкйб
Êï ô ï ì ð ï õ ê é Ý ò
РспшзмЭнб
ЦфесЬ кпфьрпхлпх
спдпкпккйнйумЭнб
ЦсЭукб Фсьцймб
Мрйукьфб (цсьлбт)
Plum-cake
Блмхс Ь жэмзт ме фхс Я
¼лб фб кбфешхгмЭнб
фсьцймб
1.5
1.5
1.5
-
0.5
1
1
0.5
1
0.7
0.5
1.2
0.6
0.4
0.7
0.7
0.5
0.3
0.4
0.5
0.3
0.5
0.4
0.4
0.4 2 - 200 20-25
0.3
0.6
0.2
-
-
-
2
3
2
2/3
3
2/3
3
3
2-4
2-4
2-4
1-3-5
1-3-5
1-3-5
2
2
2
2
2
2
2
2
2
2
10
10
10
10
15
10
10
15
15
15
15
15
15
15
15
15
15
200
200
200
200
220
220
180
180
180
180
160
200
190
210
180
180
90
-
-
-
-
-
-
-
-
-
-
250
200
220
200
200
180
220
200
180
210
70-80
70-80
70-75
70-75
15-20
25-30
60-70
20-30
40-45
40-50
25-30
30-35
20-25
15-20
20-25
20-25
180
12
20
30-35
25
35
25-30
15-20
15-18
45
10-12
77
Page 77

З буцЬлейб мйб кблЮ ухнЮиейб
Гйб нб еобуцблЯуефе фзн брпфелеумбфйкьфзфб кбй фзн буцЬлейб фзт ухукехЮт бхфЮт:
брехиэнеуфе брпклейуфйкЬ уе еопхуйпдпфзмЭнб кЭнфсб фечнйкЮт хрпуфЮсйозт
нб жзфЬфе рЬнфб фз чсЮуз бхиенфйкюн бнфбллбкфйкюн
Гйб фз мефбкЯнзуз фзт ухукехЮт, кбй гйб нб
брпупвзипэн жзмйЭт уе Ьфпмб кбй уфп Ядйп фп
рспъьн, нб чсзуймпрпйеЯфе рЬнфб фйт бнфЯуфпйчет
лбвЭт рпх хрЬсчпхн уфб рлбънЬ фпх цпэснпх.
H ухукехЮ бхфЮ учедйЬуфзке гйб мз ербггелмбфйкЮ
чсЮуз, уфп еущфесйкь кбфпйкЯбт кбй фб чбсбкфзсйуфйкЬ
фзт ден рсЭрей нб фспрпрпйпэнфбй.
Пй пдзгЯет бхфЭт йучэпхн мьнп гйб фйт чюсет
рсппсйумпэ фб уэмвплб фщн прпЯщн брейкпнЯжпнфбй
уфп егчейсЯдйп кбй уфзн фбмрелЯфуб мзфсюпх.
З злекфсйкЮ буцЬлейб фзт ухукехЮт бхфЮт
дйбуцблЯжефбй мьнп ьфбн з Ядйб еЯнбй ущуфЬ
ухндедемЭнз ме мйЬ брпфелеумбфйкЮ егкбфЬуфбуз
геЯщузт ьрщт рспвлЭрефбй брь фпхт йучэпнфет
кбнпнйумпэт буцЬлейбт .
КбфЬ фз чсЮуз фзт ухукехЮт фб иесмбнфйкЬ
уфпйчеЯб кбй псйумЭнб мЭсз фзт рьсфбт фпх
цпэснпх иесмбЯнпнфбй рплэ. РспуЭофе рплэ нб
мз фб бггЯоефе кбй ксбфЬфе фб рбйдйЬ уе брьуфбуз.
ЕрейдЮ рськейфбй гйб рзгЭт иесмьфзфбт, мзн
ерйфсЭрефе уе рбйдйЬ Ю бнЯкбнб Ьфпмб нб Эсипхн уе
ербцЮ ме:
- фпхт енфплеЯт кбй фз ухукехЮ генйкЬ
- фйт ухукехбуЯет (убкпэлет, рплхуфхсьл, кбсцйЬ, клр.)
- фз ухукехЮ, кбфЬ кбй мефЬ фз лейфпхсгЯб фпх цпэснпх кбй
фпх гксйл, дедпмЭнзт фзт хресиЭсмбнуЮт фпхт
- фзн уе бчсзуЯб ухукехЮ (уфзн ресЯрфщуз бхфЮ
кбиЯуфбнфбй бвлбвЮ фб мЭсз рпх иб мрпспэубн нб еЯнбй
ерйкЯндхнб).
Брпцеэгпнфбй пй бкьлпхиет енЭсгейет:
- нб бггЯжефе фз ухукехЮ ме всегмЭнб мЭсз фпх уюмбфпт
- нб фз чсзуймпрпйеЯфе ме гхмнЬ рьдйб
- нб фсбвЬфе фз ухукехЮ Ю фп кблюдйп фспцпдпуЯбт гйб
нб фзн брпухндЭуефе брь фзн рсЯжб сеэмбфпт
- Ьукпрет кбй ерйкЯндхнет енЭсгейет
- нб впхлюнпхн фб бнпЯгмбфб бесйумпэ Ю брпвплЮт фзт
иесмьфзфбт
- нб кбфблЮгей фп кблюдйп фспцпдпуЯбт мйксюн злекфсйкюн
ухукехюн уе иесмЬ мЭсз фзт ухукехЮт
- мзн фзн бцЮнефе екфеиеймЭнз уе бфмпуцбйсйкпэт
рбсЬгпнфет (вспчЮ, Юлйп, клр.)
- з чсЮуз фпх цпэснпх щт брпизкехфйкпэ чюспх
- з чсЮуз еэцлекфщн хгсюн рлзуЯпн фзт ухукехЮт
- з чсЮуз рспубсмпуфйкюн, рплэрсйжщн Ю/кбй
рспекфЬуещн
- рспурЬиейет егкбфЬуфбузт Ю ерйукехЮт чщсЯт фзн
ерЭмвбуз ейдйкехмЭнпх рспущрйкпэ.
РсЭрей прщудЮрпфе нб брехиэнеуфе уе ейдйкехмЭнп
рспущрйкь уфйт бкьлпхиет ресйрфюуейт:
- егкбфЬуфбуз (уэмцщнб ме фйт пдзгЯет фпх кбфбукехбуфЮ)
- ьфбн бмцйвЬллефе гйб фз лейфпхсгЯб
- бнфйкбфЬуфбуз фзт рсЯжбт уе ресЯрфщуз бухмвбфьфзфбт
ме фп вэумб фзт ухукехЮт.
РсЭрей нб брехиэнеуфе уфб еопхуйпдпфзмЭнб кЭнфсб
фечнйкЮт хрпуфЮсйозт уфйт бкьлпхиет ресйрфюуейт:
- бн бмцйвЬллефе гйб фзн бкесбйьфзфб фзт ухукехЮт бцпэ
Эчефе бцбйсЭуей фз ухукехбуЯб
- жзмйЬ Ю бнфйкбфЬуфбуз фпх кблщдЯпх фспцпдпуЯбт
- уе ресЯрфщуз влЬвзт Ю кбкЮт лейфпхсгЯбт, жзфюнфбт
бхиенфйкЬ бнфбллбкфйкЬ.
ЕЯнбй укьрймп нб екфелеЯфе фйт бкьлпхиет дйесгбуЯет:
- мьнп фп шЮуймп фщн цбгзфюн, брпцеэгпнфбт Ьллет
енЭсгейет
- нб елЭгчефе фзн бкесбйьфзфб бцпэ бцбйсЭуефе фз
ухукехбуЯб
- нб брпухндЭефе фз ухукехЮ брь фп злекфсйкь дЯкфхп уе
ресЯрфщуз кбкЮт лейфпхсгЯбт кбй рсйн брь прпйбдЮрпфе
енЭсгейб кбибсйумпэ Ю ухнфЮсзузт
- ьфбн ден чсзуймпрпйеЯфбй, нб брпухндЭефе фз ухукехЮ
брь фп злекфсйь дЯкфхп кбй нб клеЯнефе фпн кспхнь фпх
бесЯпх (бн рспвлЭрефбй)
- нб чсзуймпрпйеЯфе гЬнфйб гйб фп цпэснп гйб нб ейуЬгефе Ю
нб вгЬжефе укеэз
- нб рйЬнефе рЬнфб фз лбвЮ фпх цпэснпх уфп кЭнфсп,
дедпмЭнпх ьфй уфп Ьксп иб мрпспэуе нб еЯнбй рйп иесмЮ
ео бйфЯбт фзт еоьдпх иесмпэ бЭсб
- нб елЭгчефе рЬнфб бн пй ерйлпгеЯт еЯнбй уфз иЭуз /o
ьфбн з ухукехЮ ден чсзуймпрпйеЯфбй
- нб кьвефе фп кблюдйп фспцпдпуЯбт бцпэ фп Эчефе
брпухндЭуей брь фп злекфсйкь дЯкфхп ьфбн брпцбуЯжефе
нб мз чсзуймпрпйЮуефе рйб фз ухукехЮ.
П кбфбукехбуфЮт ден мрпсеЯ нб иещсзиеЯ хреэихнпт
гйб ендечьменет жзмйЭт рспесчьменет брь: лбнибумЭнз
егкбфЬуфбуз, чсЮуейт бльгйуфет, лбнибумЭнет кбй
Ьукпрет.
78
Page 78

ЕгкбфЬуфбуз
З егкбфЬуфбуз рсЭрей нб рсбгмбфпрпйзиеЯ уэмцщнб ме
фйт пдзгЯет фпх кбфбукехбуфЮ брь рспущрйкь
ербггелмбфйкЬ ейдйкехмЭнп. Мйб лбнибумЭнз егкбфЬуфбуз
мрпсеЯ нб рспоенЮуей жзмйЭт уе рсьущрб, жюб Ю рсЬгмбфб,
Энбнфй фщн прпЯщн п кбфбукехбуфЮт ден мрпсеЯ нб иещсзиеЯ
хреэихнпт.
Ó
змбнфйкь: прпйбдЮрпфе ерЭмвбуз сэимйузт, ухнфЮсзузт
клр. рсЭрей нб екфелеЯфбй ме фпн цпэснп брпухндедемЭнп
злекфсйкЬ.
ЕгкбфЬуфбуз фщн енфпйчйжьменщн цпэснщн
Гйб нб дйбуцблЯуефе мйб кблЮ лейфпхсгЯб фзт енфпйчйжьмензт
ухукехЮт рсЭрей фп Эрйрлп нб Эчей кбфЬллзлб чбсбкфзсйуфйкЬ.
Уфзн рбсбкЬфщ ейкьнб рбсбиЭфпнфбй пй дйбуфЬуейт фпх чюспх
фпх ерЯрлпх.
555
580
560
min
+4 -0
min
min
45
575-585
+4 -0
480
23
572
558
543545
500
39
15
595
595
• еЯнбй 20 mm: фп кйнзфь мЭспт фпх фЬкпх рсЭрей нб
бцбйсеиеЯ (Åéê. A)
• еЯнбй 18 mm: чсзуймпрпйЮуфе фп рсюфп бхлЬкй рпх еЯнбй
Юдз рспефпймбумЭнп брь фп есгпуфЬуйп (Åéê. B)
• еЯнбй 16 mm: чсзуймпрпйЮуфе фп деэфесп бхлЬкй (Åéê..C).
Åéê. A Åéê. B
Гйб нб дйбуцблйуфеЯ Энбт кбльт бесйумьт рсЭрей нб бцбйсеиеЯ
фп рЯущ фпЯчщмб фпх чюспх, еЯнбй рспфймьфесп нб
егкбфбуфЮуефе фпн цпэснп Эфуй юуфе нб бкпхмрЬей уе дэп
оэлйнпхт рЮчейт. Уе ресЯрфщуз рпх хрЬсчей Энб ухнечЭт
ерЯредп уфЮсйозт, бхфь рсЭрей нб Эчей Энб Ьнпйгмб фпхлЬчйуфпн
45 x 560 mm.
45 mm.
560 mm.
Фб рЬнел фщн гейфпнйкюн фпх цпэснпх ерЯрлщн рсЭрей нб
еЯнбй цфйбгмЭнб брь хлйкь бниекфйкь уфз иесмьфзфб.
Ейдйкьфесб, уфзн ресЯрфщуз оэлйнщн ерЯрлщн кбрлбмЬ пй
кьллет рсЭрей нб бнфЭчпхн уе иесмпксбуЯб фщн 100°C.
Уэмцщнб ме фпхт кбнпнйумпэт буцблеЯбт, бцпэ енфпйчйуфеЯ
з ухукехЮ, ден рсЭрей нб хцЯуфбнфбй ендечьменет ербцЭт
ме фб злекфсйкЬ фпйчюмбфб.
¼лб фб мЭсз рпх дйбуцблЯжпхн фзн рспуфбуЯб рсЭрей нб
уфесеюнпнфбй ме фЭфпйп фсьрп рпх нб мзн мрпсеЯ нб
бцбйсеиеЯ чщсЯт фз впЮиейб кЬрпйпх есгблеЯпх.
Гйб Энб ущуфь кенфсЬсйумб схимЯуфе фпхт 4 фЬкпхт рпх
всЯукпнфбй рлехсйкЬ фпх цпэснпх брЭнбнфй брь фйт 4 прЭт
уфп ресймефсйкь рлбЯуйп. Ейдйкьфесб, бн фп рЬчпт фпх
рлбънпэ фпх ерЯрлпх:
Åéê. C
Гйб нб уфесеюуефе фп цпэснп уфп Эрйрлп бнпЯофе фзн рьсфб
фпх цпэснпх кбй уфесеюуфе фпн цпэснп дйбмЭупх фщн 4
оэлйнщн вйдюн уфйт 4 прЭт рпх всЯукпнфбй уфп ресймефсйкь
рлбЯуйп.
ЗлекфсйкЮ уэндеуз
З злекфсйкЮ уэндеуз уфп дЯкфхп рсЭрей нб гЯней уфзн
кпхжЯнб. З ерйцЬнейб ухндЭефбй уфзн кпхжЯнб дйбмЭупх
еньт кбфЬллзлпх ухндЭумпх. Пй кпхжЯнет еЯнбй
дйбмпсцщмЭнет гйб лейфпхсгЯб ме енбллбууьменп сеэмб
уе фЬуз кбй ухчньфзфб фспцпдпуЯбт рпх бнбцЭсефбй уфзн
рйкбкЯдб чбсбкфзсйуфйкюн.
79
Page 79

Ìüíï óå
псйумЭнб
мпнфЭлб
ЕрЯредп енфпЯчйузт
P
NL2L3
L1
Eik. E
ÌÐËÅ
ЛЕХКП
КПХЖЙНБ ЕНФПЙЧЙЖПМЕНЗ
КПККЙНП
КЙФСЙНП
РСБУЙНП
Уэндеуз кблщдЯпх фспцпдпуЯбт
¢нпйгмб фзт рйнбкЯдбт бкспдекфюн:
Чсзуймпрпйюнфбт Энб кбфубвЯдй, ксбфЮуфе кьнфсб уфйт
рлехсйкЭт глщууЯфует фпх кбрбкйпэ фзт рйнбкЯдбт
бкспдекфюн
ФсбвЮофе кбй бнпЯофе фп кбрЬкй фзт рйнбкЯдбт бкспдекфюн.
Гйб фз иЭуз уе лейфпхсгЯб фпх кблщдЯпх екфелЭуфе фйт бкьлпхиет
енЭсгейет:
оевйдюуфе фз вЯдб кбй фйт вЯдет фщн ербцюн
УзмеЯщуз: пй гЭцхсет еЯнбй дйехиефзмЭнет брь фп
ЕсгпуфЬуйп гйб фз уэндеуз уе 400V фсйцбуйкь (ейк.
D).
гйб фзн екфЭлеуз фщн злекфсйкюн ухндЭуещн фщн ейк.
F êáé åéê. G, чсзуймпрпйЮуфе фйт дэп гЭцхсет рпх
всЯукпнфбй енфьт фпх кйвщфЯпх (ейк. E - учефйкь P”)
уфесеюуфе фп кблюдйп фспцпдпуЯбт уфп бнфЯуфпйчп клйр
кблщдЯпх кбй клеЯуфе фп кбрЬкй
400V 3N~
H05RR-F 5x2.5 CEI-UNEL 35363
NL3L1L2
5
3
4
Eik. D
1
2
230V 1N~
H07RN-F 3x4 CEI-UNEL 35364
NL
5
3
4
Eik. F
1
2
400V 2N~
H05RR-F 4x2.5 CEI-UNEL 35363
NL2L1
5
3
4
Eik. G
Уэндеуз фпх кблщдЯпх фспцпдпуЯбт уфп дЯкфхп
МпнфЬсефе уфп кблюдйп Энб вэумб кбнпнйкпрпйзмЭнп гйб фп
цпсфЯп рпх бнбцЭсефбй уфзн рйнбкЯдб фщн уфпйчеЯщн, уфзн
ресЯрфщуз бр ехиеЯбт уэндеузт уфп дЯкфхп егкбфбуфЮуфе
мефбоэ фзт ухукехЮт кбй фпх дйкфэпх Энб пмпйпгенЮ дйбкьрфз
ме елЬчйуфп Ьнпйгмб мефбоэ фщн ербцюн 3 mm. рпх нб ербскеЯ
гйб фп цпсфЯп кбй нб фзсеЯ фйт йучэпхует рспдйбгсбцЭт (п бгщгьт
геЯщузт ден рсЭрей нб дйбкьрфефбй брь фпн дйбкьрфз).
Фп кблюдйп фспцпдпуЯбт рсЭрей нб еЯнбй фпрпиефзмЭнп ме фЭфпйп
фсьрп юуфе уе кбнЭнб узмеЯп фпх з иесмпксбуЯб нб мзн
хресвбЯней екеЯнз фпх ресйвЬллпнфпт кбфЬ 50°C.
Рсйн рсбгмбфпрпйЮуефе фз уэндеуз вевбйщиеЯфе ьфй:
З злекфсйкЮ буцЬлейб фзт ухукехЮт бхфЮт дйбуцблЯжефбй
мьнп ьфбн з Ядйб еЯнбй ущуфЬ ухндедемЭнз уе мйб
егкбфЬуфбуз геЯщузт рпх лейфпхсгеЯ кбй фзсеЯ фйт
рспдйбгсбцЭт фщн йучхьнфщн кбнпнйумюн злекфсйкЮт
буцЬлейбт. ЕлЭгофе бн бхфЮ з вбуйкЮ рспырьиеуз
буцЬлейбт фзсеЯфбй рЬнфб. Уе ресЯрфщуз бмцйвплйюн,
жзфЮуфе еопнхчйуфйкь Элегчп брь Энбн бнбгнщсйумЭнп
фечнйкь. П кбфбукехбуфЮт ден мрпсеЯ нб иещсзиеЯ
хреэихнпт гйб ендечьменет жзмйЭт рспклзиеЯует брь фзн
брпхуЯб геЯщузт уфзн егкбфЬуфбуз.
Рсйн ухндЭуефе фз ухукехЮ, вевбйщиеЯфе ьфй фб уфпйчеЯб ерЯ
фзт рйнбкЯдбт (ерЯ фзт ухукехЮт Ю/кбй ерЯ фзт ухукехбуЯбт)
бнфбрпксЯнпнфбй уе екеЯнб фпх дйкфэпх дйбнпмЮт злекфсйкпэ
кбй бесЯпх.
1
2
80
Page 80

ЕлЭгофе бн з злекфсйкЮ рбспчЮ фзт егкбфЬуфбузт кбй фщ
рсйжюн бскпэн гйб фз мЭгйуфз йучэ фзт ухукехЮт, ьрщт
псЯжефбй уфзн рйнбкЯдб. Уе ресЯрфщуз бмцйвплЯбт
брехихниеЯфе уе бнбгнщсйумЭнп ербггелмбфЯб.
Уе ресЯрфщуз бухмвбфьфзфбт мефбоэ рсЯжбт кбй
сехмбфплЮрфз фзт ухукехЮт жзфеЯуфе фзн бнфйкбфЬуфбуз
фзт рсЯжбт ме мйб Ьллз кбфЬллзлз брь еоейдйкехмЭнп
ербггелмбфЯб. Бхфьт, ухгкексймЭнб, иб рсЭрей нб
дйбрйуфюуей бн з дйбфпмЮ фщн кблщдЯщн фзт рсЯжбт еЯнбй
кбфЬллзлз гйб фзн брпсспцпэменз йучэ брь фз ухукехЮ.
ФечнйкЬ чбсбкфзсйуфйкЬ
ГенйкЬ ден ухнйуфЬфбй з чсЮуз фщн рспубсмпуфйкюн,
рплэрсйжщн Ю/кбй рспекфЬуещн. ¼фбн ьмщт з чсЮуз фпхт
ксйиеЯ брбсбЯфзфз иб рсЭрей рЬнфб нб чсзуймпрпйпэнфбй
мьнп брлЬ Ю рпллбрлЬ рспубсмпуфйкЬ кбй рспекфЬуейт
рпх фзспэн фйт рспдйбгсбцЭт фщн йучхьнфщн кбнпнйумюн
буцблеЯбт, рспуЭчпнфбт ьмщт нб мзн оересбуфеЯ фп ьсйп
рбспчЮт уе фймЭт сеэмбфпт рпх бнбцЭсефбй уфзн
рспЭкфбуз Ю уфп брль рспубсмпуфйкь кбй екеЯнз з мЭгйуфз
йучэт рпх бнбгсЬцефбй уфп рпллбрль рспубсмпуфйкь. Ôï
вэумб кбй з рсЯжб рсЭрей нб еЯнбй еэкплб рспувЬуймб.
ЩцЭлймет дйбуфЬуейт фпх цпэснпх:
рлЬфпт: cm. 43,5
вЬипт: cm. 40
ýøïò: cm. 32
ЩцЭлймпт ьгкпт фпх злекфсйкпэ цпэснпх:
лЯфсб 56
ENERGY LABEL
ПдзгЯб 2002/40/CE гйб фзн ефйкЭфб злекфсйкюн цпэснщн
Кбнпнйумьт EN 50304
КбфбнЬлщуз енЭсгейбт ЦхуйкЮ бгщгймьфзфб
лейфпхсгЯб иЭсмбнузт: a Рбсбдпуйбкьт
КбфбнЬлщуз енЭсгейбт дЮлщуз КлЬузт ДхнбмйкЮт бгщгймьфзфбт
лейфпхсгЯб иЭсмбнузт: u ГлхкЯумбфб
ФЬуейт кбй ухчньфзфб фспцпдпуЯбт:
230/400V ~ 3N 50Hz 9200W
7
З ухукехЮ бхфЮ фзсеЯ фйт рспдйбгсбцЭт фщн
бкьлпхищн Кпйнпфйкюн Пдзгйюн:
- 73/23/CEE фзт 19/02/73 (ЧбмзлЮ ФЬуз) кбй
мефбгенЭуфесет фспрпрпйЮуейт.
- 89/336/CEE фзт 03/05/89 (ЗлекфспмбгнзфйкЮ
Ухмвбфьфзфб) кбй мефбгенЭуфесет фспрпрпйЮуейт.
- 93/68/CEE фзт 22/07/93 кбй мефбгенЭуфесет
фспрпрпйЮуейт.
81
Page 81

82
Page 82

83
 Loading...