

Hotpoint HMS313I User Manual
Instructions for Installation and UseInstructions for Installation and Use
Instructions for Installation and Use
Instructions for Installation and UseInstructions for Installation and Use
Fridge / FreezerFridge / Freezer
Fridge / Freezer
Fridge / FreezerFridge / Freezer
Model HMS313IModel HMS313I
Model HMS313I
Model HMS313IModel HMS313I

CONTENTSCONTENTS
CONTENTS
CONTENTSCONTENTS
Product Safety
Installation
Electrical Connection
Get to Know your Appliance
The Display
Getting your Appliance ready for use
How to use The Display
How to use the Refrigerator Compartment
Storage Guide
How to use the Freezer Compartment
Food Storage
Energy Saving Tips
Buzzer and Visual Warnings
Caring for your Appliance
Troubleshooting
Notes
After Sales Service
Hotpoint Guarantee
Key Contacts
3
3
4
5
6
7
7
8
9
10-11
12-13
14
14
15
16
17
18
19
Back Cover
Retention of this Instruction BookRetention of this Instruction Book
Retention of this Instruction Book
Retention of this Instruction BookRetention of this Instruction Book
This Instruction Book must be kept handy for reference as it contains important details on the safe and proper use of the
appliance.
If you sell or pass the appliance to someone else, or move house and leave it behind, make sure this Book is also provided
so the new owner can become familiar with the appliance and safety warnings.
If the Book is lost or damaged a copy may be obtained from:
GDA LTD., Morley Way, Peterborough, PE2 9JB
GB
2

PRODUCT SAFETYPRODUCT SAFETY
PRODUCT SAFETY
PRODUCT SAFETYPRODUCT SAFETY
ATTENTION
Read your manual carefully since it contains instructions which
will ensure safe installation, use and maintenance of your
appliance.
Your Refrigerator is built to International safety standards
(EN60) and has been awarded the European approval mark
(IMQ) for compliance with UK electrical safety requirements.
It also meets the EC standards on the prevention and elimination of radio interference (EC directive 87/308 - 02.06.89).
1.1.
1. This appliance must not be installed outdoors - not even
1.1.
in an area protected by a roof. It is extremely dangerous to
leave it exposed to rain or storms.
2.2.
2. It must only be used by adults and exclusively to refriger-
2.2.
ate and freeze foodstuffs, following the instructions for use
contained in this manual.
3.3.
3. Do not ever touch or handle the appliance with bare feet
3.3.
or with wet hands or feet.
4.4.
4. It is highly recommended that you do not use extension
4.4.
cords or multiple socket adapters. If the refrigerator is installed between cabinets, make sure that the cord is not
bent or dangerously pinched or compressed.
5.5.
5. Never pull on the cord or the refrigerator to remove the
5.5.
plug from the wall socket - this is very dangerous.
6.6.
6. Never touch the cooling components within the appli-
6.6.
ance, especially with wet hands because this could result in
injury.
7.7.
7. Never put ice cubes just removed from the freezer into
7.7.
your mouth because they could stick to your mouth and cause
burns.
8.8.
8. Never perform any cleaning or maintenance operations
8.8.
without first unplugging the appliance. Setting the appliance
ON/OFF control to OFF is not enough to cut off all electrical
contacts.
9.9.
9. Before having your old refrigerator picked up for disposal,
9.9.
remove or make inoperable any locking devices to prevent
children who might play in or around the appliance from
being locked inside.
10.10.
10. Before calling for service/assistance in the case of mal-
10.10.
function, consult the chapter entitled “TROUBLESHOOTING"
to determine whether it is possible to eliminate the problem.
Do not try to repair the problem by trying to access the internal components of the appliance.
11.11.
11. If damaged, the power supply cord on this appliance
11.11.
must necessarily be replaced by our service centre because
special tools are required for replacement.
12. 12.
12. Do not use electric appliances inside the compartment
12. 12.
for food storage, if these are not those recommended by the
manufacturer.
13.13.
13. At the end of the functional life of your appliance –
13.13.
containing cyclopentane gas in the insulation foam and
perhaps gas R600a (isobutane) in the refrigeration circuit –
the latter should made safe before being sent to the dump.
For this operation, please contact your dealer or the Local
Organisation in charge of waste disposal.
INSTALLATIONINSTALLATION
INSTALLATION
INSTALLATIONINSTALLATION
INSTALLATIONINSTALLATION
INSTALLATION
INSTALLATIONINSTALLATION
To ensure that the appliance operates properly andTo ensure that the appliance operates properly and
To ensure that the appliance operates properly and
To ensure that the appliance operates properly andTo ensure that the appliance operates properly and
to reduce energy consumption, it is important thatto reduce energy consumption, it is important that
to reduce energy consumption, it is important that
to reduce energy consumption, it is important thatto reduce energy consumption, it is important that
the appliance is installed correctly.the appliance is installed correctly.
the appliance is installed correctly.
the appliance is installed correctly.the appliance is installed correctly.
VentilationVentilation
Ventilation
VentilationVentilation
The compressor and condenser generate heat and, therefore,
need to be ventilated properly. Avoid placing the appliance
in direct sunlight, or next to an electric stove or similar
appliance. Areas not adequately ventilated are not suitable
for this appliance.
During installation, make sure not to cover or obstruct the
grates that allow for proper ventilation of the appliance.
Away from HeatAway from Heat
Away from Heat
Away from HeatAway from Heat
Avoid positioning the appliance in a place where it is directly
exposed to sunlight or near an oven, hob or the like.
Electrical Connection and EarthingElectrical Connection and Earthing
Electrical Connection and Earthing
Electrical Connection and EarthingElectrical Connection and Earthing
Before proceeding with the electrical connection, make sure
that the voltage indicated on the rating plate, located within
the freezer, corresponds to the mains voltage in your home
and that the socket is fitted with a standard earthing wire in
accordance with safety standards for 46/90 systems. If the
socket is not fitted with an earthing wire, the manufacturer
will not be held liable for any damages and/or injuries arising
out of the use of the appliance. Do not use multiple sockets
or adapters.
Position the appliance in such a way that you canPosition the appliance in such a way that you can
Position the appliance in such a way that you can
Position the appliance in such a way that you canPosition the appliance in such a way that you can
access the socket where it is plugged in.access the socket where it is plugged in.
access the socket where it is plugged in.
access the socket where it is plugged in.access the socket where it is plugged in.
Insufficient power?Insufficient power?
Insufficient power?
Insufficient power?Insufficient power?
The electrical socket must be able to handle the maximum
power load of the appliance, which is indicated on the rating
plate located within the freezer.
Before making the electrical connection ...Before making the electrical connection ...
Before making the electrical connection ...
Before making the electrical connection ...Before making the electrical connection ...
After the appliance has been delivered, place it in the vertical upright position and wait at least 3 hours before inserting
the plug into the socket in order to ensure that it functions
properly.
3
GB

ELECTRICAL CONNECTIONELECTRICAL CONNECTION
ELECTRICAL CONNECTION
ELECTRICAL CONNECTIONELECTRICAL CONNECTION
Your appliance is supplied with a 13amp fused plug
that can be plugged into a 13amp socket for
immediate use. Before using the appliance please
read the instructions below.
WARNING:WARNING:
WARNING:
WARNING:WARNING:
THIS APPLIANCE MUST BE EARTHED.THIS APPLIANCE MUST BE EARTHED.
THIS APPLIANCE MUST BE EARTHED.
THIS APPLIANCE MUST BE EARTHED.THIS APPLIANCE MUST BE EARTHED.
Replacing fuse covers:Replacing fuse covers:
Replacing fuse covers:
Replacing fuse covers:Replacing fuse covers:
When replacing a faulty fuse, a 13amp ASTA
approved fuse to BS 1362 should always be used
and the fuse cover re-fitted.
If the fuse cover is lost, the plug must not be used
until a replacement is obtained.
Replacement fuse covers:Replacement fuse covers:
Replacement fuse covers:
Replacement fuse covers:Replacement fuse covers:
If a replacement fuse cover is fitted, it must be of
the correct colour as indicated by the coloured
marking or the colour that is embossed in words on
the base of the plug.
Fitting a new plugFitting a new plug
Fitting a new plug
Fitting a new plugFitting a new plug
IMPORTANT:IMPORTANT:
IMPORTANT:
IMPORTANT:IMPORTANT:
WIRES IN THE MAINS LEAD ARE COLOURED IN
ACCORDANCE WITH THE FOLLOWING CODE...
Green and Yellow - Earth
Blue - Neutral
Brown - Live
As the colours of the wires in the mains lead may
not correspond with the coloured markings
identifying the terminals in your plug, proceed as
follows:
- Connect Green and Yellow wire to
terminal marked 'E' or or coloured
Green and Yellow.
- Connect Brown wire to terminal marked
'L' or coloured red or brown.
- Connect Blue wire to terminal marked 'N'
or coloured Black or Blue.
Changing the plug:Changing the plug:
Changing the plug:
Changing the plug:Changing the plug:
Removing the plugRemoving the plug
Removing the plug
Removing the plugRemoving the plug
If your appliance has a non-rewireable moulded
plug and you should wish to remove it to add a
longer cable or to re-route the mains cable through
partitions, units etc. please ensure that either:
- The plug is replaced by a fused 13amp rewireable plug bearing the BSI mark of
approval.
or
- The mains cable is wired directly into a
13amp cable outlet, controlled by a
switch (in compliance with BS 5733)
which is accessible without moving the
appliance.
Disposing of the plugDisposing of the plug
Disposing of the plug
Disposing of the plugDisposing of the plug
Cut off and dispose of the supplied plug if it does
not fit your socket. The cable should be cut as close
as possible to the moulded plug.
Remove the fuse.
If a 13amp plug (BS 1363) is used it must be
fitted with a 13amp fuse. A 15amp plug must be
protected by a 15amp fuse, either in the plug or
adaptor or at the distribution board.
If you are in any doubt about the electrical
supply to your machine, consult a qualified
electrician before use.
CE Marking certifies that this appliance
conforms to the following EEC
directives :
Low Voltage Equipment - 73/23/EEC &
93/68 EEC
Electromagnetic Compatibility
89/336/EEC, 92/31/EEC & 93/68/EEC
WARNING:WARNING:
WARNING:
WARNING:WARNING:
To avoid a shock hazard do not insert theTo avoid a shock hazard do not insert the
To avoid a shock hazard do not insert the
To avoid a shock hazard do not insert theTo avoid a shock hazard do not insert the
discarded plug into a socket anywhere else.discarded plug into a socket anywhere else.
discarded plug into a socket anywhere else.
discarded plug into a socket anywhere else.discarded plug into a socket anywhere else.
GB
4
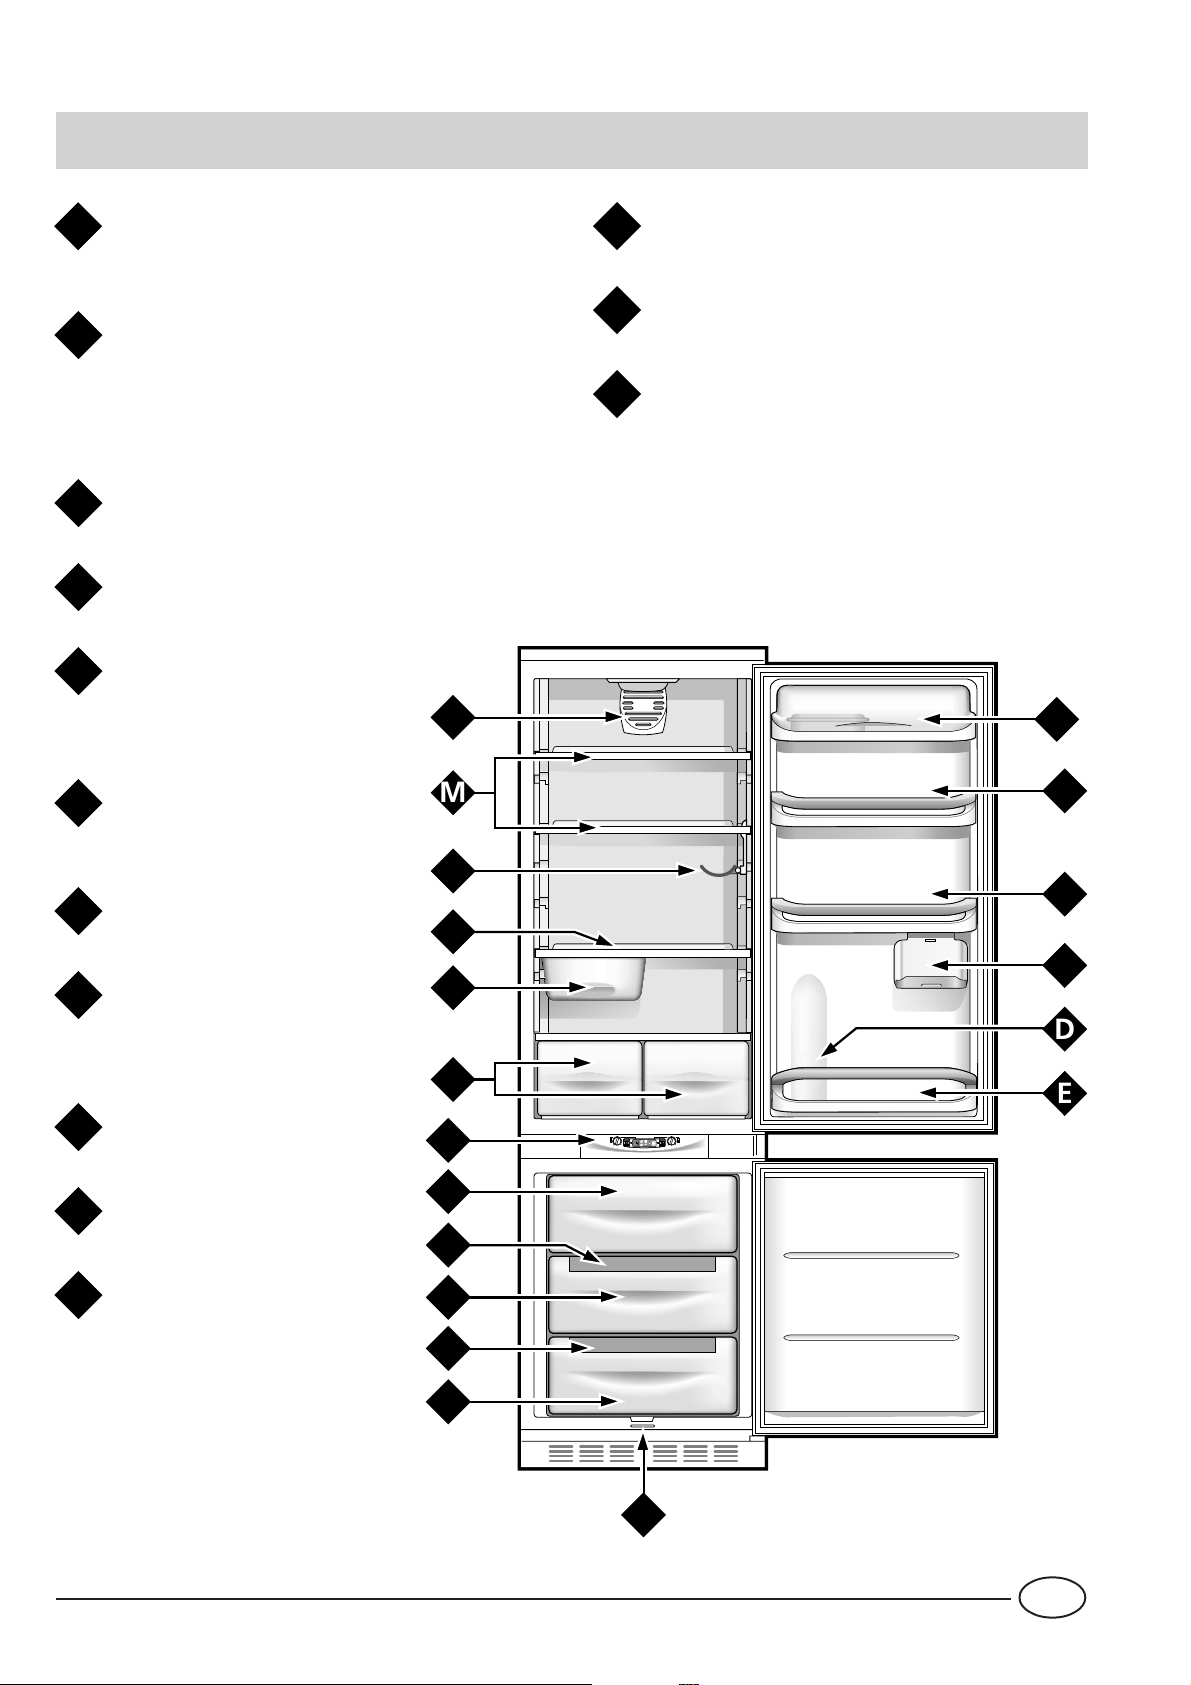
GET TO KNOW YOUR APPLIANCEGET TO KNOW YOUR APPLIANCE
ECO
M
D
E
O
N
L
M
F
K
A
B
C
B
J
G
H
G
I
H
GET TO KNOW YOUR APPLIANCE
GET TO KNOW YOUR APPLIANCEGET TO KNOW YOUR APPLIANCE
Removable/Adjustable ShelvesRemovable/Adjustable Shelves
Removable/Adjustable Shelves
Removable door shelves with lid, with egg trayRemovable door shelves with lid, with egg tray
Removable door shelves with lid, with egg tray
Removable door shelves with lid, with egg trayRemovable door shelves with lid, with egg tray
A
and lidded butter dishand lidded butter dish
and lidded butter dish
and lidded butter dishand lidded butter dish
Removable miscellaneous shelf Removable miscellaneous shelf
Removable miscellaneous shelf
Removable miscellaneous shelf Removable miscellaneous shelf
B
Hinged shelf Hinged shelf
Hinged shelf
Hinged shelf Hinged shelf
Compartment for a 2 litre bottle Compartment for a 2 litre bottle
Compartment for a 2 litre bottle
Compartment for a 2 litre bottle Compartment for a 2 litre bottle
D
Removable door shelf for bottles Removable door shelf for bottles
Removable door shelf for bottles
Removable door shelf for bottles Removable door shelf for bottles
E
Drain system for drawing off Drain system for drawing off
Drain system for drawing off
Drain system for drawing off Drain system for drawing off
F
defrost water from freezerdefrost water from freezer
defrost water from freezer
defrost water from freezerdefrost water from freezer
compartmentcompartment
compartment
compartmentcompartment
Removable/Adjustable ShelvesRemovable/Adjustable Shelves
M
Hinged bottle rack Hinged bottle rack
Hinged bottle rack
Hinged bottle rack Hinged bottle rack
N
"A.I.R. System" "A.I.R. System"
"A.I.R. System"
"A.I.R. System" "A.I.R. System"
O
(Advanced Integrated Refrigeration)(Advanced Integrated Refrigeration)
(Advanced Integrated Refrigeration)
(Advanced Integrated Refrigeration)(Advanced Integrated Refrigeration)
Compartment for storing Compartment for storing
Compartment for storing
Compartment for storing Compartment for storing
G
frozen foodsfrozen foods
frozen foods
frozen foodsfrozen foods
Ice tray "ESY ICE" Ice tray "ESY ICE"
Ice tray "ESY ICE"
Ice tray "ESY ICE" Ice tray "ESY ICE"
H
Compartment for freezing Compartment for freezing
Compartment for freezing
Compartment for freezing Compartment for freezing
I
fresh foods and storing frozenfresh foods and storing frozen
fresh foods and storing frozen
fresh foods and storing frozenfresh foods and storing frozen
foodsfoods
foods
foodsfoods
Display Display
Display
Display Display
J
Fruit and Vegetable Crispers Fruit and Vegetable Crispers
Fruit and Vegetable Crispers
Fruit and Vegetable Crispers Fruit and Vegetable Crispers
K
Meat/cheese storage box Meat/cheese storage box
Meat/cheese storage box
Meat/cheese storage box Meat/cheese storage box
L
5
GB

THE DISPLAYTHE DISPLAY
THE DISPLAY
THE DISPLAYTHE DISPLAY
Fridge ON/OFF / temperature control Fridge ON/OFF / temperature control
Fridge ON/OFF / temperature control
Fridge ON/OFF / temperature control Fridge ON/OFF / temperature control
SUPER COOL function SUPER COOL function
SUPER COOL function
SUPER COOL function SUPER COOL function
This turns the refrigerator compartment on or off and
enables you to set the relative operating temperatures.
Freezer temperature and appliance ON/OFFFreezer temperature and appliance ON/OFF
Freezer temperature and appliance ON/OFF
Freezer temperature and appliance ON/OFFFreezer temperature and appliance ON/OFF
controlcontrol
control
controlcontrol
This turns the whole appliance on or off and enables
you to set the freezer compartment operating
temperatures.
MODE button MODE button
MODE button
MODE button MODE button
This button allows you to navigate the display to have
access to the various settings/functions and to turn
off the alarm buzzers.
SELECT button SELECT button
SELECT button
SELECT button SELECT button
This button selects/deselects the different functions
and turns off the alarm buzzers.
Fridge setting Fridge setting
Fridge setting
Fridge setting Fridge setting
Displays the temperature set in the fridge
compartment and when the fridge compartment is
turned OFF (word OFF indicated).
Displays the status (disabled, selected or enabled) of
the SUPER COOL function (rapid cooling of the
refrigerator).
SUPER FREEZE function SUPER FREEZE function
SUPER FREEZE function
SUPER FREEZE function SUPER FREEZE function
Displays the status (disabled, selected or enabled) of
the SUPER FREEZE function (rapid freezing).
HOLIDAY function HOLIDAY function
HOLIDAY function
HOLIDAY function HOLIDAY function
Displays the status (disabled, selected or enabled) of
the HOLIDAY FUNCTION (optimal temperatures with
the minimum consumption in the event of prolonged
absence).
ICE PARTY function ICE PARTY function
ICE PARTY function
ICE PARTY function ICE PARTY function
Displays the status (disabled, selected or enabled) of
the ICE PARTY function (maximum speed in cooling a
warm bottle and serving it at the table in the special
bucket designed to maintain the temperature reached
by the bottle).
Freezer setting Freezer setting
Freezer setting
Freezer setting Freezer setting
Displays the temperature set in the freezer
compartment and when the appliance is turned OFF
(word OFF indicated).
GB
6
 Loading...