

Hotpoint HDA2600K User Manual

a
Dishwasher
Contink
.—
3
Air Gap
Appliance Registration
Care and Cleaning
China, Crystal, Sterling
Cycle Features
Detergent, Detergent Guide 12, 13
Dispenser Cups
Energy-Saving Tips
Front
Panel
Color Change
Loading
Lock Controls Feature
Model and
Operating Instructions 4-6
Cycle Selection
Dishwashing Shortcut
Drying Options
Soil Level 4
Pots & Pans
Problem Solver
Repair Service
Serial
Numbers
21
21
22
14-16
4, 13
18-20
23
2
17
11
13
2
6
2
4
6
5
Use and Care of
built-in model
HDA2600K
-“5
Rinse Agent
Safety Instructions
Systems Monitor
User Maintenance Instructions 21
Warranty
Water
Temperature
Winter Storage
GE Answer
800.626.2000
Center@
Back Cover
7-1o
12
3
12
21
Help us help you...
Ene~y-savi~
tips
Before
usiW
your dishwasher,
read this book carefully.
It is intended to help you operate
and
maintain your new dishwasher
properly.
Keep it handy for answers to your
questions.
If you don’t understand something
or need more help, write (include
your phone number):
Consumer Affairs
Hotpoint
Appliance Park
Louisville, KY 40225
Write down the model
and serial numbers,
You’ll find them on a label just
inside the dishwasher door.
These numbers are also on the
Consumer Product Ownership
Registration Card that came with
your dishwasher. Before sending
in this card, please write these
numbers here:
If you received
dam~ed
a
Immediately contact the dealer
(or builder) that sold you the
dishwasher.
dishwasher . . .
Save time and money.
Before you call for
service . . .
Check the Problem Solver (pages
18-20). It lists causes of minor
operating problems that you can
correct yourself.
The power consumption of your
dishwasher can be minimized if
you follow these suggestions:
●
Operate the dishwasher only
when it’s
accumulate in the dishwasher.
When you put in only a partial
load, use the RINSE & HOLD
Cycle to rinse off heavy soils. Be
sure to latch the door when waiting
for a full load. This helps to keep
soils moist, easier to remove.
full.
Let the dishes
Always select the cycle that uses
the least amount of water that
will remove the soil from the load.
page 11.
See
● Select the SOIL LEVEL that will
remove soil from load.
. If you don’t need your dishes
right away,
SAVER
drying heater off automatically.
Dishes dry naturally over a longer
period such as overnight.
●
Watch the SYSTEMS
for more ideas. See page 7.
use your ENERGY
drying that turns the
MONI~R
Model Number
Serial Number
Use these numbers in any
correspondence or service calls
concerning your dishwasher.
Convenience features
This dishwasher has many convenient
features. Among them are:
●
Controls are arranged left to right
as you use them.
● Automatic “beep” responses to
instructions and a lighted display
let you know the desired function
has been selected.
●
Le@
you adjust your washing cycle
to the amount of soil on your dishes.
●
or energy-saving, no-heat drying.
● A SYSTEMS
tells you what’s happening in the
dishwasher and if certain things
are wrong.
●
prevent accidental tampering.
●
don’t have to reprogram each time.
See
Lets you
Lets you LOCK the controls to
Remembers your last cycle so you
select
SHOR~UT
fast,
heati
MONI~R
on page 6.
drying
that
2
IMPORT~T S~TY
INSTRUCTIONS
m
Read all imtructiom before
W~~G—When
appliance, always exercise
safety precautions, including the
following:
●
Use this appliance only for
its
intended
will find
and Care
● This dishwasher must be
properly
in amordance with the
Wtition
it is used.
d~ribed
Book.
instied
Instructions before
If you did not receive
an Instigation Instructions sheet
with your dishwasher,
obtain one by contacting the
service location nearest you,
–This appliance must be
connected to a grounded
permanent wiring system; or an
—
equipment-grounding conductor
must be run with the circuit
conductors and connected to the
equipment-grounding terminal
or lead of the appliance.
–Connect to a properly rated,
protected and sired power-supply
circuit to avoid
●
Use only powder or liquid
detergents or wetting agents
recommended for use in a
dishwasher.
●
DO not
markd
quitient.
wash plastic items
“dishwasher safe” or the
Rrplastic items not so
marked, check the
recommendations.
using this
purpose, as you
in this Use
and
you
elatrid
overload.
manuticturer’s
basic
loeati
can
meti,
unless
wing thk
appliance.
●
Load light plastic items so
they will not become
dislodgd
and drop to the bottom of the
dishwasher-they might come
into contact with the heating
unit and be damaged.
To
minimti
iqury.
●
When
washed:
the possibility of
loading items to
A. Locate sharp items so that
they are not likely to damage
tie
door seal, and
B. Load sharp knives with the
handles up to reduce the risk
of cut-type injuries.
●
Do not touch the heating
elemmt
akr
●
during or immediately
use.
Do not operate your dishwasher
unless all enclosure panels are
properly in place.
●
Do not tamper with controls.
●
Do not abuse, sit on, or stand
on the door or dish rack of the
dishwasher.
●
Close supervision is necessary
if this appliance is
usd
by or near
children. Do not allow children
to play inside, on or with this
appliance or any discarded
appliance, Dispose of discarded
appliances and shipping or
packing material properly.
Before discarding a dishwasher,
remove the door of the washing
compartment.
be
●
Keep dl washing detergents
and wetting agents out of the
reach of children, preferably in
a locked cabinet. Observe all
warnings on container labels to
avoid personal injury.
●
~ROG~
GAS
is
produced by the chemical action
within your water heater. It can
accumulate in the water heater
and/or water pipes if hot water
has not been used for a period of
M w~k
or longer.
~ROGEN
GAS IS EXPLOSIVE. To prevent
the possibility of damage or
injury, if you have not used hot
water for two weeks or more, or
move into a residence in which
the hot water system may not
have been used for some time,
turn on all hot water faucets and
allow them to run for several
minutes before using any
electrical appliance which is
connected to the hot water
system. This will allow any
hydrogen gas to escape. Also,
since the gas is flammable, do
not smoke or use an open flame
or appliance during this process.
SAVE
T=E
~STRUCTIONS
3
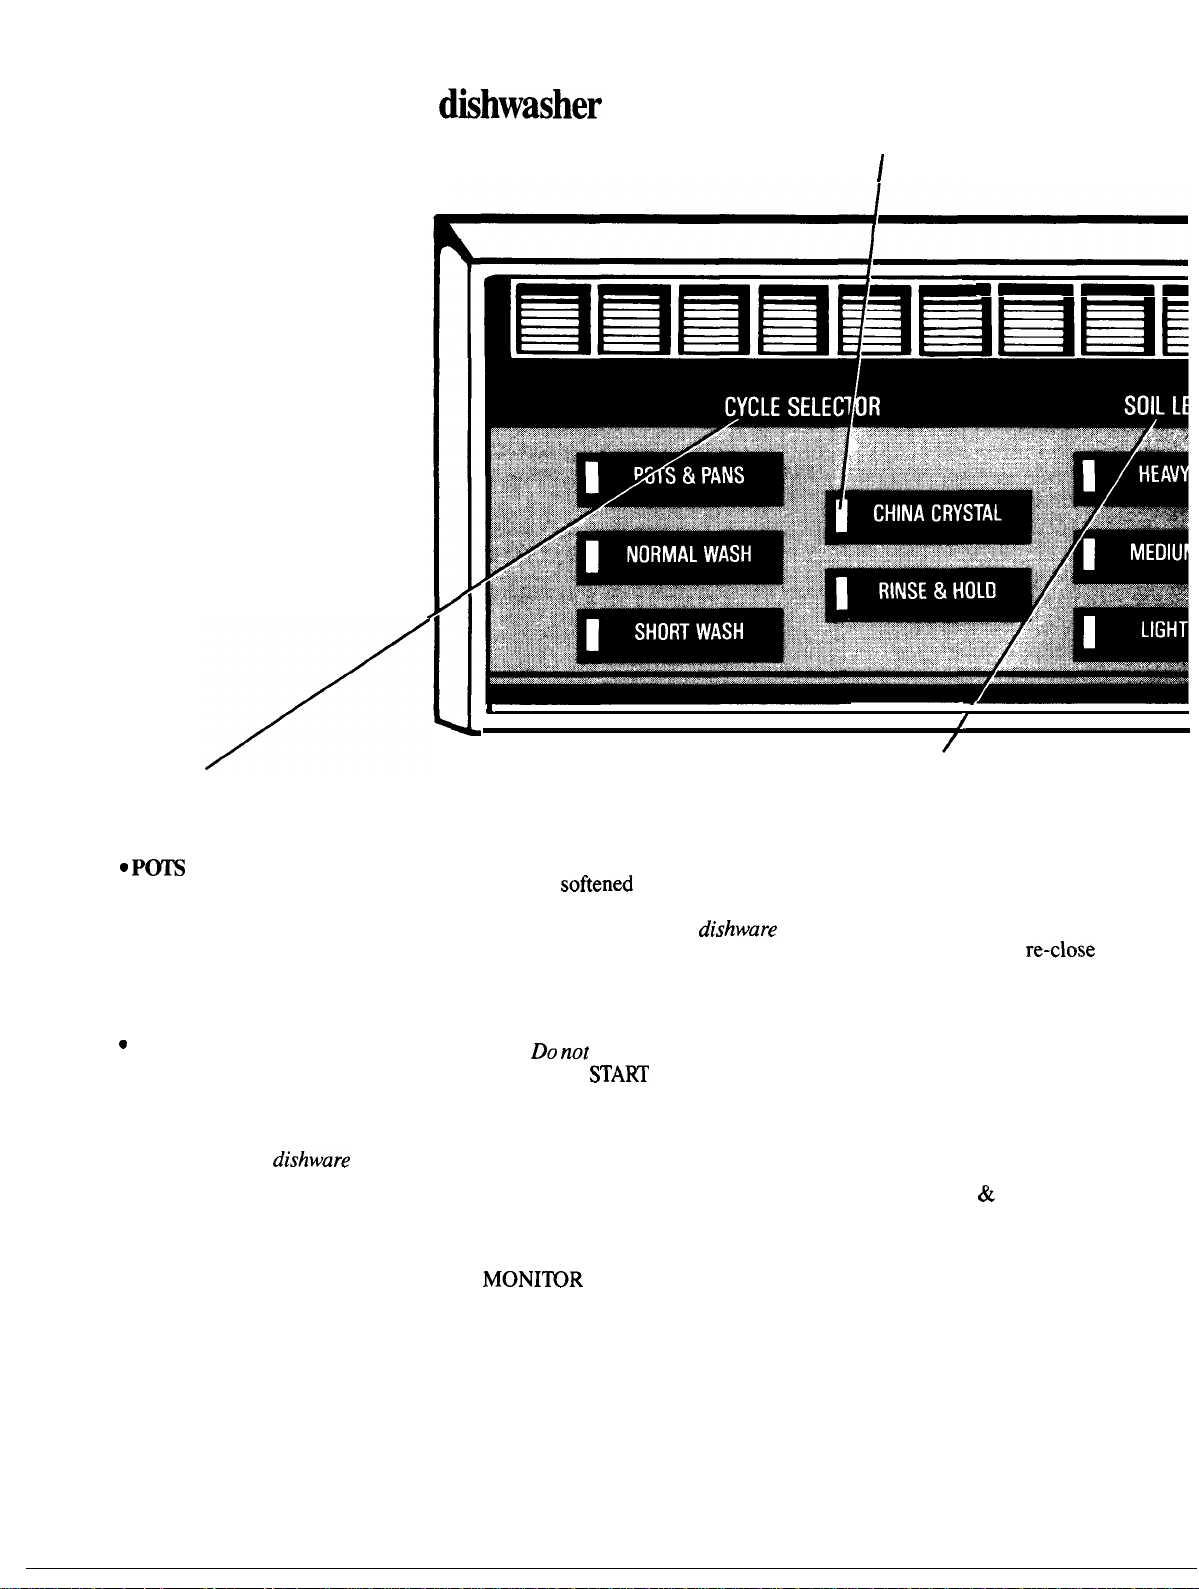
How to operate the
dkhwasher
STEP 1
Load your dishwasher with dishes,
silverware, pots, pans, bowls, etc.
according to instructions on pages
14 through 16.
STEP 2
Add detergent to the detergent
dispenser.
Use rinse aid agent to help prevent
spotting. (See page 12.)
Close and latch dishwasher door.
SELECTED
CYCLE
INDICATOR
LIGHTS
I
STEP 3
/
Select desired wash cycle
Touch the center of the pad.
c
Pm
&
PANS
such as pots, pans and casseroles.
Everyday dishes may be included,
. NORMAL WASH
everyday dishes with medium soils.
Designed to yield high performance
on normal loads.
c
SHORT WASH is
of everyday dishes with light soils
or soils that have not dried on. It
saves hot water over the higher
performance cycles, thus saving
energy.
loading.
Pre-rinse
is for items
is for loads of
for most loads
dishware
before
L
●
CHINA-CRYSTAL
soiled china and crystal. The wash
action is
along with the water to protect your
delicate items.
before loading.
instructions on pages 14 through 16.
●
RINSE & HOLD
partial loads which will be washed
later.
use DELAY
To
desired pad.
Your dishwasher is now automatically
programmed including a Soil Level
Selection. Cycle Indicator Lights
tell you the complete program.
And a number in the SYSTEMS
MONI~R
how long the cycle will take. If
you’re satisfied, just touch the
START pad.
sofiened
Pre-rinse
Follow loading
Do
not
use detergent.
STA~
change a setting,
(at right) will tell you
is for lightly
by pumping air
dishware
is for rinsing
Do not
with this cycle.
just touch
f
/
/
STEP 4
‘
Select a soil level
If you wish to make program
changes, start with the soil level.
You should select a change within
30 seconds, otherwise all panel
lights will go out. To relight, touch
any pad or open and
●
MEDIUM SOIL
programmed when a cycle is
selected. You may want to change
the selection depending on the soil
on your dishes.
● HEAVY SOIL should be
selected when dishes are extra
soiled or extra greasy. This gives
dishes an extra rinse in every cycle
except RINSE & HOLD. This
lengthens cycle.
●
LIGHT SOIL
money if you pre-rinse your dishes.
This shortens all cycles except
RINSE & HOLD.
re-close door.
is automatically
will save time and
4
.
DOOR LATCH
“OFF” POSITION
I
TIME
TO END
OF CYCLE
ENERGY
MONITOR
I
CYCLE PHASE
I
1~~
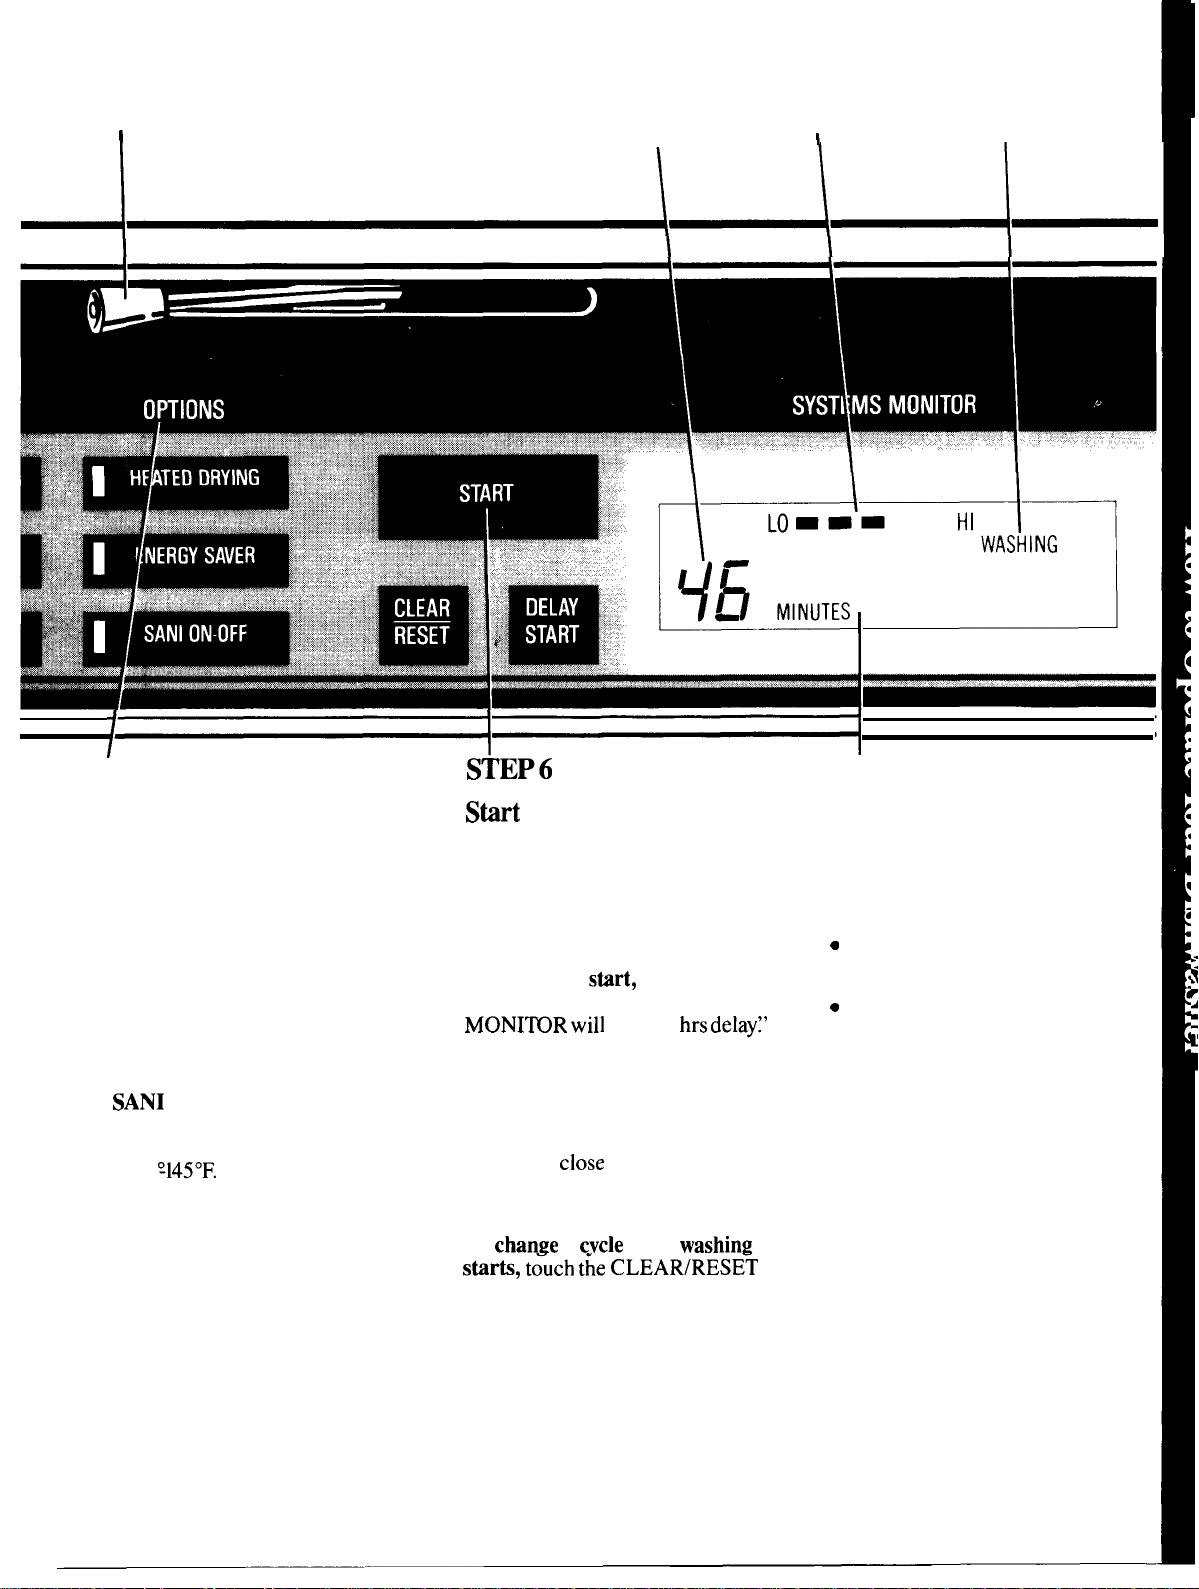
STEP 5
Select an option
●
HEATED DRYING
faster drying. Can be changed
while cycle is running.
● ENERGY SAVER shuts off
drying heater. Dishes air-dry
naturally. It takes longer, but saves
energy. You can prop door open
about 3 inches after motor stops
to speed drying. Excellent for
overnight drying.
● SANI ON-OFF. Select with
either POTS & PANS or NORMAL
WASH. Heats water in final rinse
to 140
Q145°F.
Touch pad once for
ON, once more for OFF. This
option may be changed at any time
before or after start of cycle.
provides
STEP6
Stirt
the dishwasher.
●
When you’re ready to wash
dishes, touch the START pad.
Dishwasher will proceed through
your entire program and turn off
automatically.
To delay the stirt,
START pad. The SYSTEMS
MONI~R will
Touch pad once again for each
hour desired up to 9 hours. The
machine will count down and start
automatically at the correct time.
Note: Don’t forget to put detergent
in cup and
DELAY START with the RINSE &
HOLD cycle.
To
change
stirts,
pad to cancel cycle. After water is
pumped out and motor stops, you
can reprogram and restart the
dishwasher.
close cup. Do not use
a
t;uch
touch DELAY
read “1
cvcle
tie
CLEAR/RESE~
after
hrs delay:’
washing
Systems Monitor
This panel tells you what is
happening in the dishwasher and
can alert you to some possible
problems.
Information displayed:
c
Selected wash cycle
● Selected dry option
c
Minutes to end of cycle
●
Cycle phase, such as WASHING,
RINSING or DRYING
●
Diagnostic codes to alert you to
possible problems
. Relative energy used by each
cycle. Lets you choose the cycle
you need that uses the least energy.
See pages 7-10 for explanation of
displays and codes.
5

Dishwashing
LO-
-- HI
shortcut
WASHING
Vb
The dishwasher remembers your
last cycle so you don’t have to
reprogram each time.
When the dishwasher is loaded and
the door latch is moved to the ON
position, the control panel will
display the last settings you selected.
MINUTES
If you don’t want to change any of
the settings, simply touch START.
Note: If there has been a
power failure, NORMAL WASH,
MEDIUM SOIL and HEATED
DRYING will automatically
be
prograrnmd.
selections as desired and
touch START.
Make any new
How to lock dishwasher controls
to prevent use by children
Your dishwasher has a “hidden”
control pad. When this pad is
touched twice within 3 seconds, all
pads become inoperative and no
new selections can be made until
the lock is released. The word
LOC~D
T
I
appears in the SYSTEMS
SYSTEMS MONITOR
MONI~R.
accidentally start dishwasher by
touching pads. The only control
unaffected is the DELAY START.
If this selection has been made,
dishwasher will start automatically
after whatever delay you have
selected.
Children cannot
Touch here twice within 3 seconds
lo
lock or unlock the control panel.
If cycle is interrupted dishwasher
reminds you to
You may want to stop the dishwasher
to add an extra dish. . .or for some
other reason. If you do and you forget
to
relatch
door the dishwasher will
“beep” three minutes later to remind
you that the door is not latched. The
“beep”
intervals until the door is relatched.
Dishwasher
until door is properly closed.
will
repeat at three-minute
will
not complete cycle
relatch
door
6
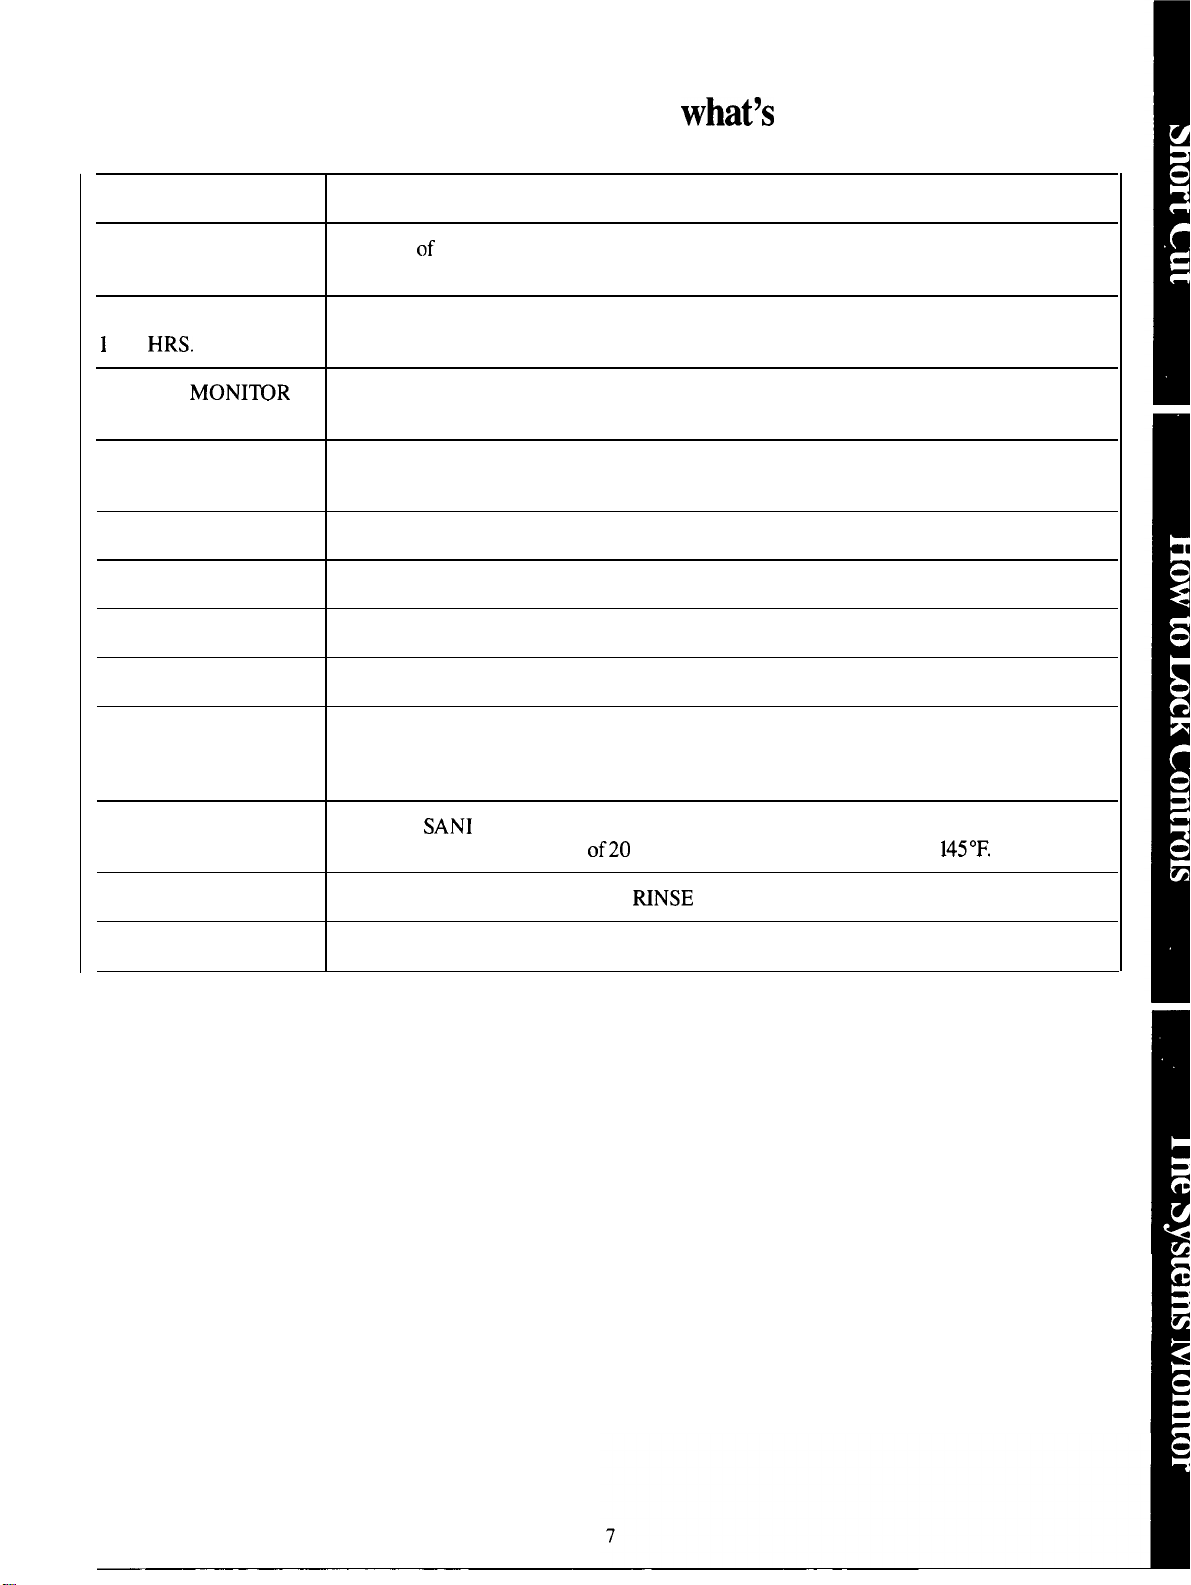
The SYSTEMS MONITOR tells you
what’s
happening
DISPLAY
NUMERALS FROM
1 to 99 MINUTES
NUMERALS FROM
1
to 9
HRS.
DELAY
ENERGY
LO – – – – –HI
ENERGY SAVER Indicates energy-efficient selection made such as SHORT WASH, LIGHT SOIL or
WASHING
RINSE
DRYING Indicates HEATED DRYING has been selected.
RINSED ONLY Indicates completion of RINSE& HOLD cycle. Remains on until door is unlatched.
HEATING
MONI~R
WHAT IT MEANS
Number of minutes left in the cycle.
Number of hours delay until start of cycle.
Shows relative amount of energy used from LO (one bar lighted) to HI (all five bars
lighted).
ENERGY SAVER (UNHEATED) drying.
Displayed during Pre-wash, Pre-rinse and Main Wash periods.
Displayed during Rinse periods following the Main Wash.
Indicates water is being heated—in wash or rinse period—to temperature necessary for
good washability. The minutes countdown is on hold for up to a maximum of 20 minutes
when HEATING is displayed.
PLUS HEATING
CLEAN
LOCKED
Indicates
increased (up to a maximum
Indicates completed cycle (except MNSE & HOLD). Remains on until door is unlatched.
Indicates controls are locked to prevent unauthorized use. See page 6.
SANI
ON option was selected prior to start of cycle. Cycle time maybe
of20
minutes) to heat final rinse water to
145°F.
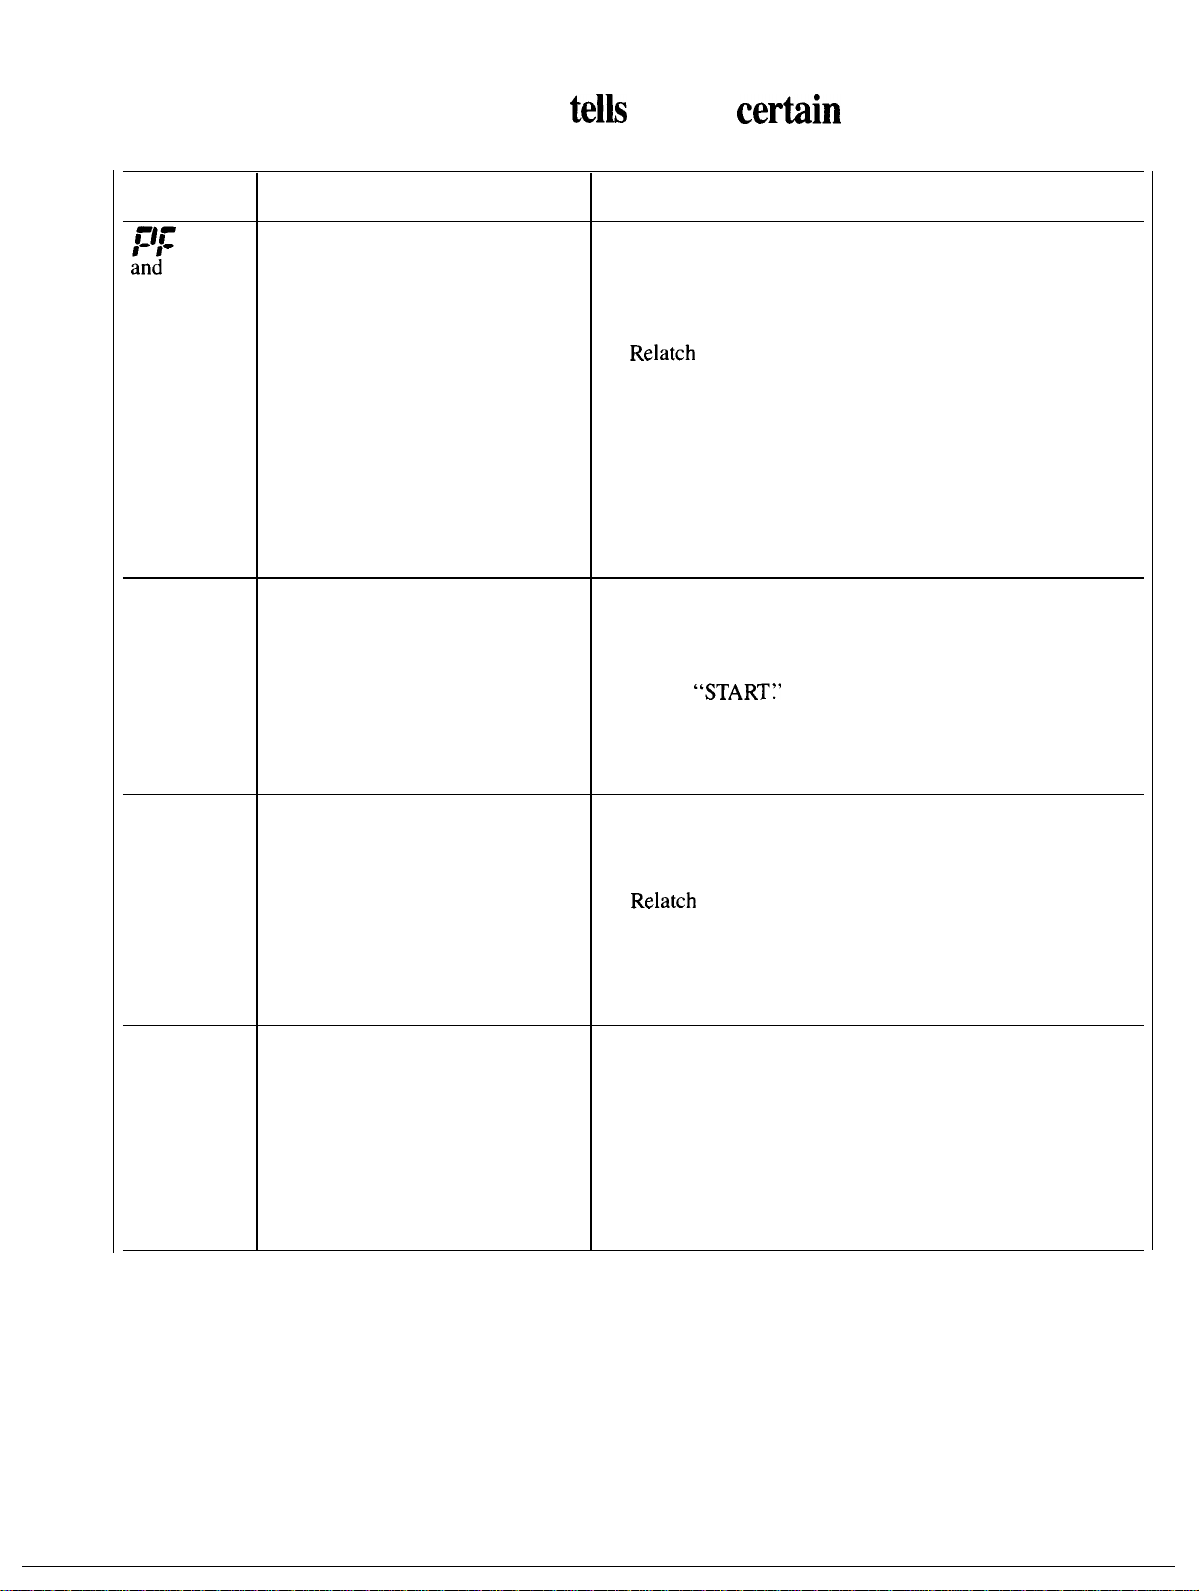
The SYSTEMS MONITOR
telh
you if
certiin
things are wrong
DISPLAY
I:/#:
;n$
RESET
CUP OPEN
WHAT IT MEANS WHAT TO DO
Electrical power has been
interrupted to the dishwasher but
is now back on.
The detergent cup was open at the 1. Unlatch the door and add detergent if spilled.
start of a cycle.
IF DISHWASHER WAS IN USE WHEN THE POWER
FAILURE OCCURRED:
1. Unlatch the door. If the detergent cup is open, add
detergent and close the cup.
2.
Relatch
3. Select the desired cycle and rerun the load.
IF DISHWASHER WAS
1. Latch door.
2. Select desired cycle.
3. Run cycle when desired.
2. Close cup.
3. Latch door and select cycle.
4. Touch
NOTE:
If cup is latched properly and “CUP OPEN” repeats you
may start wash cycle by pressing START pad a second time.
the door and touch “START” then immediately
touch “CLEAR/RESET?’ (This will pump any remaining
water out of the machine. )
NOT
IN USE:
“START:’
BLOCKED
WASH ARM
BLOCKED
DRAIN
An obstruction is preventing the
lower wash arm from turning.
This is usually caused by a utensil
sticking through the bottom of the
silverware basket or a pot handle
through the lower rack.
The dishwasher is taking longer
than normal to drain the water
out. This is usually caused by a extended. If this code continues to appear frequently then:
blockage in the drain air gap (see
page 21), a kink in the drain hose,
or a stopped up drain pipe.
1. Unlatch door.
2. Check the lower rack for any item that could block the
wash arm and reposition it.
3.
Relatch
NOTE:
If the wash arm is not blocked and “BLOCKED WASH
ARM” display still appears, you may start wash cycle by
pressing START pad a second time.
This dishwasher is designed to automatically compensate
for longer than normal drain times, but cycle time will be
1. Clean the air gap (see page 21).
2. Check for a kink in the drain hose.
3. Check plumbing for slow or stopped up drains.
door.
(NOTE: Warranty service does not cover household
drain problems. )
8
 Loading...