


GB
Instructions for use
English,1
GB
Coffee machine
Index
Installation 2
Positioning
Built-in installation
Ventilatio
n
Centring and fixing
Electrical connection
Installing the power cable
Rating plate
Description of the appliance 4
Overall view
Control panel
Starting and using 5
The first time you switch on
Priming the water circuit
Regulating water hardness
Water
filter (where installed)
Installing the water filter
Additional information for correct use of the water filter
(where installed)
Grinding regulation
Brewing 8
SBS System
Regulating the quantity of coffee per cup
Brewing coffee (1 cup)
Brewing coffee (2 cups)
Dispensing hot water
Brewing steaming/cappuccino
Maintenance and care 10
General cleaning
Descaling
Interrupting the descaling cycle
Programming 13
MENU command
Changing individual functions
Programmable functions
Factory setting
s
Display messages 21
Problems - causes - solutions 22
Precautions and recommendations 23
2
GB
Installation
! Keep this booklet for consultation at any time. In the
event of sale, transfer of the machine or of the owner
ensure that the booklet is kept with the machine so that
the new owner is informed of the operating instructions
and warnings.
! Read all instructions carefully: they contain important
information regarding installation, operation and safety.
Positioning
! Packaging is not a toy for children and should
be disposed of in accordance with regulations for
separated waste collection (see Precautions and
recommendations).
! Installation must be carried out in compliance with
these instructions by professionally qualified personnel.
Incorrect installation may cause damage to persons,
animals and/or objects.
Built-in installation
To ensure the correct functioning of the appliance, the
cabinet must have the right characteristics:
• the panels next to the coffee machine must be in
heat-resistant material;
• veneered wood cabinets should be joined using
glues resistant to 100°C and must be steamresistant;
• for all installations of built-in coffee machines
cabinets should have the following dimensions:
! Once the appliance has been encased, there must
be no contact possible with electrical parts. Declared
consumption values shown on the rating plate are
measured on the basis of this type of installation.
Ventilation
To ensure good ventilation, remove the rear panel of the
cabinet.
It is recommended to install the coffee machine so that
it is resting on a continuous surface with an opening of
at least 45 x 540 mm in the base.
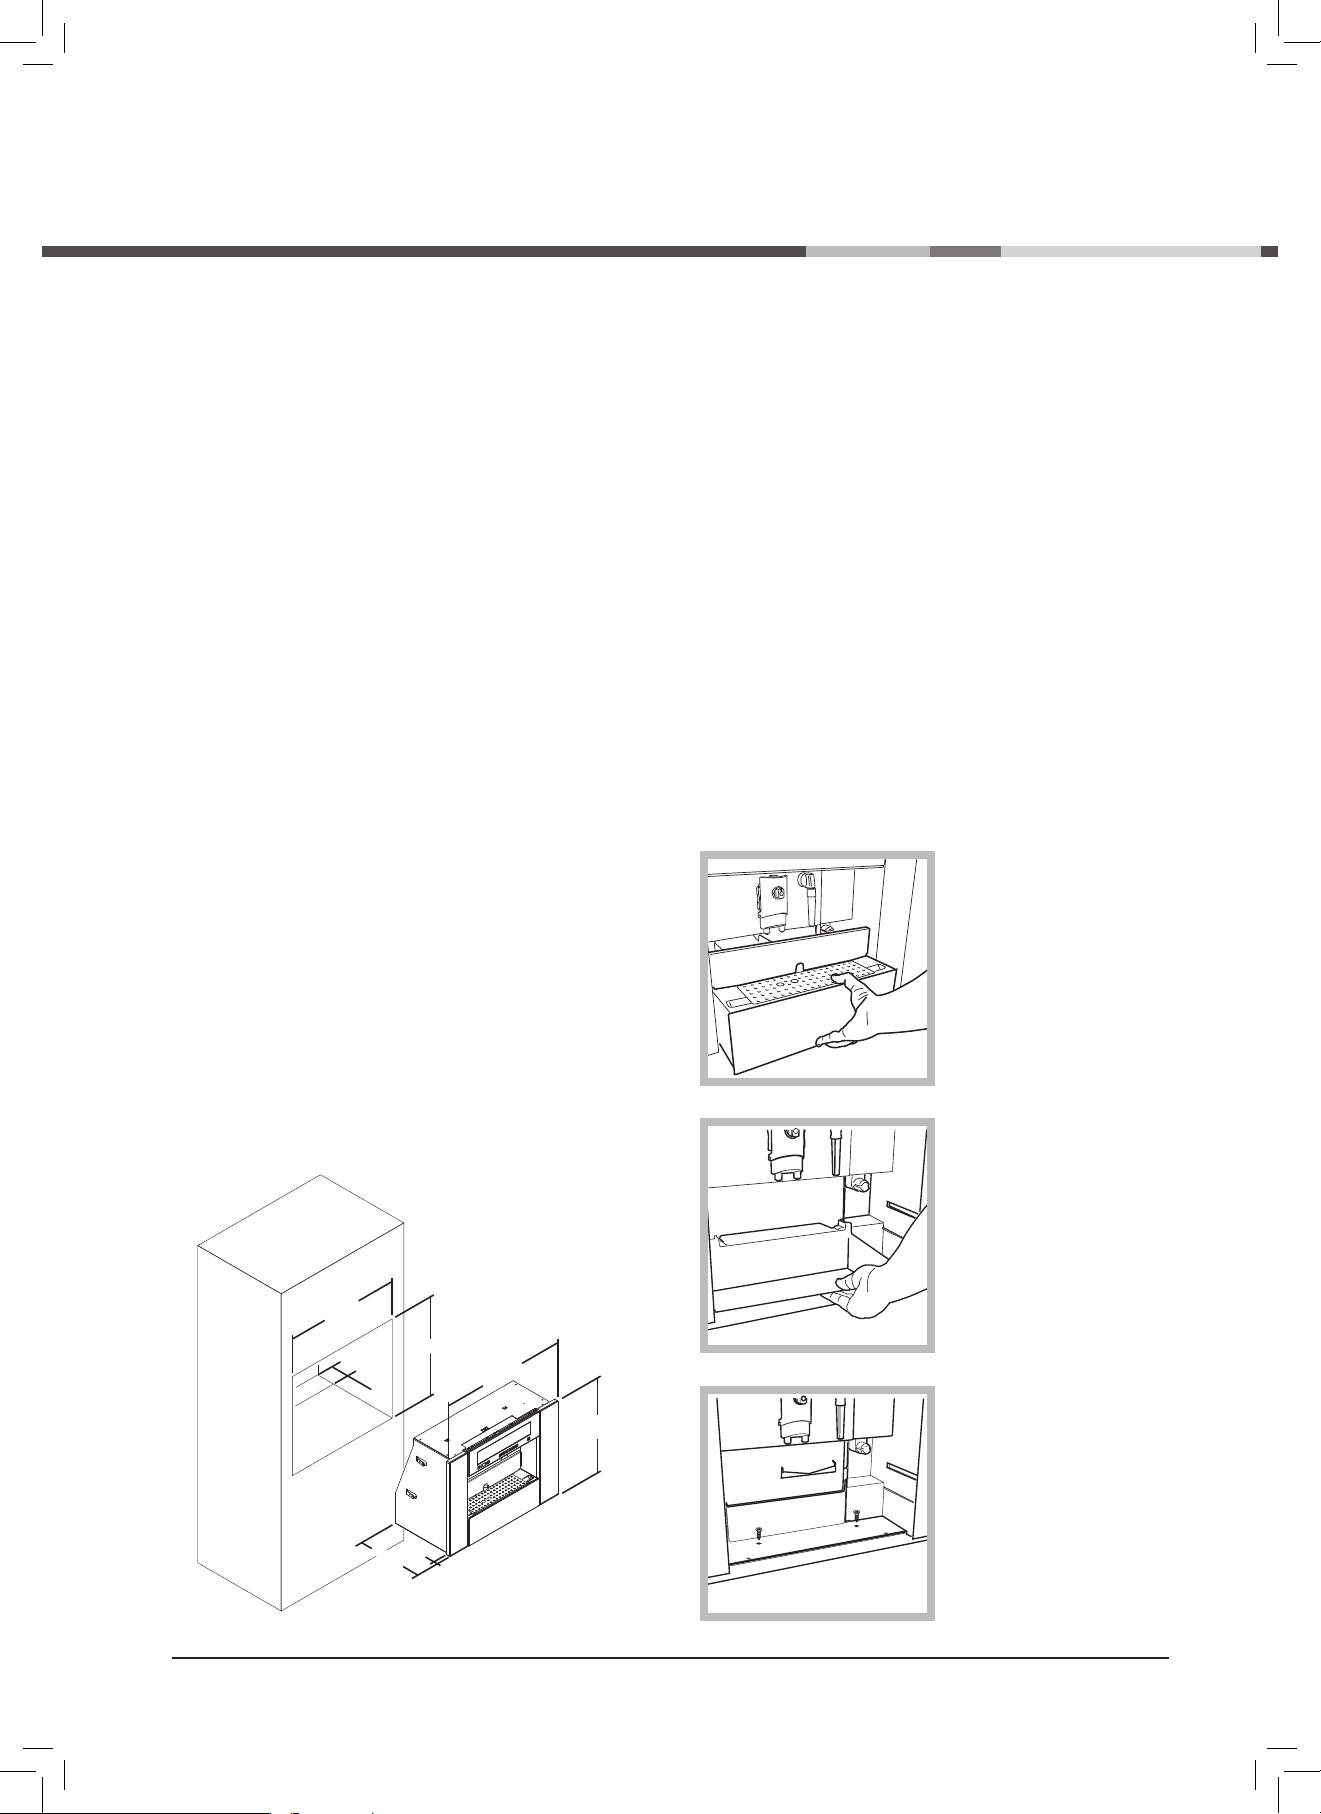
Centring and fixing
To centre the coffee machine, position the shims
beneath the holes in the outer structure of the machine.
! All shims must be attached so that they ensure perfect
stability of the machine.
To attach the shims to the cabinet proceed as follows:
• remove the drip tray
from the machine;
• fasten the 2 wood
screws in the 2 holes
located to the rear of the
base.
• remove the lower
plastic protection;
GB
3
Rating plate
• Nominal voltage
See plate on the appliance
• Power rating
See plate on the appliance
• Power supply
See plate on the appliance
• Shell material
Metal
• Dimensions (w x h x d) (mm)
595 x 460 x 320
• Weight (kg)
23
• Cable length (mm)
1200
• Control panel
Piezoelectric
• Water tank
Removable
• Water tank (l)
1.75
• Coffee bean hopper capacity (g)
300 g coffee beans
• Pump pressure (bars)
15
• Boiler
2 - Stainless Steel - Aluminium
• Safety devices
Boiler pressure safety valve
Safety thermostat
Subject to engineering and manufacturing changes
due to technological developments.
The machine conforms to the European Directive
89/336/EEC (Italian Legislative Decree 476 dated
04/12/92) concerning electromagnetic compatibility.
! All protective parts must be attached so that they
cannot be removed without the aid of a tool.
Next replace the protection and the drip tray.
Electrical connection
! Coffee machines with three-pole power cable are
regulated for alternating current, with voltage and
frequency shown on the rating plate attached to the
appliance.
! The installer is responsible for checking the correct
connection of components and observing safety
regulations.
Before connecting make sure that:
• the socket is earthed and is compliant with statutory
regulations:
• the socket is able to withstand the maximum power
load of the machine, shown on the rating plate;
• the supply voltage is within the values shown on the
rating plate;
• the socket is compatible with the appliance’s plug.
Otherwise replace the plug or the socket; do not use
extension leads or adaptors.
! Once the appliance is installed, the electric cable and
socket must be easy to reach.
! The power cable must not be subject to coiling or
compression.
! The cable must be checked regularly and replaced
only by authorised technicians.
! The company accepts no responsibility for noncompliance with these regulations.
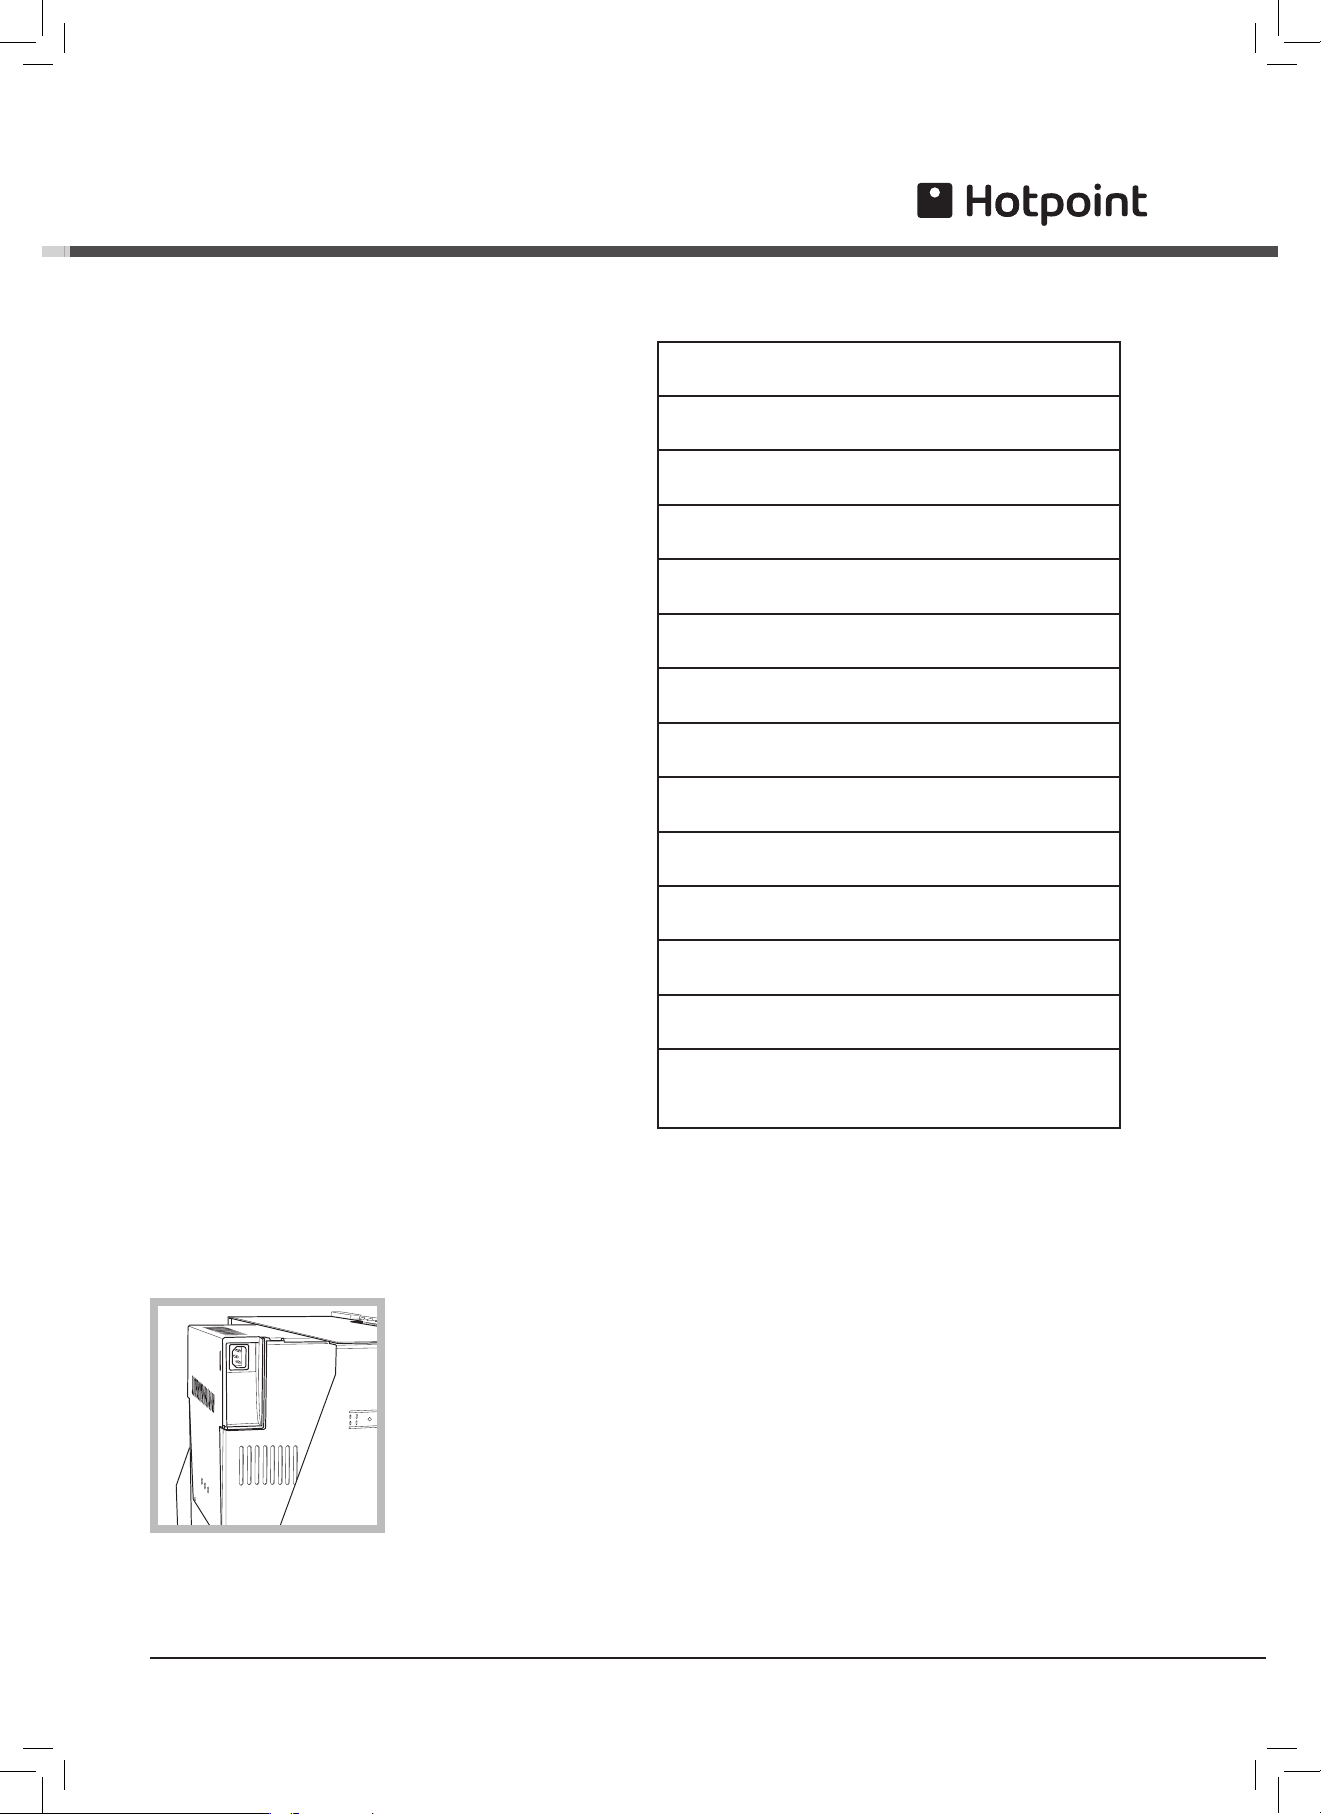
Installing the power cable
• Put the plug in the
tray socket on the rear
of the machine
• Connect the power
cable to the mains
• Put the plug in the
power socket.
The position of the
power cable must be
such that no section of it is above room temperature
by more than 50°C.
4
GB
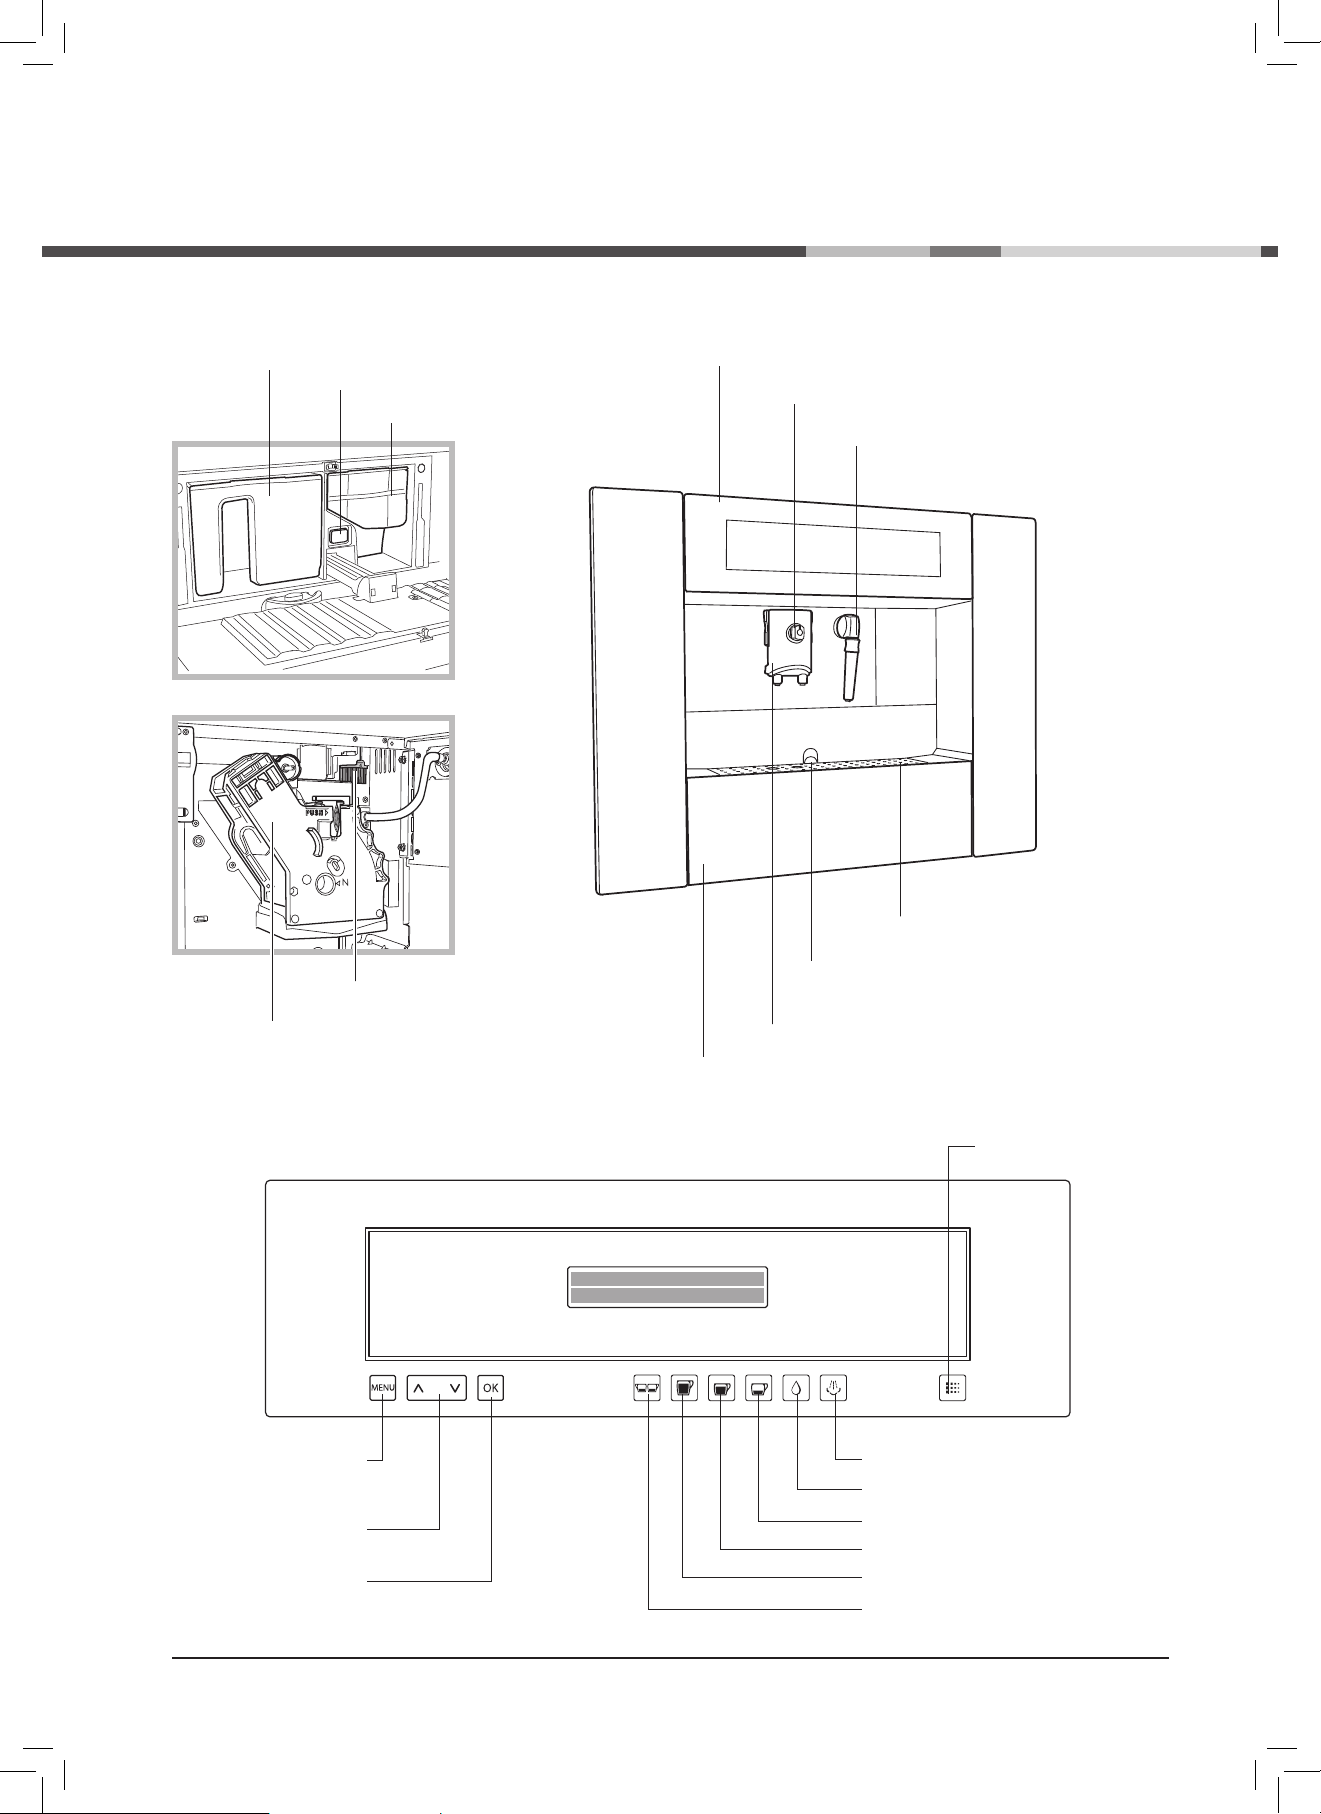
Description of the
appliance
Overall view
Control panel
Water tank
Main switch
Coffee bean hopper
Front control panel
SBS
Hot water/steam spout
Drip tray
Adjustable-height brew unit
Tray full float
Grill
Brew group
Grind regulation
Select DOUBLE COFFEE key
Select LONG COFFEE key
Select REGULAR COFFEE key
Select ESPRESSO key
Select HOT WATER key
Select STEAM key
SELECT/CONFIRM
Key
PAGE SCROLL
key
PROGRAMMING/EXIT
selection key
DESCALING
key
GB
5
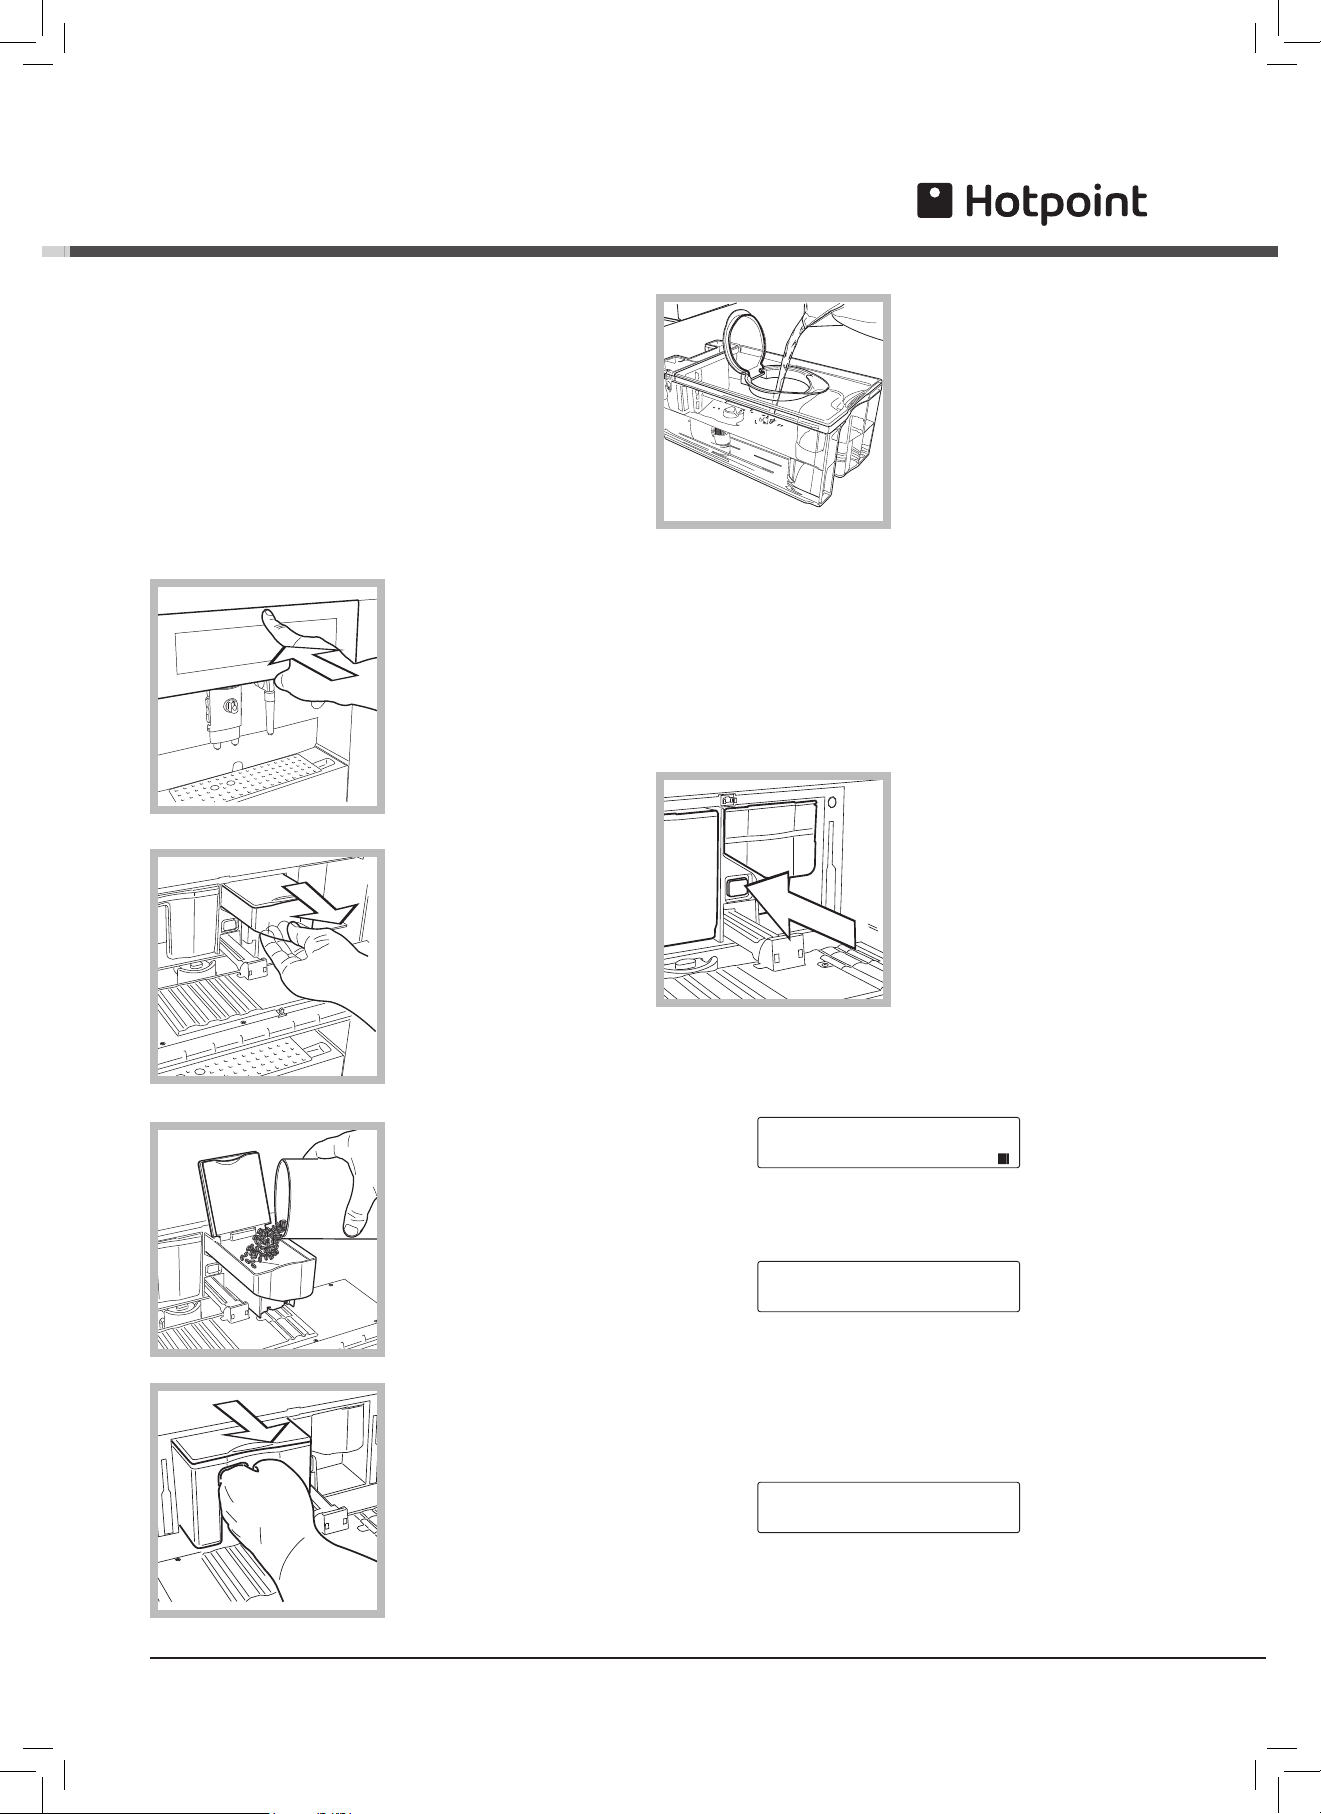
Rinse and fill the
tank with fresh drinking
water.
Close the lid and
replace the tank in
position.
! The machine requires
the tank to be filled
even when the level
is still high. This
happens because the tank of the coffee machine has
been preset to house the optional “water filter”, thus
requiring a minimum level of water in the tank for
filtering to be performed.
! Always use fresh, non-sparkling water to fill the tank.
Hot water or any other liquid may damage the tank
and/or the machine. Do
not switch the machine
on without water: make
sure there is enough
water in the tank.
The main switch is in
the “O” position. To
switch on, press the key
in the “I” position.
Close the front panel by pressing firmly in the centre.
The machine begins to heat up and the display shows:
RINSING
WARMING UP...
When the right temperature is reached, the machine
goes through a rinsing cycle.
RINSING
The machine dispenses water from the brew unit as it
rinses the internal circuits.
After rinsing, the machine returns to normal operating
conditions. The display shows:
SELECT PRODUCT
READY FOR USE
! To disable the rinse cycle, see the paragraph on
programming the machine.
Starting and using
! Before starting the machine make sure the hoppers
contain the amount described in the manual.
Prime the circuit immediately to prevent damage to the
machine.
! After starting the machine, regulate water hardness.
That will allow you to keep your machine in perfect
order (see Programming).
The first time you switch on
1. Open the front panel
by pressing firmly in the
centre
2. Remove only part of
the bean hopper.
3. Pour coffee beans
into the hopper being
careful not to add too
many.
Close the lid and replace the hopper inside the
machine.
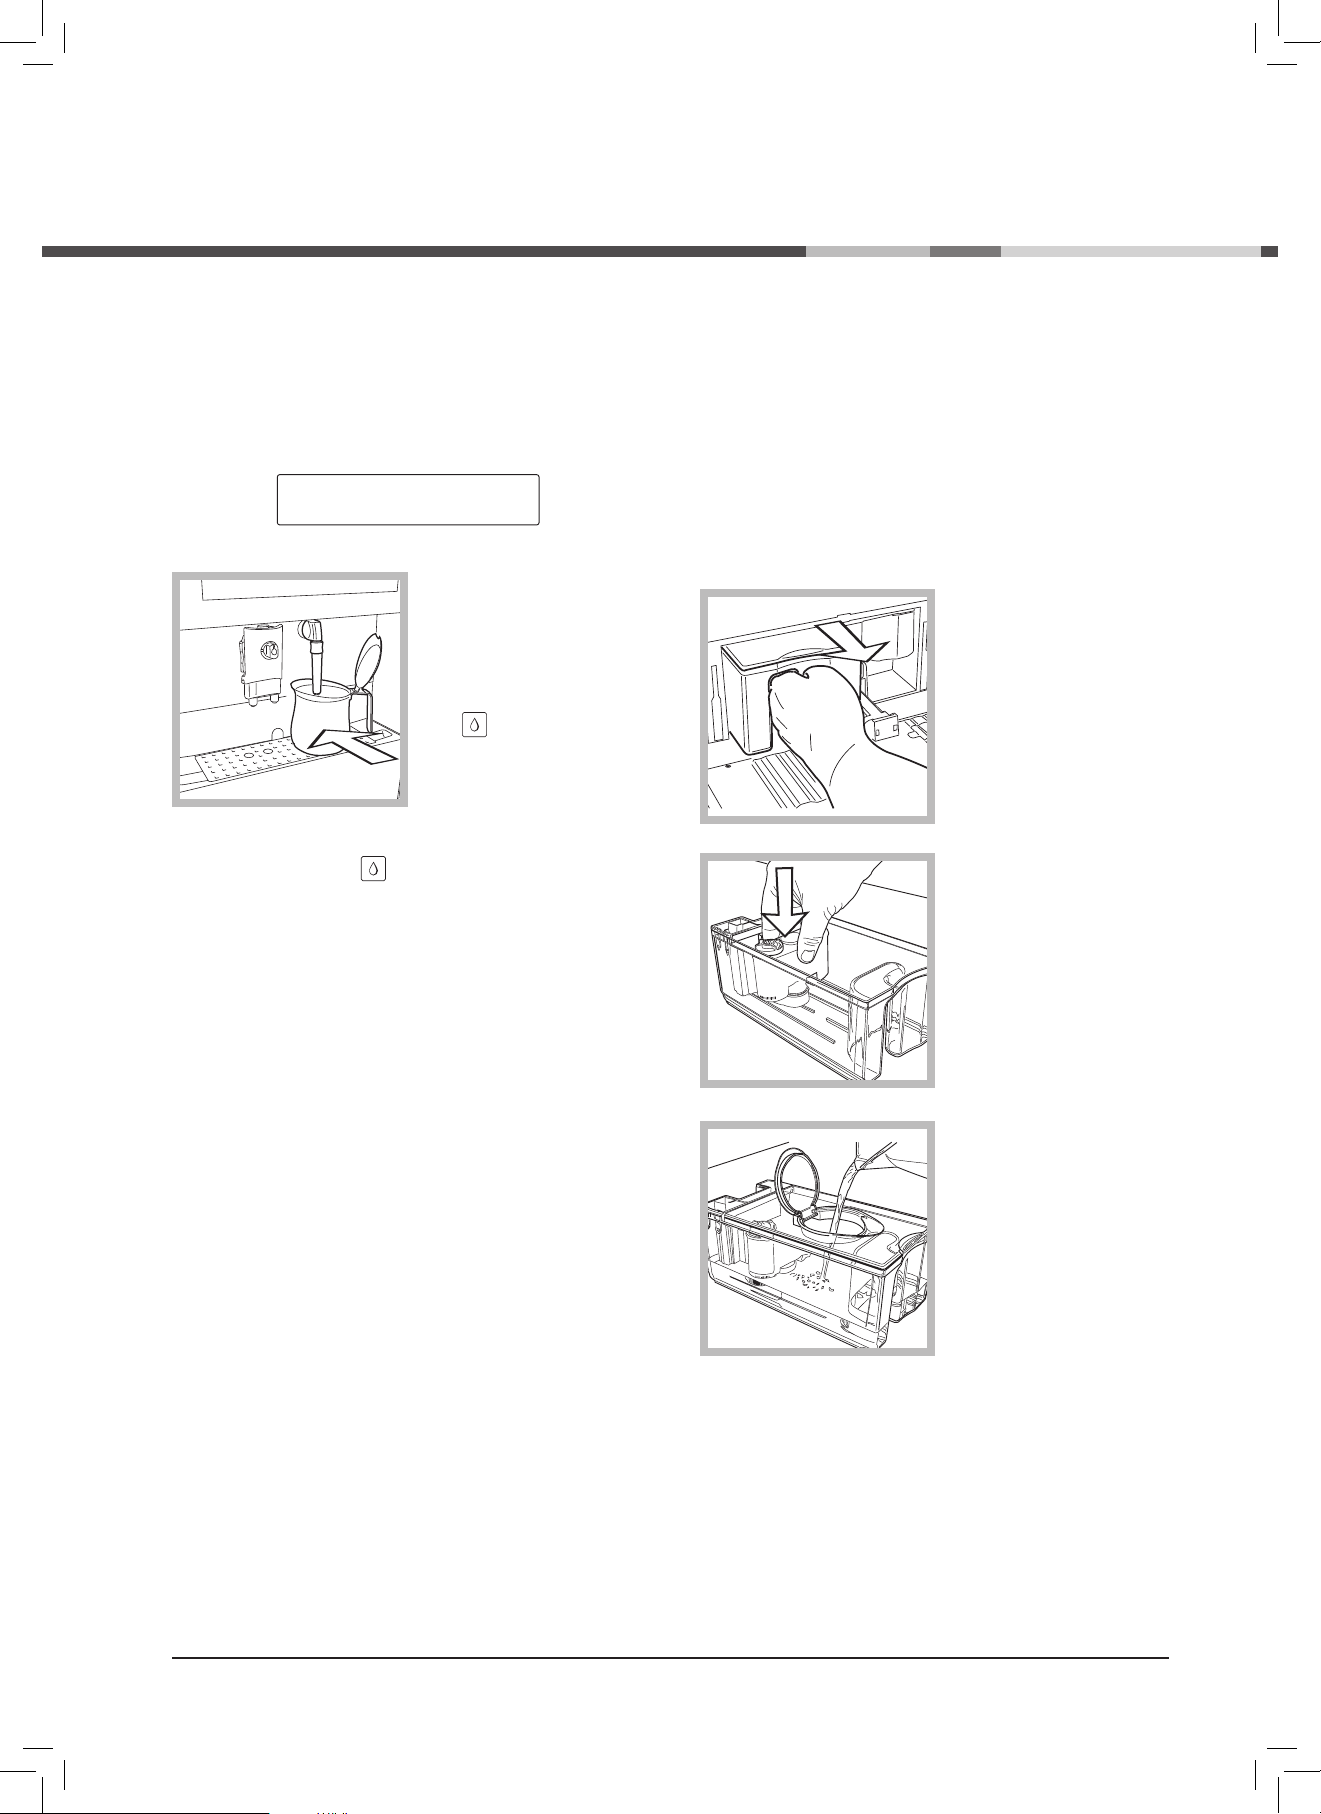
4. Remove the water
tank fully from the
machine.
6
GB
Priming the water circuit
! Before starting the machine after long periods of
inactivity, if the water tank has been completely
emptied, it is essential to prime the machine circuit.
Moreover the circuit must be primed every time the
following is displayed:
VENTILATE
1. To prime the circuit,
direct the steam spout
over the drip tray.
Place a cup or suitable
container below the
steam spout and press
the key.
2. Wait until the water
runs smoothly out of the
steam spout.
To interrupt, press the
key.
After the above operations have been completed the
machine is ready for use.
To dispense coffee, hot water or steam and for proper
use of the machine, carefully follow the instructions that
are provided.
Water filter (where installed)
The water filter purifies the water used in the
preparation of coffee.
Its properties reduce the hardness of water and remove
the unpleasant taste of chlorine.
The water filter may be installed at any time.
Installing the water filter
1. Open the front panel
and remove the water
tank.
Empty the tank of any
water.
2. Remove the filter
packaging and set the
calendar to the current
month.
! Refer to the notes for
using the filter below.
3. Insert the filter into the
tank. The reference mark
and the groove should
coincide. Press down
completely.
Fill the tank with fresh
drinking water and
replace in the machine.
Close the front panel.
Dispense all the water in
the tank into a container.
Afterwards fill the tank
again with water.
! Program the machine
for use with the filter
(see programming). The
machine informs the user when it is time to replace the
filter.
! The water filter must always be removed before running the descaling cycle.
Regulating water hardness
Regulate the machine to the right degree of water hardness that you will use.
According to this setting, the machine advises when it is
necessary to run a descaling cycle.
Read the sections on “Water hardness” in “Program
-
ming” to regulate hardness.
GB
7
Grinding regulation
! Take care when rotating the knob that regulates
grinding, which is inside the coffee hopper. Do not put
ground and/or freeze-dried coffee in the bean hopper.
! Do not put any material other than coffee beans in
the hopper.
Switch off at the mains before carrying out any type of
operation inside the bean hopper.
The quality and flavour of coffee depend on the
grinding level, as well as the blend used.
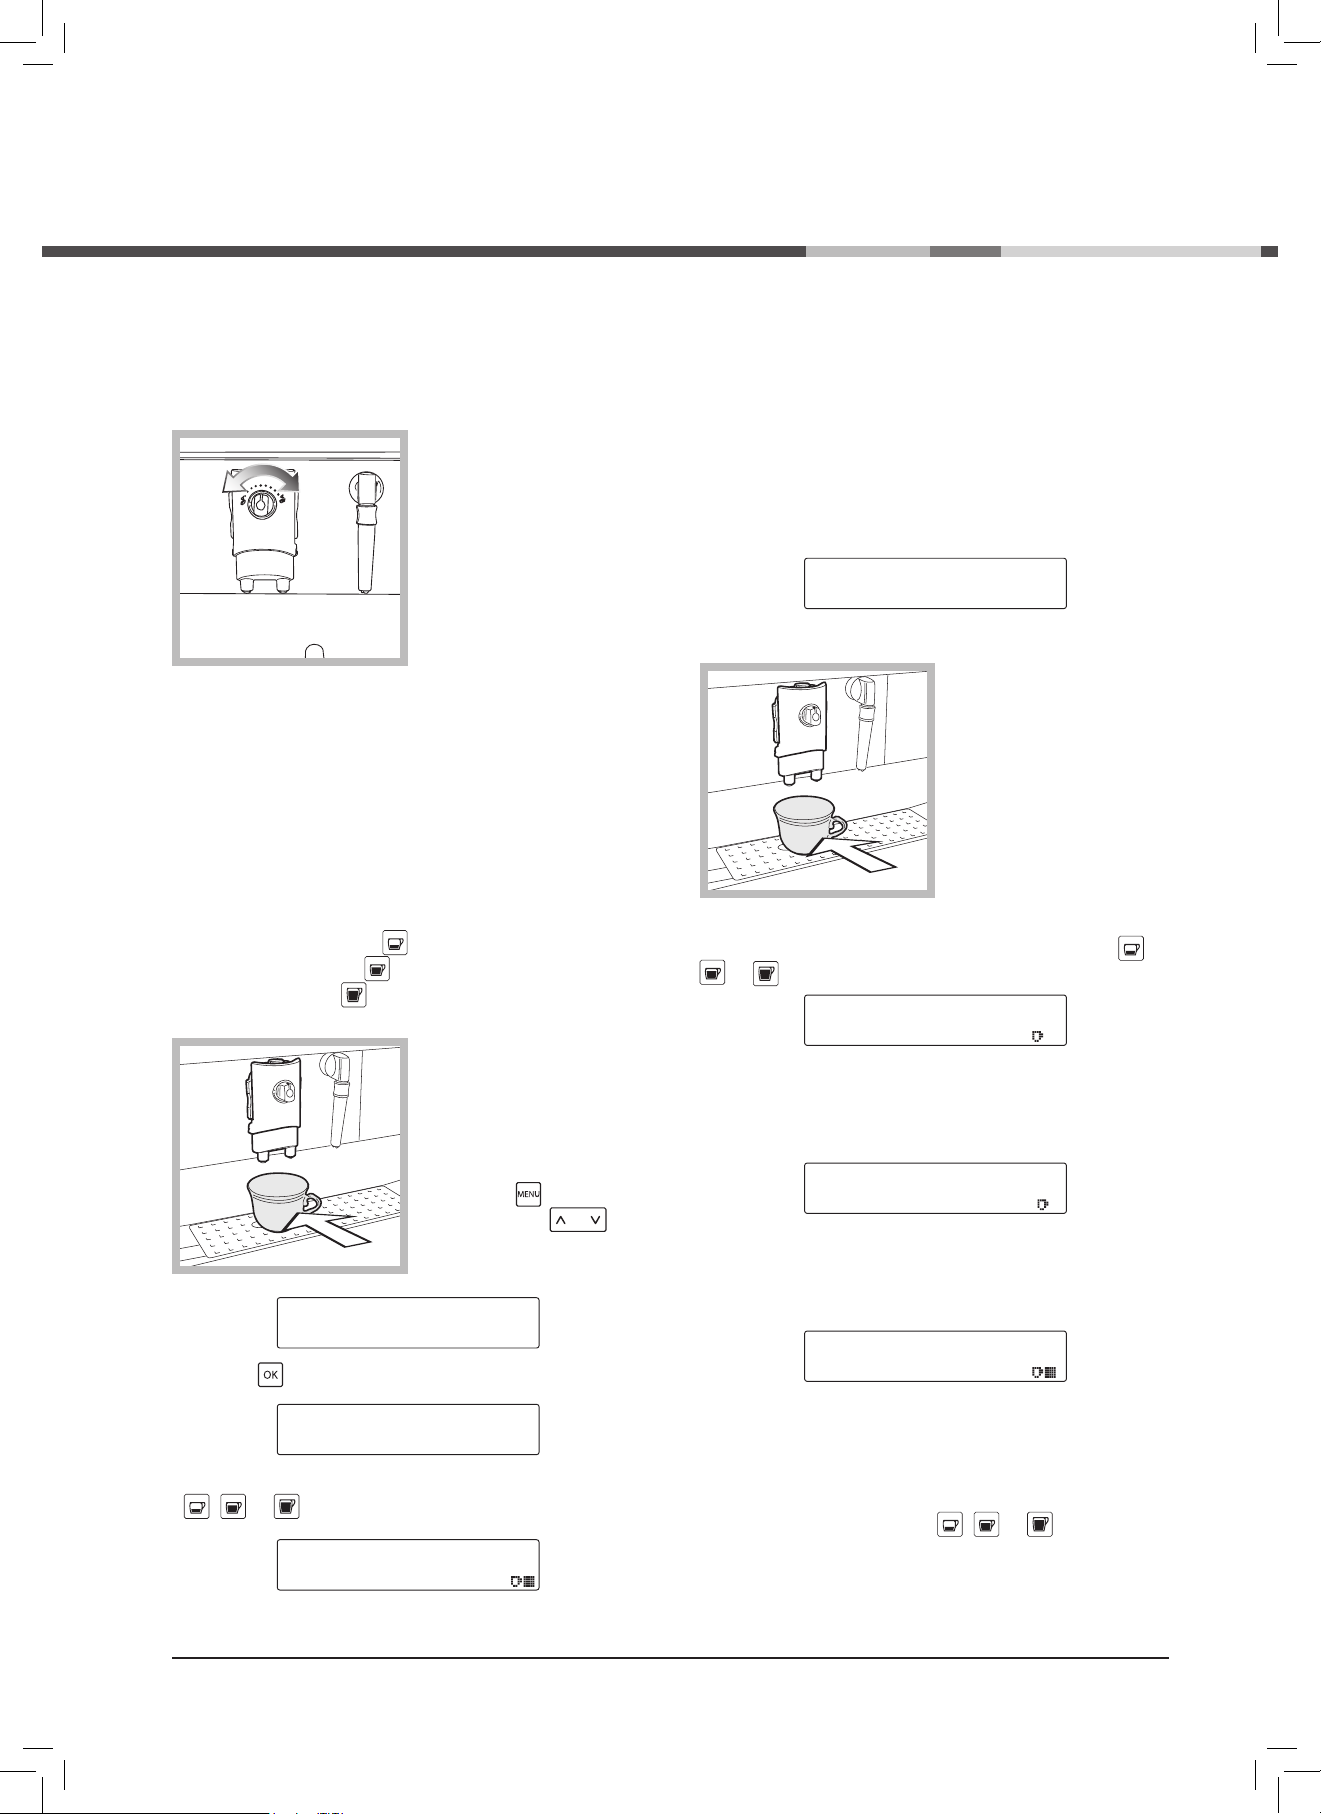
The machine has a knob to regulate the coffee
grinding.
To regulate the grinding,
turn the knob one
setting at a time. The
figures indicate the
fineness of grinding.
The manufacturer
configures each
appliance on an
intermediate grinding
setting. If the grind is
too fine, rotate the knob
to a higher setting; if the grind is too coarse, turn the
knob to a lower setting.
The variation in grind will only be seen after one or two
coffees have been brewed.
Use coffee bean blends for espresso machines. Try
not to use high grinding settings (e.g. 1/10). Use
different coffee blends for these settings. Keep the
coffee in a fresh place in a sealed, airtight container.
Grinding must only be regulated if coffee is not brewed
properly:
• if it is brewed too fast, this means that the grind is
too coarse; turn the knob to a lower setting;
• if it is brewed in drips and/or intermittently, this
means that the grind is too fine; turn the knob to a
higher setting.
Additional information for correct use of
the water filter (where installed)
For correct use of the water filter (where installed),
here are a number of recommendations:
1. Store the water filter in a cool place away from the
sun, at a temperature of between +5°C and +40°C;
2. Use in areas with temperature no higher than 60°C;
3. It is advisable to wash the water filter if the machine
has been inactive for 3 days or more;
4. Replace filter if the machine has been inactive for
20 days or more;
5. To preserve a filter that has already been opened,
place in a plastic airtight bag and store in the
refrigerator; do not store in freezer, as this will alter
the properties of the filter;
6. Before using the filter, place in water in the tank for
30 minutes;
7. Once removed from its package, do not store filter
in the open air;
8. The filter must be replaced 90 days after it has been
removed from its package, or after it has filtered 60
litres of drinking water.
8
GB
SBS System
The machine has a device to regulate the body of
coffee: SBS.
This system gives
optimal brewing with
any kind of coffee on the
market.
! Regulation can even be
done while the coffee is
brewing.
Turn the knob to
regulate.
Rotate knob:
• left for crème café;
• to the centre for espresso;
• right for a strong coffee.
Regulating the quantity of coffee per cup
The machine is programmed to brew 3 kinds of coffee:
espresso coffee with the key,
regular coffee with the key;
long coffee with the key.
To adjust the
programmed values to
the size of the cup, place
the cup beneath the
brew unit.
Press the key
and using the
key scroll through the
functions until you get to:
PROGR. COFFEE LENG.*
PROGR. WATER AMOUNT
Press the key; the display shows:
SELECT PRODUCT
PROGRAMM. COFFEE
press the key to brew the required type of coffee
( , or ); this is shown on the display (e.g.):
1 SMALL COFFEE
PROGRAMM. COFFEE
Wait for the cup to fill with the required amount. Press
the same key again.
In this way the machine is programmed to brew the
quantity of coffee you require.
Brewing coffee (1 cup)
! Before brewing coffee, make sure the water tank and
the coffee tank are full and that the display shows:
SELECT PRODUCT
READY FOR USE
Place 1 cup beneath the
brew unit spouts.
You can adjust the height
of the brew unit to your
cups by shifting it up or
down manually.
To brew the coffee press the coffee brewing key (
,
or ). This is shown on the display (e.g.):
1 SMALL COFFEE
DISPENSING
In this operating mode the machine automatically grinds
and measures out the right amount of coffee.
Next the brew cycle is started.
1 SMALL COFFEE
PREBREWING...
After the prebrewing cycle, the coffee begins to come
out of the brew unit spout.
The display will show:
1 SMALL COFFEE
DISPENSING
Dispensing stops automatically when the set level is
reached.
! It is nevertheless possible to interrupt dispensing of
coffee by pressing the key ( , or ).
Brewing

GB
9
Brewing coffee (2 cups)
! Before brewing coffee, make sure the water tank and
the coffee tank are full and that the display shows:
SELECT PRODUCT
READY FOR USE
Place 2 cups beneath
the brew unit spouts.
You can adjust the
height of the brew unit
to your cups by shifting
it up or down manually.
To brew the coffee, press first the
key, and then the
coffee brewing key ( , or ). This is shown on
the display, e.g.:
2 SMALL COFFEES
DISPENSING
In this operating mode the machine automatically
grinds and measures out the right amount of coffee.
! The preparation of two coffees requires two grinding
cycles and two separate brew cycles. These are
handled automatically by the machine.
Next the brew cycle is started.
2 SMALL COFFEES
PREBREWING...
After the prebrewing cycle, the coffee begins to come
out of the brew unit spout.
The display will show:
2 SMALL COFFEES
DISPENSING
Dispensing stops automatically when the set level is
reached.
! It is nevertheless possible to interrupt dispensing of
coffee by pressing ( , or ) key; If the first
coffee is interrupted, the second will not be dispensed.
Dispensing hot water
! At the start, short spurts of hot water may be
dispensed. Danger of scalding. The hot water spout
can reach high temperatures. Do not touch it with bare
hands.
Before dispensing water, make sure the following is
shown on the display:
SELECT PRODUCT
READY FOR USE
When the machine is
ready to brew coffee,
proceed as follows:
1. Place a cup and/or a
container below the hot
water/steam spout.
2.Press the key; the display shows:
HOT WATER
! A preset amount of water is dispensed. This may be
modified in the “PROGR. WATER AMOUNT” menu
described in the chapter on “Programming”.
To stop dispensing hot water, press the
key again.
The machine returns to normal operating mode.
Brewing steaming/cappuccino
Steam can be used to froth milk for cappuccino and
also to heat beverages.
! Danger of scalding! At the start, short spurts of hot
water may be dispensed. The brewing spout can reach
high temperatures: Do not touch it with bare hands.

10
GB
1. With the machine
ready to brew coffee,
place a cup and/or a
container below the hot
water/steam spout.
2. Press the key to
discharge any water left
in the steam spout; in a
short time, only steam
will come out of the
spout.
The display shows:
STEAM
3. Press the key to stop dispensing steam.
4. Fill 1/3 of the container you wish to use to prepare
the cappuccino with cold milk.
! Use cold milk and a cold cup for better results when
preparing cappuccino.
5. Immerse the steam
spout in the milk to be
heated and press the
key. Move the container
gently up and down for
uniform foam formation.
! Steam is dispensed for
a preset amount of time.
This may be modified
in the “PROGRAM
STEAM TIME” menu described in the chapter on
“Programming”.
6. Press the again to stop dispensing steam.
! The same system can be used to heat other
beverages.
! After this operation,
clean the steam spout
with a wet cloth.
Maintenance and care
General cleaning
! Maintenance and cleaning operations can only be
carried out when the machine is cold and disconnected
from the power supply.
• Do not immerse the machine in water or place any of
its parts in a dishwasher.
• Do not use sharp objects or harsh chemical products
(solvents) for cleaning.
• Do not dry the machine and/or its components in a
microwave and/or conventional oven.
• Clean the water tank
on a daily basis and
change the water.
• Remove and clean
the filter in the tank.
• Use a soft cloth
moistened with water to
clean the appliance.
• Clean the dispensing
outlet and the brew
group.
• We recommend
emptying and cleaning
the drip tray and the
dregs drawer on a daily
basis. To do this, extract
the drip tray then empty
and clean all parts.
• The brew unit may be
removed for cleaning:
1. Lower the brew unit
spouts
2. Grasp the brew unit as
shown and extract it from
its seat.
3. Wash the whole unit in
hot water.

GB
11
The brew group must be cleaned every time the coffee
bean hopper is filled and at least once a week.
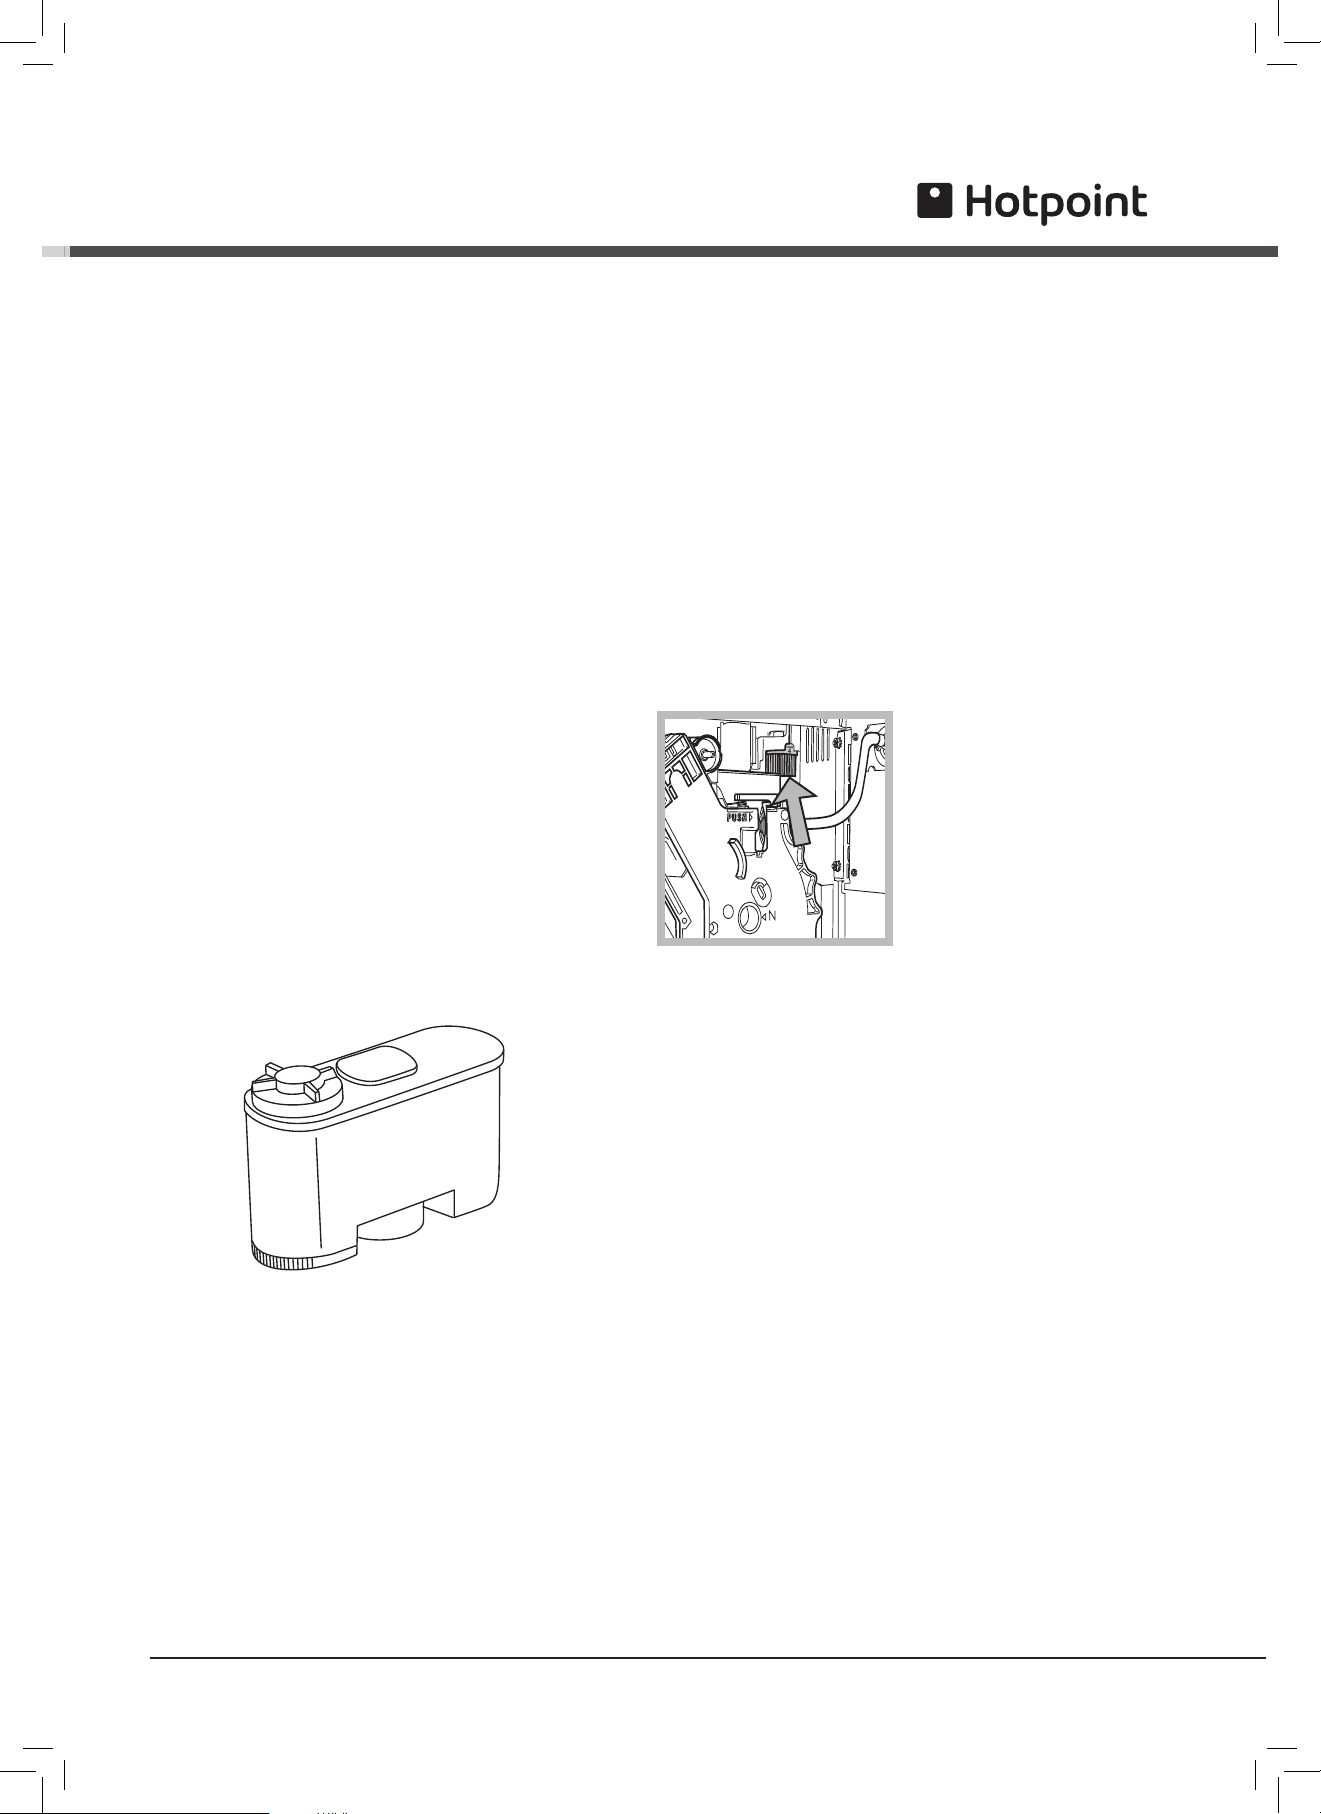
• Switch off the
machine by pressing
the main switch to “O”.
• Remove the drip
tray and the dregs
drawer. Open the
service door.
• Remove the brew
group by the handle
and press the key
marked “PUSH”.
• Wash the two steel
filters of all coffee
residues.
• The brew group
must be cleaned only
with warm water and
no detergents. Wash
all parts and dry
thoroughly.
• Thoroughly clean
the inside compartment
of the machine.
• Take the handle and
return the brew group
to the compartment
clicking it into place.
Close the door.
• Place the dregs
drawer and the grill
in the drip tray before
inserting into the machine.
! For perfect efficiency of the brew group, a
maintenance kit is available from Ariston outlets.
Descaling
Scale normally forms with use of the appliance.
Descaling is necessary every 3 - 4 months when
there is a reduction in water flow or when the machine
displays the following message:
READY FOR USE
DECALCIFY
! If you want to descale the machine yourself, you can
use a non-toxic and/or non-harmful descaling product
for coffee machines, commonly available in the shops.
Ariston descaling product is recommended.
! Never use vinegar as a descaler.
! Remove the water filter before descaling (where
installed).
Follow the instructions for descaling:
1. Mix the descaling
product with water
following the
instructions on the
product package, and
fill the tank with water.
2. Turn on the machine
at the main switch.
3. Press the key for at least 5 seconds to select the
function. The display shows:
DECALCIFY
NO
4. Using the keys, select:
DECALCIFY
YES
5. Direct the steam
spout towards the drip
tray.
6. Place a suitably
sized container below
the steam spout and
press the key.

12
GB
The machine will start an automatic descaling cycle
with pauses programmed by the manufacturer and
automatically managed by the machine.
The display will show:
MACHINE IS DESCALING
6. At the end of the cycle, dispensing of the descaling
solution will stop and the display will show:
RINSE MACHINE
FILL WATERTANK
7. Rinse the water tank
thoroughly and fill it with
fresh drinking water.
Replace the tank and
close the front panel.
The display will show:
RINSE MACHINE
PRESS WATER KEY
8. Place a suitably sized
container below the
steam spout and press
the key.
Rinsing of the machine
circuits begins and the
display will show:
MACHINE IS RINSING
9. When the rinse cycle is complete, the display will
show:
RINSING FINISHED
PRESS WATER KEY
12. Fill the water tank, press the key, reprime the
circuits and leave the machine to heat up.
! If you are using a product other than the
recommended one it is important to follow the
manufacturer’s instructions shown on the pack of the
descaling product.
Interrupting the descaling cycle
If the descaling cycle is interrupted by the machine
switching off, it is resumed when the machine is
switched on again.
The descaling cycle may be interrupted by pressing the
key; the display shows:
MACHINE IS DESCALING
INTERRUPTED
press the key and the descaling cycle resumes. If
the key and the key are pressed, the display
shows:
DESCAL. INTERRUPTED
EMPTY WATERTANK
Warning! After the operation, empty the water tank of
the descaling solution and wash it with fresh drinking
water. The machine’s circuit must be washed with a
rinse cycle.
Proceed as for a normal rinse cycle as described at
point 7 of the previous chapter.

GB
13
Setting machine functions
The user can change a number of the machine’s
operating parameters according to personal
preference.
Programmable functions
STANDBY
When the appliance is used very little, it is possible
to select the STANDBY mode. This function reduces
energy costs. Nevertheless, it is recommended to
switch off the appliance at the mains if it is to be out of
service for long periods. The machine reheats in just a
few minutes when reactivated.
Select the function by pressing the key
ENERGY SAVING *
RINSING
and enable with the key. The display shows:
ENERGY SAVING
The machine is on but none of its components is
active.
To activate the machine press
.
RINSING
Immediately after heating, the appliance automatically
eliminates any water left in the internal ducts to ensure
that only fresh water is used to make coffee.
The function has been enabled by the manufacturer.
To disable the function, press the
key, select
this function
RINSING *
LANGUAGE
and enable it with the key. The display shows:
RINSING
ON
Programming
MENU command
To change operating parameters, enter programming
mode with the key, when the machine is at rest.
In programming, select the required function and press
the key. This scrolls you through the functions
available on the machine.
To exit the programming, press the
key.
Changing individual functions
Select the required function by pressing the
key.
Enable the required function with the key. Scroll
through the variables using the key. To save
the required variable, press key.
Note: the key interrupts programming at any time
without saving changes. This operation is only possible
before pressing the key.

14
GB
Now, with the key select
RINSING
OFF
and save the choice using the key.
LANGUAGE
This function modifies the display language. Choose
from Italian, German, Portuguese, Spanish, English,
French and Dutch. The machine is generally
programmed with the language of the country where it
will be sold.
To change the language, use the
key to choose
this function:
LANGUAGE *
CONTRAST
and enable it with the key.
The display shows:
LANGUAGE
ENGLISH
Select the required language by pressing the
key and use the key to save your choice.
CONTRAST
Regulates display contrast for better viewing.
Use the key to select this function:
CONTRAST *
WATER HARDNESS
Enable it with the key.
The display shows:
CONTRAST
>¢¢¢¢¢ < 50
Now select the required contrast by pressing the
key and use the key to save your choice.
WATER HARDNESS
Water hardness varies according to geographical
region. Hence, the machine must be regulated for the
hardness of the water used. This is expressed on a
scale of 1 to 4. The appliance is already programmed
for average hardness (3).
To regulate hardness,
briefly dip (1 second) the
strip provided in water.
Next, shake the strip
gently to eliminate
excess water. After one
minute the test results
are visible. Check the
number of squares that
have changed colour.
Use the key to select this function:
WATER HARDNESS *
WATERFILTER
Enable it with the key.
The display shows:
WATER HARDNESS
HARDNESS 3
Select the right hardness using the key (e.g. 2
squares = Hardness 2) and save using the key.
! Warning: this setting allows the machine to notify
when it is time for descaling treatment.
The display shows:
READY FOR USE
DECALCIFY
WATER FILTER (where installed)
This function provides better management of the “water
filter (where installed), notifying the user when the filter
is to be replaced.
! The function must be enabled when installing the
water filter for the first time.
Use the key to select this function:
WATERFILTER *
TEMPERATURE
Programming

GB
15
Enable it with the key.
The display shows:
WATERFILTER
OFF
Use the key to select
WATERFILTER
ON
and press the key to confirm.
! The “RESET” must be given whenever a new
cartridge filter is installed.
For this command, use the
key to select the
function:
WATERFILTER
RESET
Enable it with the key.
TEMPERATURE
This function regulates the temperature of the water
for coffee (high, medium and low).
Use the key to select the function
TEMPERATURE *
PROGR. COFFEE LENG.
Enable it with the key.
The display shows (e.g.):
TEMPERATURE
MEDIUM
Select the required temperature by pressing the
key and use the key to save your choice.
PROGRAMMING COFFEE SIZE
This function enables you to regulate the amount of
coffee brewed when the ( , or ) keys are
pressed.
You can program the amount dispensed one key at
a time Continue repeating the procedure described
below to program several keys.
Use the key to select the function
PROGR. COFFEE LENG.*
PROGR. WATER AMOUNT
Enable it with the key.
The display shows:
SELECT PRODUCT
PROGRAMM. COFFEE
! In this phase, if the display remains idle for a certain
amount of time, the machine exits the function.
Position the cup that you want to fill.
Press the key to brew the required type of coffee ( ,
or ); this is shown on the display (e.g.):
1 SMALL COFFEE
DISPENSING
and then:
1 SMALL COFFEE
PROGRAMM. COFFEE
Wait for the cup to fill with the required amount. Press
the key again.
PROGRAMMING THE QUANTITY OF WATER
This function enables you to regulate the amount of
water that is dispensed whenever is pressed. You
need just one key to fill your container with the right
amount of water
Use the key to select the function
PROGR. WATER AMOUNT*
PROGRAM STEAM TIME

16
GB
AROMA ESPRESSO
This function allows you to program a dosage (quantity)
setting for coffee beans to be ground for espresso
(strong, medium, mild).
Use the key to select the function:
AROMA SMALL COFFEE *
AROMA COFFEE
Enable it with the key.
The display shows (e.g.):
AROMA SMALL COFFEE
STRONG
Select the required dose by pressing the key
and use the key to save your choice.
AROMA COFFEE
This function allows you to program a dosage (quantity)
setting for coffee beans to be ground for coffee (strong,
medium, mild).
Use the key to select the function:
AROMA COFFEE *
AROMA LARGE COFFEE
Enable it with the key.
The display shows (e.g.):
AROMA COFFEE
MEDIUM
Select the required dose by pressing the key
and use the key to save your choice.
Programming
Enable it with the key.
The display shows:
SELECT PRODUCT
PROGRAMM. WATER
Position the container that you want to fill and press .
Water is dispensed from the steam spout and the
display shows:
HOT WATER
PROGRAMM. WATER
When the required amount is reached, press the
key again.
The machine is now programmed.
PROGRAMMING STEAM TIME
This function enables you to regulate how long steam is
dispensed whenever is pressed.
Use the key to select the function:
PROGRAM STEAM TIME *
AROMA SMALL COFFEE
Enable it with the key.
The display shows:
SELECT PRODUCT
PROGRAMM. STEAM
Position the container with the drink that you want to
heat and press the key.
Steam is dispensed from the spout and the display
shows:
STEAM
PROGRAMM. STEAM
When the required amount is reached, press the
key again.
The machine is now programmed.

GB
17
AROMA LONG COFFEE
This function allows you to program a dosage
(quantity) setting for coffee beans to be ground for
long coffee (strong, medium, mild).
Use the key to select the function:
AROMA LARGE COFFEE *
PREBREWING
Enable it with the key.
The display shows (e.g.):
AROMA LARGE COFFEE
STRONG
Select the required dose by pressing the key
and use the key to save your choice.
PRE-BREWING
The pre-brewing process enhances the aroma of
coffee to give it an excellent taste. This function
moistens the coffee before it is actually brewed.
Use the key to select the function:
PREBREWING *
TOTAL COFFEES
Enable it with the key.
The display shows (e.g.):
PREBREWING
ON
Use the key to choose whether to disable the
function:
PREBREWING
OFF
or to extend the phase:
PREBREWING
LONG
to enhance the flavour of your coffee.
Save your choice using the key.
TOTAL COFFEES
This function displays the number of coffees already
dispensed by the appliance.
Use the key to select the function:
TOTAL COFFEE *
TIMER
Enable it with the key.
The display shows (e.g.):
TOTAL COFFEE
81
Press key to exit.
TIMER
This function enables you to save energy when the
machine is not used for long periods.
This function is preset by the manufacturer and is
automatically enabled.
ENERGY SAVING
after 3 hours from the use.
! Switch-off time can be regulated at 15-minute
intervals with a minimum of 15 minutes. The function
cannot be disabled.
Use the key to select the function:
TIMER *
CLOCK
Enable it with the key.
The display shows:
STANDBY
AFTER 3:00
Select the automatic switch-off interval by pressing the
key and use the key to save.
! Note: if automatic switch-on/off times are enabled in
“CLOCK” mode, this function will be ignored.

18
GB
CLOCK
This function is enabled and/or disabled by the user
and:
- displays the exact time when the machine is in
“STANDBY” or “SELECT FUNCTION” mode.
- selects the on/off time.
To correctly program this function, the exact time must
be set.
Use the key to select this function:
CLOCK *
RINSING CYCLE
Enable it with the key.
Use the key to select this function:
CLOCK TIME *
ON/OFF TIME
Enable it with the key.
Use the key to select this function:
CLOCK TIME
0:00
Set the current time by pressing the key and
save using key;
Next, press the key to set the minutes and save
using key.
The time is set and the machine returns to the previous
menu.
! Note: the time is memorised when the machine is
switched off.
To display the time
Use the key to select this function:
SHOW CLOCK TIME *
AUTOMATIC ON/OFF
Enable it with the key.
Use the key to choose whether to enable the
function:
SHOW CLOCK TIME *
ON
Save using the key.
! Note: the time is only displayed at certain times. This
function can only be disabled by the user.
To disable this function, use the
key to choose:
SHOW CLOCK TIME *
OFF
Save using the key.
Regulating on/off times
The machine can be programmed to switch on and off
automatically. Only one “on” time and one “off ” time can
be programmed on the machine.
! Note: this function is enabled only if the main switch is
in the “I” position (on).
Use the key to select this function:
ON/OFF TIME *
SHOW CLOCK TIME
Enable it with the key.
ON/OFF TIME
ON TIME 0:00
Set the “on” time by pressing the key and save
using the key.
Next, press the key to set the minutes and save
using key.
ON/OFF TIME
OFF TIME 0:00
Set the “off” time by pressing the key and save
using key.
Next, press the key to set the minutes and save
Programming

GB
19
using key.
! Attention: if the on and off times coincide, the
machine ignores both settings. The clock must be
enabled after this programming in order to function
correctly.
To enable automatic on/off
! Note: this function is enabled only if on/off times has
been programmed.
Use the key to select this function:
AUTOMATIC ON/OFF *
CLOCK TIME
Enable it with the key.
AUTOMATIC ON/OFF
NO
In this case disables this function.
Enable the function with the key and when the
display shows:
AUTOMATIC ON/OFF
YES
save using the key.
Check the parameter settings when exiting
programming. If the current time falls within the
disabled period the display shows:
ENERGY SAVING
! Note: during the disabled phase the machine may
be reactivated at any time by pressing the key. To
disable the machine again, go into programming by
pressing and exit immediately by pressing the
key.
RINSING CYCLE
This function performs a rinsing cycle using water to
clean all components involved in brewing coffee.
! A person should be present during the rinsing cycle
to supervise the operation. Before performing the
rinsing cycle fill the water tank.
Use the key to select this function:
RINSING CYCLE *
FACTORY SETTINGS
Press the key.
The display will show:
RINSING CYCLE
NO
Use the key to select
RINSING CYCLE
YES
Press the key to start the rinsing cycle. The display
shows:
RINSING CYCLE
The machine dispenses about half the quantity of
water contained in the tank from the brew unit.
Then the cycle stops automatically, and the display
shows:
SELECT PRODUCT
READY FOR USE

20
GB
Factory settings
This function resets the machine’s operating
parameters to the manufacturer’s settings.
Use the key to select this function:
FACTORY SETTINGS *
EXIT
Enable it with the key.
The display then shows:
FACTORY SETTINGS
NO
Choose whether to restore parameters with the
key, and press the
key to confirm.
! Warning: when all parameters are restored to factory
settings, all customised settings are lost.
Programming

GB
21
Display messages
Display messages
The machine’s display informs the user of how it is to
be used.
Here is a list of the alarm messages that prevent
coffee brewing and what the user should do to solve
the problem.
ENERGY SAVING
• Press the key “MENU/OK”.
READY FOR USE
DECALCIFY
• Descale the machine.
FILL WATERTANK
• Fill the water tank with fresh drinking water.
! The machine requires the tank to be filled even when
the level is still high. This happens because the tank
of the coffee machine has been preset to house the
optional “water filter”, thus requiring a minimum level of
water in the tank for filtering to be performed.
COFFEE BEANS EMPTY
READY FOR USE
• Fill the hopper with coffee beans and start the
coffee brew cycle.
WASTE TRAY FULL
• Open the door, remove the dregs drawer and empty
the dregs into a suitable container.
! Important note: The dregs drawer must only be
emptied when the machine is switched on. The dregs
drawer must be removed for at least 5 seconds. If the
drawer is emptied when the machine is switched off, it
will not be possible to brew coffee when switched back
on.
BREWUNIT MISSING
• Insert the brew group correctly.
WASTE TRAY MISSING
• Insert the drip tray and the dregs drawer correctly.
CLOSE DOOR
• Close the front door.
CLOSE CONTROL PANEL
• Close the upper panel.
VENTILATE
• Place a cup or suitable container below the steam
spout and press the key.
Wait until the water runs smoothly out of the steam
spout.
To interrupt, press the
key.
BREWUNIT BLOCKED
GRINDER BLOCKED
• Contact an authorised customer service centre.

22
GB
Problem Cause Solution
The machine does not switch on The machine is not connected to the
power supply
Check connection to the power
supply
Coffee is not hot enough The cups are cold Warm the cups with hot water
No hot water or steam is dispensed Steam spout clogged Pull the steam spout downwards to
remove it, and clean
Coffee brews too slowly Coffee too fine Change coffee blend
Rotate the grind regulation knob to
the highest number
Brew group dirty Wash the brew group
SBS system knob turned all the way
to the right
Turn the knob to the left and when
the machine is brewing, turn toward
the right
Coffee brews too quickly Coffee too coarse Change coffee blend
Rotate the grind regulation knob to
a lower value
SBS system knob turned all the way
to the left
When the machine is brewing, turn
the knob to the right
The machine takes a long time to
heat up and the amount of water
dispensed from the spout is too
small
There are limescale deposits in the
circuit
Run descaling cycle
The brew group does not come out The brew group is off position Turn the machine on. Close the
front door; the group returns to
the starting position and can be
removed.
Drip tray inserted Remove the drip tray
Coffee leaks out of the brew unit Brew unit in the wrong position Reposition the brew unit
Brew unit clogged Remove brew unit and wash
Coffee has little foam Unsuitable coffee blend or coffee is
not freshly toasted
Change coffee blend
Coffee blend too coarse Regulate the grind
SBS system knob turned towards
the left
Turn the SBS system knob to the
right
Water overflowing from the drip tray
Drip tray too full Check the position of the float and
empty the drip tray
Problems - causes - solutions

GB
23
Precautions and
recommendations
Intended use
• The coffee machine is intended only for domestic
use.
• Do not make any technical changes or use the
machine for unlawful purposes as this may lead to
hazards!
• The machine should only be used by adults in full
possession of their physical and mental faculties.
Power supply
• Only connect the coffee machine to a suitable
power socket.
• The voltage must correspond to the value on the
rating plate.
Power cable
• Never use the coffee machine if the power cable is
defective.
• Do not pass the cable around corners, over sharp
edges or over hot objects and keep it away from oil.
• Do not pull out the plug by tugging at the power
cable or touch it with wet hands or feet.
Protecting others
• Ensure that the coffee machine is out of children’s
reach. Children are not aware of the risks linked
with electrical appliances.
• Do not leave the coffee machine packaging within
the reach of children.
Danger of burning
• Never direct the jet of hot water and/or steam
towards yourself or others. Danger of scalding.
Always use the handles or knobs provided.
• Do not insert objects into the openings on the
appliance.
Installation area, use and maintenance
• Do not obstruct the ventilation or heat discharge
openings.
• Choose a location that is sufficiently lit, clean and
near a socket that is easy to reach.
• Do not place the machine on hot surfaces and close
to open flames to prevent the casing from melting or
being damaged.
• Allow a distance of 10 cm between walls and
cooking hotplates.
• Do not keep the machine at a temperature below
0°C; freezing may damage the machine.
• There must be easy access to the socket at all
times.
• Do not use the coffee machine outdoors.
Cleaning
• Before cleaning the machine, it is indispensable
to put the main switch on “O” and remove the plug
from the power socket.
• Then, wait for the machine to cool down.
• Never immerse the machine in water! Prevent it
from being sprayed with water.
• It is strictly forbidden to tamper with the inside of the
machine.
Storing the machine
• If the machine is to remain out of use for a long
time, switch off and unplug it from the socket. Store
it in a dry place out of the reach of children.
• Keep it protected from dust and dirt.
• Do not lay heavy objects on the front panel while
open.
Servicing / Maintenance
• In case of failure, faults or suspected faults, unplug
immediately. Never attempt to operate a faulty
machine.
• Servicing and repairs must only be carried out by
Authorized Customer Service Centres.
• The manufacturer accepts no responsibility
for servicing and/or repairs not carried out by
authorised customer service centres.
Fire safety
• In the event of fire, use carbon dioxide extinguishers
(CO2). Do not use water or dry-powder
extinguishers.
Disposal
• Disposal of packaging materials: comply with local
regulations for recycling of used packaging.
• European Directive 2002/96/EC on waste electrical
and electronic equipment (WEEE), states that
electrical household appliances must not be
disposed of a normal solid urban waste. Old
appliances must be collected separately to optimise
the rate of recovery and recycling of the materials of
which they are composed, and to prevent potential
damage to health and the environment. The crossed
through basket symbol is used on all products as a
reminder that they must be disposed of separately.
Electrical appliances in disuse can be delivered
to the public refuse collection service or taken to
special municipal areas. Otherwise, depending on
national legislation, they may be taken to the retailer
at the time of purchase of a similar product.
All the main manufacturers of household
appliances are actively involved in the creation
and management of collection and disposal of
appliances in disuse.

24
GB
Note
 Loading...