

Page 1
H6TG5F C UA
English
GB
EnglishEnglish
Operating Instructions
COOKER AND OVEN
Contents
Operating Instructions,1
WARNING,2
Description of the appliance-Overall view,4
Description of the appliance-Control Panel,5
Installation,6
Start-up and use,10
Precautions and tips,14
Care and maintenance,15
Assistance,15
Românã
RO
Instrucюiuni de folosire
Instrucюiuni de folosire
Instrucюiuni de folosire
ARAGAZ ЄI CUPTOR
ARAGAZ ЄI CUPTOR
ARAGAZ ЄI CUPTOR
Sumar
Sumar
Sumar
Instrucюiuni de folosire,1
AVERTISMENT,2
Descrierea aparatului- Vedere de ansamblu,4
Descrierea aparatului-Panoul de control,5
Instalare,36
Pornire şi utilizare, 41
Precauţii şi sfaturi,44
Întreţinere şi curăţire,45
Asistenţă,45
RomânãRomânã
Русский
RS
Руководство по эксплуатации
Руководство по эксплуатации
Руководство по эксплуатации
КУХОННАЯ ПЛИТА С ДУХОВЫМ ШКАФОМ
КУХОННАЯ ПЛИТА С ДУХОВЫМ ШКАФОМ
КУХОННАЯ ПЛИТА С ДУХОВЫМ ШКАФОМ
Содержание
Содержание
Содержание
Руководство по эксплуатации,1
ПРЕДУПРЕЖДЕНИЯ,2
Описание изделия-Общий вид,4
Описание изделия-Панель управления,5
Монтаж,16
Включение и эксплуатация,20
Предосторожности и рекомендации,24
Техническое обслуживание и уход,25
Техническое обслуживание,25
UA
Інструкціі з експлуатаціі
Інструкціі з експлуатаціі
Інструкціі з експлуатаціі
КУХНЯ
КУХНЯ
КУХНЯ
Зміст
Зміст
Зміст
Ін
струкціі з експлуатаціі,1
ЗАПОБІЖНИХ ЗАХОДІВ,2
Опис установки-Загальнии вигляд,4
Опис установки-Панель управління,5
Встановлення,27
Включення і використання,31
Запобіжні засоби і поради,34
Догляд i технічне обслуговування,35
Допомога,35
РусскийРусский
Украінська
УкраінськаУкраінська
Қазақша
KZ
Пайдалану нұсқаулығы
ПЕШ ПЕН АСТЫҢҒЫ ПЕШ
Мазмұны
Пайдалану нұсқаулығы, 1
ЕСКЕРТУ,2
Құрылғы сипаттамасы-Басқару тақтасы, 4
Құрылғы сипаттамасы-Жалпы көрінісі, 5
Орнату, 46
Қосу және пайдалану, 51
Конфорканы пайдалану, 52
Сақтандырулар мен кеңестер, 54
Күтім және техникалық қызмет көрсету, 55
Көмек, 55
Page 2

GB
Warnings
WARNING: The appliance and its
accessible parts become hot during
use.
Care should be taken to avoid
touching heating elements.
Children less than 8 years of
age shall be kept away unless
continuously supervised.
This appliance can be used by
children aged from 8 years and above
and persons with reduced physical,
sensory or mental capabilities or
lack of experience and knowledge
if they have been given supervision
or instruction concerning use of
the appliance in a safe way and
understand the hazards involved.
Children shall not play with the
appliance. Cleaning and user
maintenance shall not be made by
children without supervision.
WARNING: Unattended cooking on a
hob with fat or oil can be dangerous
and may result in fire.
NEVER try to extinguish a fire with
water, but switch off the appliance and
then cover flame e.g. with a lid or a fire
blanket.
Do not use harsh abrasive cleaners or
sharp metal scrapers to clean the oven
door glass since they can scratch the
surface, which may result in shattering
of the glass.
The internal surfaces of the
compartment (where present) may
become hot.
Never use steam cleaners or pressure
cleaners on the appliance.
Remove any liquid from
the lid before opening it.
Do not close
the glass cover (if present) when the
gas burners or electric hotplates are
still hot.
WARNING: Ensure that the appliance
is switched off before replacing the
lamp to avoid the possibility of electric
shock.
.
Не разрешайте детям младше 8 лет
приближаться к изделию без контроля.
Данное изделие может быть
использовано детьми старше 8
лет и лицами с ограниченными
физическими, сенсорными или
умственными способностями или
без опыта и знания
о правилах
использования изделия при условии
надлежащего контроля или обучения
безопасному использованию изделия
с учетом соответствующих рисков. Не
разрешайте детям играть с изделием.
Не разрешайте детям осуществлять
чистку и уход за изделием без
контроля взрослых.
ВНИМАНИЕ: Опасно оставлять
включенную конфорку с маслом или
жиром без присмотра, так как это
может
привести к пожару.
НИКОГДА не пытайтесь погасить
пламя/пожар водой. Прежде всего
выключите изделие и накройте пламя
крышкой или огнеупорной тканью.
ВНИМАНИЕ: Опасность пожара: не
оставляйте предметов на варочных
поверхностях.
ВНИМАНИЕ: Если
стеклокерамическая поверхность
варочной панели треснула, выключите
ее во избежание ударов током.
Не используйте абразивные вещества
или режущие металлические скребки
для чистки стеклянной дверцы
духового шкафа, так как они могут
поцарапать поверхность, что может
привести к разбиванию стекла.
Внутренняя поверхность ящика (если
он имеется) может сильно нагреться.
Никогда не используйте паровые
чистящие агрегаты или агрегаты
под высоким давлением для чистки
изделия.
Если на крышку пролита жидкость,
удалите ее перед тем,
как открыть
крышку. Не закрывайте стеклянную
крышку варочной панели (если
она имеется), если газовые или
электрические конфорки еще горячие.
ВНИМАНИЕ: Проверьте, чтобы
изделие было выключено, перед
заменой лампочки во избежание
возможных ударов током.
! ɉɪɢ ɭɫɬɚɧɨɜɤɟ ɪɟɲɟɬɤɢ
ɩɪɨɜɟɪɢɬɶ, ɱɬɨɛɵ ɮɢɤɫɚɬɨɪ ɛɵɥ
ɩɨɜɟɪɧɭɬ ɜɜɟɪɯ ɫ ɡɚɞɧɟɣ ɫɬɨɪɨɧɵ
ɜɵɟɦɤɢ.
! When you place the rack inside,
make sure that the stop is directed
upwards and in the back of the cavity.
RS
ПРЕДУПРЕЖДЕНИЯ
ВНИМАНИЕ: Данное изделие и его
доступные комплектующие сильно
нагреваются в процессе эксплуатации
Будьте осторожны и не касайтесь
нагревательных элементов
2
.
UA
ЗАПОБІЖНИХ ЗАХОДІВ
УВАГА! Під час роботи цей прилад,
а також його доступні частини
нагріваються до високих температур.
Слід бути особливо обережними, щоб
не торкатися нагрівальних елементів.
Діти віком до 8 років мають
знаходитися на небезпечній відстані
від приладу, якщо неможливо
забезпечити постійний контроль над
ними.
Page 3

Дозволяється користування цим
приладом дітьми віком від 8 років,
також особами з обмеженими
а
фізичними, сенсорними або
розумовими можливостями або
особами без належного досвіду
і знань, якщо вони перебувають
під постійним контролем або
проінструктовані щодо правил з
небезпечного користування приладу
і усвідомлюють ступені ризику. Не
дозволяйте дітям гратися з приладом.
Операції з очищення і догляду не
повинні виконуватися дітьми без
належного контролю.
УВАГА! Небезпечно залишати без
нагляду плити з жиром або олією,
тому що це може призвести до
пожежі.
НІ В ЯКОМУ РАЗІ не слід намагатися
погасити полум’я/пожежу водою.
Необхідно вимкнути прилад і накрити
полум’я, наприклад, кришкою або
вогнетривким покривалом.
Не використовувати абразивні засоби
ані металеві загострені шпателі
для очищення скляних дверцях
духовки, тому що вони можуть
пошкрябати поверхню, призводячи до
розтріскування скла.
Внутрішні поверхні відділення (де
вони наявні) можуть нагріватися до
високих температур.
Забороняється використання апаратів
для очищення парою або високим
тиском.
Витріть насухо всі наявні на кришці
рідини, перш ніж відкрити її. Не
закривайте скляну кришку (
якщо вона
наявна), якщо газові пальники або
електричні конфорки залишаються
нагрітими.
УВАГА! Щоб запобігти враженню
електричним струмом переконайтеся
в тому, що прилад вимкнений, перш
ніж заміняти лампочку.
УВАГА! використання невідповідних
захисних пристроїв варильної
поверхні може призвести до нещасних
випадків
! ɉɿɞ ɱɚɫɬ ɜɫɬɚɜɥɹɧɧɹ ɪɟɲɿɬɤɢ
ɫɥɿɞ ɩɟɪɟɤɨɧɚɬɢɫɹ, ɳɨ ɫɬɨɩɨɪ
ɩɨɜɟɪɧɭɬɢɣ ɜɝɨɪɭ ɿ ɜɫɟɪɟɞɢɧɭ ɧɿɲɿ .
RO
AVERTISMENT
ATENŢIE: Acest aparat şi părţile sale
accesibile devin foarte calde în timpul
folosirii.
Trebuie să fi ţi atenţi şi să nu atingeţi
elementele de încălzire.
Îndepărtaţi copiii sub 8 ani dacă nu sunt
supravegheaţi continuu.
Acest aparat poate fi utilizat de copiii de
peste 8 ani şi de persoane cu capacităţi
fi zice, senzoriale sau mentale reduse sau fără experienţă şi cunoştinţe
dacă se afl ă sub o supraveghere
corespunzătoare sau dacă au fost
instruiţi cu privire la folosirea aparatului
în mod sigur şi dacă îşi dau seama de
pericolele corelate. Copiii nu trebuie să
se joace cu aparatul. Operaţiunile de
curăţare şi de întreţinere nu trebuie să
fi e efectuate de copii făr
ă supraveghere.
ATENŢIE: Lăsarea unui aragaz nesupravegheat cu grăsimi şi uleiuri poate fi
periculoasă şi poate provoca un incendiu.
Nu trebuie NICIODATĂ să încercaţi să
stingeţi o fl acără/incendiu cu apă, ci tre-
buie să stingeţi aparatul şi să acoperiţi
fl acăra, de exemplu cu un capac sau cu
o pătură ignifugă.
Nu folosiţi produse abrazive, nici perii
de metal tăioase pentru a curăţa uşa de
sticlă a cuptorului, deoarece ar putea
zgâria suprafaţa, provocând astfel
spargerea geamului.
Suprafeţele interne ale sertarului (dacă
este prezent) se pot încălzi.
Nu folosiţi niciodată aparate cu aburi
sau sub presiune pentru a curăţa
aparatul.
Eliminaţi eventualele reziduuri de lichid
de pe capac, înainte de a-l deschide.
Nu închideţi capacul din sticlă (dac
ă
este prezent) cu arzătoarele de gaz sau
plita electrică încă calde.
ATENŢIE: Asiguraţi-vă că aparatul este
stins înainte de a înlocui lampa pentru a
evita posibilitatea electrocutărilor.
!Când introducei Ġgră tarul, asiguraĠi-
vă că opritorul este îndreptat în sus úi
în partea din spate a cavitiiăĠ.
KZ
ЕСКЕРТУ: Құрылғы мен оның қол жететін
бөліктері жұмыс кезінде қызуы мүмкін.
Қыздыру элементтеріне тимеуге назар
аударыңыз.
8-ге толмаған балаларға үздіксіз бақылау
болмаса, құрылғыдан аулақ ұстау керек.
Бұл құрылғыны қауіпсіз түрде қолдану
бойынша кеңес не нұсқау берілген және
ықтимал қауіп-қатерлерді түсінетін жағдайда,
оны 8-ге толған балалар мен дене,
сезіну немесе ой қабілеті төмен немесе
тәжірибесі мен білімі жеткіліксіз адамдар
қолдана алады. Балаларға құрылғымен
ойнауға болмайды. Балаларға бақылаусыз
құрылғыны тазалауға және оған қызмет
көрсетуге болмайды.
ЕСКЕРТУ
3
Page 4
ЕСКЕРТУ: Плитада майға тамақ пісірген
кезде бақылап тұрмау қауіпті болуы және өрт
шығуға әкелуі мүмкін.
Өртті ЕШҚАШАН сумен өшіруші болмаңыз,
оның орнына құрылғыны өшіріп, жалынды
жабыңыз, мысалы қақпақпен немесе
өртенбейтін матамен.
Пеш есігінің шынысын тазалау үшін қатты
ысқыш тазалағыштарды немесе өткір метал
ысқыштарды пайдаланбаңыз, себебі олар
шыныны сызып, оның шағылуына әкелуі
мүмкін.
Бөліктің (бар болса) ішкі беттері қызып кетуі
мүмкін.
Құрылғыда ешқашан бу тазартқышты немесе
шаңсорғышты пайдаланбаңыз.
Қақпақты ашпас бұрын ондағы сұйықтықты
сүртіп алыңыз.
Шыны қақпақты (бар болса) газ оттықтары
немесе электр плиталар әлі ыстық болған
кезде жаппаңыз.
ЕСКЕРТУ: Тоқ соғу мүмкіндігінің алдын алу
үшін шамды ауыстырмас бұрын құрылғы
өшірілгеніне көз жеткізіңіз.
АБАЙ БОЛЫҢЫЗ: сәйкес келмейтін
конфоркалардың қорғану құралдарын
пайдалану жазатайым оқиғаларға себеп
болуы мүмкін.
! Тартпаны ішке салған кезде шектегіш
жоғары қарап, қуыстың артқы жағында
тұрғанына көз жеткізіңіз.
1
2
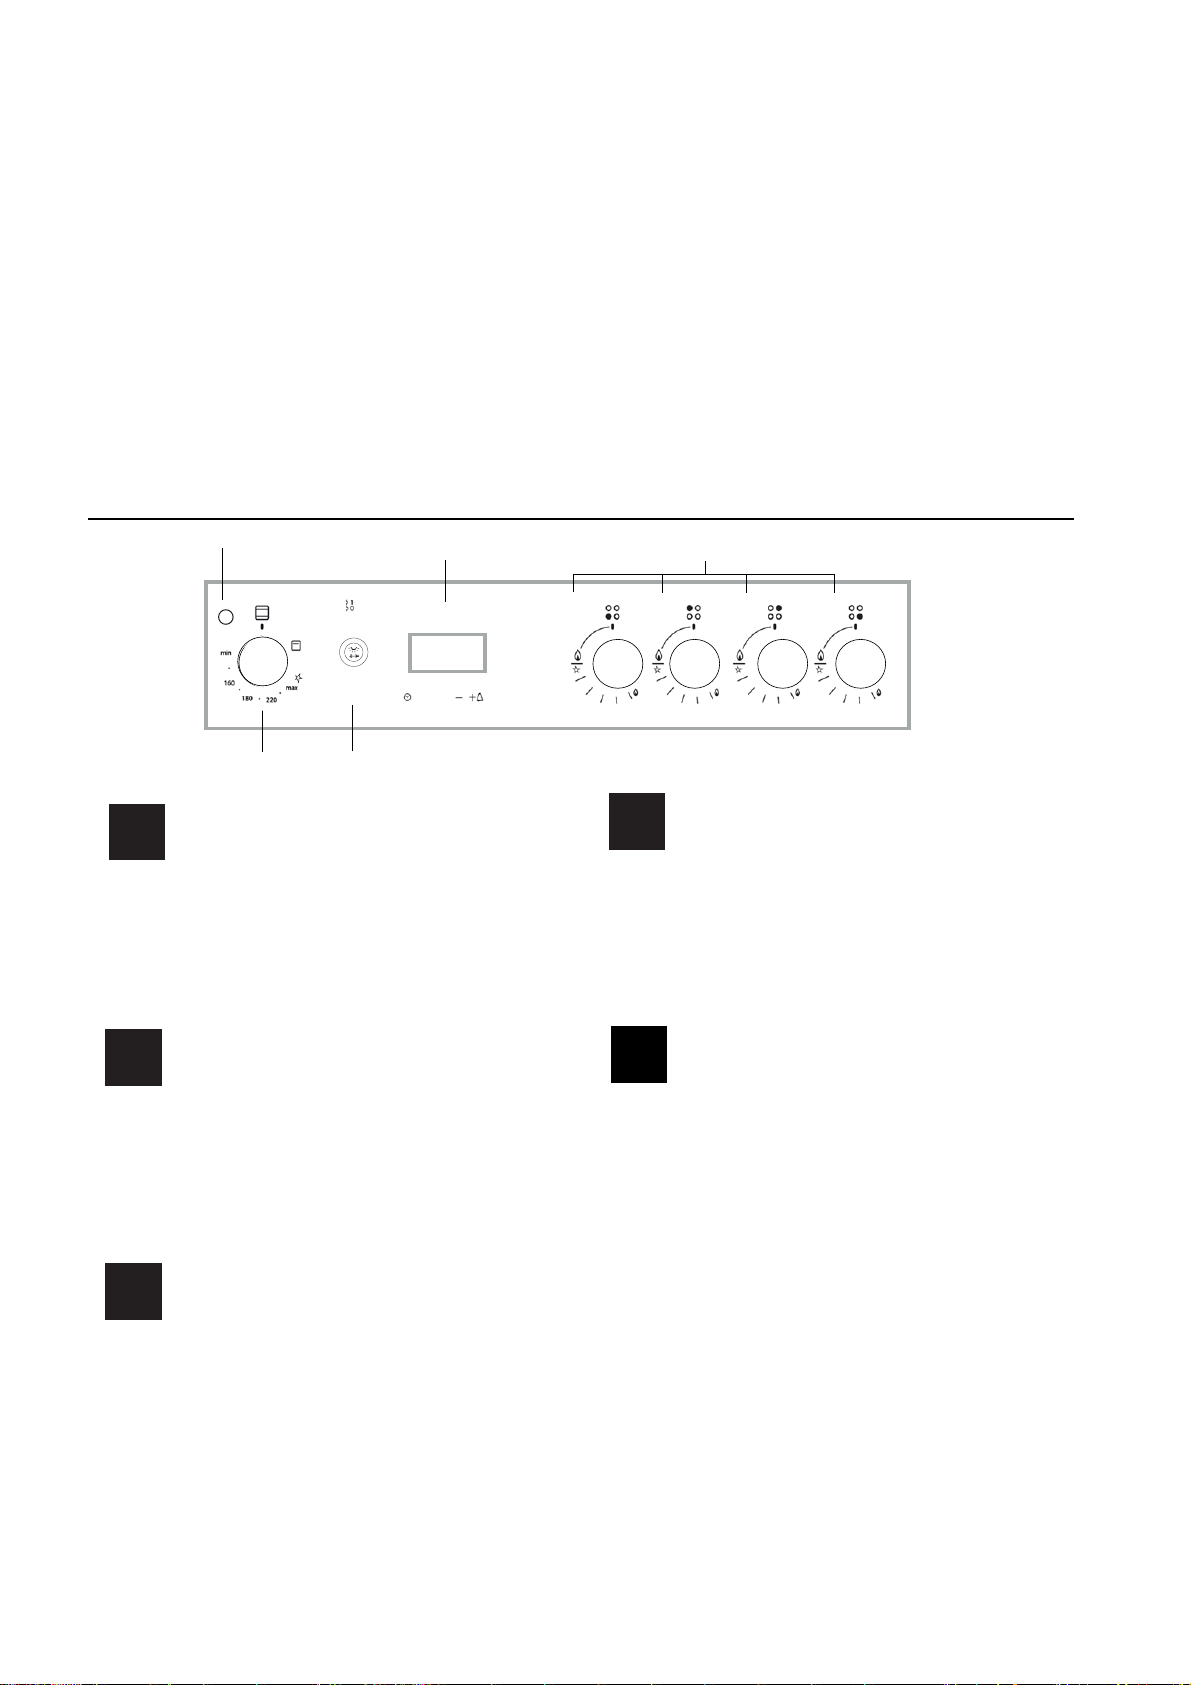
GB
1.GRILL indicator light
2.OVEN AND GRILL CONTROL knob
3.OVEN LIGHT / ROTISSERIE button
4. Hob BURNER control knob
5. Analogue Timer
RS
1.Световой индикатор
2.Рукоятка управления духовкой и грилем
3.Кнопка включения/выключения освещения духовки
4. Рукоятки включения газовых конфорок
варочной панели
5. Аналоговый таймер
Description of the appliance
Control panel
Описание изделия
Описание изделия
Описание изделия
Панель управления
Панель управления
Панель управления
3
гриль
5
4
RO
1.Indicator GRILL
2.Buton de comanda pentru cuptor i grill
3.Buton pentru activarea luminii din cuptor/ rotisserie
4.Butoane comandi ochiuri aragaz
5.Analogic Timer
KZ
1. ГРИЛЬ индикатор шамы
2. ПЕШ ПЕН ГРИЛЬ БАСҚАРУ тұтқасы
3. ПЕШ ШАМЫ түймесі
4. Плита ОТТЫҒЫН басқару тұтқасы
5. ТАЙМЕР тұтқасы
Descriere aparatului
Panoul de control
Құрылғы сипаттамасы
Басқару тақтасы
/
Қуырылған ет
түймесі
Опис плити
Опис плити
UA
1. Індикатор
2. Ручка ДУХОВКА й гриля
3.КНОПКА РОЖНА та ОСВІТЛЕННЯ ДУХОВКИ
4.Ручки для керування газовими
5. Аналоговий таймер
4
Опис плити
Панель управління
Панель управління
Панель управління
гриль
пальниками на варильній поверхні
Page 5
14
1
2
3
4
5
6
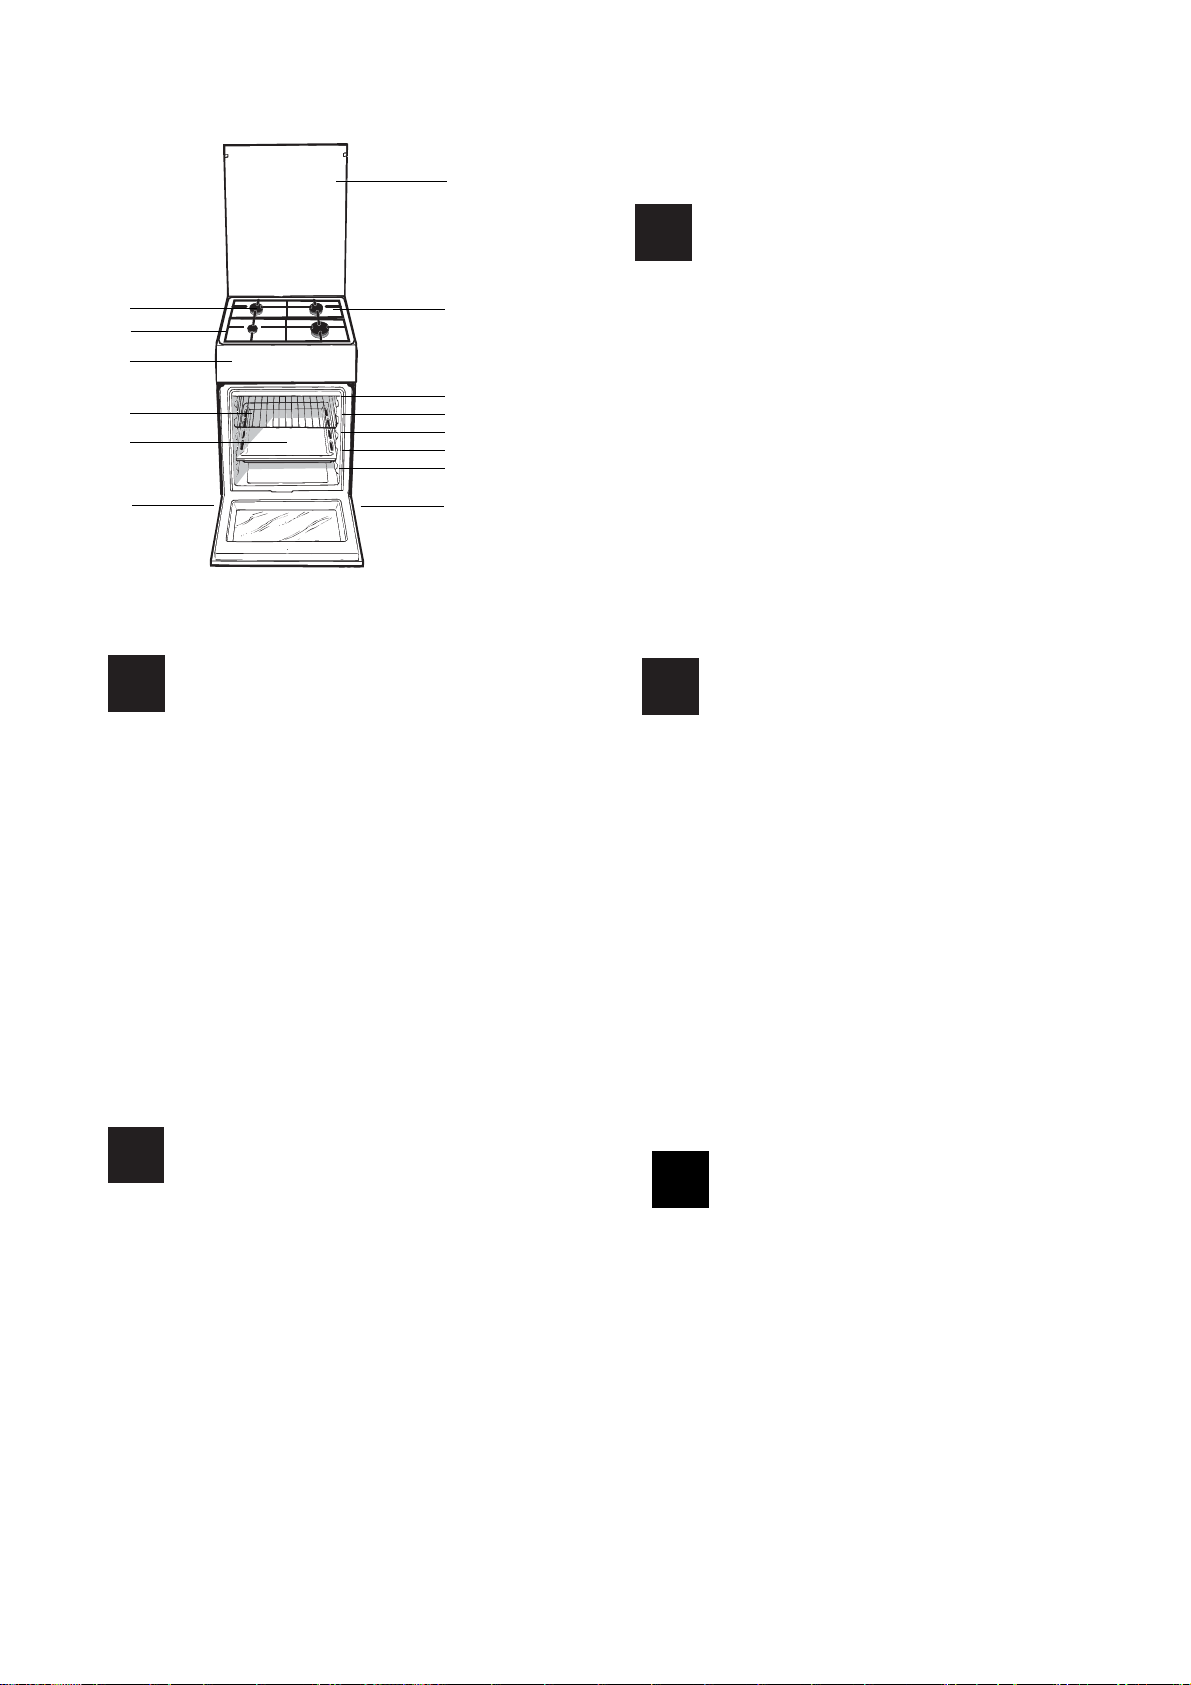
GB
1 Hob burner
2 Hob Grid
3.Control panel
4.Sliding grill rack
5.DRIPPING pan
6.Adjustable foot
7.Containment surface for spills
8.GUIDE RAILS for the sliding racks
9.position 5
10.position 4
11.position 3
12.position 2
13.position 1
14. Glass Cover *(Available only on certain
models)
Description of the appliance
Overall view
7
8
9
10
11
12
13
UA
1. Газовий пальник
2. Піддон на випадок переливань
3.Панель управління
4.Полка РЕШІТKИ
5.Полка ДEКО
6.Лапка для налаштування
7.Пoверхня для збирання збiглoї piдини
8.HAПPABЛЯЮЧІ для полиць
9.положення 5
6
10.положення 4
11.положення 3
12.положення 2
13.положення 1
14.Скляна кришка (Є лише в деяких моделях.)
1.Arzătoare pe gaz
2.Grătare plită
3.Panou frontal de control
4.Grătarul cuptorului
5.Tavă de coacere
6.Picioare reglabile
7.Plită
8.GHIDAJE alunecare rafturi
9.nivelul 5
10. nivelul 5
11.nivelul 5
12.nivelul 5
13.nivelul 5
14.Capacul din sticlă
(prezent doar la anumite modele)
Загальнии вигляд
RO
Descriere aparatului
Vedere de ansamblu
Опис плити
Описание изделия
RS
Общий вид
1 Газовые горелки
2 Рабочая поверхность
3 Панель управления
4 Решетка духовки
5 Противень или жарочный лист
6 Регулируемые ножки
7 Электрические конфорки
HAПPAB ЛЯЮЩИE для противеней решеток
8
9 Положение 1
10 Положение 2
11 Положение 3
12 Положение 4
13 Положение 5
Cтеклянная крышка
14
(
Имеется только в некоторых моделях.)
Құрылғы сипаттамасы
KZ
Жалпы шолу
1. Плита оттығы
2. Плита торы
3. Басқару тақтасы
4. Сырғымалы гриль тартпасы
5. МАЙ ЖИНАЙТЫН таба
6. Реттелмелі аяқ
7. Төгілген сұйықтықтарды ұстайтын бет
8. Сырғымалы тартпаларға арналған БАҒЫТТАУЫШ
9. 5-позиция
10. 4-позиция
11. 3-позиция
12. 2-позиция
13. 1-позиция
14. Шыны қақпақ (тек кейбір модельдерде)
5
Page 6
GB
HOOD
420
Min.
min.
650
mm. with hood
min.
700
mm. without hood
mm.
600
Min. mm.
420
Min. mm.
Installation
! Before operating your new appliance please read
this instruction booklet carefully. It contains important
information concerning the safe installation and
operation of the appliance.
! Please keep these operating instructions for future
reference. Make sure that the instructions are kept with
the appliance if it is sold, given away or moved.
! The appliance must be installed by a qualified
professional according to the instructions provided.
! Any necessary adjustment or maintenance must be
performed after the cooker has been disconnected
from the electricity supply.
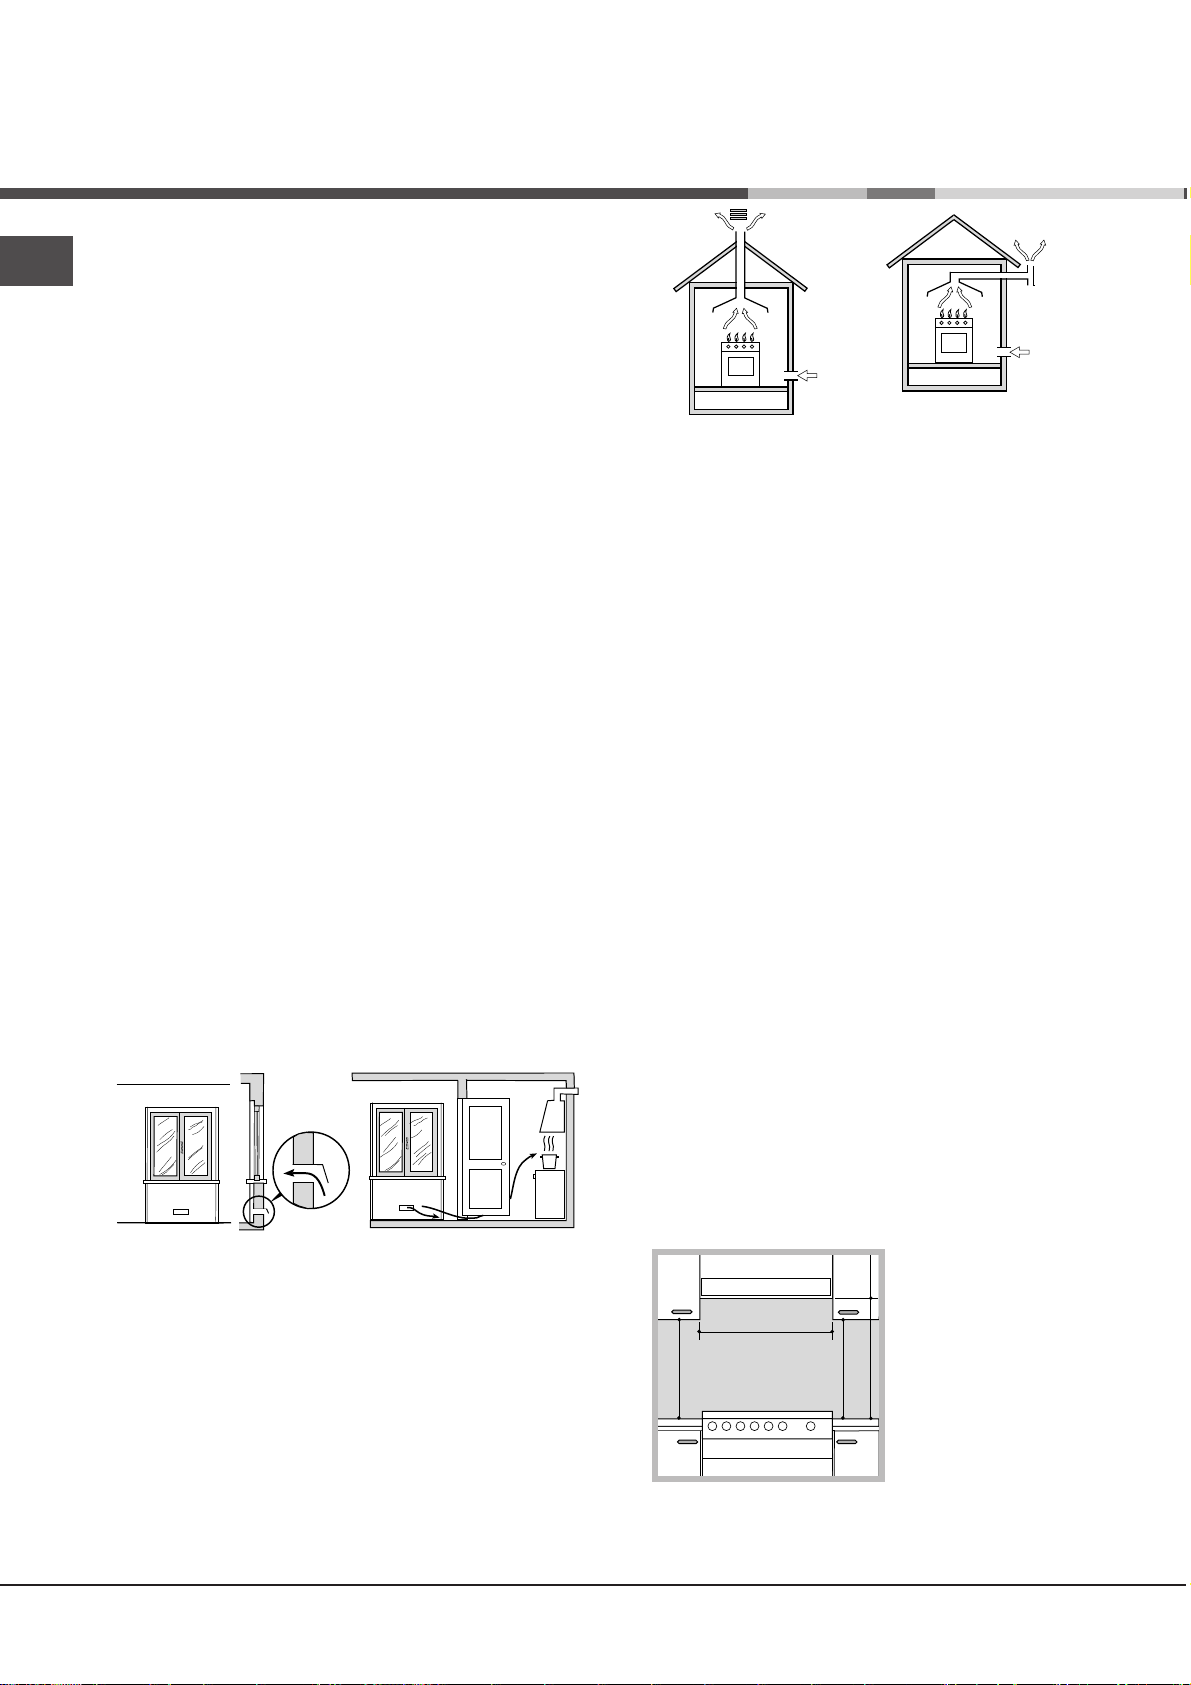
Room ventilation
The appliance may only be installed in permanentlyventilated rooms, according to current national
legislation. The room in which the appliance is
installed must be ventilated adequately so as to
provide as much air as is needed by the normal gas
combustion process (the flow of air must not be lower
than 2 m
The air inlets, protected by grilles, should have a duct
with an inner cross section of at least 100 cm2 and
should be positioned so that they are not liable to
even partial obstruction (
These inlets should be enlarged by 100% - with a
minimum of 200 cm2 - whenever the surface of the hob
is not equipped with a flame failure safety device.
When the flow of air is provided in an indirect manner
from adjacent rooms (
these are not communal parts of a building, areas with
increased fire hazards or bedrooms, the inlets should
be fitted with a ventilation duct leading outside as
described above.
A B
Ventilation opening
for comburent air
! After prolonged use of the appliance, it is advisable
to open a window or increase the speed of any fans
used.
Disposing of combustion fumes
3
/h per kW of installed power).
see figure A
see figure B
Adjacent room Room requiring
A
), provided that
Increase in the gap
between the door and
the flooring
).
ventilation
Fumes channelled through
Fumes channelled
straight outside
a chimney or a branched
flue system (reserved for
cooking appliances)
! The liquefied petroleum gases are heavier than air
and collect by the floor, therefore all rooms containing
LPG cylinders must have openings leading outside so
that any leaked gas can escape easily.
LPG cylinders, therefore, whether partially or
completely full, must not be installed or stored in
rooms or storage areas that are below ground level
(cellars, etc.). Only the cylinder being used should be
stored in the room; this should also be kept well away
from sources of heat (ovens, chimneys, stoves) that
may cause the temperature of the cylinder to rise
above 50°C.
Positioning and levelling
! It is possible to install the appliance alongside
cupboards whose height does not exceed that of the
hob surface.
! Make sure that the wall in contact with the back of
the appliance is made from a non-flammable, heatresistant material (T 90°C).
To install the appliance correctly:
• Place it in the kitchen, dining room or the bed-sit
(not in the bathroom).
• If the top of the hob is higher than the cupboards,
the appliance must be installed at least 600 mm
away from them.
• If the cooker is installed underneath a wall cabinet,
there must be a minimum distance of 420 mm
between this cabinet and the top of the hob.
This distance should be increased to 700 mm if the
wall cabinets are flammable (
see figure
).
The disposal of combustion fumes should be
guaranteed using a hood connected to a safe and
efficient natural suction chimney, or using an electric
fan that begins to operate automatically every time the
appliance is switched on (
6
see figure
).
• Do not position blinds behind the cooker or less
than 200 mm away from its sides.
• Any hoods must be installed according to the
instructions listed in the relevant operating manual.
Page 7
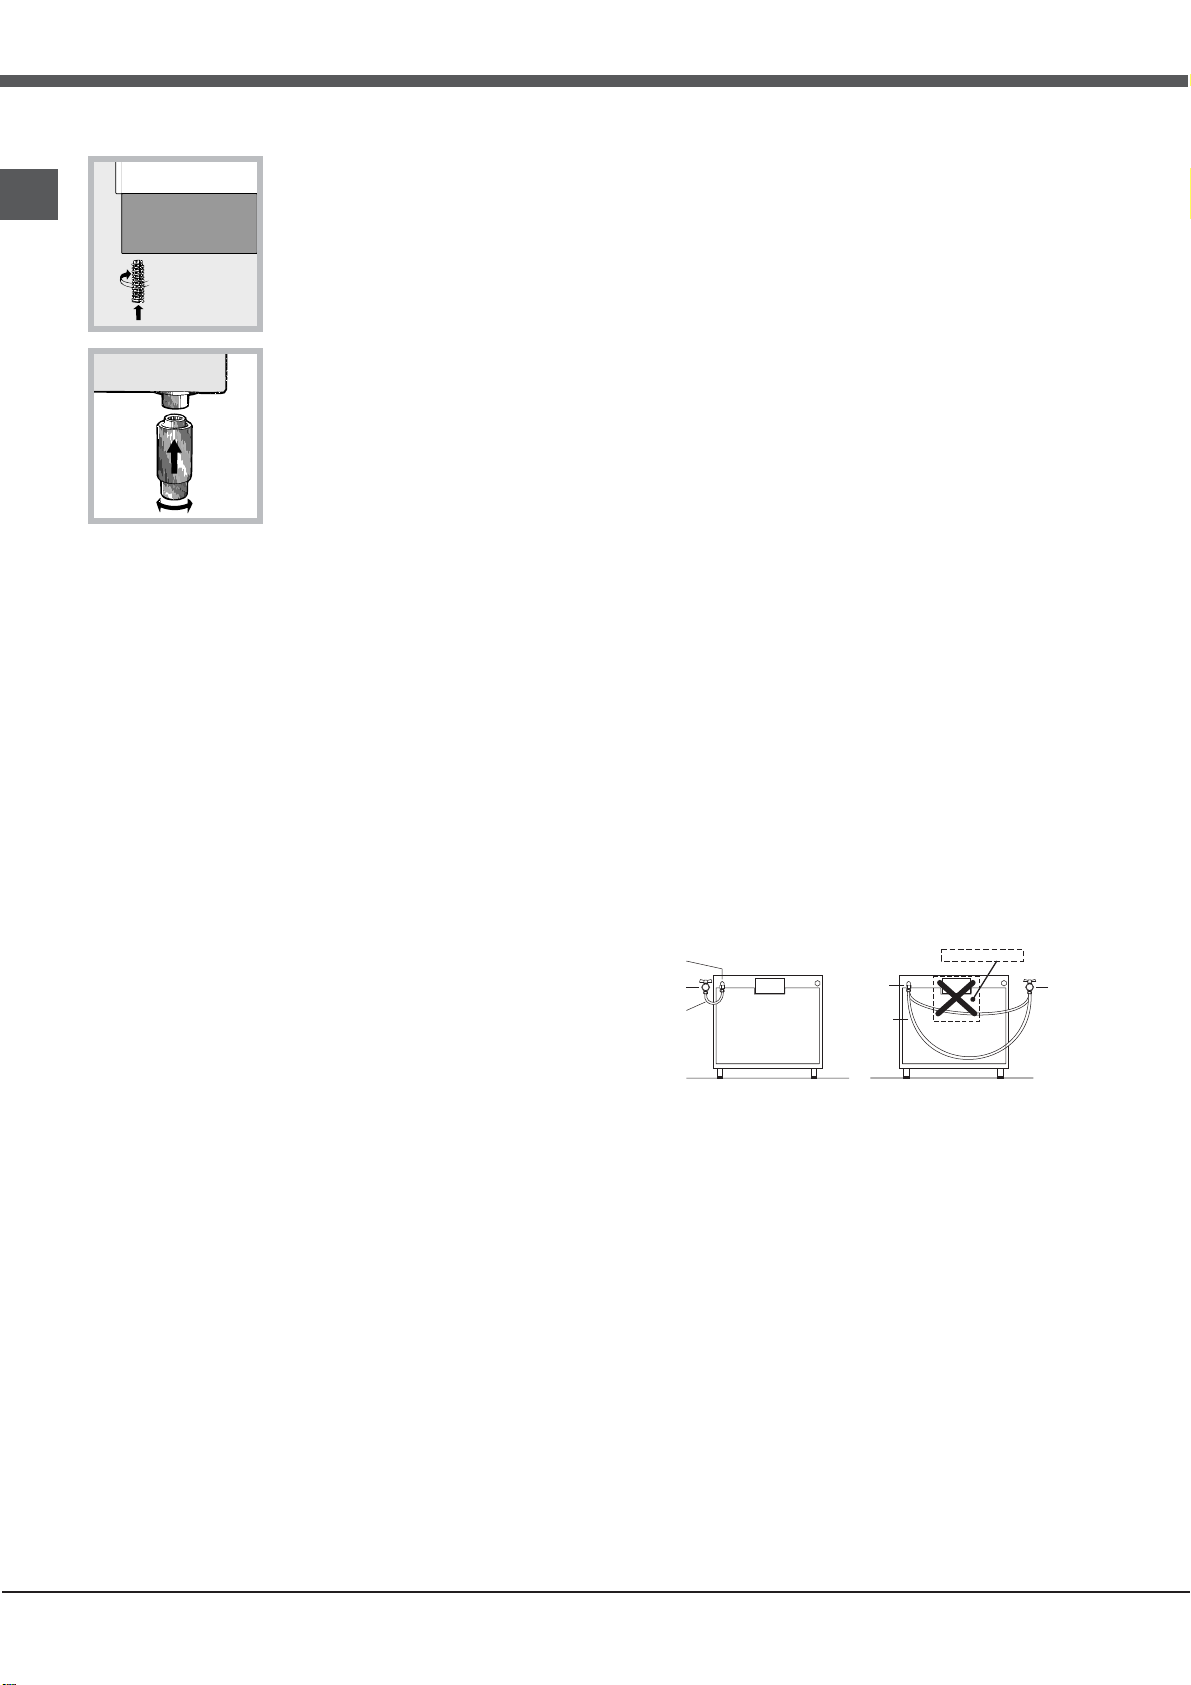
Levelling
If it is necessary to level the
appliance, screw the adjustable
feet into the places provided on
each corner of the base of the
cooker (
The legs* fit into the slots on
the underside of the base of
the cooker.
see figure
).
Electrical connection
Install a standardised plug corresponding to the load
indicated on the appliance data plate (
data table
The appliance must be directly connected to the mains
using an omnipolar circuit-breaker with a minimum
contact opening of 3 mm installed between the appliance
and the mains. The circuit-breaker must be suitable for
the charge indicated and must comply with current
national legislation (the earthing wire must not be
interrupted by the circuit-breaker). The supply cable must
be positioned so that it does not come into contact with
temperatures higher than 50°C at any point.
Before connecting the appliance to the power supply,
make sure that:
• The appliance is earthed and the plug is compliant with
the law.
• The socket can withstand the maximum power of the
appliance, which is indicated by the data plate.
• The voltage is in the range between the values
indicated on the data plate.
• The socket is compatible with the plug of the
appliance. If the socket is incompatible with the
plug, ask an authorised technician to replace it. Do
not use extension cords or multiple sockets.
! Once the appliance has been installed, the power
supply cable and the electrical socket must be easily
accessible.
! The cable must not be bent or compressed.
! The cable must be checked regularly and replaced
by authorised technicians only.
! The manufacturer declines any liability should
these safety measures not be observed.
).
see Technical
Gas connection
Connection to the gas network or to the gas cylinder
may be carried out using a flexible rubber or steel hose,
in accordance with current national legislation and after
making sure that the appliance is suited to the type of
* Only available in certain models
gas with which it will be supplied (see the rating sticker
on the cover: if this is not the case
using liquid gas from a cylinder, install a pressure
regulator which complies with current national
regulations. To make connection easier, the gas supply
may be turned sideways*: reverse the position of the
hose holder with that of the cap and replace the gasket
that is supplied with the appliance.
! Check that the pressure of the gas supply is
consistent with the values indicated in the Table of
burner and nozzle specifications (
ensure the safe operation and durability of your
appliance while maintaining efficient energy
consumption.
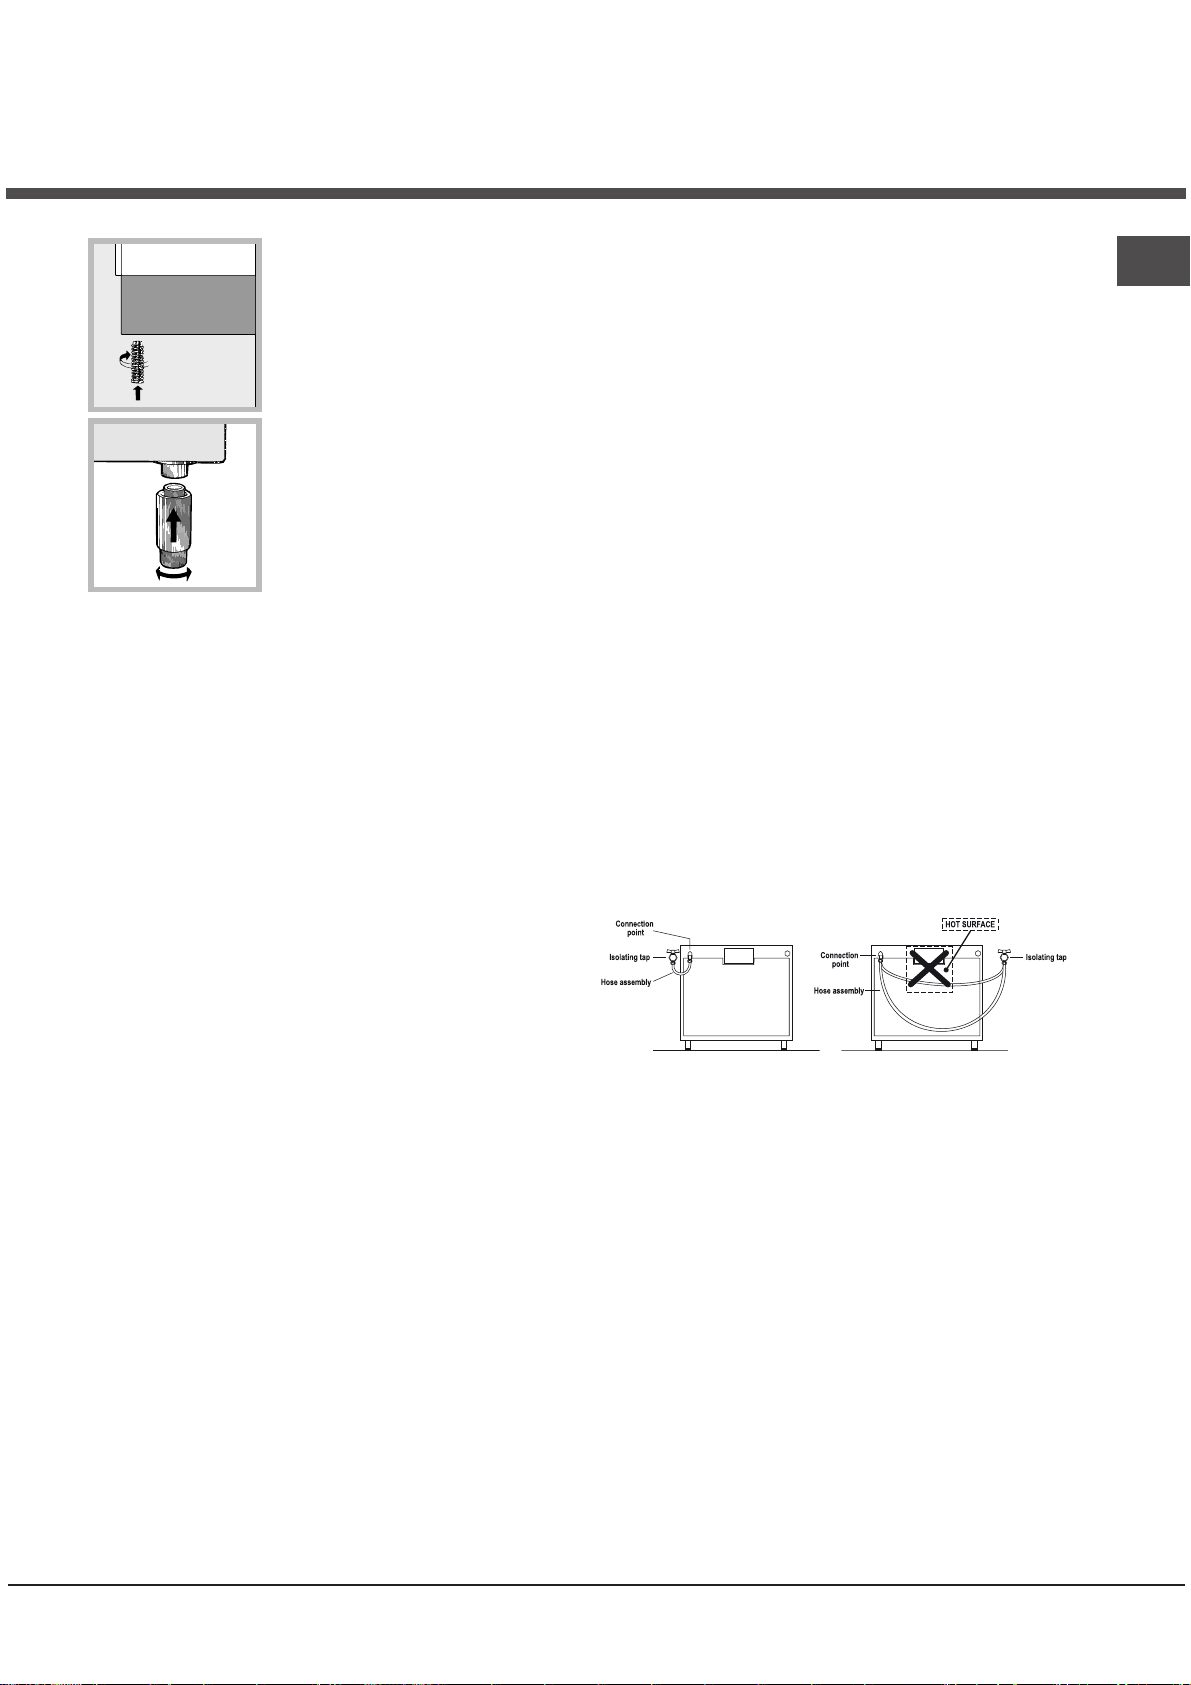
Gas connection using a flexible rubber hose
Make sure that the hose complies with current national
legislation. The internal diameter of the hose must
measure: 8 mm for liquid gas supply; 13 mm for
methane gas supply.
Once the connection has been performed, make sure
that the hose:
• Does not come into contact with any parts that
reach temperatures of over 50°C.
• Is not subject to any pulling or twisting forces and
that it is not kinked or bent.
• Does not come into contact with blades, sharp
corners or moving parts and that it is not
compressed.
• Is easy to inspect along its whole length so that
its condition may be checked.
• Is shorter than 1500 mm.
• Fits firmly into place at both ends, where it will be
fixed using clamps that comply with current
regulations.
! If one or more of these conditions is not fulfilled or if the
cooker must be installed according to the conditions
listed for class 2 - subclass 1 appliances (installed
between two cupboards), the flexible steel hose must be
used instead (
Connecting a flexible jointless stainless steel pipe
to a threaded attachment
Make sure that the hose and gaskets comply with
current national legislation.
To begin using the hose, remove the hose holder on
the appliance (the gas supply inlet on the appliance is
a cylindrical threaded 1/2 gas male attachment).
! Perform the connection in such a way that the hose
length does not exceed a maximum of 2 metres,
see below
).
see below
see below
). When
). This will
GB
7
Page 8
GB
V
making sure that the hose is not compressed and
does not come into contact with moving parts.
Checking the tightness of the connection
When the installation process is complete, check the
hose fittings for leaks using a soapy solution. Never
use a flame.
Adapting to different types of gas
It is possible to adapt the appliance to a type of gas
other than the default type (this is indicated on the
rating label on the cover).
Adapting the hob
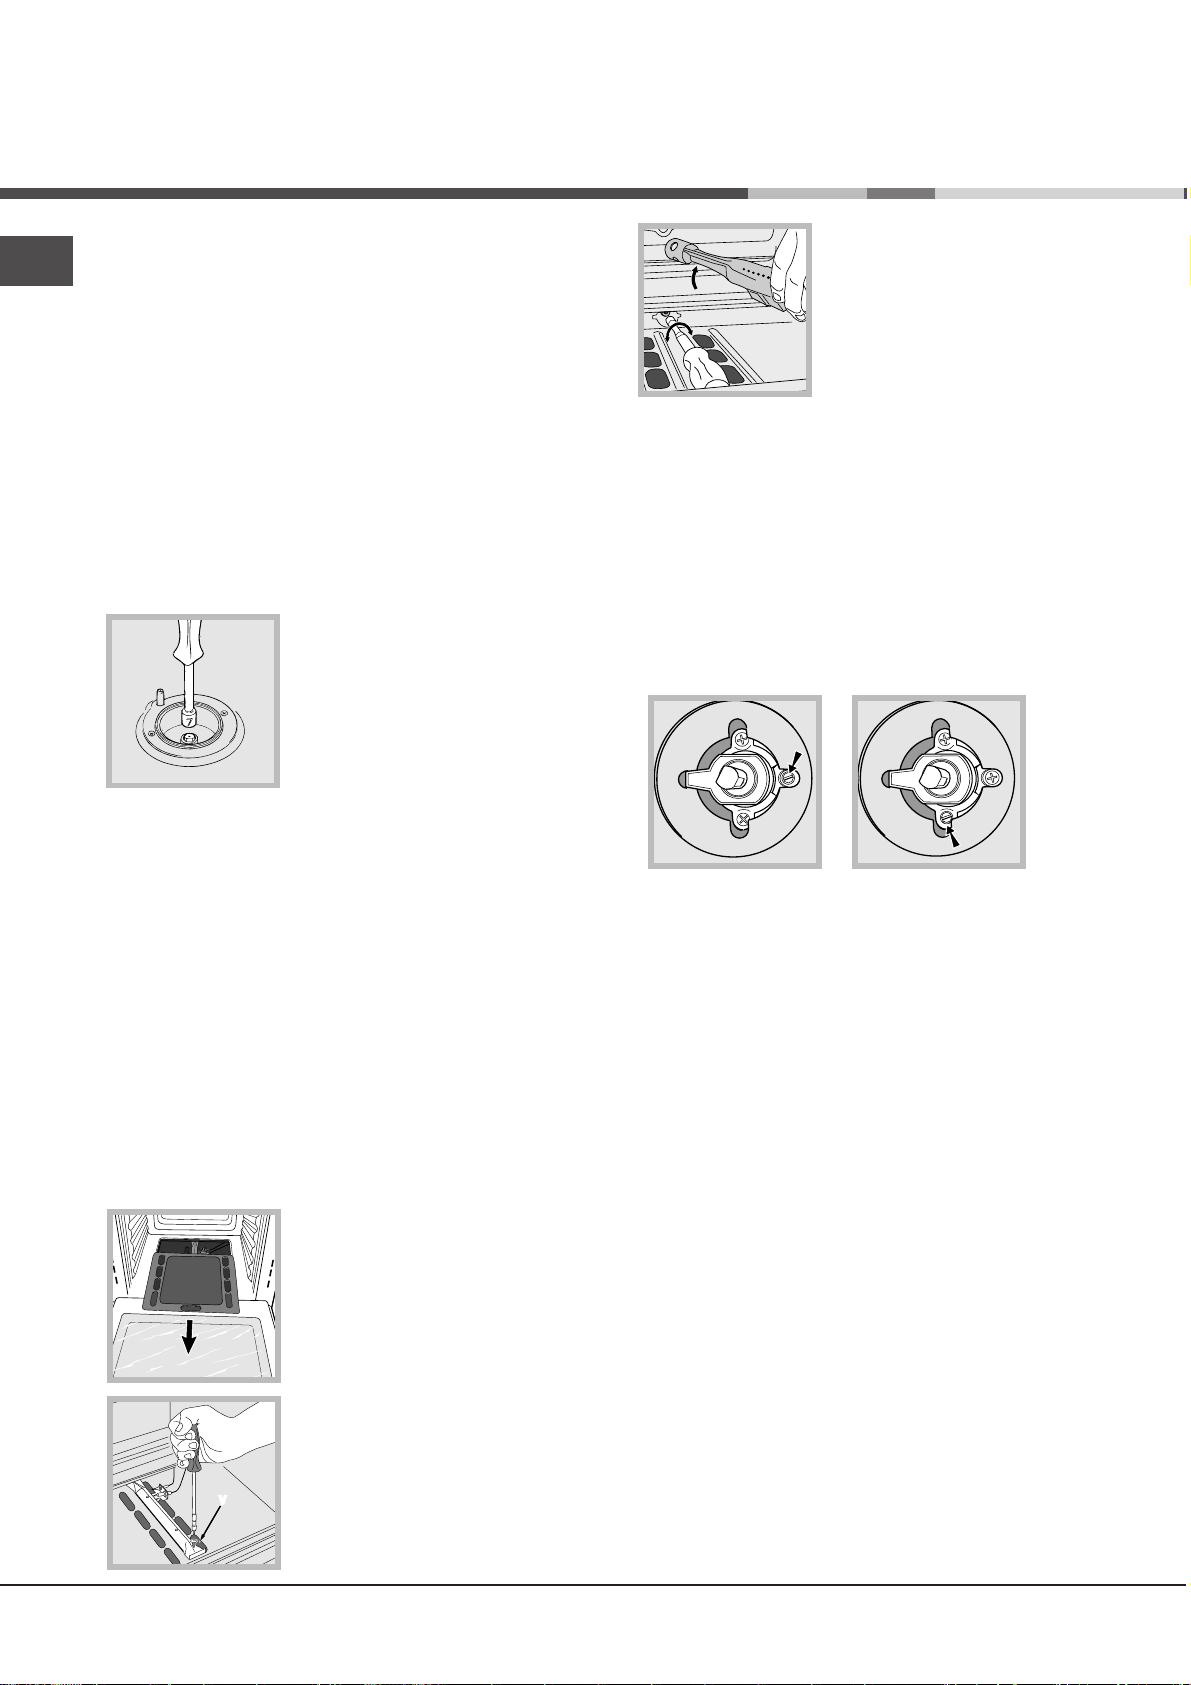
Replacing the nozzles for the hob burners:
1. Remove the hob grids and slide the burners off their
seats.
2. Unscrew the nozzles using a
7 mm socket spanner (
figure
), and replace them with
nozzles suited to the new type
of gas (
see Burner and nozzle
specifications table
3. Replace all the components
by following the above
instructions in reverse.
see
).
4. Unscrew the nozzle using a
special nozzle socket spanner
(
see figure
socket spanner, and replace it
with a new nozzle that is suited
to the new type of gas (
) or with a 7 mm
see
Burner and nozzle specifications
table
).
Adjusting the gas oven burner’s minimum setting:
1. Light the burner (
2. Turn the knob to the minimum position (MIN) after it
has been in the maximum position (MAX) for
approximately 10 minutes.
3. Remove the knob.
4. Tighten or loosen the adjustment screws on the
outside of the thermostat pin (
flame is small but steady.
! In the case of natural gas, the adjustment screw must be
unscrewed by turning it anti-clockwise.
see Start-up and Use
see figure
).
) until the
Adjusting the hob burners’ minimum setting:
1. Turn the tap to the minimum position.
2. Remove the knob and adjust the regulatory screw,
which is positioned inside or next to the tap pin, until
the flame is small but steady.
! If the appliance is connected to a liquid gas supply,
the regulatory screw must be fastened as tightly as
possible.
3. While the burner is alight, quickly change the position of
the knob from minimum to maximum and vice versa
several times, checking that the flame is not extinguished.
! The hob burners do not require primary air adjustment.
Adapting the oven
Replacing the oven burner nozzle:
1. Open the oven door fully
2. Pull out the sliding oven
bottom (
3. Remove the oven burner
after unscrewing the screws V
see figure
(
see diagram
).
).
5. Turn the knob from the MAX position to the MIN
position quickly or open and shut the oven door,
making sure that the burner is not extinguished.
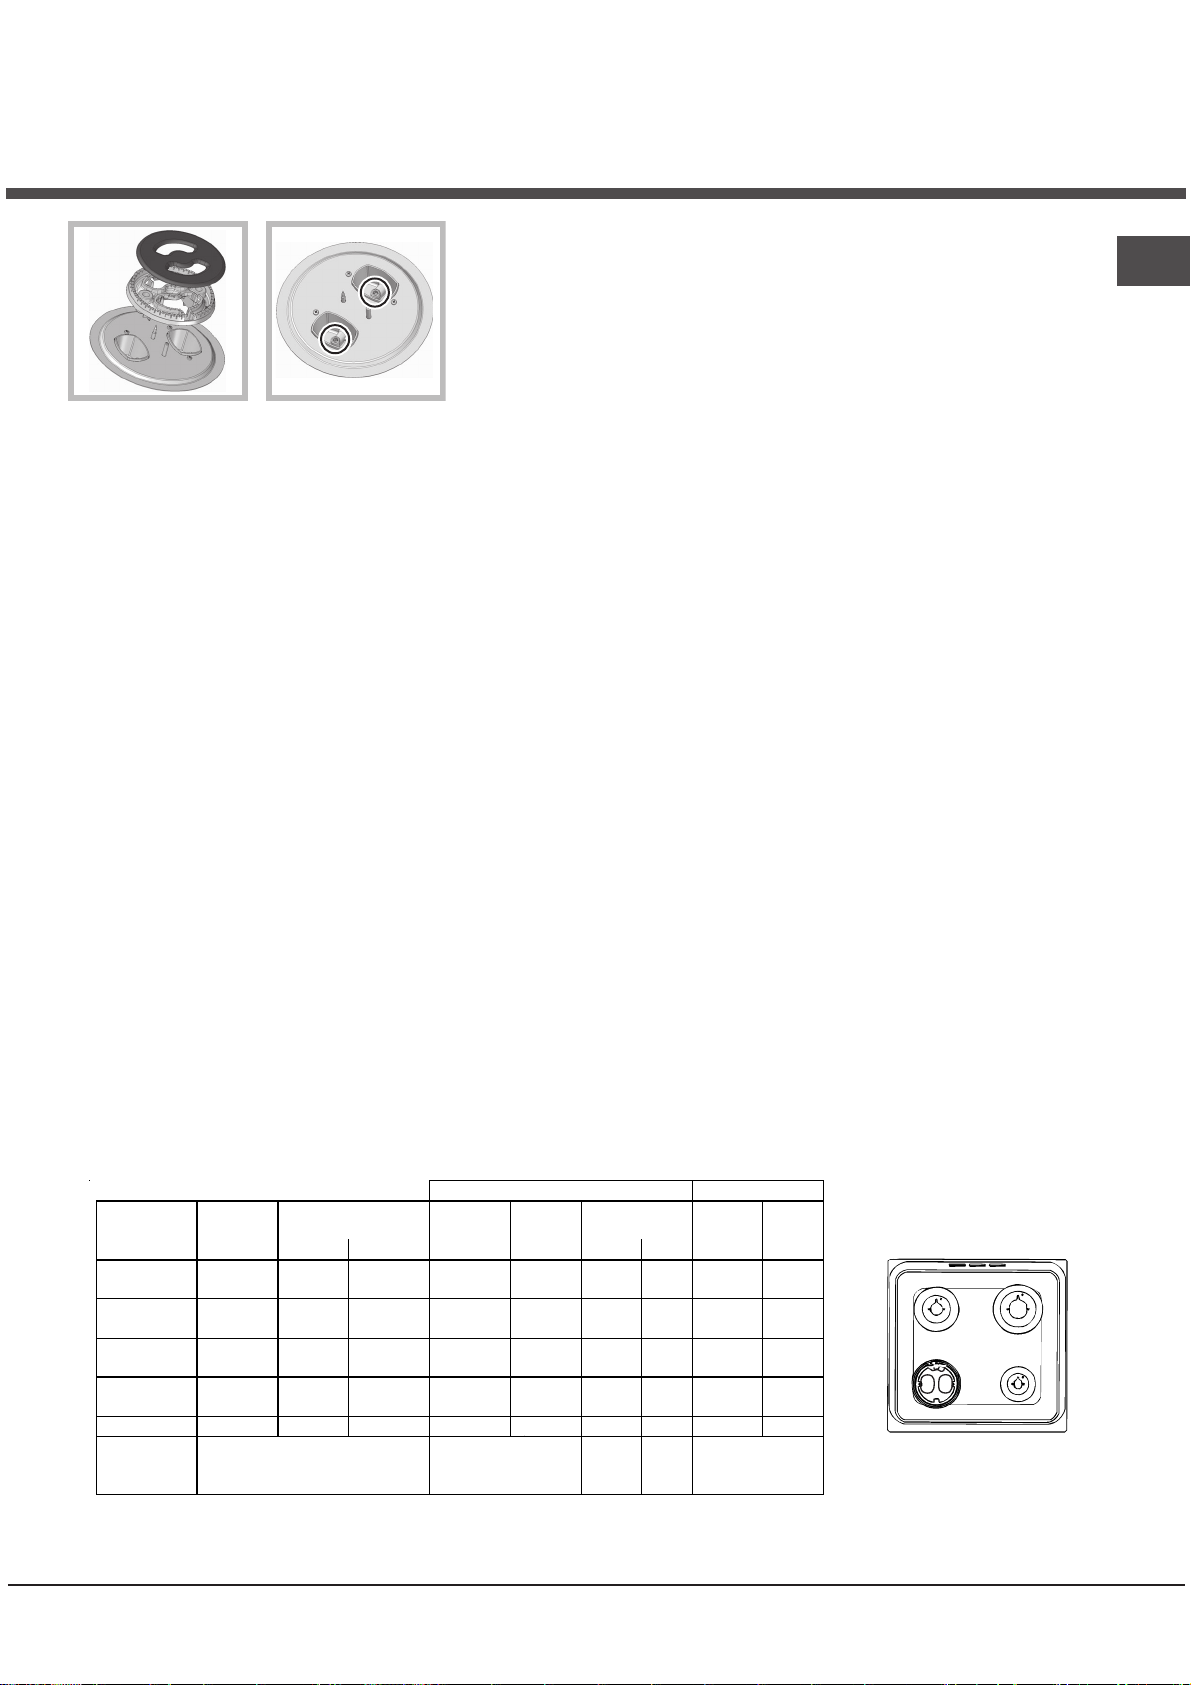
Replacing the Triple ring burner nozzles
1. Remove the pan supports and lift the burners out of their
housing. The burner consists of two separate parts (see
pictures).
2. Unscrew the nozzles using a 7 mm socket spanner.
Replace the nozzles with models that are configured for
use with the new type of gas (see Table 1). The two
nozzles have the same hole diameter.
3. Replace all the components by completing the above
operations in reverse order.
• Adjusting the burners’ primary air :
Does not require adjusting.
• Setting the burners to minimum:
1. Turn the tap to the low flame position.
2. Remove the knob and adjust the adjustment screw,
which is positioned in or next to the tap pin, until the
flame is small but steady.
3. Having adjusted the flame to the required low setting,
while the burner is alight, quickly change the position of
the knob from minimum to maximum and vice versa
several times, checking that the flame does not go out.
4. Some appliances have a safety device
(thermocouple) fitted. If the device fails to work
when the burners are set to the low flame setting,
increase this low flame setting using the adjusting
screw.
8
Page 9
5. Once the adjustment has been made, replace the
p
seals on the by-passes using sealing wax
! If the appliance is connected to liquid gas, the
regulation screw must be fastened as tightly as
possible.
! Once this procedure is finished, replace the old
rating sticker with one indicating the new type of gas
used. Stickers are available from any of our Service
Centres.
! Should the gas pressure used be different (or vary
slightly) from the recommended pressure, a suitable
pressure regulator must be fitted to the inlet pipe (in
order to comply with current national regulations).
means of a screw (not supplied with the cooker) to
the wall behind the appliance, at the same height as
the chain is attached to the appliance.
Choose the screw and the screw anchor according
to the type of material of the wall behind the appliance. If the head of the screw has a diameter smaller
than 9mm, a washer should be used. Concrete wall
requires the screw of at least 8mm of diameter, and
60mm of length.
Ensure that the chain is fixed to the rear wall of the
cooker and to the wall, as shown in figure, so that
after installation it is tensioned and parallel to the
ground level.
GB
Table of burner and nozzle specifications
Table 1 Liquid Gas Natural Gas
Burner Diameter
Fast
(Large)(R)
Semi Fast
(Medium)(S)
Auxiliary
(Small)(A)
Tripple Ring
(TC)
Oven - 2.60 1.0 52 78 189 186 119 248
Supply
Pressures
* At 15°C 1013 mbar-dry gas *** Butane P.C.S. = 49,47 MJ/Kg
** Pro
(mm)
Nominal Reduced (mm) (mm) *** ** (mm)
100 3.00 0.7 41 87 218 214 128 286
75 1.90 0.4 30 69 138 136 104 181
55 1.00 0.4 30 50 73 71 78 95
130 3.25 1,5 63 2x65 236 232 2x99 309
ane P.C.S. = 50,37 MJ/Kg Natural P.C.S. = 37,78 MJ/m³
Thermal Power
kW (p.c.s.*)
Nominal (mbar)
Minimum (mbar)
Maximum (mbar)
By Pass
1/100
Nozzle
1/100
Flow*
28-30
20
35
g/h
37
25
45
Nozzle
1/100
20
17
25
Flow*
l/h
S
R
A
TC
H6TG5F C UA
9
Page 10

GB
F
Start-up and use
Using the hob
Lighting the burners
For each BURNER knob there is a complete ring
showing the strength of the flame for the relevant
burner.
To light one of the burners on the hob:
1. Bring a flame or gas lighter close to the burner.
2. Press the BURNER knob and turn it in an
anticlockwise direction so that it is pointing to the
maximum flame setting .
3. Adjust the intensity of the flame to the desired
level by turning the BURNER knob in an
anticlockwise direction. This may be the minimum
setting , the maximum setting or any position in
between the two.
Several models are equipped with an ignition device
which is built into the knob; in this case the
electronic ignition device* is present (
ignition button is not. Simply press the BURNER
knob and turn it in an anticlockwise direction so that
it is pointing to the maximum flame setting, until the
burner is lit. The burner may be extinguished when
the knob is released. If this occurs, repeat the
operation, holding the knob down for a longer period
of time.
! If the flame is accidentally extinguished, switch off
the burner and wait for at least 1 minute before
attempting to relight it.
If the appliance is equipped
X
To switch the burner off, turn the knob until it
reaches the stop position
Flame adjustment according to levels
the burner flame intensity can be adjusted with the
knob according to 6 power levels, from maximum
to minimum with 4 intermediate positions:
a click will indicate the change from one level to
another when turning the knob . The system
guarantees a more precise adjustment, allows
to replicate the flame intensity and to identify
easily the preferred level for different cooking
operations.
Practical advice on using the burners
For the burners to work in the most efficient way
possible and to save on the amount of gas consumed,
Only available in certain models.
*
with a flame failure safety
device (X)*, press and hold
the BURNER knob for
approximately 2-3 seconds
to keep the flame alight and
C
to activate the device.
•.
C
) but the
it is recommended that only pans that have a lid and a
flat base are used. They should also be suited to the
size of the burner.
To identify the type of burner, please refer to the
diagrams contained in the “Burner and nozzle
specifications”.
Burner ř Cookware Diameter (cm)
Fast (R) 24 - 26
Semi Fast (S) 16 - 20
Auxiliary (A) 10 - 14
Triple Crown (TC) 24 - 26
! On the models supplied with a reducer shelf,
remember that this should be used only for the
auxiliary burner when you use casserole dishes with
a diameter under 12 cm.
Using the oven
! The first time you use your appliance, heat the
empty oven with its door closed at its maximum
temperature for at least half an hour. Ensure that the
room is well ventilated before switching the oven off
and opening the oven door. The appliance may emit
a slightly unpleasant odour caused by protective
substances used during the manufacturing process
burning away.
! Before operating the product, remove all plastic
film from the sides of the appliance.
! Never put objects directly on the bottom of the
oven; this will avoid the enamel coating being
damaged. Only use position 1 in the oven when
cooking with the rotisserie spit.
Lighting the oven
To light the oven burner, bring a flame or gas lighter
close to opening F (
and press the OVEN control
knob while turning it in an
anticlockwise direction until it
reaches the MAX position.
If the appliance is fitted with
an electronic lighting device*,
press the ignition button, marked with the symbol
, then hold the OVEN control knob and turn it in
an anticlockwise direction, towards the MAX
position, until the burner is lit. If, after 15 seconds,
the burner is still not alight, release the knob, open
the oven door and wait for at least 1 minute before
trying to light it again. If there is no electricity the
burner may be lit using a flame or a lighter, as
described above.
see figure
)
10
Page 11
! The oven is fitted with a safety device and it is
therefore necessary to hold the OVEN control knob
down for approximately 6 seconds.
! If the flame is accidentally extinguished, switch off
the burner and wait for at least 1 minute before
attempting to relight the oven.
Adjusting the temperature
To set the desired cooking temperature, turn the
OVEN control knob in an anticlockwise direction.
Temperatures are displayed on the control panel and
may vary between MIN (150°C) and MAX (250°C).
Once the set temperature has been reached, the oven
will keep it constant by using its thermostat.
Electronic timer
This function displays the time and works as a timer
which counts down to zero.
! All functions will be implemented approximately 7
seconds after they have been set.
Resetting the clock
After the appliance has been connected to the
power supply, or after a power cut, the clock display
will begin to blink, showing the figure:
• Press button
the exact time. Press and hold the buttons to
quicken the count upwards.
Any necessary modifications can be made by
repeating the above process.
and then buttons - and + to set
0:000:00
0:00
0:000:00
GB
! If the flame is accidentally extinguished, switch off
the burner and wait for at least 1 minute before
attempting to relight the grill.
Turnspit
To operate the rotisserie (
follows:
Oven light
The light may be switched on at any moment by
pressing the OVEN LIGHT button.
see diagram
1. Place the dripping
pan in position 1.
2. Place the rotisserie
support in position 4
and insert the spit in the
hole provided on the
back panel of the oven.
3. Acitvate the function
by pressing the
TURNSPIT button.
) proceed as
Timer feature
0:00.0:00.
0:00.
0:00.0:00.
This function may be accessed by pressing the
button, after which the display will show the symbol
. Every time the + button is pressed it
corresponds to a time increase of 10 seconds, until
it reaches 99 minutes and 50 seconds. After this
point, each press of the button represents an
increase of one minute, up to a maximum of 10
hours.
Pressing the
After the time period has been set, the timer will
begin to count down. When the timer reaches zero,
the buzzer will sound (this may be stopped by
pressing any button).
The time may be displayed by pressing the
button, and the
function has been set. After approximately 7
seconds, the display will automatically revert to the
timer.
Cancelling a time that has already been set
Press the
Adjusting the buzzer volume
After selecting and confirming the clock settings,
use the
buzzer.
-
button reduces the time.
symbol indicates that the timer
button until the display shows
–
button to adjust the volume of the alarm
–
Only available in certain models.
*
11
Page 12
GB
Safety Chain
! In order
to prevent
accidental
tipping of the
appliance, for
example by
a child climbing onto the
oven door, the
supplied safety
chain MUST be
installed!
The cooker is fitted with a safety chain to be fixed by
means of a screw (not supplied with the cooker) to
the wall behind the appliance, at the same height as
the chain is attached to the appliance.
Choose the screw and the screw anchor according
to the type of material of the wall behind the appliance. If the head of the screw has a diameter smaller
than 9mm, a washer should be used. Concrete wall
requires the screw of at least 8mm of diameter, and
60mm of length.
Ensure that the chain is fixed to the rear wall of the
cooker and to the wall, as shown in figure, so that
after installation it is tensioned and parallel to the
ground level.
TECHNICAL DATA
Oven Dimensions
HxWxD
Volume
Useful
measurements
relating to the
oven compartment
Voltage and
frequency
Burners
ENERGY LABEL
and ECODESIGN
31x43,5x43,5 cm
58 l
width 46 cm
depth 42 cm
height 8,5 cm
see data plate
may be adapted for use with any
type of gas shown on the data
plate.
EC Directives 2006/95/EC dated
12/12/06 (Low Voltage) and
subsequent amendments 04/108/EC dated 15/12/04
(Electromagnetic Compatibility)
and subsequent amendments -
2009/142/EC dated 30/11/09 (Gas)
and subsequent amendments 90/68/EEC dated 22/07/93 and
subsequent amendments. 2002/96/EC.
1275/2008(Stand-by/Off-mode)
Regulation (EU) No 65/2014 supplementing Directive 2010/30/EU.
Regulation (EU) No 66/2014 implementing
Directive 2009/125/EC.
Standard EN 15181.
Standard EN 30-2-1
WARNING! The glass lid can break in if
it is heated up. Turn off all the burners
and the electric plates before closing
the lid. *Applies to the models with
glass cover only.
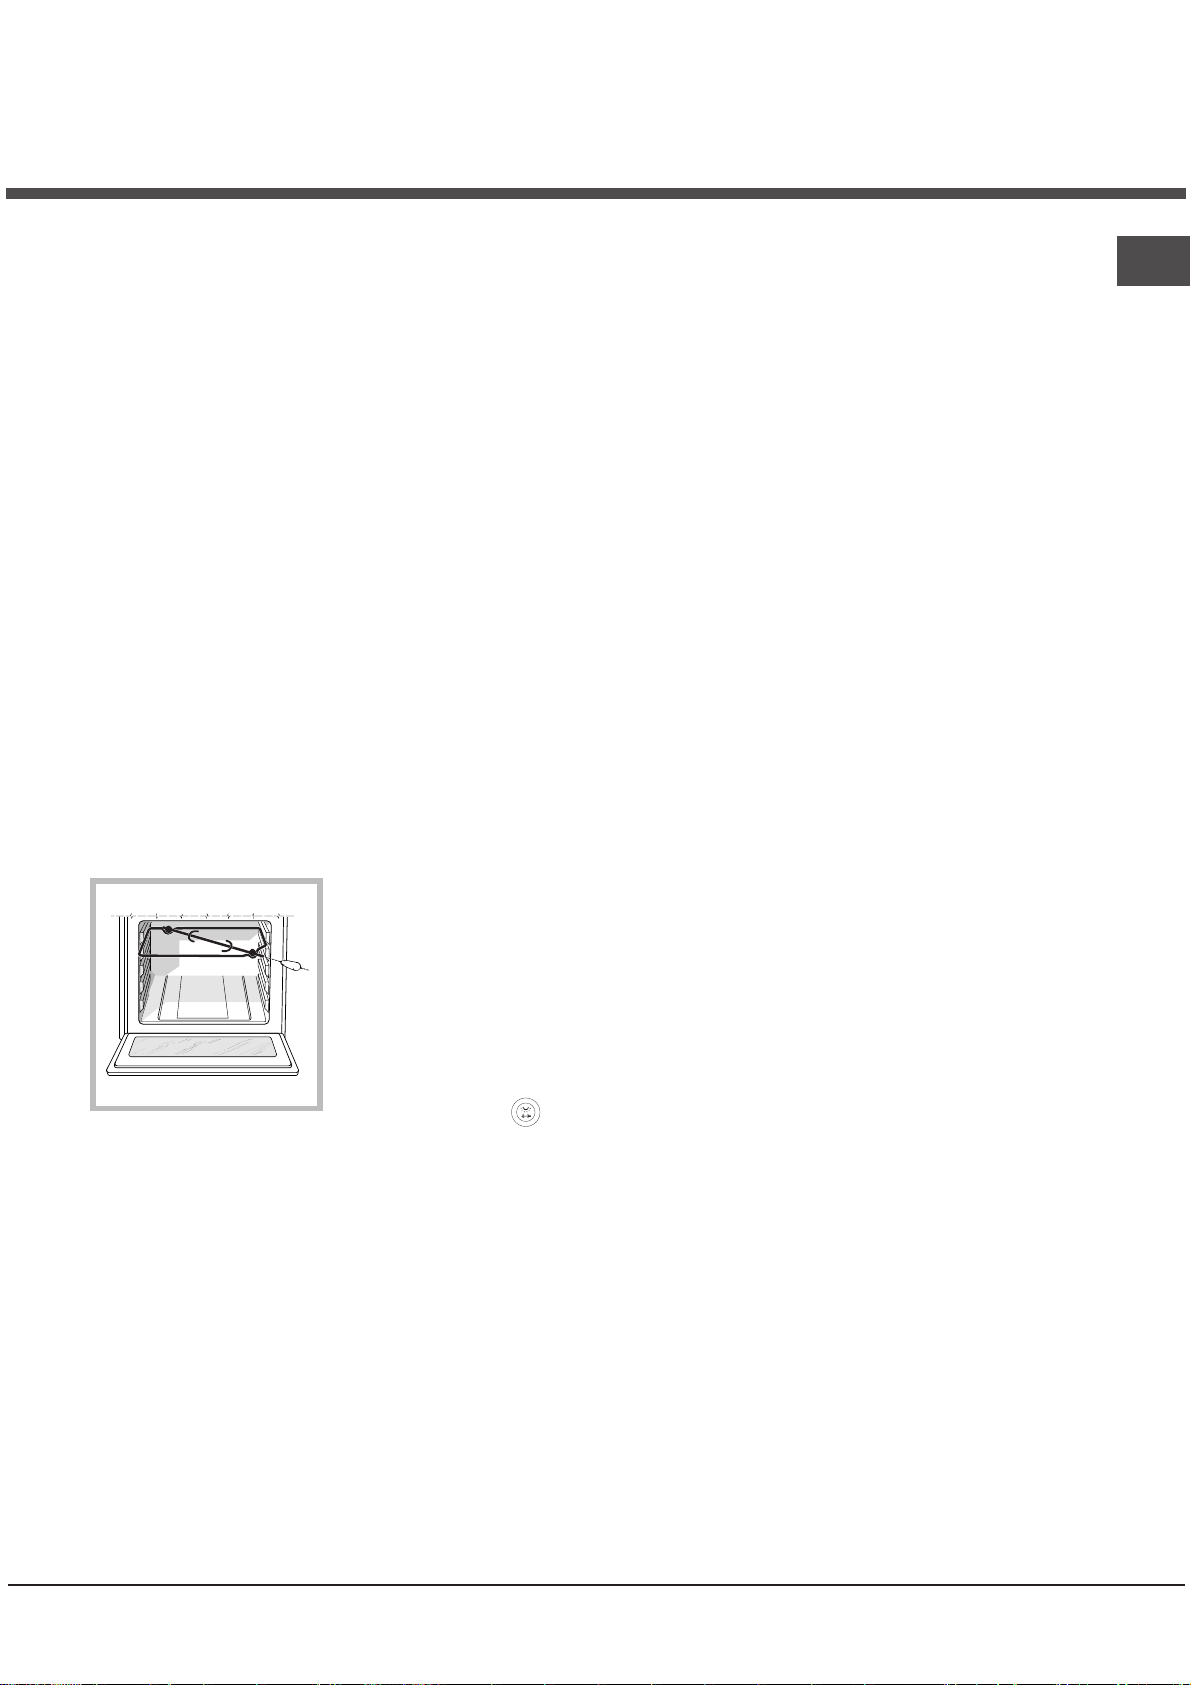
WARNING! The oven is
provided with a stop system to extract the racks
and prevent them from
coming out of the oven.(1)
As shown in the drawing,
to extract them completely, simply lift the racks,
holding them on the front
part, and pull (2).
Only available in certain models.
*
12
Page 13
Grill
By turning the OVEN control knob in an
anticlockwise direction until it reaches the
position, the infrared ray grill is activated. The grill
enables the surface of food to be browned evenly
and is particularly suitable for roast dishes, schnitzel
and sausages. Place the rack in position 4 or 5 and
the dripping pan in position 1 to collect fat and
prevent the formation of smoke.
! The GRILL indicator light shows when the grill is
operating.
! Always use the grill with the oven door shut; this
achieves better cooking results and saves energy
(approximately 10%).
Oven cooking advice table
GB
Pasta
Lasagne
Cannelloni
Gratin dishes
Meat
Veal
Chicken
Duck
Rabbit
Pork
Lamb
Fish
Mackerel
Dentex
Trout baked in foil
Pizza
Napolitan
Pies
Biscuits
Tart
Savoury pies
Leavened cakes
Grilled foods
Veal steak
Cutlets
Hamburgers
Mackerel
Toast
Foods
Weig-
ht (in
kg)
2.5
2.5
2.5
1.7
1.5
1.8
2
2.1
1.8
1.1
1.5
1
1 3 15 220 15-20
0.5
1.1
1
1
1
1.5
1
1
n.4
Rack
position
3
3
3
3
3
3
3
3
3
3
3
3
3
3
3
3
4
4
3
4
4
Preheating time
(min)
10
10
10
10
10
10
10
10
10
10
10
10
15
15
15
15
5
5
5
5
5
Recommended
temperature (°C)
210
200
200
200
220
200
200
200
200
180-200
180-200
180-200
180
180
180
180
Cooking time
(minutes)
60-75
40-50
40-50
85-90
90-100
100-110
70-80
70-80
90-95
35-40
40-50
40-45
30-35
30-35
45-50
35-40
15-20
20
7
15-20
5
13
Page 14
Precautions and tips
GB
! This appliance has been designed and manufactured
in compliance with international safety standards.
The following warnings are provided for safety
reasons and must be read carefully.
General safety
• The appliance was designed for domestic use
inside the home and is not intended for commercial
or industrial use.
• The appliance must not be installed outdoors, even
in covered areas. It is extremely dangerous to leave
the appliance exposed to rain and storms.
• Do not touch the appliance with bare feet or with
wet or damp hands and feet.
• The appliance must be used by adults only for
the preparation of food, in accordance with the
instructions outlined in this booklet. Any other
use of the appliance (e.g. for heating the room)
constitutes improper use and is dangerous.
The manufacturer may not be held liable for
any damage resulting from improper, incorrect
and unreasonable use of the appliance.
• The instruction booklet accompanies a class 1
(insulated) or class 2 - subclass 1 (recessed
between 2 cupboards) appliance.
• When the appliance is in use, the heating
elements and some parts of the oven door
become extremely hot. Make sure you don't
touch them and keep children well away.
• Make sure that the power supply cables of other
electrical appliances do not come into contact with
the hot parts of the oven.
• The openings used for the ventilation and
dispersion of heat must never be covered.
• Do not close the glass hob cover (selected
models only) when the burners are alight or when
they are still hot.
• Always use oven gloves when placing cookware
in the oven or when removing it.
• Do not use flammable liquids (alcohol, petrol,
etc...) near the appliance while it is in use.
• Do not place flammable material in the lower
storage compartment or in the oven itself. If the
appliance is switched on accidentally, it could
catch fire.
• The internal surfaces of the compartment (where
present) may become hot.
• Always make sure the knobs are in the
and that the gas tap is closed when the appliance
is not in use.
• When unplugging the appliance, always pull the plug
from the mains socket; do not pull on the cable.
position
•
• Never perform any cleaning or maintenance work
without having disconnected the appliance from
the electricity mains.
• If the appliance breaks down, under no
circumstances should you attempt to repair the
appliance yourself. Repairs carried out by
inexperienced persons may cause injury or further
malfunctioning of the appliance. Contact Assistance.
• Do not rest heavy objects on the open oven door.
• Do not let children play with the appliance.
• The appliance should not be operated by people
(including children) with reduced physical,
sensory or mental capacities, by inexperienced
individuals or by anyone who is not familiar with
the product. These individuals should, at the very
least, be supervised by someone who assumes
responsibility for their safety or receive
preliminary instructions relating to the operation of
the appliance.
•
If the cooker is placed on a pedestal, take the necessary precautions to prevent the cooker from sliding
off the pedestal itself.
Disposal
• When disposing of packaging material: observe local
legislation so that the packaging may be reused.
• The European Directive 2002/96/EC on Waste
Electrical and Electronic Equipment (WEEE),
requires that old household electrical appliances
must not be disposed of in the normal unsorted
municipal waste stream. Old appliances must be
collected separately in order to optimise the
recovery and recycling of the materials they contain
and reduce the impact on human health and the
environment. The crossed out “wheeled bin”
symbol on the product reminds you of your
obligation, that when you dispose of the appliance
it must be separately collected.
Consumers should contact their local authority or
retailer for information concerning the correct
disposal of their old appliance.
Respecting and conserving the
environment
• You can help to reduce the peak load of the
electricity supply network companies by using the
oven in the hours between late afternoon and the
early hours of the morning.
• Always keep the oven door closed when using the
GRILL mode This will achieve better results while
saving energy (approximately 10%).
• Check the door seals regularly and wipe them clean
to ensure they are free of debris so that they adhere
properly to the door, thus avoiding heat dispersion.
14
Page 15
Care and maintenance
• The base of your pot or pan should cover the hot plate.
If it is smaller, precious energy will be wasted and
pots that boil over leave encrusted remains that can
be difficult to remove.
• Cook your food in closed pots or pans with well-fitting
lids and use as little water as possible. Cooking with
the lid off will greatly increase energy consumption
• Use purely flat pots and pans
• If you are cooking something that takes a long time,
it's worth using a pressure cooker, which is twice as
fast and saves a third of the energy.
•
Clean the glass part of the oven door using a
sponge and a non-abrasive cleaning product, then
dry thoroughly with a soft cloth. Do not use rough
abrasive material or sharp metal scrapers as these
could scratch the surface and cause the glass to
crack.
• The accessories can be washed like everyday
crockery, and are even dishwasher safe.
• Do not close the cover when the burners are alight
or when they are still hot.
Inspecting the oven seals
Check the door seals around the oven regularly. If the
seals are damaged, please contact your nearest
Authorised After-sales Service Centre. We recommend
that the oven is not used until the seals have been
replaced.
GB
Switching the appliance off
Disconnect your appliance from the electricity supply
before carrying out any work on it.
Cleaning the appliance
! Never use steam cleaners or pressure cleaners on
the appliance.
• The stainless steel or enamel-coated external parts
and the rubber seals may be cleaned using a
sponge that has been soaked in lukewarm water
and neutral soap. Use specialised products for the
removal of stubborn stains. After cleaning, rinse
well and dry thoroughly. Do not use abrasive
powders or corrosive substances.
Replacing the oven light bulb
1. After disconnecting the oven
from the electricity mains,
remove the glass lid covering
the lamp socket (
2. Remove the light bulb and
replace it with a similar one:
voltage 230 V, wattage 25 W,
cap E 14.
3. Replace the lid and reconnect the oven to the
electricity supply.
! Do not use the oven lamp as/for ambient
lighting.
see figure
).
Gas tap maintenance
Over time, the taps may become jammed or difficult
to turn. If this happens, the tap must be replaced.
! This procedure must be performed by a qualified
technician authorised by the manufacturer.
Assistance
• The hob grids, burner caps, flame spreader rings
and burners may be removed to make cleaning
easier; wash them in hot water and non-abrasive
detergent, making sure all burnt-on residue is
removed before drying them thoroughly.
• Clean the terminal part of the flame failure safety
devices* frequently.
• The inside of the oven should ideally be cleaned
after each use, while it is still lukewarm. Use hot
water and detergent, then rinse well and dry with a
soft cloth. Do not use abrasive products.
! Never use the services of an unauthorised
technician.
Please have the following information to hand:
• The type of problem encountered.
• The appliance model (Mod.).
• The serial number (S/N).
The latter two pieces of information can be found on
the data plate located on the appliance.
Only available in certain models.
*
15
Page 16
GB
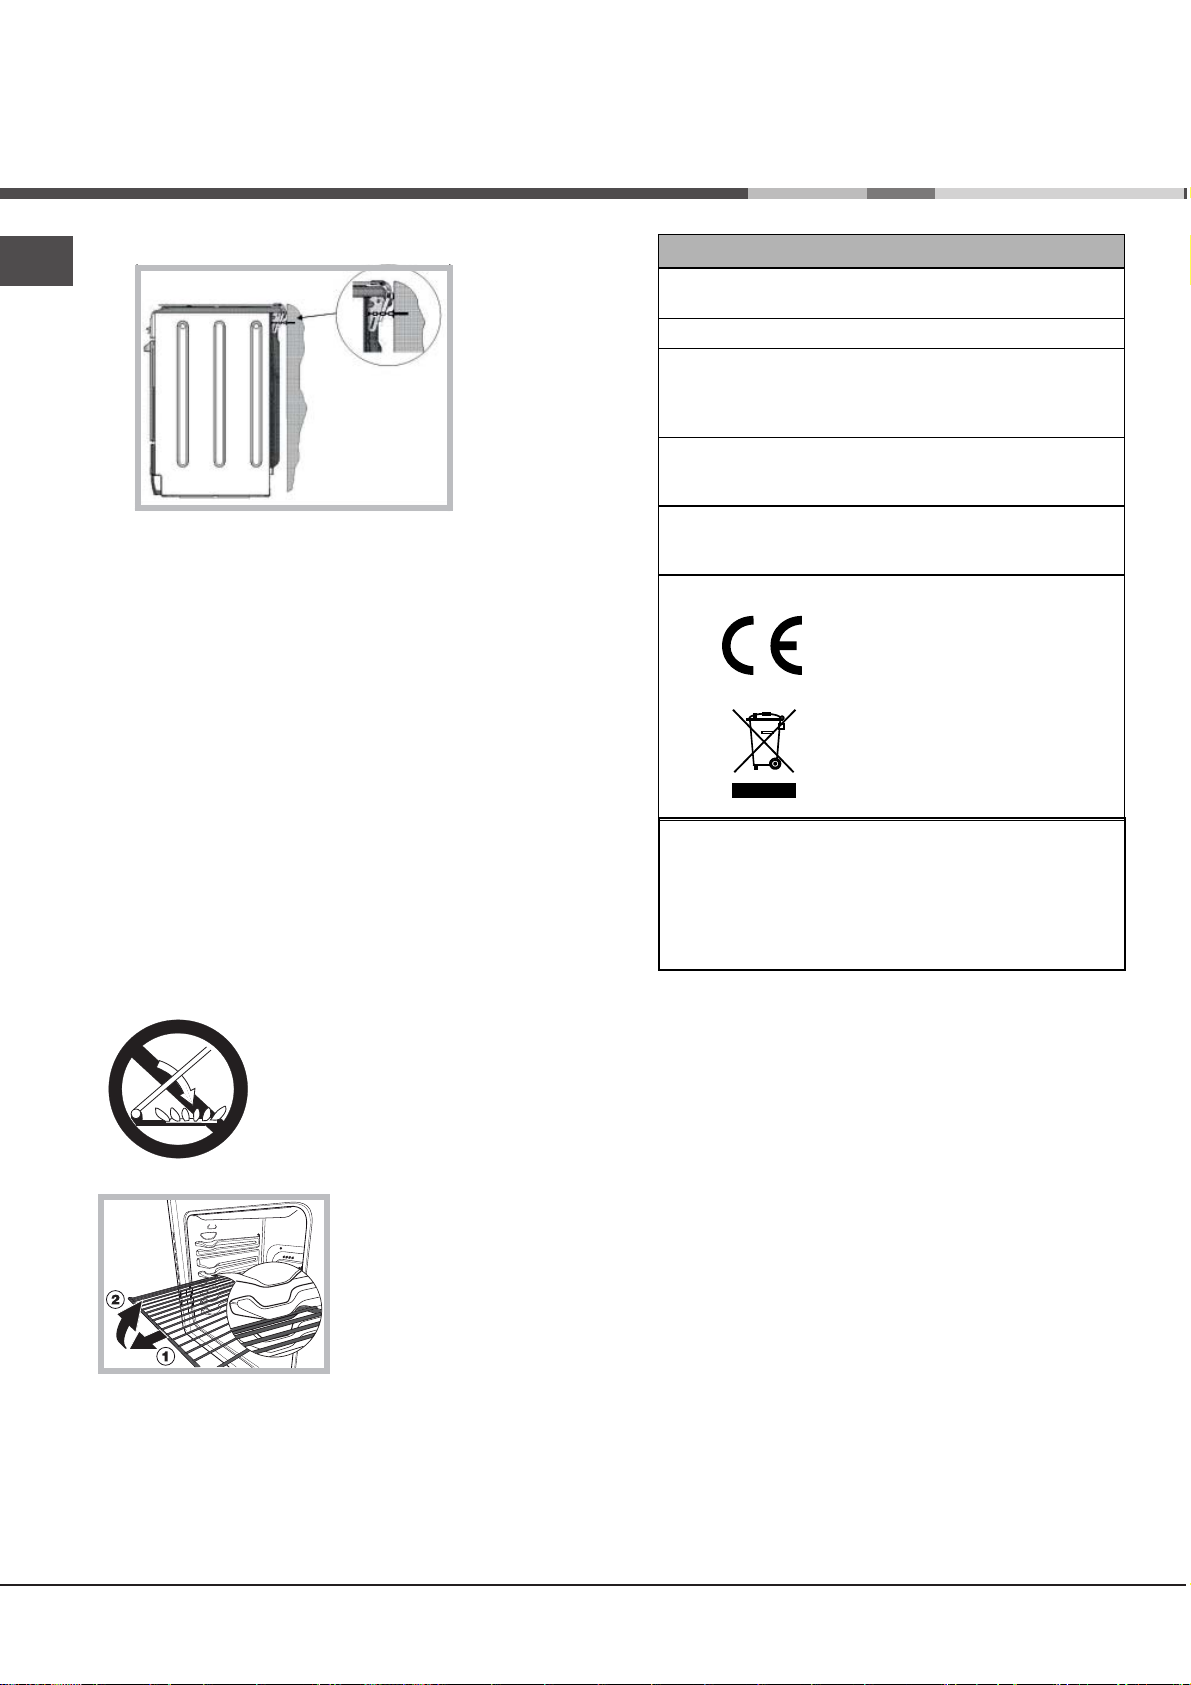
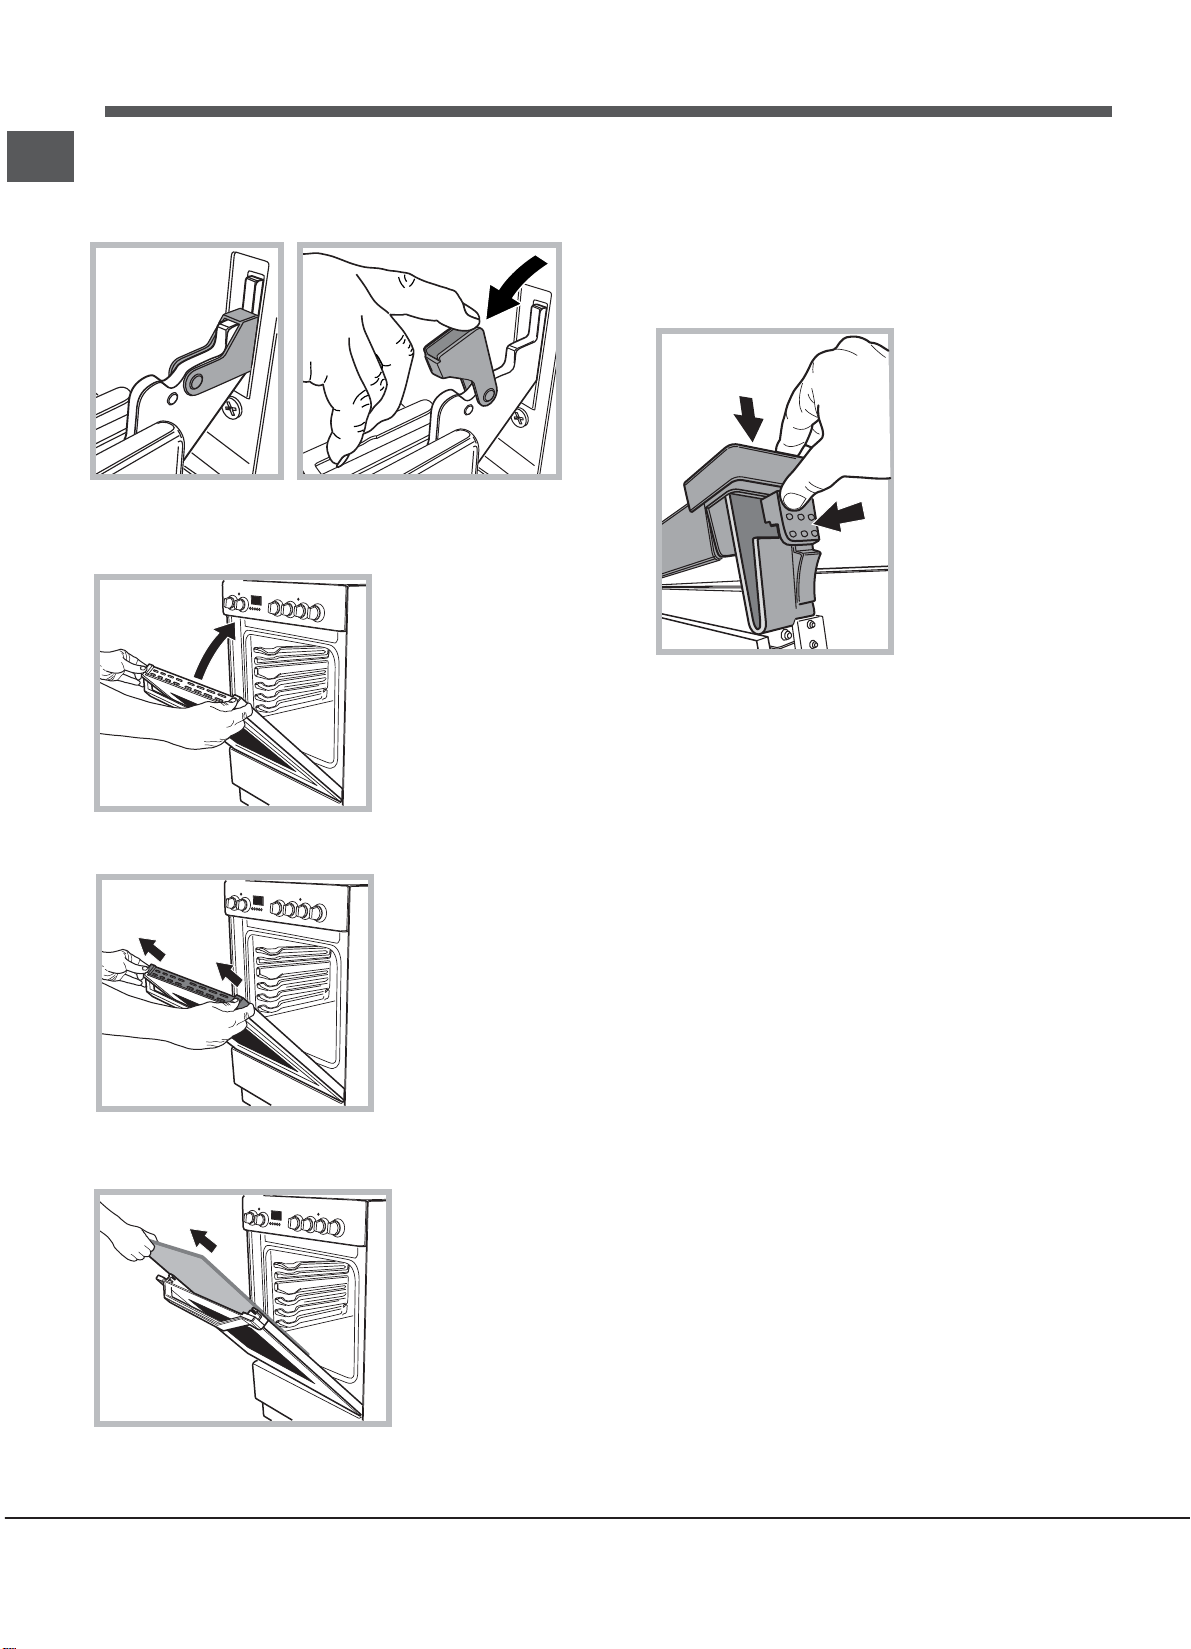
Removing and fitting the oven door:
1.Open the door
2.Make the hinge clamps of the oven door rotate
backwards completely (see photo)
3.Close the door until the clamps stop (the door will
remain open for 40° approx.) (see photo)
40°
WARNING! When reassembling the inner door
glass insert the glass panel correctly so that the
text written on the panel is not reversed and
can be easily legible.
7.Replace the profile, a click will indicate that the
part is positioned correctly.
8.Open the door completely.
9.Close the supports (see photo).
10.Now the door can be completely closed and the
oven can be started for normal use.
4.Press the two buttons on the upper profile and
extract the profile (see photo)
5.Remove the glass sheet and do the cleaning as
indicated in chapter: "Care and maintenance".
6.Replace the glass.
WARNING! Oven must not be operated with inner
door glass removed!
16
Page 17
Монтаж
HOOD
420
Min.
min.
650
mm. with hood
min.
700
mm. without hood
mm.
600
Min. mm.
420
Min. mm.
RS
! Важно сохранить данное руководство для его
последующих консультаций. В случае продажи,
передачи или переезда проверьте, чтобы данное
руководство сопровождало изделие.
! Внимательно прочитайте инструкции: в них
содержатся важные сведения об установке,
эксплуатации и безопасности изделия.
! Установка изделия производится в соответствии
с данными инструкциями квалифицированными
специалистами.
! Любая операция по
регуляции или техническому
обслуживанию должна производиться только
после отсоединения кухонной плиты от сети
электропитания.
Вентиляция помещений
Изделие может быть установлено в помещениях
с постоянной вентиляцией в соответствии с
действующими национальными нормативами. В
помещении, в котором устанавливается изделие,
должен быть обеспечен приток воздуха в объеме,
необходимом для оптимального горения газа
(расход
воздуха не должен быть меньше 2 м<+>3/
час на 1 кВт установленной мощности).
Вентиляционные отверстия, защищенные
решетками, должны иметь воздуховод площадью не
2
менее 100 мм
полезного сечения и распологаться
таким образом, чтобы их нельзя было закрыть, даже
частично (см. рисунок А).
Эти отверстия должны быть увеличины на 100% - то
2
есть иметь минимальную площадь 200 см
- если
варочная панель не оснащена предохранительным
устройством отсутствия пламени, и если воздух
в помещение поступает из смежных помещений
(см. рисунок В), которые не должны быть общими
зонами дома, пожароопасными помещениями
или спальнями, оснащенных вентиляционным
воздуховодом, выходящим на улицу, как описано
выше
A
.
A
Увеличение зазора между
дверью и полом
Смежное
помещение
Вентиляционные
отверстия для притока
B
Вентилируемое
помещение
воздуха
! После продолжительного использования изделия
рекомендуется открыть окно или
включить более
интенсивный режим вентиляторов.
Дымоудаление
Дымоудаление должно осуществляться через
вытяжной зонт, соединенный с эффективным
дымоходом с натуральной тягой, или посредством
электровентилятора, который автоматически
включается каждый раз при включении изделия (см.
рисунок
).
Дымоудаление через камин или дымоход
Прямой отвод
с медным покрытием (для кухонных
устройств для приготовления пищи)
! Сжиженные натуральные газы тяжелее воздуха,
застиваются внизу, по этой причине помещения
для хранения баллонов с СПГ должны иметь
внетиляционные отверстия у пола для вентиляции
возможных утечек газа.
Баллоны с СПГ, полные или частично
израсходованные, не дожны размещаться или
храниться в помещениях или хранилищах,
расположенных в подземных помещениях (подвалы,
и т.д.). Храните в помещении только рабочий
баллон, установив его вдали от источников тепла
(духовок, каминов, печей), которые могут
нагреть его
до температуры выше 50°C.
Расположение и нивелировка
! Изделие может быть установлено рядом с
кухонными элементами, высота которых не
превышает поверхность варочной панели.
! Проверьте, чтобы стена, к которой прилегает
задняя часть изделия, была из невозгораемого
материала и устойчивой к теплу (Т 90°C).
Правильный порядок монтажа:
• изделие может быть установлено на кухне, в
столовой или в однокомнатной квартире (
ванной комнате);
• если варочная панель кухонной плиты выше
кухонных элементов, необходимо отодвинуть их
от плиты на расстояние не менее 600 мм.
• если кухонная плита устанавливается под
навесным кухонным шкафом, он должен
располагаться на высоте не менее 420 мм от
поверхности варочной панели.
Это расстояние должно быть 700 мм, если навесные
кухонные
шкафы выполнены из возгораемого
материала (см.
рисунок);
• не заправляйте
занавески за
плиту и не приближайте
их на расстояние
меньше 200 мм.
• возможная кухонная
вытяжка должна
быть установлена в
соответствии с
не в
кухонную
17
Page 18
RS
инструкциями, приведенными в техническом
руководстве к вытяжке.
Нивелировка
При необходимости
выровнять изделие вкрутите
в специальные отверстия по
углам в основании кухонной
плиты прилагающиеся
нивелировочные ножки (см.
рисунок).
Прилагающиеся ножки*
вставляются под
основание
кухонной плиты.
*Имеется только в
некоторых моделях
действующими национальными нормативами, после
проверки настройки изделия на тип используемого
газа (см. этикетку настройки на крышке: в противном
случае см. ниже). В случае использования
сжиженного газа из баллона необходимо
установить регуляторы давления, соответствующие
действующему
национальному нормативу. Для
облегчения подсоединения газовый патрубок
является ориентируемым*: поменяйте местами
крепежную блокировочную гайку на заглушку и
замените прилагающееся уплотнение.
! Для надежного функционирования, рационального
использования энергии и более длительного срока
службы изделия проверьте, чтобы давление подачи
газа соответствовало значениям, указанным в
таблице «Характеристики газовых конфорок и
форсунок» (см. ниже).
Электрическое подсоединение
Установите на кабель электропитания
нормализованную штепсельную вилку, расчитанную
на нагрузку, указанную на паспортной табличке
изделия (см. табличку с техническими данными).
В случае прямого подключения к сети
электропитания между кухонной плитой и
сетью необходимо установить мультиполярный
выключатель с минимальным расстоянием
между контактами 3 мм, расчитанный на данную
нагрузку и соответствующий действующим
нормативам (
выключатель не должен размыкать
провод заземления). Сетевой шнур должен быть
расположен таким образом, чтобы ни в одной
точке его температура не превышала температуру
помещения более чем на 50°C.
Перед подсоединением сетевого шнура проверьте
следующее:
• сетевая розетка должна быть соединена с
заземлением и соответствовать нормативам;
• сетевая розетка должна быть рассчитана на
максимальную потребляемую мощность изделия,
указанную на паспортной табличке;
• напряжение и частота тока сети должны
соответствовать электрическим данным изделия;
• сетевая розетка должна быть совместима со
штепсельной вилкой изделия. В противном
случае замените розетку или вилку; не
используйте удлинители или
тройники.
! Изделие должно быть установлено таким образом,
чтобы сетевой шнур и сетевая розетка были легко
доступны.
! Сетевой шнур изделия не должен быть согнут или
сжат.
! Регулярно проверяйте состояние сетевого шнура
и при необходимости поручайте его замену только
уполномоченным техникам.
! Фирма снимает с себя всякую ответственность в
случае
несоблюдения вышеописанных правил.
Подсоединение к газопроводу
Подсоединение к газопроводу или к газовому
баллону выполняется посредством гибкого
резинового или стального шланга в соответствии с
Газовое подсоединение посредством резинового
шланга
Проверьте, чтобы шланг соответствовал
действующим национальным нормативам.
Внутренний диаметр шланга должен быть: 8 мм для
сжижженного газа; 13 см для газа метана.
После подсоединения проверьте, чтобы шланг:
• не касался частей, температура которых может
превысить 50°C;
• не был растянут,
перекручен, сжат или заломлен;
• не касался режущих предметов, острых углов,
подвижных предметов и не был сжат;
• был легко доступен для проверки по всей длине;
• не был длиннее 1500 мм;
• был прочно закреплен с обоих концов при
помощи хомутов, соответствующих действующим
национальным нормативам.
Точка соединения
Изолирующая
заглушка
Крепление
шланга
Точка соединения
Крепление
шланга
ГОРЯЧАЯ ПОВЕРХНОСТЬ
Изолирующая
заглушка
! Если одно или несколько из вышеописанных
условий
не будет соблюдено, и если кухонная плита
устанавливается в условиях класса 2, подгруппа
1 (изделие, встроенное между двух кухонных
элементов), необходимо использовать гибкий
стальной шланг (см. ниже).
Газовое подсоединение посредством шланга
из нержавеющей стали со сплошной оплеткой с
резьбовыми соединениями.
Проверьте, чтобы шланг и уплотнения соответствовали
действующим национальным нормативам.
Для подсоединения
шланга снимите блокировочную
гайку с изделия (патрубок подачи газа в изделие
имеет цилиндрическу резьбу Ѕ газ «папа»).
! Длина подсоединяемого шланга не должна
превышать 2 метра при максимальном растяжении.
Проверьте, чтобы шланг не касался подвижных
деталей, которые могут его сжать.
18
Page 19

V
Проверка уплотнения
По завершении подсоединения проверьте прочность
уплотнения всех патрубков при помощи
мыльного
раствора, но никогда не пламенем.
Настройка на различные типы газа
Изделие может быть настроено на тип газа,
отличающийся от оригинального (указан на этикетке
настройки на крышке).
на новую, расчитанную на
новый тип газа (см. таблицу
Характеристики горелок и
форсунок).
RS
Настройка варочной панели
Порядок замены форсунок конфорок на варочной
панели:
1. снимите решетки с варочной панели и выньте
горелки из своих гнезд;
2. отвинтите форсунки при помощи полого ключа 7
мм (см. рисунок) и замените
форсунки, расчитанные
их на
на новый тип газа (см. таблицу
Характеристики горелок и
форсунок);
3. восстановите на место все комплектующие,
выполняя операции в обратном порядке по
отношению к описанным выше.
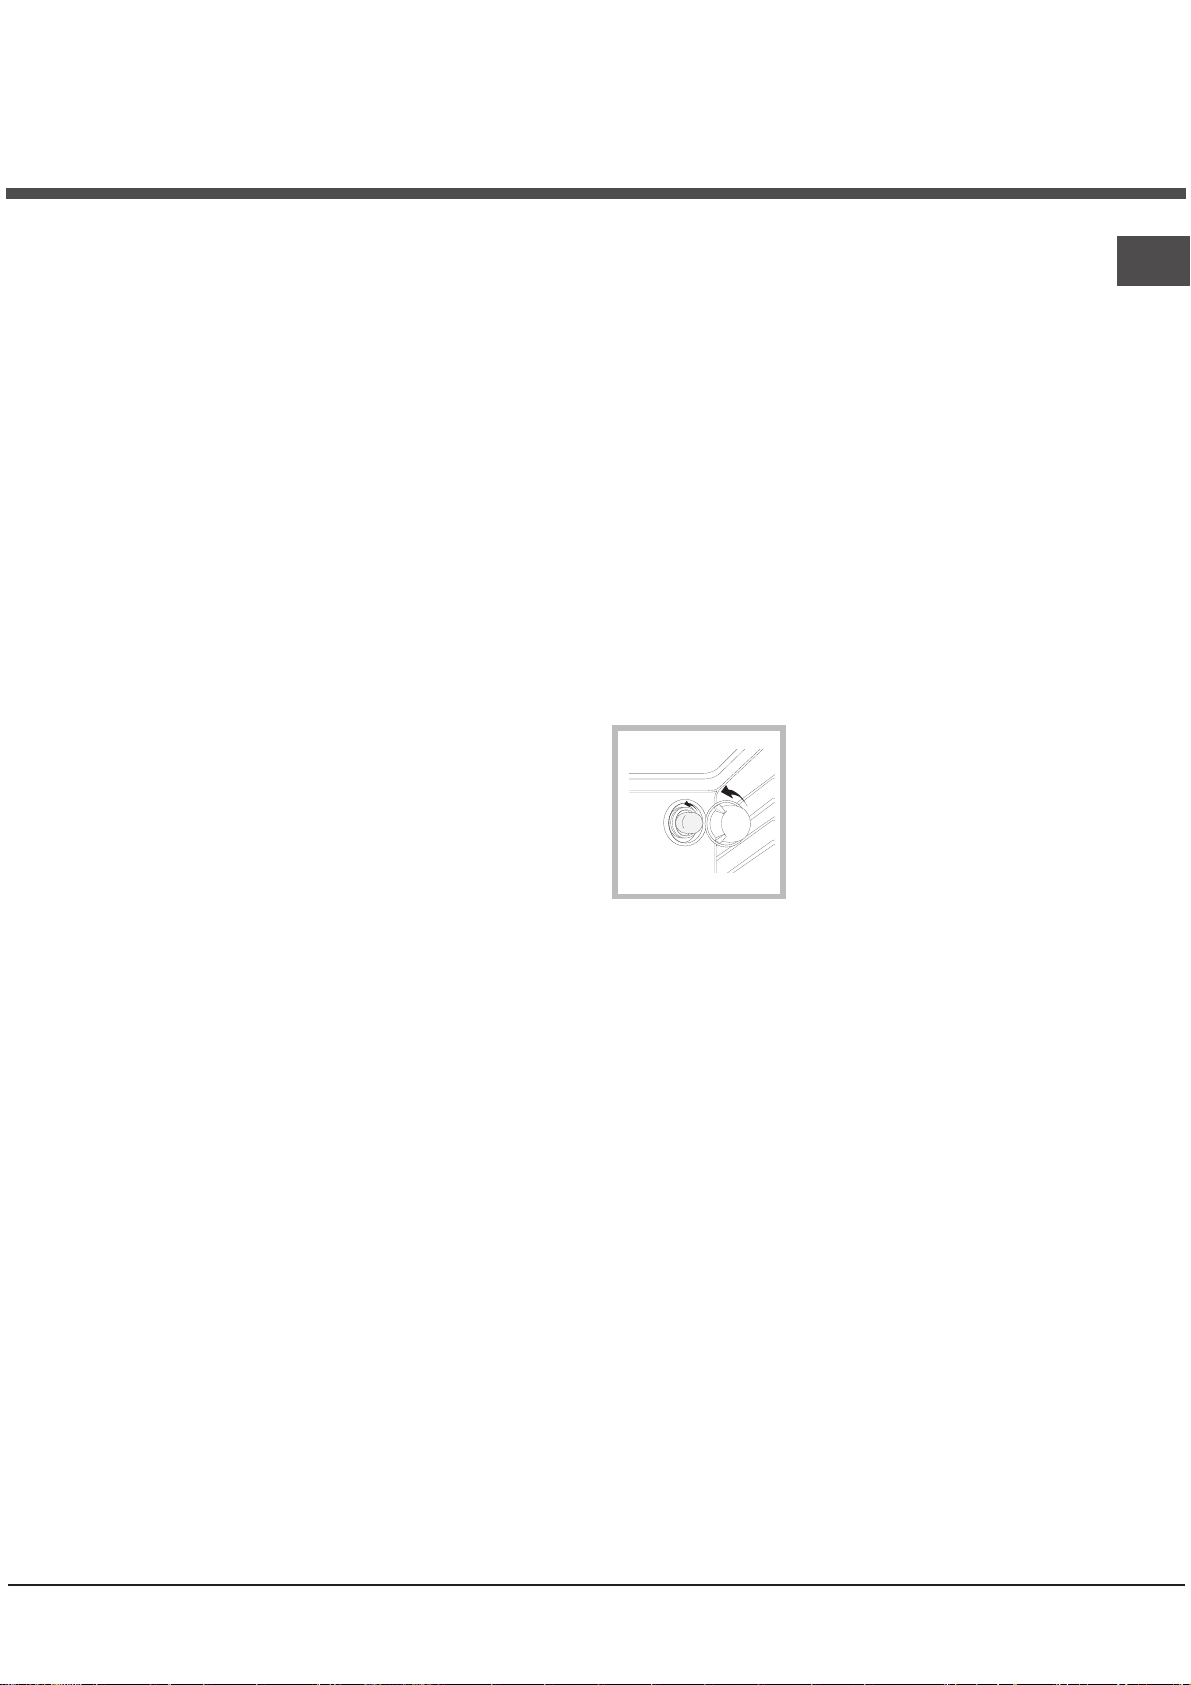
Порядок регуляции минимального пламени
конфорок на варочной панели:
1. поверните рукоятку в положение минимального
пламени;
2. снимите рукоятку и поверните регуляционный
винт, расположенный внутри или рядом со стержнем
крана, вплоть до получения стабильного малого
пламени.
В случае использования сжиженного природного
!
газа винт регуляции должен быть отвинчен против
часовой стрелки;
3. проверьте, чтобы конфорка не гасла при резком
повороте крана из положения максимального
пламени в положение минимального пламени.
! Конфорки варочной панели не нуждаются в какойлибо регуляции первичного воздуха.
:
Настройка духового шкафа
Порядок замены форсунки газовой
горелки
духового
шкафа
1. полностью откройте дверцу
духового шкафа;
2. выньте съемное дно духовки
(см. рисунок);
3. отвинтите крепежные винты
горелки и снимите горелку
духового шкафа, сняв винт V;
4. отвинтите форсунку горелки
при помощи специального
полого ключа для форсунок
(см. рисунок) или полого ключа
7 мм и замените форсунку
Регуляция минимального пламени горелки
духового шкафа:
1. включите горелку (см. Пуск и Эксплуатация);
2. оставьте рукоятку примерно в течение 10 минут в
положении максимального пламени (МАКС), затем
поверните
3. снимите рукоятку;
4. поверните регулировочный винт, расположенный внутри
стержня термостата (см. рисунок), вплоть до получения
малого стабильного пламени.
! В случае использования сжиженного природного газа винт
регуляции должен быть отвинчен против часовой стрелки;
проверьте, чтобы горелка не гасла при резком вращении
5.
рукоятки-регулятора из положения МАКС в положение МИН
или при резком открывании или закрывании дверцы духовки.
Замена форсунок тройной конфорки
1. снимите решетки и выньте горелки из своих гнезд. Горелка
из двух отдельных частей (см. схемы);
2. отвинтите форсунки полой отверткой 7 мм. Замените форсунки
на новые, пригодные для нового типа газа (см. таблицу 1). Обе
форсунки имеют одинаковое отверстие.
3. восстановите на место все комплектующие, выполняя операции
обратном порядке по отношению к описанным выше.
• Регуляция первичного воздуха горелок
Горелки не нуждаются в какой-либо регуляции первичного воздуха.
• Регуляция минимального пламени
1. Поверните рукоятку-регулятор в положение минимального
пламени;
2. Снимите рукоятку и поверните регуляционный винт,
расположенный внутри или рядом со стержнем крана, вплоть до
получения стабильного малого пламени.
3. Проверьте, чтобы при резком повороте рукоятки из положения
максимального пламени на минимальное, горелки не гасли.
ее в положение минимального
пламени (МИН);
состоит
в
19
Page 20

RS
4. В изделиях, оснащенных защитным устройством
(термопарой), в случае неисправности этого
устройства при минимальном пламени горелок
увеличьте расход газа минимального пламени при
помощи регуляционного винта.
5. По завершении регуляции восстановите сургучные
или подобные пломбы на обводном газопроводе.
! В случае использования сжиженного газа
регуляционный винт должен быть завинчен до упора
По завершении операции замените старую этикетку
!
тарирования на новую, соответствующую новому
типу используемого газа. Этикетку можно заказать в
наших Центрах Сервисного Обслуживания.
! Если давление используемого газа отличается
(или варьирует) от предусмотренного давления,
.
необходимо установить на питающем газопроводе
соответствующий регулятор давления (согласно
нормативам EN 88-1 и EN 88-2 «Регуляторы для
канализированных газов»).
Безопасность цепи
! Во избежание
случайного
опрокидывания
изделия,
например,
если ребенок
залезет на
дверцу духовки,
НЕОБХОДИМО
установить
прилагающуюся предохранительную цепь.
Духовой щкаф укомплектован предохранительной
цепью, которая должна быть прикреплена
винтом (не прилагается к печи) к стене сзади
изделия на той же высоте, на которой цепь
винт и винтовой
Выберите
.
крепится к изделию
анкерный
стены
болт, соответствующие типу материала
сзади изделия. Если головка винта имеет
диаметр меньше 9 мм, необходимо использовать
шайбу. Цементная стена требует винт диаметром
не менее 8 мм и 60 мм длиной.
S
R
A
TC
Проверьте, чтобы цепь была прикреплена к
задней стенке духового шкафа и к стене, как
показано на схеме, таким образом, чтобы после
монтажа
она была натянута и параллельна полу.
Таблица характеристик
авление
Диаметр
(мм)
(TC)
Тепловая мощность
Номинал. Сокращ мм)
100 3,00 0,7 41 86 218 214 116 286 143 286
75 1,90 0,4 30 70 138 136 10
55 1,00 0,4 30 50 73 71 79 95 80 95
130 3.25 1.5 63
- 2,60 1,0 52 78 189 186 119 248 132 248
Номинальное (мбар)
Минимальное (мбар)
Максимальное (мбар)
аблица 1
Горелка
Быстрая
Большая)(R)
олубыстрая
Средняя)(S)
спомогательн
я Малая А
Потрiйна
корона
уховка
одачи
* La 15°C єi 1013 мбар – gaz uscat
Бутан 49,47 МДж/Kg
горелок и форсунок
кВт (p.c.s.*)
H6TG5F C UA
*** **
расход*
гр/час
Байпас
1/100
Сжиженный газ
форсунка
1/100
(мм)
87
69
2x65
Пропан 50,37 МДж/Kg
Природный газ 37,78 МДж/м
236 232
28-30
20
35
37
25
45
3
форсунка
1/100
(мм)
128
104
3
78
2x99
-
Природный газ
расход*
л/час
форсунка
1/100
145
181 118 181
309
20
17
25
115
85
2x10⁷
(мм)
расход*
л/час
13
6,5
18
309
20
Page 21

Включение и эксплуатация
F
X
C
Практические советы по эксплуатации газовых
Эксплуатация варочной панели
Включение конфорок
Напротив каждого рукоятки КОНФОРКИ
закрашенным кружком показано положение данной
конфорки на варочной панели.
Порядок включения конфорки на варочной панели:
1. поднесите к конфорке зажженую спичку или
кухонную зажигалку;
2. нажмите и одновременно поверните против
часовой стрелки рукоятку КОНФОРКИ на символ
максимального пламени .
3. отрегулируйте нужную мощность пламени,
поворачивая рукоятку КОНФОРКИ
стрелки: на минимум , на максимум или на
среднюю мощность.
ЕНекоторые модели оснащены устроиством
зажигания, встроенным внутри рукоятки. В этом
случае варочная панель оснащена электронным
устроиством зажигания* (см. рисунок), но не кнопкои
зажигания. Нажмите и одновременно поверните
против часовои стрелки рукоятку КОНФОРКИ
на символ максимального пламени
зажигания конфорки. Может случиться, что
конфорка погаснет в момент, когда вы отпустите
рукоятку. В этом случае повторите операцию
зажигания, удерживая рукоятку нажатои подольше.
! В случае внезапного гашения пламени выключите
конфорку и подождите примерно 1 минуту перед ее
повторным включением.
Если изделие оснащено предохранительным
устройством* (X)отсутствия
пламени, держите рукоятку
КОНФОРКИ
примерно 2-3 секунды
для того, чтобы пламя
конфорки активировало это
устройство.
Для выключения конфорки
поверните рукоятку вплоть до гашения пламени
Регуляция уровней пламени
Интенсивность пламени горелок можно
рукояткой на 6 уровней мощности, от
максимального до минимального с 4
промежуточными уровнями:
При поворачивании рукоятки раздается щелчок,
означающий переключение с одного уровня на
другой.
Система позволяет более точно отрегулировать
мощность, позволяет копировать интенсивность
пламени и просто определять нужный
уровень для различного
Имеется только в некоторых моделях
*
более
приготовления.
против часовой
вплоть до
нажатой
•.
конфорок
Для оптимальной работы конфорок и для экономии
газа следует использовать кухонную посуду с
плоским дном, с диаметром, соответствующим
конфорке, и с крышкой:
Для определения типа конфорки смотрите рисунки в
параграфе «Характеристики конфорок и форсунок».
Горелка Диаметр дна посуды
Быстраяя(R ) 24-26
Полубыс2раяя(S) 16-20
Ä î ï î ë í è 2 å ë ü í à ÿ ÿ( A ) 1 0-1 4
Потрiйна корона ( )ТС
! В моделях, оснащенных дополнительной
решеткой, эта решетка может быть использована
только на вспомогательной конфорке с посудой
диаметром меньше 12 см.
(cì)
24 - 26
Эксплуатация духового шкафа
! При первом включении духового шкафа
рекомендуем прокалить его примерно в течение 30
минут при максимальной температуре с закрытой
дверцей. Затем выключите духовой шкаф, откройте
дверцу и проветрите помещение. Запах, который вы
можете почувствовать, вызван испарением веществ,
использованных для предохранения духового
шкафа.
! Перед началом эксплуатации необходимо снять
пленку, наклеенную с боков
! Никогда не ставьте никаких предметов на дно
духового шкафа, так как они могут повредить
эмалированное покрытие. Используйте положение
1 настройки духового шкафа только для
приготовления на вертеле.
Включение духового шкафа
Для зажигания горелки духового шкафа поднесите
к отверстию F (см. рисунок) зажженную спичку
или кухонную зажигалку, нажмите и одновременно
обозначенную символом
до упора и одновременно поверните против
часовой стрелки рукоятку КОНФОРКИ на символ
МАКСИМАЛЬНОГО пламени вплоть до зажигания
пламени. Если по прошествии 15 секунд горелка
не загориться, отпустите рукоятку, откройте дверцу
духового шкафа и подождите примерно 1 минуту
перед повторным зажиганием. В случае отсутствия
электропитания можно включить горелку от спички
кухонной зажигалки, как было описано выше.
или
изделия.
поверните
стрелки рукоятку ДУХОВКИ в
положение МАКС.
Если изделие оснащено
электронной системой
зажигания*, вначале
нажмите кнопку зажигания,
против часовой
, затем нажмите
RS
21
Page 22

RS
! Духовой шкаф оснащен предохранительным
устройством, поэтому необходимо держать рукоятку
ДУХОВКИ нажатой примерно 6 секунд.
! В случае внезапного гашения пламени выключите
горелку и подождите
повторным включением духовки.
Регуляция температуры
Для получения нужной температуры приготовления
поверните против часовой стрелки рукоятку
ДУХОВКИ. Значения температуры указаны на
панели управления и начинаются с МИН (150°C)
до МАКС (250°C). По достижении заданной
температуры в духовке она будет поддерживаться
постоянной термостатом.
! Когда вы используете гриль, необходимо оставить
дверцу духового шкафа полу-открытой, установив
между дверцей и панелью управления отражатель
D (см. рисунок), препятствующий нагреванию
рукояток.
Вертел
3. включите вертел, нажав на кнопку ВЕРТЕЛ.
Освещение духового шкафа
Освещение духового шкафа может быть
в любой момент при выключенной духовке при
помощи кнопки.
примерно 1 минуту перед ее
Порядок включения
вертела (см. рисунок):
1. установите
противень на 1-ый
уровень;
2. установите
держатель вертела
на 4-ый уровень и
вставьте вертел в
специальное отверстие
в задней
духового шкафа;
стенке
включено
Электронный таймер
Внимание
Не разрешайте детям прикасаться к
духового шкафа, так как она сильно нагревается
процессе приготовления.
Показывает время и выполняет функцию
с обратным отсчетом.
Примечание: все функции включаются примерно
через 7 секунд после их выбора.
Регуляция часов
После осуществления подсоединения к сети
электропитания или после отключения напряжения
на дисплее мигает значение: 0 00
• Нажмите кнопку
и затем кнопки и
для установки точного времени. Для быстрой
Имеется только в некоторых моделях.
*
дверце
в
таймера
регуляции держите кнопки нажатыми.
При необходимости откорректировать время
выполните вышеописанные операции.
Функция таймера
Эта функция включается при помощи кнопки n ,, и
на дисплее показывается символ “”. При каждом
нажатии кнопки t значение времени увеличивается
на 10 секунд вплоть до 99 минут и 50 секунд. Если
вы будете продолжать нажмете на эту кнопку,
значение времени будет увеличиваться на одну
минуту вплоть до 10 минут.
При помощи кнопки значение уменьшается.
После установки нужного отрезка времени,
начинается обратный отсчет. По истечении
заданного времени раздается звуковой сигнал,
погасить который вы можете, нажав любую копку.
Вы можете вывести на дисплей текущее время,
нажав на кнопку
. Символ ” означает, что на
таймере был включен обратный отсчет времени.
Примерно через 7 секунд на дисплей автоматически
вернется визуализация таймера.
Порядок обнуления таймера
Нажмите кнопку вплоть до 0:00
Регуляция громкости звукового сигнала
После осуществления и подтверждения регуляции
часов при помощи кнопки можно отрегулировать
громкость звукового сигнала.
ТЕХНИЧЕСКИЕ ДАННЫЕ
Габаритные
размеры духового
шкафа ВхШхГ
Объем
Рабочие размеры
ящика для
разогревания
пищи
Напряжение и
частота
электропитания
Горелки
Директива ЕС: 2006/95/EC от
31x43,5x43,5 см
л 58
ширина 46 см,
глубина 42 см
высота 8,5 см.
см. табличку с техническими
характеристиками
настраиваются на все типы
газа, указанные на
паспортной табличке
изделия.
12/12/06 (Низкое напряжение)
с последующими
изменениями – 2004/108/ЕC
от 15/12/04
(Электромагнитная
совместимость) с
последующими изменениями
– 2009/142/ЕC от 30/11/09
(Газ) - 90/68/СЕЕ от 22/07/93
с последующими
изменениями – 2002/96/ЕС.
1275/2008 (Stand-by/ Off
mode)
22
Page 23

Гриль
Гриль с инфракрасным излучением включается
при помощи рукоятки OVEN (ДУХОВКА),
поворачиваемой по часовой стрелке в положение
В режиме гриль поверхность продукта
.
равномерно подрумянивается. Этот режим
особенно рекомендуется для запекания продуктов,
приготовления шницелей и жареных колбасок.
Установите решетку на 4-ый или 5-ый уровень и, во
избежание образования чада, вставьте поддон для
сбора сока на 1-ый уровень.
! Включенный индикатор ГРИЛЬ показывает, что
режим гриль включен.
! Всегда закрывайте
дверцу духового шкафа при
использовании режима Гриль; это обеспечит лучший
результат приготовления и поможет сэкономить
электроэнергию (примерно 10%).
Ɍɚɛɥɢɰɚ ɩɪɢɝɨɬɨɜɥɟɧɢɹ ɜ ɞɭɯɨɜɨɦ ɲɤɚɮɭ
RS
ɉɪɨɞɭɤɬɵ
Ɇɚɤɚɪɨɧɧɵɟ ɢɡɞɟɥɢɹ
Ʌɚɡɚɧɶɹ
Ʉɚɧɧɟɥɥɨɧɢ
Ɇɚɤɚɪɨɧɧɚɹ ɡɚɩɟɤɚɧɤɚ
Ɇɹɫɨ
Ɍɟɥɹɬɢɧɚ
Ʉɭɪɢɰɚ
ɍɬɤɚ
Ʉɪɨɥɢɤ
ɋɜɢɧɢɧɚ
Ȼɚɪɚɧɢɧɚ
Ɋɵɛɚ
ɋɤɭɦɛɪɢɹ
Ʉɚɦɛɚɥɚ
Ɏɨɪɟɥɶ ɜ ɮɨɥɶɝɟ
ɉɢɰɰɚ
ɉɨ-ɧɟɚɩɨɥɢɬɚɧɫɤɢ
ȼɵɩɟɱɤɚ
ɉɟɱɟɧɶɟ
Ɍɨɪɬ ɫ ɜɚɪɟɧɶɟɦ
ɇɟɫɥɚɞɤɢɟ ɬɨɪɬɵ
ȼɵɩɟɱɤɚ ɢɡ ɞɪɨɠɠɟɜɨɝɨ ɬɟɫɬɚ
ȼɟɫ
(ɤɝ)
2.5
2.5
2.5
1.7
1.5
1.8
2.1
1.8
1.1
1.5
0.5
1.1
ɍɪɨɜɟɧɶ ȼɪɟɦɹ ɧɚɝɪɟɜɚɧɢɹ
2
1
1
1
1
3
3
3
3
3
3
3
3
3
3
3
3
3
3
3
3
3
(
ɦɢɧ
10
10
10
10
10
10
10
10
10
10
10
10
15
15
15
15
15
.)
Ɋɟɤɨɦɟɧɞɭɟɦɚɹ
ɬɟɦɩɟɪɚɬɭɪɚ
210
200
200
200
220
200
200
200
200
180-200
180-200
180-200
220
180
180
180
180
(°C)
ɉɪɨɞɨɥɠɢɬ-ɬɶ
ɩɪɢɝɨɬɨɜɥɟɧɢɹ
(ɦɢɧɭɬɵ)
90-100
100-110
60-75
40-50
40-50
85-90
70-80
70-80
90-95
35-40
40-50
40-45
15-20
30-35
30-35
45-50
35-40
23
Page 24

Предосторожности и
рекомендации
RS
! Изделие спроектировано и изготовлено в соответствии с
международными нормативами по безопасности.
Необходимо внимательно прочитать настоящие
предупреждения, составленные в целях вашей
безопасности.
Общие требования к безопасности
• Данное изделие предназначается для
непрофессионального использования в домашних
условиях.
• Запрещается устанавливать изделие на улице, даже
под навесом, так как воздействие на него дождя и
грозы является чрезвычайно опасным.
• Не прикасайтесь к изделию влажными руками, босиком
или с мокрыми ногами.
• Изделие предназначено для приготовления
пищевых продуктов, может быть использовано
только взрослыми лицами в соответствии
с инструкциями, приведенными в данном
техническом руководстве. Любое другое его
использование (например: отопление помещения)
считается ненадлежащим и следовательно
опасным. Производитель не несет ответственности
за возможный ущерб, вызванный ненадлежащим,
неправильным и неразумным использованием
изделия.
• Данное техническое руководство относится к бытовому
электроприбору класса 1 (отдельное изделие) или
класса 2 –
элементами).
• В процессе эксплуатации изделия нагревательные
элементы и некоторые части дверцы духового
шкафа сильно нагреваются. Необходимо проявлять
острожность во избежание контактов с этими
частями и не разрешать детям приближаться к
духовке.
• Избегайте контактов проводов электропитания других
бытовых электроприборов с горячими частями изделия.
• Не закрывайте вентиляционные
рассеивания тепла.
• Всегда надевайте кухонные варежки, когда ставите или
вынимаете блюда из духовки.
• Не используйте горючие жидкости (спирт, бензин и т.д.)
рядом с работающей кухонной плитой.
• Не кладите возгораемые материалы в нижний отсек
или в духовой шкаф: при случайном включении
изделия такие материалы могут загореться.
• Внутренняя поверхность ящика (если он имеется)
может сильно нагреться.
• Когда изделие не используется, всегда проверяйте,
чтобы рукоятки находились в положении
• Не тяните за сетевой шнур для отсоединения вилки
изделия из сетевой розетки, возьмитесь за вилку рукой.
подгруппа 1 (встроенное между 2 кухонными
решетки и отверстия
•.
• Перед началом чистки или технического обслуживания
изделия всегда вынимайте штепсельную вилку из
сетевой розетки.
• В случае неисправности категорически запрещается
открывать внутренние механизмы изделия с целью
их самостоятельного ремонта. Обратитесь в центр
технического обслуживания.
• Не ставьте тяжелые предметы на открытую дверцу
духового шкафа
• Не разрешайте детям играть с бытовым
электроприбором.
• Не допускается эксплуатация изделия лицами с
ограниченными физическими, сенсориальными
или умственными способностями (включая детей),
неопытными лицами или лицами, необученными
обращению с изделием без контроля со стороны
лица, ответственного за их безопасность или после
надлежащего обучения обращению с изделием.
•
Если плита расположена на пьедестал, принять
необходимые меры предосторожности для
предотвращения соскальзывания плиты с
пьедестала самого.
Утилизация
• Уничтожение упаковочных материалов: соблюдайте
местные нормативы по утилизации упаковочных
материалов.
• Согласно Европейской Директиве 2002/96/СЕ
касательно утилизации электронных и электрических
электроприборов электроприборы не должны
выбрасываться вместе с обычным городским
мусором. Выведенные из строя приборы должны
собираться отдельно для оптимизации их утилизации
и рекуперации составляющих их материалов, а также
для безопасности окружающей
Символ зачеркнутая мусорная корзинка, имеющийся на
всех приборах, служит напоминанием об их отдельной
утилизации.
За более подробной информацией о правильной
утилизации бытовых электроприборов пользователи
могут обратиться в специальную государственную
организацию или в магазин
среды и здоровья.
Экономия электроэнергии и охрана
окружающей среды
• Если вы будете пользоваться духовым шкафом
вечером и до раннего утра, это поможет
сократить нагрузку потребления электроэнергии
электростанциями.
• Рекомендуется всегда готовить в режиме ГРИЛЬ с
закрытой дверцей: это необходимо для значительной
экономии электроэнергии (примерно 10%), а также для
лучших результатов приготовления.
• Содержите уплотнения в исправном и чистом состоянии,
проверяйте, чтобы
пропускали утечек тепла.
они плотно прилегали к дверце и не
24
Page 25

Техническое
обслуживание и уход
Отключение электропитания
Перед началом какой-либо операции по
обслуживанию или чистке отсоедините изделие от
сети электропитания.
Чистка изделия
! Не используйте паровые чистящие агрегаты
или агрегаты под высоким давлением для чистки
изделия.
• Наружные эмалированные элементы или детали
из нержавеющей стали, а также резиновые
уплотнения можно протирать губкой, смоченной
в теплой воде или в растворе нейтрального
моющего средства. Для удаления особо трудных
пятен используйте специальные чистящие
средства, имеющиеся в
ополосните водой и вытрите насухо после
чистки. Не используйте абразивные порошки или
коррозийные вещества.
• Решетки, диффузоры, форсунки конфорок и
горелки варочной панели снимаются для их
более простой чистки. Вымойте их горячей водой
и неабразивным моющим средством, обращая
внимание на удаление всех налетов. После мойки
тщательно высушите.
продаже. Тщательно
Проверяйте уплотнения духового шкафа.
Регулярно проверяйте
вокруг дверцы духового шкафа. В случае
повреждения уплотнения обращайтесь в
ближайший уполномоченный Центр Технического
Обслуживания. Не рекомендуется пользоваться
духовкой с поврежденным уплотнением.
состояние уплотнения
Порядок замены лампочки в духовом
шкафу
1. Отключите духовой шкаф
от сети электропитания,
снимите стеклянную
защитную крышку лампы (см.
рисунок).
2. Выкрутите лампочку и
замените ее на новую такого
же типа: напряжение 230 В,
мощность 25 Вт, резьба Е 14.
3. Восстановите на место крышку и вновь
подключите духовой шкаф к сети электропитания.
! Не используйте лампочку духового шкафа для
освещения помещения
.
Уход за рукоятками газовой варочной
панели
RS
• Регулярно прочищайте
устройств против отсутствия пламени.
• Следует производить внутреннюю чистку духового
шкафа после каждого его использования, не
дожидаясь его полного охлаждения. Используйте
теплую воду и моющее средство, ополосните
и протрите мягкой тряпкой. Избегайте
использования абразивных средств.
• Для чистки стекла дверцы используйте
неабразивные губки и чистящие средства,
затем вытрите насухо
используйте твердые абразивные материалы или
острые металлические скребки, которые могут
поцарапать поверхность и разбить стекло.
• Съемные детали можно легко вымыть как любую
другую посуду, также в посудомоечной машине.
• Не следует закрывать крышку варочной панели,
если конфорки включены или еще не остыли.
кончики защитных
мягкой тряпкой. Не
Со временем рукоятки варочной панели могут
заблокироваться или вращаться с трудом, поэтому
потребуется произвести их внутреннюю чистку и
замену всей рукоятки.
! Данная операция должна выполняться
техником, уполномоченным производителем.
Техническое обслуживание
! Никогда не обращайтесь к неуполномоченным
техникам.
При обращении в Центр Технического
обслуживания сообщите:
• Тип неисправности;
• Модель изделия (Мод.)
• Номер тех. паспорта (серийный №)
Эти данные вы найдете на паспортной табличке,
расположенной на изделии.
* Имеется только в некоторых моделях.
25
Page 26

RS
Мы заботимся о своих покупателях и
стараемся сделать сервисное обслуживание
наиболее качественным. Мы постоянно
совершенствуем наши продукты, чтобы
сделать Ваше общение с техникой простым и
приятным.
Уход за техникой
Продлите срок эксплуатации и снизьте
вероятность поломки техники.
ȼɇɂɆȺɇɂȿ! Ⱦɭɯɨɜɨɣ
ɲɤɚɮ ɭɤɨɦɩɥɟɤɬɨɜɚɧ
ɫɢɫɬɟɦɨɣ ɛɥɨɤɢɪɨɜɤɢ
ɪɟɲɟɬɨɤ, ɩɨɡɜɨɥɹɸɳɟɣ
ɜɵɧɢɦɚɬɶ ɢɯ ɢɡ ɞɭɯɨɜɤɢ
ɧɟ ɩɨɥɧɨɫɬɶɸ (1).
Ⱦɥɹ ɩɨɥɧɨɝɨ ɜɵɧɢɦɚɧɢɹ
ɪɟɲɟɬɨɤ ɞɨɫɬɚɬɨɱɧɨ
ɩɨɞɧɹɬɶ ɢɯ, ɤɚɤ
ɩɨɤɚɡɚɧɨ ɧɚ ɫɯɟɦɟ, ɜɡɹɜ ɢɯ ɡɚ ɩɟɪɟɞɧɢɣ ɤɪɚɣ, ɢ
ɩɨɬɹɧɭɬɶ ɧɚ ɫɟɛɹ (2).
Воспользуйтесь профессиональными
средствами для ухода за техникой от
Indesit Professional для наиболее простого,
эффективного и легкого ухода за Вашей
бытовой техникой.
Продукты Indesit Professional производятся в
Италии с соблюдением высоких европейских
стандартов в области качества, экологии и
безопасности использования и созданы с учетом
многолетнего опыта производителя техники.
Узнайте подробнее на сайте
www.hotpoint-ariston.com в разделе «Сервис»
и спрашивайте в магазинах Вашего города.
Авторизованные сервисные центры
Чтобы быть ближе к нашим потребителям,
мы создали широкую сервисную сеть,
особенностью которой является высокая
подготовка, профессионализм и честность
сервисных мастеров. На сегодняшний день она
насчитывает около 350 сервисных центров на
территории России и СНГ.
ВНИМАНИЕ! При нагреве
стеклянная крышка может
лопнуть. Прежде чем закрыть
ее, выключить все конфорки или
электрические горелки.*Только
для моделей со стеклянной
крышкой
Их контакты Вы можете найти в сервисном
сертификате и на сайте
www.hotpoint-ariston.
com в разделе «Сервис».
Если вам надо обратиться в сервисный
центр:
Внимание! При ремонте требуйте
использования оригинальных запасных
частей.
Другую полезную информацию и новости Вы
можете найти на сайте
www.hotpoint-ariston.com
26
в разделе «Сервис».
Page 27

Съем и обратная установка дверцы духовки:
1. Откройте дверцу
2. Полностью отверните назад крюки петель
дверцы духовки (см. фото).
3. Закройте дверцу до упора крюка (дверца
останется открытой примерно на 40°) (см.
фото)
404040
°
ВНИМАНИЕ! Печь нельзя эксплуатировать с
внутреннимстеклянные двери удалены!
ВНИМАНИЕ
стеклянной вставкой стеклянная панель
правильно, чтобы
Текст, написанный на панели, не подлежит
восстановлению и может быть легко читаемым
7. Установите на место профиль. Если деталь
установлена правильно, раздается щелчок.
8. Полностью откройте дверцу.
9. Закройте скобы (см. фото)
! При сборке внутренней двери
RS
4. Нажмите на две кнопки в верхнем профиле
и снимите профиль (см. фото)
5. Выньте стекло и вымойте его, как
главе: "Техническое обслуживание и уход".
описано в
10. На данном этапе можно полностью закрыть
дверцу и пользоваться духовкой.
6. Установка стекла на место.
27
Page 28

Встановлення
HOOD
420
Min.
min.
650
mm. with hood
min.
700
mm. without hood
mm.
600
Min. mm.
420
Min. mm.
! Важливо зберегти цю брошуру, щоб можна було
до неі звернутися при необхідності у будь-якому
випадку. У разі продажу, передачi iншiи особi
або переізду, переконаитеся в тому, що вона
залишається разом з виробом.
! Уважно прочитаите інструкціі: інформація про
обладнання, використання и безпеку грає дуже
важливу роль.
! Установка
інструкціі кваліфікованим персоналом.
! Будь-яке втручання в регулювання або технічне
обслуговування має виконуватися на плиті,
відключеніи від електроживлення.
Вентиляція приміщень
Обладнання може бути встановлене тільки у
постіино вентильованих приміщеннях, згідно діючим
нормам в краінi, де вироб буде викорисовано. У
приміщенні, в якому встановлено обладнання, має
відбуватися зміна повітря, у ступені, необхідному
для нормального горіння газу (швидкість зміни
повітря не має бути меншою 2м
встановленоі потужності).
Вхід приточноі вентиляціі, захищении ґраткою, повинен
мати корисну площу не менше 100 см
перетину і має бути розміщении так, щоб він не міг
забитися, навіть частково ( див. малюнок A).
Такии вхід повинен бути збільшении на 100%, тобто
мінімум 200 см
має пристрою безпеки у разі зникнення полум’я, і
коли можливии непрямии потік повітря із прилеглих
приміщень (див.малюнок B) – якщо це не спільні
частини будівлі, пожежонебезпечне приміщення
або спальні кімнати, обладнані вентиляціиним
трубопроводом назовні, як описано вище.
A
Вентиляціинии отвір для
відпрацьованого повітря
! Після тривалого використання плити, доцільно
відкрити
вентиляторів.
Відведення продуктів згорання
Відведення продуктів згорання має бути
забезпечене через витяжку, підключену до каналу з
природною тягою з належною ефективністю, або за
допомогою електровентилятора, якии би включався
автоматично кожного разу при включенні плити (див.
малюнки).
вироба має виконуватися згідно даноі
3
/год на кожнии кВт
2
корисного
2
– якщо робоча поверхня плити не
Прилеглі
приміщення
B
A
Збільшення щілини між
дверима і підлогою
вікно або збільшити швидкість
Вентильовані
приміщення
UA
Відведення через канал або
Відведення
безпосередньо
назовні
розгалужении димар
(зарезервовании для
кухонного устаткування)
! Зріджені нафтові гази, важчі за повітря, бираються
внизу, тому приміщення
, де знаходяться балони з
газом, повинні бути обладнані витяжними отворами,
що виходять назовні для евакуаціі знизу при
можливому витоку газу.
Балони із зрідженим нафтовим газом, порожні або
частково повні, не повинні бути встановлені або
берігатися в приміщеннях нижче за рівень грунту
(льохи і т.п.). У приміщенні можна тримати тільки
використовувании балон, далеко від джерел тепла
(печі, каміни, обігрівачі), які нагріваються вище від
50°C.
Розміщення і вирівнювання
! Можна встановлювати плиту збоку від меблів, які
не вищі за робочу поверхню.
! Переконаитеся в тому, що поверхня стіни, яка
контактує із задньою частиною плити, виготовлена
з негорючого та теплостіикого матеріалу і витримує
нагрівання (90°C).
Для правильного встановлення
• розміщуите плиту в кухні, обідніи залі або в
однокімнатніи квартирі-студіі (не
• якщо поверхня плити є трохи вищою, ніж
поверхня меблів, меблі повинні знаходитися не
ближче ніж 200 мм від плити;
• якщо плита буде встановлена під секцією навісних
меблів, esso відстань до іі поверхні не повинна
бути меншою за 420 мм.
Така відстань повинна складати 700 мм, якщо
секція навісних меблів зроблена з
матеріалу (див. малюнок);
• не розміщуите занавісок позаду плити або ближче
ніж 200 мм від іі сторін;
у ванні);
горючого
• витяжки повинні
встановлюватися згідно
вказівкам відповідноі
інструкціі.
28
Page 29

UA
Вирівнювання
Якщо необхідно
регулюючі
ніжки, що входять до комплекту постачання,
вирівняти плиту,
вкрутіть
у спеціальні місця, що
знаходяться у кутках основи
(див. малюнок).
Ніжки* вмонтовуються у гнізда
під основою плити.
* Є лише в деяких моделях.
Підключення
Встановіть на кабелі
електроенергіі
вилку, розраховану на
навантаження, вказане на табличці з технічними
характеристиками, розміщеніи на плиті (див.
таблицю Технічних Даних).
У разі прямого підключення до мережі необхідно
помістити між плитою і мережею всеполярнии
вимикач з мінімальною відстанню між контактами 3
мм, розраховании на вказане навантаження і такии,
що відповідає нормі NFC 15-100 (дріт заземлення
не
повинен перериватися вимикачем). Кабель живлення
повинен бути розташовании так, щоб жодна з иого
частин не піддавалася нагріванню вище, ніж на 50°C
від температури довкілля.
До виконання підключення переконаитеся, що:
• розетка має заземлення, відповідно до встановлених
норм;
• розетка витримує максимальне навантаження
потужності обладнання, вказане на табличці з
характеристиками;
• напруга живлення
знаходиться в межах значень,
вказаних на табличці;
• розетка сумісна з вилкою плити. В іншому випадку
замініть розетку або вилку; не використовуите
подовжувачі и тріиники.
! Кабель не повинен мати перегинів або бути
стиснутим.
! Кабель має періодично перевірятися і мінятися
тільки фахівцями.
! Підприємство не несе будь-якоі
відповідальності, якщо ці норми не
дотримуватимуться
.
! У встановленіи плиті, має бути забезпечении
легкии доступ до електричного кабелю і розетки.
Підключення газу
Підключення до газовоі мережі або балона може
виконуватися за допомогою гнучкого гумового шланга
або шланга в сталевому обплетенні, згідно діючим
національним нормам і після того, як встановлено,
що плита була налаштована на тип газу, на якому
вона працюватиме (див. Калібрувальна бирка на
кришці: в іншому випадку див. нижче). У разі
роботи
плити від балона із зрідженим газом, використовуите
редуктори відповідно до діючих норм у странi,
де буде використовано вироб. Щоб полегшити
підключення, живлення газу може подаватися
збоку *: переставте в обратному напрямi утримувач
гумки для підключення замикаючоі пробки і замініть
ущільнювач, що входить у комплект постачання.
! Для безперебіиноі роботи, для
адекватного
використання енергіі і для більшого терміну служби
плити, забезпечте тиск подачі газу в межах значень,
вказаних в таблиці Характеристик пальників і
форсунок (див. нижче).
Підключення газу за допомогою гнучкого
гумового шланга
Перевірте, щоб шланг відповідав діючим державним
нормам. Внутрішніи діаметр шланга повинен бути: 8
мм для зрідженого газу; 13 мм для метану.
Виконавши з’єднання, переконаитеся в тому, що
шланг:
• не торкається частин, які нагріваються вище
температури в 50оC;
• не має будь-якого натягнення або скручування, не
має згинів або стискань;
• не торкається гострих предметів, краів, рухомих
частин і не здавлении;
• може бути легко оглянутии по всіи довжині для
контролю иого
стану;
• має довжину меншу ніж 1500 мм;
• добре закріплении на обох кінцях за допомогою
хомутів, відповідно до діючих державних норм.
Точк а
кріплення
Відсічний
кран
Блок гнучки
труб
Точк а
кріплення
Блок гнучки
труб
ГАРЯЧА ПОВЕРХНЯ
Відсічний
кран
! Якщо одна або більше з цих умов не будуть
дотримані, або якщо плита встановлена згідно
умовам класу 2 - підклас 1 (плита, встановлена між
двома шафами), необхідно використовувати гнучкии
шланг в сталевому
обплетенні (див. нижче).
Підключення газу за допомогою гнучкого шланга
в обплетенні з неіржавіючоі сталі до безперервноі
стіни за допомогою патронів із різьбою
Перевірте, щоб шланг і обплетення відповідали
діючим державним нормам.
29
Page 30

Щоб підключити шланг, видаліть утримувач гумки, що
V
міститься в плиті (місце підключення газу до плити має
вигляд цилiндричноі трубки з різьбою папа 1/2
дюима)
! Виконаите з’єднання так, щоб довжина
трубопроводу не перевищувала 2 метрів, при
цьому не допускаите контакту шланга з рухомими
частинами та иого стиснення.
Контроль герметичності
Після повного встановлення перевірте герметичність
всіх з’єднань, використовуючи тільки мильнии
розчин і у жодному випадку сірник.
Адаптація до різних типів газу
Є можливість налаштування плити під тип газу,
відміннии від типу, на якии вона була налаштована
підприємством-виробником (вказании на
калібрувальніи бирці на кришці).
Налаштування робочоі поверхні
Заміна форсунок пальників поверхні:
1. Зніміть ґратки и пальники з іх посадочних місць;
2. Відгвинтіть форсунки, користуючись трубним
ключем 7 мм (див. малюнок), і замініть іх
форсунками,
таблицю Характеристики пальників і форсунок);
3. Встановіть на місце всі компоненти, виконавши
вказані вище операціі у зворотніи послідовності.
що відповідають новому типу газу (див.
ключем для форсунок (див.
малюнок) або трубним
ключем 7 мм і замініть іі
форсункою, що відповідає
новому типу газу (див.
таблицю Характеристики
пальників
і форсунок).
Налаштування мінімального
рівня подачі газу в пальник духовки:
1. запаліть пальник (див.
Включення і Використання);
2. встановіть рукоятку у
положення мінімуму (МІН)
після того, як вона залишалася
приблизно протягом 10 хвилин
у максимальному положенні
3. зніміть рукоятку;
4. користуючись регулювальним гвинтом на
зовнішніи стороні стрижня термостата (див.
малюнки), добиитеся
маленького стіикого полум’я.
! У разі зріджених газів, регулювальнии гвинт
повинен бути вкручении до упору;
5. Перевірте, щоб, при швидкому обертанні
рукоятки з положення MAКС у положення МІН або
при швидкому відкритті і закриті дверцят духовки
пальник не гаснув.
UA
(MAКС);
Налаштування мінімального
рівня пальників поверхні:
1. встановіть кран у
мінімальне положення;
2. зніміть рукоятку і
користуючись регулювальним
гвинтом, що знаходиться
на внутрішніи частині або збоку на стрижні крана
,
добиитеся маленького стабільного полум’я.
! У разі зріджених газів, регулювальнии гвинт
повинен бути вкручении до упору;
3. перевірте, щоб при швидкому обертанні крана з
максимального в мінімальне положення, пальник не
гаснув.
! Пальники робочоі поверхні не потребують
регулювання первинного повітря.
Налаштування духовки
Заміна форсунки пальника духовки:
1. витягніть коробку духовки;
витягніть висувнии захист A (див. малюнок);
2.
3. видаліть пальник
духовки
після того, як відкрутите
гвинти V (див. малюнок);
процедуру виконати легше,
якщо зняти дверцята духовки.
4. відгвинтіть форсунку
пальника спеціальним трубним
Заміна форсунок на пальнику «трійна корона»
1. Зняти решітки і вийняти пальники зі своїх місць.
Пальник складається з двох незалежних частин
(див.малюнок).
2. Розкрутити форсунки за допомогою торцевого
ключа на 7 мм. Замінити форсунки на більш
придатні для нового типу газу (див.таблицю 1).
Обидва пальника мають однакові прсвердлені
отвори.
3. Встановити на
місце всі компоненти, виконуючи
вищенаведені дії в зворотному порядку.
• Регулювання основного повітря на пальники
Пальники не вимагають ніякого регулювання
основного повітря.
• Регулювання мінімального полум’я
1. Перевести кран в положення мінімуму.
2. Зняти ручку і за допомогою регулювального гвинта,
розташованого всередині або збоку стрижня крану,
налаштувати невеличке стабільне полум’я.
3. Після
цього слід перевірити, що при швидкому
обертанні крану з максимального у мінімальне
положення пальник не гасне.
30
Page 31

UA
4. Якщо у приладах, оснащених запобіжним
пристроєм (термопарою), цей останній не
працюватиме з установленими на мінімум
пальниками, необхідно збільшити мінімальні
витрати за допомогою регулювального гвинта.
5. Після регулювання слід відновити пломбу на
перепускному клапані за допомогою сургучу або
подібних матеріалів.
! При використанні скрапленого нафтового газу
регулювальний гвинт має загвинчуватися до упору
! Наприкінці операції замінити стару етикетку
про тип газу на нову, яка відповідає новому
використовуваному газу, її можна отримати у наших
центрах з технічної допомоги.
! Якщо тиск використовуваного газу відрізняється
від передбаченого або належить до змінного типу,
необхідно встановити на трубопроводі подачі
відповідний регулятор тиску (згідно до стандарту
EN 88-1 і
EN 88-2 «прохідні газові регулятори»).
Безпека ланцюга
! Щоб
запобігти
випадковому
перекиданню
приладу,
наприклад,
коли дитина
залазить
на дверцята
духової шафи,
НЕОБХІДНО
встановити
захисний ланцюжок з комплекту постачання!
Плита оснащується захисним ланцюжком, який
кріпиться за допомогою гвинта (не входить в
комплект постачання) до стіни за приладом на тій
самій висоті, на якій ланцюжок кріпиться до
.
плити. Гвинт і дюбель
для кріплення ланцюжка
слід обирати відповідно до матеріалу стіни за
приладом.
Якщо діаметр головки гвинта становить менше 9
мм, необхідно використовувати шайбу. Для
кріплення в бетонній стіні потрібен гвинт
діаметром не менше 8 мм довжиною 60 мм.
Закріпіть ланцюжок на задній стінці плити й на
стіні, як показано на малюнку, так щоб після
встановлення
він був натягнутий паралельно до
полу.
Таблиця характеристик пальників і форсунок
Таблиця 1 Зріджений газ Природний газ
Пальник
Швидкий
(великий) (R)
Напівшвидкий
(Середній) (S)
Допоміжний
(Маленький) (A)
Потрiйна корона
(ТС)
Духовой шкаф
Тиск, що
подається
* для 15°C 1013 мбар-сухий газ *** Бутан P.C.S. = 49,47 МДж/кг
** Пропан P.C.S. = 50,37 МДж/кг Природний газ P.C.S. = 37,78 МДж/м³
p.c.s.* - найвища теплота згорання
Діаметр
(мм)
100 3.00 0.7 41 87 218 214 128 286 145 286
130
Теплова ефективність
кВт (p.c.s.*)
Номінальна Зменшена
75 1.90 0.4 30 69 138 136 104 181 115 181
55 1.00 0.4 30 50 73 71 78 95 85 95
3,25
- 2.60 1.0 52 78 189 186 119 248 132 248
Номінальний (мбар)
Мінімальний (мбар)
Максимальний (мбар)
1,50
Канал
1/100
(мм) (мм) *** ** (мм) (мм)
63
Форсунка
1/100
2x65
Пропускна
здатність*
236 232
28-30
20
35
г/год
37
25
45
Форсунка
1/100
2x99
Пропускна
здатність*
л/год
309
20
17
25
H6TG5F C UA
Форсунк
а
1/100
2x10⁷
S
R
TC A
Пропускна
здатність*
л/год
309
13
6,5
18
31
Page 32

Включення і використання
F
X
C
Користування робочою поверхнею
Включення пальників
У кожноі рукоятки ПАЛЬНИК, що відноситься до неі,
показании у вигляді круга.
Щоб запалити пальник робочоі поверхні:
1. піднесіть до пальника сірник або електрозапальничку;
2. натисніть і одночасно обертаите проти
годинниковоі стрілки рукоятку ПАЛЬНИКА до
позначки максимального полум’я .
3. відрегулюите силу бажаного полум’я, обертаючи
проти годинниковоі стрілки рукоятку
мінімум , на максимум або в проміжне положення.
Деякі моделі обладнані системою
електророзпалюванням, вбудованою в рукоятки, у
цьому випадку є пристріи електророзпалюванням*
(див. малюнок,C), не має кнопки. Досить натиснути
и одночасно повернути проти годинниковоі стрілки
рукоятку ПАЛЬНИКА до позначки максимального
полум’я, щоб запалити газ. Може
що пальник згасне у момент відпускання рукоятки.
У цьому випадку повторіть операцію, утримуючи
рукоятку натиснутою на протязі довшого часу.
! У разі випадкового згасання полум’я, вимкніть
пальник і почекаите принаимні 1 хвилину, перш ніж
повторно спробувати включення.
ПАЛЬНИКА: на
трапитися так,
Практичні поради з
Для кращоі продуктивності пальників і мінімального
споживання газу необхідно використовувати посуд з
плоским дном, накритии кришкою, і якии відповідає
за розміром пальнику:
Пальник ø Дiаметр мiсткостей (см)
Швидкий (R) 24 – 26
Напівшвидкий (S) 16 – 20
Допоміжний (A) 10 – 14
Потрiйна корона (ТС) 24 – 26
Щоб визначити тип пальника, зверніться до
малюнків у параграфі “Характеристики пальників і
форсунок”.
використання пальників
Користування духовкою
! При першому включенні запустіть духовку у
холостому режимі не менше, ніж на одну годину
з максимальним положенням термостата та з
закритими дверцятами. Потім вимкніть, відкриите
дверцята духовки и провітріть приміщення. Запах,
що з’явився, є результатом випаровування речовин,
необхідних для захисту духовки.
! Ніколи нічого не кладіть на дно духовки
ви ризикуєте пошкодити емаль. Використовуите
положення 1 духовки тільки у разі використання
рожна.
, оскільки
UA
Якщо плита обладнана пристроєм безпеки*(X) за
відсутності полум’я, утримуите натиснутою рукоятку
ПАЛЬНИКА близько 2-3 секунд, щоб підтримати
горіння і активізувати плиту.
Щоб погасити пальник
обертаите рукоятку до упору
•.
Інтенсивність полум’я пальника можна регулювати
ручкою за 6 рівнями потужності, від максимального
до мінімального з 4 проміжними положеннями:
перехід від одного рівня до іншого супроводжується
клацанням при повороті ручки. Система має
можливість більш точного регулювання для
відтворення інтенсивності полум’я та легкого
встановлення бажаного рівня для різних режимів
приготування їжі..
Є лише в деяких моделях.
*
Включення духовки
Щоб включити пальник духовки піднесіть до отвору
F (див. малюнок) сірник або
електрозапальничку, натисніть
і одночасно обертаите проти
годинниковоі стрілки рукоятку
ДУХОВКА до положення
МАКС.
Якщо протягом 15 секунд
пальник не загорівся, відпустіть рукоятку, відкриите
дверцята духовки
перш ніж повторно спробувати включення.
! Духовка обладнана пристроєм безпеки, для
якого необхідно утримувати натиснутою рукоятку
ДУХОВКА приблизно 6 секунд.
! У разі випадкового згасання полум’я, вимкніть
пальник і почекаите принаимні 1 хвилину, перш ніж
повторно спробувати включення духовки.
Регулювання температури
Щоб одержати бажану температуру приготування іжі
обертаите рукоятку ДУХОВКА проти годинниковоі
стрілки. Значення температури показані на панелі
управління і починаються з МІН (140оC) до MAКС
і почекаите не менше 1 хвилини,
,
,
32
Page 33

UA
(250оC). Досягнувши заданоі температури, духовка
підтримуватиме іі постіиною завдяки термостату.
Рожен
Щоб включити рожен (див. малюнок), діите таким
чином:
1. помістіть деко в положення 1;
2. помістіть опору рожна в положення 4 і вставте
рожен в спеціальнии
отвір на задніи стінці
духовки;
3. включіть, натиснувши
на кнопку РОЖЕН.
Освітлення духовки
Лампочка може бути
включена у будьякии момент, якщо
натиснути на кнопку
ОСВІТЛЕННЯ ДУХОВКИ.
Електронний таймер
Увага
Не дозволяйте дітям торкатися дверцят духовки, тому що вони
дуже нагріваються під час готування.
Служить для показу часу і виконує функцію лічильника хвилин
зі зворотнім відліком.
Застереження: всі функції розпочинають працювати
приблизно через 7 секунд після їх завдання.
Як задати годинник
Після повторного підключення до мережі живлення або після
збоїв з енергопостачанням дисплей годинника автоматично
обнуляється на 0:00 і розпочинає мигкотіти.
• Натисніть на кнопку і потім на кнопки і , щоб задати
точну годину. Для швидкого переходу слід утримувати
кнопки натиснутими.
Можливі оновлення часу можна виконувати шляхом
повторення вищенаведених операцій.
Функція лічильника хвилин
Доступ до цієї функції досягається шляхом натискання
на кнопку , на дисплеї має з’явитися позначка «». При
кожному натисненні на кнопку час збільшується на 10
секунд до 99 хвилин і 50 секунд. Якщо ще притримати кнопку,
збільшення часу відбуватиметься з кроком в одну хвилину до
максимального часу - 10 годин.
За допомогою кнопки забезпечується повертання назад.
Після завдання
відлік. Про вичерпання часу сповіщає зумер. Щоб зупинити
зумер, достатньо натиснути на будь-яку кнопку.
Щоб подивитися час, слід натиснути на кнопку . Символ
«» вказує не те, що функцію таймер задано. Приблизно
через 7 секунд дисплей автоматично повернеться до показу
лічильника хвилин.
бажаного часу розпочинається зворотній
Гриль
Обертанням проти годинникової стрілки
регулятору ДУХОВКИ у положення
досягається вмикання грилю з ультрачервоним
випромінюванням. Гриль забезпечує
підрум’янювання страв і рекомендується для
готування ростбіфів, запіченого м’яса, шніцелів,
домашніх ковбасок, . Розташуйте ґратку-гриль
на рівні 4 або 5 і один деко на рівні 1 для
збирання жиру і попередження утворення диму.
! Про роботу гриля сповіщає увімкнений індикатор
ГРИЛЮ.
! Готування
на грилі має виконуватися з закритими
дверцятами духовки, щоб отримати найкращі
результати і значне заощадження енергії (приблизно
10%).
* Є лише в деяких моделях.
Як скасувати вже заданий час
Натисніть на кнопку , поки на дисплеї не з’явиться 0:00.
Регулювання гучності звукового сигналу
Після вибору і підтвердження параметрів годинника, кнопкою s
можна відрегулювати гучність звукового сигналу .
ТЕХНІЧНІ ДАНІ
Розміри Духовки
ВxШxГ
Об'єм
Корисні
розміри
коробки
духовки
31x43,5x43,5 см
літрiв
58
ширина см
глибина см
висота см
46
42
8,5
Напруга та
частота
живлення
Див. на табличці з даними
Налаштовуються на всі типи
газу, вказані на табличці з
Пальники
даними, розташованій в
середині виступу, або, коли
відкривається духовка, на
внутрішній лівій стінці.
Директиви ЄС: 2006/95/EC від
12/`2/06 (Низька Напруга) та
подальші зміни - 2004/108/EC
від 15/12/04 (Електромагнітна
сумісність) та подальші зміни -
2009/142/EC від 30/11/09
(Gas) та подальші зміни -
93/68/EEC від 22/07/93 та
подальші зміни - 2002/96/EC.
1275/2008 (Stand-by/ Off mode)
33
Page 34

ВНИМАНИЕ! При нагреве
стеклянная крышка может
лопнуть. Прежде чем
закрыть ее, выключить все
конфорки или электрические
горелки.*Только для моделей
со стеклянной крышкой
ɍȼȺȽȺ! Ⱦɭɯɨɜɤɚ
ɨɫɧɚɳɟɧɚ ɫɢɫɬɟɦɨɸ
ɡɭɩɢɧɟɧɧɹ ɪɟɲɿɬɨɤ,
ɡɚɜɞɹɤɢ ɹɤɿɣ ɦɨɠɧɚ
ɜɢɣɧɹɬɢ ʀɯ ɬɚɤ, ɳɨɛ
ɜɨɧɢ ɧɟ ɜɢɩɚɞɚɥɢ ɡ
ɞɭɯɨɜɤɢ(1).
ɓ ɨ ɛ ɩ ɨ ɜ ɧ ɿ ɫ ɬ ɸ ɜ
ɢ ɣ ɧ ɹ ɬ ɢ nɪɟɲɿɬɤɢ,
ɞɨɫɬɚɬɧɶɨ, ɹɤ ɩɨɤɚɡɚɧɨ ɧɚ ɦɚɥɸɧɤɭ, ɩɿɞɧɹɬɢ ʀɯ,
ɜɡɹɬɢɫɹ ɫɩɟɪɟɞɭ ɿ ɜɢɬɹɝɧɭɬɢ (2).
UA
Таблиця приготування в духовці
Страви Вага
(кг)
Макаронні вироби (паста)
Лазан’я
Каннеллоні
Запечена паста
М’ясо
Телятина
Курка
Качка
Кріль
Свинина
Баранина
Риба
Скумбрія
Зубатка
Форель в обгортці
Піца
Неаполітанська
Торти
Печиво
Пирiг
Солонi торти
Дріжджове тісто
Смажені вироби на грилі
Біфштекси з телятини
Котлети
Гамбургери
Скумбрія
Тости
* Є лише в деяких моделях.
2.5
2.5
2.5
1.7
1.5
1.8
2
2.1
1.8
1.1
1.5
1
1
0.5
1.1
1
1
1
1.5
1
1
n.4
Положення
деко
3
3
3
3
3
3
3
3
3
3
3
3
3
3
3
3
3
4
4
3
4
4
Попереднє
розігрівання
(хвилини)
10
10
10
10
10
10
10
10
10
10
10
10
15
15
15
15
15
5
5
5
5
5
Рекомендована
температура
(°C)
210
200
200
200
220
200
200
200
200
180-200
180-200
180-200
220
180
180
180
180
-
-
-
-
-
Тривалість
приготування
(хвилини)
60-75
40-50
40-50
85-90
90-100
100-110
70-80
70-80
90-95
35-40
40-50
40-45
15-20
30-35
30-35
45-50
35-40
15-20
20
20-30
15-20
4-5
33
Page 35

Запобіжні засоби и поради
! Газова плита була розроблена і сконструиована
відповідно до міжнародних норм безпеки.
Дані вказівки обумовлені вимогами безпеки і повинні бути
уважно вивчені.
Загальна безпека
• Дані вказівки діисні тільки для краін призначення,
чиі символи зображені на брошурі и на серiинiи
табличцi.
• Газова плита призначена для непрофесіиного
використання всередині житлових приміщень
• Газову плиту не можна встановлювати поза
приміщеннями, навіть, у разі захищеного простору, тому
що дуже небезпечно піддавати іі діі дощу і грози.
Не торкатися плити мокрими або вологими ногами або
•
руками.
• Прилад має використовуватися для приготування
їжі, тільки дорослими особами і згідно
інструкціям, вказаним у цій брошурі. Будь-яке
інше використання (наприклад: для обігріву
приміщень) вважатиметься не за призначенням і,
тобто, некоректним. Виробник відхиляє будь-яку
відповідальність за можливі збитки внаслідок
використання
або нерозумного застосування.
• Брошура відноситься до устаткування класу 1
(ізольоване) або класу 2 - підклас 1 (встановлене між
двома елементами меблів).
• Берегти від дітеи.
• Уникаите контакту кабелів живлення інших побутових
електроприладів з гарячими частинами плити.
• Не закриваите вентиляціині отвори и отвори для
відведення тепла.
• Не накриваите скляною
на деяких моделях), коли пальники включені або ще
гарячі.
• Завжди використовуите рукавиці для завантаження або
витягання місткостеи для іжі.
не за призначенням, помилкового
кришкою робочу поверхню (є
• У разі пошкодження, в жодному випадку не намагаитеся
самостіино полагодити внутрішні механізми. Зв’яжіться
із Сервiсною службою.
• Не ставте важкі предмети на відкриті дверцята духовки.
Не передбачається використання пристрою особами
•
(включаючи дітей) з обмеженими фізичними,
сенсорними або розумовими здібностями,
недосвідченими особами або такими, що не
ознайомилися з виробом, за виключенням випадків
нагляду з боку особи, відповідальної за їхню безпеку;
не передбачається використання пристрою особами,
якi не отримали попередніх вказівок щодо використання
пристрою.
•
Якщо плита розташована на п’єдестал, вжити
необхідних заходів обережності для запобігання
зісковзуванню плити з п’єдесталу самого.
Утилізація
• Утилізація матеріалу пакування: дотримуитесь
місцевих норм, так як пакування може бути повторно
використане.
• Європеиська директива 2002/96/CE з відходів
від електричноі и електронноі апаратури (RAEE),
передбачає, що побутові електроприлади не можуть
перероблятися у звичаиному порядку для твердих
міських відходів. Зняті з експлуатаціі побутові прилади
мають бути зібрані окремо для оптимізаціі ступеню
відновлення и
до іхнього складу і з метою усунення потенціиноі шкоди
для здоров’я та середовища. Символ закресленоі
корзини, зображеніи на всіх виробах, нагадує про
необхідність окремоі утилізаціі
Відпрацьовані побутові електроприлади можуть
передаватися в державну службу по збору, на
спеціальні комунальні територіі або, якщо це
передбачено діючим національним
передаватися постачальникам для одночасного обміну
з доплатою на нові вироби відповідного типа.
Всі основні виробники побутових електроприладів
беруть участь у створенні та управлінні системами
збору і переробки відпрацьованоі техніки.
рециклювання матеріалів, що входять
законом,
UA
• Не користуитеся рідкими горючими засобами (спирт,
бензин і т.п.) поблизу від плити, коли вона включена.
• Не кладіть горючі матеріали в нижніи відсік або в саму
духовку: при включенні плити вони можуть загорітися.
• Якщо плитою не користуються, стежте за тим, щоб
рукоятки були в положенні • і газовии кран був закритии.
• Не виимаите вилку з розетки, потягнувши за кабель,
тягніть тільки за саму вилку.
• Не виконуите чищення або технічне обслуговування,
перш ніж витягти вилку з електричноі
розетки.
Охорона і дбаиливе відношення до
довкілля
• Включення духовки в проміжку з пізнього
пiсляобiденного часу до раннього ранку дозволить
зменшити навантаження на підприємства виробники
електроенергіі.
• Підтримуите в робочому стані і миите ущільнювачі так,
щоб вони добре прилягали до дверцят і не дозволяли б
виникати
втратам тепла.
35
Page 36

Догляд i технічне
обслуговування
UA
Відключіть електричне живлення
До початку всіх робіт ізолюите прилад від мережі
електричного живлення.
Чищення вироба
! Уникаите використання абразивних або роз’ідаючих
чистячих засобів, таких як засоби для виведення плям і
продукти для антикорозіиноі обробки, миючих засобів у
порошку і губок з абразивною поверхнею: вони можуть
подряпати поверхню без можливості відновлення.
! Ніколи не використовуите прилади для миття парою або
високим тиском.
• Для звичаиного технічного
вимити поверхню вологою губкою і висушити кухонним
паперовим рушником.
• Зовнішні емальовані або неіржавіючі деталі и гумові
ущільнювачі можуть бути очищені губкою, просоченою
теплою водою і неитральним милом. Якщо плями
є такими, що важко виводяться, використовуите
спеціальні засоби. Добре промиите водою і висушіть
після миття. Не використовуите абразивні порошки
ідкі речовини.
• Ґратки, ковпачки, розсікачі полум’я
і пальники робочоі поверхні легко знімаються,
щоб полегшити миття плити; миите іх в гарячіи воді з
неабразивним миючим засобом, ретельно видаляючи
накип і повністю висушивши перед встановленням на
місце.
обслуговування досить
або
І, крім того, варто висушити можливі місця пролиття
води.
Кришка
У моделях зі скляною кришкою очищення здіиснюється за
допомогою теплоі води. Уникаите абразиві.
Можна зняти кришку для полегшення очищення позаду
робочоі поверхні: повністю відкрити іі и
(див. малюнок).
! Уникати закривання кришки, коли пальники включені або
ще гарячі.
Контроль ущільнень духовки
Регулярно перевіряите стан ущільнення навколо
дверцят духовки. У разі иого пошкодження, зверніться
в наиближчии авторизовании Сервiснии центр. Не
рекомендується використовувати духовку до завершення
ремонту.
потягнути наверх
Технічне обслуговування газових кранів
З часом може трапитися так, що кран буде заблоковании
або иого буде важко обертати, тому буде необхідно
подумати про заміну самого крана.
! Ця операція має виконуватися фахівцем,
уповноваженим виробником.
Заміна лампочки
освітлення духовки
• Для плит, що мають електророзпалювання, необхідно
регулярно виконувати акуратне чищення кінцевих
пристрою електророзпалювання и перевіряти,
частин
щоб отвори для виходу газу не були забиті.
• Внутрішню частину духовки бажано мити кожного
разу після іі використання, коли вона ще тепла.
Використовуите гарячу воду і миючии засіб, добре
промиите і витріть м’якою тканиною. Уникаите абразиві.
• Очищайте скло дверцят за допомогою м’якої губки і
неабразивних засобів , після чого висушіть його м’якою
тканиною; забороняється використовувати шорсткуваті
абразивні матеріали чи загострені металеві шкребки:
вони можуть подряпати поверхню і викликати розкол
скла.
• Аксесуари можуть митися як звичаинии посуд, зокрема
в посудомииніи машині.
• Неіржавіюча сталь може мати плями, якщо знаходилася
в тривалому контакті з вапняною водою
агресивними чистячими засобами (що містять фосфор).
Рекомендується добре промити і висушити після миття.
або з
1. Після відключення духовки
від електричноі мережі, зніміть
скляну кришку патрона (див.
малюнок).
2. Відгвинтіть лампочку і замініть іі
аналогічною: напруга 230В, потужність 25 Вт, цоколь E 14.
3. Знов встановіть кришку и повторно підключіть духовку
до електричноі мережі.
! Не використовуйте лампочку духовки для
освітлення приміщень.
Допомога
Повiдомте:
• модель плити (модель)
• серіинии номер (S/N)
Дана інформація міститься на табличці з
характеристиками, прикріпленіи до плити і / або на
упаковці.
36
Page 37

Знімання та встановлення дверцят духовки
1. Відкрийте дверцята
2. Поверніть затискачі на петлях дверцят
повністю назад (див. фото)
3. Закрийте дверцята до зупинки
затискачів (дверцята залишаться відчиненими
на близько 40°) (див. фото)
40°
ПОПЕРЕДЖЕННЯ! Духовкою не можна
користуватися, коли скло дверцят зняте!
ПОПЕРЕДЖЕННЯ! При встановленні
внутрішнього скла у дверцята слідкуйте за тим,
щоб попереджувальний надпис на панелі був
повернутий назовні та легко читався.
7. Встановіть каркас; клацання вкаже, що він
встав на місце.
8. Повністю відкрийте дверцята
9. Закрийте затискачі (див. фото).
UA
4. Натисніть на дві кнопки на верхній
частині каркаса та витягніть його (див. фото)
5. Зніміть скло та почистіть його,
як зазначено в розділі «Догляд та
обслуговування»
10. Тепер дверцята можна повністю закрити, і
духовка готова до нормального використання.
6. Поставте скло назад.
37
Page 38

Instalare
RO
! Este important sa pastrati acest manual pentru a-l
putea consulta în orice moment. În caz de vânzare,
cedare sau mutare, asigurati-va ca acesta ramâne cu
aparatul.
! Cititi cu atentie instructiunile: veti gasi informatii
importante cu privire la instalare, la folosire si la
siguranta.
! Instalarea aparatului se va face conform acestor
instructiuni, de catre persoanele califi cate profesional.
! Orice interventie de reglare, întretinere, etc., trebuie
efectuata cu aragazul deconectat de la retea.
Aerisirea încaperilor
Acest aparat poate fi instalat si poate functiona doar
în încaperi aerisite în permanenta, conform Normelor
Nationale în vigoare. Încaperea în care va fi montat
aragazul trebuie sa fi e alimentata cu o cantitate de aer
sufi cienta pentru a asigura arderea gazelor (debitul
3
de aer nu poate fi mai mic de 2 m
/h pe kW de putere
instalata).
Prizele de aer, protejate de gratare, trebuie sa aiba o
2
sectiune a conductei de cel putin 100 cm
si trebuie sa
fi e amplasate astfel încât sa nu fi e acoperite, nici macar
partial (vezi fi gura A).
Acestea trebuie sa fi e marite 100% - minim cu 200
2
– daca aragazul nu este dotat cu dispozitivul de
cm
siguranta împotriva scaparilor de gaz sau daca aerul
necesar arderii este tras dintr-o încapere alaturata
(vezi fi gura B), care oricum nu poate fi o parte comuna
a imobilului, o încapere cu pericol de incendiu sau un
dormitor. Prizele de aer trebuie sa aiba o conducta de
comunicare cu exteriorul, dupa descrierea de mai sus.
Evacuarea gazelor de ardere
Evacuarea gazelor de ardere trebuie sa fi e asigurata de
o hota legata la un cos cu tiraj natural, efi cient, sau de un
ventilator electric care sa intre în functiune automat, la
fi ecare aprindere a aragazului (vezi fi gurile).
Evacuarea la exterior
În semineu sau într-un cos de
fum ramifi cat (pt aparatele de
pregatit mâncarea)
! Gazele de petrol lichefi ate, mai grele ca aerul,
stagneaza în partea de jos a încaperii ; de aceea,
încaperea unde este amplasat aragazul - daca folositi
butelii cu GPL – trebuie sa aiba fante de aerisire spre
exterior, împotriva eventualelor scapari de gaz.
Buteliile GPL, atât goale cât si umplute partial, nu
trebuie instalate sau depozitate în încaperi sau camere
situate sub nivelul solului (pivnite, etc.). Tineti în
încapere numai butelia pe care o folositi, amplasând-o
departe de surse de caldura (cuptoare, seminee, sobe)
care o pot încalzi la peste 50°C.
Pozitionarea si punerea la nivel
! Este posibil sa instalati aparatul între alte piese
de mobilier, daca înaltimea acestora nu depaseste
înaltimea aragazului.
A.
A
Majorarea spatiului dintre
usa si podea
Încapere adiacenta
Canale de aerisire pentru
aerul necesar arderii
B
Încaperea de aerisit
! Dupa folosirea îndelungata a aparatului, se
recomanda sa deschideti fereastra sau sa mariti viteza
de rotatie a ventilatoarelor.
38
! Asigurati-va ca peretele din spatele aragazului este
facut dintr-un material neinfl amabil, rezistent la caldura
(t 90°C).
Pentru o instalare corecta:
• amplasati aparatul în bucatarie, în sala de masa
sau într-o garsoniera fara pereti despartitori, dar
niciodata în baie.
• daca aragazul este mai înalt decât celelalte piese de
mobilier, acestea trebuie sa fi e distantate cu minim
600 mm de aparat ;
• daca aragazul se instaleaza sub un raft, acesta din
urma va trebui sa fi e montat la o distanta de minim
420 mm de blatul de lucru.
Daca rafturile sunt infl amabile, distanta trebuie sa fi e de
700 mm (vezi fi gura);
Page 39

• perdelele nu trebuie sa fi e montate în spatele
HOOD
420
Min.
min.
650
mm. with hood
min.
700
mm. without hood
mm.
600
Min. mm.
420
Min. mm.
aragazului si nici la mai putin de 200 mm de
fl ancurile acestuia;
• eventualele hote trebuie sa fi e instalate conform
indicatiilor continute în manualul de instructiuni ale
acestora.
• tensiunea de alimentare sa fi e cuprinsa în valorile
indicate pe placuta cu caracteristici;
• priza sa fi e compatibila cu stecarul aparatului. În
caz contrar înlocuiti priza sau stecarul; nu folositi
prelungitoare sau prize multiple.
! Dupa instalarea aparatului, cablul de alimentare si
priza de curent trebuie sa fi e usor accesibile.
! Cablul nu trebuie sa fi e îndoit sau comprimat.
! Cablul trebuie sa fi e controlat periodic si înlocuit de
electricieni autorizati.
! Firma îsi declina orice responsabilitate în cazul în
care aceste norme nu se respecta.
RO
Punerea la nivel
Daca este necesar sa puneti
la nivel aparatul, însurubati
suruburile de reglare - din dotare
– în locasurile speciale de sub
aragaz (vezi fi gura).
Picioarele* vor fi introduse în
orifi ciile de sub aragaz.
Racordarea electrica
Montati pe cablu un stecar normalizat, capabil sa
suporte sarcina indicata pe placuta cu caracteristici a
aparatului (vezi tabelul cu Date tehnice).
În cazul efectuarii legaturii directe la retea, este necesar
sa se monteze între aparat si retea un întrerupator
omnipolar cu deschiderea minima a contactelor de
3 mm, dimensionat la sarcina, conform normelor
nationale în vigoare (fi rul de împamântare nu trebuie
sa fi e întrerupt de întrerupator). Cablul de alimentare
trebuie sa fi e pozitionat astfel încât sa nu atinga în nici
un punct o temperatura cu 50°C peste temperatura
mediului ambiant.
Înainte de a efectua legatura, asigurativa ca:
• priza sa fi e cu împamântare si conform prevederilor de
lege;
• priza sa poata suporta sarcina maxima de putere a
masinii, indicata pe placuta de caracteristici;
*doar pe anumite modele.
Racordarea la gaze
Racordarea la gaze sau la butelie poate fi efectuata cu
un furtun fl exibil din cauciuc sau otel, conform normelor
nationale în vigoare, numai dupa ce ati verifi cat ca
aparatul este reglat pentru tipul de gaz pe care îl veti
folosi (vezi eticheta de pe capac: în caz contrar vezi mai
jos). În caz de alimentare cu gaz lichefi at, de la butelie,
folositi regulatoare de presiune care sa fi e conforme
cu normele nationale în vigoare. Pentru a facilita
racordarea, alimentarea aragazului se poate orienta
lateral*: închideti racordul pe care se fi xeaza furtunul cu
capacul respectiv si înlocuiti garnitura de etansare (din
dotarea aparatului).
!Pentru o functionare sigura, pentru o folosire adecvata
a energiei si o durabilitate sporita a aparaturii,
asigurativa ca presiunea de alimentare respecta valorile
indicate în tabelul cu „Caracteristicile arzatoarelor si
duzelor”(vezi mai jos).
Racordarea la gaze cu furtun din cauciuc
Verifi cati ca furtunul sa corespunda normelor nationale
în vigoare. Diametrul intern al tubului de utilizat trebuie
sa fi e de: 8 mm pentru alimentarea cu gaz lichefi at si 13
mm pentru alimentarea cu gaz metan.
Dupa racordare, asigurati-va ca furtunul:
• nu atinge nici o componenta susceptibila de a depasi
50°C;
• nu este supus nici unui fel de forte, de tractiune si de
torsiune, si nu este curbat excesiv sau îngustat;
• nu intra în contact cu obiecte sau colturi ascutite,
parti mobile si ca nu este presat;
• este usor accesibil, pe tot traseul sau, cu scopul de
al putea controla;
39
Page 40

RO
V
• are o lungime sub 1500 mm;
• este bine introdus la capete si fi xat cu coliere de
strângere, conform normelor nationale în vigoare.
nct de
nectare
obinet
blocare
samblu
urtun
Punct de
conectare
Ansamblu
furtun
SUPRAFAŢĂ FIERBINTE
Robinet
de blocare
! Daca una sau mai multe din aceste conditii nu sunt
respectate sau daca aragazul este încastrat între doua
piese de mobilier – conditii clasa a 2a, subcategoria 1 –
va trebui sa utiliza?i pentru racordare un tub fl exibil din
o?el (vezi mai jos).
Racordarea la gaze cu tub fl exibil din otel
inoxidabil, pe perete, cu cuplari fi letate
Verifi cati ca tubul si garniturile sa corespunda normelor
nationale în vigoare.
Pentru a monta tubul, este necesar sa îndepartati mufa
furtunului de pe aragaz (robinetul de alimentare cu gaz
este „tata”, de 1, fi letat, cilindric).
3. montati la loc toate componentele efectuând aceleasi
operatii ca la demontare, dar în sens invers.
Reglarea arzatoarelor aragazului la minim:
1. rotiti busonul la minim;
2. scoateti busonul si rotiti surubul de reglare (din
interiorul sau de lânga tija centrala) pâna când obtineti
o fl acara mica, constanta;
! în cazul gazelor naturale, surubul de reglare trebuie sa
fi e desurubat (rotit în sens contrar acelor de ceasornic).
3. verifi cati apoi ca, rotind rapid busonul aragazului, de
la maxim la minim, sa nu se stinga ochiul.
! Arzatoarele blatului nu au nevoie de reglarea aerului
primar.
Adaptarea cuptorului
Înlocuirea duzei arzatorului din cuptor:
1. deschideti usa cuptorului la maxim;
2. extrageti fundul glisant (vezi
fi gura);
! Efectuati legatura astfel încât lungimea tubului sa nu
depaseasca 2 m (la întinderea maxima); asigurati-va ca
acesta nu atinge nici o componenta mobila si nu este
strivit.
Controlul etanseitatii
Dupa terminarea instalarii, controlati perfecta
etanseitate a tuturor racordurilor folosind o solutie de
sapun, însa niciodata o fl acara.
Adaptarea la diferite tipuri de gaz
Aragazul poate fi adaptat si la alte tipuri de gaz, în afara
celui pentru care a fost predispus (indicat pe eticheta
de pe capac).
Adaptarea blatului de lucru
Înlocuirea duzelor arzatoarelor:
1. înlaturati gratarul si extrageti arzatoarele din sediul
lor;
2. desurubati duzele, folosind
o cheie tubulara de 7 mm (vezi
fi gura), si înlocuitile cu cele
adecvate pentru noul tip de gaz
(vezi tabelul cu “Caracteristicile
arzatoarelor si duzelor”);
3. desurubati surubul de fi xare
al arzatorului si extrageti
arzatorul din cuptor, dupa
îndepartarea surubului V;
4. desurubati duza arzatorului
folosind o cheie tubulara pentru
duze (vezi fi gura) sau o cheie
tubulara de 7 mm si înlocuiti-o
cu cea adecvata, în functie de
tipul de gaz (vezi tabelul cu
Caracteristicile arzatoarelor si
duzelor).
Reglarea arzatoarelor cuptorului pe gaze, la minim:
1. aprindeti arzatorul (vezi Pornire si utilizare);
2. rotiti busonul la minim (MIN) dupa ce ati lasat
arzatorul sa functioneze cam 10 minute la maxim
(MAX);
3. scoateti busonul;
4. rotiti surubul de reglare de lânga tija termostatului
(vezi fi gurile) pâna când obtineti o fl acara mica,
constanta;
40
Page 41

! în cazul gazelor naturale, surubul de reglare trebuie sa
fi e desurubat (rotit în sens contrar acelor de ceasornic).
verifi cati daca, rotind repede busonul de la MAX la MIN
5.
sau daca închideti si deschideti repede usa cuptorului,
fl acara ramâne aprinsa.
Înlocuirea duzelor pe arzător Triplă coroană
1. înlăturaţi grătarul şi scoateţi arzătoarele de la locul lor.
Arzătorul este alcătuit din două părţi separate (vezi
fi gurile);
2. deşurubaţi duzele, folosind o cheie tubulară de 7
mm.Înlocuiţi duzele cu cele adecvate pentru noul tip de
gaz (vezi tabelul 1). Cele două duze au acelaşi tip de
orifi ciu.
3. montaţi la loc toate componentele, efectuând aceleaşi
operaţii ca la demontare, dar în sens invers.
• Reglarea aerului primar al arzătoarelor
Arzătoarele nu au nevoie de nicio reglare a aerului primar.
• Reglare minime
1. Rotiţi robinetul pe poziţia de minim;
2. Scoateţi butonul şi rotiţi şurubul de reglare afl at în
interiorul sau lângă tija robinetului, până când obţineţi o
fl acără mică, constantă.
3. Verifi caţi ca, rotind rapid butonul de la poziţia de maxim la
cea de minim, s
4. La aparatele prevăzute cu dispozitiv de siguranţă
ă nu se stingă arzătoarele.
! În cazul utilizării unui gaz lichefi at, şurubul de reglare
trebuie să fi e înşurubat la maxim.
! La sfârşitul operaţiunii, înlocuiţi eticheta veche cu cea
nouă, corespunzătoare gazului utilizat; eticheta se găseşte
în Centrele noastre de Asistenţă Tehnică.
! Dacă presiunea gazului utilizat este diferită de cea
prevăzută (sau variază), este necesar să instalaţi pe
conducta de intrare un regulator de presiune corespunzător
(în conformitate cu normele EN 88-1 şi EN 88-2 referitoare
la “regulatoarele pentru gaz canalizat”).
Siguranţă furnizat
! Pentru a preveni răsturnarea accidentală
a aparatului,
de exemplu de
către un copil
care se caţără
pe uşa cuptorului, TREBUIE
să fi e montat
lanţul de sigu-
ranţă furnizat!
Aragazul este echipat cu un lanţ de siguranţă care
trebuie să fi e fi xat cu un şurub (care nu este furnizat
cu
aragazul) de peretele din spatele aparatului, la aceeaşi înălţime ca şi lanţul care este ataşat la aparat.
Alegeţi şurubul şi ancora şurubului în funcţie de tipul
de material al peretelui din spatele aparatului. În
cazul în care capul şurubului are un diametru mai
mic de 9mm, trebuie să se utilizeze o şaibă. Peretele de
beton necesită un şurub cu diametrul de cel puţin 8
mm, şi lungimea de cel puţin 60mm.
Asiguraţi-vă că lanţul este fi
xat de peretele din spate
al aragazului şi de perete, aşa cum se arată în
imagine, astfel încât, după instalare, să fi e întins şi
paralel cu nivelul solului.
RO
(termocuplă), în cazul în care dispozitivul nu funcţionează
cu arzătoarele la minim, măriţi capacitatea la minim,
acţionând asupra şurubului de reglare.
5. După efectuarea reglării, restabiliţi sigiliile de pe by-pass-
uri cu ceară sau materiale echivalente.
41
Page 42

RO
Tabelul cu caracteristicile arzatoarelor si duzelor
Tabelul 1
Tipul
arzătorului
Normala Redusa *** **
Rapid
(Mare)R
Semi Rapid
(Medium)
(S)
Auxiliar
(Mic)(A)
Cuptor - 2.6 1,0 52 78 189 186 119 248
Tripla
Corona
(TC)
Presiune
furnizată
Diametru
(mm)
100 3 0,7 41 87 218 214 128 286
75 1.9 0,4 30 69 138 136 104 181
55 1.0 0,4 30 50 73 71 78 95
130 3.25 1,5 63 2x65 236 232
Nominală (mbar)
Minimă (mbar)
Maximă (mbar)
Putere Termică
kW (pcs*)
By-pass
1/100
(mm)
* La 15°C şi 1013 mbar – gaz uscat
Propan 50.37 MJ/Kg
Butan 49.47 MJ/Kg
Natural 37,78 MJ/m
3
Gaz lichefiat Gaz Natural
Ajutaj
1/100
(mm)
Debit
g/h
28-30
20
35
Ajutaj
1/100
(mm)
2x99
37
25
45
Debit
l/h
309
20
17
25
S
R
A
TC
H6TG5F C UA
42
Page 43

Pornire si utilizare
F
X
C
Utilizarea aragazului
Aprinderea arzatoarelor
Fiecare buson al aragazului are, în dreptul sau, schita
arzatoarelor; ARZATORUL comandat de buson este
reprezentat cu un cerc evidentiat.
Pentru a aprinde un arzator al aragazului:
1. apropiati de arzator o fl acara sau o bricheta de
aragaz;
2. apasati si, în acelasi timp, rotiti busonul arzatorului
în sens contrar acelor de ceasornic, pâna în pozitia
maxim .
3. reglati intensitatea fl acarii, dupa dorinta, rotind
în sens contrar acelor de ceasornic busonul
ARZATORULUI: la minim , la maxim sau într-o
pozitie intermediara.
Sfaturi practice pentru utilizarea arzatoarelor
Pentru a obtine un randament maxim al arzatoarelor,
precum si a economisi gazul, utilizati numai recipiente
cu fundul plat, acoperite cu capac, de dimensiuni
proportionale cu ale arzatoarelor:
Arzãtor
Rapid (R)
Semi Rapid (S)
Au xilia r (A )
Trippla Corona
(TC)
Pentru a identifi ca tipul arzatorului faceti referire la
desenele din paragraful „Caracteristicile arzatoarelor si
duzelor”.
ř Diametru recipienti (cm)
24 – 26
16 – 20
10 – 14
24 – 26
RO
Anumite modele sunt dotate
cu un dispozitiv de aprindere
integrat în buşon; în acest caz,
veţi observa numai dispozitivul
de aprindere electronic* (vezi
fi gura,C) dar nu şi butonul de
aprindere. Este sufi cient să
apăsaţi şi, în acelaşi timp, să
rotiţi buşonul ARZĂTORULUI în sens contrar acelor
de ceasornic, până în poziţia maxim şi să aşteptaţi
aprinderea fl ăcării. În momentul în care lăsaţi buşonul,
se poate întâmpla ca fl acăra să se stingă. În acest caz,
repetaţi operaţiile, ţinând buşonul apăsat mai mult
timp.
! Daca fl acara se stinge accidental, opriti arzatorul si
asteptati minim 1 minut înainte sa încercati din nou.
Daca aparatul este dotat cu un dispozitiv de
siguranta*(X) împotriva scaparii d e gaz, tineti apasat
busonul ARZATORULUI timp de 2-3- secunde, pentru a
mentine fl acara aprinsa si a activa dispozitivul.
Pentru a stinge arzatorul, rotiti busonul pâna în pozitia
de oprire
Ajustare fl acără conform cu nivelurile
Ajustare fl acără conform cu nivelurile
•.
Intensitatea fl acăra arzătorului poate fi ajustat cu
cursorului potrivit 6 nivele de putere, de la maxim
la minim cu 4 poziții intermediare:
un clic va indica trecerea de la un nivel la
altul, atunci când rotirea butonului.sistemul
garantează o ajustare mai precis, permite
pentru a reproduce intensitatea fl ăcării și pentru a
identifi ca
ușurință nivelul preferat pentru diferite gătit
ț
opera
iuni.
doar pe anumite modele.
*
! În cazul modelelor dotate cu o reductie pentru gratar,
aceasta din urma va trebui sa fi e folosita doar pentru
arzatorul auxiliar, când se folosesc recipiente cu
diametrul sub 12 cm.
Utilizarea cuptorului
! La prima aprindere, va recomandam sa lasati cuptorul
sa functioneze în gol timp de aproximativ 1 ora, cu
termostatul la maxim si usa închisa. Stingeti apoi
cuptorul, deschideti usa si aerisiti camera. Mirosul care
se degaja este datorat evaporarii substantelor utilizate
pentru a proteja cuptorul.
! Înainte de utilizare, este strict necesar să dezlipiţi folia
de plastic de pe laturile aparatului!
! Nu asezati niciodata obiecte pe fundul cuptorului,
pentru ca riscati sa deteriorati smaltul. Utilizati primul
nivel al cuptorului numai când folositi rotisorul.
Aprinderea cuptorului
Pentru a aprinde arzatorul
cuptorului, apropiati de orifi ciul
F (vezi fi gura) o fl acara sau
o bricheta si, în acelasi timp,
apasati si rotiti în sens antiorar
busonul CUPTORULUI pâna la
pozitia MAX.
Daca aparatul este dotat cu un dispozitiv electronic
de aprindere* (vezi fi gura), apasati mai întâi butonul
de aprindere, indicat cu simbolul
rotiti busonul ARZATORULUI în sens contrar acelor
de ceasornic, pâna când reperul ajunge în dreptul
, apoi apasati si
43
Page 44

RO
pozitiei maxim; asteptati aprinderea fl acarii. Daca, dupa
15 secunde, arzatorul nu se aprinde, lasati busonul,
deschideti usa cuptorului si asteptati cel putin 1 minut
înainte de a încerca din nou sa-l aprindeti. În caz de
pana de curent, puteti aprinde arzatorul cu o fl acara
oarecare, si de la bricheta, asa cum este descris mai
sus.
de ceasornic, pâna când reperul ajunge în dreptul
pozitiei maxim; asteptati aprinderea fl acarii. Daca, dupa
15 secunde, arzatorul nu se aprinde, lasati busonul,
deschideti usa cuptorului si asteptati cel putin 1 minut
înainte de a încerca din nou sa-l aprindeti. În caz de
pana de curent, puteti aprinde arzatorul cu o fl acara
oarecare, si de la bricheta, asa cum este descris mai
sus.
! Cuptorul este dotat cu un dispozitiv de siguranta;
de aceea este necesar sa tineti apasat busonul
CUPTORULUI timp de 6 secunde circa.
! Daca fl acara se stinge accidental, opriti arzatorul si
asteptati minim 1 minut înainte sa încercati din nou.
Reglarea temperaturii
Pentru a obtine temperatura ideala coacerii alimentelor,
rotiti busonul CUPTORULUI în sens contrar acelor de
ceasornic. Temperaturile sunt indicate pe panoul de
control si variaza de la MIN (150°C) la MAX (250°C).
Dupa obtinerea temperaturii dorite, cuptorul o va
mentine constanta, gratie termostatului.
Rotisor
Pentru a pune în
functiune rotisorul (vezi
fi gura) procedati astfel:
1. asezati tava la primul
nivel;
2. puneti suportul
rotisorului la al 4lea nivel
si introduceti frigarea în
orifi ciul de pe peretele
din spate al cuptorului;
3. porniti ROTISORUL
apasând butonul
corespunzator.
Becul cuptorului
;
.
Becul poate fi aprins în orice moment, apasând tasta
BECUL CUPTORULUI.
Grill
Rotind în sens antiorar butonul CUPTOR până la poziţia
se pune în funcţiune grătarul cu raze infraroşii. Cu
ajutorul grătarului se obţin alimente rumenite, acesta fi ind
indicat în special pentru pregătirea rosbifului, fripturilor la
cuptor, cotletelor sau cârnaţilor. Aşezaţi grătarul la nivelul
4 sau 5 şi tava cuptorului la primul nivel, pentru a colecta
grăsimea şi a evita formarea fumului.
! Funcţionarea grătarului este semnalată prin
aprinderea indicatorului GRILL.
! Efectuaţi coacerea la grătar cu uşa cuptorului închisă,
pentru a obţine rezultate superioare şi o economie
sensibilă de energie electrică (circa 10%).
Timer electronic*
Atenţie
Nu lăsaţi copiii să atingă uşa cuptorului pentru că aceasta
se supraîncălzeşte în timpul funcţionării.
Permite afi şarea orei şi a funcţiei de cronometru cu
numărătoarea inversă.
Notă: toate funcţiile devin operative după aproximativ 7
secunde de la setarea acestora.
Cum se resetează ceasul
După racordarea la reţeaua de alimentare electrică
sau după o întrerupere a curentului, display-ul ceasului
se resetează automat la 0:00 şi începe să se aprindă
intermitent.
• Apăsaţi tasta şi apoi tastele şi pentru a regla
ora exactă. Pentru o avansare rapidă, ţineţi apăsate
tastele.
Eventualele actualizări ale orei pot fi efectuate repetând
faza descrisă mai sus.
Funcţia de cronometrare
La această funcţie aveţi acces apăsând tasta
display apare simbolul “”. Fiecărei apăsări a tastei îi
corespunde o creştere a timpului cu 10 secunde până la
99 de minute şi 50 de secunde. Continuând să apăsaţi,
creşterea timpului se face cu paşi de un minut până la
maxim 10 ore.
Cu tasta se întoarce înapoi.
După setarea timpului dorit, începe numărătoarea inversă.
După expirarea timpului, soneria emite un sunet care
poate fi oprit apăsând o tastă oarecare.
Afi şarea orei este posibilă apăsând tasta
“” arată că funcţia timer a fost setată. După aproximativ
7 secunde, pe display se revine automat la afi şarea
cronometrului.
Pentru anularea unui timp setat deja
Apăsaţi tasta până când pe display se afi şează 0:00.
Reglarea volumului semnalului acustic
După alegerea şi confi rmarea setărilor ceasului, prin
intermediul tastei s se poate regla volumului semnalului
acustic de alarmă
.
, iar pe
. Simbolul
*
doar pe anumite modele.
44
Page 45

ATENğIE!Cuptorul este
prevăzut cu un sistem de
oprire a grătarelor care
permite extragerea acestora fără ca ele să iasă
din cuptor(1).
Pentru a extrage complet
grătarele este su¿ cient,
astfel cum se arată în
desen, să le ridicaĠi, prinzându-le din partea din faĠă
úi să le trageĠi (2).
ATENŢIE! Capacul din sticlă se poate
sparge dacă este încălzit. Stingeţi
toate arzătoarele sau eventualele plite
electrice înainte de a-l închide.*Se
referă numai la modelele cu capac
de sticlă
Tabelul cu recomandari pt coacerea în cuptor
DATE TEHNICE
Dimensiuni cuptor
H x L x P
Volum
Dimensiunile utile
ale sertarului de
păstrare a
alimentelor la cald
Tensiunea şi
frecvenţa de
alimentare
31x43,5x43,5 cm
l 58
lăţime cm 46
adâncime cm 42
înălţime 8,5 cm
a se vedea plăcuţa de
caracteristici
RO
adaptabile pentru toate tipurile
Arzătoare
de gaz indicate pe plăcuţa de
caracteristici
Directive Comunitare:
2006/95/EC din 12/12/06
(Tensiune Joasă) şi modificările
succesive - 2004/108/EC din
15/12/04 (Compatibilitate
Electromagnetică) şi modificările
succesive - 90/396/EEC din
29/06/90 (Gaze) şi modificările
succesive -93/68/EECdin
22/07/93 şi modificările
succesive - 2002/96/EC.
1275/2008 (Stand-by/ Off mode)
ETICHETĂ ENERGETICĂ
şi ECODESIGN
Directiva UE nr. 65/2014 de integrare
a Directivei 2010/30/UE. Regulamentul
UE nr. 66/2014 de integrare a Directivei
2009/125/CE
regulamentul EN 15181
regulamentul EN 30-2-1
Alimente Greutate
Paste făinoase
Lasagne (Foi de aluat dispuse în straturi,
umplute)
Cannelloni (macaroane groase umplute)
Paste gratinate
Carne
Viţel
Pui
Raţă
Iepure
Porc
Miel
Peşte
Scrumbie
Dentex dentex
Păstrăv în folie de aluminiu
Pizza
Napoletana
Tort
Biscuiţi
Tarte
Tarte sărate
Dulciuri din aluat dospit
Gril
Cotlete de viţel
Costiţe
Hamburger
Scrumbie
Toast
(Kg)
2.5
2.5
2.5
1.7
1.5
1.8
2
2.1
1.8
1.1
1.5
1
1
0.5
1.1
1
1
1
1.5
1
1
4
Poziţia
rafturilor
3
3
3
3
3
3
3
3
3
3
3
3
3
3
3
3
3
4
4
3
4
4
Preîncălzire (minute) Temperatură
10
10
10
10
10
10
10
10
10
10
10
10
15
15
15
15
15
5
5
5
5
5
recomandată (°C)
210
200
200
200
220
200
200
200
200
180-200
180-200
180-200
220
180
180
180
180
Durata ciclului
(minute)
60-75
40-50
40-50
85-90
90-100
100-110
70-80
70-80
90-95
35-40
40-50
40-45
15-20
30-35
30-35
45-50
35-40
15-20
20
20-30
15-20
2-4
doar pe anumite modele.
*
45
Page 46

Precautii si sfaturi
RO
! Aparatul a fost proiectat si construit conform normelor
internationale de siguranta.
Aceste avertizari sunt furnizate din motive de siguranta
si trebuie sa fi e citite cu atentie.
Norme de protectie si siguranta generale
• Acest aparat de uz casnic fost conceput pentru a fi
folosit numai în interiorul locuintelor.
• Aparatul nu trebuie instalat în aer liber, nici chiar
în cazul în care spatiul este adapostit, deoarece
expunerea acestuia la ploi si furtuni este foarte
periculoasa.
• Nu atingeti aparatul daca sunteti desculti sau daca
aveti mâinile
sau picioarele ude sau umede.
• Aparatul trebuie sa fie utilizat numai pentru
coacerea alimentelor si numai de persoane
adulte, conform instructiunilor din manual. Orice
alta utilizare (de exemplu: încalzirea locuintei)
este considerata improprie si deci periculoasa.
Fabricantul nu va putea fi considerat responsabil
pentru eventuale daune provenite din utilizarea
improprie, gresita sau irationala a aparatului.
• Acest manual face parte din aparatele de clasa 1
(izolat) sau 2 – subcategoria 1 (fi xat între doua piese
de mobilier).
• În timpul folosirii aparatului, elementele de
încalzire si unele zone ale usii cuptorului
devin foarte calde. Fiti atenti sa nu le atingeti;
îndepartati copiii de aragaz.
• Evitati ca si cablurile de alimentare ale altor aparate
electrocasnice sa atinga partile încalzite ale
aparatului.
• Nu obstructionati fantele de aerisire sau de iesire a
caldurii.
• Utilizati întotdeauna manusi speciale pentru a baga
sau scoate recipientele din cuptor.
• Nu utilizati lichide infl amabile (alcool, benzina) în
apropierea aparatului, când acesta este în functiune.
• Nu depozitati materiale infl amabile în sertarul de
sub cuptor: daca cuptorul se aprinde din greseala,
materialele depozitate pot lua foc.
• Suprafetele interne ale sertarului (daca este prezent)
se pot încalzi.
• Când nu folositi aparatul, asigurati-va ca busoanele
sunt în pozitia
• Nu scoateti stecarul din priza tragând de cablu.
• Nu executati nici o operatie de curatire sau
întretinere înainte de a fi scos stecarul din priza.
• În caz de defectiune, nu umblati în nici un caz la
mecanismele din interior si nu încercati sa o reparati
singuri. Apelati la serviciul de asistenta.
• Nu asezati obiecte grele pe usa cuptorului, când este
deschisa.
•.
• Nu lăsaţi copiii să se joace cu aparatul.
• Este interzisă utilizarea aparatului de persoanele
(inclusiv copiii) care au o redusă capacitate fi zică
sau senzorială sau mentală, precum şi de cele fără
experienţă sau care nu s-au familiarizat cu produsul,
dacă nu sunt supravegheate de un responsabil sau
dacă nu au primit în prealabil instrucţiuni asupra
modului de folosire a aparaturii.
•
În cazul în care aragazul este plasat pe un piedestal,
să ia măsurile necesare precauii pentru a preveni
aragazul să alunece piedestal
Scoaterea din uz a aparatului
• Eliminarea ambalajelor: respectati normele locale, în
acest fel ambalajele vor putea fi utilizate din nou.
• Directiva Europeana 2002/96/CE cu privire la
deseurile care provin de la aparatura electrica
sau electronica (RAEE) prevede ca aparatele
electrocasnice sa nu fi e colectate împreuna cu
deseurile urbane solide, obisnuite. Aparatele
scoase din uz trebuie sa fi e colectate separat atât
pentru a optimiza rata de recuperare si de reciclare
a materialelor componente cât si pentru a evita
pericolele care pot duce la daunarea sanatatii
omului sau poluarea mediului înconjurator. Simbolul
tomberonului taiat care apare pe toate produsele va
aminteste tocmai obligatia de a le colecta separat.
Pentru informatii suplimentare cu privire la scoaterea
din uz a electrocasnicelor, detinatorii acestora pot
apela la centrele de colectare a deseurilor sau
la vânzatorii de la care au achizitionat produsele
respective.
Economisirea energiei si protectia
mediului înconjurator
• Se recomanda sa efectuati întotdeauna coacerea
pe GRATAR cu usa cuptorului închisa: acest lucru
este util atât pentru a obtine rezultate mai bune cât si
pentru a economisi energia (10% aprox).
• Oricând este posibil, evitaţi pre-încălzirea cuptorului şi
încercaţi să îl umpleţi de fi ecare dată. Deschideţi uşa
cuptorului cât de rar este posibil deoarece se pierde
căldură la fi ecare deschidere. Pentru a salva o cantitate
substanţială de energie, opriţi cuptorul la 5-10 minute
înainte de fi nalizarea timpului de gătit planifi cat şi folosiţi
căldura generată în continuare de cuptor.
• Păstraţi garniturile curate şi îngrijite pentru a preveni
pierderea de energie din zona uşii.
• Dacă aveţi un contract pentru electricitate cu tarif per
timp, opţiunea de „temporizare pentru gătit” vă va ajuta
să reduceţi costurile alegând să utilizaţi echipamentul
în intervale de timp mai ieftine.
46
Page 47

Întretinere si curatire
• Baza oalei sau a tigăii ar trebui să acopere plita. Dacă
este mai mică, se va pierde energie preţioasă iar oalele
care dau în foc vor lăsa rămăşiţe greu de eliminat.
• Gătiţi alimentele în oale sau tigăi închise cu capace
potrivite şi folosiţi cât mai puţină apă este posibil. Gătitul
fără capac va creşte cu mult consumul energetic
• Folosiţi oale şi tigăi cu bază plată
• Dacă gătiţi ceva ce ia mult timp, merită să utilizaţi o
oală sub presiune, care este de două ori mai rapidă şi
care economiseşte o treime din energie.
Decuplarea electrica
Înainte de orice operatie, debransati aparatul de la
reteaua de alimentare cu curent electric.
Curatarea aparatului
! Evitaţi utilizarea de detergenţi abrazivi sau corosivi,
ca de ex. soluţiile de scos pete sau produsele împotriva
ruginii, detergenţii praf sau bureţii care au o suprafaţă
rugoasă: ele pot zgâria iremediabil suprafaţa aparatului.
! Nu utilizaţi niciodată produse pe bază de vapori sau
cu presiune ridicată în vederea curăţării aparatelor.
• Partile externe, smaltuite sau din inox, precum si
garniturile din cauciuc pot fi curatate cu un burete
îmbibat în apa calduta si sapun neutru. Daca petele
sunt persistente, folositi produse speciale. Clatiti cu
multa apa si stergeti, dupa curatire. Nu folositi prafuri
abrazive sau substante corosive.
• Pentru a facilita curatarea, gratarele aragazului,
capacele sau gratarele de deasupra ochiurilor
precum si arzatoarele se pot detasa; spalati-le
cu apa calda si detergent delicat, fi ind atenti sa
îndepartati orice depunere, apoi stergeti-le bine.
• Curatati des partea terminala a dispozitivelor de
siguranta* care detecteaza absenta fl acarii.
• Interiorul cuptorului se va spala, de preferinta, dupa
fi ecare utilizare, când este cald. Utilizati apa calda si
detergent; clatiti bine si stergeti cu o laveta moale.
Evitati substantele abrazive.
• Curăţaţi geamul uşii cu un burete; nu utilizaţi produse
abrazive; ştergeţi cu o lavetă moale; nu folosiţi
articole abrazive sau răzuitoare din metal, ascuţite,
deoarece acestea pot deteriora suprafaţa geamului
sau îl pot sparge.
• Accesoriile pot fi spalate ca orice alt vas, chiar si în
masina de spalat vase.
• Evitati sa închideti capacul aragazului când
arzatoarele sunt calde sau aprinse.
Controlati garniturile cuptorului.
Controlati periodic garnitura din jurul usii cuptorului.
Daca este deteriorata, apelati la cel mai apropiat
Centru de Asistenta Autorizat. Se recomanda sa nu
folositi cuptorul pâna la înlocuirea garniturii.
Înlocuirea becului cuptorului
1. Dupa ce ati debransat
aparatul de la alimentarea
electrica, scoateti capacul din
sticla care acopera becul (vezi
fi gura).
2. Desurubati becul si înlocuiti-l
cu unul similar: tensiune 230 V,
putere 25 W, cuplare E 14.
3. Montati la loc capacul de
sticla si racordati din nou aragazul la instalatia electrica
! Nu folosiţi lampa cuptorului pentru şi ca iluminare
a încăperilor.
Întretinerea robinetelor de gaz
Cu timpul, se poate întâmpla ca busoanele sa se
blocheze sau sa se roteasca mai greu; în acest caz,
este necesar sa le înlocuiti.
! Aceasta operatie trebuie sa fie executata numai de
un instalator autorizat de fabricant.
Asistenta
! Nu apelati niciodata la persoane neautorizate.
Comunicati:
• tipul de anomalie;
• modelul aparatului (Mod.);
• numarul de serie (S/N).
Aceste informatii se gasesc pe tablita cu caracteristici
lipita de aparat.
doar pe anumite modele.
*
RO
.
47
Page 48

RO
Scoaterea și montarea ușii cuptorului:
1. Deschideți ușa
2. Face clemele balamalelor din ușa cuptorului roti
înapoi complet (vezi foto)
3. Închideți ușa până când clemele opri (ușa se va
rămâne deschis pentru 40 ° aprox.) (vezi foto)
40°
ATENȚIE! Cuptorul nu trebuie să e operat
cu interior
ușă de sticlă eliminat!
ATENȚIE! La reasamblare ușa interioară
sticlă se introduce geamul corect, astfel încât
text scris pe panoul nu este inversat și
poate ușor lizibile
7. Înlocuiți pro l, un clic va indica faptul că
parte este poziționat corect.
8. Deschideți complet ușa.
9. Închideți suporturi (vezi foto).
4. Apăsați cele două butoane de pe pro lul superior și
extrage pro lului (vezi foto)
5. Scoateți foaia de sticlă și de a face curățenie în calitate
de
indicate în capitolul: "Îngrijire și întreținere".
10. Acum ușa poate închisă complet și
cuptorul poate pornit pentru o utilizare
normală.
6. Înlocuiți de sticlă.
48
Page 49

Орнату
! Құрылғыны іске қоспастан бұрын нұсқаулық
кітапшасын мұқият оқып шығыңыз. Мұнда
құрылғыны қауіпсіз орнату және қолдану туралы
маңызды ақпараттар қамтылған.
! Келешекте анықтама ретінде қарау үшін пайдалану
нұсқаулығын сақтап қойыңыз. Құрылғы сатылса,
біреуге берілсе немесе көшірілсе, нұсқаулар онымен
бірге болатынына көз жеткізіңіз.
! Құрылғыны нұсқауларға сәйкес арнайы білікті
маман орнатуға тиіс.
! Кез келген реттеу немесе қызмет көрсету
жұмыстарын плитаны токтан ажыратқаннан кейін
атқару керек.
Бөлмені желдету
Құрылғыны ағымдағы ұлттық заңдарға сәйкес тек
үнемі желдетілетін бөлмелерге орнатуға болады.
Құрылғы орнатылатын бөлме әдеттегі газ жану
процесіне қажетті ауа қамтамасыз етілетіндей тиісті
түрде желдетілуі тиіс (ауа ағыны орнатылған қуаттың
бір киловатына 2 м
Тормен жабылған ауа кірістерінде ішкі диаметрі кем
дегенде 100 см
3
/сағ-тан төмен болмауы тиіс).
2
түтігі болуы және тіпті жартылай
жабылып қалмайтындай орналастырылуы тиіс (A
суретін қараңыз).
Конфорка беті жалынның өшіп қалуынан қорғайтын
сақтандырғышпен жабдықталған болмаса, бұл
кірістерді 100%-ға, кем дегенде 200 см
2
-ге кеңейту
керек. Ауа ағыны жапсарлас бөлмелерден
жанама түрде берілген кезде (B суретін қараңыз),
ғимараттың ортақ бөліктері, өрт қаупі жоғары
аумақтар немесе жататын бөлме болмаған
жағдайда, кірістер жоғарыда айтылғандай сыртқа
шығаратын түтіктермен жабдықталуы тиіс.
Жапсарлас
бөлме
Желдетуді қажет
ететін бөлме
A B
A
Жануға қажетті ауаға
арналған желдету тесігі
Есік пен еден
арасындағы аралықты
үлкейту
! Құрылғыны ұзақ қолданғаннан кейін терезені ашқан
немесе қолданылатын кез келген желдеткіштердің
жылдамдығын арттырған жөн.
Түтінді шығару
Түтінді шығару қауіпсіз әрі тиімді мұршаға жалғанған
сорғыш немесе құрылғы қосылған кезде автоматты
түрде жұмыс істей бастайтын электр желдеткішінің
көмегімен қамтамасыз етілуі тиіс (суретті қараңыз).
Түтіндер тікелей сыртқа
шығарылады
Түтіндер мұрша немесе
тағам пісіру құрылғыларына
арналған тармақты түтін
шығару жүйесі арқылы
шығарылады)
! Сұйытылған мұнай газдары ауадан ауыр болып,
еденде жиналады, сондықтан газ оңай шығып кетуі
үшін СМГ баллондары бар барлық бөлмелерде
сыртқа шығаратын саңылаулар болуы тиіс.
Сондықтан, СМГ баллондары, жартылай немесе
толық болса да, жер деңгейінен төмен бөлмелерде
не сақтау аумақтарында (төле және т.б.)
орнатылмауы немесе сақталмауы тиіс. Бөлмеде тек
қолданылатын баллон ғана сақталуы тиіс; сондайақ, баллонды температурасын 50 °С-тан жоғары
көтеруі мүмкін жылу көздерінен (пештер, мұршалар,
кептіру пештері) аулақ қою керек.
Орналастыру және түзулеу
! Құрылғыны биіктігі плита бетінен аспайтын
шкафтардың жанына орнатуға болады.
! Құрылғының артқы жағына тиетін қабырға
жанбайтын, қызуға төзімді материалдан (Т 90 °С)
жасалғанына көз жеткізіңіз.
Құрылғыны дұрыс орнату үшін:
• Оны ас үйге, ас ішетін бөлмеге немесе тұрғын
бөлмеге (ваннаға емес) орналастырыңыз.
• Плита шкафтардан биік болса, құрылғыны
олардан кем дегенде 600 мм қашық орнату қажет.
• Пеш қабырғаға ілінетін шкафтың астына
орнатылса, осы шкаф пен плитаның жоғарғы
жағы арасында кем дегенде 420 мм ара қашықтық
болуы тиіс.
Қабырғаға ілінетін
СОРҒЫШ
Мин. 600 мм.
Мин. 420мм.
Мин. 420мм.
• Сорғыштар тиісті нұсқаулықтардағы нұсқауларға
сәйкес орнатылуы тиіс.
шкафтар жанғыш
материалдан жасалған
болса, бұл аралықты
700 мм-ге дейін
жеткізу керек (суретті
қараңыз).
сорғышсыз мин. 700 мм.
сорғышпен мин. 650 мм.
• Пештің артқы
жағына немесе
бүйірлеріне 200 мм-ден
жақын жерге жалюзи
орнатпаңыз.
KZ
49
Page 50

KZ
Түзулеу
Құрылғыны түзулеу қажет
болса, плита түбінің әрбір
бұрышындағы орындарына
реттелетін аяқтарын бұраңыз
(суретті қараңыз).
Аяқтар плита түбінің астынғы
жағындағы тесіктерге
кигізіледі.
Токқа жалғау
Құрылғының негізгі деректер кестесінде көрсетілген
жүктемеге сәйкес стандартты штепсельдік ұшты
орнатыңыз (Техникалық деректер кестесін
қараңыз).
Құрылғы тікелей электр желісіне құрылғы мен электр
желісі арасында орнатылған 3 мм ашық кішкене
байланыс бар бірнеше каналды айырып-қосқыш
арқылы қосылуы қажет. Айырып-қосқыш көрсетілген
жүктемеге лайықты және ағымдағы ток реттеуіне
сәйкес болуы қажет (жерге қосылған сым айырыпқосқыштан ажыратылмауы тиіс). Электр кабелін кез
келген нүктесі 50°C-тан жоғары температурамен
байланыспайтындай етіп орналастыру қажет.
Құрылғыны токқа қоспастан бұрын төмендегілерді
тексеріңіз:
• Құрылғы жерге қосылған және штепсельдік ұш заңға
сәйкес болып табылады.
• Розетка деректер тақтасында көрсетілген
құрылғының ең жоғарғы күшіне төзімді.
• Кернеу деректер тақтасында көрсетілген мәндер
аралығында.
• Розетка құрылғының штепсельдік ұшына сәйкес
келеді. Розетка штепсельдік ұшқа сәйкес болмаса,
өкілетті маманнан оны ауыстырып беруді өтініңіз.
Бірнеше розеткалар мен ұзартқыш сымдарын
пайдаланбаңыз.
! Қауіпсіздік шаралары сақталмаған жағдайда
өндіруші жауапкершілікті өз мойнына алудан бас
тартады.
Газды жалғау
Газ құбырына немесе газ баллонына ағымдағы
ұлттық заңдарға сәйкес және құрылғыны берілетін
газ түрімен қолдануға болатынына көз жеткізгеннен
кейін иілгіш резеңке немесе болат түтікпен жалғау
керек (қақпақтағы сипаттар тақтасын қараңыз: сәйкес
болмаса, төменде берілген ақпарратты қараңыз).
Баллоннан сұйық газды пайдаланғанда, ағымдағы
ұлттық заңнамаларға сәйкес келетін қысым
реттегішін орнатыңыз. Жалғауды жеңілдету үшін
газ жеткізу түтігін бұруға болады*: түтік тұтқышының
қалпын қақпақшаның қалпынан қарама-қарсы
бұрып, құрылғымен бірге берілетін тығындағышты
ауыстырыңыз.
! Газ беру қысымы Оттық пен форсункалар
сипаттарының кестесінде көрсетілген мәндерге
сәйкес келетінін тексеріңіз (төмендегі мәтінді
қараңыз). Бұл қуатты тиімді түрде жұмсап,
құрылғыңыздың қауіпсіз әрі ұзақ жұмыс істеуін
қамтамасыз етеді.
Майысқақ резеңке түтікпен газды жалғау
Түтік ағымдағы ұлттық заңдарға сәйкес келетініне
көз жеткізіңіз. Түтіктің ішкі диаметрі келесідей болуы
тиіс: сұйық газ үшін 8 мм; метан үшін 13 мм.
Жалғау орындалғаннан кейін түтік төмендегі
жағдайларға сәйкес келетініне көз жеткізіңіз:
• Температурасы 50 °С-тан асатын ешбір бөлікке
тимейді.
• Оны ештеңе тартпайды немесе бұрамайды және
қысылмаған я майыспаған.
• Жүздерге, өткір бұрыштарға немесе қозғалатын
бөліктерге тимейді және қысылмаған.
• Жағдайын тексере алу үшін толығымен қарап
шығу оңай.
• 1500 мм-ден қысқа.
• Екі жағында да мықтап бекітілген; ағымдағы
заңдарға сәйкес шеттерінен қысқыштармен
бекітілуі тиіс.
! Құрылғы орнатылғаннан кейін электр кабелі мен
розетка жақын жерде болуы қажет.
! Кабель иілмеуі немесе қысылмауы қажет.
! Кабель жиі тексеріліп, тек өкілетті маманның
көмегімен ғана алмастырылуы тиіс.
* Тек белгілі модельдерде болады
50
Жалғау жері
Оқшаулағыш
шүмек
Түтік жинағы
Жалғау жері
Түтік жинағы
ЫСТЫҚ БЕТ
Оқшаулағыш
шүмек
Page 51

! Осы жағдайлардың бірі немесе бірнешесі
орындалмаса не плитаны 2-сынып, 1-ішкі сынып
құрылғыларына (екі шкаф арасына орнатылатын)
қолданылатын жағдайларға сәйкес орнату қажет
болса, резеңке түтік орнына майысқақ болат түтік
қолданылуы қажет (төмендегі мәтінді қараңыз).
Майысқақ буынсыз тот баспайтын болаттан
жасалған түтікті оймасы бар жалғауға қосу
Түтік пен тығындағыштар ағымдағы ұлттық заңдарға
сәйкес келетінін тексеріңіз.
Түтікті қолдану үшін құрылғыдағы түтік тұтқышын шешіп
алыңыз (құрылғыдағы газ жеткізу кірісі цилиндрлік
оймалы 1/2 газ еркек бекітпесі болып табылады).
! Түтік қысылмайтынына және қозғалатын бөліктерге
тимейтініне көз жеткізіп, түтіктің ұзындығы 2 метрден
аспайтындай жалғаңыз.
Пешті баптандыру
Пештің оттығының форсункасын ауыстыру:
1. Пештің есігін толық ашыңыз
2. Пештің сырғымалы түбін
шығарып алыңыз (сызбаны
қараңыз).
3. «V» бұрандаларын
босатқаннан кейін пеш
оттығын шешіп алыңыз
V
(суретті қараңыз).
KZ
Жалғаудың мықтылығын тексеру
Орнату процесі аяқталғаннан кейін, сабынды
сумен түтік фитингтерінде тесіктердің бар не жоқ
екенін тексеріңіз. Ешқашанда алауды қолданушы
болмаңыз.
Газ түрлеріне сәйкестендіру
Құрылғыны әдепкі (бұл қақпақтағы сипаттар
тақтасында көрсетілген) емес газ түрлеріне бейімдеу
мүмкін.
Плитаны сәйкестендіру
Плита оттықтарының форсункаларын ауыстыру:
1. Плита торларын алып
тастап, оттықтарды
орындарынан алыңыз.
2. Форсункаларды 7 мм
гайка кілтімен босатып
(суретті қараңыз), оларды
газдың жаңа түріне сәйкес
келетін форсункалармен
алмастырыңыз («Оттық
пен форсункалардың
сипаттары» кестесін қараңыз).
3. Барлық құрамдас бөліктерді жоғарыдағы
нұсқауларды керісінше орындау арқылы
алмастырыңыз.
4. Форсунканы арнайы
форсунка кеспелтек кілтімен
(суретті қараңыз) немесе 7
мм кеспелтек кілтімен бұрап
шешіп алыңыз және оны жаңа
газ түріне сәйкес келетін жаңа
форсункамен ауыстырыңыз
(қараңыз Оттық пен
форсункалар сипаттарының кестесі).
Газ пешінің оттығының ең төмен параметрін
реттеу:
1. Оттықты жағыңыз ( «Қосу және пайдалану»
бөлімін қараңыз).
2. Тұтқаны ең жоғарғы позицияда (Ең жоғары)
шамамен 10 минут ұстағаннан кейін ең төменгі
позицияға (Ең төмен) бұрыңыз.
3. Тұтқаны алып тастаңыз.
4. Термостат шегесінің сыртқы жағындағы реттеу
бұрандаларын (суретті қараңыз) жалын кіші бірақ
тұрақты болғанша қатайтыңыз немесе босатыңыз.
! Табиғи газ қолданылса, реттеу бұрандасын сағат
тіліне қарсы бағытта бұрау арқылы шешіп алу керек.
Плита оттықтарының минималды параметрін реттеу:
1. Газ құбырының тетігін минималды қалыпқа бұраңыз.
2. Тұтқаны шешіп алып, тұтқа шегесінің ішінде немесе
оның жанында орналасқан реттеу бұрандасын жалын
кіші бірақ тұрақты болғанша реттеңіз.
! Құрылғы сұйық газ көзіне жалғанған болса, реттеу
бұрандасы мүмкін болғанша мықты бекітілуі керек.
3. Оттық жанып тұрғанда тұтқа позициясын бірнеше мәрте
ең төменгіден ең жоғарыға және қарама-қарсы жылдам
ауыстырып, жалын өшіп қалмайтынын тексеріңіз.
! Плита оттықтары үшін негізгі ауаны реттеу қажет
емес.
5. Тұтқаны «Ең жоғары» позициядан «Ең төмен»
позицияға тез бұрыңыз немесе пеш есігін ашып,
жабыңыз, бірақ оттық өшіп қалмайтынына көз
жеткізіңіз.
51
Page 52

KZ
Үш сақиналы оттық форсункаларын ауыстыру
1. Таба тұғырларын алып тастап, оттықтарды
корпустарынан көтеріп шығарыңыз. Оттық екі
бөлек бөлшектен тұрады (суреттерді көріңіз);
2. 7 мм гайка кілтімен форсункаларды бұрап
босатыңыз. Газдың жаңа түрімен қолдануға
арналған форсунка модельдерімен
алмастырыңыз (1-кестені қараңыз). Екі
форсункадағы тесіктердің диаметрі бірдей
болады.
3. Жоғарыдағы әрекеттерді кері ретпен орындау
арқылы барлық бөлшектерді орнына қойыңыз.
• Оттықтардың бастапқы ауасын реттеу:
Реттеуді қажет етпейді.
• Оттықтарды ең аз мәнге орнату:
1. Тұтқаны әлсіз жалын позициясына бұрыңыз.
2. Тұтқаны шешіп алып, тұтқа шегесінің ішінде
немесе оның жанында орналасқан реттеу
бұрандасын жалын кіші бірақ тұрақты болғанша
реттеңіз.
3. Жалынды қажетті төмен параметрге реттегеннен
кейін, оттық жанып тұрғанда тұтқа позициясын
бірнеше мәрте ең төменгіден ең жоғарыға және
қарама-қарсы жылдам ауыстырып, жалын өшіп
қалмайтынын тексеріңіз.
4. Кейбір құрылғыларда қауіпсіз құралымен
(терможұппен) жабдықталған. Оттықтар әлсіз
жалын параметріне орнатылғанда
құрылғы жұмыс істемесе, осы әлсіз жалын
параметрін реттеу бұрандасының көмегімен
арттырыңыз.
5. Реттеу жасалғаннан кейін айналып өту
клапандарындағы тығындарды сургучпен
қайтадан жабу қажет.
! Құрылғы байқаусызда түсіп кетпеуі үшін,
мысалы бала пеш есігіне шыққан жағдайда,
бірге берілген қауіпсіздік шынжыры
орнатылуы ТИІС!
Пеш қауіпсіздік
шынжырымен
жабдықталған;
оны құрылғының
артындағы қабырғаға,
шынжыр құрылғыға
бекітілген биіктікте
бұрандамен (пешпен
бірге берілмейді)
бекіту қажет.
Бұранда мен бұранда анкерін құрылғы артындағы
қабырға материалына сәйкес таңдаңыз. Бұранда
басы 9 мм-ден кіші болса, тығырық қолданылуы
тиіс. Бетон қабырғаға кем дегенде диаметрі 8 мм
және ұзындығы 60 мм бұранда керек.
Шынжыр пештің артқы жағына және
қабырғаға суретте көрсетілгендей,
орнатылғаннан кейін жермен параллель күйде
тартылып тұратындай бекітіңіз.
ТЕХНИКАЛЫҚ ДЕРЕКТЕР
Пеш өлшемдері
БхЕхТ
Көлемі 58 л
Пеш бөлігіне
қатысты пайдалы
өлшемдер
Кернеу және жиілік деректер кестесін қараңыз
Оттықтар
31x43,5x43,5
ені см
тереңдігі см
биіктігі см
деректер тақтасында көрсетілген
кез келген газ түріне бейімдеуге
болады.
46
42
8,5
! Құрылғы сұйық газға жалғанған болса, реттеу
бұрандасы мүмкін болғанша мықтап бекітілуі керек
! Бұл рәсім аяқталғаннан кейін, ескі қуаттылық
жапсырмасын енді пайдаланылатын газ түрін
көрсететін жапсырмамен алмастырыңыз.
Жапсырмаларды біздің кез келген Қызмет көрсету
орталығымыздан алуға болады.
! Егер пайдаланылатын газдың қысымы ұсынылған
қысымнан өзге болса (немесе сәл басқа болса), кіріс
түтігіне қолайлы қысым реттегіші орнатылуы керек
(ағымдағы ұлттық заңнамаларға сәйкес келу үшін).
52
12.12.2006 жылғы 2006/95/
EC (төмен кернеу) және кейінгі
өзгертулері – 15.12.04 жылғы
04/108/EC (Электромагнитті
үйлесімділік) және кейінгі
өзгертулері – 30.11.2009 жылғы
2009/142/EC (Газ) және кейінгі
өзгертулер – 22.07.1993 жылғы
93/68/EEC және кейінгі өзгертулері 2002/96/EC.
1275/2008 (күту/өшу режимі)
Page 53

«Оттық пен форсункалардың сипаттары» кестесі
1-кесте
Оттық Диаметр
(мм)
Жылу қуаты
кВт (p.c.s.*)
Айналып
өту
1/100
Номиналды Азайтылған (мм) (мм) *** ** (мм)
Жылдам
(үлкен) (R)
100 3.00 0.7 41 87 218 214 128 286
Жартылай
жылдам
75 1.90 0.4 30 69 138 136 104 181
(орташа) (S)
Қосымша
(кіші)(A)
Үштік сақина
(ТС)
55 1.00 0.4 30 50 73 71 78 95
130 3.25 1,5 63 2x65 236 232 2x99 309
Пеш - 2.60 1.0 52 78 189 186 119 248
Сұйық газ Табиғи газ
Форсунка
1/100
Ағын*
г/сағ
Форсунка
1/100
Ағын*
л/сағ
KZ
Жеткізу
қысымдары
Номиналды (мбар)
Ең төмен (мбар)
Ең жоғары (мбар)
* 15°C, 1013 мбарр жағдайында – құрғақ газ *** Бутан P.C.S. = 49,47 МДж/кг
** Пропан P.C.S. = 50,37 МДж/кг Табиғи газ P.C.S. = 37,78 МДж/м3
28-30
20
35
37
25
45
S
TC
H6TG5F C UA
20
17
25
R
A
53
Page 54

KZ
Қосу және пайдалану
Плитаны қолдану
Оттықтарды жағу
Әрбір ОТТЫҚ тұтқасында қатысты оттық
жалынының күшін көрсететін толық шеңбер бар.
Плитадағы оттықтардың бірін жағу үшін:
1. Оттыққа жалынды немесе газ жақпағын
жақындатыңыз.
2. ОТТЫҚ тұтқасын басып, ол ең жоғарғы жалын
параметріне бағытталғанша, сағат тіліне қарсы
бағытта бұрыңыз.
3. ОТТЫҚ тұтқасын сағат тіліне қарсы бағытта бұру
арқылы жалын күшін қажетті деңгейге реттеңіз. Ол
ең төменгі параметр , ең жоғарғы параметр
немесе екеуінің арасындағы кез келген позиция
болуы мүмкін.
Кейбір модельдер тұтқаға ендірілген тұтату
құралымен жабдықталған; мұндай жағдайда
электрондық тұтату құралы* болады (C), бірақ тұтату
түймесі болмайды. ОТТЫҚ тұтқасын басып, ол ең
жоғарғы жалын параметріне бағытталғанша, сағат
тіліне қарсы бағытта бұрып, оттықты жабыңыз. Тұтқа
босатылғанда оттық өшіп қалуы мүмкін. Бұл орын
алса, тұтқаны ұзағырақ ұстап, әрекетті қайталаңыз.
! Жалын байқаусыз өшірілсе, оттықты өшіріңіз де,
оны қайтадан жақпас бұрын кем дегенде 1 минут
күтіңіз.
Құрылғы жалынның
өшіп қалуына қарсы
сақтандырғышпен (X)*
жабдықталған болса,
жалынның жанып тұруы
және құралды іске қосу үшін
ОТТЫҚ тұтқасын шамамен
тұрыңыз.
Оттықты өшіру үшін тұтқаны тоқтау позициясына
жеткенше бұрыңыз.
2-3 секунд басып, ұстап
•
ɀɚɥɵɧɞɵɞɟԙɝɟɣɝɟɫԥɣɤɟɫɪɟɬɬɟɭ
ɨɬɬɵԕɠɚɥɵɧɵɧɵԙԕɚɪԕɵɧɞɵԑɵɧԕɭɚɬ
ɞɟԙɝɟɣɿɧɟɫԥɣɤɟɫɦɚɤɫɢɦɚɥɞɵɞɟԙɝɟɣɞɟɧ
ɚɪɚɥɵԕɩɨɡɢɰɢɹɚɪԕɵɥɵɦɢɧɢɦɚɥɞɵ
ɞɟԙɝɟɣɝɟɞɟɣɿɧɬԝɬԕɚɤԧɦɟɝɿɦɟɧɪɟɬɬɟɭɝɟɛɨɥɚɞɵ
ɬԝɬԕɚɧɵɛԝɪԑɚɧɤɟɡɞɟɛɿɪɞɟԙɝɟɣɞɟɧɛɚɫԕɚ
ɞɟԙɝɟɣɝɟɚɭɵɫԕɚɧɞɚ©ɬɵԕªɟɬɤɟɧɞɵɛɵɫɟɫɬɿɥɟɞɿ
ɀԛɣɟɞԥɥɿɪɟɤɪɟɬɬɟɭɝɟɤɟɩɿɥɞɿɤɛɟɪɟɞɿɠɚɥɵɧ
ԕɚɪԕɵɧɞɵԑɵɧԕɚɣɬɚɨɪɧɚɬɭԑɚɠԥɧɟԥɪɬԛɪɥɿɩɿɫɿɪɭ
ԥɪɟɤɟɬɬɟɪɿԛɲɿɧԕɚɠɟɬɬɿɞɟԙɝɟɣɞɿɨԙɚɣɚɧɵԕɬɚɭԑɚ
ɦԛɦɤɿɧɞɿɤɛɟɪɟɞɿ
Тек белгілі модельдерде болады.
*
Оттықтарды пайдалану бойынша кеңестер
Оттықтар ең тиімді түрде жұмыс істеуі және
тұтынылатын газ мөлшерін үнемдеуі үшін қақпағы
бар және асты тегіс табаларды ғана қолданған жөн.
Сондай-ақ, олар оттықтың өлшеміне сәйкес келуі
тиіс.
Оттық түрін анықтау үшін «Оттық пен
форсункалардың сипаттары» ішіндегі сызбаларды
қараңыз.
Жылдам (R) 24 - 26
Жартылай жылдам (S) 16 - 20
Қосымша (A) 10 - 14
Үштік тәж (TC) 24 - 26
! Төмендеткіш сөремен жабдықталған үлгілерде
диаметрі 12 см-ден аз кіші табақтарды қолданған
кезде оны тек қосымша оттықта ғана пайдалануға
болатынын есіңізде болсын.
Пешті қолдану
! Құрылғыны алғаш рет пайдаланғанда оны бос
күйінде есігін жауып, ең жоғарғы температурада
кемінде жарты сағаттай қыздырыңыз. Пешті
өшіріп, оның есігін ашпастан бұрын бөлменің
жақсы желдетілгенін тексеріңіз. Өндіру кезінде
қолданылған қорғағыш заттардың жанып кетуіне
байланысты жеңіл жағымсыз иіс шығуы мүмкін.
! Өнімді пайдаланбас бұрын құрылғының
бүйірлеріндегі барлық пластикалық үлдірлерді алып
тастаңыз.
! Пештің астыңғы жағына зат қоюшы болмаңыз,
әйтпесе эмальді қабат зақымдалады. Гриль-бар
істігімен пісірген кезде пеште тек 1-позицияны
қолданыңыз.
Пешті жағу
Пеш оттығын жағу үшін жалынды немесе газ
шақпағын «F» тесігіне жақындатыңыз (суретті
қараңыз), одан кейін ПЕШТІ басқару тұтқасын
басып, оны «Ең жоғары» позицияға жеткенше сағат
тіліне қарсы бағытта бұрыңыз.
Оттық ø Ыдыс диаметрі (см)
Құрылғы электрондық жағу
құралымен* жабдықталған
болса,
белгіленген тұтату түймесін
басыңыз, одан кейін ПЕШ
F
тұтқасын басып, оны оттық
жанғанша ең жоғарғы жалын
параметріне қарай, сағат
таңбасымен
54
Page 55

тіліне қарсы бағытта бұрыңыз. Егер, 15 секундтан
кейін оттық жанбаса, тұтқаны жіберіп, пеш есігін
ашыңыз да, қайтадан жағуға әрекет етпес бұрын
кем дегенде 1 минут күтіңіз. Ток болмаса, жоғарыда
айтылғандай оттықты жалынмен немесе шақпақпен
тұтатуға болады.
! Пеш сақтандырғышпен жабдықталған, сондықтан
ПЕШТІ басқару тұтқасын шамамен 6 секунд басып,
ұстап тұру керек.
! Жалын байқаусыз өшірілсе, оттықты өшіріңіз де,
пешті қайтадан жақпас бұрын кем дегенде 1 минут
күтіңіз.
Температураны реттеу
Қажетті пісіру температурасын орнату үшін ПЕШТІ
басқару тұтқасын сағат тіліне қарсы бағытта
бұрыңыз. Температуралар басқару тақтасында
көрсетіледі және «Ең төмен» (150°C) мен «Ең
жоғары» (250°C) арасында болуы мүмкін.
Орнатылған температураға жеткеннен кейін пеш
термостаттың көмегімен оны бір қалыпта ұстайды.
! Жалын байқаусыз өшірілсе, оттықты өшіріңіз де,
грильді қайтадан жақпас бұрын кем дегенде 1 минут
күтіңіз.
Гриль істігі
Гриль істігі функциясын
іске қосу үшін
(сызбаны қараңыз)
төмендегі әрекеттерді
орындаңыз:
1. Май жинайтын
табаны бірінші
позицияға
орналастырыңыз.
2. Гриль істігінің
тірегін 4-позицияға
орналастырып, істікті
пештің артқы қабырғасындағы тесікке кіргізіңіз.
3. ТАҢДАУ тұтқасының
Гриль
ПЕШ басқару тұтқасын сағат тіліне қарсы бағытта
қалпына дейін бұраған кезде инфрақызыл
сәуле грилі іске қосылады. Гриль тағамның бетін
біркелкі қызартуға мүмкіндік береді және әсіресе
қуырылған тағамдар, шницель мен сосискалар үшін
қолайлы. Тартпаны 4- немесе 5-позицияға қойыңыз
және майды жинау әрі түтін түзілуін болдырмау үшін
1-позицияға тұтқалы табаны қойыңыз.
KZ
Пеш шамы
ПЕШ ШАМЫ түймесін басу арқылы шамды кез
келген уақытта жандыруға болады.
ЕСКЕРТУ! Пеш тартпаларды
алып шығуға арналған және
пештен шығып кетуіне жол
бермейтін шектегіш жүйемен
жабдықталған.(1)
Сызбада көрсетілгендей,
толығымен шығарып алу үшін тартпаларды
алдыңғы шетінен ұстап көтеріп, тартсаңыз (2)
болғаны.
! ГРИЛЬ индикатор шамы гриль жұмыс істеп
тұрғанын көрсетеді.
! Грильді қолданған кезде пеш есігін жауып қойыңыз;
бұның арқасында пісіру нәтижесі жоғарырақ болып,
қуат үнемделеді (шамамен 10%).
ЕСКЕРТУ! Қыздырылса, шыны
қақпақша сынып кетуі мүмкін.
Қақпақты жаппас бұрын барлық
оттықтар мен электр конфоркаларды
өшіріңіз. *Тек шыны қақпағы бар
модельдер үшін қолданылады.
55
Page 56

Пеште тағам дайындау бойынша кеңестер» кестесі
KZ
Тағамдар
Паста
Лазанья
Ет қосылған қамыр түтіктері
Гратин тағамдары
Ет
Бұзау еті
Тауық
Үйрек
Қоян
Шошқа еті
Жас қой еті
Балық
Макрель
Зубан
Фольгада пісірілген бақтақ
Пицца
Наполитана 1 3 15 220 15-20
Бәліштер
Печеньелер
Жеміс қосылған бәліш
Хош иісті бәліш
Ашыған торттар
Грильденген тағамдар
Бұзау етінен пісірілген стейк
Котлет
Гамбургер
Макрель
Қуырылған нан
Салмақ
(кг)
2.5
2.5
2.5
1.7
1.5
1.8
2
2.1
1.8
1.1
1.5
1
0.5
1.1
1
1
1
1.5
1
1
№4
Тартпа
позициясы
3
3
3
3
3
3
3
3
3
3
3
3
3
3
3
3
4
4
3
4
4
Алдын ала
қыздыру
ұзақтығы (мин)
10
10
10
10
10
10
10
10
10
10
10
10
15
15
15
15
5
5
5
5
5
Ұсынылатын
температура (°C)
210
200
200
200
220
200
200
200
200
180-200
180-200
180-200
180
180
180
180
Пісіру ұзақтығы
(минут)
60-75
40-50
40-50
85-90
90-100
100-110
70-80
70-80
90-95
35-40
40-50
40-45
30-35
30-35
45-50
35-40
15-20
20
20-30
15-20
2-4
Электрондық таймер
Бұл функция уақытты көрсетеді және нөлге дейін
кері санайтын таймер ретінде жұмыс істейді.
! Барлық функциялар орнатылғаннан кейін шамамен
7 секунд ішінде қолданылады.
Сағатты қайта орнату
Құрылғы тоққа қосылғаннан кейін немесе электр
қуаты ажыратылғаннан кейін сағат жыпылықтай
бастайды да, келесі мәнді көрсетеді: 0:00
• Дәл уақытты орнату үшін
кейін
-
және + түймелерін басыңыз. Жылдамырақ
өзгерту үшін түймелерді басып, ұстап тұрыңыз.
Кез келген өзгертуді жоғарыдағы процесті қайталау
арқылы орындауға болады.
Таймер мүмкіндігі
Бұл функцияны
түймесін басып ашуға болады,
түйме басылғаннан кейін дисплейде
көрсетіледі. 99 минут 50 секундқа жеткенше
түймесі басылған сайын уақыт 10 секундқа артады.
56
түймесін, одан
таңбасы
+
Бұдан кейін түйме басылған сайын 10 сағатқа дейін
уақыт бір минутқа артып отырады.
-
түймесі басылса, уақыт азаяды.
Уақыт аралығы орнатылғаннан кейін таймер кері
санай бастайды. Таймер нөлге жеткен кезде сигнал
беріледі (оны кез келген түймені басып, өшіруге
болады).
Уақытты
және
түймесін басып шығаруға болады
таңбасы таймер функциясы орнатылғанын
білдіреді. Шамамен 7 секундтан кейін дисплей
автоматты түрде таймерге оралады.
Орнатылған уақыттан бас тарту
Дисплейде 0:00 уақыты көрсетілгенше
түймесін
–
басып, ұстап тұрыңыз.
Сигналдың дыбыс деңгейін реттеу
Сағат параметрлерін таңдап, оларды растағаннан
кейін дыбыс сигналының дыбыс деңгейін реттеу
үшін
түймесін пайдаланыңыз.
–
Page 57

Сақтандырулар мен кеңестер
! Бұл құрылғы халықаралық қауіпсіздік
стандарттарына сай жасақталып дайындалған.
Төмендегі ескертулер қауіпсіздік ережелерін ескерту
мақсатында берілген және оны мұқият оқып шығу
қажет.
Жалпы қауіпсіздік
• Құрылғы үйде қолдануға арналған, оны
коммерциялық немесе өндірістік тұрғыда
қолдануға болмайды.
• Құрылғыны далада, тіпті үсті жабылған болса да,
орнатуға болмайды. Құрылғыны қорғаусыз жаңбыр
мен боранда қалдыру аса қауіпті.
• Құрылғыны жалаң аяқ немесе ылғал не дымқыл
қолмен, аяқпен түртпеңіз.
• Құрылғыны кітапшада берілген нұсқауларға
сай, тек ересек адамдар ғана тағам дайындау
мақсатында пайдалануы тиіс. Құрылғыны
басқа түрде пайдалану (мысалы, бөлмені
жылыту үшін) дұрыс емес әрі қауіпті.
Құрылғыны тиісті, дұрыс және саналы түрде
пайдаланбау нәтижесінде пайда болған кез
келген зақымға өндіруші жауапты болмайды.
• Нұсқау кітапшасы 1-класс (оқшауланған) немесе
2-класс 1-субкласс (2 шкаф арасына орнатылған)
құрылғымен бірге беріледі.
• Құрылғыны пайдаланған уақытта қыздыру
элементтері және пеш есігінің белгілі
бөліктері қатты қызады. Бұларға тимеу және
балалардан аулақ ұстау керек.
• Басқа электр құрылғыларының кабельдері пештің
ыстық бөліктеріне тимейтінін тексеріңіз.
• Желдету және ыстықты салқындатуға арналған
ашық жерлерді ешқашан жаппау керек.
• Оттықтар жанып тұрған кезде немесе әлі ыстық
болғанда плитаның шыны қақпағын (тек кейбір
модельдерде) жаппаңыз.
• Пешке асханалық ыдысты қоярда немесе
оны алған кезде әрдайым пеш қолғаптарын
пайдаланыңыз.
• Құрылғыны пайдаланған кезде оның жанында
жанғыш сұйықтықтарды (спирт, бензин, т.б.)
қолданбаңыз.
• Төменгі сақтау бөлігіне немесе пештің өзіне
жанғыш материалдар салуға болмайды. Егер
байқаусызда құрылғы қосылса, бұл заттардың
жануы мүмкін.
• Бөліктің (бар болса) ішкі беттері қызып кетуі
мүмкін.
• Құрылғыны қолданбаған кезде тұтқалар
позициясында екенін және газ шүмегі жабылғанын
тексеріңіз.
•
• Құрылғыны өшіргенде розеткадан әрдайым
айырғышты ұстап тартыңыз, кабельден тартып
суырмаңыз.
• Құрылғыны электр желісінен ажыратпай ешқашан
тазалау немесе күтім көрсету жұмыстарын
жасамаңыз.
• Егер құрылғы істен шыққан болса, оны
ешбір жағдайда өз басыңызбен жөндеуге
әрекеттенбеңіз. Тәжірибесіз адам тарапынан
жасалған жөндеу жұмыстарынан құрылғының
істен шығуы немесе жарамсыз болып қалуы
мүмкін. Көмек көрсету бөліміне хабарласыңыз.
• Ашық пештің есігіне ауыр заттарды қоймаңыз.
• Балаларға құрылғымен ойнауға рұқсат етпеңіз.
• Құрылғыны физикалық, сезімталдық және
психикалық қабілеттері төмен адамдар (балалар
да кіреді), тәжірибесіз немесе өнімнен хабары
жоқ кез келген адамның қолданбауы тиіс.
Мұндай адамдарға, кем дегенде, қауіпсіздіктерін
қамтамасыз ететін біреулер жетекші болуы керек
немесе құрылғының жұмысына қатысты кіріспе
нұсқаулары берілуі тиіс.
Қоқысқа тастау
• Орау материалдарын тастаған кезде: ораманы қайта
пайдалана алу үшін жергілікті заңдарды орындаңыз.
• Электр және электроникалық құралдардың
қалдықтарына (WEEE) қатысты 2002/96/EC
Еуропа заңнамасына сәйкес үй құрылғылары
қалыпты сортталмаған қалалық қалдық ағымымен
бірге жойылмауы тиіс. Қоршаған орта мен адам
денсаулығына тиетін зиянның алдын ала отырып,
ескі құрылғылар қайта пайдалануды және
қайта өңдеуді оңтайландыру мақсатында бөлек
жиналуы керек. Өнімдегі сызылған «доңғалақты
қоқыс жәшік» сізге құрылғыны тастаған уақытта
бөлек жиналуы туралы есіңізге салады.
Ескі құрылғыларды дұрыс тастау жөнінде ақпарат
алу үшін пайдаланушылар жергілікті өкілдеріне
немесе сатушыларына хабарласулары керек.
Қоршаған ортаны сақтау және қорғау
• Пешті таңертең ерте немесе түстен кейін кешірек
пайдалану арқылы электр қуатын қамтамасыз
етуші желілік компаниялардың ең жоғары
жүктемесін азайтуға көмектесе аласыз.
• GRILL (ГРИЛЬ) режимін пайдаланғанда пештің
есігін жабық ұстаңыз. Бұның арқасында нәтиже
жақсырақ болып, қуат үнемделеді (шамамен
10%).
• Есік тығыздағыштарын жиі тексеріңіз, олар есікке
тығыз келетіндей етіп, қалдық болмауы үшін
тазалап сүртіп тұрыңыз, осылайша ыстықтың
сыртқа шығуын болдырмайсыз.
KZ
57
Page 58

Күтім және техникалық
қызмет көрсету
KZ
Құрылғыны өшіру
Кез келген бір жұмысты бастамастан бұрын
құрылғыны токтан ажыратыңыз.
Құрылғыны тазалау
! Құрылғыда ешқашан бу тазартқышты немесе
шаңсорғышты пайдаланбаңыз.
• Тот баспайтын болат немесе эмальданған сыртқы
бөліктер және резеңке тығыздағыштар жылы
суға малынып, түссіз сабын жағылған губкамен
тазартылады. Қиын дақтарды кетіру үшін арнайы
өнімдерді пайдаланыңыз. Жуып болған соң оны
жақсылап шайып, құрғатыңыз. Қатты ұнтақтарды
немесе таттандыратын заттарды пайдаланбаңыз.
• Тазалауды жеңілдету үшін плита торларын, оттық
қақпақтарын, жалынды тарату сақиналарын
және оттықтарды алып тастауға болады; оларды
абразивті емес жуғыш зат қосылған ыстық суда
жуып, жақсылап кептірмес бұрын күйіп қалған
қалдықтардың барлығы кеткенін тексеріңіз.
• Жалынның өшіп қалуына қарсы
сақтандырғыштардың* шеткі бөліктерін жиі
тазалап тұру керек.
• Пештің іші әрбір қолданғаннан кейін жылы
кезінде мұқият тазалануы тиіс. Ыстық су мен
тазартқышты пайдаланыңыз, одан кейін шайып,
жұмсақ шүберекпен құрғатып сүртіңіз. Қырғыш
заттарды пайдаланбаңыз.
Пеш тығыздағыштарын тексеру
Пештегі есік тығыздағыштарын жиі тексеріп
тұрыңыз. Егер тығыздағыштар зақымдалған болса,
жақын жердегі Өкілетті сатудан кейін қызмет
көрсету орталығына хабарласыңыз. Тығыздағыштар
ауыстырылғанға дейін пешті пайдаланбауды
ұсынамыз.
Пеш шамын ауыстыру
1. Пешті токтан ажыратқаннан
кейін шам ұясын жауып тұрған
шыны қақпақты шешіп алыңыз
(суретті қараңыз).
2. Шамды алып, оны сондай
басқа шаммен ауыстырыңыз:
кернеуі 230 В, қуаты 25 Вт,
цоколі E 14.
3. Қақпақты орнына қойып, пешті токқа қайтадан
қосыңыз.
Газ шүмегіне техникалық қызмет
көрсету
Уақыт өте вентильдер қатып қалуы немесе
бұрылмай қою мүмкін. Бұл жағдай орын алса,
шүмекті ауыстыру қажет.
! Бұл процедураны өндіруші өкілет берген білікті
маман орындауы тиіс.
• Пеш есігінің әйнегін ысқышпен және қырғыш
емес тазартқыш құралдармен тазалап, жұмсақ
шүберекпен мұқият құрғатыңыз. Қатты қырғыш
затты немесе өткір темір қырғыштарды
пайдаланбаңыз, себебі олар әйнек бетін тырнап,
оның сынуына әкелуі мүмкін.
• Керек-жарақтар күнделікті ыдыстар сияқты
жуылуы мүмкін, тіпті оларды ыдыс жуғыш
машинаға жууға болады.
• Оттықтар жанып тұрғанда немесе әлі ыстық
болған кезде қақпақты жаппаңыз.
58
Көмек
! Рұқсаты жоқ адамның қызметін ешқашан
қабылдамаңыз.
Келесі мәліметтерді оңай жерде ұстаңыз:
• Туындаған проблема түрі.
• Құрылғының моделі (Мод.).
• Сериялық нөмірі (С/н).
Мәліметтердің соңғы екі бөлігін құрылғының
деректер тақтасынан көре аласыз.
*
Тек белгілі модельдерде болады.
Page 59

ɉɟɲ ɟɫɿɝɿɧ ɲɟɲɿɩ ɚɥɭ ɠԥɧɟ ɛɟɤɿɬɭ:
1. ȿɫɿɤɬɿ ɚɲɵԙɵɡ
2. ɉɟɲ ɟɫɿɝɿ ɬɨɩɫɚɫɵɧɵԙ ԕɚɦɵɬɵɧ ɬɨɥɵԑɵɦɟɧ
ɤɟɪɿ
ɛԝɪɚԙɵɡ (ɮɨɬɨɫɭɪɟɬɬɿ ԕɚɪɚԙɵɡ)
KZ
3. Ԕɚɦɵɬɬɚɪ ɬɿɪɟɥɝɟɧɲɟ ɟɫɿɤɬɿ ɠɚɛɵԙɵɡ (ɟɫɿɤ
ɲɚɦɚɦɟɧ 40°-ԕɚ ɚɲɵԕ ɬԝɪɚɞɵ) (ɮɨɬɨɫɭɪɟɬɬɿ
ԕɚɪɚԙɵɡ)
40°
4. ɀɨԑɚɪԑɵ ɩɪɨɮɢɥɶɞɟɝɿ ɟɤɿ ɬԛɣɦɟɧɿ ɛɚɫɵɩ,
ɩɪɨɮɢɥɶɞɿ ɲɵԑɚɪɵɩ ɚɥɵԙɵɡ (ɮɨɬɨɫɭɪɟɬɬɿ
ԕɚɪɚԙɵɡ)
6. ɒɵɧɵɧɵ ɨɪɧɵɧɚ ɫɚɥɵԙɵɡ.
ȿɋɄȿɊɌɍ! ȱɲɤɿ ɟɫɿɝɿɧɿԙ ԥɣɧɟɝɿ ɚɥɵɧԑɚɧ ɩɟɲɬɿ
ɩɚɣɞɚɥɚɧɭԑɚ
ȿɋɄȿɊɌɍ! ȱɲɤɿ ɟɫɿɤɬɿԙ ԥɣɧɟɝɿɧ ԕɚɣɬɚ ɫɚɥԑɚɧ
ɤɟɡɞɟ, ɩɚɧɟɥɶɞɟ ɠɚɡɵɥԑɚɧ ɟɫɤɟɪɬɭ ɬԧԙɤɟɪɿɥɿɩ
ɬԝɪɦɚɣɬɵɧɞɚɣ ɠԥɧɟ ɚɧɵԕ ɤԧɪɿɧɿɩ ɬԝɪɚɬɵɧɞɚɣ
ɟɬɿɩ ԥɣɧɟɤ ɩɚɧɟɥɿɧ ɞԝɪɵɫɬɚɩ ɫɚɥɵԙɵɡ.
7. ɉɪɨɮɢɥɶɞɿ ɨɪɧɵɧɚ ԕɨɣɵԙɵɡ, ɞԝɪɵɫ ԕɨɣɵɥԑɚɧ
8. ȿɫɿɤɬɿ ɬɨɥɵԕ ɚɲɵԙɵɡ.
9. Ɍɿɪɟɤɬɟɪɞɿ ɠɚɛɵԙɵɡ (ɮɨɬɨɫɭɪɟɬɬɿ ԕɚɪɚԙɵɡ).
ɛɨɥɦɚɣɞɵ!
ɤɟɡɞɟ «ɬɵԕ» ɟɬɤɟɧ ɞɵɛɵɫ ɟɫɬɿɥɟɞɿ.
5. ɒɵɧɵɧɵ ɲɵԑɚɪɵɩ ɚɥɵɩ, ɦɵɧɚ ɬɚɪɚɭɞɚ
ɤԧɪɫɟɬɿɥɝɟɧɞɟɣ ɬɚɡɚɥɚԙɵɡ: «Ʉԛɬɿɦ ɠԥɧɟ
ɬɟɯɧɢɤɚɥɵԕ ԕɵɡɦɟɬ ɤԧɪɫɟɬɭ».
10. ȿɧɞɿ ɟɫɿɤɬɿ ɬɨɥɵԑɵɦɟɧ ɠɚɭɵɩ, ɩɟɲɬɿ
ԥɞɟɬɬɟɝɿɞɟɣ ԕɨɫɭԑɚ
.
ɛɨɥɚɞɵ.
59
Page 60

06/2014-195122661.00
XEROX FABRIANO
Indesit Company S.P.A.
Viale Aristide Merloni,47
60044 Fabriano (AN)
www.hotpoint.eu
60
 Loading...