

Hotpoint H251EWH User Manual
Instructions
H251EWH


Contents
Introduction 2
Installation 3
For Your Safety - Always 4
For Your Safety - Never 5
Features 6
Control Panel 7
Hotplate General Information Notes 8-9
Temperature Conversion chart 10
Grill 11
Guide to Grilling 12
Oven Timer Operation 13
Know Your Timer 14
Clock & Automatic Timer Operation 15-18
Top Oven Cookery Notes 19-21
Main Oven Cookery Notes 22-25
Care & Cleaning 26-27
Cooking Results not Satisfactory 28
Something Wrong? 29
Service Back Cover
You must read these instructions prior to using the appliance
and retain them for future reference.
1
Introduction
Your new appliance is guaranteed* and will give lasting service. This guarantee is only
applicable if the appliance has been installed in accordance with the installation
instructions detailed in this booklet.
To help make best use of your cooking equipment, please read this booklet carefully.
The cooker is designed specifically for domestic use and responsibility will not be
accepted for use in any other installation.
When the cooker is first used an odour may be emitted,
When first using the cooker ensure that the room is well ventilated (e.g. open a window or
use an extractor fan) and that persons who may be sensitive to the odour avoid any
fumes. It is suggested that any pets be removed from the room until the smell has
ceased. This odour is due to temporary finish on oven liners and elements and also any
moisture absorbed by the insulation.
* The guarantee is subject to the provisions that the appliance:
(a) Has been used solely in accordance with the Users Instruction Book.
(b) Has been properly connected to a suitable supply voltage as stated on the
rating plate attached to this equipment.
(c) Has not been subjected to misuse or accident or been modified or repaired by
any person other than the authorised employee or agent.
(d) Has been correctly installed.
DISPOSAL OF YOUR PRODUCT
To minimise the risk of injury to children please dispose of your product carefully and
safely. Remove all doors and lids. Remove the mains cable (where fitted) by cutting off
flush with the appliance and always ensure that no plug is left in a condition where it
could be connected to the electricity supply.
To help the environment, Local Authority instructions should be followed for the disposal
of your product.
this will cease after a period of use
This appliance conforms to the following EEC Directives:
Electromagnetic Compatibility Low Voltage Equipment
89/336/EEC 73/23/EEC
92/31/EEC 93/68/EEC
93/68/EEC
2

Installation
WARNING – THIS APPLIANCE MUST BE EARTHED.
MAINS CONNECTION
Your cooker should have been checked to ensure
supply volt
The cooker must be connected by a competent person such as a NICEIC registered
contractor to a suitable double-pole control unit with a minimum rating of 32A (30A
double-pole control switch installations found in older properties are acceptable) and a
minimum contact clearance of 3mm, which should be fitted adjacent to the cooker, in
accordance with IEE regulations. The control unit must be within 2 metres of but not
directly above the appliance and should be easily accessible in the event of an emergency.
The power supply cable should conform to B.S.6004 with a conductor size of 6mm2,
minimum.
Access to the mains terminals is gained by removing the rear access cover. The mains
cable must pass through the cable clamp adjacent to the terminal block. Sufficient cable
should be used to allow the cooker to be pulled out for servicing.
Ensure that the mains cable is routed away from any brackets affixed to the rear panel
and is not trapped to the rear wall when pushing the cooker into position between
cabinets.
this is stated on the rating plate, which is situated
age,
that the voltage corresponds with your
on the rear panel.
COOKER HEIGHT
Your cooker must stand
is stable and cannot be rocked.
Note: If the cooker is to be placed on a base, precautions must be taken to prevent it
from slipping off the base.
SITING THE COOKER
The cooker is designed to fit between kitchen cabinets spaced 500mm apart. The space
either side need only be sufficient to allow withdrawal of the cooker for servicing. It can
be used with cabinets one side or both as well as in an angled corner setting. It can also
be used freestanding. Adjacent side walls which project above hob level, must not be
nearer to the cooker than 150mm and should be
overhanging
The height of the cooker can be adjusted by means of adjustable feet in the plinth (900 915mm). Adjust the feet by tilting the cooker from the side. Then install the cooker into
position.
MOVING THE COOKER
Before moving your cooker, switch off at the cooker control unit, ensure that it is cool.
Open the grill door sufficiently to allow a comfortable grip on the underside front edge of
the oven roof, avoiding any grill elements.
Note: Take care in moving the cooker as it is heavy. Take care to ensure that any floor
covering is not damaged.
RADIO INTERFERENCE
This appliance conforms to EN 55014 regarding suppression of radio and television
interference.
surface or cooker hood should not be nearer than 650mm.
on a flat surface so that the hob is perfectly level, and the cooker
protected by heat resistant material. Any
3

Safety Information
When used properly your appliance is completely safe but as with any electrical
product there are certain precautions that must be observed.
PLEASE READ THE PRECAUTIONS BELOW BEFORE USING YOUR APPLIANCE.
Always
● Remove all packing from the appliance before switching on for the first time.
● Understand the controls prior to using the appliance.
● Keep children away from the appliance when cooking as the surfaces will get
extremely hot during and after use.
● Turn controls off when not in use.
● Stand back when opening an oven door to allow any build up of steam or heat to
disperse.
●
Always use dry good quality oven gloves when removing items from the oven/grill.
● Always place pans centrally over the hotplate making sure handles are kept away from
the edge of the hob and cannot become heated by other hotplates or pans.
●
Always take care to avoid heat or steam burns when operating the controls.
● Always turn off the electricity supply at the wall switch and allow the appliance to cool
before cleaning (or changing an oven lamp if fitted).
●
Always make sure the shelves are in the correct position before switching on the oven
or grill.
● Always keep the oven/grill door closed when the appliance is not in use.
● Always keep the appliance clean as a build up of grease or fat from cooking can cause
a fire.
●
Always follow the basic principles of food handling and hygiene to prevent the possibility
of bacterial growth.
● Always keep ventilation slots clear of obstructions.
● Always refer servicing to a qualified appliance service engineer.
● Always take care when removing items from the grill compartment when the lower
oven is in use as the contents will be hot
● Always turn off the electricity supply to the appliance at the wall switch should any
glass panel (if fitted) crack or shatter and then DO NOT USE THE APPLIANCE until
repaired.
● During use, the oven becomes hot. Care should be taken to avoid touching heating
elements inside the oven.
4

Safety Information
Never
● Never stare at Halogen heating units
● Never leave children unsupervised where a cooking appliance is installed as all sur-
faces will be hot during and after its use.
● Never allow anyone to sit or stand on any part of the appliance.
●
Never store items above the appliance that children may attempt to reach.
● Never leave anything on the hob surface when unattended and not in use.
● Never remove the oven shelves whilst the oven is hot.
● Never heat up unopened food containers as pressure can build up causing the con-
tainer to burst.
● Never store chemicals/food stuffs or pressurised containers in or on the appliance,
or in cabinets immediately above or next to the appliance.
● Never place flammable or plastic items on or near the hob.
● Never fill a deep fat frying pan more than 1/3 full of oil, or use a lid.
DO NOT LEAVE DEEP FAT FRYING PANS UNATTENDED WHILE COOKING.
● Never use the appliance as a room heater.
● Never use the grill to warm plates.
● Never dry any items on either the hob or oven doors.
● Never install the appliance next to curtains or other soft furnishings.
● Never operate the grill with the grill door closed as this will cause the appliance to
over heat.
● Never use steam cleaners.
SAFETY ADVICE IN CASE OF A CHIP-PAN FIRE
In the event of a chip pan fire or any other pan fire.
1. TURN OFF THE COOKER APPLIANCE AT THE WALL SWITCH.
2. COVER THE PAN WITH A FIRE BLANKET OR DAMP CLOTH, this will smother the flames
and extinguish the fire.
3.
LEAVE THE PAN TO COOL FOR AT LEAST 60 MINUTES BEFORE
often caused by picking up a hot pan and rushing outside with it.
MOVING IT. Injuries are
NEVER USE A FIRE EXTINGUISHER TO PUT OUT A PAN FIRE as the
force of the extinguisher is likely to tip the pan over.
Never use water to extinguish oil or fat fires.
5

Features
RATING PLATE (ON REAR PANEL)
CONTROL PANEL
LEFT REAR HOTPLATE
1000W
LEFT FRONT HOTPLATE
2000W RED SPOT
GRILL
GRILL PAN
RIGHT REAR HOTPLATE
1500W
RIGHT FRONT HOTPLATE
1500W RED SPOT
TOP OVEN STAY
CLEAN SIDE PANEL
TOP OVEN/GRILL
ROD SHELF
MAIN OVEN
STAY CLEAN
SIDE PANEL
MAIN OVEN
ROD SHELF
MODEL/SERIAL NO.
6
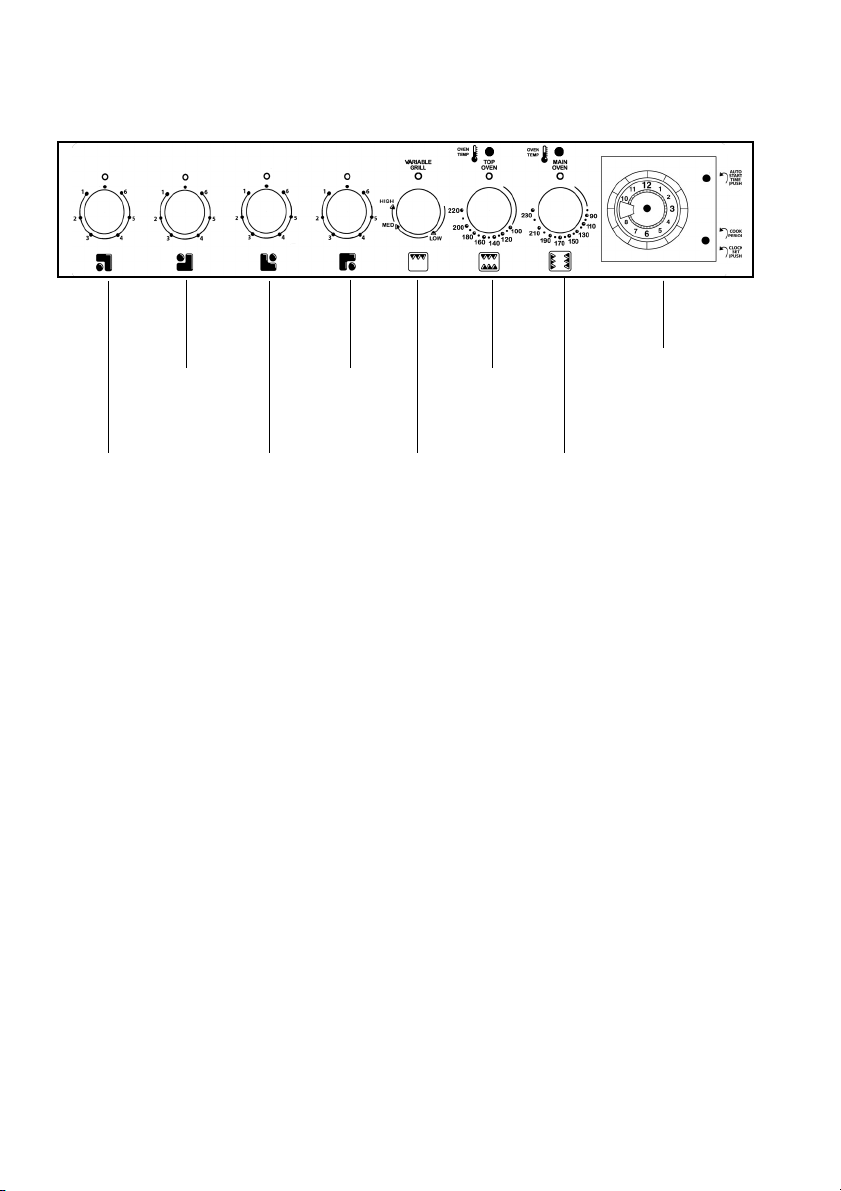
Control Panel
TIMER
FRONT LEFT
HOTPLATE
CONTROL
REAR LEFT
HOTPLATE
CONTROL
REAR RIGHT
HOTPLATE
CONTROL
FRONT RIGHT
HOTPLATE
CONTROL
GRILL CONTROL
TOP OVEN
CONTROL
MAIN OVEN
CONTROL
CONTROL KNOBS
The knobs for the grill and hotplates can be rotated in either direction to provide
variable heat control, the oven knobs can only be rotated clockwise from the Off
position.
Note Always ensure that all controls are in the OFF position, when appliance is not in
use.
7
Hotplates General Information Notes
Note: Under no circumstances should the hob be used with aluminium foil in contact with
the hob surface.
Use of Hotplates
The controls set the hotplates at six pre-set power levels. Each control can be used to
select one of six temperature settings from a minimum at position 1 to a maximum at
position 6. The red spot hotplates heat up more rapidly to give faster boiling.
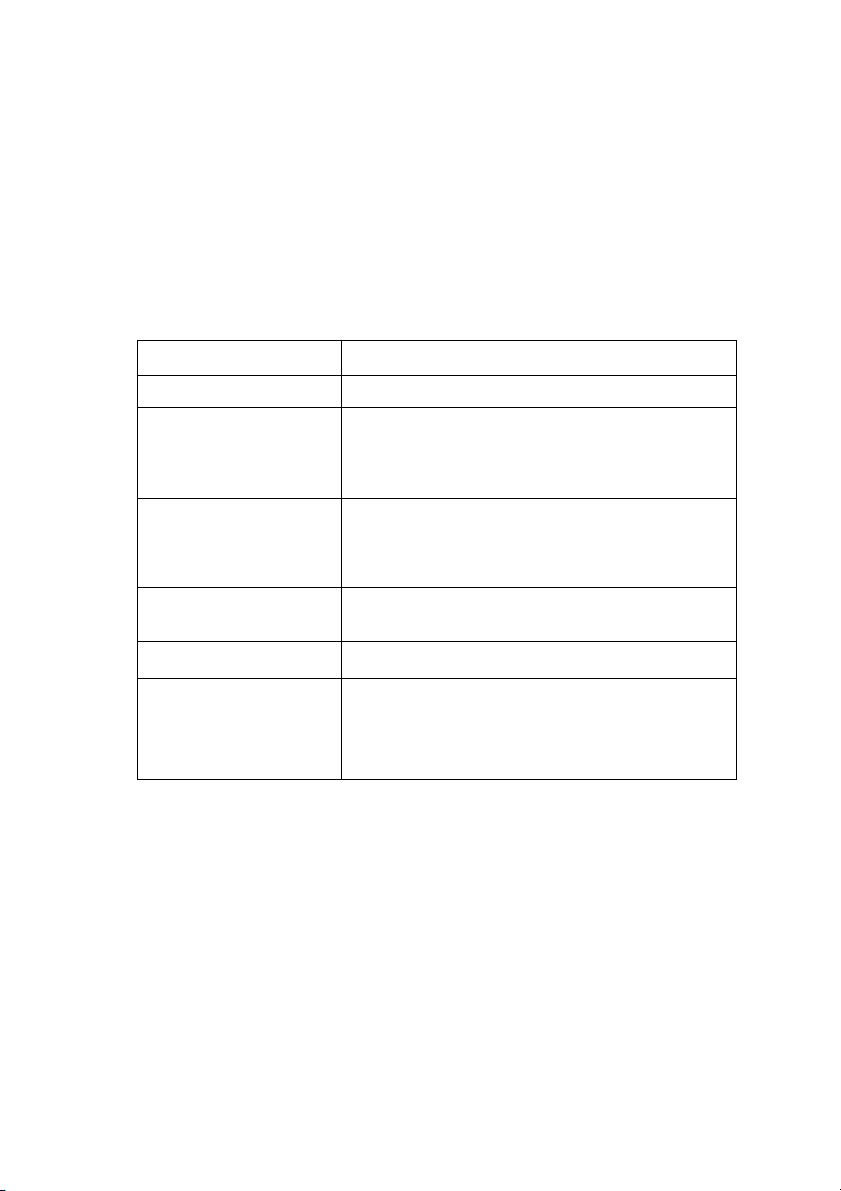
Control Settings Guide
This table is provided only as a guide – settings also depend on the type of pan used and the
quality of food.
Knob Position Type of food
1 To melt butter, chocolate etc.
1 or 2 To heat food gently.
3 To heat solid or liquid foods.
4 or 5 To cook foods, just above simmering.
5 or 6 To seal meat and fry fish.
6 Frying potatoes.
Safety requirements for deep fat frying
1. Use a deep pan, large enough to completely cover the appropriate heating area.
2. Never fill the pan more than one-third full of oil.
3. Never leave oil or fat unattended during the heating or cooking period.
4. Never try to fry too much food at a time, especially frozen food. This only lowers the
temperature of the oil or fat too much, resulting in greasy food.
5. Always dry food thoroughly before frying, and lower it slowly into the hot oil or fat.
Frozen foods, in particular, will cause frothing and spitting, if added to quickly.
6. Never heat fat, or fry, with a lid on the pan.
7. Keep the outside of the pan clean and free from streaks of oil or fat.
To keep small amounts of water simmering.
To heat sauces containing egg yolks and butter.
To simmer: stews, meat, fish, vegetables, fruit.
Keep water boiling.
Thaw frozen vegetables.
Make 2-3 egg omelettes.
To maintain ‘rolling’ boil for preserve making.
Bringing water to the boil.
Deep fat frying.
Dissolve sugar for preserve making.
8
 Loading...