

HOTPOINT H1NT 811E W Use & Care
User Manual
www.hotpoint.eu/register

USER MANUAL
THANK YOU FOR BUYING A HOTPOINT PRODUCT.
In order to receive a more complete assistance, please register
your appliance on
www.hotpoint.eu/register
INDEX
Use & Care guide . . . . . . . . . . . . . . . . . . . . . . . . . . . . . . . . . . . . . . . . . . . . . . . . . . . . . . . . . 2
Product description . . . . . . . . . . . . . . . . . . . . . . . . . . . . . . . . . . . . . . . . . . . . . . . . . . . . . . . . . 2
Accessories * . . . . . . . . . . . . . . . . . . . . . . . . . . . . . . . . . . . . . . . . . . . . . . . . . . . . . . . . . . . . . . . . . . . . . 2
Control panel . . . . . . . . . . . . . . . . . . . . . . . . . . . . . . . . . . . . . . . . . . . . . . . . . . . . . . . . . . . . . . . . . . . . 3
Shelves . . . . . . . . . . . . . . . . . . . . . . . . . . . . . . . . . . . . . . . . . . . . . . . . . . . . . . . . . . . . . . . . . . . . . . . . . 4
Door . . . . . . . . . . . . . . . . . . . . . . . . . . . . . . . . . . . . . . . . . . . . . . . . . . . . . . . . . . . . . . . . . . . . . . . . . . . 4
No-frost refrigerator compartment . . . . . . . . . . . . . . . . . . . . . . . . . . . . . . . . . . . . . . . . . . . . . . . . . . . . . 4
Defrosting the freezer compartment . . . . . . . . . . . . . . . . . . . . . . . . . . . . . . . . . . . . . . . . . . . . . . . . . . . . 4
Stop frost accessory* . . . . . . . . . . . . . . . . . . . . . . . . . . . . . . . . . . . . . . . . . . . . . . . . . . . . . . . . . . . . . . . 4
Procedure to clean the stop frost accessory * . . . . . . . . . . . . . . . . . . . . . . . . . . . . . . . . . . . . . . . . . . . . . . 5
How to use the appliance . . . . . . . . . . . . . . . . . . . . . . . . . . . . . . . . . . . . . . . . . . . . . . . . . . . . . 6
First time use . . . . . . . . . . . . . . . . . . . . . . . . . . . . . . . . . . . . . . . . . . . . . . . . . . . . . . . . . . . . . . . . . . . . . 6
Refrigerator compartment and food storage . . . . . . . . . . . . . . . . . . . . . . . . . . . . . . . . . . . . . . . . . . . . . . 6
How to store fresh food and beverages . . . . . . . . . . . . . . . . . . . . . . . . . . . . . . . . . . . . . . . . . . . . . . . . . . 6
Freezer compartment food storage . . . . . . . . . . . . . . . . . . . . . . . . . . . . . . . . . . . . . . . . . . . . . . . . . . . . . 7
Removing the freezer drawer container . . . . . . . . . . . . . . . . . . . . . . . . . . . . . . . . . . . . . . . . . . . . . . . . . . 7
Tips for freezing and storing fresh food . . . . . . . . . . . . . . . . . . . . . . . . . . . . . . . . . . . . . . . . . . . . . . . . . . 7
Frozen food: shopping tips . . . . . . . . . . . . . . . . . . . . . . . . . . . . . . . . . . . . . . . . . . . . . . . . . . . . . . . . . . . 7
Storage times for home frozen foods . . . . . . . . . . . . . . . . . . . . . . . . . . . . . . . . . . . . . . . . . . . . . . . . . . . 8
Functional sounds . . . . . . . . . . . . . . . . . . . . . . . . . . . . . . . . . . . . . . . . . . . . . . . . . . . . . . . . . . . . . . . . . 8
Alarm table . . . . . . . . . . . . . . . . . . . . . . . . . . . . . . . . . . . . . . . . . . . . . . . . . . . . . . . . . . . . . . . . . . . . . . 9
Recommendation in case of no use of the appliance . . . . . . . . . . . . . . . . . . . . . . . . . . . . . . . . . . . . . . . . 9
Cleaning and maintenance . . . . . . . . . . . . . . . . . . . . . . . . . . . . . . . . . . . . . . . . . . . . . . . . . . . 10
Troubleshooting . . . . . . . . . . . . . . . . . . . . . . . . . . . . . . . . . . . . . . . . . . . . . . . . . . . . . . . . . . 11
After-sales service . . . . . . . . . . . . . . . . . . . . . . . . . . . . . . . . . . . . . . . . . . . . . . . . . . . . . . . . . 12
Installation guide . . . . . . . . . . . . . . . . . . . . . . . . . . . . . . . . . . . . . . . . . . . . . . . . . . . . . . . 13
1
Use & Care guide
A
B
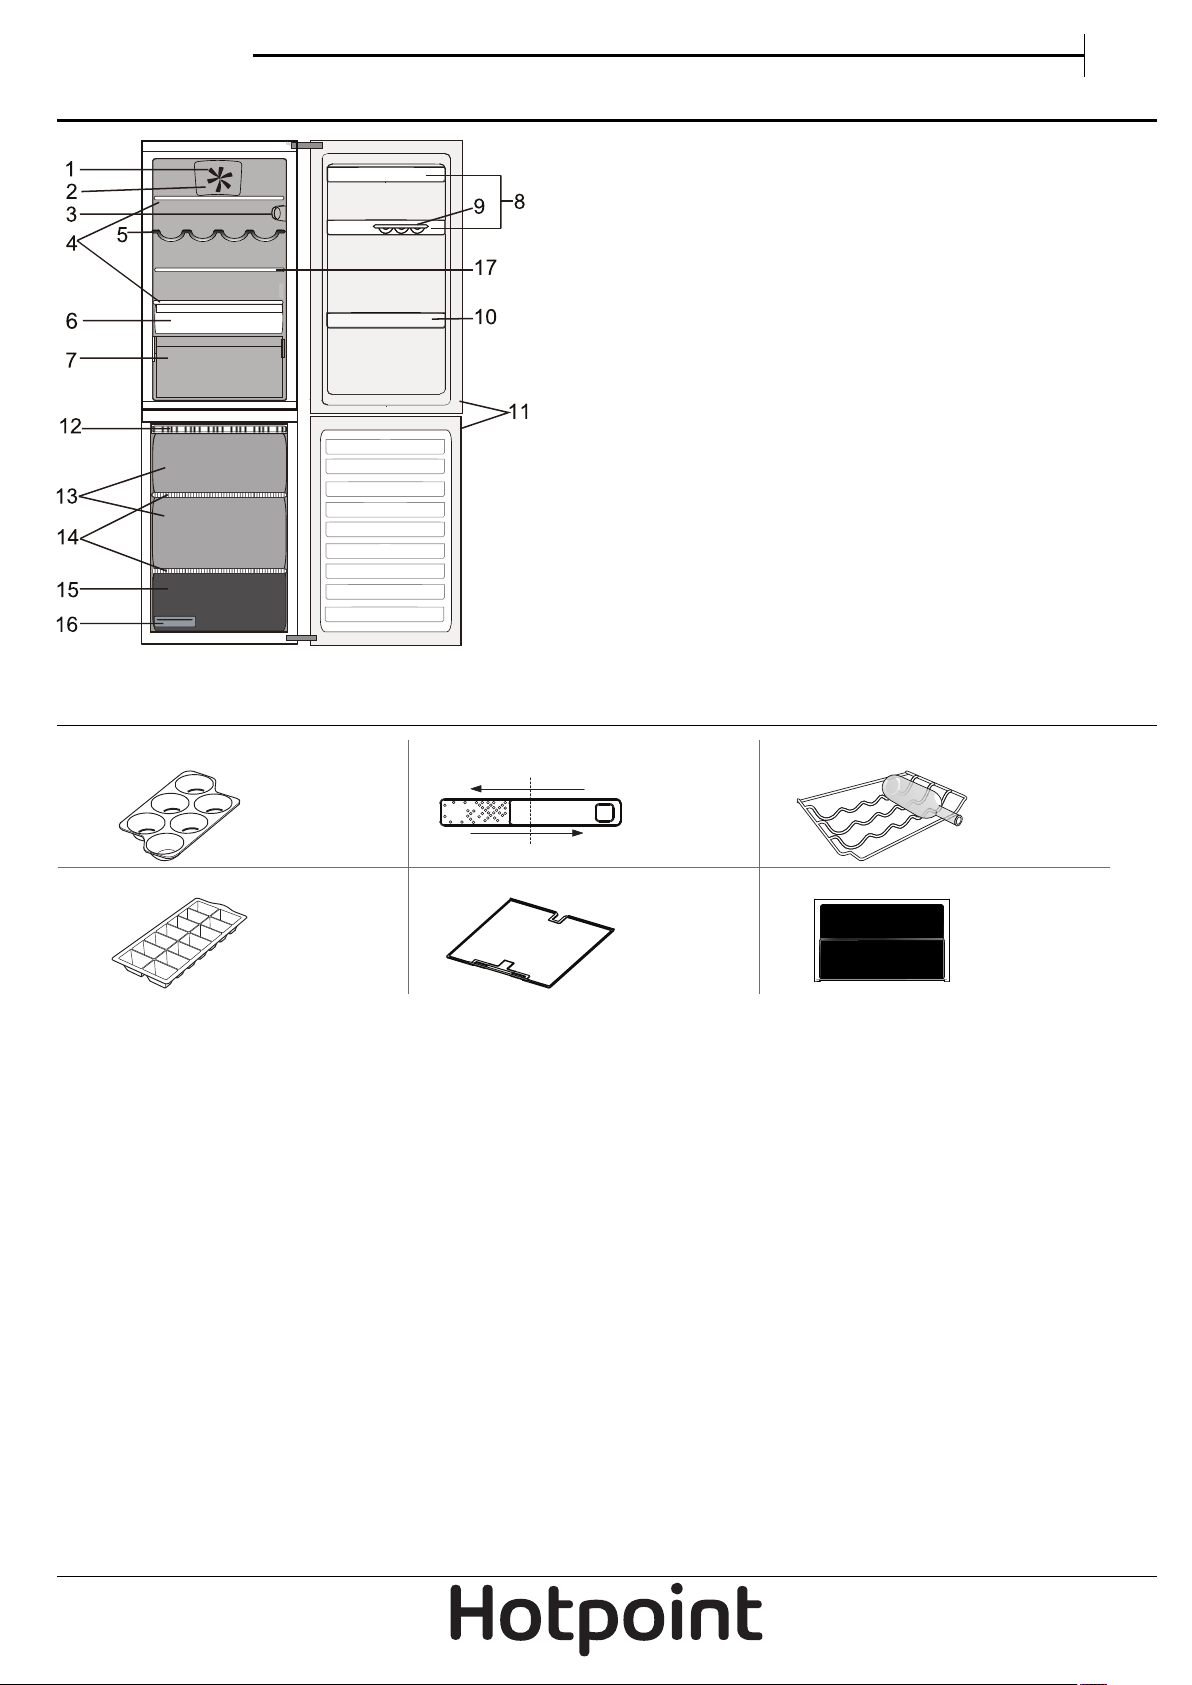
Product description
EN
1. Fan*
2. Fan cover *
3. Electronic control panel/light unit
4. Shelves
5. Bottle rack *
6. Cooler compartment *
(best for meat and fish)
7. Fruit and vegetable crisper
8. Door balconies
9. Egg tray
10. Bottle balcony
11. Door seal
12. Stop frost accessory*
13. Storage compartments
14. Shelves
15. Freezer and storage compartment
16. Ice tray
17. Tuck shelf *
Accessories *
EGG TRAY HUMIDITY CONTROL
ICE TRAY STOP FROST ACCESSORY TUCK SHELF
BOTTLE RACK
* Available only on certain models
2
Use & Care guide
OFF ON
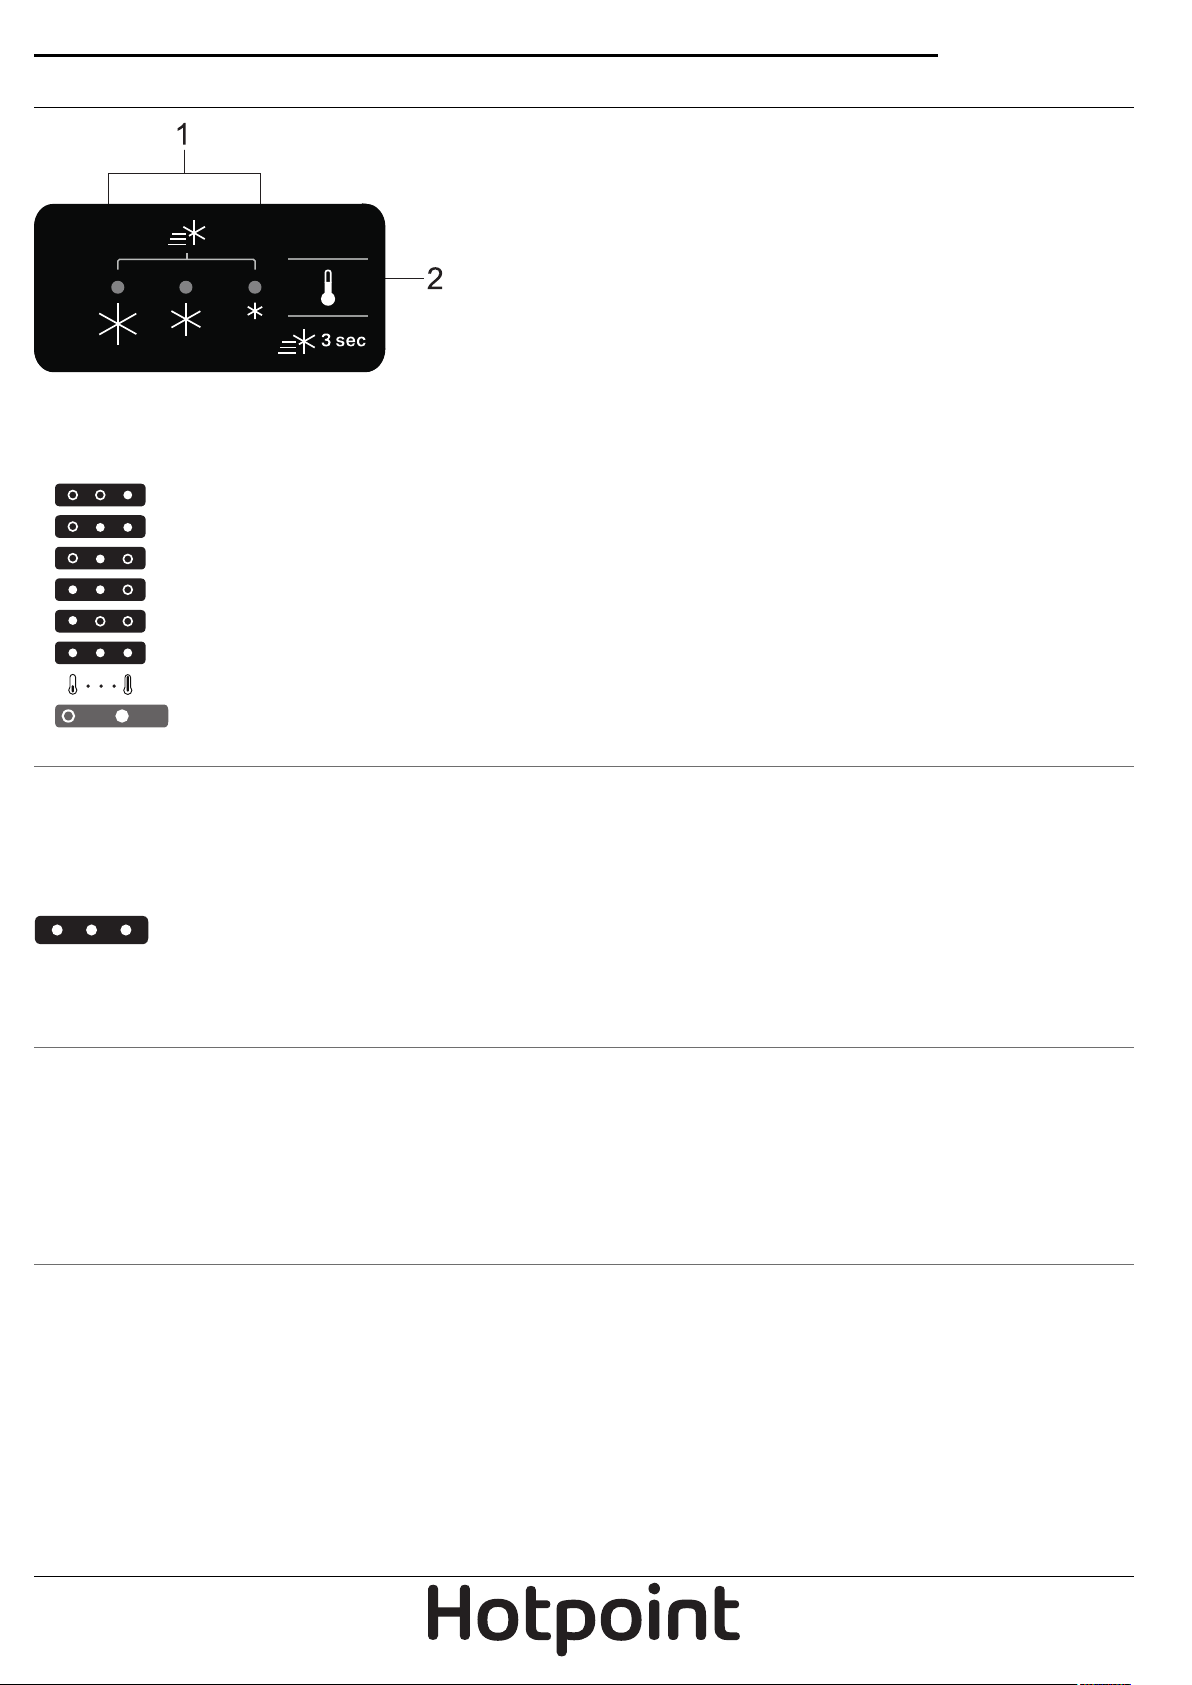
Control panel
1. Indicator Leds (to display the current temperature setpoint or the
Super Cooling function)
2. Super Cooling Button / Temperature Button
Temperature setting
Press the Temperature button on the control panel to adjust the temperature from the warmest through the lower to the
coldest level. Pressing the Temperature button, the temperature setting will change cyclically. At first plug-in of appliance
temperature setpoint is present at medium position (factory setting). Following table shows temperature setpoints:
High temp.
Med-high temp.
Medium temp.
Med-low temp.
Low temp.
Super Cooling
Note: Displayed set points correspond to the average temperature throughout the whole refrigerator.
Super Cooling
The use of the Super Cooling function is recommended to increase the cooling capacity of the refrigerator compartment
when placing a very high quantity of food within it.
To activate the Super Cooling function, press and hold for 3 seconds the Temperature button on the control panel till all the 3
LEDs will turn on.
The function is automatically deactivated after 24 hours and return to previous selected set point.
The function can be manually deactivated by pressing and holding for 3 seconds the Temperature button on the control
panel.
Note: Super Cooling function should be also switched ON before placing fresh food to be frozen in the freezer compartment, in order to
maximize the freezing capacity.
Fan*
The Fan improves temperature distribution inside the product, allowing better preservation of stored food.
By default, the fan is switched on. To turn off the fan press the button located on the bottom right corner of fan housing. If
the ambient temperature exceeds 27°C, or if drops of water are present on the glass shelves, it is essential that the fan is on to
ensure the proper preservation of the food. Deactivation of the fan allows energy consumption to be optimised. Please note
that when the fan is switched on it will not continuously work. The fan will start/stop working depending on the temperature
and/or humidity level inside the fridge.
If the appliance has the Fan it can be equipped with the antibacterial filter. Visit the website page or contact consumer service
to purchase the filter.
* Available only on certain models
3
Use & Care guide
LED light
If the LED light system does not work, please contact the Service to replace it.
Important: The refrigerator compartment light switches on when the refrigerator door is opened. If the door is kept open for
more than 8 minutes the light will be automatically switched off.
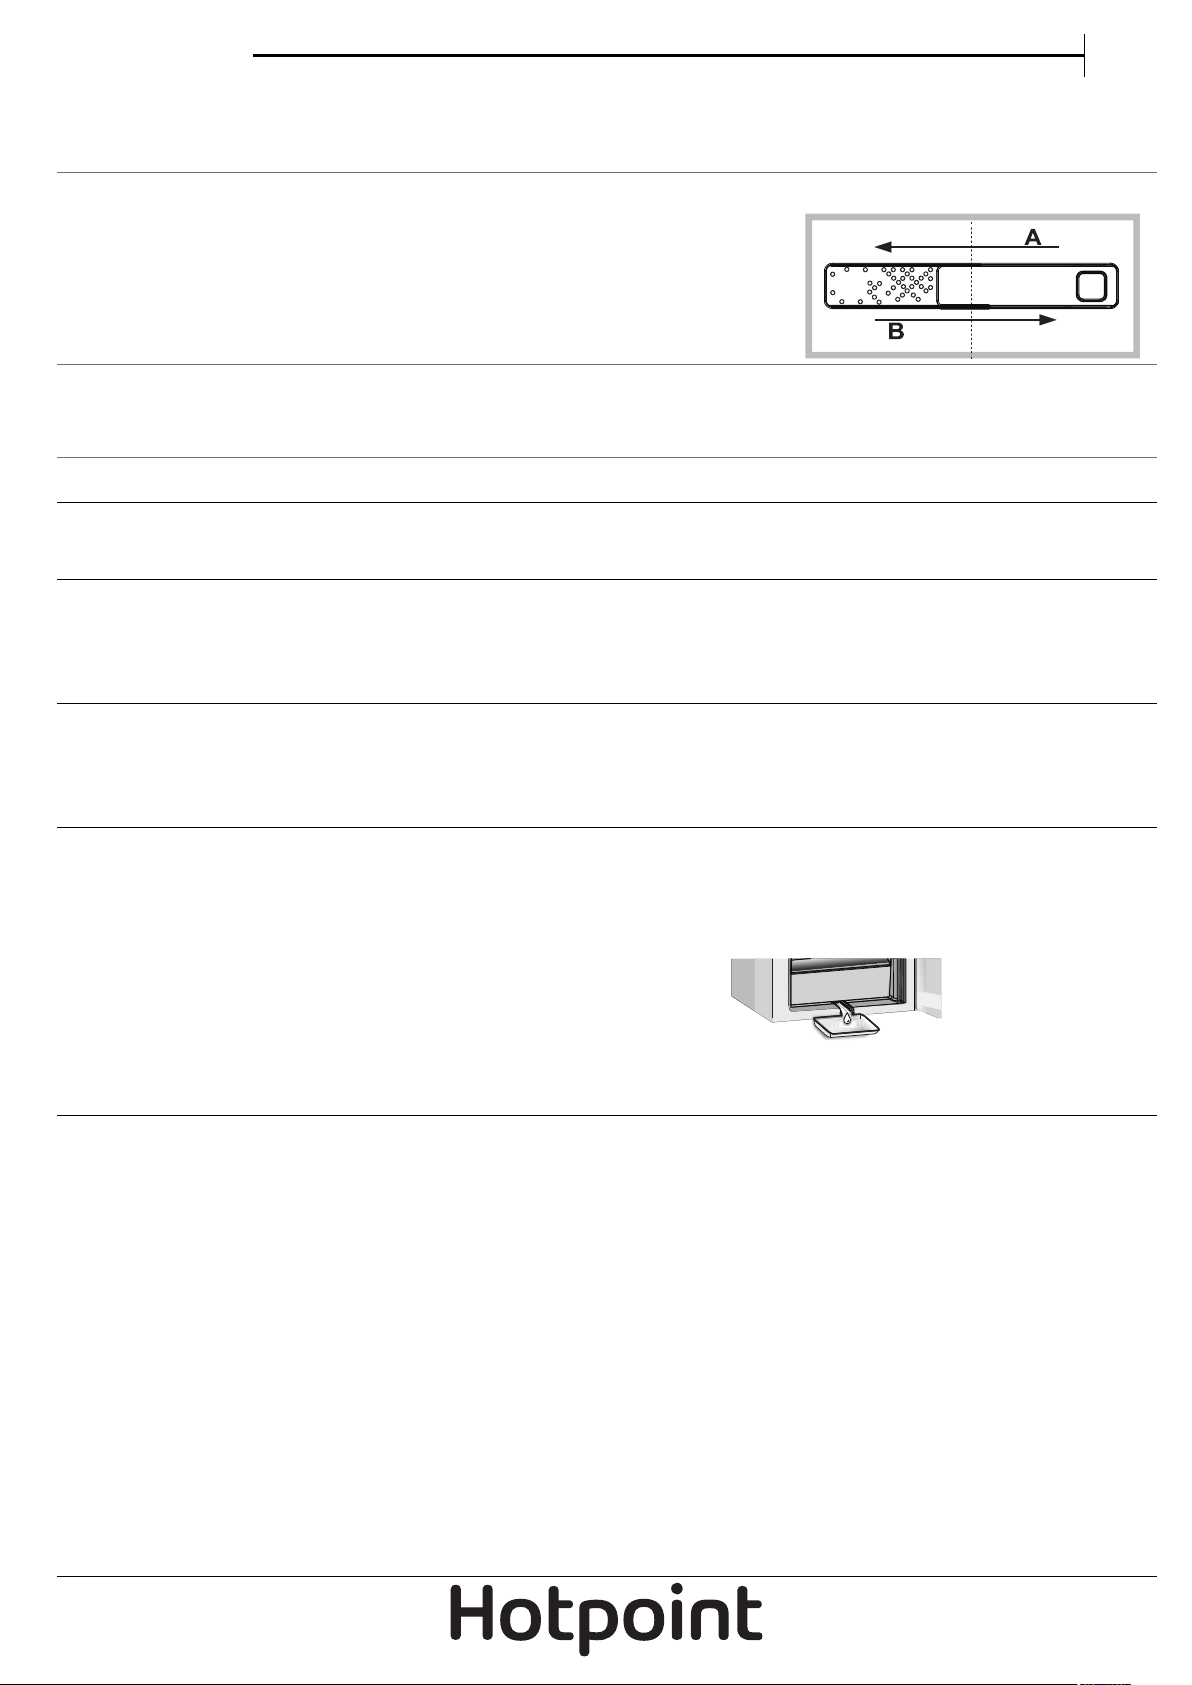
Humidity control *
Open the humidity regulator (position B) if you want to store food in a less humid
environment like fruit, or close it (position A) to store food in a more humid
environment like vegetable.
Tuck shelf *
Thanks to the rail system, this shelf allows you to slide under the front part, creating an extra space for storing tall bottles or
pitchers.
EN
Shelves
All shelves, flaps and pull-out baskets are removable.
Door
Door reversibility
Note: the direction of door opening can be changed. If this operation is performed by After-sales Service it is not covered by the
warranty. Is recommended to reverse door swing by two persons. Follow instruction.
No-frost refrigerator compartment
Refrigerator compartment defrosting is completely automatic. Droplets of water on the rear wall inside the refrigerator
compartment indicate that the automatic defrost phase is in progress.
The defrost water is automatically run into a drain hole and collected in a container, where it evaporates.
Defrosting the freezer compartment
The freezer should be defrosted once or twice a year or when excessive frost is present (3 mm thickness). The formation of frost
is normal.
The amount and rate at which frost accumulates depends on room conditions and how often the door is open. To defrost the
unit, switch off the product and take out all food.
Leave the freezer door open to allow the frost to melt.
Use the box under the bottom front of the appliance to collect water
(showed on the figure).
Clean the inside of the freezer. Rinse and dry thoroughly.
Switch the appliance back on and store the food inside.
Stop frost accessory*
The STOP FROST accessory is designed to collect some of the frost that forms in the freezer compartment and it is easy to
remove and clean, therefore reducing the time needed to defrost the inside of the freezer compartment.
* Available only on certain models
4
 Loading...